LG Electronics USA LNM1880NMQL CAR NAVIGATION User Manual PIO QL FL NNG BA55 C2DC CF54 D5A5 ENG indd
LG Electronics USA CAR NAVIGATION PIO QL FL NNG BA55 C2DC CF54 D5A5 ENG indd
User Manual

CAR NAVIGATION SYSTEM OWNER䳓S MANUAL
ENGLISH
ESPAOL

2
Thank you for purchasing this Car Navigation system.
This owner䳓s manual explains how to use the Kia Vehicle䳓s Navigation system.
Before using the product, read the contents of this owner䳓s manual carefully and use this product safely.
䳜 The screens shown in this manual may differ from the actual screens of the product.
䳜 The design and specification of this product may change without prior notification for product improvement.
䳜 When transferring the vehicle to another individual, include this owner䳓s manual so that the next driver can
continue its use.
3
Safety notes
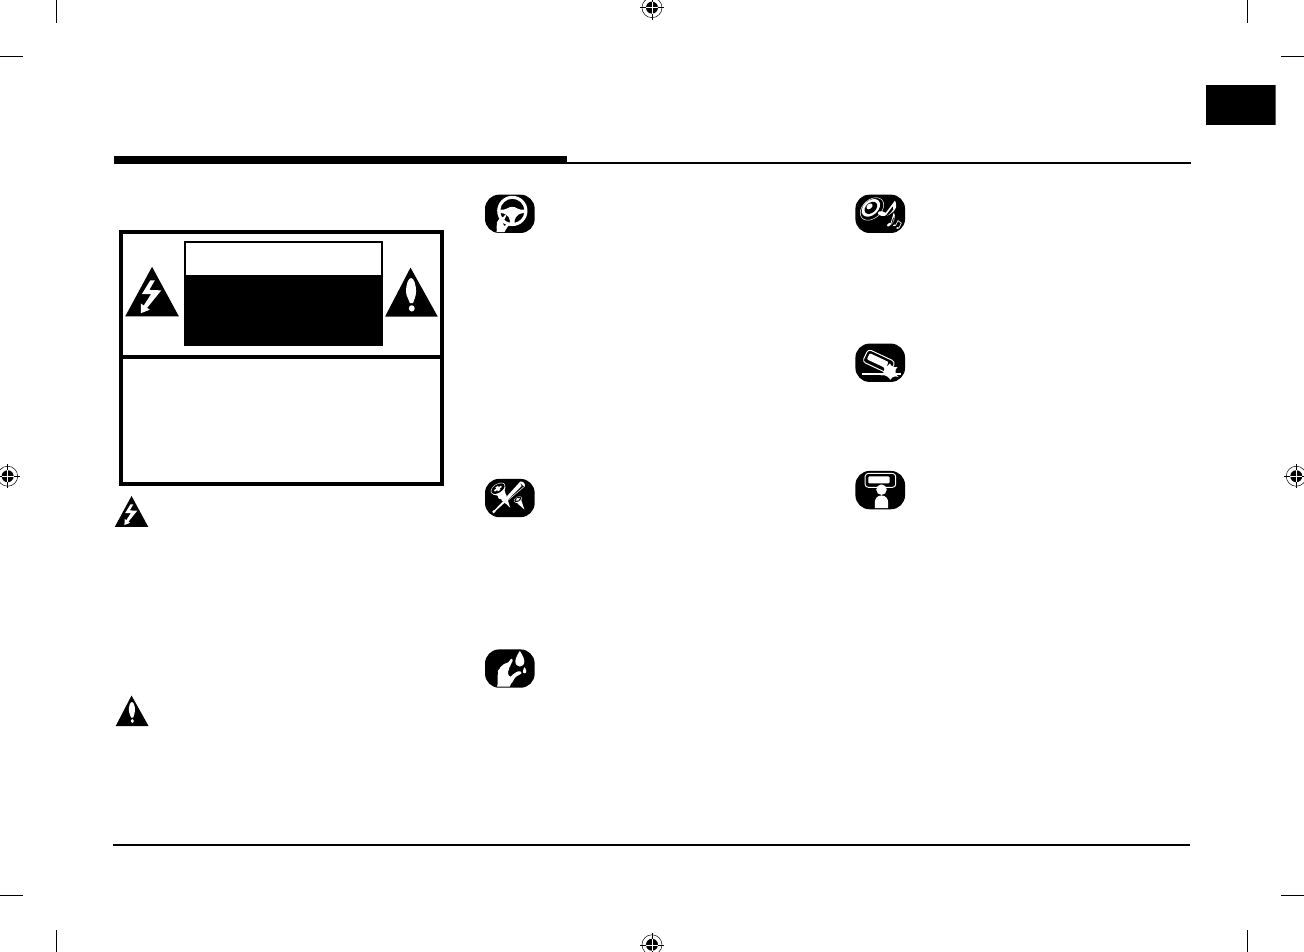
CAUTION
RISK OF ELECTRIC
SHOCK
DO NOT OPEN
CAUTION: TO REDUCE THE RISK OF
ELECTRIC SHOCK, DO NOT REMOVE THE
COVER (OR BACK). NO USER SERVICEABLE
PARTS INSIDE. REFER SERVICING TO
QUALIFIED SERVICE PERSONNEL.
The lightning flash with the arrowhead symbol
within an equilateral triangle is intended
to alert the user about the presence of
uninsulated dangerous voltage within the
product䳓s enclosure that may be of sufficient
magnitude to constitute a risk of electric
shock.
The exclamation point within an equilateral
triangle is intended to alert the user to
the presence of important operating and
maintenance (servicing) instructions in the
literature accompanying the appliance.
Always operate the vehicle in a safe manner.
Do not be distracted by the vehicle while
driving and always be fully aware of all driving
conditions. Do not change settings or any
functions.
Pull over in a safe and legal manner before
attempting such operations.
To promote safety, certain functions are
disabled unless the parking brake is on.
To reduce the risk of electric shock, do not
remove the cover or back of this product.
There are no user-serviceable parts inside.
Refer servicing to qualified service personnel.
To reduce the risk of fire or electric shock,
do not expose this product to dripping or
splashing water, rain, or moisture.
When driving your vehicle, be sure to keep the
volume of the unit low enough to allow you to
hear sounds coming from the outside.
Do not drop it and avoid heavy impacts at
anytime.
The driver should not watch the monitor while
driving. If the driver watches the monitor while
driving, it may lead to carelessness and cause
an accident.
Precautions for safety
Precautions for safety

4
Precautions for safety
WARNING:
䳜 Don䳓t use a cellular phone when you are
driving. You must stop at a safe place to use
a cellular phone.
䳜 The use of the navigation radio by no means
relieves the driver of his/her responsibilities.
The highway code must always be observed.
Always observe the current traffic situation.
䳜 The applicable traffic regulations and the
prevailing traffic situation always take
precedence over the instructions issued by
the navigation system if they contradict one
another.
䳜 For traffic safety reasons, use the navigation
system menus only before starting a journey
or when the vehicle is stationary.
䳜 In certain areas, one-way streets, turn-
off, and entry prohibitions (e.g. pedestrian
zones), the navigation system will give a
warning. Pay particular attention to these
kind of cases.
䳜 The navigation system does not take the
relative safety of the suggested routes into
consideration.
Road blocks, building sites, height or weight
restrictions, traffic or weather conditions
or other influences which affect the route
safety or travel time are not taken into
consideration for the suggested routes. Use
your own discretion in order to decide on the
suitability of the suggested routes.
䳜 The current legal road traffic speed limit
always takes priority over the values saved
on the data. It is impossible to provide an
assurance that the speed values of the
navigation system will always match those
of the current traffic regulations in every
situation.
䳜 Do not rely exclusively on the navigation
system when attempting to locate an
emergency service (hospital, fire service etc.).
It cannot be guaranteed that all available
emergency services in your vicinity are saved
in the database. Use your own discretion and
abilities to secure help in such situations.

5
CAUTION:
䳜 Do not keep the navigation system running
with the engine stopped. Doing so may
discharge the vehicle battery. When you
use the navigation system, always keep the
engine running.
䳜 Do not disassemble or modify this system.
If you do, it may result in accidents, fire, or
electrical shock.
䳜 Some states/provinces may have laws
limiting the use of video screens while
driving. Use the system only where it is legal
to do so.
Precautions for safety

6
Precautions for safety 3
Safety notes . . . . . . . . . . . . . . . . . . . . . . . . . . . .3
Table of contents 6
General information 9
About USB . . . . . . . . . . . . . . . . . . . . . . . . . . . . . .9
Music file information . . . . . . . . . . . . . . . . . . . .10
Video file information . . . . . . . . . . . . . . . . . . . .10
Using iPod devices . . . . . . . . . . . . . . . . . . . . . . .10
Precautions upon using iPod................................10
Supported iPod devices .........................................10
Cautions upon using SD cards . . . . . . . . . . . . .10
Ejecting and inserting SD cards ...........................10
Usage of SD cards ..................................................10
Name of each component 11
Head unit . . . . . . . . . . . . . . . . . . . . . . . . . . . . . .11
Steering wheel remote control . . . . . . . . . . . .13
Basic operation 14
Starting the system for the first time . . . . . .14
Turning the system on . . . . . . . . . . . . . . . . . . .14
Turning the system off . . . . . . . . . . . . . . . . . .14
AV Off . . . . . . . . . . . . . . . . . . . . . . . . . . . . . . . . .14
AV On . . . . . . . . . . . . . . . . . . . . . . . . . . . . . . . . .14
Adjusting the volume . . . . . . . . . . . . . . . . . . . .14
Resetting the system . . . . . . . . . . . . . . . . . . . .15
[Home] screen . . . . . . . . . . . . . . . . . . . . . . . . . .15
Configuration for Home screen ...........................15
Basic operation for [Home] screen .....................16
Editing the [All menus] .........................................16
Adding your favourite menu items to [My Menu]
...16
Rearranging the favourite menu items of [My
Menu] .......................................................................17
Deleting the favourite menu items of [My Menu]
..17
Playing last media source . . . . . . . . . . . . . . . .17
Radio operation 18
Listening to AM . . . . . . . . . . . . . . . . . . . . . . . . .18
Opening the station list sorted in numerical
order .........................................................................18
Auto search .............................................................18
Saving AM favourites ............................................18
Listening to FM . . . . . . . . . . . . . . . . . . . . . . . . .19
Opening the station list ........................................20
Saving FM favourites.............................................20
Scan . . . . . . . . . . . . . . . . . . . . . . . . . . . . . . . . . .20
Sound settings . . . . . . . . . . . . . . . . . . . . . . . . . .20
USB operation 21
Playing USB music . . . . . . . . . . . . . . . . . . . . . . .21
Pause ........................................................................21
Skip ...........................................................................21
Search ......................................................................21
Seek ..........................................................................21
Delete current file ..................................................22
List ............................................................................22
Repeat ......................................................................23
Shuffle......................................................................23
Sound settings ........................................................23
Viewing USB video . . . . . . . . . . . . . . . . . . . . . . .23
Switching to menu screen or full screen ...........23
Pause ........................................................................23
Skip ...........................................................................23
Search ......................................................................24
Seek ..........................................................................24
List ............................................................................24
Repeat ......................................................................24
Info............................................................................24
Sound settings ........................................................24
Display settings ......................................................24
iPod operation 25
Playing iPod . . . . . . . . . . . . . . . . . . . . . . . . . . . .25
Pause ........................................................................25
Skip ...........................................................................25
Search ......................................................................25
Seek ..........................................................................25
List ............................................................................25
Repeat ......................................................................25
Shuffle......................................................................25
Sound settings ........................................................25
Auxiliary device operation 26
Playing an AUX source . . . . . . . . . . . . . . . . . . .26
Sound settings ........................................................26
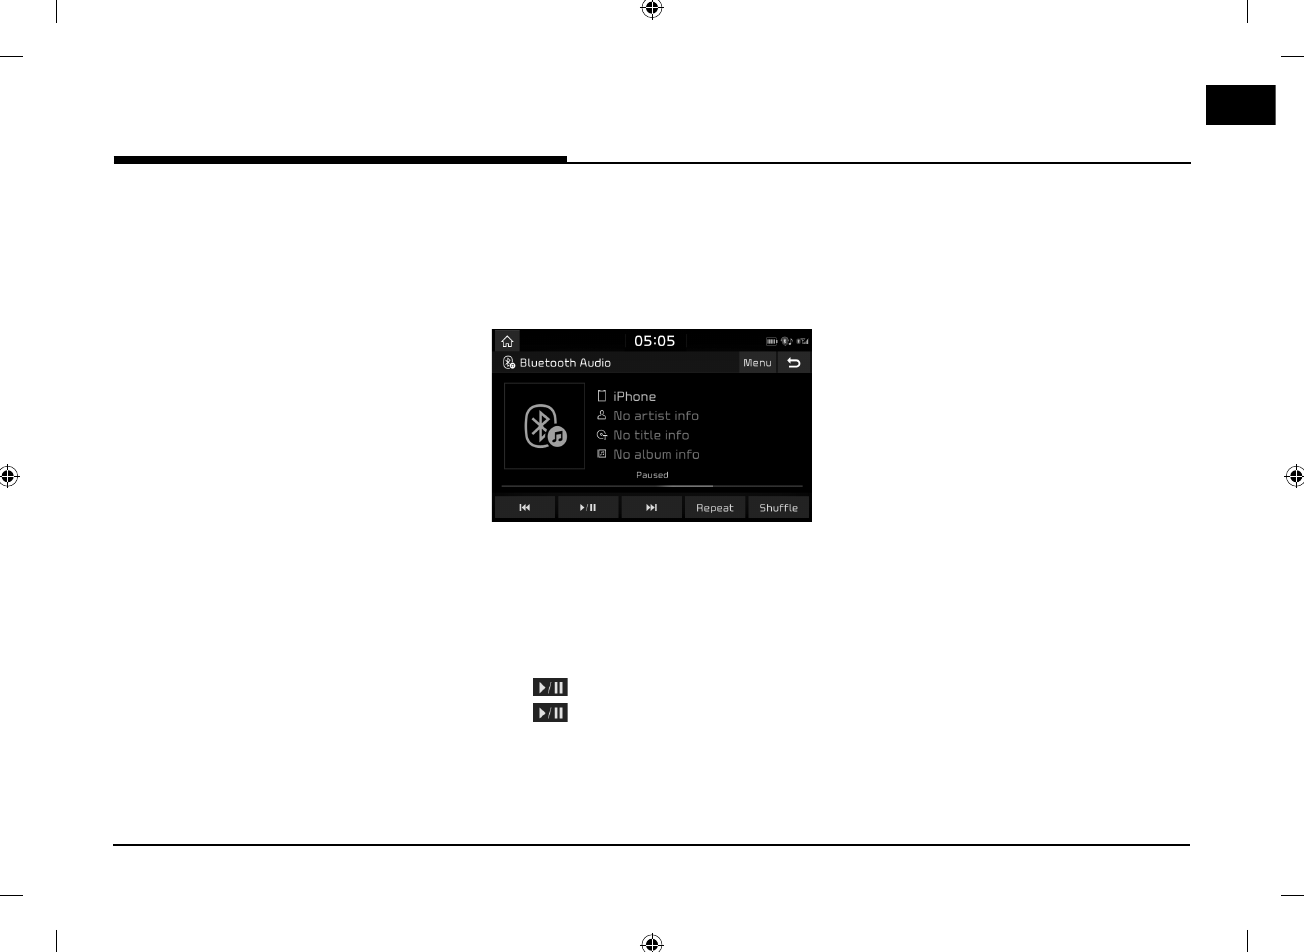
Bluetooth® audio 27
Playing Bluetooth audio . . . . . . . . . . . . . . . . . .27
Starting the Bluetooth audio ...............................27
Pause ........................................................................27
Table of contents
Table of contents

7
Skip ...........................................................................27
Repeat ......................................................................27
Shuffle......................................................................27
Connection settings ...............................................27
Sound settings ........................................................27
Getting started with navigation 28
Precautions for safe driving . . . . . . . . . . . . . .28
What is GNSS? . . . . . . . . . . . . . . . . . . . . . . . . . .28
About satellite signals . . . . . . . . . . . . . . . . . . .28
Acquiring satellite signals . . . . . . . . . . . . . . . . .28
Viewing map screen ..............................................29
Operating navigation screen . . . . . . . . . . . . . .30
Using the navigation menu . . . . . . . . . . . . . . .31
Searching for destination 32
Selecting destination . . . . . . . . . . . . . . . . . . . .32
Using combined search .........................................32
Selecting an address .............................................33
Selecting a place of interest . . . . . . . . . . . . . .34
Using quick search categories .............................34
Finding help nearby ...............................................35
Selecting a history item . . . . . . . . . . . . . . . . . .36
Selecting a saved route . . . . . . . . . . . . . . . . . .36
Entering coordinates. . . . . . . . . . . . . . . . . . . . .36
Using the route menu 37
Planning a multipoint route . . . . . . . . . . . . . . .37
Checking route information and alternatives ...37
Editing the route . . . . . . . . . . . . . . . . . . . . . . . .38
Setting a new starting point................................38
Adding an additional destination .........................38
Modifying the list of destinations .......................39
Saving the planned route .....................................39
Selecting a route alternative when planning the
route .........................................................................40
Selecting a route alternative for an existing route
. 40
Setting for navigation 42
Saving a location . . . . . . . . . . . . . . . . . . . . . . . .42
Adding an alert point . . . . . . . . . . . . . . . . . . . .43
Switching to off-road navigation ........................44
Selecting the destination in off-road mode .....44
Useful information menu . . . . . . . . . . . . . . . . .44
Android Auto/Apple CarPlay - Option
46
What is Android Auto/Apple CarPlay? . . . . . .46
Cautions ...................................................................46
Using Android Auto or Apple CarPlay . . . . . . .47
NOTICE .....................................................................47
NOTICE-Android Auto ............................................47
NOTICE-Apple CarPlay ..........................................47
Bluetooth® Wireless Technology 48
Before Using the Bluetooth hands-free . . . . .48
What is Bluetooth Wireless Technology? ..........48
Precautions for safe driving ................................48
Cautions upon connecting Bluetooth phone .....48
Pairing and connecting the unit and a Bluetooth phone
.48
When no phones have been paired .....................48
When a phone is already paired ..........................49
When pairing additional device ............................49
Disconnecting the connected phone ..................50
Deleting Bluetooth devices...................................50
Making a call by entering phone number . . . .50
Making a call by redialling . . . . . . . . . . . . . . . .50
Answering/Rejecting a call . . . . . . . . . . . . . . . .51
Switching call to the mobile phone . . . . . . . . .51
Ending a call . . . . . . . . . . . . . . . . . . . . . . . . . . . .51
Using the menu during a phone call . . . . . . . .51
Calling list . . . . . . . . . . . . . . . . . . . . . . . . . . . . . .52
Making a call from calling list ..............................52
Downloading call history .......................................52
Contacts . . . . . . . . . . . . . . . . . . . . . . . . . . . . . . .52
Making a call from contacts .................................52
Downloading mobile phone contacts ..................53
Searching by name or number ............................53
Favourites . . . . . . . . . . . . . . . . . . . . . . . . . . . . .53
Calling favourites ...................................................53
Adding as a favourite ............................................54
Deleting favourites ................................................54
Phone settings . . . . . . . . . . . . . . . . . . . . . . . . .54
Settings 55
[Settings] menu overview . . . . . . . . . . . . . . . .55
Sound . . . . . . . . . . . . . . . . . . . . . . . . . . . . . . . . .55
Display . . . . . . . . . . . . . . . . . . . . . . . . . . . . . . . .56
Bluetooth . . . . . . . . . . . . . . . . . . . . . . . . . . . . . .57
Bluetooth connections ..........................................57
Auto connection priority .......................................57
System Bluetooth info ..........................................58
Vehicle name ...........................................................58
Passkey ....................................................................58
Default .....................................................................58
Table of contents

8
Table of contents
Phone projection . . . . . . . . . . . . . . . . . . . . . . . .58
Custom button . . . . . . . . . . . . . . . . . . . . . . . . .59
Date/Time . . . . . . . . . . . . . . . . . . . . . . . . . . . . .59
Language . . . . . . . . . . . . . . . . . . . . . . . . . . . . . .59
Screensaver . . . . . . . . . . . . . . . . . . . . . . . . . . . .60
Advanced . . . . . . . . . . . . . . . . . . . . . . . . . . . . . .60
System info . . . . . . . . . . . . . . . . . . . . . . . . . . . .61
Version info .............................................................61
Update......................................................................61
Default .....................................................................61
Using rear camera - Option 62
About rear camera . . . . . . . . . . . . . . . . . . . . . .62
AVM (Around View Monitor) - Option
63
About AVM (Around View Monitor) . . . . . . . . .63
Operating Front AVM . . . . . . . . . . . . . . . . . . . .63
Operating Rear AVM . . . . . . . . . . . . . . . . . . . . .63
AVM settings . . . . . . . . . . . . . . . . . . . . . . . . . . .64
Warning display . . . . . . . . . . . . . . . . . . . . . . . . .64
Before thinking there is a product
defect 65
Troubleshooting 67
Trademarks and licenses 69
Bluetooth® Wireless Technology .........................69
iPod® ........................................................................69
Open Source Software Notice Information .......69
DivX
.......................................................................69
Specification 70

9
General information
About USB
䳜 Heed caution to static electricity when
connecting/disconnecting external USB
devices.
䳜 Encoded MP3 Players will not be recognised
when connected as an external device.
䳜 When connecting an external USB device, the
device may not properly recognise the USB is
in some states.
䳜 USB devices formatted as FAT 16/32, exFAT
or NTFS are supported.
‐ Read: FAT 16/32, exFAT, NTFS
‐ Write: FAT 16/32 (It may be limited on
using POI export function.)
䳜 Some USB devices may not be supported due
to compatibility issues.
䳜 Avoid contact between the USB connector
with bodily parts/foreign objects.
䳜 Repeated connecting/disconnecting of USB
devices within short periods of time may
result in product malfunction.
䳜 The amount of time required to recognise the
external USB device may differ depending on
the type, size, or file formats stored on the
USB. Such differences in required time are
not indications of malfunction.
䳜 The device may not recognise the USB
device if separately purchased USB hubs and
extension cables are being used. Connect the
USB directly with the multimedia terminal of
the vehicle.
䳜 When application programmes are installed
to specific USB, files may not properly play.
䳜 The device may not operate normally if MP3
Players, cellular phones, digital cameras,
or other electronic devices (USB devices
not recognised as portable disk drives) are
connected with the device.
䳜 Charging through the USB may not work for
some mobile devices.
䳜 The device may not support normal
operation when using a USB memory type
besides metal mover type USB Memory.
䳜 The device may not support normal
operation when using formats such as HDD
Type, CF, or SD Memory.
䳜 The device will not support files locked by
DivX DRM (Digital Rights Management).
䳜 USB memory sticks used by connecting an
Adaptor (SD Type or CF Type) may not be
properly recognised.
General information

10
General information
Music file information
䳜 Sampling frequency:
‐ 32, 44.1, 48 kHz (MP3, WMA, OGG, WAV)
‐ 1 Hz - 48 kHz (FLAC)
䳜 Bit rate:
‐ 32 ~ 320 kbps (MP3, WMA, OGG, FLAC)
‐ 8 bit/16 bit (WAV)
䳜 Version: Any version
䳜 Playable file format: 䳖.mp3䳗/ 䳖.wma䳗/ 䳖.ogg䳗/
䳖.flac䳗/ 䳖.wav䳗
Video file information
䳜 Playable file format: 䳖.mpg䳗, 䳖.mpeg䳗, 䳖.dat䳗,
䳖.asf䳗, 䳖.wmv䳗, 䳖. mp4䳗, 䳖m4v䳗, 䳖divx䳗, 䳖.avi䳗,
䳖.mkv䳗
䳜 It may not properly work depending on the
storage type.
Using iPod devices
Precautions upon using iPod
iPod® is a registered trademark of Apple Inc.
䳜 Some iPods with unsupported communication
protocols may not properly operate with the
system.
䳜 If the iPod malfunctions due to an iPod device
defect, reset the iPod and try again. (To learn
more, refer to your iPod manual.)
䳜 During ACC ON state, connecting the iPod
through the iPod cable (The cable that
is supplied when purchasing iPod/iPhone
product.) will charge the iPod through the
system. (However, iPad is not charged.)
䳜 The use of genuine iPod cables supplied by
Apple is recommended. (The use of other
products may result in noise or abnormal
operation.)
䳜 Within iPhones, streaming audio and iPod
control may occasionally conflict. If problems
persist, remove the iPhone and connect again.
䳜 Use iPod with complete synchronisation to
iTunes. Unauthorised song addition may
cause abnormal operation.
䳜 If iPod and Bluetooth are connected
simultaneously with the same iPhone, you
cannot use Bluetooth audio function.
䳜 If iPod touch or iPhone is used, iOS5.0 or a
later version is recommended.
Supported iPod devices
iPhone7, iPhone7 Plus
iPhoneSE, iPhone6, iPhone6 Plus,
iPhone6s, iPhone6s Plus
iPhone5C, iPhone5S, iPhone5
iPhone4S, iPhone4
iPhone3GS, iPhone3G, iPhone
iPod Touch (1st through~ 5th generation)
iPod Nano (1st through~ 7th generation)
iPod Classic (1st through~ 6th generation)
iPad WiFi (1st through~ 4th generation)
iPad Air WiFi (1st ~2nd generation)
iPad Mini (1st ~2nd generation)
Cautions upon using SD cards
Ejecting and inserting SD cards
䳜 Ejecting and inserting SD cards while the
system is operating may result in SD Card or
System errors. To eject or insert the SD card,
first turn off the system and the vehicle
should be off status.
䳜 Eject/insert SD cards only to update the map
with a new version.
䳜 When a SD Card with the new version
is installed, then the system will reboot
automatically.
Usage of SD cards
䳜 The SD Card is formatted to include only Map
and new Navi S/W.
䳜 The SD Card cannot be used to save and play
Music.
䳜 Do not add, delete, or format files within the
SD Card.
11
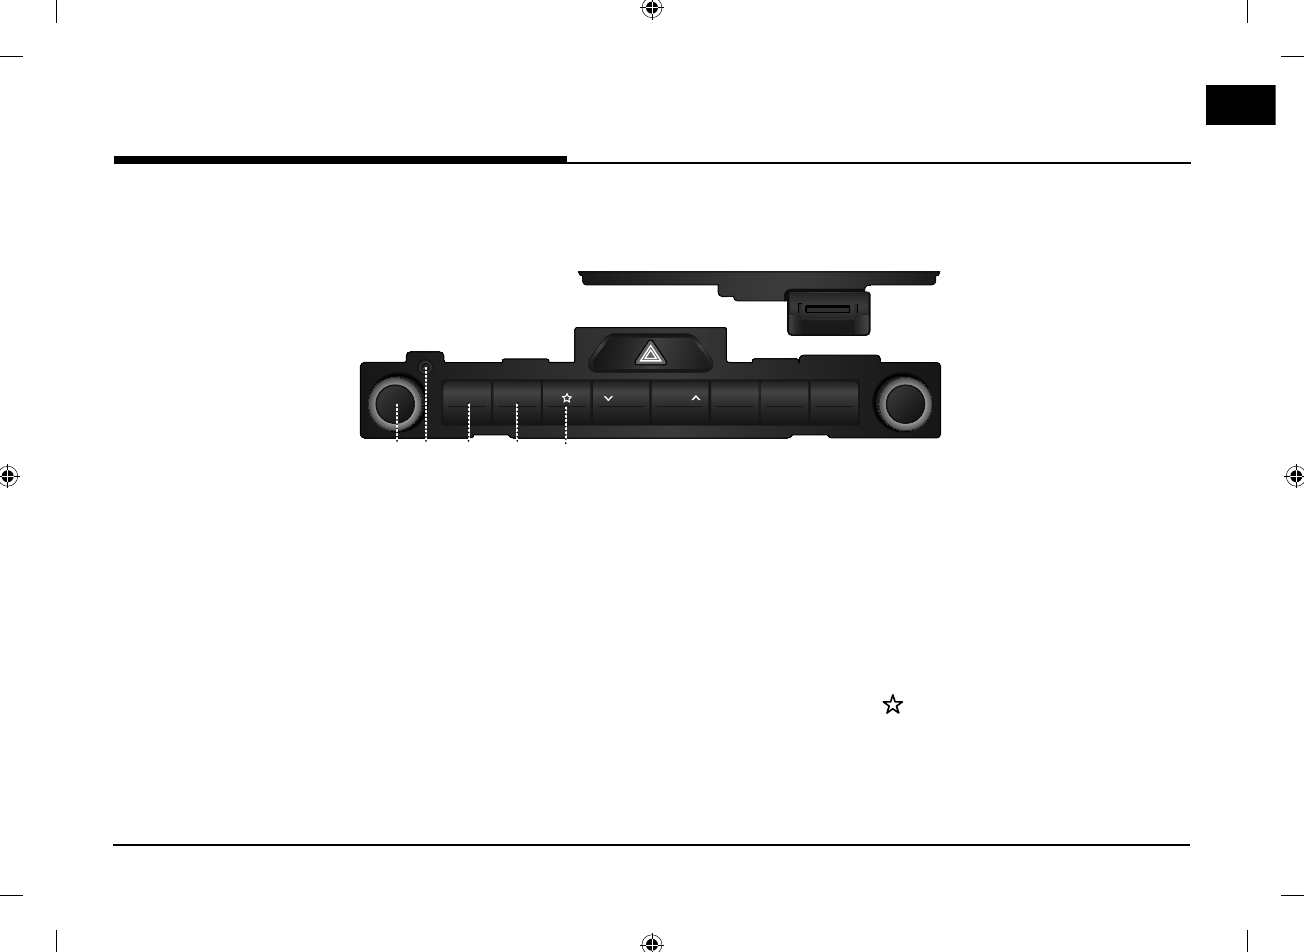
Name of each component
Head unit
5$',2 0(',$ 6((. 75$&. 0$3 1$9 6(783
acbed
1. 䳜 1 button
‐ Power on
Press this button in system OFF status.
‐ Power off
Press and hold this button in power ON
status.
䳜 Volume control knob (VOL)
Turn anticlockwise or clockwise to control
volume.
䳜 AV on/off
Press this button to turn AV on or off in
power ON status.
2. Reset hole
Press with a thin object to reset the unit
when it does not operate normally.
3. RADIO button
Converts to the last played radio mode
(FM,AM).
4. MEDIA button
If the playable media source is one, it
moves to the corresponding screen. If the
playable media sources are more than two,
it moves to the [Media] screen. You can
select a media source. ([USB Music]/ [USB
Video]/ [iPod]/ [Apple CarPlay]/ [AUX]/
[Bluetooth Audio]/ [Android Auto])
5. (Custom button)
Press to go to the [Custom button
settings] menu. After setting, press to use
desired function.
Name of each component

12
5$',2 0(',$ 6((. 75$&. 0$3 1$9 6(783
jkigfh
Name of each component
6. WSEEK/TRACKS button
‐ When it is pressed for a short time
䳜 AM mode: plays previous/next available
frequency.
䳜 FM mode: plays previous/next available
station existing within [List] menu. (If
there is no or one station in [List] menu,
the 䳖Auto tuning䳗 function is executed.)
䳜 MEDIA mode: plays previous/next file.
‐ When it is pressed and held
䳜 AM mode: plays previous/next available
frequency.
䳜 FM mode: plays previous/next available
station existing within [List] menu.
䳜 MEDIA mode (except for Bluetooth,
AUX and Android Auto): rewinds or fast
forwards the file.
7. MAP button
Press to display the map screen of the
current location.
8. NAV button
Press to move to the navigation menu
screen.
9. SETUP button
Press to go to the [Settings] menu.
10. button
‐ AM mode: turn left/right to tune manually.
‐ MEDIA mode (except for Bluetooth, Apple
CarPlay and Android Auto): turn left/right
to search for the desired file and press.
‐ Navigation mode: turn left/right to
change the map scale on the map screen.
11. Cover for protecting SD card
(SD card insert slot)
Insert the SD card into the slot.
13
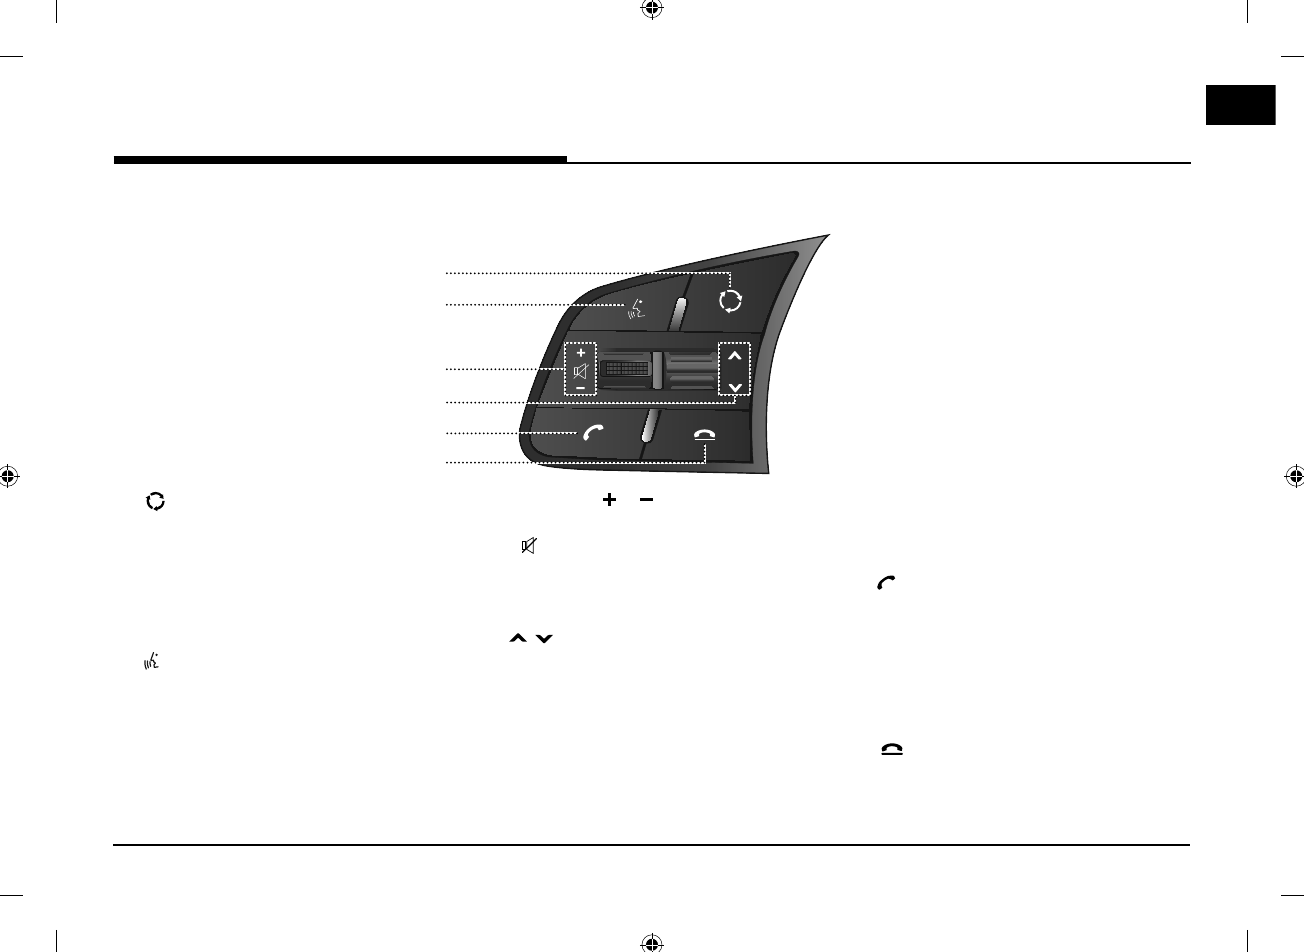
Steering wheel remote control
1
2
6
5
3
4
Name of each component
1. button
䳜 Each time this button is pressed, the
Radio or Media mode is changed. You can
select the modes to toggle in settings.
䳜 If the media is not connected, it is changed
in the order FM > AM > FM.
2. button
Press to switch to voice recognition mode
when the phone supporting Android
Auto/Apple CarPlay function is connected.
To cancel it, press the button again.
3. 䳜 Volume ( / ) button
Increases or decreases the volume level.
䳜 button
Press to mute the sound (It will be paused
in some media modes).
4. / button
‐ When it is pressed for a short time
䳜 Radio (FM, AM) mode: plays previous/
next favourites.
䳜 MEDIA mode: plays previous/next file.
‐ When it is pressed and held
䳜 AM mode: plays previous/next available
frequency.
䳜 FM
mode
:
plays previous/next favourites.
䳜 MEDIA mode (except for Bluetooth,
AUX and Android Auto): rewinds or fast
forwards the file.
5. button
Press to operate Bluetooth Hands-Free
function.
䳜 Press to accept a call.
䳜 Press to make a call from last calls.
䳜 Press and hold for redialling.
6. button
䳜 Press to end the phone call during a call.
䳜 Press to reject the call in the incoming call
screen.
14
Basic operation
Starting the system for the
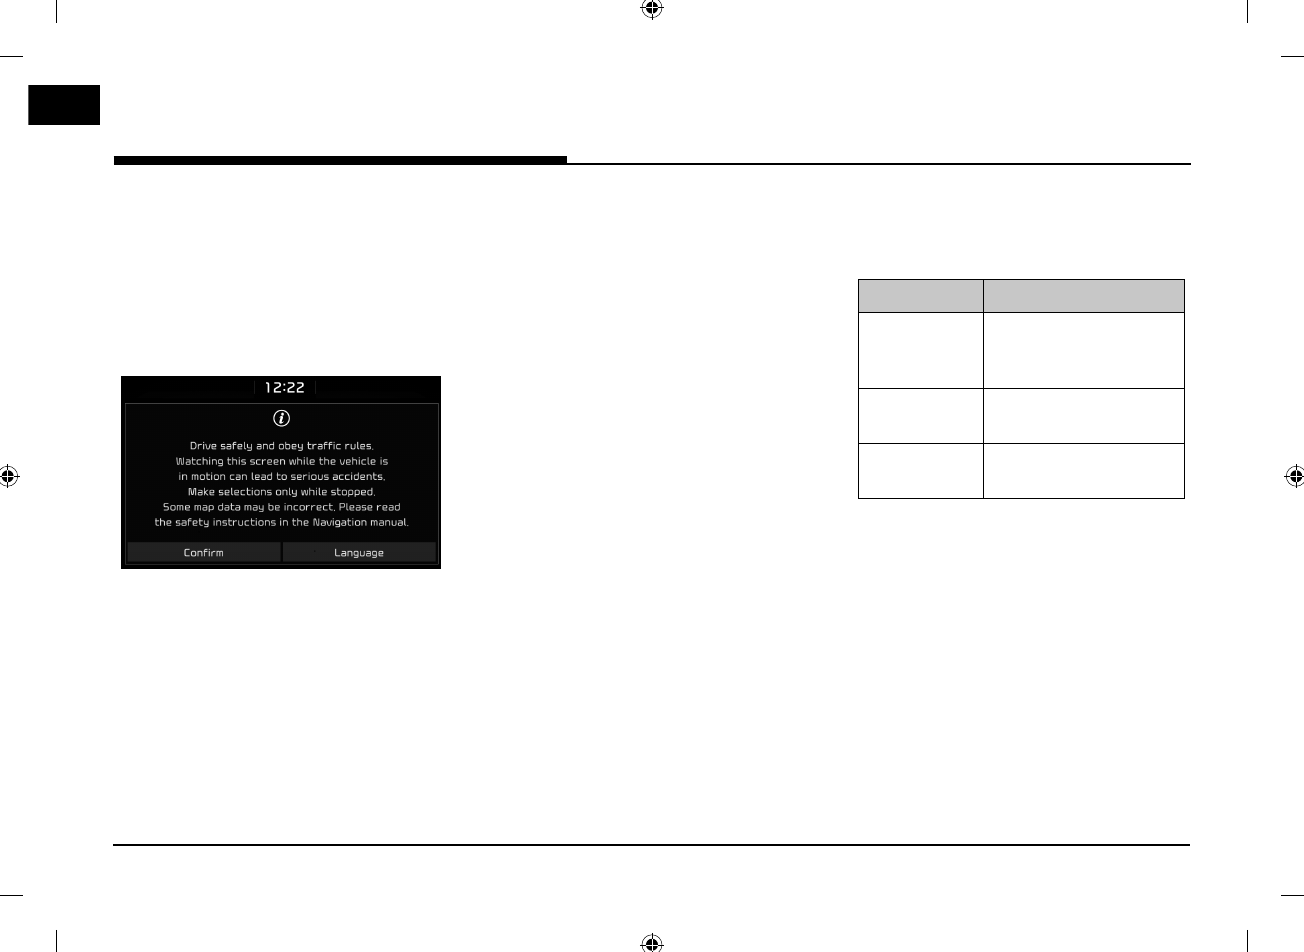
first time
1. Press the engine start button or set the
ignition key to On or ACC.
Once the system is turned on, the booting
process will start and the safety warning
page is displayed.
2. Press [Confirm].
If you want to change the system
language, press [Language]. For more
details, refer to 䳖Language䳗 on page 59.
Notes
䳜 You cannot operate the system while it is
booting up. It may take some time for all of
features to be ready.
䳜 The safety warning page is displayed every
time the ignition is turned on. The displayed
warnings are related to safety, please closely
read and comply with the safety warnings.
䳜 If there is no operation for 10 seconds in
the safety warning screen the system
automatically switches to the last played
mode.
Turning the system on
Press [
1
] on the head unit in system OFF
status.
Turning the system off
Press and hold [
1
] on the head unit in system
ON status.
AV Off
Press [
1
] on the head unit to turn AV off in
power ON status.
AV On
Press [
1
] on the head unit to turn AV on in AV
off status.
Adjusting the volume
Turn the volume control knob (
-
) on the
head unit to the left/right.
Mode Description
Radio or media During the radio or media
playback, turn it to the
left/right.
Bluetooth call During the Bluetooth call,
turn it to the left/right.
Bluetooth bell During incoming call, turn
it to the left/right.
Basic operation
15
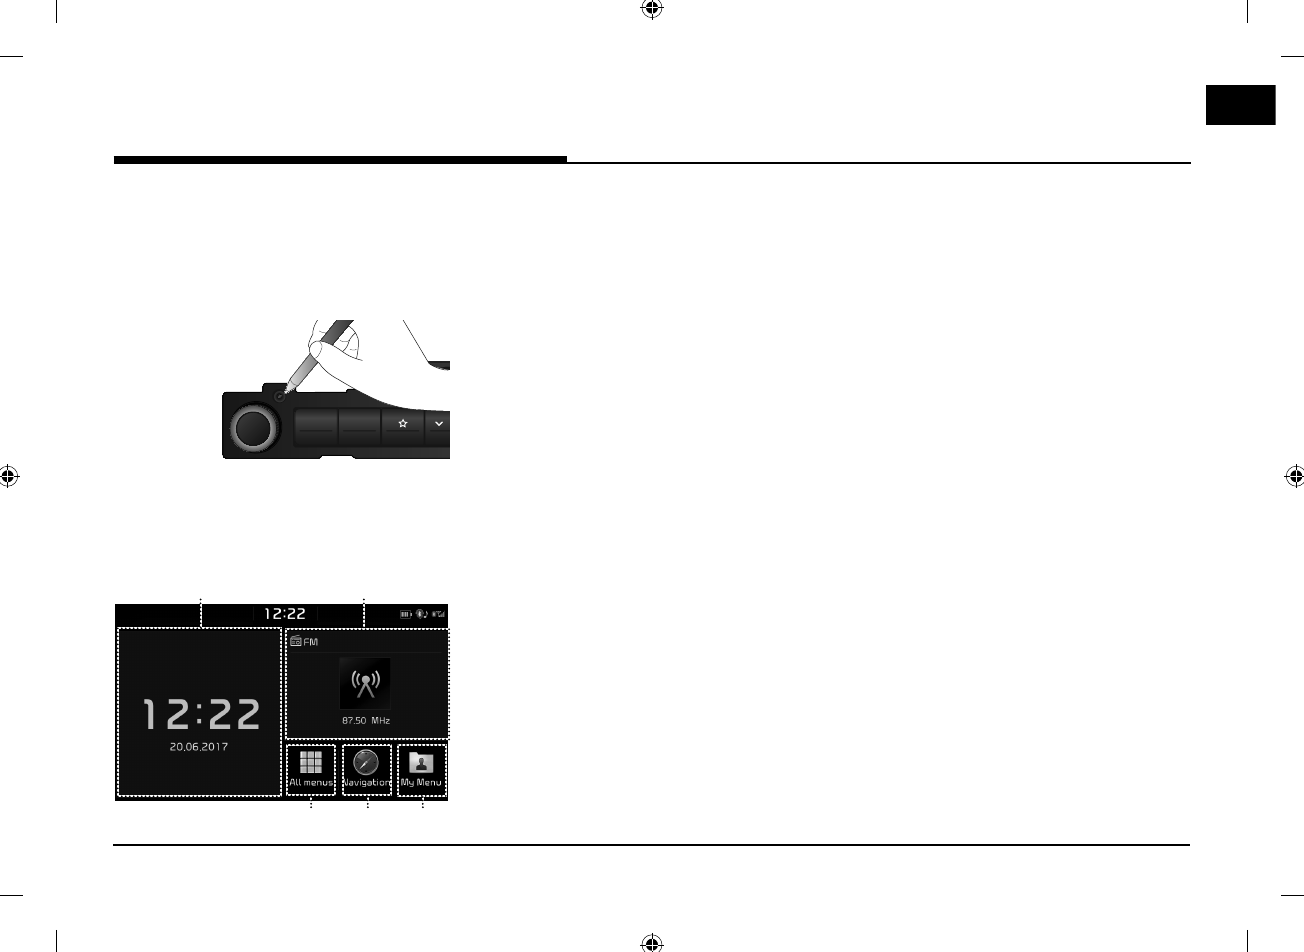
Resetting the system
This feature is used to reset the system in the
occurrence of an unforeseen error or problem.
Press 䳖RESET䳗 button. (The use of a clip or pin
is recommended when resetting the system.)
5$',2 0(',$ 6
(
[Home] screen
Configuration for Home screen
1
4
2
53
1. Date/Time
䳜 Shows current date and clock.
䳜 Press the area to move to date and clock
settings.
2. AV widget
䳜 Shows brief information on the radio or
media currently playing.
䳜 Press the area to move to the mode for
what you are listening to.
3. All menus
Press [All menus] to move to all of the
items of the system menu.
䳜 [Phone]: Operates Bluetooth Hands-Free
function.
䳜 [Android Auto]: Runs [Android Auto]
function.
䳜 [Apple CarPlay]: Runs [Apple CarPlay]
function.
䳜 [Quick guide]: Moves to the quick guide
menu. ([Using the touch screen], [Home],
[Bluetooth], [Phone projection])
䳜 [Radio]: Converts to the last played radio
mode.
䳜 [Music]: Converts to the last played music
mode.
䳜 [USB Video]: Converts to the last played
video mode.
䳜 [Current position]: Displays the map
screen of the current position.
䳜 [Navigation]: Moves to the [Navigation]
menu.
䳜 [Settings]: Moves to the [Settings] menu.
䳜 [My Menu]: Moves to the [My Menu]
menu.
4. Navigation
Press to move to the [Navigation] menu.
5. My Menu
䳜 You can add and save up 24 menu items.
䳜 You can add your favorite menu items to
have quick and easy access.
Basic operation
16
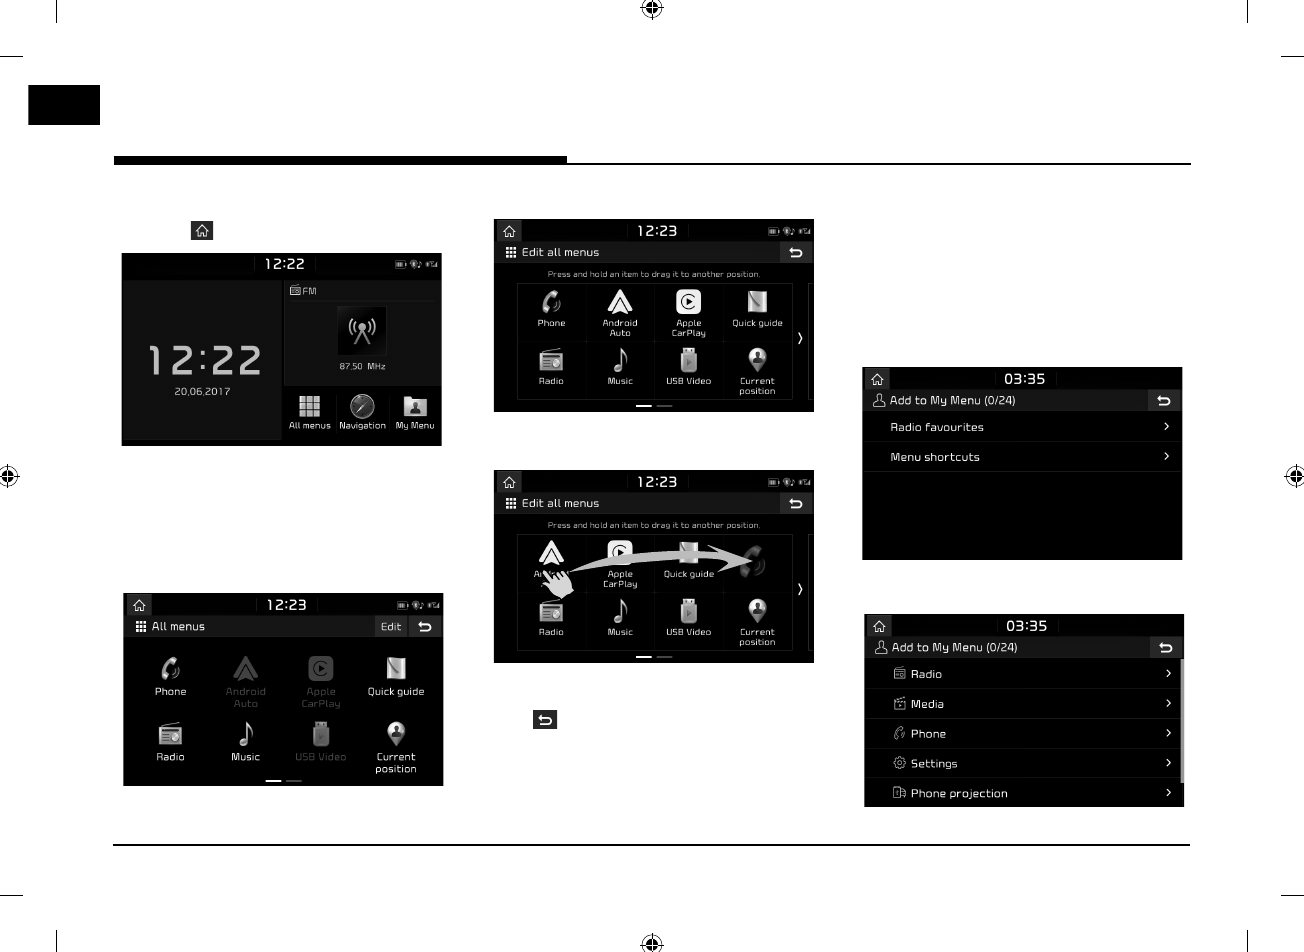
Basic operation for [Home] screen
1. Press [ ] on the screen.
2. Select a desired item and it moves to the
corresponding screen.
Editing the [All menus]
1. Press [All menus] on the [Home] screen.
2. Press [Edit] on the [All menus] screen.
3. Select the desired menu item from the list,
then drag and drop it to a desired place.
Note
Press [ ] to move to the previous screen.
Adding your favourite menu items
to [My Menu]
1. Press [My Menu] on the [Home] screen or
[All menus] screen.
2. Press [Add to My Menu].
If your favourite menu items are already
added, press [Menu] > [Add].
3. Select one of the [Radio favourites] or
[Menu shortcuts] on the screen.
<For example: the [Menu shortcuts] screen>
Basic operation
17
4. Select one of the categories.
5. Mark the subcategories.
6. Press [Add] > [Yes].
䳜 [Mark all]: Marks all items.
䳜 [Unmark all]: Unmarks all items.
Notes
䳜 Press [ ] to move to the previous screen.
䳜 Up to 24 menu items can be added to [My
Menu].
䳜 If you select the menu item added to [My
Menu], it moves to the corresponding screen.
Rearranging the favourite menu
items of [My Menu]
1. Press [My Menu] on the [Home] screen.
2. Press [Menu] > [Rearrange].
3. Select the desired menu item from the list,
then drag and drop it to a desired place.
4. Press [ ].
Deleting the favourite menu items
of [My Menu]
1. Press [My Menu] on the [Home] screen.
2. Press [Menu] > [Delete].
3. Select the desired items, then press
[Delete] > [Yes].
䳜 [Mark all]: Marks all items.
䳜 [Unmark all]: Unmarks all items.
Playing last media source
When you press engine start button or set the
ignition key to ON/ACC ON, the media source
played the last time will play automatically.
But, the message 䳖Reconnect last media
source to play.䳗 is displayed on the home
screen if you set the ignition key to ON/ACC ON
with the existing media source disconnected or
removed.
Basic operation
18
Radio operation
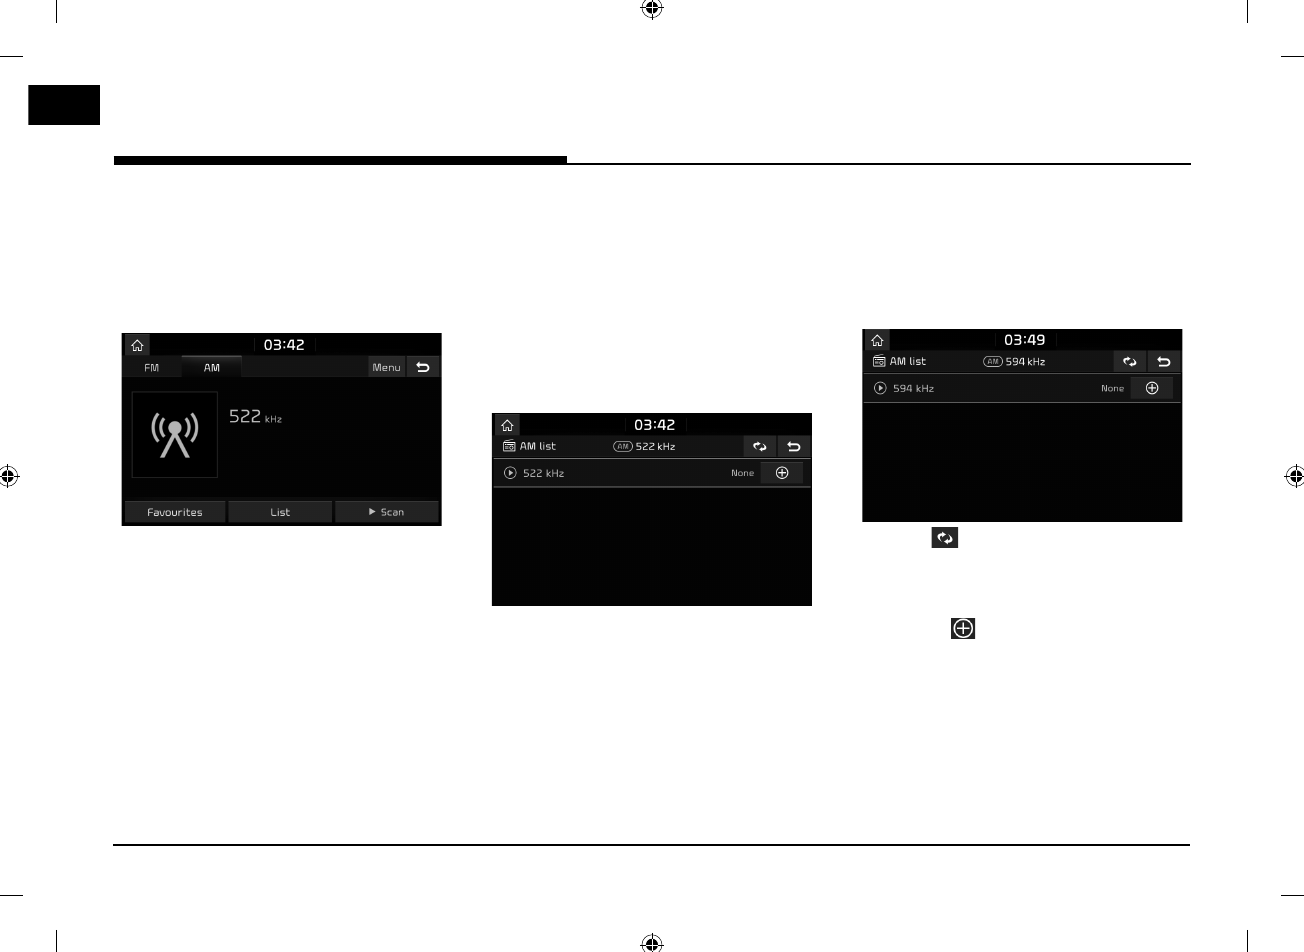
Listening to AM
1. Press [RADIO] on the head unit.
2. Press [AM] on the screen.
The AM screen of the most recent listened
to station is displayed.
Note
Each time the [RADIO] button on the head unit
is pressed, the mode is changed in the order
AM > FM > AM.
3. Auto tuning:
Press [W SEEK/TRACK S] on the head unit.
‐ Plays previous/next available station.
Manual tuning:
Turn the right knob of the head unit left/
right.
‐ The frequency moves up and down
accordingly.
Favourites tuning:
Press [Favourites]. Press the favourites
numbers of the desired broadcast station.
Opening the station list sorted in
numerical order
You can see station list with superior reception.
1. Press [AM] on the screen.
2. Press [List].
Auto search
This function lets you automatically search the
broadcast stations with superior reception.
1. Select the AM band.
2. Press [List].
3. Press [ ].
Note
If you want to save the stations to [Favourites]
menu, press [ ] and then press the desired
favourites number.
Saving AM favourites
It manually saves the listening frequency to
desired favourites list.
1. Select the AM band.
2. Select the frequency to save.
3. Press [Favourites].
Radio operation
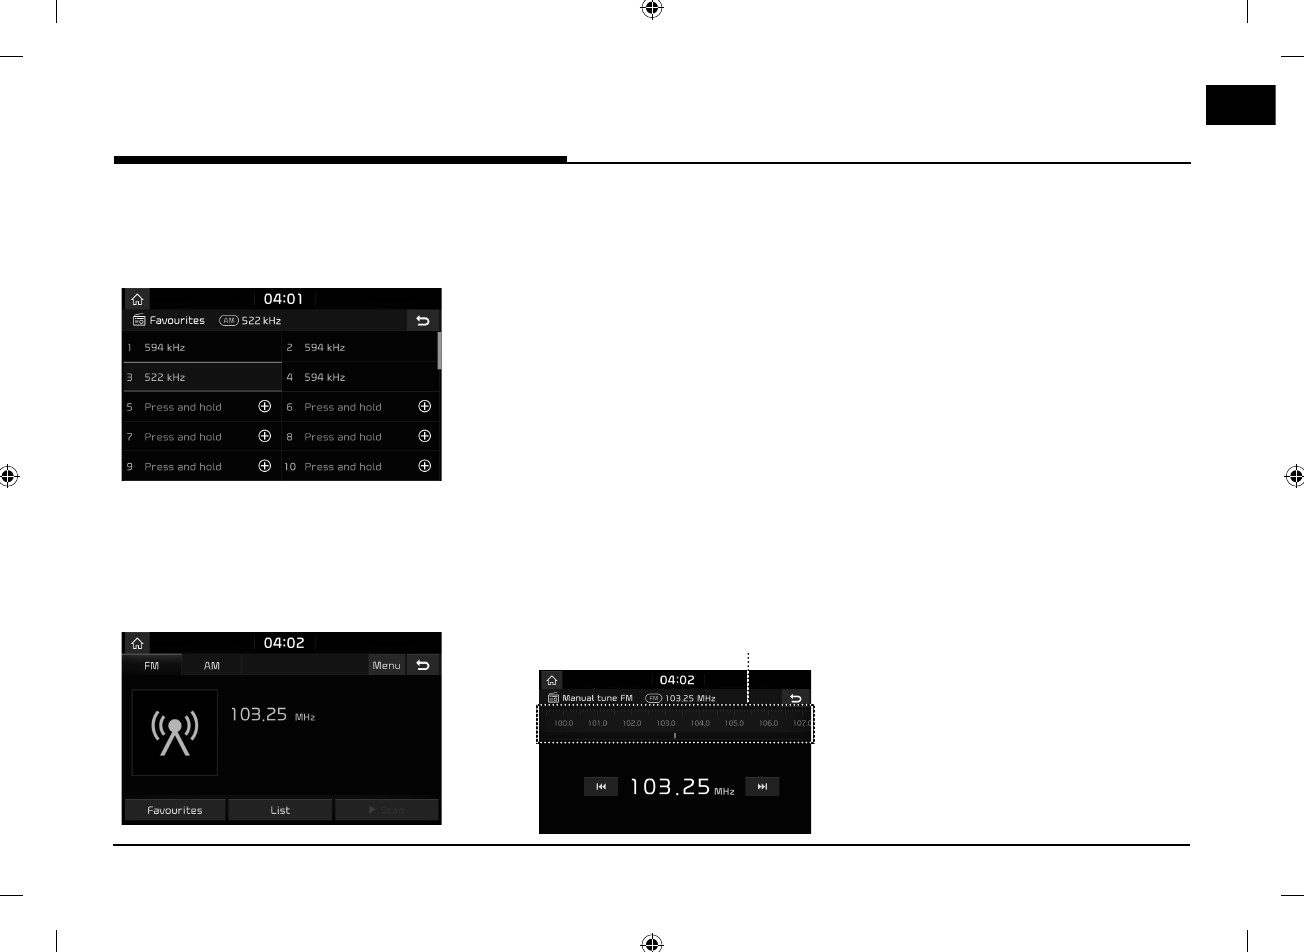
19
Radio operation
4. Press the desired favourites number.
If you want to overwrite an existing
favourites, press and hold the respective
favourites number.
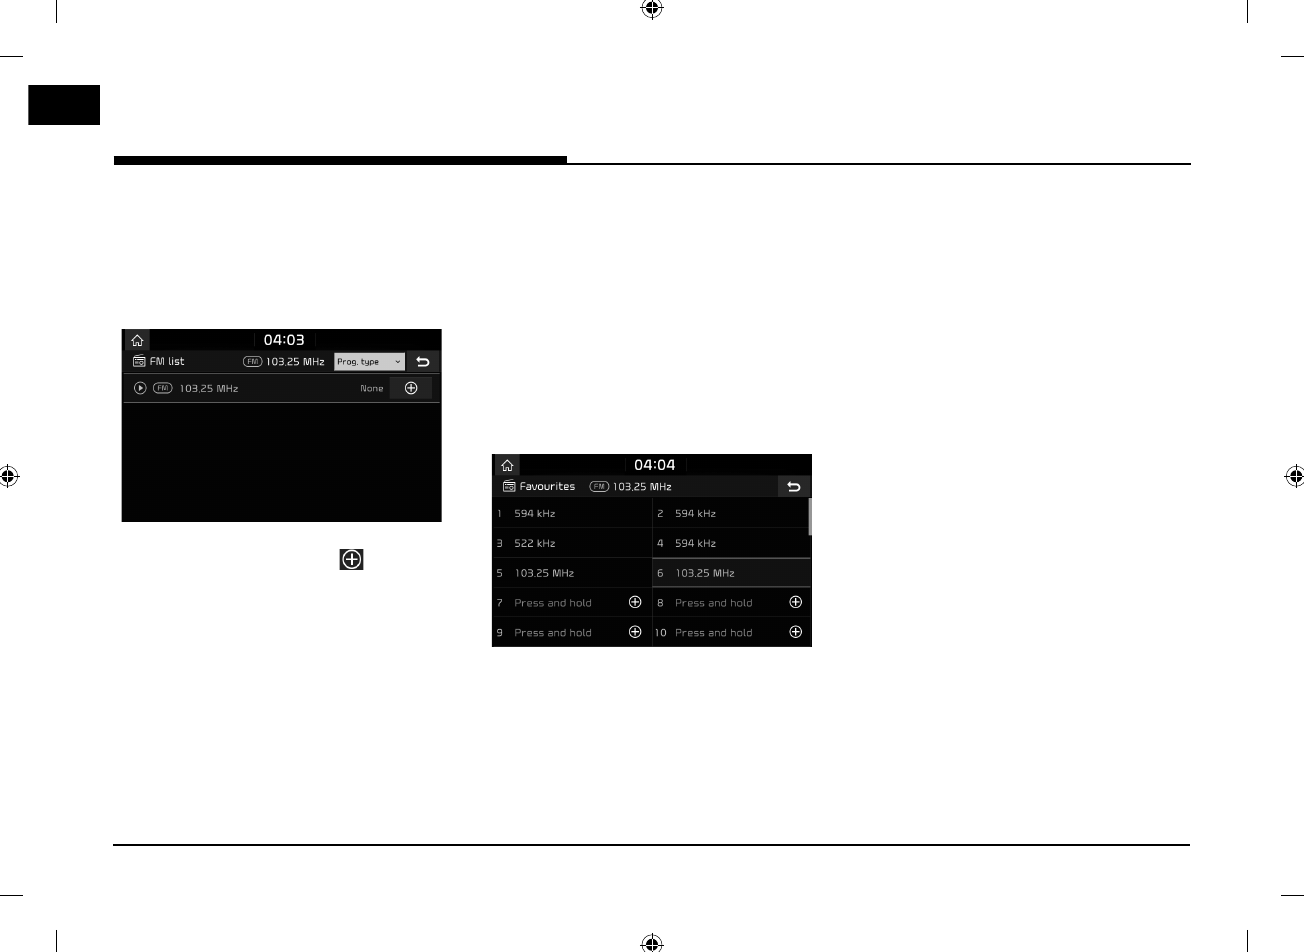
Listening to FM
1. Press [RADIO] on the head unit.
2. Press [FM] on the screen.
The FM screen of the most recent listened
to station is displayed.
Note
Each time the [RADIO] button on the head unit
is pressed, the mode is changed in the order
FM > AM > FM.
3. Auto tuning (When there are no or one
station in [List] menu):
䳜 Press [
W SEEK/TRACK S
] on the head
unit.
‐ Plays previous/next available station.
List tuning (When there are two or more
stations in [List] menu):
䳜 Press [W SEEK/TRACK S] on the head
unit.
‐ Plays previous/next available station
existing within [List] menu.
Manual tuning:
䳜 In the FM mode, press [Menu] > [Manual
tune FM].
Station bar
‐ Drag the station bar to the left/right to
find the radio station that you want.
‐ Press [
C
/
V
].
䳜 Turn the right knob of the head unit
left/right, then press it when the desired
station is displayed in a highlighted
colour.
Favourites:
䳜 Press [Favourites]. Press the favourites
numbers of the desired broadcast
station.
䳜 Press [
S/W
] on the steering wheel
remote control.
20
Radio operation
Opening the station list
You can see the station list with superior
reception.
1. Press [FM] on the screen.
2. Press [List].
䳜 If you want to save the stations to
[Favourites] menu, press [ ] and then
press the desired favourites number.
䳜 Press [Station] or [Programme type] to
arrange the list in station or programme
type order.
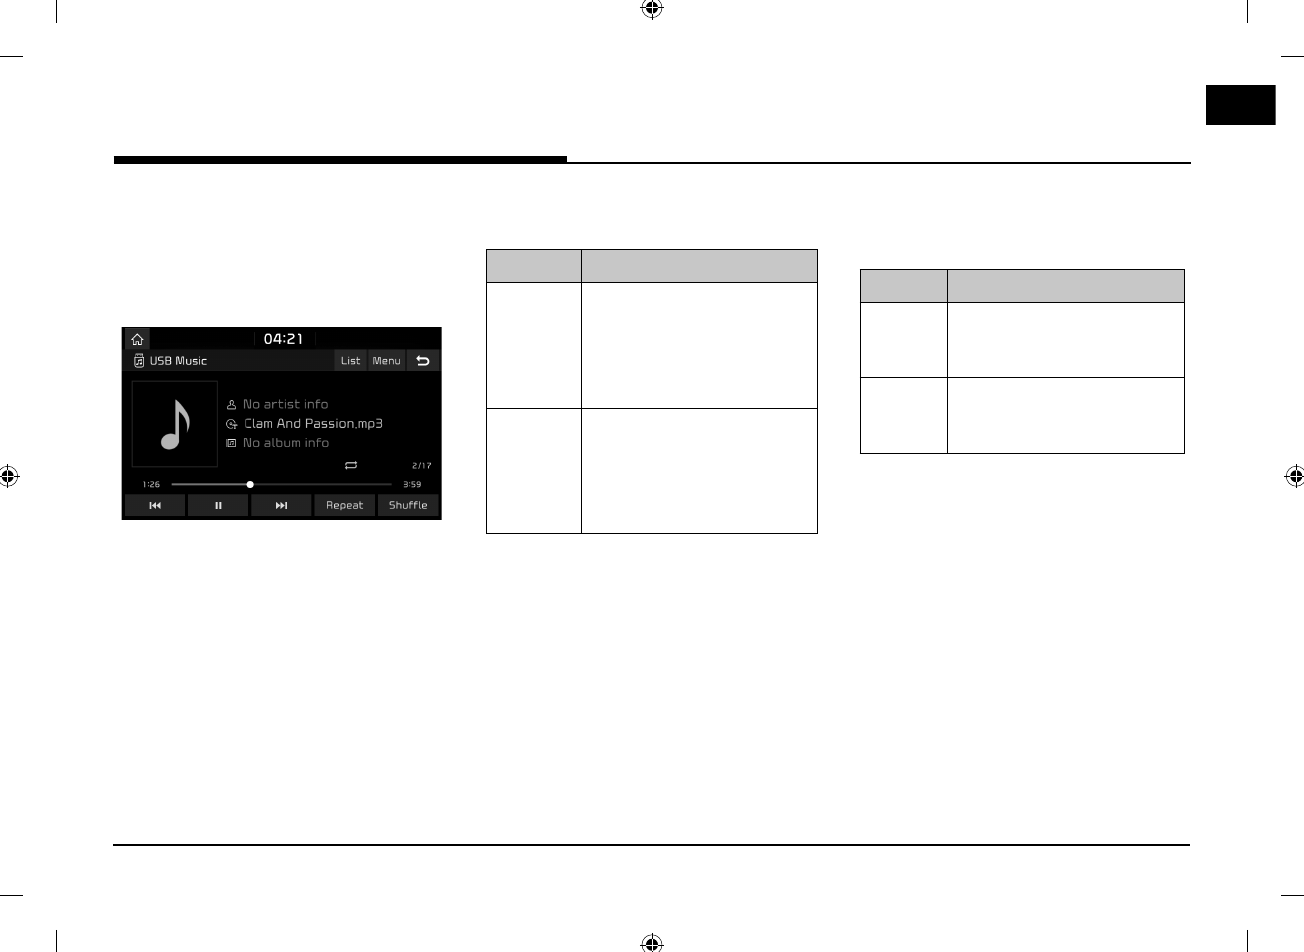
Saving FM favourites
It saves the listening station to desired
favourites list.
1. Press [FM] on the screen.
2. Select the desired station.
3. Press [Favourites].
4. Press the desired favourites number.
If you want to overwrite an existing
favourites, press and hold the respective
favourites number.
Scan
This function scans all stations and plays
only stations with good signal strength for 5
seconds each.
Press [
d
Scan].
Press [
Z
Stop] to stop the scan function.
Sound settings
1. Press [Menu] > [Sound settings].
2. For details refer to page 55 (䳖Sound䳗).
21
USB operation
Playing USB music
You can play music files stored on a USB
memory device.
Connect a USB device to the USB port and
playback starts automatically.
Note
To play USB music while a different source is
playing, press [MEDIA] > [USB Music].
Pause
You can pause the playing file.
Press [M] during playback.
Press [
d
] to play it again.
Skip
You can play the previous or next file.
Position Description
Screen 䳜 Press [
C
/
V
].
䳜 Pressing [
C
] after 3
seconds of playback time
plays the current file from
the beginning.
Head unit 䳜 Press [W SEEK/TRACK S].
䳜 Pressing [TRACK S] after
3 seconds of playback time
plays the current file from
the beginning.
Search
You can fast rewind/forward to a specific point
of a file.
Position Description
Screen Press and hold [C
/
V] and
then release at the point you
want.
Head unit Press and hold [W SEEK/TRACK
S] and then release at the
point you want.
Note
When you drag or touch the desired part on
the progress bar, the music of the selected
part plays.
Seek
You can play the file directly by searching for
the desired file.
1. To search for a desired file, turn the right
knob of the head unit left/right.
2. If the desired file is displayed, press the
right knob of the head unit to play the file.
USB operation
22
USB operation
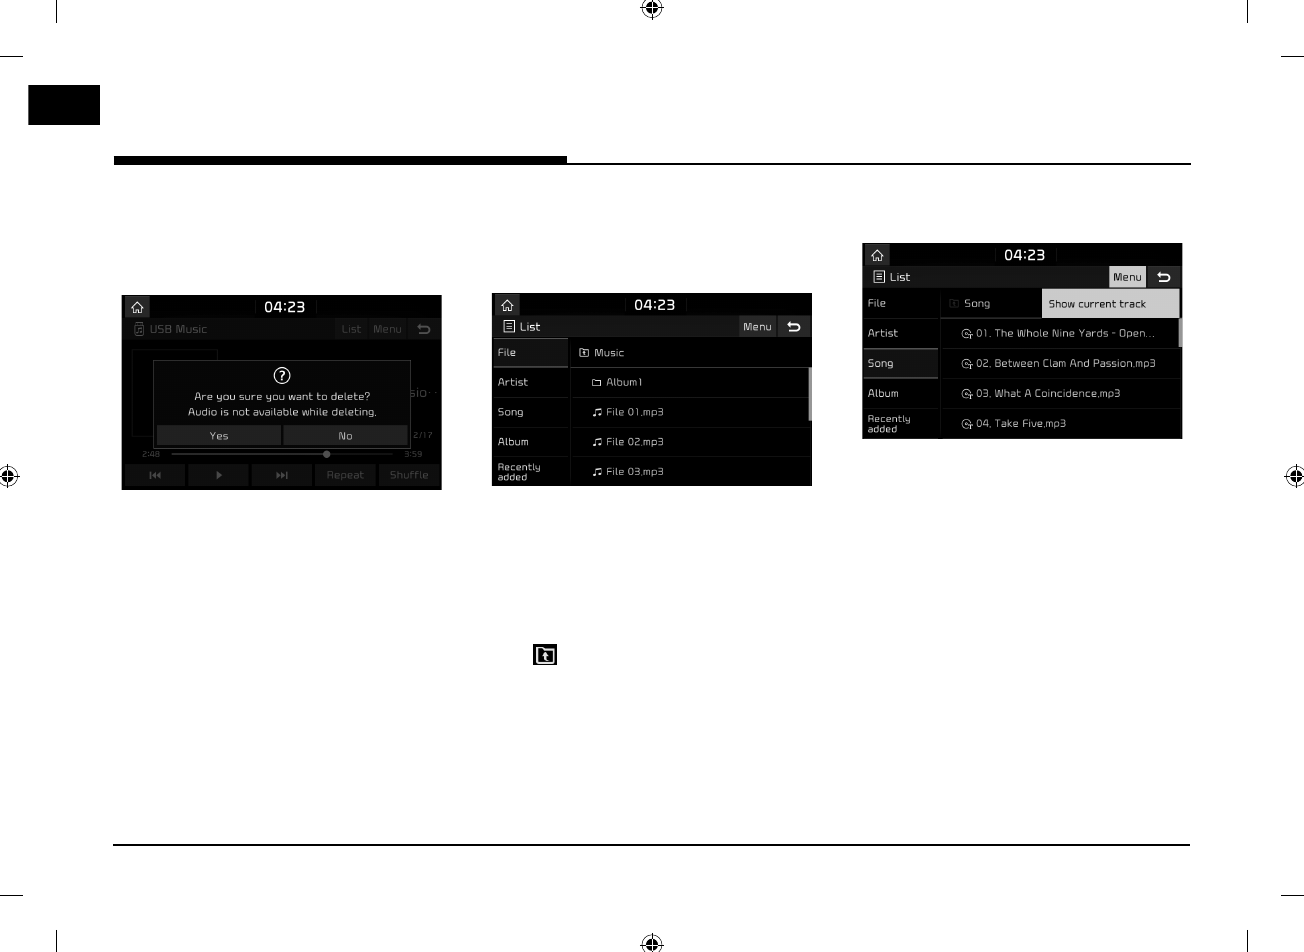
Delete current file
You can delete the currently playing file in
USB.
1. Press [Menu] > [Delete current file].
2. Press [Yes].
List
You can play the desired file by searching in
the file list of the USB Menu.
1. Press [List].
2. Press the desired file after searching for a
category.
The category can be sorted by [File],
[Artist], [Song], [Album], or [Recently
added].
Note
Press [ ] to move to an upper folder.
Using the list menu
1. Press [Menu] in list screen.
2. Press [Show current track].
The screen moves to the file list currently
playing.
23
USB operation
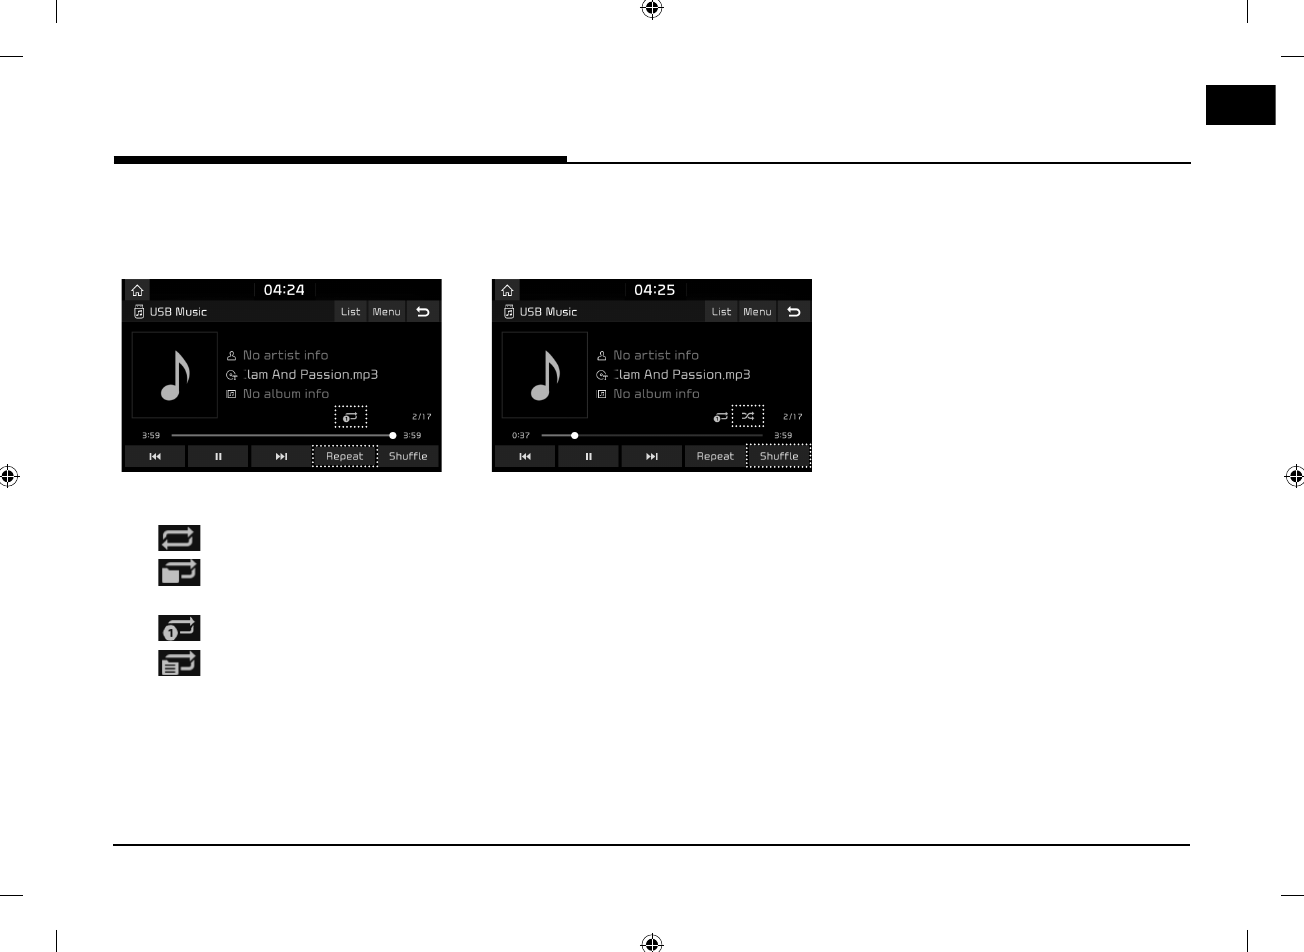
Repeat
You can play a set of files repeatedly.
1. Press [Repeat].
2. Select the desired mode by pressing
[Repeat] repeatedly.
䳜 [ ]: Plays all files sequentially.
䳜 [ ]: Repeats all files within the
current folder.
䳜 [ ]: Repeats the current file, only.
䳜 [ ]: Plays the files sequentially
within the [Artist], [Song], [Album] or
[Recently added].
Shuffle
You can play files in random order.
1. Press [Shuffle].
2. Select the desired mode by pressing
[Shuffle] repeatedly.
䳜 Plays files randomly.
Shuffle type may differ depending on the
status of [Repeat].
Sound settings
1. Press [Menu] > [Sound settings].
2. For details refer to page 55 (䳖Sound䳗).
Viewing USB video
You can watch video files saved in a USB
memory device.
1. Connect a USB device to the USB port.
2. Press [MEDIA].
To play video file while a different source
is playing, press [MEDIA] > [USB Video].
Switching to menu screen or full
screen
Press the screen repeatedly.
(If there is no operation for 10 seconds on
menu screen mode, it switches to full screen
mode.)
Pause
You can pause the playing file. For details refer
to page 21 (䳖Pause䳗).
Skip
You can play the previous or next file. For
details refer to page 21 (䳖Skip䳗).
24
USB operation
Search
You can fast forward/rewind to a specific point
of a file. For details refer to page 21 (䳖Search䳗).
Seek
You can play the file directly by searching for
the desired file. For details refer to page 21
(䳖Seek䳗).
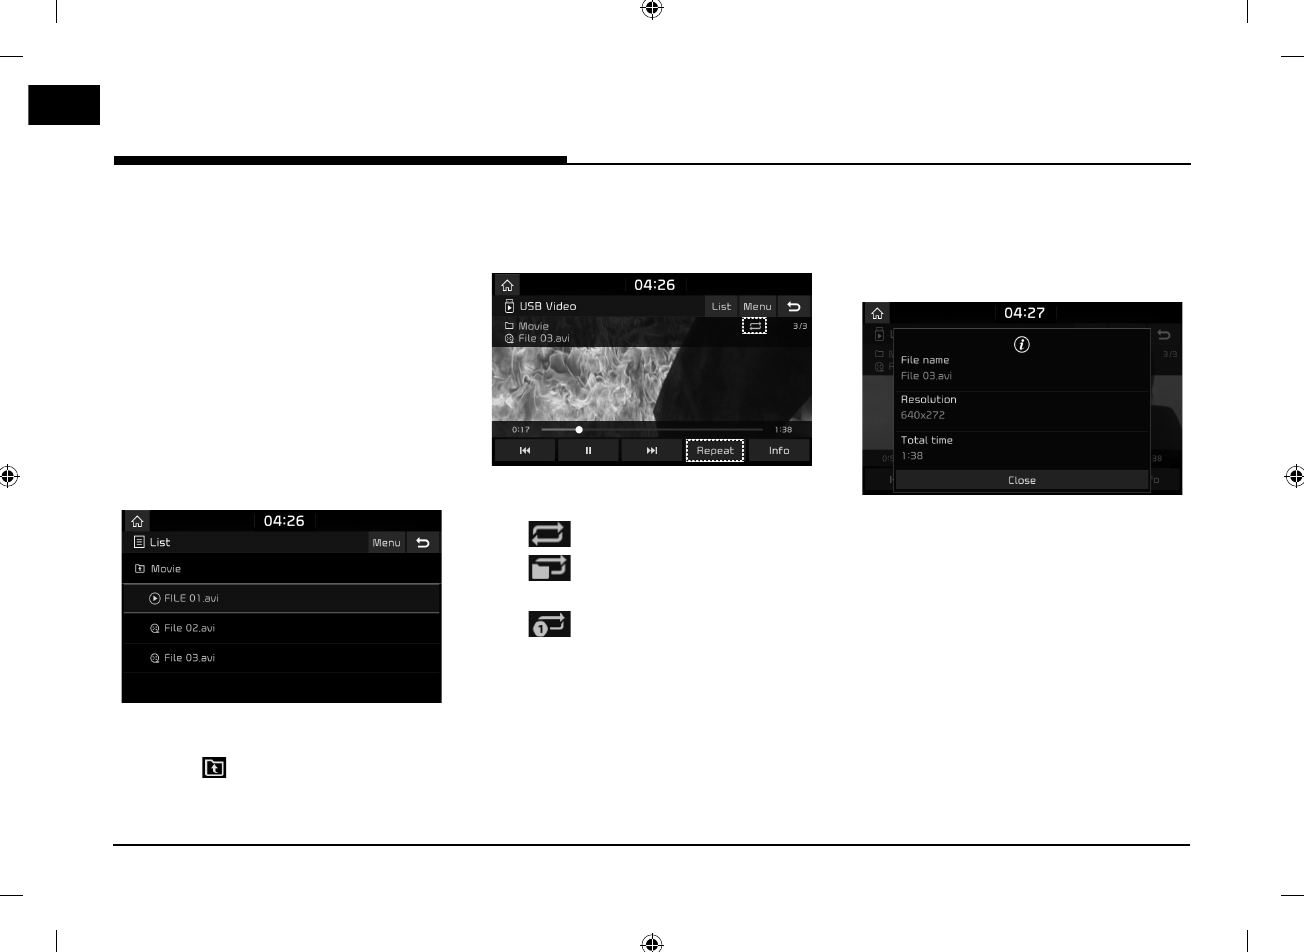
List
You can search for a desired video using the
video list.
1. Press [List].
䳜 To move to the file list screen currently
playing, press [Menu] > [Now playing].
䳜 Press [ ] to move to upper folder.
2. Press the desired video.
Repeat
You can play a set of files repeatedly.
1. Press [Repeat].
2. Select the desired mode by pressing
[Repeat] repeatedly.
䳜 [ ]: Plays all files sequentially.
䳜 [ ]: Repeats all files within the
current folder.
䳜 [ ]: Repeats the current file, only.
Info
This menu show File name, Resolution and
Total time of the currently playing video.
Press [Info].
Sound settings
1. Press [Menu] > [Sound settings].
2. For details refer to page 55 (䳖Sound䳗).
Display settings
1. Press [Menu] > [Display settings].
2. For details refer to page 56 ("Display").
25
iPod operation
Playing iPod
1. Use an iPod exclusive cable to connect an
iPod to USB connector.
2. Press [MEDIA].
To play an iPod while a different source is
playing, press [MEDIA] > [iPod].
Pause
You can pause the playing file. For details refer
to page 21 (䳖Pause䳗).
Skip
You can play the previous or next file. For
details refer to page 21 (䳖Skip䳗).
Search
You can fast rewind/forward to a specific point
of a file. For details refer to page 21 (䳖Search䳗).
Seek
You can play the file directly by searching for
the desired file. For details refer to page 21
(䳖Seek䳗).
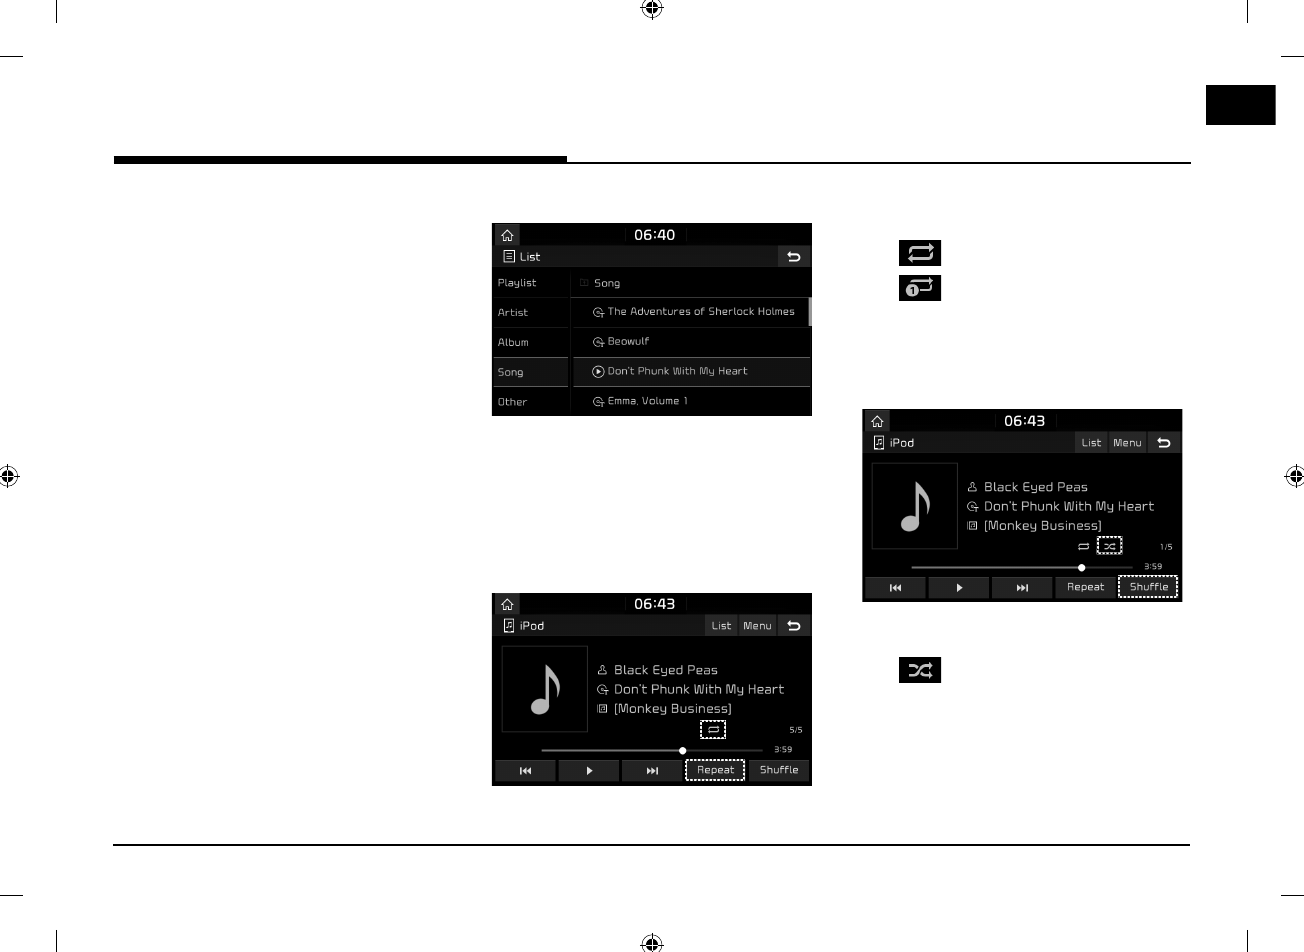
List
You can play the desired file by searching in
the files list in the iPod Menu.
1. Press [List].
2. Press the desired file after searching
for [Playlist], [Artist], [Album], [Song], or
[Other].
Repeat
You can play a set of files repeatedly.
1. Press [Repeat].
2. Select the desired mode by pressing
[Repeat] repeatedly.
䳜 [ ]: Plays all files sequentially.
䳜 [ ]: Repeats the current file, only.
Shuffle
You can play files in random order.
1. Press [Shuffle].
2. Select the desired mode by pressing
[Shuffle] repeatedly.
䳜 [ ]: Plays all files randomly.
Sound settings
1. Press [Menu] > [Sound settings].
2. For details refer to page 55 (䳖Sound䳗).
iPod operation
26
Auxiliary device operation
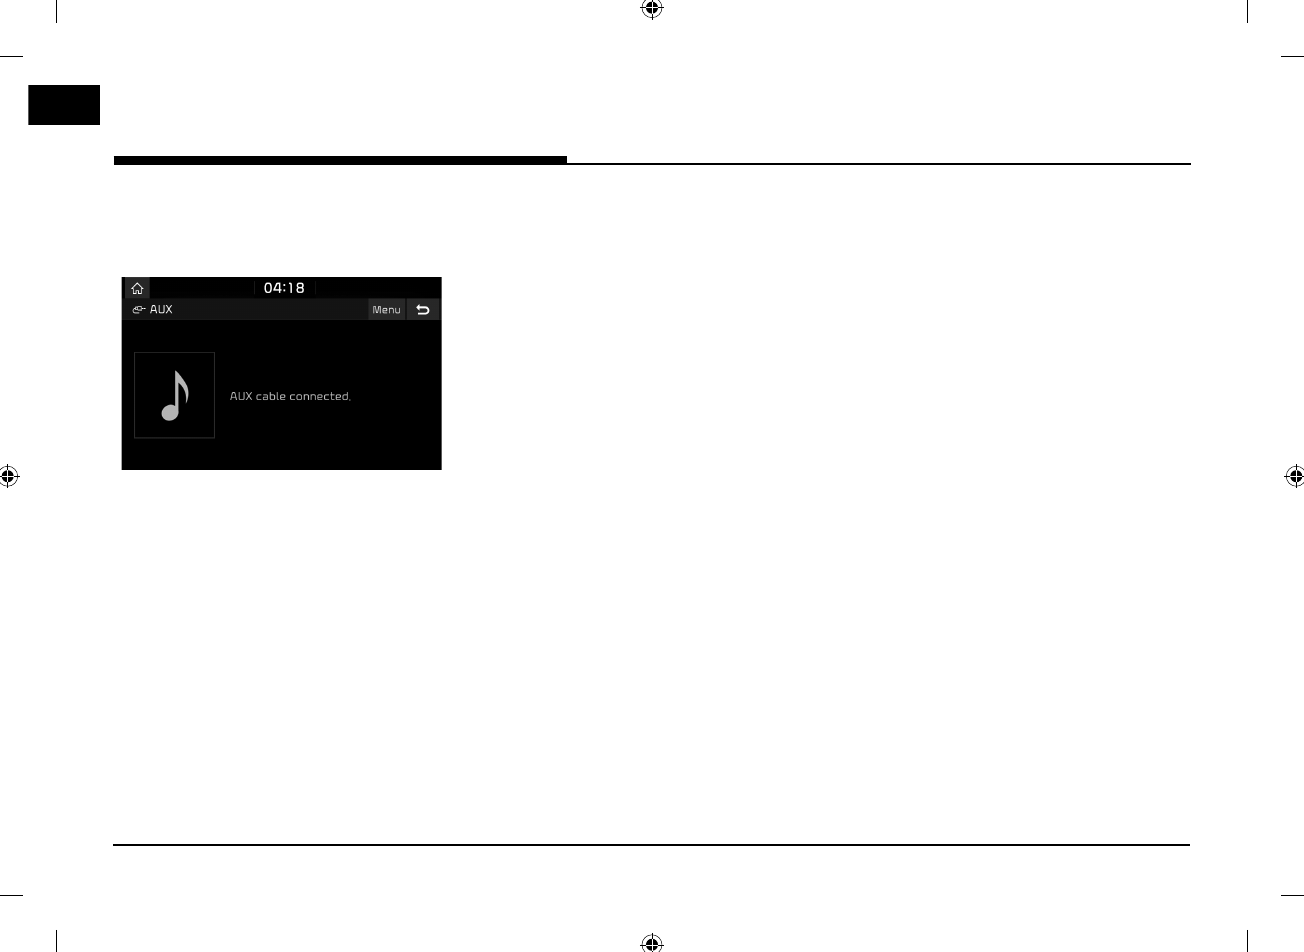
Playing an AUX source
1. Connect an auxiliary device to the AUX
terminal.
2. Play the auxiliary device.
Note
To play auxiliary device while a different source
is playing, press [MEDIA] > [AUX].
Sound settings
1. Press [Menu] > [Sound settings].
2. For details refer to page 55 (䳖Sound䳗).
Auxiliary device operation
27
Bluetooth® audio
Playing Bluetooth audio
䳜 Music stored on the mobile phone can be
played in the car through Bluetooth audio
streaming.
䳜 Bluetooth audio can be played only when a
Bluetooth phone or Bluetooth audio device
has been connected. To play Bluetooth audio,
connect the Bluetooth phone to the car
system. For more information on connecting
Bluetooth, please refer to owner䳓s manual
"Pairing and connecting the unit and a
Bluetooth phone" on page 48.
䳜 If Bluetooth is disconnected while playing
Bluetooth audio, the audio stream will be
interrupted.
䳜 The audio streaming function may not be
supported in some mobile phones. Only one
function can be used at a time, You can
not use the Bluetooth hands-free and the
Bluetooth audio function at the same time.
For example, if you convert to the Bluetooth
hands-free while playing Bluetooth audio, the
music stream is paused.
䳜 Playing music from the car is not possible
when there are no music files saved on the
mobile phone.
Starting the Bluetooth audio
1. Connect your Bluetooth device to the head
unit.
2. Press [MEDIA].
The Bluetooth audio screen is displayed.
Note
To play Bluetooth audio while a different
source is playing, press [MEDIA] > [Bluetooth
Audio].
Pause
Press [ ] during playback.
Press [ ] to play it again.
Skip
You can play the previous or next file.
For details refer to page 21 (䳖Skip䳗).
Repeat
You can play a set of files repeatedly.
Select the desired mode by pressing [Repeat]
repeatedly.
Shuffle
You can play files in random order.
Select the desired mode by pressing [Shuffle]
repeatedly.
Note
These features may not be supported in some
Bluetooth devices.
Connection settings
1. Press [Menu] > [Connection settings].
2. For details refer to page 57 (䳖Bluetooth
connections䳗).
Sound settings
1. Press [Menu] > [Sound settings].
2. For details refer to page 55 (䳖Sound䳗).
Bluetooth® audio

28
Getting started with navigation
Precautions for safe driving
Please observe and comply with local traffic
rules and regulations.
䳜 The route displayed for destination guidance
is a reference and the route guidance will
take you to the vicinity of your destination.
The highlighted route is not always the
shortest distance, the least congested, and
in some case, might not be the fastest route.
䳜 Road, name, POI and speed limit may not
always been completely updated.
䳜 The car position mark does not indicate
your exact location. This system uses GNSS
information, various sensors, and road map
data to display the current position. However,
errors in displaying your location may occur
if the satellite is transmitting inaccurate
signals or less than two satellite signals are
received. Errors that occur in such conditions
cannot be corrected.
䳜 The position of the vehicle within the
navigation may differ from your actual
location depending on various reasons,
including the satellite transmission state,
vehicle state (driving location and conditions),
etc. Additionally, the car position mark
may differ from the actual position if the
map data is different from the actual
road landscape, such as changes due to
the construction of new roads. If such
differences occur, driving for a short period
of time will automatically correct the position
of the vehicle through map matching or GNSS
information.
What is GNSS?
The GNSS(Global Navigation Satellite System)
is a satellite-based navigation system made
up of a network of 32 satellites placed into
orbit by the Global Positioning System (GPS)
of U.S.A, GLONASS of RUSSIA, etc.
GNSS works in any weather conditions,
anywhere in the world, 24 hours a day.
There are no subscription fees or setup
charges to use GNSS.
About satellite signals
Your unit must acquire satellite signals to
operate. If you are indoors, near tall buildings
or trees, or in a parking garage, the unit
cannot acquire satellite signals.
Acquiring satellite signals
Before the unit can determine your current
position and navigate a route, you must do the
following steps:
1. Go outside to an area free from tall
obstructions.
2. Turn on the unit.
Acquiring satellite signals can take a few
minutes.
Getting started with navigation
29
Getting started with navigation
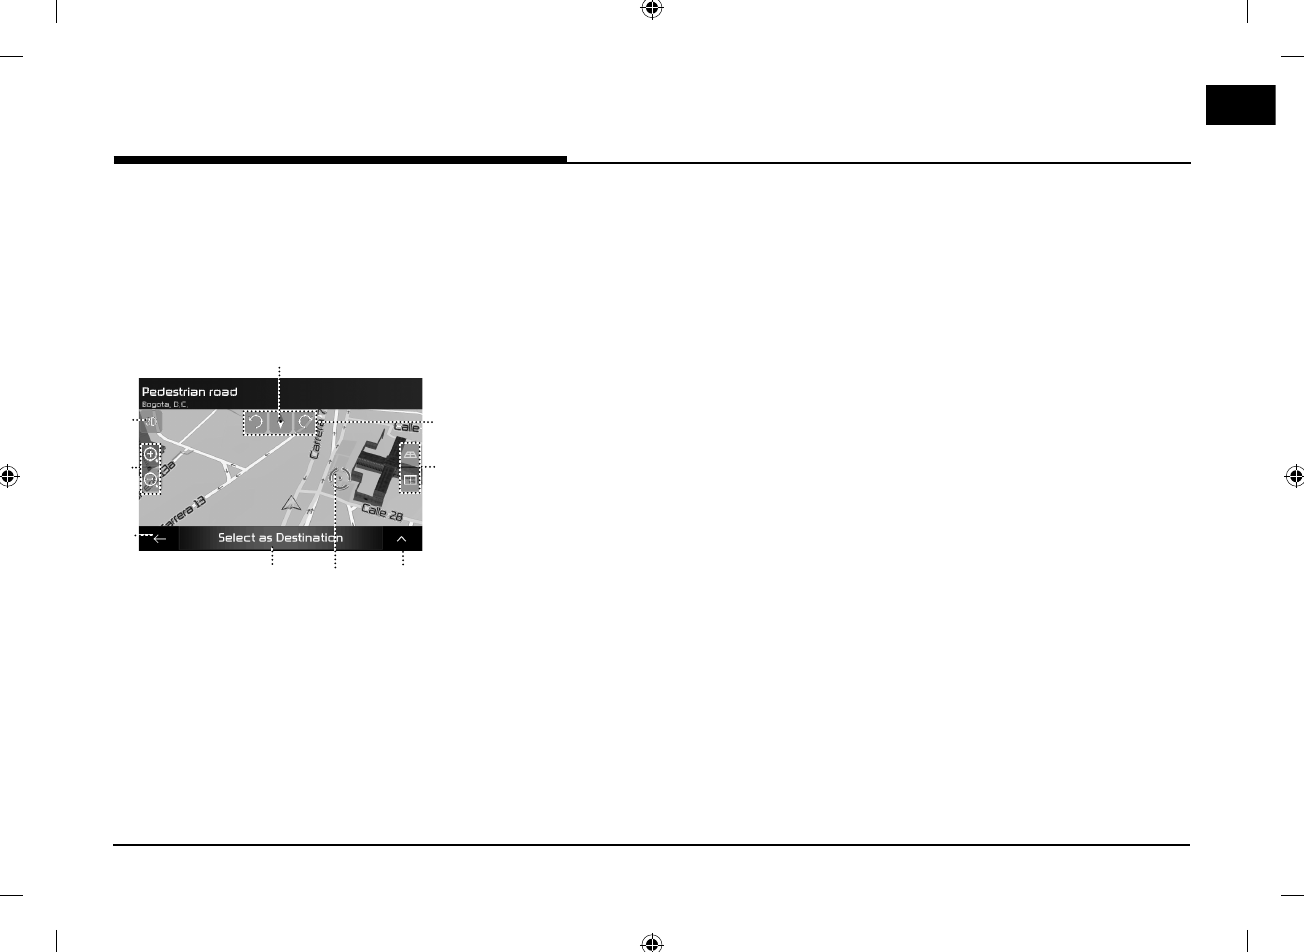
Viewing map screen
Press [MAP] button to access the map screen.
If you press the map anywhere during
navigation, the map stops following the current
position and control buttons appear to help you
modify the map view.
1
2
3
456
7
8
9
1. Changing 2D, 3D, or 2D North up
views
Switch between the 3D perspective, 2D
Heading up, and 2D North up map view
modes. In Heading up mode the map is
rotated so its top always points in the
current driving direction. This is the default
orientation in 3D map view mode. In North
up mode, the map faces North.
2.
Zooming in and out
Map scaling has a limit in 3D map view
mode. If you zoom out further, the map
switches to 2D view mode.
Press once to modify the view in a large
step, or press and hold the button to
modify it continuously and smoothly.
3. Returning to the previous screen
Press the Back button to return to the
previous screen. You can also press and
hold this button to quickly return to the
navigation view from any other screen.
4. Selecting a destination
Select the cursor location as a new
destination. The route is automatically
calculated.
5. Checking location information
The location of the cursor can be used as
the destination of the route or a new Alert
Point.
The top section of the navigation view
shows information about the selected
point.
6. Selecting additional options
Open a list of additional features like saving
a location, or searching for places around
the cursor.
7. Tilting up and down
Change the vertical view angle of the map
in 3D mode.
Press once to modify the view in a large
step, or press and hold the button to
modify it continuously and smoothly.
8. Rotating left and right
Changes the horizontal view angle of the
map.
Press once to modify the view in a large
step, or press and hold the button to
modify it continuously and smoothly.
9. Checking the compass
The direction of the compass shows North.
30
Getting started with navigation
Operating navigation screen
The navigation system displays various
information on the map screen.
1
2
3
4
567
9
10
8
1. Next turn
It shows the type of the next manoeuvre
and its distance.
2. Second next turn preview
It shows the type of the second next
manoeuvre if it is near the first one.
3. Speed limit warning
It shows the current speed limit of the
road.
4. Data fields
‐ The estimated time of the arrival at the
destination.
‐ The remaining time of the trip
‐ The remaining distance to the
destination.
You can change the default values by
pressing and holding the area where the
data fields appear.
5. Current position marker
The current position is displayed as a blue
arrow by default. When there is no GPS
position, the current position marker is
transparent and it shows your last known
position.
6. Street name
It shows the current street name.
7. Navigation menu
The menu button appears when the
navigation view is displayed. Press it to
open the navigation menu.
8. Planned route
The planned route is displayed as an
orange line.
9. Sound settings
Adjust the different sound volumes.
10. Next street
It displays the name of the next street.

31
Getting started with navigation
Using the navigation menu
On the navigation view, press [ ] to open
the navigation menu.
You can see the following menu options when
you are navigating without a planned route:
12345
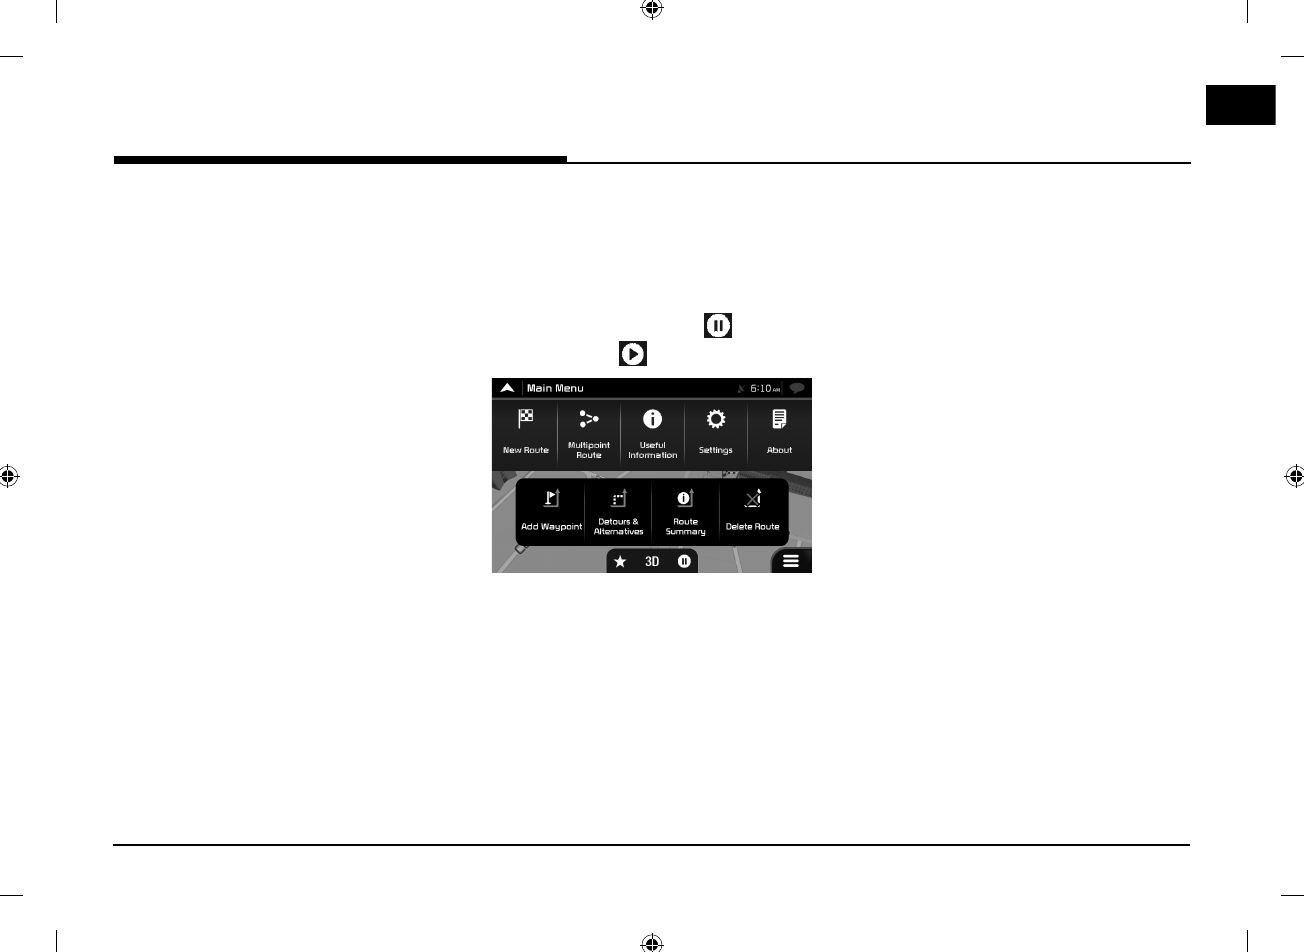
1.
New Route
Select your destination by entering an
address or its coordinate, or by selecting
a Place, a Saved location, or a saved
route. You can also look up your recent
destinations from the History.
2.
Multipoint Route
Build your route from one or more
route points. You can also plan a route
independently of your current GPS position
by setting a new starting point.
3.
Useful Information
Access additional options and check
navigation-related information.
4.
Settings
Customise the way the navigation
software works.
5.
About
See information about the navigation
software.
With a planned route, the following menu
options are also available:
67 9
8
6.
Add Waypoint
Add an intermediate destination to your
route.
7.
Detours & Alternatives
See route alternatives to avoid parts of
the route, or to avoid a specific road from
your planned route.
8.
Route Summary
View the route in its full length on the map
and check route parameters and route
alternatives.
Press [ ] to access additional options,
like Simulation or Route Preferences.
9.
Delete Route
‐ Delete Route: Delete your route.
‐ Delete Waypoint: Delete the next
waypoint or the whole route.
32
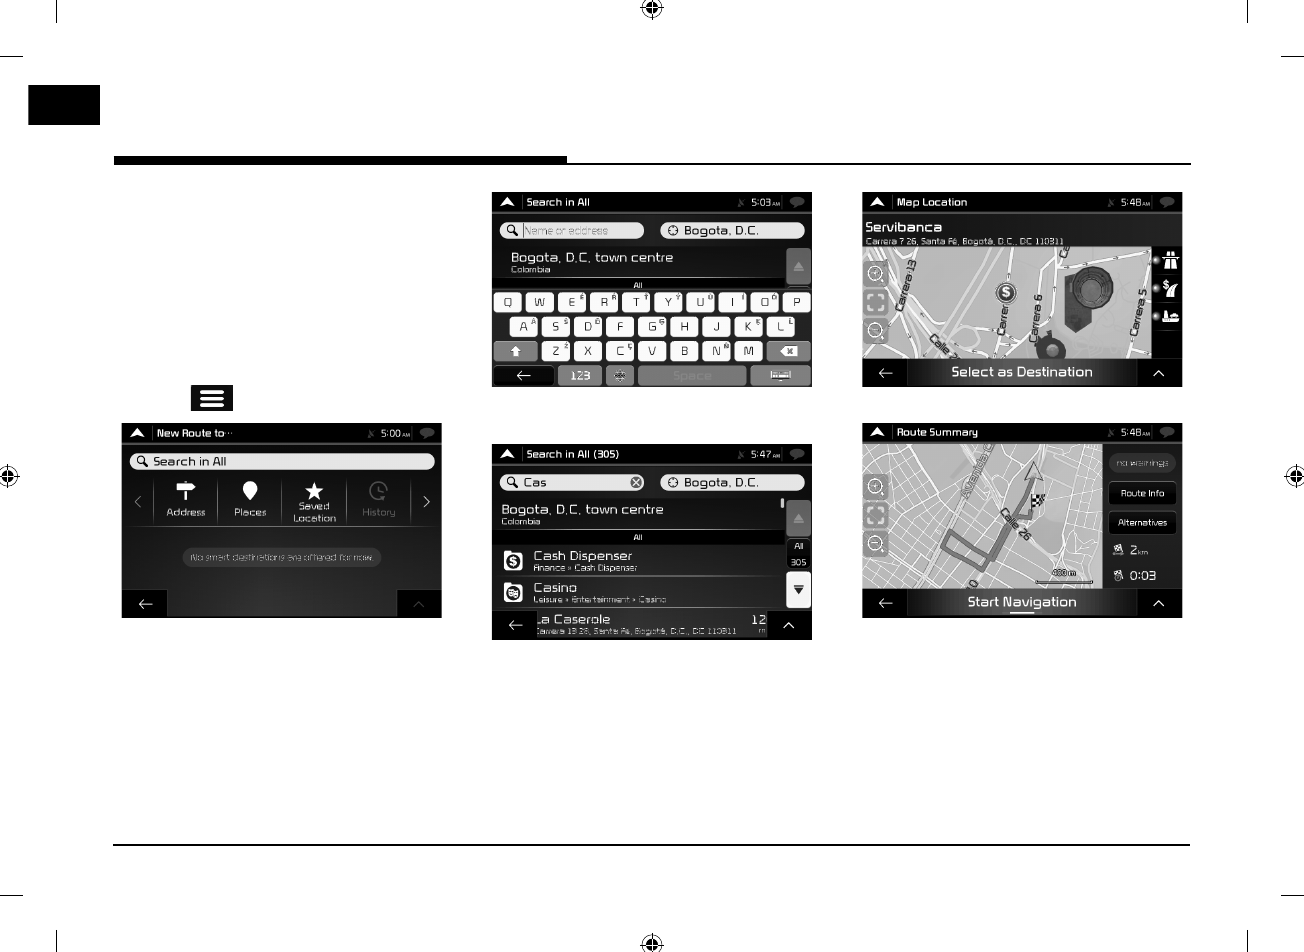
Searching for destination
Selecting destination
You can initiate a separate search for
addresses, places, saved locations or recent
destinations.
Using combined search
You can find the destination by using for
combined search.
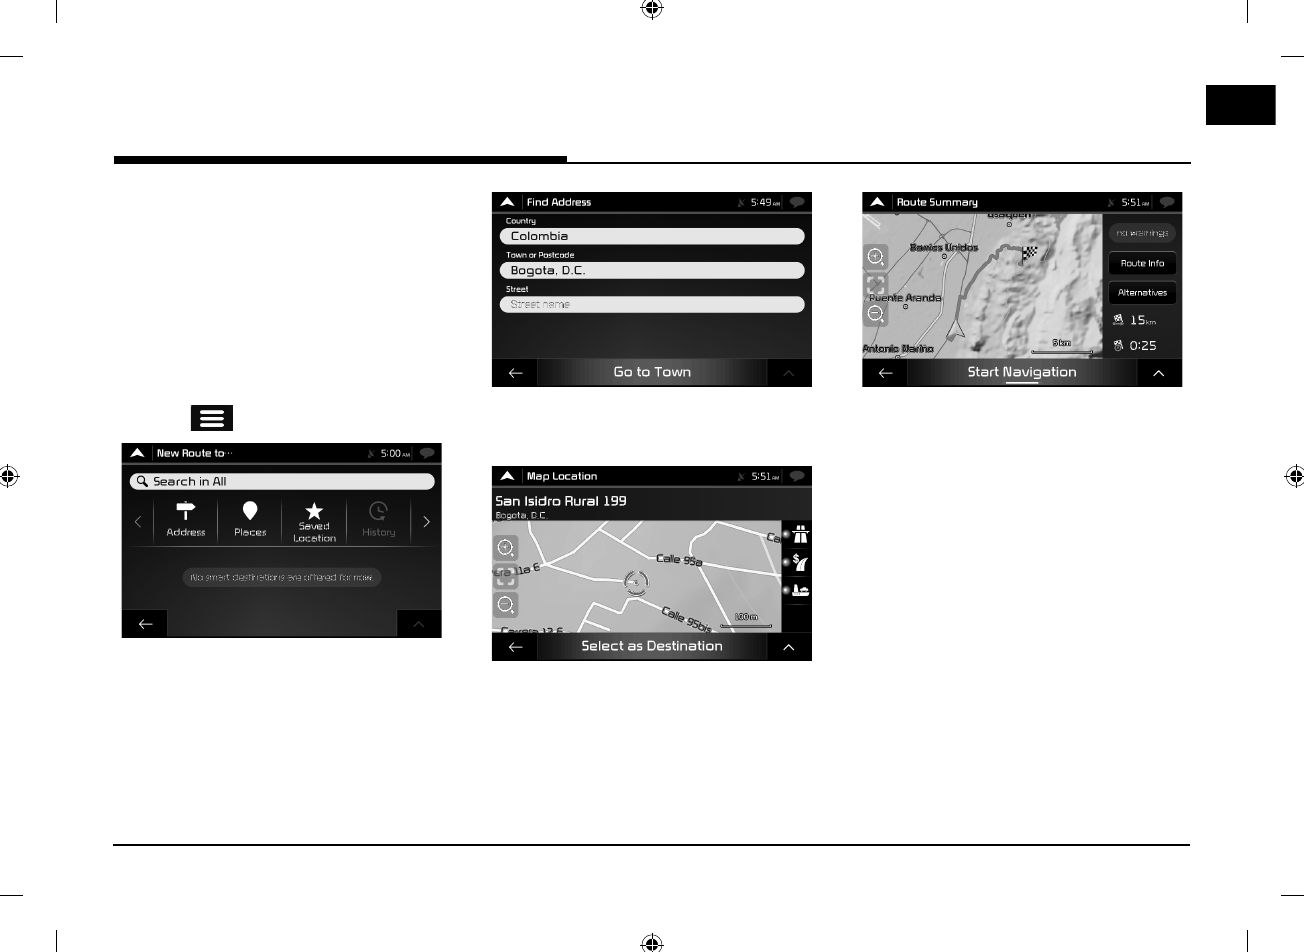
1. Press [ ] > [New Route].
2. Press [Search in All].
3. Enter Name or address then most likely
result appears below the input field.
4. Select the desired item from the list
(over and over).
If the new search area is in a different city,
start entering the city, ZIP code ...
5. Press [Select as Destination].
6. Press [Start Navigation].
Searching for destination
33
Searching for destination
Selecting an address
Using the same screen, you can find an
address by entering the following information:
(exact address, including the house number,
centre of a town, midpoint of a street,
intersection, starting the search with the
postal code)
You can find the destination by entering for an
address.
1. Press [ ] > [New Route].
2. Press [Address].
3. Enter country name, town or postcode and
street name, then press [Go to Town] or
[Go to Street].
4. Press the [Select as Destination].
5. Press [Start Navigation].
34
Searching for destination
Selecting a place of interest
You can search for places of interest in the
[Places] menu.
Using the same screen, you can find a place by
selecting one of the following options: (Quick
search categories, Searching for a Place by its
name, category)
Using quick search categories
The quick search feature helps you quickly find
the most frequently selected types of places.
1. Press [ ] > [Places].
䳜 [Gas Station]: If a planned route exists,
petrol stations are searched along the
route.
䳜 [Accommodation]: If a planned route
exists, accommodation is searched
around the destination.
䳜 [Restaurant]: If a planned route exists,
restaurants are searched along the
route.
䳜 [Parking]: If a planned route exists,
parking lots are searched around the
destination.
2. Select an item from the quick search
categories or press [Search by Name or
Category] to search by Name.
The places in the list can be reordered by
pressing [ ] name, distance, detour or
displaying all listed icons on the map screen.
3. Press [Select as Destination].
4. Press [Start Navigation].
35
Searching for destination
Finding help nearby
To quickly search for nearby assistance,
perform the following steps:
1. Press [ ] on the navigation view to
access the navigation menu.
2. Press [Useful Information] > [Help Nearby].
To quickly search for nearby assistance,
perform the following steps:
䳜 [Car Repair]: Car repair and roadside
assistance services
䳜 [Health]: Medical and emergency services
䳜 [Police]: Police stations
䳜 [Gas Station]: Gas stations
3. Press any of the quick search buttons to
get an instant list of those types of places.
Note
Press [ ] to reorder the list by name,
distance, detour and showing all.
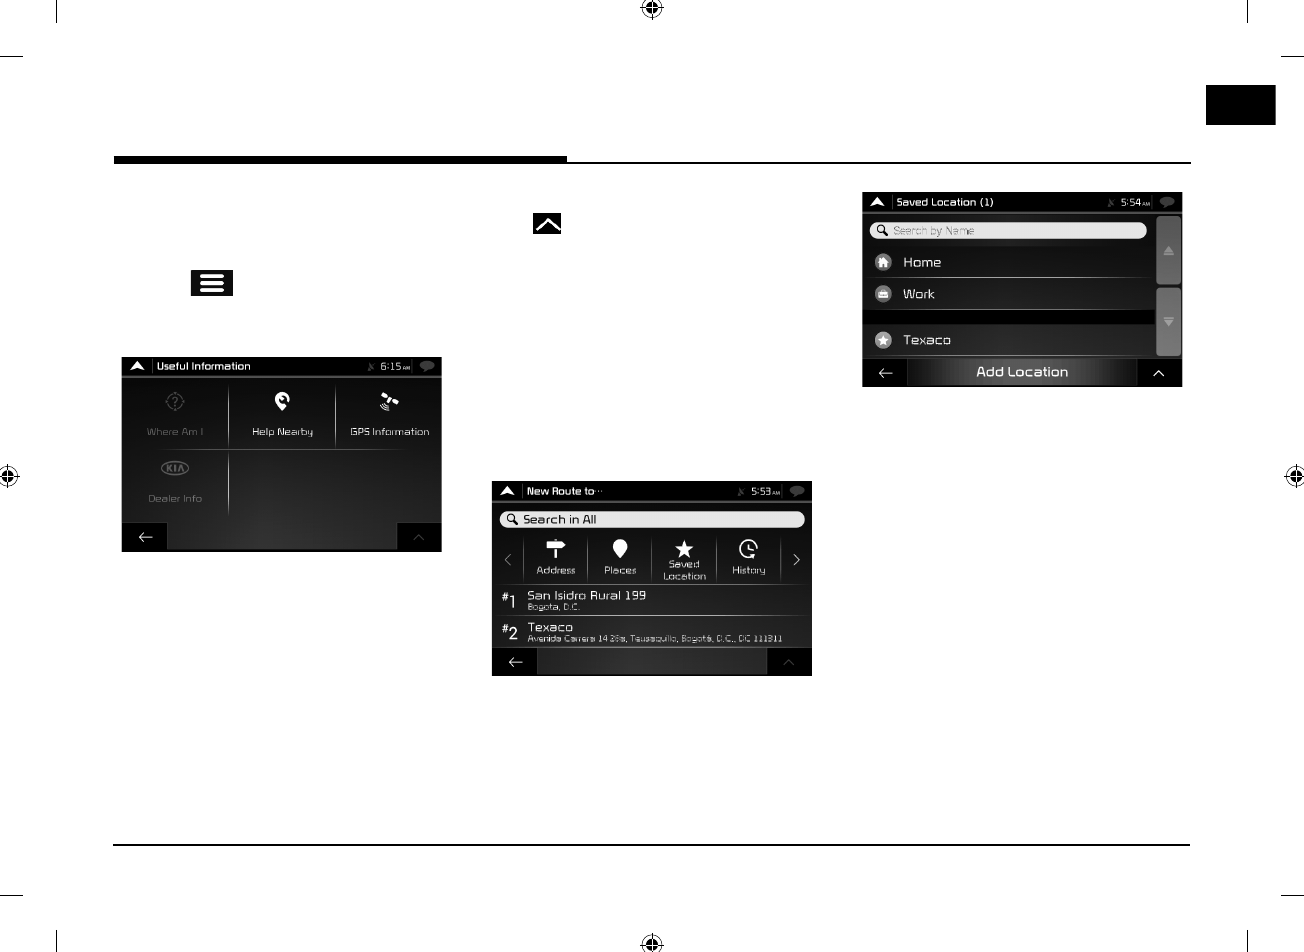
Selecting a saved location
To select a location that you have already
saved.
First of all, you can save a destination by
pressing [Add Location] to search the saved
location. (refer to the page 42.)
1. Press [New Route].
2. Press [Saved Location].
The list of saved locations is displayed.
It contains two pre-set categories: Home
and Work.
3. Press the location that you want to set as
your destination.
4. Press [Select as Destination].
5. Press [Start Navigation].
36
Searching for destination
Selecting a history item
The destinations that you have used earlier
appear in the History list. The more you use
the navigation software, the better it can
guess your desired destination.
1. Press [ ] > [New Route].
2. Press [History]. The list of recent
destinations appears. The list begins with
the three most likely destinations that are
selected based on your previous routes
(Smart History).
3. Press [Select as Destination].
4. Press [Start Navigation].
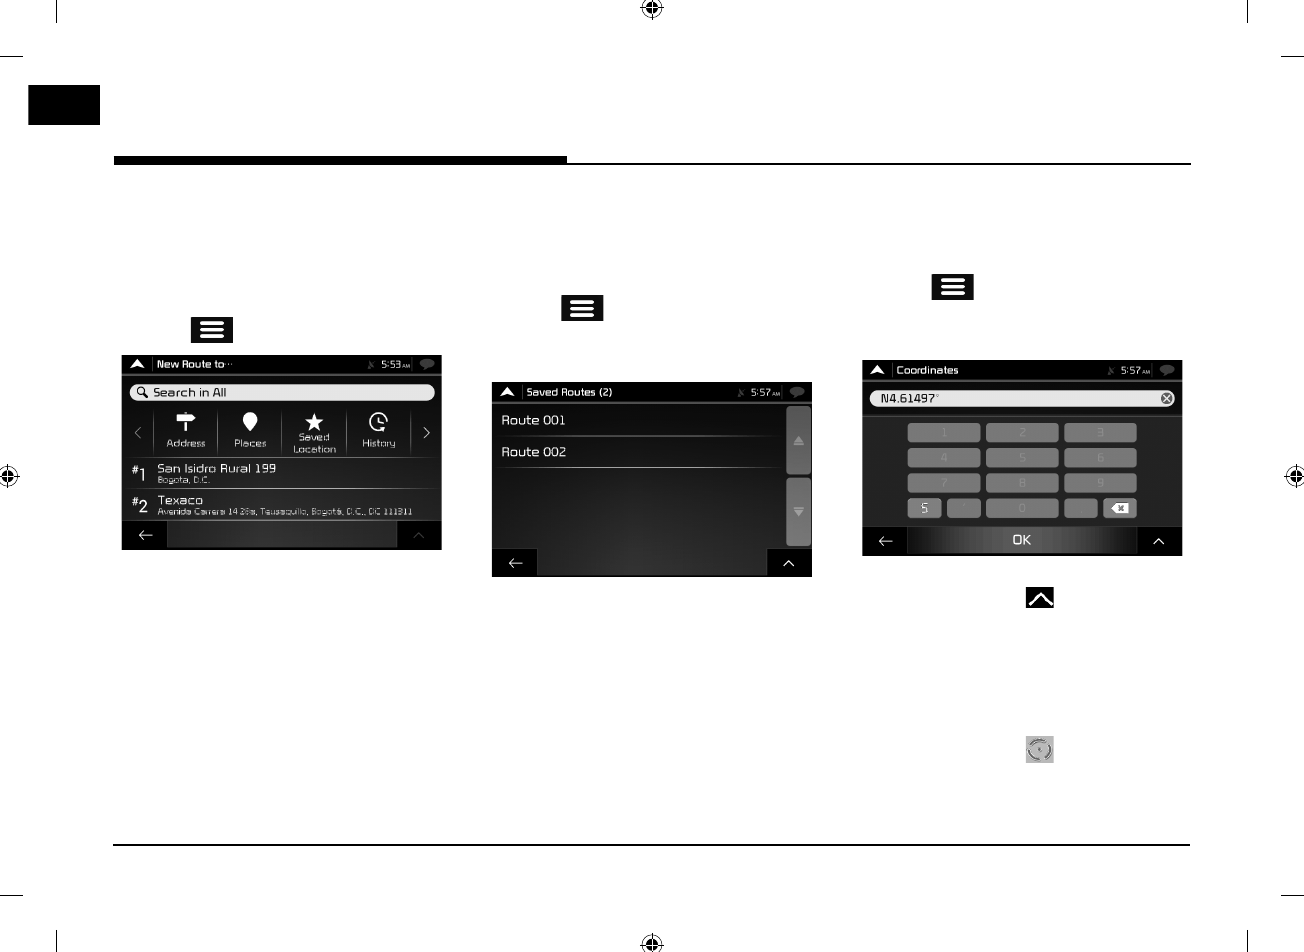
Selecting a saved route
The routes that you have saved earlier appear
in a list. To select a previous route, perform
the following steps:
1. Press [ ] on the navigation view to
access the navigation menu.
2. Press [New Route] > [Saved Routes].
3. Select a route and the Multipoint Route
screen appears. If necessary, modify the
saved route. Otherwise, press [Calculate
Route].
4. Press [Select as Destination].
5. Press [Start Navigation].
Entering coordinates
To select a destination by entering its
coordinates, perform the following steps:
1. Press [ ] on the navigation view to
access the navigation menu.
2. Press [New Route] > [Coordinates].
3. Enter the latitude and longitude values.
If necessary, press [ ] > [UTM
Coordinates] and enter the coordinate in
UTM format.
4. Press [OK] > [Go!].
A full screen map appears with the
selected point in the middle.
If necessary, press [ ] the map
somewhere else to modify the destination.
5. Press [Select as Destination].
6. Press [Start Navigation].
37
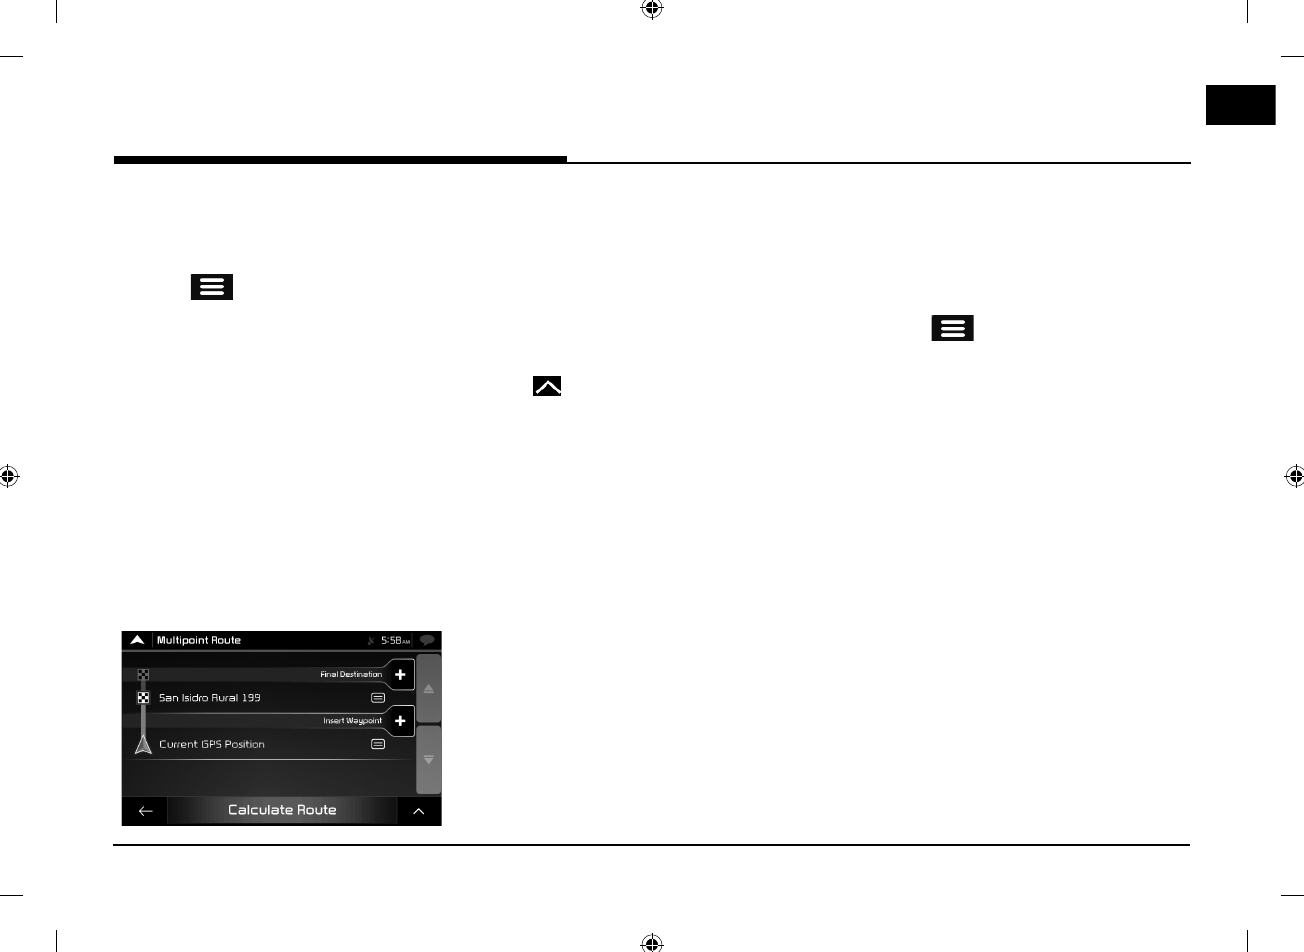
Using the route menu
Planning a multipoint route
To build your route destination-by-destination,
perform the following steps:
1. Press [ ] on the navigation view to
access the navigation menu.
2. Press [Multipoint Route].
There is only one line in the list of route
points, the starting point of the route,
which is normally the current GPS position.
3. Press [Destination +] to select the
destination. The [New Route to...] screen
appears, where you can select the
destination of the route the same way as
described in the previous sections.
4. When the selected location appears on the
map, press [Select as Destination] and the
list returns. If needed, you can add further
intermediate destinations.
5.
To add more route points, press [Insert
Waypoint] or Press [Final Destination]
to change the final destination. The Add
to Route... menu appears again, where
you can select the new route point the
same way as you have set the destination
before.
Note
Press [ ] to optimise the whole route or the
order of waypoints. You can also delete all the
destinations.
6. When you have added all the route points,
Press [Calculate Route] and the planned
route is automatically calculated.
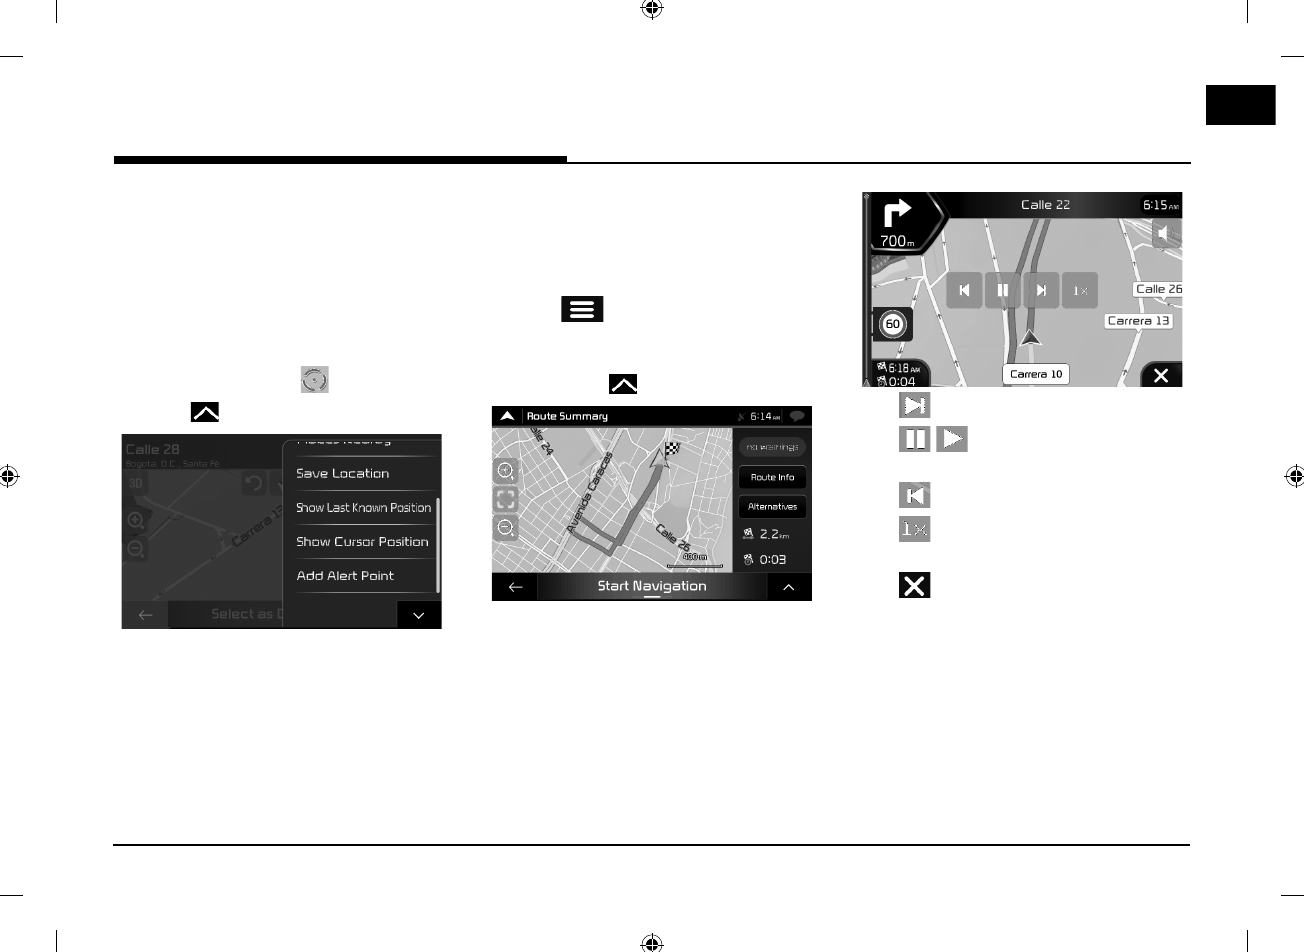
Checking route information and
alternatives
To get a map overview of the planned route
and check different parameters of the planned
route, perform the following steps:
1. Press [ ] on the navigation view to
access the navigation menu.
2. In the navigation menu, Press [Route
Summary].
Using the route menu
38
Using the route menu
Editing the route
When navigation has already started, there
are several ways to modify the planned route.
You have the following options:
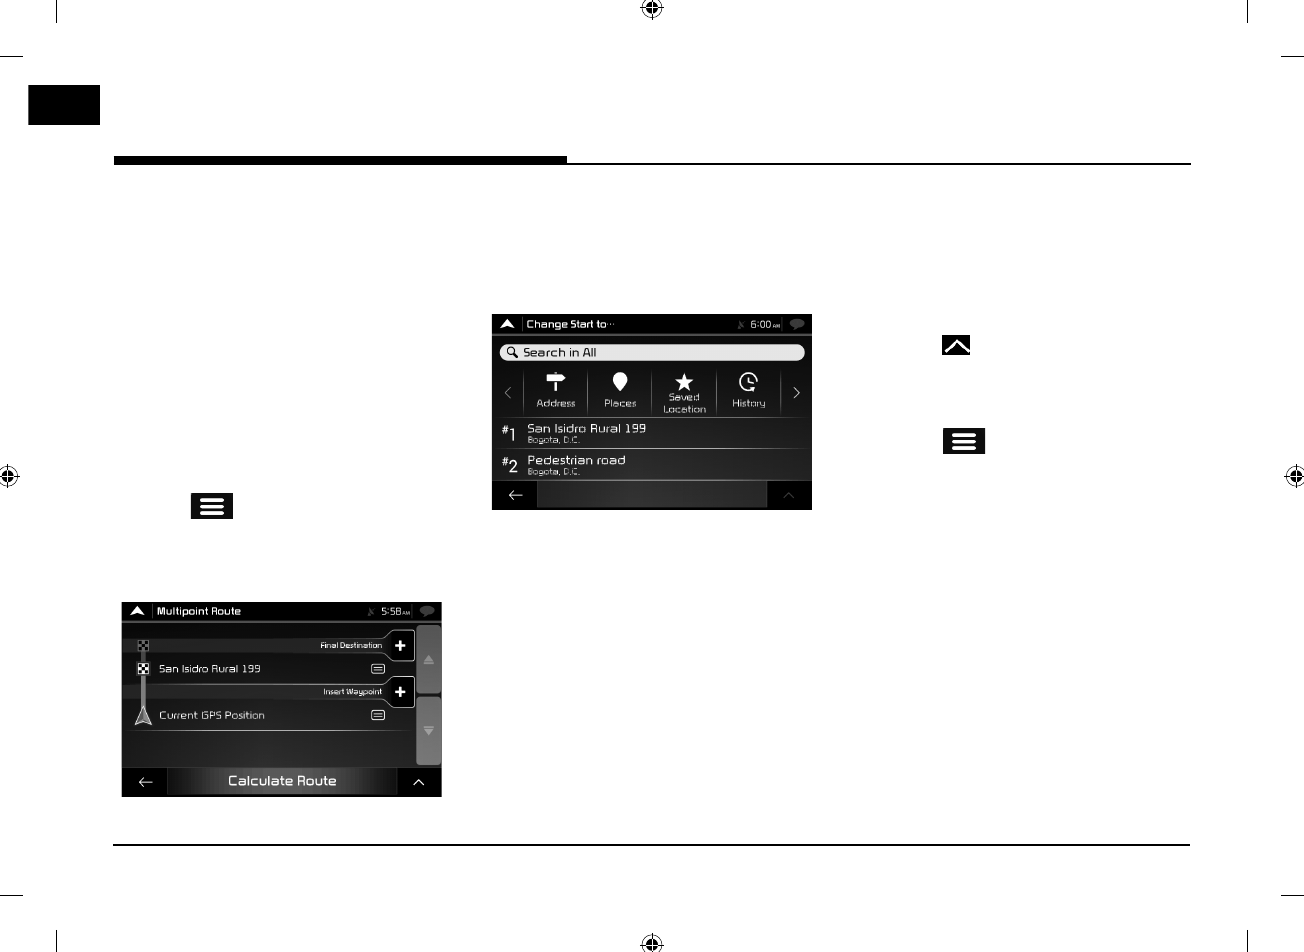
Setting a new starting point
For normal navigation, all routes are calculated
from the current position. You can pause
navigation to check future routes, simulate
them or see their length in time and distance.
Then you can set the starting point of the
route to a location other than the current GPS
position.
1. Press [ ] on the navigation view to
access the navigation menu.
2. In the navigation menu, press [Multipoint
Route].
3. Press [Current GPS Position] > [Set
Starting Point] and confirm your action at
the warning message.
4. Select the starting point of the route the
same way you select a destination.
5. You can see the new starting point on the
map. Press [Set Starting Point] and the
multipoint route screen appears where you
can continue adding a destination to your
route.
6. Press [Calculate Route] to continue.
Adding an additional destination
To add a new intermediate destination to the
planned route, perform one of the following
actions:
䳜 Press the map anywhere to browse it.
After selecting the location on the map,
press [ ] > [Select as Waypoint] to add
the selected location to your route as
an intermediate destination. The other
destinations of the route remain intact.
䳜 Press [ ] on the navigation view and
press [Multipoint Route].
Add a destination to your route as
described on page 38.
39
Using the route menu
Modifying the list of destinations
To edit your route, perform the following
steps:
1. Press [ ] on the navigation view to
access the navigation menu.
2. In the navigation menu, press [Multipoint
Route].
䳜 Press [ ] to delete all the destinations,
or optimise the waypoints or the route.
䳜 Press the name of the intermediate
destination to move it up or down in the
list, to save the location or to delete it
from the list.
䳜 If you have a route with at least one
intermediate destination, you can delete
the waypoint from the list right from
the main menu. Press [Delete Waypoint],
then confirm the deletion.
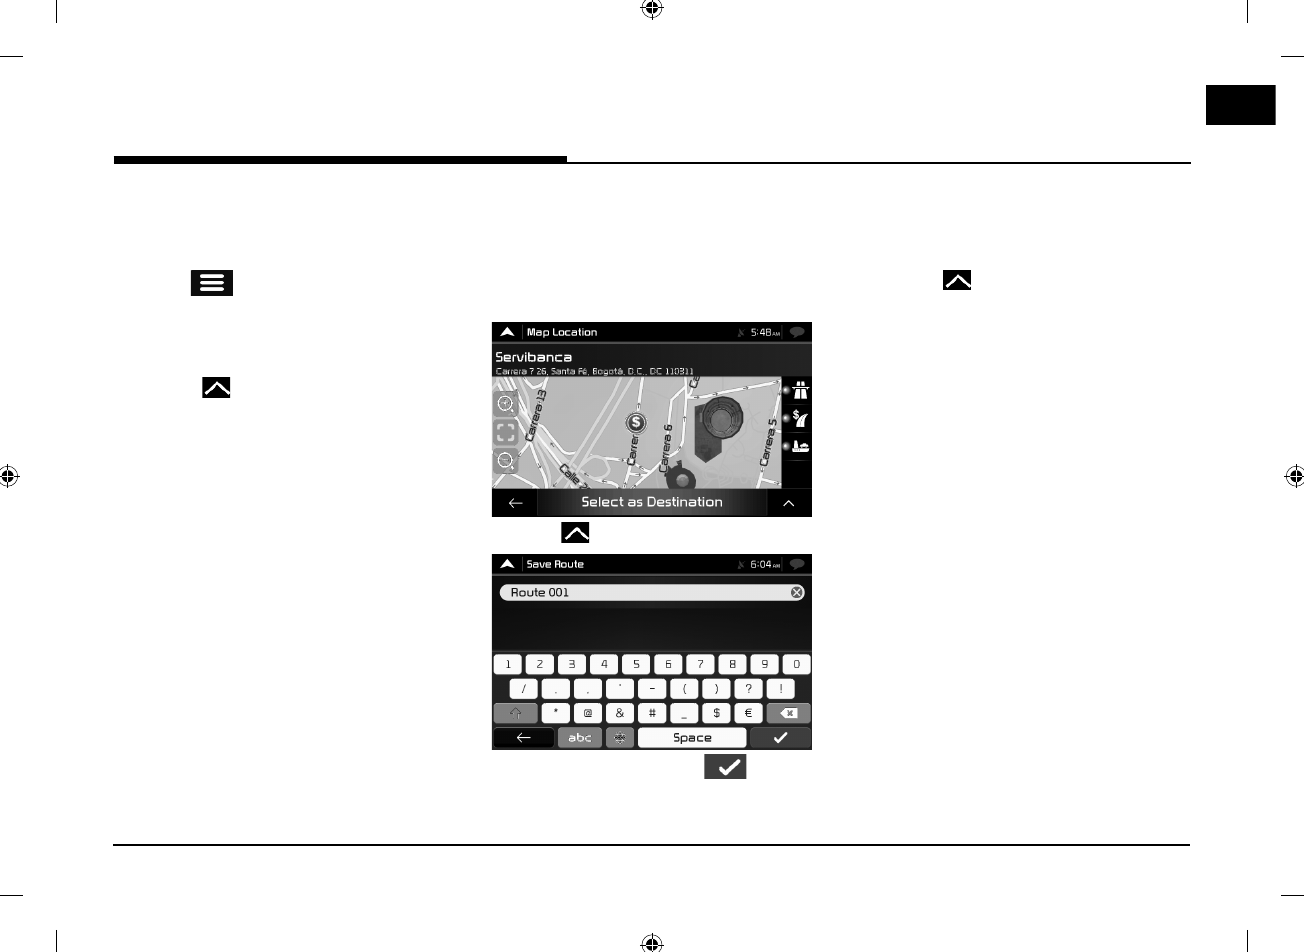
Saving the planned route
To save the planned route, perform the
following steps:
1. Select a destination as described earlier
and press [Select as Destination].
2. Press [ ] > [Save Route].
3. Type in a name and press [ ].
The route is saved and it is available in [New
Route] > [Saved Routes].
Deleting the planned route
You have the following two options to delete
the navigated route:
䳜 Press [ ] to delete all the destinations,
or optimise the waypoints or the route.
䳜 In the navigation menu, press [Delete
Route] or [Delete Waypoint]. If there
are no waypoints, the planned route is
deleted after a confirmation. If you have
waypoints, you can choose to delete the
whole route or only the next waypoint.
40
Using the route menu
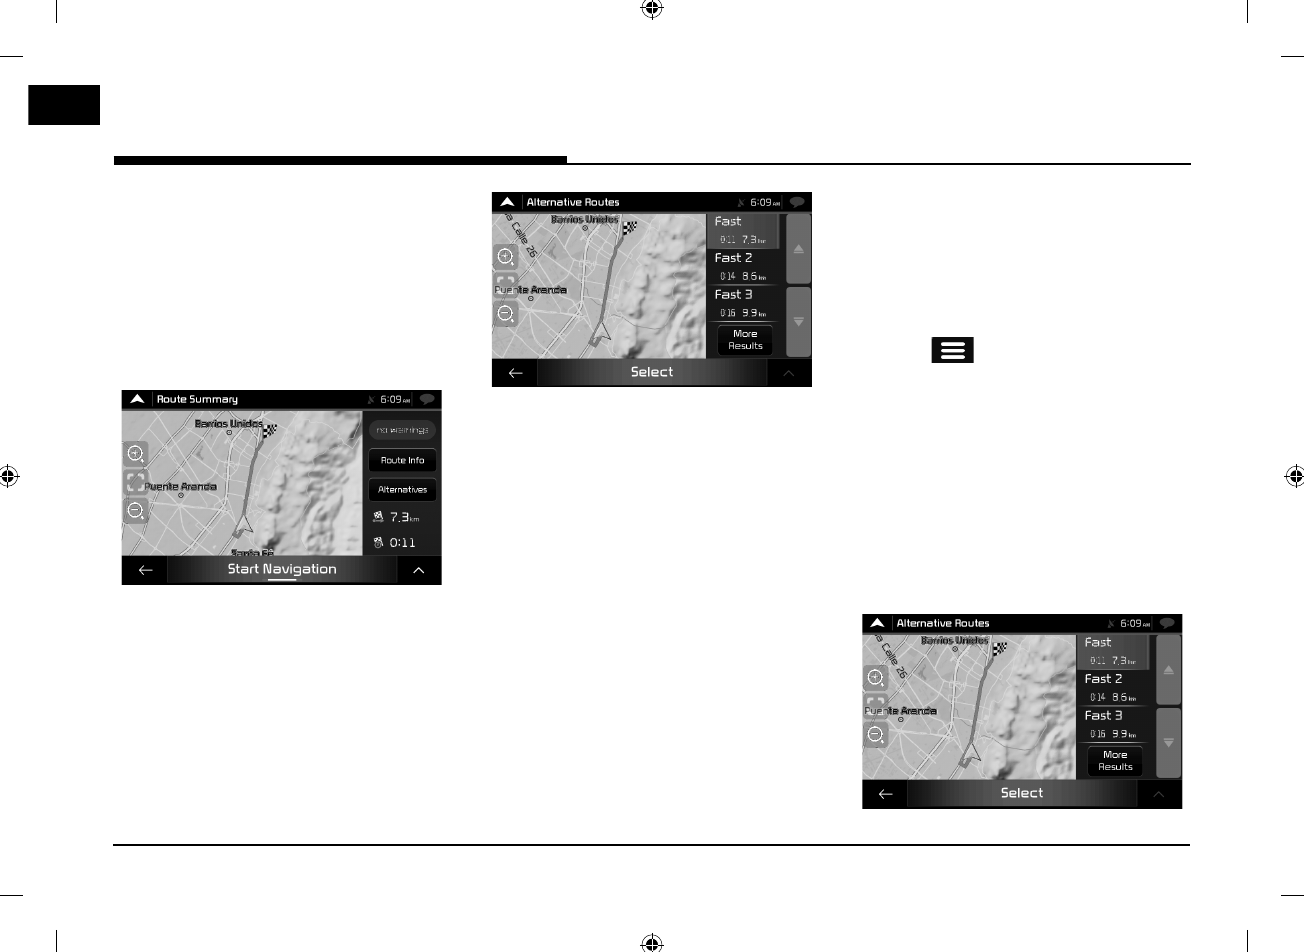
Selecting a route alternative when
planning the route
To select from different route alternatives or
change the route planning method after you
have selected a new destination, perform the
following steps:
1. Select a destination as explained earlier
and go to the route confirmation screen.
2. Press [Alternatives].
3. You can see the basic details of route
alternatives. Press any of them to see it
on the map.
4. To view more suggestions, press [More
Results] and scroll down for other
alternative routes with different route
planning methods.
5. Select one of the route alternatives and
press [Select] to return to the previous
screen. Press [Start Navigation] to start
your journey. The orange line now shows
the new planned route.
Selecting a route alternative for an
existing route
To recalculate the planned route with a
different route planning method and to
compare different route alternatives, perform
the following steps:
1. Press [ ] on the navigation view to
access the navigation menu.
2. You can access the list of route
alternatives from the navigation menu in
one of the following ways:
䳜 Press [Detours & Alternatives] >
[Alternative Routes].
䳜 Press [Route Summary] > [Alternatives].
3. You can see the basic details of a few
route alternatives. Press any of them to
see it on the map.
41
Using the route menu
If there are suitable alternatives calculated
with the route planning method that is
selected in Route preferences (page 45), they
are shown on top of the list. Routes with other
route planning methods are shown at the
bottom of the list.
4. Select one of the route alternatives and
press [Select] to return to the previous
screen. Press [Start Navigation] to start
your journey. The orange line now shows
the new planned route.
Pausing guidance
When you are driving a planned route but you
do not need guidance for a certain part of the
route, you can suspend it and continue when it
is needed again.
In the navigation menu, press [ ] to suspend
guidance or press [ ] to resume guidance.
42
Setting for navigation
Saving a location
To add any location to the saved locations (the
list of frequently used destinations), perform
the following steps:
1. Select a destination as described before.
It can be an address, a place, any location
on the map, a previously used destination
from history, and so on.
2. When the map appears with the selected
location in the middle, press [ ].
3. Press [Save Location]. Using the keyboard,
you can change the name offered for the
Saved Location.
4. Press [ ] to save the location.
To add your home and work address to the
saved locations, perform the following steps:
1. On the navigation view, press [ ] >
[New Route] > [Saved Location].
2. Press [Home] or [Work].
Press [OK] to confirm your selection.
Editing a saved location
To edit a location that you have already added
as a Saved Location, perform the following
steps:
1. On the navigation view, press [ ] >
[New Route] > [Saved Location].
The list of Saved locations is displayed.
2. Press [ ] > [Edit].
3. Press the location you want to edit, press
[Rename] and enter the name of the
location on the keyboard.
4. Press [ ] > [Done].
Setting for navigation
43
Setting for navigation
Adding an alert point
You can save any map location as an alert
point, for example a speed camera or a school
zone.
Before using alert point, you have to set the
[Alert Point Warnings] in the settings.
1. In the navigation view, select the alert
point. The red cursor [ ] appears there.
2. Press [ ].
3. Scroll down the list and press [Add Alert
Point].
4. Select the type of the alert point, the
direction from which you expect the alert,
and (if applicable) the speed limit for this
alert point.
5. Press [Save] to save the location as a new
alert point.
Running a simulation
To run a simulated navigation that
demonstrates the planned route, perform the
following steps:
1. Press [ ] on the navigation view to
access the navigation menu.
2. In the navigation menu, press [Route
Summary] > [ ].
3. Press [Simulation]. The simulation starts
from the starting point of the route and
leads you through the whole planned route
using a realistic speed.
䳜 [ ]: Moves to the next section.
䳜 [ / ]: Pauses or plays the driving
simulation.
䳜 [ ]: Moves to the previous section.
䳜 [ ]: 1X,4X,8X,16X. Sets the speed of
driving simulation.
䳜 [ ]: Ends the driving simulation.
44
Setting for navigation
Off-road navigation
This navigation calculates routes using the
road network of the maps provided with the
product.
Switching to off-road navigation
1. On the navigation view, press [ ] >
[Settings] > [Route Preferences].
2. Press [Navigation Mode] > [Off-road].
Selecting the destination in off-
road mode
Selecting a destination (waypoint or final
destination) is the same as described in the
previous sections. The only difference is that
route points are linked to form a route with
straight lines regardless of the road network
and traffic regulations.
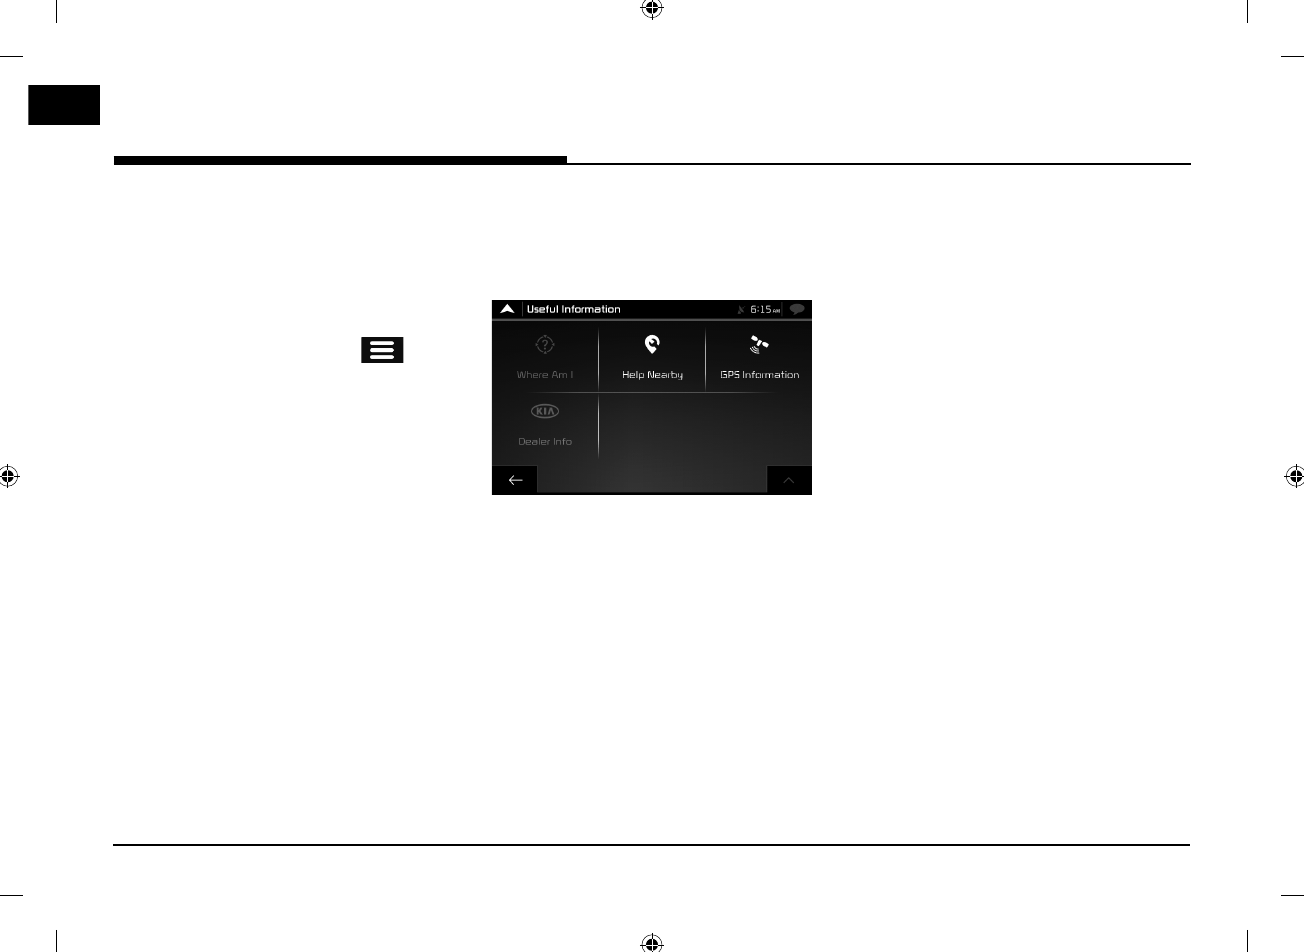
Useful information menu
The Useful Information menu provides various
additional functions. It can be found in the
navigation menu.
䳜 [Where Am I]: Shows information on
the current position (latitude, longitude,
nearest town, next crossing street, and
so on) or the last known position if GPS
reception is not available.
䳜 [Help Nearby]: Offers assistance near
your current position. (Refer to the page
35)
䳜 [GPS Information]: Shows the GPS
Information screen with satellite position
and signal strength information.
䳜 [Dealer Info]: Shows a list of nearby
dealership and service locations.
45
Setting for navigation
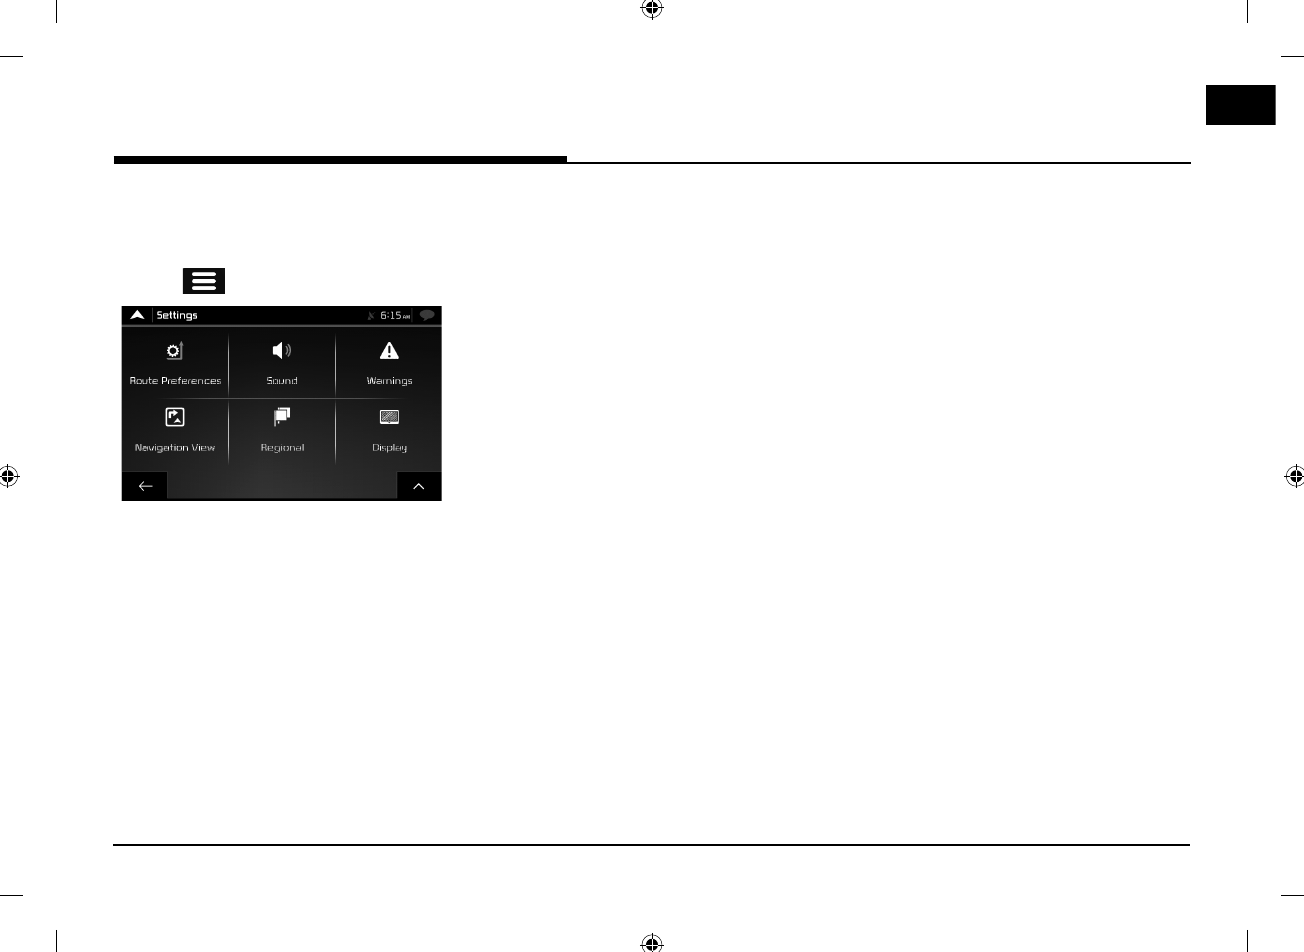
Settings menu
You can configure the navigation settings and
modify the behaviour of the navigation, by
pressing [ ] > [Settings].
䳜 [Route Preferences]: Select the road
types used in route planning, the route
planning method and road types for the
route.
䳜 [Sound]: Adjust the different sound
volumes. [Master], [Voice], [Alerts],
[Ding], [Voice Guidance, Early Indication
of Maneuvers] and [Verbosity Level].
䳜 [Warnings]: Enable and set up warnings
for speed limit, alert points (such as
speed cameras) and road signs.
䳜 [Navigation View]: Fine-tune the
appearance of the Navigation view or
adjust how the software helps you
navigate with different kinds of route-
related information on the navigation
view.
䳜 [Regional]: Change the voice guidance
language, the measurement units, the
date, and formats, and customise the
application for your local language.
䳜 [Display]: Enable or disable menu
animations.

46
䳵 Android Auto and Apple CarPlay aren't
available in some countries.
What is Android Auto/Apple
CarPlay?
Securely access your mobile phone while driving.
Various functions of your mobile phone are
displayed on and operable from the screen of the
multimedia device (e.g. navigation, making a call,
listening to music etc.)
When connected, an Android Auto/Apple CarPlay
icon appears on the screen. Available functions
and operations may differ depending on the
company model.
For more information, visit the Google or Apple
website.
‐ Google: http://support.google.com/
androidauto/
‐ Apple: http://www.apple.com/ios/
carplay/
Cautions
䳜 Android Auto is a registered trademark of
Google Inc.
䳜 Apple CarPlay is a registered trademark of
Apple Inc.
䳜 Android Auto and Apple CarPlay are
unavailable if the phone OS is not the latest
version or if the phone cannot be recognized
due to a shutdown caused by a failure or
defect in the device itself.
䳜 Your phone may not be recognised if its battery
is low. Charge your phone then try again.
䳜 If your phone is shut down due to a defect in
the device itself, reset your phone and try again.
䳜 If the USB cable of the Android Auto/ Apple
CarPlay device is repeatedly disconnected
and reconnected in a short period of time,
the phone may malfunction. This can also
cause a device failure.
䳜 The device recognition time may differ depending
on the device type and firmware/OS version.
䳜 Using the USB cable that came with the
phone is recommended. (Using a non-genuine
product may cause noise or malfunction.)
䳜 Normal operations cannot be guaranteed if
the phone is arbitrarily manipulated while
Android Auto/Apple CarPlay is active.
䳜 Apple CarPlay cannot be run while making a
call via Bluetooth.
䳜 Android Auto or Apple CarPlay may not
operate normally due to mobile phone issues.
䳜 Carrier charges may apply when using
Android Auto or Apple CarPlay.
䳵
Some features may not operate normally
according to the version of iOS and Android.
䳜 The following problems may occur due to
phone-related issues:
[Android Auto]
- Intermittent black screens appear when
entering Android Auto.
- Differentiation of phones that support
Android Auto and those which do not, may
not be possible.
- Black screens appear in some areas of the
screen due to app errors.
[Apple CarPlay]
- Intermittent black screens appear when
entering Apple CarPlay.
- Black screens appear in some areas of the
screen due to app errors when navigating
between screens in Apple CarPlay.
- The audio volume control may not operate
depending on the status of connected
phone. Apple CarPlay can control the
volume on the head unit regardless of
phone volume. Even if the phone volume
is set to 0, the sound can be outputted by
controlling the volume of head unit.
- The sound output of a call may be cut
upon disconnecting Apple CarPlay during a
call via Apple CarPlay.
䳵 If services do not work properly due to
problems similar to the specified above,
check your phone, and if necessary,
reconnect your phone after restarting.
Android Auto/Apple CarPlay - Option
Android
Auto/Apple
CarPlay
-
Option

47
Android Auto/Apple CarPlay - Option
Using Android Auto or Apple
CarPlay
1. Make sure only genuine USB cables are
used that were provided by the mobile
phones manufacturer.
2. Enter Android Auto /Apple CarPlay from
the home screen or from the submenu [All
menus].
3.
Now the features such as navigation, music
and phone are ready to be used.
NOTICE
䳜 Before connecting your mobile phone, check
whether Android Auto or Apple CarPlay is
activated in the [Phone projection] menu.
䳜 After connecting the mobile phone, the
phone has to be unlocked and the disclaimers
on the phone have to be accepted in order to
launch Android Auto or Apple CarPlay.
䳜 The screens and features displayed on
the multimedia system correspond to the
screens and features provided by Google or
Apple. They are subject to changes according
to the policy of the respective company.
NOTICE-Android Auto
䳜 Bluetooth media features will be disabled
when Android Auto is activated. After
removing the USB cable, these features will
be available again.
䳜 If Android Auto is not activated even after a
successful connection, follow these steps:
- Check whether an error occurred on the
phone.
- Check whether Android Auto has been
closed on the phone.
- Check whether Android Auto is activated in
the [Phone projection] menu.
䳜 If Android Auto does not work normally even
after a reconnection has been made, visit the
Google website http://support.google.com/
androidauto/
NOTICE-Apple CarPlay
䳜 Bluetooth phone/media features will be
disabled when Apple CarPlay is activated.
After removing the USB cable, these features
will be available again.
䳜 If Apple CarPlay is not activated even after a
successful connection, follow these steps:
- Check whether Apple CarPlay is disabled in
the iPhones application settings.
- Check whether Apple CarPlay is activated
in the [Phone projection] menu.
䳜 If Apple CarPlay does not work normally even
after a reconnection has been made, visit the
Apple website http://www.apple.com/ios/
carplay/

48
Bluetooth® Wireless Technology
Before Using the Bluetooth
hands-free
What is Bluetooth Wireless
Technology?
䳜 Bluetooth Wireless Technology refers to a
short-distance wireless networking technology
which uses a 2.45 GHz frequency to connect
various devices within a certain distance.
䳜 Supported within PCs, external devices,
Bluetooth phones, PDAs, various electronic
devices, and automotive environments,
Bluetooth Wireless Technology is transmitted at
high speeds without having to use a connector
cable.
䳜 Bluetooth hands-free refers to a device which
allows the user to conveniently make phone
calls with Bluetooth mobile phones through the
system.
䳜 The Bluetooth hands-free feature may not
be supported in some mobile phones.
Precautions for safe driving
䳜 Bluetooth hands-free is a feature that
enables drivers to practice safe driving.
Connecting the head unit with a Bluetooth
phone allows the user to conveniently make
calls, receive calls, and manage the phone
book. Before using Bluetooth Wireless
Technology, carefully read the contents of
this owner䳓s manual.
䳜 Excessive use or operations while driving
may lead to negligent driving practices and
be the cause of accidents. Do not operate
the device excessively while driving.
䳜 Viewing the screen for prolonged periods of
time is dangerous and may lead to accidents.
When driving, view the screen only for short
periods of time.
Cautions upon connecting Bluetooth
phone
䳜 Before connecting the head unit with the
mobile phone, check to see that the mobile
phone supports Bluetooth features.
䳜 If you do not want automatic connection with
your Bluetooth device, turn the Bluetooth
feature off on the Bluetooth device.
䳜 Park the vehicle when pairing the head unit
with the mobile phone.
䳜 Some Bluetooth features may occasionally
not operate properly depending on the
firmware version of your mobile phone. If
such features can be operated after receiving
a S/W upgrade from your mobile phone
manufacturer, unpair all devices and pair
again before use.
Pairing and connecting the
unit and a Bluetooth phone
To use the Bluetooth feature, make sure the
Bluetooth on your phone is turned on. Refer to
your phone䳓s user guide.
When no phones have been paired
1.
Press [ ] > [All menus] > [Phone]. Or press
[] on the steering wheel remote control.
䳜 [Cancel]: Cancels Bluetooth connection.
2. In your phone, initiate a search for
Bluetooth devices. (The default vehicle
name is KIA MOTORS.)
3. 1) If the SSP (Secure Simple Pairing) is not
supported, enter the passkey on your
Bluetooth device. (The default passkey
is 0000.)
2) If the SSP (Secure Simple Pairing) is
supported, press [Yes] on the pop-up
screen of your Bluetooth device.
(The pop-up screen may differ from the
actual information on the Bluetooth
device.)
Bluetooth® Wireless Technology
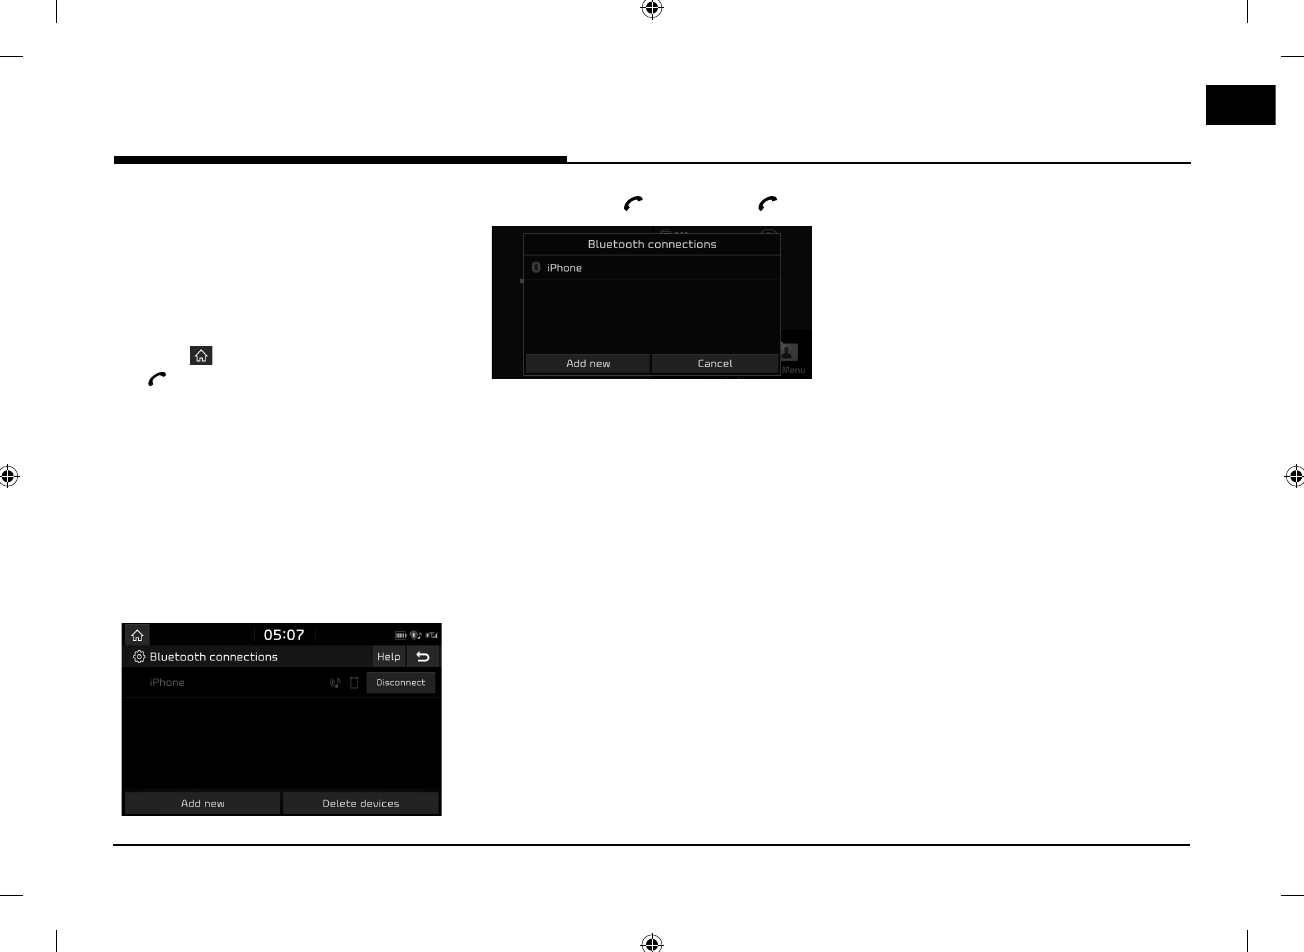
49
Bluetooth® Wireless Technology
4. Bluetooth device is connected.
The mobile phone contacts and the calling
list are downloaded.
When the connection fails, failure message
is displayed on the screen.
When a phone is already paired
1.
Press [ ] > [All menus] > [Phone]. Or press
[] on the steering wheel remote control.
2. Press the device from the Bluetooth device
list pop-up screen.
If you want to pair additional device, press
[Add new]. Follow steps 3-4 of 䳖When no
phones have been paired䳗.
When pairing additional device
1. 1) When using [SETUP] button, press
[SETUP] > [Bluetooth] > [Bluetooth
connections].
2) When using [ ] button, press [ ].
2. 1) Select the device you want to connect.
2) If there is no device you want to
connect, press [Add new].
3. In your phone, initiate a search for
Bluetooth devices. (The default vehicle
name is KIA MOTORS.)
4. 1) If the SSP (Secure Simple Pairing) is not
supported, enter the passkey on your
Bluetooth device. (The default passkey
is 0000.)
2) If the SSP (Secure Simple Pairing) is
supported, press [Yes] on the pop-up
screen of your Bluetooth device.
(The pop-up screen may differ from
the actual information on the Bluetooth
device.)
5. Bluetooth device is connected.
The mobile phone contacts and the calling
list are downloaded.
When the connection fails, failure message
is displayed on the screen.
Notes
䳜 For safety reasons, pairing a Bluetooth phone
is not possible when the vehicle is in motion.
Park the vehicle in a safe location to pair a
Bluetooth phone. It is possible to pair up to
5 mobile phones. In order to pair new phone,
you must first delete one of the previously
paired phones.
䳜 Some functions may not be supported due to
limited Bluetooth compatibility.
䳜 When a Bluetooth device is connected, a new
device cannot be paired.
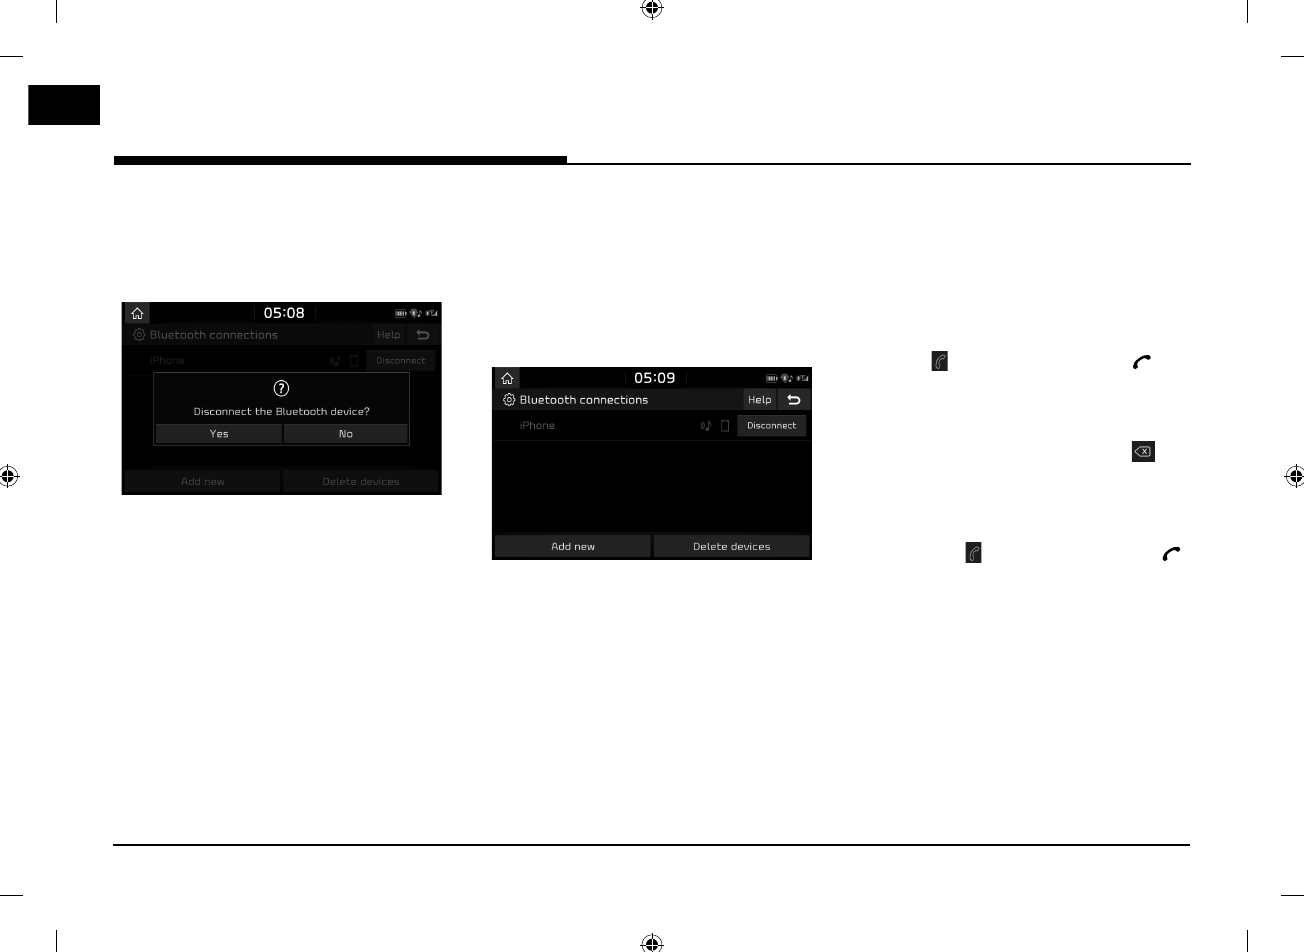
50
Bluetooth® Wireless Technology
Disconnecting the connected phone
1. Press [SETUP] > [Bluetooth] > [Bluetooth
connections].
2. Select the connected phone.
3. Press [Yes].
Note
If you want to connect the disconnected phone
again, select the disconnected phone.
Deleting Bluetooth devices
If you do not need to use a phone any
longer, you can delete it. Note that deleting a
Bluetooth device will delete all calling list and
contact entries.
1. Press [SETUP] > [Bluetooth] > [Bluetooth
connections].
2. Press [Delete devices] to delete the
devices.
Select the desired devices, then press
[Delete] > [Yes].
䳜 [Mark all]: Marks all items.
䳜 [Unmark all]: Unmarks all items.
Making a call by entering
phone number
Connect your unit and Bluetooth phone before
making a call.
1. Enter the phone number using the keypad
on the phone screen.
2. Press [ ] on the phone screen or [ ] on
the steering wheel remote control.
Note
If you press the wrong number, press [ ] to
delete one digit of the entered number.
Making a call by redialling
Press and hold [ ] on the phone screen or
[ ]
on the steering wheel remote control.
Note
Redialling is not possible when there is no
number in the dialled calls list.

51
Bluetooth® Wireless Technology
Answering/Rejecting a call
1. If there is an incoming call, a popup
message will appear.
2. Press [Accept] in the popup message or
[] on the steering wheel remote control.
To reject a call, select [Reject] in the Pop-up
message or [ ] on the steering wheel
remote control.
Notes
䳜 If the Call-ID service is available, the caller䳓s
phone number is displayed.
䳜 If the caller䳓s phone number is saved in the
phone book, the caller䳓s name is displayed on
the unit.
䳜 Upon receiving a call, the [Reject] function
may not be supported on some mobile
phones.
Switching call to the mobile
phone
1. If you want to switch the call to the mobile
phone while talking on the car hands-
free, press [Use private] on the screen or
press and hold [ ] on the steering wheel
remote control.
As shown below, the call is switched to the
mobile phone.
2. If you want to switch the call to the car
hands-free while talking on the mobile
phone, press [Use hands-free] on the
screen or press and hold [ ] on the
steering wheel remote control.
The call is switched to the car hands-free.
Ending a call
1. To end a call, press [ ] on the phone
screen or [ ] on the steering wheel
remote control.
2. The call is ended.
Using the menu during a
phone call
When making a call, you can use the following
menu items.
A
D
C
B
E
Position Description
A
Switches a voice call from the
car hands-free to the mobile
phone.
B
Ends a call.
C
Moves to a screen for entering
ARS numbers.
D
Displays the Mic volume
settings. You can adjust the
in-call volume that the other
party hears.
E
Displays the contacts list.
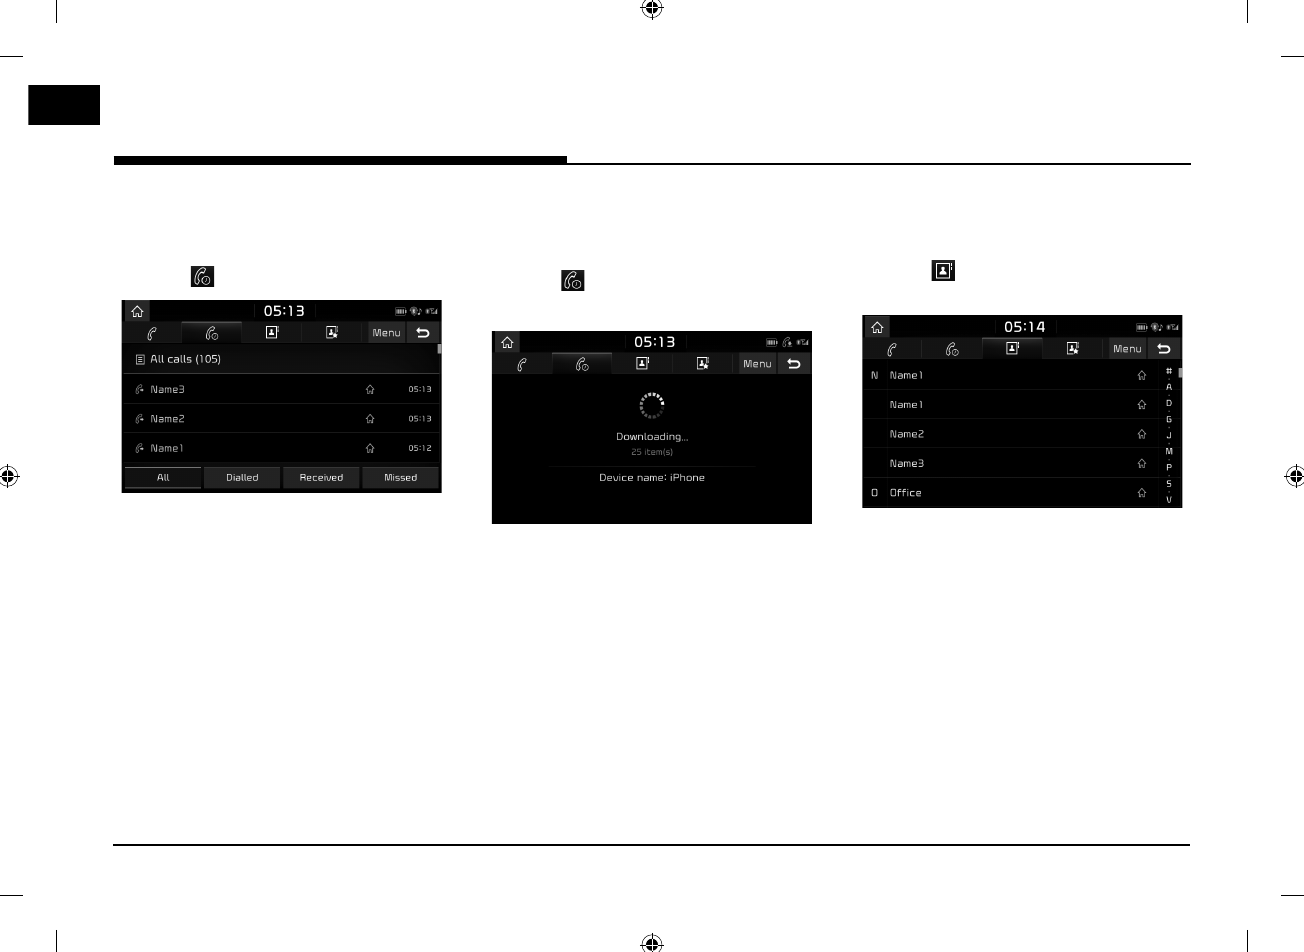
52
Bluetooth® Wireless Technology
Calling list
Making a call from calling list
1. Press [ ] on the phone screen.
2. Press [All], [Dialled], [Received], or
[Missed].
䳜 [All]: Displays all calling list.
䳜 [Dialled]: Displays the outgoing calling list.
䳜 [Received]: Displays the incoming calling
list.
䳜 [Missed]: Displays the missed calling list.
3. Press the entry you want to call.
Note
The calling list may not be saved in some
mobile phones.
Downloading call history
You can download the call history information
from your mobile phone.
1. Press [ ] on the phone screen.
2. Press [Menu] > [Download] > [Yes].
Notes
䳜 Up to 50 received, dialled, and missed call
history lists can be downloaded.
䳜 The download feature may not be supported
in some mobile phones. Check to see that
the Bluetooth device supports the download
feature.
Contacts
Making a call from contacts
1. Press [ ] on the phone screen.
The contacts are displayed on the screen.
2. Select the contact you want to call from
the list of contacts.
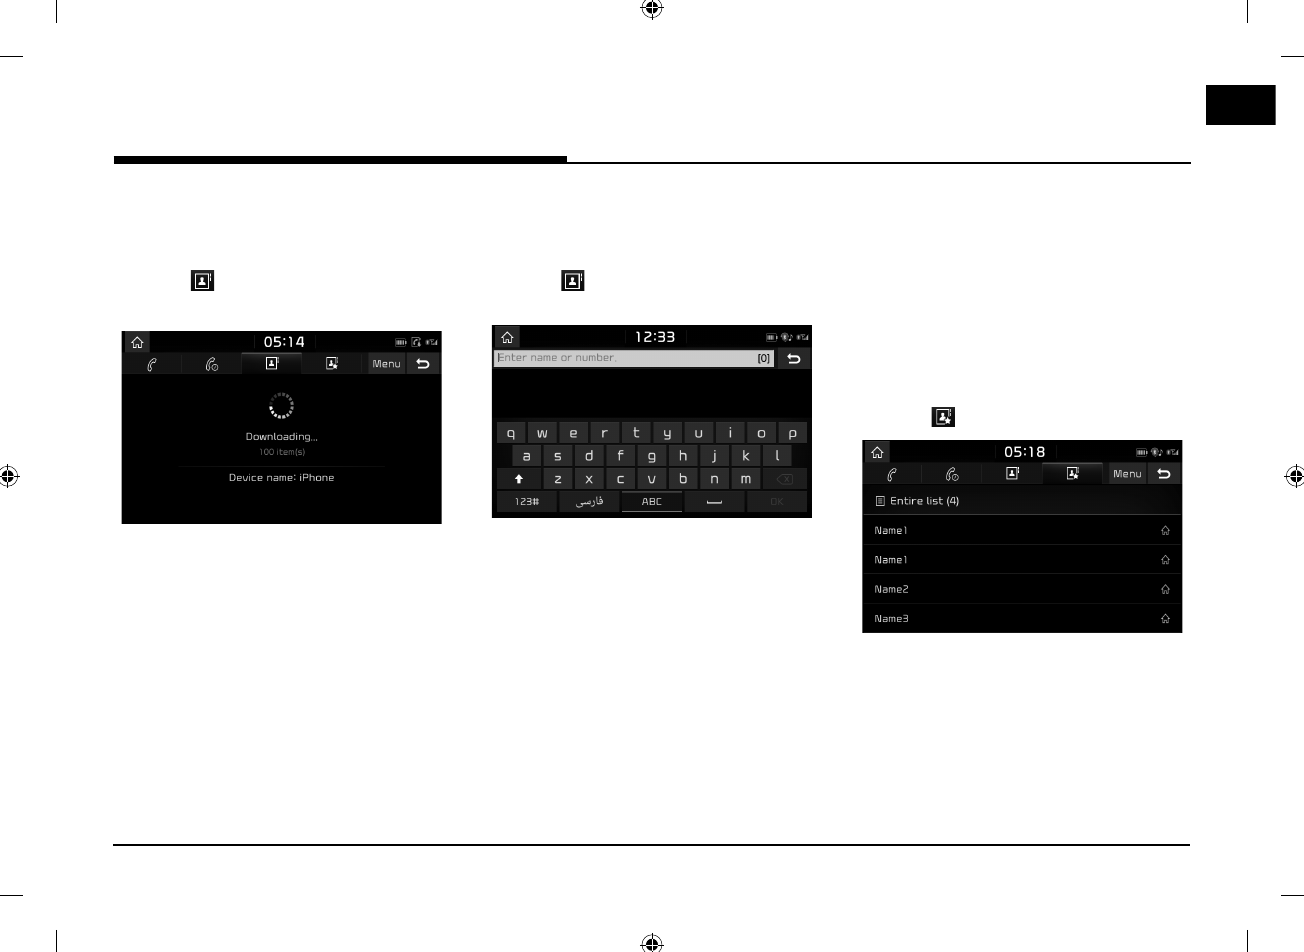
53
Bluetooth® Wireless Technology
Downloading mobile phone contacts
You can download contacts from your mobile
phone.
1. Press [ ] on the phone screen.
2. Press [Menu] > [Download] > [Yes].
Notes
䳜 Upon downloading mobile phone contacts,
the previous data is deleted.
䳜 This feature may not be supported in some
mobile phones.
Searching by name or number
You can search contacts for the name or
number that you enter.
1. Press [ ] > [Menu] > [Search] on the
phone screen.
2. Enter the name or number, press [OK].
3. Select the contact you want to call.
Favourites
Calling favourites
If the phone number has already been stored
in the favourites, it can be easily called by
pressing on it.
First of all, add the phone number in the
Favourites. Refer to 䳖Adding as a Favourite䳗 on
page 54.
1. Press [ ] on the phone screen.
<Favourites screen>
2. Select the desired favourite.
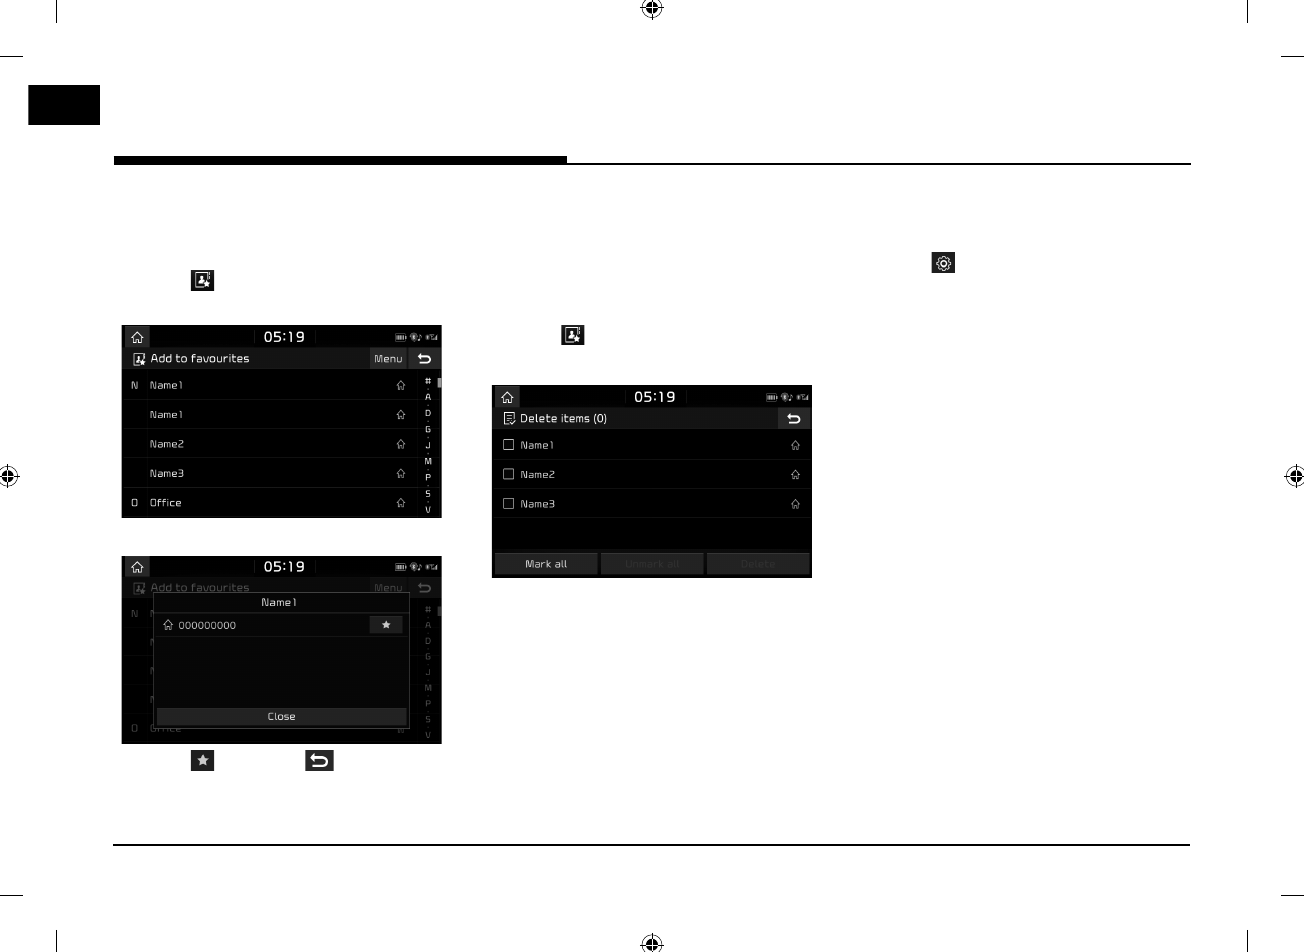
54
Bluetooth® Wireless Technology
Adding as a favourite
Up to 10 contacts can be added to [Favourites]
menu.
1. Press [ ] > [Add new] on the phone
screen.
2. Select one of the contacts.
3. Press [ ] > [Close] > [ ].
Note
If the phone numbers have already been
stored in the Favourites, you can add or delete
them by pressing [Menu] > [Edit].
Deleting favourites
1. Press [ ] on the phone screen.
2. Press [Menu] > [Delete items].
3. Select the desired item, then press [Delete]
> [Yes].
䳜 [Mark all]: Marks all items.
䳜 [Unmark all]: Unmarks all items.
Phone settings
This menu describes phone settings.
1. Press [ ] on the phone screen.
2. For details, refer to 䳖Bluetooth䳗 on page
57.
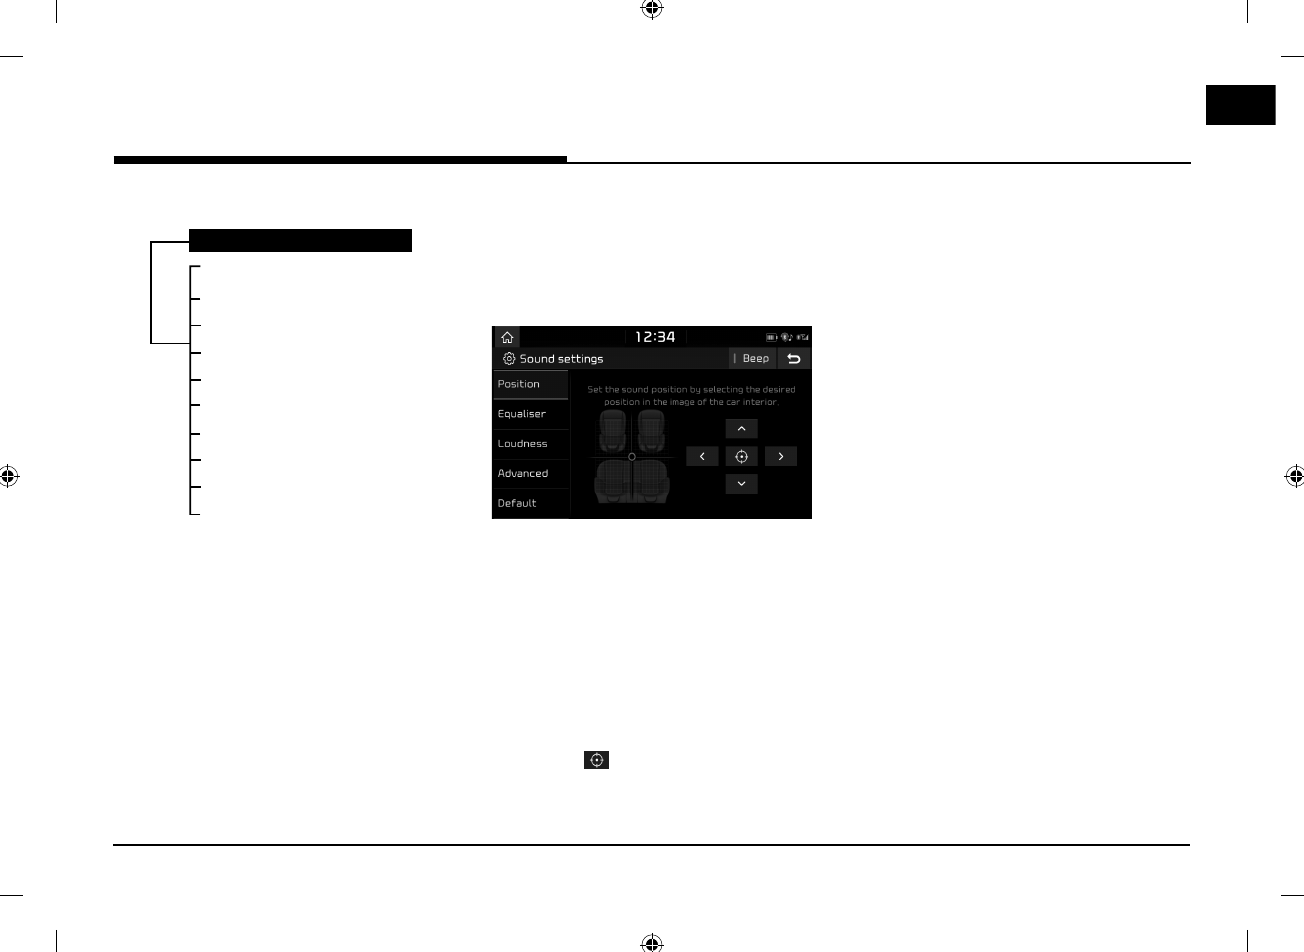
55
Settings
[Settings] menu overview
[Settings] menu
Sound
Display
Bluetooth
Phone projection
Custom button
Date/Time
Language
Screensaver
Advanced
System info
Sound
This menu is used to adjust the sound effects
for the whole system. (It may vary depending
on the type of vehicle.)
1. Press [SETUP] > [Sound].
2. Select the desired items.
䳜 [Position]: This menu allows you to set
the sound position. For example, you can
set the sound close to the driver-seat so
that the volume is relatively lower in the
passenger or rear seats.
‐ Press [
A
]/[
W
]/[
S
]/[
D
] to control the
sound positioning.
‐ Drag and drop the dot to a desired
place to adjust the sound position.
‐ Press [ ] to concentrate the sound in
the centre of the vehicle.
䳜 [Equaliser]: This menu allows you to set
the Bass [BASS]/ Middle [MID]/ Treble
[TREBLE].
‐ Press [-]/[+] to control bass/middle/
treble settings.
‐ Drag the slide bar to control bass/
middle/treble settings.
‐ Press [Centre] to initialize the settings.
䳜 [Loudness]:
‐ [Navigation prioritised]: Lowering of all
other audio volumes during playback of
navigation prompts.
‐ [Reverse warning priority]: Lowering of
audio volumes when the shift lever is
set to reverse.
䳜 [Advanced]: This menu allows you to
control automatically the audio volume
according to the speed of the vehicle.
Press [SDVC].
䳜 [Default]: Resets the sound settings to
factory default.
䳜 [Beep]: This menu allows you to play a
beep sound whenever you operate the
touch screen. Press [Beep].
Settings
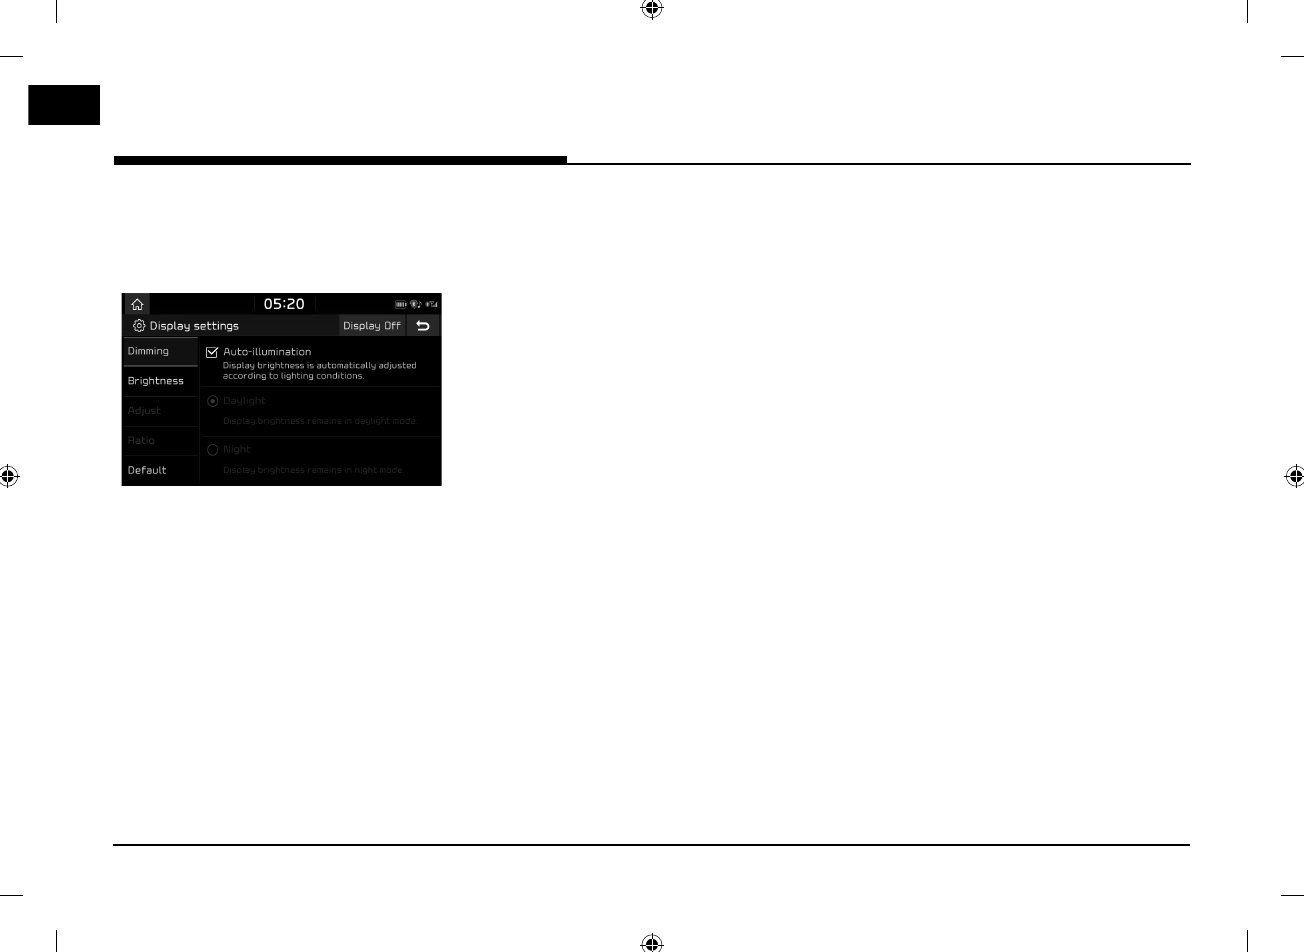
56
Settings
Display
This menu is used to change the display
environment settings.
1. Press [SETUP] > [Display].
2. Select the desired items.
䳜 [Dimming]: Sets the display brightness
according to mode changes.
‐ [Auto-illumination]: Adjusts the
brightness automatically according to
surrounding brightness.
‐ [Daylight]: Always keeps the brightness
high regardless of surrounding
brightness.
‐ [Night]: Always keeps the brightness
low regardless of surrounding
brightness.
䳜 [Brightness]:
‐ Press [-]/[+] to set display brightness
for daylight or night mode.
‐ Press [Centre] to initialize the settings.
䳜 [Adjust]: This menu can be set in video
mode.
‐ Press [-]/[+] to control [Brightness]/
[Contrast]/ [Saturation] settings.
‐ Drag the slide bar to control brightness/
contrast/saturation settings.
‐ Press [Centre] to initialize the settings.
䳜 [Ratio]: Sets the display ratio according
to mode changes.
This menu can be set in video mode.
‐ [Normal]: Adjusts the screen to 4:3.
‐ [Full]: Adjusts the screen to full screen
display.
‐ [Wide]: Adjusts the screen to 16:9.
䳜 [Default]: Resets the display settings to
factory default.
䳜 [Display Off]: Press [Display Off] to turn
the screen off. Press the screen to turn
the screen on.
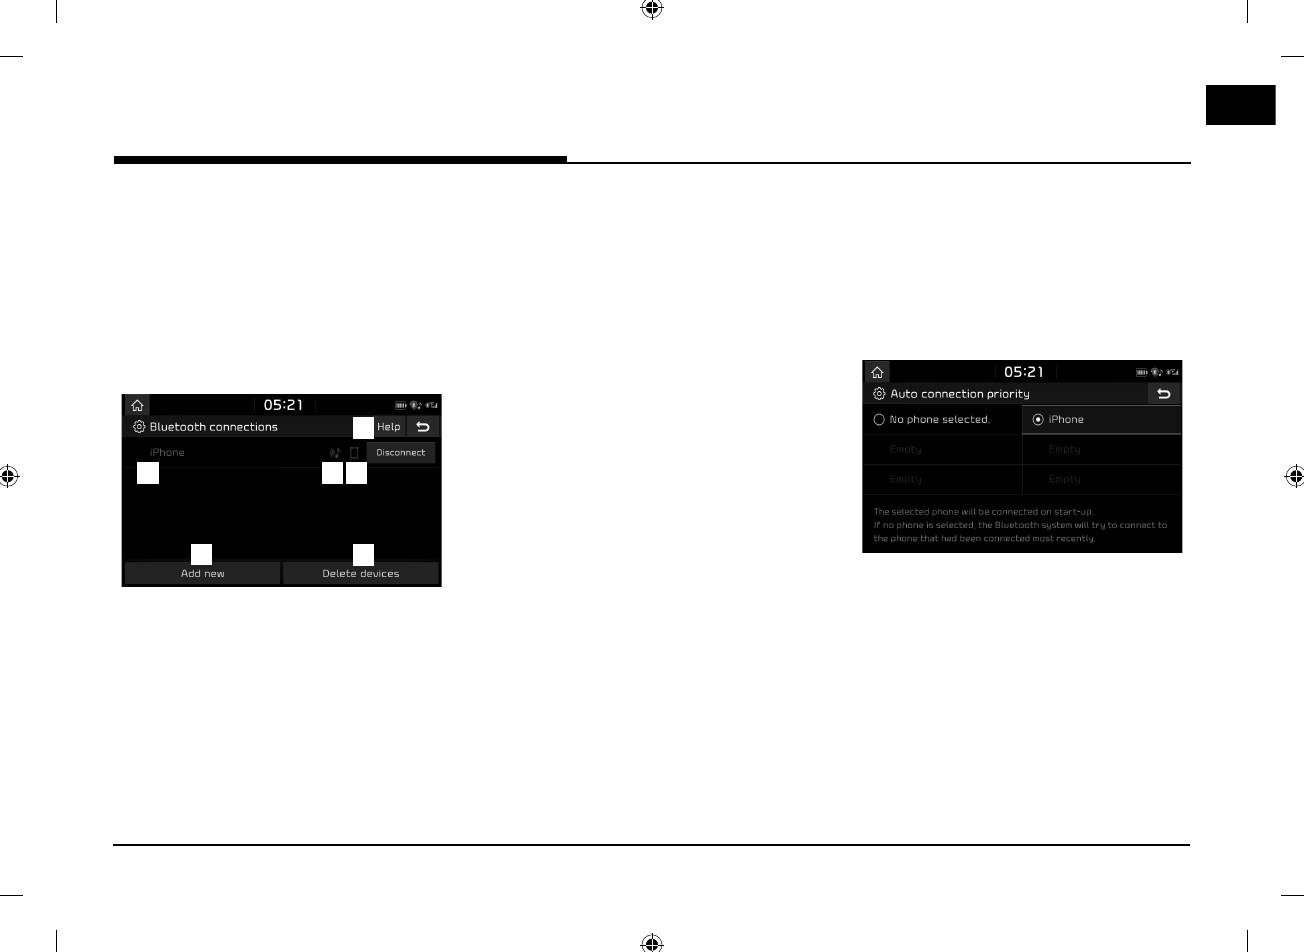
57
Settings
Bluetooth
This menu describes Bluetooth phone settings.
Bluetooth connections
This menu is used to pair and connect the
head unit and a Bluetooth phone.
Press [SETUP] > [Bluetooth] > [Bluetooth
connections].
A
D
CB
E
F
A
Paired device list: Displays the paired
Bluetooth device list. When selecting from
the list, the device is either connected or
disconnected.
B
Bluetooth audio connection status: An icon
appears when you make a Bluetooth audio
connection.
C
Bluetooth hands-free connection status:
An icon appears when you make a
Bluetooth hands-free connection.
D
[Add new]: Registers a new Bluetooth
device.
E
[Delete devices]: Moves to "Delete devices".
F
[Help]: Switches to the Bluetooth
connection help screen.
Auto connection priority
If auto connection priority is turned on,
a Bluetooth device will automatically be
connected according to the option setting
when the car ignition is turned on.
1. Press [SETUP] > [Bluetooth] > [Auto
connection priority].
2. Select the desired items.
Note
If there is no phone selected, the previously
connected phone will be automatically
connected. If there are no previously connected
phones, the system will try to connect to
devices in the list in order.
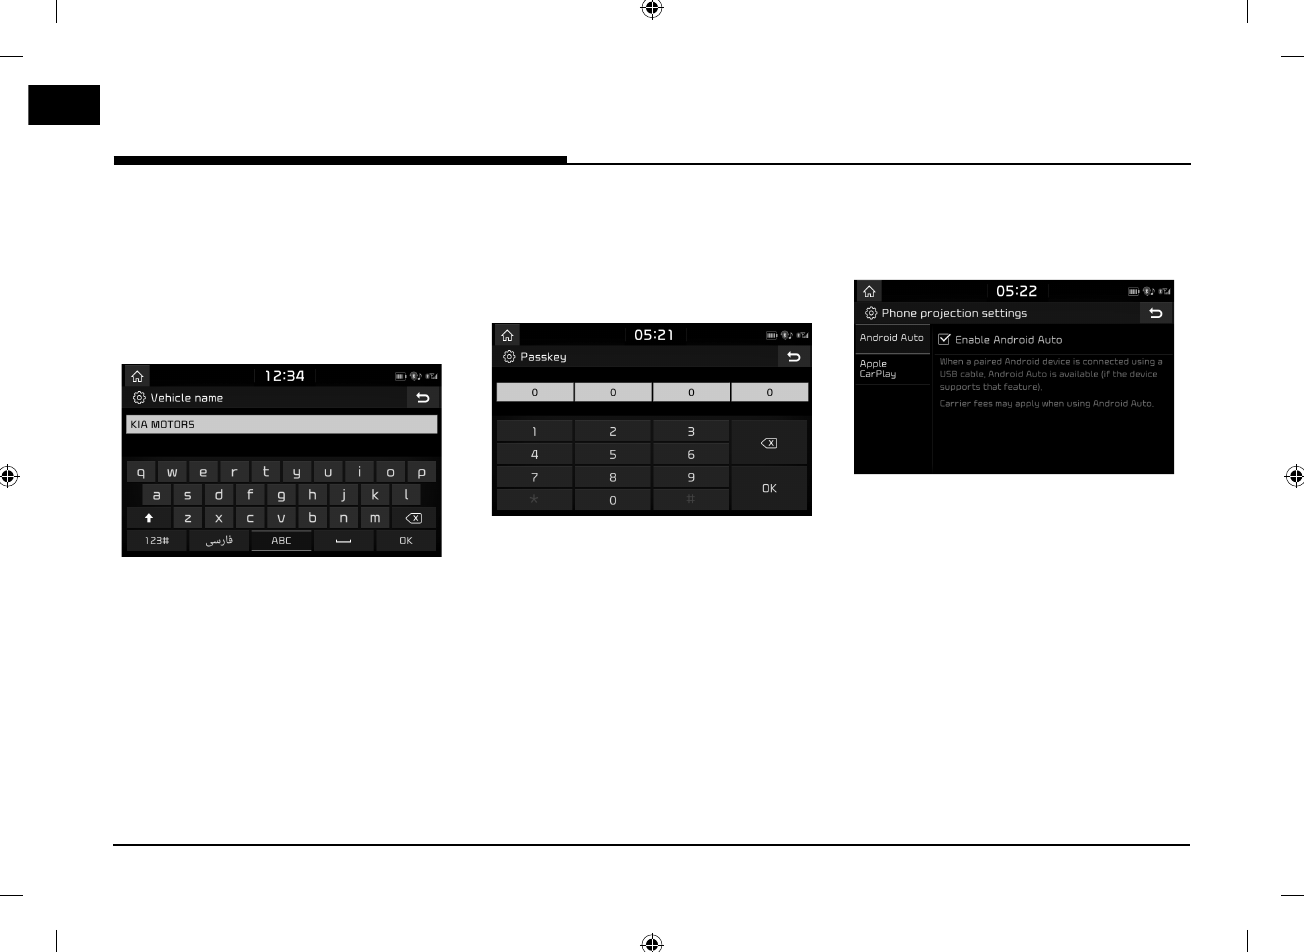
58
Settings
System Bluetooth info
Vehicle name
You can change the Bluetooth device name of
the vehicle.
1. Press [SETUP] > [Bluetooth] > [System
Bluetooth info] > [Vehicle name].
2. Enter the desired name using the keypad,
then press [OK].
Note
The default device name is set to KIA MOTORS.
Passkey
You can change the passkey used for
Bluetooth device authentication.
1. Press [SETUP] > [Bluetooth] > [System
Bluetooth info] > [Passkey].
2. Enter the passkey using the keypad.
Note
The passkey is a 4-digit authentication code
used for a Bluetooth connection between the
mobile phone and car system. The default
passkey is set to 0000.
Default
This menu is used to reset the Bluetooth
settings to factory default.
1. Press [SETUP] > [Bluetooth] > [Default].
2. Press [Yes].
Phone projection
This menu describes phone projection settings.
1. Press [SETUP] > [Phone projection].
2. Press the desired items.
䳜 [Android Auto]: If Android Auto is
checked, you can use the functions of
your Android device with a USB cable
connected.
䳜 [Apple CarPlay]: If Apple CarPlay is
checked, you can use the functions of
your iPhone with a USB cable connected.
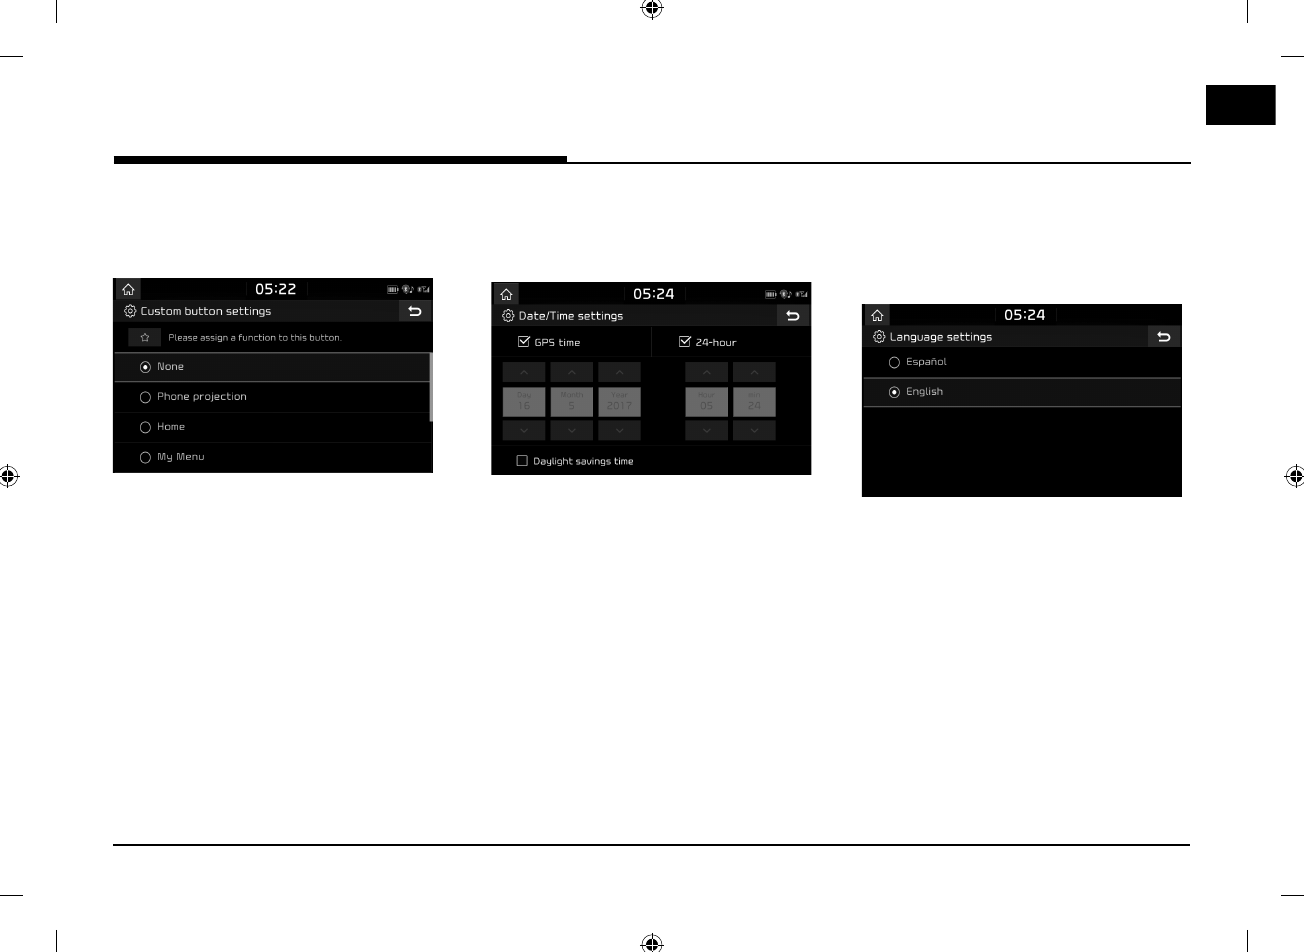
59
Settings
Custom button
You can assign a function to custom button.
1. Press [SETUP] > [Custom button].
2. Select the desired function.
Date/Time
This menu describes date and clock settings.
1. Press [SETUP] > [Date/Time].
2. Select the desired items.
䳜 [24-hour]: Switches to 12 hour or 24
hour.
䳜 [Daylight savings time]: Turns the
daylight savings time on or off. When
daylight savings time is turned on, the
clock is moved forward one hour.
䳜 [GPS time]: Displays time according to
the received GNSS(Global Navigation
Satellite System) time.
Language
This menu is used to set the language of the
system.
1. Press [SETUP] > [Language].
2. Select the desired language.
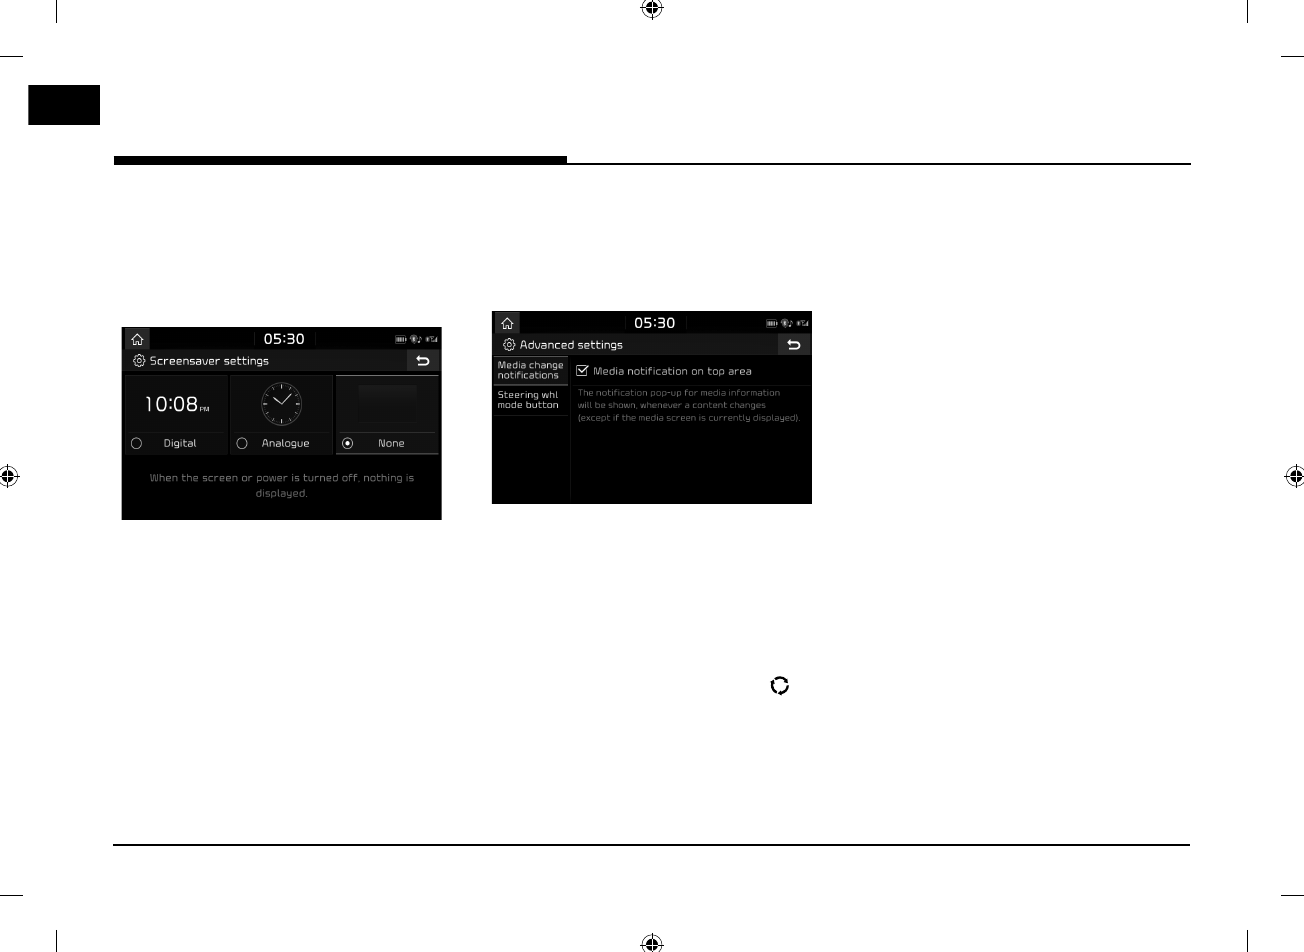
60
Settings
Screensaver
This menu is used to select the screen
displayed when the system power is turned
off.
1. Press [SETUP] > [Screensaver].
2. Select the desired items.
䳜 [Digital]: The digital clock and date is
displayed.
䳜 [Analogue]: The analogue clock and date
is displayed.
䳜 [None]: Nothing is displayed.
Advanced
This menu describes advanced settings.
1. Press [
SETUP
].
2. Press [Advanced].
3. Select the desired items.
䳜 [Media change notifications]: If the box
checked, the notification pop-up for
media information will be shown on the
top of the screen, whenever a content
changes.
䳜 [Steering whl mode button]: Selects the
desired feature when you pressing [ ]
on
steering wheel to toggle media modes.
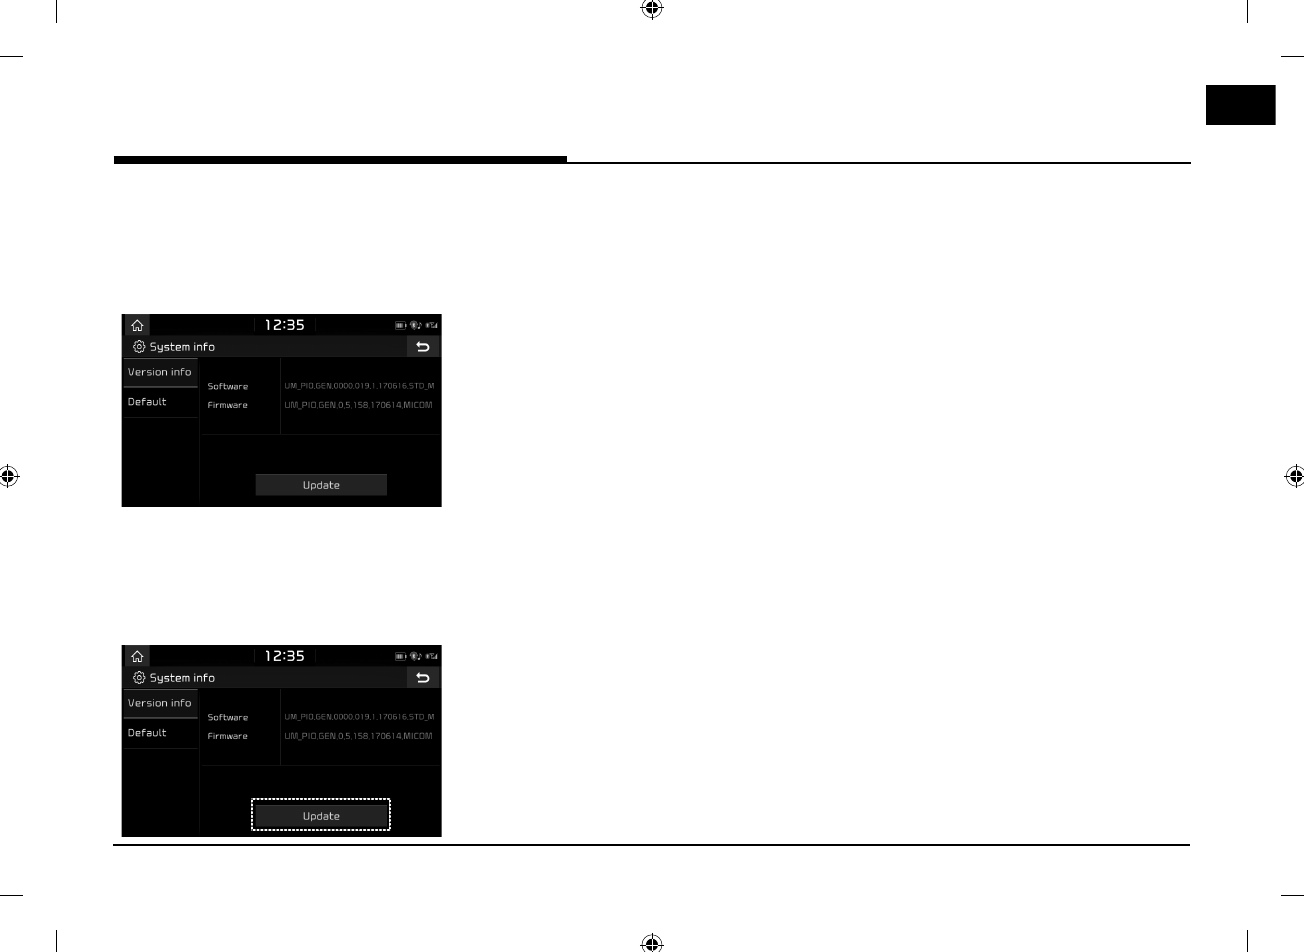
61
Settings
System info
Version info
You can view software version, firmware version.
Press [SETUP] > [System info] > [Version info].
Update
For system䳓s software security and new
function addition, you need an update.
1. Press [SETUP] > [System info] > [Version
info] > [Update].
2. Insert the SD card with latest file
downloaded into the SD card slot.
3. Press [Update] > [OK].
Once updating is complete, the system will
automatically restart.
Notes
䳜 This product requires regular updates for
Software corrections, New functions and
map updates. Updating may require up to 1
hour depending on the data size.
䳜 Turning off the power or ejecting the USB
during the update process may result in data
loss. Make sure to keep the ignition on and
wait until updating is complete.
Default
This menu is used to reset all settings
specified by the user.
1. Press [SETUP] > [System info] > [Default].
2. Press [Default] > [Yes].
Note
This [Default] menu cannot be operated if any
USB device, iPod or Android Auto/Apple CarPlay
device has been connected to the system.
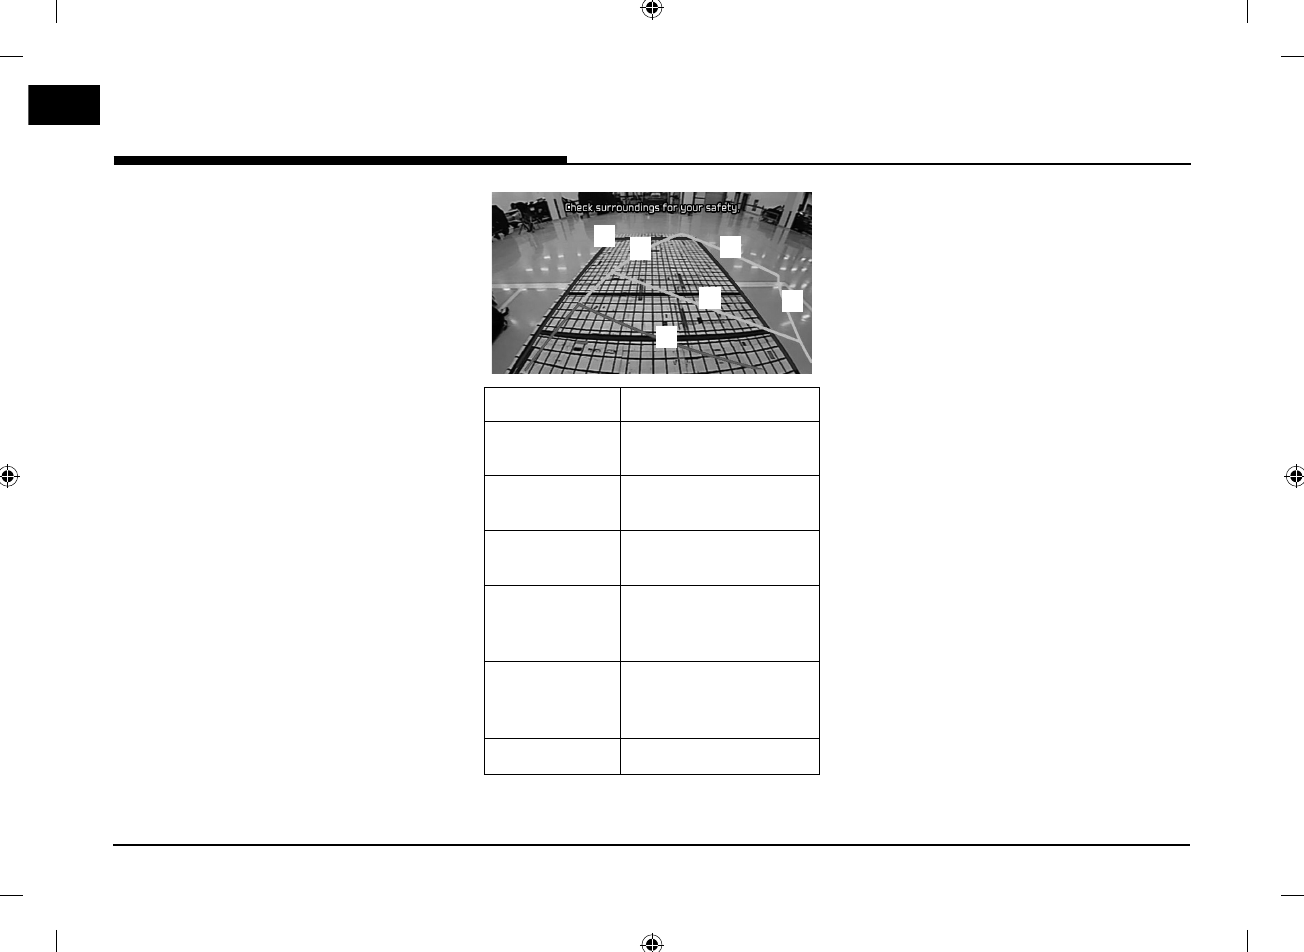
62
Using rear camera - Option
About rear camera
Rear camera is an option for the customers
who selected the option.
Rear camera is parking guide system, when
the ignition switch is on and a car start-up
with being in R position of a transmission lever.
Notes
䳜 Rear camera has an optical lens to secure
wide view, so there is a little difference in the
distance shown on the screen. For safety,
make sure to check the rear, left, and right
view by yourself.
䳜 The colour of the parking guide line on the
screen may differ from reality.
A
D
C
B
E
F
Line Instruction
A
Red line About 0.5 m from the
vehicle rear bumper
B
Yellow line 1 About 1 m from the
vehicle rear bumper
C
Yellow line 2 About 3 m from the
vehicle rear bumper
D
Yellow line 3 Vehicle path of the left
side wheel in the vehicle䳓s
front passenger seat side
E
Yellow line 4 Vehicle path of the right
side wheel in the vehicle䳓s
front passenger seat side
F
Blue line Steering neutral path
Note
When driving backwards, it displays drive and
neutral steering path.
Using rear camera - Option

63
AVM (Around View Monitor) - Option
About AVM (Around View
Monitor)
䳜 AVM is a feature for the customers who
select option.
䳜 Through the 4 cameras installed in the
vehicle, it provides the front, rear, left and
right views of the vehicle.
䳜 When the shift lever is placed in R with the
vehicle䳓s ignition turned on, AVM will operate.
䳜 If gear is changed from R to P position, AVM
(Around View Monitor) operation stops.
Operating Front AVM
After turning on the engine, put the lever of
the transmission in the N or D position and
press 䳖Camera switch䳗 to run Front AVM.
d
d
e
e
f
f
g
g
h
h
a
a
b
b
c
c
i
i
a
Warning display: Driver䳓s door, passenger䳓s
door, trunk, and side mirror status are
displayed.
b
Front camera screen: The screen on the
front of the vehicle is displayed through
the camera.
c
AVM camera screen: According to the
content of the selected display, it displays
AVM or left or right side screen.
d
(All views): It displays the vehicle䳓s
front screen and all direction (AVM)
screens at the same time.
e
(Front only): It only displays the
vehicle䳓s front screen.
f
(Front + front left): It displays the
vehicle䳓s front screen and front left screen
at the same time.
g
(Front + front right): It displays the
vehicle䳓s front screen and front right
screen at the same time.
h
(Driving Rear View): It displays the
vehicle䳓s rear screen during driving.
i
(AVM settings): Moves to AVM settings
menu.
Note
If you drive at about 15 km/h or more during
front AVM operation, AVM is turned off. At this
state, even if you drive at less than about 15
km/h, AVM is remained at OFF state.
Operating Rear AVM
After turning on the engine, put the lever of
the transmission in the R position to run Rear
AVM.
d
d
e
e
f
f
g
g
h
h
a
a
b
b
c
c
a
Warning display: Driver䳓s door, passenger䳓s
door, trunk and side mirror status are
displayed.
b
Rear camera screen: The screen on the
rear of the vehicle is displayed through the
camera.
c
AVM camera screen: According to the
content of the selected display, it displays
AVM or left or right side screen.
AVM (Around View Monitor) - Option
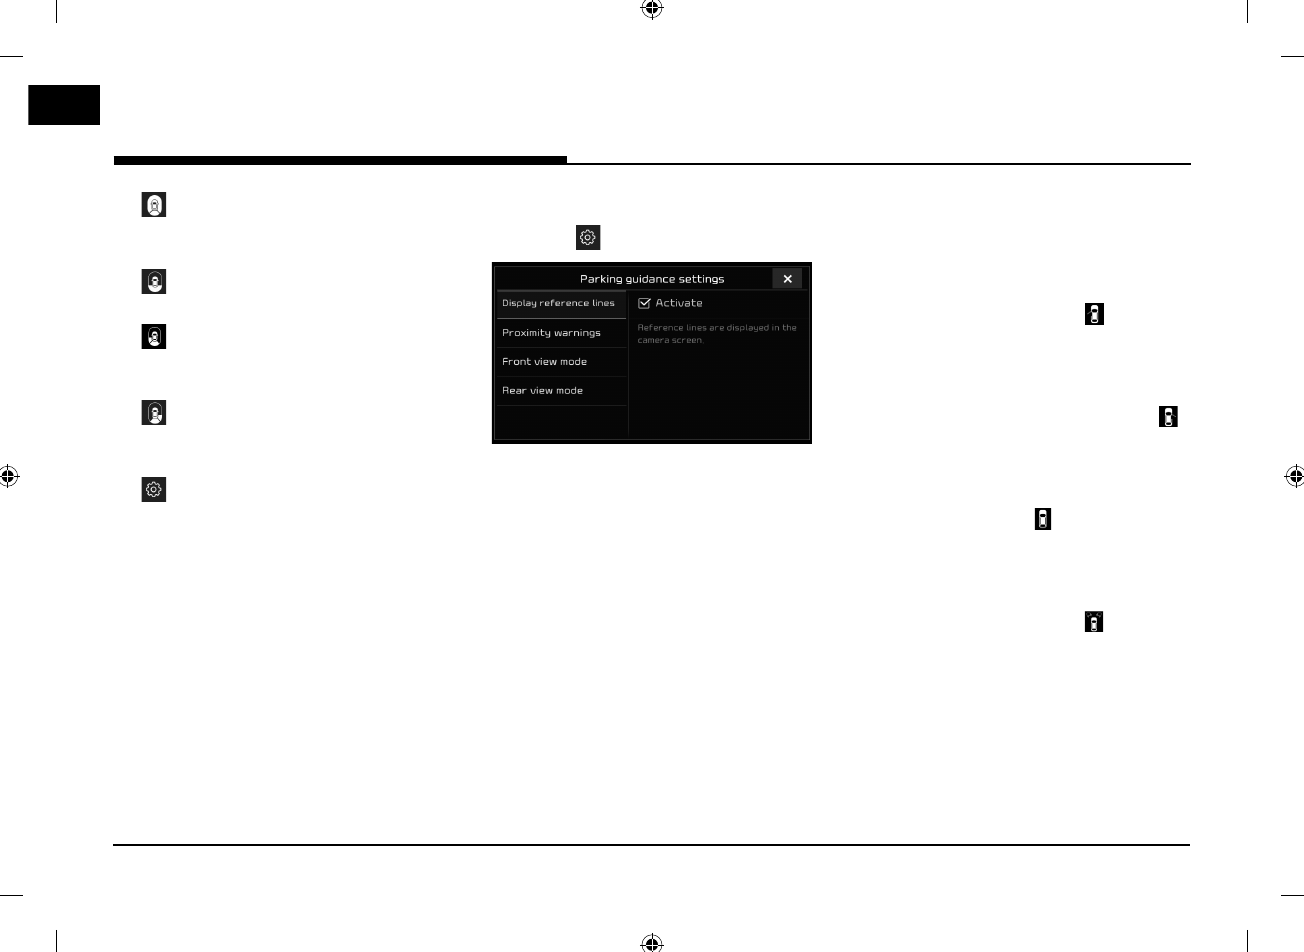
64
AVM (Around View Monitor) - Option
d
(All views): It displays the vehicle䳓s rear
screen and all direction (AVM) screens at
the same time.
e
(Rear only): It only displays the
vehicle䳓s rear screen.
f
(Rear + rear left): It displays the
vehicle䳓s rear screen and rear left screen at
the same time.
g
(Rear + rear right): It displays the
vehicle䳓s rear screen and rear right screen
at the same time.
h
(AVM settings): Moves to AVM settings
menu.
Note
If AVM (Around View Monitor) camera has an
optical lens to secure wide view, so there is a
little difference in the distance shown on the
screen. For safety, make sure to check the
rear, left and right view by yourself.
AVM settings
By pressing [ ], you can adjust AVM settings.
䳜 [Display reference lines]: Sets the reference
lines on/off.
䳜 [Proximity warnings]: Sets the warnings for
approaching an obstacle on/off.
䳜 [Front view mode]: Sets the front camera䳓s
screen as initial view.
䳜 [Rear view mode]: Sets the rear camera䳓s
screen as initial view.
Warning display
During AVM execution, the following warning
image is displayed on the screen.
Driver䳓s door open indicator
When the driver䳓s door is open, 䳖 䳖 (red colour
on left door) indicator is displayed on the top
left of the screen.
Front passenger䳓s door open indicator
When the front passenger䳓s door is open, 䳖 䳖
(red colour on right door) indicator is displayed
on the top left of the screen.
Trunk open indicator
When the trunk is open, 䳖 䳖 (red colour on
trunk) indicator is displayed on the top left of
the screen.
Side mirror folding indicator
When the side mirror is folded, 䳖 䳖 (red colour
on side mirror) indicator is displayed on the
top left of the screen.

65
Before thinking there is a product defect
The current car position as shown on
the navigation may differ from the
actual position under the following
conditions.
䳜 When driving on Y-shaped roads with narrow
angles the current position may be displayed
in the opposite direction.
䳜 Within city streets, the current position may
be displayed on the opposite side or on an
off-road position.
䳜 When changing the zoom level from
maximum to a different level, the current
position may be displayed on a different
road.
䳜 If the vehicle is loaded onto a ferry or a car
transport vehicle, the current position may
be stalled on the last position prior to loading.
䳜 When entering a road after passing an
underground parking structure, building
parking structure, or roads with many
rotations.
䳜 When driving in heavy traffic with frequent
starts and stops.
䳜 When driving under slippery conditions, such
as heavy sand, snow, etc..
䳜 When the tires have recently been replaced
(Especially upon use of spare or studless
tires).
䳜 When using tires of improper size.
䳜 When the tire pressure for the 4 tires are
different.
䳜 When the replacement tire is worn or used
(Especially studless tires having passed a
second season).
䳜 When driving near high-rise buildings.
䳜 When a roof carrier has been installed.
䳜 When a long distance route is calculated
while driving on an expressway, in such
cases, continued driving will automatically
enable the system to conduct map matching
or use updated GNSS information to provide
the current position (In such cases, up to
several minutes may be required).
Correct route guidance may not occur
due to search conditions or driving
position. The following occurrences are
not malfunctions:
䳜 Guidance to go straight may be given while
driving on a straight road.
䳜 Guidance may not be given even when
turning onto an intersection.
䳜 There are certain intersections in which
guidance may not occur.
䳜 A route guidance signaling for a u-turn may
occur in some No u-turn intersections.
䳜 Route guidance signaling entrance into a No-
entry zone may occur (No-entry zone, road
under construction, etc.).
䳜 Guidance may be given to a position that is
not the actual destination if roads to reach
the actual destination do not exist or are too
narrow.
䳜 Faulty voice guidance may be given if the
vehicle breaks away from the designated
route. (e.g. if a turn is made at an
intersection while the navigation provided
guidance to go straight.)
These situations may occur after
conducting route calculation. The
following occurrences are not
malfunctions:
䳜 Guidance may be given to a position differing
from the current position when turning at an
intersection.
䳜 When driving in high speeds, route
recalculation may take a longer period of
time.
Before thinking there is a product defect
66
Before thinking there is a product defect
1. Errors which occur during the operation or installation of the device may be mistaken as a malfunction of the actual device.
2. If you are having problems with the device, try the suggestions listed below.
3. If the problems persist, contact your authorised Kia dealer.
Problem Possible cause
There are small red, blue, or green dots
on the screen Because the LCD is manufactured with technology requiring high point density, a pixel or lighting
deficiency may occur within 0.01% of total pixels.
The sound or image is not working 䳜 Has the Switch for the vehicle been turned to [ACC] or [ON]?
䳜 Has the SYSTEM been turned OFF?
The screen is being displayed but sound
is not working 䳜 Has the volume been set to a low level?
䳜 Has the volume been muted?
When the power is turned on, the
corners of the screen are dark 䳜 The display appearing somewhat dark after prolonged periods of use is normal with LCD panels. It is not
a malfunction.
䳜 If the screen is very dark, contact your nearest authorised Kia dealer for assistance.
Sound is working from only one speaker Are the positions of Fader or Balance sound controls adjusted to only one side?
Sound does not work in AUX mode Are the audio connector jacks fully inserted into the AUX terminal?
The external device is not working Is the external device connected with a standard connector cable?
When turning power on, the most
recent mode screen is not displayed Within modes that play files by reading external sources, such as USB, iPod, or Bluetooth® streaming
mode, the most recently played mode screen prior to turning off power may not properly load.
䳜 If the corresponding device is not connected, the mode operated prior to the most recent mode will
operate.
䳜 If the previous mode still cannot be properly played, the mode operated prior to that will operate.
67
Troubleshooting
Problem Possible cause Countermeasure
The power does not
turn on.
The fuse is disconnected. 䳜 Replace with a suitable fuse.
䳜 If the fuse is disconnected again, please contact your authorised Kia dealer.
Device is not properly connected. Check to see that the device has been properly connected.
The system does
not play.
The vehicle battery is low. Charge the battery if the problem persists, contact your authorised Kia dealer.
The image colour/
tone quality is low.
The brightness, saturation, and
contrast levels are not set properly.
Properly adjust the brightness, saturation, and contrast levels through display
setup.
Sound does not
work.
The volume level is set to the lowest
level.
Adjust the volume level.
The connection is not proper. Check to see that the device has been properly connected.
The device is currently fast-forwarding,
rewinding, scanning, or playing in slow
mode.
The sound will not work when the device is fast-forwarding, rewinding, scanning,
or playing in slow mode.
Troubleshooting
68
Troubleshooting
Problem Possible cause Countermeasure
The sound or image
quality is low. Vibration is occurring from where the
conversion switch has been installed. The sound may be short circuited and the image distorted if the device
vibrates.
Image colour/tone quality is low. The device will return to normal once vibrations stop.
The USB does not
work. USB memory is damaged. Please use after formatting the USB into FAT 16/32, exFAT or NTFS format.
USB memory has been contaminated. Remove any foreign substances on the contact surface of the USB memory
and multimedia terminal.
A separately purchased USB hub is being used. Directly connect the USB memory with the multimedia terminal on the
vehicle.
A USB extension cable is being used. Directly connect the USB memory with the multimedia terminal on the
vehicle.
A USB which is not a Metal Cover Type USB
Memory is being used. Use standard USB Memory.
An HDD type, CF, SD Memory is being used. Use standard USB Memory.
There are no music files which can be played. Only MP3, WMA, OGG, FLAC and WAV file formats are supported. Please use
only the supported music file formats.
The iPod is not
recognised even
though it has been
connected.
There are no titles which can be played. Use iTunes to download and save MP3 files into the iPod.
The iPod firmware version has not been
properly updated. Use iTunes to update the firmware version and reconnect the iPod with the
device.
The iPod device does not recognise downloads. Reset the iPod and reconnect with the device.

69
Trademarks and licenses
Bluetooth® Wireless Technology
The Bluetooth Wireless Technology word mark
and logos are registered trademarks owned by
Bluetooth Wireless Technology SIG, Inc.
iPod®
iPod® is a registered trademark of Apple Inc.
Open Source Software Notice
Information
To obtain the source code under GPL, LGPL,
MPL and other open source licenses, that is
contained in this product, please visit http://
opensource.lge.com.
In addition to the source code, all referred
license terms, warranty disclaimers and
copyright notices are available for download.
LG Electronics will also provide open source
code to you on CD-ROM for a charge covering
the cost of performing such distribution (such
as the cost of media, shipping and handling)
upon email request to opensource@lge.com.
This offer is valid for three (3) years from the
date on which you purchased the product.
DivX
This DivX Certified device can play DivX HD
video files (including .avi, .divx).
Download free software at www.divx.com to
create, play and stream digital videos.
DivX, DivX Certified and associated logos
are trademarks of DivX, LLC and are used
under license.
Covered by one or more of the following U.S.
patents: 8,731,369; RE45,052.
Trademarks and licenses
70
Specification
Common
Power supply
DC 12.0 V
Operating power DC 9 V ~ DC 16 V
Current consumption
Maximum 14 A
Dark current Maximum 1 mA
Operating temperature
-20 C ~ +65 C
Storage
t
emperature -30 C ~ +75 C
Dimensions (Head unit)
223.12mm(W) x 184.6mm(H)
x 184.1mm(D)
Weight (Head unit) 1.92 kg
Bluetooth
Supported profile HFP 1.6, A2DP 1.2,
AVRCP 1.5, PBAP 1.1
Supported Bluetooth
specification 3.0
Frequency range 2402 MHz ~ 2480 MHz
Output power (Max, Class2)
4.0 dBm
Number of channels 79
Radio
AM
Tuning range 530 kHz ~ 1710 kHz
Usable sensitivity 35 dBuV
Signal-to-noise ratio Minimum 45 dB
FM
Tuning range 87.5 MHz ~ 107.9 MHz
Usable sensitivity 10 dBuV
Signal-to-noise ratio Minimum 50 dB
TFT-LCD
Screen size 202.46 mm (8 inches)
176.4 (W) x 99.36 (H) mm
(Active area)
Resolution 384,000 pixel
Operating method TFT (Thin Film Transistor)
Viewing angle
R/L/U/D 89 (Typ)
Internal lighting LED
䳜 Designs and specifications are subject to change without prior notice.
Specification

71
LIMITED WARRANTY
ORIGINAL NAVIGATION HEAD UNIT SUPPLIED BY VEHICLE DEALER
Product :
Product No. :
WHAT THIS WARRANTY COVERS
1. Vehicle Dealer Shop ("Dealer") warrants to you that the Hardware will be free from defects in workmanship and materials under Normal use
("Defects") from the original date of the registration of the motor vehicle ("Warranty Period"). During the Warranty Period the Hardware will be
repaired or replaced at DEALER's choice ("Limited Warranty") without charge to you for either parts or labor. This Limited Warranty covers the
replacement of the head unit including of the Hardware only.
WHAT THIS WARRANTY DOES NOT COVER
2. The Limited Warranty does not apply to normal wear and tear, does not apply when the Hardware is opened or repaired by someone not
authorized by DEALER and does not cover repair or replacement of any Hardware or part thereof damaged by: misuse, moisture, liquids, proximity
or exposure to heat and accident, abuse, non-compliance with the instructions supplied with the Hardware, neglect or misapplication. The
Limited Warranty does not cover physical damage to the surface of the Hardware. This Limited Warranty does not cover any software that may
accompany or be installed on the Hardware. The Limited Warranty does not cover the installation, removal or maintenance of the Hardware or any
costs related herewith.
HOW TO MAKE A WARRANTY CLAIM
3. In order to make a claim of a Defect, you must contact DEALER. If a defect arises and a valid claim under this Limited Warranty is received by
DEALER after the first 3yr / 60,000km of the Warranty Period, DEALER is entitled to charge you for any reasonable shipping and handling costs
made in connection with the repair or replacement of the Hardware. You must comply with any other return procedures stipulated by DEALER, if
any.

72
DEALER LIMITED WARRANTY
YOUR LEGAL RIGHTS
4. Some countries may not allow the exclusion or limitation of damages. If any part of this Limited Warranty is held to be invalid or unenforceable,
the remainder of the Limited Warranty shall nonetheless remain in full force and effect.
5. This Limited Warranty is the only express warranty made to you and is provided in place of any other express warranties or similar obligations (if
any) created by any advertising, documentation, packaging, or other communications.
6. Except for the Limited Warranty and to the maximum extent permitted by applicable law, DEALER and its suppliers provide the Hardware "AS IS
AND WITH ALL FAULTS", and hereby disclaim all other warranties and conditions, whether express, implied or statutory, including, but not limited
to, any (if any) implied warranties, duties or conditions of satisfactory quality, of fitness for a particular purpose, of reliability or availability, of
accuracy or completeness of responses, of results, of workmanlike effort, of lack of viruses, and of reasonable care and skill, all with regard to the
Hardware, and the provision of or failure to provide support or other services, information, software, and related content through the Hardware
or otherwise arising out of the use of the Hardware. Also, there is no warranty or condition of quiet enjoyment, quiet possession, or non-
infringement with regard to the Hardware.
7. This Limited Warranty does not affect any legal rights under applicable national legislation governing the sale of consumer goods.
8. This Limited Warranty cannot be transferred to any other person.
LIMITATION OF LIABILITY
9. Neither DEALER nor its suppliers shall be liable to you or to any third party for any damages either direct, indirect, incidental, consequential or
otherwise (including in each case, but not limited to, damages for the inability to use the equipment or access data, loss of data, loss of business,
loss of profits, business interruption or the like) arising out of the use of or inability to use the Hardware even if DEALER has been advised of the
possibility of such damages.
10. Notwithstanding any damages that you might incur for any reason whatsoever, the entire liability of DEALER and any of its suppliers shall be
limited to the amount actually paid by you for the Hardware.
11. DEALER shall not be liable for
(I) any fraud on the part of its employees and/or agents; or
(I) any fraudulent misrepresentation on the part of its employees and/or agents.
12. Notwithstanding the above, neither party's liability for death or personal injury resulting from its own negligence shall be limited.

46
FCC Warning
FCC approval
This device complies with part 15 of the FCC Rules. Operation is subject to the following two conditions: (1) This
device may not cause harmful interference, and (2) this device must accept any interference received, including
interference that may cause undesired operation.
This equipment has been tested and found to comply with the limits for a digital device, pursuant to part 15 of the
FCC Rules. These limits are designed to provide reasonable protection against harmful interference in a residential
installation. This equipment generates, uses and can radiate radio frequency energy and, if not installed and used in
accordance with the instructions, may cause harmful interference to radio communications. However, there is no
guarantee that interference will not occur in a particular installation. If this equipment does cause harmful
interference to radio or television reception, which can be determined by turning the equipment off and on, the user
is encouraged to try to correct the interference by one or more of the following measures:
Reorient or relocate the receiving antenna.
Increase the separation between the equipment and receiver.
Connect the equipment into an outlet on a circuit different from that to which the receiver is connected.
Consult the dealer or an experienced radio/TV technician for help.
Changes or modifications not expressly approved by the party responsible for compliance could void the user's
authority to operate the equipment.
This device should be installed and operated with minimum 20 cm between the radiator and your body.


P/N:MFLXXXXXXXX (O/M)
*RC05S215A*