LG Electronics USA LNN2010IWUM DIGITAL CAR AVN SYSTEM User Manual
LG Electronics USA DIGITAL CAR AVN SYSTEM Users Manual
UserManual.wiki
>
LG Electronics USA
>
LNN2010IWUM User Manual
Users Manual
Navigation menu
Upload a User Manual
Namespaces
Wiki Guide
HTML
PDF
Info
Views
User Manual
Discussion / Help
Navigation

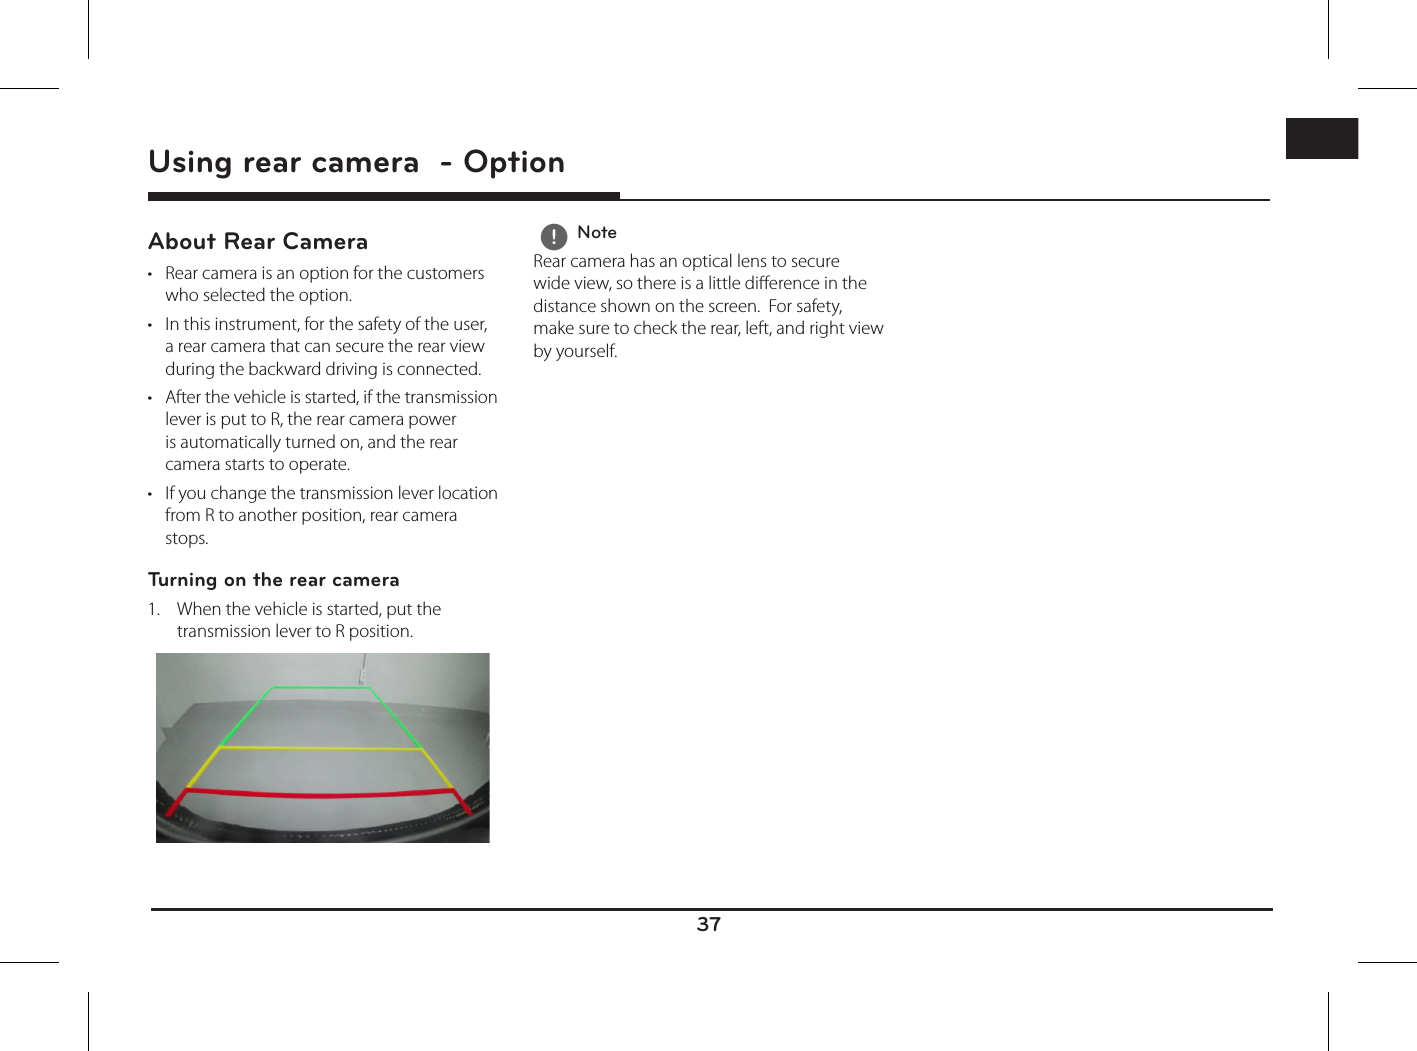
![6ENGSound settings ...................................... 23Getting started with navigation 24Precautions for safe driving � � � � � � � � � 24What is GNSS? � � � � � � � � � � � � � � � � � � � 24About satellite signals � � � � � � � � � � � � � � 24Acquiring satellite signals � � � � � � � � � � �24Initial navigation screen � � � � � � � � � � � � 24(Refer to the separate navigation manual for more detailed operation)Bluetooth® Wireless Technology 25Before Using the Bluetooth Handsfree 25What is Bluetooth Wireless Technology? ...........................................25Precautions for Safe Driving .............. 25Cautions upon Connecting Bluetooth Phone .......................................................25Pairing and connecting the unit and a Bluetooth phone � � � � � � � � � � � � � � � � � �26When no phones have been paired 26When a phone is already paired ...... 26When pairing additional device ........ 26Bluetooth help ....................................... 27Disconnecting the connected phone ..28Deleting Bluetooth Devices ................28Making a call by entering phone number 28Making a call by redialing � � � � � � � � � � �28Answering/Rejecting a call � � � � � � � � � � 29Switching call to the mobile phone � � � 29Ending a call � � � � � � � � � � � � � � � � � � � � � 29Using the menu during a phone call � �29Calling list � � � � � � � � � � � � � � � � � � � � � � �30Making a call from calling list ...........30Contacts � � � � � � � � � � � � � � � � � � � � � � � �30Making a call from contacts ..............30Updating mobile phone contacts ....30Searching for contacts ......................... 31Favourites � � � � � � � � � � � � � � � � � � � � � � � 31Calling Favourites ................................... 31Adding as a Favourite .......................... 31Deleting favourites ................................32Changing the favourites name ......... 32Bluetooth settings � � � � � � � � � � � � � � � � �32Settings 33[Settings] menu overview � � � � � � � � � � �33Sound � � � � � � � � � � � � � � � � � � � � � � � � � � 33Display � � � � � � � � � � � � � � � � � � � � � � � � � �34Bluetooth � � � � � � � � � � � � � � � � � � � � � � � �34Paired devices ....................................... 34Ringtone ..................................................34Change passkey ....................................35Rename device .................................... 35System � � � � � � � � � � � � � � � � � � � � � � � � � � 35Language ................................................35Keyboard ................................................. 36Clock ........................................................ 36Factory settings ..................................... 36Using rear camera - Option 37About Rear Camera � � � � � � � � � � � � � � � 37Turning on the rear camera ................37AVM (Around View Monitor) - Option 38About AVM (Around View Monitor) � � �38Operating front AVM � � � � � � � � � � � � � �38Operating rear AVM � � � � � � � � � � � � � � �38AVM setting � � � � � � � � � � � � � � � � � � � � � 39Warning display � � � � � � � � � � � � � � � � � � � 39Driver's door open indicator ..............39Front passenger's door open indicator .. 39Trunk open indicator .......................... 39Side mirror folding indicator .............. 39Before thinking there is a product defect 40Troubleshooting 43Trademarks and Licenses 45Bluetooth® Wireless Technology ....... 45iPod® .........................................................45OPEN SOURCE SOFTWARE NOTICE....................................................45Specification 46Table of contents](https://usermanual.wiki/LG-Electronics-USA/LNN2010IWUM/User-Guide-2719464-Page-6.png)
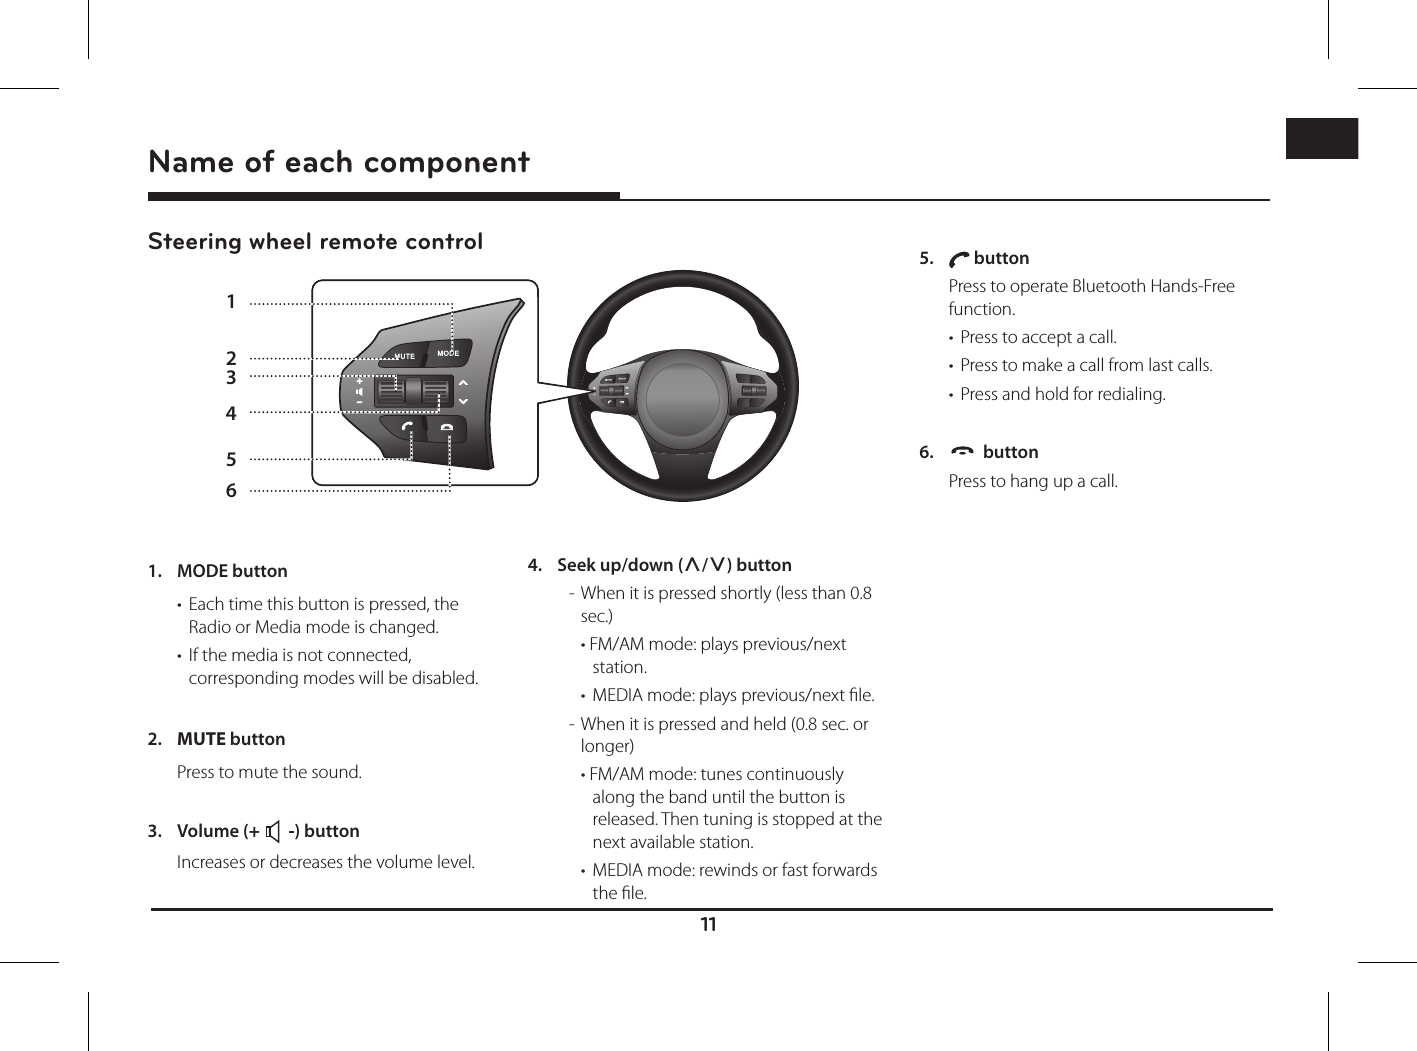
![Name of each component9ENGName of each componentHead unit142531. RADIO button Converts to the last played radio mode (FM/AM). When system is already displaying the radio screen then each time the button is pressed, the mode is changed in the order FM -> AM -> FM.2. MEDIA button Press to select a media source: [USB Music]/ [iPod]/ [Bluetooth Audio]/ [AUX]3. button Press to operate Bluetooth Hands-Free function.4. S/W button- When it is pressed shortly (less than 0.8 sec.) •FM/AM mode: plays previous/next station. •MEDIAmode:playsprevious/nextle.- When it is pressed and held (0.8 sec. or longer) •FM/AM mode: tunes continuously along the band until the button is released. Then tuning is stopped at the next available station.•MEDIAmode:rewindsorfastforwardsthe le. 5. •1 button -Power on Press this button in system OFF status. -Power o Press this button in system ON status. •Volumecontrolknob(-) Turn counterclockwise or clockwise to control volume.](https://usermanual.wiki/LG-Electronics-USA/LNN2010IWUM/User-Guide-2719464-Page-9.png)
![10ENG1011127968Name of each component6. • button -FM/AM mode: turn left/right to tune manually (FM/AM) or to search for a desired station and then press it. -MEDIA mode: turn left/right to search for the desired le and press it. -Navigation mode: turn left/right to change the map scale on the map screen. • button Press to repeat the voice guidance on the map screen.7. button Press to turn the screen on or o.8. button- Press to move to the [Settings] menu.- Press and hold to check Software version, Bluetooth version, Navigation version, Map database version, and Firmware version.9. button• Route Info• Alternatives10.NAVbutton Press to move to the navigation menu screen.11. MAP button Press to display the map screen of the current location when in a dierent mode.12.CoverforprotectingSDcard(SDcardinsertslot) Insert the SD card into the slot.](https://usermanual.wiki/LG-Electronics-USA/LNN2010IWUM/User-Guide-2719464-Page-10.png)
![13ENGRadio operation (FM/AM)Listening to FM/AM radio1. Press "RADIO" on the head unit.2. Press [Radiow] > [FM] or [AM] on the screen. The FM/AM screen of the most recent listened station is displayed. , NoteEach time the "RADIO" button on the head unit is pressed, the mode is changed in the order FM -> AM -> FM.3. Autotuning: •Press [C/V] on the screen. -Plays previous/next station.• Press and hold [C/V] on the screen. - Changes continuously the station until the button is released. Manualtuning: Turn " " (counter)clockwise. -The frequency moves up and down accordingly. Presettuning: Press [Preset]. Press the preset numbers of the desired broadcast station.Opening the station list sorted in alphanumerical orderYou can see station list with superior reception.1. Select the band (FM, AM) you want.2. Press [List]. , Note• Rotate “ ” to scroll up or down.• Press [ ] to move to the previous screen.Autostore (AM only)This function lets you automatically store the strong broadcast stations.1. Select the AM band.2. Press [List].3. Press [ ]. , Note• Rotate “ ” to scroll up or down.• Press [ ] to move to the previous screen.Radio operation (FM/AM)](https://usermanual.wiki/LG-Electronics-USA/LNN2010IWUM/User-Guide-2719464-Page-13.png)
![14ENGRadio operation (FM/AM)Presetting FM/AMSaving FM/AM preset20 preset stations each for FM/AM modes can be saved manually.1. Select the band (FM, AM) you want to store a station into.2. Select the desired station. 3. Press [Preset].4. Press the desired preset number. If you want to overwrite an existing preset, press and hold the respective preset number. , Note• Rotate “ ” to scroll up or down.• Press [ ] to move to the previous screen.Deleting FM/AM preset1. Select the band (FM, AM) you want.2. Press [Preset] > [ ].3. Press [ ] > [Yes]. Press [ ] > [Yes] to delete all presets. , Note• Rotate “ ” to scroll up or down.• Press [ ] to move to the previous screen.Setting the FM/AM optionsScanThis function scans all stations and plays only stations with sucient signal strength for 5 seconds each.1. Select the band (FM, AM) you want.2. Press [Options].3. Press [d Start]. Press [Z Stop] to stop the scan function.](https://usermanual.wiki/LG-Electronics-USA/LNN2010IWUM/User-Guide-2719464-Page-14.png)
![15ENGRadio operation (FM/AM)Sound settings1. Press [Options] > [Sound settings] in the radio screen.2. For details refer to page 33 (“Sound”).](https://usermanual.wiki/LG-Electronics-USA/LNN2010IWUM/User-Guide-2719464-Page-15.png)
![16ENGUSB OperationPlaying USB musicYou can play music les saved in a USB memory device.Connect a USB device to the USB port and playback starts automatically. , NoteTo play USB music while a dierent source is playing, press [MEDIA] > [Mediaw] > [USB Music].PauseYou can pause the playing le.Press [M] during playback.Press [d] to play it again.SkipYou can play the previous or next le.Position DescriptionScreen • Press [C/V].• Pressing [C] after 3 seconds of playback time plays the current le from the beginning.Head unit • Press "S/W".• Pressing [S] after 3 seconds of playback time plays the current le from the beginning.SearchYou can rewind/fastforward to a specic point of a le.Position DescriptionScreen Press and hold [C/V] and then release at the point you want.Head unit Press and hold "S/W" and then release at the point you want.SeekYou can play the le directly by searching for the desired le.1. Turn “ " to search for a desired le. 2. If the desired file is displayed, press the “ " to play the file.ListYou can play the desired le by searching in the les list in the USB Menu.1. Press [List].2. Press the desired file name after searching in the files list. The list can be sorted by [Folder], [Artist], [Song] or [Album] by pressing the respective softkey on the lower bar. , Note• Rotate “ ” to scroll up or down.• Press [ ] to move to the previous screen.• Press [ ] to move to upper folder.USB Operation](https://usermanual.wiki/LG-Electronics-USA/LNN2010IWUM/User-Guide-2719464-Page-16.png)
![17ENGUSB OperationScanThis function plays the rst 10 seconds of the songs to provide a preview.1. Press [Options] > [Scan].2. Press the desired item.•[All]:Playsthefirst10secondsofeachsong.•[Folder]:Playsthefirst10secondsofeachsong within the current folder.• [Off ]:Cancelsthescanfunction.RepeatThis function provides the possibility to play a set of les repeatedly.1. Press [Options] > [Repeat].2. Press the desired item.•[All]:Repeatsthewholefileslist.•[Folder]:Repeatsthefilesofthecurrentfolder.•[Track]:Repeatsthecurrentfile,only. , NoteYou can also set the Repeat functions by pressing [/ /]on the playing screen.: All, : Folder, : TrackShufflePlaying files in random order.1. Press [Options] > [Shuffle].2. Press the desired item.• [All]:Playsallfilesrandomly.• [Folder]:Playsallfileswithincurrentfolder randomly. • [Off ]: Cancels the shuffle function. , NoteYou can set or cancel the Shue function by pressing [/ ] on the playing screen.Sound settings1. Press [Options] > [Sound settings].2. For details refer to page 33 (“Sound”).](https://usermanual.wiki/LG-Electronics-USA/LNN2010IWUM/User-Guide-2719464-Page-17.png)
![18ENGUSB OperationViewing USB imageYou can play image les saved in a USB memory device.Connect a USB device to the USB port and playback starts automatically. , NoteTo display a USB image while a different source is playing, press [MEDIA] > [Mediaw] > [USB Image].Switching to menu screen or full screenPress the screen repeatedly.SkipYou can view the previous or next image.Position DescriptionScreen Press [C/V].Head unit Turn " " to the left or right.Zoom in/out1. Press [ ] in menu screen.2. Press [ / ].3. Press [ / / / ] to move the image.4. Press [ ] to return to the original image. , NotePress [ ] to move to the previous screen.Rotating image1. Press [ ] in menu screen.2. Press [ / ] to rotate the image. , NotePress [ ] to move to the previous screen.](https://usermanual.wiki/LG-Electronics-USA/LNN2010IWUM/User-Guide-2719464-Page-18.png)
![19ENGUSB OperationListYou can search for a desired image using the images list.1. Press [List].2. Press the desired image. , Note• Rotate “ ” to scroll up or down.• Press [ ] to move to the previous screen.• Press [ ] to move to upper folder.File infoThis menu shows the folder name, le name, resolution, format and date of the current image.1. Press [Options] > [File info]. , NotePress [ ] to move to the previous screen.Display settings1. Press [Options] > [Display settings].2. For details refer to page 34 ("Display").Slideshow interval(sec)You can set the slideshow interval. The slideshow is played according to the time interval. 1. Press [Options] > [Slideshow interval(sec)].2. Select the slideshow interval.3. Press [Start]. , Note• Press the screen once to stop the slideshow.• Slideshow is not available while driving. (Because of trac regulations, image is only available when your vehicle is parked.)](https://usermanual.wiki/LG-Electronics-USA/LNN2010IWUM/User-Guide-2719464-Page-19.png)
![20ENGiPod OperationPlaying iPodConnect an iPod to the USB port by using the iPod cable and playback starts automatically. , NoteTo play iPod while a dierent source is playing, press [MEDIA] > [Mediaw] > [iPod].PauseYou can pause the playing le. For details refer to page 16 (“Pause”).SkipYou can play the previous or next le. For details refer to page 16 (“Skip”).SearchYou can rewind/fastforward to a specific point of a file. For details refer to page 16 (“Search”).SeekYou can play the le directly by searching for the desired le. For details refer to page 16 (“Seek”).ListYou can play the desired file by searching in the files list in the iPod Menu.1. Press [List].2. Press the desired le after searching for [Playlist], [Artist], [Song] or [More]. , Note• Rotate “ ” to scroll up or down.• Press [ ] to move to the previous screen.Setting audiobook playback speedSetting the playback speed only aects audio books purchased from the iTunes store or audible.com.For details about iPod, refer to the iPod User Guide.1. Press [Options] > [Audiobook].2. Select the desired items.• [Slow]: Plays the audiobook with slow speed.• [Normal]: Plays the audiobook with original speed.• [Fast]: Plays the audiobook with fast speed.iPod Operation](https://usermanual.wiki/LG-Electronics-USA/LNN2010IWUM/User-Guide-2719464-Page-20.png)
![21ENGRepeatThis function provides the possibility to play a set of files repeatedly.1. Press [Options] > [Repeat].2. Press the desired item.•[All]:Repeatsthewholefileslist.•[Track]:Repeatsthecurrentfile,only. , NoteYou can also set the Repeat functions by pressing [ / ] on the playing screen.: All, : Track.ShufflePlaying files in random order:1. Press [Options] > [Shuffle].2. Press the desired item.• [All]:Playsallfilesrandomly.• [Off ]: Cancels the shuffle function. , NoteYou can set or cancel the Shue function by pressing [ ] on the playing screen.Sound settings1. Press [Options] > [Sound settings].2. For details refer to page 33 (“Sound”).iPod Operation](https://usermanual.wiki/LG-Electronics-USA/LNN2010IWUM/User-Guide-2719464-Page-21.png)
![22ENGAuxiliary device operationPlaying an AUX source1. Connect an auxiliary device to the AUX terminal.2. Play the auxiliary device. , Note• Some auxiliary devices that do not have the video source may not produce output to the video screen.• To play auxiliary device while a dierent source is playing, press [MEDIA] > [Mediaw] > [AUX].• Video is not available while driving. (Because of trac regulations, Aux Video is only available when your vehicle is parked.)Switching to menu screen or full screen during video playbackPress the screen repeatedly during video playback.Display settings1. Press [Options] during video playback.2. Press the desired item.3. Adjust [Brightness], [Contrast] or [Saturation] by pressing [w/s]. Press [Reset] to initialise the settings.Sound settings1. Press [Options] during audio playback.2. For details refer to page 33 (“Sound”).Auxiliary device operation](https://usermanual.wiki/LG-Electronics-USA/LNN2010IWUM/User-Guide-2719464-Page-22.png)
![23ENGBluetooth audioPlaying Bluetooth audioBefore playing the Bluetooth audio• Music saved in the mobile phone can be played in the car through Bluetooth audio streaming. • Bluetooth audio can be played only when a Bluetooth phone or Bluetooth audio device has been connected. To play Bluetooth audio, connect the Bluetooth phone to the car system. For more information on connecting Bluetooth, please refer to the user’s manual [Pairing and connecting the unit and a Bluetooth phone] on page 48.• If Bluetooth is disconnected while playing Bluetooth audio, the audio stream will be interrupted.• The audio streaming function may not be supported in some mobile phones. Only one function can be used at a time, either the Bluetooth handsfree or the Bluetooth audio function. For example, if you convert to the Bluetooth handsfree while playing Bluetooth audio, the music stream is interrupted.• Playing music from the car is not possible when there are no music les saved in the mobile phone.Starting the Bluetooth audio1. Press [MEDIA] > [Mediaw] > [Bluetooth Audio].2. The Bluetooth audio screen is displayed. , NoteTo play bluetooth audio while a dierent source is playing, press [MEDIA] > [Mediaw] > [Bluetooth Audio].PausePress [M] during playback.Press [d] to play it again. , NoteThis feature may not be supported in some Bluetooth devices.SkipYou can play the previous or next le.For details refer to page 16 (“Skip”). , NoteThis feature may not be supported in some Bluetooth devices.Sound settings1. Press [Options] > [Sound settings].2. For details refer to page 33 (“Sound”).Bluetooth audio](https://usermanual.wiki/LG-Electronics-USA/LNN2010IWUM/User-Guide-2719464-Page-23.png)
![24ENGGetting started with navigationPrecautions for safe drivingPlease observe and comply with local trac rules and regulations.• For your safety, some features cannot be operated while driving. Features that cannot be operated will be disabled.• The route displayed for destination guidance is a reference and the route guidance will take you to the vicinity of your destination. The highlighted route is not always the shortest distance, the least congested, and in some cases might, not be the fastest route.• Road, name, and POI information may not always been completely updated. It might happen that road names and POI information is not up to date.• The car position mark does not always indicate your exact location. This system uses GNSS information, various sensors, and road map data to display the current position. However, errors in displaying your location may occur if the satellite is transmitting inaccurate signals or two or less satellite signals can be received. Errors that occur in such conditions cannot be corrected.• The position of the vehicle within the navigation may dier from your actual location depending on various reasons, including the satellite transmission state, vehicle state (driving location and conditions), etc. Additionally, the car position mark may dier from the actual position if the map data is dierent from the actual road landscape, such as changes due to the construction of new roads. If such dierences occur, driving for a short period of time will automatically correct the position of the vehicle through map matching or GNSS information.What is GNSS?The GNSS(Global Navigation Satellite System) is a satellite-based navigation system made up of a network of 32 satellites placed into orbit by the Global Positioning System (GPS) of U.S.A, GLONASS of RUSSIA, etc.GNSS works in any weather conditions, anywhere in the world, 24 hours a day. There are no subscription fees or setup charges to use GNSS.About satellite signalsYour unit must acquire satellite signals to operate. If you are indoors, near tall buildings or trees or in a parking garage, the unit cannot acquire satellite signals.Acquiring satellite signalsBefore the unit can determine your current position and navigate a route, you must do the following steps:1. Go outside to an area free from tall obstructions.2. Turn on the unit. Acquiring satellite signals can take a few minutes.Initial navigation screenWhen you enter a navigation mode for the rst time, the caution screen is displayed on the screen. Read the caution carefully and then press [Agree].• If you want to change the system language, press [Language]. For details refer to page 35 (“Language”).• If there is no operation for 10 seconds in the caution screen the system automatically switches to the navigation screen.Getting started with navigation](https://usermanual.wiki/LG-Electronics-USA/LNN2010IWUM/User-Guide-2719464-Page-24.png)

![26ENGBluetooth® Wireless TechnologyPairing and connecting the unit and a Bluetooth phoneTo use the Bluetooth feature, make sure the Bluetooth on your phone is turned on. Refer to your phone’s user guide.When no phones have been paired1. Press " " on the head unit or the steering wheel remote control.2. Press [Yes] to search for Bluetooth phones. • [No]: Cancels Bluetooth connection.• [Help]: Moves to the [Bluetooth help] menu.3. In your phone, initiate a search for Bluetooth devices. (The default device name is KIA MOTORS.)4. 1) If the SSP (Secure Simple Pairing) is not supported, enter the passkey on your Bluetooth device. (The default passkey is 0000.) 2) If the SSP (Secure Simple Pairing) is supported, press [Yes] on the pop-up screen of your Bluetooth device. (The pop-up screen may dier from the actual information of the Bluetooth device.)5. Bluetooth becomes connected. The mobile phone contacts and the calling list are downloaded. When the connection fails, failure message is displayed on the screen.When a phone is already paired1. Press " " on the head unit or the steering wheel remote control.2. Press the device from the Bluetooth device list pop-up screen.3. Press [Yes] to activate the selected device. If you want to pair additional device, press [Add new]. Follow the steps 3-5 of “When no phones have been paired” .When pairing additional device1. Press [ ] > [Bluetooth] > [Paired devices].2. 1) Select the device you want to connect. 2) If there is no device you want to connect, press [ ].3. In your phone, initiate a search for Bluetooth devices. (The default device name is KIA MOTORS.)4. 1) If the SSP (Secure Simple Pairing) is not supported, enter the passkey on your Bluetooth device. (The default passkey is 0000.) 2) If the SSP (Secure Simple Pairing) is supported, press [Yes] on the pop-up screen of your Bluetooth device. (The pop-up screen may dier from the actual information of the Bluetooth device.)](https://usermanual.wiki/LG-Electronics-USA/LNN2010IWUM/User-Guide-2719464-Page-26.png)
![27ENGBluetooth® Wireless Technology5. When your phone is successfully connected, the phone menu is displayed on the screen. When the connection fails, failure message is displayed on the screen.<Phone screen> Once Bluetooth connection is successful, the name of the connected mobile phone will be displayed on the phone screen and Bluetooth handsfree functions will be ready to be operated. , Note• For safety reasons, pairing a Bluetooth phone is not possible when the vehicle is in motion. Park the vehicle in a safe location to pair a Bluetooth phone. It is possible to pair up to 5 mobile phones. In order to pair a new phone when there are already 5 mobile phones paired, you must rst delete one of the previously paired phones.• Some functions may not be supported due to limited Bluetooth compatibility between the car system and mobile phone.• When a Bluetooth device is connected, a new device cannot be paired. If you want to pair a new phone, rst disconnect the connected Bluetooth device.Bluetooth helpThis menu provides help concerning the usage of Bluetooth functions.1. Press [ ] on the phone screen. 2. Press [Paired devices] > [ ].3. Select the desired items.](https://usermanual.wiki/LG-Electronics-USA/LNN2010IWUM/User-Guide-2719464-Page-27.png)
![28ENGBluetooth® Wireless TechnologyDisconnecting the connected phone1. Press [ ] > [Bluetooth] > [Paired devices].2. Select the connected phone. 3. Press [Yes]. , NoteIf you want to connect the disconnected phone again, select the disconnected phone.Deleting Bluetooth DevicesIf you do not need to use a phone any longer, you can delete it. Note that deleting a Bluetooth device will delete all calling list and contact entries.1. Press [ ] > [Bluetooth] > [Paired devices] > [ ].2. Press [ ] > [Yes]. Press [ ] > [Yes] to delete all devices.Making a call by entering phone numberConnect your unit and Bluetooth phone before making a call.1. Enter the phone number using the keypad on the phone screen.2. Press [ Dial] on the phone screen or " " on the steering wheel remote control. , NoteIf you press the wrong number, press [ ] to delete one digit of the entered number.Making a call by redialingPress and hold [ Dial] on the phone screen or “ ” on the steering wheel remote control. , NoteRedialing is not possible when there is no dialled calls list.](https://usermanual.wiki/LG-Electronics-USA/LNN2010IWUM/User-Guide-2719464-Page-28.png)
![29ENGBluetooth® Wireless TechnologyAnswering/Rejecting a call1. If there is an incoming call, a popup message will appear.2. Press [Accept] to answer the call. To reject a call, select [Reject]. , Note• If the Call-ID service is available, the caller’s phone number is displayed.• If caller’s phone number is saved in the phone book, the caller’s name is displayed on the unit.• Upon receiving a call, the [Reject] function may not be supported in some mobile phones.Switching call to the mobile phone1. If you want to switch the call to the mobile phone while talking on the car handsfree, press [ ]. As shown below, the call is switched to the mobile phone.2. If you want to switch the call to the car handsfree while talking on the mobile phone, press [Transfer call back]. The call is switched to the car handsfree.Ending a call1. To end a call, press [ ] on the phone screen or " " on the steering wheel remote control.2. The call is ended.Using the menu during a phone callWhen making a call, you can use the following menu items.A DCBPosition DescriptionA Ends a call.B Turns the Mic On/Off.C Switches a voice call from the car handsfree to the mobile phone.D Moves to a screen for entering ARS numbers.](https://usermanual.wiki/LG-Electronics-USA/LNN2010IWUM/User-Guide-2719464-Page-29.png)
![30ENGBluetooth® Wireless TechnologyCalling listMaking a call from calling list1. Press [ ] on the phone screen.2. Press [All], [Missed], [Received] or [Dialled].• [All]: Displays all calling list.• [Missed]: Displays the missed calling list.• [Received]: Displays the incoming calling list.• [Dialled]: Displays the outgoing calling list.3. Press the entry you want to call. , NoteThe calling list may not be saved in some mobile phones.ContactsMaking a call from contacts1. Press [ ] on the phone screen. The contacts are displayed on the screen.<Contacts screen>2. Select the contact you want to call from the list of contacts.Updating mobile phone contactsUp to 5,000 mobile phone contacts can be updated.1. Press [ ] on the contacts screen. The contacts are deleted and the contacts of the connected phone is duplicated. , Note• Upon updating mobile phone contacts, the previous data is deleted.• This feature may not be supported in some mobile phones.](https://usermanual.wiki/LG-Electronics-USA/LNN2010IWUM/User-Guide-2719464-Page-30.png)
![31ENGBluetooth® Wireless TechnologySearching for contacts1. Press [ ] on the contacts screen. 2. Enter the name, press [OK].3. Select the contact you want to call.FavouritesCalling FavouritesIf the phone number has already been stored in the Favourites, it can be easily called by tapping on it.First of all, add the phone number in the Favourites. Refer to the “Adding as a Favourite” on page 53.1. Press [ ] on the phone screen. <Favourite screen>2. Select the desired favourite.Adding as a FavouriteUp to 20 contacts can be added to [Favourites] menu.1. Press [ ] on the phone screen. 2. Press [Add to Favourite].3. Select the desired items.4. Select one of the contacts.5. Enter favourite name, then, press [OK].](https://usermanual.wiki/LG-Electronics-USA/LNN2010IWUM/User-Guide-2719464-Page-31.png)
![32ENGBluetooth® Wireless TechnologyDeleting favourites1. Press [ ] > [ ] on the phone screen. 2. Press [ ] > [Yes]. Press [ ] > [Yes] to delete all favourites.Changing the favourites name1. Press [ ] > [ ] on the phone screen. 2. Press the desired contact.3. Enter new name, then press [OK].Bluetooth settings1. Press [ ] on the phone screen. 2. For details refer to page 34 (“Bluetooth”).](https://usermanual.wiki/LG-Electronics-USA/LNN2010IWUM/User-Guide-2719464-Page-32.png)
![33ENGSettings[Settings] menu overview SoundThis menu is used to adjust the sound eects for the whole system.1. Press [ ] > [Sound].2. Select the desired items.• [Balance]: Shows the sound control options for Position and Bass/Mid/Treble. -[Position]: Select the position of sound focus. Press [Reset] to concentrate the sound in the centre of the vehicle. -[BAS/MID/TRE]: Press [w]/[s] to control bass/mid/treble settings. Press [Reset] to initialise the settings.• [SDVC]: This menu allows you to control automatically the audio volume according to the speed of the vehicle. Select [On] or [O ].• [Volume]: Shows the volume control for each option. -[Phone]: Controls the volume related to phone. Press [w]/[s]. -[Start up]: Controls the audio volume when starting the system. Press [w]/[s]. -[Info]: Controls the volume related to pop-up information. Press [w]/[s]. -Press [Reset] to initialise the settings.• [Beep]: This menu allows you to play a beep sound whenever you operate the touch screen. Select [On] or [O ].Settings[Settings] menuSoundDisplayBluetoothSystemPosition Bass/Mid/Treble](https://usermanual.wiki/LG-Electronics-USA/LNN2010IWUM/User-Guide-2719464-Page-33.png)
![34ENGSettingsDisplayThis menu is used to adjust the brightness and set the dimming mode for the whole system.1. Press [ ] > [Display].2. Select the desired items.• [Brightness]: Select [Daylight] or [Night], then Press [w/s] to control the brightness. Press [Reset] to initialise the settings. (Daytime brightness default is “10”. Night time brightness default is “5”.)• [Dimming mode]: Sets the display brightness according to mode changes. -[Auto]: Adjusts the brightness automatically according to surrounding brightness. -[Daylight]: Always keeps the brightness high regardless of surrounding brightness. -[Night]: Always keeps the brightness low regardless of surrounding brightness.BluetoothThis menu describes Bluetooth settings.Paired devicesThis menu is used to pair and connect the head unit and a Bluetooth phone.1. Press [ ] > [Bluetooth] > [Paired devices].2. Follow the steps 2-5 of the "When pairing additional device" on page 26.RingtoneThe configured ringtone is played through the vehicle speakers when you receive a call.1. Press [ ] > [Bluetooth] > [Ringtone].2. Select the desired ringtone.](https://usermanual.wiki/LG-Electronics-USA/LNN2010IWUM/User-Guide-2719464-Page-34.png)
![35ENGSettingsChange passkeyYou can change the passkey used for Bluetooth device authentication. 1. Press [ ] > [Bluetooth] > [Change passkey].2. Enter the passkey using the keypad. , NoteThe passkey is a 4-digit authentication code used for a Bluetooth connection between the mobile phone and car system. The default passkey is set to 0000.Rename device You can change the Bluetooth device name of the vehicle.1. Press [ ] > [Bluetooth] > [Rename device].2. Enter the desired name using the keypad, then press [OK]. , NoteThe default device name is set to KIA MOTORS.SystemLanguageThis menu is used to set the language of the system.1. Press [ ] > [System] > [Language].2. Select the desired language.](https://usermanual.wiki/LG-Electronics-USA/LNN2010IWUM/User-Guide-2719464-Page-35.png)
![36ENGSettingsKeyboardThis menu is used to congure the keyboard layout for each language.Congured keyboard layouts are applied to all input modes.1. Press [ ] > [System] > [Keyboard].2. Select the keyboard type.ClockThis menu describes clock settings.1. Press [ ] > [System] > [Clock].2. Press the desired item.• [Format]: This function is used to convert the digital clock display between 12 hour/24 hour systems. Select [12h] or [24h].• [Standby screen]: This menu is used to select the screen displayed when the system power is turned o. Select [On] or [O ].• [Standby screen view]: This menu is used to set the type of clock displayed when the system power is turned o. Select [Analogue] or [Digital].Factory settingsThis menu is used to reset all settings specied by the user.1. Press [ ] > [System] > [Factory settings].2. Press the desired items.• Press [All] to select all above mentioned menus.• [Phone]: Resets all settings related to [Phone] menu.• [Radio-Media-Sound]: Resets all settings related to [Radio-Media-Sound] menu.3. Press [ ].](https://usermanual.wiki/LG-Electronics-USA/LNN2010IWUM/User-Guide-2719464-Page-36.png)
![38ENGAVM (Around View Monitor) - OptionAVM (Around View Monitor) - OptionAbout AVM (Around View Monitor) • AVM (Around View Monitor) is an option that is provided to the customers who selected the option. • Through the 4 cameras installed in the vehicle, it provides the front, rear, left and right views of the vehicle.• While vehicle is started, if gear is put to R position, it automatically starts AVM (Around View Monitor).• If gear is changed from R to P position, AVM (Around View Monitor) operation stops. Operating front AVM After starting the vehicle, if you press [AVM] after putting gear to N or D, front AVM starts. a Warning display: driver seat/front passenger seat door and side mirror, and trunk open status are displayed.b Front camera screen: screen of the front of the vehicle is displayed through camera. c AVM side camera screen: According to the selected display contents, it displays AVM or left or right side screen.d (Front + AVM display): It displays vehicle’s front screen and all direction (AVM) screens at the same time.e (Front display): It only displays vehicle’s front screen.f (Front + left side display): It displays the vehicle’s front screen and left front screen at the same time.g (Front + right side display): It displays the vehicle’s front screen and right side screen at the same time.h (AVM setting): It displays AVM setting menu. , NoteWhile front AVM is running, if you drive at about 20 km/h or more, AVM is turned o. At this state, even if you drive at about 20 km/h or less, AVM is remained at OFF state. Operating rear AVM After starting the vehicle, if you put gear at R position, rear AVM starts. a Warning display: driver seat/front passenger seat door and side mirror, and trunk open status are displayed.b Rear camera screen: screen of the rear of the vehicle is displayed through camera.c AVM side camera screen: According to the selected display contents, it displays AVM or left or right side screen.d (Rear + AVM display): It displays vehicle’s rear screen and all direction (AVM) screens at the same time.e (Rear display): It only displays vehicle’s rear screen.d e f g habcd e f g habc](https://usermanual.wiki/LG-Electronics-USA/LNN2010IWUM/User-Guide-2719464-Page-38.png)
![39ENGAVM (Around View Monitor) - Optionf (Rear + left side display): It displays the vehicle’s rear screen and left rear screen at the same time.g (Rear + right side display): It displays the vehicle’s rear screen and right rear screen at the same time.h (AVM setting): It displays AVM setting menu. , NoteAVM (Around View Monitor) camera has an optical lens to secure wide view, so there is a little dierence in the distance shown on the screen. For safety, make sure to check the rear, left, and right view by yourself. AVM setting By pressing [ ], you can adjust AVM settings.• [Sync guidelines with steering]: Sets the guide line steering interface on/off.• [Alert front-rear approach]: Sets the warning for approaching an obstacle on/off.• [Front view default]: Sets the front camera’s screen as initial view. (Around view, front view, driver seat side front, and front passenger seat side front) • [Rear view default]: Sets the rear camera’s screen as initial view. (Around view, rear view, driver seat side rear, and front passenger seat side rear) Warning displayDriver's door open indicatorWhen the driver’s door is open, “ ” (red colouron left door) indicator is displayed on the topleft of the screen.Front passenger's door open indicatorWhen the front passenger’s door is open, “ ” (red colour on right door) indicator is displayedon the top left of the screen.Trunk open indicator When trunk is open,“ ”(red colour on trunk) indicator is displayed on the top left of the screen.Side mirror folding indicatorWhen the side mirror is folded, “ ” (side mirror) indicator is displayed on the top left of the screen.](https://usermanual.wiki/LG-Electronics-USA/LNN2010IWUM/User-Guide-2719464-Page-39.png)
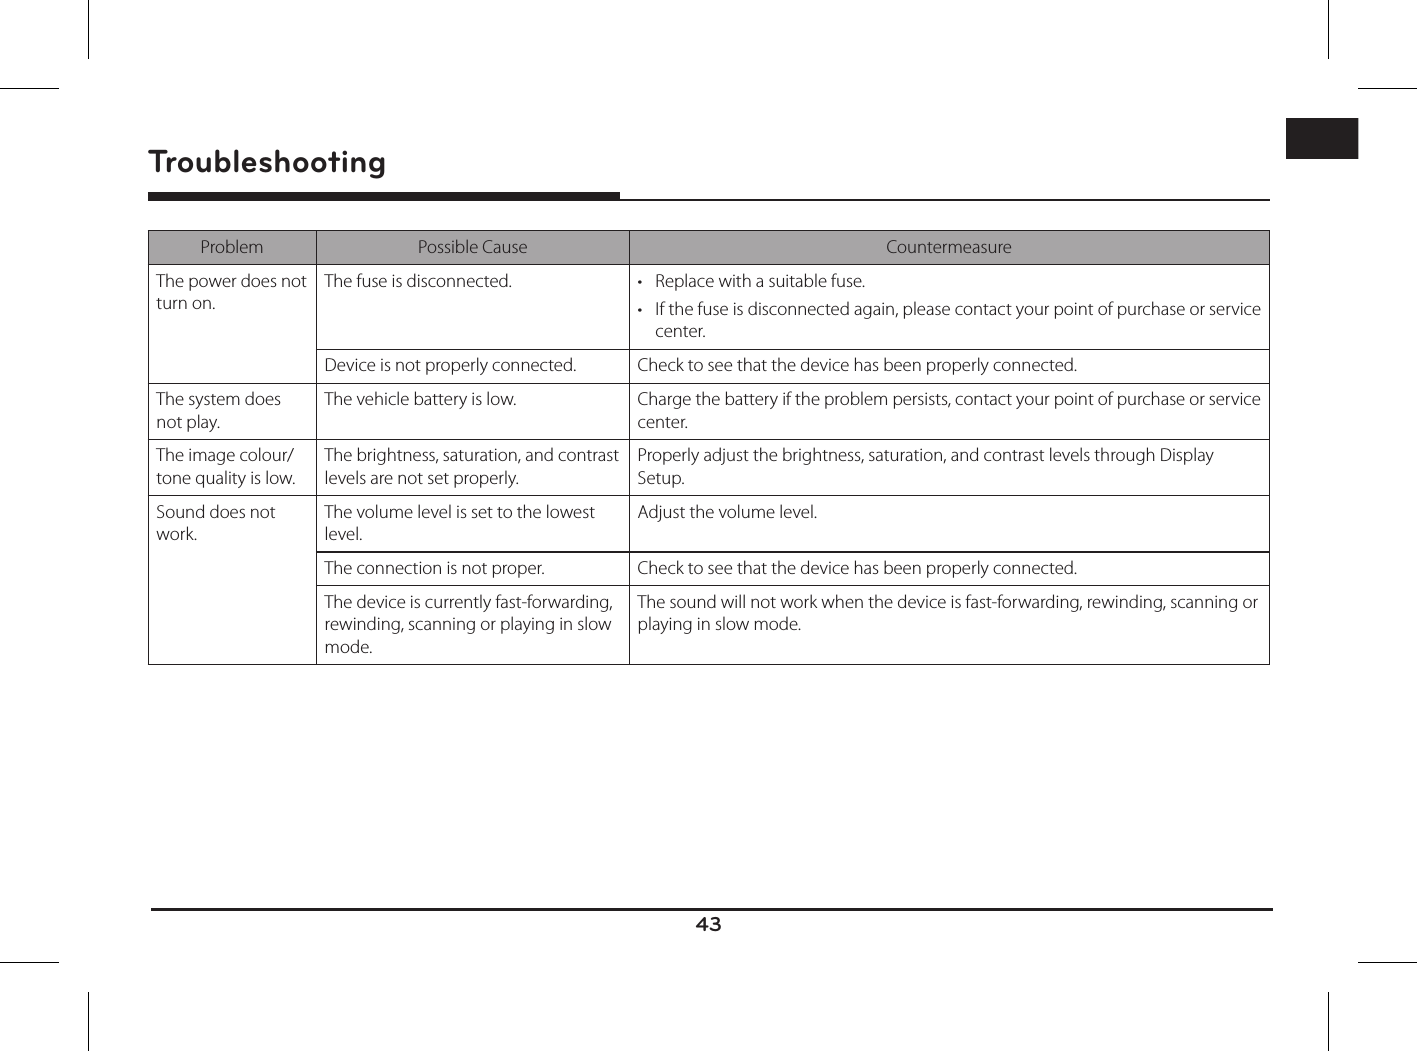
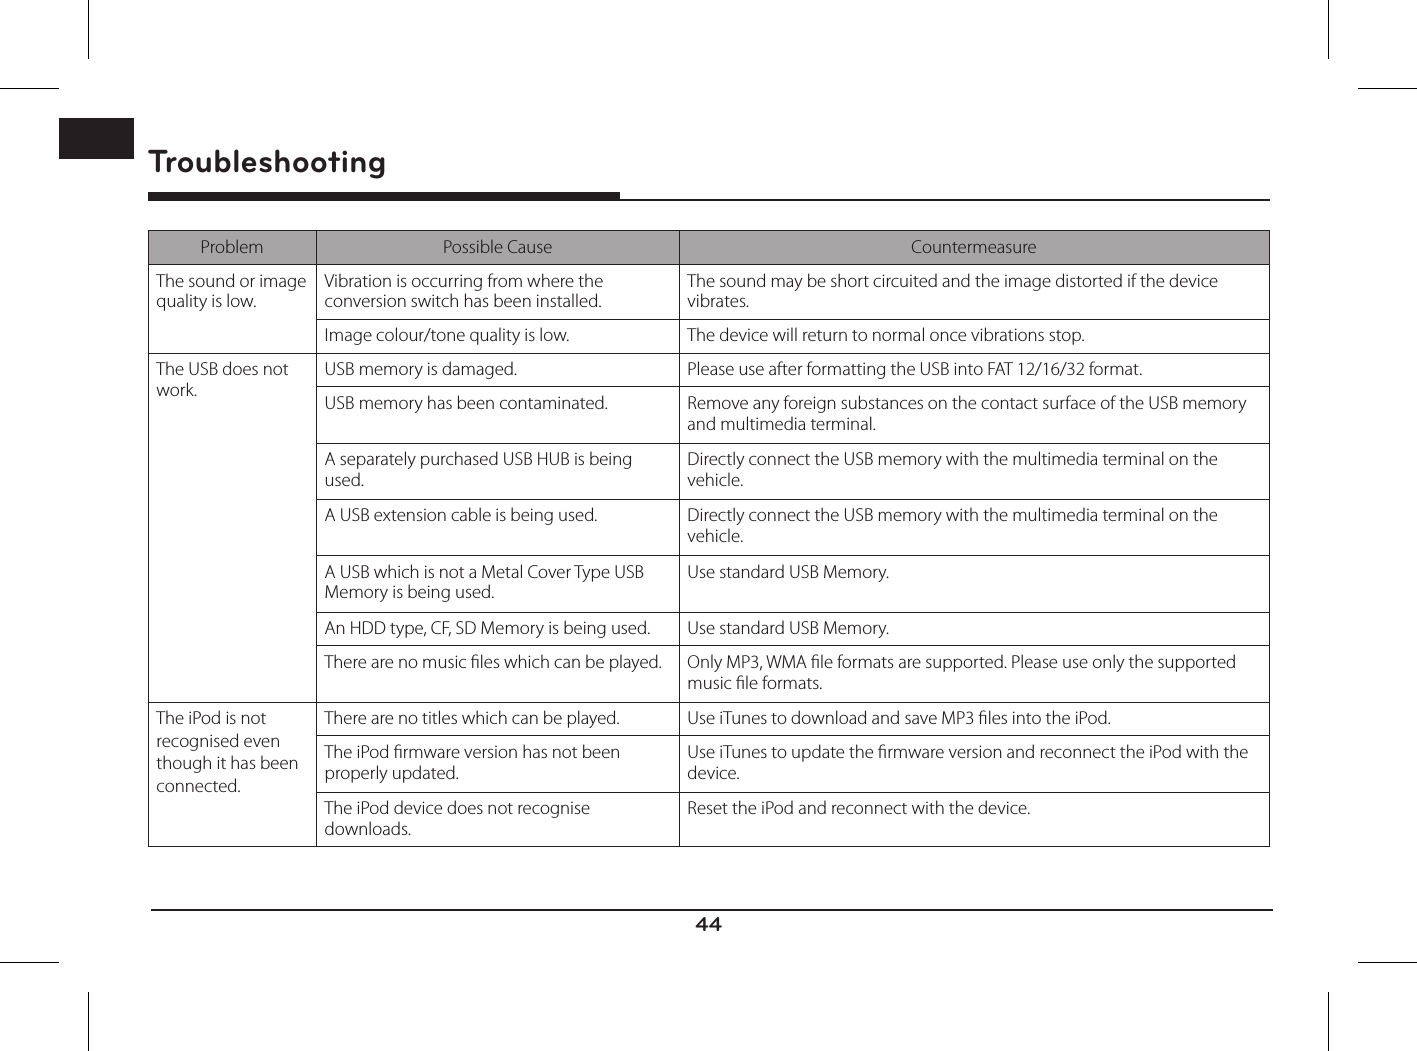
![42ENGBefore thinking there is a product defect1. Errors which occur during the operation or installation of the device may be mistaken as a malfunction of the actual device.2. If you are having problems with the device, try the suggestions listed below.3. If the problems persist, contact your dealer.Problem Possible CauseThere are small red, blue or green dots on the screen.Because the LCD is manufactured with technology requiring high point density, a pixel or lighting deciency may occur within 0.01% of total pixels.The sound or image is not working. • Has the Switch for the vehicle been turned to [ACC] or [ON]?• Has the SYSTEM been turned OFF?The screen is being displayed but sound is not working.• Has the volume been set to a low level?• Has the volume been muted?When the power is turned on, the corners of the screen are dark.• The display appearing somewhat dark after prolonged periods of use is normal with LCD panels. It is not a malfunction.• If the screen is very dark, contact your nearest dealer for assistance.Sound is working from only one speaker.Are the positions of Fader or Balance sound controls adjusted to only one side?Sound does not work in AUX mode. Are the audio connector jacks fully inserted into the AUX terminal?The external device is not working. Is the external device connected with a standard connector cable?When turning power on, the most recent mode screen is not displayed.Within modes that play les by reading external sources, such as USB, iPod or Bluetooth® streaming mode, the most recently played mode screen prior to turning o power may not properly load.• If the corresponding device is not connected, the mode operated prior to the most recent mode will operate.• If the previous mode still cannot be properly played, the mode operated prior to that will operate.](https://usermanual.wiki/LG-Electronics-USA/LNN2010IWUM/User-Guide-2719464-Page-42.png)