LG Electronics USA LS991 GSM/CDMA/WCDMA/LTE PHONE + BLUETOOTH, with DTS/UNII a/b/g/n/ac & NFC User Manual

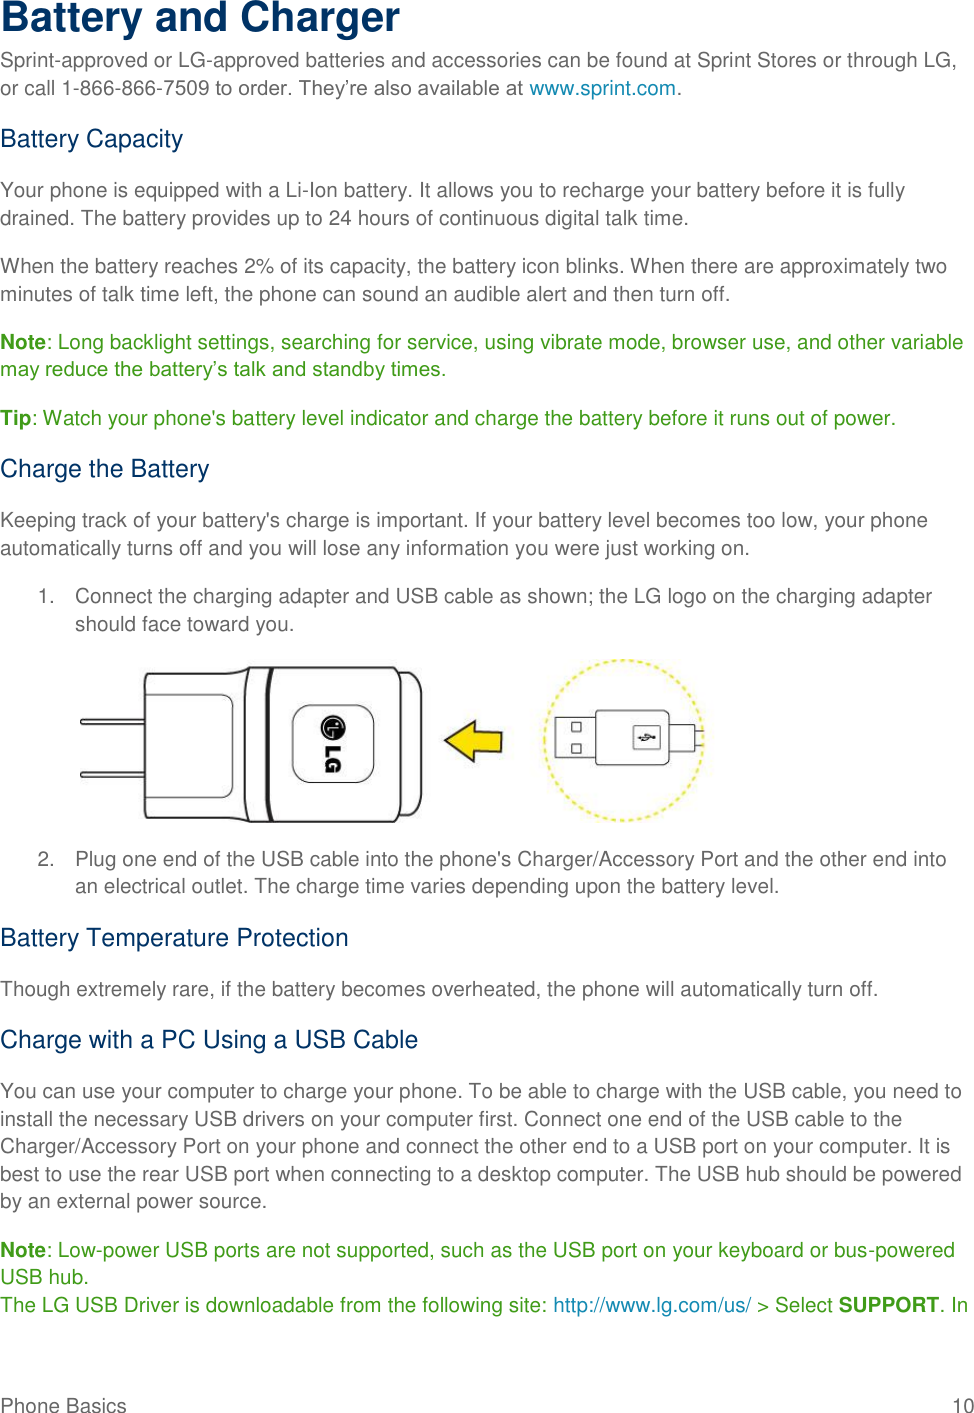
LG Electronics MobileComm USA, Inc. GSM/CDMA/WCDMA/LTE PHONE + BLUETOOTH, with DTS/UNII a/b/g/n/ac & NFC Users Manual

Users Manual

LS991 User Guide
TOC  i Table of Contents Your Phone at a Glance ........................................................................................................................ 1 Set Up Your Phone ............................................................................................................................... 1 Activate Your Phone ............................................................................................................................. 1 Complete the Setup Screens ................................................................................................................ 2 Make Your First Call.............................................................................................................................. 3 Set Up Your Voicemail .......................................................................................................................... 3 Sprint Account Information and Help .................................................................................................... 4 Sprint Account Passwords ............................................................................................................ 4 Manage Your Account .................................................................................................................. 4 Sprint Support Services ................................................................................................................ 5 Your Phone's Layout ............................................................................................................................. 6 Turn Your Phone On and Off ................................................................................................................ 7 Turn Your Screen On and Off ............................................................................................................... 8 Screen On/Off ............................................................................................................................... 8 Lock and Unlock Your Phone ....................................................................................................... 8 Unlock Your Screen Using the Knock Code Feature ............................................................................ 9 Hardware Key Control Mode ................................................................................................................. 9 Battery and Charger ............................................................................................................................ 10 Extend Your Battery Life ............................................................................................................. 11 Phone Function Keys .......................................................................................................................... 11 Recent Apps Key ........................................................................................................................ 12 Home Key ................................................................................................................................... 12 Back Key ..................................................................................................................................... 12 Notifications Panel ...................................................................................................................... 12 Touchscreen Navigation ..................................................................................................................... 13 Your Home Screen.............................................................................................................................. 14 Home Screen .............................................................................................................................. 14 Extended Home Screen .............................................................................................................. 14 Use the Applications Key ............................................................................................................ 14 Applications: How to View, Open and Switch ............................................................................. 14 Applications ................................................................................................................................. 16 Customize Your Home Screen ................................................................................................... 18
TOC  ii Add and Remove Widgets on the Home Screen ........................................................................ 19 Change the Phone's Wallpaper .................................................................................................. 20 Customize Applications Icons on the Home Screen ................................................................... 21 Status Bar ........................................................................................................................................... 21 Enter Text With the On-screen Keyboard ........................................................................................... 24 Tips for Editing Text .................................................................................................................... 25 Search Your Phone and the Web ....................................................................................................... 26 Phone and Web Search Using Text Entry .................................................................................. 26 Phone and Web Search Using Voice Command ........................................................................ 27 Using Clip Tray .................................................................................................................................... 27 Text Link .............................................................................................................................................. 27 HD™ Voice ......................................................................................................................................... 28 Make Phone Calls ............................................................................................................................... 28 Call Using the Phone Dialer ........................................................................................................ 28 Dialing Options ............................................................................................................................ 28 Missed Call Notification ............................................................................................................... 29 Wi-Fi Calling ................................................................................................................................ 29 Call Emergency Numbers ........................................................................................................... 29 In-Call Options ............................................................................................................................ 30 Dial and Save Phone Numbers With Pauses ............................................................................. 31 Dial From the Contacts List ......................................................................................................... 31 Use Direct Dialing ....................................................................................................................... 31 Plus (+) Code Dialing .................................................................................................................. 32 Receive Phone Calls ........................................................................................................................... 32 Voicemail ............................................................................................................................................. 33 Set Up Voicemail ........................................................................................................................ 33 Voicemail Notification .................................................................................................................. 33 Retrieve Your Voicemail Messages ............................................................................................ 34 Visual Voicemail .................................................................................................................................. 34 Set Up Visual Voicemail .............................................................................................................. 34 Review Visual Voicemail ............................................................................................................. 35 Listen to Multiple Voicemail Messages ....................................................................................... 36 Visual Voicemail Options ............................................................................................................ 36 Configure Visual Voicemail Settings ........................................................................................... 36 Change Your Main Greeting via the Voicemail Menu ................................................................. 37
TOC  iii Edit the Display Name via the Voicemail Menu .......................................................................... 38 Phone Call Options ............................................................................................................................. 38 In-call Options ............................................................................................................................. 38 Caller ID ...................................................................................................................................... 39 Call Waiting ................................................................................................................................. 39 3-way Calling............................................................................................................................... 40 Call Forwarding ........................................................................................................................... 40 Set Up Speed Dialing .......................................................................................................................... 41 Call Logs ............................................................................................................................................. 41 Save a Phone Number ........................................................................................................................ 43 Find a Phone Number ......................................................................................................................... 43 Text-to-Speech .................................................................................................................................... 44 Get Started With Contacts .................................................................................................................. 45 Add a Contact ..................................................................................................................................... 46 Add a Contact to Your Favorites ......................................................................................................... 46 Edit a Contact ...................................................................................................................................... 47 Communicate with Your Contacts ....................................................................................................... 50 Import, Export, and Share Contacts .................................................................................................... 50 Import Contacts From Your Internal Storage .............................................................................. 51 Export Contacts to Your Internal Storage ................................................................................... 51 Sharing Contacts ........................................................................................................................ 51 Join and Separate Contacts........................................................................................................ 51 Gmail ................................................................................................................................................... 53 Create a Google Account ............................................................................................................ 53 Sign into Your Google Account ................................................................................................... 53 Access Gmail .............................................................................................................................. 54 Send a Gmail Message ............................................................................................................... 54 Read and Reply to Gmail Messages .......................................................................................... 55 Email ................................................................................................................................................... 55 Add an Email Account (POP3 or IMAP) ..................................................................................... 56 Corporate Email (Outlook) .......................................................................................................... 56 Open Email ................................................................................................................................. 57 Create and Send Email ............................................................................................................... 57 Reply to or Delete an Email Message ........................................................................................ 58 Configure and Sync Corporate Email Settings ........................................................................... 58
TOC  iv Text and Multimedia Messaging ......................................................................................................... 60 Compose Text Messages ................................................................................................................... 61 Read and Reply to Text Messages ............................................................................................. 61 Send a Multimedia Message (MMS) ........................................................................................... 62 Save and Resume a Draft Message ........................................................................................... 63 Managing Message Conversations ............................................................................................ 63 Text and Multimedia Message Options ...................................................................................... 65 Social Networking Accounts ............................................................................................................... 67 Facebook .................................................................................................................................... 67 Google Hangouts ........................................................................................................................ 67 Synchronize Accounts ........................................................................................................................ 68 Synchronize Your Google Account ............................................................................................. 68 Synchronize Your Corporate Account................................................................................................. 69 Google Play Store ............................................................................................................................... 70 Sprint ID .............................................................................................................................................. 71 Sprint Applications .............................................................................................................................. 72 Music ................................................................................................................................................... 73 Google Play Music ...................................................................................................................... 73 Music Player................................................................................................................................ 73 Back Up Your Downloaded Music Files ...................................................................................... 74 YouTubeTM .......................................................................................................................................... 74 GPS Navigation ................................................................................................................................... 75 Google Maps™ ........................................................................................................................... 75 Scout by Telenav ........................................................................................................................ 76 Connect Wi-Fi ..................................................................................................................................... 78 Turn Wi-Fi On and Connect to a Network ................................................................................... 78 Add a Wi-Fi Network ................................................................................................................... 79 Wi-Fi Direct ................................................................................................................................. 79 Virtual Private Networks (VPN) ........................................................................................................... 80 Prepare Your Phone for VPN Connection .................................................................................. 80 Set Up Secure Credential Storage ............................................................................................. 80 Add a VPN Connection ............................................................................................................... 80 Connect to or Disconnect From a VPN ....................................................................................... 81 Browser ............................................................................................................................................... 81 Learn to Navigate the Browser ................................................................................................... 81
TOC  v Go to a Specific Website ............................................................................................................. 82 Browser Menu ............................................................................................................................. 83 Adjust Browser Settings .............................................................................................................. 83 Create Website Settings ............................................................................................................. 84 Create Bookmarks ...................................................................................................................... 84 Connections Optimizer ........................................................................................................................ 85 Data Services General Information (3G and 4G Networks) ............................................................... 86 4G Spark LTE ............................................................................................................................. 86 Your User Name ......................................................................................................................... 87 Launch a Web Connection .......................................................................................................... 87 Data Connection Status and Indicators ...................................................................................... 88 Take Pictures ...................................................................................................................................... 89 Record Videos ..................................................................................................................................... 89 Camera and Video Settings ........................................................................................................ 89 Multi-point Auto-focus ................................................................................................................. 90 Gesture Shot ............................................................................................................................... 90 Super Zooming ........................................................................................................................... 91 View Your Pictures ...................................................................................................................... 91 Gallery Options ........................................................................................................................... 91 Assign Pictures ........................................................................................................................... 92 Dual Feature ............................................................................................................................... 92 Video Options ............................................................................................................................. 93 Live Zoom ................................................................................................................................... 94 Dual Play ..................................................................................................................................... 94 LG Health ............................................................................................................................................ 95 QSlide ................................................................................................................................................. 95 QuickRemote ...................................................................................................................................... 95 QuickMemo+ ....................................................................................................................................... 96 Dual Window ....................................................................................................................................... 97 Calendar .............................................................................................................................................. 98 Open the Calendar ...................................................................................................................... 98 Change Calendar View ............................................................................................................... 98 View Event Details ...................................................................................................................... 98 Create an Event .......................................................................................................................... 98 Edit or Delete an Event ............................................................................................................... 99
TOC  vi Set an Event Reminder ............................................................................................................... 99 Respond to an Event Reminder ................................................................................................ 100 Display and Synchronize Calendars ......................................................................................... 100 Change Calendar Settings ........................................................................................................ 100 Folders .............................................................................................................................................. 101 Clock ................................................................................................................................................. 101 Tasks ................................................................................................................................................. 103 Calculator .......................................................................................................................................... 104 Bluetooth ........................................................................................................................................... 104 Turn Bluetooth On and Off ........................................................................................................ 105 Bluetooth Settings Menu ........................................................................................................... 105 Pairing Bluetooth Devices ......................................................................................................... 106 Send Items via Bluetooth .......................................................................................................... 107 Disconnect Bluetooth Connection During an Active Call .......................................................... 107 SmartShare ....................................................................................................................................... 108 Enjoy Content Via a Variety of Devices .................................................................................... 108 Enjoy Content from Nearby Devices ......................................................................................... 108 Using Content from the Cloud................................................................................................... 108 microSD Card .................................................................................................................................... 109 Insert a microSD Card .............................................................................................................. 109 Remove a microSD Card .......................................................................................................... 109 View microSD Card Memory..................................................................................................... 109 Format the microSD Card ......................................................................................................... 110 Unmount the microSD Card ...................................................................................................... 110 Transfer User Contents From an Android Phone to Your LGLS991 ................................................ 110 Transfer Via PC or Laptop ........................................................................................................ 110 Transfer Via Bluetooth Connection ........................................................................................... 111 Transfer Via Cloud Storage ...................................................................................................... 111 Wireless Networks ............................................................................................................................ 112 Airplane Mode ........................................................................................................................... 112 Wi-Fi Settings ............................................................................................................................ 112 Wi-Fi Calling Settings ................................................................................................................ 113 Bluetooth Settings ..................................................................................................................... 113 Mobile Data ............................................................................................................................... 113 Call Settings .............................................................................................................................. 113
TOC  vii Roaming Settings ...................................................................................................................... 116 Share & Connect ....................................................................................................................... 119 More Settings ............................................................................................................................ 120 Device Settings ................................................................................................................................. 122 Sound Settings .......................................................................................................................... 122 Display Settings ........................................................................................................................ 126 Home Screen Settings .............................................................................................................. 129 Lock Screen Settings ................................................................................................................ 130 Gestures .................................................................................................................................... 133 One-handed Operation ............................................................................................................. 135 Storage ...................................................................................................................................... 136 Battery ....................................................................................................................................... 136 Smart Cleaning ......................................................................................................................... 136 Apps .......................................................................................................................................... 136 Default Message App ................................................................................................................ 137 Dual Window ............................................................................................................................. 137 Personal Settings .............................................................................................................................. 137 Cloud ......................................................................................................................................... 137 Guest mode............................................................................................................................... 138 Location ..................................................................................................................................... 139 Security ..................................................................................................................................... 139 Accounts & Sync ....................................................................................................................... 140 Language & Input ...................................................................................................................... 140 Backup & Reset ........................................................................................................................ 141 System Settings ................................................................................................................................ 142 Shortcut Key.............................................................................................................................. 142 Date & Time .............................................................................................................................. 142 Accessibility............................................................................................................................... 143 QuickCircle Case ...................................................................................................................... 145 Activate This Device ................................................................................................................. 145 System Updates ........................................................................................................................ 146 Printing ...................................................................................................................................... 146 About Phone ............................................................................................................................. 147 Important Safety Information ............................................................................................................. 148 General Precautions ................................................................................................................. 148
TOC  viii Maintaining Safe Use of and Access to Your Phone ................................................................ 148 Using Your Phone With a Hearing Aid Device .......................................................................... 150 Caring for the Battery ................................................................................................................ 152 Radio Frequency (RF) Energy .................................................................................................. 153 Manufacturer‘s Warranty ................................................................................................................... 156 Manufacturer‘s Warranty ........................................................................................................... 156 General Terms and Conditions of Service ........................................................................................ 158 Basic Definitions ....................................................................................................................... 158 The Service Agreement ............................................................................................................ 159 Additional Terms ....................................................................................................................... 159 Our Policies ............................................................................................................................... 159 When You Accept The Agreement ........................................................................................... 159 Term Commitments & Early Termination Fees ......................................................................... 160 When You Don‘t Have To Pay An Early Termination Fee ........................................................ 160 Our Right To Change The Agreement & Your Related Rights ................................................. 160 Our Right To Suspend Or Terminate Services ......................................................................... 160 Your Right To Change Services & When Changes Are Effective ............................................ 161 Your Right To Terminate Services ............................................................................................ 161 Credit Checks & Credit Information .......................................................................................... 161 Account Spending Limits (―ASL‖) .............................................................................................. 161 Deposits & Returning Deposits ................................................................................................. 162 Restrictions On Using Services ................................................................................................ 162 Your Device, Number & Email Address .................................................................................... 162 Porting/Transferring Phone Numbers ....................................................................................... 162 Coverage; Where Your Device Will Work; Service Speeds ..................................................... 163 Roaming .................................................................................................................................... 163 About Data Services & Content ................................................................................................ 163 Specific Terms & Restrictions On Using Data Services ........................................................... 164 Software License ...................................................................................................................... 164 Fees, Activation & Miscellaneous Charges .............................................................................. 164 Account & Service Charges ...................................................................................................... 164 How We Calculate Your Charges For Billing Purposes ............................................................ 165 Your Bill ..................................................................................................................................... 166 Your Payments; Late Fees ....................................................................................................... 166 Taxes & Government Fees ....................................................................................................... 166
TOC  ix Surcharges ................................................................................................................................ 166 Disputing Charges - You Must Still Pay Undisputed Charges .................................................. 167 Protecting Our Network & Services .......................................................................................... 167 Your Privacy .............................................................................................................................. 167 Location-Enabled Services ....................................................................................................... 168 911 Or Other Emergency Calls ................................................................................................. 168 If Your Device Is Lost or Stolen ................................................................................................ 168 Disclaimer of Warranties ........................................................................................................... 169 You Agree That We Are Not Responsible For Certain Problems ............................................. 169 You Agree That Our Liability Is Limited - No Consequential Damages .................................... 169 DISPUTE RESOLUTION AND ARBITRATION ........................................................................ 169 No Trial By Jury and No Class Action ....................................................................................... 171 Indemnification .......................................................................................................................... 171 Providing Notice To Each Other Under The Agreement .......................................................... 172 Contacting You Regarding Billing and Collections ................................................................... 172 Other Important Terms .............................................................................................................. 172 Important Message from Sprint ......................................................................................................... 172 Index .......................................................................................................................................................... 175
Get Started  1 Get Started This section gives you all the information you need to set up your phone and Sprint service for the first time. Your Phone at a Glance The following illustration outlines your phone‗s primary external features and buttons. Set Up Your Phone You must first install and charge the battery to begin setting up your phone. 1.  Install the battery.   Insert your fingernail into the slot located on the lower left of the back cover and lift the cover up gently.   Insert the battery, contacts end first, and gently press the battery into place.   Replace the back cover, making sure all the tabs are secure and there are no gaps around the cover. Note: When you insert the battery, your phone may power on automatically. 2.  Charge your battery.   Plug the USB connector into the charger/accessory port at the bottom of your phone.   Plug the AC adapter into an electrical outlet. Fully charging a battery may take up to three hours. Note: Your phone‘s battery should have enough charge for the phone to turn on and find a signal, run the setup application, set up voicemail, and make a call. You should fully charge the battery as soon as possible.  3.  Press and hold the Power/Lock Button   to turn the phone on.    If your phone is activated, it will turn on, search for Sprint service, and begin the setup process.    If your phone is not yet activated, see Activate Your Phone for more information.  Activate Your Phone Follow the instructions below to activate your phone if it has not already been activated. Depending on your account or how and where you purchased your phone, it may be ready to use or you may need to activate it on your Sprint account. ● If you purchased your phone at a Sprint Store, it is probably activated and ready to use.
Get Started  2 ● If you received your phone in the mail and it is for a new Sprint account or a new line of service, it is designed to activate automatically.   When you turn the phone on for the first time, you should see a Hands Free Activation screen, which may be followed by a PRL Update screen and a Firmware Update screen. Follow the on-screen instructions to continue. ● If you received your phone in the mail and you are activating a new phone for an existing number on your account (you're swapping phones), you can activate on your computer online or directly on your phone.  Activate on your computer: •  Go to sprint.com/activate and complete the online instructions to activate your phone.  Activate on your phone: •  Turn on your new phone. (Make sure the old one is turned off.) Your phone will automatically attempt Hands-Free Activation. •  Touch Activate to override auto-activation and start the manual activation wizard. •  Follow the on-screen prompts to complete the activation process. To confirm activation, make a phone call. If your phone is still not activated, visit sprint.com/support for assistance. If you do not have access to the Internet, call Sprint Customer Service at 1-888-211-4727 from another phone. Tip: Do not press the Power/Lock Button   while the phone is being activated. Pressing the Power/Lock Button   cancels the activation process. Note: If you are having any difficulty with activation, visit sprint.com/support. Complete the Setup Screens The setup screens help you set up certain features and preferences on your phone. Once your phone has been turned on, you will see an Accessibility message. You can then complete the setup process. Note: You may be able to complete the setup screens before your phone has been activated on your Sprint account. Note: During or after setup, you may see a Connections Optimizer notice. Read the notice and touch I Agree to allow your phone to connect automatically to the best available data network, including Wi-Fi. To turn Connections Optimizer off at any time, from home, tap   >   >   Settings > More… > Mobile networks > Connections optimizer and uncheck the box. See Connections Optimizer for details. 1.  On the configuration screen, touch Next to get started. 2.  Follow the on-screen instructions to complete each section. For each topic, you will have the option to skip it and continue to the next screen.  Select language - Select a desired language.
Get Started  3  Set internet connection - If prompted, follow the prompts to sign in to an available Wi-Fi network. For secured Wi-Fi networks, you will need to enter a password. See Connect Wi-Fi for more details.  Google Services - Read all of the information for the available Google Services and, if you agree, tap Next. Otherwise, uncheck the options and tap Next. • Use Google's location service – Helps apps determine location. This means sending anonymous location to Google, even when no apps are running. Tap Learn more for additional information. • Help improve location services – Allows apps and services to scan for Wi-Fi networks even when Wi-Fi is off. • Help improve your Android experience – Allows your device to send diagnostic and usage data to Google automatically. Tap Learn more for additional information.  Useful settings - Set the phone name to be used for Bluetooth and Wi-Fi Direct and contact information in case your phone is lost.  Knock Code - Set your personalized Knock Code for your security.  Home touch button combination - Select the desired home touch button combination. 3.  Tap Done. Your setup is now complete. Follow the on-screen instructions to learn about basic touch menu navigation, view tutorials, or just get started. Make Your First Call Once your phone is activated, you can make phone calls. 1.  Tap   >  . 2.  Use the dialpad to enter a phone number.   If you enter a wrong number, tap   to erase digits one by one.   To erase the entire number, touch and hold  . 3.  Tap   to dial the number. Note: Your phone's battery should have enough charge for your phone to turn on and find a signal, set up your voicemail, and make a call. You should fully charge your battery as soon as possible. Set Up Your Voicemail Your phone automatically transfers all unanswered calls to your voicemail, even if your phone is in use or turned off. You should set up your Sprint voicemail and personal greeting as soon as your phone is activated. Always use a password to protect against unauthorized access. 1.  Tap   >  .
Get Started  4 2.  Touch and hold  . 3.  Follow the system prompts to:   Create your password.   Record your name announcement.   Record your greeting. Note: Sprint strongly recommends that you create a password when setting up your voicemail to protect against unauthorized access. Without a password, anyone who has access to your phone is able to access your voicemail messages. For more information about voicemail, see Voicemail or Visual Voicemail. Sprint Account Information and Help Find out about account passwords and information about managing your account and finding help. Sprint Account Passwords As a Sprint customer, you enjoy unlimited access to your personal account information, your voicemail account, and your data services account. To ensure that no one else has access to your information, you will need to create passwords to protect your privacy. Account User Name and Password If you are the account owner, you will create an account username and password when you sign on to sprint.com/mysprint. (Click Sign in/Register > Sign up now! to get started.) If you are not the account owner (if someone else receives the bill for your Sprint service), you can get a sub-account password at sprint.com/mysprint. Voicemail Password You‘ll create your voicemail password (or passcode) when you set up your voicemail. See Set Up Your Voicemail for more information on your voicemail password. Data Services Password With your Sprint phone, you may elect to set up an optional data services password to control access and authorize Premium Service purchases. For more information, or to change your passwords, sign on to sprint.com/mysprint. Manage Your Account Manage your Sprint account from your computer, your Sprint phone, or any other phone. Online: sprint.com/mysprint ● Access your account information.
Get Started  5 ● Check your minutes used (depending on your Sprint service plan). ● View and pay your bill. ● Enroll in Sprint online billing and automatic payment. ● Purchase accessories. ● Shop for the latest Sprint phones. ● View available Sprint service plans and options. ● Learn more about data services and other products like games, ringers, screensavers, and more. From Your Sprint Phone ● From the dial screen, tap       to access a summary of your Sprint service plan or get answers to other questions. ● From the dial screen, tap       to make a payment. ● From the dial screen, tap       to check minute usage and account balance. Sprint Support Services Sprint 411 and Sprint Operator Services let you easily access information and calling assistance from your Sprint phone. Sprint 411 Sprint 411 gives you access to a variety of services and information, including residential, business, and government listings; movie listings or showtimes; driving directions, restaurant reservations, and major local event information. You can get up to three pieces of information per call, and the operator can automatically connect your call at no additional charge. There is a per-call charge to use Sprint 411, and you will be billed for airtime. ■  From the dial screen, tap        . Sprint Operator Services Sprint Operator Services provides assistance when you place collect calls or when you place calls billed to a local telephone calling card or third party. ■  From the dial screen, tap    . For more information or to see the latest in products and services, visit us online at sprint.com/mysprint.
Phone Basics  6 Phone Basics Your phone is packed with features that simplify your life and expand your ability to stay connected to the people and information that are important to you. The topics in this section will introduce the basic functions and features of your phone. Tip: Phone Software Upgrades – Updates to your phone‘s software may become available from time to time. Sprint will automatically upload critical updates to your phone. You can also use the menu to check for and download updates. Tap   >   >   Settings > System updates. Your Phone's Layout The illustrations and descriptions below outline your phone‗s basic layout. Key Functions ● Front-Facing Camera Lens allows you to take pictures and video of yourself. Also lets you participate in video chats.  ● Notification LED flashes front notification LED when you receive notifications, such as an incoming call, if you enable this feature. ● Touchscreen displays all the information needed to operate your phone, such as the applications, call status, the Contacts list, the date and time, and the signal and battery strength. ● Back Key returns to the previous screen. It also closes pop-up display items such as menus and dialog boxes. Touch and hold to access the Dual window feature. ● 3.5mm Headset Jack allows you to plug in a headset for convenient, hands-free conversations. CAUTION! Inserting an accessory into the incorrect jack may damage the phone. ● Microphone transmits your voice for phone calls or records your voice or ambient sounds for voice recordings and videos. ● Recent Apps Key allows you to access recently-used apps. Touch and hold to access the available options.  ● Home Key returns to the Home screen. If you're already viewing one of extension canvases, it opens the central Home screen. Touch and hold to access Google Now. ● Proximity Sensor senses proximity towards other objects (such as your head) so that touch commands are not accidentally activated during a call. Note: Please be careful not to cover the sensors with a protective film, pouch, or a protective case not authorized by LG. ● Earpiece lets you hear the caller and automated prompts.
Phone Basics  7 ● Laser Detection Auto-focus - Long and short distance focus are quickly and accurately aligned when taking pictures or recording video with the back-facing camera. ● Power/Lock Button locks the screen. Press and hold to open the phone options menu for the following options: Power off, Power off and restart, and Turn on/off Airplane mode.  ● Speaker lets you hear the different ringers and sounds. The speaker also lets you hear the caller‘s voice in speakerphone mode. ● Charger/Accessory Port allows you to connect the phone charger or an optional USB cable. CAUTION! Inserting an accessory into the incorrect jack may damage the phone. ● NFC Touch Point allows you to tap the back of your phone to an NFC tag or another NFC compatible device in this location. ● Volume Buttons allow you to adjust the ringer and media volumes, or to adjust the in-call volume during a call. ● Flash helps you take pictures and video in dim lighting. ● Back-Facing Camera Lens lets you take pictures and record videos. ● IR (Infrared) LED uses infrared to communicate with devices using the QuickRemote app. Turn Your Phone On and Off Turn your phone on and off and wake-up the screen by using the Power/Lock Button  . Turn Your Phone On ■  Press and hold the Power/Lock Button  . Once your phone is on, it may display ―Searching for Service.‖ When your phone finds a signal, it enters standby mode – the phone‘s idle state. At this point, you are ready to begin making and receiving calls. If your phone is unable to find a signal after 15 minutes of searching, a Power Save feature is automatically activated. When a signal is found, your phone automatically returns to standby mode. In Power Save mode, your phone searches for a signal periodically without your intervention. You can also initiate a search for Sprint service by pressing any key (when your phone is turned on). Tip: The Power Save feature conserves your battery power when you are in an area where there is no signal. Turn Your Phone Off 1.  Press and hold the Power/Lock Button   for two seconds until you see the Phone options on the display screen. 2.  Tap Power off and then tap OK to power off the phone.
Phone Basics  8 Your screen remains blank while your phone is off (unless the battery is charging). Wake Up the Screen If you don‘t use the phone for a while, the screen and backlight will shut off to conserve battery power. 1.  Press the Power/Lock Button  . Your lock screen will appear. See Lock Screen Settings. 2.  Swipe the screen in any direction to unlock it. The last screen you were working on opens. (This is the default lock screen.) Note: When turning the screen on, make sure you do not cover the proximity sensor. Doing so will not allow you to turn the screen on. Turn Your Screen On and Off Turn your screen on and off and wake-up the screen by tapping the screen. Screen On/Off The KnockON feature allows you to double-tap the screen to easily turn it on or off.  To Turn the Screen On 1.  Double-tap the center of the Lock screen to turn the screen on. 2.  Unlock the screen or access any of the available shortcuts or widgets. To Turn the Screen Off 1.  Double-tap an empty area of the Home screen or the Status Bar. 2.  The screen will turn off. Lock and Unlock Your Phone You can prevent accidental screen touches from activating phone functions by locking your phone. Lock Your Phone When your phone is locked, you can only receive incoming calls or make calls to 9-1-1. ■  Press the Power/Lock Button  . Unlock Your Phone 1.  Press the Power/Lock Button   to wake up the phone. 2.  Swipe the screen in any direction to unlock it.
Phone Basics  9 Note: The default Lock screen simply locks the screen to prevent unintentional actions. For more security to guard against unauthorized use, you can set an unlock requirement (such as a pattern, PIN, or password) that will need to be entered to unlock it. Unlock Your Screen Using the Knock Code Feature The Knock Code feature allows you to create your own unlock code using a combination of knocks (or taps) on the screen. To activate the Knock Code feature: 1.  Tap   >   >   Settings. 2.  From the DEVICE section, tap Lock screen. 3.  Tap Select screen lock and tap Knock Code. 4.  Use the 2x2 grid to create a sequence of knocks (or taps) to set your knock code. Note: You have to create a Backup PIN as a safety measure in case you forget your unlock sequence. To unlock the phone using Knock Code: ■  While the screen is off, tap the same sequence you established anywhere on the screen. The Home screen will be accessed directly. Hardware Key Control Mode If your phone display is damaged or broken, you can answer an incoming call, end a call, or turn off an alarm using the hardware keys. 1.  Turn your phone off. 2.  Press and hold the Power/Lock Button   and the Volume Buttons   at the same time for more than 6 seconds to enter the Hardware key control mode. 3.  Press the Volume Buttons   to scroll to the desired option, then press the Power/Lock Button   to confirm.  Answer call: Press both Volume Buttons at the same time.  Stop alarm: When an alarm rings, press and hold the Volume Up Button to stop the alarm. Note: If you use your phone with a broken display glass, your phone can break even more or you can be injured. Make sure to visit the LG authorized service center to get your phone repaired.
Phone Basics  10 Battery and Charger Sprint-approved or LG-approved batteries and accessories can be found at Sprint Stores or through LG, or call 1-866-866-7509 to order. They‘re also available at www.sprint.com. Battery Capacity Your phone is equipped with a Li-Ion battery. It allows you to recharge your battery before it is fully drained. The battery provides up to 24 hours of continuous digital talk time. When the battery reaches 2% of its capacity, the battery icon blinks. When there are approximately two minutes of talk time left, the phone can sound an audible alert and then turn off. Note: Long backlight settings, searching for service, using vibrate mode, browser use, and other variable may reduce the battery‘s talk and standby times. Tip: Watch your phone's battery level indicator and charge the battery before it runs out of power. Charge the Battery  Keeping track of your battery's charge is important. If your battery level becomes too low, your phone automatically turns off and you will lose any information you were just working on.  1.  Connect the charging adapter and USB cable as shown; the LG logo on the charging adapter should face toward you.     2.  Plug one end of the USB cable into the phone's Charger/Accessory Port and the other end into an electrical outlet. The charge time varies depending upon the battery level.  Battery Temperature Protection Though extremely rare, if the battery becomes overheated, the phone will automatically turn off. Charge with a PC Using a USB Cable You can use your computer to charge your phone. To be able to charge with the USB cable, you need to install the necessary USB drivers on your computer first. Connect one end of the USB cable to the Charger/Accessory Port on your phone and connect the other end to a USB port on your computer. It is best to use the rear USB port when connecting to a desktop computer. The USB hub should be powered by an external power source. Note: Low-power USB ports are not supported, such as the USB port on your keyboard or bus-powered USB hub. The LG USB Driver is downloadable from the following site: http://www.lg.com/us/ > Select SUPPORT. In
Phone Basics  11 the Search box next to SEARCH PRODUCT SUPPORT, enter the model name or name and click SEARCH. Click the model. On the PRODUCT SUPPORT page, click on Software Update & Drivers. Always unplug the charger from the wall socket after the phone is fully charged to save unnecessary power consumption of the charger. Extend Your Battery Life You can extend your battery's life between charges by turning off features that run in the background. You can also monitor how applications and system resources consume battery power. ● Reduce the amount of time your backlight is on. ● Turn Bluetooth off when not in use. ● Turn Wi-Fi off when not in use.  ● Deactivate the GPS when not needed. Most applications using this function will periodically query the GPS satellites for your current location; each query drains your battery.  ● Do not wait until your battery is completely depleted before charging your phone. Repeating this process of a complete discharge and recharge can over time reduce the storage capacity of any battery. ● Turn off Automatic application sync.  ● Check the Running Services and close any unnecessary applications. Note: If you accidently press the Power/Lock Button while the device is in your pocket, the screen will turn off automatically in order to save battery power. Battery Charge Level ■  Tap   >   >   Settings > About phone > Battery. The battery status (charging or discharging) and level (as a percentage of fully charged) are displayed. Monitor and Control Battery Use The Battery use screen shows which applications consume the most battery power. You can also use it to turn off applications that you‘ve downloaded, if they are consuming too much power. ■  Tap   >   >   Settings > About phone > Battery > Battery use. Tap any of the listed items for more options. Phone Function Keys Your phone comes equipped with three main function buttons that can be used on any screen to access added functions.
Phone Basics  12 Recent Apps Key The Recent Apps Key allows you to tap   to view your most recently-used apps and also displays an available menu function for the current screen or application when you touch and hold it. Home Key The Home Key takes you back to your default Home screen canvas (of the 7 total available canvases). Tap   to access your main Home screen. Note: Touch and hold   to access Google Now. Back Key The Back Key returns you to the previously active screen. If the on-screen keyboard is currently open, the Back Key   closes the keyboard. Note: Touch and hold   to access Dual window. Notifications Panel Notification icons report the arrival of new messages, calendar events, alarms, as well as ongoing events, such as when you are on a call. When you receive a notification, text appears briefly and the notification icon will be displayed in the Status Bar. For descriptions of the various notification icons, see Status Bar. You can open the Notifications Panel to view a list of all recent notifications. Depending on your settings, you may hear a notification sound and the phone may vibrate. Note: Adjusting sound volume and other general notifications settings is described in Sound Settings. Applications whose activities produce notifications, such as Gmail and Google HangoutsTM, have their own settings, which you can use to configure whether, and how, they send notifications. See the sections on those applications for details. Open Notifications ■  Touch and drag the Status Bar to the bottom of the screen. The Notifications Panel displays the Quick Settings and a list of your current notifications, organized into ongoing and event-based notifications. Respond to Notifications 1.  Open the Notifications Panel. Your current notifications are listed in the panel, each with a brief description. 2.  Tap a notification to view it. The Notifications Panel will close and the application that corresponds to your response will open.
Phone Basics  13 For example, new voicemail notifications dial your voicemail box, and network disconnect notifications open the list of configured networks so you can reconnect. Clear Notifications 1.  Open the Notifications Panel. 2.  Tap   at the top right of the panel. All event-based notifications will be cleared; ongoing notifications will remain in the list. Close Notifications ■  Touch and drag the tab at the bottom of the Notifications Panel to the top of the screen. – or – ■  Tap  . (The panel will also close when you tap a notification.) Touchscreen Navigation Your device is a touch-sensitive phone which allows you to select an on-screen option with a single touch and to easily scroll through long lists. Simply slide up and down through the display with your fingertip. Your touchscreen provides an excellent way to interact with and use your Android phone. With the touch of your finger, you can access available applications, make menu selections, and access data saved to your phone. The following terms are used for describing the different available actions using the touchscreen: ● Tap: A single finger tap selects items, links, shortcuts and letters on the on-screen keyboard. ● Touch and hold: Touch and hold an item on the screen by touching it and not lifting your finger until an action occurs. For example, to open a contact‗s available options, touch and hold the contact in the Contacts list until the context menu opens. ● Drag: Touch and hold an item for a moment and then, without lifting your finger, move your finger on the screen until you reach the target position. You can drag items on the Home screen to reposition them, as described in Add and Remove Widgets on the Home Screen, or drag the Notifications Panel open, as described in Notifications Panel. ● Swipe or slide: To swipe or slide, quickly move your finger across the surface of the screen, without pausing when you first touch it (so you don‗t drag an item instead). For example, you can slide the screen up or down to scroll through a list, or browse through the different Home screens by swiping from left to right (and vice versa). ● Double-tap: Double-tap to zoom on a web page or a map. For example, quickly double-tap a section of a web page to adjust that section to fit the width of the screen. You can also double-tap to zoom in and out when taking a picture (using the Camera), and when using Maps. ● Pinch-to-Zoom: Use your index finger and thumb in a pinch or spread motion to zoom in or out when using the Browser, Maps, or browsing pictures.
Phone Basics  14 ● Rotate the screen: From many applications and menus, the orientation of the screen adjusts to the phone‗s physical orientation. (See Auto-Rotate Screen.)  Your Home Screen The Home screen is the starting point for many applications and functions, and it allows you to add items like application shortcuts, or Google widgets to give you instant access to information and applications. This is the default canvas and accessible from any menu by tapping  . Home Screen On the Home screen, you can view Quick Keys at the bottom of the screen. The Quick Keys and application icons provide easy, one-tap access to the functions you use the most.  To return to the Home screen: ■  Tap   at any time, from any application Extended Home Screen The operating system provides multiple Home screen canvases to provide more space for adding icons, widgets, and more. ■  Slide your finger left or right across the Home screen. The default canvas is in the center with 2 extension canvases on either side of it. (For more information on sliding, see Touchscreen Navigation.) Use the Applications Key All of your phone‘s applications are located within the Applications screen. This key accesses shortcuts to your currently available applications. Note: The Applications screen houses all default and downloaded applications (installed from Play Store). 1.  Tap   >   to open the Applications screen.   To close the Applications screen, tap  . 2.  Scroll left or right through the list and tap an icon to launch the associated application. Applications: How to View, Open and Switch All of the applications on your phone, including any applications that you downloaded and installed from Play Store or other sources, are grouped together on one Applications screen that you access from your Home screen. If you have more applications than you can currently see on the Applications screen, slide the screen left or right to view more. The Applications screen contains all of the phone's applications (though not downloaded widgets and other downloaded material that isn't an application), including the Clock, Browser, Calculator, Camera, Play Store, YouTube, Voice Search, and much more.
Phone Basics  15 Open the Applications Screen ■  Tap  . Close the Applications Screen ■  Tap  . Note: The Applications screen closes automatically when you tap an icon to open its application. Dragging an icon onto your Home screen also closes the Applications screen automatically. Open and Switch Applications Multi-tasking is easy with Android™. Opened applications can keep running in the background when you open another application. There‘s no need to quit an application before opening another. You can easily switch among several opened applications. Android manages each application, pausing and starting them as needed to ensure that unused applications don‘t waste your phone's resources. To open an application: ■  Simply tap its icon on the screen. Tip: You can customize your Home screen with shortcuts to the applications you use most often. Applications are located on the Applications screen, but you can add an application shortcut to your Home screen for faster access. No matter where the icon is, on the Applications screen or your Home screen, just tap it to open and use it. See Add Application Icons to the Home screen for more information. 1.  Tap   and tap the icon for the other application you want to open. – or – Simply tap the icon if the application you want is already on your Home screen. To switch between multiple applications: 1.  Touch  . A list of previews of applications that you‘ve used recently is displayed. 2.  Tap the application icon you want to open. – or – Tap   to return to the current application. Note: Pinch in and out to change the view type.  Add Application Icons to the Home Screen Customize your Home screen with shortcuts to the applications you use most often. 1.  Tap   >  .
Phone Basics  16 2.  Touch and hold the application icon you want to add to your Home screen. 3.  Lift your finger to place the app on your Home screen, or drag the icon to where you want it on the screen, then lift your finger. Applications The following is a listing of the default applications available on your phone. Icon Description  Google – Access the Google applications.  Box – Access, manage and share your files easily from the cloud.   Browser – Launches the browser.  Calculator – Launches the Calculator application.  Calendar – Launches the Calendar application that can sync to either your Google or Outlook® work calendar. Events can only be synched to a managed account.  Camera – Launches the Camera.  Chrome – Launches the Chrome web browser.  Clock – Access the Clock application.  Contacts – Displays the Contacts that can be synchronized with your phone from either your Google or Outlook account. Contacts can only be synched to a managed account.  Data Optimizer –  Downloads – Launches the Downloads application where you can view, reopen, or delete what you've downloaded.  Email – Provides access your POP3, IMAP, and Exchange Server (Outlook) email accounts. Also provides access to your Gmail account.
Phone Basics  17 Icon Description  File Manager – Allows you to manage files in your internal memory and SD card (if available).  Gallery – Displays a Gallery of camera images and video saved on your phone.  Lookout Security – Lookout Security provides mobile device-specific security features that are coupled with a minimal performance hit. Lookout Mobile Security provides key security options that are unique to the mobile market. Along with the antivirus and anti-malware tech, there's a lost and stolen phone locator service, an application privacy adviser, and a backup service.  Maps – Launches a dynamic map that helps you find local businesses, locate friends, view maps and get driving directions.  Messaging – Provides access to your text and multimedia messages.  Music – Launches the Music Player.  Phone – Accesses the dial pad to make calls.  Play Store – Browse, search for, and download applications on the Play Store.  QuickRemote – Launches the QuickRemote app, which allows you to use your phone as a remote control.  QuickMemo+ – Allows you to take screen shots and write a memo using the images.  Settings – Accesses the phone‗s Settings menu.  Sprint Fun & Games – Allows you to access the newest apps and games.  Sprint ID - Accesses the Sprint ID application and allows you to download ID packages to personalize your phone.  Sprint Zone – Access your Sprint account, get device information and help, find recommended apps, and more.
Phone Basics  18 Icon Description  Tasks – Allows you to create a task and to synchronize with MS Exchange account.  ThinkFree Viewer – Launches the ThinkFree Viewer application so that you can view document files on your phone.  Update Center – Launches the Update Center, which allows you to manage LG apps.  Voice Command – Allows you to perform various actions by speaking.  Voice Recorder – Launches Voice Recorder application and lets you record and play the sound files.  Voicemail – Launches the visual voicemail app.  Weather – Launches the Weather application.  Wi-Fi Calling - Allows you to make and receive calls via a Wi-Fi network.  YouTube – Launches the YouTube application.  Note: The Email application can access both Exchange Server-based email (such as Work email) and other Internet-based email providers such as Yahoo! and Gmail. Customize Your Home Screen You can customize your Home screen when you do the following. ● Create Shortcuts ● Add Widgets ● Create Contact shortcuts ● Change the Background (Wallpaper) ● Customize Application Icons  Create Shortcuts Shortcuts are different from the Home screen Widgets. Shortcuts can access a specific contact, activate a feature, action, or launch an application.
Phone Basics  19 To add a shortcut from the Applications screen: 1.  Tap   to access the Home screen. 2.  Select a location (canvas) for your new shortcut by scrolling across your available canvases until you reach the desired one. (See Extended Home Screen.) 3.  Tap   to reveal all your current applications. By default, the applications are listed in a grid view. 4.  Scroll through the list and locate your desired application. 5.  Touch and hold the on-screen icon. This creates an immediate shortcut of the selected icon and closes the Applications screen. The new shortcut then appears to hover over the Home screen. Note:   The same shortcut can be added to any of the available canvases (Home or Extended). The application you add to the canvas will still appear within the Applications screen. 6.  While holding the on-screen icon, position it on the current canvas. Once complete, release the screen to lock the shortcut into its new position. To add a shortcut via the Home screen: 1.  Tap   to access the Home screen. 2.  Touch and hold on an empty area of the screen. 3.  Tap either Apps or Widgets. 4.  Touch and hold a selection from the list and drag it to your Home screen. To delete a shortcut: 1.  Tap   to access the Home screen. 2.  Touch and hold the desired shortcut. This unlocks it from its location on the current screen. 3.  Drag the icon over Remove   and release it. Add and Remove Widgets on the Home Screen Widgets are self-contained applications that can be accessed through your Applications screen or on the Home or Extended screens. Unlike a shortcut, this Widget appears as an on-screen application. To add a Widget: 1.  Tap   to access the Home screen. 2.  Touch and hold on an empty area of the screen. 3.  Tap the Widgets tab. 4.  Touch and hold an available Widget and drag it to your current screen.
Phone Basics  20 To remove a Widget: 1.  Go to the Home screen canvas on which the widget is located. 2.  Touch and hold the widget. This unlocks it from its location on the current screen. 3.  Drag the widget over Remove   and release it.   This action does not delete the Widget. It just removes it from the current canvas. To place a Widget onto a different screen: 1.  Touch and hold the widget you want to move. 2.  Drag the widget to the edge of the screen (the left side if moving to a screen located on the left, right side if moving to a screen located on the right). 3.  After about one second, the current screen will change. Repeat until you get to the desired screen. Change the Phone's Wallpaper You can select and assign your phone's background wallpaper. 1.  Tap   >   >   Settings > Home screen > Wallpaper. – or – Touch and hold an empty spot on the Home screen, then tap the Wallpapers tab. 2.  Tap Wallpaper gallery, Gallery, ID Wallpapers, Live wallpapers, Multi-photo, or Photos.  Wallpaper gallery to use a default wallpaper from the wallpaper gallery.  Gallery to use a picture saved on your phone as a wallpaper. You can crop the picture before setting it as a wallpaper.  ID Wallpapers to open the available wallpapers that were included in your Sprint ID pack.  Live wallpapers to open a list of animated wallpapers installed on your phone. Live wallpapers can be animated or even interactive. More Live wallpapers are available in the Play Store.  Multi-photo to combine and use pictures saved on your phone as a wallpaper. You can crop the picture before setting it as a wallpaper.  Photos to use the Photos app and set a picture saved on your phone as a wallpaper. You can crop the picture before setting it as a wallpaper. 3.  Depending on the type of wallpaper, tap OK, Set wallpaper or Apply.
Phone Basics  21 Customize Applications Icons on the Home Screen You can create your own custom application icon(s) using the images in your Gallery. Your customized application icon(s) are only applied to icons on your Home screen. The Applications screen is not affected. 1. Touch and hold an application icon until it‘s unlocked from its current position. Then drop it on the screen. The editing icon   will appear in the upper right corner of the application. 2.  Tap the application icon again and select a preloaded icon sign.  – or – Tap the Add new to create a new icon using images from the Gallery.  Status Bar The Status Bar appears at the top of the screen. It displays icons indicating that you‘ve received notifications (on the left) and icons indicating the phone‘s status (on the right), along with the current time. If you have more notifications than can fit in the Status Bar, the   icon prompts you to open the Status Bar to view them all. (See Notifications Panel.) The following list identifies the symbols you‘ll see on your phone's display screen: Status Icons Icon Status  Signal Strength – Shows your current signal strength (the more bars there are, the stronger the signal is).  No Service – Your phone cannot find a mobile network.  Sprint SparkTM enhanced LTE network (data service) is available.  Sprint Spark enhanced LTE network (data service) in use.  3G/1x Connected – Indicates that 3G/1x data service is available.  3G/1x In Use – Indicates that 3G/1x data service is in use.  Wi-Fi Connected – Indicates that Wi-Fi is in use.  Bluetooth On – Indicates that Bluetooth is on.
Phone Basics  22 Icon Status  Location On – Indicates that Location is on.  Roaming – Your phone is ―roaming‖ off the Nationwide Sprint Network.  CDMA Roaming – Indicates that the phone is roaming.  Airplane Mode – Indicates that the phone is in Airplane Mode.  Vibrate Mode – Indicates that the ringer volume is set to vibrate and any sounds are silenced.  Priority – Indicates that 'Do not disturb' mode is set to allowed sound only.  Ringer Silenced – Indicates that all sounds are turned off.  Very Low Battery – Indicates that the battery is very low.  Low Battery – Indicates that the battery is low.  Battery Drained (40%) – Indicates that the battery is partially drained.  Battery Full – Shows your current battery charge level. (Icon shown is fully charged.)  Battery Charging – Indicates that the battery is charging.  Alarm Clock – Indicates that an alarm is set.  NFC Activated – Indicates that NFC is activated.  Notification Icons Icon Notification  New Gmail – Indicates a new Gmail message.
Phone Basics  23 Icon Notification  New Email – Indicates a new Email message.  New Text or Multimedia Message – Indicates that you have received a new text or multimedia message.  New Hangouts Message - Indicates a new Hangouts Message.  Problem With Text Or Multimedia Message Delivery – Indicates that a text or multimedia message was not delivered.  New Voicemail – Indicates that you have received a new voicemail message.  Upcoming Event – Alerts you to an upcoming event.  Data Is Syncing – Application sync is active and synchronization is in progress for Gmail, Calendar, and Contacts.  Problem With Sign-In Or Sync – There has been an issue with your connection to the Google server, or you were not properly signed into your account. In order to use Google application or sync features, you must set up and sign into an active Google Account.  Full Storage – Indicates that storage is full.  USB Connected – The phone has detected an active USB connection.  More Notifications Not Displayed – Indicates that there are more notifications which are not displayed in the Status Bar.  Call In Progress – Indicates that a call is in progress.  Call In Progress Using Bluetooth Headset – Indicates that a call is in progress using the Bluetooth headset.  Call Being Forwarded – Indicates that a call is being forwarded.  Call On Hold – Indicates that a call is on hold.
Phone Basics  24 Icon Notification  Missed Call – Indicates that you have missed calls.  Uploading Data – Indicates that your phone is uploading data.  Downloading Data – Indicates that your phone is downloading data.  Download Finished – Indicates that a download is complete.  Connected To VPN – Indicates that the phone is connected to a Virtual Private Network.  Disconnected From VPN – Indicates that the phone is disconnected from the Virtual Private Network.  Song Is Playing – Indicates that a song is playing.  Carrier Data – Data use threshold approaching or exceeded.  TTY – Indicates that your phone is operating in TTY mode.  Hotspot Active – Indicates that Portable Wi-Fi hotspot is active.  Enter Text With the On-screen Keyboard The on-screen keyboard displays automatically when you tap a text entry field. To manually display the keyboard, simply tap a text field where you want to enter text. By default, there are 3 methods to enter text: QWERTY keyboard, Phone keyboard, and Handwriting. To change the keyboard between QWERTY keyboard and Phone keyboard. 1.  Tap   on the keyboard. 2.  Tap Input language and keyboard layout, then tap   next to the desired input language. 3.  Tap the desired keyboard type and tap   repeatedly to go back to the entry screen. QWERTY Keyboard 1.  Tap a text field where you want to enter text.
Phone Basics  25 2.  Enter the desired text.   To enter numbers or symbols, tap     To enter letters again, tap  . 3.  When you have finished typing, tap   to close the keyboard. Tips for Editing Text Your phone gives you many options to make entering text easier, including copying, cutting, and pasting text, using voice-to-text input, customizing the user dictionary, using predictive text, and more. To cut/copy and paste: 1.  Touch and hold a word to highlight it.  2.  Drag the blue highlight markers to highlight the text you want. – or – To select all the text, tap Select all in the context menu.    To cancel the selection, simply tap unselected text or empty area.  3.  Tap Cut or Copy in the context menu. 4.  Place the cursor on the location where you want to paste the text. 5.  Touch and hold the text field and tap Paste. The text that you pasted also remains in the phone's memory (temporarily), so you can paste that same text in another location. Move Cursor Using Space Bar Touch and hold the Space Key and slide your finger to the left or right to move the cursor. Split Keyboard Using Gesture The split keyboard feature allows you to use both hands to type while in landscape view. Each half of the keyboard withdraws to the left and right of the screen. Place both thumbs on the keyboard and slide them outwards in opposite directions.  To change the keyboard height: Adjust height of keyboard to show more of the screen and to control keyboard more easily. 1.  Tap   > Keyboard height and layout > Keyboard height. 2.  Drag the blue bar to adjust the keyboard height. To change the bottom row keys: Touch and drag to add or delete keys or change the order.
Phone Basics  26 1.  Tap   >   >   Settings > Language & input > LG Keyboard   > Keyboard height and layout > QWERTY keyboard layout. 2.  Drag to add or delete keys or change the order. To change to another character on the visible key, tap the key and choose the desired character that you want displayed. Note: This function does not support some languages.  Phone Keyboard When T9 is off, to enter text, tap the key labeled with the desired letter until it appears on the screen. For example, tap   once for "a", twice for "b", or three times for "c". Handwriting Write the text with your fingertip. The touchscreen converts your movements into characters. To access handwriting mode, touch and hold   and then tap  . Search Your Phone and the Web You can search for information on your phone and on the web using the Search application. Some applications, such as Gmail, Contacts, and Browser have the ability to search contents within those specific applications. You can conduct the search by typing in the search terms or saying what you‘re looking for. Typing can be useful because the search application can provide suggestions so you don‘t necessarily have to type out your full request. Phone and Web Search Using Text Entry You can search on your phone and on the web by entering text. 1.  From the Home screen, tap the Search Widget  . (For information on how to add widget, see Add and Remove Widgets on the Home Screen.) 2.  Enter the text you're searching for in the search field.   You can use the Search preferences to configure some aspects of Google web search (for example, whether it makes suggestions below the search field as you type), and what phone features you want to include in searches. To access these settings, touch and hold   > Settings. 3.  Tap   to search for the entered text. – or – If what you want to search for appears in the suggestions list, tap that item to conduct the search. 4.  If the phones asks you to select which browser to use, tap your preference. Then, make sure that the Use as default app check box is selected to keep this preference setting.
Phone Basics  27 Phone and Web Search Using Voice Command You can search on your phone and on the web by voice command. ■  From the Home screen, tap the   on the Google Search Widget. For more information on Google Search, touch and hold   > Help & feedback from the Google search screen. Using Clip Tray Easily access the contents you stored in the Clip Tray whenever and wherever you want. You can copy images or texts and keep them in the Clip Tray. Then, you can paste them whenever and wherever you want. ● Tap and hold text and images while editing them and tap Clip Tray.  ● Tap and hold a text input field and select Clip Tray. You can also access the Clip Tray by tapping and holding  , then tapping  . Note: Saved items are stored in the Clip Tray temporarily. In Clip Tray, tap   and an item then select Done to lock the item and prevent deletion. Tap   to delete items. This function may not be supported in the downloaded apps. Text Link Text Link recommends apps related to text in messages or to other text you‘ve selected. It connects directly to the Calendar, Contacts, Phone, Messaging, Email, Browser, Maps, YouTube, Calculator, and more. Note: If your phone is set to English or Spanish, Text Link performs more functions than in other language settings. Overly long sentences are subject to limitations. Arithmetic operators (such as +, -, * and /) start the Calculator. If Text Link is not linked to an app, the Browser can be used for searching. To use Text Link: ● Tap a message bubble with the   icon. ● Highlight text on a webpage or emails and select Text Link. ● Tap Share and select Text Link.
Phone Calls  28 Phone Calls With the Sprint National Network and your phone, you can enjoy clear calling across the country. HD™ Voice Your phone is also HD Voice enabled, which means you can enjoy unparalleled voice quality in areas with HD Voice service. Experience the crystal clear difference of HD Voice from Sprint on calls between Sprint customers each using an HD Voice enabled phone while in areas with available HD Voice service.  Note: HD Voice service is available in select markets. Visit sprint.com/coverage for more information. Make Phone Calls There are several convenient ways to place calls from your phone. Call Using the Phone Dialer The most "traditional" way to place a call is by using the phone's dialer screen.  1.  Tap   >   > Dial tab (if necessary). 2.  Enter a phone number using the on-screen dialpad and tap  .   If you enter a wrong number, tap   to erase digits one by one.   To erase the entire number, touch and hold  .   You can open other applications during a call. The   will appear in the Status Bar while the call is underway.   Press the Up/Down Volume Buttons to adjust the call volume.   Use the on-screen buttons to add another call, put a call on hold, use the speakerphone, and for other options as described in In-Call Options. 3.  Tap   to end the call. Tip: To redial your last outgoing call, follow step 1 to access the Dialer, tap the Call logs tab, locate the call entry and tap  . You can also make calls from your Contacts list and from the Call logs. Dialing Options After entering numbers with the dialpad, you can use the following dialing options. Tap   to view the following options when you entered any numbers:
Phone Calls  29 ● Add to Contacts: Tap to add the entered number as a new contact or to an existing contact entry. (See Save a Phone Number.) ● Speed dial: Tap to access the speed dials list. (See Set Up Speed Dialing.) ● Add 2-sec pause: Enter digits and select this option to introduce a two-second pause before the following sequence of digits is dialed by the phone. (See Dial and Save Phone Numbers With Pauses.) ● Add wait: Enter digits and select this option to have the phone dial the preceding set of digits first, and then dial the following sequence of digits when you tap Yes on the pop-up screen. (See Dial and Save Phone Numbers With Pauses.) ● One-handed operation: Allows you to dial a phone number using one hand. Tap   to switch to the right-hand dialpad and   to switch back to the left-hand dialpad. ● Edit tabs: Allows you to select which tabs to display and rearrange the order. ● Call settings: Tap to access the Call settings screen. (See Call Settings.) ● Enable Wi-Fi Calling: Tap to enable the Wi-Fi Calling feature. Missed Call Notification A missed call icon displays when you do not answer a call. When you do not answer an incoming call,  is displayed in the Status Bar. 1.  Touch and drag the Status Bar to the bottom of the screen to open the Notification Panel. 2.  Tap the missed call notification. The Call logs screen will be displayed. To dial the phone number, tap  . Wi-Fi Calling You can make and receive calls via a Wi-Fi network. Wi-Fi Calling is an excellent solution for coverage issues in and around the home or wherever cellular coverage is limited.  When Wi-Fi Calling is enabled, all incoming and outgoing calls will be made via your Wi-Fi network. Minutes used while connected to the Wi-Fi network count against your available rate plan minutes. 1.  Tap   >   >   Wi-Fi Calling. 2.  Tap   at the top of the screen to turn Wi-Fi Calling on.  3.  Select a Wi-Fi network and follow the instructions to activate Wi-Fi Calling on your phone. Important! If you are in an active Wi-Fi call and go out of range of your Wi-Fi network, the call will be dropped. Call Emergency Numbers You can place calls to 9-1-1 even if the phone's screen is locked or your account is restricted.
Phone Calls  30 Note: When you place an emergency call, your phone automatically enters Emergency mode. To call the 9-1-1 emergency number when the phone's screen is locked with a screen lock: 1.  Touch and hold   for 2 seconds. 2.  Tap   next to the 9-1-1 entry to place the call. To call the 9-1-1 emergency number normally or when your account is restricted: 1.  Unlock the screen. For more information, see Wake Up the Screen. 2.  Tap   >  . 3.  Tap        . Enhanced 9-1-1 (E911) Information This phone features an embedded Global Positioning System (GPS) chip necessary for utilizing E911 emergency location services where available. When you place an emergency 9-1-1 call, the GPS feature of your phone seeks information to calculate your approximate location. Depending on several variables, including availability and access to satellite signals, it may take up to 30 seconds or more to determine and report your approximate location. Important: Always report your location to the 9-1-1 operator when placing an emergency call. Some designated emergency call takers, known as Public Safety Answering Points (PSAPs) may not be equipped to receive GPS location information from your phone. In-Call Options Once you initiate a call, you will see these on-screen options. ● Add call to initiate a 3-way call. ● End to end the call. ● Dialpad to display the dialpad. ● Bluetooth (Only available when a Bluetooth headset is connected to your phone) to conduct the call via the Bluetooth headset for hands-free conversation. For details about pairing the phone with a Bluetooth headset, see Pairing Bluetooth Devices. Note: When using the Bluetooth headset during a call, the Ongoing Call notification icon is blue in the Status Bar. ● Mute to mute the microphone during a call. The Mute button lights up to indicate the microphone is muted. To unmute the microphone, tap Mute again. ● Speaker to turn the speakerphone on or off. The Speaker button lights up to indicate that the speakerphone is on.
Phone Calls  31 WARNING: Because of higher volume levels, do not place the phone near your ear while using the speakerphone. Dial and Save Phone Numbers With Pauses You can dial or save phone numbers with pauses for use with automated systems, such as voicemail or credit card billing numbers. There are two types of pauses available on your phone: ● 2-Second Pause automatically sends the next set of numbers after two seconds. ● Hard Pause (Wait) sends the next set of numbers when you tap Yes on the pop-up. Note: You can have multiple pauses in a phone number and combine two-second and hard pauses. To dial or save phone numbers with pauses: 1.  Enter the phone number using the dial pad. 2.  Tap   > Add 2-sec pause or Add wait. 3.  Enter the additional numbers. 4.  Tap   to dial the number. – or – Tap   > Add to Contacts to save the number in your Contacts. Note: When dialing a number with a hard pause (Wait), tap Yes on the pop-up to send the next set of numbers. Dial From the Contacts List You can dial directly from your Contacts list. 1.  Tap   >   > Contacts tab. – or – Tap   >   >   Contacts. 2.  Find a contact to call and tap it to view the contact's information, then tap   next to the desired number. Use Direct Dialing With Direct Dialing, you are able to directly save a contact to your Home screen. 1.  Touch and hold an empty area on a Home screen.  2.  Tap the Widgets tab.
Phone Calls  32 3.  Scroll right and tap Direct dial. 4.  Tap a contact from your Contacts List. The contact will appear on your Home screen. To use Direct Dial: ■  Simply tap the contact on the Home screen. Plus (+) Code Dialing When placing international calls, Plus Code Dialing automatically enters the international access code for your location (for example, 011 for international calls made from the U.S.). 1.  In the Dial screen, touch and hold   until you see a ―+‖ on the display screen. 2.  Dial the country code and phone number and then tap  . The phone automatically prepends the access code for international dialing, followed by the country code and phone number. Receive Phone Calls When you receive a phone call, the Incoming Call screen opens with caller ID and any other available information (such as the caller's name, if saved in the Contact‘s list). The most recent incoming calls are recorded in the Call logs. (See Call Logs.) Answer an Incoming Call ■  Swipe   in any direction. ■  If Answer an incoming call is activated in the Gestures setting, bring the phone to your ear. If you were already on a call, the first call is placed on hold while you answer the new call. To silence the ringer of an incoming call, press the Volume Down Button. Your phone notifies you of incoming calls in the following ways: ● The phone rings or vibrates. ● The backlight illuminates. ● The screen displays an incoming call message. Reject an Incoming Call ■  Swipe   in any direction. The caller is sent directly to your voicemail box to leave a message. Answer a Roam Call With Call Guard Enabled Call Guard is an option that helps you manage your roaming charges when making or receiving calls while outside the Nationwide Sprint Network. Please see Roaming Settings for more information about roaming.
Phone Calls  33 ■  Tap Yes to answer the call. (See Roaming Guard for additional information.) Note: When your phone is off, calls go directly to voicemail. End a Call ■  Tap  . – or – If you opened other applications while on a call: 1.  Touch and drag the Status Bar to the bottom of the screen. 2.  Tap END CALL. Voicemail In addition to Visual Voicemail, your phone and Sprint service always offer traditional voicemail service accessed through the phone application. Set Up Voicemail You should set up your Sprint Voicemail and personal greeting as soon as your phone is activated. Always use a password to protect against unauthorized access. Your phone automatically transfers all unanswered calls to your voicemail, even if your phone is in use or turned off. 1.  Tap   >   > Dial tab (if necessary). 2.  Touch and hold   to dial your voicemail number. 3.  Follow the system prompts to:   Create your password.   Record your name announcement.   Record your greeting. Important: Voicemail Password – Sprint strongly recommends that you create a password when setting up your voicemail to protect against unauthorized access. Without a password, anyone who has access to your phone is able to access your voicemail messages. Voicemail Notification There are several ways your phone alerts you to a new voicemail message. ● By sounding the assigned ringer type. ● By displaying within the Notifications area of the Status Bar when new unheard voicemail messages are received.
Phone Calls  34 Note: When you are roaming off the Nationwide Sprint Network, you may not receive notification of new voicemail messages. Sprint recommends that you periodically check your voicemail by dialing 1 + area code + your wireless phone number. When your voicemail answers, tap   and enter your password. Roaming rates apply when you access voicemail while roaming off the Nationwide Sprint Network. Note: Your phone accepts messages even when it is turned off. However, your phone notifies you of new messages only when it is turned on and you are in a Sprint service area. Retrieve Your Voicemail Messages You can review your messages directly from your wireless phone (using either traditional voicemail or Visual Voicemail) or from any other touch-tone phone. Use Traditional Voicemail to Access Your Messages 1.  Tap   >   > Dial tab (if necessary). 2.  Touch and hold  . If prompted, enter your voicemail password. 3.  Follow the voice prompts to listen to and manage your voicemail messages. Use Visual Voicemail to Access Your Messages 1.  Tap   >   >   Voicemail. 2.  Tap an entry to listen to the message. Note: You are charged for airtime minutes when you are accessing your voicemail from your wireless phone. Use Another Phone to Access Messages 1.  Dial your wireless phone number. 2.  When your voicemail answers, tap the star key on the phone ( ). 3.  Enter your password.  Visual Voicemail Visual Voicemail gives you a quick and easy way to access your voicemail. Now you can find the exact message you are looking for without having to listen to every voicemail message first. This new feature periodically goes out to your voicemail, and gathers the caller information from all of the current voicemails. It then populates a list with the caller name and number, along with the length of time and priority level of the voicemail message. Set Up Visual Voicemail Setting up Visual Voicemail follows many of the same procedures as setting up traditional Sprint voicemail. You should set up your Sprint voicemail and personal greeting as soon as your phone is
Phone Calls  35 activated. Your phone automatically transfers all unanswered calls to your voicemail, even if your phone is in use or turned off. Note: To set up your traditional voicemail box, see Set Up Voicemail. 1.  Tap   >   >   Voicemail. 2.  Tap Personalize now and follow the system prompts to:   Create a password (part of standard voicemail).   Record your name announcement.   Record your greeting. 3.  When prompted to enter information, enter your numeric responses. Important: Voicemail Password – Sprint strongly recommends that you create a password when setting up your voicemail to protect against unauthorized access. Without a password, anyone who has access to your phone is able to access your voicemail messages. 4.  Once you have completed the setup process, return to the voicemail page (see step 1).  5.  Tap the Welcome to Voicemail message on the screen to play a brief explanation of the voicemail services. Review Visual Voicemail Visual Voicemail lets you easily access and select which messages you want to review. 1.  Tap   >   >   Voicemail. 2.  Tap a message to review it. The following is a description of the features available while reviewing a voicemail message.    Timeline provides a visual timeline for the current message. Touch and drag this bar to scroll through the message to different points. •  Tap   to pause the playback, tap   to resume. •  /  Speaker Off/On to turn the speakerphone on or off during playback. If the speakerphone feature was enabled within the Voicemail Settings menu, the speakerphone will always be automatically enabled during voicemail playback.    Call to call the person that left the message.   Delete to delete the message.    Share to share the selected message using your favorite services like Email, Messaging, and others.
Phone Calls  36    Menu to access Archive, Settings or Help. Listen to Multiple Voicemail Messages When you are done listening to a voicemail message you can easily access other voicemail messages without returning to the main voicemail screen. 1.  Tap   >   >   Voicemail. 2.  Tap a message. Then swipe your finger left or right to display the next or previous message.  You can navigate through voicemail messages as frequently as you'd like. You can even move to the next or previous message before you're finished listening to the current one. Visual Voicemail Options Use the following options to access and configure your Visual Voicemail options. 1.  Tap   >   >   Voicemail. 2.  From this initial screen, you can:   Tap   to compose a new voicemail message.   Tap Inbox to view the voicemail messages in other folder: Inbox, Trash, Archive, Sent, Store.   Tap   to access Search, Settings, and Help.   Tap   to play all new messages.    Tap   to select multiple messages to delete, save, or mark as unread/read.  Configure Visual Voicemail Settings The Visual Voicemail settings menu lets you access settings for notifications, pictures, greetings, and more. 1.  Tap   >   >   Voicemail. 2.  Tap   > Settings and select from the following:  Avatar • Disable Avatar to disable Avatar compose features and content store.  • Avatar Facebook Ad Signature to enable avatar advertising signature when posting on Facebook.  • SMS delivery to allow sending SMS messages to recipients who do not have Avatar capability.
Phone Calls  37  Display  • Themes to choose the type of theme used for the application. • Display name to enter a name to identify yourself to people when replying or forwarding messages.   Help to see the Sprint visual voicemail help.   Preferences  • Data consent agreement • Manage subscription to subscribe and unsubscribe from the visual voicemail premium monthly subscription service. This may take a minute.  • Auto forward to email to send a copy of new messages to an email address of your choice.  • Personalize voicemail to change your voicemail greeting for incoming calls and update password. • Transcription language to manage the language for voicemail transcriptions.  • Delete messages to set Visual Voicemail to permanently delete messages from the Trash folder after a specific number of days.  • Transcriptions displayed to transcribe Voicemails from voice to text.  • Disable Free Trials to opt out of future Free Trials.  Sound  • Notifications to determine how your are notified of new voicemails. Set the notification sound and vibrate option.  • Speakerphone to automatically turn the speaker on or off.  Updates to search for an upgrade to your Visual message software.  About Voicemail to view build information about the current visual voicemail application. Change Your Main Greeting via the Voicemail Menu  Your main greeting can be changed directly via the Visual Voicemail system. This direct access saves you from having to navigate within the voicemail menu.  1.  Tap   >   >   Voicemail.  2.  Tap   > Settings > Preferences > Personalize voicemail.  3.  Tap OK to connect to the Sprint voicemail system. Follow the prompts to change your current greeting.
Phone Calls  38 Edit the Display Name via the Voicemail Menu From your Visual Voicemail menu, you can quickly change the name attached to your voice messages. 1.  Tap   >   >   Voicemail. 2.  Tap   > Settings > Display > Display name. 3.  Tap the text field and enter a new identifying name (used to identify you to recipients of your voice messages). 4.  Tap OK to save your information. Use Visual Voicemail to Delete Your Messages 1.  Tap   >   >   Voicemail. 2.  Touch and hold a voicemail entry from the list, select the messages to delete and tap  . – or – Open a message and tap  . Phone Call Options Your phone application provides many useful features and options to help you make the most of your calling experience. In-call Options While you‘re on a call, you will see a number of on-screen options. Tap an option to select it. ● Add call to initiate a 3-way call.  ● End to end the current call. ● Dialpad to display the dialpad to enter additional numbers, for example, an extension or access code.   For example: When you call your bank„s 800 number, use your dialpad to enter your account number and PIN. ● Speaker to route the phone‟s audio through the speaker (On) or through the earpiece (Off).   Activate the speaker to route the phone‘s audio through the speaker. (You can adjust the speaker volume using the volume buttons.)   Deactivate the speaker to use the phone‘s earpiece. Warning: Because of higher volume levels, do not place the phone near your ear during speakerphone use.
Phone Calls  39 ● Mute to mute the microphone during an active call. Tap again to unmute the microphone. ● Bluetooth (Only available when a Bluetooth headset is connected to your phone) to route the phone‟s audio through a connected Bluetooth headset (On) or through the speaker (Off). For details about pairing the phone with a Bluetooth headset, see Pairing Bluetooth Devices.   When the call is routed to a Bluetooth headset, the current call area shows the Bluetooth call icon ( ). Note: The Headset button is activated to show the current call is routed to the connected Bluetooth headset.    To route the current call back to the phone, tap Bluetooth to temporarily use the phone. Tap it again to route the call back to the connected Bluetooth headset.   When Bluetooth or the Bluetooth headset is turned off, the call is routed through either the earpiece or speaker and shows ( ). Tap   during a call to display a list of additional in-call features. Tap an option to select it.  ● Contacts: Display your contacts list. ● QuickMemo+: Open the QuickMemo+ app. ● Messaging: Opens the Messaging app. ● Voice enhancement: Enhances voice clarity in noisy environments so you can hear more clearly. Caller ID Caller ID allows people to identify a caller before answering the phone by displaying the number of the incoming call. If you do not want your number displayed when you make a call, follow these steps. To permanently block your number, call Sprint Customer Service. 1.  Tap   >   > Dial tab (if necessary). 2.  Tap      . 3.  Enter a phone number and tap  . Call Waiting When you‘re on a call, Call Waiting alerts you of incoming calls by sounding a beep instead of a ring. Your phone's screen informs you that another call is coming in and displays the caller‘s phone number (if it is available). To respond to an incoming call while you‗re on a call: ■  Before accepting the incoming call, tap and drag one of the following on-screen options:
Phone Calls  40  Answer to answer the new call. The first caller is placed on hold.  Decline to send the call to your voicemail box. To switch back to the first caller: ■  From the In-Call options screen, tap Swap calls  . Tip: For those calls where you don‘t want to be interrupted, you can temporarily disable Call Waiting by pressing       before placing your call. Call Waiting is automatically reactivated once you end the call. 3-way Calling With 3-Way Calling, you can talk to two people at the same time. When using this feature, the normal airtime rates will be charged for each of the two calls. 1.  Tap   >   > Dial tab (if necessary). 2.  Make your call to the first recipient. 3.  Once you have established the connection, tap Add call  . 4.  Enter the second caller‘s phone number and tap   or select a number from your Contacts. (Your first call is automatically put on hold.) 5.  When you‘re connected to the second party, tap Merge calls   to combine both calls into a single 3-way call. If one of the people you called hangs up during your call, you and the remaining caller stay connected. If you initiated the call and are the first to hang up, all callers are disconnected. Call Forwarding Call Forwarding lets you forward all your incoming calls to another phone number – even when your phone is turned off. You can continue to make calls from your phone when you have activated Call Forwarding. Activate Call Forwarding 1.  Tap   >   > Dial tab (if necessary). 2.  Tap      . 3.  Enter the area code and phone number to which you want your calls forwarded. 4.  Tap  . You will hear a tone to confirm the activation of Call Forwarding and the call will end.
Phone Calls  41 Deactivate Call Forwarding 1.  Tap   >   > Dial tab (if necessary). 2.  Tap          . You will hear a tone to confirm the deactivation and the call will end. Note: You are charged a higher rate for calls you have forwarded. Set Up Speed Dialing Your phone can store up to 99 phone numbers in speed dial locations. To assign a speed dial number to a contact: 1.  Tap   >   >   Contacts. 2.  Touch and hold the contact whose phone number you want to store speed dial locations. 3.  Tap Edit contact. 4.  Tap  . 5.  Tap a desired speed dial location number from 2 to 99. 6.  Tap Save. Note: If you assign a number to an already in-use speed dial location, you will be prompted to confirm that you want to replace the previous speed dial assignment. Call Logs The Call Logs tab of the phone application lists all recent incoming, outgoing, and missed calls. It offers a convenient way to redial a number, return a call, or add a number to your Contacts. Open the Call Logs ■  Tap   >   > Call logs tab. Calls are listed in the Call logs tab, the most recent calls are located at the top of the list. Scroll down to see older entries. Note: Call logs record only calls that occur while the phone is turned on. If a call is received while your phone is turned off, it will not be included in the call logs. If you return a call from the voicemail menu, it will not be included in your phone‘s Call logs. Call Logs Options Tap an entry to view the date and time of the call and call duration. The following options are available:
Phone Calls  42 ●  to make a call. ●  to send a text message. ●  to view the contact entry. If several calls were made to one number or received by one number, the calls are displayed as one entry. When you tap this entry, the individual call logs are opened. You can also touch and hold the entry to open a menu with more options, to communicate with that contact in other ways. ● Add to Contacts (for entries not saved in Contacts) to save the number to Contacts. ● View contact (for entries saved in Contacts) to view contact information. ● Edit number before call to edit a number before you redial. ● Copy call number to copy the call number. ● Reject call to add to the call reject list. ● Delete call logs to delete all the call logs. ● Delete all logs of this number to delete all the logs of this number only. Make a Call from the Call Logs ■  From the Call logs tap   at the right of the entry. Save a Number from the Call Logs Touch and hold an entry and tap Add to Contacts. 1.  Tap New contact. – or – Tap Update contact. Search for an existing contact name and tap an existing contact to add the new number to that existing contact. 2.  Enter as much information as you want. (For more information about creating and editing contacts, see Get Started with Contacts.). Note: You cannot save phone numbers already in your Contacts or from calls identified as No ID or Restricted. Prepend a Number from the Call Logs If you need to make a call from the Call logs and you are outside your local area code, you can add the appropriate prefix by prepending the number.
Phone Calls  43 1.  Touch and hold an entry and tap Edit number before call. 2.  Tap the area immediately to the left of the phone number and enter the prefix. 3.  Tap   to call the number. – or – Tap   > Add to Contacts > New contact to save the amended number in your Contacts. Clear the Call Logs 1.  From the Call logs, tap   > Delete all. 2.  If you are certain you want to clear the Call logs, tap Yes. – or – Tap No. Save a Phone Number You can store phone numbers and contact entries in your phone. You can also synchronize them with your Google Account, Microsoft Exchange account, or other accounts that support syncing contacts. (For more information, see Get Started with Contacts.) 1.  Tap   >   > Dial tab (if necessary). 2.  Enter a phone number and tap   > Add to Contacts > New contact or Update contact.   Search for an existing contact name and tap an existing contact to add the new number to that existing contact. For more information about creating and editing contacts, see Get Started with Contacts. Find a Phone Number Your contacts are displayed alphabetically in a list. It is easy to search for a contact by name. 1.  Tap   >   >   Contacts. 2. Scroll and search for the contact or start entering the name of the contact you‘re searching for in the Search field. As you type, contacts with matching names will appear above the keyboard. You can also scroll using the letters along the right side of the screen. 3.  Tap a matching contact in the list to open its entry. To dial a number, tap  .
Phone Calls  44 Text-to-Speech The text-to-speech feature allows the phone to provide a verbal readout of on-screen data such as messages and incoming caller information (based on Caller ID). Text-to-Speech Settings 1.  Tap   >   >   Settings > Language & input > Text-to-speech output. 2.  Configure any of the following Text-to-Speech settings:  PREFERRED ENGINE: Choose which text-to-speech engine you prefer to use. Tap   to set various engine settings.  Speech rate: Allows you to adjust the rate at which the displayed text is spoken by the phone. Choose from: Very slow, Slow, Normal, Fast, and Very fast.  Pitch change: Allows you to change the tone at which the pitch is spoken by the phone. Choose from Very low, low, Normal, High and Very high.  Listen to an example: Plays a short example of what the text-to-speech feature will sound like on your phone when activated.  Default language status: Displays the default language used for this feature.
Contacts  45 Contacts The Contacts application lets you store and manage contacts from a variety of sources, including contacts you enter and save directly in your phone as well as contacts synchronized with your Google Account, your PC, compatible email programs (including Exchange Server), and your friends from compatible social networking applications. Get Started With Contacts Use the Contacts application to add, view, and communicate with your family, friends and acquaintances. Access Contacts ■  Tap   >   >   Contacts. All of your contacts are displayed alphabetically in a list. If you have a new phone and haven't added any contacts yet, the Contacts application will display hints on how to start adding contacts to your phone. ■  To add contacts shortcut to the Home screen, touch and hold an empty spot on one of the Home screen canvases, and tap the Widgets tab. Swipe the widgets left or right until you find Contact or Favorite contacts widget and select it. The Contacts List Learn how to view and navigate through your phone‗s Contacts list. ■  Tap   >   >   Contacts. You will see the Contacts list. Scroll through the list to view all your contacts. To see a specific entry, scroll to it and touch it. Tip: If you have a lot of contacts stored, you‗ll see a slider on the right when you‗re flicking up or down the list. To go directly to a letter, touch and hold the slider and drag it to a letter. Contacts List Options From the Contacts list, tap   to display the following options. ● Delete: Allows you to delete contacts. ● Share: Allows you to share contacts. ● Send message: Allows you to send a message to a contact. ● Send email: Allows you to send an email to a contact. ● Speed dial: Allows you to add a speed dial to your contacts. ● Manage contacts: Allow you to manage the options (Copy contacts, Import/Export, Join contacts).
Contacts  46 ● Edit tabs: Allows you to edit the tabs, including rearranging them. ● Settings: Allows you to set various contact settings. Add a Contact You can add contacts on your phone and synchronize them with the contacts in your Google Account, Microsoft Exchange account, or other accounts that support syncing contacts. The Contacts application tries to join new addresses with existing contacts, to create a single entry. You can also manage that process manually. 1.  Tap   >   >   Contacts. 2.  Tap   to add a contact. 3.  Tap a destination type, Phone contact or Google (if available). 4.  Tap   to select a picture to display next to the name in your list of contacts and in the Caller ID. 5.  Tap the Name field and enter a name for your contact.  6.  Tap the Phone field and enter a phone number.  7.  Tap the label button (to the right of the phone number field) to select one of the following categories: MOBILE, WORK, HOME, MAIN, WORK FAX, HOME FAX, PAGER, OTHER, CUSTOM. 8.  Tap the Email field and enter an email address and select the label from HOME, WORK, OTHER, CUSTOM. 9.  Tap the Address field and enter an address and select the label from HOME, WORK, OTHER, CUSTOM. 10. Tap the Groups field and select one of the default groups or tap   to create a new group. 11. Tap the Ringtone field and select the desired ringtone for this contact. 12. Enter any additional information you may want to save and when you're finished, tap Save. Add a Contact to Your Favorites Favorites contains a short list of the contacts you communicate with most often. 1.  Tap   >   >   Contacts. 2.  Tap a contact to view its details. 3.  Tap the star at the top right corner of the screen. (A gold star appears.) To remove a contact from your favorites list:
Contacts  47 1.  Tap   >   >   Contacts > Favorites tab. 2.  Tap a contact to view its details. 3.  Tap the gold star at the top right corner of the screen. The star will turn gray, meaning it has been removed from your Favorites. Edit a Contact You can change or add details saved in your contact entries, such as setting specific ringtones to specific contacts or setting calls from specific contacts to divert to your voicemail. Some contact entries contain information from multiple sources: information that you added manually, information joined from multiple accounts to consolidate duplicates, etc. If you find duplicate entries in Contacts, you can join them into a single entry. If you find that unrelated contacts were joined in error, you can separate them. Changes made to information from one source do not automatically change the information on the other sources. For example, if you have information about a contact from a Google Account and an Exchange account and both are configured to sync contacts, changes to the contact from the Google Account are synced to that account on the web, but the information from the Exchange account will remain unchanged. For more information about working with multiple accounts, see Synchronize Accounts. Edit a Contact 1.  Tap   >   >   Contacts. 2.  Touch and hold the contact whose details you want to edit. 3.  Tap Edit contact. 4.  Edit the desired contact information. 5.  Tap Save. Change a Contact's Default Phone Number The default phone number is used when you initiate a call or send a text message using the context menu (by touching and holding a contact). 1.  Tap   >   >   Contacts. 2.  Tap the name of a contact to view its details. 3.  Touch and hold the phone number you want to set as the contact's default phone number. 4.  Tap Set as default number. (A checkmark will appear next to the default phone number.)
Contacts  48 Select a Ringtone for a Contact 1.  Tap   >   >   Contacts. 2.  Tap the name of a contact to view its details. 3.  Tap  . 4.  Tap the RINGTONE field and tap a ringtone to select it. Then tap OK. 5.  Tap Save. Delete Contacts 1.  Tap   >   >   Contacts. 2.  Tap the name of a contact. 3.  Tap   > Delete.   If the contact contains information from a read-only account, you will not be able to delete it; you will only be able to change the sync settings for that account or delete the account itself.   If the contact contains information joined from a read-only account, a dialog box will inform you that you must separate the contact entry into individual contacts to delete the contact. 4.  Tap Yes to confirm that you want to delete the contact. Add a Number to a Contact 1.  Tap   >   >   Contacts. 2.  Touch and hold the contact's entry. 3.  Tap Edit contact in the menu that opens. 4.  Tap   in the Phone section. 5.  Tap the label button to the right of the phone number field and select the relevant label.   To create your own label, tap CUSTOM. 6.  Enter a phone number and tap Save. Edit a Contact‗s Number 1.  Tap   >   >   Contacts. 2.  Touch and hold a contact's entry. 3.  Tap Edit contact.
Contacts  49 4.  Tap a phone number to edit. 5. Re-enter or edit the number and tap Save. Assign Direct Dialing Numbers Besides speed dialing, you are also able to directly save a contact to your Home screen. 1.  Tap   >   >   Contacts. 2.  Touch and hold a contact's entry. 3.  Tap Add to Home screen > Direct dial. The contact will be shown on the Home screen. Note: If there is no available space on a particular Home screen canvas, you must delete or remove an item before you can add another item. In this case, you have the option of switching to another Home screen canvas. To use direct dial: Simply tap the contact on the Home screen. Assign a Picture to an Entry Assign a picture to display each time a certain contact calls you. 1.  Tap   >   >   Contacts. 2.  Touch and hold the contact's entry. 3.  Tap Edit contact. 4.  Tap  . 5.  Tap Take photo to take a new picture. The camera will launch. – or – Tap Select from Gallery to select a picture from the Gallery. 6.  After cropping the picture as you want, (see Gallery Options) tap Save. Find Contacts by Name 1.  Tap   >   >   Contacts. 2.  Tap the Search contacts field. 3. Start entering the name of the contact you‘re searching for. As you type, contacts with matching names will appear below the search box. 4.  Tap a matching contact in the list to open its entry.
Contacts  50 Communicate with Your Contacts From the Contacts or Favorites tab, you can quickly call or send a text (SMS) or multimedia message (MMS) message to a contact's default phone number. You can also open a menu to access different methods of communicating with that contact. The Contacts application shares your contacts with many other applications, such as Gmail™ (see Gmail) and messaging (see Text and Multimedia Messaging). To connect by using Quick Contact for Android™: 1.  Tap a contact's picture to open Quick Contact for Android. 2.  Tap the icon corresponding to the type of communication you want to start. Depending on the contact information saved, the available actions will be displayed above the name. To communicate with a contact: 1.  Tap   >   >   Contacts. 2.  Tap the contact's entry. 3.  In the contact's details screen, tap the method you wish to communicate with the contact.   Tap   next to the number you want to call to directly.   Tap   next to the number you want to message. Note: Anytime you see the green Call Key   next to a number, such as in your Favorites or Call logs, just tap it to call that number. To call a contact‗s default number: 1.  Tap   >   >   Contacts. 2.  Tap   next to the contact entry. 3.  If multiple numbers are stored, a pop-up window to select the number will open. (For more information about placing phone calls, see Make Phone Calls.) For more information about sending text and multimedia messages, see Text and Multimedia Messaging. Import, Export, and Share Contacts If you have contacts stored in vCard format on the phone's internal storage, you can import them into your Contacts application on your phone. You can also export contacts in vCard format onto the phone internal storage. Export your contacts to back them up to a computer or another phone.
Contacts  51 Import Contacts From Your Internal Storage You can import contacts from your internal storage directly to your phone. Note: See Transfer Via PC or Laptop for details about copying files to your phone from your computer. 1.  Copy the vCard files to your phone from your computer. 2.  Tap   >   >   Contacts. 3.  Tap   > Manage contacts > Import/Export > Import from internal storage. 4.  If you have more than one account on your phone, tap the account into which you want to import the contacts. 5.  Tap the files you wish to import and tap Import and Yes to confirm. Export Contacts to Your Internal Storage You can export all of the contacts on your phone, as vCard files. You can then copy this file to a computer or another phone that is compatible with this format, such as an address book application. (See Transfer Via PC or Laptop.) 1.  Tap   >   >   Contacts. 2.  Tap   > Manage contacts > Import/Export. 3.  Tap Export to internal storage. 4.  Tap the contacts you want to export, then tap Export and Yes to confirm. 5.  Enter a file name and tap OK. Sharing Contacts You can share a contact with someone by sending it to the person as a vCard file. 1.  Tap   >   >   Contacts. 2.  Tap   > Share. 3.  Choose the method for sending. Join and Separate Contacts When you have two or more entries for the same contact, you can join them into a single entry. You can also separate contacts that were joined. 1.  Tap   >   >   Contacts. 2.  Tap   > Manage contacts > Join contacts.
Contacts  52 3.  Select a tab at the top of the screen.   Tap Join suggestion to select entries to merge.   Tap Joined contacts to select entries to separate. 4.  Checkmark the entry (or entries) you want, then tap Join or Separate.
Accounts and Messaging  53 Accounts and Messaging With Sprint service and your phone‘s messaging capabilities, you have the opportunity to share information through many different channels and accounts. Gmail This email client is Google‘s web-based email service. (See Synchronize Your Google Account.) From a computer, launch your preferred web browser and navigate to www.gmail.com. Depending on your synchronization settings, Gmail (along with calendar events, phone numbers and other contact information) on your phone can be automatically synchronized between your phone and your Gmail account on the web. Create a Google Account You must create and/or sign into a Google Account to use Gmail, Google HangoutsTM, and other Google Apps. Signing into a Google Account is also necessary to download updates and applications from the Google Play Store app to sync your data (if applicable) with the Google servers, and to take advantage of any other available Google services on your phone. If you don‘t have a Google Account, you will be prompted to create one. If you have an enterprise account through your company or other organization, your IT department may have special instructions on how to sign into that account. 1.  From a computer, or from your phone's Browser, navigate to www.google.com. 2.  On the main page, select Sign in, then click Create an account. 3.  Follow the on-screen prompts to create and activate your free account. Sign into Your Google Account If you have a Google Account but have not yet signed in with your phone, follow these instructions to sign in to your Google Account. 1.  On your phone, launch an application that requires a Google Account (such as Play Store or Gmail). 2.  Enter your email and tap  . Note:   If you do not already have a Google Account, tap Create a new account and follow the on-screen prompts to create your new account. 3.  Tap the Password fields and enter your information. 4.  Tap   > OK. 5.  Follow the rest of the instructions on the screen.
Accounts and Messaging  54 Your phone may need to communicate with Google servers to confirm your information.  Important: Some phone applications such as Calendar, work only with the primary Google Account (the first Google Account set up with your phone). If you plan to use more than one Google Account with your phone, be sure to sign into the one you want to use with such applications first. When you sign in, your contacts, Gmail messages, Calendar events, and other information from these applications and services on the web can be synchronized with your phone. You will be prompted to sign in or to create a Google Account the first time you start an application that requires one, such as Gmail or Play Store. Access Gmail Access your personal Gmail account directly on your phone. When you open the Gmail application, the most recent conversations are displayed in your Inbox. 1.  Tap   >   >   Google >   Gmail. 2.  Do any of the following.  View more email messages: Swipe your finger up the screen to view more messages and conversations.  Read a new email message: Tap the unread message or the conversation with an unread message (just-arrived items display in bold).  Select messages and conversations: Tap the the image to the left of the corresponding email. Send a Gmail Message You can compose and send a message to people or groups with Gmail addresses or other email addresses. 1.  Tap   >   >   Google >   Gmail. 2.  Tap  . Note: This will start the message from your default Gmail account. To send it from another account, tap the account name at the top left corner of the Inbox, then tap the account you want to use. 3.  Enter a recipient's address. As you enter text, matching addresses are displayed from your Contact list. You can tap a suggested address or continue entering text to enter a new one. 4.  Tap the drop-down arrow in the To field to add Cc and/or Bcc. 5.  Enter a subject for the message in the Subject field. 6.  Continue into the next field to compose your email message. 7.  Tap   > Attach file to add an attachment to the email. 8.  Tap   to send the email.
Accounts and Messaging  55 – or – If you're not ready to send the message, tap   > Save draft instead. You can read your drafts by opening messages with the Drafts label. – or – Tap   > Discard to erase the message (including any saved drafts). Note: If you aren't connected to a network - for example, if you‘re working in Airplane mode - the messages that you send are stored on your phone, with the Outbox label until you connect to a network again. Read and Reply to Gmail Messages You can continue an email conversation by replying to a message or by forwarding it. 1.  Tap   >   >   Google >   Gmail. 2.  Touch a message to display it. 3.  On a message, tap   to reply to the message.   Tap   to select from Reply all or Forward.   Replying to or forwarding messages without changing the subject adds your reply to the current conversation. Changing the subject starts a new conversation.   The message will open in a new screen where you can add or remove addresses, edit the subject, and add or remove text or attachments.   You can add one or more people to an ongoing conversation by replying to all and then adding the new person's address(es) to the message.   All of the messages in the conversation are included in the new message; any messages that follow the message you forward are omitted. 4.  Tap   to send the email. Note: You can change the message action after you've started the message. Simply tap the   icon in the message header to the right of the current message action, then tap the one you want. For example, if you chose Reply but decide you want to Reply all. Email Use the Email application to send and receive emails from your webmail or other accounts, using POP3 or IMAP, or access your Exchange ActiveSync account for your corporate email needs.
Accounts and Messaging  56 Add an Email Account (POP3 or IMAP) The Email application only reveals all currently added email accounts. To view additional email accounts within the main Email screen, they must first be added. 1.  Tap   >   >   Email. 2.  Do one of the following:   If this is your first time to add an email account, tap Microsoft Exchange, Yahoo, or Other on the Select email provider screen.    If you have already added an email account in Email, tap   > Settings >   Add account. If the Select email provider screen is displayed, tap Microsoft Exchange, Yahoo, or Other.  3.  Enter the Email address and Password for your email account and then tap Next.    Tap Manual setup to configure your connection settings manually (POP3 , IMAP, or Exchange). Follow the on-screen prompts and enter the information specific to your carrier. Important: If the account type you want to set up is not in the phone database, you will be asked to enter more details. You should get all pertinent information for the email account, such as incoming and outgoing server settings, before you proceed.  4.  Enter the account name and your name and tap Done. Corporate Email (Outlook) The Email application also provides access to your Outlook Exchange server via your phone. If your company uses Microsoft Exchange Server 2003, 2007 and 2010 as the corporate email system, you can use this email application to wirelessly synchronize your email, Contacts and directly with your company‘s Exchange server. Important: This Outlook application does not utilize Microsoft® ActiveSync to synchronize the phone to your remote Exchange Server. This synchronization is done wirelessly over the air (OTA) and not via a direct connection. Set Up a Corporate Email 1.  Tap   >   >   Email. 2.  Tap Microsoft Exchange (from the add new email account screen). 3.  Enter your Email address and Password information, then tap Next. Consult your Network Administrator for further details.  Email address: Your Outlook work email address.  Password: Typically your network access password (case-sensitive). 4.  If needed, enter a Server address, Domain and tap Next.
Accounts and Messaging  57  Server: Your exchange server remote email address. Typically starts with mail.XXX.com. Obtain this information from your company's network administrator.  Domain: Enter your network domain\login username.   If your network requires SSL encryption, tap the Use secure connection (SSL) box to place a checkmark and activate this additional level of security.   If your exchange server requires this feature, leaving this field unchecked can prevent connection. Note: Signal interruptions or incorrect username or password information can cause completion issues. 5.  Read the on-screen activation disclaimer and, if prompted, tap Activate. Note: Depending on the type of account, you might be required to enable security to sync the account. 6.  Configure your Update schedule, Days to sync email (days to synchronize between your phone and server), and activate any other email settings, then tap Next. 7.  Identify your new account with a unique name and provide the outgoing name, then tap Done. Important: You can synchronize over the air (not directly) with an Exchange Server running Microsoft Exchange Server 2003 Service Pack 2 (SP2) or Microsoft Exchange Server 2010. Note: You can have multiple Work Email (Microsoft Exchange) accounts active on your phone. Open Email Reading and replying to email on your phone is as simple as on your computer. 1.  Tap   >   >   Email. 2.  Tap a message to read, manage, or reply to.   From your Inbox screen, tap   to select the following options: QSlide, Refresh, Folders, Sort by, Downloads and Settings. Create and Send Email Create and send email using any account you have set up on your phone. Increase your productivity by attaching files such as pictures, videos, or documents to email messages. 1.  From the Inbox, tap  . 2. Enter the recipient‘s email address in the To field.   You can add as many message recipients as you want. Note: To send an additional carbon copy (Cc) or a blind carbon copy (Bcc) of the current email to other recipients, enter the recipients in the Cc or Bcc field. 3.  Tap the Subject field and enter the email subject.
Accounts and Messaging  58 4.  Tap the body field and compose your email.   To add an attachment (such as picture, video, contact, event, audio, etc.), tap  .   You can access the internal storage and navigate to the file you wish to attach.   Tap the file you wish to attach. 5.  Tap   to send the email. Note: If you close the messaging window before sending it, it is stored in Drafts. Reply to or Delete an Email Message Replying to or deleting an email is simple. Reply to an Email Message 1.  From the Inbox, tap an email message to view it. 2.  With the email message displayed, tap   and choose Reply or Reply all.   If you select Forward, you must specify the message‘s recipients. 3.  Enter a new message and tap  . Delete an Email Message ■  Touch and hold an email (from your inbox list) and tap Delete from the pop-up context menu. – or – With the email message displayed, tap  . Configure and Sync Corporate Email Settings You can sync and configure various settings for your corporate email and create a corporate email signature. Sync Your Accounts 1.  Tap   >   >   Settings > Accounts & sync. 2.  Tap Microsoft Exchange, then select the Corporate account to reveal the account‘s synchronization settings screen. 3.  Place a checkmark next to each option if you want the phone to automatically synchronize. If you want to manually synchronize, tap   > Sync now.
Accounts and Messaging  59 Configure Corporate Email 1.  Tap   >   >   Settings > Accounts & sync. 2.  Tap Microsoft Exchange, then select Email Settings and tap the desired account to reveal the account‘s synchronization settings screen. 3.  The following settings are available.  Account name: Displays the name used by the phone to track the account.  Your name: Displays your name. Tap this to change it.  Use signature: To add a signature or other information to outgoing email. • Signature: Displays a signature. Tap this to change it.  Update schedule: Choose the update schedule.  Folders to sync: Select the folders you want to synchronize.  Days to sync email: Choose how many days of email you want to sync.  Message format: Select the format you want to view email messages in.  Message size limit: Allows you to set the size limit for messages.  Download over Wi-Fi: Large attachments will be queued until Wi-Fi is connected. • File size to download over Wi-Fi: Allows you to choose when to use Wi-Fi for downloading files attached to emails.   Account & sync: Goes back to Accounts & sync screen.  Calendar events to sync: Choose the Calendar events to sync.  Auto resend times: Set the number of tries to resend a failed email message.  Always Cc/Bcc me: Allows you to copy yourself to emails sent out.  Out of office settings: Allows you to set your out of office settings and message.  Security settings: Set digital signatures and encryption to secure email.  Corporate directory: Searches online directory for the recipient input.  Server policy: View the server policy currently applied.  Notifications: Allows you to decide whether to notify you of new email. • Notification sound: Allows you to select the notification sound for new emails. • Vibrate: Allows you to configure vibrate options for new emails.
Accounts and Messaging  60 • Vibrate Type: Allows you to select the vibration type for new emails.  Exchange server settings: Allows you to change the server settings for your account.  Remove account: Allows you to remove the account. 4.  Tap   to return to the previous screen, your changes will be saved. For more detailed Corporate email information, see Corporate Email (Outlook). For more information on Corporate Calendar synchronizing, see Synchronize Your Corporate Account. Configure General Email Settings 1.  Tap   >   >   Settings > Accounts & sync. 2.  Tap Email to display the account‘s synchronization settings screen. 3.  Tap Email Settings and select General settings to set the following settings.  Set default account: Allows you to set the default account.  Select download storage: Select the download storage location to Internal storage/SD card.  Email preview: Allows you to set how much lines of email to display as a preview in the mailbox.  Conversation view: Allows you to view email messages sent or received with the same subject in one thread.  Split view: Allows you to view the email list with email contents in landscape orientation.  Load linked images: Select when you want to load linked images.  Ask before deleting: Checkmark to set the phone to ask before deleting email.  Auto-advance: Select which screen to display after deleting an email.  Resize image: Set the default size for image attached while composing.  VIP settings: Set Notifications, Sound, Vibrate, Vibrate Type for VIP lists.  Trusted certificates: Trusted certificate information is available. 4.  Tap   to return to the previous screen. Text and Multimedia Messaging With text messaging (SMS), you can send and receive instant text messages between your wireless phone and another messaging-ready phones. When you receive a new message, you will be notified by your phone. Messaging is available via the Messaging application in your Applications screen. The   icon appears in Status Bar when a new text message is received.
Accounts and Messaging  61 Note: See your service plan for applicable charges for text messaging. Compose Text Messages Quickly compose and send text messages on your phone. 1.  Tap   >  >   Messaging >  . 2.  Tap the To field and enter a contact's information, see example below, using the on-screen keyboard.  Contacts: As you enter either a name, phone number, or email address, if the information matches a current contact‘s entry information, you will see a match. When you see a match, tap the associated name to complete the addressing.  Mobile: You can enter a wireless phone number directly.  Email: You can enter an email address directly. 3.  Tap a matching entry from the on-screen dropdown list. This list is populated by matches found from your contact list. 4.  Tap the text field and enter your message.   To enter a smiley from the menu options, tap   > Insert smiley. Make a selection from the list to insert it into your current message.   To enter emojis, tap  , then tap  , and select a category at the bottom of the keyboard. 5.  Review your message and tap Send. Read and Reply to Text Messages When you receive a text message, your phone will notify you. ■  Open the Notification Panel and tap the text message notification. – or – ■  Tap   >   >   Messaging and tap the new message. Reply to a Text Message 1.  While viewing a message, tap the text field to open the keyboard. 2.  Compose your reply or use the preset messages or icons.   To enter a message, use your on-screen keyboard. (See Enter Text With the On-screen Keyboard.)   To enter a smiley from the menu options, tap   > Insert smiley. Make a selection from the list to insert it into the message.
Accounts and Messaging  62   To enter emojis, tap  , then tap  , and select a category at the bottom of the keyboard. 3.  You may select additional messaging options by tapping  . 4.  Review your reply and tap Send. Send a Multimedia Message (MMS) When you need to add a little more to a text message, you can send a multimedia message (MMS) with pictures, voice recordings, audio, video files, contacts (vCard), location or memos. Note: See your service plan for applicable charges for multimedia messaging. Compose Multimedia Messages 1.  Tap   >   >   Messaging >  . 2.  Tap the To field and enter the recipient‘s name, phone number, or email information.  3.  Tap the text field and enter your message. 4.  Tap  . 5.  Select a multimedia attachment type:  Image: Opens the Gallery application. Use the on-screen navigation to select the picture you wish to send with the outgoing message.  Take photo: Opens the Camera application. Take a picture, and then tap OK to use this image in your message. (See Take Pictures.)  Video: Opens the Gallery application. Use the on-screen navigation to select a video and attach it to your outgoing message.  Record video: Opens the Camcorder application. Record a video, then tap OK to use this video in your message. (See Record Videos.)  Audio: Opens a menu that allows you to browse for audio files using different applications.  Record voice: Opens the message recorder. •  After recording your message, tap   to attach it to your message.  Location: Opens a map screen. Select a location, then tap Attach to use this.  Contact: Opens your Contacts list and allows you to select of a Contact to send.  Schedule: Opens your Schedule event list and allow you to select an event to send.  Slide: Allows you to create a slideshow with your media files. •  Insert a multimedia file, then tap   > Slide. You can also enter text to each slide.
Accounts and Messaging  63  Draw: Allows you to draw and attach an image like QuickMemo+. Note: To remove or replace a picture or an audio attachment, on the Compose screen, tap   next to the attachment. 6.  When you are finished creating your new MMS message, tap Send MMS. Save and Resume a Draft Message  While composing a text or multimedia message, tap   to automatically save your message as a draft.  To resume composing the message:  1.  On the screen with all message threads, tap the message, the following icon   is displayed if a saved draft is available. 2.  When you finish editing the message, tap Send or Send MMS.  Managing Message Conversations  Text and multimedia messages that are sent to and received from a contact (or a number) are grouped into conversations or message threads in the Messaging screen. This allows you to see exchanged messages (similar to a chat program) with a contact on the same screen.  Read a Text Message ■  Do one of the following:    On the Messages screen, tap the message thread to open and read it.    If you have a new message notification, touch and slide the Status Bar down to open the Notifications Panel. Tap the new message to open and read it.  View a Multimedia Message (MMS) 1.  Tap   >   >   Messaging. 2.  On the Messages screen, tap a message thread to open it. 3.  While viewing a message, tap the play icon (on the video or audio file) to playback the file or tap the image to view the picture. Tip: The file attachment on the multimedia message can be saved to your phone's internal storage. To save the attachment, touch and hold the file and tap Save attachment from the Message options context menu. Note: When Auto-retrieve in multimedia message settings is disabled, only the message header is downloaded. To download the entire message, tap the Download button in the message. For details, see Text and Multimedia Message Options.
Accounts and Messaging  64 Reply to a Text or Multimedia Message 1.  Tap   >   >   Messaging. 2.  On the Messages screen, tap a message thread to open it. 3.  While viewing a message, tap the text field and type your reply message. 4.  Once completed, tap Send or Send MMS. To return to the All messages screen from a text message thread, tap  . Note: To view the details of a particular message, in the message thread, touch and hold the message to open the options menu, and then tap Details.  Note: If a message contains a link to a web page, tap the message and then tap the link to open it in the web browser.  Note: If a message contains a phone number, tap the message and then tap the phone number to dial the number or add it to your contacts.  Protect (Lock) a Message You can lock a message so that it will not be deleted even if you delete the other messages in the conversation.  1.  Tap   >   >   Messaging. 2.  On the Messages screen, tap a message thread to open it.  3.  Touch and hold the message that you want to lock. 4.  Tap Lock message on the options menu. A lock icon is displayed at the right hand side of the message.  Delete a Message Thread You can delete a single message or several messages at a time. To delete a message thread:  1.  Tap   >   >   Messaging. 2.  On the Messages screen, tap the message thread that you want to delete.  3.  Tap   > Delete.  4.  Tap Select all or choose the desired messages and tap Delete. 5.  When prompted to confirm, tap Yes. Any locked messages in the thread will not be deleted unless you select the Delete locked messages check box.
Accounts and Messaging  65 Delete Multiple Message Threads 1.  Tap   >   >   Messaging. 2.  On the Messages screen, tap   > Delete.  3.  Tap the Select all checkbox at the top left corner, then tap Delete.  4.  When prompted to confirm, tap Yes. Any locked messages in the thread will not be deleted unless you select the Delete locked messages check box.  View Contact Information from a Message When you have received a message from someone in your stored contacts, you can tap the contact‘s photo or icon in the message thread to open a menu of options. Depending on the stored contact information, you can view the contact details, phone or send an email message to the contact, and more.  Text and Multimedia Message Options The messages settings menu lets you control options for your text and multimedia messages including message limits, size settings, and notifications. 1.  Tap   >   >   Messaging. 2.  On the Messages screen, tap   > Settings. 3.  Adjust the following settings according to your needs: ● Storage   Delete old messages: Enable this option to delete older text messages when the limit for maximum number of text messages is exceeded.  • Text message limit: Sets the maximum number of text messages that can be stored on the phone (per message thread). • Multimedia message limit: Sets the maximum number of multimedia messages that can be stored on the phone (per message thread).  Save to: Sets the default storage location for files received through Messages to Internal storage or SD card.  Signature: Allows you to automatically add a signature to your messages.  Callback number: Allows you to automatically add a callback number to your messages. ● Text message  Priority: Allows you to set the default priority as Normal or High.
Accounts and Messaging  66  Message reassembly: Enable this option (blue checkmark displays) so that multi-segment messages can be reassembled and shown as a single message. Each segment will still count toward your usage. ● Multimedia message  Group Messaging: Send a single message as multimedia message when there are multiple recipients.  Auto-retrieve: Enable this option to automatically retrieve the entire content of your multimedia message. When checked, the multimedia message header, message body, and any attachments will automatically download to your phone when the message is received. If you disable this option, only the multimedia message header will be retrieved and displayed. • Roaming auto-retrieve: Disable this option if you only desire the multimedia message headers to download while roaming. Enable this option to automatically download your complete multimedia messages even while roaming.  Priority: Allows you to set the default priority as Low, Normal, or High. ● Conversation theme: Allows you to select the desired conversation theme for the message thread wallpaper and message bubbles. ● Notification settings  Notifications: Enable this option if you wish to receive a notification when a new text or multimedia message arrives. • New message pop-up: Enable this option if you wish to see a new message in a pop-up window. • Preview: Enable this option if you wish to preview the contents of messages when new messages arrive. • Notification sound: Allows you to select a ringer to sound when a new message is received. Tap this option, and then select a ringtone that is specific to new text and multimedia messages. A sample will briefly be played upon selection, then press OK to save your new setting. • Vibrate: Enable this option if you want the phone to vibrate when a new text or multimedia message is received. • Vibrate type: Choose what type of vibration you wish to apply to new messages. ● Quick message: Tap this to add or edit quick messages. Quick message is the specified text message to send out when you choose to ignore an incoming call and respond to the caller with a message instead. ● Send message with Enter key: You can opt to send a message by simply using the Enter key. This menu allows you to select when this feature should be enabled. ● Text Link display: Enable this option if you want the phone to show Text Link icons to indicate apps released to message contents.
Accounts and Messaging  67 ● Emergency alerts  Presidential alerts: This allows presidential alert to be always presented. It is grayed-out because presidential alerts are of high importance and should not be disabled.  Extreme alerts: Enable this option to receive extreme alerts.  Severe alerts: Enable this option to receive severe alerts.  AMBER alerts: Enable this option to receive AMBER alerts on child abduction.  Test alerts: Enable this option to receive test alerts. Social Networking Accounts Stay in touch on the go with all your social networking accounts. Post updates on Facebook and Twitter, review your LinkedIn contacts, see what everyone‘s talking about on YouTube, and more. Facebook Post updates, read what your friends are up to, upload pictures and check-ins, and more with on-the-go Facebook access. Install the Facebook App on Your Phone Before you use Facebook on your phone, you must download and install the app from the Google Play Store app. 1.  Tap   >   >   Play Store. 2.  Touch the Search icon and search for "facebook". 3.  Touch Facebook from the results list. 4.  Touch INSTALL, and, if you agree, touch ACCEPT. 5.  When the download is complete, touch OPEN. To open the app from the Home screen, touch   > Facebook. Sign in to Your Facebook Account from Account Settings 1.  Tap   >   >   Settings > Accounts & sync > Add account. 2.  Touch Facebook. 3.  Enter your Facebook username and password and touch Log In. 4.  Choose to sync or not to sync your contacts, then touch Done. Google Hangouts The Google Hangouts application lets you have real-time text conversations with your friends.
Accounts and Messaging  68 Open the Hangouts Application ■  Tap   >   >   Google >   Hangouts. Chat with Friends 1.  Tap   >   >   Google >   Hangouts. 2.  Tap   to view your contacts list.    Tap the name of the person in your contacts list. If your friend is not yet on Hangouts, you can invite your friend via SMS. – or –   Tap the text field to enter a name, email or number. 3.  Enter your message. 4.  Tap   Synchronize Accounts Your phone is able to synchronize data from a variety of different sources or sites. These accounts can range from Google, a Corporate Exchange Server, and other social sites, including Facebook and Twitter. Enable Auto-Sync 1.  Tap   >   >   Settings > Accounts & sync. 2.  Tap Auto-sync data to place a checkmark.   Tap an account you've already set up to choose the type of data you want to synchronize. For example, you can choose to sync your Google Calendar and/or Gmail data. Synchronize Your Google Account By default, there are no accounts managed by the phone. These must be added manually. 1.  Tap   >   >   Settings > Accounts & sync. 2.  Tap Add account > Google. 3.  Enter your account user name and tap  . Note: If you do not already have a Google Account, tap CREATE NEW ACCOUNT and follow the on-screen prompts to create your new account. 4.  Enter your password and tap  . Your phone then communicates with the Google servers to confirm your information.
Accounts and Messaging  69 5.  Read the disclaimer about Backup and restore and checkmark to keep the phone backed up with the Google Account. Then, tap  . Configure Google Sync Settings 1.  Tap   >   >   Settings > Accounts & sync. 2.  Tap Google and select the desired Google Account to display the account‘s synchronization settings. 3.  Tap the type of data you wish to synchronize (Calendar, Contacts, Gmail, Google+ Photos, Google Play Books, and many more). 4.  Tap   to return to the previous screen. Synchronize Your Corporate Account Your phone is capable of synchronizing with your company‘s Exchange Servers. To add a new Corporate account: 1.  Tap   >   >   Settings > Accounts & sync. 2.  Tap Add account > Microsoft Exchange. 3.  Follow the on-screen prompts to create your new Corporate email account. (See Corporate Email (Outlook).) 4.  Tap Next.  5.  Read the disclaimer and tap Activate. 6.  Tap the options you wish to configure and tap Done.  Sync Email: Checkmark this option to sync your Exchange email.  Sync Contacts: Checkmark this option to sync your Exchange contacts.  Sync Calendar: Checkmark this option to sync your Exchange calendar.  Sync Tasks: Checkmark this option to sync your Exchange Tasks.  Update schedule: Allows you to configure when to update emails.  Days to sync email: Allows you to configure how many days of data you want to sync. For more detailed Work/Corporate email information, see Corporate Email (Outlook).
Apps and Entertainment  70   Apps and Entertainment All your phone‗s features are accessible through the Apps list. Google Play Store Play Store provides direct access to Android applications and games to download and install on your phone. Access the Play Store 1.  Tap   >   >   Play Store. 2.  If not already logged in with your Google Account, tap Existing. 3.  Enter your account information and tap  . 4.  Touch Accept to agree to the Play Store terms of service (if necessary).  Note: Play Store options may vary depending on the version installed in your phone. Your Play Store application will update automatically when available. Select and Install a Google Application 1.  Tap   >   >   Play Store. 2.  Browse for an application. Once you have decided on one, tap it to view its details. 3.  Read the application descriptions and comments. 4.  Tap INSTALL (for free applications) or the price button (for paid applications). Note: Use caution with applications which request access to any personal data, functions, or significant amounts of data usage times. 5.  Read the app's access requirements and tap AGREE if you agree to them. 6.  Check the progress of the current download by opening the Notifications Panel. 7.  You will be notified when the item is downloaded and installed on your phone. 8.  On the Play Store screen, tap   > My apps, tap the installed application in the list, and then tap OPEN. Launch an Installed Google Application 1. Tap   >   >   Play Store >   > My apps.
Apps and Entertainment  71   2.  Tap the desired application, then tap OPEN. – or – 1.  Tap   >  . 2.  Tap the icon of the newly installed application. Reinstall a Google Application If the Android Operating System is ever updated, any data contained on the phone will be erased. The only data stored on the phone are Google applications available via Play Store. Note: Pictures, videos, applications and music are stored in the phone's internal memory. Contacts and Calendars are stored remotely on your remote Google or Outlook servers. 1.  Tap   >   >   Play Store >   > My apps. 2.  Swipe the screen to the left and scroll through the list of previously downloaded Google applications and choose the one you wish to reinstall. 3.  Follow the on-screen instructions. Sprint ID ID Packs are bundles of applications, ringtones, wallpapers, settings, and more. ID Packs are installed using an application called Sprint ID. You can have multiple ID Packs installed at any one time and you can easily switch from one ID Pack to another without losing any applications already installed. Note: This application will initially be labeled as Mobile ID. After activation, it will be updated to Sprint ID. Install Your First ID Pack Note: Your phone must be activated, your battery should be fully charged, and you should be in a network coverage area before you install an ID Pack. 1.  Tap   and browse the ID packs and tap the desired one. 2.  Read the information screen for a description of the ID Pack and touch Install. Note: Touch Agree to accept the Terms & Conditions of the ID Pack, if necessary. 3.  If prompted, touch Continue on any following screens until you see the Downloading icon   in the Status Bar. Note: While the ID Pack is downloading in the background, you can begin to explore the features of your new phone from the Home screen. When the download is complete, you will see the Download finished icon   in the Status Bar.
Apps and Entertainment  72   WARNING: DO NOT interrupt the download process. 4.  Open the Notifications Panel if the download is complete, then tap ID ready to install to install the ID Pack. Switch ID Packs 1.  Tap   >   >   Sprint ID. 2.  Tap  , then tap an ID Pack to replace your current pack. Note: Certain features of Sprint ID are subject to change. For the most up-to-date information about using Sprint ID, please visit www.sprint.com. Sprint Applications You can access a wide variety of Sprint applications in many different categories with your phone and data service. Currently, various applications, such as Scout™ by Telenav, Sprint Music Plus, and Sprint TV & Movies are available when you download them from Play Store or Sprint Zone. Note: Some Sprint data applications may not work with a Wi-Fi connection present. If prompted, disable your phone's Wi-Fi feature while using these applications. Download Sprint ID Packs 1.  Tap   >   >   Sprint ID.  2.  Swipe the screen to the right to All ID Packs. 3.  Scroll down and tap the Sprint category. 4.  Tap any of the available Sprint ID Packs and follow the on-screen prompts to install the Sprint ID Pack. Note: Once you download and install one of the Sprint ID packs, various Sprint applications will appear on your Applications screen. When you switch from the Sprint pack to another ID pack, or choose a new ID pack, the Sprint applications will remain installed and visible on your Applications screen. To download and install Sprint apps: 1.  Tap   >   > [application name]. Then download or update the application. 2.  Follow the instructions to customize your application (such as selecting a favorite team or driver) or tap   to explore your options. Note: Important Privacy Message – Sprint‘s policies often do not apply to third-party applications. Third-party applications may access your personal information or require Sprint to disclose your customer information to the third-party application provider. To find out how a third-party application will collect, access, use, or disclose your personal information, check the application provider‘s policies, which can usually be found on their website. If you aren‘t comfortable with the third-party application‘s policies, don‘t use the application.
Apps and Entertainment  73   Music You can play audio files that are stored in your phone's storage. Copy audio files from your computer onto your phone before you open the Music application. The Music Player application supports audio files in numerous formats. Google Play Music Google Play Music lets you browse, shop, and play back songs purchased from the Google Play Store app, as well as songs you have loaded from your own music library. The music you choose is automatically stored in your Google Music library and instantly ready to play or download. ■  Tap   >   >   Google >   Play Music. Note: Learn more about Google Play Music at music.google.com. Music Player You can play music and set as ringtone. 1.  Tap   >   >   Music. 2.  You can select music tracks from the following tabs:  Songs: To browse through your downloaded music library.  Albums: To display your music library sorted by album.  Artists: To display your music library sorted by artist.  Genres: To display your music library sorted by genre. 3.  Tap   to see the additional options.  Favorites: To display your music library sorted by favorites.  Playlists: To select a customized playlist you‘ve created.  Folders: To browse for music files using folders.  Nearby devices: To browse music files on other DLNA-certified media servers.  Cloud: To browse music files saved on the cloud. 4. Once you‘ve displayed a list of songs, you can browse through your available titles.   To listen to a song or playlist, tap it to begin playing. Play a Song 1.  Tap   >   >   Music > Songs tab. 2.  Select the song you want to play.
Apps and Entertainment  74   Create a Playlist 1.  Tap   >   >   Music. 2.  Tap   > Add to playlist. 3.  Select the songs you want to add to the playlist and tap Add. 4.  Tap New playlist and enter a name. 5.  Tap OK to save the playlist. Assign a Song as a Ringtone 1.  Tap   >   >   Music > Songs tab. 2. Touch and hold a song you‘d like to use as your new ringtone. A context menu is displayed. 3.  Tap Set as ringtone and select Phone ringtone to set it as the default ringtone or Contact ringtone to set it as a ringtone for a specific contact. 4.  Confirm the song has been successfully assigned by navigating to your phone's ringtone menu.   Tap   >   >   Settings > Sound > Ringtone.   Open the Contact entry and check the Ringtone field. Back Up Your Downloaded Music Files Sprint recommends that you back up your downloaded music files to your computer. Although the downloaded files can only be played on your phone and on your account, backing them up to your computer lets you access the files in case your phone memory is damaged. (See Transfer Via PC or Laptop) 1.  Connect your phone to your PC using a USB cable. 2.  Open the Notifications Panel and tap USB connected. 3.  Select Media device (MTP) and use your computer to navigate to phone's Music folder. 4. Select and copy the music files to a folder on your computer‘s hard drive. YouTubeTM YouTube is a video sharing website on which users can upload and share videos. The site is used to display a wide variety of user-generated video content, including movie clips, TV clips, and music videos, as well as video content such as video blogging, informational shorts, and other original videos. Note: YouTube is a data-intensive feature. Sprint recommends that you upgrade to an unlimited data plan to avoid additional data charges.
Apps and Entertainment  75   1.  Tap   >   >   YouTube. 2.  To search for videos, tap  . 3.  Enter the text to search for or tap   to search by voice. 4.  If entering text, tap a suggestion below the search box or tap   to search. 5.  Scroll through the search results and tap a video to watch it. 6.  Tap   to return to the previous page. GPS Navigation Your phone's built-in GPS capability gives you access to a number of location-based services, including Maps and ScoutTM by TeleNav. Google Maps™ You can use Google Maps to find your current location, to view real-time traffic conditions, to get detailed directions by foot, public transportation, bicycle, or car, and to navigate by using spoken, turn-by-turn driving instructions using the Google Maps Navigation (beta) service. You can search on a street map or a satellite image to locate an address or a landmark, and you can view some locations as if you were strolling down the street.  Launch Google Maps 1.  Tap   >   >   Maps. Note: Before using any navigation programs, make sure your phone is set to allow location detection, and then select which sources you want to use. Tap   >   >   Settings > Location. Tap the Location switch   and tap Mode. Select from High accuracy (GPS and networks), Battery saving (Networks only), and Device sensors only (GPS only). 2.  Tap  . The map centers on a blue circle that indicates your location. An arrow indicates the direction the device is facing. A transparent blue circle around the dot indicates that your actual location is within the circle. To get an address and additional information for a location: 1.  Touch and hold a location on the map. A bar with the address and a thumbnail from Street View (if available) opens at the bottom of the screen. 2.  Drag the bar upwards to access additional options. To utilize Google Maps:
Apps and Entertainment  76   1.  Tap   >   >   Maps. 2.  Pinch out or in to zoom in or out of the current map view. – or – Tap each icon at the top of the screen.    (Search) to search for a location.    (Directions) to get directions.    (Menu) to view locations and additional information overlaid on the map. To search for a location: 1.  While viewing a map, tap  . 2.  In the search box, enter the place you're looking for.   You can enter an address, a city, or a type of business or establishment. For example, ―theater in New York.‖ 3.  Tap  . Red markers indicate search matches on the map. 4.  Tap a marker to display a bar that contains the name and travel information. Drag the bar upwards to open a screen with more information about the location, as well as options for obtaining directions. To get directions: 1.  While viewing a map, tap  . 2.  Enter a starting point in the Choose starting point field (your current location by default), or leave as is to allow GPS to find your location, and your destination in the Choose destination field.   To reverse directions, tap  . 3.  Tap the icon for car, public transit, biking, or walking directions. 4.  The directions to your destination appear as a blue route. Select a gray route if you prefer it. 5.  Drag the bar up to view directions as text or tap   to navigate to the destination. Scout by Telenav Scout by Telenav is a daily personal navigator that helps you get where you‘re going. It lets you see and hear turn-by-turn directions and it can provide important, personalized information about traffic and alternate routes.
Apps and Entertainment  77   Get Scout by Telenav 1.  Tap   >   >   Play Store. 2.  Tap   and search for the Scout GPS Maps, Meetup & Chat app. 3.  Install the app. Note: Before using any navigation programs, make sure your phone is set to allow location detection, and then select which sources you want to use. Tap   >   >   Settings > Location. Tap the Location switch  . Use Scout by Telenav 1.  Tap   >   >   Scout. 2.  Follow the on-screen instructions to access, launch, and use.
Web and Data  78 Web and Data Your phone's data capabilities let you wirelessly access the Internet or your corporate network through a variety of connections, including Wi-Fi, Sprint 4G, Data Services (Sprint 3G Network), and Virtual Private Networks (VPN). This section addresses your phone's data connections and the built-in web browser. Additional data-related features can be found in Accounts and Messaging, Apps and Entertainment, and Tools and Calendar. Connect Wi-Fi Wi-Fi is a wireless networking technology that can provide Internet access at distances of up to 100 meters, depending on the Wi-Fi router and your surroundings. To use Wi-Fi on your phone, you must connect to a wireless access point, or hotspot. Some access points are open and you can simply connect to them without entering any information. Others are hidden or implement other security features, so you must configure your phone to connect to them. Turn off Wi-Fi when you're not using it to extend the life of your battery. When you connect to a Wi-Fi network, the phone obtains a network address and other information it needs from the network, using the DHCP protocol. To configure the phone with a static IP address and other advanced settings, tap   > Advanced Wi-Fi from the Wi-Fi settings menu. Turn Wi-Fi On and Connect to a Network Use the Wireless & networks setting menu to enable your phone's Wi-Fi radio and connect to an available Wi-Fi network. 1.  Tap   >   >   Settings > Wi-Fi. 2.  Tap the Wi-Fi switch   to turn Wi-Fi on and scan for available Wi-Fi networks.   A list of available Wi-Fi networks will be displayed. Secured networks are indicated by a lock icon.  If the phone finds a network that you have connected to previously, it automatically connects to it. 3.  Tap a network to connect to it.   If the network is secured, you will be prompted to enter a password. (Ask your network administrator for details.)   When you're connected to a network, you can tap the network name in the Wi-Fi settings screen for details about the speed, security, address, and related settings. To receive notifications when open networks are in range:
Web and Data  79 By default, when Wi-Fi is on, you receive notifications in the Status Bar when your phone detects an open Wi-Fi network. 1.  Tap   >   >   Settings > Wi-Fi. 2.  Tap the Wi-Fi switch   to turn Wi-Fi, if it‘s not already on.  3.  From the Wi-Fi menu, tap   > Advanced Wi-Fi > Wi-Fi notification checkbox to enable/disable the feature.  Add a Wi-Fi Network You can add a Wi-Fi network manually if it does not broadcast its name (SSID) or if you want to add a Wi-Fi network when you are out of its range. To add a secured network, you need to contact the network‘s administrator to obtain the password or other required security credentials. 1.  Turn on Wi-Fi, if it's not already on. 2.  From the Wi-Fi settings screen, tap   > Add Wi-Fi. 3.  Enter the Wi-Fi name (SSID) of the network. If the network is secured, tap the Security drop-down menu and tap the type of security used for the network. 4.  Enter the required passwords and security credentials. 5.  Tap Connect. The phone will connect to the wireless network. Any credentials that you entered are saved, so you are connected automatically the next time you come within range of this network. To forget a Wi-Fi network: You can also make the phone forget about the details of a Wi-Fi network that you have added. For example, if you don't want the phone to connect to it automatically or if it is a network that you no longer use. 1.  Tap   >   >   Settings > Wi-Fi. 2.  Tap the Wi-Fi switch   to turn Wi-Fi, if it‘s not already on.  3.  In the Wi-Fi settings screen, touch and hold the name of the network. 4.  Tap Forget network. Wi-Fi Direct Wi-Fi Direct supports a direct connection between Wi-Fi enabled phones without an access point. Due to the high battery usage of Wi-Fi direct, it is recommended that you plug your phone into a power outlet while using the Wi-Fi Direct feature.
Web and Data  80 To turn on Wi-Fi Direct: 1.  Tap   >   >   Settings > Wi-Fi >   > Advanced Wi-Fi > Wi-Fi Direct. 2.  Tap Search to search for available phones.  3.  Tap the available phones. Note: Tap   > Help for more information. Virtual Private Networks (VPN) From your phone, you can add, set up, and manage virtual private networks (VPNs) that allow you to connect and access resources inside a secured local network, such as your corporate network. Prepare Your Phone for VPN Connection Depending on the type of VPN you are using at work, you may be required to enter your login credentials or install security certificates before you can connect to your company's local network. You can get this information from your network administrator. Before you can initiate a VPN connection, your phone must first establish a Wi-Fi or data connection. Set Up Secure Credential Storage If your network administrator instructs you to download and install security certificates, follow the instructions below. 1.  Tap   >   >   Settings > Security. 2.  Tap Install from storage for desired certificates. You can then download and install the certificates needed to access your local network. Your network administrator can tell you how to do this. Add a VPN Connection Use the Wireless & networks settings menu to add a VPN connection to your phone. 1.  Tap   >   >   Settings > More... > VPN. 2.  Tap Basic VPN or LG VPN.  3.  Tap Add Basic VPN network or Add LG VPN network.  Note: A screen lock is required to configure VPN.  4.  Configure the settings according to the security details you have obtained from your network administrator.  5.  When finished, tap Save. The VPN is then added to the VPNs section of the VPN settings screen.
Web and Data  81 Connect to or Disconnect From a VPN Once you have set up a VPN connection, use the Wireless & networks settings menu to connect to or disconnect from the VPN. Connect to a VPN 1.  Tap   >   >   Settings > More... > VPN. 2.  Tap Basic VPN or LG VPN.  Basic VPN: Sets your phone to use the built-in Android VPN client supporting basic features.  LG VPN: Sets your phone to use an advanced LG VPN client supporting full IP Security features and interoperability. You can add a LG VPN network or select from your list of VPN connections. 3.  In the VPNs section, tap the VPN that you want to connect to.  4.  When prompted, enter your login credentials, and then tap Connect. When you are connected, the VPN connected icon   appears in the notification area of the Status Bar. 5.  Open the web browser to access resources such as intranet sites on your corporate network.  Disconnect From a VPN 1.  Touch and drag down the Status Bar to open the Notifications Panel. 2.  Tap the VPN connection to return to the VPN settings screen, and then tap the VPN connection to disconnect from it.  When your phone has disconnected from the VPN, the VPN disconnected icon   is displayed in the notification area of the Status Bar. Browser Your phone's web browser gives you full access to both mobile and traditional websites on the go, using data service or Wi-Fi data connections. Learn to Navigate the Browser Navigating through menus and websites during a data session is easy once you‘ve learned a few basics. Here are some tips for getting around: Scrolling As with other menus on your phone, you‘ll have to scroll up and down to see everything on some websites. To scroll a web page: ■  Slide your finger on the screen in the direction you wish to scroll.
Web and Data  82 Selecting Once you‘ve learned how to scroll, you can start navigating the web. To select items or links: ■  Simply tap a link or an item. Links, which are displayed as underlined text, direct you to web pages, select special functions, or even place calls. Go Back To go back one page: ■  Tap   on your phone. Repeat this process to keep going back through your recently visited pages. Find and Copy Text on a Web Page To find text on a web page: 1.  Tap   > Find on page. 2.  Enter the text you're looking for.   As you type, the first word with matching characters is highlighted on the screen and subsequent matches are boxed. 3.  Tap     to jump to and highlight the previous or next matching word. To copy text from web page: 1.  Open a web page and scroll to the beginning of the text you want to copy 2.  Touch and hold the first word of the text you want to copy. 3.  Drag either selection tab to expand or reduce the range of selected text.   To cancel the selection, simply tap unselected text or empty area. 4.  Tap Copy on the pop-up menu. The text you selected is copied to the clipboard. You can now use the techniques described in Enter Text With the On-screen Keyboard to paste the copied text into a text field. Go to a Specific Website Follow the instructions to go to a particular website by entering a URL (website address). 1.  Tap the URL field (top of the Browser window) and enter a new web address.   As you enter the address, possible matches are displayed. Tap an entry to launch the desired website.
Web and Data  83 2.  Tap the suggested website. – or – Tap Go on the keyboard. Browser Menu The Browser menu offers additional options to expand your use of the web on your phone. Open the Browser Menu The Browser menu may be opened anytime you have an active data session, from any page you are viewing. ■  From any open web page, tap  . Options available within the Browser menu include: ● Add to bookmarks: Allows you to save the current page to your bookmarks. ● Share: Allows you to share the web page with others. ● Find on page: Allows you to search the current Web page for a word. ● Desktop view: Requests the website to provide you with the desktop version of the website, instead of the mobile version of the website. ● Save for offline reading: Allows you to save the current page for reading offline. ● Capture plus: Allows you to capture a screen shot of the current web page from top to bottom without cutting. ● Print: Allows you to print the web page. ● Settings: Allows you to configure and manage your Browser settings. ● Exit: Allows you to completely exit the Browser. Adjust Browser Settings You can change the page settings for your browser, including the default zoom level, pop-up blocking, display options, setting your home page, and more. 1.  Tap   to open the Browser menu. 2.  Tap Settings. 3.  Select a sub-category and make the desired changes.  General: Settings for homepage and form auto fill.  Privacy and security: Settings for managing personal data from web browsing and usage.
Web and Data  84  Screen and text: Adjust screen and text size.  Advanced: Adjust JavaScript and other web content settings.  Bandwidth management: Settings for load images. Set the Browser Home Page Customize your web experience by setting your browser's home page. 1.  Tap   to open the Browser menu. 2.  Tap Settings > General > Set homepage. 3.  Select one of the available options and enter the necessary information. Reset the Browser to Default 1.  Tap   to open the Browser menu. 2.  Tap Settings > Advanced > Reset to default. 3.  Tap Yes to complete the process. Create Website Settings You can create settings for individual websites. 1.  Tap   to open the Browser menu. 2.  Tap Settings > Advanced > Website settings. This allows you to remove websites from having access to Location information. 3.  Tap OK to complete the process. Create Bookmarks Make browsing easier by setting up and using custom bookmarks. Accessing Your Bookmarks You can bookmark web pages so that you can quickly return to them. 1.  From any open web page, scroll towards the top of the page to access the toolbar, then tap  . 2.  Three tabs are revealed:  Bookmarks: Displays a list of your current bookmarks.  History: Displays a record of your browsing history. These records are organized into folders such as: Today and Most visited.  Saved pages: Displays the pages you've saved for offline reading.
Web and Data  85 Saving Websites To Your Bookmarks 1.  From any open web page, tap   > Add to bookmarks. 2.  Enter a descriptive name and URL for the new bookmark. 3.  Tap OK to store the new entry to your Bookmarks list. Create Bookmarks from Other Tabs 1. From any open web page, scroll towards the top of the page to access the toolbar, then tap  . 2.  Tap the History tab. 3.  Tap the star icon adjacent to a web page entry. Enter the desired information and tap OK. – or – Touch and hold an entry from the list to display a context menu. Then, tap Add to bookmarks to add the selected entry to your current list of bookmarks. Create a New Home Page 1.  From any open web page, scroll towards the top of the page to access the toolbar, then tap  . 2.  Tap either the Bookmarks or History tab. 3.  Touch and hold an entry from the list to display a context menu. 4.  Tap Set as homepage to assign the selected entry as your new homepage. Add Bookmarks to Your Home Screen 1.  From any open web page, scroll towards the top of the page to access the toolbar, then tap  . 2.  Touch and hold an existing entry from the list to display a context menu. 3.  Tap Add shortcut to home to add the selected entry to your Home screen. Connections Optimizer The Connections Optimizer is a tool that automatically selects the best mobile network for your phone, including "remembered" Wi-Fi networks.  About Connections Optimizer  The Connections Optimizer helps you manage and enhance your data experience by finding and connecting to "remembered" Wi-Fi networks on your phone. Remembered Wi-Fi networks are networks with which you have previously chosen to connect. Active Wi-Fi connections may offer improved performance and generally improve battery life while allowing you to talk on the phone and use data at the same time.
Web and Data  86 The Connections Optimizer works by searching for available "remembered" Wi-Fi networks. If you do not leave your Wi-Fi antenna on all the time, you will only notice the Connections Optimizer operating at certain times of the day in a small number of locations on the network. Your Wi-Fi antenna will conserve battery by scanning for connections periodically (not continuously), and if no connection is achieved, the antennas will be turned off. You may also manually turn the antennas off during the scan period.  To facilitate quality assurance and enable feature enhancements, information is collected about your battery levels, Wi-Fi and network connections and usage. No personal information is collected.  Enable Connections Optimizer  1.  From the Home screen, tap   >   >   Settings > More… > Mobile networks > Connections optimizer. You will see a disclaimer.  2.  Read the disclaimer and, if you agree, touch I Agree to turn Connections Optimizer on. Disable Connections Optimizer 1.  From the Home screen, tap   >   >   Settings > More… > Mobile networks > Connections optimizer. 2.  Uncheck the Sprint Connections Optimizer option. Data Services General Information (3G and 4G Networks)  With your Sprint service, you are ready to start enjoying the advantages of data services. This section will help you learn the basics of using your data services, including managing your user name, launching a data connection, and navigating the web with your phone. Important: Certain data services requests may require additional time to process. While your phone is loading the requested service, the touchscreen or on-screen keyboard may appear unresponsive when in fact they are functioning properly. Allow the phone some time to process your data usage request. 4G Spark LTE 4G Spark LTE provides your phone with wireless Internet access over greater distances than Wi-Fi and delivers data transfer rates of up to 30 to 60 Mbps. To connect your phone to 4G Spark LTE network, you need access to a 4G Spark LTE base station. For more information about the availability of 4G Spark LTE in your location, visit sprint.com/coverage. Note: The availability and range of the 4G Spark LTE network depends on a number of factors including your distance to the 4G Spark LTE base station, and infrastructure and other objects through which the signal passes. Set Your Network Options 1.  Tap   >   >   Settings > More….
Web and Data  87 2.  Tap Mobile networks > Network mode. 3.  Select LTE/CDMA or CDMA. The phone will scan for the best available Sprint network and will automatically connect to it. When your phone is connected via Sprint Spark, the Sprint Spark icon   appears in the Status Bar and tells you the approximate signal strength (number of bands displayed). Check 4G LTE Network Status 1.  Touch   >   >   Settings > More... > Mobile networks. 2.  Touch 4G settings. The network operator name and IP address are displayed. Your User Name When you buy your phone and sign up for service, you‗re automatically assigned a user name, which is typically based on your name and a number, followed by ―@sprintpcs.com.‖ (For example, the third John Smith to sign up for Sprint data services might have jsmith003@sprintpcs.com as his user name.) When you use data services, your user name is submitted to identify you to the Nationwide Sprint Network. Your user name will be automatically programmed into your phone. You don‗t have to enter it. Update Your User Name If you choose to change your user name and select a new one online, you must then update the user name on your phone. ■  Tap   >   >   Settings > System updates > Update profile.   Your profile will be automatically updated by the network. Launch a Web Connection Launching a web connection is as simple as opening the browser on your phone. ■  Tap   >   >   Browser. Note: You can connect to the Internet via Mobile network or via Wi-Fi. (Tap   >   >   Settings > Wi-Fi.) Once the Browser loads, you are directed to the home page. Tip: To change the default home page, tap   > Settings > General > Set homepage. Note: The Browser automatically launches when a web link is touched from within an email or text message.
Web and Data  88 Data Connection Status and Indicators Your phone notifies you of the current status of your data connection through status icons in the Status Bar. The following symbols can be displayed:  Your phone is connected to the high-speed 4G Sprint Mobile Broadband Network. When the signal bands are animated, your phone is scanning and connecting. During data transfer, the animated icon is not used (for example, when you are opening a web page). When the signal bands are gray, your phone is connected to the network, signal is weak. When both the bands and the 4G icon are gray, your phone is connected to the 4G network but is not currently transferring data.  Your phone is connected to the high-speed Sprint Mobile Broadband Network(3G/1x). When the arrows are animated, your phone is transferring data. When the arrows are gray, your phone is connected to the network but is not currently transferring data. In either state, you can receive incoming calls. If you do not see an indicator, your phone does not have a current data connection. To launch a connection, see Launch a Web Connection.
Camera and Video  89   Camera and Video You can use the camera or camcorder to take and share pictures and videos. Your phone comes with a 13 megapixel camera with an auto-focus feature that lets you capture sharp pictures and videos. Note: Be sure to clean the lens with a microfiber cloth before taking pictures. A lens cover with smudges from fingers can cause blurry pictures with a "halo" effect. Take Pictures Taking pictures with your phone's built-in camera is as simple as choosing a subject, pointing the lens, and pressing a button. To take a picture: 1.  Tap   >   >   Camera. 2.  Frame your subject on the screen. 3. A group of squares will indicate when the camera has focused. 4.  Tap  . Your picture will be automatically saved to the Gallery. Record Videos In addition to taking pictures, you can record, view, and send videos with your phone's built-in video camera. 1.  Tap   >   >   Camera. 2.  Frame your subject on the screen. 3.  Tap   to start recording the video. 4.  The length of the recording is displayed on the top of the screen. Note: Tap   to take pictures while recording video. 5.  Tap   to pause recording video. You can resume recording again tapping  . 6.  Tap   to stop recording. Your video will be automatically saved to the Gallery. Camera and Video Settings From the camera mode, tap each icon to adjust the following camera settings. ●  Flash Tap to turn the flash On, Off or set it to Auto.
Camera and Video  90   ●  Swap camera to swap between the rear camera lens and the front camera lens. ●  Mode to select the mode from: Auto, Magic focus, Panorama and Dual.  Auto: Automatically focuses on a subject.   Magic focus: Allows you to change the focus on a picture after taking it.  Panorama: Creates a wide photo of a panoramic view. Hold the phone horizontally, press the shutter to start and slowly sweep the camera across the scene.  Dual: Captures a photo or records a video using both camera lens. Touch and hold the small screen to resize or move it. ●  Settings to adjust the following camera and video settings.  Dynamic tone (HDR): Combines photos taken at multiple exposures into one optimal photo to get a better photo in tricky lighting situations.   Image size: Set the size of your picture. Choose from 13M 4160x3120, W10M 4160x2340, 9M 3120x3120 or 3M 2048x1536. Set the size of your video. Choose from UHD 3840x2160, FHD 1920x1080, HD 1280x720 or 120HD Slow Motion.   Cheese shutter: Allows you to take pictures with voice commands. When on, just say "Cheese", "Smile", "Whiskey", "Kimchi", or "LG" to take a picture.   Timer: Set your camera's timer. This is ideal if you want to be a part of the picture.  Grid: Allows you to easily take pictures by displaying grid lines for easy alignment.  Storage: Set the storage location for your videos or pictures. Choose from IN (internal storage) or SD (microSD card). Note: It will be shown when you are insert the microSD card into the slot located.  Help: Allows you to learn how a function works. This icon will provide you with a quick guide. Multi-point Auto-focus When you take a picture, the Multi-point Auto-focus (AF) function operates automatically and will allow you to see a clear image. Gesture Shot The Gesture shot feature allows you to take a picture with a hand gesture using the front camera. To take photo, raise your hand, with an open palm, until the front camera detects it and a box appears on the screen (or reverse). Then close your hand into a fist and a timer will start, allowing you time to get ready.
Camera and Video  91    Super Zooming You can use a zoom up to 8 times while taking pictures. Tip: This function operates automatically while zooming in and out. Note: Use a steady hand. This feature does not work with some functions  Objects can be overlapped when taking a picture of fast-moving subjects. View Your Pictures The Gallery is where you can access the Gallery of stored camera images. You can view them in a slideshow, share them with your friends, and delete and edit them. 1.  Tap   >   >   Gallery. 2.  Select a location and tap an image to view your picture. Gallery Options The Gallery application presents the pictures and videos in your storage, including those you‘ve taken with the Camera application and those you downloaded from the web or other locations. 1.  Tap   >   >   Gallery to view the images stored in the storage.   Drag left or right to view more albums. 2.  Tap an album to open it and view its contents. (The pictures and videos in the album are displayed in chronological order.) 3.  Tap a picture in an album to view it.   Tap a picture group again to reveal the following icons: •   Camera: Opens the Camera. •   Share: You can share the picture via various methods such as Messaging or Bluetooth.
Camera and Video  92   •   Delete: Deletes the picture.   Tap a picture in an album then tap   for the following options: SmartShare, Set image as, Move, Copy, Copy to Clip Tray, Lock, Slideshow, Rotate left, Rotate right, Crop, Add location, Rename, Print and Details.   Tap   to return to the previous screen. Assign Pictures After taking a picture, assign it as a picture ID for a Contacts entry or as the Home screen background image (wallpaper). 1.  Tap   >   >   Gallery. 2.  Tap an album and tap an image to view it. 3.  With the picture displayed, tap   > Set image as. 4.  Select an option.  Home screen wallpaper to assign the picture as a background image, crop the image and tap OK to assign the picture.  Contact photo to assign the picture to a Contact entry as a picture ID. Tap an entry from Contacts, crop the image and tap OK to assign the picture.  Lock screen wallpaper to assign the picture as a background image for your lock screen.  Wallpaper to assign the picture as a background image, crop the image and tap SET WALLPAPER to assign the picture. Dual Feature The Dual feature allows you to take a picture or record video with the front and rear cameras at the same time. 1.  Tap   >   >   Camera. 2.  Tap   >  . Note: Drag the small screen to move it to your desired location.  Touch and hold the small screen to resize it.  Tap on the small screen to switch screens. 3.  Tap   to take a picture.  – or – Tap   to record a video. Tap   to stop dual recording.
Camera and Video  93   Video Options The Gallery is where you can access the Gallery of stored video images. You can view them, share them with your friends, and delete and edit them. 1.  Tap   >   >   Gallery to view the videos stored in storage.   Scroll left or right to view more albums. 2.  Tap an album to open it and view its contents. (The pictures and videos in the album are displayed in chronological order.) 3.  Tap a video to view it. You can access the following options:    QSlide: Enables an overlay on your phone's display for easy multitasking.    SmartShare: Shares media files with DLNA certified devices.     Menu: Tap to access Screen ratio, Subtitles, Share, Trim, Settings, and Details.   Screen shot: Captures a screen shot while playing a video. Note: Tap   > Settings > Screenshot on.    Volume: Tap to display the Volume slider bar, then adjust the playback volume on the slider bar.    Lock/Unlock: Locks the touch keys to prevent unintentional touches. Play a Video 1.  Tap   >   >   Gallery to view videos stored in the storage.   Scroll left or right to view more albums. 2.  Tap an album to open it and view its contents. (The pictures and videos in the album are displayed in chronological order.) 3.  Tap a video in an album to play it.   Tap the video to view the playback controls. Note: While playing a video, slide the left side of the screen up or down to adjust the screen brightness. While playing a video, slide the right side of the screen up or down to adjust the sound.  While playing a video, tap the timeline point to preview that portion of the video via a small screen. Tap the small screen to jump to that part of the video.  While playing a video, slide your finger from left to right (or vice versa) to fast-forward and rewind.
Camera and Video  94   Live Zoom Live Zoom allows you to zoom in or zoom out on a portion of a video that is being played to make the desired section appear larger or smaller. When viewing a video, use your index finger and thumb in a pinching or spreading motion to zoom in or out. Note: Do not press too hard; the touch screen is sensitive enough to pick up a light, but firm touch. Dual Play Dual Play (connected wired or wirelessly two displays) can be run on a different screen. Note: Connect two devices using wired (Slimport-HDMI) cable or wirelessly (Miracast). The connectable device can be a TV or a monitor supported by a HDMI cable or Miracast. The Gallery and Video apps are supported on Dual Play. Tap   once when two displays are a different status (i.e. the monitor is playing a video and your phone's video app is displaying empty screen), then Dual Play will start. Not all videos are supported by Dual Play. Dual Play operates at 1280X720 or higher display resolution.
Tools and Calendar  95 Tools and Calendar Learn how to use many of your phone's productivity-enhancing features. LG Health The LG Health helps you manage your health and maintain good exercise habits by tracking logs and competing with people. 1.  Tap   > Slide the screen to the far left   > LG HEALTH. 2.  On the Profile page, enter your profile information and tap Save. 3.  Tap the desired options for your health. Note: This feature is provided for user convenience. Please use for reference only. QSlide The QSlide function enables an overlay on your phone's display for easy multi-tasking. 1.  While using an app that supports QSlide, tap   to access QSlide. – or – Open the Notifications Panel and touch an app from the QSLIDE APPS section. 2.  Use the slider   to adjust the transparency of the overlay. 3.  You can make a call, or choose other phone options. 4.  Tap   to exit the QSlide function. Note: The QSlide function can support up to two windows at the same time. QuickRemote QuickRemote turns your phone into a Universal Remote for your home TV, cable box, audio system. 1.  From the Home screen, tap   >   QuickRemote >  . – or – Touch and slide the Status Bar downwards and touch   > ADD REMOTE. Note: If QuickRemote is not shown, tap   and checkmark the QuickRemote.
Tools and Calendar  96 2.  Select the type of device and its manufacturer, then follow the on-screen instructions to configure the device(s). Tip: To quickly use the QuickRemote feature, touch and slide the Status Bar downward and tap   on the Quick Settings bar to activate it. Tap   to select Edit remote name, Learn remote, Move remote, Delete remote, Settings, and Help. Note: QuickRemote features an ordinary remote control and infrared (IR) signals to operate the same way. Therefore, be careful not to cover the infrared sensor when you use the QuickRemote feature. This function may not be supported depending on the model, the manufacturer or service company. Universal Remote You can create your own personalized universal remote and choose where to place all of the buttons. 1.  From the Home screen tap   >   QuickRemote. 2.  Tap   > Universal remote. 3.  Enter the Remote name and touch OK. 4.  Place the buttons you want on the remote at the desired location and tap Next. Note:  Swipe to the left and right to view additional buttons.  5.  Tap the button to be learned. 6.  Point original remote 4 inches away from the IR receiver at the top of the phone. 7.  Press and hold the button on the original remote for 2 seconds. 8.  Tap Save to save the configurations. QuickMemo+ The QuickMemo+ feature allows you to create memos and capture screen shots. You can use QuickMemo+ to easily and efficiently create memos during a call, with a saved picture or on the current phone screen.  1.  While viewing the screen you want to capture and create a memo on, slide the Status Bar down and tap  .
Tools and Calendar  97 2.  Create a memo using the following options:    : Tap to undo the most recent action.    : Tap to redo the most recently deleted action.   : Tap to use a complex concept function.  : Tap to select the pen type and color.   : Tap to use the eraser to erase the memo that you created.   : Tap to save the current memo.  : Tap to select the desired options. Note: Please use a fingertip while using the QuickMemo+ feature. Do not use your fingernail.  3.  Tap   to save the current memo. 4.  Tap QuickMemo+ or Gallery to select where to save the QuickMemo+. Discard QuickMemo+s: ■  Tap   until you exit QuickMemo+. View the Saved QuickMemo+  Your QuickMemo+ can be saved in the QuickMemo+ application or in the Gallery application. To view QuickMemo+ saved in one of your QuickMemo+: ■  Tap   >   >   QuickMemo+ and select the memo.  To view QuickMemo+ saved in your Gallery: ■  Tap   >   >   Gallery and select the QuickMemo+ album. Dual Window The Dual window feature splits the screen to enable multi-tasking, drag and drop interaction, auto-linking and recently used apps.  1.  Touch and hold the Back Key   to split the screen.  – or – Tap   > Dual window.
Tools and Calendar  98 2.  Touch or drag an app icon to the desired space. 3.  Tap     to display the following options. You can also drag the tabs to change the size of the windows.    : Switch two screens.    : Change the apps list.    : Full screen view.    : Close the apps. Calendar With the Calendar application you can view the events you have scheduled in the coming days, weeks, or months. Open the Calendar ■  Tap   >   >   Calendar. If you have created or subscribed to more than one calendar through Google CalendarTM on the web, events from each calendar are displayed in a different color. (For information about which calendars are displayed on your phone, see Display and Synchronize Calendars.) Change Calendar View You can change the calendar view. ■  Tap   > Day, Week, Month, Year, Agenda. Each view displays the events in your calendar for the period of time that you specify. View Event Details You can view more information about an event in a number of ways, depending on the current view. ■ In Agenda, Day, Week, or Month, tap an event to view its details. Create an Event You can use the Calendar tool on your phone to create events that appear on your phone and in your Google Calendar on the web. 1.  Tap   >   >   Calendar and then  .   You can also touch and hold a spot in Day, Week, or Month view to open the new event screen with that day and time already entered. 2.  Add details about the event.
Tools and Calendar  99   Enter a name, and other optional details about the event, just as you would on Google Calendar (on the web). If you have more than one calendar, you can choose the calendar to which to add the event. Tap   to add more reminders.(See Set an Event Reminder.) 3.  Scroll to the bottom of the screen and tap Save.   The event will be added to your Calendar. You can also access and configure the event from Google Calendar on the web. Edit or Delete an Event You can edit or delete an event that you created on the phone or on the web. You can also edit or delete events created by others, if they have given you permission. Edit an Event 1.  Tap   >   >   Calendar and then tap the event to open it. (See View Event Details.) 2.  Tap  . (For information on how to create or change event information, see Create an Event.) 3.  Make your changes to the event. 4.  Tap Save. Delete an Event ■  Tap an event to view the event details. Then, tap  . Tap Yes to confirm. Set an Event Reminder You can set one or more reminders for an event, whether or not you created the event or have permission to edit its other details. 1.  Open Calendar and tap the event to open it. (See View Event Details.) 2.  Tap   Add reminder to add a reminder. 3.  Tap the reminder time to display a pop-up menu and choose your desired setting.   At the designated time, you will receive a notification to remind you about the event. (See Respond to an Event Reminder.) You can also use Google Calendar (on the web) to configure additional reminders. Delete an Event Reminder 1.  Tap   >   >   Calendar and then event to open it. 2.  Tap   to remove a reminder.
Tools and Calendar  100 Respond to an Event Reminder If you set a reminder for an event, the reminder notification appears in the Status Bar when the reminder time arrives. (See Notifications Panel.) 1.  If you receive notifications in the Status Bar, drag the Notifications Panel down to your notifications. Tap the event notification to open the list of Calendar notifications. 2.  Tap an event in the Calendar Notifications list to view more information about that event. 3.  Tap SNOOZE in the Calendar Notifications list to receive the reminder again 5 minutes later. – or – Tap Dismiss in the Calendar Notifications list to delete all reminders in the list. 4.  Tap   when viewing the Calendar Notifications list to keep the reminders. The reminders will remain in the Status Bar. Display and Synchronize Calendars Initially, all calendars that you create or subscribe to through Google Calendar on the web are also displayed in the Calendar application on your phone. You can select which calendars to show or hide on the phone, and which to keep synchronized. (For more information, see Synchronize Accounts.) Only the calendars that you've created or subscribed to on the web are shown in the Calendars list. To select calendars to display: 1.  Tap   > Calendars to sync. 2.  Checkmark the desired accounts to display those calendars. Change Calendar Settings You can change the settings for how the Calendar application displays events and how it notifies you of upcoming events. ● Tap   >   >   Calendar and then tap   > Settings > Calendar settings.  Week starts on: Opens a dialog box to configure from when the week starts on.   Hide declined events: When checkmarked, declined events so that they are not displayed in your calendar views. Tap to remove the checkmark and display all events in your calendar views.   Weather: Show weather info on Calendar.  Show events by: Select event display type Event brief or Timeline.   Show week number: Displays the week number out of the year.
Tools and Calendar  101  Lock default time zone: Lock event times and dates to default time zone.   Clear search history: Allows you to remove all the searches you have performed.   About Calendar: Display calendar application version. ● Tap   >   >   Calendar and then tap   > Settings > Event notification settings.  Default reminder time: Allows you to select the default time set for event reminders.   Notifications: Checkmark to allow notifications of new events. When Notifications is set, you can select the notification type, notification sound, vibrate or vibrate type, and whether to pop-up the notification or not.   Quick responses: Edit default responses when emailing guests. Folders Folders allow you to organize other Home screen shortcuts and icons, or folders that contain all your contacts, contacts with phone numbers, or starred contacts. Your folder's contents are kept up to date automatically. Organizing in folders can create space to add more shortcuts, widgets, or applications on the Home screen. Add a Folder 1.  Drag and drop an app icon over another app icon. 2.  A folder will be created with both app icons in it. Rename a Folder 1.  Tap the folder icon to open it. 2.  Tap  . 3.  Enter the new folder name and tap OK. Note: You can also change the folder color. Organize Items in a Folder ■  Just drag a shortcut, an icon, or a folder and drop in a folder. Clock You can use the Clock application to monitor several types of information at once, in addition to the current date and time. Open the Clock App The Clock application also allows you to set alarms.
Tools and Calendar  102 1.  Tap   >   >   Clock. 2.  Tap an existing alarm to change its time and other attributes or tap Add alarm   to add a new one. 3.  Set the time of the alarm. You can change the time by scrolling up/down the hour and minute and AM/PM field or tap the hour and minutes fields to enter the time with the keyboard. 4.  Tap Repeat to set the days when you want the alarm to sound. (If you don't set a repeat, the alarm will only sound on the assigned day.) 5.  Tap Snooze duration to open a dialog box to set the amount of time to wait before sounding the alarm again if it is not dismissed. You can set the alarm to ring repeatedly from 5 minutes up to 1 hour. 6.  Tap Alarm with vibration to have the phone vibrate, in addition to playing the ringtone. 7.  Tap Alarm sound to select a ringtone for the alarm. The ringtone plays briefly when you select it. 8.  Slide the button on the Alarm volume slider to the right to increase the alarm volume and to the left to decrease it. 9.  Tap Auto app starter to set the application you want to automatically open when you stop the alarm. 10. Tap Puzzle lock to checkmark the setting, which requires you to wake up enough to solve a simple puzzle to dismiss the alarm. 11. Tap Memo to enter a name for the alarm. 12. When you're finished, tap Save. Change Clock Settings 1.  Tap   >   >   Clock. 2.  Tap   > Settings. 3.  You can set the following options:  Volume key behavior: Allows you to set the desired behavior of the volume buttons when pressed during an alarm.  Puzzle lock: Allows you to choose the puzzle type to use during the puzzle lock.  Vibrate type: Allows you to set the vibrate type. Set a Timer 1.  Tap   >   >   Clock > Timer tab.
Tools and Calendar  103 2.  Tap the Hour/Minute/Second sections to set the timer. 3.  Tap   > Settings to set the following options:  Alarm with vibration: Set the phone vibrate along with the alert sound. (A blue checkmark appears.)   Alert sound: Select the alert sound.   Alert volume: Set the alert volume. 4.  Tap  .   Tap   to reset the timer and start over.   Tap   to resume the timer after it's stopped.   Tap   to stop the timer. Set World Clock 1.  Tap   >   >   Clock > World clock tab. 2.  Tap   to add a city. 3.  Enter the city name in the search field and tap   on the keyboard. As you enter letters, the cities which starts from the letters are displayed.  – or – Scroll through the cities list and tap the city. 4.  You can add cities as many as you want. Repeat steps 2 and 3. Play Stopwatch 1.  Tap   >   >   Clock > Stopwatch tab. 2.  Tap   to start stopwatch time. 3.  Tap   to stop the stopwatch.   While measuring time, tap   to view lap times. Tasks You can add your tasks in the Tasks application and synchronize with MS Exchange account.
Tools and Calendar  104 Synchronize MS Exchange 1.  Tap   >   >   Settings > Accounts & sync. 2.  Tap Add account. 3.  Tap Microsoft Exchange to enter your email address and password information. For further information about adding a Microsoft Exchange account, see Set Up a Corporate Email. 4.  Make sure that you place a checkmark on Tasks. Add a Task 1.  Tap   >   >   Tasks. 2.  Tap   to add a new task. 3.  Tap Tasks and select an account to save the current task. 4.  Enter the corresponding information on each field and tap Save. Calculator You can use the Calculator application to solve math problems. 1.  Tap   >   >   Calculator. 2.  Enter numbers and arithmetic operators on the screen.   Tap   to use the QSlide for easy multitasking.  Touch and hold the Calculator‘s display to open a menu where you can copy what you‘ve entered and access other tools.   Tap   to delete the last number or operator you entered. Touch and hold   to delete numbers repeatedly.   Tap   to clear the screen.   Tap   to open an Options menu to view your Calculation history or change panels between Scientific/Basic calculator. Bluetooth Bluetooth is a short-range communications technology that allows you to connect wirelessly to a number of Bluetooth phones, such as headsets and hands-free car kits, Bluetooth-enabled handhelds, computers, printers, and wireless phones. The Bluetooth communication range is usually up to approximately 30 feet.
Tools and Calendar  105 Turn Bluetooth On and Off By default, your phone‘s Bluetooth feature is set to Off. Turning Bluetooth on makes your phone ―discoverable‖ by other in-range Bluetooth phones. Note: Activating Bluetooth can drain your battery faster and reduce your available usage times. To conserve your phone‘s battery, turn off Bluetooth when not in use. Always turn off your Bluetooth when you are in locations that prohibit its use. Turn Bluetooth On 1.  Tap   >   >   Settings > Bluetooth. 2.  Tap   to activate the feature. When active,   appears within the Status Bar. Turn Bluetooth Off 1.  Tap   >   >   Settings > Bluetooth. 2.  Tap   to deactivate Bluetooth. Bluetooth Status Indicators The following icons show your Bluetooth connection status at a glance:  – Bluetooth is active  – Bluetooth is connected Bluetooth Settings Menu The Bluetooth settings menu allows you to set up many of the characteristics of your phone's Bluetooth service. Includes the following: ● Entering or changing the name your phone uses for Bluetooth communication ● Setting your phone's visibility (or ―discoverability”) for other Bluetooth phones To access the Bluetooth Settings menu: 1.  Tap   >   >   Settings > Bluetooth. 2.  Tap   to activate the feature. When active,   appears within the Status Bar. 3.  Set the following Bluetooth options:
Tools and Calendar  106   Tap the check box next to your device name to place a checkmark and make your phone visible to other phones for pairing and communication. Tap again to uncheck and make your phone invisible. Note: By default, the visibility option is set to 2 minutes. This value appears as a countdown within this field. You can change the visibility timeout. From the Bluetooth settings screen, tap   > Visibility timeout, then tap your preference. 4.  Tap Search for devices at the bottom of the screen to search for in-range Bluetooth-compatible devices. Make sure the target device is set to be discoverable. Pairing Bluetooth Devices The Bluetooth pairing process allows you to establish trusted connections between your phone and another Bluetooth device. When you pair devices, they share a passkey, allowing for fast, secure connections while bypassing the discovery and authentication process. Pair Your Phone 1.  Verify your Bluetooth is active. 2.  From the Bluetooth settings page, tap the check box next to your device name to make your phone visible. Your phone must be visible to successfully pair with an external device. If you want to search a new device, you also need to make that device visible.(See the instruction manual from the manufacturer.) 3.  Tap Search for devices. (Your phone will display a list of discovered in-range Bluetooth devices.) 4.  Tap a device from the list to initiate pairing. 5.  Depending on the device, you might have to tap Pair to accept the passkey (if they match), confirm matching passkeys, or enter the passkey or PIN Code. 6.  Tap Done > OK if you entered a passkey or PIN code. 7.  The external device will then have to accept the connection and enter your phone‘s PIN code. Note: Due to different specifications and features of other Bluetooth-compatible phones, display and operations may be different, and functions such as transfer or exchange may not be possible with all Bluetooth compatible phones. Pairing between two Bluetooth phones is a one-time process. Once a pairing has been created, the phones will continue to recognize their partnership and exchange information without having to re-enter a passcode again. Disconnect a Paired Phone Disconnecting a paired device breaks the connection between the device and your phone, but retains the pairing. At a later point when you wish to reconnect the device, there is no need to setup the connection information again. 1.  Verify your Bluetooth is active.
Tools and Calendar  107 2.  From the Bluetooth settings page, tap   next to the previously paired device (under the PAIRED DEVICE section). 3.  Tap Unpair. Note: Disconnections are manually done but often occur automatically if the paired device goes out of range of your phone or if it is powered off. Send Items via Bluetooth Depending on your paired phone's settings and capabilities, you may be able to send pictures, videos, Contacts information, or other items using a Bluetooth connection. Note: Prior to using this feature, Bluetooth must first be enabled, and the recipient‘s phone must be visible. If no phones are detected, tap Search for devices to begin a new search. Send Contact Information 1.  Tap   >   >   Contacts. 2.  Tap an entry to open its details page. 3.  Tap   > Share > Bluetooth. 4.  Tap a paired phone.   The external Bluetooth phone must be visible and communicating for the pairing to be successful. Send Pictures and/or Videos 1.  Tap   >   >   Gallery. 2.  Tap an album to open it and view its contents. (The pictures and videos in the album are displayed in chronological order.) 3.  Tap  , then checkmark pictures and/or videos to share. 4.  Tap Share > Bluetooth. 5.  Tap a paired phone.   The external Bluetooth phone must be visible and communicating for the pairing to be successful. Disconnect Bluetooth Connection During an Active Call You can manually disconnect or unpair from a Bluetooth phone through the Bluetooth settings menu. ■  During an active call, where the audio is being routed through a connected Bluetooth phone (headset or hands-free connection), tap Bluetooth to route the phone‘s audio through the connected Bluetooth headset (On) or through the speaker (Off).
Tools and Calendar  108   When the call is routed to a Bluetooth headset, the current call area is surrounded by a blue box, the Bluetooth button indicates it‘s on, and the Bluetooth call icon   is displayed in the Status Bar.   When Bluetooth is turned off, the call is routed through either the earpiece or speaker, the call area is surrounded by a green box, the Bluetooth button indicates it's off, and the Call icon   is displayed in the Status Bar. Note: Communication can be toggled between the Bluetooth headset and the phone earpiece or speaker by tapping the Bluetooth button On or Off. SmartShare You can use the SmartShare feature easily in the Gallery and Music apps. Enjoy Content Via a Variety of Devices You can share your phone's content with a variety of devices.  ■  Tap   to share the content in the Video and Music apps. ■  Tap   > SmartShare to share the contents. Playing / Sending ● Play: You can play the content via a TV, a Bluetooth speaker, etc. ● Beam: You can send the content to the device of Bluetooth and SmartShare Beam supported.  SmartShare Beam: Transfers the content fast via Wi-Fi Direct. Enjoy Content from Nearby Devices You can enjoy the content from nearby devices (i.e., PC, NAS, Mobile) in the Gallery and Music apps. Connecting Devices Connect your device and other devices supported by DLNA in the same Wi-Fi network. Searching Other Devices 1.  Tap Nearby devices, then you can see the DLNA-supported devices. 2.  Connect to the device to view the content. Using Content from the Cloud You can use content from the cloud (i.e., Dropbox) in the Gallery and Music apps.
Tools and Calendar  109 Using the Cloud Note: The supported features may vary depending on the cloud. Retrieving data may take some time depending on the cloud. 1.  Select Cloud in the Gallery and Music apps. 2.  Select the cloud what you want to use and log in. 3.  You can use the content of the cloud after logging in. 4.  Set the cloud settings to select the app to use the cloud. microSD Card  A microSD™ card is an optional accessory that allows you to store images, videos, music, documents, and voice data on your phone.  Insert a microSD Card  To insert a compatible microSD card into your phone.  1.  Insert your fingernail into the slot located on the lower left of the back cover and lift the cover up gently.  2.  Carefully insert the microSD card into the slot located above the SIM card slot.  3. Re-install the back cover. Remove a microSD Card Before removing your phone‘s microSD card, use the Storage settings menu to unmount the card. 1.  Tap   >   >   Settings > Storage > Unmount SD card. 2.  Insert your fingernail into the slot located on the lower left of the back cover and lift the cover up gently. 3.  Gently pull the microSD card out from the slot. 4.  Replace the back cover. Note: You can easily damage the microSD card by improper operation. Please be careful when inserting, removing, or handling the microSD card. Note: Make sure your battery is fully charged before using the microSD card. Your data may become damaged or unusable if the battery runs out while using the microSD card. View microSD Card Memory The Storage settings menu gives you access to your microSD card memory information.
Tools and Calendar  110 ■  With the microSD card inserted, Tap   >   >   Settings > Storage. Scroll down to view the total and available memory space. Format the microSD Card Formatting a microSD card permanently removes all files stored on the card. 1.  From home, touch   >   Settings > Storage. 2.  Scroll down the screen, touch Erase SD card > Erase SD card. 3.  Touch Erase everything to confirm the process. Note: The formatting procedure erases all the data on the microSD card, after which the files CANNOT be retrieved. To prevent the loss of important data, please check the contents before you format the card. Unmount the microSD Card When you need to remove the microSD card, you must unmount the microSD card first to prevent corrupting the data stored on it or damaging the microSD card.  1.  From home, touch   >   Settings > Storage. 2.  Touch Unmount SD card. 3.  Remove the microSD card. See Remove a microSD Card. Transfer User Contents From an Android Phone to Your LGLS991 If you want to transfer your user contents (i.e., pictures) from an Android phone to your LGLS991, you can perform one of the following steps. Transfer Via PC or Laptop You can transfer user contents via a desktop or laptop using a USB cable. 1.  Connect the Android phone to a computer using a USB cable. Then open the Android phone's Notifications Panel. 2.  Tap USB connected, then (depending on the phone) tap Media device (MTP) or Send images (PTP). 3.  On the computer, open My computer (or Windows Explorer), click the removable drive associated with your phone, then transfer all of the files you want to the computer. 4.  On the computer, safely stop/remove the USB Phone. For example, for Windows® XP, use the Safely Remove Hardware option. 5.  On the Android phone, open the Notifications Panel, tap USB connected > Charge phone then disconnect the previous Android Phone from the computer.
Tools and Calendar  111 6.  Connect the LGLS991 to the computer using the supplied USB cable. 7.  In the PC connection menu on the LGLS991, tap Media device (MTP). 8.  On the computer, organize the files in the folder, transfer the files into the LGLS991 folder, then safely stop/remove the USB Phone. 9.  On the LGLS991, open the Notifications Panel, tap USB connected > Charge phone, then disconnect it from the computer. Transfer Via Bluetooth Connection You can transfer user contents between Bluetooth-enabled phones via Bluetooth connection. For example, to transfer pictures and videos: 1.  Tap   >   >   Gallery. 2.  Tap  , then choose the file you want to send (or check Select all to send all files). 3.  Tap Share and tap Bluetooth. The Bluetooth menu appears. 4.  Tap Search for devices at the bottom of the screen to find the phone you want to send the file to. Then tap the phone and pair the devices to start the transfer.  – or – If the phone that may receive your file was already paired, it would be on the list of PAIRED PHONES. Tap the phone to start the transfer. Note: Any applications supporting Share, such as Music can send files via Bluetooth. Transfer Via Cloud Storage You can transfer user contents via the cloud service as Dropbox, Box Cloud, etc. after installing the apps from the Accounts & sync menu, Update Center, or Play Store. Note: It is recommended that you access your content through the cloud using a Wi-Fi connection to avoid data consumption.  .
Settings  112 Settings This section provides an overview of items you can change using your phone‘s System settings menus. Wireless Networks This group of settings lets you control your phone's Wi-Fi settings, Bluetooth, Tethering, VPN, Mobile networks, and more. Airplane Mode Airplane Mode (flight mode) allows you to use many of your phone‘s features, such as games, and music, when you are in an airplane or in any other area where making or receiving calls or data is prohibited. When you set your phone to Airplane Mode, it cannot send or receive any calls or access online data. Activate Airplane Mode 1.  Press and hold the Power/Lock Button   to display the phone options. 2.  Tap Turn on Airplane mode. – or – 1.  Tap   >   >   Settings. 2.  Tap the Airplane mode switch   to turn the function on. While in Airplane Mode, your phone‘s Status Bar will display  . Deactivate Airplane Mode 1.  Press and hold the Power/Lock Button   to reveal the phone options. 2.  Tap Turn off Airplane mode. – or – 1.  Tap   >   >   Settings. 2.  Tap Airplane mode switch   to turn the function off. Wi-Fi Settings Your phone lets you take advantage of Wi-Fi hotspots for high-speed data access using available computer networks. For details on your phone‗s Wi-Fi features and settings, see Connect Wi-Fi.
Settings  113 Wi-Fi Calling Settings You can make and receive calls via a Wi-Fi network. Wi-Fi Calling is an excellent solution for coverage issues in and around the home or wherever cellular coverage is limited. When Wi-Fi Calling is enabled, all incoming and outgoing calls will be made via your Wi-Fi network. Minutes used while connected to the Wi-Fi network count against your available rate plan minutes, see Wi-Fi Calling. Bluetooth Settings Your phone‘s Bluetooth capabilities let you use wireless headsets, send and receive pictures and files, and more. For details on your phone‗s Bluetooth settings, see Bluetooth Settings Menu. Mobile Data You can check the current data usage, set to enable/disable mobile data, or set the mobile data limit. Turn Mobile Data On or Off 1.  Tap   >   >   Settings > Mobile data.  2.  Tap the Mobile data switch   to turn it on.  – or – Tap the Mobile data switch   to turn it off. Call Settings Your phone's Call settings menu lets you configure International call options and TTY mode. Voicemail Settings You can configure your voicemail settings. For details on Voicemail settings, see Configure Visual Voicemail Settings. Smart Dialing Activate to make a call to the U.S. from abroad without entering the national code. Touch and hold 0 or tap the contact. 1.  Tap   >   >   Settings > Call. 2.  Tap the Smart dialing checkbox to enable/disable the feature. North American Dialing Replace + code as needed for outgoing calls. The Smart dialing option must be disabled. 1.  Tap   >   >   Settings > Call. 2.  Tap the North American dialing checkbox to enable/disable the feature.
Settings  114 International Dialing Set international dialing code for outgoing calls. The Smart dialing and North America dialing options must be disabled. 1.  Tap   >   >   Settings > Call > International dialing. 2.  Enter the international dialing code and tap OK. Incoming Voice Call Pop-up Activate to display the incoming call pop-up when using an application. 1.  Tap   >   >   Settings > Call. 2.  Tap the Incoming voice call pop-up checkbox to enable/disable the feature. Call Reject You can set call rejection and manage the reject list. 1.  Tap   >   >   Settings > Call > Call reject. 2.  Tap Call reject mode and set an option. 3.  Tap Reject calls from to set up the rejection list. Decline with Message You can send out a simple text message when you want to ignore an incoming call and respond to the caller with a text instead. You can add or edit quick messages. 1.  Tap   >   >   Settings > Call > Decline with message. 2.  Tap a quick message to edit it. – or – Tap   to add a new quick message. 3.  Enter a message and tap Save. Privacy Keeper You can set whether the phone to display the caller's information or not when you receive a call. 1.  Tap   >   >   Settings > Call > Privacy keeper. 2.  Tap Hide all info, Show number only, or Show caller info.
Settings  115 Auto Answer Tap to set auto answer with handsfree. 1.  Tap   >   >   Settings > Call > Auto answer. 2.  Tap Off, 1 sec, 3 sec or 5 sec. TTY Mode A TTY (also known as a TDD or Text Telephone) is a telecommunications phone that allows people who are deaf, hard of hearing, or who have speech or language disabilities, to communicate by telephone. Your phone is compatible with select TTY phones. Please check with the manufacturer of your TTY phone to ensure that it is compatible with digital cell phones. Your phone and TTY phone will connect via a special cable that plugs into your phone's headset jack. If this cable was not provided with your TTY phone, contact your TTY phone manufacturer to purchase the connector cable. To turn TTY Mode On or Off 1.  Tap   >   >   Settings > Call > TTY mode. 2.  Tap TTY Off to turn TTY mode off or tap TTY Full, TTY HCO or TTY VCO. To access the state Telecommunications Relay Service (TRS) for assistance with TTY calls: ■  Dial         to reach an operator. For additional information about Sprint Relay Services and TTY compatibility, call Sprint Relay Customer Service at 800-676-3777 or visit www.sprintrelay.com. Note: In TTY Mode, your phone will display the TTY access icon. When enabled, TTY mode may impair the audio quality of non-TTY phones connected to the headset jack. WARNING: 9-1-1 Emergency Calling Sprint recommends that TTY users make emergency calls by other means, including Telecommunications Relay Services (TRS), analog cellular, and landline communications. Wireless TTY calls to 9-1-1 may be corrupted when received by public safety answering points (PSAPs), rendering some communications unintelligible. The problem encountered appears related to software used by PSAPs. This matter has been brought to the attention of the FCC, and the wireless industry and the PSAP community are currently working to resolve this. Hearing Aids Tap to place the checkmark to turn on hearing aid compatibility. 1.  Tap   >   >   Settings > Call. 2.  Tap the Hearing aids checkbox to enable/disable the feature.
Settings  116 Proximity Sensor You can access the proximity sensor through the Call Settings menu. When receiving and making calls, this sensor automatically turns the backlight off and locks the touch keypad by sensing when the phone is near your ear. This extends battery life and prevents the touch keypad from activating unintentionally during calls. To enable the Proximity Sensor: 1.  Tap   >   >   Settings > Call. 2.  Tap the Proximity Sensor checkbox to enable it. (A blue checkmark will appear.) Voice Enhancement You can set the phone to enhance voice clarity in noisy environments so you can hear more clearly. To set noise reduction: 1.  Tap   >   >   Settings > Call.  2.  Tap the Voice enhancement checkbox to turn it on. (A blue checkmark will appear.)  Save Unknown Numbers You can set the phone to save the phone numbers not saved in Contacts yet.  To save unknown numbers: 1.  Tap   >   >   Settings > Call.  2.  Tap the Save unknown numbers checkbox to turn it on. (A blue checkmark will appear.) Power Key Ends Call You can set the phone to end calls with Power/Lock Button  , in addition to   on the call screen. To set to end calls with Power button: 1.  Tap   >   >   Settings > Call. 2.  Tap Power key ends call to enable it. (A blue checkmark will appear.) Roaming Settings With your phone and global roaming service from Sprint WorldwideSM Wireless Service, you can make phone calls and use wireless data services around the globe on compatible CDMA and GSM/UMTS networks.
Settings  117 Roaming Icon Your display screen always lets you know when you‘re off the Nationwide Sprint Network. Anytime you are roaming, the phone displays the CDMA roaming icon ( ) or the GSM roaming icon ( ). If you are roaming on a digital system, you will see the roaming icon along with the text – Digital Roam –. Roam on Other Digital Networks When you‘re roaming on digital networks, your call quality and security will be similar to the quality you receive when making calls on the Nationwide Sprint Network. However, you may not be able to access certain features, such as data services, depending on the available network. Note: If you‘re on a call when you leave the Nationwide Sprint Network, your call will be dropped. If your call is dropped in an area where you think Sprint service is available, turn your phone off and on again to reconnect to the network. Check for Voicemail Messages While Roaming When you are roaming off the Nationwide Sprint Network, you may not receive a notification of new voicemail messages on your phone. Callers can still leave messages, but you will need to periodically check your voicemail for new messages if you are in a roaming service area for an extended period of time. 1.  Dial your 10-digit wireless phone number. 2.  When you hear your voicemail greeting, tap  . 3.  Enter your passcode at the prompt and follow the voice prompts. When you return to the Nationwide Sprint Network, voicemail notification will resume as normal. Roaming Mode Your phone allows you to control your roaming capabilities. By using the Roaming menu option, you can determine which signals your phone accepts. Choose from two different settings on your dual-band phone to control your roaming experience. 1.  Tap   >   >   Settings > Roaming. 2.  Tap Roaming mode to change the CDMA roaming mode.  Home only to access only the home area mobile network, which is the Nationwide Sprint Network. This option also prevents roaming on other networks.  Automatic to seek service off the Nationwide Sprint Network. When Sprint service is unavailable, the phone searches for an alternate system.
Settings  118 3.  Tap each Domestic roaming option and International roaming option to place a checkmark and connect to voice and data service while roaming.  Note: With Data roaming unchecked, you can still transmit data with a Wi-Fi connection. See Connect Wi-Fi. Roaming Guard Roaming guard makes it easy to manage your roaming by requiring confirmation before placing or answering a roaming call. To turn Call Guard on or off: 1.  Tap   >   >   Settings > Roaming > Roaming guard. 2.  Tap each roaming guard option activate or deactivate this function. When active, an extra key press is required for dialing when in a roaming area. Note: Call Guard is turned on by default on your phone. Voice dialing and speed dialing are not available when you are roaming with Call Guard enabled. To place roaming calls with Call Guard on: 1.  Tap   >  . 2.  Enter 1 + area code + the seven-digit number and tap  . To answer incoming roaming calls with Call Guard on: 1.  Swipe   in any direction. A message will be displayed notifying you that roaming charges will apply. 2.  Tap Yes. Data Roam Guard Depending on service availability and roaming agreements, your phone may be able to access data services while roaming on certain digital systems. You can set your phone to alert you when you are roaming off the Nationwide Sprint Network and try to use data services such as messaging. Note: Data Roam Guard is turned on by default on your phone. To set your Data Roam Guard notification: 1.  Tap   >   >   Settings > Roaming > Roaming guard. 2.  Tap the Domestic data roaming, International data roaming checkboxes or both to place a checkmark and activate the function. To use data services when Data Roam Guard is active:
Settings  119 ■  When a pop-up notification appears informing you that data roam charges may apply, tap Connect or Always Connect to connect. Share & Connect Your phone lets you use the wireless technology that enables data transmission between devices using NFC, Wi-Fi, and other functions. NFC Settings NFC (Near Field Communication) is a wireless technology that enables data transmission between two objects when they are brought within a few inches of each other. When you enable NFC on your phone, it can exchange data with other NFC-enabled devices or read information from smart tags embedded in posters, stickers, and other products. From the NFC settings menu, you can manage direct sharing and pairing. To turn on NFC 1.  Tap   >   >   Settings > Share & connect. 2.  Tap the NFC switch   to activate the NFC feature. Note: When NFC is turned on, you can use the Tap & pay feature to pay for items just by touching your phone to a reader at a register. If your device doesn‘t have a default app, you can browse Google Play for other payment apps. Android Beam When this feature is turned on, you can beam app content to another NFC-capable device by holding the devices close together.  For example, you can beam Browser pages, YouTube videos, contacts, and more. Just bring the devices together (typically back to back) and then touch your screen. The app determines what gets beamed. Turn On Android Beam 1.  Tap   >   >   Settings > Share & connect. 2.  Tap the Android Beam switch   to activate the feature. (NFC turns on automatically).  SmartShare Beam Turn on to receive multimedia contents via SmartShare Beam from LG phones or tablets. Turn On SmartShare Beam 1.  Tap   >   >   Settings > Share & connect. 2.  Tap the SmartShare Beam switch   to activate the feature.
Settings  120 3.  Turn on the SmartShare Beam feature on other LG phones or tablets supporting SmartShare Beam to send/receive photos, music, videos and documents. Media Server  Share media content with nearby devices via DLNA.  1.  Tap   >   >   Settings > Share & connect.  2.  Tap Media sever and checkmark the Content sharing checkbox to allow nearby devices to access your content.  Miracast You can mirror the phone screen and sound onto a LG Miracast dongle or TV wirelessly. 1.  Tap   >   >   Settings > Share & connect. 2.  Tap the Miracast switch   to turn on this feature.  3.  Turn on the Miracast feature on your TV or connect to a LG Miracast dongle.  Tips: To start the Miracast feature quickly, tap the Miracast icon   in the Notifications Panel.  While mirroring, Wi-Fi Hotspot cannot be used simultaneously. More Settings This menu allows you to personalize additional wireless feature settings. USB Tethering You can share your phone's data connection with a computer by turning on USB tethering. To share your phone's data connection via USB cable: 1.  Connect your phone to your computer with a USB cable. 2.  Tap   >   >   Settings > More.... 3.  Tap the USB tethering switch   to activate it. Then tap OK to confirm. Note: You cannot access your phone's internal memory on your computer when using USB tethering. Wi-Fi Hotspot You can share your phone's data connection with up to eight phones at once by turning your phone into a Wi-Fi hotspot. To share your phone‘s data connection as a portable Wi-Fi hotspot:
Settings  121 1.  Tap   >   >   Settings > More... > Wi-Fi hotspot. 2.  Tap the Wi-Fi hotspot switch   to activate it. After a moment, the phone starts broadcasting its Wi-Fi network name (SSID), so you can connect it with up to eight (8) computers or other phones. 3.  To change the network name (SSID) or secure its Wi-Fi network, tap Set up Wi-Fi hotspot. 4. In the dialog box, configure the following options.   Tap the Wi-Fi name (SSID) field and enter a new network SSID (name) that other computers see when scanning for Wi-Fi networks.   To secure the Wi-Fi network, tap the Security menu and select WPA2 PSK (Wi-Fi Protected Access 2 with a Preshared Key). When a password field is added to the dialog box, enter a password. You will need to enter this password when you connect the phone‘s hotspot with a computer or other phone.   Tap the Broadcast SSID field to decide if you want your hotspot to be displayed to other devices.  To limit the number of phones to share your phone‘s data connection, tap Max users and select the number of the phones to limit. 5.  Tap Save. Bluetooth Tethering This feature allows you to connect other devices to your phone via Bluetooth and share its internet connection. Turn on Bluetooth Tethering 1.  Tap   >   >   Settings > More.... 2.  Tap the Bluetooth tethering switch   to activate. Help Displays help information for USB tethering, Wi-Fi hotspot, and Bluetooth tethering. Mobile Networks Settings This menu allows you to configure various mobile network settings. Enable/Disable Mobile Data Access Allows you to enable and disable data access over the mobile network. 1.  Tap   >   >   Settings > More... > Mobile networks.
Settings  122 2.  Tap the Mobile data checkbox to enable/disable the feature. 4G Settings Allows you to view your 4G Network operator and IP address. 1.  Tap   >   >   Settings > More... > Mobile networks.  2.  Tap the 4G settings to check Network operator and IP address. Network Mode Allows you to choose your preferred network mode. 1.  Tap   >   >   Settings > More... > Mobile networks > Network mode. 2.  Choose from the following options:   Tap Global to turn on the Global radio band.   Tap LTE/CDMA to turn on the LTE/CDMA radio band.   Tap CDMA to turn on the CDMA radio band.   Tap GSM/UMTS to turn on the GSM/UMTS radio band. Connections Optimizer Your phone can be set to automatically connect you to Wi-Fi networks on your device‘s remembered list and, if applicable, to the Sprint 4G Network. 1.  Tap   >   >   Settings > More.... 2.  Tap Mobile networks > Connections Optimizer.  3.  Read the message and, if you agree, tap I agree. VPN Settings From your phone, you can add, set up, and manage virtual private networks (VPNs) that allow you to connect and access resources inside a secured local network, such as your corporate network. For details on your phone's VPN settings, see Virtual Private Networks (VPN). Device Settings This group of settings lets you configure your phone's sound, display, gestures, power saver and apps. Sound Settings In the Sound settings menu, you can configure call and notification ringtones, audio volumes, as well as some related settings.
Settings  123 Sound Profile Allows you to set the sound profile to desired options. 1.  Tap   >   >   Settings. 2.  From the DEVICE section, tap Sound > Sound profile. 3.  Tap one of the three options. To switch to silent mode: 1.  Tap   >   >   Settings. 2.  From the DEVICE section, tap Sound > Sound profile. 3.  Tap Do not disturb. Volumes Adjust your phone's volume settings to suit your needs and your environment. 1.  Tap   >   >   Settings. 2.  From the DEVICE section, tap Sound > Volume. 3.  Adjust each volume level.  Ringtone: Changes the volume of your call ringtones (if applicable).  Notification sound: Allows you to set this volume level. This is the volume of the ringtone when you receive a notification.  Touch feedback & system: Changes the volume for feedback taps and system notifications.  Music, video, games & other media: Changes the volume of your music, videos and other media. 4.  Tap OK. Tip: You can adjust the ringer volume on the Home screen or Applications screen, or almost any screen by using the Volume Buttons on the back of your phone. In other applications such as Music, YouTube, spoken directions, and other audio, the Volume Buttons control the volume of the application. Vibrate Strength Set vibrate strength for incoming calls, notifications and touch feedback. Ringtone The phone ringtones alert you of incoming calls.
Settings  124 To select a ringtone for voice calls: 1.  Tap   >   >   Settings. 2.  From the DEVICE section, tap Sound > Ringtone. 3.  Tap a ringtone to select it and to hear it. If you want to set the ringtone, tap OK. If not, select another ringtone or tap Cancel. To use a song as a ringtone: You can use a song as your phone ringtone, in place of one of the ringtones that come with the phone. 1.  Tap   >   >   Settings. 2.  From the DEVICE section, tap Sound > Ringtone. 3.  Tap   and tap a song. For details about using the Music Player application, see Music. Notification Sound When you receive a notification such as the arrival of new messages, calendar events, or alarms, the phone sounds a ringtone. 1.  Tap   >   >   Settings > Sound. 2.  From the DEVICE section, tap Sound > Notification sound. 3.  Tap a sound to select it and to hear it. If you want to set the sound, tap OK. If not, select another sound or tap Cancel. Sound with Vibration Allows you to set the phone to vibrate accompanying the ringtone. 1.  Tap   >   >   Settings.  2.  From the DEVICE section, tap Sound.  3.  Tap the Sound with vibration checkbox to turn on the feature. (A blue checkmark will appear.) Vibrate Type Allows you to set a vibrate type for incoming calls, incoming messages and email, alarms, and calendar events. 1.  Tap   >   >   Settings. 2.  From the DEVICE section, tap Sound > Vibrate type.
Settings  125 Note: Vibrate Type can only be selected when Vibrate only is selected as the sound profile or Sound with vibration option is checked in the Sound screen. 3.  Set each vibrate type to the desired option. 4.  Tap OK. Do Not Disturb Allows you to set a schedule when to prevent interruptions from notifications. You can set to allow certain features to interrupt when Priority only is set. 1.  Tap   >   >   Settings. 2.  From the DEVICE section, tap Sound > Do not disturb. 3.  Set the desired options as needed. Lock Screen Allows you to choose if you want to show or hide notifications on the lock screen. 1.  Tap   >   >   Settings. 2.  From the DEVICE section, tap Sound > Lock screen. 3.  Tap the desired options. Apps Allows you to prevent apps from displaying notifications or set apps to show notifications with priority when Do not disturb is set to Priority only. 1.  Tap   >   >   Settings. 2.  From the DEVICE section, tap Sound > Apps. 3.  Tap the desired apps. 4.  Choose None to show no notifications from the app or choose Priority to show notifications with priority on top of others and when Do not disturb set to Priority only. Vibrate on Tap Vibrate when tapping the Home touch buttons and during other UI interactions. 1.  Tap   >   >   Settings. 2.  From the DEVICE section, tap Sound. 3.  Tap the Vibrate on tap checkbox to turn on the feature. (A blue checkmark will appear.)
Settings  126 Sound Effects This menu lets you select whether you hear tones when touching numbers on the dialpad, selecting on-screen options, and more.  1.  Tap   >   >   Settings. 2.  From the DEVICE section, tap Sound. 3.  Tap Sound effects, then tap the desired options checkbox to turn on the feature. (A blue checkmark will appear.)  Message/Call Voice Notifications To read out the incoming call and the message event automatically. 1.  Tap   >   >   Settings. 2.  From the DEVICE section, tap Sound > Message/call voice notifications. 3.  Tap   to turn the feature on and set the desired options. Display Settings Adjusting your phone's display settings not only helps you see what you want, it can also help increase battery life. Brightness Adjust your screen‘s contrast (brightness) to suit your surroundings. 1.  Tap   >   >   Settings. 2.  From the DEVICE section, tap Display > Brightness. 3.  Use the slider to set a brightness level. Note: For the best battery performance, use the dimmer levels. You can also set Automatic brightness to adjust brightness depending on the surrounding lighting. 4.  Tap OK. Screen Timeout Select how long the display screen remains backlit after you touch the screen or press a key before the screen darkens. 1.  Tap   >   >   Settings. 2.  From the DEVICE section, tap Display > Screen timeout.
Settings  127 3.  Tap 15 sec, 30 sec, 1 min, 2 min, 5 min, 10 min, 15 min,or Keep screen turned on. Note: Long backlight settings reduce the battery‘s talk and standby times. For the best battery performance, use the shortest convenient timeout. Screen-off Effect Select the screen-off effect when locking and turning off the screen. 1.  Tap   >   >   Settings. 2.  From the DEVICE section, tap Display > Screen-off effect. 3.  Tap the desired option. 4.  Tap OK. Note: To preview the screen-off effect, tap Preview. Auto-Rotate Screen Choose whether the phone automatically switches the orientation of the screen as you turn it sideways or even upside down. 1.  Tap   >   >   Settings. 2.  From the DEVICE section, tap Display. 3.  Tap the Auto-rotate screen checkbox to automatically rotate the screen (a blue checkmark will appear). – or – To disable the auto-rotate feature, tap the Auto-rotate screen checkbox again so that the checkmark is removed. Note: Some applications on your phone do not support the Auto-rotate feature. Daydream Screensaver will be on when the phone is sleeping while docked and/or charging. 1.  Tap   >   >   Settings. 2.  From the DEVICE section, tap Display > Daydream. 3.  Tap the feature you want to use and configure it. 4.  To activate the daydream feature, tap the Daydream switch  .
Settings  128 Font Type Choose the desired font type. 1.  Tap   >   >   Settings. 2.  From the DEVICE section, tap Display > Font type. 3.  Tap a desired font type. Font Size Choose the desired font size. 1.  Tap   >   >   Settings. 2.  From the DEVICE section, tap Display > Font size. 3.  Tap a desired font size. Smart Screen Keep the screen on when the device detects your eyes looking at the screen. 1.  Tap   >   >   Settings. 2.  From the DEVICE section, tap Display > Smart screen (A blue checkmark will appear). Home Touch Buttons Configure the Home touch button options. To select home touch buttons' combination:  1.  Tap   >   >   Settings.  2.  From the DEVICE section, tap Display > Home touch buttons > Button combination. 3.  Drag the icons to rearrange the Home touch buttons. To select home touch buttons' color: 1.  Tap   >   >   Settings. 2.  From the DEVICE section, tap Display > Home touch buttons > Color. 3.  Tap the desired color theme from the list. To select which apps hide the home touch buttons:  1.  Tap   >   >   Settings.
Settings  129 2.  From the DEVICE section, tap Display > Home touch buttons > Hide Home touch buttons. 3.  Tap the checkbox next to the apps you want to hide the home touch buttons (A blue checkmark will appear)  Notification LED Configures the notification flash options. 1.  Tap   >   >   Settings.  2.  From the DEVICE section, tap Display > Notification LED.  3.  To activate LED lights for notifications, tap the Notification LED switch  . 4.  Select the notification type(s) you want the LED to flash for.  Home Screen Settings Configure your phone's home screen settings. Select Home Choose the desired Home theme. 1.  Tap   >   >   Settings. 2.  From the DEVICE section, tap Home screen > Select Home. 3.  Choose Home (standard Android layout) or EasyHome (simplified version for users less familiar with Android navigation). Smart Bulletin Include an additional home screen showing customized info. 1.  Tap   >   >   Settings. 2.  From the DEVICE section, tap Home screen > Smart Bulletin. 3.  Tap the desired options you want to display on the Home screen (LG Health or Smart Tips). Wallpaper Choose the desired wallpaper for the Home screen. 1.  Tap   >   >   Settings. 2.  From the DEVICE section, tap Home screen > Wallpaper. 3.  Choose a location and select the desired wallpaper.
Settings  130 4.  Tap OK, Set wallpaper or Apply to set it as the wallpaper. Screen Swipe Effect Choose the desired type of effect to display when you swipe from one Home screen canvas to the next. 1.  Tap   >   >   Settings. 2.  From the DEVICE section, tap Home screen > Screen swipe effect. 3.  Tap the desired effect and OK. Allow Home Screen Looping Displays the first screen after the last screen when scrolling the Home screen. 1.  Tap   >   >   Settings. 2.  From the DEVICE section, tap Home screen. 3.  Tap the Allow Home screen looping checkbox. (A blue checkmark will appear.) Home Backup & Restore You can backup and restore app/widget layouts and the Home screen wallpaper. 1.  Tap   >   >   Settings. 2.  From the DEVICE section, tap Home screen. 3.  Tap Home backup & restore > Backup or Restore. Help Allows you to view help tips for the Home screen. Lock Screen Settings Lock screen menu lets you configure screen lock options. Select Screen Lock You can increase your phone's security by setting up a knock-code, pattern, PIN, or Password. When these features are enabled, you must show your face, draw the correct unlock pattern, enter the PIN, or enter the password on the screen to unlock and regain access to the phone. 1.  Tap   >   >   Settings. 2.  From the DEVICE section, tap Lock screen > Select screen lock. 3.  Select the desired screen lock option from the following options.
Settings  131  None: No screen lock set.  Swipe: Swipe any part of the screen to unlock the screen.   Knock Code: The Knock Code feature allows you to create your own unlock code using a combination of knocks on the screen. You can access the Home screen directly when the screen is off by tapping the same sequence on the screen.  Pattern: Opens a set of screens that guide you through drawing a screen unlock pattern. It's recommended that you enter backup PIN in case you lose the pattern. Then, you can set vibrate on touch or whether to make the pattern visible.   PIN: Enter a numeric PIN to unlock screen.   Password: Enter a password to unlock screen. From then on, any time you wish to turn the phone on or unlock the screen, you must draw your unlock pattern or enter the PIN or password to unlock the screen.  Note: You have five opportunities to enter your unlock Pattern, PIN or Password. If you've entered wrong information five times in a row, you must wait 30 seconds before you can attempt again. Note: When using Knock Code, failing to enter the correct sequence 5 times will display an outlined grid box to allow you precise entry. If you fail 1 more time, the backup PIN or Google account sign-in is required. ● If you‗ve set up a Google Account on the phone, tap the Forgot pattern? button. You will be able to unlock the phone with your Google Account username and password or entering you Backup PIN.  ● If you haven‗t created a Google Account on the phone, you must perform a factory reset.  CAUTION! If you perform a factory reset, all user applications and user data will be deleted. Please remember to back up any important data before performing a factory reset. ● When you can‗t recall your screen lock: 1.  Turn the phone off.  2.  Press and hold the following keys at the same time: Volume Down Button   + Power/Lock Button   on the back of the phone. 3.  Release only the Power/Lock Button   when the LG logo is displayed, then immediately press and hold the Power/ Lock Button   again. 4.  Release all keys when the Factory hard reset screen is displayed. 5.  Press the Volume Buttons   to highlight Yes, then press the Power/Lock Button   to continue.
Settings  132 6.  Press the Volume Buttons   to highlight Yes once more, then press the Power/Lock Button   to confirm. 7.  Your phone will perform a factory reset. Note: If you can't recall your unlock PIN or Password, call Sprint Customer Service at 1-888-211-4727. Smart Lock Allows you to set when to automatically unlock the phone. 1.  Tap   >   >   Settings.  2.  From the DEVICE section, tap Lock Screen > Smart Lock. Note: If you use this function, set a screen lock first. Screen Swipe Effect Wallpaper Select the wallpaper to display for your lock screen. 1.  Tap   >   >   Settings. 2.  From the DEVICE section, tap Lock screen > Wallpaper. 3.  Select Gallery or Wallpaper gallery. 4.  Select the desired wallpaper and tap Yes or Set wallpaper. Shortcuts  Customize clocks and shortcuts on the lock screen.  1.  Tap   >   >   Settings.  2.  From the DEVICE section, tap Lock screen > Shortcuts.  3.  Tap each shortcut key to select the desired shortcut key.  4.  After personalizing, tap Save.  Weather Animation Show weather animation effect on the lock screen based on auto-updated weather data. 1.  Tap   >   >   Settings. 2.  From the DEVICE section, tap Lock screen.
Settings  133 3.  Tap the Weather animation checkbox to show weather animation. (A blue checkmark will appear.) Contact Info for Lost Phone Select whether to display the owner information on the lock screen and customize the owner information. 1.  Tap   >   >   Settings. 2.  From the DEVICE section, tap Lock screen. 3.  Tap Contact info for lost phone the Always on Lock screen checkbox to show owner information on the lock screen. (A blue checkmark will appear.) 4.  Enter the desired information in the field provided. Lock Timer Choose the amount of time before the screen automatically locks after the screen has timed-out. 1.  Tap   >   >   Settings. 2.  From the DEVICE section, tap Lock screen > Lock timer. 3.  Tap the desired time. Power Button Instantly Locks Allows you to instantly lock the screen when you press the Power/Lock Button  . 1.  Tap   >   >   Settings. 2.  From the DEVICE section, tap Lock screen. 3.  Tap the Power button instantly locks checkbox to turn on the feature. (A blue checkmark will appear.) Gestures You can configure various gestures options. Answer an Incoming Call During an incoming call, bring the phone to your ear to answer the call. Note: If the proximity sensor is covered by an item, such as a phone case, it may cause incorrect action. 1.  Tap   >   >   Settings. 2.  From the DEVICE section, tap Gestures.
Settings  134 3.  Tap the Answer an incoming call checkbox to set this feature on. (A blue checkmark will appear.) Fade Out Ringtone You can set the phone to fade out the ringtone by picking up it from the flat surface during the incoming call. Note: If proximity sensor is covered by anything, such as a phone case, it may cause incorrect action. 1.  Tap   >   >   Settings. 2.  From the DEVICE section, tap Gestures. 3.  Tap the Fade out ringtone checkbox to set this feature on. (A blue checkmark will appear.) Silence Incoming Calls You can set the phone to silence incoming calls by just flipping the phone. 1.  Tap   >   >   Settings. 2.  From the DEVICE section, tap Gestures. 3.  Tap the Silence incoming calls checkbox to set this feature on. (A blue checkmark will appear.) Snooze or Stop Alarm You can set the phone to snooze or stop the alarm by just flipping the phone. 1.  Tap   >   >   Settings. 2.  From the DEVICE section, tap Gestures. 3.  Tap the Snooze or stop alarm checkbox to set this feature on. (A blue checkmark will appear.) Pause Video You can set the phone to pause a video by just flipping the phone. 1.  Tap   >   >   Settings. 2.  From the DEVICE section, tap Gestures. 3.  Tap the Pause video checkbox to set this feature on. (A blue checkmark will appear.) Help Allows you to view help information for the available gestures.
Settings  135 Motion Sensor Calibration Improves the accuracy of the tilt and speed of the sensor. 1.  Tap   >   >   Settings. 2.  From the DEVICE section, tap Gestures. 3.  Tap Motion sensor calibration. 4.  Place the phone on a flat surface and tap Calibrate sensor. One-handed Operation You can configure various one-handed operation's options. Dial Keypad To adjust the position of the dial keypad to the left or right. 1.  Tap   >   >   Settings. 2.  From the DEVICE section, tap One-handed operation. 3.  Tap the Dial keypad checkbox to set this feature on. (A blue checkmark will appear.) LG Keyboard To adjust the position of the LG keypad to the left or right. 1.  Tap   >   >   Settings. 2.  From the DEVICE section, tap One-handed operation. 3.  Tap the LG keyboard checkbox to set this feature on. (A blue checkmark will appear.) Lock Screen To adjust the position of the PIN entry to the left or right. 1.  Tap   >   >   Settings. 2.  From the DEVICE section, tap One-handed operation. 3.  Tap the Lock screen checkbox to set this feature on. (A blue checkmark will appear.) Help Allows you to view help information for one-handed operation features.
Settings  136 Storage The Storage menu lets you monitor the used and available internal memory and SD card (if available). you can also mount/unmount the SD card and erase its contents. 1.  Tap   >   >   Settings. 2.  From the DEVICE section, tap Storage. Battery The Battery menu lets you show any battery information and configure options. 1.  Tap   >   >   Settings. 2.  From the DEVICE section, tap Battery. 3.  Tap Battery percentage on status bar to display the battery percentage indicator on the Status Bar. 4.  Tap Battery saver to set the Battery saver feature on or off and select which functions are changed when the feature is activated. 5.  Tap Help to view tips about the Battery saver feature. Smart Cleaning Allows you to manage unused apps and data. 1.  Tap   >   >   Settings. 2.  From the DEVICE section, tap Smart cleaning. 3.  Tap the data you want to remove, then tap Clean. 4.  Tap Yes to proceed with deleting the files. Apps This menu lets you view details about the applications installed on your phone, manage their data, force them to stop, and set whether you want to permit installation of applications that you obtain from websites and email. To view details about the applications: 1.  Tap   >   >   Settings > Apps. 2.  Tap the DOWNLOADED, ON SD CARD, RUNNING or ALL tab to view your apps. 3.  Tap the desired app to view its information. To force applications to stop:
Settings  137 1.  Tap   >   >   Settings > Apps. 2.  Tap the RUNNING tab. 3.  Find the application to force stop and tap the application. 4.  Tap Stop. 5.  Read the disclaimer and tap Yes. To uninstall a downloaded application: 1.  Tap   >   >   Settings > Apps. 2.  Tap the DOWNLOADED tab. 3.  Find the application you want to uninstall and tap it. 4.  Tap Uninstall. 5.  Read the disclaimer and tap OK. Default Message App This menu allows you to set your default messaging app as desired. 1.  Tap   >   >   Settings. 2.  From the DEVICE section, tap Default message app. 3.  Tap the desired option. Dual Window Allows you to configure the Dual Window feature. 1.  Tap   >   >   Settings. 2.  From the DEVICE section, tap Dual window. Tap the Dual window switch   to activate. 3.  Tap the Split view checkmark to set this feature on. (A blue checkmark will appear.) 4.  Tap Help to view additional information on using Dual window. Personal Settings This group of settings lets you configure accounts & sync, cloud, guest mode, location, security, language & input, and backup & reset settings. Cloud The Cloud menu allows you to manage the cloud accounts for LG apps.
Settings  138 You can add your cloud account on the list and then you can browse, play and download your content on LG apps.  To add a cloud account: 1.  Tap   >   >   Settings. 2.  From the PERSONAL section, tap Cloud. 3.  To add an account, tap Add account and select Box, Dropbox, or LG Cloud. 4.  After signing in, tap the cloud menu in Gallery or Music app to use cloud content.  To set which apps to use the cloud with: 1.  Tap   >   >   Settings > Cloud. 2.  Select a cloud and tap the apps you want to use with it. To remove an account: 1.  Tap   >   >   Settings > Cloud.  2.  Select a cloud and tap   > Remove account > OK. Guest mode Use Guest mode when showing your phone to others. Only pre-selected apps will appear on a separate Home screen. You can enter Guest mode by drawing the mode pattern on the Lock screen. Note: To use Guest mode, set the Lock screen to pattern lock. Guest can also use apps not pre-selected but linked to pre-selected apps. Use Guest Mode 1.  Tap   >   >   Settings > Guest mode. 2.  To activate Guest mode, tap the Guest mode switch  . 3.  If not set, draw the pattern to use for Guest Mode. Set the Guest Mode Pattern 1.  Tap   >   >   Settings > Guest mode. 2.  Tap Set pattern to set the drawing pattern to unlock for Guest mode. Set the Apps Available for Guests 1.  Tap   >   >   Settings > Guest mode.
Settings  139 2.  Tap Set apps to select apps to be viewed in Guest mode. Help Displays help and use information for the Guest Mode feature. Location Allows you to turn on location service. Your phone determines your approximate location using GPS, Wi-Fi and mobile networks. ■  Tap   >   >   Settings > Location.  Mode – Set the location mode as High accuracy (GPS and networks), Battery saving (Networks only), and Device sensors only (GPS only). Security Use the Security settings to configure how to help secure your phone and its data. ■  Tap   >   >   Settings > Security. Content lock Select lock types to lock files in the Gallery. Encrypt Phone  Opens a screen that encrypts data on the phone for security. You will be required to enter a PIN or password to decrypt your phone each time you power it on. Encrypt SD Card Storage Encrypt SD card storage and keep data unavailable for other devices. Password Typing Visible Checkmark to briefly show each character of passwords as you enter them so that you can see what you enter. Phone Administrators Allows you to add or deactivate device administrators. Unknown Sources Allows installation of non-Play Store applications. Verify Apps Disallow or warn before installation of apps that may cause harm.
Settings  140 Storage Type Displays the storage type for credentials. Trusted Credentials Checkmark to allow applications to access your phone‘s encrypted store of secure certificates and related passwords and other credentials. You use credential storage to establish some kinds of VPN and Wi-Fi connections. If you have not set a password for the secure credential storage, this setting is dimmed. Install from Storage Touch to install a secure certificate from storage. Clear Credentials Deletes all secure certificates and related credentials and erases the secure storage's own password, after prompting you to confirm that you want to do this. Trust Agents View or deactivate Trust agents. Screen Pin This feature allows you to lock your device so that the current user can only access the pinned app. This is useful for users with children. Accounts & Sync Use the Accounts & sync settings menu to add, remove, and manage your Google and other supported accounts. You also use these settings to control how and whether all applications send, receive, and sync data on their own schedules and whether all applications can synchronize user data automatically. Gmail, Calendar, and other applications may also have their own settings to control how they synchronize data; see the sections on those applications for details. Tap Add account to add new account. 1.  Tap   >   >   Settings.  2.  From the PERSONAL section, tap Accounts & sync. Note: Tap Auto-sync data to automatically sync your account data. Language & Input Your phone's Language & input settings let you select a language for the devices screens and menus, as well as manage a personal user dictionary. The keyboard settings let you select a preferred input method, control keyboard settings, and more. Language You can choose to display your device's on-screen menus in multiple languages.
Settings  141 1.  Tap   >   >   Settings > Language & input > Language. 2.  Select a language from the list. Spelling Correction Allows spelling correction when using the on-screen keyboard.  Keyboard & Input Methods Shows the default keyboard type. Checkmark the keyboard you want to use from Google Keyboard, Swype, Google voice typing, or LG Keyboard. Tap   to configure each keyboard‘s settings.  Voice Search Tap to configure the Voice Search settings. Text-to-Speech Output Tap to set the preferred engine or general settings for text-to-speech output. Pointer Speed Adjust the pointer speed. Backup & Reset The privacy settings on your device allow you to back-up your data, automatically restore data, and erase all the data on your phone. Back Up My Data You can back up app data, Wi-Fi passwords, and other settings to Google servers. 1.  Tap   >   >   Settings > Backup & reset. 2.  Tap the Back up my data checkbox. (A blue checkmark will appear.)  3.  Check if the Backup account is correct. 4.  To set to automatically restore the backups, tap the Automatic restore checkbox. (A blue checkmark will appear.) Backup Account Allows you to choose an account to use to back up data. 1.  Tap   >   >   Settings > Backup & reset. 2.  Set the Backup account.
Settings  142 Automatic Restore When reinstalling an app, enabling this option restores backed up settings and data. 1.  Tap   >   >   Settings > Backup & reset. 2.  Tap the Automatic restore checkbox. (A blue checkmark will appear.) LG Backup Service Backs up all information on the device and restores it in the event of data loss or replacement.  ■  Tap   >   >   Settings > Backup & reset > LG Backup service.  Note: Tap   > Help to learn more about LG Backup Service. Factory Data Reset Resetting the phone restores all the factory defaults, including personal data from phone storage, information about your Google Account, any other accounts, your system and application settings, and any downloaded applications. After resetting the phone, the next time you turn on the phone, you‗re prompted to reenter the same kind of information as when you first started the phone. See Activate Your Phone. 1.  Tap   >   >   Settings > Backup & reset. 2.  If you are certain that you would like to restore all factory settings, tap Factory data reset. 3.  Tap Reset phone. 4.  Enter your unlock sequence if you have configured one, then tap Delete all and OK to confirm. System Settings This group of settings lets you configure date & time, accessibility, and other options. Shortcut Key Get quick access to apps by pressing and holding the Volume Buttons when the screen is off or locked.  : To access the QuickMemo+.  : To access the Camera. ■  Tap   >   >   Settings > Shortcut key. Date & Time Set your preferences for how the date and time is displayed. You can also select a time zone.
Settings  143 ■  Tap   >   >   Settings > Date & time. Accessibility Use the Accessibility settings to configure any accessibility plug-ins you have installed on your phone. Note: Requires additional plug-ins to become selectable. Vision Allows you to configure the following visual options. 1.  Tap   >   >   Settings > Accessibility. 2.  Set the following options as you want.   TalkBack: Tap the TalkBack switch   to turn it on. Tap Settings at the bottom of the screen to adjust the TalkBack settings. When TalkBack is turned on, the touchscreen settings require the user to first tap an item they wish to select, and then double tap the item again in order to access this feature.  Font size: Checkmark to increase the size of the text.  Invert colors: Checkmark to invert the colors of the screen and content.   Color adjustment: Set the color contrast for better screen viewing. Tap the Color adjustment switch   at the top right corner of the screen to turn it on. Then, tap the screen and drag across the screen in any direction until you see the color contrast you want to use.   Touch zoom: Zoom in or out by triple tapping the screen.  Message/call voice notifications: Use automatic spoken alerts for incoming calls and messages.  Screen shade: Set to 0% brightness of device for saving power and low vision.  Accessibility shortcut: Open accessibility options quickly on any screen.  Text-to-speech output: Text-to-speech output provides audible readout of text, for example, the contents of text messages, and the Caller ID for incoming calls. Hearing Allows you to configure the following hearing options. 1.  Tap   >   >   Settings > Accessibility. 2.  Set the following options as you want.   Audio type: Checkmark to change the sound to Mono or Stereo.
Settings  144  Sound balance: To manually adjust the sound direction.  Notification LED: Turn on the LED light for incoming calls and notifications  Flash alerts: The flash will blink for incoming calls and notifications.  Call reject message: Send a message customized for those with hearing impairments when a call is rejected.  Turn off all sounds: Activate to turn off all sounds.  Captions: Customize caption settings for those with hearing impairments. Physical and Motor Allows you to configure the following physical and motor options. 1.  Tap   >   >   Settings > Accessibility. 2.  Set the following options as you want.   Touch feedback time: Allows you to set the touch and hold delay (short, medium, or long).  Touch assistant: Provide a touch board with easy use for general buttons or gestures to access in short. Tap the Universal touch icon   to access the Power Button, Home Button, Volume Down Button, Volume Up Button, and the 1/2 button (Screen capture, Accessibility, Voice Mate, Pinch) button. Draw a "C" on the board to automatically display the Dial tab. Draw an "M" on the board to automatically display the Messaging application. Draw a "W" on the board to automatically launch the browser application. Draw a "S" on the board to automatically display the Settings. Draw an "L" on the board to automatically apply the Lock screen. Draw an "e" to open the E-mail app.  Screen timeout: Set the desired screen timeout. Recognition Allows you to configure the following touch control area option. 1.  Tap   >   >   Settings > Accessibility.  Touch control areas: Limit touch control to selected areas of the screen. Press the Volume Down Key and Home Key at the same time to activate and deactivate this feature. System Allows you to configure the following system options. 1.  Tap   >   >   Settings > Accessibility. 2.  Set the following options as you want.
Settings  145  Persistent notification: Tap the switch   to turn it on. Alerts sound repeatedly when there are unread notifications for certain apps.  Auto-rotate screen: Checkmark to allow the device to rotate the screen depending on the device orientation (portrait or landscape).  Password voice confirmation: Checkmark so that the device reads out passwords as your enter them.  Power key ends call: Checkmark so that you can end voice calls by pressing the Power/Lock Button  . When this option is enabled, pressing the Power/Lock Button during a call does not lock the screen.  Accessibility settings shortcut: Sets quick, easy access to selected features when you triple-tap the Home Key  . Choose Off, Show all, TalkBack, Invert colors, Touch assistant or Accessibility settings.  One-touch input: Checkmark so that each finger touch enters a letter/character on the LG Keyboard. Services Allows you to configure the service options.  1.  Tap   >   >   Settings > Accessibility.  Switch Access: Set to control your device using configurable key combinations. QuickCircle Case This menu allows you to select apps to be used directly on the cover in small view using QuickCircle. Keep in mind that turning on these QuickCircle case settings may result in irregular device behavior. ■  Tap   >   >   Settings > QuickCircle case. Tap   to activate the feature. Tap Select apps to choose which apps are displayed when using the QuickCircle case. Select the Auto-unlock option to unlock the phone automatically when the cover is opened, if the screen lock is set to Swipe. Activate This Device Follow the on-screen instructions to activate your phone.  1.  Tap   >   >   Settings > Activate this device.  2.  Follow the on-screen instructions.
Settings  146 System Updates From time to time, updates may become available for your phone. You can download and apply updates through the Settings menu. Update PRL This option allows you to download and update the PRL (Preferred Roaming List) automatically. 1.  Tap   >   >   Settings > System updates > Update PRL. 2.  Follow the on-screen instructions. Update Profile This option allows you to automatically update your online user profile information. If you choose to change your user name and select a new one online, you must then update the user name on your phone. 1.  Tap   >   >   Settings > System updates > Update profile. 2.  Follow the on-screen instructions. Update Firmware This option allows you to download and update the Firmware for your device. 1.  Tap   >   >   Settings > System updates > Update Firmware. 2.  Follow the on-screen instructions. Update LG Software This option allows you to download and update the LG software. 1.  Tap   >   >   Settings > System updates > Update LG software. 2.  Follow the on-screen instructions. UICC Unlock This option allows you to unlock the client initiated UICC. 1.  Tap   >   >   Settings > System updates > UICC Unlock. 2.  Follow the on-screen instructions. Printing This menu allows you to manage your Google Cloud Print settings and print jobs.
Settings  147 ■  Tap   >   >   Settings > Printing. About Phone Display information about the network, phone identity, battery, hardware, software, legal, and regulations and safety. 1.  Tap   >   >   Settings > About phone. 2.  Tap the desired menu.
Index 148 Important Information for the LGLS991 Important Safety Information This booklet contains important operational and safety information that will help you safely use your phone. Failure to read and follow the information provided in this booklet may result in serious bodily injury, death, or property damage. General Precautions Warning: This product contains chemicals known to the State of California to cause cancer and birth defects or reproductive harm. Wash hands after handling. There are several simple guidelines to operating your phone properly and maintaining safe, satisfactory service. ● To maximize performance, do not touch the bottom portion of your phone where the internal antenna is located while using the phone. ● Speak directly into the mouthpiece. ● Avoid exposing your phone and accessories to rain or liquid spills. If your phone does get wet, immediately turn the power off and remove the battery. ● Do not expose your phone to direct sunlight for extended periods of time (such as on the dashboard of a car). ● Although your phone is quite sturdy, it is a complex piece of equipment and can be broken. Avoid dropping, hitting, bending, or sitting on it. ● Any changes or modifications to your phone not expressly approved in this document could void your warranty for this equipment and void your authority to operate this equipment. Note: For the best care of your device, only Sprintauthorized personnel should service your phone and accessories. Failure to do so may be dangerous and void your warranty. Maintaining Safe Use of and Access to Your Phone Do Not Rely on Your Phone for Emergency Calls Mobile phones operate using radio signals, which cannot guarantee connection in all conditions. Therefore you should never rely solely upon any mobile phone for essential communication (e.g., medical emergencies). Emergency calls may not be possible on all cellular networks or when certain network services or mobile phone features are in use. Check with your local service provider for details. Using Your Phone While Driving Talking on your phone while driving (or operating the phone without a hands-free device) is prohibited in some jurisdictions. Laws vary as to specific restrictions. Remember that safety always comes first. Tip: Purchase an optional hands-free accessory at your local Sprint Store, or call Sprint at 1-866-866-7509.
Index 149 Following Safety Guidelines To operate your phone safely and efficiently, always follow any special regulations in a given area. Turn your phone off in areas where use is forbidden or when it may cause interference or danger. Using Your Phone Near Other Electronic Devices Most modern electronic equipment is shielded from radio frequency (RF) signals. However, RF signals from wireless phones may affect inadequately shielded electronic equipment. RF signals may affect improperly installed or inadequately shielded electronic operating systems or entertainment systems in motor vehicles. Check with the manufacturer or their representative to determine if these systems are adequately shielded from external RF signals. Also check with the manufacturer regarding any equipment that has been added to your vehicle. Consult the manufacturer of any personal medical devices, such as pacemakers and hearing aids, to determine if they are adequately shielded from external RF signals. Note: Always turn off the phone in healthcare facilities, and request permission before using the phone near medical equipment. Turning Off Your Phone Before Flying Turn off your phone before boarding any aircraft. To prevent possible interference with aircraft systems, the U.S. Federal Aviation Administration (FAA) regulations require you to have permission from a crew member to use your phone while the plane is on the ground. To prevent any risk of interference, FCC regulations prohibit using your phone while the plane is in the air. Turning Off Your Phone in Dangerous Areas To avoid interfering with blasting operations, turn your phone off when in a blasting area or in other areas with signs indicating two-way radios should be turned off. Construction crews often use remote-control RF devices to set off explosives. Turn your phone off when you‘re in any area that has a potentially explosive atmosphere. Although it‘s rare, your phone and accessories could generate sparks. Sparks can cause an explosion or fire, resulting in bodily injury or even death. These areas are often, but not always, clearly marked. They include: ● Fueling areas such as gas stations. ● Below deck on boats. ● Fuel or chemical transfer or storage facilities. ● Areas where the air contains chemicals or particles such as grain, dust, or metal powders. ● Any other area where you would normally be advised to turn off your vehicle‘s engine. Note: Never transport or store flammable gas, flammable liquids, or explosives in the compartment of your vehicle that contains your phone or accessories.
Index 150 Restricting Children‘s Access to Your Phone Your phone is not a toy. Do not allow children to play with it as they could hurt themselves and others, damage the phone or make calls that increase your Sprint invoice. Using Your Phone With a Hearing Aid Device Your LGLS991 has an M3/T3 rating. While some wireless phones are used near some hearing devices (hearing aids and cochlear implants), users may detect a buzzing, humming, or whining noise. Some hearing devices are more immune than others to this interference noise, and phones also vary in the amount of interference they generate. The wireless telephone industry has developed a rating system for wireless phones, to assist hearing device users to find phones that may be compatible with their hearing devices. Not all phones have been rated. Phones that are rated have the rating on their box or a label located on the box. The ratings are not guarantees. Results will vary depending on the user‘s hearing device and hearing loss. If your hearing device happens to be vulnerable to interference, you may not be able to use a rated phone successfully. Trying out the phone with your hearing device is the best way to evaluate it for your personal needs. M-Ratings: Phones rated M3 or M4 meet FCC requirements and are likely to generate less interference to hearing devices than phones that are not labeled. M4 is the better/higher of the two ratings. T-Ratings: Phones rated T3 or T4 meet FCC requirements and are likely to generate less interference to hearing devices than phones that are not labeled. T4 is the better/higher of the two ratings. Hearing devices may also be rated. Your hearing device manufacturer or hearing health professional may help you find this rating. Higher ratings mean that the hearing device is relatively immune to interference noise. The hearing aid and wireless phone rating values are then added together. A sum of 5 is considered acceptable for normal use. A sum of 6 is considered for best use. In the above example, if a hearing aid meets the M2 level rating and the wireless phone meets the M3 level rating, the sum of the two values equal M5. This should provide the hearing aid user with “normal usage‖ while using their hearing aid with the particular wireless phone. ―Normal usage‖ in this context is defined as a signal quality that‘s acceptable for normal operation. The M mark is intended to be synonymous with the U mark. The T mark is intended to be marks are recommended by the Alliance for Telecommunications Industries Solutions (ATIS). The U and UT marks are referenced in Section 20.19 of the FCC Rules. The HAC rating and measurement procedure are described in the American National Standards Institute (ANSI) C63.19 standard. To ensure that the Hearing Aid Compatibility rating for your phone is maintained, secondary transmitters such as Bluetooth and WLAN components must be disabled during a call. For information about hearing aids and digital wireless phones, visit: Wireless Phones and Hearing Aid Accessibility http://www.accesswireless.org/ Gallaudet University, RERC http://tap.gallaudet.edu/Voice/ FCC Hearing Aid Compatibility and Volume Control http://www.fcc.gov/cgb/dro/hearing.html The Hearing Aid Compatibility FCC Order http://hraunfoss.fcc.gov/edocs_public/attachmatch/FCC-03-168A1.pdf
Index 151 Hearing Loss Association of America [HLAA] http://hearingloss.org/content/telephonesandmobile-devices Note: HAC statement This phone has been tested and rated for use with hearing aids for some of the wireless technologies that it uses. However, there may be some newer wireless technologies used in this phone that have not been tested yet for use with hearing aids. It is important to try the different features of this phone thoroughly and in different locations, using your hearing aid or cochlear implant, to determine if you hear any interfering noise. Consult your service provider or the manufacturer of this phone for information on hearing aid compatibility. If you have questions about return or exchange policies, consult your service provider or phone retailer. Hearing aid devices may also be measured for immunity to interference noise from wireless phones and should have ratings similar to phones. Ask your hearing healthcare professional for the rating of your hearing aid. Add the rating of your hearing aid and your phone to determine probable usability: ● Any combined rating equal to or greater than six offers excellent use. ● Any combined rating equal to five is considered normal use. ● Any combined rating equal to four is considered usable. Thus, if you pair an M3 hearing aid with an M3 phone, you will have a combined rating of six for “excellent use.‖ This is synonymous for T ratings. Sprint further suggests you experiment with multiple phones (even those not labeled M3/T3 or M4/T4) while in the store to find the one that works best with your hearing aid device. Should you experience interference or find the quality of service unsatisfactory after purchasing your phone, promptly return it to the store within 14 days of purchase. (A restocking fee may be applied to exchanges. Visit sprint.com/returns for details.) More information about hearing aid compatibility may be found at: fcc.gov, fda.gov,and accesswireless.org. Getting the Best Hearing Device Experience With Your Phone To further minimize interference: ● Set the phone‘s display and keypad backlight settings to ensure the minimum time interval: 1.  Tap   >   >   Settings > Display > Screen timeout. 2.  Tap the minimum time interval setting. ● Position the phone so the internal antenna is farthest from your hearing aid. ● Move the phone around to find the point with least interference. When you‘re talking on a cell phone, it‘s recommended that you turn the BT (Bluetooth) or WLAN mode off for HAC.
Index 152 Caring for the Battery Protecting Your Battery The guidelines listed below help you get the most out of your battery‘s performance. ● Recently there have been some public reports of wireless phone batteries overheating, catching fire, or exploding. It appears that many, if not all, of these reports involve counterfeit or inexpensive, aftermarket-brand batteries with unknown or questionable manufacturing standards. Sprint is not aware of similar problems with Sprint phones resulting from the proper use of batteries and accessories approved by Sprint or the manufacturer of your phone. Use only Sprint approved or manufacturer-approved batteries and accessories found at Sprint Stores or through your phone‘s manufacturer, or call 1-866-866-7509 to order. They‘re also available at sprint.com/accessories. Buying the right batteries and accessories is the best way to ensure they‘re genuine and safe. ● In order to avoid damage, charge the battery only in temperatures that range from 32° F to 113° F (0° C to 45° C). ● Don‘t use the battery charger in direct sunlight or in high humidity areas, such as the bathroom. ● Never dispose of the battery by incineration. ● Keep the metal contacts on top of the battery clean. ● Don‘t attempt to disassemble or short-circuit the battery. ● The battery may need recharging if it has not been used for a long period of time. ● It‘s best to replace the battery when it no longer provides acceptable performance. It can be recharged hundreds of times before it needs replacing. ● Don‘t store the battery in high temperature areas for long periods of time. It‘s best to follow these storage rules:   Less than one month:    -4° F to 140° F (-20° C to 60° C)   More than one month:   -4° F to 113° F (-20° C to 45° C) ● Do not disassemble or open crush, bend or deform, puncture or shred. ● Do not modify or remanufacture, attempt to insert foreign objects into the battery, immerse or expose to water or other liquids, expose to fire, explosion or other hazard. ● Only use the battery for the system for which it is specified. ● Only use the battery with a charging system that has been qualified with the system per CTIA Certification Requirements for Battery System Compliance to IEEE1725. Use of an unqualified battery or charger may present a risk of fire, explosion, leakage, or other hazard.
Index 153 ● Do not short circuit a battery or allow metallic conductive objects to contact battery terminals. ● Replace the battery only with another battery that has been qualified with the system per this standard, IEEE-Std-1725. Use of an unqualified battery may present a risk of fire, explosion, leakage or other hazard. ● Only authorized service providers shall replace battery(If the battery is non-user replaceable). ● Promptly dispose of used batteries in accordance with local regulations. ● Battery usage by children should be supervised. ● Avoid dropping the phone or battery. If the phone or battery is dropped, especially on a hard surface, and the user suspects damage, take it to a service center for inspection. ● Improper battery use may result in a fire, explosion or other hazard. Battery information and care Always unplug the charger from the wall socket after the phone is fully changed to save unnecessary power consumption of the charger. Instructions for Wireless Charger Your LGLS991 uses a wireless charger based on the WPC Qi standard. Only use a manufacturerapproved wireless charger (sold separately). Disposal of Lithium Ion (Li-Ion) Batteries Do not handle a damaged or leaking Li-Ion battery as you can be burned. For safe disposal options of your Li-Ion batteries, contact your nearest Sprint authorized service center. Special Note: Be sure to dispose of your battery properly. In some areas, the disposal of batteries in household or business trash may be prohibited. Radio Frequency (RF) Energy Understanding How Your Phone Operates Your phone is basically a radio transmitter and receiver. When it‘s turned on, it receives and transmits radio frequency (RF) signals. When you use your phone, the system handling your call controls the power level. This power can range from 0.006 watt to 0.2 watt in digital mode. Knowing Radio Frequency Safety The design of your phone complies with updated NCRP standards described below. In 1991–92, the Institute of Electrical and Electronics Engineers (IEEE) and the American National Standards Institute (ANSI) joined in updating ANSI‘s 1982 standard for safety levels with respect to human exposure to RF signals. More than 120 scientists, engineers and physicians from universities, government health agencies and industries developed this updated standard after reviewing the available body of research. In 1993, the Federal Communications Commission (FCC) adopted this updated
Index 154 standard in a regulation. In August 1996, the FCC adopted hybrid standard consisting of the existing ANSI/IEEE standard and the guidelines published by the National Council of Radiation Protection and Measurements (NCRP). Body-Worn Operation This device was tested for typical body-worn operations with the back of the phone kept 0.39 inches (1cm) between the user‘s body and the back of the phone. To comply with FCC RF exposure requirements, a minimum separation distance of 0.39 inches (1cm) must be maintained between the user‘s body and the back of the phone. Third-party belt-clips, holsters, and similar accessories containing metallic components may not be used. Body-worn accessories that cannot maintain 0.39 inches (1cm) separation distance between the user‘s body and the back of the phone, and have not been tested for typical body-worn operations may not comply with FCC RF exposure limits and should be avoided. For more information about RF exposure, visit the FCC website at fcc.gov. SAR (Specific Absorption Rate) This model phone meets the Government‘s requirements for exposure to radio waves. Your wireless phone is a radio transmitter and receiver. It is designed and manufactured not to exceed the emission limits for exposure to radiofrequency (RF) energy set by the Federal Communications Commission (FCC) of the U.S. Government. These FCC exposure limits are derived from the recommendations of two expert organizations, the National Counsel on Radiation Protection and Measurement (NCRP) and the Institute of Electrical and Electronics Engineers (IEEE). In both cases, the recommendations were developed by scientific and engineering experts drawn from industry, government, and academia after extensive reviews of the scientific literature related to the biological effects of RF energy. The exposure limit for wireless mobile phones employs a unit of measurement known as the Specific Absorption Rate, or SAR. The SAR is a measure of the rate of absorption of RF energy by the human body expressed in units of watts per kilogram (W/kg). The FCC requires wireless phones to comply with a safety limit of 1.6 watts per kilogram (1.6 W/kg). The FCC exposure limit incorporates a substantial margin of safety to give additional protection to the public and to account for any variations in measurements. Tests for SAR are conducted using standard operating positions specified by the FCC with the phone transmitting at its highest certified power level in all tested frequency bands. Although SAR is determined at the highest certified power level, the actual SAR level of the phone while operating can be well below the maximum value. Because the phone is designed to operate at multiple power levels to use only the power required to reach the network, in general, the closer you are to a wireless base station antenna, the lower the power output. Before a phone model is available for sale to the public, it must be tested and certified to the FCC that it does not exceed the limit established by the government adopted requirement for safe exposure. The tests are performed in positions and locations (e.g., at the ear and worn on the body) as required by the FCC for each model. The highest SAR values are: ●Head: 1.19 W/kg●Body (Body-worn/Hotspot): 0.93 W/kg
Index 155 (body measurements differ among phone models, depending upon available accessories and FCC requirements). While there may be differences between SAR levels of various phones and at various positions, they all meet the government requirement for safe exposure. The FCC has granted an Equipment Authorization for this model phone with all reported SAR levels evaluated as in compliance with the FCC RF emission guidelines. SAR information on this model phone is on file with the FCC and can be found under the Display Grant section of http://www.fcc.gov/oet/ea/fccid/after searching on FCC ID ZNFLS991. To find information that pertains to a particular model phone, this site uses the phone FCC ID number which is usually printed somewhere on the case of the phone. Sometimes it may be necessary to remove the battery pack to find the number. Once you have the FCC ID number for a particular phone, follow the instructions on the website and it should provide values for typical or maximum SAR for a particular phone. Additional information on Specific Absorption Rates (SAR) can be found on the Cellular Telecommunications Industry Association (CTIA) website at http://www.ctia.org/ *In the United States and Canada, the SAR limit for mobile phones used by the public is 1.6 watts/kg(W/kg) averaged over one gram of tissue. The standard incorporates a substantial margin of safety to give additional protection for the public and to account for any variations in measurements. FCC Notice Part 15.19 statement This device complies with Part 15 of the FCC rules. Operation is subject to the following two conditions: (1) This device may not cause harmful interference. (2) This device must accept any interference received, including interference that may cause undesired operation. Part 15.21 statement Change or Modifications that are not expressly approved by the manufacturer could void the user‘s authority to operate the equipment. Part 15.105 statement This equipment has been tested and found to comply with the limits for a class B digital device, pursuant to Part 15 of the FCC Rules. These limits are designed to provide reasonable protection against harmful interference in a residential installation. This equipment generates uses and can radiate radio frequency energy and, if not installed and used in accordance with the instructions, may cause harmful interference to radio communications. However, there is no guarantee that interference will not occur in a particular installation. If this equipment does cause harmful interference or television reception, which can be determined by turning the equipment off and on, the user is encouraged to try to correct the interference by one or more of the following measures: ●Reorient or relocate the receiving antenna.●Increase the separation between the equipment and receiver.●Connect the equipment into an outlet on a circuit different from that to which the receiver isconnected.
Index 156 ●Consult the dealer or an experienced radio/TV technician for help.Owner‘s Record The model number, regulatory number, and serial number are located on a nameplate inside the battery compartment. Record the serial number in the space provided below. This will be helpful if you need to contact us about your phone in the future. Model: LGLS991 Serial No.: Laser safety statement CDRH Compliance THIS PRODUCT COMPLIES WITH APPLICABLE REQUIREMENT OF THE DHHS PERFORMANCE STANDARD FOR LASER PRODUCT, 21 CFR SUBCHAPTER J. Caution! This product employs a Laser system. To ensure proper use of this product, please read this owner‘s manual carefully and retain for future reference. Should the unit require maintenance, contact an authorized service center. Use of controls, adjustments, or the performance of procedures other than those specified herein may result in hazardous radiation exposure. To prevent direct exposure to laser beam, do not try to open the enclosure or to make the direct contact with the laser. Manufacturer’s Warranty with reliable, worry-free service. If for any reason you have a problem with your equipment, please refer to the manufacturer‘s warranty in this section. For information regarding the terms and conditions of service for your device, please visit sprint.com or call Sprint Customer Service at 1-888-211-4727. Manufacturer‘s Warranty 1. WHAT THIS WARRANTY COVERS:LG offers you a limited warranty that the enclosed subscriber unit and its enclosed accessories will be free from defects in material and workmanship, according to the following terms and conditions:
Index 157 (1) The limited warranty for the unit and enclosed accessories shall be a period of one (1) year from the date of original purchase. The remaining warranty period for the unit being repaired or replaced shall be determined by presentation of the original sales receipt for the purchase of the unit. (2) The limited warranty extends only to the original purchaser of the product and is not assignable or transferable to any subsequent purchaser / end user. (3) The limited warranty is good only to the original purchaser of the product during the warranty period as long as it is in the U.S., including Alaska, Hawaii, U.S. Territories, and all Canadian Provinces. (4) The external housing and cosmetic parts shall be free of major defects at the time of shipment and, therefore, shall not be covered under these limited warranty terms. (5) Upon request from LG, the consumer must provide information satisfactory to LG to prove the date of purchase or exchange. (6) The customer shall bear the cost of shipping the product to the Customer Service Department of LG. LG shall bear the cost of shipping the product back to the consumer after the completion of service under this limited warranty. 2. WHAT THIS WARRANTY DOES NOT COVER:(1) Defects or damage resulting from use of the product in other than its normal and customary manner. (2) Defect or damage from abnormal use, abnormal conditions, improper storage, exposure to moisture or dampness, unauthorized modifications, unauthorized connections, unauthorized repair, misuse, neglect, abuse, accident, alteration, improper installation, or other acts which are not the fault of LG, including damage caused by shipping, blown fuses, or spills of food or liquid. (3) Breakage or damage to antennas unless caused directly by defects in material or workmanship. (4) Alleged defects or malfunctions of the product if the Customer Service Department at LG was not notified by the consumer during the applicable limited warranty period. (5) Products which have had the serial number removed or made illegible. (6) This limited warranty is in lieu of all other warranties, express or implied either in fact or by operations of law, statutory or otherwise, including but not limited to any implied warranty of marketability merchantability or fitness for a particular use. (7) Damage resulting from use of non-LG approved accessories. (8) All plastic surfaces and all other externally exposed parts that are scratched or damaged due to normal customer use. (9) Products operated outside published maximum ratings. (10) Products used or obtained in a rental program. (11) Consumables (such as fuses). 3. WHAT LG WILL DO:
Index 158 LG will, at its sole option, either repair, replace or refund the purchase price of any unit that does not conform to this limited warranty. LG may choose at its option to use functionally equivalent re-conditioned, refurbished or new units or parts or any units. In addition, LG will not reinstall or back-up any data, applications or software that you have added to your device. It is therefore recommended that you back-up any such data or information prior to sending the unit to LG to avoid the permanent loss of such information. 4. STATE LAW RIGHTS:No other express warranty is applicable to this product. THE DURATION OF ANY IMPLIED WARRANTIES, INCLUDING THE IMPLIED WARRANTY OF MARKETABILITY OR MERCHANTABILITY OR FITNESS FOR A PARTICULAR PURPOSE, IS LIMITED TO THE DURATION OF THE EXPRESS WARRANTY HEREIN. LG SHALL NOT BE LIABLE FOR THE LOSS OF THE USE OF THE PRODUCT, INCONVENIENCE, LOSS OR ANY OTHER DAMAGES, DIRECT OR CONSEQUENTIAL, ARISING OUT OF THE USE OF, OR INABILITY TO USE, THIS PRODUCT OR FOR ANY BREACH OF ANY EXPRESS OR IMPLIED WARRANTY, INCLUDING THE IMPLIED WARRANTY OF MARKETABILITY OR MERCHANTABILITY OR FITNESS FOR A PARTICULAR PURPOSE APPLICABLE TO THIS PRODUCT. Some states do not allow the exclusive limitation of incidental or consequential damages or limitations on how long an implied warranty lasts; so these limitations or exclusions may not apply to you. This warranty gives you specific legal rights and you may also have other rights which vary from state to state. 5. HOW TO GET WARRANTY SERVICE:To obtain warranty service, please call or fax to the following telephone numbers from anywhere in the continental United States: Tel. 1-800-793-8896 or Fax. 1-800-448-4026 Or visit http://us.lgservice.com. Correspondence may also be mailed to: LG Electronics Service-Mobile Handsets P.O. Box 240007, Huntsville, AL 35824 DO NOT RETURN YOUR PRODUCT TO THE ABOVE ADDRESS. Please call or write for the location of the LG authorized service center nearest you and for the procedures for obtaining warranty claims. General Terms and Conditions of Service Please note that these terms may not be the most current version. A current version of the terms is available at our website at sprint.com/ termsandconditions or upon request. Para solicitar esta literatura en español, por favor contactar a 1-800-777-4681 o visitar a sprint.com/espanol. Basic Definitions In this document: (1) ―we,‖ ―us,‖ ―our,‖ and ―Sprint‖ mean Sprint Solutions, Inc., as contracting agent on behalf of the applicable Sprint affiliated entities providing the products and Services; (2) ―you,‖ ―your,‖ ―customer,‖ and ―user‖ mean an account holder with us or any user of our Devices or Services; (3)
Index 159 ―Device‖ means any phone, aircard, mobile broadband device, any other device, accessory, or other product that we provide you, we sell to you, or is active on your account with us; and (4) ―Service‖ means Sprint-branded offers, rate plans, options, wireless services, billing services, applications, programs, products, software, or Devices on your account with us. ―Service(s)‖ also includes any other product or service that we offer or provide to you that references these General Terms and Conditions of Service (―Ts&Cs‖). The Service Agreement These Ts&Cs are part of your service agreement with us (the ―Agreement‖) and constitute a contract under which we provide you Services under terms and conditions that you accept. THIS AGREEMENT CONTAINS A MANDATORY ARBITRATION PROVISION WITH A CLASS WAIVER, A REPRESENTATIVE ACTION WAIVER, AND A JURY WAIVER PROVISION. In addition to these Ts&Cs, there are several parts of the Agreement, which includes but is not limited to the following: (i) the subscriber agreement and transaction materials that you receive and accept; (ii) the plan(s) that you chose as set forth in our written services and transaction materials that we provide or refer you to during the sales transaction, including on-line and telephone transactions (if your service plan is not specifically set forth in any in-store brochure or printed materials, the requirements and terms set forth in the current written Agreement and transaction materials apply); (iii) any confirmation materials and invoices that we may provide to you; and (iv) the terms set forth in the coverage map brochures. It is important that you carefully read all of the terms of the Agreement. Additional Terms Additional terms will apply when you use certain applications, programs, Devices, and services, and these terms will be provided to you prior to your use of the items. Depending on who provides the items, the terms may come from Sprint or a third party. You are subject to any terms provided by the third party, and the terms are directly between you and that third party. Sprint is not responsible for these third-party items and associated terms. Additional terms will also apply if you activate Services as part of a bundle with another company‘s services (for example, cable services, home phone services, etc.). The additional terms for bundled Services may either modify or replace certain provisions in these Ts&Cs, including terms relating to activation, invoicing, payment, and disputing charges. Also, a different dispute resolution provision may apply to services provided by another company (the dispute resolution provisions in this Agreement will still apply to our Services). You will be provided details on any additional terms with your selection of any bundled Service. For employee and organization discounts, the discount percentage may vary from month-to-month based on the terms of the agreement between your employer, association, or organization and Sprint. The discount will be zero after your agreement or your organization‘s agreement with Sprint ends. Additional terms and eligibility requirements regarding organization discounts will be provided to you. Our Policies Services are subject to our business policies, practices, and procedures (―Policies‖). You agree to adhere to all of our Policies when you use our Services. Our Policies are subject to change at anytime with or without notice. When You Accept The Agreement You must have the legal capacity to accept the Agreement. You accept the Agreement when you do any of the following: (a) accept the Agreement through any printed, oral, or electronic statement, including on the Web by electronically marking that you have reviewed and accepted; (b) attempt to or in any way use
Index 160 the Services; (c) pay for the Services; or (d) open any package or start any program that says you are accepting the Agreement when doing so. If you don’t want to accept the Agreement, don’t do any of these things. Term Commitments & Early Termination Fees Sprint provides a variety of Services, some of which require you to maintain Your Services on a month to month basis or for a minimum term, usually 1 or 2 years (―Term Commitment‖). If your Agreement contains a Term Commitment, you will be charged a fee (―Early Termination Fee‖) for each line of Service that you terminate early (i.e., prior to satisfying the Term Commitment) or for each line of Service that we terminate early for good reason (for example, violating the payment or other terms of the Agreement) but such Early Termination Fee will be prorated based on your remaining Term Commitment. Early Termination Fees are a part of our rates. Any Term Commitment, the length of the Term Commitment, and the applicable Early Termination Fee amounts and proration will be disclosed to you during the sales transaction. Carefully review any Term Commitment and Early Termination Fee requirements prior to selecting Services. After you have satisfied your Term Commitment, your Services continue on a monthto-month basis under the then-current Terms and Conditions and Service policies. Services offered on a subscription basis, as described in the ―Account & Service Charges‖ section, may not require a Term Commitment and may not automatically renew. As explained directly below, there are instances when you will not be responsible for an Early Termination Fee for terminating Services early. When You Don‘t Have To Pay An Early Termination Fee You aren‘t responsible for paying an Early Termination Fee when terminating Services: (a) provided on a month-to-month basis; (b) provided on a subscription basis that do not include a Term Commitment; (c) consistent with our published trial period return policy; or (d) in response to a materially adverse change that we make to the Agreement as described directly below.  Our Right To Change The Agreement & Your Related Rights We may change any part of the Agreement at any time, including, but not limited to, rates, charges, how we calculate charges, discounts, coverage, technologies used to provide services, or your terms of Service. If you lose your eligibility for a particular rate plan or if a particular rate plan is no longer supported or available, we may change your rate plan to one for which you qualify. We will provide you notice of material changes—and we may provide you notice of non-material changes—in a manner consistent with this Agreement (see ―Providing Notice To Each Other Under The Agreement‖ section). If a change we make to the Agreement is material and has a material adverse effect on Services under your Term Commitment, you may terminate each line of Service materially adversely affected without incurring an Early Termination Fee only if: (a) you call us within 30 days after the effective date of the change; (b) you specifically advise us that you wish to cancel Services because of a material change to the Agreement that we have made; and (c) we fail to negate the change after you notify us of your objection to it. If you do not notify us and cancel Service within 30 days of the change, an Early Termination Fee will apply if you terminate Services before the end of any applicable Term Commitment. Our Right To Suspend Or Terminate Services We can, without notice, suspend or terminate any Service at any time for any reason. For example, we can suspend or terminate any Service for the following: (a) late payment; (b) exceeding an Account Spending Limit; (c) harassing/ threatening/abusing/offending our employees or agents; (d) providing false
Index 161 or inaccurate information; (e) interfering with our operations; (f) using/suspicion of using Services in any manner restricted by or inconsistent with the Agreement and Policies; (g) breaching, failing to follow, or abusing the Agreement or Policies; (h) providing false, inaccurate, dated, or unverifiable identification or credit information or becoming insolvent or bankrupt; (i) modifying a Device from its manufacturer specifications (for example, rooting the device); (j) failing to use our Services for an extended period of time; (k) failing to maintain an active Device in connection with our Services; or (l) if we believe the action protects our interests, any customer‘s interests, or our networks. Your Right To Change Services & When Changes Are Effective The account holder can typically change Services upon request. In some instances, changes may be conditioned on payment of an Early Termination Fee or certain other charges, or they may require a new Term Commitment. Changes to Services are usually effective at the start of the next full invoicing cycle. If the changes take place sooner, your invoice may reflect pro-rated charges for your old and new Services. We may, but are not obligated to, provide you the opportunity to authorize someone else to make changes to your Services, which will include the authority to make changes that will extend your Term Commitment. You are responsible for any changes to your Services made by a person you authorize, and those changes will be treated as modifications to this Agreement. Your Right To Terminate Services  You can terminate Services at any time by calling us and requesting that we deactivate all Services. In addition, if you return or provide your Device to Sprint and fail to either deactivate service on the Device or activate another Device in connection with your Service, we reserve the right to terminate your Service, and if you are subject to a Term Commitment, you may be charged all or part of an Early Termination Fee. You are responsible for all charges billed or incurred prior to deactivation. If Services are terminated before the end of your invoicing cycle, we won‘t prorate charges to the date of termination and you won‘t receive a credit or refund for any unused Services. Except as provided above, if you are subject to an Early Termination Fee, you must also pay the invoiced Early Termination Fee for each line of Service that you terminate early. Credit Checks & Credit Information We agree to provide you Services on the condition that you have and maintain satisfactory credit according to our standards and policies. You agree to provide information that we may request or complete any applications that we may provide you to facilitate our review. We rely on the credit information you furnish, credit bureau reports or other data available from commercial credit reference services, and other information (such as payment history with us) to determine whether to provide or continue to provide you Services. The Services we offer you can vary based on your credit history. We may at any time, based on your credit history, withdraw or change Services or place limits or conditions on the use of our Services. You agree to provide us updated credit information upon request. We may provide your payment history and other account billing/ charge information to any credit reporting agency or industry clearinghouse. Account Spending Limits (―ASL‖)  An ASL is a temporary or permanent limit (typically based on credit history, payment history, or to prevent fraud) that we place on the amount of unpaid charges you can accumulate on your account, regardless of when payment on those charges is due. We reserve the right to determine which charges count toward an ASL. If you have an ASL, we may suspend your Services without prior notice if your account balance
Index 162 reaches the ASL, even if your account is not past due. We may impose or increase an ASL at any time with notice. An ASL is for our benefit only and should not be relied on by you to manage usage. Deposits & Returning Deposits  We may at any time require a deposit as a guarantee of payment for you to establish or maintain Service (―Deposit‖). By providing us a Deposit, you grant us a security interest for all current or future amounts owed to us. We may change the Deposit at any time with notice. You can‘t use a Deposit to make or delay payments. The Deposit, the length of time we hold the Deposit, and changes to the Deposit are determined based on your credit history, payment history, and other factors. Unless prohibited by law, we may mix Deposits with our other funds and it won‘t earn interest, and we reserve the right to return the Deposit as a credit on your invoice at anytime. If your Services are terminated for any reason, we may keep and apply your Deposit to any outstanding charges. We‘ll send any remaining portion of the Deposit to your last known address within 90 days after your final invoice—if it is returned to us, we will forward it on to the appropriate state authorities to the extent required by law. Restrictions On Using Services You can‘t use our Services: (a) in a way that could cause damage or adversely affect any of our other customers or our reputation, networks, property, or Services; or (b) in any way prohibited by the terms of our Services, the Agreement, or our Policies. You cannot in any manner resell the Services to another party. For additional restrictions on the use of our Services, see our Acceptable Use Policy and Visitors Agreement, which are available on our website, and the detailed plan or other information on Services that we provide or refer you to during the sales transaction. Your Device, Number & Email Address We don‘t manufacture any Device that we might sell to you or that is associated with our Services, and we aren‘t responsible for any defects, acts, or omissions of the manufacturer. The only warranties on your Device are the limited warranties given to you by the manufacturer directly or that we pass through. Device performance may vary based on device specifications (for example, a device’s software, memory, and storage), and device performance may impact access to all of our Services. Your Device is designed to be activated on our networks and in other coverage areas that we may make available to you. As programmed, it will not accept wireless service from another carrier. Except for any legal right you may have to port/ transfer your phone number to another carrier, you have no—and cannot gain any (for example, through publication, use, etc.)—proprietary, ownership, or other rights to any phone number, identification number, email address, or other identifier that we assign to you, your Device, or your account. We‘ll notify you if we decide to change or reassign them. Your CDMA Sprint PCS phone may have software programming lock that protects certain of the handset‘s operating parameters against unauthorized reprogramming. If your device has a software programming lock, and you wish to obtain the software program lock code for your CDMA Sprint PCS phone, please visit sprint.com or call 1-888-211-4727 for information and eligibility requirements. Porting/Transferring Phone Numbers  We don‘t guarantee that number transfers to or from us will be successful. If you authorize another carrier to transfer a number away from us, then that is considered a request by you to us to terminate all of the Services associated with that number. You’re responsible for all charges billed or incurred prior to deactivation and for any applicable Early Termination Fees.
Index 163 Coverage; Where Your Device Will Work; Service Speeds Our coverage maps are available at our authorized retail locations and on sprint.com. The specific network coverage you get will depend on the radio transmissions your Device can pick up and Services you‘ve chosen. Our coverage maps provide high level estimates of our coverage areas when using Services outdoors under optimal conditions. Coverage isn’t available everywhere. Coverage and Service speeds are not guaranteed. Coverage is subject to change without notice. Service speeds may depend on the Service purchased. Actual speeds will vary. Estimating wireless coverage, signal strength, and Service speed is not an exact science. There are gaps in coverage within our estimated coverage areas that-along with other factors both within and beyond our control (for example, network problems, network or Internet congestion, software, signal strength, your Device, structures, buildings, weather, geography, topography, server speeds of the websites you access, actions of third parties, etc.)-may result in dropped and blocked connections, slower Service speeds, or otherwise impact the quality of Service. Services that rely on location information, such as E911 and GPS navigation, depend on your Device’s ability to acquire satellite signals (typically not available indoors) and network coverage. While your Device is receiving a software update, you may be unable to use your Device in any manner until the software update is complete. Roaming The term ―roaming‖ typically refers to coverage on another carrier‘s network that we may make available to you based on our agreements with other carriers. These agreements may change from time to time, and roaming coverage is subject to change without notice. Your ability to receive roaming coverage depends on the radio transmissions your Device can pick up and the availability of roaming coverage. We make no guarantee that roaming coverage will be available. Roaming coverage may exist both within and outside our network coverage areas. Your Device will generally indicate when you‘re roaming. Depending on your Services, separate charges or limits on the amount of minutes used while roaming may apply. Certain Services may not be available or work the same when roaming (for example, data Services, voicemail, call waiting, etc.). For information on whether roaming applies, see your service plan details. About Data Services & Content Our data Services and your Device may allow you to access the Internet, text, pictures, video, games, graphics, music, email, applications, sound, and other materials (―Data Content‖) or send Data Content elsewhere. Some Data Content is available from us or our vendors, while other Data Content can be accessed from others (for example, third party websites, games, ringers, applications, etc.). We make absolutely no guarantees about the Data Content that you access on your Device. Data Content may be: (1) unsuitable for children/minors; (2) unreliable or inaccurate; or (3) offensive, indecent, or objectionable. You’re solely responsible for evaluating the Data Content accessed by you or anyone through your Services. We strongly recommend that you monitor data usage by children/minors. Data Content from third parties may also harm your Device or its software. We are not responsible for any Data Content. We are not responsible for any damage caused by any Data Content that you access through your Services, that you load on your Device, or that you request that our representatives access or load on your Device. To protect our networks and Services or for other reasons, we may place restrictions on accessing certain Data Content (such as certain websites, applications, etc.); impose separate charges; limit throughput or the amount of data that you can transfer; or otherwise limit or terminate Services. If we provide you storage for Data Content that you have purchased, then we may delete the Data Content without notice or place restrictions/limits on the use of storage areas. Data Content stored on a Device, transmitted over our networks, or stored by Sprint may be deleted, modified,
Index 164 or damaged. You may not be able to make or receive voice calls while using data Services. Data Content provided by our vendors or third parties is subject to cancellation or termination at any time without notice to you, and you may not receive a refund for any unused portion of the Data Content. Specific Terms & Restrictions On Using Data Services In addition to the rules for using all of our other Services, unless we identify the Service or Device that you have selected as specifically intended for that purpose (for example, wireless routers, Data Link, etc.), you can‘t use our data Services: (1) with server devices or host computer applications or other systems that drive continuous, heavy traffic or data sessions; (2) as a substitute or backup for private lines or frame relay connections; or (3) for any other unintended use as we determine in our sole discretion. We reserve the right to limit, suspend, or constrain any heavy, continuous data usage that adversely impacts our networks‘ performance or hinders access to our networks. If your Services include Web or data access, you also can‘t use your Device as a modem for computers or other equipment, unless we identify the Service or Device you have selected as specifically intended for that purpose (for example, with ―phone as modem‖ plans, Sprint Mobile Broadband card plans, wireless router plans, etc.).  Software License  If Sprint provides you software as part of the Service and there are not software license terms provided with the software (by Sprint or by a third party), then Sprint grants you a limited, revocable, non-exclusive, non-transferable license to use the software to access the Services for your own individual use. You will not sell, resell, transfer, copy, translate, publish, create derivative works of, make any commercial use of, modify, reverse engineer, decompile, or disassemble the software. Sprint may revoke this license at any time. Fees, Activation & Miscellaneous Charges Based on our Policies, we may charge activation, prepayment, reactivation, program, or other fees to establish, change, or maintain Services. Certain transactions may also be subject to a charge (for example, convenience payment, changing phone numbers, handset upgrades, etc.). You will be provided notice of these types of fees before we complete the requested transaction. Account & Service Charges You are responsible for all charges associated with your account and the Services on your account, no matter who adds or uses the Services. Charges include, but are not limited to, the monthly recurring charges, usage charges, charges for additional services, taxes, surcharges, and fees associated with your Services. These charges are described or referred to during the sales transaction, in our marketing materials, and in confirmation materials that we may send to you. Depending on your Services, charges for additional services may include operator and directory assistance, voicemail, call forwarding, data calls, texts, and Web access. If you (the account holder) allow end users to access or use your Devices, you authorize end users to access, download, and use Services. You may have the opportunity to purchase Services on a subscription basis where we assess subscription charges that allow you access to the Services and/or provide you a certain amount of use of the Services for a defined period of time. Depending on your Service, certain types of subscription charges may be assessed automatically upon activation and automatically assessed for subsequent subscription periods. Subscription Services offered on a recurring basis do not end until terminated by you or us. Subscription charges for recurring Services occur at the beginning of each bill cycle. Information regarding your bill cycle for subscription Services will be provided when you order the Services. For Services offered on a per-day basis, you will generally be charged for use before or at the time of use. In certain instances, we
Index 165 may charge you at some point after you use the Services. Unless otherwise disclosed, Services offered on a perday basis end 24 hours after Service is initiated. How We Calculate Your Charges For Billing Purposes Regular Voice Calls: We round up partial minutes of use to the next full minute. Time starts when you press ―Talk‖ or your Device connects to the network and stops when you press ―End‖ or the network connection otherwise breaks. You‘re charged for all calls that connect, even to answering machines, voicemail, or voice transcription services. You won‘t be charged for unanswered calls or if you get a busy signal. For incoming calls answered, you‘re charged from the time shortly before the Device starts ringing until you press ―End‖ or the network connection otherwise breaks. If charges vary depending on the time of day that you place or receive calls (for example, Nights and Weekend plans), you‘re charged for the entire call based on the rate that applies to the time period in which the call starts. Call time for a single call may be subject to a maximum duration and may be automatically terminated if the maximum duration is exceeded. Rates that vary based on the time of access will be determined based on the location of the network equipment providing service and not the location of your Device or your Device‘s area code (if applicable). Push-to-Talk Charges: Charges for push-to-talk calls are billed to the person who starts the call and calculated by multiplying the duration of the call by the applicable rate and number of participants. You‘re charged at least 6 seconds of airtime for each call you start; subsequent communications in the same call are rounded up to and billed to the next second. Time begins when you press any button to start a push-totalk call and ends approximately 6 seconds after completion of a communication to which no participant responds. Subsequent pushto-talk communications are considered new calls. Charges apply for the entire period of time the push-to-talk call is connected to our network. Depending on your plan, nationwide, international, or group push-to-talk calls may use the local push-to-talk minutes in your plan and result in additional or different charges. Responses to call alert transmissions are treated as new push-to-talk transmissions even when responding within 6 seconds of receiving the alert. Push-to-talk billing methods are subject to change as we introduce new push-to-talk Services. Data Usage: Unless we specifically tell you otherwise, data usage is measured in bytes, kilobytes, megabytes, and gigabytes—not in minutes/time. 1024 bytes equals 1 kilobyte (―KB‖), 1024 KB equals 1 megabyte, and 1024 megabytes equals 1 gigabyte. Bytes are rounded up to KB, so you will be charged at least 1 KB for each data usage session (―data session‖). Rounding occurs at the end of each data session, and sometimes during a data session. Depending on your data Services, usage may be charged against an allowance or on a fixed price per KB, and you may be subject to limitations on the amount of data usage. If you are charged on a fixed price per KB, any fractional cents will be rounded up to the next cent. You are charged for all data directed to your Device‘s Internet address, including data sessions you did not initiate and for incomplete transfers. As long as your Device is connected to our data networks, you may incur data charges. Examples of data for which you will be charged includes the size of a requested file or Data Content (game, ringer, etc.); Web page graphics (logos, pictures, banners, advertisement, etc.); additional data used in accessing, transporting, and routing the file on our network; data from partial or interrupted downloads; re-sent data; and data associated with unsuccessful attempts to reach websites or use applications. These data charges are in addition to any charges for the Data Content itself (game, ringer, etc.). Data used and charged to you will vary widely, even between identical actions or data sessions. Estimates of data usage—for example, the size of downloadable files—are not reliable predictors of actual usage. Your bill won‘t separately list the number of KB attributed to a specific action/data session.
Index 166 Your Bill Your bill provides you notice of your charges. It reflects monthly recurring charges (usually billed one bill cycle in advance), fees, taxes, Surcharges, product and equipment charges, subscription charges, and usage/transaction specific charges (usually billed in the bill cycle in which they‘re incurred). Some usage charges, such as those that depend on usage information from a third party, may be billed in subsequent bill cycles and result in higher than expected charges for that month. Bill cycles and dates may change from time to time. Your bill may also include other important notices (for example, changes to your Agreement, to your Service, legal notices, etc.). Your paper bill may not include itemized billing detail. More specific billing information is available online. Paper bills may be subject to an additional charge. Unless prohibited by law, other charges (for example, data Services or taxes and surcharges) will not include itemized detail but will be listed as total charges for a category. If you choose Internet billing, you will not receive paper bills. Your Payments; Late Fees Payment is due in full as stated on your bill. If we do not receive payment in full by the date specified on your bill, a late payment charge, which may be charged at the highest rate permissible by law, may be applied to the total unpaid balance. We may also charge you any costs we pay to a collection agency to collect unpaid balances from you. If we bill you for amounts on behalf of a third party, payments received are first applied to our charges. You may be charged additional fees for certain methods of payment. We may charge you, up to the highest amount permitted by law, for returned checks or other payments paid by you and denied for any reason by a financial institution. Acceptance of payments (even if marked ―paid in full‖) does not waive our right to collect all amounts that you owe us. We may restrict your payment methods to cashier‘s check, money order, or other similar secure form of payment at any time for good reason. Taxes & Government Fees You agree to pay all federal, state, and local taxes, fees, and other assessments that we‘re required by law to collect and remit to the government on the Services that we provide to you. These charges may change from time to time without advance notice. If you‘re claiming any tax exemption, you must provide us with a valid exemption certificate. Tax exemptions generally won‘t be applied retroactively. Surcharges You agree to pay all Sprint surcharges (―Surcharges‖), which may include, but are not limited to: Federal Universal Service; Regulatory and Administrative charges; gross receipts charges, and other charges. Surcharges are not taxes, and we are not required by law to assess them. They are part of our rates we choose, at our discretion, to collect from you, to recover certain costs and are kept by us. The number and type of Surcharges will be provided on your invoice and may vary depending upon the location of the billing address of the Device and can change over time. We determine the amount for these charges, and these amounts are subject to change, as are the components used to calculate these amounts. We will provide you notice of any changes to Surcharges in a manner consistent with this Agreement (see ―Providing Notice To Each Other Under The Agreement‖ section). However, because some Surcharges are based on amounts set by the government or based on government formulas, it will not always be possible to provide advance notice of new Surcharges or changes in the amount of existing Surcharges. Information on Surcharges is provided during the sales transaction and is available on our website.
Index 167 Disputing Charges - You Must Still Pay Undisputed Charges Any dispute to a charge on your bill must be made within 60 days of the date of the bill that initially contained the charge. Disputes can only be made by calling or writing us as directed on your invoice or elsewhere. You accept all charges not properly disputed within the above time period—undisputed charges must still be paid as stated on your bill. Protecting Our Network & Services We can take any action to: (1) protect our networks, our rights and interests, or the rights of others; or (2) optimize or improve the overall use of our networks and Services. Some of these actions may interrupt or prevent legitimate communications and usage-for example, message filtering/blocking software to prevent spam or viruses; limiting throughput; limiting access to certain websites, applications, or other Data Content; prohibitions on unintended uses (for example, use as a dedicated line, or use as a monitoring service), etc. For additional information on what we do to protect our customers, networks, Services, and equipment, see our Acceptable Use Policy and Visitors Agreement at our website. Your Privacy Our Privacy Policy is available on our website. To review the policy, visit sprint.com/legal/privacy.html. This policy may change from time to time, so review it with regularity and care. Call Monitoring: To ensure the quality of our Services and for other lawful purposes, we may monitor or record calls you make to us or we make to you (for example, your conversations with our customer service or sales departments).  Authentication and Contact: You (the account holder) may password protect your account information by establishing a personal identification number (―PIN‖). You may also set a backup security question and answer in the event you forget your PIN. You agree to protect your PIN, passwords, and other account access credentials like your backup security question from loss or disclosure. You further agree that Sprint may, in our sole discretion, treat any person who presents your credentials that we deem sufficient for account access as you or an authorized user on the account for disclosure of information or changes in Service. You agree that we may contact you for Service-related reasons through the contact information that you provide, through the Services or Devices to which you subscribe, or through other available means, including text message, email, fax, recorded message, mobile, residential or business phone, or mail.  CPNI: As we provide telecommunications products and Services to you (the account holder), we develop information about the quantity, technical configuration, type, location, and destination of telecommunications products and Services you use, as well as some other information found on your bill (―CPNI‖). Under federal law, you have the right and we have a duty to protect the confidentiality of your CPNI. For example, we implement safeguards that are designed to protect your CPNI, including authentication procedures when you contact us. For some accounts with a dedicated Sprint representative, we may rely on contacting your pre-established point of contact as the standard authentication measure. Third-Party Applications: If you use a thirdparty application, the application may access, collect, use, or disclose your personal information or require Sprint to disclose your information—including location information (when applicable)—to the application provider or some other third party. If you access, use, or authorize third-party applications through the Services, you agree and authorize Sprint to provide information related to your use of the Services or the application(s). You understand that your use of
Index 168 third-party applications is subject to the third party‘s terms and conditions and policies, including its privacy policy. Be sure that you have reviewed and are comfortable with the third party‘s policies before using its application on your device.  Information on Devices: Your Device may contain sensitive or personal information (for example, pictures, videos, passwords, or stored credit card numbers). Sprint is not responsible for any information on your Device, including sensitive or personal information. If possible, you should remove or otherwise safeguard any sensitive or personal information when your Device is out of your possession or control, for example when you relinquish, exchange, return, or recycle your Device. By submitting your Device to us, you agree that our employees, contractors, or vendors may access all of the information on your Device. If you exchange, return, or recycle your Device through us, we typically attempt to erase all data on your Device, but you must remove all data from your Device before you provide it to us. Location-Enabled Services Our networks generally know the location of your Device when it is outdoors and/or turned on. By using various technologies to locate your Device, we can provide enhanced emergency 911 services and optional location-enabled services provided by us or a third party. Network coverage or environmental factors (such as structures, buildings, weather, geography, landscape, and topography) can significantly impact the ability to access your Device‘s location information and use of location-enabled services. You agree that any authorized user may access, use, or authorize Sprint or third-party location-enabled applications through the Services. You understand that your use of such location-enabled applications is subject to the application‘s terms and conditions and policies, including its privacy policy. If you activate location-enabled services for devices used by other authorized users, you agree to inform the authorized user(s) of the terms of use for locationenabled applications and that the Device may be located. 911 Or Other Emergency Calls Public safety officials advise that when making 911 or other emergency calls, you should always be prepared to provide your location information. Unlike traditional wireline phones, depending on a number of factors (for example, whether your Device is GPS-enabled, where you are, whether local emergency service providers have upgraded their equipment, etc.), 911 operators may not know your phone number, your location, or the location of your Device. In certain circumstances, an emergency call may be routed to a state patrol dispatcher or alternative location set by local emergency service providers. Enhanced 911 service (―E911‖)—where enabled by local emergency authorities—uses GPS technology to provide location information. Even when available, however, E911 does not always provide accurate location information. If your Device is indoors or for some other reason cannot acquire a satellite signal, you may not be located. Some Devices have a safety feature that prevents use of the keypad after dialing 911—you should follow voice prompts when interacting with emergency service providers employing interactive voice response systems to screen calls. If Your Device Is Lost or Stolen Call us immediately if your Device is lost or stolen because you may be responsible for usage charges before you notify us of the alleged loss or theft. A lost or stolen Device does not reduce or remove your Term Commitment. You will remain liable for any monthly recurring charges associated with the Service on your Device after you notify us of the alleged loss or theft. You agree to cooperate if we choose to investigate the matter (provide facts, sworn statements, etc.). We may not waive any applicable Early Termination Fees if you choose to terminate Services as a result of loss or theft of your Device.
Index 169 Disclaimer of Warranties UNLESS EXPRESSLY PROVIDED IN WRITING OTHERWISE, WE MAKE NO REPRESENTATIONS OR WARRANTIES, EXPRESS OR IMPLIED, INCLUDING (TO THE EXTENT ALLOWED BY LAW) ANY IMPLIED WARRANTY OF MERCHANTABILITY, NONINFRINGEMENT, OR FITNESS FOR A PARTICULAR PURPOSE CONCERNING YOUR SERVICES (INCLUDING YOUR DEVICE AND ANY SOFTWARE OR APPLICATIONS ON YOUR DEVICE). WE DON‘T PROMISE UNINTERRUPTED OR ERROR-FREE SERVICES AND DON‘T AUTHORIZE ANYONE TO MAKE WARRANTIES ON OUR BEHALF. SPRINT PROVIDES ALL SOFTWARE AND APPLICATIONS ON AN ―AS IS‖ BASIS WITH ALL FAULTS, ERRORS, AND DEFECTS. You Agree That We Are Not Responsible For Certain Problems  You agree that neither we nor our parent, subsidiary, or affiliate companies, nor our vendors, suppliers, or licensors are responsible for any damages, delay, interruption or other failure to perform resulting from: (a) anything done or not done by someone else; (b) providing or failing to provide Services, including, but not limited to, deficiencies or problems with a Device or network coverage (for example, dropped, blocked, interrupted Services, etc.); (c) traffic or other accidents, or any health-related claims relating to our Services; (d) Data Content or information accessed while using our Services; (e) an interruption or failure in accessing or attempting to access emergency services from a Device, including through 911, Enhanced 911 or otherwise; (f) interrupted, failed, or inaccurate location information services; (g) information or communication that is blocked by a spam filter; (h) damage to your Device or any computer or equipment connected to your Device, or damage to or loss of any information stored on your Device, computer, equipment, or Sprint storage space from your use of the Services or from viruses, worms, or downloads of malicious content, materials, data, text, images, video, or audio; or (i) things beyond our control, including acts of God (for example, weather-related phenomena, fire, earthquake, hurricane, etc.), riot, strike, war, terrorism, or government orders or acts. You should implement appropriate safeguards to secure your Device, computer, or equipment and to back up your information stored on each. You Agree That Our Liability Is Limited - No Consequential Damages TO THE EXTENT ALLOWED BY LAW, OUR LIABILITY FOR MONETARY DAMAGES FOR ANY CLAIMS THAT YOU MAY HAVE AGAINST US IS LIMITED TO NO MORE THAN THE PROPORTIONATE AMOUNT OF THE SERVICE CHARGES ATTRIBUTABLE TO THE AFFECTED PERIOD. UNDER NO CIRCUMSTANCES ARE WE LIABLE FOR ANY INCIDENTAL, CONSEQUENTIAL, PUNITIVE, MULTIPLE, OR SPECIAL DAMAGES OF ANY NATURE WHATSOEVER ARISING OUT OF OR RELATED TO PROVIDING OR FAILING TO PROVIDE SERVICES IN CONNECTION WITH A DEVICE, INCLUDING, BUT NOT LIMITED TO, LOST PROFITS, LOSS OF BUSINESS, OR COST OF REPLACEMENT PRODUCTS AND SERVICES. DISPUTE RESOLUTION AND ARBITRATION PLEASE READ THIS CAREFULLY; IT AFFECTS YOUR RIGHTS In those rare instances where your concern is not resolved to your satisfaction through calls to our customer care, you and Sprint each agree to try to resolve those disputes in good faith after you provide written notice of the dispute as set forth below. If the dispute is not resolved, you and Sprint agree that the dispute will be resolved through individual binding arbitration or small claims court, instead of courts of general jurisdiction.
Index 170 Mandatory Arbitration and Waiver of Class Action Instead of suing in court, you and Sprint agree to arbitrate all Disputes (as defined below) on an individual, non-representative, basis. You agree that, by entering into this Agreement, you and Sprint are waiving the right to a trial by jury or to participate in a class action or representative action. This agreement to arbitrate is intended to be broadly interpreted.  In arbitration, there is no judge or jury. Instead Disputes are decided by a neutral third-party arbitrator in a more informal process than in court. In arbitration, there is limited discovery and the arbitrator‘s decision is subject to limited review by courts. However, just as a court would, the arbitrator must honor the terms of the Agreement and can award damages and relief, including any attorneys‘ fees authorized by law. "Disputes" shall include, but are not limited to, any claims or controversies against each other related in any way to or arising out of in any way our Services or the Agreement, including, but not limited to, coverage, Devices, billing services and practices, policies, contract practices (including enforceability), service claims, privacy, or advertising, even if the claim arises after Services have terminated. Disputes also include, but are not limited to, claims that: (a) you or an authorized or unauthorized user of the Services or Devices bring against our employees, agents, affiliates, or other representatives; (b) you bring against a third party, such as a retailer or equipment manufacturer, that are based on, relate to, or arise out of in any way our Services or the Agreement; or (c) that Sprint brings against you. Disputes also include, but are not limited to, (i) claims in any way related to or arising out of any aspect of the relationship between you and Sprint, whether based in contract, tort, statute, fraud, misrepresentation, advertising claims or any other legal theory; (ii) claims that arose before this Agreement or out of a prior Agreement with Sprint; (iii) claims that are subject to on-going litigation where you are not a party or class member; and/or (iv) claims that arise after the termination of this Agreement. Dispute Notice and Dispute Resolution Period Before initiating an arbitration or a small claims matter, you and Sprint each agree to first provide to the other a written notice (―Notice of Dispute‖), which shall contain: (a) a written description of the problem and relevant documents and supporting information; and (b) a statement of the specific relief sought. A Notice of Dispute to Sprint should be sent to: General Counsel; Arbitration Office; 12502 Sunrise Valley Drive, Mailstop VARESA0202-2C682; Reston, Virginia 20191. Sprint will provide a Notice of Dispute to you in accordance with the ―Providing Notice To Each Other Under The Agreement‖ section of this Agreement. Sprint will assign a representative to work with you and try to resolve your Dispute to your satisfaction. You and Sprint agree to make attempts to resolve the Dispute prior to commencing an arbitration or small claims action. If an agreement cannot be reached within forty-five (45) days of receipt of the Notice of Dispute, you or Sprint may commence an arbitration proceeding or small claims action. Arbitration Terms, Process, Rules and Procedures (1) Unless you and Sprint agree otherwise, the arbitration will be conducted by a single, neutral arbitrator and will take place in the county of the last billing address of the Service. The arbitration will be governed by either: (a) rules that we mutually agree upon; or (b) the JAMS Comprehensive Arbitration Rules & Procedures (the ―JAMS Rules‖), as modified by this agreement to arbitrate, including the rules about the filing, administration, discovery and arbitrator fees. The JAMS rules are available on its website at jamsadr.com. Notwithstanding any JAMS Rule to the contrary or any other provision in arbitration rules chosen, by agreement, to govern the arbitration, we each agree that all issues regarding the Dispute are delegated to the arbitrator to decide, except that only a court (and not the arbitrator) shall decide any disagreements regarding the scope and enforceability of this agreement to arbitrate.
Index 171 (2) The Federal Arbitration Act (―FAA‖) applies to this Agreement and arbitration provision. We each agree that the FAA‘s provisions—not state law—govern all questions of whether a Dispute is subject to arbitration. To the extent that this agreement to arbitrate conflicts with the JAMS Policy on Consumer Arbitrations Pursuant to Pre-Dispute Clauses Minimum Standards for Procedural Fairness (the ―Minimum Standards‖), the Minimum Standards in that regard will apply. However, nothing in this paragraph will require or allow you or Sprint to arbitrate on a class-wide, representative or consolidated basis. (3) The arbitrator may award declaratory or injunctive relief only in favor of the individual party seeking relief and only to the extent necessary to provide relief warranted by that party‘s individual claim. YOU AND SPRINT AGREE THAT EACH MAY BRING CLAIMS AGAINST THE OTHER ONLY IN AN INDIVIDUAL CAPACITY, AND NOT AS A CLASS MEMBER IN ANY PUTATIVE CLASS OR REPRESENTATIVE PROCEEDING. Further, unless both you and Sprint expressly agree otherwise, the arbitrator may not consolidate more than one person‘s claims, and may not otherwise preside over any form of a representative or class proceeding. If any portion of this provision is found to be unenforceable, then the entirety of this arbitration provision shall be null and void.  (4) We each are responsible for our respective costs, including our respective counsel, experts, and witnesses. Sprint will pay for any filing or case management fees associated with the arbitration and the professional fees for the arbitrator‘s services. (5) An arbitrator‘s award will be a written statement of the disposition of each claim and will also provide a concise written statement of the essential findings and conclusions which form the basis of the award. The arbitrator‘s decision and award is final and binding, with some limited court review under the FAA, and judgment on the award may be entered in any court with jurisdiction. (6) As an alternative to arbitration, we may resolve Disputes in small claims court in the county of your most recent billing address. In addition, this arbitration agreement does not prevent you from bringing your Dispute to the attention of any federal, state, or local government agency. Such agencies can, if the law allows, seek relief against Sprint on your behalf. No Trial By Jury and No Class Action IF FOR ANY REASON A CLAIM ARISING OUT OF OR RELATING TO THIS AGREEMENT IN ANY WAY PROCEEDS IN COURT RATHER THAN IN ARBITRATION, REGARDLESS OF WHETHER THE CLAIM IS AN ACTION, COUTERCLAIM OR ANY OTHER COURT PROCEEDING, WE EACH AGREE THAT TO THE EXTENT ALLOWED BY LAW, THERE WILL NOT BE A JURY TRIAL OR CLASS ACTION AND WE EACH UNCONDITIONALLY (1) WAIVE ANY RIGHT TO TRIAL BY JURY AND (2) WAIVE ANY RIGHT TO PURSUE DISPUTES ON A CLASSWIDE BASIS, INCLUDING JOINING A CLAIM WITH THE CLAIM OF ANY OTHER PERSON OR ENTITY OR ASSERT A CLAIM IN A REPRESENTATIVE CAPACTITY ON BEHALF OF ANYONE ELSE IN ANY OTHER PROCEEDING. Indemnification You agree to indemnify, defend, and hold Sprint and our subsidiaries, affiliates, parent companies, vendors, suppliers, and licensors harmless from any claims arising out of or relating to your actions, including, but not limited to, your use of the Service and any information you submit, post, transmit, or make available via the Service; failing to provide appropriate notices regarding location-enabled services (see ―Location-Enabled Services‖ section); failure to safeguard your passwords, backup question to your shared secret question, or other account information; or violating this Agreement or any policy referenced in this Agreement, any applicable law or regulation, or the rights of any third party.
Index 172 Providing Notice To Each Other Under The Agreement Except as the Agreement specifically provides otherwise, you must provide us notice by calling or writing us as instructed on your invoice. We will provide you notice through one or more of the following: in your bill, correspondence to your last known billing address, to any fax number or email address you‘ve provided us, by calling you on your Device or any other phone number you‘ve provided us, by voice message on your Device or any other phone number you‘ve provided us, or by text message on your Device. Contacting You Regarding Billing and Collections You expressly authorize, and specifically consent to allowing Sprint and any of Sprint‘s agents to contact you in connection with any and all matters relating to unpaid past due charges you owe Sprint. You agree that, for attempts to collect unpaid past due charges, Sprint and any of its agents may contact you at any mailing address, telephone number, cellular phone number, email address, or any other electronic address that you have provided, or may in the future provide, to Sprint. You agree and acknowledge that any email address or any other electronic address that you provide to Sprint is your private address and is not accessible to unauthorized third parties. For attempts to collect unpaid charges, you agree that in addition to individual persons attempting to communicate directly with you, any type of contact described above may be made using, among other methods, pre-recorded or artificial voice messages delivered by an automatic telephone dialing system, pre-set email messages delivered by an automatic emailing system, or any other pre-set electronic messages delivered by any other automatic electronic messaging system. Other Important Terms Subject to federal law or unless the Agreement specifically provides otherwise, this Agreement is governed solely by the laws of the state encompassing the billing address of the Device, without regard to the conflicts of law rules of that state. If either of us waives or doesn‘t enforce a requirement under this Agreement in an instance, we don‘t waive our right to later enforce that requirement. Except as the Agreement specifically provides otherwise, if any part of the Agreement is held invalid or unenforceable, the rest of this Agreement remains in full force and effect. This Agreement isn‘t for the benefit of any third party except our corporate parents, affiliates, subsidiaries, agents, and predecessors and successors in interest. You can‘t assign the Agreement or any of your rights or duties under it, unless we agree to the assignment. We can assign the Agreement without notice. You cannot in any manner resell the Services to another party. The Agreement and the documents it incorporates make up the entire agreement between us and replaces all prior written or spoken agreements—you can‘t rely on any contradictory documents or statements by sales or service representatives. The rights, obligations, and commitments in the Agreement that—by their nature—would logically continue beyond the termination of Services (for example, those relating to billing, payment, 911, dispute resolution, no class action, no jury trial) survive termination of Services. Important Message from Sprint Important Information about this device’s “open‖ architecture. This device is an ―open‖ device. What that means is that you are free to use it to access the Internet as you see fit. You may go to websites you like and you may download or use applications or software that you choose. Please take care to visit only trusted websites and download applications only from trusted entities. Sprint has no control over websites you visit or applications and software you download, and Sprint‘s policies do
Index 173 not apply to those websites, applications or software. The websites you visit may place ―cookies‖ or other files on your device when you visit them. Downloaded applications or software may access, use or share information on your device, like your contacts or your location. Although Sprint is excited to allow our customers to make their own choices about the Internet sites you wish to visit or the applications or software you‘d like to use, we do want to remind you that Sprint is not able to help you troubleshoot issues connected with your use of non-Sprint applications or software (such as the ones you may select and download to your device). Sprint also will not be able to provide you credits for applications or software that you download from sources other than Sprint. And, Sprint is not liable for the websites you visit or anything you download or cause to be downloaded to your device. Damage related to websites visited or downloads to your device may not be covered by Sprint‘s Service and Repair policy, or your device insurance policy. For more information about Sprint‘s policies, products or services, please visit us at sprint.com.
Index 174 Copyright Information ©2015 Sprint. Sprint and the logo are trademarks of Sprint. Other marks are trademarks of their respective owners. All materials in this guide including, without limitation, the design, the text, and any marks are the property of LG Electronics, Inc. Copyright ©  2015 LG Electronics, Inc. ALL RIGHTS RESERVED. LG and the LG logo are registered trademarks of LG Electronics, Inc. LGLS991 is a trademark of LG Electronics, Inc. The Bluetooth® word mark and logos are registered trademarks owned by Bluetooth SIG, Inc. microSD™ is a trademark of SanDisk. Other trademarks and trade names are those of their respective owners. Unless otherwise specified herein, all accessories referenced herein are sold separately. All features, functionality, and other product specifications are subject to change. Screen shots are simulated and subject to change. DivX HD     ABOUT DIVX VIDEO: DivX® is a digital video format created by DivX, LLC, a subsidiary of Rovi Corporation. This is an official DivX Certified® device that has passed rigorous testing to verify that it plays DivX video. Visit divx.com for more information and software tools to convert your files into DivX videos. ABOUT DIVX VIDEO-ON-DEMAND: This DivX Certified® device must be registered in order to play purchased DivX Video-on-Demand (VOD) movies. To obtain your registration code, locate the DivX VOD section in your device setup menu. Go to vod.divx.com for more information on how to complete your registration. DivX Certified® to play DivX® video up to HD 720p, including premium content.  DivX®, DivX Certified® and associated logos are trademarks of Rovi Corporation or its subsidiaries and are used under license. Manufactured under license from Dolby Laboratories.  Dolby and the double-D symbol are trademarks of Dolby Laboratories. Note: Open Source Software To obtain the source code under GPL, LGPL, MPL, and other open source licenses, that is contained in this product, please visit http://opensource.lge.com. In addition to the source code, all referred license terms, warranty disclaimers and copyright notices are available for download. LG Electronics will also provide open source code to you on CD-ROM for a charge covering the cost of performing such distribution (such as the cost of media, shipping, and handling) upon email request to opensource@lge.com. This offer is valid for three (3) years from the date on which you purchased the product.
Index 175 Index 3-way Calling, 40 4G, 86 About Phone, 147 Access Gmail, 54 Accessibility, 143 Accounts & Sync, 140 Activate This Device, 145 Activate Your Phone, 1 Add a Contact, 46 Add a Contact to Your Favorites, 46 Add a VPN Connection, 80 Add a Wi-Fi Network, 79 Add an Email Account (POP3 or IMAP), 56 Add and Remove Widgets on the Home Screen, 19 Adjust Browser Settings, 83 Airplane Mode, 112 Applications, 16 Applications: How to View, Open and Switch, 14 Apps, 136 Assign Pictures, 92 Auto Answer, 115 Back Key, 12 Back Up Your Downloaded Music Files, 74 Backup & Reset, 141 Battery, 136 Battery and Charger, 10 Bluetooth, 104 Bluetooth Settings, 113 Bluetooth Settings Menu, 105 Browser, 81 Browser Menu, 83 Calculator, 104 Calendar, 98 Call Emergency Numbers, 29 Call Forwarding, 40 Call Logs, 41 Call Settings, 113 Call Using the Phone Dialer, 28 Call Waiting, 39 Caller ID, 39 Camera and Video Settings, 89 Change Calendar Settings, 100 Change Calendar View, 98 Change the Phone's Wallpaper, 20 Change Your Main Greeting via the Voicemail Menu, 37 Clock, 101 Cloud, 137 Communicate with Your Contacts, 50 Complete the Setup Screens, 2 Compose Text Messages, 61 Configure and Sync Corporate Email Settings, 58 Configure Visual Voicemail Settings, 36 Connect to or Disconnect From a VPN, 81 Connect Wi-Fi, 78 Connections Optimizer, 85 Corporate Email (Outlook), 56 Create a Google Account, 53 Create an Event, 98 Create and Send Email, 57 Create Bookmarks, 84 Create Website Settings, 84 Customize Applications Icons on the Home Screen, 21 Customize Your Home Screen, 18 Data Connection Status and Indicators, 88 Data Services General Information (3G and 4G Networks), 86 Date & time, 142 Default Message App, 137 Device Settings, 122 Dial and Save Phone Numbers With Pauses, 31 Dial From the Contacts List, 31 Dialing Options, 28 Disconnect Bluetooth Connection During an Active Call, 107 Display and Synchronize Calendars, 100 Display Settings, 126 Dual Feature, 92 Dual Play, 94 Dual Window, 97, 137 Edit a Contact, 47 Edit or Delete an Event, 99 Edit the Display Name via the Voicemail Menu, 38 Email, 55 Enjoy Content from Nearby Devices, 108 Enjoy Content Via a Variety of Devices, 108
Index 176 Enter Text With the On-screen Keyboard, 24 Export Contacts to Your Internal Storage, 51 Extend Your Battery Life, 11 Extended Home Screen, 14 Facebook, 67 Find a Phone Number, 43 Folders, 101 Format the microSD Card, 110 Gallery Options, 91 Gesture Shot, 90 Gestures, 133 Get Started With Contacts, 45 Gmail, 53 Go to a Specific Website, 82 Google Hangouts, 67 Google Maps™, 75 Google Play Music, 73 Google Play Store, 70 GPS Navigation, 75 Hardware Key Control Mode, 9 HD™ Voice, 28 Home Key, 12 Home Screen, 14 Home Screen Settings, 129 Import Contacts From Your Internal Storage, 51 Import, Export, and Share Contacts, 50 In-call Options, 38 In-Call Options, 30 Insert a microSD Card, 109 Join and Separate Contacts, 51 Language & Input, 140 Launch a Web Connection, 87 Learn to Navigate the Browser, 81 Listen to Multiple Voicemail Messages, 36 Live Zoom, 94 Location, 139 Lock and Unlock Your Phone, 8 Lock Screen Settings, 130 Make Phone Calls, 28 Make Your First Call, 3 Manage Your Account, 4 Managing Message Conversations, 63 microSD Card, 109 Missed Call Notification, 29 Mobile data, 113 More Settings, 120 Multi-point Auto-focus, 90 Music, 73 Music Player, 73 Notifications Panel, 12 One-handed Operation, 135 Open Email, 57 Pairing Bluetooth Devices, 106 Personal Settings, 137 Phone and Web Search Using Text Entry, 26 Phone and Web Search Using Voice Command, 27 Phone Call Options, 38 Phone Function Keys, 11 Phone Illustration, 1 Plus (+) Code Dialing, 32 Prepare Your Phone for VPN Connection, 80 Printing, 146 Privacy Keeper, 114 QSlide, 95 QuickCircle Case, 145 QuickMemo+, 96 QuickRemote, 95 Read and Reply to Gmail Messages, 55 Read and Reply to Text Messages, 61 Receive Phone Calls, 32 Recent Apps Key, 12 Record Videos, 89 Remove a microSD Card, 109 Reply to or Delete an Email Message, 58 Respond to an Event Reminder, 100 Retrieve Your Voicemail Messages, 34 Review Visual Voicemail, 35 Roaming Settings, 116 Save a Phone Number, 43 Save and Resume a Draft Message, 63 Scout by Telenav, 76 Screen On/Off, 8 Search Your Phone and the Web, 26 Security, 139 Send a Gmail Message, 54 Send a Multimedia Message (MMS), 62 Send Items via Bluetooth, 107 Set an Event Reminder, 99 Set Up Secure Credential Storage, 80 Set Up Speed Dialing, 41 Set Up Visual Voicemail, 34 Set Up Voicemail, 33 Set Up Your Phone, 1 Set Up Your Voicemail, 3 Share & Connect, 119 Sharing Contacts, 51 Shortcut Key, 142
Index 177 Sign into Your Google Account, 53 Smart Cleaning, 136 SmartShare, 108 Social Networking Accounts, 67 Sound Settings, 122 Sprint Account Information and Help, 4 Sprint Account Passwords, 4 Sprint Applications, 72 Sprint ID, 71 Sprint Support Services, 5 Status Bar, 21 Storage, 136 Super Zooming, 91 Synchronize Accounts, 68 Synchronize Your Corporate Account, 69 Synchronize Your Google Account, 68 System Settings, 142 System Updates, 146 Take Pictures, 89 Tasks, 103 Text and Multimedia Message Options, 65 Text and Multimedia Messaging, 60 Text Link, 27 Text-to-Speech, 44 Tips for Editing Text, 25 Touchscreen Navigation, 13 Transfer User Contents From an Android Phone to Your LGLS991, 110 Transfer Via Bluetooth Connection, 111 Transfer Via Cloud Storage, 111 Transfer Via PC or Laptop, 110 TTY Mode, 115 Turn Bluetooth On and Off, 105 Turn Wi-Fi On and Connect to a Network, 78 Turn Your Phone On and Off, 7 Turn Your Screen On and Off, 8 Unlock Your Screen Using the Knock Code Feature, 9 Unmount the microSD Card, 110 Use Direct Dialing, 31 Use the Applications Key, 14 Using Clip Tray, 27 Using Content from the Cloud, 108 Video Options, 93 View Event Details, 98 View microSD Card Memory, 109 View Your Pictures, 91 Virtual Private Networks (VPN), 80 Visual Voicemail, 34 Visual Voicemail Options, 36 Voicemail, 33 Voicemail Notification, 33 Wi-Fi Calling, 29 Wi-Fi Calling Settings, 113 Wi-Fi Direct, 79 Wi-Fi Settings, 112 Wireless Networks, 112 Your Home Screen, 14 Your Phone's Layout, 6 Your User Name, 87 YouTubeTM, 74

Navigation menu