LG Electronics USA LUV300HDL Vacuum Cleaner User Manual MFL62862401
LG Electronics USA Vacuum Cleaner MFL62862401
Manual

Vacuum Cleaner
Owner's Manual
MODEL: LuV300
Read and follow all safety and operating
instructions before first use of this product.
P/No.: MFL62862401

TABLE OF CONTENTS
-2-
LG Vacuum Cleaner Warranty ...................................................................... 3
Before Using Your New Vacuum Cleaner .....................................................4
Important Safety Instructions ...................................................................4~5
Parts and Features .........................................................................................6
Assembly ....................................................................................................7~9
Unpacking the Vacuum Cleaner ...............................................................................................7
Assembly Parts .........................................................................................................................7
Wand & Hose assembly ...........................................................................................................8
Attaching the Hose ...................................................................................................................8
Accessory Storage ...................................................................................................................9
Cord storage .............................................................................................................................9
Operation ................................................................................................10~15
Control Operation ...................................................................................................................10
Body Release Operation ........................................................................................................10
Adjusting the Pile Height ........................................................................................................11
Attachments ............................................................................................................................12
Attachment Use Chart ............................................................................................................12
Using the Wand or Wand Handle ...........................................................................................13
Installing Attachments ............................................................................................................14
Tips and Tricks .......................................................................................................................14
Using the Pet hair tool ............................................................................................................14
Stairways and Landings .........................................................................................................14
Agitator Motor Overload Protection ........................................................................................15
Thermal Overload Protection ..................................................................................................15
Care & Cleaning .....................................................................................16~22
Storing the Vacuum Cleaner ..................................................................................................16
Dust Tank Components ..........................................................................................................16
Emptying the Dust Tank .........................................................................................................17
Cleaning the Dust Tank ..........................................................................................................17
Cleaning the Foam Pre-Filter ..................................................................................................18
Replacing the HEPA Filter ......................................................................................................18
Pet Hair tool ............................................................................................................................19
Agitator Maintenance ..............................................................................................................19
Replacing the Agitator Belt .....................................................................................................20
Removing Clogs .....................................................................................................................21
Cleaning the Exterior of the Vacuum Cleaner ........................................................................22
Troubleshooting .....................................................................................23~24

LG VACUUM CLEANER WARRANTY
-3-
FIVE YEAR LIMITED WARRANTY
When assembled, operated, and maintained according to all instructions supplied with this
product, if the appliance fails due to a defect in material or workmanship within one year from
the date of purchase, return it to any LGE service center.
If this appliance is used for other than personal household use this warranty applies for only 90
days from the date of purchase.
This warranty covers only defects in material and workmanship.
LGE will NOT pay for:
1. Expendable items that can wear out, including but not limited to filters, belts, light bulbs, and
bags.
2. A service technician to instruct the user in correct product assembly, operation, or
maintenance.
3. A service technician to clean or maintain this product.
4. Damage to or failure of this product if it is not assembled, operated, or maintained according
to all instructions supplied with this product.
5. Damage to or failure of this product resulting from accident, abuse, misuse, or use for other
than its intended purpose.
6. Damage to or failure of this product caused by the use of detergents, cleaners, chemicals, or
utensils other than those recommended in all instructions supplied with this product.
7. Damage to or failure of parts or systems resulting from unauthorized modifications made to
this product.
Disclaimer of implied warranties; limitation of remedies:
Customer’s sole and exclusive remedy under this limited warranty shall be product repair as
provided herein. Implied warranties of merchantability or fitness for a particular purpose are
limited to one year or the shortest period allowed by law. Sears shall not be liable for incidental
or consequential damages. Some states and provinces do not allow the exclusion or limitation of
incidental or consequential damages, or limitations on the duration of implied warranties of
merchantability or fitness, so these exclusions or limitations may not apply to you.
This warranty applies only while this appliance is used in the United States or Canada.
This warranty gives you specific legal rights, and you may also have other rights which vary
from state to state or province to province.

BEFORE USING YOUR NEW VACUUM CLEANER
-4-
Please read this guide. It will help you assemble and operate your new LGE vacuum cleaner in
the safest and most effective way.
For more information about the care and operation, call your nearest LGE service center.
You will need the complete model and serial numbers when requesting information.
Your vacuum cleaner’s model and serial numbers are located on the Model and Serial Number
Plate. Use the space below to record the model number and serial number of your new LGE
vacuum cleaner.
Model No.:
Serial No.:
Date of Purchase:
Keep this Use and Care Guide and your sales receipt in a safe place here future reference.
The number to call for service location : 800-243-0000
IMPORTANT SAFETY INSTRUCTIONS
The Federal Communications Commission Radio Frequency Interference Statement includes the following
warning:
NOTE: This equipment has been tested and found to comply with the limits for a Class B digital device,
pursuant to Part 15 of the FCC Rules. These limits are designed to provide reasonable protection against
harmful interference in a residential installation.
This equipment generates, uses, and can radiate radio frequency energy and, if not installed and used in
accordance with the instructions, may cause harmful interferene to radio communications.
However, there is no guarantee that interference will not occur in a particular installation.
If this equipment does cause harmful interference to radio or television reception, which can be determined
by turning the equipment off and on, the user is encouraged to try to correct the interference by one or more
of the following measures:
• Reorient or relocate the receiving antenna.
• Increase the separation between the equipment and receiver.
• Connect the equipment into an outlet on a circuit different from that to which the receiver is connected.
• Consult the dealer or an experienced radio/TV technician for help.
This device complies with part 15 of the FCC Rules.
Operation is subject to the following two conditions:(1)This device may not cause harmful interference, and (2)
this device must accept any interference received, including interference that may cause undesired operation.
IMPORTANT NOTE:
FCC Radiation Exposure Statement
This equipment complies with FCC radiation exposure limits set forth an uncontrolled environment.
This equipment should be installed and operated with minimum distance 20cm between the radiator and your
body. This transmitter must not be co-located or operating in conjunction with any other antenna or transmitter.
Any changes or modifications in construction of this device which are not expressly
approved by the party responsible for compliance could void the user’s authority to
operate the equipment.
CAUTION
IMPORTANT SAFETY INSTRUCTIONS
-5-
Your safety is important to us. To reduce the risk of fire, electric shock, injury to
persons, or damage when using your vacuum cleaner, follow basic safety precautions
including the following:
WARNING
❏
READ THIS MANUAL BEFORE ASSEMBLING OR USING YOUR VACUUM CLEANER.
❏
Use your vacuum cleaner only as described in this manual. Use only with supplied attachments.
❏
To reduce the risk of electric shock, do NOT use outdoors or on wet surfaces.
❏
Disconnect electrical supply before servicing or cleaning out brush area. Failure to do so could result in
electric shock or brush suddenly starting.
❏
Always turn vacuum cleaner off before connecting or disconnecting the hose.
❏
Always turn vacuum cleaner off before unplugging.
❏
Do not unplug by pulling on cord. To unplug, grasp the plug, not the cord.
❏
Do not use with damaged cord or plug.
If the vacuum cleaner is not working properly due to the unit being dropped, damaged, left outdoors or
submerged in water do not use.
❏
Do not pull or carry the vacuum using the cord. Do not allow the cord to be caught underneath the vacuum
while using. Keep the cord away from heated surfaces.
❏
Do not leave the vacuum plugged in when you are not using it.
❏
Do not allow to be used as a toy. Close attention is necessary when used by or near children.
❏
Do not operate or unplug the vacuum with wet hands.
❏
Do not put any object into openings.
❏
Do not use with any opening blocked; keep free of dust, lint, hair, and anything that may reduce air flow.
❏
Keep hair, loose clothing, fingers, and all parts of body away from openings and moving parts.
❏
Do not use the vacuum cleaner without the dust tank and filters properly placed.
❏
Always clean the dust tank and filters after using the vacuum on carpet cleaners, fresheners or fine dirt
such as drywall dust. These products clog the filter, reduce airflow, and can cause damage to the vacuum
cleaner. Failure to clean the dust tank could result in permanent damage to the vacuum cleaner.
❏
Do not use the vacuum cleaner to pick up sharp hard objects, such as small toys, thumbtacks, paper clips
and other similar objects. These may damage the vacuum cleaner or other internal parts.
❏
Do not pick up anything that is burning or smoking, such as cigarettes, matches, or hot ashes.
❏
Do not use vacuum cleaner to pick up flammable or combustible liquids (gasoline, cleaning fluids,
perfumes, etc.), or use in areas where they may be present. The fumes from these substances can create
a fire hazard or explosion.
❏
Use extra care when cleaning stairs. Do not set the vacuum on chairs or tables, always keep the unit on
the floor.
❏
You are responsible for making sure that your vacuum cleaner is not used by anyone unable to operate it
properly.
❏
WARNING: The cords, wires, and/or cables supplied with this product contain chemicals, including lead or
lead compounds, known to the state of California to cause cancer and birth defects or other reproductive
harm. Wash hands after using.
Proper assembly and safe use of your vacuum cleaner are your responsibilities.
Your vacuum cleaner is intended only for household use. Read this Use and Care Guide carefully for
important use and safety information. This guide contains safety statements under WARNING and
CAUTION symbols. Please pay special attention to these boxes and follow any instructions given.
WARNING statements alert you to such hazards as fire, electric shock, burns, and serious personal injury.
CAUTION statements alert you to such hazards as moderate personal injury and/or property damage.
– SAVE THESE INSTRUCTIONS –
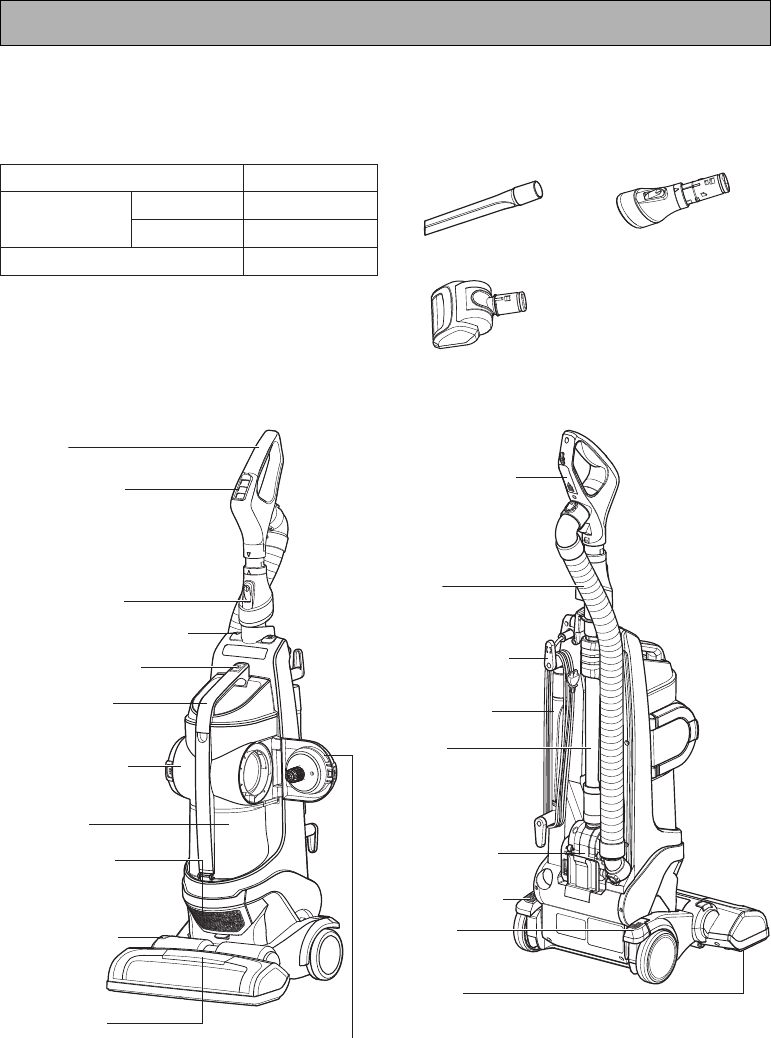
PARTS AND FEATURES
-6-
It is important to know your vacuum cleaner’s parts and features to assure its proper and
safe use. Review these before using your vacuum cleaner.
Common Replacement Parts
To order these parts call
1-800-243-0000.
Accessory Tools
Crevice Tool Dusting brush
Pet hair tool
Handle
Power control
Dusting brush
Dust bin release
Carry handle
Dust separator
Dust tank
Carpet height
indicators
LED lighting
(for 499model) Side door
Auxiliary Power button
HEPA Filter ADQ72913001
Foam Pre Filter Filter Frame MDQ61918301
(ADV72987201) Foam Filter MDJ61980601
Agitator Belt MAS61842501
Battery location
Hose
Quick release
Cord hanger
Wand
Pet hair tool
Body release
Height
adjustment
Agitator
Crevice tool
Exhaust filter
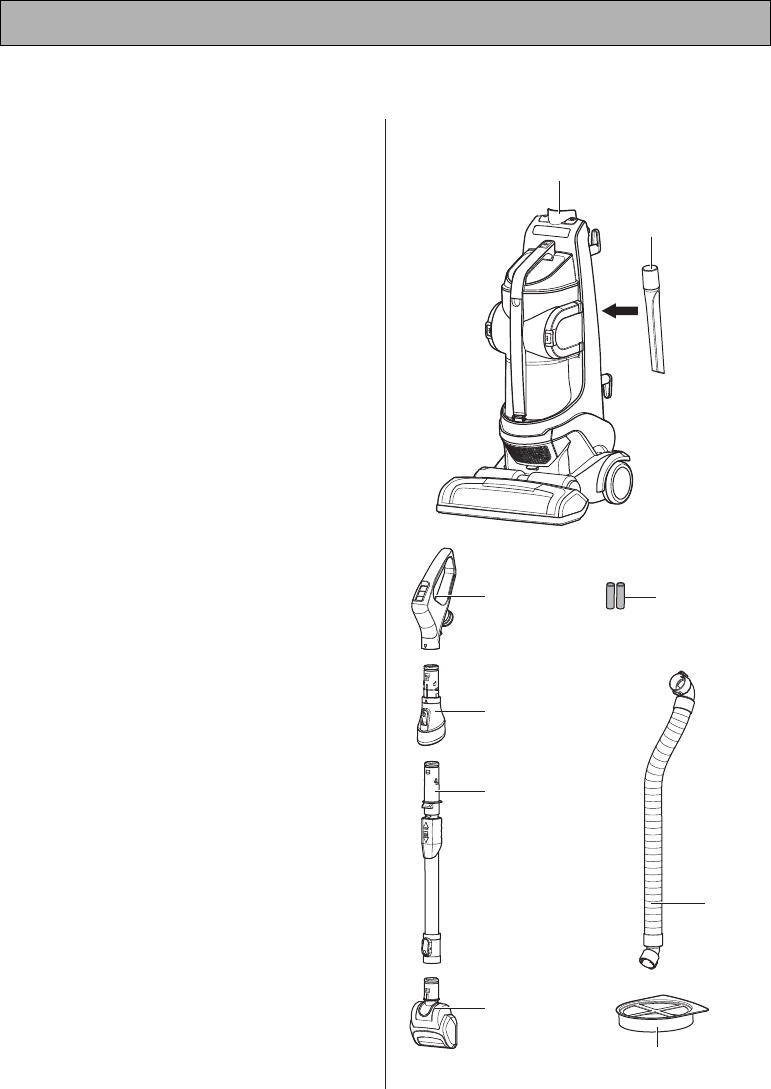
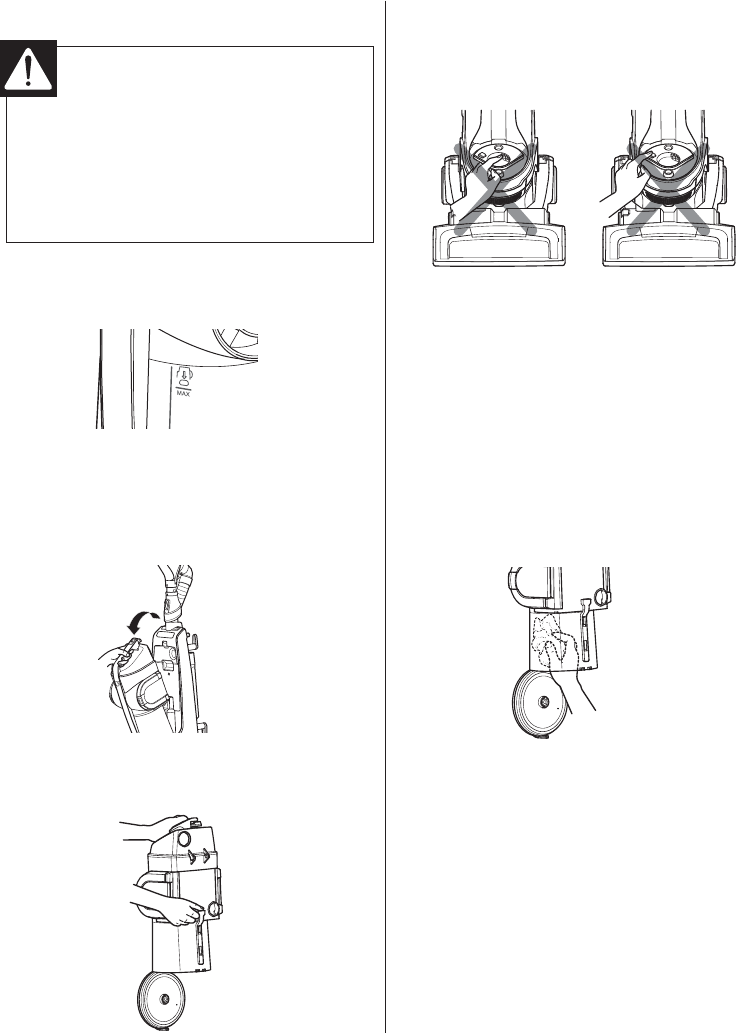
Unpacking the Vacuum Cleaner
Carefully unpack the vacuum cleaner and
make sure that you have all parts before
discarding of any packaging.
Remove any tape, cardboard inserts, and
protective film before assembly.
Items that are packed in the box:
1. Vacuum Cleaner Body
2. Crevice Tool (all ready installed)
3. Handle
4. Two “AAA” Batteries - See page 8 for
installation instructions
5. Dusting Brush
6. Adjustable Wand
7. Hose
8. Pet Hair Tool
9. Additional Foam Filter
Assembly Parts
ASSEMBLY
-7-
To reduce the risk of shipping damage, your vacuum cleaner is shipped partially
unassembled.
8. Pet Hair
Tool
6. Adjustable
Wand
3. Handle 4. Two "AAA"
Batteries
5. Dusting Brush
1. Vacuum Cleaner Body
2. Crevice Tool
7. Hose
9. Additional Foam Filter
-8-
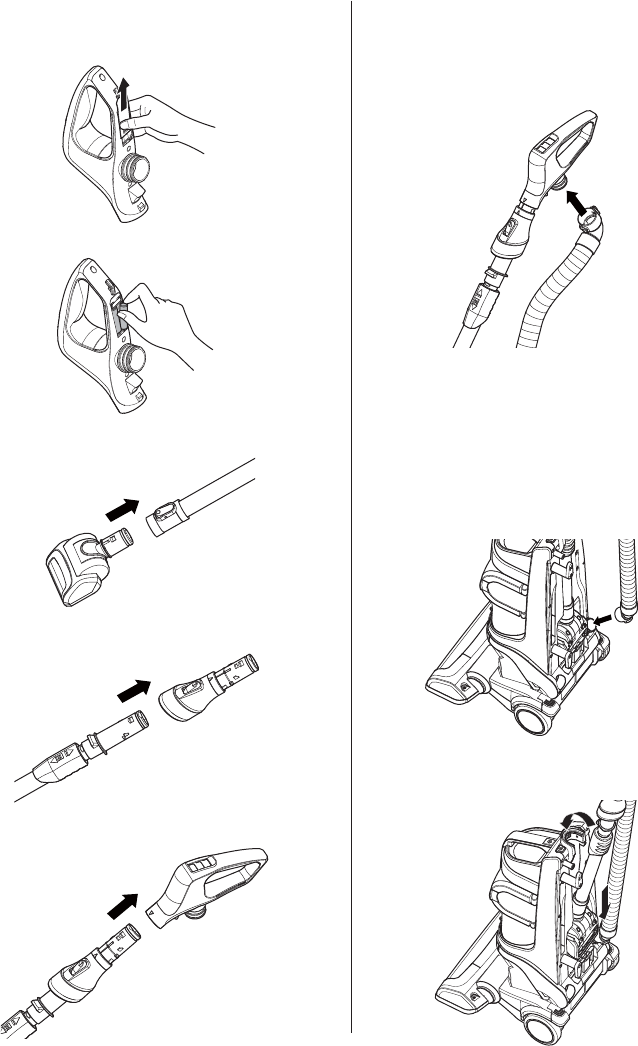
Wand & Hose assembly
1. Remove Cover by sliding up.
2. Insert the 2 “AAA” batteries.
3. Insert the Pet hair tool into the bottom of
the wand.
4. Insert the dusting brush onto the other side
of the wand.
5. Insert the handle onto the open end of the
dusting brush.
Attaching the Hose
1. Attach the top side of the hose to the
handle. The top side of the hose can be
recognized because is has 2 clips for
releasing.
2. Insert the bottom side of the hose to the
main body. The bottom side of the hose
can be recognized because it only has
1 clip to release.
Note: When inserting the bottom of the hose
to the main body the clip should be on the
side closest to the floor and centered.
3.
Inset the wand with all accessories attached
into the main body of the vacuum cleaner.
-9-
Accessory Storage
Your vacuum cleaner features convenient on-
board storage for the crevice tool.
• Put the wand & hose assembly on the back
of body, and then push the wand & hose
assembly to the body.
Cord Storage
To store the cord:
1. Make sure the cord hanger is in the UP
position.
2. Wrap the cord around the cord hanger and
hook, then clip the plug onto the cord.
NOTE: To reduce the risk of electric shock,
this vacuum cleaner has a polarized plug; one
blade is wider than the other. This plug will fit
in a polarized outlet only one way.
To release the cord:
1. Rotate the upper cord holder to the DOWN
position.
2. Unclip the plug and extend the cord.
Personal Injury and Product Damage Hazard!
DO NOT use outlets above counters. Damage to items in the surrounding area could
occur.
WARNING
OPERATION
-10-
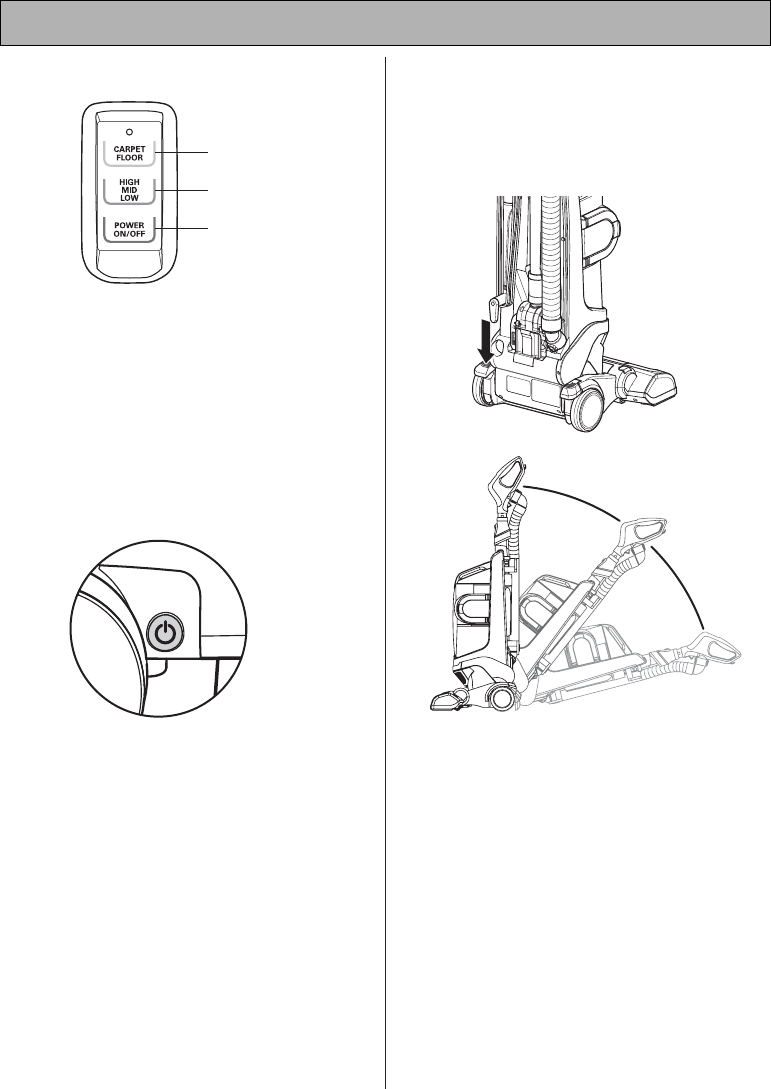
Control Operation
1. Carpet / Floor: To toggle between the
agitator being on or off.
Note: If the vacuum is in the upright
position the agitator will not run even if the
vacuum power is on.
2. High Med Low: To select the proper
suction of the vacuum such as High,
Medium or Low.
3. Power On/Off : To turn the vacuum on and
off.
This power button is only needed when the
batteries in the handle need to be changed.
When pressing the handle controls a blue light
at the top of control indicates the batteries are
OK, if there is not blue light when pressing the
batteries should be replaced.
If you need to still vacuum and replacement
batteries are not readily available the power
button on the main body can be used to run
the vacuum until the batteries are changed.
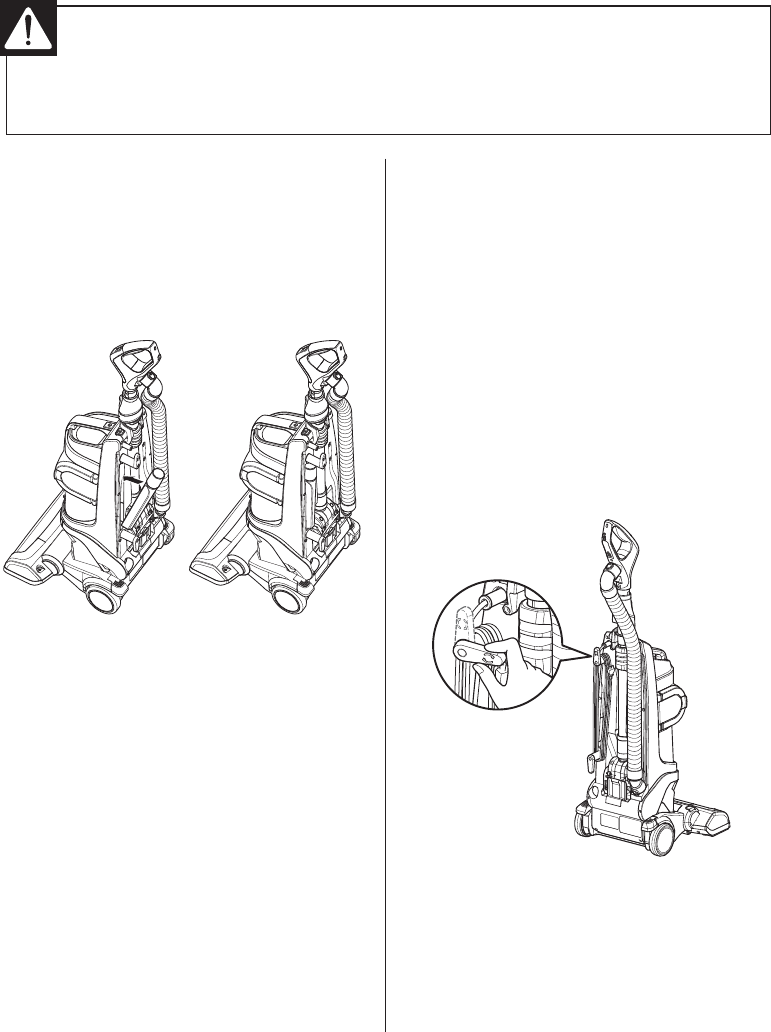
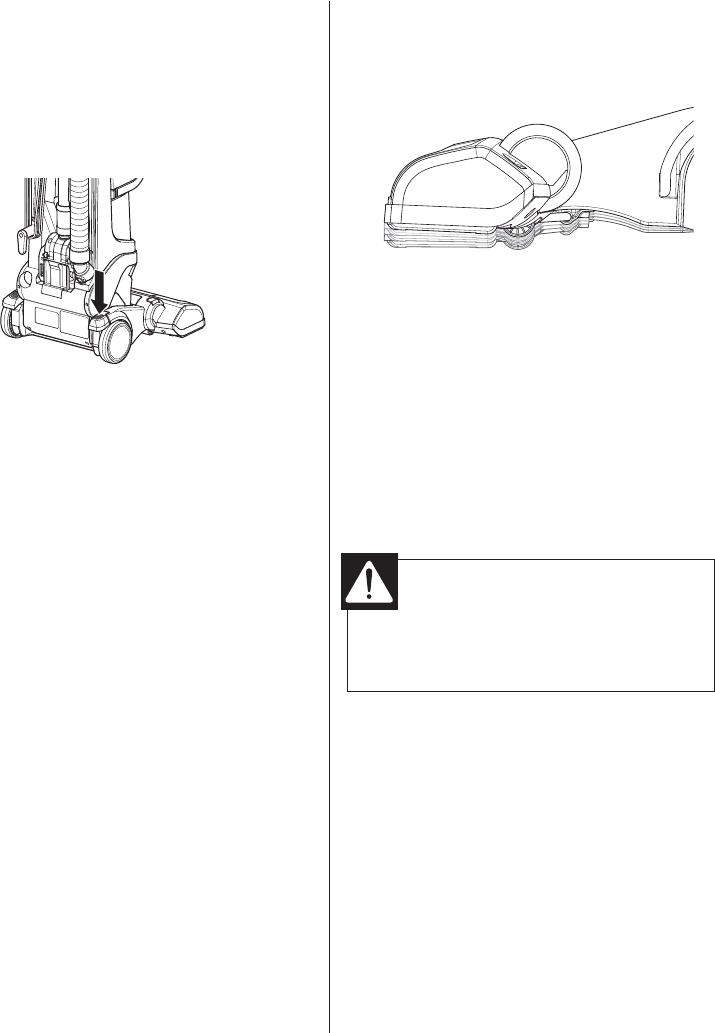
Body Release Operation
• To begin vacuuming press the pedal on the
left side of the vacuum and pull down.
NOTE: When the vacuum is in the upright
position the agitator will not run.
POWER
1
2
3
-11-
Adjusting the Pile Height
To adjust the pile height:
When it is necessary to raise and lower the
front of the cleaner for various carpet pile
heights, press the right foot pedal to adjust the
pile height. Each press will raise the agitator
one notch.
Suggested pile height settings:
You may need to raise the height to make
some jobs easier, such as vacuuming scatter
rugs and longer pile rugs.
Recommended settings:
H shag carpet, long pile, scatter rugs
Mmedium to long pile
ML short to medium pile
L very low pile, bare floors
Attention: Special care is required when
vacuuming certain types of carpet or flooring.
Always check the carpet or floor covering
manufacturer’s recommended cleaning
instructions before vacuuming.
Personal Injury Hazard
Do not set the vacuum on the stairs,
always keep the unit on the floor.
WARNING
-12-
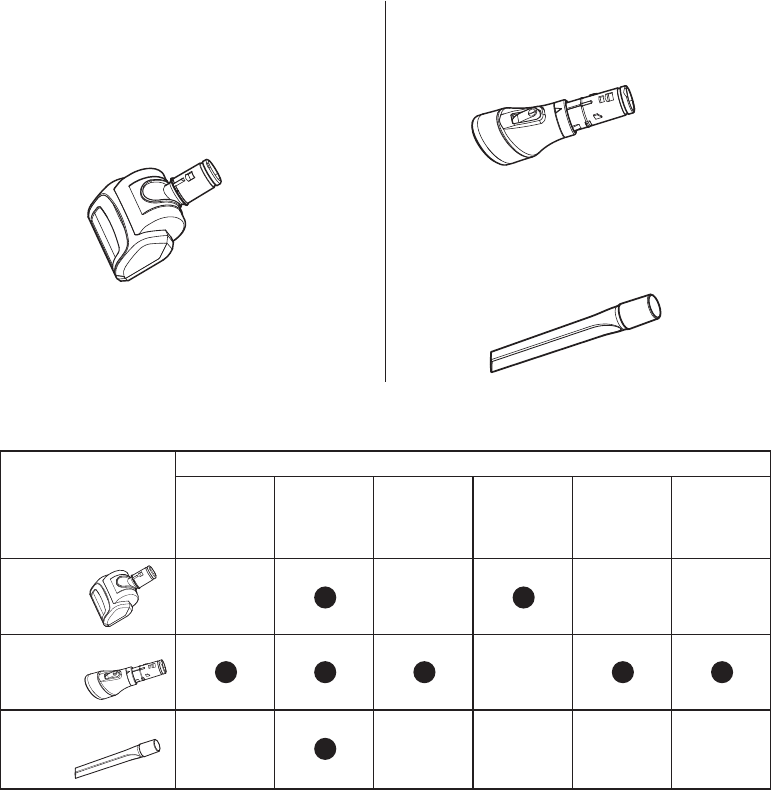
Attachment Use Chart
Attachments
Pet Hair Tool
This air-turbine powered brush is great for
stairs and vehicle interiors, as well as
removing pet hair, lint, etc. from fabrics and
carpets.
Do NOT use on pets.
Dusting brush
Use the Dusting brush in place for cleaning
furniture, walls, etc.
Crevice Tool
The crevice tool can be used for tight corners,
between cushion and various other hard to
reach places.
CLEANING AREA
* Always make sure attachments are clean before using on fabrics.
ATTACHMENT
Furniture
and Hard
Surfaces*
Between
Cushions
Upholstered
Surfaces*
Drapes*
(lower
power
level)
Stairs Carpeted
Floors/
Rugs
Walls
Pet Hair
Tool
Dusting
brush
Crevice
Tool
-13-
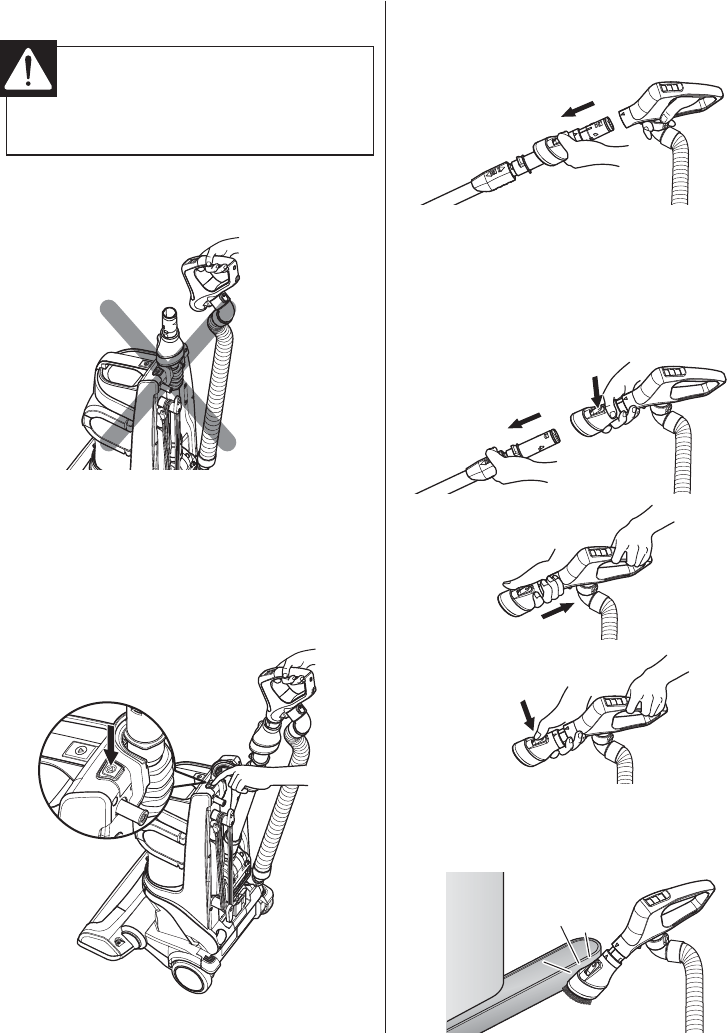
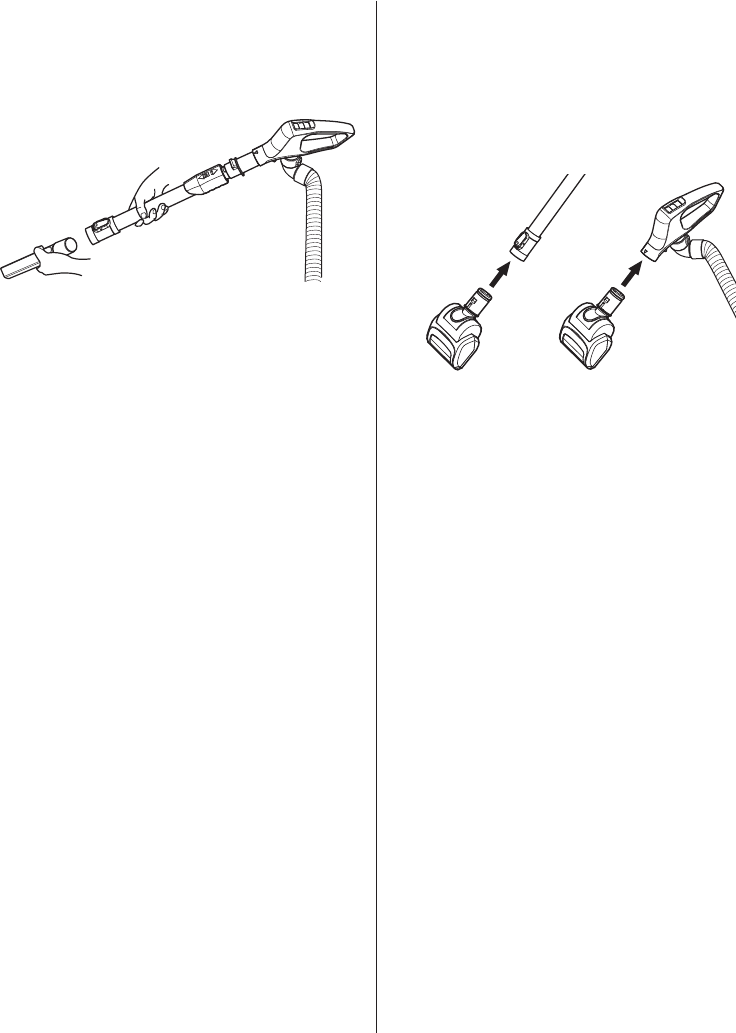
Using the Wand or Wand Handle
If using any accessory on the end of the
handle the entire wand must be removed from
the body base.
Release the wand and handle:
1. Make sure the vacuum cleaner is locked in
the upright position and on a flat, stable
surface.
2. Press the wand release button on the body
and tilt the wand handle.
3. Lift the wand out and up.
4. To use the handle only, press the release
button on the bottom of the handle and pull
the wand straight out of the handle.
5. To use the dusting brush press the release
button on the front of the dusting brush and
pull the wand straight out of the dusting
brush. Second, pull the dusting brush
toward handle. After use, press the release
button and pull out the dusting brush.
Note: The dusting brush is surrounded with a
soft rubber coating to prevent damage to your
furniture.
Never pull the vacuum cleaner by the
hose.
CAUTION
-14-
Installing Attachments
Using the crevice tool:
Slide the crevice tool over the end of the wand
or fit it into the handle.
Tips and Tricks
Carpet Edges and Corners:
For tight corners, carpet edges, and along
base boards, use the dusting/ upholstery tool.
Use the crevice tool for especially hard to
reach areas.
Use the crevice tool for hard to reach places
such as tight corners and base boards.
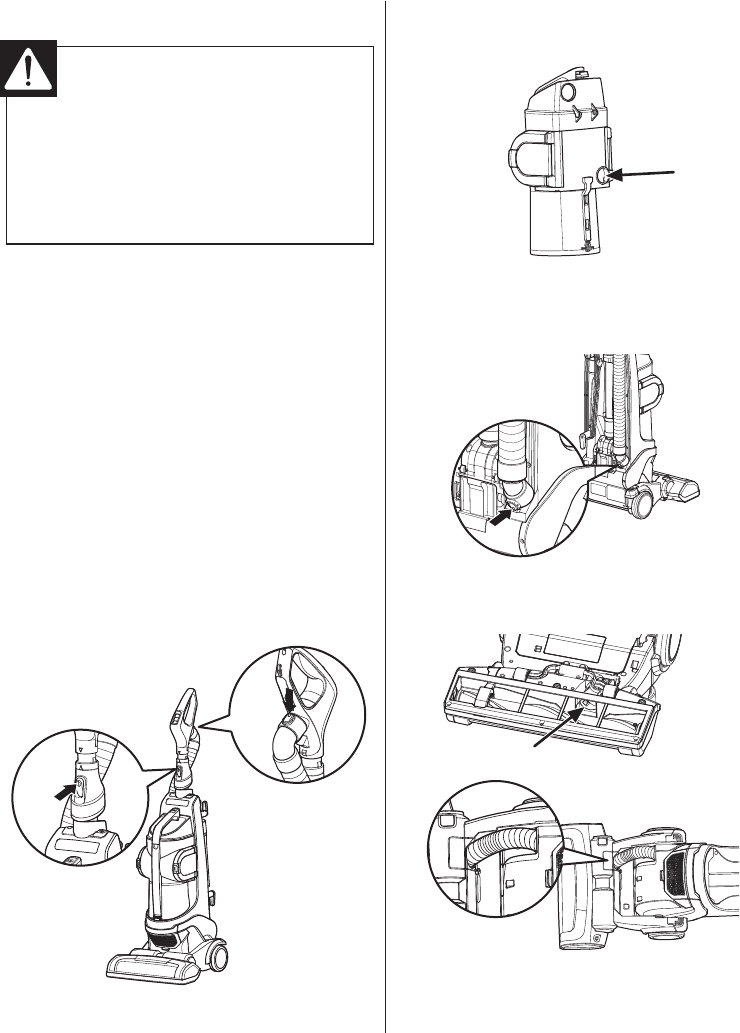
Using the Pet hair tool
The Pet hair tool attaches to the wand like the
other attachments. It features a turbine-
powered agitator to provide extra cleaning
power on carpets and fabrics. It is great for
cleaning stairs, cushions, and vehicle
upholstery.
When using the Pet hair tool, check frequently
for the buildup of hair, fibers, lint, and other
debris in the brush area.
Excessive buildup can reduce performance
and could damage the Pet hair tool. See the
Care and Cleaning section for cleaning
instructions.
Stairways and Landings
Use the dusting/upholstery tool or Pet Handi
Mate on stairs and landings. Make sure that
the vacuum cleaner is placed so that it cannot
tip or fall.
See below and page 11 for instructions on
selecting and using attachments.
-15-
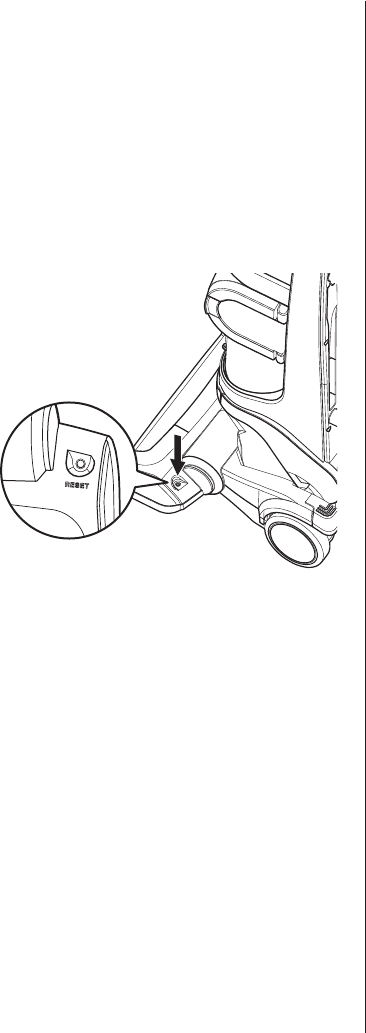
Agitator Motor Overload
Protection
The agitator has a built-in protection against
motor damage should the agitator jam. If the
agitator slows down or stops, the agitator
overload protector shuts off the agitator motor.
The suction motor will remain on at this time.
To correct problem: Turn off and unplug
vacuum cleaner, remove obstruction, and
press the reset button.
Thermal Overload Protection
This vacuum cleaner has a thermal overload
protector which automatically activates to
protect the vacuum cleaner from overheating.
If a clog prevents the normal flow of air to the
motor, the thermal protector turns the motor
off automatically to allow the motor to cool in
order to prevent possible damage to the
vacuum cleaner.
To correct the problem: Turn the vacuum
cleaner off and unplug the power cord. Check
for and remove clogs, if necessary. Also
check and clean any dirty filters.
Wait approximately 30 minutes and plug the
vacuum cleaner in and turn back on to see if
the motor protector has reset. The thermal
protector system will not reset until the
vacuum cleaner has completely cooled down.
-16-
Always follow all safety precautions when cleaning and servicing the vacuum cleaner.
Storing the Vacuum Cleaner
When not in use, wrap the cord around the
cord hanger, as shown. Store the crevice tool
in their proper places on the back of the
vacuum cleaner.
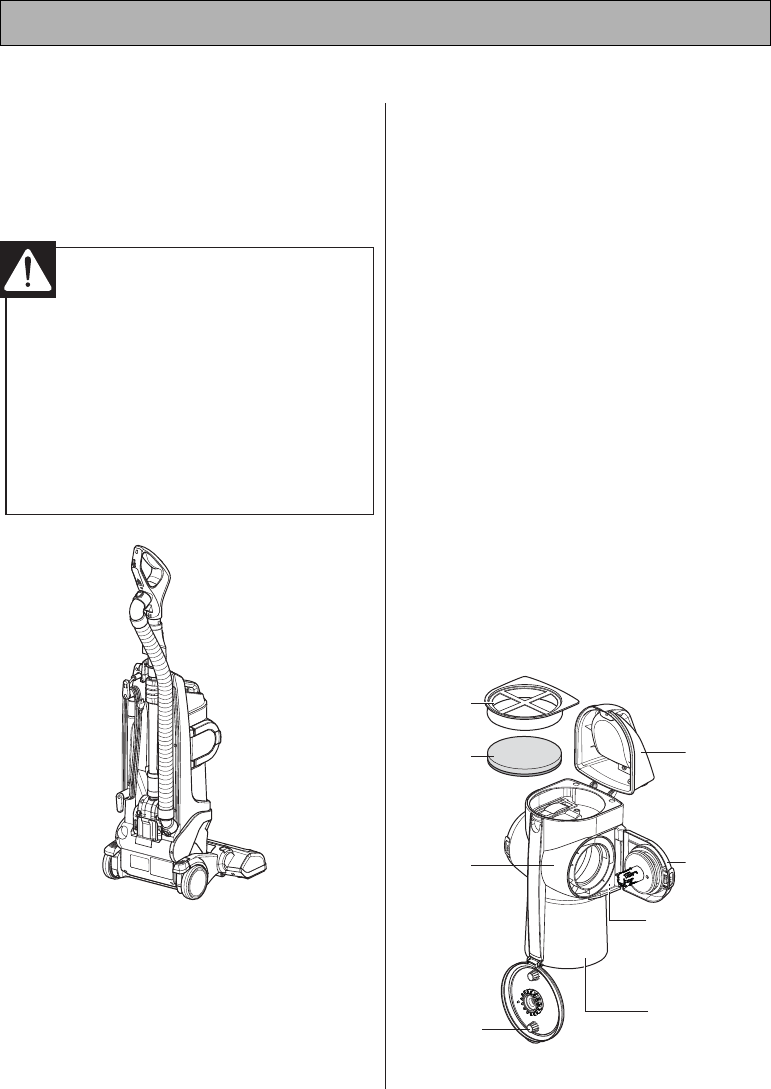
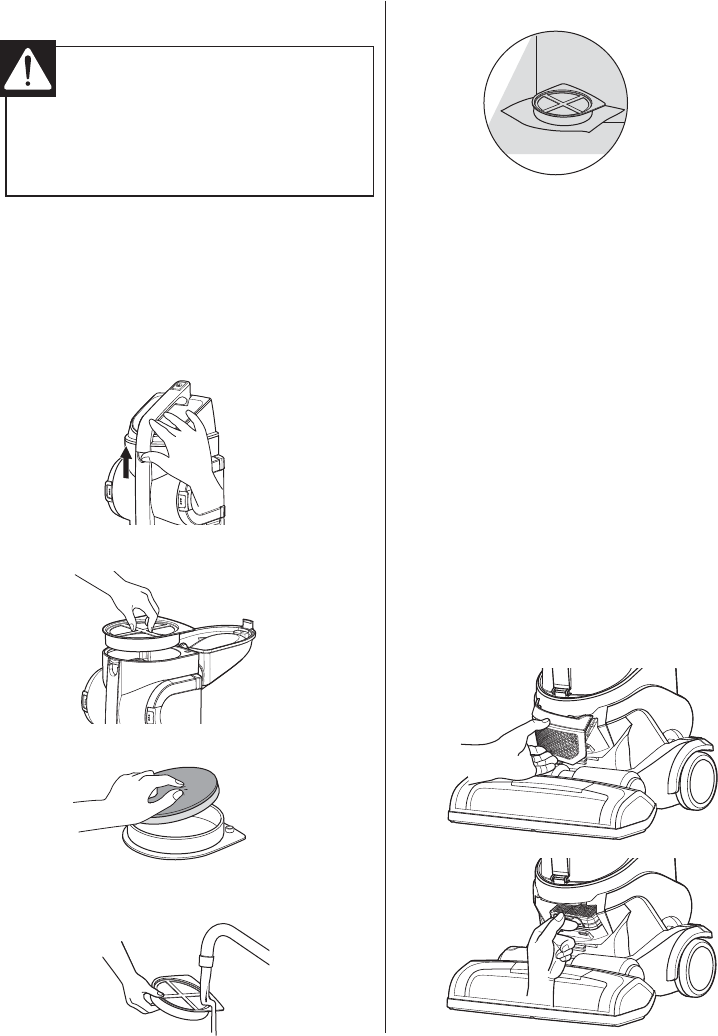
Dust Tank Components
The dust tank consists of several key
components. Always make sure that all parts are
properly reinstalled after emptying the dust tank.
NEVER operate the vacuum cleaner
without all filters in place!
NEVER operate the vacuum cleaner with
wet filters or components!
Key components:
1~2. Foam pre filter: Captures medium to
fine particles. It consists of Filter frame &
Foam filter. These are washable.
3. Dust tank lid: Open to access Foam pre
filter.
4. Dust separator: Capture dust and medium
particles.
5. Side door: Open to remove dirt from dust
separator.
6. Emptying dirt release: Press down to
open the bottom plate.
7. Dust tank: where dirt is collected.
8.
Bottom plate: Open to empty the dust tank.
Electrical shock and personal injury
hazard.
Take care when wrapping the cord.
Wrapping the cord too tightly puts
stress on the cord and can cause cord
damage. Do not criss-cross when
wrapping the cord. A damaged cord is
an electrical shock hazard and could
cause personal injury or damage.
WARNING
CARE & CLEANING
1. Filter
frame
2. Foam
filter
4. Dust
separator
7. Dust tank
3. Dust
tank lid
5. Side
door
6. Emptying
dirt release
8. Bottom
plate
-17-
Emptying the Dust Tank
For best performance, always empty the dust
tank when the dirt level reaches the MAX line.
Electrical shock and personal injury hazard.
TO REMOVE DUST TANK, press the dust
tank release button, tilt the dust tank back,
then lift it out of the vacuum cleaner.
TO EMPTY DUST TANK, press the bottom
plate release and open the bottom plate, as
shown.
TO REINSTALL THE DUST TANK, place it in
the holder, then tilt forward until it clicks into
place. Make sure the dust tank is properly
seated!
Don’t touch the inner gear and button.
Cleaning the Dust Tank
For optimal performance, check filters
regularly and clean when necessary.
To Clean the Dust Tank:
1.
Remove the dust tank from the vacuum cleaner.
2. Press the bottom plate release and open
the bottom plate.
3. Wipe out the dust tank with a damp cloth or
paper towel.
4. Release the latch on the Side door, on both
the right and left sides.
5. Remove any hair, fibers or other debris
from the dust separator.
Do not remove the cones attached to the
side door for cleaning.
NEVER operate the vacuum cleaner with
wet filters or components!
Always unplug power cord from
electrical outlet before performing any
service on vacuum cleaner. Failure to
do so could result in electrical shock
or personal injury from vacuum
cleaner suddenly starting.
WARNING
-18-
Cleaning the Foam Pre-Filter
For optimal performance, check the filters
every 3 months and clean when necessary.
Don’t close the dust tank lid without pre-filter.
To Clean the Pre-Filter:
1. Remove the dust tank from the vacuum
cleaner.
2. Lift up on the dust tank lid release and open
the lid.
3. Lift out the foam pre-filter.
4.
Separate the foam filter from the filter frame.
5. Shake out any excess dirt or debris, and
rinse the foam filter & filter frame with clean
water.
6. Dry completely under shadow place.
NEVER operate the vacuum cleaner with
wet filters or components!
If you notice a loss of suction and cleaning the
pre-filter does not help, you need to replace
the pre-filter. You can purchase additional
foam filters from LG by calling 800-243-0000
and asking for parts on page 6.
Replacing the HEPA Filter
Your vacuum cleaner features a HEPA filter
for optimal exhaust filtration. This filter cannot
be cleaned and should be replaced annually
for proper performance.
To Replace the HEPA Filter:
1. Remove the exhaust filter cover.
2. Lift out the filter by pressing the hook.
3. Insert a new filter, being sure to install it
correctly.
4. Insert the exhaust filter cover.
A wet filter can cause permanent
damage to the vacuum cleaner. Be
sure filters are completely dry before
reinstalling.
CAUTION
-19-
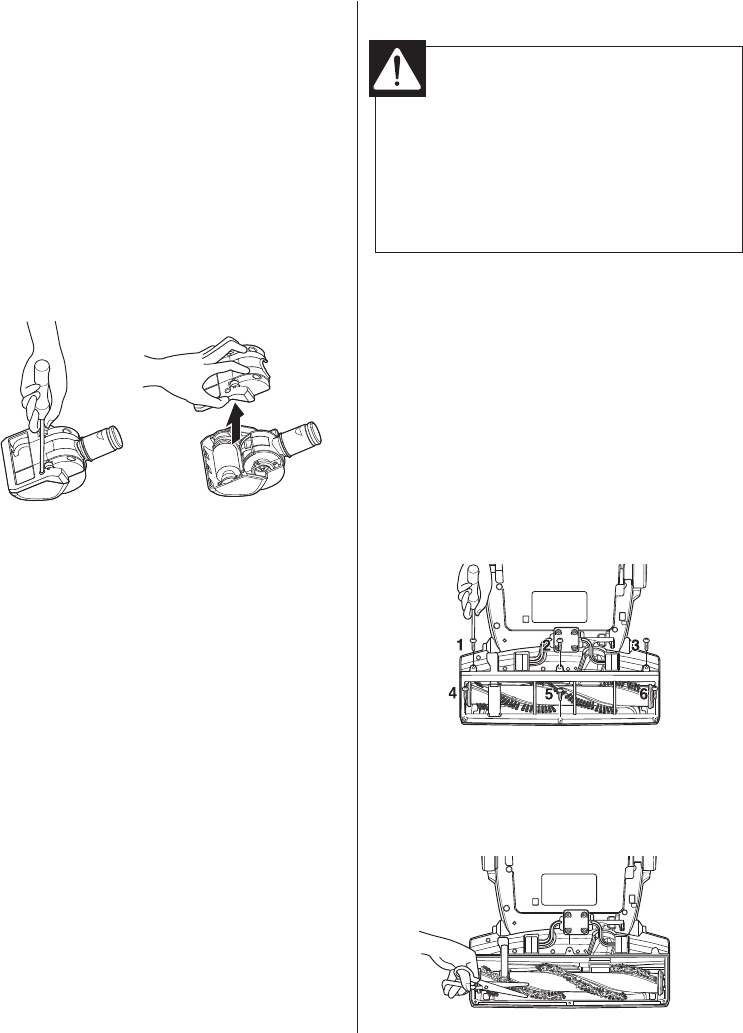
Pet hair tool
To clean the pet hair tool
1. Remove the four screws on the bottom of
the pet hair tool.
2. Press in on the tabs and lift off the cover.
3. Remove any debris.
To reassemble:
4. Carefully press cover onto tabs until they
snap into place.
5. Insert and tighten screws removed in
Step 1. Do NOT overtighten the screws.
Do Not use the pet hair tool on any animal.
Agitator Maintenance
Frequently check the agitator brush area for
hair, string, and lint buildup.
Remove the Agitator Brush Cover:
1. Unplug the vacuum cleaner. Press the left
foot pedal to release the head. Lower the
handle until the vacuum cleaner is lying flat
on the floor.
2. Turn the vacuum cleaner over, so that the
agitator is facing up.
3. Set the agitator on a cloth or a smooth
surface. Remove the six screws on the
bottom of the head and remove the cover.
4.
Carefully remove any accumulated string, hair,
etc. from the agitator and the agitator area.
To reinstall the cover.
Reverse the steps above.
Electrical shock and personal injury
hazard.
Always unplug the vacuum cleaner
before servicing. Failure to do so could
result in electrical shock or personal
injury.
WARNING
-20-
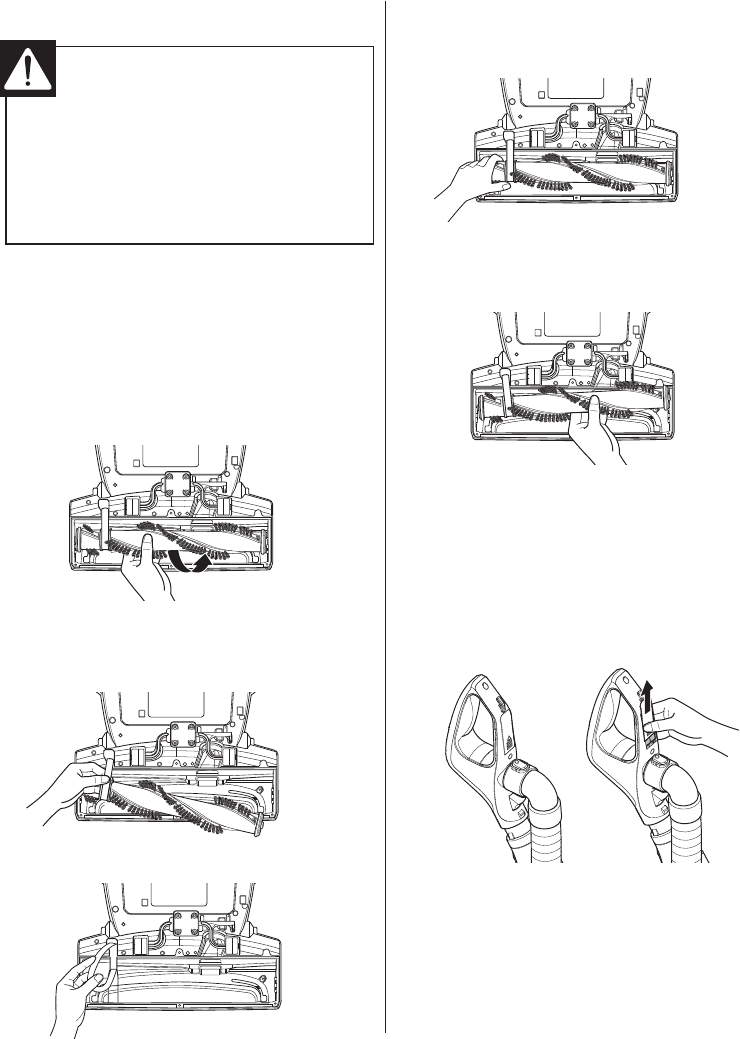
Replacing the Agitator Belt
If the belt breaks, follow the steps below to
replace the agitator belt.
To Replace the Belt:
1. Remove the agitator brush cover as
described on page 19.
2. Lift the agitator straight out.
3. Unhook the old belt from the drive pulley.
Make sure no pieces of the broken belt are
trapped in the agitator or drive pulley area.
4. Hook the new belt over drive pulley.
5. Fit the belt end of the agitator through the
belt, making sure the belt is aligned with the
pulley section of the agitator.
6. Lower the agitator into place, making sure
the oval shaped tabs fit into the indents on
the vacuum cleaner.
7. Reinstall the agitator brush cover as
described above.
For a replacement belt, order LG service
center belt part # MAS61842501.
Replacing the batteries
1. Slide the battery cover up and away from
the hose.
2. Replace the two batteries and reinstall the
battery cover.
Electrical shock and personal injury
hazard.
Always unplug the vacuum cleaner
before servicing. Failure to do so could
result in electrical shock or personal
injury.
WARNING
-21-
Removing Clogs
If you notice a loss in suction, first check the
filters as described on pages 17 and 18. If the
filters are clean, there may be a clog. The
arrows show areas where clogs are most
likely to occur.
To check for clogs:
1. Check the hose where it connects to the
handle by pressing the two release buttons
on the top end of the hose.
2. Release the wand from the vacuum cleaner
by pressing the wand release button.
Separate the wand release button.
Separate the wand and wand handle by
pressing the button on the wand handle
and check the wand and handle for clogs.
3. Remove the dust tank and check the dust
tank inlet where it connects to the vacuum
cleaner body.
4. Check the hose where it connects to back
of the body by pressing the release button
on the top end of the hose.
5. To check more thoroughly remove the
screw by the port.
Electrical shock and personal injury
hazard.
Always unplug the vacuum cleaner
before servicing. Failure to do so could
result in electrical shock or personal
injury.
WARNING
-22-
Cleaning the Exterior of the
Vacuum Cleaner
Wipe the exterior of the vacuum cleaner with
a clean, soft cloth that has been dipped in
water and wrung dry.
DO NOT allow water to enter any openings in
the vacuum cleaner.
DO NOT clean tools in dishwasher or clothes
washer. Wash tools in warm soapy water,
rinse, and allow to air dry completely.
DO NOT use tools if they are wet.
Electrical shock and personal injury
hazard.
Always unplug the vacuum cleaner
before servicing. Failure to do so could
result in electrical shock or personal
injury.
WARNING
TROUBLESHOOTING
-23-
Review this chart to find do-it-yourself solutions for minor performance problems.
Any service or repair needed, other than as described in this Use & Care Guide,
should be performed through your local LGE service center.
Electrical shock and personal injury hazard.
Always unplug the vacuum cleaner before servicing. Failure to do so could result in
electrical shock or personal injury.
WARNING
PROBLEM
Vacuum cleaner will
not run
Agitator does not
turn
Dust escapes the
dust tank
Poor dirt pickup
• Unplugged at wall outlet
• Batteries are dead
• Thermal overload
protection activated
• Switch is off (unit is in
bare floor mode)
• Cleaner is in upright
position
• Agitator Reset switch is
tripped (brush is jammed)
• Belt broken
• Dust tank improperly
installed
• Pre-filter cover not closed
• Tank bottom is not
latched
• Full or clogged dust tank
• Dust tank improperly
installed
• Wand not installed
properly
• Clogged hose or nozzle
• Belt broken/not installed
properly
• Thermal protector
activated
• Agitator overload
protector activated
• Hole in hose
• Worn agitator
• Make sure cord is plugged into a
functioning outlet
• Replace batteries see page 20
• Allow the vacuum cleaner to cool
down. See page 15
• Turn on agitator power switch
• Press handle release pedal and tilt
unit back
• Unplug the vacuum cleaner and check
the agitator for obstructions and reset
the unit. See Page 15
• Replace belt. See page 20
• Make sure all dust tank components
and filters are installed correctly
• Check pre-filter cover
• Make sure tank bottom is closed and
latched
• Empty dust tank and clean filters
• Make sure all dust tank components
and filters are installed correctly
• Make sure the wand is installed
correctly
• Check for clogs. See page 21
• Check belt, and replace if needed.
See page 20
• Allow the vacuum cleaner to cool
down. See page 15
• Unplug the vacuum cleaner and check
the agitator for obstructions. Press the
reset button
• Inspect hose carefully.
Replace if needed
• Contact service
POSSIBLE CAUSE POSSIBLE SOLUTION

-24-
PROBLEM
Cleaner picks up
moveable rugs or is
hard to push
Brush on Pet hair
tool will not run when
attached
Accessory has no
suction when using
with the handle
Handle controls not
working
• Wrong pile height setting
• Use lower power level
• Dirty brush or brush
supports
• Obstruction in turbine air
path
• Low suction from vacuum
cleaner
• Main wand still
connected to body base
• Batteries need
replacement
• Adjust pile height
• Reduce the power level
• Clean the inside of the
Pet hair tool. See page 19
• Clean the inside of the
Pet hair tool. See page 19
• Check for clogs. See page 21
Remove wand see page 13 for wand
removal
Replace batteries in handle
see page 20
POSSIBLE CAUSE POSSIBLE SOLUTION
