LG Electronics USA M1917AD 19" LCD MONITOR User Manual User s Manual H ok
LG Electronics USA 19" LCD MONITOR User s Manual H ok
UserManual.wiki
>
LG Electronics USA
>
M1917AD User Manual
USERS MANUAL
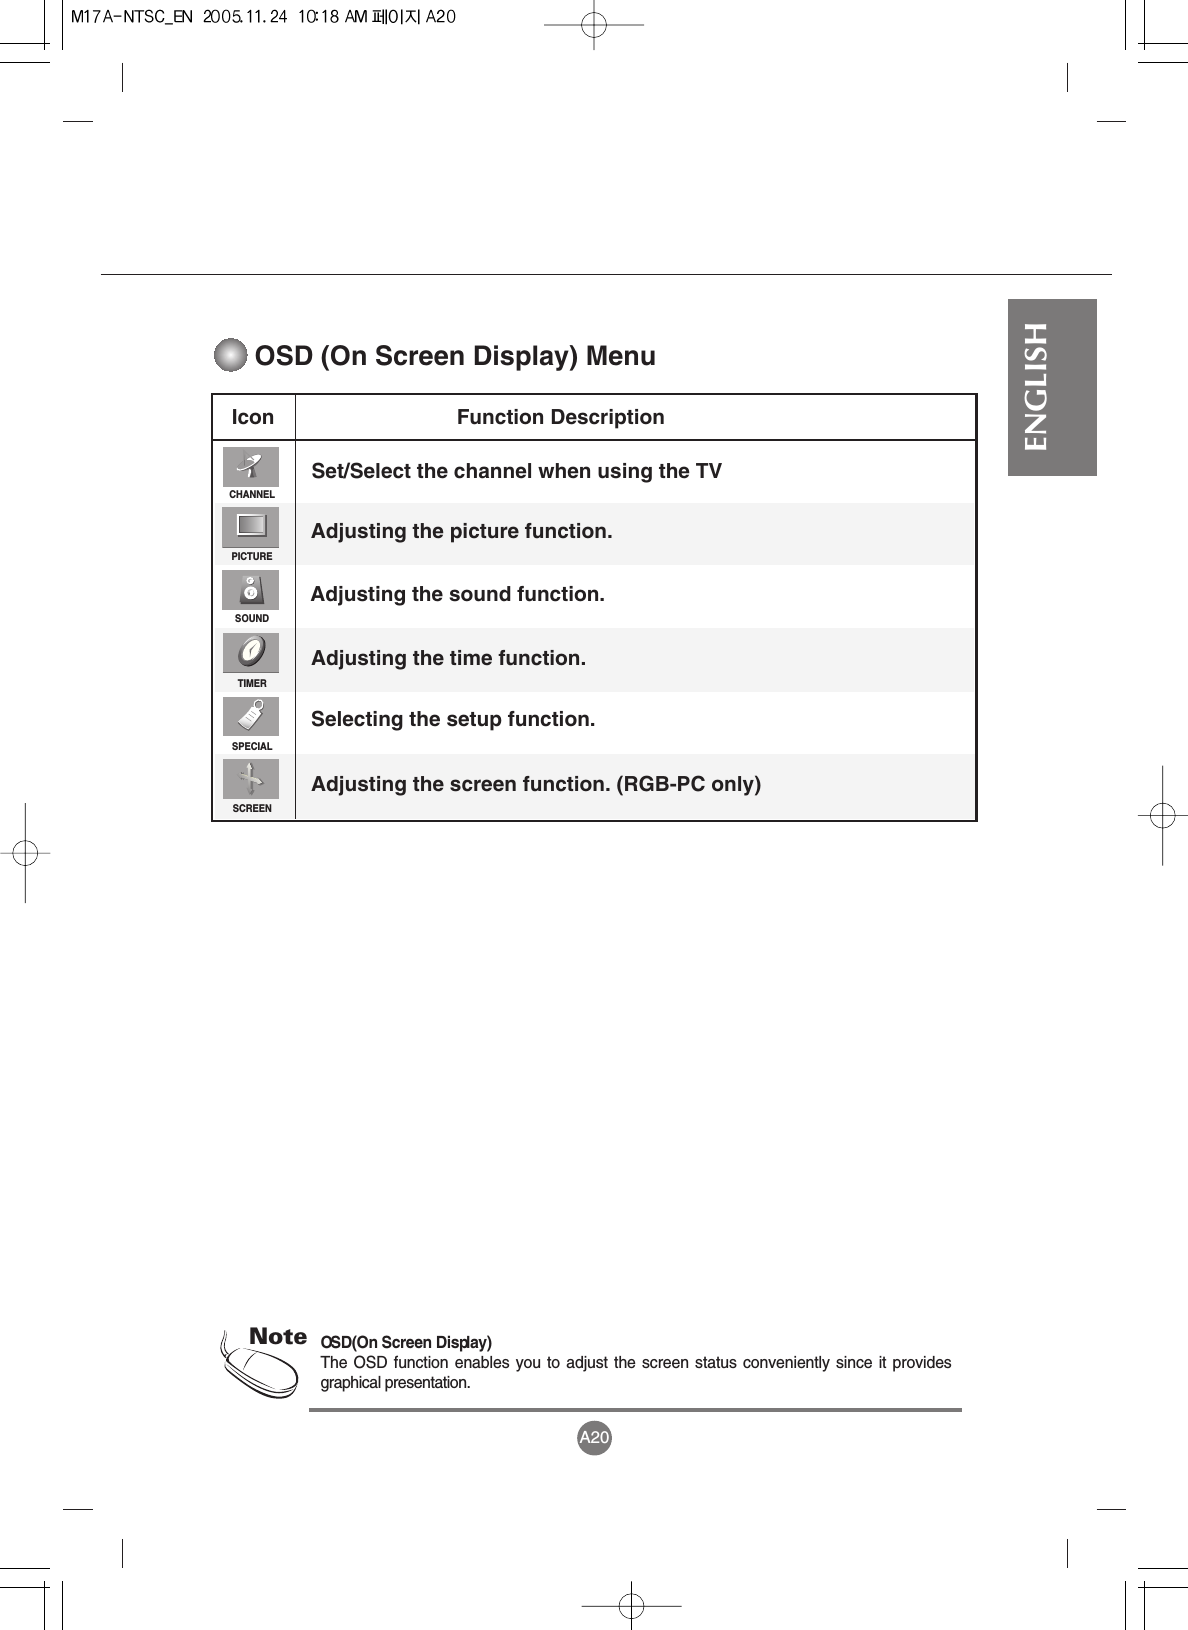
Navigation menu
Upload a User Manual
Namespaces
Wiki Guide
HTML
PDF
Info
Views
User Manual
Discussion / Help
Navigation
![A9Name and Function of the PartsS-VideoVideoAV INAudio[MONO]AudioH/PANTENNARGB(PC/DTV)Rear ViewPower Connector : Connect the power cord.AV Input TerminalD-Sub Analog Signal Connector TV Tuner Jack : Connect the antenna.PC Sound Jack : Connect to the jack in the PC sound card. Headphone/Earphone Connection Terminal](https://usermanual.wiki/LG-Electronics-USA/M1917AD/User-Guide-606666-Page-11.png)
![A10ENGLISH•Make sure to check the sound card connection terminal in the PC before connecting to the product.If the PC sound card supports both Speaker Out and Line Out, change it to Line Out by setting the jumperor the PC application. (For more details, refer to the sound card user’s guide.)- Speaker Out : The terminal connected to the speaker that is not equipped with an amplifier.- *Line Out : The terminal connected to the speaker equipped with an amplifier.If Audio Out in the PC sound card has only Speaker Out, reduce the PC volume. This product is integratedwith an amplifier.AV Input TerminalConnecting the sound card output terminalS-VideoVideoAV INAudio[MONO]S-Video Input TerminalAudio Input TerminalVideo Input Terminal](https://usermanual.wiki/LG-Electronics-USA/M1917AD/User-Guide-606666-Page-12.png)
![A11A11S-VideoVideoAV INAudio[MONO]AudioH/PANTENNARGB(PC/DTV)When Connecting to your PCFirst of all, see if the computer, product and the peripherals are turned off. Then, connect the signal input cable.When connecting with the D-Sub signal input cable. (IBM compatible PC)When connecting with the D-Sub signal input cable. (Macintosh)Rear side of the product.Connecting to External DevicesBAPC MacintoshMacintosh Adapter (Optional)Use the standard Macintosh adapter since an incompatibleadapter is available in the market. (Different signaling system)BA1.Audio cable](https://usermanual.wiki/LG-Electronics-USA/M1917AD/User-Guide-606666-Page-13.png)
![A13Connecting to External DevicesWhen connecting with an RCAcable.• Connect the input terminal with aproper colour match.(Video – Yellow, Sound (left) –White, Sound (right) – Red)When connecting with an S-Video cable.• Connect to the S-Video input terminal towatch high image quality movies.S-VideoVideoAV INAudio[MONO]VIDEOOUTAUDIOOUTRear side of the ProductRCA CableYellowWhiteRedConnect the video/audio cable as shown in the below figure and then connect the powercord (See page A12).When watching VCR/DVDVCR/DVDBAWRY(Not included)S-VideoVideoAV INAudio[MONO]VIDEOOUTAUDIOOUTRCA CableS-Video CableVCR/DVDRear side of the ProductWhiteW(Not included)(Not included)1.RedR](https://usermanual.wiki/LG-Electronics-USA/M1917AD/User-Guide-606666-Page-15.png)
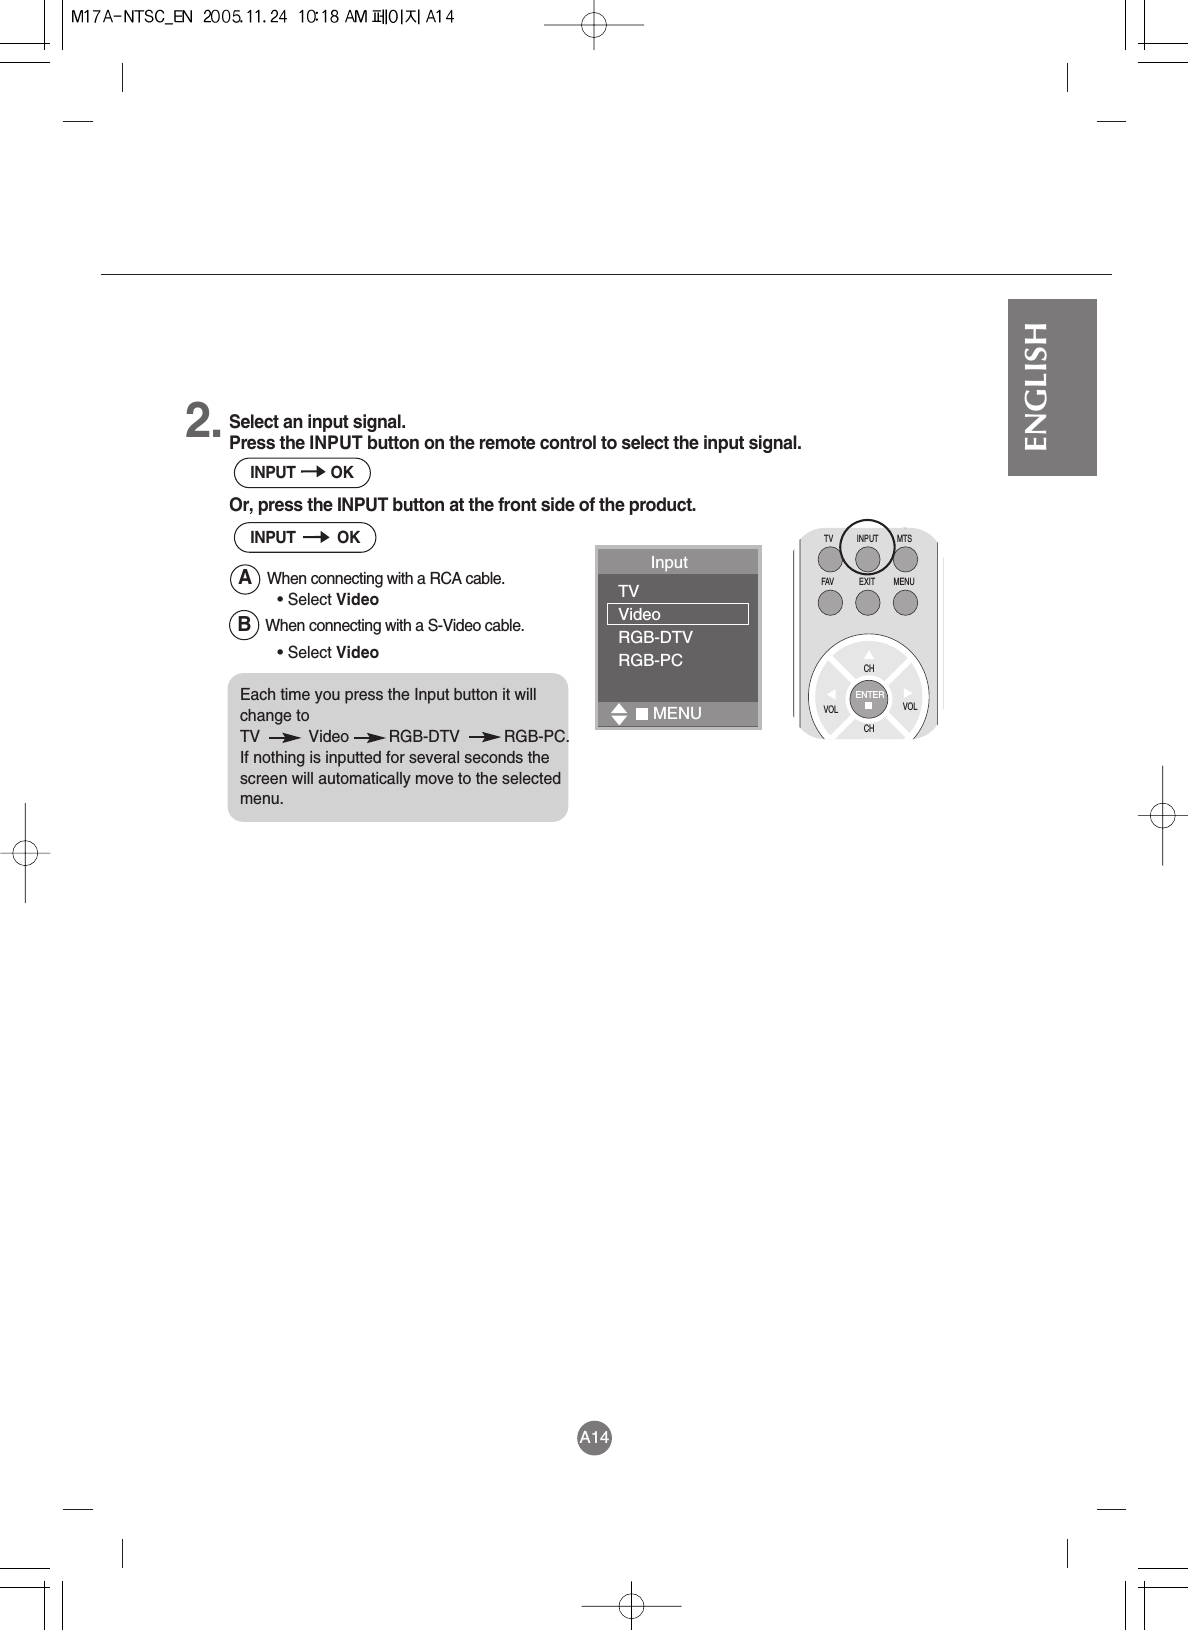
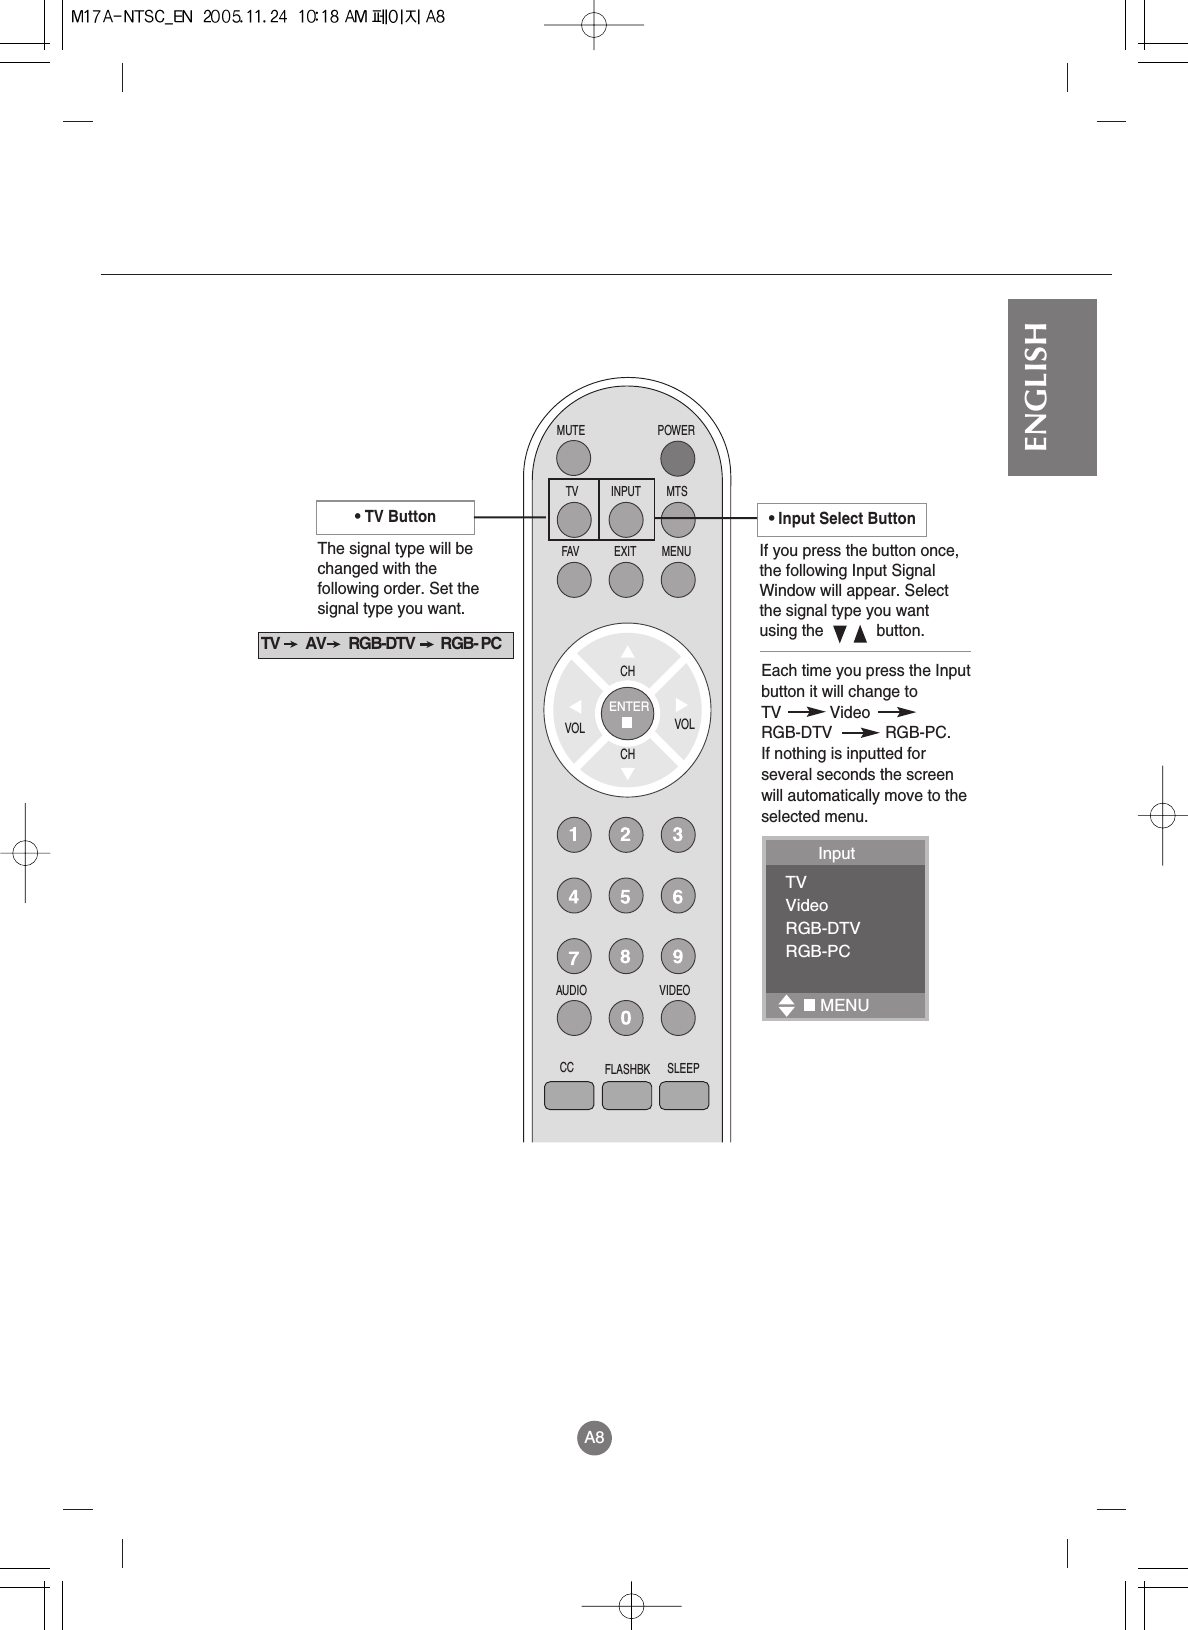
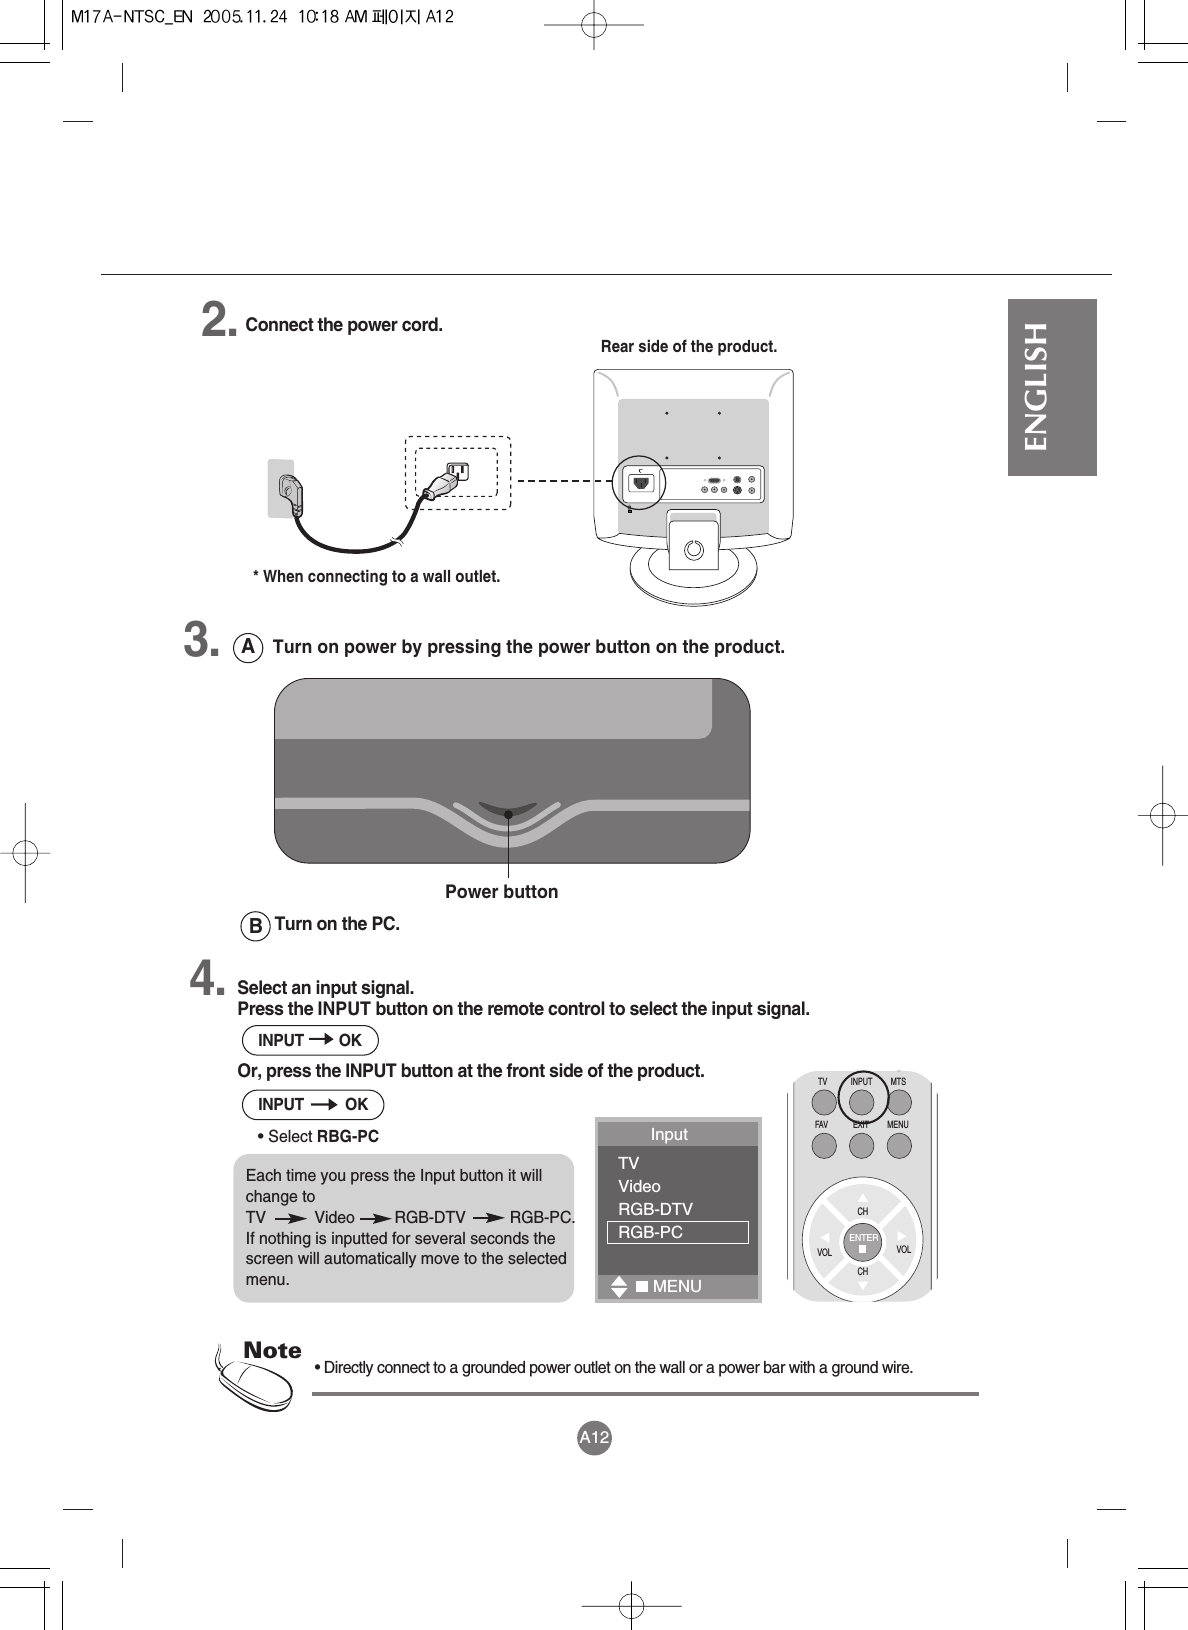
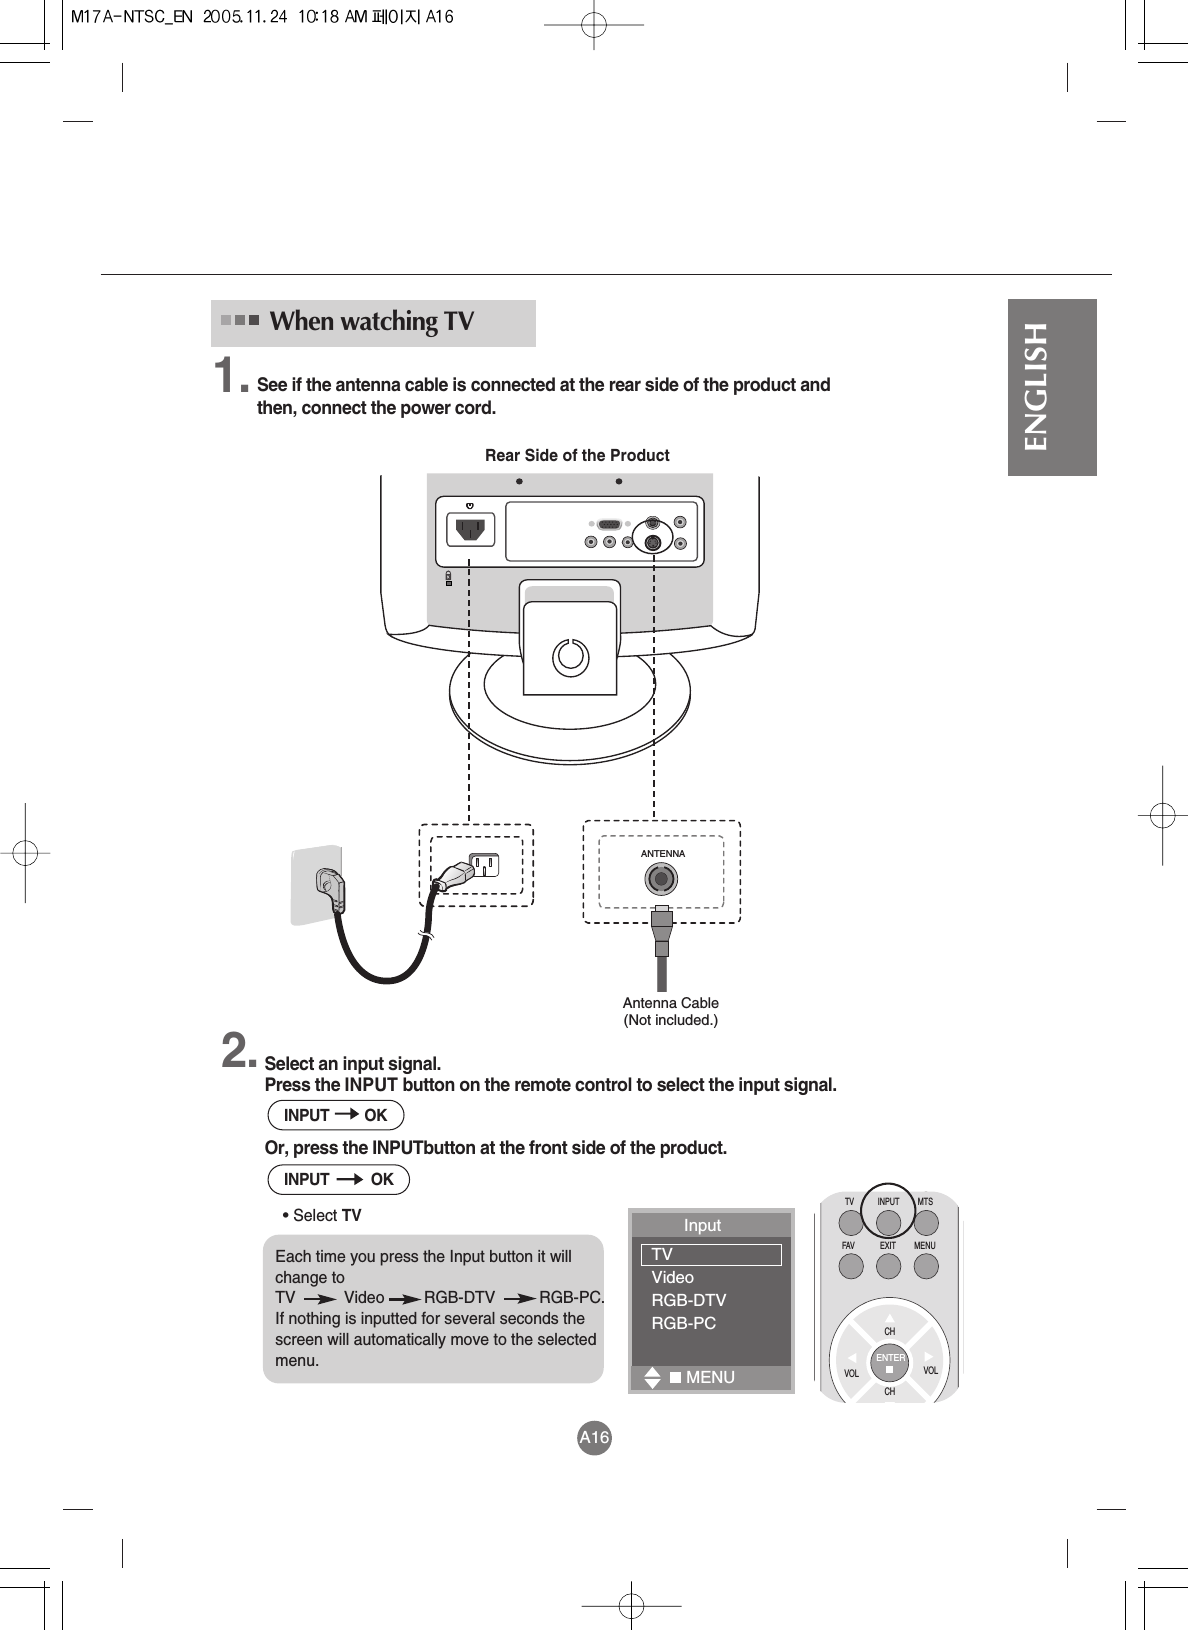
![A15Connecting to External DevicesWhen connecting the video/audio cable as shown in the below figure and thenconnect the power cord. (see page A12)AudioANTENNARGB(PC/DTV)[Rear side of the Product][Set-top Box/DVD]D-Sub cableRCA/PC cable(Not Included)When watching D-Sub from the DVD/SET-TOP BOXWRSelect an input signal.Press the INPUT button on the remote control to select the input signal. Or, press the INPUT button at the front side of the product.• Select RGB-DTV2.1.INPUT OKINPUT OKCHTV MTSINPUTFAV MENUEXITCHVOL VOLENTEREach time you press the Input button it willchange to TV Video RGB-DTV RGB-PC.If nothing is inputted for several seconds thescreen will automatically move to the selectedmenu. Input TVVideoRGB-DTVRGB-PCMENU](https://usermanual.wiki/LG-Electronics-USA/M1917AD/User-Guide-606666-Page-17.png)
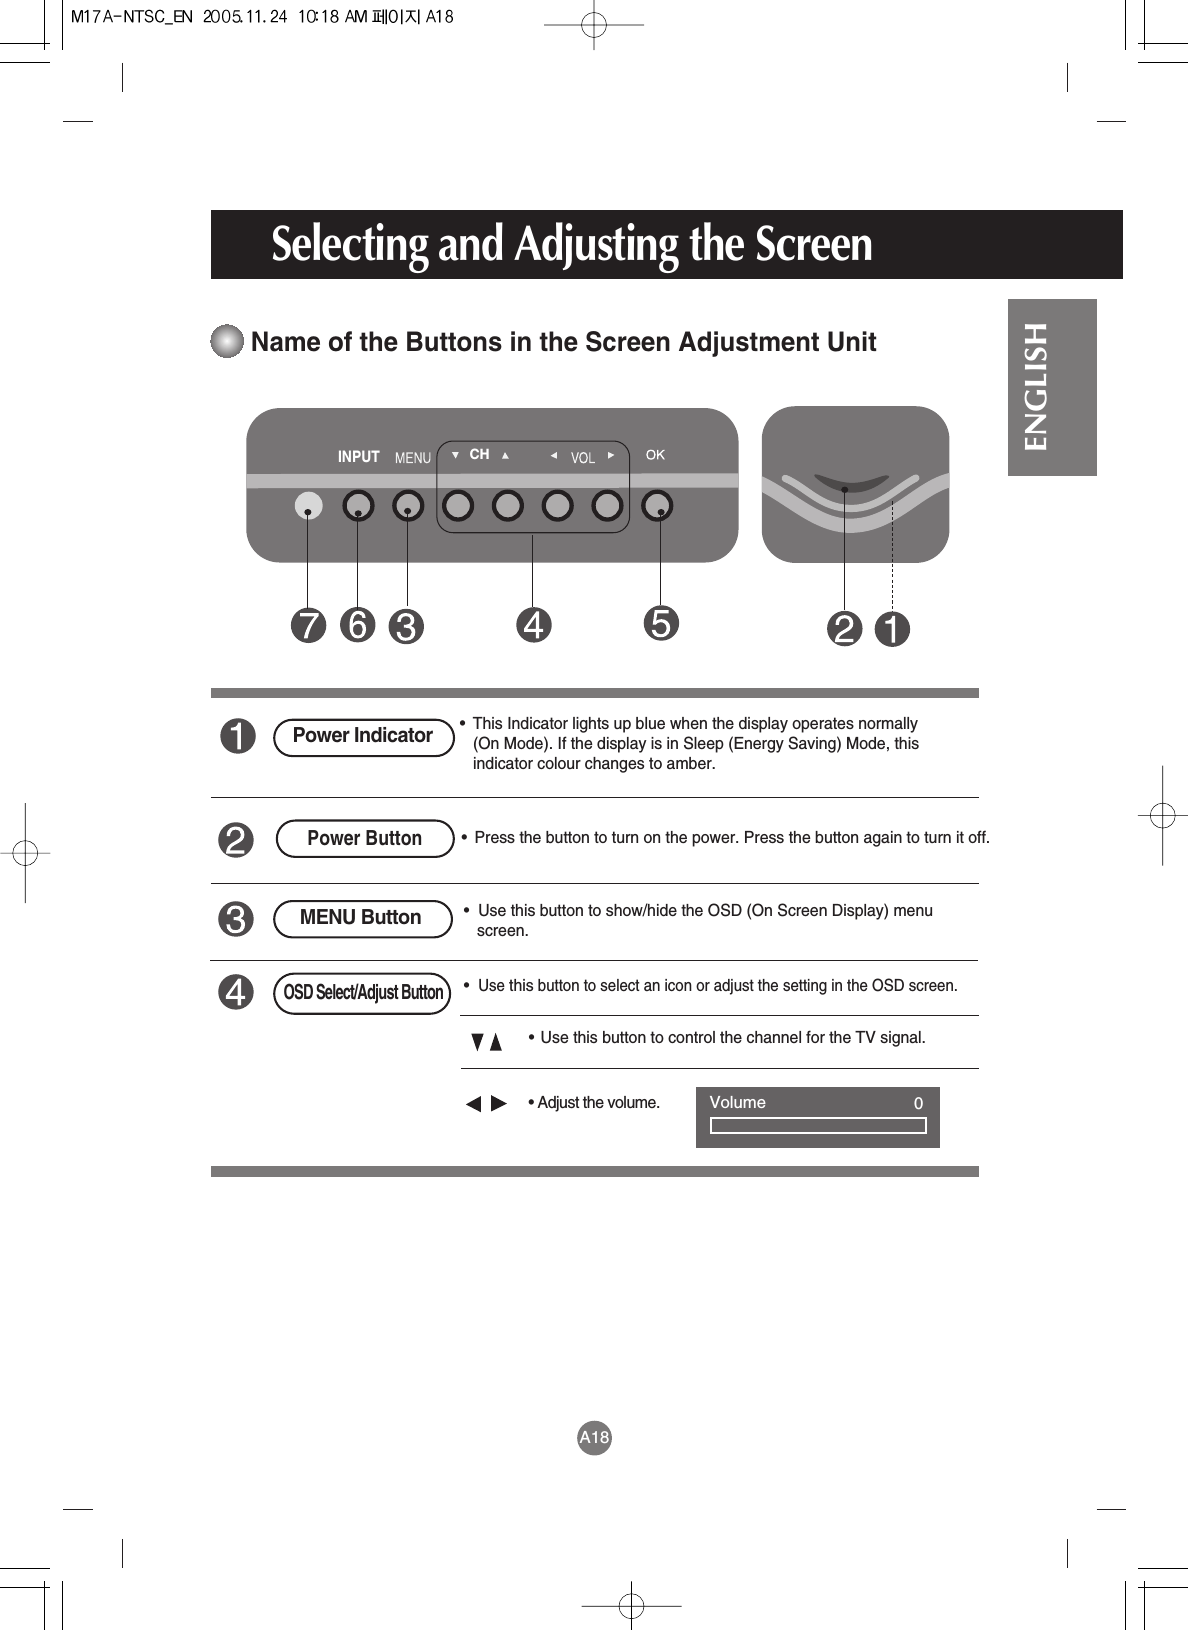
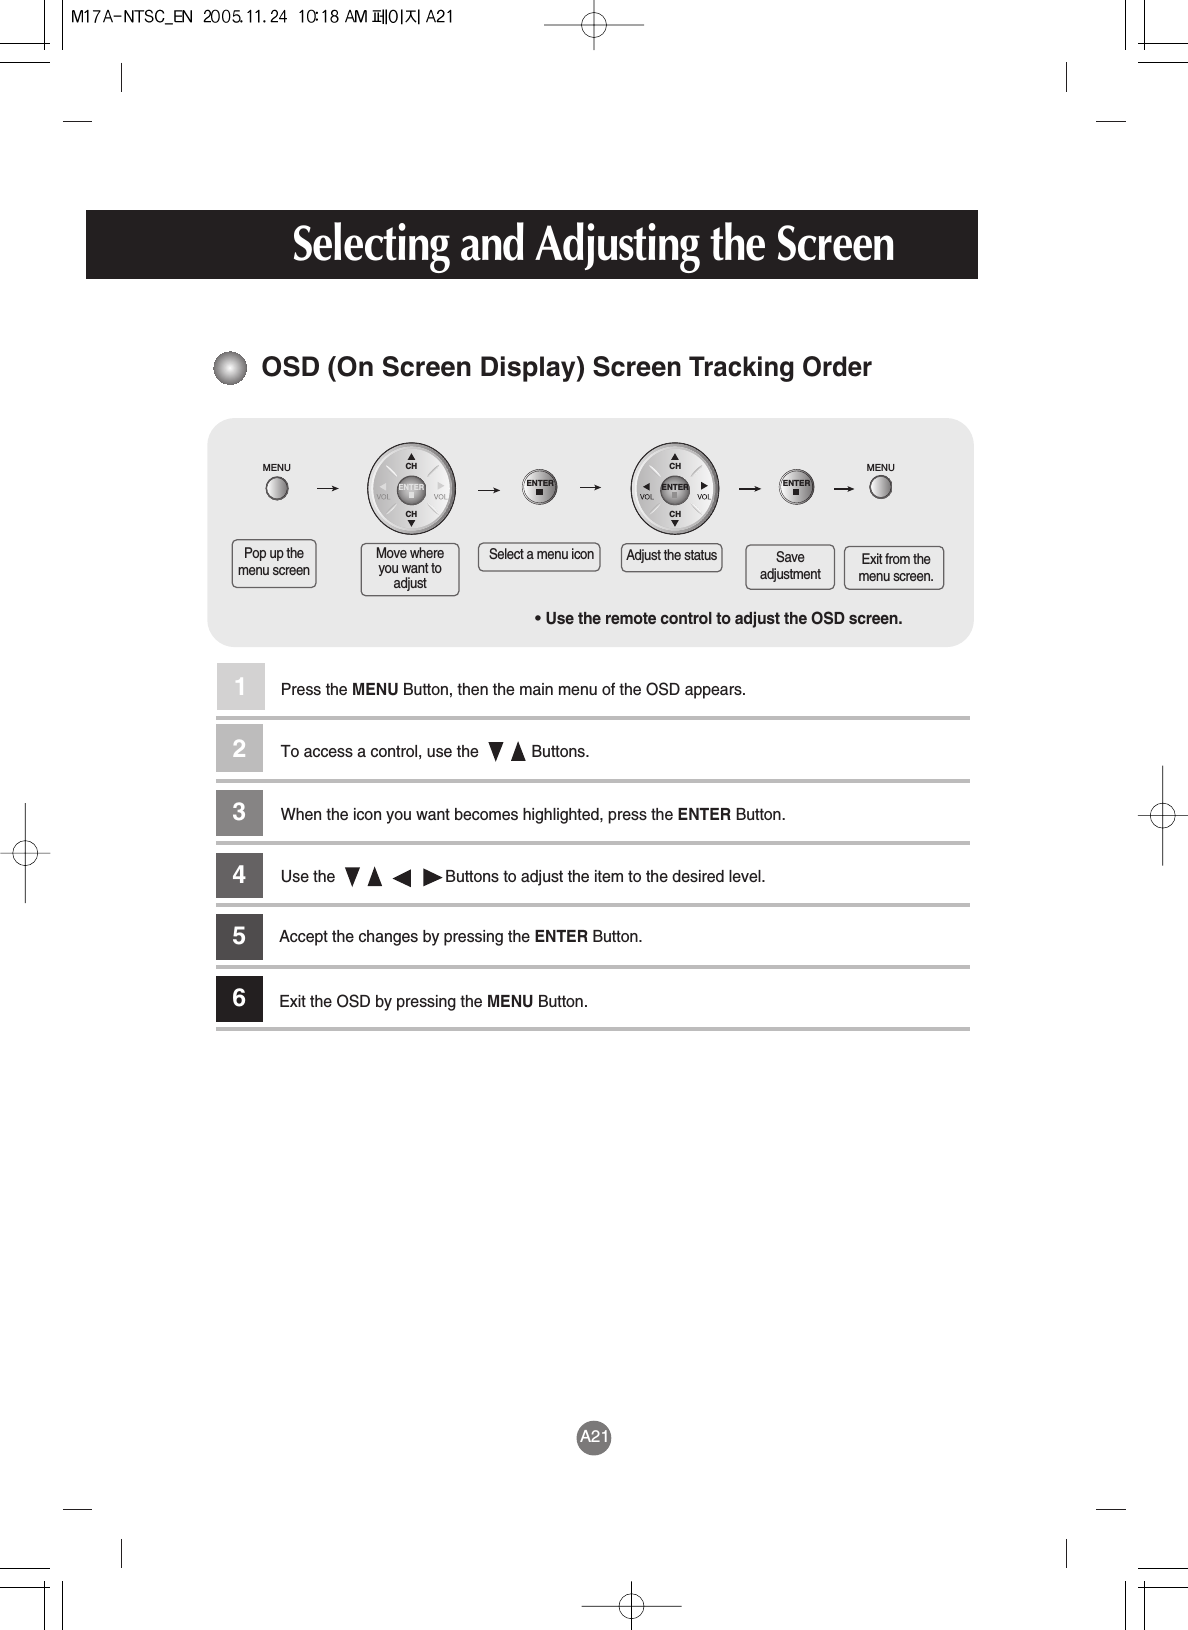
![A19Selecting and Adjusting the ScreenName of the Buttons in the Screen Adjustment UnitOK ButtonTV TelevisionAV CVBS, S-VideoRGB-DTV DTVRGB-PC D-Sub analog signalINPUT Button•The unit that receives the signal from the remote control.RGB-PC InformationIR Receiver1024 X 768 60Hz•Select the icon to adjust on the OSD screen.[For PC Analog signal]Each time you press the Input button it will change to TV Video RGB-DTV RGB-PC.If nothing is inputted for several seconds the screen will automaticallymove to the selected menu. Input TVVideoRGB-DTVRGB-PCMENU](https://usermanual.wiki/LG-Electronics-USA/M1917AD/User-Guide-606666-Page-21.png)

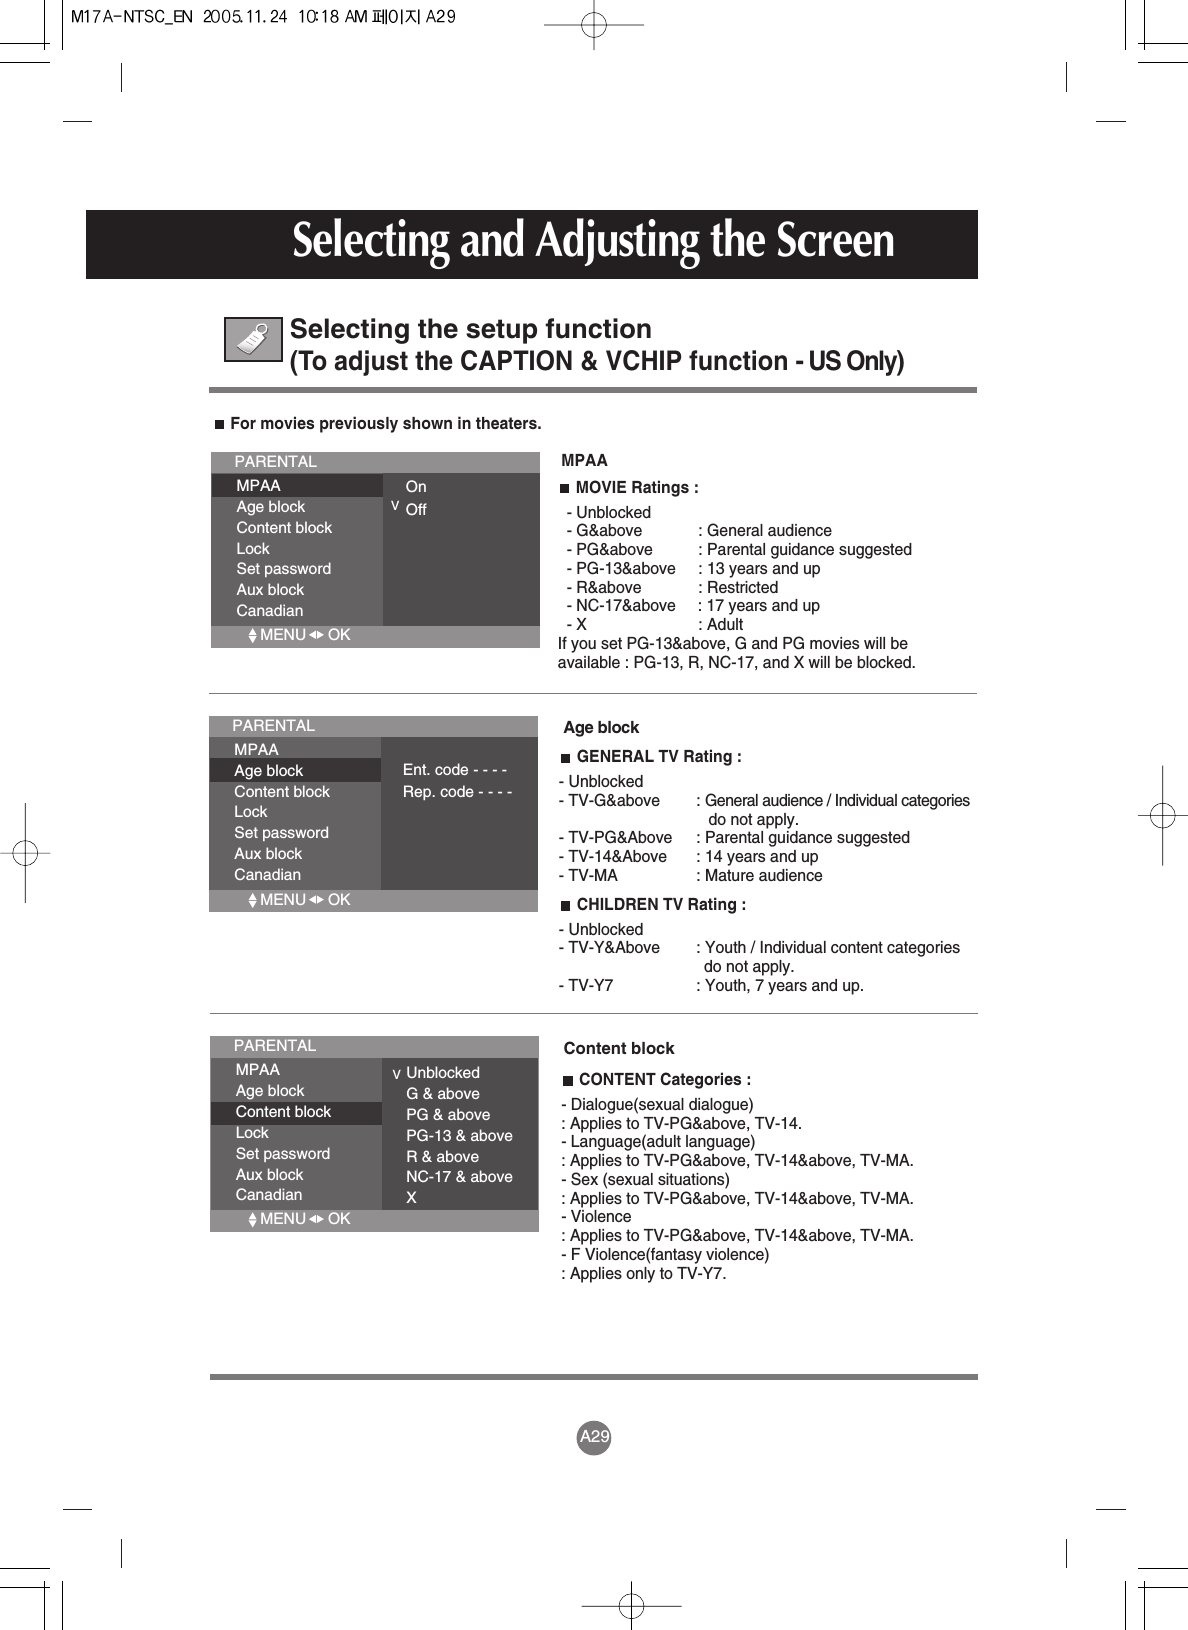
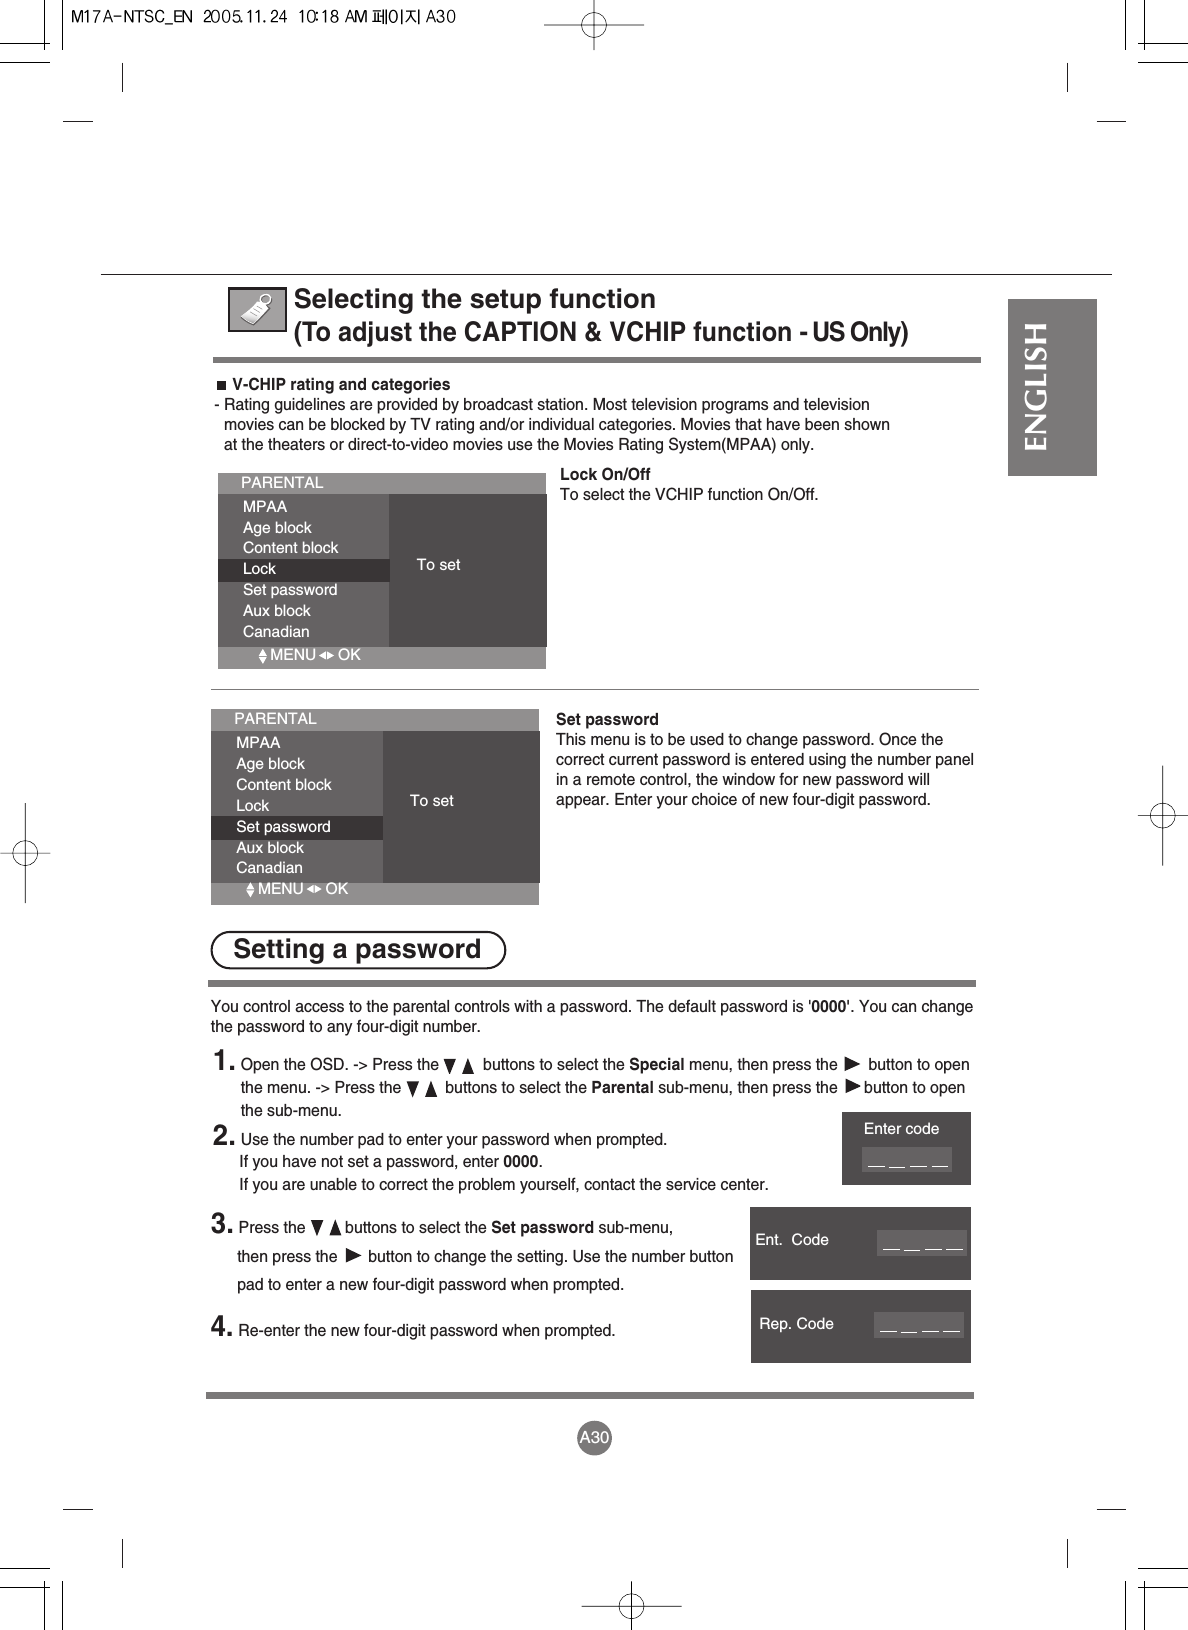
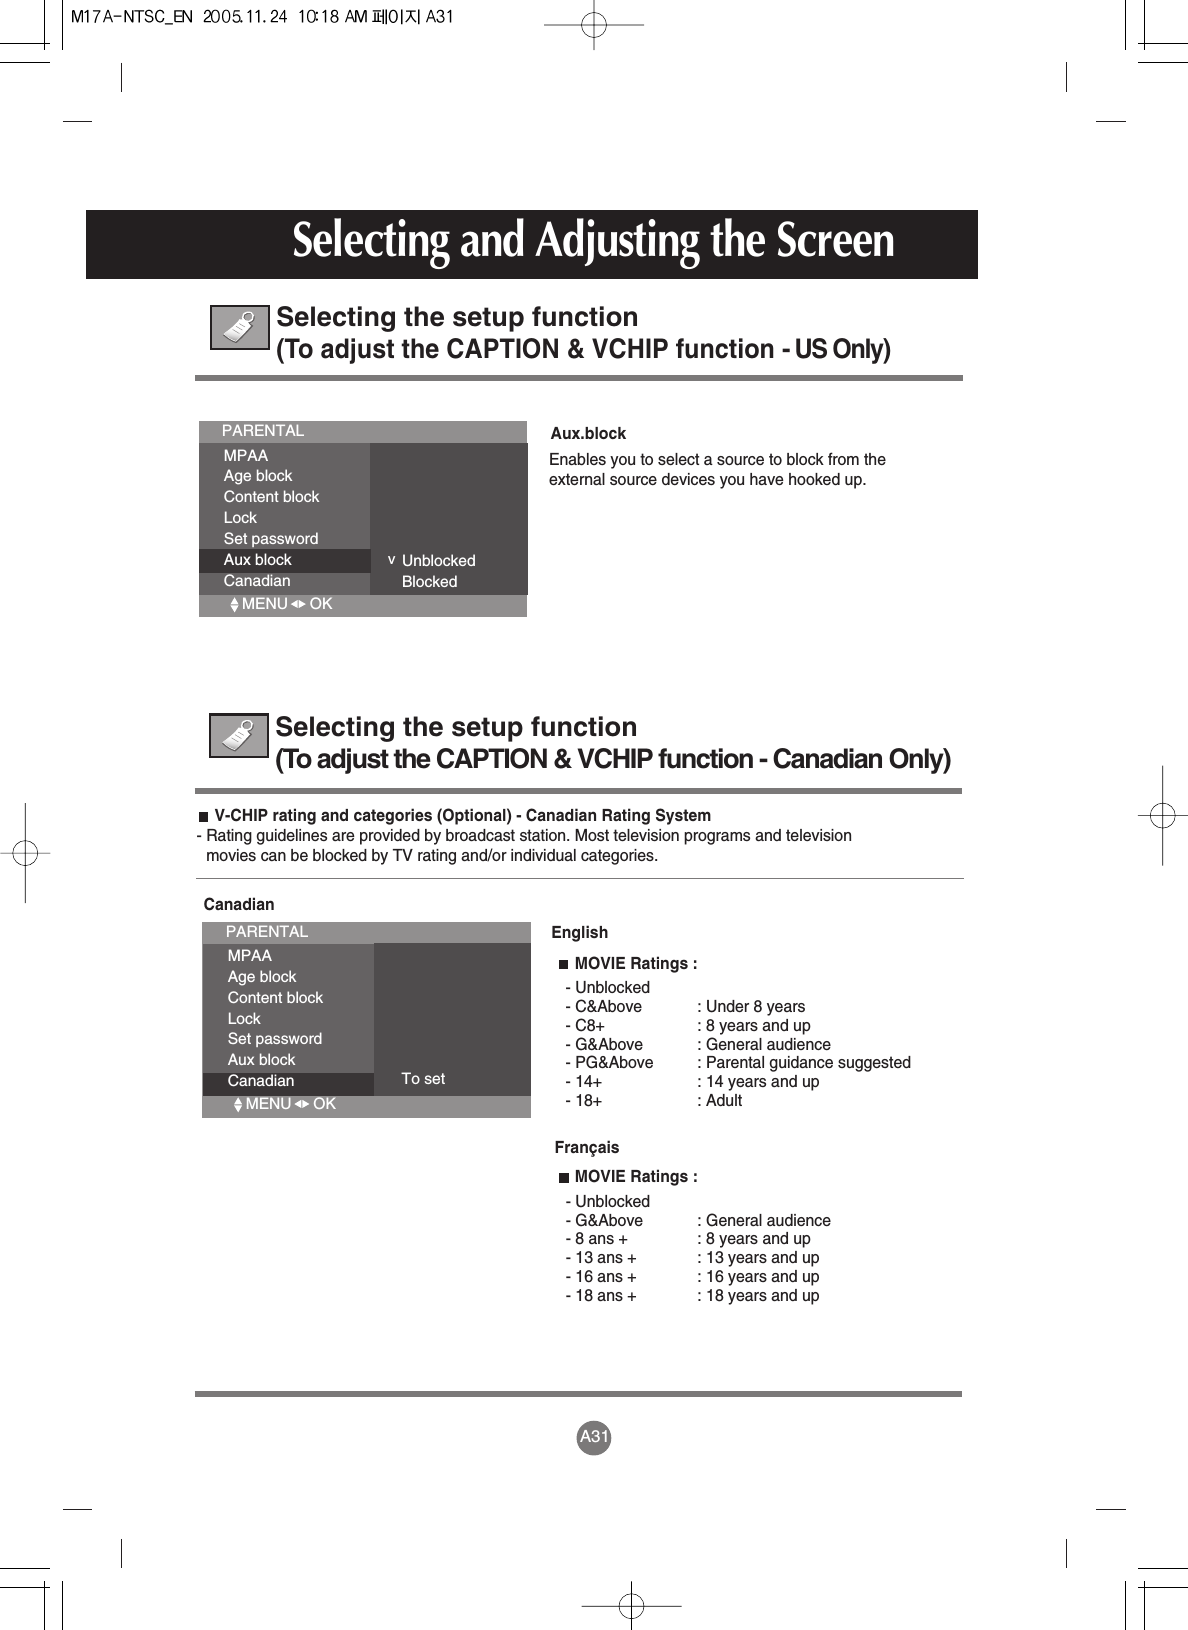
![A28ENGLISHUse the buttons to select captions. * EZ Mute: If sound is on, the caption will be off. On the contrary, if sound is off, the caption will be on.Off On EZ Mute[Remote Control]Press the CC button repeatedly to display the caption option as shown below. Press theenter button to select the caption option.Selecting the setup function (To adjust the CAPTION & VCHIP function - US Only)Caption(TV input only)Select the Parenta menu and click button. The 'Enter code' window will appear. Once the correct four-digitpassword is entered, sub-menu that allows a user to control various blocks will be enabled. The initial password isset for '0000' and it can be changed through 'Set password' menu. This function is used to block program viewing based on the ratings sent by the broadcast station. Thedefault setting is to allow all programs to be viewed. Viewing can be blocked by the type of program and bythe categories chosen to be blocked. It is also possible to block all program viewing for a time period.PAGE A30Parental SPECIALCaption/TextParental PARENTALMPAAAge blockContent blockLock Set passwordAux blockCanadianUnblockedG&AbovePG&AbovePG-13&AboveR&AboveNC-17&AboveXOptional (Canadian only)VSPECIALCaptionsParental CC1 Text1CC2 Text2CC3 Text3CC4 Text4Enter codeMENU OK MENU OK MENU OK](https://usermanual.wiki/LG-Electronics-USA/M1917AD/User-Guide-606666-Page-30.png)
![A37SpecificationsThe product specifications can change without prior notice for product improvement.[17 inch]Screen Type 17 inches (43.27 cm) TFT (Thin Film Transistor) LCD (Liquid Crystal Display) PanelVisible diagonal size: 43.27 cmPixel Pitch 0.264 mmMax. Resolution 1280 X 1024 @60 Hz Recommended Resolution1280 X 1024 @60 Hz Horizontal Frequency 30 - 70 kHzVertical Frequency 56 - 75 HzSynchronization Type SeparateS-Video, Composite video, TV, D-Sub Analog, Headphone, PC Audio InRated Voltage AC 100-240V~ 50/60Hz 1.0APower Consumption On Mode : 40 WSleep Mode ≤1 WOff Mode ≤1 W Tilt Range 3˚ ~ 25˚Tilt Stand AttachedSwivel 345˚Size (WxLxH) 389.5 mm x 232 mmx 437.9 mmWeight (excl. package) 5.28 kg (12.9 Ibs)Operational Condition Temperature: 10˚C ~ 35˚C , Humidity: 10% ~ 80% Storage Condition Temperature: -20˚C ~ 60˚C , Humidity: 5% ~ 95% LCD PanelVideo SignalInput ConnectorPowerTiltDimension/WeightEnvironmental Conditions](https://usermanual.wiki/LG-Electronics-USA/M1917AD/User-Guide-606666-Page-39.png)
![A38ENGLISHThe product specifications can change without prior notice for product improvement.[19 inch]Screen Type 19 inches (48.18 cm) TFT (Thin Film Transistor) LCD (Liquid Crystal Display) PanelVisible diagonal size: 48.18 cmPixel Pitch 0.294 mmMax. Resolution 1280 X 1024 @60 Hz Recommended Resolution1280 X 1024 @60 Hz Horizontal Frequency 30 - 70 kHzVertical Frequency 56 - 75 HzSynchronization Type SeparateS-Video, Composite video, TV, D-Sub AnalogHeadphone, PC Audio InRated Voltage AC 100-240V~ 50/60Hz 1.0APower Consumption On Mode : 45 WSleep Mode ≤1 WOff Mode ≤1 W Tilt Range 3˚ ~ 25˚Tilt Stand AttachedSwivel 345˚Size (WxLxH) 443.6 mm x 232.0 mm x 475.6 mmWeight (excl. package) 5.98 kg (14.7 Ibs)Operational Condition Temperature: 10˚C ~ 35˚C , Humidity: 10% ~ 80% Storage Condition Temperature: -20˚C ~ 60˚C , Humidity: 5% ~ 95% LCD PanelVideo SignalInput ConnectorPowerTiltDimension/WeightEnvironmental Conditions](https://usermanual.wiki/LG-Electronics-USA/M1917AD/User-Guide-606666-Page-40.png)
![A39SpecificationsPC Mode – Preset ModePreset modeHorizontalFrequency(kHz)VerticalFrequency(Hz)Preset modeHorizontalFrequency(kHz)VerticalFrequency(Hz)1234567640 x 350720 x 400640 x 480640 x 480800 x 600800 x 600832 x 62431.46931.46831.46937.50037.87946.87549.72570705975607574VGAVGAVGAVESAVESAVESAMAC891011121024 x 7681024 x 7681152 x 8701152 x 9001280 x 102448.36360.12368.68161.80563.981VESAVESAMACVESAVESA6075756560[17 inch] [19 inch]Power IndicatorMode ProductOn ModeSleep ModeOff ModeBlueAmberOffLocking DeviceUse this locking cable (optional) to prevent theft.Theft prevention locking device](https://usermanual.wiki/LG-Electronics-USA/M1917AD/User-Guide-606666-Page-41.png)