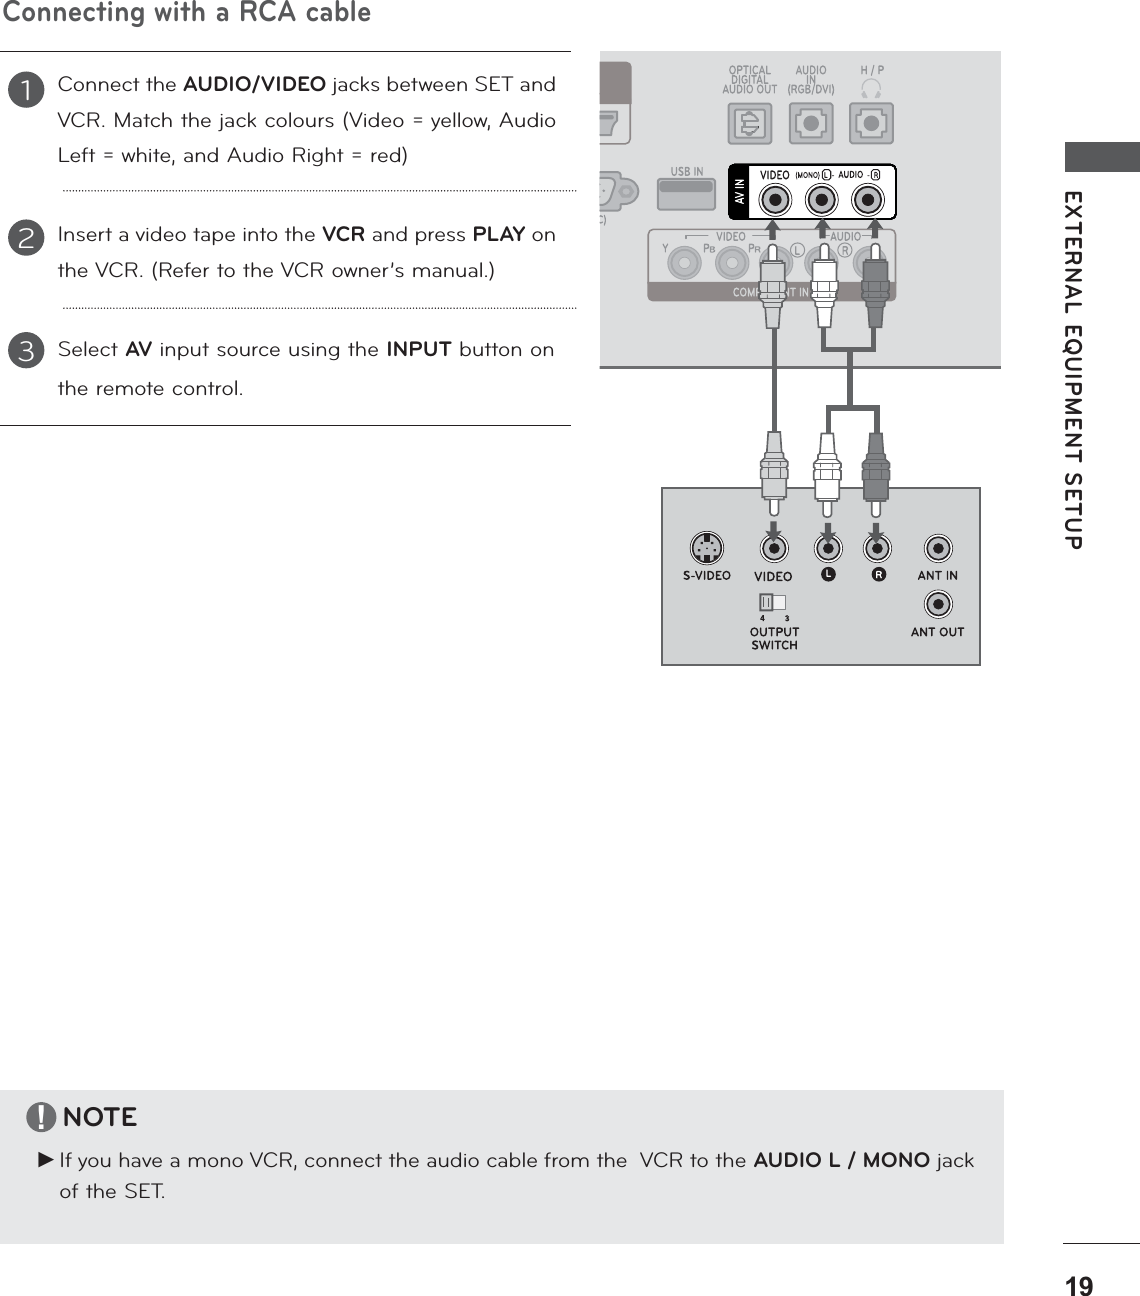
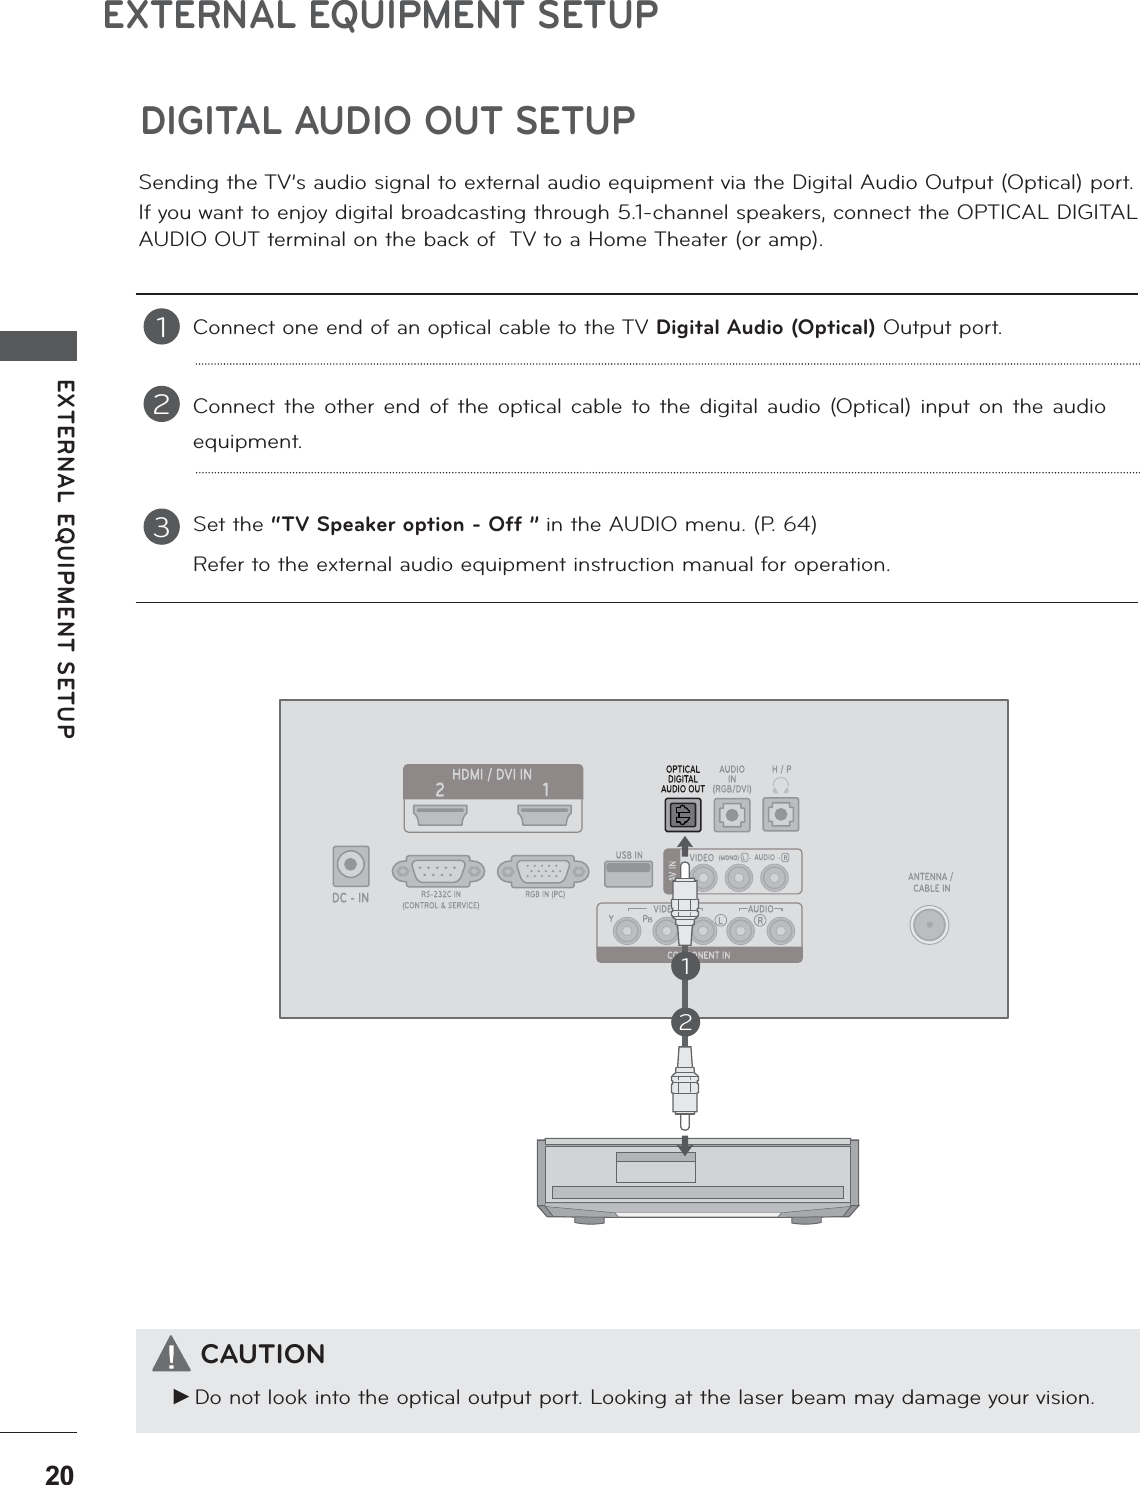
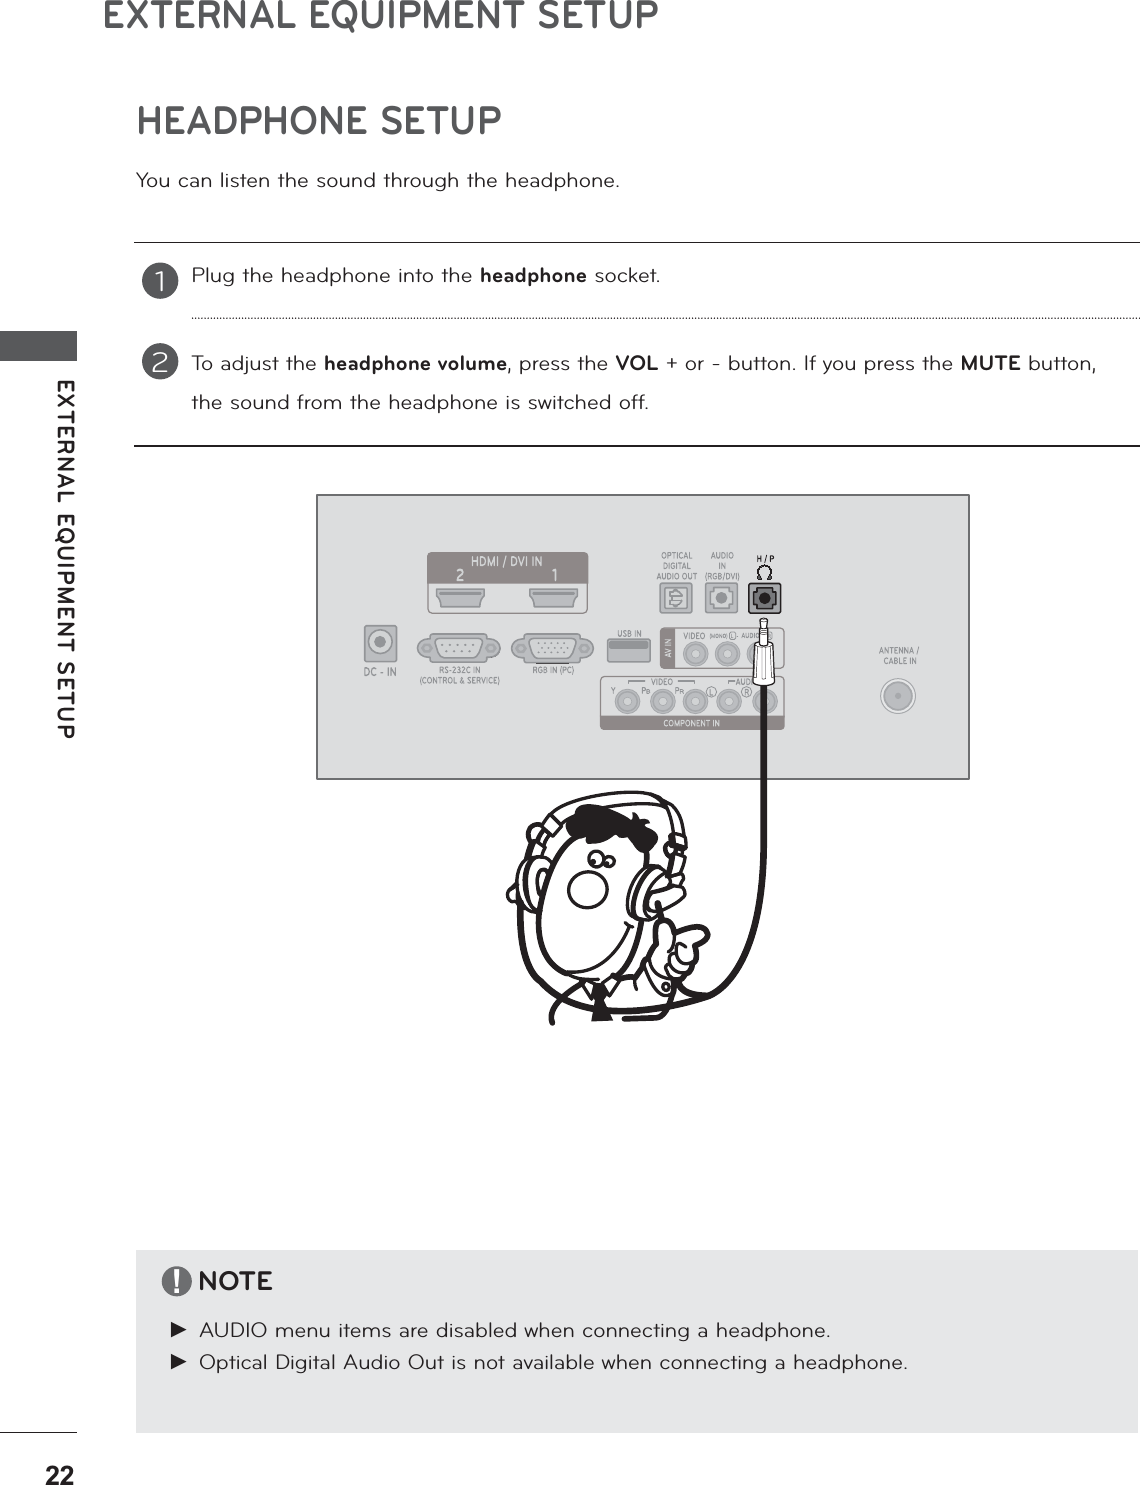
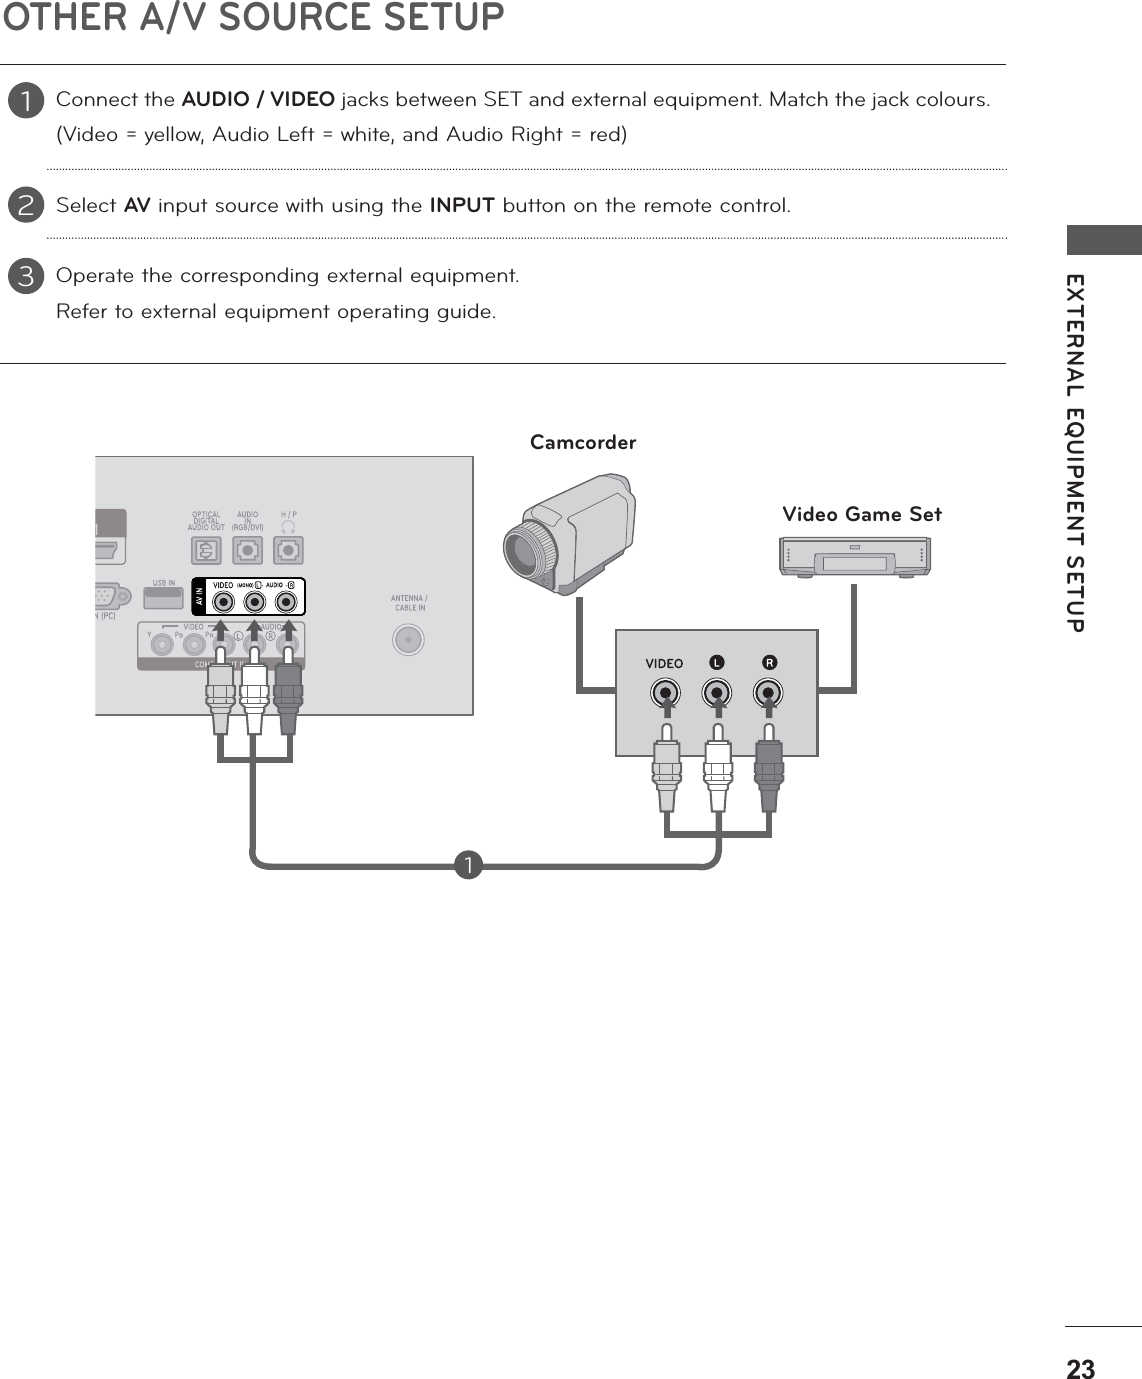
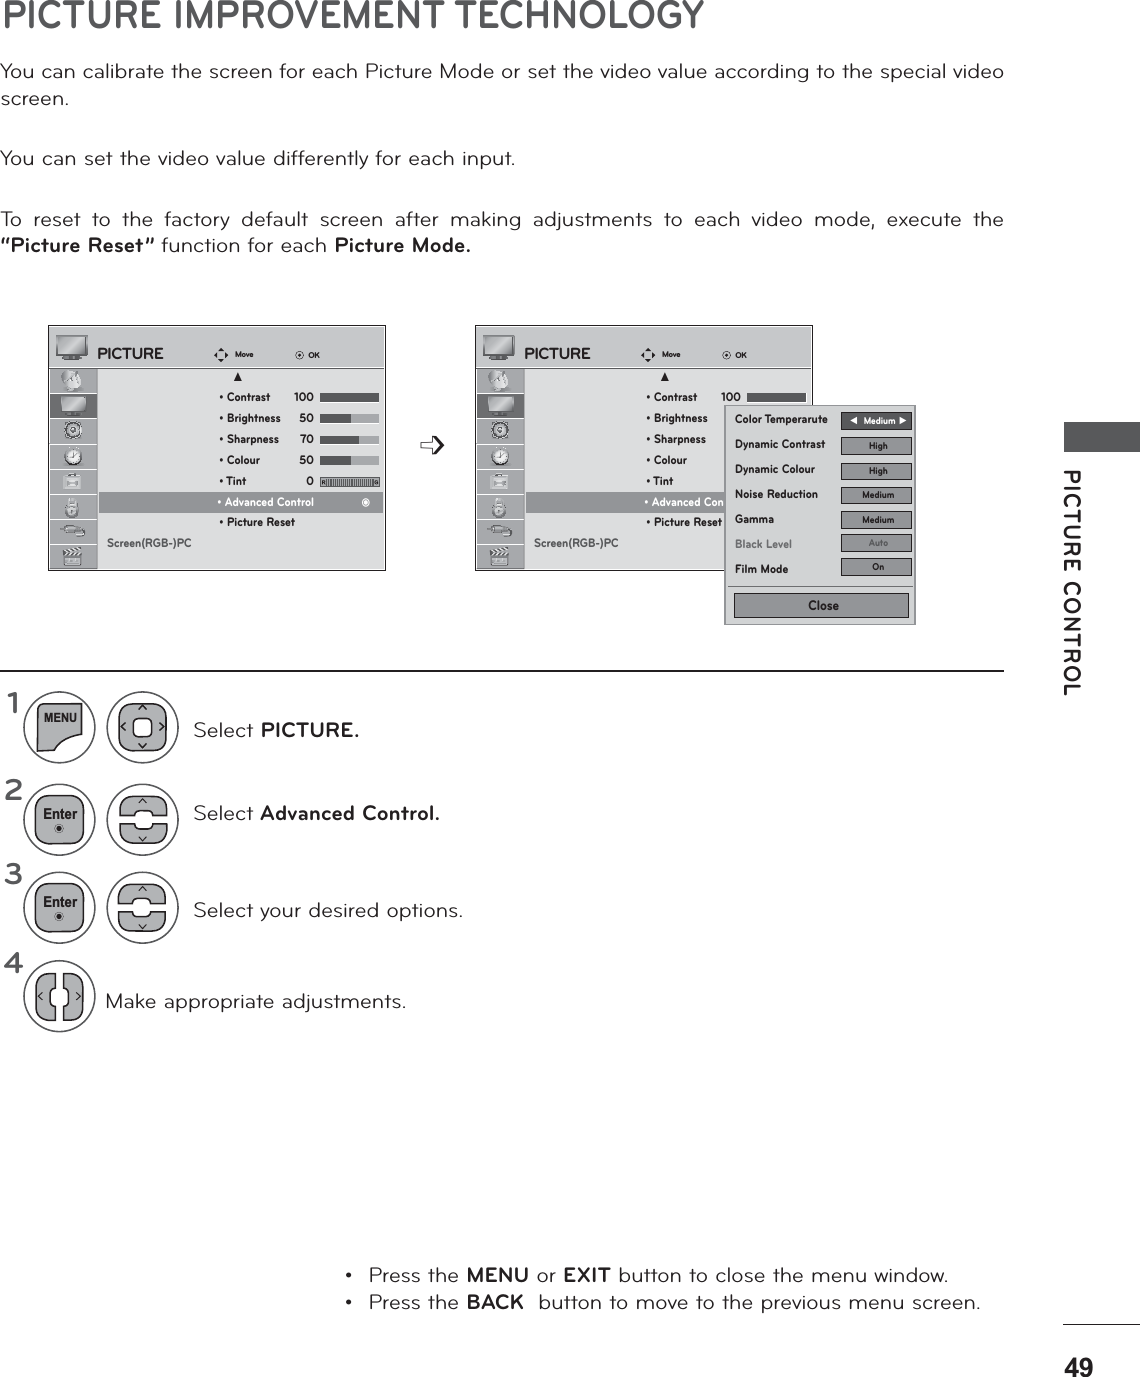
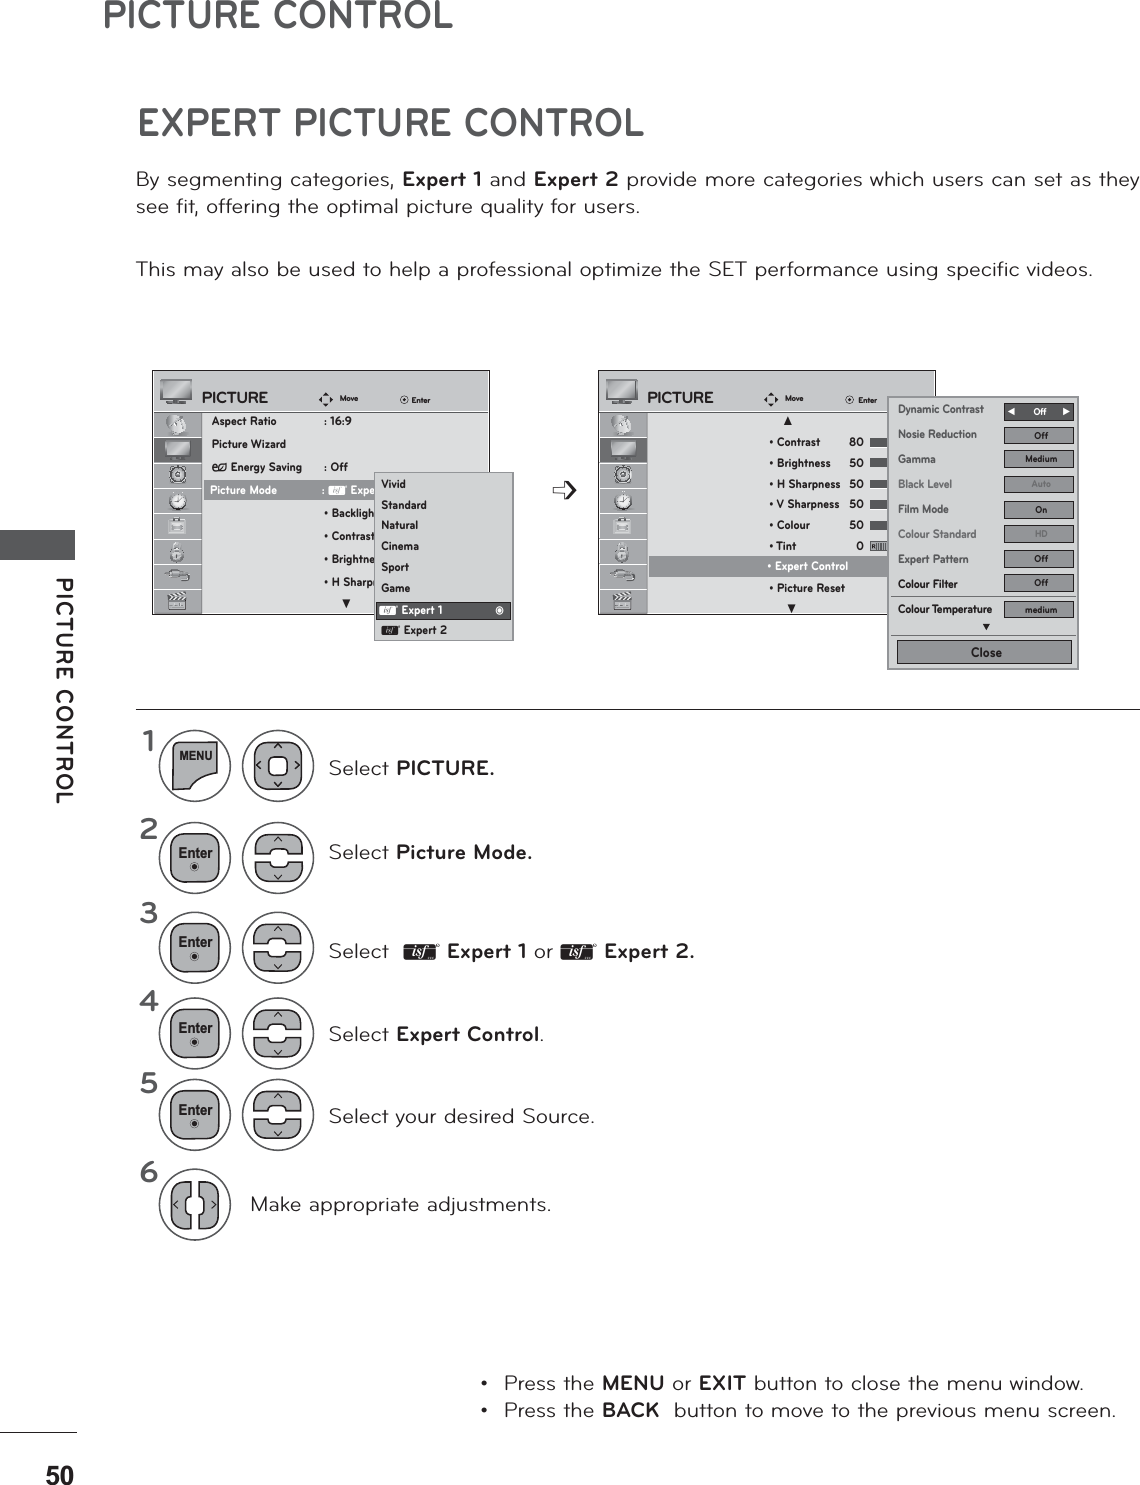
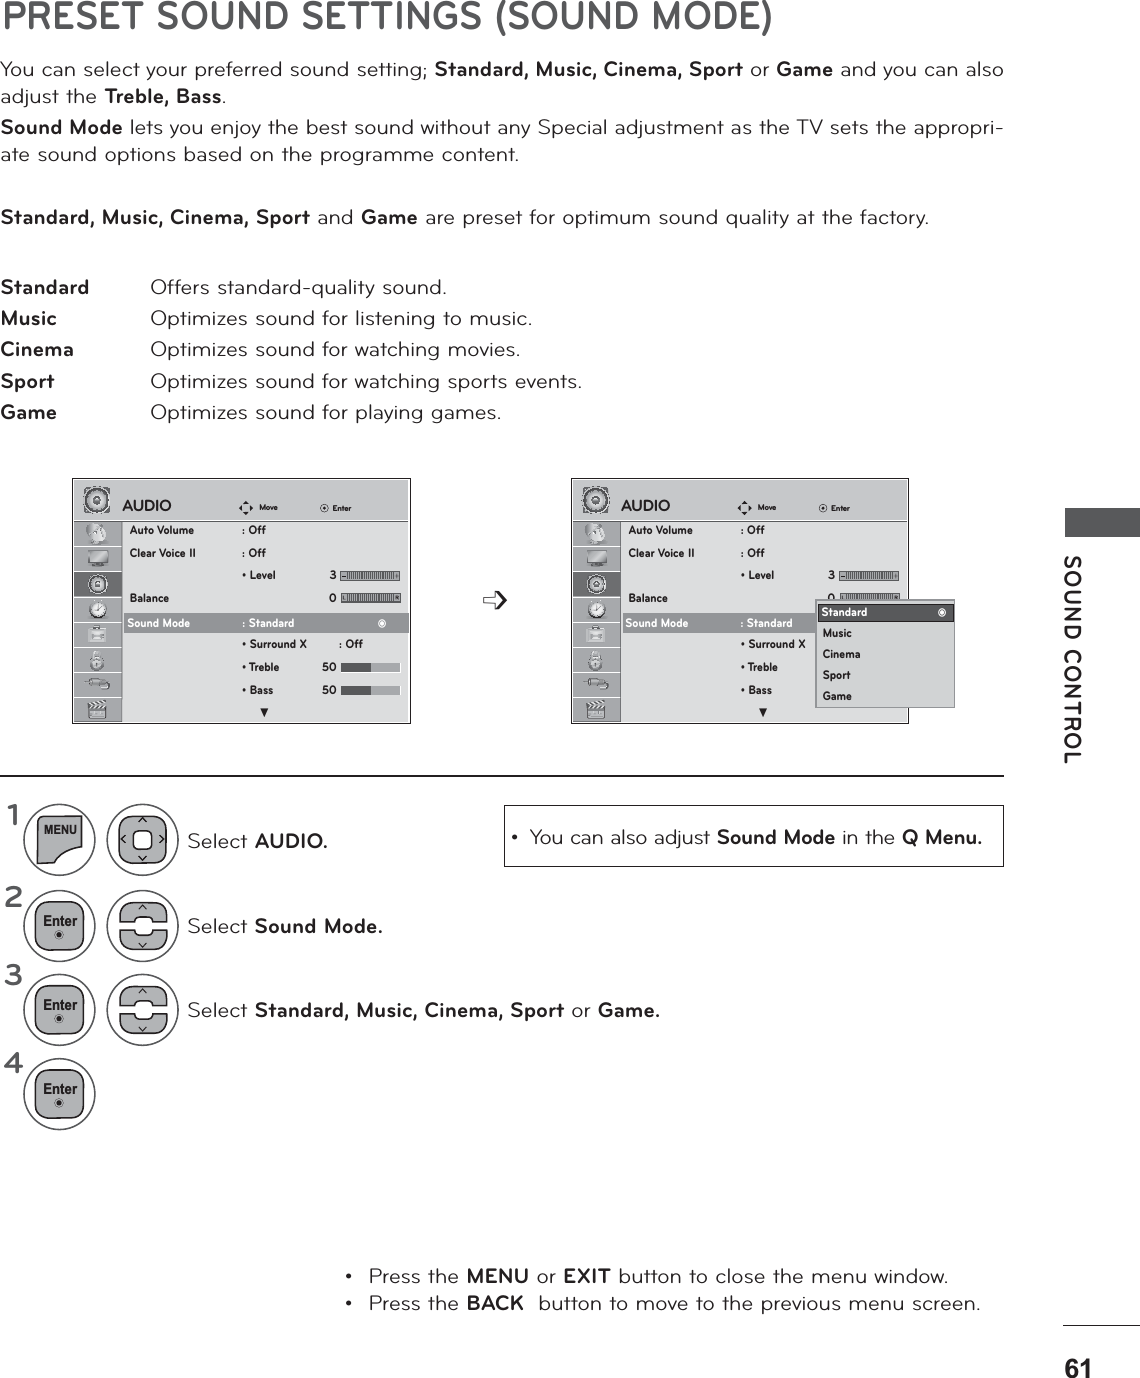
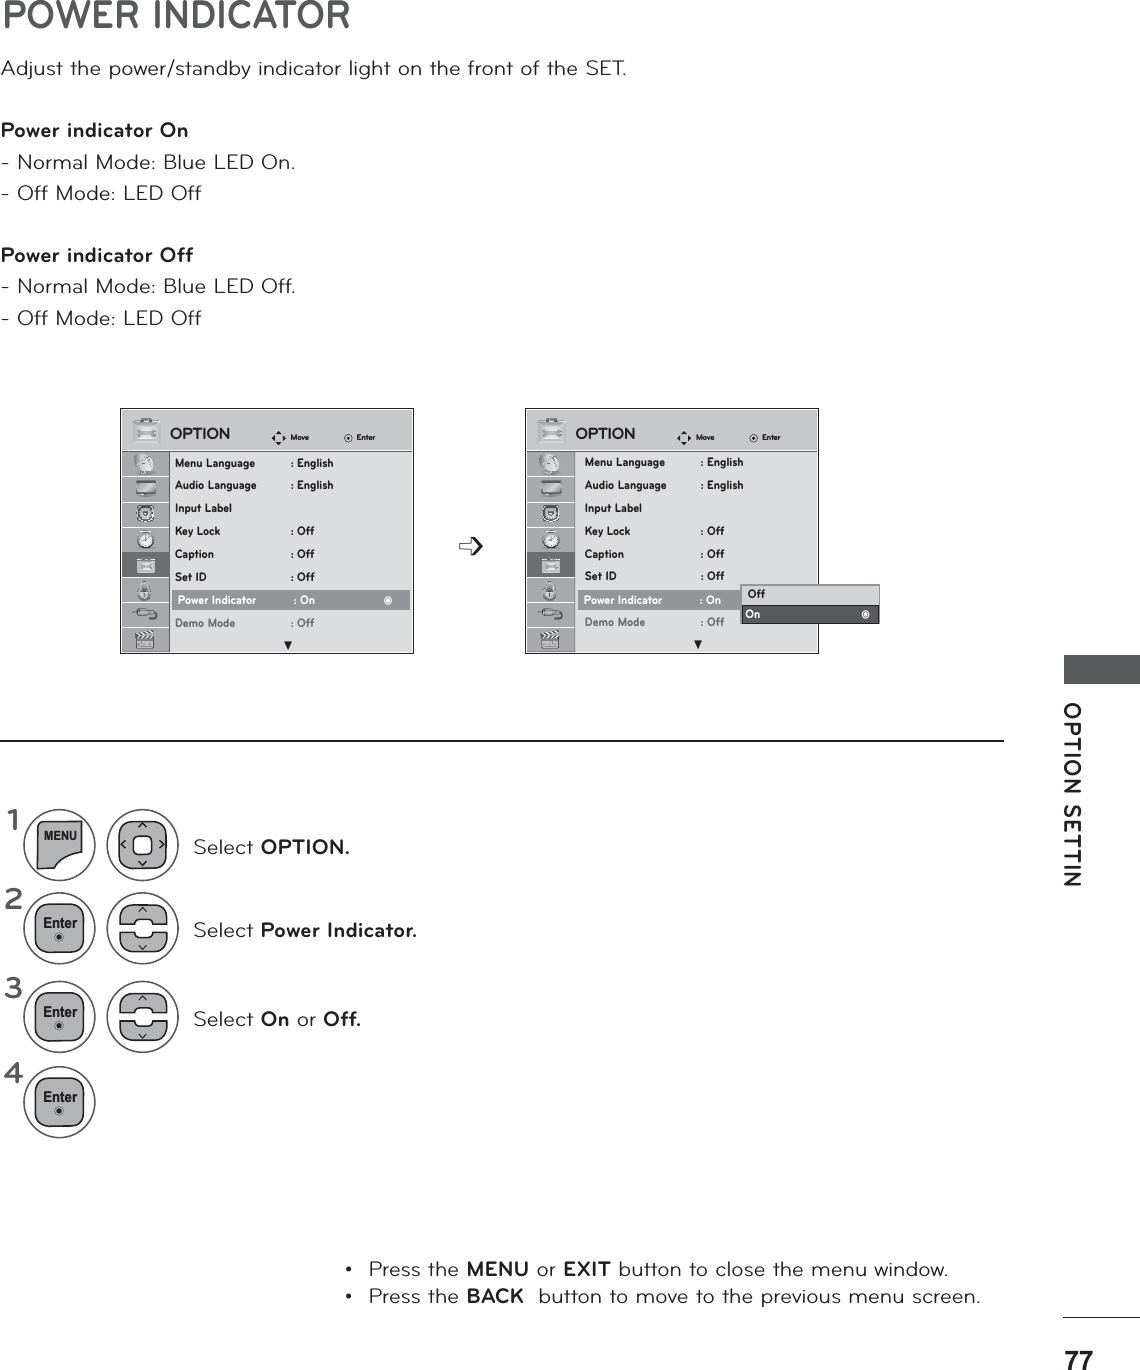
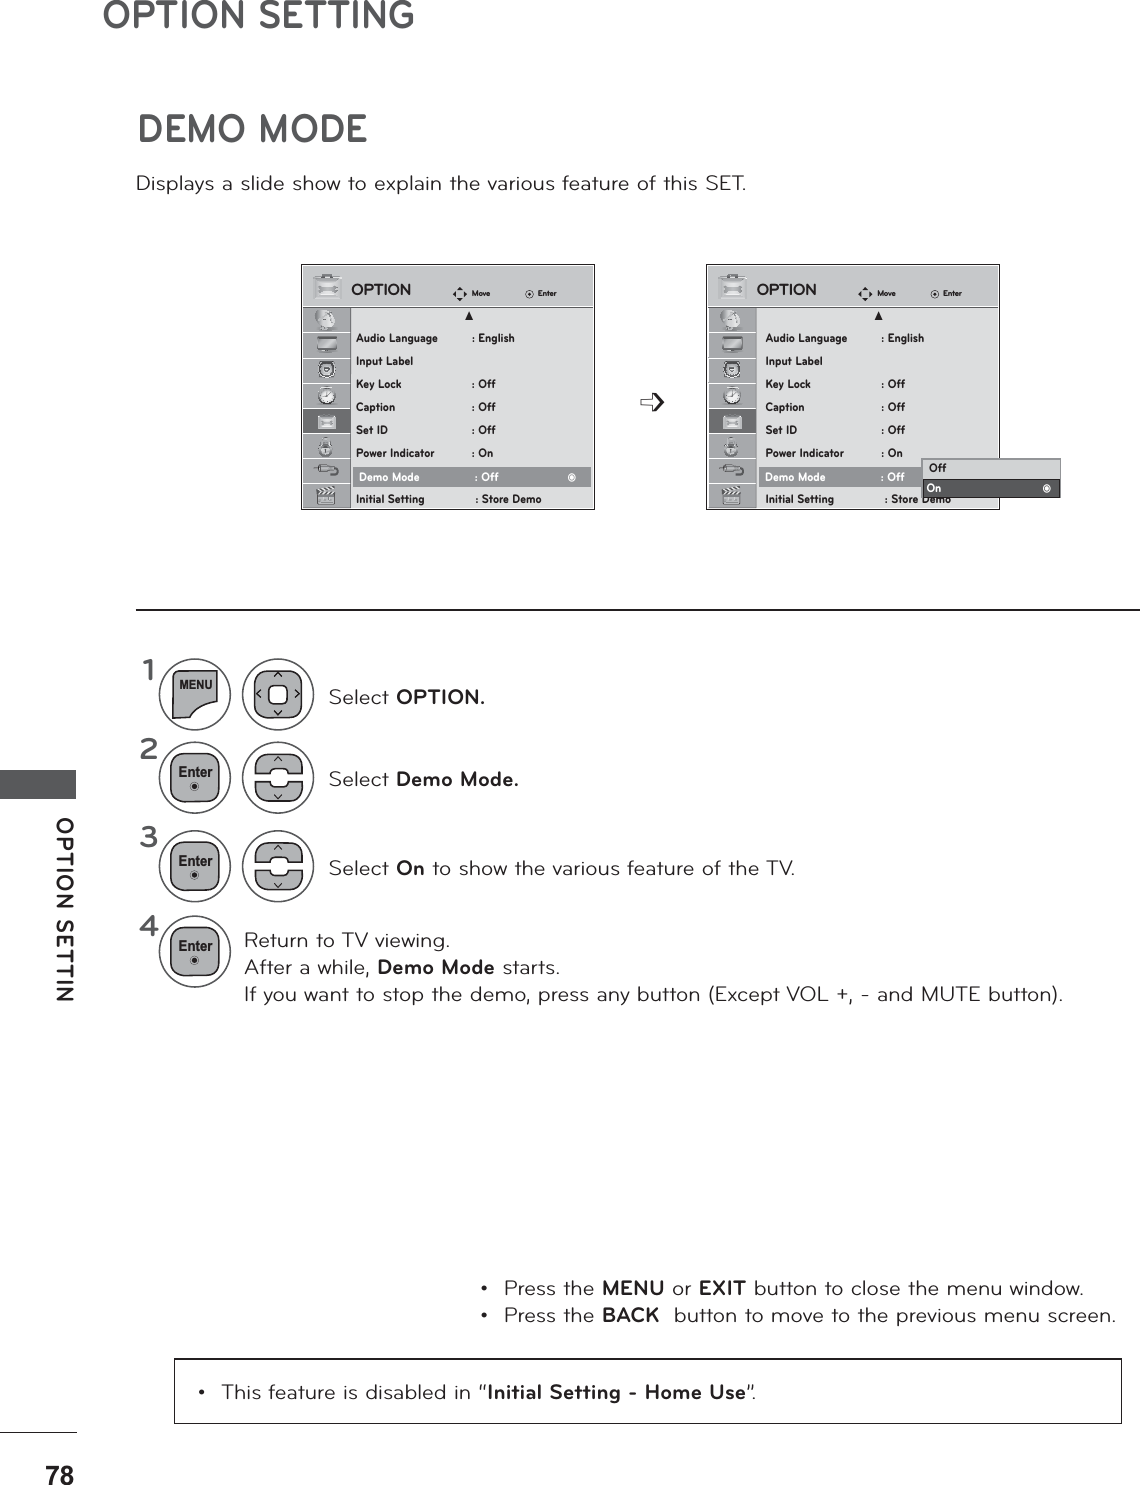
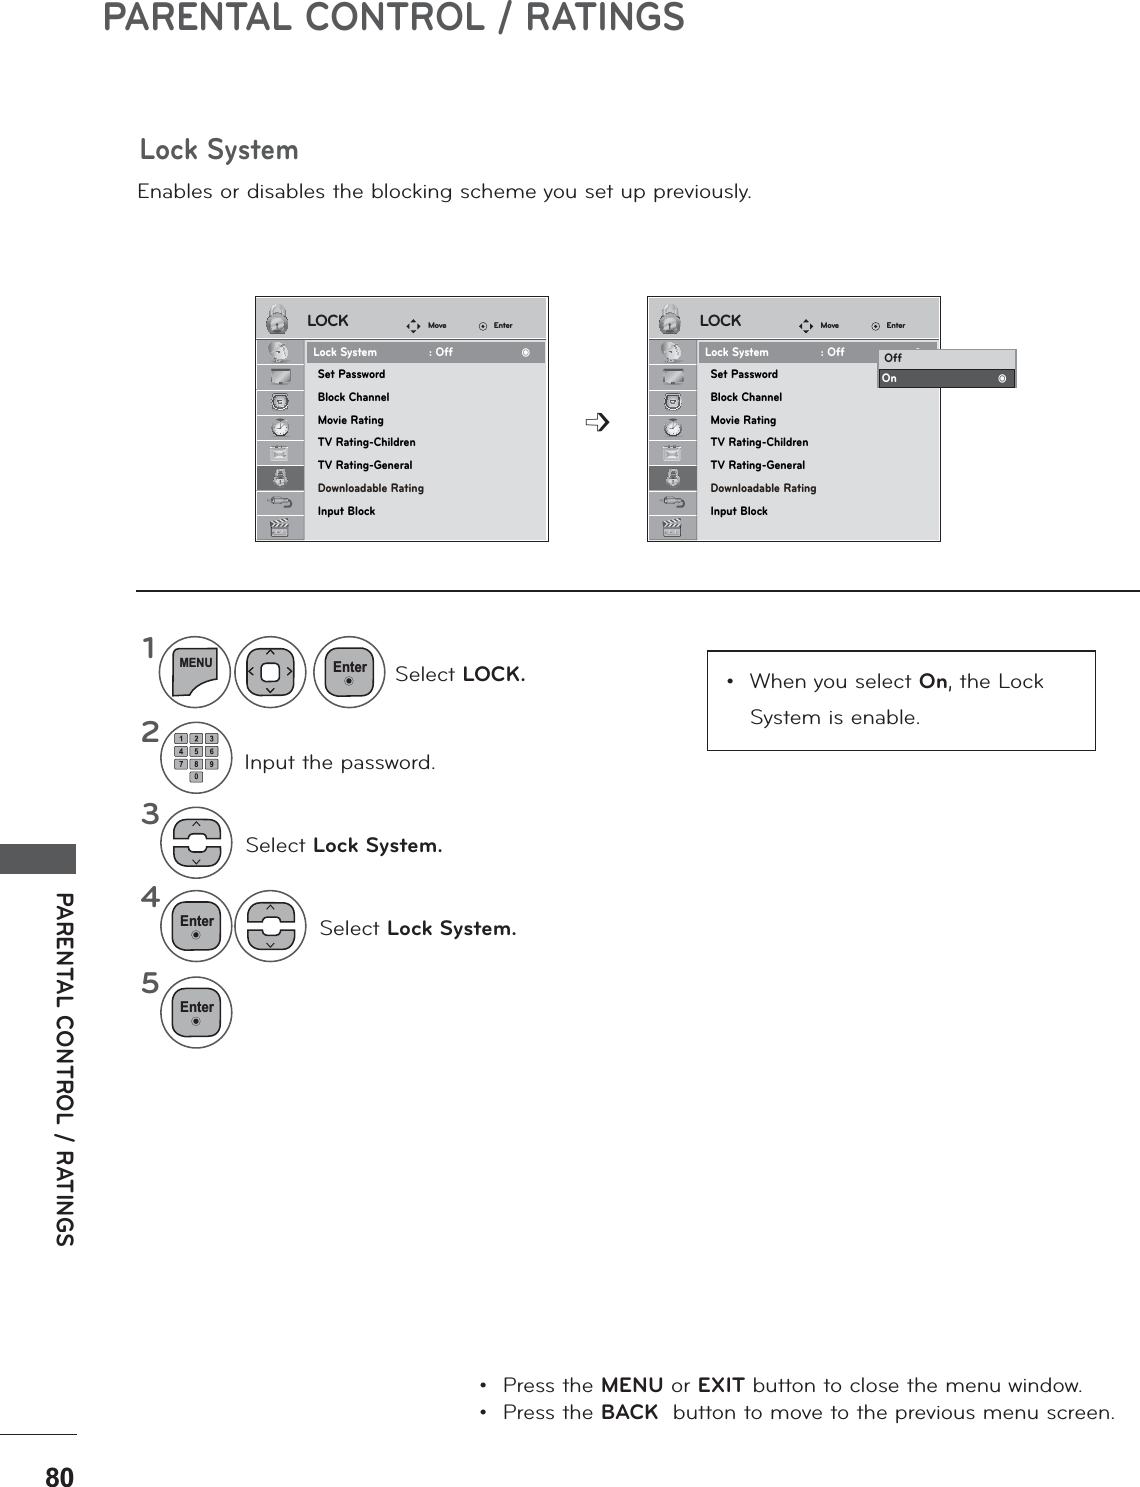
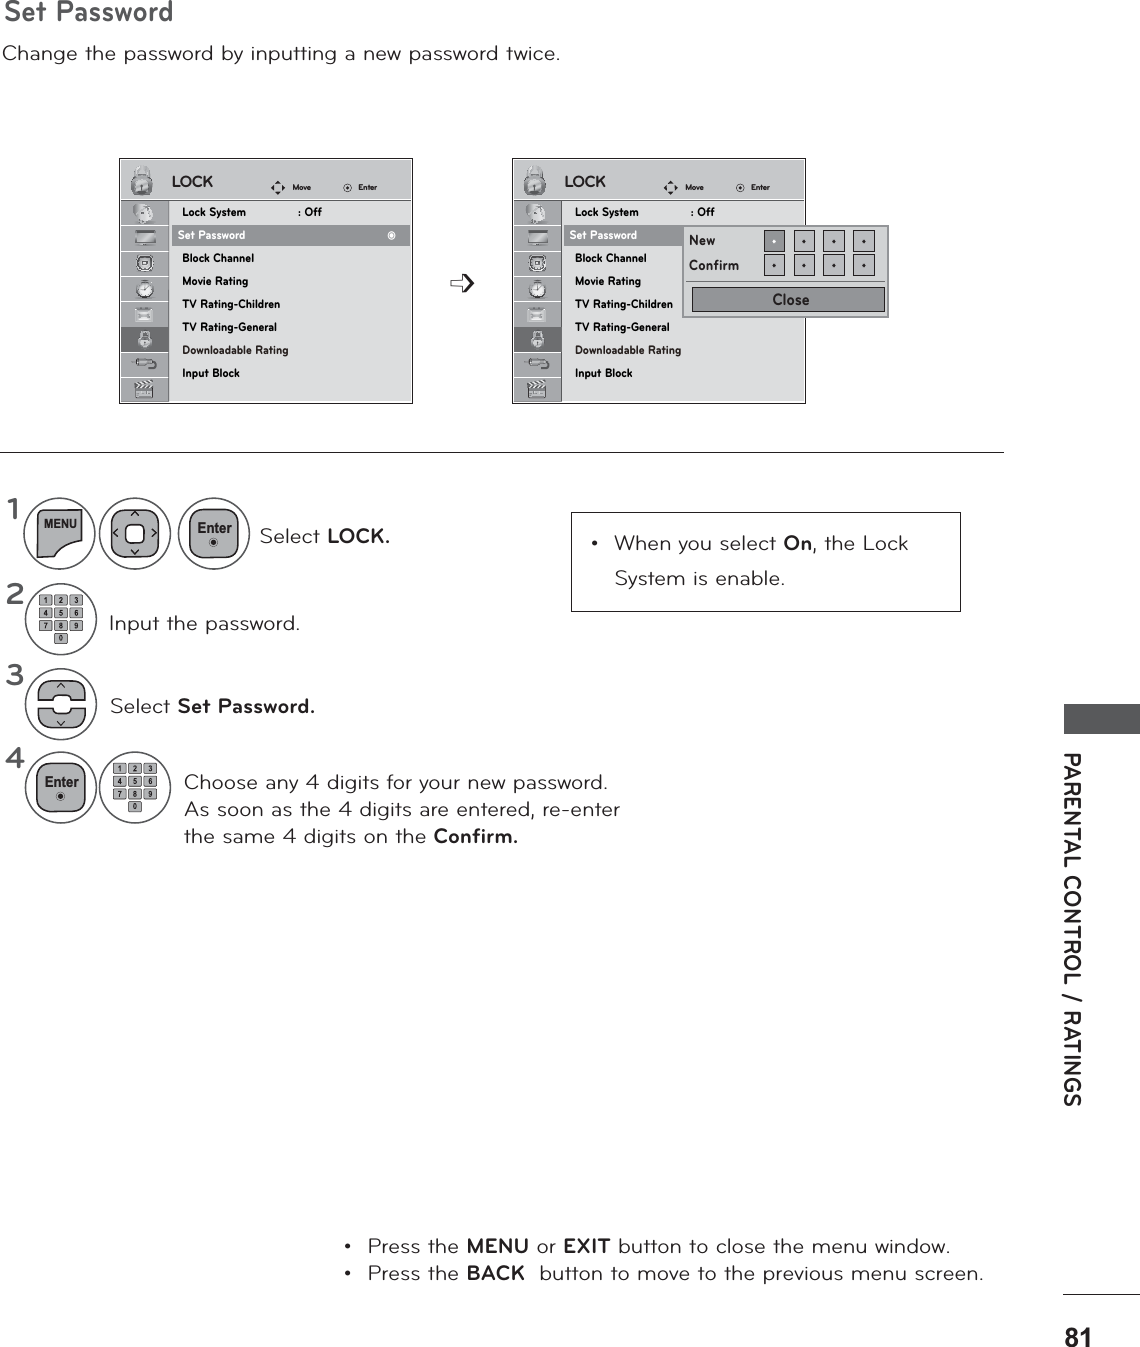
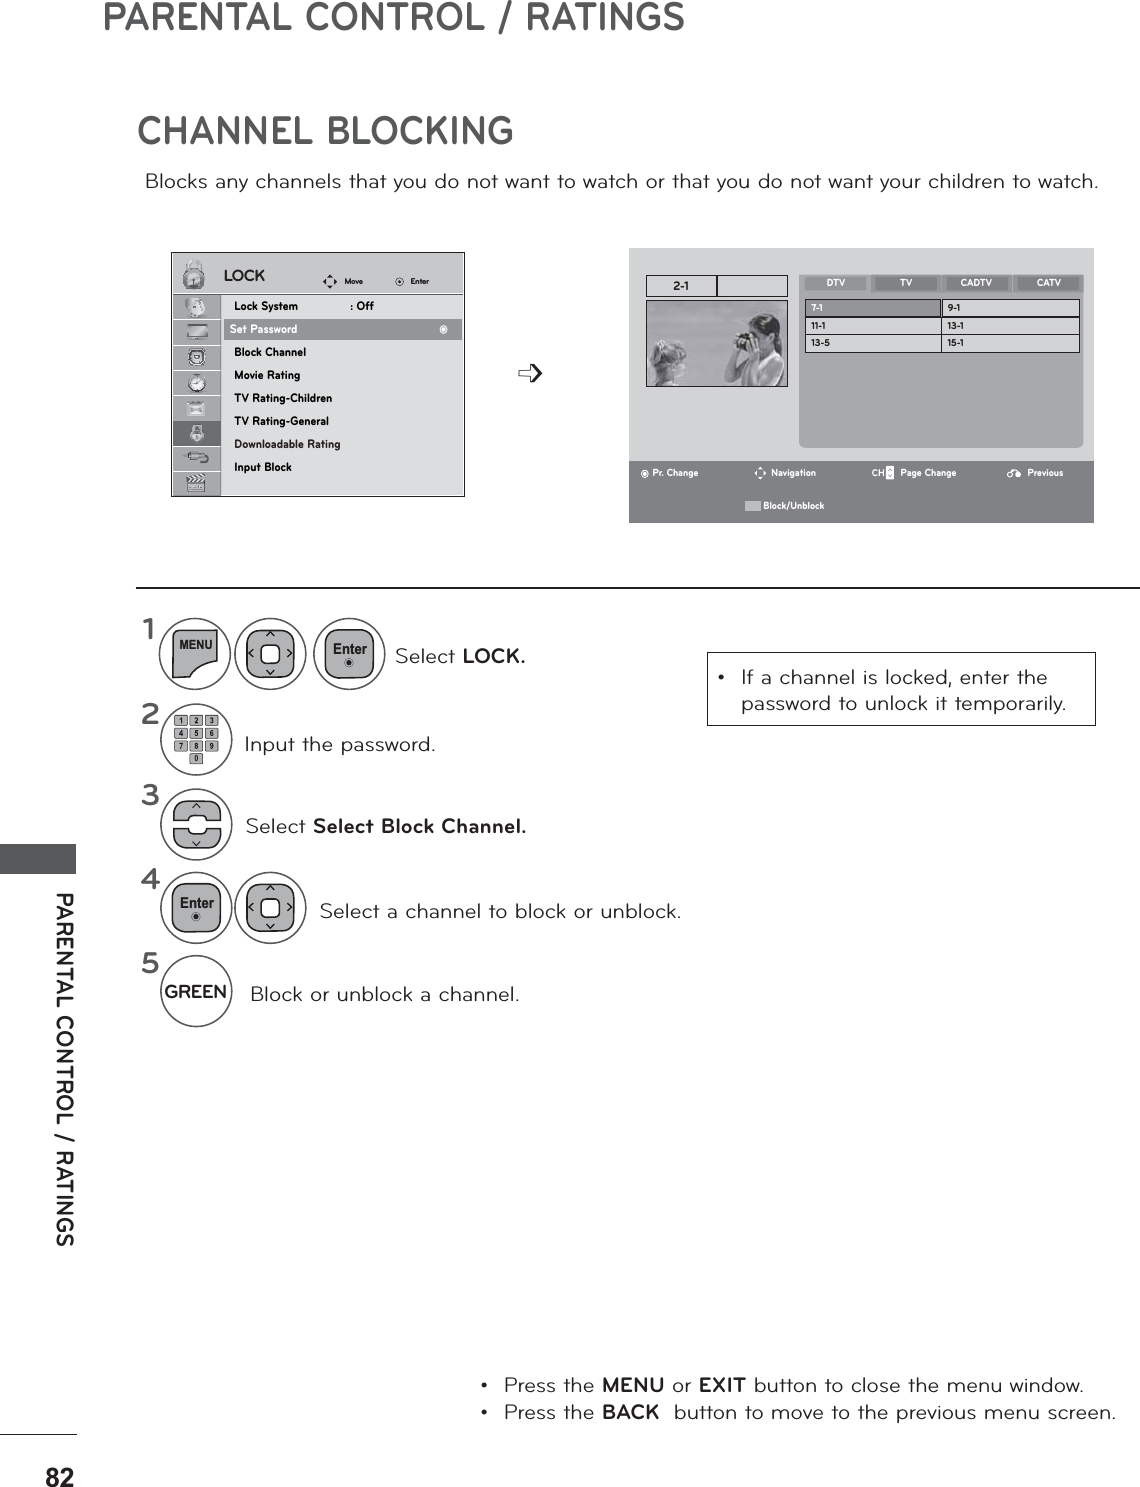
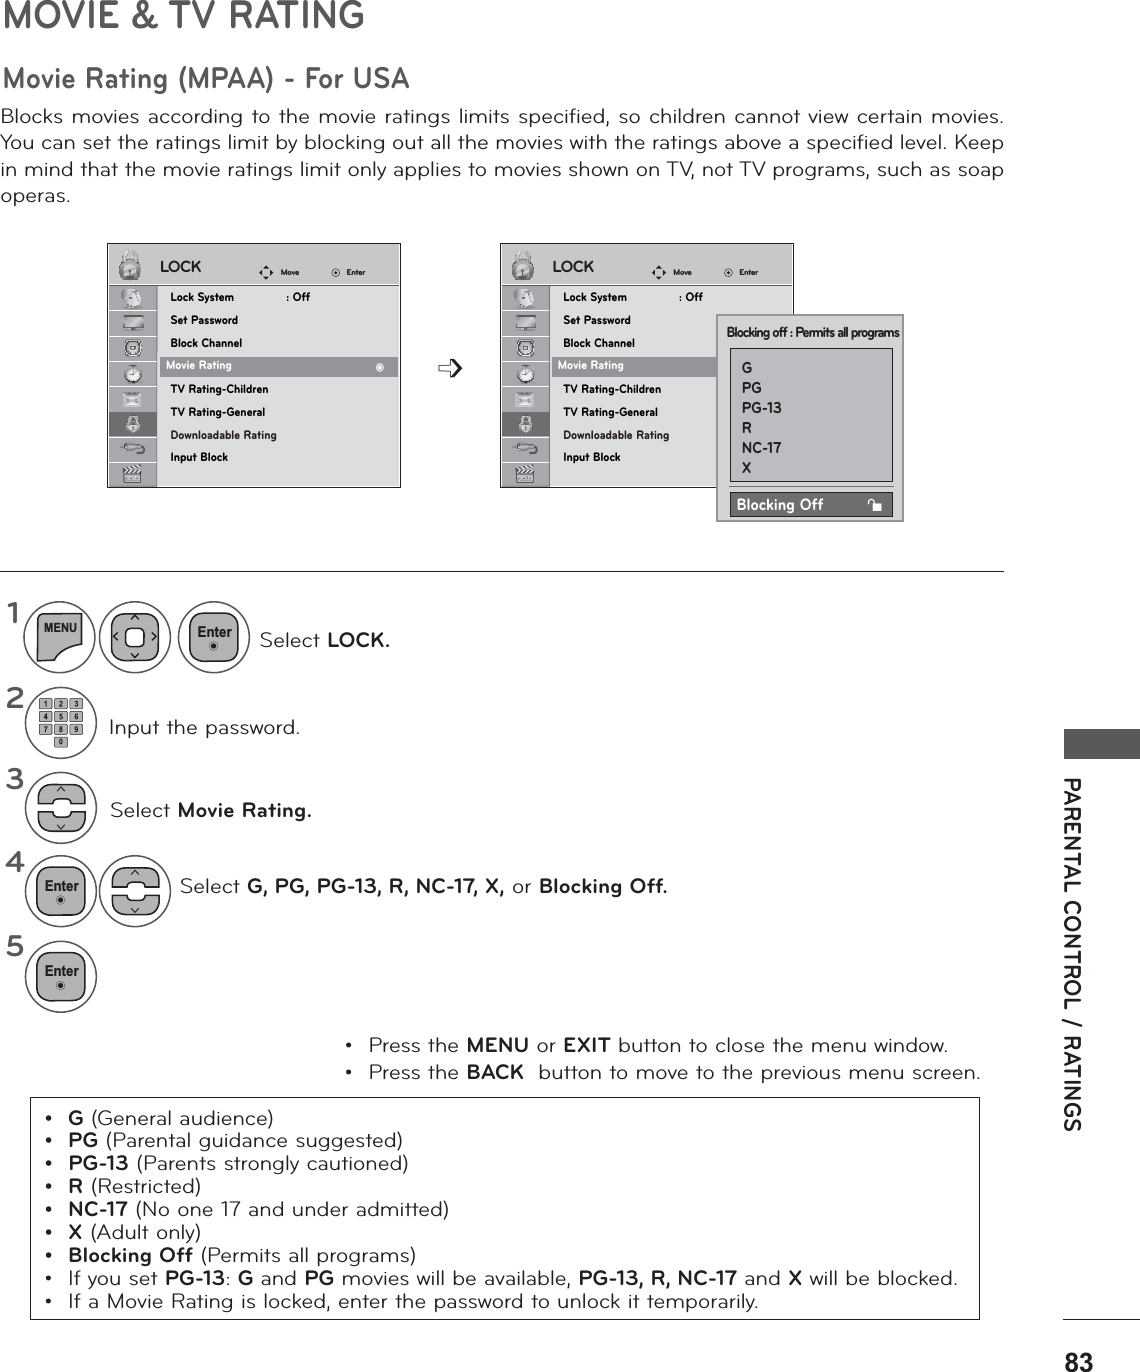
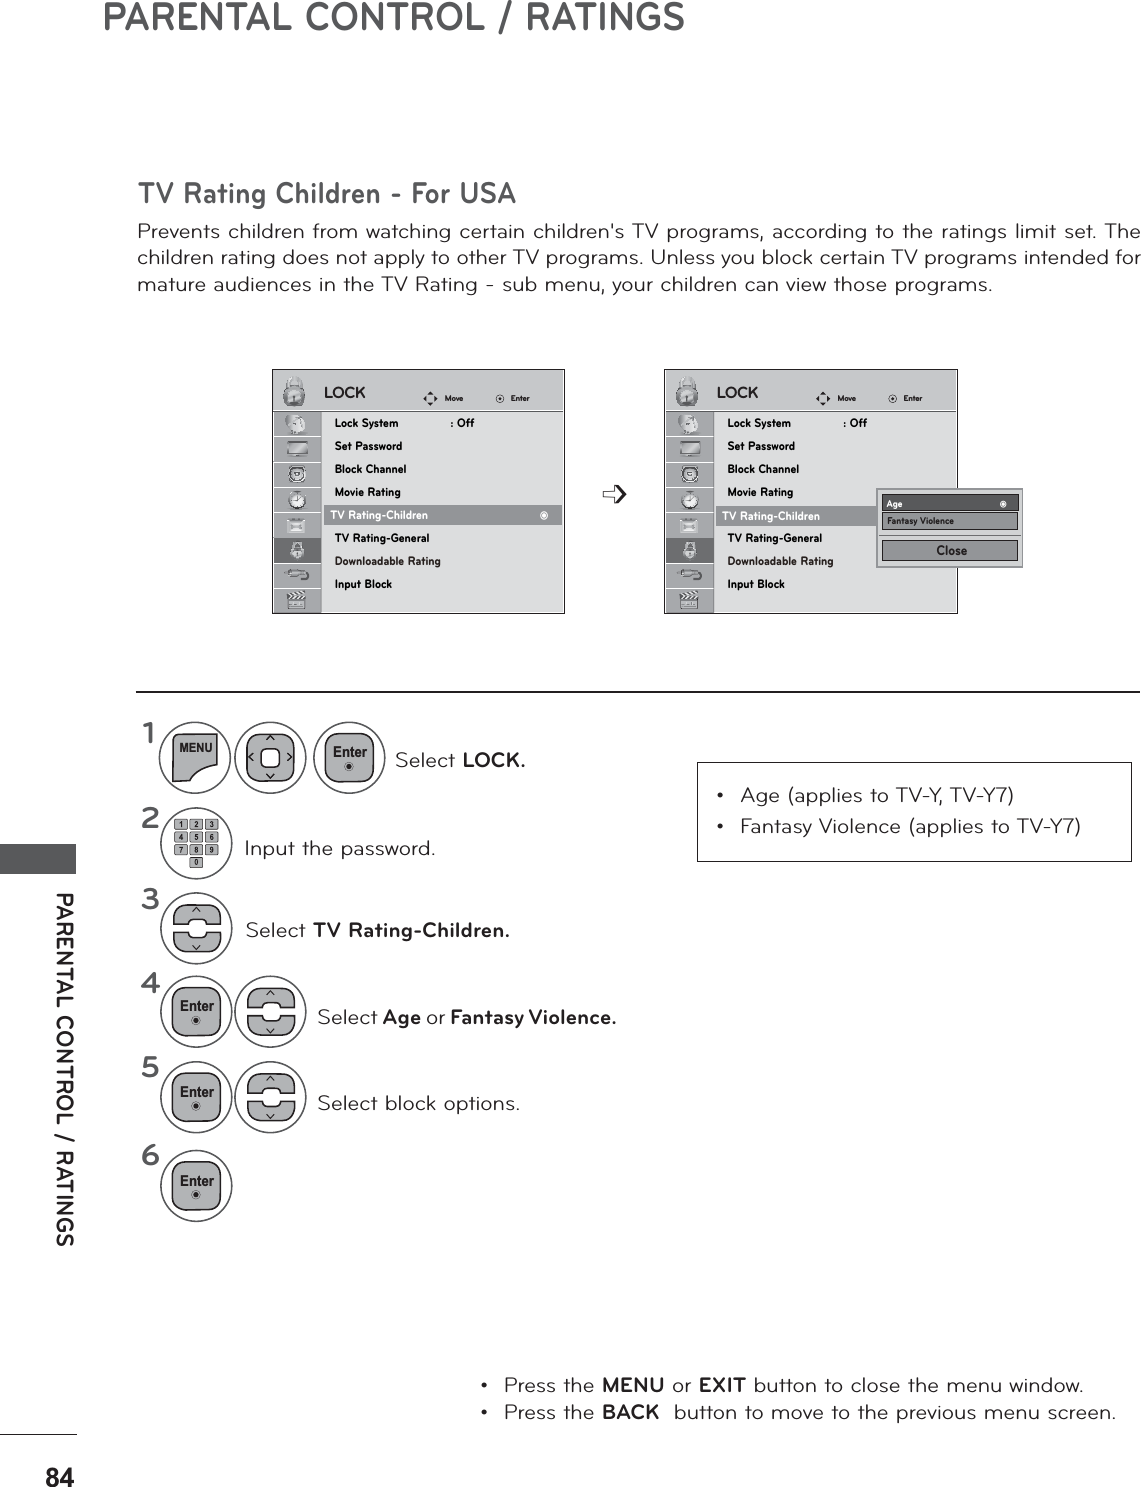
LG Electronics USA M2080DFM LED LCD TV MONITOR User Manual G User s manual
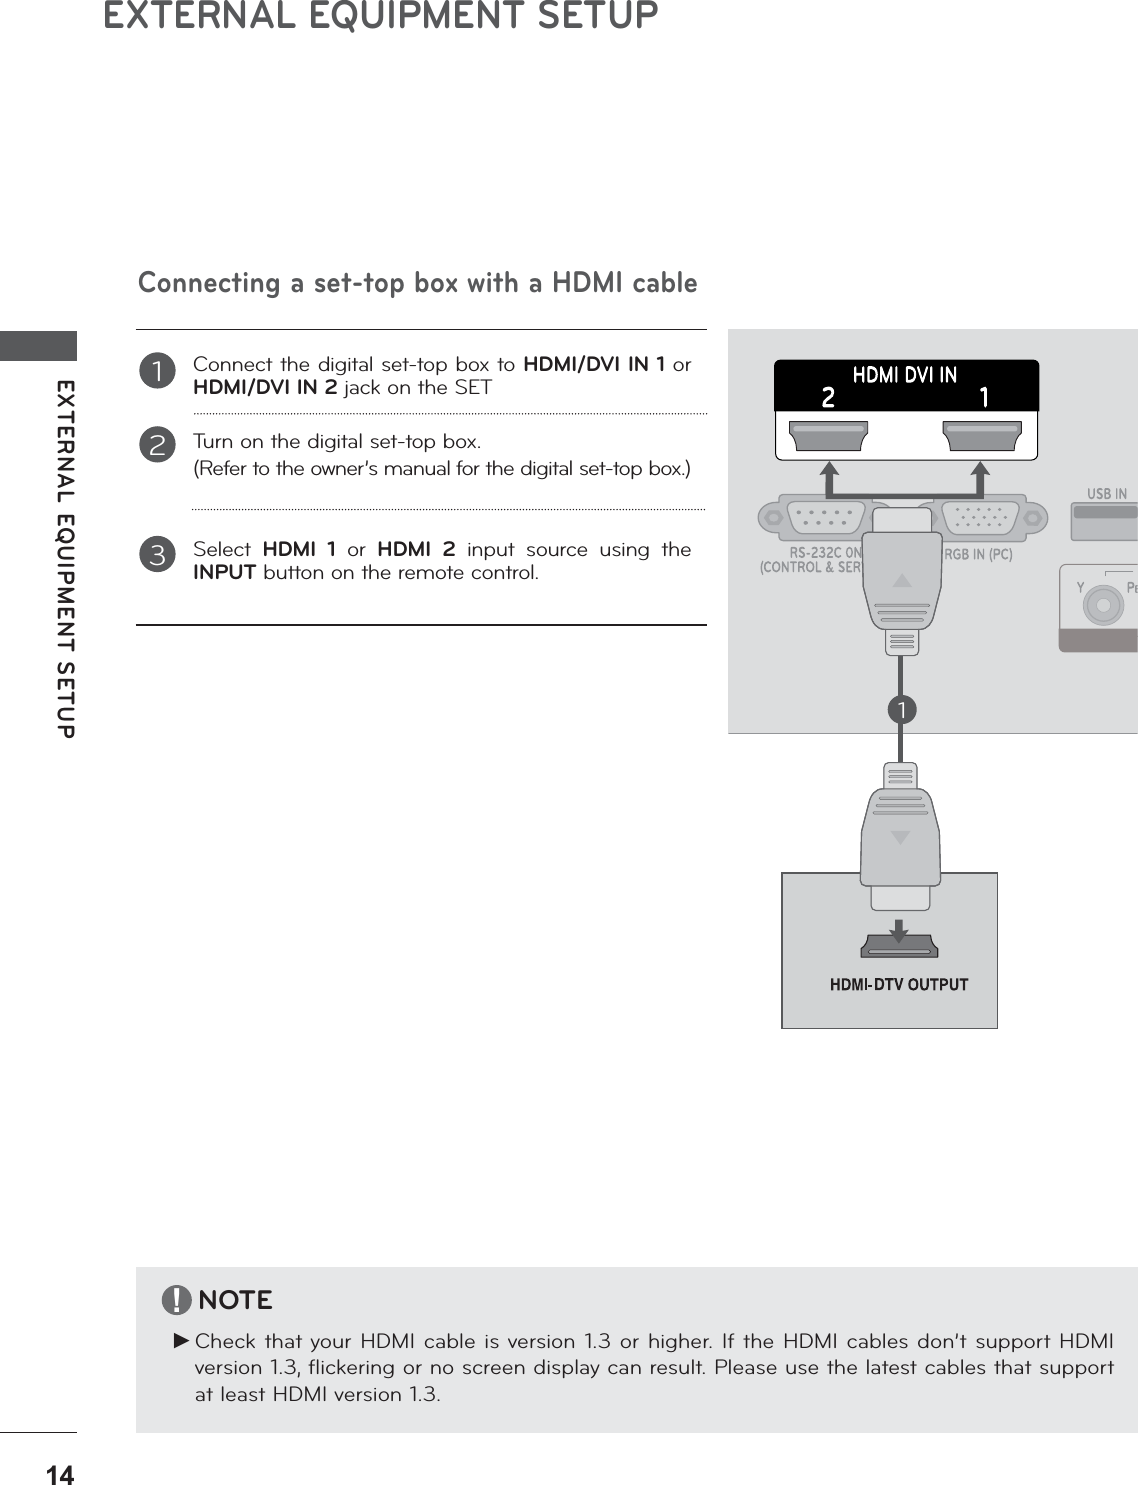
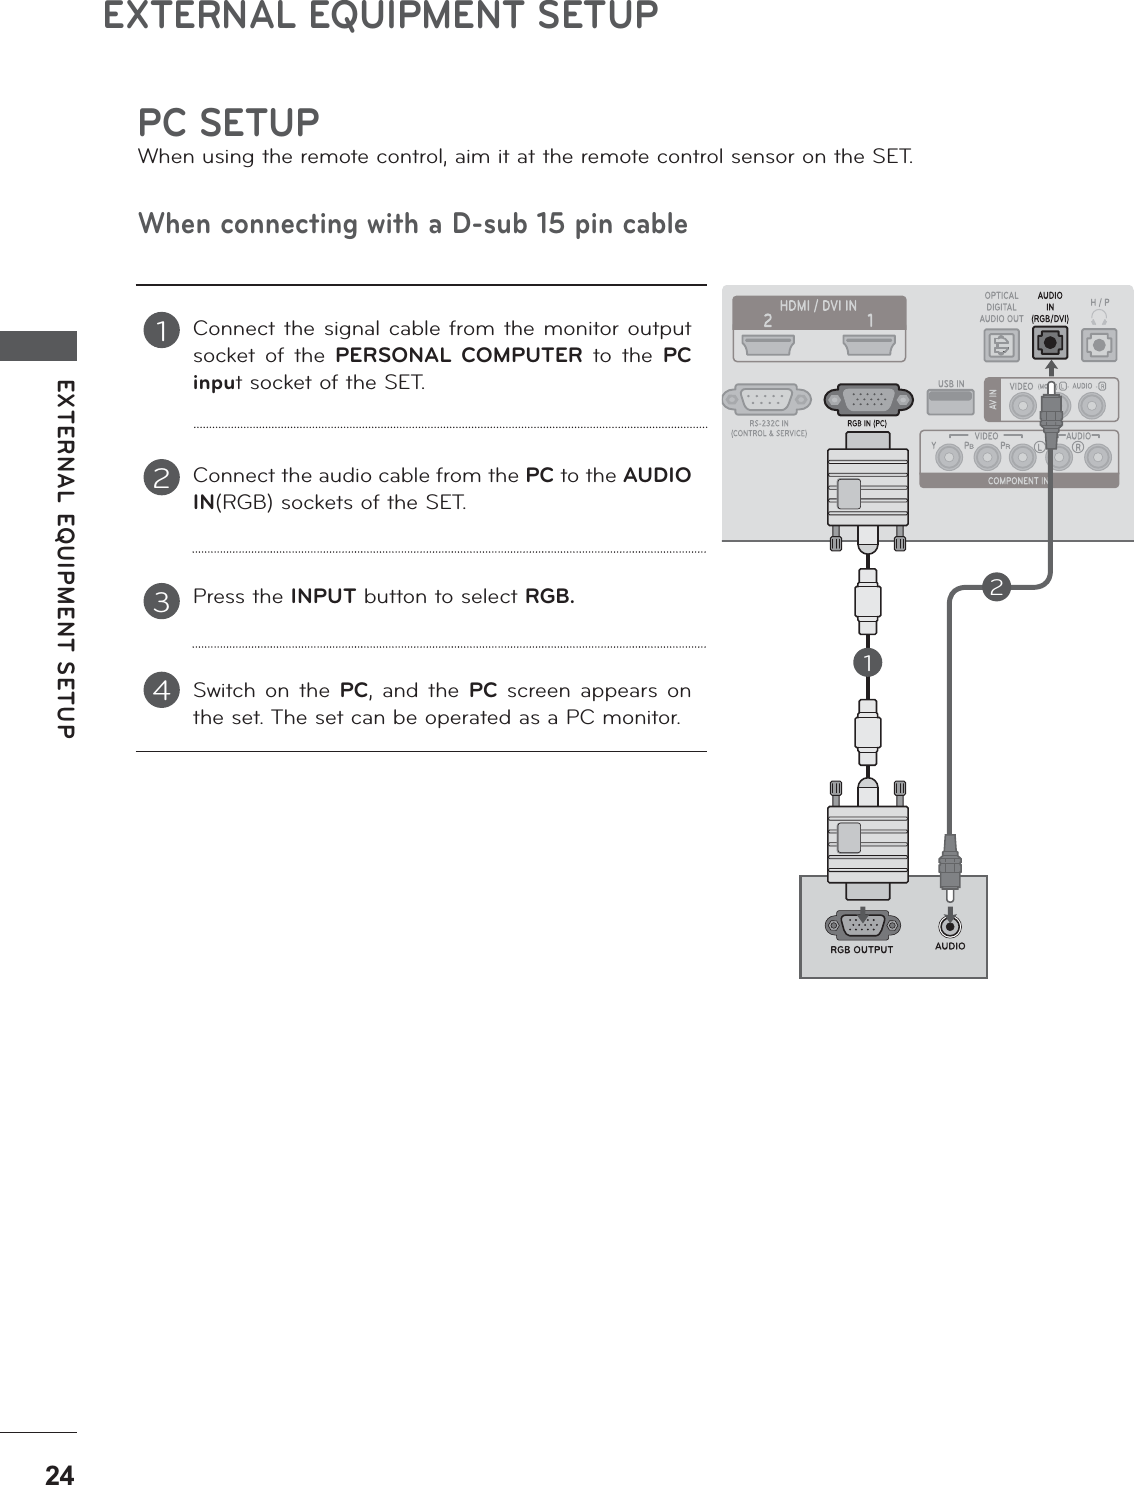
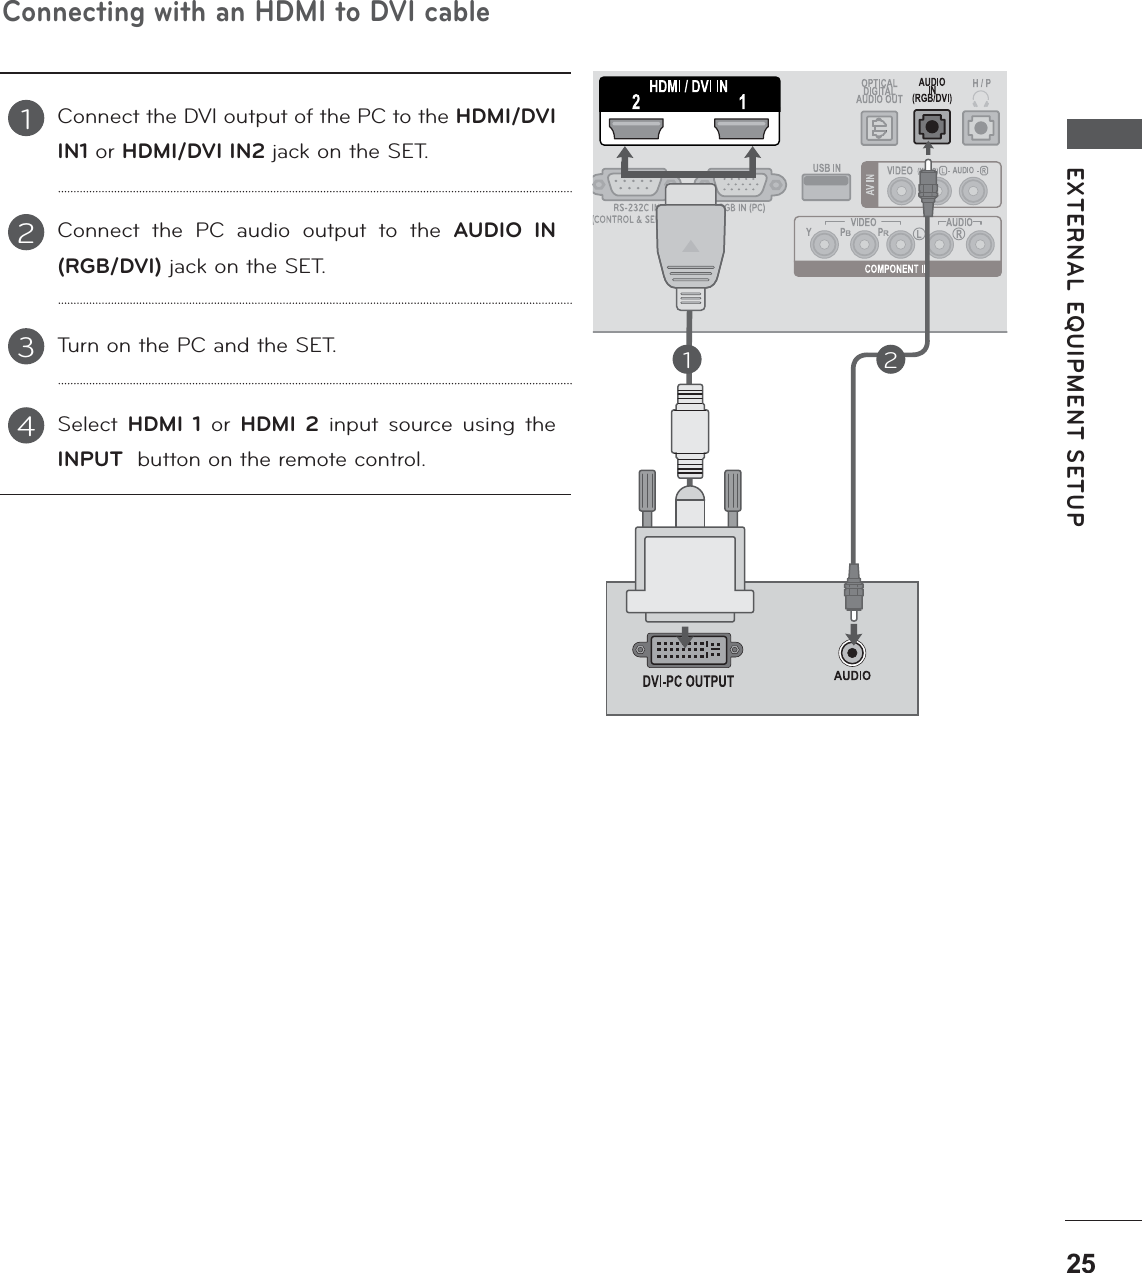
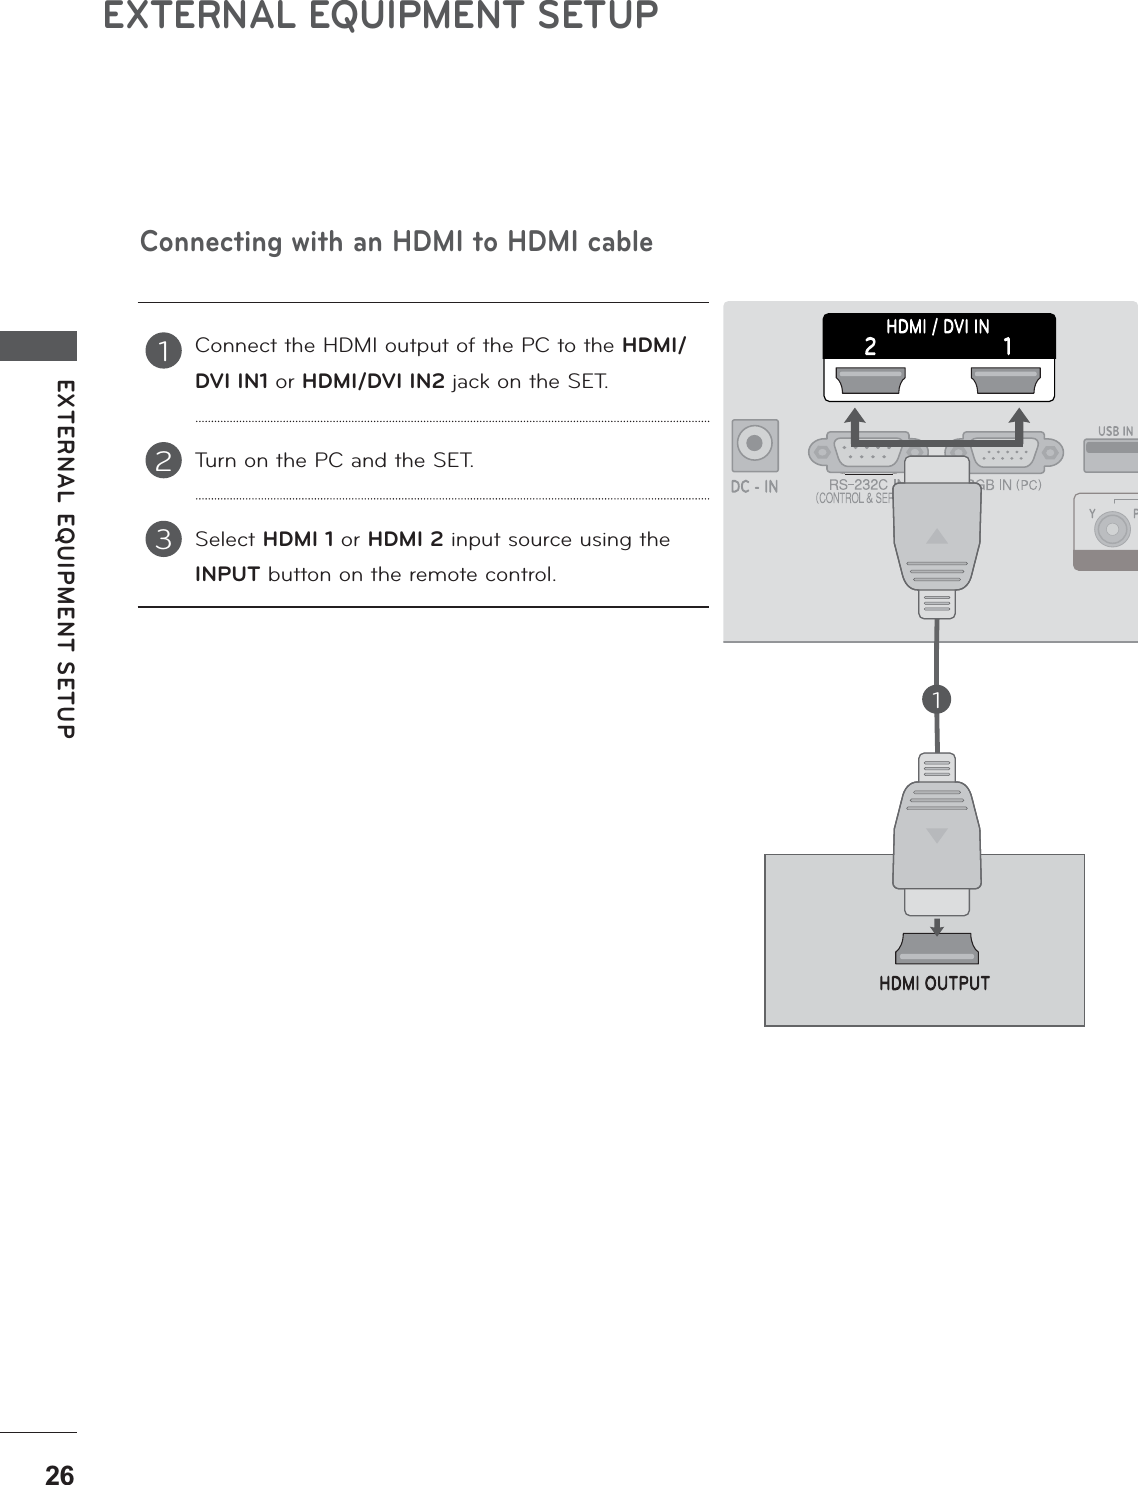
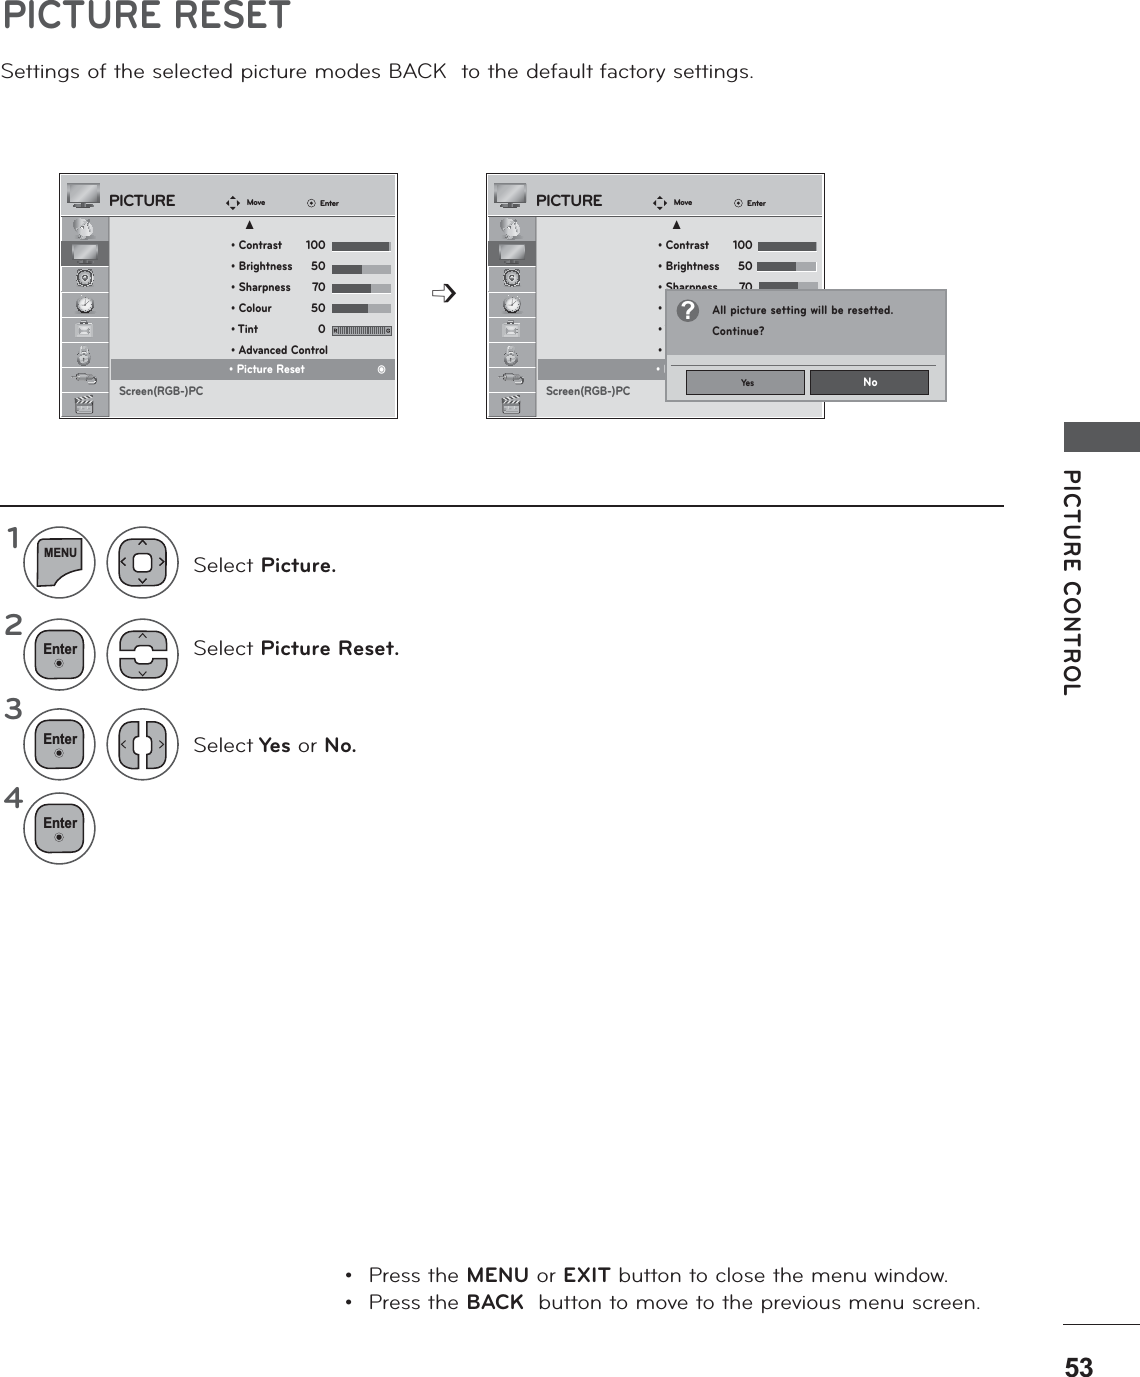
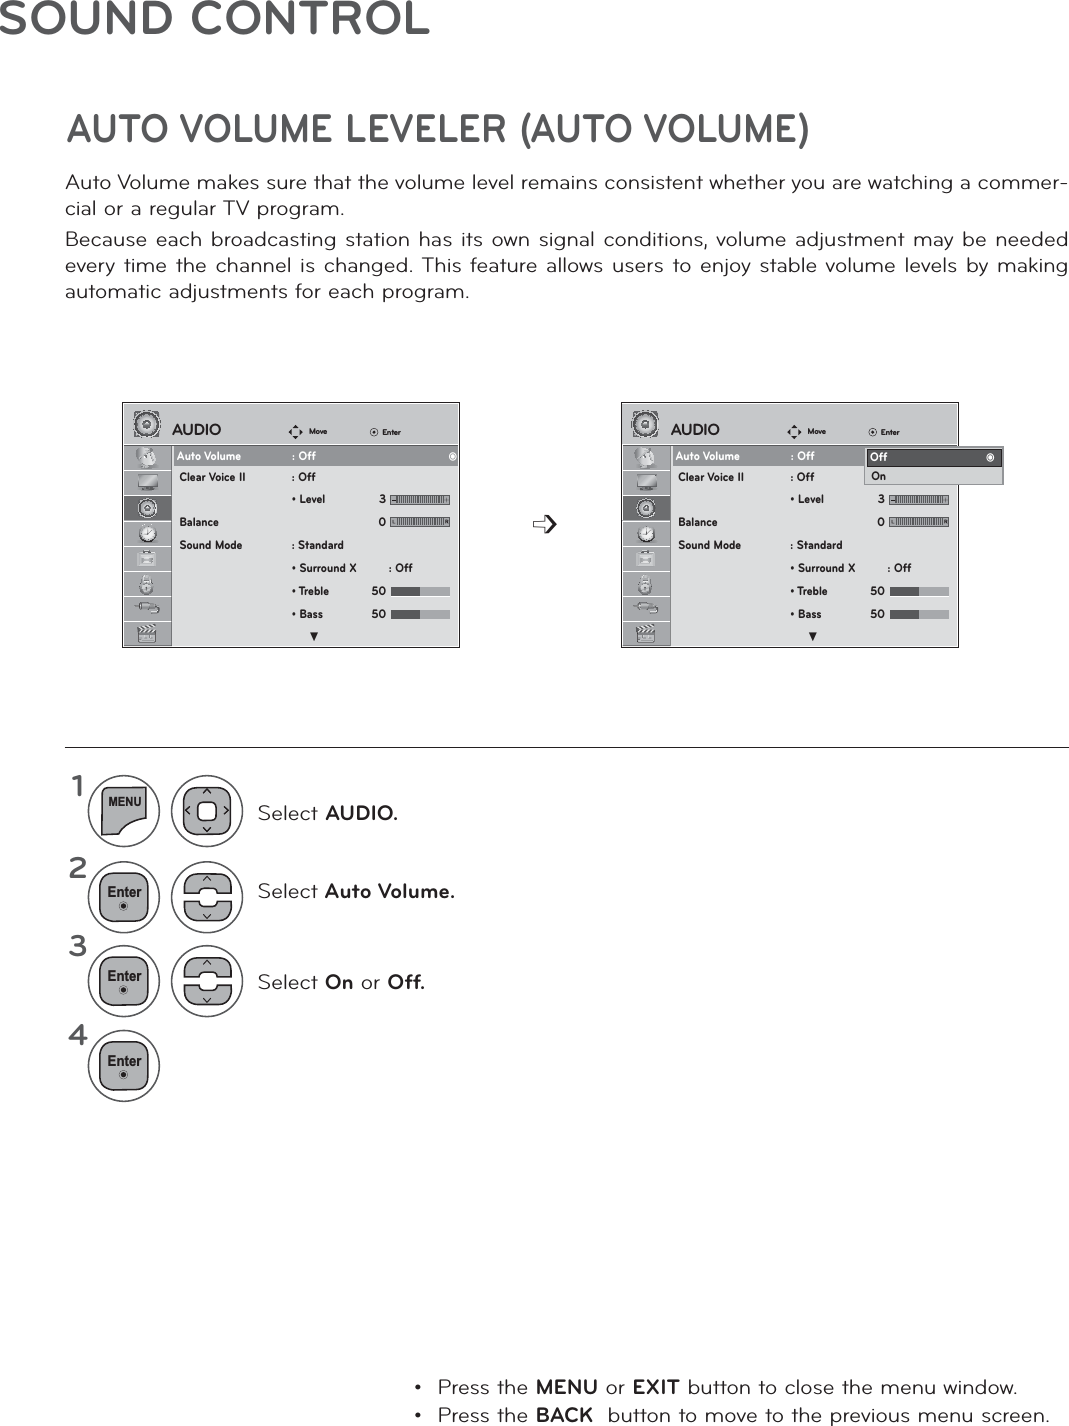
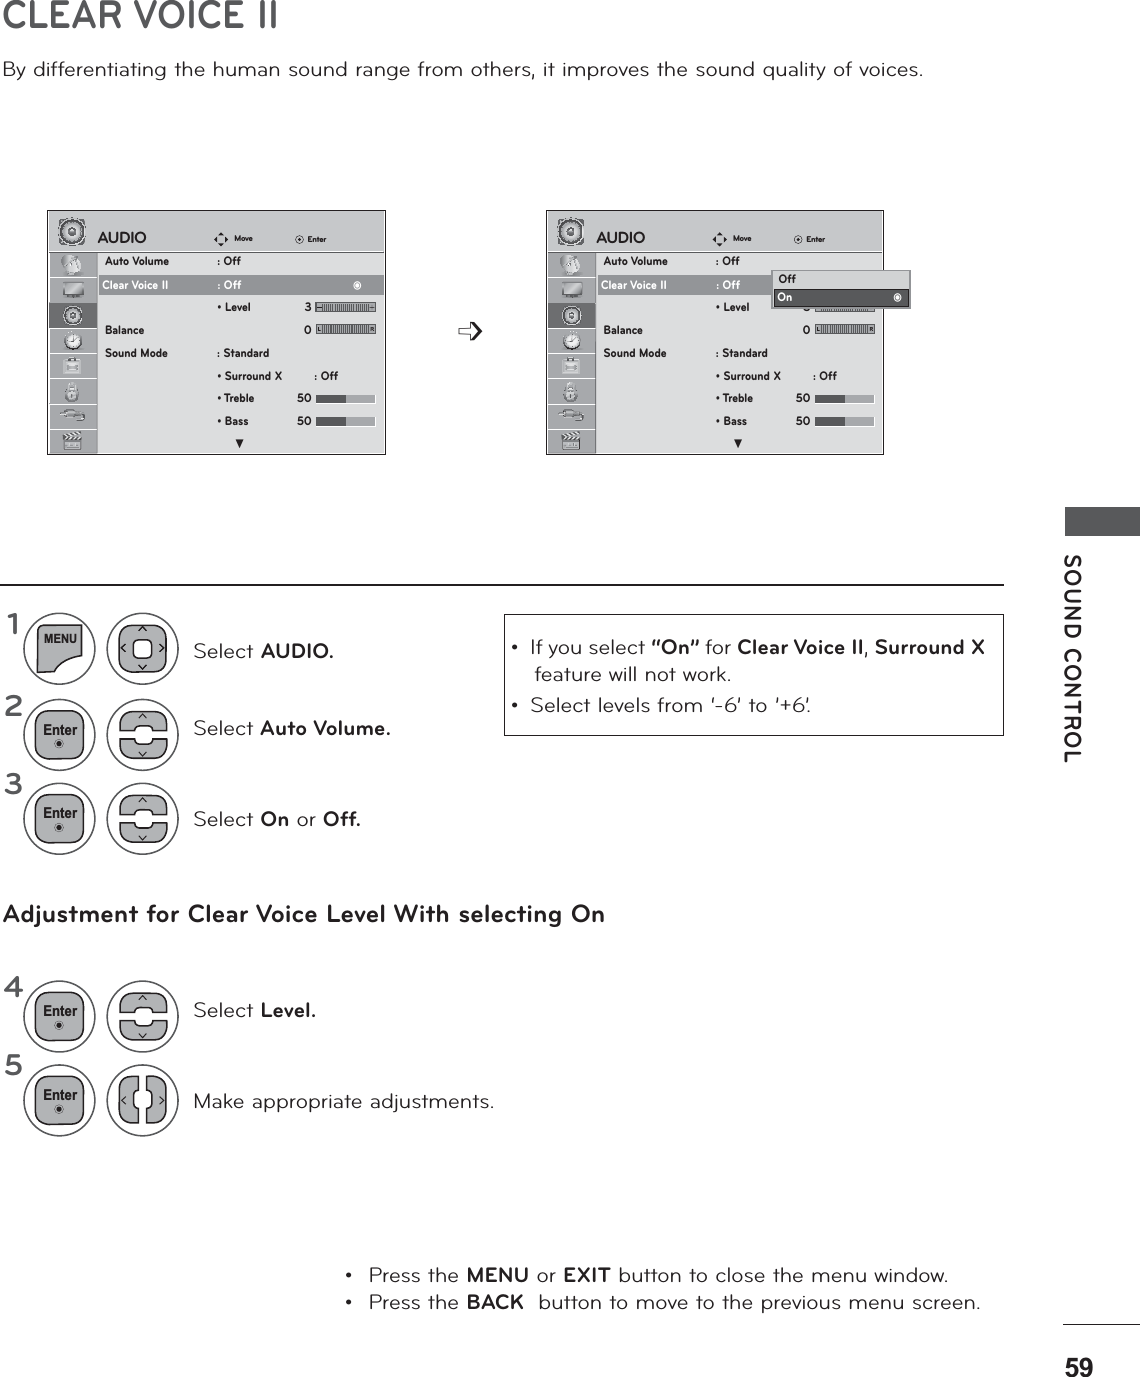
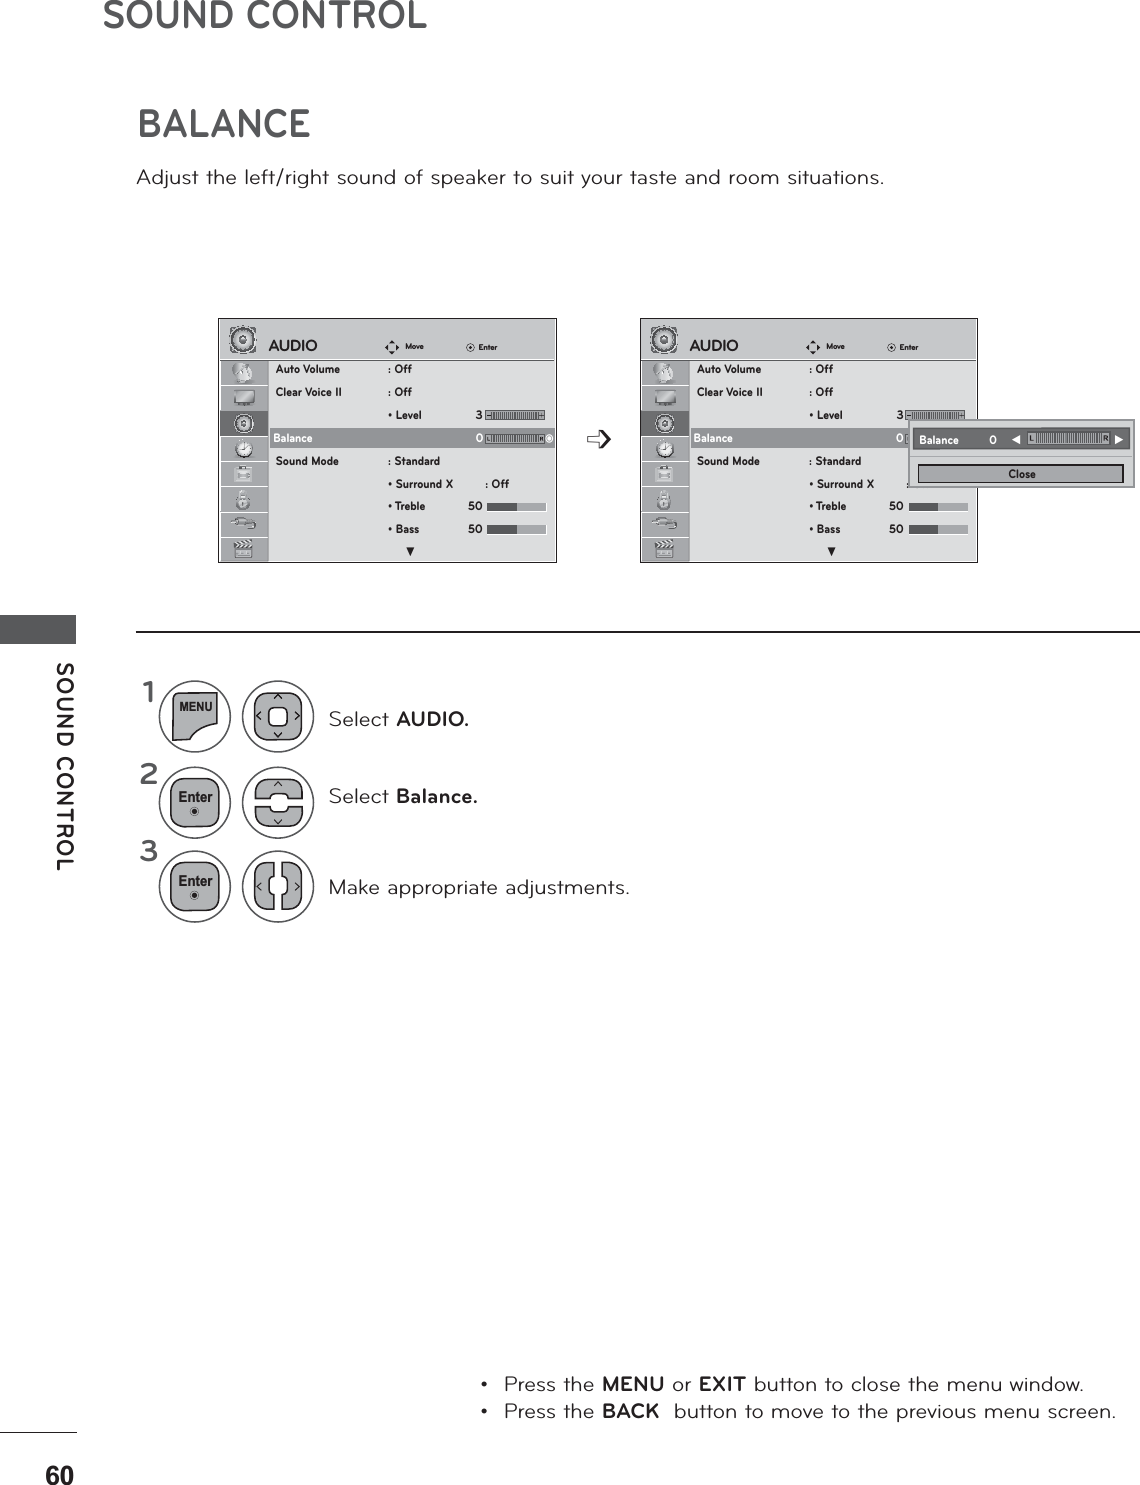
LG Electronics USA LED LCD TV MONITOR G User s manual
UserManual.wiki
>
LG Electronics USA
>
M2080DFM User Manual
Users Manual
Navigation menu
Upload a User Manual
Namespaces
Wiki Guide
HTML
PDF
Info
Views
User Manual
Discussion / Help
Navigation
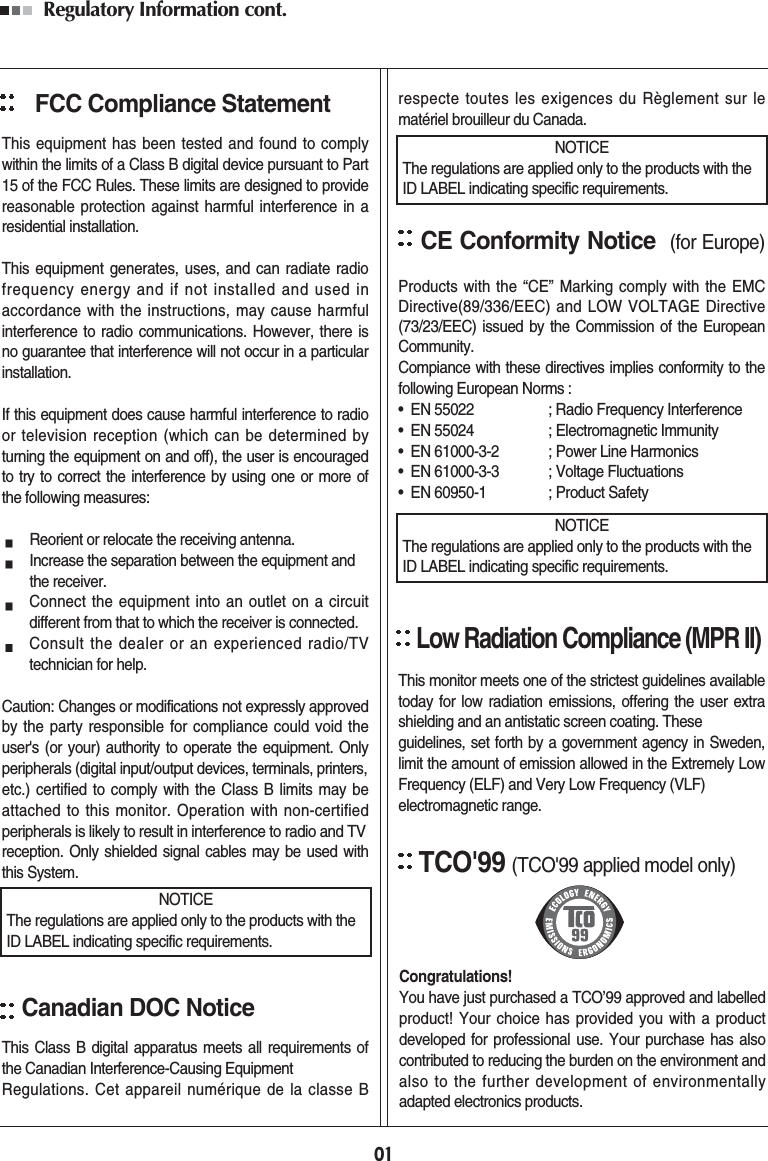
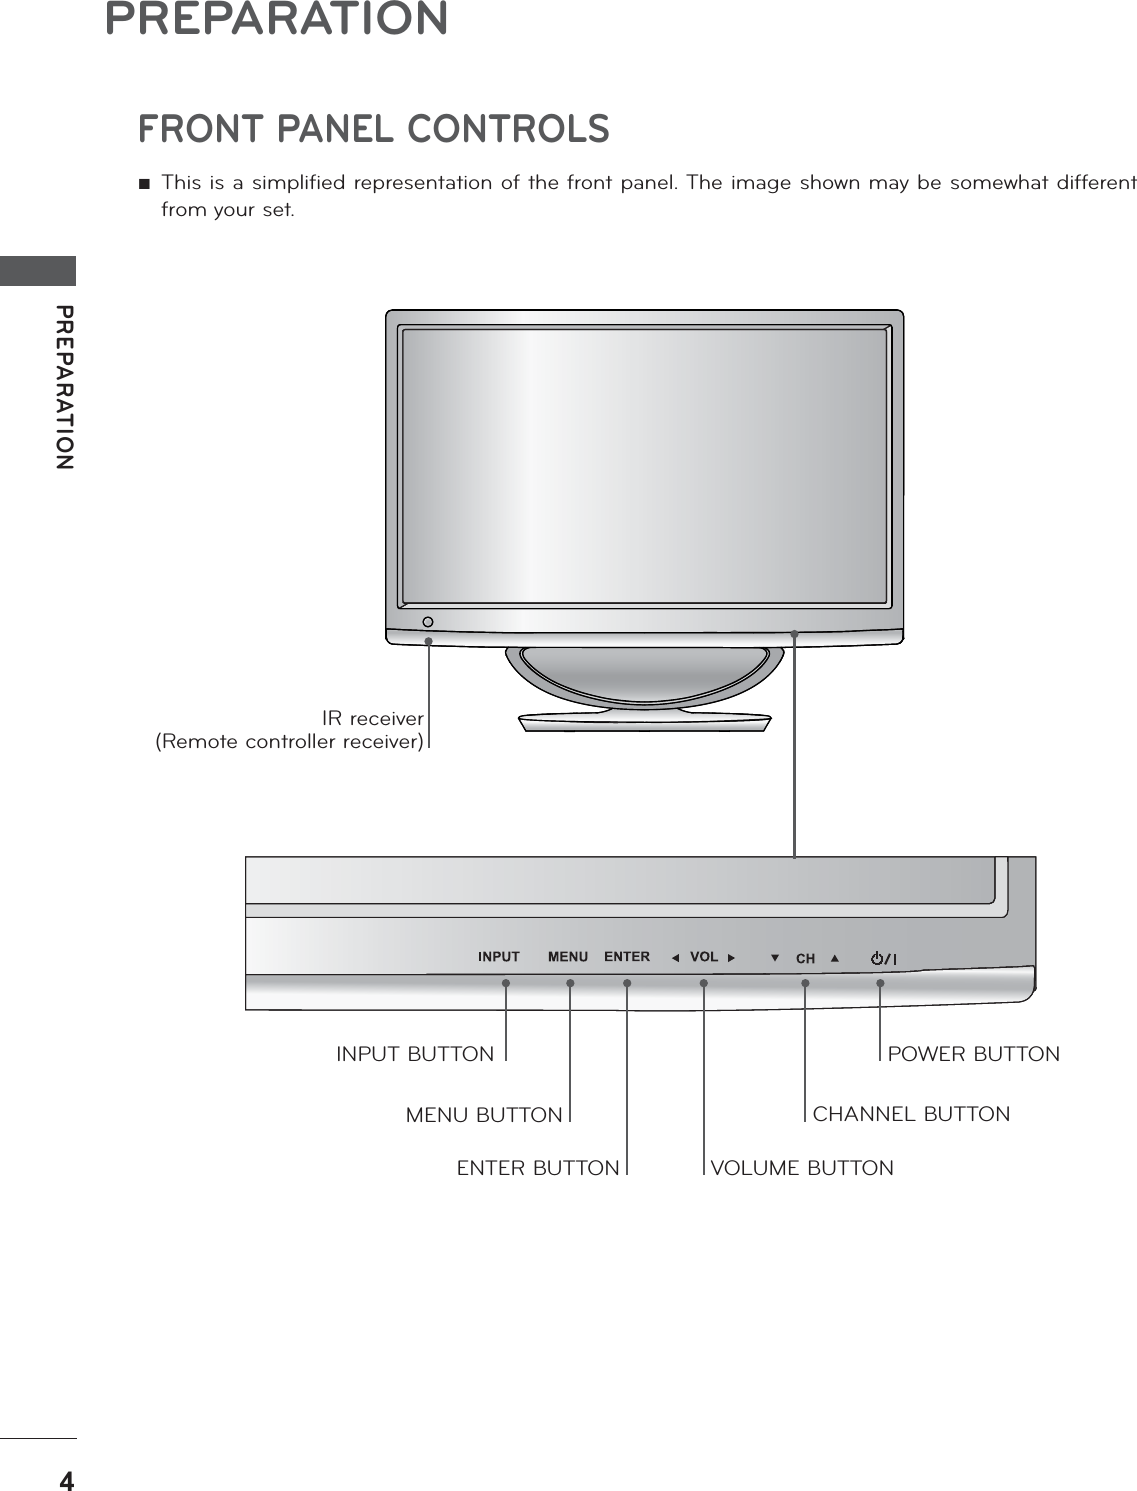
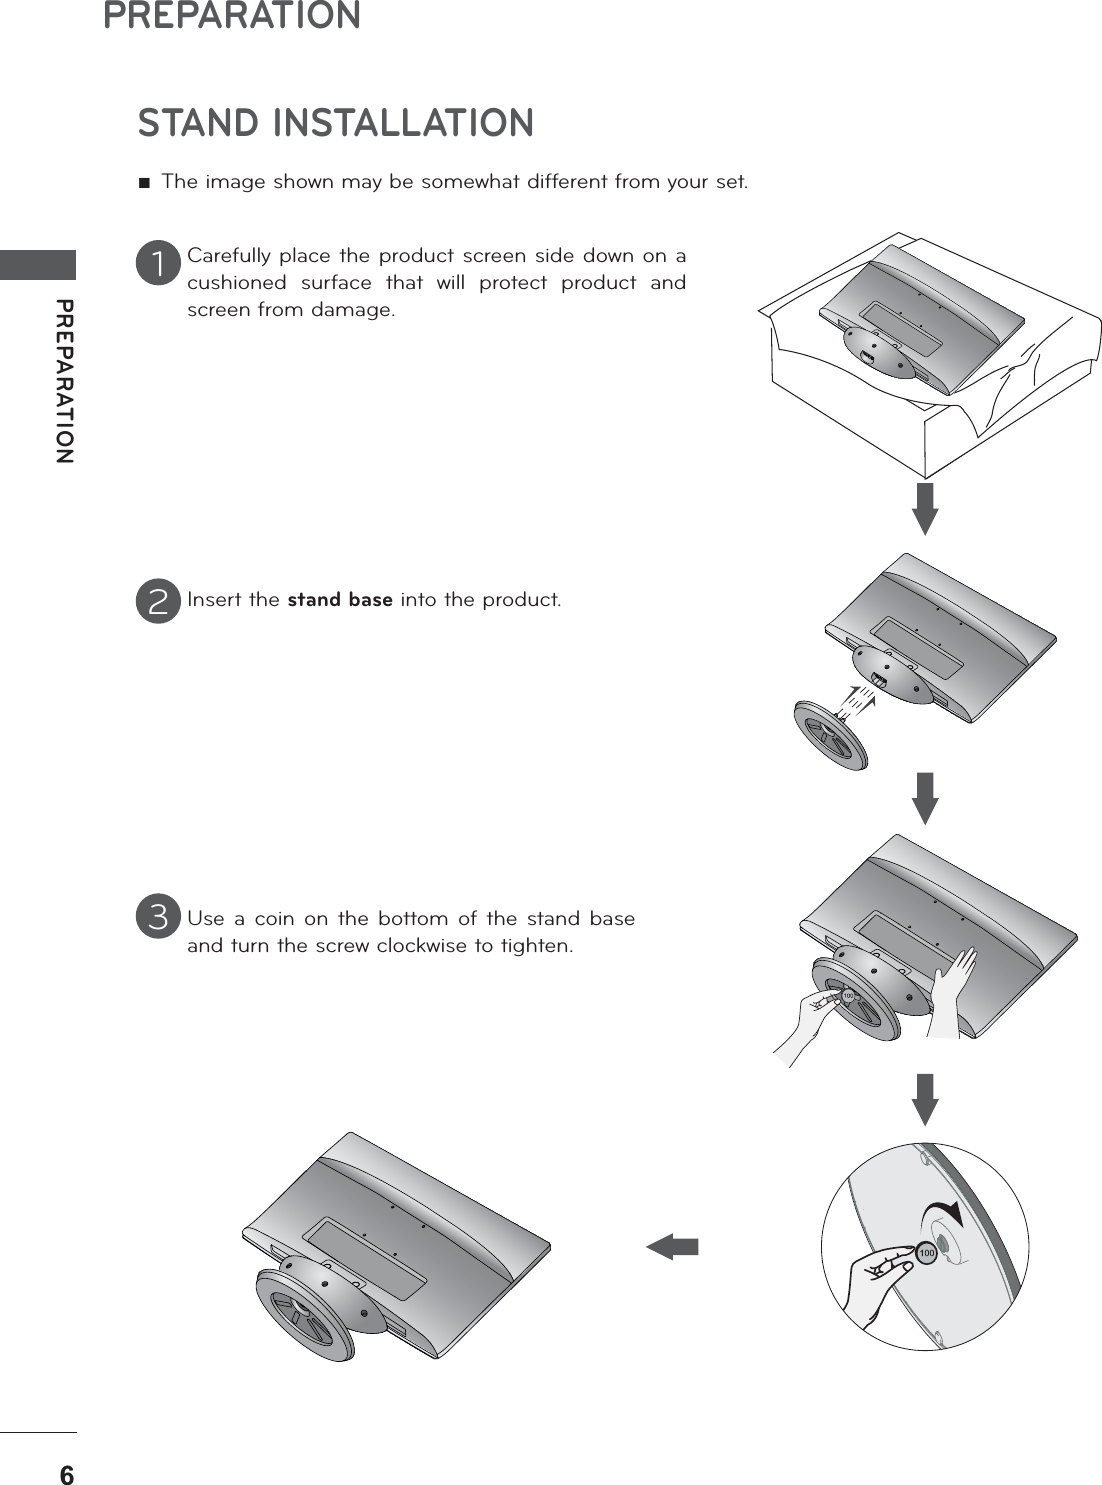
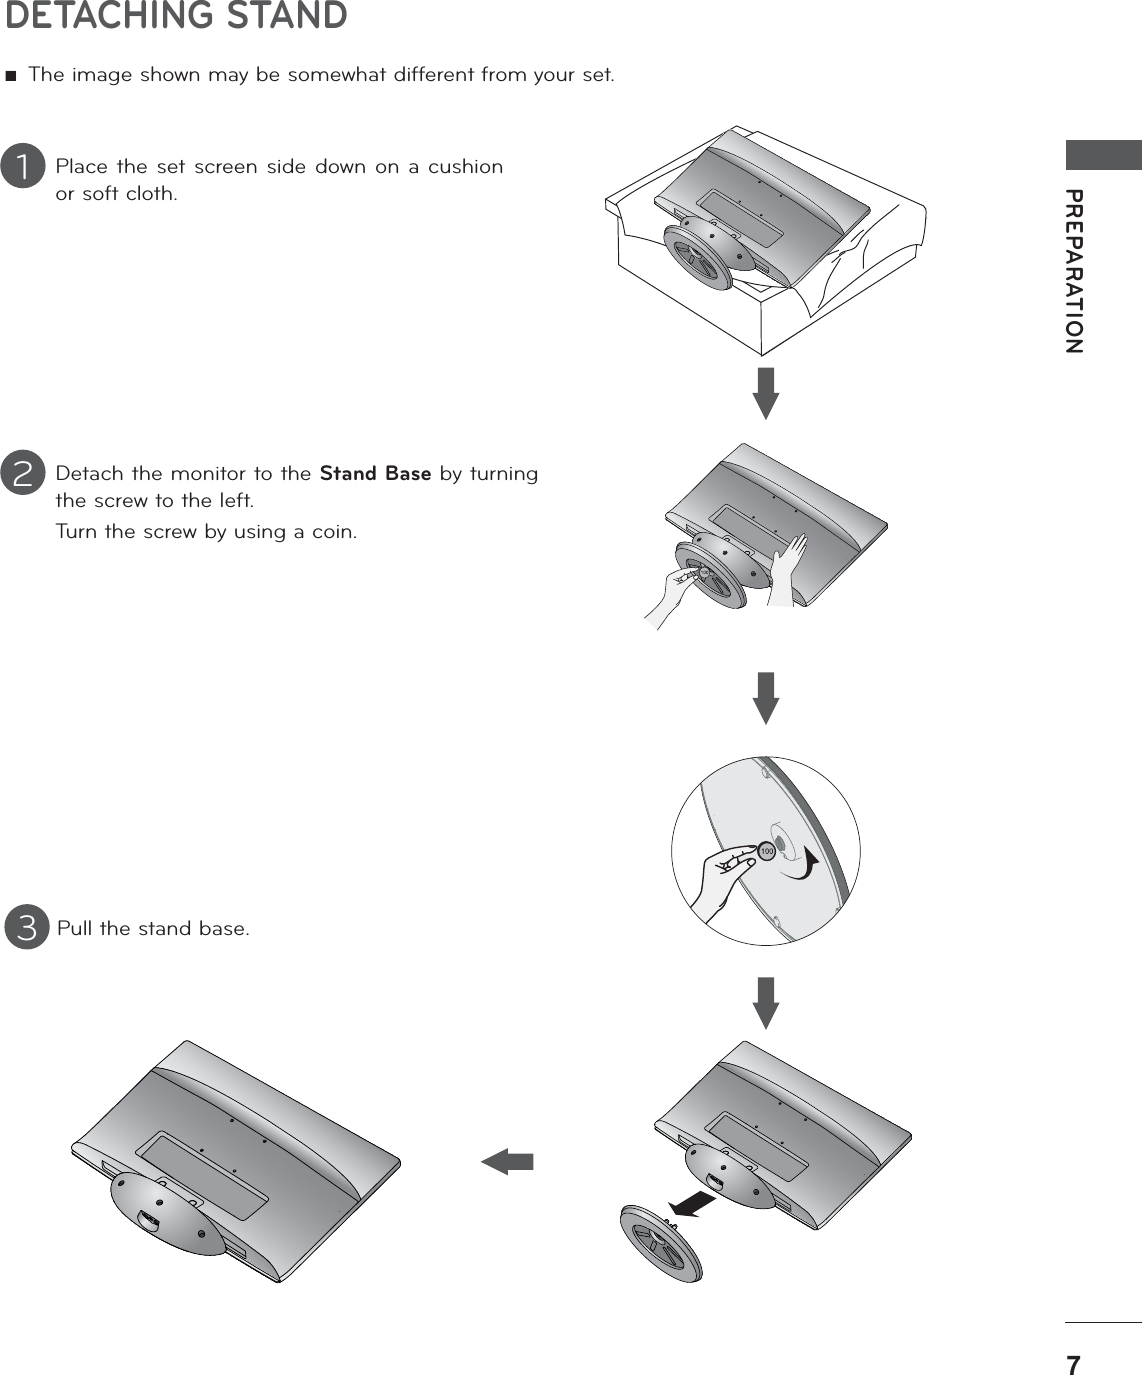
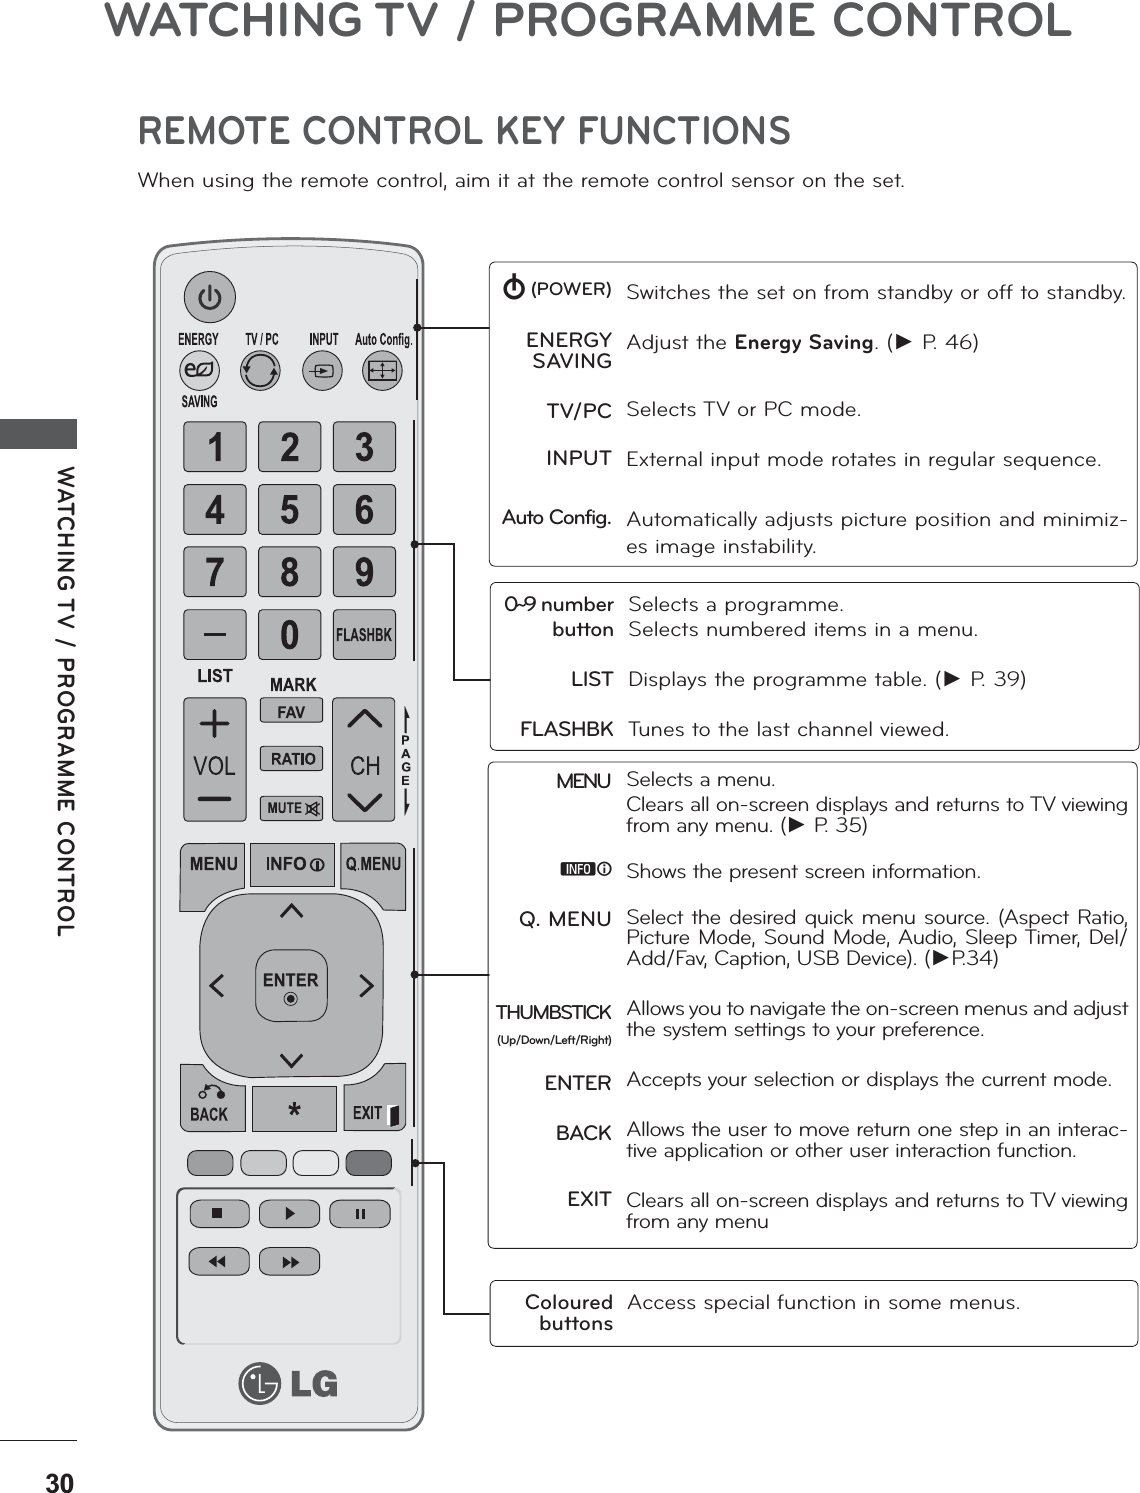
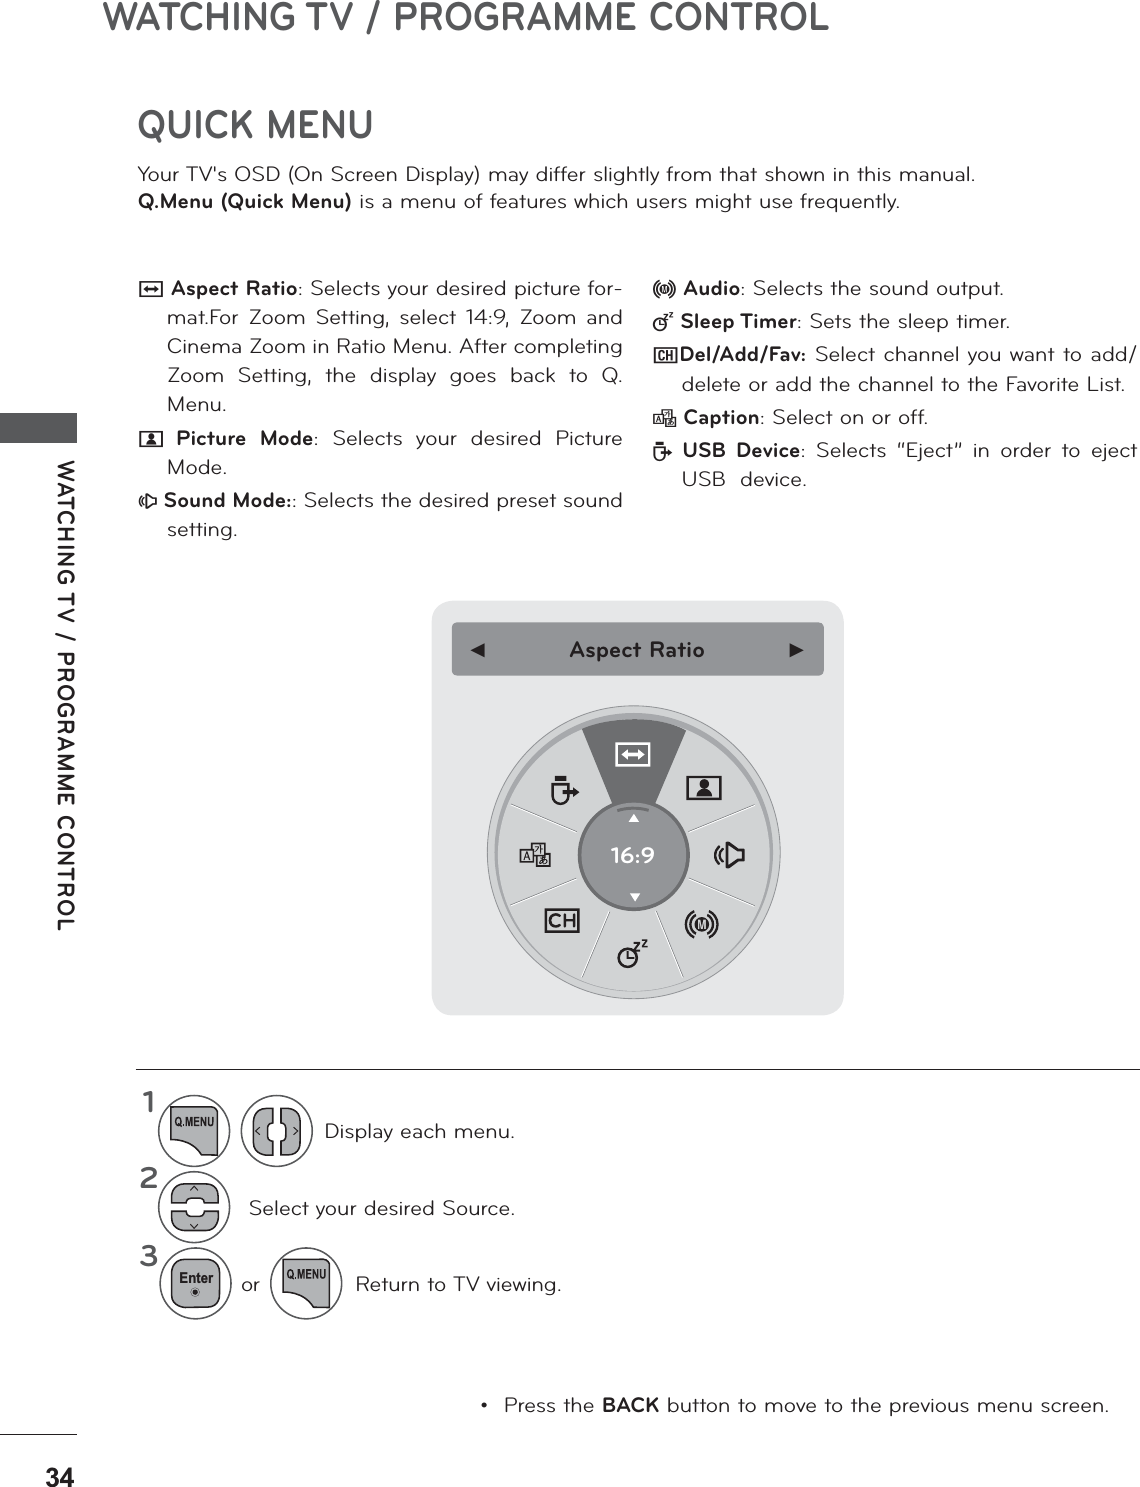
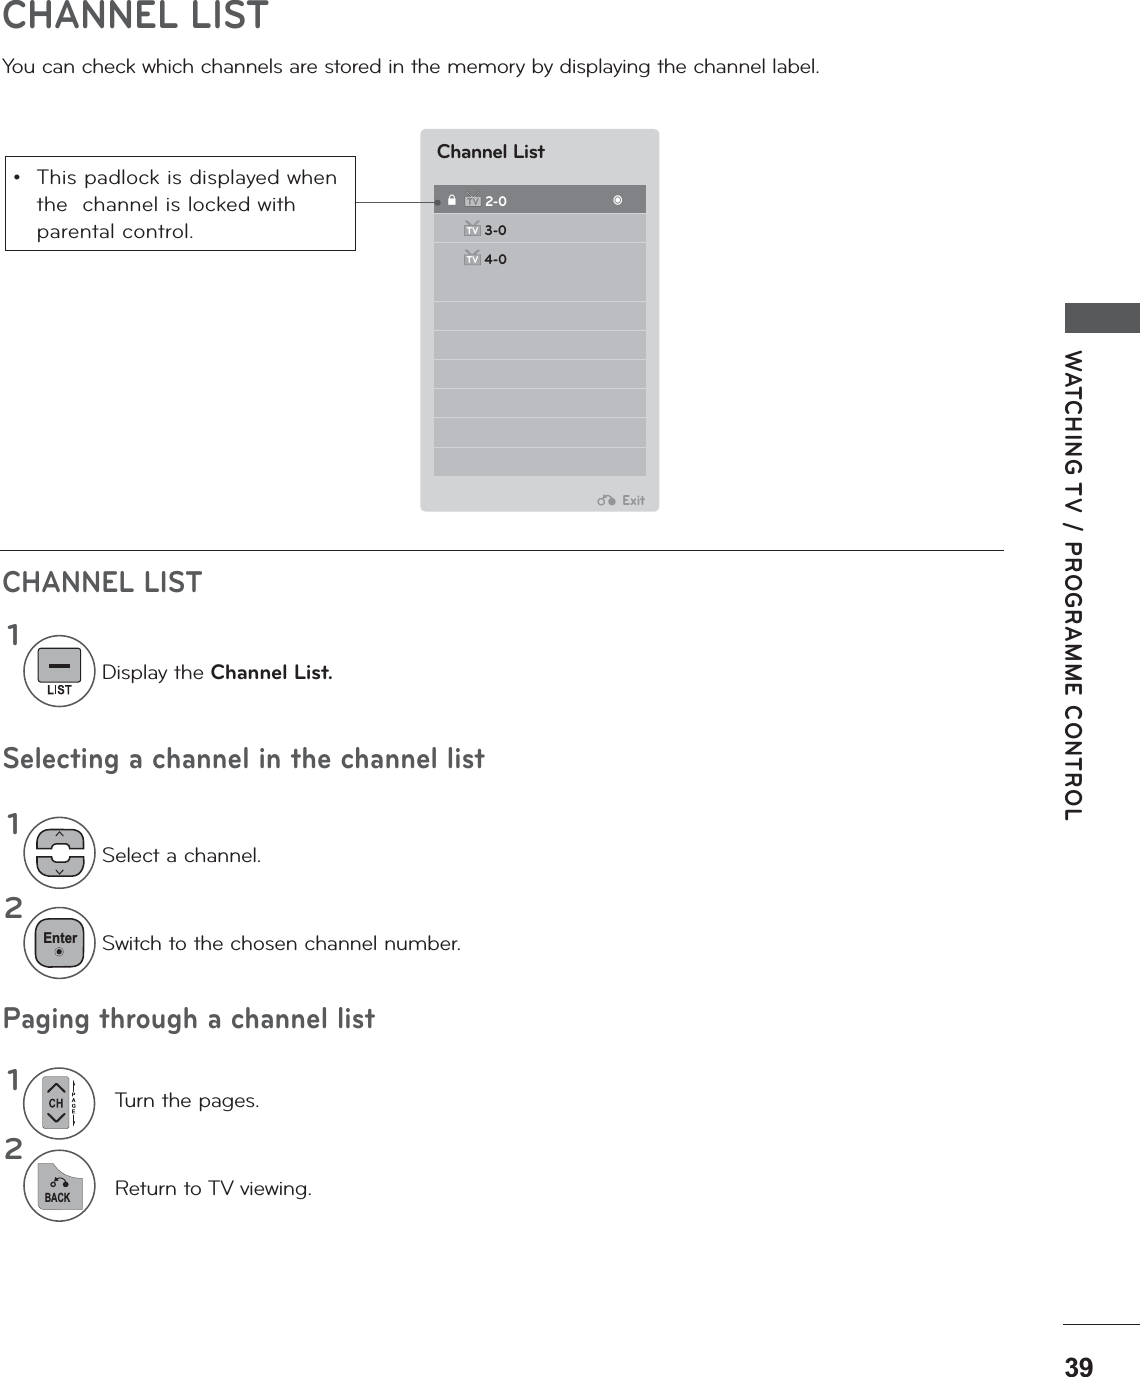
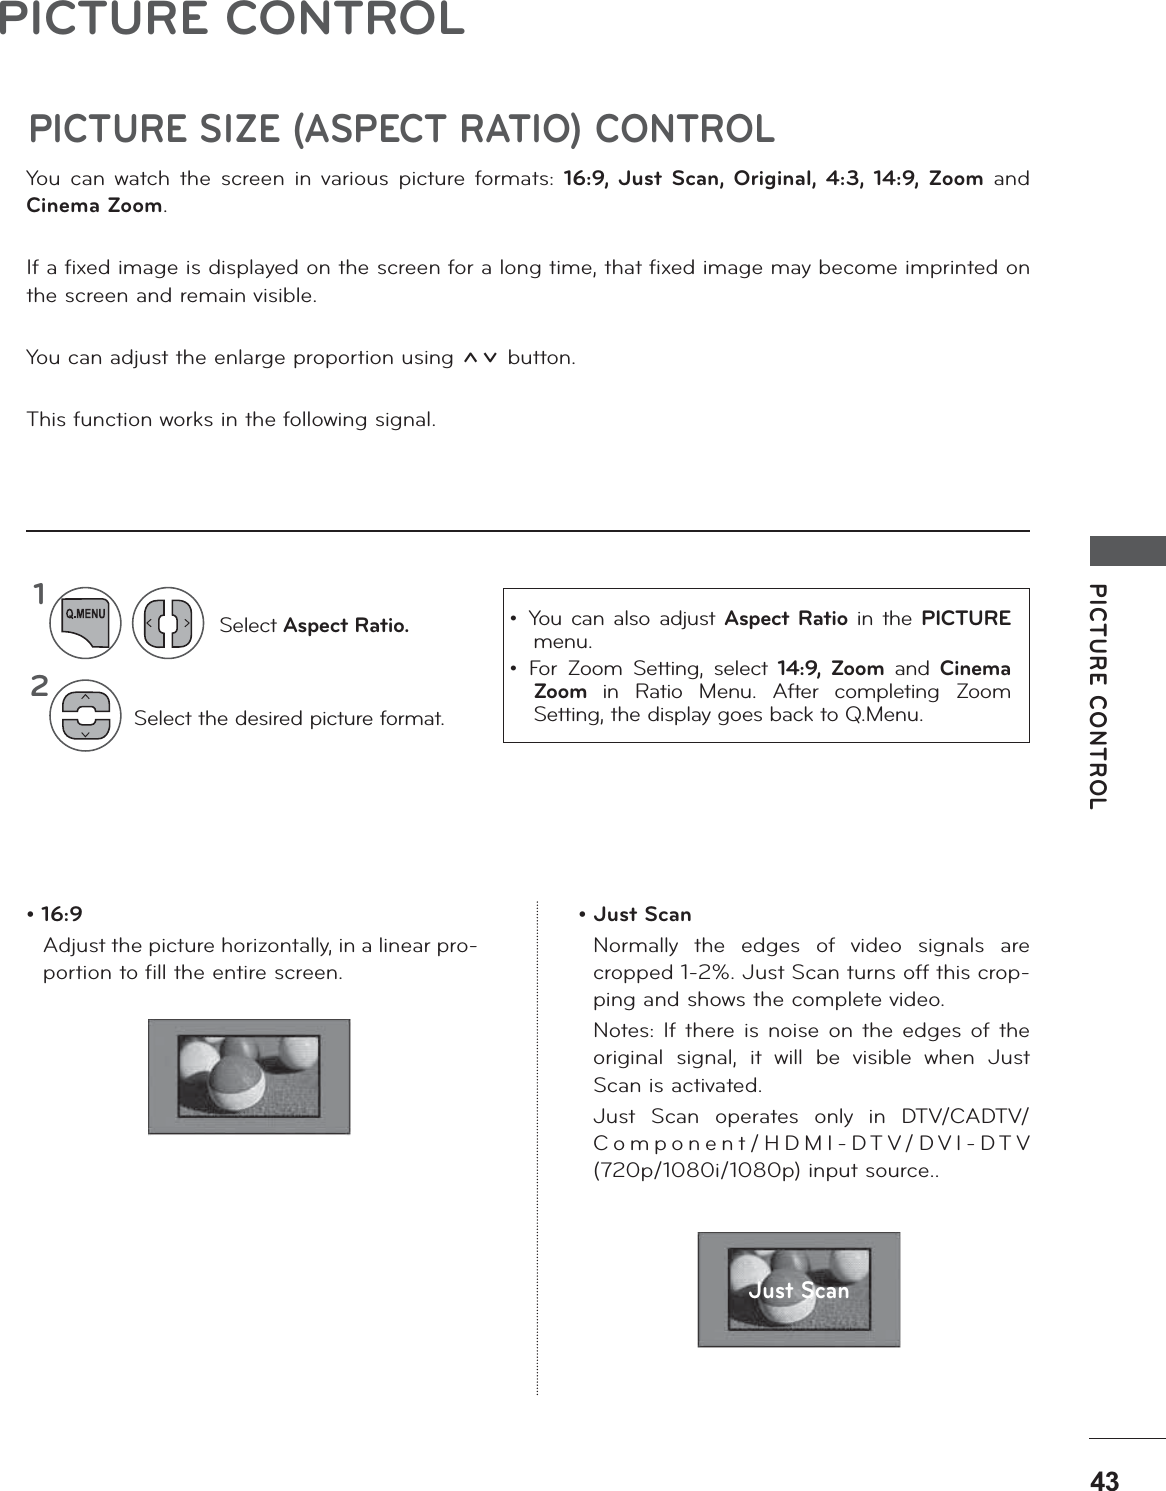
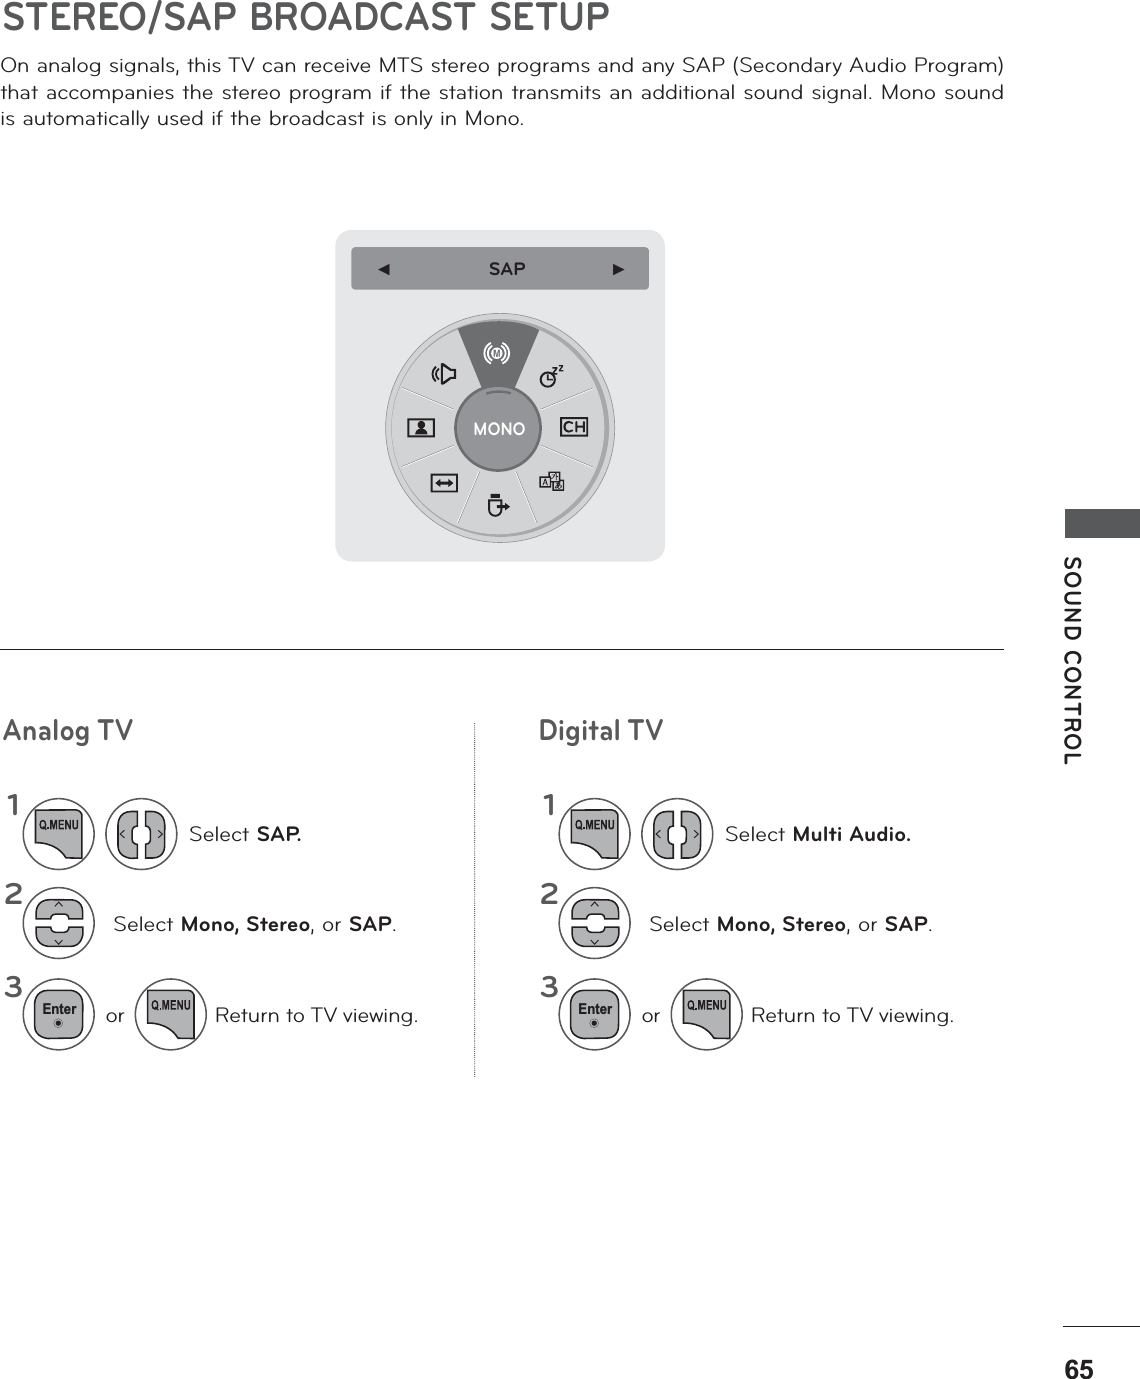
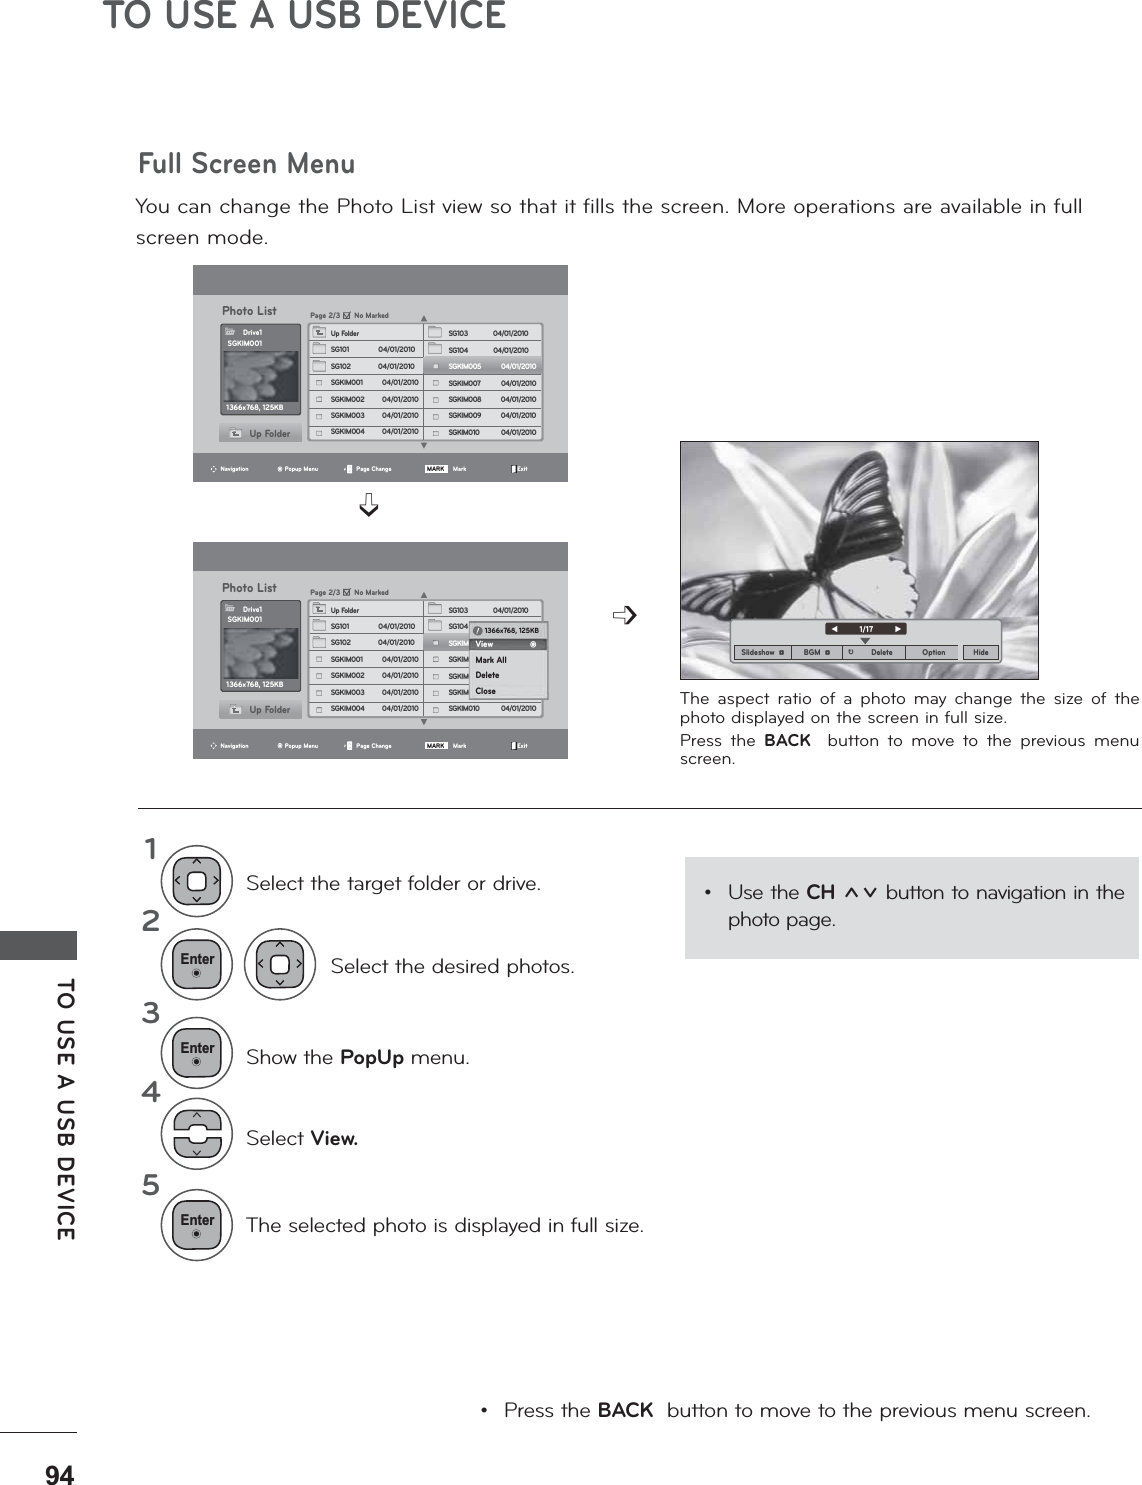
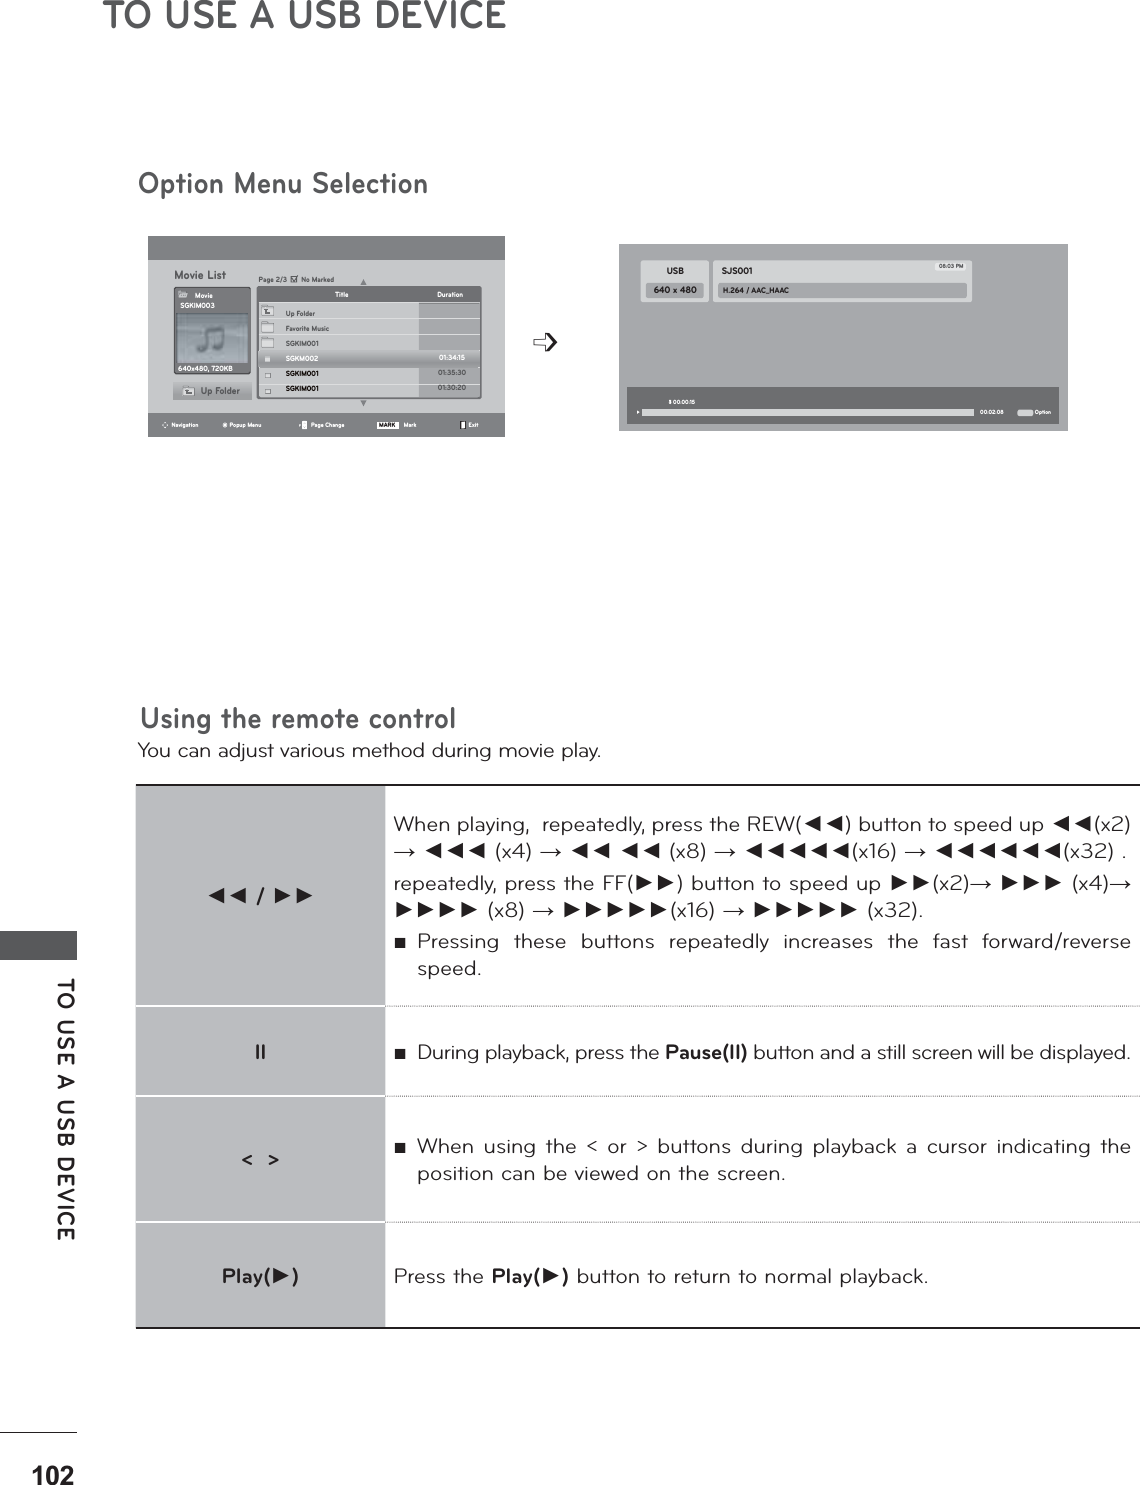
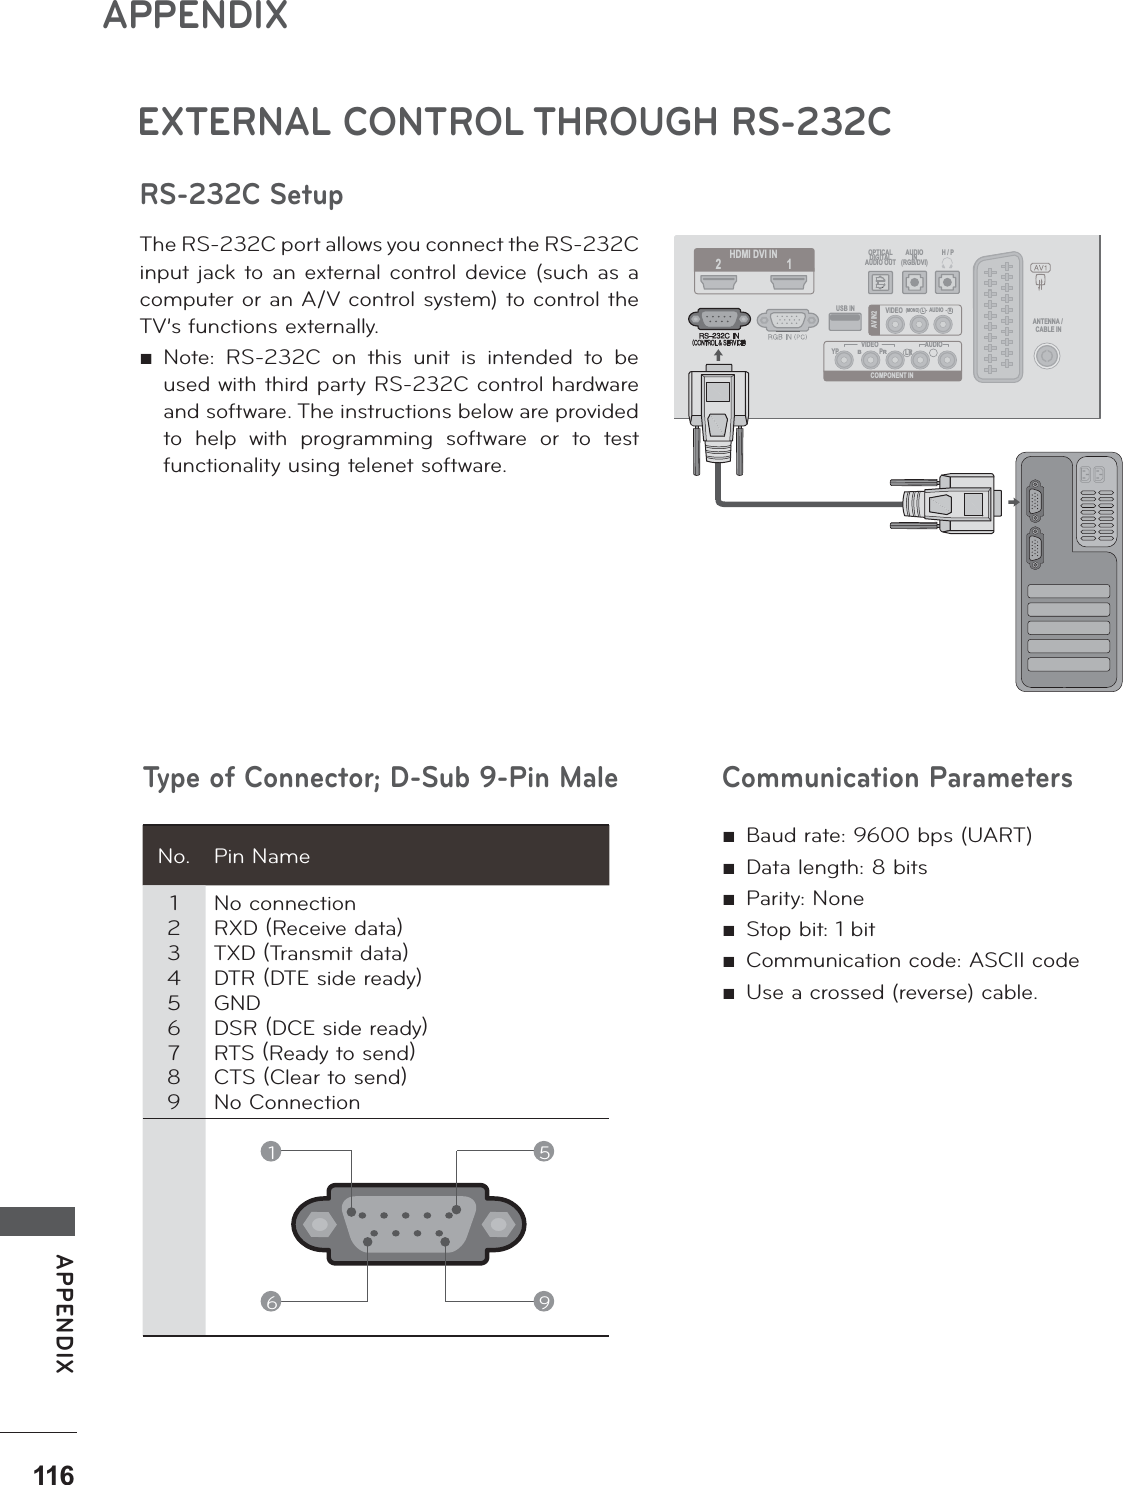
![CONTENTSCONTENTSPREPARATIONFRONT PANEL CONTROLS .................................... 4BACK PANEL INFORMATION ................................. 5STAND INSTALLATION .............................................6DETACHING STAND ................................................... 7WALL MOUNT: HORIZONTAL INSTALLATION ....8DESKTOP PEDESTAL INSTALLATION ................. 9POSITIONING YOUR DISPLAY ............................. 10LOCATION ................................................................... 10KENSINGTON SECURITY SYSTEM .......................11EXTERNAL EQUIPMENT SETUPANTENNA CONNECTION .......................................12HD RECEIVER SETUP Connecting with a component cable ..............13 Connecting a set-top box with a HDMI cable ......14 Connecting with an HDMI to DVI cable ........ 15DVD SETUP Connecting with a component cable ..............16 When connecting HDMI cable ..........................17VCR SETUP Connecting with a RF cable .............................. 18 Connecting with a RCA cable ...........................19DIGITAL AUDIO OUT SETUP ............................... 20USB SETUP ..................................................................21HEADPHONE SETUP .............................................. 22OTHER A/V SOURCE SETUP .............................. 23PC SETUP When connecting with a D-sub 15 pin cable .......24 Connecting with an HDMI to DVI cable ....... 25 Connecting with an HDMI to HDMI cable ........26BACK COVER FOR WIRE ARRANGEMENT .....27SUPPORTED DISPALY RESOLUTION ............... 28WATCHING TV / PROGRAMME CONTROLREMOTE CONTROL KEY FUNCTIONS ............. 30TURNING ON THE TV ............................................ 32PROGRAMME SELECTION ................................... 32VOLUME ADJUSTMENT ........................................ 32INITIAL SETTING ...................................................... 33QUICK MENU ............................................................ 34ON SCREEN MENUS SELECTION AND ADJUSTMENT ........................................................... 35AUTO SCAN (AUTO TUNING) ............................. 36ADD/DELETE CHANNEL (MANUAL TUNING) .......37CHANNEL EDITING ................................................. 38CHANNEL LIST ......................................................... 39FAVORITE CHANNEL SETUP ............................... 40FAVORITE CHANNEL LIST .................................... 40BRIEF INFORMATION ...............................................41INPUT LIST ................................................................. 42PICTURE CONTROLPICTURE SIZE (ASPECT RATIO) CONTROL .. 43PICTURE WIZARD ................................................... 45ᭆ ENERGY SAVING ............................................... 46PRESET PICTURE SETTINGS ...............................47MANUAL PICTURE ADJUSTMENT ................... 48PICTURE IMPROVEMENT TECHNOLOGY ....... 49EXPERT PICTURE CONTROL .............................. 50PICTURE RESET ....................................................... 53SCREEN SETUP FOR PC MODE Selecting Resolution .......................................... 54 Auto Configure (RGB [PC] mode only) ....... 55 Adjustment for screen Position, Size, Phase ....... 56 Screen Reset .........................................................57SOUND CONTROLAUTO VOLUME LEVELER (AUTO VOLUME) .. 58CLEAR VOICE II ........................................................ 59BALANCE ................................................................... 60PRESET SOUND SETTINGS (SOUND MODE) ....................................................61PRESET SOUND SETTINGS -USER MODE ........................................................ 62Surround X .................................................................. 62AUDIO RESET ........................................................... 63TV SPEAKERS ON / OFF SETUP ....................... 64STEREO/SAP BROADCAST SETUP .................. 65](https://usermanual.wiki/LG-Electronics-USA/M2080DFM/User-Guide-1301248-Page-3.png)


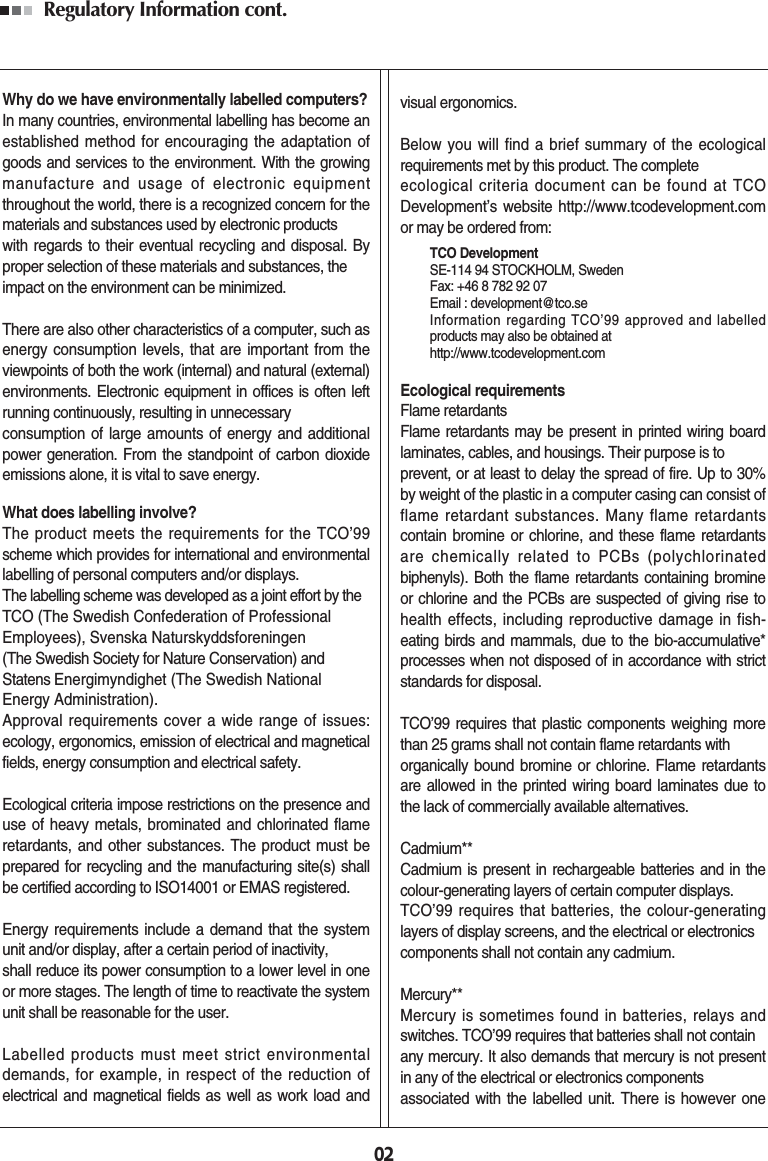
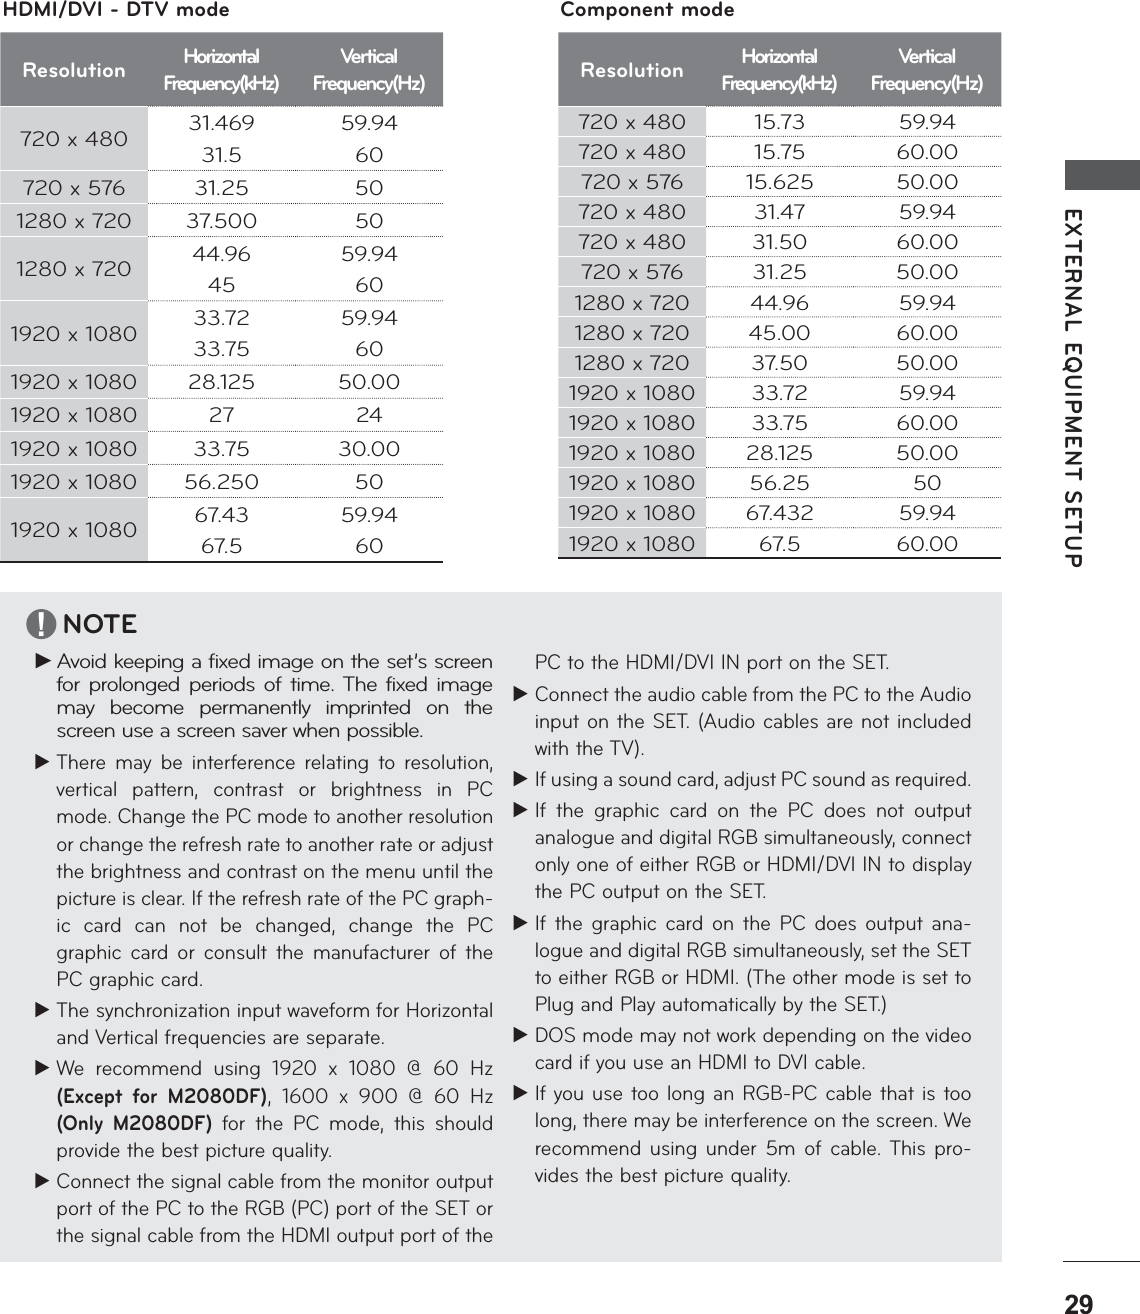
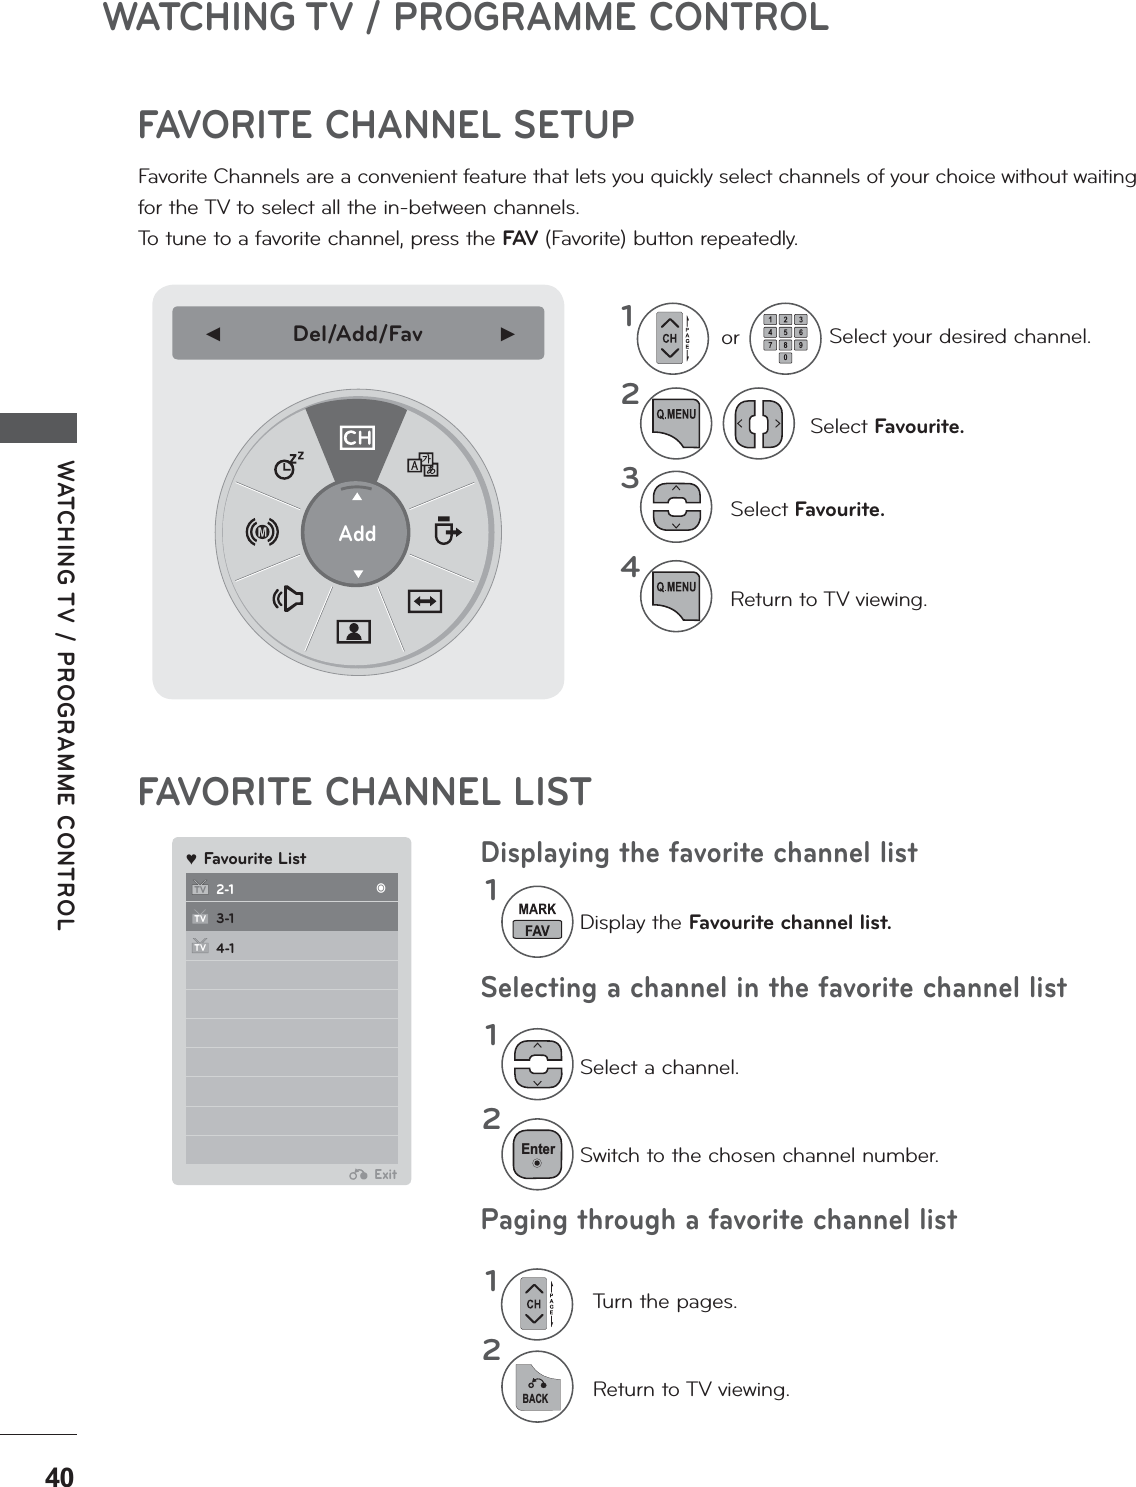
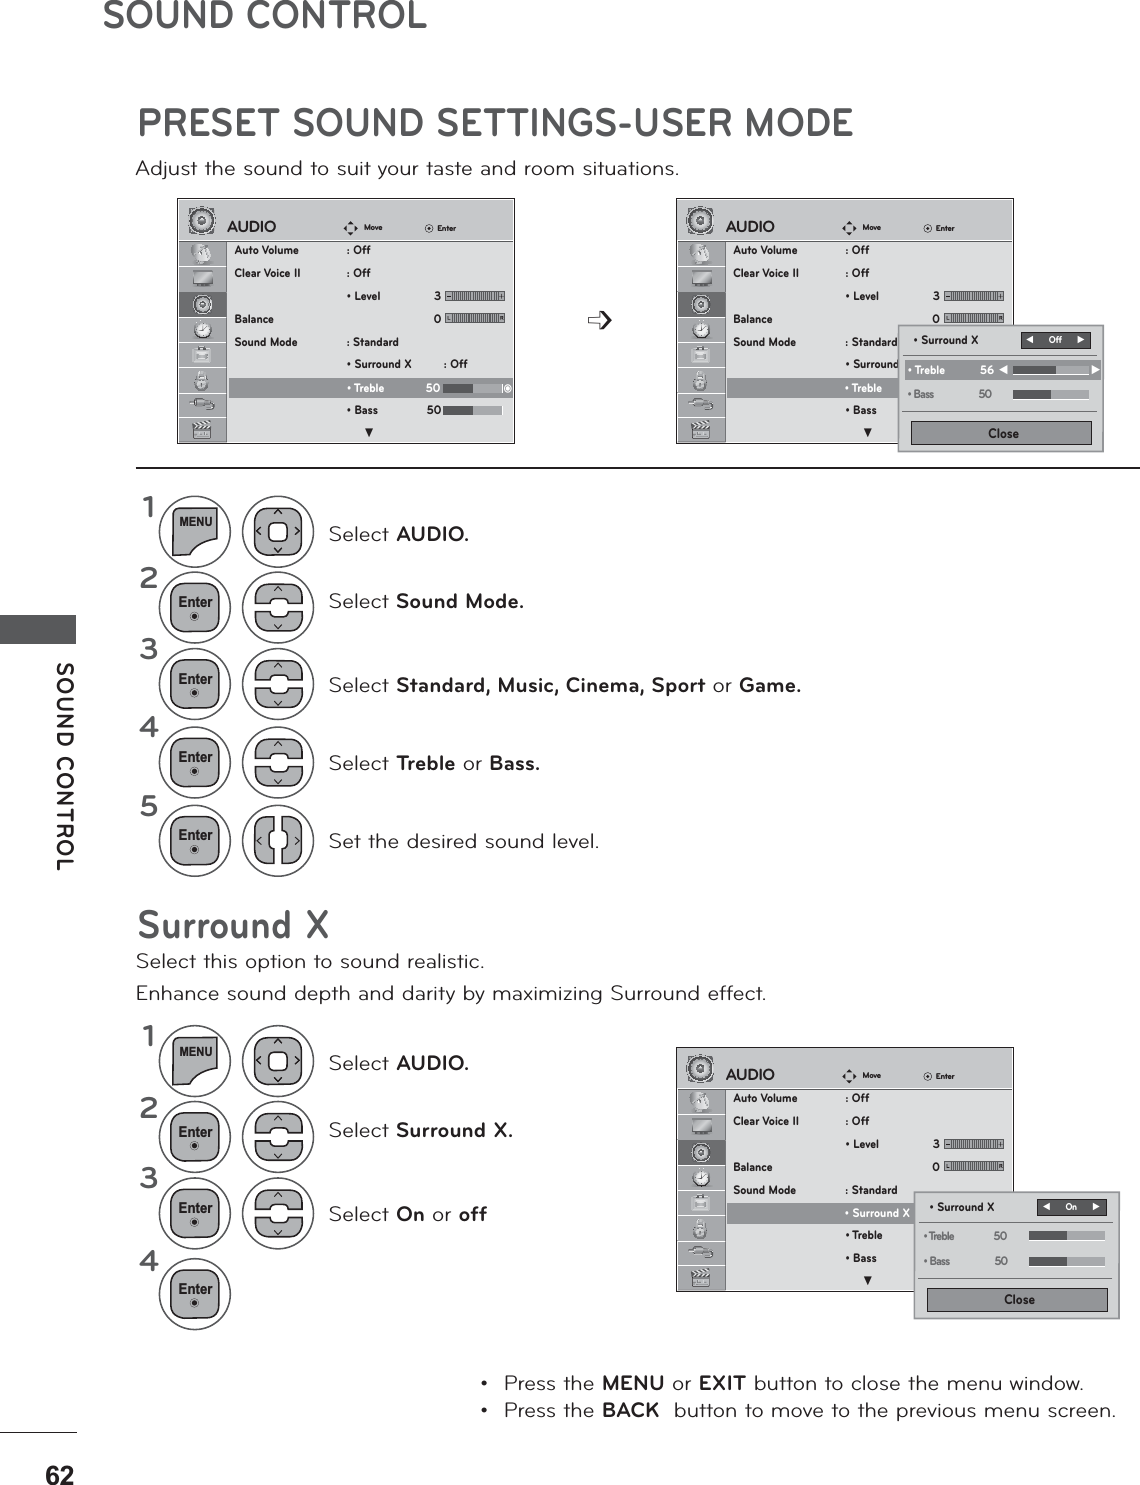
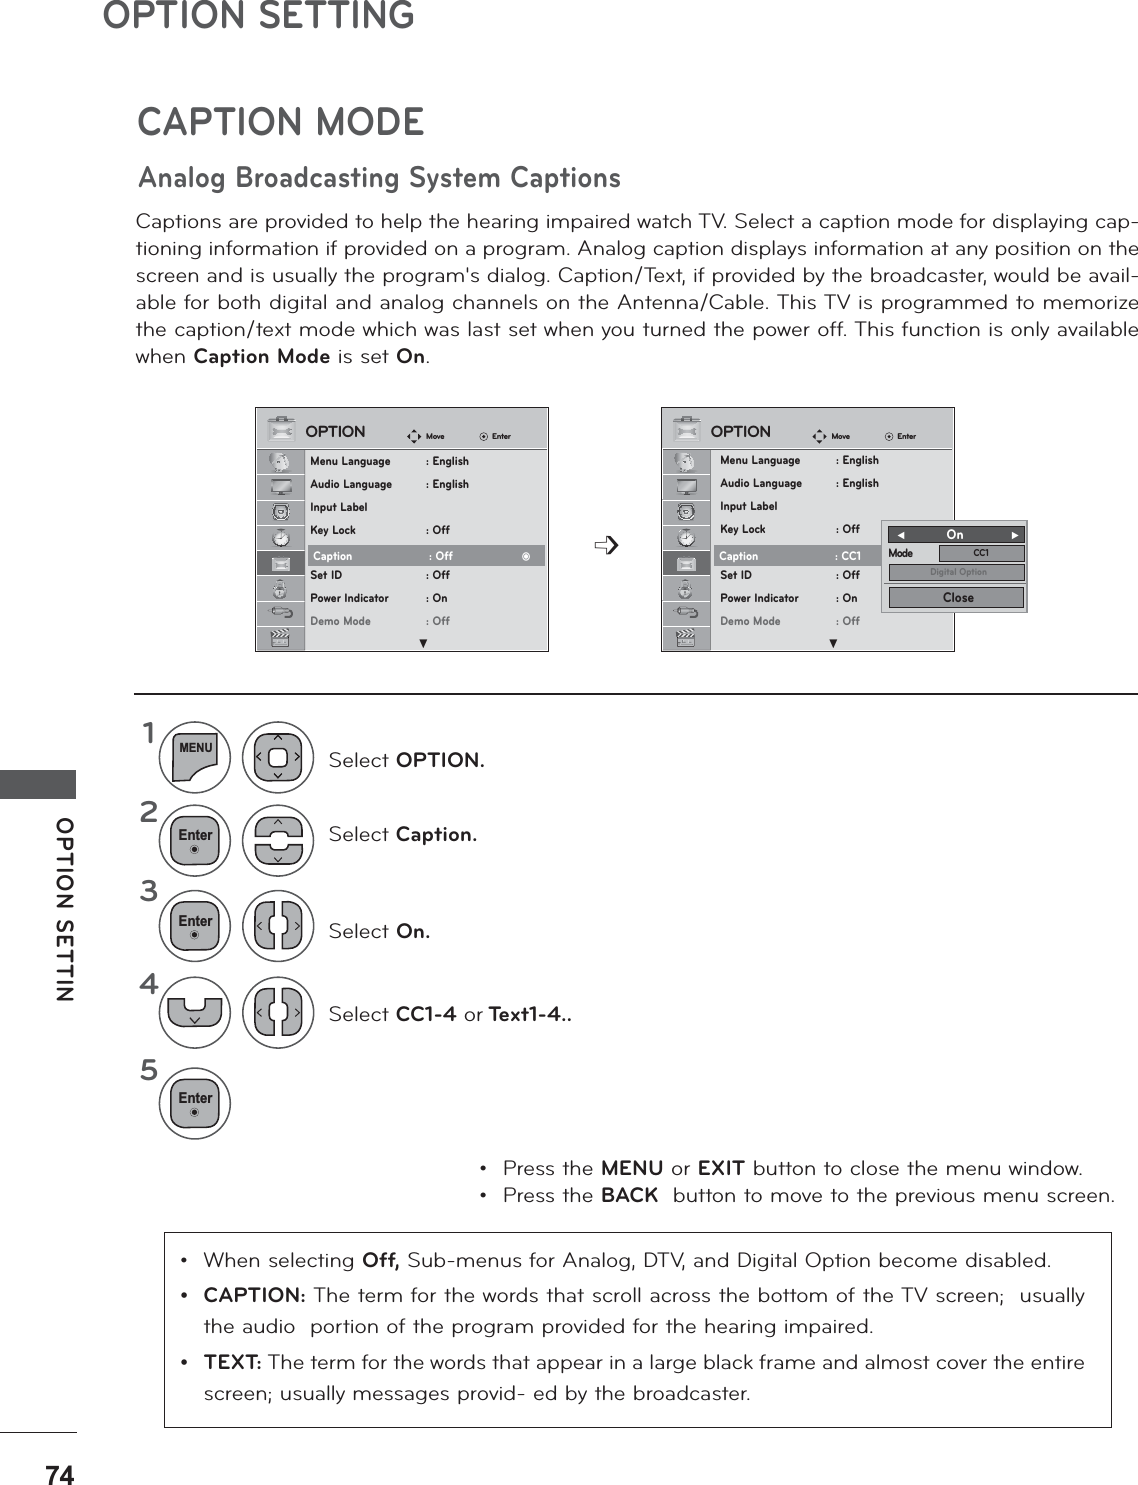
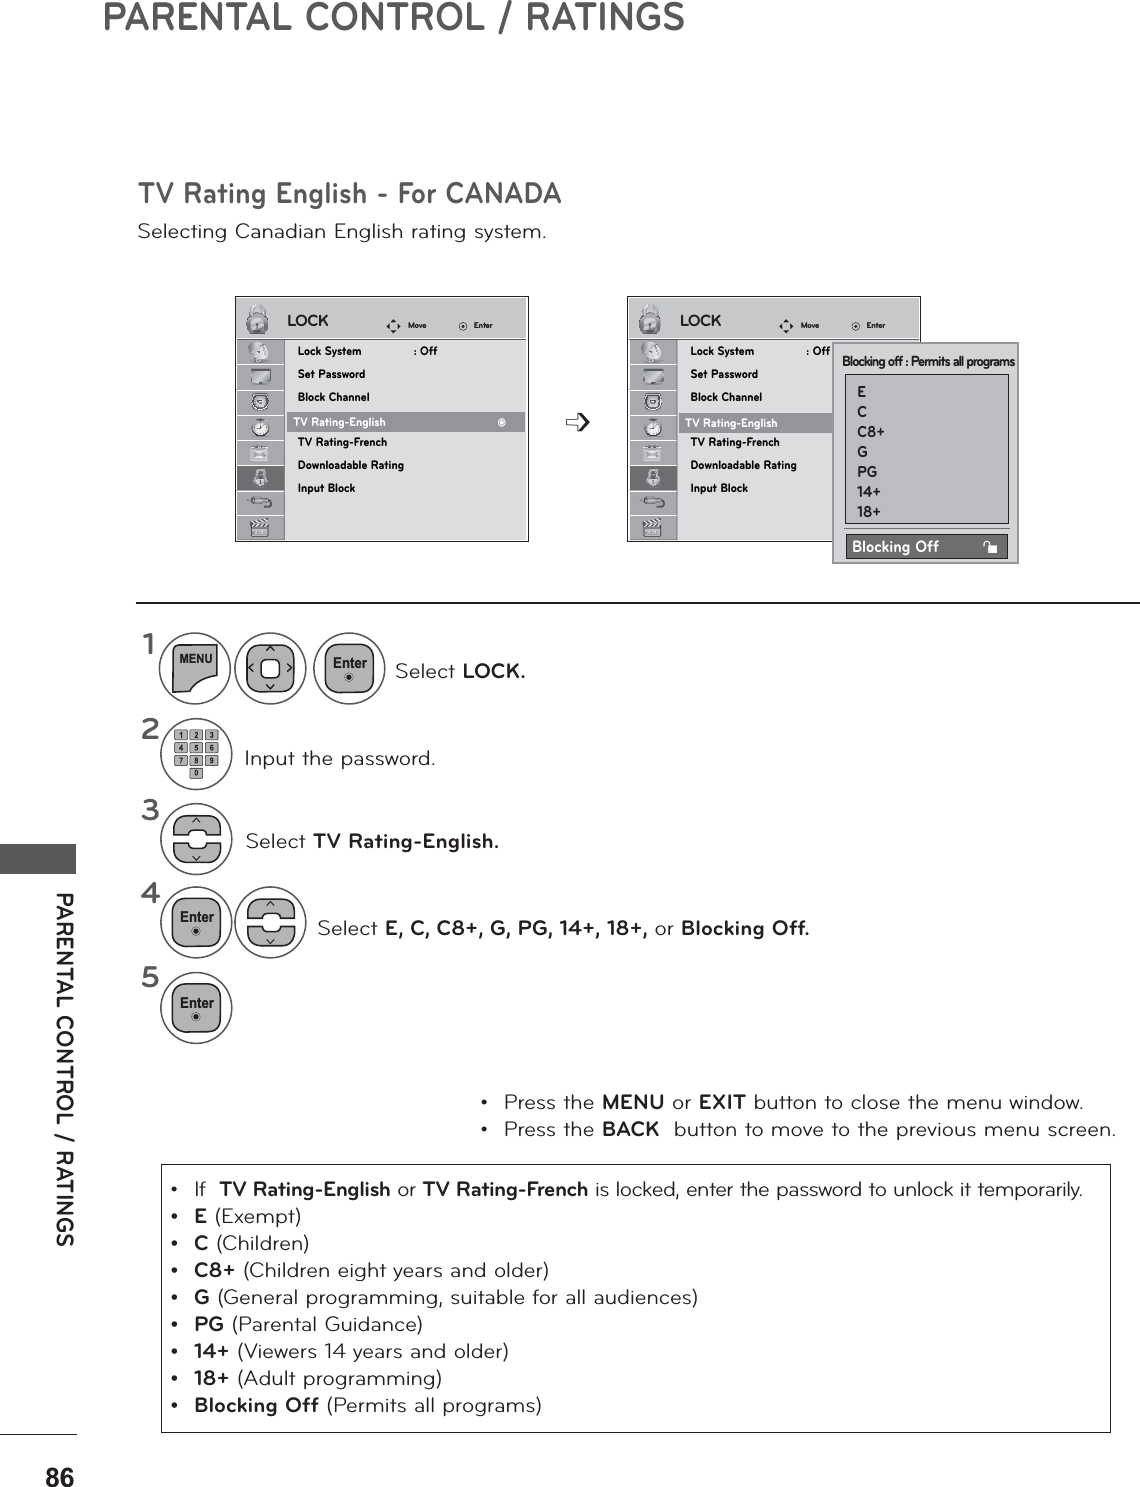
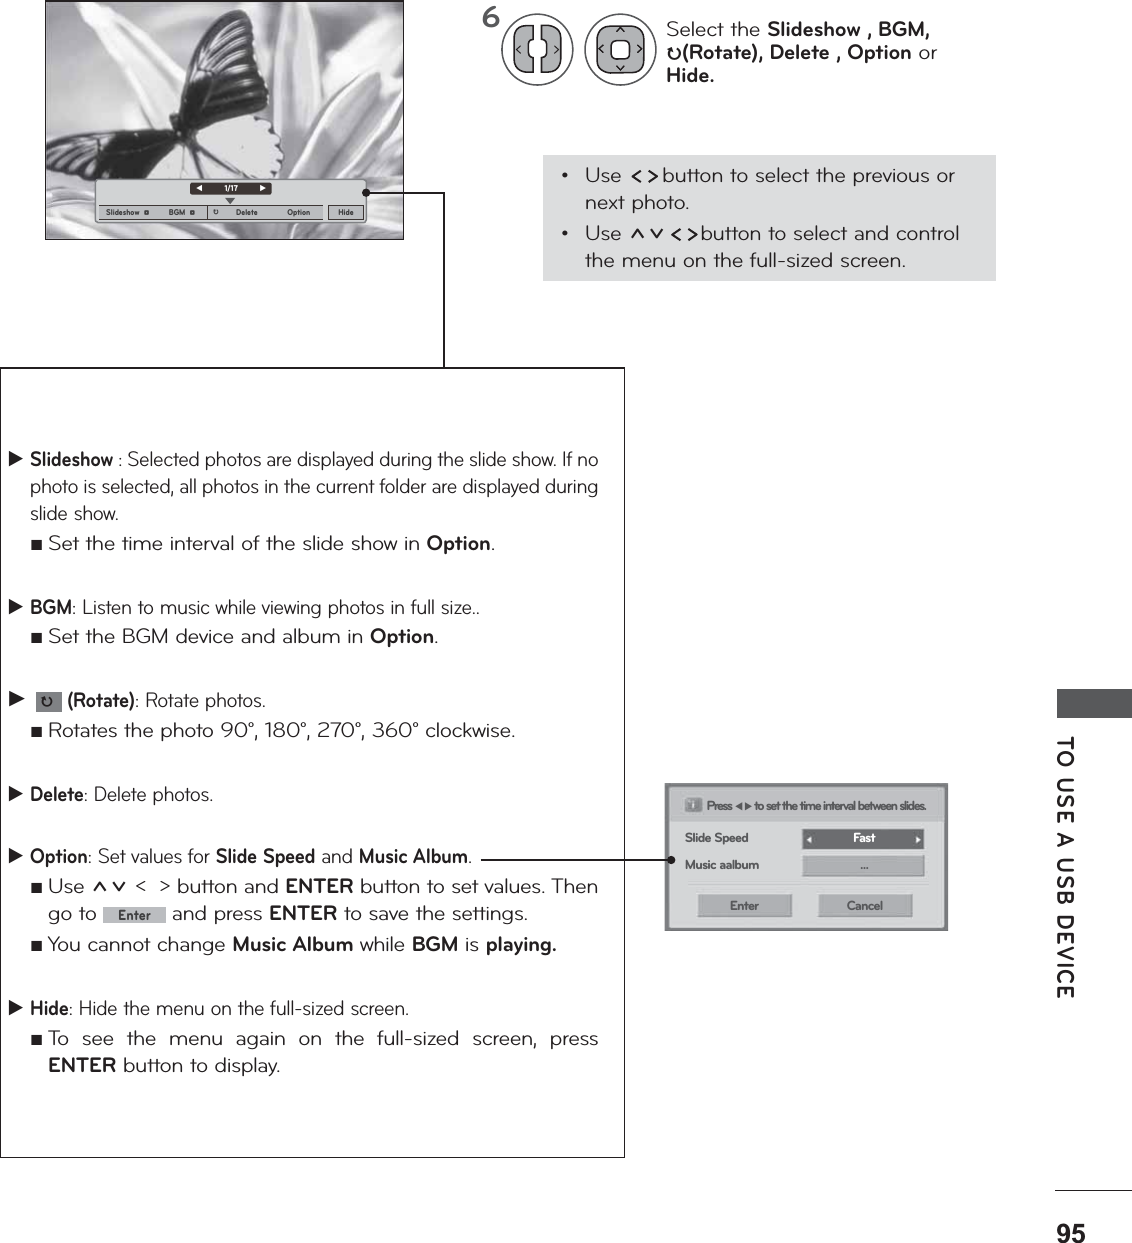
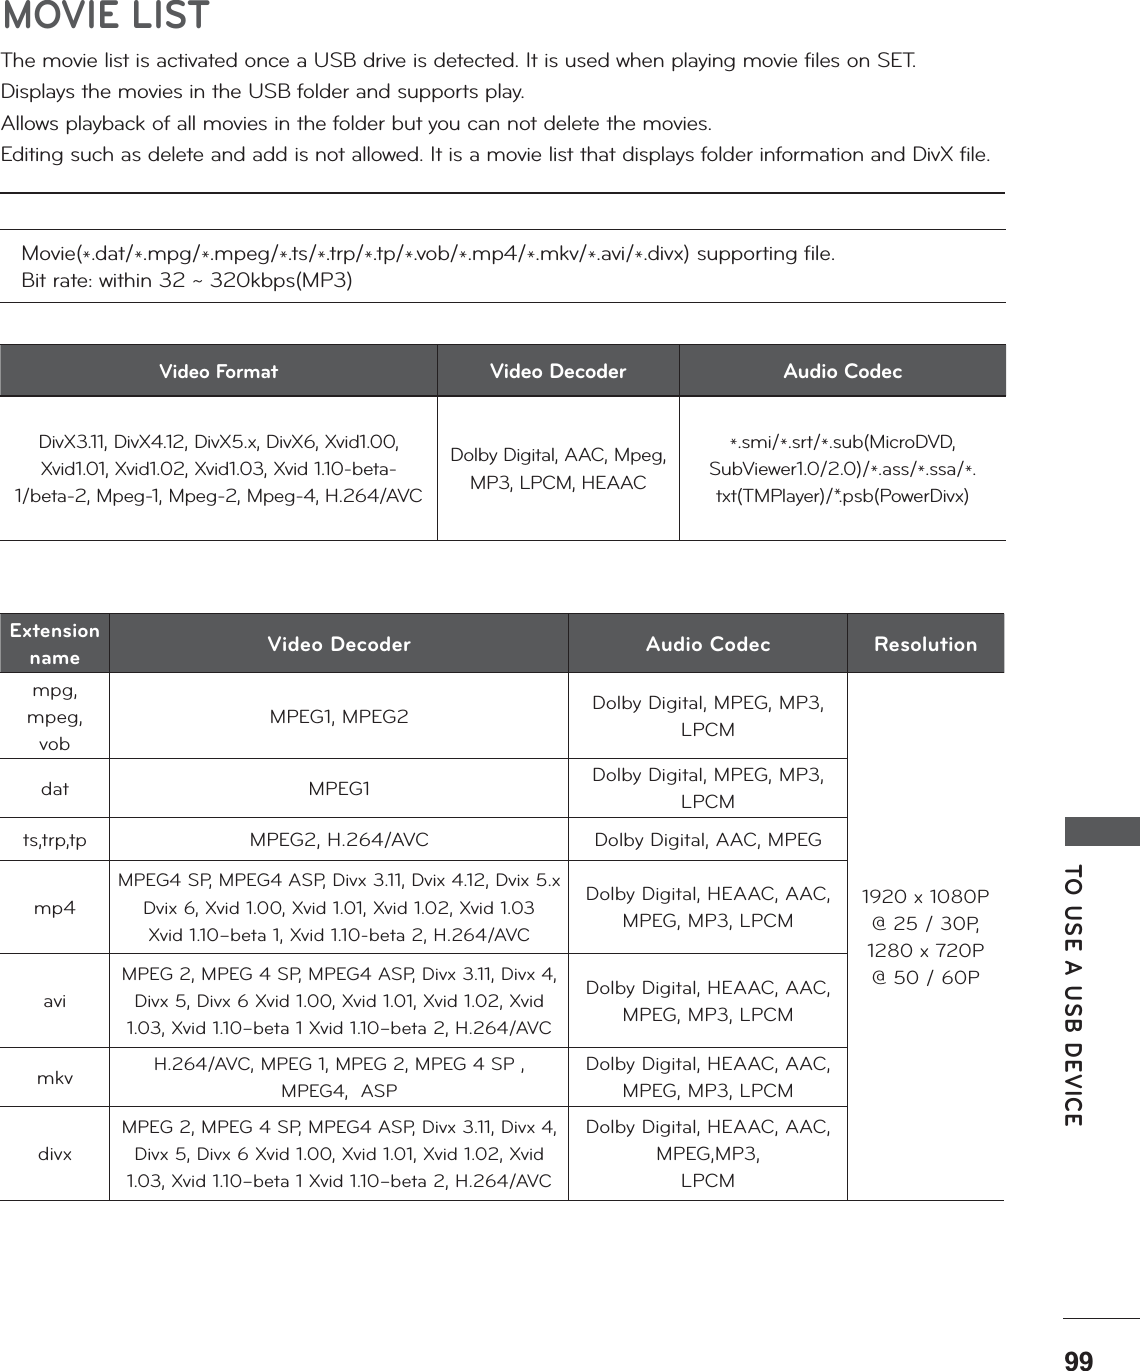
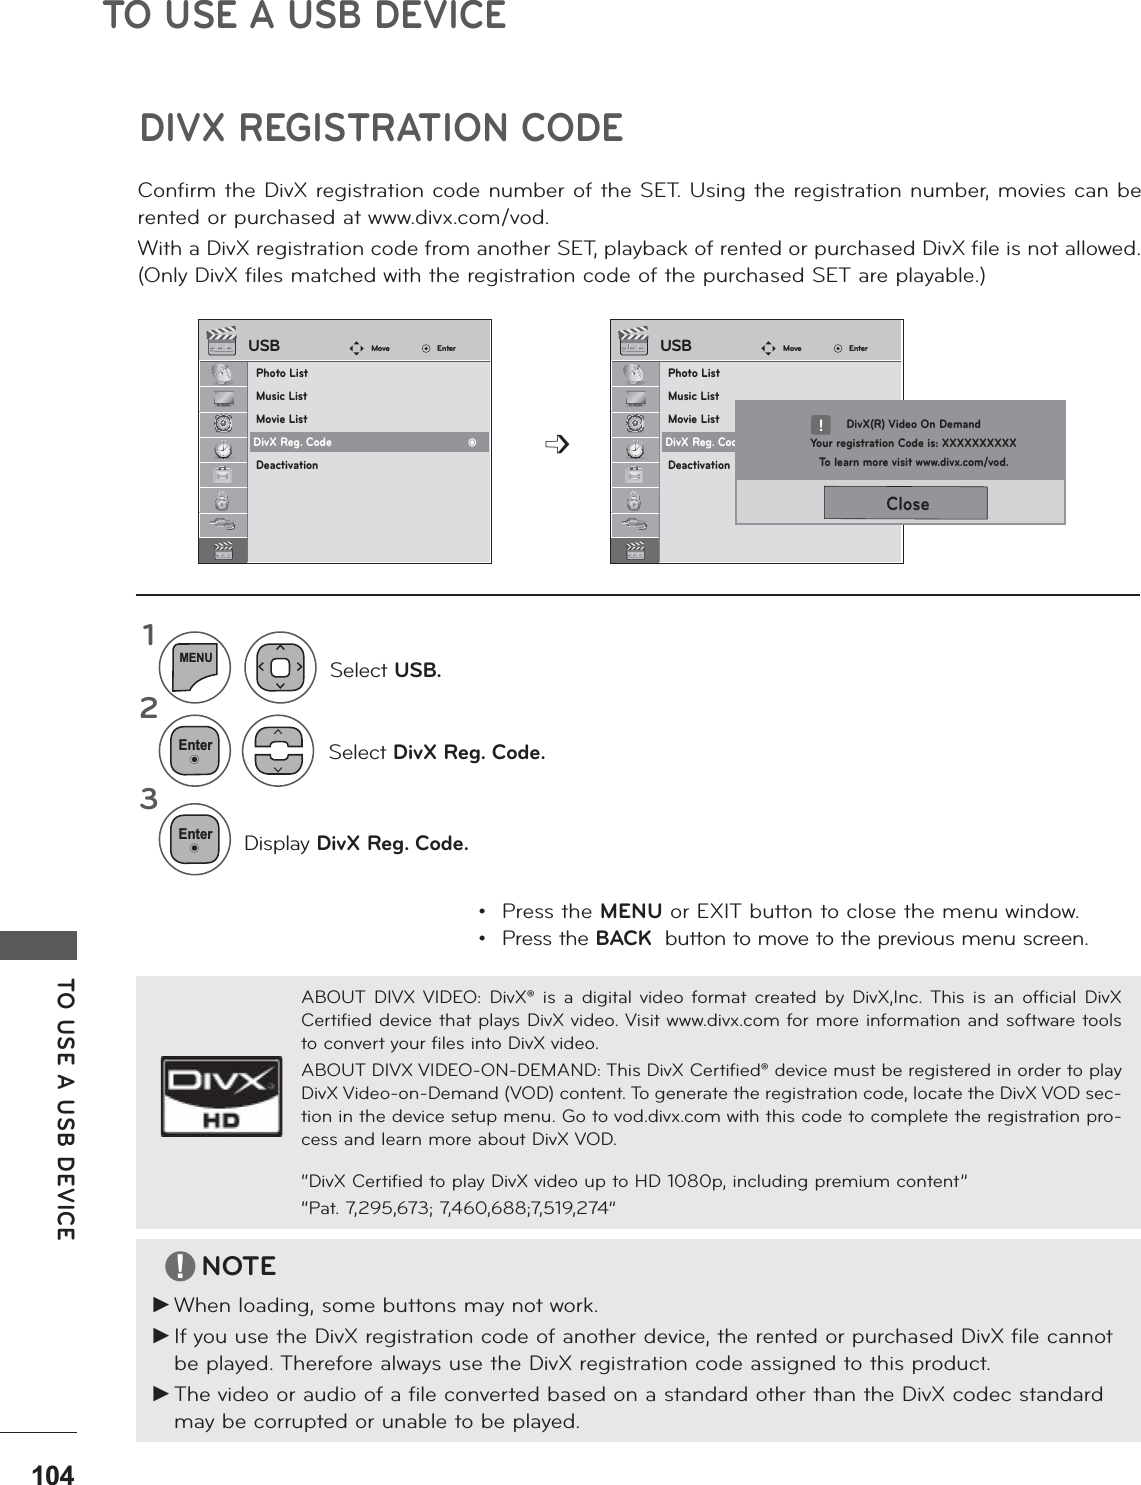
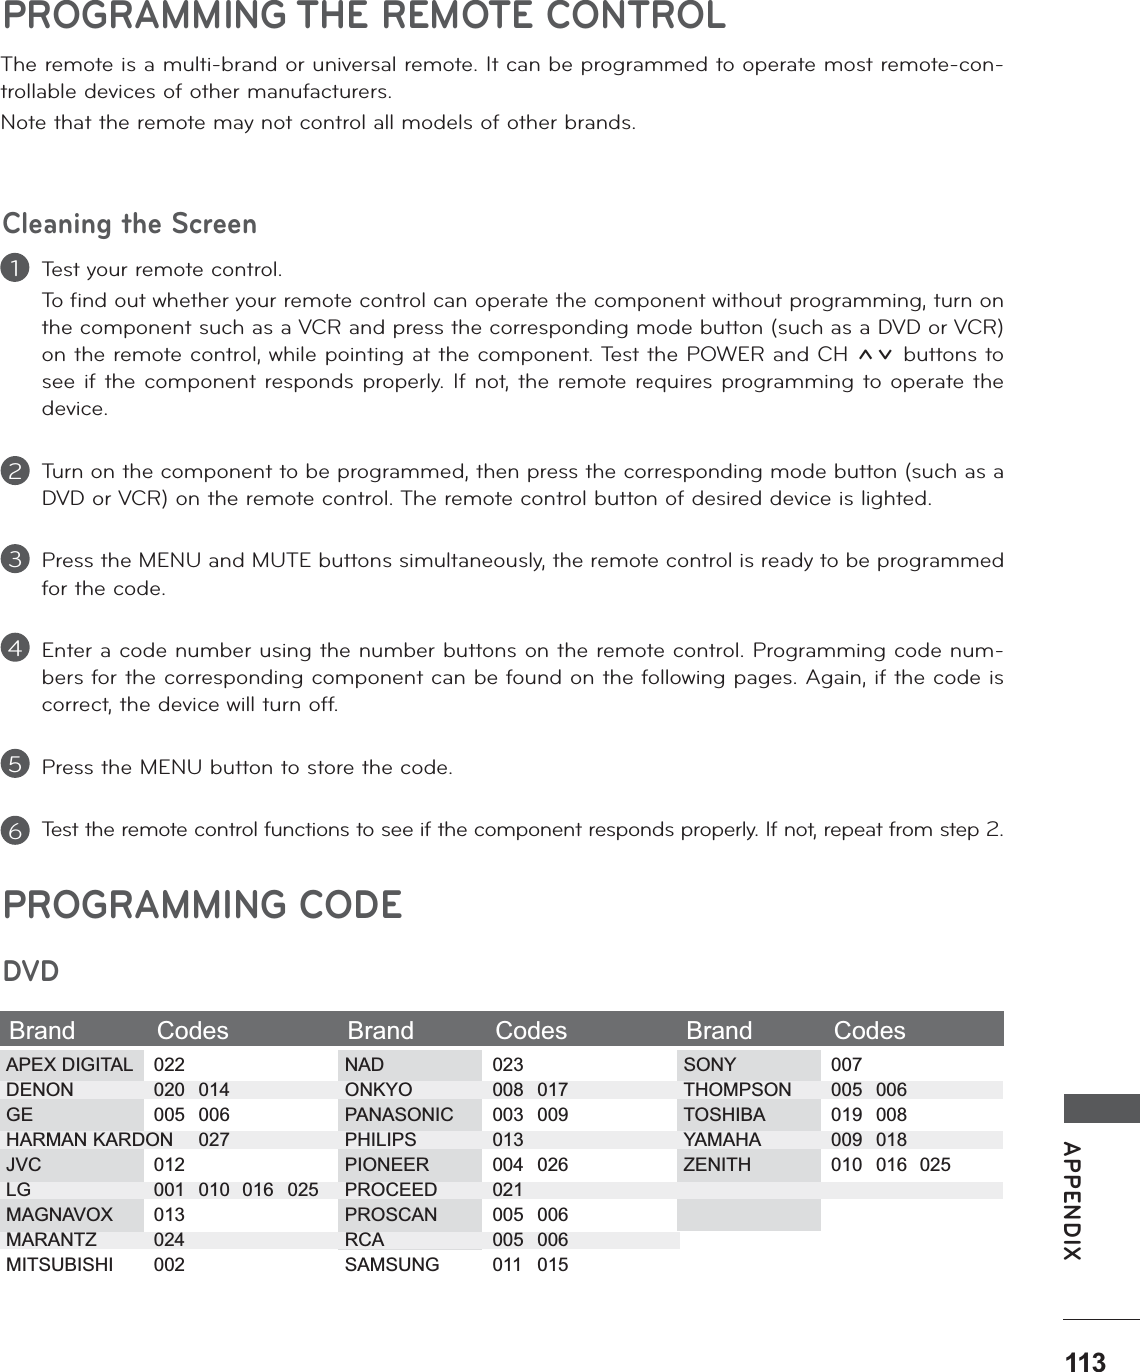
![EXTERNAL EQUIPMENT SETUPEXTERNAL EQUIPMENT SETUPSUPPORTED DISPALY RESOLUTIONRGB[PC] modeHDMI/DVI - PC modeResolution HorizontalFrequency(kHz)VerticalFrequency(Hz)640 x 480 31.469 59.94640 x 480 37.5 75800 x 600 37.879 60.317800 x 600 46.875 75832 x 624 49.725 64.551024 x 768 48.363 601024 x 768 60.023 75.0291280 x 1024 63.981 60.021600 x 900 60 60Resolution HorizontalFrequency(kHz)VerticalFrequency(Hz)640 x 480 31.469 59.94640 x 480 37.5 75800 x 600 37.879 60.317800 x 600 46.875 75832 x 624 49.725 64.551024 x 768 48.363 601024 x 768 60.023 75.0291280 x 1024 63.981 60.021600 x 900 60 60Resolution HorizontalFrequency(kHz)VerticalFrequency(Hz)720 x 400 31.468 70.08640 x 480 31.469 59.94640 x 480 37.5 75800 x 600 37.879 60.317800 x 600 46.875 75.01024 x 768 48.363 60.01024 x 768 60.023 75.0291152 x 864 67.500 75.0001280 x 1024 63.981 60.021280 x 1024 79.976 75.0251680 x 1050 64.674 59.8831680 x 1050 65.290 59.9541600 x 1200 75.0 60.01920 x 1080 67.5 60Resolution HorizontalFrequency(kHz)VerticalFrequency(Hz)720 x 400 31.468 70.08640 x 480 31.469 59.94640 x 480 37.5 75800 x 600 37.879 60.317800 x 600 46.875 75.01024 x 768 48.363 60.01024 x 768 60.023 75.0291152 x 864 67.500 75.0001280 x 1024 63.981 60.021280 x 1024 79.976 75.0251680 x 1050 64.674 59.8831680 x 1050 65.290 59.9541600 x 1200 75.0 60.01920 x 1080 67.5 60M2080DFM2080DFM2280DF/M2380DFM2280DF/M2380DF](https://usermanual.wiki/LG-Electronics-USA/M2080DFM/User-Guide-1301248-Page-29.png)
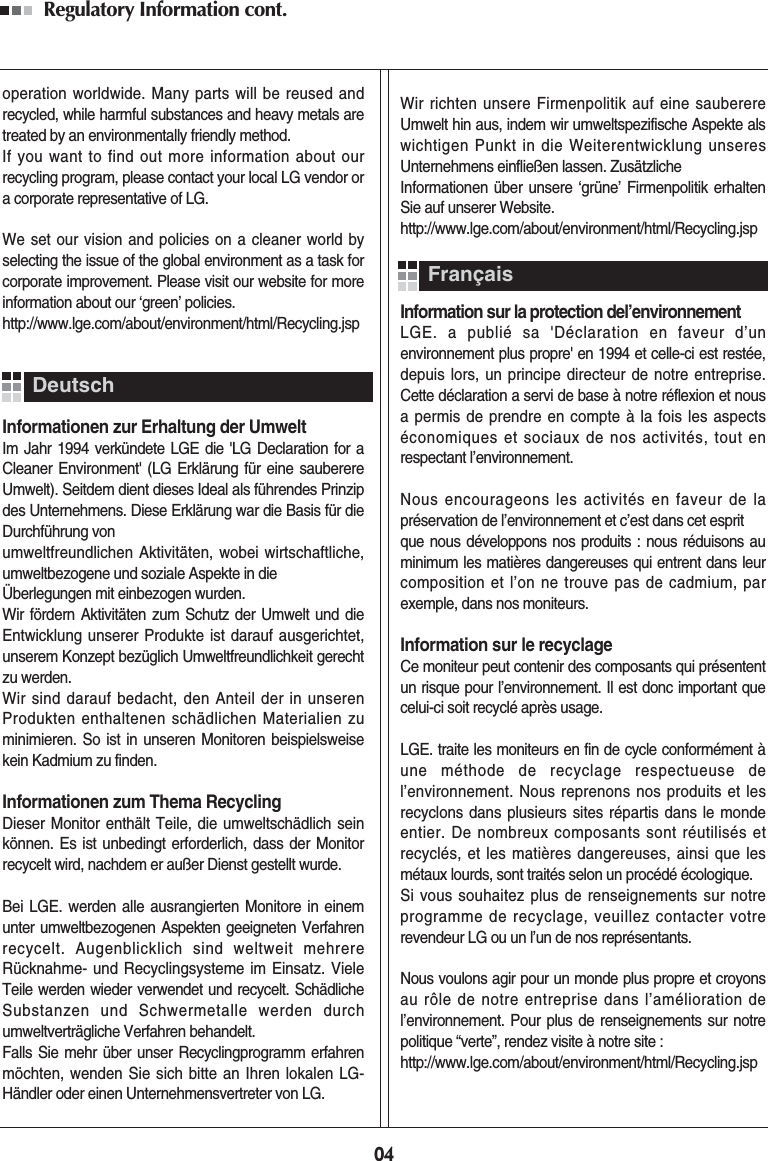
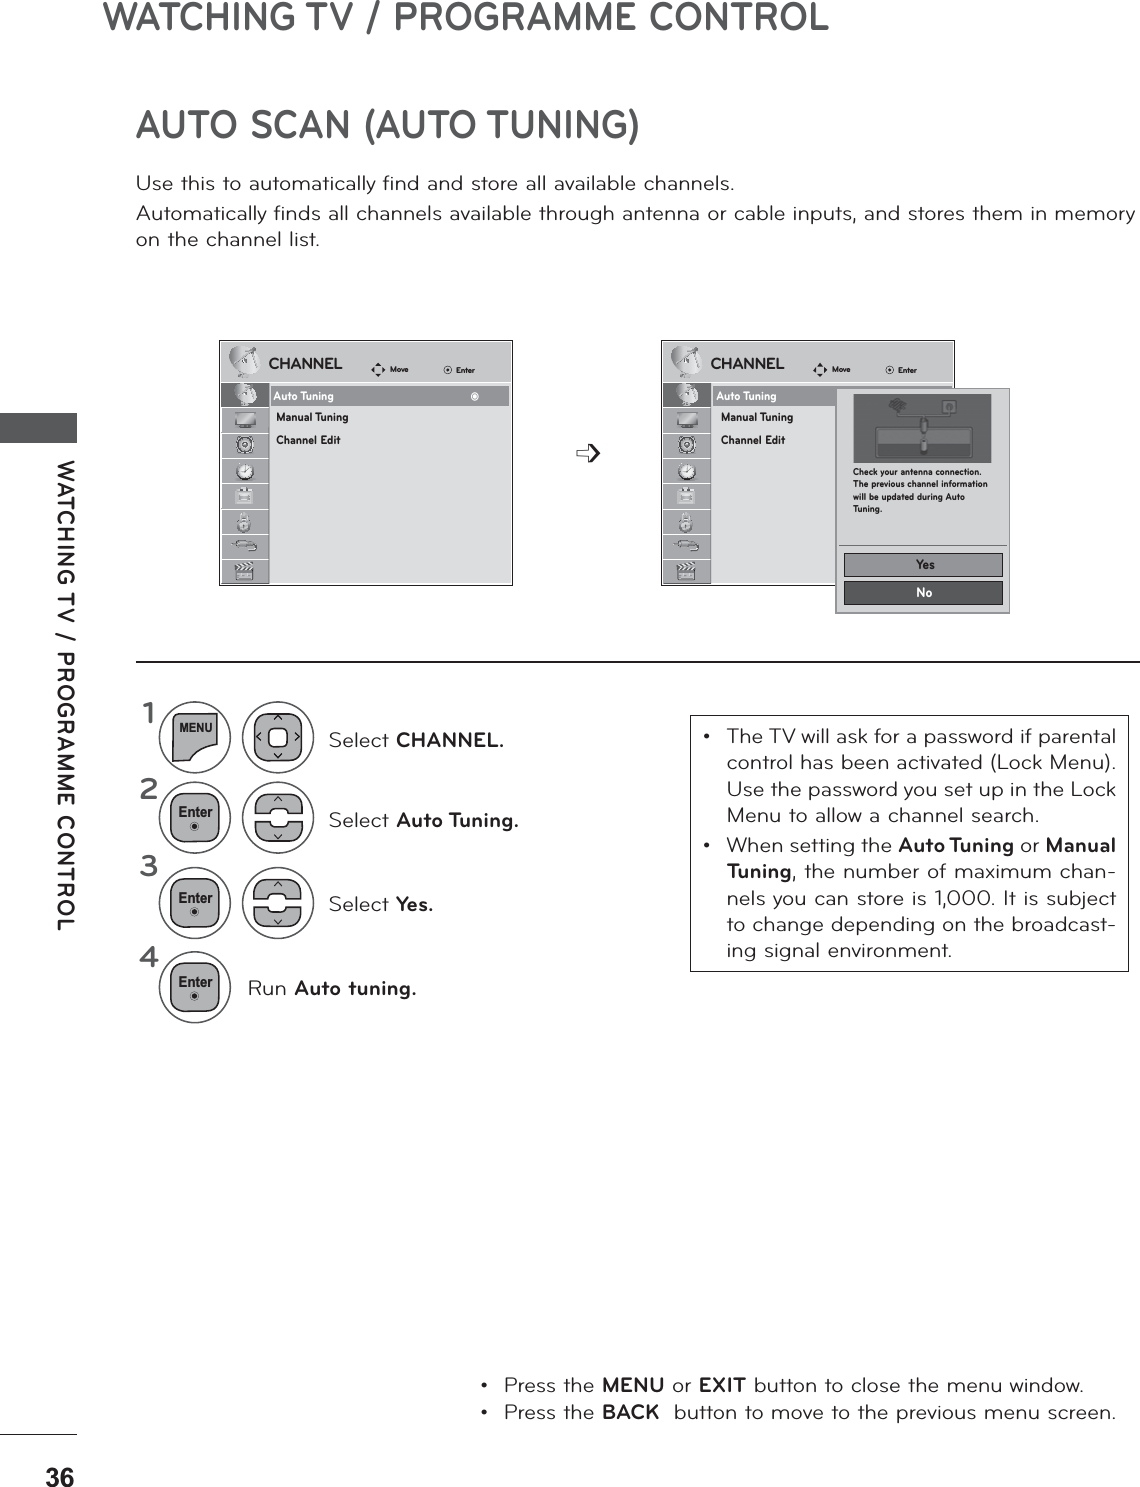
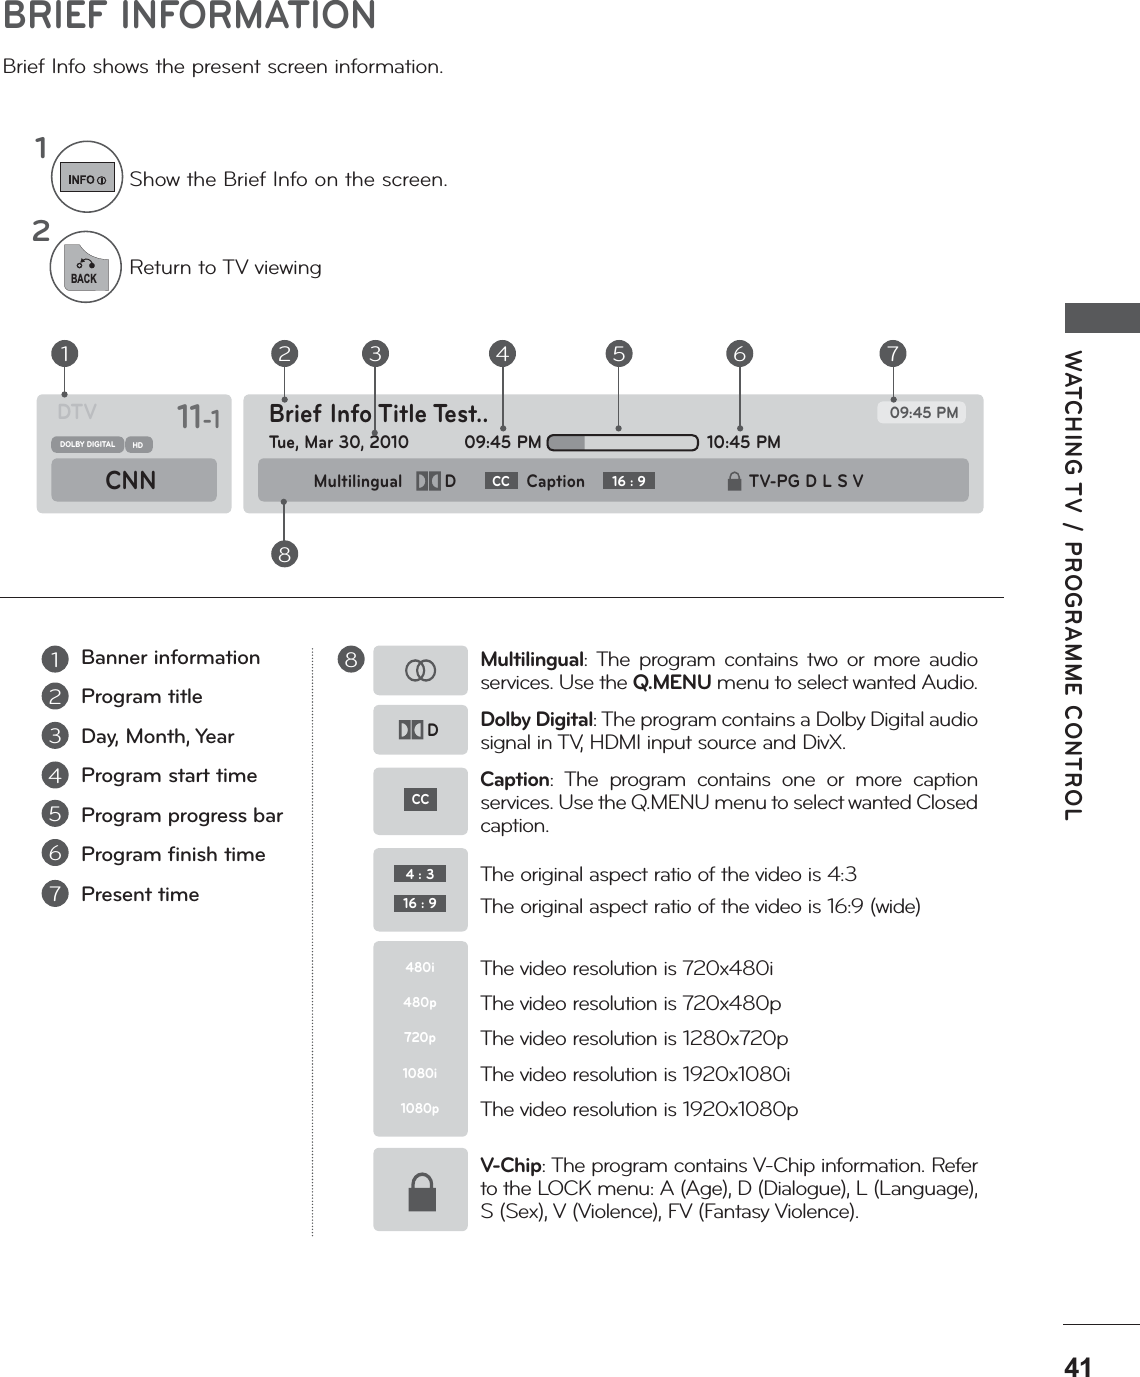
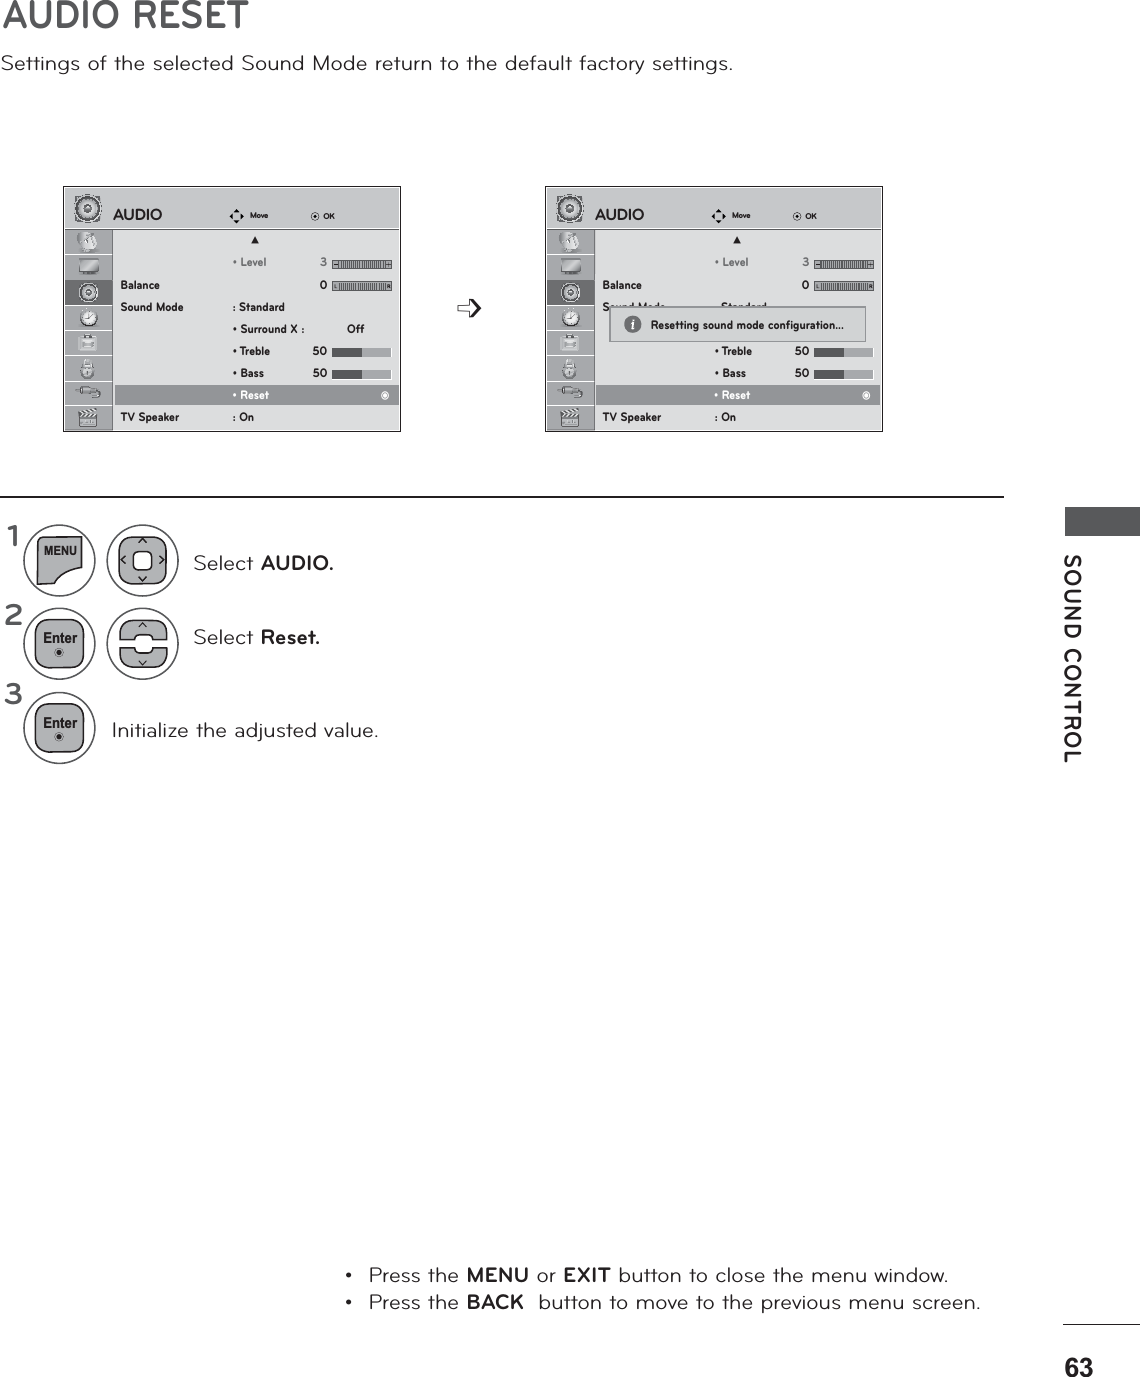
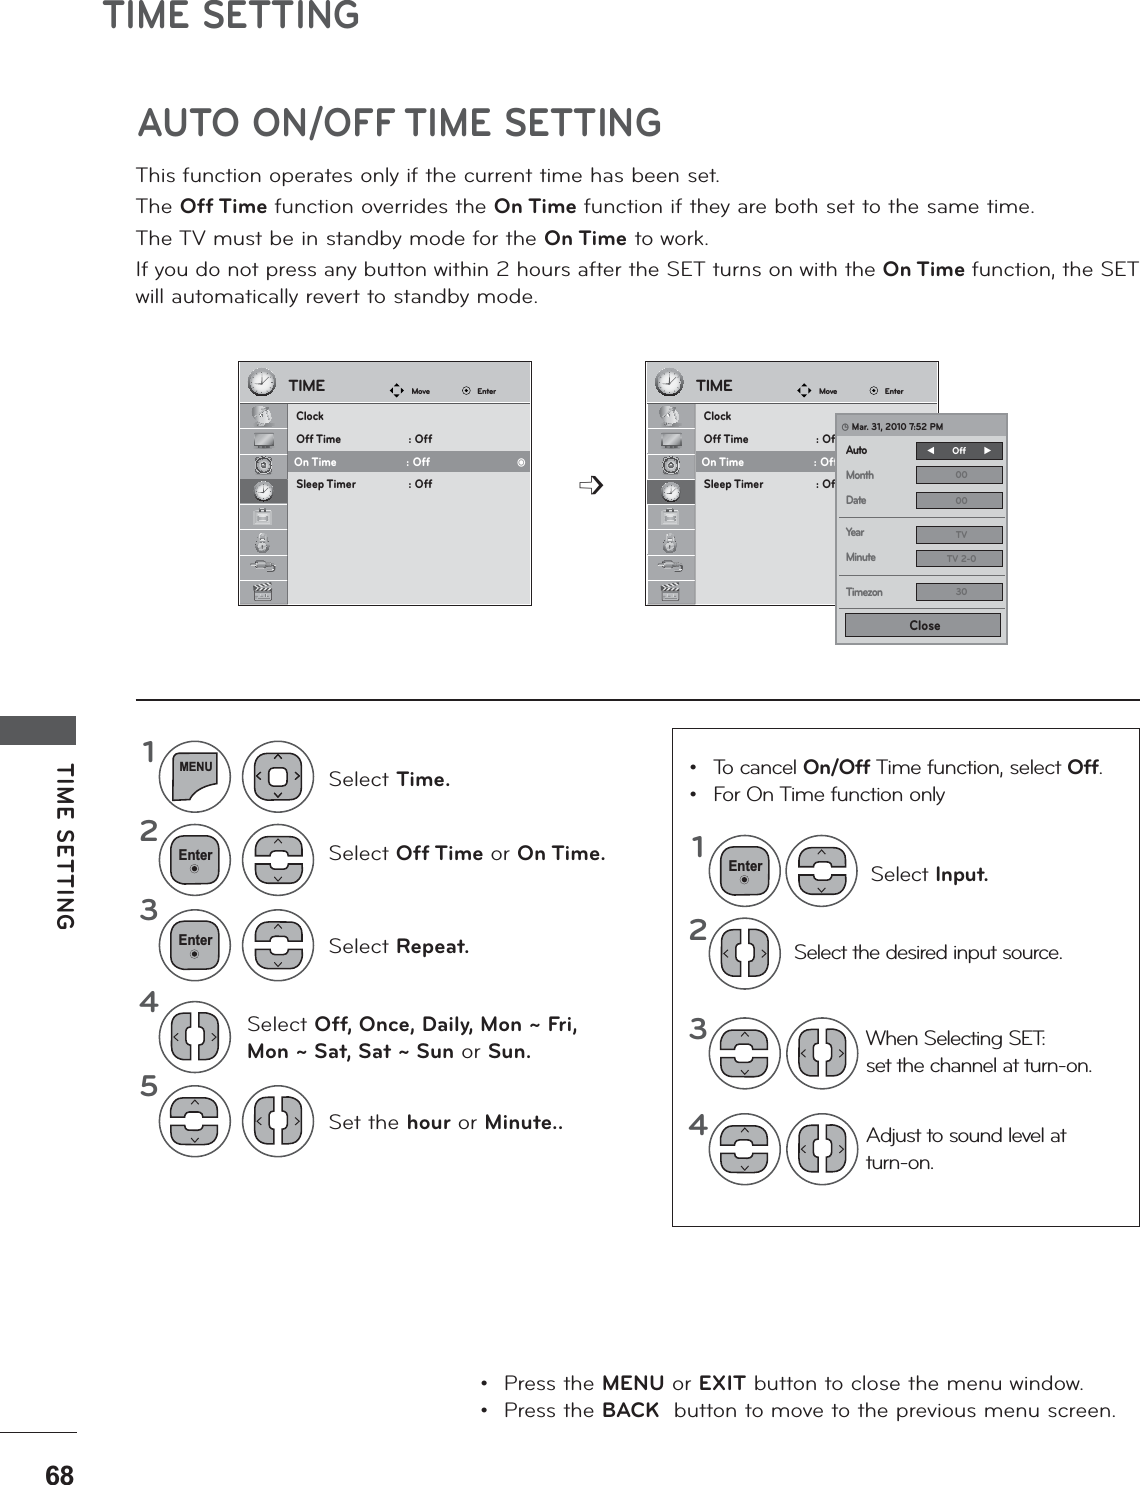
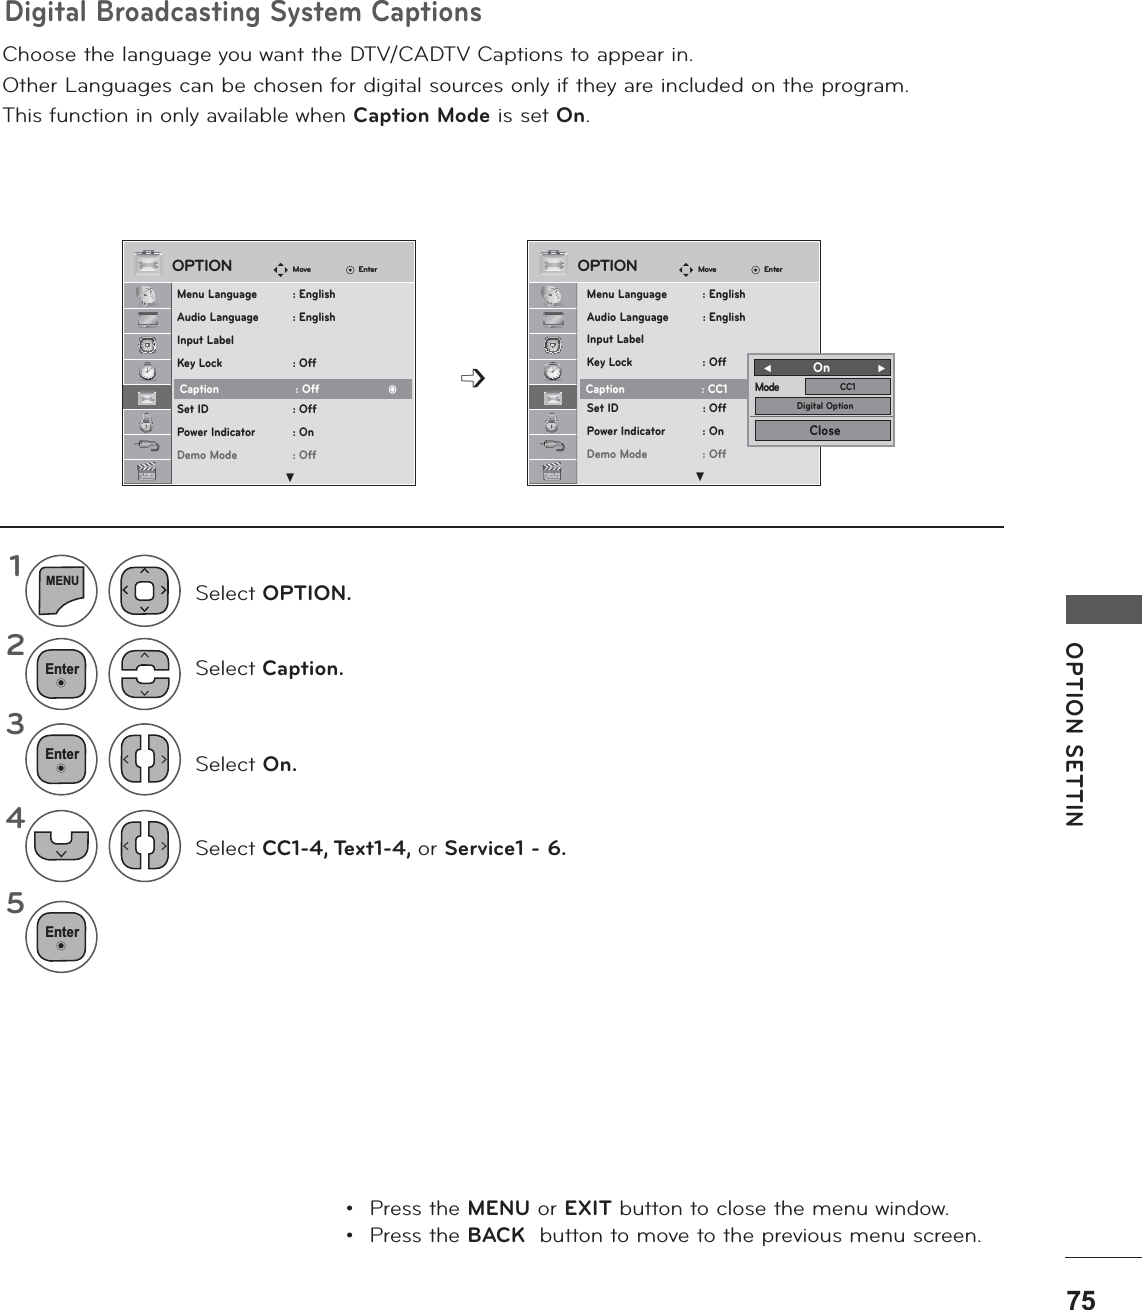
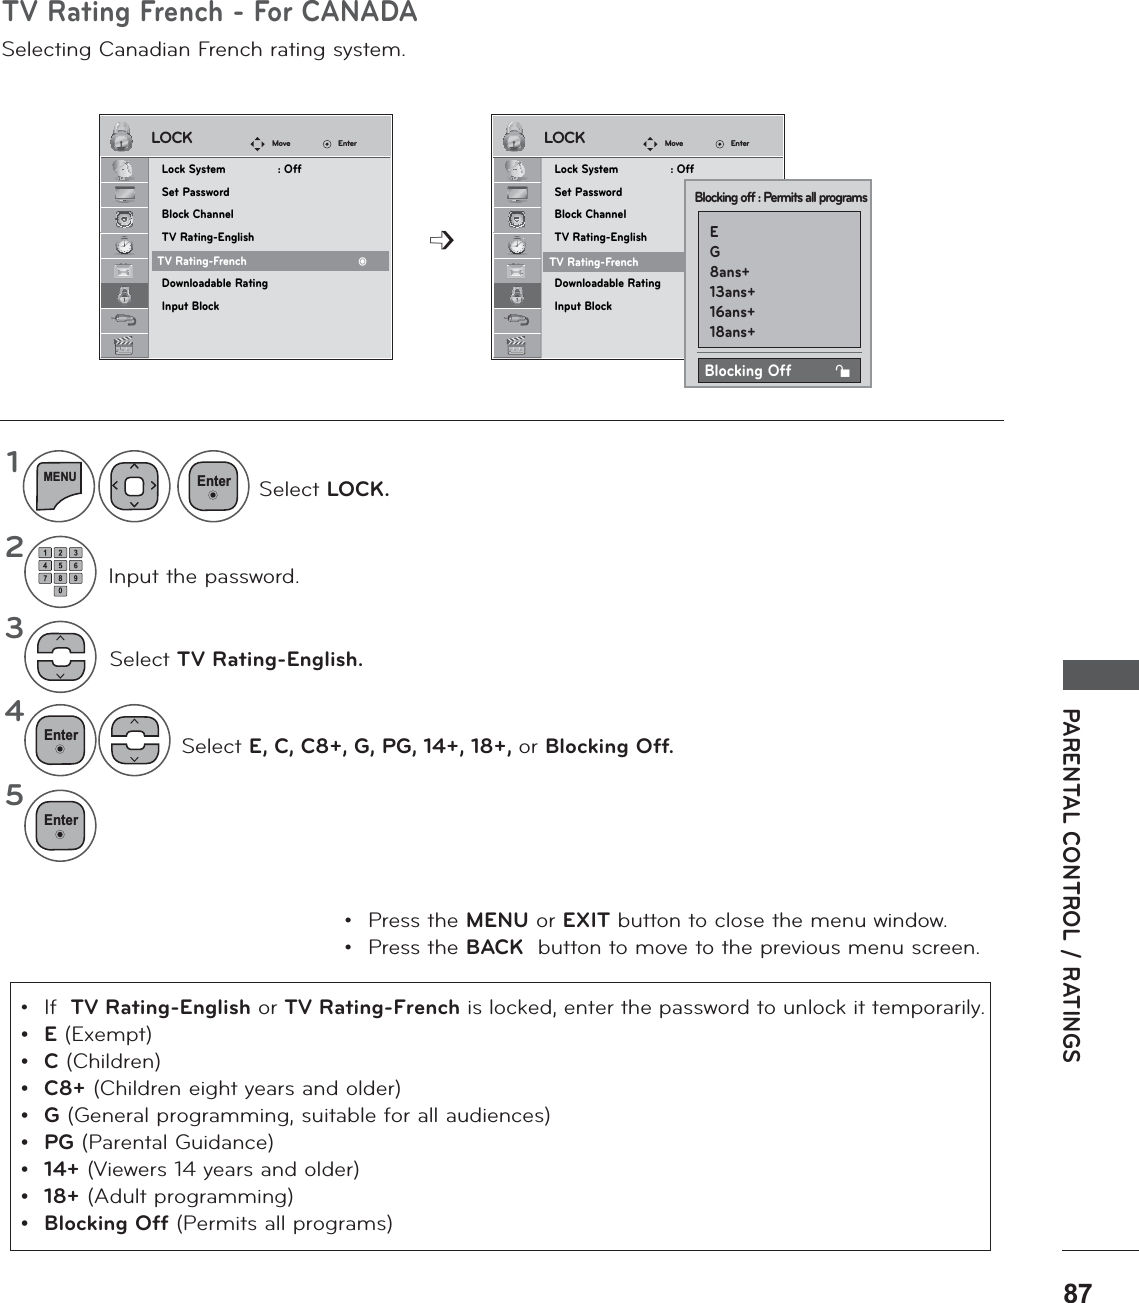
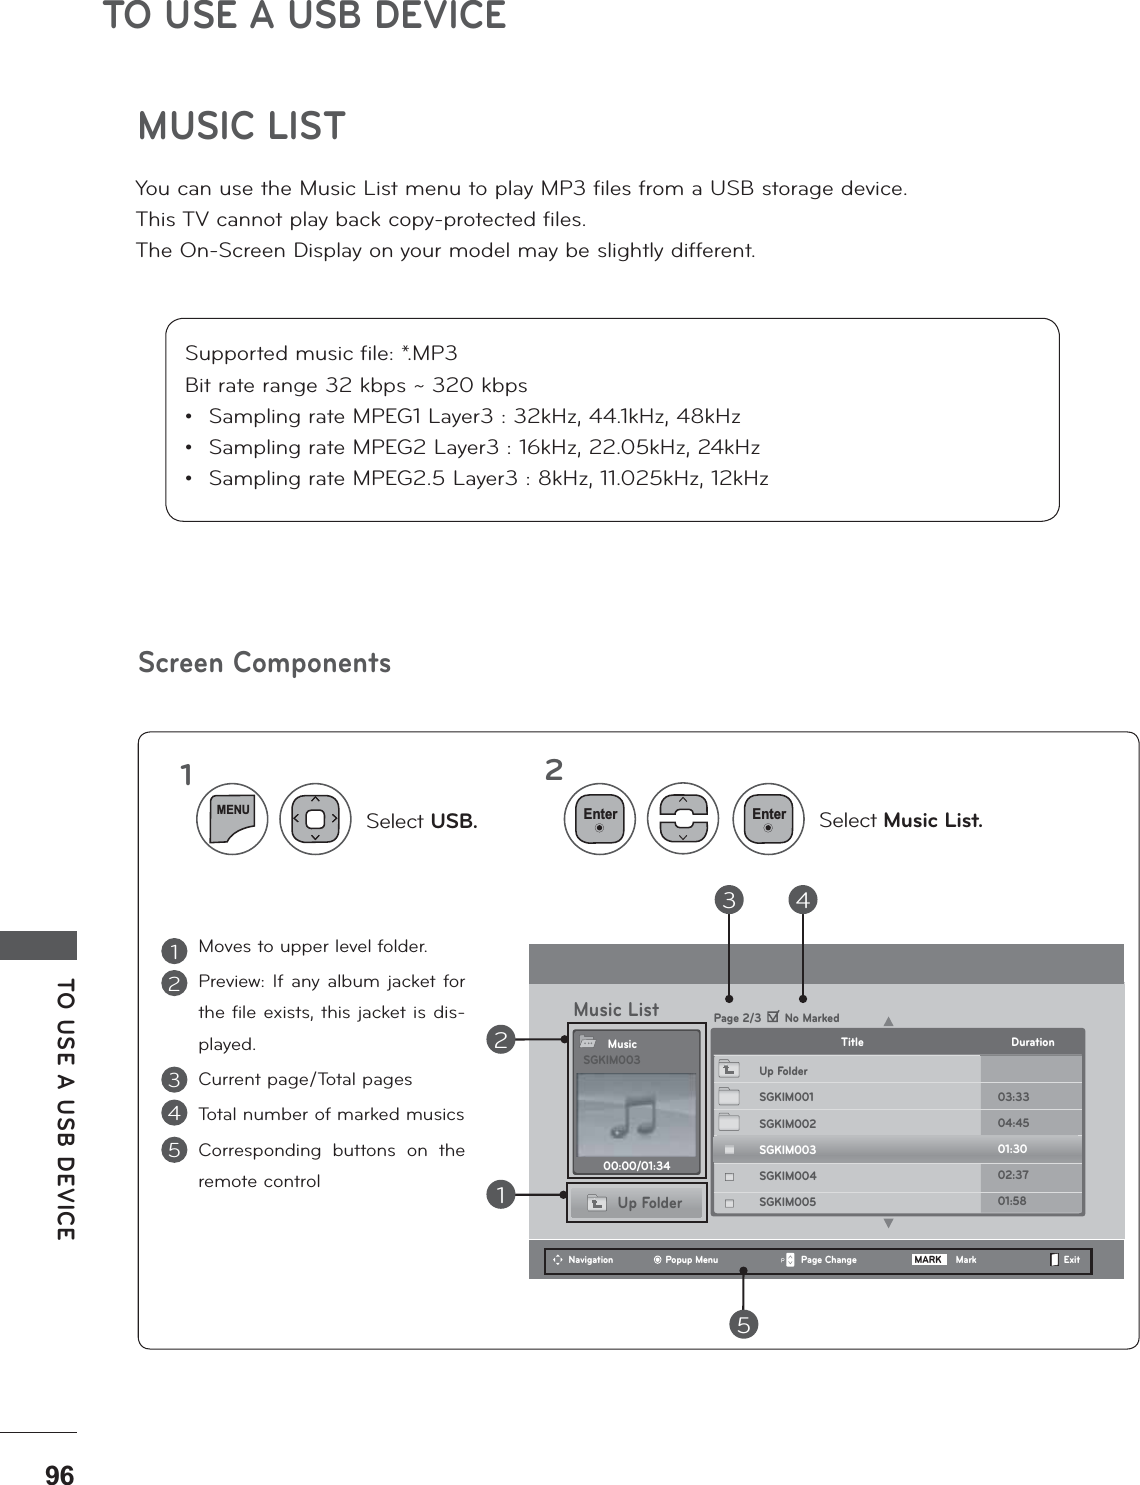
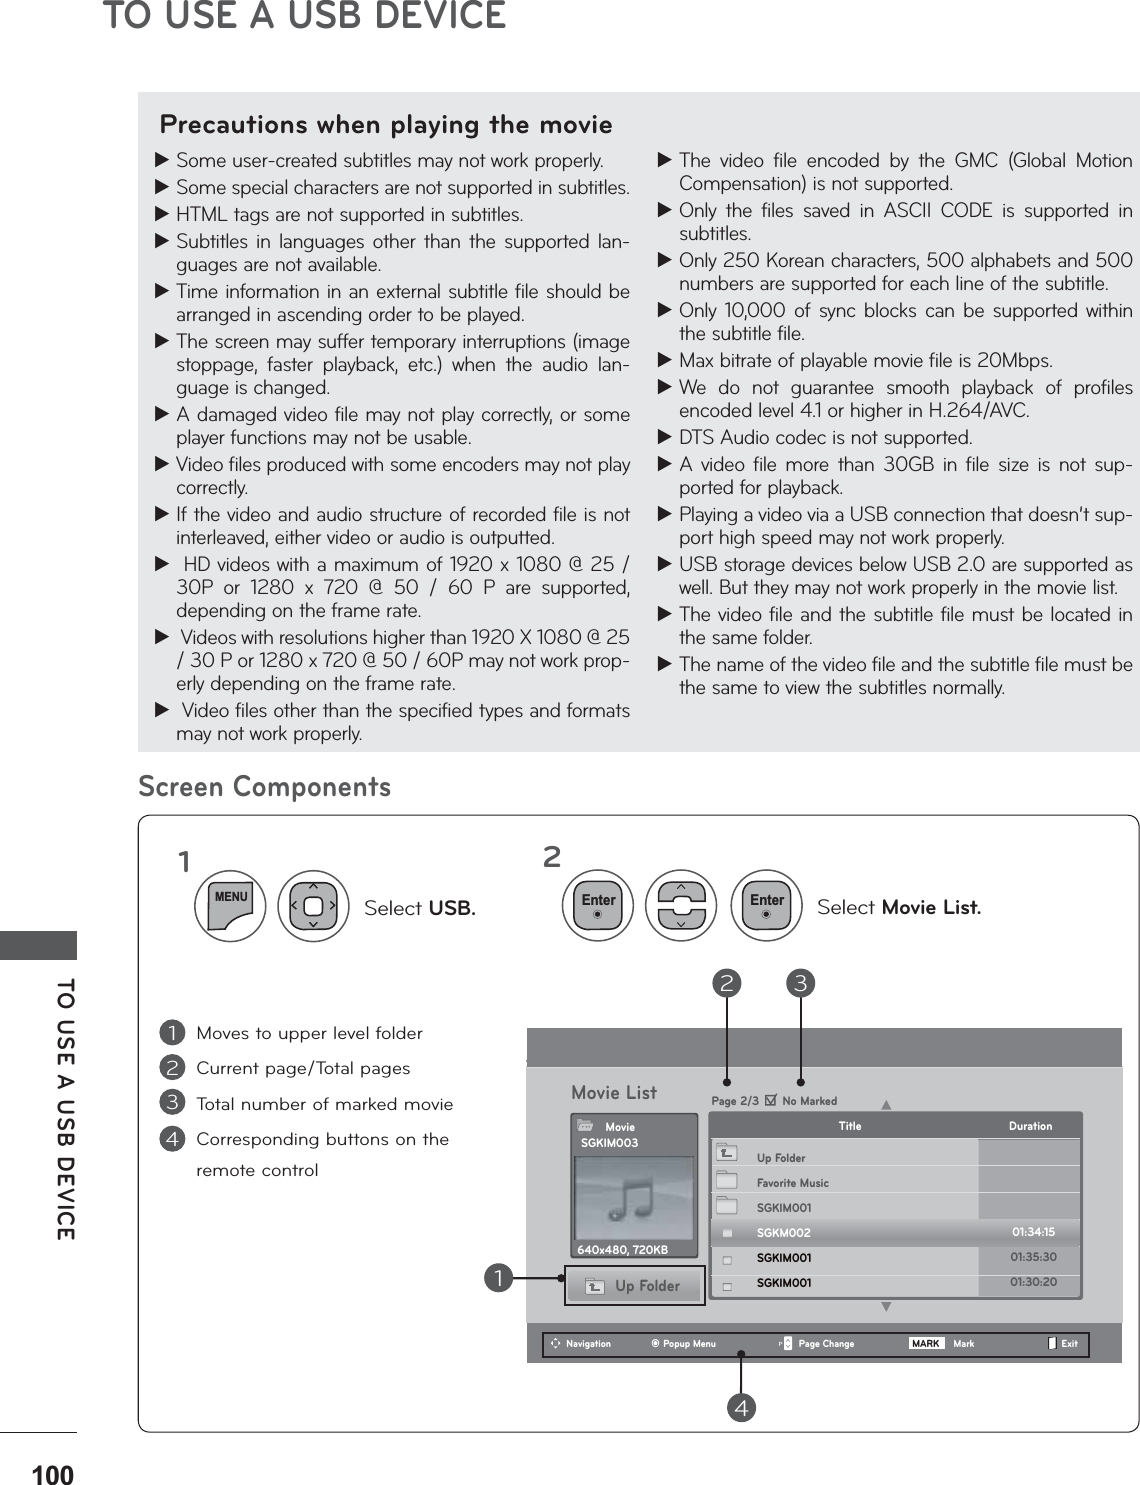
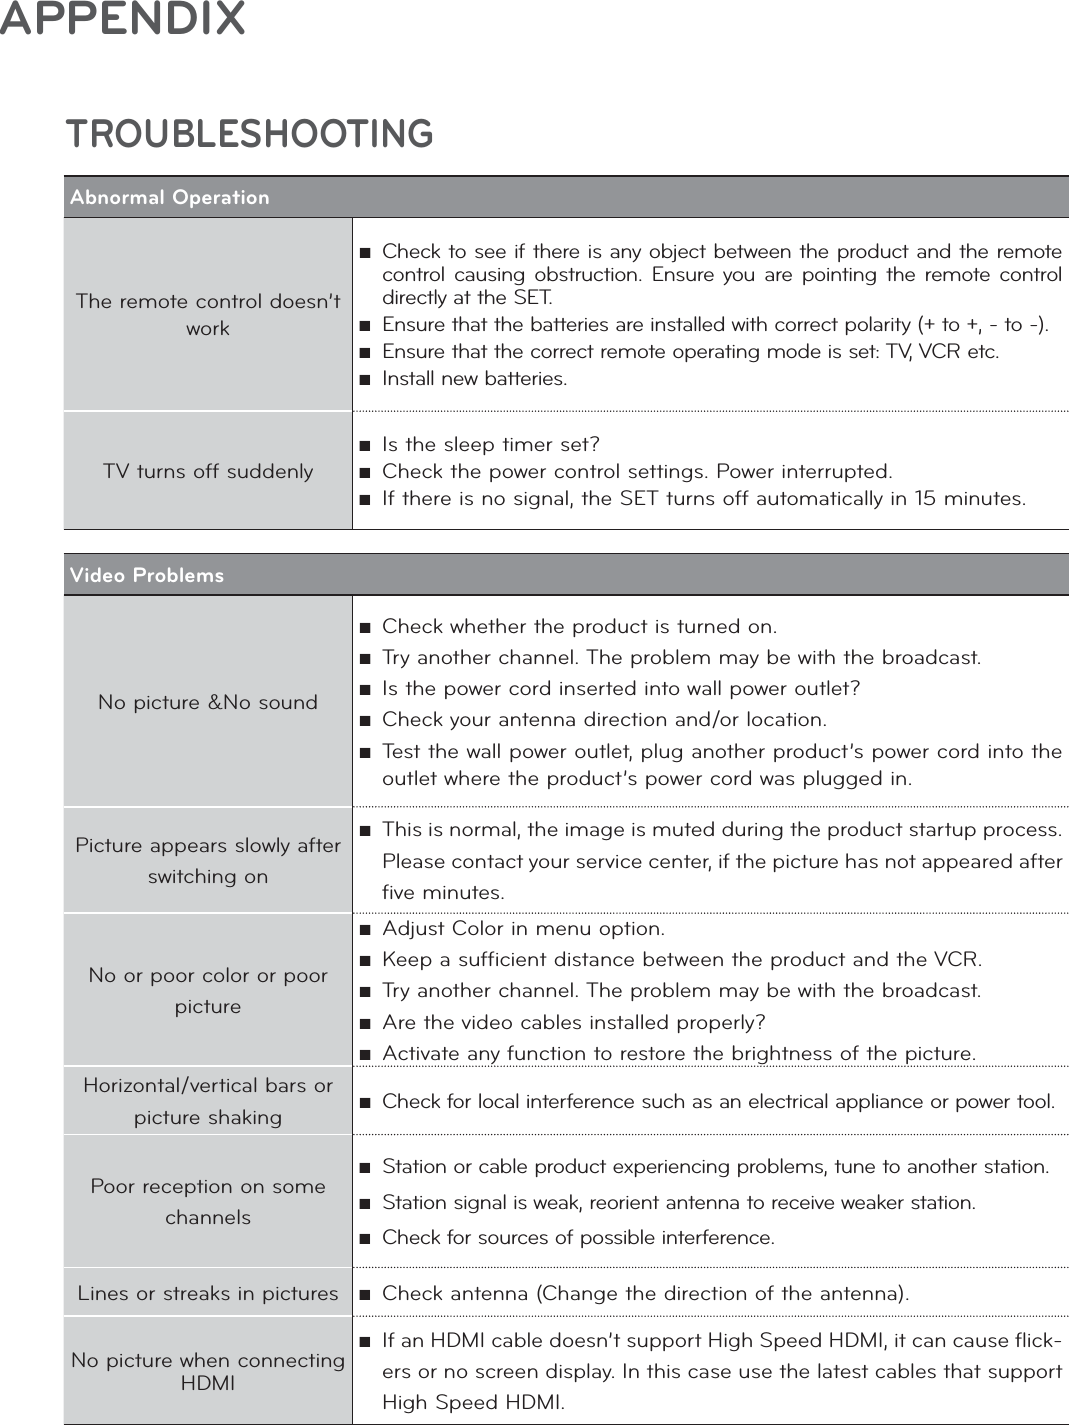
![WATCHING TV / PROGRAMME CONTROLINITIAL SETTINGStep1. Welcome Step4. Time settingStep2. Selecting LanguageStep3. Mode setting Step3. Mode settingThis Function guides the user to easily set the essential items for viewing the TV for the first time when purchasing the TV. If will be displayed on the screen when turning the TV on for the first time. It can also be activated from the user menus. ŶDefault selection is “Home Use”. We recommend setting the TV to “Home Use” mode for the best picture in your home environment. Ŷ “Store Demo” Mode is only intended for use in retail environments. Customers can adjust the “Picture menu - Picture mode” manually while inspecting the TV, but the TV will automatically return to preset instore mode after 5 minutes. Ŷ “Store Demo” Mode is an optimal setting for displaying at stores. “Store Demo” mode initializes the TV to set the image quality. Ŷ You can also adjust Initial Setting in the OPTION menu.111211Select Menu Language.Select Auto or Manual.Select desired timeoption.Check your antenna connection and start Auto Tuning.Select Home Use. WELCOMENextWELCOME!Thank you for choosing LG Language Mode SettingNextNextNextPrevisousPrevisousPrevisousEnglishHome UseFrançaisEspañol⦽ǎᨕStore DemoSelecting the environment.Choose the setting mode you want.Select [Home Use] to use this TV at home. To use this TV at Store, select [Store Demo]. Auto TuningBefore starting,be sure that theTV antenna is connected. Time SettingNextPrevisousŻAuto Ź&BTUFSO"VUPCurrent Time SettingMonthDateYea rHourMinuteTime ZoneDaylight Saving(QWHU(QWHU(QWHU(QWHU(QWHU](https://usermanual.wiki/LG-Electronics-USA/M2080DFM/User-Guide-1301248-Page-34.png)

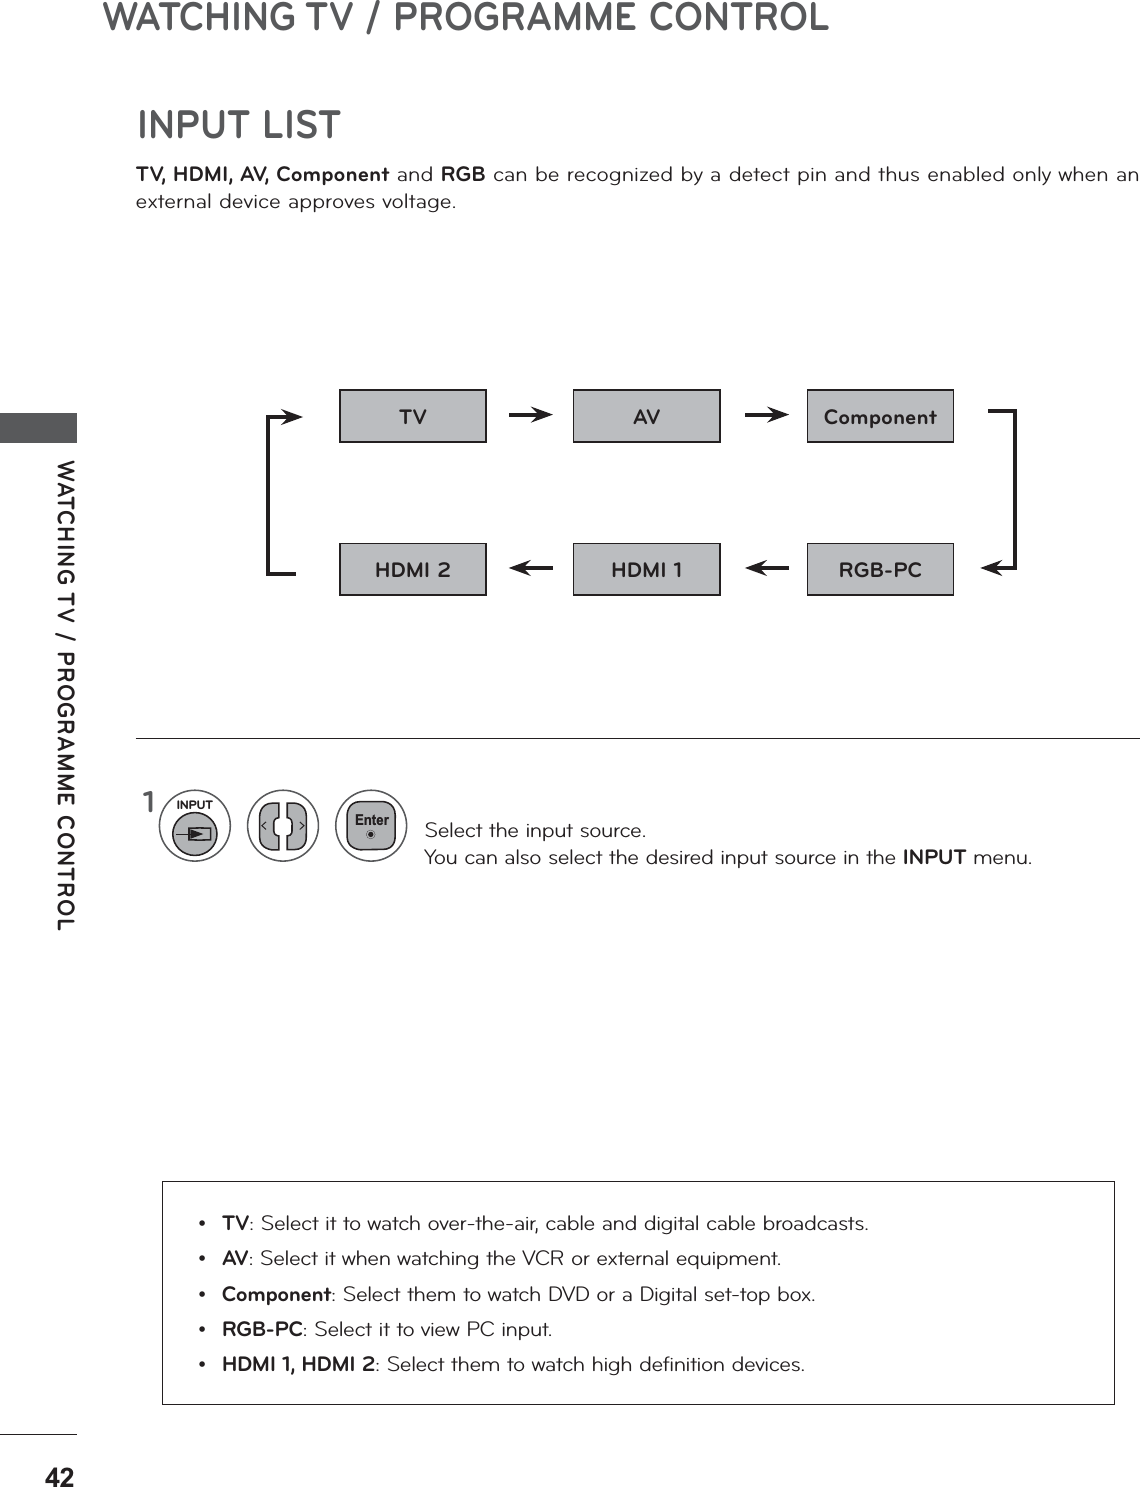


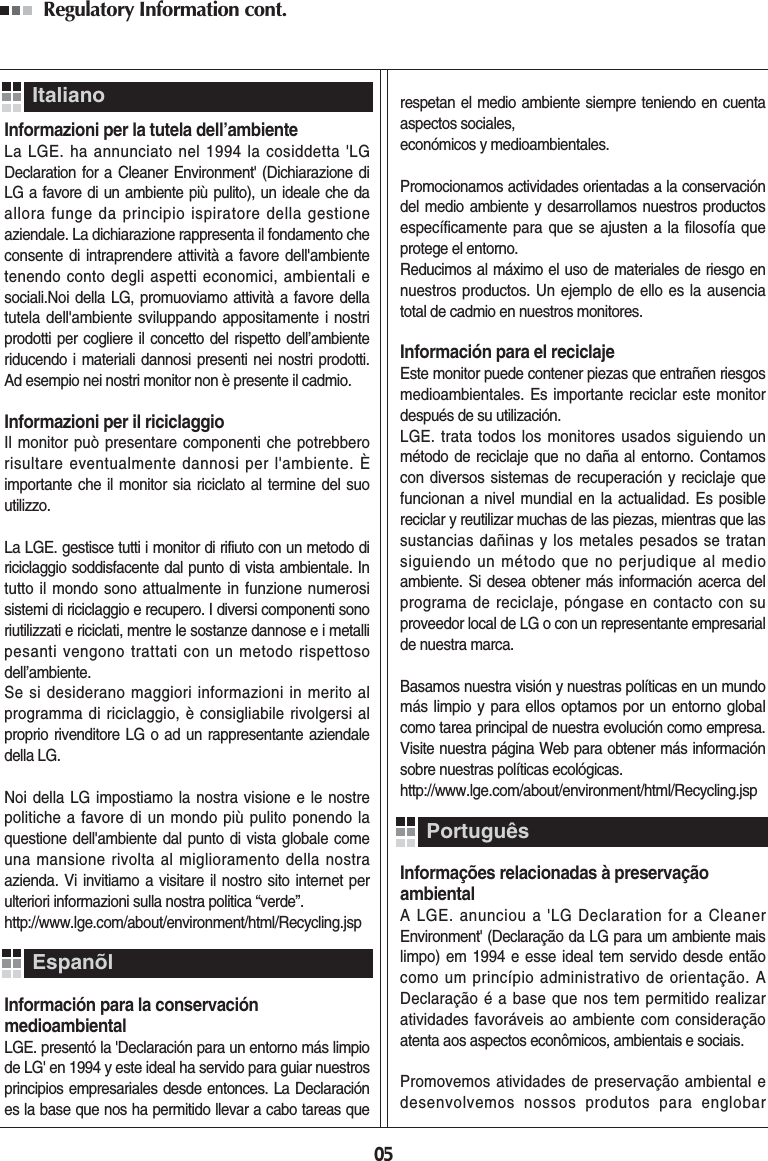
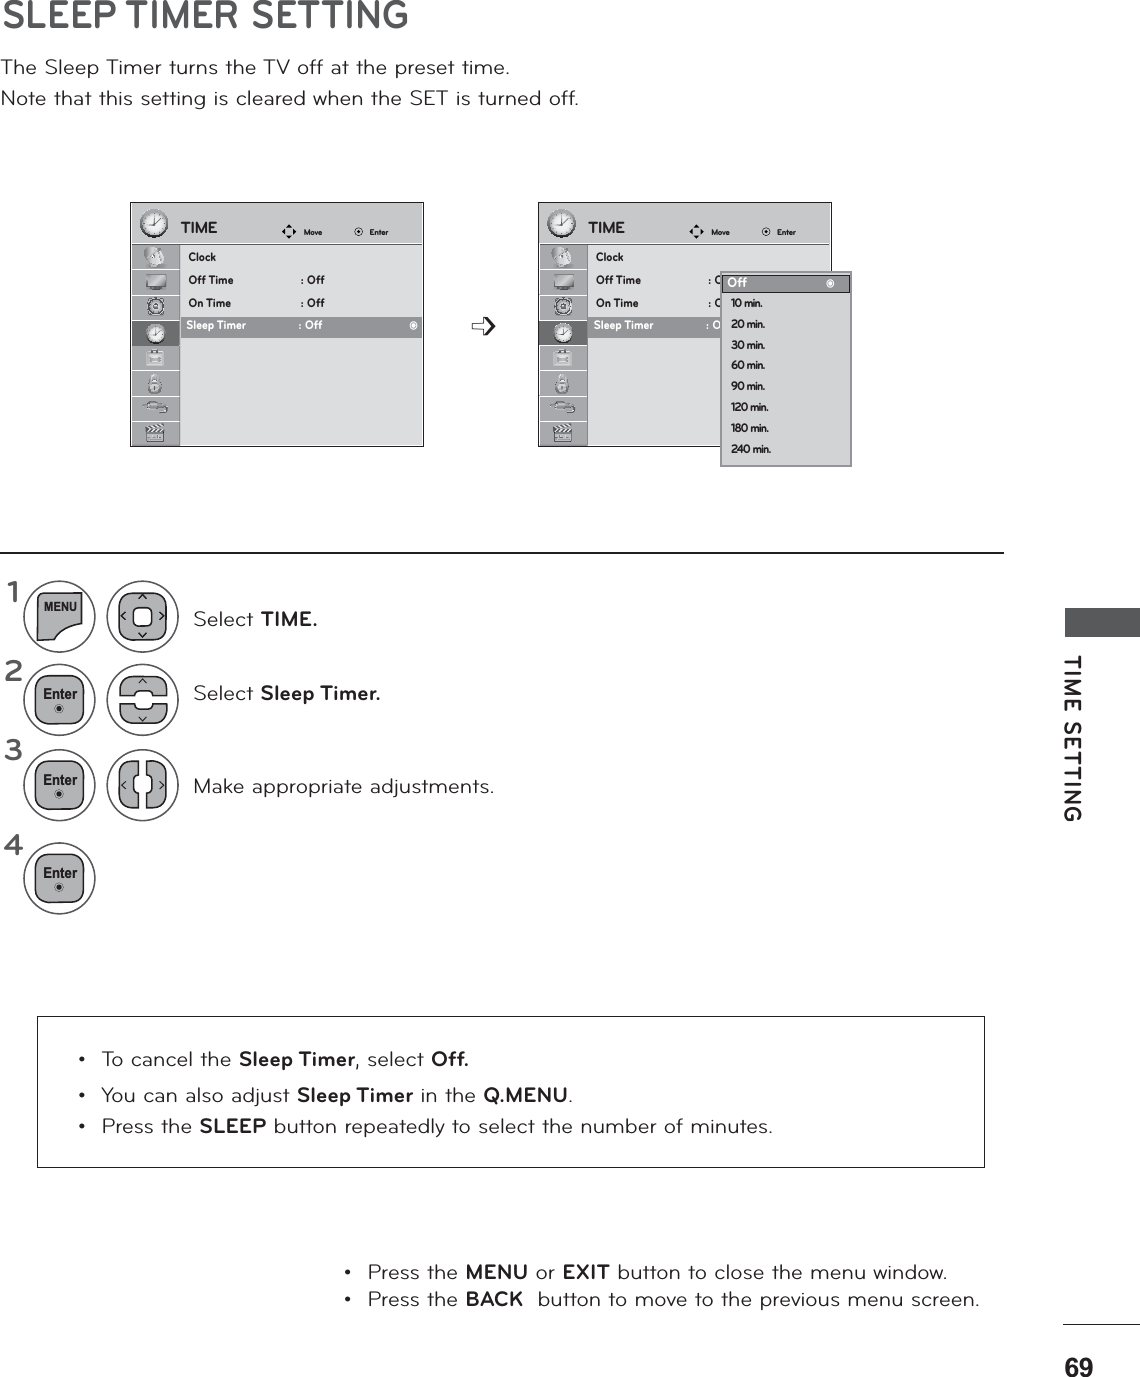
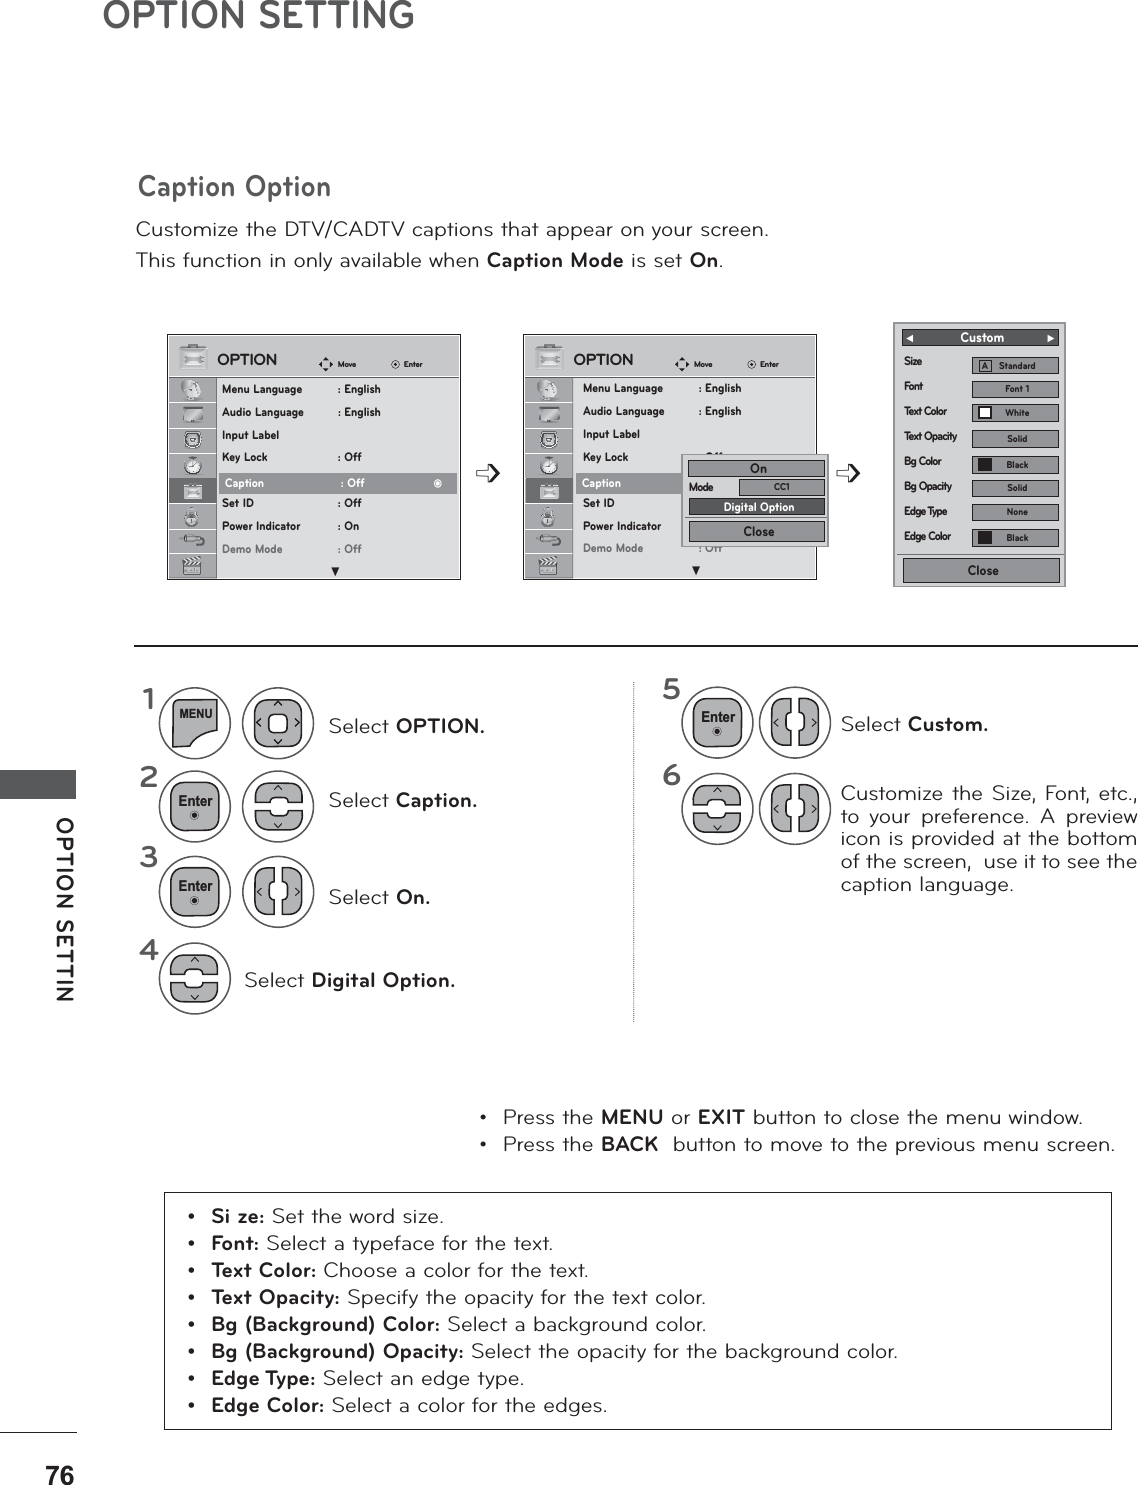
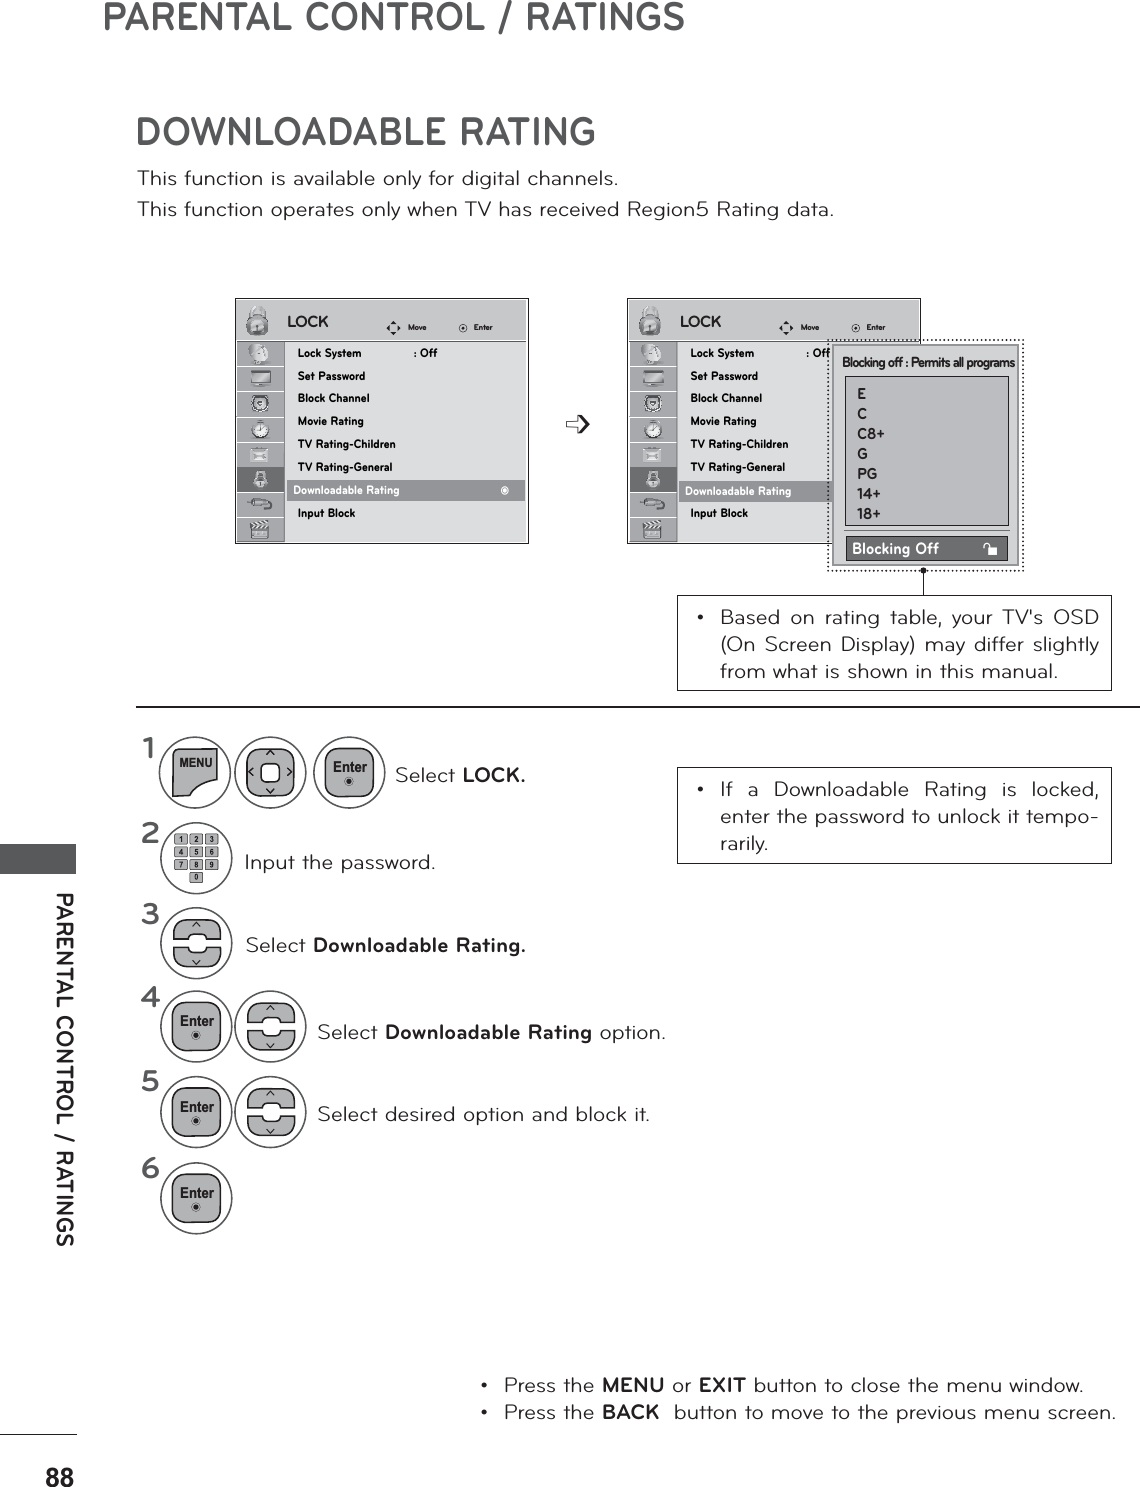
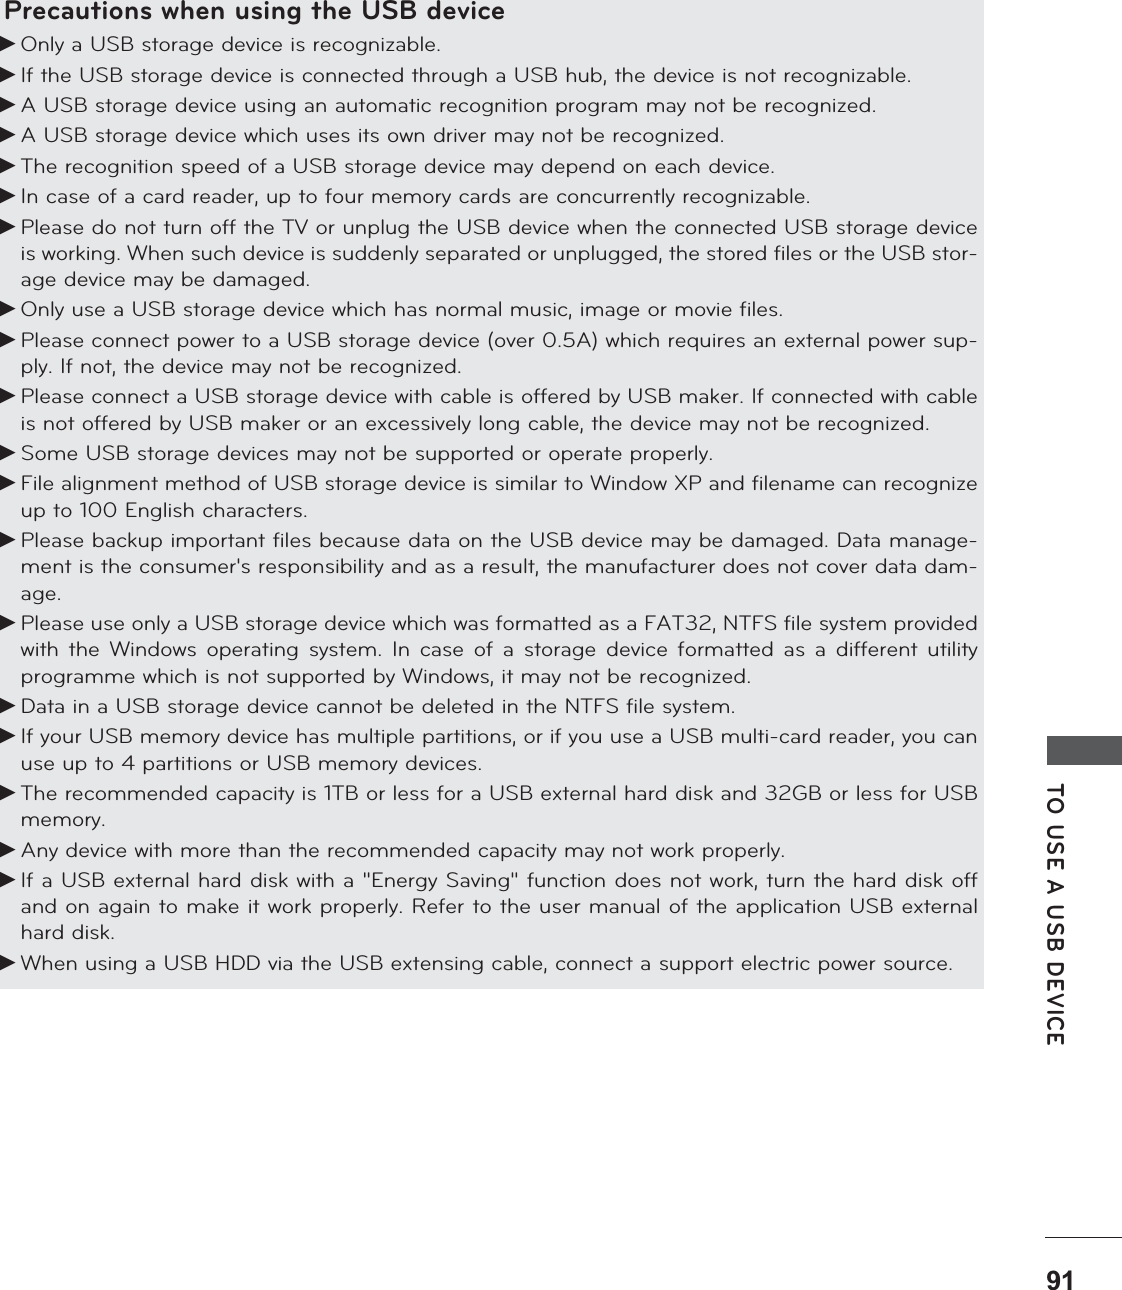
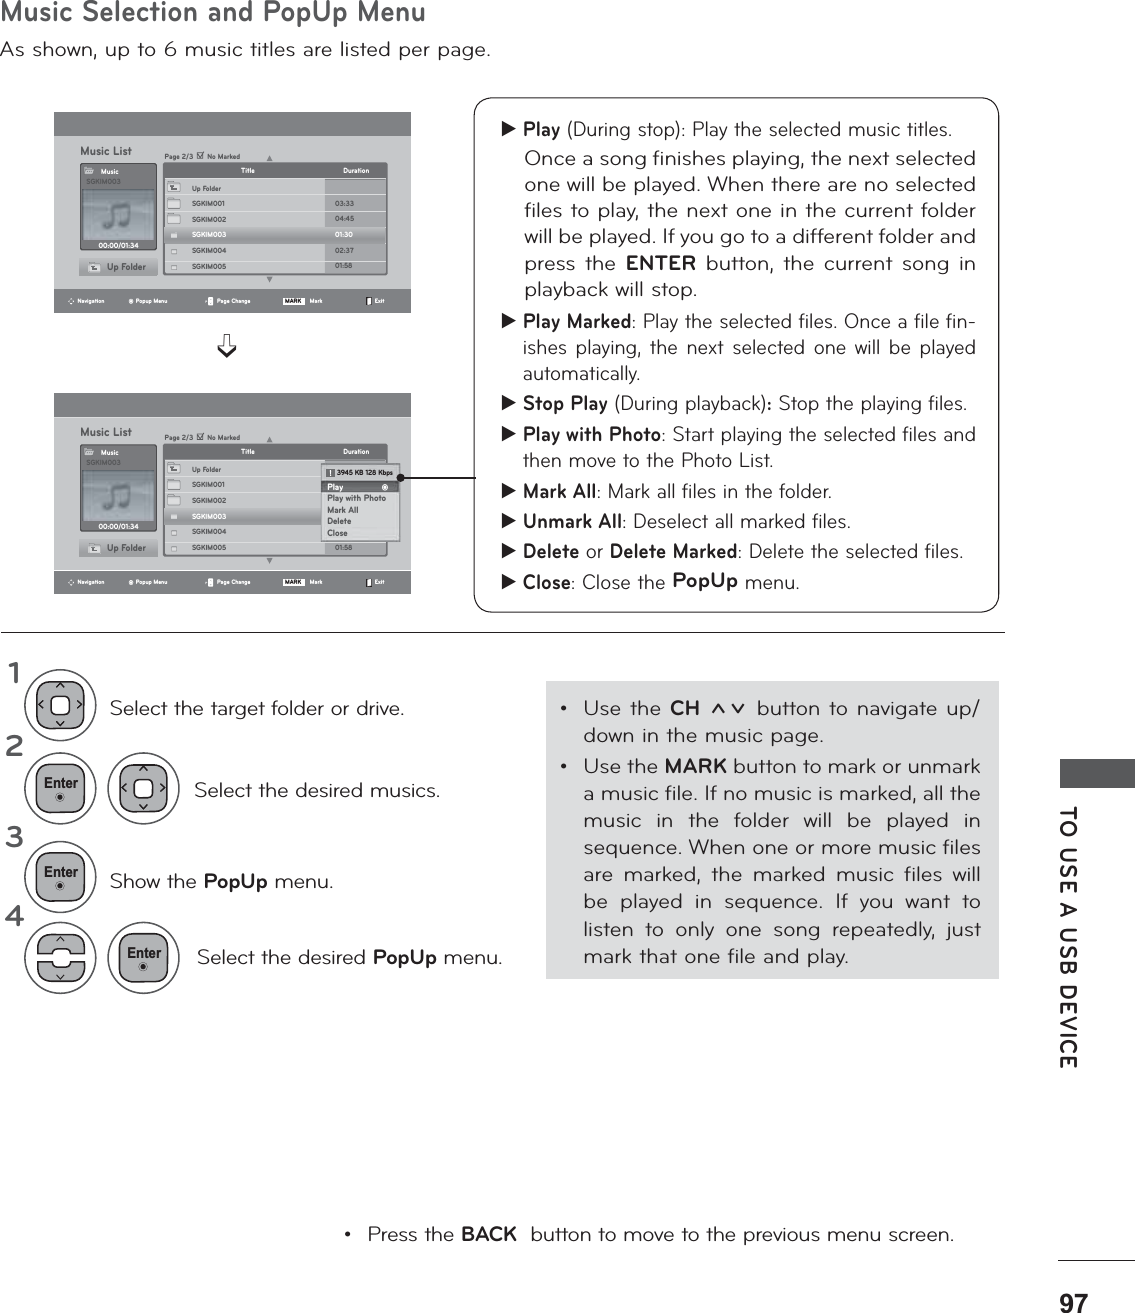
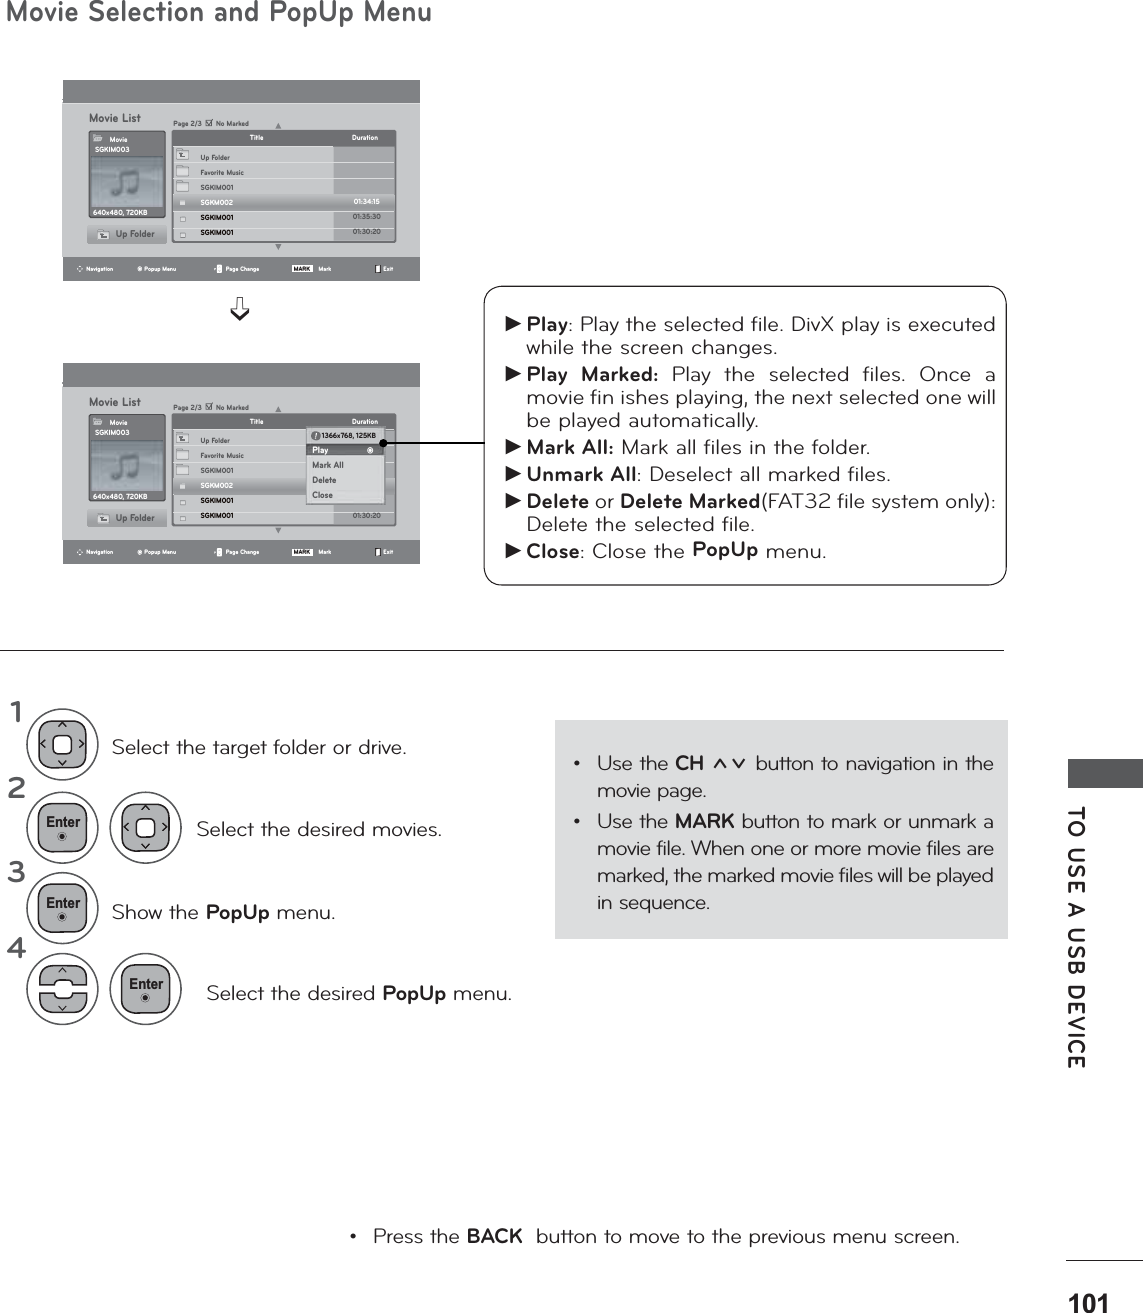
![PICTURE CONTROLPICTURE CONTROLSelecting ResolutionTo view a normal picture, match the resolution of RGB mode and selection of PC mode.This function works in the following mode: RGB[PC] mode.<Vertical resolution : 768><Vertical resolution : 900>SCREEN SETUP FOR PC MODEMove EnterPICTURE • Contrast 100 • Brightness 50 • Sharpness 70 • Colour 50 • Tint 0 • Advanced Control • Picture ResetScreen(RGB-)PC Screen(RGB-)PC ܙResoluttion Auto Config.PositionSizePhaseReset1024 x 7681280 x 7681360 x 7681280 x 9601400 x 9001600 x 900Resoluttion Auto Config.PositionSizePhaseResetMoveMovePrev.Prev.SCREENSCREEN123450(18Select Screen.Select Resolution.Select the desired resolution.Select Picture.• Press the MENU or EXIT button to close the menu window.• Press the BACK button to move to the previous menu screen.(QWHU(QWHU(QWHU(QWHU](https://usermanual.wiki/LG-Electronics-USA/M2080DFM/User-Guide-1301248-Page-55.png)
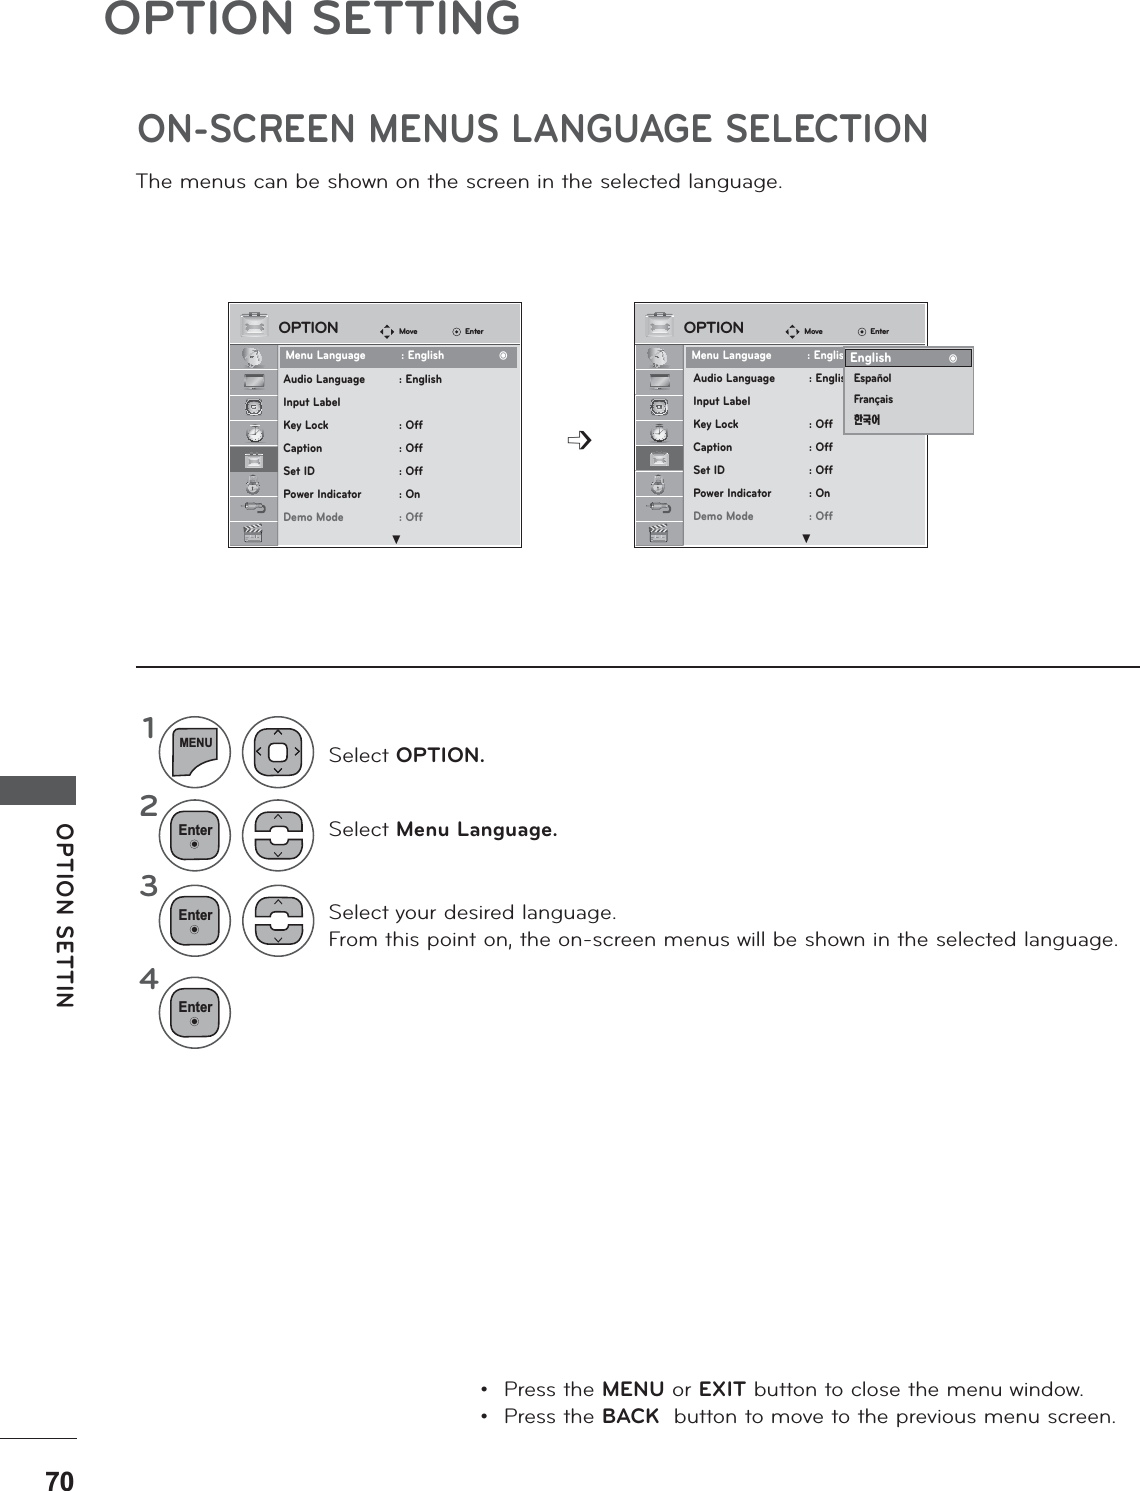
![PICTURE CONTROLAuto Configure (RGB [PC] mode only)Automatically adjusts picture position and minimizes image instability. After adjustment, if the image is still not correct, your set is functioning properly but needs further adjustment.Auto configureThis function is for automatic adjustment of the screen position, clock, and phase The displayed image will be unstable for a few seconds while the auto configuration is in progress.1. Using OSDܙ123450(18Run Auto Config.Select Screen.Select Auto Config.Select Yes.Select PICTURE.• Press the MENU or EXIT button to close the menu window.• Press the BACK button to move to the previous menu screen.Resolution Auto Config. PositionSizePhaseResetSCREENTo S e tYes No• If the position of the image is still not correct, try Auto adjustment again.• If picture needs to be adjusted again after Auto adjustment in RGB (PC), you can adjust the Posi tion, Size or Phase.2. Using Auto Config. (Remocon)<M2080DF><M2280DF, M2380DF >This function is available for RGB signals only.<Others Resolution><Others Resolution><1600 x 900 Resolution><1920 x 1080 Resolution>Press Auto Config.Press Auto Config.11Auto in progressFor optimal displaychange resolution 1600 x 900Auto in progressFor optimal displaychange resolution 1920 x 1080Auto in progressAuto in progress!!Move EnterPICTURE • Contrast 100 • Brightness 50 • Sharpness 50 • Colour 50 • Tint 0 • Advanced Control • Picture ResetScreen(RGB-)PC Screen(RGB-)PC (QWHU(QWHU(QWHU (QWHUMove Prev.](https://usermanual.wiki/LG-Electronics-USA/M2080DFM/User-Guide-1301248-Page-56.png)
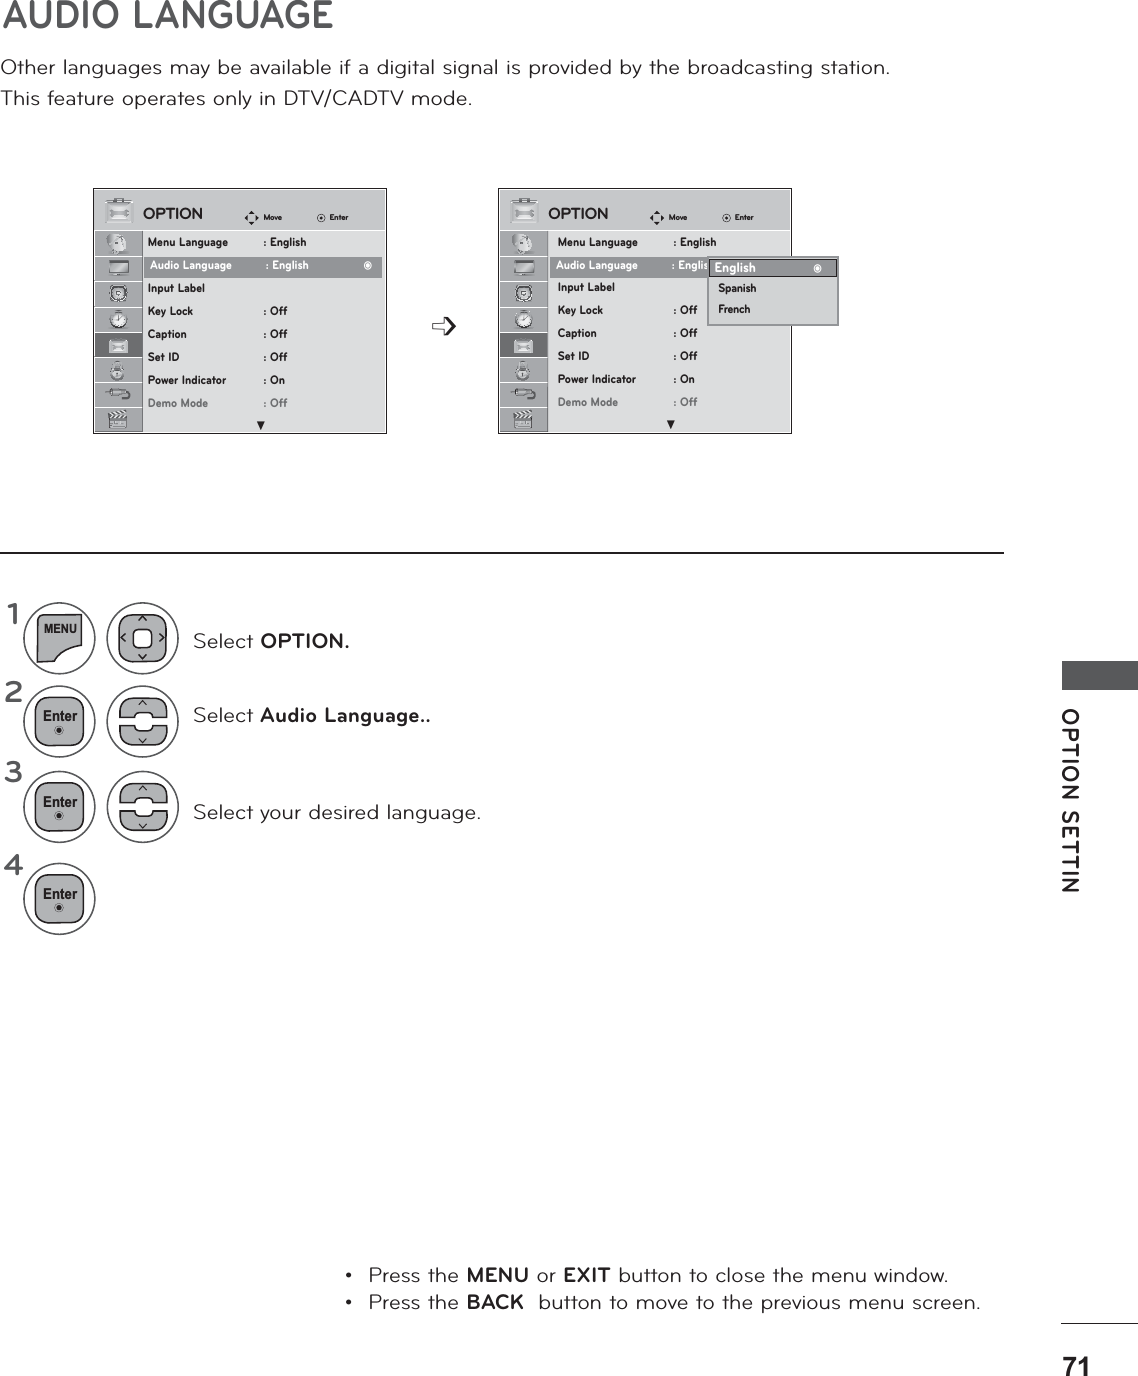
![PICTURE CONTROLPICTURE CONTROLAdjustment for screen Position, Size, PhaseIf the picture is not clear after auto adjustment and especially if characters are still trembling, adjust the picture phase manually.This function works in the following mode: RGB[PC].ܙResolution Auto Config. Position SizePhaseResetSCREEN123450(18Select Screen.Select Position, Size or Phase.Make appropriate adjustments.Select PICTURE.• Press the MENU or EXIT button to close the menu window.• Press the BACK button to move to the previous menu screen.Move EnterPICTURE • Contrast 100 • Brightness 50 • Sharpness 50 • Colour 50 • Tint 0 • Advanced Control • Picture ResetScreen(RGB-)PC Screen(RGB-)PC (QWHU(QWHU(QWHU(QWHUMove Prev.](https://usermanual.wiki/LG-Electronics-USA/M2080DFM/User-Guide-1301248-Page-57.png)
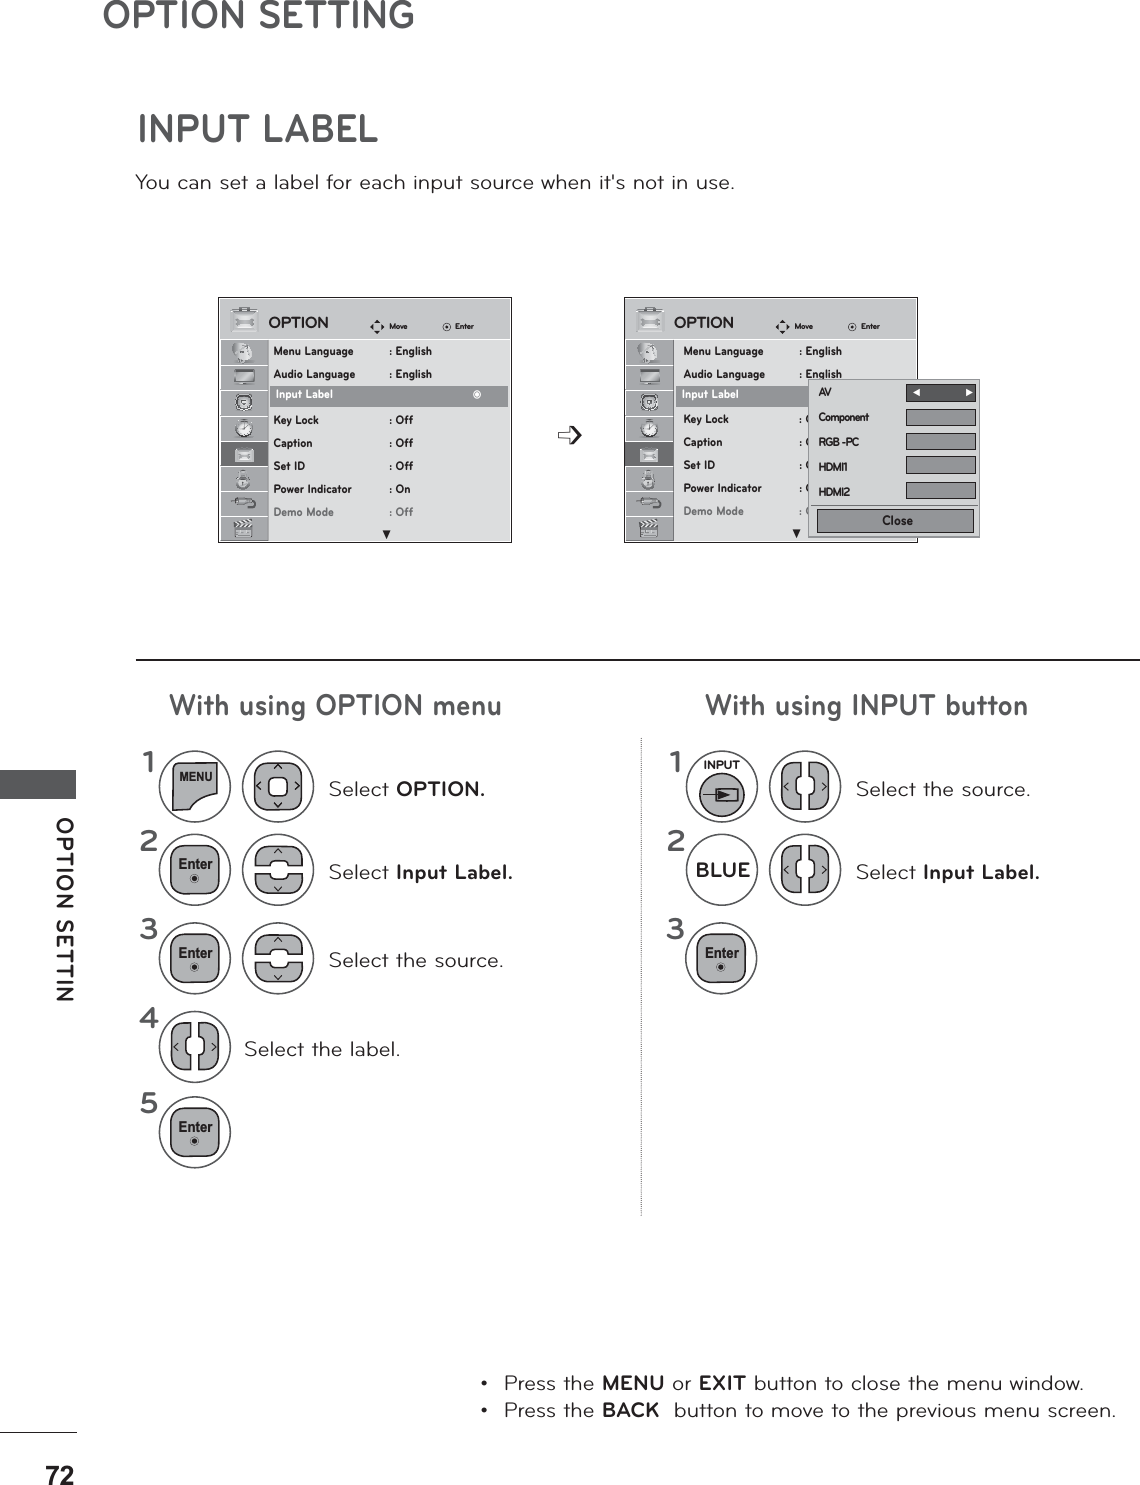
![PICTURE CONTROLScreen ResetReturns Position, Size and Phase to the factory default settings.This function works in the following mode: RGB[PC].ܙ123450(18Select Screen.Select Reset.Select Yes.Run Reset.Select PICTURE.• Press the MENU or EXIT button to close the menu window.• Press the BACK button to move to the previous menu screen.Resolution Auto Config. PositionSizePhaseReset SCREENTo S e tYes NoMove EnterPICTURE • Contrast 100 • Brightness 50 • Sharpness 50 • Colour 50 • Tint 0 • Advanced Control • Picture ResetScreen(RGB-)PC Screen(RGB-)PC (QWHU(QWHU(QWHU(QWHUMove Prev.](https://usermanual.wiki/LG-Electronics-USA/M2080DFM/User-Guide-1301248-Page-58.png)
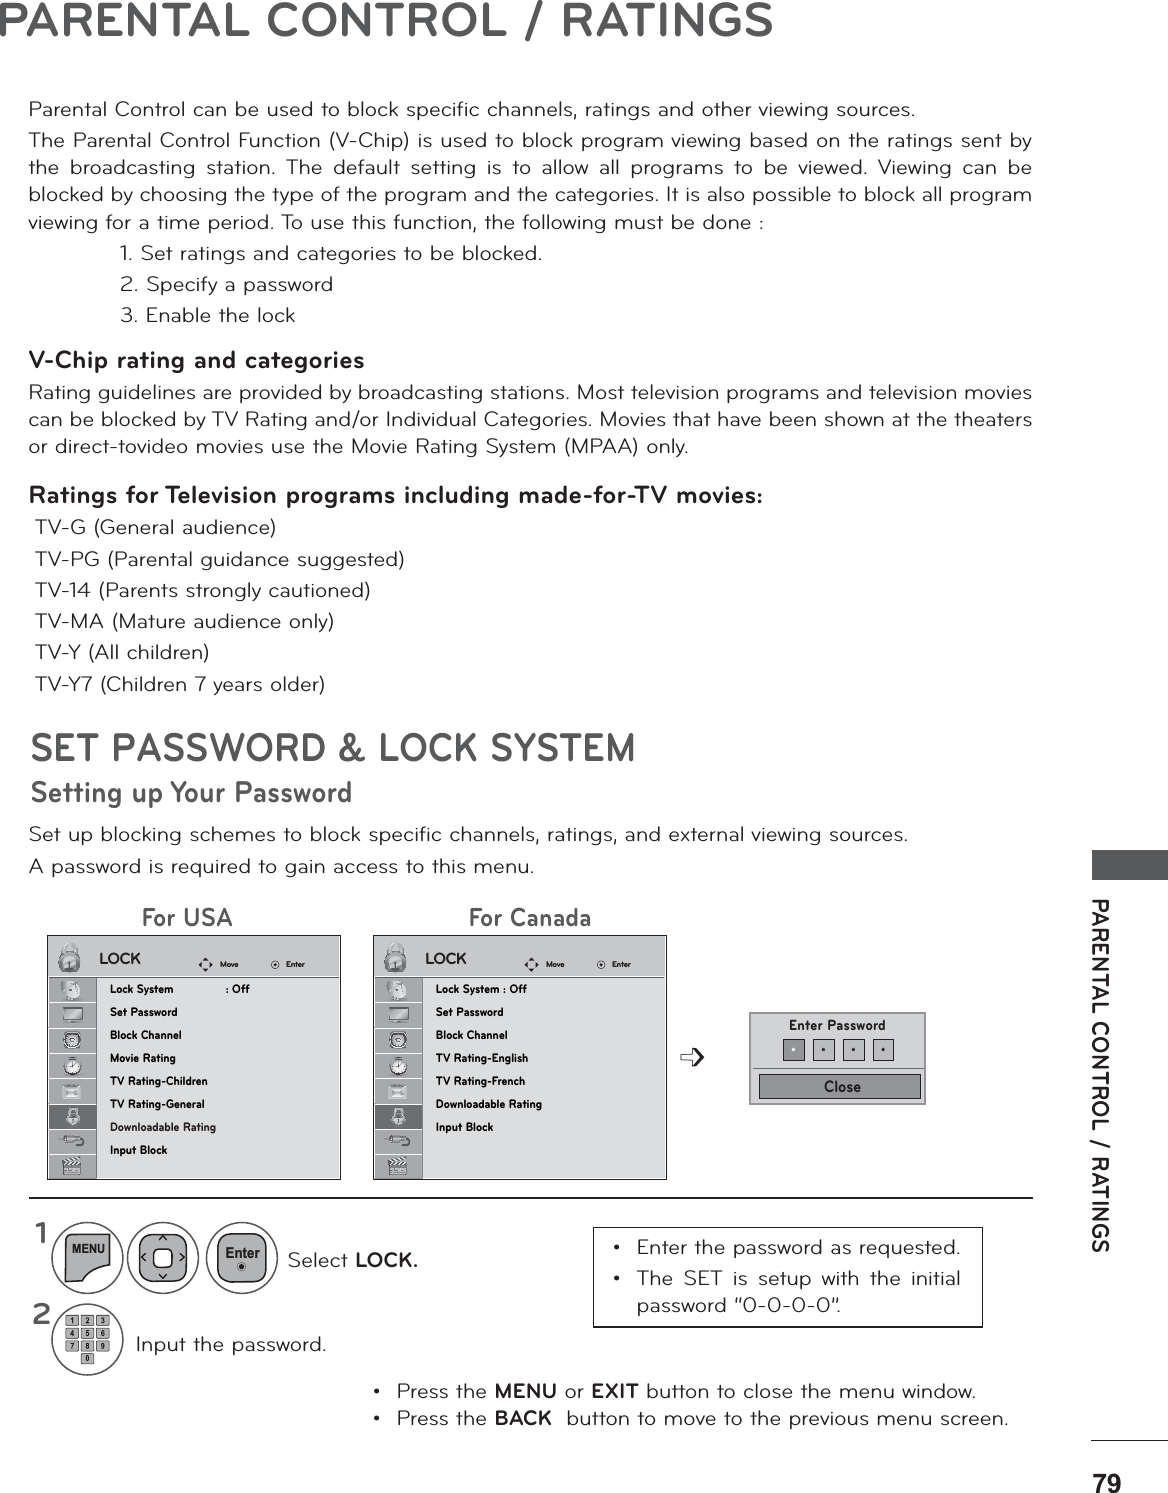


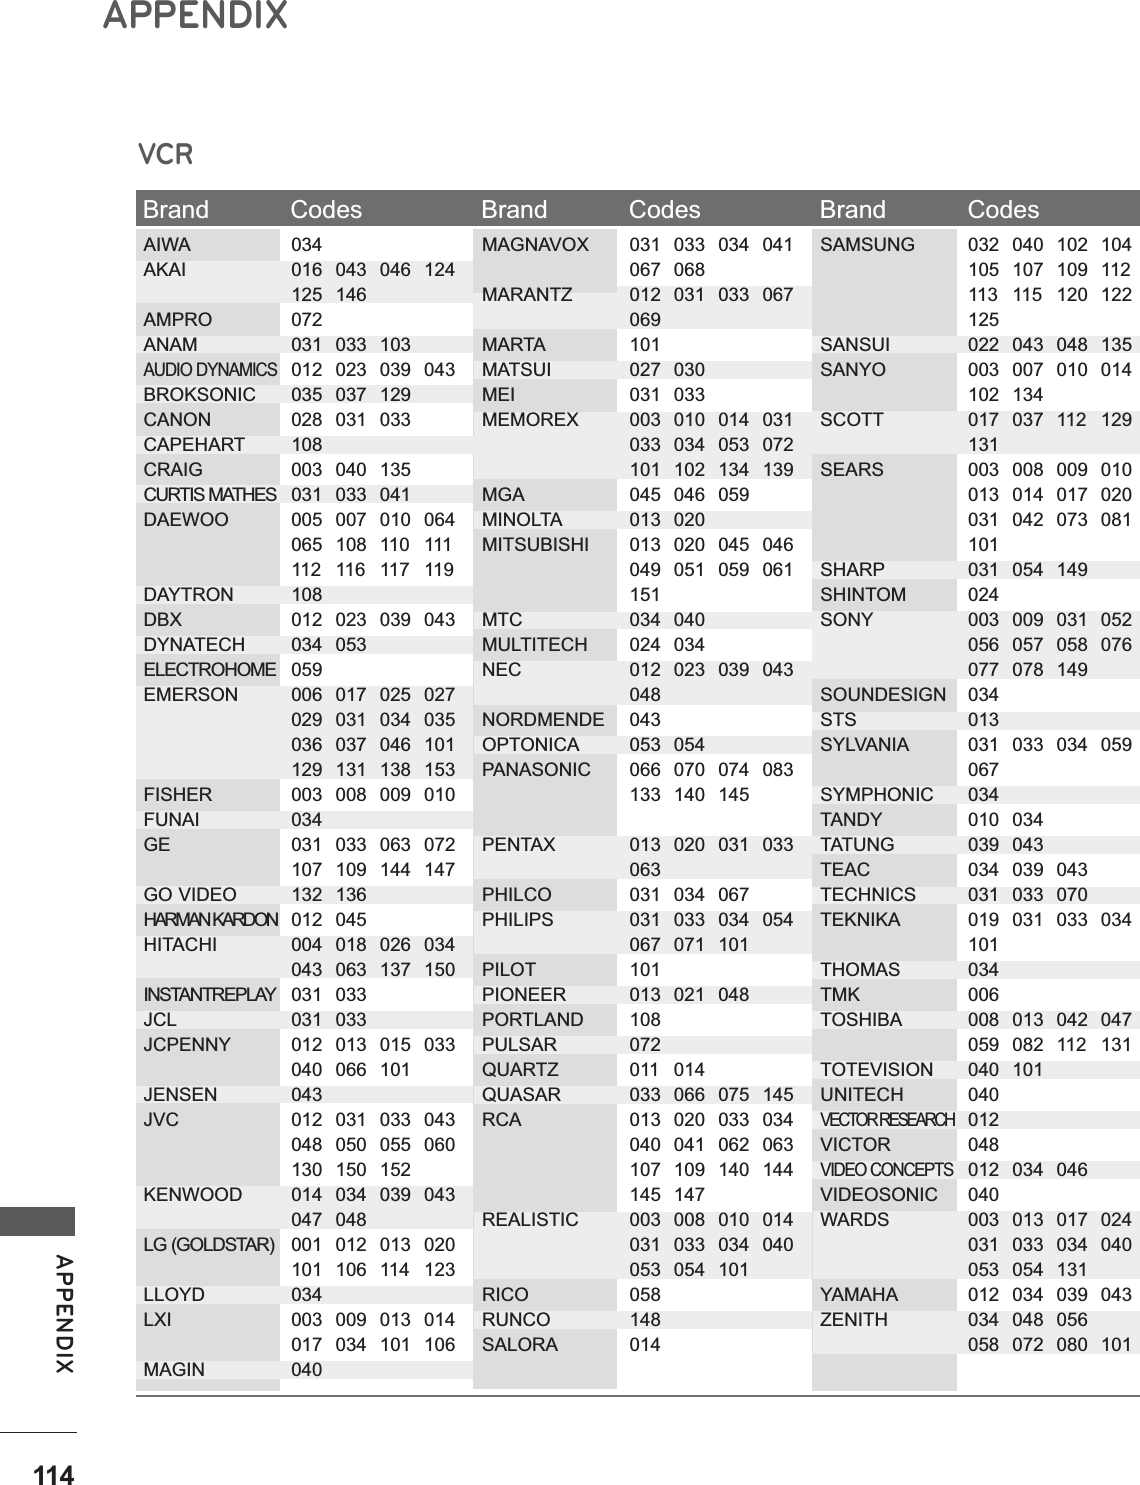
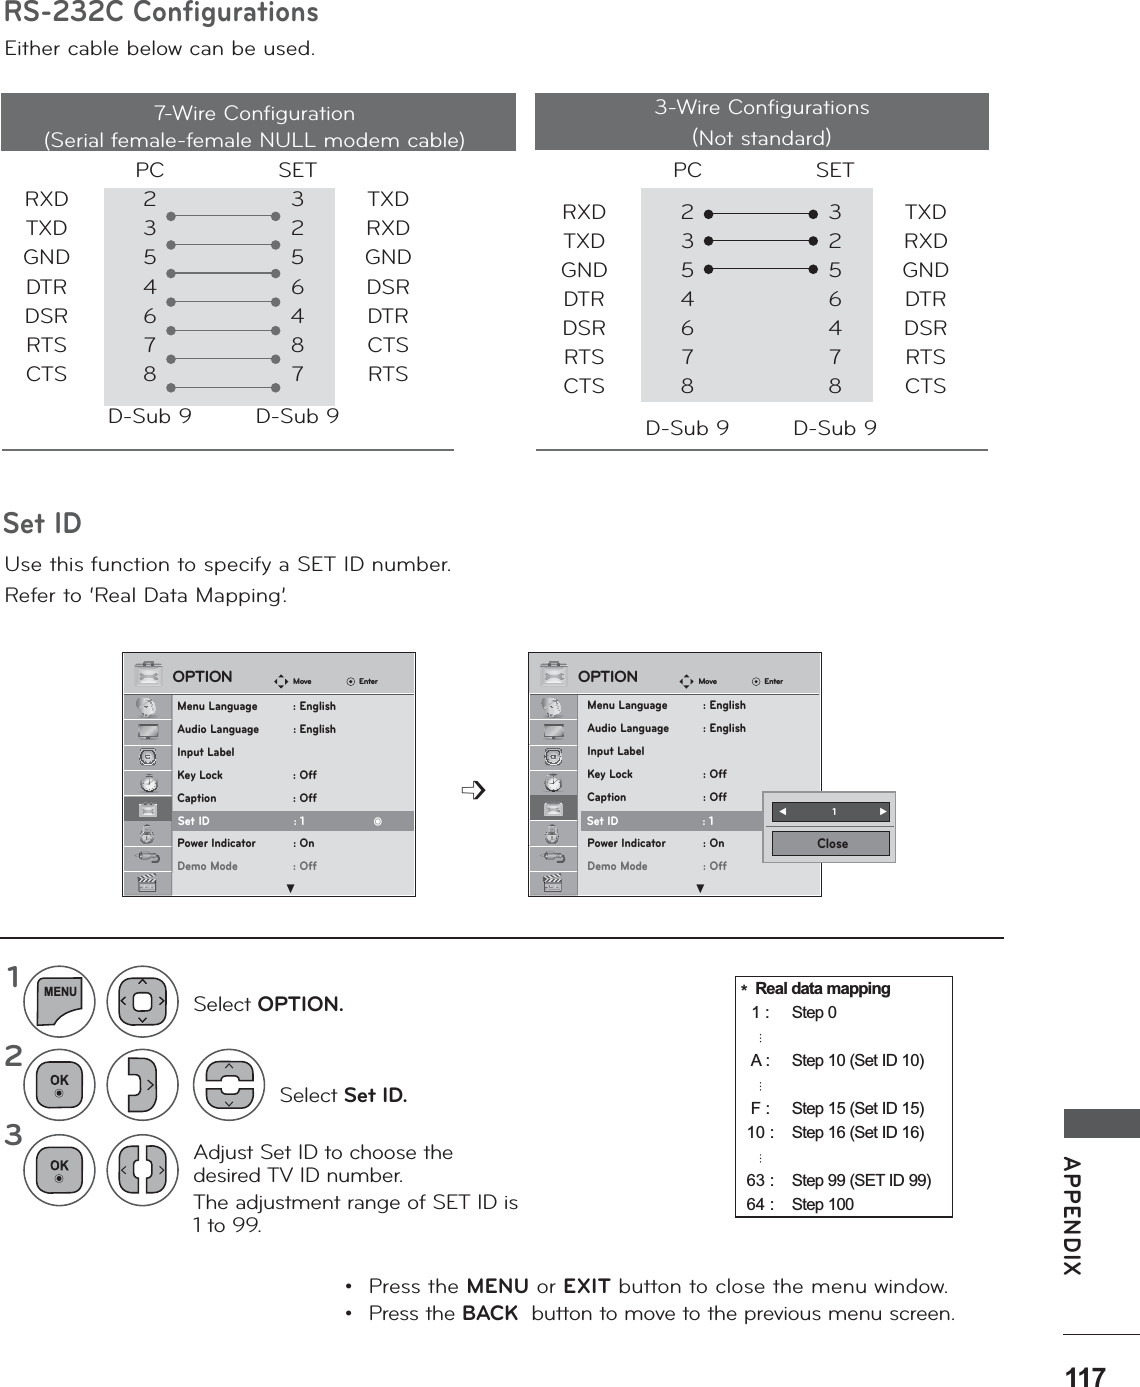
![APPENDIXAPPENDIXCommand Reference ListTransmission / Receiving Protocol COMMAND 1COMMAND 2DATA(Hexadecimal) COMMAND 1COMMAND 2DATA(Hexadecimal)01. Power k a 00 to 01 14. Treble k r 00 to 6402. Input Select x b ( p.119) 15. Bass k s 00 to 6403. Aspect Ratio k c ( p.119) 16. Balance k t 00 to 6404. Screen Mute k d 00 to 01 17. Color Temperature k u 00 to 0205. Volume Mute k e 00 to 01 18. Auto Configuration j u ( p.120)06. Volume Control k f 00 to 64 20. Channel Add/Del m b 00 to 0107. Contrast k g 00 to 64 21. Key m c ( p.121)08. Brightness k h 00 to 64 22. Backlight m g 00 to 6409. Color k i 00 to 6410. Tint k j 00 to 6411. Sharpness k k 00 to 6412. OSD Select k l 00 to 0113. Remote Control Lock Mode k m 00 to 01COMMAND 1COMMAND 2DATA00(Hexadecimal)DATA01(Hexadecimal)DATA03(Hexadecimal)DATA0 4(Hexadecimal)DATA05(Hexadecimal)DATA06(Hexadecimal)19. Channel Tuning m a physicalprogram highmajorprogram low major low minor high minor low attributeTransmission[Command 1] : First command to control the set.(j, k, m or x)[Command 2] : Second command to control the set.[Set ID] : You can adjust the set ID to choose desired TV ID number in Setup menu. Adjustment range is 1~ 99. When selecting Set ID ‘0’, every connected the TV is controlled. Set ID is indicated as decimal (1~ 99) on menu and as Hexa decimal (0x0~ 0x63) on transmission /receiving protocol.[DATA] : To transmit the command data. T ransmit the ‘FF’ data to read status of command.[Cr] : Carriage Return ASCII code ‘0x0D’[ ] : ASCII code ‘space (0x20)’* In this model, TV will not send the status during the standby mode.OK Acknowledgement The TV transmits ACK (acknowledgement) based on this format when receiving normal data. At this time, if the data is data read mode, it indicates present status data. If the data is data write mode, it returns the data of the PC com-puter.* In this model, TV will not send the status during the standby mode.* Data Format[Command 2] : Use as command.[Set ID] : Use the small character, if set ID is 10, it will send the ‘0’, ‘a’.[DATA] : Use the small character, if data is 0 x ab, it will send the ‘a’, ‘b’.[OK] : Use the large character.Error Acknowledgement The TV transmits ACK (acknowledgement) based on this format when receiving abnormal data from non-viable func-tions or communication errors.Data1: Illegal CodeData2: Not supported functionData3: Wait more time* In this model, TV will not send the status during the standby mode.* Data Format[Command 2] : Use as command.[Set ID] : Use the small character, if set ID is 10, it will send the ‘0’, ‘a’.[DATA] : Use the small character, if data is 0 x ab, it will send the ‘a’, ‘b’.[NG] : Use the large character[Command1][Command2][ ][Set ID][ ][Data][Cr][Command2][ ][Set ID][ ][OK][Data][x][Command2][ ][Set ID][ ][NG][Data][x]](https://usermanual.wiki/LG-Electronics-USA/M2080DFM/User-Guide-1301248-Page-119.png)
![APPENDIX01. Power (Command: k a) To control Power On/Off of the TV. Transmission [k][a][ ][Set ID][ ][Data][Cr] Data 00: Power Off Data 01: Power On Acknowledgement [a][ ][Set ID][ ][OK/NG][Data][x] * In a like manner, if other functions transmit ‘FF’ data based on this format, Acknowledgement data feed-back presents status about each function. * Note: In this model, TV will send the Acknowledge after power on processing completion. There might be a time delay between command and acknowledge.02. Input Select (Command: x b) To select input source for TV. Transmission [x][b][ ][Set ID][ ][Data][Cr] Data 00: DTV (Antenna) Data 01: DTV (Cable) Data 10: Analog (Antenna) Data 11: Analog (Cable) Data 20: AV Data 40: Component Data 60: RGB-PC Data 90: HDMI1 Data 91: HDMI2 Acknowledgement [b][ ][Set ID][ ][OK/NG][Data][x]03. Aspect Ratio (Command: k c) To adjust the screen format. Transmission [k][c][ ][Set ID][ ][Data][Cr] Data 01: 4:3 09: Just scan 02: 16:9 10: Cinema Zoom1 04: Zoom 06: Set by program 1F: Cinema Zoom16 Acknowledgement [c][ ][Set ID][ ][OK/NG][Data][x]04. Screen Mute (Command: k d) To select screen mute on/off. Transmission [k][d][ ][Set ID][ ][Data][Cr] Data 00: Screen mute off (Picture on), Video-out Mute off Data 01: Screen mute on (Picture off) Data 10: Video-out Mute on Acknowledgement [d][ ][Set ID][ ][OK/NG][Data][x] * In case of Video-out Mute on only, TV will display On Screen Display (OSD). But, in case of screen mute on, TV will not display On Screen Display (OSD).05. Volume Mute (Command: k e) To control volume mute on/off. You can also adjust mute using the MUTE button on remote control. Transmission [k][e][ ][Set ID][ ][Data][Cr] Data 00: Volume mute on (Volume off) Data 01: Volume mute off (Volume on) Acknowledgement [e][ ][Set ID][ ][OK/NG][Data][x]06. Volume Control (Command: k f) To adjust volume. You can also adjust volume with the volume buttons on remote control. Transmission [k][f][ ][Set ID][ ][Data][Cr] Data Min: 00 ~ Max: 64 (*transmit by Hexadecimal code) *Refer to ‘Real data mapping’. See page 117. Acknowledgement [f][ ][Set ID][ ][OK/NG][Data][x]07. Contrast (Command: k g) To adjust screen contrast. You can also adjust contrast in the PICTURE menu. Transmission [k][g][ ][Set ID][ ][Data][Cr] Data Min: 00 ~ Max: 64 (*transmit by Hexadecimal code) *Refer to ‘Real data mapping’. See page 118. Acknowledgement [g][ ][Set ID][ ][OK/NG][Data][x]08. Brightness (Command: k h) To adjust screen brightness. You can also adjust brightness in the PICTURE menu. Transmission [k][h][ ][Set ID][ ][Data][Cr] Data Min: 00 ~ Max: 64 (*transmit by Hexadecimal code) *Refer to ‘Real data mapping’. See page 117. Acknowledgement [h][ ][Set ID][ ][OK/NG][Data][x]09. Color (Command: k i) To adjust screen color. You can also adjust color in the PICTURE menu. Transmission [k][i][ ][Set ID][ ][Data][Cr] Data Min: 00 ~ Max: 64 (*transmit by Hexadecimal code) *Refer to ‘Real data mapping’. See page 117. Acknowledgement [i][ ][Set ID][ ][OK/NG][Data][x]10. Tint (Command: k j) To adjust screen tint. You can also adjust tint in the PICTURE menu. Transmission [k][j][ ][Set ID][ ][Data][Cr] Data Red: 00 ~ Green: 64 (*transmit by Hexadecimal code) *Refer to ‘Real data mapping’. See page 117. Acknowledgement [ j ][ ][Set ID][ ][OK/NG][Data][x]](https://usermanual.wiki/LG-Electronics-USA/M2080DFM/User-Guide-1301248-Page-120.png)
![APPENDIXAPPENDIX11. Sharpness (Command: k k) To adjust screen sharpness. You can also adjust sharpness in the PICTURE menu. Transmission [k][k][ ][Set ID][ ][Data][Cr] Data Min: 00 ~ Max: 64 (*transmit by Hexadecimal code) *Refer to ‘Real data mapping’. See page 117. Acknowledgement [k][ ][Set ID][ ][OK/NG][Data][x]12. OSD Select (Command: k l) To select OSD (On Screen Display) on/off. Transmission [k][l][ ][Set ID][ ][Data][Cr] Data 00: OSD off Data 01: OSD on Acknowledgement [l][ ][Set ID][ ][OK/NG][Data][x]13. Remote Control Lock Mode (Command: k m) To lock the remote control and the front panel controls on the set. Transmission [k][m][ ][Set ID][ ][Data][Cr] Data 00: Lock off Data 01: Lock on Acknowledgement [m][ ][Set ID][ ][OK/NG][Data][x] If you’re not using the remote control and front panel controls on the TV, use this mode. When main power is on/off, remote control lock is released. If Key Lock is on in the standby mode, TV will not turn on by POWER button of remote control and on the TV.14. Treble (Command: k r) To adjust treble. You can also adjust treble in the AUDIO menu. Transmission [k][r][ ][Set ID][ ][Data][Cr] Data Min: 00 ~ Max: 64 (*transmit by Hexadecimal code) *Refer to ‘Real data mapping’. See page 117. Acknowledgement [r][ ][Set ID][ ][OK/NG][Data][x]15. Bass (Command: k s) To adjust bass. You can also adjust bass in the AUDIO menu. Transmission [k][s][ ][Set ID][ ][Data][Cr] Data Min: 00 ~ Max: 64 (*transmit by Hexadecimal code) *Refer to ‘Real data mapping’. See page 117. Acknowledgement [s][ ][Set ID][ ][OK/NG][Data][x]16. Balance (Command: k t) To adjust balance. You can also adjust balance in the AUDIO menu. Transmission [k][t][ ][Set ID][ ][Data][Cr] Data Min: 00 ~ Max: 64 (*transmit by Hexadecimal code) *Refer to ‘Real data mapping’. See page 117. Acknowledgement [t][ ][Set ID][ ][OK/NG][Data][x]17. Color Temperature (Command: k u) To adjust color temperature. You can also adjust color temperature in the PICTURE menu. Transmission [k][u][ ][Set ID][ ][Data][Cr] Data 00: Medium 01: Cool 02: Warm Acknowledgement [u][ ][Set ID][ ][OK/NG][Data][x]18. Energy Saving (Command: j q) To control the energy saving function. Transmission [ j ][q][ ][Set ID][ ][Data][Cr] Data 00: Energy saving - off 01: Energy saving - Minimum 02: Energy saving - Medium 03: Energy saving - Maximum 04: Energy saving - Screen off Acknowledgement [q][ ][Set ID][ ][OK/NG][Data][x]19. Auto Configuration (Command: j u) To adjust picture position and minimize image shaking automatically. Auto configuration only works in RGB-PC mode. Transmission [ j ][u][ ][Set ID][ ][Data][Cr] Data 01: To set Acknowledgement [u][ ][Set ID][ ][OK/NG][Data][x]20. Channel Tuning (Command: m a) To tune channel to following physical/major/minor number. Transmission [m][a][ ][Set ID][ ][Data00][ ][Data01] [ ][Data02][ ][Data03][ ][Data04][ ][Data05][Cr] Digital channels have a Physical, Major, and Minor channel number. The Physical number is the actual digital channel number, the Major is the number that the channel should be mapped to, and the Minor is the sub-channel. Since the ATSC tuner automatically maps the channel to the Major number, the Physical number is not required when sending a command. Data 00: Physical Channel Number NTSC air: 02~45, NTSC cable: 01, 0E~7D ATSC air: 01~45, ATSC cable: 01~87 Data 01 & 02: Major Channel Number Data 01: High byte Data 02: Low byte Two bytes are available for the Major and Minor, normally only the second byte is used. Data 03 & 04: Minor Channel Number Not needed for NTSC.](https://usermanual.wiki/LG-Electronics-USA/M2080DFM/User-Guide-1301248-Page-121.png)
![APPENDIXData5: The table above lists the binary code which must be converted to Hexadecimal before sending. For example: The binary code to tune the sub source to an NTSC cable channel is “1000 0001”, which translates to “81” in Hex. * 7th bit : For which source do you want to change the channel. * 6th bit: Use a two part or one part channel. Most cases just use 0 since it’s ignored when using NTSC. * 5th bit: Use 0 with NTSC since it can only use the physical channel number. Normally use 1 for ATSC since most times it doesn’t matter what the physi-cal number is. * 4th bit: Set to 0. * 3-0 bits: Choose signal type. * Tune Command Examples: 1. Tune to the analog (NTSC) cable channel 35. Data 00 = Physical of 35 = 23 Data 01 & 02 = No Major = 00 00 Data 03 & 04 = No Minor = 00 00 Data 05 = 0000 0001 in binary = 01 Total = ma 00 23 00 00 00 00 01 2. Tune to the digital (ATSC) local channel 30-3. Data 00 = Don’t know Physical = 00 Data 01 & 02 = Major is 30 = 00 1E Data 03 & 04 = Minor is 3 = 00 03 Data 05 = 0010 0010 in binary = 22 Total = ma 00 00 00 1E 00 03 22 Acknowledgement[a][ ][Set ID][ ][OK][Data00][Data01] [Data02][Data03][Data04][x][a][ ][Set ID][ ][NG][Data00][x]21. Channel Add/Del (Command: m b) To add and delete the channels. Transmission [m][b][ ][Set ID][ ][Data][Cr] Data 00: Channel Delete Data 01: Channel Add Acknowledgement [b][ ][Set ID][ ][OK/NG][Data][x]22. Key (Command: m c) To send IR remote control code. Transmission [m][c][ ][Set ID][ ][Data][Cr] See page 118.. Acknowledgement [c][ ][Set ID][ ][OK/NG][Data][x] When TV is in the standby mode, TV will turn on by POWER button of remote control only.23. Backlight (Command: m g) To adjust screen backlight. Transmission [m][g][ ][Set ID][ ][Data][Cr] Data Min:00 ~ Max:64 (*transmit by Hexadecimal code) *Refer to ‘Real data mapping’. Acknowledgement [g][ ][Set ID][ ][OK/NG][Data][x] Step NTSC AirNTSC CableATSC AirATSC Cable_std ATSC Cable_hrcATSC Cable_ircATSC cable_autoReserved...Reserved100110011x1200001111x1300000000x14xxxxxxxxxxReserved501UseNo UseUsing PhysicalChannel601TwoOneTwo/One Part Channe701MainSubMain/Sub Picture 001010101x1](https://usermanual.wiki/LG-Electronics-USA/M2080DFM/User-Guide-1301248-Page-122.png)