LG Electronics USA M4210LG LCD MONITOR User Manual G User s manual
LG Electronics USA LCD MONITOR G User s manual
UserManual.wiki
>
LG Electronics USA
>
M4210LG User Manual
Users Manual
Navigation menu
Upload a User Manual
Namespaces
Wiki Guide
HTML
PDF
Info
Views
User Manual
Discussion / Help
Navigation


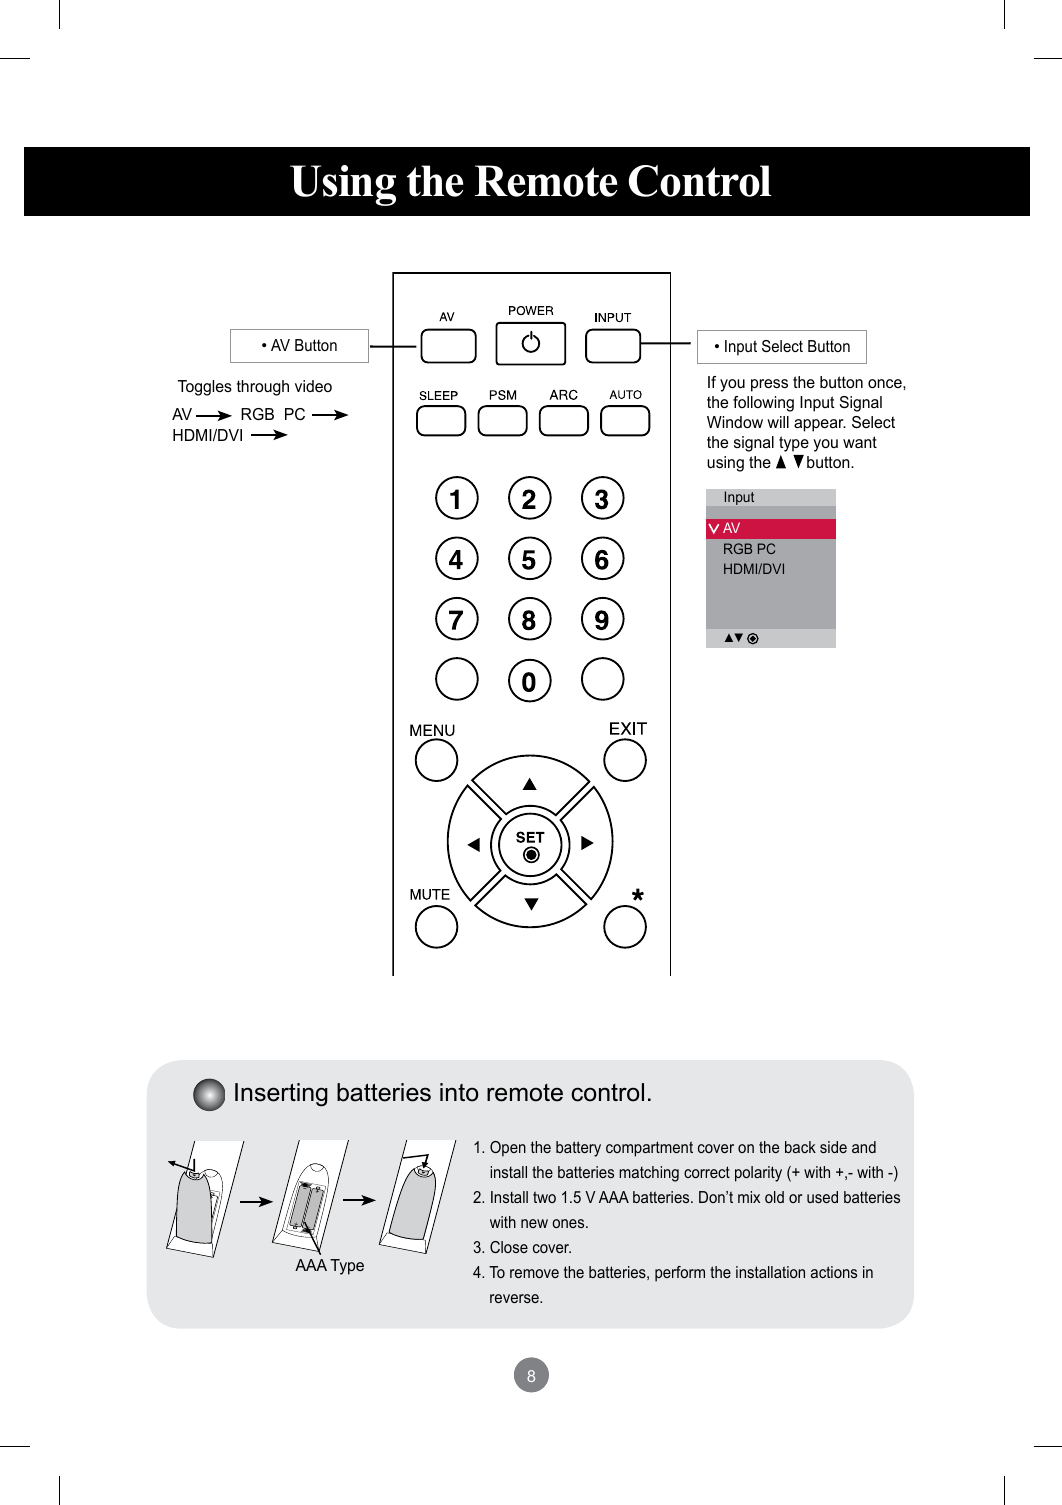
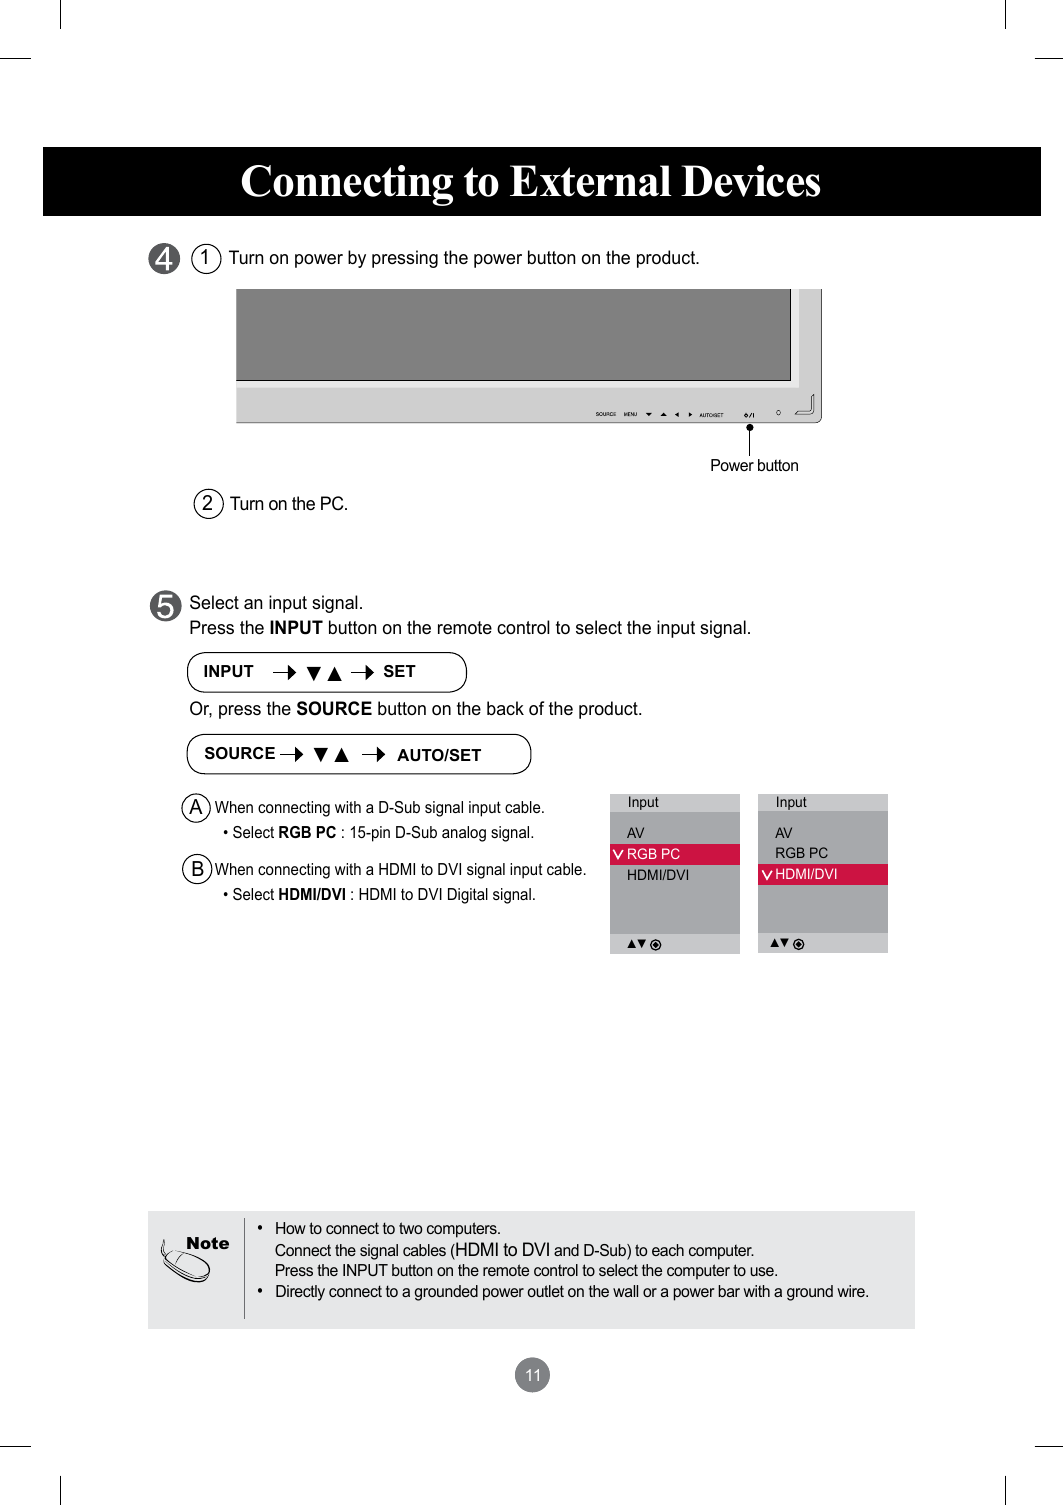

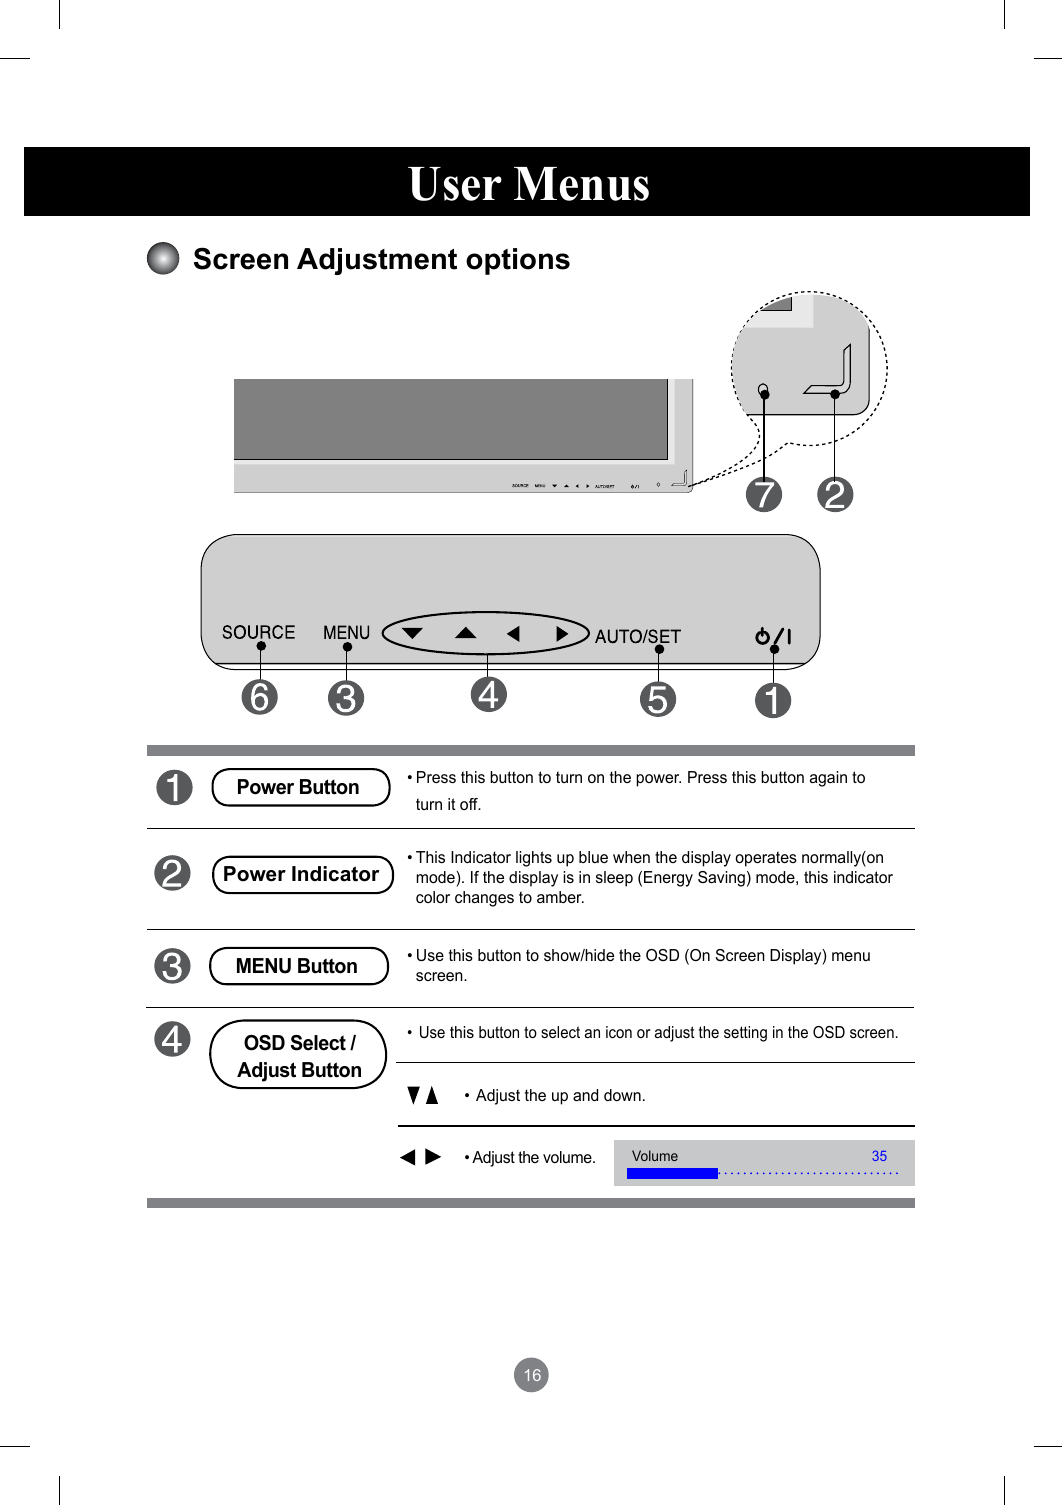
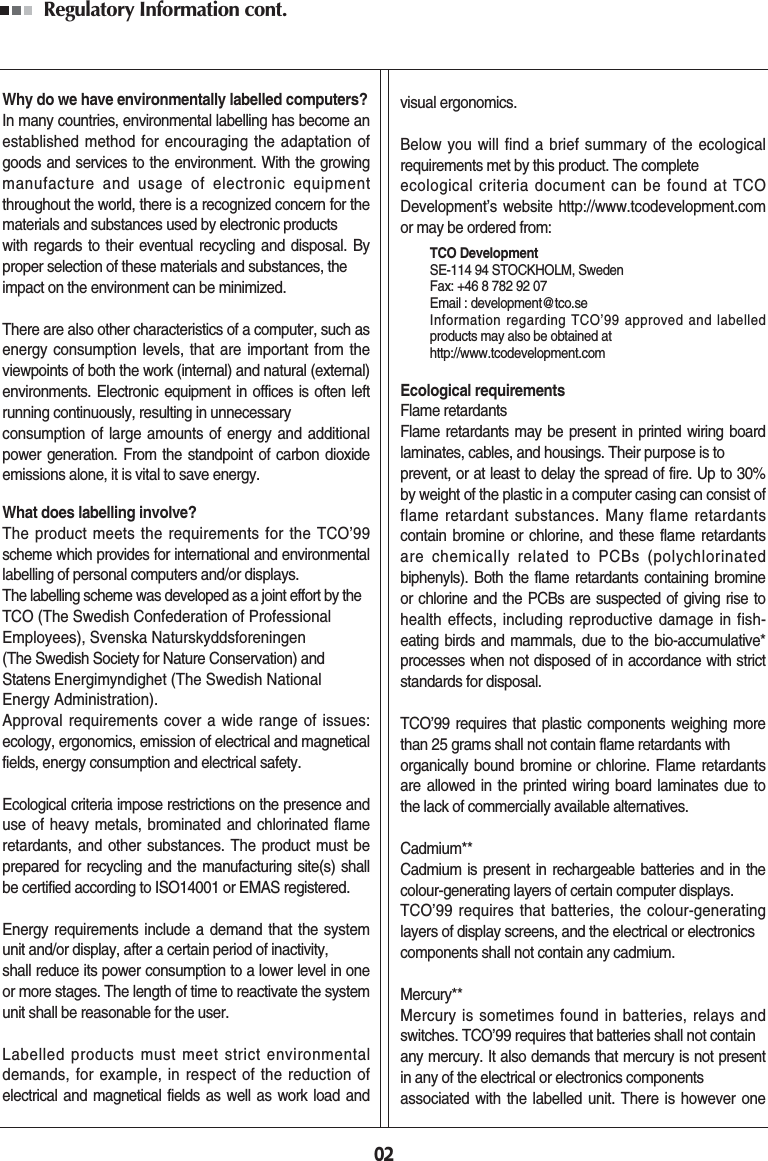
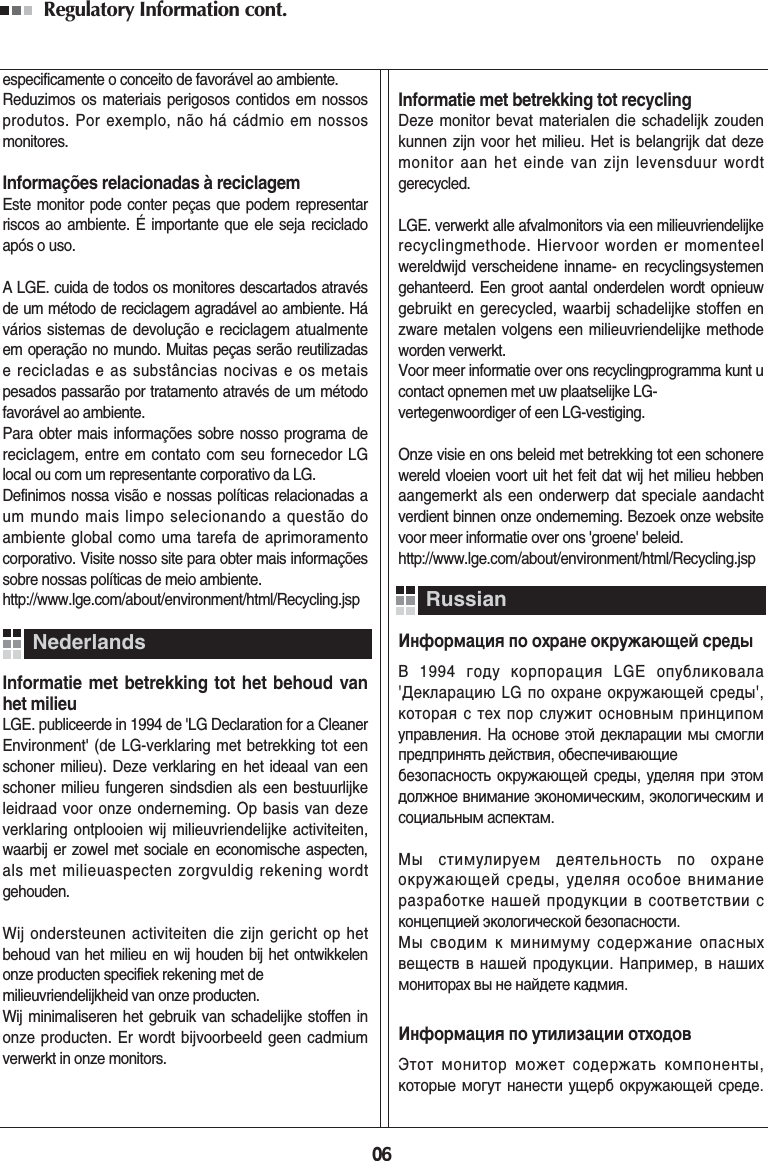
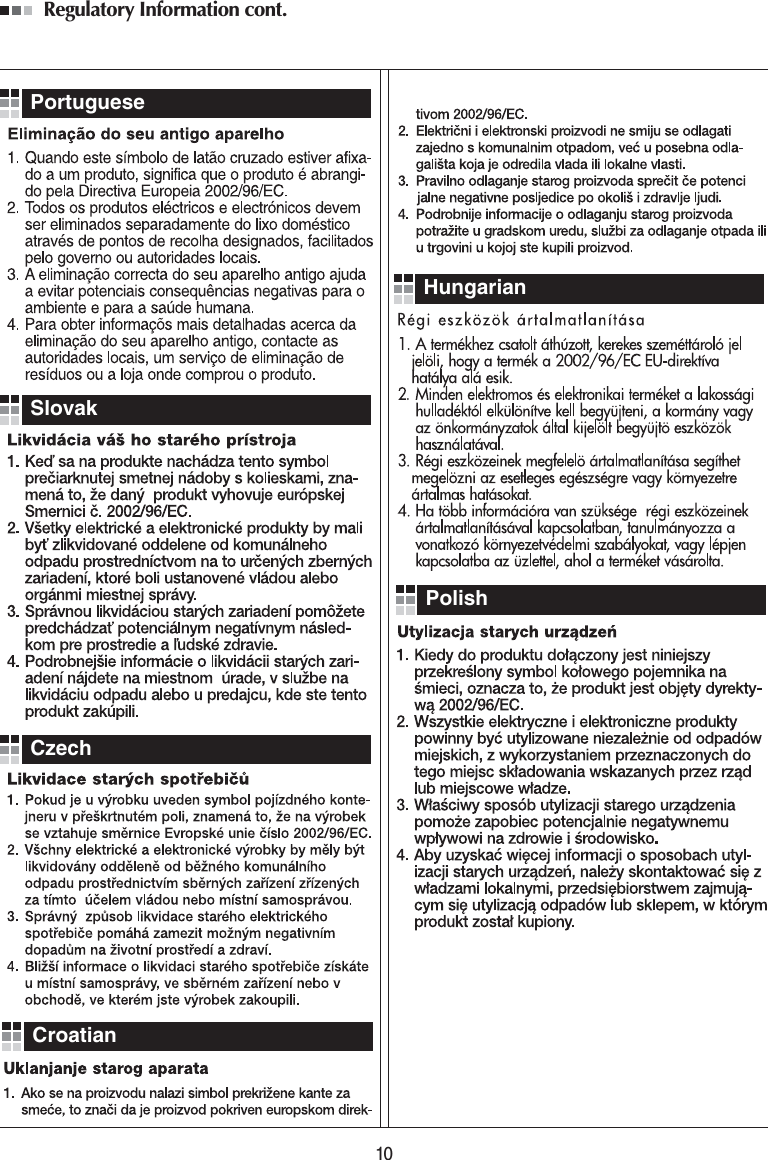
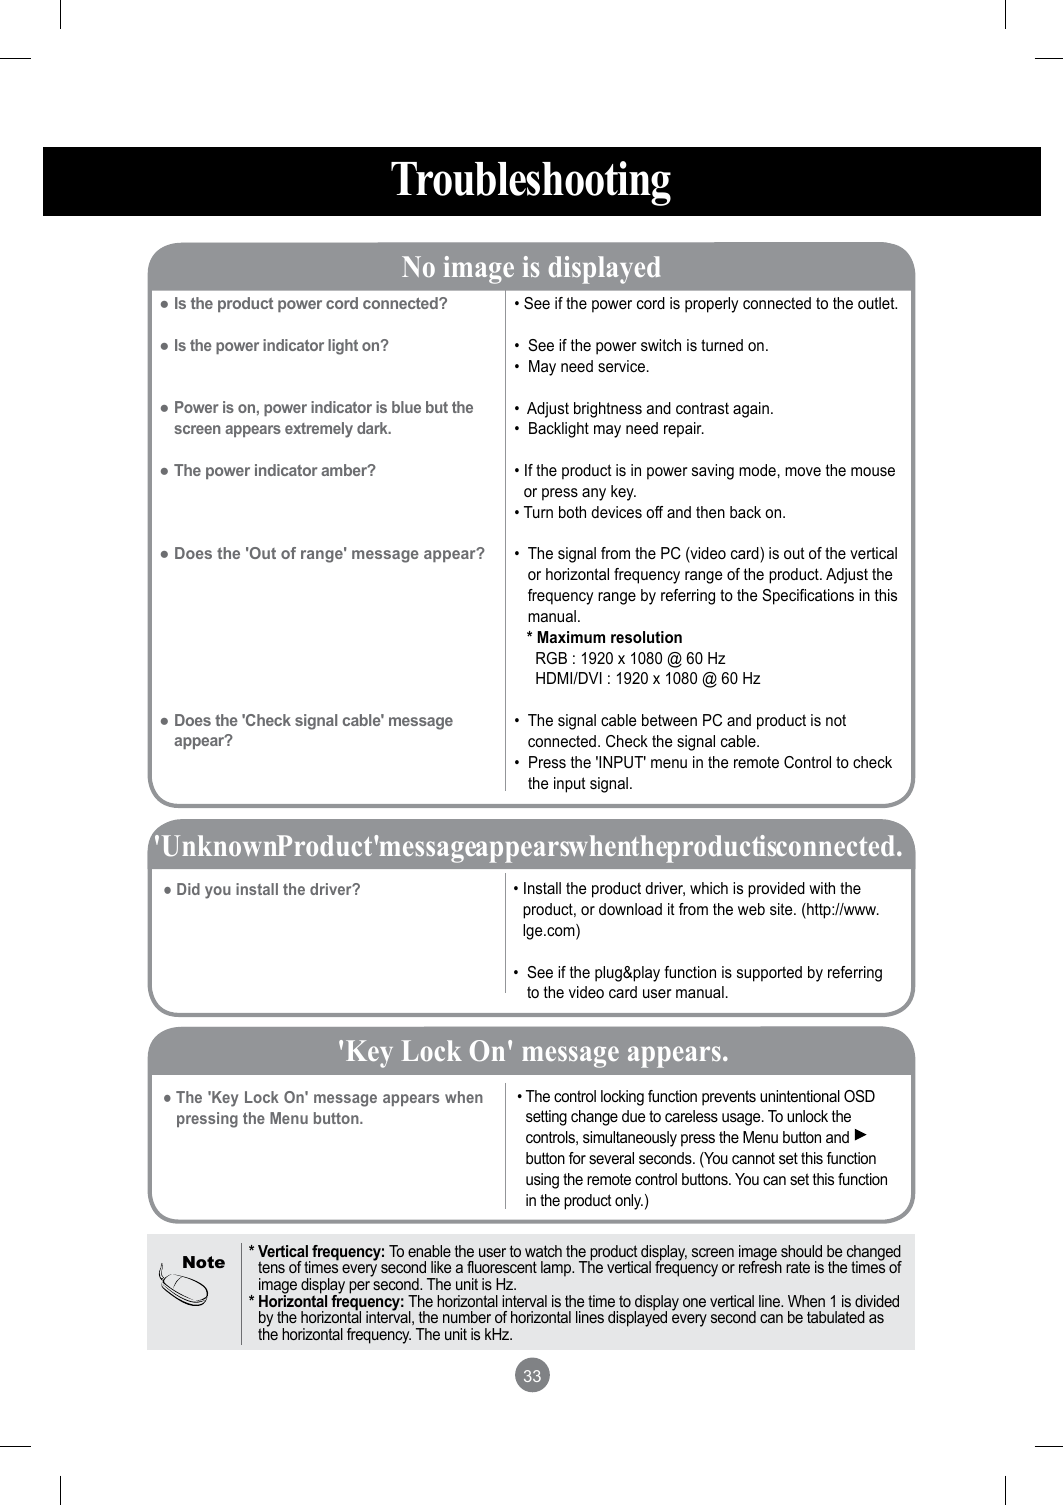
![17User Menus• This is where the unit receives signals from the remote control.Screen Adjustment options[For PC Analog signal]AUTO/SET ButtonAV Composite Video, Separate VideoRGB PC 15-pin D-Sub analog signalHDMI/DVI Digital signal- Toggles between inputsSOURCE ButtonIR Receiver[When 1920 x 1080 is selected]InputAVRGB PCHDMI/DVI▲▼Auto in progressFor optimal display changeresolution to 1920 x 1080Auto in progressSOURCE AUTO/SET ▼▲](https://usermanual.wiki/LG-Electronics-USA/M4210LG/User-Guide-1273443-Page-17.png)
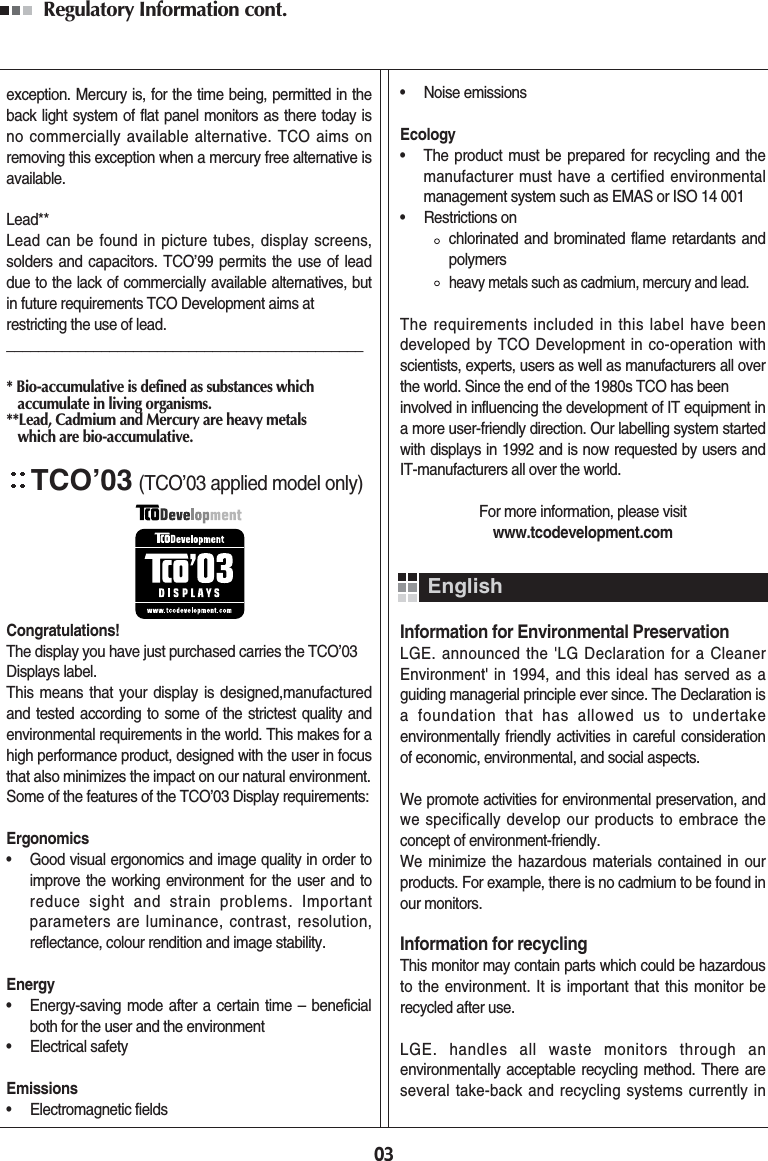
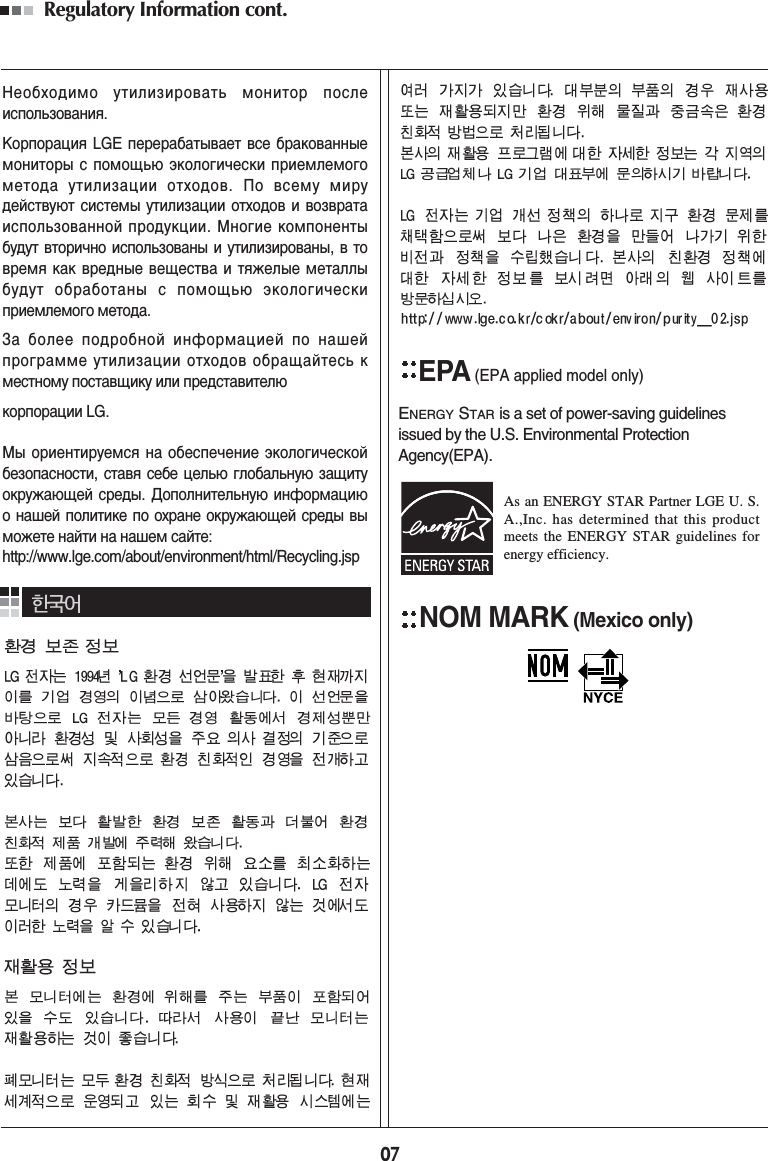
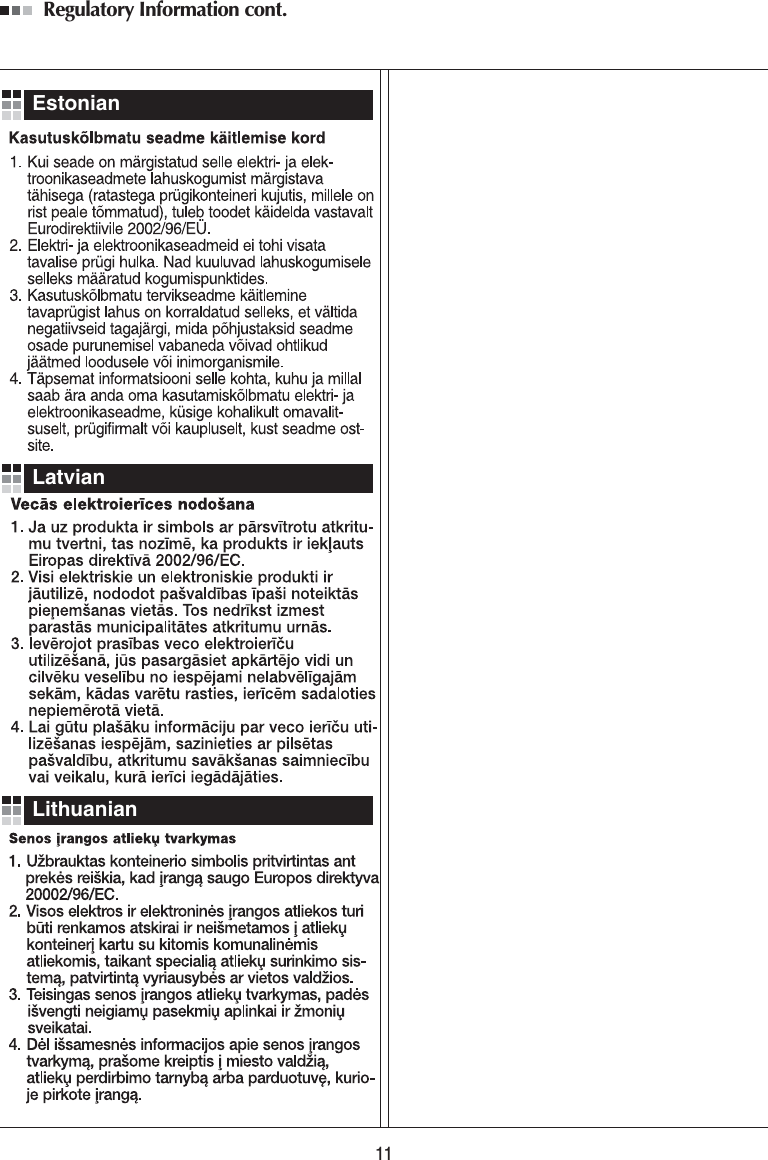
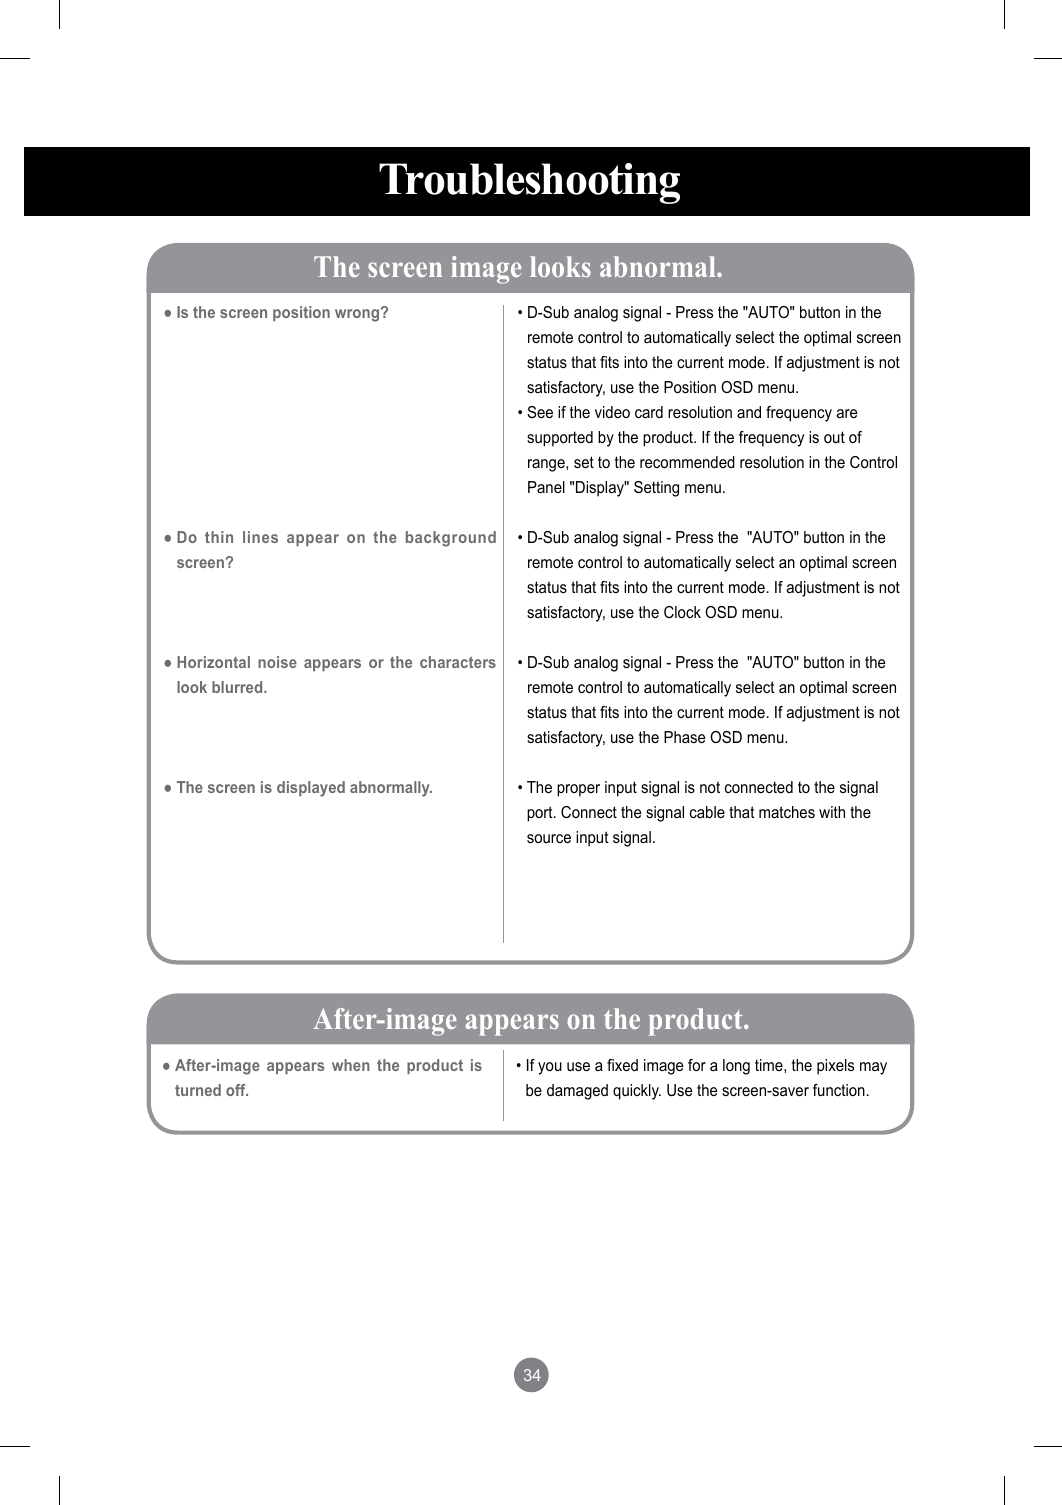
![19User MenusHow to adjust the OSD (On Screen Display) screen• Use the remote control to adjust the OSD screen.How to adjust the screen automaticallyPress the AUTO/SET button (AUTO button on a remote Control) in the PC analog signal. Then optimal screen settings will be selected that fit into the current mode. If adjustment is not satisfactory, you can adjust the screen manually.Press the MENU Button, then the main menu of the OSD appears.To access a control, use the Buttons. When the icon you want becomes highlighted, press the SET Button.Use the Buttons to adjust the item to the desired level.Accept the changes by pressing the SET Button.Exit the OSD by pressing the EXIT Button.123456Pops up the menu screenMove where you want to adjustMove where you want to adjustSelect a menu iconSelect a menu icon Adjust the status Save adjustmentExit from the menu screen.[When 1920 x 1080 is selected]Auto in progress](https://usermanual.wiki/LG-Electronics-USA/M4210LG/User-Guide-1273443-Page-19.png)

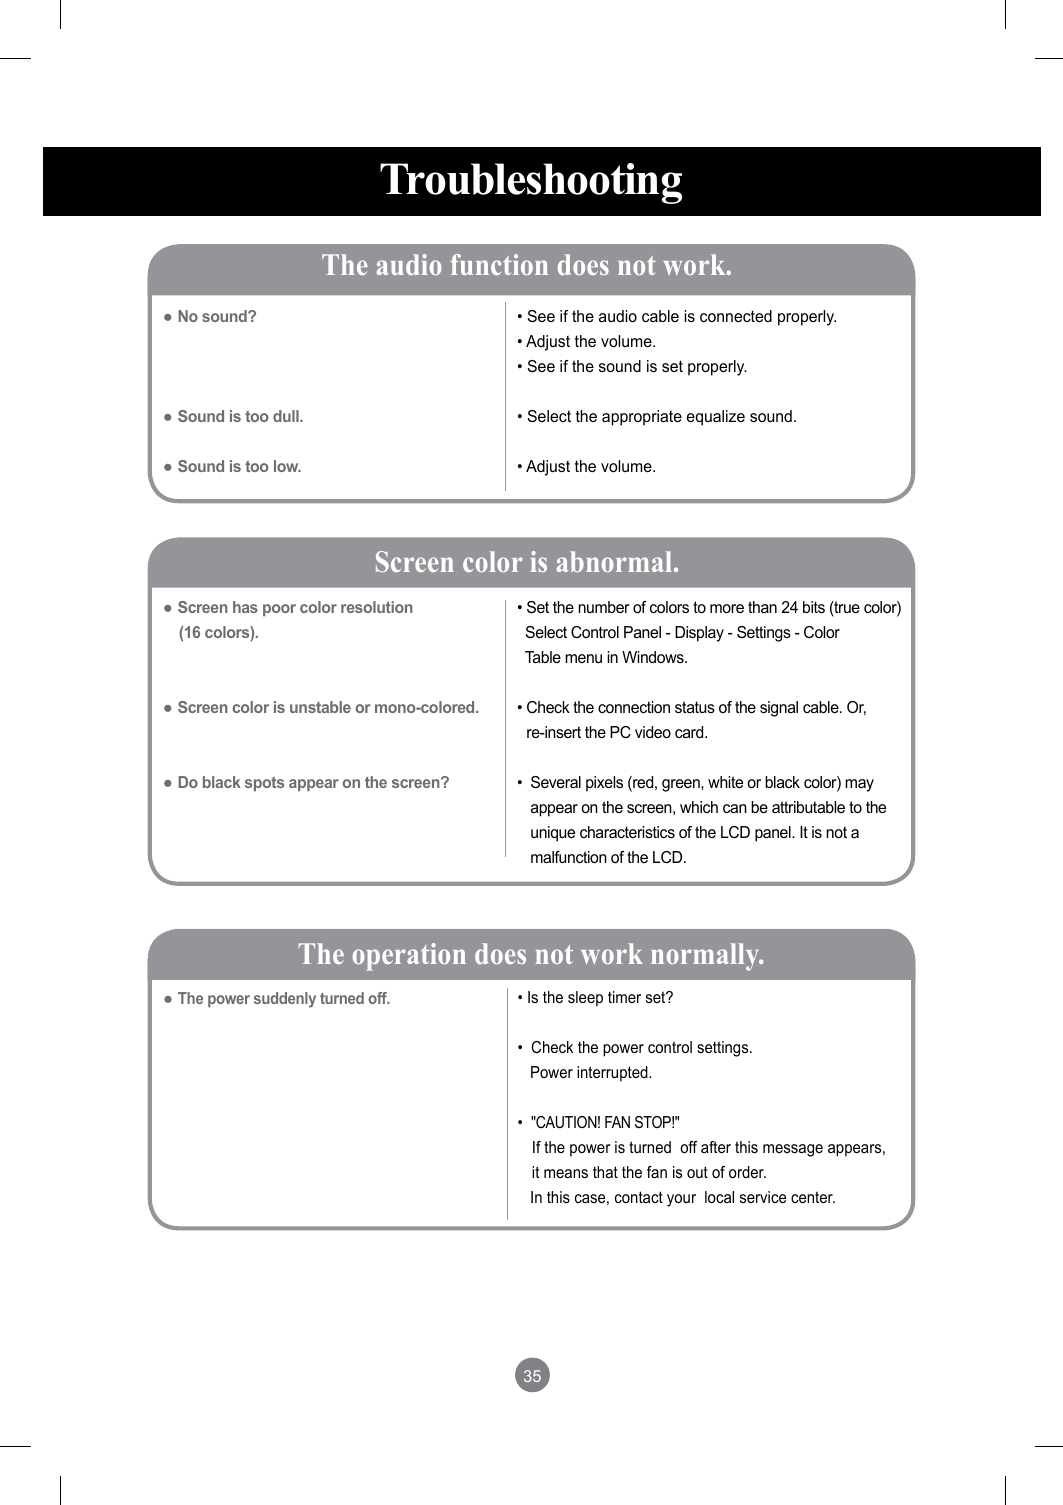
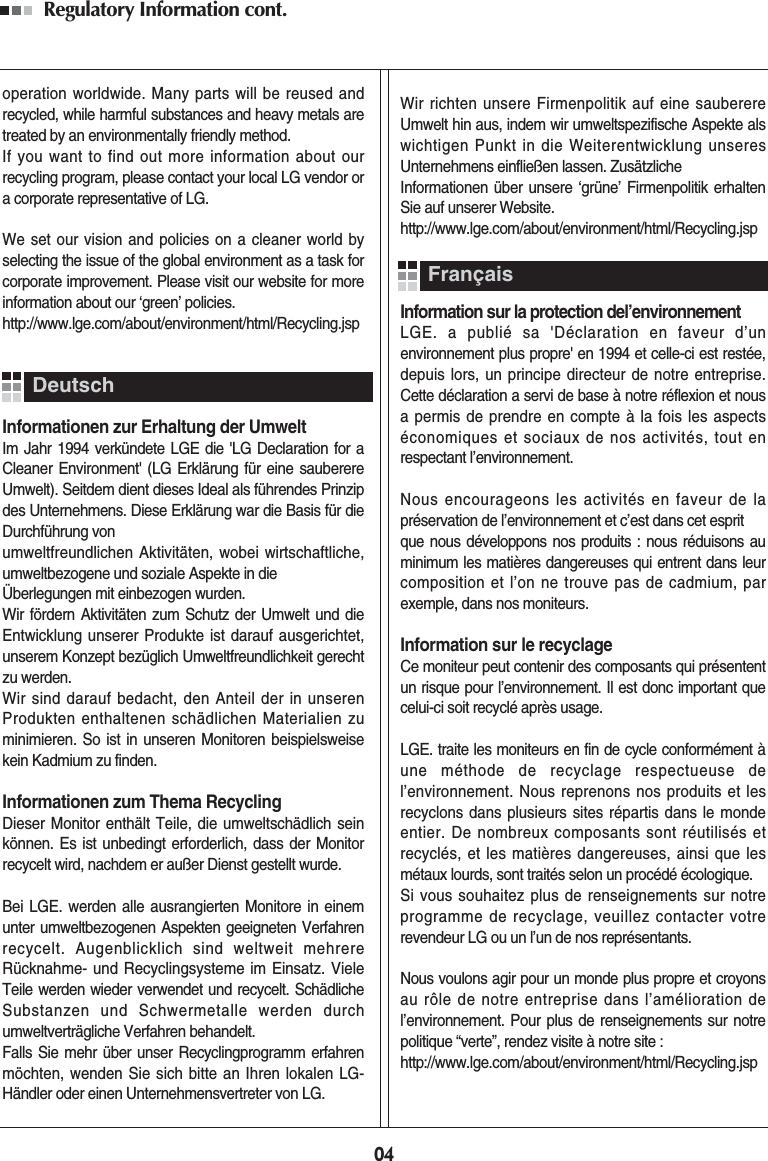
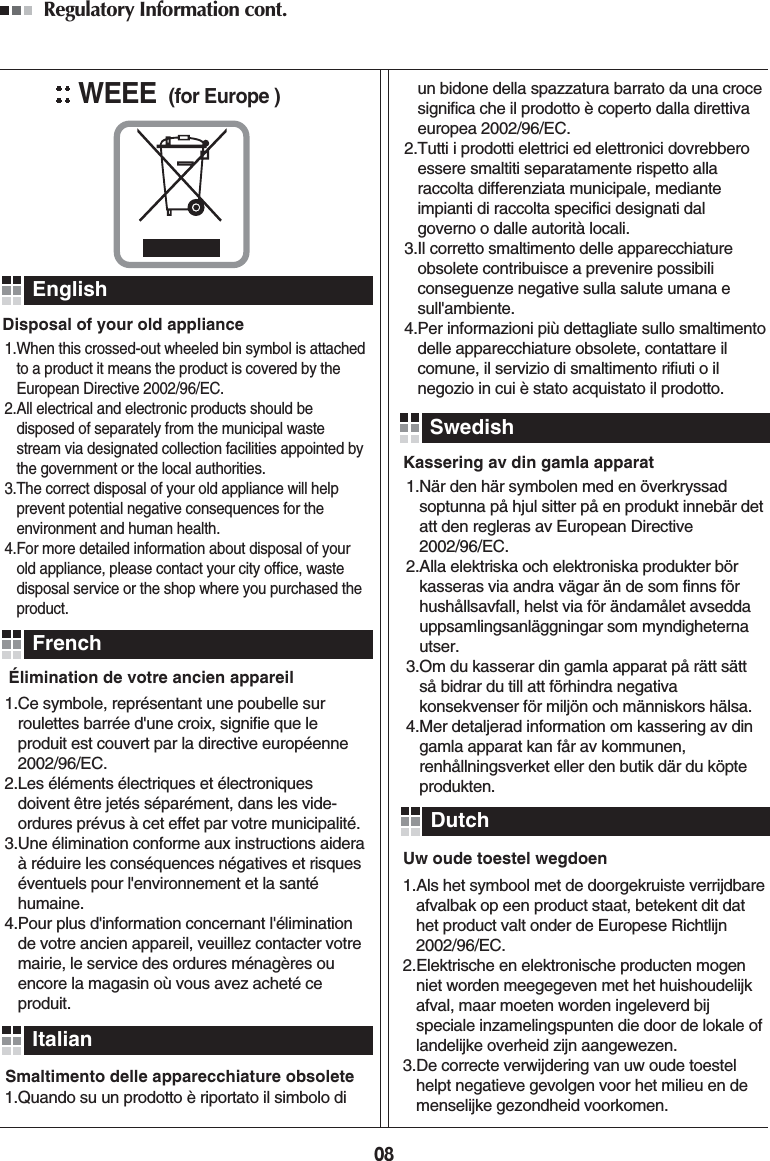
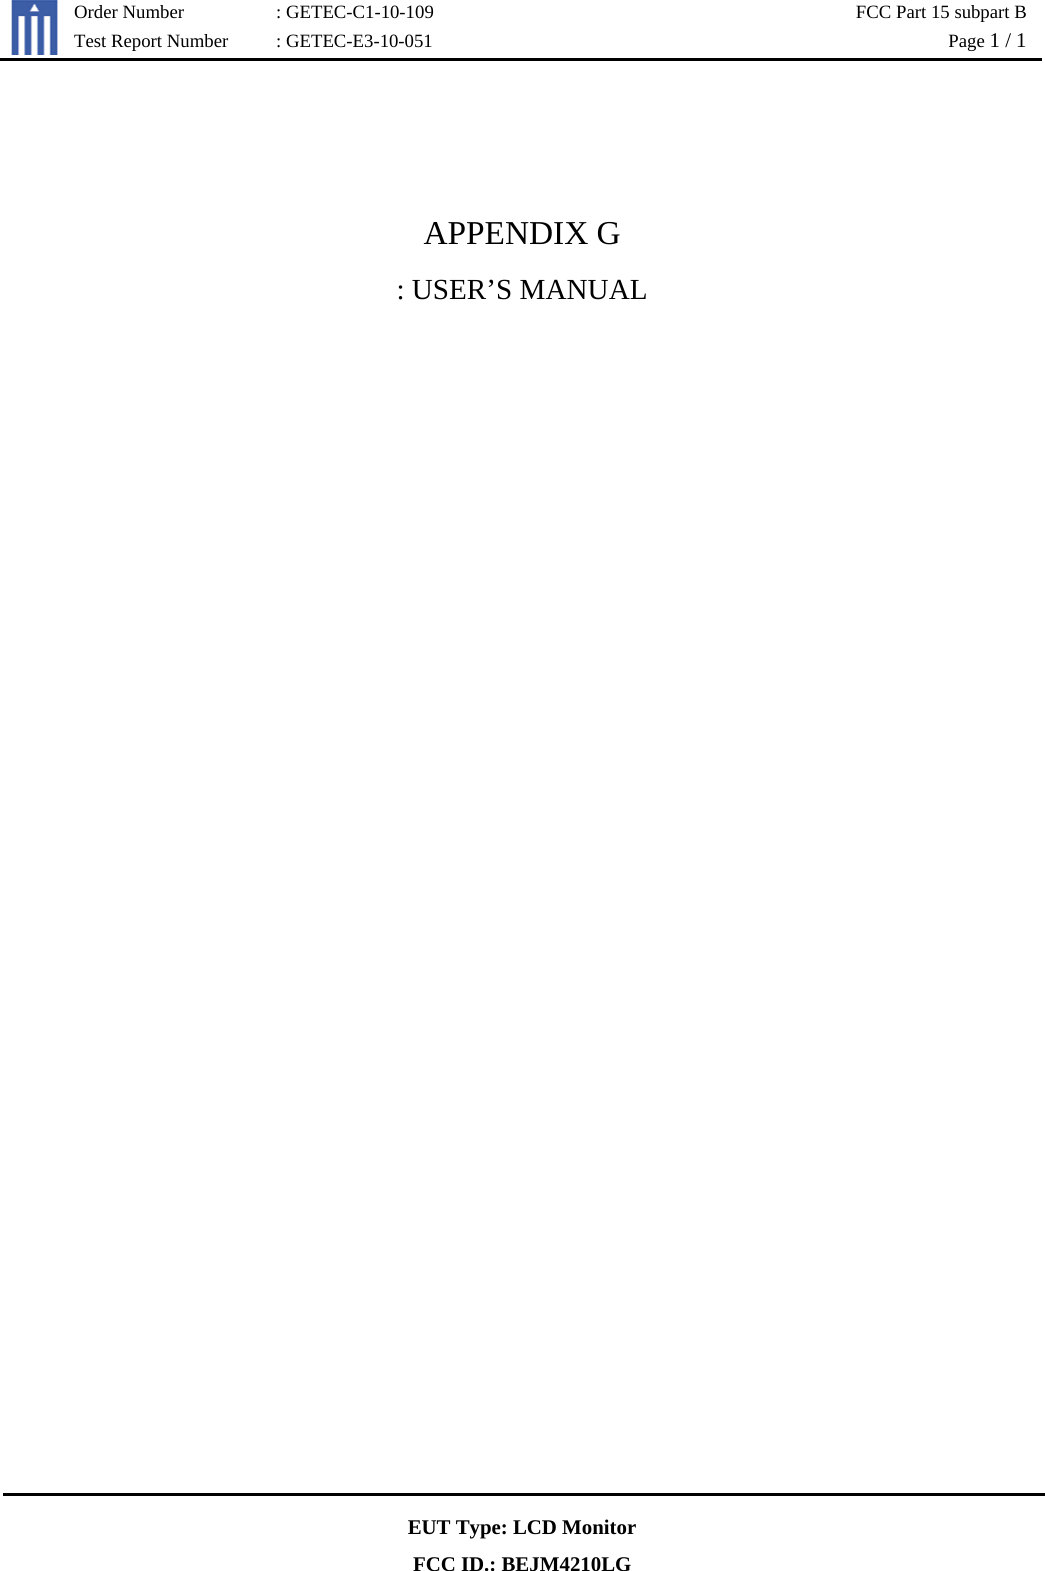
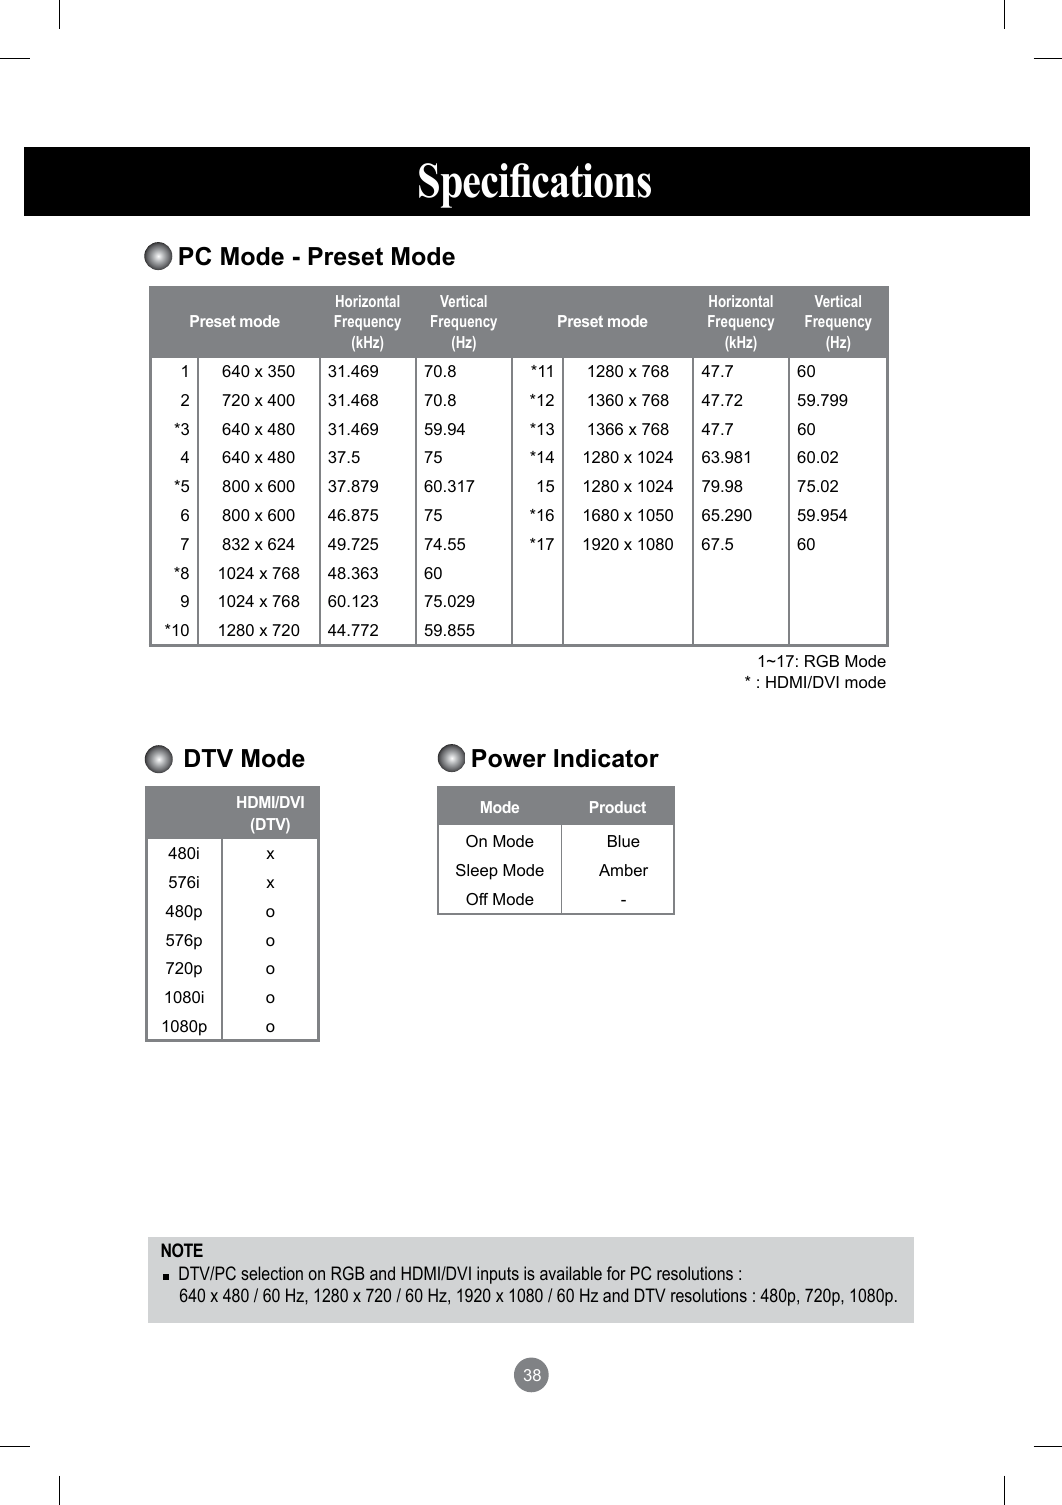
![36LCD Panel 106.73 cm (42.02 inch) TFT (Thin Film Transistor)LCD (Liquid Crystal Display) PanelVisible diagonal size: 106.73 cm0.4845 mm (H) x 0.4845 (V) mm (Pixel Pitch)Power Rated Voltage AC 100-240 V~ 50 / 60 Hz 2.2 APower Consumption On Mode : 220 W Typ. Sleep Mode : ≤ 1 W (RGB) / 2 W (HDMI/DVI) Off Mode : ≤ 0.5 WDimensions & WeightWidth x Height x Depth[1] 99.56 cm (39.19 inch) x 67.41 cm (26.54 inch) x 29.30 cm (11.54 inch)[2] 99.56 cm (39.19 inch) x 58.76 cm (23.13 inch) x 11.37 cm (4.47 inch)[3] 99.56 cm (39.19 inch) x 67.41 cm (26.54 inch) x 29.30 cm (11.54 inch)[4] 99.56 cm (39.19 inch) x 58.76 cm (23.13 inch) x 11.37 cm (4.47 inch)Net[1] 19.2 kg (42.33 lb) [2] 15.8 kg (34.83 lb)[3] 21.8 kg (48.06 lb) [4] 18.4 kg (40.57 lb)Specications NOTE Information in this document is subject to change without notice.The product specifications can change without prior notice for product improvement.[1] WH[2] WHDD[3] H[4] H](https://usermanual.wiki/LG-Electronics-USA/M4210LG/User-Guide-1273443-Page-36.png)
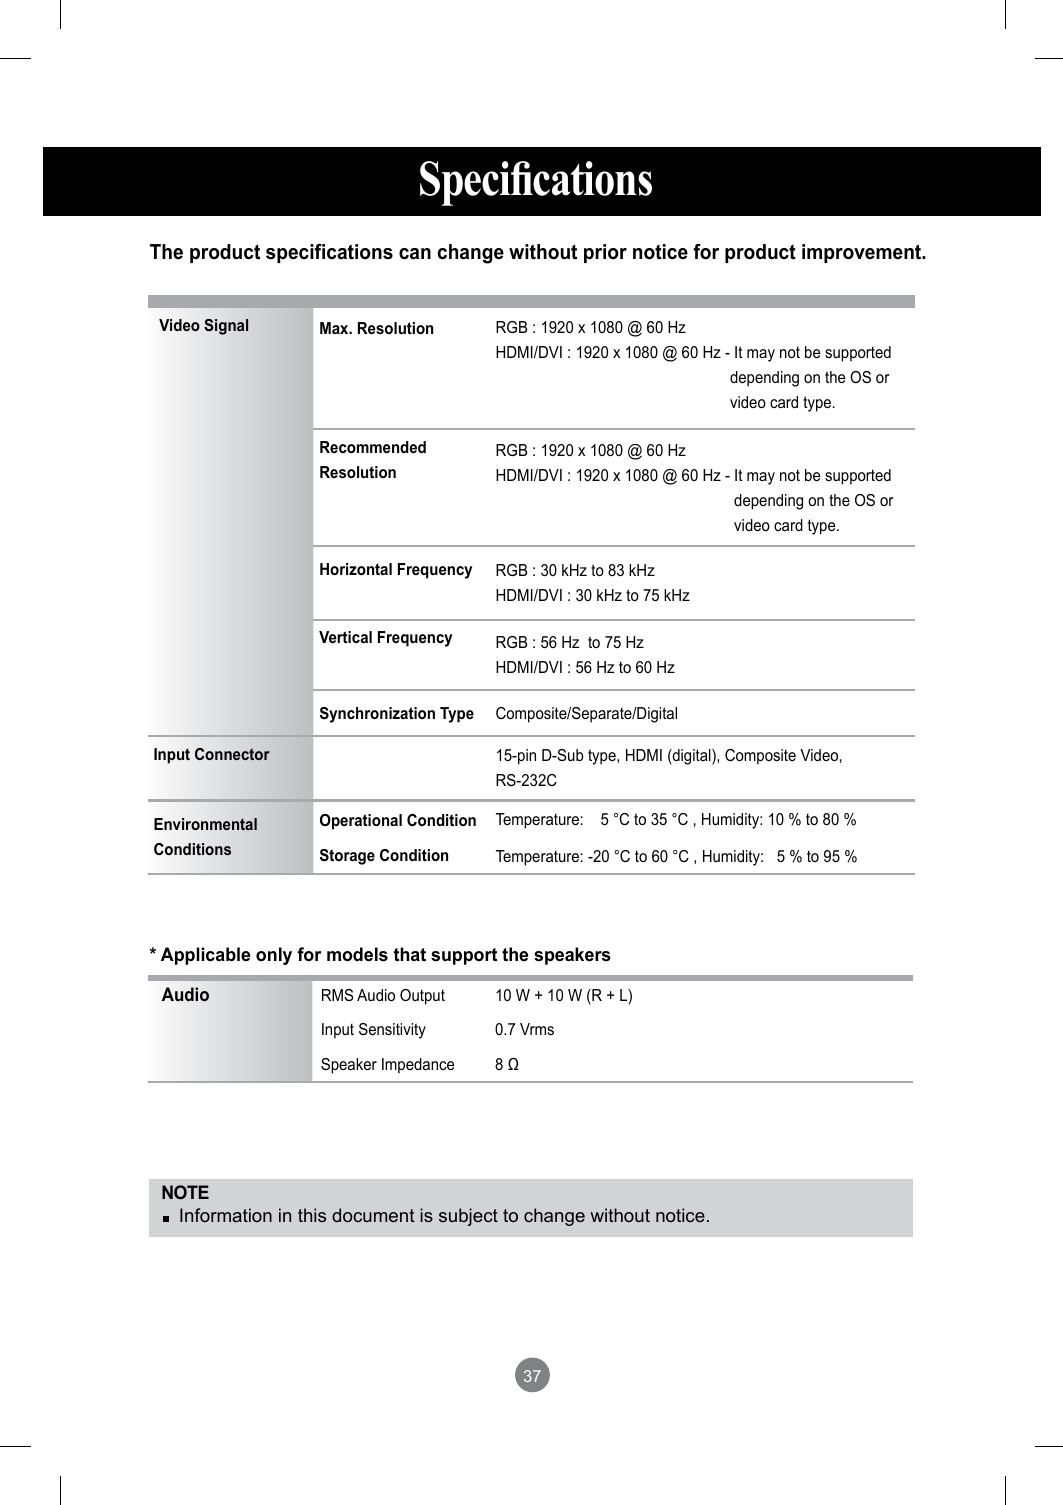
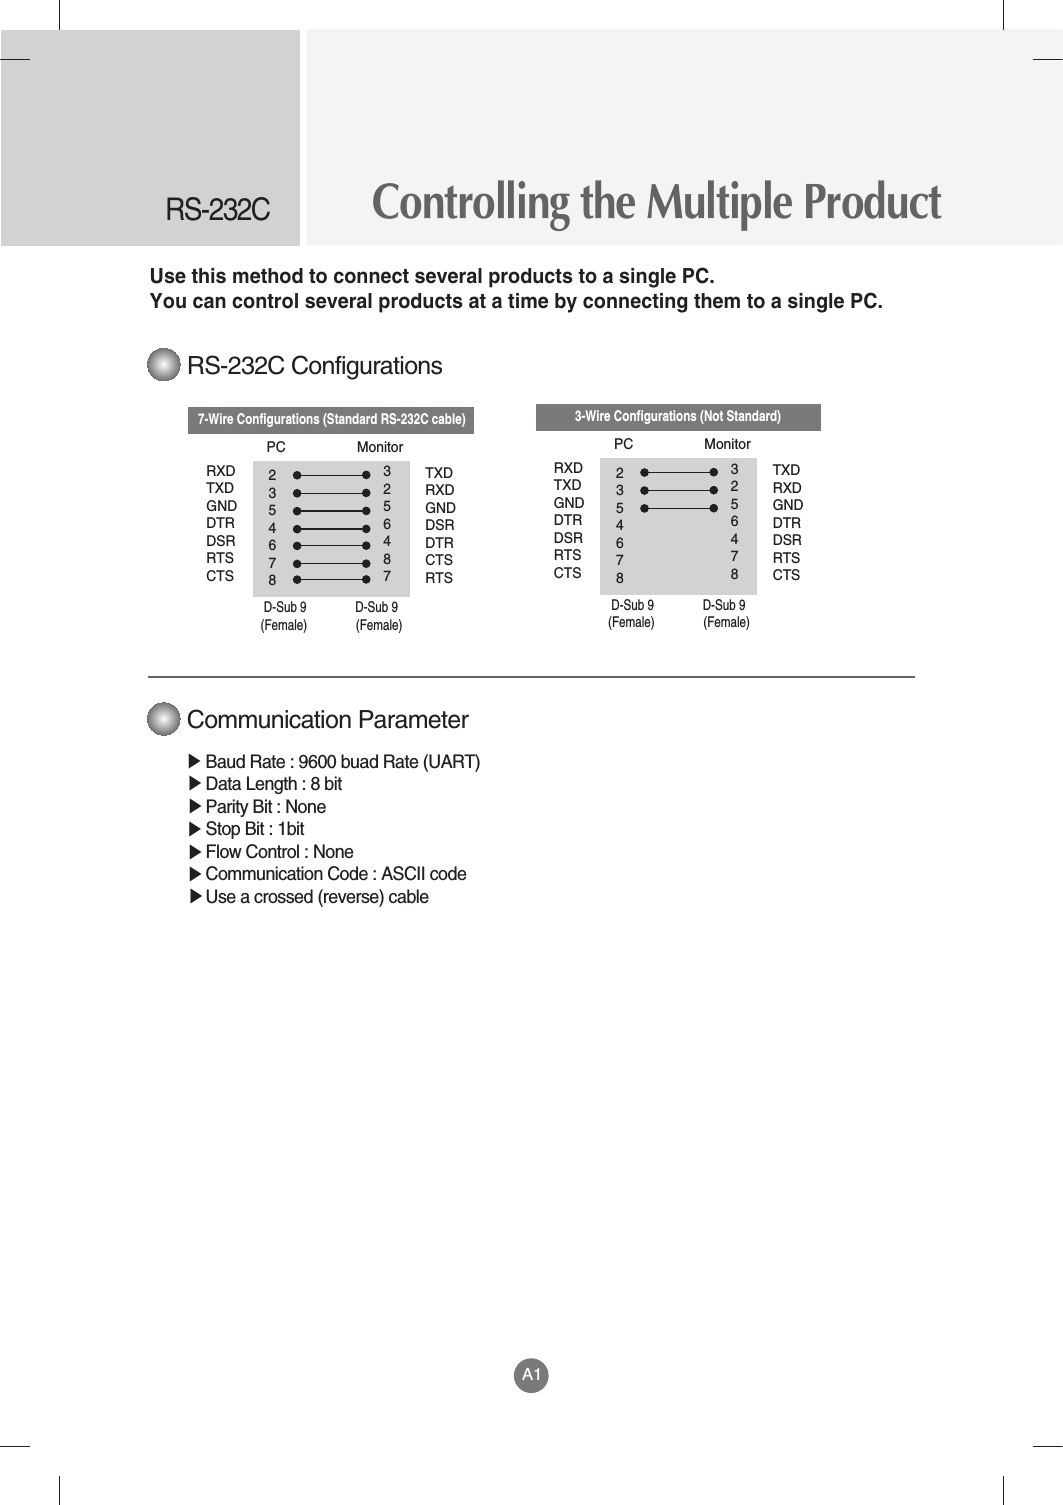
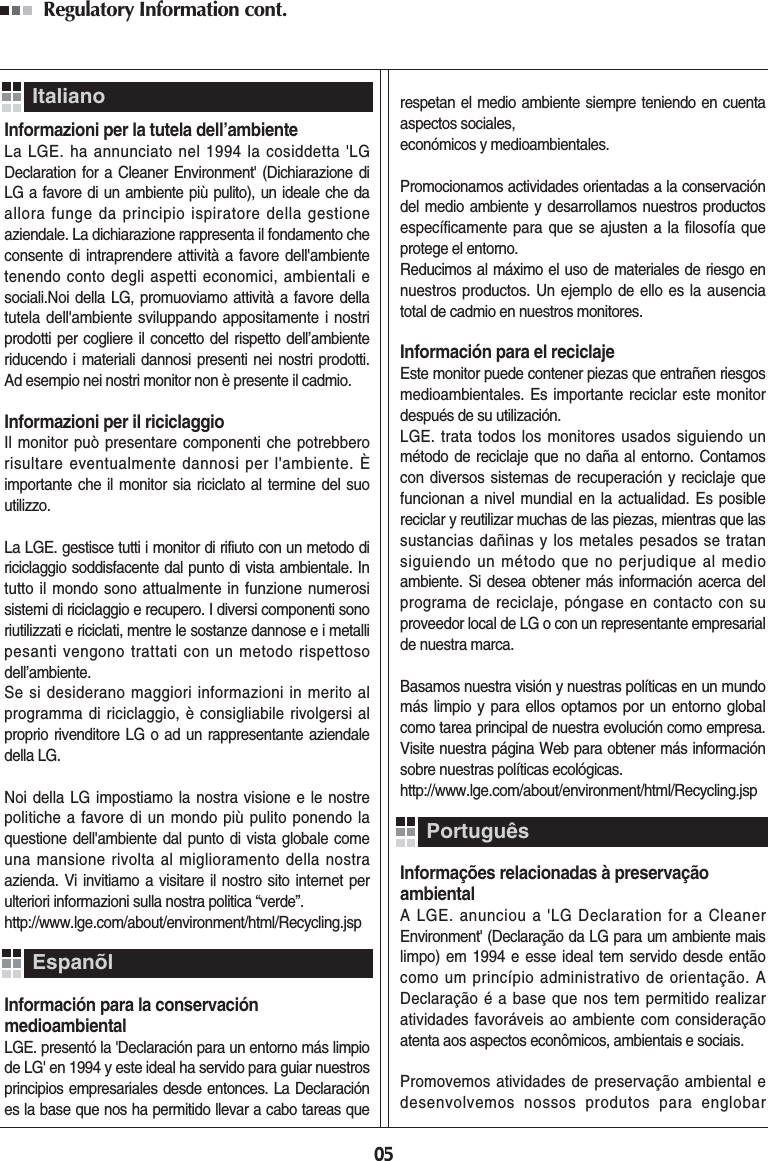
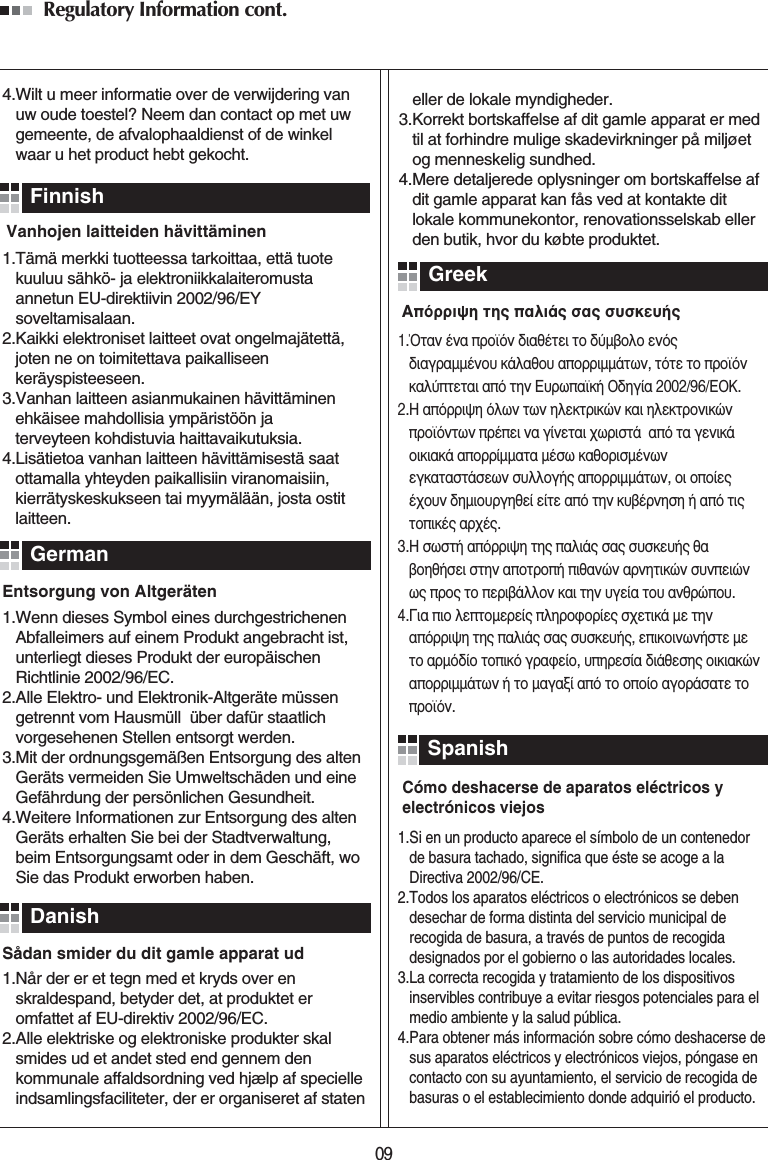
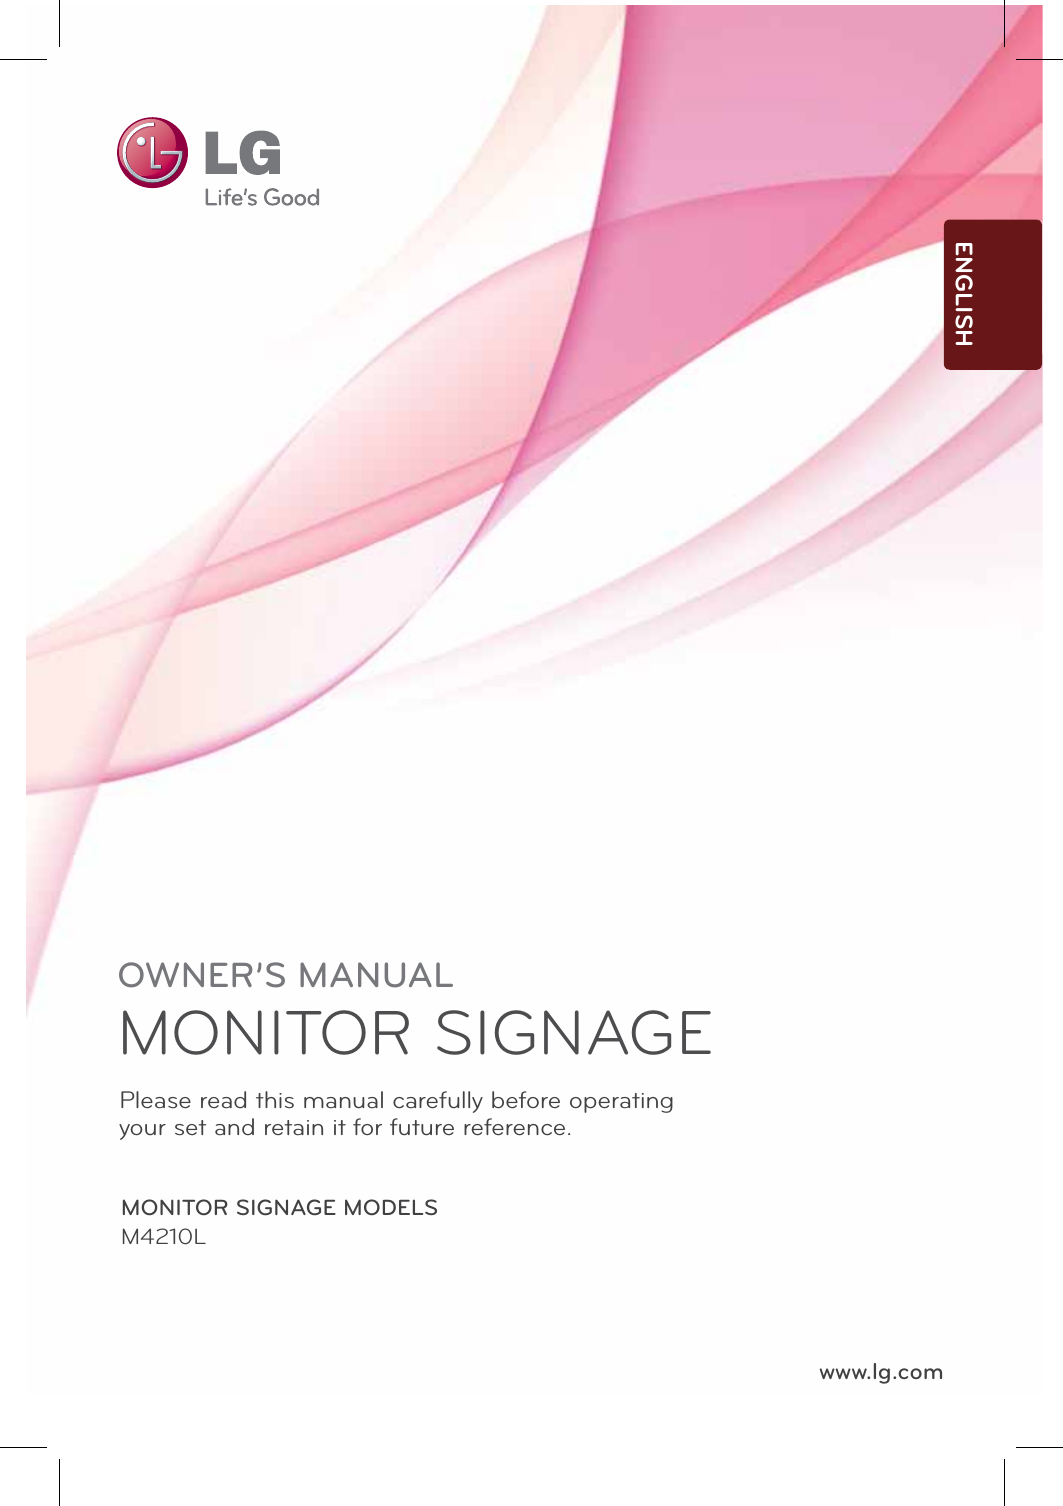
![Controlling the Multiple ProductRS-232CA4OK Acknowledgement[Command2][ ][Set ID][ ][OK][Data][x]* The Product transmits ACK (acknowledgement) based on this format whenreceiving normal data. At this time, if the data is data read mode, it indicatespresent status data. If the data is data write mode, it returns the data of the PC computer.Error Acknowledgement[Command2][ ][Set ID][ ][NG][Data][x]* If there is error, it returns NGTransmission[Command1][Command2][ ][Set ID][ ][Data][Cr]* [Command 1]: First command. (k, j, m, d, f, x)* [Command 2]: Second command.(a to u)* [Set ID]: Set up the Set ID number of product.range : 01Hto63H. by setting '0', server can control all products.* In case of operating with more than 2 sets using set ID as '0' at the sametime, it should not be checked the ack message.Because all sets will send the ack message, so it's impossible the checkthe whole ack messages. * [DATA]: To transmit command data.Transmit 'FF' data to read status of command.* [Cr]: Carriage ReturnASCII code ‘0 x 0 D’* [ ]: ASCII code Space (0 x 20)’Transmission / Receiving Protocol](https://usermanual.wiki/LG-Electronics-USA/M4210LG/User-Guide-1273443-Page-42.png)
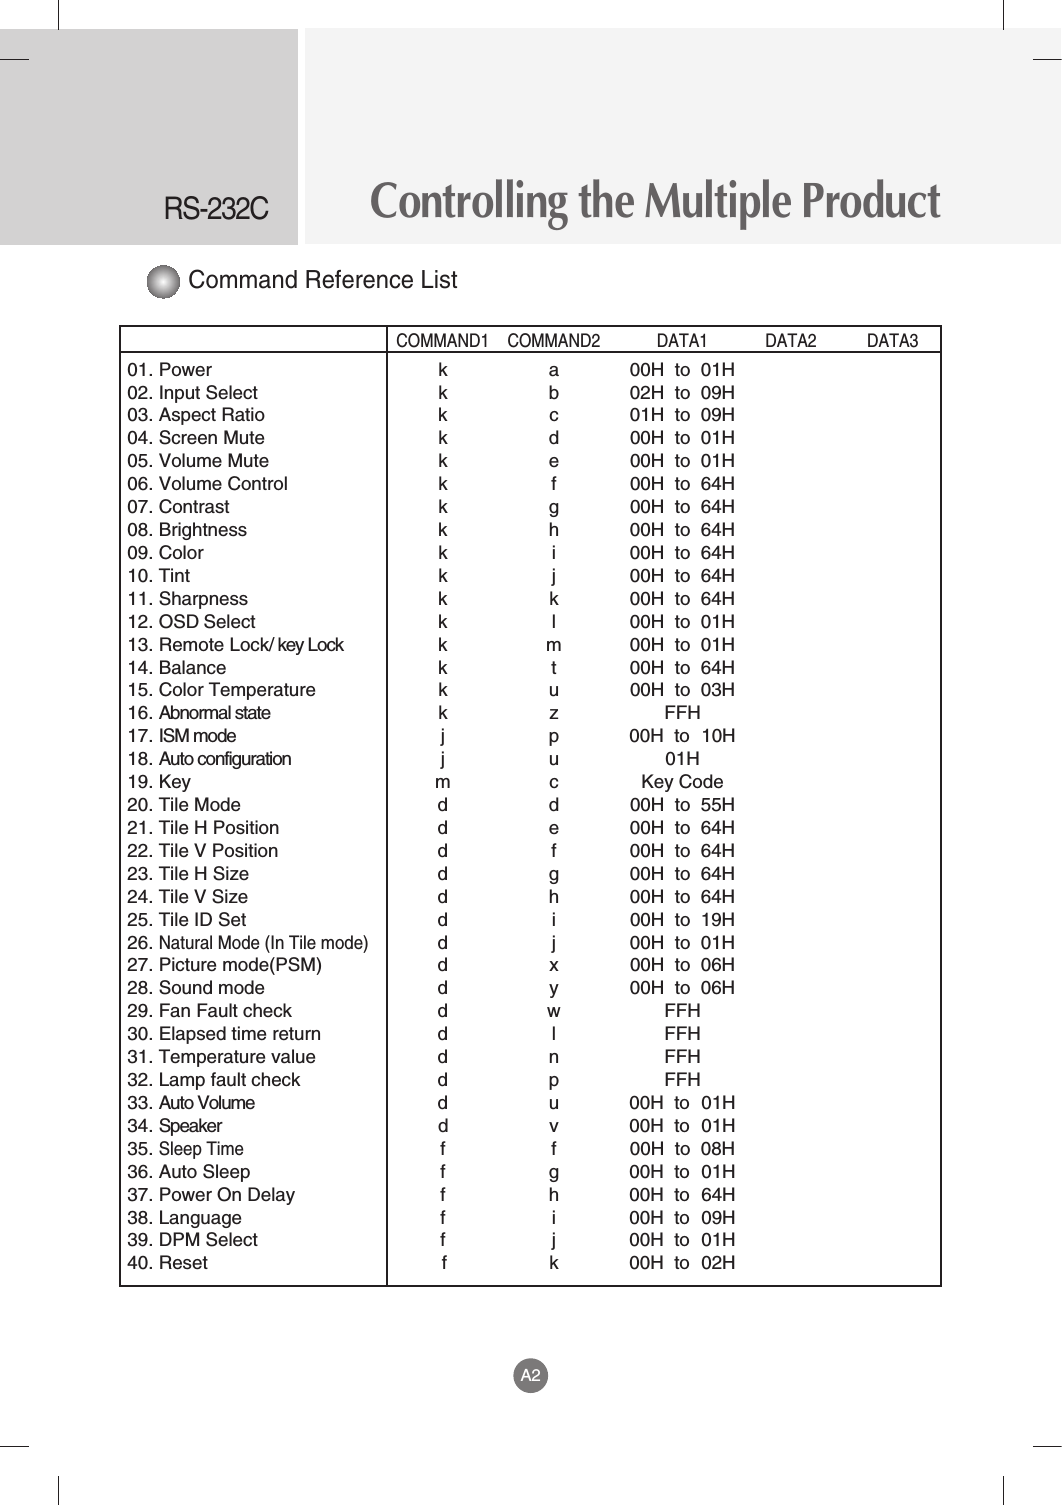
![Controlling the Multiple ProductRS-232CA5Transmission / Receiving Protocol01. Power(Command : a)To control Power On / Off of the Set.Transmission[k][a][ ][Set ID][ ][Data][Cr]Data 0 : Power Off 1 : Power OnAcknowledgement[a][ ][Set ID][ ][OK][Data][x]To show the status of Power On / Off.Transmission[k][a][ ][Set ID][ ][FF][Cr]Acknowledgement[a][ ][Set ID][ ][OK][Data][x]Data 0 : Power Off 1 : Power On02. Input Select (Command : b) (Main Picture Input)To select input source for the Set.You can also select an input source using the INPUT button on the remote control.Transmission[k][b][ ][Set ID][ ][Data][Cr]Data 2 : AV7 : RGB (PC)8 : HDMI (DTV)9 : HDMI (PC)Acknowledgement[b][ ][Set ID][ ][OK][Data][x]Data 2 : AV7 : RGB (PC) 8 : HDMI (DTV)9 : HDMI (PC)▲▲▲](https://usermanual.wiki/LG-Electronics-USA/M4210LG/User-Guide-1273443-Page-43.png)
![Controlling the Multiple ProductRS-232CA603. Aspect Ratio(Command : c) (Main picture format)To adjust the screen format.You can also adjust the screen format using the ARC(Aspect Ratio Control) button on remote control or in theScreen menu.Transmission[k][c][ ][Set ID][ ][Data][Cr]Data 1 : Normal Screen (4 : 3) 2 : Wide Screen (16 : 9) 4 : Zoom1 (AV) 5 : Zoom2 (AV) 6 : Original (AV) 7 :14 : 9 (AV) 9 : Just Scan(HD DTV), 1 : 1 (RGB PC, HDMI / DVI PC)Acknowledgement[c][ ][Set ID][ ][OK][Data][x]04. Screen Mute(Command : d) To select screen mute on / off.Transmission[k][d][ ][Set ID][ ][Data][Cr]Data 0 : Screen mute off (Picture on)1 : Screen mute on (Picture off)Acknowledgement[d][ ][Set ID][ ][OK][Data][x]Transmission / Receiving Protocol▲▲](https://usermanual.wiki/LG-Electronics-USA/M4210LG/User-Guide-1273443-Page-44.png)
![Controlling the Multiple ProductRS-232CA705. Volume Mute(Command : e) To control On/Off of the Volume Mute.Transmission[k][e][ ][Set ID][ ][Data][Cr]Data 0 : Volume Mute On (Volume Off)1 : Volume Mute Off (Volume On)Acknowledgement[e][ ][Set ID][ ][OK][Data][x]Data 0 : Volume Mute On (Volume Off)1 : Volume Mute Off (Volume On)06. Volume Control(Command : f) To adjust Volume .Transmission[k][f][ ][Set ID][ ][Data][Cr]Data Min : 00H to Max : 64H(Hexadecimal code)Acknowledgement[f][ ][Set ID][ ][OK][Data][x]Data Min : 00H to Max : 64H• Refer to ‘Real data mapping’ page A 8.Transmission / Receiving Protocol▲▲](https://usermanual.wiki/LG-Electronics-USA/M4210LG/User-Guide-1273443-Page-45.png)
![Controlling the Multiple ProductRS-232CA8Transmission / Receiving Protocol07. Contrast(Command : g)To adjust screen contrast.You can also adjust the contrast in the Picture menu. Transmission[k][g][ ][Set ID][ ][Data][Cr]Data Min : 00H to Max : 64H• Refer to ‘Real data mapping’ as shown below.Acknowledgement[g][ ][Set ID][ ][OK][Data][x]* Real data mapping0 : Step 0:A : Step 10 : F : Step 15 10 : Step 16 :64 : Step 10008. Brightness(Command : h)To adjust screen brightness.You can also adjust the brightness in the Picture menu.Transmission[k][h][ ][Set ID][ ][Data][Cr]Data Min : 00H to Max : 64H• Refer to ‘Real data mapping’ as shown below.Acknowledgement[h][ ][Set ID][ ][OK][Data][x]* Real data mapping 0 : Step : A : Step 10 :F : Step 1510 : Step 16 : 64 : Step 100▲▲](https://usermanual.wiki/LG-Electronics-USA/M4210LG/User-Guide-1273443-Page-46.png)
![Controlling the Multiple ProductRS-232CA9Transmission / Receiving Protocol09. Color(Command : i) (Video Timing only)To adjust the screen color.You can also adjust the color in the Picture menu.Transmission[k][i][ ][Set ID][ ][Data][Cr]Data Min : 00H to Max : 64H(Hexadecimal code)• Refer to ‘Real data mapping’ page A 8.Acknowledgement[i][ ][Set ID][ ][OK][Data][x]Data Min : 00H to Max : 64H 10. Tint(Command : j) (Video Timing only)To adjust the screen tint.You can also adjust the tint in the Picture menu.Transmission[k][j][ ][Set ID][ ][Data][Cr]Data Red : 00H to Green: 64H(Hexadecimal code)• Refer to ‘Real data mapping’ page A 8.Acknowledgement[j][ ][Set ID][ ][OK][Data][x]Data Red : 00H to Green : 64H* Tint Real data mapping0 : Step 0 to Red:64 : Step 100 to Green▲▲](https://usermanual.wiki/LG-Electronics-USA/M4210LG/User-Guide-1273443-Page-47.png)
![Controlling the Multiple ProductRS-232CA1011. Sharpness(Command : k) (Video Timing only)To adjust the screen Sharpness.You can also adjust the sharpness in the Picture menu.Transmission[k][k][ ][Set ID][ ][Data][Cr]Data Min : 00H to Max : 64H(Hexadecimal code)• Refer to ‘Real data mapping’ page A 8.Acknowledgement[k][ ][Set ID][ ][OK][Data][x]Data Min : 00H to Max : 64H 12. OSD Select(Command : l)To control OSD on/off to the set.Transmission[k][l][ ][Set ID][ ][Data][Cr]Data 0 : OSD Off 1 : OSD OnAcknowledgement[l][ ][Set ID][ ][OK][Data][x]Data 0 : OSD Off 1 : OSD On13. Remote Lock /Key Lock (Command : m)To control Remote Lock on/off to the set.This function, when controlling RS-232C, locks the remote control and the local keys. Transmission[k][m][ ][Set ID][ ][Data][Cr]Data 0 : Off 1 : OnAcknowledgement[m][ ][Set ID][ ][OK][Data][x]Data 0 : Off 1 : OnTransmission / Receiving Protocol▲▲▲](https://usermanual.wiki/LG-Electronics-USA/M4210LG/User-Guide-1273443-Page-48.png)
![Controlling the Multiple ProductRS-232CA11Transmission / Receiving Protocol14 Balance(Command : t)To adjust the sound balance.Transmission[k][t][ ][Set ID][ ][Data][Cr]Data Min : 00H to Max : 64H(Hexadecimal code)• Refer to ‘Real data mapping’ page A 8.Acknowledgement[t][ ][Set ID][ ][OK][Data][x]Data Min : 00H to Max : 64H* Balance : L50 to R5015. Color Temperature (Command : u)To adjust the screen color temperature.Transmission[k][u][ ][Set ID][ ][Data][Cr]Data 0 : Medium1 : Cool2 : Warm 3 : User Acknowledgement[u][ ][Set ID][ ][OK][Data][x]Data 0 : Medium1 : Cool2 : Warm 3 : User • Running the Color Temperature command changes the Picture Mode settings toUser1.▲▲](https://usermanual.wiki/LG-Electronics-USA/M4210LG/User-Guide-1273443-Page-49.png)
![Controlling the Multiple ProductRS-232CA12Transmission / Receiving Protocol16. Abnormal state (Command : z)Abnormal State : Used to Read the power off status when Stand-by mode. Transmission[k][z][ ][Set ID][ ][Data][Cr]Data FF : Read0 : Normal (Power on and signal exist)1 : No signal (Power on)2 : Turn the monitor off by remote control3 : Turn the monitor off by sleep time function4 : Turn the monitor off by RS-232C function8 : Turn the monitor off by off time function9 : Turn the monitor off by auto off functionAcknowledgement[z][ ][Set ID][ ][OK][Data][x]17. ISM mode(Command: j p)Used to select the afterimage preventing function. Transmission[j][p][ ][Set ID][ ][Data][Cr]Data 1H : Inversion2H : Orbiter4H : White Wash8H : Normal10H : Dot WashAcknowledgement[p][ ][Set ID][ ][OK][Data][x]▲▲](https://usermanual.wiki/LG-Electronics-USA/M4210LG/User-Guide-1273443-Page-50.png)
![Controlling the Multiple ProductRS-232CA1318. Auto Configure(Command: j u)To adjust picture position and minimize image shakingautomatically. it works only in RGB(PC) mode.Transmission[j][u][ ][Set ID][ ][Data][Cr]Data 1 : To setAcknowledgement[u][ ][Set ID][ ][OK][Data][x]Transmission / Receiving Protocol▲19. Key(Command : m c)To send IR remote key code.Transmission[m][c][ ][Set ID][ ][Data][Cr]Data Key code : Refer to page A 34.Acknowledgement[c][ ][Set ID][ ][OK][Data][x]▲](https://usermanual.wiki/LG-Electronics-USA/M4210LG/User-Guide-1273443-Page-51.png)
![Controlling the Multiple ProductRS-232CA1420. Tile Mode(Command : d d)Change a Tile Mode.Transmission[d][d][][Set ID][][Data][x]* The data can not be set to 0X or X0 except 00.Acknowledgement[d][][00][][OK/NG][Data][x]Transmission / Receiving Protocol▲Data Description00 or 11 Tile mode is off.12 1 x 2 mode(column x row)13 1 x 3 mode14 1 x 4 mode... ...55 5 x 5 mode](https://usermanual.wiki/LG-Electronics-USA/M4210LG/User-Guide-1273443-Page-52.png)
![Controlling the Multiple ProductRS-232CA1521. Tile H Position(Command : d e)To set the Horizontal position. Transmission[d][e][][Set ID][][Data][x]Data Min : 00H to Max : 64H• Refer to ‘Real data mapping’ page A 8.Acknowledgement[e][][Set ID][][OK/NG][Data][x]22. Tile V Position(Command : d f)To set the Vertical position. Transmission[d][f][][Set ID][][Data][x]Data Min : 00H to Max : 64H• Refer to ‘Real data mapping’ page A 8.Acknowledgement[f][][Set ID][][OK/NG][Data][x]Transmission / Receiving Protocol▲▲](https://usermanual.wiki/LG-Electronics-USA/M4210LG/User-Guide-1273443-Page-53.png)
![Controlling the Multiple ProductRS-232CA1623. Tile H Size(Command : d g)To set the Horizontal size. Transmission[d][g][][Set ID][][Data][x]Data Min : 00H to Max : 64H• Refer to ‘Real data mapping’ page A 8.Acknowledgement[g][][Set ID][][OK/NG][Data][x]24. Tile V Size(Command : d h)To set the Vertical size. Transmission[d][h][][Set ID][][Data][x]Data Min : 00H to Max : 64H• Refer to ‘Real data mapping’ page A 8.Acknowledgement[h][][Set ID][][OK/NG][Data][x]Transmission / Receiving Protocol▲▲](https://usermanual.wiki/LG-Electronics-USA/M4210LG/User-Guide-1273443-Page-54.png)
![Controlling the Multiple ProductRS-232CA1725. Tile ID Set(Command : d i)To assign the Tile ID for Tiling function . Transmission[d][i][][Set ID][][Data][x]Data Min : 00H to Max : 19H(Hexadecimal code)Acknowledgement[i][][Set ID][][OK/NG][Data][x]26 Natural Mode (In Tile mode) (Command : d j)To assign the Tile Natural mode for Tiling function . Transmission[d][j][][Set ID][][Data][x]Data 0 : Natural Off1 : Natural Onff : Read StatusAcknowledgement[j][][Set ID][][OK/NG][Data][x]Transmission / Receiving Protocol▲▲27. Picture Mode (Command : d x)To adjust the picture mode. Transmission[d][x][][Set ID][][Data][x]Data StructureAcknowledgement[x][][Set ID][][OK/NG][Data][x]▲Data(Hex)00010203040506MODEVivid StandardCinemaSportGameUser1User2](https://usermanual.wiki/LG-Electronics-USA/M4210LG/User-Guide-1273443-Page-55.png)
![Controlling the Multiple ProductRS-232CA18Transmission / Receiving Protocol28. Sound Mode (Command : d y )To adjust the Sound mode. Transmission[d][y][][Set ID][][Data][x]Data StructureAcknowledgement[y][][Set ID][][OK/NG][Data][x]▲Data(Hex)00010203040506ModeClear VoiceStandardMusicCinemasportGameUser29. Fan Fault check (Command : d w )To check the Fan fault of the TV. Transmission[d][w][][Set ID][][Data][x]* The data is always FF(in Hex).Data ff: Read StatusAcknowledgement[w][][Set ID][][OK/NG][Data][x]* Data is the status value of the Fan fault.Data 0: Fan fault1: Fan OK2: N/A(Not Avaliable)▲](https://usermanual.wiki/LG-Electronics-USA/M4210LG/User-Guide-1273443-Page-56.png)
![Controlling the Multiple ProductRS-232CA1931. Temperature value (Command : d n) To read the inside temperature value. Transmission[d][n][][Set ID][][Data][x]* The data is always FF(in Hex).Acknowledgement[n][][Set ID][][OK/NG][Data][x]* The data is 1 byte long in Hexadecimal.32. Lamp fault Check(Command : d p) To check lamp fault. Transmission[d][p][][Set ID][][Data][x]* The data is always FF(in Hex). Acknowledgement[p][][Set ID][][OK/NG][Data][x]Data 0 : Lamp Fault1: Lamp OKTransmission / Receiving Protocol▲▲30. Elapsed time return(Command : d l)To read the elapsed time. Transmission[d][l][][Set ID][][Data][x]* The data is always FF(in Hex).Acknowledgement[l][][Set ID][][OK/NG][Data][x]* The data means used hours.(Hexadecimal code)▲](https://usermanual.wiki/LG-Electronics-USA/M4210LG/User-Guide-1273443-Page-57.png)
![Controlling the Multiple ProductRS-232CA2033. Auto volume (Command : d u) Automatically adjust the volume level. Transmission[d][u][][Set ID][][Data][x]Data 0 : Off1 : OnAcknowledgement[u][][Set ID][][OK/NG][Data][x]34. Speaker (Command : d v) Turn the speaker on or off. Transmission[d][v][][Set ID][][Data][x]Data 0 : Off1 : OnAcknowledgement[v][][Set ID][][OK/NG][Data][x]Transmission / Receiving Protocol▲▲](https://usermanual.wiki/LG-Electronics-USA/M4210LG/User-Guide-1273443-Page-58.png)
![Controlling the Multiple ProductRS-232CA2135. Sleep Time (Command : f f) Set Sleep Time. Transmission[f][f][][Set ID][][Data][Cr]Data 0 : Off1 : 102 : 203 : 304 : 605 : 906 : 1207 : 1808 : 240(Orderly)Acknowledgement[f][][Set ID][][OK/NG][Data][x]▲Transmission / Receiving Protocol36. Auto Sleep (Command : f g) Set Auto Sleep. Transmission[f][g][][Set ID][][Data][Cr]Data 0 : Off1: OnAcknowledgement[g][][Set ID][][OK/NG][Data][x]▲](https://usermanual.wiki/LG-Electronics-USA/M4210LG/User-Guide-1273443-Page-59.png)
![Controlling the Multiple ProductRS-232CA2237. Power On Delay (Command : f h) Set the schedule delay when the power is turned on (Unit: second).Transmission[f][h][][Set ID][][Data][Cr]Data : 00H to 64H (Data value)• Refer to ‘Real data mapping’ page A 8.Acknowledgement[h][][Set ID][][OK/NG][Data][x]Transmission / Receiving Protocol▲38. Language (Command : f i) Set the OSD language. Transmission[f][i][][Set ID][][Data][Cr]Data 0 : English1 : French2 : German3 : Spanish 4 : Italian5 : Portuguese6 : Chinese7 : Japanese8 : Korean9 : RussianAcknowledgement[i][][Set ID][][OK/NG][Data][x]▲](https://usermanual.wiki/LG-Electronics-USA/M4210LG/User-Guide-1273443-Page-60.png)
![Controlling the Multiple ProductRS-232CA2339. DPM Select (Command : f j) Set the DPM (Display Power Management) function. Transmission[f][j][][Set ID][][Data][Cr]Data 0 : Off1: OnAcknowledgement[j][][Set ID][][OK/NG][Data][x]Transmission / Receiving Protocol▲40. Reset (Command : f k) Execute the Picture, Screen and Factory Reset functions. Transmission[f][k][][Set ID][][Data][Cr]Data 0 : Picture Reset1 : Screen Reset2 : Factory ResetAcknowledgement[k][][Set ID][][OK/NG][Data][x]▲](https://usermanual.wiki/LG-Electronics-USA/M4210LG/User-Guide-1273443-Page-61.png)
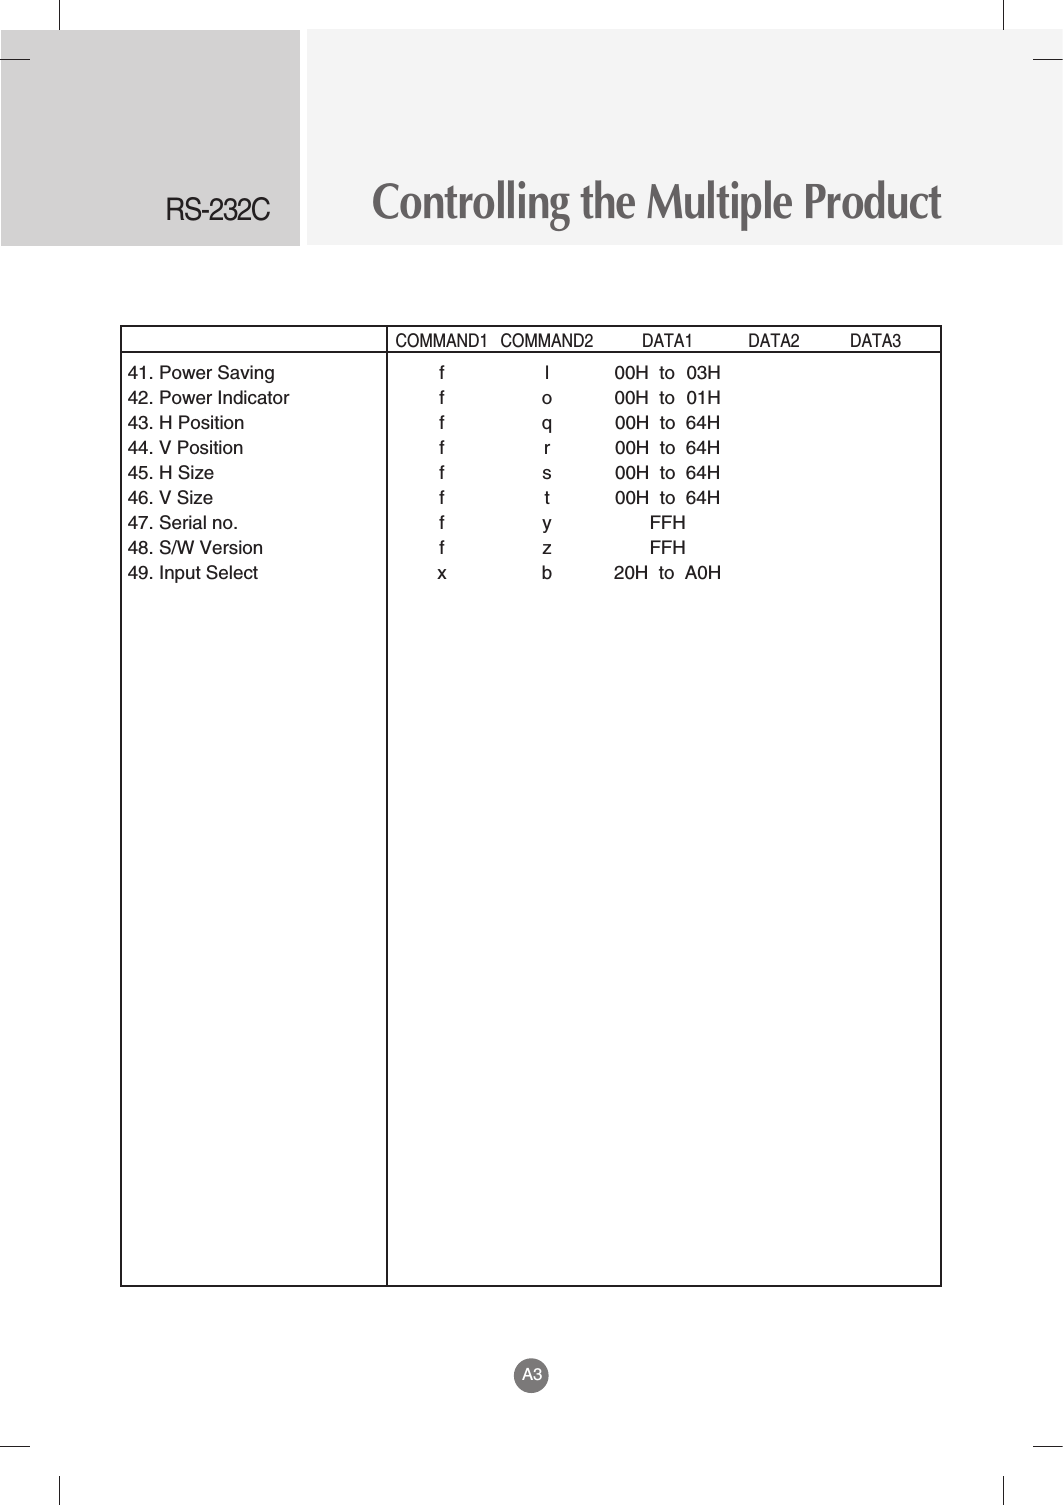
![Controlling the Multiple ProductRS-232CA2441. Power saving(Command : f I) To set the Power saving mode. Transmission[f][I][][Set ID][][Data][Cr]Data 0 : Off1: (static level 1)2: (static level 2)3: (static level 3)Acknowledgement[I][][Set ID][][OK/NG][Data][x]Transmission / Receiving Protocol▲42. Power Indicator (Command : f o) To set the LED for Power Indicator Transmission[f][o][][Set ID][][Data][Cr]Data 0 : Off1: OnAcknowledgement[o][][Set ID][][OK/NG][Data][x]▲43. H Position (Command : f q) To set the Horizontal position Transmission[f][q][][Set ID][][Data][Cr]* The data range is from 00 to 64(in Hex)• Refer to ‘Real data mapping’ page A 8.Acknowledgement[q][][Set ID][][OK/NG][Data][x]▲](https://usermanual.wiki/LG-Electronics-USA/M4210LG/User-Guide-1273443-Page-62.png)
![Controlling the Multiple ProductRS-232CA25Transmission / Receiving Protocol44. V Position (Command : f r) To set the Horizontal position Transmission[f][r][][Set ID][][Data][Cr]* The data range is from 00 to 64(in Hex)• Refer to ‘Real data mapping’ page A 8.Acknowledgement[r][][Set ID][][OK/NG][Data][x]▲45. H Size (Command : f s) To set the Horizontal size. Transmission[f][s][][Set ID][][Data][Cr]* The data range is from 00 to 64(in Hex)• Refer to ‘Real data mapping’ page A 8.Acknowledgement[s][][Set ID][][OK/NG][Data][x]▲* H Size Real Data Mapping[Data1]0x00: Step 00x0A: Step 100x14: Step 200x1E: Step 300x28: Step 400x32: Step 500x3C: Step 600x46: Step 700x50: Step 800x5A: Step 900x64: Step 100](https://usermanual.wiki/LG-Electronics-USA/M4210LG/User-Guide-1273443-Page-63.png)
![Controlling the Multiple ProductRS-232CA26Transmission / Receiving Protocol46. V Size (Command : f t) To set the Vertical size Transmission[f][t][][Set ID][][Data][Cr]* The data range is from 00 to 64(in Hex)• Refer to ‘Real data mapping’ page A 8.Acknowledgement[t][][Set ID][][OK/NG][Data][x]▲* V Size Real Data Mapping[Data1]0x00: Step 00x0A: Step 100x14: Step 200x1E: Step 300x28: Step 400x32: Step 500x3C: Step 600x46: Step 700x50: Step 800x5A: Step 900x64: Step 10047. Serial no.Check (Command : f y) To read the serial numbers Transmission[f][y][][Set ID][][Data][Cr]Data FF (to read the serial numbers)Acknowledgement[y][][Set ID][][OK/NG][Data1] to [Data13] [x]▲* The data format is ASCII Code.](https://usermanual.wiki/LG-Electronics-USA/M4210LG/User-Guide-1273443-Page-64.png)
![Controlling the Multiple ProductRS-232CA2748. S/W Version (Command : f z) Check the software version. Transmission[f][z][][Set ID][][Data][Cr]Data FFH : ReadAcknowledgement[z][][Set ID][][OK/NG][Data][x]▲49. Input Select (Command : x b) To select input source for the Set.Transmission[x][b][ ][Set ID][ ][Data][Cr]Data 20H : AV60H : RGB (PC) 90H : HDMI/DVI (DTV)A0H : HDMI/DVI (PC)Acknowledgement[b][ ][Set ID][ ][OK][Data][x]Data 20H : AV60H : RGB (PC) 90H : HDMI/DVI (DTV)A0H : HDMI/DVI (PC)▲Transmission / Receiving Protocol](https://usermanual.wiki/LG-Electronics-USA/M4210LG/User-Guide-1273443-Page-65.png)