LG Electronics USA M6100 GSM 900/1800/1900 PCS phone with Bluetooth User Manual M6100 RUS 0915
LG Electronics USA GSM 900/1800/1900 PCS phone with Bluetooth M6100 RUS 0915
UserManual.wiki
>
LG Electronics USA
>
M6100 User Manual
Manual
Navigation menu
Upload a User Manual
Namespaces
Wiki Guide
HTML
PDF
Info
Views
User Manual
Discussion / Help
Navigation


![General Functions221. Make sure your phone is powered on.2. Enter a phone number including the area code. Toedit a number on the display screen, simply pressthe key to erase one digit at a time.]Press and hold the key to erase the entirenumber.3. Press the key to call the number.4. When finished, press the key.Making a Call by Send Key1. Press the key, and the most recent incoming,outgoing and missed phone numbers will be displayed.2. Select the desired number by using the navigationkey.3. Press the key.Making International Calls1. Press and hold the key for the internationalprefix. The ‘+’ character can be replaced with the international access code.2. Enter the country code, area code, and the phonenumber.3. Press the key.Ending a CallWhen you have finished a call, press the key.Making a Call From the Contact listYou can store names and phone numbers dialled frequently in the SIM card as well as the phone memoryknown as the Contact list. You can dial a number by simply looking up a name inthe contact list. For more details on the Contacts feature, please refer to page 40.Making a Call](https://usermanual.wiki/LG-Electronics-USA/M6100/User-Guide-626242-Page-22.png)
![25General Functions]The word changes as letters are typed - ignorewhat’s on the screen until the word is typed completely.]If the word is still incorrect after typing completely,press the down navigation key once or more tocycle through the other word options.Example: Press to type Good.Press [down navigation key] to type Home.]If the desired word is missing from the word choices list, add it by using the ABC mode.2. Enter the whole word before editing or deleting anykeystrokes.3. Complete each word with a space by pressing thekey or key.To delete letters, press . Press and hold downto erase the letters continuously. nNotice To exit the text input mode without saving yourinput, press . The phone returns to the idelscreen.Using the ABC ModeUse the to keys to enter your text.1. Press the key labeled with the required letter:]Once for the first letter.]Twice for the second letter.]And so on.2. To insert a space, press the key once. To deleteletters, press the key. Press and hold down thekey to erase the letters continuously.](https://usermanual.wiki/LG-Electronics-USA/M6100/User-Guide-626242-Page-25.png)
![General Functions26nNotice Refer to the table below for more information onthe characters available using the keys. Using the 123 (Numbers) ModeThe 123 Mode enables you to enter numbers in a textmessage (a telephone number, for example).Press the keys corresponding to the required digitsbefore manually switching back to the appropriate textentry mode.Using the Symbol ModeThe Symbol Mode enables you to enter various symbolsor special characters.To enter a symbol, press the key. Use the navigation keys to select the desired symbol and pressthe [OK] key.Characters in the order displayKey Upper Case. , / ? ! - : ' '' 1Ä Å Ç É 2 A B CÑ Ö Ü á 3 D E Fà â ä ã 4 G H Iå ç é è 5 J K Lê ë í ì 6 M N Oî ï ñ ó 7 P Q R Sò ô ö õ 8 T U Vú ù û ü 9 W X Y ZSpace 0Lower Case. , / ? ! - : ' '' 1‡ · ‚ „ 2 a b c ‰ Â Á Ê 3 d e fË È Í Î 4 g h i Ï Ì Ó Ô 5 j k l Ò Ú Û 6 m n oÙ ı ˆ ˜ 7 p q r s¯ ˘ ˙ ˚ 8 t u v¸ ˝ ˛ fl 9 w x y zSpace 0](https://usermanual.wiki/LG-Electronics-USA/M6100/User-Guide-626242-Page-26.png)
![In-Call Menu28Your phone provides a number of control functions thatyou can use during a call. To access these functionsduring a call, press the left soft key [Options].The menu displayed on the handset screen during a callis different than the default main menu displayed whenin idle screen, and the options are described below.Making a Second Call (Network Dependent)You can get a number you wish to dial from the AddressBook to make a second call. Press the Right soft keythen select Contacts.Swapping Between Two CallsTo switch between two calls, press key or the leftsoft key, and then select Swap. Answering an Incoming CallTo answer an incoming call when the handset is ringing,simply press the key. The handset is also able towarn you of an incoming call while you are already on acall. A tone sounds in the earpiece, and the display willshow that a second call is waiting. This feature, knownas Call Waiting, is only available if your network supports it. For details of how to activate and deactivate itsee Call Waiting (Menu 7.4.4).If Call Waiting is on, you can put the first call on holdand answer the second, by pressing .Rejecting an Incoming CallYou can reject an incoming call without answering bysimply pressing the key.During a call, you can reject an incoming call by pressing the key.During a Call](https://usermanual.wiki/LG-Electronics-USA/M6100/User-Guide-626242-Page-28.png)
![In-Call Menu29Muting the MicrophoneYou can mute the microphone during a call by pressingthe [Options] key then selecting [Mute]. The handsetcan be unmuted by pressing the [Unmute]. When thehandset is muted, the caller cannot hear you, but youcan still hear them.DTMF tones while callingTo switch on DTMF tones while calling (e.g. to use thephone with an automatic switchboard) press the key[Options] followed by Send DTMF – DTMF on. SelectDTMF off to disable DTMF tones. DTMF tones are normally on.The conference service provides you with the ability tohave a simultaneous conversation with more than onecaller, if your network service provider supports this feature. A conference call can only be set up when youhave one active call and one call on hold, both callshaving been answered. Once a conference call is setup, calls may be added, disconnected or separated (thatis, removed from the conference call but still connectedto you) by the person who set up the conference call.These options are all available from the In-Call menu.The maximum callers in a conference call are five. Oncestarted, you are in control of the conference call, andonly you can add calls to the conference call.Making a Second CallYou can make a second call while currently on a call.Enter the second number and press the . When thesecond call is connected, the first call is automaticallyplaced on hold. You can swap between calls, by pressing the key.Setting Up a Conference CallTo set up a conference call, place one call on hold andwhile the active call is on, press the left soft key andthen select the Join menu of Conference call.Conference Calls](https://usermanual.wiki/LG-Electronics-USA/M6100/User-Guide-626242-Page-29.png)
![ProfilesIn Profiles, you can adjust and customise the phonetones for different events, environments, or callergroups.There are six preset profiles: Vibrate only, Silent,General, Loud and Headset. Each profile can be personalised.Press the left soft key [Menu] and select Profilesusing up/down navigation keys.Activate Menu 1.x.11. A list of profiles is displayed.2. In the Profiles list, scroll to the profile you want toactivate and press the left soft key [Select] orOK key.3. Then, select Activate.Personalise Menu 1.x.2Scroll to the desired profile in the Profile list. Afterpressing the left soft key or the OK key, selectPersonalise. The profile setting option opens. Set theoption as required.]Call alert type: Set the alert type for incoming calls.]Ring tone: Select the desired ring tone from the list.]Ring volume: Set the volume of the ringing tone.]Message alert type: Set the alert type for messages.]Message tone: Select the alert tone for messages.]Keypad tone: Select the desired keypad tone.]Keypad volume: Set the volume of keypad tone.]Slide tone: Set the tone when you sliding up/downthe phone.]Effect sound volume: Set the volume of effectsound.]Power on/off volume: Set the volume of the ringingtone when switching the phone on/off.]Auto answer: This function will be activated onlywhen your phone is connected to the headset.• Off: The phone will not answer automatically.• After 5 secs: After 5 seconds, the phone willanswer automatically.Menu 133](https://usermanual.wiki/LG-Electronics-USA/M6100/User-Guide-626242-Page-33.png)
![Profiles• After 10 secs: After 10 seconds, the phone willanswer automatically.Rename Menu 1.x.3You can rename a profile and give it any name youwant. nNote Vibrate only,Silent and Headset profiles cannot berenamed.1. To change the name of a profile, scroll to the profilein the profile list and after pressing the left soft keyor the OK key, select Rename.2. Key in the desired name and press the OK key or theleft soft key [OK].34](https://usermanual.wiki/LG-Electronics-USA/M6100/User-Guide-626242-Page-34.png)
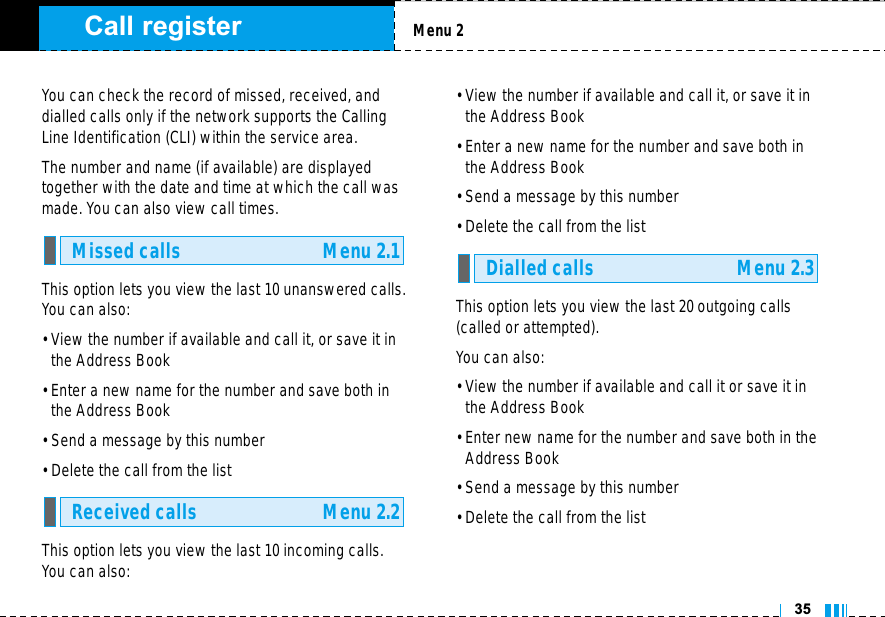
![Call registerAllows you to delete Missed calls and Received callslists. You can delete Dialled calls and All calls lists atone time.Call duration Menu 2.5.1Allows you to view the duration of your incoming andoutgoing calls. You can also reset the call times. Thefollowing timers are available:]Last call: Length of the last call.]All calls: Total length of all calls made and incoming calls since the timer was last reset.]Received calls: Length of the incoming calls.]Dialled calls: Length of the outgoing calls.]Reset all: Allows you to clear the length of all callsby pressing the left soft key [Yes].Call costs Menu 2.5.2Allows you to check the cost of your last call, all calls,remaining and reset the cost. To reset the cost, youneed to PIN2 code. Settings Menu 2.5.3(SIM Dependent)]Set tariff: You can set the currency type and theunit price. Contact your service providers to obtaincharging unit prices. To select the currency or unitin this menu, you need the PIN2 code. ]Set credit: This network allows you to limit the costof your calls by selected charging units.If youselect Read, the number of remaining unit is shown.If you select Change, you can change your changelimit.]Auto display: This network service allows you tosee automatically the cost of your last calls. If setto On, you can see the last cost when the call isreleased.Call charges Menu 2.5Delete recent calls Menu 2.436](https://usermanual.wiki/LG-Electronics-USA/M6100/User-Guide-626242-Page-36.png)
![You can set up to 5 alarm clocks to go off at a speci-fied time.1. Select On and enter the alarm time you want.2. Select the repeat period: Once, Mon~Fri, Mon~Sat,Everyday.3. Select the alarm tone you want and press [OK].4. Edit the alarm name and press [OK].Bluetooth enables compatible mobile devices, periph-erals and computers that are in close proximity tocommunicate directly with each other without wires.This handset supports built-in Bluetooth connectivity,which makes it possible to connect them with compat-ible Bluetooth headsets, computer applications and soon.nNote You can exchange the data within only phonebookvia bluetooth.My devices Menu 3.2.1You can view all devices which are compatible withbluetooth phone.Handsfree devices Menu 3.2.2You can view the list of handsfree devices which iscompatible with bluetooth phone.If you enter My devices or Handsfree devices menu,you access the options as follow.]Connect/ Disconnect: Allows to connect the otherbluetooth devices.]Add new: A]Connect/ Disconnect: Allows to search new blue-tooth device.]Assign name: Allows to change the name of blue-tooth.]Set as authorised/Set as unauthorised: Allows toset the authorised connection between each blue-tooth devices.Bluetooth Menu 3.2Alarm clock Menu 3.1Tools38](https://usermanual.wiki/LG-Electronics-USA/M6100/User-Guide-626242-Page-38.png)
![]All service: Allows to view all services which aresupported by bluetooth device.]Delete: Allows to delete the bluetooth device.]Delete all: Allows to delete all bluetooth devices.Settings Menu 3.2.3You can register new device which is compatible withbluetooth. If you already have added the device, youcan search it after entering a password.]Set bluetooth: You can activate or cancel bluetoothfunction.]Handset's visibility: You can set the function thatyour phone is shown on the other bluetoothdevices.]Handset's name: You can set the name of bluetoothdevice. The default name is M6100.This contains the standard functions such as +, –, x, ÷: Addition, Subtraction, Multiplication, and Division.1. Input the numbers by pressing numeric keys.2. Use a navigation key to select a sign for calculation.3. Then input the numbers.4. Press the left soft key [Result] to view the result.5. Press the left soft key [Reset] or enter numbersto repeat the procedure above.6. To end Calculator, press the right soft key[Back].nNote Use key to erase any numbers or signs. If you presskey , you can input a minus number. In addition,press key , you can input a decimal number.This converts any measurement into a unit you want.There are 4 types that can be converted into units:Length, Area, Weight, and Volume.1. You can select one of four unit types by pressing[Unit] key.Unit converter Menu 3.4Calculator Menu 3.3Tools39](https://usermanual.wiki/LG-Electronics-USA/M6100/User-Guide-626242-Page-39.png)
![Tools402. Select the standard value by using , 3. Select the unit you want to convert by pressingand .4. You can check the converted value for the unit youwant. Also, you can input a decimal number bypressing .You can view clocks of the world’s major cities.1. Select the city belonged to the time zone by pressing , key.2. You can set the current time to the city time youselect by pressing the left soft key [Set].Modem Menu 3.6World time Menu 3.5](https://usermanual.wiki/LG-Electronics-USA/M6100/User-Guide-626242-Page-40.png)
![OrganiserIn standby mode, press right soft key [Names] toaccess directly.Search Menu 4.1.1(Calling from phonebook)1. Select Search by press the left soft key [Select]or [OK].2. Enter the name that you want to search or selectleft soft key [List] to view all the phonebook list.nNote Instant searching is available by inputting the initialletter of the name or number you want to search.3. If you want to edit, delete, copy an entry, or to addthe voice to one, select left soft key [Options].The following menu will be displayed.]Edit: You can edit the name, number, group, character and picture by using the navigation key.]Write text/multimedia message: After you havefound the number you want, you can send atext/multimedia message to the selected number.]Copy: You can copy an entry from SIM to phone orfrom phone to SIM.]Main number: You can select the one out of mobile,home, office that you often use. After you set this,the main number will be displayed first, when yousearch.]Delete: You can delete an entry.Add new Menu 4.1.2You can add phonebook entry by using this function.Phone memory capacity is 200 entries. SIM card mem-ory capacity depends on the cellular service provider.You can also save 20 characters of name in The Phonememory, and save characters in the SIM card. Thenumber of character is SIM dependent feature.1. Select Add new by press left soft key [Select]or [OK].2. Select the memory you want to save: SIM or Phone.If you set to Phone, you need to select which number you want as Main number.a. Press [OK] to input a name.Contacts Menu 4.1Menu 441](https://usermanual.wiki/LG-Electronics-USA/M6100/User-Guide-626242-Page-41.png)
![42Organiserb. Press [OK], then you can input a number.c. Press [OK].d. You can set a group for the entry by pressing , :e. You can set a character and a picture for theentry by pressing , , , .Caller groups Menu 4.1.3You can list up to 20 members per one group. Thereare 7 groups you can make lists to.]Member list: Shows the group members you haveselected.]Group ring tone: Allows you to specify ring tone forthe group members’ call.]Group icon: Allows you to select the icon dependent on Group.]Add member: You can add group members. Eachgroup member shouldn’t be exceeded 20.]Remove member: You can remove the member fromthe Group member list. But the name and the number still remain in phonebook.]Rename: You can change a group name.Speed dial Menu 4.1.4You can assign any of the keys, to with aName list entry. You can call directly by pressing thiskey. 1. Open the phonebook first by pressing the Right softkey [Names] in standby mode.2. Scroll to Speed dial, then press the left soft key[Select].3. If you want to add Speed dial, select (empty). Then,you can search the name in phonebook.4. Select allocated a name by speed dial, and chooseChange or Delete to edit the name.Settings Menu 4.1.51. Press the right soft key [Names] in standbymode.](https://usermanual.wiki/LG-Electronics-USA/M6100/User-Guide-626242-Page-42.png)
![2. Scroll to Settings, then press the left soft key[Select].]Set memoryScroll to highlight Set memory, and then press theleft soft key [Select].- If you select Variable, when adding entry, thephone will ask where to store.- If you select SIM or Phone, the phone will storean entry to SIM or phone.]Search byScroll to highlight Search by, then press the leftsoft key [Select].- If you select Variable, the phone will ask how tosearch.- If you select Name or Number, the phone willsearch an entry by Name or Number.]View optionsScroll to highlight View options, and then pressthe left soft key [Select].- Name only: Set the phonebook list with displaying only name.- With pictures: Set the phonebook list with theinformation of character and picture.- Name & number: Set the phonebook list withdisplaying name and number.Copy all Menu 4.1.6You can copy/move entries from SIM card memory toPhone memory and vice versa.1. Open the Phonebook first by pressing the right softkey [Names] in standby mode.2. Scroll to Copy all, and then press the left soft key[Select] to enter this menu.• SIM to Phone: You can copy the entry from SIMCard to Phone memory.• Phone to SIM: You can copy the entry from Phonememory to SIM Card.3. You can see the following submenus.Organiser43](https://usermanual.wiki/LG-Electronics-USA/M6100/User-Guide-626242-Page-43.png)
![Organiser• Keep original: When copying, Original DialNumber is kept.• Delete original: When copying, Original DialNumber will be erased.Delete all Menu 4.1.7You can delete all entries in SIM and Phone. Thisfunction requires Security code.1. Press the right soft key [Names] in standbymode and select Delete all, press [Select].2. Then select a memory to erase.3. Enter security code and Press the left soft key[OK] or the right soft key [Back].Information Menu 4.1.8]Service dial numberUse this function to access a particular list of services provided by your network operator (if supported by the SIM card).1. Open the phonebook first by pressing the rightsoft key [Names] in standby mode and selectInformation.2. Scroll to Service dial number, then press the leftsoft key [Select] to enter.3. The names of the available services will beshown.4. Use and to select a service. Press[Send].]Memory status This feature allows you to see how many free andin-use are in your phonebook.1. Open the phonebook first by pressing the rightsoft key [Names] in standby mode. SelectInformation by pressing the left soft key[Select].2. Scroll to Memory status, then press the left softkey [OK].44](https://usermanual.wiki/LG-Electronics-USA/M6100/User-Guide-626242-Page-44.png)
![Organiser]Own number (SIM dependent)You can save and check your own number in SIMcard.When you enter this menu a Calendar will show up.On top of the screen there are sections for date.Whenever you change the date, the calendar will beupdated according to the date.And square cursor willbe used to locate the certain day. If you see under baron the calendar, it means that there is a schedule ormemo that day. This function helps to remind you ofyour schedule and memo. The phone will sound analarm tone if you set this for the note.To change the day, month, and year.In the scheduler mode, press left soft key [Options] as follows;Add new Menu 4.2.1Allows you to add new schedule and memo for thechosen day. You can store up to 20 notes.Input the subject and then press left soft keyc[OK]. Youenter the appropriate information in the follow section; Time, Repeat and Alarm. View Menu 4.2.2View all schedules and memo for the chosen day. Useto browse through the note lists. If you setalarm for the note, the alarm icon is displayed.If you want to view the note in detail, press left softkey [Select]. Press left soft key [Options] todelete, edit the note you selected.View all Menu 4.2.3Shows the notes that are set for all days. Use ,to browse through the note lists. If you want toCalendar Menu 4.245Key DescriptionYearlyMonthlyWeeklyDaily](https://usermanual.wiki/LG-Electronics-USA/M6100/User-Guide-626242-Page-45.png)
![Organiserview the note in detail, press left soft key[Select]. Delete past Menu 4.2.4You can delete the past schedule that has beenalready notified you.Delete all Menu 4.2.5You can delete for the all notes.1. Select the Memo by pressing the left soft key[Select].2. If being empty, Add new by pressing the left soft key[Add].3. Input the memo and then press left soft key[Ok].nNote If you want to change the text input mode, press thein order.Memo Menu 4.346](https://usermanual.wiki/LG-Electronics-USA/M6100/User-Guide-626242-Page-46.png)
![MessagesThis menu includes functions related to SMS (ShortMessage Service), MMS (Multimedia MessageService), voice mail, as well as the network’s servicemessages.Write text message Menu 5.1.1You can write and edit text message, checking thenumber of message pages.1. Enter the Messages menu by pressing the left softkey [Select].2. If you want to write a new message, select Writetext message.3. To make text input easier, use T9.4. Press [Insert] to attach the followings.5. If you want to set option for your text, or to finishyour writing, press the left soft key [Options].nNote The phone which supports EMS release 5 is available to send colour pictures, sounds, textstyles, etc.. The other party may not receive pictures, sounds or text styles you sent properly ifthe phone does not support such options.Options]Send: Sends text messages.1. Enter numbers of recipient.2. Press key to add more recipients.3. You can add phone numbers in the address book.4. Press the left soft key after entering numbers.All messages will be automatically saved in the outbox folder, even after a sending failure.]Save: Stores messages in Drafts.]Font: You can select Size and Style of fonts.]Colour: You can select Colour of foreground andbackground.]Alignment: You can make the message contentsaligned Left, Center or Right.]Add T9 dictionary: You can add your own word.This menu can be shown only when edit mode isPredictive (T9Abc/T9abc/T9ABC).New message Menu 5.1Menu 547](https://usermanual.wiki/LG-Electronics-USA/M6100/User-Guide-626242-Page-47.png)
![Messages]T9 languages: Select a T9 input mode.]Exit: If you press Exit while writing a message, youcan end the writing message and back to theMessage menu. The message you have written isnot saved.Insert]Symbol: You can add special characters.]Picture: You can insert the Default graphics orgraphics in My pictures that are available for shortmessages.]Sound: You can insert sounds that are available forshort messages.]Text templates: You can use Text templates alreadyset in the phone.]Contacts: You can add phone numbers or e-mailaddresses in address book.]Signature: You can add your signature to the message.Write multimedia message Menu 5.1.2You can write and edit multimedia messages, checking message size.1. Enter the Message menu by pressing the left softkey [Select].2. If you want to write a new message, select Writemultimedia message.3. You can create a new message or choose one ofthe multimedia message templates already made.4. Press Insert to add Symbol, Photo, Take photo,Picture, Sound, Voice memo, Text templates,Phonebook, and Signature.Options]Send: You can send multimedia messages to multiple recipients, priorities your message, andmake it sent later as well.nNote • All messages will be automatically saved in theoutbox folder, even after a sending failure.• Check with your service provider if the Priority service is available.48](https://usermanual.wiki/LG-Electronics-USA/M6100/User-Guide-626242-Page-48.png)
![Messages]Preview: You can preview multimedia messagesyou wrote.]Save: You can save multimedia messages In draftsor As template.]Add slide: You can add a slide before or after current slide.]Move to slide: You can move to previous or nextslide.]Delete slide: You can delete current slides.]Set slide format- Set timer: You can set timer for slide, text, pictureand sound.- Swap text and picture: You can switch the position of picture and text of the message.]Remove media: You can remove picture or sound inthe slide.nNote This option can be shown only when any mediaexists.]Add T9 dictionary: You can add your own word.This menu can be shown only when edit mode isPredictive (T9Abc/T9abc/T9ABC).]T9 languages: Select a T9 input mode.]Exit: You can back to the Message menu.nNote If you select the picture (15K) on writing multimediamessage, loading duration will take around 15 seconds at least. Furthermore, you can’t activateany key during loading time. After 15 seconds, it isavailable to write multimedia message.You will be alerted when you have received messages.They will be stored in Inbox.In Inbox, you can identify each message by icons. Fordetail, see the icon directive.Inbox Menu 5.249](https://usermanual.wiki/LG-Electronics-USA/M6100/User-Guide-626242-Page-49.png)
![MessagesIf the phone shows ‘No space for SIM message’, youhave to delete only SIM messages from Inbox. If thephone displays ‘No space for message’, you can makespace of each repository as deleting messages, mediaand pplications.✴SIM messageSIM message means the message exceptionallystored in SIM card. You can move this message tothe phone.For notified multimedia message, you have to wait fordownloading and processing of the message.To read a message, select one of the messages bypressing the left soft key .]View: You can view the received messages.]Reply: You can reply to the sender.]Forward: You can forward the selected message toanother party.]Return call: You can call back to the sender.]Delete: You can delete the current message.]View information: You can view information aboutreceived messages; Sender’s address, Subject(only for Multimedia message), Message date &time, Message type, Message size.]Delete all: You can delete all messages.You can see sent and unsent messages here. For sentmessage, you can see the delivery status.Outbox Menu 5.350Icon Icon directiveMultimedia messageShort messageSIM messageRead multimedia messageRead text messagePush messageNotified multimedia message](https://usermanual.wiki/LG-Electronics-USA/M6100/User-Guide-626242-Page-50.png)
![MessagesThe browsing is same as that for the inbox message.When you already sent the message:]View: You can view the sent messages.]Forward: You can forward the current message toother recipients.]Delete: You can delete the current message.]View Information: You can view information aboutoutbox messages; Recipient’s address, Subject(only for Multimedia message), Message date &time, Message type, Message size.]Delete all: You can delete all messages didn’t send.Using this menu, you can preset up to five multimediamessages that you use most frequently. This menushows the preset multimedia message list.The following options are available.]Edit: Modifies the massage you choose.]Delete: Deletes the message you choose.]Information: To view the information of the message.Once this menu has been selected, simply press theleft soft key [OK] to listen to voice mail. You canalso hold down the key in standby mode to listento voice mail.nNote When you receive a voice mail, your phone displaysthe icon and you hear an alert. Please check withyour network provider for details of their service inorder to configure the handset correctly.Listen to voice mail Menu 5.5Drafts Menu 5.451Icon Icon directiveMMS SentMMS UnsentMMS delivery confirmedSMS sentSMS unsentSMS delivery confirmed](https://usermanual.wiki/LG-Electronics-USA/M6100/User-Guide-626242-Page-51.png)
![MessagesInfo service messages are text messages delivered bythe network to GSM. They provide general informationsuch as weather reports, traffic news, taxis, pharmacies, and stock prices. Each type of information has the number; therefore, you can contact service provider as long as you have input thecertain number for the information. When you havereceived an info service message, you can see thepopup message to show you that you have received amessage or the info service message is directly displayed. To view the message again or not in standby mode, follow the sequence shown below;Read Menu 5.6.11. When you have received an info service messageand select Read to view the message, it will be displayed on the screen. You can read another message by scrolling , , or [Next].2. The message will be shown until another messageis reached.Topics Menu 5.6.2(Dependent to network and subscription)]Add new: You can add Info service message numbers in the Phone memory with its nickname.]View list: You can see Info service message numbers which you added. If you press[Options], you can edit and delete info messagecategory which you added.]Active list: You can select info service messagenumbers in the active list. if you activate an infoservice number, you can receive messages sentfrom the number.Text templates Menu 5.7.1You have 6 text templates as below;• Please call me back• I'm late. I will be there at• Where are you now?Templates Menu 5.7Info message Menu 5.6(Dependent to network and subscription)52](https://usermanual.wiki/LG-Electronics-USA/M6100/User-Guide-626242-Page-52.png)
![Messages• I am on the way.• Top urgent. Please contact.• I love you.Multimedia templates Menu 5.7.2You can use the following options.]View: You can see multimedia templates.]Edit: You can edit multimedia templates.]Add new: Allows you to add new multimedia templates.]Write messages: You can write and send multimedia messages.]Delete: You can delete multimedia templates.]Delete all: Allows you to delete all multimedia messages.Signature Menu 5.7.3You can make your Signature.Text message Menu 5.8.1]Message types:Text, Voice, Fax, Natl. paging, X.400, Email, ERMESUsually, the type of message is set to Text. You canconvert your text into alternative formats. Contact your service provider for the availability of this function.]Validity period: This network service allows you toset how long your text messages will be stored atthe message centre.]Delivery report: If you set to Yes, you can checkwhether your message is sent successfully.]Reply via same service centre: When a message issent, it allows the recipients to reply and chargethe cost of the reply to your telephone bill.Settings Menu 5.853](https://usermanual.wiki/LG-Electronics-USA/M6100/User-Guide-626242-Page-53.png)
![Messages]SMS centre: If you want to send the text message, you can receive the address of SMS centre through this menu.Multimedia message Menu 5.8.2]Priority: You can set the priority of the message youchoose.]Validity period: This network service allows you toset how long your text messages will be stored atthe message centre.]Delivery report: If it is set to Yes in this menu, youcan check whether your message is sent successfully.]Auto download: If you select on, you receive multimedia messages automatically. If you selectOff, you receive only notification message in theinbox and then you can check this notification. Ifyou select Home network only, you receive multimedia messages depends on Homenetwork.]Network settings: If you select multimedia messageserver, you can set URL for multimedia messageserver.]Permitted typesPersonal: Personal message.Advertisements: Commercial message.Information: Necessary information.Voice mailbox number Menu 5.8.3You can receive the voicemail if your network serviceprovider supports this feature. When a new voicemailis arrived, the symbol will be displayed on the screen.Please check with your network service provider fordetails of their service in order to configure the phone accordingly.]Home: You can listen to voice mails by selectingHome.]Roaming: Even when you are in abroad, you can listen to voice mails if roaming service is supported.54](https://usermanual.wiki/LG-Electronics-USA/M6100/User-Guide-626242-Page-54.png)
![MessagesInfo message Menu 5.8.4]ReceiveYes: If you select this menu, your phone will receiveInfo service messages.No: If you select this menu, your phone will notreceive Info service messages any more.]AlertYes: Your phone will beep when you have receivedInfo service message numbers.No: Your phone will not beep even though you havereceived info service messages.]LanguagesYou can select the language you want by pressing[On/Off]. Then, the info service message will beshown in the language that you selected.Push messages Menu 5.8.5You can set the option whether you will receive themessage or not.55](https://usermanual.wiki/LG-Electronics-USA/M6100/User-Guide-626242-Page-55.png)
![With the camera you can take pictures of people andevents while on the move.• To take a picture with Folder opened1. Select Take photo, and then press . If you wantto reach this menu directly, press for a long time.2. Focus on the subject to capture the image, and thenpress the key.3. If you want to save it, press the left soft key orthe key.nNote You can control the image size, brightness, colourand zooming by pressing the navigation key. (or ).]Resolution [ ]: Allows you to set the imagesize to one of Hi (1280X960), Med (640x480), Low(320x240) main screen, contact, and front screen.]Picture quality [ ]: Allows you to set theimage quality from Standard, Fine and Superfine.]Flash [ ]: Allow you to set the flash when youtake a photo in dark place. ]Multishot[ ]: Allows to take a multishot pho-tos successively.]Zoom [ ]: Allows you to set the zoomingvalue from x1 to x2 depends on resolution]Brightness [ ]: Use the right/left navigationkeys to adjust lighting. 9 lighting levels are avail-able: -2.0, -1.5, -1.0, -0.5, 0.0, +0.5, +1.0, +1.5, +2.0.]Lighting settings [ ]: Allows you to changethe settins according to the enviroment.]Night time [ ]: Allows you to take a pictureby using this menu at night.]Autoshoot [ ]: Allows you to select the delaytime (None, 3 Seconds , 5 Seconds, 10 seconds).Then the phone takes a photo after the specifiedtime.]Colour [ ]: 3 settings are available: Color,Sepia, Black/White.]Memory status [ ]: Check the available mem-ory to take new pictures.Camera Menu 6.1Multimedia Menu 656](https://usermanual.wiki/LG-Electronics-USA/M6100/User-Guide-626242-Page-56.png)
![Multimedia• To take a picture with Folder closedYou can see yourself by sub LCD, when you take yourself-portrait.1. Press [ ] for a long time.2. Focus on the subject to capture the image, and thenpress [ ]. This time, the picture is saved automati-cally.• Take photo: Activate the Take photo mode.• Slide show: View the pictures in Album as slideshow.• Torch: Activate the flash light.• Back: Go back to the previous menu.You can record video streaming for 20 seconds.1. Select Take silent movie menu.2. If you want to record the data, press the left soft key[Record].3. You can check the remained time by time bar.You can view and send a picture. In addition, you canset the window as a background.All photos Menu 6.3.1You can view all pictures in order.General photos Menu 6.3.2You can view all pictures except of frame and phonebook ones.My photo Menu 6.3Video camera Menu 6.257SaveMMS messageDeleteAfter finishing all the setting, focus on the subjectto capture and press the Camera key or OK key.With a click, the image is captured and the fol-lowing menu bar appears.](https://usermanual.wiki/LG-Electronics-USA/M6100/User-Guide-626242-Page-57.png)
![58Mode photos Menu 6.3.3You can view all frame pictures.Contacts photos Menu 6.3.4You can view all contacts photos.]SFull view: You can view full photo.]Set as wallpaper: You can set a picture as a wall-paper.]Send via multimedia message: You can send a pic-ture thru MMS.]Send via bluetooth: You can send the photo bybluetooth.]Copy/ Move to external memory: You can copy ormove between phone and the SD memory.]Rename: You can edit the title of picture.]Delete: You can delete the photo.]Information: You can view the information aboutTitle, Size, Date and Time you’ve taken.This menu allows to play or delete the video file. Youcan change the name of file, and check informationrelated to size and time.The M6100 has an integrated MP3 player built-in. Youcan enjoy listening to MP3 music files on a memory inyour phone using a compatible headset or via theinternal loudspeaker.nNote Because of the small dimension of the speaker, insome cases the audio could be distorted, especiallyat maximum volume and when there are lots of basssounds. Therefore, we recommend you to use thestereo headset in order to appreciate the high quali-ty of your music.The music player supports:• MPEG-1 Layer III: Sampling frequency up to 48KHz,Bit rate from 32Kbps up to 192Kbps, stereoMP3 Menu 6.5My video Menu 6.4Multimedia](https://usermanual.wiki/LG-Electronics-USA/M6100/User-Guide-626242-Page-58.png)
![59Multimedia• MPEG-2 Layer III: Sampling frequency up to 24KHz,Bit rate from 32Kbps up to 160Kbps, stereo• AAC: ADIF, ADTS formats (Sampling frequency up to48KHz)nNote M6100 doesn't support the variable rate of MP3 andAAC file. Therefore, you can't change the file fromVBR MP3 format to AAC.You can transfer MP3 files from a compatible PC to thememory in your phone using the LG Contents Bank onthe CD-ROM in the sales package.When you connect the phone to a PC using the USBcable (supplied in the same package), you need toinstall a driver. For further details, refer to the CD-ROMmanual.nNote • The PC should run Windows 98 SE, Windows ME,Windows 2000, Windows XP operating system.• Besides downloading the MP3 files to the phone,you can upload the pictures taken on the phone tothe PC using the USB cable. And you can alsomanage the phonebook, scheduler, and Memo onthe PC. Consult with the authorised dealer foravailability of accessories.• To download MP3 file in Windows 2000, you shouldset folder option in PC as follow: View WEB UseWindows default folder (I).MP3 player Menu 6.5.11. Press MP3 menu, and then select MP3 player.2. Press the left soft key [Options] to access thefollowing menus.]Main LCD skin: This menu allows to change thebackgroud of main LCD on playing MP3 file.]Front LCD skin: This menu allows to change thebackgroud of front LCD on playing MP3 file withclosing a folder.]Equalizer: This menu helps you to adjust various ofenvironment on listening to the music. This phonesupports four preset menus. When you enter thismenu, you can view current value of equalizer.]Flip setting:• Continue playingAlthough you close the flip on playing, the playmode is continued without a pause.](https://usermanual.wiki/LG-Electronics-USA/M6100/User-Guide-626242-Page-59.png)
![Multimedia• Stop playingWhen you close the flip, you can stop the playmode.]View play list: You can view the play list on listen-ing to the music.]Playmode: This menu allows to set the play mode:Play all, Repeat all, Random all, Play one andRepeat one.]Set as ring tone: This menu allows to set the MP3file as a ring tone. You can also set it as a ring tonein Profile.MP3 player Menu 6.5.2This menu allows to view the whole play list. You canmove the track by pressing the navigation key. In addi-tion, if you select option menu, you can delete the fileor view its information.The voice memo feature you to record up to 10 voicemessages and each memo is up to 20 Seconds.Record Menu 6.6.1You can record voice memo in Voice recorder menu.1. Once recording is started, the message Recordingand the remaining time is displayed.2. If you want to finish recording, press the left softkey [Save].3. Key in Voice memo title, press the left soft key[OK].View list Menu 6.6.2The phone shows voice memo list. You can Playbackand Delete the recorded voice memo.Camera Menu 6.7.1]Auto save: If you set On, the images will be savedautomatically without displaying menu bar to save.]Shutter tone: You can change the shutter tone totake a picture.Settings Menu 6.7Voice recorder Menu 6.660](https://usermanual.wiki/LG-Electronics-USA/M6100/User-Guide-626242-Page-60.png)
![Multimedia]Delete all photos: This menu allows to delete allphotos after asking your confirmation.Voice recorder Menu 6.7.2]Duration: You can set the duration to record for 30seconds or 1 minute.Voice recorder Menu 6.7.3You can check the capacity of memory in use.61](https://usermanual.wiki/LG-Electronics-USA/M6100/User-Guide-626242-Page-61.png)
![62Settings Menu 7You can set the following menus for your convenienceand preferences.1. Press [Menu] in standby mode.2. Press for direct access to enter Settings.You can set functions relating to the date and time.Set date Menu 7.1.1You can enter the current date.Date format Menu 7.1.2You can set the Date format such as DD/MM/YYYY,MM/DD/YYYY, YYYY/MM/DD. (D: Day / M: Month / Y:Year)Set time Menu 7.1.3You can enter the current time.Time format Menu 7.1.4You can set the time format between 24-hour and 12-hour.You can set functions relating to the phone.Display settings Menu 7.2.1]Wallpaper: You can select the background picturesin standby mode.]Handset scheme: You can choose 4 kind of colorschemes, Clean, Clear, Paper and Metalic style.]Greeting note: If you select On, you can edit thetext which is displayed in standby mode.]Calendar: You can set the calendar in standbymode.]Backlight: You can set the light-up duration of thedisplay.]LCD contrast: You can set the LCD contrast bypressing , .Phone settings Menu 7.2Date & Time Menu 7.1](https://usermanual.wiki/LG-Electronics-USA/M6100/User-Guide-626242-Page-62.png)
![63Settings]Information window: You can preview the currentstate of the selected menu before open the menu.The state is shown at bottom of the display.]Network name: If you set ON, Network name (thename of service provider) will be appeared inInternal LCD.Language Menu 7.2.2You can change the language for the display texts inyour phone.This change will also affect the Language Input mode.You can set the menu relevant to a call by pressing[Select] in the Setting menu.Call divert Menu 7.3.1The Call divert service allows you to divert incomingvoice calls, fax calls, and data calls to another number. For details, contact your service provider.]All voice callsDiverts voice calls unconditionally.]If busyDiverts voice calls when the phone is in use.]If no replyDiverts voice calls which you do not answer.]If out of reachDiverts voice calls when the phone is switched offor out of coverage.]All data callsDiverts to a number with a PC connection unconditionally.]All fax callsDiverts to a number with a fax connection unconditionally.]Cancel allCancels all call divert service.Call settings Menu 7.3](https://usermanual.wiki/LG-Electronics-USA/M6100/User-Guide-626242-Page-63.png)
![64The submenusCall divert menus have the submenus shown below.• ActivateActivate the corresponding service.To voice mail centreForwards to message centre. This function is notshown at All data calls and All fax calls menus.To other numberInputs the number for diverting.To favourite numberYou can check recent 5 diverted numbers.• CancelDeactivate the corresponding service.• View statusView the status of the corresponding service.Answer mode Menu 7.3.2]Slide openIf you select this menu, you can receive an incom-ing call when only sliding the keypad.]Any keyIf you select this menu, you can receive a call bypressing any key except [End] key.]Send key onlyIf you select this menu, you can receive a call byonly pressing [Send] key.Send my number Menu 7.3.3(network and subscription dependent)]OnYou can send your phone number to another party.Your phone number will be shown on the receiver’sphone.]OffYour phone number will not be shown.Settings](https://usermanual.wiki/LG-Electronics-USA/M6100/User-Guide-626242-Page-64.png)
![65Settings]Set by networkIf you select this, you can send your phone numberdepending on two line service such as line 1 or line 2.Call waiting Menu 7.3.4(network dependent)]ActivateIf you select Activate, you can accept a waiting(receiving) call.]CancelIf you select Cancel, you cannot recognize the waiting (receiving) call.]View statusShows the status of Call waiting.Minute minder Menu 7.4.5If you select On, you can check the call duration bydeep sound every minute during a call.Auto redial Menu 7.4.6]OnWhen this function is activated, the phone will automatically try to redial in the case of failure toconnect a call.]OffYour phone will not make any attempts to redialwhen the original call has not connected.PIN code request Menu 7.4.1In this menu, you can set the phone to ask for the PINcode of your SIM card when the phone is switchedon. If this function is activated, you’ll be requested toenter the PIN code.1. Select PIN code request in the security settingsmenu, and then press [Select].2. Set On/Off.Security settings Menu 7.4](https://usermanual.wiki/LG-Electronics-USA/M6100/User-Guide-626242-Page-65.png)
![663. If you want to change the setting, you need to enterPIN code when you switch on the phone.4. If you enter wrong PIN code more than 3 times, thephone will lock out. If the PIN is blocked, you willneed to key in PUK code.5. You can enter your PUK code up to 10 times. If youput wrong PUK code more than 10 times, you cannot unlock your phone. You will need to contact yourservice provider.Handset lock Menu 7.4.2You can use security code to avoid unauthorized useof the phone. Whenever you switch on the phone, thephone will request security code if you set phone lockto On. If you set phone lock to Automatic, your phonewill request security code only when you change yourSIM card.Call barring Menu 7.4.3The Call barring service prevents your phone frommaking or receiving certain category of calls. Thisfunction requires the call barring password. You canview the following submenus.]All outgoingThe barring service for all outgoing calls.]InternationalThe barring service for all outgoing internationalcalls.]International when roamingThe barring service for all international outgoingcalls except home network.]All incoming The barring service for all incoming calls]Incoming when roamingThe barring service for all incoming calls whenroaming]Cancel allYou can cancel all barring services.Settings](https://usermanual.wiki/LG-Electronics-USA/M6100/User-Guide-626242-Page-66.png)
![67Settings]Change passwordYou can change the password for Call BarringService.The submenus:• ActivateAllows to request the network to set call restrictionon.• CancelSet the selected call restriction off.• View statusView the status whether the calls are barred or not.Fixed dial number Menu 7.4.4(SIM dependent) You can restrict your outgoing calls to selected phonenumbers. The numbers are protected by your PIN2code.]ActivateYou can restrict your outgoing calls to selectedphone numbers.]CancelYou can cancel fixed dialling function.]Number listYou can view the number list saved as Fixed dialnumber.Change codes Menu 7.4.5 PIN is an abbreviation of Personal IdentificationNumber to prevent use by unauthorized person.You can change the access codes: PIN code, PIN2 code, Security code.1. If you want to change the Security code/ PIN2 code/PIN code input your original code, and then press[OK].2. Input new Security code/PIN2 code /PIN code andverify them.You can select a network which will be registeredeither automatically or manually. Usually, the network selection is set to Automatic.Network settings Menu 7.5](https://usermanual.wiki/LG-Electronics-USA/M6100/User-Guide-626242-Page-67.png)
![68Network selection Menu 7.5.1]Automatic: If you select Automatic mode, the phonewill automatically search for and select a networkfor you. Once you have selected “Automatic”, thephone will be set to “Automatic” even though thepower is off and on.]Manual: The phone will find the list of available net-works and show you them. Then you can select thenetwork which you want to use if this network hasa roaming agreement with your home networkoperator. The phone let you select another networkif the phone fails to access the selected network.]Preferred: You can set a list of preferred networksand the phone attempts to register with first, beforeattempting to register to any other networks. Thislist is set from the phone’s predefined list of knownnetworks.Band selection Menu 7.5.2Use this to set the network band between two choic-es, GSM 900/1800 or GSM1900.You can initialize all factory defaults. You needSecurity code to activate this function.GPRS(General Packet Radio Service) is a technologythat allows mobile phones to be used for sending andreceiving data over the mobile network. GPRS is adata bearer that enables wireless access to data network such as the Internet.Before you can use GPRS technology- You need to subscribe to the GPRS service. For availability and subscription to GPRS service, contact your network operator or service provider.- You need to save the GPRS settings for the applications used over GPRS.Switch on Menu 7.7.1If you select Power on and you are in a network thatsupports GPRS, the phone registers to the GPRS GPRS setting Menu 7.7Initialization Menu 7.6Settings](https://usermanual.wiki/LG-Electronics-USA/M6100/User-Guide-626242-Page-68.png)
![ServiceBookmarks Menu 8.1.2This menu allows you to store the URL of favouriteweb pages for easy access at a later time. Your phonehas several pre-installed bookmarks. These pre-installed bookmarks cannot be deleted.To create a bookmark1. Press the left soft key [Options].2. Select Add new and press the OK key.3. After entering the desired URL and title, press theOK key.✽Tip: Use the key and key to enter symbols. Toenter “.”, press .After selecting a desired bookmark, the followingoptions are available.]Connect: Connects to the selected bookmark.]Add new: Select this to create a new bookmark.]Edit: You can edit the URL and/or the title of theselected bookmark.]Delete: Deletes the selected bookmark.Delete all: Deletes all the bookmarks.Profiles Menu 8.1.3A profile is the network information used to connect tothe Internet.Each profile has submenus as follows:]Activate: Activates the selected profile.]Settings: Use this to edit and change WAP settingsfor the selected profile.- Homepage: This setting allows you to enter theaddress (URL) of a site you want to use as homepage. You do not need to type http:// at thefront of each URL as the WAP Browser will automatically add it.- Bearer: You can set the bearer data service.1 Data 2 GPRS- Data settings: Appears only if you select DataSettings as a Bearer / service.IP address: Enter the IP address of the WAP gateway you want.71](https://usermanual.wiki/LG-Electronics-USA/M6100/User-Guide-626242-Page-71.png)
![ServiceSecondary server: Input the IP address of thesecondary DNS server you access- Secure settings: According to the used gatewayport, you can choose this option as On or Off.- Display image: You can select whether images onWAP cards are displayed or not.]Rename: You can change the profile name.]Delete: Deletes the selected profile from the list.]Add new: You can add a new profile.Go to URL Menu 8.1.4You can connect directly to the site you want. Afterentering a specific URL, press the OK key.Cache settings Menu 8.1.5The information or services you have accessed aresaved in the cache memory of the phone.Clear cacheRemoves all context saved in cache.Check cacheSet a value whether a connection attempt is madethrough cache or not. nNote A cache is a buffer memory, which is used to savedata temporarily.Cookies settings Menu 8.1.6The information or services you have accessed aresaved in the cache memory of the phone.Clear cookiesRemoves all context saved in cookie.Check cookiesCheck whether a cookie is used or not. Security certification Menu 8.1.7A list of the available certification is shown.]Authority: You can see the list of authority certificates that have been stored in your phone.73](https://usermanual.wiki/LG-Electronics-USA/M6100/User-Guide-626242-Page-73.png)
![Service]Personal: You can see the list of personal certificates that have been stored in your phone.Reset profiles Menu 8.1.8You can reset profiles to return to original settings.Browser version Menu 8.1.9The WAP browser version is displayed.Your service provider can offer special applicationthrough SIM card, such as home banking, stock mar-ket, etc.If you are registered for one of these services, the ser-vice name will appear at the end of the Main Menu.With the SIM Services menu your phone is future-proof and will support additions to your serviceprovider’s service. For more information contact your service provider.SIM service Menu 8.274](https://usermanual.wiki/LG-Electronics-USA/M6100/User-Guide-626242-Page-74.png)
![Downloads• My games & more: In this menu, you can manage theJava applications installed in your phone. You canplay or delete downloaded applications, or set theconnect option. The downloaded applications areorganised in folders. Press the left soft key [Select] to open the selected folder or launch theselected midlet. Using the left soft key [Menu],the following menus are available.]Launch: Start the selected application.]Info: Shows the information of the application.]Update: Updates an application using WAP.]Option: Some Java applications may require adata connection to be made. 3Select this to setthe connecting options.- Always: The connection is created immediatelywithout a notification.- Prompt: You will be asked before the applicationmakes the connection.- Never: No connection is allowed.nNote You cannot remove or rename the preinstalled folder or a game in the folder.Games & Apps Menu 9.1Menu 975JavaTM‚ is a technology developed by SunMicrosystems. Similar to the way you would download the JavaApplet using the standard Netscape or MSInternet Explorer browsers, Java MIDlet can bedownloaded using the WAP enabled phone.Depending on the service provider, all Java basedprograms such as Java games can be downloaded and run on a phone. Once downloaded, the Java program can be viewed inthe My games & more menu where you canselect, execute, or delete. The Java program filessaved in the phone are in .JAD or .JAR format.](https://usermanual.wiki/LG-Electronics-USA/M6100/User-Guide-626242-Page-75.png)
![76DownloadsThe left soft key [Options] will bring up the following options.]Set as wallpaper: Currently selected Picture can beset as a Wallpaper.]Write multimedia message: Downloaded Picturecan be sent via MMS.The left soft key [Options] will bring up the following options.]Set as ringtone: This sets the Ring Tone with currently selected Sound.]Write messages: Melody Sound can be sent viaSMS and MMS.]Send via bluetooth: The sound downloaded fromnetwork can be sent by bluetooth.Sounds Menu 9.3Images Menu 9.2nNote • The JAR file is a compressed format of theJava program and the JAD file is a descriptionfile that includes all detailed information. From the network, prior to download, you can view all detailed filedescriptions from the JAD file.• While being based on a standard language(J2ME), not all Java applications are compatible with all handsets on sale insofaras specific libraries may be used for a telephone model. The software may beblocked or switch itself on when Java applications not specifically developed for thephone this manual refers to are downloaded,making it necessary to “restart” the handset.We would like to point out that these problemsare caused by incompatible applications andare not a product fault.nCaution Only J2ME (Java 2 Micro Edition) based programs will run in a phone environment.The J2SE (Java 2 Standard Edition) basedprograms will only run in a PC environment.](https://usermanual.wiki/LG-Electronics-USA/M6100/User-Guide-626242-Page-76.png)