LG Electronics USA MB576C 15-inch Color Monitor User Manual Attachments
LG Electronics USA 15-inch Color Monitor Attachments
Users Manual

© 2000 PCTEST Lab
ATTACHMENT J – USER’S MANUAL
P/NO : 3828TUL Printed in Indonesia
Please read this manual carefully before operating your set.
Retain it for future reference.
Record model number and serial number of the set.
See the label attached on the back cover and quote this
information to your dealer when you require service.
http://www.lge.com
Color Monitor
57M
User’s Guide
Benutzerhandbuch
Manuel d’utilisation
Guida Utente
Guia del Usuario
Manual do preprietário
Handleiding
StudioWorks
USER’S GUIDE StudioWorks 57M Color Monitor

Contents
Introduction ..........................................................A1
Connecting the Monitor........................................A2
Location and Function of Controls.......................A3
Control Panel Function.........................................A4
On Screen Display (OSD) Control Adjustment ...A6
On Screen Display(OSD) Selection
and Adjustment ....................................................A7
Sound Selection and Adjustment ......................A11
Video Memory Modes ........................................A12
Troubleshooting..................................................A13
Specifications ......................................................A14
Einleitung...............................................................B1
Anschließen...........................................................B2
Ort und Funktion der Bedienungselemente .........B3
Bedienungselemente der Bildkontrolle.................B4
On Screen Display (OSD) Anpassung ..................B6
OSD Einstellung und Auswahlsymbole ................B7
Ton Einstellung und Auswahlsymbole................B11
Videospeichermodi .............................................B12
Störungen ............................................................B13
Produktbeschreibung..........................................B14
Introduction ..........................................................C1
Branchement du Moniteur ...................................C2
Nomenclature et Fonctions ..................................C3
Fonctions du Paneau de Commande....................C4
Réglage des Commandes Affichage Écran............C6
Options de sélection et de Réglage
OSD (affichage écran) .........................................C7
Son de Sélection et de Réglage...........................C11
Mise en Mémoire de Modes Vidéo.....................C12
Quelques Conseils en Cas D’incident ................C13
Spécifications D'entree.......................................C14
Introduzione .........................................................D1
Collegamento del Monitor ...................................D2
Posizione e Funzione dei Conando di Controllo ...D3
Funzione del Pannello di Controllo......................D4
Controllo Regolazione On Screen Display (OSD)
...D6
Elementi di Selezione e Regolazione dell'OSD....D7
Souno di Selezione e Regolazione.....................D11
Modalità di Memoria Video...............................D12
In Caso di Problemi............................................D13
Specifiche............................................................D14
Introducción ..........................................................E1
Conectando del Monitor .......................................E2
Ubicacion y Funcion de los Controles ..................E3
Función del Panel de Control................................E4
Ajuste del Control de Exhibición en Pantalla (OSD)
......E6
Ajuste del OSD y Selección de Elementos............E7
Ajuste del Sonido y Selección de Elementos ......E11
Modos de Memoria de Video..............................E12
Sugerencias para Localizar las Fallas ..................E13
Especificaciones...................................................E14
Introdução..............................................................F1
Conectando o Monitor..........................................F2
Posição dos Controles e Descrição .......................F3
Funções do Painel de Controle .............................F4
Ajuste On Screen Display(OSD) ...........................F6
Ajustes OSD e Itens de Seleção ............................F7
Ajustes Som e Seleção.........................................F11
Modos de Memória de Vídeo..............................F12
Resolvendo Problemas.........................................F13
Especificações......................................................F14
Inleiding ................................................................N1
De Monitor Aansluiten.........................................N2
De plaatsing en de werking van de knoppen.......N3
Het bedieningspaneel...........................................N4
Bediening via het beeldscherm OSD
(On Screen Display) .............................................N6
Kiezen en instellen via het OSD-systeem.............N7
Selectie en aanpassing van het geluid ...............N11
Modi voor videogeheugen..................................N12
Problemen oplossen ...........................................N13
Specificaties ........................................................N12
ENGLISH
DEUTSCH
FRANÇAIS
ITALIANO
ESPAÑOL
PORTUGUÊS
NEDERLANDS

Thank you for purchasing a high resolution monitor. It will give you high
resolution performance and convenient reliable operation in a variety of
video operating modes.
Features
The monitor is a 15 inches (14.0 inches viewable ) intelligent, microprocessor
based monitor compatible with most analog RGB (Red, Green, Blue) display
standards, including IBM PC®, PS/2®, Apple®, Macintosh®, Centris®, Quadra®, and
Macintosh II family.
The monitor provides crisp text and vivid color graphics with VGA, SVGA, XGA,
and VESA Ergonomic modes (non-interlaced), and most Macintosh compatible
color video cards when used with the appropriate adaptor. The monitor's wide
compatibility makes it possible to upgrade video cards or software without
purchasing a new monitor.
Digitally controlled auto-scanning is done with the micro-processor for horizontal
scan frequencies between 30 and 70kHz, and vertical scan frequencies
between 50-160Hz.
This monitor is capable of producing a maximum horizontal resolution of 1280
dots and a maximum vertical resolution of 1024 lines.
The microprocessor-based digital controls allow you to adjust conveniently a
variety of image controls by using the OSD (On Screen Display).
Plug and play capability if supported by your system.
This monitor has DDC 2B function.*
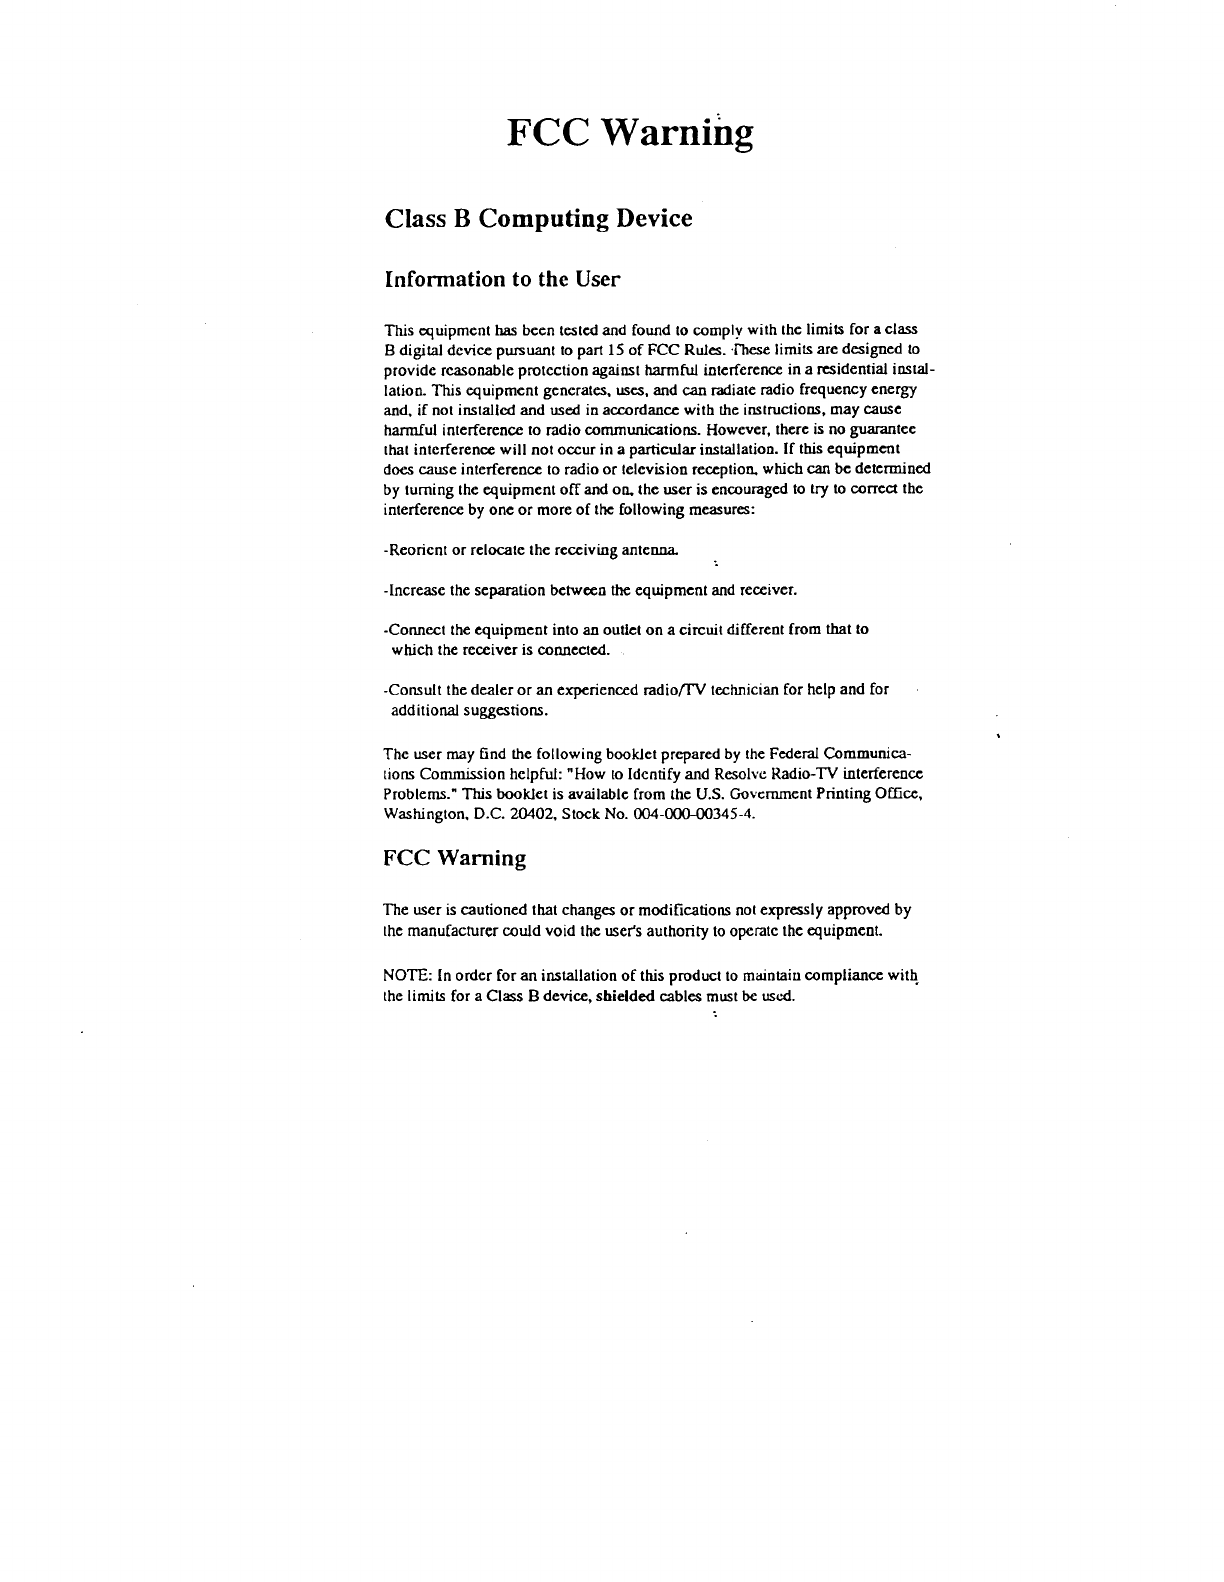
Compliant with the following regulated specifications :*
-
EPA ENERGY STAR
-
Swedish MPR II
A1
Introduction
ENGLISH
*
For detailed information, please refer to the Reference Guide provided .
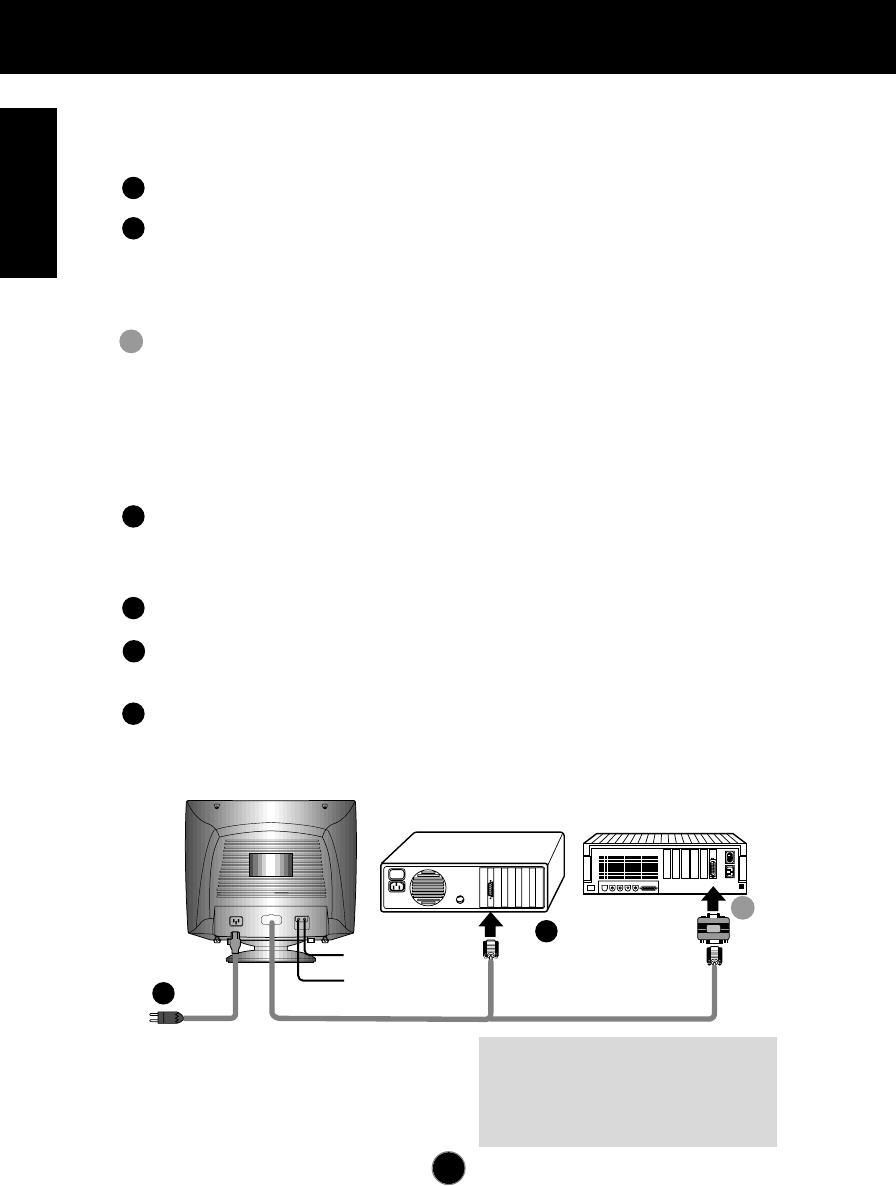
Connecting the Monitor
A2
On the back of the monitor are two plug-in connections; one for the AC
power cord, and the other for the signal cable from the video card.
Power off both the monitor and PC.
Connect the 15 pin VGA connector of the supplied signal cable to the output
VGA video connector on the PC. The connectors will mate only one way. If
you cannot attach the cable easily, turn the connector upside down and try
again. When mated, tighten the thumbscrews to secure the connection.
Locate the appropriate MAC to VGA adapter block at your local computer
store. This adapter changes the high density 3 row 15 pin VGA connector to
the correct 15 pin 2 row connection to mate with your MAC. Attach the other
end of the signal cable to the side of the adapter block with 3 rows.
Connect the attached adapter block/signal cable to the video output on your
MAC.
One end of the AC power cord is connected into the AC power connector on
the back of the monitor. The other end is plugged into a properly grounded
three-prong AC outlet.
Power ON the PC, then the monitor.
If you see the SELF DIAGNOSTICS message, check the signal cable and
connectors.
After using the system, power OFF the monitor, then the PC.
MIC.
OUT AUDIO.
IN
Power Cord
Signal Cable
D-15P
Audio In
Mic Out
IBM PC MACINTOSH
D-15P
Mac Adapter
*NOTE : For Apple Macintosh use, a
separate plug adapter is needed to
change the 15 pin high density (3 row)
D-sub VGA connector on the supplied
cable to a 15 pin 2 row connector.
1
2
3
3
4
5
6
2'
2
2'
A3
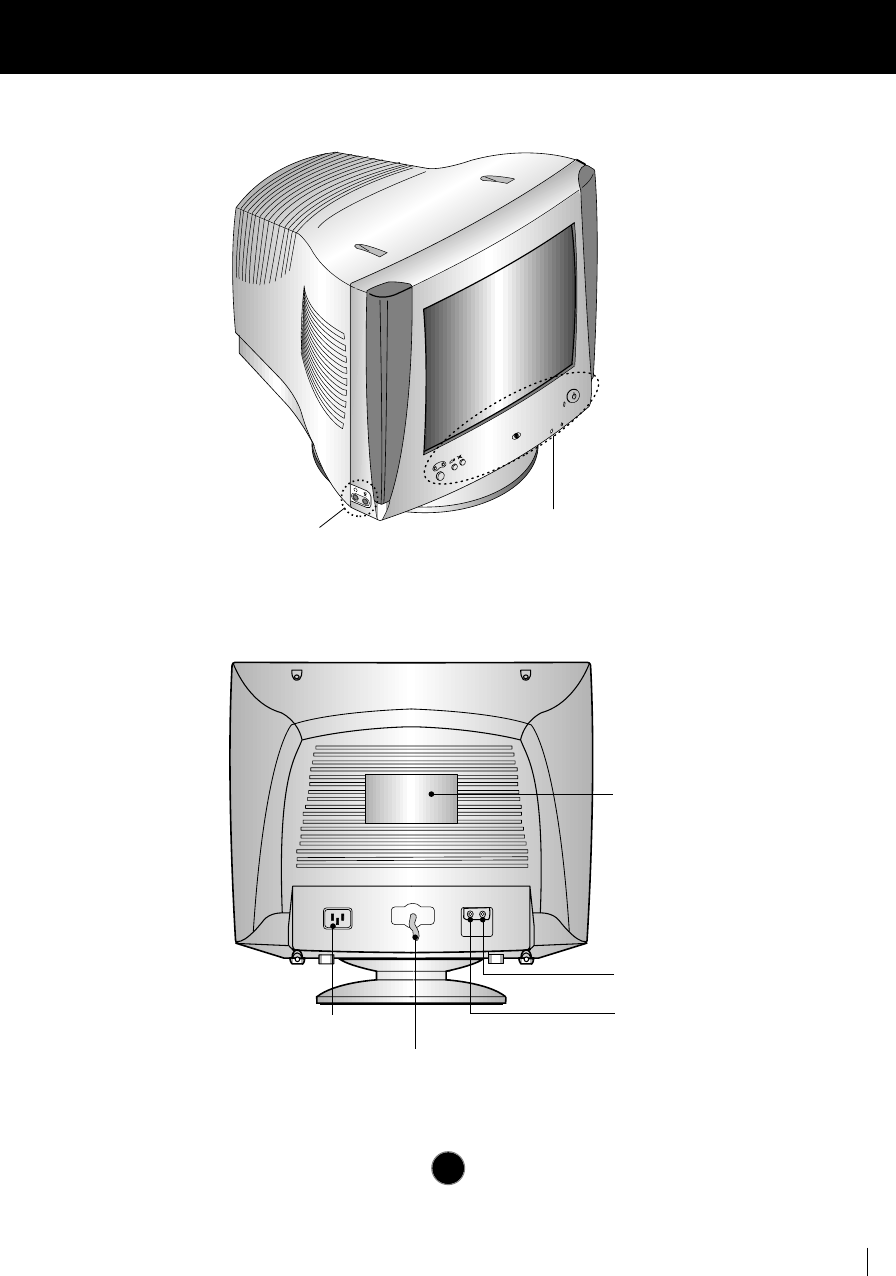
Location and Function of Controls
Rear View
Front View
MIC.
OUT AUDIO
IN
ID Label
Audio IN
Mic Out
D-Sub Signal Cable
AC Power Socket
Front Panel Controls
Left Side Jacks
A4
Control Panel Function
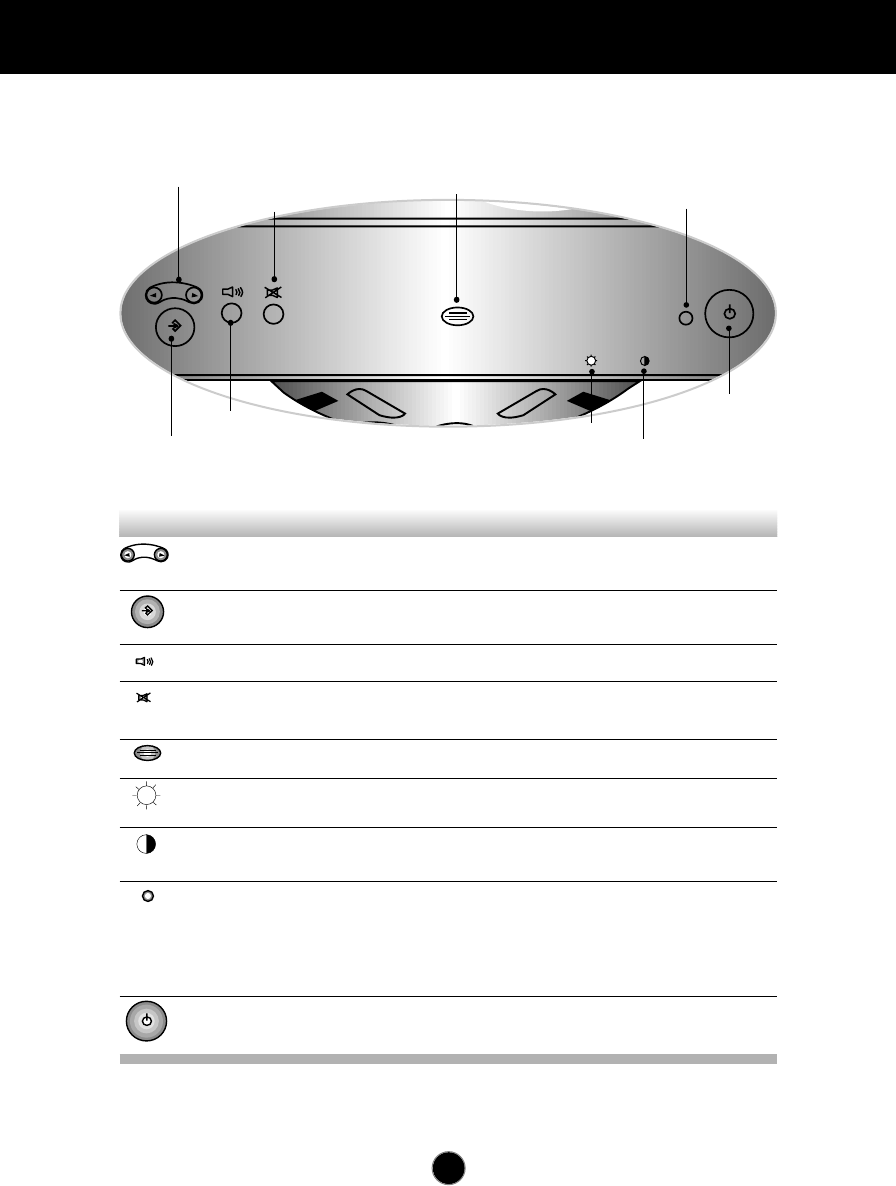
Front Panel Controls
OSD ON/OFF Enter Button
Sound Menu
OSD Select /Adjustment Control
Power Button
Brightness
Contrast
Power (DPMS) Indicator
Built-in Microphone
Sound Mute
OSD Select/
Adjustment Control Use these buttons to choose or adjust items in
the on screen display.
Use this button to enter or exit the on screen
display.
To adjust sound menu.
Used to select mute on (means sound off) and
mute off (means sound on).
OSD ON/OFF
Enter Button
Sound Menu
Sound Mute
Built-in Microphone.Built-in Microphone
Used to adjust the brightness of the screen.
Brightness
Adjustment Control
Adjust the display to the contrast desired.
Contrast
Adjustment Control
This Indicator lights up green when the monitor
operates normally. If the monitor is in DPM
(Energy Saving) mode (stand-by/suspend/power
off), this indicator color changes to amber.
Power (DPMS)
Indicator
Use this button to turn the monitor on or off.Power Button
Control Function
A5
Control Panel Function
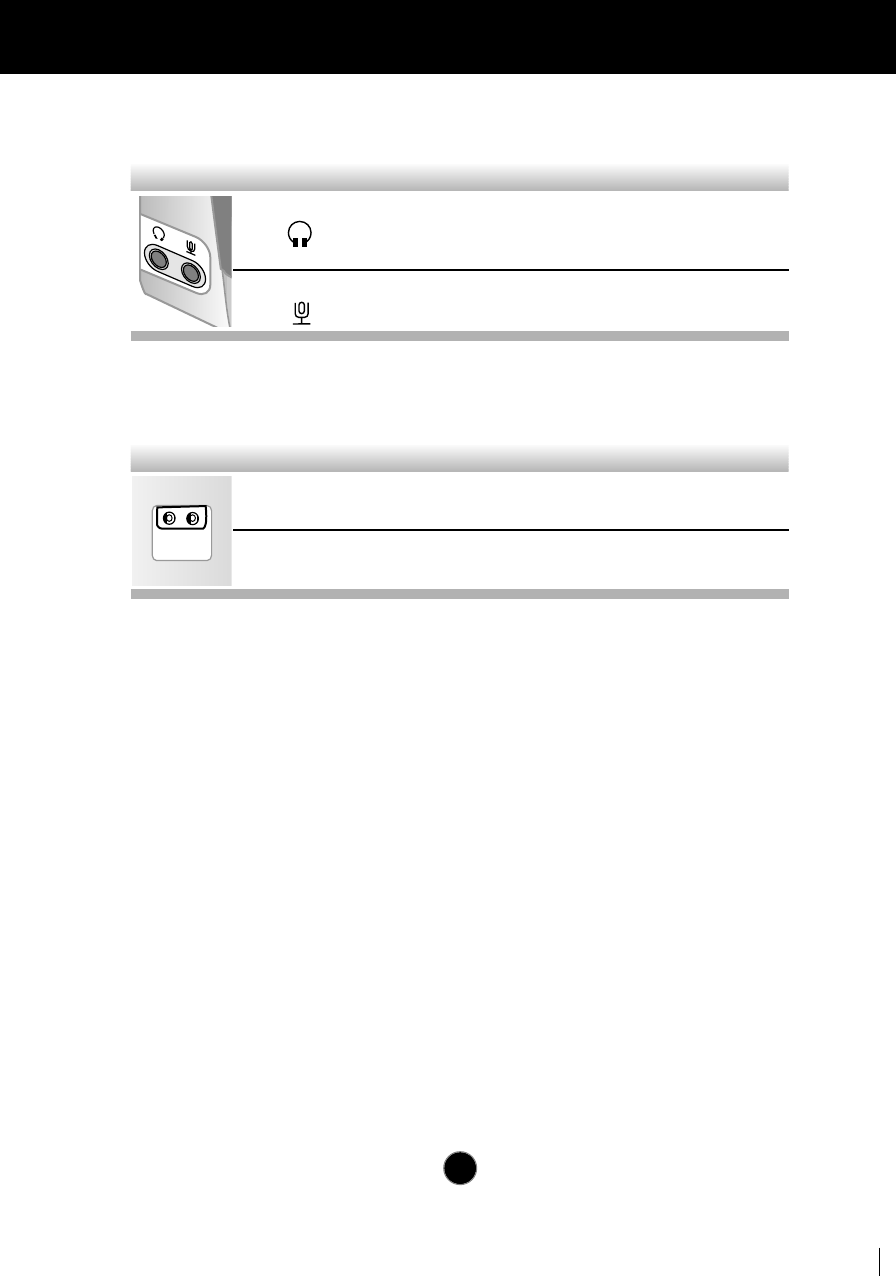
Left Side Jacks
Rear Panel Jacks
Headphone Jack Headphone Jack that automatically mutes
the speaker volume when headphone is
attached.
Microphone Jack An external microphone can be used
instead of the built-in microphone.
MIC.
OUT AUDIO
IN
Mic. Out Connects microphone sound to PC via
cable.
Audio In Connects speaker sound to PC via cable
attachment.
Microphone Operation
On the left side there is a MIC (Microphone) jack. By plugging a microphone in
here, it may reduce the long length of cable needed to reach the PC's sound card.
In order to use this MIC jack, you need to use a cable (supplied) to plug into the
rear of the monitor (MIC OUT) and into the MIC input jack of your sound card (if
available).
Audio Features
A major feature of this monitor is its built-in audio system. This conveniently
integrates a stereo audio amplifier and speakers without taking up any more
space. Because the monitor is designed like this, you can easily upgrade to audio
capable multimedia applications by attaching your PC with sound card to the back
of this monitor. It will result in significantly less cabling and space requirements.
A6
On Screen Display (OSD) Control Adjustment
Making adjustments to the image size, position and operating parameters of
the monitor are quick and easy with the On Screen Display Control system. A
quick example is given below to familiarize you with the use of the controls.
Following section is an outline of the available adjustments and selections you
can make using the OSD.
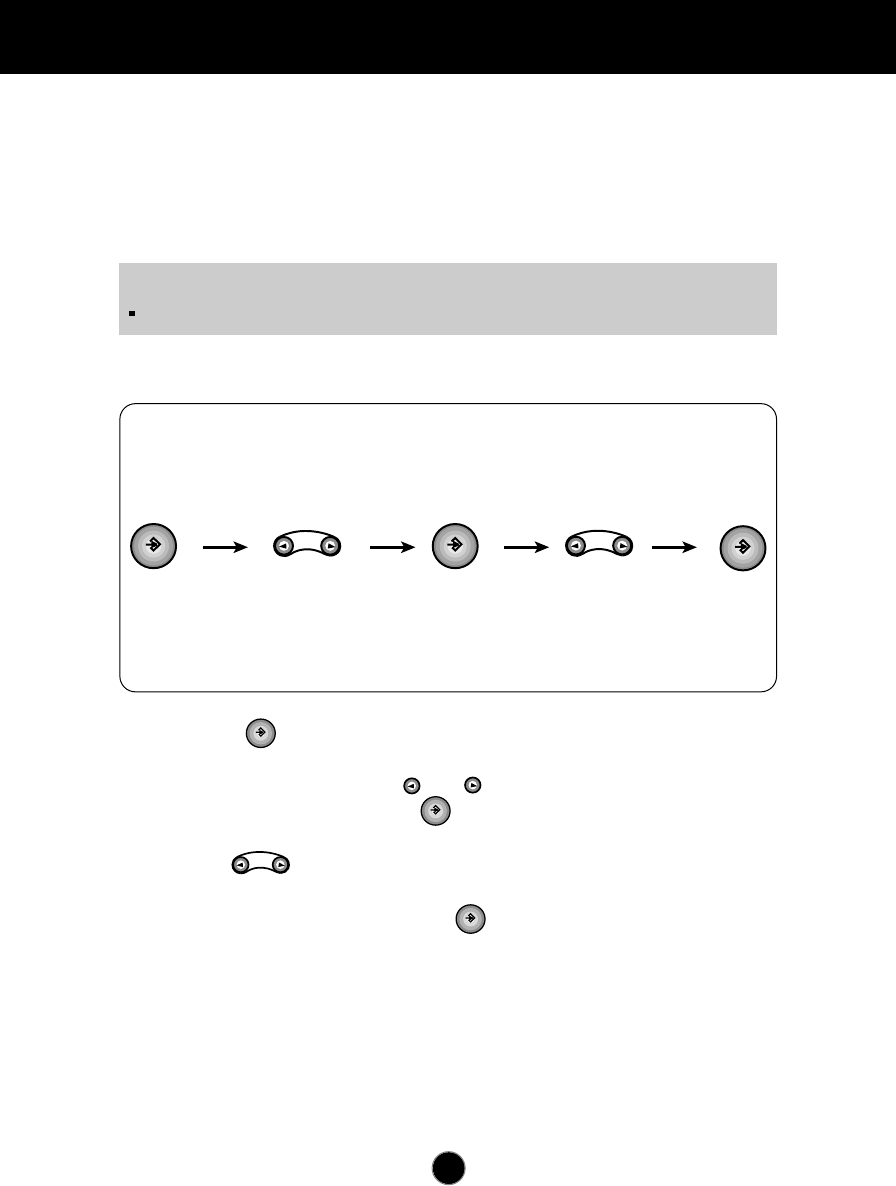
To make adjustments in the On Screen Display, follow these steps:
Press the Button, then the main menu of the OSD appears.
To acces a control, use the or Buttons. When the icon you want
becomes highlighted, press the Button.
Use the Buttons to adjust the item to the desired level.
Accept the changes by pressing the Button.
NOTE
Allow the monitor to stabilize for at least 30 minutes before making image adjustment.
1
1
2
3
4
5
6
7
1
2
2
3
4
5
6
7
1
2
3
3
4
5
6
7
1
2
3
4
4
5
6
7
To adjust image height.
Decreases the size of the screen
image.
Increases the size of the screen
image.
A7
On Screen Display(OSD) Selection and Adjustment
You were introduced to the procedure of selection and adjusting an item
using the OSD system. Listed below are the icons, icon names, and icon
descriptions of the items that are shown on the Menu.
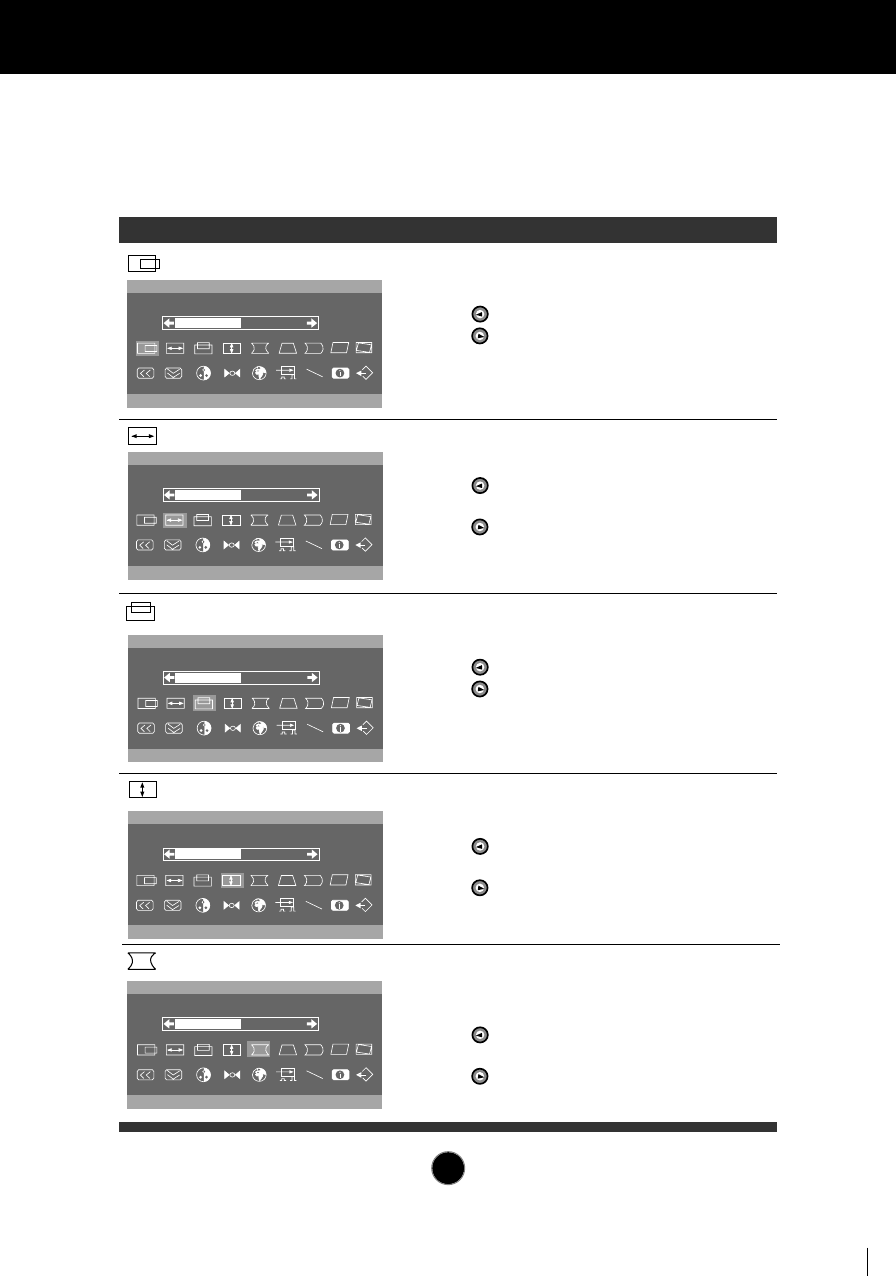
OSD Adjust Description
68.7kHz/85Hz
H POSITION
50
U
68.7kHz/85Hz
H SIZE
50
U
68.7kHz/85Hz
V POSITION
50
U
To move image up and down.
Moves the screen image down.
Moves the screen image up.
To move picture image left and right.
Moves the screen image left.
Moves the screen image right.
To adjust image width.
Decreases the size of the screen
image.
Increases the size of the screen
image.
H POSITION
H SIZE
V POSITION
68.7kHz/85Hz
V SIZE
50
U
68.7kHz/85Hz
PINCUSHION
50
U
To correct the bowing in and out of the
image.
Curves the image's edges
inwards.
Curves the image's edges
outwards.
V SIZE
PINCUSHION

To correct the balance of both sides
bowing.
Curvature of the sides to the right.
Curvature of the sides to the left.
A8
On Screen Display(OSD) Selection and Adjustment
OSD Adjust Description
68.7kHz/85Hz
TRAPEZOID
50
U
68.7kHz/85Hz
PIN BALANCE
50
U
68.7kHz/85Hz
PARALLELOGRAM
50
U
68.7kHz/85Hz
TILT
50
U
To correct geometric distortion.
Makes the screen image narrower
at the top.
Moves the screen image wider at
the top.
This control adjusts for a skewing of
the screen image.
Tilts the screen image leftward.
Tilts the screen image rightward.
To correct image rotation.
Tilts the screen image left.
Tilts the screen image right.
TRAPEZOID
PIN BALANCE
PARALLELOGRAM
TILT
68.7kHz/85Hz
H MOIRE
0
U
68.7kHz/85Hz
V MOIRE
0
U
Reduce horizontal moire when
interference patterns of dark steady
wary lines appear on your screen.
The moire adjustments may affect the
focus of the screen.
Reduce vertical moire when
interference patterns of dark steady
wary lines appear on your screen.
The moire adjustments may affect the
focus of the screen.
H MOIRE
V MOIRE
A9
On Screen Display(OSD) Selection and Adjustment
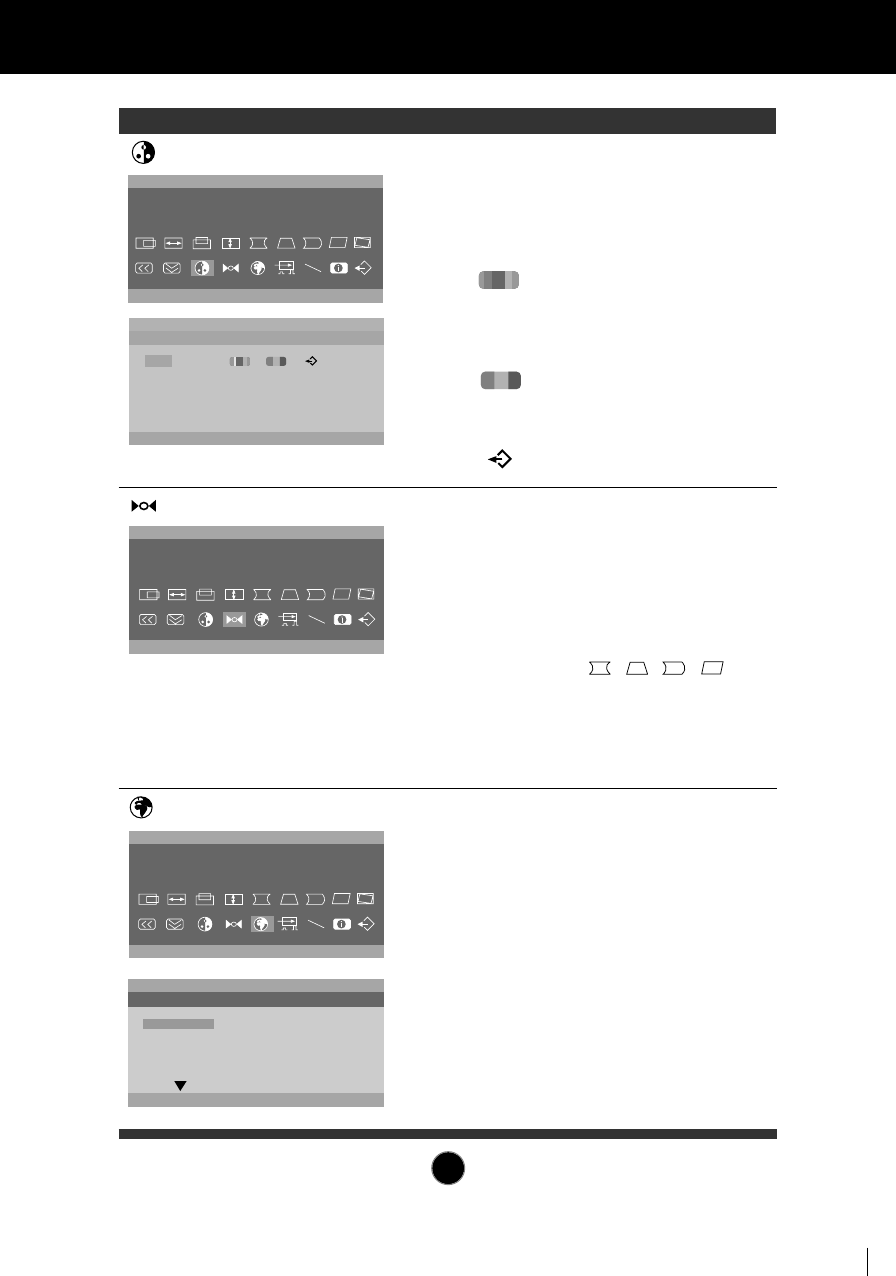
OSD Adjust Description
68.7kHz/85Hz
COLOR
U
68.7kHz/85Hz
RECALL
U
68.7kHz/85Hz
COLOR
9300 6500 R G B
K
•9300 : To appear the display’s
color temperature. Slightly
bluish white.
•6500 : To appear the display’s
color temperature.
Slightly reddish white.
•: Temperature range is from
5000K to 10000K. So, user
easily color set without
adjustment Red, Green and
Blue (R/G/B).
•: To set your own color levels.
Allow for specific
adjustments to Red, Green
and Blue (R/G/B).
•: To exit the COLOR OSD.
You can use this function when you
want to go back to the screen display
of the time you purchased the product
after adjusting to modify it in the
Preset Mode.
When you are in the User mode, you
can recall only , , ,
items. After using Recall, adjust the
screen display again if necessary.
If you want more information on the
Preset Mode, refer to A12 page.
COLOR
RECALL
K
R G B
68.7kHz/85Hz
LANGUAGE
U
68.7kHz/85Hz
LANGUAGE
ENGLISH
DEUTSCH
FRANÇAIS
ESPAÑOL
ITALIANO
To choose the language in which the
control names are displayed.
OSD Menus are available in 7
languages : English, German,
French, Spanish, Italian, Português
and Korean.
LANGUAGE
A10
On Screen Display(OSD) Selection and Adjustment
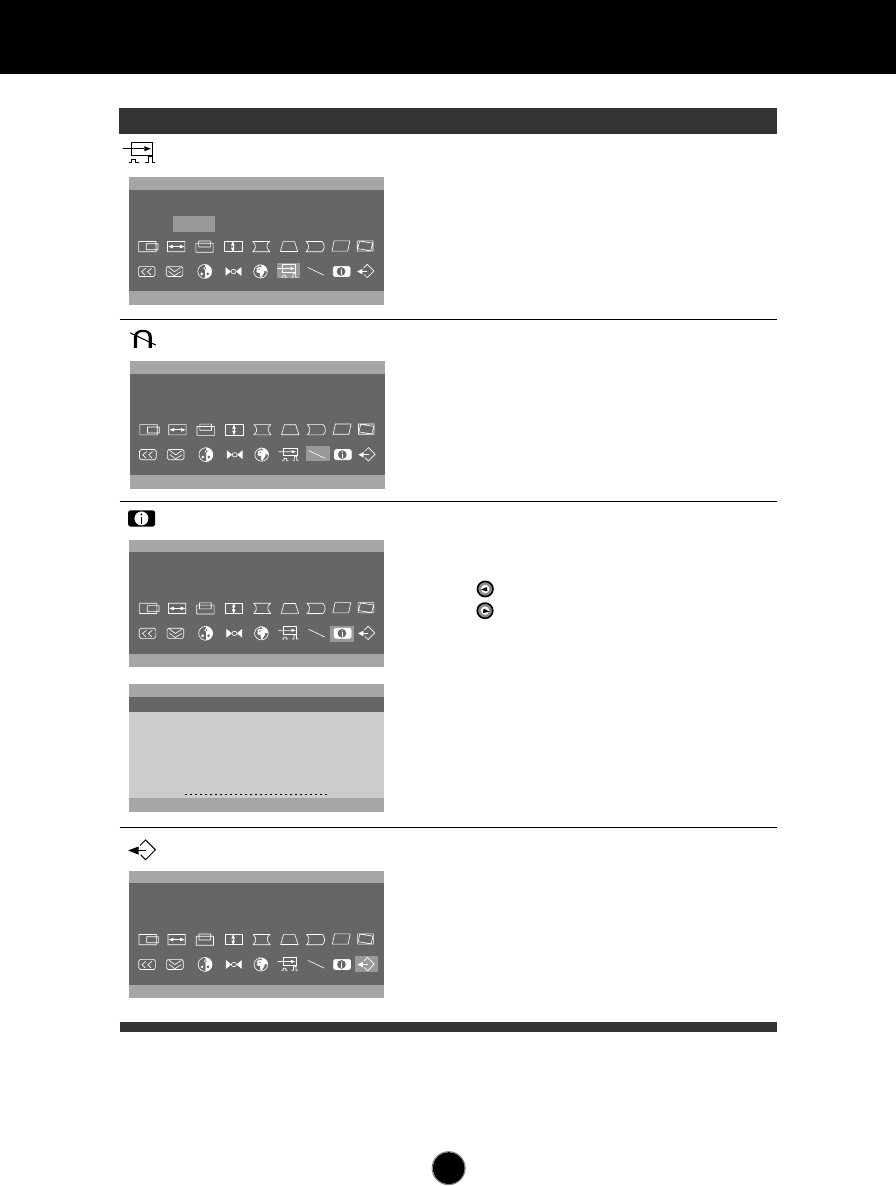
OSD Adjust Description
68.7kHz/85Hz
DEGAUSS
U
68.7kHz/85Hz
INFORMATION
U
68.7kHz/85Hz
INFORMATION
PRESET MODE
1 37.5kHz / 75Hz
2 46.8kHz / 75Hz
3 53.6kHz / 85Hz
4 68.6kHz / 85Hz
5 31.5kHz / 70Hz
6 31.5kHz / 60Hz
To manually demagnetize the screen
which may show some image or color
incorrectly.
To inform users of preset and user
mode data.
: USER MODE
: PRESET MODE
68.7Hz/85Hz
VIDEO LEVEL
0.7V 1.0V
U
This item is used to select the
monitor's input signal level. The normal
level used for most PC's is 0.7V.
When the screen suddenly gets
brightened or blurry, please select 1.0V
and try again.
VIDEO LEVEL
DEGAUSS
68.7kHz/85Hz
OSD EXIT
U
To disappear of the OSD on the
screen.
OSD EXIT
INFORMATION
You were introduced to the procedure of selection and adjusting an item
using the OSD system. Listed below are the icons, icon names, and icon
descriptions of the items that are shown on the main Menu.
To make adjustments in the On Screen Display, follow these steps:
A11
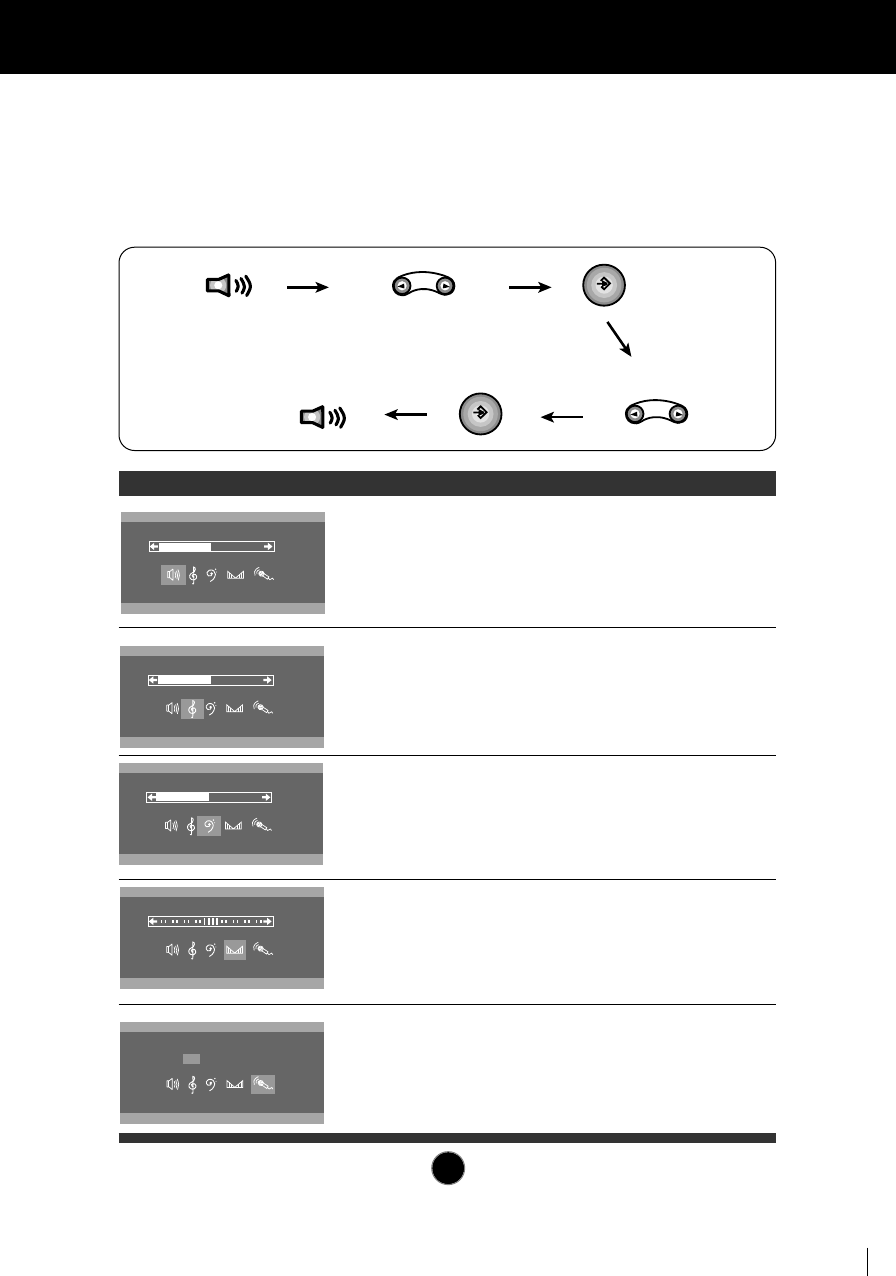
Sound Selection and Adjustment
68.7kHz/85Hz
TREBLE
50
68.7kHz/85Hz
BASS
50
68.7kHz/85Hz
BALANCE
50
68.7kHz/85Hz
MICROPHONE
ON OFF
68.7kHz/85Hz
VOLUME
50
OSD Adjust Description
Raises or lowers audio level.
VOLUME
Raises or lowers treble level.TREBLE
Raises or lowers Bass level.BASS
Changes balance of left/right speaker
level.
BALANCE
Enables or disables microphone
usage.
MICROPHONE

A12
Video Memory Modes
The monitor has 31 memory locations for display modes, 6 of which are
factory preset to popular video modes.
Preset Modes (Resolution)
User Modes
Modes 7-31are empty and can accept new video data. If the monitor detects a
new video mode that has not been present before or is not one of the preset
modes, it stores the new mode automatically in one of the empty modes
starting with mode 7.
If you use up the 25 blank modes and still have more new video modes, the
monitor replaces the information in the user modes starting with mode 7.
Recalling Display Modes
When your monitor detects a mode it has seen before, it automatically recalls
the image settings you may have made the last time you used that mode.
You may, however, manually force a recall of each of the 6 preset modes by
pressing the Recall button. All preset modes are automatically recalled as the
monitor senses the incoming signal.
The ability to recall the preset modes is dependent on the signal coming from
your PC’s video card or system. If this signal does not match any of the factory
modes, the monitor automatically sets itself to display the image.
Display Modes (Resolution) Horizontal Freq.(kHz) Vertical Freq.(Hz)
1
2
3
4
5
6
720 x 400
640 x 480
800 x 600
800 x 600
1280 X 1024
1024 X 768
31.47
37.50
46.88
53.67
63.98
68.68
70
75
75
85
60
85
VGA
VESA
VESA
VESA
VESA
VESA

A13
Troubleshooting
Check the following before calling for service.
SELF DIAGNOSTICS message.
The signal cable is not connected, or is loose. Check and secure the connection.
OUT OF FREQUENCY message appears.
The frequency of the signal from the video card is outside the operating range of
the monitor.
* Horizontal Frequency : 30-70kHz
* Vertical Frequency : 50-160Hz
Use the graphics board's utility software to change the frequency setting (Refer
to the manual for graphics board).
The power LED is illuminated amber.
Display power management mode.
There is no active signal coming from the PC.
The signal cable is not fastened securely.
Check the computer power and graphics adapter configuration.
The image on the SCREEN is not centered, or too small, or not a
rectangle shape.
Image adjustment not been done yet in the current operating mode. Use the
and buttons to set the image to your liking.
The monitor doesn't enter the power saving off mode (Amber).
Computer video signal is not VESA DPMS standard. Either the PC or the video
controller card is not using the VESA DPMS power management function.
An abnormal picture is displayed on the screen. For example, the
upper part of the picture may be missing or dark.
If using certain non-VESA Standard video card, an abnormal picture may be
displayed. Try setting it to one of the factory preset modes, or selecting to a
resolution and refresh rate within the specification limits of the monitor.
NOTE
If the power indicator(LED) light is blinking amber, may result in abnomal condition of
the monitor.
Then press a power ON/OFF button on the front panel control and call your service
technician for more information.
A14
Specifications
15 inch (14.0 inches viewable) FST
90 degree deflection
0.28mm dot pitch
ARAS(Anti-Reflective Anti-Static) coating
Horizontal Freq. 30 - 70kHz (Automatic)
Vertical Freq. 50 - 160Hz (Automatic)
Input Form Separate TTL, Positive/Negative
Signal Input 15 pin D-Sub Connector
Input Form
Separate, RGB Analog, 0.7Vp-p/75 ohm, Positive
Resolution(max) 1280 x 1024
@
60Hz
RMS Audio Output
4W (R+L)
Input Sensitivity 0.7 Vrms
Built-in MIC
E.C.M type (Electrect Condenser Microphone)
Speaker Impedance
4Ω
Normal ≤110W
Stand-by/Suspend
≤15W
Power Off ≤8W
Width 41.7 cm / 16.4 inches
Height 32.8 cm / 12.9 inches
Depth 39.1 cm / 15.4 inches
Europe AC 200-240V 50Hz 1.5A
Others AC 100-240V 50/60Hz 2.0A
The products should be used according to the Power
requirements of each ID LABEL.
Net 14.9 kg (32.8 lbs)
Operating Condition
Temperature 10 ˚C to 40 ˚C
Humidity 10 % to 90 % non-Condensing
Storage Condition
Temperature 0 ˚C to 60 ˚C
Humidity 5 % to 90 % non-Condensing
NOTE
Information in this document is subject to change without notice.
Picture Tube
Sync Input
Video Input
Audio
Power
Consumption
Dimensions (with
tilt/ swivel stand)
Power Input
Weight
Environmental
Conditions