LG Electronics USA ME550D Cellular/PCS GSM/EDGE Phone with Bluetooth User Manual ME550d Brazil vivo 0205
LG Electronics USA Cellular/PCS GSM/EDGE Phone with Bluetooth ME550d Brazil vivo 0205
UserManual.wiki
>
LG Electronics USA
>
ME550D User Manual
Users Manual
Navigation menu
Upload a User Manual
Namespaces
Wiki Guide
HTML
PDF
Info
Views
User Manual
Discussion / Help
Navigation
![8For Your SafetyImportant InformationThis user guide contains important information on the use andoperation of this phone. Please read all the informationcarefully for optimal performance and to prevent any damageto or misuse of the phone. Any changes or modifications notexpressly approved in this user guide could void your warrantyfor this equipment.Before You StartSafety InstructionsWARNING! To reduce the possibility of electric shock, do notexpose your phone to high humidity areas, such as thebathroom, swimming pool, etc.Always store your phone away from heat. Never store yourphone in settings that may expose it to temperatures less than32°F or greater than 104°F, such as outside during extremeweather conditions or in your car on a hot day. Exposure toexcessive cold or heat will result in malfunction, damageand/or catastrophic failure.Be careful when using your phone near other electronicdevices. RF emissions from your mobile phone may affectnearby in adequately shielded electronic equipment. Youshould consult with manufacturers of any personal medicaldevices such as pacemakers and hearing aides to determine ifthey are susceptible to interference from your mobile phone.Turn off your phone in a medical facility or at a gas station.Never place your phone in a microwave oven as this willcause the battery to explode.IMPORTANT! Please read the TIA SAFETY INFORMATION onpage 78 before using your phone.Safety InformationRead these simple guidelines. Breaking the rules may bedangerous or illegal. Further detailed information is given in thisuser guide.]Never use an unapproved battery since this could damagethe phone and/or battery and could cause the battery toexplode.]Never place your phone in a microwave oven as it willcause the battery to explode.]Do not dispose of your battery by fire or with hazardous orflammable materials.]Make sure that no sharp-edged items come into contactwith the battery. There is a risk of this causing a fire.]Store the battery in a place out of reach of children.]Be careful that children do not swallow any parts such asrubber plugs (earphone, connection parts of the phone,etc.). This could cause asphyxiation or suffocation.](https://usermanual.wiki/LG-Electronics-USA/ME550D/User-Guide-761624-Page-7.png)
![9For Your Safety]Unplug the power cord and charger during lightning stormsto avoid electric shock or fire.]When riding in a car, do not leave your phone or set up thehands-free kit near to the air bag. If wireless equipment isimproperly installed and the air bag is activated, you may beseriously injured.]Do not use a hand-held phone while driving.]Do not use the phone in areas where its use is prohibited.(For example: aircraft).]Do not expose the battery charger or adapter to directsunlight or use it in places with high humidity, such as abathroom.]Never store your phone in temperatures less than- 4°F orgreater than 122°F.]Do not use harsh chemicals (such as alcohol, benzene,thinners, etc.) or detergents to clean your phone. There is arisk of this causing a fire.]Do not drop, strike, or shake your phone severely. Suchactions may harm the internal circuit boards of the phone.]Do not use your phone in high explosive areas as the phonemay generate sparks.]Do not damage the power cord by bending, twisting, pulling,or heating. Do not use the plug if it is loose as it may causea fire or electric shock.]Do not place any heavy items on the power cord. Do notallow the power cord to be crimped as it may cause fire orelectric shock.]Do not handle the phone with wet hands while it is beingcharged. It may cause an electric shock or seriouslydamage your phone.]Do not disassemble the phone.]Do not place or answer calls while charging the phone as itmay short-circuit the phone and/or cause electric shock orfire.]Only use the batteries, antennas, and chargers provided byLG. The warranty will not be applied to products provided byother suppliers.]Only authorized personnel should service the phone and itsaccessories. Faulty installation or service may result inaccidents and consequently invalidate the warranty.]Do not hold or let the antenna come in contact with yourbody during a call.]An emergency call can be made only within a service area.For an emergency call, make sure that you are within aservice area and that the phone is turned on.](https://usermanual.wiki/LG-Electronics-USA/ME550D/User-Guide-761624-Page-8.png)
![11For Your SafetyVehicle Mounted External Antenna(optional, if available)A minimum separation distance of 8 inches (20cm) must bemaintained between the user/bystander and the vehiclemounted external antenna to satisfy FCC RF exposurerequirements. For more information about RF exposure, visitthe FCC website at www.fcc.govFCC Part 15 Class B ComplianceThis device and its accessories comply with part 15 of FCCrules. Operation is subject to the following two conditions: (1) This device and its accessories may not cause harmfulinterference, and (2) this device and its accessories mustaccept any interference received, including interference thatmay cause undesired operation.Cautions for Battery]Do not disassemble.]Do not short-circuit.]Do not expose to high temperature: 60°C (140°F).]]Do not incinerate.Battery Disposal]Please dispose of your battery properly or bring to yourlocal wireless carrier for recycling.]Do not dispose in fire or with hazardous or flammablematerials.Adapter (Charger) Cautions]Using the wrong battery charger could damage your phoneand void your warranty.]The adapter or battery charger is intended for indoor useonly.Do not expose the adapter or battery charger to direct sunlightor use it in places with high humidity, such as the bathroom.](https://usermanual.wiki/LG-Electronics-USA/ME550D/User-Guide-761624-Page-10.png)
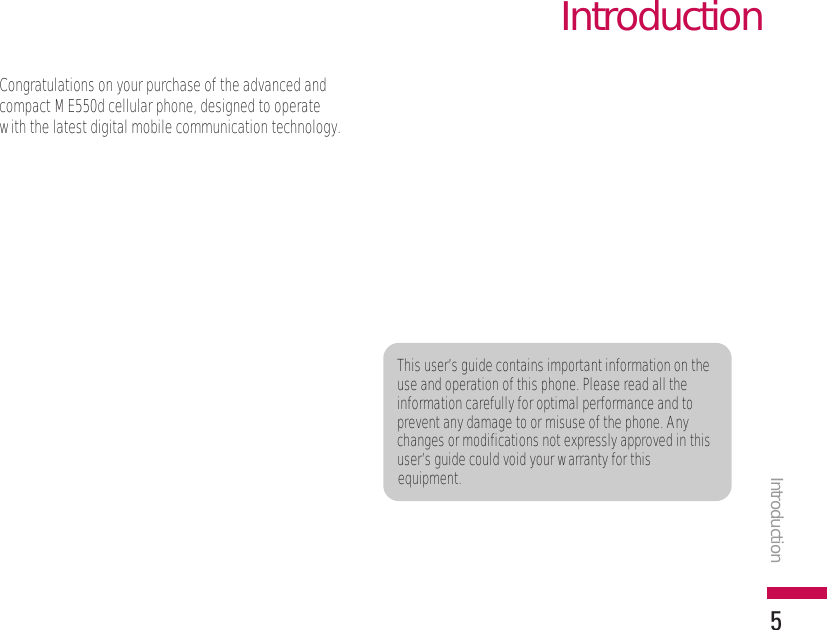
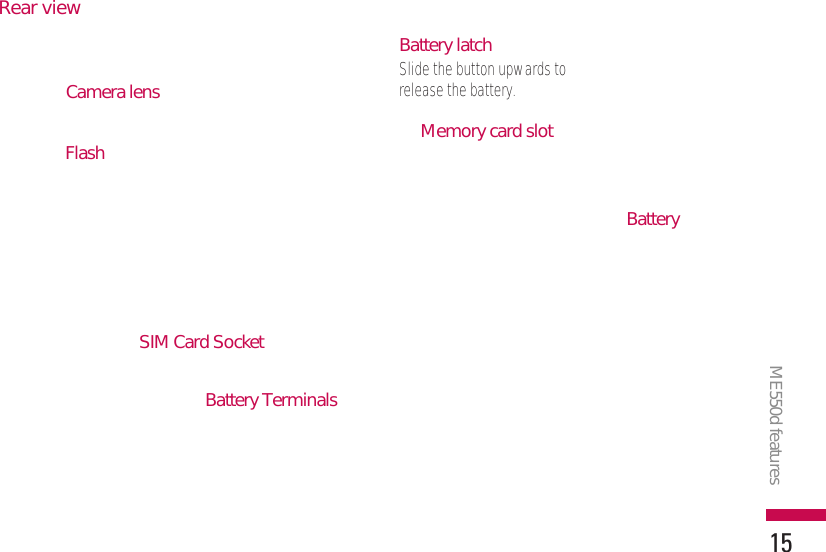
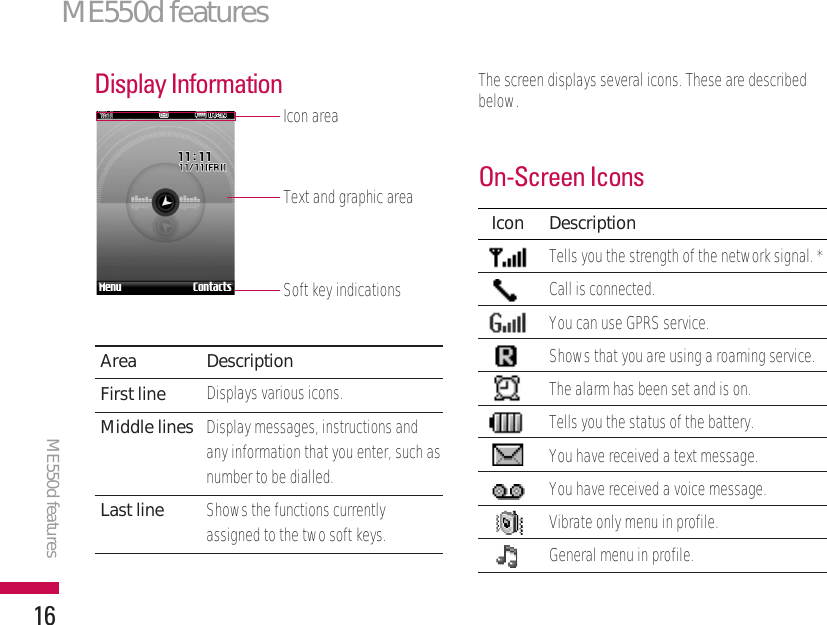
![ME550d features12Parts of the phoneFront viewME550d featuresAlpha numeric keys]In standby mode: Input numbers to dialHold down- International calls- Activate Voice mail centre menuto - Speed dials]In editing mode: Enter numbers &charactersLCD•Top: Signal strength, battery leveland various function•Bottom: Soft key indicationsNavigation key]In standby mode:Briefly: Write Text MessageBriefly: List of Address bookBriefly: List of ProfilesBriefly: List of Favourites]In menu: scroll up & downEarpieceMicrophone](https://usermanual.wiki/LG-Electronics-USA/ME550D/User-Guide-761624-Page-12.png)
![ME550d features13Send key]Dial a phone number and answer a call.]In standby mode: shows recently dialled,received and missed call.Left soft key/ Right soft key These keys perform the function indicated in thebottom of the display.Clear keyDeletes a character with each press. Hold the key down to clear all input. Use this key to go back to a previous screen.](https://usermanual.wiki/LG-Electronics-USA/ME550D/User-Guide-761624-Page-13.png)
![ME550d features14ME550d featuresLeft side view Right side view Side keys]In standby mode (opened):Volume of key tone]In standby mode (closed):Short press - The LCD light on.]In menu: scroll up & down]During a call: volume of theearpieceBattery Charging Connector/Cable connector and Ear jackEnd key•Switch on/off (hold down)•End or reject a call.Side camera keyLong press - Photo camera activationNote]To protect the sense ofhearing, maximum volumelevel is 3.Note]Pleas ensure phone is poweredon and in idle mode beforeconnecting the USB cable.](https://usermanual.wiki/LG-Electronics-USA/ME550D/User-Guide-761624-Page-14.png)
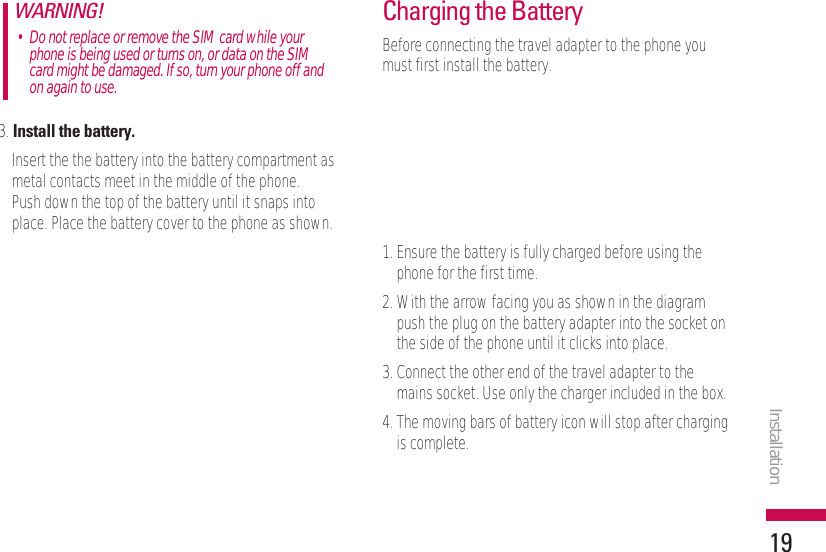
![Installation18Installing the SIM card and thehandset batteryMake sure the power is off before you remove the SIMcard or battery.1. Remove the battery.Press and hold down the battery release button and liftoff the battery cover. Turn the phone up-side down, asshown, then press down the battery lightly with yourfingers and pull-out the battery.2. Install the SIM card.Insert the SIM card into the holder. Slide the SIM cardinto the SIM card holder. Make sure that the SIM cardis inserted properly and that the gold contact area onthe card is facing downwards. To remove the SIM card,press down lightly and pull it in the reverse direction.To insert the SIM card To remove the SIM cardNote]The metal contact of the SIM card can be easilydamaged by scratches. Pay special attention tothe SIM card while handling. Follow theinstructions supplied with the SIM card.Note]Removing the battery from the phone when thepower is on may cause the phone to malfunction.Installation](https://usermanual.wiki/LG-Electronics-USA/ME550D/User-Guide-761624-Page-18.png)
![Inserting the memory cardInsert the memory card into the slot until the memorycard is fully inserted into the slot, as shown in the figurebelow:Removing the memory cardCarefully remove the memory card out of the soket, asshown in the figure below:Note]Only use memory cards that have been approvedby the manufacturer. Some memory cards mightnot be compliant with the handset.Note]The gold connectors must be face down andinserted first into the memory card slot.Installation21](https://usermanual.wiki/LG-Electronics-USA/ME550D/User-Guide-761624-Page-21.png)
![General functions22Making a Call1. Make sure your phone is powered on.2. Enter a phone number including the area code.To edit a number on the display screen, simply pressthe key to erase one digit at a time.]Press and hold the key to erase the entirenumber.3. Press the key to call.4. When you want to finish, press the key.Making a Call by Send Key1. Press the key, and the most recent incoming,outgoing and missed phone numbers will be displayed.2. Select the desired number by using the navigation key.3. Press the key.Making International Calls1. Press and hold the key for the internationalprefix. The ‘+’ character can be replaced with theinternational access code.2. Enter the country code, area code, and the phonenumber.3. Press the key.Ending a CallWhen you have finished a call, press the key.Making a Call From the Contact listYou can store names and phone numbers dialledfrequently in the SIM card as well as the phone memoryknown as the Contact list.You can dial a number by simply looking up a name in thecontact list.General functions](https://usermanual.wiki/LG-Electronics-USA/ME550D/User-Guide-761624-Page-22.png)
![General functions23Adjusting the VolumeDuring a call, if you want to adjust the earpiece volume,use the side keys of the phone.In idle mode, you can adjust the key volume using theside keys.Answering a CallWhen you receive a call, the phone rings and the flashingphone icon appears on the screen. If the caller can beidentified, the caller’s phone number (or name if stored inyour Address Book) is displayed.1. Slide up and press the key or the left soft key toanswer an incoming call. If the Any Key menu option(Menu 9.5.2), has been set to any key press willanswer a call except for the key or the right soft key.2. End the call by closing the phone or pressing thekey.Vibrate Mode (Quick)Vibrate Mode can be activated by pressing and holdingthe left navigation key.Signal StrengthIf you are inside a building, being near a window maygive you better reception. You can see the strength ofyour signal by the signal indicator ( ) on yourphone’s display screen.Note]You can answer a call while using the AddressBook or other menu features. In case phone isconnected with PC via USB cable, call andmessage are not available.](https://usermanual.wiki/LG-Electronics-USA/ME550D/User-Guide-761624-Page-23.png)
![General functions24Entering TextYou can enter alphanumeric characters by using thephone’s keypad. For example, storing names in theAddress Book, writing a message, creating schedulingevents in the calendar all require entering text. Thefollowing text input methods are available in the phone.T9 ModeThis mode allows you to enter words with only onekeystroke per letter. Each key on the keypad has morethan one letter. The T9 mode automatically comparesyour keystrokes with an internal linguistic dictionary todetermine the correct word, thus requiring far fewerkeystrokes than the traditional ABC mode.ABC ModeThis mode allows you to enter letters by pressing the keylabeled with the required letter once, twice, three or fourtimes until the letter is displayed.123 Mode (Numbers Mode)Type numbers using one keystroke per number. Tochange to 123 mode in a text entry field, press key until 123 mode is displayed.Symbolic ModeThis mode allows you to enter special characters.Changing the Text Input Mode1. When you are in a field that allows characters to beentered, you will notice the text input mode indicator inthe upper right corner of the display.2. If you want to change modes, press . Theavailable modes are changed.Note]Some fields may allow only one text input mode(e.g. telephone number in address book fields).General functions](https://usermanual.wiki/LG-Electronics-USA/ME550D/User-Guide-761624-Page-24.png)
![General functions25Using the T9 ModeThe T9 predictive text input mode allows you to enterwords easily with a minimum number of key presses. As you press each key, the phone begins to display thecharacters that it thinks you are typing based on a built-indictionary. As new letters are added, the word changesto reflect the most likely candidate from the dictionary.1. When you are in the T9 predictive text input mode,start entering a word by pressing keys to Press one key per letter]The word changes as letters are typed-ignore what’s onthe screen until the word is typed completely.]If the word is still incorrect after typing completely,press the down navigation key once or more to cyclethrough the other word options.Example: Press to type Good.]If the desired word is missing from the word choiceslist, add it by using the ABC mode.2. Enter the whole word before editing or deleting anykey strokes.3. Complete each word with a space by pressing the keyor key.To delete letters, press . Press and hold down toerase the letters continuously.Note]You can select a different T9 language from themenu option or press hold down the key .The default setting on the phone is T9 disablemode.](https://usermanual.wiki/LG-Electronics-USA/ME550D/User-Guide-761624-Page-25.png)
![General functions26Using the ABC ModeUse the to keys to enter your text.1. Press the key labeled with the required letter:]Once for the first letter.]Twice for the second letter.]And so on.2. To insert a space, press the key once. To deleteletters, press the key. Press and hold down thekey to erase the letters continuously.Key Characters in the order displayUpper Case Lower Case. , ? ! ' '' 1 - ( ) @ / : _ . , ? ! ' '' 1 - ( ) @ / : _A B C 2 À Â Æ Ç a b c 2 à á â ã ä æ çD E F 3 É È Ê Ë d e f 3 è é ê ë G H I 4 Î Ï g h i 4 ì í î ïJ K L 5 £ j k l 5 £M N O 6 Ñ Ò Ó Ô Õ Ö OEm n o 6 ñ ò ó ô õ ö oeP Q R S 7 ß S¸ p q r s 7 ß s˛ T U V 8 Ú Ù Û Ü t u v 8 ú ù û üW X Y Z 9 w x y z 9Space 0 (long press) Space 0 (long press)Note]Refer to the table below for more information onthe characters available using the keys.General functionsNote]To exit the text input mode without saving yourinput, press . The phone returns to the idlescreen.](https://usermanual.wiki/LG-Electronics-USA/ME550D/User-Guide-761624-Page-26.png)
![General functions27Using the 123 (Numbers) ModeThe 123 Mode enables you to enter numbers in a textmessage (a telephone number, for example).Press the keys corresponding to the required digits beforemanually switching back to the appropriate text entrymode.Using the Symbol ModeThe Symbol Mode enables you to enter various symbolsor special characters.To enter a symbol, press the key. Use thenavigation keys to select the desired symbol and pressthe [OK] key.](https://usermanual.wiki/LG-Electronics-USA/ME550D/User-Guide-761624-Page-27.png)
![In-call menuIn-call menu29Your phone provides a number of control functions thatyou can use during a call. To access these functionsduring a call, press the left soft key [Options].During a CallThe menu displayed on the handset screen during a callis different than the default main menu displayed whenin idle screen, and the options are described below.Making a Second Call (Network Dependent)You can get a number you wish to dial from the AddressBook to make a second call.Swapping Between Two CallsTo switch between two calls, press key or the leftsoft key, and then select Swap Call.Answering an Incoming CallTo answer an incoming call when the handset is ringing,simply press the key. The handset is also able towarn you of an incoming call while you are already on acall. A tone sounds in the earpiece, and the display willshow that a second call is waiting.This feature, known as Call waiting, is only available ifyour network supports it. For details of how to activateand deactivate it see Call waiting (Menu 9.5.4).If Call Waiting is on, you can put the first call on hold andanswer the second, by pressing the left soft key .Rejecting an Incoming CallYou can reject an incoming call without answering bysimply pressing the key.During a call, you can reject an incoming call by pressingthe key.](https://usermanual.wiki/LG-Electronics-USA/ME550D/User-Guide-761624-Page-29.png)
![In-call menu30Muting the MicrophoneYou can mute the microphone during a call by pressingthe [Mute] key. The handset can be unmuted by pressingthe [Unmute]. When the handset is muted, the callercannot hear you, but you can still hear them.DTMF tones while callingTo switch on DTMF tones while calling (e.g. to use thephone with an automatic switchboard) press the key[Options] followed by Send DTMF on. Select DTMF off todisable DTMF tones. DTMF tones are normally on.Conference CallsThe conference service provides you with the ability tohave a simultaneous conversation with more than onecaller, if your network service provider supports thisfeature. A conference call can only be set up when youhave one active call and one call on hold, both callshaving been answered.Once a conference call is set up, calls may be added,disconnected or separated (that is, removed from theconference call but still connected to you) by the personwho set up the conference call. These options are allavailable from the In-Call menu. The maximum callers ina conference call are five. Once started, you are in controlof the conference call, and only you can add calls to theconference call.Making a Second CallYou can make a second call while currently on a call.Enter the second number and press the .When the second call is connected, the first call isautomatically placed on hold. You can swap betweencalls, by pressing the key.Setting Up a Conference CallTo set up a conference call, place one call on hold andwhile the active call is on, press the left soft key and thenselect the Join menu of Conference call.In-call menu](https://usermanual.wiki/LG-Electronics-USA/ME550D/User-Guide-761624-Page-30.png)
![In-call menu31Activate the Conference Call on HoldTo activate a conference call on hold, press the key.Alternatively press the left soft key [Options] and selectJoin all/Hold all calls. Other users on hold will stayconnected. To return to conference call mode, press theleft soft key [Options] followed by Conference call.Adding Calls to the Conference CallTo add a call to an existing conference call, press the leftsoft key, and then select the Join menu of Conferencecall.Private Call in a Conference CallTo have a private call with one caller from a conferencecall, display the number of the caller you wish to talk toon the screen, then press the left soft key. Select thePrivate menu of Conference call to put all the othercallers on hold.Ending a Conference CallCurrently displayed caller from a conference call can bedisconnected by pressing the key.](https://usermanual.wiki/LG-Electronics-USA/ME550D/User-Guide-761624-Page-31.png)
![Menu Tree32The following illustration shows the available menu structure and indicates the:]Number assigned to each menu option.]Page where you can find the feature description.You can go to the desired menu using the left soft key [Menu], navigation keys and the [OK] key. And you can also take ashortcut by pressing the corresponding number key of desired menu after pressing the left soft key [Menu].1.1 Home1.2 Bookmarks1.3 Go to URL1.4 History1.5 Settings1.6 Information1. TIM WAP2.1 All calls2.2 Missed calls2.3 Dialled calls2.4 Received calls2.5 Call duration2.6 Call costs2.7 Data information2. Call history3.1 Alarm clock3.2 Calendar3.3 Calculator3.4 Memo3.5 To-do3.6 Stop watch3.7 Unit converter3.8 World clock3. ToolsMenu Tree](https://usermanual.wiki/LG-Electronics-USA/ME550D/User-Guide-761624-Page-32.png)
![TIM WAP35You can access various WAP (Wireless ApplicationProtocol) services such as banking, news, weatherreports and flight information. These services arespecially designed for mobile phones and they aremaintained by WAP service providers.Check the availability of WAP services, pricing and tariffswith your network operator and/or the service providerwhose service you wish to use. Service providers willalso give you instructions on how to use their services.Once connected, the homepage is displayed. The contentdepends on the service provider. To exit the browser atany time, press the ( ) key. The phone will return to theidle menu.Navigating with the WAP browserYou can surf the Internet using either the phone keys orthe WAP browser menu.Using the phone keysWhen surfing the Internet, the phone keys functiondifferently to phone mode.Key DescriptionScrolls each line of the content areaReturns to the previous pageSelects options and confirms actionsUsing the WAP browser menuThere are various menu options available when surfingthe Mobile Web.Note]The WAP browser menus may vary, dependingon your browser version.TIM WAP](https://usermanual.wiki/LG-Electronics-USA/ME550D/User-Guide-761624-Page-35.png)
![TIM WAP36Home Menu 1.1Connects to a homepage. The homepage will be the sitewhich is defined in the activated profile. It will be definedby the service provider if you have not defined it in theactivated profile.Bookmarks Menu 1.2This menu allows you to store the URL of favourite webpages for easy access at a later time.To create a bookmark1. Press the left soft key [OK].2. Select Add new and press the OK key.3. After entering the desired URL and title, press the OKkey.After selecting a desired bookmark, the following optionsare available.]Connect: Connects to the selected bookmark.]View: You can see the selected bookmark.]Edit: You can edit the URL and/or the title of theselected bookmark.]Delete: Deletes the selected bookmark.]New bookmark: Select this to create a newbookmark.]New Folder: You can create a new folder.]Move/Copy: You can move/copy the selectedbookmark to other folder. ]Send URL: Sends the selected bookmark viaText/Multimedia message.]Delete all: Deletes all the bookmarks.Go to URL Menu 1.3You can connect directly to the site you want. Afterentering a specific URL, press the OK key.History Menu 1.4This menu will show the recent browsing pages.TIM WAP](https://usermanual.wiki/LG-Electronics-USA/ME550D/User-Guide-761624-Page-36.png)
![TIM WAP37Settings Menu 1.5You can set the profile, cache and security related tointernet service.Network profiles (Menu 1.5.1)A profile is the network information used to connect tothe Internet.There are default profiles for some operators, stored inphone memory. It’s impossible to rename defaultprofiles.Each profile has submenus as follows:]Activate: Activates the selected profile.]View: You can see the selected profile.]New profile: You can add a new profile.]Reset all: Allows you to reset all profiles.Cache (Menu 1.5.2)The information or services you have accessed are savedin the cache memory of the phone.Cookies (Menu 1.5.3)The information or services you have accessed are savedin the cache memory of the phone.Security certificates (Menu 1.5.4)You can view the security certificates that have bennsotred in your phone to use WAP.Note]A cache is a buffer memory, which is used tosave data temporarily.](https://usermanual.wiki/LG-Electronics-USA/ME550D/User-Guide-761624-Page-37.png)
![You can check the record of missed, received, and dialledcalls only if the network supports the Calling LineIdentification (CLI) within the service area.The number and name (if available) are displayedtogether with the date and time at which the call wasmade. You can also view call times.All calls Menu 2.1You can view all lists of outgoing or incoming calls.Missed calls Menu 2.2This option lets you view the unanswered calls. You canalso:]View the number if available and call it, or save it in theAddress Book]Enter a new name for the number and save both in theAddress Book]Send a message by this number]Delete the call from the listDialled calls Menu 2.3This option lets you view the outgoing calls (called orattempted). You can also:]View the number if available and call it or save it in theAddress Book]Enter new name for the number and save both in theAddress Book]Send a message by this number]Delete the call from the listReceived calls Menu 2.4This option lets you view the incoming calls. You canalso:]View the number if available and call it or save it in theAddress Book]Enter new name for the number and save both in theAddress Book]Send a message by this number]Delete the call from the listCall historyCall history39](https://usermanual.wiki/LG-Electronics-USA/ME550D/User-Guide-761624-Page-39.png)
![Call duration Menu 2.5Allows you to view the duration of your incoming andoutgoing calls. You can also reset the call times.The following timers are available:]Last call: Length of the last call.]Dialled calls: Length of the outgoing calls.]Received calls: Length of the incoming calls.]All calls: Total length of all calls made and incomingcalls since the timer was last reset.Call costs Menu 2.6Allows you to check the cost of your Last call and Allcalls.To check Cost setting, you should check the followingmenus.]Set credit: This network service allows you to limit thecost of your calls by selected charging units. If youselect Read, the number of remaining unit is shown. Ifyou select Change, you can change your change limit.]Set tariff: You can set the currency type and the unitprice. Contact your service providers to obtain chargingunit prices. To select the currency or unit in this menu,you need the PIN2 code.]Auto display: This network service allows you to seeautomatically the cost of your last calls. If set to On,you can see the last cost when the call is released.Data information Menu 2.7You can check the amount of data transferred over thenetwork through the GPRS information option.In addition, you can also view how much time you areonline.Call historyCall history40](https://usermanual.wiki/LG-Electronics-USA/ME550D/User-Guide-761624-Page-40.png)
![Alarm clock Menu 3.1You can set the alarm clock to go off at a specified time.1. Select On and enter the alarm time you want.2. Select the repeat period: Once, Mon-Fri, Mon-Sat, Sat-Wed, Sat-Thu, Everyday.3. Select the alarm tone you want and press [OK].Calendar Menu 3.2When you enter this menu a calendar will show up. Ontop of the screen there are sections for date. Wheneveryou change the date, the calendar will be updatedaccording to the date. And square cursor will be used tolocate the certain day. If you see marked date in thecalendar, it means that there is a schedule or memo thatday. This function helps to remind you of your scheduleand memo. The phone will sound an alarm tone if you setthis for the note.To change the day, month, and year.Key Description, Yearly, Monthly, Weekly, DailyIn the scheduler mode, press left soft key [Options]as follows;]ViewView all schedules and memo for the chosen day.Use , to browse through the note lists.If you want to view the note in detail, press left softkey [OK]. Press left soft key [Options] toView, Delete, New schedule, Send via Textmessage/Multimedia message/Bluetooth/Email, Edit,Calendar, Scheduler tone, All schedules, Go to date,Multi delete and Delete all.TooolsTools41](https://usermanual.wiki/LG-Electronics-USA/ME550D/User-Guide-761624-Page-41.png)
![]New scheduleAllows you to add new schedule and memo for thechosen day. You can store up to 100 notes.Input the subject and then press left soft key [OK]. You enter the appropriate information in the followsection; Time, Repeat and Alarm.]Scheduler toneYou can set the alarm tone of each chosen date.]Go to dateYou can go the chosen date directly.Calculator Menu 3.3This contains the standard functions such as +, -, x, n:Addition, Subtraction, Multiplication, and Division.Furthermore, you can use the various function ofcalculator such as +/-, sin, cos, tan, log, ln, exp, sqrt, deg,rad.1. Input the numbers by pressing numeric keys.2. Use a navigation key to select a sign for calculation.3. Then input the numbers.4. Press key to view the result.5. To input the decimal number, press key.6. To end Calculator, press the right soft key [Back].ToolsTools42](https://usermanual.wiki/LG-Electronics-USA/ME550D/User-Guide-761624-Page-42.png)
![Memo Menu 3.41. Select the Memo by pressing the left soft key [OK].2. If the entry is empty, press the left soft key [New].3. Input the memo and then press left soft key [Options] > [Save].To do Menu 3.5You can view and create to do notes.1. Select the To do by pressing the left soft key .2. In the note is not created yet, press the left softkey [Options].3. Input the memo and the schedule alarm and thenpress the left soft key [Save].Stop watch Menu 3.61. Press [Start] to take time and record the lap time bypressing [Lap].2. Press [Stop] to ascertain the record of lap time.3. Press [Reset] to default condition.Unit converter Menu 3.7This converts any measurement into a unit you want.There are 7 types that can be converted into units:Currency, Area, Length, Weight, Temperature, Volumeand Velocity.1. You can select one of unit types by pressing [OK]key.2. Select the unit you want to convert by pressing ,. It’s impossible to input “-” symbol in unitconverter.3. Select the standard value by using , .Tools43Note]If you want to change the text input mode, pressthe in order.](https://usermanual.wiki/LG-Electronics-USA/ME550D/User-Guide-761624-Page-43.png)
![World clock Menu 3.8You can check the current time of Greenwich Mean Time(GMT) and major cities around the world, using theleft/right navigation keys and left soft key [Cities].The screen shows the city name, current date and time.To select the time zone in which you are located, proceedas follows:1. Select the city corresponding to your time zone bypressing the left/right navigation keys and left softkey[Cities] one or more times. The local date and timeare displayed.2. If you want to change the time display in standby modeto the selected time, press [OK] key twice.ToolsTools44](https://usermanual.wiki/LG-Electronics-USA/ME550D/User-Guide-761624-Page-44.png)
![You can enjoy your multimedia function such as camera,voice recorder, MP3 for your fun and convinience.MP3 player Menu 4.1The ME550d has an integrated MP3 player built-in. Youcan enjoy listening to MP3 music files on a memory inyour phone using a compatible headset or via the internalloudspeaker.The music player supports:• MPEG-2 Layer III, MPEG-2.5 Layer III: Samplingfrequency up from 8KHz to 48KHz. Bit rate up to320Kbps, stereo.• AAC: ADIF, ADTS formats (Sampling frequency from8KHz to 48KHz)• AAC+: V1: (Bit rate 16~128Kbps)V2 : (Bit rate 16~48Kbps)(Sampling frequency from 8KHz to 48KHz) Note]Because of the small dimension of the speaker, insome cases the audio could be distorted,especially at maximum volume and when thereare lots of bass sounds. Therefore, werecommend you to use the stereo headset inorder to appreciate the high quality of your music.Note]When the status of the battery indicates low, youmay not use Camera or Multimedia function.]While using Multimedia function, the status ofthe battery is changeable.MultimediaMultimedia45](https://usermanual.wiki/LG-Electronics-USA/ME550D/User-Guide-761624-Page-45.png)
![You can transfer MP3 files from a compatible PC to thememory in your phone using the Mass Storage.When you connect the phone to a PC using the USB cable(supplied in the same package), and then you can showremovable disk through windows explorer. After you copysongs in removable disk, you should execute safe removefrom your system. RepeatPlay allRepeat allRepeat oneNote]You should copy MP3 to Sounds/MP3 folder. Ifyou copy another folder, you can’t see MP3 files.]The PC should run Windows 98 SE, WindowsME, Windows 2000, Windows XP operatingsystem.Note]ME550d doesn’t support the variable bit rate ofall mentioned file types. Therefore, you can’tchange the file from MP3 format to AAC.MultimediaMultimedia463TXMSR &EGOPlayer skinFile nameRunning timeStereo/Playmode/ShuffleProgressive barVolume levelStatus of themusic controller](https://usermanual.wiki/LG-Electronics-USA/ME550D/User-Guide-761624-Page-46.png)
![1. Press Multimedia menu, and then select MP3 player.2. Press the left soft key [Options] to access thefollowing menus.]Now playing: You can paly the MP3 player]All song: You can see all songs stored in your MP3Player. ]My playlist: You can select another music you wanton playing MP3 file.]Settings- Shuffle: It you select On, you can listen to the musicat random.- Repeat: This menu allows to set the play mode:Repeat all, Repeat one, Repeat off. - Equalizer: This menu helps you to adjust various ofenvironment on listening to the music.- Player skin: You can select the visual effect menus:Real spectrum, Fake. This menu allows to change thebackground of main LCD on playing MP3 file.Note]Music is copyright protected in internationaltreaties and national copyright laws. It may benecessary to obtain permission or a license toreproduce or copy music. In some countriesnational law prohibits private copying ofcopyrighted material. Please check the nationallegislation of the applicable country concerningthe use of such material.Note]In case that any invalid file is included in theplaylist, an error message will be popped up andgo back to the prior screen.Multimedia47](https://usermanual.wiki/LG-Electronics-USA/ME550D/User-Guide-761624-Page-47.png)
![Camera Menu 4.2Using the camera module built in your phone, you cantake pictures of people or record videos. Additionally, youcan send photos to other people and select photos aswallpaper.Shutter sound or video recording sound is omitted evenwhen setting mode, including manner mode .• To take a pictureHold down the camera button. The camera will beready to use after you remove the camera lens cover andyou may want to rotate the screen into a horizontalposition.- To take clear pictures, press the camera button whileholding the camera without any movement.- Appropriately adjust distance to the object that youwant take a picture of (more than 50 cm).- Handle carefully since the camera is vunerable to shockand use a soft cloth when cleaning the camera lens.- Do not disassemble or modify the camera as this maylead to fire or malfunctioning.- Auto Focus function is enabled when taking a picture orsticker shot. Press the camera button half way toadjust focus.1. Hold down the in standby mode. 2. Focus on the subject to capture the image, and thenpress the key.3. If you want to save it, press the [Options] key.MultimediaMultimedia48Note]When using the camera, power consumptionincreases. If this icon appears on thewallpaper, indicating low battery, recharge thebattery before use.Note]You can adjust the brightness by using the , .](https://usermanual.wiki/LG-Electronics-USA/ME550D/User-Guide-761624-Page-48.png)
![]Resolution [ ]: Allows you to set the imagesize.(1600x1200), (1200x960) (640x480) and (320x240).Multishot is only available with the (320x240),(640x480) pixel resolution.]Quality [ ]: Allows you to set the image qualityfrom Normal, Fine and Super fine.]Flash [ ]: Allow you to set the flash when you takea photo in dark place.]Self timer [ ]: Allows you to select the delay time(Off, 3 seconds, 5 seconds, 10 seconds). Then the phonetakes a photo after the specified time.]View Options: Full Image/Full Screen]Multi shot [ ]: Allows to take multishot photossuccessively. (1 Shot/3 Shots/6 Shots/9 Shots)]Color effect [ ]: 4 settings are available.(Off/Sepia/Mono/Negative)]White balance [ ]: Allows you to change thesettings according to the enviroment.(Fluorescent/Cloudy/Incandescent/Daylight/Auto)]Shutter tone [ ]: You can set the sound whentaking a picture.]Reset settings [ ] : Allows you to reset thesettings. Video camera Menu 4.31. Select Video camera menu.2. Video camera settings menu is the same with Photocamera settings, except following item:]Video Mode [ ]: Allows you to set to send a videofile through MMS or General. Multimedia49](https://usermanual.wiki/LG-Electronics-USA/ME550D/User-Guide-761624-Page-49.png)
![Multimedia50FM Radio Menu 4.4You can search radio stations and enjoy listening to theradio.2. Press the corresponding number key of a channel tostore the currently selected radio station into.3. After presetting radio channels, you can listen to otherchannel by pressing the corresponding number key(short press).4. You can access the following option menus bypressing the left soft key [Options].]Edit: You can adjust frequency and change the radiostation in the selected channel. You can change thefrequency 0.1 MHz at a time with Left/Right navigationkeys and number keys.]Auto scan: If you select "Auto Scan Now?" On,automatically set the radio channel.And When "Save this Station?" message will bepopped up, if you select Yes, the selected frequencywill be stored.]Reset all channels: ]Listen via speaker: Select this to listen to the radiothrough the built-in speaker. To turn off the speaker,select "Listen via headset" in the [Options]]Station info on/off: Select on, you can view the radiostation information.]Af on/off: Note]To improve the radio reception, extend theheadset cord which functions as the FM antenna.Multimedia](https://usermanual.wiki/LG-Electronics-USA/ME550D/User-Guide-761624-Page-50.png)
![Multimedia51Voice recorder Menu 4.5You can record voice memo.Once recording is started, the message Recording andthe remaining time is displayed.If you want to pause or resume recording, press left softkey or OK key.If you want to finish recording, press right soft key.The following [Options] menus are available]New voice record: You can record voice memonewly.]Play: You can listen to the restored voice memo. ]Send via: Allows you to send voice memo throughMultimedia message/Bluetooth.]Album: You can display Sounds which have beensaved in the memory. Sound files are stored eachfolder of Default sounds, My melody, Voice records,MP3 and Downloaded.](https://usermanual.wiki/LG-Electronics-USA/ME550D/User-Guide-761624-Page-51.png)
![Messaging52New message Menu 5.1This menu includes functions related to SMS (ShortMessage Service), MMS (Multimedia Message Service),Email, voice mail, as well as the network’s servicemessages.Text (Menu 5.1.1)You can write and edit text message, checking thenumber of message pages.1. Enter the New messages menu by pressing the leftsoft key [OK].2. If you want to write a new message, select Text.3. To make text input easier, use T9.4. Press [Options] to attach the followings.Options]Send to: Send text messages.1. Enter numbers of recipient.2. Press key to add more recipients.3. You can add phone numbers in the address book.4. Press the [Option] and then press send afterentering numbers. All messages will be automaticallysaved in the outbox folder, even after a sending failure.]Insert- Symbol: You add special characters.- Image: You can insert the Default graphics orgraphics in My pictures that are available for shortmessages.- Default images: You can insert Animations stored.- Audio: You can insert sounds that are available forshort messages.- Text template: You can use Text templates alreadyset in the phone.- Contact: You can add phone numbers or e-mailaddresses in address book.- My business card: You can add your Business cardto the message.Messaging](https://usermanual.wiki/LG-Electronics-USA/ME550D/User-Guide-761624-Page-52.png)
![Messaging53]Save to drafts: Stores messages in Drafts.]T9 languages: Select the language for T9 input mode.You can also deactivate T9 input mode by selecting ‘T9 off’.]Clear text: You can clear text while writing SMS.]Exit: If you press Exit while writing a message, you canend the writing message and back to the Messagemenu. The message you have written is not saved.Multimedia (Menu 5.1.2)You can write and edit multimedia messages, checkingmessage size.1. Enter the New message menu by pressing the left softkey [OK].2. If you want to write a new message, selectMultimedia.3. You can create a new message or choose one of themultimedia message templates already made.Maximum available file size, that can be inserted toMMS-message, is 300 kb.Options]Send to: You can send multimedia messages tomultiple recipients, priorities your message, and makeit sent later as well.]Insert: You can add Symbol, Image, Video, Sound, Texttemplate, Contact, Business card, Others.]New Slide: You can insert the new slide before andafter. ]Preview: You can preview multimedia messages youhave created.]Save: You can save multimedia messages To drafts orAs templates]Edit subject: Allows you to modify the multimediamessage you have chosen.Note]All messages will be automatically saved in theoutbox folder, even after a sending failure.](https://usermanual.wiki/LG-Electronics-USA/ME550D/User-Guide-761624-Page-53.png)
![Messaging54]Slide duration: You can set the duration of slide ofmultimedia message.]T9 languages: Select the language for T9 input mode.You can also deactivate T9 input mode by selecting ‘T9off’.]New T9 word: Select the New T9 word for inputtingNew word into the dictionary.]Exit: You can get back to the Message menu.Bluetooth message (Menu 5.1.3)You can write and edit messages and send them viabluetooth. Options are are sames as Text has. Inbox Menu 5.2You will be alerted when you have received messages.They will be stored in Inbox.If the phone shows ‘No space for SIM message’, youhave to delete only SIM messages from Inbox. If thephone displays ‘No space for message’, you can makespace of each repository as deleting messages, mediaand applications.* SIM messageSIM message means the message exceptionally storedin SIM card. You can move this message to the phone.For notified multimedia message, you have to wait fordownloading and processing of the message.To read a message, select one of the messages bypressing the left soft key .]View: You can view the received messages.]Delete: You can delete the current message.]Reply: You can reply to the sender.]Forward: You can forward the selected message toanother party.Note]If you select the picture (200K) on writingmultimedia message, loading duration will takearound 10 seconds at least. Furthermore, youcan’t activate any key during loading time. After10 seconds, it is available to write multimediamessage.Messaging](https://usermanual.wiki/LG-Electronics-USA/ME550D/User-Guide-761624-Page-54.png)
![Messaging55]Return call: You can call back to the sender.]Information: You can view information about receivedmessages; Sender’s address, Subject (only forMultimedia message), Message date & time, Messagetype, Message size.]Multi delete: After selecting the messages you wantto remove, you can delete the selected messages.]Delete all read: You can delete all messages read.]Delete all: You can delete all messages.Bluetooth box Menu 5.3You can send and receive messages via Bluetooth, andyou can use the same features as Write messages,Inbox, Draft, Outbox, and Sent as in the commonmessages. Drafts Menu 5.4Using this menu, you can preset multimedia messagesthat you use most frequently. This menu shows thepreset multimedia message list.The following options are available.]View: You can see the multimedia messages.]Edit: Modifies the message you choose.]Delete: Deletes the message you choose.]Information: You can view information about themessage you choose.]Multi delete: After selecting the messages you wantto remove, press OK and you can delete the selectedmessages.]Delete all: Deletes all of the messages in the folder.](https://usermanual.wiki/LG-Electronics-USA/ME550D/User-Guide-761624-Page-55.png)
![Messaging56Outbox Menu 5.5This menu allows to view the message which is about tosend or is failed sending.After sending the message successfully, the messagewill be moved to sent box.]View: You can view the message.]Delete: You can delete the message.]Resend: You can resend the selected message.]Edit: Modifies the massage you choose.]Information: You can check information of eachmessage.]Multi delete: Select and delete the selectedmessages.]Delete all: You can delete all messages in outbox.Sent Menu 5.6This menu allows you to view the messages which arealready sent. You can check the time and the contents ofmessage.Listen voicemail Menu 5.7Once this menu has been selected, simply press the leftsoft key [OK] to listen to voice mail. You can alsohold down the key in standby mode to listen tovoice mail.Info message Menu 5.8(Dependent to network and subscription)Info service messages are text messages delivered bythe network to GSM. They provide general informationsuch as weather reports, traffic news, taxis, pharmacies,and stock prices.Note]When you receive a voice mail, your phonedisplays the icon and you hear an alert. Pleasecheck with your network provider for details oftheir service in order to configure the handsetcorrectly.Messaging](https://usermanual.wiki/LG-Electronics-USA/ME550D/User-Guide-761624-Page-56.png)
![Messaging57Each type of has the number; therefore, you can contactservice provider as long as you have input the certainnumber for the information.When you have received an info service message, youcan see the popup message to show you that you havereceived a message or the info service message isdirectly displayed.To view the message again or not in standby mode,follow the sequence shown below;Read (Menu 5.8.1)1. When you have received an info service message andselect Read to view the message, it will be displayedon the screen. You can read another message byscrolling , or [Next].2. The message will be shown until another message isreached.Topics (Menu 5.8.2)(Dependent to network and subscription)]View list: You can see Info service message numberswhich you added. If you press [Options], you can editand delete info message category which you added.]Active list: You can select info service messagenumbers in the active list. if you activate an info servicenumber, you can receive messages sent from thenumber.Templates Menu 5.9Text (Menu 5.9.1)You have 8 text templates as below;• I need to talk to you• I'm missing you. • I'll call you later. • What's up today? • Let's date today? • Sorry, I'm late. • I'll call you after the meeting.• Happy Birthday! The following options are available.]View: You can see multimedia templates.](https://usermanual.wiki/LG-Electronics-USA/ME550D/User-Guide-761624-Page-57.png)
![Messaging58]Edit: Use this to write a new message or edit theselected template message from the text template list.]Send via- Text message: Use this to send the selectedtemplate message by SMS.- Multimedia message: Use this to send theselected template message by MMS.]Delete: Deletes the template.]New template: Use this to create new template.]Delete all: Allows you to delete all multimediamessages.Multimedia (Menu 5.9.2)When you edit the template, you can use the followingoptions.]Send to: You can choose ]Insert: You can add Symbol, Image, Video, Sound,New slide, Text template, Contact, Business card andOthers.]New Slide: Insert slide before/after.]Preview: You can preview multimedia templates youwrote.]Save: Allows you to save new multimedia templatesyou created.]Edit subject: Allows you to modify the multimediamessage you have chosen.]Slide duration: You can set the duration of slide ofmultimedia message.]T9 languages: Select the desired language for T9input mode. You can also deactivate T9 input mode byselecting ‘T9 off’.]New T9 word: Select the New T9 word for inputtingNew word into the dictionary.]Exit: Will take you back to the Message menu.Settings Menu 5.0Text message (Menu 5.0.1)]Message types:Text, Voice, Fax, Paging, X.400, Email, ERMESUsually, the type of message is set to Text. You canconvert your text into alternative formats. Contact yourservice provider for the availability of this function.Messaging](https://usermanual.wiki/LG-Electronics-USA/ME550D/User-Guide-761624-Page-58.png)
![Messaging59]Validity period: Maximum, 30 Minutes, 1 Hour, 6Hours, 1 Day, 1 Week. This network service allows youto set how long your messages will be stored at themessage centre.]Delivery reports: If you set to Yes, you can checkwhether your message is sent successfully.]Reply charging: When a message is sent, it allowsthe recipients to reply and charge the cost of the replyto your telephone bill.]Message centre number: If you want to send thetext message, you can receive the address of SMScentre through this menu.]Bearer setting: You can set the bearer setting such asGSM, GPRS.Multimedia message (Menu 5.0.2)]Subject: You can enter multimedia messages subjectwhen this menu is on.]Slide duration: Display the duration of each pagewhen writing the message.]Priority: You can set the priority of the message youchoose.]Validity period: This network service allows you toset how long your text messages will be stored at themessage centre.]Delivery reports: If it is set to Yes in this menu, youcan check whether your message is sent successfully.]Read report: You can receive the report whether thereceiver read the message or not.]Auto download: If you select On, you receivemultimedia messages automatically. If you select Off,you receive only notification message in the inbox andthen you can check this notification. If you select Homenetwork only, you receive multimedia messagesdepends on Homenetwork.]Network profile: If you select multimedia messageserver, you can set URL for multimedia message server.]Permitted message typePersonal: Personal message.Advertisement: Commercial message.Informational: Necessary information.](https://usermanual.wiki/LG-Electronics-USA/ME550D/User-Guide-761624-Page-59.png)
![Messaging60Voicemail number (Menu 5.0.3)You can receive the voicemail if your network serviceprovider supports this feature. When a new voicemail isarrived, the symbol will be displayed on the screen.Please check with your network service provider fordetails of their service in order to configure the phoneaccordingly.Info message (Menu 5.0.4)]ReceiveYes: If you select this menu, your phone will receiveInfo service messages.No: If you select this menu, your phone will notreceive Info service messages any more.]AlertYes: Your phone will beep when you have receivedInfo service message numbers.No: Your phone will not beep even though you havereceived info service messages.]Auto display Yes: If you seleft this menu, the message will bedispaly on your LCD automatically. No: If you select this menu, the message won't bedisplayed. ]LanguagesYou can select the language you want by pressing OKkey. Then, the info service message will be shown inthe language that you selected.Messaging](https://usermanual.wiki/LG-Electronics-USA/ME550D/User-Guide-761624-Page-60.png)
![My stuffMy stuff61Images Menu 6.1Show the list of JPG files at My media\Photos inMultimedia memory.]View: You can see the JPG file when pressing OK keyor selecting View menu of Option menus.]Delete: You can delete the image file. ]Set as- Wallpaper: Currently selected image can be set as awallpaper(Full screen/Full image)- Picture ID: Currently selected image can be set as aPicture ID.]Send via: Send the selected file image to anotherdevice via Multimedia message, Bluetooth.]File info: Show the file information.]SlideshowYou can view the slide show of files you stored.- New folder: You can create a new folder.- Multi delete: You can remove a number of files youselected.- Delete all: Delete all files in the list.]Sort by: Da]Sort by: Date/Type/Name]List view: Allows you to set the view type.Sounds Menu 6.2Show the list of MP3, MP4, AAC, M4A files at Mymedia\Music in Multimedia memory.]Play: You can play the MP3 file when pressing OK keyor selecting Play menu of Option menu.]Delete: You can delete the file]Set as: Currently selected sound can be set as aRingtone/Ringtone ID.]File info: Show the file information.- New folder: You can create a new folder.- Multi delete: You can remove a number of files youselected.- Delete all: Delete all files in the list.]Sort by: Date/Type/Name](https://usermanual.wiki/LG-Electronics-USA/ME550D/User-Guide-761624-Page-61.png)
![Videos Menu 6.3Show the list of 3GP, 3G2 files at My media\Videos inMultimedia memory. Supported only .3gp files, that areencoded with MPEG4 and h.263 video-codecs and AMRaudio-codec.]Play: You can play the video file when pressing OK keyor selecting Play menu of Option menus.]Delete: Delete a file.]Send via: Send the selected file to another device viaMultimedia message, Bluetooth.]File: You can save/move/copy the folder or externalmemory.- Rename: Change the file name of selected file. The maximum length of characters is 200. And youcan not change the extension of file.- Move to folder: Move the selected file to the folder.- Information: Show the file information.]New folder: You can create a new folder.]Multi delete: You can remove a number of files youselected.]Delete all: Delete all files in the list.- Sort by: Date/Type/NameWarning!You can’t use the following characters, \ / : * ? “ < > |Note]You may send files via Bluetooth only if they arestored in phone memory, not on memory card. Tosend file from external memory, please, firstlycopy it to internal phone memory.Note]You may send files via Bluetooth only if they arestored in phone memory, not on memory card. Tosend file from external memory, please, firstlycopy it to internal phone memory.My stuffMy stuff62](https://usermanual.wiki/LG-Electronics-USA/ME550D/User-Guide-761624-Page-62.png)
![- Thumbnail View:- Portrait view: Others Menu 6.4Show the list of MP3, MP4, AAC, M4A files at Mymedia\Music in Multimedia memory.]Play: You can play a file if its type is the one of 3GP,3G2, MP3, MP4, AAC, and M4A.]View: You can see a file if its type is the one of JPG,GIF, WBMP and PNG.]Send via Bluetooth: Send the selected file to anotherdevice via Bluetooth.Note]When you connect phone with PC via bluetooth,to Music, Video, Others and Text folders you canwrite and receive files, and from Photo, Soundsand Images folders you may only receive files,copy files to this folders from PC is impossible. Allsupported file types you may copy from PC tophone’s Others folder, and then you may view orplay these files. When connecting with PC via USB cable ininternal phone memory you may see only Photo,Music, Others and Video folders, and on externalmemory card you may see all folders.Note]You may send files via Bluetooth only if they arestored in phone memory, not on memory card. Tosend file from external memory, please, firstlycopy it to internal phone memory.My stuff63](https://usermanual.wiki/LG-Electronics-USA/ME550D/User-Guide-761624-Page-63.png)
![Games & Apps Menu 6.5In this menu, you can manage the Java applicationsinstalled in your phone. You can play or deletedownloaded applications, or set the connect option.External memory Menu 6.6This menu allows you to view Videos, Photos, Music,Images, Sounds and Others in memory card. If theexternal memory is not available, a pop up message“Please insert external memory” is displayed.Note]Removable disk will be not available, if in phoneSim card absence.My stuffMy stuff64New Fantastic LGThere is mass storage function in ME550d. if youconnect the USB cable, you can use the phone as aRemovable Disk.You can download MP3 files, and photos, video, txtfiles etc. this gives you fast access from PC toPhone, by just connecting the USB cable.Note]Please do not try to remove the cable while youare downloading files. After you download thefiles, you need to click “window HW safelyremove” on PC and then disconnect cable.]When you copy a file to the removable disk, youcan see the Main LCD display “transferring”. itmeans MASS STORAGE is working. while“transferring”, do not disconnect the cable. if youdisconnect the cable while “transferring”, datawill be broken. ]If you receive a call during MASS STORAGE calland message are not available.](https://usermanual.wiki/LG-Electronics-USA/ME550D/User-Guide-761624-Page-64.png)
![In Profiles, you can adjust and customise the phone tonesfor different events, environments, or caller groups.There are six preset profiles: General, Silent, Vibrateonly, Outdoor and Headset.Each profile can be personalised. Press the left soft key[Menu] and select Profiles using up/down navigationkeys.Activate (Menu 7.X.1)1. A list of profiles is displayed.2. In the Profiles list, scroll to the profile you want toactivate and press the left soft key [OK] or OK key.3. Then, select Activate.Personalise (Menu 7.X.2)Scroll to the desired profile in the Profile list. Afterpressing the left soft key or the OK key, selectPersonalise.The profile setting option opens. Set the option asrequired.]Ring alert type: Set the alert type for incoming calls.]Ring tones: Select the desired ring tone from the list.]Ring volume: Set the volume of the ringing tone.]Message alert type: Set the alert type for messages.]Message tones: Select the alert tone for messages.]Keypad tones: Select the desired keypad tone.]Keypad volume: Set the volume of keypad tone.]Slide tones: Allows to set the flip tone for adjustingenvironment.]Effect sound volume: Set the volume of effect sound.]Power on/off volume: Set the volume of the ringingtone when switching the phone on/off.]Auto answer: This function will be activated onlywhen your phone is connected to the handsfree kit.• Off: The phone will not answer automatically.• After 5 secs: After 5 seconds, the phone willanswer automatically.• After 10 secs: After 10 seconds, the phone willanswer automatically.Note]All profiles cannot be renamed.ProfilesProfiles65](https://usermanual.wiki/LG-Electronics-USA/ME550D/User-Guide-761624-Page-65.png)
![Search Menu 8.11. Select Search by press the left soft key [OK].2. Enter the name that you want to search.3. If you want to edit, delete, copy an entry, or to add thevoice to one, select left soft key [Options].The following menu will be displayed.]View: You can view each entry in details.]Edit: You can edit the name, number, group, ringtoneand picture by using the navigation key.]New message: After you have found the number youwant, you can send a text/multimedia message to theselected number.]Send via: You can send the data of phone book viaText message, Multimedia message or Bluetooth.]Delete: You can delete an entry.]New contact: After selecting the place (SIM/Phone)you want to save, you can add to the phonebook list.]Multi delete: Allows you to remove a number of filesselected.]Copy to phone: You can copy an entry from SIM tophone or from phone to SIM.New contact Menu 8.2You can add phonebook entry by using this function.Phone memory capacity is 1000 entries. SIM cardmemory capacity depends on the cellular serviceprovider. The number of character is SIM dependentfeature.Note]Maximum stored name and number lengthdepends on SIM-card type.Note]Instant searching is available by inputting theinitial letter of the name.ContactsContacts66](https://usermanual.wiki/LG-Electronics-USA/ME550D/User-Guide-761624-Page-66.png)
![1. Select New contact by press left soft key [OK].2. Input a name.3. Press , then you can input a number.4. You can set a group for the entry by pressing , .5. You can set a ringtone and a photo for the entry bypress left soft key [Options].Speed dials Menu 8.3You can assign any of the keys to with aName list entry. You can call directly by pressing this key.1. Open the phonebook first by pressing the right soft key[Contacts] in standby mode.2. Scroll to Speed dial, then press the left soft key [OK].3. If you want to add speed dial, select <empty> bypressing the left soft key [Assign]. Then, you cansearch the name in phonebook.4. After assigning the number as speed dial, you canchange and delete the entry. You can also make a callor send a message by this number.Groups Menu 8.4You can list up to the members per each group. There are7 groups you can make lists to.]View members: Shows the group members you haveselected.]Group ringtone: Allows you to specify ring tone forthe group members’ call.]Group icon: Allows you to select the icon dependenton Group.]Add member: You can add group members.]Remove member: You can remove the member fromthe Group member list. But the name and the numberwill be remained in phonebook.]Rename: You can change a group name.]Reset all: Allows you to delete all the members in thegroup.Contacts67](https://usermanual.wiki/LG-Electronics-USA/ME550D/User-Guide-761624-Page-67.png)
![Copy all Menu 8.5You can copy entries from SIM card memory to Phonememory and vice versa.]SIM to phone: You can copy the entry from SIM Cardto Phone memory.]Phone to SIM: You can copy the entry from Phonememory to SIM Card.Delete all Menu 8.6You can delete all entries from SIM or Phone.Settings Menu 8.71. Press the right soft [Contacts] in standby mode.2. Scroll to Settings, then press the left soft key [OK].]View optionsScroll to highlight View options, and then press the leftsoft key [OK].- Name only: Set the phonebook list with displayingonly name.- Name and number: Set the phonebook list withdisplaying name and number.- With picture: Set the phonebook list with theinformation of character and picture.ContactsContacts68](https://usermanual.wiki/LG-Electronics-USA/ME550D/User-Guide-761624-Page-68.png)
![Information Menu 8.8]Service dial numbersUse this function to access a particular list of servicesprovided by your network operator (if supported by theSIM card).]Own numbers (SIM dependent)You can save and check your own number in SIM card.]My business cardThis option allows you to create your own businesscard featuring Name and an mobile phone number.To create a new business card, press the left soft key[New] and enter the information into the fields.If you want to edit, delete or to send a business card,select left soft key [options].Contacts69](https://usermanual.wiki/LG-Electronics-USA/ME550D/User-Guide-761624-Page-69.png)
![Settings71Brightness (Menu 9.3.3)You can set the brightness of LCD: 100%, 80%, 60%,40%Home screen shortcut (Menu 9.3.4)Selecting On displays the functionalities of 4 Navigationkeys and Menu key as pictures on the middle of the idlewindow. (Profiles/Messaging/ Favourites/Contacts)Menu style (Menu 9.3.5)Your phone provides you with Grid and Wheel menuthemes. Set the menu style by scrolling and pressing theleft soft key [OK].Dialing style (Menu 9.3.6)Your phone provides you with four dialing styles. (Color style/Beads style/Digital style/Sketchbook style)Standby text (Menu 9.3.7)If you select On, you can edit the text which is displayedin standby mode.Network name (Menu 9.3.8)If this function is activated, network name will bedisplayed on LCD.Connectivity Menu 9.4Bluetooth (Menu 9.4.1)Bluetooth enables compatible mobile devices,peripherals and computers that are in close proximity tocommunicate directly with each other without wires. This handset supports built-in Bluetooth connectivity,which makes it possible to connect them withcompatible Bluetooth headsets, computer applicationsand so on.](https://usermanual.wiki/LG-Electronics-USA/ME550D/User-Guide-761624-Page-71.png)
![Settings72]Bluetooth on/offYou can activate or cancel the bluetooth function.]Device listYou can view all devices which your ME550d isalready paired to. If you enter Paired devices, youaccess the options- Connect: After pairing with headset or stereoheadset, you should connect with those devices.Then you can use those devices.- Add new: Allows to search new bluetooth devicesand add them to your phone’s list of paired devices.When you select Add new your handset will start tosearch for Bluetooth devices within range. Once thedevice you wish to pair appears on the list press theright soft key [Stop]. Scroll to the desired device and press the left soft key[Pair]. You will then be asked to enter a passcode.The passcode can be any code you wish to use (thesame passcode must be used by both devices) or isone that is pre-determined by the manufacturer of thedevice you are trying to pair with. Please check theUser Manual of the device you are initiating the pairwith to see if it already has a predeterminedpasscode in place.Note]If you use LG PC Sync via bluetooth, you canexchange the data only within phonebook]When you receive data from another Bluetoothdevice, the phone requests confirmation. Afterconfirming the transfer, the file will be copied onto your phone.]Depending on the file type, it will be stored in thefollowing folders:- Video (.3gp, mp4):Videos folder- Image (.bmp, gif, jpg, png):Images folder- Sound (.amr, wav, aac):Sounds folder- MP3 (.mp3):Sounds/MP3 folder- Other files (.txt, html):Others folderSettings](https://usermanual.wiki/LG-Electronics-USA/ME550D/User-Guide-761624-Page-72.png)
![Settings73- Assign short name: Allows you to change the nameof the paired Bluetooth device and how it is displayedon the handset.- Set as authorised/Set as unauthorized: Allowsyou to set an authorised connection between eachBluetooth device. For example if you regularly use aBluetooth headset with your phone then setting theconnection as authorised will mean the headset willautomatically connect to the handset each time theheadset is powered on.- All services: Allows to view all services which aresupported by bluetooth device.- Delete: Allows to delete a paired bluetooth device.- Delete all: Allows to delete all a paired bluetoothdevices.]Bluetooth settings- My visibility: This indicates whether or not yourhandset will be visible to other Bluetooth devices.- My name: You can set the name of bluetoothdevice. The default name is LG ME550d.- My address: You can view the address of yourBluetooth device.Network (Menu 9.4.2)You can select a network which will be registered eitherautomatically or manually.Network selection (Menu 9.4.2.1)Usually, the network selection is set to Automatic.]Automatic: If you select Automatic mode, the phonewill automatically search for and select a network foryou. Once you have selected “Automatic”, the phonewill be set to “Automatic” even though the power is offand on.]Manual: The phone will find the list of availablenetworks and show you them. Then you can select thenetwork which you want to use if this network has aroaming agreement with your home network operator.The phone let you select another network if the phonefails to access the selected network.]Preferred: You can set a list of preferred networks andthe phone attempts to register with first, beforeattempting to register to any other networks. This list isset from the phone’s predefined list of knownnetworks.](https://usermanual.wiki/LG-Electronics-USA/ME550D/User-Guide-761624-Page-73.png)
![Settings74GPRS attach (Menu 9.4.2.2)You can set GPRS service depending on varioussituations.]Power onIf you select this menu, the phone is automaticallyregistered to a GPRS network when you switch thephone on. Starting a WAP or PC dial-up applicationcreated the connection between phone and networkand data transfer is possible. When you end theapplication, GPRS connection is ended but theregistration to the GPRS network remains.]When neededIf you select this menu, the GPRS connection isestablished when you connect a WAP or applicationservice and closed when you end the WAP orapplicaion connection.Network profile (Menu 9.4.2.3)]Data connections- Name: You can type the network name.- Bearer: You can set the bearer data service.1 Data/2 GPRS- Data settings: Appears only if you select DataSettings as a Bearer/service.Dial number: Enter the telephone number to dial toaccess your WAP gateway.User ID: The users identity for your dial-up server (and NOT the WAP gateway).Password: The password required by your dial-upserver (and NOT the WAP gateway) to identify you.Call type: Select the type of data call; Analogue orDigital (ISDN).Call speed: The speed of your data connection; 9600or 14400 (Depends on Operator)Linger time: You need to enter timeout period. After entering that, the WAP navigation service willbe unavailable if any data is not input or transferred.Settings](https://usermanual.wiki/LG-Electronics-USA/ME550D/User-Guide-761624-Page-74.png)
![Settings75- GPRS settings: The service settings are onlyavailable when GPRS is chosen as a bearer service.APN: Input the APN of the GPRS.User ID: The users identify for your APN server.Password: The password required by your APNserver.- Primary server: Input the IP address of the primaryDNS server you access.- Secondary server: Input the IP address of thesecondary DNS server you access.USB Mass storage (Menu 9.4.3)You can choose one mode of Data service and Massstorage. When you have finished using the phone memory, clickExit and take the following steps.1. Click on the notification area.[Unplug or Eject Hardware]2. Select USB Mass Storage Device, click on Stop. The following message will appear: “The ‘USB MassStorage Device’ device can now be safely removedfrom the system”3. Then remove the cable.Caution]Before you remove the cable, it is necessary thatyou click Exit. Or, the integrity of transferred datais not guaranteed.](https://usermanual.wiki/LG-Electronics-USA/ME550D/User-Guide-761624-Page-75.png)
![Settings76Calling Menu 9.5You can set the menu relevant to a call by pressing [Select] in the Setting menu.Call divert (Menu 9.5.1)The Call divert service allows you to divert incomingvoice calls, fax calls, and data calls to another number.For details, contact your service provider.]All voice callsDiverts voice calls unconditionally.]If busyDiverts voice calls when the phone is in use.]If no replyDiverts voice calls which you do not answer.]If out of reachDiverts voice calls when the phone is switched off orout of coverage.]All data callsDiverts to a number with a PC connectionunconditionally.]All fax callsDiverts to a number with a fax connectionunconditionally.]Cancel allCancels all call divert service.The submenusCall divert menus have the submenus shown below.- ActivateActivate the corresponding service.To voice mailboxForwards to message centre. This function is not shownat All data calls and All fax calls menus.To other numberInputs the number for diverting.To favourite numberYou can check recent 5 diverted numbers.- CancelDeactivate the corresponding service.Settings](https://usermanual.wiki/LG-Electronics-USA/ME550D/User-Guide-761624-Page-76.png)
![Settings77- View statusView the status of the corresponding service.Answer mode (Menu 9.5.2)]Slide openIf you select this menu, you can receive an incomingcall when you open the slide.]Any keyIf you select this menu, you can receive a call bypressing any key except [End] key.]Send key onlyIf you select this menu, you can receive a call by onlypressing [Send] key.Send my number (Menu 9.5.3)(network and subscription dependent)]Set by networkIf you select this, you can send your phone numberdepending on two line service such as line 1 or line 2.]OnYou can send your phone number to another party. Your phone number will be shown on the receiver’sphone.]OffYour phone number will not be shown.Call waiting (Menu9.5.4)(network dependent)]ActivateIf you select Activate, you can accept a waiting(receiving) call.]CancelIf you select Cancel, you cannot recognize the waiting(receiving) call.]View statusShows the status of Call waiting.](https://usermanual.wiki/LG-Electronics-USA/ME550D/User-Guide-761624-Page-77.png)
![Minute minder (Menu 9.5.5)If you select On, you can check the call duration by a beepsound given every minute during a call.Auto redial (Menu 9.5.6)]OnWhen this function is activated, the phone willautomatically try to redial in the case of failure toconnect a call.]OffYour phone will not make any attempts to redial whenthe original call has not connected.Closed user group (Menu 9.5.7)Send DTMF tones (Menu 9.5.8)You can send touch tones during an active call to controlyour voice mailbox or other automated phone services.Carrier selection (Menu 9.5.9)Security Menu 9.6PIN code request (Menu 9.6.1)In this menu, you can set the phone to ask for the PINcode of your SIM card when the phone is switched on.If this function is activated, you’ll be requested to enterthe PIN code.1. Select PIN code request in the security settings menu,and then press [OK].2. Set On/Off.3. If you want to change the setting, you need to enterPIN code when you switch on the phone.4. If you enter wrong PIN code more than 3 times, thephone will lock out. If the PIN is blocked, you will needto key in PUK code.5. You can enter your PUK code up to 10 times. If you putwrong PUK code more than 10 times, you can notunlock your phone. You will need to contact yourservice provider.SettingsSettings78](https://usermanual.wiki/LG-Electronics-USA/ME550D/User-Guide-761624-Page-78.png)
![Auto key lock (Menu 9.6.2)Phone lock (Menu 9.6.3)You can use a security code to avoid unauthorized use ofthe phone. Whenever you switch on the phone, thephone will request security code if you set phone lock toWhen switch on.If you set phone lock to When SIM changed, your phonewill request security code only when you change yourSIM card.Call barring (Menu 9.6.34)The Call barring service prevents your phone from makingor receiving certain category of calls. This functionrequires the call barring password. You can view thefollowing submenus.]All outgoing The barring service for all outgoing calls.]Outgoing internationalThe barring service for all outgoing international calls.]O/G international except home countryThe barring service for all international outgoing callsexcept home network.]All incomingThe barring service for all incoming calls.]Incoming when abroadThe barring service for all incoming calls whenroaming.]Cancel all barringYou can cancel all barring services.]Change passwordYou can change the password for Call Barring Service.Settings79](https://usermanual.wiki/LG-Electronics-USA/ME550D/User-Guide-761624-Page-79.png)
![The submenus:- ActivateAllows to request the network to set call restriction on.- CancelSet the selected call restriction off.- View statusView the status whether the calls are barred or not.Fixed dial number (Menu 9.6.4)(SIM dependent)You can restrict your outgoing calls to selected phonenumbers. The numbers are protected by your PIN2 code.]OnYou can restrict your outgoing calls to selected phonenumbers.]OffYou can cancel fixed dialling function.]Number ListYou can view the number list saved as Fixed dialnumber.Change codes (Menu 9.6.5)PIN is an abbreviation of Personal Identification Numberto prevent use by unauthorized person.You can change the access codes: Security code, PIN1 code, PIN2 code.1. If you want to change the Security code/PIN1/ PIN2code input your original code, and then press [OK].2. Input new Security code/PIN/PIN2 code and verifythem.SettingsSettings80](https://usermanual.wiki/LG-Electronics-USA/ME550D/User-Guide-761624-Page-80.png)
![Flight mode Menu 9.7This allows you to use only the phone’s features that donot require the use of the wireless network when you arein an airplane or in places where the wireless network isprevented.If you set the flight mode on, the icon will be displayed onthe screen instead of the network signal icon.]On: You cannot make (or receive) any calls, includingemergency calls, or use other features that requirenetwork coverage]Off: You can deactivate the flight mode and restart yourhandset to access the network.Power save Menu 9.8If you set On, you can save the power when you don’t usethe phone.Reset Menu 9.9You can initialize all factory defaults. You need Securitycode to activate this function.Memory status Menu 9.0You can check free space and memory usage of eachrepository, Internal memory and Multimedia memory. Youcan go to each repository menu.Settings81](https://usermanual.wiki/LG-Electronics-USA/ME550D/User-Guide-761624-Page-81.png)
![AccessoriesAccessories82Standard BatteryTravel AdapterThis charger allows you tocharge the battery while awayfrom home or your office.Data cable/CDYou can connect your phoneto PC to exchange the databetween them.Hands free earmicrophoneand music player controllercombo]Stereo headset]Controller: Answer & Endbutton, music player control, volume control, Holdbutton and microphone.Note]Always use genuine LG accessories.]Failure to do this may invalidate your warranty.]Accessories may be different in different regions;please check with our regional service companyor agent for further inquires.There are various accessories for your mobile phone. You can select these options according to yourpersonal communication requirements.](https://usermanual.wiki/LG-Electronics-USA/ME550D/User-Guide-761624-Page-82.png)