LG Electronics USA MG180 GSM Phone User Manual MG191a all0113
LG Electronics USA GSM Phone MG191a all0113
UserManual.wiki
>
LG Electronics USA
>
MG180 User Manual
Manual
Navigation menu
Upload a User Manual
Namespaces
Wiki Guide
HTML
PDF
Info
Views
User Manual
Discussion / Help
Navigation
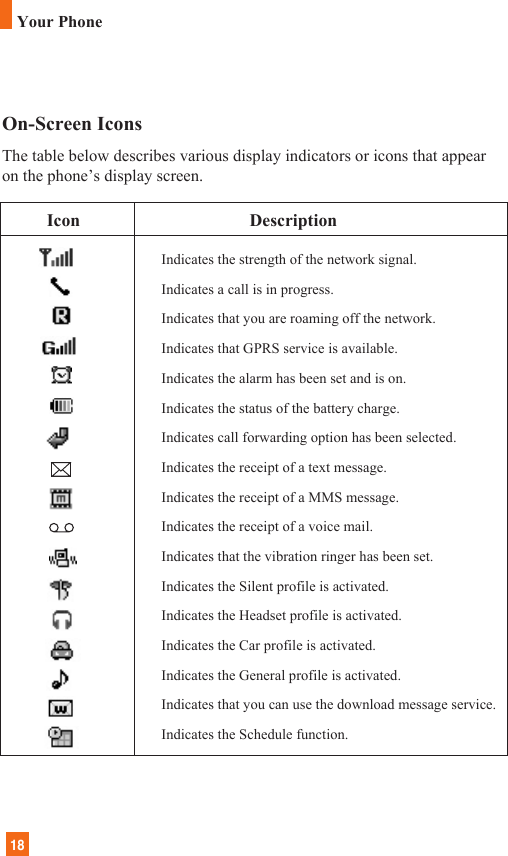
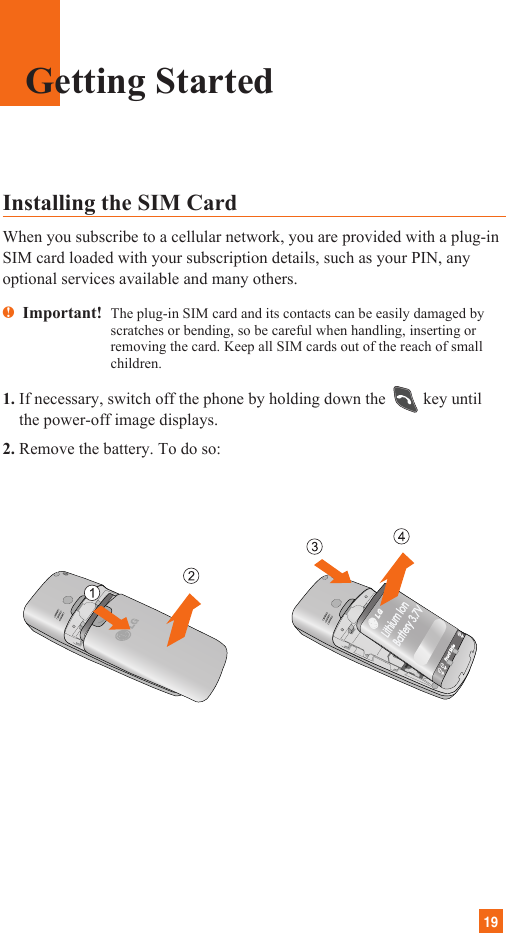
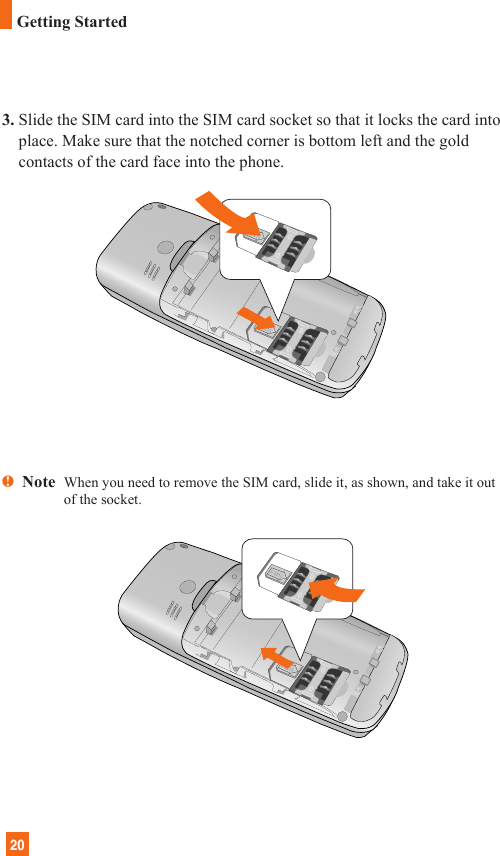
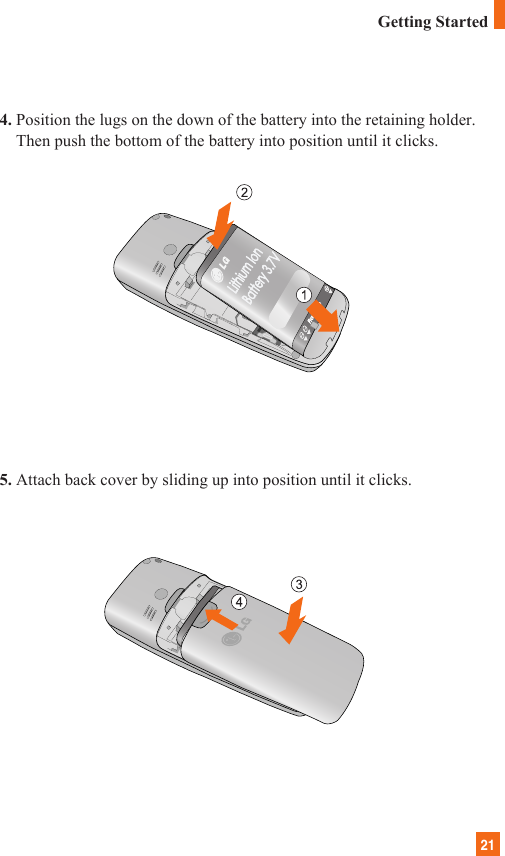
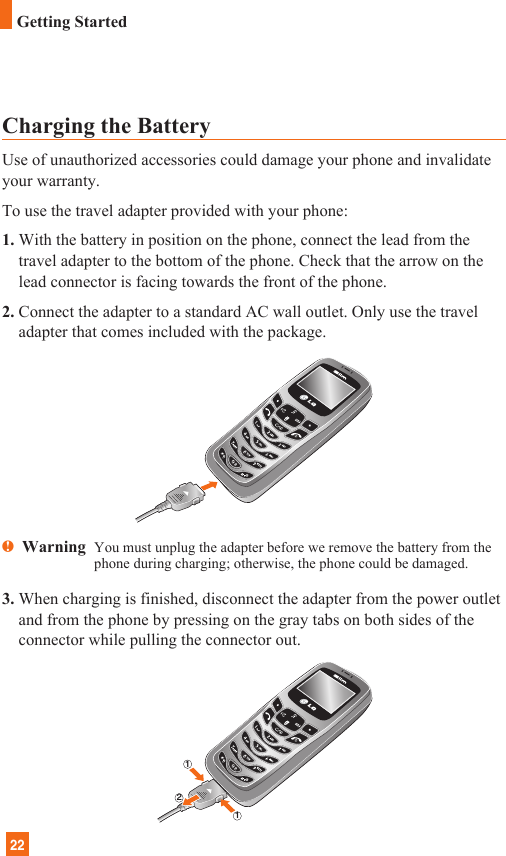
![10Safety InformationPlease read and observe the following information for the safe and properuse of your phone and to prevent any unanticipated damage. Also, keep theuser’s manual in an accessible place at all times after reading it.] Unplug the power cord and charger during a lightning storm to avoidelectric shock or fire.] Do not use your phone in high explosive areas as the phone maygenerate sparks.] Do not put your phone in a place subject to excessive dust, and keep theminimum required distance between the power cord and heat sources.] Do not damage the power cord by bending, twisting, pulling, orsubjecting it to heat. Do not use the plug if it is loose as it may cause fireor electric shock.] Hold the power cord plug firmly to plug and unplug the power cord.Ensure the plug is firmly connected. If it is not firmly connected, it maycause excessive heat or fire.] Do not place a heavy item on the power cord. Do not allow the powercord to be crimped as it may cause fire or electric shock.] Be careful not to let the battery contact metal conductors such as anecklace or coins. When shorted, it may cause an explosion.] Do not disassemble or impact the battery as it may cause electric shock,short-circuit, and fire. Store the battery in a place out of reach ofchildren.] Using a damaged battery or placing a battery in your mouth may causeserious injury.] Charging is displayed on the screen after connecting the travel adapter.Only if the battery is totally empty, Call indicator Light is on withoutdisplaying “Charging”.For Your Safety](https://usermanual.wiki/LG-Electronics-USA/MG180/User-Guide-644297-Page-8.png)
![11] Do not place items containing magnetic components such as a creditcard, phone card, bank book or a subway ticket, near your phone. Themagnetic strip can be damaged by the phone.] Do not hold or let the antenna come in contact with your body during acall. ] Talking on your phone for a long period of time may reduce the callquality due to heat generated during the use of the phone.] Do not allow excessive vibration or impact to the phone.] When you do not plan to use the phone for a long period of time, store itin a safe area with the power cord unplugged.FCC RF Exposure InformationWARNING! Read this information before operating the phone.In August 1996, the Federal Communications (FCC) of the United States,with its action in Report and Order FCC 96-326, adopted an updated safetystandard for human exposure to radio frequency (RF) electromagneticenergy emitted by FCC regulated transmitters. Those guidelines areconsistent with the safety standard previously set by both U.S. andinternational standards bodies.The design of this phone complies with the FCC guidelines and theseinternational standards.For Your Safety](https://usermanual.wiki/LG-Electronics-USA/MG180/User-Guide-644297-Page-9.png)
![13FCC Part 15 Class B Compliance This device and its accessories comply with part 15 of FCC rules.Operation is subject to the following two conditions: (1) This device andits accessories may not cause harmful interference, and (2) this device andits accessories must accept any interference received, includinginterference that may cause undesired operation.Cautions for Battery ] Do not disassemble.] Do not short-circuit.] Do not expose to high temperature: 60°C (140°F).] Do not incinerate.Battery Disposal] Please dispose of your battery properly or bring to your local wirelesscarrier for recycling.] Do not dispose in fire or with hazardous or flammable materials.Adapter (Charger) Cautions] Using the wrong battery charger could damage your phone and void yourwarranty.] The adapter or battery charger is intended for indoor use only.Do not expose the adapter or battery charger to direct sunlight or use it inplaces with high humidity, such as the bathroom.For Your Safety](https://usermanual.wiki/LG-Electronics-USA/MG180/User-Guide-644297-Page-11.png)
![23nNotice] If your phone is powered on while charging, you’ll see the bars in thebattery indicator icon cycle. When the battery is fully charged, the bars in the battery indicator icon willflash on and off.] If your phone is powered off, the display will show the charging status.‘Charging’ or ‘Full’ will be displayed.If the battery fails to charge completely:] After turning the phone on and off, please attempt to recharge the battery.] After detaching and reattaching the battery, please attempt to recharge thebattery.Getting Started](https://usermanual.wiki/LG-Electronics-USA/MG180/User-Guide-644297-Page-21.png)
![24Turning Your Phone On and Off1. Open the flip.2. Hold down the key until the phone switches on.3. If the phone asks for a PIN, enter the PIN and press the left soft key[OK]. For further details, see page 93.The phone searches for your network and after finding it, the idle screen,illustrated below, appears on both displays. Now, you can make or receivea call.nNote The display language is preset to English at the factory. To change thelanguage, use the Languages menu option (Menu 8.2.3).For further details, see page 87.4. When you wish to switch the phone off, hold down the key until thepower-off image displays.Getting Started](https://usermanual.wiki/LG-Electronics-USA/MG180/User-Guide-644297-Page-22.png)
![26General FunctionsMaking a Call 1. Make sure your phone is powered on.2. Enter a phone number including the area code. To edit a number on thedisplay screen, press the right/left navigation keys to move the cursor todesired position or simply press the key to erase one digit at atime.] Press and hold the key to erase the entire number.3. Press the key to call the number.4. When finished, press the key.Making a Call by Send Key1. Press the key, and the most recent incoming, outgoing and missedphone numbers will be displayed.2. Select the desired number by using the navigation key.3. Press the key.Making International Calls1. Press and hold the key for the international prefix.The ‘+’ character can be replaced with the international access code.2. Enter the country code, area code, and the phone number.3. Press the key.Ending a CallWhen you have finished a call, press the key.](https://usermanual.wiki/LG-Electronics-USA/MG180/User-Guide-644297-Page-24.png)
![27Making a Call From the Contact ListYou can store names and phone numbers dialed frequently in the SIM cardas well as the phone memory known as the Contact List.You can dial a number by simply looking up a name in the contact list. Formore details on the Contact List feature, please refer to page 79.Adjusting the VolumeDuring a call, if you want to adjust the earpiece volume, use the side keysof the phone. In idle mode with the flip cover open, you can adjust the ring volume usingthe side keys.Answering a CallWhen you receive a call, the phone rings and the flashing phone iconappears on the screen. If the caller can be identified, the caller’s phonenumber(or name if stored in your Address Book) is displayed.1. Open the flip and press the key or the left soft key to answer anincoming call. If the Any Key menu option(Menu 9.4.2) has been set to, any key press will answer a call except for the key or theright soft key.nNotice] To reject an incoming call, press and hold the side keys on the left side ofthe phone without opening the flip.] If the Flip Open menu option(Menu 9.4.2) is set to , you do not needto press any key. You can answer the call simply by opening the flip.2. End the call by closing the phone or pressing the key.nNotice You can answer a call while using the Address Book or other menufeatures.General Functions](https://usermanual.wiki/LG-Electronics-USA/MG180/User-Guide-644297-Page-25.png)
![29Symbolic ModeThis mode allows you to enter special characters.nNotice You can select a different T9 language from the menu option. Thedefault setting on the phone is T9 disabled mode. Changing the Text Input Mode1. When you are in a field that allows characters to be entered, you willnotice the text input mode indicator in the upper right corner of thedisplay.2. If you want to change modes, press and hold down the key. Theavailable modes are displayed.Using the T9 ModeThe T9 predictive text input mode allows you to enter words easily with aminimum number of key presses. As you press each key, the phone beginsto display the characters that it thinks you are typing based on a built-indictionary. As new letters are added, the word changes to reflect the mostlikely candidate from the dictionary.1. When you are in the T9 predictive text input mode, start entering a wordby pressing keys to Press one key per letter.] The word changes as letters are typed - ignore what’s on the screenuntil the word is typed completely.] If the word is still incorrect after typing completely, press the downnavigation key once or more to cycle through the other word options.Example: Press to type HomePress [down navigation key] to type Inme] If the desired word is missing from the word choices list, add it byusing the ABC mode.General Functions](https://usermanual.wiki/LG-Electronics-USA/MG180/User-Guide-644297-Page-27.png)
![302. Enter the whole word before editing or deleting any keystrokes.3. Complete each word with a space by pressing the key.To delete letters, press . Press and hold down to erase entirewords.nNotice To exit the text input mode without saving your input, press . The phone returns to the previous menu level.Using the ABC ModeUse the to keys to enter your text.1. Press the key labeled with the required letter:] Once for the first letter] Twice for the second letter] And so on2. To insert a space, press the key once. To delete letters, press the key. Press and hold down the key to clear the display.General Functions](https://usermanual.wiki/LG-Electronics-USA/MG180/User-Guide-644297-Page-28.png)
![32General FunctionsUsing the Symbol ModeThe Symbol Mode enables you to enter various symbols or specialcharacters.To enter a symbol, press the key. Use the navigation keys to selectthe desired symbol and press the [OK] key.](https://usermanual.wiki/LG-Electronics-USA/MG180/User-Guide-644297-Page-30.png)
![35Your phone provides a number of control functions that you can use duringa call. To access these functions during a call, press the left soft key[Options].During a CallThe menu displayed on the handset screen during a call is different thanthe default main menu displayed when in idle screen, and the options aredescribed below.Making a Second CallYou can get a number you wish to dial from the Address Book to make asecond call. Press the left soft key then select Contact List.Swapping Between Two CallsTo switch between two calls, press the left soft key or key, and thenselect Swap. Answering an Incoming CallTo answer an incoming call when the handset is ringing, simply press the key. The handset is also able to warn you of an incoming call whileyou are already on a call. A tone sounds in the earpiece, and the displaywill show that a second call is waiting. This feature, known as CallWaiting, is only available if your network supports it. For details of howto activate and deactivate it see Call Waiting (Menu 8.4.4).If Call Waiting is on, you can put the first call on hold and answer thesecond, by pressing . You can end the current call and answer thewaiting call by pressing the left soft key and then selecting Active callmenu of End call.In-Call Menu](https://usermanual.wiki/LG-Electronics-USA/MG180/User-Guide-644297-Page-33.png)
![36In-Call MenuRejecting an Incoming CallYou can reject an incoming call without answering by simply pressingthe key.During a call, you can reject an incoming call by pressing the left soft key,which is the [Menu] key and selecting the Reject call or by pressingthe key.Muting the MicrophoneYou can mute the microphone during a call by pressing the [Menu] keythen selecting Mute or right soft key [Mute]. The handset can be unmutedby pressing the Unmute menu or right soft key [Unmute]. When thehandset is muted, the caller cannot hear you, but you can still hear them.](https://usermanual.wiki/LG-Electronics-USA/MG180/User-Guide-644297-Page-34.png)
![39*:Shown only if supported by CPHS(Common PCS Handset Specification)The following illustration shows the available menu structure and indicatesthe:] Number assigned to each menu option.] Page where you can find the feature description.1. Messaging (see page 42)1.1 Text Messages1.1.1 Write Message 1.1.2 Inbox1.1.3 Sent1.1.4 Drafts1.1.5 Settings1.1.6 Delete All1.2 Multimedia Messages1.2.1 Write Message1.2.2 Inbox1.2.3 Sent1.2.4 Outbox1.2.5 Drafts1.2.6 Settings1.3 Voice Mail1.3.1 Listen To Voice Mail1.3.2 Voice Mailbox Number1.4 Download Messages1.4.1 Inbox1.4.2 Receive1. Messaging (continued)1.5 Info Service1.5.1 Receive1.5.2 Inbox1.5.3 Topics1.5.4 Alert1.5.5 Auto Display1.5.6 Languages1.6 Templates2.6.1 Text2.6.2 Multimedia2.6.3 Business Card1.7 Memory Status**Menu Tree](https://usermanual.wiki/LG-Electronics-USA/MG180/User-Guide-644297-Page-37.png)
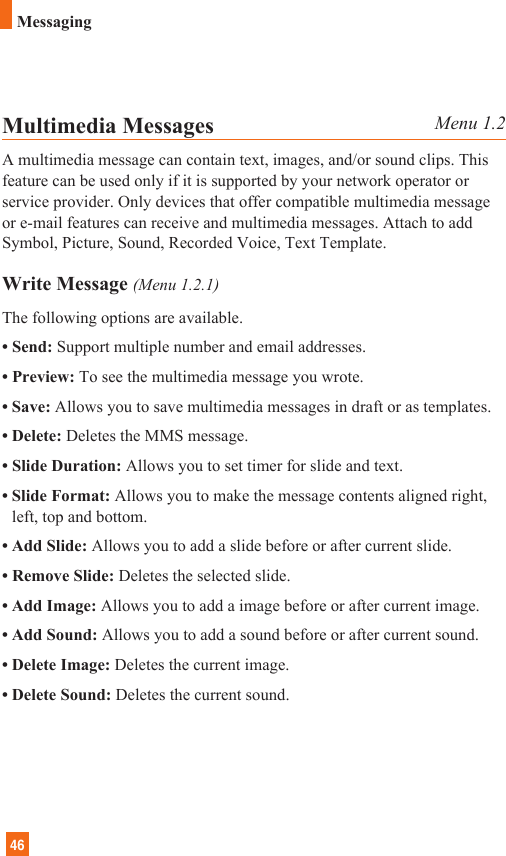
![42Text Messages Menu 1.1Your phone receives voice mail notification messages and Short MessageService (SMS) messages.Voice mail and SMS are network services. Please contact your serviceprovider for more information.When the icon appears, you have received a new voice mail. Whenthe icon appears, you have received a new text message. If themessage memory is full, an error message is displayed, the iconflashes and you cannot receive any new messages. Use the Delete option inthe Inbox (Menu 1.1.2) to delete obsolete messages. Once there is space inthe memory any undelivered SMS messages will be received (providedsufficient space is available).Write Message (Menu 1.1.1)You can write and edit text messages of up to 918 characters.1. Type in a message using key presses. For details on how to enter text,refer to page 28 (Entering Text).2. After completing the message select the required option by pressing theright soft key [Options].The following options are available.] Send: Enter the phone number or select the number from the addressbook.]Send To Email: Enter the email or select the email from the addressbook.]Save To Drafts: Save the message so that it can be sent later.] Set T9: Set on and off for the T9 input mode.]Set Input Language:: Choose between English, Spanish or French T9language. For details on how to enter text, refer to page 29 (Using the T9Mode).*Messaging*:Shown only if supported by SIM card](https://usermanual.wiki/LG-Electronics-USA/MG180/User-Guide-644297-Page-40.png)
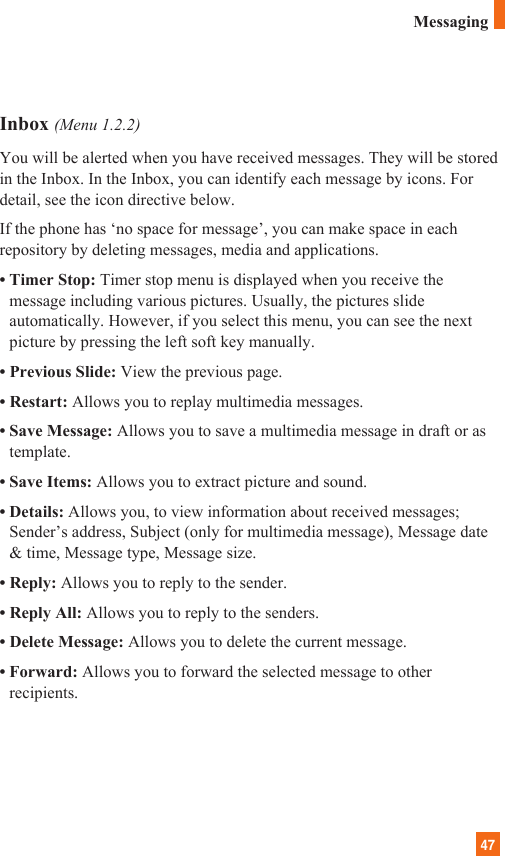
![43] Clear Text: Deletes the written message.] Cancel: Exit the text editor.The following options are available. (Press the left soft key [Attach])] Symbol: Attach special characters.] Picture: Send and receive text messages that contain pictures, known asEnhanced Messaging Service. Several preset pictures are available in thephone and they can be replaced with new ones received from othersources.] Animation: Attaching an animation in a message can be done through EMS(Enhanced Messaging Service).] Sound: Attach sounds that are available for short message.] Text Templates: Use the text templates already set in the phone.] Phone Number: Attach a phone number.] Business Card: Attach your name card.Inbox (Menu 1.1.2)Received text messages, page messages, and email lists may be searchedand the contents may be viewed. Received messages are displayed fromnewest to oldest.The following options are available.] Reply: Replies to the received message.]Delete: Deletes the selected message from the Inbox.]Forward: Forwards a received message to other recipients. Afterrecipients are entered, the message can be forwarded.]Return Call: Call back the sender.]Extract: Extract picture, sound, text webpage and email address from themessage.Messaging](https://usermanual.wiki/LG-Electronics-USA/MG180/User-Guide-644297-Page-41.png)
![44MessagingSent (Menu 1.1.3)View lists and contents of sent messages in this menu and also verify iftransmission was successful.The following options are available.] Delete: Deletes the selected message from the Outbox.] Forward: Forwards the current message to other recipients.Drafts (Menu 1.1.4)This menu option shows the preset message list. Scroll through the listusing the up/down navigation keys. The following options are available.] Edit: You can edit a selected message.]Delete: Deletes the selected preset message.Settings (Menu 1.1.5)This menu allows you to set up default SMS information.] Message Types: Allows you to set the default message type (Text,Voice, Fax, Paging, X.400, E-mail, ERMES). The network can convertthe messages into the selected format. The type of message you desirecan be set to Text Type.]Valid Period: Allows you to set the length of time for which your textmessages will be stored at the SMS center while attempts are made todeliver them to the recipient. Possible values are Maximum, 30 Minutes,1 Hour, 6 Hours, 1 Day and 1 Week which can be authorized by yourservice provider.*****:Shown only if supported by SIM card](https://usermanual.wiki/LG-Electronics-USA/MG180/User-Guide-644297-Page-42.png)
![45] Delivery Reports: Allows you to activate or deactivate the reportfunction. When this function is activated, the network informs youwhether or not your message has been delivered.] Reply With Same Service: Allows the recipient of your SMS messageto send you a reply via your message center, if the service is provided bythe network.] Message Center Number: Allows you to store or change the number ofyour email gateway required when sending text messages. You mustobtain this number from your service provider.] Email Gateway: Allows you to store or change the number of youremail gateway required when sending text messages.] Subject: If you set it to on, allows you to enter the subject.] Bearer Setting: You can select GPRS or GSM. Contact your networkoperator or service provider for information related to setting a selectedbearer, pricing and connection speed.GSM Preferred/GPRS PreferredDelete All (Menu 1.1.6)Allows you to delete all messages.*****:Shown only if supported by SIM cardMessaging](https://usermanual.wiki/LG-Electronics-USA/MG180/User-Guide-644297-Page-43.png)

![51Settings (Menu 1.2.6)Via this menu, you can set up default multimedia message information.The following options are available:] Message Subject: Enter the message title.] Slide Duration: Display the duration of each page when writing themessage.] Alignment: Set the position of a message and text message. • Image Bottom • Image Left• Image Top • Image Right] Valid Period: Set the duration for keeping messages on the networkserver.] Auto Download• On: If you select this, messages are downloaded automatically onreceipt.• Confirm: Requires you to confirm you want to download the message.• Off: Defers downloading messages.] Message Center URL: Enter the address of an MMS server to use theMMS service.] Access Point: For further details, see page 62.Messaging](https://usermanual.wiki/LG-Electronics-USA/MG180/User-Guide-644297-Page-49.png)
![52Messaging**:Shown only if supported by SIM cardVoice Mail Menu 1.3This menu provides you with a quick way of accessing your voice mailbox(if provided by your network).Before using this feature, you must enter the voice server number obtainedfrom your service provider. When new voicemail is received, the symbol will be displayed on thescreen. Please check with your network service provider for details of theirservice in order to configure the handset accordingly.Listen To Voice Mail (Menu 1.3.1)Before using this feature, you must enter the voice server number obtainedfrom your service provider (see menu option 2.3.2). You can then selectthis option and press the left soft key [OK] to listen to your messages. You can quickly connect to the first voice server by pressing and holdingthe key in Idle Mode.Voice Mailbox Number (Menu 1.3.2)Allows you to change the voice mail server number, if necessary.nNote Voice Mail is a network feature. Please contact your service provider forfurther details.](https://usermanual.wiki/LG-Electronics-USA/MG180/User-Guide-644297-Page-50.png)
![53Download Messages Menu 1.4Inbox (Menu 1.4.1)You can order push messages from WAP service providers. Push messages are notifications of, for example, news headlines and theymay contain a text message or address of a WAP service. For availabilityand subscription, contact your WAP service provider.Service providers can update an existing push message every time a newpush message is received. Messages can be updated even if you havemoved them to another folder. Push messages expire and they are deletedautomatically.] Information: Shows the information of received push messages.] Load: Allows you to connect to a specific site using the information inthe received push message.] Delete: Delete the selected push message.Receive (Menu 1.4.2)You can set the option whether you will receive the message or not.Messaging](https://usermanual.wiki/LG-Electronics-USA/MG180/User-Guide-644297-Page-51.png)
![54Info Service Menu 1.5Info service messages are text messages sent by the network to GSMphone users. They provide general information such as weather reports,traffic news, taxis, pharmacies, and stock prices. Each type of informationis associated with a number, which can be obtained from the serviceprovider. When you receive an info service message, a popup message willindicate a new message receipt or the info service message will bedisplayed directly. In standby mode, the following options are availablewhen viewing the info service message.Receive (Menu 1.5.1)Ability to enable or disable the reception of broadcast messages.Inbox (Menu 1.5.2)The list of received broadcast messages can be searched and the contentsviewed.Topics (Menu 1.5.3)To create new topics, press the left soft key [Select] and then select thenew topics menu by pressing the left soft key [Options].You can Deactivate, Edit, Delete and Add New topics by pressing the leftsoft key [Select].Alert (Menu 1.5.4)Ability to select the alert type for a new message.Auto Display (Menu 1.5.5)This option will automatically display all broadcast messages received.Scroll through the messages using the up/down navigation keys.*:Shown only if supported by SIM card*Messaging](https://usermanual.wiki/LG-Electronics-USA/MG180/User-Guide-644297-Page-52.png)
![55Languages (Menu 1.5.6)This option allows you to select the language preferred. The cellbroadcast message will be displayed in the language selected. If you use all languages supported by phone, select ‘Automatic’ at thebottom of the list.Templates Menu 1.6There are 9 predefined messages in the list. You can view and edit thetemplate messages or create new messages. Two options are available:Text and Multimedia.Text (Menu 1.6.1)• Where are you? • I will be later• Hi, how are you? • I got your message, I will call you later• Talk to me it's urgent • What are you doing?• Call me urgently • Thank you• Call me as soon as you canThe following options are available.] Edit: Allows you to write a new message or edit the selected templatemessage.] Send Via Text Message: Sends the selected template message by SMS.] Send Via Multimedia Message: Sends the selected template messageby MMS.] Delete: Allows you to delete the selected template message.Multimedia (Menu 1.6.2)For further details, see page 49.• Send: Support multiple number and email addresses.Messaging](https://usermanual.wiki/LG-Electronics-USA/MG180/User-Guide-644297-Page-53.png)
![56• Preview: To see the multimedia message you wrote.• Save: Allows you to save multimedia messages in draft or as templates.• Delete: Deletes the MMS message.• Slide Duration: Allows you to set timer for slide and text.• Slide Format: Allows you to make the message contents aligned right,left, top and bottom.• Add Slide: Allows you to add a slide before or after current slide.• Remove Slide: Deletes the selected slide.• Add Image: Allows you to add a image before or after current image.• Add Sound: Allows you to add a sound before or after current sound.• Delete Image: Deletes the current image.• Delete Sound: Deletes the current sound.Business Card (Menu 1.6.3)This option allows you to make your own name card. Key in the Name,Mobile number, Office number, Fax number and E-mail address.]Edit: Allows you to write a new message or edit the selected name card.]Send Via Text Message: Sends the selected name card by SMS.]Send Via Multimedia Message: Sends the selected name card by MMS.]Delete: Allows you to delete the selected name card.Memory Status Menu 1.7You can check the current memory status of each memory for SMS andMMS.Messaging](https://usermanual.wiki/LG-Electronics-USA/MG180/User-Guide-644297-Page-54.png)
![59Go To URL Menu 2.3You can directly connect to the site you want. You need to enter a specificURL.Access Point Menu 2.4A Profile is the network information used to connect to the internet. Telcelsupports two kinds of profiles: Telcel and GPRS Telcel.If you want to connect the internet using CSD(Circuit Switched Data),select the profile ‘Telcel’. otherwise using GPRS, select the profile ‘GPRSTelcel’.Because Telcel also selects a bearer automatically according to the currentnetwork status, the user doesn’t need to select any of them.Each profile has submenus as follows:] Activate: Set a current profile as a default.] Settings: Edit the various items of the current profile.] Rename: Revise the name of profile.] Add New: Create new profile.] Delete: Delete the profile.] Delete All: Allows all Profiles within the Access Point to be deleted soplease take precaution prior to using this option.nNote The changes using these options may affect the other applicationfunction.1. Activate2. Settings3. Rename4. Add New5. Delete6. Delete AllWeb Access](https://usermanual.wiki/LG-Electronics-USA/MG180/User-Guide-644297-Page-57.png)
![61Java is a technology developed by Sun Microsystems. Similar to the wayyou would download the Java Applet using the standard Netscape or MSInternet Explorer browsers, Java MIDIet can be downloaded using theWAP enabled phone. Depending on the service provider, all Java basedprograms such as Java games can be downloaded and run on a phone.Once downloaded, the Java program can be viewed within the Games &Apps menu where you can select, execute or delete. The Java program filessaved in the phone are in .JAD and .JAR formats.nNote The JAR file is a compressed format of the Java program and the JADfile is a description file that includes all detailed information. From thenetwork, prior to download, you can view all detailed file descriptionsfrom the JAD file.nWarning Only J2ME (Java 2 Micro Edition) based programs will run in aphone environment. Games & Apps Menu 3.1Games & Apps menu displays the list of Java programs downloaded usingthe WAP. All previous downloaded programs can be selected, deleted orviewed in detail within the Games & Apps menu. From the list within theApplication menu, the following options are available:] Open: Open the selected program. The list includes all Java programsinstalled in the phone.] Delete: Delete the selected program. Once deleted, you will not be ableto restore the program unless it is downloaded again using the WAP.]Details: Display detailed information on the selected program. Thisincludes the program name, program size, program version, vendorinformation and the website address or the URL.]Send Information: Selected Java MIDIet information such as MIDIetname, size, version, vendor and jad URL can be sent via SMS.Games & Apps](https://usermanual.wiki/LG-Electronics-USA/MG180/User-Guide-644297-Page-59.png)
![62Games & AppsFavorites Menu 3.2When a new Java program is downloaded using the WAP, the addressfrom which a download takes place is known as a bookmark. The Javamenu includes a bookmark list for downloading Java programs and thisbookmark list can be viewed from the Bookmarks menu. ] Connect: Selected address in the bookmark is used for data connection.After successful connection, desired Java program can be downloadedfrom the list.]View: Detailed information on a bookmark can be viewed such as nameof bookmark and address of bookmark.]Delete: Selected bookmark is deleted. Deleted bookmark cannot berestored so caution is required when deleting bookmarks.]Edit: Selected bookmark can be edited. Editing a bookmark is done inthe order of URL >Title >Profile(Access Point) >User ID >Password.When creating a new bookmark, same order is followed. The serviceprovider can require user ID and password information, but if none isprovided, no input is necessary.]Add New: New bookmark is added. If there is no Bookmark, you get adisplay indicating that there is no Bookmark. Bookmarks can be addedby pressing the left soft key[Add].]Send URL: Selected bookmark URL can be sent via SMS.]Delete All: This deletes all of the selected bookmark as well as thebookmarks directory within the Games & Apps menu.nNote After selecting the Connect function to access the Java MIDlet Provider’sserver, you may choose one of many Java programs to download andinstall into your phone. Once connected to the server, the Go button canbe pressed to view the JAD information on a desired program. The Getbutton will begin the download and install process. The download andinstall process will take place simultaneously and once download iscomplete you can immediately run the Java program. The installed Javaprogram can be selected to run at a later time from the Games & Appsmenu.](https://usermanual.wiki/LG-Electronics-USA/MG180/User-Guide-644297-Page-60.png)
![64Favorites Menu 4.1Your phone may have some pre-installed bookmarks for sites not affiliatedwith LG. LG does not warrant or endorse these sites. If you choose toaccess them, you should take the same precautions, for security or content,as you would with any site. For further details, see page 65.Games & Apps Menu 4.2For further details, see page 64 (Menu 3.1).Ring tone/Audio Menu 4.3The left soft key [Options] will bring up the following options.]Send Via Text Message: iMelody Sound can be sent via SMS.]Send Via Multimedia Message: Downloaded Sound can be sent viaMMS.]Set As Ring Tone: This sets the Ring Tone with currently selectedSound.]Delete: This deletes currently selected Sound.]Edit Title: This deletes the Title of currently selected Sound.]Delete All: This deletes all sounds. My Folder](https://usermanual.wiki/LG-Electronics-USA/MG180/User-Guide-644297-Page-62.png)
![65Graphics Menu 4.4The right soft key [Options] will bring up the following options.]Send Via Text Message: EMS Picture can be sent via SMS.]Set As Wallpaper: Currently selected Picture can be set as a Wallpaper.]Delete: Currently selected Picture can be deleted.]Edit Title: Title of currently selected Picture can be edited.]Delete All: All Pictures can be deleted.Multimedia Contents Menu 4.5The left soft key [Options] will bring up the following options.]Send Via Text Message: EMS Animation can be sent via SMS.]Send Via Multimedia Message: Downloaded Animation can be sent viaMMS.]Set As Wallpaper: Currently selected Animation can be set as aWallpaper.]Delete: Currently selected Animation can be deleted.]Edit Title: Title of currently selected Animation can be edited.]Delete All: All Animations can be deleted.My Folder](https://usermanual.wiki/LG-Electronics-USA/MG180/User-Guide-644297-Page-63.png)
![68Recent CallsCall Costs Menu 5.6This network service allows you to check the last call cost and the total callcost. The call cost is displayed on the bottom of the LCD screen. To resetthe call cost, press the left soft key [Reset] or the OK key. You arerequested to enter the PIN2 codenNotice The actual cost invoiced for calls by your service provider may vary,depending on network features, rounding-off for billing, taxes, etc.Call Settings Menu Menu 5.7Call Cost’s Limit (Mene 5.7.1)This network service allows you to limit the cost of your calls to thenumber of charging units or units of currency. You can make or receive acall up to the specified cost limit. You can change the call cost’s limit afterentering the PIN2 code.Set Tariff (Mene 5.7.2)You can set the currency type and the unit price. Contact your serviceproviders to obtain charging unit prices. To select the Currency or 1 Unit inthis menu, you need the PIN2 code.nNotice When all units have been used, no calls can be made except emergencycalls. Depending on the SIM card, you need the PIN2 code to set a callcost limit.Auto Display (Mene 5.7.3)This network service allows you to see automatically the cost of your lastcall. If you select On in Auto display menu, you can see the cost of the lastcall when the call is released.](https://usermanual.wiki/LG-Electronics-USA/MG180/User-Guide-644297-Page-66.png)
![70ToolsAlarm Clock Menu 6.1Set the alarm to ring at a specific time. In the Alarm Clock menu, thefollowing options are available:On: Set the time(hour and minute) for activating the alarm.1. Enter the menu.2. Select [On] by pressing the right/left navigation keys.3. If you want to set the time for activating the alarm, press the downnavigation key.4. Enter the required time, press the down navigation key.5. The following options are available.• Once: The alarm rings only once and is then deactivated.• Daily: The alarm rings every day at the same time.• Weekly: The alarm rings every week on the same day and at the sametime.• Monthly: The alarm rings every month on the same day and at thesame time.6. Allows you to select the alarm melody by using the right/left navigationkeys.7. Press the left soft key [Set].Off: Cancel the alarm.nNotice If this option is set to On, the alarm will ring at the specified time, evenwhen the phone is switched off.To stop the alarm when it rings, open the phone and press the right softkey[Quit].](https://usermanual.wiki/LG-Electronics-USA/MG180/User-Guide-644297-Page-68.png)
![71Calendar Menu 6.2When you enter this menu a calendar will be displayed. Top of thescreen indicates sections for date. Square cursor is used to locate aparticular day. The under bar on the calendar indicates a schedule ormemo on that day. This function helps to remind you of the schedule andmemo. The phone will sound an alarm tone if it has been set for aspecific note.For changing the day, month, and year.nNote Your phone should be switched on to use this function.]View: Press the left soft key [Options] to delete or edit the note youselected. ]Edit: Allows you to edit the schedule.]Delete: Allows you to delete the schedule.]Add New: You can edit maximum of 30 characters and create up to 30notes.]Calendar: Allows you to consult the calendar.]Scheduler Tone: The phone can sound an alarm tone when thescheduled date for an event has been reached with this option.Key Descriptionup/down navigation keyleft/right navigation keykey/ keykey/ keyWeeklyDailyYearlyMonthlyTools](https://usermanual.wiki/LG-Electronics-USA/MG180/User-Guide-644297-Page-69.png)
![72Tools]View All Schedules: Shows the notes that are set for all days. Use theup/down navigation keys to browse through the note lists. You can usethe menu by press the left soft key [Options].]Go To Date: Allows you to jump to a specific date.]Delete Past: Delete past schedule event that has already been notified.]Delete All: Delete all schedules. You are asked to confirm your action.nNote You can see Edit, Delete,View all schedules, Delete past, and Delete allmenus dependent on setting of the schedule.Voice Recorder Menu 6.3Allows you to record a memo. You can record up to 3 voice messageswith each message up to 30 seconds.You can use the Voice Memo feature to:• Play the recorded voice memos• Delete one or all voice memos1. Once recording is started, the message ‘Recording...’ and the remainingtime is displayed.nNote If all memo locations are full, you must delete an old memo beforerecording a new one.2. If you want to finish recording, press the left soft key [Save].]Play: Allows you to play back all memos recorded, starting with themost recent memo. The screen displays the date and time when thememo was recorded.]Delete: Allows you to delete a specific memo. All memos recorded areplayed back, starting with the most recent one.] Record New: Allows you to record a memo.](https://usermanual.wiki/LG-Electronics-USA/MG180/User-Guide-644297-Page-70.png)
![73]Rename: Allows you to rename a specific memo.]Send Via Multimedia Message: Sends the selected voice memo byMMS.]Delete All: Allows you to delete all memos.Calculator Menu 6.4Using this feature, you can use the phone as a calculator. The calculatorprovides the basic arithmetic functions: addition, subtraction,multiplication and division.Using the Calculator1. Enter the first number using the numeric keys.2. Use the navigation keys to select a sign for calculation.nNote To include a negative number, press the key.3. To calculate the result, press the left soft key [Result]or key.Memo Menu 6.5To write, edit and delete a memo on a specific date, proceed as follows.1. Press the left soft key [Add].2. Input the memo and press the left soft key [Options].The following options are available.] Save: Allows you to save the memo.]T9 Languages: Allows you to select the T9 language to use in memo.]Exit Editor: Allows you to exit in memo editor.Or1. Select a Memo.2. Press the left soft key [Options].Tools](https://usermanual.wiki/LG-Electronics-USA/MG180/User-Guide-644297-Page-71.png)
![74ToolsThe following options are available.] View: Allows you to view the memo.]Delete: Allows you to delete the memo. You can press the left soft key[Options >Delete] to edit the memo displayed.] Edit: If you select a memo that already exists, you can press the left softkey [Options >Edit] to edit the memo displayed.]Add New: Add a new memo, up to 20 memos and 40 characters per eachmemo.]Delete All: Allows you to delete all memos. You are asked to confirmyour action.World Time Menu 6.6Allows you to check the current Greenwich Mean Time(GMT) and 51major cities around the world, using the left/right navigation keys.The screen shows the city name, current date and time.To select the time zone in which you are located, proceed as follows:1. Select the city corresponding to your time zone by pressing the left/rightnavigation keys one or more times. The local date and time aredisplayed.2. Press the left soft key [Options].3. If you want to set, press the key.4. If you want to set Daylight Savings, press the key in Optionsmenu.nNote The time zone setting of each city in World time menu may be affectedby network condition.](https://usermanual.wiki/LG-Electronics-USA/MG180/User-Guide-644297-Page-72.png)
![75Unit Converter Menu 6.7This converts any measurement into a unit you want.There are 4 types that can be converted into units: Length, Surface,Weight, and Volume.1. You can select one of four unit types by pressing the left soft key [Unit].2. Select the standard value by using the left/right navigation keys.3. Select the unit you want to convert by pressing the up/down navigationkeys.4. You can check the converted value for the unit you want. Also, you caninput a decimal number by pressing the key.Tools](https://usermanual.wiki/LG-Electronics-USA/MG180/User-Guide-644297-Page-73.png)
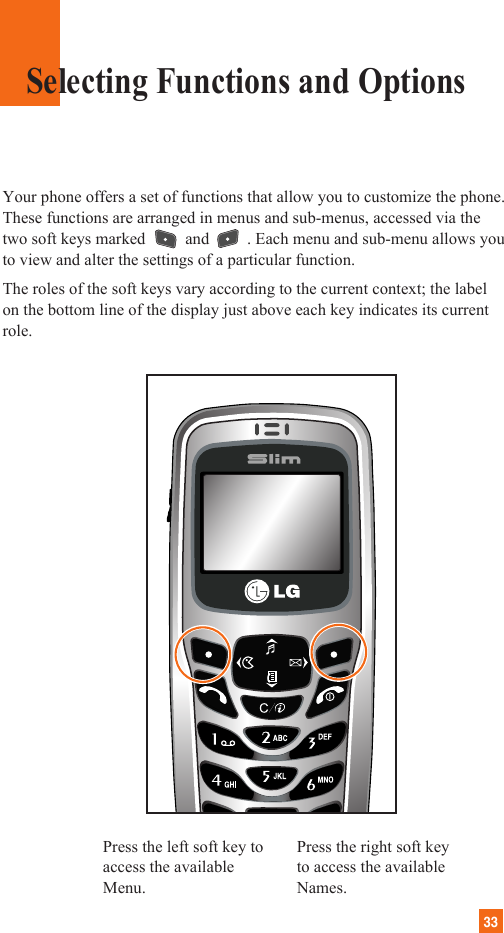
![76Address BookYou can store phone numbers and their corresponding names in thememory of your SIM card. In addition, you can store up to 255 numbersand names in the phone memory. The SIM card and phone memories,although physically separate, are used as if they were a single entity, calledthe Address Book.Contact List Menu 7.11. When the idle screen is displayed, press the right soft key [Names].2. Press the left soft key [Select].nNote You can also scroll through the Address Book from the beginning, in idlemode with the flip cover open, by pressing the down navigation keydirectly.3. If you want to edit, delete, copy an entry, or to add the voice to one,select [Options].4. Once you have found the required entry, press the to dial the number.• View Detail: To view in detail the selected name.• Delete: You can delete an entry.• Write Text Message: You can write a text message. For further details,see page 45.• Write Multimedia Message: You can write a multimedia message. Forfurther details, see page 49.• Edit: You can edit the name, mobile number, home number, officenumber, E-mail, group, memo and picture by press the left soft key[Select].• Copy To Phone: You can copy an entry from SIM to phone.• Copy To SIM: You can copy an entry from Phone to SIM.• Voice Tag: You can add voice to the entry or change the voice tag.• Main Number: You can select the main number out of your mobile,home or office numbers. Choose the one that is most often used. Themain number will be displayed first, if you set this.](https://usermanual.wiki/LG-Electronics-USA/MG180/User-Guide-644297-Page-74.png)
![77New Contact Menu 7.2You can add a address book entry by using this function. Phone memorycapacity is 255 entries. SIM card memory capacity depends on the cellularservice provider. You can also save 20 characters of name in the phonememory, and save characters in the SIM card. The number of characters isdependent on the SIM.1. Open the Address Book first by pressing the right soft key [Names] instandby mode.2. Scroll to highlight New Contact, and press the left soft key [Select].3. You can add new address book entries to SIM memory or the addressbook memory. To select the memory, go to Set memory (Menu 7.8.1).(Refer to page 83.)• Adding new entries into SIM memoryYou can enter a name and number, and select the required group.(Depends on the SIM)• Adding new entries into phone memoryYou can enter a name, numbers, E-mail address and memo, and select therequired group.Speed Dials Menu 7.3You can assign any of the keys, to with a name list entry. Youcan call directly by pressing this key for 2-3 seconds. 1. Open the Address Book first by pressing the right soft key [Names] in astandby mode.2. Scroll to Speed Dials, then press the left soft key [Select].3. If you want to add a number to speed dial, select <Empty>. Then, youcan search the name from the Address Book.Address Book](https://usermanual.wiki/LG-Electronics-USA/MG180/User-Guide-644297-Page-75.png)
![78Address Book4. Select the name from the speed dial. You can change and delete thename. In addition, you can call by this number, write text message, andmultimedia message.Voice Tag List Menu 7.4You can see all the phone numbers which contain voice. You can also calldirectly by pressing the key. After selecting the phone number byusing the up/down navigation keys, press the left soft key [Options] and itwill offer the following submenus:]Listen: You can play back the voice attached to a phone number.]Change: You can change the voice attached to a phone number.]Remove: You can delete the voice attached to a phone number.]Call: You can call by selecting this submenu.]Add New Voice Tag: You can add a new voice to phone number.]Remove All: You can delete all the voice attached to a phone number.nNote The voice can only be attached to the main number which you set. Forexample, if you change the main number, voice will be automaticallyattached to the changed number. This means that you cannot attach voiceto mobile, office and home numbers simultaneously. You can add a voicetag to a phone number in the SIM card. The voice tag can be erased if youremove or change the SIM card.](https://usermanual.wiki/LG-Electronics-USA/MG180/User-Guide-644297-Page-76.png)
![79Caller Groups Menu 7.5There are 6 predefined groups as well as one additional group labeledOthers where you can create your own lists.1. You can set the phone to ring in a specific way and display a preselectedgraphic icon when a particular person calls you.2. Scroll to Caller Groups then press the left soft key [Select] to enter thismenu.3. Every Group list will be displayed: Family, VIP, Friends, Colleague,Group 1, Group 2, Others.4. Select the Group name that you want to manage by pressing the left soft key [Options].5. You will see the following submenus under the predefined groupsexcept for the Others group.• Members List: Allows you to see the member list in the group.• Group Ring Tone: Allows you to select the ring tone to be used whenyou receive a voice phone call from a person in the group.• Group Icon: Allows you to select the graphic icon to be displayedwhen you receive a call from a person in the group.• Add Member: Allows you to add the member to the group.• Delete Member: Allows you to delete the member in the group.• Rename: Allows you to assign a name to the group.Address Book](https://usermanual.wiki/LG-Electronics-USA/MG180/User-Guide-644297-Page-77.png)
![80Address BookCopy All Menu 7.6You can copy or move entries from the SIM card memory to the phonememory and vice versa.SIM To Phone (Menu 7.6.1)You can copy the entry from the SIM card to phone memory. Phone To SIM (Menu 7.6.2)You can copy the entry from the phone memory to the SIM card.The following options are available:] Keep Original: When copying, Original Dial Number is kept.] Delete Original: When copying, Original Dial Number will be erased.Delete All Menu 7.7You can delete all entries in the SIM, Phone and Voice Tag List. Thisfunction requires the security code except for Voice.Press the key to return to the standby mode.Settings Menu 7.8Set Memory (Menu 7.8.1)Scroll to highlight the Set Memory option, then press the left soft key[Select].] If you select Variable when adding entry, the phone will ask where tostore.] If you select SIM or Phone, the phone will store an entry to the SIM orthe phone.](https://usermanual.wiki/LG-Electronics-USA/MG180/User-Guide-644297-Page-78.png)
![82Sounds Menu 8.1You can use the Sound Settings feature to customize various settings, suchas the:] Ring melody, volume and type] Sounds made when you press a key, make an error or receive a messageThis menu option connects to Telcel’s ring tone download site.Ring tones (Menu 8.1.1)This option allows you to select the required ring melody. You can choosebetween many different melodies. If you have downloaded any soundsfrom the Internet or received any ring tone messages, you can view the listin this menu.Volume (Menu 8.1.2)] Ring tone: To set the volume level for the ringing tones.] Key Tone: To set the volume level for keypad tones.] Call: This can adjust the volume level.] Headset: When using the Headset, volume level can be adjusted.] Car Kit: When using the Car Kit, volume level can be adjusted.Ring Alert Type (Menu 8.1.3)You can select an option from Ring, Ring and Vibrate and Vibrate thenRing.Message Alert Tones (Menu 8.1.4)Select the alert tone for messages.Settings](https://usermanual.wiki/LG-Electronics-USA/MG180/User-Guide-644297-Page-80.png)
![83Key Tones (Menu 8.1.5)This menu option allows you to select a tone that the phone sounds whenyou press a key. You can select an option from Beep and Voice.Voice Recording (Menu 8.1.6)For further details, see page 74 (Menu 6.3).Display Menu 8.2You can change the background image and the display style for MenuMode according to your preference.My Wallpaper (Menu 8.2.1)This option allows you to change the background image (wallpaper) to bedisplayed in idle mode.To change the background image, proceed as follows.1. Scroll through the list by pressing the left or right navigation key.You have various preset images available. You can also select the blankbackground and any images downloaded from the Internet.2. Press the left soft key [Select] when the required image is highlighted.The selected image is displayed.Backlight (Menu 8.2.2)You can select whether or not the phone uses the backlight. A marginalincrease in the standby/talk time can be achieved by turning the backlightoff.]Main Display• Off means that the backlight is never on.Settings](https://usermanual.wiki/LG-Electronics-USA/MG180/User-Guide-644297-Page-81.png)
![84Settings• 10 Seconds turns the backlight off 10 seconds after the last key waspressed.• 30 Seconds turns the backlight off 30 seconds after the last key waspressed.• 60 Seconds turns the backlight off 60 seconds after the last key waspressed.• Always On turns the backlight always on while flip is opened.]Sub DisplayOff/10 Seconds/30 Seconds/60 Seconds/Always OnContrast (Menu 8.2.3)This option allows you to adjust the brightness level of the display screen.You can adjust by using the right/left and up/down navigation key.Languages (Menu 8.2.4)You can select the display language. When the language option is set toAutomatic, the language is automatically selected according to thelanguage of the SIM card used. English will be set if the language on theSIM card is not supported in the phone.Menu Style (Menu 8.2.5)This option allows you to select the menu display style. You can chooseeither Icon style or List style.**:Shown only if supported by SIM card](https://usermanual.wiki/LG-Electronics-USA/MG180/User-Guide-644297-Page-82.png)
![86SettingsCall Settings Menu 8.4To change the settings for call diverting:Call Forwarding (Menu 8.4.1)When this network service is activated, you can direct your incoming callsto another number, for example, to your voice mailbox number. Fordetails, contact your service provider. Select one of the divert options, forexample, select If busy to divert voice calls when your number is busy orwhen you reject incoming calls.The following options are available:] All Voice Calls: Diverts voice calls unconditionally.] If Busy: Diverts voice calls when the phone is in use.] If No Reply: Diverts voice calls which you do not answer.] If Out Of Reach: Diverts voice calls when the phone is switched off orout of coverage.] ] All Fax Calls: Diverts to a number with a fax connectionunconditionally.• Activate: Activates the corresponding service.- To Other Number: Inputs the number for diverting.- Favorite Number: You can check recent five diverted numbers.• Cancel: Cancels the corresponding service.• View Status: Checks the status of the service.] Cancel All: Cancels all call divert service.**:Shown only if supported by SIM card](https://usermanual.wiki/LG-Electronics-USA/MG180/User-Guide-644297-Page-84.png)
![87Answer Mode (Menu 8.4.2)Allows you to determine when to answer the phone.] Flip Open: This option allows you to answer a call simply by openingthe flip. ]Any Key: You can answer an incoming call by pressing any key, exceptthe key.]Send Key Only: You can answer an incoming call by only pressingthe key.Send My Number (Menu 8.4.3)This network service allows you to set your phone number to be displayed(On) or hidden (Off) from the person to whom you are calling. Select SetBy Network to reset the phone to the setting that you have agreed uponwith your service provider.Call Waiting (Menu 8.4.4)The network will notify you of a new incoming call while you have a callin progress. Select Activate to request the network to activate call waiting,Cancel to request the network to deactivate call waiting, or View Status,to check if the function is active or not.***:Shown only if supported by SIM cardSettings](https://usermanual.wiki/LG-Electronics-USA/MG180/User-Guide-644297-Page-85.png)
![88SettingsMinute Minder (Menu 8.4.5)This option allows you to specify whether the phone must beep everyminute during an outgoing call to keep you informed of the length of thecall.Voice Dial (Menu 8.4.6)You can make a phone call by saying a voice tag that has been added to acontact card. Any spoken word(s) can be a voice tag. Before using voicedialing, note that:• Voice tags are not language dependent. They are dependent on thespeaker’s voice.• Voice tags are sensitive to background noise. Record them and makecalls in a quiet environment.• When recording a voice tag or making a call by using a voice tag, theloudspeaker is in use. Hold the phone at a short distance away from yourmouth and face so that the proximity sensor does not turn the loudspeakeroff.• Very short names are not accepted. Use long names and avoid similarnames for different numbers.] Automatic: You can enter the voice dial mode whenever you open theflip.]Manual: You can enter the voice dial mode by holding down thekey.nNote You must say the name exactly as you said when you recorded it. Thismay be difficult in, for example, a noisy environment or during anemergency, so you should not rely solely upon voice dialing in allcircumstances.](https://usermanual.wiki/LG-Electronics-USA/MG180/User-Guide-644297-Page-86.png)
![89Auto Redial (Menu 8.4.7)Select On, and your phone will make a maximum of three attempts toconnect the call after an unsuccessful call attempt.Closed User Group (Menu 8.4.8)Closed user group is a network service that specifies the group of peoplewhom you can call and who can call you. For more information contactyour network operator or service provider. If a group index is specified, itis used for all outgoing calls. If no group index is specified, the networkwill use the preferential index (a specific index that is stored in thenetwork).] Preset: Setting the selected CUG Index.]On: Activating and editing the CUG Index. ]Off: Deleting the selected CUG. Send DTMF (Menu 8.4.9)You can send the DTMF (dual tone multi-frequency) tones of the numberon the display during a call.This option is helpful for entering a password or account number when youcall an automated system, like a banking service.**:Shown only if supported by SIM cardSettings](https://usermanual.wiki/LG-Electronics-USA/MG180/User-Guide-644297-Page-87.png)
![90SettingsSecurity Menu 8.5Various codes and passwords are used to protect the features of yourphone. They are described in the following sections (see pages 25)PIN Code Request (Menu 8.5.1)When the PIN code request feature is enabled, you must enter your PINeach time you switch the phone on. Consequently, any person who doesnot have your PIN cannot use your phone without your approval.nNote Before disabling the PIN code request feature, you must enter your PINThe following options are available:] Enable: You must enter the PIN each time the phone is switched on.] Disable: The phone connects directly to the network when you switch iton.Call Barring Service (Menu 8.5.2)Call barring allows you to restrict from making and receiving calls withyour phone. For this function, you need the barring password, which youcan obtain from your service provider.The following options are available:] All Outgoing: Calls cannot be made.]Outgoing International: International calls cannot be made.]O/G (Outgoing) International Except Home Country: When abroad,calls can be made only to numbers within the current country and to yourhome country, which is where your home network provider is located.]All Incoming: Calls cannot be received.]Incoming When Abroad: Calls cannot be received when you are usingyour phone outside your home service area.**:Shown only if supported by SIM card](https://usermanual.wiki/LG-Electronics-USA/MG180/User-Guide-644297-Page-88.png)
![91] Cancel All Barrings: All call barring settings are deactivated; calls canbe made and received normally.]Change Password: You can set and change the call barring passwordobtained from your service provider using this option. You must enter thecurrent password before you can specify a new one. Once you haveentered a new password, you are asked to confirm it by entering it again.nNote To use Call Barring service, you must input the network password. Whencalls are barred, calls may be possible to certain emergency numbers insome networks.Fixed Dial Number (FDN) (Menu 8.5.3)Allows you to restrict your outgoing calls to selected phone numbers, ifthis function is supported by your SIM card. The PIN2 code is required.The following options are available:] Enable: You can only call phone numbers stored in the Address Book.You must enter your PIN2.]Disable: You can call any number.]Number List: You can view the number list saved as fixed dial number.nNote Not all SIM cards have a PIN2. If your SIM card does not, this menuoption is not displayed.Change Codes (Menu 8.5.4)The Change codes feature allows you to change your current password to anew one. You must enter the current password before you can specify anew one.You can change the access codes: Security Code, PIN1 Code, PIN2 Code nNote PIN: Personal Identification Number.Settings](https://usermanual.wiki/LG-Electronics-USA/MG180/User-Guide-644297-Page-89.png)
![92SettingsConnection Menu 8.6Network Selection (Menu 8.6.1)The Network Selection feature allows you to indicate how the network youwill use is selected when roaming outside your home area. Options are: Automatic, Manual, and Preferred.nNote You can select a network other than your home network only if it has avalid roaming agreement with your home network.] Automatic: Allows you to set the phone to automatically search for andselect one of the cellular networks available in your area. The phone will be set to Automatic even though the power is off and on.] Manual: Allows you to select the desired network manually from a listof networks. If the connection to the manually selected network is lost,the phone will sound an error tone and ask you to select a network again.The selected network must have a roaming agreement with your homenetwork, that is, the operator whose SIM card is in your phone. Thephone lets you select another network if the phone fails to access theselected network. If you switch off the phone, the phone will be reset toAutomatic.] Preferred: You can set a list of preferred networks the handset shouldattempt to register with first, before attempting to register to any othernetworks. This list is created from the handset’s predefined list of knownnetworks.World Phone (Menu 8.6.2)When the America(850/1900) option is selected the device can be used inthe US, and when the Europe(1800) option is chosen the device can beused in European countries.nNote The US frequency is set at 850/1900 MHz and the European frequency isset at 1800 MHz. **:Shown only if supported by SIM card](https://usermanual.wiki/LG-Electronics-USA/MG180/User-Guide-644297-Page-90.png)
![94Please check to see if any problems you have encountered with the phoneare described in this section before taking the phone in for a service orcalling a service engineer.QHow do I view the list of outgoing calls, incoming calls and missedcalls?APress the key.QHow do I clear all call history?APress the left soft key[Menu] and then the key.QHow do I view all numbers stored in memory?APress right soft key[Names] and then .QWhy is the connection inconsistent or not audible in certain areas?AWhen frequency environment is unstable in a certain area, connectionmay be inconsistent and not audible. Relocate to another area and tryagain.QWhy is the connection not consistent abruptly disconnects even whenestablished?A When frequency is unstable or weak or if there are too many users,connection may be cut off even after it was established. Please try againlater or attempt after relocating to other areas.Q&A](https://usermanual.wiki/LG-Electronics-USA/MG180/User-Guide-644297-Page-92.png)
![100Safety GuidelinesPhone OperationNORMAL POSITION: Hold the phone as you would any other telephonewith the antenna pointed up and over your shoulder.Tips on Efficient OperationFor your phone to operate most efficiently:] Do not touch the antenna unnecessarily when the phone is in use.Contact with the antenna affects call quality and may cause the phone tooperate at a higher power level than otherwise needed.DrivingCheck the laws and regulations on the use of wireless phones in the areaswhere you drive. Always obey them. Also, if using your phone whiledriving, please:] Give full attention to driving — driving safely is your first responsibility;] Use hands-free operation, if available;] Pull off the road and park before making or answering a call if drivingconditions so require.Electronic DevicesMost modern electronic equipment is shielded from RF signals. However,certain electronic equipment may not be shielded against the RF signalsfrom your wireless phone.PacemakersThe Health Industry Manufacturers Association recommends that aminimum separation of six (6’) inches be maintained between a handheldwireless phone and a pacemaker to avoid potential interference with thepacemaker. These recommendations are consistent with the independentresearch by and recommendations of Wireless Technology Research.](https://usermanual.wiki/LG-Electronics-USA/MG180/User-Guide-644297-Page-96.png)
![101Persons with pacemakers:] Should ALWAYS keep the phone more than six inches from theirpacemaker when the phone is turned ON;] Should not carry the phone in a breast pocket.] Should use the ear opposite the pacemaker to minimize the potential forinterference.] If you have any reason to suspect that interference is taking place, turnyour phone OFF immediately.Hearing AidsSome digital wireless phones may interfere with some hearing aids. In theevent of such interference, you may want to consult your service provider.Other Medical DevicesIf you use any other personal medical device, consult the manufacturer ofyour device to determine if they are adequately shielded from external RFenergy. Your physician may be able to assist you in obtaining thisinformation. Turn your phone OFF in health care facilities when any regulations postedin these areas instruct you to do so. Hospitals or health care facilities maybe using equipment that could be sensitive to external RF energy.VehiclesRF signals may affect improperly installed or inadequately shieldedelectronic systems in motor vehicles. Check with the manufacturer or itsrepresentative regarding your vehicle. You should also consult the manufacturer of any equipment that has beenadded to your vehicle.Posted FacilitiesTurn your phone OFF in any facility where posted notices so require.Safety Guidelines](https://usermanual.wiki/LG-Electronics-USA/MG180/User-Guide-644297-Page-97.png)
![104Safety Guidelines] Support needed research into possible biological effects of RF of thetype emitted by wireless phones;] Design wireless phones in a way that minimizes any RF exposure to theuser that is not necessary for device function; and] Cooperate in providing users of wireless phones with the best possibleinformation on possible effects of wireless phone use on human health.The FDA belongs to an interagency working group of the federal agenciesthat have responsibility for different aspects of RF safety to ensurecoordinated efforts at the federal level. The following agencies belong tothis working group:o National Institute for Occupational Safety and Healtho Environmental Protection Agencyo Occupational Safety and Health Administrationo National Telecommunications and Information AdministrationThe National Institutes of Health participates in some interagency workinggroup activities, as well.The FDA shares regulatory responsibilities for wireless phones with theFederal Communications Commission (FCC). All phones that are sold inthe United States must comply with FCC safety guidelines that limit RFexposure. The FCC relies on the FDA and other health agencies for safetyquestions about wireless phones.The FCC also regulates the base stations that the wireless phone networksrely upon. While these base stations operate at higher power than do thewireless phones themselves, the RF exposures that people get from thesebase stations are typically thousands of times lower than those they can getfrom wireless phones. Base stations are thus not the subject of the safetyquestions discussed in this document.](https://usermanual.wiki/LG-Electronics-USA/MG180/User-Guide-644297-Page-100.png)