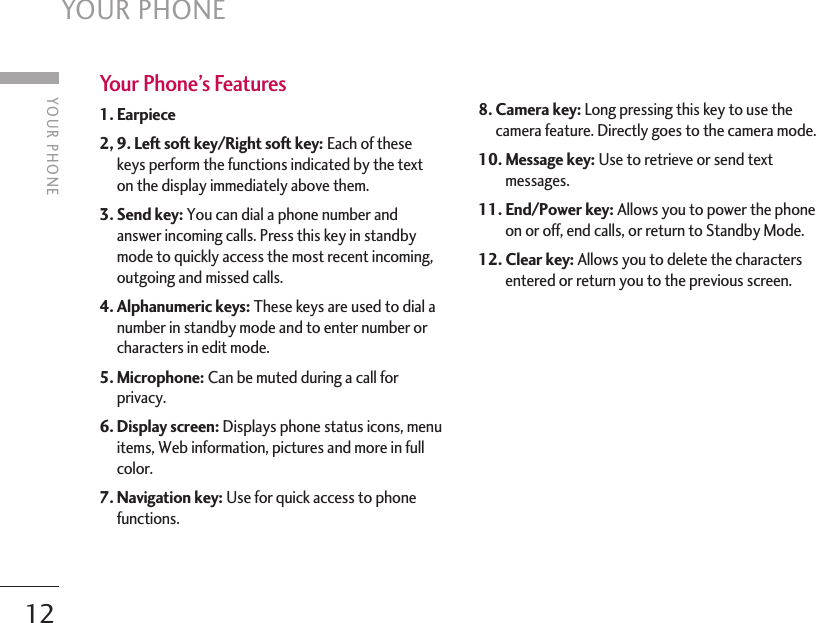
LG Electronics USA MG185 Tri-Band GSM Phone User Manual S5100 E 0110 4
LG Electronics USA Tri-Band GSM Phone S5100 E 0110 4
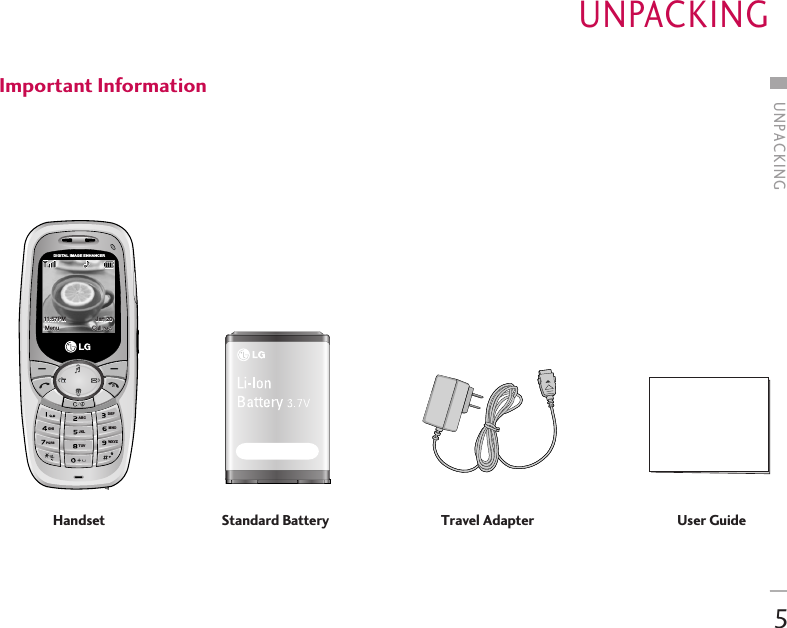
UserManual.wiki
>
LG Electronics USA
>
MG185 User Manual
Manual
Navigation menu
Upload a User Manual
Namespaces
Wiki Guide
HTML
PDF
Info
Views
User Manual
Discussion / Help
Navigation
![9must be maintained between the user s body and theback of the phone. Third-party belt-clips, holsters, andsimilar accessories containing metallic componentsshould not be used. Body-worn accessories thatcannot maintain 0.6 inches(1.5cm) separationdistance between the user's body and the back of thephone, and have not been tested for typical body-worn operations may not comply with FCC RFexposure limits and should be avoided.Vehicle Mounted External Antenna(optional, if available)A minimum separation distance of 8 inches (20cm)must be maintained between the user/bystander andthe vehicle mounted external antenna to satisfy FCCRF exposure requirements. For more informationabout RF exposure, visit the FCC website atwww.fcc.govFCC Part 15 Class B ComplianceThis device and its accessories comply with part 15 ofFCC rules. Operation is subject to the following twoconditions: (1) This device and its accessories may not causeharmful interference, and (2) this device and itsaccessories must accept any interference received,including interference that may cause undesiredoperation.Cautions for Battery•Do not disassemble.•Do not short-circuit.•Do not expose to high temperature: 60°C (140°F).]•Do not incinerate.Battery Disposal•Please dispose of your battery properly or bring toyour local wireless carrier for recycling.•Do not dispose in fire or with hazardous orflammable materials.FOR YOUR SAFETY](https://usermanual.wiki/LG-Electronics-USA/MG185/User-Guide-634262-Page-9.png)
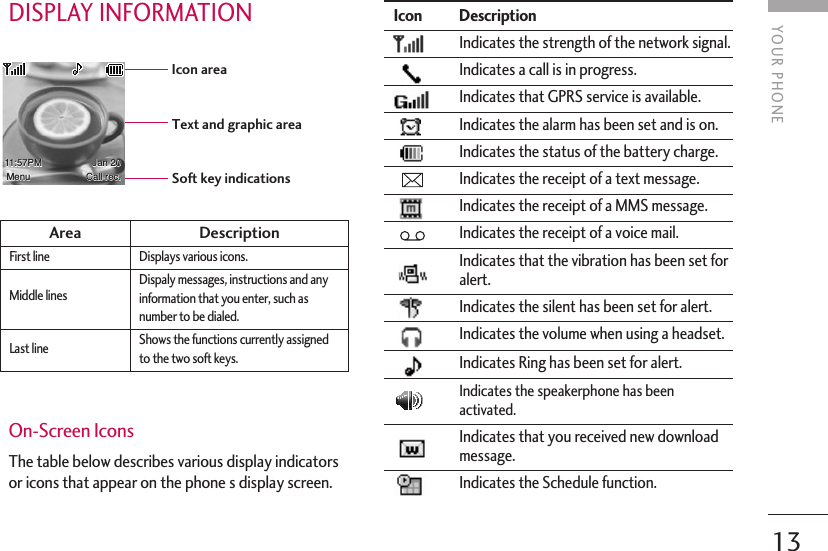
![INSTALLING THE SMARTCHIP When you subscribe to a cellular network, you areprovided with a plug-in SIM loaded with yoursubscription details, such as your PIN, any optionalservices available and many others. 1. If necessary, switch off the phone by holding downthe key until the power-off image displays.2. Remove the battery. To do so:1Pull and hold the battery lock above the batterytoward the top of the phone.2Lift the battery away, as shown.3. Slide the SIM into the SIM socket so that it locksthe card into place. Make sure that the notchedcorner is bottom left and the gold contacts of thecard face into the phone. NoteWhen you need to remove the SmartChip, slide it,as shown, and take it out of the socket.Important!]The plug-in SIM and its contacts can be easilydamaged by scratches or bending, so be carefulwhen handling, inserting or removing the card.Keep all SIM out of the reach of small children.GETTING STARTED14GETTING STARTEDMOBILECAMERAF2.8,2.1mmSIMMOBILECAMERAF2.8,2.1mmSIM➁➀➂➃MOBILECAMERAF2.8,2.1mmSIMSIM](https://usermanual.wiki/LG-Electronics-USA/MG185/User-Guide-634262-Page-14.png)
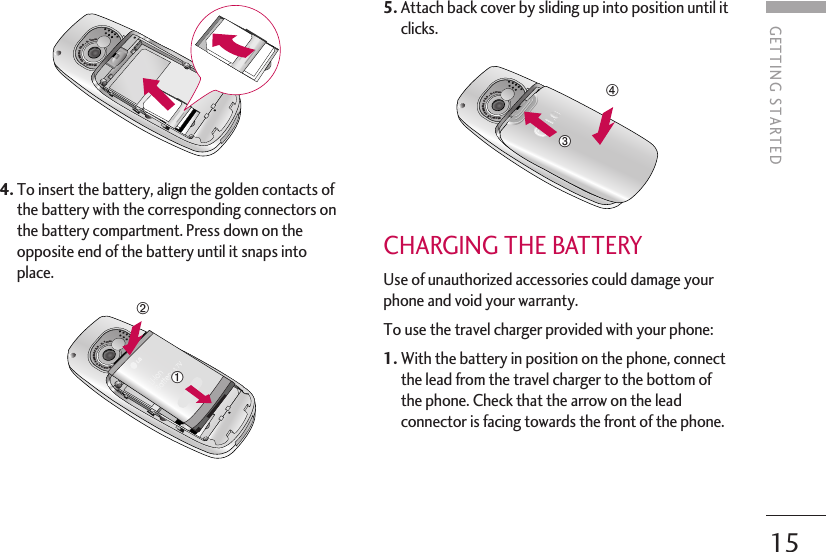
![GETTING STARTED162. Connect the travel charger to a standard AC walloutlet. Only use the travel charger that comesincluded with the package. 3. When charging is finished, disconnect the travelcharger from the phone by pressing on the graytabs on both sides of the connector while pullingthe connector out.Notice]If your phone is powered on while charging,you’ll see the bars in the battery indicator iconcycle. When the battery is fully charged, thebars in the battery indicator icon will flash onand off.WarningThe travel charger must be unplugged before youremove the battery, otherwise, the phone couldthe damaged.ABCGHIPQRSJKLTUVWXYZMNODEFDIGITAL IMAGE ENHANCERABCGHIPQRSJKLTUVWXYZMNODEFDIGITAL IMAGE ENHANCERGETTING STARTED➀➀➁](https://usermanual.wiki/LG-Electronics-USA/MG185/User-Guide-634262-Page-16.png)
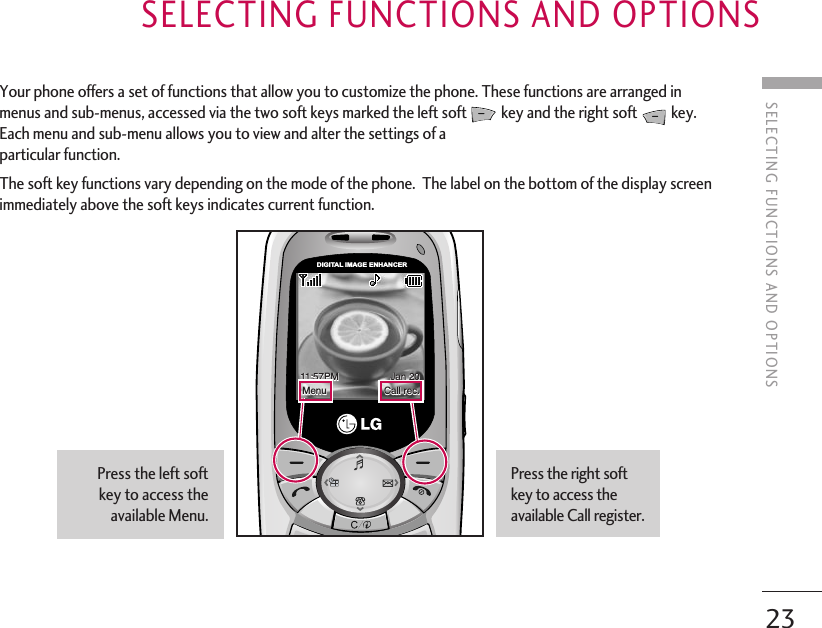
![GETTING STARTED17If the battery fails to charge completely:]After turning the phone on and off, please attemptto recharge the battery.]After detaching and reattaching the battery, pleaseattempt to recharge the battery.TURNING YOUR PHONE ON AND OFF 1. Hold down the [END] key until the phoneswitches on.2. If the phone asks for a PIN, enter the PIN and pressthe key.The phone searches for your network and after findingit goes to the idle screen as illustrated below. From theidle screen, you can make or receive a call.3. When you wish to switch the phone off, hold downthe [END] key until the power-off imagedisplays.ACCESS CODES You can use the access codes described in this sectionto avoid unauthorized use of your phone. The accesscodes can be changed by using the Change Codesfeature (Menu 7.5.6).Security code (4 digits)The security code protects the unauthorized use ofyour phone. The default security code is set to ‘0000’and the security code is required to delete all phoneentries and to activate the Restore Factory Settingsmenu. The security code default setting can bemodified from the Security Settings menu.NoteThe display language is preset to Automatic atthe factory. To change the language, use theLanguages menu option (Menu 7.2.5).11:57PM Jan 20Menu Call rec.](https://usermanual.wiki/LG-Electronics-USA/MG185/User-Guide-634262-Page-17.png)
![GENERAL FUNCTIONS18GENERAL FUNCTIONSMAKING A CALL1. Make sure your phone is powered on.2. Enter a phone number including the area code. Toedit a number on the display screen, simply pressthe key to erase one digit at a time.]Press and hold the key to erase the entirenumber.3. Press the [SEND] key to call the number.4. When finished, press the [END] key.Making a Call by Send Key1. Press the [SEND] key, and the most recentincoming, outgoing and missed phone numbers willbe displayed.2. Select the desired number by using the navigationkey.3. Press the [SEND] key.Making International Calls 1. Press and hold the key and the internationalaccess character ‘+’ will appear.2. Enter the country code, area code, and the phonenumber.3. Press the [SEND] key. Ending a Call When you have finished a call, press the [END]key.Making a Call From the Contacts You can store names and phone numbers dialedfrequently in the SmartChip as well as in the phonememory known as the Contacts.You can dial a number by simply selecting a name inthe contacts and pressing the [SEND] key.](https://usermanual.wiki/LG-Electronics-USA/MG185/User-Guide-634262-Page-18.png)
![GENERAL FUNCTIONS19ADJUSTING THE VOLUMEDuring a call, if you want to adjust the earpiecevolume, use the side keys of the phone.In idle mode, you can adjust the ring volume using theside keys.ANSWERING A CALLWhen you receive a call, the phone rings and theflashing phone icon appears on the screen. If the callercan be identified, the caller’s phone number (or nameif stored in your Address Book) is displayed.1. Open the Slide and press the [SEND] key orthe left soft key to answer an incoming call. If AnyKey has been set as the answer mode (Menu9.4.2), any key press will answer a call except forthe [END] key or the right soft key. 2. End the call by closing the phone or pressingthe [END] key.Using the SpeakerphoneYou can use the integrated Speakerphone during a callby pressing the [OK] key . The loudspeaker isautomatically deactivated when you end the call.Vibrate Mode (Quick)Vibrate Mode can be activated by pressing andholding down the[Star] key.WarningDue to higher volume levels, don’t place thephone near your ear while the speakerphone isenabled.NoticeYou can answer a call while using the AddressBook or other menu features.](https://usermanual.wiki/LG-Electronics-USA/MG185/User-Guide-634262-Page-19.png)
![21GENERAL FUNCTIONSChanging the Text Input ModeChange the text input mode by pressing . You can check the current text inputmode in the upper right corner of the screen.Using the T9 ModeThe T9 predictive text input mode allows you to enterwords easily with a minimum number of key presses. Asyou press each key, the phone begins to display thecharacters that it thinks you are typing based on abuilt-in dictionary. As new letters are added, the wordchanges to reflect the most likely candidate from thedictionary.1. When you are in the T9 predictive text input mode,start entering a word by pressing keys toPress one key per letter.]The word changes as letters are typed - ignorewhat’s on the screen until the word is typedcompletely.]If the word is still incorrect after typingcompletely, press the [Star] key once or moreto cycle through the other word options.]If the desired word is missing from the wordchoices list, add it by using the ABC mode.2. Enter the whole word before editing or deleting anykeystrokes.3. Complete each word with a space by pressing thekey or the right navigation key.To delete letters, press .Press and hold down to erase the letterscontinuously.to erase entire words.Using the ABC ModeUse the keypad keys to enter your text.1. Press the key labeled with the required letter:]Once for the first letter]Twice for the second letter]And so onNoticeTo exit the text input mode without saving yourinput, press the [END] key.WXYZABC](https://usermanual.wiki/LG-Electronics-USA/MG185/User-Guide-634262-Page-21.png)
![GENERAL FUNCTIONS22GENERAL FUNCTIONS2. To insert a space, press the key once. Todelete letters, press the key. Press and holddown the key to erase the letters continuously.Using the 123 (Numbers) ModeThe 123 Mode enables you to enter numbers in a textmessage (a telephone number, for example) morequickly.Press the keys corresponding to the required digitsbefore manually switching back to the appropriatetext entry mode.Using the Symbol ModeThe Symbol Mode enables you to enter varioussymbols or special characters.To enter a symbol, press the[Star] key. Use thenavigation keys to select the desired symbol and pressthe [OK] key.NoticeRefer to the table below for more information onthe characters available using the keys.Key Characters in the Order DisplayUpper Case Lower Case1. , - ¿ ? ¡ ! @ 1 . , - ¿ ? ¡ ! @ 12A B C Á Ã Ç 2 a b c á ã ç 23D E F É 3 d e f é 34G H I Í 4 g h i í 45J K L 5 j k l 56M N O Ó Ñ 6 m n o ó ñ 67P Q R S 7 p q r s 78T U V Ú Ü 8 t u v ú ü 89W X Y Z 9 w x y z 90Space Key, 0 Space Key, 0(Long press) (Long press)](https://usermanual.wiki/LG-Electronics-USA/MG185/User-Guide-634262-Page-22.png)
![24IN-CALL MENUYour phone provides a number of control functionsthat you can use during a call. To access thesefunctions during a call, press the right soft key[Options].DURING A CALLThe menu displayed on the handset screen during acall is different than the default main menu displayedwhen in idle screen, and the options are describedbelow.Making a Second CallYou can select a number you wish to dial from theAddress Book to make a second call. Press the rightsoft key then select Contacts.Swapping Between Two CallsTo switch between two calls, press the right soft keyor the [SEND] key, and then select Swap. Answering an Incoming CallTo answer an incoming call when the handset isringing, simply press the [SEND] key. Thehandset is also able to warn you of an incoming callwhile you are already on a call. A tone sounds in theearpiece, and the display will show that a second call iswaiting. This feature, known as Call Waiting, is onlyavailable if your network supports it.If Call Waiting is on, you can put the first call on holdand answer the second call, by pressing the[SEND] key.Rejecting an Incoming CallYou can reject an incoming call without answering bysimply pressing the [END] key.During a call, you can reject an incoming call bypressing the [END] key.Muting the MicrophoneYou can mute the microphone during a call by pressingthe [Options] key then selecting Mute or the left softkey [Mute]. The handset can be unmuted by pressingIN-CALL MENU](https://usermanual.wiki/LG-Electronics-USA/MG185/User-Guide-634262-Page-24.png)
![25IN-CALL MENUthe Unmute menu or the left soft key [Unmute]. Whenthe handset is muted, the caller cannot hear you, butyou can still hear the caller.CONFERENCE CALLSThe conference service provides you with the abilityto have a simultaneous conversation with more thanone caller. The conference call feature can be usedonly if your network service provider supports thisfeature. The conference call can only be set up whenyou have one call active and one call on hold, meaningboth calls must have been answered. Once aconference call is set up, calls may be added,disconnected or separated (that is, removed from theconference call but still connected to you) by theperson who set up the conference call. These optionsare all available from the In-Call menu. The maximumnumber of callers in a conference call is five. Oncestarted, you are in control of the conference call, andonly you can add calls to the conference call. Making a Second CallYou can make a second call while currently on a callsimply by entering the second number and pressingthe [SEND] key. When the second call isconnected, the first call is automatically placed onhold. You can swap between calls, by pressingthe [SEND] key.Setting Up a Conference CallTo set up a conference call, place one call on hold,conference in the second active call by pressing theright soft key and select the Join Calls sub menuoption from the Conference Call menu. Activate the Conference Call on HoldTo activate a conference call on hold, press the [SEND] key.Adding Calls to the Conference CallTo add a call to an existing conference call, press theright soft key, and then select the Join Calls sub menufrom the Conference Call option.](https://usermanual.wiki/LG-Electronics-USA/MG185/User-Guide-634262-Page-25.png)
![IN-CALL MENU26Private Call in a Conference CallTo have a private call with one caller from a conferencecall, press the right soft key and select the PrivateMenu from the Conference Call option. When thenumbers of the callers are displayed, select the oneyou wish to speak in private. Ending a Conference CallCurrently active conference call can be disconnectedby pressing the [END] key.IN-CALL MENU](https://usermanual.wiki/LG-Electronics-USA/MG185/User-Guide-634262-Page-26.png)
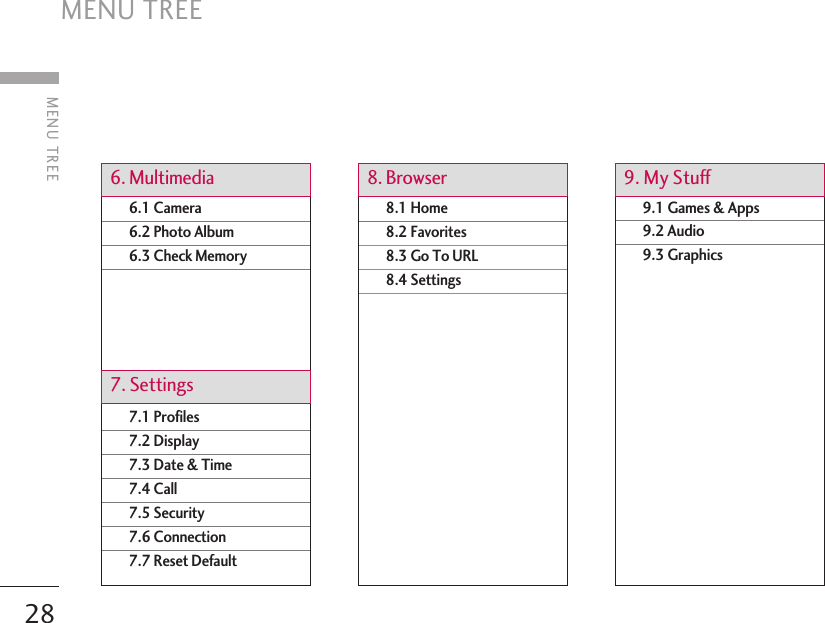
![MENU TREE27MENU TREEThe following illustration shows the available menu structure and indicates the: ]Number assigned to each menu option.]Page where you can find the feature description.5.1 New Message5.2 Inbox5.3 Drafts5.4 Outbox5.5 Sent5.6 Listen Voicemail5.7 Info Service5.8 Templates5.9 Settings5.0 Check Memory3.1 Voice Memo3.2 Calculator3.3 Notepad3.4 World Clock3.5 Unit Converter3.6 Tip Calculator4.1 Alarm Clock4.2 Calendar1.1 Contacts1.2 New Contact 1.3 Speed Dial List 1.4 Caller Groups1.5 Copy All Contacts1.6 Delete All Contacts1.7 Settings1.8 Information2.1 Missed Calls2.2 Dialed Calls2.3 Received Calls2.4 Delete Recent Calls2.5 Call Duration2.6 Data Information1. Contacts3. Tools 5. Messages4. Organizer2. Call register](https://usermanual.wiki/LG-Electronics-USA/MG185/User-Guide-634262-Page-27.png)
![CONTACTS29CONTACTSCONTACTS MENU 1.1This menu allows you to save and manage contactaddress information. The Contacts functions allow youto add a new address or search saved contactaddresses by name.NEW CONTACT MENU 1.2This menu allows you to add a new contact address.You can input contact address information includingname, phone numbers, email addresses, groupinformation items, memos, ringtones, and image(photograph).You have to select the Handset or the SmartChipmemory using the left and right navigation keys.SPEED DIAL LIST MENU 1.3This menu allows you to configure the speed dialnumbers. You can select a number as a speed dial from2 to 9. You can configure speed dial numbers for anyof the 8 numbers for a specific contact address so thata contact address may have multiple speed dialnumbers.CALLER GROUPS MENU 1.4There are 6 predefined groups as well as oneadditional group labeled Others where you can createyour own lists.1. You can set the phone to ring in a specific way anddisplay a preselected graphic icon when a particularperson calls you. 2. Scroll to Caller Groups then press the left soft key[OK] to enter this menu. 3. Every Group list will be displayed : Family, VIP,Friends, Colleague,Group 1, Group 2, No Group.4. Select the Group name that you want to manage bypressing the right soft key [Options]. 5. You will see the following submenus under thepredefined groups except for the No Groups group. •View: Allows you to see the member list in the group. •Group Ring Tone: Allows you to select the ring toneto be used when you receive a voice phone call froma person in the group.](https://usermanual.wiki/LG-Electronics-USA/MG185/User-Guide-634262-Page-29.png)
![30CONTACTS•Group Icon: Allows you to select the graphic icon tobe displayed when you receive a call from a person inthe group. •Add Member: Allows you to add the member to thegroup.•Remove Member: Allows you to delete the memberin the group. •Rename: Allows you to assign a name to the group. COPY ALL CONTACTS MENU 1.5This menu allows you to copy all of the informationfrom your SmartChip, e.g. name, handset number, etc.,to your handset. If a name is duplicated during thecopying operation, the information is also duplicated.SIM to Phone (Menu 1.5.1)You can copy the entry from the SmartChip card tothe phone memory.Phone to SIM (Menu 1.5.2)You can copy the entry from the handset memory tothe SmartChip card (not all the data will be copied).]Keep Original: When copying, Original Dial Numberis kept. ]Delete Original: When copying, Original DialNumber will be erased. DELETE ALL CONTACTS MENU 1.6You can delete all entries in the SIM and the Phone.Press the [END] key to return to standby mode.SETTINGS MENU 1.7Set Memory (Menu 1.7.1)Scroll to highlight the Set Memory option, then pressthe left soft key [OK]. ]If you select Ask Always when adding entry, thephone will ask where to store. ]If you select SIM or Phone, the phone will store anentry to the SmartChip or the phone. Set View Detail (Menu 1.7.2)CONTACTS](https://usermanual.wiki/LG-Electronics-USA/MG185/User-Guide-634262-Page-30.png)
![31CONTACTS31INFORMATION MENU 1.8Service Dial Number (Menu 1.8.1)You can view the list of Service Dialing Numbers(SDN) assigned by your network provider. Suchnumbers could include the emergency, directoryassistance and voice mail numbers.1. Select the Service dial number option.2. The names of the available services will be shown.3. Use the up/down navigation keys to select aservice. Press the [SEND] key.Check Memory (Menu 1.8.2)You can check how many names and numbers arestored in the Contacts (SIM card and phonememories). My Numbers (Menu 1.8.3)This displays your phone numbers stored in theSmartChip.](https://usermanual.wiki/LG-Electronics-USA/MG185/User-Guide-634262-Page-31.png)
![TOOLSTOOLS34VOICE MEMO MENU 3.1Allows you to record a memo. You can record up to 3voice messages with each message up to 30 seconds. You can use the Voice Memo feature to:• Play the recorded voice memos• Delete one or all voice memos1. Once recording is started, the message ‘ Recording... ’ and the remaining time is displayed.2. If you want to finish recording, press the left softkey [Save]. ]Play: Allows you to play back all memos recorded,starting with the most recent memo. The screendisplays the date and time when the memo wasrecorded. ]Delete: Allows you to delete a specific memo. Allmemos recorded are played back, starting with themost recent one. ]New Voice Memo: Allows you to record a memo. ]Rename: Allows you to rename a specific memo. ]Send Via Multimedia Message: Sends the selectedvoice memo by MMS. ]Delete All: Allows you to delete all memos. CALCULATOR MENU 3.2The calculator function allows you to add, subtract,multiply and divide. You can input numbers using thenumber keys, and input operators using the up, down,left, and right navigation keys.You can input a decimal point by pressing the [Star] key.Whenever you press the key, characters aresequentially deleted in reverse direction.NoteIf all memo locations are full, you must delete anold memo before recording a new one.](https://usermanual.wiki/LG-Electronics-USA/MG185/User-Guide-634262-Page-34.png)
![35TOOLSNOTEPAD MENU 3.3To write, edit and delete a memo on a specific date,proceed as follows.1. Press the left soft key [New].2. Input the memo and press the right soft key[Options].The following options are available.]Save: Allows you to save the memo.]Set T9: Allows you to select the T9 language to usein memo.]Cancel: Allows you to exit in memo editor.Or1. Select a Memo.2. Press the right soft key [Options].The following options are available.]View: Allows you to view the memo.]Delete: Allows you to delete the memo. You canpress the right soft key [Options ’ Delete] to editthe memo displayed.]New Notepad: Add a new memo, up to 20 memosand 40 characters per each memo.]Edit: If you select a memo that already exists, youcan press the right soft key [Options ’ Edit] to editthe memo displayed.]Delete All: Allows you to delete all memos. You areasked to confirm your action.WORLD CLOCK MENU 3.4Allows you to check the current Greenwich MeanTime(GMT) and major cities around the world, usingthe left/right navigation keys.The screen shows the city name, current date and time.To select the time zone in which you are located,proceed as follows:1. Select the city corresponding to your time zone bypressing the left/right navigation keys one or moretimes. The local date and time are displayed.2. If you want to set, press the key.3. If you want to set Daylight Savings, press thekey in Options menu.ABC](https://usermanual.wiki/LG-Electronics-USA/MG185/User-Guide-634262-Page-35.png)
![TOOLS36TOOLSUNIT CONVERTER MENU 3.5This converts any measurement into a unit you want.There are 4 types that can be converted into units:Length, Surface, Weight, and Volume.1. You can select one of four unit types by pressingthe left soft key [Unit].2. Select the standard value by using the left/rightnavigation keys.3. Select the unit you want to convert by pressing theup/down navigation keys. 4. You can check the converted value for the unit youwant. Also, you can input a decimal number bypressing the key.TIP CALCULATOR MENU 3.6This feature allows you to quickly and easily calculatethe tip amount based on the total bill as well as thesplit of the total bill based on the number of people. NoteThe time zone setting of each city in World timemenu may be affected by network condition.](https://usermanual.wiki/LG-Electronics-USA/MG185/User-Guide-634262-Page-36.png)
![ORGANIZER37ORGANIZERALARM CLOCK MENU 4.1Set the alarm to ring at a specific time. In the AlarmClock menu, the following options are available: On: Set the time(hour and minute) for activating thealarm. 1. Enter the menu. 2. Select [On] by pressing the right/left navigationkeys. 3. If you want to set the time for activating the alarm,press the down navigation key. 4. Enter the required time, press the down navigationkey. 5. The following options are available. • Once: The alarm rings only once and is thendeactivated. • Daily: The alarm rings every day at the same time. • Weekly: The alarm rings every week on the sameday and at the same time. • Monthly:The alarm rings every month on the sameday and at the same time. 6. Allows you to select the alarm melody by using theright/left navigation keys. 7. Press the left soft key [Set]. Off: Cancel the alarm. CALENDAR MENU 4.2When you enter this menu a calendar will be displayed.The square cursor is used to locate a particular day.The under bar on the calendar indicates schedule(s)on for that day. This function helps to remind you ofthe schedule. The phone will sound an alarm tone if ithas been set for a specific schedule item.NoticeIf this option is set to On, the alarm will ring atthe specified time, even when the phone isswitched off. To stop the alarm when it rings,open the phone and press the right soft key[Quit].](https://usermanual.wiki/LG-Electronics-USA/MG185/User-Guide-634262-Page-37.png)
![The following [Options] are available:]View: Press the right soft key [Options] to delete oredit the note you selected. ]Delete: Allows you to delete the schedule. ]New Schedule: You can edit maximum of 30characters and create up to 30 notes. ]Edit: Allows you to edit the schedule. ]Calendar: Allows you to consult the calendar. ]Scheduler Tone: The phone can sound an alarmtone when the scheduled date for an event has beenreached with this option. ]All Schedules: Shows the notes that are set for alldays. Use the up/down navigation keys to browsethrough the note lists. ]Go To Date: Allows you to jump to a specific date.]Delete Old: Delete past schedule event that hasalready been notified. ]Delete All: Delete all schedules. You are asked toconfirm your action. NoteYou can see Edit, Delete,View all schedules,Delete past, and Delete all menus dependent onsetting of the schedule. ORGANIZER38ORGANIZERKey Descriptionup/down navigation key Weeklyleft/right navigation key Dailykey/ key Yearlykey/ key MonthlyDEF](https://usermanual.wiki/LG-Electronics-USA/MG185/User-Guide-634262-Page-38.png)
![MESSAGES39MESSAGES• Sound: Attach sounds that are available for shortmessage.• Text Template: Use the text templates alreadyset in the phone.• Contacts: Attach a phone number.• Business Card: Attach your name card.]Save To Drafts: Save the message so that it can besent later.]Set T9: Allows you to select the T9 language to usein memo.]Clear Text: Deletes the written message.]Cancel: Exit the text editor.Press the right soft key [Send].]Send: Enter the phone number or select the numberfrom the contacts.NEW MESSAGE MENU 5.1Text (Menu 5.1.1)You can write and edit text messages of up to 918characters.1. Type in a message using key presses. For details onhow to enter text, refer to page 22 (EnteringText).2. After completing the message select the requiredoption by pressing the right soft key [Options].The following options are available.]Insert• Symbol: Attach special characters.• Picture: Send and receive text messages thatcontain pictures, known as Enhanced MessagingService. Several preset pictures are available in thephone and they can be replaced with new onesreceived from other sources.• Animation: Attaching an animation in a messagecan be done through EMS(Enhanced MessagingService).](https://usermanual.wiki/LG-Electronics-USA/MG185/User-Guide-634262-Page-39.png)
![40Multimedia (Menu 5.1.2)You can write and edit multimedia messages, checkingmessage size.You can create a new message or choose one of themultimedia message templates already made.Press the right soft key [Send].]Send: You can send multimedia messages tomultiple recipients, prioritize your message, andmake it sent later as well.The following options are available.]Insert: Symbol, Graphic, Sound, New Slide, TextTemplate, Contact or Business card.]Preview: You can preview multimedia messages youwrote.]Save: You can save multimedia messages To Draftsor As Template.]Move to: You can move to previous or next slide.]Delete Slide: You can delete current slide.]Set Timer: You can set timer for slide, text, pictureand sound.]Set T9: Select a T9 input mode.]Cancel: You can back to the Message menu.INBOX MENU 5.2You will be alerted when you receive a message. Theywill be stored in the Inbox.In the Inbox, you can identify each message by icons.If you are notified that you have received a multimediamessage, you can download the whole multimediamessage by selecting it in the Receive menu. The following [Options] are available in the Inboxlist.]Reply: Replies to the received message.]Delete: You can delete the current message.NoteIf you select the photo on writing multimediamessage, loading duration will take about 5seconds. At that time, you can’t activate any keyduring loading time. After that time, it is availableto write multimedia message.MESSAGESMESSAGES](https://usermanual.wiki/LG-Electronics-USA/MG185/User-Guide-634262-Page-40.png)
![41MESSAGES]Forward: You can forward the selected message toanother party.]Extract: Extract picture, sound, text webpage andemail address from the message.]Return Call: Call back the sender.DRAFTS MENU 5.3You can view the messages saved as a draft. The following [Options] are available.]Edit: You can edit a selected message.]Delete: Deletes the selected draft mesage.OUTBOX MENU 5.4Outbox is a temporary storage place for messageswaiting to be sent.When you press the [SEND] key, the messagemoves to the Outbox and from there the message issent.If the message fails to be sent from the Outbox, youwill receive a sound alert along with a MessageSending Fail notice on the screen. Another attempt will be made to send the failedmessage and after two unsuccessful attempts, themessage will no longer be sent automatically. In order to send the message that has failed, you mustpress Resend.After the maximum number of Send attempts hasbeen reached the Send function has failed.If you were trying to send a text message, open themessage and check that the Sending options arecorrect.When the message Send has failed, the following[options] are available.]Resend: Allows you to send the message again aftera time-out period.]Edit: You can edit a selected message.]Delete: Deletes the selected message which hasbeen failed to send.](https://usermanual.wiki/LG-Electronics-USA/MG185/User-Guide-634262-Page-41.png)
![MESSAGES42SENT MENU 5.5This is where you can view the lists and contents ofsent messages and also verify if transmission wassuccessful.]Forward: Forwards the current message to otherrecipients.]Delete: Deletes the selected message from the Sentlist.LISTEN VOICEMAIL MENU 5.6This menu provides you with a quick way of accessingyour voice mailbox (if provided by your network).Before using this feature, you must enter the voiceserver number obtained from your service provider.This may already be available; to check the voicemail,press and hold the keyWhen new voicemail is received, the symbol will bedisplayed on the screen.INFO SERVICE MENU 5.7Info service messages are text messages sent by thenetwork to GSM phone users. They provide generalinformation such as weather reports, traffic news,taxis, pharmacies, and stock prices. Each type ofinformation is associated with a number, which can beobtained from the service provider. When you receivean info service message, a popup message will indicatea new message receipt or the info service message willbe displayed directly. In standby mode, the followingoptions are available when viewing the info servicemessage.Receive (Menu 5.7.1)Ability to enable or disable the reception of broadcastmessages.Inbox (Menu 5.7.2)The list of received broadcast messages can besearched and the contents viewed.MESSAGES](https://usermanual.wiki/LG-Electronics-USA/MG185/User-Guide-634262-Page-42.png)
![43MESSAGESTopics (Menu 5.7.3)To create new topics, press the left soft key [OK] andthen select the new topics menu by pressing the leftsoft key [Options]. Alert (Menu 5.7.4)Ability to select the alert type for a new message.Auto Display (Menu 5.7.5)This option will automatically display all broadcastmessages received.Scroll through the messages using the up/downnavigation keys.Languages (Menu 5.7.6)This option allows you to select the languagepreferred. The cell broadcast message will bedisplayed in the language selected.If you use all languages supported by phone, select‘Automatic’ at the bottom of the list.TEMPLATES MENU 5.8There are 6 predefined messages in the list. You canview and edit the template messages or create newmessages. Text (Menu 5.8.1)• Please call me back • I’m late. I will be there at• Where are you now? • I’m on the way.• Urgent! Please contact. • I love youThe following options are available.]Edit: Allows you to write a new message or edit theselected template message.]Send Via- Text Message: Sends the selected templatemessage by SMS.- Multimedia Message: Sends the selectedtemplate message by MMS.]Delete: Allows you to delete the selected templatemessage.](https://usermanual.wiki/LG-Electronics-USA/MG185/User-Guide-634262-Page-43.png)
![MESSAGES44MESSAGESMultimedia (Menu 5.8.2)For further details, see page 41.Business Card (Menu 5.8.3)This option allows you to make your own name card.Key in the Name, Mobile number, Office number, Faxnumber and E-mail address.]Edit: Allows you to write a new message or edit theselected name card.]Send Via- Text Message: Sends the selected name card bySMS.- Multimedia Message: Sends the selected namecard by MMS.]Delete: Allows you to delete the selected namecard.SETTINGS MENU 5.9Text Message (Menu 5.9.1)]Message Types: Allows you to set the defaultmessage type (Text, Voice, Fax, Paging, X.400, E-mail, ERMES). The network can convert themessages into the selected format. The type ofmessage you desire can be set to Text Type.]Validity Period: Allows you to set the length oftime for which your text messages will be stored atthe SMS center while attempts are made to deliverthem to the recipient. Possible values are Maximum,30 Minutes, 1 Hour, 6 Hours, 1 Day and 1 Weekwhich can be authorized by your service provider.]Delivery Reports: Allows you to activate ordeactivate the report function. When this function isactivated, the network informs you whether or notyour message has been delivered.]Reply With Same Service: Allows the recipient ofyour SMS message to send you a reply via yourmessage center, if the service is provided by thenetwork.](https://usermanual.wiki/LG-Electronics-USA/MG185/User-Guide-634262-Page-44.png)
![45MESSAGES]Message Center Number: If you want to send thetext message, you can receive the address of theSMS center through this menu.]Email Gateway: You can send the text message toan Email Address via this gateway.]Subject: If you set it to on, allows you to enter thesubject.]Bearer Setting: You can select GPRS or GSM.Contact your network operator or service providerfor information related to setting a selected bearer,pricing and connection speed.GSM Preferred/GPRS PreferredMultimedia Messages (Menu 5.9.2)Via this menu, you can set up default multimediamessage information.The following options are available:]Subject: Enter the message title.]Slide Duration: Display the duration of each pagewhen writing the message.]Priority: You can set the priority of the messageyou choose.]Validity Period: This network service allows you toset how long your multimedia messages will bestored at the message center.]Delivery Reports: If it is set to Yes in this menu, youcan check whether your message is sent successfully.]Read Receipts: This menu allows you to determinewhether to request a read confirmation mail to arecipient.]Auto Download• On: You can always receive multimedia messagesautomatically.• Off: You receive only notification messages in theinbox and then you can check the notifications.]Network Profile: For further details, see page 45.Voicemail Number (Menu 5.9.3)This menu allows you to get the voice mail if thisfeature is supported by the network service provider.Please check with your network service provider fordetails of their service in order to configure thehandset accordingly.](https://usermanual.wiki/LG-Electronics-USA/MG185/User-Guide-634262-Page-45.png)
![46MESSAGESMESSAGESDownload Messages (Menu 5.9.4)You can set the Service option to determine whetheryou will receive the service messages or not.You can set the Automatic Download option todetermine whether you will automatically connect tothe service or not.]Receive: You can set the option whether you willreceive the message or not.CHECK MEMORY MENU 5.0You can check the current memory status of eachmemory for Text Messages and Multimedia.](https://usermanual.wiki/LG-Electronics-USA/MG185/User-Guide-634262-Page-46.png)
![494. To save the image, centre the “ ” and press theOK key. If you don't want to save the image, centrethe “ ” and press the OK key. You can also send the image via multimedia message by selecting “ ”. For further informationregarding multimedia message writing, refer to page70-71. After taking a picture in 96x96 (phonebook), youcan directly save the image in the phonebook byselecting “ ”.PHOTO ALBUM MENU 6.2In this menu, you can review the pictures you havetaken. This feature offers the ability to store allcaptured photo images in an album. When no imageshave been captured, the Empty message will bedisplayed. The picture will display the last imageviewed. The title of the image will be displayed on topas well as the index number of the displayed image.The left or right navigation key is used to viewprevious or next image. ]View: You can view one image at a time.]Send Photo: Allows you to send a multimediamessage using the taken picture. ]Set As Wallpaper: Set selected photo image as awallpaper. ]Set As Photo ID: You can add the selected image toa address book contact to use Photo Caller IDfeature.]Delete: Delete current image. ]Slideshow: The Slide Show mode will display theimages in slide show format. The images are shownevery 1.5 second intervals.Notehis feature links only the phonebook in the phonememory.MULTIMEDIADeleteSavePhonebook entry](https://usermanual.wiki/LG-Electronics-USA/MG185/User-Guide-634262-Page-49.png)
![MULTIMEDIA50]Rename: Allows you to rename the taken picture. ]Delete All: Deletes all the images in your phone.]Information: Displays Title, Size, Date and Timeinformation on selected image. CHECK MEMORY MENU 6.3You can check the current memory status on thephone.NoteThe phone has built-in 1 MB memory for photos,in which maximum 300 photos can be stored. Butnote that you cannot take pictures any more ifthe memory is full, even if you've taken less than300 photos. And vice versa: you can take nomore pictures if you've already taken 300 photoseven though the memory is available.MULTIMEDIA](https://usermanual.wiki/LG-Electronics-USA/MG185/User-Guide-634262-Page-50.png)
![SETTINGS52Message alert typeAllows to alert when receiving a message for adjustingenvironment.Message toneAllows to select the alert tone for message reception.Keypad toneAllows to select the keypad tone for adjustingenvironment.Keypad volumeAllows to set the keypad volume for adjustingenvironment.Effect sound volumeAllows to set the effect sound volume for adjustingenvironment.Power on/off volumeAllows to set the power on/off volume for adjustingenvironment.RenameYou can change the default profile name except ofVibrate only, Headset, and Car menus.Note]If you set the Handsfree kit to the phone, youcan’t use the vibrate mode related with Callalert type or Message alert menu.In car menu,the following submenus are available;- Call alert type : Ring, No alert- Message alert type : Ring once, Ringperiodically, No alertSETTINGS](https://usermanual.wiki/LG-Electronics-USA/MG185/User-Guide-634262-Page-52.png)
![55SETTINGSCall Waiting (Menu 7.4.4)The network will notify you of a new incoming callwhile you have a call in progress. Select Activate torequest the network to activate call waiting, Cancel torequest the network to deactivate call waiting, or ViewStatus, to check if the function is active or not.Minute Minder (Menu 7.4.5)This option allows you to specify whether the phonewill beep every minute during an outgoing call to keepyou informed of the length of the call.Auto Redial (Menu 7.4.6)Select On, your phone redials the number you'retrying to call up to 10 times after you hear a quick,busy signal. Press [END] to stop the callattempts.This feature attempts to redial numbers that are busydue to the wireless network. It does not redialnumbers to a busy party.Closed User Group (Menu 7.4.7)Closed user group is a network service that specifiesthe group of people whom you can call and who cancall you. For more information contact your networkoperator or service provider. If a group index isspecified, it is used for all outgoing calls. If no group index is specified, the network will use thepreferential index (a specific index that is stored in thenetwork).]Preset: Setting the selected CUG Index.]On: Activating and editing the CUG Index.]Off: Deleting the selected CUG.NoteThere will be no alert indicating the call has beenconnected. You must stay on the line to hearwhen the call is connected.](https://usermanual.wiki/LG-Electronics-USA/MG185/User-Guide-634262-Page-55.png)
![SETTINGS56Send DTMF (Menu 7.4.8)You can send the DTMF (dual tone multi-frequency)tones of the number on the display during a call.This option is helpful for entering a password oraccount number when you call an automated system,like a banking service.SECURITY MENU 7.5Various codes and passwords are used to protect thefeatures of your phone. They are described in thefollowing sections (see pages 25).PIN Code Request (Menu 7.5.1)When the PIN code request feature is enabled, youmust enter your PIN each time you switch the phoneon. Consequently, any person who does not have yourPIN cannot use your phone without your approval.The following options are available:]Enable: You must enter the PIN each time thephone is switched on.]Disable: The phone connects directly to thenetwork when you switch it on.Phone Lock (Menu 7.5.2)You can use security code to avoid unauthorized useof the phone. Whenever you switch on the phone, thephone will request security code if you set phone lockto On. If you set phone lock to Automatic, your phonewill request security code only when you change yourSIM card.Auto Key Lock (Menu 7.5.3)When you enable Automatic key lock, keypad will belocked automatically on an idle screen after 30seconds without any key requesting. NoteBefore disabling the PIN code request feature,you must enter your PINSETTINGS](https://usermanual.wiki/LG-Electronics-USA/MG185/User-Guide-634262-Page-56.png)
![SETTINGS57Call Barring Services (Menu 7.5.4)Call barring allows you to restrict from making andreceiving calls with your phone. For this function, youneed the barring password, which you can obtain fromyour service provider.The following options are available:]All Outgoing: Calls cannot be made.]Outgoing International: International calls cannotbe made.]O/G (Outgoing) International Except HomeCountry: When abroad, calls can be made only tonumbers within the current country and to yourhome country, which is where your home networkprovider is located.]All Incoming: Calls cannot be received.]Incoming When Abroad: Calls cannot be receivedwhen you are using your phone outside your homeservice area.]Cancel All Barrings: All call barring settings aredeactivated; calls can be made and receivednormally.]Change Password: You can set and change the callbarring password obtained from your serviceprovider using this option. You must enter thecurrent password before you can specify a newone.Once you have entered a new password, you areasked to confirm it by entering it again.NoteTo use Call Barring service, you must input thenetwork password. When calls are barred, callsmay be possible to certain emergency numbers insome networks.Note]If you want to lock your phone keypadmanually, enter Top menu and press key.]If you want to unlock your phone keypad, press [unlock] key and then press key. Butif you enabled Automatic key lock before, yourphone keypad will be unlock and then after 30seconds the keypad will be lock up againautomatically.](https://usermanual.wiki/LG-Electronics-USA/MG185/User-Guide-634262-Page-57.png)
![SETTINGS58Fixed Dial Number (Menu 7.5.5)Allows you to restrict your outgoing calls to selectedphone numbers, if this function is supported by yourSIM card. The PIN2 code is required.The following options are available:]Enable: You can only call phone numbers stored inthe Address Book. You must enter your PIN2.]Disable: You can call any number.]Number List: You can view the number list saved asfixed dial number.Change Codes (Menu 7.5.6)The Change codes feature allows you to change yourcurrent password to a new one. You must enter thecurrent password before you can specify a new one.You can change the access codes: Security Code,PIN1 Code, PIN2 Code.CONNECTION MENU 7.6Network Selection (Menu 7.6.1)The Network Selection feature allows you to indicatehow the network you will use is selected when roamingoutside your home area.Options are: Automatic, Manual, and Preferred.Note PINPersonal Identification Number.Note Be sure to store any changes you make in a placeyou can remember or contact your serviceprovider if you need to reset your security codes.NoteNot all SIM cards have a PIN2. If your SIM carddoes not, this menu option is not displayed.SETTINGS](https://usermanual.wiki/LG-Electronics-USA/MG185/User-Guide-634262-Page-58.png)
![SETTINGS59]Automatic: Allows you to set the phone toautomatically search for and select one of thecellular networks available in your area.The phone will be set to Automatic by default.]Manual: Allows you to select the desired networkmanually from a list of networks. If the connection tothe manually selected network is lost, the phone willsound an error tone and ask you to select a networkagain. The selected network must have a roamingagreement with your home network, that is, theoperator whose SIM card is in your phone.The phone lets you select another network if thephone fails to access the selected network. If youswitch off the phone, the phone will be reset toAutomatic.]Preferred: You can set a list of preferred networksthe handset should attempt to register with first,before attempting to register to any other networks.This list is created from the handset’s predefined listof known networks.Change Freqency Band (Menu 7.6.2)When the America(1900) option is selected thedevice can be used in the US, and when theEurope(900/1800) option is chosen the device canbe used in European countries.NoteThe US frequency is set at 1900 MHz and theEuropean frequency is set at 900/1800 MHz.NoteYou can select a network other than your homenetwork only if it has a valid roaming agreementwith your home network.](https://usermanual.wiki/LG-Electronics-USA/MG185/User-Guide-634262-Page-59.png)
![BROWSER62You can access various WAP (Wireless ApplicationProtocol) / Web services such as news, and weather.These services are specially designed for mobilephones and they are maintained by the serviceproviders.Once connected, the homepage is displayed. Thecontent depends on the service provider.To exit the browser at any time, press the [END]key. The idle screen is displayed.Menus for the BrowserYou can surf the Internet using either the phone keysor the WAP Browser menu.Using the Navigation KeysWhen surfing the Internet, the keys functiondifferently than when in the phone mode. Key Descriptionup/down navigation key Scroll each line of the content areaUsing the WAP Browser MenuThere are various menus available when surfing theInternet.HOME MENU 8.1Connect to a homepage. The homepage may be thesite which is defined in the activated profile. It will bedefined by the Service Provider if you have not definedit in the activated profile.NoteCheck the availability of WAP services, pricingand tariffs with your network operator and/or theservice provider whose service you wish to use.Service providers will also give you instructionson how to use their services.Please contact your service provider to open anInternet account.BROWSER](https://usermanual.wiki/LG-Electronics-USA/MG185/User-Guide-634262-Page-62.png)
![63FAVORITES MENU 8.2This function allows you to store and edit frequentlyaccessed sites. The following [Options] are available.Options in the Favorites view • Connect: Connect to the URL address todownload the ringtone.• View: Display the bookmark title and URL.• Delete: Allow you to erase the selectedbookmark.• Edit: Modify the existing bookmark item.• Move to Folder: Move the Favorite to otherfolder.• New Favorite: Create new Favorite in currentfolder.• New Folder: Create new sub-folder.• Send URL: Allows the bookmark information tobe sent via SMS to another person.• Delete All: Allows you to erase all bookmarks.GO TO URL MENU 8.3You can directly connect to the site you want byentering a specific URL.SETTINGS MENU 8.4Profiles (Menu 8.4.1)A Profile is the network information used to connectto the internet. Because Claro also selects a bearer automaticallyaccording to the current network status, the userdoesn’t need to select any of them.NoteYour phone may have some pre-installedbookmarks for sites not affiliated with LG. LGdoes not warrant or endorse these sites. If youchoose to access them, you should take the sameprecautions for security or content as you wouldwith any site.BROWSER](https://usermanual.wiki/LG-Electronics-USA/MG185/User-Guide-634262-Page-63.png)
![64Each profile has submenus as follows:]Activate: Set a current profile as a default.]Edit: Edit the various items of the current profile.]Rename: Revise the name of profile.]New Network Profile: Create new profile.]Delete: Delete the profile.]Delete All: Allows all Profiles within the Access Pointto be deleted so please take precaution prior tousing this option.Cache Check (Menu 8.4.2)Set a value whether a connection attempt is madethrough cache or not.Clear Cache (Menu 8.4.3)Remove all cached data in the memory.Security Certificates (Menu 8.4.4)A list of the available certificates is shown.WAP Information (Menu 8.4.5)The WAP Browser version is displayed.NoteA cache is a buffer memory, which is used to storedata temporarily.NoteThe changes using these options may affect theother application function.BROWSERBROWSER](https://usermanual.wiki/LG-Electronics-USA/MG185/User-Guide-634262-Page-64.png)
![MY STUFF66]View: Detailed information on a bookmark can beviewed such as name of bookmark and address ofbookmark.]Delete: Selected bookmark is deleted. Deletedbookmark cannot be restored so caution is requiredwhen deleting bookmarks.]Edit: Selected bookmark can be edited. Editing abookmark is done in the order of URL →Title →Profile(Access Point) →User ID→Password. Whencreating a new bookmark, same order is followed.The service provider can require user ID andpassword information, but if none is provided, noinput is necessary.]New Favorite: New bookmark is added. If there is noBookmark, you get a display indicating that there isno Bookmark. Bookmarks can be added by pressingthe left soft key[Add].]Send URL: Selected bookmark URL can be sent viaSMS.]Delete All: This deletes all of the selected bookmarkas well as the bookmarks directory within the Games& Apps menu.NoteAfter selecting the Connect function to accessthe Java MIDlet Provider°Øs server, you maychoose one of many Java programs to downloadand install into your phone. Once connected to the server, the Go button canbe pressed to view the JAD information on adesired program. The Get button will begin thedownload and install process. The download andinstall process will take place simultaneously andonce download is complete you can immediatelyrun the Java program. The installed Java programcan be selected to run at a later time from theGames & Apps menu.MY STUFF](https://usermanual.wiki/LG-Electronics-USA/MG185/User-Guide-634262-Page-66.png)
![67MY STUFFInformation (Menu 9.1.3)The downloaded programs using WAP are stored inthe phone memory. There is a maximum memorycapacity in a phone and once you exceed this memory,you will not be able to store any more programs. TheView Information menu allows you to check theavailable memory capacity in a phone.Check MemoryDisplays maximum memory capacity and totalavailable memory information.Java VersionDisplays current Java version.AUDIO MENU 9.2]Send via- Text Message: iMelody Sound can be sent viaSMS.- Multimedia Message: Downloaded Sound can besent via MMS.]Set As Ring Tone: This sets the Ring Tone withcurrently selected Sound.]Delete: This deletes currently selected Sound.]Rename: This deletes the Title of currently selectedSound. ]Delete All: This deletes all sounds. NoteSounds supplied as default can only be usedunder the Set As Ring Tone mode.](https://usermanual.wiki/LG-Electronics-USA/MG185/User-Guide-634262-Page-67.png)
![MY STUFF68GRAPHICS MENU 9.3]View: You can view selected graphics.]Send Via Multimedia Message: DownloadedPicture can be sent via MMS.]Set As Wallpaper: Currently selected Picture canbe set as a Wallpaper.]Delete: Currently selected Picture can be deleted.]Edit Title: Title of currently selected Picture can beedited.]Delete All: All Pictures can be deleted.]List / Icon View: You can set the view style as Listand Icon.NotePictures supplied as default can only be usedunder the Set As Wallpaper mode.MY STUFF](https://usermanual.wiki/LG-Electronics-USA/MG185/User-Guide-634262-Page-68.png)
![Q&A69Q&APlease check to see if any problems you have encountered with the phone are described in this sectionbefore taking the phone in for a service or calling a service engineer. QHow do I view the list of outgoing calls, incomingcalls and missed calls?APress the key.QHow do I clear all call history?APress the left soft key [Menu] and then thekey.QHow do I view all numbers stored in memory?APress right soft key [Names] and then .QWhy is the connection inconsistent or not audiblein certain areas?AWhen frequency environment is unstable in acertain area, connection may be inconsistent andnot audible. Relocate to another area and tryagain.QWhy is the connection not consistent abruptlydisconnects even when established?AWhen frequency is unstable or weak or if there aretoo many users, connection may be cut off evenafter it was established. Please try again later orattempt after relocating to other areas.QWhy does the LCD not turn on?ARemove the battery and turn on the power afterplacing it back on. If there is no change, fullycharge the battery and try again.QWhy is there an echo when a connection is madewith certain telephones in a certain area?AThis is called the ‘Echo Phenomenon’, where itoccurs if connection volume is too high or causedby special properties (semi electronic telephoneexchange) of the equipment on the other end.GHIGHIDEF](https://usermanual.wiki/LG-Electronics-USA/MG185/User-Guide-634262-Page-69.png)
![Tips on Efficient Operation For your phone to operate most efficiently:]Do not touch the antenna unnecessarily when thephone is in use. Contact with the antenna affectscall quality and may cause the phone to operate ata higher power level than otherwise needed.Driving Check the laws and regulations on the use of wirelessphones in the areas where you drive. Always obeythem. Also, if using your phone while driving, please:]Give full attention to driving-driving safely is yourfirst responsibility;]Use hands-free operation, if available;]Pull off the road and park before making oranswering a call if driving conditions so require.Electronic Devices Most modern electronic equipment is shielded fromRF signals. However, certain electronic equipmentmay not be shielded against the RF signals from yourwireless phone.Pacemakers The Health Industry Manufacturers Associationrecommends that a minimum separation of six (6’)inches be maintained between a handheld wirelessphone and a pacemaker to avoid potentialinterference with the pacemaker. Theserecommendations are consistent with theindependent research by and recommendations ofWireless Technology Research.Persons with pacemakers: ]Should ALWAYS keep the phone more than sixinches from their pacemaker when the phone isturned ON; ]Should not carry the phone in a breast pocket.]Should use the ear opposite the pacemaker tominimize the potential for interference. ]If you have any reason to suspect thatinterference is taking place, turn your phone OFFimmediately.73SAFETY GUIDELINES](https://usermanual.wiki/LG-Electronics-USA/MG185/User-Guide-634262-Page-72.png)
![Potentially Explosive Atmosphere Turn your phone OFF when in any area with apotentially explosive atmosphere and obey all signsand instructions. Sparks in such areas could cause anexplosion or fire resulting in bodily injury or evendeath.Areas with a potentially explosive atmosphere areoften, but not always, marked clearly. Potential areasmay include: fueling areas (such as gasoline stations);below deck on boats; fuel or chemical transfer orstorage facilities; vehicles using liquefied petroleumgas (such as propane or butane); areas where the aircontains chemicals or particles (such as grain, dust,or metal powders); and any other area where youwould normally be advised to turn off your vehicleengine.For Vehicles Equipped with an Air Bag An air bag inflates with great force. DO NOT placeobjects, including either installed or portable wirelessequipment, in the area over the air bag or in the airbag deployment area. If in-vehicle wirelessequipment is improperly installed and the air baginflates, serious injury could result.Safety InformationPlease read and observe the following information forsafe and proper use of your phone and to preventdamage. Also, keep the user guide in an accessibleplace at all the times after reading it.Charger and Adapter Safety]The charger and adapter are intended for indooruse only.Battery Information and Care]Please dispose of your battery properly or take itto your local wireless carrier for recycling.]The battery does not need to be fully dischargedbefore recharging.]Use only LG-approved chargers specific to yourphone model since they are designed to maximizebattery life.]Do not disassemble or impact the battery as itmay cause electric shock, short-circuit, and fire.Store the battery in a place out of reach ofchildren.]Keep the battery’s metal contacts clean.75SAFETY GUIDELINES](https://usermanual.wiki/LG-Electronics-USA/MG185/User-Guide-634262-Page-74.png)
![76]Replace the battery when it no longer providesacceptable performance. The battery can berecharged several hundred times beforereplacement.]Recharge the battery after long periods of non-use to maximize battery life.]Battery life will vary due to usage patterns andenvironmental conditions.]Use of extended backlighting,MEdia Net Browsing,and data connectivity kits affect battery life andtalk/standby times.]The self-protection function of the battery cutsthe power of the phone when its operation is in anabnormal state. In this case, remove the batteryfrom the phone, reinstall it, and turn the phone on.Explosion, Shock, and Fire Hazards]Do not put your phone in a place subject toexcessive dust and keep the minimum requireddistance between the power cord and heatsources.]Unplug the power cord prior to cleaning yourphone, and clean the power plug pin when it isdirty.]When using the power plug, ensure that it is firmlyconnected. If it is not, it may cause excessive heator fire.]If you put your phone in a pocket or bag withoutcovering the receptacle of the phone (power plugpin), metallic articles (such as a coin, paperclip orpen) may short-circuit the phone. Always coverthe receptacle when not in use.]Do not short-circuit the battery. Metallic articlessuch as a coin, paperclip or pen in your pocket orbag may short-circuit the + and – terminals of thebattery (metal strips on the battery) uponmoving. Short-circuit of the terminal may damagethe battery and cause an explosion.SAFETY GUIDELINESSAFETY GUIDELINES](https://usermanual.wiki/LG-Electronics-USA/MG185/User-Guide-634262-Page-75.png)
![77General Notice]Using a damaged battery or placing a battery inyour mouth may cause serious injury.]Do not place items containing magneticcomponents such as a credit card, phone card,bank book or subway ticket near your phone. Themagnetism of the phone may damage the datastored in the magnetic strip.]Talking on your phone for a long period of timemay reduce call quality due to heat generatedduring use.]When the phone is not used for a long periodtime, store it in a safe place with the power cordunplugged.]Using the phone in proximity to receivingequipment (i.e., TV or radio) may causeinterference to the phone.]Do not use the phone if the antenna is damaged. Ifa damaged antenna contacts skin, it may cause aslight burn. Please contact an LG AuthorizedService Center to replace the damaged antenna.]Do not immerse your phone in water. If thishappens, turn it off immediately and remove thebattery. If the phone does not work, take it to anLG Authorized Service Center.]The power cord on this product will expose you tolead, a chemical known to the State of Californiato cause (cancer) birth defects or otherreproductive harm. Wash hands after handling.]Do not paint your phone.]The data saved in your phone might be deleteddue to careless use, repair of the phone, orupgrade of the software. Please backup yourimportant phone numbers. (Ring tones, textmessages, voice messages, pictures, and videoscould also be deleted.) The manufacturer is notliable for damage due to the loss of data.]When you use the phone in public places, set thering tone to vibration so as not to disturb others.]Do not turn your phone on or off when putting itin your ear.SAFETY GUIDELINES](https://usermanual.wiki/LG-Electronics-USA/MG185/User-Guide-634262-Page-76.png)
![SAFETY GUIDELINES78FDA Consumer UpdateThe U.S. Food and Drug Administrationís Center forDevices and Radiological Health Consumer Updateon Mobile Phones.1.Do wireless phones pose a health hazard? The available scientific evidence does not show thatany health problems are associated with usingwireless phones. There is no proof, however, thatwireless phones are absolutely safe. Wirelessphones emit low levels of radiofrequency energy(RF) in the microwave range while being used. Theyalso emit very low levels of RF when in the standbymode. Whereas high levels of RF can producehealth effects (by heating tissue), exposure to lowlevel RF that does not produce heating effectscauses no known adverse health effects. Manystudies of low level RF exposures have not foundany biological effects. Some studies have suggestedthat some biological effects may occur, but suchfindings have not been confirmed by additionalresearch. In some cases, other researchers have haddifficulty in reproducing those studies, or indetermining the reasons for inconsistent results.2.What is the FDA’s role concerning the safety ofwireless phones? Under the law, the FDA does not review the safetyof radiation-emitting consumer products such aswireless phones before they can be sold, as it doeswith new drugs or medical devices. However, theagency has authority to take action if wirelessphones are shown to emit radiofrequency energy(RF) at a level that is hazardous to the user. In sucha case, the FDA could require the manufacturers ofwireless phones to notify users of the health hazardand to repair, replace, or recall the phones so thatthe hazard no longer exists.Although the existing scientific data do not justifyFDA regulatory actions, the FDA has urged thewireless phone industry to take a number of steps,including the following: ]Support needed research into possible biologicaleffects of RF of the type emitted by wirelessphones; ]Design wireless phones in a way that minimizesany RF exposure to the user that is not necessaryfor device function; andSAFETY GUIDELINES](https://usermanual.wiki/LG-Electronics-USA/MG185/User-Guide-634262-Page-77.png)
![79]Cooperate in providing users of wireless phoneswith the best possible information on possibleeffects of wireless phone use on human health. The FDA belongs to an interagency working group ofthe federal agencies that have responsibility fordifferent aspects of RF safety to ensure coordinatedefforts at the federal level. The following agenciesbelong to this working group:]National Institute for Occupational Safety andHealth]Environmental Protection Agency]Occupational Safety and Health Administration]National Telecommunications and InformationAdministration The National Institutes of Health participates insome interagency working group activities, as well.The FDA shares regulatory responsibilities forwireless phones with the Federal CommunicationsCommission (FCC). All phones that are sold in theUnited States must comply with FCC safetyguidelines that limit RF exposure. The FCC relies on the FDA and other health agenciesfor safety questions about wireless phones.The FCC also regulates the base stations that thewireless phone networks rely upon. While these basestations operate at higher power than do the wirelessphones themselves, the RF exposures that people getfrom these base stations are typically thousands oftimes lower than those they can get from wirelessphones. Base stations are thus not the subject of thesafety questions discussed in this document.3.What kinds of phones are the subject of thisupdate?The term ‘wireless phone’ refers here to handheldwireless phones with built-in antennas, often called‘cell’, ‘mobile’, or ‘PCS’ phones. These types ofwireless phones can expose the user to measurableradiofrequency energy (RF) because of the shortdistance between the phone and the user’s head.These RF exposures are limited by FCC safetyguidelines that were developed with the advice ofthe FDA and other federal health and safetyagencies. When the phone is located at greaterdistances from the user, the exposure to RF isdrastically lower because a person’s RF exposureSAFETY GUIDELINES](https://usermanual.wiki/LG-Electronics-USA/MG185/User-Guide-634262-Page-78.png)