LG Electronics USA MG295D Cellular/PCS GSM Phone with Bluetooth User Manual MG295 ENG 0509 1
LG Electronics USA Cellular/PCS GSM Phone with Bluetooth MG295 ENG 0509 1
UserManual.wiki
>
LG Electronics USA
>
MG295D User Manual
Users Manual
Navigation menu
Upload a User Manual
Namespaces
Wiki Guide
HTML
PDF
Info
Views
User Manual
Discussion / Help
Navigation
![8For Your SafetyImportant InformationThis user guide contains important information on the use andoperation of this phone. Please read all the informationcarefully for optimal performance and to prevent any damageto or misuse of the phone. Any changes or modifications notexpressly approved in this user guide could void your warrantyfor this equipment.Before You StartSafety InstructionsWARNING! To reduce the possibility of electric shock, do notexpose your phone to high humidity areas, such as thebathroom, swimming pool, etc.Always store your phone away from heat. Never store yourphone in settings that may expose it to temperatures less than32°F or greater than 104°F, such as outside during extremeweather conditions or in your car on a hot day. Exposure toexcessive cold or heat will result in malfunction, damageand/or catastrophic failure.Be careful when using your phone near other electronicdevices. RF emissions from your mobile phone may affectnearby in adequately shielded electronic equipment. Youshould consult with manufacturers of any personal medicaldevices such as pacemakers and hearing aides to determine ifthey are susceptible to interference from your mobile phone.Turn off your phone in a medical facility or at a gas station.Never place your phone in a microwave oven as this willcause the battery to explode.IMPORTANT! Please read the TIA SAFETY INFORMATION onpage 78 before using your phone.Safety InformationRead these simple guidelines. Breaking the rules may bedangerous or illegal. Further detailed information is given in thisuser guide.]Never use an unapproved battery since this could damagethe phone and/or battery and could cause the battery toexplode.]Never place your phone in a microwave oven as it willcause the battery to explode.]Do not dispose of your battery by fire or with hazardous orflammable materials.]Make sure that no sharp-edged items come into contactwith the battery. There is a risk of this causing a fire.]Store the battery in a place out of reach of children.]Be careful that children do not swallow any parts such asrubber plugs (earphone, connection parts of the phone,etc.). This could cause asphyxiation or suffocation.](https://usermanual.wiki/LG-Electronics-USA/MG295D/User-Guide-806130-Page-3.png)
![9For Your Safety]Unplug the power cord and charger during lightning stormsto avoid electric shock or fire.]When riding in a car, do not leave your phone or set up thehands-free kit near to the air bag. If wireless equipment isimproperly installed and the air bag is activated, you may beseriously injured.]Do not use a hand-held phone while driving.]Do not use the phone in areas where its use is prohibited.(For example: aircraft).]Do not expose the battery charger or adapter to directsunlight or use it in places with high humidity, such as abathroom.]Never store your phone in temperatures less than- 4°F orgreater than 122°F.]Do not use harsh chemicals (such as alcohol, benzene,thinners, etc.) or detergents to clean your phone. There is arisk of this causing a fire.]Do not drop, strike, or shake your phone severely. Suchactions may harm the internal circuit boards of the phone.]Do not use your phone in high explosive areas as the phonemay generate sparks.]Do not damage the power cord by bending, twisting, pulling,or heating. Do not use the plug if it is loose as it may causea fire or electric shock.]Do not place any heavy items on the power cord. Do notallow the power cord to be crimped as it may cause fire orelectric shock.]Do not handle the phone with wet hands while it is beingcharged. It may cause an electric shock or seriouslydamage your phone.]Do not disassemble the phone.]Do not place or answer calls while charging the phone as itmay short-circuit the phone and/or cause electric shock orfire.]Only use the batteries, antennas, and chargers provided byLG. The warranty will not be applied to products provided byother suppliers.]Only authorized personnel should service the phone and itsaccessories. Faulty installation or service may result inaccidents and consequently invalidate the warranty.]Do not hold or let the antenna come in contact with yourbody during a call.]An emergency call can be made only within a service area.For an emergency call, make sure that you are within aservice area and that the phone is turned on.](https://usermanual.wiki/LG-Electronics-USA/MG295D/User-Guide-806130-Page-4.png)
![11For Your SafetyVehicle Mounted External Antenna(optional, if available)A minimum separation distance of 8 inches (20cm) must bemaintained between the user/bystander and the vehiclemounted external antenna to satisfy FCC RF exposurerequirements. For more information about RF exposure, visitthe FCC website at www.fcc.govFCC Part 15 Class B ComplianceThis device and its accessories comply with part 15 of FCCrules. Operation is subject to the following two conditions: (1) This device and its accessories may not cause harmfulinterference, and (2) this device and its accessories mustaccept any interference received, including interference thatmay cause undesired operation.Cautions for Battery]Do not disassemble.]Do not short-circuit.]Do not expose to high temperature: 60°C (140°F).]]Do not incinerate.Battery Disposal]Please dispose of your battery properly or bring to yourlocal wireless carrier for recycling.]Do not dispose in fire or with hazardous or flammablematerials.Adapter (Charger) Cautions]Using the wrong battery charger could damage your phoneand void your warranty.]The adapter or battery charger is intended for indoor useonly.Do not expose the adapter or battery charger to direct sunlightor use it in places with high humidity, such as the bathroom.](https://usermanual.wiki/LG-Electronics-USA/MG295D/User-Guide-806130-Page-6.png)
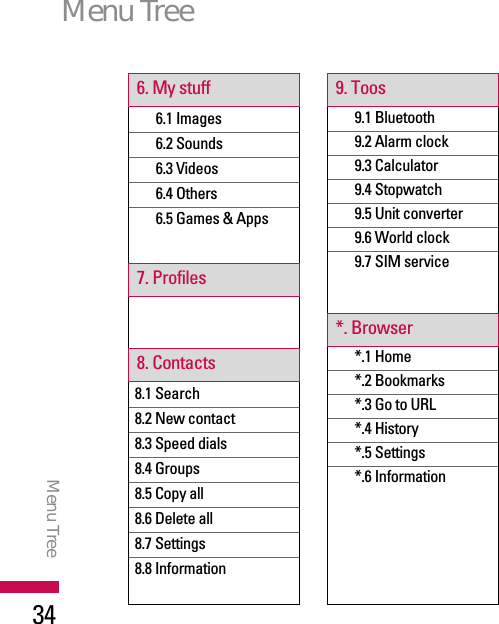
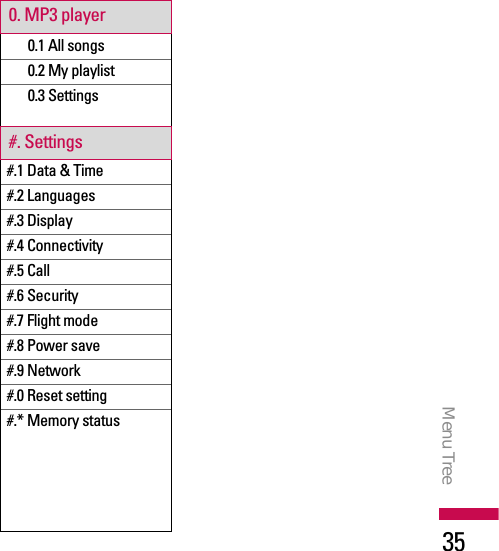
![The following illustration shows the available menu structure andindicates the:]Number assigned to each menu option.]Page where you can find the feature description.Menu TreeMenu Tree331.1 Games & Apps2.1 Missed calls2.2 Received calls2.3 Dialled calls2.4 All calls2.5 Call charges2.6 Data information3.1 Calendar3.2 Memo3.3 To do1. Games & Apps2. Call history3. Organiser4.1 Camera4.2 Video camera4.3 Voice recorder4.4 FM Radio5.1 New message5.2 Inbox5.3 Drafts5.4 Outbox5.5 Sent5.6 Listen voicemail5.7 Info messages5.8 Templates5.9 Settings4. Multimedia5. Messaging](https://usermanual.wiki/LG-Electronics-USA/MG295D/User-Guide-806130-Page-7.png)
![Games & AppsMenu 1.1After selecting a folder, press[Options] and then sub menusavailable to several options aredisplayed.]Open: You can see the storedgames / applications.]New folder: Create a newslide.Games (Menu 1.1.1)In this menu, you can play gamesinstalled in your phone.Press the [OK] key or left soft key[Options] and select Play toplay the selected game.Followings are options you canselect.]Update: Update the gameapplication.]Information: View the name,version, vendor, size, domainof the selected game.]Permissions: Set up thevalues regarding networkconnection.Games & Apps Games & Apps 36JavaTM, is a technologydeveloped by SunMicrosystems. Similar to theway you would download theJava Applet using the standardMS Internet Explorer browsers,Java MIDlet can be downloadedusing a WAP enabled phone.Depending on the serviceprovider, all Java basedprograms such as Java gamescan be downloaded and run on aphone. Once downloaded, theJava program can be viewed inthe Games & Apps menuwhere you can select, execute,or delete. The Java programfiles saved in the phone are in.JAD or .JAR format.](https://usermanual.wiki/LG-Electronics-USA/MG295D/User-Guide-806130-Page-10.png)
![Applications (Menu 1.1.2)In this menu, you can manage theJava applications installed inyour phone. You can play ordelete downloaded applications,or set the connect option. Thedownloaded applications areorganised in folders.Press the left soft key [Options]and select Open to open theselected slide or launch theselected midlet.CAUTION!Only J2ME(Java 2 Micro Edition)based programs will run in aphone environment. TheJ2SE(Java 2 Standard Edition)based programs will only run in aPC environment.]While being based on astandard language (J2ME),not all Java applicationsare compatible with allhandsets on sale insofar asspecific libraries may beused for a telephonemodel. The software maybe blocked or switch itselfon when Java applicationsnot specifically developedfor the phone this manualrefers to are downloaded,making it necessary to“restart” the handset. Wewould like to point out thatthese problems are causedby incompatibleapplications and are not aproduct fault.Note]The JAR file is acompressed format of theJava program and the JADfile is a description file thatincludes all detailedinformation. From thenetwork, prior to download,you can view all detailedfile descriptions from theJAD file.Games & Apps 37](https://usermanual.wiki/LG-Electronics-USA/MG295D/User-Guide-806130-Page-11.png)
![Games & Apps Games & Apps 38New Fantastic LG There is MassStorage function in the KG280. ifyou connect the USB cable, youcan use the phone as a RemovableDisk.You can download MP3 files, andphotos, video, txt files etc. thisgives you fast access from PC toPhone, by just connecting the USBcable.This function does not require theinstallation of additional software.1. Whilst the phone is displayingthe standby screen, connect thephone to the PC using thesupplied USB cable. The PCshould recognise the handsetwithin a few seconds.2. The phone will display <USB> onthe screen.3. The phone will be identified as<Removable disk> in MyComputer. The PC should thentreat the KG280 as a standarddrive allowing you to place filesto and from the handset'smemory.You can either use Window'sdrag and drop or copy andpaste methods to transfercontent.4. Double click on <Removabledisk> and open. A folder calledMy media will be displayed.Within that folder there are afurther 5 folders. Do notdisconnect the phone whilst afile transfer is in progress,doing so may damage thememory and corrupt the file.5. When you want to disconnectthe phone from your PC, useWindows to safely remove thehandware and then disconnectthe USB cable from thehandset.]If you receive a call whilst inmass storage mode, the callwill be rejected. Once thehandset is disconnected, theKG280 will display informationabout any calls missed.](https://usermanual.wiki/LG-Electronics-USA/MG295D/User-Guide-806130-Page-12.png)
![Call historyCall history39Missed calls Menu 2.1This option lets you view the last10 unanswered calls.You can also:]View the number if availableand call it, or save it in theAddress Book]Enter a new name for thenumber and save both in theAddress Book]Send a message to thisnumber]Delete the call from the listReceived calls Menu 2.2This option lets you view the last10 incoming calls.You can also:]View the number if availableand call it or save it in theAddress Book]Enter new name for thenumber and save both in theAddress Book]Send a message to thisnumber]Delete the call from the listDialled calls Menu 2.3This option lets you view the last20 outgoing calls (called orattempted).You can also:]View the number if availableand call it or save it in theAddress Book]Enter new name for thenumber and save both in theAddress Book]Send a message to thisnumber]Delete the call from the list](https://usermanual.wiki/LG-Electronics-USA/MG295D/User-Guide-806130-Page-13.png)
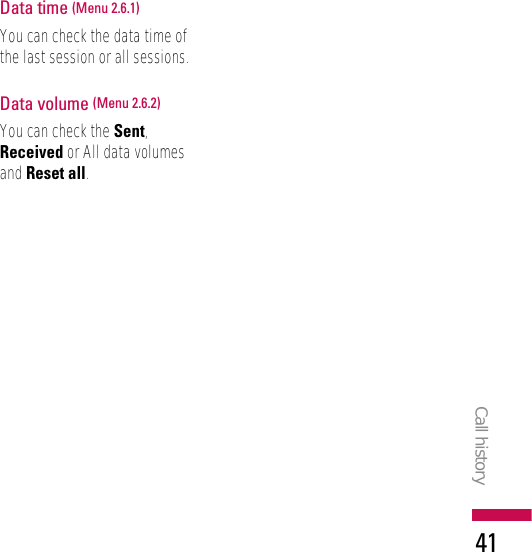
![All calls Menu 2.4You can view all lists of outgoingor incoming calls.Call charges Menu 2.5Call duration (Menu 2.5.1)Allows you to view the durationof your incoming and outgoingcalls. You can also reset the calltimes.The following timers areavailable:]Last call: Length of the lastcall.]Dialled calls: Length of theoutgoing calls.]Received calls: Length of theincoming calls.]All calls: Total length of allcalls made and incoming callssince the timer was last reset.Call costs (Menu 2.5.2)Allows you to check the cost ofyour last call, all calls, remainingand reset the cost. To reset thecost, you need to PIN2 code.Cost settings (Menu 2.5.3)Data informationMenu 2.6You can check the amount ofdata transferred over thenetwork through the GPRSinformation option. In addition,you can also view how muchtime you are online.Call historyCall history40](https://usermanual.wiki/LG-Electronics-USA/MG295D/User-Guide-806130-Page-14.png)
![Calendar Menu 3.1When you enter this menu, acalendar appears. A squarecursor is located on the currentdate. You can move the cursor toanother date using thenavigation keys. On the calendar,you can use the following keys.You can enter a schedule ormemo in the scheduler bypressing the left soft key[Options].]View: Shows the schedulenote or memo for the chosenday.]New schedule: Select this toenter a new schedule ormemo.]Scheduler tone: You can setthe Scheduler tone of eachchosen date.]All schedules: You candisplay all schedules.]Go to date: You can go thechosen date directly.]Delete old: Select this todelete the expired schedulenotes that you have alreadybeen notified of.]Delete all: Select this todelete all the schedule notesand memos.OrganiserOrganiser42skips back a year.Each press ofskips forward ayear.skips back a month.skips forward amonth.](https://usermanual.wiki/LG-Electronics-USA/MG295D/User-Guide-806130-Page-16.png)
![Organiser43Memo Menu 3.21. Select the Memo by pressingthe left soft key or .2. If the entry is empty, press theleft soft key [New].3. Input the memo and then pressthe left soft key [OK].To do Menu 3.3You can view, edit and add liststo do. To do lists are displayed intime order. To do lists that havebeen in progress or completedare displayed. And you can sendvia text or picture message.](https://usermanual.wiki/LG-Electronics-USA/MG295D/User-Guide-806130-Page-17.png)
![Camera Menu 4.1This application enables you totake a still picture. You can takea picture in your desired size, anduse it for the contacts photo,home screen and other moregeneral purposes. Once taken, astill image can be sent viaMultimedia msg or Email.Press the left soft key [Options] to display the followingpopup menu items.]Resolution: Determines thesize of an image.]Quality: Determines thequality of an image.]Timer: Determines the delaytime.]View mode: Determines theway to view.]Multi shot: Determineswhether to take a single ,multishot or frame shot photo.]Colour effect: Determines thespecial effect to the picture.]White balance: Allows youto change the settingsaccording to the environment.]Shutter tone: Selects thesound used when you takephotos.]Reset setting: Determineswhether to reset currentsetting or not.Note]Once the photo has beentaken and saved, go toPhonebook and select thecontact you wish toassociate the photo to orselect New contact tocreate a new contact(please note that a photocan only be associatedwith a contact stored in thephone's memory and noton the SIM).MultimediaMultimedia44](https://usermanual.wiki/LG-Electronics-USA/MG295D/User-Guide-806130-Page-18.png)
![Multimedia45Video camera Menu 4.2This application enables you torecord a video clip. You can playand watch a saved video filewhile using this function.Press the left soft key todisplay the following popupmenu items.]Quality: Determines thequality of a video clip.]Colour effect: Determines thespecial effect to the video clip.]White Balance: Allows youto change the settingsaccording to the environment.]Reset setting: Determineswhether to reset the currentsetting or not.Note]Select Edit. Unless youwish to edit the name,press OK and then use thenavigation keys to highlightthe picture tab.]Use the , keys toscroll through the photos.]Once you have selected thephoto you wish to use,press the left soft key tosave this in the contactsprofile.]The photo will be shownwhen this particularcontact calls you (as longas the contact does nothave their telephonenumber set to hidden).](https://usermanual.wiki/LG-Electronics-USA/MG295D/User-Guide-806130-Page-19.png)
![Voice recorder Menu 4.3In this feature you can recordover 10 voice memos, up to amaximum of 60 seconds each.FM Radio Menu 4.4You can search radio stationsand enjoy listening to the radio.Connect the FM Radio headsetinto headset jack on the rightside of the phone to activate thismenu.1. Press the correspondingnumber key of a channel tostore the currently selectedradio station into.2. After presetting radiochannels, you can listen toother channel by pressing thecorresponding number key(short press)3. You can access the followingoption menus by pressing theleft soft key [Options].]Edit: You can adjust frequencyand change the radio station inthe selected channel. You canchange the frequency 0.1 MHzat a time with Left/Rightnavigation keys and numberkeys.MultimediaMultimedia46](https://usermanual.wiki/LG-Electronics-USA/MG295D/User-Guide-806130-Page-20.png)
![MessagingMessaging47New message Menu 5.1This menu includes functionsrelated to SMS (Short MessageService), MMS (MultimediaMessage Service), Email, voicemail, as well as the network’sservice messages.Text (Menu 5.1.1)You can write and edit textmessage, checking the number ofmessage pages.1. Enter the New messagemenu by pressing the left softkey [OK].2. If you want to write a newmessage, select TEXT.3. To make text input easier, useT9.4. After you complete themessage, to select therequired option, press the leftsoft key [Options].Options]Send to: Sends textmessages.1. Enter numbers of recipient.2. Press key to add morerecipients.3. You can add phone numbers inthe address book. Press theleft soft key and selectContacts.4. Once the numbers have beenentered, press the left soft key[Options] and selectSend to send the message. Allmessages will automaticallybe saved in the outbox folder,even after a sending failure.Insert]Symbol: You can add specialcharacters.](https://usermanual.wiki/LG-Electronics-USA/MG295D/User-Guide-806130-Page-21.png)
![]Image: You can insert theDefault graphics or graphics inMy pictures that are availablefor short messages.]Sound: You can insert soundsthat are available for shortmessages.]Text templates: You can useText templates already set inthe phone.]Contacts: You can add phonenumbers or e-mail addressesin the address book.]My business card: You canadd your Business card to themessage.]Save to drafts: Storesmessages in the Drafts folder.]T9 languages: Select thedesired language for T9 inputmode. You can also deactivatethe T9 input mode by selecting‘T9 off’.]New T9 word: You can addyour own words.]Clear text: Delete all themessages you have entered.]Exit: If you press Exit whilstwriting a message, you canselect whether to cancelediting through a popupwindow. If you select YES,you will be taken back to theNew message main menu.Also the written message willnot have been saved.Note]This phone supports EMSrelease 5, so is available tosend colour pictures,sounds, text styles, etc.. Ifthe other parties handsetsdo not support suchoptions, the pictures,sounds or texts sent maynot be displayed correctlyon their phones.MessagingMessaging48](https://usermanual.wiki/LG-Electronics-USA/MG295D/User-Guide-806130-Page-22.png)
![Messaging49Multimedia (Menu 5.1.2)A multimedia message cancontain text, images, and/orsound clips. This feature can beused only if it is supported byyour network operator or serviceprovider. Only devices that offercompatible multimedia messageor e-mail features can receiveand send multimedia messages.1. Enter the New messagemenu by pressing the left softkey [OK].2. If you want to write a newmultimedia message, selectMultimedia.3. You can create a newmessage or choose one of themultimedia messagetemplates already made.Maximum available file size, thatcan be inserted to Multimedia-message, is 100 kb.If you want to select the requiredoptions, press the left soft key[Options].Options]Send to: You can sendmultimedia messages tomultiple recipients, as well assave it to send at a later time.]Insert: You can add Symbol,Image, Sound, New photo,New sound, New slide, Texttemplates, Contact, Mybusiness card.]Preview: You can previewmultimedia messages youhave created.Note]All messages will beautomatically saved in theoutbox folder, even after asending failure.](https://usermanual.wiki/LG-Electronics-USA/MG295D/User-Guide-806130-Page-23.png)
![]Save: You can savemultimedia messages ToDrafts or As template.]Edit subject: Allows you tomodify the multimediamessage you have chosen.]Delete slide: You can deletecurrent folders.]Slide duration: You can set atimer for slide.]T9 languages: Select thedesired language for T9 inputmode. You can also deactivateT9 input mode by selecting ‘T9off’.]New T9 word: You can addyour own words.]Exit: Will take you back to theNew message main menu.Inbox Menu 5.2You will be alerted when youhave received messages. Theywill be stored in Inbox.If the phone shows ‘No space forSIM message’, you have todelete only SIM messages fromInbox. If the phone displays ‘Nospace for message’, you canmake space of each repository asdeleting messages, media andapplications.Note]When creating amultimedia message, if youupload a picture 50K) youmay find that whilst thepicture is loading you willnot be able to carry out anyother actions until thepicture has competedloading.MessagingMessaging50](https://usermanual.wiki/LG-Electronics-USA/MG295D/User-Guide-806130-Page-24.png)
![Messaging51* SIM messageSIM message means themessage exceptionally storedin SIM card. You can move thismessage to the phone.For notified multimedia message,you have to wait for downloadingand processing of the message.To read a message, select one ofthe messages by pressing theleft soft key .]View: You can view thereceived messages.]Delete: You can delete thecurrent message.]Reply: You can reply to thesender.]Reply all: You can reply to allof the sender.]Forward: You can forward theselected message to anotherparty.]Return call: You can call backto the sender.]Information: You can viewinformation about receivedmessages; Sender’s address,Subject (only for Multimediamessage), Message date &time, Message type, Messagesize.]Multi delete: After selectingthe messages you want toremove, you can delete theselected messages.]Delete all read: You candelete all messages read.]Delete all: You can delete allmessages.](https://usermanual.wiki/LG-Electronics-USA/MG295D/User-Guide-806130-Page-25.png)
![Drafts Menu 5.3Using this menu, you can presetmessages that you use mostfrequently. This menu shows thepreset message list.The following options areavailable.]View: You can see themessages.]Edit: Modifies the messageyou choose.]Delete: Deletes the messageyou choose.]Information: You can viewinformation about themessage you choose.]Multi delete: After selectingthe messages you want toremove, press OK and you candelete the selected messages.]Delete all: Deletes all of themessages in the folder.Outbox Menu 5.4This menu allows to view themessage which is about to sendor is failed sending.After sending the messagesuccessfully, the message will bemoved to sent box.]View: You can view themessage.]Delete: You can delete themessage.]Resend: You can resend theselected message.]Edit: Modifies the massageyou choose.]Information: You can checkinformation of each message.]Multi delete: Select anddelete the selected messages.]Delete all: You can delete allmessages in outbox.MessagingMessaging52](https://usermanual.wiki/LG-Electronics-USA/MG295D/User-Guide-806130-Page-26.png)
![Messaging53Sent Menu 5.5This menu allows you to view themessages which are alreadysent. You can check the time andthe contents of message.Listen voicemail Menu 5.6Once this menu has beenselected, simply press the leftsoft key [OK] to listen tovoice mail. You can also holddown the key in standbymode to listen to voice mail.Info messages Menu 5.7Info service messages are textmessages delivered by thenetwork to GSM. They providegeneral information such asweather reports, traffic news,taxis, pharmacies, and stockprices.Each type of has the number;therefore, you can contactservice provider as long as youhave input the certain number forthe information.When you have received an infoservice message, you can see thepopup message to show you thatyou have received a message orthe info service message isdirectly displayed.To view the message again ornot in standby mode, follow thesequence shown below;Note]When you receive a voicemail, your phone displaysthe icon and you hear analert. Please check withyour network provider fordetails of their service inorder to configure thehandset correctly.](https://usermanual.wiki/LG-Electronics-USA/MG295D/User-Guide-806130-Page-27.png)
![MessagingMessaging54Templates Menu 5.8Text (Menu 5.8.1)You have 6 text templates asbelow;• Please call me back.• I’m late. I will be there at• Where are you now?• I’m on the way• Urgent! Please contact.• I love youThe following options areavailable.]View: You can see texttemplates.]Edit: Edit the selectedtemplate message from thetext template list.]Send via- Text message: Use this tosend the selected templatemessage by SMS.- Multimedia message: Usethis to send the selectedtemplate message by MMS.- Email: Use this to send theselected template messageby Email.]Delete: Deletes the template.]New template: Use this tocreate new text template.]Delete all: Allows you todelete all text templates.Multimedia (Menu 5.8.2)After saving new template, youcan use the following options.]Save: Allows you to save newmultimedia templates youcreated.](https://usermanual.wiki/LG-Electronics-USA/MG295D/User-Guide-806130-Page-28.png)
![Messaging55]Insert: You can add Symbol,Image, Video, Sound, Newslide, Text template, Contact,Business card and Others.]Preview: You can previewmultimedia templates youwrote.]Edit subject: Allows you tomodify the multimediamessage you have chosen.]Slide duration: You can setthe duration of slide ofmultimedia message.]T9 languages: Select thedesired language for T9 inputmode. You can also deactivateT9 input mode by selecting ‘T9off’.]New T9 word: Select theNew T9 word for inputtingNew word into the dictionary.]Exit: Will take you back to theMessage menu.Settings Menu 5.9Text message (Menu 5.9.1)]Message type:Text, Voice, Fax, Paging,X.400, Email, ERMES Usually, the type of messageis set to Text. You can convertyour text into alternativeformats. Contact your serviceprovider for the availability ofthis function.]Validity period: This networkservice allows you to set howlong your messages will bestored at the message centre.]Delivery report: If you set toYes, you can check whetheryour message is sentsuccessfully.](https://usermanual.wiki/LG-Electronics-USA/MG295D/User-Guide-806130-Page-29.png)
![]Reply charging: When amessage is sent, it allows therecipients to reply and chargethe cost of the reply to yourtelephone bill.]Message centre number: Ifyou want to send the textmessage, you can receive theaddress of SMS centrethrough this menu.]Bearer setting: You can setthe bearer setting such asGSM, GPRS.Multimedia message (Menu 5.9.2)]Subject: You can entermultimedia messages subjectwhen this menu is on.]Slide duration: Display theduration of each page whenwriting the message.]Priority: You can set thepriority of the message youchoose.]Validity period: This networkservice allows you to set howlong your text messages willbe stored at the messagecentre.]Delivery report: If it is set toYes in this menu, you cancheck whether your messageis sent successfully.]Read report: You can receivethe report whether thereceiver read the message ornot.]Auto download: If you selectOn, you receive multimediamessages automatically. If youselect Off, you receive onlynotification message in theinbox and then you can checkthis notification. MessagingMessaging56](https://usermanual.wiki/LG-Electronics-USA/MG295D/User-Guide-806130-Page-30.png)
![If you select Home networkonly, you receive multimediamessages depends on Homenetwork.]Network profile: If youselect multimedia messageserver, you can set URL formultimedia message server.]Permitted message type Personal: Personal message.Advertisement: Commercialmessage.Information: Necessaryinformation.Voicemail number (Menu 5.9.3)You can receive the voicemail ifyour network service providersupports this feature. When anew voicemail is arrived, thesymbol will be displayed on thescreen. Please check with your networkservice provider for details oftheir service in order to configurethe phone accordingly.Info message (Menu 5.9.4)]ReceiveYes: If you select this menu,your phone will receive Infoservice messages.No: If you select this menu,your phone will not receiveInfo service messages anymore.]AlertsOn: Your phone will beepwhen you have received Infoservice message numbers.Off: Your phone will not beepeven though you have receivedinfo service messages.Messaging57](https://usermanual.wiki/LG-Electronics-USA/MG295D/User-Guide-806130-Page-31.png)
![]LanguageYou can select the language youwant by pressing OK key. Then,the info service message will beshown in the language that youselected.Push message (Menu 5.9.5)You can set the option whetheryou will receive the message ornot.MessagingMessaging58](https://usermanual.wiki/LG-Electronics-USA/MG295D/User-Guide-806130-Page-32.png)
![Images Menu 6.1Show the list of jpg, bmp, gif,wbmp, png files at Images folderin Multimedia memory.]View: You can see the JPGfile when pressing OK key orselecting View menu of Optionmenus.]Delete: Delete a file.]Set as- Full image wallpaper:Currently selected image canbe set as a wallpaper.- Landscape wallpaper:Currently selected image canbe displayed horizontally as awallpaper.- Picture ID: Currentlyselected image can be set asa Picture ID.]Send via: Allows you to senda image throughMMS/Bluetooth/Email.]File - Rename: Change the filename of selected file. Youcan not change the extensionof file.- Move to folder: Move theselected file to the folder.- Move to external memory:Move the selected file to theMultimedia memory/externalmemory.Note]You can’t use the followingcharacters \ / : * ? “ < > |]In case of large size image,the Landscape functioncannot be worked.My stuffMy stuff59](https://usermanual.wiki/LG-Electronics-USA/MG295D/User-Guide-806130-Page-33.png)
![- Copy to external memory:Copy the selected file to theMultimedia memory/externalmemory.- Information: Show the fileinformation.]Print via Bluetooth: Mostpictures that you’ve taken inthe camera mode anddownloaded through WAP canbe transmitted via Bluetooth toa printer.]Slide showYou can view a slide show ofthe files you stored.]New folder: You can create anew folder.]Multi delete: You can removea number of files you selected.]Delete all: Delete all files inthe list.]List view: Allows you to setthe view type.Sounds Menu 6.2Show the list of MP3, AAC, IMY,WAV, AMR, MIDI files at Soundsfolder in Multimedia memory.]Play: You can play the MP3file when pressing OK key orselecting Play menu of Optionmenu.]Set as: Currently selectedsound can be set as aRingtone/Ringtone ID.Warning!If you remove the externalmemory during data transfer, itcan seriously damage the phone.Warning!If you remove the externalmemory during data transfer, itcan seriously damage the phone.My stuffMy stuff60](https://usermanual.wiki/LG-Electronics-USA/MG295D/User-Guide-806130-Page-34.png)
![]File info: Show the fileinformation.Videos Menu 6.3Shows the list of 3GP, MP4 filesat My media\Videos inMultimedia memory. Supportedfile types are 3gp files, that areencoded with MPEG4 and h.263video-codecs and AMR audio-codec.]Play: You can play the videofile when pressing OK key orselecting Play menu of Optionmenus.]Delete: Delete a file.]Send via: Send the selectedfile to another device viaMultimedia message,Bluetooth or Email.]File: You can save/move/copythe folder or external memory.- Rename: Change the filename of selected file. The maximum length ofcharacters is 36. And you cannot change the extension offile.- Move to folder: Move theselected file to the folder.- Move to external memory:Move the selected file to theMultimedia memory\externalmemoryWarning!If you remove the externalmemory during data transfer itwill cause serious damage toyour phone.Warning!You can’t use the followingcharacters \ / : * ? “ < > |My stuff61](https://usermanual.wiki/LG-Electronics-USA/MG295D/User-Guide-806130-Page-35.png)
![- Copy to external memory:Copy the selected file to theMultimedia memory\externalmemory.- Information: Shows the fileinformation.]New folder: You can create anew folder.]Multi delete: You can removea number of files you haveselected.]Delete all: Delete all the filesin the list.Others Menu 6.4Show the list of files in Mymedia\Others in the Multimediamemory.Note]When you connect thephone with a PC viaBluetooth, you can bothsend and receive files tothe Music and Videofolders. You can copy anyfile type to the Others. Youcan only receive files fromthe Photos, Sounds, andImages folders. You canonly view or play files in theOthers folder if the filetypes are supported. When connecting with aPC via USB cable you willonly see the followingfolders in the internalmemory: Images, Sounds,Videos, and Others. Youcan see all folders in theexternal memory.My stuffMy stuff62](https://usermanual.wiki/LG-Electronics-USA/MG295D/User-Guide-806130-Page-36.png)
![Games & AppsMenu 6.5This menu enables you to viewdocument files (txt, ppt, pdf, docand excel).You can use the followingOptions menu]View: You can see thedocument file when pressingthe OK key or selecting Viewmenu of Option menus.]Information: Show the fileinformation.My stuff63](https://usermanual.wiki/LG-Electronics-USA/MG295D/User-Guide-806130-Page-37.png)
![In Profiles, you can adjust andcustomise the phone tones fordifferent events, environments, orcaller groups.There are five preset profiles:General, Silent, Vibrate only,Outdoor and Headset.Each profile can be personalised.Press the left soft key [Menu] andselect Profiles using up/downnavigation keys.Activate (Menu 7.X.1)1. A list of profiles is displayed.2. In the Profiles list, scroll to theprofile you want to activateand press the left soft key[OK] or OK key.3. Then, select Activate.Personalise (Menu 7.X.2)Scroll to the desired profile in theProfile list. After pressing the leftsoft key or the OK key,select Personalise.The profile setting option opens.Set the option as required.]Call alert type: Set the alerttype for incoming calls.]Ring tones: Select the desiredring tone from the list.]Ring volume: Set the volumeof the ringing tone.]Message alert type: Set thealert type for messages.]Message tones: Select thealert tone for messages.]Keypad tones: Select thedesired keypad tone.]Keypad volume: Set thevolume of keypad tone.ProfilesProfiles64](https://usermanual.wiki/LG-Electronics-USA/MG295D/User-Guide-806130-Page-38.png)
![]Effect sound volume: Set thevolume of effect sound.]Power on/off volume: Setthe volume of the ringing tonewhen switching the phoneon/off.]Auto answer: This functionwill be activated only whenyour phone is connected to thehandsfree kit.• Off: The phone will notanswer automatically.• After 5 secs: After 5seconds, the phone willanswer automatically.• After 10 secs: After 10seconds, the phone willanswer automatically.Note]All profiles cannot berenamed.Profiles65](https://usermanual.wiki/LG-Electronics-USA/MG295D/User-Guide-806130-Page-39.png)
![Search Menu 8.11. Select Search. You are askedto enter a name.2. Enter the start of the namethat you wish to find and pressthe left soft key [Search].]You can access the Contactsdirectly by pressing navigationkey in standby mode.3. After finding the desiredcontact, you can make a call tothe number by pressing thekey. Or press the left softkey [Option] to use thefollowing options.]View: You can view name andnumber.]Edit: You can edit the nameand number.]Make call: You can call thecontact.]New message-Textmessage: Use this to write atext message to the contact.]New message-Multimediamessage: Use this to write amultimedia message to thecontact.]Send via: You can send textmessage or picture message.]Delete: Deletes the contact.]Assign speed dial: You canassign the number for speeddial.]New contact: You canregister a new contact.]Multi delete: You can checkthe list and delete at once.]Copy to phone/SIM: You cancopy an entry from SIM tophone or from phone to SIM.ContactsContacts66](https://usermanual.wiki/LG-Electronics-USA/MG295D/User-Guide-806130-Page-40.png)
![New contact Menu 8.2You can add a contact entryusing this function.There are 2 memories: Phonememory and SIM memory. Thephone memory capacity is 1000entries. You can enter up to 20characters in each name in thephone memory. The SIM cardmemory capacity depends on theSIM card.1. Press the Menu key and selectContacts > Add new.2. You can add new contactentries to the SIM memory orthe phone memory.Speed dials Menu 8.3Assign contacts to any of thekeys to . You can thencall that contact by pressing thecorresponding number key.1. Scroll to Speed dial, thenpress [OK].2. To add a number to Speeddial, select (Empty). Then, youcan search the name throughContacts.3. You can change or delete aspeed dial number, make a callor send a message by pressingthe left soft key [Option].Groups Menu 8.4You can add up to 20 membersper group, with up to a maximumof 7 groups in total.1. Select Caller groups. All grouplists will be displayed: Family,Friend, Colleague, VIP, Group1, Group 2, and Others.2. Select the group name thatyou want to manage bypressing the left soft key[Option].Contacts67](https://usermanual.wiki/LG-Electronics-USA/MG295D/User-Guide-806130-Page-41.png)
![The following submenus will bedisplayed.]View members: Displays themember list in the group.]Group ringtone: Use this toselect the ring tone to be usedwhen you receive a voicephone call from a person in thegroup.]Group icon: Use this to selectthe graphic icon to bedisplayed when you receive acall from a person in thegroup.]Add member: Add a memberto the group. You can add upto 20 members per group.]Remove member: Removesthe member from the groupmember list. The contact entrystill remains in Contacts.]Remove all members:Remove all the members.]Rename: Assigns a newname to the group.]Reset all: Allows you to resetall.Copy all Menu 8.5You can copy/move entries fromthe SIM card memory to thephone memory and vice versa.]SIM to Phone: Use this tocopy the entry from the SIMCard to the Phone memory.]Phone to SIM: Use this tocopy the entry from the Phonememory to the SIM Card.The following options areavailable.•Keep original: When copying,the original dial numbers arekept.ContactsContacts68](https://usermanual.wiki/LG-Electronics-USA/MG295D/User-Guide-806130-Page-42.png)
![•Delete original: Whencopying, the original dialnumbers will be erased.Delete all Menu 8.6You can delete all entries in theSIM and/or phone. This functionrequires the security code.Press to return to standbymode.Settings Menu 8.7View options (Menu 8.7.1)You can set the Contact displayoption.]Name only: When you searchContacts, the list displays thenames only.]Name & number: When yousearch Contacts, the listdisplays the names andnumbers.]With picture: When yousearch Contacts, the listdisplays names andcorresponding pictures.Information Menu 8.8]Service dial number (SIMdependent): Use this to viewthe list of Service DiallingNumbers (SDN) assigned byyour network operator (ifsupported by the SIM card).Such numbers include theemergency, directory enquiriesand voice mail numbers.1. Select the Service dial numberoption.2. The names of the availableservices will be shown.Contacts69](https://usermanual.wiki/LG-Electronics-USA/MG295D/User-Guide-806130-Page-43.png)
![3. Use the up/down navigationkeys to select a service. Press.]Own number (SIMdependent): Use this todisplay your phone number inthe SIM card.]Business card: This optionallows you to create your ownbusiness card featuring Nameand a mobile phone number.To create a new business card,press the left soft key [New]and enter the information intothe fields.ContactsContacts70](https://usermanual.wiki/LG-Electronics-USA/MG295D/User-Guide-806130-Page-44.png)
![Bluetooth Menu 9.1Bluetooth enables compatiblemobile devices, peripherals andcomputers that are in closeproximity to communicatedirectly with each other withoutwires. This handset supportsbuilt-in Bluetooth connectivity,which makes it possible toconnect them with compatibleBluetooth headsets, computerapplications and so on.]Bluetooth on/off: You canactivate or cancel theBluetooth function.Note]Depending on the file type,it will be stored in thefollowing folders: - MP3 (.mp3, mp4, aac, m4a,wma): Music folder.- Video (.3GP, MP4): videofolder.- Phonebook contacts(.VCF): Phonebook.- Text (.txt): Text folder.- Other files (.*.*): Filestorage folder.]The handset normallyoperates with WIDCOMMdriver(version 1.4.3.4) orWIDCOMM driver(version1.4.2.10). And it does notsupport the LG ContentsBank with Bluetooth.Note]If you use LG PC Sync viaBluetooth, you canexchange data only withinthe phonebook.]When you receive datafrom another Bluetoothdevice, the phone requestsconfirmation. Afterconfirming the transfer, thefile will be copied on toyour phone.ToosToos71](https://usermanual.wiki/LG-Electronics-USA/MG295D/User-Guide-806130-Page-45.png)
![]Device list: You can view alldevices which your KG280 isalready paired to.If you have entered Paireddevices or Handsfree devices,you will see the followingoptions in both those menus.•Connect/Disconnect:Allows you to connect toyour paired Bluetoothdevices.•Add new: Allows you tosearch for new Bluetoothdevices and add them to yourphone's list of paireddevices. When you selectAdd new your handset willstart to search for Bluetoothdevices within range. Oncethe device you wish to pairappears on the list press theright soft key [Stop].Scroll to the desired deviceand press the left soft key[Pair]. You will then be asked toenter a passcode. The passcode can be anycode you wish to use (thesame passcode must be usedby both devices) or is onethat is predetermined by themanufacturer of the deviceyou are trying to pair with.Please check the UserManual of the device you areinitiating the pair with to seeif it already has apredetermined passcode inplace.•Assign name: Allows you tochange the name of thepaired Bluetooth device andhow it is displayed on thehandset.•Set as authorised/Set asunauthorised: Allows youto set an authorisedconnection between eachBluetooth device. ToosToos72](https://usermanual.wiki/LG-Electronics-USA/MG295D/User-Guide-806130-Page-46.png)
![For example if you regularlyuse a Bluetooth headset withyour phone then setting theconnection as authorised willmean the headset willautomatically connect to thehandset each time theheadset is powered on.•All services: Allows you toview all services which aresupported by a Bluetoothdevice.•Delete: Allows you to deletea paired Bluetooth device.•Delete all: Allows you todelete all paired Bluetoothdevices.]Bluetooth settings•My visibilityThis indicates whether or notyour handset will be visibleto other Bluetooth devices.•My nameYou can set the name of yourBluetooth device. The defaultname is LG KG280.•My addressYou can view the Bluetoothaddress of your phone.Supported servicesDisplays a list of Bluetoothservices the handset supports.•Headset•Handsfree kit•File transfer•Image printing•Dial-up networking•Business card transfer•Browsing other device•Serial Port ProfileToos73](https://usermanual.wiki/LG-Electronics-USA/MG295D/User-Guide-806130-Page-47.png)
![Alarm clock Menu 9.2You can set the alarm clock to gooff at a specified time.1. Select On and enter the alarmtime you want.2. Select the repeat period: Once,Mon-Fri, Mon-Sat, Sat-Wed,Sat-Thu, Everyday.3. Select the alarm tone youwant and press [Set].Calculator Menu 9.3When you enter this menu acalendar will show up. On top ofthe screen there are sections fordate. Whenever you change thedate, the calendar will beupdated according to the date.And square cursor will be used tolocate the certain day. If you seemarked date in the calendar, itmeans that there is a schedule ormemo that day.This function helps to remind youof your schedule and memo. Thephone will sound an alarm tone ifyou set this for the note. To change the day, month, andyear.In the scheduler mode, press leftsoft key [Options] as follows;]ViewView all schedules and memofor the chosen day.Use , to browsethrough the note lists.ToosToos74Key Description,Yearly,Monthly, Weekly, Daily](https://usermanual.wiki/LG-Electronics-USA/MG295D/User-Guide-806130-Page-48.png)
![If you want to view the note indetail, press left soft key[OK]. Press left soft key [Options] to View, Delete, Newschedule, Send via Textmessage/Multimediamessage/Bluetooth/Email,Edit, Calendar, Scheduler tone,All schedules, Go to date,Multi delete and Delete all.]New scheduleAllows you to add newschedule and memo for thechosen day. You can store upto 100 notes.Input the subject and thenpress left soft key [OK].You enter the appropriateinformation in the followsection; Time, Repeat andAlarm.]Scheduler toneYou can set the alarm tone ofeach chosen date.]All schedulesView all schedules and memofor the chosen day.Use , to browsethrough the note lists. If youset alarm for the note, thealarm icon is displayed.]Go to dateYou can go the chosen datedirectly.]Delete allYou can delete for the allnotes.Schedule SMS (SSMS)The SSMS feature of this phoneprovides you with the ability tosend the Schedule SMS byScheduled time and date. Themoment schedule matches withthe current time and date, aSchedule SMS is triggered fromyour phone and the message issend to your pre-defined number.Toos75](https://usermanual.wiki/LG-Electronics-USA/MG295D/User-Guide-806130-Page-49.png)
![In the calendar menu, press leftsoft key [Options] and select Allschedules and it displaysfollowing options.]ViewView all scheduled SMS andCalendar Schedule.]New schedule SMSAllows you to add newschedule SMS.]New scheduleAllows you to add newschedule and memo for thechosen day. You can store upto 100 notes. Input the subjectand then press left softkey[OK].You enter theappropriate information in thefollow section; Time, Repeatand Alarm.]EditYou can Edit selected SSMSand Calendar Schedule.]DeleteYou can delete the selectedSchedule SMS.]Delete allYou can delete all ScheduleSMS and calendar schedule.When you enter Calendar menu aCalendar is show up. Press LeftSoft Key and select newschedule SMS option.1. Select New schedule SMS.2. Select Right soft Navigationkey to Switch ON/OFF SSMS.3. Enter Date, time, phonenumber and message.4. Select Left Soft Key or OK keyto Save.ToosToos76](https://usermanual.wiki/LG-Electronics-USA/MG295D/User-Guide-806130-Page-50.png)
![Stopwatch Menu 9.41. Press [Start] to take time andrecord the lap time by pressing[Lap].2. Press [Stop] to ascertain therecord of lap time.3. Press [Reset] to defaultcondition.Unit converterMenu 9.5This converts any measurementinto a unit you want. There are 7types that can be converted intounits: Currency, Area, Length,Weight, Temperature, Volumeand Velocity.1. You can select one of unittypes by pressing [OK]key.2. Select the unit you want toconvert by pressing , .It’s impossible to input -symbol in unit converter.3. Select the standard value byusing , .World clock Menu 9.6You can view clocks of theworld’s major cities.1. Select the city belonged to thetime zone by pressing , key.2. You can set the current time tothe city time you select bypressing the left soft key[Set].SIM service Menu 9.7This menu depends on SIM andthe network services.Toos77](https://usermanual.wiki/LG-Electronics-USA/MG295D/User-Guide-806130-Page-51.png)
![Home Menu *.1Connects to a homepage. Thehomepage will be the site whichis defined in the activatedprofile. It will be defined by theservice provider if you have notdefined it in the activated profile.Bookmarks Menu *.2This menu allows you to storethe URL of favourite web pagesfor easy access at a later time.To create a bookmark1. Press the left soft key [Options].2. Select New bookmark andpress the OK key.3. After entering the desired URLand title, press the OK key.After selecting a desiredbookmark, the following optionsare available.]Connect: Connects to theselected bookmark.]View: You can see theselected bookmark.]Edit: You can edit the URLand/or the title of the selectedbookmark.]New bookmark: Select thisto create a new bookmark.]Send URL via: Sends theselected bookmark viaText/Multimedia message andEmail.Go to URL Menu *.3You can connect directly to thesite you want. After entering aspecific URL, press the OK key.BrowserBrowser78](https://usermanual.wiki/LG-Electronics-USA/MG295D/User-Guide-806130-Page-52.png)
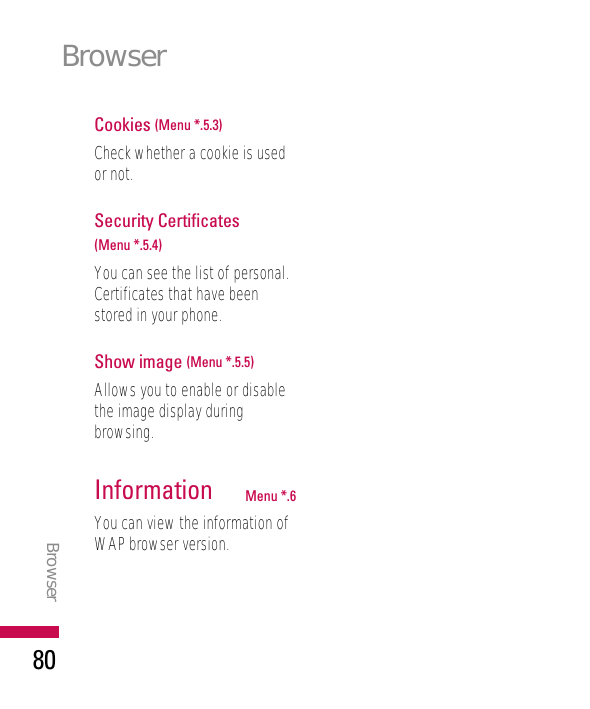
![History Menu *.4This menu will shows the recentbrowsing pages.Settings Menu *.5You can set the profile, cacheand security related to internetservice.Network profiles (Menu *.5.1)A profile is the networkinformation used to connect tothe Internet.There are default profiles forsome operators, stored in phonememory. It’s impossible torename default profiles.Each profile has submenus asfollows:]Activate: Activates theselected profile.]View: You can see theselected profile.]Edit: You can edit the selectedprofile.]New profile: You can add anew profile.]Delete: Deletes the selectedprofile from the list.]Delete all: Deletes all profilefrom the list.]Reset all: Allows you to resetall profiles.Cache (Menu *.5.2)The information or services youhave accessed are saved in thecache memory of the phone.Note]A cache is a buffermemory, which is used tosave data temporarily.Browser79](https://usermanual.wiki/LG-Electronics-USA/MG295D/User-Guide-806130-Page-53.png)
![Call Menu #.5Call divert (Menu #.5.1)The Call divert service allows youto divert incoming voice calls, faxcalls, and data calls to anothernumber. For details, contact yourservice provider.]All voice callsDiverts voice callsunconditionally.]If busyDiverts voice calls when thephone is in use.]If no replyDiverts voice calls which youdo not answer.]If out of reachDiverts voice calls when thephone is switched off or out ofcoverage.]All data callsDiverts to a number with a PCconnection unconditionally.]All fax callsDiverts to a number with a faxconnection unconditionally.]Cancel allCancels all call divert service.The submenusCall divert menus have thesubmenus shown below.•ActivateActivate the correspondingservice.To voice mail centreForwards to message centre.This function is not shown at Alldata calls and All fax callsmenus.To other numberInputs the number for diverting.SettingsSettings84](https://usermanual.wiki/LG-Electronics-USA/MG295D/User-Guide-806130-Page-58.png)
![To favourite numberYou can check back to last fivediverted numbers.•CancelDeactivate the correspondingservice.•View statusView the status of thecorresponding service.Answer mode (Menu #.5.2)]Flip openIf you select this menu, youcan receive an incoming callwhen only opening the flip.]Any keyIf you select this menu, youcan receive a call by pressingany key except [End] keyand .]'Send' key onlyIf you select this menu, youcan receive a call by onlypressing [Send] key.Send my number (Menu #.5.3)]Set by networkIf you select this, you can sendyour phone number dependingon two line service such asline 1 or line 2.]OnYou can send your phonenumber to another party. Yourphone number will be shownon the receiver’s phone.]OffYour phone number will not beshown.Call waiting (Menu #.5.4)]ActivateIf you select Activate, you canaccept a waiting (receiving)call.]CancelIf you select Cancel, youcannot recognize the waiting(receiving) call.Settings85](https://usermanual.wiki/LG-Electronics-USA/MG295D/User-Guide-806130-Page-59.png)
![]View statusShows the status of Callwaiting.Minute minder (Menu #.5.5)If you select On, you can checkthe call duration by a beep soundgiven every minute during a call.Auto redial (Menu #.5.6)]OnWhen this function isactivated, the phone willautomatically try to redial inthe case of failure to connect acall.]OffYour phone will not make anyattempts to redial when theoriginal call has notconnected.Send DTMF tones (Menu #.5.7)You can send touch tones duringan active call to control yourvoice mailbox or other automatedphone services.(DTMF tone: Dual Tones MultipleFrequency.)Security Menu #.6PIN code request (Menu #.6.1)In this menu, you can set thephone to ask for the PIN code ofyour SIM card when the phone isswitched on.If this function is activated, you’llbe requested to enter the PINcode.1. Select PIN code request in thesecurity settings menu, andthen press [OK].2. Set On/OffSettingsSettings86](https://usermanual.wiki/LG-Electronics-USA/MG295D/User-Guide-806130-Page-60.png)
![3. If you want to change thesetting, you need to enter PINcode when you switch on thephone.4. If you enter wrong PIN codemore than 3 times, the phonewill lock out. If the PIN isblocked, you will need to keyin PUK code.5. You can enter your PUK codeup to 10 times. If you putwrong PUK code more than 10times, you can not unlock yourphone. You will need tocontact your service provider.Phone lock (Menu #.6.2)You can use a security code toavoid unauthorised use of thephone. Whenever you switch onthe phone, the phone willrequest security code if you setphone lock to When switch on.If you set phone lock to WhenSIM changed, your phone willrequest security code only whenyou change your SIM card.Call barring (Menu #.6.3)The Call barring service preventsyour phone from making orreceiving certain category ofcalls. This function requires thecall barring password. You canview the following submenus.]All outgoing callsThe barring service for alloutgoing calls.Settings87](https://usermanual.wiki/LG-Electronics-USA/MG295D/User-Guide-806130-Page-61.png)
![Fixed dial number (Menu #.6.4)You can restrict your outgoingcalls to selected phone numbers.The numbers are protected byyour PIN2 code. The numbers youwish to allow access to once thisservice has been enabled, mustbe added to the contacts afterenabling Fixed dial number.]OnYou can restrict your outgoingcalls to selected phonenumbers.]OffYou can cancel fixed diallingfunction.]Number listYou can view the number listsaved as Fixed dial number.Change codes (Menu #.6.5)PIN is an abbreviation ofPersonal Identification Numberto prevent use by unauthorisedperson. You can change theaccess codes: PIN2 code,Security code1. If you want to change the PIN2code/Security code input youroriginal code, and then press[OK].2. Input new PIN2 code/Securitycode and verify them.Flight mode Menu #.7This allows you to use only thephone’s features that do notrequire the use of the wirelessnetwork when you are in anairplane or in places where thewireless network is prevented.SettingsSettings88](https://usermanual.wiki/LG-Electronics-USA/MG295D/User-Guide-806130-Page-62.png)
![If you set the flight mode on, theicon will be displayed on thescreen instead of the networksignal icon.]On: You cannot make (orreceive) any calls, includingemergency calls, or use otherfeatures that require networkcoverage]Off: You can deactivate theflight mode and restart yourhandset to access thenetwork.Power save Menu #.8If you set On, you can save thepower when you don’t use thephone.Network Menu #.9You can select a network whichwill be registered eitherautomatically or manually.Network selection (Menu #.9.1)Usually, the network selection isset to Automatic.]Automatic: If you selectAutomatic mode, the phonewill automatically search forand select a network for you.Once you have selected“Automatic”, the phone willbe set to “Automatic” eventhough the power is off andon.]Manual: The phone will findthe list of available networksand show you them. Then youcan select the network whichyou want to use if thisnetwork has a roamingSettings89](https://usermanual.wiki/LG-Electronics-USA/MG295D/User-Guide-806130-Page-63.png)
![agreement with your homenetwork operator. The phonelet you select another networkif the phone fails to access theselected network.]Preferred: You can set a listof preferred networks and thephone attempts to registerwith first, before attempting toregister to any other networks.This list is set from thephone’s predefined list ofknown networks.Change frequency band(Menu #.9.2)GPRS attach (Menu #.9.3)You can set GPRS servicedepending on various situations.]Switch onIf you select this menu, thephone is automaticallyregistered to a GPRS networkwhen you switch the phoneon.Starting a WAP or PC dial-upapplication created theconnection between phoneand network and data transferis possible. When you end theapplication, GPRS connectionis ended but the registration tothe GPRS network remains.]When neededIf you select this menu, theGPRS connection isestablished when you connecta WAP or application serviceand closed when you end theWAP or applicationconnection. SettingsSettings90](https://usermanual.wiki/LG-Electronics-USA/MG295D/User-Guide-806130-Page-64.png)
![Access point (Menu #.9.4)]Data connections•Name: You can type thenetwork name.•Bearer: You can set thebearer data service. 1 Data/2 GPRS<Data settings>Appears only if you selectData Settings as aBearer/service.-Dial number: Enter thetelephone number to dial toaccess your WAP gateway.-User ID: The users identityfor your dial-up server (andNOT the WAP gateway).-Password: The passwordrequired by your dial-upserver (and NOT the WAPgateway) to identify you.-Call type: Select the typeof data call; Analogue orDigital (ISDN).-Call speed: The speed ofyour data connection; 9600or 14400 (Depends onOperator)-Linger time: You need toenter timeout period. Afterentering that, the WAPnavigation service will beunavailable if any data isnot input or transferred.-Primary server: Input theIP address of the primaryDNS server you access.-Secondary server: Inputthe IP address of thesecondary DNS server youaccess.Settings91](https://usermanual.wiki/LG-Electronics-USA/MG295D/User-Guide-806130-Page-65.png)
![Please check to see if anyproblems you haveencountered with the phoneare described in this sectionbefore taking the phone in fora service or calling a serviceengineer.QHow do I view the list ofoutgoing calls, incomingcalls and missed calls?APress the key.QHow do I clear all callhistory?APress the left softkey[Menu] and thenthe key.QHow do I view all numbersstored in memory?APress right soft key[Names] and then .QWhy is the connectioninconsistent or not audiblein certain areas?AWhen frequencyenvironment is unstable in acertain area, connectionmay be inconsistent and notaudible. Relocate toanother area and try again.QWhy is the connection notconsistent abruptlydisconnects even whenestablished?AWhen frequency is unstableor weak or if there are toomany users, connectionmay be cut off even after itwas established. Please tryagain later or attempt afterrelocating to other areas.Q&AQ&A93](https://usermanual.wiki/LG-Electronics-USA/MG295D/User-Guide-806130-Page-67.png)