LG Electronics USA MG300 Tri-Band GSM Camera Phone with Bluetooth User Manual MG300d E
LG Electronics USA Tri-Band GSM Camera Phone with Bluetooth MG300d E
UserManual.wiki
>
LG Electronics USA
>
MG300 User Manual
>
Revised Manual
Contents
1.
Revised Manual
2.
Revised manual
Revised Manual
Navigation menu
Upload a User Manual
Namespaces
Wiki Guide
HTML
PDF
Info
Views
User Manual
Discussion / Help
Navigation

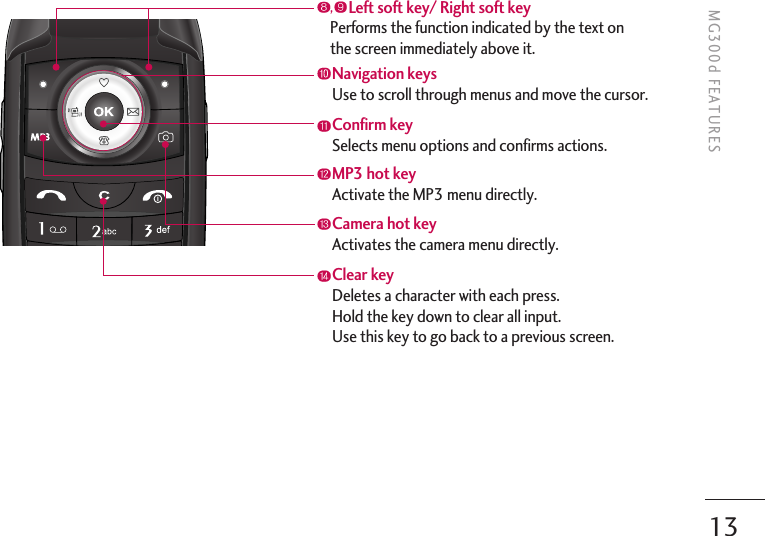
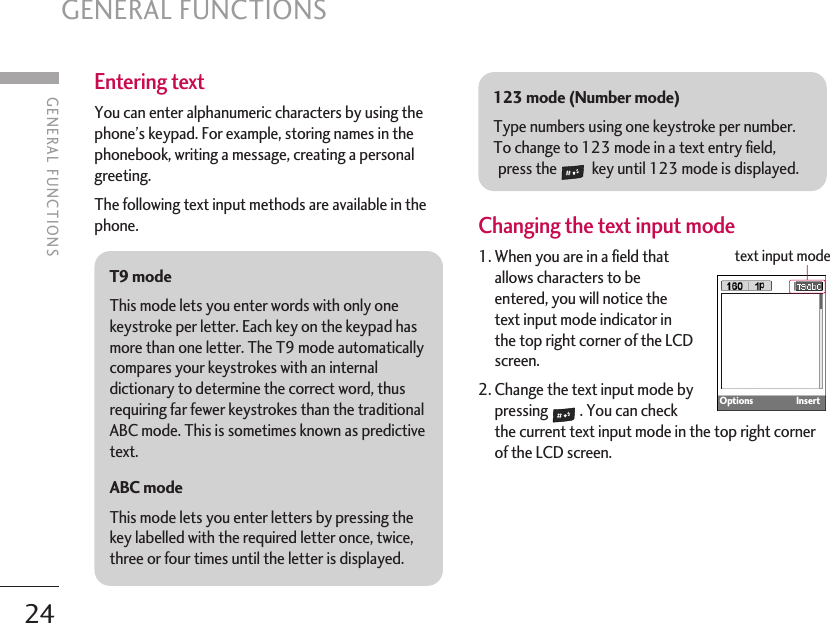
![PARTS OF THE PHONEFront viewMG300d FEATURESMG300d FEATURES10➌FlashNote]Dirt on the camera lenscould affect the imagequality.Headset jack➊• Connect a headset hereUp/down side keys➋• When the phone is closed, pressthis key to display the currenttime on the front screen.• Controls the volume of keypadtone in standby mode with thephone open. • Controls the earpiece volumeduring a phone call. ➎Front screen➍Camera lens](https://usermanual.wiki/LG-Electronics-USA/MG300.Revised-Manual/User-Guide-619621-Page-10.png)
![MG300d FEATURES14DISPLAY INFORMATIONThe table below describes various display indicators oricons that appear on the phone’s display screen.On-Screen IconsNote]*The quality of the conversation may changedepending on network coverage. When thesignal strength is below 2 bars, you mayexperience muting, call drop and bad audio.Please take the network bars as indicator foryour calls. When there are no bars, that meansthat there is no network coverage: in this case,you won’t be able to access the network for anyservice (call, messages and so on).Icon DescriptionIndicates the strength of the networksignal. *Indicates a call is in progress.Indicates that you are roaming on anothernetwork.Indicates that GPRS service is available.MG300d FEATURES](https://usermanual.wiki/LG-Electronics-USA/MG300.Revised-Manual/User-Guide-619621-Page-14.png)
![MG300d FEATURES15Icon DescriptionAgenda event set Call divert service active Bluetooth enabled Icon DescriptionIndicates the alarm has been set and is on. Indicates the status of the battery charge. Indicates the receipt of a message. Indicates the receipt of a voice message. Indicates that the vibration ringer hasbeen set. Indicates the Loud profile is activated. Indicates the Silent profile is activated. Indicates the Headset profile is activated. Indicates the General profile is activated. Indicates that you can use the pushmessage service.Indicates that the phone is accessing theWAP. Indicates that you are using GPRS. Note]When the status of the battery indicates low,you may not use Camera or Multimediafunction. ]While using Multimedia function, the status ofthe battery is changeable.](https://usermanual.wiki/LG-Electronics-USA/MG300.Revised-Manual/User-Guide-619621-Page-15.png)
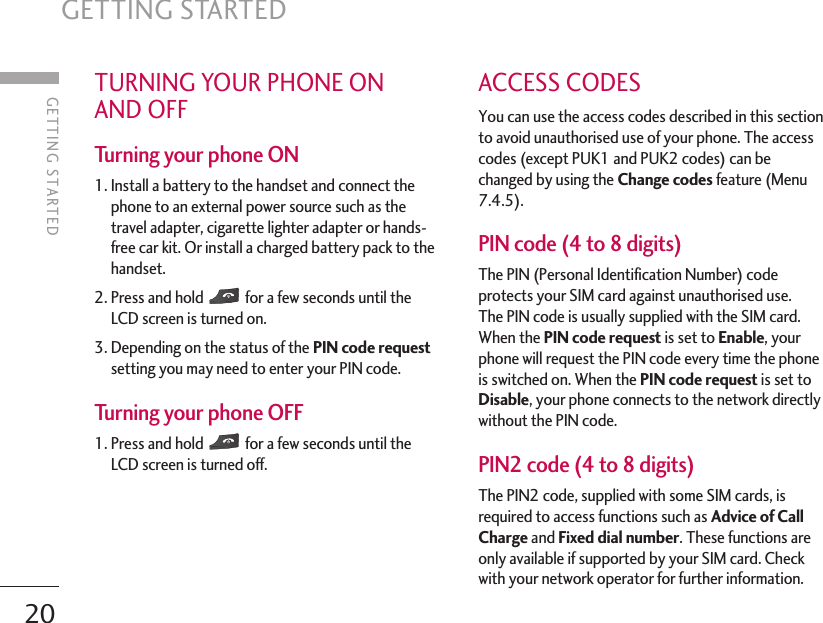
![GETTING STARTED16INSTALLING THE SIM CARD ANDBATTERY Make sure the power is off before you remove thebattery. 1. Remove the battery cover. Press the battery release latch and slide the batterycover toward the bottom of the phone. Remove thebattery cover. 2. Remove the battery. Hold the top edge of the battery and lift thebattery from the battery compartment. Note]Removing the battery from the phone when thepower is on may cause the phone tomalfunction. GETTING STARTED](https://usermanual.wiki/LG-Electronics-USA/MG300.Revised-Manual/User-Guide-619621-Page-16.png)

![GETTING STARTED19DISCONNECTING THE ADAPTER 1. When charging is finished, the moving bars of thebattery icon stop and ‘Full’ is displayed on thescreen. 2. Unplug the adapter from the power outlet.Disconnect the adapter from the phone by pressingthe grey tabs on both sides of the connector andpull the connector out. Note]Ensure the battery is fully charged before usingthe phone for the first time.]Do not remove the battery or SIM card whilecharging.]In the case the battery is not properly charged,please turn the phone off and on using thepower key. Then detach and reattach thebattery, and recharge the phone.](https://usermanual.wiki/LG-Electronics-USA/MG300.Revised-Manual/User-Guide-619621-Page-19.png)
![GENERAL FUNCTIONS22MAKING AND ANSWERING CALLSMaking a call 1. Make sure your phone is switched on. 2. Enter a phone number, including the area code. ]Press and hold the clear key ( ) to erase theentire number. 3. Press the send key ( ) to call the number. 4. To end the call, press the end key ( ) or theright soft key. Making a call from the call history list 1. In standby mode, press the send key ( ), andthe latest incoming, outgoing and missed phonenumbers will be displayed. 2. Select the desired number by using the up/downnavigation keys. 3. Press to call the number. Making an international call 1. Press and hold the key for the internationalprefix. The ‘+ ’ character automatically selects theinternational access code. 2. Enter the country code, area code, and the phonenumber. 3. Press to call the number. Ending a call When you have finished your call, press the end() key. Making a call from the phonebook You can save the names and phone numbers dialledregularly in Contacts. You can save them to the SIMcard and/or phone memory. You can dial a number bysimply looking up the desired name in the phonebookand pressing the ( ) key. GENERAL FUNCTIONS](https://usermanual.wiki/LG-Electronics-USA/MG300.Revised-Manual/User-Guide-619621-Page-22.png)
![GENERAL FUNCTIONS23Adjusting the volume If you want to adjust the earpiece volume during a call,use the side keys ( ) . Press the up side key toincrease and down side key to decrease the volume. Answering a call When you receive a call, the phone rings and theflashing phone icon appears on the screen. If the callercan be identified, the caller’s phone number (or nameif saved in the phonebook) is displayed. 1. To answer an incoming call, open the phone(WhenFlip open has been set as the answer mode(Menu7.3.2).). ]To reject an incoming call, press and hold one ofthe side keys on the left side of the phone withoutopening the phone. ]You can answer a call while using the addressbook or other menu features. 2. To end the call, close the phone or press thekey. Manner mode (Quick) You can activate the manner mode by pressing andholding down the key after opening the phone. Signal strength You can check the strength of your signal by the signalindicator ( ) on the LCD screen of your phone.Signal strength can vary, particularly inside buildings.Moving near to a window may improve reception. Note] If Press any key has been set as the answermode, any key press will answer a call except forthe or the right soft key. Note] In standby mode with the phone open, pressingthe side keys adjusts the key tone volume.](https://usermanual.wiki/LG-Electronics-USA/MG300.Revised-Manual/User-Guide-619621-Page-23.png)
![25GENERAL FUNCTIONS]Using the T9 modeThe T9 predictive text input mode lets you enterwords easily with a minimum number of key presses. As you press each key, the phone begins to display thecharacters that it thinks you are typing based on thebuilt-in dictionary. You can also add new words in thedictionary. As new words are added, the word changesto reflect the most likely candidate from thedictionary. You can turn the T9 mode on or off, andchange the T9 language by holding down the ( )key. 1. When you are in the T9 predictive text input mode,start entering a word by pressing keys to .Press one key per letter. - The word changes as letters are typed. Ignorewhat’s on the screen until the word is typedcompletely. - If the word is still incorrect after typing completely,press the down navigation key once or more tocycle through the other word options. Example:Press to type GoodPress [Down navigation key] totype Home- If the desired word is missing from the word choicelist, add it using the ABC mode. - You can select the language of the T9 mode. Pressthe left soft key [Option], then select T9languages. Select the desired language of T9mode. You can also turn off the T9 mode byselecting T9 off. The default setting on the phoneis T9 enabled mode. 2. Enter the whole word before editing or deleting anykeystrokes. 3. Complete each word with a space by pressingthe key. To delete letters, press . Pressand hold down to erase entire words. Note] To exit from the text input mode without savingyour input, press . The phone goes backto standby mode.](https://usermanual.wiki/LG-Electronics-USA/MG300.Revised-Manual/User-Guide-619621-Page-25.png)
![GENERAL FUNCTIONS26]Using the ABC modeUse the to keys to enter your text. 1. Press the key labelled with the required letter: - Once for the first letter - Twice for the second letter - And so on 2. To insert a space, press the key once. Todelete letters, press the key. Press and holddown the key to clear the whole display. Note] Refer to the table below for more informationon the characters available using thealphanumeric keys.Key Characters in the order display Upper Case Lower Case. , / ? ! - : ‘ ‘’ 1 . , / ? ! - : ‘ ‘’ 1AB C 2 a b c 2D E F 3 d e f 3G H I 4 g h i 4J K L 5 j k l 5M N O 6 m n o 6 P Q R S 7 p q r s 7 T U V 8 t u v 8W X Y Z 9 w x y z 9Space, 0 Space, 0GENERAL FUNCTIONS](https://usermanual.wiki/LG-Electronics-USA/MG300.Revised-Manual/User-Guide-619621-Page-26.png)
![GENERAL FUNCTIONS27]Using the 123 (Number) modeThe 123 mode enables you to enter numbers in a textmessage (a telephone number, for example). Press the keys corresponding to the required digitsbefore manually switching back to the appropriatetext entry mode. You can quickly switch from lettersto numbers by pressing and holding the ( ) key. CONTACTS You can store phone numbers and their correspondingnames in the memory of your SIM card. In addition, you can store up to 1000 numbers andnames in the phone memory. The SIM card and phone are both used in the sameway in the Contacts menu. IN-CALL MENU Your phone provides a number of control functions thatyou can use during a call. To access these functionsduring a call, press the left soft key [Options]. During a call The menu displayed on the handset screen during acall is different to the default main menu displayedwhen in standby mode, and the options are describedbelow. Making a second call You can get a number you wish to dial from thephonebook to make a second call. Press the right softkey then select Search. To save the dialled numberinto the phonebook during a call, press the right softkey then select Add new. Switching between two calls To switch between two calls, press the left soft keythen select Swap. Answering an incoming call To answer an incoming call when the handset isringing, simply press the key. The handset is alsoable to warn you of an incoming call while you arealready on a call. A tone sounds in the earpiece, andthe display will show that a second call is waiting.](https://usermanual.wiki/LG-Electronics-USA/MG300.Revised-Manual/User-Guide-619621-Page-27.png)
![28This feature, known as Call waiting, is only available ifyour network supports it. For details of how toactivate and deactivate it see Call waiting(Menu 7.3.4) . If Call waiting is activated, you can put the first call onhold and answer the second, by pressing or byselecting the left soft key, then Hold & Answer. Youcan end the current call and answer the waiting call byselecting the left soft key and then End & Answer. Rejecting an incoming call You can reject an incoming call without answering bysimply pressing the key. During a call, you can reject an incoming call bypressing the left soft key [Menu] key and selecting theConference/Reject or by pressing the . Muting the microphone You can mute the microphone during a call by pressingthe [Menu] key then selecting Mute on. The handsetcan be unmuted by selecting Mute off. When thehandset is muted, the caller cannot hear you, but youcan still hear them. Switching DTMF tones on during a call To turn DTMF tones on during a call, press the leftsoft key, and then select DTMF on. DTMF tones canbe turned off the same way. DTMF tones allow yourphone to make use of an automated switchboard. MULTIPARTY OR CONFERENCECALLS The multiparty or conference service provides youwith the ability to have a simultaneous conversationwith more than one caller, if your network operatorsupports this feature. A multiparty call can only be setup when you have one active call and one call on hold,both calls having been answered. Once a multipartycall is set up, calls can be added, disconnected orseparated (that is, removed from the multiparty callbut still connected to you) by the person who set upthe multiparty call. These options are all available fromthe In-Call menu. The maximum callers in a multipartycall are five. Once started, you are in control of themultiparty call, and only you can add callers to themultiparty call. GENERAL FUNCTIONSGENERAL FUNCTIONS](https://usermanual.wiki/LG-Electronics-USA/MG300.Revised-Manual/User-Guide-619621-Page-28.png)
![MENU TREE30The following illustration shows the available menu structure and indicates the:]Number assigned to each menu option. MENU TREE5.1 New message5.2 Inbox5.3 Outbox5.4 Drafts5.5 Listen to voice mail5.6 Info message5.7 Templates5.8 Settings3.1 Alarm clock3.2 Bluetooth3.3 Calculator3.4 Unit converter3.5 World time3.6 Modem4.1 Contacts4.2 Calendar4.3 Memo1.x.1 Activate 1.x.2 Personalise 1.x.3 Rename 2.1 Missed calls2.2 Received calls2.3 Dialled calls2.4 Delete recent calls2.5 Call charges2.6 GPRS information1. Profiles3. Tools 5. Messages4. Organiser2. Call register](https://usermanual.wiki/LG-Electronics-USA/MG300.Revised-Manual/User-Guide-619621-Page-30.png)
![32Your phone offers a set of functions that allow you tocustomise the phone. These functions are arranged inmenus and sub-menus, accessed via the two soft keysmarked [ ] and [ ]. Each menu and sub-menulets you view and alter the settings of a particularfunction. The role of the soft keys vary according to the currentcontext or the label on the bottom line of the screenjust above each key indicates its current role. SELECTING FUNCTIONS AND OPTIONSSELECTING FUNCTIONS AND OPTIONSPress the right softkey to access theavailable Contacts. Press the left softkey to access theavailable menu.✬❙❘❳❊●❳❲✬❙❘❳❊●❳❲✬❙❘❳❊●❳❲✬❙❘❳❊●❳❲✬❙❘❳❊●❳❲✬❙❘❳❊●❳❲✬❙❘❳❊●❳❲✬❙❘❳❊●❳❲✬❙❘❳❊●❳❲✬❙❘❳❊●❳❲✬❙❘❳❊●❳❲✬❙❘❳❊●❳❲✶■❘❨✶■❘❨✶■❘❨✶■❘❨✶■❘❨✶■❘❨✶■❘❨✶■❘❨✶■❘❨✶■❘❨✶■❘❨✶■❘❨](https://usermanual.wiki/LG-Electronics-USA/MG300.Revised-Manual/User-Guide-619621-Page-32.png)
![33PROFILES PROFILES33In Profiles, you can adjust and customise the phonetones for different events, environments, or callergroups. There are five preset profiles: Vibrate only,Silent, General, Loud and Headset. Each profile canbe personalised. Press the left soft key [Menu] andselect Profiles using up/down navigation keys. Activate (Menu 1.x.1)1. A list of profiles is displayed. 2. In the Profiles list, scroll to the profile you want toactivate and press the left soft key [Select] orOK key. 3. Then, select Activate. Personalise (Menu 1.x.2)Scroll to the desired profile in the Profile list. Afterpressing the left soft key or the OK key, selectPersonalise. The profile setting option opens. Set theoptions as required. ]Call alert type: Set the alert type for incoming calls.]Ring tone: Select the desired ring tone from the list. ]Ring volume: Set the volume of the ringing tone. ]Message alert type: Set the alert type formessages. ]Message tone: Select the alert tone for messages. ]Keypad tone: Select the desired keypad tone. ]Keypad volume: Set the volume of keypad tone.]Flip tone: Allows to set the flip tone for adjustingenvironment. ]Effect sound volume: Set the volume of effectsound. ]Power on/off volume: Set the volume of theringing tone when switching the phone on/off. ]Auto answer: This function will be activated onlywhen your phone is connected to the headset. •Off: The phone will not answer automatically. •After 5 secs: After 5 seconds, the phone willanswer automatically. •After 10 secs: After 10 seconds, the phone willNote] To protect the sense of hearing while Folderopen, maximum volume level is 3.](https://usermanual.wiki/LG-Electronics-USA/MG300.Revised-Manual/User-Guide-619621-Page-33.png)
![34answer automatically. Rename (Menu 1.x.3)You can rename a profile and give it any name youwant. 1. To change the name of a profile, scroll to the profilein the profile list and after pressing the left soft keyor the OK key, select Rename. 2. Key in the desired name and press the OK key orthe left soft key [OK]. Note] Vibrate only, Silent and Headset profilescannot be renamed.PROFILES PROFILES](https://usermanual.wiki/LG-Electronics-USA/MG300.Revised-Manual/User-Guide-619621-Page-34.png)
![CALL REGISTERCALL REGISTER36DELETE RECENT CALLS MENU 2.4 Allows you to delete Missed calls and Received callslists. You can delete Dialled calls and All calls lists atone time.CALL CHARGES MENU 2.5Call duration (Menu 2.5.1)Allows you to view the duration of your incoming andoutgoing calls. You can also reset the call times. Thefollowing timers are available: ]Last call: Length of the last call. ]All calls: Total length of all calls made and incomingcalls since the timer was last reset.]Received calls: Length of the incoming calls. ]Dialled calls: Length of the outgoing calls. ]Reset all: Allows you to reset the timers of all callsby pressing the left soft key [Yes ]. Call costs (Menu 2.5.2)Allows you to check the cost of your last call, all calls,remaining and reset the cost. To reset the cost, youneed to know your PIN2 code. Settings (SIM Dependent) (Menu 2.5.3)]Set tariff: You can set the currency type and theunit price. Contact your service providers to obtaincharging unit prices. To select the currency or unit inthis menu, you need the PIN2 code. ]Set credit: This network allows you to limit the costof your calls by selected charging units.If you selectRead, the number of remaining unit is shown. If youselect Change, you can change your change limit. ]Auto display: This network service allows you tosee automatically the cost of your last calls. If set toOn, you can see the last cost when the call isreleased.](https://usermanual.wiki/LG-Electronics-USA/MG300.Revised-Manual/User-Guide-619621-Page-36.png)

![TOOLS38ALARM CLOCK MENU 3.1You can set up to 5 alarm clocks to go off at aspecified time. 1. Select On and enter the alarm time you want. 2. Select the repeat period: Once, Mon ∼∼ Fri, Mon ∼∼Sat, Everyday. 3. Select the alarm tone you want and press [OK]. 4. Edit the alarm name and press [OK].BLUETOOTH MENU 3.2Bluetooth enables compatible mobile devices,peripherals and computers that are in close proximityto communicate directly with each other withoutwires. This handset supports built-in Bluetoothconnectivity, which makes it possible to connect themwith compatible Bluetooth headsets, computerapplications and so on.When you receive data from another Bluetoothdevice, the phone requests for a confirmation. After confirming the transfer, the file will be copied inyour phone.Depending on the file type, it will be stored in thefollowing folders:- MP3: MP3 folder (Menu 6.5.2)- Video (.3GP): video folder (Menu 6.4)- Phonebook contacts (.VCF): Phonebook (Menu4.1.1)- Other files: File storage folder (Menu 9.4)Paired devices (Menu 3.2.1)You can view all devices which are compatible withyour Bluetooth phone. Note]Due to a compatibility problem, some devicesmay not support this function.]Supported Bluetooth software (Bluetoothstacks) for DUN : - WIDCOMM Bluetooth forWindows 1.4 and 3.0TOOLS](https://usermanual.wiki/LG-Electronics-USA/MG300.Revised-Manual/User-Guide-619621-Page-38.png)
![TOOLS39Handsfree devices (Menu 3.2.2)You can view the list of handsfree devices which arecompatible with your Bluetooth phone. Settings (Menu 3.2.3)You can register a new device which is compatible withBluetooth. If you already have added the device, youcan connect to it after entering a password(usually 0000). CALCULATOR MENU 3.3This contains the standard functions such as +,−,×,÷:Addition, Subtraction, Multiplication, and Division. 1. Input the numbers by pressing numeric keys. 2. Use a navigation key to select a sign for calculation. 3. Then input the numbers. 4. Press the left soft key [Result] to view the result. 5. Press the left soft key [Reset] or enter numbersto repeat the procedure above. 6. To end Calculator, press the right soft key[Back]. UNIT CONVERTER MENU 3.4 This converts any measurement into a unit you want.There are 7 types that can be converted into units:Currency, Surface, Length, Weight, Temperature,Volume and Velocity.1. You can select one of unit types by pressing [Unit] key. 2. Select the unit you want to convert bypressing and . Note] Use key to erase any numbers or signs. Ifyou press key, you can input a minusnumber. In addition, press key, you caninput a decimal number.](https://usermanual.wiki/LG-Electronics-USA/MG300.Revised-Manual/User-Guide-619621-Page-39.png)
![3. You can check the converted value for the unit youwant. WORLD TIME MENU 3.5 You can view clocks of the world’s major cities. 1. Select the city belonged to the time zone bypressing , key. 2. You can set the current time to the city time youselect by pressing the left soft key [Set]. MODEM MENU 3.6This function allows you to use the modem.TOOLS40TOOLS](https://usermanual.wiki/LG-Electronics-USA/MG300.Revised-Manual/User-Guide-619621-Page-40.png)
![CONTACTS MENU 4.1Search (Calling from phonebook) (Menu 4.1.1)1. Select Search by pressing the left soft key[Select] or [OK]. 2. If you want to edit, delete or copy an entry, selectthe left soft key [Options]. The following menuwill be displayed. ]Edit: You can edit the name, number, group,character and picture by using the navigation key. ]Write text/multimedia message: After you havefound the number you want, you can send a text/multimedia message to the selected number. ]Send via Bluetooth: You can send the data ofphone book to devices which is compatible withBluetooth through Bluetooth. ]Copy: You can copy an entry from SIM to phone orfrom phone to SIM. ]Main number: You can select the one out of mobile,home, office that you often use. After you set this,the main number will be displayed first, when yousearch. ]Delete: You can delete an entry. Add new (Menu 4.1.2)You can add phonebook entry by using this function.Phone memory capacity is 1000 entries. SIM cardmemory capacity depends on the service provider.The number of characters you can save in the SIM cardis a SIM dependent feature. 1. Select Add new by pressing the left soft key[Select] or [OK]. 2. Select the memory you want to save: SIM or Phone.If you set to Phone, you need to select whichnumber you want as Main number. Note] Instant searching is available by inputting theinitial letter of the name you want to search.Note] In standby mode, press right soft key[Back] to access directly.ORGANISER41ORGANISER](https://usermanual.wiki/LG-Electronics-USA/MG300.Revised-Manual/User-Guide-619621-Page-41.png)
![42]Remove member: You can remove the memberfrom the Group member list. But the name and thenumber will remain in the phonebook. ]Rename: You can change a group name. Speed dial (Menu 4.1.4) Assign contacts to any of the keys to . Youcan then call that contact bypressing the corresponding number key. 1. Open the phonebook first by pressing the Rightsoft key [Back] in standby mode. 2. Scroll to Speed dial, then press the left soft key[Select]. 3. If you want to add Speed dial, select (empty). Then,you can search the name in phonebook. 4. After assigning the number as speed dial, you canchange and delete the entry. You can also make acall or send a message to this number. ORGANISERORGANISERa. Press [OK] to input a name. b. Press [Save], then you can input a number. c. Press [Save]. d. You can set a group for the entry by pressing , : e. You can set a character and a picture for theentry by pressing , , , . Caller groups (Menu 4.1.3) You can add up to 20 members per group, with up toa maximum of 7 groups on total.]Member list: Shows the group members you haveselected. ]Group ring tone: Allows you to specify ring tone forthe group members’ call. ]Group icon: Allows you to select the icondependent on Group. ]Add member: You can add group members. Eachgroup should not exceed 20 members.](https://usermanual.wiki/LG-Electronics-USA/MG300.Revised-Manual/User-Guide-619621-Page-42.png)
![43Settings (Menu 4.1.5) 1. Press the right soft [Back] in standby mode. 2. Scroll to Settings, then press the left soft key[Select]. ]Set memoryScroll to highlight Set memory, and then press theleft soft key [Select]. - If you select Variable, when adding entry, thephone will ask whether you wish to store on thesim or phone. - If you select SIM or Phone, the phone will store anentry to SIM or phone. ]View options Scroll to highlight View options, and then press theleft soft key [Select]. - Name only: Set the phonebook list by displayingthe name only. - With pictures: Set the phonebook list with theinformation of character and picture. - Name & number: Set the phonebook list bydisplaying the name and number. Copy all (Menu 4.1.6) You can copy/move entries from SIM card memory toPhone memory and vice versa. 1. Open the Phonebook first by pressing the right softkey [Back] in standby mode. 2. Scroll to Copy all, and then press the left soft key[Select] to enter this menu. •SIM to Phone: You can copy/move the entriesfrom SIM Card to Phone memory. •Phone to SIM: You can copy/move the entriesfrom Phone memory to SIM Card. 3. You can see the following submenus. •Keep original: When copying the Original DialNumber is kept. •Delete original: When copying the Original DialNumber is erased.ORGANISER](https://usermanual.wiki/LG-Electronics-USA/MG300.Revised-Manual/User-Guide-619621-Page-43.png)
![ORGANISER44Delete all (Menu 4.1.7) You can delete all entries in the SIM and Phone. Thisfunction requires the Security code. 1. Press the right soft key [Back] in standby modeand select Delete all, press [Select]. 2. Highlight the memory you wish to erase, and thenpress the left soft key ( ) [Select].3. Enter the security code and press the left soft key[OK] or the right soft key [Back].Information (Menu 4.1.8) ]Service dial number Use this function to access a particular list ofservices provided by your network operator (if supported by the SIM card). 1. Open the phonebook first by pressing the rightsoft key [Back] in standby mode and selectInformation. 2. Scroll to Service dial number, then press the leftsoft key [Select] to enter. 3. The names of the available services will be shown. 4. Use and to select a service. Press[Send]. ]Memory status This feature allows you to see how many entries arein use, or free in your phonebook. 1. Open the phonebook first by pressing theright soft key [Back] in standby mode. SelectInformation by pressing the left soft key[Select]. 2. Scroll to Memory status, then press the left softkey [OK]. ]Own number (SIM dependent) You can check and save your own number in the SIMcard. ORGANISER](https://usermanual.wiki/LG-Electronics-USA/MG300.Revised-Manual/User-Guide-619621-Page-44.png)
![45CALENDAR MENU 4.2 When you enter this menu a Calendar will bedisplayed. The month and year are shown at the top of thescreen. Whenever you change the date under theSettings menu, the calender will update automatically.The current date will be highlighted in green and anyschedule or memos will be indicated with a red triangleat the top left hand corner of the correspondingsquare. An audible alarm can be set for memo's andreminders. To change the day, month, and year.In the scheduler mode, press left soft key [Options] as follows; Add new (Menu 4.2.1)Allows you to add a new schedule for the chosen day.Input the subject and then press the left soft key[OK]. View daily schedules (Menu 4.2.2) You can refer to a detailed schedule, that is the wholecontents of the schedule configured by you. Delete past (Menu 4.2.3)You can delete the past schedule that is no longerrequired. Delete all (Menu 4.2.4)You can delete all notes. Go to date (Menu 4.2.5)You can go to the chosen date directly.Set alarm tone (Menu 4.2.6)You can set the alarm tone.ORGANISERKey Description Key DescriptionYearly WeeklyMonthly Daily](https://usermanual.wiki/LG-Electronics-USA/MG300.Revised-Manual/User-Guide-619621-Page-45.png)
![ORGANISER46MEMO MENU 4.31. Select the Memo by pressing the left soft key[Select]. 2. If the entry is empty, add new by pressing the leftsoft key [Add]. 3. Input the memo and then press the left soft key[OK]. Note] If you want to change the text input mode,press the in order.ORGANISER](https://usermanual.wiki/LG-Electronics-USA/MG300.Revised-Manual/User-Guide-619621-Page-46.png)
![47MESSAGESMESSAGES Press the Menu key ( ) and select Messages usingnavigation keys. NEW MESSAGE MENU 5.1Write text message (Menu 5.1.1)Your phone receives voice mail notification messagesand Short Message Service(SMS) messages. Voicemail and SMS are network services. Please contactyour network operator for more information. When the icon appears, you have received voicemail. When the icon appears, you have received anew text message. If the message memory is full, amessage is displayed, the icon flashes and youcannot receive any new messages. Use the Deleteoption in the Inbox menu to delete obsoletemessages. Once there is space in the messagememory, any undelivered SMS messages will bereceived (provided sufficient space is available). 1. Key in your message. For details on how to entertext, refer to page 24 through 27 (Entering Text). 2. After you complete the message, to select therequired option, press the left soft key [Options]. The following options are available. ]Send: Enter the number or select the number fromthe phonebook or the recent numbers. You cansend a message up to 5 phone numbers at a time.Press the left soft key [Options]. The followingoptions will be displayed. ➀Contact list (It only shows after a phone numberis entered) ➁ Recent list ➂ Send]Save to drafts: Allows you to save the message sothat it can be sent later. ]Font: Sets the font size and style.]Colour: You can set the colour of the text(foreground) and the background. ]Alignment: You can set the position of themessage - Right, Centre or Left.](https://usermanual.wiki/LG-Electronics-USA/MG300.Revised-Manual/User-Guide-619621-Page-47.png)
![48MESSAGESMESSAGES]Add T9 dictionary: You can add your own words.This menu will only be shown when the edit modehas been set to T9ABC/T9Abc/T9abc.]T9 languages: Select the desired language for T9input mode. You can also deactivate the T9 inputmode by selecting ‘T9 off ’. ]Exit: If you select this whilst writing a message, youwill be taken back to the message menu. Also thewritten message will not have been saved. 3. You can also send attachments with the message bypressing the right soft key [Insert], while you’reentering a message. ]Images: You can send and receive text messagesthat contain pictures, known as ‘picture messages’.Several preset pictures are available in the phoneand they can be replaced with new ones receivedfrom other sources. ]Sounds: If available, you can attach a soundavailable for a short message.]Text templates: You can use text templates alreadyset in the phone. ]Contacts: You can add phone numbers in themessage. ]Symbol: You can attach special characters. ]My business card: You can attach your name card. Write multimedia message (Menu 5.1.2)A multimedia message can contain text, images,and/or sound clips. This feature can be used only if itis supported by your network operator or serviceprovider. Only devices that offer compatiblemultimedia message or e-mail features can receive andsend multimedia messages. 1. Key in the multimedia message. Using the right softkey, you can input symbols and numbers, or use T9input mode. After the multimedia message input,press the left soft key [OK]. 2. Add an image and/or sound. You can move to thenext section using the up/down navigation.3. You can add a slide by option menu using the leftsoft key. If press the left key and select "Add slide"from the option menu, you can add the new slide.](https://usermanual.wiki/LG-Electronics-USA/MG300.Revised-Manual/User-Guide-619621-Page-48.png)
![494. Press the left soft key [Options]. The followingoptions are available. ]Send: Supports multiple numbers and emailaddresses. ]Preview: Displays the multimedia message you wishto send. ]Save: Saves the multimedia message in drafts or as atemplate. ]Add slide: Adds a slide before or after the currentslide. ]Move to slide: Moves to the next or previous slide. ]Delete slide: Deletes the selected slide. ]Set slide format - Set timer: You can set the timer for slide, text,picture and sound. - Swap text and picture: You can switch theposition of picture and text of the message. ]Remove media: You can remove a picture or soundin the slide. This option can be shown only when anymedia file has been added. ]Add T9 dictionary: You can add your own word.This menu will only be shown when the edit modehas been set to T9ABC/T9Abc/T9abc.]T9 languages: Select the language for T9 inputmode. You can also deactivate the T9 input modeby selecting ‘T9 off ’. ]Exit: If you select this whilst writing a message, youwill be taken back to the message menu. Also thewritten message will not have been saved. 5. Press the right soft key [Insert]. You can insert asymbol, photos, Images or New photo, sounds,contacts, New sound, Text templates and Mybusiness card. MESSAGES](https://usermanual.wiki/LG-Electronics-USA/MG300.Revised-Manual/User-Guide-619621-Page-49.png)
![MESSAGES50Icon Icon directiveMultimedia messageShort messageSIM messageRead multimedia messageRead text messagePush messageRead push messageNotified multimedia messageINBOX MENU 5.2You will be alerted when you have received messages.They will be stored in the Inbox. In the Inbox, you can identify each message by icons.For detail, see the icon directive. If the phone shows ‘No space for SIM message’, youonly have to delete the SIM messages from the Inbox.If the phone displays ‘No space for message’, you willthen need to delete messages, media or applicationsto free up space. *SIM messageSIM message means that the message isexceptionally stored in the SIM card. You can movethis message to the phone. When you are notified that you have received amultimedia message, you have to wait for the messageto be downloaded before you can view it. To read a message, select one of the messages bypressing the left soft key . ]View: You can view the received messages. ]Delete: You can delete the current message. ]Reply: You can reply to the sender. ]Forward: You can forward the selected message toanother party. ]Return call: You can call back to the sender. MESSAGES](https://usermanual.wiki/LG-Electronics-USA/MG300.Revised-Manual/User-Guide-619621-Page-50.png)
![51]Information: You can view information aboutreceived messages; Sender’s address, Subject (only for Multimedia message), Message date &time, Message type, Message size. ]Delete all: You can delete all messages. * Specific MMS options ]Repeat: Allows you to repeat reproduction of theselected multimedia message. ]Receive: (for multimedia message notification only).Multimedia messages, unlike text messages, must bedownloaded from the server automatically ormanually. The network initially sends multimediamessage notification: If the Auto retrieve option isoff or an error has occurred, receipt must beconfirmed by selecting [Receive]. If the Autoretrieve option is on, the message is automaticallydownloaded after receipt of notification. * Specific download message options ]Information: Shows the content of the downloadedmessages. ]Load: Launches the WAP connection to the URLcontained in the download message. The phonemust be configured for WAP services to downloadmessages. OUTBOX MENU 5.3You can see the sent and unsent messages here. Forsent messages, you can see the delivery status. Thebrowsing is same as that for the inbox message.MESSAGESIcon Icon directiveMMS SentMMS UnsentMMS delivery confirmedSMS sentSMS unsentSMS delivery confirmed](https://usermanual.wiki/LG-Electronics-USA/MG300.Revised-Manual/User-Guide-619621-Page-51.png)
![MESSAGES52When you already sent the message: ]View: You can view the sent messages. ]Forward: You can forward the current message toother recipients. ]Delete: You can delete the current message. ]Information: You can view information aboutoutbox messages; Recipient’s address, Subject (onlyfor Multimedia message), Message date & time,Message type, Message size. ]Delete all: You can delete all messages in theoutbox. When you didn’t send the message: ]View: You can view messages you didn't.]Delete: You can delete the current message. ]Send: You can send the message. ]Information: You can view information aboutoutbox]Delete all: You can delete all messages that havenot been sent. DRAFTS MENU 5.4 Using this menu, you can preset up to five multimediamessages that you use most frequently. This menushows the preset multimedia message list. Thefollowing options are available.]View: You can see the multimedia messages. ]Edit: Allows you to modify the chosen message. ]Delete: Deletes the message you choose. ]Information: To view the information of themessage. ]Delete all: Deletes all of the messages in the folder.LISTEN TO VOICE MAIL MENU 5.5 This menu provides you with a quick way of accessingyour voice mailbox (if provided by your network).Before using this feature, you must enter the voiceserver number obtained from your network operator. When new voice message is received, the symbolwill be displayed on the screen. Please check with yournetwork provider for details of their service in order toconfigure the handset correctly. MESSAGES](https://usermanual.wiki/LG-Electronics-USA/MG300.Revised-Manual/User-Guide-619621-Page-52.png)
![53INFO MESSAGE MENU 5.6 (DEPENDANT TO NETWORK ANDSUBSCRIPTION)Info service messages are text messages sent by thenetwork to mobile phone users. They provide generalinformation such as weather reports, traffic news, taxis,pharmacies, and stock prices. When you receive an infoservice message, a popup message will indicate a newmessage receipt or the info service message will bedisplayed directly. In standby mode, the followingoptions are available when viewing info service messages.Read (Menu 5.6.1) When you have received broadcast messages andselect Read to view the message, it will be displayedon the screen. Topics (Menu 5.6.2) To create new topics, press the left soft key [Option]then select Add new. If you already have topics, youcan deactivate, edit, or delete them by using the leftsoft key [Options]. TEMPLATES MENU 5.7 There are pre-defined messages in the list. You canview and edit the template messages or create newmessages. Two types of templates are available: Textand Multimedia. Text templates (Menu 5.7.1)•Please call me back. •I’m late. I will be there at •Where are you now? •I am on the way.•Top urgent. Please contact. •I love you.The following options are available. ]View: Views the selected message.]Delete: Deletes the template.]Add new: Uses this to create new template. ]Send via: To send via Text message or Multimediamessage.]Edit: Use this to edit the selected template.MESSAGES](https://usermanual.wiki/LG-Electronics-USA/MG300.Revised-Manual/User-Guide-619621-Page-53.png)
![MESSAGES54]Delete all: Deletes all templates.Multimedia templates (Menu 5.7.2) ]Preview: Displays the draft multimedia message. ]Save: Saves multimedia messages as templates.]Edit subject: You can edit the subject.]Add Slide: Adds a slide before or after the currentslide. ]Move to slide: Moves to the next or previous slide. ]Delete slide: Deletes the highlighted slide. ]Set slide format: Sets the timer for slide, text, or toalign the message contents right, left, top andbottom. ]Add T9 dictionary: You can add our own word.This menu can be shown only when the edit mode isPredictive. ]T9 languages: Selects T9 input mode. ]Exit: Exits the menu. My business card (Menu 5.7.3) This option helps you to make your own name card.Key in the name, mobile phone number, office number,Fax number, and E-mail address. SETTINGS MENU 5.8 Text message (Menu 5.8.1) ]Message types: Text, Voice, Fax, Natl. paging, X.400, Email,ERMESUsually, the type of message is set to Text. You canconvert your text into alternative formats. Contactyour service provider for the availability of thisfunction. ]Validity period:1 hour, 12 hours, 1 day, MaximumThis network service allows you to set how longyour text messages will be stored at the messagecentre. MESSAGES](https://usermanual.wiki/LG-Electronics-USA/MG300.Revised-Manual/User-Guide-619621-Page-54.png)
![55]Delivery report: If you set to Yes, you can checkwhether your message is sent successfully.]Reply charging: When a message is sent, it allowsthe recipients to reply and charge the cost of thereply to your telephone bill. This feature is notsupported by some network operators. ]SMS centre: If you want to send the text message,you can receive the address of SMS centre throughthis menu. Multimedia message (Menu 5.8.2)]Priority:High, Normal, LowYou can set the priority of the message you choose. ]Validity period:1 hour, 12 hours, 1 day, MaximumThis network service allows you to set how longyour multimedia messages will be stored at themessage centre.]Delivery report: If it is set to Yes in this menu, youcan check whether your message is sent successfully. ]Auto retrieve: If you select on, you receivemultimedia messages automatically. If you selectOff, you receive only notification message in theinbox and then you can check this notification. If youselect Home network only, you receive multimediamessages depends on Homenetwork. ]Network settings: If you select multimedia messageserver, you can set URL for multimedia messageserver.]Permitted Message typesPersonal: Personal message. Advertisements: Commercial message. Information: Necessary information. Voice mailbox number (Menu 5.8.3)You can receive the voicemail if your network serviceprovider supports this feature. When a new voicemailhas arrived, the symbol will be displayed on the screen.Please check with your network service provider fordetails of their service in order to configure the phoneaccordingly.]Home: You can listen to voice mails by selectingHome.]Roaming: Even when you are in abroad, you canMESSAGES](https://usermanual.wiki/LG-Electronics-USA/MG300.Revised-Manual/User-Guide-619621-Page-55.png)
![MESSAGES56listen to voice mails if a roaming service issupported. Info message (Menu 5.8.4) ]ReceiveYes: If you select this menu, your phone will receiveInfo service messages. No: If you select this menu, your phone will notreceive Info service messages any more. ]Alert Yes: Your phone will beep when you have receivedInfo service message numbers. No: Your phone will not beep even though you havereceived info service messages. ]Languages You can select the language you want by pressing[On/Off]. Then, the info service message will beshown in the language that you selected. Push messages (Menu 5.8.5) You can set the option whether you will receive themessage or not. MESSAGES](https://usermanual.wiki/LG-Electronics-USA/MG300.Revised-Manual/User-Guide-619621-Page-56.png)
![57CAMERA MENU 6.1 You can take pictures with the integrated camera andsend them via MMS. You an easily take pictures ofsubjects in front of you using the camera on the upperfolder. To take self-portrait pictures, you can simplyclose the folder and access the camera menu longpressing the camera side-key. In this case, the picturewill be displayed on the sub-LCD. MG300d has a built-in 1.3M pixel digital camera,which allows to take pictures at 1280x960 pixel (alsoknown as SXGA). The CMOS sensor allows highquality pictures and additional functions as 4x digitalzoom (depending on the resolution), brightness andwhite balance control, various effects and so on.Through the integrated flash, you can take alsopictures in low light conditions. • Taking pictures with open folder1. Select Camera. To directly access to this menu,long press the camera side-key from stand-bymode.2. Center you subject on the viewfinder and press theOK key or the camera side-key to take the photo.3. If you want to save the picture, select the disk icon.Camera icons descriptionAfter taking a picture, the following option windowappears:]: Send the picture through MMS. Only picturesbelow 100KB can be sent through MMS.]: Store the pictures in the Photo album.]: Delete the photo.To change the camera settings, press the left soft-key. Use the left/right directional keys to scroll thevarious options and press OK to change them,following the indications described below: MULTIMEDIAMULTIMEDIA ResolutionMulti shotindicatorFlash on/offTimer indicatorZoom levelSettings menu](https://usermanual.wiki/LG-Electronics-USA/MG300.Revised-Manual/User-Guide-619621-Page-57.png)
![58]Brightness: changes the brightness of thephoto among 5 levels (-2, -1, 0, 1 and 2). You canalso change the brightness of the picture using theleft/right directional keys from the viewfinder.]Size: Set the size (resolution) of the picture.You can choose between 320x240, 640x480,1280x960, 48x48 – for phonebook – e 128x160– to be used as wallpaper.]Timer : Using this function you can delay thecamera shutter time by selecting either None, 3seconds, 5 seconds or 10 seconds.]Quality: You can select the desired quality ofpicture by selecting either S-Fine, Fine or Normal. ]White balance: Using this function you canadjust the tone of the background picture accordingto the weather by selecting either Auto, Cloudy,Incandescent, Fluorescent and Daylight.]Album: Show all the pictures stored in thealbum.]Exit: Exit from the settings menu. ]Mode: Set the kind of picture to be taken. Youcan choose among the following options: • Still shot: Takes a standard picture. • Multi shot: You can take up to 9consecutive shots, depending on the resolution.After shooting, you can check each picture, one byone, pressing the down directional key. Note] A high quality setting will increase the definitionof the photo, but the memory size will bebigger.Note] You can set the timer pressing the keyfrom the viewfinder. Note] Bigger size pictures will take more memory tobe saved. MULTIMEDIA MULTIMEDIA](https://usermanual.wiki/LG-Electronics-USA/MG300.Revised-Manual/User-Guide-619621-Page-58.png)
![59After checking the photos, you can either savethem or delete them choosing the relative icons.• Frame shot: You can apply 10 kinds offrame effects when taking a picture. To select theframe, press the up directional key and confirmyour choice pressing OK.]Effect: Changes the color of the pictures.Available options are: Color, night, Sepia, Black &white and Negative. ]Flash: Toggles the flash to take pictures in lowlight conditions. ]Zoom: The digital camera integrates a zoomfunction up to 4X. There are 4 zoom levels you canchange using the left/right directional keys. You canalso change the zoom level using the up/downdirectional keys from the viewfinder. Note] The zoom function is available only in specificresolutions. Please refer to the following tablefor more details: - 48x48: Zoom 1x - 128x160: Zoom 1x - 320x240: Zoom 1x, 2x, 3x, 4x - 640x480: Zoom 1x, 2x - 1280x960: Zoom 1x Note] You can toggle the flash also pressing the keyfrom the viewfinder.Note] Frame shots are only available with the128x160 pixel resolution. Note] The multi shot function is only available if theresolution is set as 320x240 or 640x480. Youcan take 9 consecutive shots with 320x240,while only 3 with 640x480. The pictures will behandled all together (deleted or saved), you can’thandle them one by one.MULTIMEDIA](https://usermanual.wiki/LG-Electronics-USA/MG300.Revised-Manual/User-Guide-619621-Page-59.png)
![MULTIMEDIA60• Taking pictures with closed folderTaking a self-portrait, you can see your picture on thesub-LCD. 1. Long press the camera side key. 2. Select Take picture using the volume side keysfollowed by the camera side key to confirm it. 3. Choose the subject to acquire and press the cameraside key. The picture will be automatically saved inthe Photo album. 4. To exit the camera mode, long press the camera sidekey. Long press the camera side key when the folder isclosed to open the following menu (use the volumeside keys to move between the options and confirmthe selections through the camera side key):•MP3: Plays the music files in the phone. Check (Menu6.5.1) for further details. • Take picture: Enter the camera mode. • Slide show: Display a slide show of all the pictures inthe photo album. • Torch: Toggle the flash functionality. • Back: Exits the menu.VIDEO CAMERA MENU 6.2 MG300d includes a video camera which can takeevery kind of video at resolution of 176x144 or128x96 pixel. Video duration depends on theavailable memory. Videos are encoded in 3gp format. To record a video, follow the instructions below: 1. Turn on the video camera (Menu 6.2) 2. Change the video camera settings according toyour needing, pressing the left softkey . The videocamera settings are mostly the same as camerasettings described in (Menu 6.1). Note] Taking a self-portrait, you can’t change thecamera settings (zoom, brightness, quality andso on). The phone will automatically use thelatest camera settings. Also, you can’t use theFlash or use the Multi shot and the Frame shotfunctions. MULTIMEDIA](https://usermanual.wiki/LG-Electronics-USA/MG300.Revised-Manual/User-Guide-619621-Page-60.png)
![61]Brightness: Changes the brightness of thevideo among 5 levels (-2, -1, 0, 1 and 2). You canalso change the brightness of the video using theleft/right directional keys from the viewfinder. ]Size: Set the size (resolution) of the video. Youcan choose between 176x144 or 128x96 pixel. ]Timer : Using this function you can delay thevideo recording start time by selecting either None,3 seconds, 5 seconds or 10 seconds.]Quality: You can select the desired quality ofthe video by selecting either S-Fine, Fine or Normal. ]White balance: Using this function you canadjust the tone of the video according to theweather by selecting either Auto, Cloudy,Incandescent, Fluorescent and Daylight.]Record time:: Set the video duration time(Unlimited, 1 minute, 5 minutes, 30 minutes or 90minutes).]Album: Show all the videos stored in thealbum.]Exit: Exit from the settings menu.]Effect: Changes the color of the video.Available options are: Color, night, Sepia, Black &white and Negative.]Flash: Toggles the flash to record videos inlow light conditions.Note] A high quality setting will increase the definitionof the video, but the memory size will be bigger.Note] You can set the timer pressing the keyfrom the viewfinder. Note] Bigger size videos will take more memory to besaved.MULTIMEDIA](https://usermanual.wiki/LG-Electronics-USA/MG300.Revised-Manual/User-Guide-619621-Page-61.png)
![]Zoom: The video camera integrates a zoomfunction up to 4X. There are 4 zoom levels you canchange using the left/right directional keys. You canalso change the zoom level using the up/downdirectional keys from the viewfinder.3. Put the camcorder where you want it and press theOK key to start recording. A red timer will indicatethe recording time. Press again the OK key to stopthe recording. The recorded video is automaticallysaved in the gallery (Menu 6.4).MY PHOTOS MENU 6.3You can view and send a picture. In addition, you canset the window picture as a wallpaper.Options ]Multi view: You can view the maximum of 9thumbnails in a screen.]Send via Bluetooth: You can send a pciture viaBluetooth.]Write multimedia messages: You can send apicture via MMS.]Set as wallpaper: You can set a picture as awallpaper.]Slide show: This menu allows you to view as a slideshow automatically.]Delete: You can delete a picture.]Edit title: You can edit the title of picture.]Information: You can view the information aboutTitle, Size, Date and Time you’ve taken.MY VIDEOS MENU 6.4You can play and send a video. Options ]Play : Play the video ]Send via Bluetooth : You can send the video byBluetooth. ]Rename : You can edit the title of video.Note] You can toggle the flash also pressing thekey from the viewfinder. MULTIMEDIA62MULTIMEDIA](https://usermanual.wiki/LG-Electronics-USA/MG300.Revised-Manual/User-Guide-619621-Page-62.png)
![]Delete : You can delete the video. ]Delete all : You can delete all files. ]Information : You can view the information of thevideo. MP3 MENU 6.5The MG300d has an integrated MP3 player built-in.You can enjoy listening to MP3 music files on yourphone memory using a compatible headset or via theinternal loudspeaker. The music player supports: • MPEG-1 Layer III,MPEG-2 Layer III,MPEG-2.5 LayerIII Sampling frequency up from 8KHz to 48KHz. Bit rate up to 320Kbps, stereo. • AAC: ADIF, ADTS formats (Sampling frequency from8KHz to 48KHz) • AAC+: V1 : (Bit rate 16 28Kbps)V2 : (Bit rate 16 48Kbps)(Sampling frequency from 8KHz to 48KHz) • MP4 , M4A : Sampling frequency up from 8KHz to48KHz, Bit rate up to 320Kbps, stereo.• WMA : Sampling frequency up from 8KHz to 48KHz,Bit rate up to 320Kbps, stereo.You can transfer MP3 files from a compatible PC tothe memory in your phone using the Mass Storage.when you connect the phone to a PC using the USBcable(supplied in the same package), you just try toNote] MG300d doesn't support the variable rate ofMP3 and AAC file. Therefore, you can't changethe file from VBR MP3 format to AAC.Note] Because of the small dimension of the speaker,in some cases the audio could be distorted,especially at maximum volume and when thereare lots of bass sounds. Therefore, werecommend you to use the stereo headset inorder to appreciate the high quality of yourmusic. 63MULTIMEDIA](https://usermanual.wiki/LG-Electronics-USA/MG300.Revised-Manual/User-Guide-619621-Page-63.png)
![connect to PC via USB cable. If you use on win98 SE,you have to install Mass storage drive for windows 98on CD-ROM. MP3 player (Menu 6.5.1)1. Press MP3 menu, and then select MP3 player. 2. Press the left soft key [Options] to access thefollowing menus. ]View play list: You can view the play list on listeningto the music.]Area repeat: The special area part of the currentmusic is repeated when you select ON of the menu.]Set as ring tone: This menu allows to set the MP3file as a ring tone. You can also set it as a ring tone inProfile.]Settings:- Equalizer: This menu helps you to adjust a varityof environment on listening to the music. Thisphone supports four preset menus. When youenter this menu, you can view current value ofequalizer.- Playmode : This menu allows to set the playmode. - Set shuffle: You can listen to MP3 music allrandomly.- Visual effect : You can select the visual effectmenus:Light, Bounce and Guitarist. This menu allows to change the backgroud of mainLCD and sub LCD on playing MP3 file.Note] The PC should run Windows 98 SE, WindowsME, Windows 2000, Windows XP operatingsystem. ] Besides downloading the MP3 files to thephone, you can upload the pictures taken onthe phone to the PC using the USB cable. Andyou can also manage the phonebook,scheduler, and Memo on the PC. Consult withthe authorised dealer for availability ofaccessories. ] To download MP3 file in Windows 2000, youshould set folder option in PC as follow: ViewWEB->Use Windows default folder (I).MULTIMEDIA64MULTIMEDIA](https://usermanual.wiki/LG-Electronics-USA/MG300.Revised-Manual/User-Guide-619621-Page-64.png)
![- Flip settingContinue playing: Although you close the flip onplaying, the play mode is continued without apause.Stop playing: When you close the flip, you canstop the play mode.Playlist (Menu 6.5.2) This menu allows to view the whole Playlist. You canmove the track by pressing the navigation key. In addition, if you select option menu, you can deletethe file or view its information . Settings (Menu 6.5.3)This menu allows to set the following items; Equalizer,Playmode, Set shuffle, Visual effect and Flip setting.VOICE RECORDER MENU 6.6 The voice memo feature you to record up to 10 voicemessages and each memo is up to 20 Seconds. Record (Menu 6.6.1)You can record a voice memo in the Voice recordermenu. 1. Once recording has started, the message Recordingand the remaining time is displayed. Note] The copyright of music files can be protectedin international treaties and national copyrightlaws.Therefore, it may be necessary to obtain apermission or a license to reproduce or copymusic. In some countries national law prohibitsprivate copying of copyrighted material.Before downloading or copying the file, pleasecheck the national legislation of the applicablecountry concerning the use of such material.65MULTIMEDIA](https://usermanual.wiki/LG-Electronics-USA/MG300.Revised-Manual/User-Guide-619621-Page-65.png)
![2. If you want to finish recording, press the left soft key[Save]. 3. Key in Voice memo title, press the left soft key[OK]. View list (Menu 6.6.2)The phone shows voice memo list. You can Playbackand Delete the recorded voice memo. SETTINGS MENU 6.7Camera (Menu 6.7.1)]Auto save: If you set On, the images will be savedautomatically without displaying menu bar to save.]Delete all photos: This menu allows to delete allphotos after asking your confirmation.Video camera (Menu 6.7.2)]Delete all videos: This menu allows you to delete allthe videos.MULTIMEDIA66MULTIMEDIA](https://usermanual.wiki/LG-Electronics-USA/MG300.Revised-Manual/User-Guide-619621-Page-66.png)
![You can set the following menus for your convenienceand preferences. 1. Press [Menu] in standby mode. 2. Press for direct access to enter Settings. DATE & TIME MENU 7.1 You can set functions relating to the date and time. Date (Menu 7.1.1)Set DateYou can enter the current date. Date format You can set the Date format such as DD/MM/YYYY,MM/DD/YYYY, YYYY/MM/DD.(D: Day / M: Month / Y: Year) Time (Menu 7.1.2)Set Time You can enter the current time. Time format Your can set the time format between 24-hour and12-hour. PHONE SETTINGS MENU 7.2You can set functions relating to the phone. Display settings (Menu 7.2.1) ]Wallpaper: You can select the background picturesin standby mode. - Main LCD - Sub LCDDefault You can select a picture or an animation ofwallpaper by pressing or . My folder You can select a picture or an animation aswallpaper. SETTINGS67SETTINGS](https://usermanual.wiki/LG-Electronics-USA/MG300.Revised-Manual/User-Guide-619621-Page-67.png)
![68]Standby text: If you select On, you can edit the textwhich is displayed in standby mode. ]Backlight time: You can set the light-up duration ofthe display. ]Network name: If you set ON, Network name (thename of service provider) will be appeared inInternal LCD. Theme settings (Menu 7.2.2) Allows you to choose from one of the preset themes.Language (Menu 7.2.3) You can change the language for the display texts inyour phone. This change will also affect the LanguageInput mode. CALL SETTINGS MENU 7.3You can set the menu relevant to a call by pressing[Select] in the Setting menu. Call divert (Menu 7.3.1)The Call divert service allows you to divert incomingvoice calls, fax calls, and data calls to another number.For details, contact your service provider. ]All voice calls: Diverts voice calls unconditionally.]If busy: Diverts voice calls when the phone is in use. ]If no reply: Diverts voice calls which you do notanswer.]If out of reach: Diverts voice calls when the phone isswitched off or out of coverage. ]All data calls: Diverts to a number with a PCconnection unconditionally.]All fax calls: Diverts to a number with a faxconnection unconditionally. ]Cancel all: Cancels all call divert service. The submenus Call divert menus have the submenus shown below. •Activate Activate the corresponding service. SETTINGSSETTINGS](https://usermanual.wiki/LG-Electronics-USA/MG300.Revised-Manual/User-Guide-619621-Page-68.png)
![69To voice mail centreForwards to message centre. This function is notshown at All data calls and All fax calls menus. To other number Inputs the number for diverting. To favorite number You can check recent 5 diverted numbers. •Cancel Deactivate the corresponding service. •View statusView the status of the corresponding service. Answer mode (Menu 7.3.2) ]Flip open: If you select this menu, you can receivean incoming call by simply opening flip.]Any key: If you select this menu, you can receive acall by pressing any key except [End] key. ]Send key only: If you select this menu, you canreceive a call by only pressing [Send] key. Send my number (Menu 7.3.3) (network and subscription dependent)]Set by network: If you select this, you can sendyour phone number depending on two line servicesuch as line 1 or line 2. ]On: You can send your phone number to anotherparty. Your phone number will be shown on thereceiver’s phone.]Off: Your phone number will not be shown. Call waiting (network dependent) (Menu 7.3.4) ]Activate: If you select Activate, you can accept awaiting (receiving) call. ]Cancel: If you select Cancel, you cannot recognizethe waiting (receiving) call.]View status: Shows the status of Call waiting. Minute minder (Menu 7.3.5) If you select On, you can check the call duration bydeep sound given every minute during a call. SETTINGS](https://usermanual.wiki/LG-Electronics-USA/MG300.Revised-Manual/User-Guide-619621-Page-69.png)
![SETTINGS70Auto redial (Menu 7.3.6)]On: When this function is activated, the phone willautomatically try to redial in the case of failure toconnect a call. ]Off: Your phone will not make any attempts toredial when the original call has not connected. SECURITY SETTINGS MENU 7.4 PIN code request (Menu 7.4.1)In this menu, you can set the phone to ask for the PINcode of your SIM card when the phone is switched on.If this function is activated, you’ll be requested toenter the PIN code. 1. Select PIN code request in the security settingsmenu, and then press [Select]. 2. Set On/Off. 3. If you want to change the setting, you need to enterPIN code when you switch on the phone. 4. If you enter wrong PIN code more than 3 times, thephone will lock out. If the PIN is blocked, you willneed to key in the PUK code. 5. You can enter your PUK code up to 10 times. If youput wrong PUK code more than 10 times, you cannot unlock your phone. You will need to contactyour service provider. Handset lock (Menu 7.4.2)You can use security code to avoid unauthorized useof the phone. Whenever you switch on the phone, thephone will request security code if you set phone lockto On. If you set phone lock to Automatic, yourphone will request security code only when youchange your SIM card. Call barring (Menu 7.4.3) The Call barring service prevents your phone frommaking or receiving certain category of calls. Thisfunction requires the call barring password. You canview the following submenus. ]All outgoing calls: The barring service for alloutgoing calls. SETTINGS](https://usermanual.wiki/LG-Electronics-USA/MG300.Revised-Manual/User-Guide-619621-Page-70.png)
![71]Outgoing international: The barring service for alloutgoing international calls. ]Outgoing international when roaming: Thebarring service for all international outgoing callsexcept home network. ]All incoming: The barring service for all incomingcalls. ]Incoming when roaming: The barring service for allincoming calls when roaming. ]Cancel all: You can cancel all barring services. ]Change password: You can change the passwordfor Call Barring Service. The submenus:•Activate Allows to request the network to set call restrictionon. •Cancel Set the selected call restriction off. •View status View the status whether the calls are barred or not. Fixed dial number (Menu 7.4.4)(SIM dependent)You can restrict your outgoing calls to selected phonenumbers. The numbers are protected by your PIN2 code.]Enable: You can restrict your outgoing calls toselected phone numbers. ]Disable: You can cancel fixed dialling function. ]Number list: You can view the number list saved asFixed dial number. Change codes (Menu 7.4.5)PIN is an abbreviation of Personal IdentificationNumber to prevent use by unauthorized person. You can change the access codes: PIN2 code,Security code. 1. If you want to change the Security code/PIN2 codeinput your original code, and then press [OK]. 2. Input new Security code/PIN2 code and verifythem. SETTINGS](https://usermanual.wiki/LG-Electronics-USA/MG300.Revised-Manual/User-Guide-619621-Page-71.png)
![74You can access various WAP (Wireless ApplicationProtocol) services such as banking, news, weatherreports and flight information. These services arespecially designed for mobile phones and they aremaintained by WAP service providers. Check the availability of WAP services, pricing andtariffs with your network operator and/or the serviceprovider whose service you wish to use. Serviceproviders will also give you instructions on how to usetheir services. Once connected, the homepage is displayed. Thecontent depends on the service provider. To exit thebrowser at any time, press the ( ) key. Thephone will return to theprevious menu. Navigating with the WAP browser You can surf the Internet using either the phone keysor the WAP browser menu. Using the phone keys When surfing the Internet, the phone keys functiondifferently to phone mode. Using the WAP browser menu There are various menu options available when surfingthe Mobile Web. INTERNET MENU 8.1 Home (Menu 8.1.1) Connects to a homepage. The homepage will be thesite which is defined in the activated profile. It will bedefined by the service provider if you have not definedit in the activated profile. Note] The WAP browser menus may vary, dependingon your browser version.Key DescriptionScrolls each line of the content areaReturns to the previous pageSelects options and confirms actionsSERVICESERVICE](https://usermanual.wiki/LG-Electronics-USA/MG300.Revised-Manual/User-Guide-619621-Page-74.png)
![75Bookmarks (Menu 8.1.2)This menu allows you to store the URL of favorite webpages for easy access at a later time. Your phone hasseveral pre-installed bookmarks. These pre-installedbookmarks cannot be deleted. To create a bookmark 1. Press the left soft key [Options]. 2. Select Add new and press the OK key. 3. After entering the desired URL and title, press theOK key. * Tip: Use the “ ” key and key to entersymbols. To enter “ .”, press “ ” . After selecting a desired bookmark, the followingoptions are available. ]Connect: Connects to the selected bookmark. ]Add new: Select this to create a new bookmark. ]Edit: You can edit the URL and/or the title of theselected bookmark. ]Delete: Deletes the selected bookmark. ]Delete all: Deletes all the bookmarks. Go to URL (Menu 8.1.3) You can connect directly to the site you want. Afterentering a specific URL, press the OK key. Settings (Menu 8.1.4)Profiles A profile is the network information used to connectto the Internet. Each profile has submenus as follows:]Activate: Activates the selected profile. ]Settings: Use this to edit and change WAP settingsfor the selected profile. Note] In case the SIM card support SAT(i.e. SIMApplication Toolkit) services, this menu will bethe operator specific service name stored onthe SIM card. In case the SIM card does notsupport SAT services, this menu will be Profiles.SERVICE](https://usermanual.wiki/LG-Electronics-USA/MG300.Revised-Manual/User-Guide-619621-Page-75.png)
![77]Rename: You can change the profile name. ]Delete: Deletes the selected profile from the list. ]Add new: You can add a new profile. Cache Set a value whether a connection attempt is madethrough cache or not. CookieCheck whether a cookie is used or not.Clear cache Removes all context saved in cache. Clear cookie Removes all context saved in cookie. Security A list of the available certification is shown. ]Authority: You can see the list of authoritycertificates that have been stored in your phone. ]Personal: You can see the list of personalcertificates that have been stored in your phone. SIM SERVICE(SIM DEPENDENT) MENU 8.2 Your service provider can offer special applicationsthrough the SIM card, such as home banking, stockmarket, etc. If you are registered for one of theseservices, the service name will appear at the end of theMain Menu. With the SIM Services menu your phone isfuture-proof and will support additions to your serviceprovider’s service. For more information contact your service provider. SERVICE](https://usermanual.wiki/LG-Electronics-USA/MG300.Revised-Manual/User-Guide-619621-Page-77.png)
![78GAMES & APPS MENU 9.1Games & Apps (Menu 9.1.1) In this menu, you can manage the Java applicationsinstalled in your phone. You can play or deletedownloaded applications, or set the connect option.The downloaded applications are organised in folders.Press the left soft key [Select] to open the selectedfolder or launch the selected midlet. Using the left softkey [Options], the following menus are available. ]Launch: Start the selected application.]Information: Shows the information of theapplication. ]Permissions: Some Java applications may require adata connection to be made. Select this to set theconnecting options. - Always: The connection is created immediatelywithout a notification. - Prompt: You will be asked before the applicationmakes the connection. - Never: No connection is allowed. Note] You cannot remove or rename the preinstalledfolder or a game in the folder.Note] After downloading any Java game, press the“Ok” Key ( ) to save it in the root folder.DOWNLOADSJavaTM, is a technology developed by SunMicrosystems. Similar to the way you woulddownload the Java Applet using the standard MSInternet Explorer browser, Java MIDlets can bedownloaded using the WAP enabled phone.Depending on the service provider, all Java basedprograms such as Java games can be downloadedand run on a phone. Once downloaded, the Javaprogram can be viewed in the Games & Appsmenu where you can select, execute, or delete.The Java program files saved in the phone are in.JAD or .JAR format. DOWNLOADS](https://usermanual.wiki/LG-Electronics-USA/MG300.Revised-Manual/User-Guide-619621-Page-78.png)
![79Profiles (Menu 9.1.2)This menu contains the same settings of the Internetmenu. In fact, in order to download new applications, aWAP connection is needed. IMAGES MENU 9.2 The left soft key [Options] will bring up thefollowing options. ]Set as wallpaper: Currently selected Picture can beset as a Wallpaper. ]Write multimedia message: Downloaded Picturecan be sent via MMS. ]Send via Bluetooth: The picture can be sent viaBluetooth.Note] The JAR file is a compressed format of the Javaprogram and the JAD file is a description filethat includes all detailed information. From thenetwork, prior to download, you can view alldetailed file descriptions from the JAD file. ] While being based on a standard language(J2ME), not all Java applications are compatiblewith all handsets on sale in so far as specificlibraries may be used for a telephone model.The software may be blocked or switch itself onwhen Java applications not specificallydeveloped for the phone is downloaded. Wewould like to point out that these problems arecaused by incompatible applications and arenot a product fault.Caution] Only J2ME (Java 2 Micro Edition) basedprograms will run in a phone environment. TheJ2SE (Java 2 Standard Edition) based programswill only run in a PC environment. DOWNLOADS](https://usermanual.wiki/LG-Electronics-USA/MG300.Revised-Manual/User-Guide-619621-Page-79.png)