LG Electronics USA MG810 GSM Phone with Bluetooth User Manual MG810 Eng 0314
LG Electronics USA GSM Phone with Bluetooth MG810 Eng 0314
UserManual.wiki
>
LG Electronics USA
>
MG810 User Manual
Manual
Navigation menu
Upload a User Manual
Namespaces
Wiki Guide
HTML
PDF
Info
Views
User Manual
Discussion / Help
Navigation

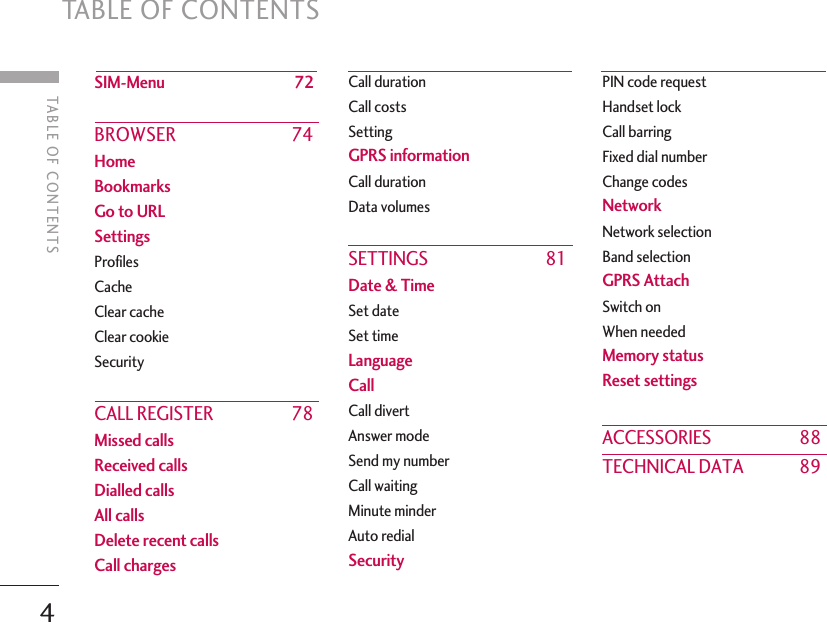
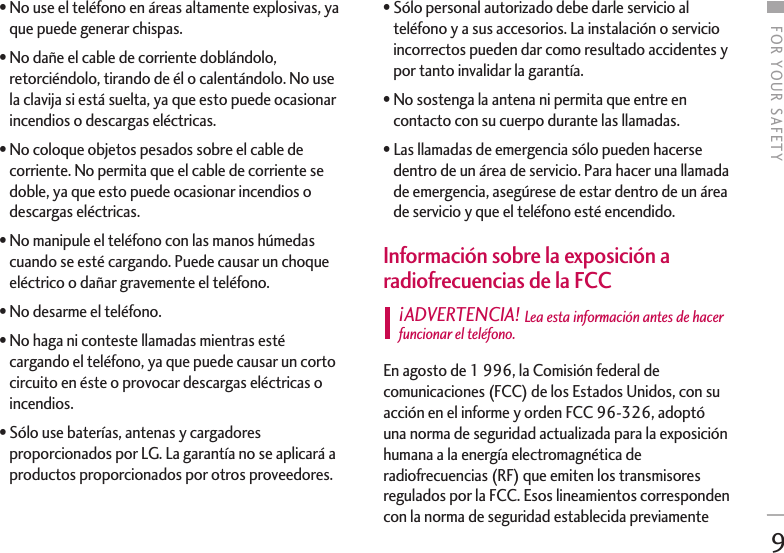
![CAUTIONS FOR TOUCHBUTTONS1. Make sure your handsare clean and dry.- Remove all moisturefrom the surface ofyour hands or thetouch buttons in ahumid environment.2. You don’t need to presshard on the touchbuttons to make it worknormally.Keep product fromsevere impact, as sensorsof touch buttons may bedamaged.3. Use the tip of the finger to press exactly on thetouch button you want, being careful not to touchthe buttons for other functions.4. When both waiting screen and touch button lightare off, pressing a touch button will not turn on thewaiting screen light. Press Quit button and useafter waiting screen light is on (touch buttons donot work when touch button lights are off).5. If your slide is closed, Touch Protection function ison, and during calls, Touch button Lock function isautomatically on. (For details, see ‘Touch ButtonStatus When Using Mobile Phone’.)6. Touch button may not work normally if mobilephone case or plastic is covering the touch button.Also, touch button may not work normally if youare using it wearing a glove.7. Keep metal and other conductive material awayfrom the surface of touch buttons, as contact withthem may result in error.HOW TO USE TOUCH BUTTON 5]This product’s buttons on the slide are touch buttons.]Be sure to read “Cautions for Touch Buttons” before using touch buttons.Touch ButtonHOW TO USE TOUCH BUTTON](https://usermanual.wiki/LG-Electronics-USA/MG810/User-Guide-636810-Page-5.png)
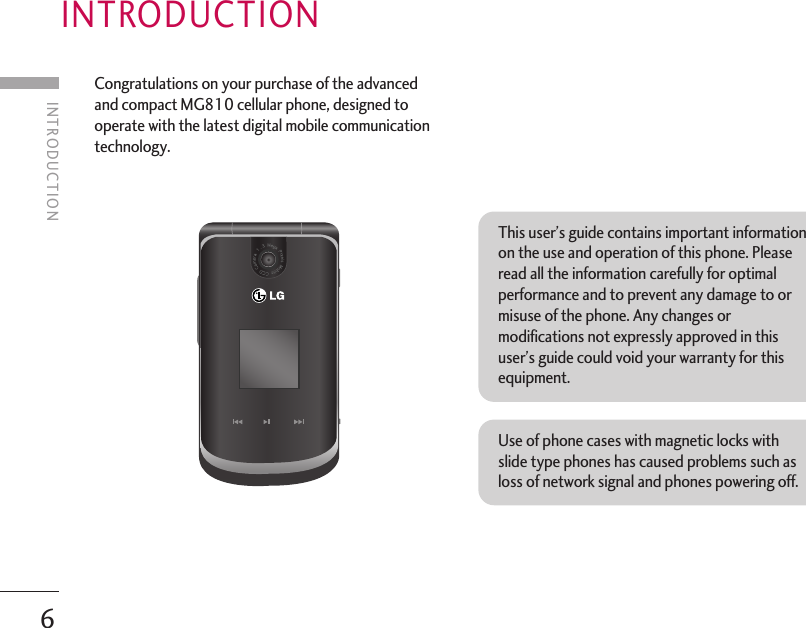
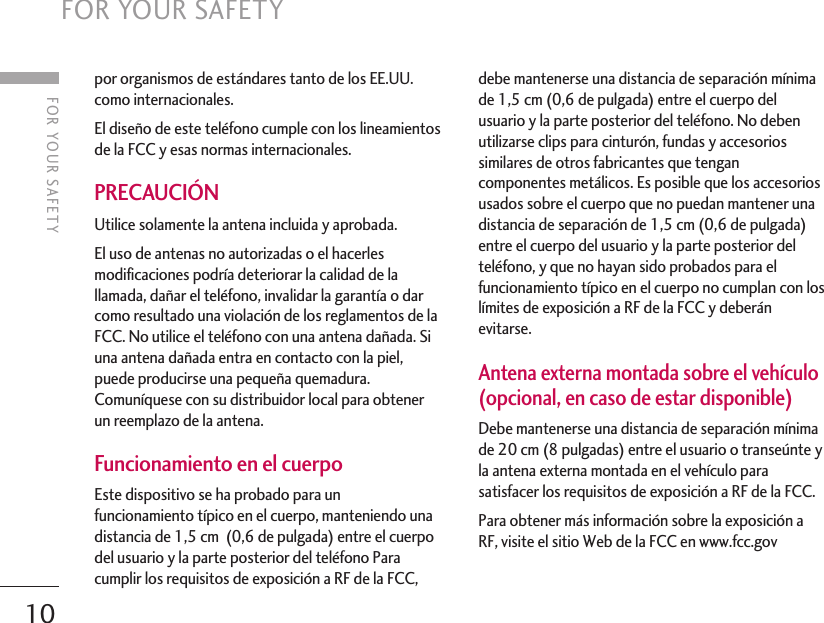

![14MG810 FEATURESMG810 FEATURESLeft side view Right side view End key]Switch on/off (hold down)]End or reject a call.Camera and Multimedia hot key]Activates the camera (long press) andMultimedia menu (short press)directly.Note]To protect the sense ofhearing while Slide open,maximum volume level is 3.Side keys s]In standby mode (opened):Volume of key tone• In standby mode (closed):Short press - The main LCD light on.Long press - Only display a wallpaper.• In menu: scroll up & down• During a call: volume of the earpiece](https://usermanual.wiki/LG-Electronics-USA/MG810/User-Guide-636810-Page-14.png)
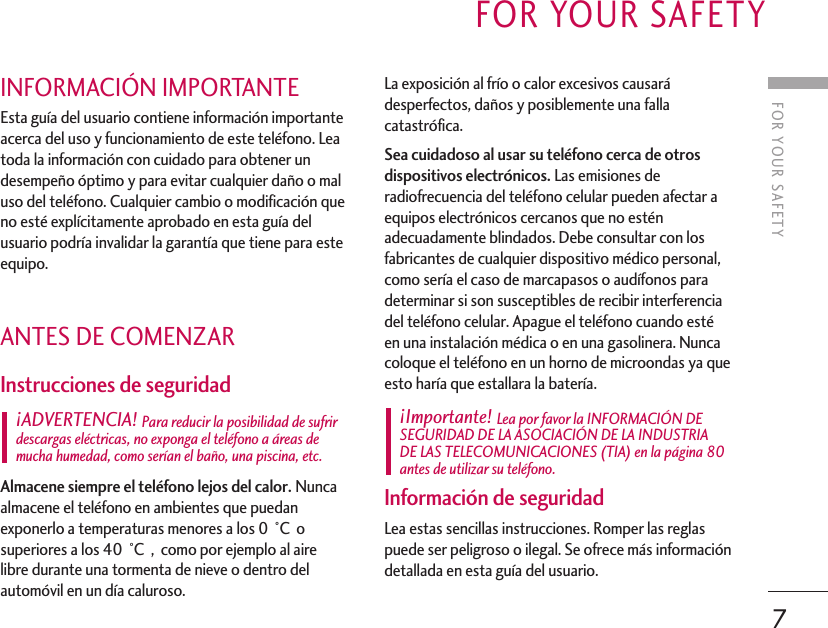
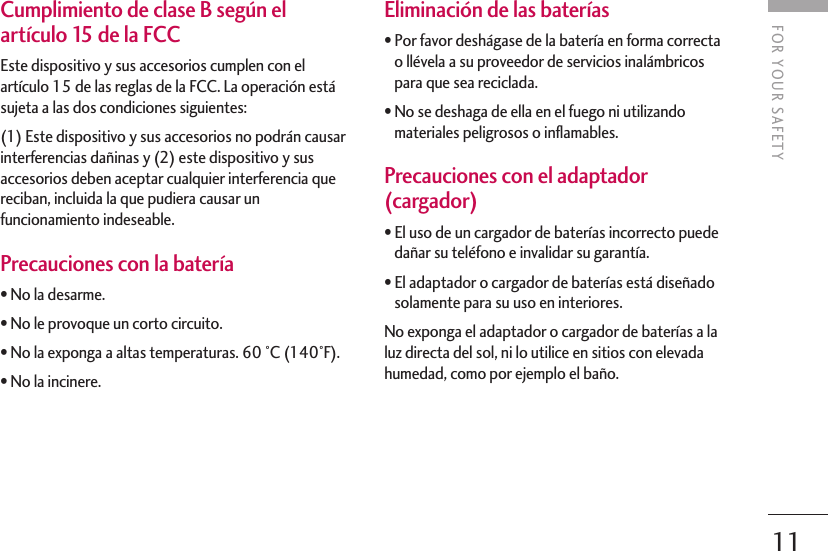
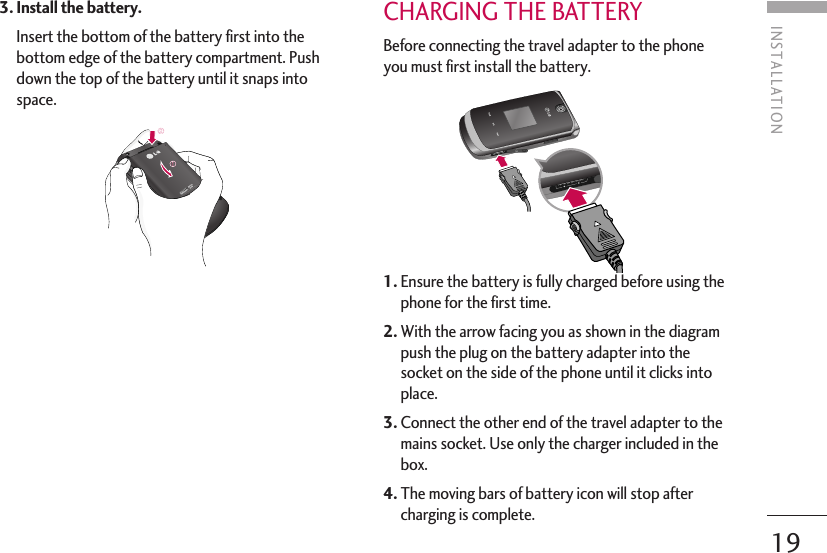
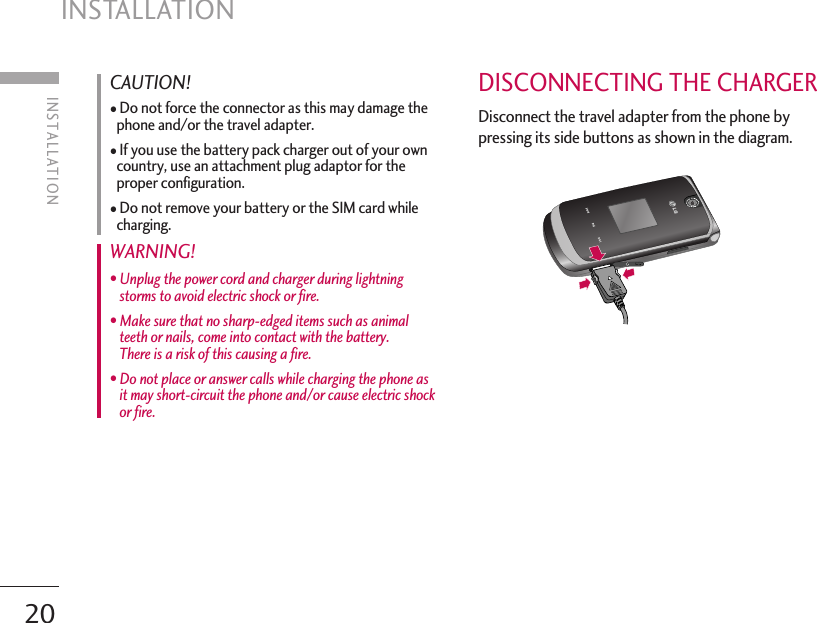
![INSTALLATION18INSTALLING THE SIM CARD ANDTHE HANDSET BATTERYMake sure the power is off before you remove thebattery.1. Remove the battery.Hold the top edge of the battery and lift thebattery from the battery compartment. 2. Install the SIM card.Insert the SIM card into the holder. Slide the SIMcard into the SIM card holder. Make sure that theSIM card is inserted properly and that the goldcontact area on the card is facing downwards. To remove the SIM card, press down lightly and pullit in the reverse direction.To insert the SIM card To remove the SIM cardNote]The metal contact of the SIM card can be easilydamaged by scratches. Pay special attention tothe SIM card while handling. Follow theinstructions supplied with the SIM card.DIGITAL ZOOMHigh Resolution Digital Camera PhoneDIGITAL ZOOM1.3High Resolution Digital Camera PhoneDIGITAL ZOOM1.3DIGITAL ZOOMINSTALLATION](https://usermanual.wiki/LG-Electronics-USA/MG810/User-Guide-636810-Page-18.png)
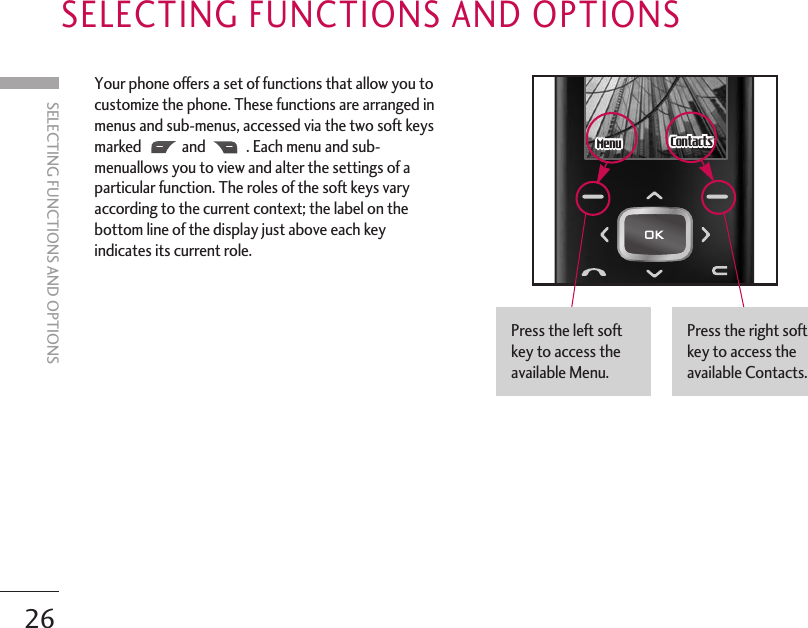
![GENERAL FUNCTIONS21GENERAL FUNCTIONSMAKING A CALL 1. Make sure your phone is powered on.2. Enter a phone number including the area code. Toedit a number on the display screen, simply pressthe key to erase one digit at a time. ]Press and hold the key to erase the entirenumber.3. Press the key to call.4. When you want to finish, press the key.Making a call from the call history list. 1. Press the key, and the most recent incoming,outgoing and missed phone numbers will bedisplayed.2. Select the desired number by using the navigationkeys.3. Press the key.Making International Calls 1. Press and hold the key for the internationalprefix. The ‘+’ character can be replaced with theinternational access code.2. Enter the country code, area code, and the phonenumber.3. Press the key.Ending a Call When you have finished a call, press the key.Making a Call From the Contact list You can store names and phone numbers dialledfrequently in the SIM card as well as the phonememory known as the Contact list.You can dial a number by simply looking up a name inthe contact list. For more details on the Contactsfeature.Adjusting the Volume During a call, if you want to adjust the earpiecevolume, use the side keys of the phone.In idle mode, you can adjust the key volume using theside keys.](https://usermanual.wiki/LG-Electronics-USA/MG810/User-Guide-636810-Page-21.png)
![Answering a Call When you receive a call, the phone rings and theflashing phone icon appears on the screen. If the callercan be identified, the caller’s phone number (or name/photo, if stored in your Address Book) isdisplayed.1. Open the flip and press the key or the left softkey to answer an incoming call. If the Any Key menuoption (Menu #.3.2), has been set, any key presswill answer a call except for the key or theright soft key.2. End the call by closing the phone or pressing thekey.Vibrate Mode (Quick) Vibrate Mode can be activated by pressing andholding the left navigation key.Signal Strength If you are inside a building, being near a window maygive you better reception. You can see the strength ofyour signal by the signal indicator ( ) on yourphone’s display screen.Note]You can answer a call while using the AddressBook or other menu features. Note]To reject an incoming call, press and hold theside keys on the left side of the phone.22GENERAL FUNCTIONSGENERAL FUNCTIONS](https://usermanual.wiki/LG-Electronics-USA/MG810/User-Guide-636810-Page-22.png)
![ENTERING TEXT You can enter alphanumeric characters by using thephone’s keypad. For example, storing names in theAddress Book, writing a message, creating schedulingevents in the calendar all require entering text. Thefollowing text input methods are available in thephone.T9 Mode This mode allows you to enter words with only onekeystroke per letter. Each key on the keypad has morethan one letter. The T9 mode automatically comparesyour keystrokes with an internal linguistic dictionaryto determine the correct word, thus requiring far fewerkeystrokes than the traditional ABC mode.ABC Mode This mode allows you to enter letters by pressing thekey labeled with the required letter once, twice, threeor four times until the letter is displayed.123 Mode (Numbers Mode) Type numbers using one keystroke per number. Tochange to 123 mode in a text entry field, press key until 123 mode is displayed.Symbolic Mode This mode allows you to enter special characters.Changing the Text Input Mode 1. When you are in a field that allows characters to beentered, you will notice the text input modeindicator in the upper right corner of the display.2. If you want to change modes, press .The available modes are changed.Note]Some fields may allow only one text input mode(e.g. telephone number in address book fields).23GENERAL FUNCTIONS](https://usermanual.wiki/LG-Electronics-USA/MG810/User-Guide-636810-Page-23.png)
![Using the T9 Mode The T9 predictive text input mode allows you to enterwords easily with a minimum number of key presses. Asyou press each key, the phone begins to display thecharacters that it thinks you are typing based on abuilt-in dictionary. As new letters are added, the wordchanges to reflect the most likely candidate from thedictionary.1. When you are in the T9 predictive text input mode,start entering a word by pressing keys toPress one key per letter.]The word changes as letters are typed-ignorewhat’s on the screen until the word is typedcompletely.]If the word is still incorrect after typingcompletely, press the down navigation key onceor more to cycle through the other word options.Example: Press to type Good. ]If the desired word is missing from the wordchoices list, add it by using the ABC mode.2. Enter the whole word before editing or deleting anykeystrokes.3. Complete each word with a space by pressing thekey or key.To delete letters, press . Press and holddown to erase the letters continuously.Using the ABC Mode Use the to keys to enter your text.1. Press the key labeled with the required letter:]Once for the first letter.]Twice for the second letter.]And so on.2. To insert a space, press the key once. ToNote]To exit the text input mode without saving yourinput, press . The phone returns to theidlescreen.Note]You can select a different T9 language from themenu option by holding down the key.Thedefault setting on the phone is T9 enabled.GENERAL FUNCTIONSGENERAL FUNCTIONS24](https://usermanual.wiki/LG-Electronics-USA/MG810/User-Guide-636810-Page-24.png)
![delete letters, press the key. Press andholddown the key to erase the letterscontinuously.Key Characters in the order display Upper Case Lower Case. , - ? ! ' @ : 1 . , - ? ! ' @ : 1A B C 2 a b c 2D E F 3 d e f 3G H I 4 g h i 4J K L 5 j k l 5 M N O 6 m n o 6P Q R S 7 p q r s 7 T U V 8 t u v 8W X Z Y 9 w x y z 9 Space 0 Space 0Using the 123 (Numbers) Mode The 123 Mode enables you to enter numbers in a textmessage (a telephone number, for example). Press the keys corresponding to the required digitsbefore manually switching back to the appropriatetext entry mode.Using the Symbol Mode The Symbol Mode enables you to enter varioussymbols or special characters.To enter a symbol, press the key. Use thenavigation keys to select the desired symbol and pressthe [OK] key.Note]Refer to the table below for more informationon the characters available using the keys.GENERAL FUNCTIONS25](https://usermanual.wiki/LG-Electronics-USA/MG810/User-Guide-636810-Page-25.png)
![27IN-CALL MENUIN-CALL MENU27Your phone provides a number of control functionsthat you can use during a call. To access thesefunctions during a call, press the left soft key [Options].DURING A CALL The menu displayed on the handset screen during acall is different than the default main menu displayedwhen in idle screen, and the options are describedbelow.Speaker phone During call you can activate speaker phone selectingOptions/Speaker phone on, or by pressing OKbutton. To mute speaker phone selectOptions/Speaker phone off, or press OK button onemore time.Making a Second Call (Network Dependent)You can get a number you wish to dial from theAddress Book to make a second call. Press the Rightsoft key then select Contacts.Swapping Between Two Calls To switch between two calls, press key or theleft soft key, and then select Swap.Answering an Incoming Call To answer an incoming call when the handset isringing, simply press the key. The handset isalsoable to warn you of an incoming call while you arealready on a call. A tone sounds in the earpiece, andthe display will show that a second call is waiting.This feature, known as Call Waiting, is only available ifyour network supports it. For details of how toactivate and deactivate it see Call Waiting (Menu#.3.4)If Call Waiting is on, you can put the first call on holdand answer the second, by pressing .Rejecting an Incoming Call You can reject an incoming call without answering bysimply pressing the key.During a call, you can reject an incoming call bypressing the key.](https://usermanual.wiki/LG-Electronics-USA/MG810/User-Guide-636810-Page-27.png)
![28Muting the Microphone You can mute the microphone during a call by pressingthe [Options] key then selecting [Mute]. The handsetcan be unmuted by pressing the [Unmute]. When thehandset is muted, the caller cannot hear you, but youcan still hear them.DTMF tones while calling To switch on DTMF tones while calling (e.g. to use thephone with an automatic switchboard) press the key[Options] followed by Send DTMF _DTMF on. SelectDTMF off to disable DTMF tones. DTMF tones arenormally on.CONFERENCE CALLS The conference service provides you with the abilityto have a simultaneous conversation with more thanone caller, if your network service provider supportsthis feature. A conference call can only be set up whenyou have one active call and one call on hold, bothcalls having been answered. Once a conference call isset up, calls may be added, disconnected or separated(that is, removed from the conference call but stillconnected to you) by the person who set up theconference call. These options are all available fromthe In-Call menu. The maximum callers in a conferencecall are five. Once started, you are in control of theconference call, and only you can add calls to theconference call.Making a Second Call You can make a second call while currently on a call.Enter the second number and press the .Whenthe second call is connected, the first call isautomatically placed on hold. You can swap betweencalls, by pressing the key.IN-CALL MENUIN-CALL MENU](https://usermanual.wiki/LG-Electronics-USA/MG810/User-Guide-636810-Page-28.png)
![29Setting Up a Conference Call To set up a conference call, place one call on hold andwhile the active call is on, press the left soft key andthen select the Join menu of Conference call.Activate the Conference Call on Hold To activate a conference call on hold, press thekey. Alternatively press the left soft key [Options] andselect Conference/Hold all calls. Other users on holdwill stay connected. To return to conference callmode, press the left soft key [Options] followedbyConference call.Adding Calls to the Conference Call To add a call to an existing conference call, press theleft soft key, and then select the Join menu ofConference call.Private Call in a Conference Call To have a private call with one caller from a conferencecall, display the number of the caller you wish to talkto on the screen, then press the left soft key. Selectthe Private menu of Conference call to put all theother callers on hold.Ending a Conference Call Currently displayed caller from a conference call canbe disconnected by pressing the key.IN-CALL MENU](https://usermanual.wiki/LG-Electronics-USA/MG810/User-Guide-636810-Page-29.png)
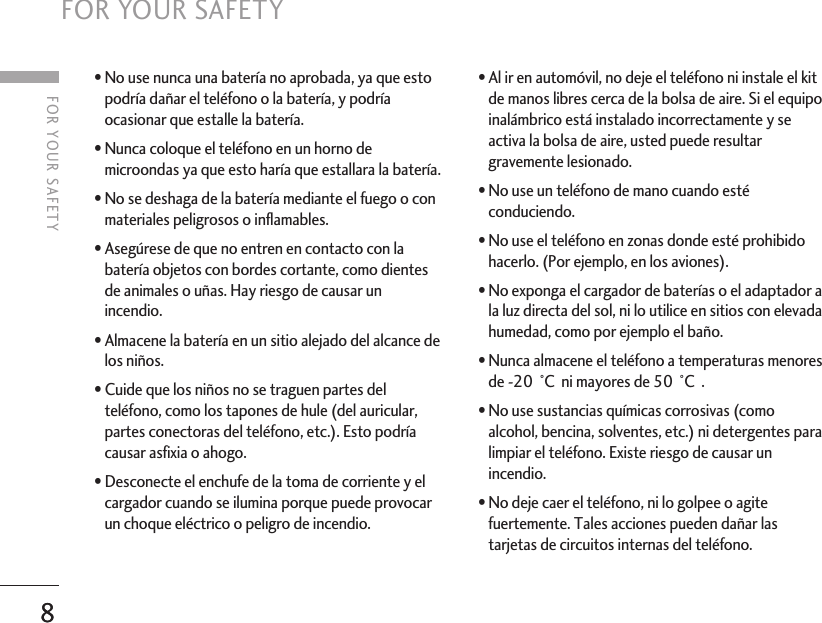
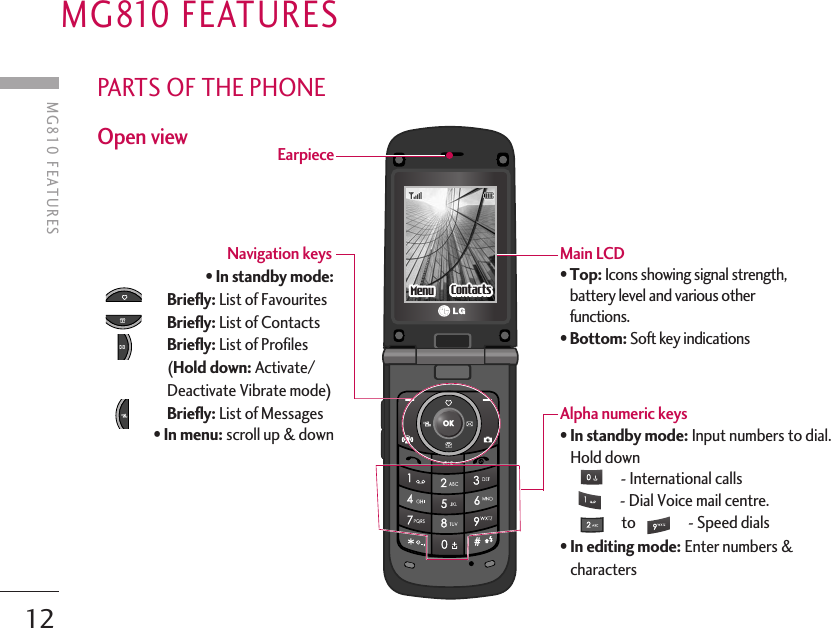
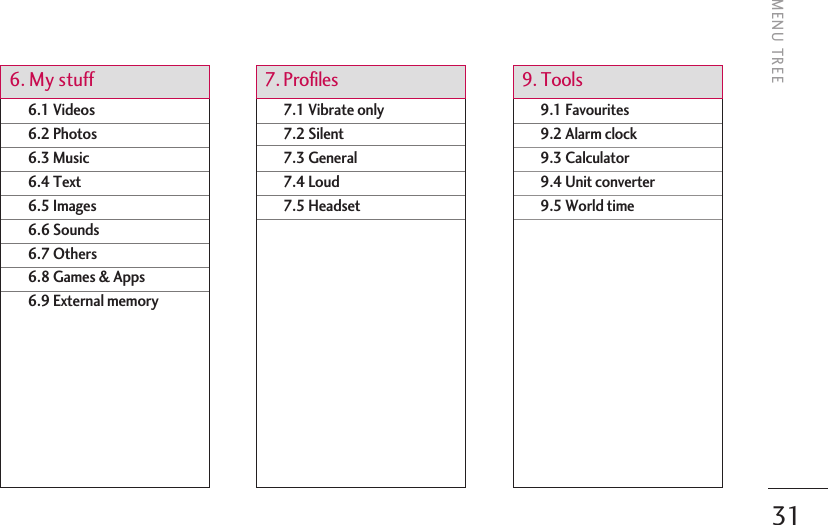
![MENU TREE30The following illustration shows the available menu structure and indicates the:]Number assigned to each menu option. MENU TREE5.1 New message5.2 Inbox5.3 Mailbox5.4 Drafts5.5 Outbox5.6 Listen to voice mail5.7 Info message5.8 Templates5.9 Settings3.1 Calendar3.2 Memo4.1 Camera4.2 Video camera4.3 Voice recorder4.3 MP34.3 Photo album4.3 Video album4.3 Settings1.1 Games & Apps 1.2 Profiles 2.1 Search2.2 Add new2.3 Caller groups2.4 Speed dial2.5 Own number2.6 My business card2.7 Settings1. Games & Apps3. Organiser 5. Messages4. Multimedia2. Contacts](https://usermanual.wiki/LG-Electronics-USA/MG810/User-Guide-636810-Page-30.png)
![GAMES & APPS MENU 1.1•Default Games: In this menu, you can manage theJava applications installed in your phone. You canplay or delete downloaded applications, or set theconnect option. The downloaded applications areorganised in folders. Press the left soft key [Select] to open theselected slide or launch the selected midlet. After selecting a folder, press [Options] and then submenus available to several options are displayed.]Open: You can see the stored games.]New slide: Create a new slide.PROFILES MENU 1.2 A profiles is the network information used to connectto the Internet.If you want to see the details of a profile, please referto Menu *.4.1 GAMES & APPSGAMES & APPS33JavaTM, is a technology developed by SunMicrosystems. Similar to the way you woulddownload the Java Applet using the standard MSInternet Explorer browsers, Java MIDlet can bedownloaded using a WAP enabled phone.Depending on the service provider, all Java basedprograms such as Java games can be downloadedand run on a phone. Once downloaded, the Javaprogram can be viewed in the Games & Appsmenu where you can select, execute, or delete.The Java program files saved in the phone are in.JAD or .JAR format.](https://usermanual.wiki/LG-Electronics-USA/MG810/User-Guide-636810-Page-33.png)
![Note]The JAR file is a compressed format of the Javaprogram and the JAD file is a description file thatincludes all detailed information. From thenetwork, prior to download, you can view alldetailed file descriptions from the JAD file.]While being based on a standard language(J2ME), not all Java applications are compatiblewith all handsets on sale insofar as specificlibraries may be used for a telephone model.The software may be blocked or switch itself onwhen Java applications not specificallydeveloped for the phone this manual refers toare downloaded, making it necessary to“restart” the handset. We would like to pointout that these problems are caused byincompatible applications and are not a productfault.GAMES & APPS34GAMES & APPS](https://usermanual.wiki/LG-Electronics-USA/MG810/User-Guide-636810-Page-34.png)
![SEARCH MENU 2.11. Select Search by pressing the right soft key [Contacts] or [OK].2. Enter the name that you want to search.3. If you want to edit, delete or copy an entry, selectthe left soft key [Options]. The followingmenuwill be displayed.]Edit: You can edit the name, number, group,character and picture by using the navigation key.]Write messages: After you have found the numberyou want, you can send a text/multimedia messageto the selected number.]Send via Bluetooth: You can send the data ofphone book to devices which is compatible withbluetooth through Bluetooth.]Copy to handset: You can copy an entry from SIMto phone or from phone to SIM.]Assign speed dial: You can assign the entry as aspeed dial.]View caller groups: For further details see (Menu2.3).]Delete: You can delete an entry.ADD NEW MENU 2.2You can add a phonebook entry by using this function.Phone memory capacity is 1000 entries. SIM cardmemory capacity depends on the cellular serviceprovider. You can also save 20 characters of name inThe Phone memory, and save characters in the SIMcard. The number of characters is a SIM dependentfeature.Note]Maximum stored name and number lengthdepends on SIM-card type.Note]Instant searching is available by inputting theinitial letter of the name or number you want tosearch.CONTACTS35CONTACTS](https://usermanual.wiki/LG-Electronics-USA/MG810/User-Guide-636810-Page-35.png)
![1. Select Add new by pressing the left soft key [Select] or [OK].2. Select the memory you want to save: SIM or Phone.If you set to Phone, you need to select whichnumber you want as a main number.a. Press [OK] to input a name.b. Press [Save], then you can input a number.c. You can set a group for the entry by pressing, .d. You can set a character and a picture for theentry by pressing , .CALLER GROUPS MENU 2.3You can add up to 20 members per group, with up toa maximum of 7 groups in total.]Member list: Shows the group members you haveselected.]Group ring tone: Allows you to specify ring tone forthe group members’ call.]Group icon: Allows you to select the icondependent on Group.]Add member: You can add group members. Eachgroup should not exceed 20 members.]Remove member: You can remove the memberfrom the Group member list. But the name and thenumber will be remained in phonebook.]Rename: You can change a group name.]Remove all: Allows you to delete all the members inthe group.SPEED DIAL MENU 2.4Assign contacts to any of the keys to .You can then call that contact by pressing thecorresponding number key.1. Open the phonebook first by pressing the right softkey [Contacts] in standby mode.2. Scroll to Speed dial, then press the left soft key[Select].3. If you want to add speed dial, select (empty). Then,you can search the name in phonebook.CONTACTSCONTACTS36](https://usermanual.wiki/LG-Electronics-USA/MG810/User-Guide-636810-Page-36.png)
![374. After assigning the number as speed dial, you canchange and delete the entry. You can also make acall or send a message by this number.OWN NUMBER MENU 2.5(SIM DEPENDENT)You can save and check your own number in SIM card.MY BUSINESS CARD MENU 2.6 This option allows you to create your own businesscard featuring Name and an mobile phone number. Tocreate a new business card, press the left soft key[Edit] and enter the information into the fields.SETTINGS MENU 2.71. Press the right soft [Contacts] in standbymode.2. Scroll to Settings, then press the left soft key[Select].]Default memory Scroll to highlight Default memory, and then pressthe left soft key [Select].- If you select Always ask, when adding entry, thephone will ask where to store.- If you select SIM or Phone, the phone will store anentry to SIM or phone.]View options Scroll to highlight View options, and then press theleft soft key [Select].- Name only: Set the phonebook list by displayingthe name only.- Name & number: Set the phonebook list bydisplaying the name and number.- With pictures: Set the phonebook list with theinformation and picture of contact.CONTACTS](https://usermanual.wiki/LG-Electronics-USA/MG810/User-Guide-636810-Page-37.png)
![]Copy/Move allYou can copy/move entries from SIM card memoryto Phone memory and vice versa.1. Open the Phonebook first by pressing the right softkey [Contacts] in standby mode.2. Scroll to Copy/Move all, and then press the leftsoft key [Select] to enter this menu.•SIM to Phone: You can copy/move the entriesfrom SIM Card to Phone memory.•Phone to SIM: You can copy/move the entriesfrom Phone memory to SIM Card.]Memory in use: This feature allows you to see howmany entries are in use, or free in your phonebook.]Clear contacts You can delete all the entries in the SIM and Phone.This function requires the Security code.1. Scroll to highlight Clear contacts, and then pressthe left soft key [Select].2. Highlight the memory you wish to erase, and thenpress the left soft key [Select].3. Enter the security code and press the left soft key[OK] or the right soft key [Back].]Service dial number Use this function to access a particular list ofservices provided by your network operator (ifsupported by the SIM card).CONTACTSCONTACTS38](https://usermanual.wiki/LG-Electronics-USA/MG810/User-Guide-636810-Page-38.png)
![39CALENDAR MENU 3.1When you enter this menu a calendar will be displayed.The month and year are shown at the top of thescreen. Whenever you the change the date under theSettings menu, the calender will update automatically.The current date will be highlighted in green and anyschedule or memos will be indicated with a red triangleat the top left hand corner of the correspondingsquare. An audible alarm can be set for memo’s andreminders.To change the day, month and year.In the scheduler mode, press left soft key [Options] as follows;Add new(Menu 3.1.1) Allows you to add new schedule and memo for thechosen day. You can store up to 20 notes. Input thesubject and then press left soft key [OK]. Youenter the appropriate information in the followingsection; Time, Repeat and Alarm.View daily schedules (Menu 3.1.2) View all schedules and memo for the chosen day. Use, to browse through the note lists. If you setalarm for the note, the alarm icon is displayed.If you want to view the note in detail, press the leftsoft key [Select]. Press left soft key [Options] todelete, edit the note you selected.Delete past(Menu 3.1.3) You can delete the past schedule that you havealready been notified of.Delete all (Menu 3.1.4) You can delete all the notes.Go to date(Menu 3.1.5) You can go the chosen date directly.ORGANISERORGANISERKey Description Key DescriptionYearly WeeklyMonthly Daily](https://usermanual.wiki/LG-Electronics-USA/MG810/User-Guide-636810-Page-39.png)
![ORGANISER40Set alarm tone (Menu 3.1.6)You can set the alarm tone of each chosen date.MEMO MENU 3.2 1. Select the Memo by pressing the left soft key[Select].2. If the entry is empty, press the left soft key [Write].3. Input the memo and then press the left soft key[OK].Note]If you want to change the text input mode,press the in order.ORGANISER](https://usermanual.wiki/LG-Electronics-USA/MG810/User-Guide-636810-Page-40.png)
![You can enjoy your multimedia functions such ascamera, voice recorder, MP3 for your fun andconvenience.CAMERA MENU 4.1•To take a picture with phone opened 1. Press the Menu key and then navigate andselect Multimedia. Select Camera and the screen willnow become the viewfinder. If you want to reachthis menu directly, press or for a fewseconds.2. Focus on the subject to capture the image, and thenpress the key.3. If you want to save it, press the left soft key or the key.]Mode [ ]: Allows to take multishot photossuccessively.•Still shot: 72x72, 176x220, 320x240,640x480, 1280x720, 1280x960, 1600x1200•multishot: 320x240•frameshot: 176x220 ]Scene [ ]: Allows you to take a picture by usingthis menu at night.]Effect [ ]: 4 settings are available: Colour,Sephia, Black & white, Negative.]Flash [ ]: Allows you to set the flash when youtake a photo in dark surroundings. Note]You can control the image size, brightness,colour and zooming by going into the camerasettings . Then use the , , tonavigate and change the various settings.( or ).Note]When a low battery indication is given, theCamera or Multimedia function may notoperate.]The battery level indication may appear lowerwhen using the Multimedia functions, due tohigh current consumption.MULTIMEDIAMULTIMEDIA41](https://usermanual.wiki/LG-Electronics-USA/MG810/User-Guide-636810-Page-41.png)
![42MULTIMEDIAMULTIMEDIA]Zoom [ ]: Allowing you to set the zooming valuefrom x1, x2, x3 and x4 depending on the resolution.]Brightness [ ]: Use the right/left navigation keysto adjust lighting. 5 lighting levels are available: -2, -1, 0, 1, 2.]Size [ ]: Allows you to set the image size to oneof Hi (1600x1200), (1280x960), (1280x720),Med (640x480), Low (320x240), (176x220),(72x72) main screen, contact, and front screen. Ifyou want to take panorama (1280x720), youshould swivel the phone. Frame shots are onlyavailable with the 176x220 pixel resolution.]Timer [ ]: Allows you to select the time delay(Off, 3 Seconds, 5 Seconds or 10 seconds). Thenthe phone takes a photo after the specified time.]Quality [ ]: Allows you to set the image qualityfrom Normal, Fine and Superfine.]White Balance [ ]: Allows you to change thesettings according to the environment.]Auto focus [ ]: Automatically adjusts the focusfor a clear, sharp picture with a single press of abutton.]Metering [ ]: Determines the lighting based on acertain part of the subject. You can select one of thefollowing options Centred, Spot and Combined.]Memory in use [ ]: You can select a storagespace; Phone or Memory card.]Album [ ]: Allow you to see photos saved inyour phone.]Exit [ ]: Back to the screen mode to take photos. Note]In My album you may only view pictures takenby the handset’s camera.](https://usermanual.wiki/LG-Electronics-USA/MG810/User-Guide-636810-Page-42.png)
![43When you are in Photo Camera capture mode, youmay adjust the zoom by pressing the side Up/Downnavigation keys. •To take a picture with phone closed 1. Press and hold [ ] for a few seconds.•MP3: Activates the MP3 mode.•Take picture: Activates the Take photo mode.• Slide show: View the pictures in Album as a slideshow.Digital Camera Mode To enter the Digital Camera Mode you should swiveland close the flip whilst the handset is in idle mode.Now the handset will automatically enter DigitalCamera Mode.- To enter the camera’s main menu, press and hold theside camera button.- With side up/down buttons you may scroll throughthe settings items. After the necessary item isselected, press the side camera button, and you willaccess the detailed settings of this selected feature.By using the side up/down buttons select thedesired setting and press the side camera button forconfirmation.Note]To take a panorama photo (1280x720resolution) you should swivel and close the flip.MULTIMEDIAOnce all the desired settings have been selected,focus on the subject to capture and press theCamera key or OK key. With a click, the image iscaptured and the following menu bar appears.MMS messageSave Delete](https://usermanual.wiki/LG-Electronics-USA/MG810/User-Guide-636810-Page-43.png)
![MULTIMEDIA44- To exit to camera capture mode you should pressthe and hold side camera button.- A short press of the camera key is all that is requiredto take a photo.• Torch: Activates the flash light.• Back: Goes back to the previous menu.VIDEO CAMERA MENU 4.21. Select Video camera menu.2. To be able to record, you must reverse the displayof the phone and close.3. You can also amend the brightness, size, quality andother settings by pressing and holding downthe for a few seconds.Video camera settings menu is the same with Photocamera settings, except following items: ]Size: You may select following resolution:128x96, 176x144 and 208x160. ]Record time: You may select recording time fromthe list: 1 min, 5 min, 30 min, 90 min andunlimited. Once the settings are displayed on the screen, youcan scroll through them using the side keys. Scroll to the setting you wish to change, pressthe and it will bring up the setting values. Usethe side keys to scroll to your preferred choice andthen press the to select.4. To start recording press . As soon as it startsto record a timer will be displayed.5. Press the to end the recording and this willnow be saved.VOICE RECORDER MENU 4.3With the voice memo feature you can record up to 20voice messages and each memo can be up to 20seconds long.Note]When you are in Digital Camera Mode, andthere’s no action for some time, the phone willautomatically exit to idle mode.MULTIMEDIA](https://usermanual.wiki/LG-Electronics-USA/MG810/User-Guide-636810-Page-44.png)
![45Record (Menu 4.3.1)You can record a voice memo in the Voice recordermenu.1. Once recording has started, the message Recordingand the remaining time is displayed.2. If you want to finish recording, press the left softkey [Save].3. Key in Voice memo title, press the left soft key[OK].View list (Menu 4.3.2) The list of voice memos are displayed. You canplayback and delete the recorded voice memo. Thefollowing [Options] menus are available]Play: Allows you to listen to the recorded voicememo.]Send: Allows you to send via multimedia messageand e-mail.]Delete: Allows you to delete voice memo.]Delete all: Allows you to delete all voice memos.MP3 MENU 4.4 The MG810 has an integrated MP3 player. You canenjoy listening to MP3 music files on your phonememory using a compatible headset or via the internalloudspeaker. The music player supports:• MPEG-1 Layer III, MPEG-2 Layer III, MPEG-2.5Layer III: Sampling frequency up from 8KHz to48KHz. Bit rate up to 320Kbps, stereo.• AAC: ADIF, ADTS formats (Sampling frequency from8KHz to 48KHz)Note]Because of the small dimension of the speaker,in some cases the audio could be distorted,especially at maximum volume and when thereare lots of bass sounds. Therefore, werecommend you to use the stereo headset inorder to appreciate the high quality of yourmusic.MULTIMEDIA](https://usermanual.wiki/LG-Electronics-USA/MG810/User-Guide-636810-Page-45.png)
![MULTIMEDIA 46• AAC+: V1 : (Bit rate 16-128Kbps) V2 : (Bit rate 16-48Kbps) (Sampling frequency from 8KHz to48KHz)• MP4, M4A: Sampling frequency up from 8KHz to48KHz, Bit rate up to 320Kbps, stereo.• WMA: Sampling frequency up from 8KHz to 48KHz,Bit rate up to 320Kbps, stereo.After you copy songs in removable disk, you shouldexecute safe remove from your system.MP3 player (MENU 4.4.1) The following screen is shown up.Note]You should copy your MP3 files to Mymedia\Music slide. If you copy to another slide,you will not be able to view MP3 files.Note]MG810 doesn’t support the variable bit rate ofall mentioned file types. Therefore, you can’tchange the file from MP3 format to AAC.MULTIMEDIA File name withthe fileextensionPlayer skinStereoShufflePlaymodeStatus of themusic controllerVolume level6 volume levelsincluding muteEqualizersetting valueRunning time Progressive bar](https://usermanual.wiki/LG-Electronics-USA/MG810/User-Guide-636810-Page-46.png)
![471. Press MP3 menu, and then select MP3 player.2. Press the left soft key [Options] to accessthefollowing menus.]View playlist: You can select another MP3 file youwish to play.]Area repeat: The special area part of the currentmusic is repeated when you select ON of the menu.]Set as ringtone: You can set an MP3 file as a ring-tone.]Settings: There are 5 settings under this menu,which are explained in more detail on the next page.Playlist (Menu 4.4.2)This menu allows you to view the whole play list. Youcan move through the tracks by pressing thenavigation key. In addition, once you have selected thetrack, you can delete the file or view its information viathe options menu.Settings (Menu 4.4.3)]Equalizer This phone has 5 preset equalizer settings. Whenyou enter this menu, you can view and change thesettings as desired.]PlaymodeThis menu allows you to set the play mode: Play all,Repeat all, Repeat one.]Set shuffle If you select the ON option, then your saved trackswill be played in a random order.]Visual effect This menu allows you to change the visual back-ground of the main and sub LCD on the phonewhilst an MP3 is playing.Note]In case that any invalid file is included in theplaylist, an error message will be popped up andgo back to the prior screen.MULTIMEDIA Repeat LoopPlay all Repeat all A>BRepeat one](https://usermanual.wiki/LG-Electronics-USA/MG810/User-Guide-636810-Page-47.png)
![MULTIMEDIA 48]Flip setting: • Continue playingAlthough you close the flip of the phone, yourMP3 continues playing without interruption.• Stop playingThe MP3 will stop playing, once the flip is closed.PHOTO ALBUM MENU 4.5You can view and send a picture. In addition, you canset the picture as a wallpaper. ]Multi view: You can view the maximum of 9thumbnails in a screen.]Send via Bluetooth: You can send a picture byBluetooth. ]Set as wallpaper: You can set a picture as awallpaper. ]Slide show: You can view the pictures in a slideshow. ]Delete: You can delete a picture. ]Edit title: You can edit the title of picture. ]Information: Displays information about the savedpicture. Note]The Photo Album will only display picturestaken by the handsets camera.Note]Music is copyright protected in internationaltreaties and national copyright laws. It may benecessary to obtain permission or a license toreproduce or copy music. In some countriesnational law prohibits private copying ofcopyrighted material. Please check the nationallegislation of the applicable country concerningthe use of such material.MULTIMEDIA](https://usermanual.wiki/LG-Electronics-USA/MG810/User-Guide-636810-Page-48.png)
![49VIDEO ALBUM MENU 4.6You can view videos which have been saved in thememory.]Play: You can play the video file when pressing theOK key or selecting Play menu of the Options menu.To play recorded video with 208x160 resolutionyou should swivel and close flip.]Send via Bluetooth: Send the selected file toanother device via Bluetooth]Copy/Move to external memory: Copy/Move theselected file to the same slide at Multimedia]Rename: Change the file name of selected file. Themaximum length of characters is 90. In filename it’simpossible to use symbols such as / < > # @ * andetc. And You can’t change the extension of file.]Delete: Delete a file.]Delete all: Delete all files in the list]Information: Show the file information.SETTINGS MENU 4.7 Camera(Menu 4.7.1)]Auto save: If you set this feature to On, the imageswill be saved automatically without displaying themenu bar to save.]Delete all photos: You can delete all the photoswhich have been saved in the memory.Video camera (Menu 4.7.2) ]Delete all videos: Allows you to delete all the videoswhich have been saved in the memory.MULTIMEDIA](https://usermanual.wiki/LG-Electronics-USA/MG810/User-Guide-636810-Page-49.png)
![MESSAGES 50NEW MESSAGE MENU 5.1This menu includes functions related to SMS (ShortMessage Service), MMS (Multimedia MessageService), Email, voice mail, as well as the network’sservice messages.Write text message (Menu 5.1.1) You can write and edit text message, checking thenumber of message pages.1. Enter the New messages menu by pressing the leftsoft key [Select].2. If you want to write a new message, select Writetext message. 3. To make text input easier, use T9.4. Press [Insert] to attach the following;Insert ]Images: You can insert the Default graphics orgraphics in My pictures that are available for shortmessages.]Sounds: You can insert sounds that are available forshort messages. ]Text templates: You can use Text templates alreadyset in the phone.]Contacts: You can add phone numbers or e-mailaddresses in the address book.]Symbol: You can add special characters.]My business card: You can add your Business cardto the message.5. After you complete the message, to select therequired option, press the left soft key [Options].Options ]Send: Sends text messages.1. Enter numbers of recipient.2. Press key to add more recipients.3. You can add phone numbers in the address book.4. Once the numbers have been entered, press the leftsoft key to send the message. All messageswill automatically be saved in the outbox slide, evenafter a sending failure.]Save to drafts: Stores messages in the Drafts slide.MESSAGES](https://usermanual.wiki/LG-Electronics-USA/MG810/User-Guide-636810-Page-50.png)
![51]Font & Alignment: You can select the Size andStyle of font, and the alignment of text.]Colour: You can also set the Colour of the text(foreground) and the background.]Add T9 dictionary: You can add your own words.This menu will only be shown when the edit modehas been set to T9ABC/T9Abc/T9abc.]T9 languages: Select the desired language for T9input mode. You can also deactivate the T9 inputmode by selecting ‘T9 off’.]Exit: If you press Exit whilst writing a message, youwill be taken back to the message menu. Also thewritten message will not have been saved.Write multimedia message (Menu 5.1.2)A multimedia message can contain text, images,and/or sound clips. This feature can be used only if itis supported by your network operator or serviceprovider. Only devices that offer compatiblemultimedia message or e-mail features can receive andsend multimedia messages.1. Enter the New message menu by pressing the leftsoft key [Select].2. If you want to write a new message, select Writemultimedia message. 3. You can create a new message or choose one of themultimedia message templates already made.4. Press Insert to add Image, Sound, External memory,Contacts, Symbol, New photo, New sound, Texttemplates, My business card.Maximum available file size, that can be inserted toMMS-message, is 100 kb.Options ]Send: You can send multimedia messages to multiplerecipients, as well as save it to send at a later time.Note]This phone supports EMS release 5, so isavailable to send colour pictures, sounds, textstyles, etc.. If the other parties handsets do notsupport such options, the pictures, sounds ortexts sent may not be displayed correctly ontheir phones.MESSAGES](https://usermanual.wiki/LG-Electronics-USA/MG810/User-Guide-636810-Page-51.png)
![52]Preview: You can preview multimedia messages youhave created.]Save: You can save multimedia messages To draftsor As template.]Edit subject: Allows you to modify the multimediamessage you have chosen.]Add slide: You can add a slide before or aftercurrent slide.]Move to slide: You can move to previous or nextslide.]Delete slide: You can delete current folders.]Set slide format- Set timer: You can set a timer for slide, text,picture and sound.]Add T9 dictionary: You can add your own words.This menu will only be shown when the edit modehas been set to T9ABC/T9Abc/T9abc.]T9 languages: Select the desired language for T9input mode. You can also deactivate T9 input modeby selecting ‘T9 off’.]Exit: Will take you back to the Message menu. Write email message (Menu 5.1.3) To send/receive an email, you should set up the emailaccount. Refer to Email on page 49 first.1. You can input up to 12 email addresses in the Toand Cc field.Tip: To input “ @”, press the and select “ @”.2. Key in the subject of the mail and press OK.3. After writing an email message, press the left softkey [Options]. You can access the followingoption menus. Note]When creating a multimedia message, if youupload a picture (50K) you may find that whilstthe picture is loading you will not be able tocarry out any other actions until the picture hascompeted loading.Note]All messages will be automatically saved in theoutbox slide, even after a sending failure.MESSAGES MESSAGES](https://usermanual.wiki/LG-Electronics-USA/MG810/User-Guide-636810-Page-52.png)
![53]Send: Sends the email message. ]Edit recipients: You can edit recipients.]Edit subject: You can edit the subject. ]Save to drafts: Select this to save the message inDrafts.]T9 dictionary: Select the language for T9 inputmode. You can also deactivate the T9 input mode byselecting ‘T9 off’.]Exit: If you select Exit whilst writing a message, youwill be taken back to the message menu. Also thewritten message will not have been saved.4. You can attach files by pressing the right soft key[Attach].Note]For each e-mail account you may save up to 50messages (totally 150 for three accounts). InInbox slide you may save not more than 30messages, in Drafts and Outbox folders - 5messages, and in Sent slide up to 10 messages.In case Drafts Outbox or Sent slide is full, andyou try to save new message to one of thisfolders, first saved message will be automaticallydeleted.]Maximum size for one sent message is 300 kbwith attachments, and maximum size for onereceived message is 100 kb. In case you havereceived message with more than 5attachments, only 5 of them will be received.Some attachment may display incorrectly.MESSAGES](https://usermanual.wiki/LG-Electronics-USA/MG810/User-Guide-636810-Page-53.png)
![54INBOX MENU 5.2You will be alerted when you have received a message.They will be stored in the Inbox. In the Inbox, you canidentify each message by icons. For detail, see the icondirective.If the phone shows ‘No space for SIM message’, youonly have to delete the SIM messages from the Inbox.If the phone displays ‘No space for message’, you willthen need to delete messages, media or applicationsto free up space.* SIM messageSIM message means that the message isexceptionally stored in the SIM card. You can movethis message to the phone.When you are notified that you have received amultimedia message, you have to wait for the messageto be downloaded before you can view it.To read a message, select one of the messages bypressing the left soft key .]View: You can view the received messages.]Delete: You can delete the current message.]Reply: You can reply to the sender.]Forward: You can forward the selected message toanother party. ]Return call: You can call back the sender. ]Information: You can view information aboutreceived messages; Sender’s address, Subject (onlyfor Multimedia message), Message date & time,Message type, Message size.]Delete all: You can delete all messages.MESSAGES Icon Icon directiveMultimedia message Short message SIM message Read multimedia messageRead text message Push message Notified multimedia messageMESSAGES](https://usermanual.wiki/LG-Electronics-USA/MG810/User-Guide-636810-Page-54.png)
![55MAILBOX MENU 5.3 When you access this menu, you can either connect toyour remote mailbox to retrieve your new emailmessages, or you can view the previously retrievedemail messages without logging in to the email server.You can check the saved emails, drafts, outbox, andsent emails. In the Inbox, up to 30 emails are stored.DRAFTS MENU 5.4Using this menu, you can preset up to five multimediamessages that you use most frequently. This menushows the preset multimedia message list.The following options are available.]View: You can see the multimedia messages.]Edit: Allows you to modify the chosen message.]Delete: Deletes the message you choose.]Information: To view the information of themessage. ]Delete all: Deletes all of the messages in the slide.OUTBOX MENU 5.5This menu allows you to view the messages which youhave sent, those that are currently sending ormessages that have failed sending previously.]View: You can view the message.]Forward: You can forward the selected message toanother party.]Delete: You can delete the message.]Information: You can check the information of eachmessage.]Delete all: You can delete all the messages in theoutbox.MESSAGES Icon Icon directiveMMS Unsent MMS delivery confirmed SMS unsent SMS delivery confirmed](https://usermanual.wiki/LG-Electronics-USA/MG810/User-Guide-636810-Page-55.png)
![LISTEN TO VOICE MAIL MENU 5.6Once this menu has been selected, simply press theleft soft key [OK] to listen to voice mail. Youcan also hold down the key in standby mode tolisten to voice mail.INFO MESSAGE MENU 5.7(DEPENDENT TO NETWORK AND SUBSCRIPTION) Info service messages are text messages delivered bythe network to your handset. They provide generalinformation such as weather reports, traffic news,taxis, pharmacies, and stock prices. When you receivean info service message, you will see a popup messageshow you that or the info service message is directlydisplayed. To view the message again follow thesequence shown below;Read(Menu 5.7.1)1. When you have received an info service messageand select Read to view the message, it will bedisplayed on the screen. You can read anothermessage by scrolling , or [Next].2. The message will be shown until another message isselected.Topics (Menu 5.7.2)(Dependent to network and subscription)]Add new: You can add Info service message numbersin the Phone memory with its nickname.]View list: You can see Info service message numberswhich you have added. If you press [Options],you can edit and delete info message categorieswhich you have added.]Active list: You can select info service messagenumbers in the active list. if you activate an infoservice number, you can receive messages sent fromthe number.Note]When you receive a voice mail, your phone willdisplay an icon and you will hear an alert. Pleasecheck with your network provider for details oftheir service in order to configure the handsetcorrectly.MESSAGES 56MESSAGES](https://usermanual.wiki/LG-Electronics-USA/MG810/User-Guide-636810-Page-56.png)
![TEMPLATES MENU 5.8 Text templates(Menu 5.8.1) You have 6 text templates as below;• Please call me back. • I’m late. I will be there at •Where are you now? •I am on the way. • Top urgent. Please contact. • I love you. Multimedia templates (Menu 5.8.2)After you have saved a new template, you can use thefollowing options.]View: You can see multimedia templates.]Delete: You can delete multimedia templates.]Add new: Allows you to add new multimediatemplates.]Write messages: You can write and send multimediamessages.]Edit: You can edit multimedia templates.]Delete all: Allows you to delete all multimediamessages.SETTINGS MENU 5.9Text message (Menu 5.9.1)]Message types:Text, Voice, Fax, Natl. paging, X.400, E-mail,ERMESUsually, the type of message is set to Text. You canconvert your text into alternative formats. Contactyour service provider for the availability of thisfunction.]Validity period: This network service allows you toset how long your text messages will be stored at themessage centre.]Delivery report: If you set to Yes, you can checkwhether your message is sent successfully.57MESSAGES](https://usermanual.wiki/LG-Electronics-USA/MG810/User-Guide-636810-Page-57.png)
![]Reply charging: When a message is sent, it allowsthe recipients to reply and charge the cost of thereply to your telephone bill.]SMS centre: If you want to send the text message,you can receive the address of SMS centre throughthis menu.Mulitimedia message (Menu 5.9.2) ]Priority: You can set the priority of the message youchoose.]Validity period: This network service allows you toset how long your text messages will be stored at themessage centre.]Subject: You can enter multimedia messages subjectwhen this menu is on.]Delivery report: If it is set to Yes in this menu, youcan check whether your message is sent successfully.]Auto retrieve: If you select On, you receivemultimedia messages automatically. If you select Off,you receive only notification message in the inboxand then you can check this notification. If you select Home network only, you receivemultimedia messages depends on Homenetwork.]Network settings: If you select multimedia messageserver, you can set URL for multimedia messageserver.]Permitted message types Personal: Personal message. Advertisements: Commercial message. Information: Necessary information.Email (Menu 5.9.3)This menu allows you to edit, delete or add an emailaccount.]Account You can set up to 3 email accounts by selecting Addnew. Using the Edit menu, you can set the followingvalues.]Set as defaultMESSAGES 58MESSAGES](https://usermanual.wiki/LG-Electronics-USA/MG810/User-Guide-636810-Page-58.png)
![]Edit - Title: Account name.- User ID: Enter your email ID.- Password: Enter your email password.- Email address: Enter the email address given toyou by your service provider.- Outgoing server: Enter the SMTP address andPort number of computer that sends your email.- Incoming server: Enter the POP3 address andPort number of the that receives your email.- Leave msg on server: Select Yes to leave themessages on the server.- Insert signature: Select Yes to attach yoursignature to your email messages.- Access point: Allow you to select the accesspoint from the list.- SMTP port number: Allow you to edit SMTP portnumber.- POP3 port number: Allow you to edit POP3 portnumber.- Outgoing server ID/PW: Enter the ID andpassword for sending your email.]Delete: Deletes the selected account from the list.]Access point You can edit the access points.There are default access points for some opera tors,stored in phone memory.]Title: Access point name.]APN: Input the APN of Access point.]User ID: Enter the User ID of your access point.]Password: Enter the Password of your access point.]Signature: You can make your signature.Voice mailbox number (Menu 5.9.4)You can receive the voicemail if your network serviceprovider supports this feature. When a new voicemailhas arrived, the symbol will be displayed on the screen.Please check with your network service provider fordetails of their service in order to configure the phoneaccordingly.59MESSAGES](https://usermanual.wiki/LG-Electronics-USA/MG810/User-Guide-636810-Page-59.png)
![]Home: You can listen to voice mails by selectingHome. ]Roaming: Even when you are abroad, you can listento voice mails if a roaming service is supported.Info message (Menu 5.9.5) ]Receive Yes: If you select this menu, your phone will receiveInfo service messages. No: If you select this menu, your phone will notreceive Info service messages any more.]Alert Yes: Your phone will beep when you have receivedInfo service message numbers.No: Your phone will not beep even though you havereceived info service messages.]Languages You can select the language you want by pressing[On/Off]. Then, the info service message will beshown in the language that you selected.Push message (Menu 5.9.6) You can set the option whether you will receive themessage or not.MESSAGES60MESSAGES](https://usermanual.wiki/LG-Electronics-USA/MG810/User-Guide-636810-Page-60.png)
![VIDEOS MENU 6.1Show the list of 3GP, 3G2 files at My media\Videos inMultimedia memory.]Play: You can play the video file by pressing the OKkey or selecting Play from the Option menu. To playrecorded videos with 208x160 resolution youshould swivel and close flip.]Send via Bluetooth: Send the selected file toanother device via Bluetooth ]Copy to External memory: Copy the selected fileto the same slide at Multimedia memory/Externalmemory.]Move to External memory: Move the selected fileto the same slide at Multimedia memory/Externalmemory.]Rename: change the file name of the selected file.The maximum length of characters is 200. And Youcan not change the extension of file.]Delete: Delete a file.]Delete all: Deletes all the files in the list]Information: Shows the file information.WARNING! The following characters, \ / : * ? ì < > cannot be used.WARNING! Please do not remove the external memorywhilst in the process of copying/moving a file as this maycause damage to the phone.Note]You may send files via Bluetooth only if they arestored in the phone memory, not on thememory card. To send files from the externalmemory, please, firstly copy it to internal phonememory.Note]Do not change the default slide name, or it doesnot work properly.MY STUFF61MY STUFF](https://usermanual.wiki/LG-Electronics-USA/MG810/User-Guide-636810-Page-61.png)
![62PHOTOS MENU 6.2Shows the list of JPG files at My media\Photos inMultimedia memory.]View: You can see the JPG file by pressing the OKkey or selecting View from the Option menu.]Send via email: Send the selected file to anotherdevice via email if the file size is less than 300Kbytes.]Send via Bluetooth: Send the selected file toanother device via Bluetooth.]Copy to External memory: Copy the selected fileto the same slide at Multimedia memory/Externalmemory.]Move to External memory: Move the selected fileto the same slide at Multimedia memory/Externalmemory.]Rename: change the file name of selected file. Themaximum length of characters is 200. And You cannot change the extension of file.]Delete: Delete a file.]Delete all: Deletes all the files in the list]Information: Shows the file information.]In Photos slide in internal and in externalmemory only .JPG (.JPEG) files can be stored. InImages slide in internal and in external memoryyou may store .GIF, .JPG (.JPEG) and otherimage format files.]To setup .JPG (.JPEG) file from Photo slide aswallpaper, go to Menu-Multimedia-Photo albumand then please select Set as wallpaper inOptions menu.Note]You may send files via Bluetooth only if they arestored in phone memory, not on memory card.To send files from the external memory, please,firstly copy it to internal phone memory.Note]The maximum size of JPG file you can see is460Kbytes.MY STUFF MY STUFF](https://usermanual.wiki/LG-Electronics-USA/MG810/User-Guide-636810-Page-62.png)
![63MUSIC MENU 6.3Shows the list of MP3, MP4, AAC, M4A, WMA files atMy media\Music in Multimedia memory. ]Play: You can play the MP3 file by pressing the OKkey or selecting Play from the Option menu. ]Send via Bluetooth: Send the selected file toanother device via Bluetooth ]Copy to External memory: Copy the selected fileto the same slide at Multimedia memory/Externalmemory.]Move to External memory: Move the selected fileto the same slide at Multimedia memory/Externalmemory.]Rename: change the file name of selected file. Themaximum length of characters is 200. And You cannot change the extension of file.]Delete: Delete a file.]Delete all: Deletes all files in the list]Information: Shows the file information.TEXT MENU 6.4Show the list of TXT files at My media\Text inMultimedia memory. ]View: You can see the TXT file by pressing the OKkey or selecting View from the Option menu. ]Send via email: Send the selected file to anotherdevice via email if the file size is less than 300Kbytes]Send via Bluetooth: Send the selected file toanother device via Bluetooth. Note]The maximum size of TXT file you can see is460Kbytes.Note]You may send files via Bluetooth only if they arestored in the phone memory, not on memorycard. To send file from external memory, please,firstly copy it to internal phone memory.MY STUFF](https://usermanual.wiki/LG-Electronics-USA/MG810/User-Guide-636810-Page-63.png)
![MY STUFF 64]Copy to External memory: Copy the selected fileto the same slide at Multimedia memory/Externalmemory.]Move to External memory: Move the selected fileto the same slide at Multimedia memory/Externalmemory.]Rename: change the file name of selected file. Themaximum length of characters is 200. And You cannot change the extension of file.]Delete: Delete a file.]Delete all: Delete all files in the list]Information: Show the file information.IMAGES MENU 6.5 After selecting a image, press the left key [View] and then you can check the options as follow:]Set as wallpaper: Currently selected image can beset as a wallpaper.]Write messages: The images downloaded from thenetwork can be sent by Multimedia or Email service.Maximum message size is 100 kb for MMS messageand 300 kb for E-mail message.]Send via Bluetooth: The sound downloaded fromnetwork can be sent by Bluetooth. ]Copy to External memory: Copy the selected fileto the same slide at Multimedia memory/Externalmemory.Note]You may send files via Bluetooth only if they arestored in the phone memory, not on memorycard. To send file from external memory, please,firstly copy it to internal phone memory.]Maximum .GIF supporting size is 100 Kb.Note]You may send files via Bluetooth only if they arestored in the phone memory, not on memorycard. To send file from external memory, please,firstly copy it to internal phone memory.MY STUFF](https://usermanual.wiki/LG-Electronics-USA/MG810/User-Guide-636810-Page-64.png)
![65SOUNDS MENU 6.6 After selecting a sound, press the left key [Options].You can check the options as follow:]Set as ringtone: Currently selected sound can beset as a ringtone.]Write messages: The sound downloaded fromnetwork can be sent by SMS or MMS, Email service.Maximum MMS message is 100 kb, and for e-mail is300 kb.]Send via Bluetooth: The sound downloaded fromnetwork can be sent by Bluetooth.]Copy to External memory: Copy the selected fileto the same slide at Multimedia memory/Externalmemory.OTHERS MENU 6.7Shows the list of files at My media\Others inMultimedia memory. ]Play: You can play a file if it is one of the followingtypes; 3G2, MP3, MP4, AAC, M4A and WMA. ]View: You can see a file if it is one of the followingtypes; JPG, GIF, WBMP, PNG and TXT.]Send via Bluetooth: Send the selected file toanother device via BluetoothNote]You may send files via Bluetooth only if they arestored in the phone memory, not on memorycard. To send file from external memory, please,firstly copy it to internal phone memory.Note]You may send files via Bluetooth only if they arestored in the phone memory, not on memorycard. To send file from external memory, please,firstly copy it to internal phone memory. Whenyou send .MMF or .MIDI sound file from anotherphone via Bluetooth, it will be saves to Othersslide. But if you will setup this file as ring tone, itwill be copied to Sounds slide.MY STUFF](https://usermanual.wiki/LG-Electronics-USA/MG810/User-Guide-636810-Page-65.png)
![MY STUFF 66GAMES & APPS MENU 6.8In this menu, you can manage the Java applicationsinstalled on your phone. You can play or deletedownloaded applications, or set the connect option.This menu will connect to the Menu 1.1.MY STUFF New Fantastic LG There is mass storage functionin MG810. You can download MP3 files, and photos, video,txt files etc. NoticeMASS STORAGE function will only work in idlemode.]If you receive a call during MASS STORAGE thecall will be rejected but after you safely removethe cable, you will be able to see the missed call.](https://usermanual.wiki/LG-Electronics-USA/MG810/User-Guide-636810-Page-66.png)
![67PROFILES MY STUFF In Profiles, you can adjust and customise the phonetones for different events, environments, or callergroups.There are five preset profiles: Vibrate only, Silent,General, Loud and Headset. Each profile can bepersonalised. Press the left soft key [Menu] and selectProfiles using up/down navigation keys.Activate (Menu 7.X.1)1. A list of profiles is displayed.2. In the Profiles list, scroll to the profile you want toactivate and press the left soft key [Select]or OK key.3. Then, select Activate.Personalise (Menu 7.X.2)Scroll to the desired profile in the Profile list. Afterpressing the left soft key or the OK key, selectPersonalise. The profile setting option opens. Set theoption as required.]Call alert type: Set the alert type for incoming calls. ]Ring tone: Select the desired ring tone from the list. ]Ring volume: Set the volume of the ringing tone.]Message alert type: Set the alert type for messages.]Message tone: Select the alert tone for messages.]Keypad tone: Select the desired keypad tone.]Keypad volume: Set the volume of keypad tone.]Flip tone: Allows you to set the flip tone.]Effect sound volume: Set the volume of effectsound.]Power on/off volume: Set the volume of the ringingtone when switching the phone on/off.]Auto answer: This function will be activated onlywhen your phone is connected to the handsfree kit.• Off: The phone will not answer automatically.• After 5 secs: After 5 seconds, the phone willanswer automatically.• After 10 secs: After 10 seconds, the phone willanswer automatically.](https://usermanual.wiki/LG-Electronics-USA/MG810/User-Guide-636810-Page-67.png)
![68PROFILES PROFILES Rename (Menu 7-X-3)You can rename a profile and give it any name youchoose to.1. To change the name of a profile, scroll to the profilein the profile list and after pressing the left soft keyor the OK key, select Rename.2. Key in the desired name and press the OK key orthe left soft key [OK].Note]Vibrate only, Silent and Headset profilescannot be renamed.](https://usermanual.wiki/LG-Electronics-USA/MG810/User-Guide-636810-Page-68.png)
![69CONNECTIVITYCONNECTIVITYBLUETOOTH MENU 8.1Bluetooth enables compatible mobile devices,peripherals and computers that are in close proximityto communicate directly with each other without wires.This handset supports built-in Bluetooth connectivity,which makes it possible to connect them withcompatible Bluetooth headsets, computer applicationsand so on.Paired devices (Menu 8.1.1)You can view all devices which are compatible withBluetooth phone. Handsfree devices (Menu 8.1.2)You can view the list of handsfree devices which iscompatible with Bluetooth phone.If you have entered Paired devices or Handsfreedevices, you will see the following options in boththose menus.]Connect/Disconnect: Allows you to connect toother Bluetooth devices. ]Add new: Allows you to search for new Bluetoothdevice.]Assign name: Allows you to change the name ofBluetooth device and how its displayed on thehandset.]Set as authorised/Set as unauthorised: Allows youto set the authorised connection between eachBluetooth devices.]All service: Allows you to view all services which aresupported by a Bluetooth device. ]Delete: Allows you to delete the Bluetooth device. ]Delete all: Allows you to delete all Bluetoothdevices.Note]Due to a compatibility problem, some devicesmay not support this function.](https://usermanual.wiki/LG-Electronics-USA/MG810/User-Guide-636810-Page-69.png)
![CONNECTIVITY70Settings (Menu 8.1.3) You can register a new device which is compatible withBluetooth. If you already have added the device, youcan search it after entering a password.]Set Bluetooth You can activate or cancel Bluetooth function.]My handset’s visibilityYou can set the function that your phone is visibleon the other Bluetooth devices.]My handset’s nameYou can set the name of Bluetooth device. Thedefault name is LG MG810.Supported services (Menu 8.1.4) You can see the Bluetooth service list, like a Filetransfer, Image printing.MODEM MENU 8.2You can access the network services through theModem. RED MENU 8.3Puede seleccionar una red que se registraráautomática o manualmente. Normalmente, la selecciónde red está establecida en Automático. Selección red (Menu 8.3.1) ]Automático: Si selecciona el modo automático, elteléfono buscará y seleccionará automáticamenteuna red. Una vez seleccionada la opción Automático,el teléfono se quedará configurado en “Automático”aunque se apague y se encienda.]Manual: El teléfono buscará la lista de redesdisponibles y las mostrará. A continuación, puedeseleccionar la red que desea usar si la red tiene unacuerdo de itinerancia con el operador de red local.El teléfono le permite seleccionar otra red si nopuede acceder a la red seleccionada. CONNECTIVITY](https://usermanual.wiki/LG-Electronics-USA/MG810/User-Guide-636810-Page-70.png)
![CONNECTIVITY71]Preferidas: Puede establecer una lista de redespreferidas para que el teléfono intente registrarlecon éstas antes de intentarlo con otras. Esta listaestá establecida en la lista predefinida de redesconocidas del teléfono. Selección banda (Menu 8.3.2) Utilice esta opción para definir el ancho de banda condos posibles selecciones: EGSM/PCS o EGSM/DCS.ADJUNTAR MENU 8.4Si selecciona Encender y está en una red compatiblecon datos en paquetes (packet data), el teléfono seregistra en la red GPRS y el envío de mensajes cortosse hará mediante GPRS. También es más rápido iniciaruna conexión de datos en paquete, por ejemplo paraenviar y recibir correo electrónico. Si selecciona Si esnecesario, el teléfono usará una conexión de datos enpaquete sólo si usted inicia una aplicación o emprendepaquete sólo si usted inicia una aplicación o emprendecierra después de que ninguna aplicación la utilice ya.NoteSi no hay cobertura de GPRS y usted ha elegidoEncender, el teléfono tratará periódicamente deestablecer una conexión de datos en paquete.](https://usermanual.wiki/LG-Electronics-USA/MG810/User-Guide-636810-Page-71.png)
![TOOLS72FAVOURITES MENU 9.1This option allows you to add your own favourites tothe list already provided. Once you create your ownmenu, you can access the desired function quickly inthe idle screen by pressing the up navigation key.ALARM CLOCK MENU 9.2You can set up to 5 alarm clocks to go off at aspecified time.1. Select On and enter the alarm time you want.2. Select the repeat period: Once, Mon Fri,Mon Sat, Everyday.3. Select the alarm tone you want and press [OK].4. Edit the alarm name and press [OK].CALCULATOR MENU 9.3This contains the standard functions such as +, _, x, ÷ :Addition, Subtraction, Multiplication, and Division.Furthermore, you can use the various function ofcalculator such as +/_, sin, cos, tan, log, in, exp, sqrt.1. Input the numbers by pressing numeric keys.2. Use a navigation key to select a sign for calculation.3. Then input the numbers.4. Press key to view the result.5. To input the decimal number, press key. Ifyoupress key, you can enter ( ).6. To end Calculator, press the right soft key [Back].Note]The menu of SMS, MMS and MP3 is alreadyprovided in your own favourites.TOOLS](https://usermanual.wiki/LG-Electronics-USA/MG810/User-Guide-636810-Page-72.png)
![73TOOLSUNIT CONVERTER MENU 9.4This converts any measurement into a unit you want.There are 9 types that can be converted into units:Currency, Surface, Length, Weight, Temperature,Volume, Velocity, Shoes and Clothes.1. You can select one of four unit types by pressing[Select] key.2. Select the unit you want to convert by pressing and . It’s impossible to input “-” symbolinunit converter.3. Select the standard value by using , .WORLD TIME MENU 9.5You can view clocks of the world’s major cities.1. Select the city belonged to the time zone bypressing , key.2. You can set the current time to the city time youselect by pressing the left soft key [Set].](https://usermanual.wiki/LG-Electronics-USA/MG810/User-Guide-636810-Page-73.png)
![74You can access various WAP (Wireless ApplicationProtocol) services such as banking, news, weatherreports and flight information. These services arespecially designed for mobile phones and they aremaintained by WAP service providers.Check the availability of WAP services, pricing andtariffs with your network operator and/or the serviceprovider whose service you wish to use. Serviceproviders will also give you instructions on how to usetheir services.Once connected, the homepage is displayed. Thecontent depends on the service provider. To exit thebrowser at any time, press the ( ) key. The phonewill return to the idle menu.Navigating with the WAP browser You can surf the Internet using either the phone keysor the WAP browser menu.Using the phone keys When surfing the Internet, the phone keys functiondifferently to phone mode.Using the WAP browser menu There are various menu options available when surfingthe Mobile Web. HOME MENU *.1Connects to a homepage. The homepage will be thesite which is defined in the activated profile. It will bedefined by the service provider if you have not definedit in the activated profile.Note]The WAP browser menus may vary, dependingon your browser version.BROWSERKey DescriptionScrolls each line of the content area Returns to the previous page Selects options and confirms actions BROWSER](https://usermanual.wiki/LG-Electronics-USA/MG810/User-Guide-636810-Page-74.png)
![75BROWSERBOOKMARKS MENU *.2This menu allows you to store the URL of favouriteweb pages for easy access at a later time.To create a bookmark 1. Press the left soft key [Options].2. Select Add new and press the OK key.3. After entering the desired URL and title, press theOK key.After selecting a desired bookmark, the followingoptions are available. ]Connect: Connects to the selected bookmark. ]Add new: Select this to create a new bookmark. ]Edit: You can edit the URL and/or the title of theselected bookmark. ]Delete: Deletes the selected bookmark. ]Delete all: Deletes all the bookmarks.GO TO URL MENU *.3 You can connect directly to the site you want. Afterentering a specific URL, press the OK key.SETTINGS MENU *.4You can set the profile, cache, cookie and securityrelated to internet service.Profiles (Menu *.4.1) A profile is the network information used to connectto the Internet. There are default profiles for some operators, storedin phone memory. It’s impossible to rename defaultprofiles.Each profile has submenus as follows:]Activate: Activates the selected profile.]Settings: Use this to edit and change WAP settingsfor the selected profile.](https://usermanual.wiki/LG-Electronics-USA/MG810/User-Guide-636810-Page-75.png)
![- Homepage: This setting allows you to enter theaddress (URL) of a site you want to use ashomepage. You do not need to type http:// at thefront of each URL as the WAP Browser willautomatically add it.- Bearer: You can set the bearer data service. 1Data/2 GPRS- Data settings: Appears only if you select DataSettings as a Bearer/service.Dial number: Enter the telephone number to dial toaccess your WAP gateway.User ID: The users identity for your dial-up server(and NOT the WAP gateway).Password: The password required by your dial-upserver (and NOT the WAP gateway) to identify you.Call type: Select the type of data call : Analogue ofDigital (ISDN). Linger time: You need to enter timeout period. Afterentering that, the WAP navigation service will beunavailable if any data is not input or transferred.Call speed: The speed of your data connection;9600 or 14400 ( Depends on Operator)- GPRS settings: The service settings are onlyavailable when GPRS is chosen as a bearer service.APN: Input the APN of the GPRS.User ID: The users identify for your APN server.Password: The password required by your APNserver.- Proxy settings Proxy: Activates or cancels proxy. IP address: Input the IP address of the Proxy serveryou access.Port: Input the Proxy Port.- DNS settings Primary server: Input the IP address of the primaryDNS server you access.Secondary server: Input the IP address of thesecondary DNS server you access. ]Rename: You can change the profile name. ]Add new: You can add a new profile.]Delete: Deletes the selected profile from the list.BROWSER BROWSER76](https://usermanual.wiki/LG-Electronics-USA/MG810/User-Guide-636810-Page-76.png)
![BROWSER77Cache (Menu *.4.2) The information or services you have accessed aresaved in the cache memory of the phone.Cookie (Menu *.4.3) The information or services you have accessed aresaved in the cache memory of the phone.Clear cache (Menu *.4.4) Removes all context saved in cache.Clear cookie (Menu *.4.5) Removes all context saved in cookie.Security (Menu *.4.6) A list of the available certification is shown. ]Authority: You can see the list of authoritycertificates that have been stored in your phone. ]Personal: You can see the list of personalcertificates that have been stored in your phone.Note]A cache is a buffer memory, which is used tosave data temporarily.](https://usermanual.wiki/LG-Electronics-USA/MG810/User-Guide-636810-Page-77.png)

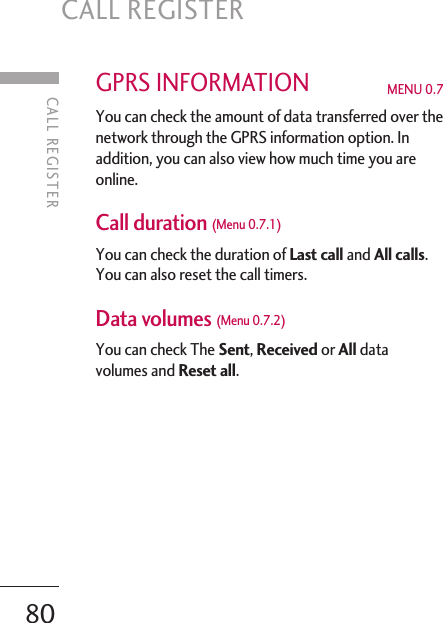
![CALL REGISTER79ALL CALLS MENU 0.4You can view all lists of outgoing or incoming calls.DELETE RECENT CALLS MENU 0.5 Allows you to delete Missed calls and Received callslists. You can delete Dialled calls and All calls lists atone time.CALL CHARGES MENU 0.6Call duration (Menu 0.6.1) Allows you to view the duration of your incoming andoutgoing calls. You can also reset the call times.The following timers are available:]Last call: Length of the last call.]All calls: Total length of all calls made and incomingcalls since the timer was last reset.]Received calls: Length of the incoming calls.]Dialled calls: Length of the outgoing calls.]Reset all: Allows you to reset the timers of all callsby pressing the left soft key [Yes].Call costs (Menu 0.6.2)Allows you to check the cost of your last call, all calls,remaining and reset the cost. To reset the cost, youneed to know your PIN2 code.Settings(SIM Dependent) (Menu 0.6.3) ]Set tariff: You can set the currency type and theunit price. Contact your service providers to obtaincharging unit prices. To select the currency or unit inthis menu, you need the PIN2 code.]Set credit: This network allows you to limit the costof your calls by selected charging units. If you selectRead, the number of remaining unit is shown. If youselect Change, you can change your change limit.]Auto display: This network service allows you to seeautomatically the cost of your last calls. If set to On,you can see the last cost when the call is released.](https://usermanual.wiki/LG-Electronics-USA/MG810/User-Guide-636810-Page-79.png)
![SETTINGSSETTINGS81DATE &TIME MENU #.1 You can set functions relating to the date and time.Set date (Menu #.1.1)]Set date You can enter the current date.]Date format You can set the Date format such asDD/MM/YYYY, MM/DD/YYYY, YYYY/MM/DD.(D: Day / M: Month / Y: Year)Set time(Menu #.1.2)]Set time You can enter the current time.]Time format Your can set the time format between 24-hour and12-hour.DISPLAY SETTINGS MENU #.2Wallpaper (Menu #.2.1) You can select the background pictures in standbymode.]Main LCD• Default : You can select a picture or an animationof wallpaper by pressing or .• My slide : You can select a picture or an animationas wallpaper.Menu Colour (Menu #.2.2) Your phone provides you with 4 menu colour themes.Set the menu colour by scrolling and pressing the leftsoft key [Select].Standby text (Menu #.2.3) If you select On, you can edit the text which isdisplayed in standby mode.](https://usermanual.wiki/LG-Electronics-USA/MG810/User-Guide-636810-Page-81.png)
![Backlight (Menu #.2.4) You can set the light-up duration of the display.Network name (Menu #.2.5) If this function is activated, network name will bedisplayed on main LCD.LANGUAGE MENU #.3You can change the language for the display texts inyour phone. This change will also affect the LanguageInput mode.CALL MENU #.4You can set the menu relevant to a call by pressing[Select] in the Setting menu.Call divert (Menu #.4.1) The Call divert service allows you to divert incomingvoice calls, fax calls to another number. For details,contact your service provider.]All voice calls Diverts voice calls unconditionally.]If busy Diverts voice calls when the phone is in use.]If no reply Diverts voice calls which you do not answer.]If out of reach Diverts voice calls when the phone is switched off orout of coverage.]All data calls]All fax calls]Cancel allCancels all call divert service.SETTINGS82SETTINGS](https://usermanual.wiki/LG-Electronics-USA/MG810/User-Guide-636810-Page-82.png)
![SETTINGS83The submenus Call divert menus have the submenus shown below.• Activate Activate the corresponding service.To voice mail centre Forwards to message centre. This function is notshown at All data calls and All fax calls menus.To other number Inputs the number for diverting.To favourite number You can check recent 5 diverted numbers.• Cancel Deactivate the corresponding service.• View status View the status of the corresponding service.Answer mode (Menu #.4.2)]Flip open If you select this menu, you can receive an incomingcall when you open the flip.]Any key If you select this menu, you can receive a call bypressing any key except [End] key.]Send key only If you select this menu, you can receive a call by onlypressing [Send] key.Send my number (Menu #.4.3) (network and subscription dependent)]Set by network If you select this, you can send your phone numberdepending on two line service such as line 1 or line 2.]OnYou can send your phone number to another party.Your phone number will be shown on the receiver’sphone.](https://usermanual.wiki/LG-Electronics-USA/MG810/User-Guide-636810-Page-83.png)
![]Off Your phone number will not be shown.Call waiting (Menu #.4.4) (network dependent)]Activate If you select Activate, you can accept a waiting(receiving) call.]Cancel If you select Cancel, you cannot recognize thewaiting (receiving) call.]View status Shows the status of Call waiting.Minute minder (Menu #.4.5) If you select On, you can check the call duration by abeep sound given every minute during a call.Auto redial (Menu #.4.6) ]OnWhen this function is activated, the phone willautomatically try to redial in the case of failure toconnect a call.]Off Your phone will not make any attempts to redialwhen the original call has not connected.SECURITY MENU #.5PIN code request (Menu #.5.1)In this menu, you can set the phone to ask for the PINcode of your SIM card when the phone is switched on.If this function is activated, you’ll be requested toenter the PIN code.1. Select PIN code request in the security settingsmenu, and then press [Select].2. Set Enable/Disable SETTINGSSETTINGS84](https://usermanual.wiki/LG-Electronics-USA/MG810/User-Guide-636810-Page-84.png)
![SETTINGS853. If you want to change the setting, you need to enterPIN code when you switch on the phone.4. If you enter wrong PIN code more than 3 times, thephone will lock out. If the PIN is blocked, you willneed to key in PUK code.5. You can enter your PUK code up to 10 times. If youput wrong PUK code more than 10 times, you cannot unlock your phone. You will need to contactyour service provider.Handset lock (Menu #.5.2) You can use a security code to avoid unauthorized useof the phone. Whenever you switch on the phone, thephone will request security code if you set phone lockto When switch on. If you set phone lock to When SIM changed, yourphone will request security code only when youchange your SIM card.Call barring (Menu #.5.3) The Call barring service prevents your phone frommaking or receiving certain category of calls. Thisfunction requires the call barring password. You can view the following submenus.]All outgoing callsThe barring service for all outgoing calls.]Outgoing international The barring service for all outgoing internationalcalls.]Outgoing international when roaming The barring service for all international outgoingcalls except home network.]All incomingThe barring service for all incoming calls.]Incoming when roamingThe barring service for all incoming calls whenroaming.]Cancel all You can cancel all barring services.]Change password You can change the password for Call BarringService.](https://usermanual.wiki/LG-Electronics-USA/MG810/User-Guide-636810-Page-85.png)
![The submenus: • Activate Allows to request the network to set call restrictionon.• Cancel Set the selected call restriction off.• View statusView the status whether the calls are barred or not.Fixed dial number (Menu #.5.4)(SIM dependent)You can restrict your outgoing calls to selected phonenumbers. The numbers are protected by your PIN2code.]Enable You can restrict your outgoing calls to selectedphone numbers.]Disable You can cancel fixed dialling function.]Number list You can view the number list saved as Fixed dialnumber.Change codes (Menu #.5.5) PIN is an abbreviation of Personal IdentificationNumber to prevent use by unauthorized person. Youcan change the access codes: Security code, PINcode, PIN2 code.1. If you want to change the Security code/PIN1/PIN2 code input your original code, and then press[OK].2. Input new Security code/PIN1/PIN2 code andverify them.MEMORY STATUS MENU #.6You can check free space and memory usage of eachrepository, Internal memory, Multimedia memory andExternal memory. You can go to each repositorymenu.SETTINGSSETTINGS86](https://usermanual.wiki/LG-Electronics-USA/MG810/User-Guide-636810-Page-86.png)
![SETTINGS87RESET SETTINGS MENU #.7You can initialize all factory defaults. You needSecurity code to activate this function. ]Restore default settings: Allows you to restoredefault settings. ]Clear multimedia memory: Allows you to formatthe multimedia memory and create a defaultdirectory. ]Clear external memory: Allows you to format theexternal memory and create default directory.](https://usermanual.wiki/LG-Electronics-USA/MG810/User-Guide-636810-Page-87.png)