LG Electronics USA MIBPQMIN MIB2 Entry User Manual
LG Electronics USA MIB2 Entry
User Manual

CONFIDENTIAL
not for distribution
CONFIDENTIAL
not for distribution
Composition Touch, Composition
Colour
Radio
Composition Touch, Composition Colour:
Radio
Stand: 21.08.2013
Englisch: 11.2013
Artikel-Nr.: 142.5R6.RCT.20
1425R6RCT20
CONFIDENTIAL
not for distribution
CONFIDENTIAL
not for distribution
Description of symbols
Refers to a section within a chapter that
contains important information and safety
notes that should always be observed.
Indicates that the section is continued on
the next page.
Indicates the end of a section.
Indicates situations in which the vehicle
must be stopped as quickly as possible.
® ™Indicates a registered trademark. Howev-
er, the absence of this symbol does not
constitute a waiver of the rights concern-
ing any term.
⇒ Symbols like these refer you to warnings
within the same section or on a given
page. They draw your attention to possi-
ble risks of accident or injury and explain
how they can be avoided.
⇒
⇒
⇒ Cross reference to information about pos-
sible damage to your vehicle within the
same section or on a given page.
DANGER
Texts with this symbol indicate dangerous
situations which will lead to fatal or severe in-
juries if you do not observe the warning.
WARNING
Texts with this symbol indicate dangerous
situations which could lead to fatal or severe
injuries if you do not observe the warning.
CAUTION
Texts with this symbol indicate dangerous
situations which could lead to slight or se-
vere injuries if you do not observe the warn-
ing.
NOTICE
Texts with this symbol indicate situations
which could cause damage to the vehicle or ve-
hicle equipment if you do not observe the
warning.
Texts with this symbol contain additional in-
formation on the protection of the environ-
ment.
Texts with this symbol contain additional in-
formation.
Volkswagen AG works continuously to develop and
further improve all models. Please understand that
we must therefore reserve the right to alter any
part of the vehicle and its equipment or technical
specifications at any time. The data provided con-
cerning scope of delivery, appearance, perform-
ance, dimensions, weights, fuel consumption,
standards and vehicle functions are all correct at
the time of going to print. Some of the equipment
described might not yet be available in a particular
vehicle (information can be provided by your local
Volkswagen dealership), and some equipment may
not be available in certain countries. No legal com-
mitment may be inferred from the information, illus-
trations or descriptions in this manual.
No part of this manual may be reprinted, repro-
duced or translated without the written permission
of Volkswagen AG.
All rights under the laws of copyright are expressly
reserved by Volkswagen AG. Subject to alteration
and amendment.
Printed in Germany.
© Volkswagen AG 2013
This paper was bleached without the use of
chlorine.
FCC Compliance Statement [Level 4]
<North America>
This device complies with part 15 of the FCC Rules. Operation is subject to the following
two conditions: (1) This device may not cause harmful interference, and (2) this device must
accept any interference received, including interference that may cause undesired operation.
NOTE:
This equipment has been tested and found to comply with the limits for a Class B digital
device, pursuant to Part 15 of the FCC Rules. These limits are designed to provide reasonable
protection against harmful interference in a residential installation. This equipment
generates, uses, and can radiate radio frequency energy and, if not installed and used in
accordance with the instructions, may cause harmful interference to radio communications.
However, there is no guarantee that interference will not occur in a particular installation. If
this equipment does cause harmful interference to radio or television reception, which can
be determined by turn-ing the equipment off and on, the user is encouraged to try to
correct the interference by one or more of the following measures:
• Reorient or relocate the receiving antenna.
• Increase the separation between the equipment and receiver.
• Connect the equipment into an outlet on a circuit different from that to which the
receiver is connected.
• Consult the dealer or an experienced radio/TV technician for help.
Caution:
Any changes or modifications in construction of this device which are not expressly
approved by the party responsible for compliance could void the user’s authority to operate
the equipment.
<Canada>
This Class B digital apparatus complies with Canadian ICES-003 “To prevent radio
interference to the licensed service, this device is intended to be operated indoors and away
from windows to provide maximum shielding. Equipment (or its transmit antenna) that is
installed outdoors is subject to licensing.”
Cet appareil numérique de la classe B est conforme à la norme NMB-003 «Pour
empêcher que cet appareil cause du brouillage au service faisant l'objet d'une licence, il doit
être utilisé à l'intérieur et devrait être placé loin des fenêtres afin de fournir un écran de
blindage maximal. Si le matériel (ou son antenne d'émission) est installé à l'extérieur, il doit
faire l'objet d'une licence.»
Operation is subject to the following two conditions :
(1) This device may not cause Interference, and (2) this device must accept any
interference, including interference that may cause undesired operation of the device.

Bluetooth Specification
Standard Bluetooth Version 4.0
Frequency Range 2400 ~ 2483.5 MHz
Output Power (Max.) +4 dBm Max.

CONFIDENTIAL
not for distribution
About this manual
● An alphabetical index is included at the end of
this manual.
● A list of abbreviations explains technical abbre-
viations and terms.
●Directions and positions (e.g. right, left, front,
rear) are normally relative to the vehicle's direction
of travel.
●Illustrations help with orientation and should be
regarded as a general guide.
● In right-hand drive vehicles the controls may
sometimes be different to those displayed in illus-
trations or described in the text.
All equipment and models are described without
indicating whether the equipment is optional or
specific to the model type. This means that some
of the equipment described might not be fitted in
your vehicle. Your Volkswagen dealership can pro-
vide more information on this.
All details provided in this manual correspond to
the information available at the time of going to
print and apply only to factory-fitted infotainment
systems. Due to continuous technical improvement
of the infotainment system and possible updates to
the unit's software, the displays and functions on
the infotainment system may differ from the details
given in this manual. No claims may be derived
from the differing details, illustrations or descrip-
tions.
Please ensure that this manual is in the vehicle if
you lend or sell the vehicle to someone else.
Composition Touch, Composition Colour
CONFIDENTIAL
not for distribution
Introduction
Before using the unit for the first time
Before using the infotainment system for the first time, carry out the following steps. This will
enable you to use the infotainment system safely and make full use of the functions it provides:
Observe safety notes ⇒ page 3.
Familiarise yourself with the controls for the infotainment system ⇒ page 7.
In the System setup, reset the infotainment system to its original condition (factory settings)
⇒ page 40.
Use suitable data storage devices for media mode ⇒ page 20.
Safety information for the infotainment system
WARNING
Accidents and injuries can occur if the driver
is distracted. Operating the infotainment sys-
tem can distract you from the road.
● Always drive carefully and responsibly.
● Select volume settings that allow signals
from outside the vehicle (such as emergency
services sirens) to be easily heard at all
times.
● Setting the volume too high may damage
your hearing. This also applies even if you
are only exposed to high volumes for short
periods.
WARNING
The volume level may suddenly change when
you switch audio source or connect a new
audio source.
● Reduce the base volume before switching
audio source or connecting a new audio
source.
WARNING
Connecting, inserting or removing a storage
device while the vehicle is in motion can dis-
tract you from the road and lead to accidents.
WARNING
Connecting leads for external devices may
obstruct the driver.
● Arrange the connecting leads so that they
do not obstruct the driver.
WARNING
External devices that are placed loose in the
vehicle or not properly secured can be flung
though the interior and cause injuries during
a sudden driving or braking manoeuvre, or in
the event of an accident.
● You should never position or attach an ex-
ternal device on a door, on the windscreen or
above or near to the areas marked “AIRBAG”
on the steering wheel, the dash panel and the
seat backrests, or between these areas and
the vehicle occupants. External devices can
cause serious injury in an accident, especial-
ly when the airbags deploy.
WARNING
The armrest may obstruct the driver's arm
movements, which could cause accidents
and severe injuries.
● Always keep the armrest down while the
vehicle is in motion.
WARNING
Opening the housing on a CD player can lead
to injuries from invisible laser radiation.
● CD players should only be repaired by a
qualified workshop.
NOTICE
The infotainment system can be damaged by
incorrect insertion of a storage device or inser-
tion of an incompatible storage device.
Introduction
142.5R6.RCT.20
CONFIDENTIAL
not for distribution
NOTICE (Continued)
● When inserting a memory card, ensure that
it is correctly positioned ⇒ page 20.
● Applying force may destroy the memory
card slot's locking mechanism.
● Only use suitable memory cards.
● When inserting and removing a CD, always
hold it flat and at a right angle to the front of
the unit. Inserting or removing a CD at an angle
to the drive can lead to scratching ⇒ page 20.
● Inserting a second CD while a CD is already
in the CD drive or being ejected can destroy the
CD drive in the unit. Always wait until the CD is
completely ejected!
NOTICE
The CD drive can be damaged by any foreign
objects attached to a storage device, and by ir-
regularly shaped storage devices.
NOTICE (Continued)
● Only clean 12 cm standard CDs should be
used.
– Do not affix stickers or other items to the
data storage device. Stickers may peel off
and damage the CD drive.
– Do not use printable data storage devi-
ces. Coatings and prints may peel off and
damage the drive.
– Do not insert 8 cm single CDs or irregu-
larly shaped CDs or DVDs.
– Do not insert DVD Plus discs, dual discs
or flip discs, as these are thicker than nor-
mal CDs.
NOTICE
The vehicle loudspeakers may be damaged if
the volume is too high or the sound is distor-
ted.
Composition Touch, Composition Colour

CONFIDENTIAL
not for distribution
Introduction
142.5R6.RCT.20

CONFIDENTIAL
not for distribution
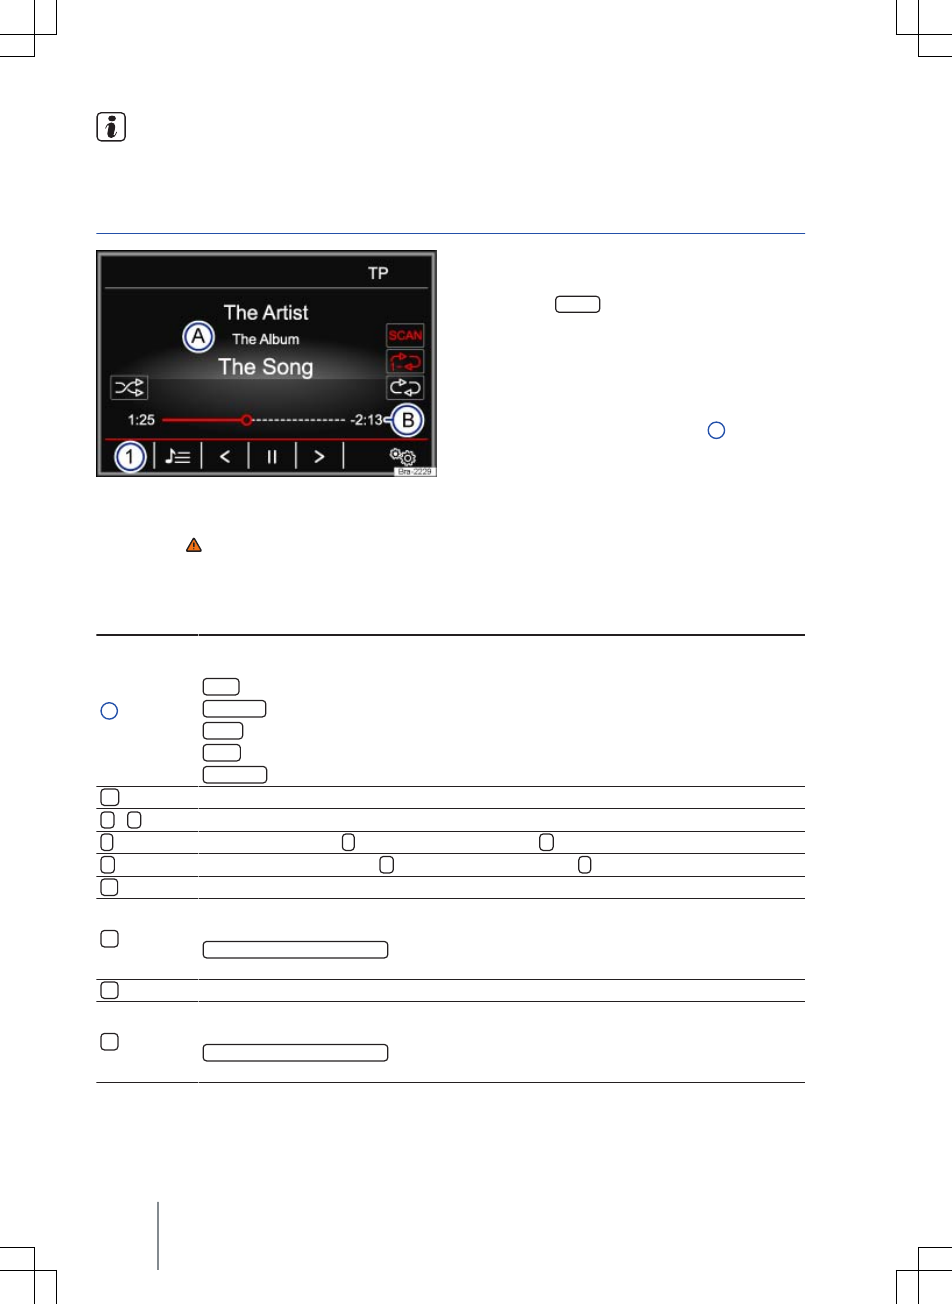
Overview of the control elements
Fig. 1 Overview of the control elements
Different versions of the infotainment system are supplied. The labelling and functions of the infotainment
buttons ⇒ Fig. 1 2 and the position of the CD slot 5 may vary between versions.
Rotary/push knob:
–Press to switch on or off ⇒ page 7.
–Turn to adjust the basic volume on whichever source is in use ⇒ page 7.
Infotainment buttons: press a button to select a function.
–RADIO : switches to radio mode and changes frequency band in radio mode ⇒ page 12.
–MEDIA : switches to media mode ⇒ page 20.
–CAR : opens vehicle and system settings ⇒ Booklet Owner's manual, chapter Introduction to the in-
fotainment system.
–SETUP : opens menu and system settings ⇒ page 40.
–SOUND : opens sound and volume settings ⇒ page 40.
–EJECT : ejects the CD ⇒ page 20.
–MUTE : mute the audio source ⇒ page 8.
–PHONE : opens the telephone control system ⇒ page 30. The current audio source is muted if no
mobile telephone provision is installed.
Touchscreen ⇒ page 7.
Setting knob: the function of this button depends on the unit's operating state.
– In all radio modes: turn for manual station or channel selection. Press to start and stop the scan
function ⇒ page 12.
– In media mode: turn to open the track list. Press to start and stop the scan function ⇒ page 20.
–Turn to select menu options in long lists and press to access the selected option (e.g. select a sta-
tion from the station list).
CD slot: for inserting and removing CDs ⇒ page 20.
AUX-IN socket: for connecting an external audio source ⇒ page 20.
Memory card slot: the slot is located underneath or to the left of the screen, depending on the unit
version ⇒ page 20.
1
2
3
4
5
6
7
Composition Touch, Composition Colour

CONFIDENTIAL
not for distribution
Overview of the control elements
Fig. 1 Overview of the control elements
Different versions of the infotainment system are supplied. The labelling and functions of the infotainment
buttons ⇒ Fig. 1 2 and the position of the CD slot 5 may vary between versions.
Rotary/push knob:
–Press to switch on or off ⇒ page 7.
–Turn to adjust the basic volume on whichever source is in use ⇒ page 7.
Infotainment buttons: press a button to select a function.
–RADIO : switches to radio mode and changes frequency band in radio mode ⇒ page 12.
–MEDIA : switches to media mode ⇒ page 20.
–CAR : opens vehicle and system settings ⇒ Booklet Owner's manual, chapter Introduction to the in-
fotainment system.
–SETUP : opens menu and system settings ⇒ page 40.
–SOUND : opens sound and volume settings ⇒ page 40.
–EJECT : ejects the CD ⇒ page 20.
–MUTE : mute the audio source ⇒ page 8.
–PHONE : opens the telephone control system ⇒ page 30. The current audio source is muted if no
mobile telephone provision is installed.
Touchscreen ⇒ page 7.
Setting knob: the function of this button depends on the unit's operating state.
– In all radio modes: turn for manual station or channel selection. Press to start and stop the scan
function ⇒ page 12.
– In media mode: turn to open the track list. Press to start and stop the scan function ⇒ page 20.
–Turn to select menu options in long lists and press to access the selected option (e.g. select a sta-
tion from the station list).
CD slot: for inserting and removing CDs ⇒ page 20.
AUX-IN socket: for connecting an external audio source ⇒ page 20.
Memory card slot: the slot is located underneath or to the left of the screen, depending on the unit
version ⇒ page 20.
1
2
3
4
5
6
7
Composition Touch, Composition Colour
CONFIDENTIAL
not for distribution
General information on operating the unit
Introduction
This chapter contains information on the following
subjects:
Rotary/push knobs and infotainment buttons . 7
Switching on and off . . . . . . . . . . . . . . . . . . . . . 7
Adjusting base volume . . . . . . . . . . . . . . . . . . . 8
Operating function buttons and displays on
the screen . . . . . . . . . . . . . . . . . . . . . . . . . . . . . 8
Selecting list entries and browsing lists . . . . . 9
Input windows with on-screen keypad . . . . . . 10
Additional display information and display
options . . . . . . . . . . . . . . . . . . . . . . . . . . . . . . . . 11
Changes to settings may cause the display content
to vary and some aspects of the infotainment sys-
tem operation to differ from the descriptions given
in this manual.
Additional information and warnings:
●Safety information for infotainment system
⇒ page 3
● Overview of the control elements ⇒ page 6
Lightly pressing the buttons or briefly touch-
ing the touchscreen is sufficient to operate
the infotainment system.
Not all listed function buttons and functions
may be available due to the device software
used in your market. The equipment is not faulty if
a function button is missing from the screen.
Due to country-specific legislation, certain
functions cannot be selected on the screen
when the vehicle is travelling above a certain
speed.
Using a mobile telephone in the vehicle may
cause noise from the vehicle loudspeakers.
There may be restrictions on the use of Blue-
tooth® devices in some countries. Information
is available from the local authorities.
In some vehicles equipped with ParkPilot, the
volume of the current audio source is auto-
matically lowered when reverse gear is engaged.
Volume reduction can be set in the Sound setup
menu⇒ page 42.
Rotary/push knobs and infotainment buttons
First read and observe the safety warn-
ings on page 3 and the introductory
information on page 7.
Rotary/push knobs
The left-hand rotary/push knob ⇒ Fig. 1 1 is re-
ferred to as the volume control or the on/off switch.
The right-hand rotary/push knob ⇒ Fig. 1 4 is re-
ferred to as the setting knob.
Infotainment buttons
This manual uses a button symbol with blue con-
tent and the term “infotainment button” to refer to
buttons on the infotainment system, e.g. the info-
tainment button MEDIA .
Infotainment buttons are operated either by press-
ing them or by pressing and holding.
Switching on and off
First read and observe the safety warn-
ings on page 3 and the introductory
information on page 7.
To switch the infotainment system on or off man-
ually, briefly press the rotary/push knob
⇒ Fig. 1 1.
After switching on, the system starts at the last se-
lected volume setting, provided that this does not
exceed the preselected maximum switch-on vol-
ume ⇒ page 42, Sound and volume settings.
Depending on the unit version and the country, the
infotainment system may switch off automatically
when the engine is switched off or the vehicle key
Introduction 7
142.5R6.RCT.20
CONFIDENTIAL
not for distribution
is removed from the ignition lock. If the infotain-
ment system is switched on again, it will switch off
automatically after approximately 30 minutes
(switch-off delay).
The infotainment system is permanently
linked to the vehicle. It cannot be used in an-
other vehicle.
If the vehicle battery has been disconnected,
the ignition must be switched on before
switching the infotainment system back on.
Adjusting base volume
First read and observe the safety warnings on page 3 and the introductory information
on page 7.
Function: action
Increasing the volume: turn the volume control ⇒ Fig. 1 1 clockwise or press the button on the
multifunction steering wheel ⇒ Booklet Owner's manual.
Decreasing volume: turn the volume control ⇒ Fig. 1 1 anticlockwise or press the button on the
multifunction steering wheel.
Changes to the base volume are indicated by a
“bar” on the screen. During this time the infotain-
ment system cannot be operated.
It is possible to preset certain volume settings and
adjustments ⇒ page 42.
Muting the infotainment system
● Turn the volume control ⇒ Fig. 1 1 anti-
clockwise until is displayed.
●OR: press the MUTE infotainment system but-
ton1) ⇒ Fig. 1 2.
Any media source currently being played is stop-
ped while the infotainment system is muted. ap-
pears on the display.
If the base volume has been considerably in-
creased to play a certain audio source, re-
duce the volume again before switching to another
audio source.
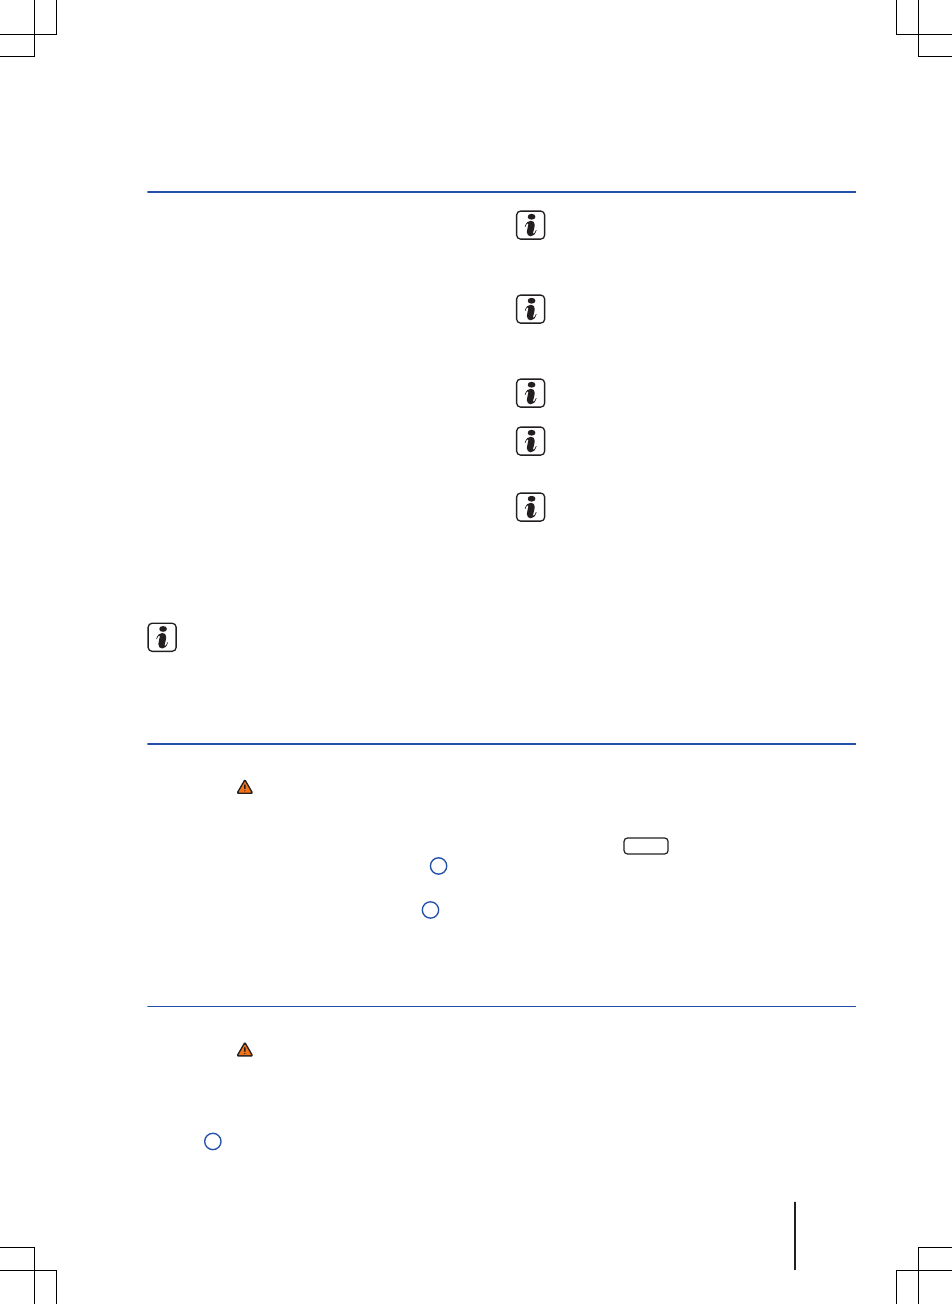
Operating function buttons and displays on the screen
Fig. 2 Overview of possible function buttons on
the screen
First read and observe the safety warn-
ings on page 3 and the introductory
information on page 7.
The infotainment system is equipped with a
touchscreen ⇒ Fig. 1 3.
Active areas of the screen where certain functions
can be accessed are called “function buttons”.
These buttons are operated by briefly touching the
screen or by touching and holding. Function but-
tons are referred to in this manual with the word
“function button” and a button symbol ... .
Function buttons start functions or open subme-
nus. In submenus the name of the currently selec-
ted menu is displayed in the title bar ⇒ Fig. 2 A.
1) Depending on the unit version.
Composition Touch, Composition Colour8
CONFIDENTIAL
not for distribution
Inactive (grey) function buttons cannot be selected.
Overview of displays and function buttons
Displays and function buttons: action and effect
AIn the title bar, the currently selected menu and any other possible function buttons are
displayed.
BTouch to open a further menu.
CMove the crosshair across the screen with slight pressure without losing contact.
OR: touch the desired position on the screen, the crosshair moves to this position.
Touch to move up one level at a time from certain lists.
Touch to move up one level at a time to the main menu from a submenu or to undo in-
puts made.
... Touch to open a pop-up window (option window), displaying further setting options.
... / ... Some functions or displays are marked with a checkbox and are activated or deacti-
vated by touching this box.
OK Touch to confirm an input or selection.
Touch to close a pop-up window or an input window.
+ / -Touch to change settings incrementally.
Move the slider across the screen with slight pressure without losing contact.
Selecting list entries and browsing lists
Fig. 3 List entries settings menu
First read and observe the safety warn-
ings on page 3 and the introductory
information on page 7.
List entries can be opened by touching them di-
rectly on the screen or by using the setting knob
⇒ Fig. 1 4.
Marking and selecting list entries with the
setting knob
●Turn the setting knob to mark each consecutive
list entry with a selection box so you can browse
through the list.
●Press the setting knob to select the marked list
entry.
Browsing lists (scrolling)
If there are more items available in a list view than
can be displayed on the screen, function buttons
for scrolling or a scroll bar are displayed on the
right of the screen ⇒ Fig. 3.
●Browsing lists line-by-line: touch the or
function button briefly.
●Browsing lists page-by-page: briefly touch the
screen above or below the scroll marker.
●Browsing long lists quickly page-by-page: touch
and hold the screen above or below the scroll
marker.
●To quickly scan through a long list, place your
finger on the scroll marker and move it over the
screen without losing contact. Lift your finger off
the screen when you reach the desired position.
Introduction 9
142.5R6.RCT.20
CONFIDENTIAL
not for distribution
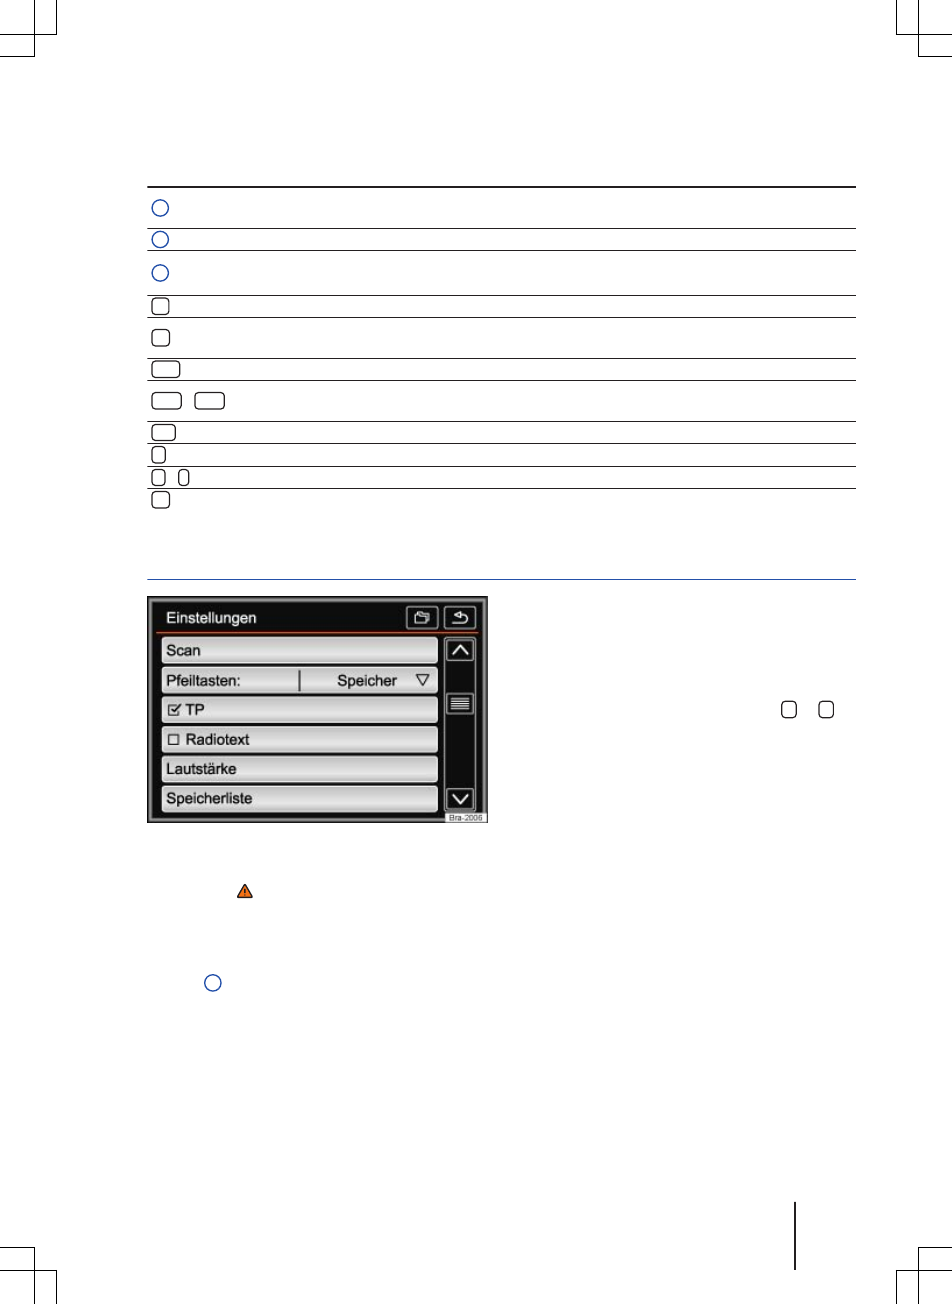
Input windows with on-screen keypad
Fig. 4 Input window with on-screen keyboard
First read and observe the safety warn-
ings on page 3 and the introductory
information on page 7.
Input windows with on-screen keyboard allow you
to enter text, such as an entry name for storing a
destination or a search term for searching in long
lists.
Not all of the function buttons listed here are avail-
able in all countries and for all topics.
Subsequent chapters only explain those functions
that differ from the general view described here.
The input line with the cursor is located on the left
in the top line of the screen *. All inputs are dis-
played here.
Input windows for free text input
An input window for free text entry allows any let-
ter, number and special character to be entered in
any combination.
Touching the OK function button applies the se-
quence of characters currently displayed in the
window.
Input windows for selecting a stored entry
It is only possible to select a sequence of letters,
numbers and special characters that matches a
stored entry.
Every time a character is entered, a destination
corresponding to the specifications is proposed in
the input line. When terms are made up of more
than one word, the space must be entered as well.
If fewer than 99 entries are available, the number
of remaining entries is displayed after the input line
⇒ Fig. 4 2. Touching this function button displays
a list of these remaining entries.
Overview of function buttons
Function buttons: action and effect
1123... : touch to open the input window for numbers and special characters.
ABC... : touch to go back to the input window for letters.
2Displays the number and opens the list of entries corresponding to the specifications
that are still available.
Letters/numbers Touch to insert the character in the input line.
Letters and
Press and hold to open a pop-up window with special characters based on the letter
shown.
Touch the desired character to enter it. Some special characters can also be written out
(e.g. “AE” for “Ä”).
Touch to switch between upper and lower case.
Touch to enter a space.
OK Touch to accept the suggestion in the input line and close the input window.
Touch to delete characters in the input line from right to left.
Press and hold to delete several characters at once.
Touch to close the input window.
Composition Touch, Composition Colour10

CONFIDENTIAL
not for distribution
Additional display information and display options
First read and observe the safety warn-
ings on page 3 and the introductory
information on page 7.
The displays that appear on the screen can vary
depending on the settings, and may differ from
those described here.
Displays such as the current time and the current
outside temperature can be displayed on the
screen in the status bar.
All displays appear only after the infotainment sys-
tem has completed start-up.
Introduction 11
142.5R6.RCT.20
CONFIDENTIAL
not for distribution
Audio mode
Radio mode
Introduction
This chapter contains information on the following
subjects:
RADIO main menu . . . . . . . . . . . . . . . . . . . . . . 12
RDS radio data service . . . . . . . . . . . . . . . . . . . 13
Station buttons . . . . . . . . . . . . . . . . . . . . . . . . . . 14
Selecting, setting and storing stations . . . . . . . 14
Scan function (SCAN) . . . . . . . . . . . . . . . . . . . . 16
Radio text . . . . . . . . . . . . . . . . . . . . . . . . . . . . . . 16
TP function (traffic program) . . . . . . . . . . . . . . . 17
Incoming traffic announcement . . . . . . . . . . . . 17
FM/AM settings . . . . . . . . . . . . . . . . . . . . . . . . . 18
Additional information and warnings:
● Safety information for infotainment system
⇒ page 3
●Overview of the control elements ⇒ page 6
● Basic information on use ⇒ page 7
● Menu and system settings (SETUP)
⇒ page 40
Multi-storey car parks, tunnels, high buildings
and mountains can impair radio reception.
Foil or metal-coated stickers attached to the
windows may affect reception on vehicles
with a window aerial.
RADIO main menu
Fig. 5 RADIO main menu Fig. 6 Radio mode station list
First read and observe the safety warn-
ings on page 3 and the introductory
information on page 12.
Selecting the frequency band
● Select the required frequency band by pressing
the RADIO infotainment button.
Function buttons in the RADIO main menu
Function button: effect
1Changes the displayed station button group by touching the function button.
Opens the list of currently receivable radio stations ⇒ page 14.
Opens the frequency dial for the selected frequency band ⇒ page 15.
Opens the settings menu for the currently activated frequency band (FM or AM)
⇒ page 18.
Composition Touch, Composition Colour12
CONFIDENTIAL
not for distribution
Function button: effect
< / >Browses through the available or stored stations. Setting for the arrow buttons in the
FM/AM setup menu ⇒ page 18.
SCAN The function button is only displayed while the scan function is on ⇒ page 16.
1... to 12... Station buttons for storing stations ⇒ page 14.
Updates the station list (AM frequency band) ⇒ page 15.
Possible displays and symbols
Display: meaning
ADisplays station frequency or station name, and also possibly radio text. Station name
and radio text are only displayed when RDS is available and activated ⇒ page 13.
RDS offa) The RDS radio data service is deactivated. RDS can be activated in the FM setup
menu ⇒ page 18.
TP TP traffic news is activated and can be received ⇒ page 17.
No TP No traffic news station can be received.
The radio station is stored to a station button.
a) Varies by country and unit version.
RDS radio data service
Fig. 7 RADIO main menu Fig. 8 Radio mode station list
First read and observe the safety warn-
ings on page 3 and the introductory
information on page 12.
RDS (radio data system) is a radio data service
which enables additional FM services, such as the
display of station names, automatic station track-
ing, radio text and TP traffic news (TP).
RDS is not supported by all units and is not availa-
ble everywhere or on every FM radio station.
RDS can be deactivated in some country and unit
versions ⇒ page 18.
Without RDS it is not possible to use radio data
services.
Station name and automatic station tracking
If RDS is available, station names can be dis-
played in the RADIO main menu and in the FM
station list.
FM radio stations may occasionally or continuously
broadcast different content on different regional
frequencies under the same station name (e.g. Ra-
dio 2).
By default, automatic station tracking always
switches to the currently selected station's frequen-
cy that offers the best reception, as the vehicle
travels from one area to the next. As a result, you
may lose the regional programme you are listening
to.
Automatic frequency changing and automatic sta-
tion tracking can be deactivated in the FM setup
⇒ page 18.
Audio mode 13
142.5R6.RCT.20
CONFIDENTIAL
not for distribution
The radio stations are responsible for the
content of the information sent.
Station buttons
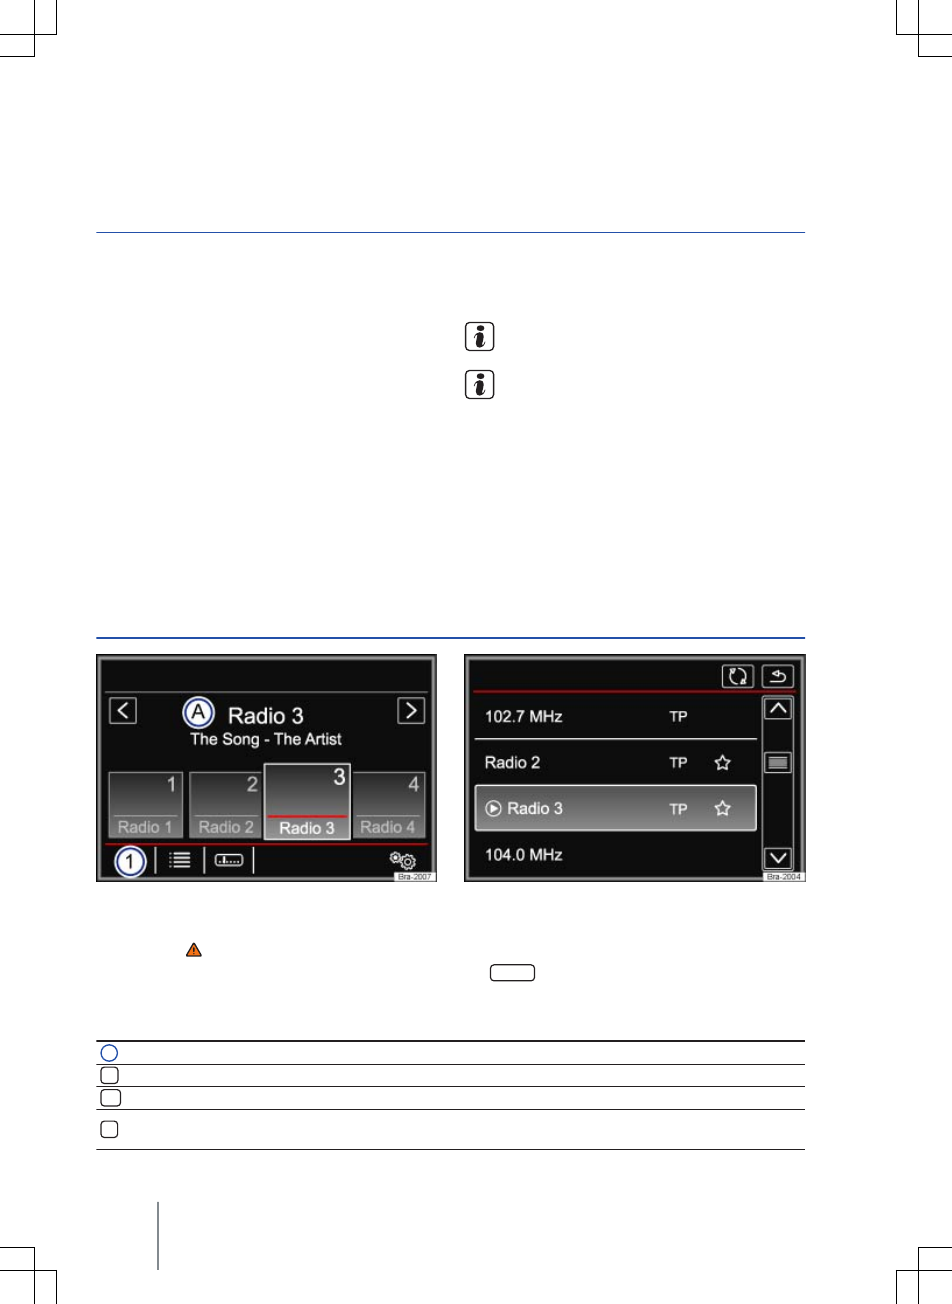
Fig. 9 RADIO main menu
First read and observe the safety warn-
ings on page 3 and the introductory
information on page 12.
In the RADIO main menu, you can store stations
from the currently selected frequency band on
12 consecutively numbered function buttons.
These function buttons are called station buttons.
Selecting stations via the station
buttons
Touch the station button that shows the required station.
When a stored station is selected via the station buttons, it will only be
played if it can be received at your current location.
Changing station button group
Touch the ⇒ Fig. 9 1 function button.
The station buttons are displayed in groups of four function buttons
(1 ... to 4 ... , 5 ... to 8 ... and 9 ... to 12 ... ).
Displaying station buttons If radio text is shown instead of the station buttons, touch radio text in
order to show the station buttons.
Storing stations to station but-
tons
See Storing stations ⇒ page 15.
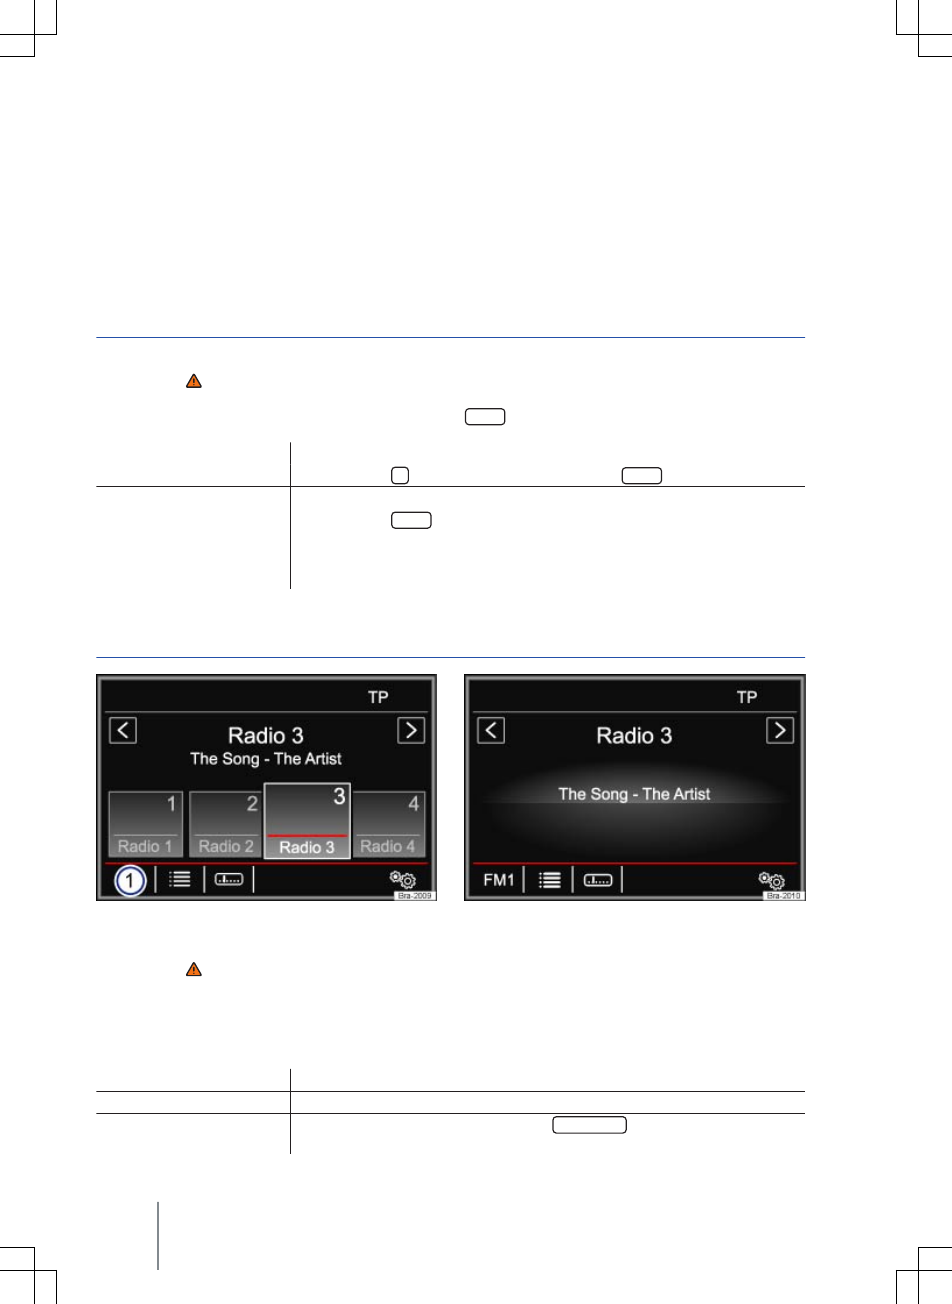
Selecting, setting and storing stations
Fig. 10 RADIO main menu Fig. 11 Radio mode station list
Composition Touch, Composition Colour14

CONFIDENTIAL
not for distribution
First read and observe the safety warnings on page 3 and the introductory information
on page 12.
Selecting stations
Selecting stations using arrow
buttons
< / >
Touch the < or > ⇒ Fig. 10 function button.
The unit only switches to stored or receivable stations, depending on
what settings have been made for the arrow buttons. Setting for the ar-
row buttons in the FM/AM setup menu ⇒ page 18.
Selecting stations from a station
list
Touch the ⇒ Fig. 10 function button to open the station list.
Search through the list and touch the required station to select it.
To close the station list, touch the ⇒ Fig. 11 function button.
Updating the station list
In the FM frequency band the station list is updated automatically.
In the AM frequency band, touch the ⇒ Fig. 11 function button to up-
date the station list.
Tuning to a station frequency manually
Displaying the frequency dial Turn the setting knob one stop further.
OR: touch the ⇒ Fig. 10 function button.
Adjusting the frequency in
stages
Turn the setting knob.
OR: touch the arrow buttons to the left or the right of the frequency
band.
Quickly browsing through the
frequency band
Touch one of the arrow buttons at the top of the screen ⇒ Fig. 10. The
next receivable station is set automatically.
OR: press and hold one of the arrow buttons at the top of the screen
⇒ Fig. 10. When you release the button, the unit automatically tunes to
the next available station.
OR: place your finger on the slider in the frequency dial and drag it
along the dial.
Hiding the frequency band
Briefly press the setting knob.
Manual frequency selection is also closed if you select a station with a
station button. The frequency band closes automatically after a period
of inactivity.
Storing stations
Storing the current station to a
station button
Press and hold the desired station button ⇒ Fig. 10 until a tone is soun-
ded.
The station currently playing is then stored on that station button.
Storing a station from the station
list to a station button
Touch the ⇒ Fig. 10 function button to open the station list.
Stations already stored on a station button are marked in the station list
with the ⇒ Fig. 11 symbol.
Select the desired station by pressing and holding on the screen.
Touch the button to which you wish this station to be assigned.
A signal tone sounds, and the station is then stored on this station but-
ton. Repeat the process to store further stations from the station list.
Deleting stored stations All stored stations can be deleted individually or together in the FM/AM
setup menu ⇒ page 18.
Audio mode 15
142.5R6.RCT.20
CONFIDENTIAL
not for distribution
Stopping station names scrolling (FM
frequency)
Some radio stations transmit a very long station
name, which is shown on the screen as a scrolling
text.
To fix the text that is currently displayed to the
screen, touch the station name and hold until a
tone is sounded.
Fixed station names are indicated by a dot to each
side of the name.
The fixed text is adopted for all the station buttons
on which the corresponding station is stored.
Scan function (SCAN)
First read and observe the safety warn-
ings on page 3 and the introductory
information on page 12.
When the scan function is running, all available
stations on the current frequency band are played
in sequence for approximately 5 seconds each.
SCAN appears on the display.
Starting the scan function Press the setting knob briefly.
OR: touch the function button and then select SCAN .
Stopping the scan function
Press the setting knob briefly.
OR: touch the SCAN function button to end the scan function at the station
arrived at.
Manually selecting a station with the station buttons also stops the scan
function.
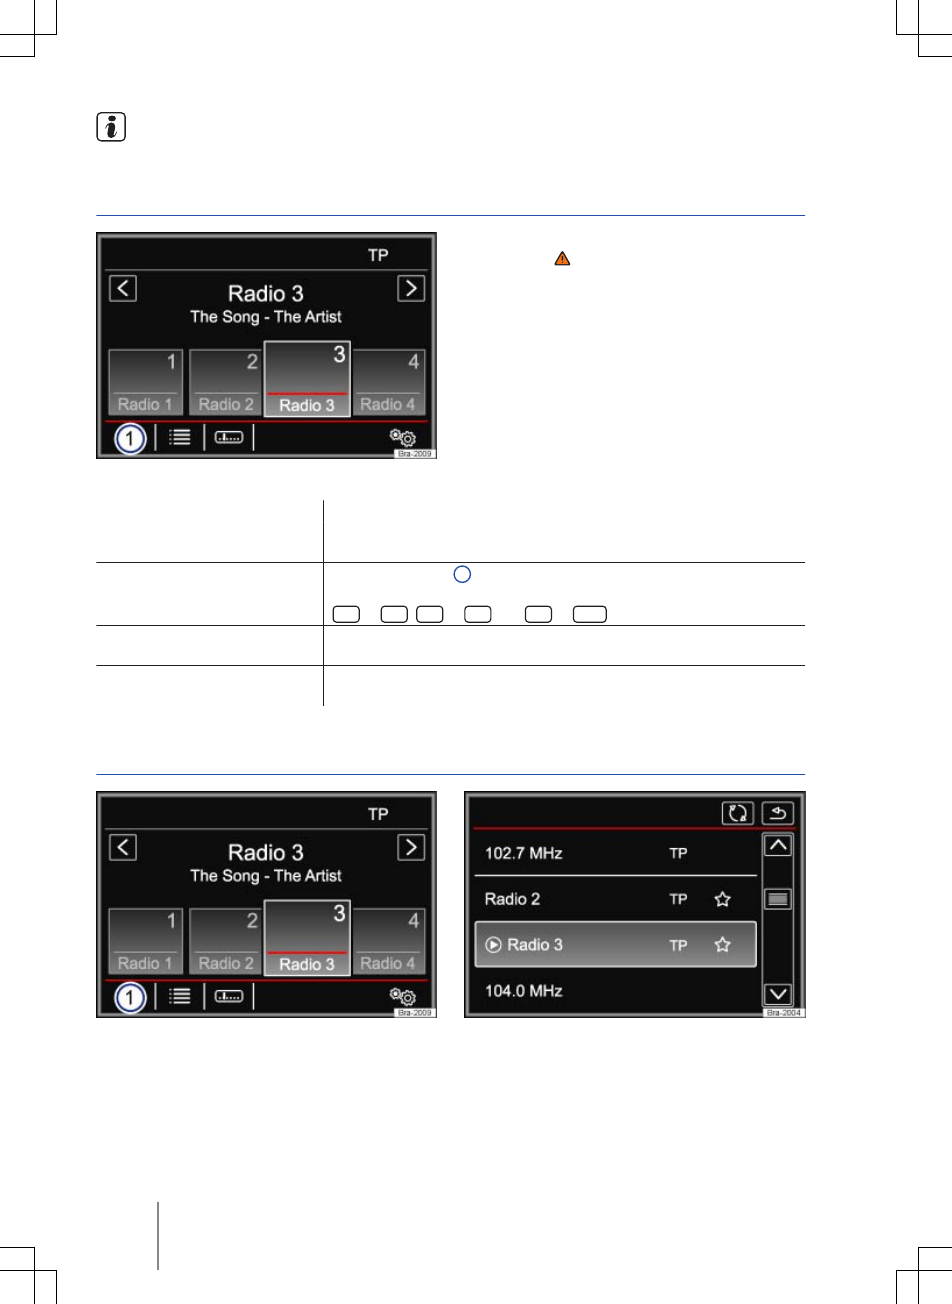
Radio text
Fig. 12 RADIO main menu Fig. 13 Radio mode: radio text is visible
First read and observe the safety warn-
ings on page 3 and the introductory
information on page 12.
Some RDS-compatible stations also broadcast ad-
ditional text information known as radio text.
The station buttons can be hidden to enlarge the
display area for the radio text ⇒ Fig. 13.
Hiding station buttons Touch displayed radio text ⇒ Fig. 12.
Displaying station buttons Touch displayed radio text ⇒ Fig. 13.
Switching off radio text per-
manently
In the FM setup menu, deactivate the Radio text function button by touch-
ing it ⇒ page 18.
Composition Touch, Composition Colour16
CONFIDENTIAL
not for distribution
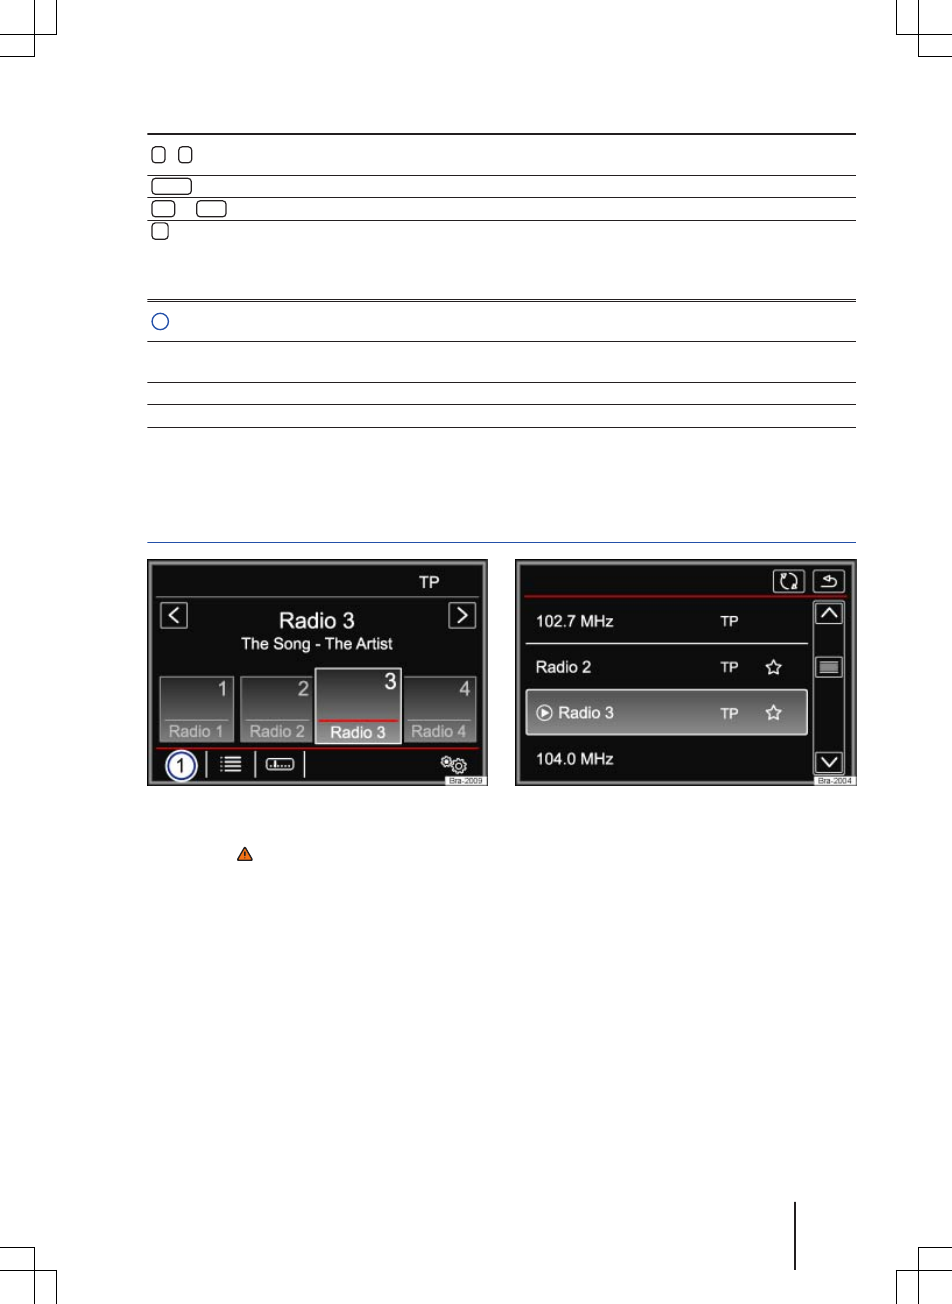
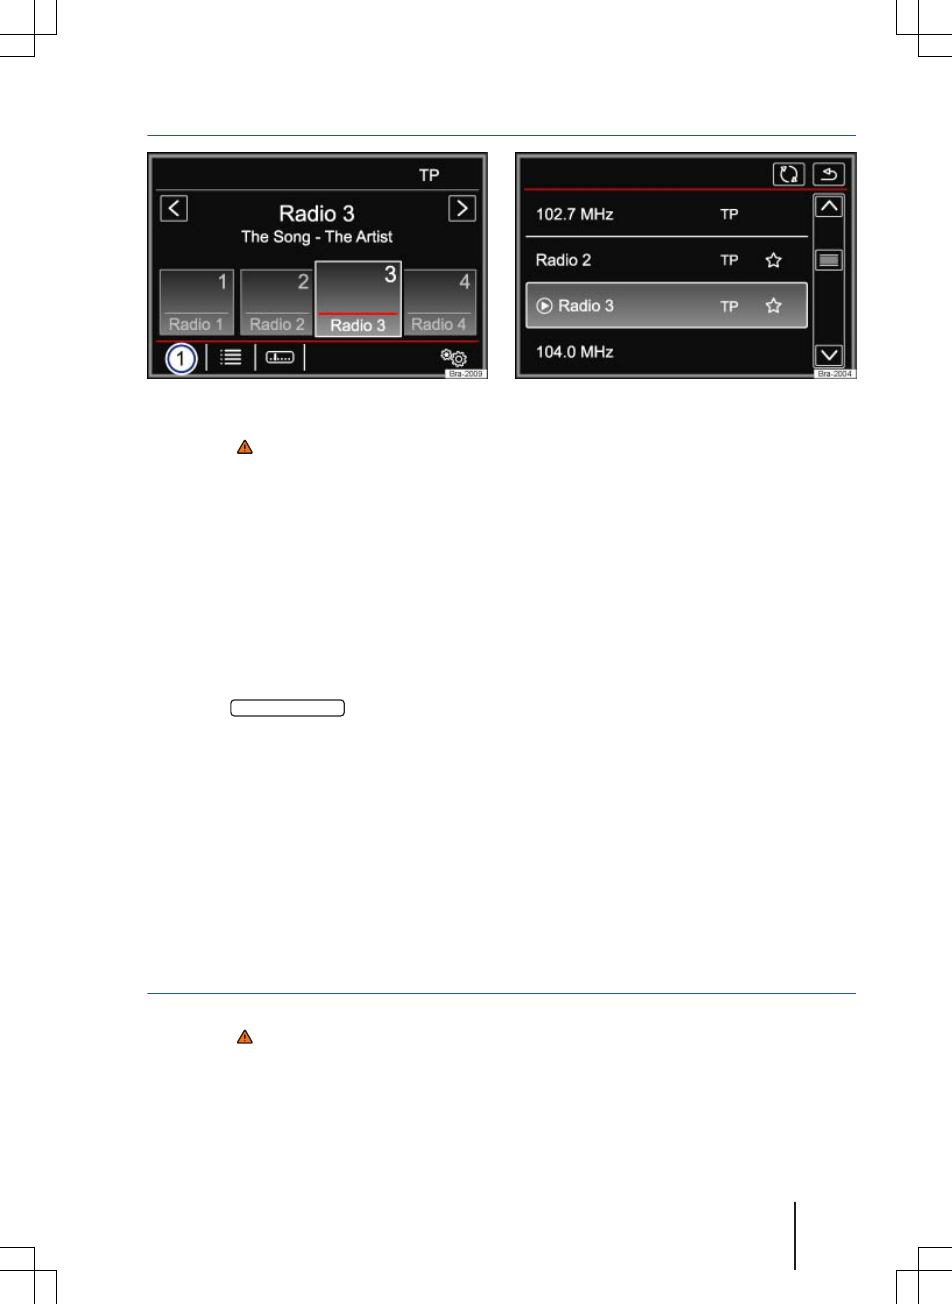
TP function (traffic program)
Fig. 14 RADIO main menu with TP display Fig. 15 Radio mode: station list with TP display
First read and observe the safety warn-
ings on page 3 and the introductory
information on page 12.
Traffic news monitoring with the TP function is only
possible if a traffic news station is available. Traffic
news stations are indicated in the RADIO main
menu and in the station list by TP ⇒ Fig. 14 and
⇒ Fig. 15.
Some stations that do not broadcast their own traf-
fic news support the TP function through a link to a
traffic news station (EON).
Switching the TP function on and off
● In the FM/AM setup menu, activate or deac-
tivate the Traffic program (TP) function button by
touching it ⇒ page 18.
If the station that is currently selected does not
support the TP function, No TP will be shown in
the top right of the screen.
Activated TP function and station selection
While traffic news monitoring is on, TP is displayed
at the top right in audio mode ⇒ Fig. 14. Traffic an-
nouncements broadcast by the current station or a
linked traffic news station will interrupt the current
audio mode.
In FM mode, the selected station must support the
TP function. After the TP function is switched on, if
you change via the station buttons or manual se-
lection to a station that does not support the TP
function, traffic news monitoring will not be possi-
ble (display: No TP).
If the currently selected traffic news station can no
longer be received, No TP is also displayed and
you will have to start a manual station search
⇒ page 14.
In AM mode or media mode, the unit will always
automatically tune to a traffic news station in the
background, provided that a TP station is availa-
ble. This procedure may take some time.
Incoming traffic announcement
First read and observe the safety warn-
ings on page 3 and the introductory
information on page 12.
Incoming traffic announcements will interrupt the
active audio mode.
During the traffic announcement a pop-up window
is displayed and, if required, the radio is switched
to the traffic news station (EON) for the duration of
the traffic announcement.
The media mode is paused and the volume is ad-
justed to the preset level ⇒ page 42.
Audio mode 17
142.5R6.RCT.20

CONFIDENTIAL
not for distribution
The traffic announcement volume setting can be
adjusted with the volume control ⇒ Fig. 1 1.
The adjusted volume setting will be applied to sub-
sequent announcements.
● Touch the Cancel function button to end the
traffic announcement. The TP function remains ac-
tivated.
●OR: touch the Deactivate function button to end
the current traffic announcement and permanently
switch off the TP function.
FM/AM settings
First read and observe the safety warn-
ings on page 3 and the introductory
information on page 12.
FM setup
● Select the FM frequency band by pressing the
RADIO infotainment button.
● Touch the function button to open the FM
setup menu.
Function button: effect
Scan : scan function (SCAN). When the scan function is running, all available stations on the current fre-
quency band are played in sequence for approximately 5 seconds each ⇒ page 16.
Arrow buttons : define the settings for the < und > arrow buttons. The setting is adopted for all frequency
bands (FM, AM).
Preset list : all stored stations on the selected frequency band can be browsed with the arrow
buttons.
Stations : all available stations on the selected frequency band can be browsed with the arrow
buttons.
Traffic program (TP) : the TP function (traffic news monitoring) is activated ⇒ page 17.
Radio text : radio text is activated ⇒ page 16.
Delete preset list : to delete some or all stored stations.
All : all stored stations will be deleted (FM 1, FM 2, FM 3).
To delete individual stations, selected the desired preset list FM 1 , FM 2 or FM 3 . Then touch
the station button of the station you wish to delete.
Advanced setup : settings for the RDS radio data services.
RDS Regional : defines the setting for automatic station tracking with RDS ⇒ page 13.
Fixed : the unit only switches to alternative frequencies for the selected station that
broadcast the same regional service.
Automatic : the unit always switches to the station's frequency that currently offers the
best reception. As a result, regional programmes may be interrupted.
Radio Data System (RDS) a): the radio data system (RDS) is deactivated ⇒ page 13. If the
checkbox is deactivated, the traffic program (TP) and radio text functions are not available.
Alternative frequency (AF) : automatic station tracking is activated. If the checkbox is deactiva-
ted, automatic station tracking is switched off. The RDS Regional function button is then inac-
tive (greyed out).
a) Varies by country and unit version.
AM setup
● Select the AM frequency band by pressing the
RADIO infotainment button.
● Touch the function button to open the AM
setup menu.
Composition Touch, Composition Colour
18
CONFIDENTIAL
not for distribution
Function button: effect
Scan : scan function (SCAN). When the scan function is running, all available stations on the current fre-
quency band are played in sequence for approximately 5 seconds each ⇒ page 16.
Arrow buttons : define the settings for the < und > arrow buttons. The setting is adopted for all frequency
bands (FM, AM).
Preset list : all stored stations on the selected frequency band can be browsed with the arrow
buttons.
Stations : all available stations on the selected frequency band can be browsed with the arrow
buttons.
Traffic program (TP) : the TP function (traffic news monitoring) is activated ⇒ page 12.
Delete preset list : to delete some or all stored stations.
All : all stored stations will be deleted (AM 1, AM 2, AM 3).
To delete individual stations, select the desired preset list AM 1 , AM 2 or AM 3 . Then touch the
station button of the station you wish to delete.
Audio mode 19
142.5R6.RCT.20
CONFIDENTIAL
not for distribution
Media mode
Introduction
This chapter contains information on the following
subjects:
Data storage device and file requirements . . . 20
Playing order of files and folders . . . . . . . . . . . 21
MEDIA main menu . . . . . . . . . . . . . . . . . . . . . . 22
Changing the media source . . . . . . . . . . . . . . . 23
Changing tracks in the MEDIA main menu . . . 24
Selecting tracks from the track list . . . . . . . . . . 24
Inserting or ejecting a CD . . . . . . . . . . . . . . . . . 25
Inserting or removing a memory card . . . . . . . 26
External data storage device connected to
USB port . . . . . . . . . . . . . . . . . . . . . . . . . . . . 26
External audio source connected to the AUX-
IN socket . . . . . . . . . . . . . . . . . . . . . . . . . . . . . . 27
Connecting an external audio source via
Bluetooth® . . . . . . . . . . . . . . . . . . . . . . . . . . . . . 28
Media settings . . . . . . . . . . . . . . . . . . . . . . . . . . 28
“Media sources” are audio sources containing au-
dio files on various different storage devices (e.g.
CD, memory card, external MP3 player). These au-
dio files can be played by the infotainment system
from its corresponding drives or audio input sock-
ets (internal CD drive, memory card slot, AUX-IN
socket etc.).
Copyright
Audio and video files stored on data storage devi-
ces are normally subject to national and interna-
tional copyright laws. Observe legal requirements.
Additional information and warnings:
● Safety information for infotainment system
⇒ page 3
● Overview of the control elements ⇒ page 6
● Basic information on use ⇒ page 7
This product is subject to certain intellectual
property rights and copyrights owned by the
Microsoft Corporation. The use or distribution of
this type of technology outside this product re-
quires a licence from Microsoft or an authorised
Microsoft company.
Data storage device and file requirements
First read and observe the safety warn-
ings on page 3 and the introductory
information on page 20.
Factory-fitted CD drives conform to safety class 1
according to DIN IEC 76 (CO) 6/ VDE 0837.
The infotainment system only accepts standard 12
cm CDs, and memory cards measuring
32 mm x 24 mm x 2.1 mm or 1.4 mm.
The supported file formats listed are collectively re-
ferred to below as “audio files”. A CD containing
audio files of these types is referred to as an “au-
dio data CD”.
Media source Requirements for playing in the unit
Audio CDs (up to 80 minutes). – CD Digital Audio specification .
CD-ROM, CD-R and CD-RW audio
data CDs up to max. 700 MB (mega-
bytes) with the file systems ISO 9660
Level 1 or 2, Joliet or UDF 1.02, 1.5, 2.01
SD and MMC memory cards with the
file systems FAT12, FAT16, FAT32, VFAT
or exFAT up to max. 2 GB (gigabytes),
SDHC memory cards up to max. 32 GB
and SDXC memory cards up to max. 2
TB (terabytes).
– MP3 files (.mp3) with bit rates of between 32 and 320 kbit/s
or with variable bit rate.
– WMA files (.wma) up to 10 mono/stereo without copy protec-
tion.
– Playlists in the formats PLS, M3U and WPL.
– Playlists no larger than 20 kB and containing no more than
1,000 entries.
– File name and path information not longer than 256 charac-
ters.
Composition Touch, Composition Colour20
CONFIDENTIAL
not for distribution
Media source Requirements for playing in the unit
AUX External audio source. – Playback of external audio sources via 3.5 mm jack plug
⇒ page 27.
Audio file playback via Bluetooth®a). – The external media player must support the A2DP Blue-
tooth® profile ⇒ page 28.
a) Bluetooth® is a registered trademark of Bluetooth® SIG, Inc.
Restrictions and notes
Contamination, exposure to high temperatures and
mechanical damage can render storage devices
unusable. Please observe the manufacturer's in-
structions.
Variations in the quality of storage devices from dif-
ferent manufacturers can lead to problems during
playback.
Please observe copyright laws.
The unit may be unable to read individual tracks or
the entire storage device due to the storage devi-
ce's configuration or the devices and programs
used for recording. Information about the best
ways to create audio files and configure storage
devices (compression rate, ID3 tag etc.) can be
found online.
The reading time may vary considerably depend-
ing on the condition of the storage device (copying
and deleting actions), folder structure and file type.
Playlists only determine a certain playing order.
There are no files stored in a playlist. The unit will
not play a playlist if the files are not stored on the
storage device at the locations referred to by the
playlist (relative file paths).
Do not use memory card adapters.
No liability can be accepted for damaged or
lost files on the storage devices.
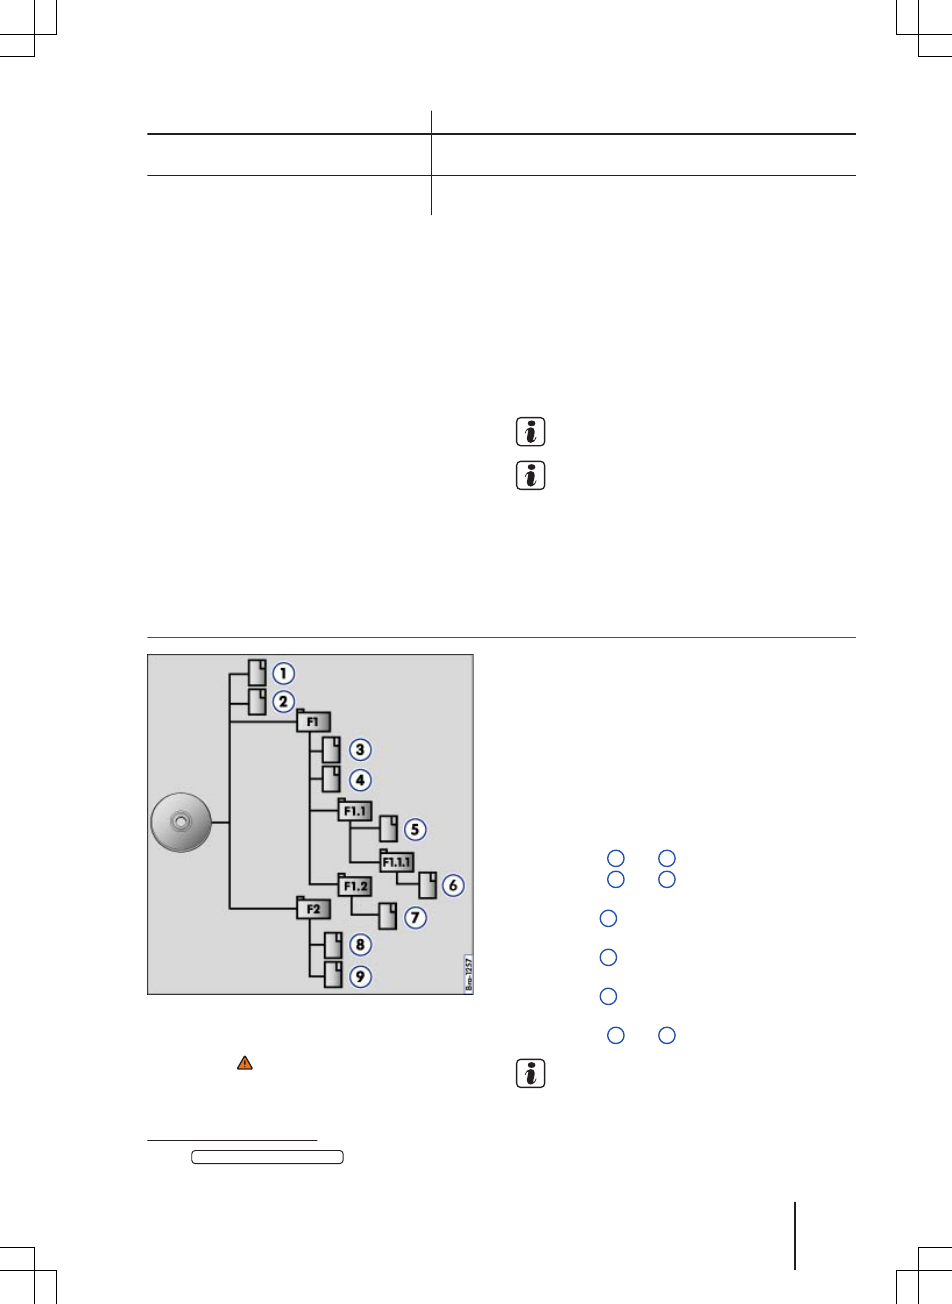
Playing order of files and folders
Fig. 16 Possible structure on an audio data CD
First read and observe the safety warn-
ings on page 3 and the introductory
information on page 20.
Audio files on storage devices are often sorted
by folders and playlists to determine a certain
playing order.
Tracks, folders and playlists on a storage device
are each sorted by name in alphanumeric order.
The illustration shows a typical audio data CD that
contains tracks , folders and subfolders
⇒ Fig. 16.
The tracks are played in the following order1):
Tracks 1 and 2 in the CD's root directory
Tracks 3 and 4 in the first folder F1 in the
CD's root directory
Track 5 in the first subfolder F1.1 of the
folder F1
Track 6 in the first subfolder F1.1.1 of the
subfolder F1.1
Track 7 in the second subfolder F1.2 of
the folder F1
Tracks 8 and 9 in the second folder F2
The playing order can be altered by selecting
different playback modes ⇒ page 22.
1.
2.
3.
4.
5.
6.
1) The Mix/Repeat including subfolders function must be activated ⇒ page 40 in the Media setup menu.
Audio mode 21
142.5R6.RCT.20
CONFIDENTIAL
not for distribution
Playlists are not played automatically. In-
stead they must be specifically selected via
the track selection menu ⇒ page 24.
MEDIA main menu
Fig. 17 MEDIA main menu
First read and observe the safety warn-
ings on page 3 and the introductory
information on page 20.
In the MEDIA main menu, various media sources
can be selected and played.
● Press the MEDIA infotainment button to open
the MEDIA main menu ⇒ Fig. 17.
Playback of the media source that was most re-
cently played resumes from the point where it stop-
ped.
The media source currently playing is indicated at
the bottom left in the function button 1.
The MEDIA main menu will indicate if no media
source is available.
Function buttons in the MEDIA main menu
Function button: effect
1
Indicates the media source currently selected. Touch to select a different media source
⇒ page 23.
CD : internal CD drive ⇒ page 25.
SD card : memory card ⇒ page 26.
USB : external data storage device connected to USB port ⇒ page 26.
AUX : external audio source connected to AUX-IN socket ⇒ page 27.
BT audio : Bluetooth® audio ⇒ page 28.
Opens the track list ⇒ page 24.
< / >Changes track when in media mode ⇒ page 24
Playback stops. The function button changes to ⇒ page 24.
Playback is resumed. The function button changes to ⇒ page 24.
Opens the Media setup menu ⇒ page 28.
Repeats all tracks.
All tracks on the same memory level as the current track will be repeated. If
Mix/repeat including subfolders is activated in Media setup subfolders are also inclu-
ded⇒ page 28.
Repeat current track.
Random play.
All tracks on the same memory level as the current track are included. If
Mix/repeat including subfolders is activated in Media setup subfolders are also inclu-
ded⇒ page 28.
Composition Touch, Composition Colour22
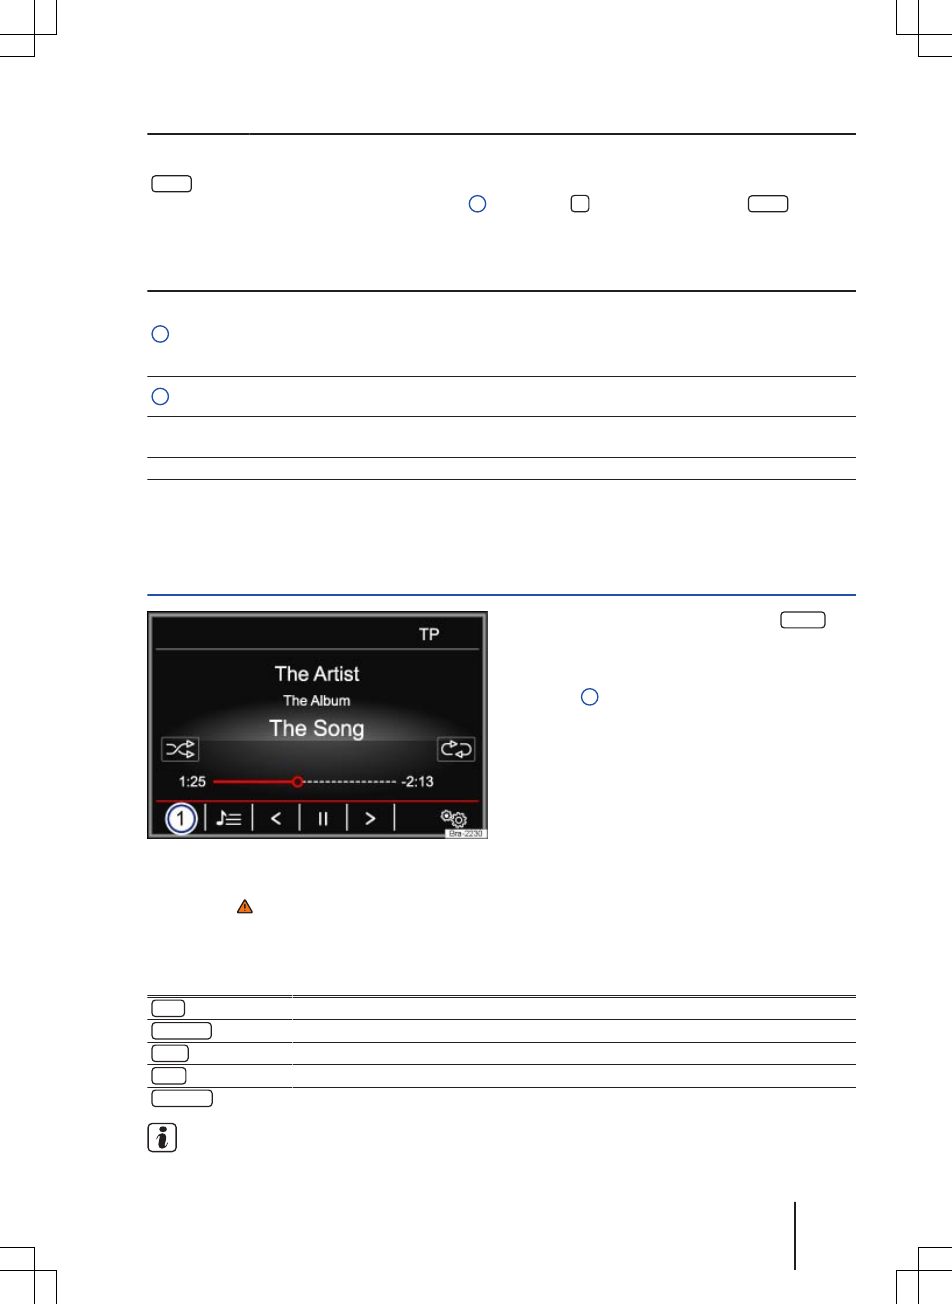
CONFIDENTIAL
not for distribution
Function button: effect
SCAN
When the scan function is running, all tracks in the current track list are played for approx-
imately 10 seconds each.
The function button is only displayed while the scan function is on. To start the scan func-
tion, press setting knob ⇒ Fig. 1 4 or open the track list and touch the SCAN function
button.
Displays and symbols in the MEDIA main menu
Display: meaning
A
Display of track information (CD text , ID3 tag with MP3 files).
Audio CDs: track and track number corresponding to the track order on the CD are dis-
played.
Audio files: artist name, album name and track name are displayed.
BTrack playing time and remaining playing time in minutes and seconds. The remaining
playing time displayed may differ for audio files with variable bit rate (VBR).
RDS offa) The RDS radio data service is deactivated. RDS can be activated in the FM setup menu
⇒ page 12.
TP TP is activated and can be received ⇒ page 12.
No TP No traffic news station can be received.
a) Varies by market and unit version.
Changing the media source
Fig. 18 MEDIA main menu
First read and observe the safety warn-
ings on page 3 and the introductory
information on page 20.
● In the MEDIA main menu, press the MEDIA in-
fotainment button as often as required to switch
between the available media sources.
●OR: in the MEDIA main menu, touch the
⇒ Fig. 18 1 function button and select the desired
media source.
Media sources not currently available are shown
as inactive (grey) in the pop-up window.
If a media source that has already been played is
selected again, playback is resumed from the point
that was last reached.
Optionally selectable media sources
Function button: media source
CD Audio or audio data CD in the internal CD drive ⇒ page 25.
SD card Memory card ⇒ page 26.
USB External data storage device connected to USB ⇒ page 26.
AUX External audio source connected to AUX-IN socket ⇒ page 27.
BT audio Bluetooth® audio ⇒ page 28.
The media source can also be changed in
the Track list view ⇒ page 24.
Audio mode 23
142.5R6.RCT.20

CONFIDENTIAL
not for distribution
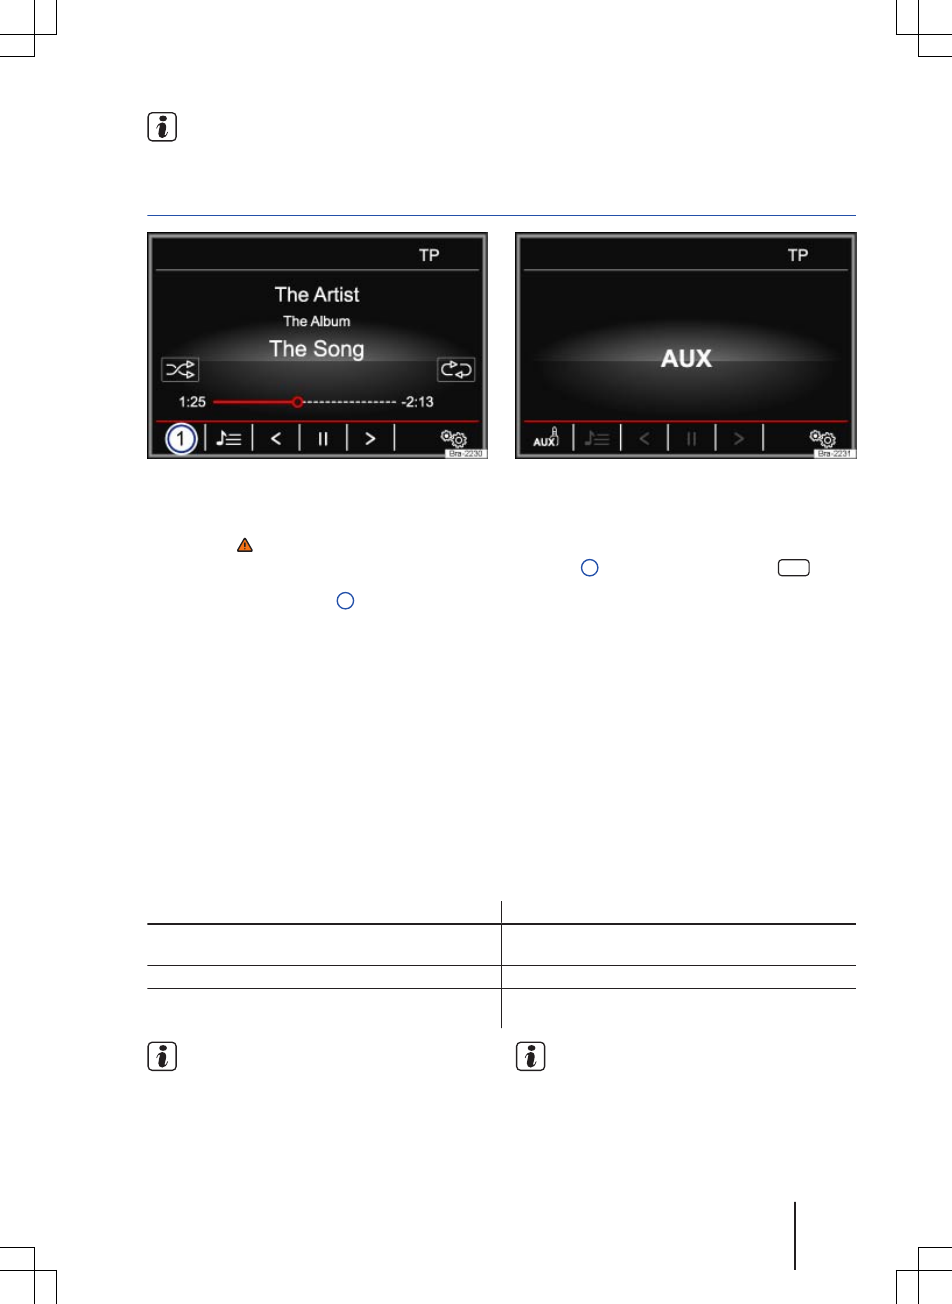
Changing tracks in the MEDIA main menu
Fig. 19 MEDIA main menu
First read and observe the safety warn-
ings on page 3 and the introductory
information on page 20.
You can browse through the tracks of the media
source that is currently playing using the arrow but-
tons.
You cannot switch to playback from a playlist us-
ing the arrow keys. Playback from a playlist must
be started manually via the track selection menu
⇒ page 24, Selecting tracks from the track list.
Controlling playback via the MEDIA main menu
Action Effect
Briefly touch the function button < once. Goes to the start of the current track. If the track is short-
er than 3 seconds, the system goes to the start of the
previous track.
Briefly touch the function button < twice. Goes to the start of the previous track. Changes from the
first track to the last track on the storage device that is
being played.
Briefly touch the function button > once. Goes to the next track. Changes from the last track to
the first track on the storage device that is being played.
Press and hold the < function button. Fast reverse.
Press and hold the > function button. Fast forward.
Briefly touch the function button once. Playback stops. The function button changes to .
Briefly touch the function button once. Playback is resumed. The function button changes to
.
Selecting tracks from the track list
Fig. 20 Track list from a media source
First read and observe the safety warn-
ings on page 3 and the introductory
information on page 20.
Opening the track list
● In the MEDIA main menu, touch the function
button ⇒ Fig. 19 to open the track list. The track
that is currently playing is highlighted ⇒ Fig. 20.
● Search through the track list and touch the de-
sired track.
If track information is available, the track name is
displayed instead of Track + No..
Composition Touch, Composition Colour
24
CONFIDENTIAL
not for distribution
Overview of function buttons in the track list
Function button: effect
Opens the Sources menu. Touch to select a different media source.
A
Indicates the media source currently selected. Touch to change the media source.
CD : internal CD drive ⇒ page 25.
SD card : memory card ⇒ page 26.
USB : external data storage device connected to USB port ⇒ page 26.
AUX : external audio source connected to AUX-IN socket ⇒ page 27.
BT audio : external media player connected via Bluetooth® ⇒ page 28.
Touch the function button to open the parent folder of the current folder on the media
source. The name of the current folder will be displayed to the right of the symbol.
Starts playback at the first track.
Repeats all tracks.
All tracks on the same memory level as the current track will be repeated. If
Mix/repeat including subfolders is activated in Media setup subfolders are also inclu-
ded⇒ page 28.
Repeat current track.
Random play.
All tracks on the same memory level as the current track are included. If
Mix/repeat including subfolders is activated in Media setup subfolders are also inclu-
ded⇒ page 28.
SCAN When the scan function is running, all tracks in the current track list are played for approx-
imately 10 seconds each.
Closes track list.
Tracks, folders and playlists can also be
marked by turning the setting knob then loa-
ded or opened up or opened by pressing the knob.
Inserting or ejecting a CD
First read and observe the safety warn-
ings on page 3 and the introductory
information on page 20.
The internal CD drive can play audio CDs and au-
dio data CDs.
When an audio CD without CD text is playing, only
TITLE and the track number, corresponding to the
playing order on the data medium, are displayed in
the centre line of the screen.
If the audio file CDs played contain additional track
information (CD text , ID3 tag for MP3 files), it
can be displayed on the screen.
Inserting a CD
● Hold the CD with the printed side facing up.
● Push the CD into the CD slot only to the point
where it is drawn in automatically.
● When the CD is inserted, playback will start au-
tomatically.
Ejecting a CD
In some countries, the vehicle key must be in the
ignition lock of a cabriolet vehicle in order to eject a
CD (anti-theft protection).
● Press the EJECT infotainment button.
● The CD in the drive will be ejected and must be
removed within approximately 10 seconds.
For safety reasons, the CD will be drawn back into
the player if it is not removed within roughly 10
seconds, but the unit will not switch to CD mode.
CD cannot be read or is faulty
A message will be shown on the screen if the data
on an inserted CD cannot be read or the CD is
faulty.
Uneven road surfaces and strong vibrations
can cause playback to jump.
Audio mode 25
142.5R6.RCT.20
CONFIDENTIAL
not for distribution
When the temperature inside the infotain-
ment system is too high, loading and play-
back of CDs is disabled.
If you insert a number of different CDs and
receive the message Error: CD drive ev-
ery time, contact a qualified workshop.
Inserting or removing a memory card
First read and observe the safety warn-
ings on page 3 and the introductory
information on page 20.
Only supported audio files are displayed and
played. Other files are ignored.
Inserting a memory card
Fig. 1 7
Vertical card slot
Insert a compatible memory card into the memory card slot with the cut-off
corner first and the lettering facing left (contact surfaces facing down) until
the card clicks into place.
Horizontal card slot
Insert a compatible memory card into the memory card slot with the cut-off
corner first and the label facing up (contact surfaces facing down) until the
card clicks into place.
If a memory card cannot be inserted, ensure that it
is positioned correctly and is compatible with the
unit.
Playback starts automatically if supported audio
files are stored on the memory card.
Removing a memory card
The inserted memory card must be prepared for
removal.
● In the MEDIA main menu touch the function
button to open the Media setup menu.
●OR: press the SETUP infotainment button.
● Touch the Remove the SD card safely function but-
ton.
●OR: touch the Remove safely function button and
then select SD card .
Once the memory card has been ejected from the
system, a message is shown on the screen and
the function button is greyed out. The memory card
can then be removed.
●Press the inserted memory card. The memory
card springs out of the slot.
● Remove the memory card.
Memory card cannot be read
If you insert a memory card containing data that
cannot be read, the unit will not change to memory
card mode after loading.
A corresponding message is displayed.
External data storage device connected to USB port
First read and observe the safety warn-
ings on page 3 and the introductory
information on page 20.
In some countries and with some equipment lev-
els, the vehicle may be fitted with a USB connec-
tion in the stowage compartment in the centre
console. ⇒ Booklet Owner's Manual, chapter Prac-
tical equipment.
Only supported audio files are displayed and
played. Other files are ignored.
Playback starts automatically if supported audio
files are stored on the data storage device.
Removing
The connected storage device must be prepared
before removal.
● In the MEDIA main menu, touch the function
button to open the Media setup menu.
●OR: press the SETUP infotainment button.
● Touch the Remove safely function button and
then select USB .
Data media cannot be read
The message No playable files available
appears if the data on the connected storage de-
vice cannot be read.
Composition Touch, Composition Colour26
CONFIDENTIAL
not for distribution
Please read and observe the manufacturer's
manual for the external storage device.
External audio source connected to the AUX-IN socket
Fig. 21 MEDIA main menu Fig. 22 External audio source connected to AUX-
IN
First read and observe the safety warn-
ings on page 3 and the introductory
information on page 20.
The AUX-IN socket ⇒ Fig. 1 6 can only be used
with a 3.5 mm jack plug.
The connected external audio source is played
over the vehicle speakers and cannot be control-
led via the infotainment system.
AUX shows on the screen when an external audio
source is connected ⇒ Fig. 22.
Connecting an external audio source to the
AUX-IN socket
● Reduce the base volume on the infotainment
system.
● Connect the external audio source to the AUX-
IN socket.
● Start playback on the external audio source.
● In the MEDIA main menu, touch the
⇒ Fig. 21 1 function button and select AUX .
The output volume of the external audio source
should be adjusted to the volume of the other au-
dio sources ⇒ page 42.
Information on operating an external audio source connected to the AUX-IN socket
Action Effect
Selecting another audio source on the infotainment
system.
The external audio source continues to run in the
background.
Stopping playback on the external audio source. The infotainment system remains in the AUX menu.
Disconnecting the plug from the AUX-IN socket. The infotainment system switches to playback of
the most recently played audio source.
Please read and observe the manufacturer's
manual for the external audio source.
Interference may occur if the external audio
source is powered from the vehicle’s 12-volt
socket.
Audio mode 27
142.5R6.RCT.20

CONFIDENTIAL
not for distribution
Connecting an external audio source via Bluetooth®
Fig. 23 MEDIA main menu
First read and observe the safety warn-
ings on page 3 and the introductory
information on page 20.
In Bluetooth® audio mode, audio files from a Blue-
tooth® audio source (e.g. mobile telephone) that is
connected via Bluetooth® can be played over the
vehicle loudspeakers (Bluetooth® audio playback).
Conditions
● The Bluetooth® audio source must support
the A2DP Bluetooth® profile.
● The Bluetooth audio (A2DP/AVRCP) function must
be activated in the Bluetooth setup menu
⇒ page 39.
Starting Bluetooth® audio transfer
●Switch on Bluetooth® visibility on the external
Bluetooth® audio source (e.g. mobile telephone).
● Reduce the base volume on the infotainment
system.
● Press the MEDIA infotainment button.
● Touch the ⇒ Fig. 23 1 function button and se-
lect BT audio .
● Touch the Find devices function button to con-
nect an external Bluetooth® audio source for the
first time.
●OR: touch the Paired devices function button to
select an external Bluetooth® audio source from
the list.
● Continue the process by following the prompts
on the infotainment system screen and in the dis-
play on the Bluetooth® audio source.
You may then have to start playback on the Blue-
tooth® audio source manually.
When playback on the Bluetooth® audio source is
stopped, the infotainment system remains in Blue-
tooth® audio mode.
Controlling playback
The extent to which the Bluetooth® audio source
can be controlled via the infotainment system var-
ies depending on what Bluetooth® audio source is
connected.
With media players that support the AVRCP Blue-
tooth® profile, playback on the Bluetooth® audio
source can be automatically started or stopped
when the unit is switched to Bluetooth® audio
mode or to a different audio source. In addition,
track display or track change is possible via the in-
fotainment system.
Due to the large number of possible Blue-
tooth® audio sources, it is not possible to
guarantee fault-free operation of all described
functions.
Always switch off the warning and service
tones on a connected Bluetooth® audio
source, e.g. key tones on a mobile telephone, to
prevent interference noise and malfunctions.
Media settings
First read and observe the safety warn-
ings on page 3 and the introductory
information on page 20.
● Select the MEDIA main menu by pressing the
MEDIA infotainment button.
● Touch the function button to open the Media
setup menu.
Function button: effect
Remove the SD card safely : memory card is ejected from the system and can then be safely removed
⇒ page 26.
Sound : sound settings ⇒ page 42.
Bluetooth : opens the Bluetooth setup menu ⇒ page 39.
Composition Touch, Composition Colour28

CONFIDENTIAL
not for distribution
Function button: effect
Traffic program (TP) : the TP function (traffic news monitoring) is activated ⇒ page 12.
Mix/Repeat including subfolders : subfolders will be included in the selected playback mode ⇒ page 22.
Remove safely : disconnect data storage device (USB storage device or SD card) from the system. Once
the storage device has been ejected from the system the respective function button is greyed out.
Audio mode 29
142.5R6.RCT.20

CONFIDENTIAL
not for distribution
Telephone control (PHONE)
Introduction to telephone control system
Introduction
This chapter contains information on the following
subjects:
General information . . . . . . . . . . . . . . . . . . . . . . 31
Areas where special regulations apply . . . . . . 31
Bluetooth® . . . . . . . . . . . . . . . . . . . . . . . . . . . . . 31
Pairing and connecting mobile telephone on
the infotainment system . . . . . . . . . . . . . . . . . . 32
Switching telephone control system off . . . . . . 33
The telephone functions described in the following
section can be controlled via the infotainment sys-
tem if a mobile telephone that is switched on is
paired and connected with the infotainment sys-
tem.
The mobile telephone must support the Blue-
tooth® function otherwise a connection cannot be
made between the telephone and the infotainment
system.
If a mobile telephone is not connected to the info-
tainment system, the telephone control system
cannot be used.
Observe the notes on using a mobile telephone in
the vehicle without a connection to the external
aerial ⇒ Booklet Owner's manual.
Additional information and warnings:
● Safety information for infotainment system
⇒ page 3
●Overview of the control elements ⇒ page 6
● Basic information on use ⇒ page 7
WARNING
Making telephone calls and operating the tel-
ephone control system while the vehicle is in
motion can distract you from the road and
lead to accidents.
● Always drive carefully and responsibly.
● Select volume settings that allow signals
from outside the vehicle (such as emergency
services sirens) to be easily heard at all
times.
● Your call may be cut off or you may be un-
able to make calls if you are in an area with
no mobile telephone network coverage, an
WARNING (Continued)
area where the network is very weak or, in
some cases, in a tunnel, garage or under-
pass. This also means that no emergency
calls can be made.
WARNING
If a mobile telephone is not secured or is in-
correctly secured in the vehicle, it could be
flung though the interior during a sudden
driving or braking manoeuvre, or in the event
of an accident. This can cause injuries.
● While the vehicle is in motion, always se-
cure the mobile telephone properly outside
the airbag deployment area.
WARNING
Carrying a mobile telephone that is switched
on just next to a pacemaker may cause the
pacemaker to malfunction.
● Maintain a gap of approximately 20 centi-
metres between the aerials of the mobile tele-
phone and the pacemaker, as mobile tele-
phones may affect the functioning of pace-
makers.
●Do not carry a mobile telephone in your
breast pocket above your pacemaker when
the telephone is switched on or in standby
mode.
● If you suspect interference, switch off the
mobile telephone immediately.
WARNING
The centre armrest may obstruct the driver's
arm movements if raised, which could cause
accidents and severe injuries.
● Always keep the armrest down while the
vehicle is in motion.
NOTICE
High speeds, poor weather and poor road con-
ditions as well as the network quality may im-
pair telephone calls in the vehicle.
Composition Touch, Composition Colour30
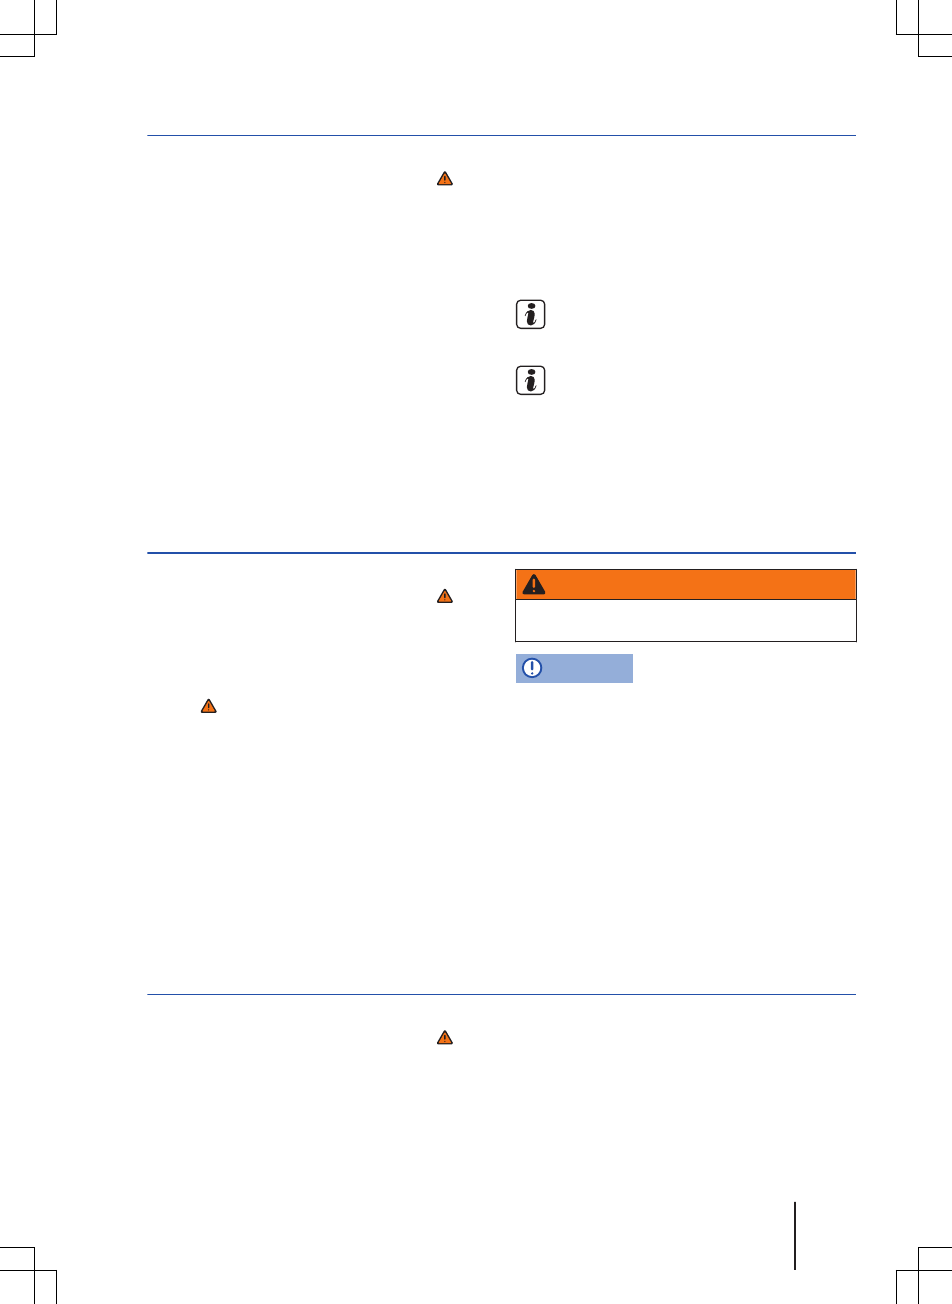
CONFIDENTIAL
not for distribution
General information
First read and observe the introductory
information and safety warnings on
page 30.
How the individual telephone menus are displayed
depends on the mobile telephone being used.
There may be differences.
Observe the notes on using a mobile telephone in
the vehicle without a connection to the external
aerial ⇒ Booklet Owner's manual, chapter Vehicle
care and maintenance.
Use compatible Bluetooth® devices only. Informa-
tion on compatible Bluetooth® products is available
from your Volkswagen dealership or online.
Follow the operating manual for your mobile tele-
phone and the instructions provided by the acces-
sory manufacturer.
You may experience poor reception or may be cut
off in areas where the signal is weak.
Most electronic devices are shielded against high-
frequency signals. In rare cases, however, elec-
tronic devices may not be shielded against high-
frequency signals emitted by the telephone control
system. This can cause interference.
There may be restrictions on the use of Blue-
tooth® devices in some countries. Information
is available from the local authorities.
When connecting the telephone control sys-
tem with a device using Bluetooth®, read the
device's operating manual for detailed safety infor-
mation. Use compatible Bluetooth® products only.
Areas where special regulations apply
First read and observe the introductory
information and safety warnings on
page 30.
Switch off the mobile telephone and mobile tele-
phone provision in areas with a risk of explosion.
These areas are often clearly marked, but not al-
ways ⇒ in Introduction on page 30. They in-
clude, for example:
● Areas immediately around chemical pipelines
and tanks.
● Lower decks of ships and ferries.
● The area around vehicles which run on liquid
gas (such as propane or butane).
● Places where there are chemicals or particles
such as flour, dust and metal powder in the air.
● All other places where the vehicle engine must
be switched off.
WARNING
Switch off the mobile telephone in areas with
a risk of explosion!
NOTICE
Your mobile telephone must always be switch-
ed off in areas where special regulations apply
and when the use of mobile telephones is for-
bidden. The radiation produced by the mobile
telephone when switched on may interfere with
sensitive technical and medical equipment,
possibly resulting in malfunction or damage to
the equipment.
Bluetooth®
First read and observe the introductory
information and safety warnings on
page 30.
Bluetooth®
Bluetooth® technology is used to connect a mobile
telephone to the telephone control system fitted in
a vehicle. A pairing process has to be carried out
before the telephone control system can be used
with a Bluetooth® mobile telephone.
Telephone control (PHONE) 31
142.5R6.RCT.20
CONFIDENTIAL
not for distribution
Some Bluetooth® mobile telephones are detected
and connected automatically when the ignition is
switched on, if a connection already exists. For this
to happen, the mobile telephone itself and the
Bluetooth® function in the telephone must be
switched on and all active Bluetooth® connections
to other units must be disconnected.
The Bluetooth® connection is free of charge.
Bluetooth® is a registered trademark of Blue-
tooth® SIG, Inc.
Bluetooth® profiles
When a mobile telephone is connected to the tele-
phone control system, data is exchanged via one
of the Bluetooth® profiles.
Basic telephony Bluetooth® Hands-Free Profile
(HFP):
● If a mobile telephone is connected via HFP to
the telephone control system, you can make calls
wirelessly via the hands-free system. The vehicle's
exterior aerial cannot be used with this. Observe
the notes on using a mobile telephone in the vehi-
cle without a connection to the external aerial
⇒ Booklet Owner's manual.
Music playback Bluetooth® Advanced Audio Dis-
tribution Profile (A2DP):
● Bluetooth® profile for the transmission of ster-
eo-quality audio signals.
Playback controls Bluetooth® Audio Video Re-
mote Control Profile (AVRCP):
● Bluetooth® profile for displaying track informa-
tion and control of playback in the mobile device.
Pairing and connecting mobile telephone on the infotainment system
First read and observe the introductory
information and safety warnings on
page 30.
In order to operate a mobile telephone via the info-
tainment system, a single pairing process is re-
quired for both devices.
Pairing should only be performed when the vehicle
is stationary.
Conditions
● Ignition is switched on.
● If necessary, disconnect any headsets from the
mobile telephone.
● The Bluetooth® function must be activated or
set to visible on the mobile telephone and on the
infotainment system.
● The keypad lock on the mobile telephone has
to be unlocked.
Follow the operating manual for the mobile tele-
phone.
The Bluetooth® function is set to visible on the
infotainment system for about 3 minutes after the
ignition is switched on.
Entries have to be made on the mobile telephone
keypad during the pairing process. The mobile tel-
ephone has to be at hand for this.
Starting mobile telephone pairing
● Press the PHONE infotainment button.
● Touch the Find telephone function button.
OR:
● Press the PHONE infotainment button.
● Touch the Setup function button.
● Touch the Select telephone function button and
then Find telephone .
Once the search process is complete, the names
of all Bluetooth® devices found will be displayed on
the screen.
●Select the mobile telephone to be paired from
this list of Bluetooth® devices and then select
Hands-free telephone (HFP).
The infotainment system and the mobile telephone
are now connected. Further input may be required
on the mobile telephone and on the infotainment
system to conclude the connection process.
Composition Touch, Composition Colour
32
CONFIDENTIAL
not for distribution
● If necessary, confirm the pairing on the mobile
telephone.
Depends on the mobile telephone:
● Enter the PIN code that is then displayed on
the infotainment system into the mobile telephone
and confirm it.
OR:
● Compare the PIN code displayed on the info-
tainment system with the PIN code displayed on
the mobile telephone. If the PIN code matches, it
has to be confirmed on both devices.
The PHONE main menu is displayed and the tele-
phone book and the call lists stored in the mobile
telephone are loaded automatically once pairing
has been completed. The time taken by the load-
ing process varies depending on the amount of da-
ta stored in the mobile telephone. This data is
available on the infotainment system once the
loading process is completed.
Pairing and connecting mobile telephones
Several mobile telephones can be paired with the
infotainment system, but only one mobile tele-
phone can be connected to the infotainment sys-
tem at a time.
When you switch the infotainment system on, a
connection is automatically set up with the mobile
telephone that was connected last. If no connec-
tion can be set up with this mobile telephone, the
telephone control system automatically attempts to
set up a connection with the next mobile telephone
in the list of paired devices.
Bluetooth® connections have a maximum range of
10 metres. Any active Bluetooth® connection is in-
terrupted when this distance is exceeded. The con-
nection is automatically restored as soon as the
device enters the Bluetooth® range.
You will find further information on pairing
and connecting mobile telephones on the In-
ternet at www.volkswagen.com.
Switching telephone control system off
First read and observe the introductory
information and safety warnings on
page 30.
● Switch off the ignition.
● Remove the vehicle key from the ignition lock.
The telephone control system is switched off and
any active call is transferred to the mobile tele-
phone.
The telephone control system is not switched off if
the vehicle key is left in the ignition lock after the
engine is switched off. Once a set time has ex-
pired, a message appears on the infotainment sys-
tem screen informing you that the telephone con-
trol system will be switched off automatically. An
active call will be transferred to the mobile tele-
phone.
The transfer of an active call from the tele-
phone control system to the mobile telephone
can take up to approximately 10 seconds (depend-
ing on the mobile telephone being used).
Telephone control (PHONE) 33
142.5R6.RCT.20
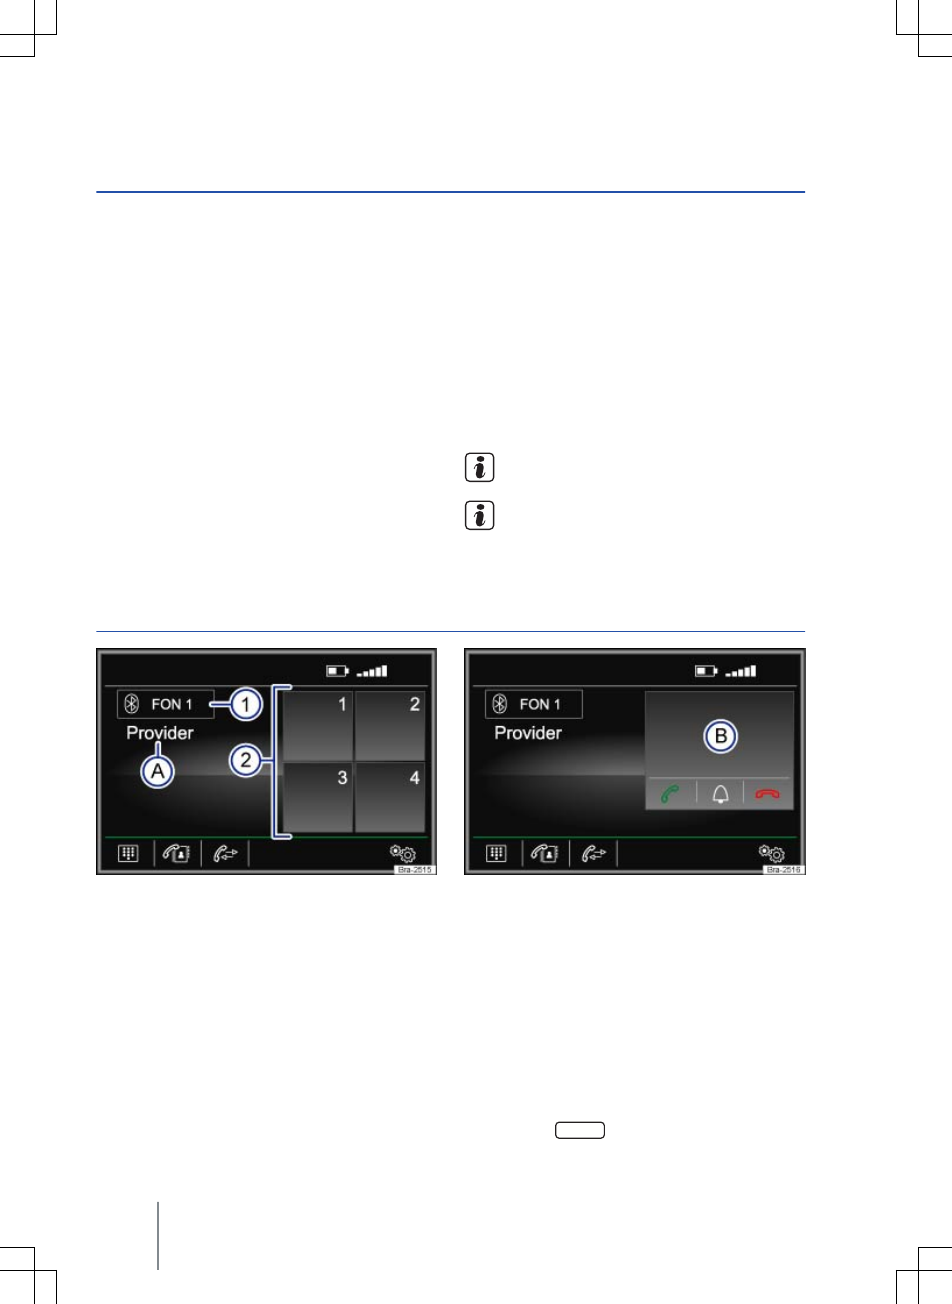
CONFIDENTIAL
not for distribution
Description of telephone control system
Introduction
This chapter contains information on the following
subjects:
PHONE main menu . . . . . . . . . . . . . . . . . . . . . . 34
During a telephone call . . . . . . . . . . . . . . . . . . . 35
Entering a telephone number . . . . . . . . . . . . . . 36
Telephone book menu (Contacts) . . . . . . . . . . 36
Call lists menu . . . . . . . . . . . . . . . . . . . . . . . . . . 37
Speed dial buttons . . . . . . . . . . . . . . . . . . . . . . . 38
Telephone settings . . . . . . . . . . . . . . . . . . . . . . 38
Bluetooth settings® . . . . . . . . . . . . . . . . . . . . . . 39
User profile settings . . . . . . . . . . . . . . . . . . . . . 39
Some functions and settings are only available
when the vehicle is stationary, and are not suppor-
ted by all mobile telephones.
The range of possible settings depends on the
country, the unit and the vehicle's equipment speci-
fication.
Up to 20 devices can be linked to the telephone
control system. One device at a time can be con-
nected via the hands-free profile (HFP) or audio
playback profile (A2DP) ⇒ page 33.
Additional information and warnings:
● Safety information for infotainment system
⇒ page 3
● Overview of the control elements ⇒ page 6
● Basic information on use ⇒ page 7
● Introduction to and safety information for tel-
ephone control system ⇒ page 30
Using a mobile telephone in the vehicle may
cause noise from the vehicle speakers.
Some networks might not support all lan-
guage-dependent characters and services.
PHONE main menu
Fig. 24 PHONE main menu Fig. 25 Incoming call
First read and observe the introductory
information given on page 34.
Assignment to a user profile
Telephone book data, call lists and stored speed
dial buttons are assigned to a user profile and stor-
ed in the telephone control system. They are avail-
able when the mobile phone is connected with the
telephone control system again.
If, while connected to the radio, telephone book
entries on the mobile telephone are changed, you
can start a manual update of the telephone book
data via the User profile setup menu
⇒ page 39. The telephone book will be automati-
cally updated when the telephone is connected
again (e.g. on the next journey).
A maximum of 4 user profiles can be stored for
mobile telephones in the telephone control system.
If another mobile telephone is connected, the user
profile which has not been used for the longest
amount of time will be deleted automatically.
Telephone control function buttons
● Press the PHONE infotainment button to open
the PHONE main menu.
Composition Touch, Composition Colour34
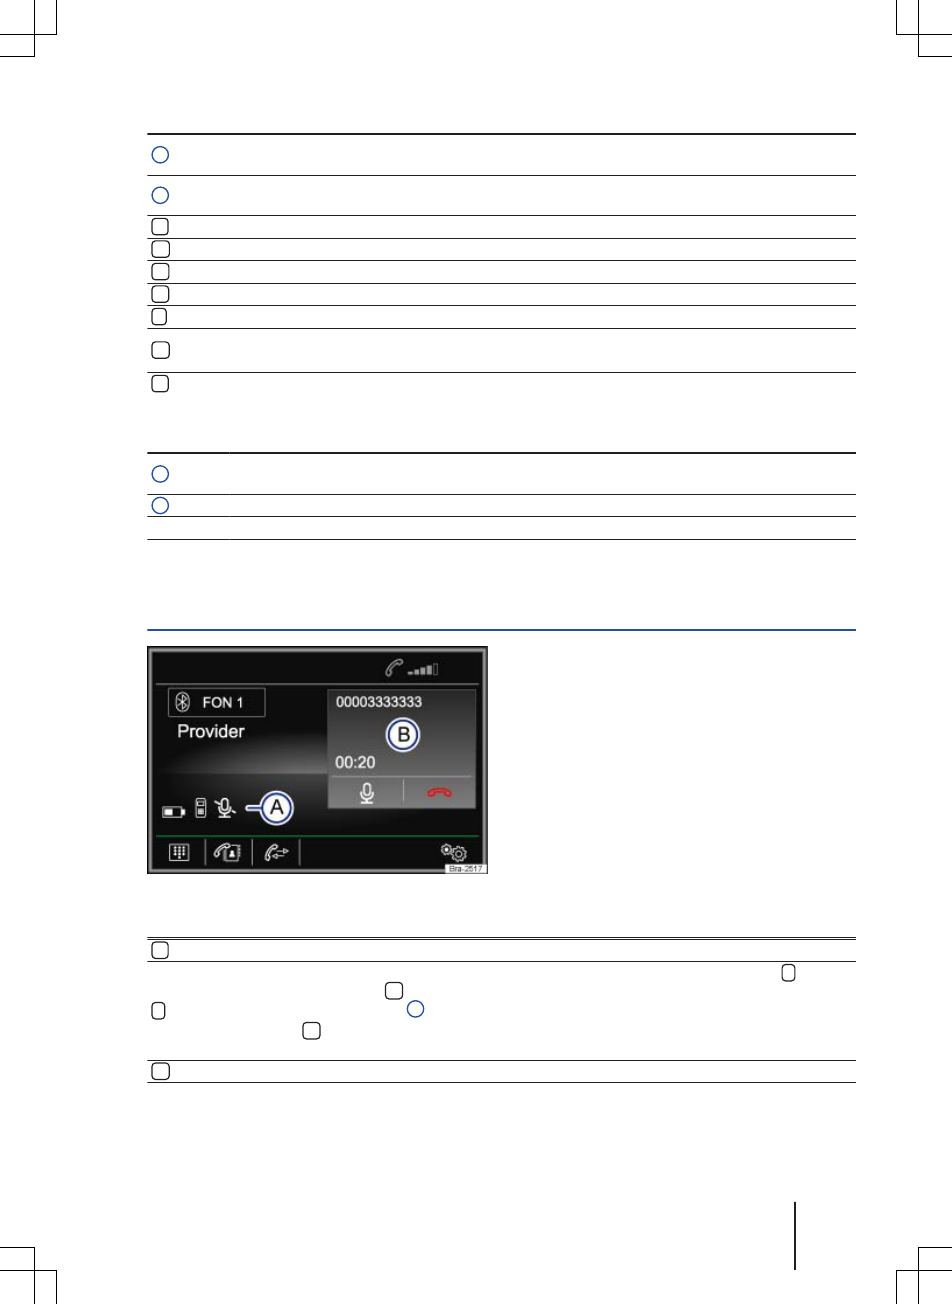
CONFIDENTIAL
not for distribution
Function button: effect
1Name of the paired mobile telephone or the user profile in use. Touch to connect or pair an-
other mobile telephone.
2Speed dial buttons which can be used to store one telephone number from the telephone
book each ⇒ page 38.
Opens the keypad to enter a telephone number ⇒ page 36.
Opens the telephone book in the paired mobile telephone ⇒ page 36.
Opens the call lists in the paired mobile telephone ⇒ page 37.
Opens the Telephone setup menu ⇒ page 38.
Touch to accept a call.
Touch to end a call.
OR: touch to reject an incoming call.
Touch to mute the ring tone during a call or to switch the mute off.
Telephone control displays and symbols
Display: meaning
AThe name of the mobile telephone network provider where the inserted SIM card or the SIM
card of the paired mobile telephone is registered.
BDisplays the telephone number or the stored name.
The charge level of the paired mobile telephone.
The signal strength of the current mobile telephone transmitter station.
During a telephone call
Fig. 26 During a telephone call
First read and observe the introductory
information given on page 34.
When a connection is made to a dialled telephone
number, the PHONE main menu changes to the
telephone call view ⇒ Fig. 26.
Displays and function buttons: action and effect
a) Touch to make the call on the mobile telephone provision.
Touch to switch off the microphone in the mobile telephone provision during a call ( func-
tion button changes to ). The conversation in the vehicle cannot be heard at the other end.
appears on the display A.
Touch the function button to switch on the microphone in the mobile telephone provision
again.
Touch to end a call.
Telephone control (PHONE) 35
142.5R6.RCT.20

CONFIDENTIAL
not for distribution
Displays and function buttons: action and effect
A
: call is being made with the connected mobile telephone. Touch the function button to
make the call on the mobile telephone provision.
: the microphone in the provision for mobile telephone is switched off.
: charge level of the paired mobile telephone.
BDisplay of call duration and telephone number or the stored name.
a) This function button is only displayed when the call is made on the mobile telephone.
Entering a telephone number
Fig. 27 Entering a telephone number
First read and observe the introductory
information given on page 34.
In the PHONE main menu, press the function
button.
Possible functions
Entering a telephone num-
ber
Enter the telephone number on the keypad.
Touch the function button to dial the number.
Selecting a contact from a
list
Enter the first letters of the required contact on the keypad. Possible en-
tries appear in the contact list.
Browse through the contact list and touch the desired contact to make the
call.
Telephone book menu (Contacts)
Fig. 28 Contacts menu Fig. 29 Search window
First read and observe the introductory
information given on page 34.
Composition Touch, Composition Colour36
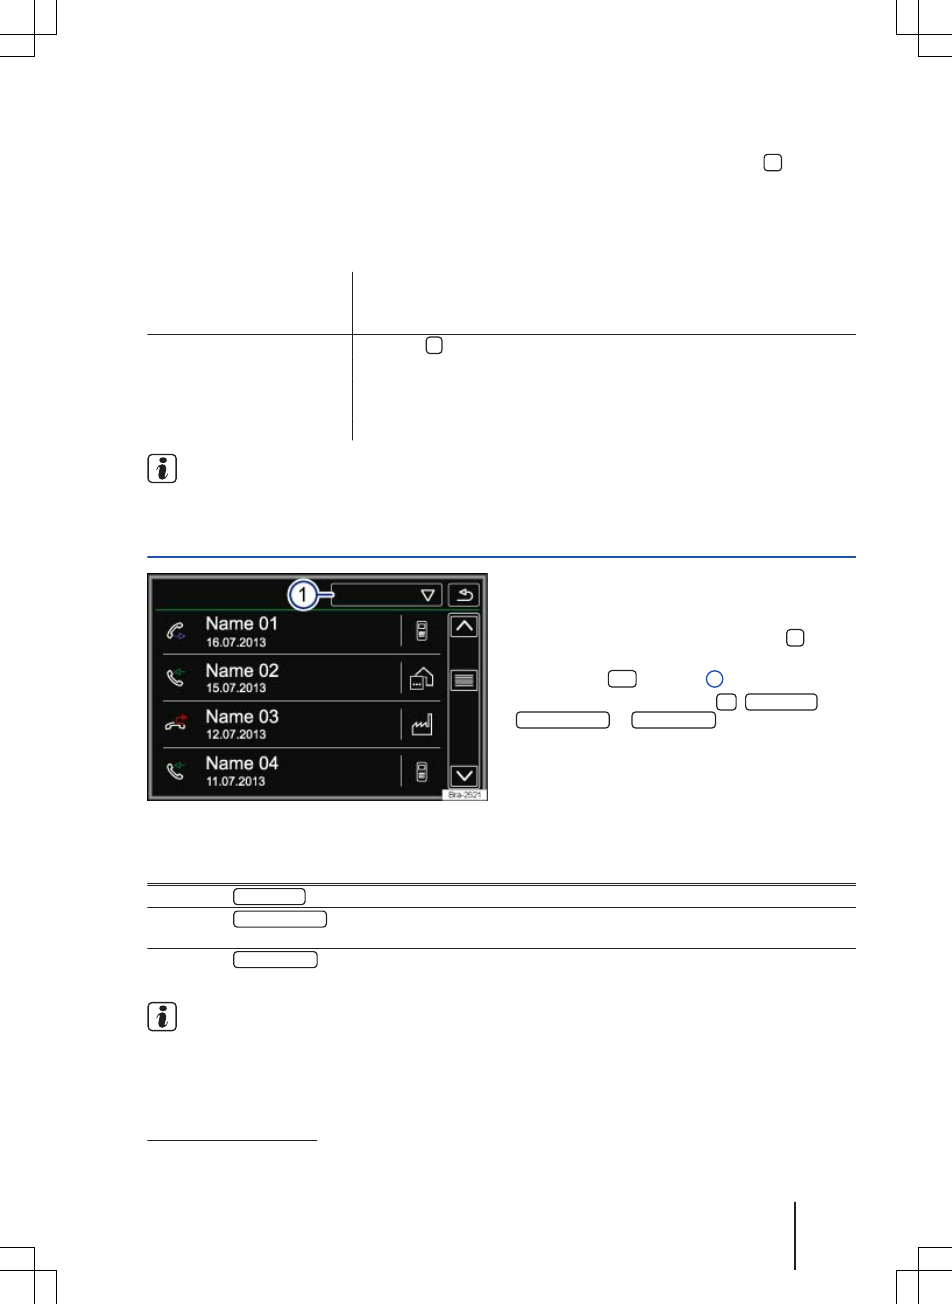
CONFIDENTIAL
not for distribution
It may take a few minutes after the first pairing
process until the telephone book data1) from the
paired mobile telephone is available on the info-
tainment system. The process could take up to an
hour, depending on the amount of data to be trans-
ferred. If necessary, confirm the transfer on the
mobile telephone.
The telephone book can also be opened during an
on-going telephone call.
In the PHONE main menu, press the function
button.
Possible functions
Selecting a contact from a
list
Browse through the list and touch the desired contact to make the call.
OR: if several numbers are allocated to the same contact, first touch the
contact and then the desired number to make the call.
Finding a contact in the
search window
Touch the ⇒ Fig. 28 function button to open the search window.
Enter the name you are looking for in the search window ⇒ Fig. 29.
The number of matching results is displayed to the right of the entry field.
Touch the function button to go to the list view.
Browse through the list and touch the desired contact to make the call.
Availability of telephone book menu depends
on the mobile telephone being used.
Call lists menu
Fig. 30 Call list menu
First read and observe the introductory
information given on page 34.
● In the PHONE main menu, press the func-
tion button.
● Touch the ... ⇒ Fig. 30 1 function button.
● Select the desired call list: All , Missed calls ,
Dialled numbers or Received calls .
If a telephone number is already stored in the tele-
phone book, the stored name is displayed in the
call list instead of the telephone number.
Possible displays in the call menu
Display Meaning
Missed calls : shows telephone numbers of missed and unanswered calls.
Dialled numbers : shows telephone numbers that were dialled on the mobile telephone and the
infotainment system telephone control system.
Received calls : shows all telephone numbers that were received on the mobile telephone and
on the infotainment system via the telephone control system.
Availability of call lists depends on the mobile
telephone being used.
1) Depending on what device is used, only contacts from the telephone memory may be loaded.
Telephone control (PHONE) 37
142.5R6.RCT.20
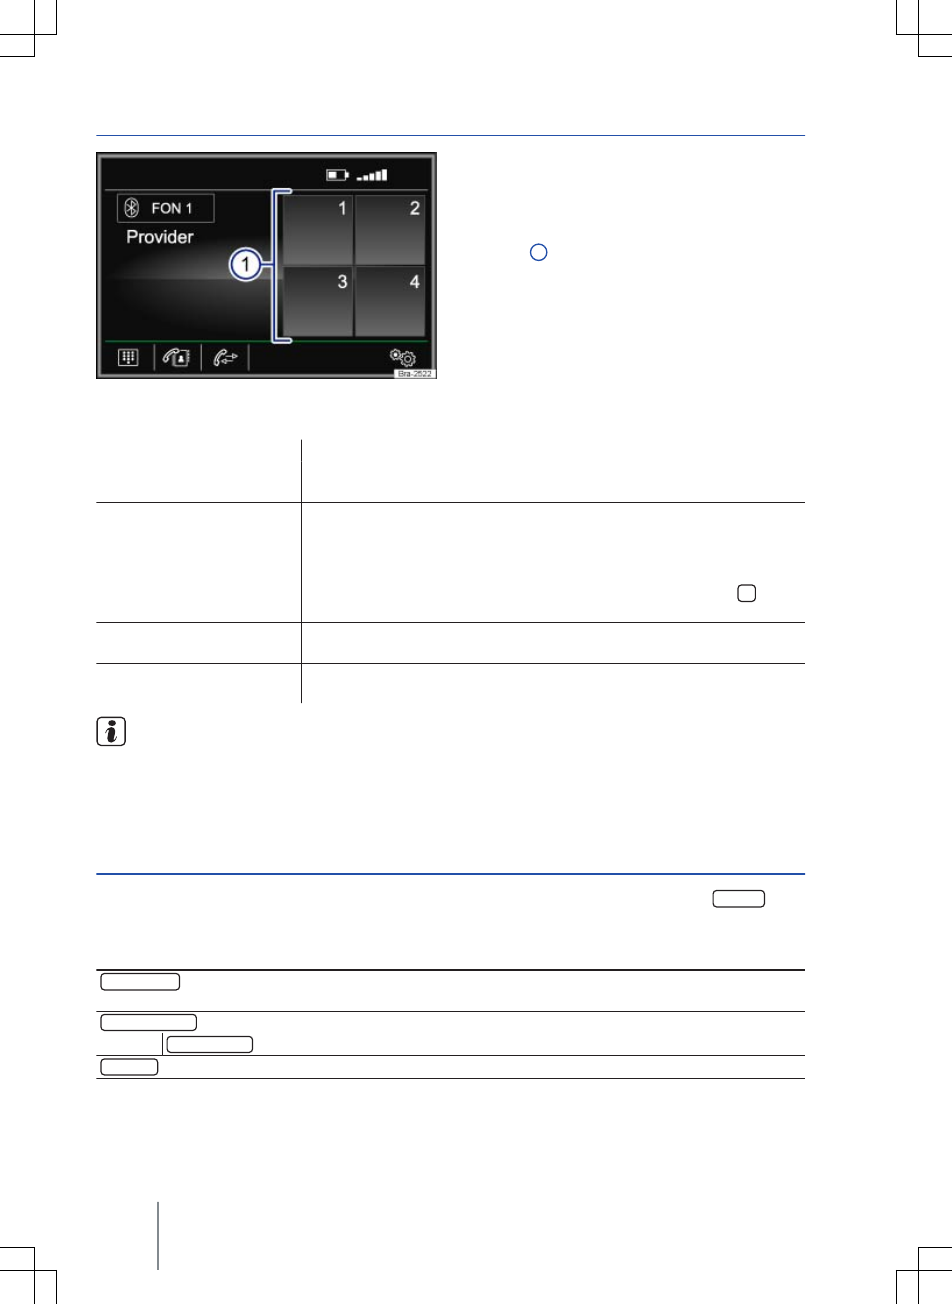
CONFIDENTIAL
not for distribution
Speed dial buttons
Fig. 31 PHONE main menu
First read and observe the introductory
information given on page 34.
One telephone number from the telephone book
can be stored to each of the speed dial buttons
⇒ Fig. 31 1.
All speed dial buttons must be assigned manually
and are then specific to a user profile.
Possible functions
Assigning speed dial but-
tons
In the PHONE main menu, touch a free speed dial button.
Select the desired contact from the list. If several telephone numbers are
stored for the selected contact, select the desired number.
Editing assigned speed di-
al buttons
In the PHONE main menu, press and hold an assigned speed dial button
until the Contacts menu opens.
Select the desired contact from the list. If several telephone numbers are
stored for the selected contact, select the desired number.
To close the Contacts menu without applying changes, touch the func-
tion button.
Deleting assigned speed
dial buttons
Any telephone number stored on a speed dial button can be deleted in the
User profile setup menu ⇒ page 39.
Dialling with speed dial
buttons
In the PHONE main menu, briefly touch an assigned speed dial button to
dial the telephone number stored to that button.
Contacts stored to the speed dial buttons are
not updated automatically. If a contact stored
to a speed dial button is modified on the mobile tel-
ephone, the speed dial button must be assigned
again.
Telephone settings
First read and observe the introductory
information given on page 34.
In the PHONE main menu, touch the Setup func-
tion button.
Function button: effect
Hands-free a): the hands-free function is activated. Touch the function button during a telephone call to
make the call on the mobile telephone.
Select telephone : select the mobile telephone from the list view to connect it to the infotainment system.
Find telephone : touch to connect a new mobile telephone.
Bluetooth : opens the Bluetooth setup menu ⇒ page 39.
Composition Touch, Composition Colour38
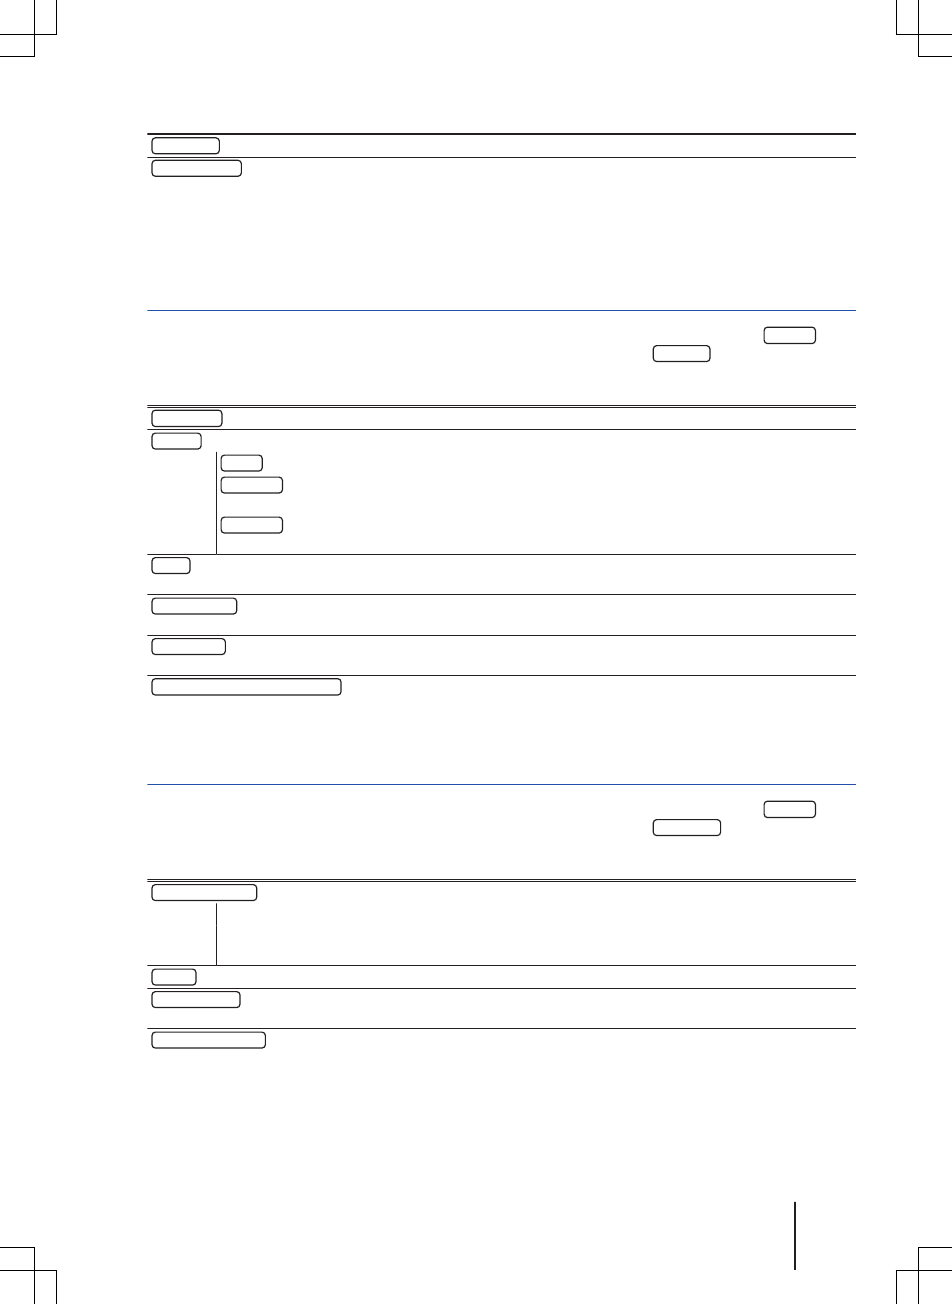
CONFIDENTIAL
not for distribution
Function button: effect
User profile : opens the User profile setup menu ⇒ page 39.
Select ring tone b): select the ring tone from the list of preset ring tones. The selected ring tone is played and
stored when you leave the submenu.
a) This function button is only active during a telephone call.
b) Either the selected ring tone or the ring tone set in the mobile phone is sounded, depending on what mobile phone is being used.
Bluetooth settings®
First read and observe the introductory
information given on page 34.
In the PHONE main menu, touch the Setup func-
tion button and then Bluetooth .
Function button: effect
Bluetooth : touch to switch Bluetooth® off. All existing connections are ended.
Visibility : switch Bluetooth® visibility on and off.
Visible : Bluetooth® visibility is activated.
Not visible : Bluetooth® visibility is deactivated. The Bluetooth® visibility has to be switched on
before a Bluetooth® device can be externally paired with the infotainment system.
Upon start : Bluetooth® visibility is deactivated approximately 3 minutes after the engine is star-
ted.
Name : to display or edit the device name. This name is displayed to other Bluetooth® devices in their
Bluetooth® settings.
Paired devices : displays paired devices. Separating and connecting individual Bluetooth® devices and
Bluetooth® profiles.
Find devices : finds Bluetooth® devices that are set to visible and are within the range of the infotainment
system. The maximum range is approximately 10 metres.
Bluetooth audio (A2DP/AVRCP) : this function must be activated if you want to connect an external audio
source to the infotainment system via Bluetooth®⇒ page 28.
User profile settings
First read and observe the introductory
information given on page 34.
In the PHONE main menu, touch the Setup func-
tion button and then User profile .
Function button: effect
Manage favourites : to edit speed dial buttons.
Assigned speed dial button: touch to delete the stored number.
Unassigned speed dial button: touch to store a number from the address book to the speed
dial button.
Sort by : set the sorting order for telephone book entries (Last name or First name).
Import contacts : touch to import the address book from the connected telephone or to update the previously
imported address book.
Delete other profiles : to delete individual or all non-active user profiles.
Telephone control (PHONE) 39
142.5R6.RCT.20
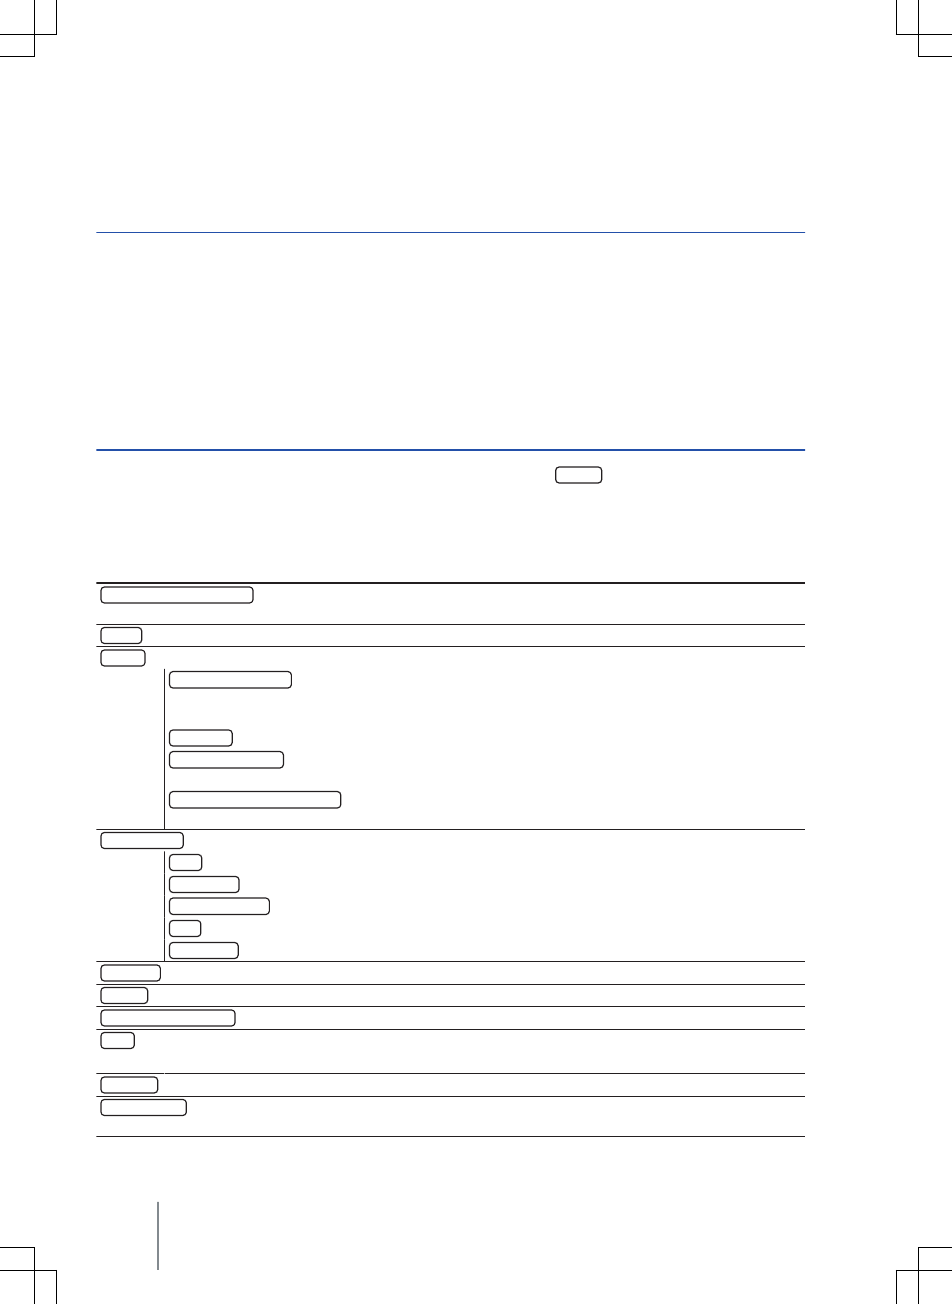
CONFIDENTIAL
not for distribution
Settings
Menu and system settings (SETUP)
Introduction
This chapter contains information on the following
subjects:
System settings main menu (Setup) . . . . . . . . 40
The range of possible settings depends on the
country, the unit and the vehicle's equipment speci-
fication.
Additional information and warnings:
●Safety information for infotainment system
⇒ page 3
● Overview of the control elements ⇒ page 6
● Basic information on use ⇒ page 7
System settings main menu (Setup)
First read and observe the introductory
information given on page 40.
● Press the SETUP infotainment button to open
the System setup main menu.
● To adjust the settings for a certain function,
touch the appropriate function button.
Function button: effect
Remove the SD card safely : ejects the memory card from the system. Once the memory card has been ejec-
ted from the system the function button is greyed out.
Sound : make sound and volume settings ⇒ page 42.
Screen : make screen settings.
Display off (in 10 s) : when this function is activated, the screen switches off if no button is press-
ed on the infotainment system for about ten seconds. The screen is switched back on by touch-
ing the screen or pressing an infotainment button.
Brightness : select the brightness of the screen.
Confirmation tone : activates the confirmation tone that sounds when a function button is
touched.
Show clock in standby mode : the screen shows the current time when the infotainment system is
in standby mode.
Time and date : set the time and date.
Time : to set the current time.
Time format : select the format for the time display (12 or 24-hour).
Summer (DST) : summer time is activated.
Date : set the current date.
Date format : to select the format for the date display (DD.MM.YY, YY-MM-DD or MM-DD-YY).
Language : select the desired language for text and voice output.
Keypad : select the required layout (alphabetical or keyboard layout).
More keypad languages : select additional keypad languages.
Units : sets units of measurement for displays in the vehicle.
Distance, Speed, Temperature, Volume, Consumption and Pressure.
Bluetooth : make settings relating to Bluetooth® ⇒ page 39.
Remove safely : disconnect data storage device (USB storage device or SD card) from the system. Once
the storage device has been ejected from the system the respective function button is greyed out.
Composition Touch, Composition Colour40

CONFIDENTIAL
not for distribution
Function button: effect
Factory settings : restoring the factory settings will erase entered data and settings depending on which
option has been selected.
System information : displays the system information (serial number, hardware and software versions).
Copyright : copyright information.
It is important that the correct date and time
are set in the vehicle to ensure the infotain-
ment system works properly.
Settings 41
142.5R6.RCT.20
CONFIDENTIAL
not for distribution
Sound and volume settings
Introduction
This chapter contains information on the following
subjects:
Adjusting settings . . . . . . . . . . . . . . . . . . . . . . . 42
The range of possible settings depends on the
country, the unit and the vehicle's equipment speci-
fication.
Additional information and warnings:
●Safety information for infotainment system
⇒ page 3
● Overview of the control elements ⇒ page 6
● Basic information on use ⇒ page 7
Adjusting settings
First read and observe the introductory
information given on page 42.
● Press the SOUND infotainment button.
●OR: press the SETUP infotainment button and
then select Sound to open the Sound setup main
menu.
●To adjust the settings for a certain function,
touch the appropriate function button.
Changes are automatically stored when a menu is
closed.
Function button: effect
Bass - Mid- Treble : sets the tonal quality (Bass - Mid - Treble).
Balance or Balance - Fader : set the sound focus.
The crosshair shows the where the sound is currently focused in the car's interior. To move the sound
focus, touch the required position on the interior view or use the arrow buttons to change the position. To
place the focus of sound at the centre of the interior view, touch the function button between the arrows.
Volume : to make volume settings.
Max. switch-on volume : define the maximum volume at switch-on.
Announcements : to set the output volume for announcements (e.g. traffic announcements).
Speed-dep. vol. (GALA) : define the scope of the speed-dependent volume control. The audio vol-
ume is automatically increased as the vehicle speed increases.
Audio lower. : set how much the volume of the infotainment system should be reduced by when
the ParkPilot is active.
AUX volume : to set the output volume for audio sources that are connected via the AUX-IN mul-
timedia socket (Quiet, Medium or Loud). Please also refer to ⇒ page 42, Adjusting playback
volume of external audio sources.
BT audio : to set the output volume for audio sources connected via Bluetooth® (quiet, medium
or loud). Please also refer to ⇒ page 42, Adjusting playback volume of external audio sour-
ces.
Confirmation tone : activates the confirmation tone that sounds when a function button is touched.
Adjusting playback volume of external audio
sources
If you need to increase the output volume of an ex-
ternal audio source, first lower the base volume on
the infotainment system.
If the sound from the external audio source is too
quiet, increase the output volume on the external
audio source if possible. If this is not sufficient, set
the input volume to Medium or Loud.
Composition Touch, Composition Colour
42

CONFIDENTIAL
not for distribution
If the sound from the connected external audio
source is too loud or distorted, lower the output
volume on the external audio source if possible. If
this is not sufficient, set the input volume to Me-
dium or Quiet.
Settings 43
142.5R6.RCT.20

CONFIDENTIAL
not for distribution
Abbreviations
Abbreviation Definition
Generic technology for the transmission of audio signals via Bluetooth® (Advanced Audio
Distribution Profile).
Amplitude modulation (medium wave, MW).
Auxiliary audio input.
Universal technology for remote control of audio sources via Bluetooth® (Audio Video Re-
mote Control Profile).
German Standards Authority (Deutsches Institut für Normung).
Digital rights management.
Supporting of other networks (enhanced other network).
Frequency modulation (very high frequency, VHF).
Wireless telephony (hands-free profile).
Format for compressing audio files.
Radio data system.
Traffic news function (traffic program).
Variable bit rate.
Format for compressing audio files.
A2DP
AM
AUX-IN
AVRCP
DIN
DRM
EON
FM
HFP
MP3
RDS
TP
VBR
WMA
Composition Touch, Composition Colour44

CONFIDENTIAL
not for distribution
Index
A
AM . . . . . . . . . . . . . . . . . . . . . . . . . . . . . . . . . . 12
Areas where special regulations apply . . . . 31
AUX-IN . . . . . . . . . . . . . . . . . . . . . . . . . . . . . . 27
AUX-IN socket . . . . . . . . . . . . . . . . . . . . . . 27
External audio sources . . . . . . . . . . . . . . . 27
Selecting . . . . . . . . . . . . . . . . . . . . . . . . . . 23
AUX-IN socket . . . . . . . . . . . . . . . . . . . . . . . . 27
B
Base volume . . . . . . . . . . . . . . . . . . . . . . . . . . 8
Adjusting . . . . . . . . . . . . . . . . . . . . . . . . . . . 8
Muting . . . . . . . . . . . . . . . . . . . . . . . . . . . . . 8
Bluetooth
Profiles . . . . . . . . . . . . . . . . . . . . . . . . . . . . 31
Settings . . . . . . . . . . . . . . . . . . . . . . . . . . . 39
Bluetooth audio . . . . . . . . . . . . . . . . . . . . . . . 28
Browsing lists . . . . . . . . . . . . . . . . . . . . . . . . . 9
BT audio . . . . . . . . . . . . . . . . . . . . . . . . . . . . . 28
Buttons . . . . . . . . . . . . . . . . . . . . . . . . . . . . . . . 8
Infotainment system . . . . . . . . . . . . . . . . . . . 6
C
Call lists . . . . . . . . . . . . . . . . . . . . . . . . . . . . . 37
CD
Cannot be read . . . . . . . . . . . . . . . . . . . . . 25
Ejecting . . . . . . . . . . . . . . . . . . . . . . . . . . . 25
Faulty . . . . . . . . . . . . . . . . . . . . . . . . . . . . . 25
Inserting . . . . . . . . . . . . . . . . . . . . . . . . . . . 25
Mode . . . . . . . . . . . . . . . . . . . . . . . . . . . . . 25
Selecting . . . . . . . . . . . . . . . . . . . . . . . . . . 23
Checkboxes . . . . . . . . . . . . . . . . . . . . . . . . . . . 8
Control elements (infotainment system) . . . . 6
Copyright . . . . . . . . . . . . . . . . . . . . . . . . . . . . 20
Information . . . . . . . . . . . . . . . . . . . . . . . . . 41
Cursor . . . . . . . . . . . . . . . . . . . . . . . . . . . . . . . 10
D
Dialling a number . . . . . . . . . . . . . . . . . . . . . 36
During a telephone call . . . . . . . . . . . . . . . . . 35
E
Eject
see CD . . . . . . . . . . . . . . . . . . . . . . . . . . . . 25
EON . . . . . . . . . . . . . . . . . . . . . . . . . . . . . . 17, 44
Explosion risk areas
Telephone . . . . . . . . . . . . . . . . . . . . . . . . . 31
External audio sources . . . . . . . . . . . . . . . . . 27
Adjusting playback volume . . . . . . . . . . . . 42
BT audio . . . . . . . . . . . . . . . . . . . . . . . . . . . 28
External data storage device
USB . . . . . . . . . . . . . . . . . . . . . . . . . . . . . . 26
F
Factory settings . . . . . . . . . . . . . . . . . . . . . . . 40
FM . . . . . . . . . . . . . . . . . . . . . . . . . . . . . . . 12, 44
Frequency band
AM . . . . . . . . . . . . . . . . . . . . . . . . . . . . . . . 12
Changing . . . . . . . . . . . . . . . . . . . . . . . . . . 12
FM . . . . . . . . . . . . . . . . . . . . . . . . . . . . . . . 12
Selecting . . . . . . . . . . . . . . . . . . . . . . . . . . 12
Function buttons . . . . . . . . . . . . . . . . . . . . . . . 8
MEDIA main menu . . . . . . . . . . . . . . . . . . . 22
Operating . . . . . . . . . . . . . . . . . . . . . . . . . . . 8
Radio main menu . . . . . . . . . . . . . . . . . . . . 12
Function buttons (soft keys)
PHONE main menu . . . . . . . . . . . . . . . . . . 34
G
GALA . . . . . . . . . . . . . . . . . . . . . . . . . . . . . . . 42
H
Hard keys . . . . . . . . . . . . . . . . . . . . . . . . . . . . . 7
Hard keys (infotainment system) . . . . . . . . . . 6
I
Ignition off
Switch-off delay (timeout) . . . . . . . . . . . . . . . 7
Infotainment buttons . . . . . . . . . . . . . . . . . . 6, 7
Input window . . . . . . . . . . . . . . . . . . . . . . . . . 10
Interference from a mobile telephone . . . . . . 7
Introduction . . . . . . . . . . . . . . . . . . . . . . . . . . . 3
K
Keypad . . . . . . . . . . . . . . . . . . . . . . . . . . . . . . 10
M
Main menu
MEDIA . . . . . . . . . . . . . . . . . . . . . . . . . . . . 22
PHONE . . . . . . . . . . . . . . . . . . . . . . . . . . . 34
RADIO . . . . . . . . . . . . . . . . . . . . . . . . . . . . 12
Settings (SETUP) . . . . . . . . . . . . . . . . . . . . 40
Sound . . . . . . . . . . . . . . . . . . . . . . . . . . . . . 42
MEDIA
AUX-IN socket . . . . . . . . . . . . . . . . . . . . . . 27
Bit rate . . . . . . . . . . . . . . . . . . . . . . . . . . . . 20
Index 45
142.5R6.RCT.20

CONFIDENTIAL
not for distribution
Bluetooth audio . . . . . . . . . . . . . . . . . . . . . 28
CD audio data . . . . . . . . . . . . . . . . . . . . . . 20
CD cannot be read . . . . . . . . . . . . . . . . . . . 25
CD faulty . . . . . . . . . . . . . . . . . . . . . . . . . . 25
CD mode . . . . . . . . . . . . . . . . . . . . . . . . . . 25
Changing media source . . . . . . . . . . . . . . . 23
Changing tracks . . . . . . . . . . . . . . . . . . . . . 24
Copyright . . . . . . . . . . . . . . . . . . . . . . . . . . 20
Displays . . . . . . . . . . . . . . . . . . . . . . . . . . . 22
Displays and symbols . . . . . . . . . . . . . . . . 23
Ejecting a CD . . . . . . . . . . . . . . . . . . . . . . . 25
External data storage device connected to
USB port . . . . . . . . . . . . . . . . . . . . . . . . . 26
Fast forward . . . . . . . . . . . . . . . . . . . . . . . . 24
Fast reverse . . . . . . . . . . . . . . . . . . . . . . . . 24
Function buttons . . . . . . . . . . . . . . . . . . . . 22
Inserting a CD . . . . . . . . . . . . . . . . . . . . . . 25
Inserting memory card . . . . . . . . . . . . . . . . 26
Main menu . . . . . . . . . . . . . . . . . . . . . . . . . 22
Media mode . . . . . . . . . . . . . . . . . . . . . . . . 20
Media source selection menu . . . . . . . . . . 23
Memory card cannot be read . . . . . . . . . . . 26
MP3 files . . . . . . . . . . . . . . . . . . . . . . . . . . 20
Playback modes . . . . . . . . . . . . . . . . . . . . . 22
Playing order . . . . . . . . . . . . . . . . . . . . . . . 21
Playlists . . . . . . . . . . . . . . . . . . . . . . . . . . . 21
Preparing for removal . . . . . . . . . . . . . . . . 26
Random play (Mix) . . . . . . . . . . . . . . . . . . . 22
Removing memory card . . . . . . . . . . . . . . . 26
Repeat function (Repeat) . . . . . . . . . . . . . . 22
Requirements . . . . . . . . . . . . . . . . . . . . . . . 20
Restrictions . . . . . . . . . . . . . . . . . . . . . . . . 21
Scan function (SCAN) . . . . . . . . . . . . . . . . 22
Selecting storage devices . . . . . . . . . . . . . 23
Selecting track . . . . . . . . . . . . . . . . . . . . . . 24
Settings . . . . . . . . . . . . . . . . . . . . . . . . . . . 28
Track information . . . . . . . . . . . . . . . . . . . . 23
Track list . . . . . . . . . . . . . . . . . . . . . . . . . . . 24
WMA files . . . . . . . . . . . . . . . . . . . . . . . . . . 20
Media sources . . . . . . . . . . . . . . . . . . . . . . . . 23
AUX-IN . . . . . . . . . . . . . . . . . . . . . . . . . . . . 23
CD . . . . . . . . . . . . . . . . . . . . . . . . . . . . . . . 23
Memory card . . . . . . . . . . . . . . . . . . . . . . . 23
Selecting . . . . . . . . . . . . . . . . . . . . . . . . . . 23
Memory card
Cannot be read . . . . . . . . . . . . . . . . . . . . . 26
Inserting . . . . . . . . . . . . . . . . . . . . . . . . . . . 26
Preparing memory card for removal . . . . . 26
Removing . . . . . . . . . . . . . . . . . . . . . . . . . . 26
Selecting . . . . . . . . . . . . . . . . . . . . . . . . . . 23
Muting . . . . . . . . . . . . . . . . . . . . . . . . . . . . . . . . 8
N
Numbers
Dialling . . . . . . . . . . . . . . . . . . . . . . . . . . . . 36
O
On-screen keypad . . . . . . . . . . . . . . . . . . . . . 10
Operation
Additional display information . . . . . . . . . . . 11
Adjusting the volume . . . . . . . . . . . . . . . . . . 8
Browsing lists . . . . . . . . . . . . . . . . . . . . . . . . 9
Checkboxes . . . . . . . . . . . . . . . . . . . . . . . . . 8
Entries . . . . . . . . . . . . . . . . . . . . . . . . . . . . 10
Function buttons . . . . . . . . . . . . . . . . . . . . . 8
Infotainment buttons . . . . . . . . . . . . . . . . . . 7
Input window . . . . . . . . . . . . . . . . . . . . . . . 10
Muting . . . . . . . . . . . . . . . . . . . . . . . . . . . . . 8
On-screen keypad . . . . . . . . . . . . . . . . . . . 10
PHONE . . . . . . . . . . . . . . . . . . . . . . . . 30, 34
RADIO . . . . . . . . . . . . . . . . . . . . . . . . . . . . 12
Rotary/push knobs . . . . . . . . . . . . . . . . . . . . 7
Scrolling . . . . . . . . . . . . . . . . . . . . . . . . . . . . 9
Slider . . . . . . . . . . . . . . . . . . . . . . . . . . . . . . 9
Switching on and off . . . . . . . . . . . . . . . . . . . 7
Touchscreen . . . . . . . . . . . . . . . . . . . . . . . . . 8
P
PHONE
A2DP . . . . . . . . . . . . . . . . . . . . . . . . . . . . . 31
Areas where special regulations apply . . . 31
Bluetooth profiles . . . . . . . . . . . . . . . . . . . . 31
Bluetooth settings . . . . . . . . . . . . . . . . . . . 39
Call lists . . . . . . . . . . . . . . . . . . . . . . . . . . . 37
Connecting via infotainment system . . . . . 32
Contacts . . . . . . . . . . . . . . . . . . . . . . . . . . . 36
Description of functions . . . . . . . . . . . . . . . 31
Dialling . . . . . . . . . . . . . . . . . . . . . . . . . . . . 36
Displays and symbols . . . . . . . . . . . . . . . . 35
During a telephone call . . . . . . . . . . . . . . . 35
Entering telephone number . . . . . . . . . . . . 36
Explosion risk areas . . . . . . . . . . . . . . . . . . 31
Function buttons . . . . . . . . . . . . . . . . . . . . 34
General information . . . . . . . . . . . . . . . . . . 31
HFP . . . . . . . . . . . . . . . . . . . . . . . . . . . . . . 31
Main menu . . . . . . . . . . . . . . . . . . . . . . . . . 34
Mobile telephone pairing . . . . . . . . . . . . . . 32
Pairing via infotainment system . . . . . . . . . 32
Settings . . . . . . . . . . . . . . . . . . . . . . . . . . . 38
Speed dial buttons . . . . . . . . . . . . . . . . . . . 38
Telephone book . . . . . . . . . . . . . . . . . . . . . 36
Telephone control . . . . . . . . . . . . . . . . . . . . 30
Telephone control system . . . . . . . . . . . . . 34
User profile settings . . . . . . . . . . . . . . . . . . 39
Playback
AUX-IN . . . . . . . . . . . . . . . . . . . . . . . . . . . . 27
CD . . . . . . . . . . . . . . . . . . . . . . . . . . . . . . . 25
External data storage device (USB) . . . . . . 26
MEDIA . . . . . . . . . . . . . . . . . . . . . . . . . . . . 22
Memory card . . . . . . . . . . . . . . . . . . . . . . . 22
RADIO . . . . . . . . . . . . . . . . . . . . . . . . . . . . 12
Track . . . . . . . . . . . . . . . . . . . . . . . . . . . . . 24
Composition Touch, Composition Colour
46

CONFIDENTIAL
not for distribution
Pop-up windows . . . . . . . . . . . . . . . . . . . . . . . 8
Q
Quick reference guide . . . . . . . . . . . . . . . . . . . 3
R
RADIO . . . . . . . . . . . . . . . . . . . . . . . . . . . . . . . 12
AM settings . . . . . . . . . . . . . . . . . . . . . . . . 18
Display of station names . . . . . . . . . . . . . . 13
Displays and symbols . . . . . . . . . . . . . . . . 13
EON . . . . . . . . . . . . . . . . . . . . . . . . . . . . . . 17
FM settings . . . . . . . . . . . . . . . . . . . . . . . . 18
Frequency change . . . . . . . . . . . . . . . . . . . 12
Function buttons . . . . . . . . . . . . . . . . . . . . 12
Main menu . . . . . . . . . . . . . . . . . . . . . . . . . 12
Radio mode . . . . . . . . . . . . . . . . . . . . . . . . 12
Radio text . . . . . . . . . . . . . . . . . . . . . . . . . . 16
RDS . . . . . . . . . . . . . . . . . . . . . . . . . . . . . . 13
Scan function (SCAN) . . . . . . . . . . . . . . . . 16
Selecting stations . . . . . . . . . . . . . . . . . . . . 14
Settings . . . . . . . . . . . . . . . . . . . . . . . . . . . 18
Setting station frequency . . . . . . . . . . . . . . 14
Setting stations . . . . . . . . . . . . . . . . . . . . . 14
Station buttons . . . . . . . . . . . . . . . . . . . . . . 14
Station list . . . . . . . . . . . . . . . . . . . . . . . . . 14
Station tracking via RDS . . . . . . . . . . . . . . 13
Stopping station name scrolling . . . . . . . . . 16
Storing stations . . . . . . . . . . . . . . . . . . . . . 14
TP (traffic program) . . . . . . . . . . . . . . . . . . 17
Traffic announcement (INFO) . . . . . . . . . . 17
Traffic news . . . . . . . . . . . . . . . . . . . . . . . . 17
Radio text (RDS) . . . . . . . . . . . . . . . . . . . . . . 16
Random play (Mix) . . . . . . . . . . . . . . . . . . . . . 22
RDS . . . . . . . . . . . . . . . . . . . . . . . . . . . . . . . . . 13
Automatic station tracking . . . . . . . . . . . . . 13
Radio text . . . . . . . . . . . . . . . . . . . . . . . . . . 16
RDS Regional . . . . . . . . . . . . . . . . . . . . . . 13
TP (traffic program) . . . . . . . . . . . . . . . . . . 17
Repeat . . . . . . . . . . . . . . . . . . . . . . . . . . . . . . 22
Repeat function (Repeat) . . . . . . . . . . . . . . . 22
Requirements for
CDs . . . . . . . . . . . . . . . . . . . . . . . . . . . . . . 20
memory cards . . . . . . . . . . . . . . . . . . . . . . 20
Rotary/push knobs . . . . . . . . . . . . . . . . . . . . . 7
Rotary/push knobs (infotainment system) . . 6
S
Safety information
Infotainment system . . . . . . . . . . . . . . . . . . . 3
SCAN
Media . . . . . . . . . . . . . . . . . . . . . . . . . . . . . 22
Radio . . . . . . . . . . . . . . . . . . . . . . . . . . . . . 16
Scan function (SCAN)
MEDIA . . . . . . . . . . . . . . . . . . . . . . . . . . . . 22
RADIO . . . . . . . . . . . . . . . . . . . . . . . . . . . . 16
Screen
Operating . . . . . . . . . . . . . . . . . . . . . . . . . . . 8
Screen (infotainment system) . . . . . . . . . . . . 6
Scrolling . . . . . . . . . . . . . . . . . . . . . . . . . . . . . . 9
SD card
see Memory card . . . . . . . . . . . . . . . . . . . . 26
Setting date . . . . . . . . . . . . . . . . . . . . . . . . . . 40
Settings
AM . . . . . . . . . . . . . . . . . . . . . . . . . . . . . . . 18
Bluetooth . . . . . . . . . . . . . . . . . . . . . . . . . . 39
Defaults . . . . . . . . . . . . . . . . . . . . . . . . . . . 40
Factory settings . . . . . . . . . . . . . . . . . . . . . 40
FM . . . . . . . . . . . . . . . . . . . . . . . . . . . . . . . 18
Main menu . . . . . . . . . . . . . . . . . . . . . . . . . 40
Media . . . . . . . . . . . . . . . . . . . . . . . . . . . . . 28
Menu and system settings . . . . . . . . . . . . . 40
PHONE . . . . . . . . . . . . . . . . . . . . . . . . . . . 38
Radio . . . . . . . . . . . . . . . . . . . . . . . . . . . . . 18
Sound . . . . . . . . . . . . . . . . . . . . . . . . . . . . . 42
System . . . . . . . . . . . . . . . . . . . . . . . . . . . . 40
User profile . . . . . . . . . . . . . . . . . . . . . . . . . 39
Volumes . . . . . . . . . . . . . . . . . . . . . . . . . . . 42
Setting time . . . . . . . . . . . . . . . . . . . . . . . . . . 40
SETUP
see Settings . . . . . . . . . . . . . . . . . . . . . . . . 40
Slider . . . . . . . . . . . . . . . . . . . . . . . . . . . . . . . . 9
Soft keys
Infotainment system . . . . . . . . . . . . . . . . . . . 8
MEDIA main menu . . . . . . . . . . . . . . . . . . . 22
Radio main menu . . . . . . . . . . . . . . . . . . . . 12
Sound focus (balance, fader) . . . . . . . . . . . . 42
Sound settings (treble, bass) . . . . . . . . . . . . 42
Speed-dependent volume . . . . . . . . . . . . . . . 42
Speed dial buttons . . . . . . . . . . . . . . . . . . . . 38
Station buttons . . . . . . . . . . . . . . . . . . . . . . . 14
Station names . . . . . . . . . . . . . . . . . . . . . . . . 13
Stations
Scan function (SCAN) . . . . . . . . . . . . . . . . 16
Selecting . . . . . . . . . . . . . . . . . . . . . . . . . . 14
Setting . . . . . . . . . . . . . . . . . . . . . . . . . . . . 14
Stopping station name scrolling . . . . . . . . . 16
Storing . . . . . . . . . . . . . . . . . . . . . . . . . . . . 14
Station search . . . . . . . . . . . . . . . . . . . . . . . . 16
Station tracking . . . . . . . . . . . . . . . . . . . . . . . 13
Switch-off delay (timeout) . . . . . . . . . . . . . . . . 7
Switching off . . . . . . . . . . . . . . . . . . . . . . . . . . 7
Switching on . . . . . . . . . . . . . . . . . . . . . . . . . . 7
T
Telephone control
see PHONE . . . . . . . . . . . . . . . . . . . . . . . . 30
Index 47
142.5R6.RCT.20

CONFIDENTIAL
not for distribution
Telephone control system (PHONE)
Switching off . . . . . . . . . . . . . . . . . . . . . . . . 33
Text input . . . . . . . . . . . . . . . . . . . . . . . . . . . . 10
Things to note
AUX operation . . . . . . . . . . . . . . . . . . . . . . 27
Displays . . . . . . . . . . . . . . . . . . . . . . . . . . . . 11
Volume reduction . . . . . . . . . . . . . . . . . . . . . 7
Timeout . . . . . . . . . . . . . . . . . . . . . . . . . . . . . . . 7
Touchscreen (infotainment system) . . . . . . . 6
TP (traffic program)
EON . . . . . . . . . . . . . . . . . . . . . . . . . . . . . . 17
Switching on and off . . . . . . . . . . . . . . . . . . 17
Traffic announcement (INFO) . . . . . . . . . . 17
Track list . . . . . . . . . . . . . . . . . . . . . . . . . . . . . 24
Traffic announcement (INFO) . . . . . . . . . . . . 17
Traffic news
see TP (traffic program) . . . . . . . . . . . . . . . 17
U
Unit buttons . . . . . . . . . . . . . . . . . . . . . . . . . . . 7
USB
Connecting an external data storage device . .26
Disconnecting . . . . . . . . . . . . . . . . . . . . . . 26
Not readable . . . . . . . . . . . . . . . . . . . . . . . 26
User profile
Settings . . . . . . . . . . . . . . . . . . . . . . . . . . . 39
V
VHF
see FM . . . . . . . . . . . . . . . . . . . . . . . . . . . . 44
Volume
Adjusting . . . . . . . . . . . . . . . . . . . . . . . . . . . 8
Base volume . . . . . . . . . . . . . . . . . . . . . . . . 8
Determining for external audio sources . . . 42
Speed-dependent volume increase (GALA) . .42
Traffic announcements . . . . . . . . . . . . . . . . 42
Volume distribution (balance, fader) . . . . . . 42
Volume reduction . . . . . . . . . . . . . . . . . . . . . . 7
Composition Touch, Composition Colour
48
FCC Information to User
This equipment has been tested and found to comply with the limits for a Class B digital
device, pursuant to Part 15 of the FCC Rules. These limits are designed to provide
reasonable protection against harmful interference in a residential installation. This
equipment generates, uses and can radiate radio frequency energy and, if not installed
and used in accordance with the instructions, may cause harmful interference to radio
communications. However, there is no guarantee that interference will not occur in a
particular installation. If this equipment does cause harmful interference to radio or
television reception, which can be determined by turning the equipment off and on, the
user is encouraged to try to correct the interference by one of the following measures:
• Reorient or relocate the receiving antenna.
• Increase the separation between the equipment and receiver.
• Connect the equipment into an outlet on a circuit different from that to which the
receiver is con-nected.
• Consult the dealer or an experienced radio/TV technician for help.
Caution
Modifications not expressly approved by the party responsible for compliance could void
the user’s authority to operate the equipment.
FCC Compliance Information : This device complies with Part 15 of the FCC Rules.
Operation is subject to the following two conditions: (1) This device may not cause
harmful interference, and (2) this device must accept any interference received, including
interference that may cause undesired operation