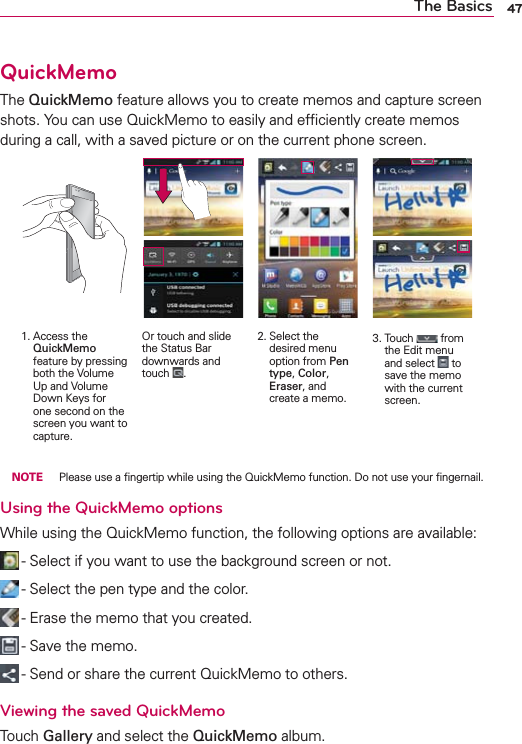
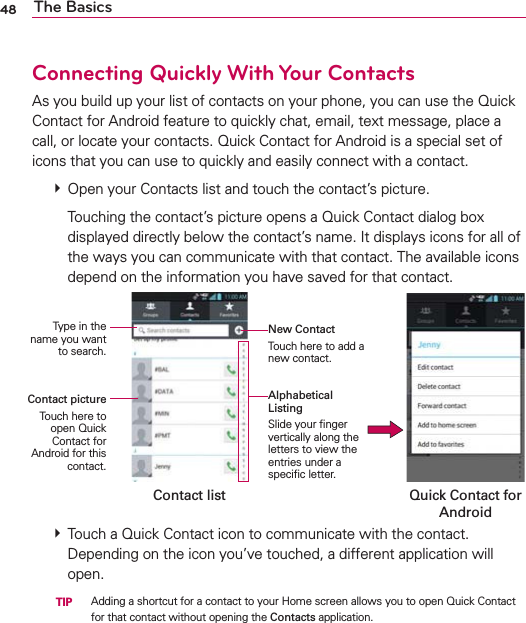
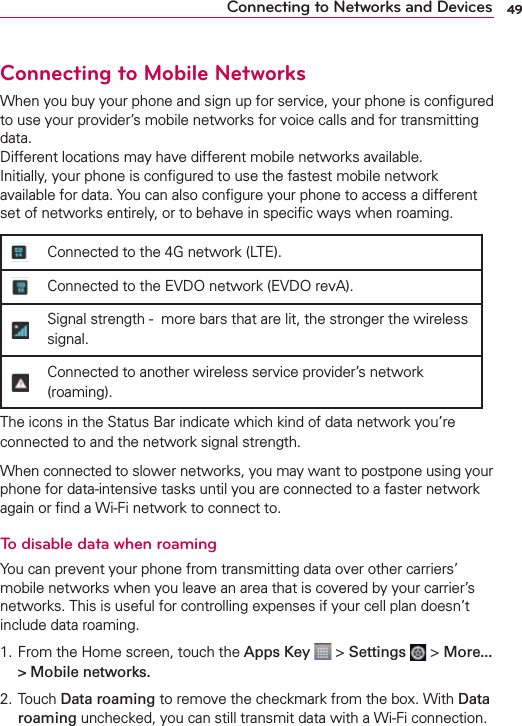
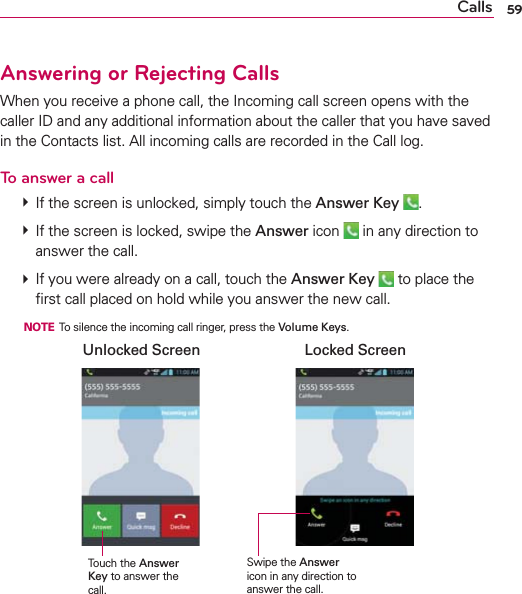
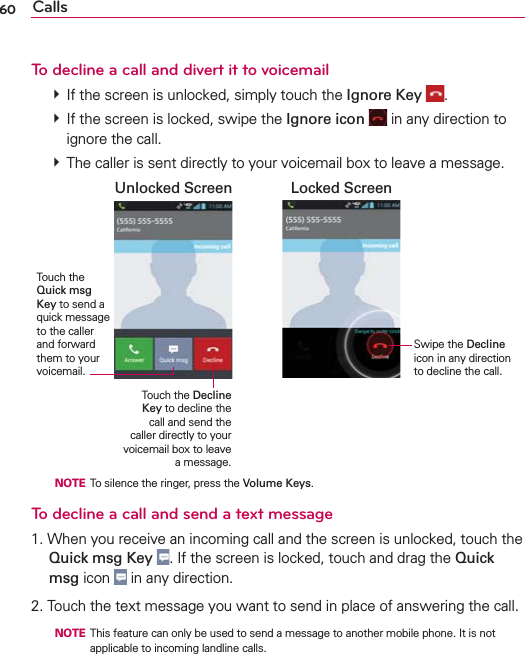
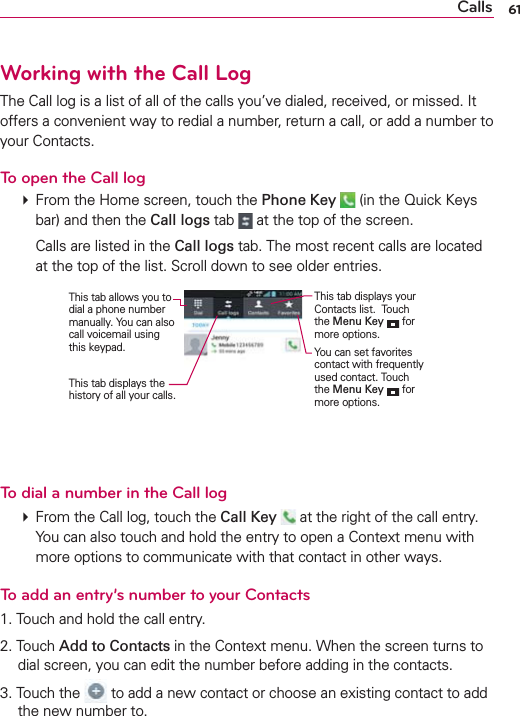
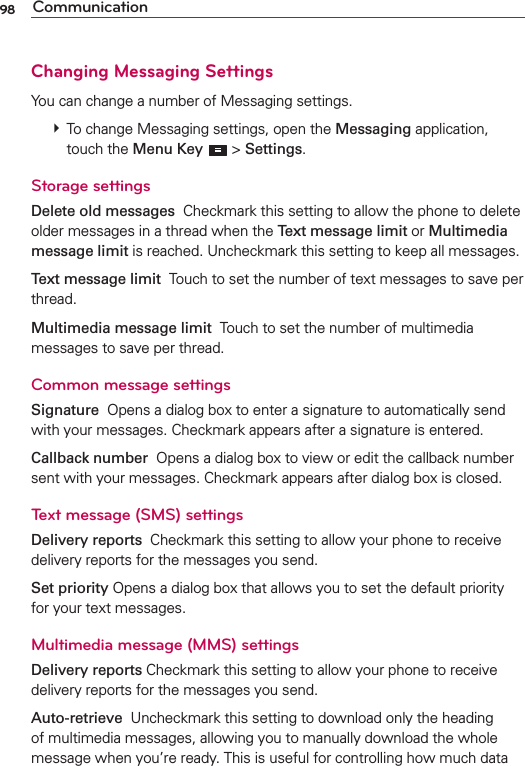
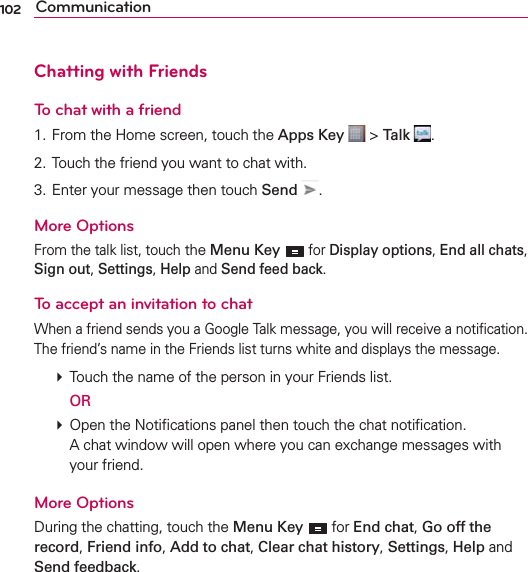
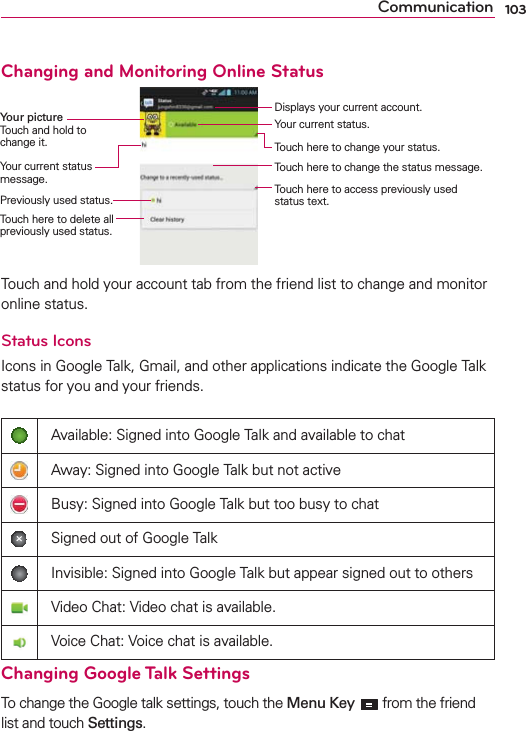
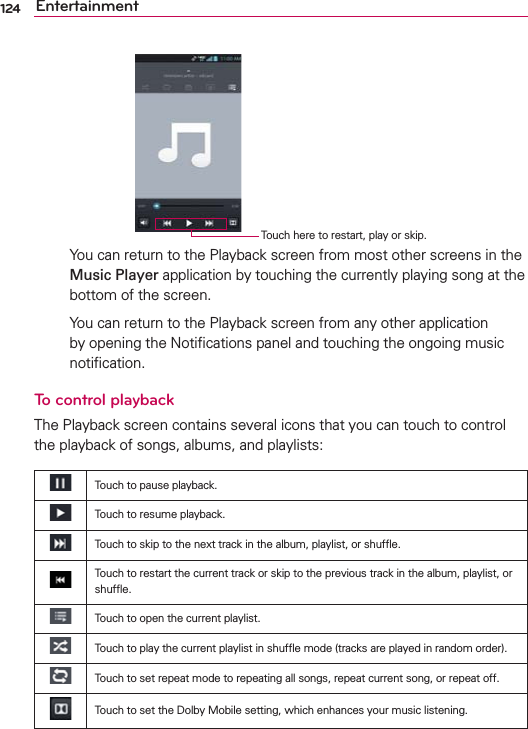
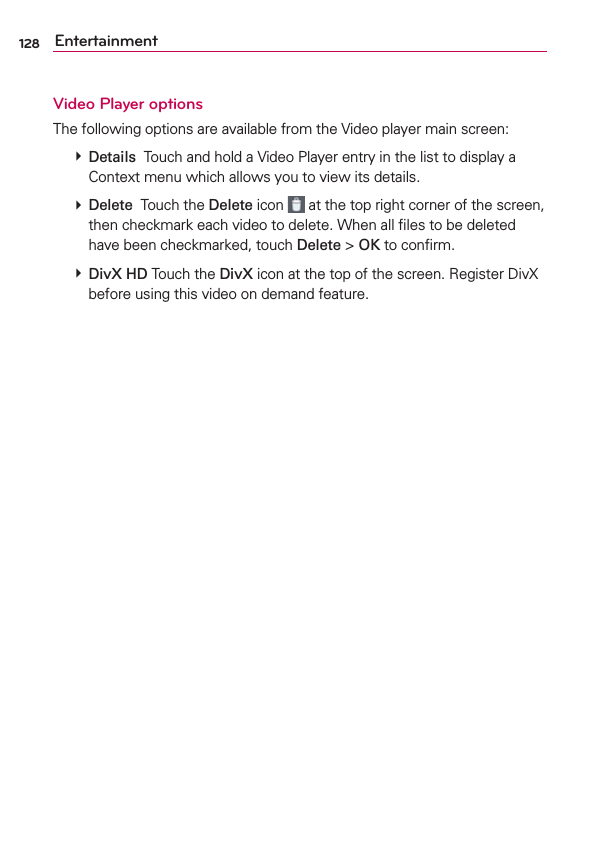
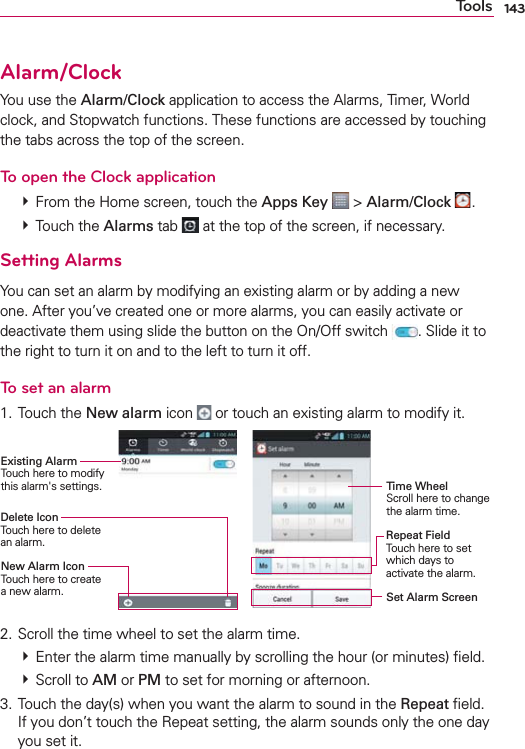
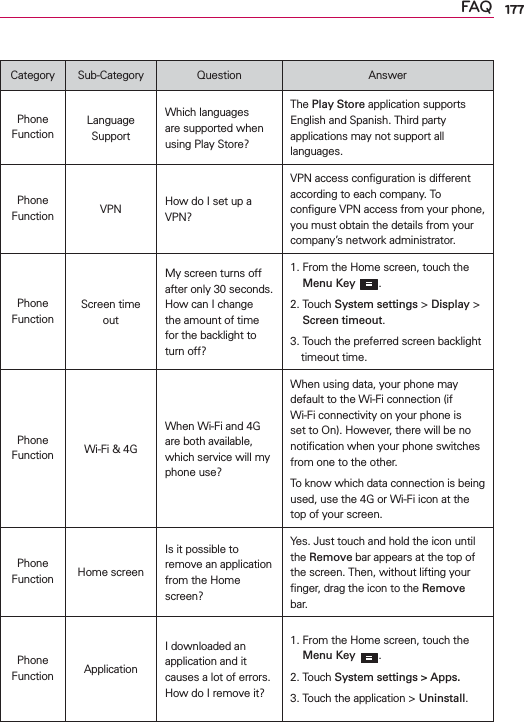
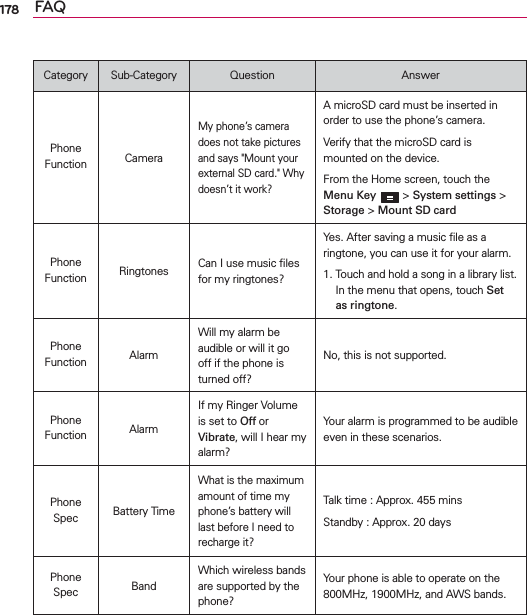
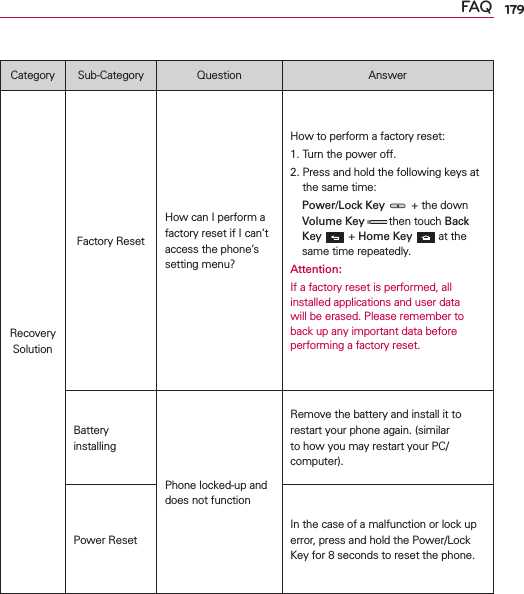
LG Electronics USA MS870 Cellular/PCS/AWS CDMA/LTE Phone with WLAN and Bluetooth User Manual LG MS870 MPCS UG EN V1 0 120713

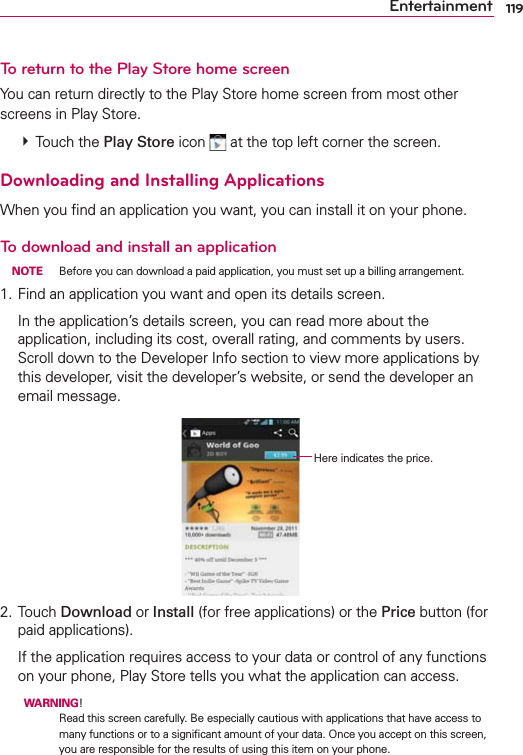
LG Electronics MobileComm USA, Inc. Cellular/PCS/AWS CDMA/LTE Phone with WLAN and Bluetooth LG MS870 MPCS UG EN V1 0 120713
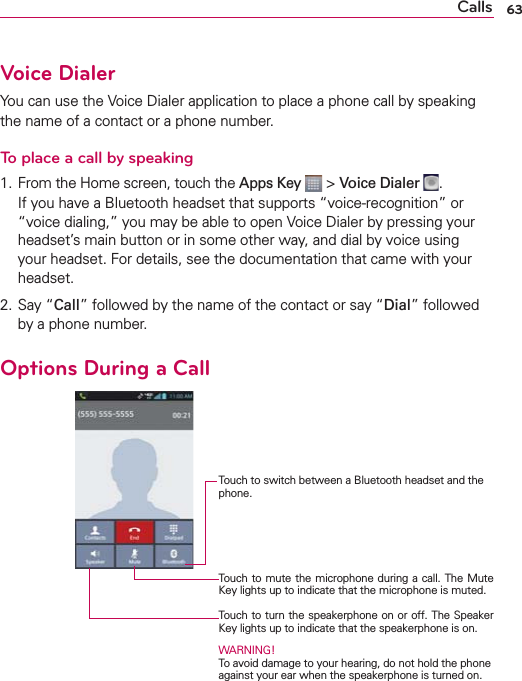
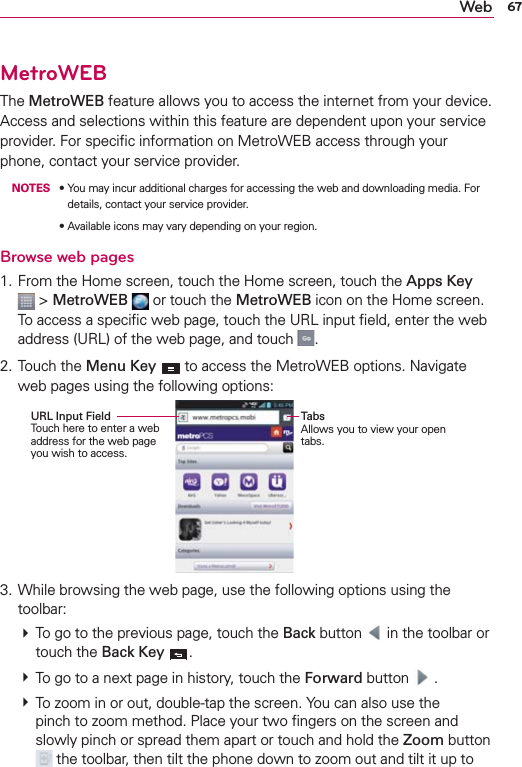
Users Manual

1Important Customer InformationWhen using this product, the safety precautions below must be taken to avoid possible legal liabilities and damages.Retain and follow all product safety and operating instructions. Observe all warnings in the product operating instructions. To reduce the risk of bodily injury, electric shock, fire, and damage to the equipment, observe the following precautions.ELECTRICAL SAFETYThis product is intended for use when supplied with power from the designated battery or power supply unit. Other usage may be dangerous and will invalidate any approval given to this product.SAFETY PRECAUTIONS FOR PROPER GROUNDING INSTALLATIONCAUTION: Connecting to improperly grounded equipment can result in an electric shock to your device. This product is equipped with a USB cable for connecting to a desktop or notebook computer. Be sure your computer is properly grounded (earthed) before connecting this product to the computer. The power supply cord of a desktop or notebook computer has an equipment-grounding conductor and a grounding plug. The plug must be plugged into an appropriate outlet which is properly installed and grounded in accordance with all local codes and ordinances.SAFETY PRECAUTIONS FOR POWER SUPPLY UNITUse the correct external power sourceA product should be operated only from the type of power source indicated on the electrical ratings label. If you are not sure of the type of power source required, consult your authorized service provider or local power company. For a product that operates from battery power or other sources, refer to the operating instructions that are included with the product.
2Important Customer InformationHandle battery packs carefullyThis product contains a Li-ion battery. There is a risk of fire and burns if the battery pack is handled improperly. Do not attempt to open or service the battery pack. Do not disassemble, crush, puncture, short external contacts or circuits, dispose of in fire or water, or expose a battery pack to temperatures higher than 60°C (140°F).WARNING: Danger of explosion if battery is incorrectly replaced. To reduce risk of fire or burns, do not disassemble, crush, puncture, short external contacts, expose to temperature above 60°C (140°F), or dispose of in fire or water. Replace only with specified batteries. Recycle or dispose of used batteries according to the local regulations or reference guide supplied with your product.Take extra precautionsO  Keep the battery or device dry and away from water or any liquid as it may cause a short circuit.O Keep metal objects away so they don’t come in contact with the battery or its connectors as it may lead to short circuit during operation.O  The phone should be only connected to products that bear the USB-IF logo or have completed the USB-IF compliance program.O  Do not use a battery that appears damaged, deformed, or discolored, or one that has any rust on its casing, overheats, or emits a foul odor.O  Always keep the battery out of the reach of babies and small children, to avoid swallowing of the battery. Consult a doctor immediately if the battery is swallowed.O  Only use the battery with a charging system that has been qualified with the system per this standard, IEEE-Std-1725-200x. Use of an unqualified battery or charger may present a risk of fire, explosion, leakage or other hazard.O  Replace the battery only with another battery that has been qualified with the system per this standard, IEEE-Std-1725-200x. Use of an unqualified battery may present a risk of fire, explosion, leakage or other hazard.
3Important Customer InformationO  Avoid dropping the phone or battery. If the phone or battery is dropped, especially on a hard surface, and the user suspects damage, take it to a service center for inspection.O  If the battery leaks:  Do not allow the leaking fluid to come in contact with skin or clothing. If contact occurs, flush the affected area immediately with clean water and seek medical advice.  Do not allow the leaking fluid to come in contact with eyes. If contact occurs, DO NOT rub; rinse with clean water immediately and seek medical advice.  Take extra precautions to keep a leaking battery away from fire as there is a danger of ignition or explosion.SAFETY PRECAUTIONS FOR DIRECT SUNLIGHTKeep this product away from excessive moisture and extreme temperatures. Do not leave the product or its battery inside a vehicle or in places where the temperature may exceed 140°F (60°C), such as on a car dashboard, window sill, or behind glass that is exposed to direct sunlight or strong ultraviolet light for extended periods of time. This may damage the product, overheat the battery, or pose a risk to the vehicle.PREVENTION OF HEARING LOSSCAUTION: Permanent hearing loss may occur if earphones or headphones are used at high volume for prolonged periods of time.SAFETY IN AIRCRAFTDue to the possible interference caused by this product to an aircraft’s navigation system and its communications network, using this device’s phone function on board an airplane is against the law in most countries. If you want to use this device when its use is restricted on board an aircraft, remember to switch to Airplane Mode which turns off RF functions that could cause interference.
4Important Customer InformationENVIRONMENT RESTRICTIONSDo not use this product in gas stations, fuel depots, chemical plants or where blasting operations are in progress, or in potentially explosive atmospheres such as fueling areas, fuel storehouses, below deck on boats, chemical plants, fuel or chemical transfer or storage facilities, and areas where the air contains chemicals or particles, such as grain, dust, or metal powders. Please be aware that sparks in such areas could cause an explosion or fire resulting in bodily injury or even death.EXPLOSIVE ATMOSPHERESWhen in any area with a potentially explosive atmosphere or where flammable materials exist, the product should be turned off and the user should obey all signs and instructions. Sparks in such areas could cause an explosion or fire resulting in bodily injury or even death. Users are advised not to use the equipment at refueling points such as service or gas stations, and are reminded of the need to observe restrictions on the use of radio equipment in fuel depots, chemical plants, or where blasting operations are in progress. Areas with a potentially explosive atmosphere are often, but not always, clearly marked. These include fueling areas, below deck on boats, fuel or chemical transfer or storage facilities, and areas where the air contains chemicals or particles, such as grain, dust, or metal powders.ROAD SAFETYVehicle drivers in motion are not permitted to use communication services with handheld devices, except in the case of emergency. In some countries, using hands-free devices as an alternative is allowed.
5Important Customer InformationSAFETY PRECAUTIONS FOR RF EXPOSUREO  Avoid using your phone near metal structures (for example, the steel frame of a building).O  Avoid using your phone near strong electromagnetic sources, such as microwave ovens, sound speakers, TV and radio.O  Use only original manufacturer-approved accessories, or accessories that do not contain any metal.O  Use of non-original manufacturer-approved accessories may violate your local RF exposure guidelines and should be avoided.INTERFERENCE WITH MEDICAL EQUIPMENT FUNCTIONSThis product may cause medical equipment to malfunction. The use of this device is prohibited in most hospitals and medical clinics.If you use any personal medical device(s), consult the manufacturer of your device(s) to determine if the device(s) are adequately shielded from external RF energy. Your physician may be able to assist you in obtaining this information. Turn your phone OFF in health care facilities when any regulations posted in these areas instruct you to do so. Hospitals or health care facilities may be using equipment that could be sensitive to external RF energy.HEARING AIDSSome digital wireless phones may interfere with some hearing aids. In the event of such interference, you may want to consult your service provider, or call the customer service line to discuss alternatives.
6Important Customer InformationNON-IONIZING RADIATIONYour device has an internal antenna. This product should be operated in its normal-use position to ensure the radiative performance and safety from interference. As with other mobile radio transmitting equipment, users are advised that for satisfactory operation of the equipment and for personal safety, it is recommended that no part of the human body be allowed to come too close to the antenna during operation of the equipment. Use only the supplied integral antenna. Use of unauthorized or modified antennas may impair call quality and damage the phone, causing loss of performance and SAR levels exceeding the recommended limits as well as result in non-compliance with local regulatory requirements in your country. To assure optimal phone performance and ensure human exposure to RF energy is within the guidelines set forth in the relevant standards, always use your device only in its normal-use position. Contact with the antenna area may impair call quality and cause your device to operate at a higher power level than needed. Avoiding contact with the antenna area when the phone is IN USE optimizes the antenna performance and the battery life.HACThis phone has been tested and rated for use with hearing aids for some of the wireless technologies that it uses. However, there may be some newer wireless technologies used in this phone that have not been tested yet for use with hearing aids. It is important to try the different features of this phone thoroughly and in different locations, using your hearing aid or cochlear implant, to determine if you hear any interfering noise. Consult your service provider or the manufacturer of this phone for information on hearing aid compatibility. If you have questions about return or exchange policies, consult your service provider or phone retailer.
7Important Customer Information...........................................................1Table of Contents ................................................................................... 7Technical Details .....................................................................................8The Basics ............................................................................................. 13Connecting to Networks and Devices ................................................49microSD Card ...................................................................................... 54Calls .......................................................................................................57Communication ....................................................................................77Entertainment .....................................................................................105Tools ..................................................................................................... 135Settings ............................................................................................... 147Safety ................................................................................................... 149Specifications ..................................................................................... 172FAQ ...................................................................................................... 173LIMITED WARRANTY STATEMENT ................................................180Table of Contents
8Technical DetailsCautions  The user interface of Google applications (Google Search, Google Maps, Navigation, etc.) can vary depending on its software version.  Locations are inaccurate when GPS and Wi-Fi are not set to On.  With the Android operating system, some available Play Store applications only operate correctly with phones that have a specific screen resolution. Please be advised that some of the applications on the Play Store may not be available for your phone due to an LCD resolution requirement that does not match your phone. In addition, please be aware that 3rd party applications with programming defects may cause issues with your phone, including lock-ups and resets.Technical DetailsCDMA Standard Designator DescriptionBasic Air InterfaceTIA/EIA-95ATSB-74ANSI J-STD-008TIA/EIA-IS2000CDMA Dual-Mode Air Interface14.4kbps Radio Link Protocol and Inter-band OperationsIS-95 Adapted for PCS Frequency Band CDMA2000 1xRTT Air InterfaceNetworkTIA/EIA/IS-634TIA/EIA/IS-651TIA/EIA/IS-41-CTIA/EIA/IS-124MAS-BSPCSC-RSIntersystem OperationsNon-Signaling Data Communications
9Technical DetailsServiceTIA/EIA/IS-96-BTIA/EIA/IS-637TIA/EIA/IS-657IS-801TIA/EIA/IS-707-ASpeech CODECShort Message ServicePacket DataPosition Determination Service (gpsOne)High Speed Packet Data1x EV-DO Related InterfaceTIA/EIA/IS-856TIA/EIA/IS-878TIA/EIA/IS-866TIA/EIA/IS-890CDMA2000 High Rate Packet Data Air Interface1x EV-DO Inter-Operability Specification for HRPD Access Network InterfacesRecommended Minimum Performance Standards for HRPD High Rate Packet Data Access TerminalTest Application Specification (TAS) for High Rate Packet Data Air InterfaceLTE Standard Designator DescriptionBasic Air InterfaceTS 36.101TS 36.104Evolved Universal Terrestrial Radio Access (E-UTRA); User Equipment (UE) radio transmission and receptionEvolved Universal Terrestrial Radio Access (E-UTRA); Base Station (BS) radio transmission and reception
10 Technical DetailsConformance TestTS 36.521-1TS 36.521-2TS 36.521-3Evolved Universal Terrestrial Radio Access (E-UTRA); User Equipment (UE) conformance specification; Radio transmission and reception; Part 1: Conformance testingEvolved Universal Terrestrial Radio Access (E-UTRA); User Equipment (UE) conformance specification; Radio transmission and reception; Part 2: Implementation Conformance Statement (ICS)Evolved Universal Terrestrial Radio Access (E-UTRA); User Equipment (UE) conformance specification; Radio transmission and reception; Part 3: Radio Resource Management (RRM) conformance testingFCC RF Exposure InformationWARNING! Read this information before operating the phone.In August 1996, the Federal Communications Commission (FCC) of the United States, with its action in Report and Order FCC 96-326, adopted an updated safety standard for human exposure to Radio Frequency (RF) electromagnetic energy emitted by FCC regulated transmitters. Those guidelines are consistent with the safety standard previously set by both U.S. and international  standards bodies. The design of this phone complies with the FCC guidelines and those international standards.
11Technical DetailsBodily Contact During OperationThis device was tested for typical use with the back of the phone kept 0.39 inches (1.0 cm) from the body. To comply with FCC RF exposure requirements, a minimum separation distance of 0.39 inches (1.0 cm) must be maintained between the user’s body and the back of the phone, including the antenna. Third-party belt-clips, holsters, and similar accessories containing metallic components should not be used. Avoid the use of accessories that cannot maintain 0.39 inches (1.0 cm) distance between the user’s body and the back of the phone and have not been tested for compliance with FCC RF exposure limits.Vehicle-Mounted External Antenna (Optional, if available.)To satisfy FCC RF exposure requirements, keep 8 inches (20 cm) between the user / bystander and vehicle-mounted external antenna. For more information about RF exposure, visit the FCC website at www.fcc.gov.FCC Notice and CautionsThis device and its accessories comply with part 15 of FCC rules. Operation is subject to the following two conditions: (1) This device and its accessories may not cause harmful interference, and (2) this device and its accessories must accept any interference received, including interference that causes undesired operation.Any changes or modifications not expressly approved in this user guide could void your warranty for this equipment. Use only the supplied antenna. Use of unauthorized antennas (or modifications to the antenna) could impair call quality, damage the phone, void your warranty and/or violate FCC regulations.Don’t use the phone with a damaged antenna. A damaged antenna could cause a minor skin burn. Contact your local dealer for a replacement antenna.Part 15.19 statementThis device complies with part 15 of FCC rules. Operation is subject to the following two conditions: (1) This device may not cause harmful interference, and (2) this device must accept
12 Technical Detailsany interference received, including interference that causes undesired operation.Part 15.21 statementChanges or modifications that are not expressly approved by the manufacturer could void the user’s authority to operate the equipment.Part 15.105 statementThis equipment has been tested and found to comply with the limits for a class B digital device, pursuant to Part 15 of the FCC rules. These limits are designed to provide reasonable protection against harmful interference in a residential installation. This equipment generates, uses, and can radiate radio frequency energy and, if not installed and used in accordance with the instructions, may cause harmful interference to radio communications. However, there is no guarantee that interference will not occur in a particular installation. If you experience interference with reception (e.g., television), determine if this equipment is causing the harmful interference by turning the equipment off and then back on to see if the interference is affected. If necessary, try correcting the interference by one or more of the following measures:  - Reorient or relocate the receiving antenna. - Increase the separation between the equipment and receiver. -  Connect the equipment into an outlet on a circuit different from that to which the receiver is connected.- Consult the dealer or an experienced radio/TV technician for help.The LG MS870 operates on 4G network, based on Long Term Evolution (LTE) technology and Mobile Broadband 4G networks in the United States*.Now you can connect easily at high speeds to the Internet, your corporate Intranet, and your email while you’re away from the office. *  Service not available everywhere. *  Information subject to change.
13The BasicsPhone OverviewFront View NOTES  All screen shots in this guide are simulated. Actual displays may vary.         Instructions to perform tasks in this guide are based on the default phone settings and may change depending on the software version on your phone.1. Proximity Sensor Senses proximity towards other objects (such as your head) so that touch commands are not accidentally activated during a call.  NOTES O  Do not block the sensor or near the sensor to avoid problems with the touchscreen.        O  The use of a film cover produced by manufacturers other than LG can cause a disturbance in touch operation, the display, etc.2. Quick Keys -  Phone Key Opens the Phone application for access to the dial pad, Call logs, Contacts, and Favorites. -  Contacts Key Opens the Contacts application. -  Messaging Key Opens the Messaging application. -  Apps key Opens the Applications screen, where you can view all your installed applications.3. Back Key Returns to the previous screen. Also closes pop-up display items, such as menus and dialog boxes.Proximity SensorQuick KeysBack KeyHome KeyMenu KeyEarpieceTouchscreenPower/ Lock KeyFront Camera Lens
14 The Basics4. Home Key Returns to the Home screen. If you’re already viewing one of the Home screen extension panes, it navigates you to the central Home screen pane. Touch and hold to view the most recently used applications.5. Menu Key Opens an Options menu with options that affect the current screen or application.6. Touchscreen Displays all the information needed to operate your phone, such as applications, call status, date, time, signal status, and battery strength.7. Front Camera Lens Use to take pictures and video of yourself. Keep clean for optimal performance.8. Power/Lock Key Locks the screen with a single press. Press and hold to open the phone Options menu for the following options: Power off, Power off and restart, and Airplane mode. You can also change the ringer type from this menu.9. Earpiece Lets you hear callers and automated prompts.3.5mm Headset JackBack Camera LensBack CoverSpeakerRear ViewMicrophone
15The Basics10.  3.5mm Headset Jack Allows you to plug in an optional headset for convenient, hands-free conversations. You can also plug in headphones to listen to music.11.  Back Camera Lens Use for taking pictures and recording videos. Keep clean for optimal performance.12. Back Cover Encloses the battery compartment.13.  Speaker Allows you to hear sounds and ringers. It also allows you to hear the caller’s voice when using Speaker mode.14. Microphone Transmits your voice to the other caller and for   Voice- activated functions.15. Volume Keys Allow you to adjust the ringer, media volumes, or the in-call volume during a call.16.  Accessory/Charger Port Allows you to connect the phone charger, USB cable, or other compatible accessories.Side ViewVolume KeysAccessory/ Charger Port
16 The BasicsInstalling the Battery and microSD Card  NOTE  It is important to fully charge the battery before initial use of the phone.Installing the batteryThe phone comes with a rechargeable battery. Keep the battery charged while not in use in order to maximize talk, use, and standby time. The battery charge level is shown at the top right corner of the screen.Removing the battery1.  Turn the phone off and use the fingertip cutout at the bottom of the phone to remove the battery cover.2.   Remove the battery from the battery compartment by lifting the bottom of  the battery using the fingertip cutout.1  Use the fingertip cutout at the bottom of the phone to remove the battery cover.2  Align the battery contacts with the terminals in the battery compartment and push the battery down until it clicks into place.3  Place the battery cover over the battery compartment, then press it downward until it clicks into place.
17The BasicsInserting a microSD cardRemove the battery cover (as demonstrated in the previous instructions) and locate the microSD card slot (microSD is inscribed near the slot opening). Position the microSD card with the label side facing up and slide it into place until it is fully inserted and locked in place. NOTE  The microSD card can be easily damaged by improper operation. Please be careful when inserting, removing or handling it.To remove the microSD cardYou must first unmount the microSD card prior to removing it (see section below). Then remove the battery cover and locate the microSD card slot. Carefully pull the microSD card out to remove it.To unmount the microSD cardIt is important to unmount the microSD card to avoid damage to it or data saved on the card. 1. From the Home screen, touch the Apps Key .2. Touch Settings  > Storage.3. Touch Unmount SD card > OK.Installing the 4G micro-SIM cardTurn the power off. Remove the battery cover and the battery (as demonstrated in the previous instructions). Locate the 4G micro-SIM card slot (a SIM card graphic is inscribed near the slot opening). Position the 4G micro-SIM card with the label side facing up and slide it into place until it is fully inserted and locked in place.Removing the 4G micro-SIM cardTurn the power off. Remove the battery cover and take the battery out. Locate the 4G micro-SIM card slot. Gently slide the 4G micro-SIM card out to remove it.
18 The BasicsCharging the PhoneYour device comes with an adapter and a USB cable which connect together to charge your phone. To charge your phone:  NOTICE Please only use an approved charging accessory to charge your LG phone. Improper handling of the Accessory/Charger Port, as well as the use of an incompatible charger, may cause damage to your phone and void the warranty.1. Connect the USB cable into the adapter. When connecting, as shown below, the LG logo on the USB cable should face toward you.2. Plug the USB cable (as shown below) into the phone’s Accessory/Charger port.Charging with USBYou can use your computer to charge your phone. To be able to charge with the USB cable, you need to have the necessary USB drivers installed on your PC first. Connect one end of the USB cable to the Accessory/Charger Port on your phone and connect the other end to a USB port on your PC. It is best to use the rear USB port when connecting to a desktop PC. The USB hub should be powered by an external power source.USB Cable AdapterNOTEMake sure that the 'B' side is facing toward you when inserting the USB cable into the phone.
19The BasicsOptimizing Battery LifeYou can extend your battery’s life between charges by turning off features that run in the background. You can also monitor how applications and system resources consume battery power.  From the Home screen, touch the Apps Key  > Settings  > Apps > Running tab and select the items that are no longer in use and touch Stop.Tips to extend the life of your battery㻌 Turn off radio communications that you aren’t using. If you aren’t using Wi-Fi, Bluetooth, or GPS, use the Settings menu to turn them off (Note that the GPS receiver is only turned on when you’re using an application that makes use of it).㻌 Turn down screen brightness and set a shorter screen timeout.㻌 Turn off automatic syncing for Gmail, Calendar, Contacts, and other applications if you don’t need it.㻌 Use the Power Control widget to control the wireless connections, GPS connection, Bluetooth power, display brightness, and syncing activity.To check the battery charge level㻌 From the Home screen, touch the Apps Key  > Settings  > About phone > Status.The battery status (Charging or Discharging) and level (as a percentage of fully charged) will be displayed at the top of the screen.To monitor and control what uses the batteryThe Battery use screen allows you to see which applications are consuming the most battery power. Information on this screen allows you to identify downloaded applications you may want to turn off when not being used, so you can get the most out of your battery power.㻌 From the Home screen, touch the Apps Key  > Settings  > Power saver > Battery use.
20 The BasicsThe screen will display battery usage time. A list of applications or services using battery power are displayed in order of energy used, from greatest amount to least.㻌 Touch an application in the Battery use screen to see the details about its power consumption. Different applications offer different kinds of information and they may even include options to modify the settings so you can reduce power consumption by that application.Setup WizardThe first time you turn on your phone, the Setup Wizard guides you through signing in to your Google Account. If you don’t have one, don’t worry, the Setup Wizard will help you create one.You can also set up social networking accounts, such as Facebook and Twitter.  NOTE  This phone supports several applications and services. It is recommended that you purchase a data plan that meets your needs. Contact your service provider for details.1. Press and hold the Power/Lock Key  on the top edge of your phone to turn it on.2. Follow the Setup Wizard to configure your phone set up including creating or logging in to your Google Account.  NOTE  If you have an existing Google Account, your contacts from that account are synced to your phone.
21The BasicsTurning the Phone On and OffTurning the phone on㻌 Press and hold the Power/Lock Key  for a couple of seconds until the screen turns on.Turning the phone off1. Press and hold the Power/Lock Key  until the pop-up menu appears.2. Touch Power off in the pop-up menu.3. Touch OK to confirm that you want to turn off the phone.To unlock the phoneIf you don’t use the phone for a while, the screen and backlight will shut off to conserve battery power. To unlock the phone:1. Press the Power/Lock Key .Your Lock Screen will appear.2. Swipe in any direction to unlock. The last screen you were working on opens.  NOTE  This is the default Lock Screen. If you've set up an Unlock Pattern, use your fingertip to draw the pattern.To turn the phone sounds offIf you’re in a place where your phone sounds may disturb others, you can quickly silence your phone from the Home screen.  From the Home screen, press and hold the Power/Lock Key , then touch  . OR  Press the down Volume Key  on the side of the phone until all sounds are turned off or vibration is set. OR  Open the Notifications panel and touch the Sound icon until   is displayed.
22 The BasicsSetting Up Your DeviceWhen you turn on your wireless device for the first time, you have the option to quickly set up various accounts. Simply follow the on-screen instructions to complete the initial setup of your wireless device.To set up your device, follow the steps below:1. On the Welcome screen, select your language and touch Next.2. Set your internet connection settings and touch Next.3. Select Sign in to sign into your Google Account or Get an account to create one. Touch Not now to skip to the next step. With a Google Account, Google applications are automatically synced between your phone and computer regardless of where you make an update. 4. Set your Google location settings and touch Next.5. Set up your email and social networking accounts and touch Next.6. Touch Done to start using the phone.Setting up your Google Account1. At the setup screen, touch Existing or New.2. Enter your username and password and any other necessary information (if creating an account).  NOTE Touch the Back Key  to close the keyboard.3. Touch Sign in.Now your Gmail, Google Contacts, and Google Calendar events will all be loaded to your phone automatically.You can use the area below to record your Google Account information for future reference.Username:___________________________@gmail.comPassword:________________________________________________
23The BasicsYour Google AccountYou must sign into a Google Account to use Gmail, Google Talk, Google Calendar, and other Google Apps; to download applications from Play Store; to back up your settings to Google servers; and to take advantage of other Google services on your phone. IMPORTANT      O  If you want to restore your settings to this phone, from another phone that was running Android release 4.0 or later, you must sign into your Google Account now, during setup. If you wait until after setup is complete, your settings are not restored.      O  If you don’t have a Google Account, you’re prompted to create one.      O  If you have an enterprise account through your company or other organization, your IT department may have special instructions on how to sign into that account.      O   When you sign in, your contacts, Gmail messages, Calendar events, and other information from these applications and services on the web are synchronized with your phone.      O  If you don’t sign into a Google Account during setup, you are prompted to sign in or to create a Google Account the first time you start an application that requires one, such as Gmail or Play Store.      O  When you sign in, you’re prompted to enter your username and password, using the on-screen keyboard.
24 The BasicsPhone’s Status IconsThe Status Bar appears at the top of every screen. It displays icons indicating that you’ve received notifications (on the left) and icons indicating the phone’s status (on the right), along with the current time.If you have more notifications than can fit in the Status Bar, a plus icon prompts you to open the Notifications panel to view them all.The following icons indicate the status of your phone.Call iconsMute microphone during a call Missed callIn call In call using Bluetooth deviceSpeaker onCalendar & Alarm iconsAlarm set Calendar event Email Messaging iconsOther Email event received Sending other Email failed Sending message failed New message receivedGoogle Talk message receivedNew voicemail receivedNotification icons Status icons
25The BasicsSound iconsMusic playing Silent modeVibrate mode Phone jack connectedNetwork icons4G network connected 4G network in useDownloading data through 4G networkUploading data through 4G networkEVDO network connected Using EVDO data networkDownload through EVDO data networkUpload through EVDO data networkDownloading data Uploading dataGPS on Searching the current location via GPSNo service Weak network signalAirplane mode RoamingLocation service onConnectivity icons Weak Wi-Fi signal Strong Wi-Fi signalUSB debugging connected USB connectedBluetooth on Bluetooth device connectedMobile Hotspot on USB tethering on
26 The BasicsSystem iconsMore icons available System securedSystem error SD card insertedPreparing SD card SD card errorNo SIM card Unknown SIM cardSync in process Sync errorBattery empty Battery fullBattery charging Battery status unknown
27The BasicsGetting to Know the Home ScreenThe Home screen is your starting point to access all the features on your phone. It displays application shortcuts, icons, widgets, and other features.Quick KeysThe Quick Keys are located at the bottom of the Home screen.  :    Opens the Phone application which displays the dial pad so you can dial an unsaved number. It also provides additional tabs to access the  Call logs, Contacts, and your Favorites.  :    Opens the Contacts application. You can access Dial, Call logs, and Favorites by touching the tabs across the top of the screen.  :   Opens the Messaging application so you can send and receive text  and multimedia messages.  :   Opens the Applications screen and displays phone options and   applications.To return to the Home screen㻌 Touch the Home Key  at any time, from any application.To view other Home screen panes㻌 Slide your finger left or right across the Home screen. The Home screen spans seven screen widths, allowing more space for icons, widgets, shortcuts, and other items.Status Bar Shows device status information, including the time, signal strength, battery status, and notification icons.Application Icon Touch an icon (application, folder, etc.) to open the application and use it.Quick Keys Provide easy, one-touch access to the functions you use the most.Apps Key Touch to open the Applications screen to view all of your installed applications.
28 The BasicsHome Screen Pane Indicator The bars near the bottom of the screen indicate which Home screen pane you are viewing.  TIP!  Pinch in on the Home screen to display the mini canvas view, then touch the Home screen canvas you want to view.  Touch and hold home screen to edit. Drag the screen to  Remove icon on the top to delete.TouchscreenYour touchscreen provides an excellent way to interact with and use your Android phone. With the touch of your finger, you can download and use available applications, make menu selections, and access data saved to your phone.The following terms are used for describing the different available actions using the touchscreen:Touch  A single finger touch selects items. For example, touch an icon (e.g., application or menu item), touch words (e.g., menu selection or to answer onscreen question), or touch letters and numbers to type.Touch and hold  Touch and hold an item on the screen by touching it and not lifting your finger until an action occurs. For example, to open an Options menu for editing a contact, touch and hold a contact entry until the menu pops up.Touch here to set default home screen.Touch here to add more screen.
29The BasicsDrag  Touch and hold an item for a moment and then, without lifting your finger, move your finger on the screen until you reach the target position. You can drag items on the Home screen to reposition them.Swipe or slide  To swipe or slide, quickly move your finger across the surface of the screen, without pausing when you first touch it (so you don’t drag an item instead). For example, you can drag or slide the screen up or down to scroll a list or browse through the different Home screens by swiping from left to right (and vice versa).Double-tap  Double-tap to zoom a web page or a map. For example, quickly double-tap a section of a web page to zoom that section to fit the width of the screen. You can also double-tap to control the zoom in Maps and in other applications.Pinch-to-Zoom  Use your index finger and thumb in a pinch or spread motion to zoom in or out when using the MetroWEB, a map, or pictures.Rotate the screen  From many applications, the orientation of the screen rotates with the phone as you turn it from upright to sideways and back again.Rotate the phone sideways for landscape orientation. Rotate the phone upright for portrait orientation.Capturing the screen  If you press the Volume down  and Power/Lock Key  at the same time, the current image on the screen is captured. You can find the captured image in the Gallery (Note that you cannot capture an image from some videos and applications).
30 The BasicsText Input MethodsOn-screen KeyboardYou can easily enter text using the on-screen keyboard. The on-screen keyboard displays automatically on the screen when you need to enter text. To manually display the keyboard, simply touch a text field where you want to enter text.Touch here to add contacts from the contact list.Toggles between different languages.Toggles from 123/SYM mode to ABC mode.Touch here to send.Touch here to attach files.Typing tipsEnter other characters Touch the Numbers Key   and the Alt Key   for more characters and symbols.Enter one capital letter Touch the Shift Key  .Enter all capital letters Touch the Shift Key   twice. Touch again to revert to lowercase.Highlight textDouble-tap a word to highlight it. To highlight a range of text, double-tap the word, then drag the blue highlight markers to highlight the text you want. Cut or copy selected textTouch and hold the the highlighted text, then touch Cut or Copy.Paste cut or copied text Touch and hold the location to paste the text, then touch Paste.Delete a character Touch the Delete Key  .
31The BasicsLanguage toggleTouch and hold the Language Key   to open a dialog box to set the languages to toggle between.Text input settingsTo change your text entry settings and see the dictionary of terms you’ve used, from the Home screen, touch the Apps Key  > Settings  > Language & input.O  To change the default language, touch Language.Applications: How to View, Open and SwitchAll of the applications on your phone, including any applications that you downloaded and installed from Play StoreTM or other sources, are grouped together on the Applications screen, which you access from your Home screen. If you have more applications than can fit on the Applications screen, you can slide the screen up or down to view more.   Home screenApplications screenTouch   to open the Applications screen.Touch an application icon to open the application.Slide the screen left or right to  bring more icons into view.
32 The BasicsYour Home screenCustomizing the Application design from the Home screen NOTE  This feature allows you to make and use a icon with the pictures in your Gallery.According to your preference you can further edit application icons on the Home screen.1. Touch and hold an icon until the canvas grid is displayed, then release the icon. An editing icon appears at the upper right side of the application icon.2. Touch the icon and select the desired icon design.3. Touch Create photo icon and select Take photo to open the Camera application and take a picture or Select from Gallery to choose one of the available pictures.Opening and Closing the Applications screenOpening the Applications screenIt’s easy to access the Applications screen no matter what feature you’re currently using. Simply touch the Home Key , then touch the Apps Key .Closing the Applications screenTo manually close the Applications screen, touch the Home Key  .  NOTE  The Applications screen closes automatically when you touch an icon to open its application. Dragging an icon onto your Home screen also closes the Applications screen automatically.
33The BasicsCustomizing the Applications screen The phone includes a wide variety of applications and you can download even more applications to your device. You can customize these items on the Applications screen for faster access (less scrolling) to the applications you use most often. Rearranging the Applications screen iconsYou can rearrange the order of the icons on the Applications screen to provide more convenient access to the applications you use the most.1. From the Home screen, touch the Apps Key .2. Touch the Apps tab (if necessary), then touch the Settings icon   at the top right of the tab bar. The Settings icon changes to a checkmark. 3. Touch and hold the Application icon you want to move, drag it to its new position, then lift your finger. The remaining icons shift to the right.   NOTE  If you drag the application icon onto another application icon, it creates a folder with both of the applications in it.Checking application informationTo check on an application’s detail information from the Applications screen:1. From the Home screen, touch the Apps Key .2. Touch the Apps tab, then touch the Setting icon   at the top right of the tab bar. The Settings icon changes to a checkmark.3. Touch any of the Application icons to display an information dialog box. 4. Touch the OK button to exit. Opening and Switching Applications Multi-tasking is easy with AndroidTM because open applications keep running even when you open another application. There’s no need to quit an application before opening another. You can use and switch among several open applications. Android manages each application, stopping and starting them as needed, to ensure that idle applications don’t consume resources unnecessarily.
34 The BasicsOpening an application  Open an application simply by touching its icon on the screen.  TIP   You can customize your Home screen with the application icons you use most often. Applications are located on the Applications screen, but you can copy any application icon to your Home screen for faster access. No matter where the icon is, on the Applications screen or your Home screen, just touch it to open and use it.Opening multiple applications1. Touch an application icon to open it.2. Touch the Home Key .  NOTE  If the application icon you want is on your Home screen, simply touch the icon to open and use it.3. From the Home screen, touch the Apps Key  .4. Touch the icon for the other application you want to open.Switching between multiple applications1. Touch and hold the Home Key . A screen with the icons of the applications that you’ve used recently will appear.2. Touch the application preview of the application you want to use or touch the Back Key  to return to the current screen.   Touch an an app preview to open an application you’ve used recently (touching the background redisplays the Home screen)..If you flick the application preview to the right or left, it disappears from the recent app list.
35The BasicsAdding application icons to the Home screenCustomize your Home screen with the applications you use most often.1. Open the Applications screen.2. Touch and hold the application icon you want to add to your Home screen. The Applications screen will close so that you can place the icon on the Home screen.3. Lift your finger to place it or drag the icon to where you want it on the screen, then lift your finger.Moving applications to other Home screensYou can place application icons on any of the Home screen canvases.  Drag  Touch and hold, then drag the icon to the left or right edge of the screen to advance to the other screen canvases before lifting your finger.   Tilt  Touch and hold an item, then tilt the device to move it to one of the Home screen canvases in that direction, then lift your finger.  NOTE  To be able to use the Tilt method, the Move home screen items checkbox needs to be checkmarked. From the Home screen, touch the Menu Key  > System settings > Gesture > Move home screen items checkbox.
36 The BasicsWorking with MenusThere are two kinds of Android menus: Options menus and Context menus.Options menusOptions menus contain tools that apply to the activities of the current screen or application, not to any specific item on the screen. To open the available options menu, touch the Menu Key . Not all applications have Options menus; if you touch the Menu Key  on a screen that has no Options menu, nothing will happen.Context menusContext menus contain options that apply to a specific item on the screen. To open a Context menu, touch and hold an item on the screen. Not all items have Context menus. If you touch and hold an item that has no Context menu, nothing will happen.
37The BasicsWhen you touch and hold certain items on a screen, a Context menu opens.Managing NotificationsNotification icons report the arrival of new messages, calendar events, alarms, as well as ongoing events, such as when you are in a call. When you receive a notification, the notification icon will be displayed in the Status Bar. You can open the Notifications panel to view a list of all recent notifications. Depending on your settings, you may hear a notification sound and/or the phone may vibrate.To open the Notifications panel  Touch and drag the Status Bar to the bottom of the screen.  OR  From the Home screen, touch the Menu Key  > Notifications.    The Notifications panel displays your wireless provider and a list of your current notifications, organized into ongoing and event-based notifications.Touch a notification to open it.Touch to clear your list of event-based notifications.
38 The BasicsTo respond to a notification1. Open the Notifications panel. Your current notifications are listed in the panel, each with a brief description.2. Touch a notification to view it.  The Notifications panel will close and the application that corresponds to your response will open. For example, new voicemail notifications dial your voicemail box and Gmail notifications open the Gmail application so you can read your new messages.To clear all notifications1. Open the Notifications panel.2. Touch the Clear icon .All event-based notifications will be cleared; ongoing notifications will remain in the list.To close the Notifications panelTouch and drag the Notification Bar handle  at the bottom of the Notifications panel to the top of the screen or just touch the Back Key .The panel will also close when you touch a notification.  NOTE  The Notifications Bar handle at the bottom of screen is sensitive to the drag motion so just beginning the upward drag will close the panel.Quick settings on the Notifications panelThe top of the Notifications panel includes a Quick settings bar. The icons in this bar provide a quick, convenient way to change settings without accessing any applications. The Quick settings bar icons include QuickMemo, Wi-Fi, Bluetooth, GPS, Sound, Airplane, Data, Sync, Rotation, and Brightness. If you set more than four icons on the bar, swipe left and right to scroll through the list. Touch Add   to open a dialog box to checkmark the items you want displayed in the Quick settings bar.
39The BasicsTap any of the Quick settings icons to toggle through the available settings:  QuickMemo activates the ability to write on the current Home screen canvas.  Wi-Fi On  and Wi-Fi Off .  Bluetooth On  and Bluetooth Off .  GPS On  and GPS Off .  Sound , Vibrate , and Silent .  Airplane mode On  and Airplane mode Off .  Data On  and Data Off .  Sync On  and Sync Off .  Rotation On  and Rotation Off .  Brightness On  and Brightness Off .  NOTE  If necessary, scroll horizontally to see all of the available icons.Using QuickMemoTap the QuickMemo icon in the Notifications panel Quick settings bar for the convenience of having a pen and paper at your fingertips. QuickMemo options are displayed at the top of the screen. Touch the Note icon   to display a blank paper background to write on. Touch the Pen icon   to select the pen type and pen color. Touch the Erase icon   to selectively erase pen marks using your fingertip. Touch the Share icon   to select how to share your memo. Touch the Save icon   to save your memo in your Gallery. Searching Your Phone and the WebYou can search for information on your phone and on the web by using the Google search application. Some applications, such as Gmail, Contacts, and MetroWEB have the ability to search contents within those specific applications. You can conduct the search by typing in the search terms or saying what you’re looking for. As you enter text, the search application can provide
40 The Basicssuggestions so you don’t necessarily have to type out your full request.Phone and Web search using text entry1. Touch the Search Widget  at the top of the Home screen or touch and hold the Menu Key  .  Then the Quick Search Box will open automatically.Voice SearchTouch to search by voice.Provides one-touch shortcut to matching search items and past searches.  In some applications, such as Gmail, Contacts, and MetroWEB, the application’s own search box opens when you touch and hold the Menu Key . This is indicated by the application’s icon on the left side of the search box.2. Enter the text you’re searching for in the Quick Search Box.As you type, search results from your phone, previous search terms, and web search suggestions appear. Touch an item to activate that search result.  You can use the Search preferences to configure some aspects of web search (for example, whether it makes suggestions below the Quick Search Box as you type), and what phone features you want to include in searches. To access settings, open the application and touch the Menu
41The BasicsKey  > Settings.3. Touch   to search for the entered terms.Locking the ScreenYou can lock your screen so that only you can unlock it to make calls, access your data, buy applications, and prevent unauthorized use.Setting Swipe, Face Unlock, Pattern, PIN, or Password for the First Time1. From the Home screen, touch the Apps Key  > Settings  > Lock Screen.2. Touch Select screen lock.3. Touch None, Swipe, Face Unlock, Pattern, PIN or Password.None: No lock screen is enabled so the screen will never be locked from use. Swipe: A swipe motion in any direction on the touchscreen will unlock the screen. Face Unlock: Unlocks the screen using face recognition. Keep in mind that Face Unlock is less secure than a pattern, PIN or password because it uses generalized shape and dimension to verify your face. Pattern: Unlocks the screen using a pattern you draw with your finger. The first time you set an unlock pattern, you will see a tutorial with instructions on how to create it. Read the tutorial and touch the Next button. Draw your pattern (connect at least 4 dots) and touch the Continue button. Then redraw your pattern and touch the Confirm button. PIN Unlocks the screen with a number sequence. Enter a PIN (at least 4 digits) and touch the Continue button. Reenter your PIN and touch the OK button to confirm it. Password Unlocks the screen with an alphanumeric sequence. Enter a password (at least 4 characters) and touch the Continue button. Reenter your password and touch the OK button to confirm it.
42 The Basics  NOTE  Follow the on-screen instructions to create a backup PIN number in case you forget your pattern.   From then on, any time you wish to turn the phone on or unlock the screen, you will need to draw your unlock pattern or enter your PIN or password to unlock the screen.  NOTES O  You have 5 opportunities to enter your unlock pattern, PIN or password. If you used all the 5 opportunities, you can try again after 30 seconds.     O  When you can’t recall your unlock pattern:      -  If you’ve created a Google Account on the phone, touch Forgot pattern?. Then you are required to sign in with your Google Account or enter your backup PIN to unlock your phone.        -  If you haven’t created a Google Account on the phone, you need to perform a factory reset (Caution: If you perform a factory reset, all user applications and user data will be deleted. Please remember to back up any important data before performing a factory reset).      1. Turn the power off.        2.   Press and hold the following keys at the same time: Power/Lock Key  + the down Volume Key  .        3. Touch Back Key   + Home Key  at the same time repeatedly.Disabling the lock sequenceIf you change your mind about using a lock sequence to secure your phone, you can disable it. 1.  From the Home screen, touch the Apps Key  > Settings   > Lock screen. 2. Touch Select screen lock. 3. Confirm your unlock information. 4. Touch None. Changing Your Unlock Pattern1. From the Home screen, touch the Apps Key  > Settings  > Lock screen.2. Touch Select screen lock. 3. Draw your current unlock pattern.4. Touch Pattern to change it.
43The Basics5. You’re prompted to draw and redraw your new pattern.6. Enter a Backup PIN and touch Continue. Then confirm your Backup PIN and touch OK.Changing your Lock Screen PIN or Password1. From the Home screen, touch the Apps Key  > Settings  > Lock screen.2. Touch Select screen lock. 3. Enter your current unlock sequence, then touch the Next button.4. Touch PIN to change your number lock sequence, touch Password to change your alphanumeric lock sequence, or touch None to disable the lock sequence. 5. You’re prompted to enter and reenter your new lock sequence.  From then on, you will need to enter that sequence and touch the OK button to unlock the screen.  NOTES O   You have 5 opportunities to enter your unlock pattern, PIN or password. If you used all of the opportunities, you can try again after 30 seconds.  O   If you have set up a Microsoft Exchange account, you are only allowed to set up a password to unlock the screen.     O   When you can’t recall your unlock pattern:         -   If you’ve created a Google Account on the phone, touch Forgot pattern?. Then you are required to sign in with your Google Account to unlock your phone.        -   If you forgot the unlock pattern, you can touch the Backup PIN button, enter your backup PIN sequence, then touch the OK button to unlock your phone.Lock timerIf a security lock is enabled, touch Lock timer to set the delay time after the screen darkens due to inactivity before the screen automatically locks and requires you to enter your unlock sequence.Power button instantly locksIf a security lock is enabled, checkmark the box to enable instant Power button lock, or remove the checkmark to disable it.
44 The BasicsThe default Lock screenPress the Power/Lock Key  to illuminate the touchscreen if it has timed-out.  If the unlock sequence is set to Swipe, a default Lock screen is displayed, but you can still conveniently check the date, time, and Status Bar icons. You can drag the Status Bar down to open the Notifications Panel without unlocking the screen. In addition, you can also quickly access four applications (the Phone application, the Email application, the Messaging application, and the Clock application) without fully unlocking the screen. Simply swipe the icon upward to open and use it. Changing the items on the default Lock Screen1. From the Home screen, touch the Apps Key  > Settings   > Lock screen.2. Touch Clocks & shortcuts.  To change the Quick access icons, touch one of the icons at the bottom of the screen, then touch the application you want to replace it with.  To change the date and time format, swipe left or right until the one you want is displayed.3. Touch the Save button to save these settings.
45The BasicsCustomizing the Home ScreenYou can personalize your Home screen by adding application icons, shortcuts, widgets, and other items to any Home screen canvas. You can also change the wallpaper.To add an item to the Home screen1. Go to the Home screen canvas where you want to add the item.2. Touch the Add . Or, just touch and hold an empty spot on the Home screen canvas.  NOTE  If space is not available on a particular Home screen canvas, you must delete or remove an item before you can add another item. Or, switch to another Home screen canvas.3. In the menu that opens, touch the desired tab.Touch and hold the icon and drag at the screen you want to put.Touch to access different tabs.Slide the screen right or left to view different screen.4. Touch the type of item you want to add to the Home screen.To move an item on the Home screen1. Touch and hold the item.2. Drag the item to a new location on the screen. Pause at the left or right edge of the screen to drag the item onto the next available Home screen canvas.3. When the item is where you want it, lift your finger.  NOTE If Move home screen items is enabled in the Gesture settings, simply tilt the device in the direction you want to move the item and it will slide to the canvases in that direction. Lift your finger when it arrives at the canvas you want.
46 The BasicsTo remove an item from the Home screen1. Touch and hold the item.2. Drag the item to the Remove icon  at the top of the screen.3. When the Remove icon changes to  , lift your finger.To change the look of your Home screenFrom the Home screen, touch the Menu Key  > Home screen settings to access Animation, Screen swipe effect, Wallpaper, Scroll wallpaper, Scroll screens circularly and Home backup & restore.  Animation: Set whether you want to enjoy animated transitions for all supported effects (including when navigating from screen to screen) or to use the phone without any optional animation effects (this setting does not control animation in all applications).  Screen swipe effect: Sets how the items on the Home screen canvases slide from one to the next. Choose from Basic, Breeze, Accordion, Panorama, Carousel, Layer, or Domino.  Wallpaper: Allows you to set the wallpaper. Choose from Gallery, Live wallpapers, or Wallpapers.  Scroll wallpaper: Checkmark this setting so that the background wallpaper scrolls with the Home screen canvases instead of having a static image.  Scroll screens circularly: Checkmark this setting so that the Home screen canvases continuously rotate (does not stop at the far left or right right canvas).  Home backup & restore: Touch to backup and restore app/widget configurations and themes.
47The BasicsQuickMemoThe QuickMemo feature allows you to create memos and capture screen shots. You can use QuickMemo to easily and efficiently create memos during a call, with a saved picture or on the current phone screen.1.  Access the QuickMemo feature by pressing both the Volume Up and Volume Down Keys for one second on the screen you want to capture.Or touch and slide the Status Bar downwards and touch  .2.  Select the desired menu option from Pen type, Color, Eraser, and create a memo.3.  Touch   from the Edit menu and select   to save the memo with the current screen. NOTE  Please use a fingertip while using the QuickMemo function. Do not use your fingernail.Using the QuickMemo optionsWhile using the QuickMemo function, the following options are available: - Select if you want to use the background screen or not. - Select the pen type and the color. - Erase the memo that you created. - Save the memo. - Send or share the current QuickMemo to others.Viewing the saved QuickMemoTouch Gallery and select the QuickMemo album.
48 The BasicsConnecting Quickly With Your ContactsAs you build up your list of contacts on your phone, you can use the Quick Contact for Android feature to quickly chat, email, text message, place a call, or locate your contacts. Quick Contact for Android is a special set of icons that you can use to quickly and easily connect with a contact.  Open your Contacts list and touch the contact’s picture.     Touching the contact’s picture opens a Quick Contact dialog box displayed directly below the contact’s name. It displays icons for all of the ways you can communicate with that contact. The available icons depend on the information you have saved for that contact. Quick Contact for AndroidContact listAlphabetical ListingSlide your finger vertically along the letters to view the entries under a specific letter.New ContactTouch here to add a new contact.Contact pictureTouch here to open Quick Contact for Android for this contact.Type in the name you want to search.  Touch a Quick Contact icon to communicate with the contact. Depending on the icon you’ve touched, a different application will open.  TIP   Adding a shortcut for a contact to your Home screen allows you to open Quick Contact for that contact without opening the Contacts application.
49Connecting to Networks and DevicesConnecting to Mobile NetworksWhen you buy your phone and sign up for service, your phone is configured to use your provider’s mobile networks for voice calls and for transmitting data. Different locations may have different mobile networks available.  Initially, your phone is configured to use the fastest mobile network available for data. You can also configure your phone to access a different set of networks entirely, or to behave in specific ways when roaming.Connected to the 4G network (LTE).Connected to the EVDO network (EVDO revA).Signal strength -  more bars that are lit, the stronger the wireless signal.Connected to another wireless service provider’s network (roaming).The icons in the Status Bar indicate which kind of data network you’re connected to and the network signal strength.When connected to slower networks, you may want to postpone using your phone for data-intensive tasks until you are connected to a faster network again or find a Wi-Fi network to connect to.To disable data when roamingYou can prevent your phone from transmitting data over other carriers’ mobile networks when you leave an area that is covered by your carrier’s networks. This is useful for controlling expenses if your cell plan doesn’t include data roaming.1. From the Home screen, touch the Apps Key  > Settings  > More... > Mobile networks.2. Touch Data roaming to remove the checkmark from the box. With Data roaming unchecked, you can still transmit data with a Wi-Fi connection.
50 Connecting to Networks and DevicesConnecting to Wi-Fi NetworksWi-Fi is a wireless networking technology that can provide Internet access at distances of up to 100 meters, depending on the Wi-Fi router and your surroundings.To use Wi-Fi on your phone, you must connect to a wireless access point. Some access points are open and you can simply connect to them. Others are hidden or implement other security features, so you must configure your phone so it can connect to them.Turn off Wi-Fi when you’re not using it, to extend the life of your battery.The following Status Bar icons indicate your Wi-Fi status.Connected to a Wi-Fi network (waves indicate connection strength).Notification that an open Wi-Fi network is in range.When you connect to a Wi-Fi network, the phone obtains a network address and other information it needs from the network, using the DHCP protocol. To configure the phone with a static IP address and other advanced setting, from Wi-Fi settings touch the Menu Key  > Advanced or touch and hold the connected network > Modify network and check the Show advanced options.To turn Wi-Fi on and connect to a Wi-Fi network1. From the Home screen, touch the Apps Key  > Settings  > Wi-Fi.2. If the Wi-Fi button is on the left and the icon is grey-colored, drag the button to the right. Your device scans for available Wi-Fi networks and the icon turns blue when successful.3. Touch a network and then touch Connect to connect to it. O  If the network is open, you can connect to the network directly by touching the Network name. O  If the network is secured, you will be prompted to enter a password (Ask your network administrator for details).
51Connecting to Networks and Devices O  When you’re connected to a network, you can touch the network name in the Wi-Fi settings screen for details about the speed, security, address, and related settings.To receive notifications when open networks are in rangeBy default, when Wi-Fi is on, you receive notifications in the Status Bar when your phone detects an open Wi-Fi network.1. Turn on Wi-Fi, if it’s not already on.2. From the Wi-Fi settings screen, touch Network notification to checkmark the box. Touch again to remove the checkmark and stop receiving notifications.To add a Wi-Fi networkYou can add a Wi-Fi network so the phone will remember it, along with any security credentials, and connect to it automatically when it is in range. You can also add a Wi-Fi network manually if it does not broadcast its name (SSID) or if you want to add a Wi-Fi network when you are out of its range. To add a secured network, you need to contact the network’s administrator to obtain the password or other required security credentials.1. Turn on Wi-Fi, if it’s not already on.2. From the Wi-Fi settings screen, touch ADD NETWORK.3. Enter the Network SSID (name) of the network. If the network is secured, touch Security and touch the type of security deployed on the network.4. Enter the required passwords and security credentials.5. Touch Save.  The phone will connect to the wireless network. Any credentials that you entered are saved, so you are connected automatically the next time you come within range of this network.
52 Connecting to Networks and DevicesTo forget a Wi-Fi networkYou can make the phone forget about the details of a Wi-Fi network that you added. For example, if you don’t want the phone to connect to it automatically or if it’s a network that you no longer use.1. Turn on Wi-Fi, if it’s not already on.2. In the Wi-Fi settings screen, touch and hold the name of the network that you want to forget.3. Touch Forget network.USB connectionUSB connection is a feature that allows your device to connect to a PC using a USB cable.  Allows the phone to be used as Mass storage when a microSD card is present in the device. It also allows you to transfer unprotected content from the phone to the PC and vice versa.  NOTE  User content, such as photos, videos, and voice recordings, can be stored on a removable microSD card that is inserted in the device. To select a USB mode for a connection1.  From the Home screen, touch the Apps Key  > Settings  > Connectivity > USB connection type.2. Touch LG software to connect to the PC.  Touch Charge only to use only the charging function and not the USB function.Always askYou can choose to be asked to confirm the USB connection when connecting to a computer. When Ask on connection is checkmarked, the USB selection window is displayed.
53Connecting to Networks and DevicesUsing the Status Bar to change the settingsThe Status Bar shows the current USB connection mode so you can easily open the Status Bar and change the settings as needed.When connected via USB, the current USB connection mode also appears on the Notifications panel. Touch the connection setting to display a screen where you can change the USB connection mode.  NOTE If the Ask on connection checkbox is marked, the screen is only provided during USB connection, but is not provided in the notification area.
54 microSD CardmicroSD CardUnmounting and removing the microSD CardTo safely remove the microSD card from your device, first you need to unmount the microSD card before removing it from the phone.1.  From the Home screen, touch the Apps Key  > Settings  > Storage > Unmount SD card > OK. Now you can safely remove the microSD card.2. Remove the back cover. 3. Carefully pull the microSD card out of the slot.  NOTE  You can easily damage the microSD card and its adapter by improper operation. Please be careful when inserting, removing, or handling them.microSD Card SettingsViewing Memory in the microSD Card1. From the Home screen, touch the Apps Key  > Settings  > Storage.2. Review the available information. O  The storage capacity page is divided into two sections: Internal Storage and SD Card.Formatting the microSD CardFormatting a microSD card permanently removes all files stored on the card.1. From the Home screen, touch the Apps Key  > Settings  > Storage.2. Touch Unmount SD card and OK to release the microSD card from device use. The icon appears within the Notifications panel to indicate an unmounted microSD card.3. Once released, touch Erase SD card > Erase SD card > Erase everything. O  Once completely formatted, the card is automatically re-mounted (reconnected for use by the device).
55microSD Card  NOTE  The formatting procedure erases all the data on the microSD card, after which the files CANNOT be retrieved. To prevent the loss of important data, please check the contents before you format the card.Connecting Your Device to Your ComputerBefore using your device’s mass storage capabilities, you need to prepare your device’s data services to synchronize with your desktop or laptop computer. Once you have connected the device to the computer, you can transfer your data to or from the device memory.To connect your device to a computer via USB1. Use the USB cable that came with your phone to connect the phone to a USB port on your computer.2. Open the Notifications panel and then touch USB connected.3. Touch the connection mode you want to use to connect to the PC. Choose from the following options: Charge only, Media sync (MTP), USB tethering, LG software or Camera (PTP)Device memoryYour phone has removable memory in the form of a 2GB microSD card. Most applications allow you to choose to save the user content to the removable microSD card. Using Media sync (MTP) modeWhen you connect the phone and PC using a USB cable and set your device’s USB connection mode to Media sync (MTP), you will see one Portable Devices on the PC. You can copy files to/from the removable SD card.
56 microSD CardSending data from your phone using BluetoothSending data using BluetoothYou can use Bluetooth to send data by opening a corresponding application, not from the Bluetooth menu as on most other mobile phones.*  Sending pictures: Open the Gallery application, then open the picture and touch   > Bluetooth. Check whether Bluetooth is turned on, then touch Search for devices. Choose the device you want to send data to from the list.*  Exporting contacts: Open the Contacts application. Touch the Contact you want to export. Touch the Menu Key  > Share > Bluetooth. Check whether Bluetooth is turned on, then touch Search for devices. Choose the device you want to send data to from the list.*  Sending multi-selected contacts: Open the Contacts application. To select more than one contact, touch the Menu Key  > Share > Select all > Done > Bluetooth . Check whether Bluetooth is turned on, then touch Search for devices. Choose the device you want to send data to from the list.*  Connecting to FTP (only FTP server is supported on this handset): From the Home screen, touch the Apps Key   > Settings   > Bluetooth. Switch   to the right so you can search for your phone on other devices. Find the FTP service and connect to the FTP server. O  If you want to search for this phone from other devices, go to from the Home screen, touch the Apps Key   > Bluetooth. Switch   to the right. Your device will be able to be detected by other devices for 120 seconds.
57CallsPlacing and Ending CallsYou can place calls using the Phone application. Calls can be manually dialed using the Dial tab. You can also dial from your phone’s memory using the Call logs tab, the Contacts tab, or the Favorites tab.To open the Phone application  From the Home screen, touch the Phone Key  in the Quick Keys bar.To place a call by dialing1. From the Home screen, touch the Phone Key  to open the Phone application.    2. Touch the keys on the dial pad to manually enter a phone number. O  If you enter a wrong number, touch the Delete Key  to erase digits one by one. O  To erase the entire number, touch and hold the Delete Key  . O To dial an international number, touch and hold   to enter the plus ( + ) symbol. Then enter the international prefix for the country; followed by the full phone number.3. Touch the Call Key  to dial the number that you entered.To dial an international number, touch and hold  to enter the plus ( + ) symbol. Then enter the international prefix for the country; followed by the full phone number.Touch the Call Key  to dial the number that you entered.Touch to send a message. Touch to erase a digit. Touch and hold to erase the entire number.
58 Calls O  You can use other phone features while the call is underway. If you open another application, the Call icon appears in the Status Bar for the duration of the call.  O Press the Volume Keys to adjust the call volume. O  Use the on-screen buttons to enter additional numbers, place the call on hold and take an incoming call, add another call, use the speakerphone, end the call, and other options.  NOTE  If you opened other applications while on a call, you'll need to return to the Call screen to end the call. You can touch the Home Key , then the Phone Key  or drag the Notifications panel down and touch the Call icon. You can also touch the Contact's name or number at the top left corner of the Home screen.Airplane modeSome locations may require you to turn off your phone’s wireless connections by placing your phone in Airplane mode.1. Press and hold the Power/Lock Key .2. Touch Airplane mode.  NOTE  The Wireless & networks menu also has a checkbox to enable or disable Airplane mode.
59CallsAnswering or Rejecting CallsWhen you receive a phone call, the Incoming call screen opens with the caller ID and any additional information about the caller that you have saved in the Contacts list. All incoming calls are recorded in the Call log.To answer a call  If the screen is unlocked, simply touch the Answer Key  .  If the screen is locked, swipe the Answer icon   in any direction to answer the call.  If you were already on a call, touch the Answer Key  to place the first call placed on hold while you answer the new call.  NOTE  To silence the incoming call ringer, press the Volume Keys.Swipe the Answer icon in any direction to answer the call.Unlocked Screen Locked ScreenTouch the Answer Key to answer the call.
60 CallsTo decline a call and divert it to voicemail  If the screen is unlocked, simply touch the Ignore Key  .  If the screen is locked, swipe the Ignore icon  in any direction to ignore the call.  The caller is sent directly to your voicemail box to leave a message.Touch the Quick msg Key to send a quick message to the caller and forward them to your voicemail.Unlocked Screen Locked ScreenTouch the Decline Key to decline the call and send the caller directly to your voicemail box to leave a message.Swipe the Decline icon in any direction to decline the call.  NOTE  To silence the ringer, press the Volume Keys.To decline a call and send a text message1. When you receive an incoming call and the screen is unlocked, touch the Quick msg Key . If the screen is locked, touch and drag the Quick msg icon   in any direction.2. Touch the text message you want to send in place of answering the call.   NOTE  This feature can only be used to send a message to another mobile phone. It is not applicable to incoming landline calls.
61CallsWorking with the Call LogThe Call log is a list of all of the calls you’ve dialed, received, or missed. It offers a convenient way to redial a number, return a call, or add a number to your Contacts.To open the Call log  From the Home screen, touch the Phone Key  (in the Quick Keys bar) and then the Call logs tab   at the top of the screen.    Calls are listed in the Call logs tab. The most recent calls are located at the top of the list. Scroll down to see older entries.This tab displays the history of all your calls.This tab allows you to dial a phone number manually. You can also call voicemail using this keypad.This tab displays your Contacts list.  Touch the Menu Key  for more options.You can set favorites contact with frequently used contact. Touch the Menu Key  for more options.To dial a number in the Call log  From the Call log, touch the Call Key   at the right of the call entry.You can also touch and hold the entry to open a Context menu with more options to communicate with that contact in other ways.To add an entry’s number to your Contacts1. Touch and hold the call entry.2. Touch Add to Contacts in the Context menu. When the screen turns to dial screen, you can edit the number before adding in the contacts.3. Touch the   to add a new contact or choose an existing contact to add the new number to.
62 CallsCalling Your ContactsInstead of manually dialing phone numbers using the dial pad, you can use your Contacts list to dial quickly and easily.You can also quickly call a contact by using Quick Contact.If you have contacts on the web, they’re synchronized with your phone when you first synchronize to your GoogleTM Account.To call a contact1. From the Home screen, touch the Contacts Key  from the Quick Keys bar.2. Touch the contact you wish to call.3. Touch the contact’s phone number you want to call.To call a favorite contact1. From the Home screen, touch the Contacts Key  from the Quick Keys bar, then touch the Favorites tab.2. Touch the contact you wish to call.3. Touch the contact’s phone number you want to call.
63CallsVoice DialerYou can use the Voice Dialer application to place a phone call by speaking the name of a contact or a phone number.To place a call by speaking1.  From the Home screen, touch the Apps Key  > Voice Dialer  .If you have a Bluetooth headset that supports “voice-recognition” or “voice dialing,” you may be able to open Voice Dialer by pressing your headset’s main button or in some other way, and dial by voice using your headset. For details, see the documentation that came with your headset.2. Say “Call” followed by the name of the contact or say “Dial” followed by a phone number.Options During a Call    Touch to switch between a Bluetooth headset and the phone.Touch to mute the microphone during a call. The Mute Key lights up to indicate that the microphone is muted.Touch to turn the speakerphone on or off. The Speaker Key lights up to indicate that the speakerphone is on.WARNING! To avoid damage to your hearing, do not hold the phone against your ear when the speakerphone is turned on.
64 CallsTo mute the microphone during a call  Touch the Mute Key  .  The Mute Key  lights up to indicate that the microphone is muted. The Mute icon will appear in the Status Bar to remind you that the microphone is turned off.    When viewing the in-call screen, you can unmute the microphone by touching the Mute Key  again.    The microphone is unmuted automatically when the call ends.To turn the speakerphone on or off  Touch the Speaker Key  .  The Speaker Key   lights up to indicate that the speakerphone is on. The Speaker icon will appear in the Status Bar and the sound from your call is played through the phone’s speaker.    When viewing the in-call screen, you can turn the speakerphone off by touching the Speaker Key  again.    The speaker is turned off automatically when the call ends. WARNING!To avoid damage to your hearing, do not hold the phone against your ear when the speakerphone is turned on.To switch between a Bluetooth headset and the phoneWhen a Bluetooth headset is paired and connected to your phone, you can conduct calls on the headset for hands-free conversation. During a call, you can opt to use the Bluetooth headset or just the phone.When using the Bluetooth headset during a call, the Ongoing Call notification icon is blue in the Status Bar (the icon is green when using the phone).  Touch the Bluetooth Key to switch the call from the headset to the phone, or vice versa.
65CallsManaging Multiple CallsContact your wireless service provider to learn whether they support conference calls and how many participants you can include.To switch between current calls  Touch the Swap Key  .    The current call will be placed on hold and you will be connected with the other call.To set up a conference callContact your wireless service provider to learn whether they support conference calls and how many participants you can include.1. Place a call to the first participant.2. When you’re connected, touch the Menu Key  > Add Call.3. Touch the keys on the dialpad to manually enter a phone number, then touch the Call Key  .4. After you’re connected, touch the Merge call Key . The participant is added to the conference call.Touch here to add the number of participant.Touch here to merge the calls.Touch here to set the Bluetooth.Touch here to set as speaker phone. Touch here to set as Mute.
66 CallsListening to Your VoicemailWhen you have a new voicemail message, the Voicemail notification icon  appears in the Status Bar. If you have not set up your voicemail number, or if you need to change it, you can do that in the Call settings.To listen to your Voicemail  Open the Notifications panel and touch New voicemail.  OR  Touch the Phone Key  in the Quick Keys bar, then touch and hold . Typically, your carrier’s voicemail system guides you through the process of listening to and managing your voicemail. The first time you call your voicemail, it also guides you through the process of recording greetings, setting a password, etc.To set up your Voicemail1. From the Home screen, touch the Phone Key  in the Quick Keys bar on the Home screen.2. Touch and hold   to dial your voice mailbox.3. If you hear a system greeting, touch  to interrupt it, if applicable.4. Follow the setup tutorial.5. Select a password.6.  Record a voice signature and greetings touch the Pound Key voice mailbox.To access your voice mail from your wireless device1. From the Home screen, touch the Phone Key  in the Quick Keys bar on the Home screen.2. Touch and hold   to dial your voice mailbox. If you hear a system greeting or your own greeting, touch the Pound Key   immediately to interrupt the system greeting and follow the prompts.3. Follow the prompts to enter your password and retrieve your messages.
67WebMetroWEBThe MetroWEB feature allows you to access the internet from your device. Access and selections within this feature are dependent upon your service provider. For specific information on MetroWEB access through your phone, contact your service provider. NOTESs9OUMAYINCURADDITIONALCHARGESFORACCESSINGTHEWEBANDDOWNLOADINGMEDIA&ORdetails, contact your service provider.s!VAILABLEICONSMAYVARYDEPENDINGONYOURREGIONBrowse web pages1. From the Home screen, touch the Home screen, touch the Apps Key  > MetroWEB  or touch the MetroWEB icon on the Home screen. To access a specific web page, touch the URL input field, enter the web address (URL) of the web page, and touch  .2. Touch the Menu Key  to access the MetroWEB options. Navigate web pages using the following options:URL Input Field Touch here to enter a web address for the web page you wish to access.TabsAllows you to view your open tabs.3. While browsing the web page, use the following options using the toolbar:  To go to the previous page, touch the Back button   in the toolbar or touch the Back Key  .  To go to a next page in history, touch the Forward button   .  To zoom in or out, double-tap the screen. You can also use the pinch to zoom method. Place your two fingers on the screen and slowly pinch or spread them apart or touch and hold the Zoom button  the toolbar, then tilt the phone down to zoom out and tilt it up to
68 Webzoom in.  To open a new window, touch the New tab button  in the toolbar  To view the list of bookmarks, touch Bookmarks   in the toolbar. You can also edit,or delete a bookmark from this menu.  To stop loading a web page, touch the Menu Key  > Stop. The Stop option appears while a web page is loading.  To reload the current web page, touch the Menu Key  > Refresh.  To bookmark the current web page, touch the Menu Key  > Save to bookmarks.  To open the home page, touch the Menu Key  > Go to Homepage.  To send the web address (URL) of the web page to others, touch the Menu Key  > Share page.  To search for text on the web page, touch the Menu Key  > Find on page.    Touch and hold the text from web page. The selected text would be highlighted and pop up would appear for Select all, Copy, Share Find, or Web Search. If you want to adjust the range of the teat, drag the cursor from each edge of the text.  To change the current mobile page to desktop page, touch the Menu Key  and check the Request desktop site checkbox.  Touch access the current web page later, you can save it in the device storage by touching Menu Key  > Save for offline reading to access when offline. You can check the saved web paged  from   > Saved pages.  To adjust the brightness touch the Menu Key  > Brightness.   To customize the MetroWEB settings, touch the the Menu Key  > Settings.  To close the MetroWEB module, touch the Menu Key  > Exit. Once you exit MetroWEB though Exit, you would be connected to home page for next visit.
69Web  To view the currently active windows, touch the Tabs button  .You can scroll up and down the open windows. To close the window, touch   or flick the window to the right or left. The windows closes and disappears from the screen.  To open new incognito tab, touch the Tabs button  > Menu Key  > New incognito tab.  To view the web page details, touch the icon to the left of URL bar.  NOTE  When you are in a secure page, touch the View certificate button on the Page info screen to see the certificate for the current page.Bookmark your favorite web pagesIf you know the web address of the web page, you can manually add a bookmark. To add a bookmark:1. Touch the Menu Key  > Save to bookmarks2. You can edit the  label and Address (URL). You can also select or create the new folder.3. Touch OK.From the bookmarks list, touch and hold a bookmark and use the following options:  To open the web page in the current window, touch Open.  To open the web page in a new window, touch Open in new tab.  To edit the bookmark details, touch Edit bookmark.
70 Web  To add the bookmark as a shortcut to one of the Home screen canvases, touch Add shortcut to Home.  To send the web address (URL) of the web page to others, touch Share link.  To copy the web address (URL) of the web page, touch Copy link URL.  To delete the bookmark, touch Delete bookmark.  To use the web page as your MetroWEB homepage, touch Set as homepage.  To delete the group of bookmark list at once, touch the Menu Key  Delete. Touch each bookmark to be deleted to checkmark it, touch Delete > OK.  To move the group of bookmark list at once, touch the Menu Key  > Move. Touch each bookmark to be moved to checkmark it, touch Move, select the subfolder, then touch OK.  To view the recently visited web pages, touch   > History tab. You can also access the most visited web pages.  To view the saved pages, touch   > Saved pages tab.Changing MetroWEB settingsYou can configure a number of MetroWEB settings, such as managing your privacy settings.  To open the MetroWEB settings screen, open MetroWEB and touch the Menu Key  > Settings.Page content settingsGeneralSet homepage Opens a dialog box with the following choices: Current page, Blank page, Default page, Most visited sites, Other.Toolbar Displays the toolbar on the bottom of the screen.Form auto-fill Fill out forms with a single touch.
71WebAuto-fill text Set text auto-fill in web forms.Privacy & SecurityClear cache Clear locally cached content and databases.Clear history Clear the MetroWEB navigation history.Show security warnings Show warning if there’s a problem with a site’s security.Accept cookies Allow sites to save and read cookie data.Clear all cookie data Clear all MetroWEB cookies.Remember form data Remember data I type in forms for later use.Clear form data Allow sites to request to your location.Enable location Allow sites to request access to your location.Clear location access Clear location access for all websites.Remember passwords Save usernames and passwords for websites.Clear passwords Clear all saved passwords.AccessibilityForce enable zoom  Checkmark to override a website’s request to control the zoom behavior.TEXT SIZEPreview  Allows you to see how the text size choices are affected as you move the slider on the Text scaling bar and the Minimum font size bar.Text scaling  Sets the text magnification when you access a web page.  Move the slider along the bar to set it. Zoom on double-tap  Sets the zoom magnification when you double-tap the screen.  Move the slider along the bar to set it. Minimum font size  Sets the minimum font size to display.  Move the slider along the bar to set it. INVERTED SCREEN RENDERING
72 WebPreview  Displays what the screen will look like if the Inverted rendering box is checkmarked.Inverted rendering  Checkmark for inverted rendering. Black becomes white and vice versa.Contrast  Allows you to adjust the contrast level. This option is only available when the Inverted rending option is selected.AdvancedSet search engine  Opens a dialog box to select which search engine to use.Open in background  Checkmark to open new window tabs behind the current window tab.Enable javascript  Checkmark to enable javascript.Enable plug-ins  Opens a dialog box to set when to enable plug-ins.Website settings  Allows you to manage advanced settings for individual websites.Storage  Opens a dialog box to set where to store your downloaded data.PAGE CONTENTDefault zoom  Opens a dialog box to set the default zoom to far, medium, or close.Open pages in overview  Checkmark to show newly-opened pages in an overview format.Auto-fit pages  Checkmark to format web pages to fit the screen.Block pop-ups  Checkmark to block websites from displaying pop-ups.Text encoding  Opens a dialog box to set text encoding.RESET DEFAULTSReset to default  Restores all of the MetroWEB settings back to the default values.
73WebBandwidth managementSearch result preloading Allow MetroWEB to preload hide confidence search results in the background.Load images Display images on Web pages.LabsQuick controls Slide thumb from the left or right edge to open quick controls and hide app and URL bars.Fullscreen Use fullscreen mode to hide status bar.MapsLayers IconTouch here to select the type of map you want to view.Local IconTouch here to find types of places near your location.Maps MenuTouch here to access Map, Local, Navigation, Offers, Join Latitude, Location history, and My Places.Directions IconTouch here to get directions to a destination.Search IconTouch here to open the keyboard to enter your search.To search for a location NOTE   A pop-up appears upon initial use. Read the information and touch OK to continue.1. From the Home Screen, touch the Apps Key  > Maps  .2. Touch the search icon   at the bottom of the screen.3. In the search box, enter the place you’re looking for. You can enter an address, a city, or a type of business or establishment. For example, “theater in New York”.4. Touch the Search Key on the keyboard.  Red markers indicate search matches on the map.
74 Web  You can touch a marker to open a balloon that contains a label. Touch the balloon to open a screen with more information about the location, as well as options for obtaining directions.To get directions1. From the Home screen, touch the Apps Key  > Maps  .2. Touch Directions .3. Enter a starting point in the first box and your destination in the second box.   The starting point and destination can be entered manually using the keyboard or you can select places using their drop-down menus.   The starting point dropdown menu includes My current location, Contacts, Point on map, and My Places.  The destination dropdown menu includes Contacts, Point on map, and My Places. NOTE  When you search for a location in the Maps application, your current location is automatically entered as the starting point and a dialog box displays your recent searches allowing you to touch one to select it as the destination.4. Touch the Car icon   for driving directions, the Transit icon   for transit directions, the Cycling icon   for cycling directions, or the Walking icon  for walking directions.5. Touch GET DIRECTIONS at the bottom of the screen.6. Your route is displayed on a map.   Touch a white circle marker on the map to see direction change indicators.   Touch   to display each direction instruction sequentially in a bubble at each juncture. You can touch   to step backward through the direction instructions.  To view the directions in text format, touch DIRECTIONS LIST at the bottom left corner of the screen.   Touch the Back Key  to return to map view.
75Web  NOTE  To reverse the directions, from the Directions list, touch the Menu Key   > Reverse.Switching between common featuresThe Maps application has icons for easy access to many common features used when searching for the places you want to go.   Touch the Maps menu  at the top left corner of the screen to access Map, Local, Navigation, Offers, Join Latitude, Location history, and My Places.  Touch the Layers icon  in the Maps toolbar at the bottom right of the screen to access Traffic, Satellite, Terrain, Transit Lines, Latitude, My Maps, Bicycling, Wikipedia, and your search history.  Touch the Local icon   in the Maps toolbar at the bottom of the screen to search for places near your location or your destination.  Touch the Directions icon   icon in the Maps toolbar at the bottom of the screen to get directions.  Touch the Search icon   in the Maps toolbar at the bottom left of the screen to conduct a new search.  Touch the My Location icon  in the top right corner of the screen to display your current location on the map. Maps settingsAccess the Maps application, then touch the Menu Key  > Settings.
76 WebChecking the WeatherThe Weather application provides weather forecasts. You can place a Weather widget on your Home screen for a summary of your local weather.  Access the Weather application for more detailed weather information. To get details about the weatherFrom the Home screen, touch the Apps Key  > Weather  .  Swipe right or left to scroll through the weather information for each of the cities in your list.  Touch the Refresh Icon  in the lower right corner of the Weather application screen to update the current weather of the city displayed on the weather application screen. To update or add cityThe City list screen allows you to manage a list of cities that you want to monitor. Touch the Add icon  to add a new city or update your current location.  Touch Current location at the top of the screen to update your current location.Touch to delete the text.Touch to search.Type in the city, state or ZIP code to search the name.Changing Weather SettingsYou can configure a number of settings for the Weather application.The location and related settings also affect the display of the Weather widget application.  To open the Weather settings screen, touch the Menu Key  > Settings.
77CommunicationContactsThe Contacts application allows you to store names, phone numbers and other information in your phone’s memory.Using Your ContactsUse the Contacts application to add, view, and communicate with your friends and acquaintances.To open your Contacts application  From the Home screen, touch the Apps Key  > Contacts . OR Touch the Home Key  > Contacts   in the Quick Keys bar.  All of your contacts are displayed alphabetically in a list. If you have a new phone and haven’t added any contacts yet, the Contacts application will display hints on how to start adding contacts to your phone.To open a list of your favorite contacts  Open your Contacts application and touch the Favorites tab at the top of the screen.   Favorites lists the contacts you’ve added to the list. To view details about a contact1. Open your Contacts application.2. Touch the contact whose details you want to view.
78 Communication3. The Contact’s information will be displayed. The following options are available.  The Dial icon  places a call to the number.  The Message icon  starts a message.   The Mail icon  starts an email.  The Chat icon  starts a chat. Touch the Menu Key  for the following menu options: Delete, Share, Join, Export, and Add to home screen.Adding ContactsYou can add contacts on your phone and synchronize them with the contacts in your GoogleTM Account, Microsoft Exchange account, or other accounts that support syncing contacts.Since your contacts can come from a variety of sources, the Contacts application attempts to join new information with existing similar contact entries, to create a single entry. You can also manage that process manually by joining or splitting entries.To add a new contact1. Open the Contacts application.2. Touch the New contact icon  to the right of the Search box.3. If you have more than one account with contacts, touch   at the top of the screen and choose the account to which you want to add the contact.4. Enter the contact’s name.5. Touch a category of contact information, such as phone number or email address, to enter that kind of information about your contact.6. Touch a category’s Add new icon   to add more than one entry for that category. For example, in the phone number category, enter a work number and add a home number. Touch the label field to the right of the entered information to open a drop-down menu of preset labels. For example, Work or Home for a phone number.
79Communication7. Touch the Picture frame icon   to select a picture to display next to the name in your list of contacts and in other applications.8. When you’re finished, touch the Save button.Importing, Exporting, and Sharing ContactsIf you have contacts stored in vCard format on a microSD card you can import them into your Contacts application on your phone. You can also export contacts in vCard format onto a microSD card. Export to back them up to a computer or other device or so you can send a contact via email.To import contacts from your microSD cardYou can copy contacts, in vCard format, onto your microSD card then import them into your phone.1. Insert the memory card (that contains the vCard files) into your phone.2. Open the Contacts application.3. Touch the Menu Key  > Import/Export.4. Touch Import from SD card.5. If you have more than one account on your phone, touch the account into which you want to import the contacts.6. Touch the contacts you want to import to the microSD card. Then touch Import.To export contacts to your microSD cardYou can export all of the contacts on your phone to your microSD card, as vCard files. You can then copy this file to a computer or another device that is compatible with this format, such as an address book application.1. Open the Contacts application.2. Touch the Menu Key  > Import/Export.3. Touch Export to SD card.4. Touch the contacts you wish to export to the SD card. To export all Communication
80 Communicationcontacts, touch Select all in the top left corner of the screen. Then touch Export and OK.To share a contactYou can share a contact with someone by sending it to them as a vCard file.1. Open the Contacts application.2. Touch the contact you want to share to view the contact details.3. Touch the Menu Key  > Share.4.  Choose the method for sending.5.  Enter the necessary information and share it.Adding a Contact to Your FavoritesThe Favorites section contains a short list of the contacts you communicate with most often.To add a contact to your favorites list1. Open the Contacts application.2. Touch a contact to view its details.3. Touch the star to the right of the contact’s name. When the contact is added to your favorites list, the star will be  gold-colored.To remove a contact from your favorites list1. Open the Contacts application and touch the Groups tab.2. Touch Favorites, then touch a contact entry to view its details.3. Touch the gold star to the right of the contact’s name. The grey-colored star will indicate that the contact was removed from your Favorites list.
81CommunicationCommunicating with Your ContactsFrom the Contacts or Favorites tab, you can quickly call or send a text (SMS) or multimedia message (MMS) to a contact’s default phone number. You can also open a list of all the ways you can communicate with that contact.This section describes ways to initiate communication when viewing your list of contacts. The Contacts application shares your contacts with many other applications, such as GmailTM and Messaging.To connect by using Quick Contact for AndroidTM1. Touch a contact’s picture to open Quick Contact for Android.Contact listAlphabetical ListingSlide your finger vertically along the letters to view the entries under a specific letter.New Contact Touch here to add a new contact.Contact pictureTouch here to open Quick Contact for Android for this contact.Type in the name you want to search.Quick Contact for Android2. Touch the icon corresponding to the type of communication you want to start.  The communication icons displayed depend on the types of information you saved in the contact information.To communicate with a contact1. Open the Contacts application.2. Touch the contact with whom you want to communicate.3. In the contact’s details screen, touch the way to start communicating with the contact.  The Dial icon  places a call to the number.
82 Communication  The Message icon  starts a message.   The Mail icon  starts an email.  The Chat icon  starts a chat. NOTE  Anytime you see the Dial icon  next to a number, such as in your Favorites or Call log, just touch it to call that number.To call a contact’s default number1. Open the Contacts application.2. Touch Dial icon   next to the contact entry you wish to call.Selecting Which Contacts are DisplayedYou can hide contacts that don’t have phone numbers. You can also configure which groups of contacts you want to display in the Contacts list.To change which groups are displayed1. Open the Contacts application.2. Touch the Menu Key  > Display options.3. Touch an account to open its list of available groups.4. Touch All contacts to display contacts from all of your sync’d accounts, touch a single account, or touch Customize to select more than one (but not all) account types to display their contacts
83CommunicationJoining ContactsWhen you add an account or add contacts in other ways, such as by exchanging emails, the Contacts application attempts to avoid duplication by joining contact information automatically. You can also join contacts manually.To join contacts1. Open the Contacts application.2. Touch the contact entry to which you want to add information. The contact name for this entry will remain unchanged after you join with another contact.3. Touch the Menu Key  > Join.4. Touch the contact whose information you want to join with the first contact. The information from the two contacts will be merged and displayed under the name from the first contact.Separating Contact InformationEach contact entry on your phone may contain ‘joined’ information from a variety of sources. If contact information from different sources was joined in error, you can separate the information back into individual contact entries on your phone.To separate contact information1. Open the Contacts application.2. Touch the contact entry whose information you want to separate.3. Touch the Menu Key  > Separate.4. Touch OK to confirm you want to separate the entries. The contact information will separated into individual contact entries in the Contacts list.
84 CommunicationEmailYou can use the Email application to read email from providers other than Gmail. The Email application supports the following account types: POP3, IMAP and Microsoft Exchange (for Enterprise users).To open the Email application1. From the Home screen, tap the Apps Key  > Email  .The first time you open the Email application, a setup wizard opens to help you add an email account. Microsoft Exchange Email AccountEmail address – Enter the account email address.Username – Enter the account username.Password – Enter the account password.Server address – Enter the server address.Domain – Enter the account domain (optional).Use SSL – Choose whether or not to use SSL for Microsoft Exchange.Other (POP3, IMAP) Email Account Email address – Enter the account email  address.Password – Enter the account password.Incoming Server SettingsPOP3 / IMAP4 – Select protocol type, either POP3 or IMAP4.Incoming server – Enter the incoming email server address.Secure type – TLS/SSL/Off.Port number – Normally each account’s default number will be displayed.
85CommunicationAdvanced Server Settings (Outgoing)Outgoing  server – Enter the outgoing email server address.SMTP secure type – Choose from Off, SSL, or TLS.SMTP Port number – Normally each account’s default number will be displayed.The Accounts ScreenThe Accounts screen lists your Combined Inbox and each of your email accounts.1. Open the Email application and touch the Menu Key  > Accounts. 2. The Account list appears. TIP     To make a shortcut to the Inbox of an account: In the accounts list, touch and hold an email account. Then tap Add to home screen. You can tap an account to view its Inbox. The default account from which you send email is indicated with a checkmark.To open your Combined InboxIf you have configured email to send and receive email from more than one account, you can view all messages sent to all accounts in your Combined Inbox.1. Open the Email application and touch Combined Inbox (on the Accounts screen).Messages in the Combined Inbox are color coded on the left, by account, using the same colors used for your accounts in the Accounts screen. When a new email arrives in the inbox, there will be sound and vibration notification. Tap the email notification to end it.Composing and Sending Email 1. In the Email application, touch Compose  .2. Enter an address for the message’s intended recipient. As you enter text, matching addresses will be offered from your contacts. Separate multiple addresses with commas.
86 Communication3. Touch the Cc/Bcc, From field to copy or blind copy to other contacts/email addresses.4. Touch the text field and enter the text of the message.5. Touch Attach  to attach the file you want to send with your message.6. Touch Send  to send the message.If you are not connected to a network, for example if you’re working in airplane mode, the messages you send are stored in your Outbox folder until you’re connected to a network. If it contains any pending messages, the Outbox will be displayed on the Accounts screen. NOTE  The messages sent using an Exchange account will not be stored on the phone; they will be stored on the Exchange server itself. If you want to see your sent messages in the Sent folder, you may need to open the Sent folder and select Refresh from the options menu.Working with Account Folders Each account has Inbox, Outbox, Sent, Drafts, Trash and Junk folders. Depending on the features your account service provider supports, you may have additional folders.
87CommunicationAdding and Editing Email Accounts To add an email account1. From the Home screen, touch the Apps Key  > Email  .2. Select the desired email provider.   If an email account is already set up, the wizard is not activated automatically. In this case, tap the Menu Key  > Add account on the Accounts screen.To change account settings1. Open the Accounts screen.2. Tap the Menu Key  > Settings.To delete an email account1. Open the Accounts screen.2. Touch and hold the account you want to delete.3. Tap Delete account in the context menu and tap OK in the dialogue box to confirm.
88 CommunicationGmailOpening Gmail and Your InboxWhen you open the Gmail application, the most recent conversations are displayed in your Inbox.To open the Gmail applicationFrom the Home screen, touch the Apps Key   > Gmail  .All of your conversations are displayed in your Inbox unless you delete, archive, or filter them.The current Google Account is displayed at the top of the Inbox. If you have more than one account, you can switch accounts to view the messages in each Inbox. Simply touch the account drop-down icon  to the right of the current account to select another account to display.Conversations with new messages are displayed with bold subject lines. To read a message in a conversation, touch its subject line text.   indicates that this message was sent directly to you.  indicates that you were CC’d on this message.No indicator  indicates that this message was sent to a group that includes you.Adding another Google Account1. From your Gmail Inbox, touch the Menu Key  > Settings. 2. Touch ADD ACCOUNT at the top right corner of the screen.3. Touch the Existing button or the New button, then enter the necessary information.
89CommunicationTo switch accountsGmail displays conversations and messages from one Google Account at a time. If you have set up more than one Google Account on your device, you can easily switch between them.    From your Gmail Inbox, touch the Accounts icon  on the Inbox header, then touch the account that contains the email you want to read. NOTE  The number to the right of the selected Google Account indicates the number of unread messages you have in that account.           Touch here to add an account.    Gmail InboxAccounts IconTouch here to open a drop-down menu of account choices and account folders.
90 CommunicationNavigating in the Gmail applicationIf you are viewing a message or another label, touch the Back Key  until you return to your Inbox.The icons at the bottom of the screen allow you to navigate within the Gmail Application. While viewing your Inbox, swipe the screen up and down to scroll through the list and use the following icons:  The Compose icon . Touch this icon to start a new Gmail message.   The Search icon  . Touch this icon to search within the Gmail application.  The Labels icon  . Touch this icon to view your messages by Gmail label.   The Sync icon  . Touch this icon to sync your Google Account(s) on your device.While viewing a message, swipe the screen left and right to scroll through all of your messages and use the following icons:  The Archive icon  . Touch this icon to send the message to your archive folder.   The Delete icon  . Touch this icon to delete the message.   The Labels icon  . Touch this icon to set labels for the message to help organize your messages.   The Unread icon  . Touch this icon to return the message to an unread state.
91CommunicationReading Your MessagesWhile viewing a list of conversations in your Inbox or in any list of labeled conversations, you can open a conversation to read its messages.To read a message  Touch a conversation that contains the message you want to read.    The conversation opens to the first new (unread) message, or to the first starred message, if you’ve previously starred a message in the conversation.Google Talk Online StatusTouch the Contact's picture to open Quick Contact.    The Google Talk online status will appear next to the name of the sender of each message if the sender has a Google Account. Touch the contact’s picture to open Quick Contact.     While reading messages in a conversation, you can use the icons at the bottom of the screen to archive the entire conversation  , delete it  , add a label  , or label it as unread  . After you archive or delete a conversation, you can touch Undo in the dialog box that appears at the bottom of the screen to undo the last action and restore the message to its previous location.    You can also swipe left and right across the screen to scroll though and read the messages in your Inbox (or the conversation list you’re working in).    While viewing a message, touch the message action icons on the message header to access options which include   to mark it as
92 Communicationimportant,   to reply to the sender, and   to access Reply all to reply to all addresses and Forward to forward  the message to someone else.To reread a messageWhen you open a conversation, messages that you’ve already read are minimized into a tab that indicates the number of hidden messages.1. From the Home screen, touch the Apps Key  > Gmail  . Then touch the conversation you want to view.2. Touch the contact name to open that message.While reading a message you can touch  to return a read message to the unread state. For example, to remind yourself to read it again later.Composing and Sending a MessageYou can compose and send a message to people or groups with Gmail addresses or other email addresses.To compose and send a message1. From the Home screen, touch the Apps Key  > Gmail   > the Compose icon   at the bottom left corner of the screen. NOTE  If you want to send the message from a different Google Account, touch the Accounts icon   to the right of the current Google Account, then touch the account you want to use.2. Enter a recipient’s address.  As you enter text, matching addresses are offered from your Contacts list. You can touch a suggested address or continue entering text to enter a new one.3. Touch the Menu Key  > Add Cc/Bcc to copy (normal or blind status) recipients, if necessary.4. Enter a subject for the message in the Subject field.5. Enter your email text in the Compose email field.
93Communication6. Touch the Menu Key  > Attach file if you want to add an attachment to the email.7. Touch the Send icon   at the top right corner of the screen to send your message. NOTE    If you aren't ready to send the message, touch the Menu Key , then touch Save draft.Replying to or Forwarding a MessageYou can continue an email conversation by replying to a message or by forwarding it.To reply to or forward a message1. Open the message you want to reply to or forward.2. On the message header, touch the Reply icon  , or touch the message actions icon  , then touch Forward.  Replying to or forwarding messages without changing the subject adds your reply to the current conversation.  Changing the subject starts a new conversation. The message will open in a new screen where you can add or remove addresses, edit the subject, and add or remove text or attachments.  You can add one or more people to an ongoing conversation by replying to all and then adding the new person’s address(es) to the reply.  Note that the conversation text and previous messages are also included in your reply (or forwarded message).3. Touch the Send icon   at the top right corner of the screen to send your message. NOTE    You can change the message action after you've started the message. Simply touch the message action icon   in the message header next to the current message action and touch the one you want. For example, if you chose Reply but decide you want to Reply all.
94 CommunicationGoogle Account settings 1. From the Home screen, touch the Apps Key  > Gmail  . 2. Touch the Menu Key  > Settings > General settings. Confirm before deleting  Mark the checkbox to ask to confirm before deleting a message.Confirm before archiving  Mark the checkbox to ask to confirm before archiving a message.Confirm before sending  Mark the checkbox to ask to confirm before sending a message.Reply all  Mark the checkbox to make Reply all the default message action. Auto-advance  Opens a dialog box to set which conversation list is viewed next.Message text size  Opens a dialog box to set your message text size. Hide checkboxes  Mark the checkbox to hide checkboxes and allow touch and hold to select an item.Message actions  Opens a dialog box to set when to show message actions.Clear search history  Touch to clear your search history.Hide pictures in messages  Pictures will not be displayed automatically until you allow by sender.
95CommunicationMessagingOpening the Messaging ApplicationTo open Messaging  From the Home screen, touch the Messaging Key  in the Quick Keys bar.Touch here to create a new message.  Touch New message  to start a new text or multimedia message.  Touch an existing message thread to open it.To delete a message thread from the Messaging window1. Touch and hold the message thread.2. Touch Delete thread in the Context menu that opens.3. Touch Delete to confirm you want to delete the message thread.To send a text message1. On the Messaging screen, touch New message  .2. Enter a mobile phone number in the To field.  As you enter the mobile phone number, matching contacts appear. You can touch a suggested recipient or continue entering the phone number.3. Touch the text field to start entering your message.Touch here to add contacts from the contact list.Touch here to attach the files.The character counter Displays number of characters entered and amount remaining.
96 Communication  A counter is displayed in the top right corner of the text field to tell you how many characters are left and the number of pages.  If you touch the Back Key  while composing a message, it’s saved as a draft in your Messaging application. Touch the message to resume composing it.4. Touch Send to send the message.Your message is displayed and responses appear in the same window, creating a message thread with that contact.To create and send a multimedia message1. On the Messaging screen, touch New message  at the top right corner of the screen.2. Enter a mobile phone number, email address, or Contact name in the To  field. As you type, matching contacts appear. You can touch a suggested contact or continue typing.3. Touch the text field to start entering your message.4. Touch the Menu Key  > Add subject to add a message subject.5. Touch the Attachment icon   to open a dialog box where you can choose the type of media file to attach to the message.  If you touch Picture, you’re prompted to select a picture from your Gallery.  If you touch Capture picture, the Camera application opens so you can take a picture and attach it.  If you touch Video, you’re prompted to select a video from your Gallery.  If you touch Capture video, the Camcorder application opens so you can record a video and attach it.  If you touch Audio, you’re prompted to select an audio file from your microSD card.  If you touch Record voice, the voice recording function opens and allows you to record an audio message and attach it.
97Communication  If you touch Slideshow, a dialog box opens and allows you to as-semble photos, audios, videos, texts into a slideshow (up to 10 slides) to attach to the message. Use the buttons in the slideshow screen to preview the message, add or replace a picture, or remove a slide. Touch the Done button when you finish editing the slideshow.  If you touch Contact (vCard), you’re prompted to select the contact(s) you want to send as vCard file(s).6. Touch the Send MMS button to send the message.To respond to messages you receiveIf you’re working in a message window, messages that you receive from that contact are displayed. Otherwise, you receive a new message notification and a new message icon   appears in the Status Bar. When you touch the new message notification, the Message screen opens where you can reply to the message.If Auto-retrieve is uncheckmarked, you must touch Download to view the message.If the message contains a media file, touch the Play button to view, watch, or listen to it. Touch and hold the media file to open a Context menu with additional options.To view details about a message1. Touch and hold a message in a message window.2. Touch View message details in the menu that opens.
98 CommunicationChanging Messaging SettingsYou can change a number of Messaging settings.  To change Messaging settings, open the Messaging application, touch the Menu Key  > Settings.Storage settingsDelete old messages  Checkmark this setting to allow the phone to delete older messages in a thread when the Text message limit or Multimedia message limit is reached. Uncheckmark this setting to keep all messages.Text message limit  Touch to set the number of text messages to save per thread.Multimedia message limit  Touch to set the number of multimedia messages to save per thread.Common message settingsSignature  Opens a dialog box to enter a signature to automatically send with your messages. Checkmark appears after a signature is entered.Callback number  Opens a dialog box to view or edit the callback number sent with your messages. Checkmark appears after dialog box is closed.Text message (SMS) settingsDelivery reports  Checkmark this setting to allow your phone to receive delivery reports for the messages you send.Set priority Opens a dialog box that allows you to set the default priority for your text messages.Multimedia message (MMS) settingsDelivery reports Checkmark this setting to allow your phone to receive delivery reports for the messages you send.Auto-retrieve  Uncheckmark this setting to download only the heading of multimedia messages, allowing you to manually download the whole message when you’re ready. This is useful for controlling how much data
99Communicationyou download.Roaming auto-retrieve Allows you to automatically retrieve messages while roaming.Set priority Opens a dialog box that allows you to set the default priority for your multimedia messages.Notification settingsNotifications Checkmark this setting to allow your phone to receive a notification in the Status Bar whenever you receive a new message.Notification sound Opens a dialog box where you can select the ringtone to sound when you receive new message notifications.Vibrate Opens a dialog box to set the phone vibration setting when you receive a new message notification.New message popup  A popup will be shown when the messages are received.How to select the type of keyboard you want1. Open the Notifications panel and touch Select input method.2. Choose between Google voice typing, LG Keyboard, or Swype.  You will now be able to enter text using the new keyboard.Touch Select input method.Touch and drag. Choose the type of keyboard you want.
100 CommunicationUsing the Swype KeyboardThe Swype™ keyboard uses error correcting algorithms and also includes a predictive text system.Swype Text Entry TipsYou can access Swype Tips and watch a tutorial on using Swype. You can also use the following Swype text entry tips.  Create a squiggle (like an S shape) to create a double letter (such as pp in apple).  Touch and hold a key to enter the alternate letter or symbol located at the top right corner of the key.   Move your finger over the apostrophe to enter contractions.   Double-touch on the word you want to change or correct a misspelled word.   Touch the Delete Key  to erase one character. Touch and hold the Delete Key  to erase an entire word.
101CommunicationTalkTo open Google Talk and sign in  From the Home screen, touch the Apps Key  > Talk  .    When you first open Google Talk, your Friends list will be displayed. This list includes all of the friends you’ve added by using Google Talk on the web or on the phone.Touch here to add account.To sign out of Google TalkYou can sign out of Google Talk. For example, if you want to limit Google Talk conversations to your computer. Also, signing out can extend your battery life. Touch here to search.Touch here to add friend.  From your Friends list, touch the Menu Key  > Sign out.    You will no longer receive chat notifications or see others’ Google Talk status in other applications, such as GmailTM.
102 CommunicationChatting with FriendsTo chat with a friend1. From the Home screen, touch the Apps Key  > Talk  .2. Touch the friend you want to chat with.3. Enter your message then touch Send  .More OptionsFrom the talk list, touch the Menu Key  for Display options, End all chats, Sign out, Settings, Help and Send feed back.To accept an invitation to chatWhen a friend sends you a Google Talk message, you will receive a notification. The friend’s name in the Friends list turns white and displays the message.  Touch the name of the person in your Friends list.  OR  Open the Notifications panel then touch the chat notification.A chat window will open where you can exchange messages with your friend.More OptionsDuring the chatting, touch the Menu Key  for End chat, Go off the record, Friend info, Add to chat, Clear chat history, Settings, Help and Send feedback.
103CommunicationChanging and Monitoring Online StatusTouch here to change your status.Displays your current account.Your current status.Touch here to change the status message.Touch here to access previously used status text.Touch here to delete all previously used status.Previously used status.Your current status message.Your picture Touch and hold to change it.Touch and hold your account tab from the friend list to change and monitor online status.Status IconsIcons in Google Talk, Gmail, and other applications indicate the Google Talk status for you and your friends.Available: Signed into Google Talk and available to chatAway: Signed into Google Talk but not activeBusy: Signed into Google Talk but too busy to chatSigned out of Google TalkInvisible: Signed into Google Talk but appear signed out to othersVideo Chat: Video chat is available.Voice Chat: Voice chat is available.Changing Google Talk SettingsTo change the Google talk settings, touch the Menu Key  from the friend list and touch Settings.
104 CommunicationVoice DialerCall a Contact by Voice DialingYou can call numbers directly by saying the contact’s name or number.1. From the Home screen, touch the Apps Key  > Voice Dialer  .2. Say “Call” or “Dial” then a name or a phone number.   Or you can say “Redial” to redial the last number dialed.3. If a list of results is displayed, touch the one you want to use.Open an Application using Voice Dialer1. From the Home screen, touch the Apps Key  > Voice Dialer  .2. Say “Open” and then an application name.3. If a list of results is displayed, touch the one you want to use.  The device opens the corresponding application.
105EntertainmentCameraTo open the Camera application, from the Home screen touch the Apps Key  > Camera  .Getting to know the viewfinder   NOTE  Default resolution is 5M(2560x1920).Photo optionsYou can make adjustments to optimize your shot. The following options are available:O Flash  : Allows you to set the Flash to Off, On, or Auto.O Brightness  : Defines and controls of the amount of light entering the lens. Slide the brightness indicator along the bar toward “-” for a lower brightness image or toward “+” for a higher brightness image.O Focus  : Allows you to adjust the focus mode to Auto or Face tracking.O Image size  : Allows you to adjust the image size to 5M (2460x1920), 3M (2048x1536), W3M (2064x1376), 1M (1280x960), W1M (1296x864).O Scene mode  : Adjust for better image capture in different environments. Choose from Normal, Portrait, Landscape, Sports,  Time catch shot – Time catch shot allows you to capture the missing moments by taking five sequential pictures at once before the shutter key is touched.Mode Switch – Touch this icon to switch between Camera mode and Video mode.Capture – Touch to take a photo.Gallery – Accesses your saved photos from within Camera mode. Simply touch this icon and your Gallery will appear on the screen.Cheese Shutter – Allows you to say 'Cheese' to take a photo.Settings – Opens the Camera settings menu.Shot Mode – Allows you to set the Shot mode to Normal, HDR, Panorama, or Continuous shot.Swap Camera – Allows you to swap between the rear camera lens and the front camera lens.
106 EntertainmentSunset, Night, and Smart shutter.O ISO  : Controls the camera’s sensitivity to light. Choose from Auto, 400, 200, 100.O White balance  : Improves color qualities under different lighting conditions. Choose from Auto, Incandescent, Sunny, Fluorescent, and Cloudy.O Color effect  : Applies artistic effects to pictures. Choose from None, Mono, Sepia, or Negative.O Timer  : Allows you to set a timer to delay taking the picture. Choose from 3 sec, 5 sec, or 10 sec.O Geotagging  : Allows you to select if you want to save the location information for the pictures you take. Choose from Off or On.O Shutter sound  : Allows you to set the shutter sound. Choose from Tone 1, Tone 2, Tone 3, Tone 4, or Off.O Auto review  : Allows you to set if you want to automatically view the picture after you take it. Choose from Off, On, 2 sec, or 5 sec.O Storage  : Sets where your pictures are saved. Choose from SD card or Internal storage.O Reset  : Resets all of the settings back to the default values.O Camera help guide  : Touch to get information of camera.Using the focus modeYou can select from the following focus options:Auto  Sets the camera to focus automatically.Face tracking  Sets the camera to detect and focus on human faces automatically.Taking a quick photo 1. Open the Camera application.2. Holding the phone horizontally, point the lens toward the subject you want to photograph.3. Touch the subject on the screen and a focus box will appear in the viewfinder.
107Entertainment4. When the focus box turns green, the camera has focused on your subject.5. Touch the Capture button  to take the picture.  NOTE  You can also press the Volume Keys to take a picture.Once you’ve taken the photoYour captured photo will appear on the screen until you touch an option or icon to proceed (if Auto review is set to On).The following options are available after taking a photo:Share   Touch to share your photo using Bluetooth, Email, Facebook, Gmail, Google+, Memo, Messaging, Picasa, Social+, Twitter, mail@metro, or any other application you’ve downloaded that supports this feature.Set as  Touch to use the image as a Contact photo, Home screen wallpaper, or Lockscreen Wallpaper.Touch to delete the image, then touch OK to confirm.Touch to take another photo immediately. Your current photo will be saved to your Gallery.Touch to view the Gallery of your saved photos. The thumbnail shows the recently taken photo.Viewing your saved photosYou can access your saved photos from Camera mode. Just touch the image thumbnail at the bottom of the Camera screen.  TIP   Slide or flick your finger left or right to view other photos or videos.While viewing a photo, touch the screen to access the following options:  Touch to share the photo using SmartShare (turn on Wi-Fi if it’s not already on).  Touch to take a photo, or record a video.Share   Touch to open a dialog box to select which application to use to share the photo.
108 EntertainmentDelete   Touch to delete the photo, then touch the OK button. Menu Key  Touch to open an Options menu that includes the following additional options.   Set image as  Touch to set the photo as the icon identifying a contact or set it as your Lock screen wallpaper or Home screen wallpaper.  Move  Touch to move the picture to another album or folder.  Rename  Touch to open the keyboard to rename the photo for easy identification.  Rotate left  Touch to rotate the photo counter-clockwise.  Rotate right  Touch to rotate the photo clockwise.  Crop  Touch to open a cropping box tool that allows you to manually crop the photo. Use your finger to move or resize the cropping box to encompass only the part of the photo you want to see, then touch the OK button.   Edit  Touch to edit the photo.  Slideshow  Touch to see your photos played in a slideshow.  Details  Touch to display information about the photo (e.g., file type, file size, etc.).  TIP   You can use the pinch-to-zoom gesture to easily zoom in and out of the displayed picture.
109EntertainmentVideo CameraTo open the Video Camera, from the Home screen touch the Apps Key   > Camcorder . Getting to know the viewfinder Video optionsYou can make adjustments to optimize your video. The following options are available when you touch Settings  on the viewfinder screen:  Flash  : Allows you to set the flash mode.  Video size  : Allows you to select the video size for the video. Choose from Full HD (1920x1080), HD (1280x720), TV (720x480), VGA (640x480), MMS (QVGA-320x240), MMS (QCIF-176x144)  White balance  : Improves color qualities under different lighting conditions. Choose from Auto, Incandescent, Sunny, Florescent, and Cloudy.   Color effect  : Applies artistic effects to videos. Choose from None, Mono, Sepia, and Negative.Brightness – Defines and controls of the amount of sunlight entering the lens. Slide the brightness indicator along the bar toward “-” for a lower brightness video or toward “+” for a higher brightness Video.Zoom – Zoom in or zoom out. Set the zoom before starting a video. You cannot change the zoom setting during recording.Settings – Opens the Camcorder settings menu.Live effect – Allows you to add various visual effects when recording a video.Swap Video Camera – Allows you to swap between the rear camera lens and the front camera lens.Mode Switch – Touch this icon to switch between Camera mode and Video mode.Record – Starts video recording.Gallery – Accesses your saved photos and videos from video camera mode.
110 Entertainment  Geotagging  : Allows you to add location information to the video. This is ideal for geotagging purposes. Choose from Off or On.  Audio recording  : Allows you to select if you want to record audio for the video. Choose from On or Off.  Auto review  : Allows you to briefly view the video after taking it. Choose from Off, On, 2 sec, or 5 sec.  Storage  : Allows you to select where to store your videos. Choose from SD card or Internal storage.   Reset  : Resets all of the settings back to the default values.  Video help guide  : Allows you to get information of video.Recording a quick video1. Open the Camcorder application.2. The Video camera’s viewfinder will appear on the screen.3.  Holding the phone horizontally, point the lens toward the subject of the video.4. Touch Record  once to start recording.5. The Record dot at the bottom of the viewfinder turns red and the video length timer begins counting.6. Touch Stop  on the screen to stop recording.  NOTE  You can also press the Volume Keys to start and stop recording. After recording a videoA still image representing your video will appear on the screen until you touch an option or icon to proceed (if Auto review is set to On).The following options are available:Play Touch to play the video you just recorded.Share  Touch to share your video using Bluetooth, Email, Gmail, Google+, Messaging, YouTube, mail@metro, or any other compatible applications you have downloaded.
111Entertainment NOTE  Additional charges may apply when MMS messages are downloaded while roaming.Touch to delete the video you just made, and confirm by touching OK. The viewfinder will reappear.Touch to record another video right away. Touch to view the Gallery of your saved videos. The thumbnail shows the recently recorded video.Watching your saved videos1. In the viewfinder, touch the video thumbnail at the bottom of the Camera application.2. Your Gallery will appear on the screen.3. Touch the video to play it automatically.Your Photos and VideosAdjusting the volume when viewing a videoTo adjust the volume of a video while it is playing, use the Volume Keys on the right side of the phone.
112 EntertainmentGalleryOpening Gallery and Viewing Your AlbumsOpen the Gallery application to view albums of your pictures and videos.To open Gallery and view your albums  From the Home screen, touch the Apps Key  > Gallery  .  OR  Open Gallery from the Camera application by touching the thumbnail image at the bottom right corner of the screen.  The Gallery application presents the pictures and videos saved in your phone (external memory), including those you’ve taken with the Camera application and those you downloaded from the web or other locations.  Touch an album to open it and view its contents.  Touch a picture or video in an album to view it.  Return to the main Gallery screen at any time by touching   at the top left of the screen.  Touch the Menu Key  to access Settings and Delete.To share an albumYou can share the entire contents of one or more albums or individual images or videos from an album.1. From the Home screen, touch the Apps Key  > Gallery  .2. Touch and hold the desired album and then touch Share.
113EntertainmentWorking with PicturesUse the Gallery application to view pictures that you’ve taken with the Camera application, downloaded, copied onto your microSD card or that are stored in Picasa web albums.To view and browse pictures1. From the Home screen, touch the Apps Key  > Gallery  .2. Open an album and touch a picture.3. Touch the Menu Key  to access Set image as, Move, Rename, Rotate left, Rotate right, Crop, Edit, Slideshow or Details.Touch here to share.Touch here to delete.Touch here to go to  camera mode.To edit picturesTouch here to go to next step.Touch here to go to previous step. Touch here to save.Touch here to access the editing tools.
114 EntertainmentWorking with VideosUse the Gallery application to play videos that you’ve taken with the Camera application and to share them with friends.To play videos  Open a Gallery album then touch a video.The video plays in the orientation you recorded it in.Touch here to lock the screen.Touch here to access SmartShare.Touch here to access Dolby Mobile You need to insert ear jack to access.Touch here to adjust the volume.  Touch the screen while the video is playing to view the playback controls.To share a videoYou can share your videos in a variety of ways, including sending it by email or multimedia message (MMS), or via SmartShare or a Bluetooth device. You even have the option to share your videos publicly by uploading it to the YouTubeTM website.1. From the Home screen, touch the Apps Key  > Gallery , then touch an album.2. While viewing an album, touch the Menu Key .3. Touch  .4. In the dialog box that opens, touch the application you would like to use to share the selected videos. 5. Enter the necessary information and share it.
115EntertainmentTo delete a video1. From the Home screen, touch the Apps Key  > Gallery , then touch an album.2. While viewing an album, touch the Delete icon   at the top right corner of the screen.3. Touch to checkmark the video(s) you want to delete.4. Touch Delete at the bottom of the screen.5. Touch OK.  NOTE  Touch and hold a video file to delete a single video. Touch Delete, then touch OK to confirm.
116 EntertainmentVideo WizYou can make your own movie using your images, videos, and music.1. From the Home screen, touch the Apps Key  > Video Wiz  .2. Touch the Add image/ video button (see ❹ below) to add the image and video files to make your music video. NOTE  You can add up to 20 images and 5 videos. Video files should be between 3sec. - 10mins.3. Touch the Add music button (see ❼ below) to select the background music.4. Touch the Add style button (see ❸ below) to select the style of video you want to create.5. Touch the Play button (see ❽ below) to preview your music video.  NOTE  The length of the final version will vary depending on the size and number of the images, the size and length of the video footage, as well as the music added and the style selected.6. Touch the Save button (see ❺ below) to save the video. NOTE  Your saved music video is saved in the 'video wiz' folder of your microSD card.❶❷❸❹❺❻❼❽❾ Video Wiz Options ❶ Add Media   Touch this icon to add additional images and/or video to your movie.  Touch Images to add images, then touch the image(s) you want to add.  Touch Videos to add video footage, then touch the video(s) you want to add.
117Entertainment  Touch OK   to exit after all of the media files have been added. ❷ Delete Media   Touch this icon to remove the selected image(s) and/or video(s).  Touch an image or video in the added media contents section, touch the Delete Media icon , then touch Delete selected (or Delete all). ❸ Add Style Touch this button to select the desired movie style.  Touch the up or down arrow to scroll through and select the style you want. ❹ Added Contents window Displays all of the selected image(s) and/or video(s) for your movie.  Swipe left and right to scroll through all of the files you’ve added. ❺ Save   Touch this icon to save the movie file. ❻ Edit   Touch this icon to edit the movie file.  Swipe left and right to select the footage to edit.  Touch the Overlay Text icon  to insert text.  Touch the Overlay Image icon  to insert selected graphic(s).  Touch the Trim Video icon  to trim segments from your video footage.  Touch OK   to exit when you’re finished editing. ❼ Add Music Touch this button to set the background music. ❽ Preview   Touch this icon to play your movie. ❾ Help   Touch this icon to view information on how to use the Video Wiz application.
118 EntertainmentPlay StoreTMPlay Store allows you to browse and search for free and paid applications.To open the Play Store application  From the Home screen, touch the Apps Key  > Play Store  or touch the Play Store icon   on the Home screen.  When you open Play Store application for the first time, you must read and accept the terms of service to continue.  Scroll to the left and right to view and explore sub-categories.Touch here to search for the apps.To get help with Play StorePlay Store Help web pages are available from all Play Store screens.  Touch the Menu Key  > Help.  The MetroWEB application opens to the Play Store Help page, with links to many help topics. To open a screen with details about an application  At any time while browsing Play Store, touch an application to open its details screen.    The Application details screens include a description, ratings, comments, and related information about the application. From this screen, you can download, install, uninstall, and rate the application, and more.
119EntertainmentTo return to the Play Store home screenYou can return directly to the Play Store home screen from most other screens in Play Store.  Touch the Play Store icon   at the top left corner the screen.Downloading and Installing ApplicationsWhen you find an application you want, you can install it on your phone.To download and install an application NOTE  Before you can download a paid application, you must set up a billing arrangement.1. Find an application you want and open its details screen.  In the application’s details screen, you can read more about the application, including its cost, overall rating, and comments by users. Scroll down to the Developer Info section to view more applications by this developer, visit the developer’s website, or send the developer an email message.Here indicates the price.2. Touch Download or Install (for free applications) or the Price button (for paid applications).  If the application requires access to your data or control of any functions on your phone, Play Store tells you what the application can access.  WARNING! Read this screen carefully. Be especially cautious with applications that have access to many functions or to a significant amount of your data. Once you accept on this screen, you are responsible for the results of using this item on your phone.
120 Entertainment3. If you agree to the application’s access requirements, touch Accept & download (for free applications) or Accept & buy (for paid applications).  If you selected a paid application, you’re redirected to the GoogleTM Checkout screen to pay for the application before it’s downloaded to your phone.  If you selected a paid application (or after touching Accept & buy in Google Checkout), you receive a series of notifications as the application is downloaded and then installed on your phone.    When the application is installed, you can touch the notification to open the application or open it by touching its icon in the Applications screen.     You have 15 minutes to try out an application and, if you decide you don’t want it, to uninstall it for a refund.    If you have another AndroidTM phone, you can download a paid application to that phone using the same Play Store account, at no additional charge.To create a Google Checkout accountYou must have a Google Checkout account associated with your Google Account to purchase items from Play Store.  On your computer, go to http://checkout.google.com to establish a Google Checkout account.  OR  The first time you use your phone to buy an item from Play Store, you’re prompted to enter your billing information to set up a Google Checkout account.  WARNING! When you’ve used Google Checkout once to purchase an application from Play Store, the phone remembers your password, so you don’t need to enter it the next time. For this reason, you should secure your phone to prevent others from using it without your permission.
121EntertainmentMusic PlayerTransferring Music Files to Your PhoneThe Music Player application plays audio files that are stored on your phone’s microSD card. Copy audio files from your computer onto the microSD card before you open the Music Player application.   NOTE  The LG USB driver needs to be installed on your PC before connecting your phone to transfer music.To copy music files onto the phone’s microSD card1. Connect the phone to your computer with a USB cable. If the default connection mode is not set to Media sync (MTP), open the Notifications panel and touch USB connected > Media sync (MTP). Your computer will prompt you with different actions to take. Choose to open the folder to view files.  Use the computer to organize your audio files then create a music folder at the top level of the microSD card.  NOTE The LG MS870 can use a removable microSD card to store user content, such as photos, videos, and voice recordings.         If the USB connection mode is set to Media sync (MTP) when connecting the phone to a PC via USB cable, one Portable Devices drive will be displayed on your PC, one for the internal memory and another for the microSD card (if installed). You can copy files to and from both disk drives.”2. Use the computer to copy music and other audio files into the folder that you created on the microSD card.  You can use subfolders on the microSD card to organize your music files or you can simply copy the audio files to the top level of the microSD card.3. To disconnect your phone, open the Notifications panel and touch USB connected > Charge only. Then disconnect the USB cable from the phone.
122 EntertainmentOpening Music and Working with Your LibraryAfter you’ve copied some music onto your microSD card you can open the Music Player application and view your library of music files, sorted in one of four ways.To open Music and view your music library  From the Home screen, touch the Apps Key  > Music Player  .  The Music Player application searches the microSD card for music files you copied to your card, then builds a catalog of your music based on the information contained in each music file. This can take from a few seconds to several minutes, depending on how many files you have copied onto the microSD card.    When the catalog is complete, the Music library screen opens with tabs at the top of the screen that you can touch to view your music library organized by Songs, Albums, Artists, Playlists, or Folders.Touch here to select a different tab.Touch one of the entries to play it.Music is listed in alphabetical order.You can return to the main Library screen from the Playback screen in the Music Player application by touching the Menu Key  > Library.To search for music in your library1. Open the main Library screen then touch the Menu Key  > Search.2. Start typing the name of the artist, album, or track you’re looking for. Matching songs are displayed in the list below the search box.3. Touch a matching song to play it or touch a matching album or artist to view a list of associated songs.
123EntertainmentTo delete a song from the microSD cardYou can delete music from the microSD card.  Touch and hold a song in a Library list. In the Context menu that opens, touch Delete, then touch the OK button.  OR  On the Playback screen, touch the Menu Key  > Delete > OK.    You can also delete music files from the microSD card when your phone is connected to the computer. To do this, browse for the music files you want to delete then delete them from the folder.Playing MusicYou can listen to music using the phone’s built-in speaker, through a wired headset, or through a wireless Bluetooth stereo headset that supports the A2DP profile. To play music  Touch a song in your library to listen to it.  OR  While viewing a list of tracks in an album, touch the Menu Key  > Play all.    The Playback screen opens and the song you touched or the first song in the album or other playlist starts to play. Your music continues to play even when you switch applications or receive a phone call. The tracks in the current playlist play in order until it reaches the end, then stops. If you choose a repeat option, playback only stops when you stop it.
124 EntertainmentTouch here to restart, play or skip.    You can return to the Playback screen from most other screens in the Music Player application by touching the currently playing song at the bottom of the screen.    You can return to the Playback screen from any other application by opening the Notifications panel and touching the ongoing music notification.To control playbackThe Playback screen contains several icons that you can touch to control the playback of songs, albums, and playlists: Touch to pause playback.Touch to resume playback.Touch to skip to the next track in the album, playlist, or shuffle.Touch to restart the current track or skip to the previous track in the album, playlist, or shuffle.Touch to open the current playlist.Touch to play the current playlist in shuffle mode (tracks are played in random order).Touch to set repeat mode to repeating all songs, repeat current song, or repeat off.Touch to set the Dolby Mobile setting, which enhances your music listening.
125EntertainmentTo control playback volumeIn addition to the techniques for setting media volume, you can control the volume of music in the Music Player application.  Press the phone’s up/down Volume Keys.A panel opens to show the current media volume. Some headsets include their own volume controls or ways to pause and resume playback or to skip tracks.To play your tracks in a party shuffleWhen you turn on Party Shuffle, the Music Player application plays tracks from your microSD card in random order until Party Shuffle is turned off.  In a Library screen, touch the Menu Key  > Party shuffle.  The Music Player application creates a playlist of tracks selected randomly from your microSD card and starts playing them.  View the current playlist that Party Shuffle is playing by touching the Playlist icon  on the Playback screen.  Add a track to the end of the Party Shuffle playlist by touching and holding the name of a track in your library. In the menu that opens, touch Add to playlist > Current playlist.  Stop Party Shuffle by touching the Menu Key  > Party shuffle off.To customize settings in the Playback or a Library screenTouch the Menu Key  > Settings in a Library or Playback screen.  Show notification  Shows the controller on the notification bar.  Sleep timer  Turns off the player automatically. Touch the following options to apply sleep timer: Off, After 10 minutes, After 20 minutes, After 30 minutes, After 1 hour, After 2 hours  Audio effects Applies the following sound effect options: Off, Dolby Mobile, Bright stage, Clear treble, Deep bass, Dynamic, Pure bypass, Custom
126 EntertainmentTo use a song as a ringtoneYou can use a song as your phone ringtone, in place of one of the ringtones that come with the phone.  Touch and hold a song in a Library list. In the Context menu that opens, touch Set as ringtone.  OR  On the Playback screen, touch the Menu Key  > Set as ringtone.Working with PlaylistsYou can create playlists to organize your music files into sets of songs, which you can play in the order you set or in a shuffle.To create a playlist1. From the Music Player Library, touch the Playlists tab.2. Touch the Menu Key  > New playlist. 3. Enter a name for the playlist and touch OK. The new playlist is added to the Playlist tabTo add a song to a playlist1. From the Music Player Library, touch the Playlists tab.2. Touch the name of the playlist you want to add the song to. You can also add the song that is playing in the Playback screen to a playlist by pressing the Menu Key  > Add to playlist.3. Select the songs you want to add and touch Add.To remove a song from a playlist1. Open a playlist.2.  Touch and hold the song you want to remove then touch Remove from playlist.
127EntertainmentTo delete or rename a playlist1. Open the Playlist library.2. Touch and hold the playlist to display the Context menu then touch Delete or Rename.Video playerYou can play a wide variety of videos using the Video player. The video player supports the following file formats: mp4, avi, wmv, mov, mkv (Codec: MPEG4, H.263, H.264, VC-1, DivX® and Xvid). NOTE    Supported file formats are dependent on the software version of the phone.To open the Video player application  1. From the Home screen, touch the Apps Key  > Video Player  .  2. Touch the video you want to play.Playback controlsTouch the screen to display the playback controls. The following options allow you to control the video playback:Pause playback.Play a video file.Touch to play the next video file. Touch and hold to fast-forward playback.Touch to play the previous video file. Touch and hold to rewind playback.Touch to set the Dolby Mobile setting, which enhances your audio listening.
128 EntertainmentVideo Player optionsThe following options are available from the Video player main screen:  Details  Touch and hold a Video Player entry in the list to display a Context menu which allows you to view its details.  Delete  Touch the Delete icon   at the top right corner of the screen, then checkmark each video to delete. When all files to be deleted have been checkmarked, touch Delete > OK to confirm.   DivX HD Touch the DivX icon at the top of the screen. Register DivX before using this video on demand feature.
129EntertainmentYouTubeTMOpening YouTube and Watching VideosYou can browse, search for, view, upload, and rank YouTube videos on your phone with the YouTube application.To open the YouTube application  From the Home screen, touch the Apps Key  > YouTube  .    Touch a video to watch it or touch the Menu Key   to take other actions on the video.To watch and interact with YouTube videos  Touch a video to play it.  Touch the screen to view the Playback controls. You can pause and play the video or drag the slider to the point in the video you want to watch.  Touch the Back Key  to stop playback and return to the videos list.
130 Entertainment  Touch the Menu Key  for the following options: Like, Dislike, Copy URL, Flag, Settings, Feedback, and Help.    For details about these features, visit the YouTube website.To search for videos1. At the top of the main YouTube screen, touch  .2. Enter the text to search for or touch the Microphone icon  to search by voice.3. Touch a suggestion below the search box or touch the Search Key.4. Scroll through the search results and touch a video to watch it.To share your videos on YouTubeYou can record and share a video using the YouTube application. First, you must create a YouTube account and sign into it on your phone.You can also share the videos you record with the Camera application by uploading them to YouTube.1. Touch   at the top right of main YouTube screen.2. If you want to set any configurations manually, touch the screen to open the video camera settings.3. Point the lens to frame the scene where you want to start.4. Touch   to start recording.5. Touch   to stop recording.6. Touch OK and sign into your YouTube account (if necessary).7. Enter a title, description, and tags for your video.8. If you want to share the video with everyone, touch the Privacy field and touch Public. If not touch Private or Unlisted.9. Touch Upload.
131EntertainmentUsing SmartShareSmartShare uses DLNA (Digital Living Network Alliance) technology to share digital content through a wireless network. Both devices must be DLNA certified to support this feature.To turn SmartShare on and allow sharing contents1. To access this application, from the Home screen, touch the Apps Key  > SmartShare  . 2. Touch the Menu Key  > Settings.3. Touch Discoverable to checkmark it to allow your device to be detected by other devices.  Checkmark Always accept request if you would like to automatically accept sharing requests from other devices.  Checkmark Receive files if you would like to allow other devices to upload media files to your phone.4. Under the My shared contents section, touch to checkmark the types of content you would like to share. Choose from Pictures, Videos, and Music.5. SmartShare is now activated and ready to share the available content type(s) you selected for sharing.To control your renderer devicesLet your renderer device (e.g., TV) play multimedia contents from your remote content library (e.g., PC). NOTE  Make sure that the DLNA functionality of your devices are properly configured (e.g., TV and PC).1. From the Home screen, touch the Apps Key  > SmartShare  .2. Touch the To icon   at the top right of the screen, then touch the device you want to use from the renderer device list.3. Touch the From icon  at the top left of the screen, then touch the device that has your remote content library.4. You can browse through the content library to find the content(s) you want.
132 Entertainment5. Touch and hold a content thumbnail and touch Play or touch the Menu Key  > Play.To share contents from your phone to your renderer device (e.g., TV) NOTE  Make sure that your renderer device is properly configured.1. While watching your pictures or videos using the Gallery application, touch one of the icons   /   /  in the Title area. 2. Select the device from renderer lists to play the files. NOTE  The Video Player uses similar steps to share contents.       : Need to connect to a network.  Allows you to connect.        : Allows you to select a device on the network.       : Content is currently being shared through SmartShare. NOTICE   Check that your device is connected with your home network using a Wi-Fi connection to use this application. Some DLNA enabled devices (e.g., TV) support only the DMP feature of DLNA and will not appear in the renderer device list.  Your device might not be able to play some contents.To download contents from the remote content library1. From the Home screen, touch the Apps Key  > SmartShare  .2. Touch the From icon  at the top left of the screen, then touch the device that has your remote content library.3. You can browse through the content library to find the content(s) you want.4. Touch and hold a content thumbnail, then touch Download in the Context menu. NOTICE   Some content types are not supported.To upload contents from the remote content library NOTE  Make sure that the microSD card is correctly mounted and the Receive files option in the Settings menu is checkmarked.1. From the Home screen, touch the Apps Key  > SmartShare  .2. Touch the From icon  at the top left of the screen, then select My phone.3.  You can browse through the local content library to find the content(s) you want.
133Entertainment4.  Touch and hold a content thumbnail, then touch Upload in the Context menu.5.  Select the device of the remote content library to be uploaded. NOTICE  s  Some DLNA enabled devices do not support the DMS upload functionality and will not upload files.      sSome content types are not supported.Voice RecorderThe Voice Recorder application records audible files for you to use in a variety of ways. Use them simply to remind you about something you don’t want to forget (like a grocery list) or record sound effects that you can attach to a message or set as a ringtone for calls.Record a Voice Memo1. From the Home screen, touch the Apps Key  > Voice Recorder  .2. Touch   to start recording.3. Speak into the microphone.4. When you’re finished, touch  .  The recording is automatically saved to your recordings list.   Touch   to listen to your recording.   Touch   to record a new voice memo.  Touch   to view your list of recordings. Play a Voice Memo1. From the Home screen, touch the Apps Key  > Voice Recorder  .2. Touch  .3. Touch the voice memo you wish to play. NOTE  You can send the voice memo to others by touching and holding a voice memo and touching Share.
134 EntertainmentManaging your Voice Memos1. From the Home screen, touch the Apps Key  > Voice Recorder  .2. Touch  .3. Touch the following options from the quick action bar at the top of the screen.  Touch the New icon   to return to the Voice Record screen to record a new audio file.  Touch the Share icon   to send via Bluetooth, Email, Gmail, mail@metro, Memo, Messaging, or other compatible applications you have downloaded.  Touch the Delete icon   to delete voice memo(s). Touch the voice memo(s) to delete then touch Delete > OK. NOTE  You can also touch and hold an audio file in the list to select Details, Share, Delete, or Rename in the Context menu that appears.
135ToolsCalendarViewing Your Calendar and EventsOpen the Calendar application to view events you’ve created or that others have invited you to.When you first set up your phone, you configured it to use an existing Google Account or you created a new account. The first time you open the Calendar application on your phone, it displays any existing calendar events from your Google Account on the web.To open the Calendar application  From the Home screen, touch the Apps Key  > Calendar  .    Events from each account you’ve added to your phone and configured to synchronize calendars is displayed in your Calendar.    Events from each calendar account are displayed in a different color.To change your calendar viewNo matter where you are in the Calendar application, you can easily switch calendar views. Simply touch the date in the upper left corner of the screen to display a drop-down menu of calendar views. Touch Day, Week, Month, or Agenda.   To view more information about an event in the Agenda, Day, or Week view, touch the event.  To view the events of a day in Month view, touch a day. The event will be displayed below the calendar. Touch the event to view its details.
136 ToolsWorking in Day ViewDay view displays a list of the events of one day, in a table of one-hour rows. The current time will be designated as a thick horizontal black line. If it’s a day of commemoration (e.g., a holiday) it is listed at the top of the screen. All-day and multi-day events are displayed at the top. Part of the title of each event is displayed in the row that corresponds to when it occurs.To view other days, simply swipe left to see future days and right to see past days.To switch to Day view  Touch the date in the top left corner above the calendar, then touch Day in the drop-down menu. Touch here to create a new event.Touch here to switch to Week, Month, or Agenda view.To learn more about events in Day view  Touch an event to view its details.To add an event in Day view  Touch and hold an empty spot or an event in the day to open a Context menu then touch New event to create a new event at that time.  OR  Touch   and select the calendar you want to use (if applicable).
137ToolsWorking in Week ViewWeek view displays a chart of the events of one week. All-day and  multi-day events are displayed at the top. To view other weeks, simply swipe left to see future weeks and right to see past weeks.To switch to Week view  Date in the top left corner above the calendar, then touch Week in the drop-down menu. Touch here to create a new event.Touch here to switch to Day, Month, or Agenda view.To learn more about events in Week view  Touch an event to view its details.To add an event in Week view  Touch and hold an empty spot or an event in the week to open a Context menu then touch New event to create a new event at that time.  OR  Touch   and select the calendar you want to use (if applicable).
138 ToolsWorking in Month ViewMonth view displays a chart of the events of the month. Segments of each day with scheduled events are blue in the day’s vertical bar. To view other months, simply swipe upward to see future months and downward to see past months.To switch to Month view  Date in the top left corner above the calendar, then touch Month in the drop-down menu. Touch here to create a new event.Touch here to switch  to Day, Week,  or Agenda view.To view more information about events in Month view  Touch a day to display the events below the calendar. You can then touch the event to view more information about it.
139ToolsWorking in Agenda ViewAgenda view is a list of your events in chronological order by day. A month’s worth of events is displayed. To show earlier Agenda events, touch Touch to view events before at the top of your Agenda list. To show later Agenda events touch Touch to view events after at the bottom of your Agenda list. All-day and multi-day events are listed at the start of each day.To switch to Agenda view  Date in the top left corner above the calendar, then touch Agenda in the drop-down menu. Touch here to create a new event.Touch here to switch to Day, Week, or Month view.To learn more about events in Agenda view  Touch an event.    A screen with details about the event opens.
140 ToolsViewing Event DetailsYou can view more information about an event in a number of ways, depending on the current view.To view information about an event  In Agenda, Day, or Week view, touch an event to view its details.  In Month view, touch a day to display the events. Then touch an event to view its details.Touch here to delete the event.Touch here to edit the event.Touch here to go back  to Calendar view.Touch the Reminders field to change reminder settings, touch Add reminder  to add another reminder, or touch the Remove reminder icon   to remove the reminder. If you have permission to change the event, you can touch the Edit icon   (at the top of the screen) to edit the event or touch the Delete icon   (at the top right corner of the screen) to delete the event.To share an event, touch the Menu Key , touch Share in the Options menu. Choose the method for sharing and complete as necessary.
141ToolsSetting an Event ReminderYou can set one or more reminders for an event, whether or not you created the event or have permission to edit its other details.To set an event reminder1. Touch an event to view its details.2. If no reminder is set, touch Add reminder0  to automatically add a reminder for 10 minutes before the event.  If a reminder is already set, touch touch Add reminder  to set more reminders for the event.3. Touch the Time field to set the length of time before the event that you want to be reminded of it. Touch the Notification field to set how you want to be reminded (by Notification or by email).  When the time comes, you receive a notification about the event.  You can use Google Calendar on the web to configure additional reminder settings.To delete an event reminder1. Touch an event to view its details.2. Touch the Remove reminder icon   next to the reminder field.
142 ToolsCalculatorAllows you to perform simple mathematical calculations.To open and use the Calculator  From the Home screen, touch the Apps Key  > Calculator  .        Enter numbers and arithmetic operators on the Basic panel.  Drag the Basic panel to the left to open the Advanced panel.  Touch and hold the Calculator’s display to open a Context menu where you can copy what you’ve entered and access other tools.  Touch the Delete key   to delete the last number or operator you entered. Touch and hold the Delete key   to delete all of the entered information.  Touch the Menu Key  to open an Options menu to clear your calculation(s) history or change panels between Advanced and Basic.  Touch   to view your calculator history. You can touch an entry to calculate it again or edit it.
143ToolsAlarm/ClockYou use the Alarm/Clock application to access the Alarms, Timer, World clock, and Stopwatch functions. These functions are accessed by touching the tabs across the top of the screen.To open the Clock application  From the Home screen, touch the Apps Key  > Alarm/Clock  .  Touch the Alarms tab   at the top of the screen, if necessary.Setting AlarmsYou can set an alarm by modifying an existing alarm or by adding a new one. After you’ve created one or more alarms, you can easily activate or deactivate them using slide the button on the On/Off switch  . Slide it to the right to turn it on and to the left to turn it off. To set an alarm1. Touch the New alarm icon  or touch an existing alarm to modify it.Delete Icon Touch here to delete an alarm. Repeat Field Touch here to set which days to activate the alarm.Existing AlarmTouch here to modify this alarm's settings. Time Wheel Scroll here to change the alarm time.New Alarm Icon Touch here to create a new alarm. Set Alarm Screen2. Scroll the time wheel to set the alarm time.  Enter the alarm time manually by scrolling the hour (or minutes) field.  Scroll to AM or PM to set for morning or afternoon.3. Touch the day(s) when you want the alarm to sound in the Repeat field. If you don’t touch the Repeat setting, the alarm sounds only the one day you set it.
144 Tools4. Touch Snooze duration to open a dialog box to set the amount of time to wait before sounding the alarm again if it is not dismissed. You can set the alarm to ring repeatedly from 5 minutes up to 1 hour.5. Touch Vibration to checkmark the setting and have the phone vibrate, in addition to playing the ringtone.6. Touch Alarm sound to select a ringtone for the alarm, then touch the OK button. The ringtone plays briefly when you select it.7. Touch Puzzle lock to checkmark the setting, which requires you to wake up enough to solve a simple puzzle to dismiss the alarm.8. Touch Memo to enter a name for the alarm.9. When you’re finished, touch the Save button.When the alarm sounds  Touch the Stop button or, if set, use the gesture feature of simply flip-ping the device over to stop the alarm.  Touch the Snooze button to stop the alarm for the snooze duration you set. NOTE If Puzzle lock is set to On, using the gesture feature of flipping the device over will snooze the alarm instead of turning it off.Setting the TimerThe Timer application can be used to alert you with an audible signal when a set amount of time has passed. 1. Open the Alarm/Clock application and touch the Timer tab  .2. Set the time by scrolling the Hour, Minute and/or Second on the time wheel.3. Touch Vibration to checkmark the setting and have the phone vibrate when the set time expires.4. Touch Alert sound to select an alert tone for the timer, then touch the OK button.5. Touch the green Start button at the bottom of the screen. to begin the time countdown.6. Once the alarm sounds, touch the Stop button to stop the timer.
145ToolsSetting the World ClockThis feature allows you to set up a list of cities to easily check current times in other time zones with a quick glance.1. Open the Alarm/Clock application and touch the World clock tab  .2. Touch the New City icon   at the bottom of the screen then search through the available cities for the one you want.Managing the World Clock Cities  Touch the New City icon   at the bottom of the screen to select another city for your list.  Touch the Delete icon   at the bottom right corner of the screen to select one or more cities select a city to delete from your list.  Touch the Menu Key  to delete all of the cities in your World Clock list.  Touch and hold an entry in the list to open a Context menu to select Set DST (Daylight Savings Time) or Delete.Using the StopwatchThis feature allows you to use your phone as a Stopwatch.1. Open the Alarm/Clock application and touch the Stopwatch tab  .2. Touch the green Start button at the bottom of the screen to start timing and touch the Stop button to stop the time.You can use the Lap function by touching the Lap button to record lap times.3. Touch the Reset button to reset the Stopwatch or the Resume button to resume it.
146 ToolsPolaris OfficePolaris Office 3.0 is a professional Mobile Office Solution which enables users to conveniently view or edit various types of office documents including Word, Excel, and PowerPoint file extensions anywhere, anytime, using their mobile device.To access this application, from the Home Screen, touch the Apps Key  , then touch Polaris Office  .Managing FilesPolaris Office 3.0 provides mobile users with the convenience of managing files including copying, moving, and deleting files and folders right on the device.Viewing FilesMobile users now have the convenience of being able to view a wide variety of file types including Microsoft Office documents, Adobe PDF right on their mobile device. When viewing these documents using Polaris Office 3.0, the objects and layout remain unchanged from their original documents.Editing Microsoft Office FilesMobile users also have the convenience of being able to create, edit, and save Word, Excel and PowerPoint documents on their mobile device. Saved documents generated or modified using Polaris Office 3.0, are not distorted from the originals.
147SettingsSettingsThe Settings application contains most of the tools for customizing and configuring your phone. All of the settings in the Settings menu are described in this section.To open Settings  From the Home screen, touch the Menu Key  > System settings.  Note Home screen settings, Lock screen settings, and App settings are also available if you touch the Menu Key  from the Home screen.  OR  From the Home screen, touch the Apps Key  > Settings  .Update your smart phone without a PC(FOTA)This feature allows you to conveniently update your phone’s software to a newer version via Firmware Over-the-Air (FOTA), without connecting with to a USB data cable.1.  From the Home screen, touch the Menu Key  > System settings > About phone > Software update.2. Select the task. Device serviceO Check now for update: You can check the new software update and conduct the update (Wi-Fi mode is enabled for a download of more than 50MB).O Check automatically: When checked, you will be notified of the new update when it becomes available. Update historyO Last update: Displays the date of the last software update.O Next check for updates: Displays the date when the next check for software update will occur. NOTE -  If no connection to the data network has previously been made since purchase, the  timeline for the next update cannot be identified since the interval for the automated   update will not be created.
148 Settings        - You will not be charged for data for software updates.        - Available Software will be checked automatically.        - Make sure to check if the battery is charged before update.      -  After download, you can install the software immediately or select a later time for the   installation.      -  Each software version is updated sequentially. Even after the update is complete,   check if there is any newer version available.        - Some features and service may vary by area, phone, carrier, plan and software version.        - LG reserves the right to make firmware updates available only for selected models at    its own discretion and does not guarantee the availability of the newer version of the    firmware for all handset models.Update your smart phone by connecting it to your PCThis feature allows you to update the fi rmware on your phone to a newer version conveniently from the Internet without you needing to visit a service centre.1.  Go to www.lg.com > Support > Search for the model.2.  Scroll down and click on the SOFTWARE UPDATE tab.3.  Install and execute the USB DRIVER and LG MOBILE SUPPORT TOOL by clicking Download button.4.  Connect your phone to the PC by using the bundled USB Cable.5. Click Start Updating within the LG Mobile Support Tool to begin. NOTE s)FYOURPHONENEEDSTOUPDATETHEStart Updating button will be enabled.s0LEASENOTETHATREMOVINGTHE53"DATACABLEORBATTERYDURINGTHEUPDATEMAY  seriously damage your mobile phone and make it inoperable.s4HISFEATUREISONLYAVAILABLEIFORWHEN,'MAKESANEWERlRMWAREVERSIONAVAILABLE  for your device.
149SafetyTIA Safety InformationThe following is the complete TIA Safety Information for wireless handheld phones. Exposure to Radio Frequency SignalYour wireless handheld portable phone is a low power radio transmitter and receiver. When ON, it receives and sends out Radio Frequency (RF) signals.In August, 1996, the Federal Communications Commissions (FCC) adopted RF exposure guidelines with safety levels for handheld wireless phones. Those guidelines are consistent with the safety standards previously set by both U.S. and international standards bodies:  ANSI C95.1 (1992) *  NCRP Report 86 (1986) ICNIRP (1996)  *American National Standards Institute; National Council on Radiation Protection and Measurements; International Commission on  Non-Ionizing Radiation Protection Those standards were based on comprehensive and periodic evaluations of the relevant scientific literature. For example, over 120 scientists, engineers, and physicians from universities, government health agencies, and industry reviewed the available body of research to develop the ANSI Standard (C95.1).The design of your phone complies with the FCC guidelines (and those standards).Antenna CareUse only the supplied or an approved replacement antenna. Unauthorized antennas, modifications, or attachments could damage the phone and may violate FCC regulations.
150 SafetyPhone OperationNORMAL POSITION: Hold the phone as you would any other telephone with the antenna pointed up and over your shoulder.Tips on Efficient OperationFor your phone to operate most efficiently:Don’t touch the antenna unnecessarily when the phone is in use. Contact with the antenna affects call quality and may cause the phone to operate at a higher power level than otherwise needed.DrivingCheck the laws and regulations on the use of wireless phones in the areas where you drive and always obey them. Also, if using your phone while driving, please observe the following:O  Give full attention to driving -- driving safely is your first responsibility;O  Use hands-free operation, if available;O  Pull off the road and park before making or answering a call if driving conditions or the law require it.Electronic DevicesMost modern electronic equipment is shielded from RF signals. However, certain electronic equipment may not be shielded against the RF signals from your wireless phone.PacemakersThe Health Industry Manufacturers Association recommends that a minimum separation of six (6) inches be maintained between a handheld wireless phone and a pacemaker to avoid potential interference with the pacemaker. These recommendations are consistent with the independent research by and recommendations of Wireless Technology Research.
151SafetyPersons with pacemakers:O  Should ALWAYS keep the phone more than six (6) inches from their pacemaker when the phone is turned ON;O  Should not carry the phone in a breast pocket;O  Should use the ear opposite the pacemaker to minimize the potential for interference;O  Should turn the phone OFF immediately if there is any reason to suspect that interference is taking place.Hearing AidsSome digital wireless phones may interfere with some hearing aids. In the event of such interference, you may want to consult your service provider (or call the customer service line to discuss alternatives). Other Medical DevicesIf you use any other personal medical device, consult the manufacturer of your device to determine if it is adequately shielded from external RF energy. Your physician may be able to assist you in obtaining this information. Health Care FacilitiesTurn your phone OFF in health care facilities when any regulations posted in these areas instruct you to do so. Hospitals or health care facilities may use equipment that could be sensitive to external RF energy.VehiclesRF signals may affect improperly installed or inadequately shielded electronic systems in motor vehicles. Check with the manufacturer or its representative regarding your vehicle. You should also consult the manufacturer of any equipment that has been added to your vehicle.Posted FacilitiesTurn your phone OFF in any facility where posted notices so require.
152 SafetyAircraftFCC regulations prohibit using your phone while in the air. Switch OFF your phone before boarding an aircraft.Blasting AreasTo avoid interfering with blasting operations, turn your phone OFF when in a “blasting area” or in areas posted: “Turn off two-way radio”. Obey all signs and instructions.Potentially Explosive AtmosphereTurn your phone OFF when in any area with a potentially explosive atmosphere and obey all signs and instructions. Sparks in such areas could cause an explosion or fire resulting in bodily injury or even death.Areas with a potentially explosive atmosphere are often, but not always marked clearly. Potential areas may include: fueling areas (such as gasoline stations); below deck on boats; fuel or chemical transfer or storage facilities; vehicles using liquefied petroleum gas (such as propane or butane); areas where the air contains chemicals or particles (such as grain, dust, or metal powders); and any other area where you would normally be advised to turn off your vehicle engine.For Vehicles Equipped with an Air BagAn air bag inflates with great force. DO NOT place objects, including either installed or portable wireless equipment, in the area over the air bag or in the air bag deployment area. If in-vehicle wireless equipment is improperly installed and the air bag inflates, serious injury could result.
153SafetySafety InformationPlease read and observe the following information for safe and proper use of your phone and to prevent damage. Also, keep the user guide in an accessible place at all times after reading it.Violation of the instructions may cause minor or serious damage to the product.O  Do not disassemble or open crush, bend or deform, puncture or shred.O  Do not modify or remanufacture, attempt to insert foreign objects into the battery, immerse or expose to water or other liquids, expose to fire, explosion or other hazard.O  Only use the battery for the system for which it is specified.O  Only use the battery with a charging system that has been qualified with the system per this standard. Use of an unqualified battery or charger may present a risk of fire, explosion, leakage, or other hazard.O  Do not short circuit a battery or allow metallic conductive objects to contact battery terminals.O  Replace the battery only with another battery that has been qualified with the system per this standard, IEEE-Std-1725-200x. Use of an unqualified battery may present a risk of fire, explosion, leakage or other hazard.O  Promptly dispose of used batteries in accordance with local regulations.O  Battery usage by children should be supervised.O  Avoid dropping the phone or battery. If the phone or battery is dropped, especially on a hard surface, and the user suspects   damage, take it to a service center for inspection.O  Improper battery use may result in a fire, explosion or other hazard.O  For those host devices that utilize a USB port as a charging source, check the host device’s user manual for the USB-IF logo or some other means to ensure that it has completed the USB-IF compliance program.
154 SafetyCharger and Adapter SafetyO  The charger and adapter are intended for indoor use only.O  Insert the battery pack charger vertically into the wall power socket.O  Only use the approved battery charger. Otherwise, you may cause serious damage to your phone.O  Use the correct adapter for your phone when using the battery pack charger abroad.Battery Information and CareO  Always unplug the charger from the wall socket after the phone is fully charged to save unnecessary power consumption of the charger.O  Please dispose of your battery properly or take it to your local wireless carrier for recycling.O  The battery doesn’t need to be empty before recharging.O  Use only LG-approved chargers specific to your phone model since they are designed to maximize battery life. O  Do not disassemble or short-circuit the battery.O  Keep the battery’s metal contacts clean.O  Replace the battery when it no longer provides acceptable performance. The battery can be recharged several hundred times before replacement.O  Recharge the battery after long periods of non-use to maximize battery life.O  Battery life will vary due to usage patterns and environmental conditions.O  Use of extended backlighting, Browser, and data connectivity kits affect battery life and talk/ standby times.O  The self-protection function of the battery cuts the power of the phone when its operation is in an abnormal state. In this case, remove the battery from the phone, reinstall it, and turn the phone on.
155SafetyExplosion, Shock, and Fire HazardsO  Do not put your phone in a place subject to excessive dust and keep the minimum required distance between the power cord and heat sources.O  Unplug the power cord prior to cleaning your phone, and clean the power plug pin when it’s dirty.O  When using the power plug, ensure that it’s firmly connected. If not, it may cause excessive heat or fire.O  If you put your phone in a pocket or bag without covering the receptacle of the phone (power plug pin), metallic articles (such as a coin, paperclip or pen) may short-circuit the phone. Always cover the receptacle when not in use.O  Don’t short-circuit the battery. Metallic articles such as a coin, paperclip or pen in your pocket or bag may short-circuit the + and – terminals of the battery (metal strips on the battery) upon moving. Short-circuit of the terminal may damage the battery and cause an explosion.General NoticeO  Using a damaged battery or placing a battery in your mouth may cause serious injury.O  Do not place items containing magnetic components such as a credit card, phone card, bank book, or subway ticket near your phone. The magnetism of the phone may damage the data stored in the magnetic strip.O  Talking on your phone for a long period of time may reduce call quality due to heat generated during use.O  When the phone is not used for a long period time, store it in a safe place with the power cord unplugged.O  Using the phone in proximity to receiving equipment (i.e., TV or radio) may cause interference to the phone.O  Do not use the phone if the antenna is damaged. If a damaged antenna contacts skin, it may cause a slight burn. Please contact an LG Authorized Service Center to replace the damaged antenna.
156 SafetyO  Do not immerse your phone in water. If this happens, turn it off immediately and remove the battery. If the phone does not work, take it to an LG Authorized Service Center.O  Do not paint your phone.O  The data saved in your phone might be deleted due to careless use, repair of the phone, or upgrade of the software. Please backup your important phone numbers. (Ringtones, text messages, voice messages, pictures, and videos could also be deleted.) The manufacturer is not liable for damage due to the loss of data.O  When you use the phone in public places, set the ringtone to vibration so you don’t disturb others.O  Do not turn your phone on or off when putting it to your ear.O  Use accessories, such as earphones and headsets, with caution. Ensure that cables are tucked away safely and do not touch the antenna unnecessarily.O  Do not use your device for long periods of time while a part of your body is making direct contact with it. The temperature of the product may increase during normal operation and this may result in harming or burning your skin.Caution:  Avoid potential hearing loss.Prolonged exposure to loud sounds (including music) is the most common cause of preventable hearing loss. Some scientific research suggests that using portable audio devices, such as portable music players and cellular telephones, at high volume settings for long durations may lead to permanent noise induced hearing loss. This includes the use of headphones (including headsets, earbuds and Bluetooth® or other wireless devices). Exposure to very loud sound has also been associated in some studies with tinnitus (a ringing in the ear), hypersensitivity to sound and distorted hearing. Individual susceptibility to noise-induced hearing loss and other potential hearing problems varies.
157SafetyThe amount of sound produced by a portable audio device varies depending on the nature of the sound, the device, the device settings and the headphones. You should follow some commonsense recommendations when using any portable audio device:O  Set the volume in a quiet environment and select the lowest volume at which you can hear adequately.O  When using headphones, turn the volume down if you cannot hear the people speaking near you or if the person sitting next to you can hear what you are listening to.O  Do not turn the volume up to block out noisy surroundings. If you choose to listen to your portable device in a noisy environment, use noise-cancelling headphones to block out background environmental noise.O  Limit the amount of time you listen. As the volume increases, less time is required before your hearing could be affected.O  Avoid using headphones after exposure to extremely loud noises, such as rock concerts, that might cause temporary hearing loss. Temporary hearing loss might cause unsafe volumes to sound normal.O  Do not listen at any volume that causes you discomfort. If you experience ringing in your ears, hear muffled speech or experience any temporary hearing difficulty after listening to your portable audio device, discontinue use and consult your doctor.You can obtain additional information on this subject from the following sources:
158 SafetyAmerican Academy of Audiology11730 Plaza American Drive, Suite 300Reston, VA 20190Voice: (800) 222-2336Email: info@audiology.orgInternet: www.audiology.orgNational Institute on Deafness and Other Communication DisordersNational Institutes of Health31 Center Drive, MSC 2320Bethesda, MD USA 20892-2320Voice: (301) 496-7243Email: nidcdinfo@nih.govInternet: http://www.nidcd.nih.gov/health/hearingNational Institute for Occupational Safety and HealthHubert H. Humphrey Bldg.200 Independence Ave., SWWashington, DC 20201Voice: 1-800-35-NIOSH (1-800-356-4674)Internet:http://www.cdc.gov/niosh/topics/noise/default.html
159SafetyFDA Consumer Update The U.S. Food and Drug Administration’s Center for Devices and Radiological Health Consumer Update on Mobile Phones:1. Do wireless phones pose a health hazard?The available scientific evidence does not show that any health problems are associated with using wireless phones. There is no proof, however, that wireless phones are absolutely safe. Wireless phones emit low levels of Radio Frequency (RF) energy in the microwave range while being used. They also emit very low levels of RF when in standby mode. Whereas high levels of RF can produce health effects (by heating tissue), exposure to low level RF that does not produce heating effects causes no known adverse health effects. Many studies of low level RF exposures have not found any biological effects. Some studies have suggested that some biological effects may occur, but such findings have not been confirmed by additional research. In some cases, other researchers have had difficulty in reproducing those studies, or in determining the reasons for inconsistent results.2. What is the FDA’s role concerning the safety of wireless phones?Under the law, the FDA does not review the safety of radiation-emitting consumer products such as wireless phones before they can be sold, as it does with new drugs or medical devices. However, the agency has authority to take action if wireless phones are shown to emit Radio Frequency (RF) energy at a level that is hazardous to the user. In such a case, the FDA could require the manufacturers of wireless phones to notify users of the health hazard and to repair, replace, or recall the phones so that the hazard no longer exists.Although the existing scientific data does not justify FDA regulatory actions, the FDA has urged the wireless phone industry to take a number of steps, including the following:O  Support needed research into possible biological effects of RF of the type emitted by wireless phones;
160 SafetyO  Design wireless phones in a way that minimizes any RF exposure to the user that is not necessary for device function; andO  Cooperate in providing users of wireless phones with the best possible information on possible effects of wireless phone use on human health.The FDA belongs to an interagency working group of the federal agencies that have responsibility for different aspects of RF safety to ensure coordinated efforts at the federal level. The following agencies belong to this working group:O  National Institute for Occupational Safety and HealthO  Environmental Protection AgencyO  Occupational Safety and Health AdministrationO  National Telecommunications and Information AdministrationThe National Institutes of Health participates in some interagency working group activities, as well.The FDA shares regulatory responsibilities for wireless phones with the Federal Communications Commission (FCC). All phones that are sold in the United States must comply with FCC safety guidelines that limit RF exposure. The FCC relies on the FDA and other health agencies for safety questions about wireless phones.The FCC also regulates the base stations that the wireless phone networks rely upon. While these base stations operate at higher power than do the wireless phones themselves, the RF exposures that people get from these base stations are typically thousands of times lower than those they can get from wireless phones. Base stations are thus not the subject of the safety questions discussed in this document.3. What kinds of phones are the subject of this update?The term “wireless phone” refers here to handheld wireless phones with built-in antennas, often called “cell”, “mobile”, or “PCS” phones. These types of wireless phones can expose the user to measurable Radio Frequency (RF) energy because of the short distance between the phone and the user’s head.
161SafetyThese RF exposures are limited by FCC safety guidelines that were developed with the advice of the FDA and other federal health and safety agencies. When the phone is located at greater distances from the user, the exposure to RF is drastically lower because a person’s RF exposure decreases rapidly with increasing distance from the source. The so-called “cordless phones,” which have a base unit connected to the telephone wiring in a house, typically operate at far lower power levels, and thus produce RF exposures far below the FCC safety limits.4. What are the results of the research done already?The research done thus far has produced conflicting results, and many studies have suffered from flaws in their research methods. Animal experiments investigating the effects of Radio Frequency (RF) energy exposures characteristic of wireless phones have yielded conflicting results that often cannot be repeated in other laboratories. A few animal studies, however, have suggested that low levels of RF could accelerate the development of cancer in laboratory animals. However, many of the studies that showed increased tumor development used animals that had been genetically engineered or treated with cancer-causing chemicals so as to be pre-disposed to develop cancer in the absence of RF exposure. Other studies exposed the animals to RF for up to 22 hours per day. These conditions are not similar to the conditions under which people use wireless phones, so we do not know with certainty what the results of such studies mean for human health. Three large epidemiology studies have been published since December 2000. Between them, the studies investigated any possible association between the use of wireless phones and primary brain cancer, glioma, meningioma, or acoustic neuroma, tumors of the brain or salivary gland, leukemia, or other cancers. None of the studies demonstrated the existence of any harmful health effects from wireless phone RF exposures. However, none of the studies can answer questions about long-term exposures, since the average period of phone use in these studies was around three years.5. What research is needed to decide whether RF exposure from wireless phones poses a health risk?
162 SafetyA combination of laboratory studies and epidemiological studies of people actually using wireless phones would provide some of the data that are needed. Lifetime animal exposure studies could be completed in a few years. However, very large numbers of animals would be needed to provide reliable proof of a cancer promoting effect, if one exists. Epidemiological studies can provide data that is directly applicable to human populations, but ten or more years follow-up may be needed to provide answers about some health effects, such as cancer. This is because the interval between the time of exposure to a cancer-causing agent and the time tumors develop - if they do - may be many, many years. The interpretation of epidemiological studies is hampered by difficulties in measuring actual RF exposure during day-to-day use of wireless phones. Many factors affect this measurement, such as the angle at which the phone is held, or which model of phone is used.6. What is the FDA doing to find out more about the possible health effects of wireless phone RF?The FDA is working with the U.S. National Toxicology Program and with groups of investigators around the world to ensure that high priority animal studies are conducted to address important questions about the effects of exposure to Radio Frequency (RF) energy. The FDA has been a leading participant in the World Health Organization International Electro Magnetic Fields (EMF) Project since its inception in 1996. An influential result of this work has been the development of a detailed agenda of research needs that has driven the establishment of new research programs around the world. The project has also helped develop a series of public information documents on EMF issues. The FDA and the Cellular Telecommunications & Internet Association (CTIA) have a formal Cooperative Research And Development Agreement (CRADA) to do research on wireless phone safety. The FDA provides the scientific oversight, obtaining input from experts in government, industry, and academic organizations. CTIA-funded research is conducted through contracts with independent investigators. The initial research will include both laboratory studies and studies of wireless phone users. The CRADA
163Safetywill also include a broad assessment of additional research needs in the context of the latest research developments around the world.7. How can I find out how much Radio Frequency energy exposure I can get by using my wireless phone?All phones sold in the United States must comply with Federal Communications Commission (FCC) guidelines that limit Radio Frequency (RF) energy exposures. The FCC established these guidelines in consultation with the FDA and the other federal health and safety agencies. The FCC limit for RF exposure from wireless phones is set at a Specific Absorption Rate (SAR) of 1.6 watts per kilogram (1.6 W/kg). The FCC limit is consistent with the safety standards developed by the Institute of Electrical and Electronic Engineering (IEEE) and the National Council on Radiation Protection and Measurement. The exposure limit takes into consideration the body’s ability to remove heat from the tissues that absorb energy from the wireless phone and is set well below levels known to have effects. Manufacturers of wireless phones must report the RF exposure level for each model of phone to the FCC. The FCC website (http://www.fcc.gov/cgb/cellular.html) gives directions for locating the FCC identification number on your phone so you can find your phone’s RF exposure level in the online listing.8. What has the FDA done to measure the Radio Frequency energy coming from wireless phones?The Institute of Electrical and Electronic Engineers (IEEE) is developing a technical standard for measuring the Radio Frequency (RF) energy exposure from wireless phones and other wireless handsets with the participation and leadership of FDA scientists and engineers. The standard, “Recommended Practice for Determining the Spatial-Peak Specific Absorption Rate (SAR) in the Human Body Due to Wireless Communications Devices: Experimental Techniques”, sets forth the first consistent test methodology for measuring the rate at which RF is deposited in the heads of wireless phone users. The test method uses a tissue-simulating model of the human head. Standardized SAR test methodology is expected to greatly improve the consistency of measurements made at different laboratories on the same
164 Safetyphone. SAR is the measurement of the amount of energy absorbed in tissue, either by the whole body or a small part of the body. It is measured in watts/kg (or milliwatts/g) of matter. This measurement is used to determine whether a wireless phone complies with safety guidelines. 9. What steps can I take to reduce my exposure to Radio Frequency energy from my wireless phone?If there is a risk from these products - and at this point we do not know that there is - it is probably very small. But if you are concerned about avoiding even potential risks, you can take a few simple steps to minimize your exposure to Radio Frequency (RF) energy. Since time is a key factor in how much exposure a person receives, reducing the amount of time spent using a wireless phone will reduce RF exposure. If you must conduct extended conversations by wireless phone every day, you could place more distance between your body and the source of the RF, since the exposure level drops off dramatically with distance. For example, you could use a headset and carry the wireless phone away from your body or use a wireless phone connected to a remote antenna. Again, the scientific data does not demonstrate that wireless phones are harmful. But if you are concerned about the RF exposure from these products, you can use measures like those described above to reduce your RF exposure from wireless phone use.10. What about children using wireless phones?The scientific evidence does not show a danger to users of wireless phones, including children and teenagers. If you want to take steps to lower exposure to Radio Frequency (RF) energy, the measures described above would apply to children and teenagers using wireless phones. Reducing the time of wireless phone use and increasing the distance between the user and the RF source will reduce RF exposure. Some groups sponsored by other national governments have advised that children be discouraged from using wireless phones at all. For example, the government in the United Kingdom distributed leaflets containing such a recommendation in December 2000. They noted that no evidence exists that using a wireless phone causes brain tumors or other ill effects. Their recommendation to limit wireless phone use by children was strictly
165Safetyprecautionary; it was not based on scientific evidence that any health hazard exists.11. What about wireless phone interference with medical equipment?Radio Frequency (RF) energy from wireless phones can interact with some electronic devices. For this reason, the FDA helped develop a detailed test method to measure Electro Magnetic Interference (EMI) of implanted cardiac pacemakers and defibrillators from wireless telephones. This test method is now part of a standard sponsored by the Association for the Advancement of Medical Instrumentation (AAMI). The final draft, a joint effort by the FDA, medical device manufacturers, and many other groups, was completed in late 2000. This standard will allow manufacturers to ensure that cardiac pacemakers and defibrillators are safe from wireless phone EMI.The FDA has tested hearing aids for interference from handheld wireless phones and helped develop a voluntary standard sponsored by the Institute of Electrical and Electronic Engineers (IEEE). This standard specifies test methods and performance requirements for hearing aids and wireless phones so that no interference occurs when a person uses a “compatible” phone and a “compatible” hearing aid at the same time. This standard was approved by the IEEE in 2000. The FDA continues to monitor the use of wireless phones for possible interactions with other medical devices. Should harmful interference be found to occur, the FDA will conduct testing to assess the interference and work to resolve the problem.12. Where can I find additional information?For additional information, please refer to the following resources:FDA web page on wireless phones (http://www.fda.gov), under “C” in the subject index, select Cell Phones > Research.Federal Communications Commission (FCC) RF Safety Program (http://www.fcc.gov/oet/rfsafety/)
166 SafetyInternational Commission on Nonlonizing Radiation Protection (http://www.icnirp.de)World Health Organization (WHO) International EMF Project (http://www.who.int/emf)Health Protection Agency (http://www.hpa.org.uk/)10 Driver Safety TipsYour wireless phone gives you the powerful ability to communicate by voice almost anywhere, anytime. An important responsibility accompanies the benefits of wireless phones, one that every user must uphold.When operating a car, driving is your first responsibility. When using your wireless phone behind the wheel of a car, practice good common sense and remember the following tips:1. Get to know your wireless phone and its features such as speed dial and redial. Carefully read your instruction manual and learn to take advantage of valuable features most phones offer, including automatic redial and memory. Also, work to memorize the phone keypad so you can use the speed dial function without taking your attention off the road. 2. When available, use a hands-free device. A number of hands-free wireless phone accessories are readily available today. Whether you choose an installed mounted device for your wireless phone or a speaker phone accessory, take advantage of these devices if available to you. 3. Make sure you place your wireless phone within easy reach and where you can reach it without removing your eyes from the road. If you get an incoming call at an inconvenient time, if possible, let your voicemail answer it for you. 4. Suspend conversations during hazardous driving conditions or situations. Let the person you are speaking with know you are driving; if necessary, suspend the call in heavy traffic or hazardous weather conditions. Rain, sleet, snow, and ice can be hazardous, but so is heavy traffic. As a driver, your first responsibility is to pay attention to the road.5. Don’t take notes or look up phone numbers while driving. If you are
167Safetyreading an address book or business card, or writing a “to-do” list while driving a car, you are not watching where you are going. It is common sense. Do not get caught in a dangerous situation because you are reading or writing and not paying attention to the road or nearby vehicles.6. Dial sensibly and assess the traffic; if possible, place calls when you are not moving or before pulling into traffic. Try to plan your calls before you begin your trip or attempt to coincide your calls with times you may be stopped at a stop sign, red light, or otherwise stationary. But if you need to dial while driving, follow this simple tip - dial only a few numbers, check the road and your mirrors, then continue. 7. Do not engage in stressful or emotional conversations that may be distracting. Stressful or emotional conversations and driving do not mix; they are distracting and even dangerous when you are behind the wheel of a car. Make people you are talking with aware you are driving and if necessary, suspend conversations which have the potential to divert your attention from the road.8. Use your wireless phone to call for help. Your wireless phone is one of the greatest tools you can own to protect yourself and your family in dangerous situations -- with your phone at your side, help is only three numbers away. Dial 911 or other local emergency number in the case of fire, traffic accident, road hazard, or medical emergency. Remember, it’s a free call on your wireless phone! 9. Use your wireless phone to help others in emergencies. Your wireless phone provides you a perfect opportunity to be a “Good Samaritan” in your community. If you see an auto accident, crime in progress or other serious emergency where lives are in danger, call 911 or other local emergency number, as you would want others to do for you. 10. Call roadside assistance or a special wireless non-emergency assistance number when necessary. Certain situations you encounter while driving may require attention, but are not urgent enough to merit a call for emergency services. But you can still use your wireless phone to lend a hand. If you see a broken-down vehicle posing no serious hazard, a broken traffic signal, a minor traffic accident where no one appears injured or a vehicle you know to be stolen, call roadside assistance or other special non-emergency wireless number.
168 Safety  The above tips are meant as general guidelines. Before deciding to use your mobile device while operating a vehicle, it is recommended that you consult your applicable jurisdiction’s local laws or other regulations regarding such use. Such laws or other regulations may prohibit or otherwise restrict the manner in which a driver may use his or her phone while operating a vehicle. Consumer Information on SAR(Specific Absorption Rate)This model phone meets the Government’s requirements for exposure to radio waves. Your wireless phone is a radio transmitter and receiver. It is designed and manufactured not to exceed the emission limits for exposure to radiofrequency (RF) energy set by the Federal Communications Commission (FCC) of the U.S. Government. These FCC exposure limits are derived from the recommendations of two expert organizations, the National Counsel on Radiation Protection and Measurement (NCRP) and the Institute of Electrical and Electronics Engineers (IEEE). In both cases, the recommendations were developed by scientific and engineering experts drawn from industry, government, and academia after extensive reviews of the scientific literature related to the biological effects of RF energy.The exposure limit for wireless mobile phones employs a unit of measurement known as the Specific Absorption Rate, or SAR. The SAR is a measure of the rate of absorption of RF energy by the human body expressed in units of watts per kilogram (W/kg). The  FCC requires wireless phones to comply with a safety limit of 1.6 watts per kilogram (1.6 W/kg). The FCC exposure limit incorporates a substantial margin of safety to give additional protection to the public and to account for any variations in measurements.Tests for SAR are conducted using standard operating positions specified by the FCC with the phone transmitting at its highest certified power level in all tested frequency bands. Although SAR is determined at the highest certified power level, the actual SAR level of the phone while operating can be well below the maximum value. Because the phone is designed to operate at multiple power levels to use only the power required to reach the network, in general, the closer you are to a wireless base station
169Safetyantenna, the lower the power output.Before a phone model is available for sale to the public, it must be tested and certified to the FCC that it does not exceed the limit established by the government adopted requirement for safe exposure. The tests are performed in positions and locations (e.g., at the ear and worn on the body) as required by the FCC for each model.This device was tested for typical body-worn operations with the back of the phone kept 0.39 inches (1.0 cm) between the user’s body and the back of the phone. To comply with FCC RF exposure requirements, a minimum separation distance of 0.39 inches (1.0 cm) must be maintained between the user’s body and the back of the phone. Third-party belt-clips, holsters, and similar accessories containing metallic components should not be used. Body-worn accessories that cannot maintain 0.39 inches (1.0 cm) separation distance between the user’s body and the back of the phone, and have not been tested for typical body-worn operations may not comply with FCC RF exposure limits and should be avoided.The FCC has granted an Equipment Authorization for this model phone with all reported SAR levels evaluated as in compliance with the FCC RF emission guidelines. The highest SAR value for this model phone when tested for use at the ear is 1.03 W/kg and when worn on the body, as described in this user’s manual, is 1.24 W/kg. While there may be differences between SAR levels of various phones and at various positions, they all meet the government requirement for safe exposure. SAR information on this model phone is on file with the FCC and can be found under the Display Grant section of http://www.fcc.gov/oet/ea/fccid/ after searching on FCC ID ZNF.To find information that pertains to a particular model phone, this site uses the phone FCC ID number which is usually printed somewhere on the case of the phone. Sometimes it may be necessary to remove the battery pack to find the number. Once you have the FCC ID number for a particular phone, follow the instructions on the website and it should provide values for typical or maximum SAR for a particular phone.1.05W/kg1.09W/kg
170 SafetyAdditional information on Specific Absorption Rates (SAR) can be found on the Cellular Telecommunications Industry Association (CTIA) website at http://www.ctia.org/*In the United States and Canada, the SAR limit for mobile phones used by the public is 1.6 watts/kg (W/kg) averaged over one gram of tissue. The standard incorporates a substantial margin of safety to give additional protection for the public and to account for any variations in measurements.FCC Hearing-Aid Compatibility (HAC) Regulations for Wireless DevicesOn July 10, 2003, the U.S. Federal Communications Commission (FCC) Report and Order in WT Docket 01-309 modified the exception of wireless phones under the Hearing Aid Compatibility Act of 1988 (HAC Act) to require digital wireless phones be compatible with hearing-aids. The intent of the HAC Act is to ensure reasonable access to telecommunications services for persons with hearing disabilities.While some wireless phones are used near some hearing devices (hearing aids and cochlear implants), users may detect a buzzing, humming, or whining noise. Some hearing devices are more immune than others to this interference noise, and phones also vary in the amount of interference they generate.The wireless telephone industry has developed a rating system for wireless phones, to assist hearing device users to find phones that may be compatible with their hearing devices. Not all phones have been rated. Phones that are rated have the rating on their box or a label located on the box.The ratings are not guarantees. Results will vary depending on the user’s hearing device and hearing loss. If your hearing device happens to be vulnerable to interference, you may not be able to use a rated phone successfully. Trying out the phone with your hearing device is the best way to evaluate it for your personal needs.M-Ratings: Phones rated M3 or M4 meet FCC requirements and are likely
171Safetyto generate less interference to hearing devices than phones that are not labeled. M4 is the better/higher of the two ratings.Hearing devices may also be rated. Your hearing device manufacturer or hearing health professional may help you find this rating. Higher ratings mean that the hearing device is relatively immune to interference noise. The hearing aid and wireless phone rating values are then added together. A sum of 5 is considered acceptable for normal use. A sum of 6 is considered for best use.In the example to the left, if a hearing aid meets the M2 level rating and the wireless phone meets the M3 level rating, the sum of the two values equal M5. This should provide the hearing aid user with “normal usage” while using their hearing aid with the particular wireless phone. “Normal usage” in this context is defined as a signal quality that’s acceptable for normal  operation.The M mark is intended to be synonymous with the U mark. The T mark is intended to be synonymous with the UT mark. The M and T marks are recommended by the Alliance for Telecommunications Industries Solutions (ATIS). The U and UT marks are referenced in Section 20.19 of the FCC Rules. The HAC rating and measurement procedure are described in the American National Standards Institute (ANSI) C63.19 standard.When you’re talking on a cell phone, it’s recommended that you turn the BT (Bluetooth) or WLAN mode off for HAC.According to HAC policy(KDB 285076), we state this handset has not been rated for hearing aid compatibility with respect to the WiFi capability.For information about hearing aids and digital wireless phonesWireless Phones and Hearing Aid Accessibilityhttp://www.accesswireless.org/Home.aspxFCC Hearing Aid Compatibility and Volume Controlhttp://www.fcc.gov/cgb/consumerfacts/hac_wireless.html
172 SpecificationsDivX Mobile ABOUT DIVX VIDEO: DivX® is a digital video format created by DivX, LLC, a subsidiary of Rovi Corporation. This is an official DivX Certified® device that plays DivX video. Visit divx.com for more information and software tools to convert your files into DivX videos. ABOUT DIVX VIDEO-ON-DEMAND: This DivX Certified® device must be registered in order to play purchased DivX Video-on-Demand (VOD) movies. To obtain your registration code, locate the DivX VOD section in your device setup menu. Go to vod.divx. com for more information on how to complete your registration. DivX Certified® to play DivX® video up to HD 720p, including premium content.DivX®, DivX Certified® and associated logos are trademarks of Rovi Corporation or its subsidiaries and are used under license.Dolby Mobile License notice   Manufactured under license from Dolby Laboratories. Dolby and the  double-D symbol are trademarks of Dolby Laboratories.
173FAQPlease check to see if any problems you have encountered with your phone are described in this section, before taking the phone in for service or calling a service representative.Category Sub-Category Question AnswerBT Bluetooth DevicesWhat are the functions available via Bluetooth?Connecting to Stereo/Mono Headset, Car Kit, FTP server is possible. When it’s connected to another phone via Bluetooth, you can receive Contacts data.BT Bluetooth HeadsetIf my Bluetooth headset is connected, can I listen to my music through my 3.5mm wired headphones?When a Bluetooth headset is connected, all system sounds are played over the headset. As a result, you will not be able to listen to music through your wired headphones.Data Contacts BackupHow can I back up Contacts?The Contacts data can be synchronized between your phone and GmailTM.DataSynchronizationIs it possible to set up one-way-sync with Gmail?Only two-way synchronization is available.DataSynchronizationIs it possible to synchronize all the Email folders?The Inbox is automatically synchronized. You can view other folders by touching the Menu Key  and selecting Folders.DataSynchronizationIs it possible to transfer Contacts data from a feature phone to an AndroidTM phone?Yes, if your contacts can be extracted into a .CSV file.How to transfer:1.  Create “.CSV” file with the contacts on your current phone (you may be able to use the PC suite software provided by LGE).2.  Log into Gmail with your PC.3.  Click Contacts. 4.  Click Import.5.  Attach the “.CSV” file.6.  Your contacts will then be synchronized between your Android phone and Gmail.
174 FAQCategory Sub-Category Question AnswerGoogleTM Service Gmail Log-InShould I have to log into Gmail whenever I want to access Gmail?Once you log into Gmail, you don’t need to log in Gmail again.Google ServiceGoogle AccountIs it possible to filter emails?No, email filtering is not supported via the phone.Phone Function YouTubeTM Is it possible to play YouTube videos?Yes, YouTube videos are supported but may have to be viewed through the YouTube application (and not the Browser).Phone Function EmailWhat happens when I execute another application while writing an email?Your email will automatically be saved as a draft.Phone Function RingtoneIs there a file size limitation for when I want to use a .MP3 file as a ringtone?There is no file size limitation.Phone Function Message TimeMy phone does not display the time of receipt for messages older than 24 hours. How can I change this?You will only be able to see the times for messages received the same day.Phone Function microSD CardIs it possible to save applications to the microSD card?Some applications can be saved to the microSD card.1.  From the Home screen, touch the Menu Key  > System settings > Apps.2.  Touch an application > Move to SD card.
175FAQCategory Sub-Category Question AnswerPhone Function microSD CardWhat is the maximum supported size for a memory card?32GB memory cards are compatible.Phone Function NavigationIs it possible to install another navigation application on my phone?Any application that is available on Play StoreTM and is compatible with the hardware can be installed and used.Phone FunctionSynchronizationIs it possible to synchronize my contacts from all my email accounts?Only Gmail and MS Exchange server (Company Email Server) contacts can be synchronized.Phone FunctionWait and PauseIs it possible to save a contact with Wait and Pause in the numbers?If you transferred a contact with the Wait and Pause functions saved into the number, you will not be able to use those features. You will need to re-save each number.How to re-save numbers with Wait and Pause:1.  From the Home screen, touch the Phone Key .2.  Dial the number, then touch the Menu Key  .3. Touch Add 2-sec pause or Add wait.Phone Function SecurityWhat are the phone’s security functions?You are able to set the phone to require the entry of an unlock sequence (pattern, PIN, or password) before the phone can be accessed or used.Phone Function Unlock PatternWhat should I do if I forget my Unlock Pattern?After attempting the Unlock Pattern 5 times, you can touch the Forget Pattern? option and use your Google Account information to unlock your phone.
176 FAQCategory Sub-Category Question AnswerPhone Function Unlock Pattern How do I create the Unlock Pattern?1.  From the Home screen, touch the Menu Key .2.  Touch System settings > Lock screen.3.  Touch Select screen lock. 4.  Touch Pattern. The first time you do this, a short tutorial about creating an unlock pattern appears. 5.  Set up by drawing your pattern once > Continue, draw again > Confirm.Phone Function Speed Dial Is Speed Dialing supported?Yes. You can set Speed Dials as well as save a contact directly on your Home screen. To set a Speed Dial:1.  Open the Contacts application. 2.  Touch the Menu Key  > Speed dials. 3.  Touch the speed dial location and select the desired contact. To set a Direct Dial shortcut to your Home screen:1.  Touch and hold an empty area on your Home screen.2.  Touch Widgets > Direct Dial.3.  Select a contact from your Contacts List.Phone Function Memory Will I know when my memory is full? Yes, you will receive a notification.Phone FunctionLanguage SupportIs it possible to change the language?The phone has multi-lingual capabilities.To change the language:1.  From the Home screen, touch the Menu Key  > Settings.2.  Touch Language & input > Language.3. Touch the desired language.
177FAQCategory Sub-Category Question AnswerPhone FunctionLanguage SupportWhich languages are supported when using Play Store?The Play Store application supports English and Spanish. Third party applications may not support all languages.Phone Function VPN How do I set up a VPN?VPN access configuration is different according to each company. To configure VPN access from your phone, you must obtain the details from your company’s network administrator.Phone FunctionScreen time outMy screen turns off after only 30 seconds. How can I change the amount of time for the backlight to turn off?1.  From the Home screen, touch the Menu Key .2.  Touch System settings > Display > Screen timeout.3.  Touch the preferred screen backlight timeout time.Phone Function Wi-Fi & 4GWhen Wi-Fi and 4G are both available, which service will my phone use?When using data, your phone may default to the Wi-Fi connection (if Wi-Fi connectivity on your phone is set to On). However, there will be no notification when your phone switches from one to the other.To know which data connection is being used, use the 4G or Wi-Fi icon at the top of your screen.Phone Function Home screenIs it possible to remove an application from the Home screen?Yes. Just touch and hold the icon until the Remove bar appears at the top of the screen. Then, without lifting your finger, drag the icon to the Remove bar.Phone Function ApplicationI downloaded an application and it causes a lot of errors. How do I remove it?1.  From the Home screen, touch the Menu Key .2.  Touch System settings > Apps.3.  Touch the application > Uninstall.
178 FAQCategory Sub-Category Question AnswerPhone Function CameraMy phone’s camera does not take pictures and says "Mount your external SD card." Why doesn’t it work?A microSD card must be inserted in order to use the phone’s camera.Verify that the microSD card is mounted on the device.From the Home screen, touch the Menu Key  > System settings > Storage > Mount SD cardPhone Function Ringtones Can I use music files for my ringtones?Yes. After saving a music file as a ringtone, you can use it for your alarm. 1.  Touch and hold a song in a library list. In the menu that opens, touch Set as ringtone.Phone Function AlarmWill my alarm be audible or will it go off if the phone is turned off?No, this is not supported.Phone Function AlarmIf my Ringer Volume is set to Off or Vibrate, will I hear my alarm?Your alarm is programmed to be audible even in these scenarios.Phone Spec Battery TimeWhat is the maximum amount of time my phone’s battery will last before I need to recharge it?Talk time : Approx. 455 minsStandby : Approx. 20 daysPhone Spec BandWhich wireless bands are supported by the phone?Your phone is able to operate on the 800MHz, 1900MHz, and AWS bands.
179FAQCategory Sub-Category Question AnswerRecovery SolutionFactory ResetHow can I perform a factory reset if I can’t access the phone’s setting menu?How to perform a factory reset:1. Turn the power off.2.  Press and hold the following keys at the same time:  Power/Lock Key  + the down Volume Key  then touch Back Key  + Home Key  at the same time repeatedly.Attention: If a factory reset is performed, all installed applications and user data will be erased. Please remember to back up any important data before performing a factory reset.Battery installingPhone locked-up and does not functionRemove the battery and install it to restart your phone again. (similar to how you may restart your PC/computer).Power ResetIn the case of a malfunction or lock up error, press and hold the Power/Lock Key for 8 seconds to reset the phone.
180 LIMITED WARRANTY STATEMENT1. WHAT THIS WARRANTY COVERS:LG offers you a limited warranty that the enclosed subscriber unit and its enclosed accessories will be free from defects in material and workmanship, according to the following terms and conditions: (1) The limited warranty for the product extends for TWELVE (12) MONTHS beginning on the date of purchase of the product with valid proof of purchase, or absent valid proof of purchase, FIFTEEN (15) MONTHS from date of manufacture as determined by the unit’s manufacture date code.(2) The limited warranty extends only to the original purchaser of the product and is not assignable or transferable to any subsequent purchaser/end user.(3) This warranty is good only to the original purchaser of the product during the warranty period as long as it is in the U.S., including Alaska, Hawaii, U.S. Territories and Canada.(4) The external housing and cosmetic parts shall be free of defects at the time of shipment and, therefore, shall not be covered under these limited warranty terms.(5) Upon request from LG, the consumer must provide information to reasonably prove the date of purchase.(6) The customer shall bear the cost of shipping the product to the Customer Service Department of LG. LG shall bear the cost of shipping the product back to the consumer after the completion of service under this limited warranty.2. WHAT THIS WARRANTY DOES NOT COVER:(1) Defects or damages resulting from use of the product in other than its normal and customary manner.(2) Defects or damages from abnormal use, abnormal conditions, improper storage, exposure to moisture or dampness, unauthorized modifications, unauthorized connections, unauthorized repair, misuse, neglect, abuse, accident, alteration, improper installation, or other acts which are not the fault of LG, including damage caused by shipping, blown fuses, spills of food or liquid.(3) Breakage or damage to antennas unless caused directly by defects in material or workmanship.(4) That the Customer Service Department at LG was not notified by consumer of the alleged defect or malfunction of the product during the
181LIMITED WARRANTY STATEMENTapplicable limited warranty period.(5) Products which have had the serial number removed or made illegible.(6) This limited warranty is in lieu of all other warranties, express or implied either in fact or by operations of law, statutory or otherwise, including, but not limited to any implied warranty of marketability or fitness for a particular use.(7) Damage resulting from use of non LG approved accessories.(8) All plastic surfaces and all other externally exposed parts that are scratched or damaged due to normal customer use.(9) Products operated outside published maximum ratings.(10) Products used or obtained in a rental program.(11) Consumables (such as fuses).3. WHAT LG WILL DO:LG will, at its sole option, either repair, replace or refund the purchase price of any unit that does not conform to this limited warranty.  LG may choose at its option to use functionally equivalent re-conditioned, refurbished or new units or parts or any units.  In addition, LG will not re-install or back-up any data, applications or software that you have added to your phone. It is therefore recommended that you back-up any such data or information prior to sending the unit to LG to avoid the permanent loss of such information.4. STATE LAW RIGHTS:No other express warranty is applicable to this product. THE DURATION OF ANY IMPLIED WARRANTIES, INCLUDING THE IMPLIED WARRANTY OF MARKETABILITY, IS LIMITED TO THE DURATION OF THE EXPRESS WARRANTY HEREIN. LG SHALL NOT BE LIABLE FOR THE LOSS OF THE USE OF THE PRODUCT, INCONVENIENCE, LOSS OR ANY OTHER DAMAGES, DIRECT OR CONSEQUENTIAL, ARISING OUT OF THE USE OF, OR INABILITY TO USE, THIS PRODUCT OR FOR ANY BREACH OF ANY EXPRESS OR IMPLIED WARRANTY, INCLUDING THE IMPLIED WARRANTY OF MARKETABILITY APPLICABLE TO THIS PRODUCT.
182 LIMITED WARRANTY STATEMENTSome states do not allow the exclusive limitation of incidental or consequential damages or limitations on how long an implied warranty lasts; so these limitations or exclusions may not apply to you. This warranty gives you specific legal rights and you may also have other rights which vary from state to state.5. HOW TO GET WARRANTY SERVICE:If you experience any problems with either the Bluetooth headset or the mobile handset, in each case as may be covered by this limited warranty, you need only return the affected device. For example, if a problem exists with the Bluetooth headset, please DO NOT return your mobile handset with the headset. Likewise, if a problem exists with the mobile handset, please DO NOT return the Bluetooth Headset with the handset.To obtain warranty service, please call or fax to the following telephone numbers from anywhere in the continental United States: Tel. 1-800-793-8896 or Fax. 1-800-448-4026Or visit http://us.lgservice.com. Correspondence may also be mailed to:LG Electronics Service- Mobile Handsets, P.O. Box 240007, Huntsville, AL 35824DO NOT RETURN YOUR PRODUCT TO THE ABOVE ADDRESS.Please call or write for the location of the LG authorized service center nearest you and for the procedures for obtaining warranty claims.
18312310 Driver Safety Tips  166RomanAAdding a Contact to Your Favorites  80Adding and Editing Email Accounts  87Adding application icons to the Home screen  34Adding Contacts  78Alarm/Clock  143and Sharing Contacts  79Answering or Rejecting Calls  59Applications: How to View  31CCalculator  142Calendar  135Call a Contact by Voice Dialing  104Calling Your Contacts  62Calls  57Camera  105Cautions  8Changing and Monitoring Online Status  103Changing Google Talk Settings  103Changing Messaging Settings  98Changing MetroWEB settings  70Changing Weather Settings  76Charging the Phone  18Chatting with Friends  102Checking the Weather  76Communication  77Composing and Sending a Message  92Connecting Quickly With Your Contacts  47, 48Connecting to Mobile Networks  49Connecting to Networks and Devices  49Connecting to Wi-Fi Networks  50Consumer Information on SAR  168Contacts  77Customizing the Applications screen  32Customizing the Home Screen  45DDownloading and Installing Applications  119Index
184 IndexEELECTRICAL SAFETY  1Email  84Entertainment  105Exporting  79FFAQ  173FCC Hearing-Aid Compatibility (HAC) Regulations for Wireless Devices  170FDA Consumer Update  159GGallery  112Getting to Know the Home Screen  27Gmail  88IImportant Customer Information  1Importing  79Installing the Battery and microSD Card  16JJoining Contacts  83LLIMITED WARRANTY STATEMENT  180Listening to Your Voicemail  66Locking the Screen  41MManaging Multiple Calls  65Managing Notifications  37Managing the World Clock Cities  145Maps  73Messaging  95MetroWEB  67microSD Card  54microSD Card Settings  54Music Player  121OOpen an Application using Voice Dialer  104Open and Switch  31Opening and Closing the Applications screen  32Opening and Switching Applications  33Opening Gallery and Viewing Your Albums  112Opening Gmail and Your Inbox  88Opening Music and Working with Your Library  122Opening the Messaging Application  95Opening YouTube
185Indexand Watching Videos  129Optimizing Battery Life  19Options During a Call  63PPage content settings  70Phone Overview  13Phone’s Status Icons  24Placing and Ending Calls  57Playing Music  123Play Store   118Polaris Office  146QQuickMemo  47RReading Your Messages  91Replying to or Forwarding a Message  93SSafety  149Safety Information  153SAFETY PRECAUTIONS FOR PROPER GROUNDING INSTALLATION  1Searching Your Phone and the Web  39Selecting Which Contacts are Displayed  82Sending data from your phone using Bluetooth  56Separating Contact Information  83Setting Alarms  143Setting an Event Reminder  141Settings  147Setting the Timer  144Setting the World Clock  145Setting Up Your Device  22Specifications  172TTable of Contents  7Talk  101Technical Details  8Text Input Methods  30The Basics  13TIA Safety Information  149Tools  135Touchscreen  28Turning the Phone On and Off  21UUpdate your smart phone by connecting it to your PC  148Update your smart phone without a PC(FOTA)  147
186 IndexUsing SmartShare  130, 131Using the Stopwatch  145Using the Swype Keyboard  100VVideo Camera  109Video player  127Video Wiz  116Viewing Event Details  140Viewing Your Calendar and Events  135Voice Dialer  63, 104Voice Recorder  133WWeb  67Working in Agenda View  139Working in Day View  136Working in Month View  138Working in Week View  137Working with Account Folders  86Working with Menus  36Working with Pictures  113Working with Playlists  126Working with the Call Log  61Working with Videos  114YYour Home screen  32Your Photos and Videos  111YouTubeTM  129

Navigation menu