LG Electronics USA MU60PZ12 60" Plasma Monitor User Manual 2 of 2
LG Electronics USA 60" Plasma Monitor 2 of 2
Contents
- 1. User Manual 1of 2
- 2. User Manual 2 of 2
User Manual 2 of 2
26
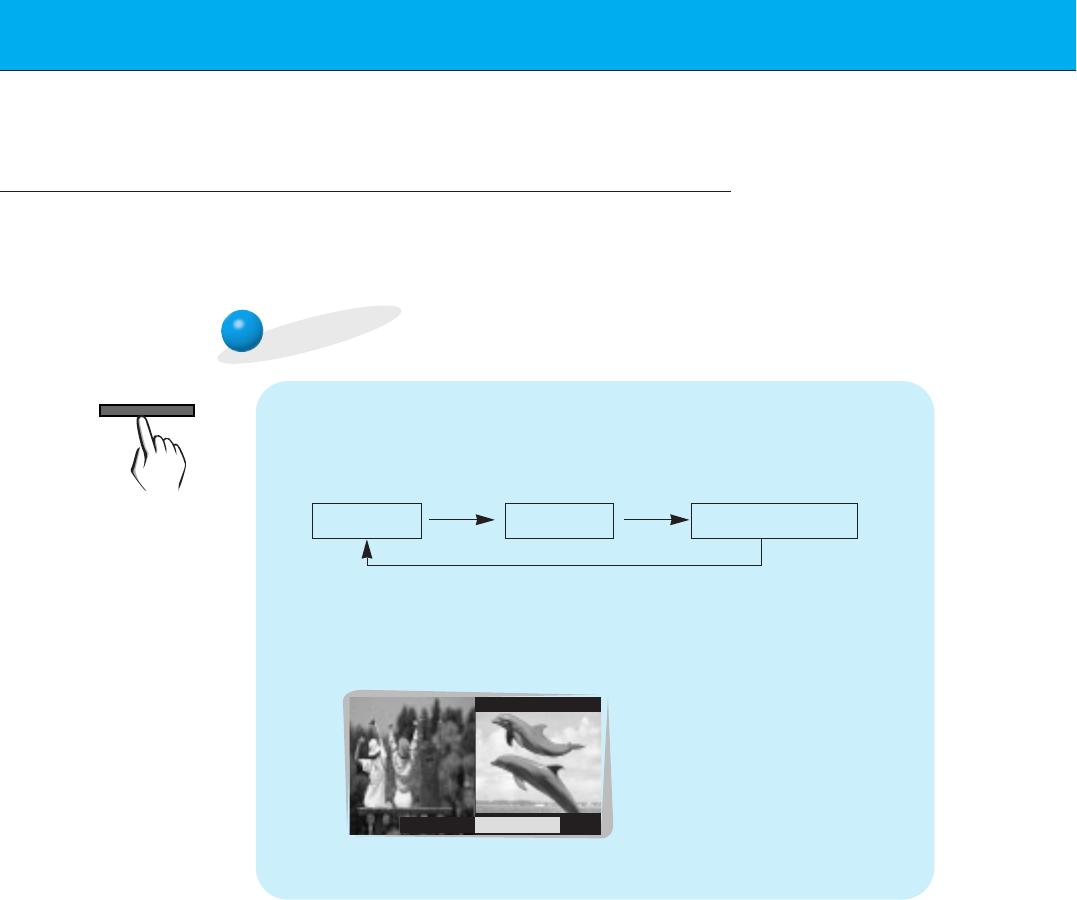
Picture In Picture (PIP) function
-PIP lets you view 2 different inputs (sources) on your monitor screen at the same time. One source will
be large, and the other source will show a smaller inset image.
- Select RGB input source before pressing PIP.
- This function works only in the following resolutions;
640x480, 800x600, 1024x768 (only in Vertical frequency 60 Hz)
- When you select RGB or DTV for main picture in PIP/Twin picture, you can watch video, cable TV or
DVD for sub picture.
- Color of main picture may be different from PIP’s in PIP/Twin picture mode.
- If input source for main picture is changed while in PIP/Twin picture mode, sub picture will disappear.
- When watching PIP/Twin picture, SCREEN option is not available in Special menu.
- With PIP active, not all picture formats can be used for the main/sub picture.
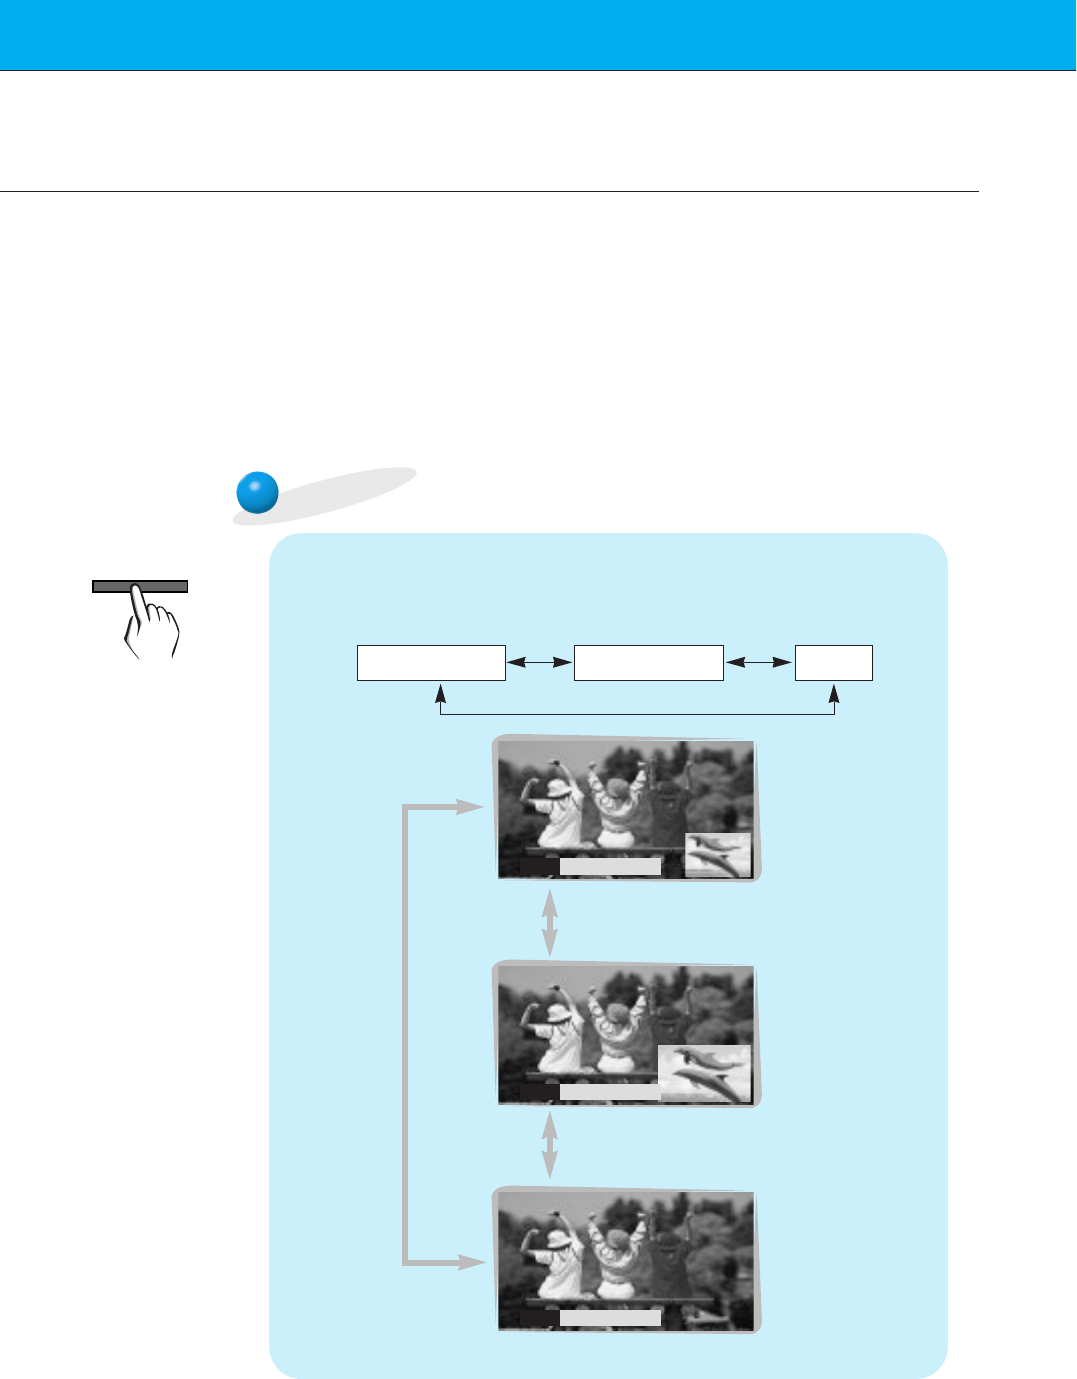
Watching the PIP (Picture in Picture)
Press the PIP button.
•Each time you press PIP or F /Gbutton, you can change the
PIP size as below.
PIP[S] PIP [L] OFF
PIP
F
PIP [S]
G
PIP
F
PIP [L]
G
PIP
F
OFF
G
<Small PIP>
<Large PIP>
<Off>
PIP
27
Safety instructions Monitor Overview Basic operation Sleep timer Picture & Sound Special features Others
Connections
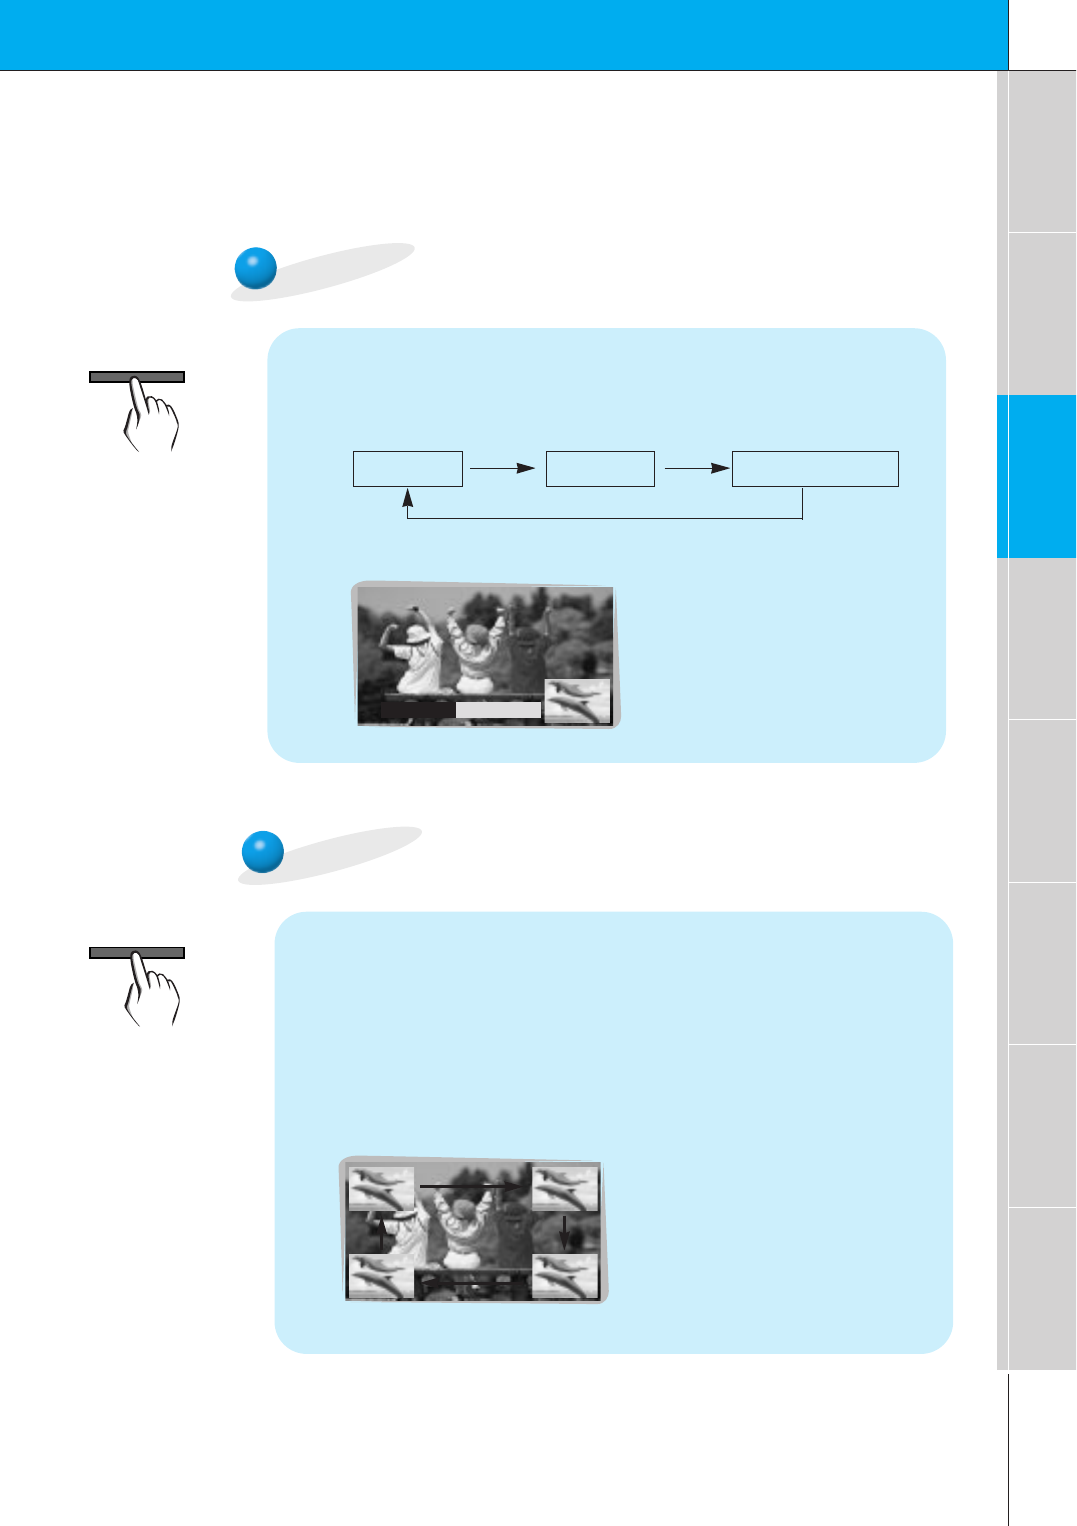
Selecting the source input signal
Press the PIP INPUT button in PIP mode.
•Each time you press PIP INPUT button, you toggle VIDEO,
S-VIDEO and COMPONENT.
COMPONENT source only works in 480i mode.
VIDEO S-VIDEO COMPONENT
PIP INPUT
F
VIDEO
G
Moving the Sub (inset) picture
Press the POSITION button in PIP mode.
•Each press of the POSITION button will change the position of
the sub picture on the screen as shown below.
PIP INPUT
POSITION
28
3
2
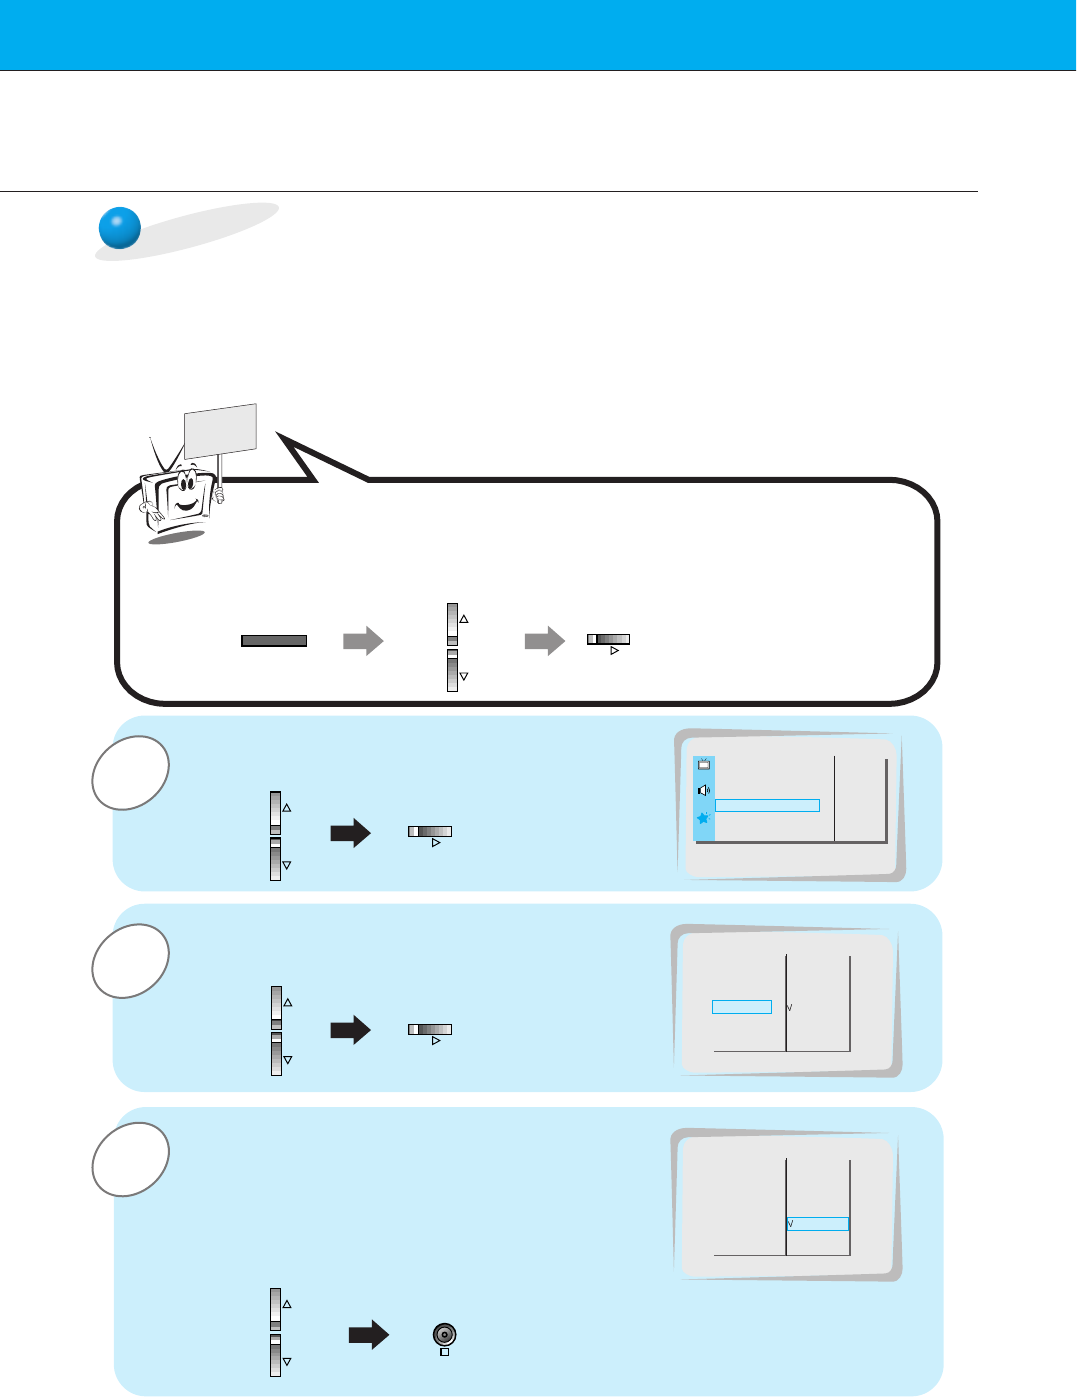
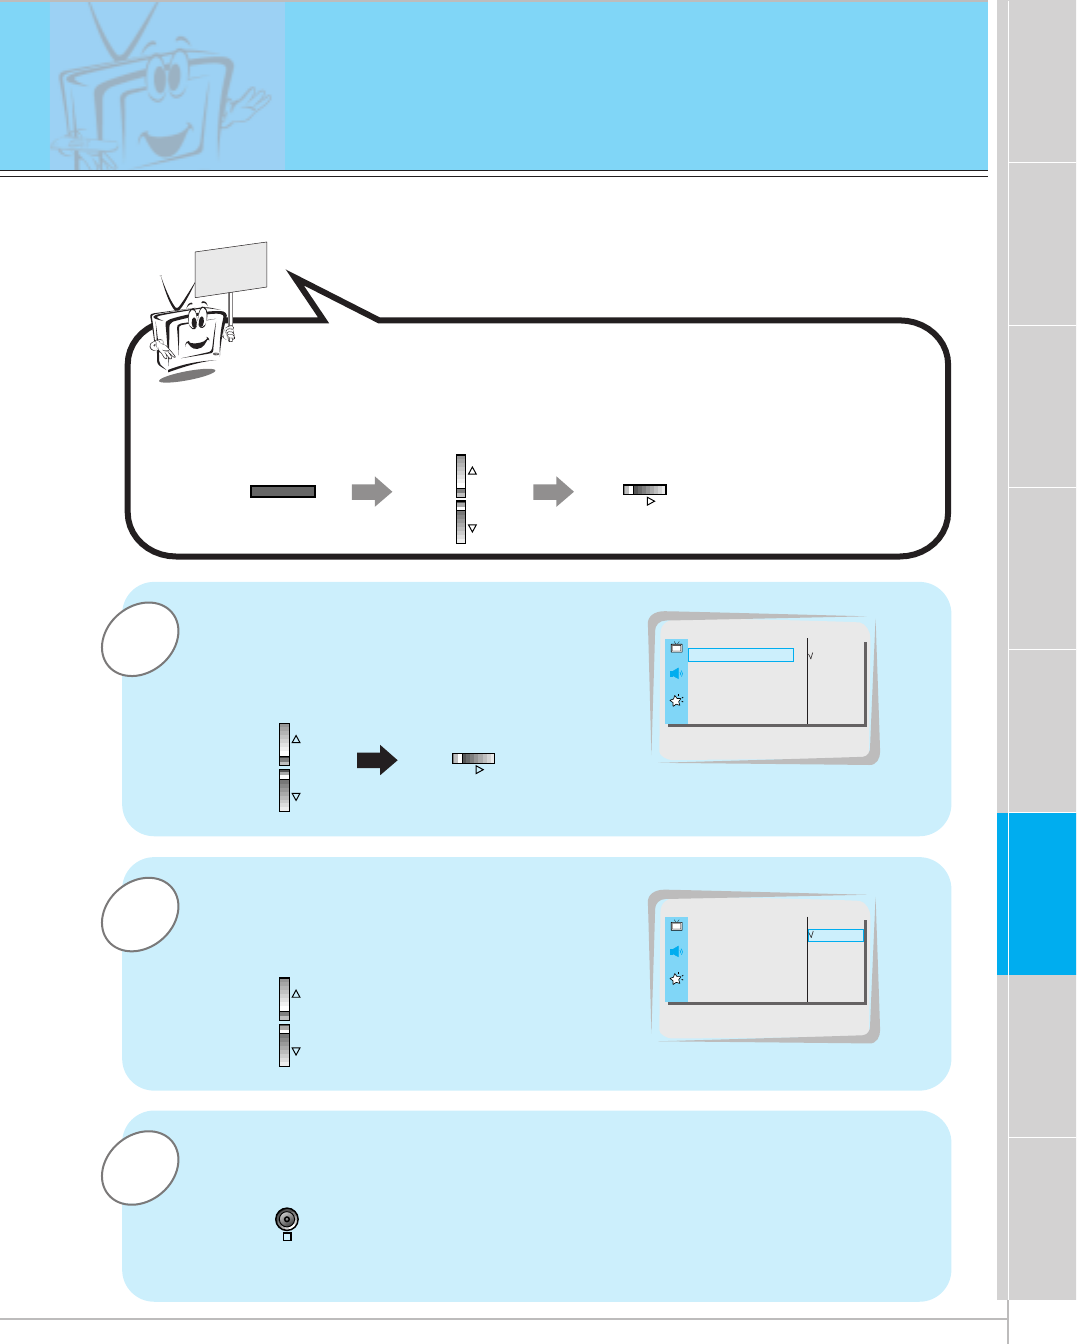
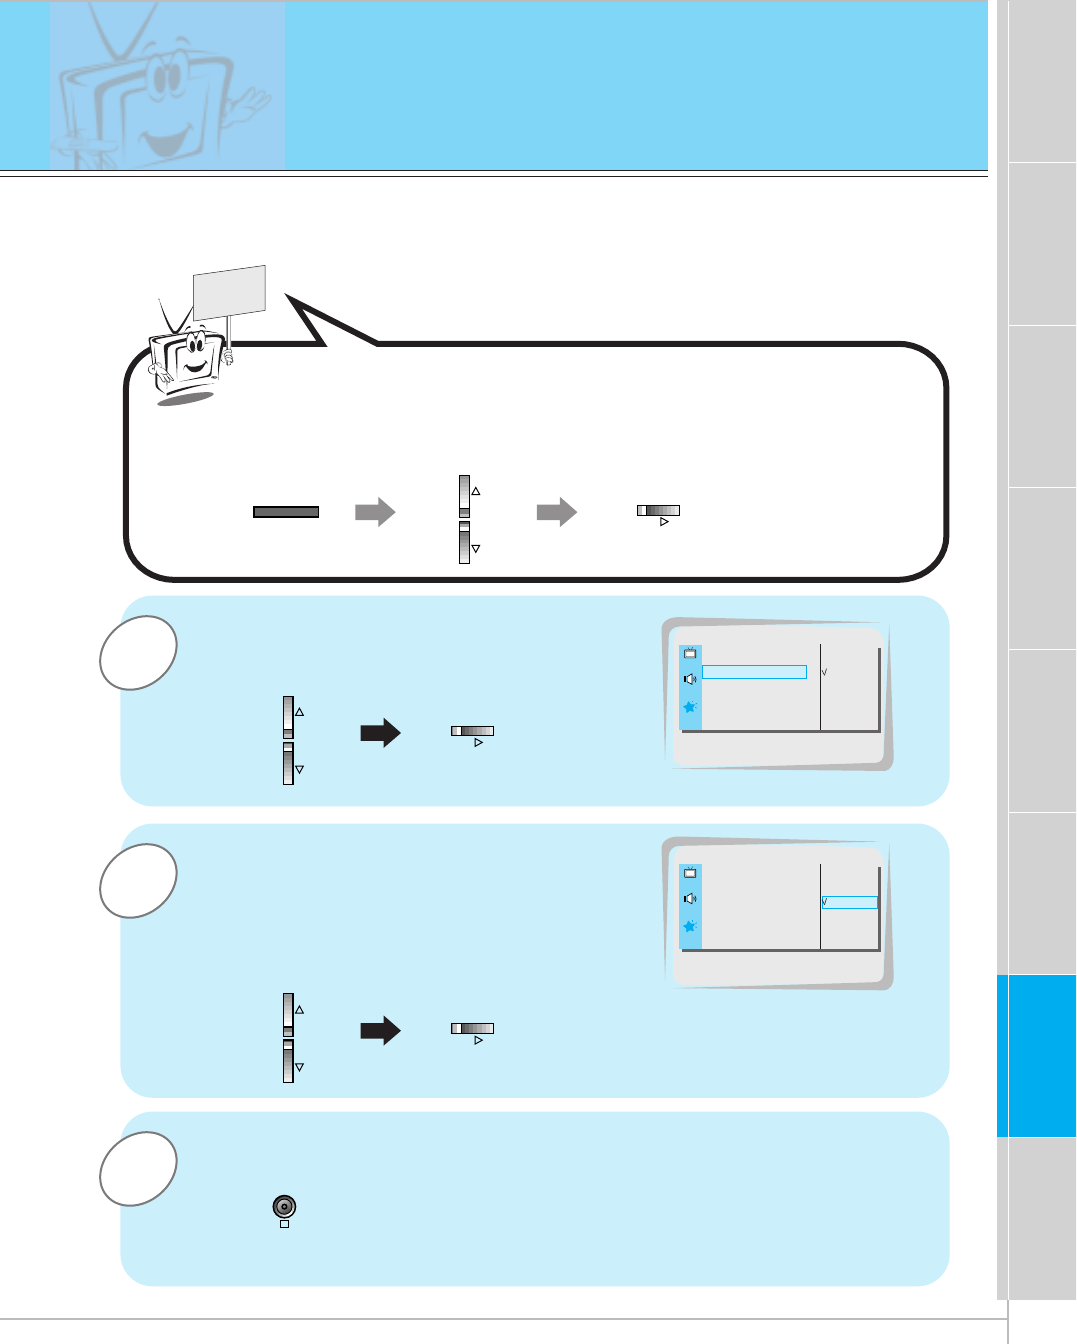
1Use the D / Ebuttons to select PIP/DW and
then press the Gbutton.
READY
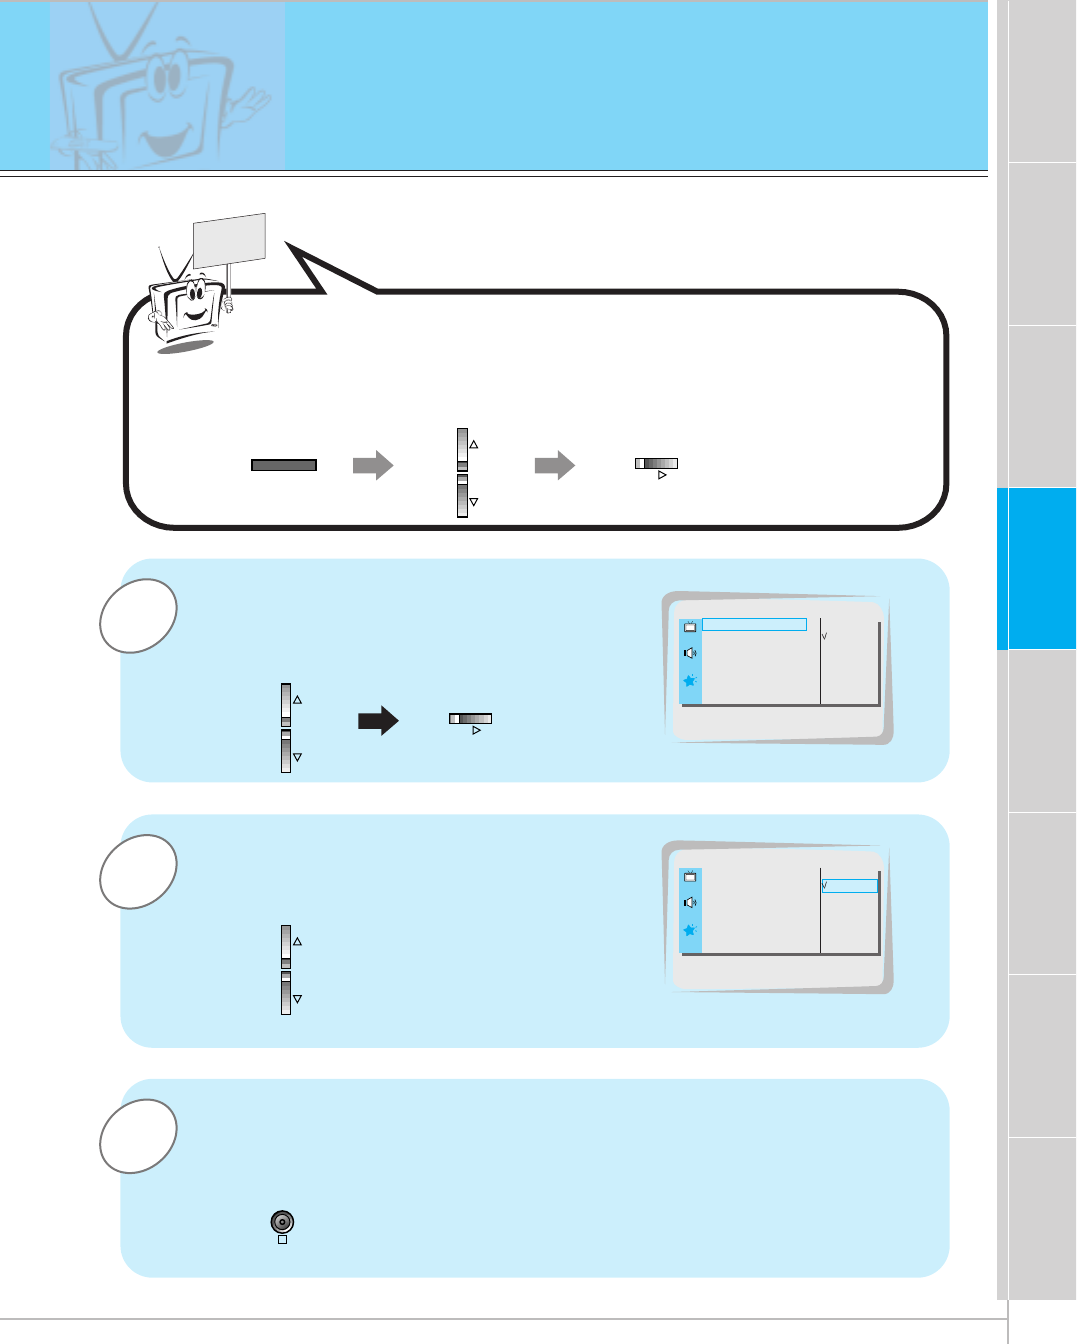
Press the D / Ebutton to select SOUND
SELECT and then press the Gbutton.
•Each time you press D / E button, you toggle
between SOUND [M] or SOUND [S].
Press the D / Ebuttons to select main
image sound (SOUND [M]) or PIP (inset
image) sound (SOUND [S]) and then press
the OK button.
LANGUAGE
G
CAPTION
G
AUTO OFF
G
SCREEN
G
RGB-OUTPUT
G
DW
G
PIP
G
INPUT
G
SOUND SELECT
G
POSITION
G
SOUND [M]
SOUND [S]
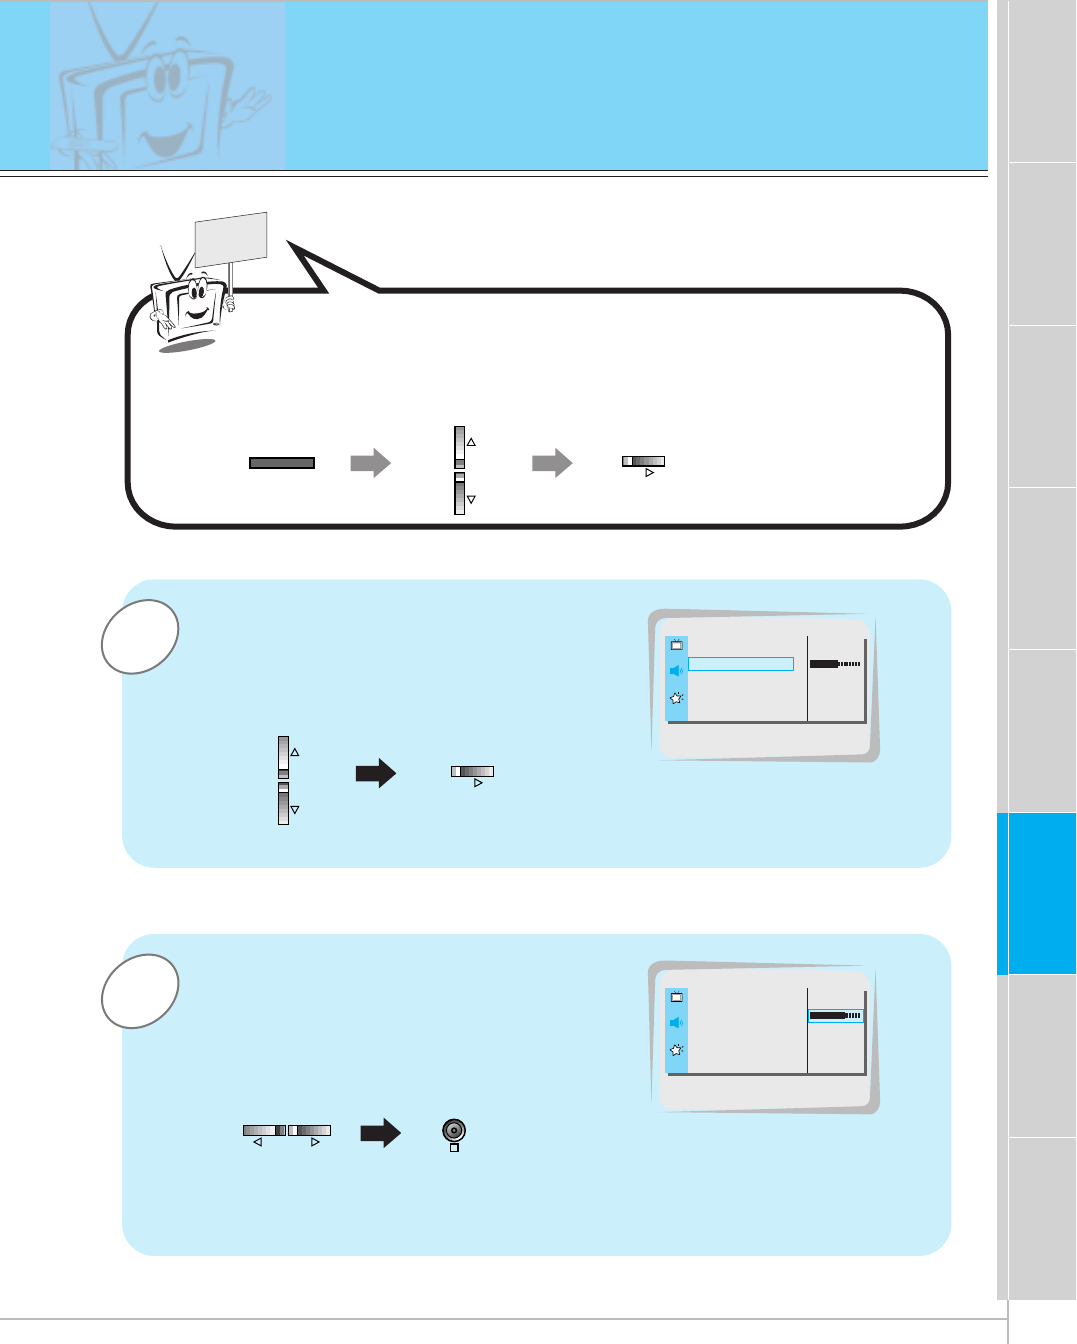
Press the MENU button and then press the D / Ebutton to
select SPECIAL menu.
Press the Gbutton.
SOUND SELECT
LANGUAGE
G
CAPTION
G
AUTO OFF
G
SCREEN
G
RGB-OUTPUT
G
DW
G
PIP
G
INPUT
G
SOUND SELECT
G
POSITION
G
SOUND [M]
SOUND [S]
LANGUAGE G
ARC G
SCREEN G
TRANSPARENCY G
PIP/DW G
SET ID G
COLOR TEMP. G
G
TO SET
SPECIAL
PIP/DW
- To select main or sub (inset) sound
- This function only works with the following resolutions;
640x480, 800x600, 1024x768 (only in Vertical frequency 60 Hz)
- To use this function, connect PC/DTV video output to RGB-PC INPUT/RGB-DTV INPUT and connect PC/DTV
audio outputs to AUDIO INPUT.
-SOUND SELECT is always the main picture sound (SOUND[M]) regardless of prior sound choice.
Selecting PIP sound options
SOUND [S]
Picture In Picture (PIP) function
MENU
VOL
VOL
VOL
OK
29
Safety instructions Monitor Overview Basic operation Sleep timer Picture & Sound Special features Others
Connections
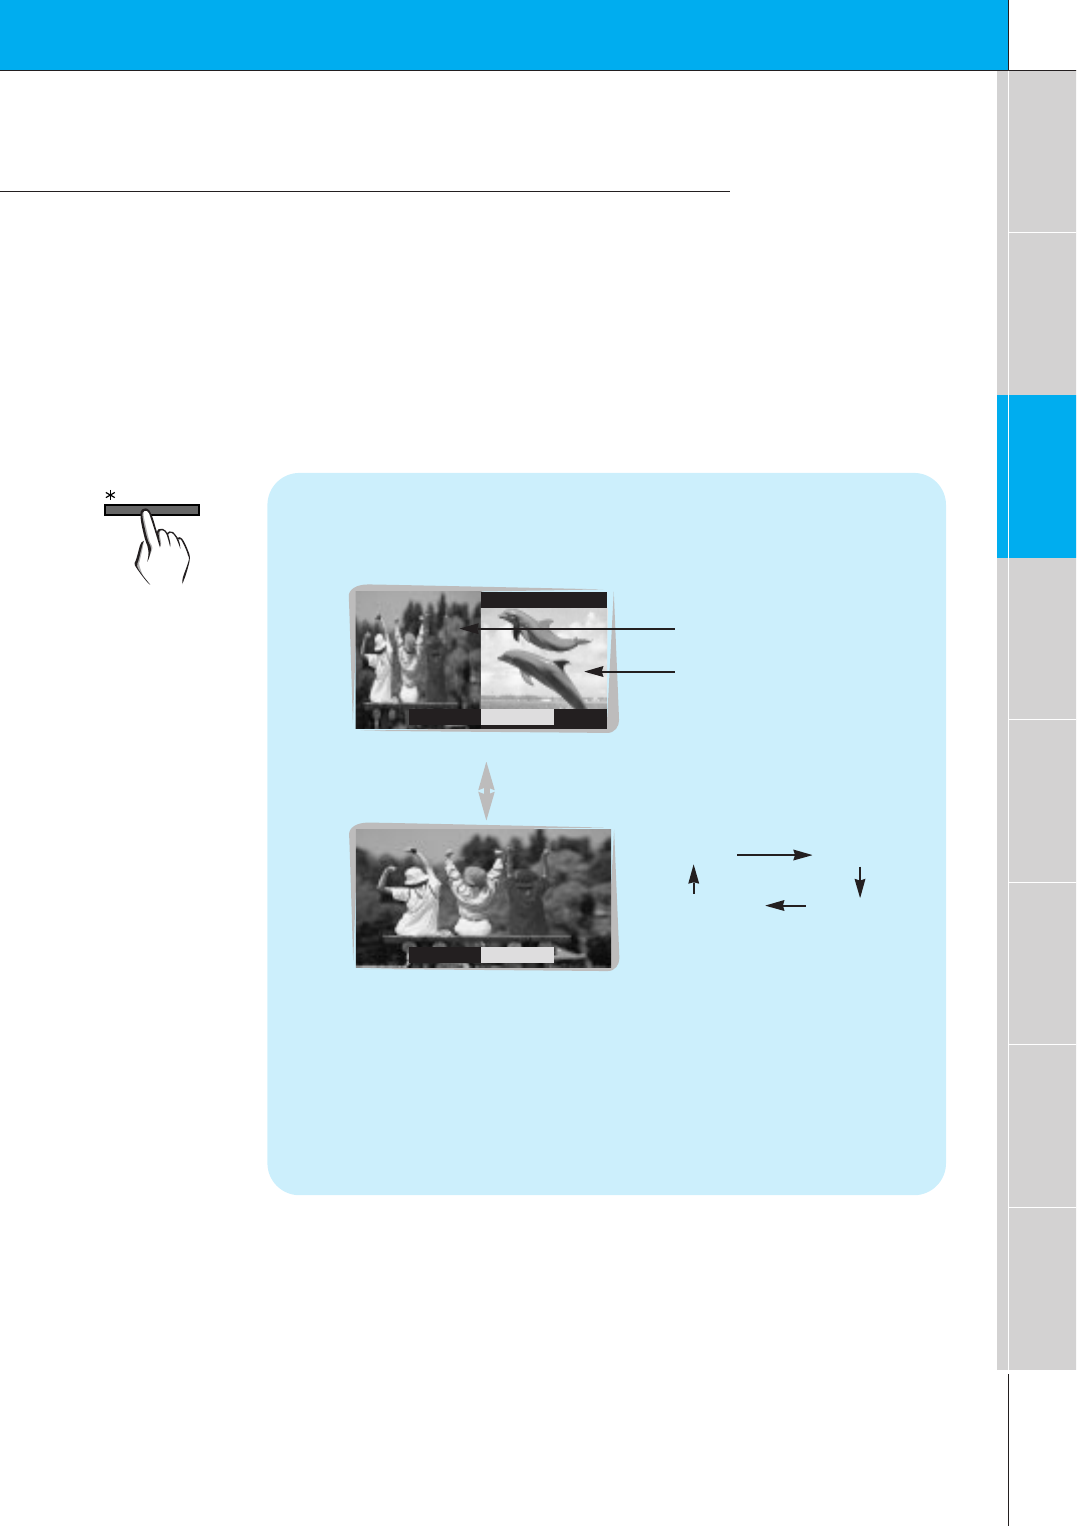
Twin picture mode
-As the name suggests, this mode splits the screen into 2, allowing 2 sources to be shown on
the monitor screen at the same time. Each source is given half the screen.
- Select RGB input source.
- This function works only in the following resolutions;
DTV 480p/720p/1080i, RGB 640x480 (only in Vertical frequency 60 Hz)
- With TWIN PICTURE active, not all picture formats can be used for the main/sub picture.
Press the ✱/TWIN PICTURE button.
•Each time you press ✱/TWIN PICTURE or F /Gbuttons, you
can select ON or OFF.
<ON>
<OFF>
DW
F
OFF
G
DW
F
ON
G
Sub picture
Main picture
• To avoid a permanent image
being burned into the screen,
the sub picture will move
every 2 hours.
:Center Upside
Downside Center
• The sub picture starts in the
center position and then
moves as described above.
• You may notice a small
amount of video noise at the
bottom or top of the sub pic-
ture. This is normal.
/ TWIN PICTURE
30
Twin picture mode
Selecting a source for the Twin picture
Press the PIP INPUT button in TWIN PICTURE mode.
•Each time you press PIP INPUT button, you toggle VIDEO,
S-VIDEO and COMPONENT.
COMPONENT source only works in 480i input signal.
PIP INPUT
F
VIDEO
G
VIDEO S-VIDEO COMPONENT
PIP INPUT
31
Safety instructions Monitor Overview Basic operation Sleep timer Picture & Sound Special features Others
Connections
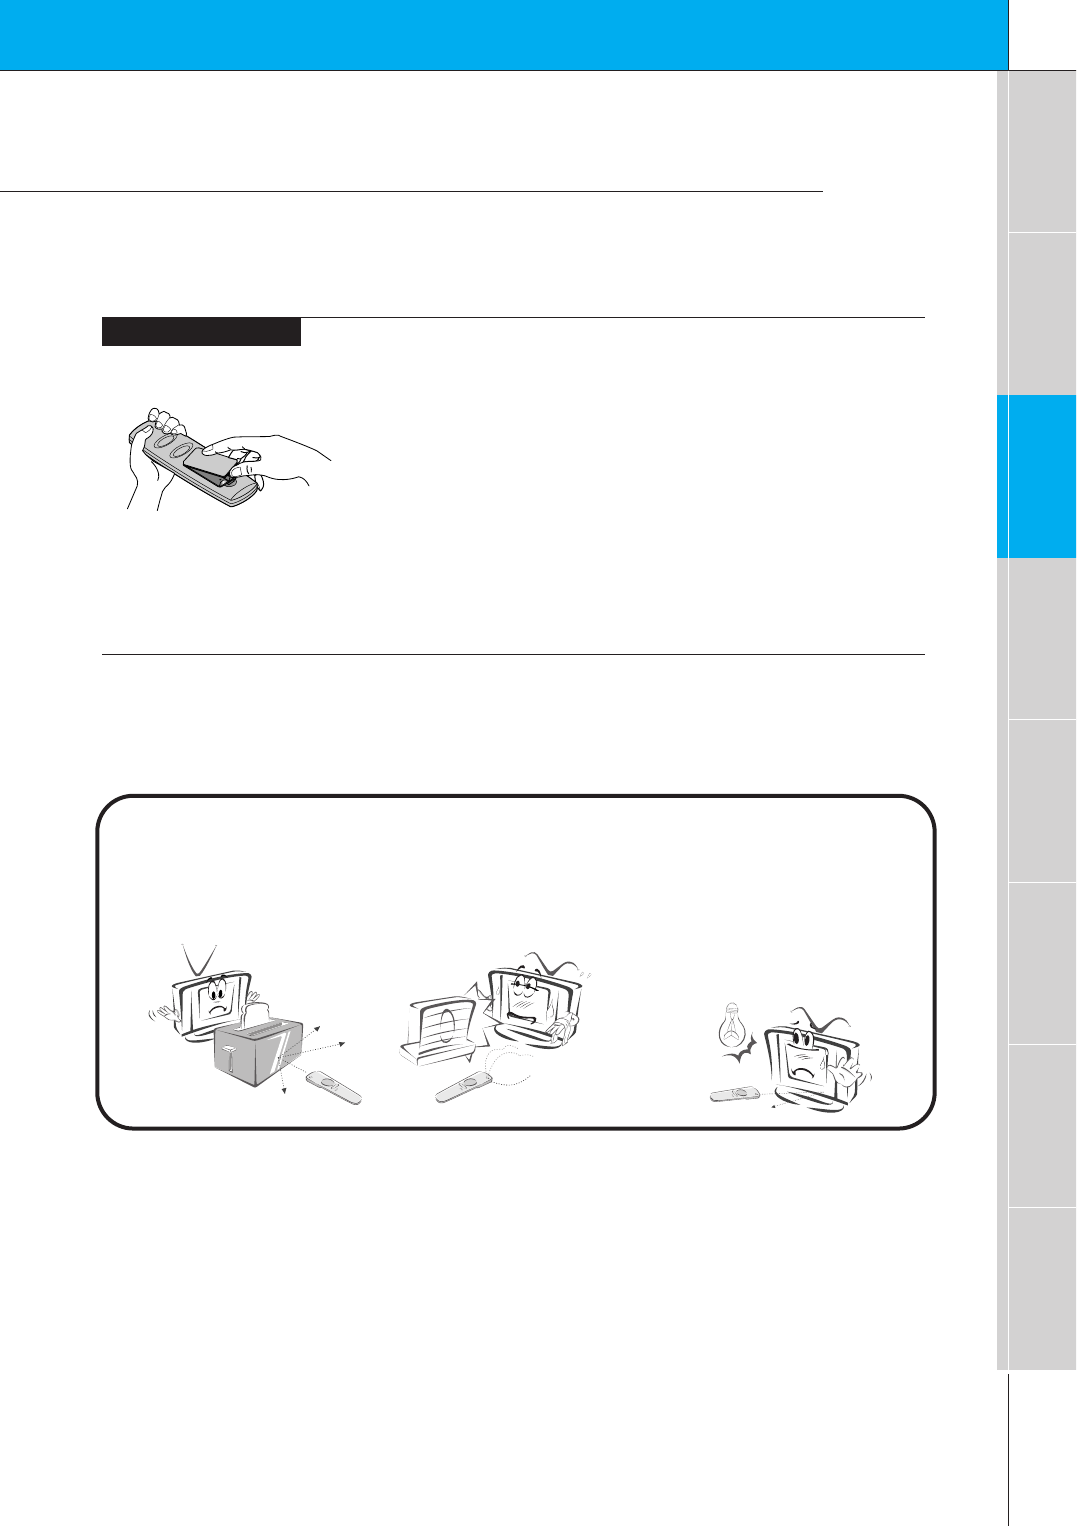
Using the remote control
Installing batteries
• Open the battery compartment cover on the back
of the remote control and insert the batteries with
correct polarity, match “+” with “+”, and match “-”
with “-”.
• Install two 1.5V “AAA” alkaline batteries.
Don’t mix used batteries with new batteries.
Notes for using the remote control
Make sure these are no
objects between the
remote control and its
sensor.
Don’t place the remote control
near a heater or damp place.
Strong impact on the remote con-
trol may cause operation failure.
Signal from the remote control
may be disturbed by sun light or
other strong light. In this case,
turn the set to other direction.
32
Turning on the Monitor
3
2
1
2
1
- When using the remote control, aim it at its sensor on the Monitor.
Turning on the Monitor just after installation
Turning on the Monitor (power cord is still connected)
Connect power cord correctly.
Press the main ON/OFF button on the Monitor. At this moment, the Monitor is
switched to standby mode. Press the or INPUT SELECT button on the
Monitor or press the POWER or INPUT SELECT button on the remote control
and then the Monitor will be turned on.
Press the or INPUT SELECT button on the Monitor or press the POWER
or INPUT SELECT button on the remote control and then the Monitor will be
turned on.
If the Monitor is turned off with the button on the Monitor
• Press the main ON/OFF button on the Monitor to turn on the Monitor.
If the Monitor is turned off with the ON/OFF button on the Monitor
• Press the main ON/OFF button on the Monitor and then press the or
INPUT SELECT button on the Monitor or press the POWER or INPUT
SELECT button on the remote control and then the Monitor will be turned on.
If the Monitor is turned off with the remote control and also the ON/OFF
button on the Monitor
Tips
•Adjusting volume level
The volume(GG) button increases the sound and the volume(FF) button reduces
the level of sound.
33
Safety instructions Monitor Overview Connections Basic operation Sleep timer Picture & Sound Special features Others
Selecting language for the menus
3
2
1
READY
Press the D / Ebutton to select LAN-
GUAGE and then press the Gbutton.
Press the D / Ebutton to select the
desired language.
Press the OK button to exit.
Press the MENU button and then press the D / Ebutton to
select SPECIAL menu.
Press the Gbutton.
LANGUAGE G
ARC G
SCREEN G
TRANSPARENCY G
PIP/DW G
SET ID G
COLOR TEMP. G
ENGLISH
ESPAÑOL
PORTUGUÊS
FRANÇAIS
SPECIAL
LANGUAGE
˙–„
LANGUAGE G
ARC G
SCREEN G
TRANSPARENCY G
PIP/DW G
SET ID G
COLOR TEMP. G
ENGLISH
ESPAÑOL
PORTUGUÊS
FRANÇAIS
SPECIAL
˙–„
ENGLISH
OK
MENU VOL
VOL
34
1
3
2
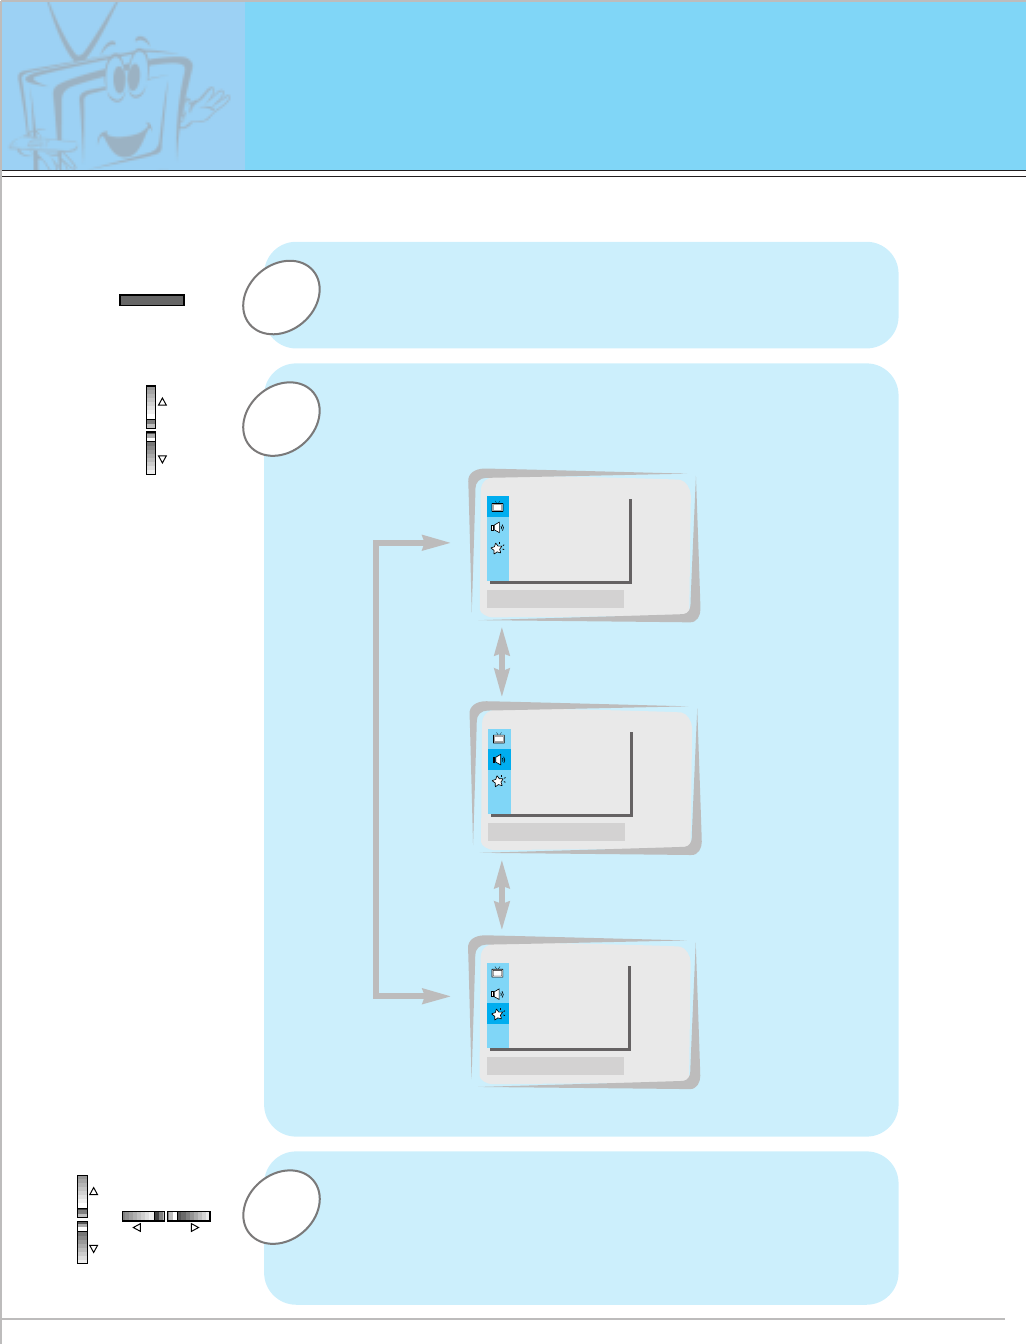
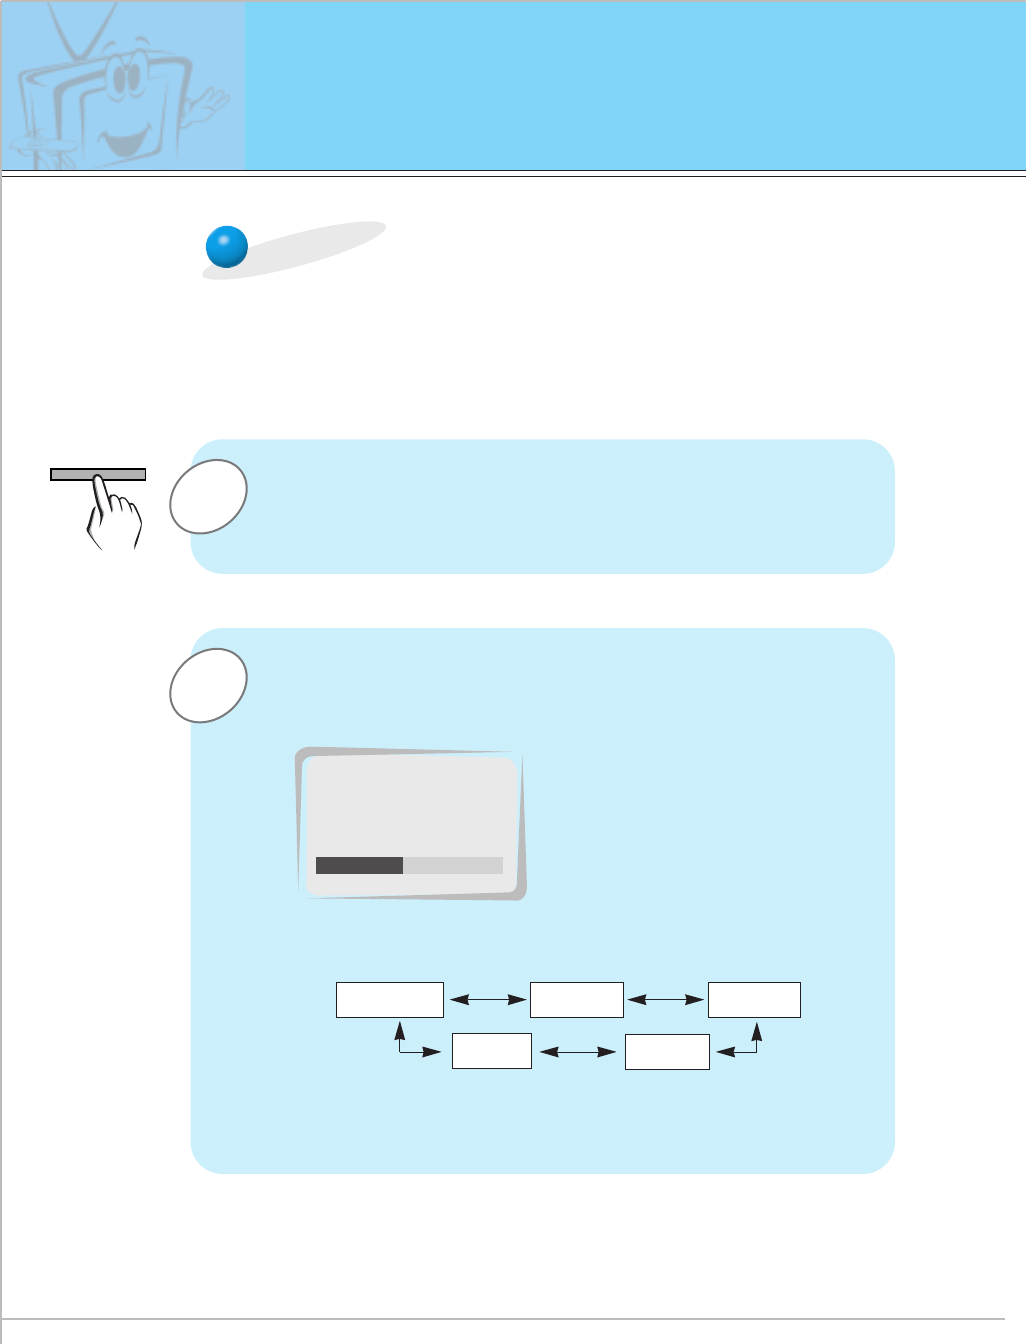
Press the MENU button.
Press the D / Ebutton.
•Each press will cycle through the menus shown below.
Checking features
Press the Gbutton to select a feature to adjust,
and then press the D / Eor F / Gbuttons to
adjust the selected item.
•Press the OK button to exit.
APC G
DRP G
CONTRAST 100 G
BRIGHTNESS 50 G
COLOR 50 G
TINT 0 G
SHARPNESS 50 G
MOVE GNEXT AEXIT
PICTURE
D
E
DASP G
AVL G
TREBLE 50 G
BASS 50 G
BALANCE 0 G
MOVE GNEXT AEXIT
SOUND
D
E
LANGUAGE G
ARC G
SCREEN G
TRANSPARENCY G
PIP/DW G
SET ID G
COLOR TEMP. G
MOVE GNEXT AEXIT
SPECIAL
D
E
<Picture menu>
<Sound menu>
<Special menu>
-Use the remote control to make adjustments.
- Select VIDEO input source
MENU
VOL VOL
35
Safety instructions Monitor Overview Connections Basic operation Sleep timer Picture & Sound Special features Others
Setting Sleep Timer
Sleep Timer turns the Monitor off after a preset time
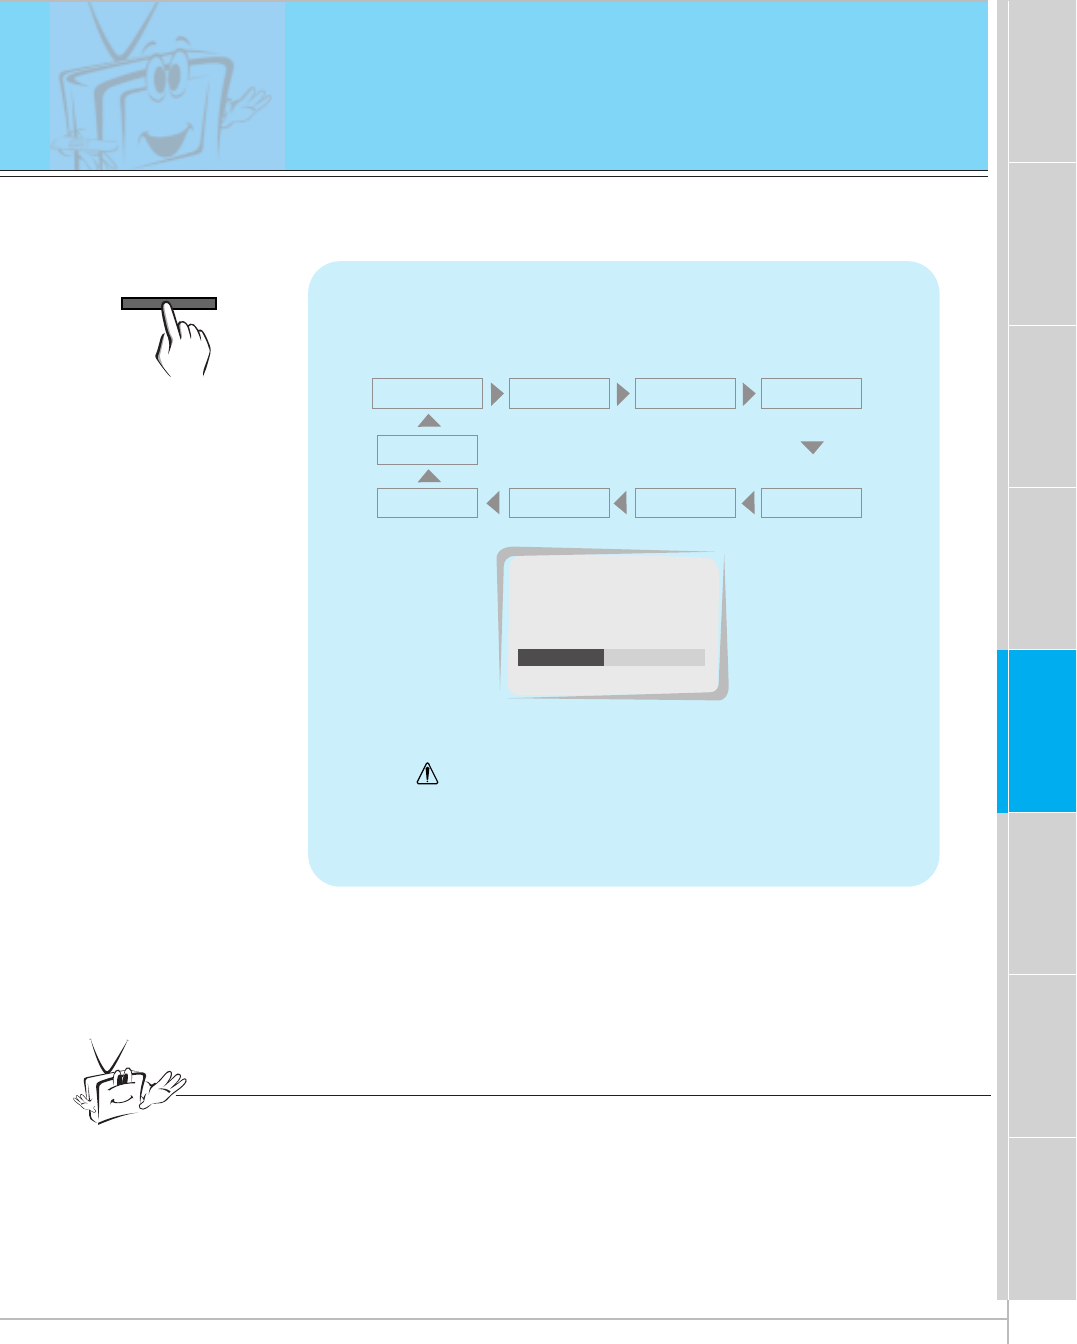
Press the SLEEP button to set sleep time.
Each time you press SLEEP button, the next pre-
set setting time is changed as follows:
• To release sleep time setting, press the SLEEP or
F /Gbutton repeatedly to select F--- G.
•‘ SLEEP 1’will be displayed one minute before
the Monitor is due to switch off.
F--- G F 10 GF20 G F 30 G
F120 GF 180 G
F240 G
F90 G F 60 G
Tips
•When the sleep time you want is displayed on the screen, don’t press the
SLEEP button. After 20 seconds, the screen display disappears and sleep
time is set.
• To check remaining sleep time after setting, press the SLEEP or OK button
just once.
• If you turn the Monitor off after setting the sleep timer, the setting is erased.
The sleep timer will then have to be set again.
F 30 G
SLEEP
SLEEP
36
2
1
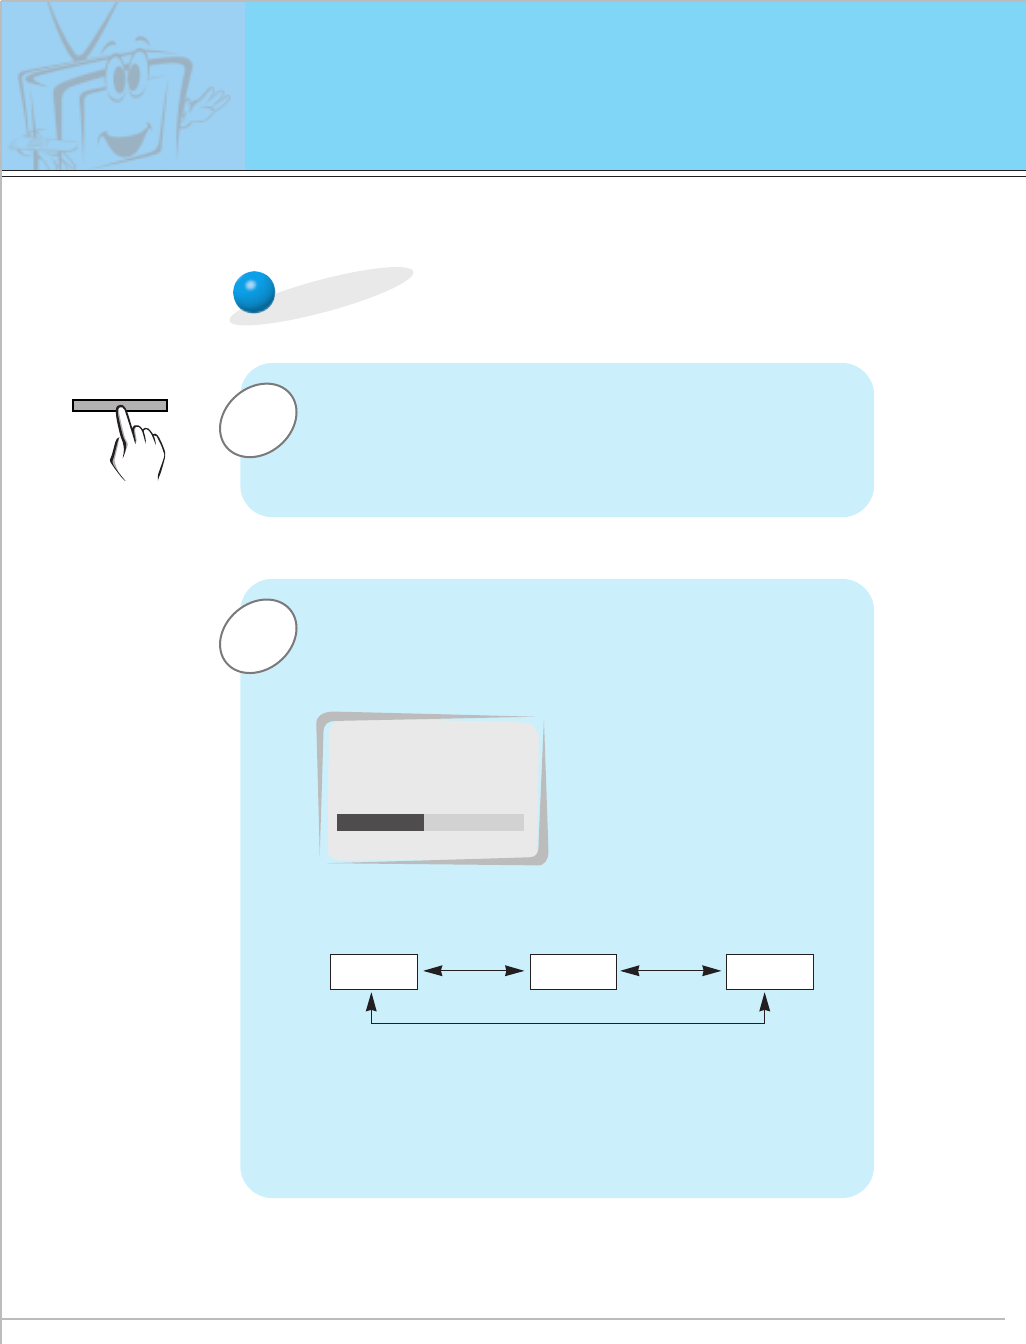
APC (Auto Picture Control)
Press the APC button.
Press the APC or F / Gbuttons to select your
desired picture condition.
•Each press of F /Gbuttons changes the screen display as
shown below.
• You can also select CLEAR, SOFT or USER in the PIC-
TURE menu. User refers to adjustments you made to the
picture menu items. See next page.
CLEAR SOFT USER
F CLEAR G
APC
Auto picture control
Use APC to set the Monitor for the best picture appearance
-APC is not available in RGB or PIP/TWIN PICTURE modes.
APC
37
Safety instructions Monitor Overview Connections Basic operation Sleep timer Picture & Sound Special features Others
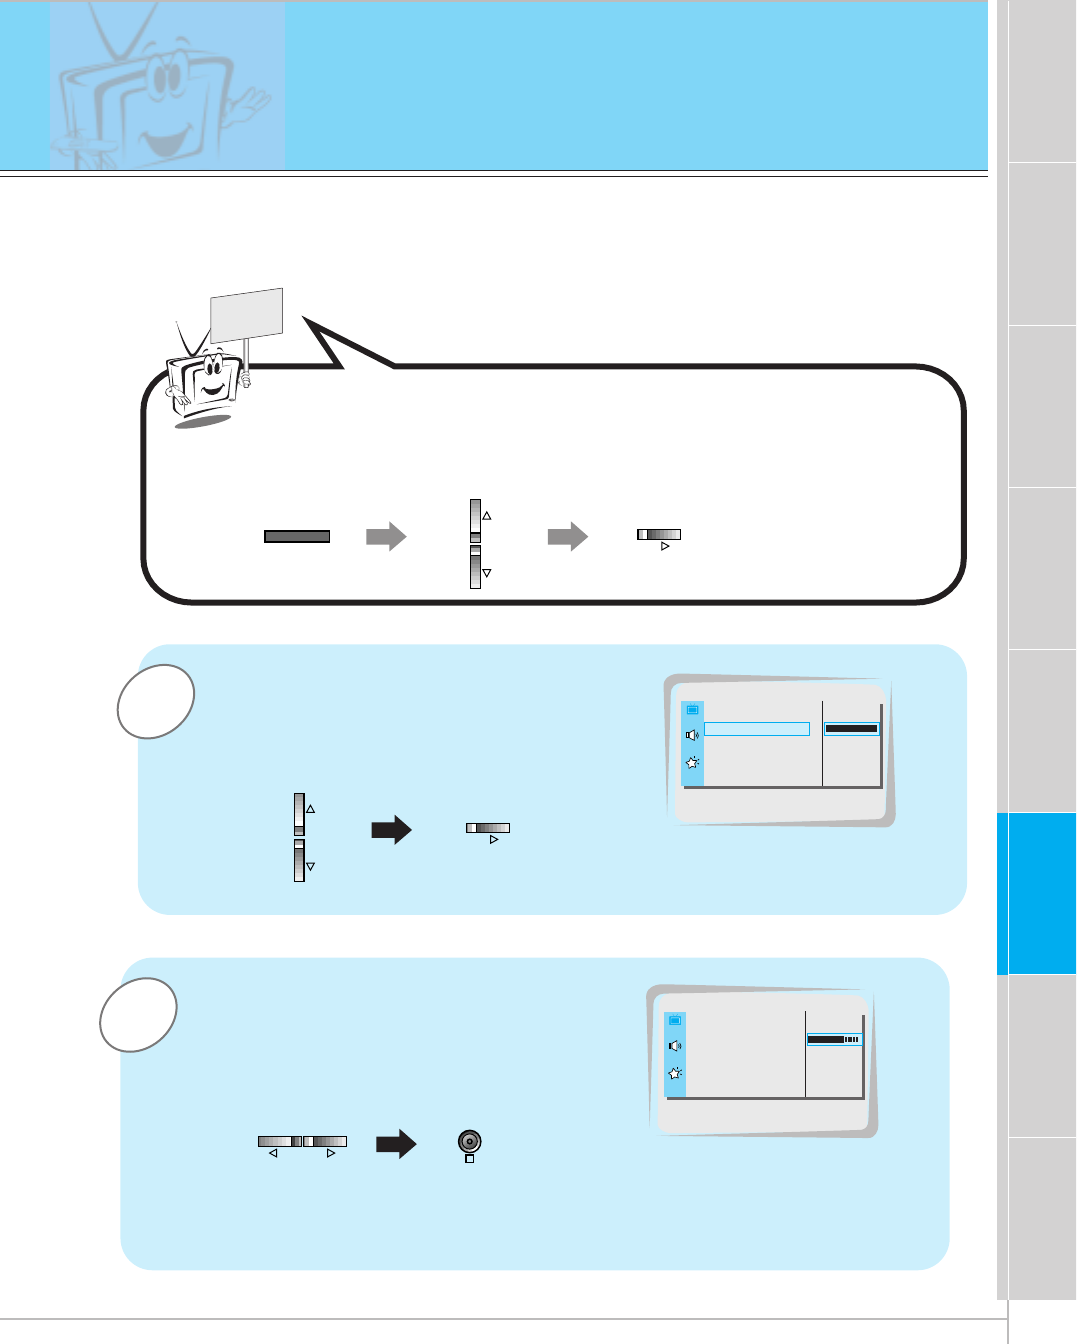
2
1
READY
Example : Changing the contrast.
Press the D / Ebutton to select CON-
TRAST and then press the
Gbutton.
•Adjust BRIGHTNESS, COLOR, TINT and
SHARPNESS in the same way.
Use the F / Gbuttons to make appro-
priate adjustments and then press the
OK button.
•Press the D /Ebuttons to select other items.
Press the MENU button and then press the D / Ebutton to
select PICTURE menu.
Press the Gbutton.
Adjusting picture appearance
APC G
DRP G
CONTRAST 100 G
BRIGHTNESS 50 G
COLOR 50 G
TINT 0 G
SHARPNESS 50 G
PICTURE
CONTRAST 100
APC G
DRP G
CONTRAST 70 G
BRIGHTNESS 50 G
COLOR 0 G
TINT 0 G
SHARPNESS 50 G
PICTURE
- PIP and Twin picture inset settings are not adjustable.
OK
VOL VOL
MENU VOL
VOL

38
DRP (Digital Reality Picture)
DRP improves image outlines in dark screens.
3
1
READY
Press the D / Ebutton to select DRP
and then press the Gbutton.
Press the OK button to exit.
APC G
DRP G
CONTRAST 100 G
BRIGHTNESS 50 G
COLOR 50 G
TINT 0 G
SHARPNESS 50 G
CLEAR
SOFT
PICTURE
DRP
2Press the D / Ebutton to select
CLEAR or SOFT.APC G
DRP G
CONTRAST 100 G
BRIGHTNESS 50 G
COLOR 50 G
TINT 0 G
SHARPNESS 50 G
CLEAR
SOFT
PICTURE
CLEAR
-This function works in video, component 480i mode.
Press the MENU button and then press the D / Ebutton to
select PICTURE menu.
Press the Gbutton.
MENU
VOL
OK
VOL
39
Safety instructions Monitor Overview Connections Basic operation Sleep timer Picture & Sound Special features Others
Adjusting sound
Manual setting
2
1
READY
Example : Adjustment treble
Use the D / Ebuttons to select
TREBLE and then press the
Gbutton.
•Adjust BASS and BALANCE in the same way.
Use the F / Gbuttons to make appropri-
ate adjustment and then press the OK
button to exit.
•Press the D /Ebuttons to select other options.
Press the MENU button and then press the D / Ebutton to
select SOUND menu.
Press the Gbutton.
DASP G
AVL G
TREBLE 50 G
BASS 50 G
BALANCE 0 G
SOUND
TREBLE 50
DASP G
AVL G
TREBLE 70 G
BASS 50 G
BALANCE 0 G
SOUND
OK
VOL VOL
MENU VOL
VOL
40
Auto Sound Control
DASP (Digital Auto Sound Processing)
•This function lets you enjoy the best sound without any manual adjustment
because the Monitor automatically selects the appropriate audio tone levels
based on the program content.
1Press the DASP button.
2Press the DASP or F / Gbuttons to select a sound
setup.
•Each press of DASP or F /Gbuttons changes the screen
display as shown below.
• You can also select FLAT, SPORTS, CINEMA, MUSIC or
USER in the SOUND menu.
FLAT SPORTS
USER
CINEMA
MUSIC
F USER G
DASP
DASP
41
Safety instructions Monitor Overview Connections Basic operation Sleep timer Special features Others
Picture & Sound
AVL (Auto Volume Leveler)
This feature maintains an equal volume level; even if you change channels.
3
1
READY
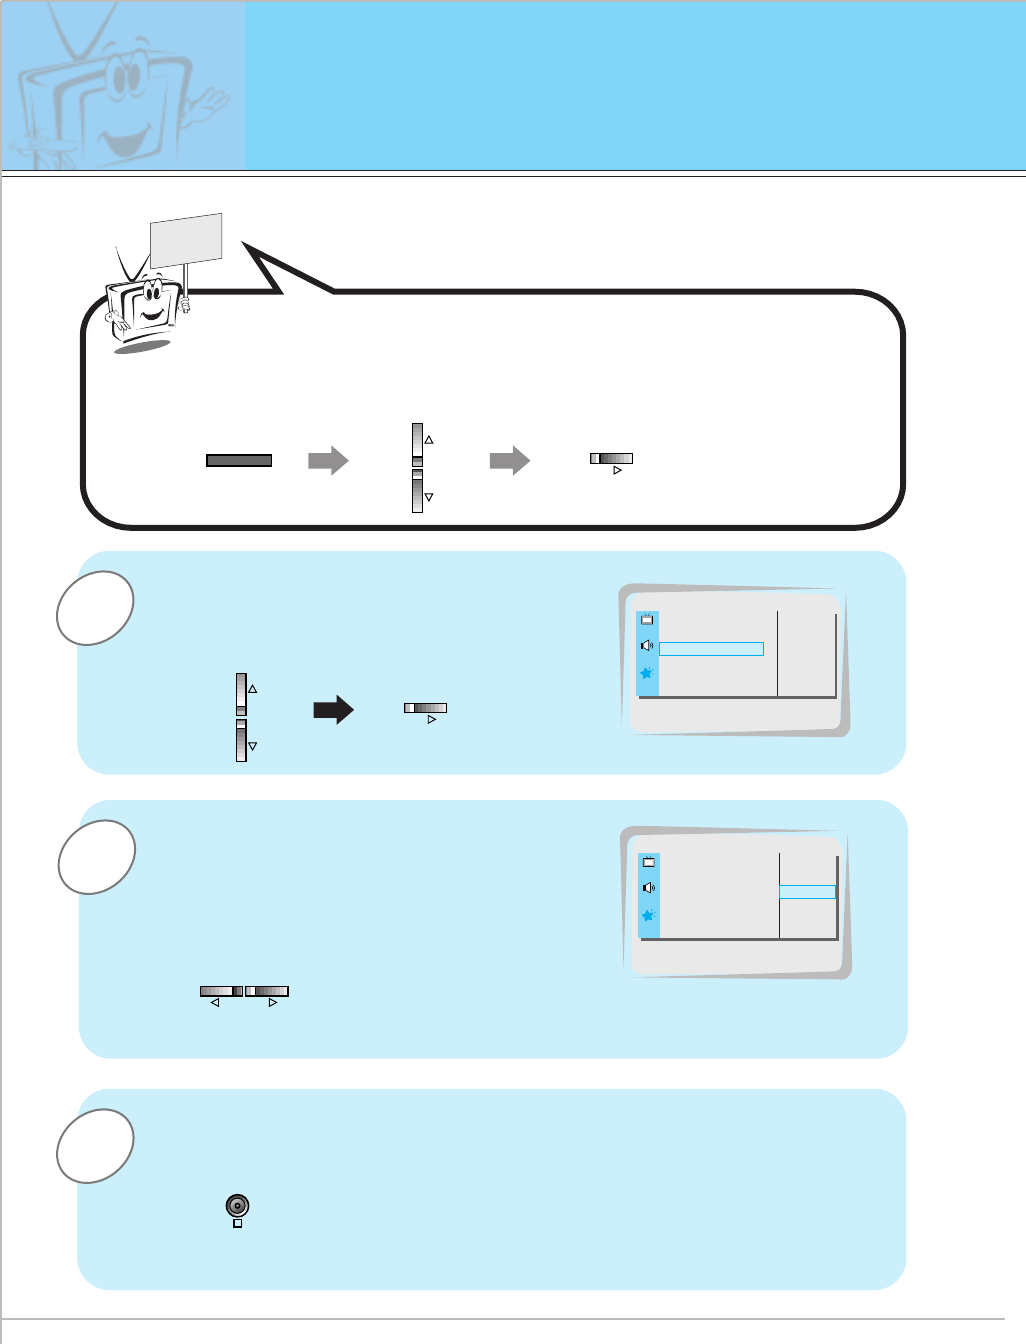
Press the D / Ebutton to select AVL
and then press the Gbutton.
Press the OK button to exit.
Press the MENU button and then press the D / Ebutton to
select SOUND menu.
Press the Gbutton.
DASP G
AVL G
TREBLE 50 G
BASS 50 G
BALANCE 0 G
ON
OFF
SOUND
AVL
2Press the D / Ebutton to select ON or
OFF.
ON
OFF
SOUND
ON
DASP G
AVL G
TREBLE 50 G
BASS 50 G
BALANCE 0 G
OK
MENU VOL
VOL
42
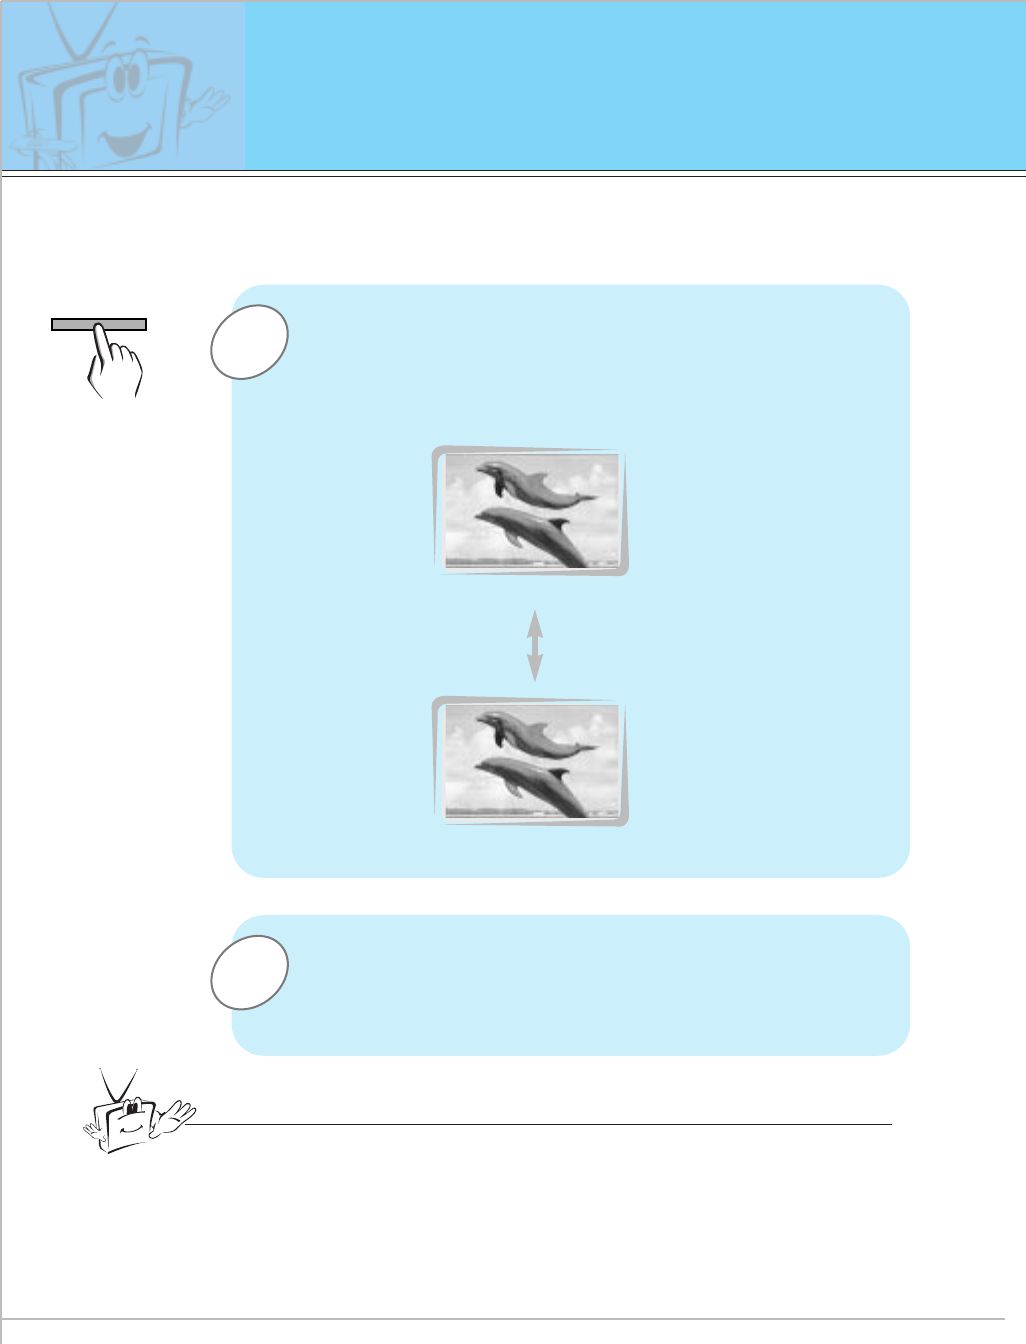
Using Still function
1
2
Press the STILL button.
•The image displayed is frozen(still).
• The sub picture is stilled in PIP or Twin picture mode.
• In PIP or TWIN PICTURE modes, the sub (inset) picture is
frozen.
<Moving image>
<Still image>
To return to normal viewing, press the STILL button
again.
Tips
•If still picture is on the screen for more than 5 minutes, the image becomes
dark.
If another function is activated, normal brightness of the screen is restored.
• This is a protective feature designed to reduce a ghost image burning into the
monitor.
• This feature does not work with RGB source.
-This feature isn’t available for RGB input source.
- Use with A/V or COMPONENT video inputs.
STILL
43
Safety instructions Monitor Overview Connections Basic operation Sleep timer Picture & Sound Special features Others
3
2
1
READY
Use the D / Ebutton to select SCREEN
and then press the Gbutton.
Use the D / Ebuttons to select TV or VCR.
•Select the VCR option if watching a VCR.
• Select the TV option for other
equipment.(Except VCR)
• Each time you press the D / Ebutton you toggle
between TV and VCR.
Press the OK button to exit.
Press the MENU button and then press the D / Ebutton to
select SPECIAL menu.
Press the Gbutton.
LANGUAGE G
ARC G
SCREEN G
TRANSPARENCY G
PIP/DW G
SET ID G
COLOR TEMP. G
TV
VCR
SPECIAL
SCREEN
LANGUAGE G
ARC G
SCREEN G
TRANSPARENCY G
PIP/DW G
SET ID G
COLOR TEMP. G
TV
VCR
SPECIAL
VCR
Using the screen options
- This function works only in the video mode.
-
Use this option if there are a trembling or instability of a video tape on screen during viewing
the video.
OK
MENU
VOL
VOL
VOL
44
Adjusting OSD Transparency
To make the menus clear or opaque
3
2
1
READY
Press the D / Ebutton to select
TRANSPARENCY and then press the
Gbutton.
Press the F / Gbuttons to adjust OSD
transparency.
•The adjustment range of TRANSPARENCY
is 0 ~ 5.
Press the OK button to exit.
Press the MENU button and then press the D / Ebutton to
select SPECIAL menu.
Press the Gbutton.
LANGUAGE G
ARC G
SCREEN G
TRANSPARENCY G
PIP/DW G
SET ID G
COLOR TEMP. G
5
SPECIAL
TRANSPARENCY
LANGUAGE G
ARC G
SCREEN G
TRANSPARENCY G
PIP/DW G
SET ID G
COLOR TEMP. G
SPECIAL
3
OK
MENU VOL
VOL
VOL VOL
45
Safety instructions Monitor Overview Connections Basic operation Sleep timer Picture & Sound Special features Others
READY
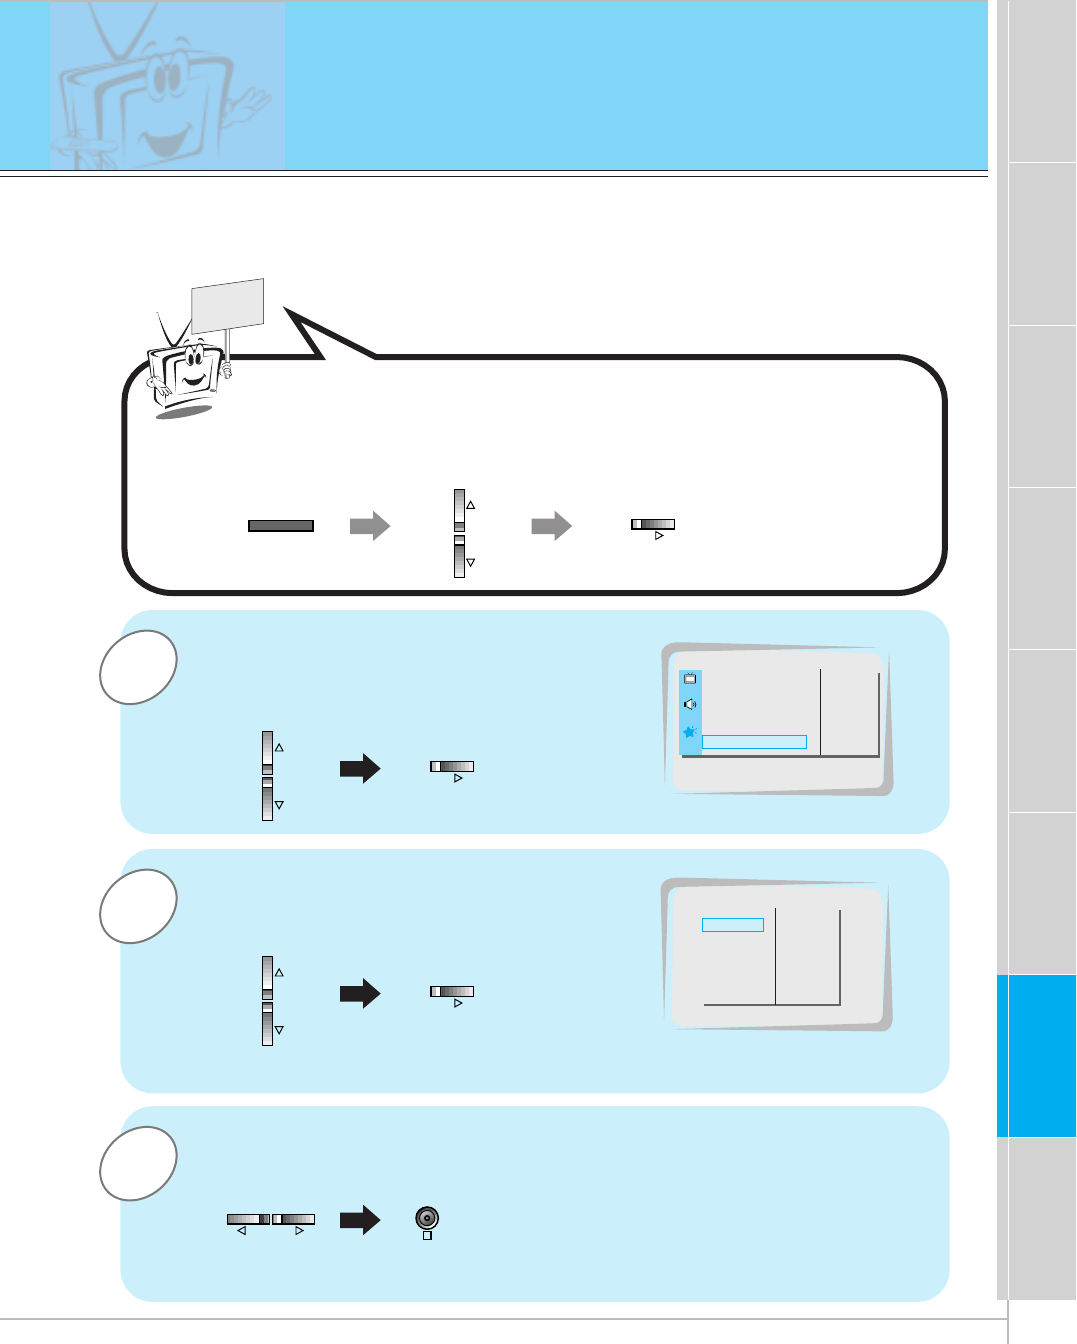
Press the MENU button and then press the D / Ebutton to
select SPECIAL menu.
Press the Gbutton.
MENU
VOL
Adjusting color temperature
3
2
1Press the D / Ebutton to select
COLOR TEMP. and then press the G
button.
Press the D / Ebutton to select RED and
then press the Gbutton.
(to adjust RED setting)
Use the F / Gbutton to make appropriate adjustments and then
press the OK button.
•The adjustment range of RED, GREEN and BLUE is -5 ~ +5.
• Adjust GREEN and BLUE in the same way.
OK
VOL
VOL
VOL VOL
LANGUAGE G
ARC G
SCREEN G
TRANSPARENCY G
PIP/DW G
SET ID G
COLOR TEMP. G G TO SET
SPECIAL
COLOR TEMP.
LANGUAGE
G
CAPTION
G
AUTO OFF
G
SCREEN
G
RGB-OUTPUT
G
RED
G
GREEN
G
BLUE
G
0
RED
- You should be adjust color temperature in PC mode again although color temperature is
adjusted in other input source.
- To initialize adjusted value, select ‘0’ in RED, GREEN and BLUE.
46
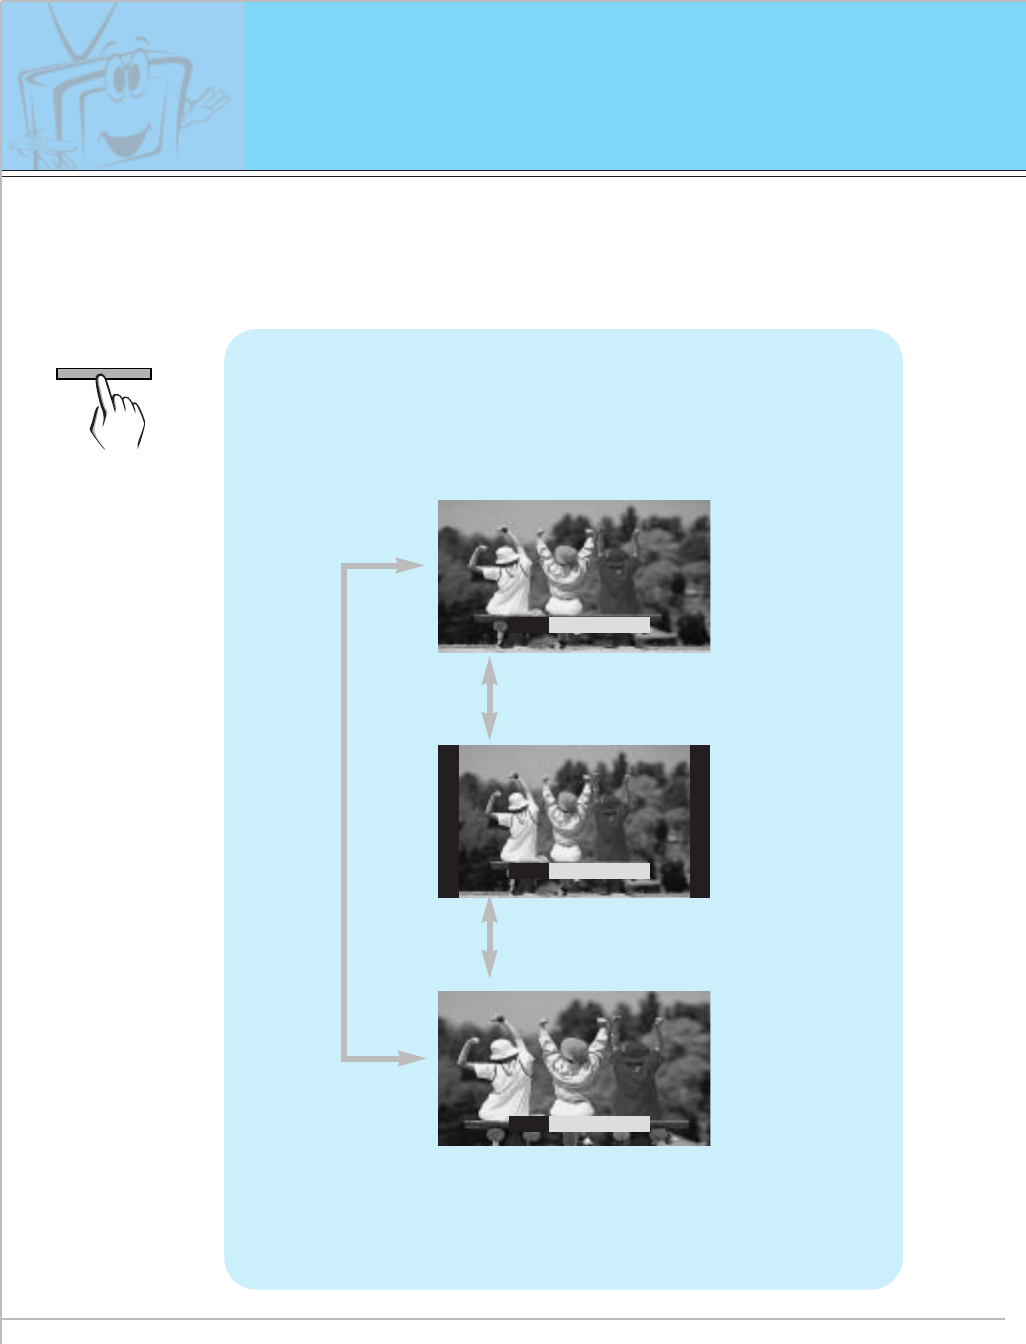
Setting picture format
Press the ARC button to select a desired picture
format.
• You can also select 16:9, 4:3 or ZOOM in the SPECIAL menu.
• Each time you press ARC or F /Gbuttons, you can
select 16:9, 4:3 or ZOOM alternatively.
ARC
F
16 : 9
G
<16:9>
<4:3>
<Zoom>
ARC
F
4 : 3
G
ARC
F
ZOOM
G
- With the RGB (PC/DTV) input, you can select either 16:9 or 4:3 screen aspect ratios.
- If 4:3 mode is used for a long time, the outline of the image may remain on the screen after
you change to the 16:9 screen.
- Don’t display 4:3 picture format or TWIN PICTURE for more than 10 hours continuously.
ARC
47
Safety instructions Monitor Overview Connections Basic operation Sleep timer Picture & Sound Special features Others
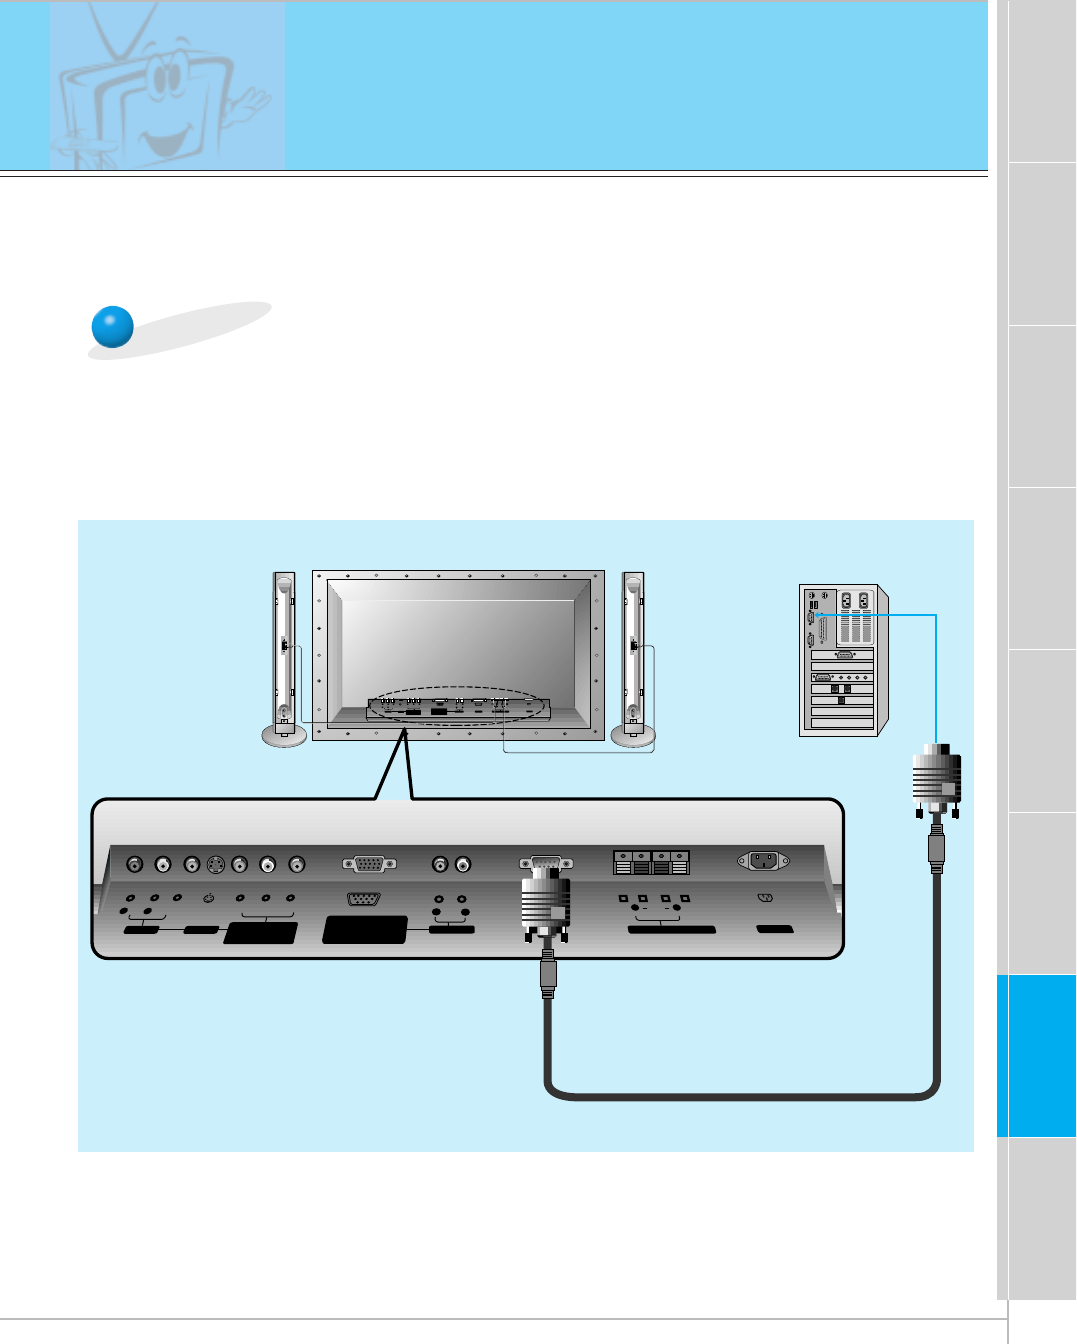
-Connect the RS-232C input jack to an external control device (such as a computer or an A/V control
system) and control the Monitor’s functions externally.
(+) ( ) (+)( )
AUDIO
(MONO)
RLVIDEO Y PBR
P
AV INPUT
AUDIO
RL RL
EXTERNAL SPEAKER (8Ω) AC INPUTAUDIO INPUTS-VIDEO COMPONENT
(480i/480p/720p/1080i)
RGB-PC INPUT
(VGA/SVGA/XGA/SXGA)
RGB-DTV INPUT
(480p/720p/1080i)
(DVD/DTV INPUT)
(+) ( ) (+)( )
AUDIO
(MONO)
RL
AV INPUT S-VIDEO
COMPONENT
(480i/480p/720p/1080i)
(DVD/DTV INPUT)
RGB-PC INPUT
AUDIO INPUT
EXTERNAL SPEAKER(8Ω)
RL
AC INPUT
(VGA/SVGA/XGA/SXGA)
RGB-DTV INPUT
(480p/720p/1080i)
VIDEO YP
B
P
R
RS-232C
RS-232C
RL
AUDIO
Monitor Rear Connections Panel
• Connect the serial port of the control device to the RS-232C jack on the Monitor back panel.
• RS-232C connection cables are not supplied with the Monitor.
• The Monitor remote control and front panel controls (except main power) will not be function-
al if the Monitor is controlled by a PC computer or other external device.
How to connect external control equipment
External Control Device Setup
48
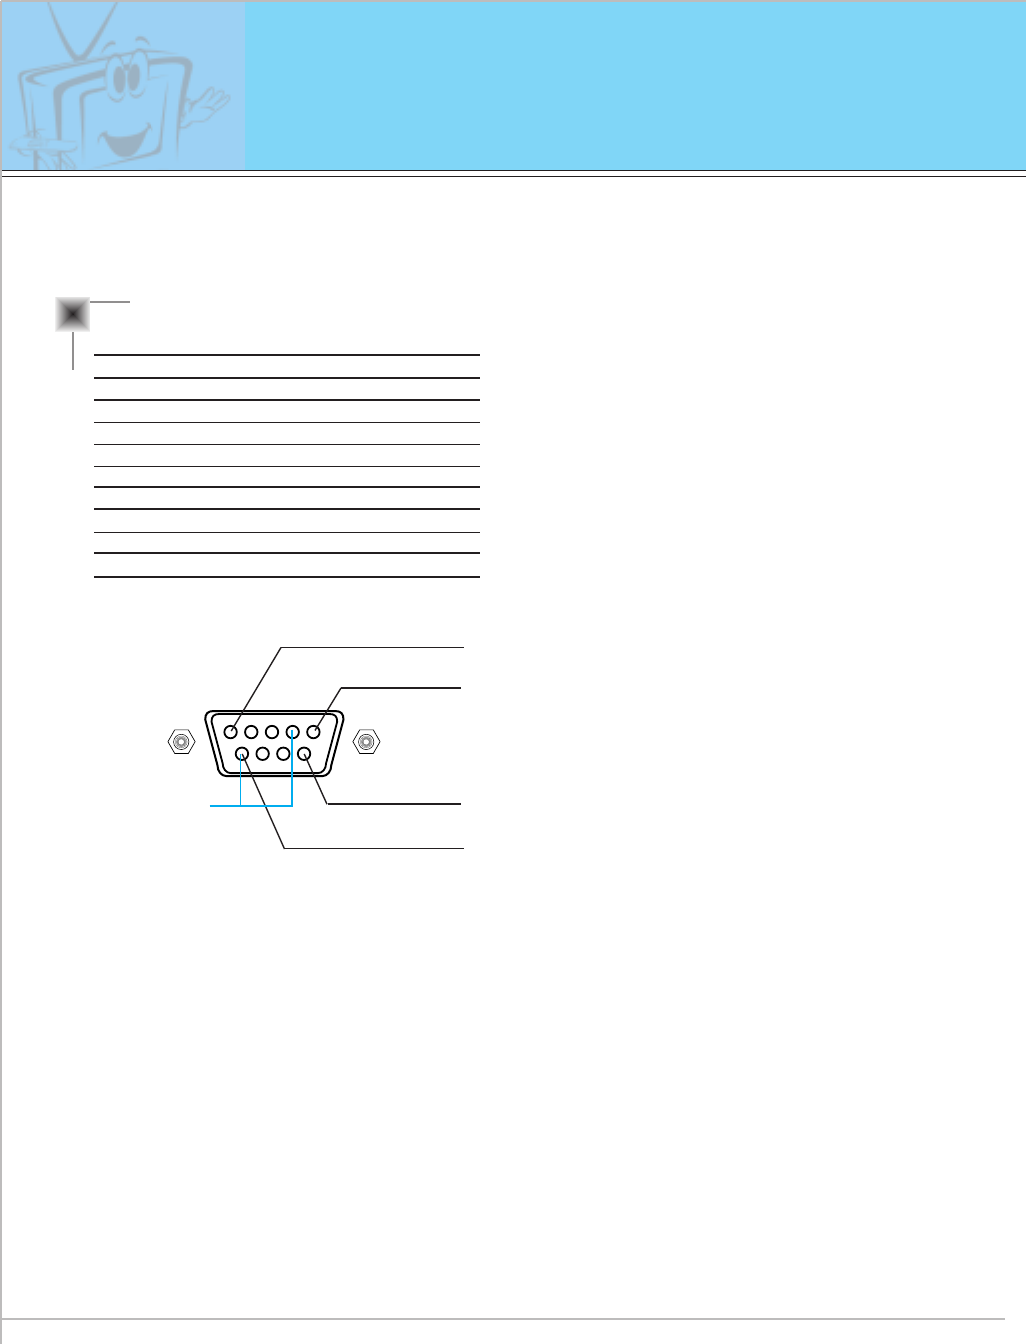
External Control Device Setup
Type of connector : D-Sub 9-pin male
* Use a null modem cable.
Wire the 7-Wire cable so that each pair of data lines cross between the two devices. These data line pairs
are RXD (Receive data) and TXD (Transmit data), DTR (DTE side ready) and DSR (DCE side ready), and
RTS (Ready to send) and CTS (Clear to send).
When using the 3-Wire cable connected to RXD, TXD and GND; Pin No. 4 (DTR) and Pin No. 6 (DSR)
must be connected to the monitor. (The cable must be disconnected from the Monitor to be able to use the
remote control and Monitor front panel controls.)
* With the RS-232 input connected, the Monitor cannot be controlled by both an external control device and
the remote control at the same time. The Monitor can only be controlled by either the remote control or the
external control device.
No. Pin name
1 No connection
2 RXD (Receive data)
3 TXD (Transmit data)
4 DTR (DTE side ready)
5 GND
6 DSR (DCE side ready)
7 RTS (Ready to send)
8 CTS (Clear to send)
9 No Connection
1
5
6
9
Pin No.4 and Pin
No.6 must be
connected on
monitor side.
49
Safety instructions Monitor Overview Connections Basic operation Sleep timer Picture & Sound Special features Others
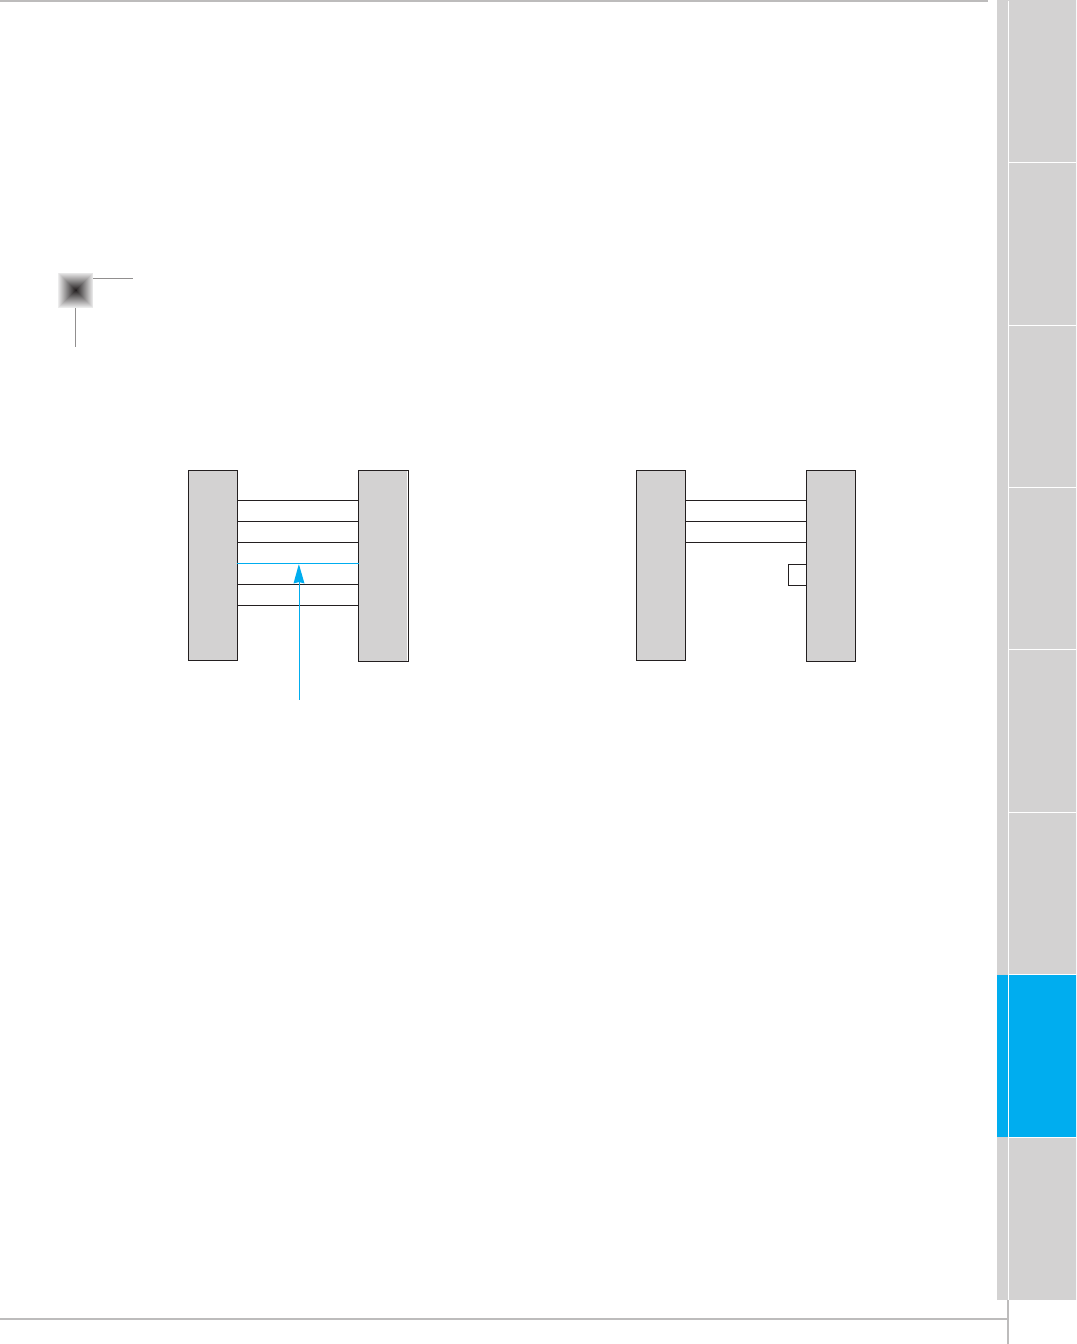
RS-232C configurations
2
3
5
4
6
7
8
RXD
TXD
GND
DTR
DSR
RTS
CTS
TXD
RXD
GND
DSR
DTR
CTS
RTS
PC
7-wire configuration
(Standard RS-232C cable)
DB 9
Control line
3
2
5
6
4
8
7
PDP
DB 9
2
3
5
4
6
7
8
RXD
TXD
GND
DTR
DSR
RTS
CTS
TXD
RXD
GND
DTR
DSR
RTS
CTS
PC
3-wire configuration
(Not standard)
DB 9
3
2
5
4
6
7
8
PDP
DB 9
7-Wire Cable Configuration
• The Monitor is available to switch between external
adjustment and remote control adjustment using a
control line.
Note: If the control line is high, the monitor is con-
trolled by the external control device. If the control
line is low, the Monitor is controlled by the Monitor's
remote control.
3-Wire Cable Configuration
• When using a 3-Wire cable configuration there is no
control line. The external control device must put the
Monitor into the "change into remote control adjust-
ment mode" (see page 55). The Monitor will then be
able to be controlled by the remote control. If the
Monitor is turned back on, it will revert back to exter-
nal device control.
50
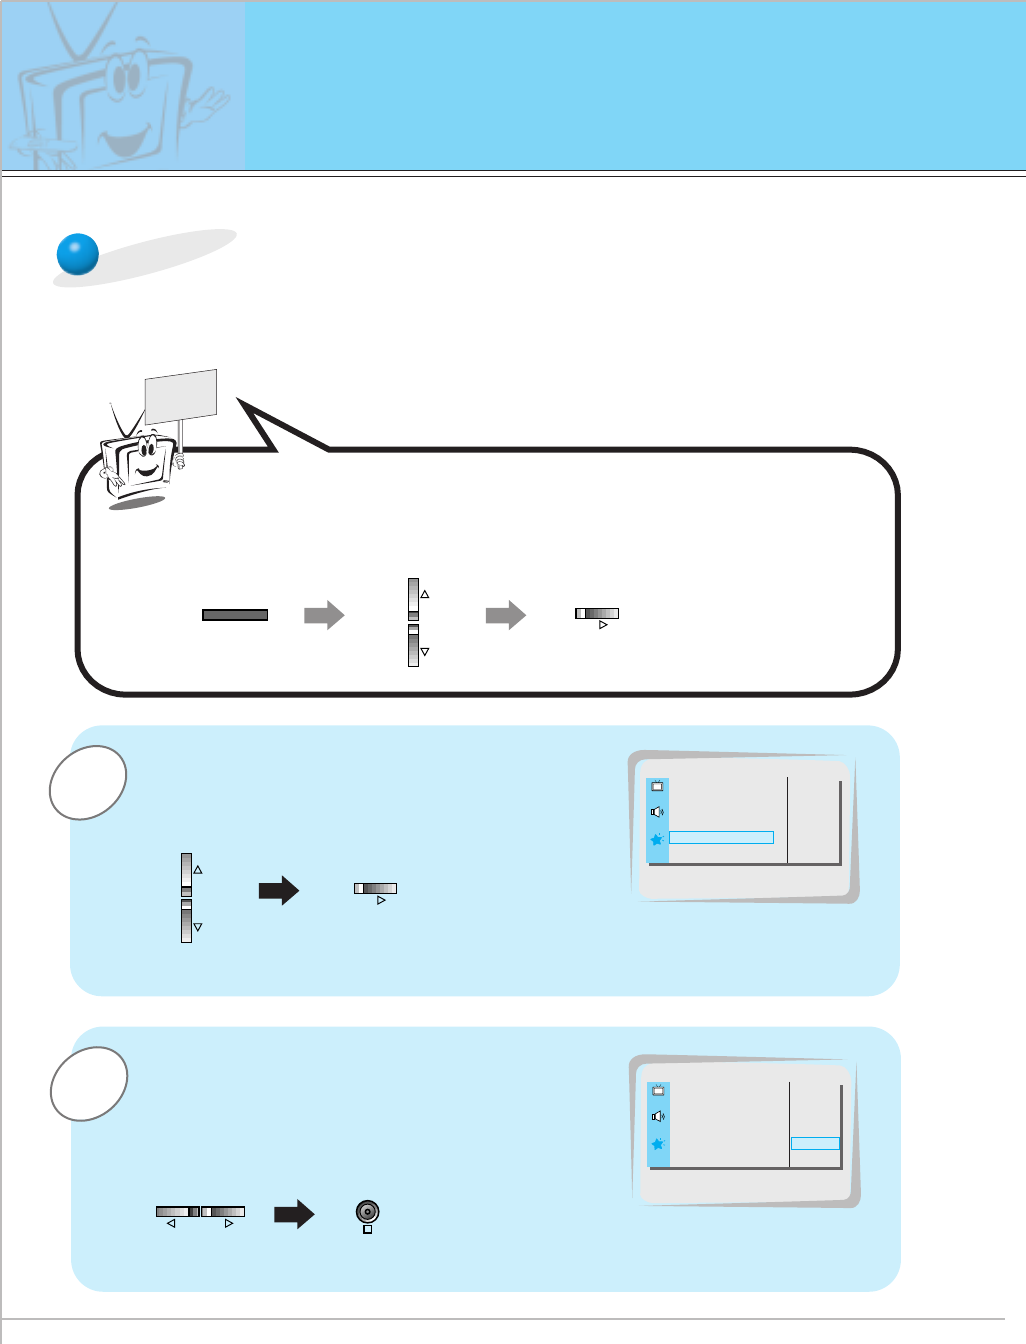
1Use the D / Ebuttons to select SET ID and
then press the Gbutton.
•Use this function to specify a monitor ID number.
SET ID
READY
Press the MENU button and then press the D / Ebutton to
select the SPECIAL menu.
Press the Gbutton.
2Use the F / Gbutton to adjust SET ID to
choose the desired monitor ID number.
•The adjustment range of SET ID is 1 ~ 99.
LANGUAGE G
ARC G
SCREEN G
TRANSPARENCY G
PIP/DW G
SET ID G
COLOR TEMP. G
1
SPECIAL
SET ID
LANGUAGE G
ARC G
SCREEN G
TRANSPARENCY G
PIP/DW G
SET ID G
COLOR TEMP. G
1
SPECIAL
1
MENU VOL
VOL
OK
VOL VOL
External Control Device Setup

51
Safety instructions Monitor Overview Connections Basic operation Sleep timer Picture & Sound Others
Special features
Communication Parameters
Command Reference List
-The RS-232C input jack is used to control the Monitor’s functions using an external control device.
•Baud rate : 2400 bps (UART)
•Data length : 8 bits
•Parity : None
•Stop bit : 1 bit
•Communication code : ASCII code
* If the command interval is interrupted for more than 4
seconds, only Command 1 will be recognized.
Be careful when using the power command.
Transmission
* [Command] : To control PDP set.
* [Set ID] : You can adjust the set ID to choose
desired monitor ID number in special
menu. See page 50. Adjustment range
is 1 ~ 99.
When selecting Set ID ‘0’, every connected
PDP set is controlled.
* [DATA] : To transmit command data.
Transmit ‘FF’ data to read status of
command.
* [Cr] : Carriage Return
ASCII code ‘0x0D’
* [ ] : ASCII code ‘space (0x20)’
[Command][ ][Set ID][ ][Data][Cr]
OK Acknowledgement
* The Monitor transmits ACK (acknowledgement) based
on this format when receiving normal data. At this
time, if the data is data read mode, it indicates present
status data. If the data is data write mode, it returns
the data of the PC computer.
[Set ID][:][OK][x][Data][x]
Error Acknowledgement
* The Monitor transmits ACK (acknowledgement) based
on this format when receiving abnormal data from
non-viable functions or communication errors.
[Set ID][:][NG][x]
Transmission / Receiving Protocol
NAME COMMAND DATA RANGE
01. Power p 0 ~ 1
02. Input Select i 0 ~ 3
03. Aspect Ratio r 0 ~ 2
04. Screen mute m 0 ~ 1
05. Volume mute w 0 ~ 1
06. Volume control v 0 ~ 64
07. Contrast k 0 ~ 64
08. Brightness b 0 ~ 64
09. Color c 0 ~ 64
10. Tint t 0 ~ 64
11. Sharpness s 0 ~ 64
12. OSD select d 0 ~ 1
13. Abnormal state a 0 ~ 1
14. PIP/DW z 0 ~ 3
15. PIP input select e 0 ~ 1
16. PIP sound select u 0 ~ 1
17. PIP position x 0 ~ 3
18. remote control j 0 ~ 1
adjustment mode
52
External Control Device Setup
01. Power (Command:p)
GTo control Power On/Off of the Monitor.
Transmission
Data 0 : Power Off
1 : Power On
* Example : Power on for set ID No.3.
Type : P 3 1 ‘0x0D’
[p][ ][Set ID][ ][Data][Cr]
Acknowledgement
Data 0 : Power Off
1 : Power On
* In example : Monitor Acknowledges power on for set ID
No.3.
[Set ID][:][OK][x][Data][x]
02. Input select (Command:i)
GTo select input source for the Monitor.
You can also select an input source using the INPUT
SELECT button on the Monitor's remote control.
Transmission
Data 0 : RGB
1 : AV (Video)
2 : Component
3 : S-AV (S-Video)
[i][ ][Set ID][ ][Data][Cr]
Acknowledgement
Data 0 : RGB
1 : AV (Video)
2 : Component
3 : S-AV (S-Video)
[Set ID][:][OK][x][Data][x]
GTo show Power On/Off.
Transmission
[p][ ][Set ID][ ][FF][Cr]
Acknowledgement
Data 0 : Power Off
1 : Power On (RGB)
2 : Power On (Video)
3 : Power On (Component)
4 : Power On (S-Video)
* In like manner, if other functions transmit ‘FF’ data
based on this format, Acknowledgement data feed
back presents status about each function.
[Set ID][:][OK][x][Data][x]
03. Aspect Ratio (Command:r)
GTo adjust the screen format.
You can also adjust the screen format using the ARC
(Aspect Ratio Control) button on remote control or in
the Special menu.
Transmission
Data 0 : Wide screen (16:9)
1 : Normal screen (4:3)
2 : Full screen (Zoom)
[r][ ][Set ID][ ][Data][Cr]
Acknowledgement
Data 0 : Wide screen (16:9)
1 : Normal screen (4:3)
2 : Full screen (Zoom)
* Using the PC input, you select either 16:9 or 4:3 screen
aspect ratio.
* Using the DTV 720p/1080i input, you can only select
16:9 screen aspect ratio.
[Set ID][:][OK][x][Data][x]
04. Screen mute (Command:m)
GTo select screen mute on/off.
Transmission
Data 0 : Screen mute on (Picture off)
1 : Screen mute off (Picture on)
[m][ ][Set ID][ ][Data][Cr]
Acknowledgement
Data 0 : Screen mute on (Picture off)
1 : Screen mute off (Picture on)
[Set ID][:][OK][x][Data][x]
05. Volume mute (Command:w)
GTo control volume mute on/off.
You can also adjust mute using the MUTE button on
remote control.
Transmission
Data 0 : Volume mute on (Volume off)
1 : Volume mute off (Volume on)
[w][ ][Set ID][ ][Data][Cr]
Acknowledgement
Data 0 : Volume mute on (Volume off)
1 : Volume mute off (Volume on)
[Set ID][:][OK][x][Data][x]
53
Safety instructions Monitor Overview Connections Basic operation Sleep timer Picture & Sound Others
Special features
* Real data mapping
0 : Step 0
A : Step 10
F : Step 15
10 : Step 16
64 : Step 100
06. Volume control (Command:v)
GTo adjust volume.
You can also adjust volume with the volume buttons
on remote control.
Transmission
Data Min : 0 ~ Max : 64
* Refer to ‘Real data mapping’ as shown below.
[v][ ][Set ID][ ][Data][Cr]
Acknowledgement
Data Min : 0 ~ Max : 64
[Set ID][:][OK][x][Data][x]
07. Contrast (Command:k)
GTo adjust screen contrast.
You can also adjust contrast in the Picture menu.
Transmission
Data Min : 0 ~ Max : 64
* Refer to ‘Real data mapping’ as shown below.
[k][ ][Set ID][ ][Data][Cr]
Acknowledgement
Data Min : 0 ~ Max : 64
[Set ID][:][OK][x][Data][x]
08. Brightness (Command:b)
GTo adjust screen brightness.
You can also adjust brightness in the Picture menu.
Transmission
Data Min : 0 ~ Max : 64
* Refer to ‘Real data mapping’ as shown below.
[b][ ][Set ID][ ][Data][Cr]
Acknowledgement
Data Min : 0 ~ Max : 64
[Set ID][:][OK][x][Data][x]
09. Color (Command:c)
GTo adjust the screen color.
You can also adjust color in the Picture menu.
Transmission
Data Min : 0 ~ Max : 64
* Refer to ‘Real data mapping’ as shown below.
[c][ ][Set ID][ ][Data][Cr]
Acknowledgement
Data Min : 0 ~ Max : 64
[Set ID][:][OK][x][Data][x]
10. Tint (Command:t)
GTo adjust the screen tint.
You can also adjust tint in the Picture menu
Transmission
Data Red : 0 ~ Green : 64
* Refer to ‘Real data mapping’ as shown below.
[t][ ][Set ID][ ][Data][Cr]
Acknowledgement
Data Red : 0 ~ Green : 64
[Set ID][:][OK][x][Data][x]
11. Sharpness (Command:s)
GTo adjust the screen sharpness.
You can also adjust sharpness in the Picture menu
Transmission
Data Min : 0 ~ Max : 64
* Refer to ‘Real data mapping’ as shown below.
[s][ ][Set ID][ ][Data][Cr]
Acknowledgement
Data Min : 0 ~ Max : 64
[Set ID][:][OK][x][Data][x]
54
External Control Device Adjustments
12. OSD select (Command:d)
GTo select OSD (On Screen Display) on/off.
Transmission
* The remote control and Monitor front panel controls
(except main power) are not operable when the Monitor
is set up to be controlled by the PC computer.
* This function is “read only”.
Data 0 : OSD off
1 : OSD on
[d][ ][Set ID][ ][Data][Cr]
Acknowledgement
Data 0 : OSD off
1 : OSD on
[Set ID][:][OK][x][Data][x]
13. Abnormal state (Command:a)
GTo recognize an abnormal state.
Transmission
[a][ ][Set ID][ ][FF][Cr]
Acknowledgement
Data 0 : OK
1 : Fan alarm
2 : 5V down
3 : AC down
[Set ID][:][OK][x][Data][x]
14. PIP / DW (Command:z)
GTo control PIP (Picture-in-Picture) or twin picture (DW).
You can also control PIP/DW using the pip/twin picture
button on remote control or in the Special menu.
Transmission
Data 0 : PIP/ DW off
1 : PIP (small)
2 : PIP (large)
3 : Twin picture (DW)
[z][ ][Set ID][ ][Data][Cr]
Acknowledgement
Data 0 : PIP/ DW off
1 : PIP (small)
2 : PIP (large)
3 : Twin picture (DW)
* PIP only works in the following resolutions:
RGB PC 640x480 (VGA) / 800x600(SVGA) / 1024x768
(XGA) (only in vertical frequency 60Hz),
Component 480p / 720p / 1080i.
* Twin picture works only in the following resolutions:
RGB PC 640x480 (VGA) (only in vertical frequency 60Hz),
RGB DTV, Component 480p/720p/1080i.
[Set ID][:][OK][x][Data][x]
15. PIP input select (Command:e)
G To select input source for sub picture in PIP mode.
You can also select source using PIP input button on
the remote control or in the Special menu.
Transmission
* COMPONENT source only works with 480i input signal.
Data 0 : AV (VIDEO)
1 : COMPONENT
2 : S-AV (S-VIDEO)
[e][ ][Set ID][ ][Data][Cr]
Acknowledgement
Data 0 : AV (VIDEO)
1 : COMPONENT
2 : S-AV (S-VIDEO)
[Set ID][:][OK][x][Data][x]
55
Safety instructions Monitor Overview Connections Basic operation Sleep timer Picture & Sound Special features Others
* COMPONENT source only works in 480i input signal.
16. PIP sound select (Command:u)
G To select main or sub (inset) sound for PIP/Twin picture.
You can also select sound select in PIP/DW on the
special menu.
Transmission
[u][ ][Set ID][ ][Data][Cr]
Acknowledgement
Data 0 : Main picture sound
1 : Sub picture sound
Data 0 : Main picture sound
1 : Sub picture sound
[Set ID][:][OK][x][Data][x]
* If external equipment commands the Monitor to
"change into remote control adjustment mode", the
Monitor can only be adjusted by the remote control.
To revert the Monitor control to external control device
adjustment, turn the Monitor off and then on again.
18. Change into Remote control
adjustment mode (Command:j)
G To control the Monitor with the remote control while
the cable is still connected.
Transmission
[j][ ][Set ID][ ][Data][Cr]
Acknowledgement
Data 0 : PC adjustment mode
1 : Remote control adjustment mode
Data 1 : Remote control adjustment mode
[Set ID][:][OK][x][Data][x]
17. PIP position (Command:x)
GTo select sub picture position for PIP.
You can also adjust the sub picture position using the
position button on the remote control or in PIP/DW on
the Special menu.
Transmission
Data 0 : Right down on screen
1 : Left down on screen
2 : Left up on screen
3 : Right up on screen
[x][ ][Set ID][ ][Data][Cr]
Acknowledgement
Data 0 : Right down on screen
1 : Left down on screen
2 : Left up on screen
3 : Right up on screen
[Set ID][:][OK][x][Data][x]

56
Note
57
Safety instructions Monitor Overview Connections Basic operation Sleep timer Picture & Sound Special features OthersOthers
Maintenance
Cleaning the screen
1. Here’s a great way to keep the dust off your screen for a while. Wet a
soft cloth in a mixture of lukewarm water and a little fabric softener or
dish washing detergent. Wring the cloth until it’s almost dry, and then
use it to wipe the screen.
2. Make sure the excess water is off the screen, and then let it air-dry
before you turn on your Monitor.
Cleaning the cabinet
To remove dirt or dust, wipe the cabinet with a soft, dry, lint-free cloth.
Please be sure not to use a wet cloth.
Extended absence
If you leave your Monitor dormant for a long time (such as a
vacation), it’s a good idea to unplug the power cord to protect
against possible damage from lightning or power surges.
- Early malfunction can be prevented. Careful and regular cleaning can extend the amount of
time you will have with your new Monitor. Be sure to turn the power off and unplug the
power cord before you begin any cleaning.
58
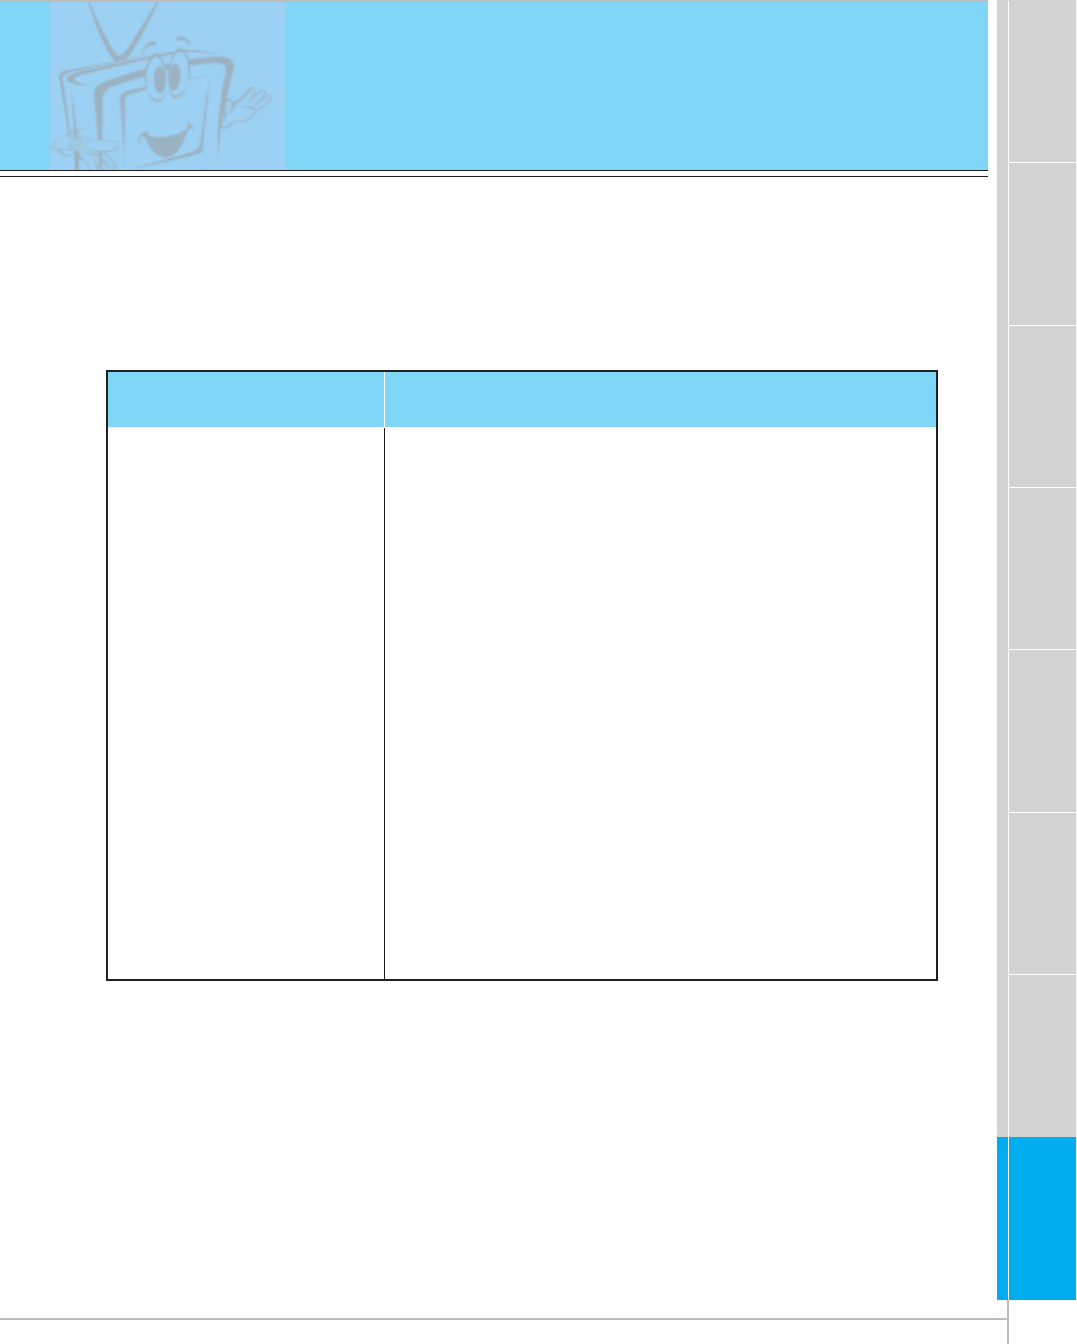
No output from one
of the speakers • Adjust BALANCE in the SOUND menu. (Refer to p.39)
Troubleshooting check list
No picture &
No sound
•Check whether the Monitor is turned on.
• Power cord inserted into wall outlet?
• Plug another product’s power cord into the wall outlet where
the Monitor’s power cord was plugged in.
No or Poor color
or Poor picture
• Select COLOR in the PICTURE menu and press the VOL-
UME (G) button. (Refer to p.37)
• Increase the distance between the Monitor and the VCR.
• Activate any function to restore the brightness of the picture.
(If still picture is on the screen for more than 5 minutes, the
screen gets dark.)
The remote control
doesn’t work
•Check to see if there is any object between the Plasma
Display and the remote control causing obstruction.
• Check to see if the batteries are installed with the correct
polarities. (Refer to p.31)
• Install new batteries. (Refer to p.31)
Picture OK &
No sound
•Press the VOLUME (G) button.
• Sound muted? Press MUTE button.
59
Safety instructions Monitor Overview Connections Basic operation Sleep timer Picture & Sound Special features Others
Product specifications
MODEL
Width (inches / mm)
Height (inches / mm)
Depth (inches / mm)
Weight (pounds / kg)
Power requirement
Resolution
Color
Temperature (In operation)
Humidity (In operation)
MU-60PZ12/A/B/K/S
MU-60PZ15/A/B/K/S
57.3 / 1455
34.8 / 883
3.9 / 99
154.3 / 70
120V, 60Hz
1280 x 720 (Dot)
16,770,000 (256 steps of each R, G and B)
0 ~ 40°C
under 80%
• The specifications shown above may be changed without prior notice for
quality improvement.