LG Electronics USA NT-H1000B Portable Computer User Manual Rev 02
LG Electronics USA Portable Computer Rev 02
UserManual.wiki
>
LG Electronics USA
>
NT H1000B User Manual
User Manual-Rev.02
Navigation menu
Upload a User Manual
Namespaces
Wiki Guide
HTML
PDF
Info
Views
User Manual
Discussion / Help
Navigation

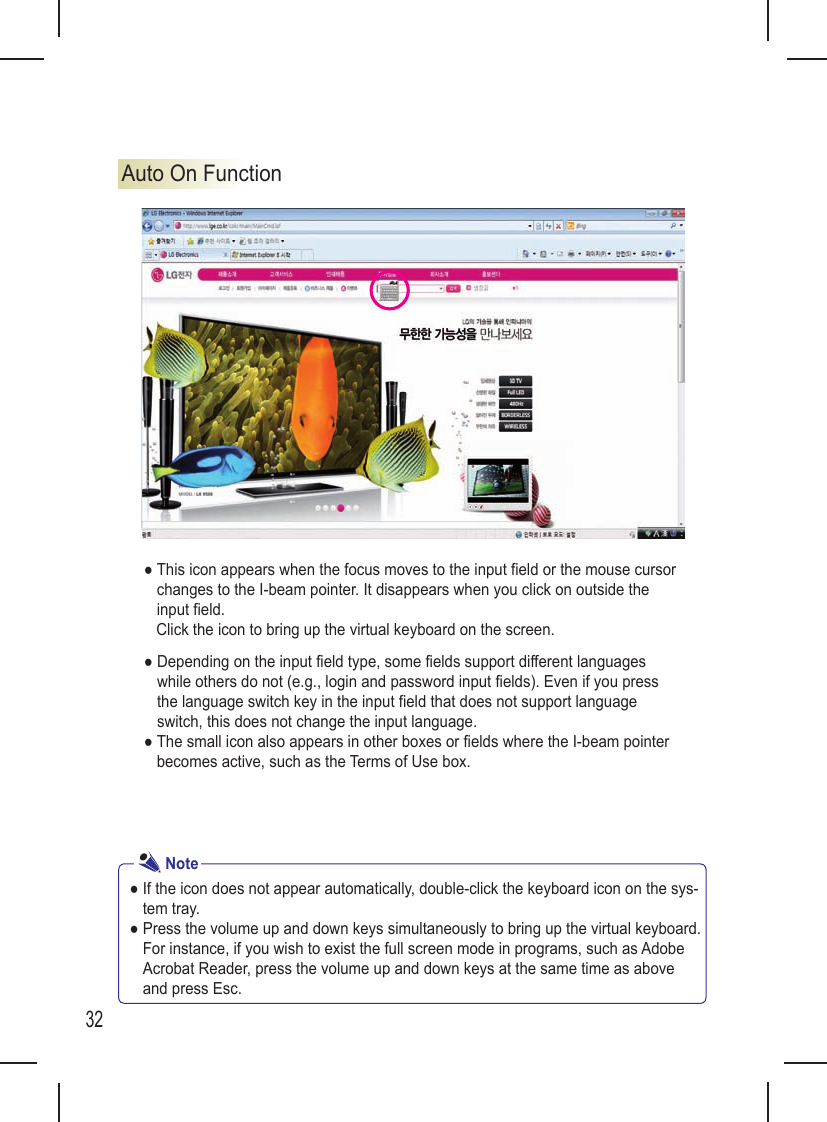
![10Setting the Product for the First Time1. Click the button on the bottom left of the screen.3. When the on-screen keyboard appears on the screen as illustrated, click the Next button.2. Select [Type without the keyboard (On-Screen Keyboard)] and click [OK].4. Use the virtual keyboard to enter the user name and click the Next button.* Keep the virtual keyboard open as you will need to use it for entering the password.](https://usermanual.wiki/LG-Electronics-USA/NT-H1000B/User-Guide-1368967-Page-9.png)
![13Using Windows® 7With enhanced information management and security features, Windows® 7 greatly increases the user’s productivity. Windows® 7 makes it easy to access data on the personal computer and on the workplace network. It provides stronger security for data.Windows® 7 Welcome Center provides online documentation for Windows® 7’s new features and the basic tools required for customizing Windows 7 and backing up les.Click [Start] > [Getting Started] to visit the Welcome Center.1. Click the arrow button on the right of the [Start] button to selectively use different functions.2. Select a function or information to open. The options presented in the Windows® 7 Welcome Center may vary depending on the product speci cation.● The virtual XP Mode for Windows® 7 is available only for the Professional version or higher and may not be supported depending on CPU capacity.● Some features, including Aero and Flip 3D, are not supported in Windows® 7 Starter and Home Basic.● Due to performance constraints on some models, the system may slow down or the video playback may be lagged when using Windows Aero or Flip 3D.● For more information on using Windows® 7, see Start > Help and Support.● Some features may contain operating system messages which are not appropriate for tablet products.NoteWindows® 7 Welcome Center](https://usermanual.wiki/LG-Electronics-USA/NT-H1000B/User-Guide-1368967-Page-12.png)
![17Windows® 7 Power ManagementWindows® 7 provides simpler and yet more reliable power management features than previous versions of Windows. Use Power Management to manage the power con-sumption more ef ciently.1. Go to Start > Control Panel and select View by > Small icons. Then, click Power Op-tions.2. When the [Select a power plan] window opens, select one you want under Plans shown on the battery meter. If the [High performance] plan is hidden, click the little arrow to the right of [Show additional plans].Balanced: Automatically balances perfor-mance with energy consumption on capable hardware.Power saver: Saves energy by reducing your computer's performance where possible. Using this plan gives you the maximum battery life.High performance: Favors performance and response speed, but may use more energy.](https://usermanual.wiki/LG-Electronics-USA/NT-H1000B/User-Guide-1368967-Page-16.png)
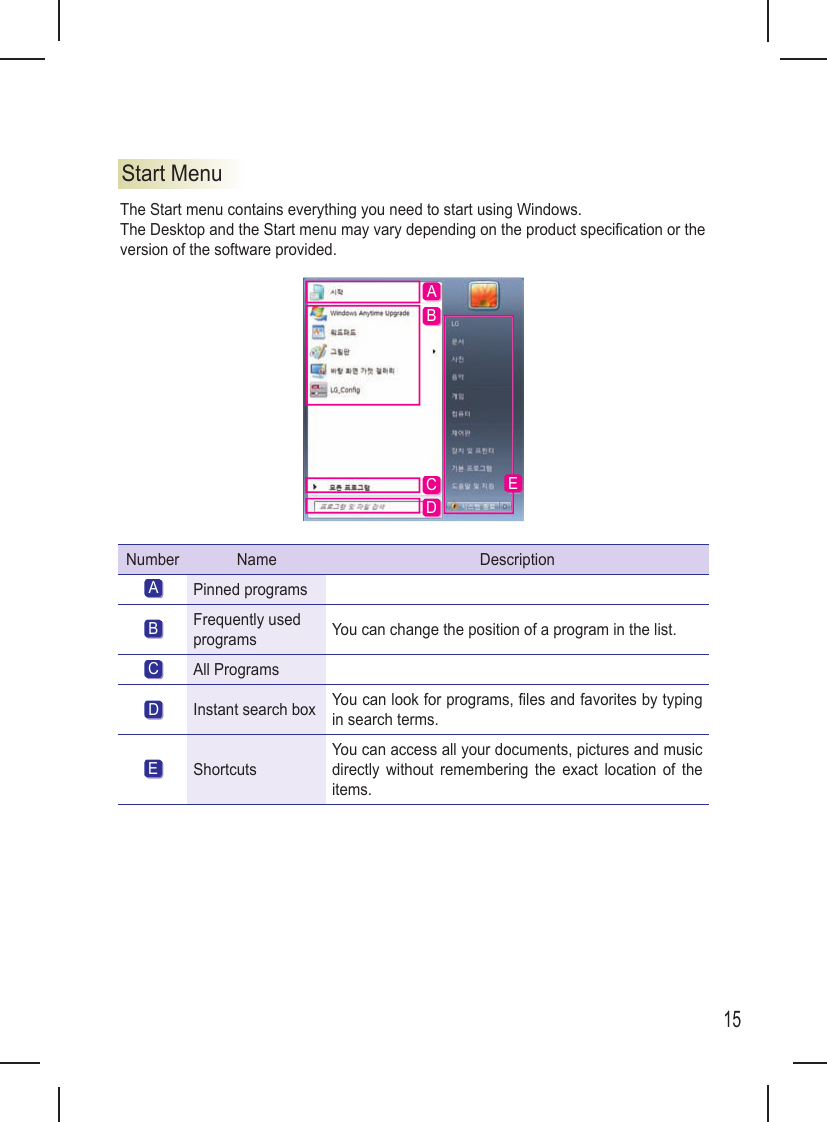
![18System Shutdown OptionsWindows® 7 provides a shortcut menu to log off the user, lock the computer, restart the computer, or quickly switch users without logging the previous user off.Click the right-arrow button to the right of the [Shut down] button to display the additional options for system shutdown.Number Name DescriptionSwitch user Logs in with another user account registered in the system.Log off Closes all open programs and logs off the current user account.Lock Locks the user account.Restart Closes all open programs and safely restarts the system.Sleep Switches the power off for the unused devices to minimize power consumption.Hibernate Saves the user programs and switches the system power off.ABCDEFCaution● There may be times when Windows does not shut down properly. In this case, press and hold the power button for 5 seconds or more to force shut down the sys-tem. This should be used in emergency cases only as it can adversely affect the system. It is best to shut down the computer by clicking the [Start] button on the desktop and then selecting the [Shut down] button. If you do not use the [Shut down] button to correctly power off the computer, data on your hard disk may get damaged. If a program stops responding, press the Ctrl-Alt-Delete key combination to quit the program in the Windows Task Manager or restart the system. If Windows or an application is damaged by an abnormal shutdown, reinstall Windows or the application. LG Electronics is not liable for any loss of data caused by the user's actions.● If you insert a USB memory stick just before entering the standby mode, the com-puter may not enter the standby mode.](https://usermanual.wiki/LG-Electronics-USA/NT-H1000B/User-Guide-1368967-Page-17.png)
![19If you set a password for the product, follow the instructions below to enter the password with the on-screen keyboard.1. Click the button on the bottom left of the screen.Setting the On-Screen Keyboard3. When the on-screen keyboard appears on the screen as illustrated, enter the password.2. Select [Type without the keyboard (On-Screen Keyboard)] and click [OK].](https://usermanual.wiki/LG-Electronics-USA/NT-H1000B/User-Guide-1368967-Page-18.png)
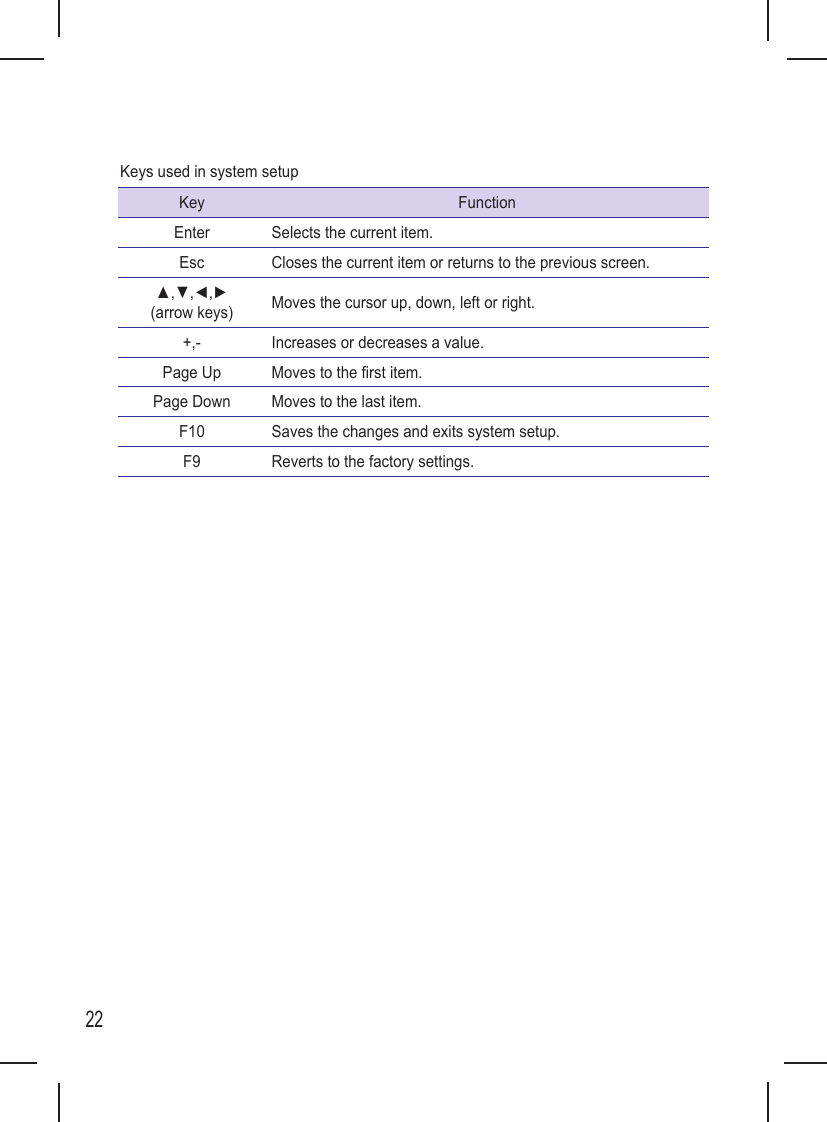
![21Con guring the System SetupEntering the System Setup* Make sure to connect the USB keyboard before use.Con guring the system setup involves accessing the CMOS RAM where the hardware con guration is stored. Through the system setup process, the product acquires informa-tion about the current date and time, memory capacity, hard disk capacity and type, etc.This process is used for changing the password, modifying the boot order, or adding a new device.The information displayed in the setup window may vary depending on the product speci- cation.1. Turn the product power on.2. When the logo appears, press the F2 key.3. Then, the system setup window appears in a moment.Caution● Do not change the system setup unless necessary. An incorrect system setup may cause an error so you will have to be careful.● The CMOS setup menu and the factory default settings may be changed without prior notice for performance improvement and may differ from the ones shown in this user manual.Phoenix SecureCore(tm) Setup UtilityF1 Help Select Item -/+ Change Values F9 Setup DefaultsESC Exit EnterSelect Menu Select Sub-Menu F10 Save and ExitAdvanced Security Boot ExitSystem Time: [ ] Item Specific Help<Tab>, <Shift-Tab>, or<Enter> selects fieldSystem Date:Product Name:Processor Type:Processor Spd:BIOS Version:KBC Version:UUID Number:Pri MasterTotal Memory:信信=信信=信信[ ]信信=信信=信信信信信信信信信信信信信信信信1信信信信信信信信信信信信信信信信信信信信信信信信信信信信信信信信信信信信信信信[ ]信信2信信22009GHzMBMain](https://usermanual.wiki/LG-Electronics-USA/NT-H1000B/User-Guide-1368967-Page-20.png)
![23Setting the PasswordSet a password so that unauthorized users cannot use the product or change the set-tings.You can set your password when starting the system or con guring the system setup.Set Supervisor PasswordSet a password to prevent product access by unauthorized users. By default, no pass-word is set. If an unauthorized user modi es the CMOS setup and sets a new password when the computer is turned on, this prevents the original user from accessing the product.1. Activate the system setup window and use the arrow keys to move to the Security section. 2. In the window shown on the left, use the arrow keys to select [Set Supervi-sor Password] and press the [Enter] key.3. When the message shown on the left appears, enter a password and press the [Enter] key. The password can be up to 8 alphanumeric characters (A - Z, 0 - 9).4. When the message shown on the left appears, press the [Enter] key. 5. Press the [F10] key to save the changes.6. When the message shown on the left appears, select [Yes] and press the [Enter] key. Then, the product restarts.Caution● If you forgot your password, you cannot use the system. Write the password down and keep it in a safe place.● After setting the password, you must boot the system with a USB keyboard connected.Phoenix SecureCore(tm) Setup UtilityF1 Help Select Item -/+ Change Values F9 Setup DefaultsESC Exit EnterSelect Menu Select Sub-Menu F10 Save and ExitAdvanced Boot ExitSupervisor Password Is:Set Supervisor PasswordUser Password Is:Set User PasswordPassword on boot:Item Specific HelpSupervisor Passwordcontrols access to thesetup utility.Main SecurityClear[ Enter ]Clear[Enter][Disabled]Phoenix SecureCore(tm) Setup UtilityF1 Help Select Item -/+ Change Values F9 Setup DefaultsESC Exit EnterSelect Menu Select Sub-Menu F10 Save and ExitAdvanced Boot ExitSupervisor Password Is:Set Supervisor PasswordUser Password Is:Set User PasswordPassword on boot:Item Specific HelpSupervisor Passwordcontrols access to thesetup utility.Main SecurityClear[ Enter ]Clear[Enter][Disabled]](https://usermanual.wiki/LG-Electronics-USA/NT-H1000B/User-Guide-1368967-Page-22.png)
![24Set User PasswordSet User Password allows you to set a password that is lower than Set Supervisor Password. To set a user password, a supervisor password must be set.1. Activate the system setup window and use the arrow keys to move to the Security section. 2. In the window shown on the left, use the arrow keys to select [Set User Password] and press the [Enter] key.3. When the message shown on the left appears, enter a password and press the [Enter] key. The password can be up to 8 alphanumeric characters (A - Z, 0 - 9).Phoenix SecureCore(tm) Setup UtilityF1 Help Select Item -/+ Change Values F9 Setup DefaultsESC Exit EnterSelect Menu Select Sub-Menu F10 Save and ExitAdvanced Boot ExitSupervisor Password Is:Set Supervisor PasswordUser Password Is:Set User PasswordPassword on boot:Item Specific HelpSupervisor Passwordcontrols access to thesetup utility.Main SecurityClear[ Enter ]Clear[ Enter ][Disabled]4. When the message shown on the left appears, press the [Enter] key. 5. Press the [F10] key to save the changes.6. When the message shown on the left appears, select [Yes] and press the [Enter] key. Then, the product restarts.● There are more restrictions for using CMOS setup with user password than with supervisor password.NotePhoenix SecureCore(tm) Setup UtilityF1 Help Select Item -/+ Change Values F9 Setup DefaultsESC Exit EnterSelect Menu Select Sub-Menu F10 Save and ExitAdvanced Boot ExitSupervisor Password Is:Set Supervisor PasswordUser Password Is:Set User PasswordPassword on boot:Item Specific HelpSupervisor Passwordcontrols access to thesetup utility.Main SecurityClear[ Enter ]Clear[ Enter ][Disabled]Caution● HDD password is required for protection of privacy and data. ● If you forgot your password, you cannot use the system. Write the password down and keep it in a safe place.](https://usermanual.wiki/LG-Electronics-USA/NT-H1000B/User-Guide-1368967-Page-23.png)
![25Password on bootThe Password on boot option protects the system by requiring the user to enter the supervisor password or the user password on boot.1. Activate the system setup window and use the arrow keys to move to the Security section. 2. In the window shown on the left, set the supervisor password or both of the supervisor password and user password.3. Select the Password on boot option and use the + and - keys to change it from Disable to Enable.Phoenix SecureCore(tm) Setup UtilityF1 Help Select Item -/+ Change Values F9 Setup DefaultsESC Exit EnterSelect Menu Select Sub-Menu F10 Save and ExitAdvanced Boot ExitSupervisor Password Is:Set Supervisor PasswordUser Password Is:Set User PasswordPassword on boot:Item Specific HelpSupervisor Passwordcontrols access to thesetup utility.Main SecurityClear[ Enter ]Clear[ Enter ][Disabled]Phoenix SecureCore(tm) Setup UtilityF1 Help Select Item -/+ Change Values F9 Setup DefaultsESC Exit EnterSelect Menu Select Sub-Menu F10 Save and ExitAdvanced Boot ExitSupervisor Password Is:Set Supervisor PasswordUser Password Is:Set User PasswordPassword on boot:Item Specific HelpSupervisor Passwordcontrols access to thesetup utility.Main SecurityClear[ Enter ]Clear[ Enter ][ Enter ]● Press [Shift] and [+] at the same time to select [Enabled] or [Disabled].NotePhoenix SecureCore(tm) Setup UtilityF1 Help Select Item -/+ Change Values F9 Setup DefaultsESC Exit EnterSelect Menu Select Sub-Menu F10 Save and ExitAdvanced Boot ExitSupervisor Password Is:Set Supervisor PasswordUser Password Is:Set User PasswordPassword on boot:Item Specific HelpSupervisor Passwordcontrols access to thesetup utility.Main SecurityClear[ Enter ]Clear[ Enter ][Disabled]Phoenix SecureCore(tm) Setup UtilityF1 Help Select Item -/+ Change Values F9 Setup DefaultsESC Exit EnterSelect Menu Select Sub-Menu F10 Save and ExitAdvanced Boot ExitSupervisor Password Is:Set Supervisor PasswordUser Password Is:Set User PasswordPassword on boot:Item Specific HelpSupervisor Passwordcontrols access to thesetup utility.Main SecurityClear[ Enter ]Clear[ Enter ][ Enter ]Phoenix SecureCore(tm) Setup UtilityF1 Help Select Item -/+ Change Values F9 Setup DefaultsESC Exit EnterSelect Menu Select Sub-Menu F10 Save and ExitAdvanced Boot ExitSupervisor Password Is:Set Supervisor PasswordUser Password Is:Set User PasswordPassword on boot:Item Specific HelpSupervisor Passwordcontrols access to thesetup utility.Main SecurityClear[ Enter ]Clear[ Enter ][Disabled]](https://usermanual.wiki/LG-Electronics-USA/NT-H1000B/User-Guide-1368967-Page-24.png)
![26Deleting or Changing the PasswordYou can do this only if you already know the password.1. When changing the password2. When deleting the password1. Activate the system setup window, enter the existing password, and press the [Enter] key.2. Change the password in the same way as setting the password.1. Activate the system setup window, enter the previously set password, and press the [Enter] key.4. When the message shown on the left appears, enter the current password in Enter Current Password.5. Press the [Enter] key for Enter New Password and Con rm New Password.6. When the message shown on the left appears, select [Continue] and press the [Enter] key.7. Press the [F10] key to save the changes.8. When the message shown on the left ap-pears, select [Yes] and press the [Enter] key. Then, the product restarts.2. In the system setup window, use the ar-row keys to move to the Security section.3. In the window shown on the left, use the arrow keys to select [Set Supervisor Password] and press the [Enter] key. Phoenix SecureCore(tm) Setup UtilityF1 Help Select Item -/+ Change Values F9 Setup DefaultsESC Exit EnterSelect Menu Select Sub-Menu F10 Save and ExitAdvanced Boot ExitSupervisor Password Is:Set Supervisor PasswordUser Password Is:Set User PasswordPassword on boot:Item Specific HelpSupervisor Passwordcontrols access to thesetup utility.Main SecurityClear[ Enter ]Clear[Enter][Disabled]Phoenix SecureCore(tm) Setup UtilityF1 Help Select Item -/+ Change Values F9 Setup DefaultsESC Exit EnterSelect Menu Select Sub-Menu F10 Save and ExitAdvanced Boot ExitSupervisor Password Is:Set Supervisor PasswordUser Password Is:Set User PasswordPassword on boot:Item Specific HelpSupervisor Passwordcontrols access to thesetup utility.Main SecurityClear[ Enter ]Clear[Enter][Disabled]](https://usermanual.wiki/LG-Electronics-USA/NT-H1000B/User-Guide-1368967-Page-25.png)
![27Restoring to the Factory SettingsIf you have unintentionally changed the system setup, you can use this function to revert to the factory settings.1. Activate the system setup window and use the arrow keys to move to the Exit section.2. Use the arrow keys to select Load Setup Defaults and press the [Enter] key.3. When the message shown on the left appears, select [Yes] and press the [Enter] key. Then, the system setup reverts to the factory settings.4. Press the [F10] key to save the changes.5. When the message shown on the left appears, select [Yes] and press the [Enter] key. Then, the product restarts.● Press [F9] to use Load Setup Defaults.Note](https://usermanual.wiki/LG-Electronics-USA/NT-H1000B/User-Guide-1368967-Page-26.png)
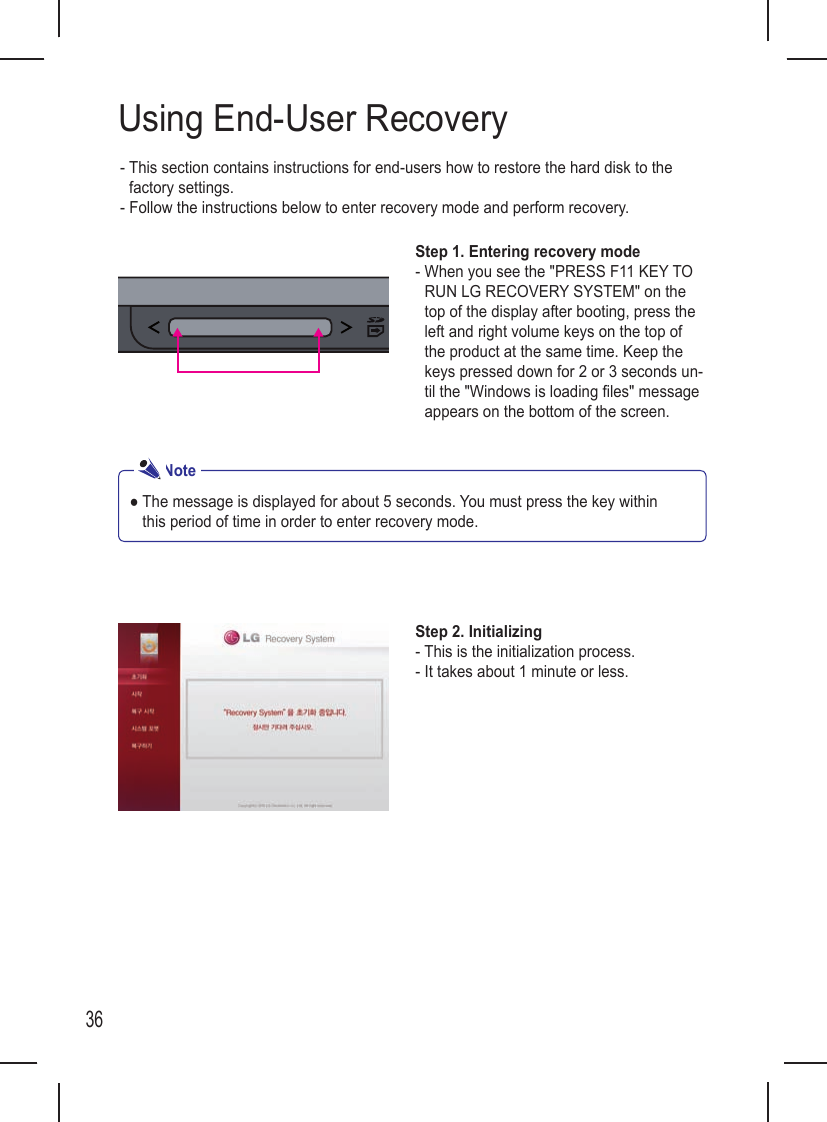
![37Step 4. Starting Recovery- To start the system recovery, click [Recov-ery System] > [Start Recovery].- To return to the main menu, click the [Previous Page] button.- To exit recovery mode, click the [Exit] button.Step 3. Main menu- To start the system recovery, click [Recov-ery System] > [Start Recovery].- To backup important data on an external storage device (e.g., USB memory and USB external HDD) before performing system recovery, click the [File Manager] button. - To exit recovery mode, click the [Exit] button.Note● The window similar to the one above appears when you run File Manager. Similar to Windows Explorer, you can copy, move or delete les with this.](https://usermanual.wiki/LG-Electronics-USA/NT-H1000B/User-Guide-1368967-Page-36.png)
![38Step 5. Recovery conrmation- This process asks you whether or not to continue the system recovery. Click [Yes] to start the recovery process.Step 6. Formatting the system- This process formats the system before recovering the operating system. It will begin automatically.Step 7. Recovering the system- This process recovers the operating system. It will begin automatically. Once the recovery is complete, the system will automatically restart after 10 seconds.- A system recovery takes 15 - 28 minutes.Caution● Always keep backup copies of important data.● You cannot perform the recovery function if the system partition size is set smaller than the minimum size required for operating system installation.● In addition to using the recovery mode, you can connect a USB keyboard and a USB mouse to install the operating system manually.](https://usermanual.wiki/LG-Electronics-USA/NT-H1000B/User-Guide-1368967-Page-37.png)
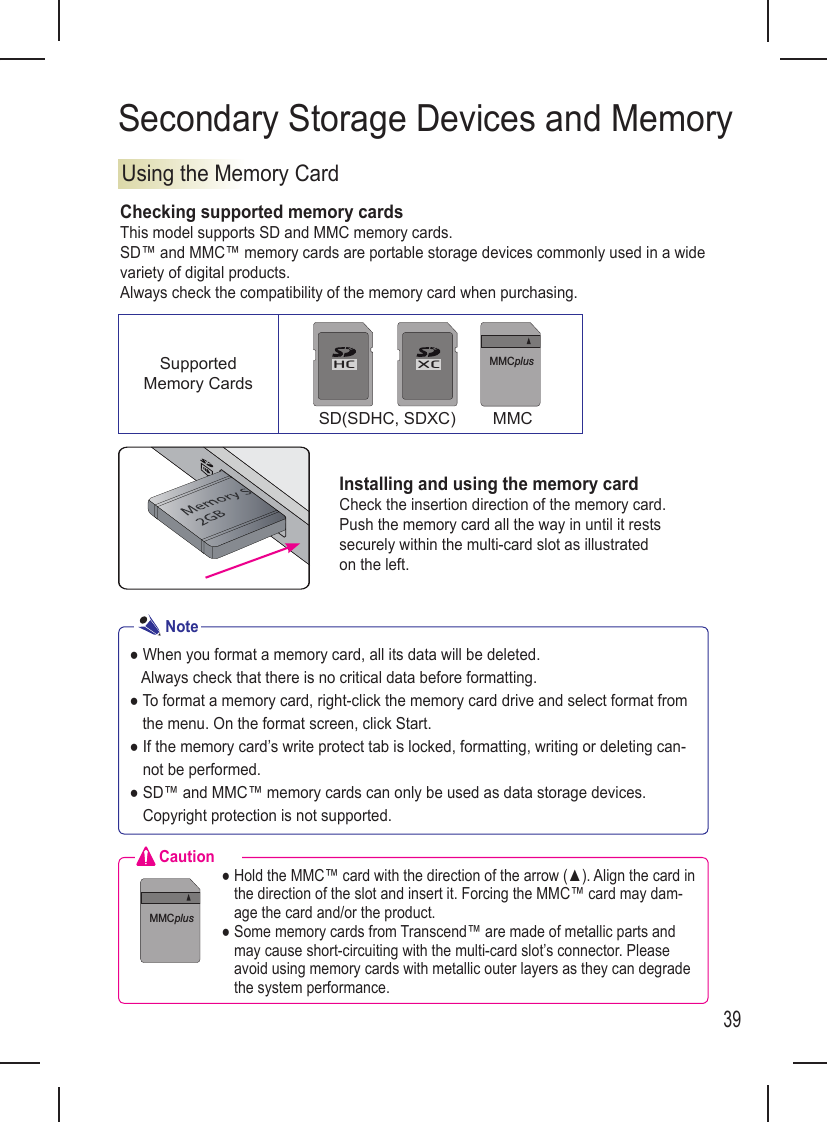
![40Removing the memory cardPush the inserted memory card with your nger and release it. The memory card will be ejected as illustrated below. Pull the ejected memory card in the direction of the arrow.To removing the memory card safely1. Click the [Safely Remove Hardware and Eject Media] icon on the taskbar.2. Click [Eject ****].3. When the [Safely Remove Hardware] window appears, remove the memory card.● The device name you inserted will be placed in [Eject ****]. For example, Eject Removable Disk.Note](https://usermanual.wiki/LG-Electronics-USA/NT-H1000B/User-Guide-1368967-Page-39.png)
![42- Only of cially certi ed Bluetooth headsets can be detected and connected.- Bluetooth headsets which support A2DP and HSP functions can be connected.- To connect a Bluetooth headset, the Bluetooth password and the passkey speci ed in the headset’s user manual must match each other. Connection cannot be established otherwise. For more information, see your device’s user manual.- You may experience problems when detecting or connecting if: there is a strong electromagnetic interference; there are many Bluetooth devices nearby; or the headset is turned off, not in the place, or is out of order. Devices such as a microwave oven, wireless LAN, plasma lamp, and gas range hoods operate in the same frequency band as Bluetooth. This may cause communication failures.- Try using only one Bluetooth headset at a time.- Bluetooth devices other than a headset cannot be connected simultaneously.- If the headset is not connected correctly, reconnect it using [Bluetooth Headset].Precautions for Using Bluetooth Headsets](https://usermanual.wiki/LG-Electronics-USA/NT-H1000B/User-Guide-1368967-Page-41.png)