LG Electronics USA NT-LG15Z96 Notebook Computer User Manual
LG Electronics USA Notebook Computer
User Manual

2Introduction / Important Safety Precautions
Introduction / Important Safety Precautions
Using LG Easy Guide, LG Troubleshooting
LG Electronics Inc. provides LG Easy Guide (User's Guide) and LG Troubleshooting
(Troubleshooting Guide) to users for their easy and convenient use of the product.
ENGLISH
Introduction / Important Safety Precautions 3
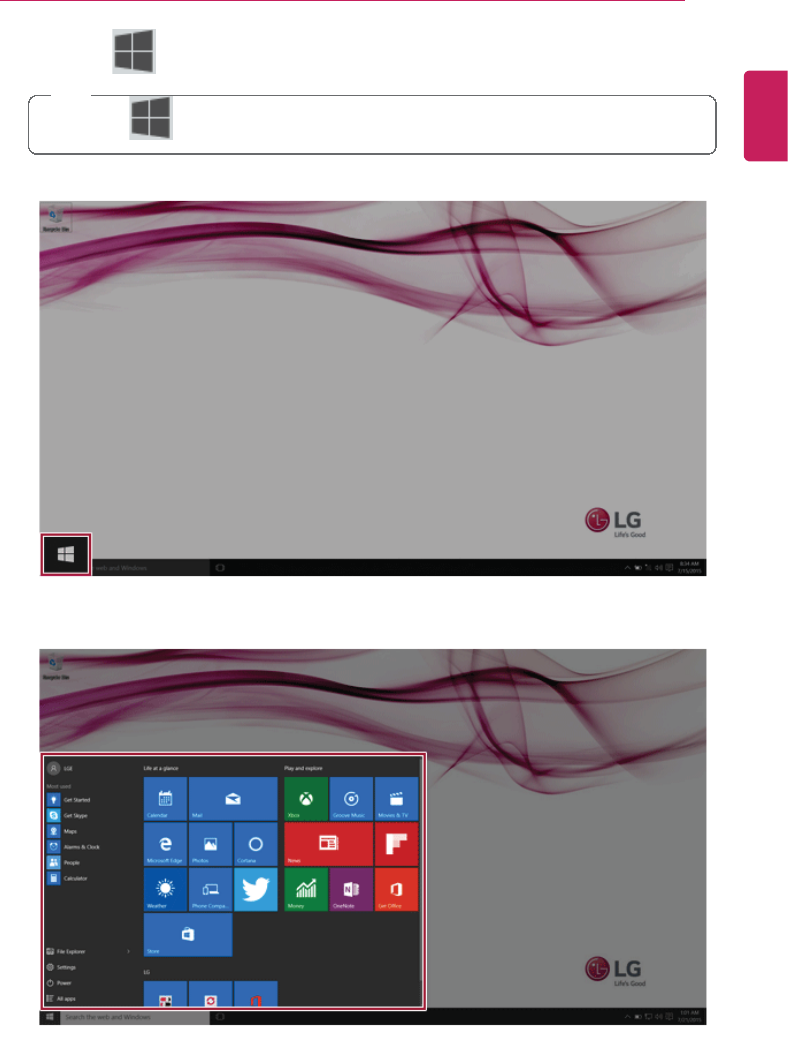
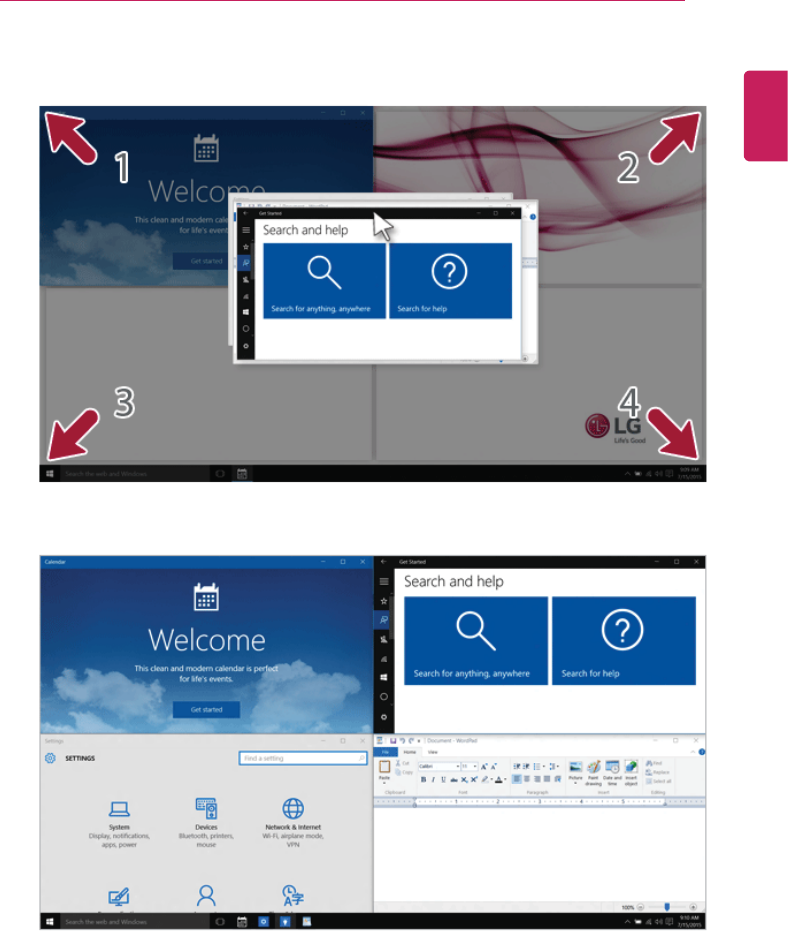
1Press the [ ] button to display the Start menu.
TIP
Press the [ ] key or [Ctrl] + [Esc] to display the Start menu.
ENGLISH
4Introduction / Important Safety Precautions
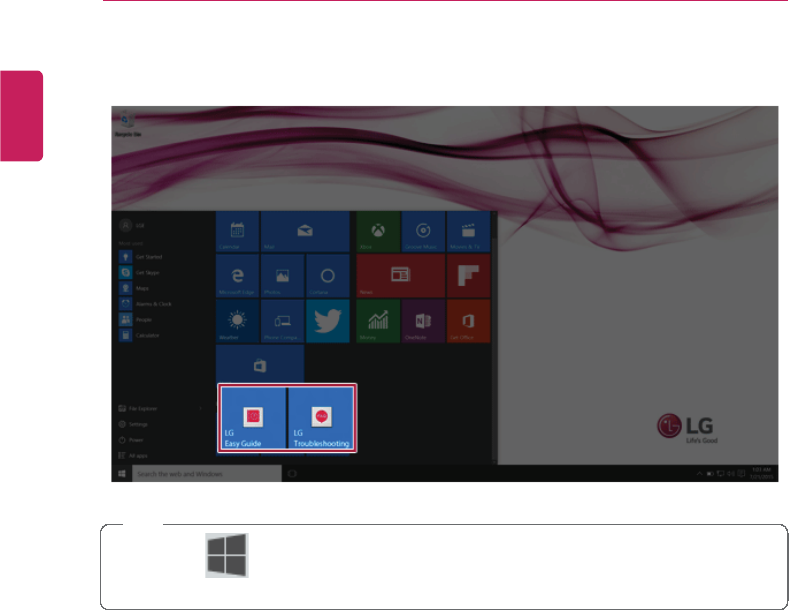
2Select [LG Easy Guide] or [LG Troubleshooting] tile to run it.
TIP
Select the [ ] button > [All Apps] > [LG Software] to run [LG Easy Guide] or [LG
Troubleshooting].
ENGLISH

Introduction / Important Safety Precautions 5
Information/Precautions Before Using
Before reading LG Easy Guide, first check the following information.
•This LG Easy Guide has been written for the Windows 10 operating system.
•The screen and menu configurations may differ from this manual depending on the
status of the Windows update.
•Representative images are used in LG Easy Guide. Product purchased may differ in
appearance and color.
•LG Easy Guide includes instruction about optional products. There may be information
about products you did not purchase.
•The contents of LG Easy Guide are subject to change without prior notice.
•Use, duplication, or reproduction of any part of LG Easy Guide without prior permission
from LG Electronics Inc. is strictly prohibited.
•LG Electronics Inc. does not provide warranty for data loss. In order to minimize damage
from data loss, please make backup copies of important data.
Safety Precaution Notations
The below symbols are to inform you of dangers and safety concerns that you must be
aware of. Read the symbol-indicated instructions with caution to avoid any possible mishap.
WARNING
Appears in the case of noncompliance with the instruction that may cause serious
physical damage or fatal injuries.
CAUTION
Appears in the case of noncompliance with the instruction that may cause minor damage
to the body or the machine.
Text Notations
The symbols below are used to display information required to use the product. Familiarize
yourself with the instructions marked by the symbols to ensure proper operation of the
product.
TIP
Indicates that the following information is added to help the user utilize the machine more
conveniently.
ENGLISH
6Introduction / Important Safety Precautions
The Option symbol indicates that the concerned device is not included in the product
package and thus has to be purchased separately, or the device may not be applied to
the user's machine depending on model type.
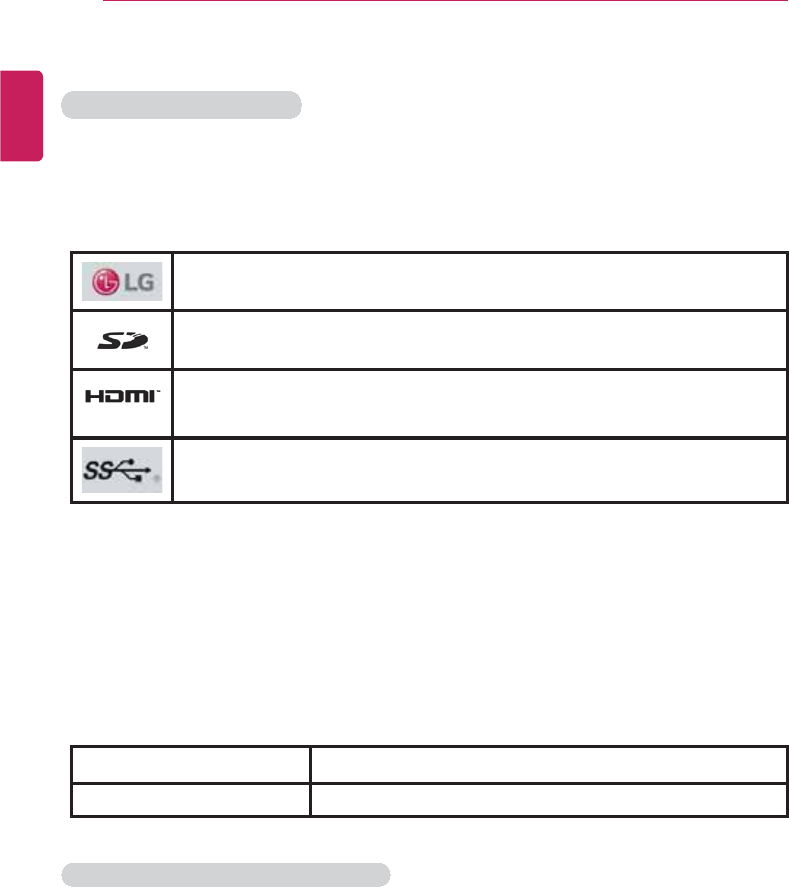
Manufacturer and Copyright
Microsoft™,MS™, WinPE™, and Windows®are the registered trademarks of Microsoft
Corporation™.
Manufacturer and Copyright represent the logo and trademark of the manufacturer, and
bear no relationship to the functions supported by the product.
LG™logo is a registered trademark of LG™Corporation.
SD™logo is a registered trademark of Secure Digital™Corporation.
The terms HDMI and HDMI High-Definition Multimedia Interface, and the
HDMI logo are trademarks or registered trademarks of HDMI Licensing LLC
in the United States and other countries.
The SuperSpeed USB Trident logo is a registered trademark of USB
Implementers Forum, Inc.
LG Easy Guide may contain undetectable errors despite our dedicated efforts to provide
users with reliable information. We ask for your understanding.
The illustrated figures in LG Easy Guide may differ in appearance with the actual products.
Unauthorized reproduction or duplication of any part of LG Easy Guide is strictly prohibited.
LG Electronics Inc. reserves the right to modify any part of this manual for quality purposes,
without prior notice.
Copyright (C) 2015 LG Electronics Inc. Digitalmate Co., LTD
Country of Origin China
Manufacturer LG Electronics Inc.
OPEN SOURCE SOFTWARE NOTICE
To obtain the source code under GPL, LGPL, MPL and other open source licenses,
that is contained in this product, please visit http://opensource.lge.com.
In addition to the source code, all referred license terms, warranty disclaimers and
copyright notices are available for download.
LG Electronics will also provide open source code to you on CD-ROM for a charge
covering the cost of performing such distribution (such as the cost of media,
ENGLISH

Introduction / Important Safety Precautions 7
shipping and handling) upon email request to opensource@lge.com. This offer is
valid for three (3) years from the date on which you purchased the product.
System Protection Feature
If the system becomes too hot, the system protection feature automatically stops recharging
the battery and switches to hibernate mode or turns the power off.
The PC system may not be reactivated until it cools down enough.
Information on Hard Drive / Memory Capacity
Information on Hard Drive (HDD, SSD, eMMC) Capacity
The hard drive capacity shown by Windows is lower than that stated by the hard drive
manufacturer due to a difference in calculation.
Manufacturer Hard drive manufacturers use a decimal definition of 1 KB = 1,000
Bytes.
100 GB Storage Device (HDD, SSD, eMMC): 100,000 MB /
1,000 Bytes = 100 GB
Windows Windows use the binary definition of 1 KB = 1,024 Bytes.
100 GB Storage Device (HDD, SSD, eMMC): 100,000 MB /
1,024 Bytes = 97.6 GB
RAM Capacity
RAM capacity shown by Windows may be lower than the actual capacity because the PC
uses shared memory for BIOS and the integrated graphics card.
Due to BIOS using shared memory, 1,024 MB RAM may be reported as 1,022 MB or
slightly less.
If the PC has integrated graphics card, 1,024 MB RAM may be reported as 1,022 MB or
less than 1,000 MB.
CMOS Backup Battery
The CMOS backup battery of the main board ensures that the system setup (BIOS) does
not disappear even if the power is disconnected.
The CMOS backup battery is an expendable component.
CMOS backup battery may not be available depending on the model.
ENGLISH

8Introduction / Important Safety Precautions
CAUTION
•To replace the CMOS backup battery, visit the LG Electronics Service Center.
•The computer may be damaged if an incompatible battery is used.
•The product warranty is not applied to failure or breakdown caused by willful
damage by the user.
Adjusting Volume (headset and speakers)
Check the volume level before listening to music.
CAUTION
•Before using the headset, check if the volume is too high.
•Do not use the headset too long.
ENGLISH

Introduction / Important Safety Precautions 9
Important Safety Precautions
Please use the machine in the proper environment to extend the machine's lifespan. Use
the machine in a safe and stable place.
The warranty does not cover any damage resulting from reckless use or use in
undesirable environments.
ENGLISH
10 Introduction / Important Safety Precautions
Product Installation/Usage Precautions
CAUTION
Place the machine in a safe place so it does not fall.
•If dropped, the machine may be damaged or cause an injury.
Use the product in a clean, dust-free environment.
•Otherwise, the system may not function properly.
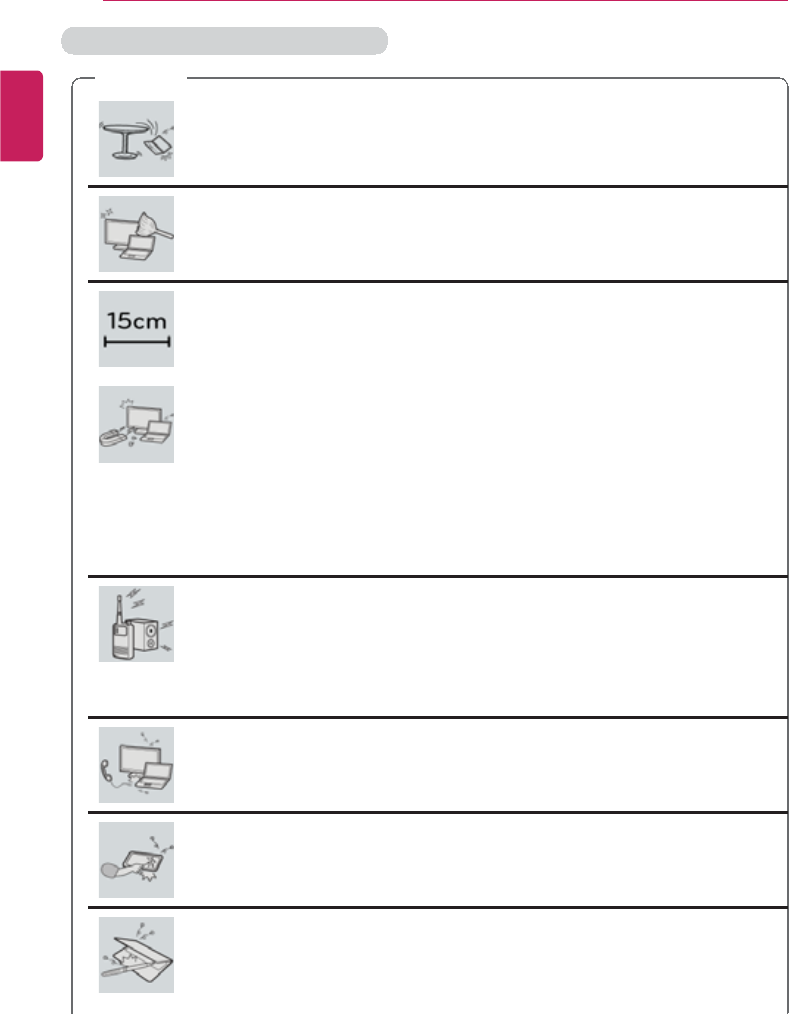
Do not place any objects within 15 cm of the PC.
•Lack of ventilation may overheat the PC from inside and put users at risk
of burn injuries.
Do not store or use the PC near a magnetic object (i.e. a bag with a
magnetic object, a diary, a wallet, a memo board, high-powered
speakers, a bracelet, or etc.).
•Otherwise, the storage device (HDD, SSD, eMMC) and the system may
be damaged, and the system may fail to operate properly.
Do not use the PC on a bag with magnetic objects attached to it.
•Otherwise, the storage device and the system may be damaged, and the
system may fail to operate properly.
Operate the product where there is no electromagnetic interference.
•Keep a proper distance between the PC and electronic appliances such
as radios or speakers that generate strong magnetic fields.
•Otherwise, data may be lost from the storage device (HDD, SSD,
eMMC) or the LCD color may be damaged.
Do not connect a key-phone line to a wired LAN port.
•A fire may occur or the product may get damaged.
If the LCD screen is damaged, do not touch LCD with your hands.
•Contact the service center as it may cause an injury.
Do not leave any objects such as a pen between the keypad and the
LCD.
•You might break the LCD by unwittingly closing it with a foreign object
remaining on the pad.
ENGLISH

Introduction / Important Safety Precautions 11
Do not press or scratch the LCD with a sharp object.
•It may cause impairment.
Ensure the power is off before shutting the LCD.
•The product may catch fire, be broken or deformed due to temperature
rise.
Do not impose excessive force on the LCD screen or drop it.
•You may break the LCD glass panel.
Do not forcibly open the LCD screen with one hand.
•External impact may be inflicted on the machine.
To clean the LCD screen, use designated agents and soft cloth and
rub the screen in one direction.
•Too much force may damage the LCD screen.
When handling PC parts, follow the instructions in the manual.
•Otherwise, the product may get damaged.
Install a vaccine program on your PC and do not download illegal
programs nor access any corruptive web site such as those pushing
pornographic contents.
•The system may be infected and impaired.
Do not insert devices other than designated ones in the ports.
•Otherwise, the product may get damaged.
Do not press Eject while the optical disk drive (CD/DVD/Blu-ray) is
running.
•The data may be lost or the disk may spin out unexpectedly to cause an
injury.
Do not use a damaged optical disc (CD/DVD/Blu-ray).
•It may cause product damage or physical injury.
ENGLISH
12 Introduction / Important Safety Precautions
Avoid using a wireless LAN connection within the 5 m radius of a
microwave or plasma lamp. If you have to use wireless LAN and a
plasma bulb within the range, do so between channels 11 and 13.
•The transmission rate may drop even if the connection is made.
Turn off the PC if you are not going to use it for an extended period of
time.
•It may overheat the battery.
Make sure that the memory cover is securely closed before turning
on the PC.
•Do not use the machine when the memory cover is open. It may damage
the machine.
Please use parts certified by LG Electronics Inc™.
•Otherwise, a fire or product damage may occur.
Consult our service engineer before you use a peripheral device not
manufactured by LG Electronics Inc.™
•The product may get damaged.
Handle devices and parts of the machine with care.
•The product may get damaged.
Do not drop any part or device of the machine while disassembling it.
•If dropped, it may be damaged and cause an injury.
WARNING
Dispose of the desiccating agent and plastic wrap properly.
•The desiccating agent and plastic wrap may cause suffocation.
Do not use the machine in damp places like a laundry room or
bathroom.
ENGLISH
Introduction / Important Safety Precautions 13
•Moisture may cause a glitch or electric shock.
•Please use the machine within the appropriate temperature range (10 °C
to 35 °C) and humidity range (20% RH to 80% RH).
Clean the PC with a proper agent and dry it completely before using it
again.
•If the PC is used while wet, an electric shock or fire may occur.
When lightning flashes in your area, disconnect the power, wired LAN
and other connections.
•An electric shock or fire may occur.
Do not leave a cup or other containers filled with watery substance
near the PC.
•In the case that liquid goes inside the PC, a fire or electric shock may
occur.
If you have dropped or damaged the PC, disconnect the power and
contact the local service center for a safety check.
•If a damaged PC is used continuously, an electric shock or fire may
occur.
Do not put a lit candle or live cigarette on the PC.
•A fire may occur.
If you detect or smell smoke from the PC, stop use immediately and
disconnect the power source before contacting your local service
center.
•A fire may occur.
As the AC adapter can be hot, do not touch it with bare skin while
using it.
•Extended period of exposure may cause burn.
The bottom of the PC gets hot when the system is in operation. Do not
touch or put it on your lap.
•Extended period of exposure may cause burn.
Do not play the PC games excessively.
•Playing a PC game for an extended period of time may cause a mental
disorder. It may also inflict physical impairments on the elderly and
children.
Do not put your finger or an object into PC ports.
•An injury or electric shock may occur.
ENGLISH
14 Introduction / Important Safety Precautions
Ask one of our engineers to run a safety check after your computer
has been repaired.
•Otherwise, an electric shock or fire may occur.
For minors, we recommend a program that blocks access to illegal or
pornographic web sites.
•Minors' exposure to adult-only contents may inflict psychological
instability or even trauma on them. Take an extra precaution for your
children if the whole family is using this machine.
Keep the machine away from heat-emitting devices such as a heater.
•The product may get deformed or catch on fire.
Prevent children from thrusting their finger into the optical disk drive
(CD/DVD/Blu-ray) tray.
•The finger may be stuck in the tray and injured.
To remove an optical disc (CD/DVD/Blue-ray) from the tray, turn off the
program accessing the disc and wait until the disc drive light is
turned off before pressing the [Eject] button.
•The optical disk spins fast inside the tray and may be ejected from the
tray to cause bodily injury.
Do not block the ventilation hole with any object.
•Otherwise, an electric shock may occur.
Do not leave the machine in a car.
•The battery may cause an explosion or fire.
To upgrade the PC, turn off the system and disconnect the power cord
and battery. If the wired LAN is connected, disconnect the network
cable.
•An electric shock or fire may occur.
When you upgrade the PC, ensure that children will not swallow any
parts including bolts.
•If a child swallowed a nut, he or she may get suffocated.
•In that case, see the doctor immediately.
Do not disassemble or moderate the machine arbitrarily.
•It may cause an electric shock and the customer is not entitled to request
free-of-charge warranty service.
ENGLISH

Introduction / Important Safety Precautions 15
If you dissemble the PC, connect the power after reassembly is done.
•Any exposed part may give you an electric shock.
Do not put in metal items such as coins, hair pin or other irons or
inflammables such as paper or matches. Especially, ensure that
children will not do so.
•A fire or electric shock may occur.
•If any foreign substance gets in the product, unplug the product and
contact the local service center.
ENGLISH
16 Introduction / Important Safety Precautions
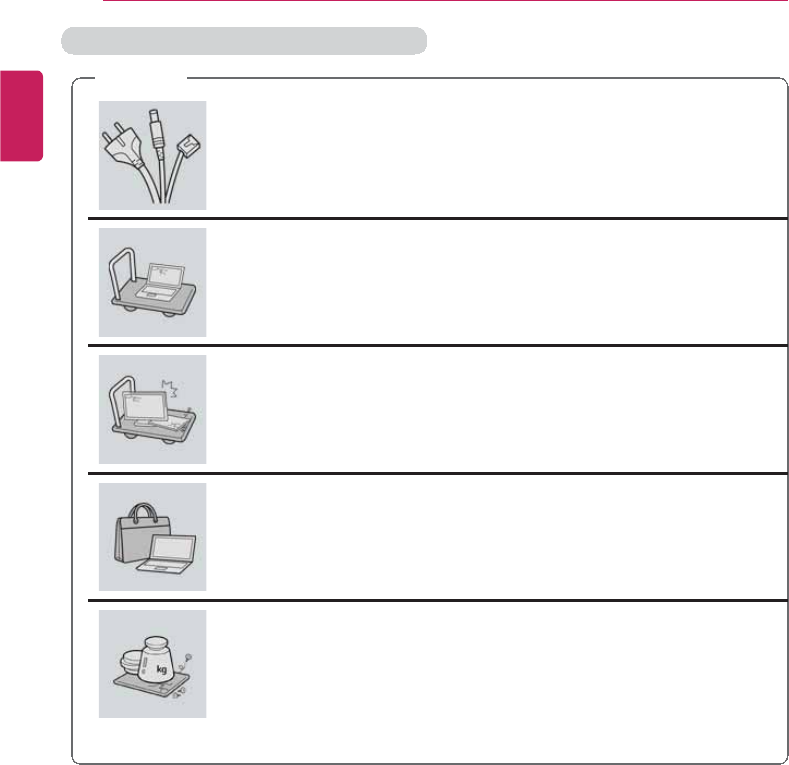
Product Storage/Transportation Precautions
CAUTION
Before carrying the machine, turn off the power and disconnect
all the cables.
•Otherwise, you may trip over the wire, damaging the PC and
sustaining an injury.
Do not carry the machine with the LCD open.
•Otherwise, the product may get damaged.
Protect the machine from any shock while carrying it.
•System damage or an injury may result.
Carry the product in a bag designed for it.
•Carrying it in another type of bag may result in product damage.
Do not put any heavy object on the PC.
•There is the risk of malfunction. If the object were to fall, it may
cause an injury or damage the machine.
ENGLISH
Introduction / Important Safety Precautions 17
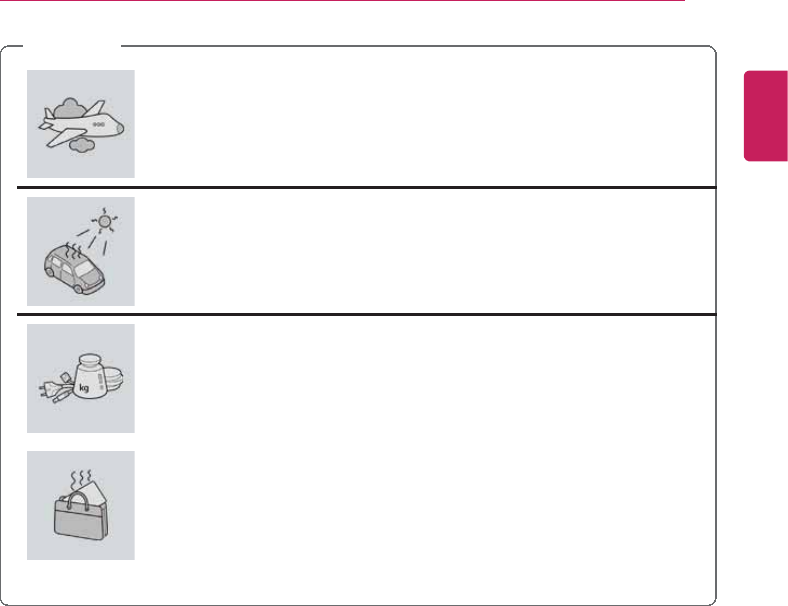
WARNING
During air travel, follow the directions of flight attendants.
•Using the PC during flight may cause an aircraft accident.
When leaving the machine in a car, avoid exposure to direct
sunlight.
•The product may get deformed or caught on fire due to a
temperature rise.
Do not put any heavy object on the power cable and AC adapter,
and avoid damage from impacts.
•A malfunction or fire may occur.
Do not leave the powered-on PC in a space without enough
ventilation (i.e. bags) for an extended or repeated time.
•The battery may overheat and cause a fire.
ENGLISH
18 Introduction / Important Safety Precautions
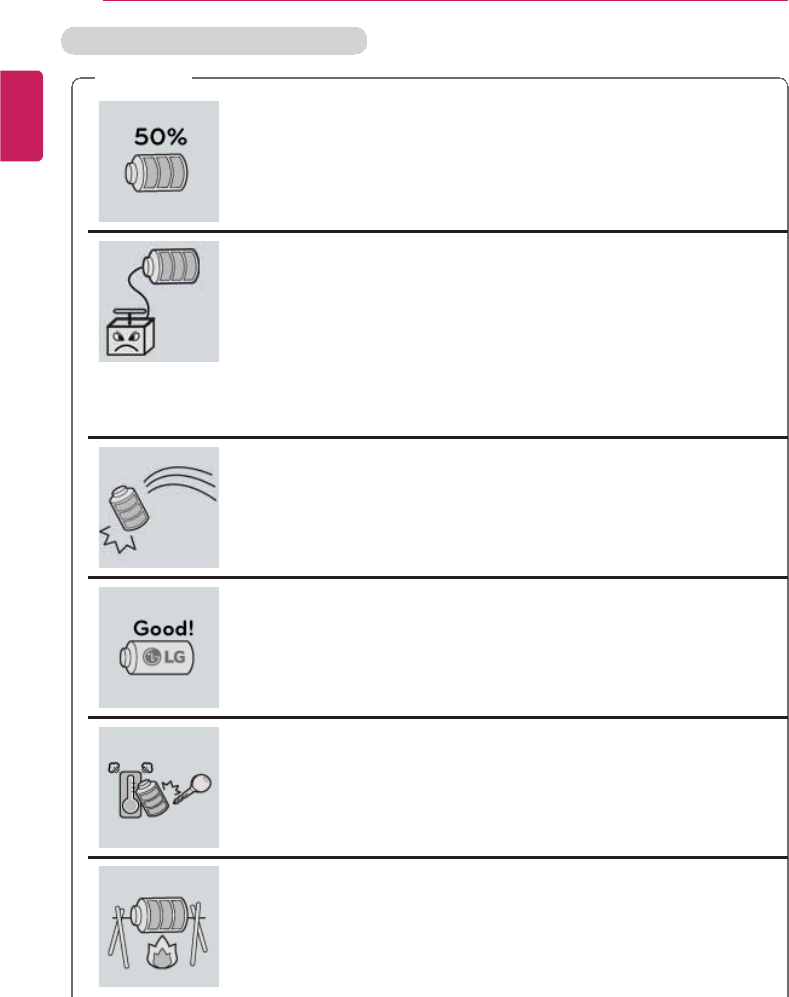
Battery and AC Adapter Precautions
WARNING
When the PC is not used for an extended period of time, keep
the battery level at 50%.
•Do not leave the product with discharged battery for an extended
period of time. It may damage the battery.
Charge the battery only with the provided instrument.
•Otherwise, the battery may be damaged presenting a risk of fire.
Do not throw or disassemble the battery.
•The resulting damage may cause an injury, explosion, or fire.
Use batteries certified and acknowledged by LG Electronics
Inc™.
•Otherwise, an explosion or fire may occur.
Prevent the battery from being in contact with any metallic
object like a car ignition key or a paper clip.
•Otherwise, this may cause damage to the battery, a fire or burn
due to overheat in the battery.
Keep the battery away from heat.
•Otherwise, an explosion or fire may occur.
ENGLISH
Introduction / Important Safety Precautions 19
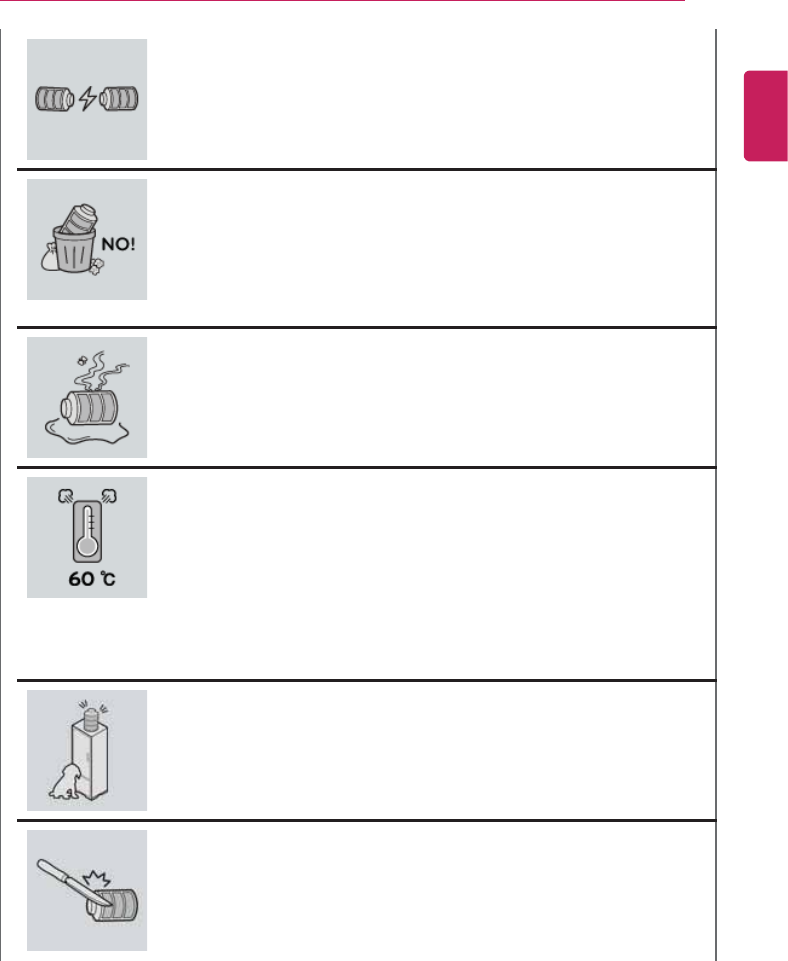
Do not short-circuit the battery.
•Otherwise, it may explode.
Do not dispose of a spent or backup (standby) battery
arbitrarily.
•It may explode or cause a fire.
•Disposal methods may differ by country and region. Dispose of
spent batteries in accordance with the laws and safety rules of the
country and region you reside in.
If you find leakage or smell bad odor from the battery, remove
the battery and contact the local service center.
•It may explode or cause a fire.
Do not store in places with temperatures above 60 °C and high
humidity (in cars or saunas).
•It may explode or cause a fire.
Keep the battery out of the reach of children or pets.
•If damaged, it may cause an injury.
Keep the battery from being pierced by a sharp object or
chewed by pets.
•It may explode or cause a fire.
ENGLISH
20 Introduction / Important Safety Precautions
Do not put the battery in water.
•Otherwise, the battery may be damaged or explode.
Do not use the PC on top of carpet, blanket or bed. Also, do not
put the adapter under the blanket.
•This may cause a malfunction, fire or burn due to overheat in the
PC and adapter.
Read the battery usage precautions carefully before use.
•Keep the battery at the room temperature. Refer to Tips in LG
Easy Guide and Installation Guide to use and store the battery
properly.
Ensure that the power jack linked to the AC adapter and product
is connected firmly.
•Loose connection may cause malfunction or fire.
Do not bend the power cable for AC adapter too much or get
stamped by a sharp object.
•The wires inside the cable may break and cause electric shock or
fire.
Do not use loose plugs or damaged power cords.
•An electric shock or fire may occur.
Do not touch the power cord with your hands wet.
•Otherwise, an electric shock may occur.
ENGLISH
Introduction / Important Safety Precautions 21
Pull the plug, not the cord, to disconnect the AC adapter and
power jack.
•Otherwise, a fire or product damage may occur.
Operate the product at the proper voltage.
•Excessive voltage may result in damage on the product, electric
shock or fire.
Use power outlets with an earth pin installed and proper supply
of rated electricity.
•An electric leakage may cause an electric shock or fire.
•The shape of the power cord and outlet may differ by country and
region.
Plug the power cord tightly into the outlet.
•Loose connection of the power cord may cause a fire.
In the case of strange noise from the cord or plug, disconnect
the power cord from the outlet immediately and contact the
service center.
•A fire or electric shock may occur.
Use the power supply/adapter provided with the product and
never disassemble the product.
•Using a different product or disassembling it may cause an electric
shock or fire.
Ensure that the power outlet is earthed before plugging in.
•Otherwise, an electric shock from power leakage may occur.
ENGLISH
22 Introduction / Important Safety Precautions
Always keep the AC adapter and power outlet clean.
•A fire may occur.
Keep children and pets from damaging the power cord.
•It may cause a fire or an electric shock.
Disconnect the PC completely before cleaning it.
•Otherwise, an electric shock or impairment may occur.
If the power/AC adapter or the product is soaked, disconnect
the battery, power/AC adapter, and all other lines before
contacting the local service center.
•An electric shock or fire may occur.
When installing the battery, be sure that the bottom of the PC is
locked in place.
•Otherwise, the battery may be damaged.
ENGLISH
Introduction / Important Safety Precautions 23
Other Safety Precautions
CAUTION
Handle the machine with care to prevent loss of data from the
storage device (HDD, SSD, eMMC).
•Since the storage device is fragile, you need to back up your
important data frequently.
•The manufacturer is not responsible for any storage device data loss
caused by a user's mistake.
Damage to the storage device (HDD, SSD, eMMC) and data loss
may occur when:
•External shocks are inflicted on the machine while disassembling or
installing it.
•The machine is reset (i.e. restarted) or turned on again after a power
outage while the storage device is operating.
•The PC is infected with a virus, tainting the data irrecoverably.
•Abrupt turning-off of the PC can damage the PC.
•If the product is moved, shaken or exposed to external shock while
the storage device is running, file damage or bad sectors may occur.
To minimize data loss resulting from storage device damage
(HDD, SSD, eMMC), frequently back up important data.
•The manufacturer is not responsible for any data loss.
We do not refund or replace a product that malfunctions due to
the installation or use of an operating system other than the one
provided by LG Electronics Inc.
•Some software applications may not work properly in other
operating systems. Such malfunctions are not covered by the
warranty.
ENGLISH

24 Introduction / Important Safety Precautions
ENERGY STAR®
ENERGY STAR®
ENERGY STAR®Specifications
•LG Electronics Inc. participates in ENERGY STAR®and the energy
efficiency of this product complies with the specifications of ENERGY
STAR®.
•ENERGY STAR®is a set of regulations that encourages manufacturers
of electronic devices to create more energy efficient products.
•The energy consumption of this product was decreased along with the
cost. Also, it helps preserve natural resources.
•This PC includes a feature that lets it turn into (Sleep) mode when not
used for up to 30 minutes.
•To leave sleep mode, click a mouse button or press any key on the
keyboard.
ENGLISH

Introduction / Important Safety Precautions 25
Product Specifications
PC Specifications
Display 39.6 cm IPS LCD
The display resolution may differ by model.
CPU Intel®Core™i7 / i5 / i3 or Intel®Pentium®processor
The CPU differs depending on model type and cannot be replaced
by the user.
Graphics Intel®HD Graphics 520 or Intel®HD Graphics (Dynamic Video Memory
Technology)
The graphics differs depending on model type and cannot be
replaced by the user.
When processing large graphic data like 3D graphics, it utilizes
dynamically allocated shared graphics memory. The size of the allocated
memory depends on the system memory size.
System
Memory
DDR3L SODIMM
The maximum capacity of the main board is 8 GB (8,192 MB).
Memory of 3 GB or more is supported only in a 64-bit O/S.
Memory size may differ depending on the model. The user must not
arbitrarily replace the memory.
Storage M.2 SSD (2280)
SSD capacity may differ depending on the model.
Any malfunction of a Solid State Disk (SSD)-built-in model may
cause the loss of the stored data. You must back up all critical user
data to an external storage device (USB HDD, memory card, etc.).
Bluetooth Bluetooth 4.0 + LE
If you connect to Bluetooth device and wireless LAN at the same time,
the system may become slow.
In order to use Bluetooth 4.0, the device you want to connect to must
support Bluetooth 4.0.
Wireless
LAN
Intel®7265NGW
Intel®3165NGW
The WLAN card may differ depending on model. The user must not
arbitrarily replace the WLAN card.
Manufacturers and installers cannot provide services related to
human safety as this wireless device may cause radio interference.
Webcam 1.3M / HD Webcam
LAN 10/100 Megabit or gigabit.
To use a wired LAN, you need to have a LAN adapter installed
separately.
The performance of the provided adapter depends on the model.
Product
Weight
Approx. 980 g (battery included)
The weight may differ depending on the model.
ENGLISH
26 Introduction / Important Safety Precautions
The types and specifications of the display, CPU, Graphics, Storage Device (HDD,
SSD, eMMC), Bluetooth, Wireless LAN and Web Camera may differ depending on the
computer model. The user must not replace them.
Power Supply and Environments
AC Adapter (Free Voltage) Power Capacity: 40 W
Input: AC 100 V to 240 V, 1.0 A to 1.1 A 50 / 60 Hz
Output: DC 19 V, 2.1 A (40 W)
Battery (Li-Ion) Rated Capacity: 7.6 V or 7.7 V
Charging Hours: At room temperature 10 °C to 40 °C,
Power turned off - Less than 3 hours (Time may differ
by model type.)
Not charged under 0 °C.
The above temperatures are internal temperatures of
the battery, and may be different from the actual room
temperature.
Operating and Storage
Conditions
Operating Temperature: 10 °C to 35 °C
Operating Humidity: 20 % RH to 80 % RH
Storage Temperature: -5 °C to 40 °C
Storage Humidity: 5 % RH to 90 % RH
Power Consumption
Operating Conditions Approx. 15 W The system is running video clips.
Standby mode (Idle state) Approx. 5 W When the monitor display is off
Sleep (Standby) Mode 1 W or lower In S3 (Suspend)
Off Mode 0.5 W or lower The system is turned off.
The above power consumption is calculated on the assumption that the battery is
fully charged.Power consumption during operation, standby, sleep and off modes
may differ depending on the programs the system is running, product specifications
and the adapter type.Even when the system is turned off, it consumes a minute
amount of power, if supplied. To cut off the power supply completely, disconnect the
power cord from the power outlet.
ENGLISH

Using Windows 10 27
Using Windows 10
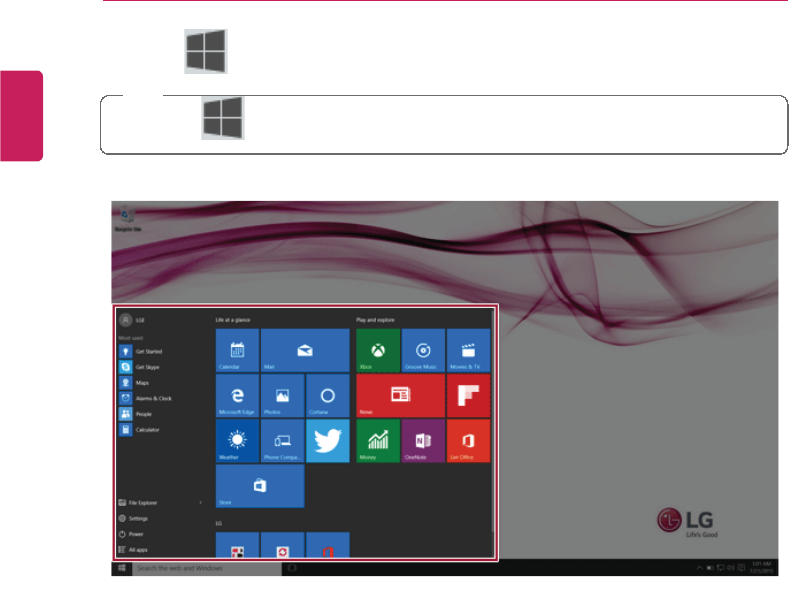
Start Menu
A New Start Menu
The Start menu in Windows 10 has been changed so you can use Windows quickly and
easily.
Press the [ ] button in the lower-left corner of the screen to display the Start menu.
TIP
Press the [ ] key or [Ctrl] + [Esc] to display the Start menu.
ENGLISH
28 Using Windows 10
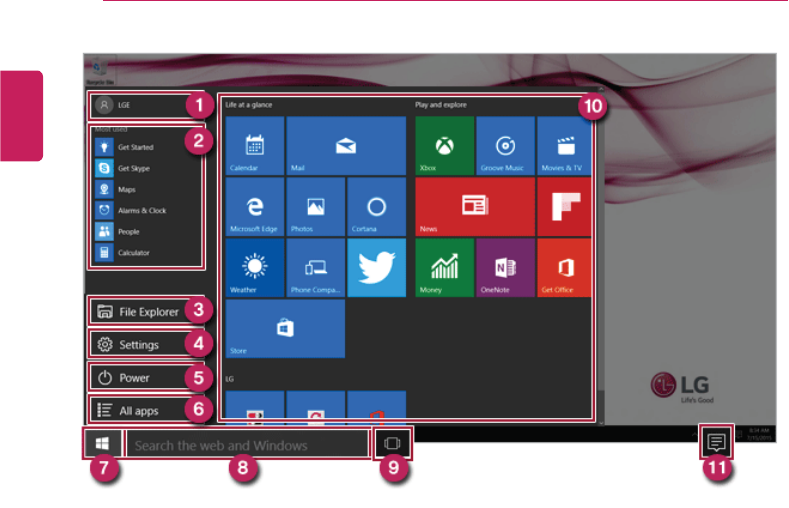
1User Account: Displays the current user's information. You can use functions such as
Change Account Settings, Lock or Logout.
2Frequently Used Apps: Displays frequently used apps and recently added items.
3File Explorer: You can sort data as you wish and quickly search for the items in the
system.
4Settings: You can set up the system including the network settings.
5Power: Sleep, System Shutdown, and Restart menus are available.
6All Apps: All the apps installed in the system are displayed. You can select and run an
app.
7Start Button: Opens or closes the Start menu.
8Web and Windows Search : Searches for the text entered by the user in My Items
(system) or the Internet.
9Add/Toggle Desktops: You can add and use multiple desktops.
10 App Tile: Apps added to the Start menu are displayed in tile format.
11 Action Center: You can view the system-related notification messages and change PC
settings.
ENGLISH

Using Windows 10 29
TIP
•Press [ ] + [X], and then the [ ] button pop-up menu appears. You can use
the pop-up menu to easily access the shortcuts for Control Panel, Explorer, Search,
System Shutdown, and the desktop environment.
Desktop Apps and Windows Apps
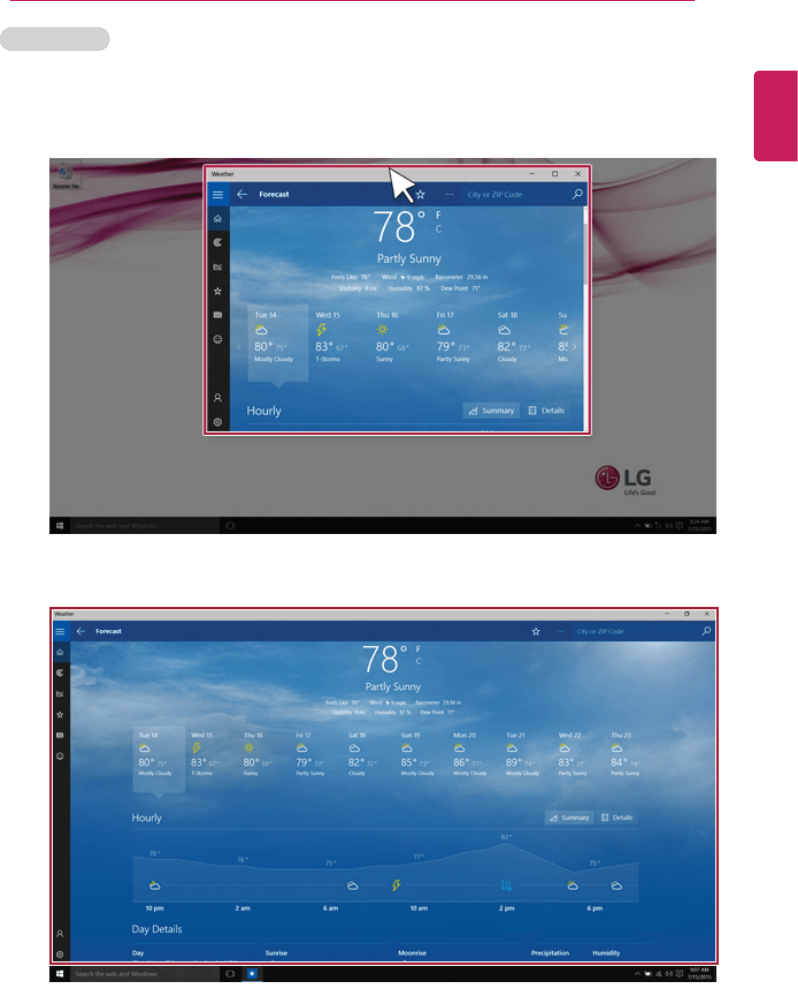
The Desktop apps remain unchanged from the previous Windows apps, but Windows apps
have been changed to include various features.
The Windows apps provide easy-to-use menus according to the window size and a variety
of convenient reatures such as Update and Alarm.
ENGLISH
30 Using Windows 10
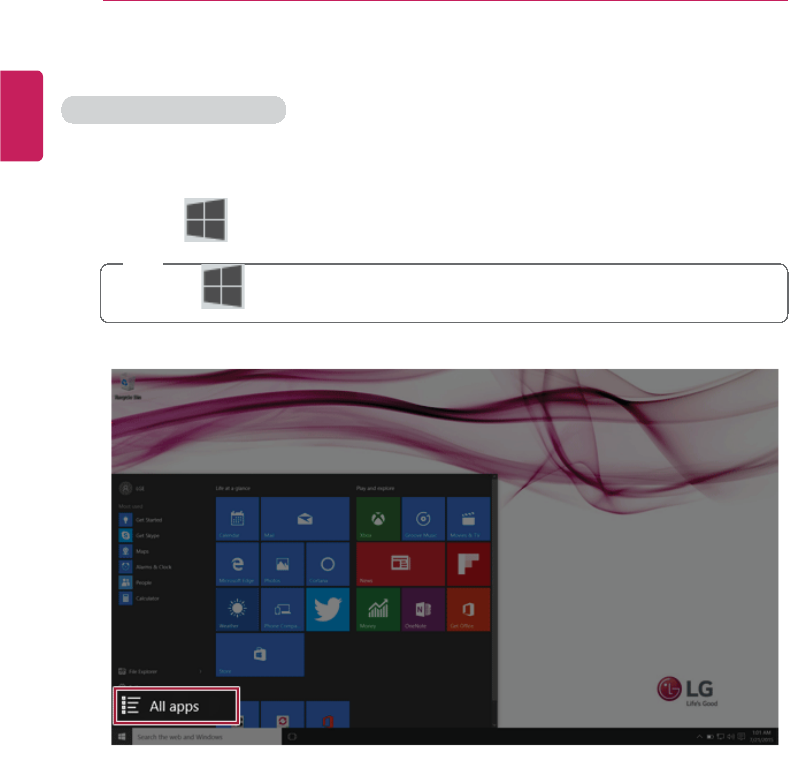
Using Apps
Running and Exiting Apps
The apps not added on the Start menu or installed in the system may be run by using the
following method:
1Press the [ ] button and select the [All Apps] menu.
TIP
Press the [ ] key or [Ctrl] + [Esc] to display the Start menu.
ENGLISH
Using Windows 10 31
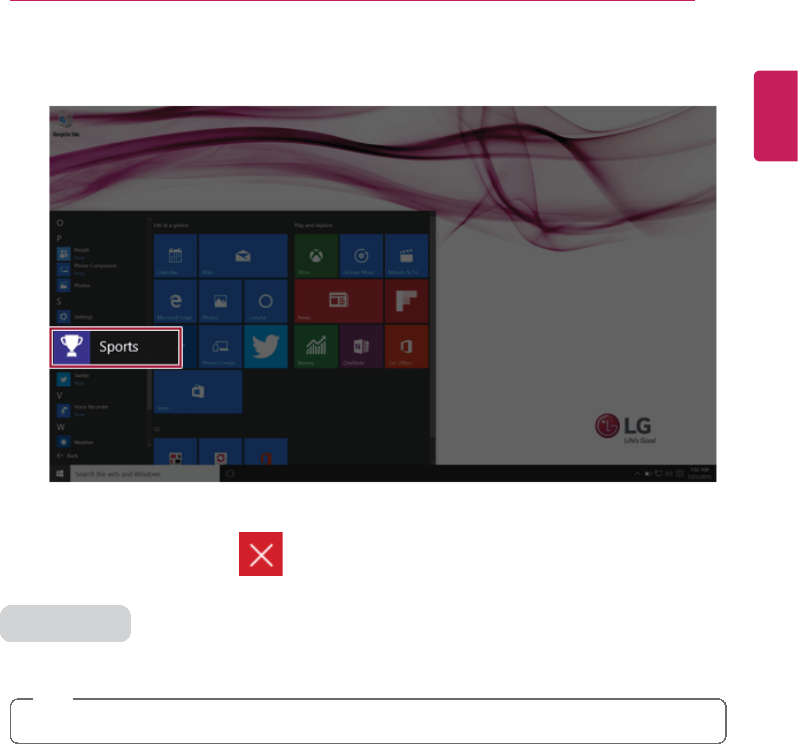
2When the app list appears, select and run an app.
3To exit an app, press the [ ] button on the top of the app screen.
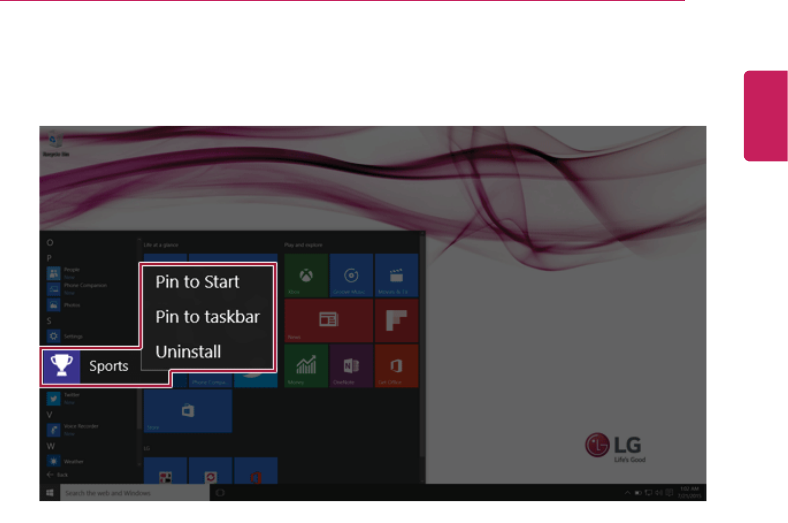
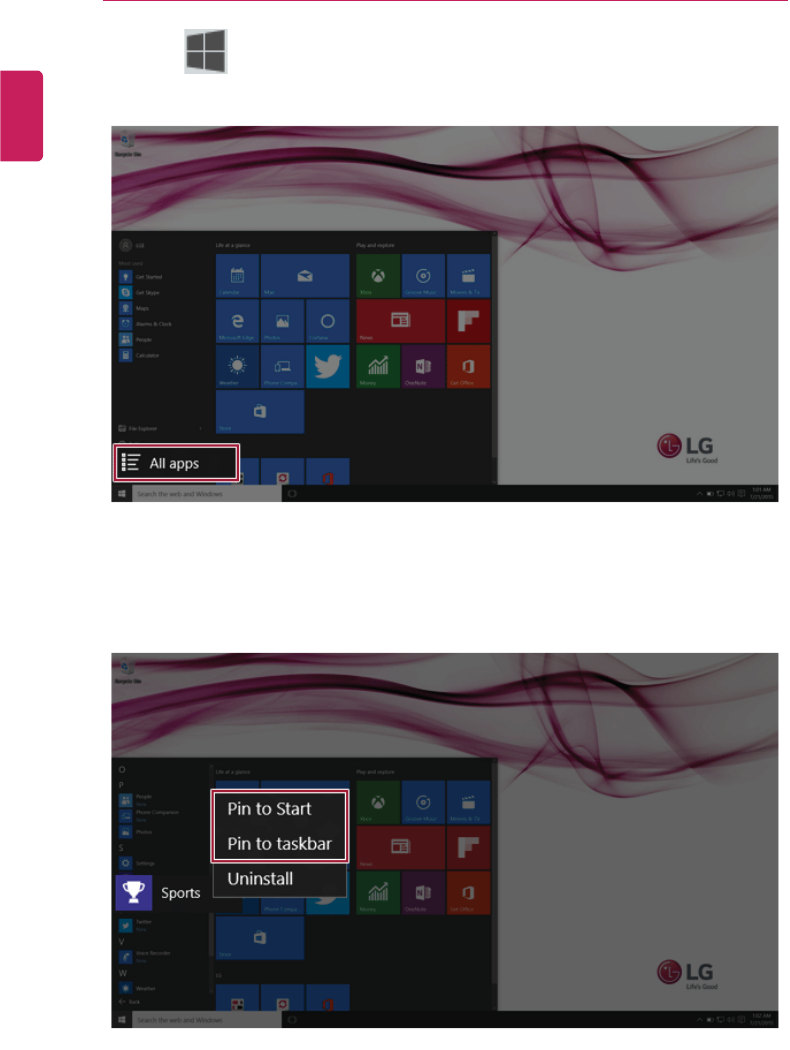
Deleting Apps
You can delete apps from the Start menu tiles or [All Apps] menu.
TIP
The basic Windows apps that are required may not be deleted.
ENGLISH
32 Using Windows 10
1Press the [ ] button to display the Start menu.
TIP
Press the [ ] key or [Ctrl] + [Esc] to display the Start menu.
ENGLISH
Using Windows 10 33
2Go to the Start menu app tiles or the [All Apps] menu and right-click the app you wish to
delete.
ENGLISH
34 Using Windows 10
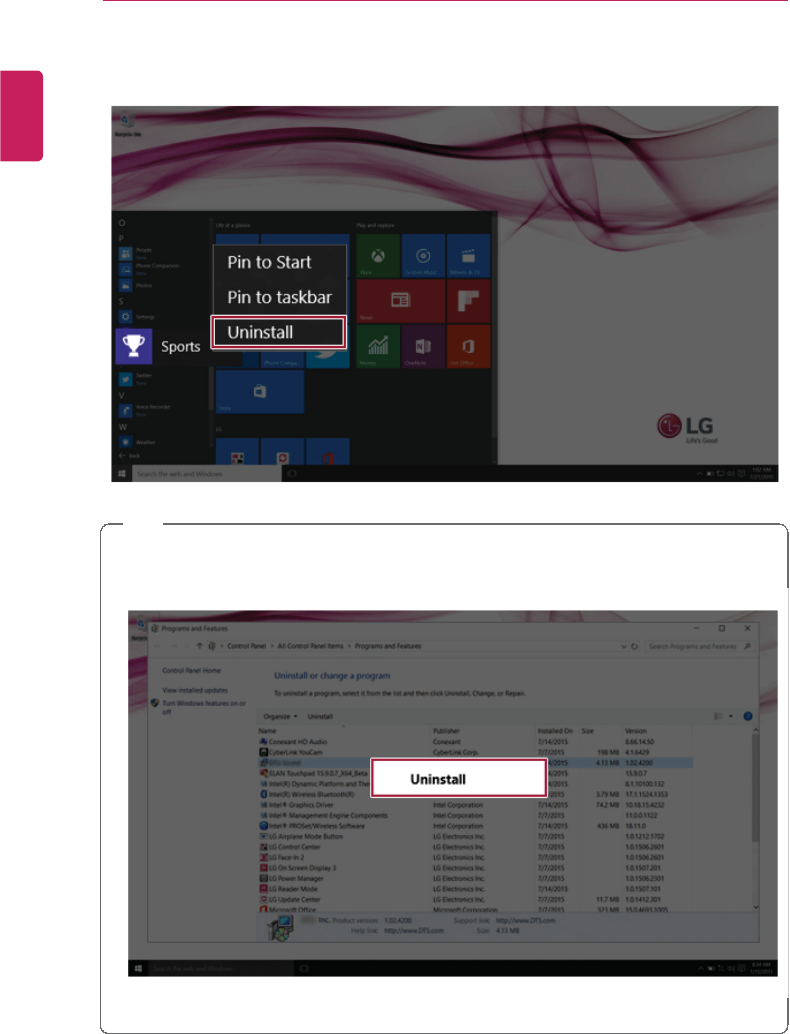
3When the pop-up menu appears, select [Uninstall].
TIP
If you are deleting a desktop app, the [Programs and Features] window appears.
Right-click the app you wish to delete and press the [Uninstall/Change] button.
ENGLISH
Using Windows 10 35
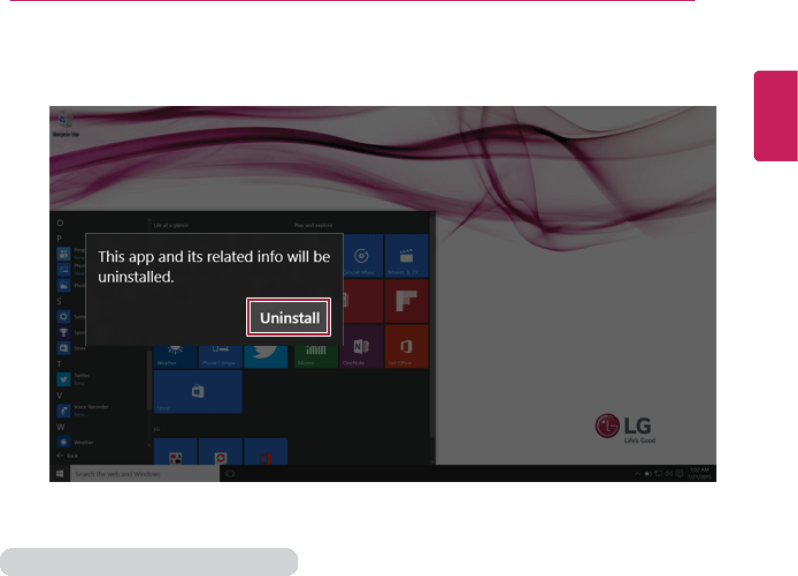
4When prompted to confirm the deletion, press the [Uninstall] button to delete the app.
Adding Apps to Start Menu/Taskbar
You can add frequently used apps on the Start menu and taskbar for easy and quick
access.
ENGLISH
36 Using Windows 10
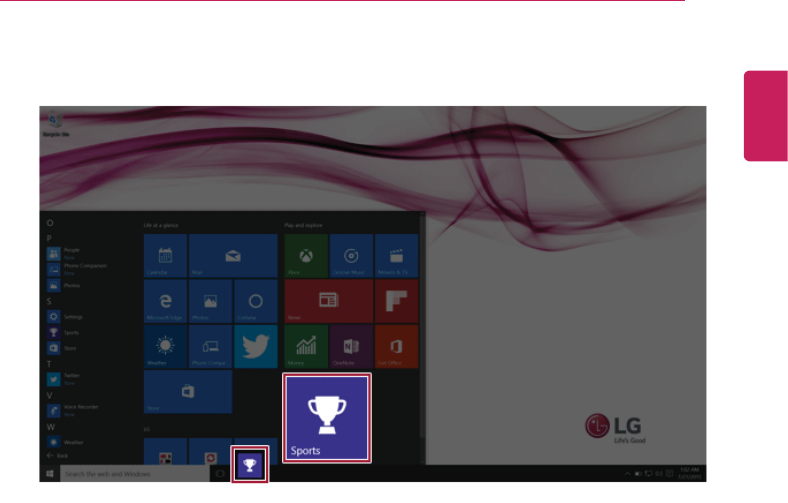
1Press the [ ] button and select the [All Apps] menu.
2Right-click on the app you want from the app list, and then select [Pin to Start] or [Pin to
taskbar].
ENGLISH
Using Windows 10 37
3The selected app is added to the Start menu or taskbar.
ENGLISH
38 Using Windows 10
Toggling and Adding Apps/Desktops
In Windows 10, you can toggle the running apps easily and quickly, and add desktops to
use them like multiple PCs.
TIP
For an app that does not allow multitasking, you may be switched to the desktop where
the app was executed, or you may have an error message.
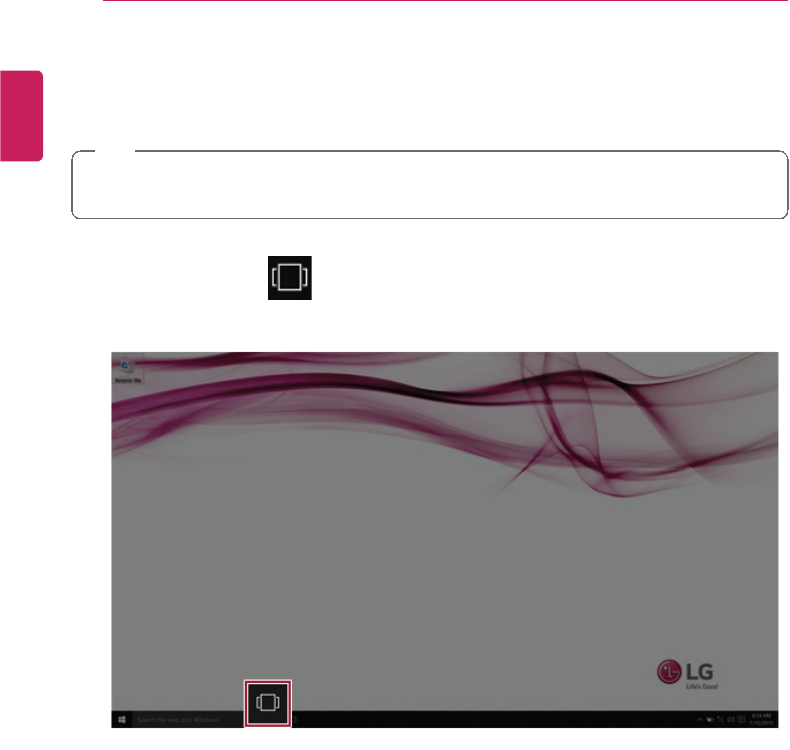
1In the taskbar, press [ ].
ENGLISH
Using Windows 10 39
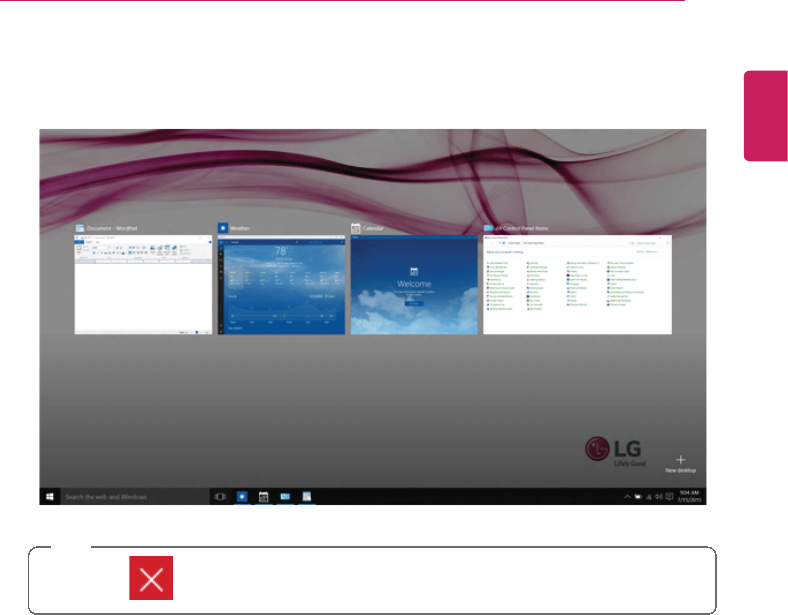
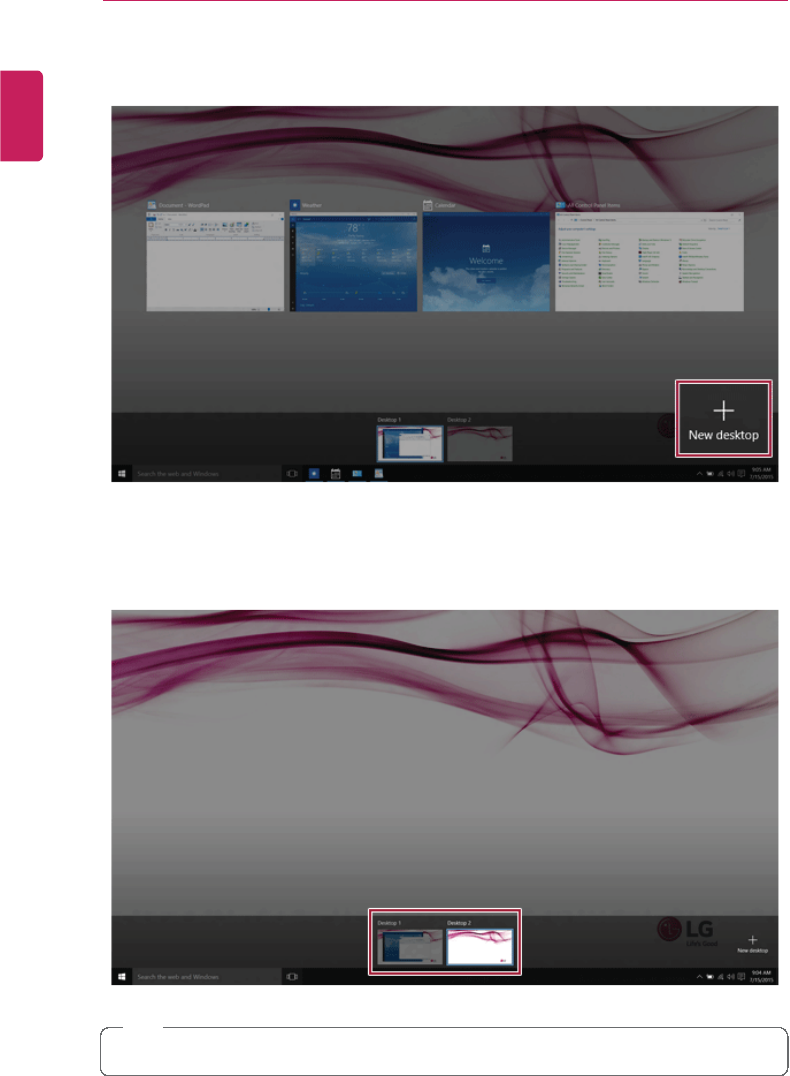
2The screen to switch between apps and desktops appears and the running apps are
displayed in the preview.
TIP
Press the [ ] button of an app in the preview to exit the app.
ENGLISH
40 Using Windows 10
3Press the [New Desktop] tile.
4[Desktop 1] and [Desktop 2] are created.
TIP
Two desktops are provided by default and you can add more if necessary.
ENGLISH
Using Windows 10 41
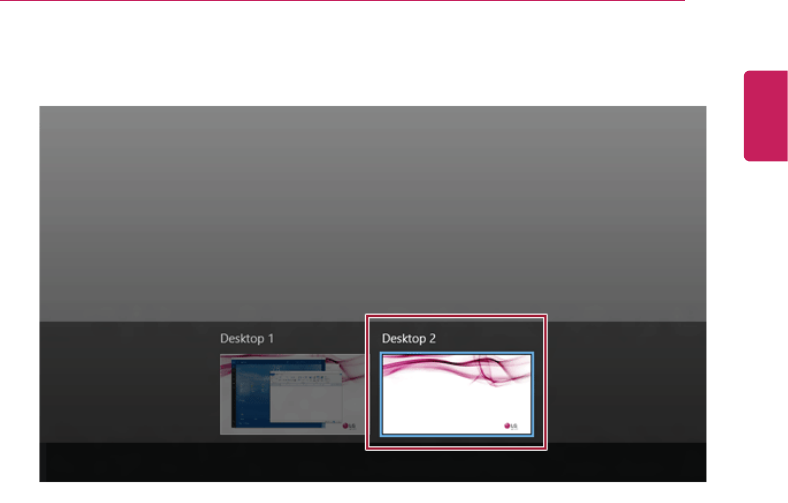
5Select an app in the preview or desktop.
6The screen is toggled to the selected app or desktop.
ENGLISH
42 Using Windows 10
TIP
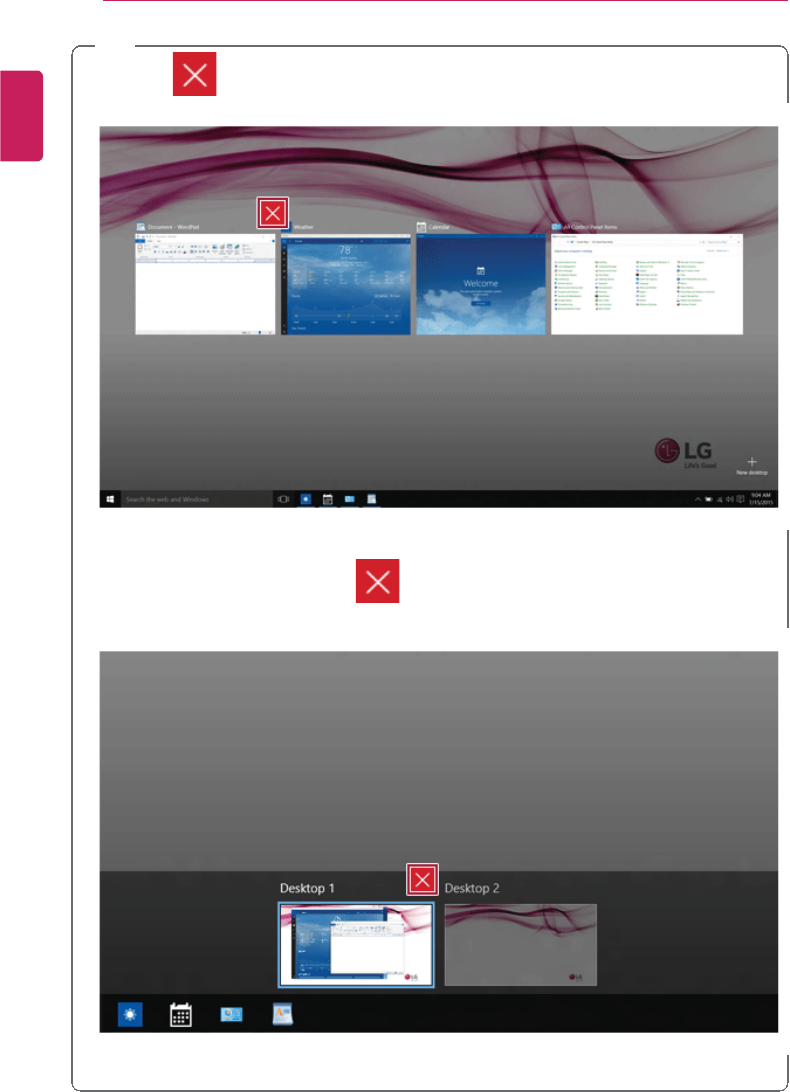
Press the [ ] button in the app preview to exit the app.
In the desktop preview, press the [ ] button to delete the desktop and move running
apps to another desktop.
ENGLISH
Using Windows 10 43
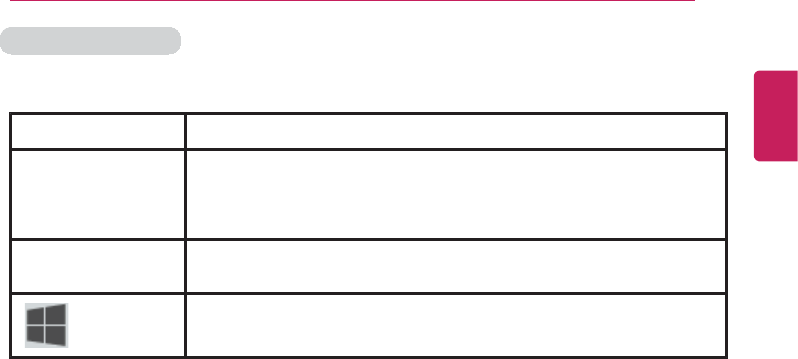
Using Shortcut Keys
Use the shortcut keys to quickly toggle between apps and desktops.
Shortcut Keys Comments
[Alt] + [Tab] Press [Alt] together with the [Tab] key to view the running apps in
the preview.
Press [Tab] several times to select an app you wish to switch to
and release the key.
[Alt] + [Ctrl] + [Tab] The running apps on the screen are displayed in the preview.
Select and switch to an app.
[] + [Tab] If the desktop toggling screen appears, select an app or desktop
you wish to switch to.
ENGLISH

44 Using Windows 10
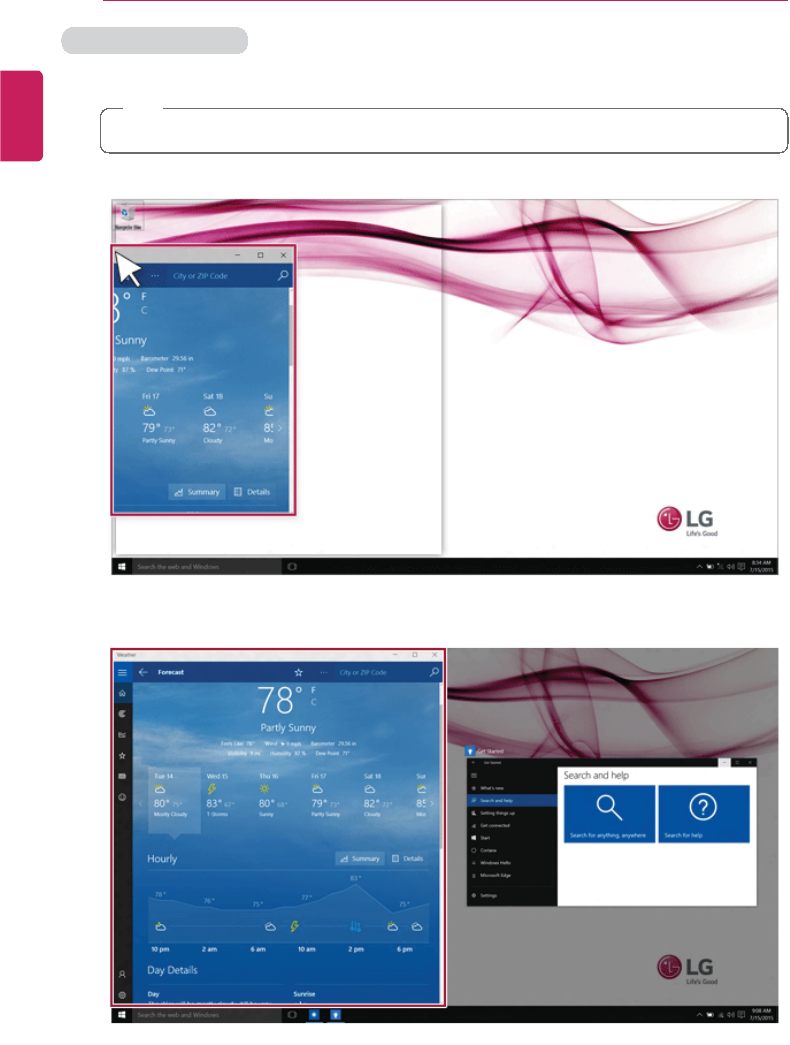
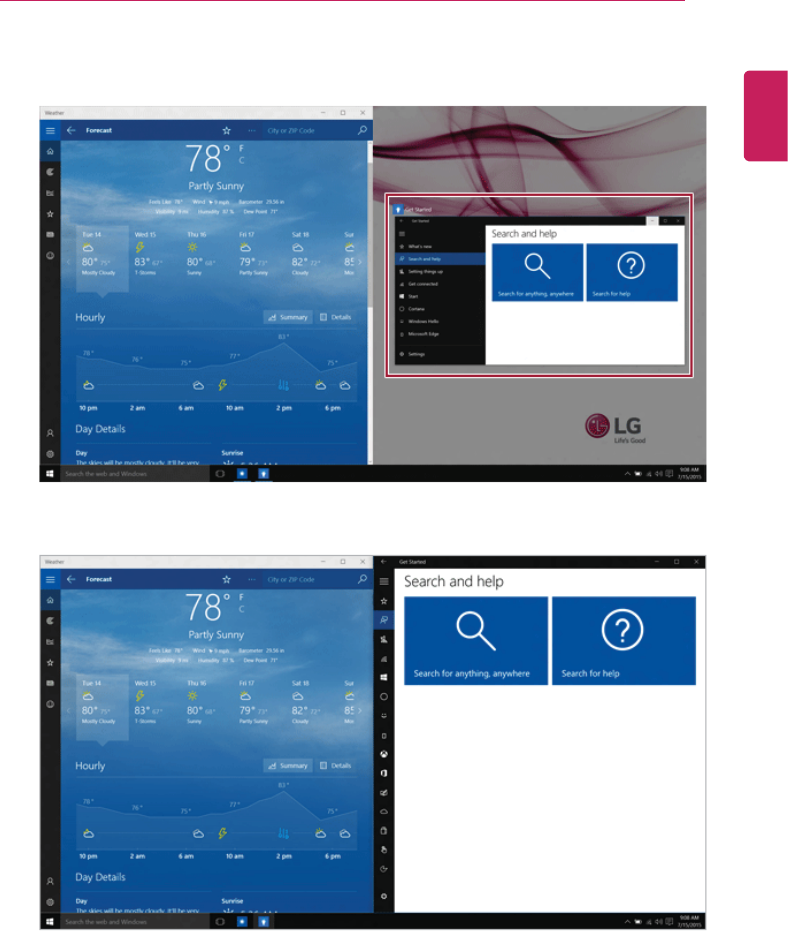
Splitting the App Screen
In Windows 10, you can easily adjust window sizes and split windows if necessary.
TIP
Some apps that cannot adjust the window size do not support the screen split.
ENGLISH
Using Windows 10 45
Full Screen
1Drag and drop an app to the top end of the screen to change the app to the full screen
size.
2Drag and drop the app again to a different location to return to its original size.
ENGLISH
46 Using Windows 10
Screen Split into Two
1Drag and drop an app to the right end or left end to reduce the size by half.
TIP
The screen is split according to the guideline.
ENGLISH
Using Windows 10 47
2Select a running app displayed in the preview on the split screen.
3Drag and drop the app again to a different location to return to its original size.
ENGLISH
48 Using Windows 10
Screen Split into Four
1Drag and drop an app to the left corner to reduce the app to 1/4 size of the screen.
TIP
The screen is split according to the guideline.
ENGLISH
Using Windows 10 49
2You can use this method to place up to four apps on the screen.
3Drag and drop the app again to a different location to return to its original size.
ENGLISH
50 Using Windows 10
Using the Store
You can purchase apps or get free apps from Windows Store.
TIP
If a local account is being used, a window to switch to a Microsoft account appears while
using Windows Store. Follow the instructions on the screen to switch the local account to
a Microsoft account.
You can also do so by selecting [Start menu] > [User Account] > [Change Account
Settings].
If you switch to a Microsoft account, your PC settings (background, user settings, etc.)
may be changed to the previous settings.
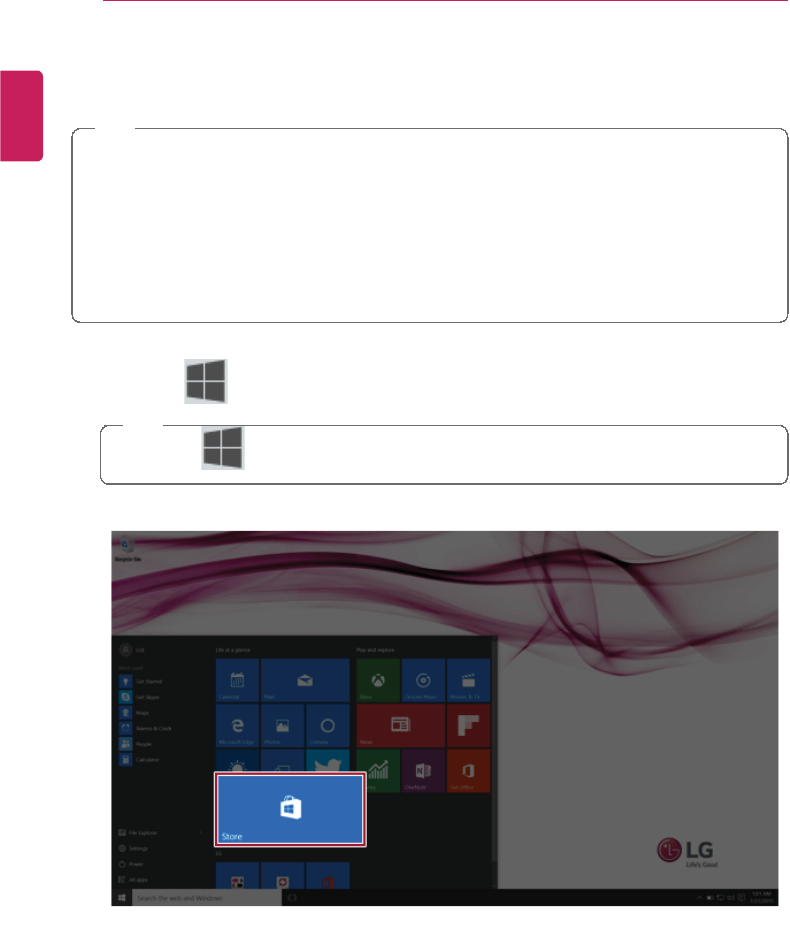
1Press the [ ] button to move to the Start menu and select the [Store] tile.
TIP
Press the [ ] key or [Ctrl] + [Esc] to display the Start menu.
ENGLISH
Using Windows 10 51
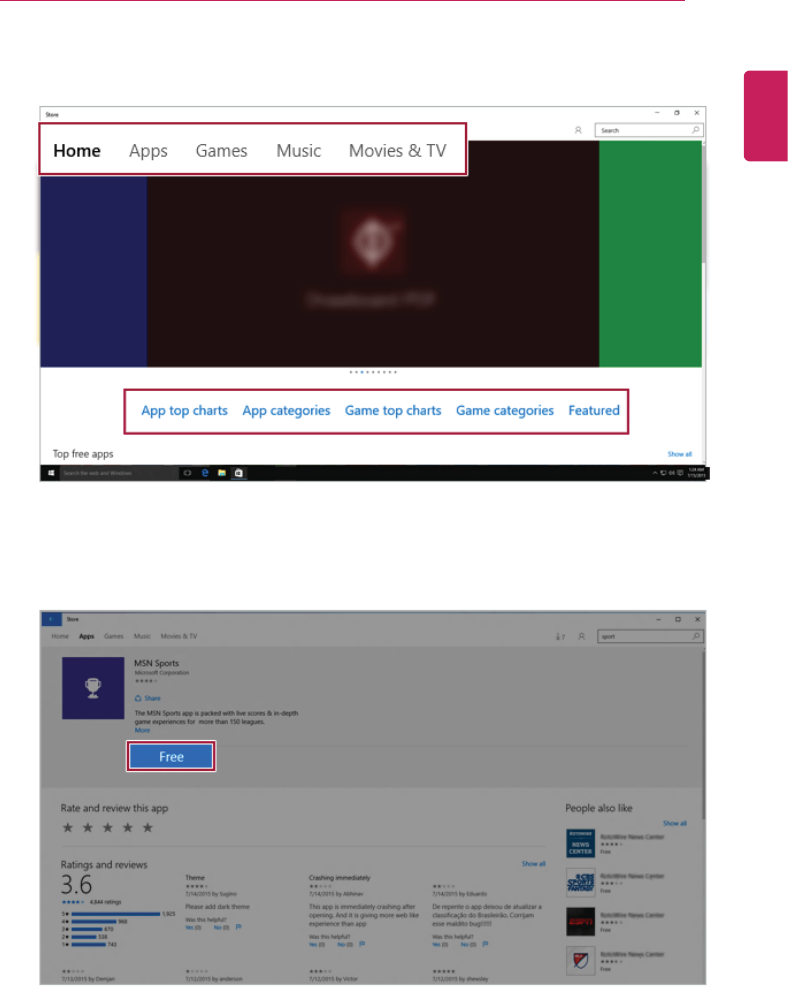
2On the Store screen, select a category or app of your choice.
3On the app details screen, select [Free], [Install] or a button with an app price.
4App installation starts in a moment.
ENGLISH

52 Using Windows 10
5Press [All Apps] on the Start menu to check the apps installed in the app list.
ENGLISH
Using Windows 10 53
Switching to Tablet Mode
If you are using Windows on a tablet PC, you can easily switch to the tablet mode.
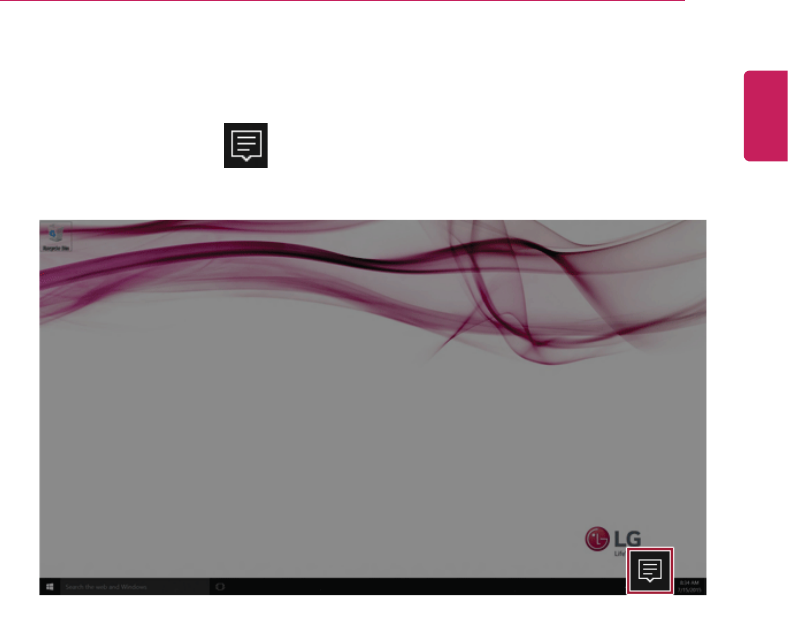
1Press the Action Center [ ] icon on the right side of the taskbar.
ENGLISH
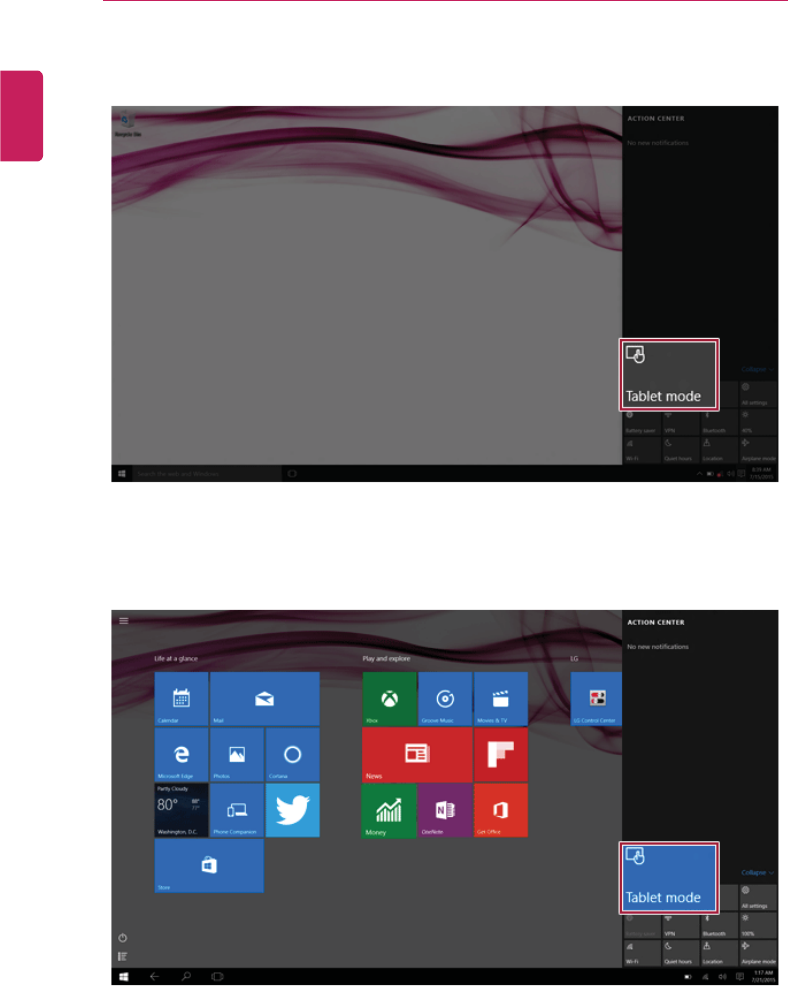
54 Using Windows 10
2Select [Tablet Mode] to switch Windows to tablet mode.
3Select Tablet Mode again to deactivate the mode.
ENGLISH
Using Windows 10 55
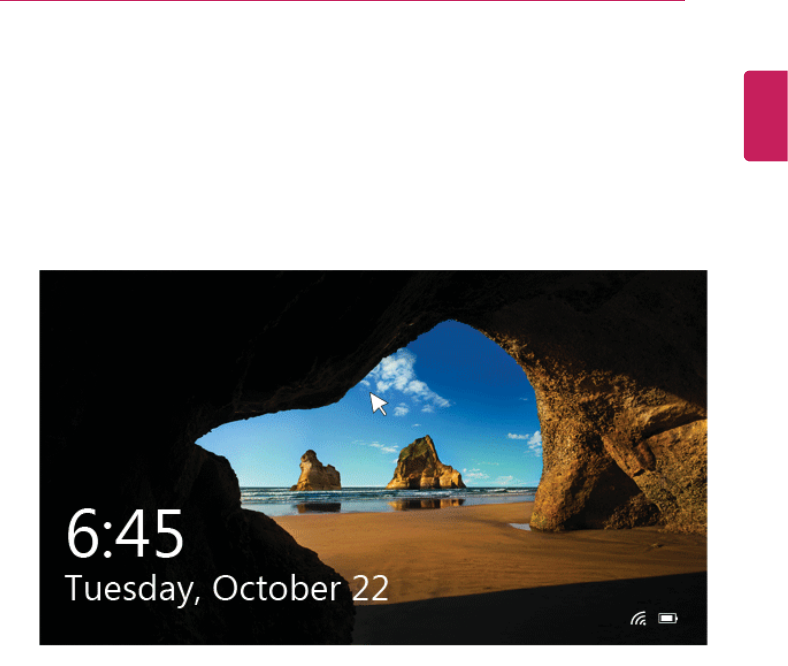
Unlocking the Screen
If the PC is not used for an extended period, it goes into a locked state.
When the PC is used again, a lock screen appears for security purposes and may be
unlocked by using the following method.
1From the lock screen, press any key on the keyboard or drag up while you click and
hold the mouse button.
2When the login window appears, enter the password and press [Enter].
(If no password is set, press the login button to immediately unlock the screen.)
ENGLISH
56 Using Windows 10
Setting the PC
Windows 10 supports various features so the user can change the PC settings easily and
quickly.
Using Action Center
You can use the Action Center to easily change the settings for tablet mode, display, media
connection and network settings.
The features supported by the Action Center may differ depending on the model.
1Press the Action Center ( ) icon on the right side of the taskbar.
ENGLISH
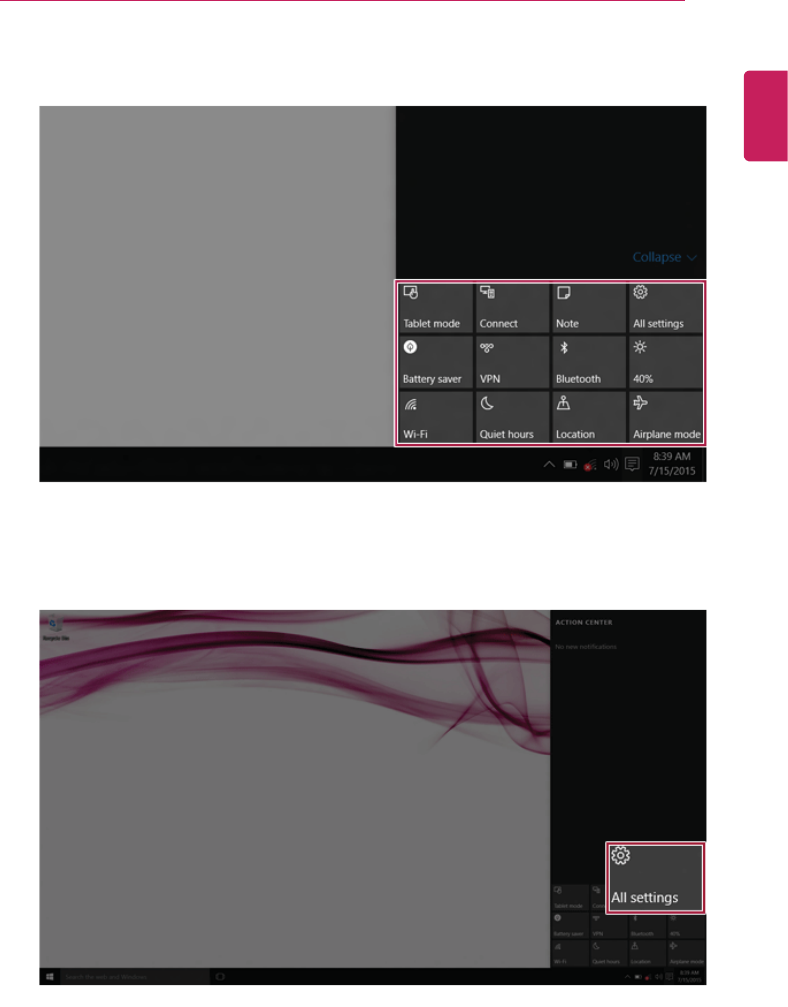
Using Windows 10 57
2Change the PC settings as needed.
3To change the detailed settings of the PC, press the [All Settings] tile.
ENGLISH
58 Using Windows 10
Using the Start Menu
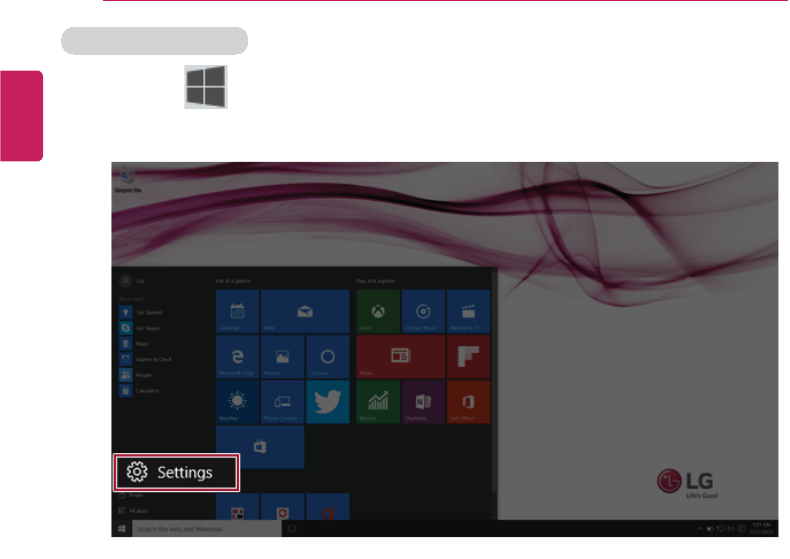
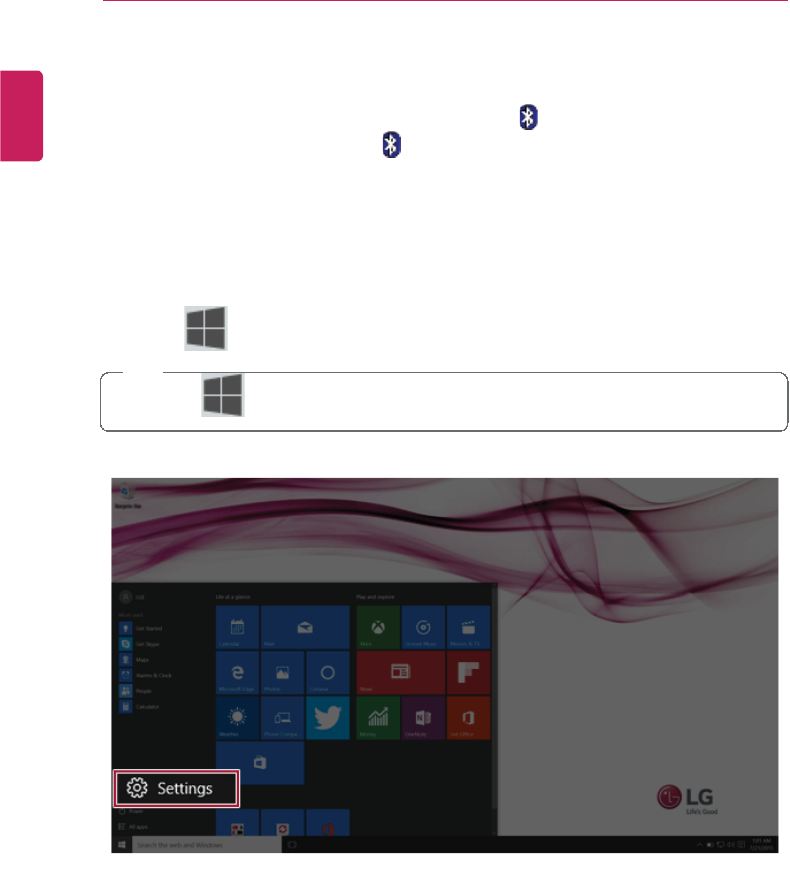
1Press the [ ] button and select the [Settings] menu.
ENGLISH
Using Windows 10 59
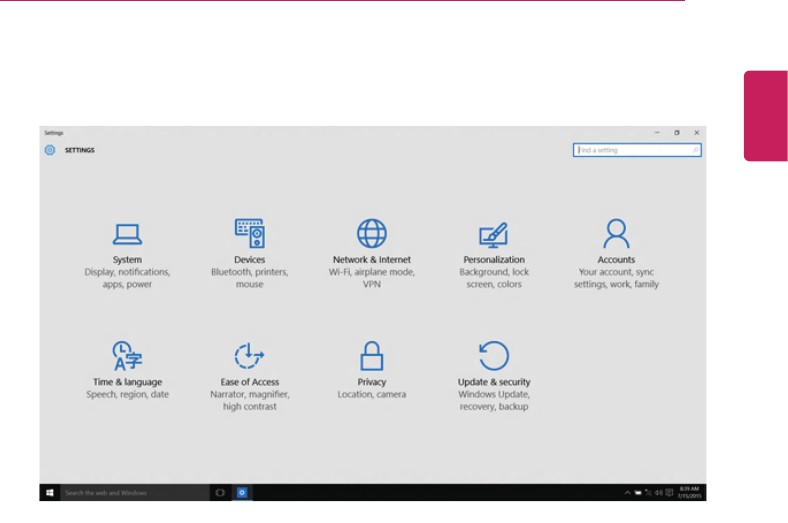
2When the screen for PC's detailed settings appears, select and change the settings as
needed.
ENGLISH
60 Using Windows 10
Windows Shutdown Option
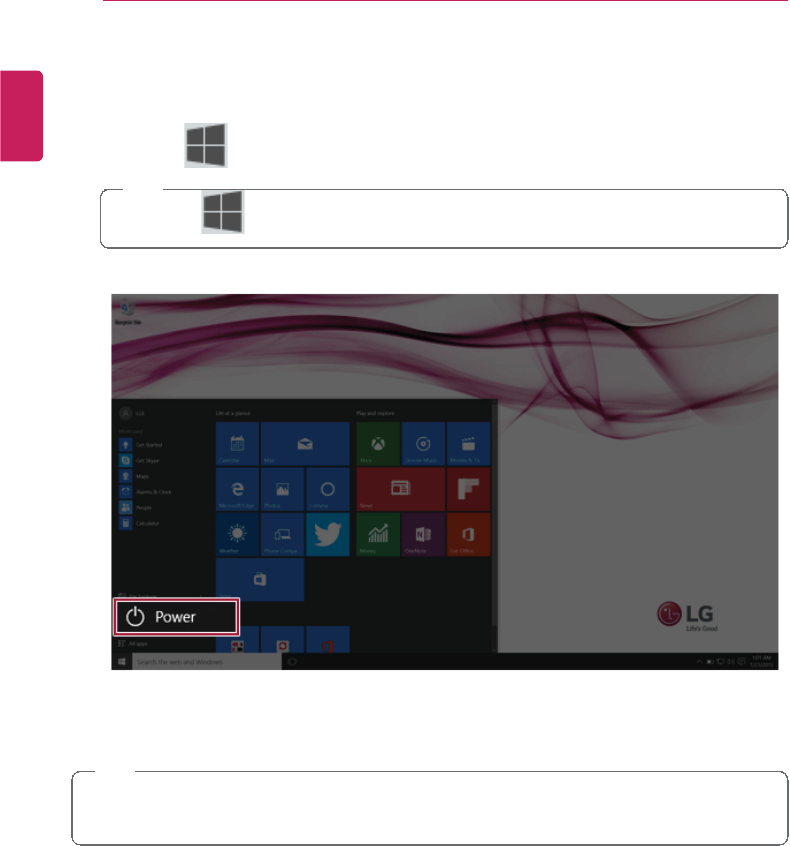
In Windows 10, you can use the Windows shutdown option by following these steps:
1Press the [ ] button and select the [Power] menu.
TIP
Press the [ ] key or [Ctrl] + [Esc] to display the Start menu.
2Select a Windows shutdown option.
TIP
On the desktop, press [Alt] + [F4] to use the Windows shutdown options.
(Pressing [Alt] + [F4] on a running app may close it, so be careful.)
ENGLISH

Using the PC 61
Using the PC
Using an AC Adapter and a Battery
Connect the AC adapter to power and charge the product.
TIP
The power cable and the AC adapter type may differ per model type and country
and there is no difference in functionality.
This product has a built-in battery pack.
The internal battery should not be arbitrarily disassembled or replaced. Arbitrarily
disassembling the product may void the warranty.
If you need to disassemble or replace the battery, please visit the designated LG
Electronics Service Center.
We charge a fee for removing or replacing the battery.
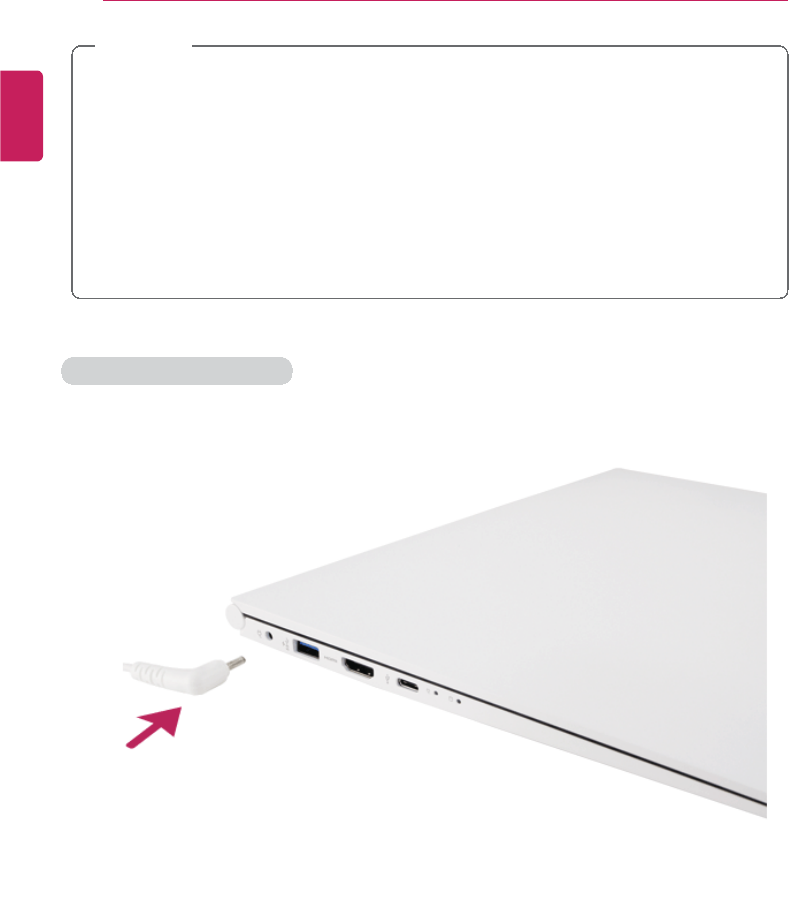
Using an AC Adapter
An AC adapter of 100 V - 240 V can be used.
1Connect the AC adapter to a power outlet.
2Connect the adapter to the machine.
3Adjust the LCD to the most comfortable angle.
4Press the power button to turn on the machine.
TIP
•You need a different plug to use the AC adapter with 110 V. (the plug for 110 V is
sold separately).
CAUTION
Do not leave a liquid container on the PC.
•The system may be short-circuited and damaged.
ENGLISH
62 Using the PC
WARNING
Please use an AC adapter certified by LG Electronics Inc.™
•Uncertified batteries may explode.
•It may cause a problem in battery charging or system operation.
When you use an AC adapter, follow the directions below.
•60 °C or more high-humidity spaces, for example, inside cars or saunas, should be
avoided when you use or store it.
•Do not disassemble or modify the AC adapter.
•Do not twist the AC adapter plug.
•When you connect the AC adapter, do not forcefully push the plug.
Checking the Battery State
1Connect the AC adapter to the power port in the PC.
ENGLISH

Using the PC 63
2Open the LCD and check the charging state.
When the AC adapter lamp is blinking, charge it fully with the AC adapter before using it.
CAUTION
Use batteries certified and acknowledged by LG Electronics Inc™.
•Uncertified batteries may explode.
ENGLISH

64 Using the PC
WARNING
The battery may explode due to excessive heat, causing fire. For a safe and
efficient use of battery, follow the below directions.
•Do not short-circuit the battery.
•Keep the battery out of reach of children.
•A visible swelling of the battery pack indicates a possible danger. When this occurs,
contact your local vendor or service center immediately.
•Use only a certified and designated recharger.
•Keep the battery pack away from heat. (Never put it in a microwave.)
•Do not leave inside a car under the summer heat.
•Do not leave or use at a hot and humid place like a sauna.
•Do not use the machine placed on a heating blanket or other heat reserving
materials.
•Do not leave the machine turned on inside a closed space.
•Make sure that the power ports are not touched by any metallic objects like a key,
coin, necklace, and watch.
•Use only a lithium secondary battery certified and guaranteed by mobile device
manufactures.
•Do not disassemble or modify the battery. Do not compress or pierce the battery.
•Do not apply shock to the battery. For example, do not drop the battery from a high
place.
•Keep the room temperature between 0 °C and 50 °C. Do not expose the PC to heat
hotter than 60 °C.
•Keep the machine dry.
•Do not discard the battery arbitrarily as you are requested to follow the local
procedure for discarding the battery.
•Before using this machine, read this guide carefully.
ENGLISH

Using the PC 65
TIP
When the PC is not used for an extended period of time, refer to the following:
•Check the battery charge level on a regular basis and keep it at 50%. This allows
you to extend the battery life.
•If the battery is left fully charged for an extended period of time, the battery capacity
and battery running time may be reduced.
•If the battery is left fully discharged for an extended period of time, it may become
over-discharged and cannot be charged again.
For more efficient use of the battery, read the following carefully.
•Natural discharge: The battery runs low naturally even if it is kept unused.
•Periodical full (dis)charge: Repeated recharge in midway shortens the running time
gradually. To lengthen the span, charge and discharge the battery to the fullest once
or twice. For optimal use, execute the full charge/discharge every 30 to 60 days.
Also, it is recommended to fully recharge the battery after it has run out.
The battery capacity may change due to chemical reactions during charge and
discharge.
•The system checks the charge status of LG batteries frequently, and then calculates
and indicates the actual battery duration on the current system setup.
•The battery is wearable goods and thus the life span may become shorter with use.
The battery running time may also become shorter accordingly.
•When the battery is fully charged, the machine stops recharging. It resumes
recharging when the battery charge rate drops below 95%. This feature secures the
safe and efficient use of the battery.
•When the temperature of the battery drops below 10 °C, it is charged in a low current
to protect the battery cells. In this case, charging time may stretch to 32 hours or
longer.
If you use the system at a low temperature, refer to the following:
•The battery capacity may be reduced depending on the chemical characteristics of
the battery and the system may not be turned on after it freezes or it is turned off.
•If the system freezes or if it is not turned on, connect the AC adapter to the system
and charge the battery fully before use.
•If there is any error in the indication of the battery capacity, charge and discharge the
battery two or three times at room temperature to return to the normal operation.
ENGLISH
66 Using the PC
Operation Status Lamps
1Power Lamp:
•On: The system is on and running by the AC adapter or battery.
•Off: The system is turned off.
•Blinking: The system is in the standby mode.
2AC Adapter Lamp
•On: The AC adapter is connected.
•Off: The AC adapter is not connected.
•Blinking: The battery is charged less than the low-battery limit.
If you try to turn on the system that has entered the Hibernates mode or been
turned off after a low-battery alarm, the system will not be turned on but the
lamp will blink three times.
3Storage Device (HDD, SSD, eMMC) Indicator Lamp
•When the PC accesses the storage device, the indicator lamp turns on.
Do not turn off the power forcibly while the lamp is on or blinking. Otherwise,
the disk or its data may get damaged.
4Caps Lock Lamp
•On: When the caps lock is activated
•Off: When the caps lock is deactivated
ENGLISH

Using the PC 67
5Touchpad Lamp
•On: When the touchpad is activated
•Off: When the touchpad is deactivated
6Reader Mode Lamp
•On: When the reader mode is activated
•Off: When the reader mode is deactivated
7Webcam Operation Status Lamp
•On: When the webcam is operating
•Off: When the webcam is not operating
ENGLISH
68 Using the PC
Keyboard
The keyboard allows the user to input data or give commands.
The keyboard may differ in appearance and color depending on your country.
CAUTION
•Spilling a watery substance like coffee or juice on the keyboard may cause a fault,
malfunction, or electric shock.
•The keys may not work properly when you use several keys at the same time while
playing a PC game. (Please change the key combination settings according to the
combinations necessary for the game play.)
Using Hot Keys
You can use the hot keys shown below to use the PC conveniently.
Fn + F1 Runs LG Control Center
Fn + F2 Decreases LCD brightness, which can have eleven different levels.
Fn + F3 Increases LCD brightness, which can have eleven different levels.
Fn + F4 Windows Executes the mode defined in Sleep Mode. (Example:
Standby Mode, Hibernate Mode)
Fn + F5 When the user presses the Fn + F5 keys, the touchpad mode toggles
from Touchpad Off (touchpad is disabled) Touchpad Auto (touchpad
is auto disabled when an external USB mouse is connected).
Touchpad On (touchpad is enabled). Initialization takes 1 to 2
seconds. It is recommended to use after the initialization.
Fn + F6 Airplane Mode ON/OFF (Wireless LAN, Bluetooth OFF/ON)
Fn + F7 Switches between the monitor and projector
Fn + F8 Runs Audio manager
Fn + F9 Switching to Reader Mode
Fn + F10 Mute
Fn + F11 Decreases the sound volume.
Fn + F12 Increases the sound volume.
Fn + ◀Works as the [Home] key.
Fn + ▶Works as the [End] key.
Fn + ▲Works as [Page Up].
ENGLISH
Using the PC 69
Fn + ▼Works as [Page Down].
Fn + Prt Sc Works as the [Scr LK] key.
Fn + Ctrl Works as the [Pop-up Window] key.
Shortcut Keys
TIP
•To change the input mode temporarily, you can press the [Shift] key together with the
letter you want to enter. By doing so, you can enter an uppercase letter when the
Caps Lock key is not pressed and a lowercase letter when it is pressed.
To use Windows more conveniently, remember the following Windows key
combinations:
•+F1
Displays Windows Help.
•+F3
Displays Start menu.
•+R
Displays an input window for program execution.
•+Tab
Displays the running desktop in the preview.
•+M
Minimizes the current window.
ENGLISH
70 Using the PC
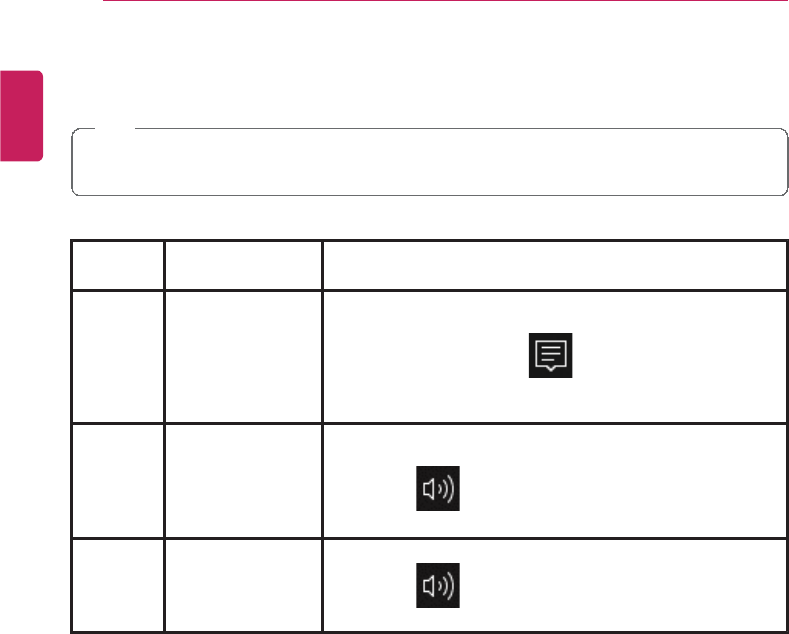
Adjusting Screen Brightness and Volume
LG PC allows you to use the hot keys to easily adjust the screen brightness and volume.
TIP
According to the model type, a button for volume control (mute, volume up / down, etc.)
may be available.
Func-
tion
Hot Keys Comments
Screen
Bright-
ness
[Fn] + [F2], [F3] Press [F2] to darken the screen and [F3] to brighten the
screen.
Press the Action Center ( ) icon on the right side of
taskbar to run the Action Center. Press the [Brightness]
tile to adjust the screen brightness.
Volume [Fn] + [F11],
[F12]
Press [F11] to lower the volume and [F12] key to
increase the volume.
Press the [ ] icon on the right side of the taskbar to
adjust the volume.
Mute Fn + F10 Press the button to turn on or off the mute feature.
Press the [ ] icon on the right side of the taskbar to
mute the sound.
ENGLISH
Using the PC 71
Using the Touchpad
The built-in touchpad provides the same features as an external mouse. You can use the
touchpad and USB mouse simultaneously.
For best performance, it is recommended to use the driver provided by the touchpad
manufacturer.
The driver provided by the touchpad manufacturer is preinstalled when you purchase
this product. You can reinstall the driver throughLG Update Center.
The touchpad scroll feature is not supported in the model that supports the gesture
feature.
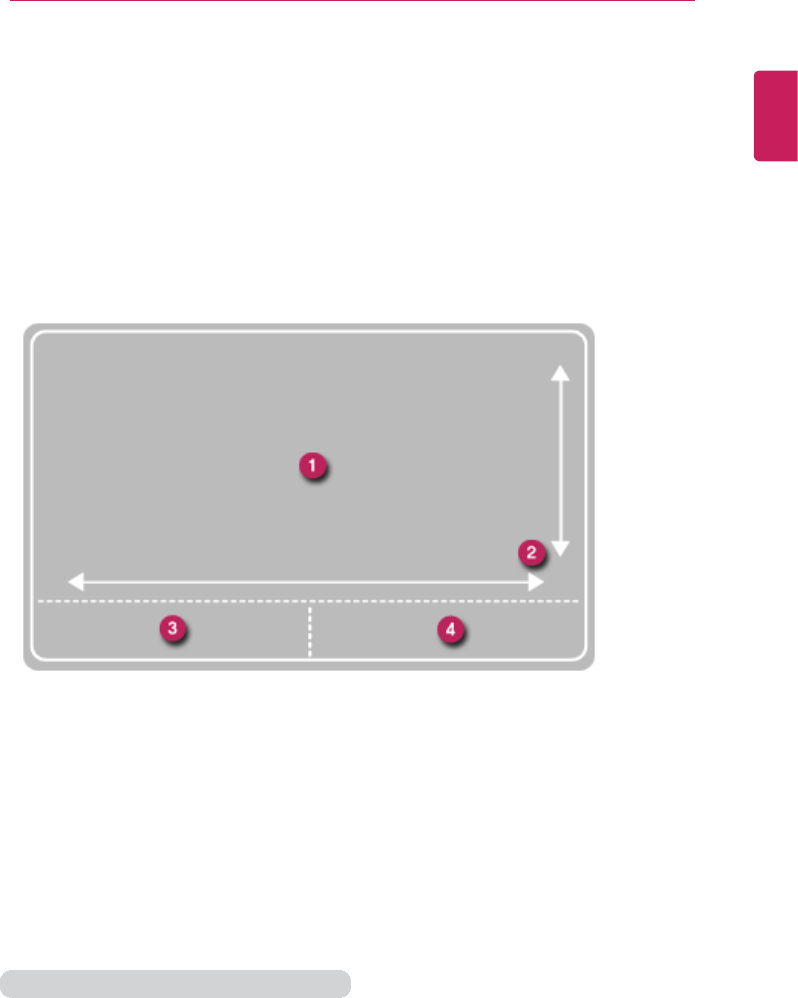
1Touchpad
•Moves the cursor.
2Scrolling area
3Left button
•Use to select or execute programs.
4Right button
•Functions as the right button of a mouse in most cases. However, the usage may
differ depending on programs.
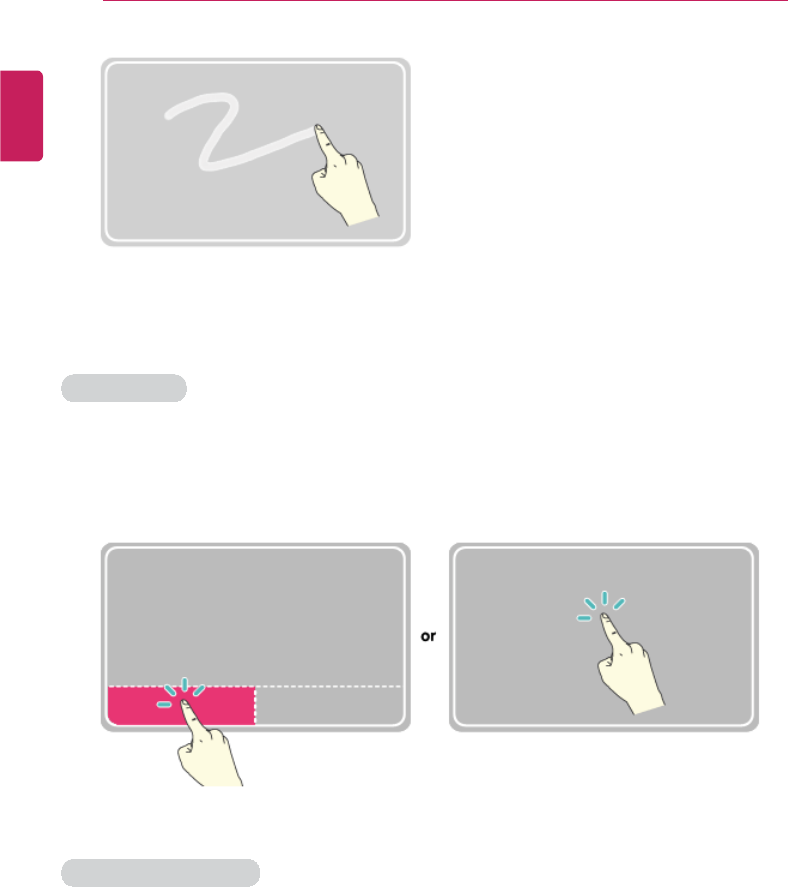
Moving the Cursor (Pointer) on the Screen
Place a finger on the touchpad and glide the finger.
ENGLISH
72 Using the PC
Click (Select)
Press and release the left button swiftly with a finger. (Or tap the touchpad once.)
Do this, for example, to select a menu or icon and to place the cursor to type on a word
processor file.
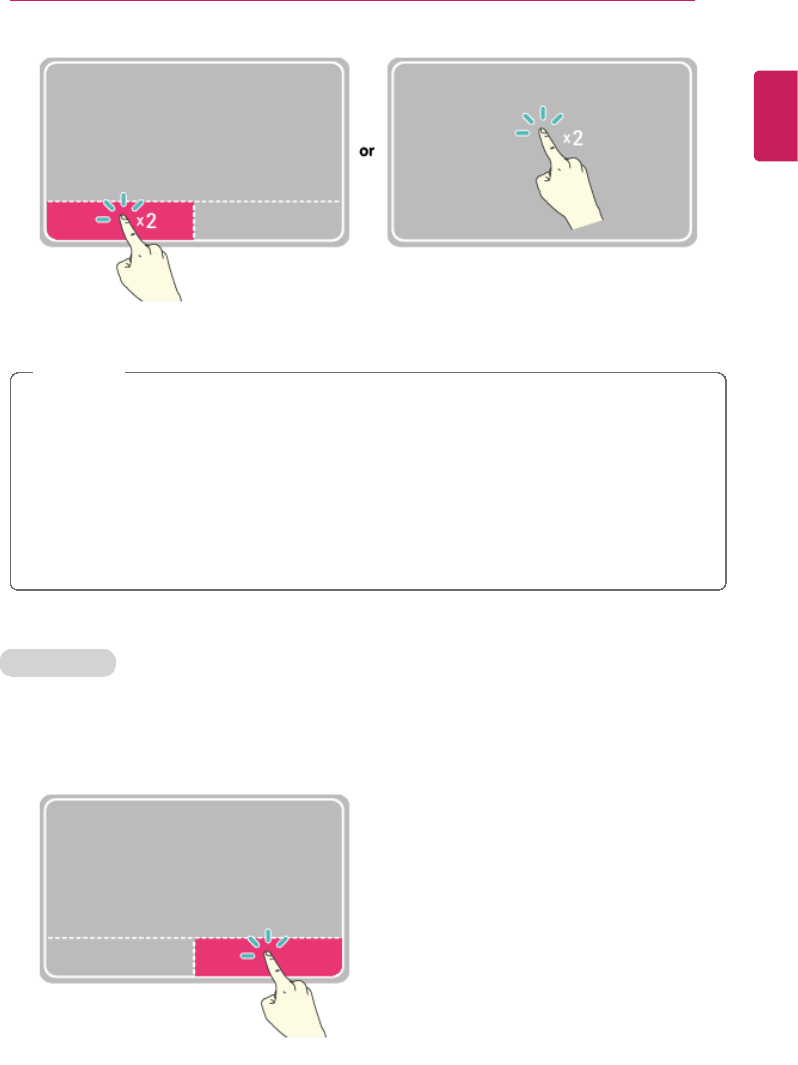
Double-click (Execute)
Press the left button twice consecutively and release the button. (Or tap the touchpad
twice.)
Do this, for example, to run a program after selecting its execution file (or icon).
ENGLISH
Using the PC 73
CAUTION
Notes on Using the Touchpad
•Do not use a sharp object such as a pen on the pad nor peel the cover. It may cause
an impairment.
•Do not place more than one finger, and do not use while wearing a glove or when
the hand is wet. The Touchpad will not work properly. Oil or dirt at the fingertip can
also cause an impairment.
•The touchpad is sensitive. Do not impose excessive force or maintain an
uncomfortable position. Otherwise, it may result in a finger or wrist injury.
Right button
Press and release the right button swiftly with a finger.
Functions as the right button of a mouse, but the usage may differ depending on programs.
ENGLISH

74 Using the PC
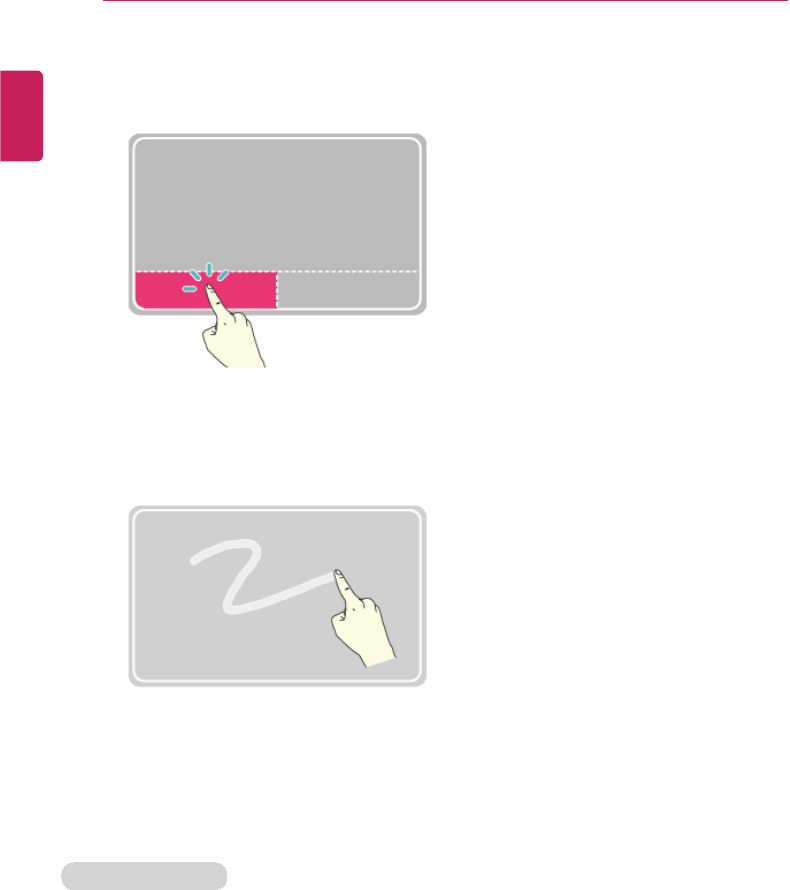
Drag & Drop
To drag, click and hold an icon, and move it to another location.
To drop, release the dragged icon in the location you want.
To move a file icon to another folder or to Recycle Bin, place the cursor (or the pointer) on
the icon, press and hold the left button, and glide another finger on the touchpad until the
icon reaches the aimed location. After reaching the destination, release the left button.
1Drag
•Glide one finger on the pad with another finger pressing and holding the left button.
2Drop
•Release the left button to drop it into the Recycle Bin. (By using this, you can drop a
file into the Recycle Bin at will.)
ClickLock
When activated, this feature allows you to drag/scroll without pressing and holding the left
button.
ENGLISH

Using the PC 75
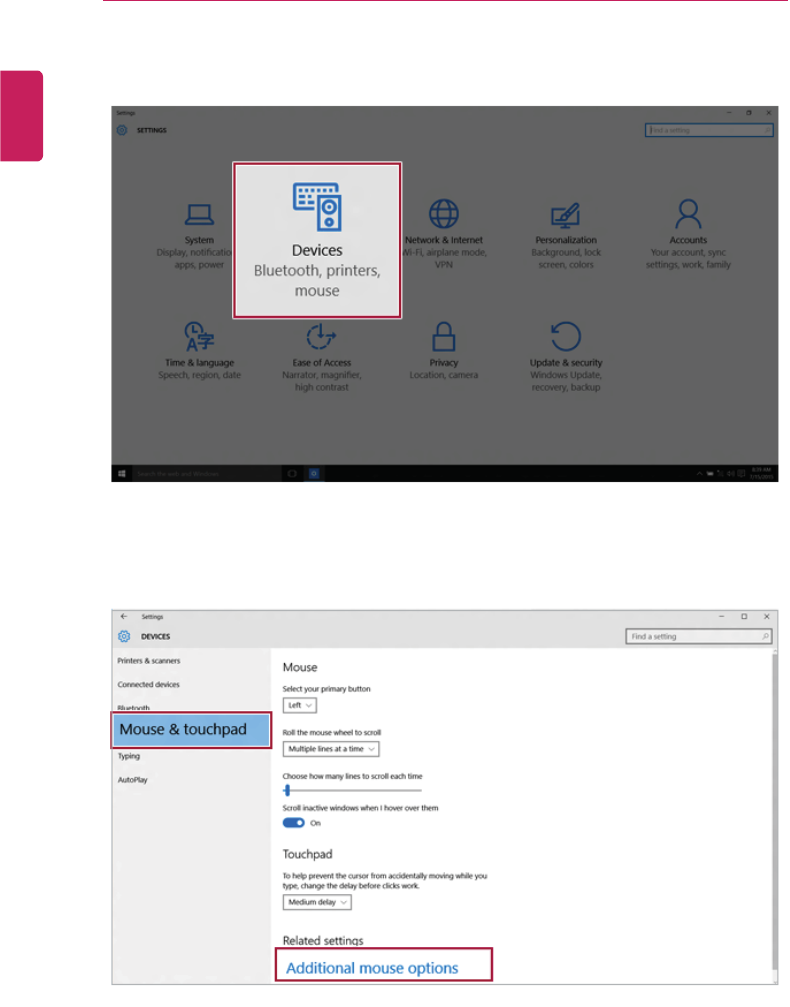
1Press the [ ] button and select the [Settings] menu.
TIP
Press the [ ] key or [Ctrl] + [Esc] to display the Start menu.
ENGLISH
76 Using the PC
2When [Settings] screen appears, select [Devices].
3Select [Mouse and Touchpad] > [Additional Mouse Options].
ENGLISH
Using the PC 77
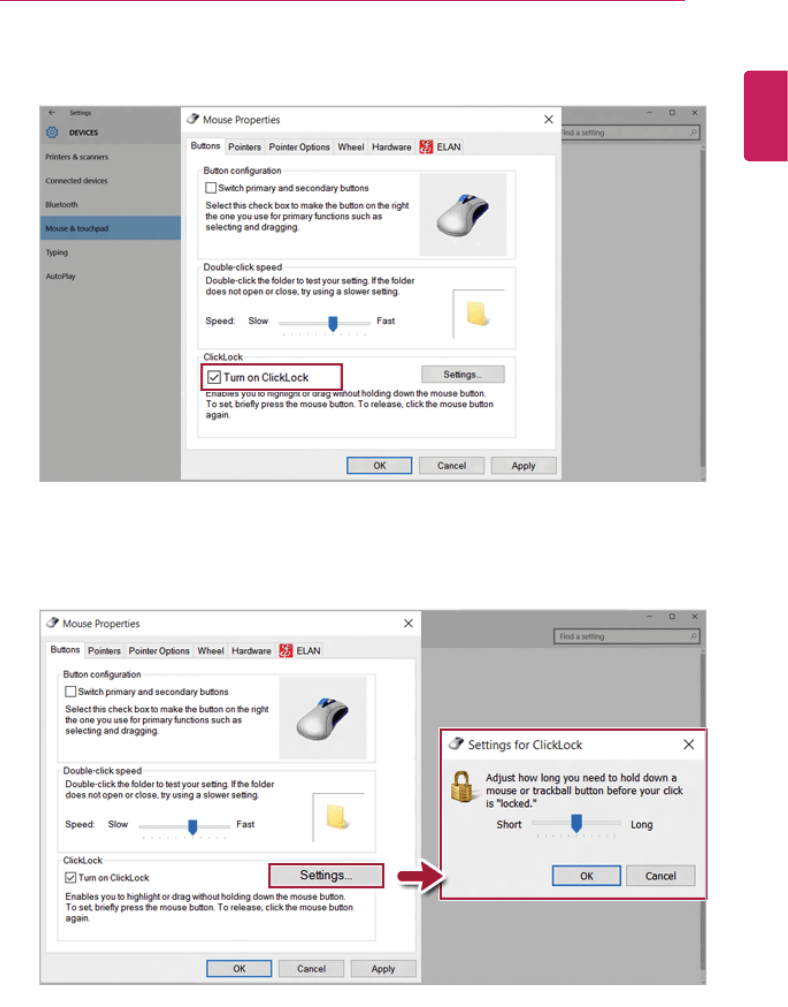
4When [Mouse Properties] screen appears, select [Turn on ClickLock].
5Press [Settings] to set the time for the ClickLock.
ENGLISH
78 Using the PC
6Press the left button of the touchpad and release it to change the button into the
pressed state.
7Move on the touchpad to use the drag/scroll feature.
8Press the left mouse button to turn off the ClickLock.
Touchpad Gesture
The touchpad gesture feature allows you to use Windows programs more easily by utilizing
different touching methods.
Windows 10 Touchpad Gestures allow you to use the PC more easily.
The touchpad gesture feature may not be supported in some models.
ENGLISH
Using the PC 79
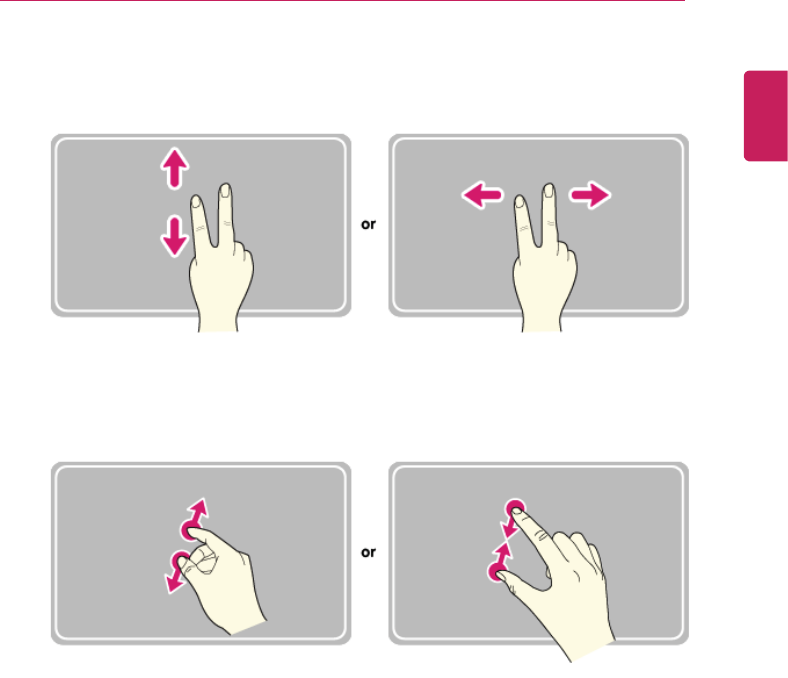
•Place two fingers on the touchpad and move up/down/left/right to scroll the screen.
(It operates only on an app or screen which scrolling is available.)
•Place two fingers on the touchpad and widen or narrow them to zoom out or in.
ENGLISH

80 Using the PC
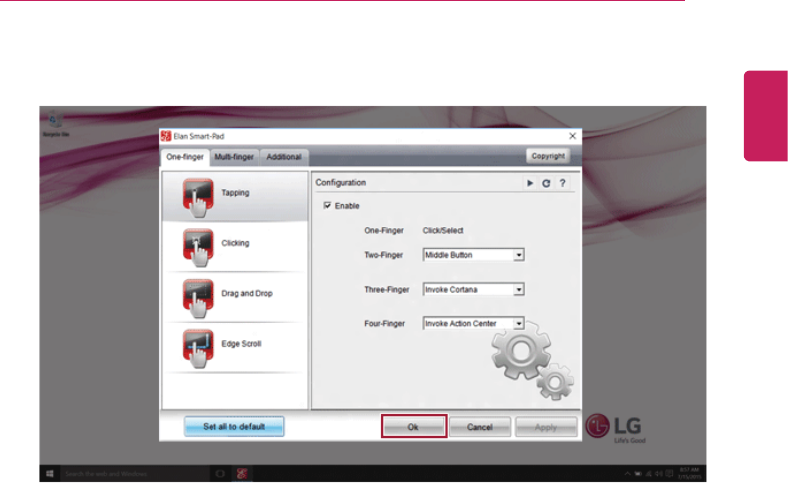
Setting Touchpad
You can change the touchpad features or enable/disable the gesture feature.
The figures herein may differ by language selection and is subject to change for
performance improvements without prior notice.
1On the desktop taskbar, double-click the touchpad settings icon.
ENGLISH
Using the PC 81
2When the following screen appears, change the settings and press [OK].
ENGLISH
82 Using the PC
Connecting to External Display
TIP
•Ensure the monitor power is off before connecting the external monitor to the PC.
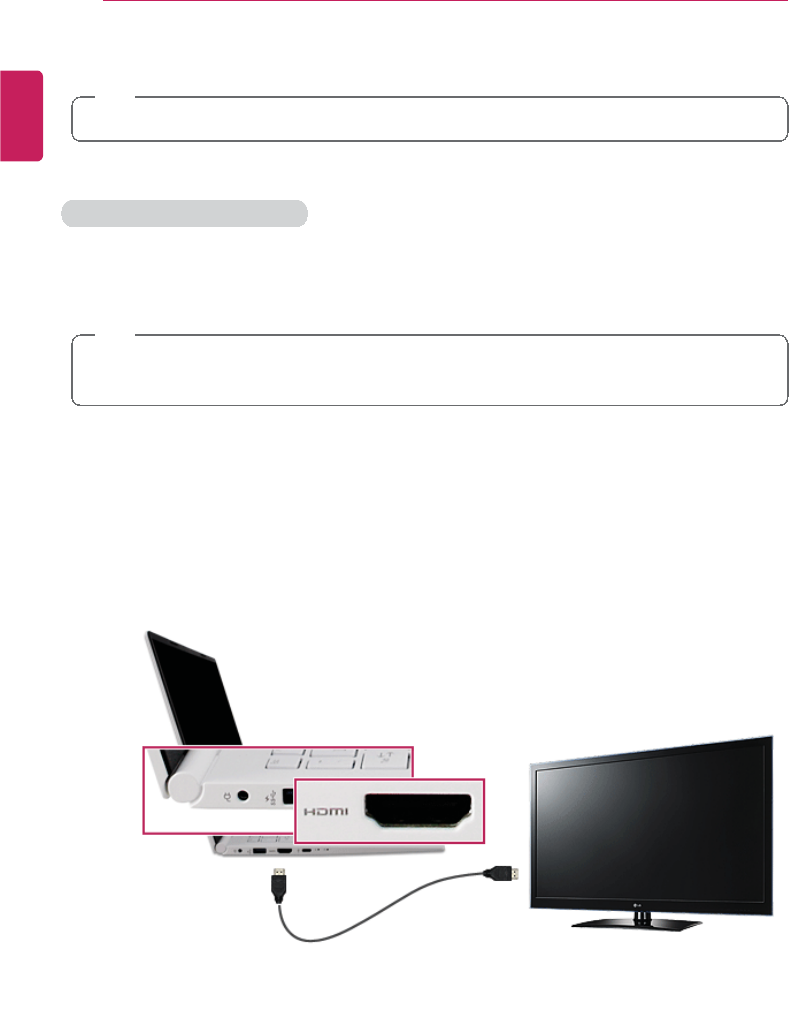
Connecting to the HDMI Port
HDMI is a high-speed multimedia interface that can transfer uncompressed full digital audio
and video signals.
When LG Notebook PC supports SPDIF, HDMI is not supported.
TIP
Use ‘HDMI to VGA Gender' to connect to VGA port.
HDMI to VGA Gender is available at LG Service Center.
1Connect the HDMI cable to the PC and the external device (TV, monitor) that supports
HDMI.
2HDMI port transfers both video and audio simultaneously. Hence, there is no need for a
separate audio connection.
ENGLISH

Using the PC 83
3Press [Fn] + [F7] to redirect the video output to the external device.
TIP
Switching screen output device by pressing [Fn] + [F7]
•Press [Fn] + [F7] to display the Toggle Screen menu. Then select the screen mode
you want and press [Enter].
CAUTION
•If you do not set Speaker as the default value after disconnecting the HDMI cable,
the system may not produce any sound.
•If a program was running already, you need to exit and restart the program for it to
produce sound.
ENGLISH

84 Using the PC
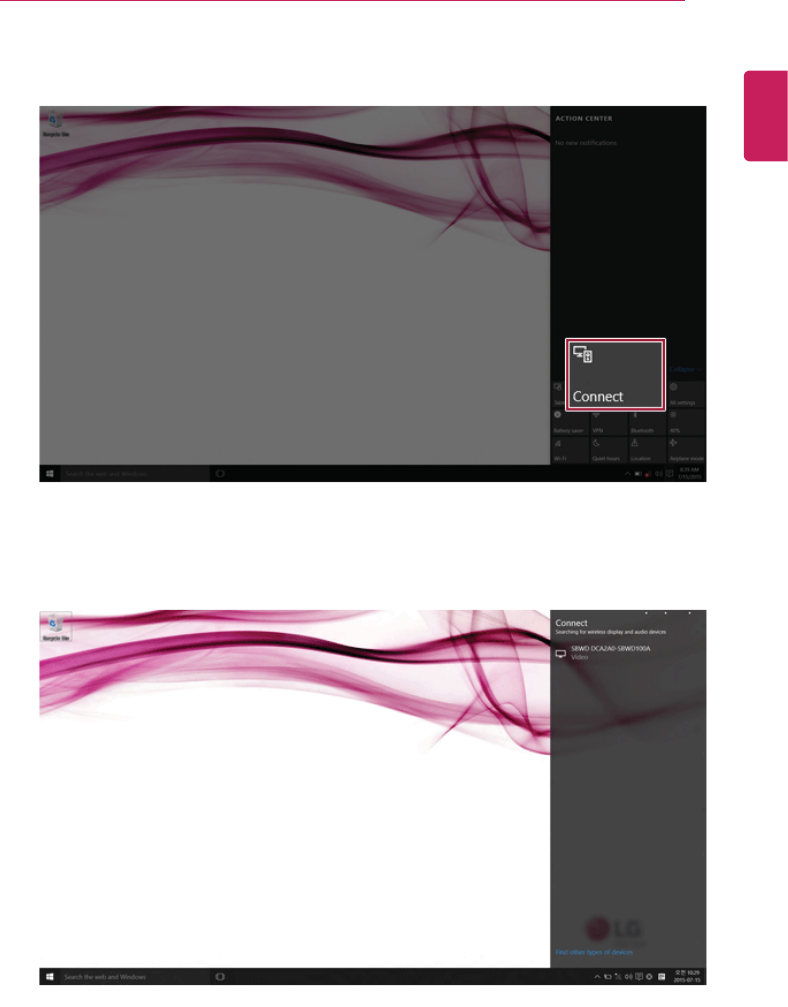
Connecting to Wireless Display
The wireless display feature connects the PC screen and sound to a display (TV, projector,
etc.).
•To use the wireless display feature, the display device must support the wireless
display feature.
•To connect to the display device that does not support wireless display, you must
separately purchase a wireless display connection device.
•Once the wireless display connection is established, no additional procedures and
searching are necessary the next time you try to connect.
Connecting to Wireless Display
1Press the Action Center ( ) icon on the right side of the taskbar.
ENGLISH
Using the PC 85
2When the Action Center screen appears, press the [Connect] tile.
3Search for wireless display devices in the proximity.
ENGLISH
86 Using the PC
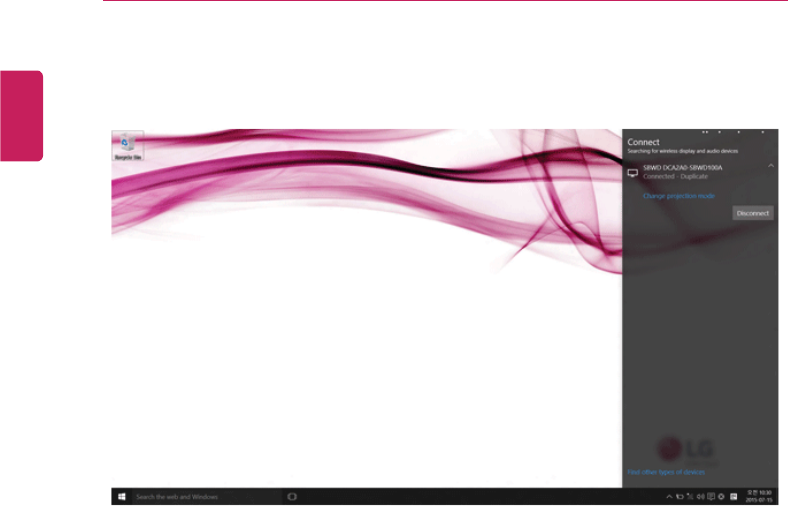
4If the device is connected as shown below, the PC screen and sound are produced on
the wireless display device.
ENGLISH

Using the PC 87
Using the USB Type-C Port
The USB Type-C port mounted on this product supports USB 3.1 Gen 1 (USB 3.0)
standards.
Use the Type-C port to charge the notebook PC battery or to output a screen to an external
display.
Using as a USB Port
If a USB device is connected to the Type-C port, it works as an ordinary USB port.
TIP
When a USB device that has a Power Delivery 5 V / 2 A Profile is connected, it supports a
5 V / 2 A output.
To use a conventional USB device, a separate conversion adapter should be used.
(Conversion adapters may be purchased separately.)
Charging a Battery
Connect a power supply unit that has a Power Delivery 20 V / 2 A Profile to the Type-C
port to charge the notebook PC battery.
CAUTION
Unless a 20 V / 2 A Profile is followed, the power supply unit does not support the
charging feature.
Outputting to an External Display
By connecting a display that supports Type-C Alternate Mode, you can use the Type-C port
to output a screen to an external display.
TIP
We support DisplayPort (DP) 1.2 interface standards.
CAUTION
You must use a cable that supports Alternate Mode to output a screen to another display.
If you use Type-C accessories (cables or interface conversion adapters) that are used for
other products, you may have compatibility problems (no screen output or a malfunction).
ENGLISH
88 Using the PC
Bluetooth
Bluetooth allows the user to access wirelessly various devices such as camera, cell phone,
headset, printer, and GPS receiver that support Bluetooth . It can also establish a network
and exchange data with other Bluetooth -enabled PC or smartphone.
The Bluetooth device is optional, and it may not be available in some models.
The figures herein may differ by language selection and is subject to change for
performance improvements without prior notice.
For details on connecting Bluetooth, refer to the user manual that came with the
Bluetooth device.
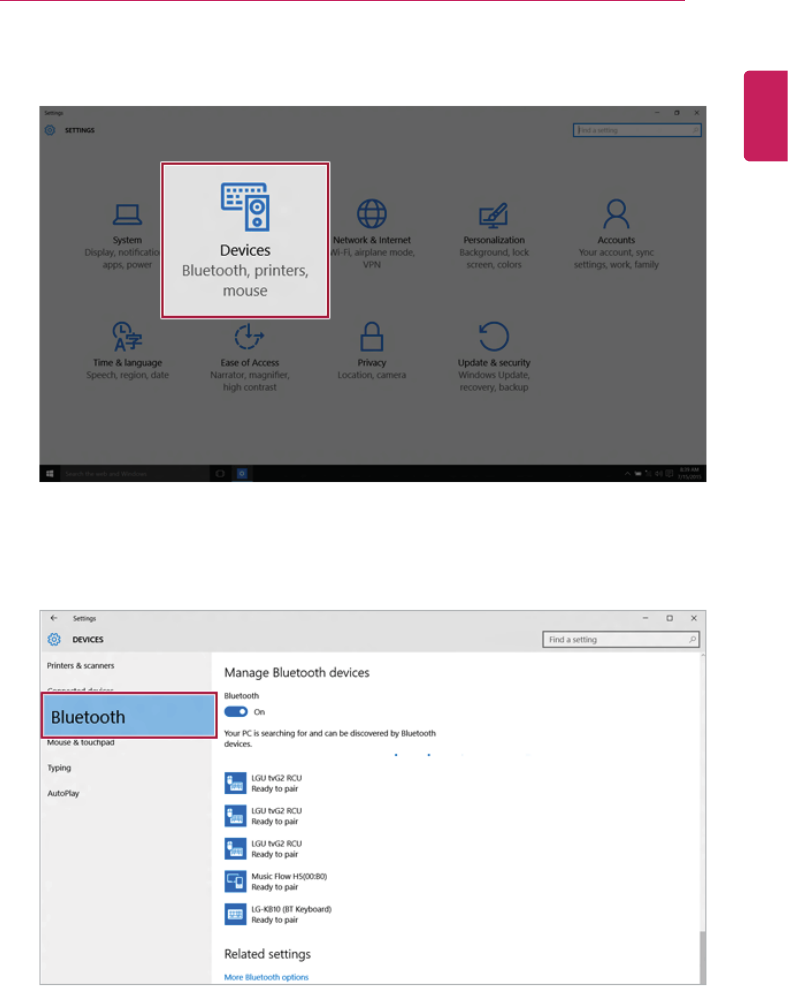
1Press the [ ] button and select the [Settings] menu.
TIP
Press the [ ] key or [Ctrl] + [Esc] to display the Start menu.
ENGLISH
Using the PC 89
2When [Settings] screen appears, select [Devices].
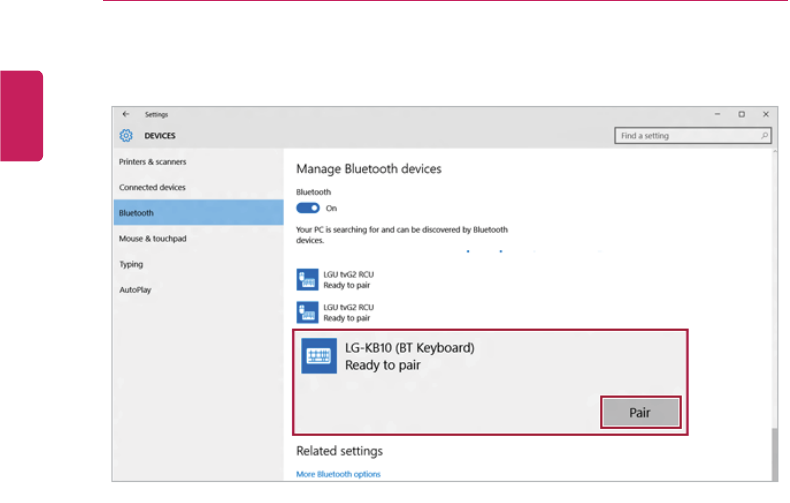
3Select the [Bluetooth] menu to search for Bluetooth devices automatically.
ENGLISH
90 Using the PC
4Select a device to connect and press [Pair].
5Complete the Bluetooth connection as guided.
ENGLISH
Using the PC 91
Wired LAN
Wired LAN is the network environment that users can connect to by using a cable to
connect to their internet providers or the company's network.
Using Wired LAN
Wired LAN is installed with an automatic IP (DHCP) as default value.
Please refer to the following instructions for details on setting up an automatic IP (DHCP) or
static IP.
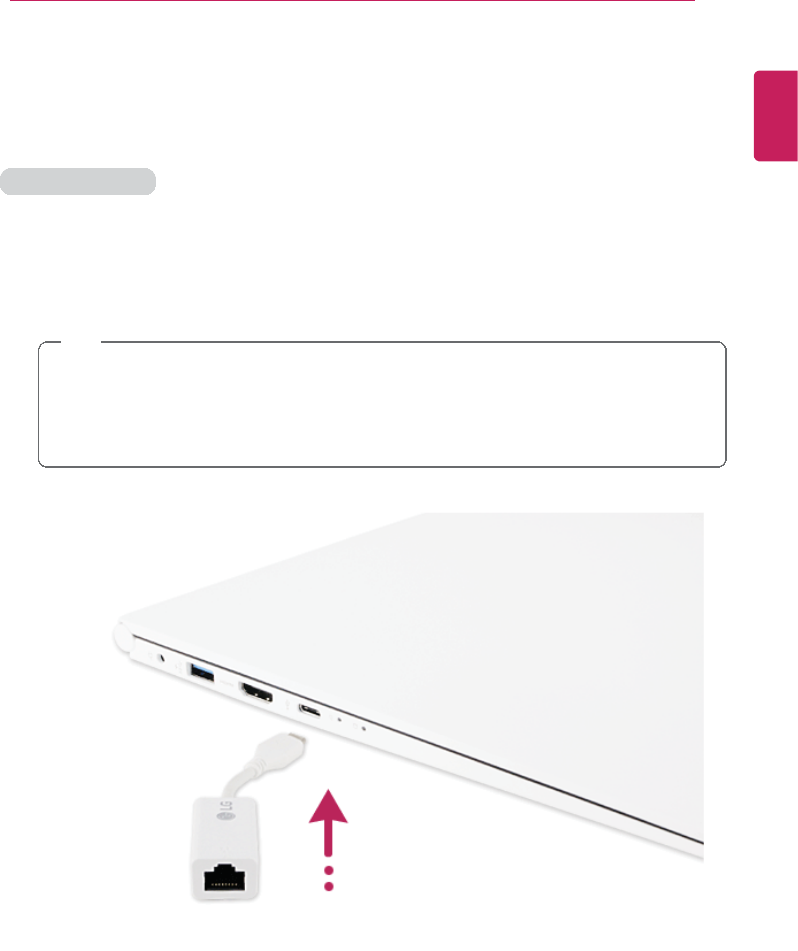
1Connect the LAN adapter to the USB Type-C port on the PC.
TIP
The recommended network cable for the optimal network environment is CAT5 or
higher.
The network (LAN) cable may be connected when the LAN adapter is used.
The LAN adapter may be separately purchased at LG Service Center.
ENGLISH
92 Using the PC
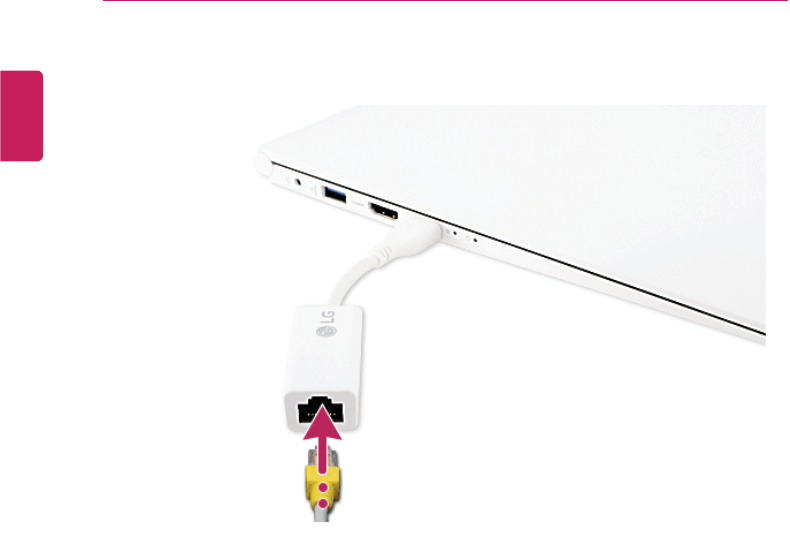
2Connect the wired LAN cable to the LAN port.
ENGLISH

Using the PC 93
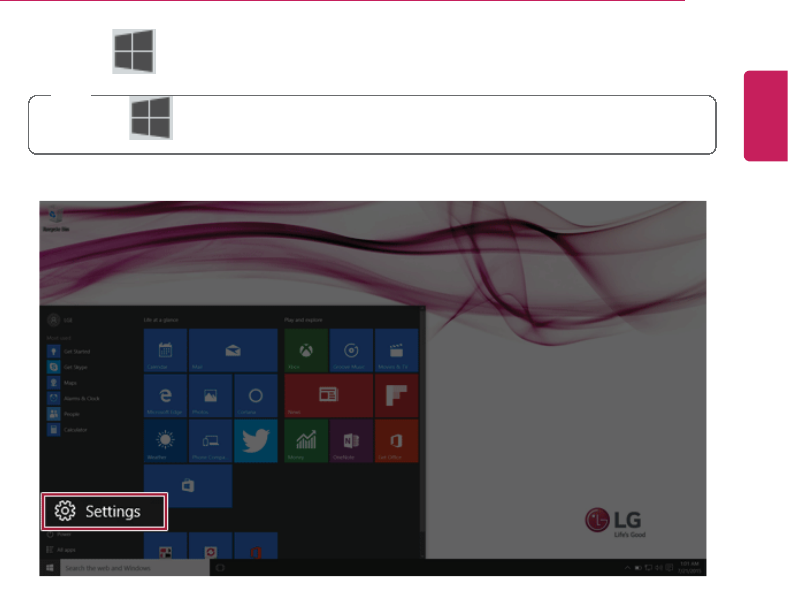
3Press the [ ] button and select the [Settings] menu.
TIP
Press the [ ] key or [Ctrl] + [Esc] to display the Start menu.
ENGLISH

94 Using the PC
4Select [Network and Internet] >[Ethernet] >[Change Adapter Options].
ENGLISH
Using the PC 95
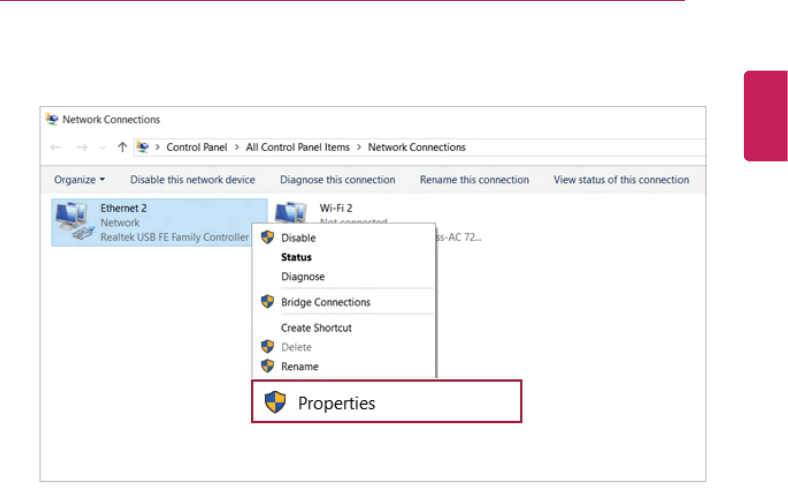
5Right-click [Ethernet] and select the [Properties] menu.
ENGLISH
96 Using the PC
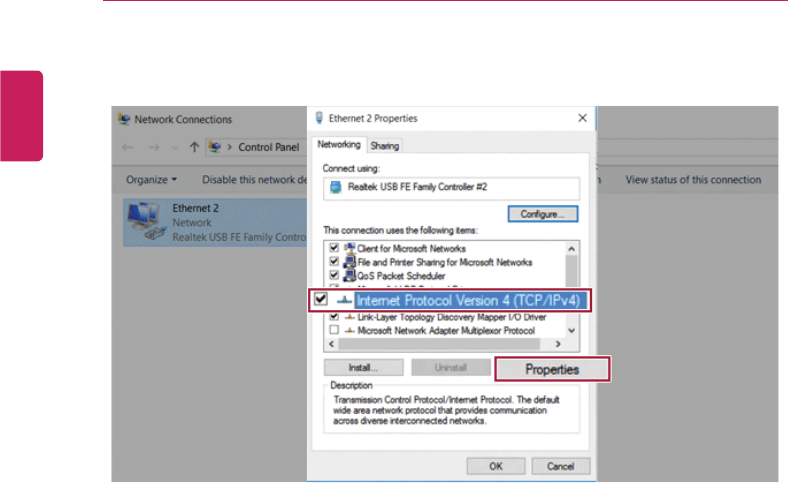
6Select [Internet Protocol Version 4 (TCP/IPv4)] and press the [Properties] button.
ENGLISH
Using the PC 97
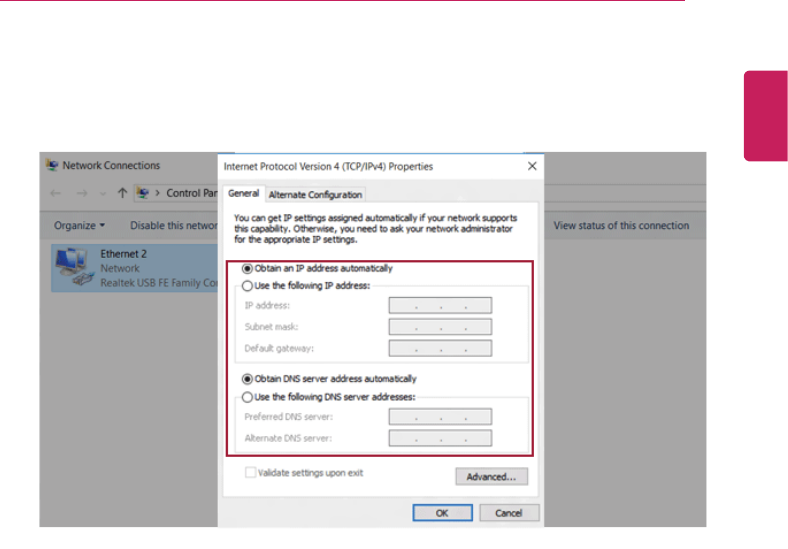
7To use an automatic IP(DHCP), select [Obtain an IP Address Automatically]. If you
wish to use a static IP, select [Use the following IP address] to enter the address.
Contact the network service provider or administrator to use a static IP.
8Press [OK] to complete the network setup.
9Press Internet Browser to check if the internet is working properly.
ENGLISH

98 Using the PC
Wireless LAN
The wireless network (Wireless LAN) is the network environment that connects a PC with
the internet provider or company network through an Access Point (wired or wireless
router).
Wireless LAN is optional. Hence, it may not be installed in some models.
Turning On/Off Airplane Mode
Prior to using the wireless LAN, press [Fn] + [F6] to turn off Airplane Mode.
Pressing [Fn] + [F6] keys will turn on or off. If you are not going to use the mode, keep the
mode turned on to reduce the battery power consumption.
Using the Wireless LAN
If an Access Point (wired or wireless router) is in the vicinity of the PC, the wireless LAN can
easily be accessed.
During the search for a wireless network (Wireless LAN), various Access Point may
be found according to the location where the PC is used.
In case no accessible wireless network (Wireless LAN) is near the PC, no Access
Point might be found.
A password protected Access Point cannot be accessed without the correct
password.
ENGLISH
Using the PC 99
1Press the [ ] button and select the [Settings] menu.
TIP
Press the [ ] key or [Ctrl] + [Esc] to display the Start menu.
ENGLISH

100 Using the PC
2Select [Network and Internet] > [WiFi] to search for near access points.
3Select an access point to connect to and press the [Connect] button.
ENGLISH

Using the PC 101
4If a connection is established, [Connected] is displayed below the access point name.
5Press Internet Browser to check if the internet is working properly.
ENGLISH

102 Using the PC
Using a Wired/Wireless Router
A wired / wireless router connects several PCs and mobile devices to one internet line and
enables the use of internet and the network.
A wired / wireless router has to be bought separately. Refer to the manual provided
by the manufacturer for instructions.
Connecting a Wired or Wireless Router
If one internet line is used with a wired / wireless router and several devices are connected,
this may result in a slower connection.
In case of a wireless LAN, it is recommended to change the network name and security
settings for a more secure connection.
Network speed can differ according to operation environment and specifications.
1Connect the internet cable of the modem that was provided by your internet provider to
the router's WAN port.
2Connect all devices (PC, IPTV, internet phone, etc.) with a LAN cable to LAN ports 1 to
4 of the router.
The number of LAN ports can vary for each router model.
3Please refer to the manual provided by the router manufacturer for setup of the network
and Internet.
ENGLISH
Using the PC 103
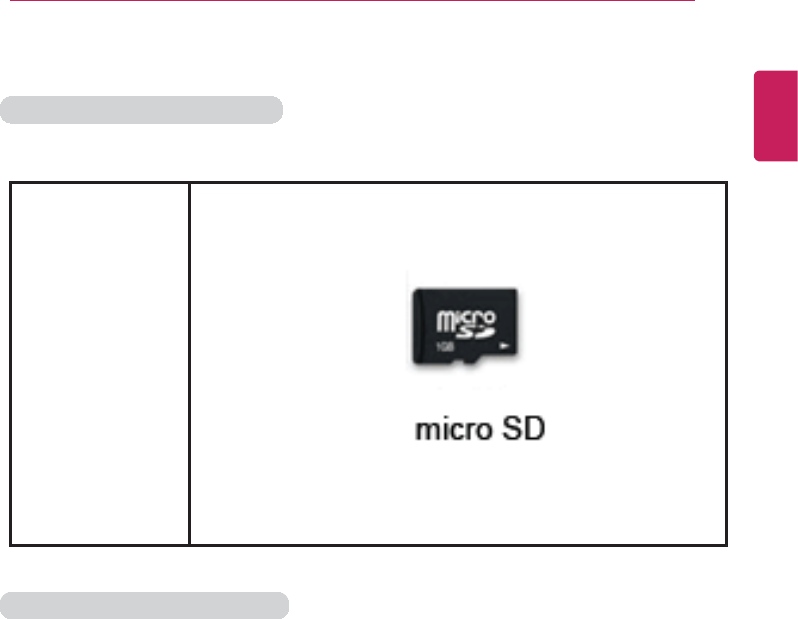
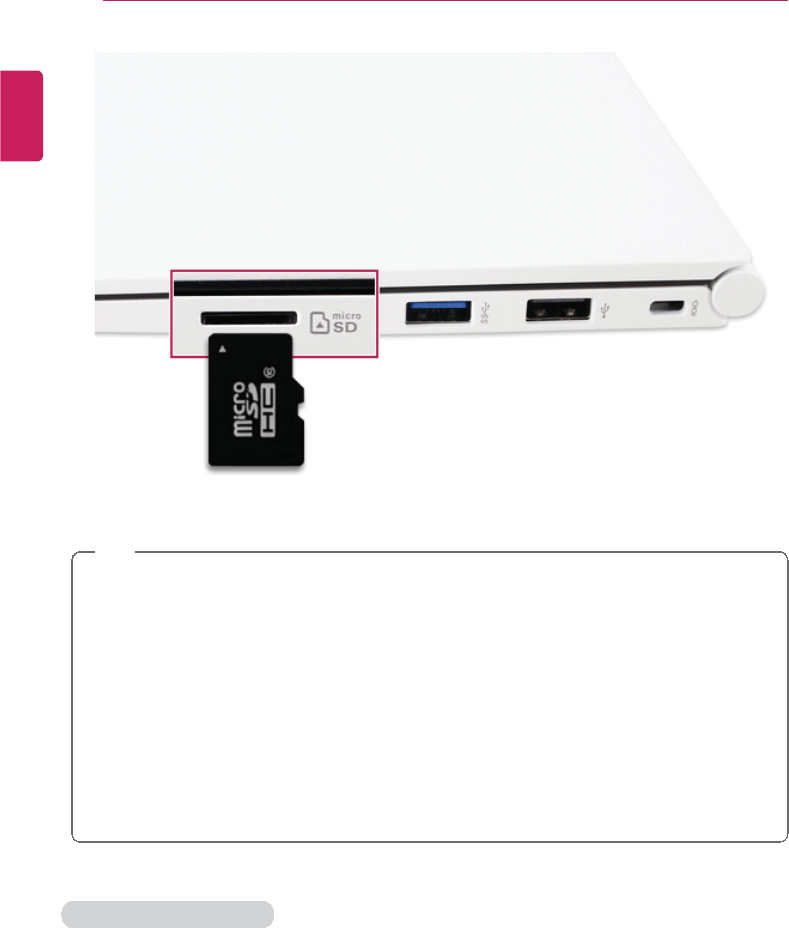
Micro SD Slot
Checking Available Memory Card
This model supports Micro SD memory cards.
Directly applicable
memory cards
Mounting and Using Memory Card
This product supports one Micro SD slot.
Insert the card into the multi-card slot to the fullest in the right direction as shown in the
following figure.
ENGLISH
104 Using the PC
TIP
•When the memory card is formatted, the data stored in the memory card will be
deleted. Check whether there are important data before formatting the memory stick.
•To format a memory card, right-click the memory card drive and select Format.
When Format window appears, press Start to continue.
•Windows The format feature may not be available on the Windows whose version is
lower than Vista®. Format the card on other digital devices or format it after installing
Memory Stick Formatter.
•If the write protection tab of memory card is locked, the user cannot format the
memory stick nor write or delete the data.
•SD™, MMC™memory cards can be used only as storage devices and do not
support the copyright protection feature.
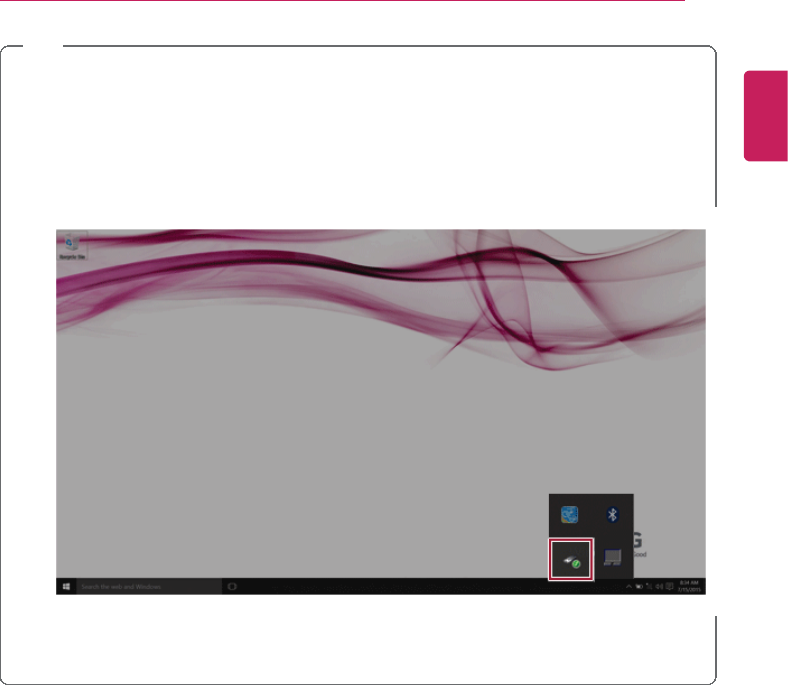
Removing Memory Card
Push the card with your finger to make the card spring out of the slot. Remove the memory
card.
ENGLISH
Using the PC 105
TIP
To safely remove a memory card:
The figures herein may differ by language selection and is subject to change for
performance improvements without prior notice.
1Press Safely Remove Hardware and other Media icon on the right side of the
taskbar.
2Select [Remove Multi-Card USB Device] to safely remove hardware.
ENGLISH
106 Using Software
Using Software
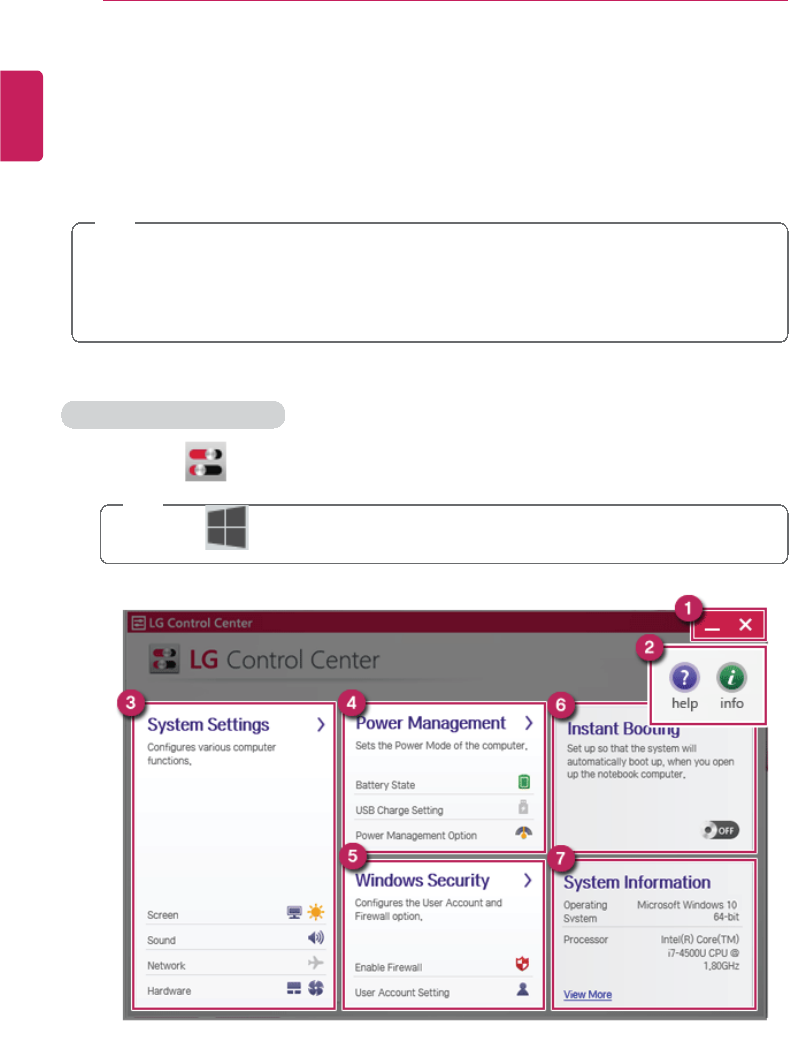
LG Control Center
LG Control Center is a software that helps you to change PC Settings, Power Settings,
Windows Security Settings, etc. as well as viewing system information.
TIP
LG Control Center For more details about how to use , refer to the corresponding
help.
The figures herein is subject to change for performance improvements without prior
notice and the features supported by LG Control Center may vary from models.
Using LG Control Center
1Press the [ ] icon on the desktop to run [LG Control Center].
TIP
Select the [ ] button > [All Apps] > [LG Software] and run [LG Control Center].
ENGLISH

Using Software 107
aMinimize/Exit Button: Minimizes the size of the window, or exits the software.
bHelp/Information Button: Runs Help or displays information about the software.
cSystem Settings : Sets up the screen brightness / resolution, external display, sound
and other various devices.
dPower Management Settings : Sets up power management option, USB charging,
battery status and battery life extension.
eWindows Security Settings : Sets User Account Control settings and Firewall
settings.
fInstant Booting: You can set the system to be automatically booted whenever you
open the notebook PC.
gSystem Information : Displays the PC OS in use, processor information and other
system information.
ENGLISH
108 Using Software
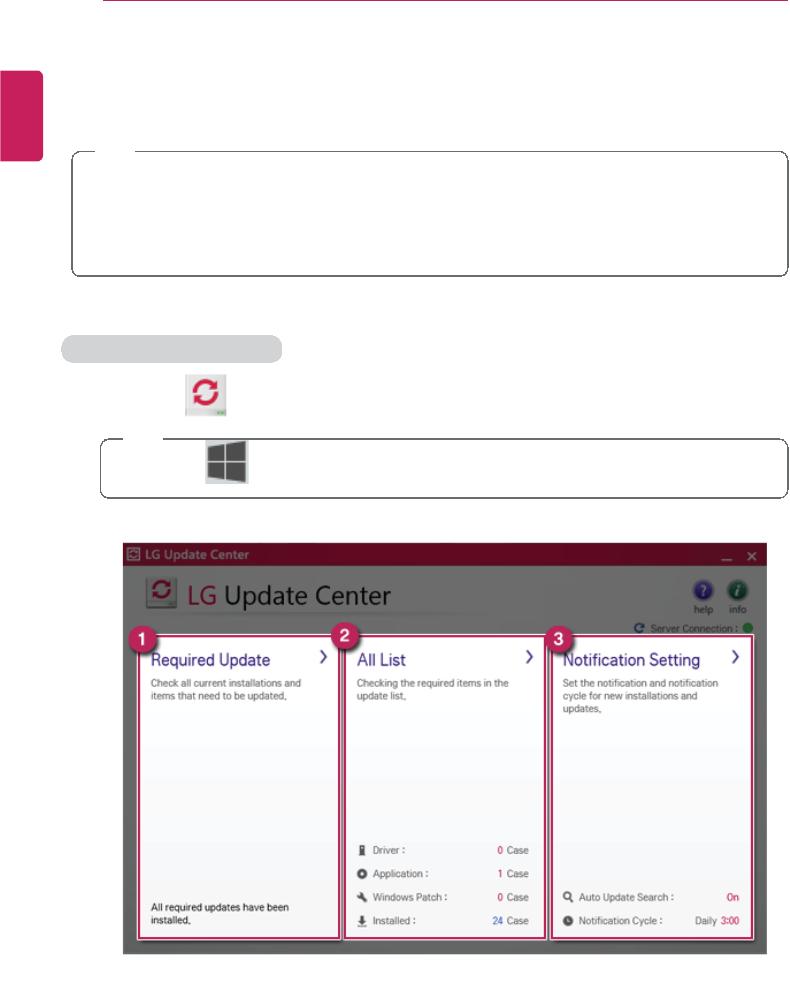
LG Update Center
LG Update Center allows you to install various PC drivers, applications and Windows
patches easily.
TIP
The illustrated images are subject to change without prior notice.
It may not work properly depending on user preferences (security tools, etc.) and the
network status.
For more information on LG Update Center, refer to [Help].
Using LG Update Center
1Press the [ ] icon on the desktop to run LG Update Center.
TIP
Select the [ ] button > [All Apps] > [LG Software] and run [LG Update Center].
aRequired Update: Installs critical items that must be applied to the system.
bAll List : Displays and installs all required items for the system.
ENGLISH

Using Software 109
cNotification Setting: Sets up notifications for online updates for installed items.
TIP
You can use LG Update Center to install deleted drivers or latest drivers easily and
quickly.
Use LG Update Center to keep your system current and optimized.
ENGLISH
110 Using Software
LG Reader Mode
LG Reader Mode allows you to change the screen to reader mode or movie mode
according to the user's needs.
Using LG Reader Mode
TIP
You can use hot keys to use the reader mode more conveniently.
•Press [Fn]+[F9] keys to switch the PC screen to reader mode and press again to
turn off the reader mode.
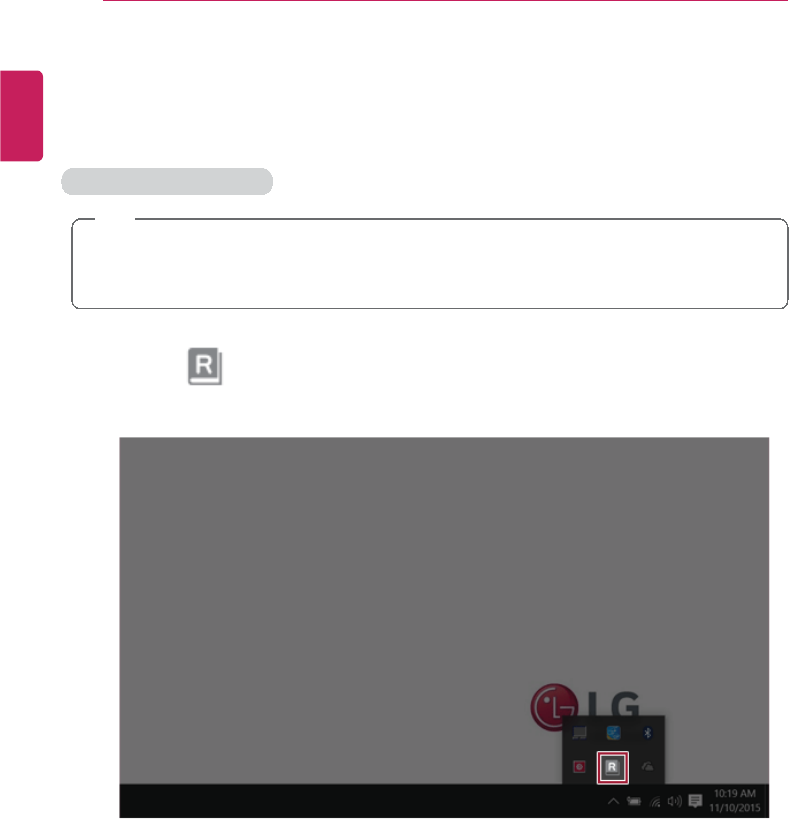
1Press the [ ] icon on the taskbar.
ENGLISH
Using Software 111
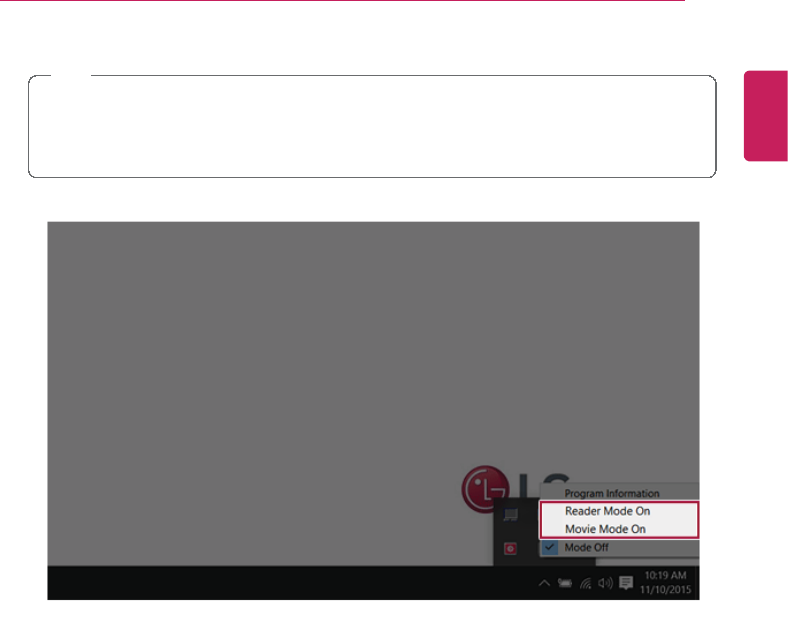
2Select the [Reader Mode On] or [Movie Mode On] menu.
TIP
Reader Mode: The screen outputs like printed paper to prevent eyestrain.
Movie Mode: Changes to a screen optimized for movie watching.
Select [Mode Off] to turn off the mode.
ENGLISH
112 Restoring the System
Restoring the System
Restoring the System
If the system has an error, you can use Windows 10's recovery feature to recover or restore
the system to its initial pre-purchase state.
CAUTION
If you have deleted the restoration data in the protected area of the hard disk, or have
arbitrarily installed another operating system, the recovery feature may not work.
To recover the system, the AC adapter must be connected.
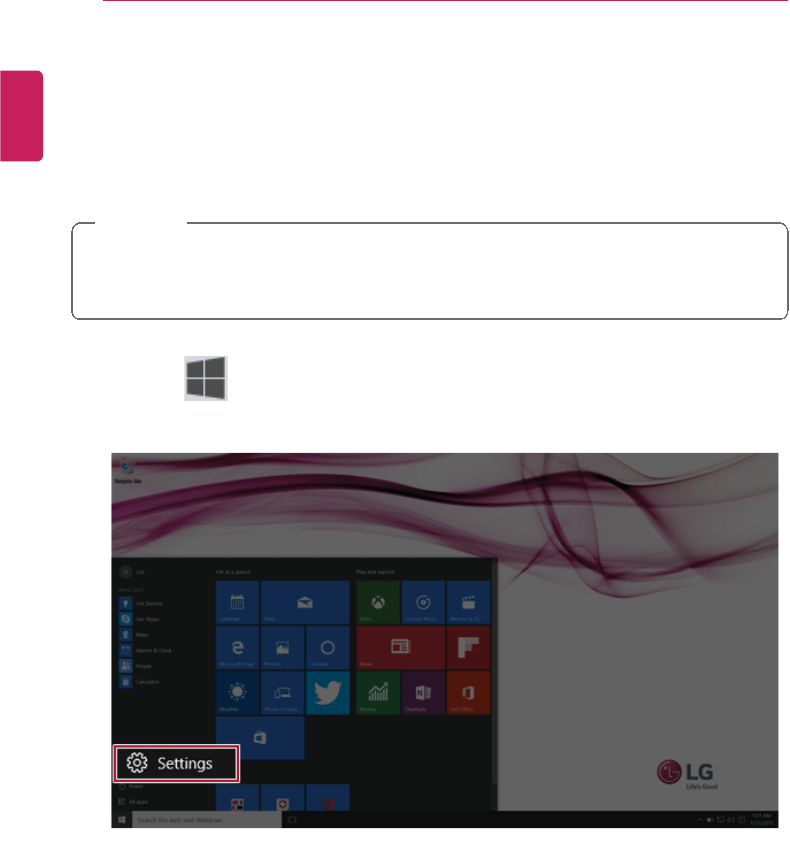
1Press the [ ] button and select the [Settings] menu.
ENGLISH
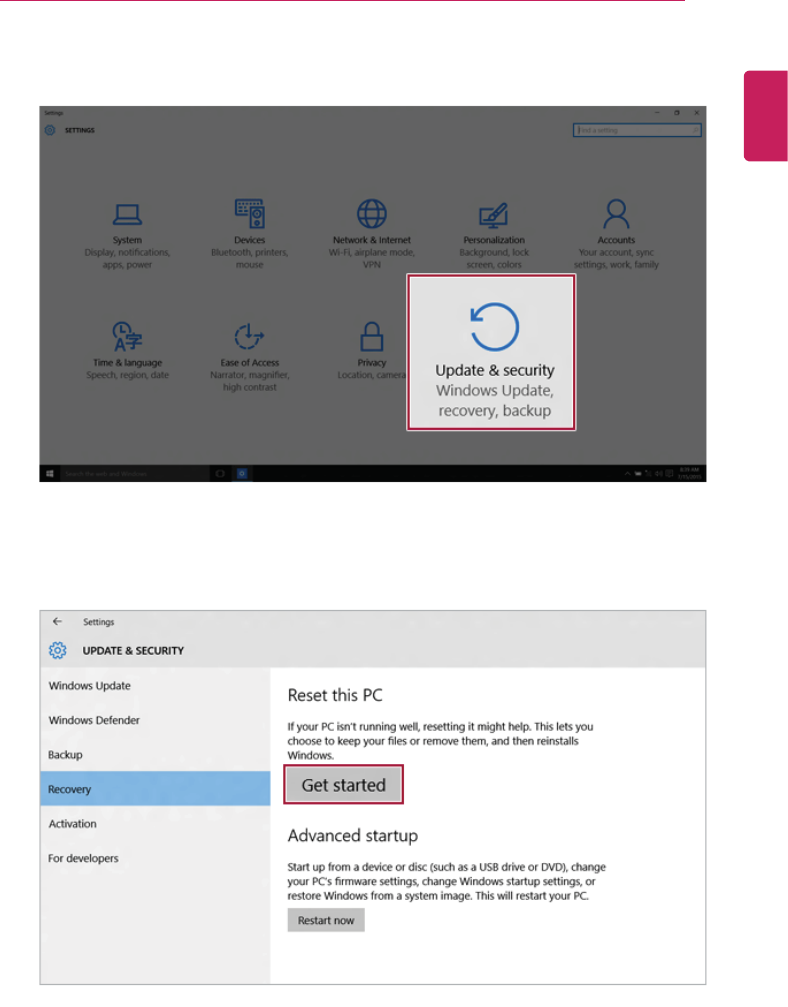
Restoring the System 113
2When the [Settings] screen appears, select [Update & security].
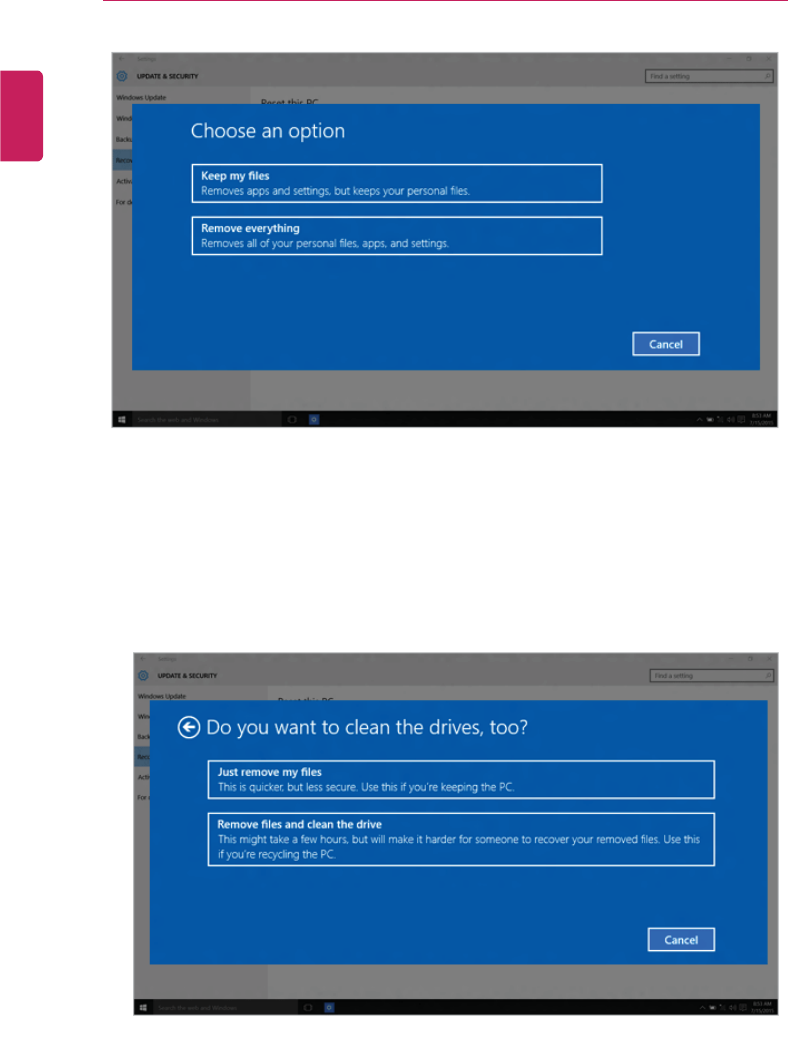
3Select the [Recovery] menu and press [Get started] to reset the PC.
4If the following screen appears, select a desired option to proceed with recovery.
ENGLISH
114 Restoring the System
a Keep my files : Recovers the PC without losing any personal files.
PC settings are reset to the default and any user-installed Desktop app will be
deleted.
b Remove everything : Removes all items from the system and restores the system to
its initial pre-purchase state.
ENGLISH

Restoring the System 115
•Just Remove My Files: Factory-resets the drive where Windows is installed (for
example: Drive C).
•Remove files and clean the drive: Resets all partitions and drives in the system.
CAUTION
All data is lost during the initialization, so you must backup all critical data in advance.
It may take about 5 hours or longer depending on the system conditions.
ENGLISH
116 Restoring the System
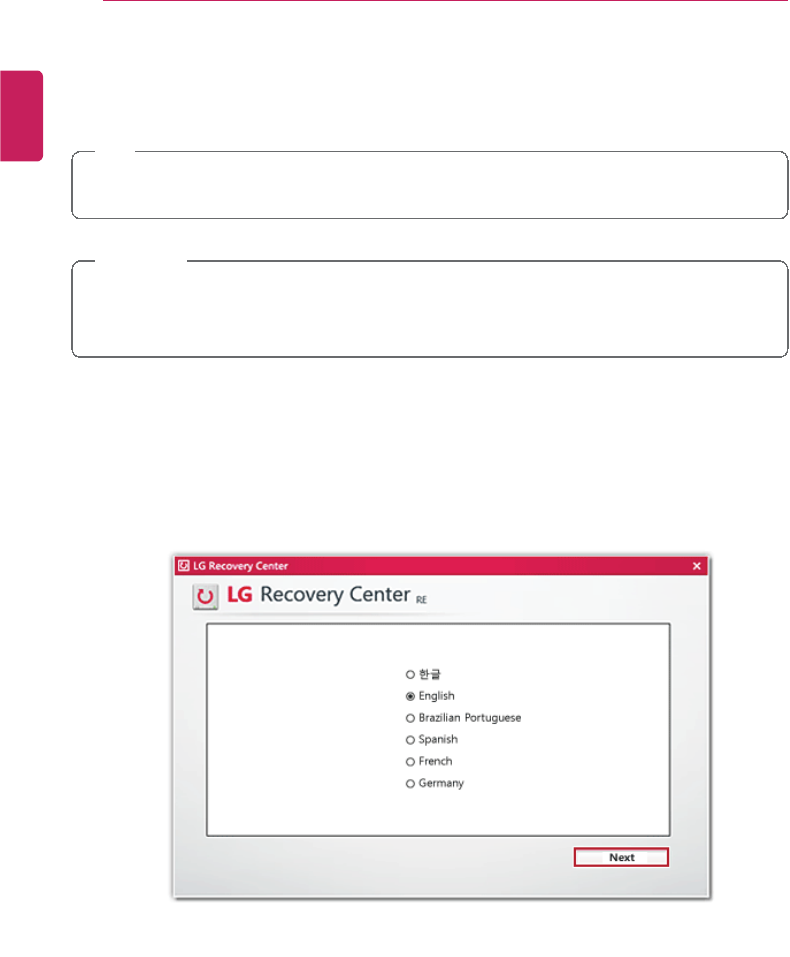
LG Recovery Center RE
If booting is impossible due to an error with the system, you can recover the system using
LG Recovery Center RE.
TIP
It is recommended that you create a recovery drive in case a serious error occurs in the
system.
CAUTION
If you have deleted the restoration data in the protected area of the hard disk, the restore
feature may not work.
All data is lost during the initialization, so you must backup all critical data in advance.
1Turn on the PC and press [F11].
2When the following screen appears, select a language you want to use and then press
[Next].
ENGLISH
Restoring the System 117
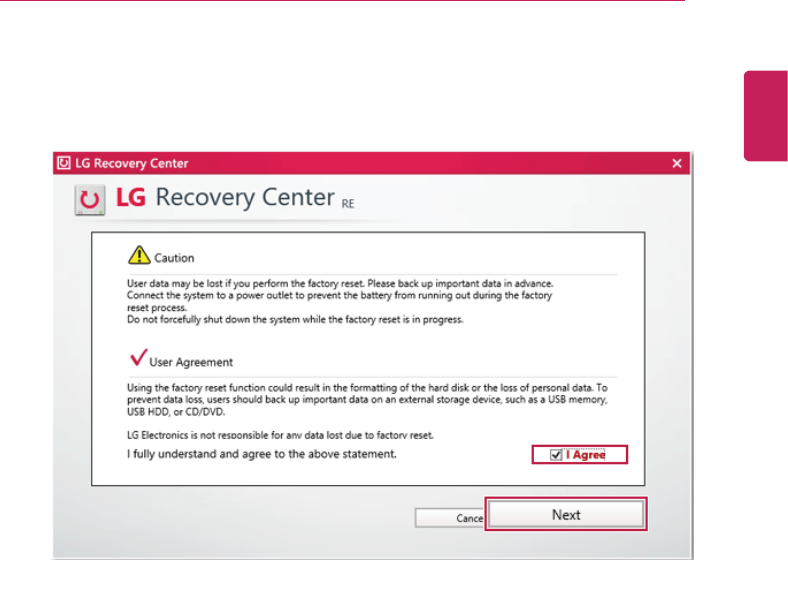
3When the following screen appears, select the [I Agree] button and then press [Next].
For recovery, the power adapter must be connected. Connect the system power
and then recover the system.
ENGLISH

118 Restoring the System
4When the factory reset is completed as shown in the following figure, press [Complete]
and then restart the system.
ENGLISH
Restoring the System 119
Recovery Drive
Creating Recovery Drive
Create a recovery drive in case LG Recovery Center RE is unable to recover the system.
TIP
This process may delete all data on the storage device designated as the recovery drive.
Make sure to back up all important data in advance.
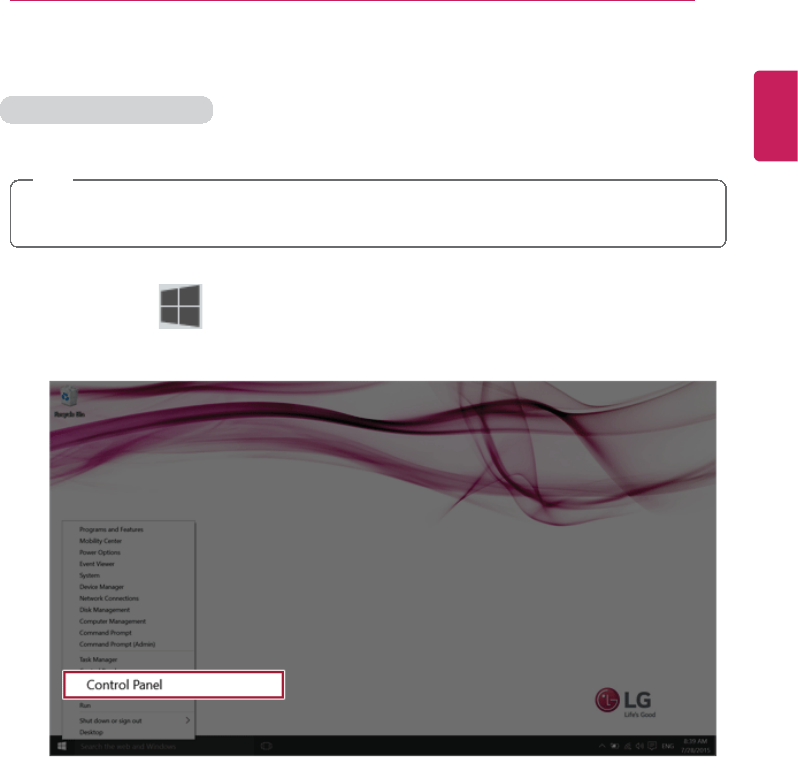
1Right-click the [ ] button and select the [Control Panel] menu.
ENGLISH
120 Restoring the System
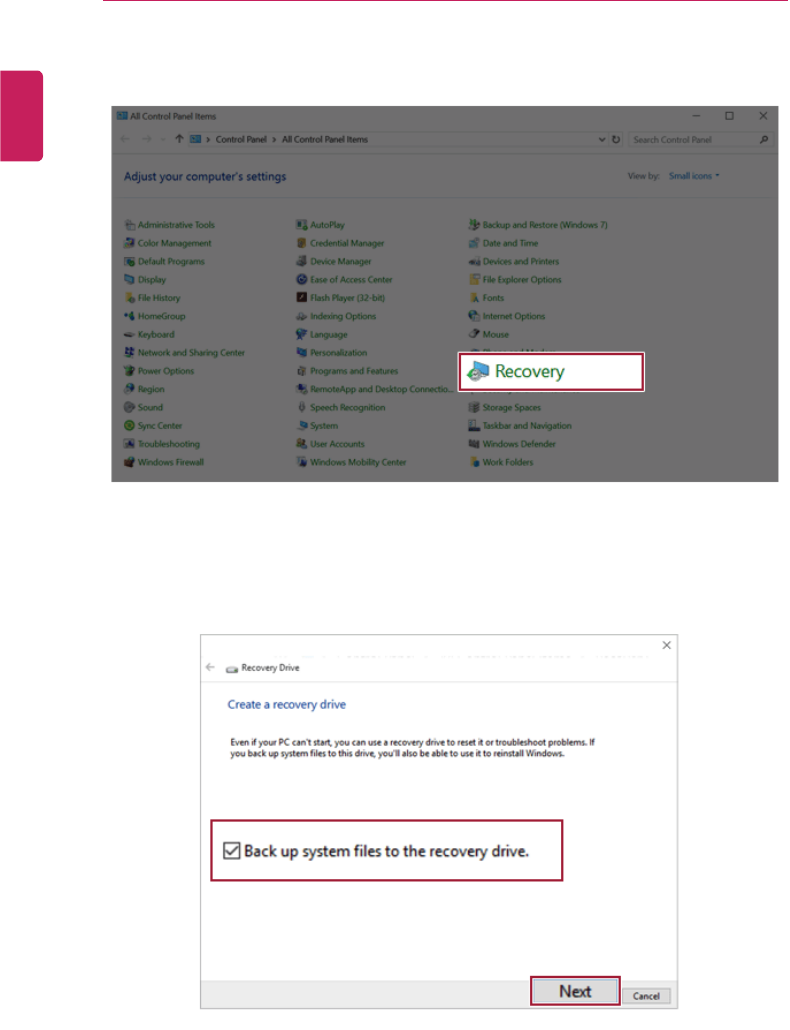
2Press [Recovery] in the control panel and select [Create Recovery Drive].
3When the following screen appears, select [Back up the system files to the recovery
drive.] and press [Next].
ENGLISH
Restoring the System 121
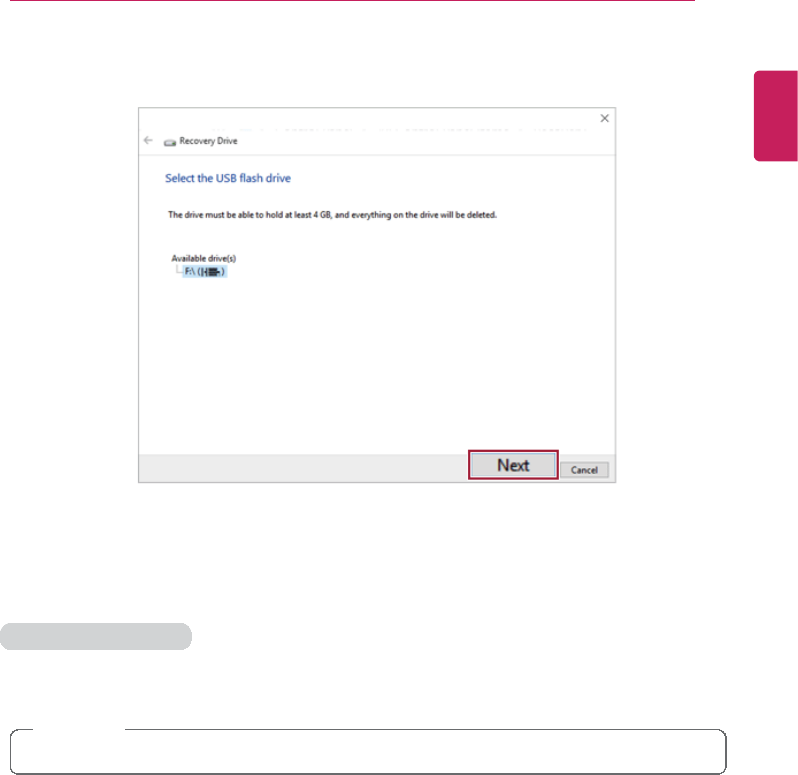
4Select the USB flash drive to use and press [Next] to create a recovery drive.
5Once the storage device is ready, press [Finish] to complete the creation of the recovery
drive.
Using Recovery Drive
In case LG Recovery Center RE is unable to recover the system, you can use the recovery
drive to recover the system.
CAUTION
All data may be lost depending on the user settings during the system recovery.
1Connect the recovery drive to the USB port of the PC.
2Turn on the PC and press [F10] several times.
3When the screen for selecting the boot device appears, select the connected recovery
drive and press [Enter].
4Set a language and select the [Troubleshooting] menu.
5Select the item you want to recover the system by following the instructions.
ENGLISH
122 Setup and Upgrade
Setup and Upgrade
Installing the Driver
The figures herein may differ by language selection and is subject to change for
performance improvements without prior notice.
Using LG Update Center to install the Driver
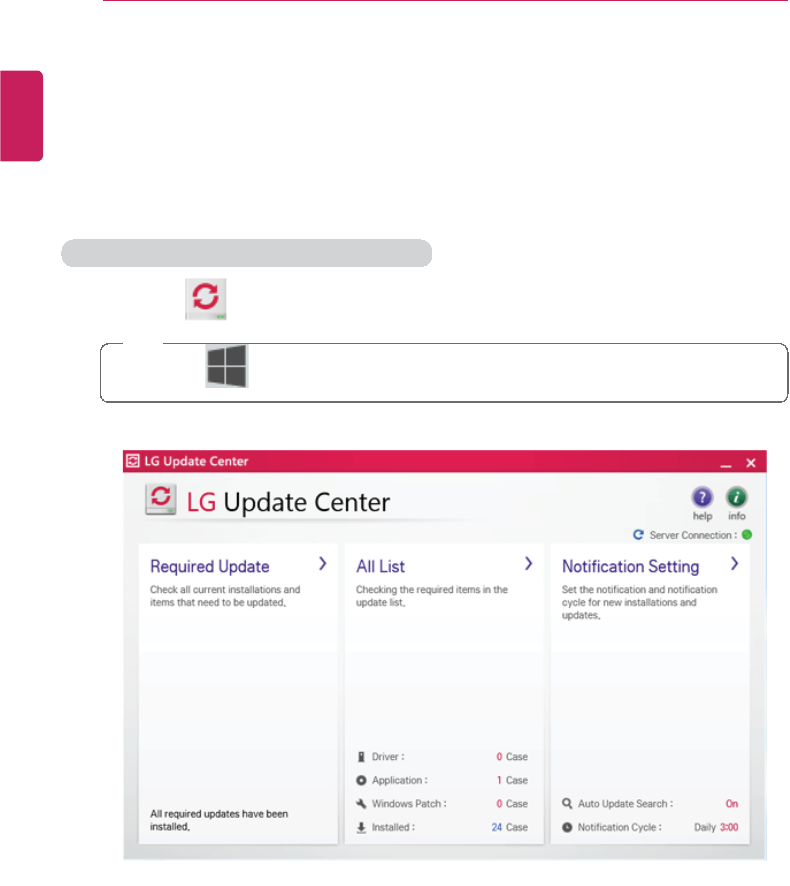
1Press the [ ] icon on the desktop to run LG Update Center.
TIP
Select the [ ] button > [All Apps] > [LG Software] and run [LG Update Center].
2Select [Required Update] or [All List] to install the driver.
For more information on LG Update Center, refer to [Help].
ENGLISH

Setup and Upgrade 123
TIP
You can use LG Update Center to install deleted drivers or latest drivers easily and
quickly.
For the system optimization, use LG Update Center to keep up-to-date.
How to Download LG Update Center
You can download LG Update Center from LG Electronics Cyber Service Center (www.lg.
com).
ENGLISH

124 Setup and Upgrade
Starting System Setup
System setup means storing the hardware configuration information of the PC in the flash
memory. Through system setup, the PC retrieves various information including current date
and time, memory capacity, and storage device (HDD, SSD, eMMC) capacity and type.
You setup the system when you set passwords, change the boot order, and add new
peripheral devices to the machine.
Items displayed on the Setup screen may differ by model type and specification.
•Refer to .
•Refer to .
•Refer to .
TIP
To use the system setup (F2), booting device selection (F10), or recovery (F11), you need
to restart the system (click [Restart] in the system power menu) and then immediately
press the corresponding function key due to the fast booting speed.
CAUTION
•Do not change the system setup unless necessary. Incorrect system setup may
cause errors during system operation. Use caution when changing the system
setup.
•For performance improvement, the system setup menu configuration and the initial
setup status may be changed and may become different from images included in the
user manual.
ENGLISH
Setup and Upgrade 125
1Reboot the system and press [F2].
2In a few moments, the system setup screen appears.
ENGLISH

126 Setup and Upgrade
Keys Used in System Setup
Keys Function
Enter Selects the current item.
Esc To deselect the current item or to move to the previous screen.
▲,▼,◄,►(Arrow
keys)
Moves the cursor up, down, left, and right.
F10 Saves the new settings or exits the system setup.
ENGLISH
Setup and Upgrade 127
Setting the Password
This process is to set a password so that other people cannot use the PC or change the
settings.
The user can set a password while booting the system or setting up the system.
CAUTION
•Without the registered password, access to the system will be denied. Write down
and keep the password in a safe place.
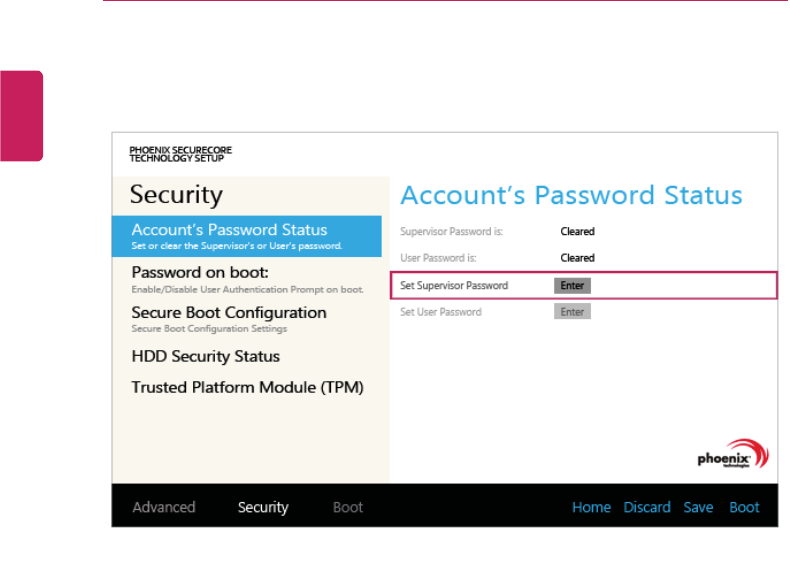
Set Supervisor Password
The password prevents unauthorized people from accessing the PC. By default, no
password is set for the machine. If an unauthorized person changes the password in the
System Setup, you will be unable to access the system.
1After opening the system setup screen, press the [Security] button.
ENGLISH
128 Setup and Upgrade
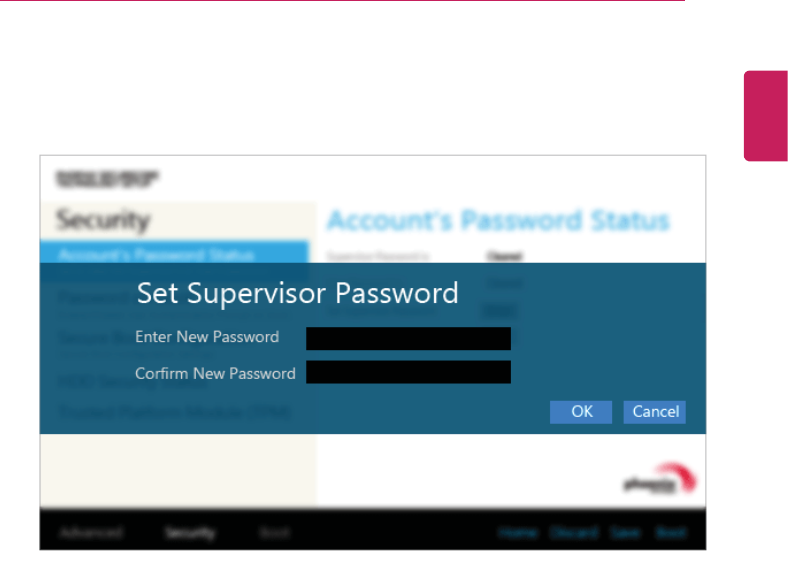
2When the following screen appears, press [Enter] in the [Set Supervisor Password]
menu.
ENGLISH
Setup and Upgrade 129
3When the following message appears, enter the password and press [OK]. The
password must not exceed 8 characters consisting of letters (A - Z), numbers (0 - 9), or
a combination of both.
ENGLISH

130 Setup and Upgrade
4When the following message appears, press [OK].
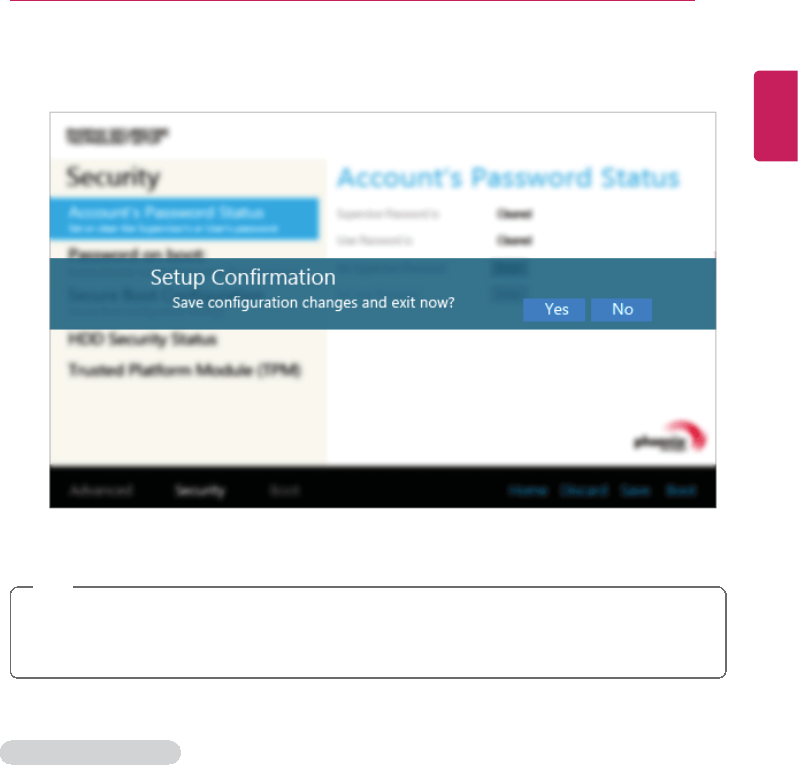
5To save the changes in the system setup, press [F10].
ENGLISH
Setup and Upgrade 131
6When the following message appears, press [YES]. The PC will restart.
TIP
•With Supervisor Password, you are authorized to set all items in the System Setup
and to set Password on boot. In case other people also use the PC, it is
recommended to set the Set User Password.
Set User Password
The password set by the [Set User Password] process is lower in level than that set by the
[Set Supervisor Password] process, and so the user can use the[Set User Password]
only after setting a password in the [Set Supervisor Password] menu.
ENGLISH

132 Setup and Upgrade
1After opening the system setup screen, press the [Security] button.
2When the following screen appears, press [Enter] in the [Set User Password] menu.
ENGLISH
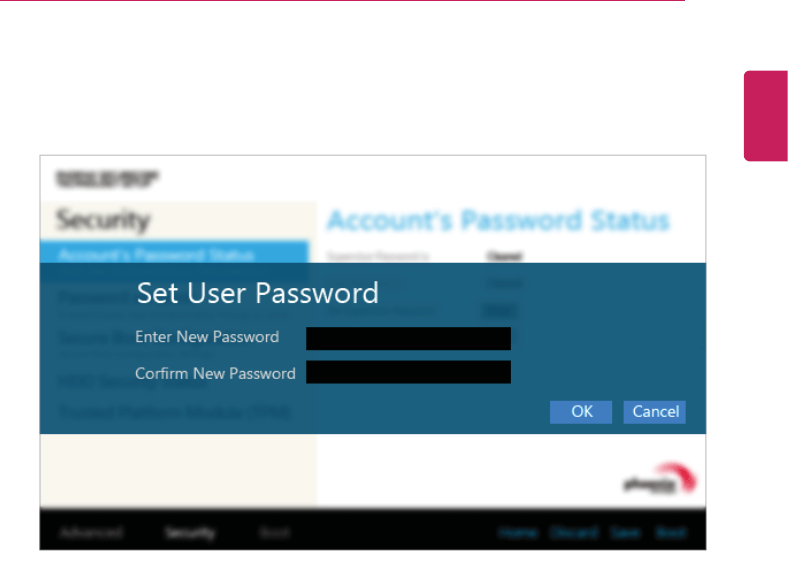
Setup and Upgrade 133
3When the following message appears, enter the password and press [OK]. The
password must not exceed 8 characters consisting of letters (A - Z), numbers (0 - 9), or
a combination of both.
ENGLISH

134 Setup and Upgrade
4When the following message appears, press [OK].
5To save the changes in the system setup, press [F10].
ENGLISH

Setup and Upgrade 135
6When the following message appears, press [YES]. The PC will restart.
TIP
•[User Password] allows limited access to the items in the System Setup compared
to the [Supervisor Password] item.
Password on boot
[Password on boot] menu protects the system by requesting [Set Supervisor Password]
or [Set User Password] during boot up.
ENGLISH
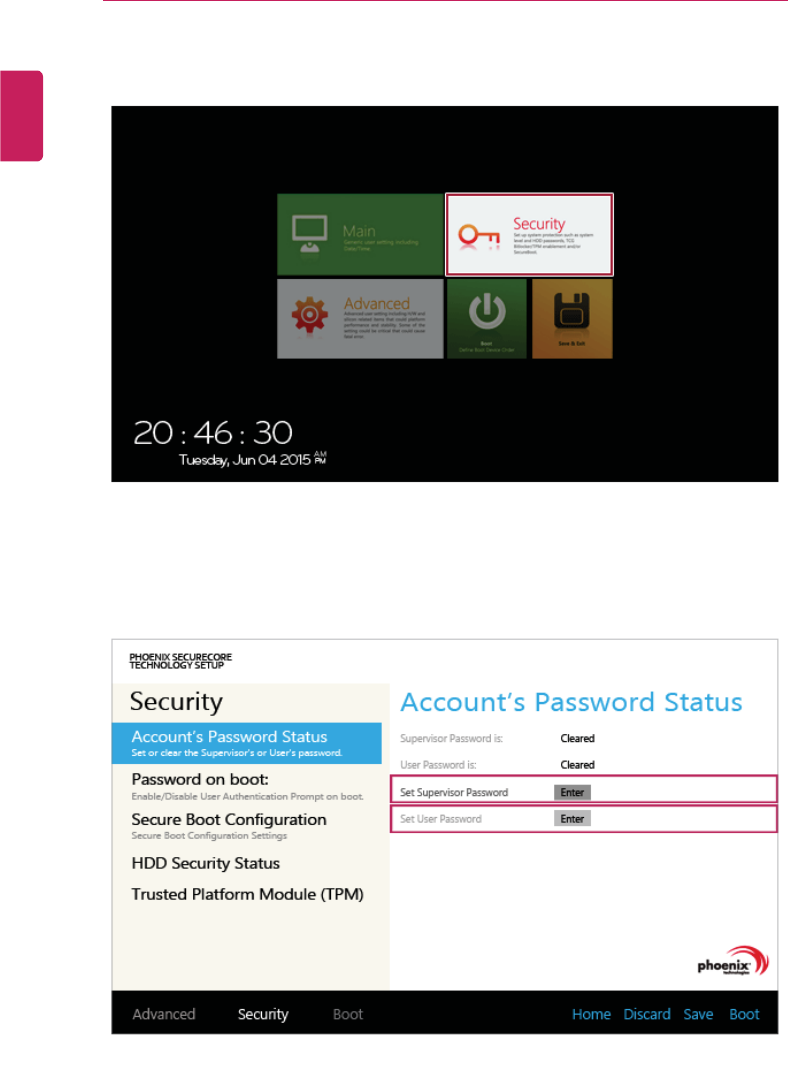
136 Setup and Upgrade
1After opening the system setup screen, press the [Security] button.
2When the following screen appears, set [Set Supervisor Password] only or both [Set
Supervisor Password] and [Set User Password].
ENGLISH
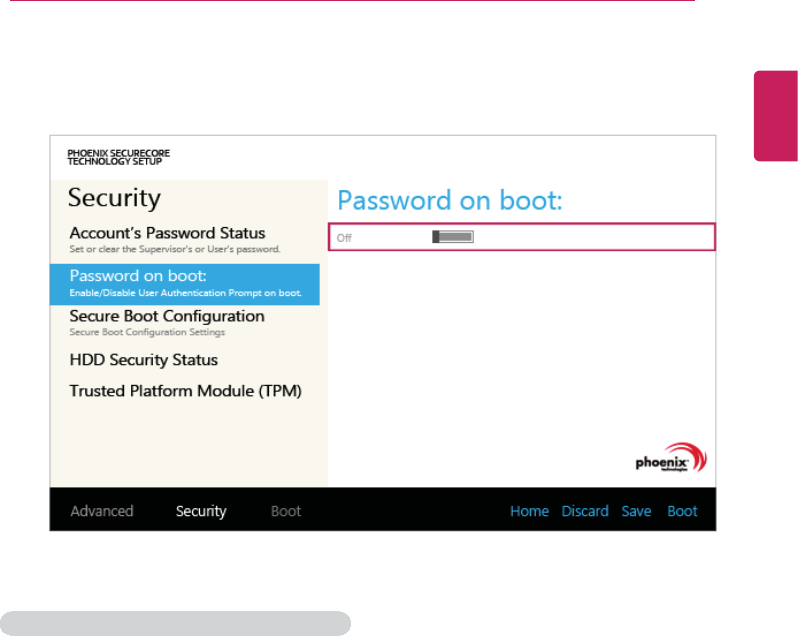
Setup and Upgrade 137
3Press the [Off] button in the [Password on boot] menu as shown in the following figure.
The button changes to [On] and the [Password on boot] setting is completed.
Set HDD Password / Set SSD Password
HDD / SSD Password is to set a password in the HDD and SSD separately from the
Supervisor Password.
If you set both HDD password and SSD password, the password input window
appears twice during booting.
If you set both HDD password and SSD password, the password input window
appears in order of [Boot Priority Order] at the top of the [Boot] menu.
ENGLISH

138 Setup and Upgrade
1After opening the system setup screen, press the [Security] button.
2When the [Security] menu appears, press the [HDD Security Status] button.
ENGLISH
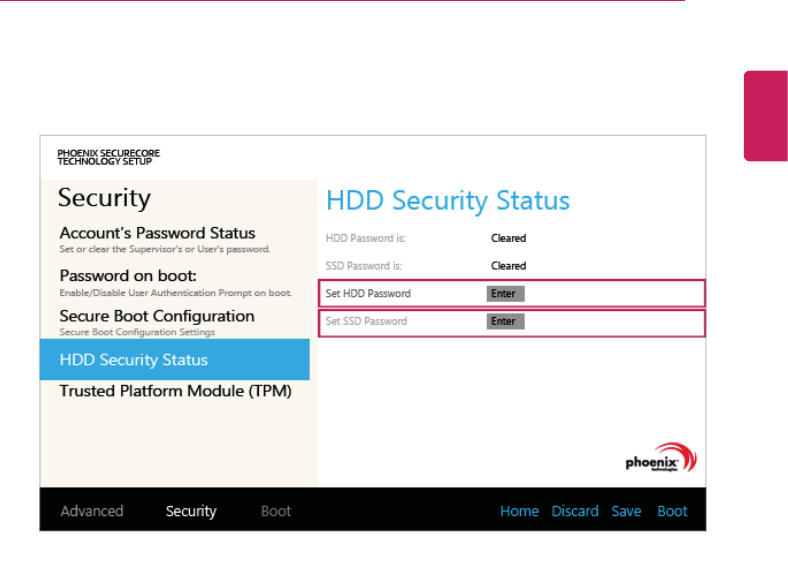
Setup and Upgrade 139
3When the following screen appears, press [Enter] in the [Set HDD Password] or [Set
SSD Password] menu.
ENGLISH
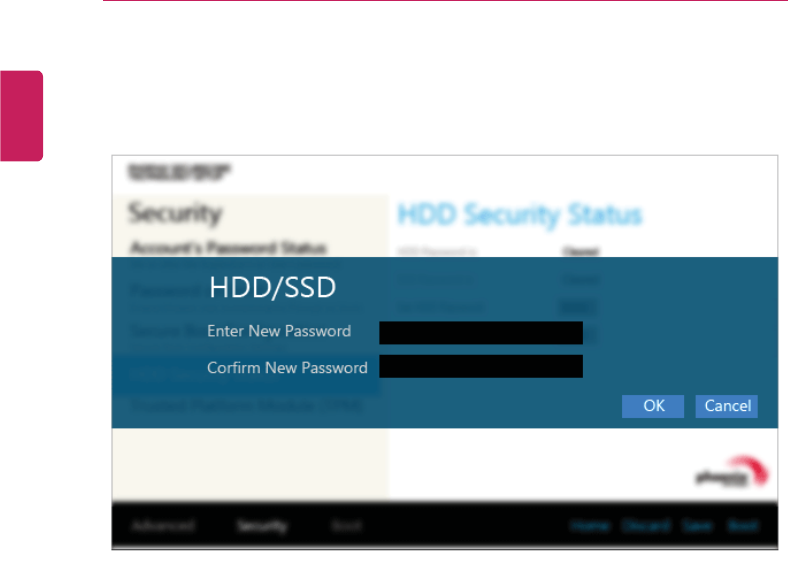
140 Setup and Upgrade
4When the following message appears, enter the password and press [OK]. The
password must not exceed 8 characters consisting of letters (A - Z), numbers (0 - 9), or
a combination of both.
ENGLISH

Setup and Upgrade 141
5When the following message appears, press [OK].
6To save the changes in the system setup, press [F10].
ENGLISH
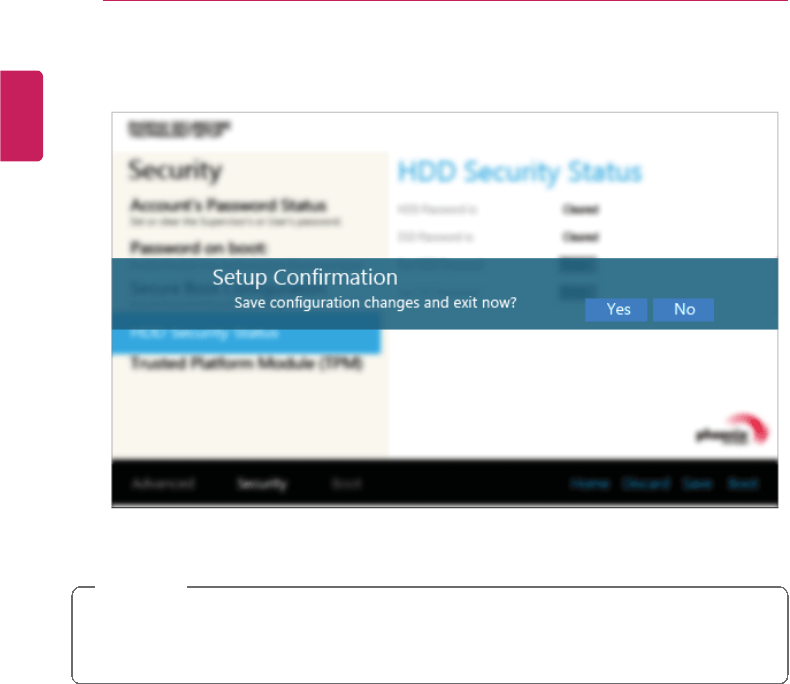
142 Setup and Upgrade
7When the following message appears, press [YES]. The PC will restart.
CAUTION
HDD Password Without the password, it is impossible to recover the HDD.
•The replacement of HDD due to a forgotten HDD Password is not covered by
warranty.
ENGLISH
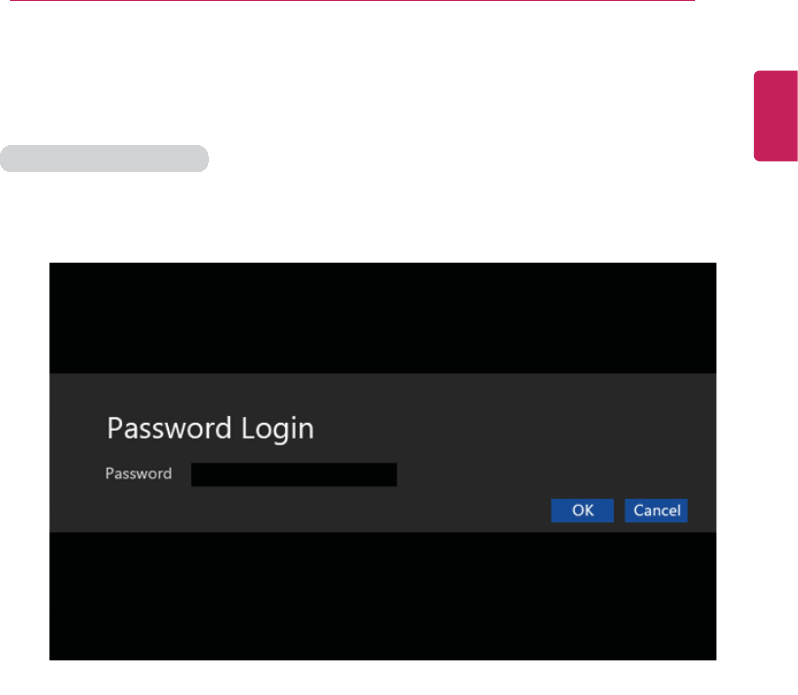
Setup and Upgrade 143
Changing or Deleting the Password
You can delete or change the password only after entering the current password.
Changing the Password
1Execute System Setup, enter the password, and press [Enter].
2Change the password in the same way as setting one.
ENGLISH

144 Setup and Upgrade
Deleting the Password
1Execute System Setup, enter the password, and press the [Security] button.
ENGLISH
Setup and Upgrade 145
2When the following screen appears, press [Enter] in the [Set Supervisor Password]
menu.
ENGLISH
146 Setup and Upgrade
3When the following message appears, enter the current password in the [Enter Current
Password] field.
ENGLISH
Setup and Upgrade 147
4Press [Enter] in [Enter New Password] and [Confirm New Password].
ENGLISH
148 Setup and Upgrade
5When the following message appears, press [OK].
6To save the changes in the system setup, press [F10].
ENGLISH
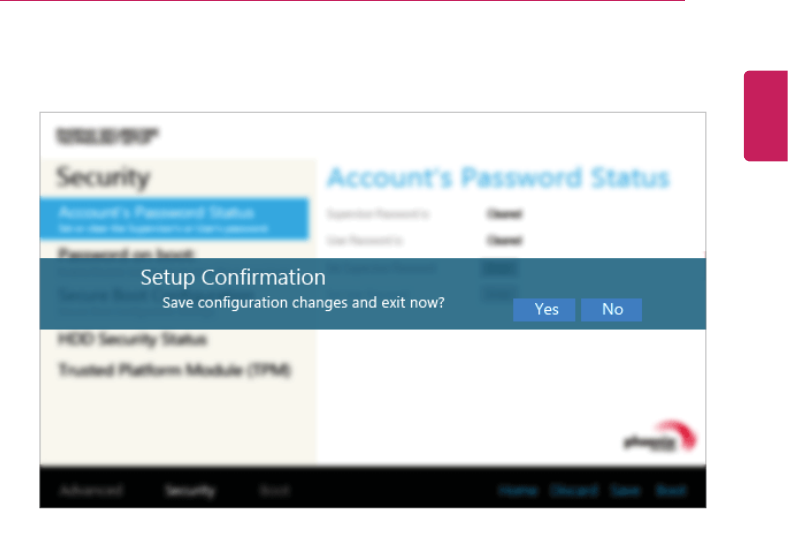
Setup and Upgrade 149
7When the following message appears, press [YES]. The PC will restart.
ENGLISH
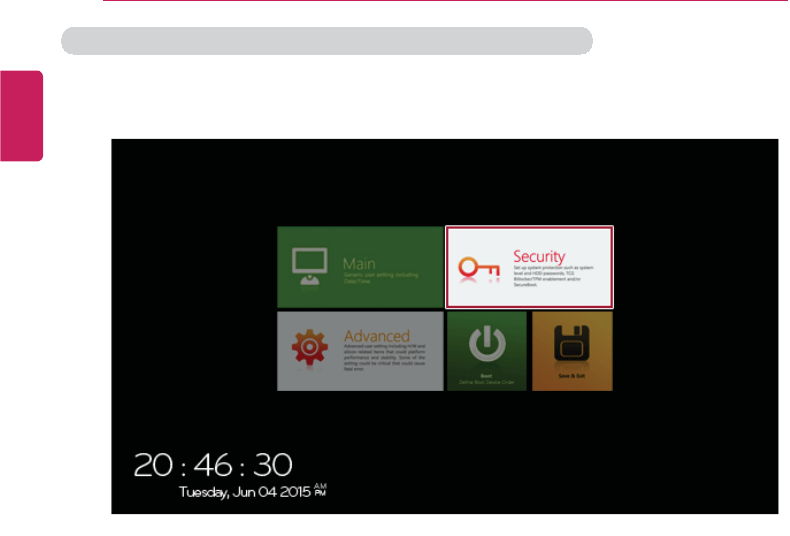
150 Setup and Upgrade
Deleting the Password (Set HDD Password / Set SSD Password)
1Execute System Setup, enter the password, and press the [Security] button.
2When the [Security] menu appears, press the [HDD Security Status] button.
ENGLISH

Setup and Upgrade 151
3When the following screen appears, press [Enter] in the [Set HDD Password] or [Set
SSD Password] menu.
ENGLISH

152 Setup and Upgrade
4When the following message appears, enter the current password in the [Enter Current
Password] field.
ENGLISH
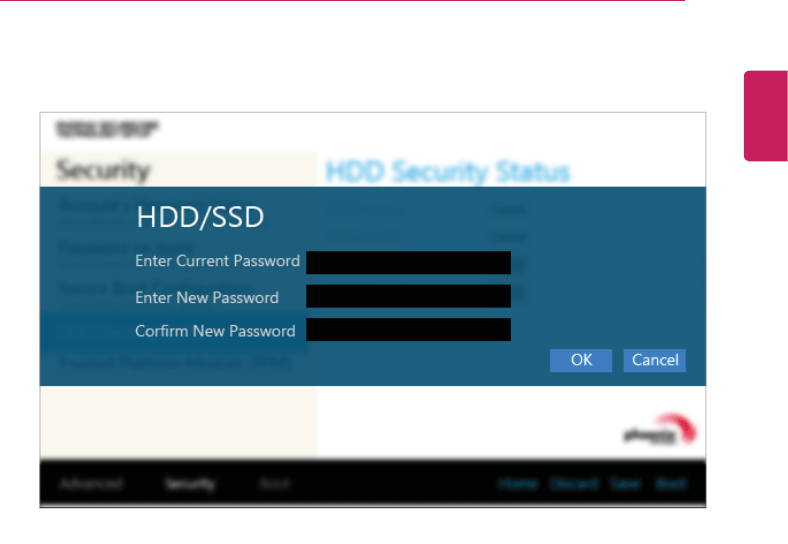
Setup and Upgrade 153
5Press [Enter] in [Enter New Password] and [Confirm New Password].
ENGLISH
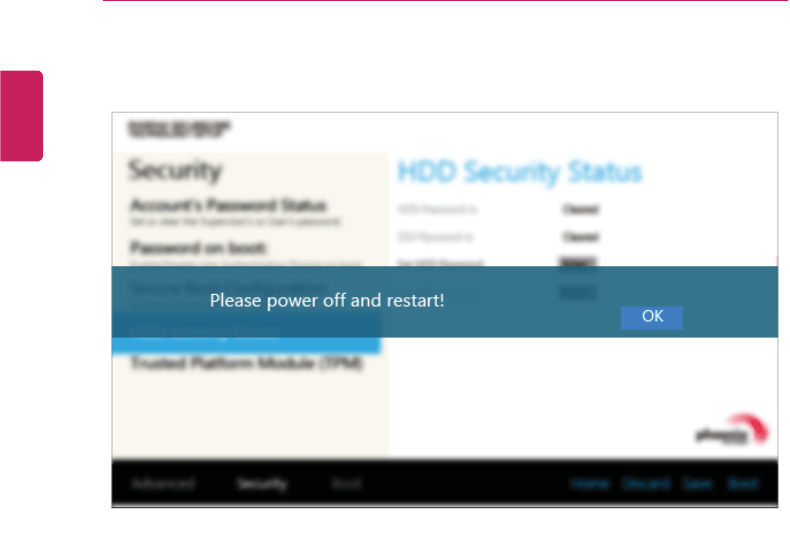
154 Setup and Upgrade
6When the following message appears, press [OK].
7To save the changes in the system setup, press [F10].
ENGLISH
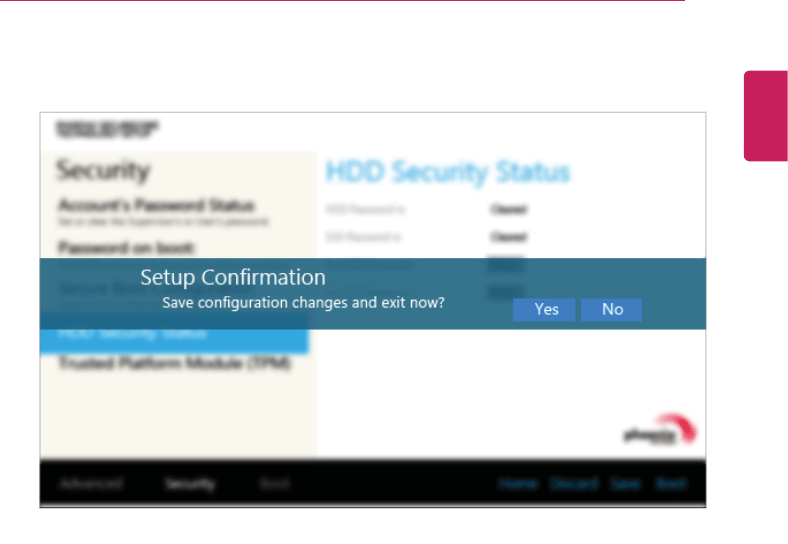
Setup and Upgrade 155
8When the following message appears, press [YES]. The PC will restart.
ENGLISH
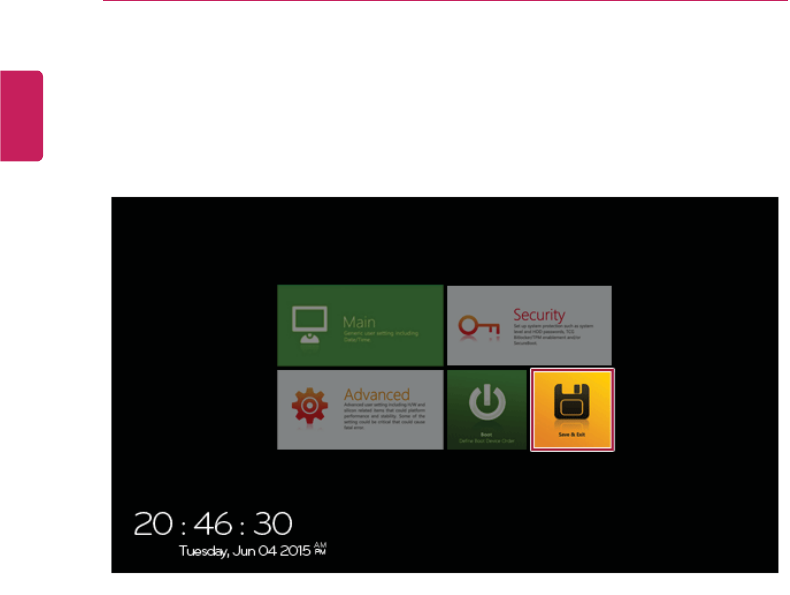
156 Setup and Upgrade
Restoring the Factory Default Settings
If you have changed the system setup by mistake, you can restore the default settings.
1After opening the system setup screen, press the [Save & Exit] button.
ENGLISH
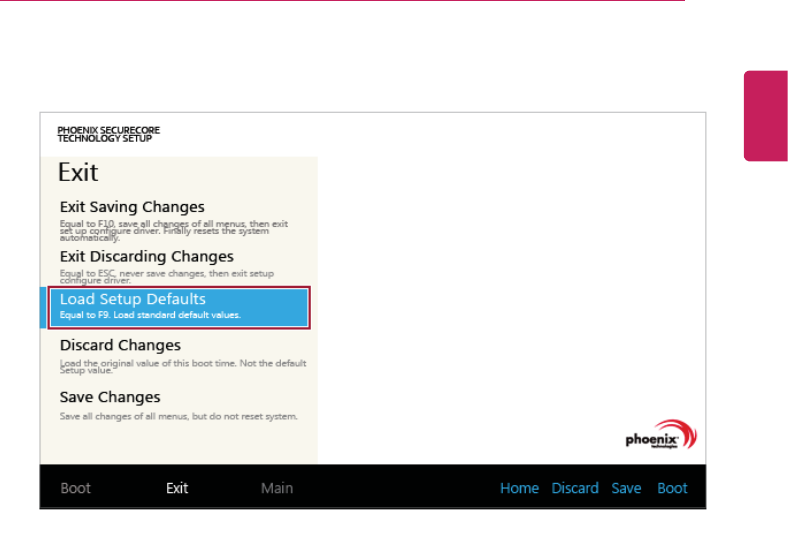
Setup and Upgrade 157
2When the [Exit] menu appears, select [Load Setup defaults].
ENGLISH
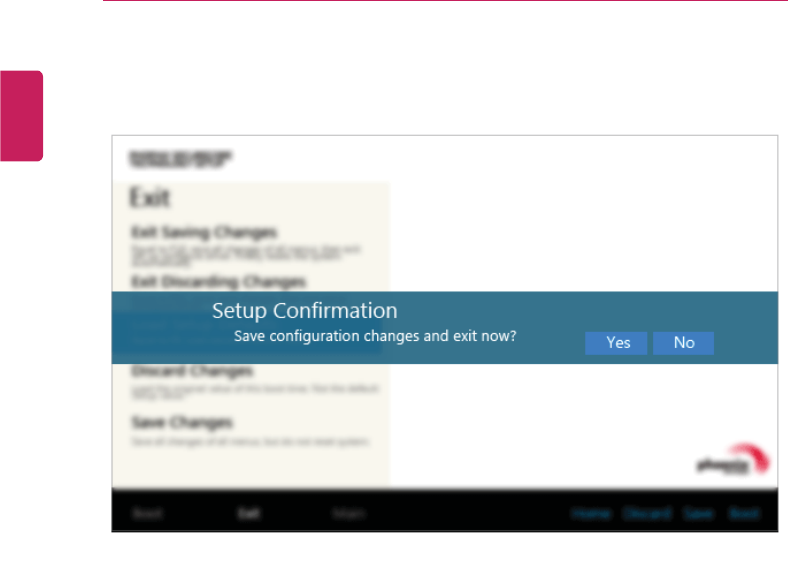
158 Setup and Upgrade
3When the following message appears, press [Yes]. The settings will be reset to the
factory default.
4To save the changes in the system setup, press [F10].
ENGLISH
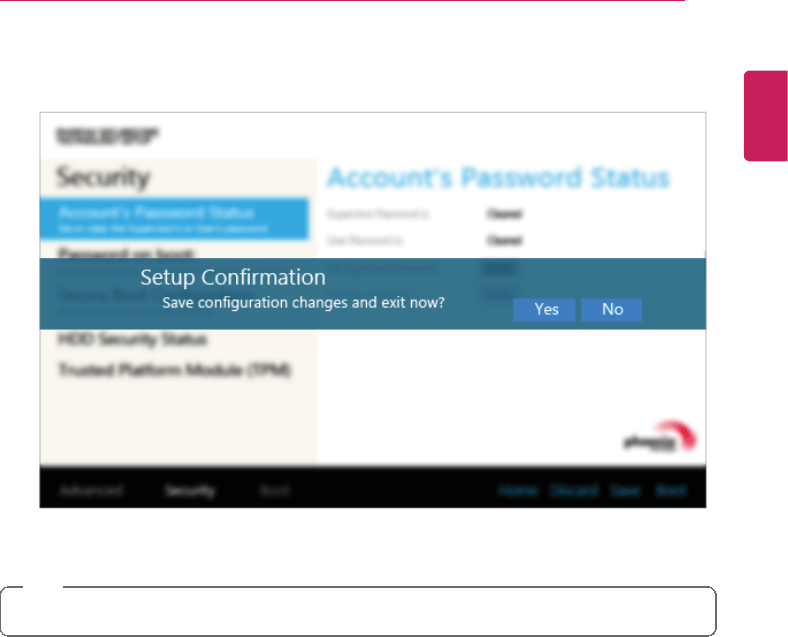
Setup and Upgrade 159
5When the following message appears, press [YES]. The PC will restart.
TIP
•You may press [F9] to use the [Load Setup defaults] menu.
ENGLISH
160 Setup and Upgrade
Changing the Boot Order
The user can change the boot order according to his or her needs, or select a boot device
The model in the example can differ from actual models and is subject to change for
performance improvements, without prior notice.
TIP
To use the system setup (F2), booting device selection (F10), or recovery (F11), you need
to restart the system (click [Restart] in the system power menu) and then immediately
press the corresponding function key due to the fast booting speed.
Changing the Boot Order
1Reboot the system and press [F2].
ENGLISH
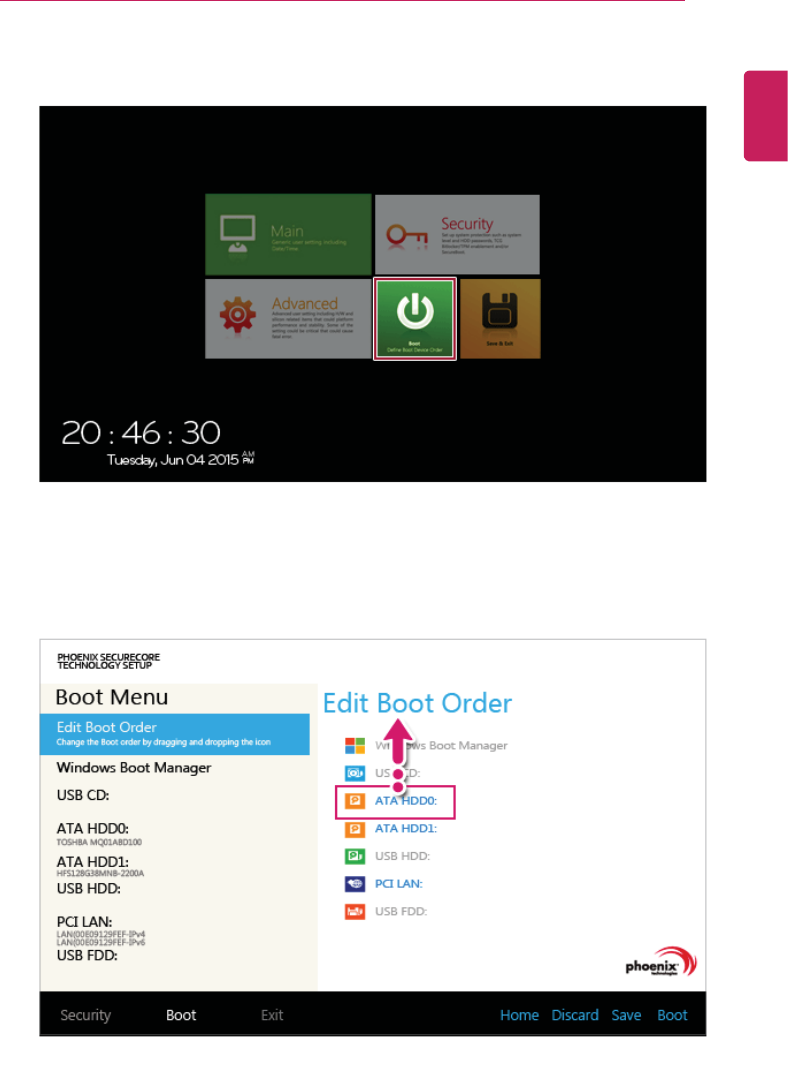
Setup and Upgrade 161
2When the system setup screen appears, press the [Boot] button.
3Drag the icon of the device to change the boot order in the [Edit Boot Order] menu to
change the boot order.
ENGLISH
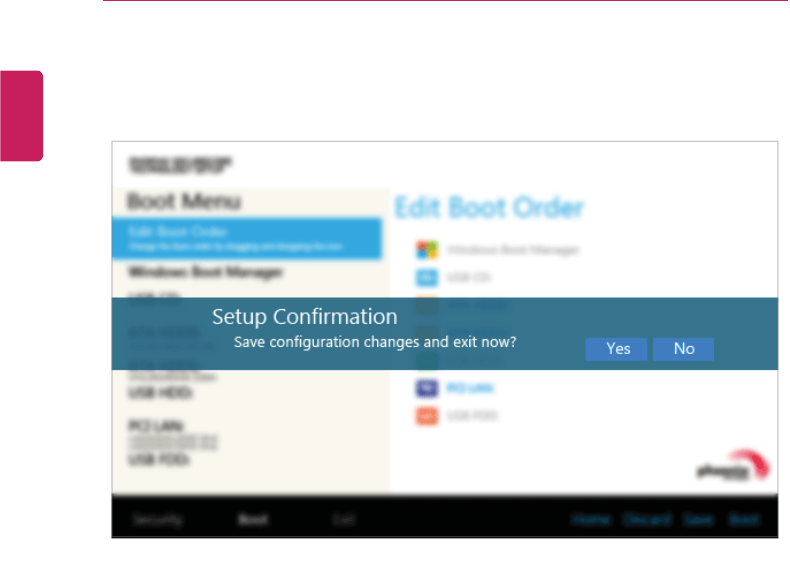
162 Setup and Upgrade
4To save the changes in the system setup, press [F10].
5When the following message appears, press [YES].
6The changes are saved and the system reboots.
ENGLISH

Setup and Upgrade 163
Selecting a Boot Device to Use
1Reboot the system and press [F10].
ENGLISH
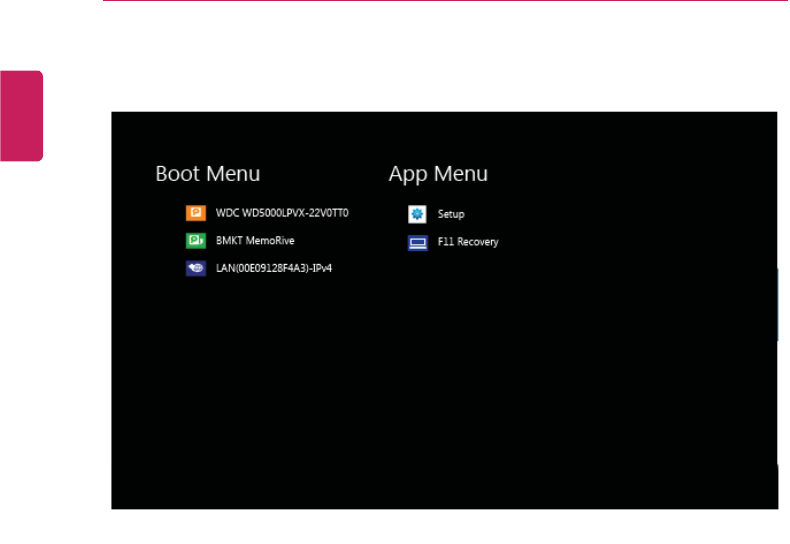
164 Setup and Upgrade
2When the Select Boot Device screen appears, select the device.
3Boots using the selected device.
ENGLISH
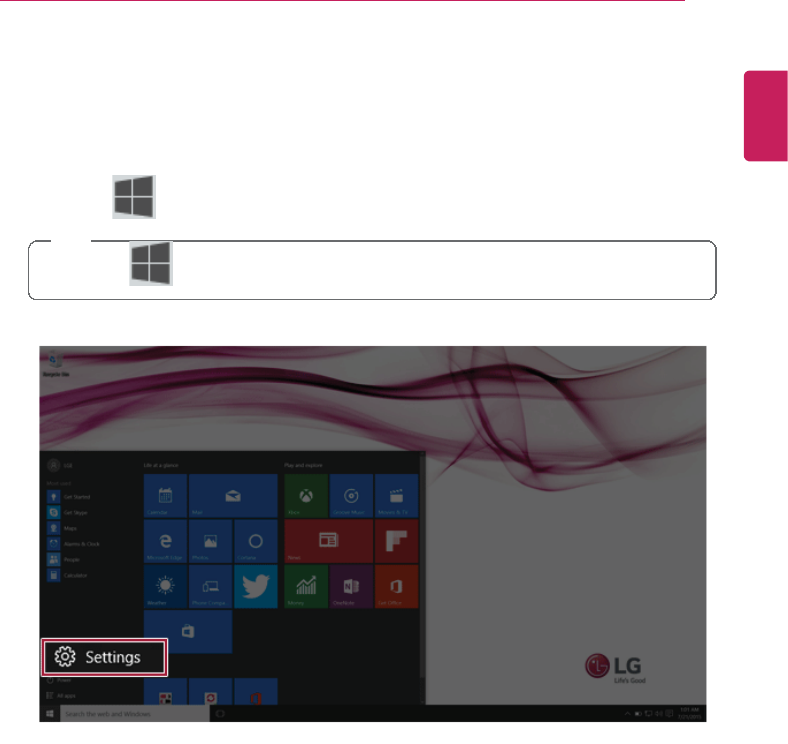
Setup and Upgrade 165
Windows 10 Auto Scaling
Windows 10 Auto Scaling feature for the user's convenience may partially blur the screen
or display some icons and texts larger.
Refer to the following information to change the DPI scaling to suit your needs.
1Press the [ ] button and select the [Settings] menu.
TIP
Press the [ ] key or [Ctrl] + [Esc] to display the Start menu.
ENGLISH

166 Setup and Upgrade
2Select [System] >[Display].
3[Change the size of text, apps and other items.] Adjust the value to change the size.
ENGLISH
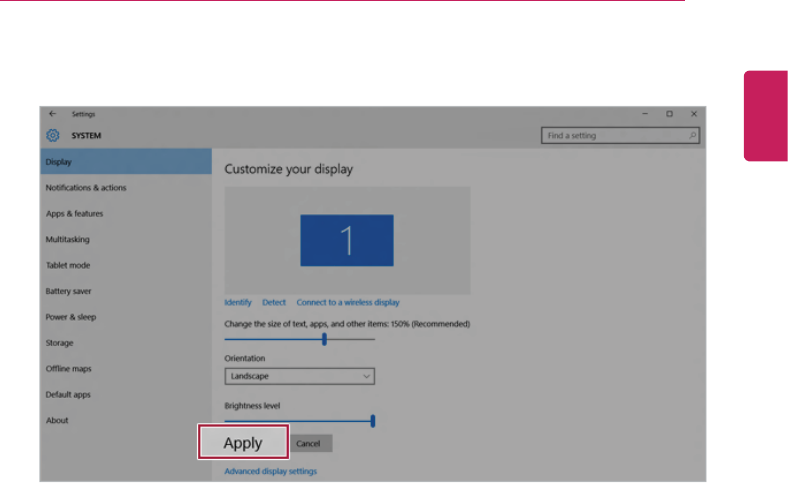
Setup and Upgrade 167
4Press [Apply] to apply the changes.
ENGLISH
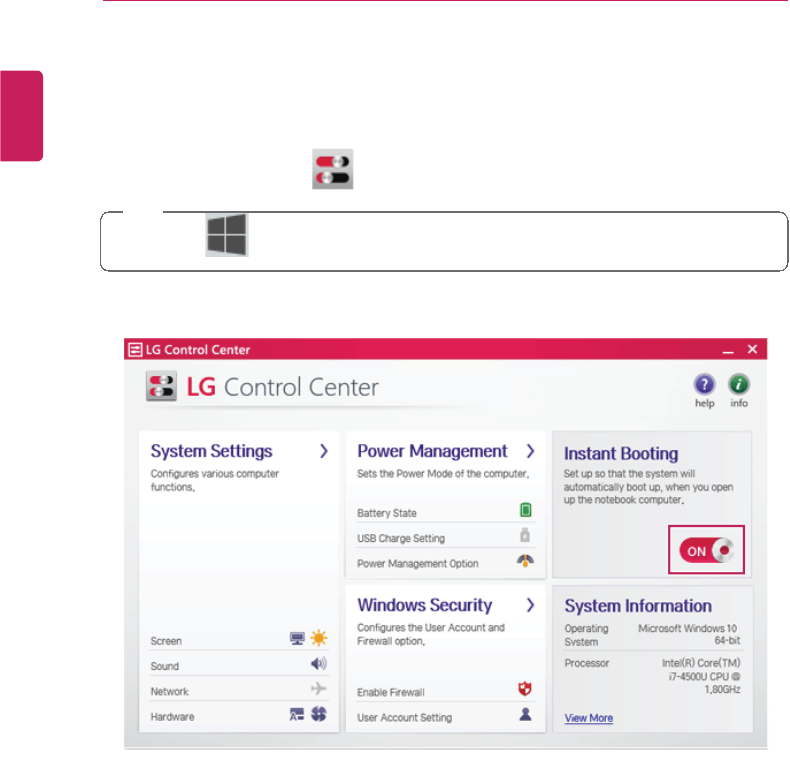
168 Setup and Upgrade
Using Instant Booting
Instant Booting allows the system to boot automatically when the notebook PC cover is
opened, so that you can use the system without pressing the power button.
1On the desktop, press the [ ] icon to run [LG Control Center].
TIP
Select the [ ] button > [All Apps] > [LG Software] and run [LG Control Center].
2On LG Control Center screen, set the [Instant Booting] to [ON].
3Exit the system and close the notebook PC cover.
4When the cover is opened, the notebook PC turns on and the system starts to boot
automatically.
ENGLISH
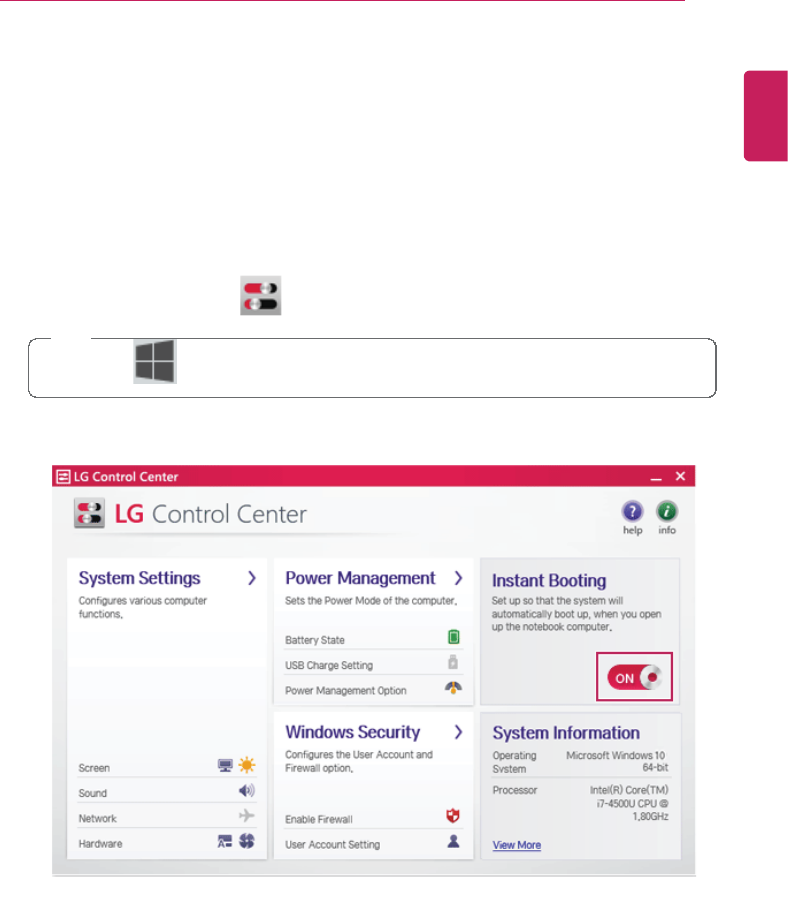
FAQ 169
FAQ
FAQ Content
Using Instant Booting
Instant Booting allows the system to boot automatically when the notebook PC cover is
opened, so that you can use the system without pressing the power button.
1On the desktop, press the [ ] icon to run [LG Control Center].
TIP
Select the [ ] button > [All Apps] > [LG Software] and run [LG Control Center].
2On LG Control Center screen, set the [Instant Booting] to [ON].
3Exit the system and close the notebook PC cover.
4When the cover is opened, the notebook PC turns on and the system starts to boot
automatically.
ENGLISH
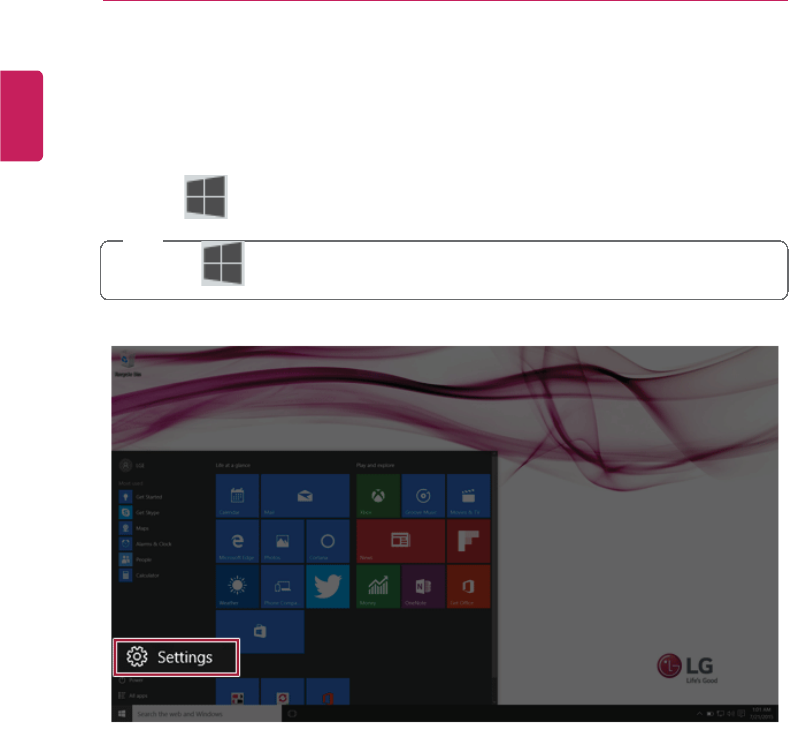
170 FAQ
Windows 10 Auto Scaling
Windows 10 Auto Scaling feature for the user's convenience may partially blur the screen
or display some icons and texts larger.
Refer to the following information to change the DPI scaling to suit your needs.
1Press the [ ] button and select the [Settings] menu.
TIP
Press the [ ] key or [Ctrl] + [Esc] to display the Start menu.
ENGLISH
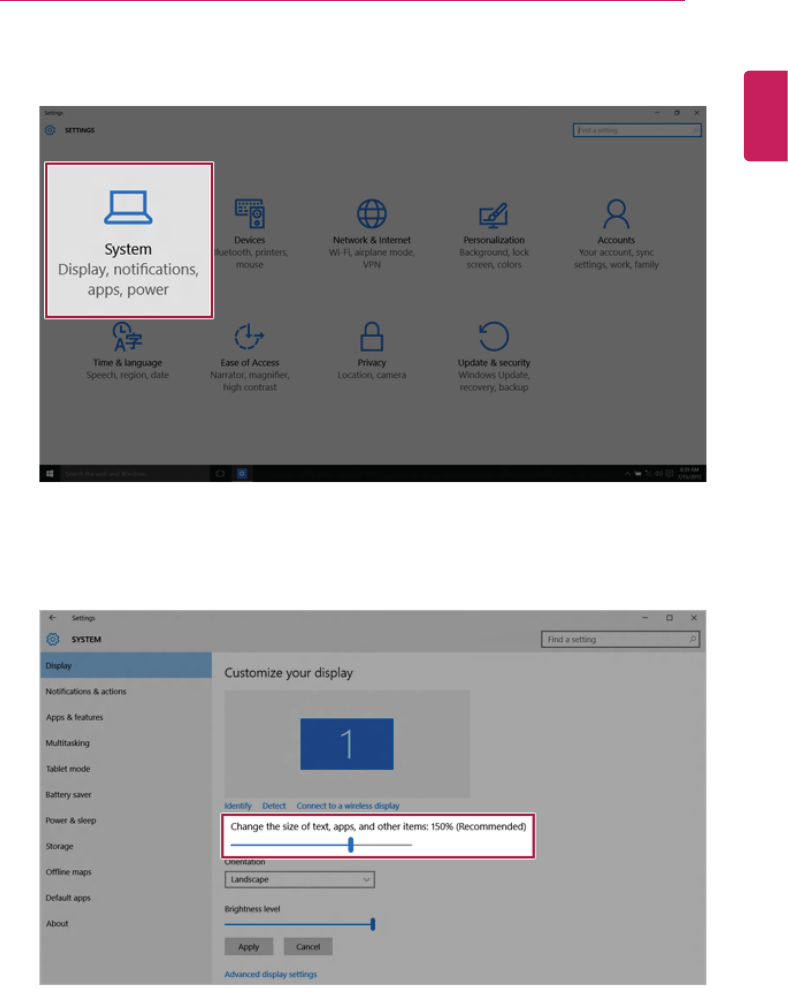
FAQ 171
2Select [System] >[Display].
3[Change the size of text, apps and other items.] Adjust the value to change the size.
ENGLISH
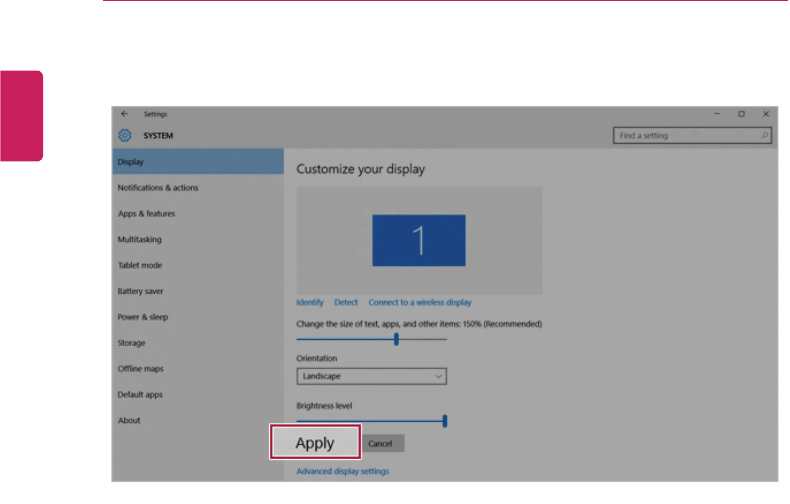
172 FAQ
4Press [Apply] to apply the changes.
ENGLISH
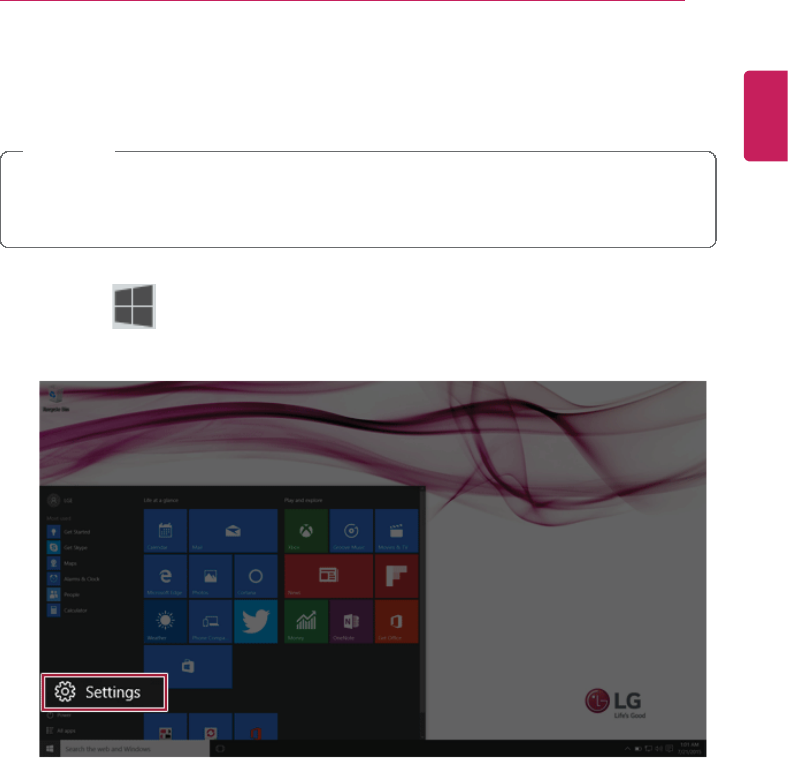
FAQ 173
Restoring the System
If the system has an error, you can use Windows 10's recovery feature to recover or restore
the system to its initial pre-purchase state.
CAUTION
If you have deleted the restoration data in the protected area of the hard disk, or have
arbitrarily installed another operating system, the recovery feature may not work.
To recover the system, the AC adapter must be connected.
1Press the [ ] button and select the [Settings] menu.
ENGLISH
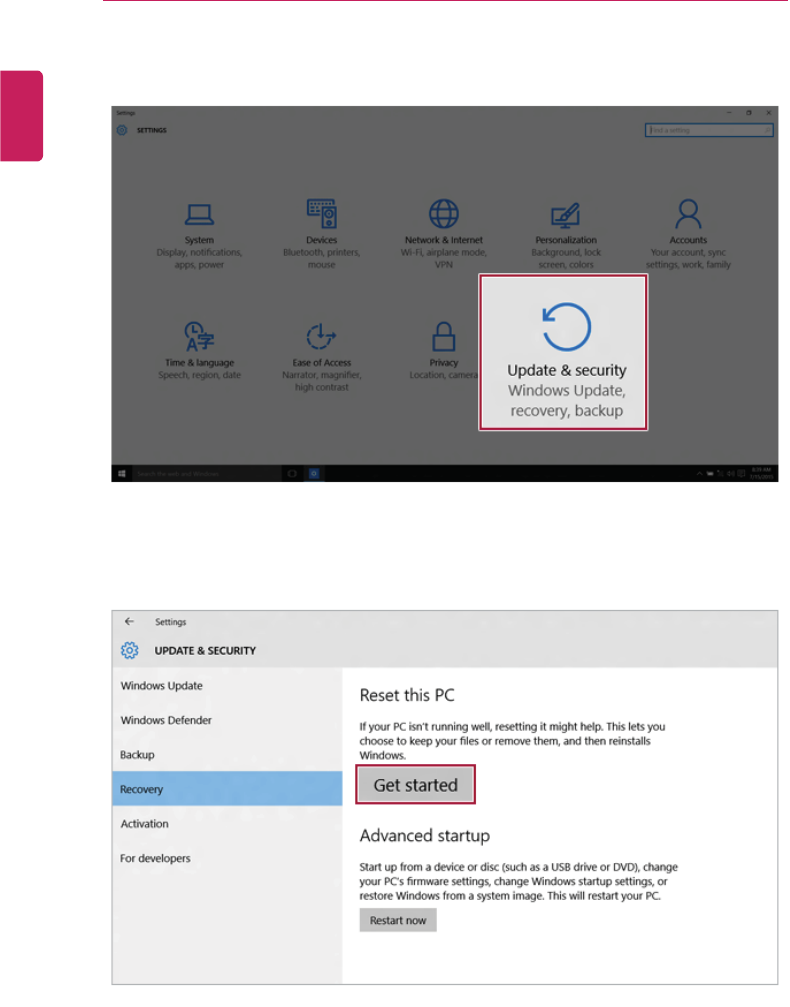
174 FAQ
2When the [Settings] screen appears, select [Update & security].
3Select the [Recovery] menu and press [Get started] to reset the PC.
4If the following screen appears, select a desired option to proceed with recovery.
ENGLISH
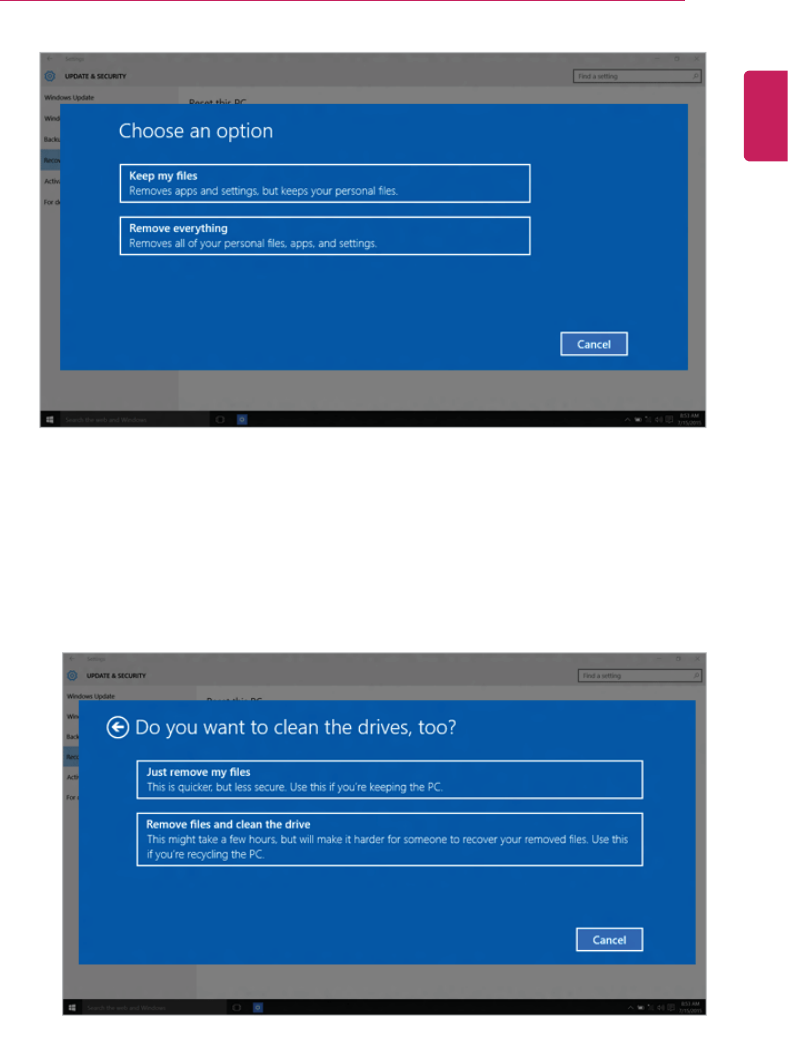
FAQ 175
a Keep my files : Recovers the PC without losing any personal files.
PC settings are reset to the default and any user-installed Desktop app will be
deleted.
b Remove everything : Removes all items from the system and restores the system to
its initial pre-purchase state.
ENGLISH

176 FAQ
•Just Remove My Files: Factory-resets the drive where Windows is installed (for
example: Drive C).
•Remove files and clean the drive: Resets all partitions and drives in the system.
CAUTION
All data is lost during the initialization, so you must backup all critical data in advance.
It may take about 5 hours or longer depending on the system conditions.
ENGLISH
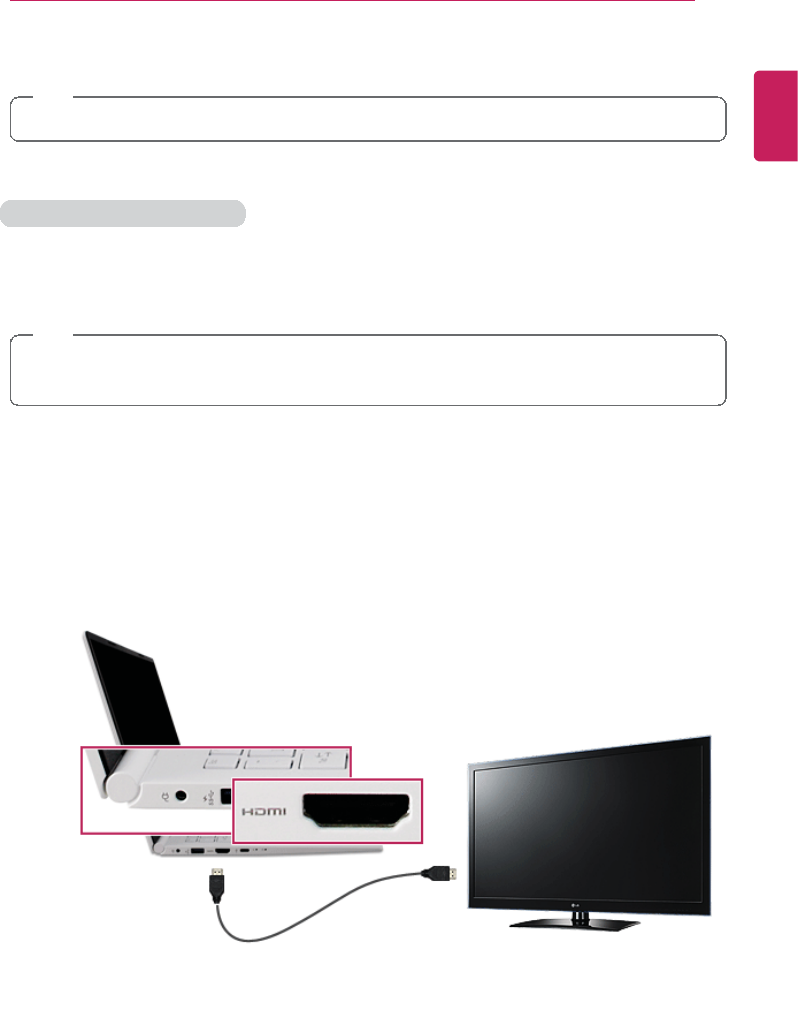
FAQ 177
Connecting to External Display
TIP
•Ensure the monitor power is off before connecting the external monitor to the PC.
Connecting to the HDMI Port
HDMI is a high-speed multimedia interface that can transfer uncompressed full digital audio
and video signals.
When LG Notebook PC supports SPDIF, HDMI is not supported.
TIP
Use ‘HDMI to VGA Gender' to connect to VGA port.
HDMI to VGA Gender is available at LG Service Center.
1Connect the HDMI cable to the PC and the external device (TV, monitor) that supports
HDMI.
2HDMI port transfers both video and audio simultaneously. Hence, there is no need for a
separate audio connection.
ENGLISH

178 FAQ
3Press [Fn] + [F7] to redirect the video output to the external device.
TIP
Switching screen output device by pressing [Fn] + [F7]
•Press [Fn] + [F7] to display the Toggle Screen menu. Then select the screen mode
you want and press [Enter].
CAUTION
•If you do not set Speaker as the default value after disconnecting the HDMI cable,
the system may not produce any sound.
•If a program was running already, you need to exit and restart the program for it to
produce sound.
ENGLISH

FAQ 179
Using a Wired/Wireless Router
A wired / wireless router connects several PCs and mobile devices to one internet line and
enables the use of internet and the network.
A wired / wireless router has to be bought separately. Refer to the manual provided
by the manufacturer for instructions.
Connecting a Wired or Wireless Router
If one internet line is used with a wired / wireless router and several devices are connected,
this may result in a slower connection.
In case of a wireless LAN, it is recommended to change the network name and security
settings for a more secure connection.
Network speed can differ according to operation environment and specifications.
1Connect the internet cable of the modem that was provided by your internet provider to
the router's WAN port.
2Connect all devices (PC, IPTV, internet phone, etc.) with a LAN cable to LAN ports 1 to
4 of the router.
The number of LAN ports can vary for each router model.
3Please refer to the manual provided by the router manufacturer for setup of the network
and Internet.
ENGLISH

180 FAQ
Wireless LAN
The wireless network (Wireless LAN) is the network environment that connects a PC with
the internet provider or company network through an Access Point (wired or wireless
router).
Wireless LAN is optional. Hence, it may not be installed in some models.
Turning On/Off Airplane Mode
Prior to using the wireless LAN, press [Fn] + [F6] to turn off Airplane Mode.
Pressing [Fn] + [F6] keys will turn on or off. If you are not going to use the mode, keep the
mode turned on to reduce the battery power consumption.
Using the Wireless LAN
If an Access Point (wired or wireless router) is in the vicinity of the PC, the wireless LAN can
easily be accessed.
During the search for a wireless network (Wireless LAN), various Access Point may
be found according to the location where the PC is used.
In case no accessible wireless network (Wireless LAN) is near the PC, no Access
Point might be found.
A password protected Access Point cannot be accessed without the correct
password.
ENGLISH

FAQ 181
1Press the [ ] button and select the [Settings] menu.
TIP
Press the [ ] key or [Ctrl] + [Esc] to display the Start menu.
ENGLISH
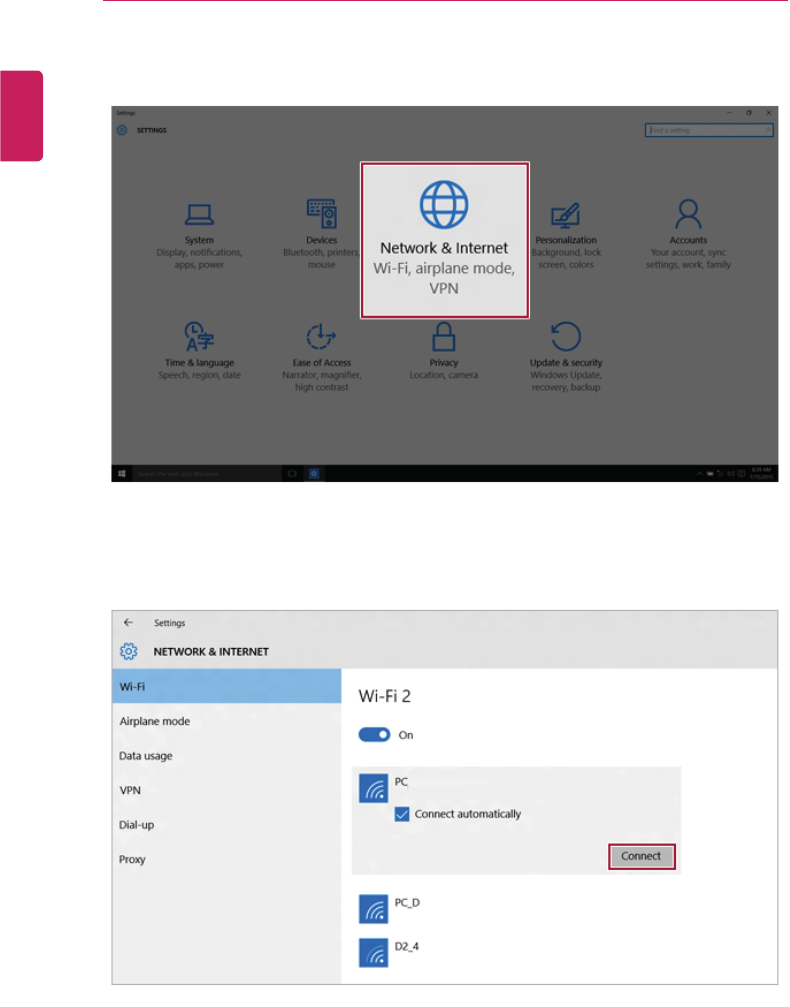
182 FAQ
2Select [Network and Internet] > [WiFi] to search for near access points.
3Select an access point to connect to and press the [Connect] button.
ENGLISH
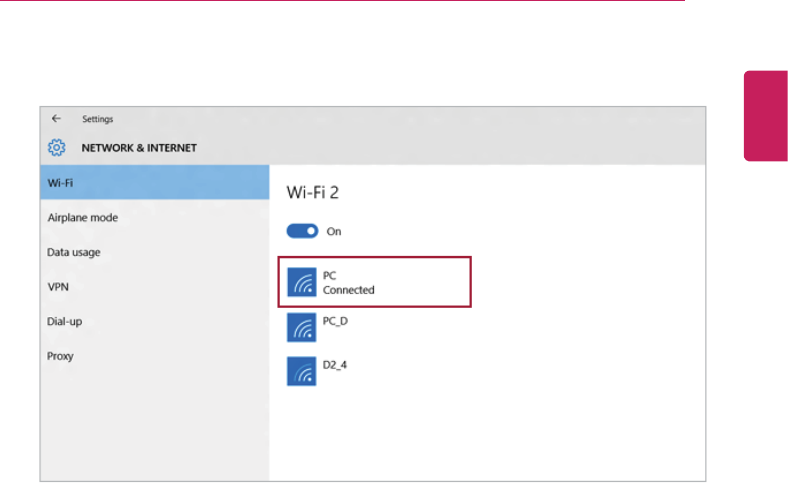
FAQ 183
4If a connection is established, [Connected] is displayed below the access point name.
5Press Internet Browser to check if the internet is working properly.
ENGLISH
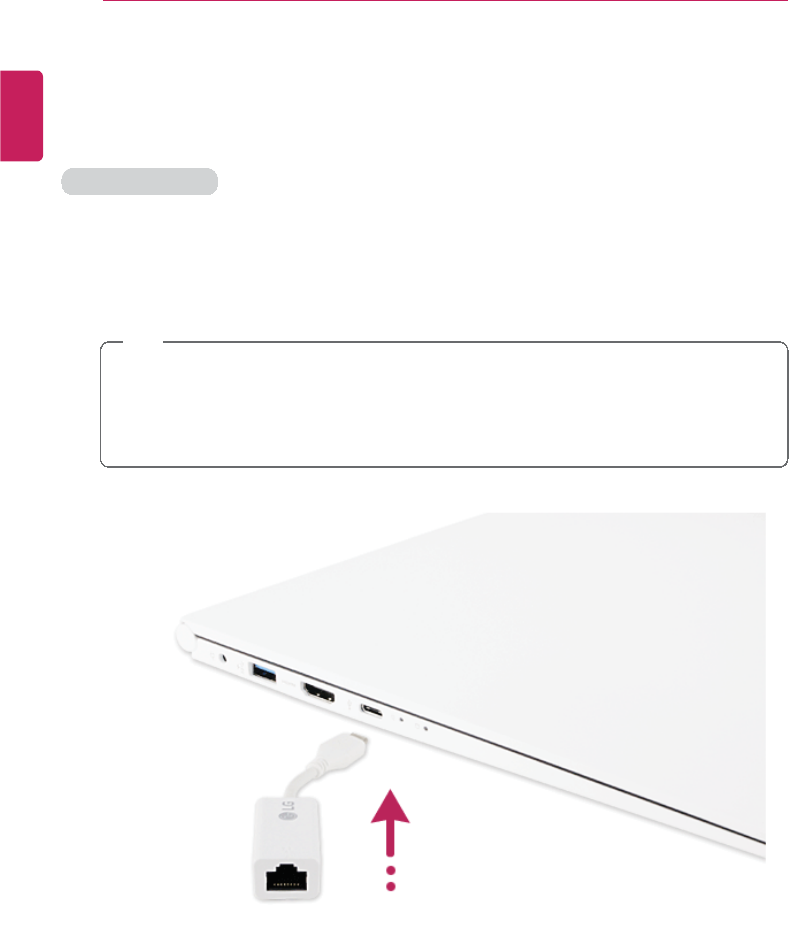
184 FAQ
Wired LAN
Wired LAN is the network environment that users can connect to by using a cable to
connect to their internet providers or the company's network.
Using Wired LAN
Wired LAN is installed with an automatic IP (DHCP) as default value.
Please refer to the following instructions for details on setting up an automatic IP (DHCP) or
static IP.
1Connect the LAN adapter to the USB Type-C port on the PC.
TIP
The recommended network cable for the optimal network environment is CAT5 or
higher.
The network (LAN) cable may be connected when the LAN adapter is used.
The LAN adapter may be separately purchased at LG Service Center.
ENGLISH
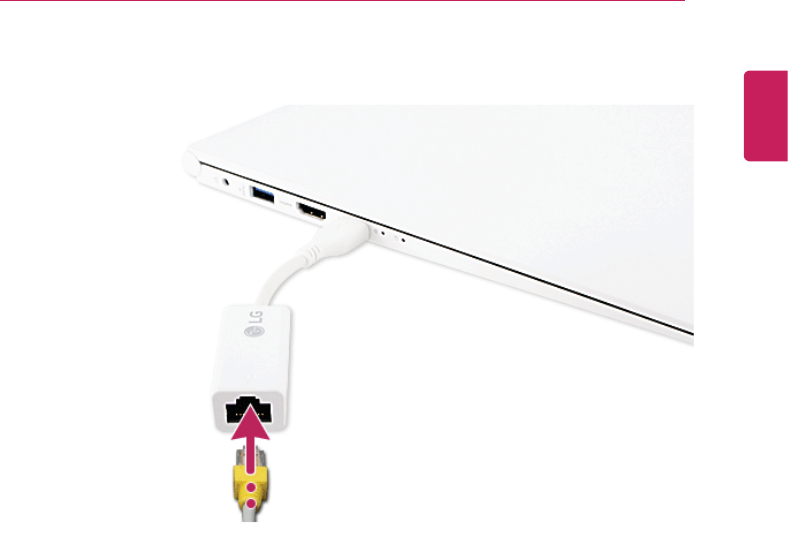
FAQ 185
2Connect the wired LAN cable to the LAN port.
ENGLISH
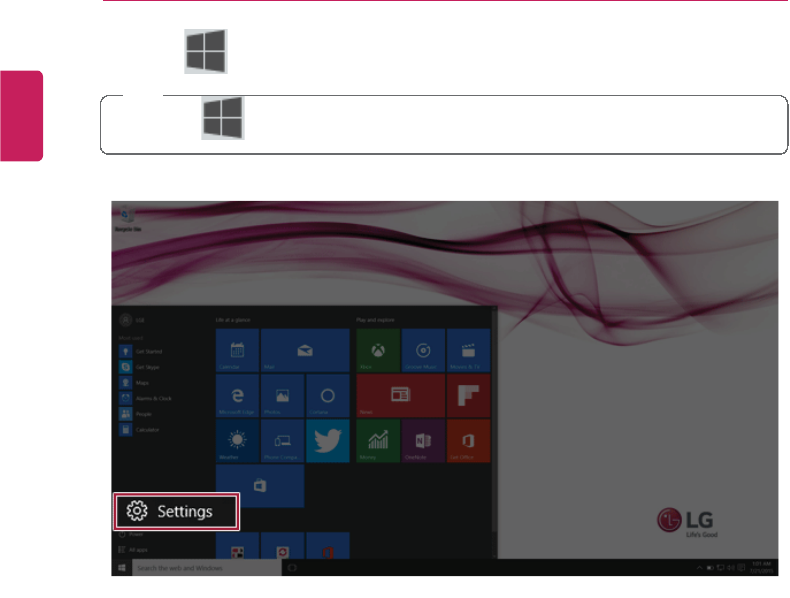
186 FAQ
3Press the [ ] button and select the [Settings] menu.
TIP
Press the [ ] key or [Ctrl] + [Esc] to display the Start menu.
ENGLISH

FAQ 187
4Select [Network and Internet] >[Ethernet] >[Change Adapter Options].
ENGLISH
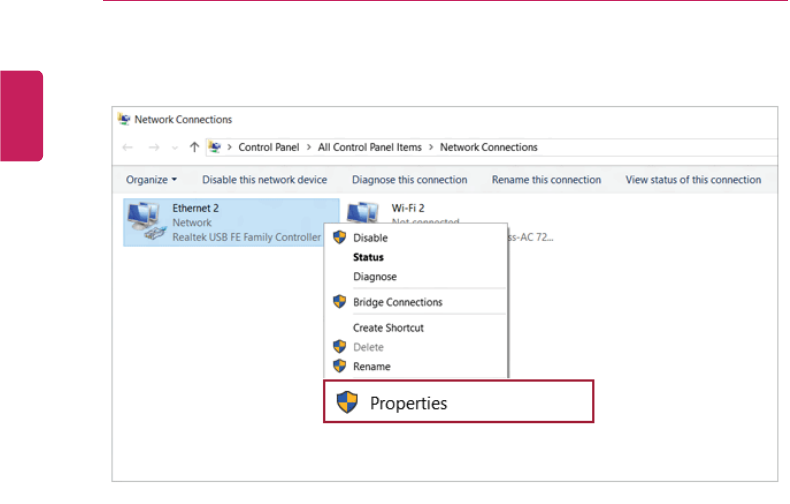
188 FAQ
5Right-click [Ethernet] and select the [Properties] menu.
ENGLISH
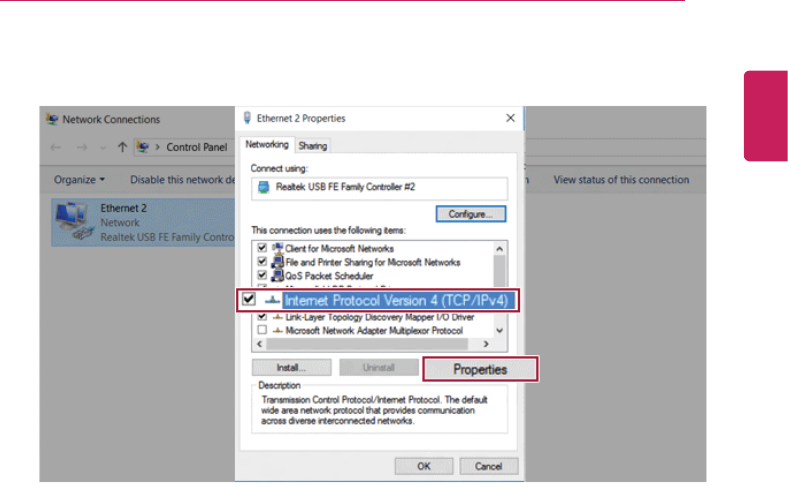
FAQ 189
6Select [Internet Protocol Version 4 (TCP/IPv4)] and press the [Properties] button.
ENGLISH
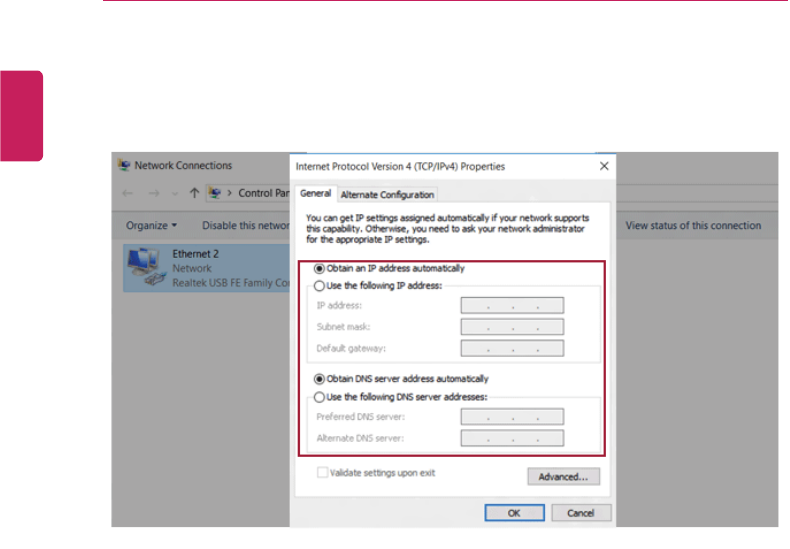
190 FAQ
7To use an automatic IP(DHCP), select [Obtain an IP Address Automatically]. If you
wish to use a static IP, select [Use the following IP address] to enter the address.
Contact the network service provider or administrator to use a static IP.
8Press [OK] to complete the network setup.
9Press Internet Browser to check if the internet is working properly.
ENGLISH
)&&:DUQLQJ
7KLVHTXLSPHQWKDVEHHQWHVWHGDQGIRXQGWRFRPSO\ ZLWKWKHOLPLWVIRU DGLJLWDOGHYLFHSXUVXDQW WRSDUWRI WKH)&&5XOHV7KHVH
OLPLWVDUHGHVLJQHGWRSURYLGHUHDVRQDEOHSURWHFWLRQDJDLQVWKDUPIXOLQWHUIHUHQFHLQDUHVLGHQWLDOLQVWDOODWLRQ
7KLV HTXLSPHQW JHQHUDWHV XVHV DQG FDQ UDGLDWH UDGLR IUHTXHQF\ HQHUJ\ DQG LI QRW LQVWDOOHG DQG XVHG LQ DFFRUGDQFH ZLWK WKH
LQVWUXFWLRQVPD\ FDXVH KDUPIXO LQWHUIHUHQFH WR UDGLR FRPPXQLFDWLRQV +RZHYHU WKHUH LV QR JXDUDQWHH WKDW LQWHUIHUHQFH ZLOO QRW RFFXU
LQDSDUWLFXODULQVWDOODWLRQ,I WKLVHTXLSPHQWGRHV FDXVHKDUPIXOLQWHUIHUHQFHWRUDGLR RUWHOHYLVLRQUHFHSWLRQ ZKLFKFDQEH GHWHUPLQHG
E\WXUQLQJWKHHTXLSPHQWRIIDQGRQWKHXVHULVHQFRXUDJHGWRWU\WRFRUUHFWWKHLQWHUIHUHQFHE\RQHRUPRUHRIWKHIROORZLQJPHDVXUHV
•5HRULHQWRUUHORFDWHWKHUHFHLYLQJDQWHQQD
•,,QFUHDVHWKHVHSDUDWLRQEHWZHHQWKHHTXLSPHQWDQGUHFHLYHU
•&RQQHFWWKHHTXLSPHQWLQWRDQRXWOHWRQDFLUFXLWGLIIHUHQWIURPWKDWWRZKLFKWKHUHFHLYHULVFRQQHFWHG
•&RQVXOWWKHGHDOHURUDQH[SHULHQFHGUDGLR79WHFKQLFLDQIRUKHOS
&DXWLRQ$Q\FKDQJHVRUPRGLILFDWLRQVWRWKLVGHYLFHQRWH[SOLFLWO\DSSURYHGE\PDQXIDFWXUHUFRXOGYRLG\RXUDXWKRULW\WRRSHUDWHWKLV
HTXLSPHQW
7KLVGHYLFHFRPSOLHVZLWKSDUWRIWKH)&&5XOHV2SHUDWLRQLVVXEMHFWWRWKHIROORZLQJWZRFRQGLWLRQV
7KLVGHYLFHPD\QRWFDXVHKDUPIXOLQWHUIHUHQFHDQGWKLVGHYLFHPXVWDFFHSWDQ\LQWHUIHUHQFHUHFHLYHGLQFOXGLQJLQWHUIHUHQFHWKDW
PD\FDXVHXQGHVLUHGRSHUDWLRQ
7KLVHTXLSPHQWFRPSOLHVZLWK)&&UDGLDWLRQH[SRVXUHOLPLWV
7KLVWUDQVPLWWHUPXVWQRWEHFROORFDWHGRURSHUDWLQJLQFRQMXQFWLRQZLWKDQ\RWKHUDQWHQQDRUWUDQVPLWWHUXQOHVVDXWKRUL]HGWRGRVRE\WKH
)&&
,&:DUQLQJ
³7KLVGHYLFHFRPSOLHVZLWK,QGXVWU\&DQDGDOLFHQFHH[HPSW566VWDQGDUGV´
2SHUDWLRQLVVXEMHFWWRWKHIROORZLQJFRQGLWLRQVWKLVGHYLFHPD\QRWFDXVHLQWHUIHUHQFHDQGWKLVGHYLFHPXVWDFFHSWDQ\
LQWHUIHUHQFHLQFOXGLQJLQWHUIHUHQFHWKDWPD\FDXVHXQGHVLUHGRSHUDWLRQRIWKHGHYLFH
/HSUpVHQWDSSDUHLOHVWFRQIRUPHDX[&15G¶,QGXVWULH&DQDGDDSSOLFDEOHVDX[DSSDUHLOVUDGLRH[HPSWVGHOLFHQFH/¶H[SORLWDWLRQHVW
DXWRULVpHDX[GHX[FRQGLWLRQVVXLYDQWHVO¶DSSDUHLOQHGRLWSDVSURYRTXHUGHEURXLOODJHHWO¶DSSDUHLOGRLWDFFHSWHUWRXWEURXLOODJH
UDGLRpOHFWULTXHVXELPrPHVLOHEURXLOODJHHVWVXVFHSWLEOHG¶HQFRPSURPHWWUHOHIRQFWLRQQHPHQW
K_UM_G4.0[EN]AVN PART 10.indd 10-18 2014-10-02 오후 1:22:59
•7KLVHTXLSPHQWFRPSOLHVZLWK)&&UDGLDWLRQH[SRVXUHOLPLWV
•&HWpTXLSHPHQWHVWFRQIRUPHDX[OLPLWHVGH[SRVLWLRQDX[UDGLDWLRQVGHOD)&&
•7KLVGHYLFHLVUHVWULFWHGWRLQGRRUXVHRQO\ZLWKLQWKHa*+]%DQG