LG Electronics USA NT-LGX14A NOTEBOOK COMPUTER User Manual Golf X140 Win7 UG ENG 100209
LG Electronics USA NOTEBOOK COMPUTER Golf X140 Win7 UG ENG 100209
Contents
- 1. Users Manual 1
- 2. Users Manual 2
- 3. Users Manual 3
Users Manual 3
86
System Setup
6-4. Restore the Default Settings
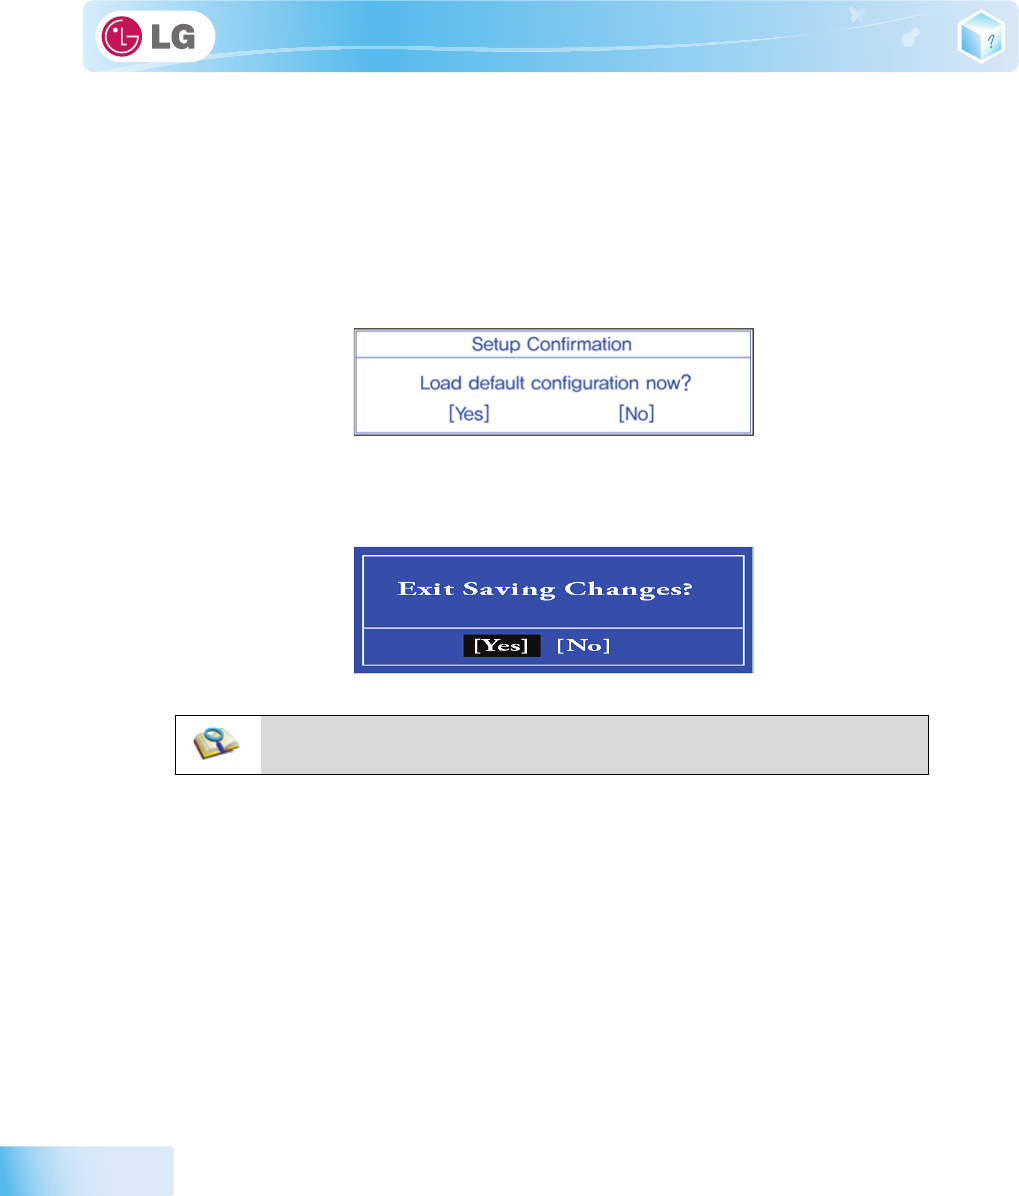
If you have changed the system setup by mistake, you can restore the default settings.
1. After opening the system setup screen, use the arrow keys to move to
Exit
.
2. Use the arrow keys to select
Load Optimal Defaults
, and press [Enter].
3. When the following message appears, select
[Yes]
and press
[Enter]
. The settings will be reset to
their original defaults.
4. To save the changes in system setup, press
[F10]
.
5. When the following message appears, select
[Yes]
and press
[Enter]
. The notebook PC will restart.
■ You may also press [F9] to use Load Setup Defaults.

Chapter7.Using LG Smart Recovery
88
Using LG Smart Recovery
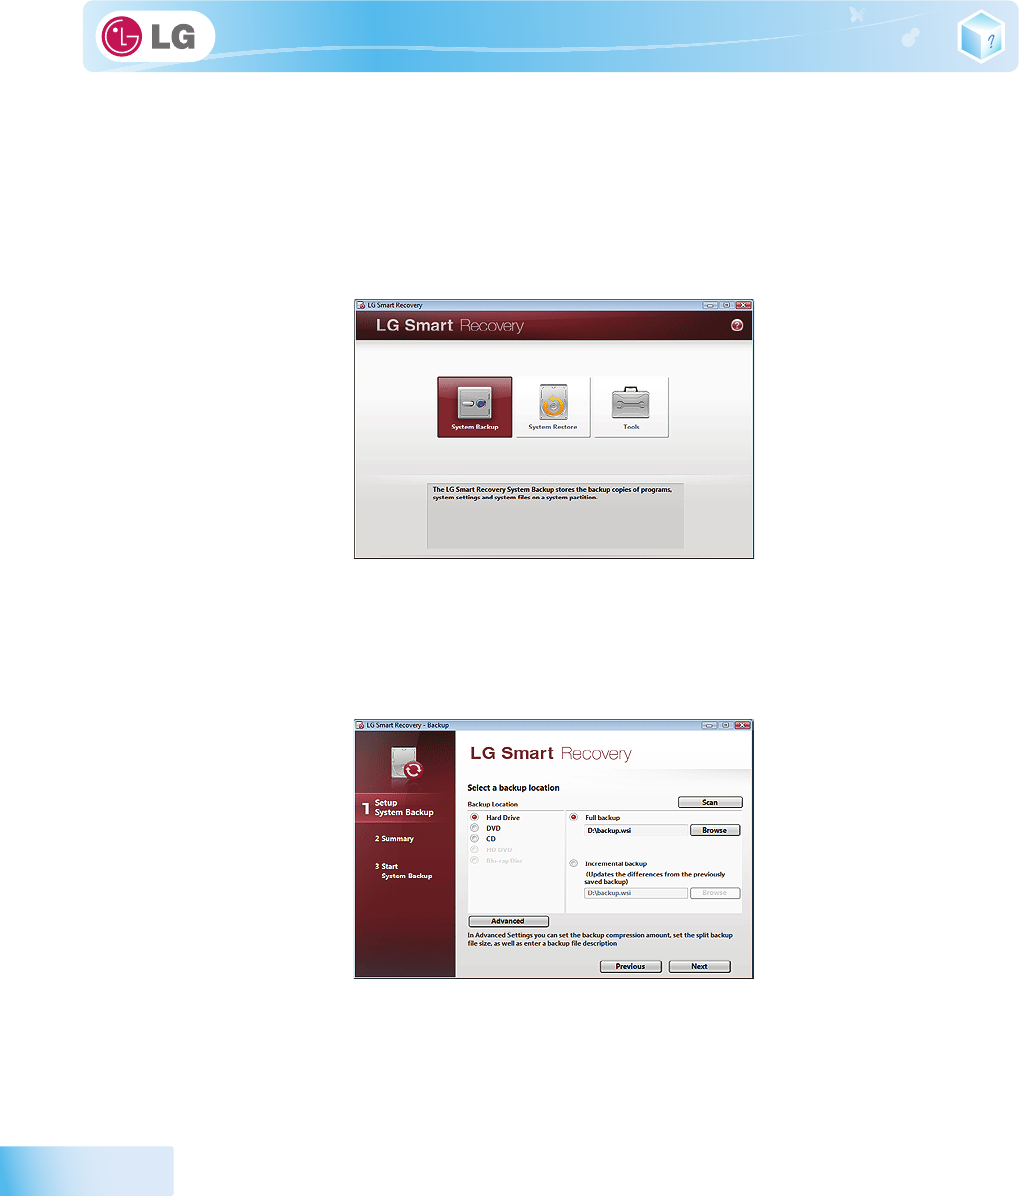
7-1. LG Smart Recovery System Backup
LG Smart Recovery
helps you safely install and recover
Windows
7.
※ The figures herein may differ by language selection and be subject to change without prior notice.
1. Double-click the
LG Smart Recovery
icon to run
LG Smart Recovery
.
2. Click the
System Backup
icon.
3. When the following screen appears, select the location to back up.
※ If you choose one among
DVD, CD, HD DVD, Blu-ray Disc
, a Media Disc for the restoration purpose will be
generated, and you can restore system only by rebooting it with the Media Disc.
※ The backup locations may vary depending on product specifications.
4. Choose Full Backup or Incremental Backup and click
Browse
button.
※ You can select Incremental Backup only when you have previously run Full Backup and the system has

Using LG Smart Recovery
89
complete backup data.
5. Specify the location to save the backup file, type file name and click
Save
button.
※ If you have selected Incremental Backup, choose the existing Full backup data and click Open.
6. Once you complete the process to set the Full Backup location, click
Next
.
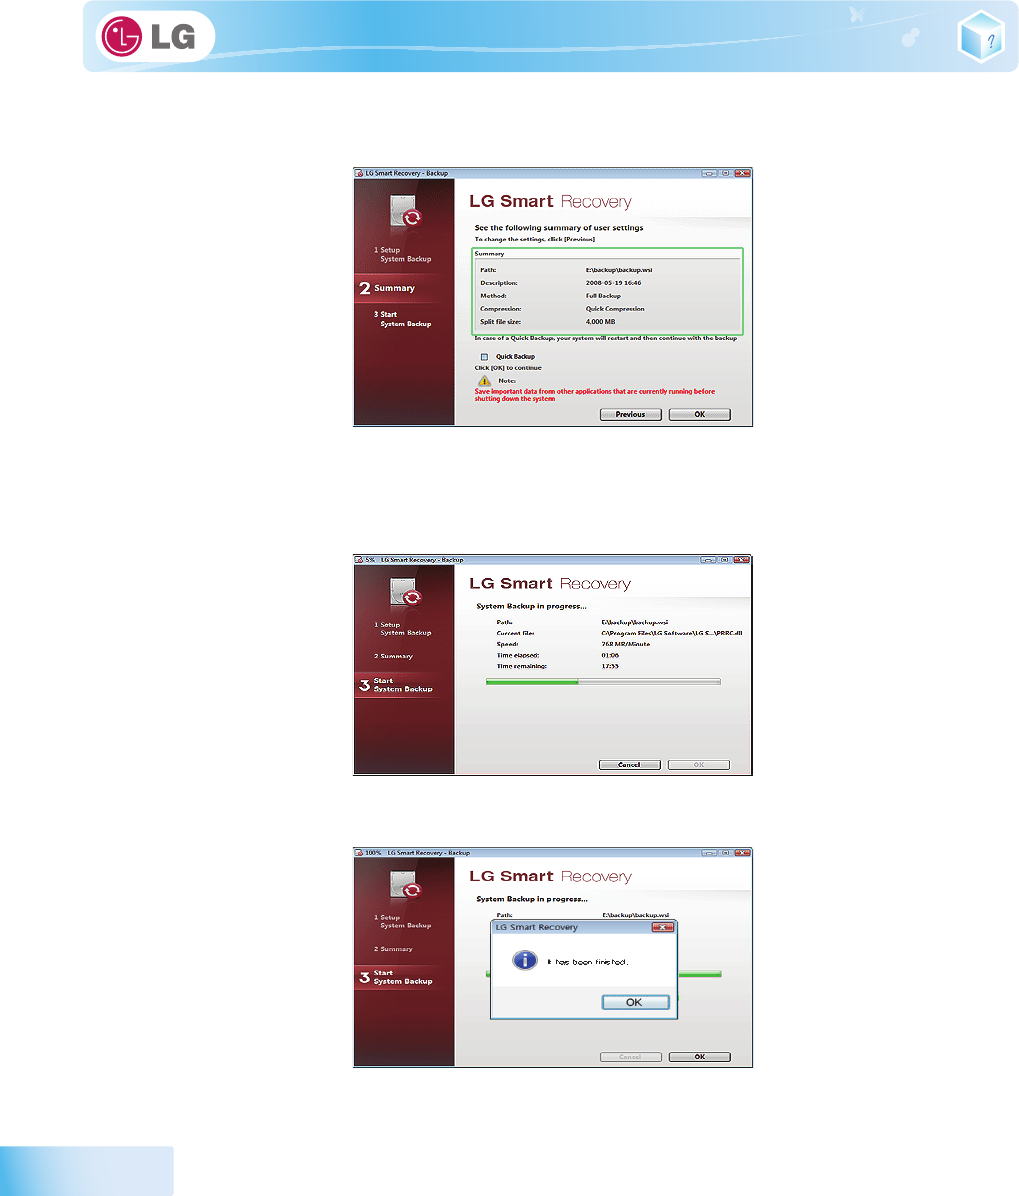
7. Check the system backup preferences you have selected and click
OK
button.
90
Using LG Smart Recovery
※ Quick Backup reduces time required to backup the system.
8. The screen showing the progress of system backup appears.
※ Depending on product specifications and backup file size, the system may need longer time to load the file. Do
not turn off the power forcibly or reboots the system while it is loading the file.
9. After the system backup is complete, click
OK
to finish the process.
Using LG Smart Recovery
91
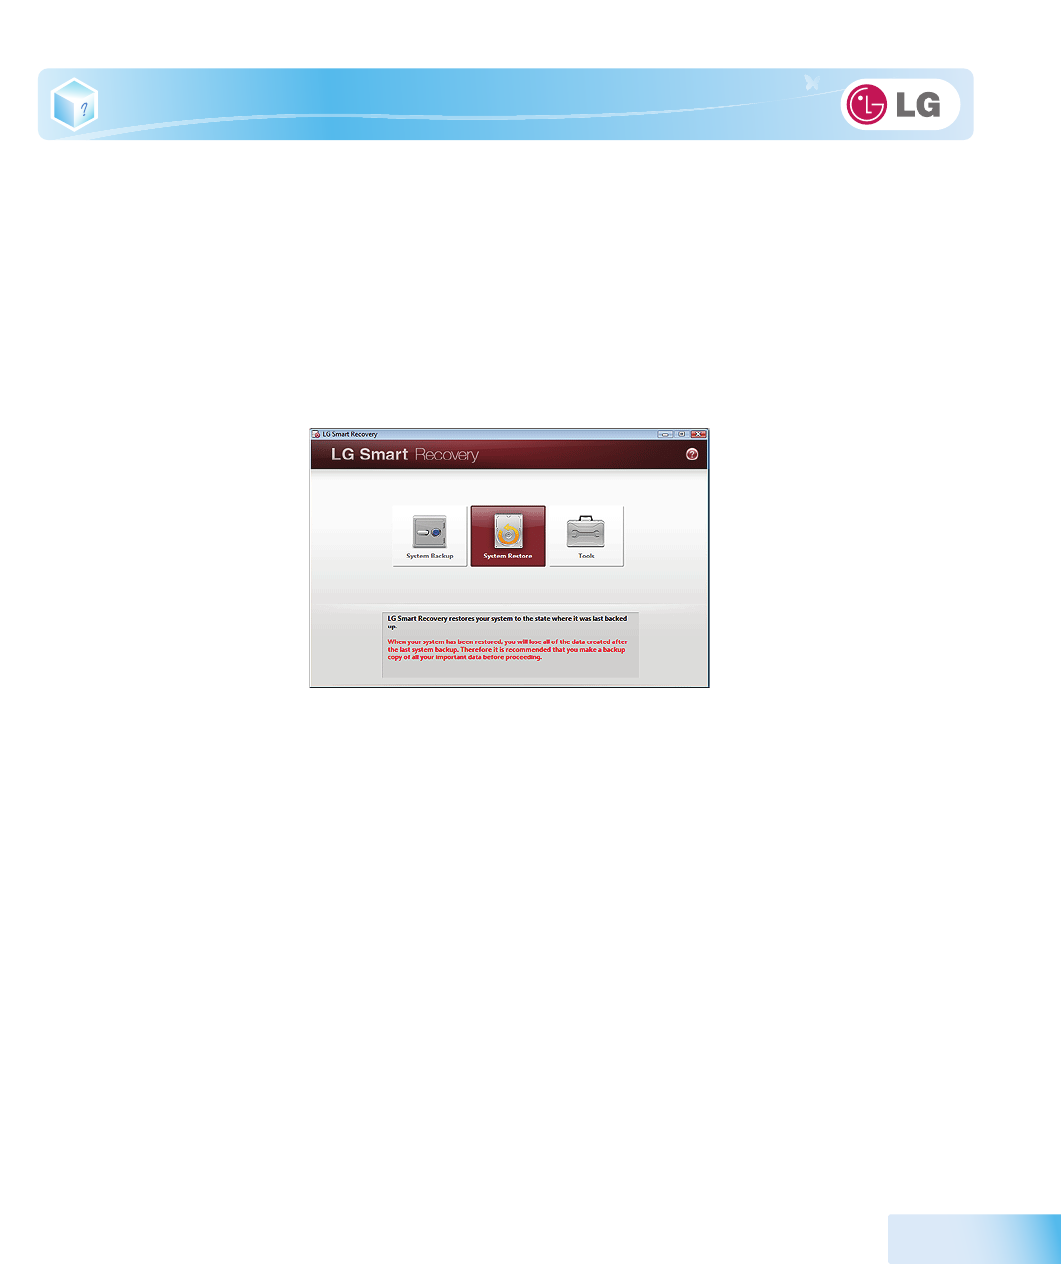
7-2. LG Smart Recovery System Restoration
You can restore the system by using the
LG Smart Recovery
backup data.
※ The figures and instructions herein are subject to change without prior notice.
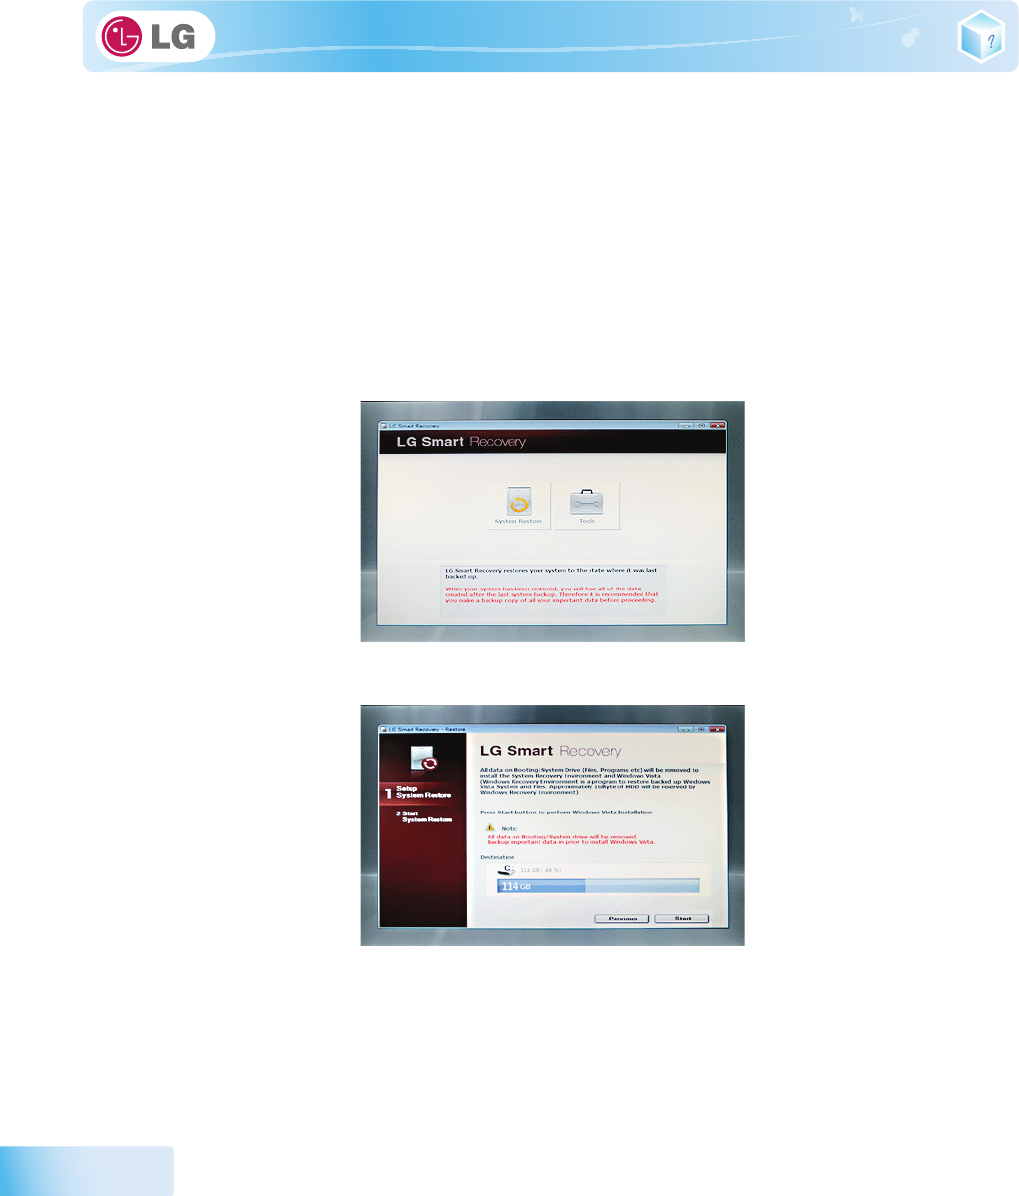
1. Double-click the
LG Smart Recovery
icon to run
LG Smart Recovery
.
※ When
Windows
7 does not operate normally, restart the computer. When "
PRESS F11 TO RUN LG RECOVERY..
"
appears on the screen during the booting process, press
F11
to start
LG Smart Recovery
.
※ Backup important data by using Tools menu before starting the System Restore process.
2. Click the
System Restoration
button.
92
Using LG Smart Recovery
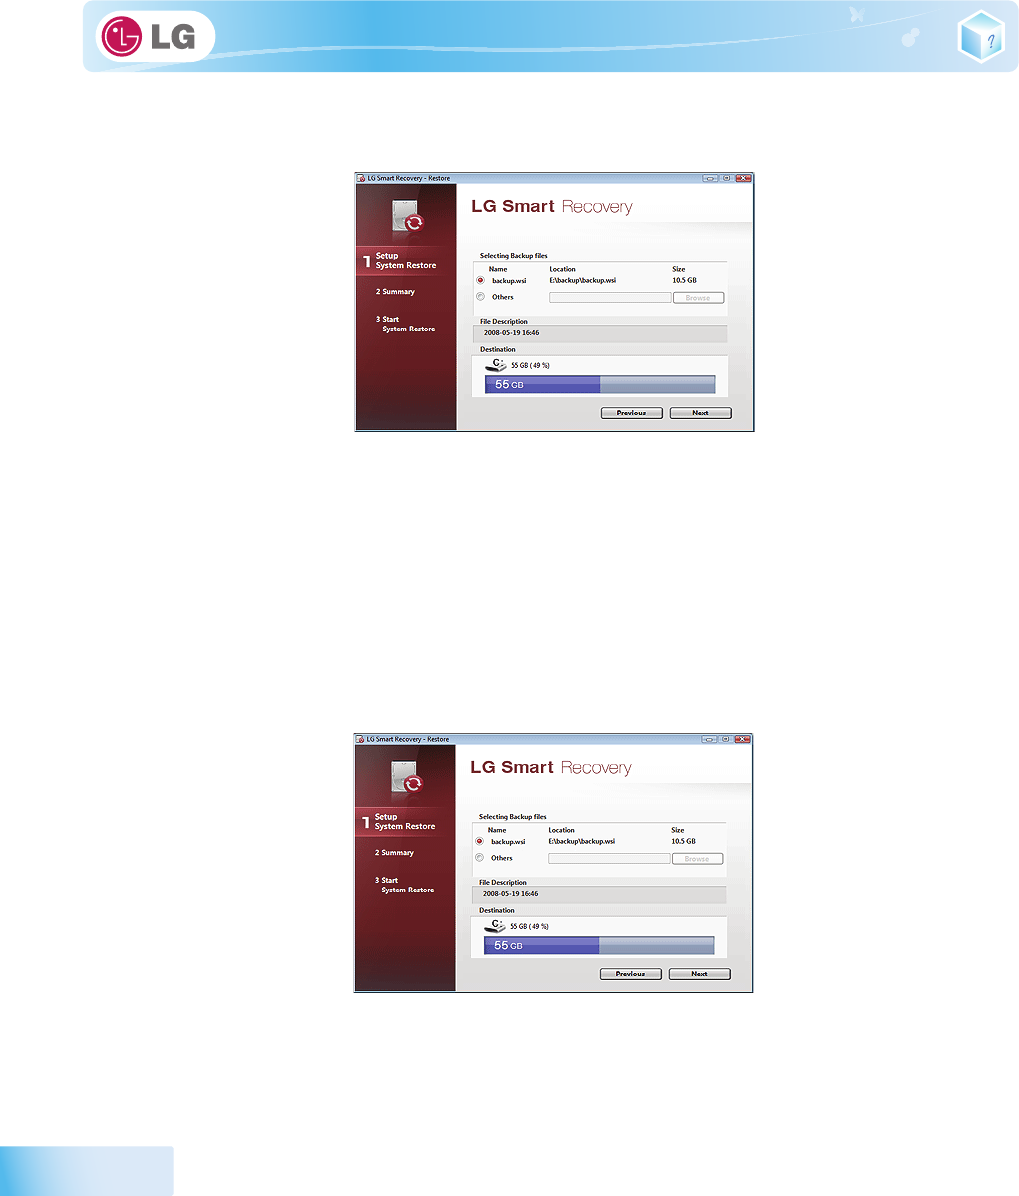
3. The System Restore Settings screen will appear.
4. Click the Protected Hard Disk Area or
Browse
to select a file you want to back up and click
Next
.
※ The Protected Hard Disk Area option will be presented only if you have selected the
Safe Backup
when you run
the
LG Smart Recovery
for the first time.
※ If you select the Protected Hard Disk Area, the system will be restored to the initial status when you have
bought it.
Using LG Smart Recovery
93
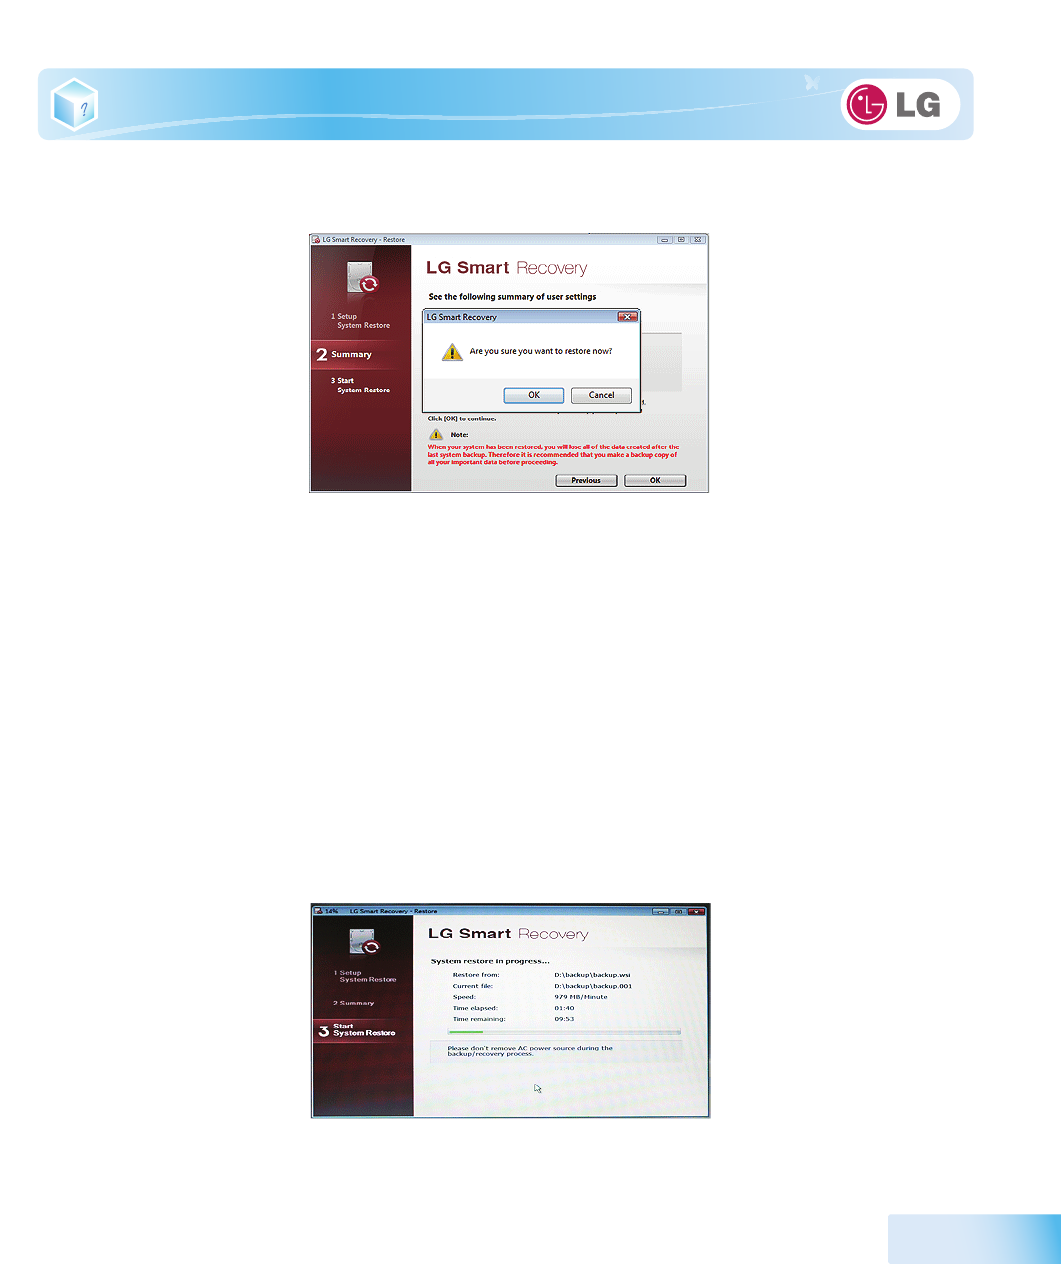
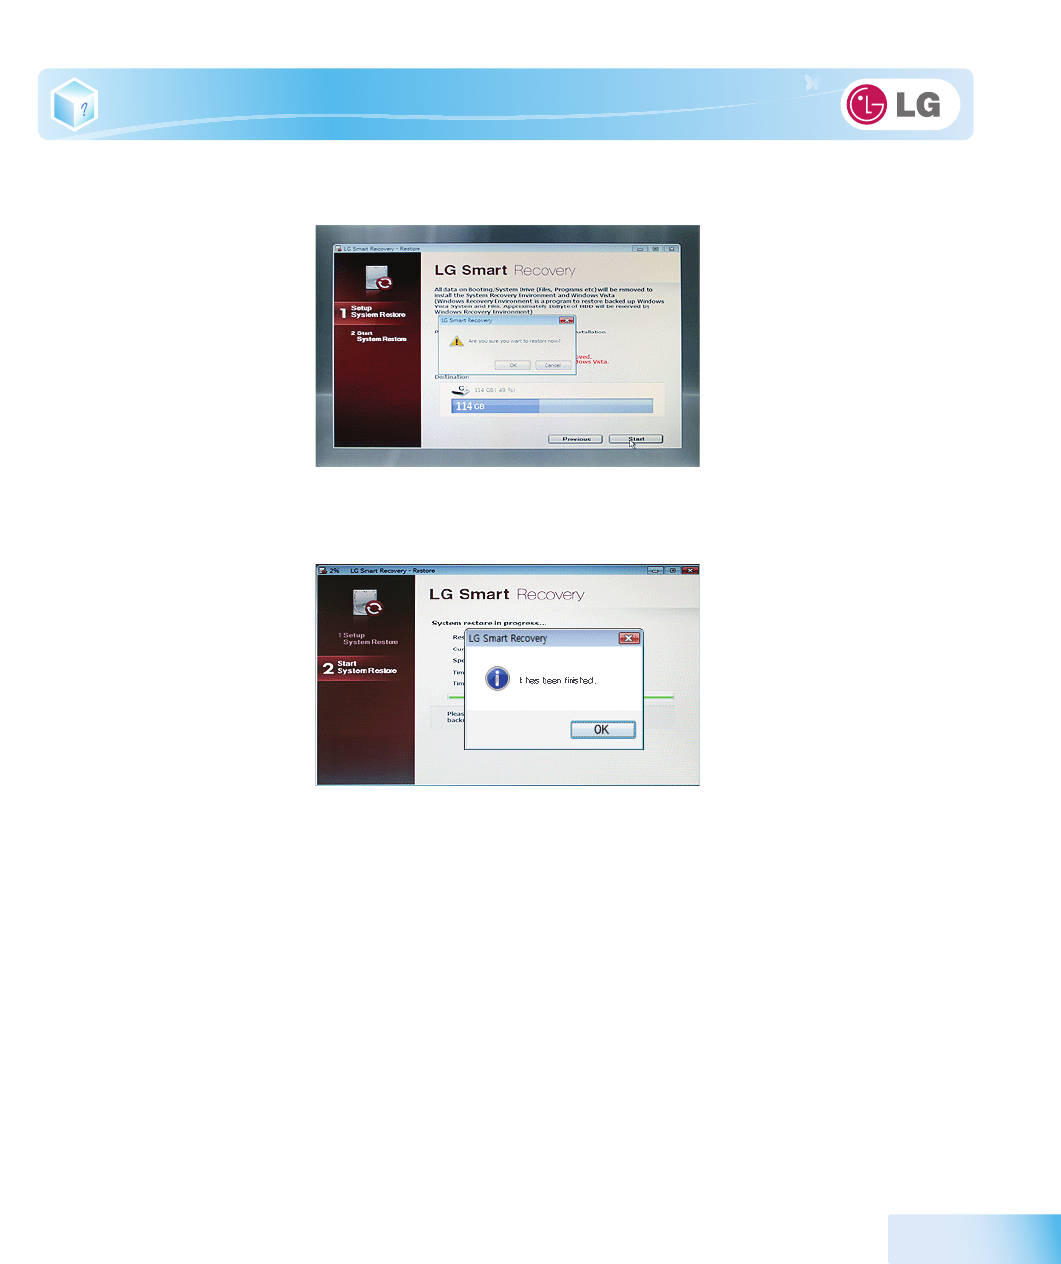
5. Confirm the restoration settings and click
OK
. The Restoration In Process message will appear.
6. Click
OK
. The system will automatically restart in 1 minute and show the System Backup In Process
screen.
※ Depending on product specifications and backup file size, the system may need longer time to load the file. Do
not turn off the power forcibly or reboots the system while it is loading the file.
94
Using LG Smart Recovery
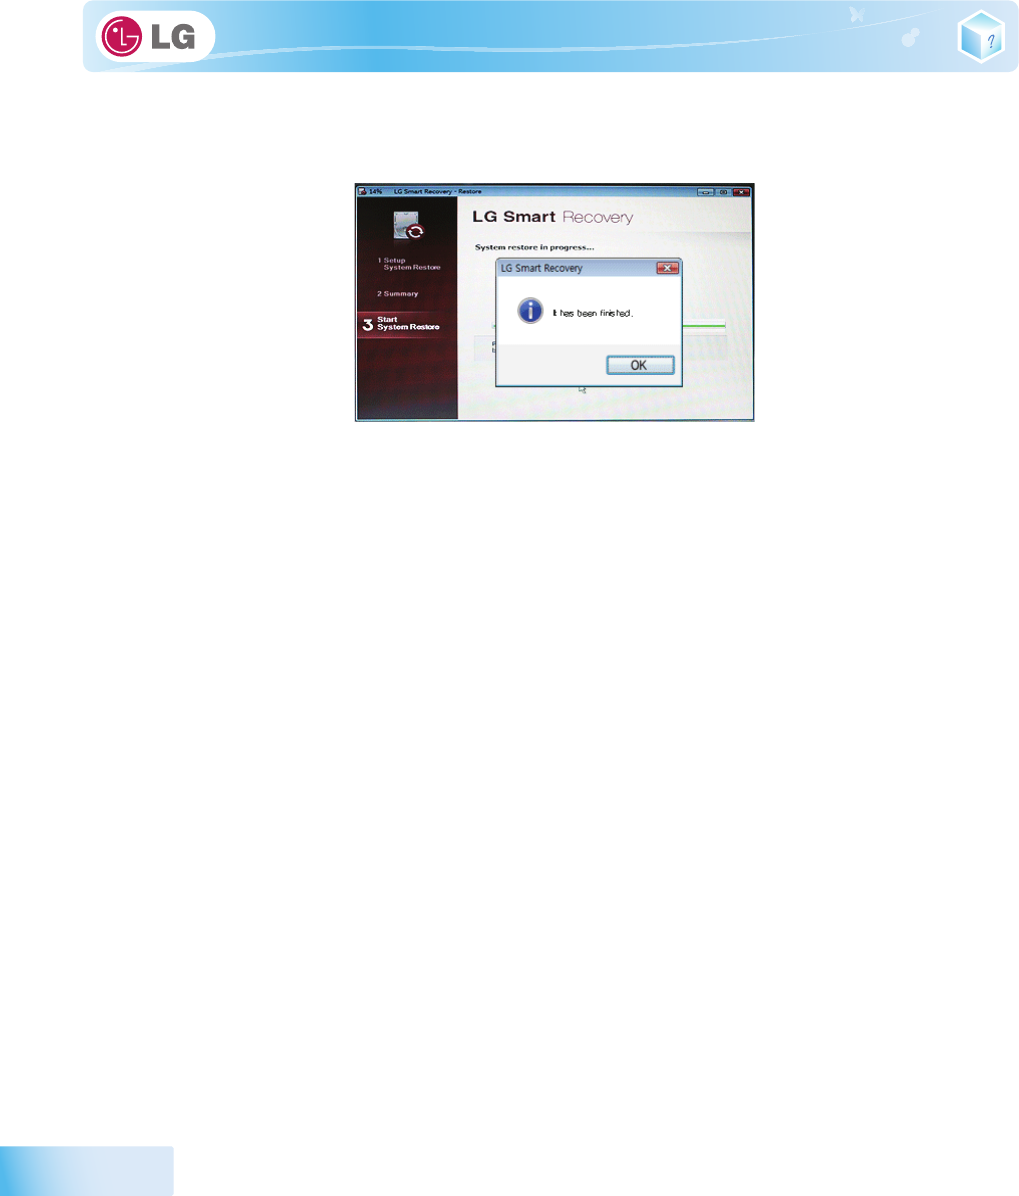
7. Once the system restoration process completes, click
OK
and the system will automatically restart in
10 seconds.
Using LG Smart Recovery
95
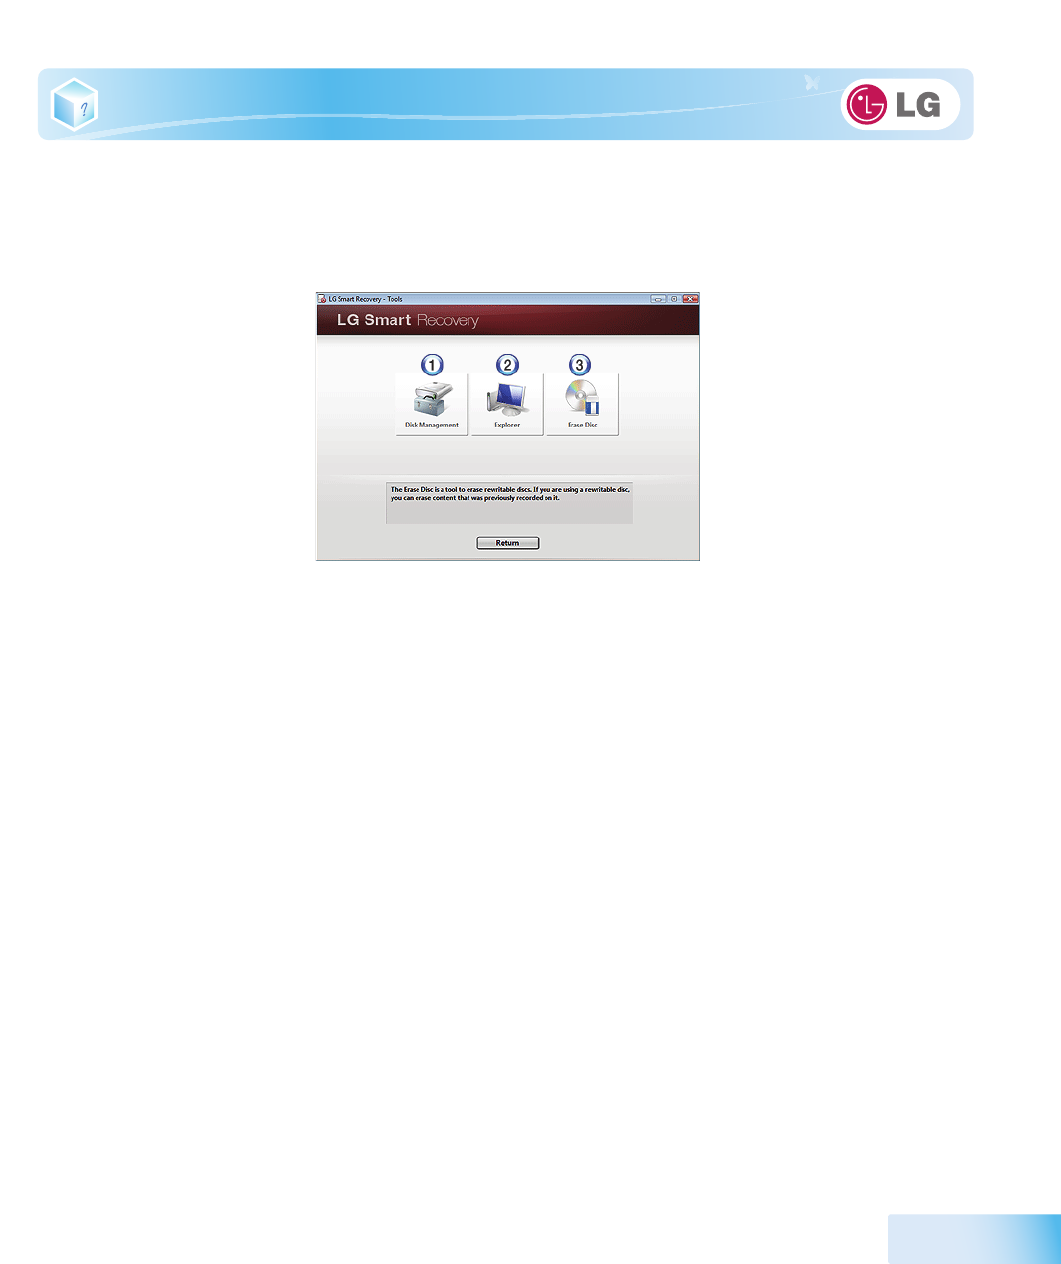
7-3. LG Smart Recovery Tools Menu
LG Smart Recovery
Tools menu provide useful tools to back up and restore the system efficiently.
※ The figures and instructions herein are subject to change without prior notice.
1.
Disk Management
: By using the Disk Management tool, you can perform disk-related tasks
including creating partition and volume, formatting, and assigning drive letter.
2.
Explorer
: This tool shows drive disks and other hardware connected to the computer.
※ By using the Explorer, you can back up user data before proceeding the system restore.
3.
Delete Disk
: You can delete rewritable disks.

96
Using LG Smart Recovery

Chapter8.Using LG Smart Recovery Center
98
Using LG Smart Recovery Center
8-1. LG Smart Recovery Center
※
LG Smart Recovery Center
DVD
may not be available depending on the model.
When
LG Smart Recovery
fails to restore the system, you can reinstall
Windows
7 by using the
LG
Smart Recovery Center
.
1. Insert the
LG Smart Recovery Center
DVD
into the
DVD-ROM
and restart the system.
※ If the
LG Smart Recovery Center
DVD
fails to boot the system, restart the computer and press
F2
to start the
BIOS SETUP
and change the Booting Order option.
2. When the booting completes, the System Restore screen will appear.
3. Click the
System Restoration
button.
※ Backup important data by using Tools menu before starting the System Restoration process.
4. Click
Start
button.
Using LG Smart Recovery Center
99
5. When prompted to confirm to start the System Restoration, click OK.
6. When it completes the restoration process, the system will present the Completed the Restoration
message.
7. Click
OK
to restart the system automatically after 10 seconds.
※ Remove the
LG Smart Recovery Center
DVD
from the
DVD-ROM
once the System Restoration process completes.

100
Using LG Smart Recovery Center

Chapter9.Reinstalling the Driver
102
Reinstalling the Driver
9-1. Reinstalling the Driver
※ The figures herein may differ by language selection and be subject to change without prior notice.
▶ Reinstalling the Driver Using
LG Intelligent Update
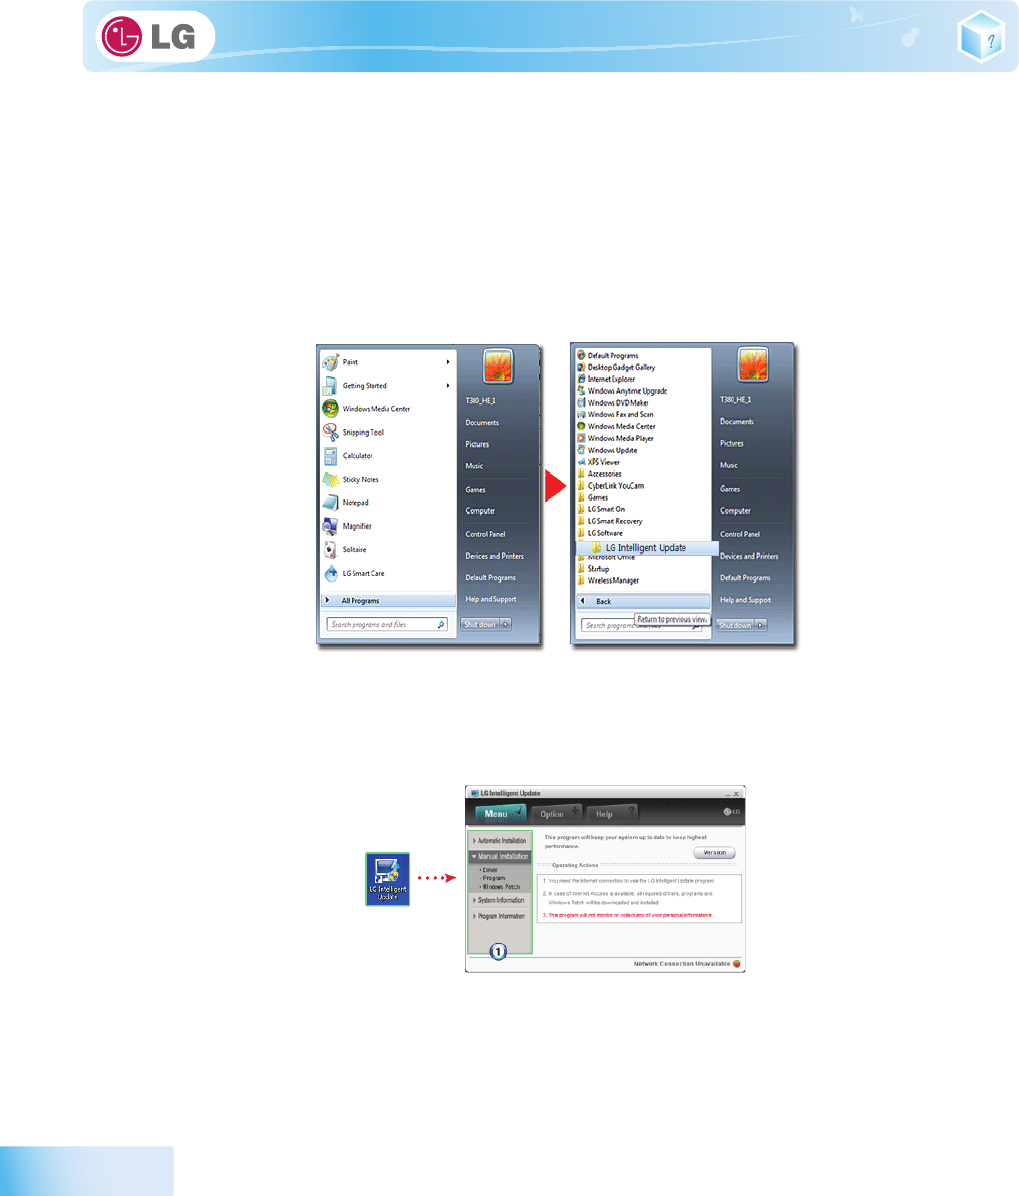
1. Select
Start
>
All Programs
>
LG Software
>
LG Intelligent Update
to continue.
※ You can also double-click the
LG Intelligent Update
icon to run the program.
2. Select
[Automatic Installation]
or
[Manual Installation]
to reinstall the driver.
※ For more details, refer to Help.
1. Now, you can install drivers and applications needed for the system.
Reinstalling the Driver
103
▶ Installing
LG Intelligent Update
※
LG Intelligent Update
comes preinstalled in your system. You can also download the application from the
Internet.
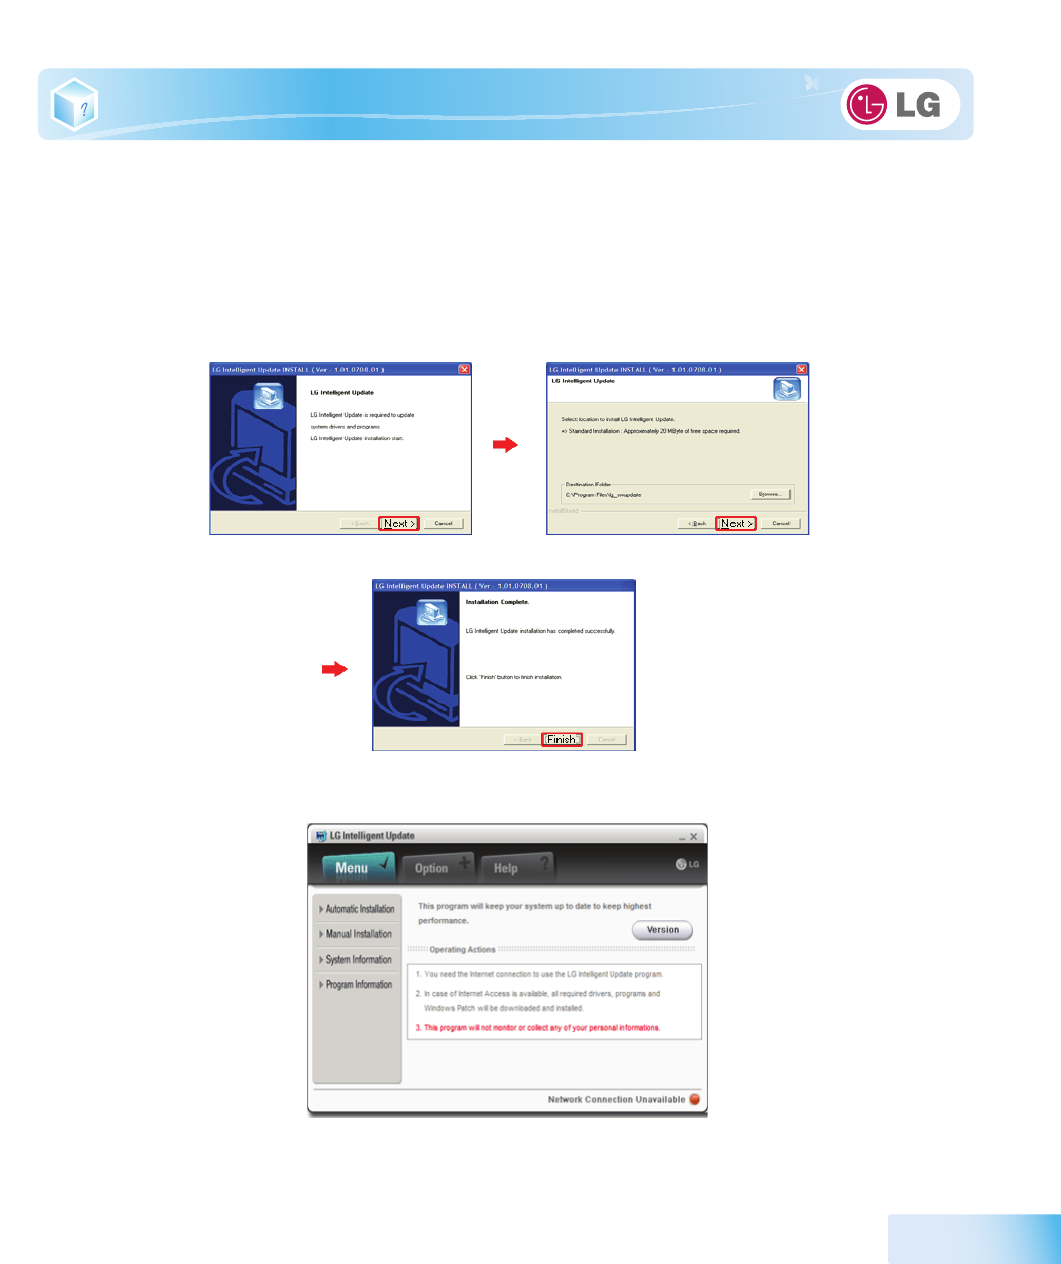
1. Go to "www.lge.com", download
LG Intelligent Update
and install the program.
2. When the installation screen appears, click
Next
>
Next
>
Finish
or press
Enter
to install the
program.
3.
LG Intelligent Update
screen appears.

104
Reinstalling the Driver

Chapter10.Using the Internet
106
Using the Internet
10-1. Using the Internet
There are various methods to access the Internet. Choose the most desirable method for user
environments and system specifications.
※ Items displayed during the process may differ by model type and spec.
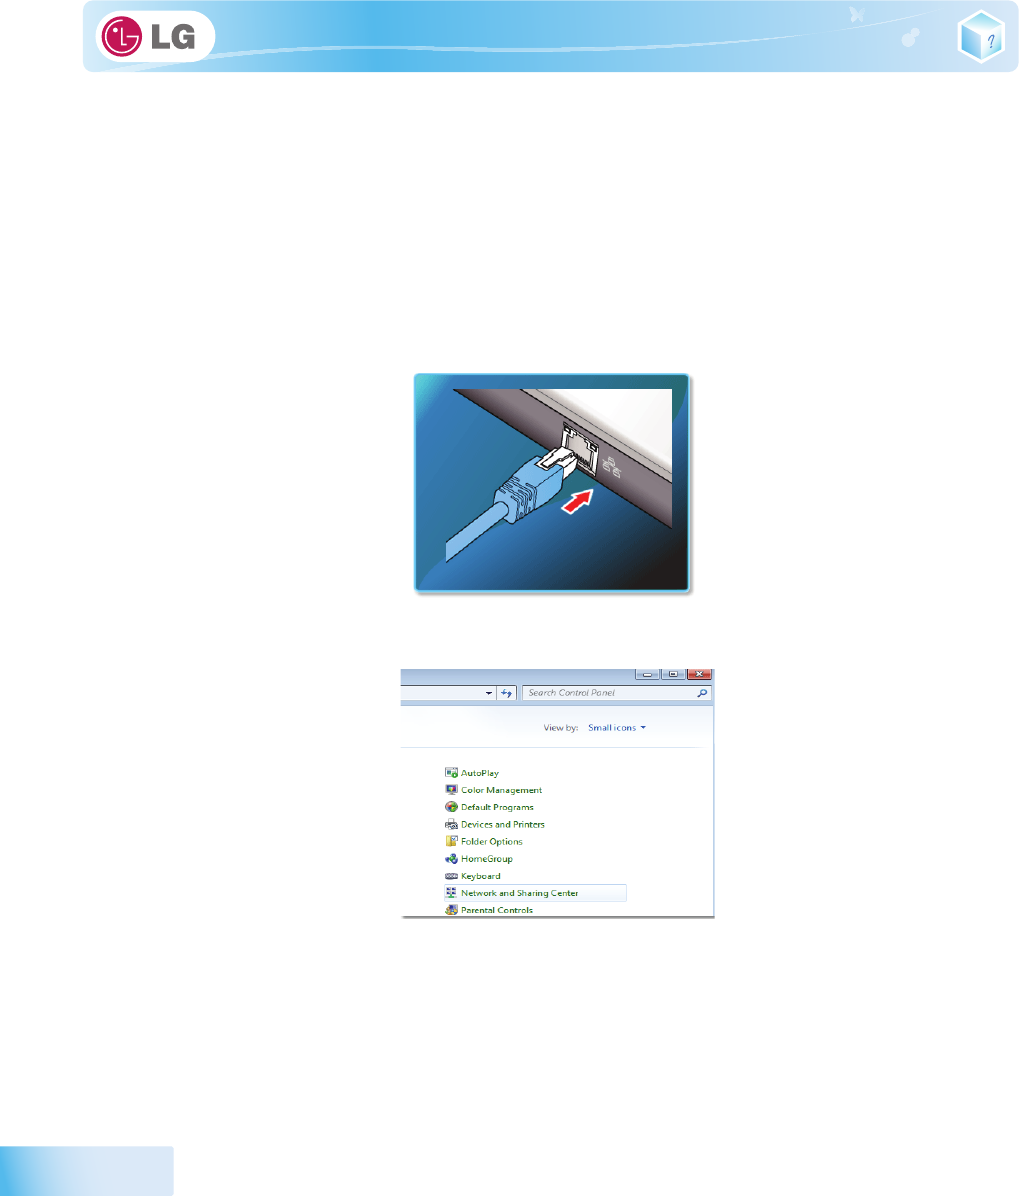
▶Using LAN
LAN refers to high speed network environments linking companies and households.
1. Connect LAN cable to the LAN port.
2. Select
Start
>
Control Panel
>
View by
>
Small icons
>
Network and Sharing Center
.
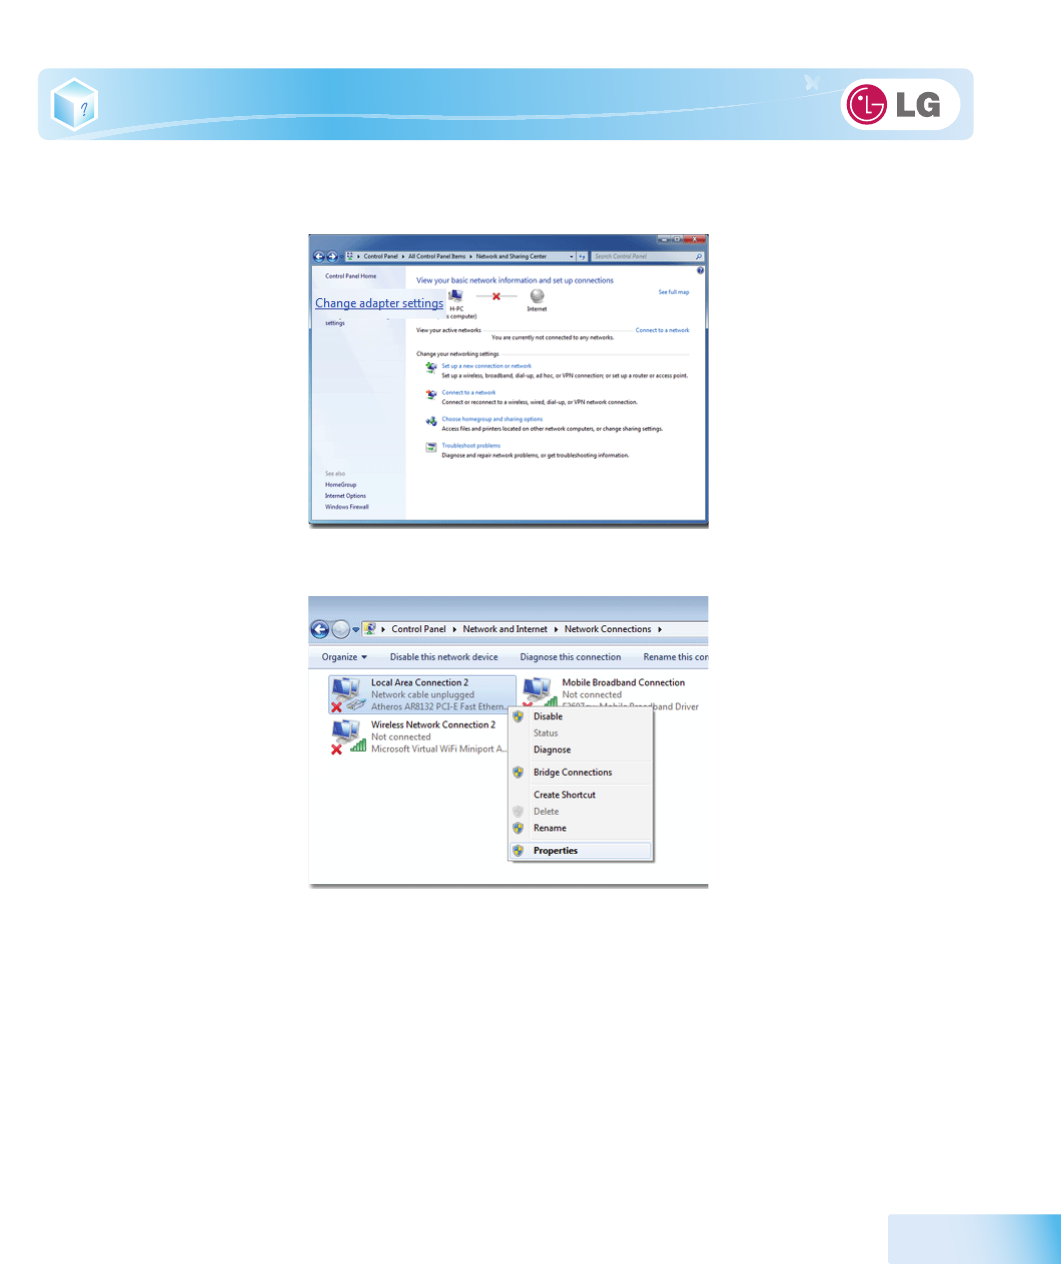
Using the Internet
107
3. Click
Change Adapter Settings
.
4. Right-click
Local Area Connections
and select
Properties
.
108
Using the Internet
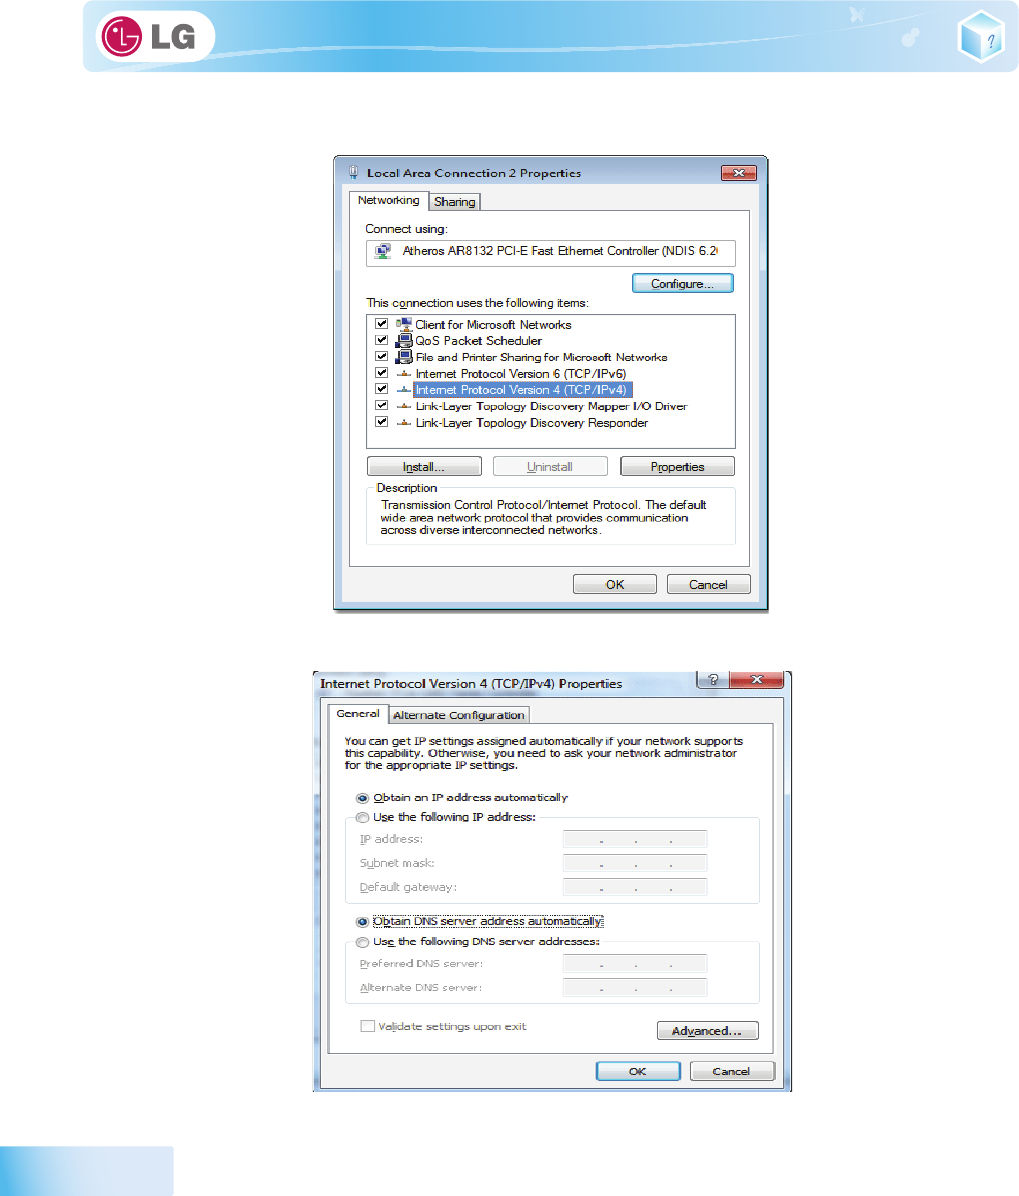
5. Select
Internet Protocol Version 4 (TCP/IPv4)
and click
Properties
.
6. On the
General
tab, select
Obtain an IP address automatically
.

Using the Internet
109
7. Click the
OK
button when the Internet Protocol (
TCP/IP
) properties are set.
▶ Using Wireless LAN
※ The Wireless LAN card is optional, and so it may not be installed in some models.
Wireless LAN supports multi-terminal networking at home and office.
Wireless network offers general network features (e.g. sharing files, folders, and a printer) and
allows a computer without the Internet connection in a small network to access the Internet through
another terminal.
※ By default, this computer is set for wireless network on the
Windows
.
▶ Setting Wireless LAN Environment
1. Click the button to display the available wireless network list.
※ When the wireless network list is not displayed, check if the wireless network device is turned on. Then click
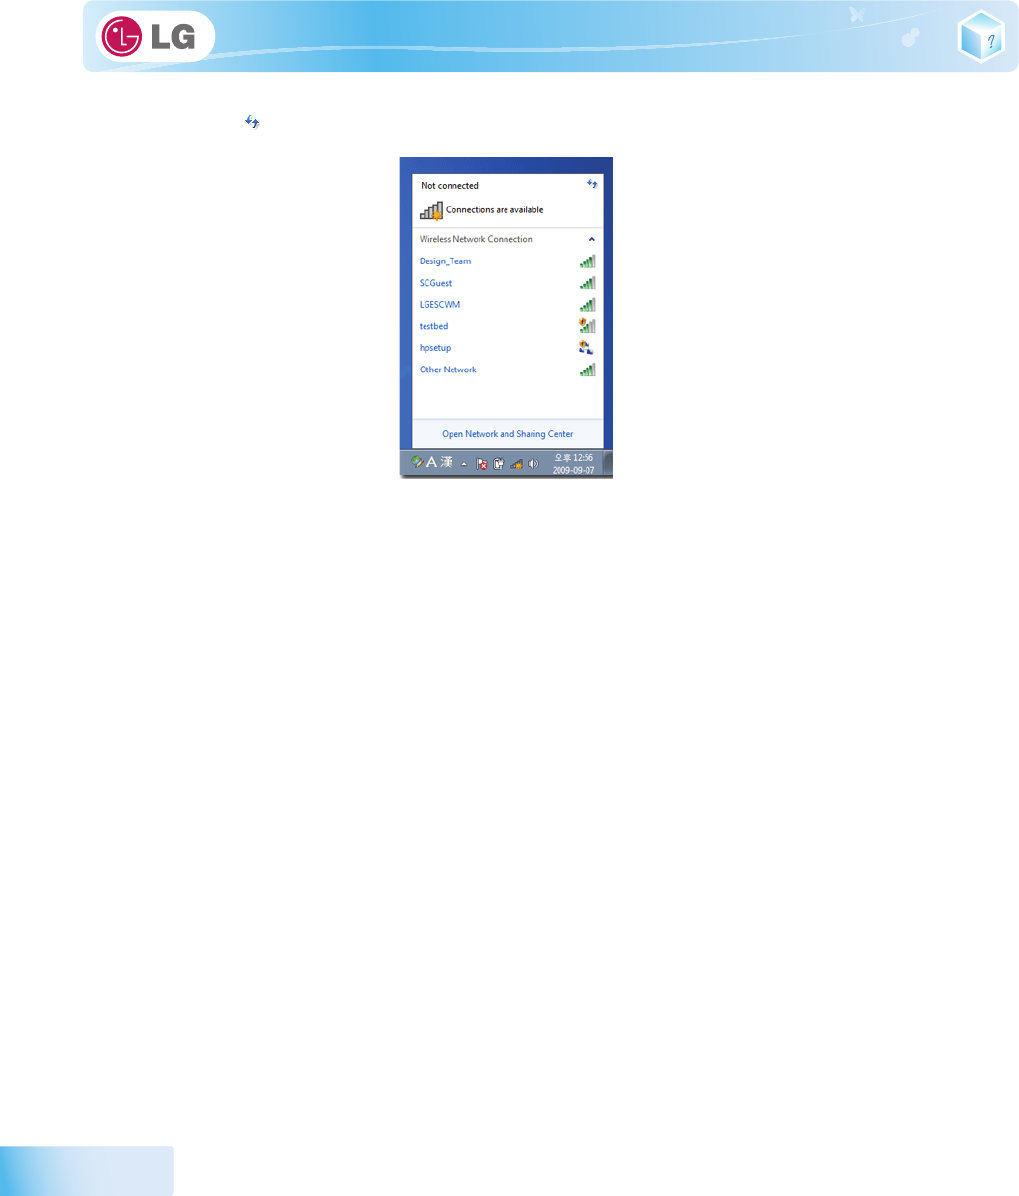
110
Using the Internet
the button to search for the wireless network again.
2. Select the
Access Point
(wireless network) you want to use and click
[Connect]
to connect to the
Access Point
.
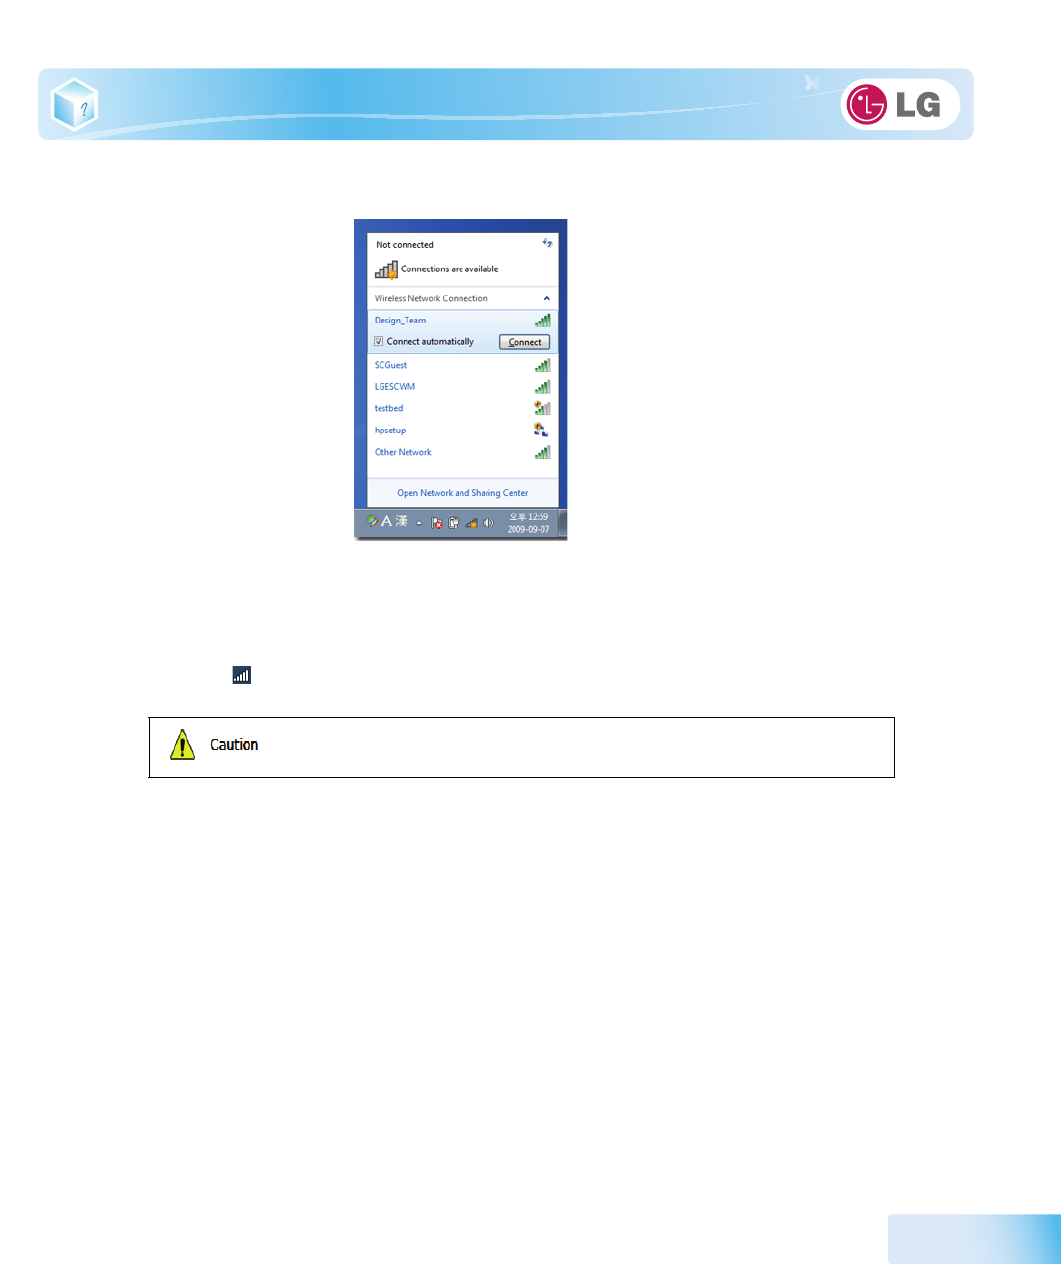
Using the Internet
111
※ If a password is set for the wireless network, the Enter Password window appears.
3. Click the button to see if the
Access Point
is connected to the network.
■ Ensure the network is secured to share the computer and be careful not to share
confidential data.

112
Using the Internet

Chapter11.Secondary Storage Device and Mem-

114
Secondary Storage Device and Memory
ory
Secondary Storage Device and Memory
115
11-1. Using the Memory Card
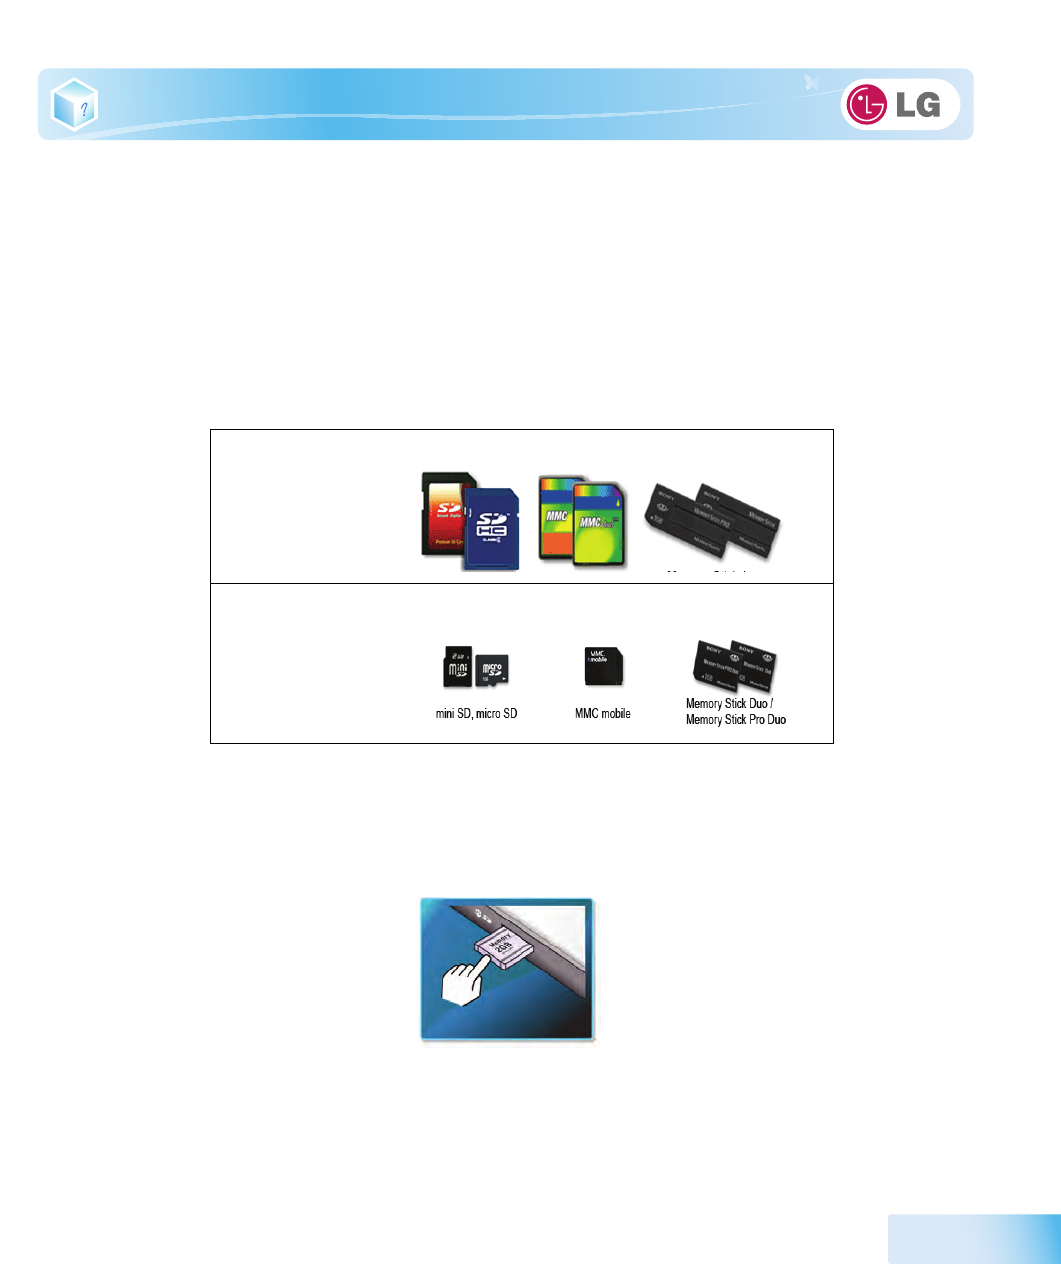
▶ Checking Available Memory Card
※ This model supports SD, MMC, Memory Stick, and Memory Stick Pro.
SD
,
MMC
,
Memory Stick
,
Memory Stick Pro
cards are mobile storage devices like a floppy disk, widely
used in many digital products these days.
To use
Memory Stick Duo
,
Memory Stick Pro Duo
,
mini SD
,
micro SD
and
MMC mobile
cards, mount
it on the dedicated adapter and insert the adapter into the multi-card slot.
(The available memory type and capacity may differ by the computer model type.)
※ Check availability before buying a memory card.
▶ Mounting and Using Memory Card
Insert the card into the multi-card slot to the fullest in the right direction.
Directly applicable
memory cards
Memory cards
applicable indirectly
through dedicated
adapter
116
Secondary Storage Device and Memory
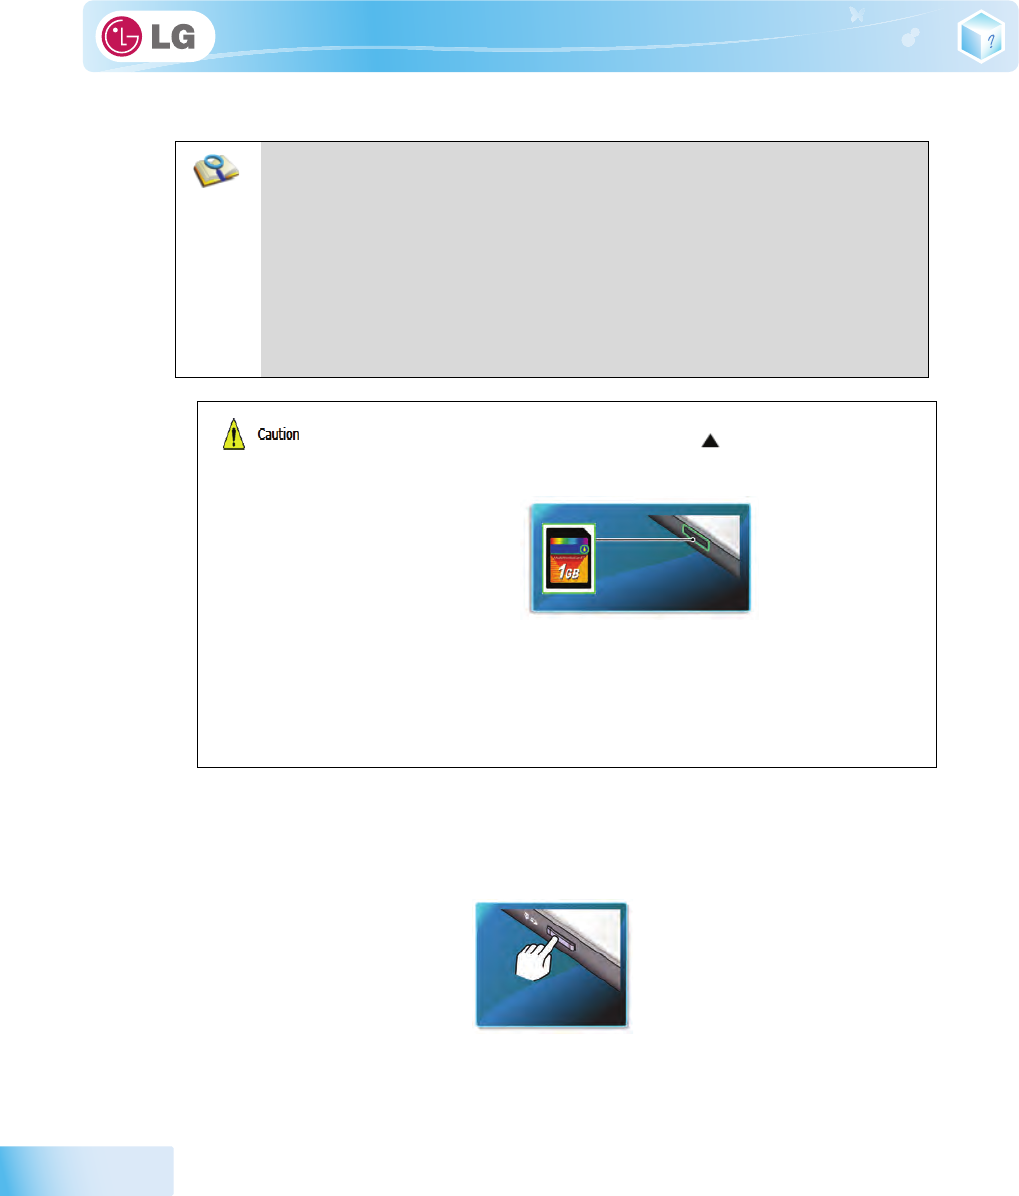
▶ Removing memory card
Push the card as depicted in the following picture to make the card spring out of the slot. Pull the
card out in the direction of the arrow.
■ When the memory card is formatted, the data stored in the memory card will be
deleted. Check whether there are important data before formatting the memory stick.
■ To format a memory card, right-click the memory card drive and select Format.
When Format window appears, click Start to continue.
■ The format feature may not be available on those Windows whose version is lower
than Windows Vista. Format the card on other digital devices or format it after
installing Memory Stick Formatter.
■ If the writing prevention tab of memory card is locked, the user cannot format the
memory stick nor write or delete the data.
■SD, MMC memory cards can be used only as storage devices and do not support
the copyright protection function.
When using an MMC card:
■Place the
MMC
card with the arrow facing upward ( ), and insert it into the slot. Forcing
the
MMC
card into the slot may cause an impairment.
■ Some memory products manufactured by
Transcend
are made of metal and may cause
a short circuit when contacting with the connection port in the multi-card slot. Avoid using
metallic-surfaced memory products. They could offset the system performance.
When using a memory card through dedicated adapter:
■ Use the dedicated adapter. Otherwise a short-circuit may occur, causing damage to the
computer and the memory card.
Secondary Storage Device and Memory
117
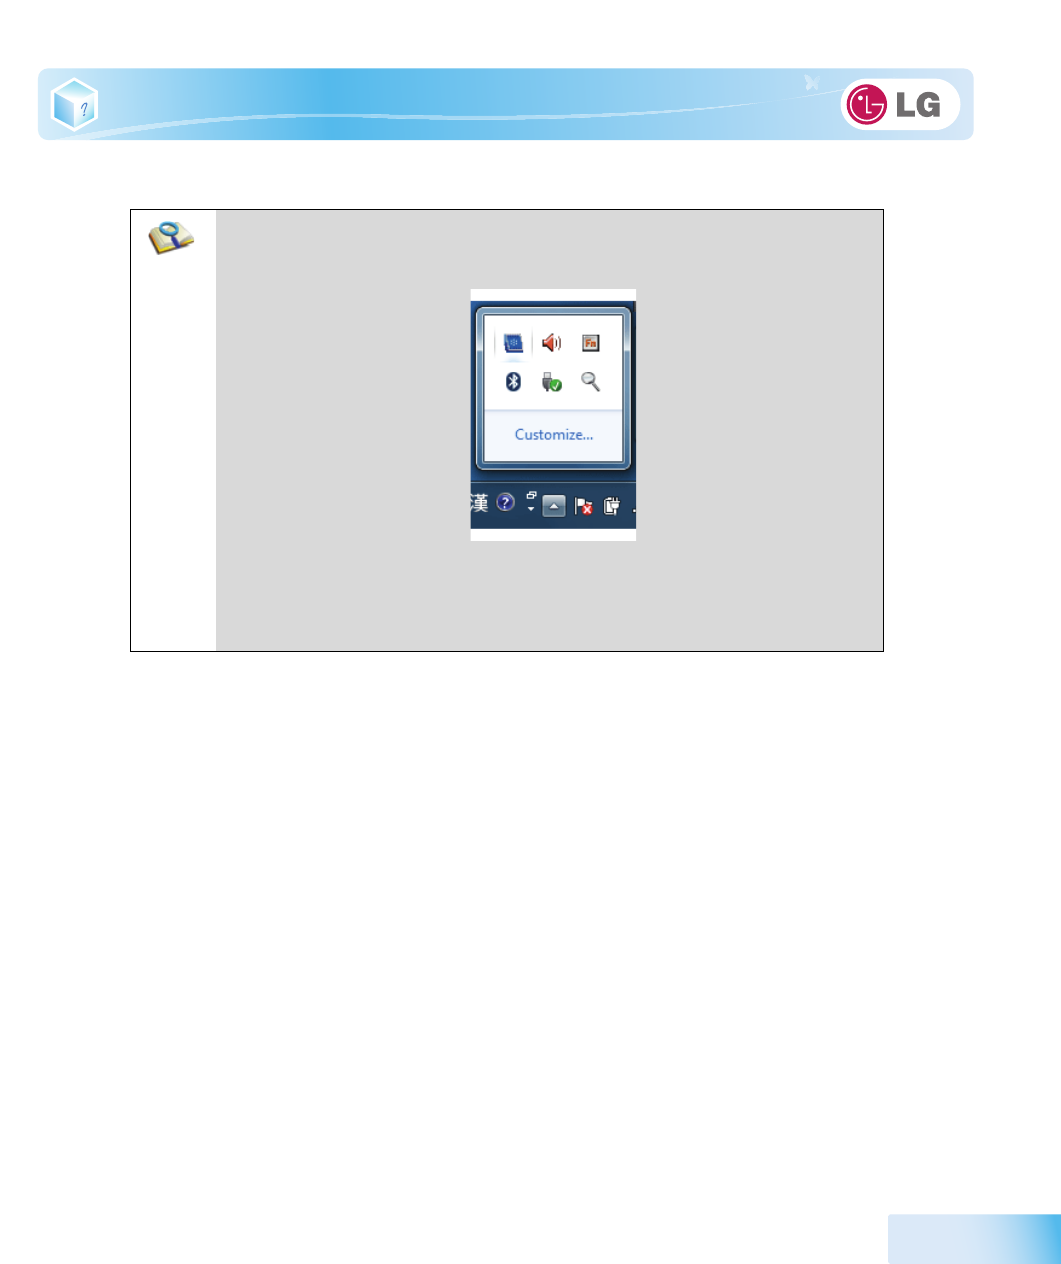
To safely removing a memory card:
1. Click
Safely Remove Hardware
icon on the taskbar.
2. Click
Safely Remove Hardware (S)
.
3. When
Safety Remove Hardware
window appears, click
Stop
.
4. When
Stop Hardware
window appears, click
OK
.
118
Secondary Storage Device and Memory
11-2. Expanding Memory Capacity
You may need to expand the notebook memory for better performance.
※ For memory expansion, we recommend that you receive a paid service from a service center certified by LG.
LG disclaims any responsibility for damage resulting from uncertified service or arbitrary disassembly.
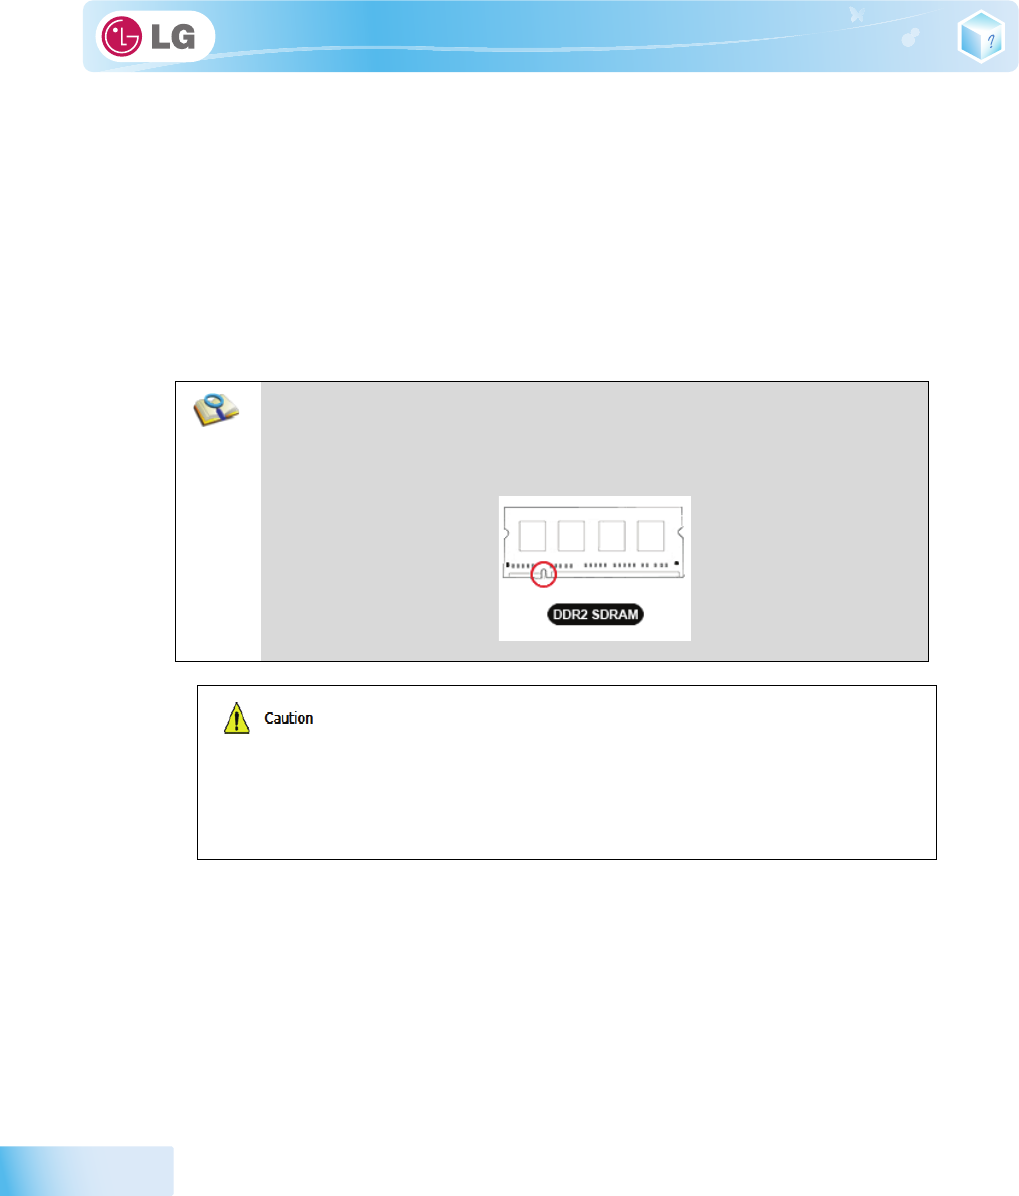
▶ About Memory
This system uses a 200-pin,
SO-DIMM
(
Small Outline Dual In-Line Memory Module
)-type
DDR2
SDRAM
.
※ The models that have two 1 GB(1024 MB) memories cannot be upgraded later.
▶ Preparing Memory
Before purchasing memory, study the specifications and features of the current memory.
1. Rated Capacity:
PC2-6400S(800 MHz) DDR2 SDRAM SO-DIMM
2. Speed:
800 MHz (400 MHz x 2)
3. Type:
1 GB(1024 MB)
■ When expanding the memory, add a memory with the same specification (DDR2
SDRAM for 1.8 V). (Subject to change depending on model type)
■The DDR2 memory provides greatly improved transmission rate than existing
memories, and is differently shaped.
To upgrade the machine, turn off the system and disconnect the power cord and the battery.
■ Disconnect the telephone line linked to the modem, if any. An electric shock or fire may
occur.
Supported Memory
■
PC2-6400S(800 MHz) 1 GB(1024 MB) DDR2 SDRAM SO-DIMM
※ When you expand your memory capacity, make sure to use the memory from the
same company.
Secondary Storage Device and Memory
119
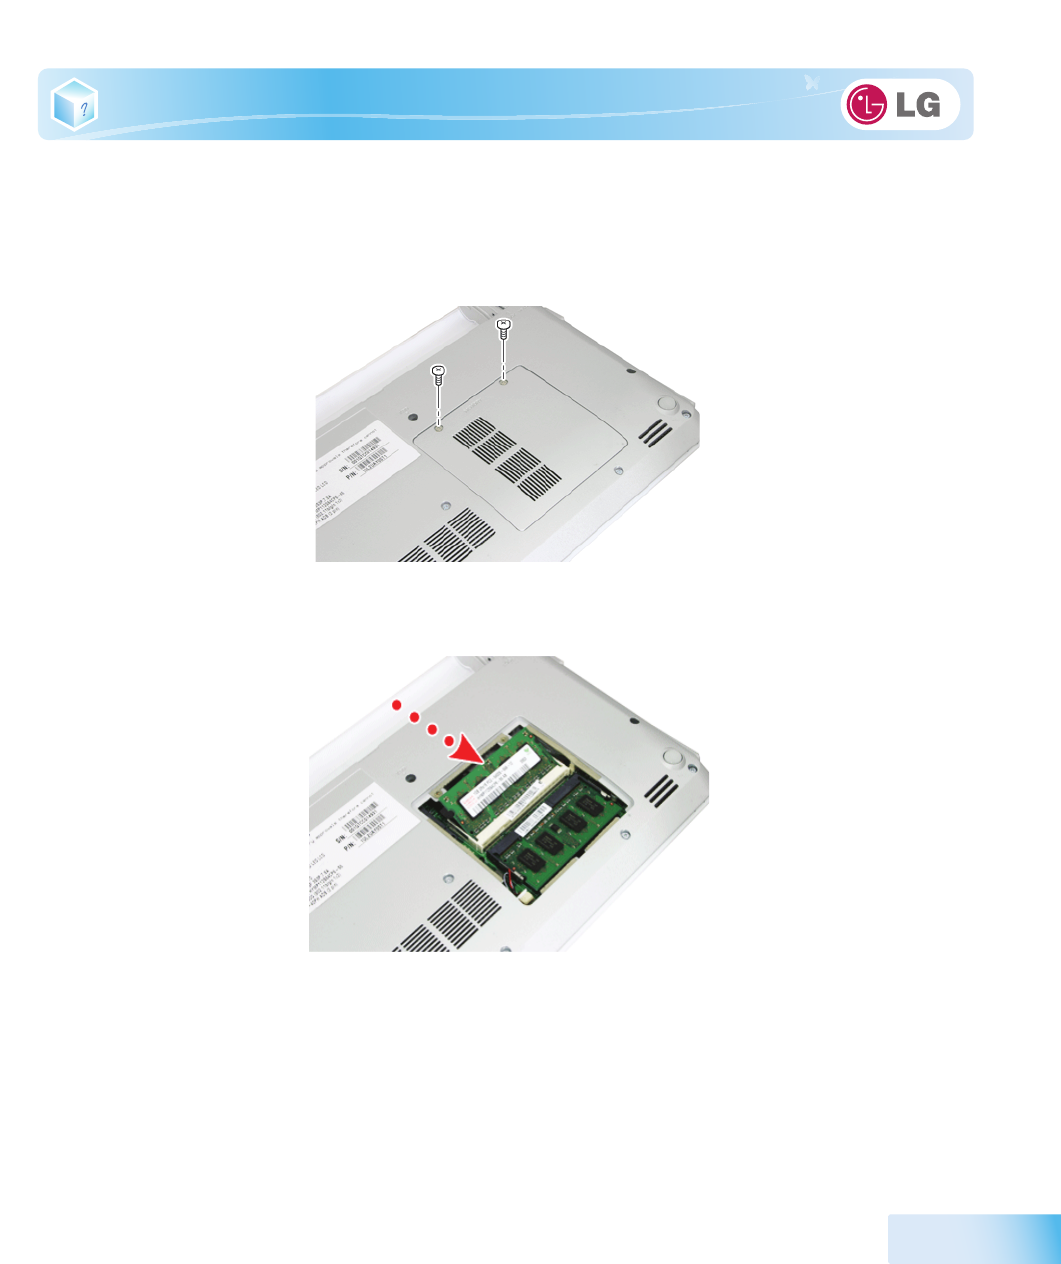
▶ Expanding Memory Capacity
※ Main board configuration, memory socket and memory type may differ by model.
1. Loosen the two screws at the bottom of the notebook PC to remove the cover.
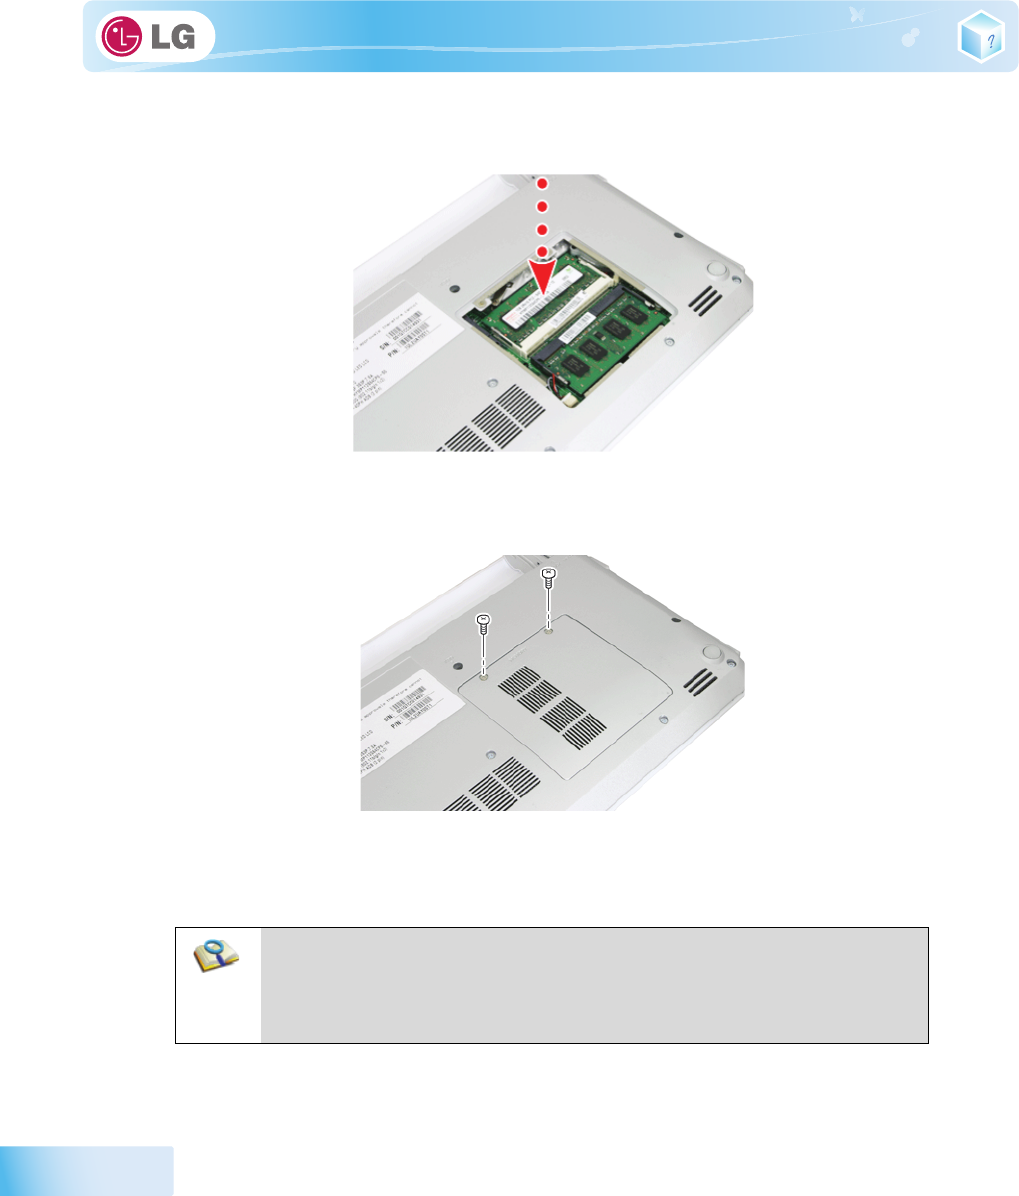
2. Insert the expansion memory to the memory socket as indicated by the arrow.
120
Secondary Storage Device and Memory
3. Push the memory in the direction of the arrow until you hear a "click" sound.
4. After inserting the memory, fasten the cover with the screws.
5. If an error message related to the main memory capacity is displayed during booting after the
memory is expanded, press
F2
key and save the settings.
■ Before remove the PC cover, turn off the AC power, and remove the battery and all
peripherals. Then, disconnect the cable.
■ Push till the memory is completely fixed in the lock.
■ Check the memory capacity during the second booting. If the memory capacity is
not correct, install the main memory again.
Secondary Storage Device and Memory
121
■ Use only the expandable main memory module manufactured by LG. Using a main
memory module other than recommended products may cause malfunctioning of the
notebook PC.

122
Secondary Storage Device and Memory

Chapter12.Appendix

124
Appendix
12-1. Specifications
▶ Available Processors
Intel
Atom
Processor (L2 Cache Size: 512 KB) is supported.
※ The user must not replace or expand the CPU capacity arbitrarily. The CPU capacity differs depends on model
type.
▶Main Memory
One 1 GB(1024 MB) memory or two 1 GB(1024 MB) memories are provided as main memory. The
notebook PC has two memory slots.
※ The models that have two 1 GB(1024 MB) memories cannot be upgraded later.
※ Memory types and specifications may differ depending on the model.
▶ Secondary Storage Devices
6.35 cm
(2.5 inches) Hard Disk Drive(SATA)
※ The hard disk capacity and the type depend on the notebook PC model.
External Optical Disk Drive
※ It may not be provided depending on the model. Its specifications also differ depending on the model.
▶LCD
25.6 cm
(10.1 inches) WSVGA LED (1024 x 600) TFT Color LCD
25.6 cm
(10.1 inches) HD LED (1366 x 768) TFT Color LCD
※ Some models are equipped with Glare Type LCD. This model is enhanced the sharpness compare to the other
types of LCD. So, it may appears glaring a lot but this is the normal status.
※ The size and the resolution rate of the LCD depend on the notebook PC model.
▶ Bluetooth
Broadcom BCM92070MD_REF
Bluetooth 2.1 + EDR
※ Bluetooth is optional, and so it may not be installed in some models.
▶Web Camera
1.3 Mega Pixel Web Camera module
0.3 Mega Pixel Web Camera module
※ The web camera module is optional and may not be provided in some models. Also, its specifications may differ
depending on the model.

Appendix
125
▶ External I/O Interface
External VGA Monitor Port: 1
Microphone: 1
Microphone Input Port: 1
Headset Output Port: 1
USB 2.0 Ports: 3
Multi-card Slot: 1
RJ 45 (LAN) Port: 1 (Gender)
▶Video
Mobile
Intel
Graphic Media Accelerator 3150 (Dynamic Video Memory Technology)
※ The DVMT actively utilizes part of the system memory when processing large graphic data like 3D graphics.
Therefore, the size of the graphic memory is displayed as the sum of the actual graphic memory size and the
utilized amount of memory, which is decided by the size of system memory.
※ Applications (graphics program, game, etc.) requiring strong graphic processing power may not work properly.
※ Specifications may differ by model type.
▶ Sound
Realtek High Definition Audio Codec (ALC272)
Built-in Stereo Speakers
▶LAN
Realtek RTL8102E/RTL8103EL Family PCI-E Fast Ethernet NIC (10 / 100 Mbps)
RJ 45 Jack
※ The LAN specifications may differ depending on the model.
▶HSPA modem
LG LUM850T / LUM900D
Erricson F3307
※ The HSPA modem is optional and may not be provided in some models. Also, its specifications may differ
depending on the model.
▶Wireless LAN
Realtek Semiconductor Corp. RTL8191SE

126
Appendix
※ Wireless LAN specifications may differ by model type and cannot be arbitrarily changed by the user.
※ Manufacturers and installers cannot provide services related to human safety as this wireless device may cause
radio interference.
▶Weight
Full Installation: About 1.3 kg (including 6-cell battery) / 1.45 kg (including 9-cell battery)
Battery: About 320 g (6 cells) / 460 g (9 cells)
※ Weight descriptions may differ by model type.
Appendix
127
12-2. Power Supply and Environments
▶ AC Adapter (Free Voltage)
Power Capacity: 40 W
※ Input: AC 100 to 240 V, 1.2 A, 50 / 60 Hz
※ Output: DC 20 V, 2 A
※ Caution: Use a rated and legitimate AC adapter, suitable for the model.
▶Battery (Li-Ion)
Rated Capacity: 11.1 V or 10.8 V
※ Charging Hours: At room temperature (0 to 40 ) and power turned off - less than 3 hours (6-cell battery)
※ Not charged under 0 .
※ The above temperatures are internal temperatures of the battery pack, and may be different from the actual
room temperature.
▶ Operation and Storage Environments
Operating Temperature: 10 to 35
Operating Humidity: 20 % RH to 80 % RH
Storage Temperature: -10 to 60
Storage Humidity: 10 % RH to 80 % RH
▶ Power Consumption
※ The above power consumption is calculated on the assumption that the battery is fully charged.
※ Power consumption during operation or standby may differ depending on the programs the system is running
and product specifications.
※ Even when the system is turned off, it consumes a minute amount of power, if supplied. To cut off the power
supply completely, disconnect the power cord from the power outlet.
Operating Conditions Approximately 17.7 W When running video clips
Standby mode (Idle state) Approximately 6 W When the monitor display is off
Power Saving mode (Sleep Mode) 0.7 W or lower In S3(Suspend)
Off Mode (Standby(off) Mode) 0.5 W or lower When the system is turned off