LG Electronics USA P710 Cellular/PCS GSM and PCS WCDMA Phone with WLAN, Bluetooth and RFID User Manual 1 per CRN143526
LG Electronics MobileComm USA, Inc. Cellular/PCS GSM and PCS WCDMA Phone with WLAN, Bluetooth and RFID Users Manual 1 per CRN143526
Contents
- 1. Users Manual
- 2. Users Manual 1 per CRN143526
- 3. Users Manual 2 per CRN143526
Users Manual 1 per CRN143526

User Guide
LG-P710
MFL00000000 (1.0) www.lg.com
ENGLISH

Part 15.21 statement
" Change or Modifications that are not expressly approved by the manufacturer could void
the user's authority to operate the equipment. “
Part 15.105 statement
This equipment has been tested and found to comply with the limits for a class B digital
device, pursuant to Part 15 of the FCC Rules.
These limits are designed to provide reasonable protection against harmful interference in
a residential installation. This equipment generates uses and can radiate radio frequency
energy and, if not installed and used in accordance with the instructions, may cause harmful
interference to radio communications. However, there is no guarantee that interference will
not occur in a particular installation. If this equipment does cause harmful interference or
television reception, which can be determined by turning the equipment off and on, the user
is encouraged to try to correct the interference by one or more of the following measures:
- Reorient or relocate the receiving antenna.
- Increase the separation between the equipment and receiver.
- Connect the equipment into an outlet on a circuit different from that to
which the receiver is connected.
- Consult the dealer or an experienced radio/TV technician for help.
This device is not intended for sale in the USA.

FCC Part 15 Class B Compliance
This device comply with part 15 of FCC

Conformité aux normes FCC Part 15 Class B
Cet appareil et ses accessoires sont conformes aux
normes FCC Part 15 Class B de la Federal
Communications Commission et aux exigences pour
appareils numériques ICES-003 Class B d’Industrie
Canada.Son fonctionnement est sujet aux deux conditions
suivantes :(1) Cet appareil et ses accessoires ne doivent
pas provoquer de brouillage préjudiciable, et (2) cet
appareil et ses accessoires doivent accepter toutes les
interférences reçues, y compris celles pouvant causer un
fonctionnement indésirable.
Utilisation comme appareil portatif
Ce téléphone a été testé en vue d’une utilisation type
comme appareil portatif, avec une distance de 1.0cm (0,39
pouces) entre l’arrière de l’appareil et le corps de
l’utilisateur. Pour satisfaire aux exigences de la FCC en
matière d’exposition aux radiofréquences, une distance
d’au moins 1.0cm (0,39 pouces) doit être maintenue entre
le corps de l’utilisateur et l’arrière du téléphone. Les
pinces de ceinture, les étuis et autres accessoires
semblables d’autres marques et contenant des
composantes métalliques ne doivent pas être utilisés.Les
accessoires portatifs empêchant le maintien d’une
distance de 1.0 cm (0,39 pouces) entre le corps de
l’utilisateur et l’arrière du téléphone et qui n’ont pas été
testés en vue d’une utilisation type comme accessoires
portatifs peuvent ne pas satisfaire aux limites d’exposition
aux radiofréquences stipulées par la FCC et, par
conséquent, ne doivent pas être utilisés.

User Guide
• Screen displays and illustrations may differ from
those you see on actual phone.
• Some of the contents of this guide may not apply
to your phone, depending on the software and your
service provider. All information in this document is
subject to change without notice.
• This handset is not suitable for people who have a
visual impairment due to the touch screen keyboard.
• Copyright ©2013 LG Electronics, Inc. All rights
reserved. LG and the LG logo are registered
trademarks of LG Group and its related entities. All
other trademarks are the property of their respective
owners.
• Google™, Google Maps™, Gmail™, YouTube™,
Google Talk™ and Play Store™ are trademarks of
Google, Inc.
ENGLISH

13
Getting to know your phone
Please check to see whether any problems you encountered with your phone are
described in this section before taking the phone in for service or calling a service
representative.
1. Phone memory
When there is less than 10% of space available in your phone memory, your phone
cannot receive new messages. You need to check your phone memory and delete some
data, such as applications or messages, to make more memory available.
To uninstall applications:
1 Touch > Apps tab > Settings > Apps from the DEVICE category.
2 Once all applications appear, scroll to and select the application you want to
uninstall.
3 Touch Uninstall.
2. Optimising battery life
Extend your battery's life between charges by turning off features that you don't need
to having running constantly in the background. You can monitor how applications and
system resources consume battery power.
Extending your phone's battery life:
• Turn off radio communications you are not using. If you are not using Wi-Fi, Bluetooth
or GPS, turn them off.
• Reduce screen brightness and set a shorter screen timeout.
Before you start using the phone, please read this!
14
• Turn off automatic syncing for Google Mail™, Calendar, Contacts and other
applications.
• Some applications you have downloaded may reduce battery power.
To check the battery power level:
• Touch > Apps tab > Settings > About phone from the SYSTEM > Status
The battery status (charging or not charging) and level (percentage charged) is
displayed at the top of the screen.
To monitor and control how battery power is being used:
• Touch > Apps tab > Settings > Power saver from the DEVICE > Battery use
from the BATTERY INFORMATION
Battery usage time is displayed at the top of the screen. It tells you how long it
has been since you last connected your phone to a power source or, if currently
connected, how long the phone was last running on battery power. The screen shows
the applications or services using battery power, listed in order from the greatest to
smallest amount used.
3. Using folders
You can combine several app icons in a folder. Drop one app icon over another on a
Home screen, and the two icons will be combined.
NOTE: To see a smaller collection of frequently used apps, touch the Google
Apps folder near the bottom of the screen. As with any folder, you can
customise its contents.
NOTE: After you open an app, you can usually adjust its settings by choosing
items from its Menu icon near the top or bottom of the screen.
Getting to know your phone
15
4. Before installing an open source application and OS
WARNING
If you install and use an OS other than the one provided by the manufacturer
it may cause your phone to malfunction. In addition, your phone will no longer
be covered by the warranty.
WARNING
To protect your phone and personal data, only download applications from
trusted sources, such as Play Store™. If there are improperly installed
applications on your phone, it may not work normally or a serious error may
occur. You must uninstall those applications and all associated data and
settings from the phone.
5. Using the hard reset (Factory reset)
If your phone needs to be restored to its original condition, use hard reset to reboot
your phone.
1 When the phone is switched off, press and hold the Volume down key +
Powerkey with your left hand.
2 When the LED on the bottom of the phone lights up, touch and hold the Menu key with
your right hand. You need to do this immediately, before the screen displays the LG logo.
Make sure your left hand is still holding the Volume down and Power keys. Then release
the power key at vibration time.
3 When the LG logo is displayed on the screen, continue to hold the keys for around 2
seconds, and then release all them at the same time, before the LG logo disappears.
Leave your phone for at least a minute while the hard reset is carried out. You will then
be able to switch your phone back on.

16
Caution: If you perform a hard reset, all user applications and user data will be deleted.
This cannot be reversed. Remember to back up any important data before performing a
hard reset.
6. Opening and switching applications
Multitasking is easy with Android because you can keep more than one application
running at the same time. There's no need to quit an application before opening
another. Use and switch between several open applications. Android manages each
application, stopping and starting them as needed to ensure that idle applications don't
consume resources unnecessarily.
To return to view list recently used applications:
Simply press and hold the Home key.
To stop applications:
1 Touch > Apps tab > Settings > Apps > Running from the DEVICE
2 Scroll and touch the desired application and touch Stop to stop it.
7. Installing PC Software (LG PC Suite)
"LG PC Suite" PC Application is a program that helps you connect your device to a PC
via a USB cable and Wi-Fi. Once connected, you can use the functions of your device
from your PC.
With your "LG PC Suite" PC Application, You Can...
• Manage and play your media contents (music, movie, pictures) on your PC.
• Send multimedia contents to your device.
• Synchronises data (schedules, contacts, bookmarks) in your device and PC.
• Backup the applications in your device.
• Update the softwares in your device.
• Backup and restore the device.
Getting to know your phone

17
• Play multimedia contents of your PC from other device.
• Play multimedia content stored on your PC from your device.
NOTE: You can use the Help menu from the application to find out how to
use your "LG PC Suite" PC application.
Installing "LG PC Suite" PC Application
"LG PC Suite" PC application can be downloaded from the webpage of LG.
1 Go to www.lg.com and select a country of your choice.
2 Go to Support > Mobile Phone Support > Select the Model (LG-P710).
3 Click PC Sync from Download, and click WINDOW PC Sync Download to down-
load "LG PC Suite" PC software.
System Requirements for "LG PC Suite" PC software
• OS: Windows XP 32 bit(Service pack 2), Windows Vista 32bit/64bit, Windows7
32bit/64bit
• CPU: 1GHz or higher processors
• Memory: 512MB or higher RAMs
• Graphic card: 1024 x 768 resolution, 32bit color or higher
• HDD: 100MB or more free hard disk space (More free hard disk space may be
needed depending on the volume of data stored.)
• Required software: LG integrated drivers
NOTE: LG Integrated USB Driver
LG integrated USB driver is required to connect an LG device and PC and
installed automatically when you install "LG PC Suite" PC software.
18
8. Synchronising your phone to a computer via USB
NOTE: To synchronise your phone with your PC using the USB cable, you
need to install LG PC Suite onto your PC.
Please refer to previous pages to install LG PC Suite.
1 Use the USB cable to connect your phone to a USB port on your computer. Once
connected, you will receive a notification that a USB connection has been made.
2 Open the notification drawer and touch USB connected.
3 Touch PC software to confirm that you want to transfer files between your phone's
microSD card and the computer.
TIP! To use the microSD card on your phone again, you need to open the
notification drawer and touch > Charge only.
During this time, you can't access the microSD card from your phone, so you can't use
applications that rely on the microSD card.
To disconnect your phone from the computer:
Open the notification drawer and touch > Charge only to disconnect your phone
from the computer safely.
9. Hold your phone upright
Hold your mobile phone vertically, as you would a regular phone. The LG-P710 has an
internal antenna. Be careful not to scratch or damage the back of the phone, as this
may affect performance.
While making/receiving calls or sending/receiving data, avoid holding the lower part of
the phone where the antenna is located. Doing so may affect call quality.
Getting to know your phone

19
10. When the screen freezes
If the screen freezes or the phone does not respond when you try to operate it:
Remove the battery, reinsert it, then turn the phone on.
OR
Press and hold the Power/Lock key for 10seconds to turn it off.
If it still does not work, please contact the service centre.
20
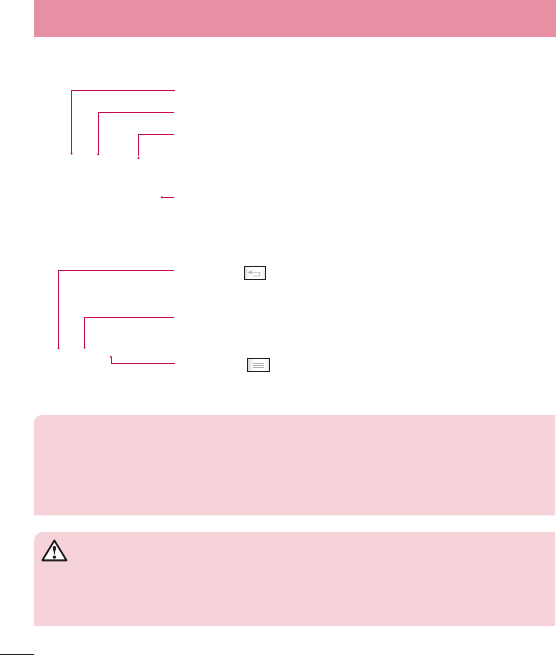
Device components
Earpiece
Proximity sensor
Home key
• Return to the Home screen from any screen.
Back key
• Return to the previous screen.
Power/Lock key
• Switch your phone on/off by pressing and holding this key.
• Short press to lock/unlock the screen.
Menu key
• Check what options are available.
Camera lens
NOTE: Proximity sensor
When receiving and making calls, the proximity sensor automatically turns
the backlight off and locks the touch screen by sensing when the phone is
near your ear. This extends battery life and prevents you from unintentionally
activating the touch screen during calls.
WARNING
Placing a heavy object on the phone or sitting on it can damage the LCD and
touch screen functions. Do not cover the LCD proximity sensor with protective
film. This could cause the sensor to malfunction.
Getting to know your phone

21
Power/Lock key
Volume keys
• In the Home screen: Control
ringer volume.
• During a call: Control your
earpiece volume.
• When playing a track: Control
volume continuously.
Charger/USB port
Microphone
Earphone jack
Battery cover
Camera lens
LED flash
SIM card slot
microSD Card slot
Speaker
Battery
22
Installing the SIM card and battery
Before you can start exploring your new phone, you'll need to set it up. To insert the
SIM card and battery:
1 To remove the battery cover, hold the phone firmly in one hand. With your other
hand, lift off the battery cover with your thumbnail as shown in figure.
NOTE: Put your thumbnail into the USB port hole and lift off the battery cover.
2 Slide the SIM card into the SIM card slot. Make sure the gold contact area on the
card is facing downwards.
Getting to know your phone

23
3 Insert the battery into place by aligning the gold contacts on the phone and the
battery (1) and pressing it down until it clicks into place (2).
4 Align the battery cover over the battery compartment and press down each of the 6
points as shown in the figure until it clicks into place.

24
Getting to know your phone
Charging the phone
The charger connector is at the bottom of the phone. Insert the charger and plug it into
an electrical outlet.
NOTE: The battery must be fully charged initially to improve battery lifetime.
NOTE: Do not open the battery cover during the charging your phone.
Using the memory card
To insert a memory card:
Insert the memory card into the slot. Make sure the gold contact area is facing
downwards.
To remove the memory card safely:
Touch > Apps tab > Settings > Storage from the DEVICE > Unmount SD card
> OK.
25
NOTE: The LG-P710 supports memory cards up to 32 GB.
WARNING
Do not insert or remove the memory card when the phone is on. Doing so
may damage the memory card as well as your phone, and the data stored on
the memory card may get corrupted.
To format the memory card:
Your memory card may already be formatted. If it isn't, you must format it before you
can use it.
NOTE: All files on your memory card are deleted when it is formatted.
1 On the home screen, touch > Apps tab to open the menu.
2 Scroll and touch Settings > Storage.
3 Touch Unmount SD card and touch OK to confirm it.
4 Touch Erase SD card > Erase SD card > Erase everything, then confirm your
choice.
5 If you have set a pattern lock, input the pattern lock then select Erase everything.

26
Getting to know your phone
NOTE: If there is content on your memory card, the folder structure may be
different after formatting as all the files will be deleted.
Locking and unlocking the screen
If you do not use the phone for a while, the screen is turned off and locked
automatically. This helps to prevent accidental touches and saves battery power.
When you are not using the LG-P710, press the Power/Lock key to lock your phone.
Secure your lock screen
You can lock your screen so that only you can unlock it to access your phone.
To set an Unlock Pattern, PIN or Password for the first time:
1 Touch > Apps tab > Settings > Lock screen > Select screen lock.
2 Choose from None, Touch and hold, Swipe, Face Unlock, Pattern, PIN, or
Password.
3 Enter the desired information.
NOTE: Precautions to take when using pattern lock
It is very important to remember the unlock pattern you set. You will not be
able to access your phone if you use an incorrect pattern 5 times. You have 5
opportunities to enter your unlock pattern, PIN or password. If you have used
all 5 opportunities, you can try again after 30 seconds.
When you cannot recall your unlock pattern:
If you logged in to your Google account on the phone but failed to enter the correct
pattern 5 times, tap the Forgot pattern button. You are then required to log in with your
Google account to unlock your phone.
If you have not created a Google account on the phone or you forgot it, you have to
perform a hard reset.

27
Your Home screen
Touch screen tips
Here are some tips on how to navigate around your phone.
Touch – To choose a menu/option or open an application, touch it.
Touch and hold – To open an options menu or grab an object you want to move, touch
and hold it.
Drag – To scroll through a list or move slowly, drag across the touch screen.
Swipe or slide – To swipe or slide, quickly move your finger across the surface of the
screen, without pausing when you first touch it (so you don’t drag an item instead). For
example, you can slide the screen up or down to scroll through a list, or browse through
the different Home screens by swiping from left to right (and vice versa).
Double-tap – Double-tap to zoom on a web page or a map. For example, quickly
double-tap a section of a web page to adjust that section to fit the width of the screen.
You can also double-tap to zoom in and out when using Maps.
Pinch-to-Zoom – Use your index finger and thumb in a pinch or spread motion to
zoom in or out when using the Browser, Maps, or browsing pictures.
Rotate the screen – From many applications and menus, the orientation of the screen
adjusts to the device's physical orientation.
NOTE:
• To select an item, touch the centre of the icon.
• Do not press too hard; the touch screen is sensitive enough to pick up a
light, firm touch.
• Use the tip of your finger to touch the option you want. Be careful not to
touch any other keys.
Home
Simply swipe your finger to the left or right to view the panels. You can customise each
panel with Apps, Downloads, Widgets and wallpapers.

28
Your Home screen
NOTE: Some screen images may be different depending on your phone
provider.
On your Home screen, you can view quick keys at the bottom of the screen. Quick keys
provide easy, one-touch access to the functions you use the most.
Touch the Phone icon to bring up the touch screen dialpad to make a call.
Touch the Contacts icon to open your contacts.
Touch the Messaging icon to access the messaging menu. This is where you can
create a new message.
Touch the Apps icon at the bottom of the screen. You can then view all your
installed applications. To open any application, simply touch the icon in the applications
list.
Customising the Home screen
You can customise your Home screen by adding Apps, Downloads, Widgets or
Wallpapers. For more convenience using your phone, add your favourite widgets to the
Home screen.
To add items on your Home screen:
1 Touch and hold the empty part of the Home screen.
2 In the Add Mode menu, select items you want to add. You will then see added items
on the Home screen.
3 Drag it to the location you want and lift your finger.
To remove an item from the Home screen:
• Home screen > touch and hold the icon you want to remove > drag it to
TIP! To add an application icon to the Home screen from the Applications
menu, touch and hold the application you want to add.
29
Returning to recently-used applications
1 Touch and hold the Home key. The screen displays a pop-up with icons of
applications you used recently.
2 Touch an icon to open the application. Or touch the Back key to return to your
current application.
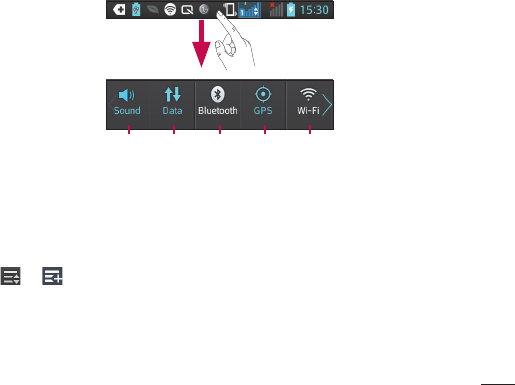
Notification drawer
The notification drawer runs across the top of your screen.
Touch and slide the notification drawer down with your finger.
Wi-FiGPSBluetoothDataSound
profile
Below is a table explaining the meaning of icons you're likely to see in the status bar.
The Notifications Panel displays all your notifications along with the Quick Settings at
the top.
Swipe the Quick Settings bar left or right to see more keys.
Touch > to manage your Quick Settings. Here you can add and remove
manage Sound profile, Data enabled, Bluetooth, GPS, Wi-Fi, Accounts & sync, Auto-
rotate screen, Airplane mode, Portable Wi-Fi hotspot, or Power saver.
30
Your Home screen
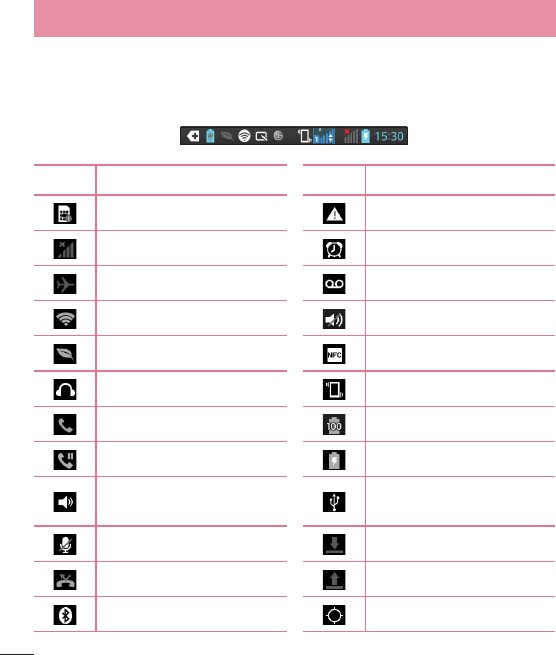
Viewing the status bar
The status bar uses different icons to display phone information such as signal
strength, new messages, battery life, active Bluetooth and data connections.
Icon Description Icon Description
No SIM card System warning
No signal Alarm is set
Airplane mode New voicemail
Connected to a Wi-Fi network Ringer is silenced
Power saver is on NFC is on
Wired headset Vibrate mode
Call in progress Battery fully charged
Call hold Battery is charging
Speakerphone Phone is connected to PC via
USB cable
Phone microphone is muted Downloading data
Missed call Uploading data
Bluetooth is on GPS is acquiring
31
Receiving location data from
GPS
FM radio turned on in the
background
Data is syncing USB tethering is active
New Gmail Portable Wi-Fi hotspot is
active
New Google Talk message Both USB tethering and
portable hotspot are active
Song is playing
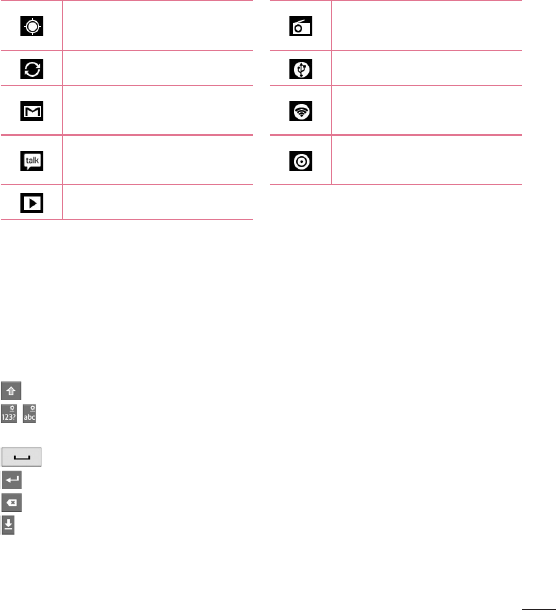
On-screen keyboard
You can enter text using the onscreen keyboard. The onscreen keyboard appears
automatically on the screen when you need to enter text. To manually display the
keyboard, simply touch a text field where you want to enter text.
Using the keypad & entering text
Tap once to capitalise the next letter you type. Double-tap for all caps.
Tap to switch to the numbers and symbols keyboard. You can also touch and
hold this tab to view the Settings menu.
Tap to enter a space.
Tap to create a new line in the message field.
Tap to delete the previous character.
Tap to hide the onscreen keyboard.

32
Your Home screen
Entering accented letters
When you select French or Spanish as the text entry language, you can enter special
French or Spanish characters (e.g. "á").
For example, to input "á", touch and hold the "a" key until the zoom-in key grows
bigger and displays characters from different languages.
Then select the special character you want.

33
Google account setup
When you first turn on your phone, you have the opportunity to activate the network, to
sign into your Google Account and how you want to use some Google services.
To set up your Google account:
• Sign into a Google Account from the prompted set up screen.
OR
• Touch > Apps tab > select a Google application, such as Gmail > select New to
create a new account.
If you have a Google account, touch Existing, enter your email address and password,
then touch Sign in.
Once you have set up your Google account on your phone, your phone automatically
synchronises with your Google account on the web.
Your contacts, Gmail messages, Calendar events and other information from these
applications and services on the web are synchronised with your phone. (This depends
on your synchronisation settings.)
After signing in, you can use Gmail™ and take advantage of Google services on your
phone.gning in, you can use Gmail™ and take advantage of Google services on your
phone.

34
Connecting to Networks and Devices
Wi-Fi
With Wi-Fi, you can use high-speed Internet access within the coverage of the wireless
access point (AP). Enjoy wireless Internet using Wi-Fi, without extra charges.
Connecting to Wi-Fi networks
To use Wi-Fi on your phone, you need to access a wireless access point or "hotspot".
Some access points are open and you can simply connect to them. Others are hidden
or use security features; you must configure your phone to be able to connect to them.
Turn off Wi-Fi when you're not using it to extend the life of your battery.
NOTE: If you are out of the Wi-Fi zone or set Wi-Fi to OFF, additional charges
may be applied by your mobile operator for mobile data use.
Turning Wi-Fi on and connecting to a Wi-Fi network
1 Touch > Apps tab > Settings > Wi-Fi from the WIRELESS & NETWORKS
2 Set Wi-Fi to ON to turn it on and start scanning for available Wi-Fi networks.
3 Tap Wi-Fi menu again to see a list of active and in-range Wi-Fi networks.
• Secured networks are indicated by a lock icon
4 Touch a network to connect to it.
• If the network is open, you are asked to confirm that you want to connect to that
network by touching Connect.
• If the network is secured, you are prompted to enter a password or other
credentials. (Ask your network administrator for details)
5 The status bar displays icons that indicate Wi-Fi status.
35
Bluetooth
You can use Bluetooth to send data by running a corresponding application, not from
the Bluetooth menu as on most other mobile phones.
TIP! With LG-P710, you can enjoy Bluetooth high speed.
If the device you want to share files with also supports high speed Bluetooth,
the files will automatically be transferred via the high-speed network. To use
Bluetooth high speed data transfer, please make sure the Wi-Fi is OFF on your
devices before use. The settings for Bluetooth high speed may be different
depends on the device. Please check the device's settings with their service
provider.
Turning on Bluetooth and pairing up your phone with a Bluetooth device
You must pair your device with another device before you connect to it.
1 Touch > Apps tab > Settings > Set Bluetooth to ON from the WIRELESS &
NETWORKS
2 Tap Bluetooth menu again. Your phone will scan for and display the IDs of all
available Bluetooth in-range devices. If the device you want to pair with isn’t on
the list, make sure the target device is set to be discoverable, then tap Search for
devices again.
3 Choose the device you want to pair up with from the list.
Once the paring is successful, your device will connect to the device.
Sending pictures using Bluetooth
1 Select a Picture > > Bluetooth
2 Check whether Bluetooth is ON, then select Search for devices.
3 Choose the device you want to send data to from the list.

36
Sharing your phone's data connection
USB tethering and portable Wi-Fi hotspot are great features when there are no wireless
connections available. You can share your phone's mobile data connection with a
single computer via a USB cable (USB tethering). You can also share your phone's
data connection with more than a single device at a time by turning your phone into a
portable Wi-Fi hotspot.
When your phone is sharing its data connection, an icon appears in the status bar and
as an ongoing notification in the notifications drawer.
For the latest information about tethering and portable hotspots, including supported
operating systems and other details, visit http://www.android.com/tether.
To change Portable Wi-Fi hotspot settings:
• Touch > Apps tab > Settings > More from the WIRELESS & NETWORKS >
Portable Wi-Fi hotspot > Choose options that you want to adjust.
TIP! If your computer is running Windows 7 or a recent distribution of some
flavours of Linux (such as Ubuntu), you don't usually need to prepare your
computer for tethering. But if you're running an earlier version of Windows
or another operating system, you may need to prepare your computer to
establish a network connection via USB. For the most current information
about which operating systems support USB tethering and how to configure
them, visit http://www.android.com/tether.
To rename or secure your portable hotspot
You can change the name of your phone's Wi-Fi network name (SSID) and secure its
Wi-Fi network.
1 On the Home screen, touch > Apps tab > Settings
2 Touch More from the WIRELESS & NETWORKS and select Portable Wi-Fi hotspot.
3 Ensure Portable Wi-Fi hotspot is ticked.
Connecting to Networks and Devices

37
4 Touch Set up Wi-Fi hotspot.
• The Set up Wi-Fi hotspot dialog box will open.
• You can change the network SSID (name) that other computers see when scanning
for Wi-Fi networks.
• You can also touch the Security menu to configure the network with Wi-Fi Protected
Access 2 (WPA2) security using a pre-shared key (PSK).
• If you touch the WPA2 PSK security option, a password field is added to the Set up
Wi-Fi hotspot dialog. If you enter a password, you will need to enter that password
when you connect to the phone's hotspot with a computer or other device. You can
set Open in the Security menu to remove security from your Wi-Fi network.
5 Touch Save.
ATTENTION! If you set the security option as Open, you cannot prevent
unauthorised usage of online services by other people and additional charges
can be incurred. To avoid unauthorised usage, you are advised to keep the
security option active.
Using the Wi-Fi Cast
You can share your music, picture and video content between users who use Android
Phones connected via the same Wi-Fi & Wi-Fi Directed network.
Check your Wi-Fi & Wi-Fi Directed network in advance and make sure the users are
connected to the same network.
1 Touch > Apps tab > Settings > More from the WIRELESS & NETWORKS >
Wi-Fi Direct
2 Touch the Wi-Fi Direct checkbox to turn on.
3 Select a device to connect from the scanned device list.
4 Touch Connect.
38
Enabling Wi-Fi Direct to share through SmartShare
Wi-Fi Direct automatically scans nearby Wi-Fi Direct devices and the searched devices
are listed as they are found and you can select a specific device to share multimedia
data through Smart Share.
Wi-Fi Direct cannot be enabled while using other Wi-Fi functions.
1 Touch > Apps tab > Settings > More from the WIRELESS & NETWORKS >
Wi-Fi Direct
2 Select a device to connect from the scanned device list.
CREATE GROUP– Touch to activate group owner mode, which enables the legacy
Wi-Fi devices to connect by scanning your phone. In this case you must enter the
password that is set in Password.
NOTE: When your phone becomes a group owner, it will consume more
battery power than when it is a client. Wi-Fi Direct connection does not
provide Internet service. Additional costs may be incurred when connecting
and using online services. Check data charges with your network provider.
Using SmartShare
SmartShare uses DLNA (Digital Living Network Alliance) technology to share digital
content through a wireless networ k.
Both devices must be DLNA certified to support this feature.
To turn SmartShare on and allow sharing contents
1 Touch > Apps tab > SmartShare
2 Press and select Settings.
3 Touch Discoverable checkbox to allow your phone to be detected by other devices.
• Touch Always accept request if you would like to automatically accept sharing
requests from other devices.
Connecting to Networks and Devices
39
• Touch Receive files if you would like to automatically allow upload files to my phone
from other devices.
4 Under the Sharing contents section, touch to checkmark the types of content you
would like to share. Choose from Photos, Videos and Music.
5 SmartShare is now activated and ready to share contents.
NOTE: Make sure that the DLNA function of your devices is properly
configured (e.g., for TV and PC).
1 Touch > Apps tab > SmartShare.
2 Touch the To button and select the device from the renderer device list.
3 Touch the From button and select the device for the remote content library.
4 You can browse the content library.
5 Touch and hold a content thumbnail and fl ick it to the top area with your finger or
touch the Menu Key > Play.
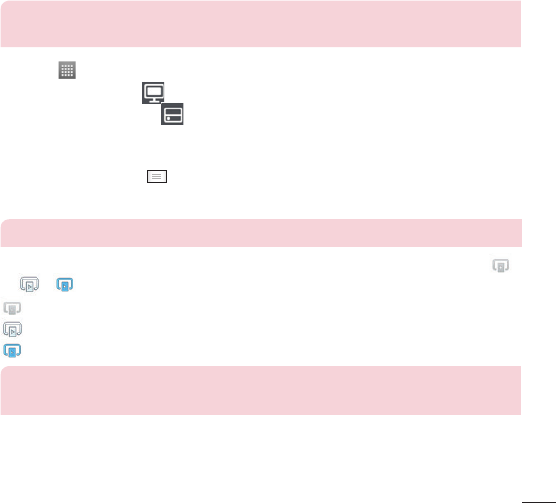
To share content from your phone to your renderer device (e.g. TV)
NOTE: Make sure that your renderer device is properly configured.
1 While watching your pictures or videos using the Gallery application, touch tab /
/ in the Title area.
: Need to be connected to a network
: Select the device in the network
: Currently, the content is being shared through SmartShare.
NOTE: Follow the same steps to use the Music Player, Video Player and
Polaris Office to share content.
2 Select the device from renderer lists to play the files.
40
NOTICE: Make sure that your device is connected to your home network
using Wi-Fi connection to use this application.
Some DLNA enabled devices (e.g. TV) support only the DMP feature of DLNA
and will not appear in the renderer device list.
Your device may not be able to play some content.
To download contents from the remote content library
1 Touch > Apps tab > SmartShare.
2 Touch the From button and select the device for the remote content library.
3 You can now browse the content library.
4 Touch and hold a content thumbnail and then touch Download.
NOTICE: A few types of content are not supported.
To upload content from the remote content library
1 Touch > Apps tab > SmartShare.
2 Touch the From button and select My phone.
3 You can browse the local content library.
4 Touch and hold a content thumbnail and then touch Upload.
5 Select the device for the remote content library to be uploaded.
NOTICE: Some DLNA enabled devices do not support the DMS upload
functionality and will not upload files. A few types of content are not
supported.
Connecting to Networks and Devices
41
Calls
Making a call
1 Touch to open the keypad.
2 Enter the number using the keypad. To delete a digit, touch the .
3 Touch to make a call.
4 To end a call, touch the End icon .
TIP! To enter "+" to make international calls, touch and hold .
Calling your contacts
1 Touch to open your contacts.
2 Scroll through the contact list or enter the first few letters of the contact you want
to call by touching Search contacts.
3 In the list, touch the contact you want to call.
Answering and rejecting a call
When you receive a call in Lock state, hold and slide the to Answer incoming call.
Hold and slide the to Decline an incoming call.
Hold and slide the Quick msg icon from the bottom if you want to send one.
TIP! Quick msg
You can send a message quickly using this function. This is useful if you need
to reply the message during a meeting.
42
Adjusting call volume
To adjust the in-call volume during a call, use the Volume up and down keys on the left-
hand side of the phone.
Making a second call
1 During your first call, touch Menu > Addcall and dial the number. Also, you can go
recent dialled list by touching or can search contacts by touching and select
the number you want to call.
2 Touch to make the call.
3 Both calls are displayed on the call screen. Your initial call is locked and put on
hold.
4 Touch the displayed number to toggle between calls. Or touch Merge call to
make a conference call. To end active calls, touch End or press Home Key and
slide the notification bar down and select End call icon .
NOTE: You are charged for each call you make.
Viewing your call logs
On the Home screen, touch and choose the Call logs tab .
View a complete list of all dialled, received and missed voice calls.
TIP! Touch any call log entry to view the date, time and duration of the call.
TIP! Press the Menu key, then touch Delete all to delete all the recorded
items.
Calls

43
Call settings
You can configure phone call settings such as call forwarding and other special features
offered by your carrier.
1 On the Home screen, touch .
2 Touch Menu.
3 Tap Call settings and choose the options that you want to adjust.
4 Tap SIM1 or SIM2 to configure the following call options.
Fixed dialing numbers – To turn on and compile a list of numbers that can be called
from your phone. You’ll need your PIN2, which is available from your operator. Only
numbers within the fixed dial list can be called from your phone.
Voicemail – Allows you to select your carrier’s voicemail, enter the phone number to
use for listening to and managing your voicemail, and configure the notification sound
or vibration option.
Call forwarding – Choose whether to divert all calls, when the line is busy, when there
is no answer or when you have no signal.
Call barring – Select when you would like calls to be barred. Enter the call barring
password. Please check with your network operator about this service.
Call duration – View the duration of calls including last call, dialled calls, received calls
and all calls.
Additional settings – This lets you change the following settings:
Caller ID: Choose whether to display your number on an outgoing call.
Call waiting: If call waiting is activated, the handset will notify you of an incoming call
while you are on the phone (depending on your network provider).
5 Tap Common to configure the following call options.
Call reject – Allows you to set the call reject function and manage the reject list.
Decline with messages – When you want to reject a call, you can send a preset
message. In this menu, you can add or edit messages to send instead, when you reject
a call.

44
Calls
Connection vibration – Choose whether to set the phone vibrates or not when the
other party answers the call.
Privacy keeper – Configure the privacy keeper option.
Power button ends call – Checkmark this option if you want to press the power
button to end a call.
Save unknown numbers – Add unknown numbers to contacts after a call.
45
Contacts
Add contacts to your phone and synchronise them with the contacts in your Google
account or other accounts that support contact syncing.
Searching for a contact
In the Home screen
1 Touch to open your contacts.
2 Touch Search contacts and enter the contact name using the keyboard.
Adding a new contact
1 Touch , enter the new contact's number, then press the Menu key. Touch Add to
contacts > Create new contact.
2 If you want to add a picture to the new contact, touch the image area.
Choose from Take photo or Select from Gallery.
3 Select the contact type by touching .
4 Touch a category of contact information and enter the details about your contact.
5 Touch Save.
Favourite contacts
You can classify frequently called contacts as favourites.
Adding a contact to your favourites
1 Touch to open your contacts.
2 Touch a contact to view their details.
3 Touch the star to the right of the contact's name. The star turns gold and the
contact is added to your favourites.

46
Contacts
Removing a contact from your favourites list
1 Touch to open your contacts.
2 Touch the tab, select Favourites at the top of the list and choose a contact to
view its details.
3 Touch the star to the right of the contact's name. The star turns grey and the
contact is removed from your favourites.
Moving contacts from your old device to your new
device
Export your contacts as a CSV file from your old phone to your PC using a PC
sync program.
1 Export your contacts as a CSV fi le from your old device to your PC using a PC sync
program.
2 Install "LG PC Suite" on the PC first. Run the program and connect your Android
mobile phone to the PC using a USB cable.
3 In the top menu, select Device > Import to device > Import contacts.
4 A pop-up window to select the fi le type and a fi le to import will appear.
5 In the pop-up, click the Select a file and Windows Explorer will appear.
6 Select the Contacts file to import in Windows Explorer and click Open.
7 Click OK.
8 A Field mapping pop-up to link the contacts in your device and new contact data
will appear.
9 If there is a confl ict between the data in your PC contacts and device contacts,
make the necessary selections or modifi cations in LG PC Suite.
10 Click OK.
47
Messaging
Your LG-P710 combines SMS and MMS into one intuitive, easy-to-use menu.
Sending a message
1 Touch on the home screen, and touch to open a blank message.
2 Enter a contact name or contact number in the To field. As you enter the contact
name, matching contacts appear. You can touch a suggested recipient. You can add
multiple contacts.
NOTE: You will be charged for a text message for every person you send the
message to.
3 Touch the text field and start to compose your message.
4 Press to open the Options menu. Choose from Quick message, Insert smiley,
Schedule sending, Add subject and Discard.
5 Touch Send to send your message.
6 The message screen opens, with your message after Recipient Name/Number.
Responses appear on the screen. As you view and send additional messages, a
message thread is created.
WARNING: The 160-character limit may vary from country to country
depending on the language and how the SMS is coded.
WARNING: If an image, video or audio file is added to an SMS message,
it is automatically converted into an MMS message and you are charged
accordingly.

48
Threaded box
Messages (SMS, MMS) exchanged with another party can be displayed in chronological
order so that you can conveniently see an overview of your conversation.
Using Smilies
Liven up your messages using Smilies.
When writing a new message, press the Menu key, then choose Insert smiley.
Changing your message settings
Your LG-P710 message settings are predefined, so you can send messages
immediately. You can change the settings based on your preferences.
• From the home screen, touch > touch > Settings.
Messaging
49
E-mail
You can use the Email application to read emails from services other than Google Mail.
The Email application supports the following account types: POP3, IMAP and Exchange.
Your service provider or system administrator can provide the account settings you
need.
Managing an email account
The first time you open the E-mail application, a setup wizard opens to help you to set
up an email account.
To add another email account:
• Touch > Apps tab > E-mail > touch > Accounts > touch > Add
account.
After the initial setup, Email displays the contents of your inbox. If you have added more
than one account, you can switch among accounts.
To change an email account's settings:
• Touch > Apps tab > E-mail > touch > Account settings.
To delete an email account:
• Touch > Apps tab > E-mail > touch > Accounts > touch and hold an
account you want to delete > Remove account.
Email account screen
You can touch an account to view its Inbox. The account from which you send email by
default is indicated with a tick.
– Touch the folder icon to open the account folders.
Only the most recent emails in your account are downloaded to your phone.
50
Working with account folders
Each account has an Inbox, Outbox, Sent and Drafts folder. Depending on the features
supported by your account's service provider, you may have additional folders.
Composing and sending email
To compose and send a message
1 While in the E-mail application, touch the .
2 Enter an address for the message's intended recipient. As you enter text, match-
ing addresses are offered from your Contacts. Separate multiple addresses with
semicolon.
3 Add Cc/Bcc and add attachment files if required.
4 Enter the text of the message.
5 Touch the .
If you aren't connected to a network, for example, if you're working in airplane
mode, the messages that you send are stored in your Outbox folder until you're
connected to a network again. If it contains any pending messages, the Outbox is
displayed on the Accounts screen.
TIP! When a new email arrives in the inbox, you will receive a notification by
sound or vibration. Tap the email notification to stop notifications.
E-mail