LG Electronics USA P760 Cellular/PCS GSM/EDGE Phone with Bluetooth, WLAN and RFID User Manual LG P760 ENG ADDC ACA9 C6A9 120806 indd
LG Electronics MobileComm USA, Inc. Cellular/PCS GSM/EDGE Phone with Bluetooth, WLAN and RFID LG P760 ENG ADDC ACA9 C6A9 120806 indd
Contents
- 1. Users Manual 1
- 2. Users Manual 2
Users Manual 1
![2CTVUVCVGOGPV&KDQJHRU0RGLILFDWLRQVWKDWDUHQRWH[SUHVVO\DSSURYHGE\WKHPDQXIDFWXUHUFRXOGYRLGWKHXVHUVDXWKRULW\WRRSHUDWHWKHHTXLSPHQW2CTVUVCVGOGPV7KLVHTXLSPHQWKDVEHHQWHVWHGDQGIRXQGWRFRPSO\ZLWKWKHOLPLWVIRUDFODVV%GLJLWDOGHYLFHSXUVXDQWWR3DUWRIWKH)&&5XOHV7KHVHOLPLWVDUHGHVLJQHGWRSURYLGHUHDVRQDEOHSURWHFWLRQDJDLQVWKDUPIXOLQWHUIHUHQFHLQDUHVLGHQWLDOLQVWDOODWLRQ7KLVHTXLSPHQWJHQHUDWHVXVHVDQGFDQUDGLDWHUDGLRIUHTXHQF\HQHUJ\DQGLIQRWLQVWDOOHGDQGXVHGLQDFFRUGDQFHZLWKWKHLQVWUXFWLRQVPD\FDXVHKDUPIXOLQWHUIHUHQFHWRUDGLRFRPPXQLFDWLRQV+RZHYHUWKHUHLVQRJXDUDQWHHWKDWLQWHUIHUHQFHZLOOQRWRFFXULQDSDUWLFXODULQVWDOODWLRQ,IWKLVHTXLSPHQWGRHVFDXVHKDUPIXOLQWHUIHUHQFHRUWHOHYLVLRQUHFHSWLRQZKLFKFDQEHGHWHUPLQHGE\WXUQLQJWKHHTXLSPHQWRIIDQGRQWKHXVHULVHQFRXUDJHGWRWU\WRFRUUHFWWKHLQWHUIHUHQFHE\RQHRUPRUHRIWKHIROORZLQJPHDVXUHV5HRULHQWRUUHORFDWHWKHUHFHLYLQJDQWHQQD,QFUHDVHWKHVHSDUDWLRQEHWZHHQWKH HTXLSPHQWDQGUHFHLYHU&RQQHFWWKHHTXLSPHQWLQWRDQRXWOHWRQDFLUFXLWGLIIHUHQWIURPWKDWWRZKLFKWKHUHFHLYHULVFRQQHFWHG&RQVXOWWKHGHDOHURUDQH[SHULHQFHGUDGLR79WHFKQLFLDQIRUKHOS(%%2CTV%NCUU$%QORNKCPEG7KLVGHYLFHDQGLWVDFFHVVRULHVFRPSO\ZLWKSDUWRI)&&UXOHVDQG,&(6&ODVV%GLJLWDODSSDUDWXVUHTXLUHPHQWVIRU,QGXVWU\&DQDGD2SHUDWLRQLVVXEMHFWWRWKHIROORZLQJWZRFRQGLWLRQV7KLVGHYLFHDQGLWVDFFHVVRULHVPD\QRWFDXVHKDUPIXOLQWHUIHUHQFHDQGWKLVGHYLFHDQGLWVDFFHVVRULHVPXVWDFFHSWDQ\LQWHUIHUHQFHUHFHLYHGLQFOXGLQJLQWHUIHUHQFHWKDWPD\FDXVHXQGHVLUHGRSHUDWLRQ$QF[YQTP1RGTCVKQP7KLVGHYLFHKDVEHHQWHVWHGIRUERG\ZRUQRSHUDWLRQVZLWKWKHGLVWDQFHRIFPLQFKHVEHWZHHQWKHXVHUĜVERG\DQGWKHSKRQH7RFRPSO\ZLWK)&&5)H[SRVXUHUHTXLUHPHQWVDPLQLPXPVHSDUDWLRQGLVWDQFHRIFPLQFKHVPXVWEHPDLQWDLQHGIURPWKHXVHUVERG\7KLUGSDUW\EHOWFOLSVKROVWHUVDQGVLPLODUDFFHVVRULHVFRQWDLQLQJPHWDOOLFFRPSRQHQWVPD\QRWEHXVHG%RG\ZRUQDFFHVVRULHVWKDWFDQQRWPDLQWDLQFPLQFKHVVHSDUDWLRQGLVWDQFHEHWZHHQWKHXVHUVERG\DQGWKHSKRQHDQGKDYHQRWEHHQWHVWHGIRUW\SLFDOERG\ZRUQRSHUDWLRQVPD\QRWFRPSO\ZLWK)&&5)H[SRVXUHOLPLWVDQGVKRXOGEHDYRLGHG9+(+%CWVKQP7KLVGHYLFHLVFDSDEOHRIRSHUDWLQJLQDQPRGH)RUDQGHYLFHVRSHUDWLQJLQWKHIUHTXHQF\UDQJHRI *+]WKH\DUHUHVWULFWHGIRULQGRRURSHUDWLRQVWRUHGXFHDQ\SRWHQWLDOKDUPIXOLQWHUIHUHQFHIRU0RELOH6DWHOOLWH6HUYLFHV066LQWKH86:,),$FFHVV3RLQWVWKDWDUHFDSDEOHRIDOORZLQJ\RXUGHYLFHWRRSHUDWHLQDQPRGH *+]EDQGDUHRSWLPL]HGIRULQGRRUXVHRQO\,I\RXU:,),QHWZRUNLVFDSDEOHRIRSHUDWLQJLQWKLVPRGHSOHDVHUHVWULFW\RXU:,),XVHLQGRRUVWRQRWYLRODWHIHGHUDOUHJXODWLRQVWRSURWHFW0RELOH6DWHOOLWH6HUYLFHV7KLV GHYLFHLVQRWLQWHQGHGIRUVDOHLQWKH86$](https://usermanual.wiki/LG-Electronics-USA/P760.Users-Manual-1/User-Guide-1790997-Page-2.png)
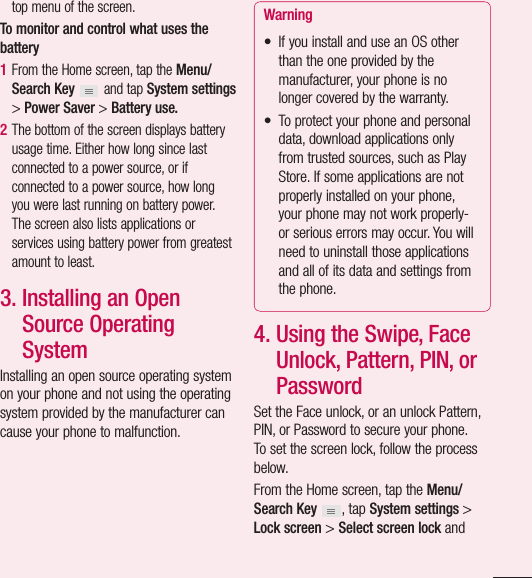

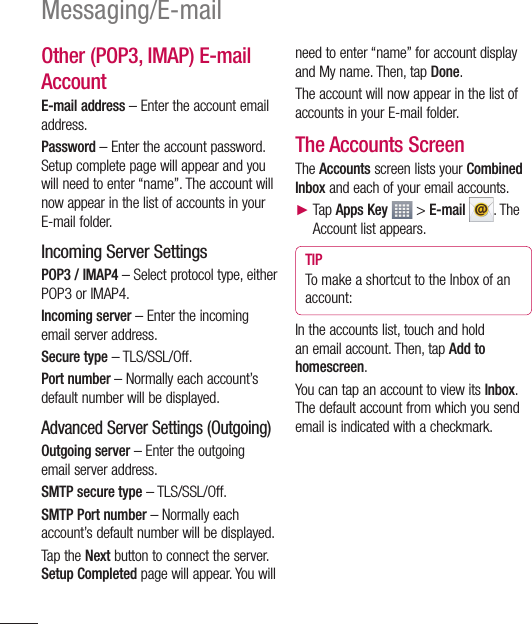
![37Touch and hold the Status Bar and slide it down with your finger to open the Notifications Panel. From here, you can check and quickly turn on and off Sound mode, QuickMemo, Wi-Fi, Bluetooth, and any other options you add.Viewing the Status barThe Status bar uses different icons to display phone information, such as signal strength, new messages, battery life, and active Bluetooth and data connections.Below is a table explaining the meaning of icons you are likely to see in the Status bar.[Status bar]Icon DescriptionNo SIM card insertedNo network signal availableAirplane mode is onConnected to a Wi-Fi networkWired headset connectedCall in progressCall on holdSpeakerphone is onPhone microphone is mutedMissed callBluetooth is onConnected to a Bluetooth deviceAlarm is setNew voicemail available](https://usermanual.wiki/LG-Electronics-USA/P760.Users-Manual-1/User-Guide-1790997-Page-27.png)