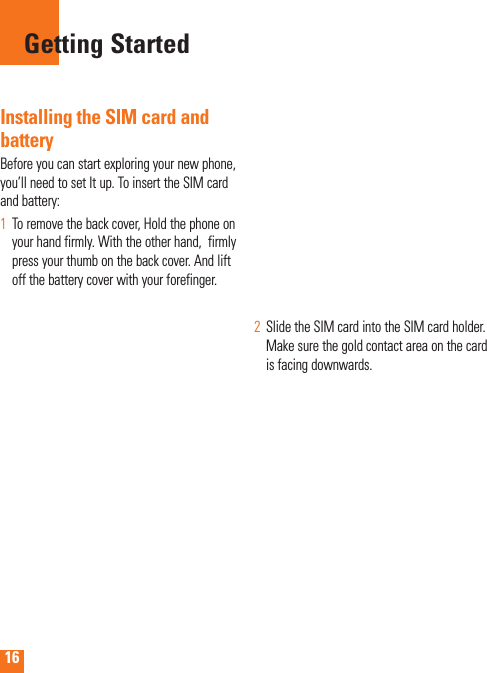
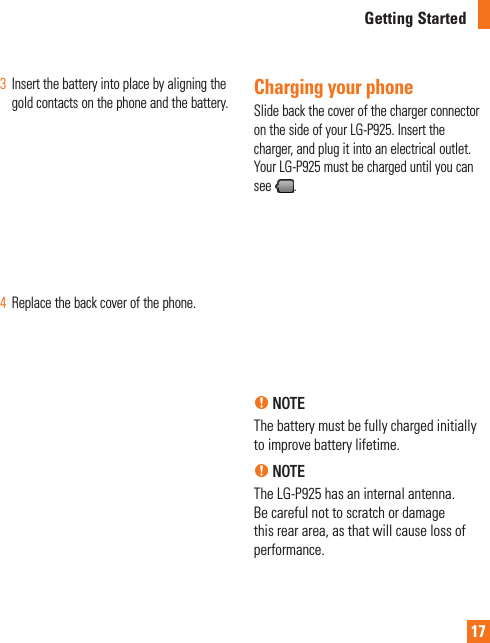
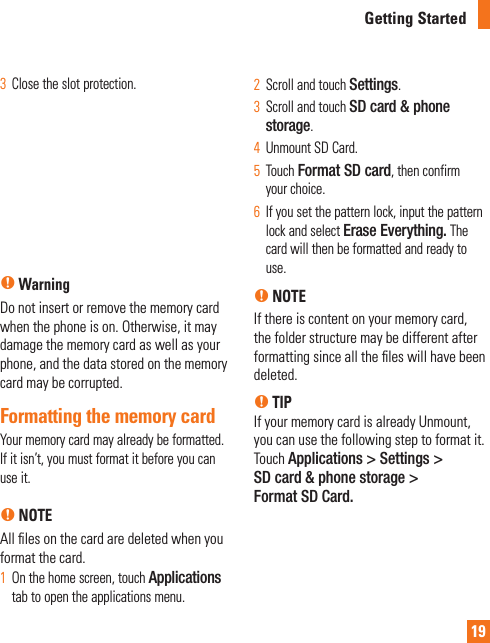
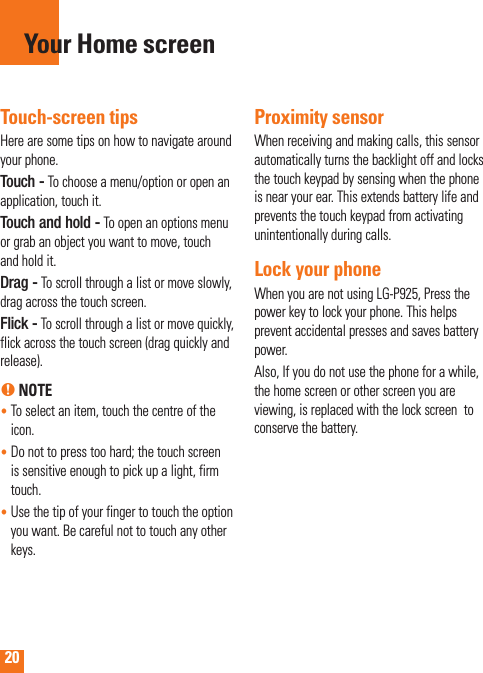
LG Electronics USA P925 Cellular/PCS GSM/WCDMA/EDGE Phone with WLAN and Bluetooth User Manual

LG Electronics USA Cellular/PCS GSM/WCDMA/EDGE Phone with WLAN and Bluetooth Users Manual

Users Manual

User Guide
7Please check to see if any problems you have encountered with your phone are described in this section, before taking the phone in for service or calling a service representative.1. Phone memoryWhen available space on your phone memory is less than 10%, your phone can not receive a new message. You need to check your phone memory and delete some data such as applications or messages to make more memory available.To manage the application On the home screen, touch 1  Applications tab and select Settings> Applications> Manage applications.When all applications appear, scroll and 2  select the application you want to uninstall.Tap 3  Uninstall and touch OK to uninstall application you desired.2. Optimising Battery LifeYou can extend your battery's life between charges by turning off features that you don't need to run constantly in the background. You can also monitor how applications and system resources consume battery power. To extend the life of your battery-  Turn off radio communications that you aren't using. If you aren't using Wi-Fi, Bluetooth, or GPS, turn them off.-  Turn down screen brightness and set a shorter screen timeout.-  Turn off automatic syncing for Google mail™, Calendar, Contacts, and other applications.-  Some applications you’ve downloaded may cause your battery’s life to be reduced.To check the battery charge levelOn the home screen, touch 1  Applications tab and select Settings> About phone> Status.The battery status (charging, discharging) 2  and level (as a percentage of fully charged) are displayed at the top of the screen.Important notice
8To monitor and control what uses the batteryOn the home screen, touch 1  Applications tab and select Settings> About phone> Battery use.The top of the screen displays battery usage 2  time. Either how long since last connected to a power source or, if connected to a power source, how long you were last running on battery power. The body of the screen lists applications or services using battery power from greatest amount to least.3.  Installing an Open Source OSIf you install an open source OS on your phone, and do not use the OS provided by the manufacturer, this may cause your phone to malfunction.n WarningIf you install and use an OS other than the one provided by the manufacturer, your phone is no longer covered by the warranty.n WarningTo protect your phone and personal data, download applications only from trusted sources, such as Android Market™.  If some applications are not properly installed on your phone, your phone may not work normally or a serious error may occur. You will need to uninstall those applications and all of its data and settings from the phone.4. Using Unlock patternSet unlock pattern to secure your phone. Opens a set of screens that guide you through drawing a screen unlock pattern.n WarningPrecautions to take when using the Pattern Lock, It is very important that you remember the unlock pattern you set. You will not be able to access your phone if you use an incorrect pattern 5 times. You have 5 opportunities to enter your unlock Pattern, PIN or Password. If you used all the 5 opportunities, you can attempt it after 30 seconds.Important notice
9When you can’t recall your unlock Pattern, PIN, or Password: If you logged in Google account on the phone and failed to use correct pattern 5times, tab the Forgot pattern button. Then, you are required to sign in with your Google account to unlock your phone.If you haven’t created a Google account on the phone or you forgot it, you need to perform a hard reset.n CautionIf you perform a hard reset, all user applications and user data will be deleted. Please remember to back up any important data before performing a hard reset.Turn the power off.1  Press and hold for over 10 seconds: Power 2  key + Home Key + Up volume key.When the power turns on, release these 3  keys.5.  Using Safe Mode and Hard ResetUsing Safe mode*   To recover from malfunction state of your phoneTurn off your phone and reboot. While your 1  phone is powering back on, press and hold the Menu key while the Android Logo is displayed. Your phone will boot all the way to the main screen and display "safe mode" in lower left corner. Select2   Settings> Applications>Manage applications, and choose the application then select an Uninstall icon. After uninstalling the application, turn off 3  and reboot your phone.*  Using Hard Reset (Factory Reset)  If this does not restore it to the original condition, use Hard Reset to initialise your phone. If you turn on the phone while pressing and holding Power + Home + Up volume keys at the same time (for 10 seconds),  the phone will turn on and perform hard reset immediately.  Important notice
10n WarningIf you perform Hard Reset, all user applications and user data will be deleted. Please remember to back up any important data before performing Hard Reset.6.  Connecting to Wi-Fi networksTo use Wi-Fi on your phone, you access a wireless access point, or “hotspot.” Some access points are open and you can simply connect to them. Others are hidden or implement other security features, so you must configure your phone so it can connect to them.Turn off Wi-Fi when you're not using it, to extend the life of your battery.To turn Wi-Fi on and connect to a Wi-Fi networkOn the home screen, touch 1  Applications tab and select Settings > Wireless & networks > Wi-Fi settings.Touch 2  Wi-Fi to turn it on and begin scan for available Wi-Fi networks.-  List of available Wi-Fi networks is displayed. Secured networks are indicated by a lock icon.Touch a network to connect to it.3  -  If the network is open, you are prompted to confirm that you want to connect to that network by touching Connect.-  If the network is secured, you're prompted to enter a password or other credentials. (Ask your network administrator for details.)The Status bar displays icons that indicate 4  Wi-Fi status.Important notice
117. Using a microSD cardPictures, along with Music and Video files, can only be saved to external memory.Before using the built-in camera, you need to insert a micro SD memory card to your phone first. Without inserting a memory card, you will not be able to save pictures and video you had taken.n NOTEApplications can only be saved to the phone's internal memory.n WarningDo not insert or remove the memory card when the phone is on. Otherwise, it may damage the memory card as well as your phone, and the data stored on the memory card may be corrupted. To remove the memory card safely, please select Home Screen > Applications Settings > SD Card&phone storage > Unmount SD card.8.  Opening and Switching ApplicationsMulti-tasking is easy with Android because open applications keep running even when you open another application. There’s no need to quit an application before opening another. Use and switch among several open applications. Android manages each application, stopping and starting them as needed, to ensure that idle applications don’t consume resources unnecessarily.To stop the application you useOn the home screen, touch 1  Applications tab and select Settings> Applications> Manage applications.Scroll to the desire application and touch 2  Force stop to stop using it.n TIPGetting back to recent Apps-  Press and hold Home key, then a screen will display a listing the applications you used recentlyImportant notice
129.  Connecting your phone to a computer via USBUse the USB cable with your phone to 1  connect the phone to a USB port on your computer. You'll receive a notification that the USB is connected.Open the Notification drawer and touch USB 2  connected.Touch 3  Mount to confirm that you want to transfer files between your phone’s microSD card and the computer.When the phone is connected as USB storage, you receive a notification. You phone’s microSD card is mounted as a drive on your computer. You can now copy files to and from the microSD card.10.  Unlock screen when using data connectionYour display will go dark if untouched for a period of time when using data connection. To turn on your LCD screen, just touch it.n TIP To use a microSD card on you phone again, you need to open the Notification drawer and touch "Turn off USB storage".During this time, you can’t access the microSD card from your phone, so you can’t use applications that rely on the microSD card, such as Camera, Gallery and Music.To disconnect your phone from the computer, carefully follow your computer’s instructions to disconnect USB devices correctly, to avoid losing information on the card. Safely disconnect the USB device on your 1  computer.Open the Notification drawer and touch 2  Turn off USB storage.Touch 3  Turn off in the dialog that opens.Important notice
1311.  Hold Phone straight upPlease hold the mobile phone straight up as a regular phone.While making/receiving calls or sending/receiving data, try to avoid holding the lower part of the phone where the antenna is located. It may affect call quality.12. When Screen freezesIf the phone does not respond to user input or the screen freezes:Remove the battery, insert it again and power on the phone. If it still does not work, please contact to the service centre.13.  Do not connect your phone When you power on/off your PC Make sure to disconnect your phone and PC via data cable as it might have errors on your PC.Important notice
14Your PhoneTo turn on the phone, press and hold Power key for 3 seconds.To Turn off the phone, press Power key for 3 seconds and touch Power Off.Home key -  Returns to home screen from any screen.Menu key -  Check what options are available.EarpieceBack key -  Returns to the previous screen.Search key -  Search the web and contents in your phone.Power/Lock key -  Powers your phone on/off by pressing and holding the key.-  Turns off the screen and locks.Proximity Sensorn WarningPlacing a heavy object on the phone or sitting on it can damage its LCD and touch screen functionalities. Do not cover the protective film on the LCD’s proximity sensor.  This can cause the sensor to malfunction.n TIP Press Menu key whenever you tap an application to check what options are available.n TIP LG-P925 does not support Video call.n TIP If LG-P925 has errors when you use it or you can not turn it on, remove battery ,install it again and turn it on after 5 seconds.
15Back coverBatterySIM card slotmicroSD memory card slotCamera lensYour PhoneRear ViewCharger, micro USB cable connectorStereo earphone connectorVolume keys-  On the home screen: controls ringer volume. -  During a call: controls your earpiece volume.-  When playing a track: controls volume continuously.Power/Lock key Microphone
16Installing the SIM card and batteryBefore you can start exploring your new phone, you’ll need to set It up. To insert the SIM card and battery: To remove the back cover, Hold the phone on 1  your hand firmly. With the other hand,  firmly press your thumb on the back cover. And lift off the battery cover with your forefinger.Slide the SIM card into the SIM card holder. 2  Make sure the gold contact area on the card is facing downwards.Getting Started
17Insert the battery into place by aligning the 3  gold contacts on the phone and the battery.Replace the back cover of the phone.4  Charging your phoneSlide back the cover of the charger connector on the side of your LG-P925. Insert the charger, and plug it into an electrical outlet. Your LG-P925 must be charged until you can see  .n NOTE The battery must be fully charged initially to improve battery lifetime.n NOTE The LG-P925 has an internal antenna. Be careful not to scratch or damage this rear area, as that will cause loss of performance.Getting Started
18Installing the memory cardTo store multimedia files such as captured images by using a built-in camera, you must insert a memory card to your phone.  To insert a memory card:n NOTE The LG-P925 supports upto a 32GB memory card.Turn the phone off before inserting or 1  removing the memory card. Remove the back cover.Open the slot protection and insert the 2  memory card into the slot. Make sure the gold contact area is facing downwards.Getting Started
19Close the slot protection. 3  n WarningDo not insert or remove the memory card when the phone is on. Otherwise, it may damage the memory card as well as your phone, and the data stored on the memory card may be corrupted.Formatting the memory cardYour memory card may already be formatted. If it isn’t, you must format it before you can use it.n NOTEAll files on the card are deleted when you format the card.On the home screen, touch 1  Applications tab to open the applications menu.Scroll and touch 2  Settings.Scroll and touch 3  SD card & phone storage. Unmount SD Card.4  Touch 5  Format SD card, then confirm your choice.If you set the pattern lock, input the pattern 6  lock and select Erase Everything. The card will then be formatted and ready to use.n NOTEIf there is content on your memory card, the folder structure may be different after formatting since all the files will have been deleted.n TIP If your memory card is already Unmount, you can use the following step to format it.  Touch Applications > Settings >  SD card & phone storage > Format SD Card.Getting Started
20Touch-screen tipsHere are some tips on how to navigate around your phone.Touch - To choose a menu/option or open an application, touch it.Touch and hold - To open an options menu or grab an object you want to move, touch and hold it.Drag - To scroll through a list or move slowly,  drag across the touch screen.Flick - To scroll through a list or move quickly, flick across the touch screen (drag quickly and release).n NOTE•  To select an item, touch the centre of the icon.•  Do not to press too hard; the touch screen is sensitive enough to pick up a light, firm touch.•  Use the tip of your finger to touch the option you want. Be careful not to touch any other keys.Proximity sensorWhen receiving and making calls, this sensor automatically turns the backlight off and locks the touch keypad by sensing when the phone is near your ear. This extends battery life and prevents the touch keypad from activating unintentionally during calls. Lock your phoneWhen you are not using LG-P925, Press the power key to lock your phone. This helps prevent accidental presses and saves battery power. Also, If you do not use the phone for a while, the home screen or other screen you are viewing, is replaced with the lock screen  to conserve the battery.Your Home screen
21-  If there are any programs running when you set the pattern, they may be still running in lock mode. It is recommended to exit all programs before entering the lock mode to avoid unnecessary charges. (e.g., phone call, web access and data communications)Setting unlock pattern: You can draw your own unlock pattern by connecting four or more dots.If you set a pattern, the phone's screen is locked. To unlock the phone, draw the pattern you set on the screen.n CautionBefore you set an unlock pattern, you need to create your Google mail account first.n CautionIf there are more than 5 pattern drawing errors in a row, you cannot unlock the phone. In this case, your personal information and downloaded data will be deleted.Unlock screenWhenever your LG-P925 is not in use, it will return to the lock screen. Slide your finger from left to right to unlock the screen.Silent ModeFrom Notification drawer, touch   to be  Or if you don't use unlock pattern , simply drag    to the left.To wake up your phone, press Menu, Home, Back, Search or Power Key. The lock screen will appear. Touch the lock icon and drag your finger to the right to unlock your home screen. The last screen you were working on opens.Home Simply swipe your finger to the left or right to view the different panels.  You can also customize each panel with widgets which are shortcuts to your favourite applications, folders and wallpapers. You can also customize each panel with widgets, shortcuts and quick keys except Phone key.Your Home screen
22n NOTESome screen images may be different depending on your phone provider.In your LG home screen, you can view quick keys on the bottom of the screen. The quick keys provide easy, one-touch access to the functions you use the most. Touch the Phone icon to bring up the touch-dialling pad to make a call. Touch to open contacts Touch the Applications tab at the bottom of the screen. You can then view all your installed applications. Touch the Message icon to access the messaging menu.  Here, you can create a new message. Touch to open AT&T site.Adding widgets to your home screenYou can customise your home screen by adding shortcuts, widgets, or folders to it. For more convenience using your phone, add your favourite widgets on the home screen.On the home screen, touch 1  Menu key and select Add. Or long touch the empty part of the home screen.On the 2  Add to Home screen menu, touch the type of item you want to add.For example, select 3  Folders from the list and tap it. You will see a new folder’s icon on the home 4  screen. Drag it to the desired location on the desired panel and release your finger from the screen.n TIPTo add a preloaded application or an application you've downloaded from the Android Marketplace to home screen, simply touch and hold the icon you want added to home screen.n TIPTo delete an application icon on the home screen, click and hold the shortcut icon you want to delete and drag to  .n TIPYou cannot delete the preloaded applications. (Only their icons can be deleted from the screen.)Your Home screen
23Getting back to a recently used applicationsTouch and hold the 1  Home key. The screen will show you a pop up with icons of applications that you've used recently.Touch an icon to open its application. Or, 2  touch Back key to return to the current application.Notification drawerThe notification drawer runs across the top of your screen. Ring Airplane ModeGPSBluetoothWi-FiTouch and slide the notification drawer down with your finger. Or, on the home screen, touch Menu key and select Notifications. Here, you can check and manage Wi-Fi, Bluetooth, GPS status as well as other notifications.Viewing the status barThe status bar uses different icons to display phone information, such as signal strength, new messages, battery life, and active Bluetooth and data connections.Below is a table explaining the meaning of icons you’re likely to see in the status bar.[Status bar]Icon DescriptionNo SIM cardNo signalWi-Fi is on and connectedWired headsetCall forwardCall holdSpeakerphoneCall muteYour Home screen
24Icon DescriptionMissed callBluetooth onBluetooth connectedSystem warningAlarmNew voicemailFlight modeSilentVibrateNo SD cardBattery fully chargedBattery is chargingData inData outData in and outUSB to PCIcon DescriptionDownloadUploadGPS is acquiringGPS is onOnscreen KeyboardYou can also enter text using the onscreen keyboard. The onscreen keyboard displays automatically on the screen when you need to enter text. To manually display the keyboard, simply touch a text field where you want to enter text.Qwerty Keypad (Phone Keypad)  Shift Key - Touch once to capitalise the next letter you type. Double-tap for all caps. Setting key Number and Symbols Key - Touch to change input to number and symbol entry. caps. Enter Key Key Remove keypad from the screen. Delete KeyYour Home screen
25  Go forward or backword between letters.Entering textKeypad Tap to change between the number, symbol, and text keypads. Use   to swap between lowercase and uppercase. The coloured circle on the button tells you if uppercase is locked on (green) or if it is just on for one character (orange).To enter a space, touch  .Tip! To switch between Qwerty Keypad and Phone Keypad, Touch   and choose Keyboard Layouts.Abc modeThis mode allows you to enter letters by touching the key labelled with the required letter once, twice, three or four times until the letter is displayed.123 ModeThis mode allows you to enter numbers in a text message (a telephone number, for example) more quickly. Touch the keys corresponding to the required digits before manually switching back to the appropriate text entry mode.Entering accented lettersWhen you select French or Spanish as the text entry language, you can enter special French or Spanish characters (e.g., “a”).After the corresponding letter character disappears, press the same key repeatedly until you see the special character you want.Your Home screen
26ExampleTo input, press and hold the “a” key.After the letter “a...” disappears, keep your finger pressed on the screen and slide left or right to select the desired character.Your Home screen
27The first time you open the Google application on your phone, you will be required to sign in with your existing Google account. If you do not have a Google account, you’re prompted to create one. Creating your Google account On the home screen, touch 1  Applications tab   to open the applications menu.Tap2   Google mail and tap Next > Create to start the Google mail™ set up wizard.Touch a text field to open the touch 3  keyboard, and enter your name and username for your Google account. When you entering the text, you can move to the next text field by touching Next on the keyboard.When you’re finished to input name 4  and username, tap Next. Your phone is communicating with Google servers and checking username availability. Enter and re-enter your password. Then 5  follow the instructions and enter the required and optional information about the account. Wait while the server creates your account.Signing in your Google accountEnter your e-mail address and password, 1  then tap Sign in.After signing in, you can use Google mail™ 2  and take advantages of Google services on your phone. Once you have set up your Google 3  account on your phone, your phone will be automatically synchronised with your Google account on the web. (Depending on your synchronisation settings.)After signing in, you can use Google mail™, Google Calendar, Android Market™ and Google Map™; Download applications from Android Market™; back up your settings to Google servers; and take advantage of other Google services on your phone. IMPORTANT•  Some applications, such as Calendar, work only with the first Google Account you add. If you plan to use more than one Google Account with your phone, be sure to sign into the one you want to use with such applications first. When you sign in, your contacts, Google mail messages, Calendar Google Account Set-up
28events, and other information from these applications and services on the web are synchronised with your phone. If you don’t sign into a Google Account during setup, you will be prompted to sign in or to create a Google Account the first time you start an application that requires one, such as Google mail or Android Market™.•  If you want to use the backup feature to restore your settings to this phone from another phone that was running Android release 2.0 or later, you must sign into your Google Account now, during setup. If you wait until after setup is complete, your settings will not be restored.•  If you have an enterprise account through your company or other organisation, your IT department may have special instructions on how to sign into that account.Google Account Set-up
29Making a callTouch 1    to open the keypad. Enter the number on the keypad. To delete a 2  digit, touch the Clear icon   .Touch the 3  Call icon   to make a call.To end a call, touch 4  End icon  .n TIPTo enter “+” to make international calls, touch and hold down   . Calling your contactsTouch 1    to open your contacts.Scroll through the contact list or enter the 2  first letter(s) of the contact you want to call by touching Search.In the list, touch the contact you want to 3  call.Answering and rejecting a callWhen screen lockedWhen your phone rings, Drag the Answer icon   to the right.Drag Decline icon   to the left reject an incoming call. Drag Excues msg bar from the bottom if you want to send one. If the caller is unknow, this Excuse msg bar is not available.When screen unlockedWhen your phone ring, touch the Answer icon  . Touch Decline icon   to reject an incoming call.Touch Excues msg bar from the bottom if you want to send one. If the caller is unknow, this Excuse msg bar is not available.Adjusting call volumeTo adjust the In-call volume during a call, use volume up & down key on the right side of the phone. Calls
30Making a second callDuring your initial call, touch 1   . Then, select the number you want to call.Dial the number, or search your contacts.2  Touch the 3  Call icon   to connect the call.Both calls will be displayed on the call 4  screen. Your initial call will be locked and put on hold.Touch 5    to toggle between calls. Or touch  to make a conference call.To end active calls, touch 6  End call. If there is no active call, it will end the Hold call. To end all calls at the same time, press the Menu key and select End all calls.n NOTEYou will be charged for each call you make.Viewing your call logsOn the home screen, touch   and choose Call log tab.View a complete list of all dialed, received, and missed voice calls.n TIPTouch any single call log entry to view the date, time, and duration of the call.n TIPPress the Menu key, then touch Clear call log to delete all the recorded items.Call settingsYou can configure phone call settings, such as call forwarding,  and other special features offered by your carrier. Scroll and touch 1  Settings. Tap 2  Call settings.Calls
31You can add contacts on your phone and synchronise them with the contacts in your Google Account or other accounts that support syncing contacts.Searching for a contactThere are two ways to search for a contact:On the Home screenOn the home screen, touch 1   to open your contacts. Touch 2  Search and enter the contact name using the keypad.Adding a new contactOn the home screen, touch 1    , and enter the new contact’s number, then press the Menu key, touch Add to contact and then Create new contact. If you want to add a picture to the new 2  contact, touch   . Choose from Take a picture or Pick from gallery.Select the contact type by touching 3   .Touch a category of contact information and 4  enter the details about your contact.Touch 5  Done.Favourite ContactsYou can classify frequently called contacts as favourites.To add a contact to your favouritesOn the home screen, touch1     to open your contacts.Touch a contact to view its details.2  Touch the star to the right of the contact’s 3  name. The star turns gold.To remove a contact from your favourites listOn the home screen, touch 1    to open your contacts.Touch the 2  Favorites tab and choose a contact to view its details.Touch the gold star to the right of the 3  contact’s name. The star turns grey and the contact is removed from your favourites.Contacts
32AT&T Address Book Native Sync (AAB) AT&T Address Book Native Sync (AAB) is a service application for the synchronization of phone contact list information and AAB server. When you turn on the phone or change your SIM card, the AAB Start UP application is displayed after copying the SIM card information.After checking the membership identification for this service, you can find the menu for the synchronization with AAB server by selecting Address Book, More and AT&T AddressBook.]  Sync Log: Shows recently synchronized information. n NOTEThis indicator[  ] is displayed during the AAB synchronization.Contacts
33Messaging/E-mailMessagingYour LG-P925 combines SMS and MMS into one intuitive, easy-to-use menu.Sending a messageTouch 1    icon on the home screen, and touch New message to open a blank message.Enter a contact name or call number in the 2  To field. As you enter the contact name, matching contacts appear. You can touch a suggested recipient. You can add multiple contacts.n NOTEYou will be charged for a text message for every person you send the message to.Touch type to compose below to start 3  entering your message.Press the 4  Menu key to open the options menu. Choose from Call, Attach, Send, Insert Smiley, Discard, Templates, All threads and Add to Contacts. Touch 5  Send to send your message.The message screen opens, with your 6  message after your name. Responses appear on the screen. As you view and send additional messages, a message thread is created.n WarningThe 160-character limit may vary from country to country depending on how the SMS is coded and language.n WarningIf an image, video, or audio file is added to an SMS message, it will be automatically converted into an MMS message, and you will be charged accordingly.n NOTEWhen you get an SMS message during a call, there will be ring notification.Threaded box Messages (SMS, MMS) exchanged with another party can be displayed in chronological order so that you can conveniently see an overview of your conversation.
34Using smiliesLiven up your messages using smilies.When writing a new message, press the Menu key, then choose Insert Smiley.Changing your message settingsYour LG-P925 message settings are predefined, so you can send messages immediately. You can change the settings based on your preferences. n WarningIn this mode, the MMS Client device guides the user in creating and sending messages with content belonging to the Core MM Content Domain. This guidance is provided through warning dialogs.Opening Email and the Accounts ScreenYou can use the Email application to read email from services other than Google mail. The Email application supports the following account types: POP3, IMAP and Exchange.To open the Email application] From the Home screen, touch Email.The first time you open the Email application, a setup wizard opens to help you add an email account.  After the initial setup, Email displays the contents of your Inbox (if you have only one account) or the Accounts screen (if you have multiple accounts).The Accounts screenThe Accounts screen lists your Combined Inbox and each of your email accounts. Open the Email application. If you’re not on 1  the Account screen, press the Menu Key and touch Accounts.Select the Email service provider.2   - Touch to open your Combined Inbox, with messages sent to all of your accounts. - Touch to open a list of just your starred messages. - Touch the folder icon to open the account’s folders.You can touch an account to view its Inbox. The account from which you send email by default is indicated with a checkmark.Messaging/E-mail
35Messaging/E-mailTo open your Combined InboxIf you have configured Email to send and receive email from more than one account, you can view all messages sent to all accounts in your Combined Inbox.Touch 1  Email.Touch 2  Combined Inbox (in the Accounts screen). Messages in the Combined Inbox are colour coded along their left sides, by account, using the same colours that are used for your accounts in the Accounts screen.Only your account’s most recent emails are downloaded to your phone. To download more (earlier) email messages, touch Load more messages at the bottom of the emails list.Reading Your MessagesTouch the message you want to read. The message opens in a screen that includes information about who sent it, the date it was sent, and other related information.You can touch that status indicator to open Quick Contact. Responding to a MessageYou can reply to it, forward it or even just delete it.To delete a message]While reading a message, touch the Delete button.   OR]While reading a message, press the Menu Key and touch Delete. For many types of accounts, deleted messages are moved to a Trash folder, so you can retrieve them in case they were deleted by mistake.Composing and Sending EmailTo compose and send a message While in the 1  Email application, press the Menu Key and touch Compose.Enter an address for the message’s intended 2  recipient. As you enter text, matching addresses are offered from your Contacts. Separate multiple addresses with commas.Press the 3  Menu Key and touch Add Cc/Bcc to be able to Cc or Bcc other contacts/email addresses.Enter the text of the message. 4
36Press the 5  Menu Key and touch Attach to send a photo with the message.Touch the 6  Send button. If you’re not ready to send the message, touch the Save as draft button to save it in a Drafts folder. Touch a draft message in a Drafts folder to resume working on it. Your message will also be saved as a draft if you touch the Back Key  before sending it. Touch the Discard button to abandon and delete a message, including any saved drafts. If you aren’t connected to a network, for example, if you’re working in airplane mode, the messages that you send are stored in your Outbox folder until you’re connected to a network again. If it contains any pending messages, the Outbox is displayed on the Accounts screen.Please note that messages sent using an Exchange account will not be located on the phone; they will, however, be located on the Exchange server itself. If you want to see your sent messages in the Sent folder (or with the Sent label), you will often need to open the Sent folder/label and select Refresh from the options menu.Working with Account FoldersEach account has Inbox, Outbox, Sent, and Drafts folders. Depending on the features supported by your account’s service provider, you may have additional folders.Adding and Editing Email AccountsTo add an email accountPress the 1  Menu Key and touch Add account. Touch the 2  Next button. Or, if you need to enter email account settings.Enter a name for the account, confirm how 3  you want your name to appear in outgoing mail, then touch the Done button.To change an account’s settingsOpen the Accounts screen. 1  Touch and hold the account whose settings 2  you want to change. In the menu that opens, touch Account settings.Messaging/E-mail
37Messaging/E-mailTo delete an email accountOpen the Accounts screen. 1  Touch and hold the account you want to 2  delete.Touch 3  Remove account in the menu that opens.Touch the 4  OK button in the dialog box to confirm that you want to delete the account.Social Networking With your phone, you can enjoy the social networking and manage your micro-blog in on-line communities. You can update your current status upload photos and view your friends’ status updates real-time. You can add your Facebook, Twitter accounts to your phone. If you don’t have an account, you can visit their sites to set it up. n NOTEAdditional costs may be incurred when connecting and using online services. Check your data charges with your network provider. Adding your account to your phoneOn the home screen, choose any SNS 1  application you want to use. If you don't have an account yet, touch Sign 2  up now and input details. Enter your e-mail address and password 3  that you set up on your community, then tap Log in.Wait while your details are checked with 4  your community. Check your community is turned 5  ON. If you tap your community, you can see the current status of your social community.n NOTEIf you add a social networking widget on your home screen, the widget will show your status when your phone updates from the network.  You can also access the social community directly by touching up the widget.
38Viewing and updating your status Choose a community you want to access.1  You can see the current status of your social 2  community. You can update your status with comments 3  or uploading photos.n NOTEThis is dependent on network services.n TIPYou can use information about friends only in SNS or sync all data to Contacts.Removing accounts on your phoneChoose Settings > Accounts & Sync settings > Choose an accounts you want to delete > Touch Remove account.Messaging/E-mail
39Getting to know the viewfinderZoom – Zoom in or zoom out. Alternatively you can use the side volume keys.  Brightness – This defines and controls of the amount of sunlight entering the image. Slide the brightness indicator along the bar, towards “-” for a lower brightness image, or towards “+” for a higher brightness image.Settings – Touch this icon to open the settings menu. See Using the advanced settings.Focus – Touch this icon to select the options menu. See Using the focus mode.Scene mode – Choose from Auto, Portrait, Landscape, Sports, Night, and Sunset.Video mode – Slide down this icon to switch to video mode.Taking a photoGallery – This enables you to access your saved photos from within the camera mode. Simply touch, and your gallery will appear on the screen.n NOTEYou need to insert a memory card first to take a picture. Without inserting a memory card, you will not be able to take a picture nor save the picture you had taken.n NOTEYou can close all the shortcut options to give a clearer viewfinder screen. Just touch the centre of the viewfinder once. To recall the options, touch the screen again.Camera
40Using the focus modeYou can select the focus mode as following options;Auto Focus – Set the camera to focus automatically.Macro – Macro mode allows you to take extreme close-ups. If you are trying to take a close-up shot but the focus box remains red, try turning the macro mode on.Face tracking – If you set Face tracking and take a photo, your camera detects and focuses on human faces automatically.Manual – Set the camera to focus manually.Taking a quick photo Choose Camera application.1  Holding the phone horizontally, point the 2  lens towards the subject you want to photograph.Touch and hold the capture button lightly, 3  and a focus box will appear in the centre of the viewfinder screen.Position the phone so you can see the 4  subject in the focus box.When the focus box turns green, the camera 5  has focused on your subject.Off the capture button.6  Once you’ve taken the photoYour captured photo will appear on the screen. Share    Touch to share your photo as Bluetooth, Email, Facebook, Google mail, Messaging, Picasa or Twitter.n NOTEAdditional charges may apply when MMS messages are downloaded while roaming.Set as    Touch to use the image as Contact icon or Wallpaper.Rename   Touch to edit the name of the selected picture.   Touch to delete the image.   Touch to take another photo immediately. Your current photo will be saved.   Touch to view a gallery of your saved photos. Camera
41Using the advanced settingsIn the viewfinder, touch   to open all advanced options.You can change the camera setting by scrolling the list. After selecting the option, touch the Back key.Image size – Touch to set the size (in pixels) of the picture you take. Select a pixel value from the numerical options: 3M (2048x1536), 2M (1600x1200), 1M (1280x960), VGA (640x480),   QVGA (320x240).ISO – The ISO rating determines the sensitivity of the camera’s light sensor. The higher the ISO, the more sensitive the camera will be. This is useful under darker conditions when you cannot use the flash. Select from ISO values of Auto, 400,200 and 100.White balance – Choose from Auto, Incandescent, Sunny, Fluorescent, and Cloudy. Colour effect – Choose a colour tone for your new photo.Once you’ve made your selection, use the Back key to close the colour tone menu. You are then ready to take a picture.n NOTEYou can change a colour picture to black and white or sepia, but you cannot change a black-and-white or sepia picture to colour.Timer – The self-timer allows you to set a delay after the shutter is pressed. Select Off, 3 seconds, 5 seconds, or 10 seconds. This is ideal if you want to be included in a photo.Shot mode – Choose from Normal, Continuous shot, Beauty shot, Art shot, Face effect and Cartoon. Image quality – Choose from Super fine, Fine, and Normal. The finer the quality, the sharper the photo. However, the file size will increase as a result, which means you’ll be able to store fewer photos in the memory.Auto review – If you set Auto review on, it will show you the picture you just had taken automatically.Shutter sound – Select one of the four shutter sounds.Tag location – Activate to use your phone’s location-based services. Take pictures wherever you are and tag them with the location. If you upload tagged pictures to a blog that supports geotagging, you can see the pictures displayed on a map.Camera
42n NOTEThis function is only available when GPS is active.Reset  – Restore all camera default settings. – Touch whenever you want to know how this function operates. This is provide you a quick guide.n TIPWhen you exit the camera, all settings will return to their defaults, except image size and image quality. Any nondefault settings must be reset, such as colour tone and ISO. Check these before you take your next photo.n TIP The settings menu is superimposed over the viewfinder, so when you change elements of the image colour or quality, you will see a preview of the image change behind the settings menu. Viewing your saved photosYou can access your saved photos from 1  within the camera mode. Just touch   and touch the screen then you will see Slideshow and Menu.n TIPFlick left or right to view other photos or videos. - Touch to see slide show.  -  Touch to share the contents or delete Touch More for more options below.Detail - Check information of contents.Set as - Set as contact icon or wallpaperCrop -Crop your photo. Move your finger across the screen to select the area.Rotate - Rotate left or rightCamera
43Video cameraGetting to know the viewfinderZoom – Zoom in or zoom out. Alternatively you can use the side volume keys. Before starting record a video, you can use the zoom function. You can not control the zoom function during recording.Brightness – This defines and controls of the amount of sunlight entering the Video. Slide the brightness indicator along the bar, towards “-” for a lower brightness Video, or towards “+” for a higher brightness Video.Settings – Touch this icon to open the settings menu. See Using the advanced settings.Video size – Touch to set the size (in pixels) of the video you record. Choose your video image size from VGA (640x480), QVGA (320x240) or QCIF (176x144).Scene mode – Set the camera to adjust to the environment. Choose from Auto, Portrait, Landscape, Sports, Sunset and Night.Camera mode – Slide up this icon to switch to camera mode.Start recordingGallery – This enables you to access your saved photos & Videos from within the video camera mode. Simply touch, and your gallery will appear on the screen.
44Shooting a quick videoSlide the camera mode button down 1  position, the icon will change to  . The video camera’s viewfinder will appear 2  on the screen.Holding the phone horizontally, point the 3  lens towards the subject of the video.Press the capture button once to start 4  recording.REC will appear at the bottom of the 5  viewfinder with a timer showing the length of the video.Touch 6    on the screen to stop recording.After shooting a videoA still image representing your video will appear on the screen. Play    Touch to play the video. Share    Touch to share your video as Bluetooth, Email, Google mail™, MMS or YouTube™.n NOTE Additional charges may apply when MMS messages are downloaded while roaming.Rename   Touch to edit the name of the selected video.   Touch to shoot another video right away. Your current video will be saved.   Touch to delete the video you just made, and confirm by touching Yes. The viewfinder will reappear.   Touch to view a gallery of your saved videos.Using the advanced settingsUsing the viewfinder, touch   to open all the advanced options.  Adjust the video camera setting by scrolling the list. After selecting the option, touch the Back key.White balance – The white balance ensures any the white areas in your video are realistic. To enable your camera to adjust the white balance correctly, you may need to determine the light conditions. Choose from Auto, Incandescent, Sunny, Fluorescent, and Cloudy.Colour effect – Choose a colour tone to use for your new view.Video camera
45Duration – Set a duration limit for your video. Choose between Normal and MMS to limit the maximum size to send as an MMS message. If you set as MMS , you can record 600k video.Also you can choose QVGA and QCIF only in this mode.n TIPWhen choosing MMS duration, the Video quality will be set as QCIF and you can shoot longer videos.Video quality – Choose from Super fine, Fine and Normal.Audio recording – Choose Mute to record a video without sound.Auto review – If you Autoreview on, it will show you the video you just recorded automatically.Reset  – Restore all video camera default settings. – Touch whenever you want to know how this function operates. This is provide you a quick guide.n TIPYou can change a video shot in colour to black and white or sepia, but you cannot change a black-and-white or sepia video to colour.Watching your saved videosIn the viewfinder, touch 1    .Your gallery will appear on the screen.2  Touch a video once to bring it to the front of 3  the gallery. It starts to play automatically.Video camera
46Adjusting the volume when viewing a videoTo adjust the volume of a video while it is playing, use the volume keys on the right side of the phone.Setting a photo as wallpaperTouch the photo you want to set as 1  wallpaper to open it.Touch the screen to open the options menu.2  Touch 3  Set as , then touch Set Wallpaper.Your photos and videos
47You can store multimedia files to a memory card to have easy access to all your image and video files.Touch Applications tab, then select Gallery. You can open a list of catalogue bars that store all your multimedia files.n NOTEMake sure you install a memory card into the phone to save photos and access all your pictures. Without a memory card, the phone will not display any photos or videos without Picasa images which are in your Picasa album.View modelTouch Gallery and you will see Folder view. Touch any folder and it will turn to Grid view mode. If you tap any photo, it will turn to Full view mode.Timeline viewLG-P925 Gallery provides a timeline view of your photos and videos. From Grid view mode,drag   to the right, the date you took your photos will be displayed starting latest. If you select a specific date, all the photos you took on that day will be grouped over a white background.My Images options menuSelect a photo, then press Menu key twice to see the available options.Sending a photoTo send a photo, touch and hold the photo 1  you want.Select 2  Share. Choose from Bluetooth, Email, Google mail™, Messaging, SNS or Picasa.When you choose 3  Email, Google mail™ or Messaging, your photo will be attached to a message, then you write and send the message normally. n TIPIf you have a SNS account and set it up on your phone, you can share your photo to SNS community.Sending a videoTo send a video, touch and hold the video 1  you want.Select 2  Share. Choose from Bluetooth, Email, Google mail™, Messaging, or YouTube™. Multimedia
48When you choose 3  Email, Google mail™ or Messaging, your video will be attached to a message, then you write and send the message normally.Using an imageChoose images to use as wallpaper or identify callers.Touch and hold a photo, then select 1  Set as.Choose from2   Contact icon, or Wallpaper.Creating a slideshowFrom Full view mode, you can create a slideshow so you don’t have to open and close each image.Touch and hold a photo, then select 1  Slideshow.Checking your photoYou can view a photo’s detailed information, such as Name, Date, Time, Size and Type.Touch 1  Menu > More > Details.Transferring files using USB mass storage devicesTo transfer files using USB devices:Connect the LG-P925 to a PC using a USB 1  cable.If you didn't install LG Android Platform 2  Driver on your PC, you need to change settings manually. Choose Settings > SD Card & Phone Storage > Activate Mass Storage Only.Touch 3  Turn on USB storage.You can view the mass storage contents on 4  your PC and transfer the files.n NOTE You need to install and SD card first. Without an SD card, you cannot use USB mass storage.n NOTEIf you installed LG Android Platform Driver, you will see pop up with 'Turn on USB storage' immediately.Multimedia
49MusicYour LG-P925 has a built-in music player that lets you play all your favourite tracks. To access the music player, touch Music.Playing a songOn the home screen, touch 1  Applications tab and select Music. Touch 2  Songs.Select the song you want to play.3  Touch 4    to pause the song.Touch 5    to skip to the next song.Touch 6    to go back to the first part of the song. Touch   two times to go back to the previous sfong.To change the volume while listening to music, press the up and down volume keys on the right side of the phone.Touch and hold any song in the list. It will display Play, Add To Playlist, Use As Phone Ringtone, Delete, Details, and Search as options.n NOTE Music file copyrights may be protected by international treaties and national copyright laws. Therefore, it may be necessary to obtain permission or a licence to reproduce or copy music. In some countries, national laws prohibit private copying of copyrighted material. Before downloading or copying the file, please check the national laws of the relevant country concerning the use of such material.Searching for stationsYou can tune in to radio stations by searching for them manually or automatically. They will then be saved to specific channel numbers, so you don’t have to keep re-tuning in.  You can store up to 48 channels on your phone.To tune in automaticallyOn the home screen, touch 1  Applications tab and select FM radio.Press the 2  Menu key and touch Auto scan.If there are pre-set channels, you will see 3  a pop-up with 'Reset all channels and start Auto scan?'. If you choose OK, all the pre-set channels will be deleted and Auto scan will start.Multimedia
50During Auto scanning, touch Stop if you 4  want to stop scanning. Only scanned  channels before you stop scanning will be saved.n NOTE You can also manually tune in to a station using the displayed wheel.Resetting channelsPress the 1  Menu key and choose Reset Channel to reset the current channel, or choose Reset All Channels to reset all the channels.Multimedia
51First, set up a Google account. Enter your 1  user name and password.After signing in, your contacts, email, 2  and calendar in your Google account will automatically synchronise with your LG-P925.n TIP If you change your Google account after signing in, or you want to log out, please use the below step: Menu > Settings > Applications > Manage applications > Google Apps > Clear data.Google Maps™Check your current location and traffic and receive directions to your destination. The LG-P925 must be connected to Wi-Fi or 3G/GPRS.n NOTEGoogle Maps™ does not cover all cities and countries. Press Menu key to use options:Search   – Enter the place you are looking for.Directions   – This will let you find out the route of your entered place. Touch  to input the data . Choose from Contacts or Point on Map or My current location. Layers   – You can switch view from Traffic to Satellite or Terrain. Tap Latitude then you will see the location of your contacts from Google Account.My Location   – Point your current location on the map.Join Latitude   – Share your location with friends you choose and Google.More   – Clear map or find Starred items and more.n NOTEWhile viewing Street View for a location, press the Menu key then touch Compass Mode to turn compass mode on.Market™Android Market™ lets you download useful applications and games. If you install applications and games from Android Market™, they appear in the LG-P925 menu. You can check downloaded application by tapping Downloads tab.You can check other's comment regarding an Google applications
52application or you can post your comments.Select a category from 1  Apps and Games to browse its contents. It will show you Top paid, Top free and Just in.Choose an application to install.2  n NOTE When you want to finish the game, use the Home or Back key. You will return to the home screen. Or use the Menu key of the game.Google mail™Google mail™ is configured when you first set up your phone. Depending on your synchronisation settings, Google mail™ on your phone is automatically synchronised with your Google mail™ account on the web.The inbox conversations list is your default Google mail™ view.Press the Menu key, then touch Refresh to send or receive new emails and to synchronise your emails with your Google mail™ account on the web. With Menu key, you can compose an email, Add account , Go to labels, Search and More.Google Talk™Google Talk™ is Google’s instant messaging program. It lets you communicate with other people who also use Google Talk™. Press the Menu key and check available options.All friends   – Join all friends to communicate. Add friend   – Send invitation to chat.Search   – It search any chat that contains your entered word or sentences.Sign Out   – Sign out from chat. When you touch Talk icon from the Home screen, you will be Signed in automatically if you set Automatically sign in active.Settings   – Adjust indicator or notification. etc.More   – From here, you can close all chats and check Invites and Blocked list.Google applicatiFons
53Setting your alarmOn the home screen, touch 1  Applications tab and select Clock.If you want to add a new alarm, touch 2   . Set the time and touch 3    to turn on the alarm. After you set the time, the LG-P925 will let you know how much time is left before the alarm sounds.Set Repeat, Ringtone or Vibrate and add 4  Label to name the alarm. Touch Done. Press the 5  Menu key to add alarm or adjust Snooze duration or alarm volume from settings.Using your calculatorOn the home screen, touch 1  Applications tab and select Calculator.Touch the number keys to enter numbers.2  For simple calculations, touch the function 3  you want (+, –, x, or ÷), followed by =.For more complex calculations, press the 4  Menu key, touch the Advanced panel, then choose sin, cos, tan, log, and so on.Adding an event to your calendarOn the h1   ome screen, touch Applications tab and select Calendar. First, you must create a Google account to 2  use Calendar.To check the event, touch the date. Touch 3  and hold if you want to add a New event. then touch New event.Touch 4  What, then enter the event name. Check the date and enter the time you want your event to begin and finish. Also, touch 5  Where, then enter the location.If you would like to add a note to your event, 6  touch Description and enter the details.If you want to repeat the alarm, set 7  Repetition, and set Reminders, if necessary.Touch 8  Done to save the event in the calendar. A coloured square in the calendar will mark all days that have saved events. An alarm will sound at the event start time to help you stay organised.Utilities
54Changing your calendar viewOn the home screen, touch 1  Applications tab and select Calendar. Press the Menu key.Select the calendar view for a particular day, 2  week, or month. ThinkFree OfficeThinkFree Office allows you to read documents, and provides limited edit functions for  Microsoft Word, Excel and PowerPoint. But You can not edit PDF file.Touch and hold a file, then Open, Upload, 1  Rename, Move, Copy, Delete, Send and Properties options are available. This is depending on the file type.Press Menu key New – Add document, Spreadsheet, Presentation or Folder. Refresh – Refresh datas. Sort – Sort by name, Date or Size. Preferences – Adjust ThinkFree Office settings. Update – Update ThinkFree Office. About – More information about ThinkFree Office.Voice recorderUse the voice recorder to record voice memos or other audio files.Recording a sound or voiceOn the home screen, touch 1  Applications tab and select Voice Recorder.Touch 2    to begin recording.Touch 3    to end recording.Press the 4  Menu key and select Use as to set as the Phone ringtone.n NOTE Touch Go to list to access your album. You can listen to the saved recording.Sending the voice recordingOnce you have finished recordƒing, you can 1  send the audio clip by touching the Menu key and Share.Choose from 2  Bluetooth, Email, Google mail™ and Messaging. When you select Email, Google mail™ and Messaging, the voice recording will be added to the message that you write and send it normally.Utilities
55BrowserBrowser gives you a fast, full-colour world of games, music, news, sports, entertainment, and much more, right on your mobile phone. Wherever you are and whatever you’re into.n NOTEAdditional charges apply when connecting to these services and downloading content. Check data charges with your network provider.Using optionsPress the Menu key to view options.  New window – Open a new window.  Bookmark – Add/Show Bookmark, show Most Visited Site and History.  Window – Show all your open windows.  Refresh – Touch to refresh the web page. Forward – Goes to the page you connected later than current page. This is opposite concept with Back key, which goes to the previous page. More•  Add bookmark – Add the current web page as bookmark.•  Find on page – If you enter a letter or any word, it will marks all the letters you entered from the web page.•  Select Text – Touch and select the lines you want to copy. Long touch any input box then you can paste it.•  Page info – show the web page information.•  Share Page – Send the web page.•  Downloads – Show downloaded history.•  Settings – Set browser settings.n TIPTo return the previous web-page, press Back key.Adding and accessing bookmarksPress the 1  Menu key then select Bookmarks.Touch a bookmark and enter a name for the 2  bookmark followed by its URL.To access the bookmark, simply touch the 3  bookmark. You will be connected to the bookmarked page.The Web
56Changing Web browser settingsPress the Menu key then select More > Settings.The Web
57Wireless & networksHere, you can manage Wi-Fi and Bluetooth. Also, you can set mobile networks, airplane mode.Airplane mode – After setting Airplane mode, all wireless connections will be disabled.SoundAdjust sound, notification default settings ,vibrate mode. You can manage audible and Haptic feedback also.DisplayBrightness – Adjust the brightness of the screen.Auto-rotate screen – Set to switch orientation automatically when you rotate the phone.Animation – Set to display an animationScreen timeout – Set the time for screen timeout.Location & Security Use wireless networks – If you check Use wireless networks, your phone will be determine your approximate location by using Wi-Fi and mobile networks. When you check this option, you’re asked whether you consent to allowing Google to use your location when providing these services.Use GPS Satellites – If you check Enable GPS satellites, your phone will be determine your location to street-level accuracy.  Set up screen lock – Set unlock pattern to secure your phone. Opens a set of screens that guide you through drawing a screen unlock pattern. You can set PIN or Password instead of Pattern or leave it as None.When you turn on your phone or wake up the screen, you're prompted to draw your unlock pattern to unlock the screen.Set up Sim card lock – Set up SIM card lock or change SIM PIN.Visible passwords – Select to show passwords as you type them or deselect to hide passwords as you type them.Settings
58Select device administrators – Add or more administrationsUse secure credentials – Allows you to access secure certificates Install from SD card – choose to install encrypted certificates from your SD card. Set password – set or change the credential storage password.Clear storage - Clear credential storage of all contents and reset its passwordApplicationsYou can manage applications and set up quick launch shortcuts.Manage Applications –  Manage and remove installed applications.Running services - Check currently running servicesDevelopment – Set options for application development.Accounts & sync settingsActivate Background data synchronisation or Auto-sync. Check or add accounts.PrivacyYou can Factory data reset. Be careful as this will erase all your data.SD card & phone storageCheck total available SD card space. Touch Unmount SD card for safe removal. Format the SD card, if you want to delete all data from the SD card.SearchTouch Google search and you can adjust sGoogle search settings. Adjust Searched items so you can get necessary information effectively . Choose from Web, Apps, Contacts, Messaging Search, Music or Twitter.Language & keyboardSelect language and customize text settings.Settings
59Voice input & outputSet Voice recognizer settings and use the Text-to-Speech  settings  to  configure  the  Android text-to-speech synthesiser, for applications that can take advantage of it.AccessibilityYou use the Accessibility settings to configure any accessibility plug-ins you have installed on your phone.n NOTERequires additional plug-ins to become selectable.Date and timeSet date, time, time zone, and formats.About phoneView legal information, and check phone status and software version.Settings
60With Wi-Fi, you can use high-speed Internet access within the coverage of the wireless access point (AP). You can enjoy wireless Internet with Wi-Fi, without extra charges. Turn on Wi-FiFrom Home Screen , open Notification drawer and touch   on. From Menu, Choose settings > Wireless & network settings > Wi-Fi  .To connect to Wi-FiChoose Wi-Fi network you want to connect. If you see   , you need to enter password to connect.n TIPIf you are out of Wi-Fi area and choose 3G connection, additional chareges may be applied.USB tetheringYou can share your phone's internet connection with your computer.You can tether your phone to your computer with a USB cable.Settings > Wireless & network settings > Tethering & portable hotspot > USB tetheringFor more information regarding USB tethering, click Help.n TIPTo use USB Tethering, you need to install LG Android Platform Driver on your PC. Wi-Fi TetheringUse your LG-P925 as portable Wi-Fi hotspotSettings > Wireless & network settings > Tethering & portable hotspot > Portable Wi-Fi hotspotWi-Fi
61n NOTEThe LG-P925 supports WEP, WPA/WPA2-PSK and 802.1x EAP. security. If your Wi-Fi service provider or network administrator sets encryption for network security, fill in the key in the pop-up window. If encryption is not set, this pop-up window will not be shown. You can obtain the key from your Wi-Fi service provider or network administrator.Wi-Fi
62Phone Software updateLG Mobile Phone Software update from internetFor more information on using this function, please visit thehttp://update.lgmobile.com orhttp://www.lg.com/common/index.jsp g select country and language. This Feature allows you to update the firmware of your phone to the latest version conveniently from the internet without the need to visit a service centre. As the mobile phone firmware update requires the user’s full attention for the duration of the update process, please make sure to check all instructions and notes that appear at each step before proceeding. Please note that removing the USB data cable or battery during the upgrade may seriously damage you mobile phone.DivX Mobile   ABOUT DIVX VIDEO: DivX® is a digital video format created by DivX, Inc. This is an official DivX Certified® device that plays DivX video. Visit www.divx.com for more information and software tools to convert your files into DivX video.ABOUT DIVX VIDEO-ON-DEMAND: This DivX Certified® device must be registered in order to play purchased DivX Video-on-Demand (VOD) movies. To obtain your registration code, locate the DivX VOD section in your device setup menu. Go to vod.divx.com for more information on how to complete your registration. DivX Certified® to play DivX® video up to 320 x 240.DivX®, DivX Certified® and associated logos are trademarks of DivX, Inc. and are used under license.Software update
63Please check to see if any problems you have encountered with the phone are described in this section before taking the phone in for a service or calling a service engineer.Q&AQHow do I view the list of outgoing calls, incoming calls and missed calls?APress the   key.QWhy is the connection inconsistent or not audible in certain areas?AWhen the frequency environment is unstable in a certain area, connection may be inconsistent and inaudible. Relocate to another area and try again.QWhy is the connection inconsistent or abruptly disconnects even when established?AWhen frequency is unstable or weak, or if there are too many users, a connection may be cut off even after it was established. Please try again later or attempt again after relocating to other areas.QWhy won't the LCD turn on?ARemove the battery, then replace it. Then turn on the power. If there is no change, fully charge the battery and try again.QWhy does the phone heat up?AThe phone may get hot when there is a very long call duration, when games are played or even when surfing the Internet for a long time. This has no effect upon the life of the product or performance.QWhy does the battery run out so quickly during normal use?AThis may be due to the user environment, a large number of calls or a weak signal.QWhy is no number dialed when an Address Book entry is recalled?ACheck that the number has been stored correctly by using the Address book Search feature. Re-store them, if necessary.
64There are a variety of accessories available for your mobile phone, some of which may be sold separately. You can select these options according to your personal communication requirements. Consult your local dealer for availability.Travel AdapterThis adapter allows you to charge the battery. It supports standard US 120 Volt 60Hz outlets.BatteryStandard battery is available.n NOTE•  Always use genuine LG accessories. Failure to do this may invalidate your warranty.•  Accessories may be different in different regions; please check with our regional service company or agent for further enquiries.Accessories
65Before using the mobile phone, please read first!How to save music/video files to the phoneConnect your phone to the PC using the USB cable.Touch and drag down the status bar on the home screen. Select USB connected > Turn on USB storage > Open folder to view files.If you didn't install LG Android Platform Driver on your PC, you need set it manually.For more information, refer to 'Transferring files using mass storage devices' .Save music or video files from the PC to the phone's removable storage.-  You may copy or move files from the PC to the phone's removable storage using a card reader.-  If there is a video file with a subtitle file (.smi or .srt file with the same name as the video file), place them in the same folder to display the subtitle automatically when playing the video file.-  When downloading music or video files, copyright must be secured. Please note that a corrupted file or file with a wrong extension may cause damage to the phone.How to play music/video files to the phonePlaying music filesLocate the file you want in the list and select it to play.Playing video filesLocate the file you want in the list and select it to play.How to move the contacts from the old phone to the current phoneExport your contacts as a CSV file from your old phone to the PC using a PC sync program.Download Mobile Sync for Android at www.1  lg.com and install it in the PC. Run the program and connect your Android mobile phone to the PC using the USB cable.Select the 2  Contacts icon. Go to Menu > File > Import and select the CSV file saved in the PC.If the fields in the imported CSV file are 3  different from the ones in Mobile Sync for Android, you need to map the fields.
66After mapping the fields, click OK. Then, the contacts are added in Mobile Sync for Android.If the connection of LG-P925 phone (using 4  the USB cable) is detected by Mobile Sync for Android, click "Sync" or "Sync contacts" to synchronise the contacts saved in the PC to your phone and save them.How to send data from your phone via BluetoothSending data via Bluetooth: You can send data via Bluetooth by running a corresponding application, not from Bluetooth menu, unlike regular mobile phones.*  Sending pictures: Run the Gallery application and select Picture > Menu. Click Share and select Bluetooth > Check If Bluetooth is turned on and select Scan for devices > Choose the device you want to send data from the list.*  Exporting contacts: Run the Contacts application. Touch the address you want to export to. Press Menu and Select Share > Bluetooth > Check If Bluetooth is turned on and select Scan for devices > Choose the device you want to send data from the list.*  Sending multi-selected contacts: Run the "Contacts" application. To Select more than one contact press Menu key and touch Multiselect . Select the contacts you want to send or press Menu key and touch Select all > Touch Share > Bluetooth > Select all. Select Share > Bluetooth > Check If Bluetooth is turned on and select Scan for devices > Choose the device you want to send data from the list.*  Connecting to FTP (Only the FTP server is supported on this handset): Select "Settings" > "Wireless & networks" > "Bluetooth settings". Then, select the "Discoverable" checkbox and search for other devices. Find the service you want and connect to the FTP server.Before using the mobile phone, please read first!
67Before using the mobile phone, please read first!n TIPThe version is Bluetooth 2.1 EDR and certified by Bluetooth SIG. It is compatible with other Bluetooth SIG certified devices.-  If you want to search for this phone from other devices, go to "Settings" > "Wireless & networks" > "Bluetooth settings".Then, select the "Discoverable" checkbox.The checkbox is cleared after 120 seconds.-  Supported profiles are SDAP, HFP, HSP, OPP, PBAP (server), FTP (server), A2DP, AVRCP, and DUN.
Part 15.21 statement" Change or Modifications that are not expressly approved by the manufacturer could void        the user's authority to operate the equipment. “Part 15.105 statement This equipment has been tested and found to comply with the limits for a class B digitaldevice, pursuant to Part 15 of the FCC Rules. These limits are designed to provide reasonable protection against harmful interference in a residential installation. This equipment generates uses and can radiate radio frequency energy and, if not installed and used in accordance with the instructions, may cause harmfulinterference to radio communications. However, there is no guarantee that interference willnot occur in a particular installation. If this equipment does cause harmful interference or television reception, which can be determined by turning the equipment off and on, the user is encouraged to try to correct the interference by one or more of the following measures:- Reorient or relocate the receiving antenna.- Increase the separation between the equipment and receiver.- Connect the equipment into an outlet on a circuit different from that towhich the receiver is connected.- Consult the dealer or an experienced radio/TV technician for help.
Part 15 Class B ComplianceThis device and its accessories comply with part15 of FCC rules.Operation is subject to the following two conditions:(1) This device & its accessories may not cause harmful interference.(2) This device & its accessories must accept any interference received, including interference that may cause undesired operation.Body-worn OperationThis device has been tested for body-worn operations with the distance of 0.79inches (2.0cm) for a normal mode and with the distance of 0.39inches(1.0cm) for a hotspot mode from the user's body.To comply with FCC RF exposure requirements, a minimum separation distance of 0.79inches(2.0cm) for a normal mode and 0.39inches(1.0cm) for a hotspot modemust be maintained from the user's body.For example, this device must be maintained from the user's body with an appropriate belt-clip accessory.[More than 0.79inches(2.0cm)] Additionally, Belt clips, holsters & other body-worn accessories may not containmetallic components.
90Safety GuidelinesHearing Aid Compatibility (HAC) with Mobile PhonesWhen some mobile phones are used near some hearing devices (hearing aids and cochlear implants),users may detect a buzzing, humming, or whining noise. Some hearing devices are more immune than others to this interference noise, and phones also vary in the amount of interference they generate. The wireless telephone industry has developed ratings for some of their mobile phones, to assist hearing device users in finding phones that may be compatible with their hearing devices. Not all phones have been rated. Phones that are rated have the rating on their box or a label on the box. The ratings are not guarantees. Results will vary depending on the user’s hearing device and hearing loss. If your hearing device happens to be vulnerable to interference, you may not be able to use a rated phone successfully. Trying out the phone with your hearing device is the best way to evaluate it for your personal needs.M-Ratings: Phones rated M3 or M4 meet FCC requirements and are likely to generate less interference to hearing devices than phones that are not labeled. M4 is the better/higher of the two ratings.T-Ratings: Phones rated T3 or T4 meet FCC requirements and are likely to be more usable with a hearing device’s telecoil (“T Switch” or “Telephone Switch”) than unrated phones. T4 is the better/higher of the two ratings. (Note that not all hearing devices have telecoils in them.)Hearing devices may also be measured for immunity to this type of interference. Your hearing device manufacturer or hearing health professional may help you find results for your hearing device. The more immune your hearing aid is, the less likely you are to experience interference noise from mobile phones.To ensure that the Hearing Aid Compatibility rating for your phone is maintained, secondary transmitters such as Bluetooth® and WLAN components must be disabled during a call. See Page 83 for instructions to disable these components.
322※ HAC statement regarding Multiband  This phone has been tested and rated for use with hearing aids for some of the wireless technologies  that it uses.  However, there may be some newer wireless technologies used in this phone that have not been tested yet for use with hearing aids.  It is important to try the different features of this phone thoroughly and in different locations, using your hearing aid or cochlear implant,  to determine if you hear any interfering noise.   Consult your service provider or the manufacturer of this phone for information on hearing aid compatibility.   If you have questions about return or exchange policies, consult your service provider or phone retailer.

Navigation menu