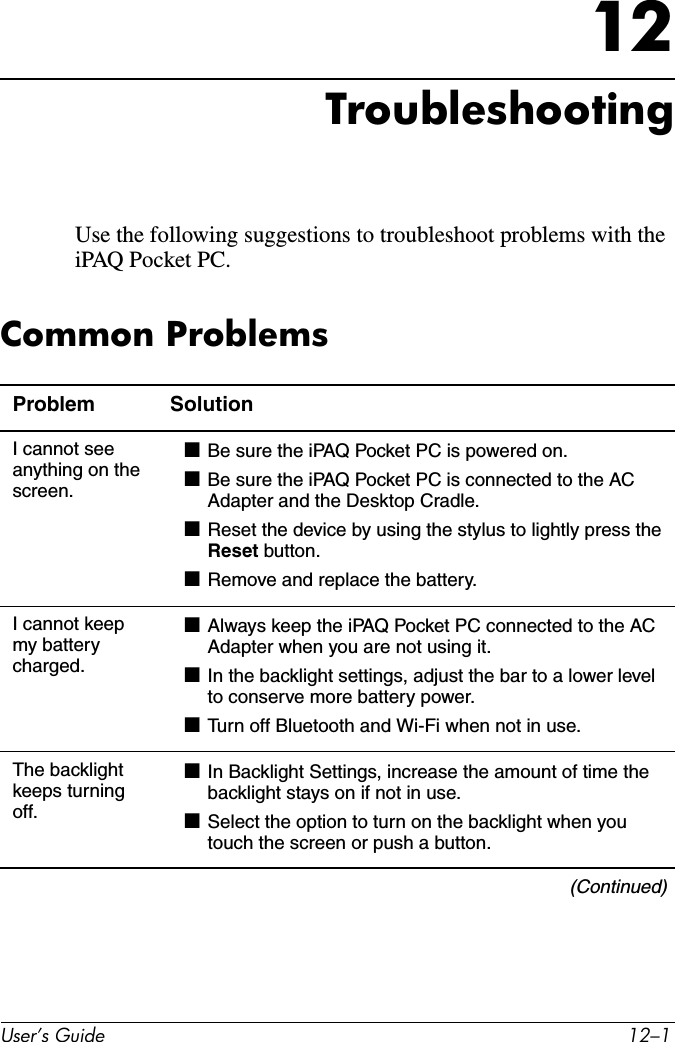
LG Electronics USA PDA-L05C-WL PDA With 802.11b WLAN and Bluetooth User Manual
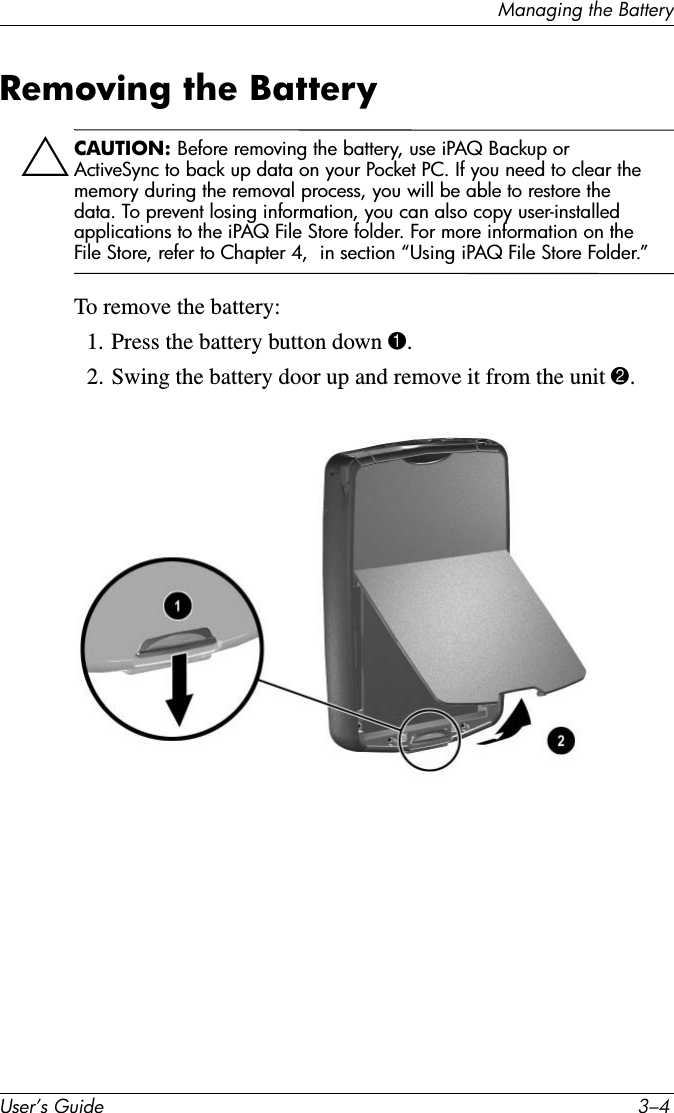
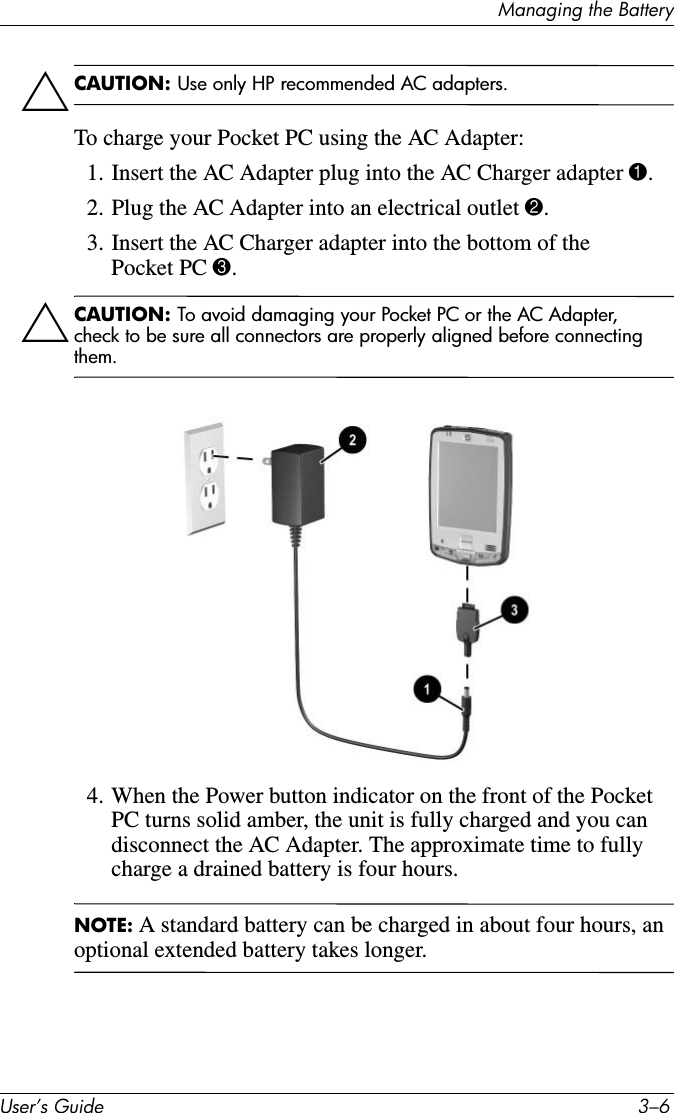
LG Electronics USA PDA With 802.11b WLAN and Bluetooth
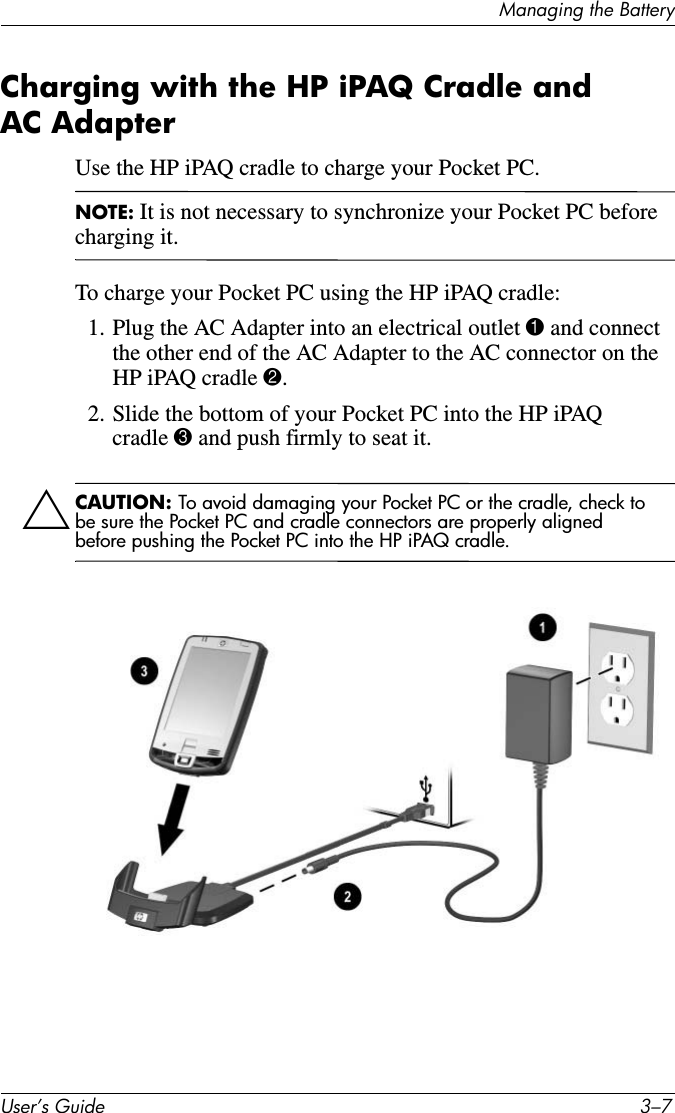
UserManual.wiki
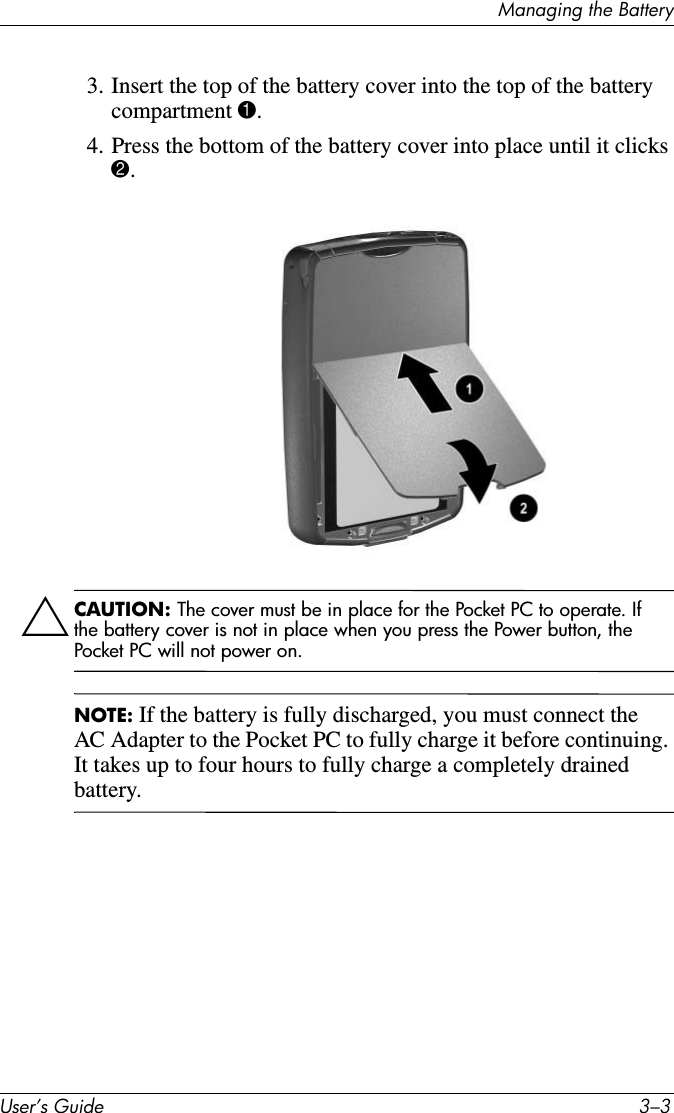
>
LG Electronics USA
>
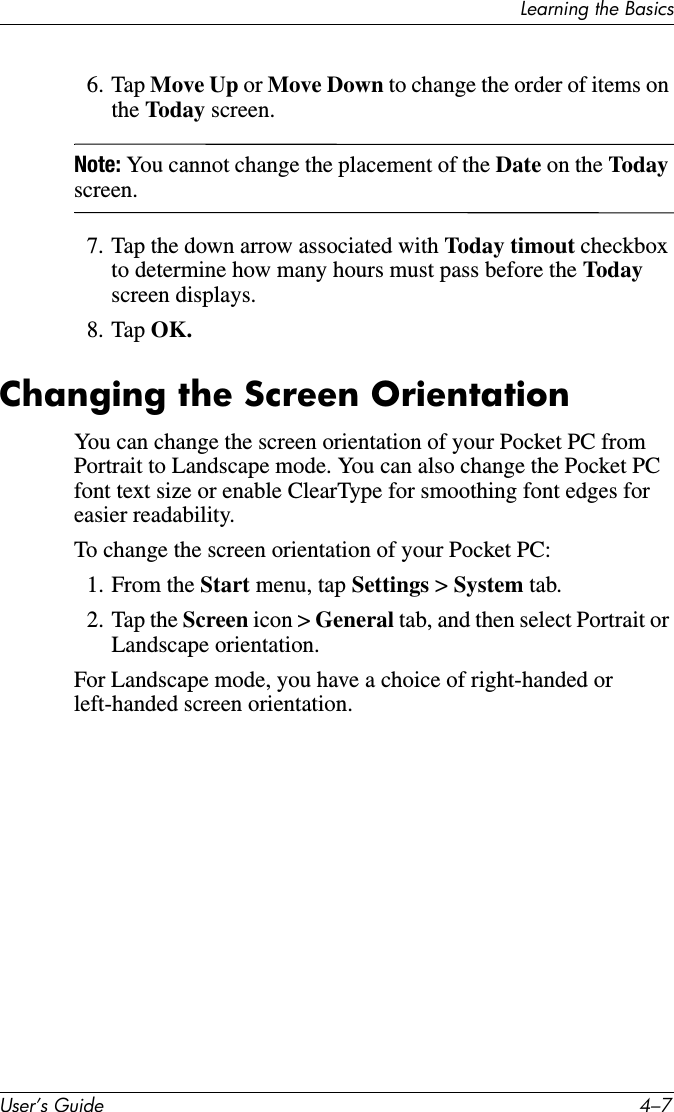
PDA L05C WL User Manual
User Manual
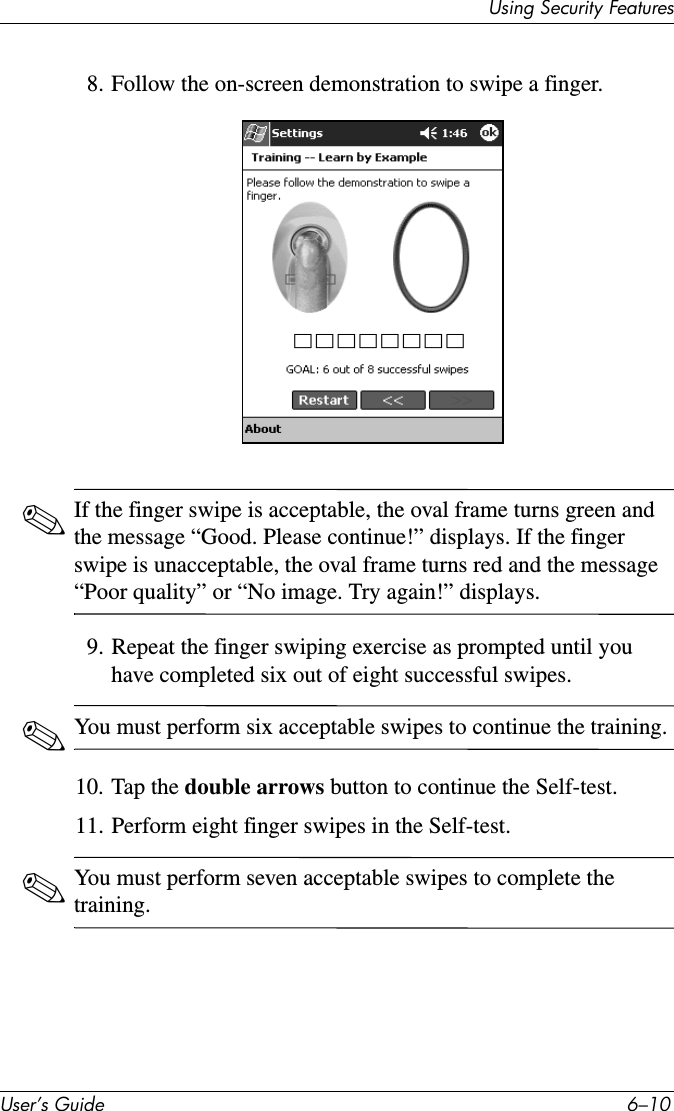
Navigation menu
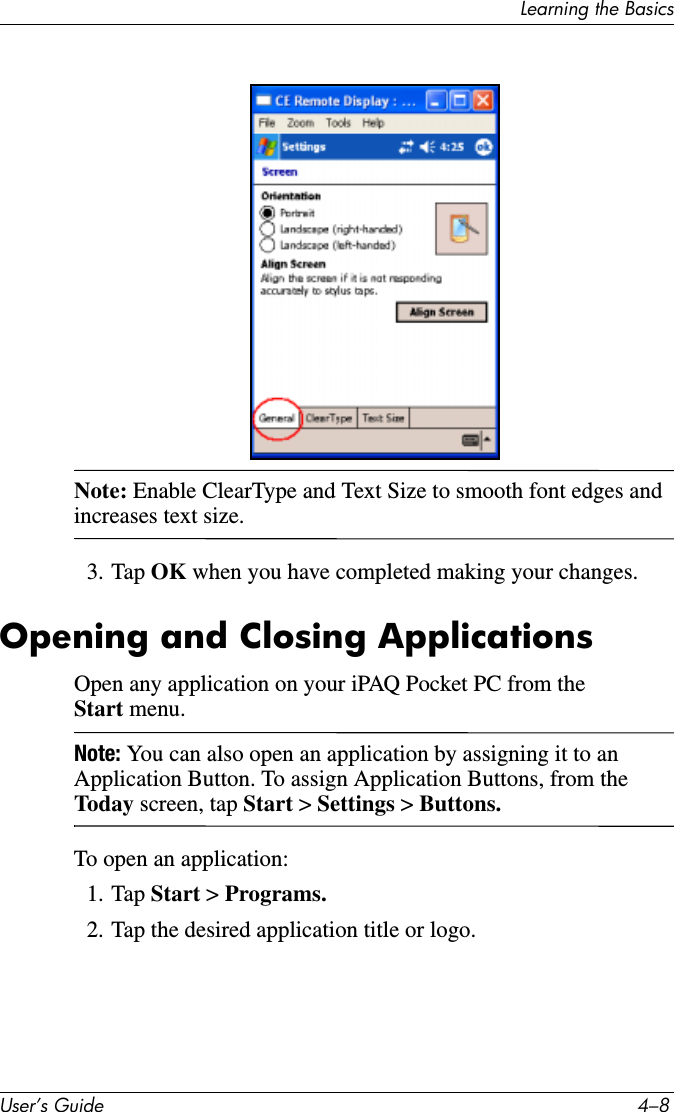
Upload a User Manual
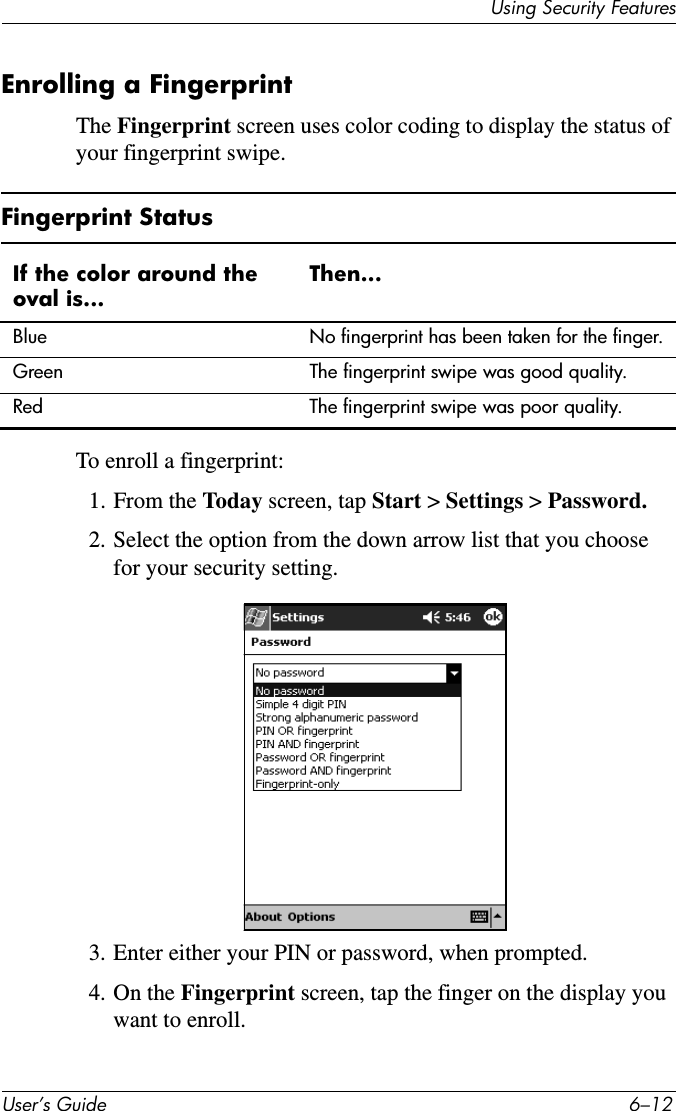
Namespaces
Wiki Guide
HTML
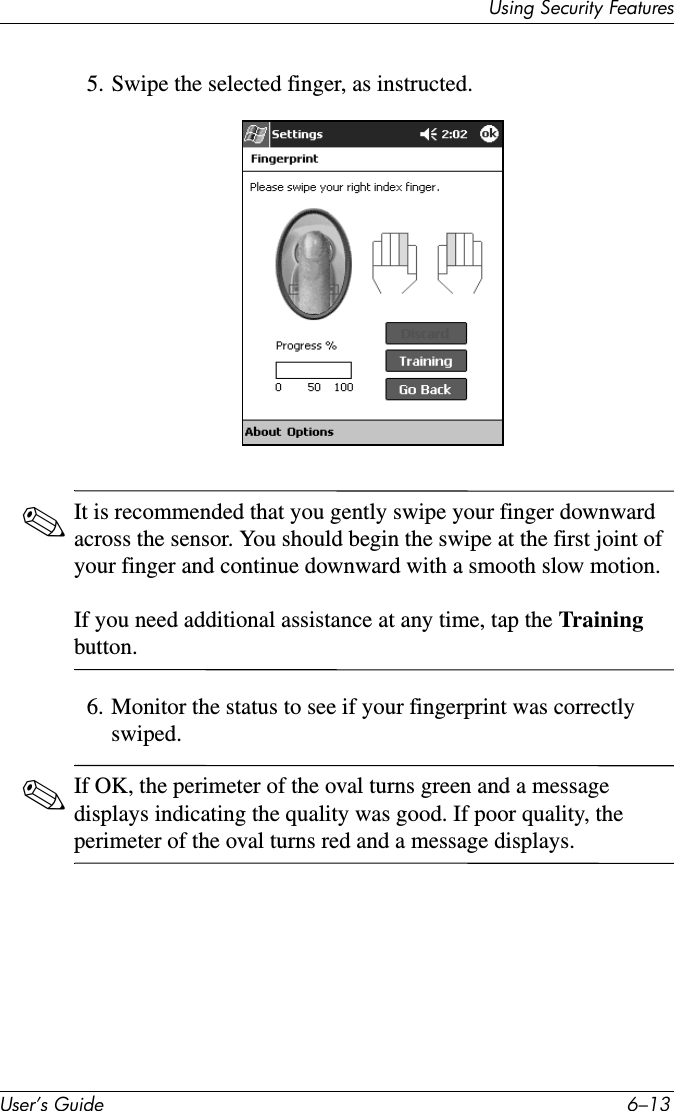
PDF
Info
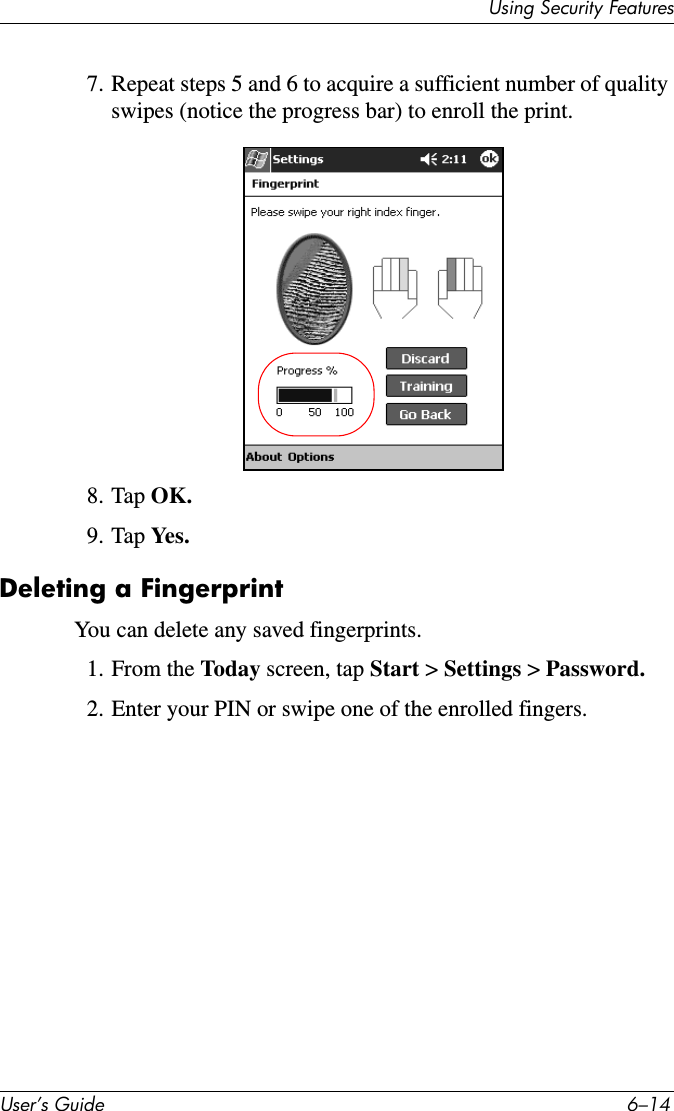
Views
User Manual
Discussion / Help
Navigation


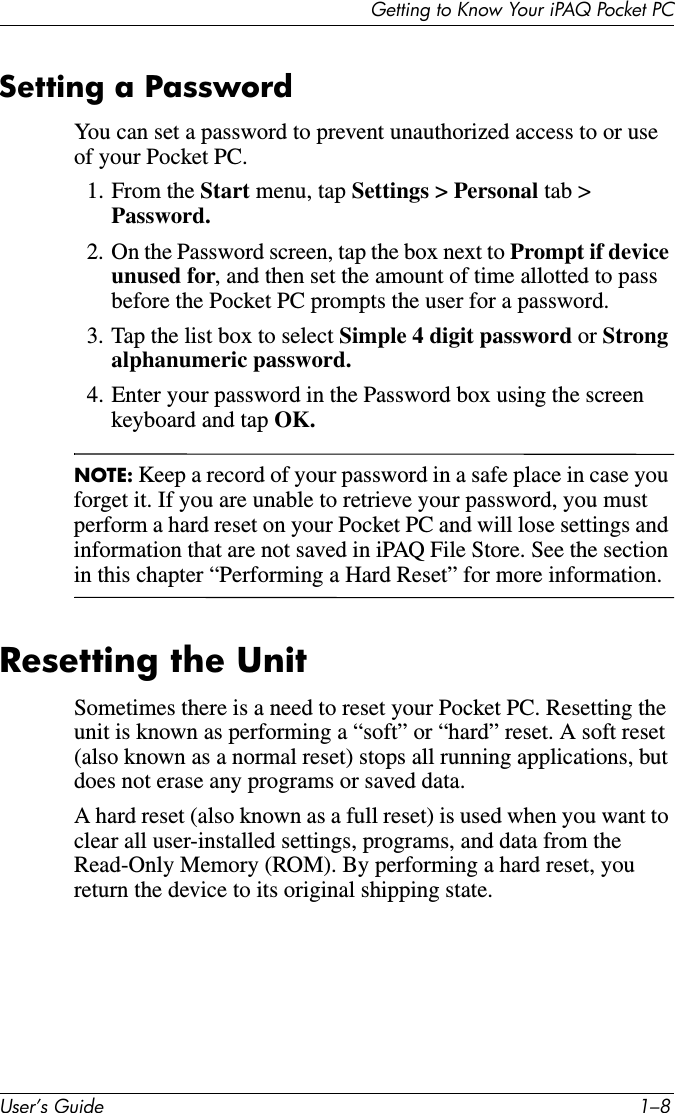
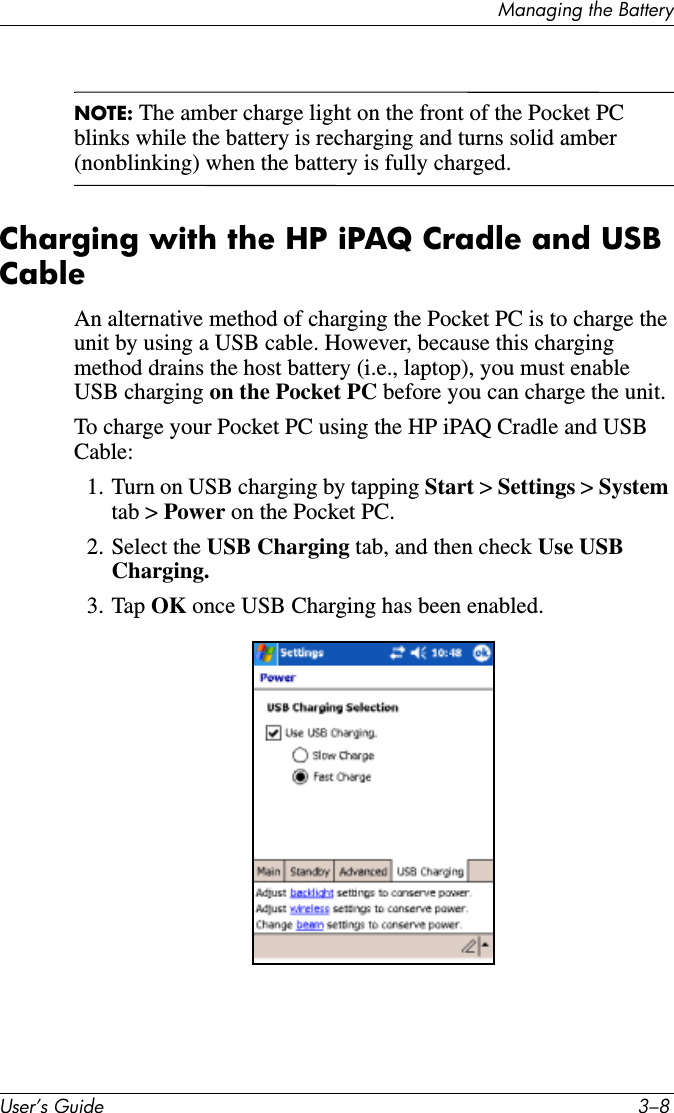
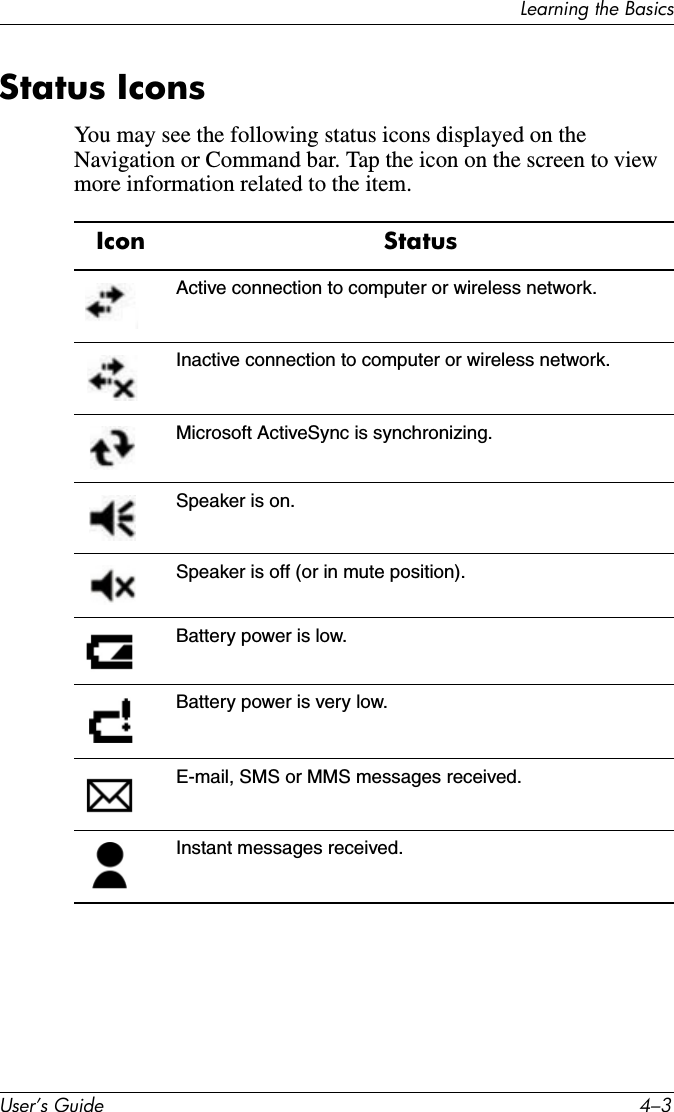
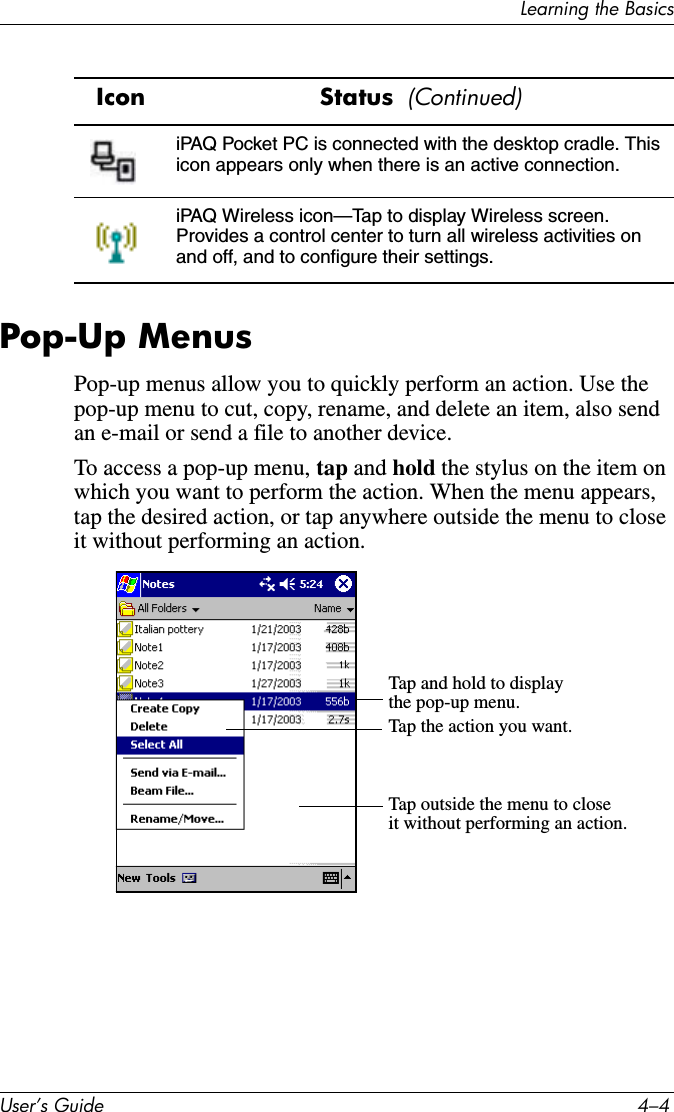
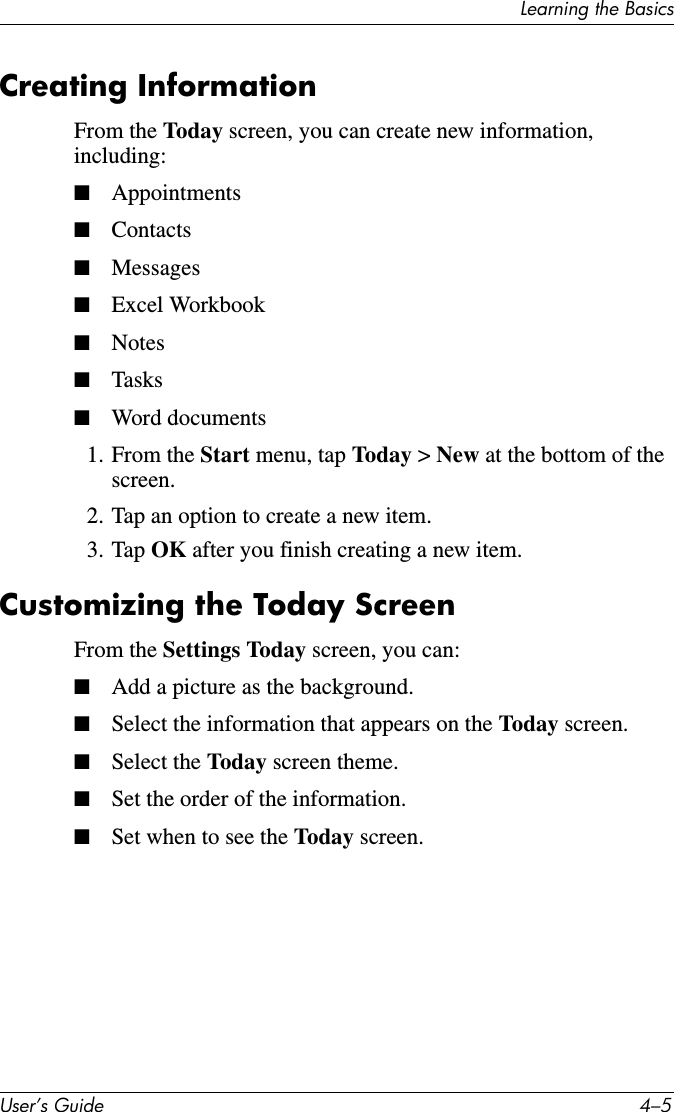
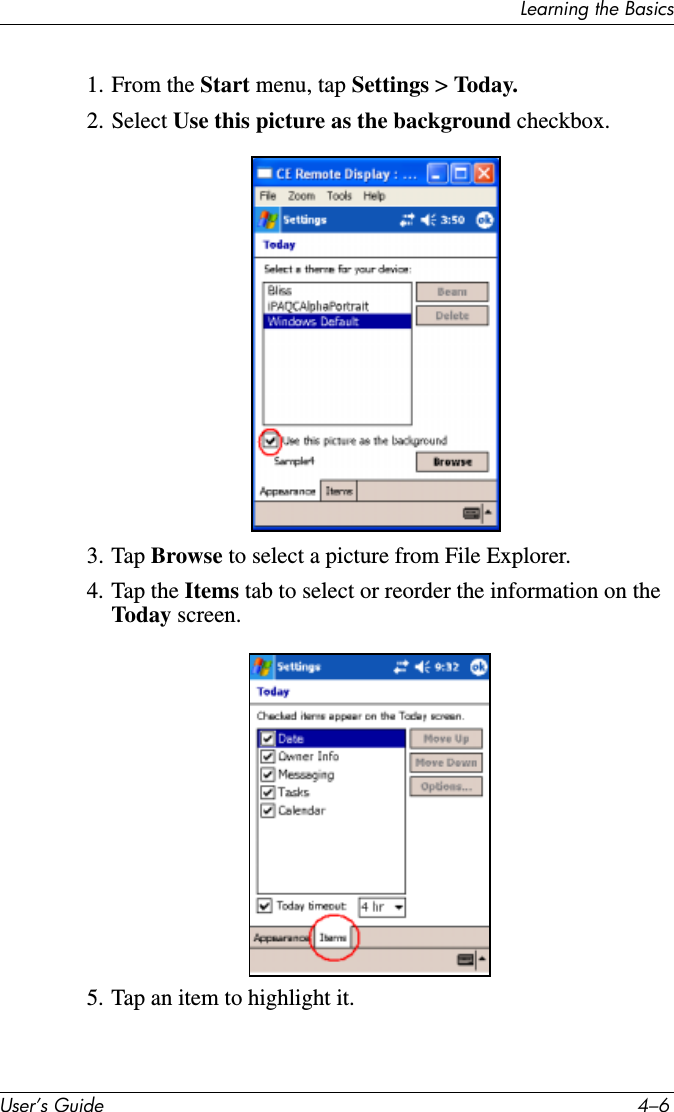
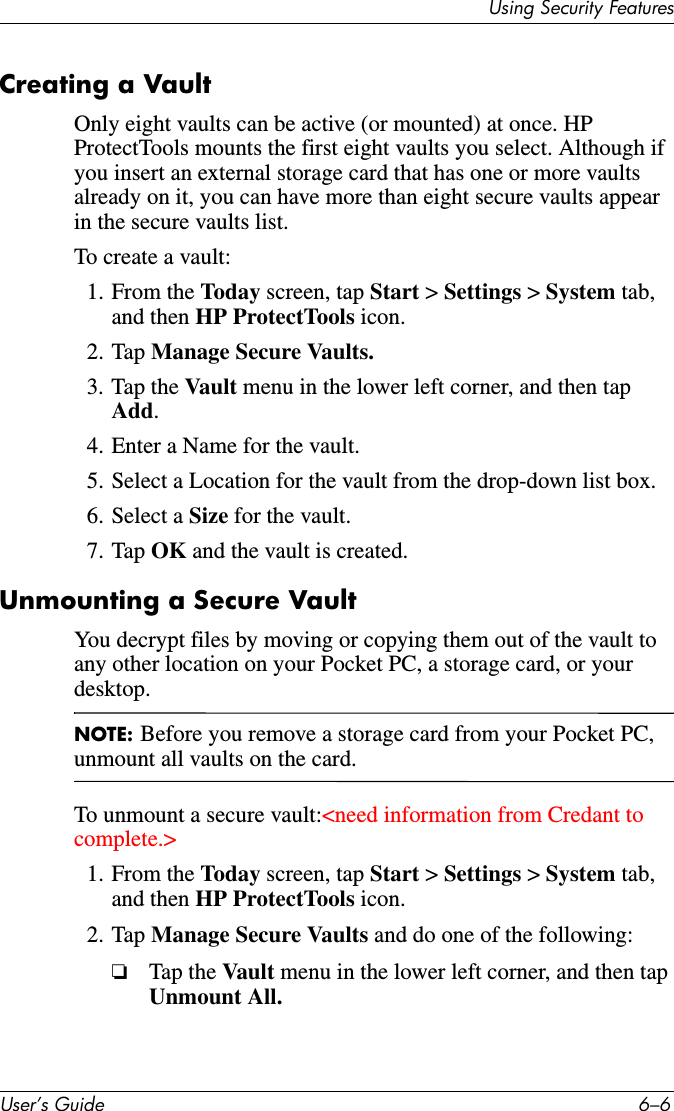
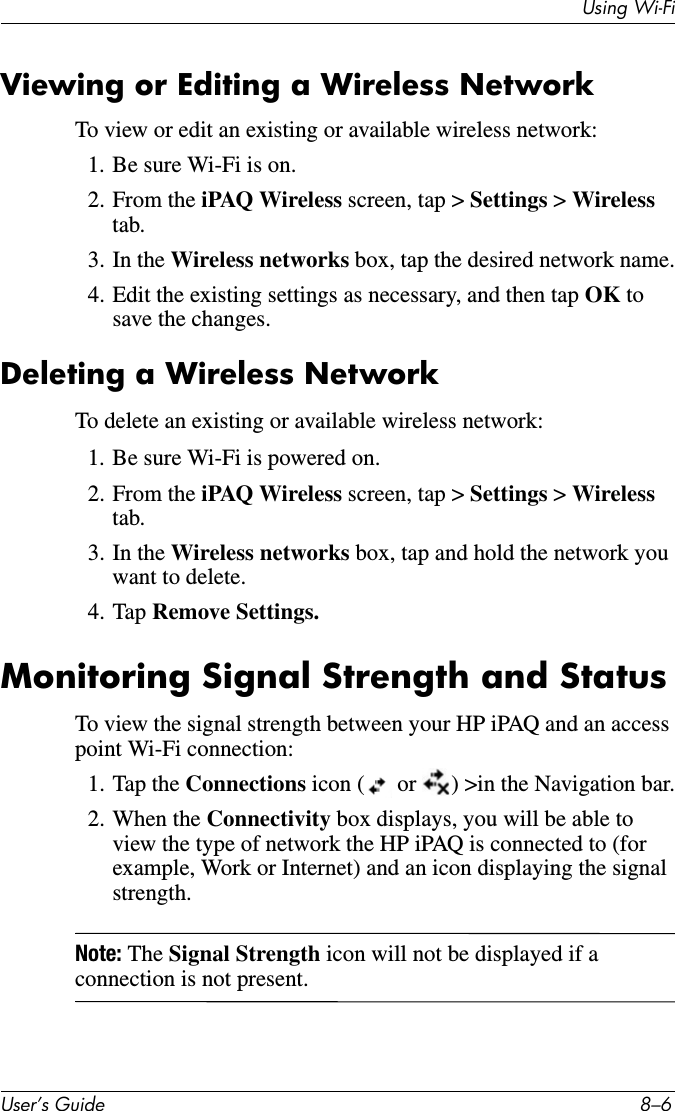
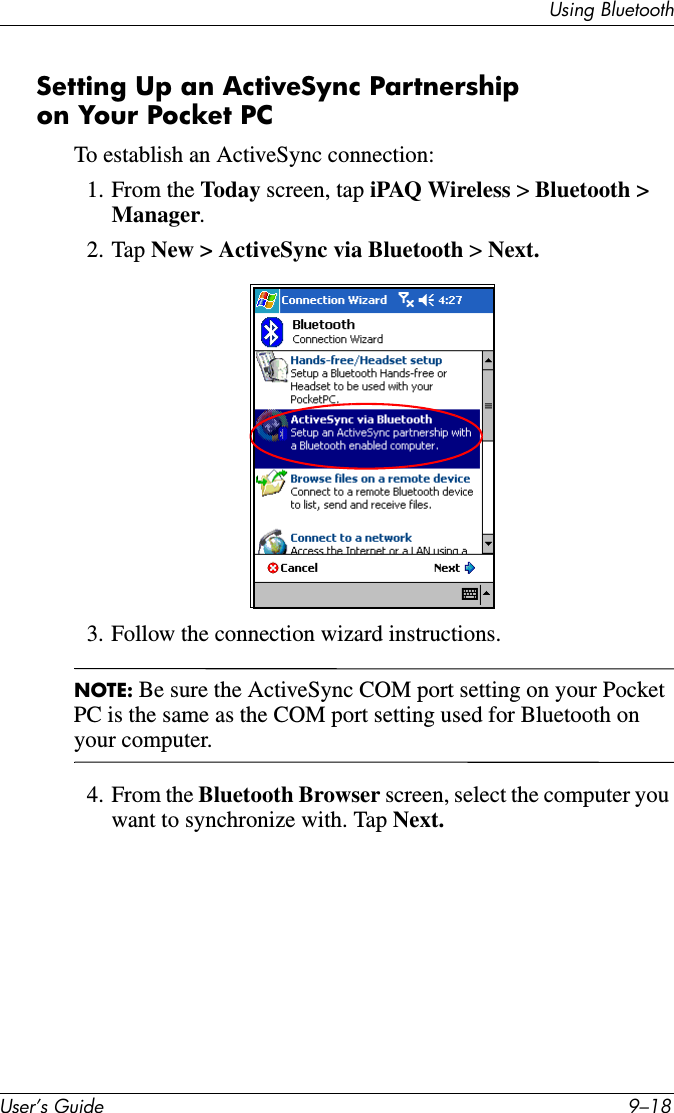
![8VHU·V*XLGH ²*HWWLQJWR.QRZ<RXUL3$43RFNHW3&Aligning the ScreenWhen the iPAQ Pocket PC is turned on for the first time, you are guided through a screen alignment process. You must realign your screen if:■The Pocket PC does not respond accurately to your taps.■You perform a full reset of your Pocket PC.To realign the iPAQ Pocket PC screen:1. From the Start menu, tap Settings > System tab > Screen icon.2. Tap the Align Screen button.Shortcut: To access the Align Screen application without tapping on the screen, press and release all four application buttons at the same time. [Verification to come.]3. Tap the cross-hair object at each location. Be precise when tapping the cross-hair object.4. Tap OK.Using the Touchscreen[Information to come.]](https://usermanual.wiki/LG-Electronics-USA/PDA-L05C-WL/User-Guide-484855-Page-20.png)
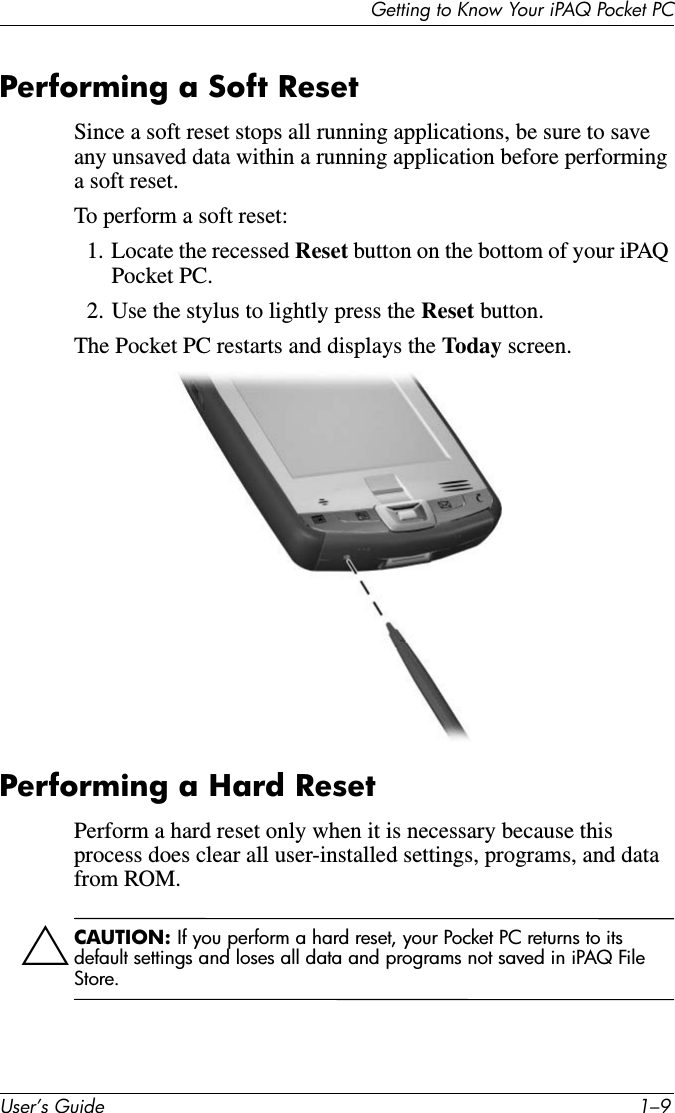
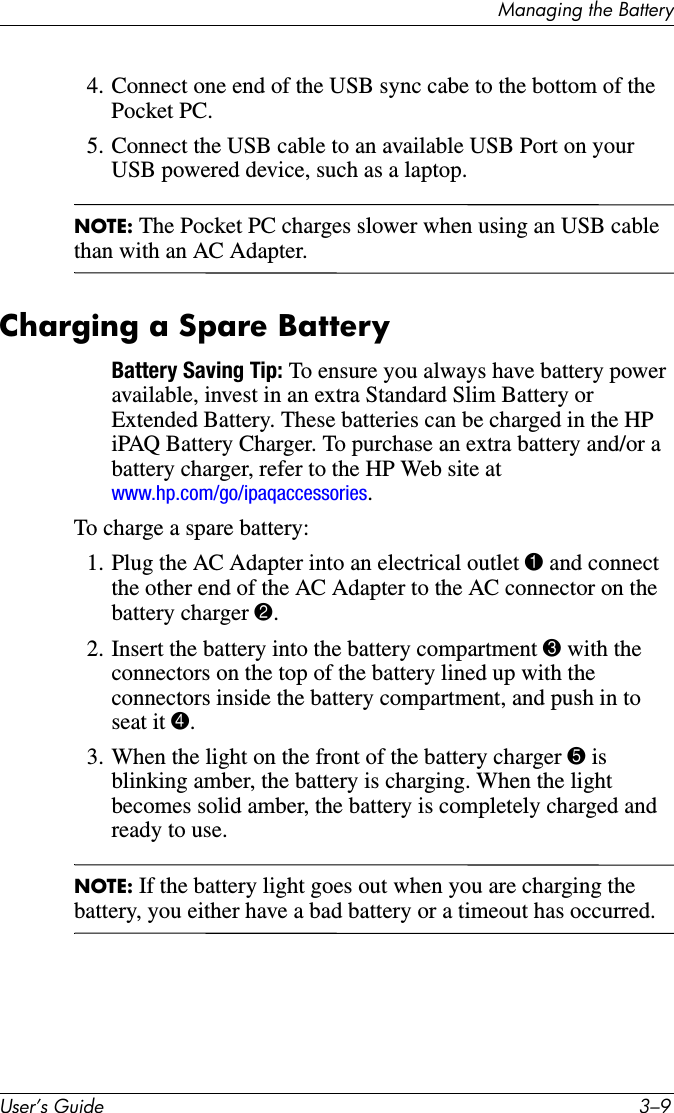
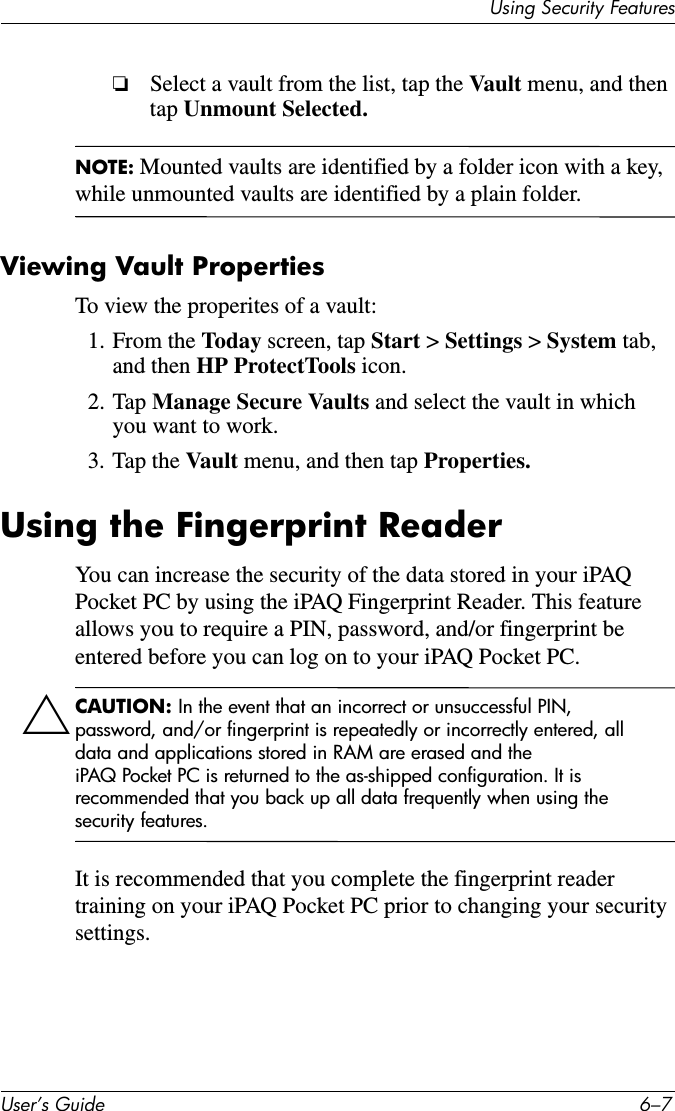
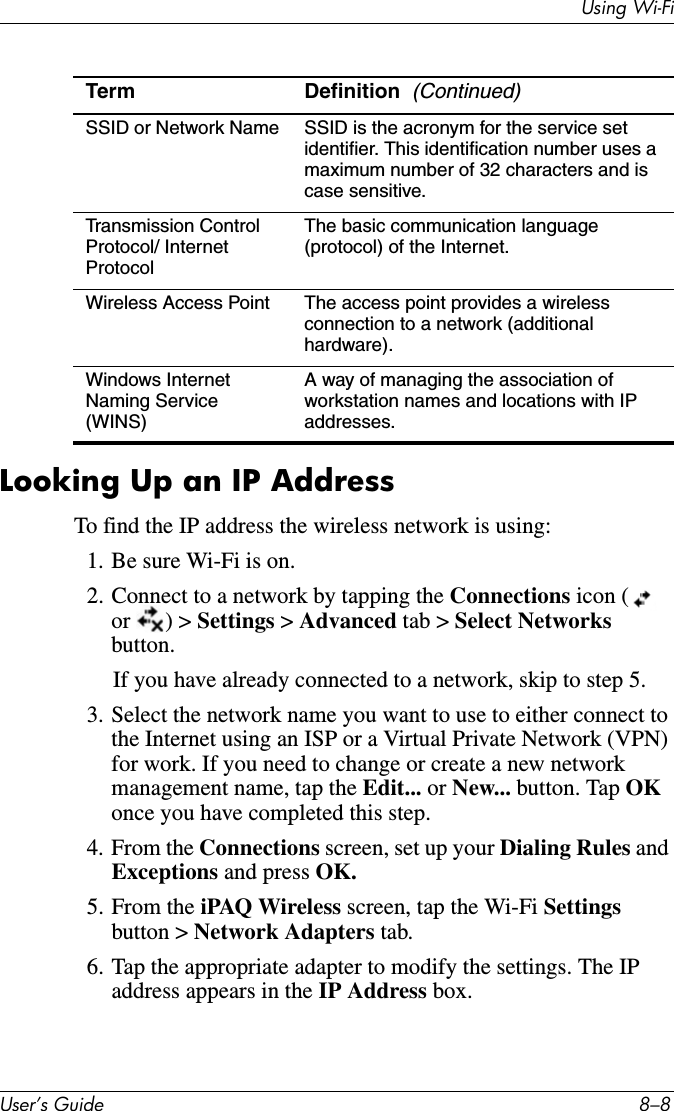
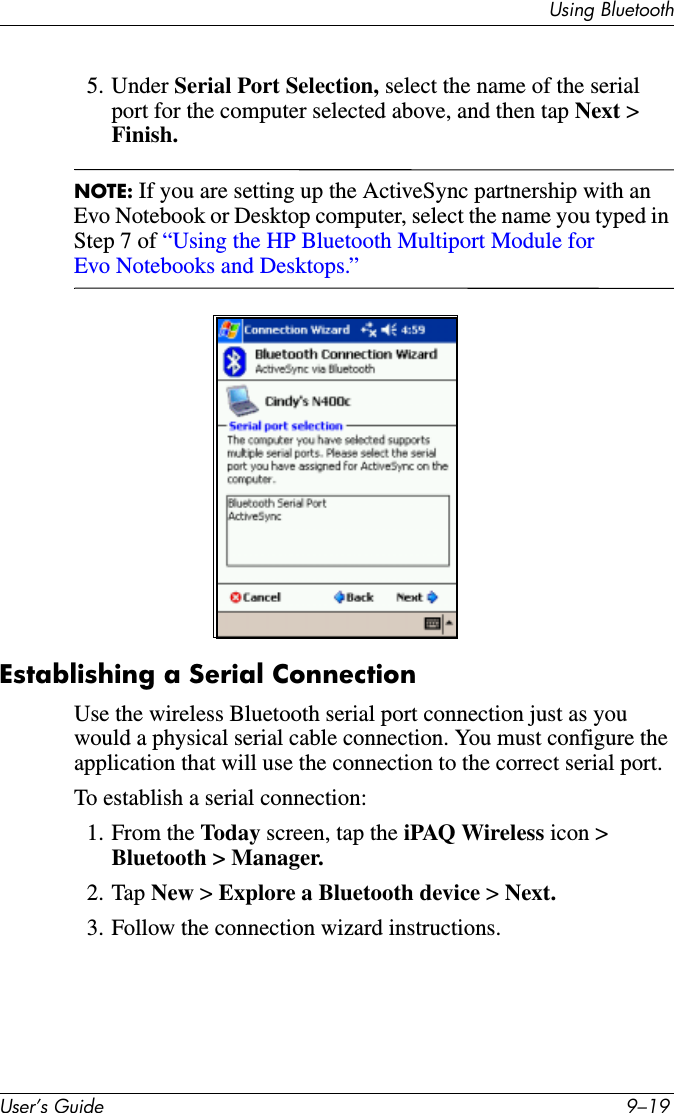
![8VHU·V*XLGH ²6\QFKURQL]LQJZLWK<RXU&RPSXWHU2. After the introductory screen displays, click Setup Wizard.The Setup Wizard detects the programs on your computer, and guides you step by step so you can install ActiveSync on your computer as well as other programs on your Pocket PC. 3. Follow the screen recommendations and when prompted, connect your Pocket PC to your personal computer:a. Plug the round end of the AC Adapter 1 into the charger adapter on the sync cable.b. Connect the AC Adapter 2 to a standard electrical outlet.c. Connect one end of the sync cable 3 to the bottom of the Pocket PC.d. Connect the USB connector on the sync cable 4 to the USB port on your computer.4. Once you are finished with the Setup Wizard, you can disconnect the Pocket PC from the sync cable.](https://usermanual.wiki/LG-Electronics-USA/PDA-L05C-WL/User-Guide-484855-Page-24.png)
![6\QFKURQL]LQJZLWK<RXU&RPSXWHU8VHU·V*XLGH ²Synchronizing with Your ComputerWith ActiveSync installed on your computer, you can:■Use it any time to create an additional partnership so you can synchronize information with up to two computers.■Add or delete the type of data (Contacts, Calendar, Inbox, Tasks, Favorites, Files, Notes, and AvantGo) you want synchronized with your Pocket PC.Note: When you synchronize files, you can drag and drop the selected files from your computer to the synchronized folder on your iPAQ Pocket PC. If you named your device “PC1” when you created your partnership, then the synchronized folder is named “PC1.” When you synchronize, the files are automatically moved to and from your iPAQ Pocket PC.Changing Synchronization SettingsYou can modify your synchronization settings for Microsoft ActiveSync to:■Change when your iPAQ Pocket PC synchronizes with your host computer.■Change the type of connection (serial, USB, or infrared) from your iPAQ Pocket PC to your computer.■Select the files and information to synchronize.■Select the files and information you do not want to synchronize (for example, e-mail attachments).■Determine how conflicts between information on your iPAQ Pocket PC and information on your computer are to be handled.](https://usermanual.wiki/LG-Electronics-USA/PDA-L05C-WL/User-Guide-484855-Page-25.png)
![8VHU·V*XLGH ²6\QFKURQL]LQJZLWK<RXU&RPSXWHUTo change synchronization settings:1. From the Start menu on your computer, click Programs > Microsoft ActiveSync > Tools > Options.a. On the Sync Options tab, select the files and information to synchronize with your computer.b. On the Schedule tab, select when your iPAQ Pocket PC synchronizes with your computer.c. On the Rules tab, determine how conflicts between information on your iPAQ Pocket PC and information on your computer are to be handled.2. Tap OK when you are finished.3. From the File menu, click Connection Settings. Select the type of connection to be allowed between the iPAQ Pocket PC and the computer.Using the Infrared ConnectionAs an alternative to using the desktop cradle, you can synchronize your Pocket PC and your computer using the infrared connection if you have an infrared port or an infrared USB adapter installed on your computer. The infrared connection option works only on computers that have Microsoft Windows 98SE, Me, 2000, or XP operating systems installed.To set up an infrared connection to a computer:1. Synchronize your Pocket PC with your computer using the desktop cradle before the first time you establish an ActiveSync connection via infrared.2. Follow your computer manufacturer’s instructions to install and set up an infrared port.3. Remove the Pocket PC from the cradle and line up the infrared port with the computer infrared port so they are unobstructed and within 12 inches (30.5 cm) of each other.](https://usermanual.wiki/LG-Electronics-USA/PDA-L05C-WL/User-Guide-484855-Page-26.png)
![6\QFKURQL]LQJZLWK<RXU&RPSXWHU8VHU·V*XLGH ²4. Initiate a connection by tapping Start > Programs > ActiveSync > Tools >Connect via IR. Synchronization begins on your device.5. To disconnect, move the devices away from each other or tap X in the upper right of the screen to turn off.Copying FilesYou can copy files to and from your host computer using Explorein ActiveSync and Windows Explorer.To copy files:1. Insert your iPAQ Pocket PC into the sync cable.2. From the Start menu on your computer, click Programs >Microsoft ActiveSync.3. Click Explore.4. Double-click the My Pocket PC.5. On your computer, right-click the Start menu, and select Explore.6. Locate the file to be moved.Note: You cannot copy preinstalled files or system files.7. Drag and drop your files between your iPAQ Pocket PC and your computer. ActiveSync converts the files so that they can be used by the Pocket Office programs, if necessary.Note: Move your files directly into My Documents on your iPAQ Pocket PC (or into a folder inside My Documents), so the programs on your iPAQ Pocket PC can locate them.](https://usermanual.wiki/LG-Electronics-USA/PDA-L05C-WL/User-Guide-484855-Page-27.png)
![8VHU·V*XLGH ²6\QFKURQL]LQJZLWK<RXU&RPSXWHUInstalling ProgramsTo install programs on your iPAQ Pocket PC from your computer using ActiveSync:1. Connect your iPAQ Pocket PC to your computer using the sync cable.2. Follow the instructions on the screen.3. Check the screen of your iPAQ Pocket PC to see if any further steps are necessary to complete the installation.Backing up and Restoring FilesTo help reduce the chance of losing information, you should back up information to your computer regularly. For more information on backing up and restoring information using Microsoft ActiveSync, refer to Chapter 7, in section “Using iPAQ Backup to Backup/Restore.”Synchronizing LinksYou can synchronize links to websites from the Favorites list on your computer to view them offline with Pocket Internet Explorer.1. From the Start menu on your computer, click Programs and double-click the Internet Explorer.2. Click Favorites to see the list of links to your favorite websites.3. To save a website link to Mobile Favorites, open the website and click Create Mobile Favorite.If you select “Favorites” as an information type to be synchronized, ActiveSync copies your mobile favorite to your Pocket PC the next time you synchronize.4. Follow the instructions in Synchronize information to manually synchronize your favorite links.](https://usermanual.wiki/LG-Electronics-USA/PDA-L05C-WL/User-Guide-484855-Page-28.png)
![6\QFKURQL]LQJZLWK<RXU&RPSXWHU8VHU·V*XLGH ²Sending and Receiving E-mailYou can send and receive e-mail messages by synchronizing your iPAQ Pocket PC with your computer using ActiveSync. If you are using ActiveSync to send and receive e-mail messages, the name of the folder you are using is displayed at the bottom of the screen. For more information on sending and receiving e-mail using ActiveSync, from the Start menu, tap Help > Inbox.Requesting MeetingsYou can schedule a meeting and send a meeting request through ActiveSync. For more information, from the Start menu, tap Help > Calendar.](https://usermanual.wiki/LG-Electronics-USA/PDA-L05C-WL/User-Guide-484855-Page-29.png)


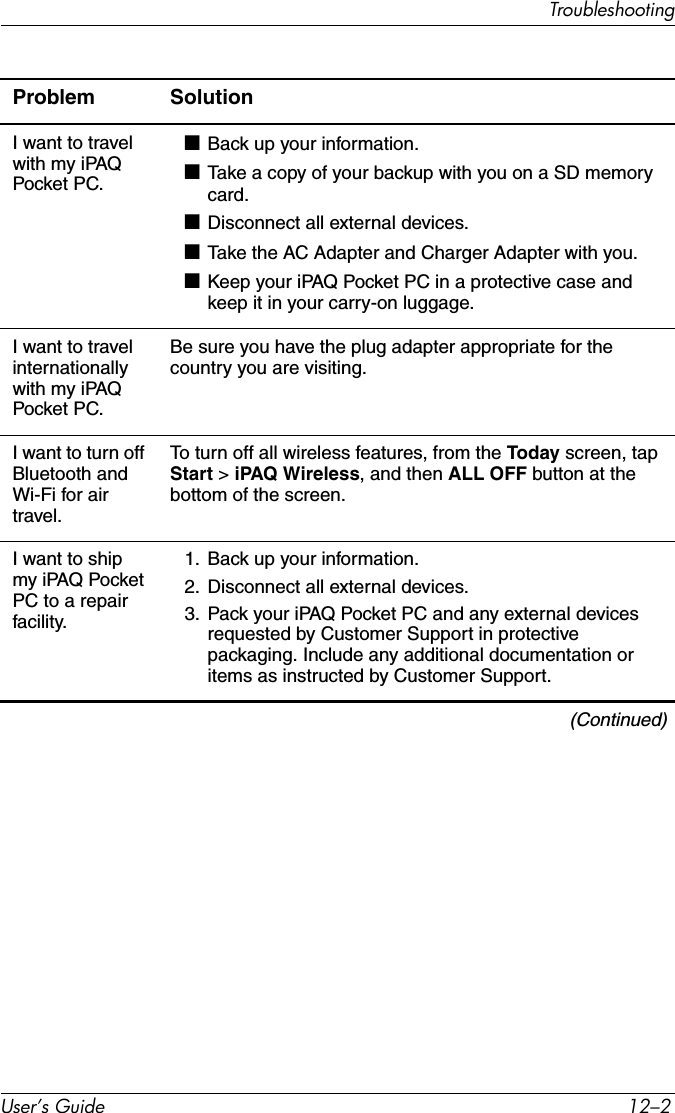
![7URXEOHVKRRWLQJ8VHU·V*XLGH ²I cannot connect to a network.■Be sure you have added the necessary server information.■Be sure the network you are attempting to connect to is not busy.■If you are using an SDIO Ethernet card, be sure the proper drivers for your card are installed.■Be sure your user name and password are correct.■Ta p Start > Settings > Connections tab > Connections and check your connection settings. Tap OK when you are finished to save your changes.■Be sure the WEP key is correct.■Be sure the IP Address is correct.■Be sure the hardware you are using with your iPAQ Pocket PC is properly configured and operational.■Reset the device by using the stylus to lightly press the Reset button.When I try to open the Inbox, I receive an error or the applicationhangs.Limit the number of e-mail services you create.I get an error when I try to record a note in Calendar or in Tasks.Try using a more compressed recording format in Calendar or Tasks (8,000 Hz, Mono [8 KB/s] is the most compressed format available). To switch to a more compressed recording format, from the Today screen, tap Start > Settings > Input > Options tab.I want to see the current date.The current date is displayed at the top of the Todayscreen.I cannot see all my appointments.Be sure the appointment you created is in the selected category.(Continued)Problem Solution](https://usermanual.wiki/LG-Electronics-USA/PDA-L05C-WL/User-Guide-484855-Page-157.png)