LG Electronics USA PG60GJE DLP PROJECTOR User Manual EMISSION TEST REPORT
LG Electronics USA DLP PROJECTOR EMISSION TEST REPORT
UserManual.wiki
>
LG Electronics USA
>
PG60GJE User Manual
User Manual
Navigation menu
Upload a User Manual
Namespaces
Wiki Guide
HTML
PDF
Info
Views
User Manual
Discussion / Help
Navigation

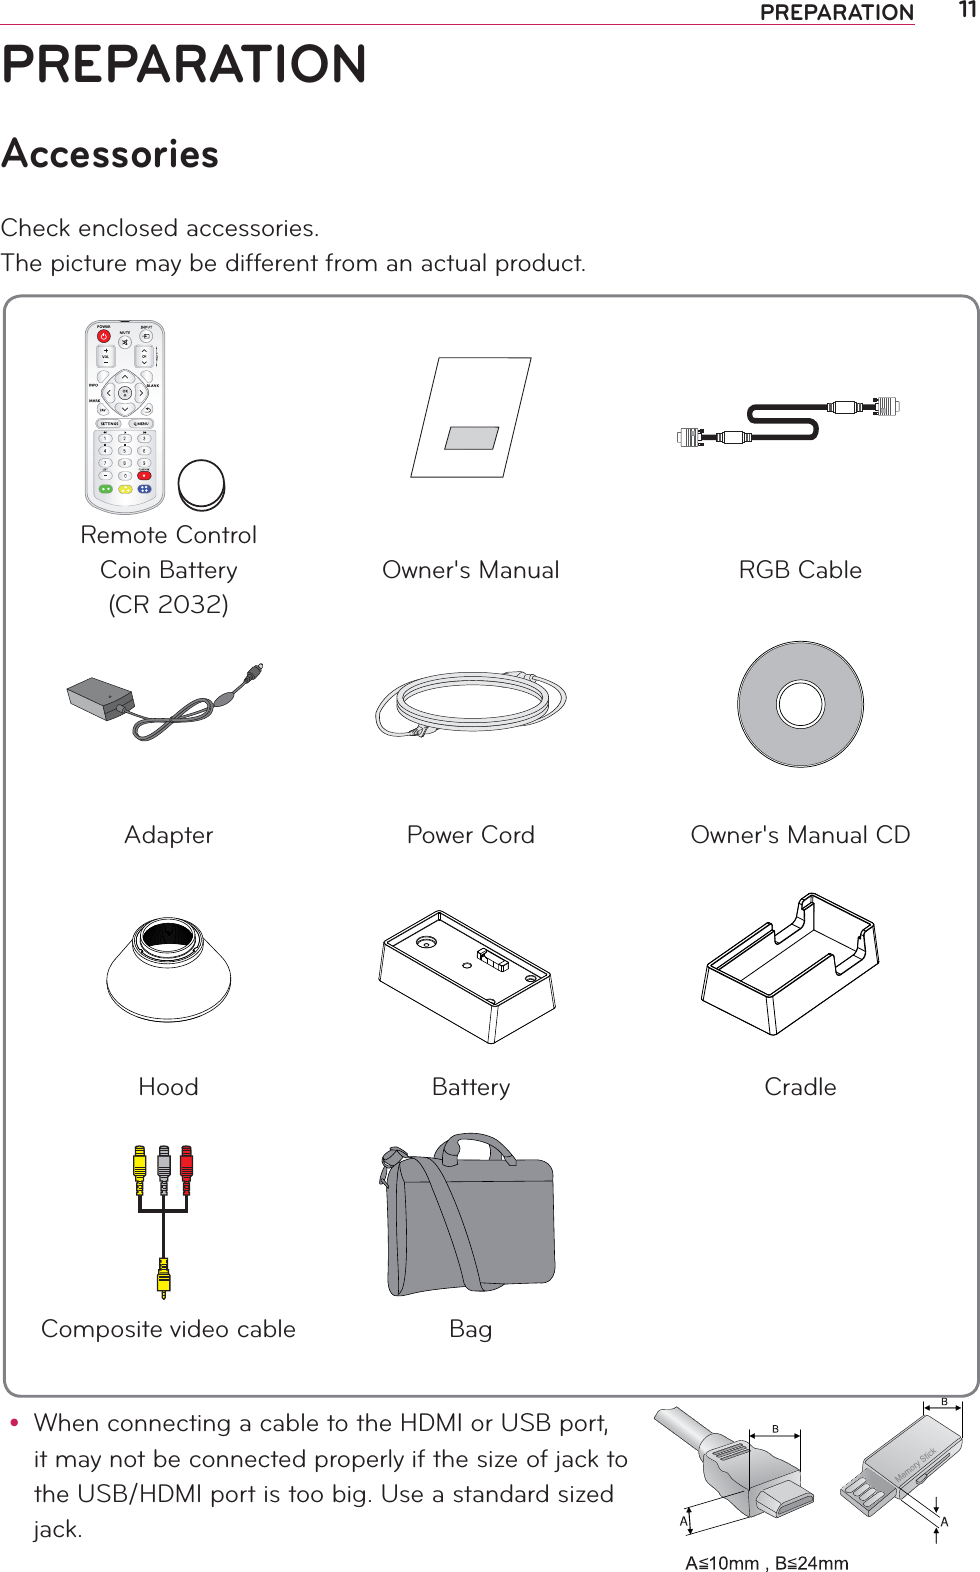
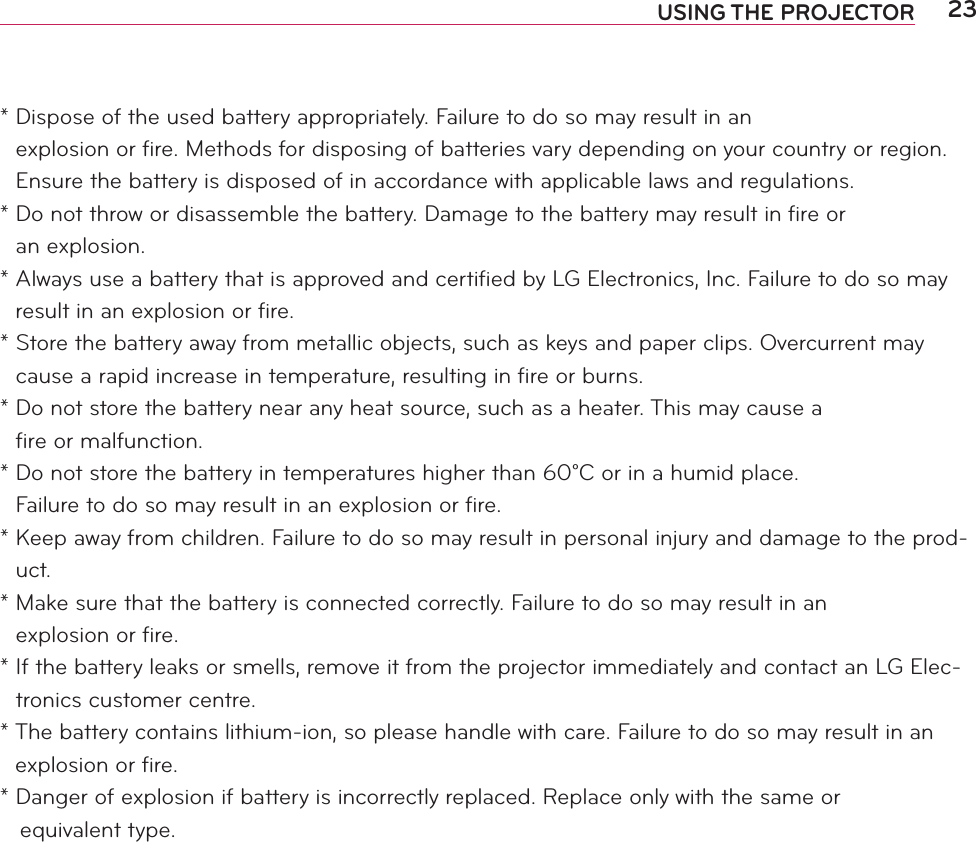
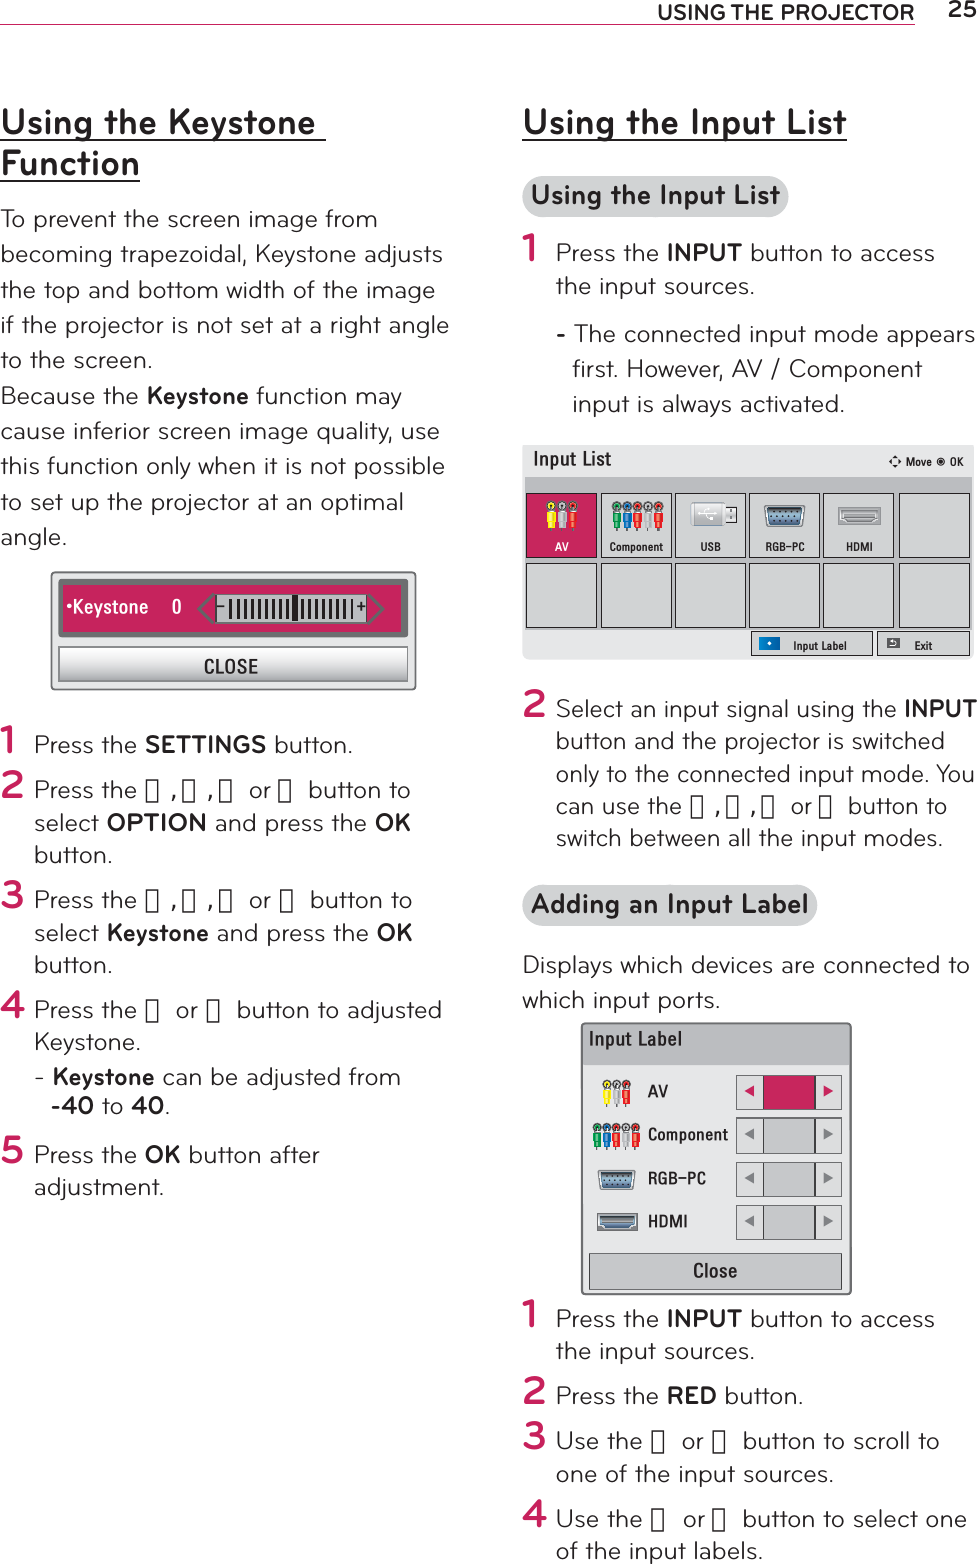
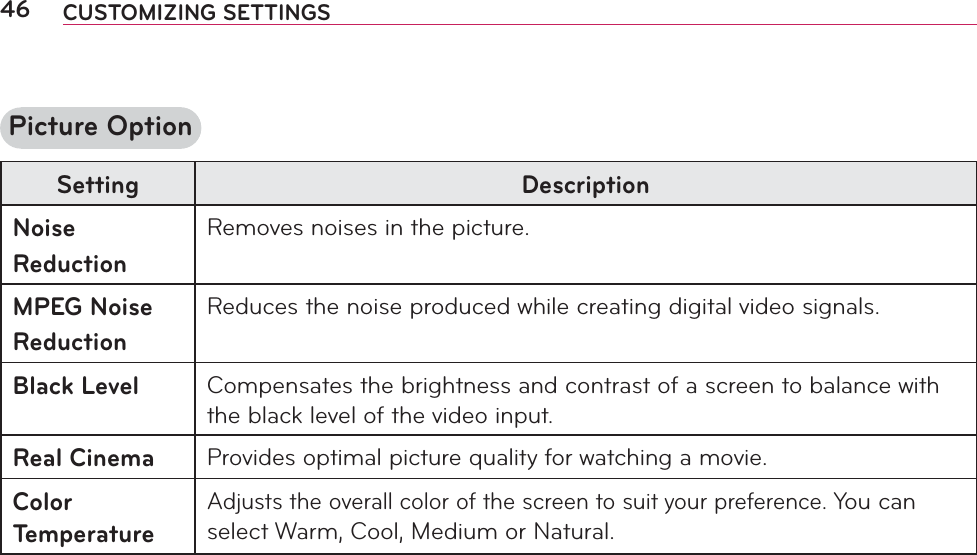
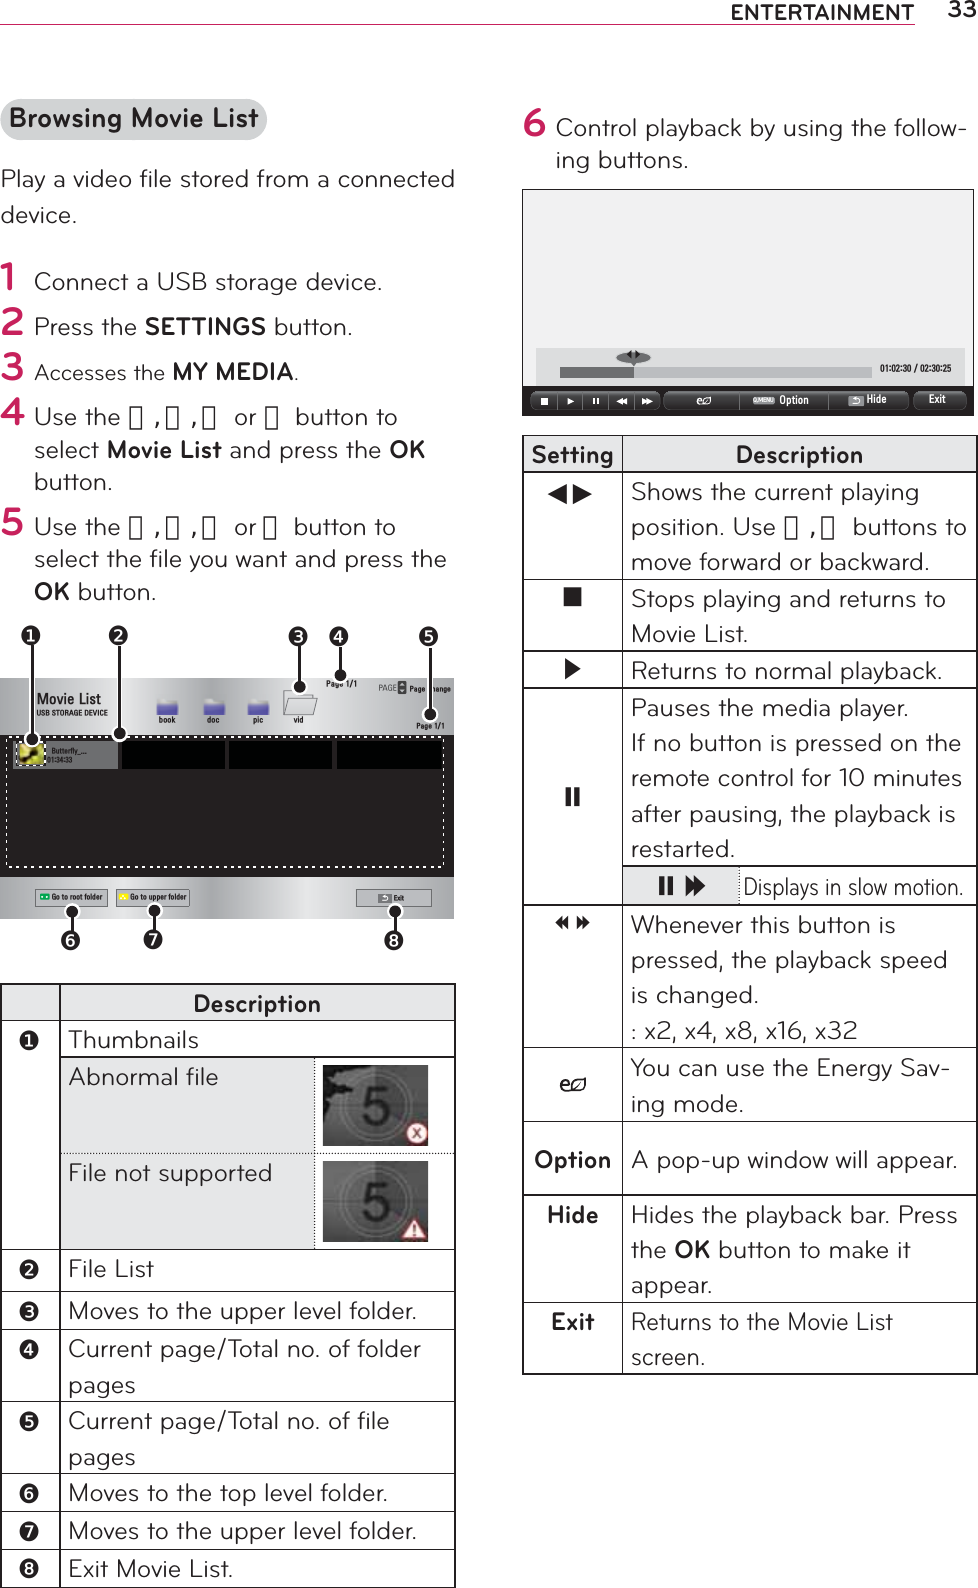
![27ENTERTAINMENTENTERTAINMENTWiDi (Wireless Display) Setup1 Set the external input of the projector to WiDi.2#Run the WiDi( )#program on your notebook.#3#After running the WiDi program on your notebook, a list will show all available devices that were detected. In the list, select the Projector you want and click Connect. Enter the 4 - digit number shown() on the screen () and then click Continue.$POOFDUFEBEBQUFSzaGuGGU%FUFDUFEBEBQUFST 1SPQFSUJFT )FMQ{GGGGGGGGGGuGGGGGGGGGGGGGGGGGGGGGGGGGGGGGGGGGGGGGGGpkGGGGGGGGGGGGtGGGGGGGGGGGGGGGGGGGGGGGGGGGGGzsnG~kGw km^Y ujGZUW,QGLFDWHVDQDGDSWHU\RXKDYHSUHYLRXVO\FRQQHFWHGWRzGGG &RQQHFWÖ[Intel Notebook] Request connection To connect, enter the PINMy PIN****CancelRemain: 92 second(s) 1SPQFSUJFT )FMQ'PVGTUGEWTKV[EQFG7KLVLVWKHILUVWWLPH\RXĜUHFRQQHFWLQJWR/*:L'L3URMHFWRU3OHDVHHQWHUWKHGLJLWVHFXULW\FRGH\RXVHHRQ\RXU3URMHFWRUVFUHHQ&RQWLQXH &DQFHOProjector Screen Notebook Screen4#The Notebook screen will appear on the projector screen soon. Note that the wireless connection speed will affect the quality of the video displayed on the notebook. If the connection is poor, the intel WiDi connection may be lost or quality of the video may be poor.* For more information on Intel WiDi, visit http://intel.com/go/widi* If you change the input signal while watching in WiDi mode, the WiDi connection will be disabled.](https://usermanual.wiki/LG-Electronics-USA/PG60GJE/User-Guide-1974363-Page-28.png)

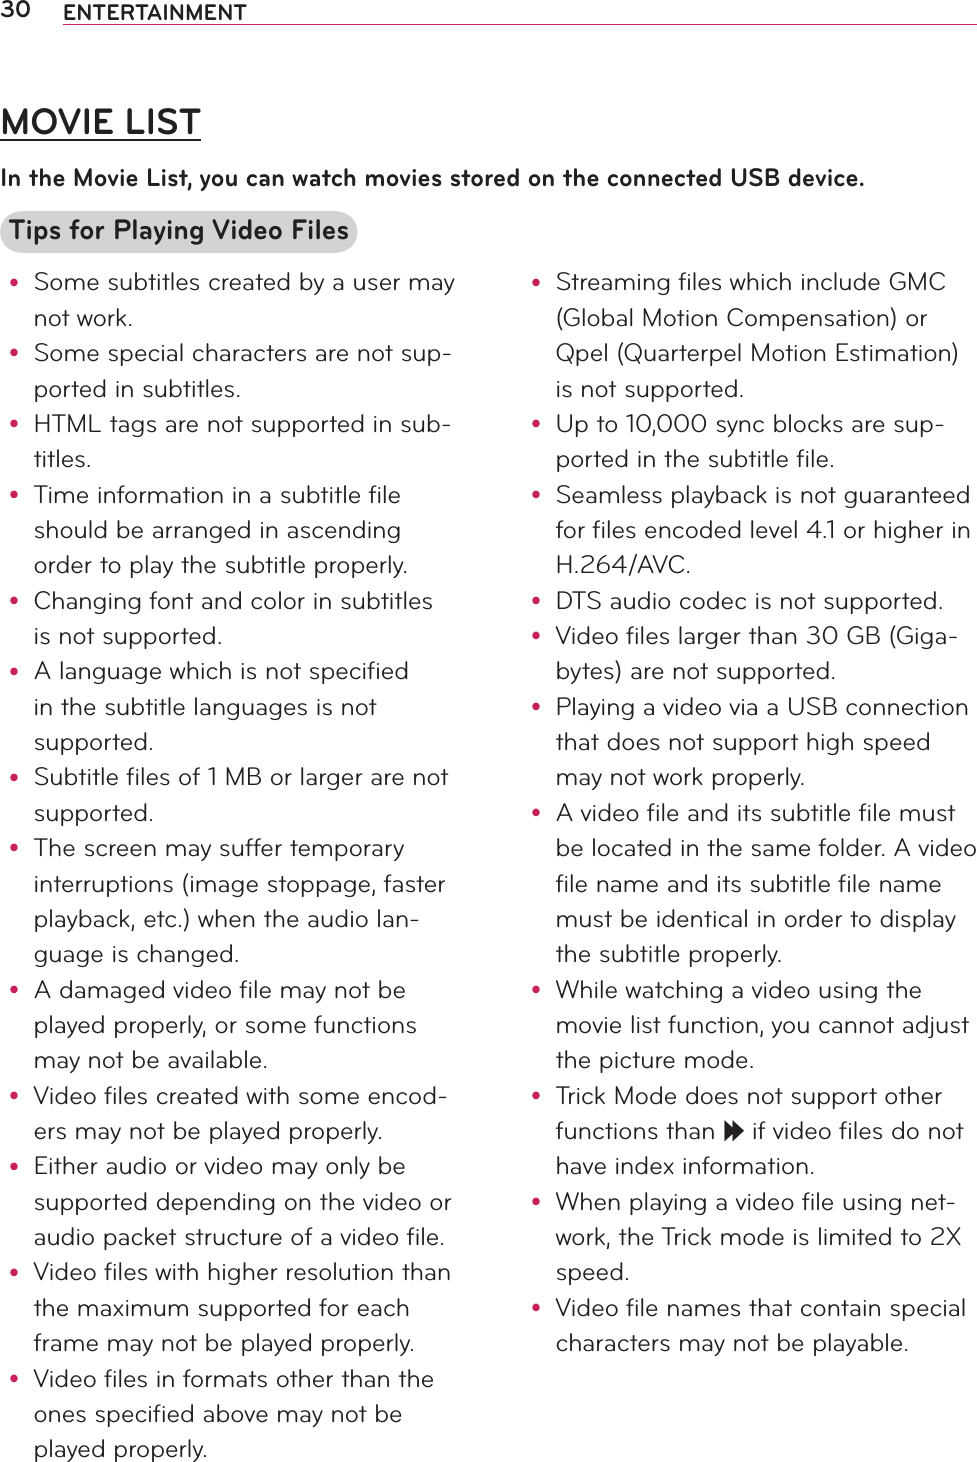
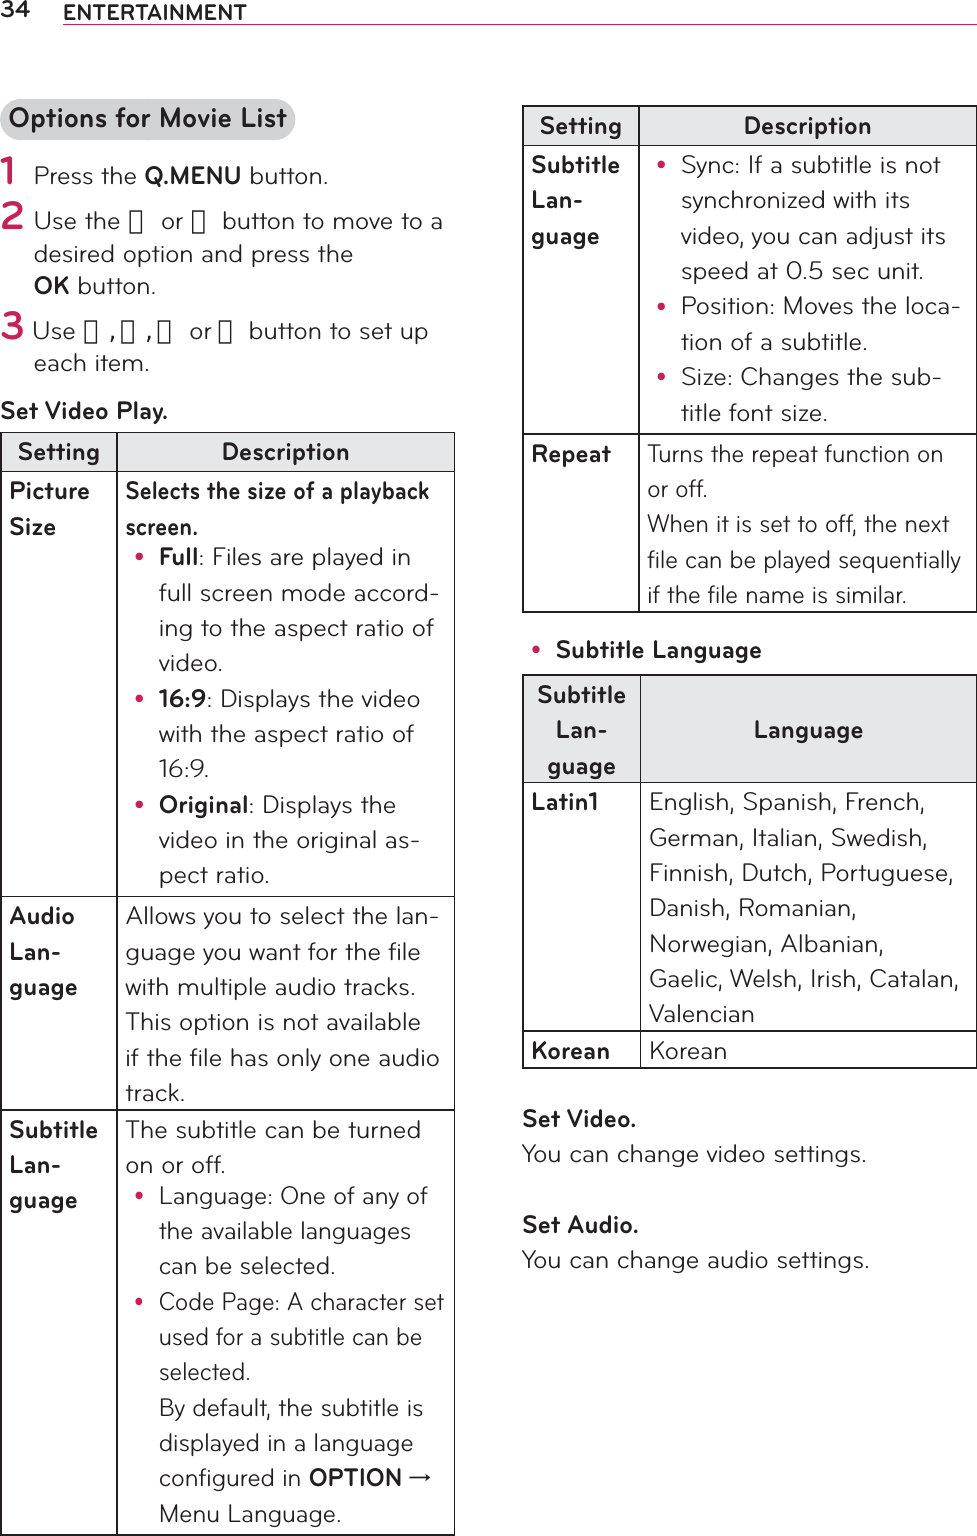
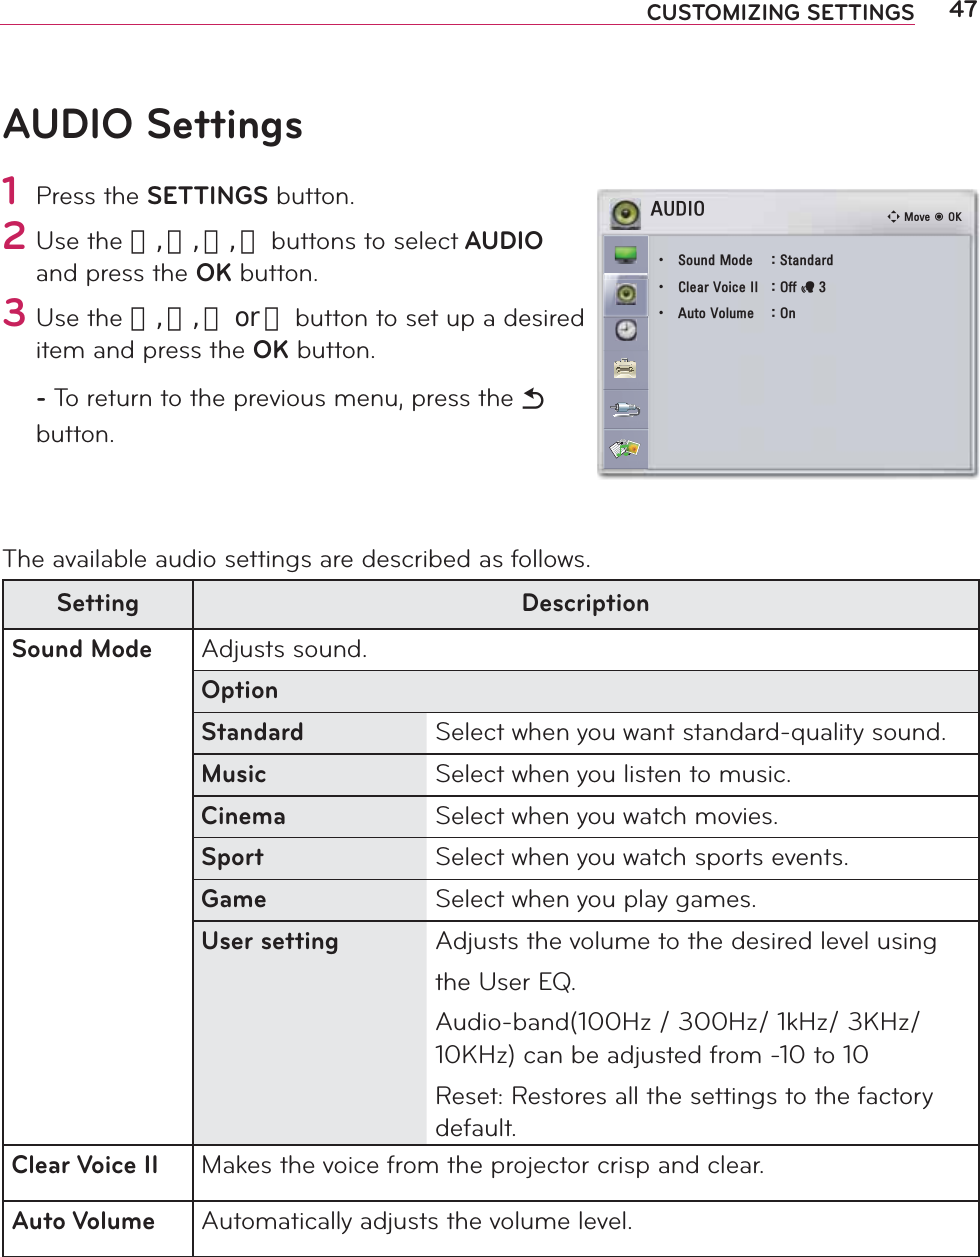
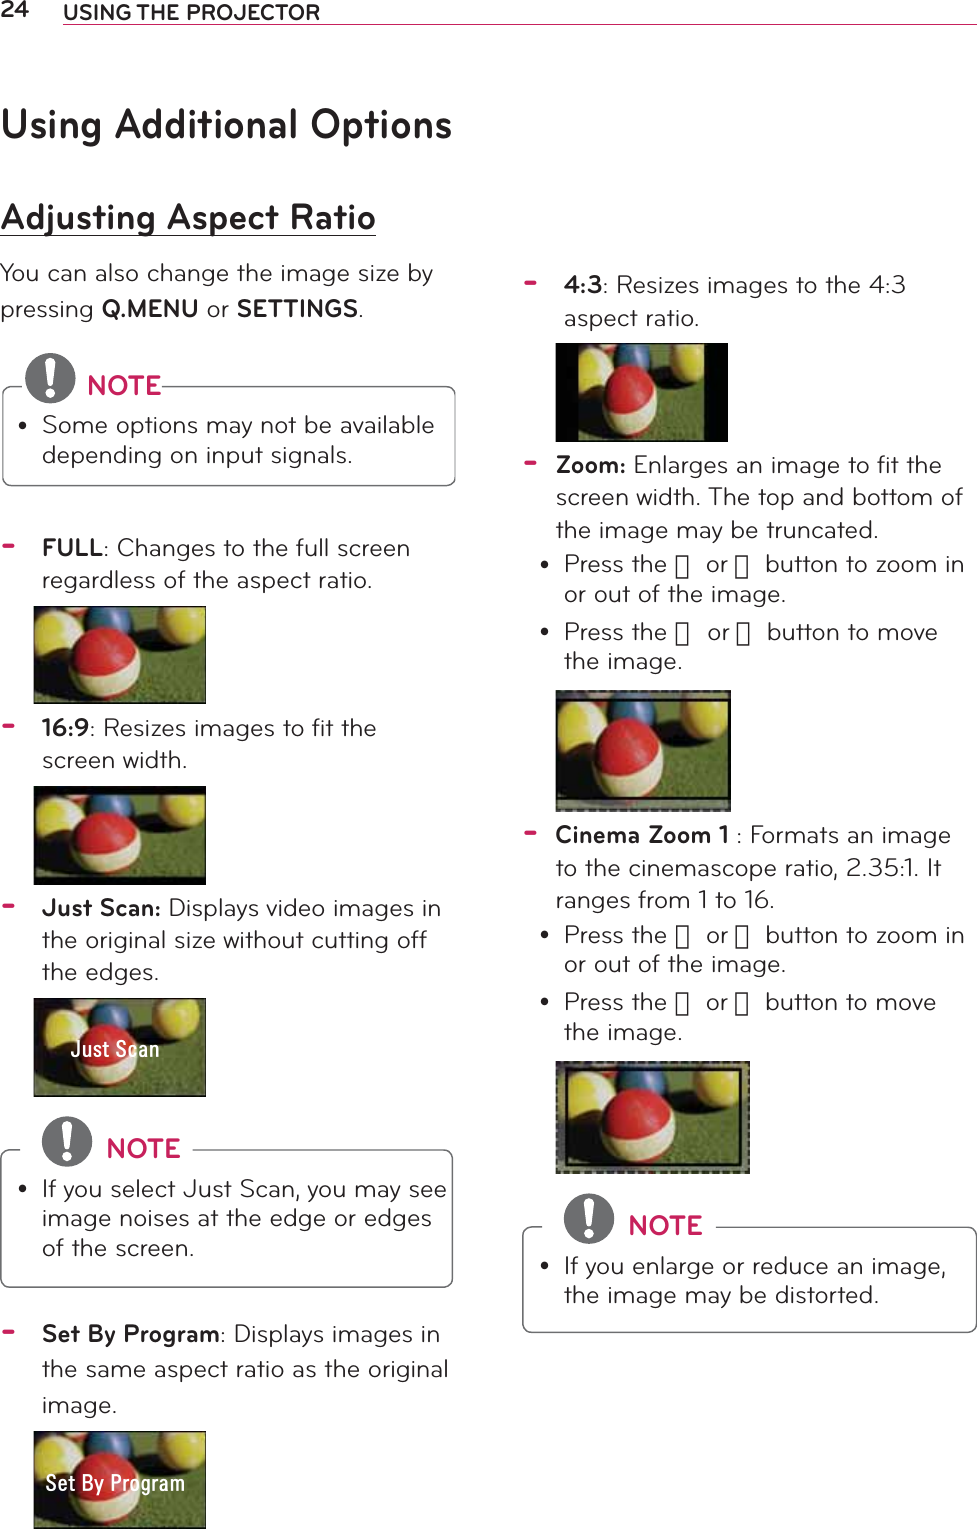
![35ENTERTAINMENTRegistering the DivX codePlease check your DivX code. For more information on the registration process, visit www.divx.com/vod. After registra-tion, your can enjoy DivX VOD content protected by the DivX DRM code.1 Press SETTINGS button to enter Setup menu.2 Move to OPTION and press DivX(R) VOD.5HJLVWUDWLRQ'HUHJLVWUDWLRQ&ORVH3 Press the or button to move to Registration and press the OK but-ton.&ORVH<RXPXVWUHJLVWHU\RXUGHYLFHWRSOD\'LY;5SURWHFWHGYLGHRV5HJLVWUDWLRQ&RGH;;;;;;;;;;5HJLVWHUDWKWWSYRGGLY[FRPL4 Check the DivX registration code. NOTEy You cannot use DivX registration codes assigned to other devices. Make sure to use the DivX registra-tion code assigned to your device.y The video or audio files that are not converted by the standard DivX codec may be corrupted or not be played.To deregister the DivX codeUse the DivX deregistration code to deactivate the DivX DRM function.1 Press SETTINGS button to enter Setup menu.2 Move to OPTION and press DivX(R) VOD.3 Use the or button to go to Deregistration and press the OK button.<HV 1R<RXUGHYLFHLVDOUHDG\UHJLVWHUHG$UH\RXVXUH\RXZLVKWRGHUHJLVWHU" ➡<HV 1R'HUHJLVWUDWLRQFRGH'HUHJLVWHUDWKWWSYRGGLY[FRP&RQWLQXHZLWKUHJLVWUDWLRQ"L4 Select Yes. NOTEy What is DRM [Digital Rights Management]? This is a technology and service that prevents the illegal use of digital media to protect the benefits and rights of the copyright owner. Files can be played after the license is verified through an online method, etc.](https://usermanual.wiki/LG-Electronics-USA/PG60GJE/User-Guide-1974363-Page-36.png)