LG Electronics USA RD7230 Single-Band CDMA Cellular Phone User Manual BEJRD7230
LG Electronics USA Single-Band CDMA Cellular Phone BEJRD7230
User Manual
Operating Manual
LG-RD7230
User Guide
CDMA PHONE
Contents
Introduction
Highlights
Important Information
Check Accessories
Before You Start
FCC RF EXPOSURE INFORMATION
Chapter 1. Getting Started
Cautions
Phone Overview
On screen Icons
Chapter 2. Basic Functions
Turning the Phone On and Off
Making a Call
Correcting Dialing Mistakes
Receiving Calls
Speed Dialing
Phone Book Features
Chapter 3. Menu Features
General Guidelines to MENU Access and Settings
Phone book
Volume/Ringer
Display
Camera
Utilities
Schedule
Security
Settings
R-world
Chapter 4. Message Features
Write Msg
Voice Note
Forward outbox
Draft
Clear outbox
Text
Voice
Store
Clear inbox
Clear store
Inbox Alert
Alert Tone
Font Color
Chapter 5. Accessories
Appendix Installation
Appendix RF Exposure Statement
Chapter 1. Getting Started
Cautions
??Using the phone in proximity to receiving equipment (i.e., TV or radio) may cause
interference.
??Keep your phone in a safe place when not in use.
??Only use the batteries, antennas, and chargers provided by LG. Using the wrong
accessories could void your warranty.
??Only authorized personnel should service the phone and its accessories. Faulty installation
or service may result in accidents and consequently invalidate the warranty.
??Do not hold the antenna while the phone is in use.
??Do not use the phone in designated “no cellular phone use” areas.
??Do not expose the phone to high temperature or humidity.
??Avoid getting your phone wet. If the phone gets wet, turn the power off immediately and
remove the battery pack. If the phone is mal-functional, return it to the dealer for service.
??Avoid shock or impact on the phone.
Phone Overview
Function Key Descriptions
Lamp The light goes on when you use the power key to turn on the phone and when there are
incoming calls and messages.
LCD screen Displays messages & indicator icons.
END/PWR Used to turn power on/off. This key disconnects a call. Using this key, you can also exit out of
a menu back to the phone’s standby display without changing the setting.
SEND Allows user to place or answer calls.
Mouse Key
This mouse key allows quick access to text and voice mail notification messages. Profiles, R-
World, and RingTone menu.
And these keys are used to scroll through the memory locations and menu items.
Alphanumeric
Keypad These keys enable you to enter numbers and characters and choose menu items.
Soft Keys
The current operation of a soft key is defined by the word at the bottom of the display.
Soft Keys 2 :
If you press this key once in a menu, you can go back one level and if you press and hold the
key in a menu, you can go back to the standby display.
Side Keys These keys enable you to adjust keybeep volume (in standby mode) and earpiece volume (in a
call status).
Star/Pound Key - In the standby status, set the manner mode by pressing the [ * ]button. (for 2 seconds)
- In the standby status, set the lock function by pressing the [ # ]button. (for 2 seconds)
Clear Key This key erase character.
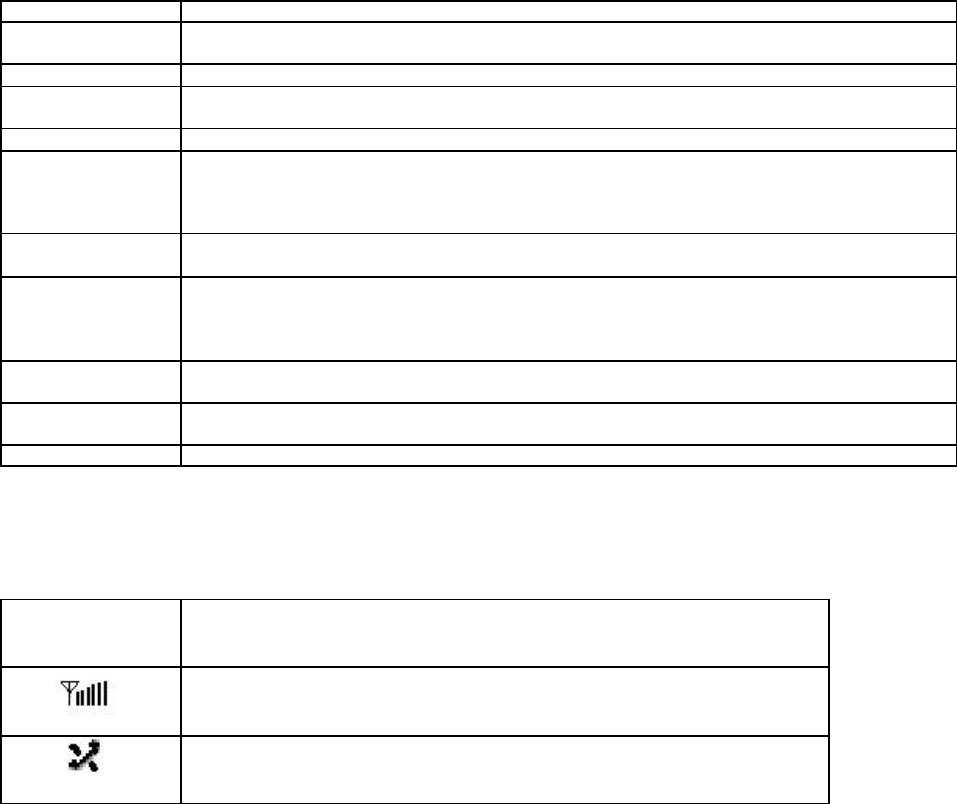
On screen Icons
The phone screen displays several onscreen icons and onscreen icons appears when the phone is
power on.
Icons Descriptions
Displays the strength of the signal received by the phone and current signal
strength is indicated a s the number of bars displayed on the screen.
No service
The phone is not receiving a system signal.
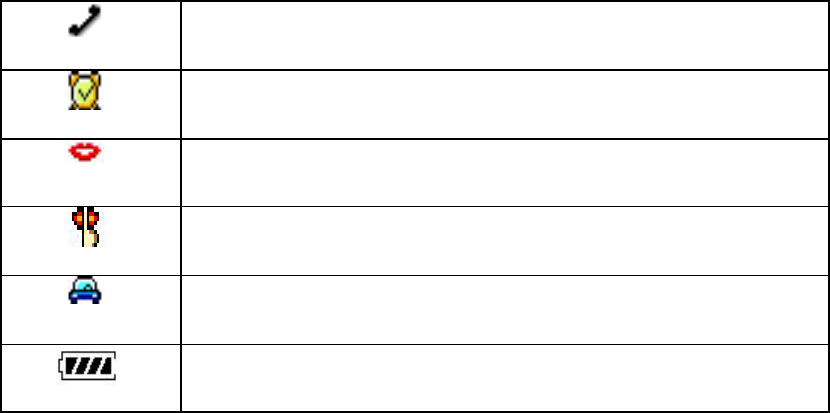
In use
A call is in progress.
No icon indicates the phone is in standby mode.
In Alarm mode (alarm clock is set).
Automatic answering mode is selected.
The Manner mode is selected.
Driving mode is selected.
Shows your current battery charge strength.
(Icon shown fully charged)
D
Chapter 2. Basic Functions
Turning the Phone On and Off
Turning the Phone On
1. Install a charged battery pack or connect the phone to an external power source such as the
cigarette lighter adapter or car kit.
2. Press [END/PWR] for a few seconds until the red light on the top of the phone flashes.
??Fully extend the antenna for the best performance.
<Note> Like any other radio device, avoid any unnecessary contact with the antenna while your
phone is on.
Turning the Phone Off
1. Press and hold until display screen will be turned off, and then release the key.
2. Protect the antenna by pushing it back into the phone, if extended.
Making a Call
When you make a mistake in dialing, if you press [CLR], the dialed number will be deleted one by one.
1. Dial the number with an area code.
2. Press [SEND]
3. To terminate a, close the folder or press [END].
When the call is terminated, you will hear the terminating sound.
1. If you press [SEND] on standby mode, the recent call history appears and if you want to call
the number press [SEND] after selecting the number with navigator button.
2. When the ear mike is connected to the phone, if you press [SEND] after dialing the number, the
call is not terminated even when the folder is closed.
When the folder is closed, talk after opening the folder.
When the folder is open, if the phone rings, press any button except [END].
If answer mode is set to (Folder open), you may answer the call only when you press any button
except [END] after opening the folder.
*If ear mike is connected to your phone, talk after pressing the button on the ear mike. (You may
answer the call by pressing the button on the ear mike even when the folder is closed.)
Correcting Dialing Mistakes
If you make mistakes in dialing a number, press [CLR] key once to erase the last entered digit or
hold down [CLR] for at least two second to delete all digits.
Receiving Calls
1. When the phone rings, open the folder or If the folder is open, press any key (except [END] ) to
answer.
2. Press [END] to disconnect the call.
Dialing a call from Phone Book
You can place a call from any memory location either by speed dialing or by pressing [SEND] while
looking up the memory location.
One-Touch Dialing : One-touch dialing is a convenient feature which enables you to dial
frequently used numbers in your speed-dial data by pressing a key .
??Press digit, then press [SEND].
Two-Touch Dialing (Speed Dialing) : This dialing feature enables you to dial numbers in your
phone book through two keys (for locations 10 to 99).
1) Press the first digit.
2) Press and hold the key of the second digit.
OR
1) Press the first and second digits, then press [SEND].
Dialing from a Memory List
1) From a memory list, press the scroll keys to go to the memory location you want.
2) Press [SEND].
Dialing from a Memory Location.
On viewing and checking the memory location to call, press [SEND].
Chapter 3. Menu Features
General Guidelines to MENU Access and Settings
1. Press Soft Key [Menu]. The animation of menu category will appear on the display screen.
2. Press Soft key [Ok]. The menu items will appear on the display screen.
3. Press[( ] to go through the list of menu features, or use the side keys.
4. Press the corresponding number to the menu item that you want to select. Then the sub-menu list will
appear on the screen.
5. Press the appropriate key to select the sub-menu you want to access.
6. Press Soft Key [Back] to go one step backward while accessing menu.
7. Press Soft Key [Ok] to save the settings or Soft Key [Back] to cancel without saving.
Phone Book ([Menu]+[1])
1. New entry Speed dial ([Menu]+[1] +[1])
You can store your most frequently used phone numbers such as home numbers, office numbers,
mobile phone numbers and so on up to 4000 entries.
?? Name/Group/Memo/E-Mail/Mobile/Home/Office/Etc./
Secret/Character/Photo/Sel
2. Speed dial ([Menu]+[1] +[2])
For the numbers designated for speed dials, you may speed up dialing by pressing
The speed dials.
?? 1~99
3. Call Duration ([Menu]+[1] +[3])
Allows you to keep track of the time you spend for calls. You may check the time duration.
?? Last call/All calls/Dialed calls
4. Clear History ([Menu]+[1] +[4])
Deletes all the information or data stored in call history list.
5. Delete all ([Menu]+[1] +[5])
Is used to delete all information saved in the memory locations. Be careful about using this
function, since any deleted information is nor recoverable.
Vol/Ringer ( [Menu]+ [2] )
1. Select Ringer ([Menu]+[2] +[1])
You can select the type of ring sound you want.
?? Incoming Call/Power On/Power Off
2. MY Melodies ([Menu]+[2] +[2])
?? My Bell/Music Bell/Charac Bell
3. Ring/Vibrate ([Menu]+[2] +[3])
Reception mode is to notify you of an incoming call. The function allows you to select a
phone bell type when receiving a call. You can select the vibrate mode for public places.
?? 1. Ringer Sound/2. Escalate/3.Vibrator/4.Vib+Ring/5. Vib->Ring/6. Lamp+Mute
4. Ring Volume ([Menu]+[2] +[4])
You can hear the volume of each ringing tone as you scroll through the various levels.
5. Key Tone ([Menu]+[2] +[5])
Allows you to select types of key tones you want.
?? 1. Voice/2. Xylophone/3. Drop/4.Puppy/5. Default
6. Folder Tone ([Menu]+[2] +[6])
Allows you to select types of folder tones you want.
7. Connect Alert ([Menu]+[2] +[7])
An alert tone notifies the user of the call connection.
?? 1.Deactivate/2. Activate
8. Service Alert ([Menu]+[2] +[8])
If the switch is on, it alert you when the service changes.
?? 1.Deactivate/2. Activate
9. 1 Min Alert ([Menu]+[2] +[9])
Every time you use an additional 1 minute during a call, this function warns you 10 seconds before
the next minute starts by making a beep sound.
.Deactivate/2. Activate
Display ( [Menu]+ [3] )
you can select picture, num setting and menu style etc.
1. Display Theme( [Menu]+[3]+[1] )
You can select a character shown on the LCD screen.
2. Banner ( [Menu]+[3]+[2] )
Allows you to enter or change the 16-character field displayed on the first line f your phone’s
display screen in standby mode.
3. Num Setting( [Menu]+[3]+[3] )
Allows you to adjust the size or color of numbers displayed on the screen when placing a call.
4. Standby Clock( [Menu]+[3]+[4] )
Allows you choose the type of clock to be displayed on the screen.
5. Menu Style( [Menu]+[3]+[5] )
Allows you to select the menu style.
??Big Icon : LCD will display animation menu.
??Disk : LCD will display revolving menu.
??List : LCD will display listed menu.
6. Menu Color( [Menu]+[3]+[6] )
Allows you to select the background color on the menu screen.
7. Group Display( [Menu]+[3]+[7] )
Allows you to identify the call with LCD Screen when you have an incoming call by
designating the pattern for each group.
8. Backlight ( [Menu]+[3]+[8] )
Allows you to use your phone at dark places by letting the lights on for the screen and each
key button for the designated times.
9. Contrast ( [Menu]+[3]+[9] )
Allows you to set up LCD display contrast with [??] key.
Camera ([Menu]+[4])
1. Photo ([Menu]+[4] + [1])
?? Take Photo([Menu]+[4] + [1] + [1])
?? Sticker Photo([Menu]+[4] + [1] + [2])
?? Series Photo([Menu]+[4] + [1] + [3])
?? My Album([Menu]+[4] + [1] + [4])
?? Photo Mail([Menu]+[4] + [1] + [5])
?? Settings([Menu]+[4] + [1] + [6])
2. Motion Picture([Menu]+[4]+ [2])
?? Motion Shot([Menu]+[4] + [2] + [1])
?? Motion Album([Menu]+[4] + [2] + [2])
?? Settings([Menu]+[4] + [2] + [3])
Utilities ([Menu]+[5])
1. Alarm Clock( [Menu]+[5]+[1] )
Used to sound alarm at the fixed time if you set up the alarm time.
2. Wake-up Call( [Menu]+[5]+[2] )
Alarm will sound at the time designated and the message “time to wake up”will be displayed on the
screen. When you press the menu “confirm”, you may select either extend 5 minutes of release.
3. Calculator ( [Menu]+[5]+[3] )
You can use the phone as a 9-digit calculator. The calculator performs basic arithmetic functions;
addition, subtraction, multiplication, division.
4. World Time ( [Menu]+[5]+[4] )
Is usedful if you need to make a call to another country and you are not sure about the time difference
between the country you are currently in and the country you want to call.
5. Answer Mode ( [Menu]+[5]+[4] )
When you are not available to answer an incoming call, you may select an item out of the following 3
otions.
??Deactivate/Auto Answer/Driving Mode
6. Record Answer ( [Menu]+[5]+[4] )
When you are not availavle to answer an incoming call, you may select an item out of following 2
options.
??Ans. Machine/ Driving Mode
7. Recorded Msgs ( [Menu]+[5]+[4] )
Manages the messages recored in menus such as voice memo, record during a call, auto answer and
driving mode.
8. IrDA Exchange ( [Menu]+[5]+[4] )
Schedule ([Menu]+[6])
The scheduler helps you to keep track of reminders, calls that you need to make, meetings, and birthdays.
The phone sounds an alarm tone when the set date for a birthday, reminder or call is reached.
1. New Schedule ( [Menu]+[6]+[1] )
Allows you to keep track of appointments.
2. Find Schedule ( [Menu]+[6]+[1] )
Allows you to enter keyword to find a schedule or event for a certain day.
3. Delete Past( [Menu]+[6]+[1] )
Can be used to delete old records which may not be useful anymore.
Security ([Menu]+[7])
1. Privacy ( [Menu]+[7]+[1] )
you can select one of 2 option(Deactivate and activate)
2. Phone Lock ( [Menu]+[7]+[2] )
Prevents unauthorized use of your phone.
?? Deactivate/Power-on/Now
3. Reject Call ( [Menu]+[7]+[3] )
When you are not availavle to answer the phone for you may set your phone not to receive the
incoming calls for the time being.
?? 1.Deactivate/2. Activate
4. Call Barring ( [Menu]+[7]+[4] )
Limits outgoing calls, and you have the following four options.
?? Deactivate/Int’I. call/700 call/All calls
5. Security Code ( [Menu]+[7]+[5] )
Allows you to enter a new four-digit lock code number. For confirmation, your phone will
prompt you to enter the new lock code twice.
Settings ([Menu]+[8])
1. Call Answer ( [Menu]+[8]+[1] )
1.Open folder - If Incomming call, enabled to call open folder
2.Press key - If Incomming call, enabled to call pressing any key.
2. Connection ( [Menu]+[8]+[2] )
1.USB - Connect to PC with USB Cable.
2.115K - Connect to PC with Serial Cable
3.230K
3. Set Line ( [Menu]+[8]+[3] )
Select the phone' s NAM (Number Assignment Module) if the phone is registered with multiple
service provides.
4. Phone Info ( [Menu]+[8]+[4] )
LCD will display about SW version, JAVA version and PRL information
R-World ([Menu]+[9])
1. R-Menu ( [Menu]+[9]+[1] )
2. Multimedia( [Menu]+[9]+[2] )
3. Games( [Menu]+[9]+[3] )
4. Reset R-Menu( [Menu]+[9]+[4] )
Chapter 4. Message Features
Text message and page become available as soon as the power is on.
You can make a call to the call back number by pressing the [Send] during a message check.
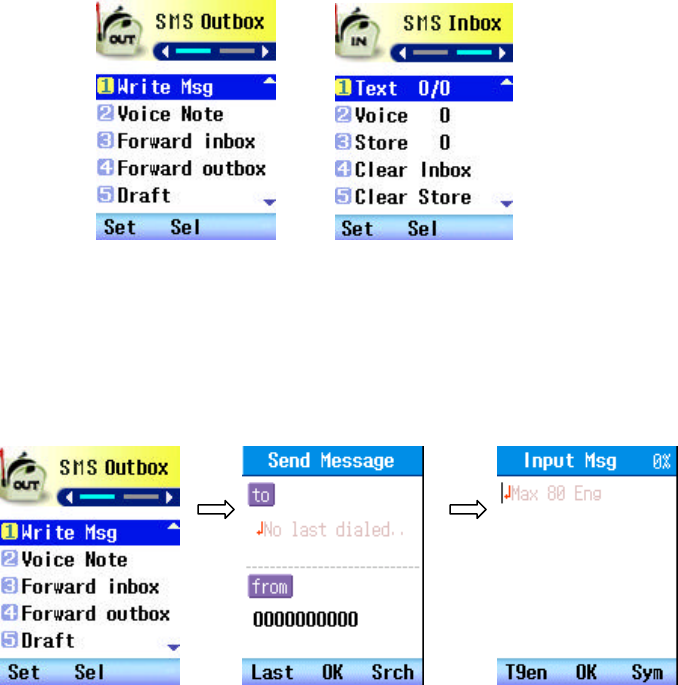
Massage Service
<Initial Message Service Image >
,
- Move the cursor with the upside and downside keys [?], and press Soft Key [Sel] for the
menu requested.
1. Write Msg
Press [Sel]
Input message.
and Press[OK]
Enter Phone
Number.
If you want to send to
number saved in book,
press[Srch]
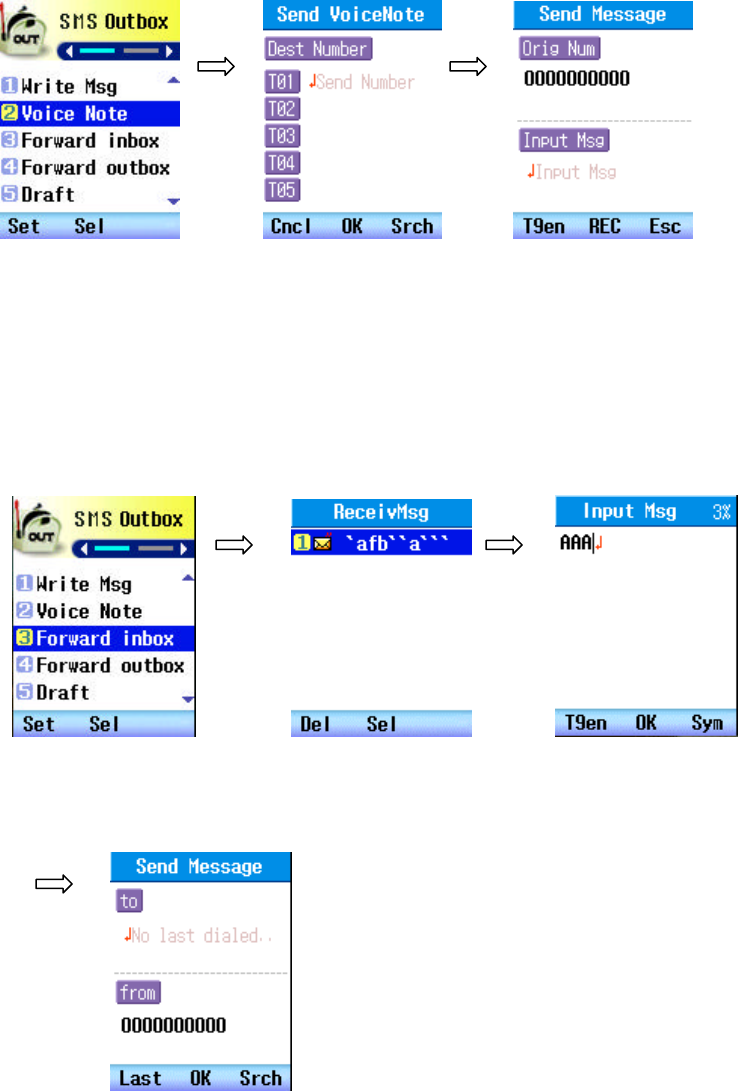
2. Voice Note
3. Forward inbox
Press [Sel]
Input phone number.
and Press [OK]
Input message.
and Press [REC]
Press [Sel] Press [Sel]
Add message
and Press[OK]
Enter Phone Number.
If you want to send to
number sa
ved in book,
press[Srch]
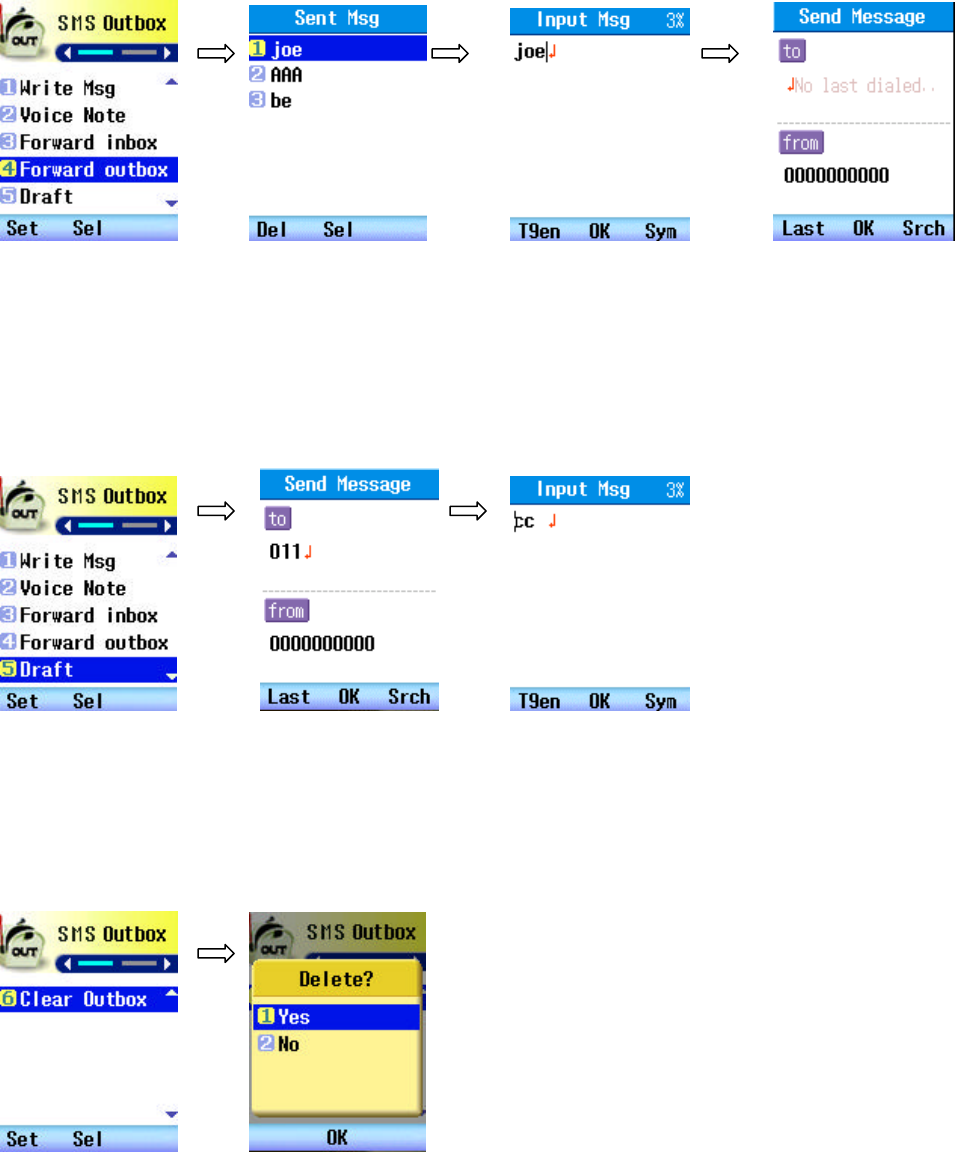
4. Forward outbox
5. Draft
6. Clear Outbox
Press [Sel]
Select one of Message.
And Press[Sel]
Add message
and Press[OK]
Enter Phone Number.
If you want to send to
number saved in book,
press[Srch]
P
ress 1 key.
And Press [OK]
Press [Sel] Enter Phone Number.
Add message
and Press[OK]
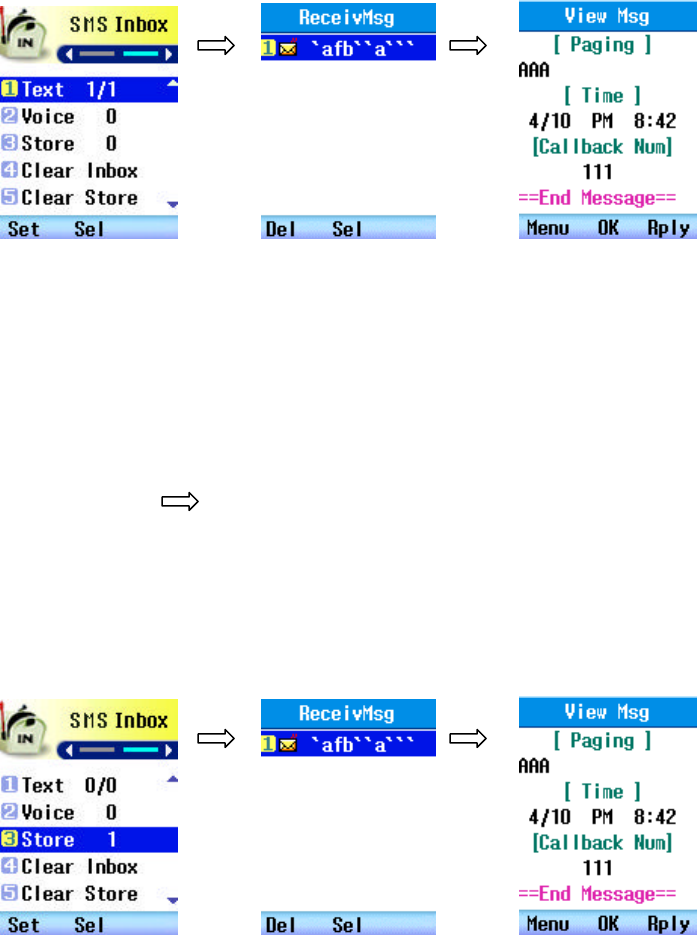
1.Text
2. Voice
3. Store
Press [Sel]
Press [Sel] Press [Sel]
Press [Sel] Press [Sel]
Press [Sel] Press [Sel]
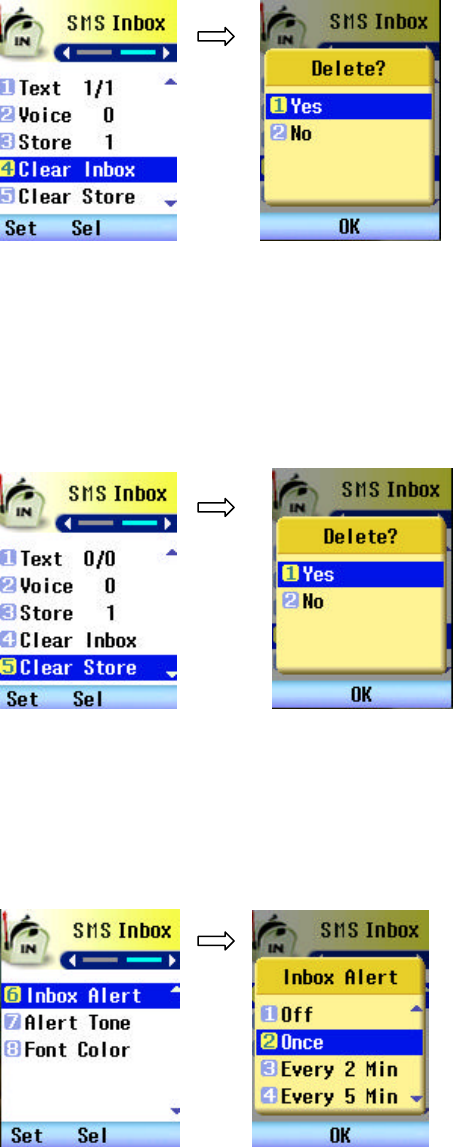
5. Clear Inbox
6. Clear Store
7. Inbox Alert
Press [Sel]
Press 1 key.
And Press [OK]
Press [Sel]
Press 1 key.
And Press [OK]
Press [Sel]
Select one of 7 option
And Press [OK]
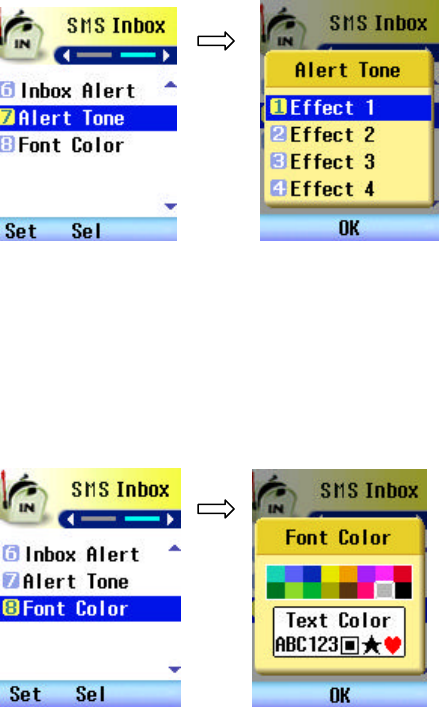
8. Alert Tone
9. Font Color
Press [Sel]
Select one of 7 option
And Press [OK]
Press [Sel]
Select color
And Press [OK]

LG-RD7230
LGE
LG
Electronics Inc.
Appendix Installation
Installing a Battery Pack
1) The Battery pack is keyed so it can only fit one way. Align the groove in the battery pack with the rail
on the back of the phone until the battery pack rests flush with the back of the phone.
2) Insert the bottom of battery into the openning on the back of the phone. Then, push the battery down
until the latch clicks..
For Desktop Charger Use
1) Plug the charger into a wall outlet. The charger can be operated from either a 110V or a 220V source.
When AC power is connected to the desktop charger, both the green and red LED’s blink once.
2) Insert the phone with the installed battery pack or a spare battery pack into the individual battery pack
slot. Red light indicates battery is being charged.. Green light indicates battry is fully charged.
For Mobile Mount
Installation Position
In order to reduce echo sound when using the Hands-Free Kit, make sure that the speaker and
microphone are not facing each other and keep microphone a generous distance from the speaker.
Cradle Installation
Choose an appropriate flat surface where the unit will not interface with driver’s movement or passenger’s
comfort. The driver/user should be able to access the phone with ease. Using the four self-tapping
screws provided, mount the supplied braket on the selected area. Then with the four machine screws
provided, mount the counterpart on the reverse side of the reverse side of the cradle. Secure the two
brackets firmly together by using the two bracket joint screws provide. The distance between the cradle
and the interface box must not exceed the length of the main cable.
Interface Box
Choose an appropriate flat surface ( somewhere under the dash on the passenger side is preferred ) and
mount the IB bracket with the four self-tapping screws provided. Clip the IB into the IB bracket.
Microphone Installation

LG-RD7230
LGE
LG
Electronics Inc.
13/27
Install the microphone either by cliiping I onto the sunvisor (driver’s side) or by attaching it to door post
(driver’s side), using a velcno adhesive tape (not included).
Cable Connections
Power and Ignition Cables
Connect the red wire to the car battery positive terminal and the black wire to the car ground. Connect
the green wire to the car ignition sensor terminal. ( In order to operate HFK please make sure to connect
green wire to ignition sensor terminal.) Connect the kit’s power cable connector to the interface box
power receptacle.
Antenna Cable Connection
Connect the antenna coupler cable connector from the cradle to the external antenna connector.
( Antenna is not included.)
12
Appendix. RF Exposure Statement
WARNING! Read this information before operating the phone.
In August 1996, the Federal Communications (FCC) of the United States, with its action in Report
and Order FCC 96-326, adopted an updated safety standard for human exposure to radio frequency
(RF) electromagnetic energy emitted by FCC regulated transmitters. Those guidelines are consistent
with the safety standard previously set by both U.S. and international standards bodies.
The design of this phone complies with the FCC guidelines and these international standards.
CAUTION
Use only the supplied and approved antenna. Use of unauthorized antennas or modifications could
impair call quality, damage the phone, void your warranty and/or result in violation of FCC
regulations.
Do not use the phone with a damaged antenna. If a damaged antenna comes into contact with skin, a
minor burn may result. Contact your local dealer for a replacement of antenna.
Body Worn Operation
This device was tested for typical body-worn operations with the back of the phone kept 1.5 cm
from the body. To comply with FCC RF exposure requirements, a minimum separation distance of
1.5 cm must be maintained between the user’s body and the back of the phone, including the
antenna, whether extended or retracted. The use of belt-clips, holsters, and similar accessories
should not containing metallic components in its assembly. The use of accessories that do not satisfy
these requirements may not comply with FCC RF exposure requirements, and should be
avoided.
For Your Safety FCC Part 15 Class B Compliance
This device and its accessories comply with part 15 of FCC rules. Operation is subject to the
following two conditions: (1) This device and its accessories may not cause harmful interference,
and (2) this device and its accessories must accept any interference received, including interference
that may cause undesired operation.