LG Electronics USA RLJA20 LCD Projector User Manual 2
LG Electronics USA LCD Projector Users Manual 2
UserManual.wiki
>
LG Electronics USA
>
RLJA20 User Manual
>
Users Manual 2
Contents
1.
Users Manual 1
2.
Users Manual 2
Users Manual 2
Navigation menu
Upload a User Manual
Namespaces
Wiki Guide
HTML
PDF
Info
Views
User Manual
Discussion / Help
Navigation

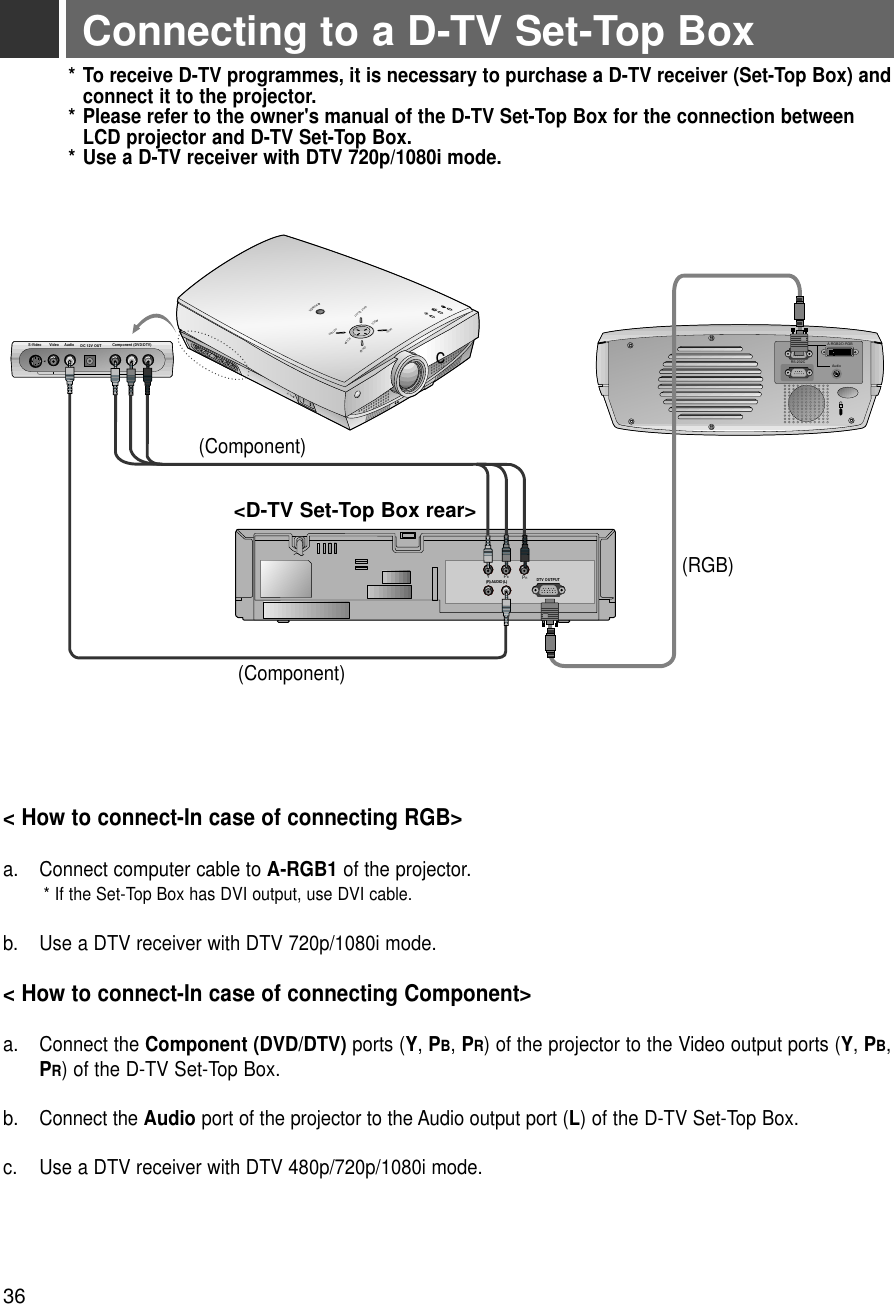
![Function checking3Press the MENU button to show a menu on screen.1Press the D, E button to select a menu. ●Each press will cycle through the different menus as shown below.Press the OK (A)button and then press the D, E or VOLUME (F, G) buttons to select a feature youwant to use.●To finish the menu display, press the MENU button.*In Video and S-Video mode and Component(480i(576i)), D-RGB mode menu is not displayed.* Only A-RGB1, A-RGB2, Component(480p, 720p, 1080i) mode displays [Horizontal], [Vertical] in menu*The sub menus of menu in Video and S-Video mode and Component mode are different from those in the RGBmode. (Refer to page 52).* [Color R], [Color G], [Color B] : Use only for the A-RGB1 and the A-RGB2 modes. [Color R], [Color G], [Color B]items are used to adjust the R/G/B color levels when the RGB analog input signal has improper R/G/B signal levels.2* If there is no input signal, Menu will not display on screen.* This operating guide explains operation of A-RGB1 mode mainly.37BASIC FUNCTIONSContrast 50Brightness 50Color R 50Color G 50Color B 50ResetLanguageARCFlip HorizontalFlip VerticalEnglish16:9Twin PictureColor Temp. R 0Color Temp. G 0Color Temp. B 0OffAuto TrackingClock 25Phase 25Horizontal 0Vertical 0V Keystone 0H Keystone 0ZoomBlank ImageSet IDLamp TimeBlue0 Hr1Menu exit move OK Menu exit move OKMenu exit move OKMenu exit move OKMenu exit move OK](https://usermanual.wiki/LG-Electronics-USA/RLJA20.Users-Manual-2/User-Guide-286044-Page-7.png)
![Selecting languagePress the MENU button and then use D/ Ebutton to select the menu.1Press the OK (A)button and then use D/ Ebutton to select [Language] item.Press the VOLUME (F, G) button to select the language you want to use.● On-Screen-Display(OSD) is marked in the selected language from this point.●To finish menu display, press the MENU button.2339SPECIALFUNCTIONSLanguageARCFlip HorizontalFlip VerticalEnglish16:9Menu exit move OKLanguageARCFlip HorizontalFlip VerticalEnglish16:9Menu prev. move select](https://usermanual.wiki/LG-Electronics-USA/RLJA20.Users-Manual-2/User-Guide-286044-Page-9.png)

![41Manual Color Temperature Control SPECIALFUNCTIONS* You can adjust red, green, or blue to any color temperature you prefer.Press the MENU button and then use D/ Ebutton to select the menu.1Press the OK (A)button and then use D/ Ebutton to select a color.Use the VOLUME (F, G)button to make appropriate adjustments.● The adjustment range of [Color Temp. R], [Color Temp. G] and [Color Temp. B] is -50 ~ +50.●To exit the menu display, press the MENU button.23Twin PictureColor Temp. R 0Color Temp. G 0Color Temp. B 0OffMenu exit move OKTwin PictureColor Temp. R 0Color Temp. G 0Color Temp. B 0OffMenu prev. move adjust](https://usermanual.wiki/LG-Electronics-USA/RLJA20.Users-Manual-2/User-Guide-286044-Page-11.png)

![43SPECIALFUNCTIONSSelecting Blank Image colorSelecting Blank Image colorPress the MENU button and then use D/ Ebutton to select the menu.1Press the OK (A)button and then use D/ Ebutton to select [Blank Image] item.2V Keystone 0H Keystone 0ZoomBlank ImageSet IDLamp TimeBlue0 Hr1Menu exit move OKV Keystone 0H Keystone 0ZoomBlank ImageSet IDLamp TimeBlue0 Hr1Press the VOLUME (F, G) button to select the color you want to use.●Background color will be changed to the selected Blank function color from this point.●To exit menu display, press the MENU button.3Menu prev. move select](https://usermanual.wiki/LG-Electronics-USA/RLJA20.Users-Manual-2/User-Guide-286044-Page-13.png)
![44Using Flip Horizontal / Vertical functionFlip Horizontal FunctionFlip Horizontal Function* This function reverses the left and the right side of the projected image. Use this function when projecting from behind onto a transparent screen being viewed from the opposite side.Press the MENU button and then use D/ Ebutton to select the menu.1Press the OK (A)button and then use D/ Ebutton to select [Flip Horizontal] item.Press the OK(A)button to see reversed image.●Each time you press the button, the image will be reversed.●To finish menu display, press the MENU button.23LanguageARCFlip HorizontalFlip VerticalEnglish16:9Menu exit move OKLanguageARCFlip HorizontalPress OK to FlipFlip VerticalEnglish16:9Menu prev move OK](https://usermanual.wiki/LG-Electronics-USA/RLJA20.Users-Manual-2/User-Guide-286044-Page-14.png)
![45SPECIALFUNCTIONSFlip VFlip Vertical Functionertical Function* This function reverses the upper and the lower side of the projected image. * When you hang the projector upside down from the ceiling for using, you need to reverse all the sides(left, right, upper, lower) of the image.Press the MENU button and then use D/ Ebutton to select the menu.1Press the OK (A)button and then use D/ Ebutton to select [Flip Horizontal] item.Press the OK(A)button to see reversed image.●Each time you press the button, the image will be reversed.●To finish menu display, press the MENU button.23LanguageARCFlip HorizontalFlip VerticalEnglish16:9Menu exit move OKLanguageARCFlip HorizontalFlip VerticalPress OK to FlipEnglish16:9Menu prev move OK](https://usermanual.wiki/LG-Electronics-USA/RLJA20.Users-Manual-2/User-Guide-286044-Page-15.png)
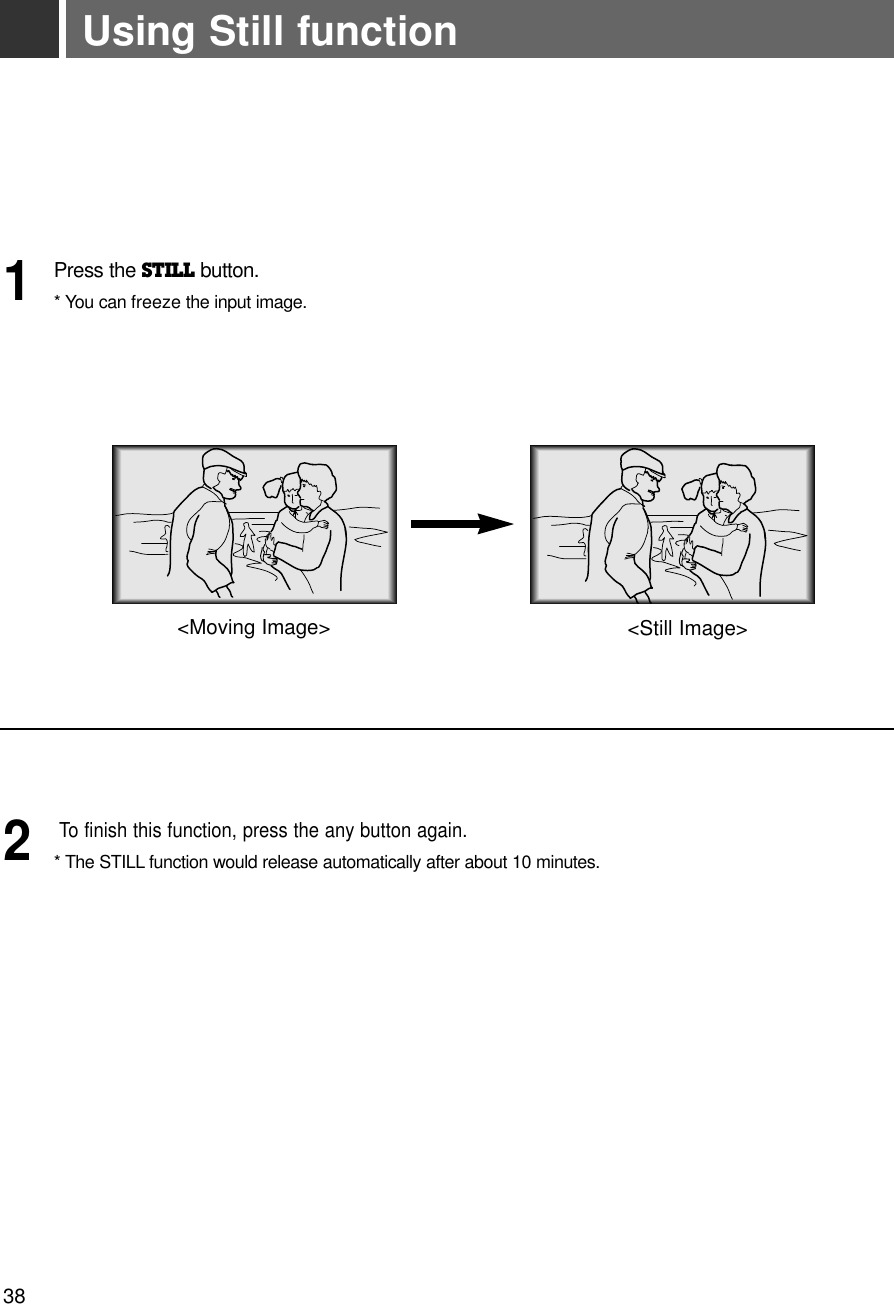
![Changing the picture of main and sub pictureSWAPPress the SWAP button in twin picture mode.A-RGB2Video VideoA-RGB2Using Still function in twin picture mode.STILL Press the STILL button in twin picture mode.47SPECIALFUNCTIONS●You can cancel this function directly by selecting [Off] in menu.●The STILL function is cancelled when changing the input signal. [Main Still] is cancelled when changing the input signal with INPUT SELECT button and [Sub Still] is cancelled when changing the input signal with SUB INPUT button. That is, [Main/Sub Still] work separately.●The STILL function would release automatically after about 10 minutes.Main StillSub Stillexit selectOffOff](https://usermanual.wiki/LG-Electronics-USA/RLJA20.Users-Manual-2/User-Guide-286044-Page-17.png)
![Adjusting screen display *If the image size does not fit the screen in accordance with the input source, set the position of the imageby selecting Horizontal / Vertical position.(For A-RGB1, A-RGB2, Component 480p/720p/1080i)Press the MENU button and then use D/ Ebutton to select the menu.1Press the OK (A)button and then use D/ Ebutton to select [Horizontal] or [Vertical] item.Press the VOLUME (F, G) button to adjust the screen condition as you want.● [Horizontal], [Vertical] are adjusted from -50 to +50.●To exit the menu display, press the MENU button.23Auto TrackingClock 25Phase 25Horizontal 0Vertical 0Menu exit move OKAuto TrackingClock 25Phase 25Horizontal 0Vertical 0Menu prev. move adjust48](https://usermanual.wiki/LG-Electronics-USA/RLJA20.Users-Manual-2/User-Guide-286044-Page-18.png)
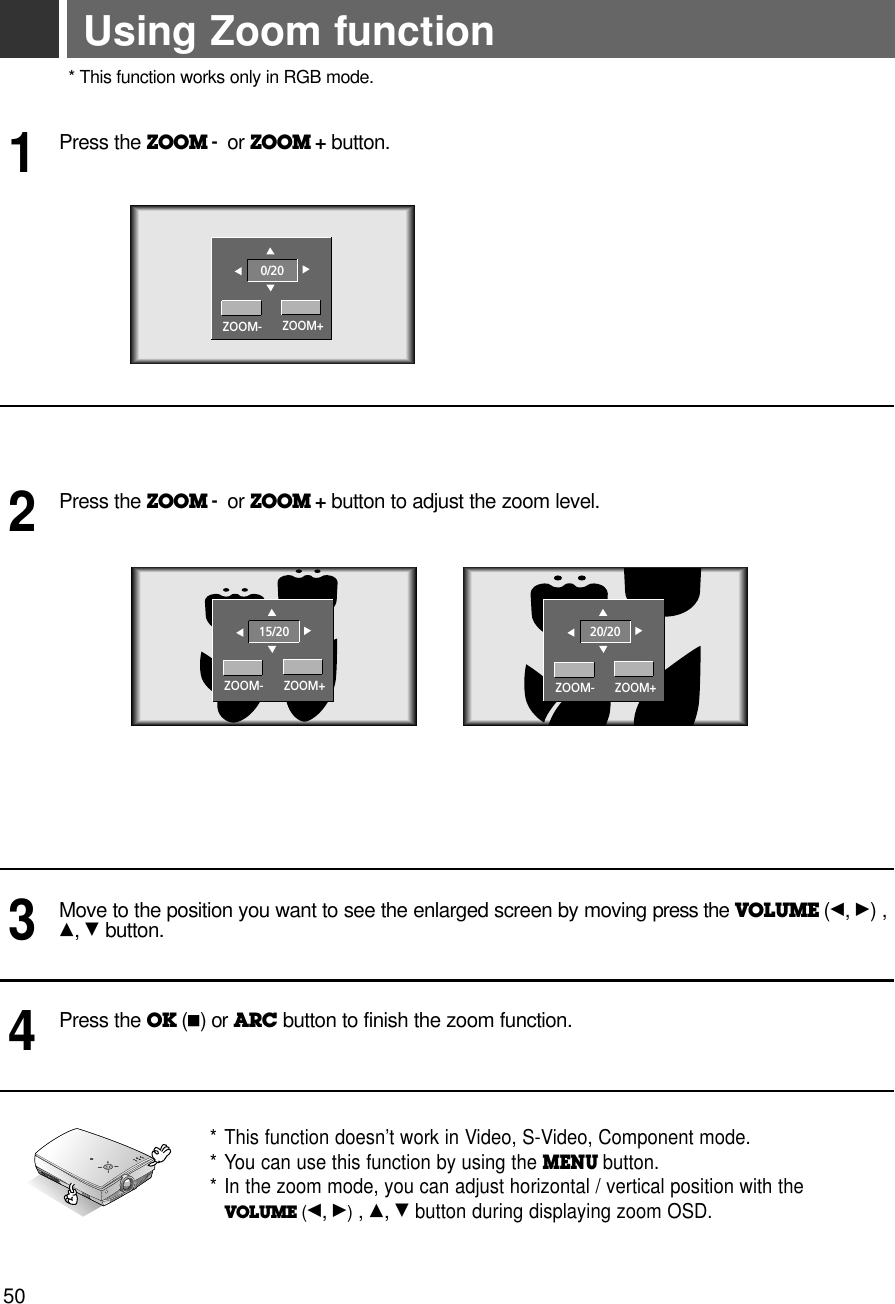
![Using Keystone functionPress the KEYSTONE button.13V Keystone 0H Keystone 0exit adjust*Keystone function adjusts the upper and lower width of the projected image to prevent the image from being a trapezoid shape. Use this function when the screen or the projector is slanted and cannot make an ideal projection angle.* Only use the Keystone function when you can’t get the best angle of projection, because it may cause a blazing fire of the screen.Press the D/ Ebutton to select [V Keystone] or [H Keystone] item.249POSITION-INGPress the VOLUME (F, G)button to adjust the screen condition as you want.● [Keystone]are adjusted from -50 to +50.●Adjustment range of H/V Keystone may not work until -50 ~ +50 because they are interlocked.●To exit the menu display, press the OK (A)button.●You can also use this function by using the MENU button.](https://usermanual.wiki/LG-Electronics-USA/RLJA20.Users-Manual-2/User-Guide-286044-Page-19.png)
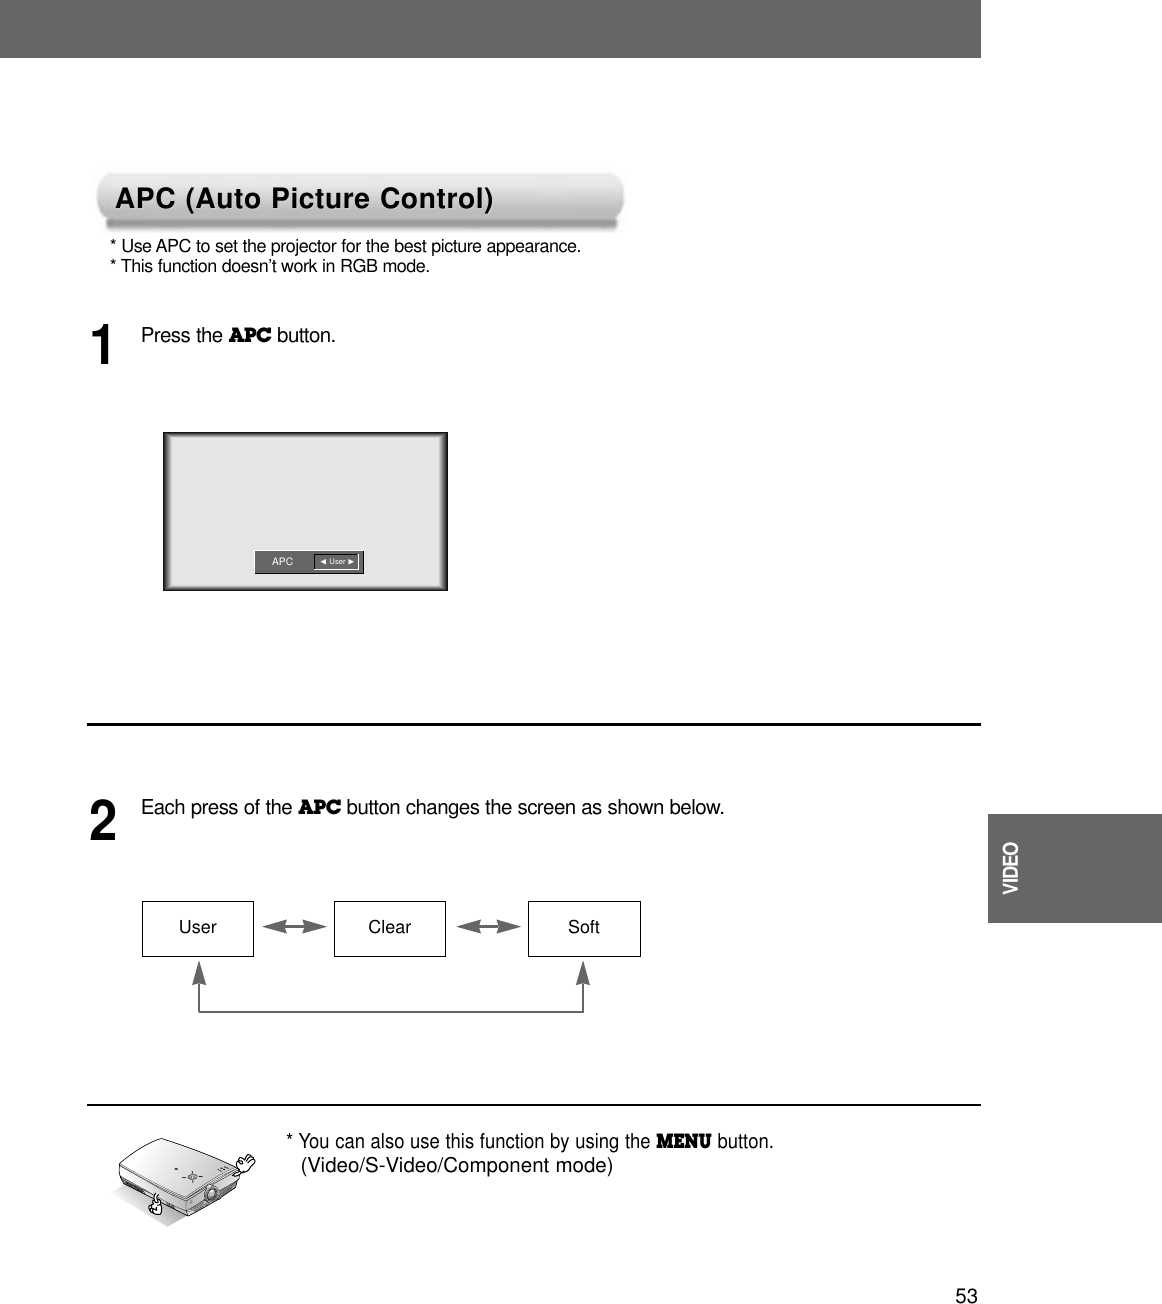
![Adjusting Video Press the MENU button and move the D/ E button up or down to select each menu. 1Press the D/ Ebutton up or down to select a video item you want to adjust.3Press the VOLUME (F, G)button to adjust the selected video item as you want. ●You can only adjust [Contrast] and [Brightness] of menu in Twin picture mode. In Twin picture mode, adjustment for [Contrast] and [Brightness] doesn’t effect other input sources. Adjustments apply to main andsub picture simultaneously.●Each adjustment of menu options don’t effect other input source. As required, re-adjust menu optionsfor the following input source : Video/S-Video/Component(480i(576i)), Component(480p, 720p, 1080i)●To restore the original image condition after changing it, press OK (A)button after selecting [Reset] item.●In the broadcasting system NTSC, the picture item Tint is displayed and adjusted.●To finish menu display, press the MENU button.4Press the OK (A)button.2< RGB mode >< Video, S-Video, Component mode >< RGB mode >< Video, S-Video, Component mode >52APCContrast 50Brightness 50Color 50Sharpness 50Tint 0UserMenu exit move OK< Twin picture mode >Contrast 50Brightness 50ResetMenu exit move OKAPCContrast 50Brightness 50Color 50Sharpness 50Tint 0UserContrast 50Brightness 50Color R 50Color G 50Color B 50ResetMenu exit move OKContrast 50Brightness 50Color R 50Color G 50Color B 50ResetMenu Prev. move adjust< Twin picture mode >Contrast 50Brightness 50ResetMenu Prev. move adjustMenu Prev. move select](https://usermanual.wiki/LG-Electronics-USA/RLJA20.Users-Manual-2/User-Guide-286044-Page-22.png)
![Using Tracking function* Auto Tracking FunctionThis function assures you of getting the best video quality by automatically adjusting the difference of horizontal size andsynchronization of the image. Auto Tracking function works in Analog RGB(A-RGB1, A-RGB2) input only.* Image positioning and synchronization are automatically adjusted.Press the AUTO TRACKING button.1Adjust [Clock] or [Phase] in menu after operation of [Auto Tracking] if you want to get bet-ter picture quality in accordance with diverse Analog RGB(A-RGB1, A-RGB2) input modes. In certain circumstances, you can’t get the best picture quality only with auto-correction.(Refer to page 55.)2* You can also use this function by using the MENU button.(Only in Analog RGB mode)* For best results, perform this function while displaying a still image.RAuto TrackingAuto TAuto Tracking Functionracking Function54](https://usermanual.wiki/LG-Electronics-USA/RLJA20.Users-Manual-2/User-Guide-286044-Page-24.png)
![* Clock FunctionThis function adjusts the horizontal width of the projected image to get the image to fit on the screen size. * Phase FunctionThis function is for the detailed adjustment of the clock function.* It’s available to adjust [Clock], [Phase] in Analog RGB mode only.Clock / Phase FunctionClock / Phase FunctionPress the MENU button and then use D/ Ebutton to select the menu.1Press the OK (A)button and then use D/ Ebutton to select [Clock] or [Phase] item.Press the VOLUME (F, G)button to adjust the screen condition.● To exit the menu display, press the MENU button. 23Auto TrackingClock 25Phase 25Horizontal 0Vertical 0Menu exit move OKAuto TrackingClock 25Phase 25Horizontal 0Vertical 0Menu prev. move adjust55TRACKING](https://usermanual.wiki/LG-Electronics-USA/RLJA20.Users-Manual-2/User-Guide-286044-Page-25.png)
![•Use this function to specify projector ID number.SET IDExternal control device setup* Connect the RS-232C input jack to an external control device (such as a computer or an A/V control system)and control the Projector’s functions externally.*When you connect a control(RS-232C) cable to this projector, use a control cable with a ferrite core attached.If you do not do this, this projector will not conform to mandatory CISPR22(EN55022) standards.56Press the MENU button and then use D/ Ebutton to select the menu.1Press the OK (A)button and then use D/ Ebutton to select [Set ID] item.2V Keystone 0H Keystone 0ZoomBlank ImageSet IDLamp TimeBlue0 Hr1Menu exit move OKV Keystone 0H Keystone 0ZoomBlank ImageSet IDLamp TimeBlue0 Hr1Press the VOLUME (F, G) button to adjust Set ID to choose the desired projector ID number.● The adjustment range of Set ID is 1~99. ● If projector have specified ID number, the choosed projector operates only.● To exit the menu display, press the MENU button. 3Menu prev. move select](https://usermanual.wiki/LG-Electronics-USA/RLJA20.Users-Manual-2/User-Guide-286044-Page-26.png)
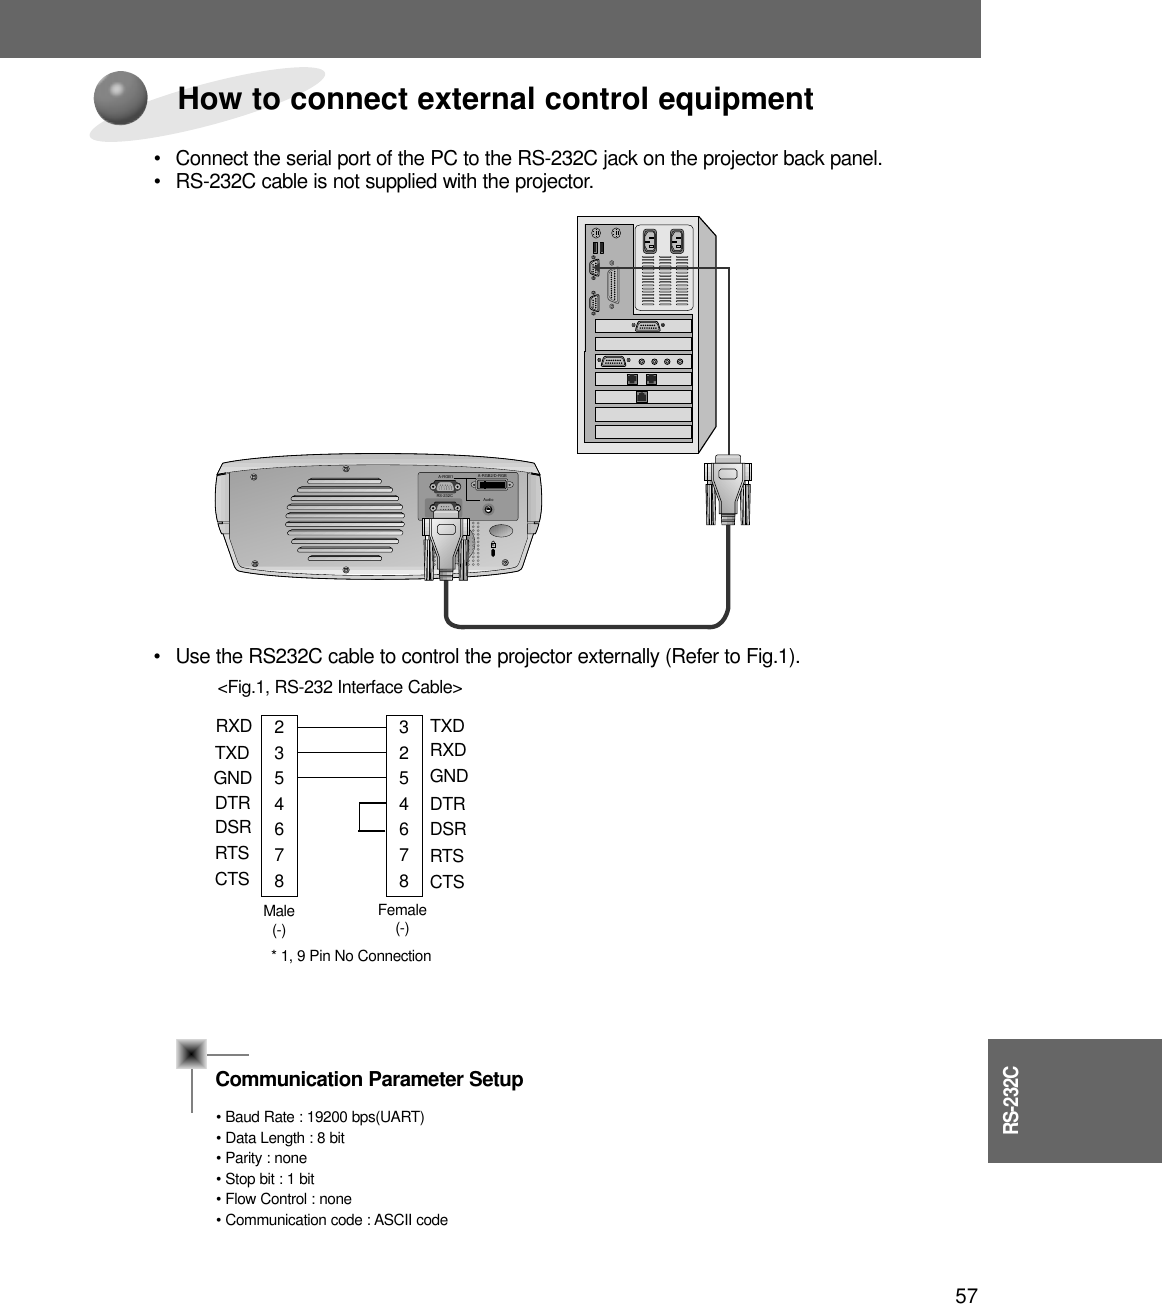
![Command Reference ListExternal control device setup581. Transmission* [Command 1] : To classify factory adjustment mode or user adjustment mode.(ASCII code, 1 Character)* [Command 2-1] : Group classification code to control set.(ASCII code, 1 Character)➜ Shortening Key Group :0, Video Group : 3, Twin Picture Group : 4, Audio Group:5, Others : 9* [Command 2-2] : To control projector set.* [Set ID] : You can adjust the set ID to choose desired projector ID number in special menu. See previous page. Adjustment range is 1 ~ 99. When selecting Set ID ‘0’, every connected projector set is controlled.* [DATA] : To transmit command data. Transmit 2 character when organized ASCII code.* Transmit ‘FF’ data to read status of command.* [Cr] : Carriage ReturnASCII code ‘0x0D’* [ ] : ASCII code character correspond to “Space Bar” which is in order to classify command set ID and Data.[Command1][Command2-1][Command2-2][ ][Set ID][ ][Data][Cr]*The Projector transmits ACK (acknowledgement) based on this format when receiving normal data. At this time, if the data is data read mode, it indicates present status data. If the data is data write mode, it returns the data of the PC computer.[Command2-1][Command2-2][ ][Set ID][ ][OK][Data][X][Command2-1][Command2-2][ ][Set ID][ ][NG][Data][X]2. Error Acknowledge*The Projector transmits ACK (acknowledgement) based on this format when receiving abnormal data from non-viable functions or communication errors.Data : [01] : illegal code(This command is not supported.)[02] : not support function(This function doesn’t work.)[03] : wait more time(Try again a few minute later.)❑ Communication ProtocolCommand1 Command2-1 Command2-2 SET ID Data(Hexa) Data(Hexa)01. Power k 0 0 00~63 00, 0102. Input Select k 0 1 00~63 00~0503. Aspect Ratio k 0 2 00~63 00~0504. Screen Mute k 0 3 00~63 00, 0105. Sub Input Select k 0 4 00~63 00~0506. Contrast k 3 0 00~63 00~6407. Brightness k 3 1 00~63 00~6408. Color k 3 2 00~63 00~6409. Tint k 3 3 00~63 00~6410. Sharpness k 3 4 00~63 00~6411. Color R k 3 6 00~63 00~6412. Color G k 3 7 00~63 00~6413. Color B k 3 8 00~63 00~6414. Color Temp. R k 3 900~63 00~6415. Color Temp. G k 3 a00~63 00~6416. Color Temp. B k 3 b00~63 00~6417.Twin Picture Mode Select k 4 1 00~63 00, 01, 0218. Volume Mute k 5 4 00~63 00, 0119. Volume Control k 5 0 00~63 00~6420. OSD Lock mode k 9 0 00~63 00, 0121.Remote Control Lock modek 9 1 00~63 00, 01](https://usermanual.wiki/LG-Electronics-USA/RLJA20.Users-Manual-2/User-Guide-286044-Page-28.png)
![59RS-232C01. Power (Command2-1:0, Command2-2:0)➜To control Power On/Off of the Projector.TransmissionData 00 : Power Off01 : Power On [k] [0] [0] [Set ID] [ ] [Data] [Cr][k] [0] [0] [ ] [Set ID] [ ] [FF] [Cr][0] [0] [ ] [Set ID] [ ] [OK] [Data] [X][0] [0] [ ] [Set ID] [ ] [OK] [Data] [X]AckAckData 00 : Power Off01 : Power On➜To show Power On/Off status.TransmissionData 00 : Power Off01 : Power On*In like manner, if other functions transmit ‘FF’ data based on this format, Acknowledgement data feed back presents status about each function.02. Input Select (Command2-1:0, Command2-2:1)➜To select input source for the Set. TransmissionData 00 : A-RGB1 01 : A-RGB2 02 : D-RGB03 : Video 04 : S-Video 05 : ComponentData 00 : A-RGB1 01 : A-RGB2 02 : D-RGB03 : Video 04 : S-Video 05 : Component[k] [0] [1] [ ] [Set ID] [ ] [Data] [Cr][0] [1] [ ] [Set ID] [ ] [OK] [Data] [X]Ack03. Aspect Ratio (Command2-1:0, Command2-2:2)➜To adjust the screen format.TransmissionData 00 : Wide Screen(16:9) 01 : Normal Screen( 4:3)02 : Zoom 1 03 : Zoom 204 : Zoom 3 05 : Zoom 4Data 00 : Wide Screen(16:9) 01 : Normal Screen( 4:3)02 : Zoom 1 03 : Zoom 204 : Zoom 3 05 : Zoom 4[k] [0] [2] [ ] [Set ID] [ ] [Data] [Cr][0] [2] [ ] [Set ID] [ ] [OK] [Data] [X]Ack* Using the PC input, you select either 16:9 or 4:3 screen aspect ratio.* Screen size function doesn’t work with HD signal.* Zoom1~Zoom4 mode works only with Video/S-Video/Component(480i(576i), 480p) input.04. Screen Mute (Command2-1:0, Command2-2:3)➜To select screen mute on/off.TransmissionData 01 : Screen Mute On (Picture Off)00 : Screen Mute Off (Picture On)Data 01 : Screen Mute On (Picture Off)00 : Screen Mute Off (Picture On)[k] [0] [3] [ ] [Set ID] [ ] [Data] [Cr][0] [3] [ ] [Set ID] [ ] [OK] [Data] [X]Ack05. Sub Input Select (Command2-1:0, Command2-2:4)➜To select input source for sub picture.TransmissionData 00 : A-RGB1 01 : A-RGB2 02 : D-RGB03 : Video 04 : S-Video 05 : ComponentData 00 : A-RGB1 01 : A-RGB2 02 : D-RGB03 : Video 04 : S-Video 05 : Component[k] [0] [4] [ ] [Set ID] [ ] [Data] [Cr][0] [4] [ ] [Set ID] [ ] [OK] [Data] [X]Ack](https://usermanual.wiki/LG-Electronics-USA/RLJA20.Users-Manual-2/User-Guide-286044-Page-29.png)
![External control device setup6006. Contrast (Command2-1:3, Command2-2:0)➜To adjust screen contrast. TransmissionData Min : 00 ~ Max : 64*Refer to ‘Real data mapping 1’.* Always marks data value with Hexadecimal. That is, marks with two-place Hexadecimal while writing and read data is also marked withHexadecimal value.Data Min : 00 ~ Max : 64[k] [3] [0] [ ] [Set ID] [ ] [Data] [Cr][3] [0] [ ] [Set ID] [ ] [OK] [Data] [X]Ack07. Brightness (Command2-1:3, Command2-2:1)➜To adjust screen brightness.TransmissionData Min : 00 ~ Max : 64*Refer to ‘Real data mapping 1’.* Always marks data value with Hexadecimal. That is, marks with two-place Hexadecimal while writing and read data is also marked withHexadecimal value.Data Min : 00 ~ Max : 64[k] [3] [1] [ ] [Set ID] [ ] [Data] [Cr][3] [1] [ ] [Set ID] [ ] [OK] [Data] [X]Ack08. Color (Command2-1:3, Command2-2:2)➜To adjust the screen color.TransmissionData Min : 00 ~ Max : 64*Refer to ‘Real data mapping 1’.* Always marks data value with Hexadecimal. That is, marks with two-place Hexadecimal while writing and read data is also marked withHexadecimal value.Data Min : 00 ~ Max : 64[k] [3] [2] [ ] [Set ID] [ ] [Data] [Cr][3] [2] [ ] [Set ID] [ ] [OK] [Data] [X]Ack9. Tint (Command2-1:3, Command2-2:3)➜To adjust the screen tint.TransmissionData Red : 00 ~ Green : 64* Refer to ‘Real data mapping2’.* Always marks data value with Hexadecimal. That is, marks with two-place Hexadecimal while writing and read data is also marked withHexadecimal value.Data Red : 00 ~ Green : 64* This is a Hexadecimal number data.[k] [3] [3] [ ] [Set ID] [ ] [Data] [Cr][3] [3] [ ] [Set ID] [ ] [OK] [Data] [X]Ack* Real data mapping 10: Step 0A: Step 10F : Step 1510 : Step 1664 : Step 100* Real data mapping 20 : Step -5032 : Step 064 : Step 5010. Sharpness (Command2-1:3, Command2-2:4)➜To adjust the screen sharpness.TransmissionData Min : 00 ~ Max : 64* Refer to ‘Real data mapping 1’.* Always marks data value with Hexadecimal. That is, marks with two-place Hexadecimal while writing and read data is also marked withHexadecimal value.Data Min : 00 ~ Max : 64[k] [3] [4] [ ] [Set ID] [ ] [Data] [Cr][3] [4] [ ] [Set ID] [ ] [OK] [Data] [X]Ack](https://usermanual.wiki/LG-Electronics-USA/RLJA20.Users-Manual-2/User-Guide-286044-Page-30.png)
![61RS-232C11. Color R Adjustment (Command2-1:3, Command2-2:6)➜ To adjust red in color temperature.TransmissionData Min : 00 ~ Max : 64* Refer to ‘Real data mapping 1’.* Always marks data value with Hexadecimal. That is, marks with two-place Hexadecimal while writing and read data is also marked withHexadecimal value.Data Min : 00 ~ Max : 64[k] [3] [6] [ ] [Set ID] [ ] [Data] [Cr][3] [6] [ ] [Set ID] [ ] [OK] [Data] [X]Ack12. Color G Adjustment (Command2-1:3, Command2-2:7)➜ To adjust green in color temperature.TransmissionData Min : 00 ~ Max : 64*Refer to ‘Real data mapping 1’.* Always marks data value with Hexadecimal. That is, marks with two-place Hexadecimal while writing and read data is also marked withHexadecimal value.Data Min : 00 ~ Max : 64[k] [3] [7] [ ] [Set ID] [ ] [Data] [Cr][3] [7] [ ] [Set ID] [ ] [OK] [Data] [X]Ack13. Color B Adjustment (Command2-1:3, Command2-2:8)➜ To adjust blue in color temperature.TransmissionData Min : 00 ~ Max : 64*Refer to ‘Real data mapping 1’.* Always marks data value with Hexadecimal. That is, marks with two-place Hexadecimal while writing and read data is also marked withHexadecimal value.Data Min : 00 ~ Max : 64[k] [3] [8] [ ] [Set ID] [ ] [Data] [Cr][3] [8] [ ] [Set ID] [ ] [OK] [Data] [X]Ack14. Color Temp. R(Command2-1:3, Command2-2:9)➜ Adjust the color temperature R of LCD part.TransmissionData Min : 00 ~ Max : 64*Refer to ‘Real data mapping 1’.* Always marks data value with Hexadecimal. That is, marks with two-place Hexadecimal while writing and read data is also marked withHexadecimal value.Data Min : 00 ~ Max : 64[k] [3] [9] [ ] [Set ID] [ ] [Data] [Cr][3] [9] [ ] [Set ID] [ ] [OK] [Data] [X]Ack15. Color Temp. G(Command2-1:3, Command2-2:a)➜ Adjust the color temperature G of LCD part.TransmissionData Min : 00 ~ Max : 64*Refer to ‘Real data mapping 1’.* Always marks data value with Hexadecimal. That is, marks with two-place Hexadecimal while writing and read data is also marked withHexadecimal value.Data Min : 00 ~ Max : 64[k] [3] [a] [ ] [Set ID] [ ] [Data] [Cr][3] [a] [ ] [Set ID] [ ] [OK] [Data] [X]Ack16. Color Temp. B(Command2-1:3, Command2-2:b)➜ Adjust the color temperature B of LCD part.TransmissionData Min : 00 ~ Max : 64*Refer to ‘Real data mapping 1’.* Always marks data value with Hexadecimal. That is, marks with two-place Hexadecimal while writing and read data is also marked withHexadecimal value.Data Min : 00 ~ Max : 64[k] [3] [b] [ ] [Set ID] [ ] [Data] [Cr][3] [b] [ ] [Set ID] [ ] [OK] [Data] [X]Ack](https://usermanual.wiki/LG-Electronics-USA/RLJA20.Users-Manual-2/User-Guide-286044-Page-31.png)
![21. Remote Control Lock mode (Command2-1:9, Command2-2:1)➜To lock the front panel controls on the projector and remote control.TransmissionData 00 : Remote Control Lock Off01 : Remote Control Lock OnData 00 : Remote Control Lock Off01 : Remote Control Lock On[k] [9] [1] [ ] [Set ID] [ ] [Data] [Cr][9] [1] [ ] [Set ID] [ ] [OK] [Data] [X]Ack* If you’re not use the remote control, set this mode.19. Volume Control (Command2-1:5, Command2-2:0)➜To adjust volume.TransmissionData Min : 00 ~ Max : 64* Refer to ‘Real data mapping 1’.* Always marks data value with Hexadecimal. That is, marks with two-place Hexadecimal while writing and read data is also marked withHexadecimal value.Data Min : 00 ~ Max : 64[k] [5] [0] [ ] [Set ID] [ ] [Data] [Cr][5] [0] [ ] [Set ID] [ ] [OK] [Data] [X]Ack20. OSD Lock mode (Command2-1:9, Command2-2:0)➜This function operates Local Keypad and Remote control Lock so that only Power button on Local Keypad works with “OSD Lock On”.TransmissionData 00 : OSD Lock Mode Off01 : OSD Lock Mode OnData 00 : OSD Lock Mode Off01 : OSD Lock Mode On[k] [9] [0] [ ] [Set ID] [ ] [Data] [Cr][9] [0] [ ] [Set ID] [ ] [OK] [Data] [X]Ack18. Volume Mute (Command2-1:5, Command2-2:4)➜To control volume mute on/off.TransmissionData 00 : Volume Mute On (Volume Off)01 : Volume Mute Off (Volume On)Data 00 : Volume Mute On (Volume Off)01 : Volume Mute Off (Volume On)[k] [5] [4] [ ] [Set ID] [ ] [Data] [Cr][5] [4] [ ] [Set ID] [ ] [OK] [Data] [X]Ack62External control device setup17. Twin Picture Mode Select(Command2-1:4, Command2-2:1)➜To control the twin picture.TransmissionData 00 : FULL 01 : TWIN 1 02 : TWIN 2Data 00 : FULL 01 : TWIN 1 02 : TWIN 2[k] [4] [1] [ ] [Set ID] [ ] [Data] [Cr][4] [1] [ ] [Set ID] [ ] [OK] [Data] [X]Ack](https://usermanual.wiki/LG-Electronics-USA/RLJA20.Users-Manual-2/User-Guide-286044-Page-32.png)