LG Electronics USA RU15LA40 LCD TV/Monitor User Manual LG Electronics USA
LG Electronics USA LCD TV/Monitor LG Electronics USA
User Manual

LCD
15”
LCD
15”
cover 126 1012.1 10-12-2001 14:37 Pagina 1

cover 126 1012.1 10-12-2001 14:37 Pagina 2
Congratulations
on your
purchase,
and welcome to the
“family!”
Dear PHILIPS product owner:
Thank you for your confidence in PHILIPS.You’ve selected one of the best-built, best-backed products available
today.And we’ll do everything in our power to keep you happy with your purchase for many years to come.
As a member of the PHILIPS “family,” you’re entitled to protection by one of the most comprehensive
warranties and outstanding service networks in the industry.
What’s more, your purchase guarantees you’ll receive all the information and special offers for which
you qualify, plus easy access to accessories from our convenient home shopping network.
And most importantly you can count on our uncompromising commitment to your total satisfaction.
All of this is our way of saying welcome–and thanks for investing in a PHILIPS product.
Sincerely,
Robert Minkhorst
President and Chief Executive Officer
Know these
safetysymbols
This “bolt of lightning” indicates uninsulated material within your unit which may cause an electrical
shock. For the safety of everyone in your household, please do not remove product covering.
The “exclamation point” calls attention to features for which you should read the enclosed
literature closely to prevent operating and maintenance problems.
WARNING:TO PREVENT FIRE OR SHOCK HAZARD, DO NOT EXPOSE THIS EQUIPMENT TO RAIN
OR MOISTURE.
CAUTION:To prevent electric shock, match wide blade of plug to wide slot, and fully insert.
ATTENTION: Pour éviter les chocs électriques, introduire la lame la plus large de la fiche dans la borne
correspondante de la prise et pousser jusqu’au fond.
CAUTION
RISK OF ELECTRIC SHOCK
DO NOT OPEN
CAUTION: TO REDUCE THE RISK OF ELECTRIC SHOCK, DO NOT
REMOVE COVER (OR BACK). NO USER-SERVICEABLE PARTS
INSIDE. REFER SERVICING TO QUALIFIED SERVICE PERSONNEL.
P.S. Remember, to get the most from your PHILIPS product,
you must return your Warranty Registration Card
within 10 days. So please mail it to us right now!
2
INTERNET ADDRESS: http://www.philipsusa.com
Once your PHILIPS purchase is registered, you’re eligible to receive all the privileges of owning a PHILIPS product.
So complete and return the Warranty Registration Card enclosed with your purchase at once.And take advantage of
these important benefits.
Return your Warranty Registration card today to ensure you receive all
the benefits you’re entitled to.
Warranty
Verification
Registering your product within
10 days confirms your right to
maximum protection under the
terms and conditions of your PHILIPS
warranty.
Owner
Confirmation
Your completed Warranty
Registration Card serves as
verification of ownership in the
event of product theft or loss.
Model
Registration
Returning your Warranty Registration
Card right away guarantees you’ll
receive all the information and special
offers which you qualify for as the
owner of your model.
R
E
G
I
S
T
R
A
T
I
O
N
N
E
E
D
E
D
W
I
T
H
I
N
1
0
D
A
Y
S
Hurry!
126 .....1 am 10-12-2001 14:36 Pagina 1
1. Read these instructions.
2. Keep these instructions.
3. Heed all warnings.
4. Follow all instructions.
5. Do not use this apparatus near water.
6. Clean only with a dry cloth.
7. Do not block any of the ventilation openings. Install in
accordance with the manufacturers instructions.
8. Do not install near any heat sources such as radiators, heat
registers, stoves, or other apparatus (including amplifiers) that
produce heat.
9. Do not defeat the safety purpose of the polarized or grounding-
type plug. A polarized plug has two blades with one wider than
the other. A grounding type plug has two blades and third
grounding prong.The wide blade or third prong are provided for
your safety.When the provided plug does not fit into your
outlet, consult an electrician for replacement of the obsolete
outlet.
10. Protect the power cord from being walked on or pinched
particularly at plugs, convenience receptacles, and the point
where they exit from the apparatus.
11. Only use attachments/accessories specified by the manufacturer.
12. Use only with a cart, stand, tripod, bracket, or table
specified by the manufacturer, or sold with the
apparatus.When a cart is used, use caution when
moving the cart/apparatus combination to avoid injury
from tip-over.
13. Unplug this apparatus during lightning storms or when unused
for long periods of time.
14. Refer all servicing to qualified service personnel. Servicing is
required when the apparatus has been damaged in any way, such
as power-supply cord or plug is damaged, liquid has been spilled
or objects have fallen into apparatus, the apparatus has been
exposed to rain or moisture, does not operate normally, or has
been dropped.
15. This product may contain lead or mercury. Disposal of these
materials may be regulated due to environmental considerations.
For disposal or recycling information, please contact your local
authorities or the Electronic Industries Alliance: www.eiae.org.
16. Damage Requiring Service - The appliance should be
serviced by qualified service personnel when:
A. The power supply cord or the plug has been damaged; or
B. Objects have fallen, or liquid has been spilled into the
appliance; or
C. The appliance has been exposed to rain; or
D. The appliance does not appear to operate normally or
exhibits a marked change in performance; or
E. The appliance has been dropped, or the enclosure damaged.
17. Tilt/Stability - All televisions must comply with recommended
international global safety standards for tilt and stability
properties of its cabinets design.
• Do not compromise these design standards by applying
excessive pull force to the front, or top, of the cabinet which
could ultimately overturn the product.
• Also, do not endanger yourself, or children, by placing
electronic equipment/toys on the top of the cabinet. Such
items could unsuspectingly fall from the top of the set and
cause product damage and/or personal injury.
18. Wall or Ceiling Mounting - The appliance should be mounted
to a wall or ceiling only as recommended by the manufacturer.
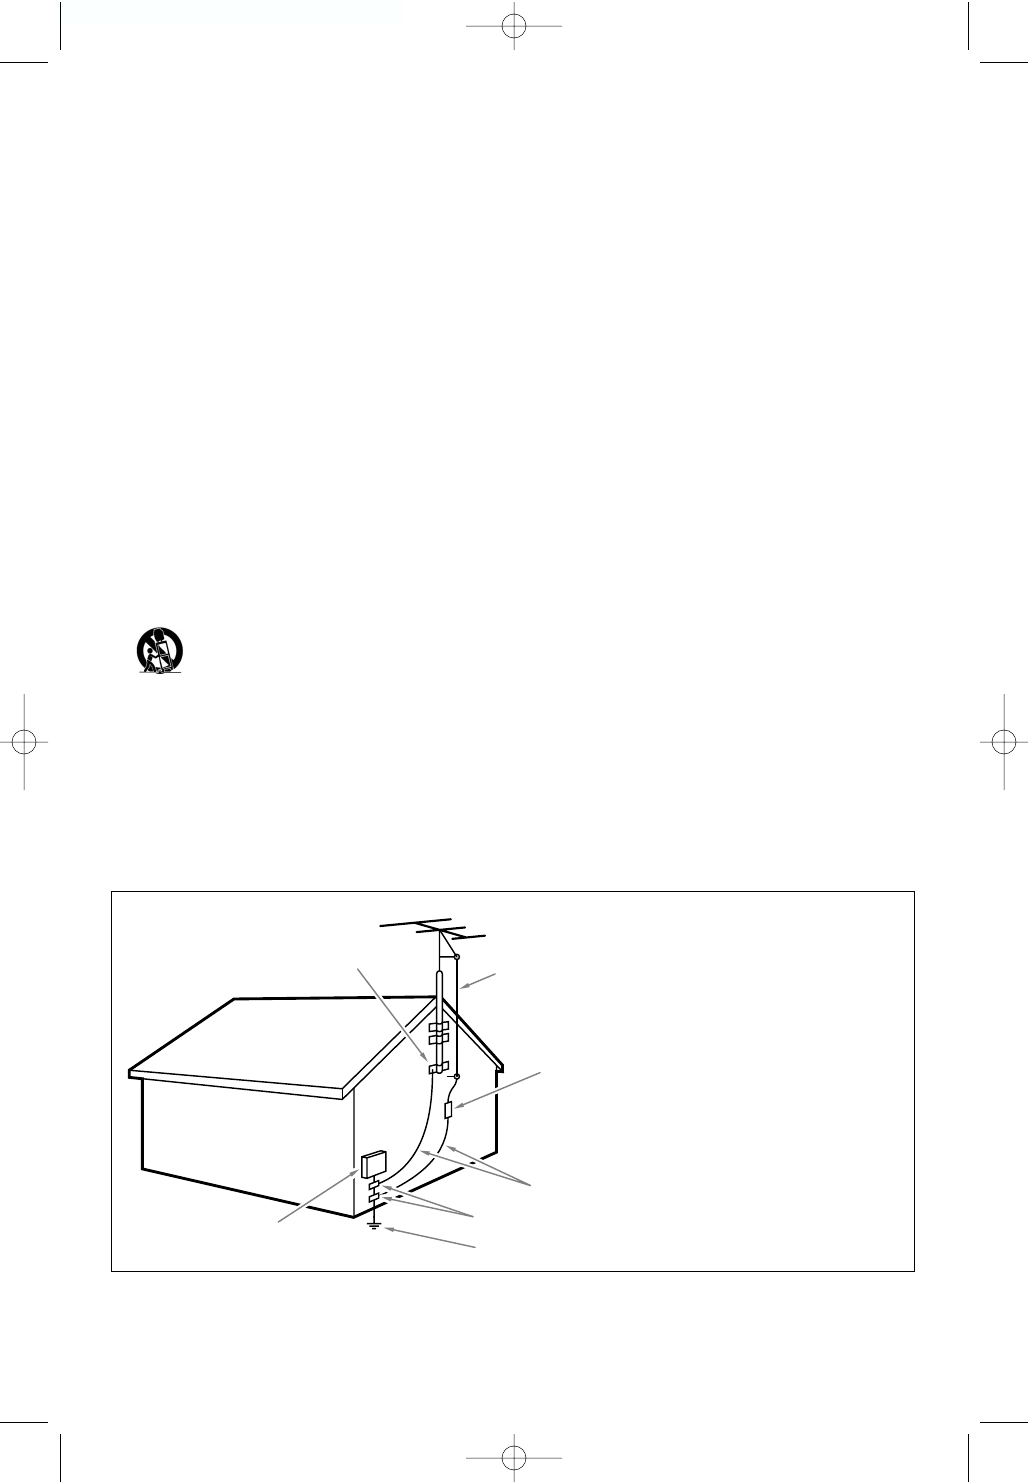
19. Power Lines - An outdoor antenna should be located away
from power lines.
20. Outdoor Antenna Grounding - If an outside antenna is
connected to the receiver, be sure the antenna system is
grounded so as to provide some protection against voltage
surges and built up static charges.
Section 810 of the National Electric Code, ANSI/NFPA No. 70-
1984, provides information with respect to proper grounding of
the mats and supporting structure grounding of the lead-in wire
to an antenna-discharge unit, size of grounding connectors,
location of antenna-discharge unit, connection to grounding
electrodes and requirements for the grounding electrode. See
Figure below.
21. Objects and Liquid Entry - Care should be taken so that
objects do not fall and liquids are not spilled into the enclosure
through openings.
IMPORTANT SAFETY INSTRUCTIONS
Read before operating equipment
Note to the CATV system installer :This reminder is provided to call the CATV system installer’s attention to Article 820-40 of the
NEC that provides guidelines for proper grounding and, in particular, specifies that the cable ground shall be connected to the grounding
system of the building, as close to the point of cable entry as practical.
EXAMPLE OF ANTENNA GROUNDING AS PER NATIONAL ELECTRICAL CODE (NEC)
ANTENNA LEAD IN WIRE
GROUND CLAMP
ELECTRIC SERVICE EQUIPMENT GROUND CLAMPS
POWER SERVICE GROUNDING ELECTRODE SYSTEM (NEC ART 250, PART H)
ANTENNA DISCHARGE UNIT (NEC SECTION 810-20)
GROUNDING CONDUCTORS (NEC SECTION 810-21)
126 .....1 am 10-12-2001 14:36 Pagina 2
English
Contents
Installation
Use of the remote control 8-9
Keys in front of the TV 10
Picture menu 11
Sound menu 11
Closed Caption 12-13
Parental control functions 13-15
Setting up blocking 15
Your remote control 4
Preparation 5
To use the menus 6
Setup menu 6
Select the input 6
Select the menu language 6
Select the menu language 6
Program/Erase channels 7
Auto programming channels 7
Memorizing/Erasing current channel 7
Connect peripheral equipment
Connecting and selecting equipment 16-18
Connect your PC 19
Use of your PC 20
Before Calling Service 21
Tips 22
Conversion tables for off-air
and cable channels 23-24
Glossary 24
Help?
If this instruction manual does not
give an answer or if ‘Before Calling
Service’ does not solve your TV
problem, you can call your Local
Philips Customer or Service Centre.
See the supplied World-wide
guarantee booklet.
Please, have the Model and
Product number which you can
find at the back of your television
set or on the packaging, ready,
before calling the Philips helpline.
Model: . . . . . . . . . . . . . . . . . . . .
Product No: . . . . . . . . . . . . . . . .
Operation
3
126 .....1 am 10-12-2001 14:36 Pagina 3
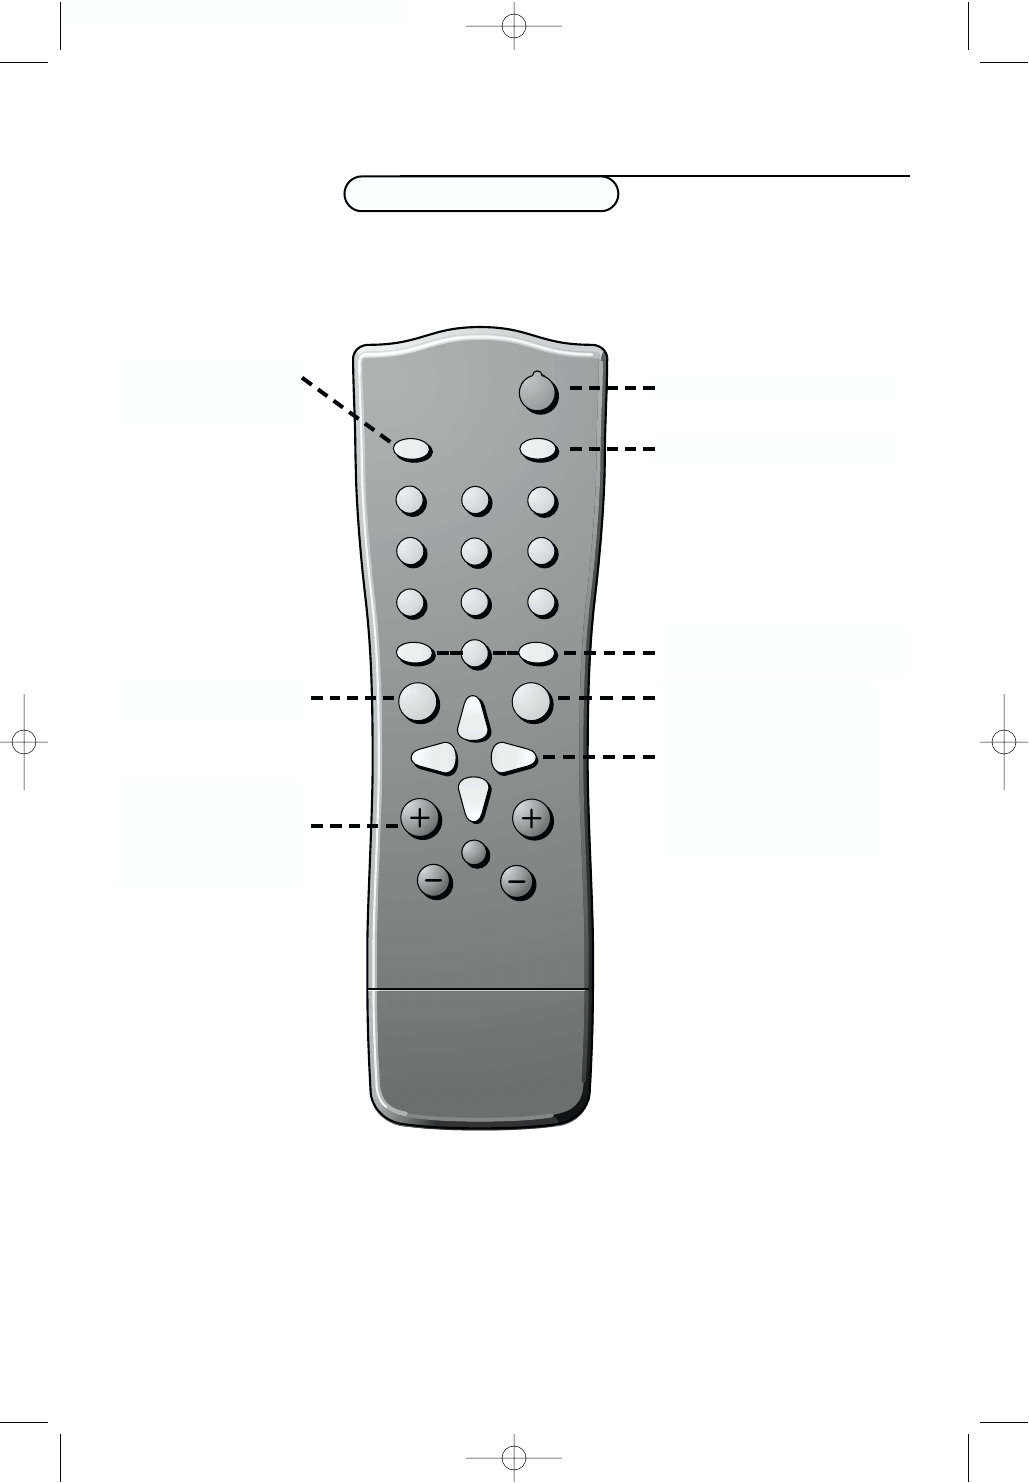
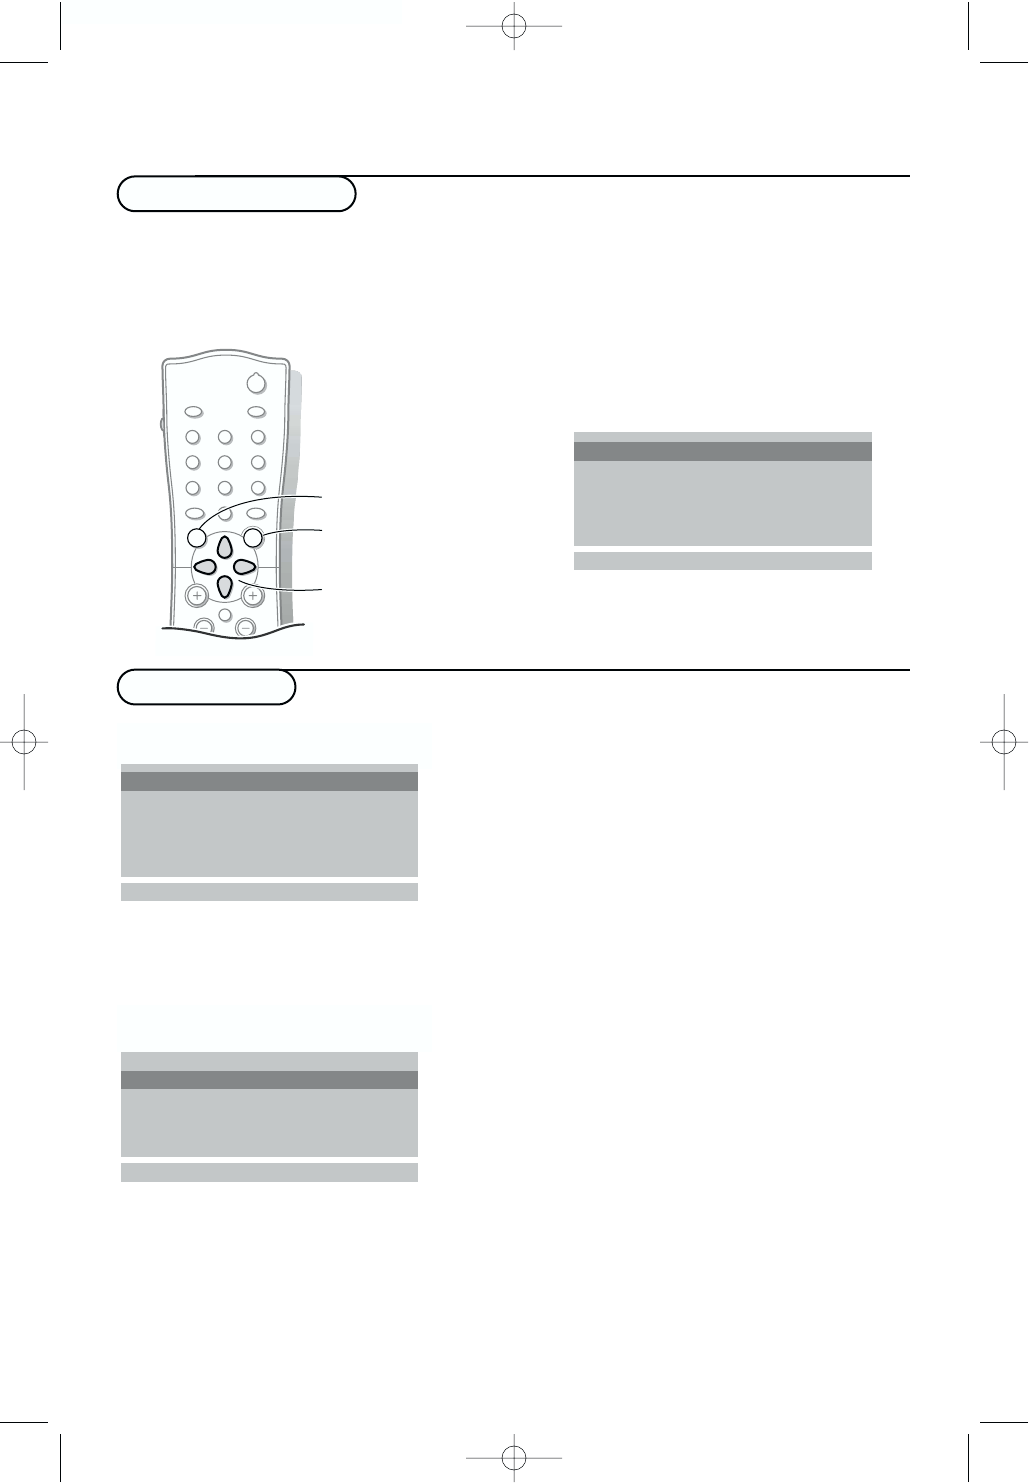
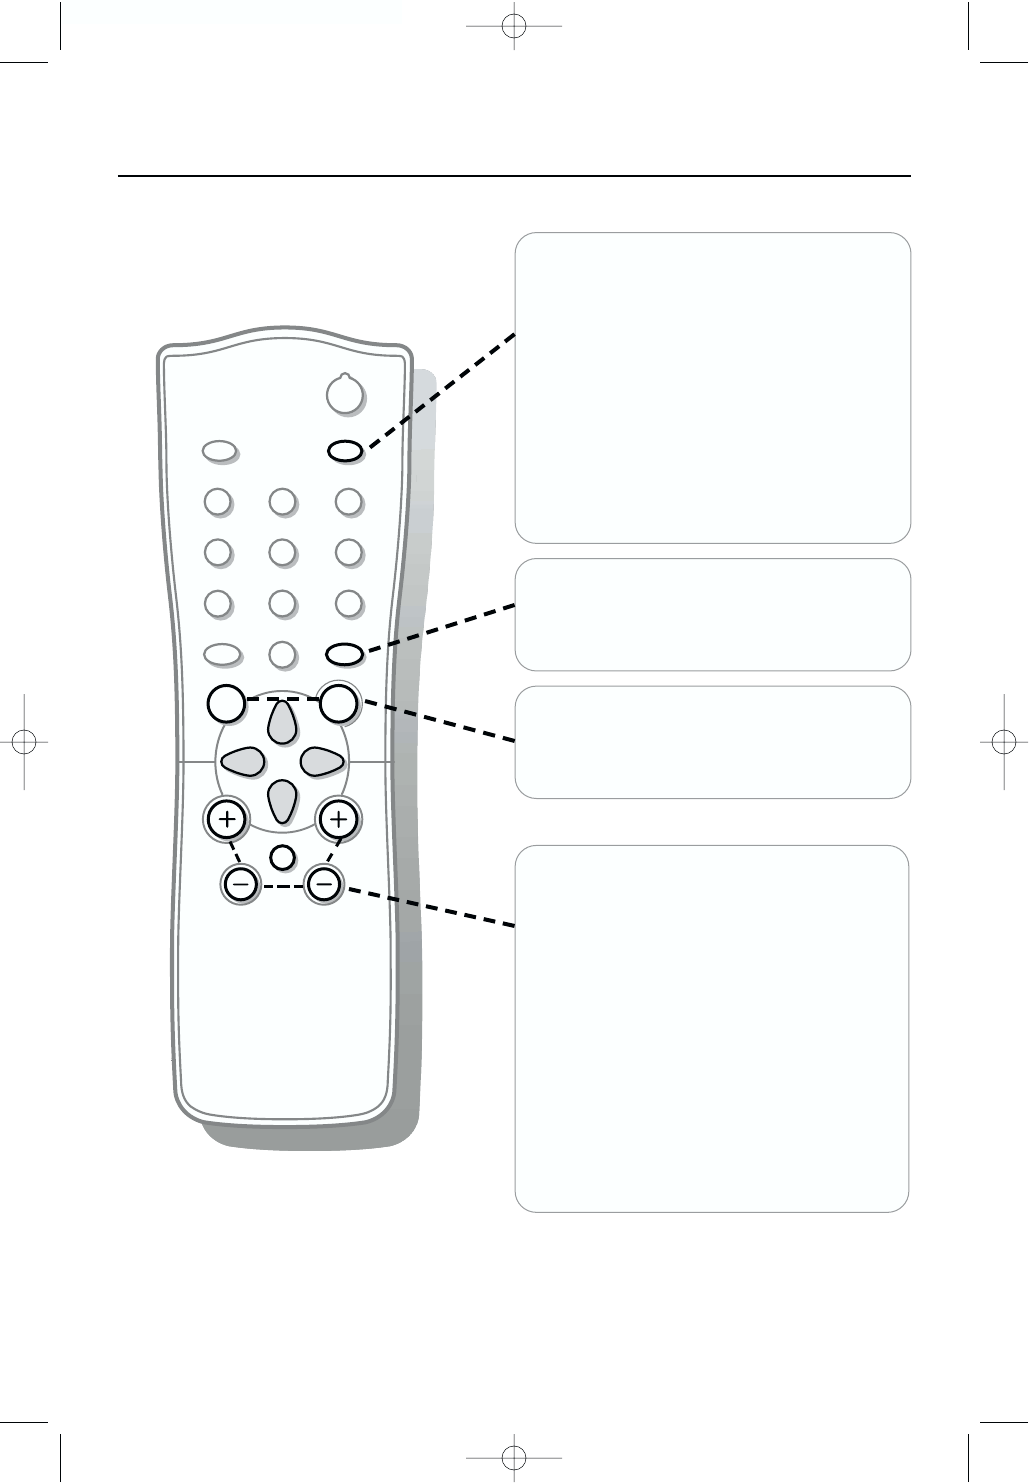
¬
B
B
2
13
5
4 6
8
79
0
0CC
MENU OK
EXT SLEEP
CHV
MENU main menu on/off
p. 9
EXT Sources p. 8
selection of TV,AV
or PC mode
Vvolume up/down p. 9
¬sound mute p. 9
CH channel selection p. 9
Bturn on/off p. 8
SLEEP sleeptimer p. 9
0previous channel p. 8
CC Closed Captions on/off p. 9
OK activate your choice
Cursor to select your choice
Your remote control
4Your remote control
Installation
126 .....1 am 10-12-2001 14:36 Pagina 4
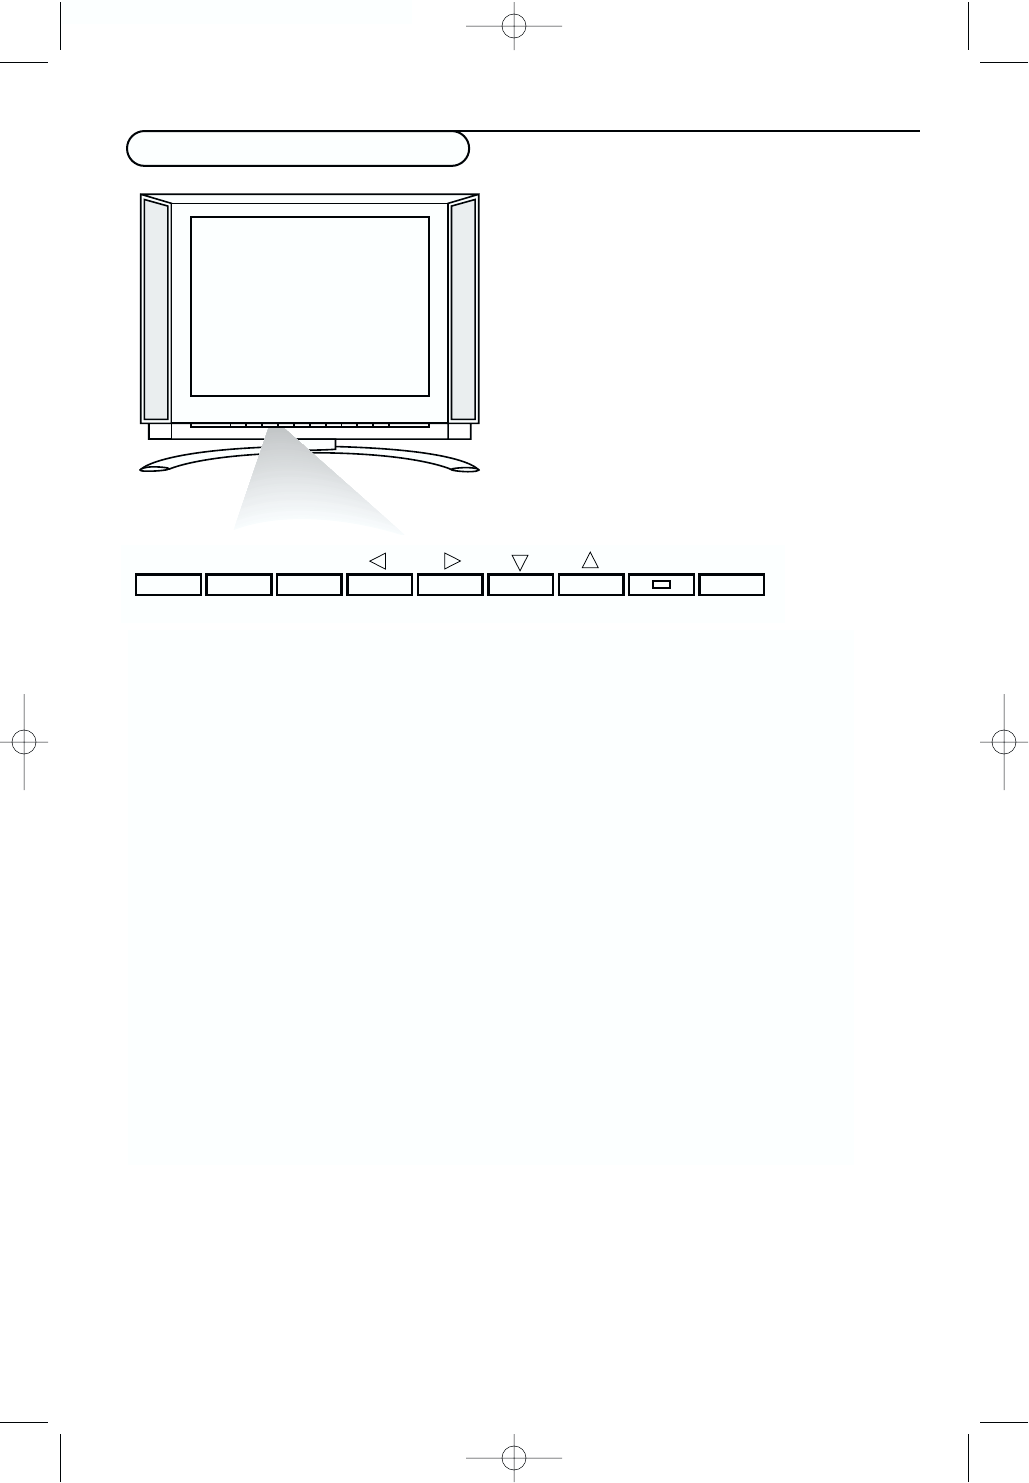
Preparation
Please, make sure to connect the
power plug to the wall outlet socket
after connecting the TV to the
adapter!
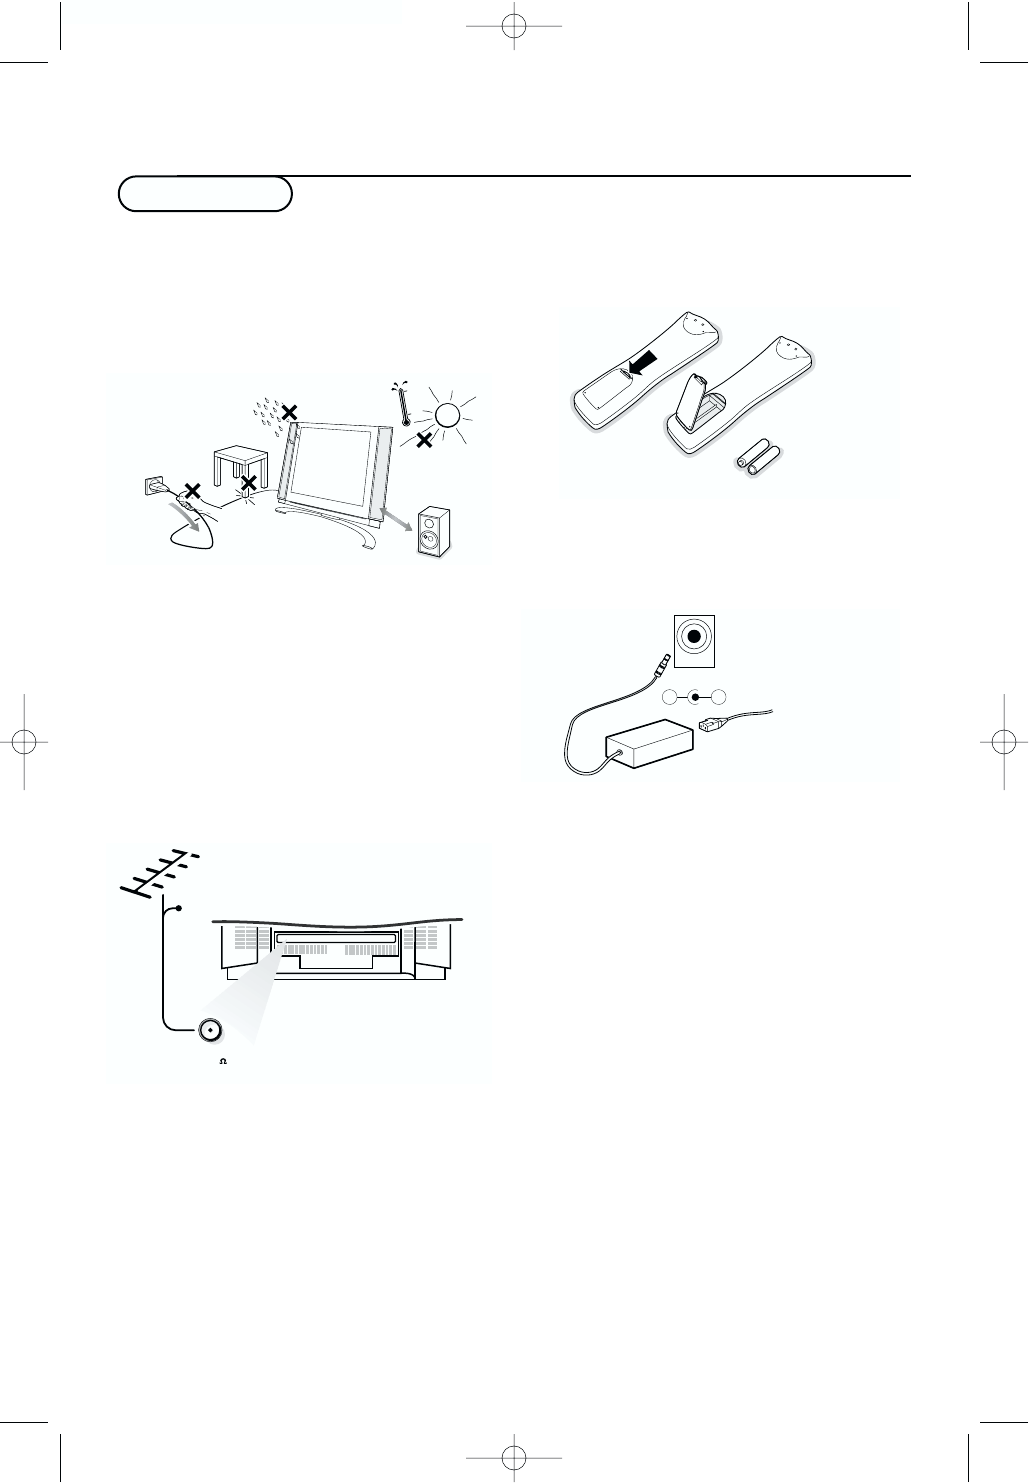
&Place the TV on a solid surface.
Ensure that the TV is placed in a position to
allow free flow of air. Do not cover the
ventilation openings on the back cover.
To prevent any unsafe situations, no naked
flame sources, such as lighted candles,
should be placed on or in the vicinity.
Avoid heat, direct sunlight and exposure to
rain or water.The equipment shall not be
exposed to dripping or splashing.
éInsert the aerial plug firmly into the
aerial socket ANT IN x75 Ωat the back
of the TV.
“To connect your computer, see Connect
peripheral equipment, Personal computer,
p 19.To connect other peripherals,
see p. 16.
1m
min.
x 75
ANT IN
CABLE
‘Remote control: Remove the cover of the
battery compartment. Insert the 2 batteries
supplied (Type R6-1.5V).
(Power:This TV operates on a DC supply
provided by the AC-DC adapter.The
voltage is as indicated on the label on the
back cover.
Only use the AC-DC adapter supplied with
the TV and never apply an AC power cord
to the TV directly.The AC-DC adapter
operates on an AC power supply, the
voltage is as indicated on the label of the
AC-DC adapter.
Connect the DC plug of the AC-DC
adapter to the DC 12V socket at the back
of the TV. Connect the AC-DC adapter and
its power cord.
Insert the power cord in the wall socket
having a AC power supply of 110V.
§Turn the TV on: Press the power button
at the front side of the TV to turn it on or
off.
If the TV is in standby mode, the standby
indicator in front of the TV illuminates brightly.
Press the Bbutton on the remote control or
the – CH + button or one of the digit buttons
to turn the TV on.
See p. 7 to memorize the channels available
in your local broadcast area.
R6 / 1,5 V
5Preparation
DC 12V
_+
126 .....1 am 10-12-2001 14:36 Pagina 5
&Press the MENU key repeatedly to display each menu.
éUse the cursor up/down to select a menu item.
“Use the cursor left/right to adjust the setting of a menu item or press the OK key to enter a
submenu.
B
CHV¬
5
13
2
46
79
8
0
0CC
EXT SLEEP
MENU OK
&Press the MENU button on the remote control
once to select the setup menu.
éSelect Input.
“Press the OK button or the cursor left/right.
‘Press the cursor up/down to select TV to be
sure your remote control is in the TV mode.
(Press the OK button.
6Installation
To use the menus
Setup menu
Select the input
Auto program
Language
Captions
Caption/Text
Parental ctl
oœ OK MENU
Input TV
Input
Language
Captions
Caption/Text
Parental ctl
oœ OK MENU
Language
Auto program
Language
Captions
Caption/Text
Parental ctl
oœ pπ OK MENU
Input
switch menu on/off
select menu item
activate
&Press the MENU button on the remote control
once to select the setup menu.
éUse the cursor down to select Language.
“Press the OK button or the cursor left/right.
‘Press the cursor up/down to select your
language.
(Press the OK button.
§Press the MENU button to select the channel
menu to memorize the channels available in
your local broadcast area.
Select the menu language
126 .....1 am 10-12-2001 14:36 Pagina 6
The Auto Program function memorizes all the
receiving channels of terrestrial TV signals or
cable TV programs
&Press the MENU button repeatedly to select
the channel menu.
éPress the OK button or the cursor left/right.
The Auto Program function memorizes the
channels which are being received at that
time.
Note: If you press the MENU button in auto
programming, the functions will stop and only
channels programmed up to that time will
remain.
“After auto programming is finished, check
the memorized channels with the cursor
up/down.
‘Press the MENU button to return to the
channel menu.
Auto program
Manual program
oœ OK MENU
Auto program
System BG
1 34%
MENU
Auto program TV 62
7Installation
Program/Erase channels
Auto programming channels
Fine tune
In case of poor reception, you can improve
the reception by fine tuning.
TV channels broadcast by a cable
company
Some cable systems operate with frequency
offsets that are as much as + 2 MHz or - 2
MHz. See Conversion tables, p. 23.
Off-air channels
The frequencies for TV channels used by a
cable company may differ from the
frequencies of off-air TV channels. Consult
the tables on p. 23.
&Select Fine in the Manual Program menu
with the cursor up/down.
éPress the cursor left/right to fine tune for
the best picture and sound.
“Press the OK button.
Memorizing/Erasing current channel
Auto ogramme
Fine
Storage Memory
oœ OK MENU
Channel TV 13
&Select Manual Program in the channel
menu.
éPress the OK button or the cursor
left/right to enter the Manual Program
menu.
The current channel number is displayed.
“Press the cursor left/right.
‘Press the cursor up/down to select
another channel number.
(Press the cursor left/right to return to
the Manual Program menu.
§Select Storage with the cursor up/down.
èPress the cursor left/right to select
Memory or Erase.
!Press the OK button.
The selected channel is memorized or
erased.
126 .....1 am 10-12-2001 14:36 Pagina 7
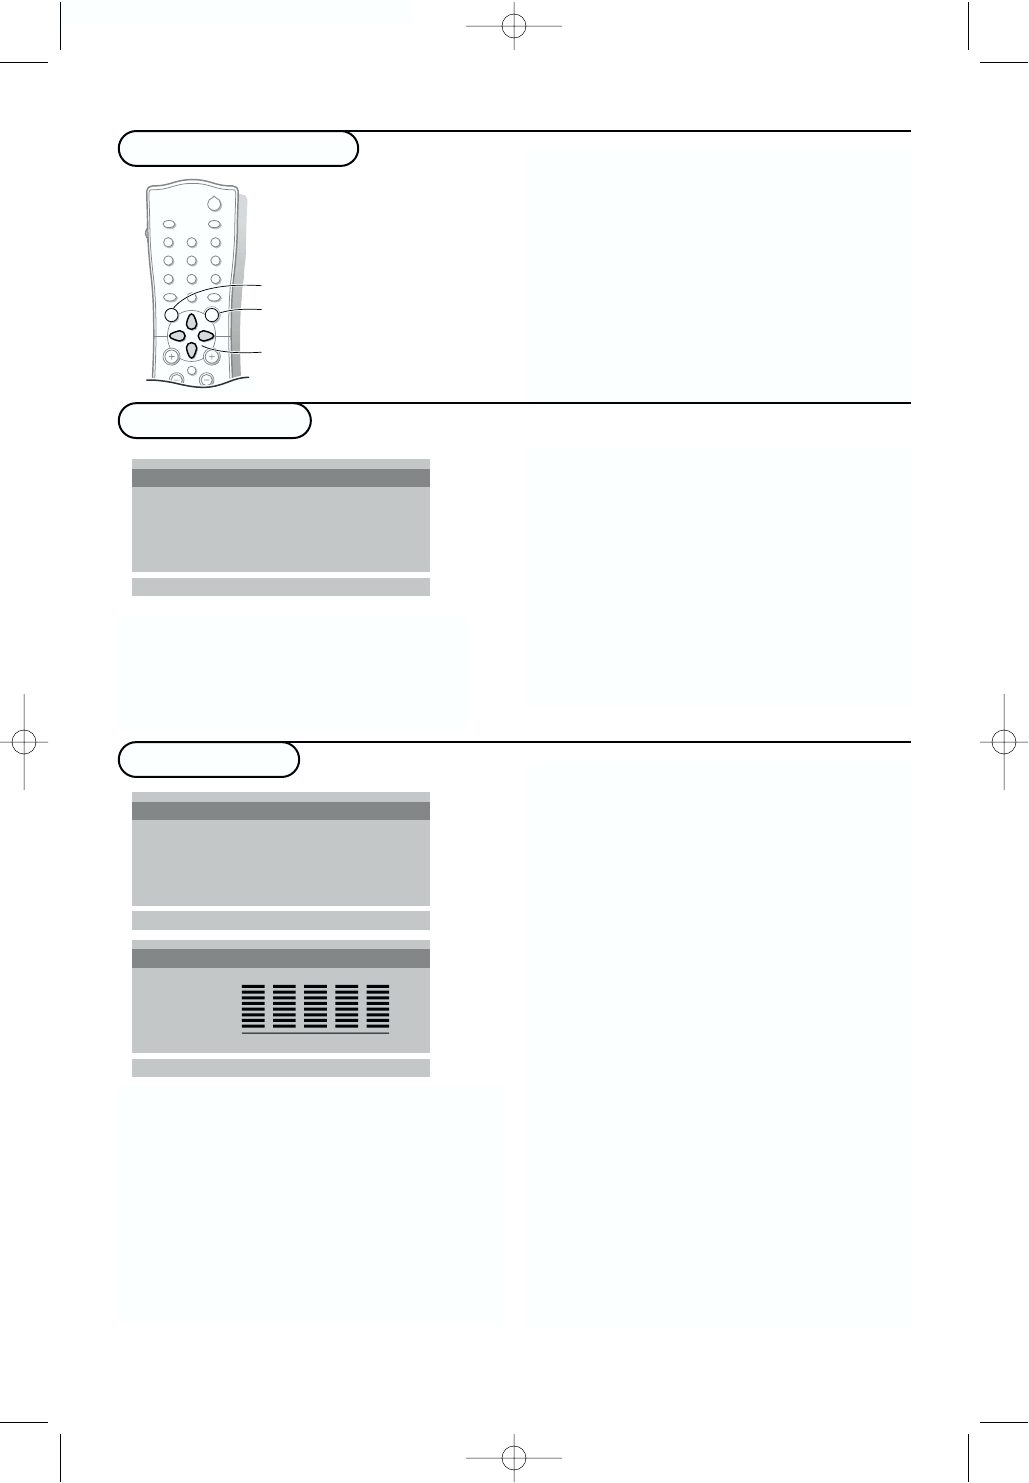
0/9 Digit keys
To select a TV channel.
0Previous program
To display the previously selected TV channel
or AV source.
Operation
Use of the remote control
8Use of the remote control
B
MENU OK
CHV¬
5
13
2
46
79
8
0
0CC
EXT SLEEP
EXT Source
Select your computer or other peripherals:
press repeatedly to select TV,VIDEO,
S-VIDEO, COMPONENT or PC monitor
mode, according to where you connected
your external source. See p. 16.
•VIDEO for a VCR connected to the AV
connectors of the TV.
•S-VIDEO for a S-Video VCR connected to
the S-VIDEO connector of the TV.
•COMPONENT for a DVD or another
component video device connected to Y,
Pb,Pr (480i) and to the AV AUDIO inputs
Land R.
•PC for a personal computer connected to
the PC INPUT connector of the TV.
Note:When a VCR is connected via the aerial
socket, the TV is used in TV mode.
Alternatively, you can select the tv, video, s-video,
component or pc monitor mode with the EXT
button on the remote control.
BStandby
Press to turn on/off the TV.The TV is never
completely powered off unless it is physically
unplugged.
126 .....1 am 10-12-2001 14:36 Pagina 8
B
MENU OK
CHV¬
5
13
2
46
79
8
0
0CC
EXT SLEEP
VVolume
Press + or - to adjust the volume.
¬Mute
Temporarily interrupt the sound or restore it.
The captions automatically appear if the
watched TV program provides CC info and
Ez-mute has been selected as Closed Caption
(see p. 12).
CH Channel selection
To browse through the TV channels which are
not erased.
To view a blocked channel, use the digit
buttons to access the channel and enter your
access code.
SLEEP Sleeptimer
With this key you can set a time period after
which the TV should switch itself to standby.
Press the key repeatedly to select the number
of minutes.The counter runs from ..., 10, 20,
30... to 240 minutes.The timer begins to
count down from the number of minutes
selected after the display has disappeared.
Note:To view the remaining time, press the SLEEP
button once.To cancel the sleep time, repeatedly
press the SLEEP button until ... appears.
If you turn the TV off after setting the sleep time,
the setting will be erased. Set it again.
MENU Press repeatedly to display each menu.
OK Press this key to activate your choice,
when in the menus.
9Use of the remote control
CC Closed Caption
Press this button to turn Closed Caption on.
Be sure you have selected Caption On in the
Setup menu. See p. 12.
126 .....1 am 10-12-2001 14:36 Pagina 9
Should your remote control be lost or broken you can still operate your TV with the
buttons in front of the TV.
ON/OFF: Press the power ON/OFF button to turn the TV on or off
TV/VIDEO: Press repeatedly to select TV,VIDEO, S-VIDEO, COMPONENT or PC monitor
mode
MENU: Press repeatedly to display each menu
OK: - Press this button to activate your choice when in the menu
- Auto demonstration: Keep the OK button pressed for about 10 seconds.
All the menus are being displayed automatically one after the other.
To stop Auto demonstration, press any button on the front panel.
- VOL + : - Press - or + to select a menu item;
- Press - or + to adjust the volume;
- Press - or + to adjust the menu settings.
- CH/PR +:- Press - or + to browse through the TV channels which are not erased;
- Press - or + to select a menu item;
- To turn the TV on from standby.
B: Turns the TV on from standby or off to standby.
The Bindicator lights up brightly when the TV is in standby, dims when the TV is
turned on.
Buttons in front of the TV
10 Keys in front of the TV
TV / VIDEO MENU OK VOL CH / PR
_+_+BON / OFF
126 .....1 am 10-12-2001 14:36 Pagina 10
B
CHV¬
5
13
2
46
79
8
0
0CC
EXT SLEEP
MENU OK
&Press the MENU button repeatedly to
display one of the menus.
éUse the cursor up/down to select a menu
item.
“Use the cursor left/right to adjust the
setting of a menu item or press the OK
button to enter a submenu.
‘Press the MENU button repeatedly if you
want to exit the menu.
You can adjust picture contrast, brightness,
color, tint and sharpness to the levels you
prefer.
Press the OK button to store the
adjustments.
The message Stored appears.
Press the MENU key repeatedly to exit the
menu
AVL
Switch AVL On to maintain constant
volume levels when switching TV channels.
Equalizer
&Select Equalizer and press the OK button
or press the cursor left/right to enter the
Equalizer menu.
éSelect one of the predefined factory sound
settings or select User to adjust your
personal sound settings of treble and bass.
Setting the equalizer User
&Select User with the cursor up/down.
éPress the cursor left/right to select a
sound band.
“Press the cursor up/down to adjust the
appropriate sound level.
‘Press the OK button to store the
Personal adjustments.
The message Stored appears.
Press the MENU button repeatedly to exit
the menu.
Picture menu
Sound menu
Use of the menus
Contrast 1 00
Brightness
Color
Tint
Sharpness
oœ p π OK MENU
Contrast
Equalizer
AVL 0n/Off
Equalizer
oœ OK MENU
MTS Mono/Stereo/SAP
Flat
Music
Sports
User
oœ p π OK MENU
0.1 0.5 1.5 5.0 10 kHz
Cinema
You can select your preferred sound setting or
you can also adjust the sound frequency of the
equalizer.
MTS
In case of second audio program (SAP)
transmission, you can switch from Mono to
Stereo or to the secondary language.
In case of stereo transmission you can switch to
Mono or Stereo sound.
switch menu on
select menu item
activate
11Use of the menus
•Contrast, Brightness, Color are adjusted
from 0 to 100.
•Tint is adjusted from Red 50 to
Green 50.
•Sharpness is adjusted from 0 to 10.
126 .....1 am 10-12-2001 14:36 Pagina 11
Closed Caption
Closed Captioning allows you to read the dialog of
television programs on the TV screen. Designed to
help the hearing impaired, this feature uses on screen
"text boxes" to show dialogue and conversations
while the TV program is in progress. Captions will
appear on the screen only during captioned
broadcasts.
Remark: the captions do not always use correct
spelling and grammar.
Not all TV programs and product commercials are
made for broadcast with Closed Caption information
included. Refer to your area's TV program listings for
the TV channels and times of Closed Caption shows.
The captioned programs are usually noted in the TV
listings with service marks such as "CC".
B
5
13
2
46
79
8
0
0
EXT SLEEP
MENU OK
CC
CC
Input
Language
Captions
Caption/Text
Parental ctl
oœp π MENU
Captions
Input
Language
Captions
Caption/Text
Parental ctl
oœp π MENU
Caption/Text
12 Closed Caption
Turning on/off Closed Caption
Setting Closed Caption
&Select the desired TV program (Not a blocked
channel or PC).
éPress the MENU button once.
“Select Captions with the cursor up/down.
‘Press the cursor left/right to select Captions
On,Ez mute or Off.
Ez mute: Select this mode if you want the
captions to appear automatically when the mute
button ¬on the remote control is pressed, if
the watched TV program provides CC info.
&Press the cursor up/down to select
Caption/Text.
éPress the cursor left/right to select the desired
Closed Caption mode. See next page.
“Press the MENU button repeatedly if you want
to exit the menu.
Note:This television receiver provides display of
television closed captioning in accordance with
Section 15.119 of the FCC rules.
126 .....1 am 10-12-2001 14:36 Pagina 12
Caption modes:
• Caption 1,2,3or 4mode:
Dialogue (and descriptions) for the action on the captioned TV program shows on
screen.
Usually Caption 1 is the most used mode. Caption 2 may be used for alternate
languages if they are being transmitted.
•Text 1,2,3or 4mode:
Often used for channel guide, schedules, bulletin board information for Closed Caption
programs, news, weather information or stock market reports.
Not all Closed Caption modes are necessarily being used by a TV channel during the
transmission of a Closed Caption program.
Caption tips:
Your TV might not receive caption signals normally when:
- Poor reception conditions are encountered.
- An old, bad or illegally recorded tape is played.
- Strong, random signals from a car or airplane interfere with the TV signals.
- The antenna signal is weak.
- The program wasn’t captioned when it was produced, transmitted or taped.
The Parental control function (V-chip) is used to block
program viewing based on the ratings sent by the
broadcaster.The default setting is to allow all
programs to be viewed.Viewing can be blocked by the
type of program and by the categories chosen to be
blocked. It is also possible to block all program
viewing for a time period.
To use the Parental Control Function, the following
must be set:
1. Ratings and categories to be blocked.
2. Number of hours to lock the television viewing
control.
3. Set a password.
4. Enable the lock
V-Chip rating and categories
Rating guidelines are provided by the broadcaster.
Most television programs and television movies can be
blocked by TV Rating and/or Individual Categories.
Movies that have been shown at the theaters or
direct-to-video movies use the Movie Rating System
(MPAA) only.
Parental control function
Input
Language
Captions
Caption/Text
Parental ctl
oœp π MENU
Parental ctl
13Parental control
126 .....1 am 10-12-2001 14:36 Pagina 13

For Movies previously shown in theaters:
• Movie Ratings:
Unblocked
G and above (general audience)
PG and above (parental guidance suggested)
PG-13 and above (13 years and up)
R and above (restricted)
NC-17 and above (18 years and up)
X (adult)
If you set PG-13 and above: G and PG movies will be available, PG-13, R, NC-17 and X
will be blocked.
For Television programs including made-for-TV movies:
• General TV Ratings:
Unblocked
TV-G and above (general audience) (individual categories do not apply)
TV-PG and above (parental guidance suggested)
TV-PG-14 and above (14 years and up)
TV-MA (mature audience)
• Children TV Ratings:
Unblocked
TV-Y and above (youth) (individual content categories do not apply)
TV-Y7 (youth, 7 years and up)
• Content Categories:
Dialog - sexual dialogue (applies to TV-PG and above,TV-14)
Language - adult language (applies to TV-PG and above,TV-14 and above,TV-MA)
Sex scenes - sexual situations (applies to TV-PG and above,TV-14 and above,TV-MA)
Violence (applies to TV-PG and above,TV-14 and above,TV-MA)
F Violence - fantasy violence (applies only to TV-Y7)
No Rating (blocks all viewing)
14 Parental Control
126 .....1 am 10-12-2001 14:36 Pagina 14

&Press the MENU button to select the setup
menu.
éPress the cursor up/down to select Parental ctl.
“Press the cursor left/right to enter the Parental
control menu.
If parental control is already set then enter the
password when requested.
‘Press the cursor up/down to select the types of
blocking to be set.
(Press the cursor left/right to select the types of
ratings to block: MPAA,Age and/or Content
Block may be set.
§Press the MENU button to return to the
parental control menu.
èPress the cursor up/down to select Set Hours.
!Press the cursor left/right to set the number of
hours for the blocking (up to 99).
çPress the cursor up/down to select Set
Password.
0Enter a four digit password.
Enter it again when requested.
Note: A new password may be chosen each time
blocking is setup.
1Press the cursor up/down to select Lock
On/Off.
2Press the cursor left/right to set the Lock On.
3Press the MENU button on the remote control
repeatedly to exit the menu.
Aux. Block Sources blocked
MPAA PG-13 and above
Age Block
Content Blk
Set Hours
pπ
Hours
Set Password
pπ
To Set
Lock On/Off Off
oœp π MENU
Aux. Block Sources blocked
Input
Language
Captions
Caption/Text
Parental ctl
oœp π MENU
Parental ctl
15Parental control
Setting up Blocking
126 .....1 am 10-12-2001 14:36 Pagina 15
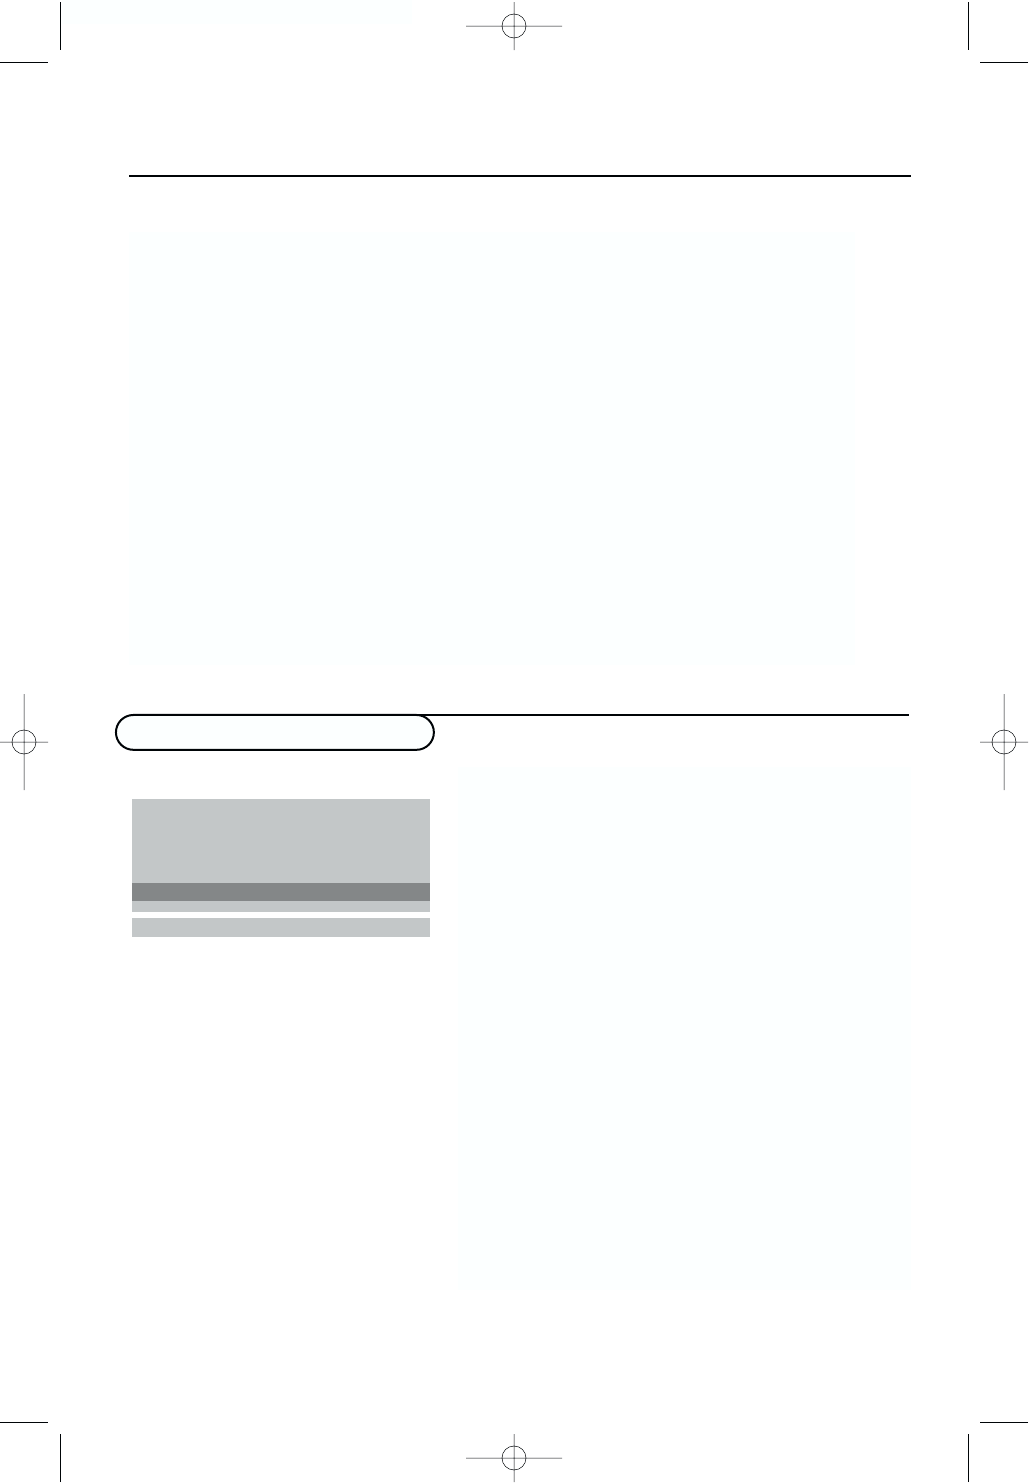
16 Connect Peripheral Equipment
Connect Peripheral Equipment
There is a wide range of video and audio
equipment that can be connected to your TV.
The following connection diagrams show you
how to connect them.
Preparation
Remove the backplate at the back of the TV as
shown on the illustration opposite.
Lay the LCD TV with the screen down on a
table as it will be easier to connect your
peripheral equipment. Please take your
precautions not to damage the screen.
How to connect
&Connect the supplied antenna cable 1to
the RF IN port of your VCR.
éConnect another RF cable 2from the
output OUT of your VCR to the xinput
of your TV. Better quality when playing
from your VCR can be obtained if you also
connect the Video,Audio Left and Right
(only for stereo equipment) cables 3to
the VIDEO,AUDIO L and Rinputs AV.
If you are using only mono equipment,
connect only the VIDEO and the AUDIO L
(Mono) ports.
If your VCR has an S-VHS video jack:
For improved picture quality, connect a
S-Video cable with the S-VIDEO input on
the TV instead of connecting the VCR to
the VIDEO port of AV.
S-Video does not provide audio, so audio
cables must still be connected to provide
sound.
Watching VCR
&If you use connection 2, select the TV
channel 3 or 4.
éIf you use connection 3, select VIDEO or
S-VIDEO in the Input menu item of the
setup menu, see p. 6.
“Insert a video tape in the VCR and press
the PLAY button.
Video recorder
S-VIDEO
IN
VIDEO (MONO) L
AV
RAUDIO
VCR
CABLE
23
x 75
DC 12V ANT IN PC INPUTYPb
COMPONENT INPUT (480i)
Pr
1
126 .....1 am 10-12-2001 14:36 Pagina 16
How to connect
&Connect your camera, camcorder,
videogame set, ... to the VIDEO port 2
and AUDIO L (MONO) 3for mono
equipment.
éFor stereo equipment also connect
AUDIO R 3.
S-VHS quality with an S-VHS camcorder is
obtained by connecting the S-VHS cables
with the S-VIDEO input 1and AUDIO
input 3.
How to use
&Select VIDEO or S-VIDEO in the Input
menu item of the setup menu, see p. 6.
éTurn on the external AV equipment.
Camera, camcorder,Video Game set, ...
3
2
1
x 75
DC 12V ANT IN S-VIDEO
IN
PC INPUT
YVIDEO
Pb
COMPONENT INPUT (480i)
Pr L
AV
RAUDIO
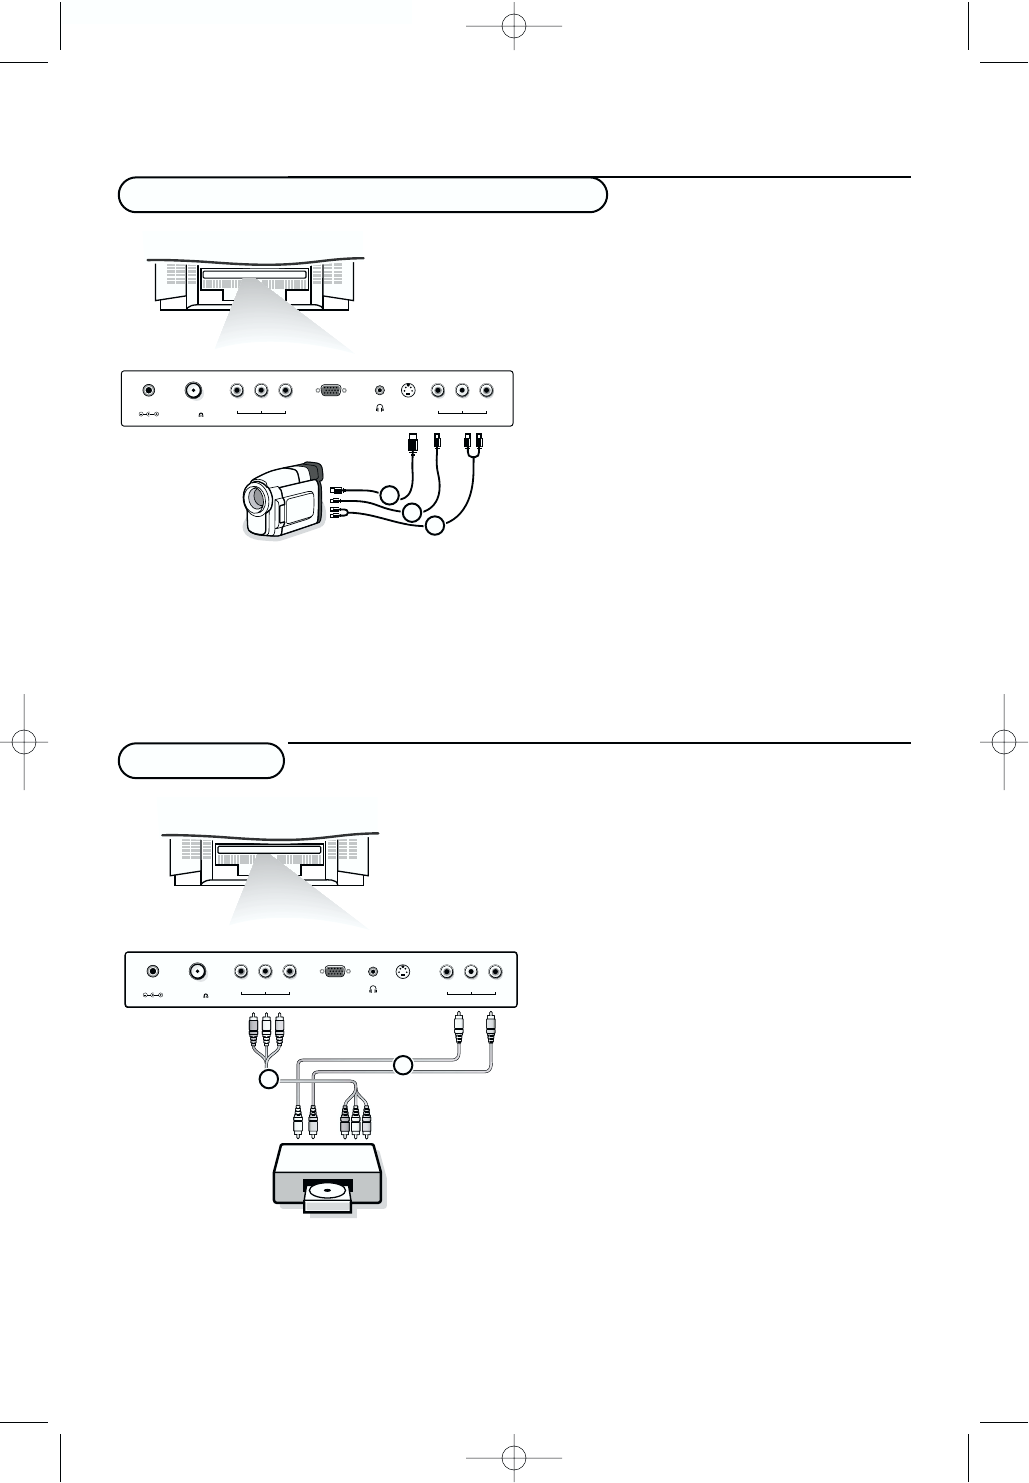
How to connect
&Connect the three separate component
video cables 1to the DVD player’s
Y,Pb and Pr ports and to the Y,Pb and
Pr (480i) ports on the TV.
éConnect the audio cables 2to the DVD
player’s AUDIO L and Rports and to the
L (MONO) and R AUDIO AV ports on the
TV.
How to use
&Select COMPONENT in the Input menu
item of the setup menu, see p. 6.
éTurn on the DVD set.
DVD player
S-VIDEO
IN
VIDEO (MONO) L
AV
R
AUDIO
x 75
DC 12V ANT IN PC INPUT
YPb
COMPONENT INPUT (480i)
Pr
DVD
2
1
17Connect Peripheral Equipment
126 .....1 am 10-12-2001 14:36 Pagina 17
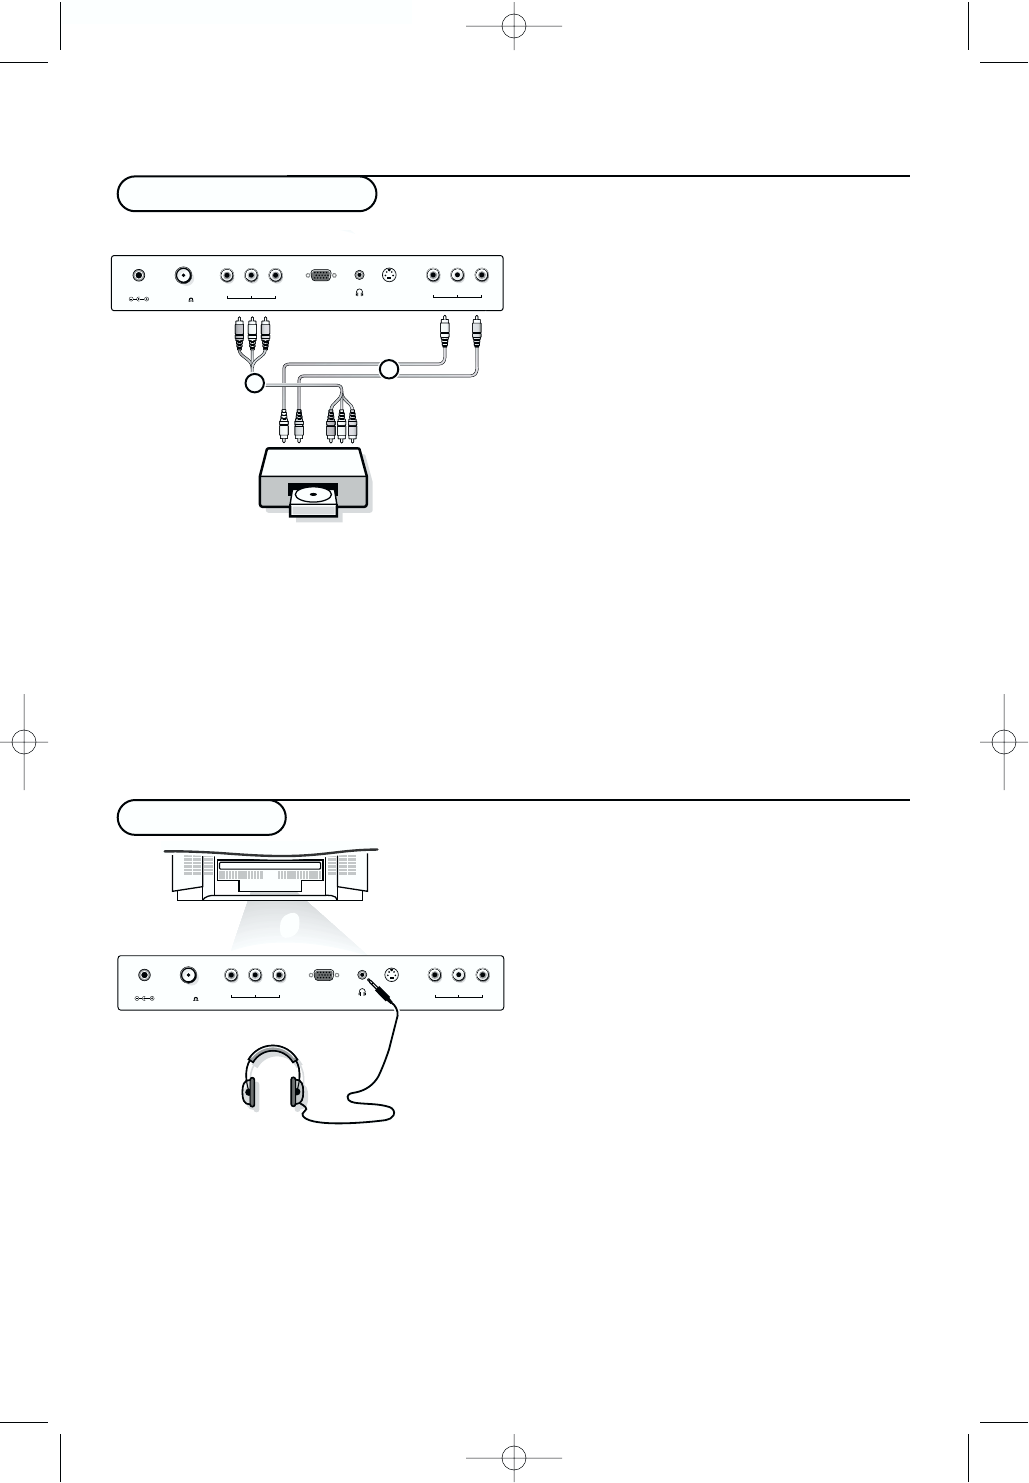
&Insert the plug into the headphone port
L.
éPress the ¬key on the remote control to
switch off the sound from the headphone
and the internal loudspeakers of the TV.
“Press the cursor left/right to adjust the
volume.
Note:When a TV channel or external AV source is
blocked because of a rating set via the Parental
control menu (see p. 13), also the headphone is
muted.
Headphone
L
S-VIDEO
IN
VIDEO (MONO) L
AV
RAUDIO
x 75
DC 12V ANT IN PC INPUTYPb
COMPONENT INPUT (480i)
Pr
When you dispose of a Digital Antenna cable
connected to a digital Set Top Box, connect the
Set Top Box to the COMPONENT INPUT (480i).
How to connect
&Connect the three separate component
video cables 1to the DTV player’s
Y,Pb and Pr ports and to the Y,Pb and
Pr (480i) ports on the TV.
éConnect the audio cables 2to the DTV
player’s AUDIO L and Rports and to the
L (MONO) and R AUDIO AV ports on the
TV.
How to use
&Select COMPONENT in the Input menu
item of the setup menu, see p. 6.
éTurn on the DTV set.
Warning: In case you notice scrolling images, wrong
colors or no color, no picture or even combinations of
these, on your screen, check if the connections are
done in the right way. Check if the cable colors
match with the input connector colors.
Digital Set Top Box
x 75
DC 12V ANT IN PC INPUT
YPb
COMPONENT INPUT (480i)
Pr
DTV / SET TOP BOX
2
1
S-VIDEO
IN
VIDEO (MONO) L
AV
RAUDIO
18 Connect Peripheral Equipment
126 .....1 am 10-12-2001 14:36 Pagina 18
Monitor Display modes
MODE Resolution Horizontal Vertical
Frequency (KHz) Frequency (KHz)
VGA 640x480 31,5 KHz 60Hz
640x480 35 KHz 67Hz
640x480 37,9 KHz 72Hz
640x480 37,5 KHz 75Hz
640x480 43,3 KHz 85Hz
720x400 31,5 KHz 70Hz
SVGA 800x600 35,2 KHz 56Hz
800x600 37,9 KHz 60Hz
800x600 48,1 KHz 72Hz
800x600 46,9 KHz 75Hz
800x600 53,7 KHz 85Hz
(MAC) 832x624 49,7KHz 75Hz
XGA 1024x768 48,4KHz 60Hz
1024x768 56,5KHz 70Hz
1024x768 60,2KHz 75Hz
1024x768 68,7KHz 85Hz
Note:
- If the set is cold, there may be a small "flicker"
when the set is switched on.This is normal, there is
nothing wrong with the set.
- If possible, use the VESA 1,024x768@60Hz video
mode to obtain the best image quality for your
LCD monitor. If used under the other resolutions,
some scaled or processed pictures may appear on
the screen.The TV has been pre-adjusted to the
mode VESA 1,024x768@60Hz.
- Some dot defects may appear on the screen, like
red, green or blue spots. However, this will have no
impact or effect on the monitor performance.
- Do not press the LCD screen with your finger for a
long time as this may incur some afterimages.
Personal computer
S-VIDEO
IN
VIDEO (MONO) L
AV
R
AUDIO
x 75
DC 12V ANT IN YPb
COMPONENT INPUT (480i)
Pr
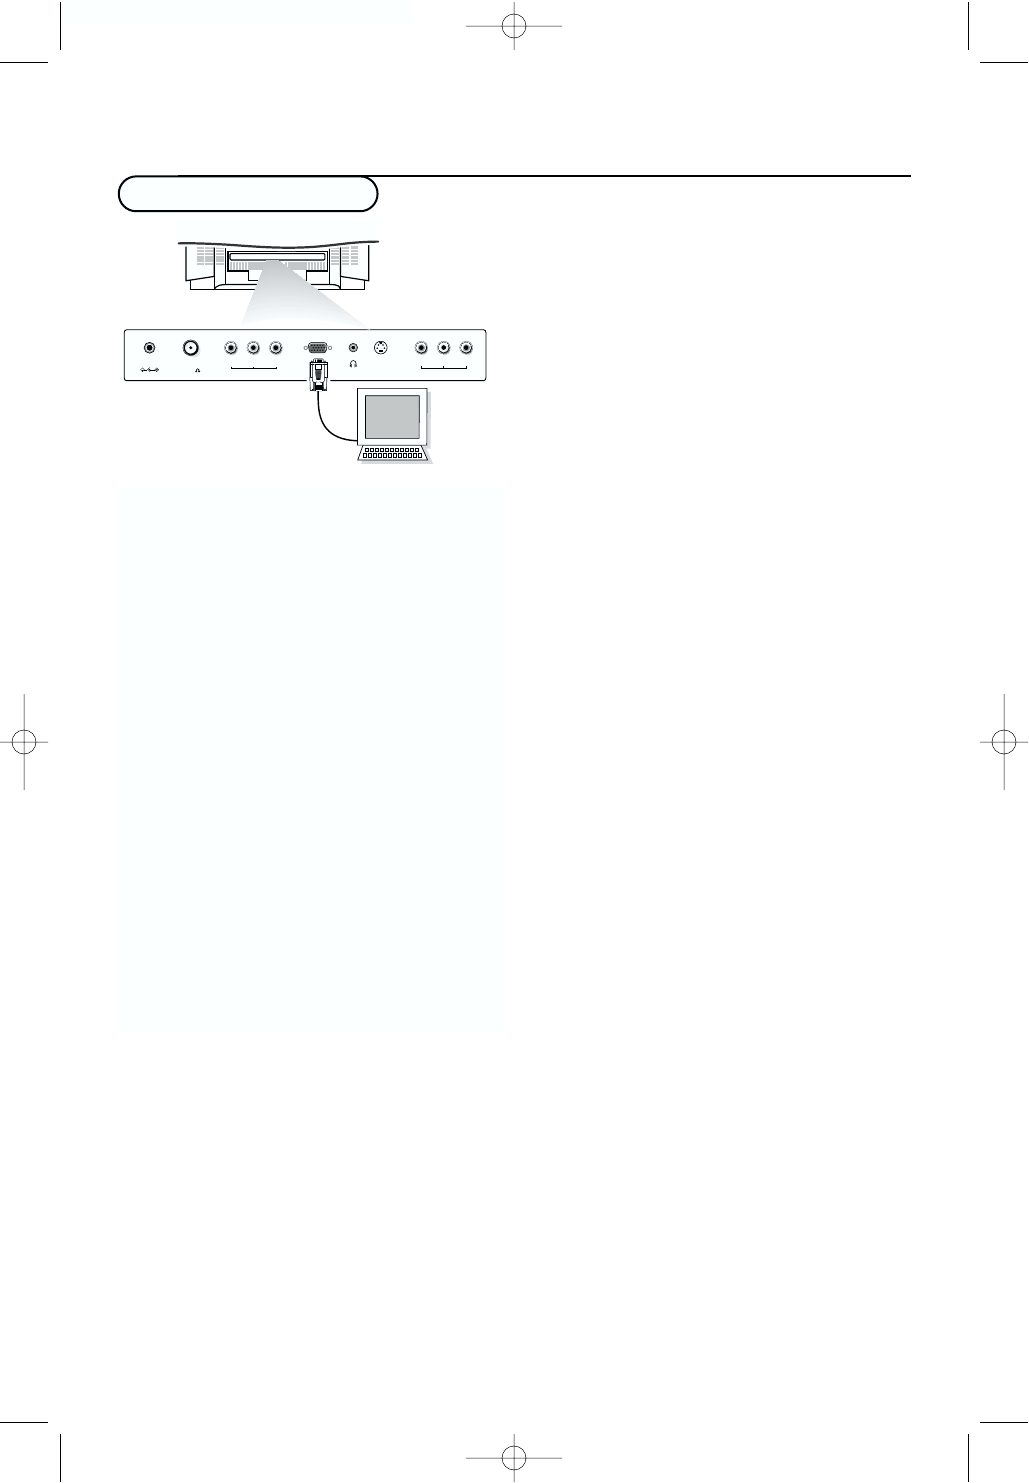
&Connect one end of a (male to male)
VGA cable to the video card of the
computer and the other end to the VGA
connector PC INPUT at the back of the
TV. Fix the connectors firmly with the
screws on the plug.
Note: the VGA cable is not supplied with the
TV.
éIn case of a Multimedia computer, connect
the audio cables to the audio outputs of
your Multimedia computer and to the
AUDIO L and Rconnectors of the AV
input of the TV.
“Press the EXT button on the remote
control or select Input in the setup menu
(See p. 6) to select PC.
‘Switch on the computer.The TV can be
operated as the computer monitor.
Note: If you have an Apple Macintosh
computer, connect the VGA desktop block from
the 3 row 15 pin to 2 row 15 pin with the
signal cable and connect the VGA desktop
block to the Apple Macintosh computer.
19Connect peripheral equipment
126 .....1 am 10-12-2001 14:36 Pagina 19
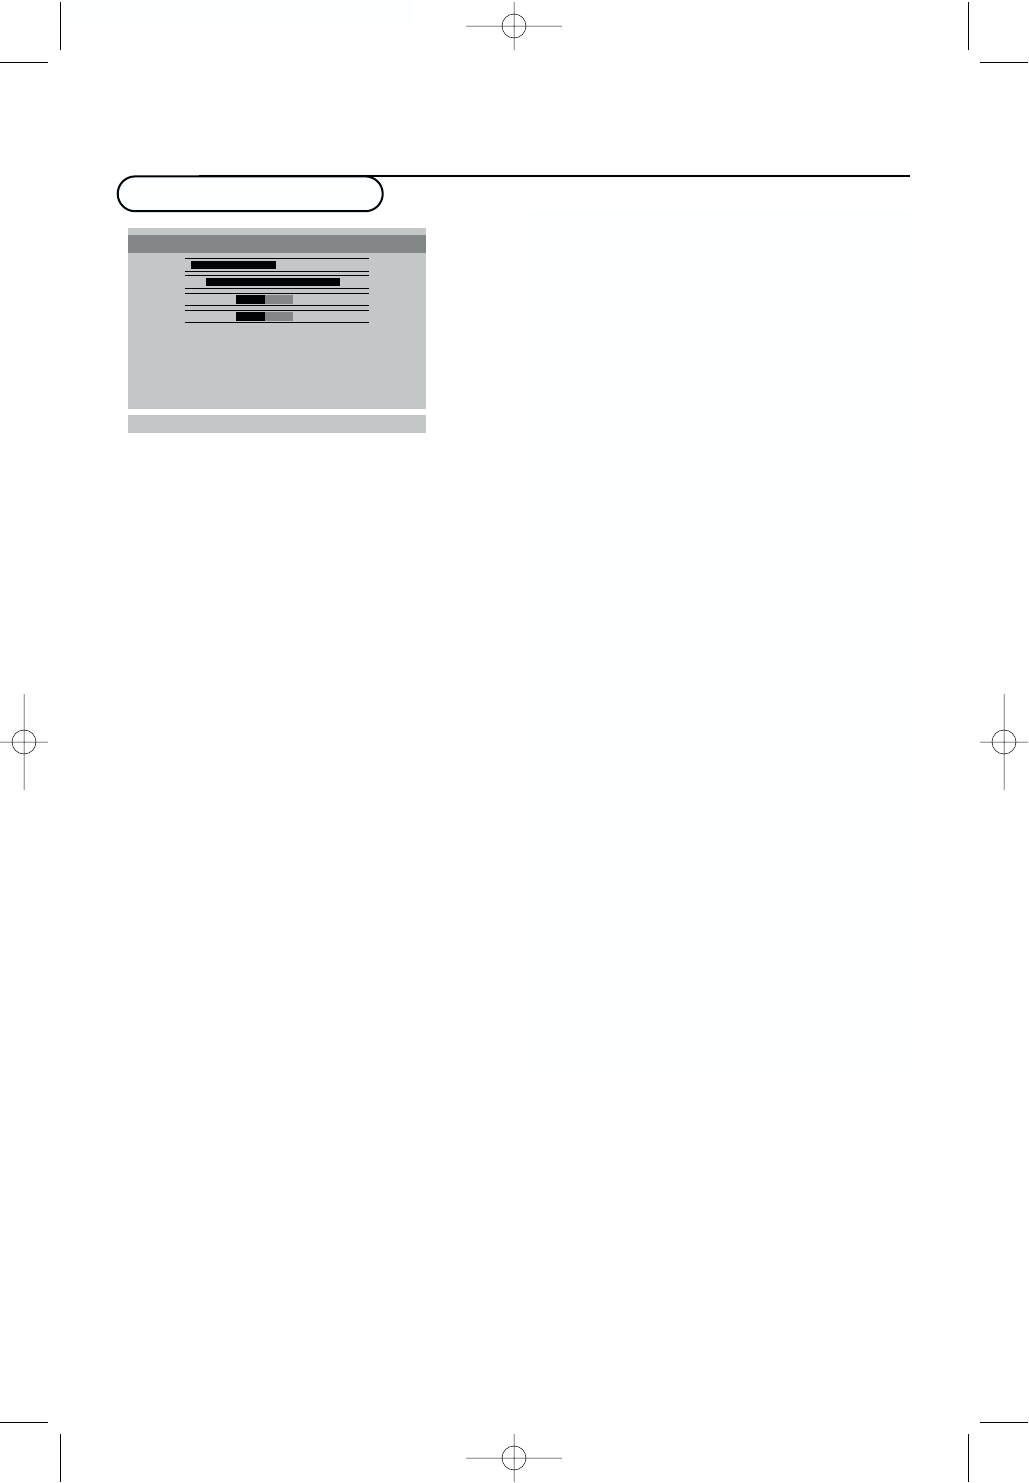
You can adjust picture contrast, brightness,
horizontal and vertical position, clock,
clock phase, auto-configure and factory
settings as you prefer.
&Repeatedly press the EXT button on the
remote control or select Input in the
setup menu, see p. 6 to select the PC
monitor mode.
éPress the MENU key to select the PC
menu.
“Use the cursor up/down to select the
desired PC item.
‘Use the cursor left/right to make
appropriate adjustments.
Use of the PC menu
Horizontal and vertical picture
position
Press the cursor left/right to adjust the
picture position.
Clock
Press the cursor left/right to minimise any
vertical bars or stripes visible on the
screen background.
Clock phase
Press the cursor left/right to, when
necessary, adjust the pixel phase of the
picture to avoid picture interference.
Auto-configure
Select Auto-configure On for the
automatic adjustment of the screen
position, clock and clock phase.
When Auto-configure is in progress, the
displayed picture will disappear for a few
seconds.
Note: Some signals from some graphic boards
may not function properly. If the results are
unsatisfactory, adjust your monitor’s position,
clock and clock phase manually.
Reset
Select Reset On to return to the factory
predefined settings.
(Press the OK key to store the PC
monitor picture settings.
The message Stored is displayed.
§Press the EXT button repeatedly and
select TV to return to normal TV viewing.
20 Use of the PC menu
Input PC
H60
G90
≈0
Ú0
Clock 40
Clock phase 16
Auto configure
Reset
oœ p π OK MENU
Input PC
126 .....1 am 10-12-2001 14:36 Pagina 20
Please make these simple checks before calling service.These tips may save you time and money since
charges for receiver installation and adjustments of customer controls are not covered under your
warranty.
Before Calling Service
Items to Check and Actions to follow
•This may be caused by obstruction to the antenna due to high rise
buildings or hills. Using a highly directional antenna may improve
the picture.
•Check that the TV’s AC power cord is plugged into the mains
socket.
•Unplug the TV, wait for 60 seconds. Then re-insert plug into the
mains socket and turn on the TV again.
•Check antenna connections at the rear of the TV to see if it is
properly connected to the TV.
•Possible broadcast station trouble. Try another channel.
•Adjust the contrast and brightness settings.
•Check the Closed Captions control. Some TEXT modes could
block the screen.
•Switch your VGA-source to a correct display mode.
•Increase the VOLUME.
•Check that the TV is not muted, press the ¬button on the
remote control.
•Adjust the contrast, color and brightness settings.
•Sometimes, poor picture quality occurs when having activated an
S-VHS camera or camcorder connected and having connected
another peripheral at the same time. In this case, switch off one of
the other peripherals.
•Check the antenna connection.
•This may be caused by electrical interference (e.g. hairdryer, nearby
neon lights, etc.)
•Turn off the equipment.
•Check whether the batteries are working. Replace if necessary.
•Clean the remote control sensor lens on the TV.
•You can still use the buttons at the front of your TV.
•Select the TV mode to be sure your remote control is in the TV
mode.
•Check if you have selected the correct VGA mode in your PC
(640x480, 640x400, 640x350, 856x480, 800x450, MAC II, SVGA,
XGA).
Symptoms
“Ghost” or double images
No power
No picture
Good picture but no sound
Good sound but poor color
Poor picture
Snowy picture and noise
Horizontal dotted line
Television not responding to
remote control
No stable or not
synchronized VGA picture
If your problem is not solved
Turn your TV off and then on again once.
Never attempt to repair a defective TV
yourself.
Check with your dealer or call a TV technician.
Tel. number Philips Customer Care Center
800-531-0039
21
126 .....1 am 10-12-2001 14:36 Pagina 21

This equipment has been tested and found to
comply with the limits for a Class B digital device,
pursuant to part 15 of the FCC Rules.These limits
are designed to provide reasonable protection
against harmful interference in a residential
installation.This equipment generates, uses, and can
radiate radio frequency energy and, if not installed
and used in accordance with the instructions, may
cause harmful interference to radio
communications. However, there is no guarantee
that interference will not occur in a particular
installation. If this equipment does cause harmful
interference to radio or television reception, which
can be determined by turning the equipment off
and on, the user is encouraged to try to correct
the interference by one or more of the following
measures:
Reorient or relocate the receiving antenna.
Increase the separation between the equipment
and the TV.
Connect the equipment into an outlet on a circuit
different from that to which the receiver is
connected.
Consult the dealer or an experienced radio or
television technician for help.
Modifications -
The FCC requires the user to be notified that any
changes or modifications made to this device that
are not expressly approved by Philips Consumer
Electronics may void the user’s authority to
operate the equipment.
Cables -
Connections to this device must be made with
shielded cables with metallic RFI/EMI connector
hoods to maintain compliance with FCC Rules and
Regulations.
Canadian notice -
This Class B digital apparatus meets all
requirements of the Canadian Interference-Causing
Equipment Regulations.
Avis Canadien -
Cet appareil numérique de la classe B respecte
toutes les exigences du Règlement sur le matériel
brouilleur du Canada.
Regulatory Notices - Federal Communications Commission Notice
Care of the screen
Do not rub or strike the screen with anything hard as this may scratch, mar, or damage the screen
permanently.
Unplug the screen before cleaning the screen. Dust the TV by wiping the screen and the cabinet with
a soft, clean cloth. If the screen requires additional cleaning, use a clean, damp cloth. Do not use
liquid cleaners or aerosol cleaners.
Mobile telephone warning
To avoid disturbances in picture and sound, malfunctioning of your TV or even damage to the TV,
keep away your mobile telephone from the TV.
End of life directives
We are paying a lot of attention to produce environmentally-friendly in green focal areas.Your new
receiver contains materials which can be recycled and reused.
At the end of its life specialized companies can dismantle the discarded receiver to concentrate the
reusable materials and to minimize the amount of materials to be disposed of.
Please ensure you dispose of your old receiver according to local regulations.
How to dispose of batteries?
The batteries supplied do not contain the heavy metals mercury and cadmium. Nevertheless in many
countries batteries may not be disposed of with your household waste. Please ensure you dispose of
batteries according to local regulations.
Tips
22 Tips
126 .....1 am 10-12-2001 14:36 Pagina 22
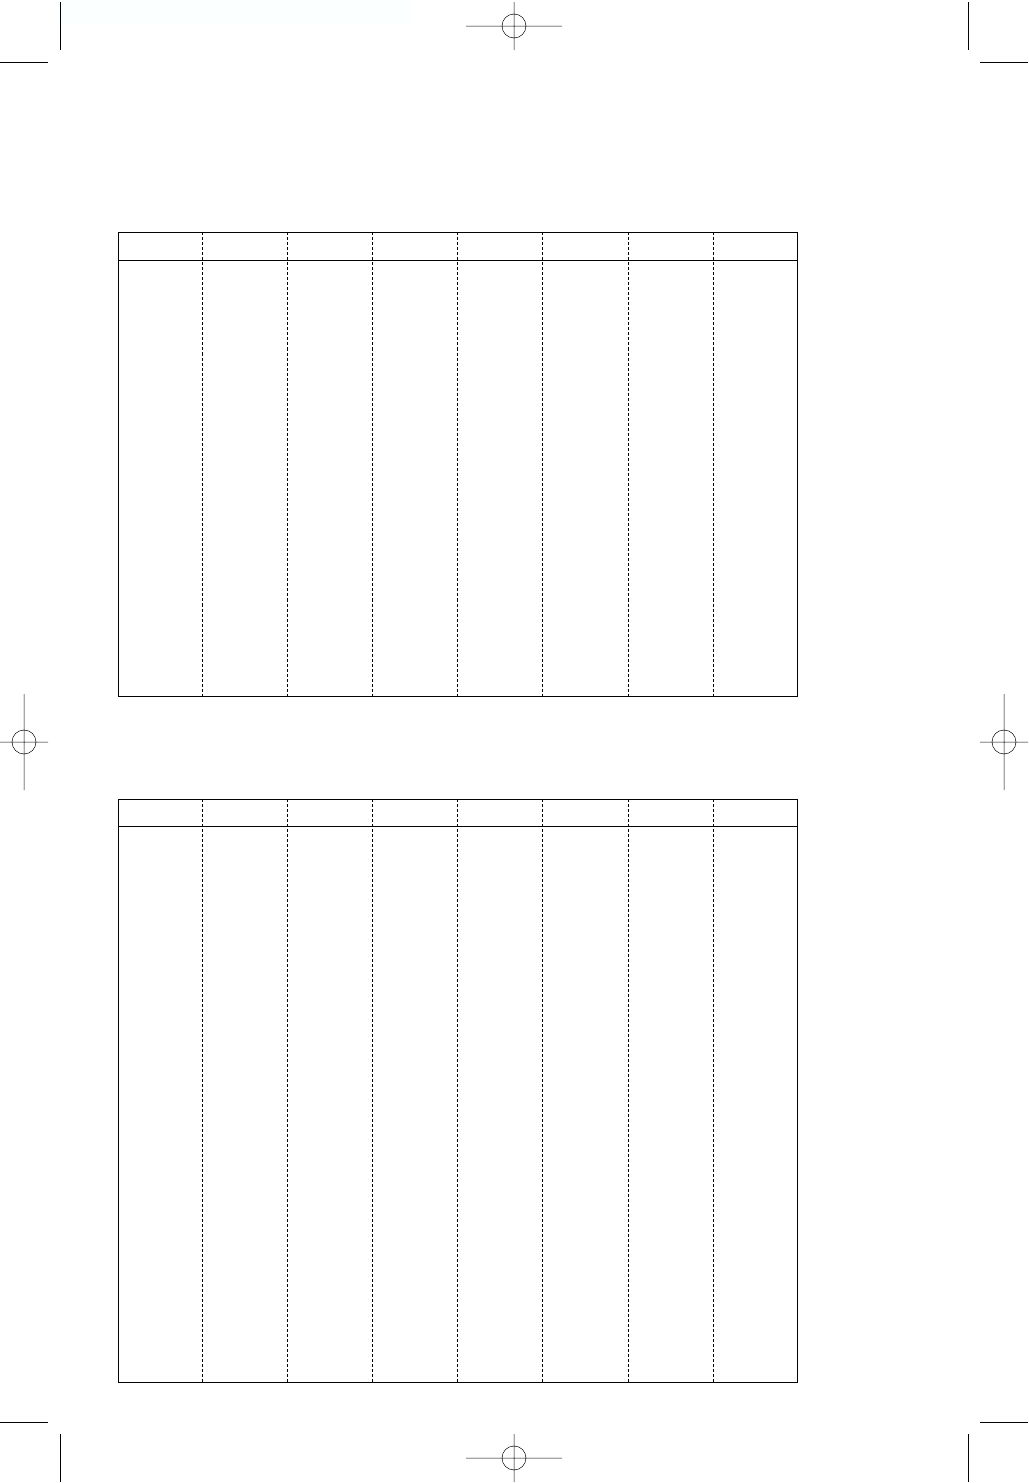
Channel MHz Channel MHz Channel MHz Channel MHz
2 55.25 14 471.25 39 621.25 64 771.25
3 61.25 15 477.25 40 627.25 65 777.25
4 67.25 16 483.25 41 633.25 66 783.25
5 77.25 17 489.25 42 639.25 67 789.25
6 83.25 18 495.25 43 645.25 68 795.25
7 175.25 19 501.25 44 651.25 69 801.25
8 181.25 20 507.25 45 657.25
9 187.25 21 513.25 46 663.25
10 193.25 22 519.25 47 669.25
11 199.25 23 525.25 48 675.25
12 205.25 24 531.25 49 681.25
13 211.25 25 537.25 50 687.25
26 543.25 51 693.25
27 549.25 52 699.25
28 555.25 53 705.25
29 561.25 54 711.25
30 567.25 55 717.25
31 573.25 56 723.25
32 579.25 57 729.25
33 585.25 58 735.25
34 591.25 59 741.25
35 597.25 60 747.25
36 603.25 61 753.25
37 609.25 62 759.25
38 615.25 63 765.25
Conversion Table A: channel to frequency (in MHz) for off-air channels.
The frequencies used by a cable company may differ from the frequencies on the table.
Consult your cable company or your dealer for detailed information.
Channel MHz Channel MHz Channel MHz Channel MHz
C1 73.25
C2 55.25 C33 277.25 C64 463.25 C95 91.25
C3 61.25 C34 283.25 C65 469.25 C96 97.25
C4 67.25 C35 289.25 C66 475.25 C97 103.25
C5 77.25 C36 295.25 C67 481.25 C98 109.25
C6 83.25 C37 301.25 C68 487.25 C99 115.25
C7 175.25 C38 307.25 C69 493.25 C100 649.25
C8 181.25 C39 313.25 C70 499.25 C101 655.25
C9 187.25 C40 319.25 C71 505.25 C102 661.25
C10 193.25 C41 325.25 C72 511.25 C103 667.25
C11 199.25 C42 331.25 C73 517.25 C104 673.25
C12 205.25 C43 337.25 C74 523.25 C105 679.25
C13 211.25 C44 343.25 C75 529.25 C106 685.25
C14 121.25 C45 349.25 C76 535.25 C107 691.25
C15 127.25 C46 355.25 C77 541.25 C108 697.25
C16 133.25 C47 361.25 C78 547.25 C109 703.25
C17 139.25 C48 367.25 C79 553.25 C110 709.25
C18 145.25 C49 373.25 C80 559.25 C111 715.25
C19 151.25 C50 379.25 C81 565.25 C112 721.25
C20 157.25 C51 385.25 C82 571.25 C113 727.25
C21 163.25 C52 391.25 C83 577.25 C114 733.25
C22 169.25 C53 397.25 C84 583.25 C115 739.25
C23 217.25 C54 403.25 C85 589.25 C116 745.25
C24 223.25 C55 409.25 C86 595.25 C117 751.25
C25 229.25 C56 415.25 C87 601.25 C118 757.25
C26 235.25 C57 421.25 C88 607.25 C119 763.25
C27 241.25 C58 427.25 C89 613.25 C120 769.25
C28 247.25 C59 433.25 C90 619.25 C121 775.25
C29 253.25 C60 439.25 C91 625.25 C122 781.25
C30 259.25 C61 445.25 C92 631.25 C123 787.25
C31 265.25 C62 451.25 C93 637.25 C124 793.25
C32 271.25 C63 457.25 C94 643.25 C125 799.25
Conversion Table B: Channel to frequency (in MHz) for cable TV channels.
The frequencies used by a cable company may differ from the frequencies on the table.
Consult your cable company or your dealer for detailed information.
23
126 .....1 am 10-12-2001 14:36 Pagina 23

Glossary
Audio/Video Inputs
Located on the rear and the front of the
receiver these connectors (RCA phono type
plug) are used for the input of audio and video
signals. Designed for use with VCRs (or other
accessories) in order to receive higher picture
resolution and offer sound connection options.
Menu
An on-screen listing of feature controls shown
on the TV screen that are made available for
user adjustments.
MPAA
Motion Picture Association of America
Multichannel Television sound (MTS)
The broadcast standard that allows for stereo
sound to be transmitted with the TV picture.
Programming
The procedure of adding or deleting channel
numbers into the TV’s memory.
In this way the TV ‘remembers’ only the locally
available or desired channel numbers and skips
over any unwanted channel numbers.
RF
Radio Frequency or modulated signal design
used as the carrier for television broadcasts.
Second Audio Program (SAP)
Another or additional audio channel provided
for in the Multichannel Television Sound (MTS)
broadcast standard.A monaural soundtrack
included within the recorded or video signal
(usually containing a second language translation
for the displayed program).
Sleep Timer
Function with which you can set a time period
after which the TV should turn itself off.
S-Video Input
Allows direct connection of high-resolution
video sources, such as a Super VHS
videocassette recorder, Laser Disc player, etc.
Provides improved picture resolution, sharpness,
and clarity.
24 Glossary
126 .....1 am 10-12-2001 14:36 Pagina 24

cover 126 1012.1 10-12-2001 14:37 Pagina 3
Printed in Korea
P/NO: 3828VA0222Q(MF004A, 071A TX) 3122 126 xxxx.1
Printed on recycled paper
cover 126 1012.1 10-12-2001 14:37 Pagina 4