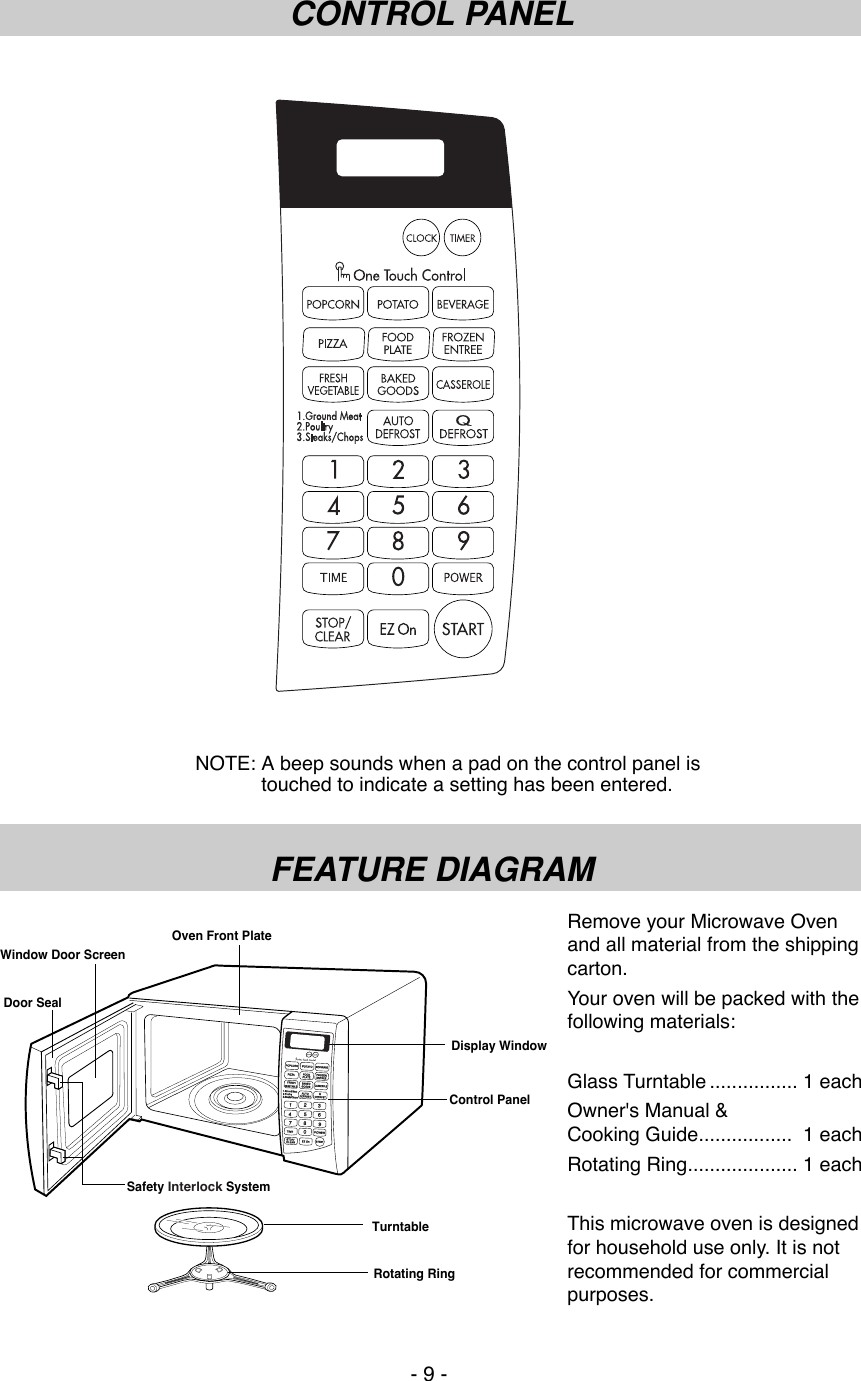
LG Electronics USA S114ZM Microwave Oven User Manual
LG Electronics USA Microwave Oven Users Manual
UserManual.wiki
>
LG Electronics USA
>
S114ZM User Manual
Users Manual
Navigation menu
Upload a User Manual
Namespaces
Wiki Guide
HTML
PDF
Info
Views
User Manual
Discussion / Help
Navigation
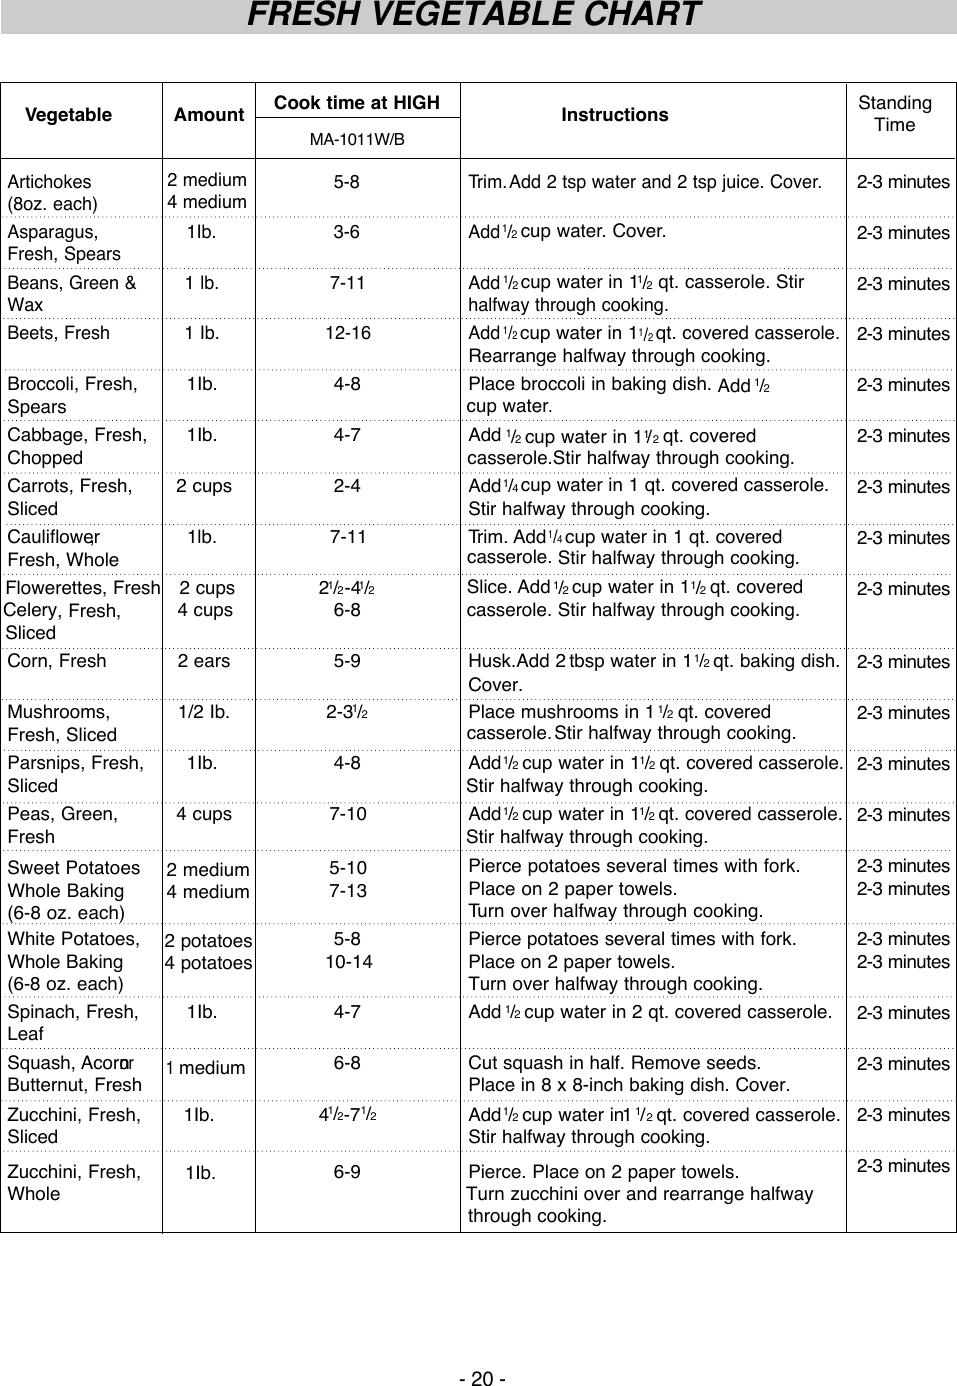
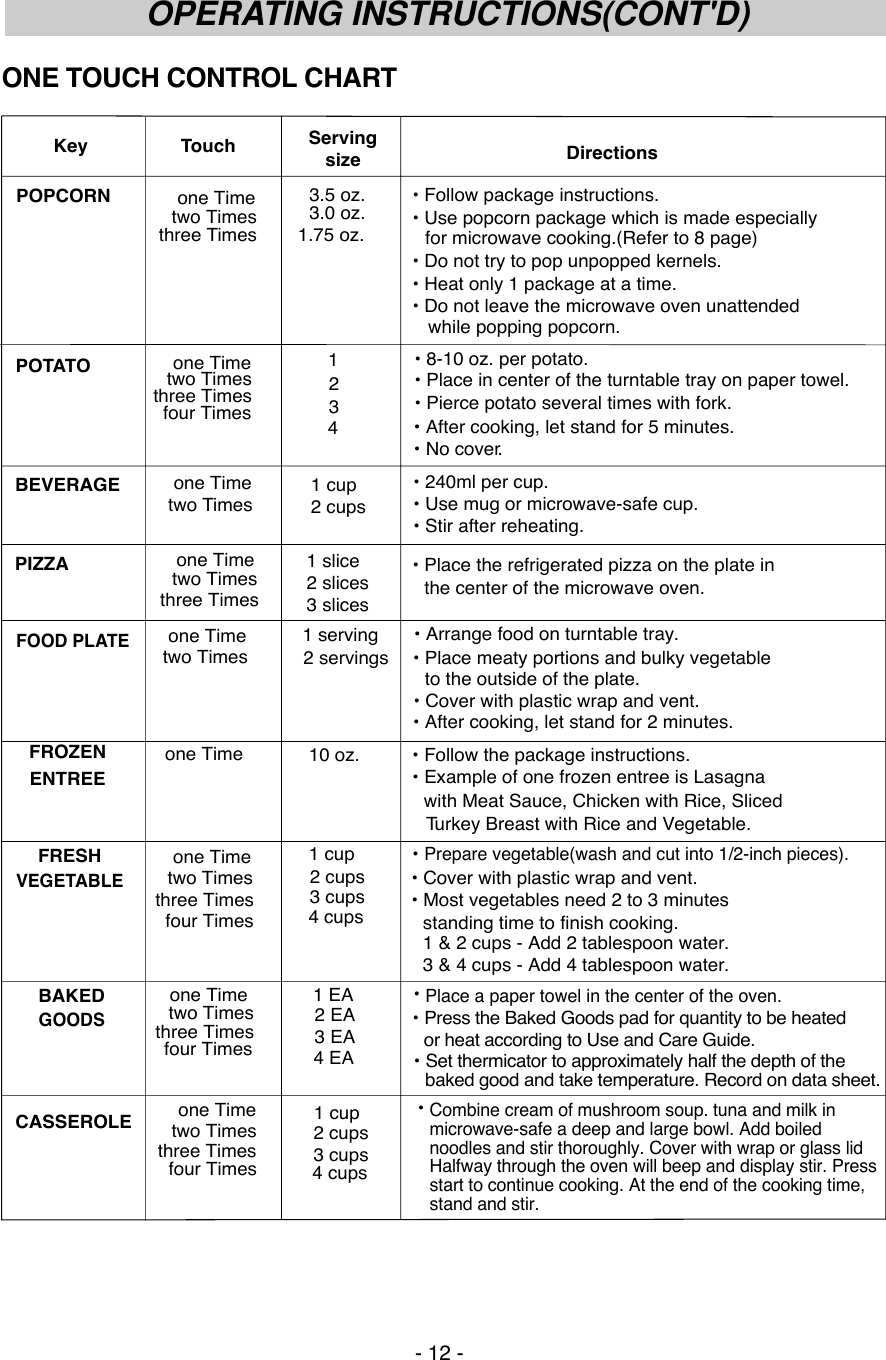
![SETTING TIME OF DAYWhen your oven is plugged in for the first time orwhen power resumes after a power interruption,the numbers in the display reset to 0.To set time of day:1. Touch STOP/CLEAR.2. Touch CLOCK.3. Enter the time by using the number key pads.Example: To set 3:15, touch number keypads [3], [1], and [5].4. Touch CLOCK.The clock starts counting.NOTE:If the clock (or display) shows any abnormality,unplug the oven from the AC outlet, plug it backin and then reset the clock.TIMED COOKINGMany foods need slower cooking (at less than HIpower) in order to give you the best results.In addition to HI-POWER, there are 10 multi-power settings.EXAMPLE: If you want to cook food on 80%Power(Power 8) for 5 minutes 30 seconds.1. Touch STOP/CLEAR.2. Touch TIME. Display shows 0.3. Enter 5 minutes 30 seconds by touching [5],[3], and [0].4. Touch POWER.P-HI appears in the display.This is to tell you that the oven is set on HIunless a different power setting is chosen.5. Touch [8] to select power level 8. 6. Touch START.Two short and one long tone sound and theword End shows in the display window whenthe cooking time is over. Then the oven shutsitself off.NOTE : If you do not select the power level, the oven willoperate at power HIGH. To set HI-POWERcooking, skip steps 4, 5 above.2 STAGE OR 3 STAGE TIMEDCOOKINGFor Two or Three Stage cooking, repeat abovestep 2 through 5 before touching the START padfor every additional Time and Power programyou want to add.Ez OnEz On allows you to cook for 30 seconds at100% power by simply touching the Ez On pad.You can also extend cooking time in multiples of30 seconds by repeatedly touching the Ez Onpad during cooking.EXAMPLE: To set cooking for 2 minutes withADD 30 pad.1. Touch STOP/CLEAR.2. Touch Ez On 4 times. The oven beginscooking and display shows time countingdown.NOTE:Maximum available time is 99 minutes 59 seconds.- 10 -OPERATING INSTRUCTIONSTOUCH KEY SEQUENCETOUCH KEY SEQUENCETOUCH KEY SEQUENCECLOCKTIME0START8EzOnPOWER➠ ➠ ➠ ➠ ➠➠➠➠➠➠➠ CLOCK](https://usermanual.wiki/LG-Electronics-USA/S114ZM/User-Guide-515188-Page-10.png)
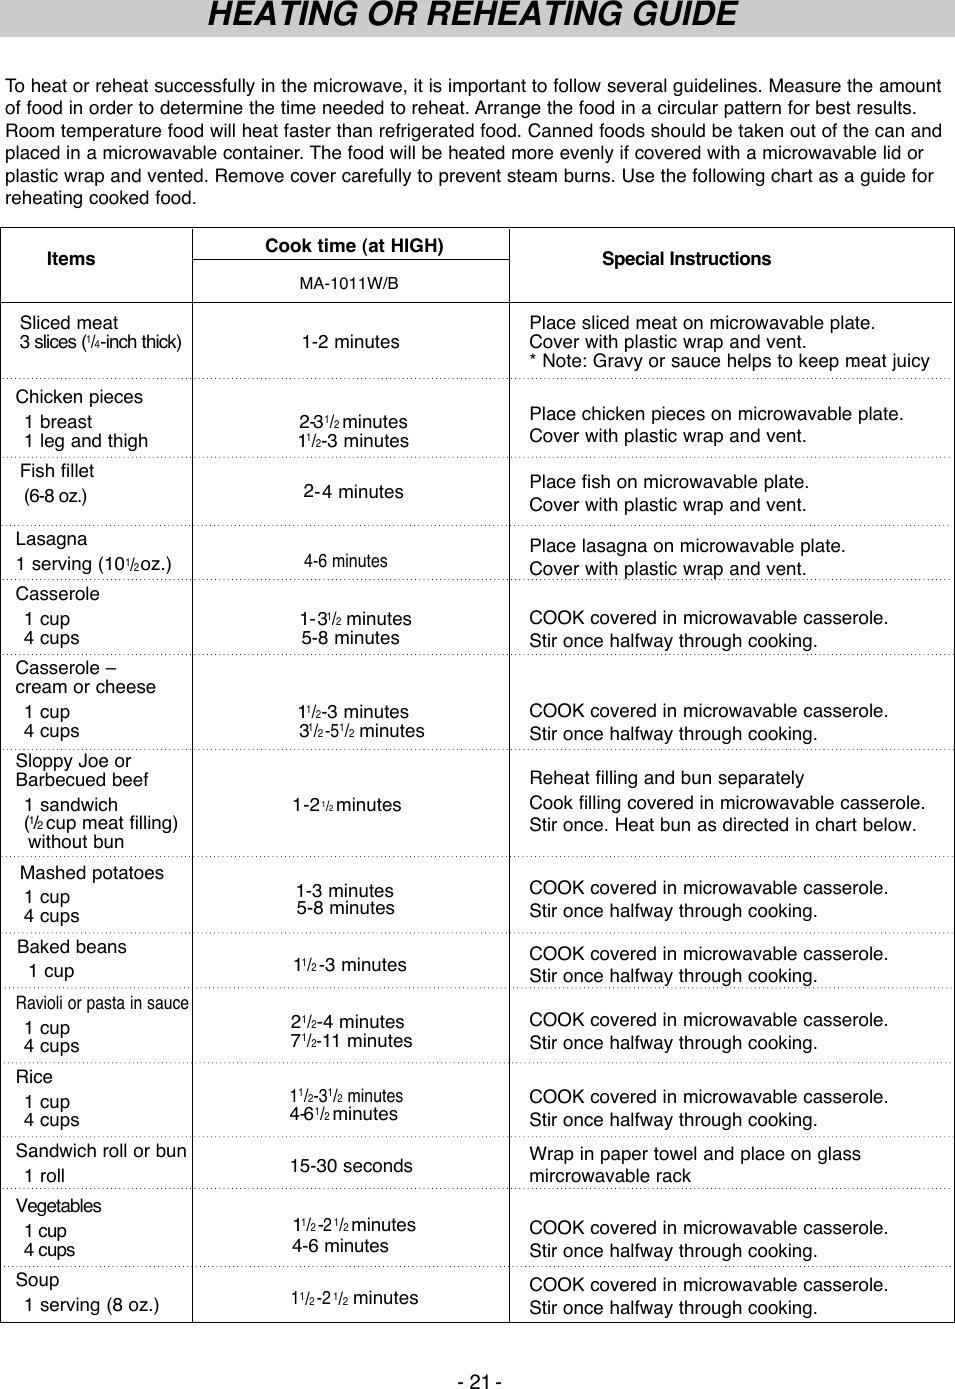
![TIMERYou can use the Timer of your oven for purposes other than food cooking.Example:To count 3 minutes for an egg or telephone call.1. Touch STOP/CLEAR.2. Touch TIMER.3. Touch numbers for time, [3], [0], [0].4. Touch START.CHILD LOCKThis is a unique safety feature that prevents accidental running of the oven. Once the childlock is set, no cooking can take place.When the child lock is set, you can't input any key.To set the child lock:1. Touch STOP/CLEAR. 2.Touch and hold 0 until Lappears in the display. 2. Lremains in the display.To cancel the child lock:1. Touch and hold 0until Ldisappears in thedisplay. 2. The time of day returns to the display window.ONE TOUCH CONTROLThis function allows you to cook popcorn, potato,beverage, pizza, food plate, frozen entree, freshvegetable, baked goods, and casserole by touchingthe One Touch key pad.Example:To cook a 3.5 oz. bag of microwave popcorn.1. Touch STOP/CLEAR.2. Touch POPCORN once.The oven begins the cooking you selected without the need to touch START.- 11 -TOUCH KEY SEQUENCEOPERATING INSTRUCTIONS(CONT'D)TIMESTAR0 000POPCORNTOUCH KEY SEQUENCE➠➠➠➠TOUCH KEY SEQUENCE➠ TOUCH KEY SEQUENCE➠](https://usermanual.wiki/LG-Electronics-USA/S114ZM/User-Guide-515188-Page-11.png)
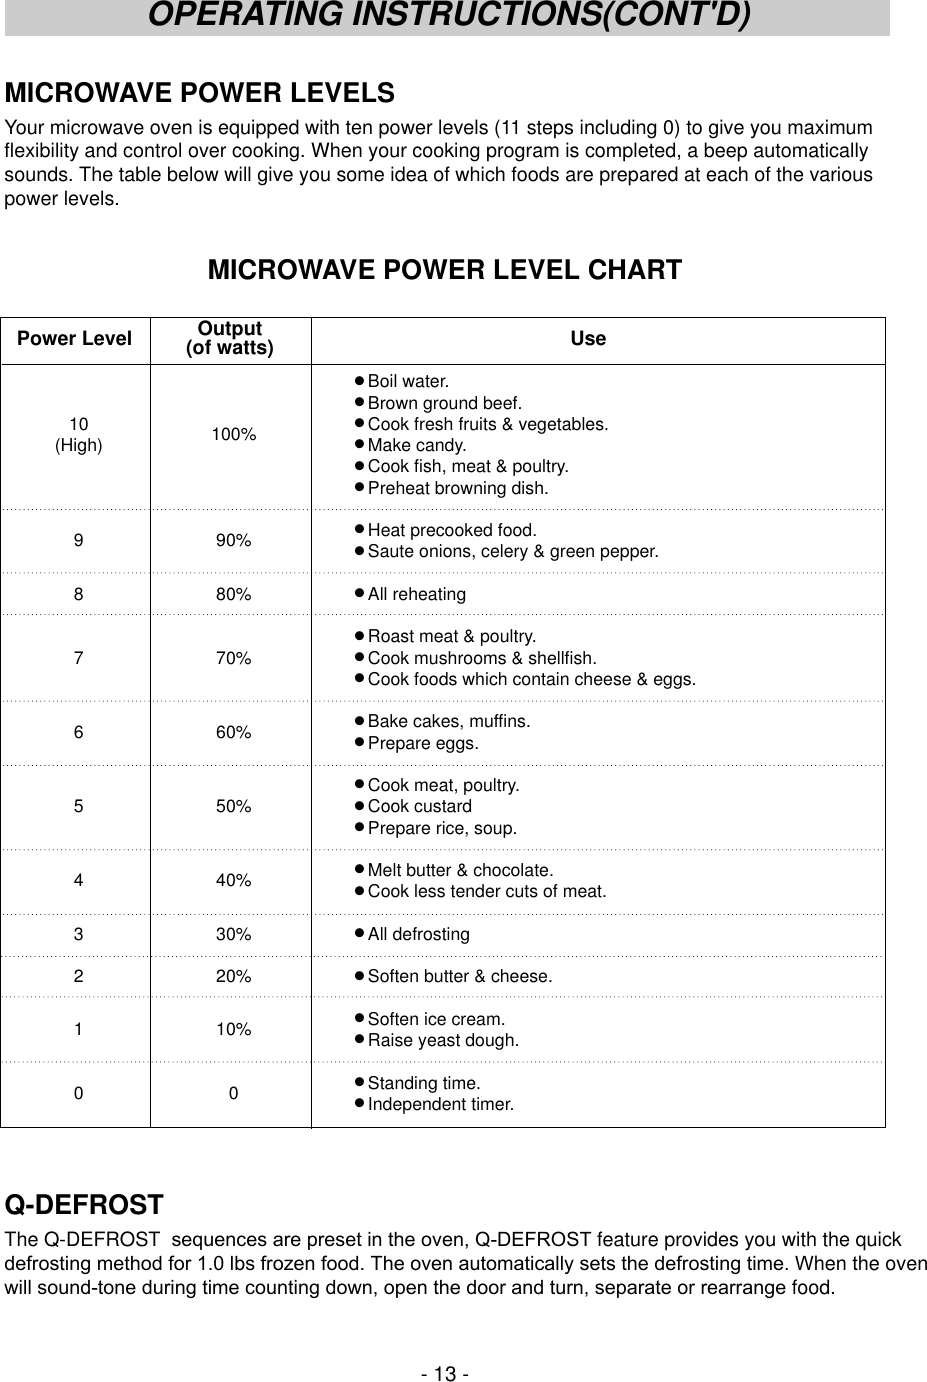
![AUTO DEFROSTThree defrost sequences are preset in the oven.The defrost feature provides you with the bestdefrosting method for frozen foods. The autodefrost guide will show you which defrostsequence is recommended for the food you aredefrosting.The oven automatically determines requireddefrosting times for each food item according tothe weight you enter.For added convenience, the Auto DefrostFeature contains a built-in beep mechanism thatlets you check, turn over, separate or rearrangeas recommended in the AUTO DEFROSTGUIDE.Three different defrosting levels are provided.dEF1 GROUND MEATdEF2 POULTRYdEF3 STEAKS/CHOPSEXAMPLE: To defrost 1.2lbs of ground beef. 1. Touch STOP/CLEAR.2. TouchAUTO DEFROST once.dEF1 appears in the display.3. Enter the weight by touching [1] and [2]. 1.2 appears in the display.4. Touch START.The display changes to defrost time countdown. The oven will beep during the DEFROSTcycle. At this time, open the door and turn,separate or rearrange the food.Remove any portions that have thawed.Return frozen portions to the oven and touchSTART to resume the defrost cycle. The ovenwill not STOP during the BEEP unless the dooris opened.For best results, remove fish, shellfish, meat,and poultry from its original closed paper orplastic package (wrapper). Otherwise, thewrap will hold steam and juice close to thefoods, which can cause the outer surface ofthe foods to cook.Place foods in a shallow glass baking dish ormicrowave roasting rack to catch drippings.Food should still be somewhat icy in thecenter when removed from the oven.- 14 -OPERATING INSTRUCTIONS(CONT'D)TOUCH KEY SEQUENCEAUTO DEFROST GUIDESEQUENCETOUCH FOOD MIN./MAX.AUTO DEFROST• BEEF ..................Ground beef, Cubes for stew, ...............................Pot roast, Rib roast, Rump roast,GROUND one time ...............................Chuck roast, Hamburger patty.MEAT • LAMB .................Rolled roast 0.1/6.0 lbs.• PORK .................Hot dogs, Spareribs, ...............................Country-style ribs,...............................Rolled roast, Sausage.• VEAL ..................Cutlets (1lb., 1/2-inch thick)• POULTRY ...........Whole (under 4 lbs), Cut up POULTRY two times ...............................Breasts (boneless) 0.1/6.0 lbs.• CORNISH HENS...Whole• TURKEY..............Breast (under 6 lbs.)• STEAKS..............Round steak, Tenderloin steak.STEAKS/CHOPSthree times • CHOPS................Lamb chops (1-inch thick), Pork chops (1/2-inch thick). 0.1/6.0 lbs.• FISH.....................Fillets, Steaks, Whole.• SHELLFISH.........Crab meat, Lobster tails, Shrimp,...............................Scallops1AUTODEFROST2START➠➠➠](https://usermanual.wiki/LG-Electronics-USA/S114ZM/User-Guide-515188-Page-14.png)