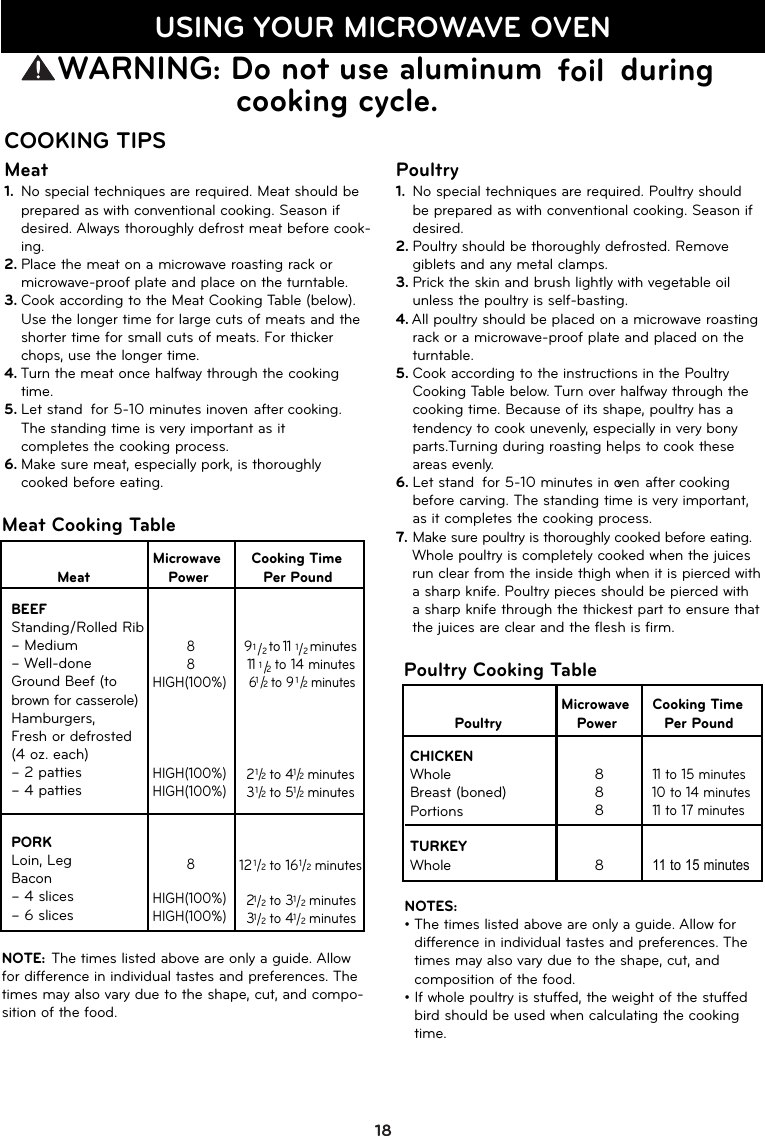
LG Electronics USA S154FV Microwave Oven User Manual

LG Electronics USA Microwave Oven Users Manual

Users Manual

LCRT1513STwww.lg.comOWNER’S MANUALMICROWAVE OVENPLEASE READ THIS OWNER’S MANUAL THOROUGHLY BEFORE OPERATING.MFL38260004
TABLE OF CONTENTSSAFETY.......................................................................................................................................................................3-4Precautions to Avoid Possible Exposure To Excessive Microwave Energy .............................................................................. 3Grounding Instructions .......................................................................................................................................................3Important Safety Instructions ..............................................................................................................................................4UNDERSTANDING YOUR MICROWAVE OVEN ....................................................................................................5-9Specifications.....................................................................................................................................................................5Installation..........................................................................................................................................................................5Parts and Accessories ........................................................................................................................................................6Control Panel .....................................................................................................................................................................7Cookware Guide .................................................................................................................................................................8Tips for Microwave Cooking ................................................................................................................................................9Cleaning............................................................................................................................................................................9USING YOUR MICROWAVE OVEN .....................................................................................................................10-19Clock................................................................................................................................................................................10Child Lock ........................................................................................................................................................................10Timer...............................................................................................................................................................................10EZ-ON.............................................................................................................................................................................10Sensor Touch Operation Instruction ..................................................................................................................................11Potato (Example) ..............................................................................................................................................................11Quick Sensor Touch Table ................................................................................................................................................11Sensor Touch Popcorn.....................................................................................................................................................12Auto Cook......................................................................................................................................................................13Auto Cook Chart ...................................................................................................................................................................13Auto Defrost ................................................................................................................................................................14Quick Defrost.......................................................................................................................................................................14Defrosting Tips ................................................................................................................................................................15Multi-stage Cooking ........................................................................................................................................................15Soften.............................................................................................................................................................................16Melt..................................................................................................................................................................................16Cook Time .......................................................................................................................................................................17Microwave Power Levels ...................................................................................................................................................17Cooking Tips ..............................................................................................................................................................18-19MEAT ..............................................................................................................................................................................18Meat Cooking Table .........................................................................................................................................................18POULTRY ........................................................................................................................................................................18Poultry Cooking Table ......................................................................................................................................................18FISH................................................................................................................................................................................19Fresh Fish Cooking Table ................................................................................................................................................19TROUBLESHOOTING..........................................................................................................................................20-22Questions and Answers ............................................................................................................................................20-21Before Calling for Service.................................................................................................................................................22WARRANTY............................................................................................................................................Inside back coverEnergy Saving ................................................................................................................................................19Thank you for purchasing a LG microwave oven. Please record the model number and serial number of this unit for future reference. We also suggest you record the details of your contact with LG (LG Electronics U.S.A., Inc.) concerning this unit.Staple your receipt here for proof of purchase.Model No: Serial No: Dealer:Dealer Phone No: Customer RelationsLG Electronics U.S.A., Inc.Service Division Bldg. #3201 James Record Rd.Huntsville, AL 35824-0126
SAFETY•Do not attempt to operate this oven withthe door open, since open-door operation canresult in harmful exposure to microwave energy. It is important not to defeat or tamperwith the safety interlocks.•Do not place any object between the ovenfront face and the door,or allow soil or cleaner residue to accumulate on sealing surfaces.•Do not operate the oven if it is damaged.It is particularly important that the oven doorclose properly and that there is no damage tothe:- door (bent),- hinges and latches (broken or loosened),  - door seals and sealing surfaces.•The oven should not be adjusted orrepaired by anyone except properly qualifiedservice personnel.PRECAUTIONS TO AVOID POSSIBLE EXPOSURETO EXCESSIVE MICROWAVE ENERGYGROUNDING INSTRUCTIONSThis appliance must be grounded. In the eventof an electrical short circuit, grounding reducesthe risk of electric shock by providing an escapewire for the electric current. This appliance isequipped with a cord having a grounding wireand a grounding plug. The plug must beplugged into an outlet that is properly installedand grounded.WARNING Improper grounding can result in a risk of elec-tric shock. Consult a qualified electrician if thegrounding instructions are not completely under-stood, or if doubt exists as to whether the appli-ance is properly grounded, and either:  1. If it is necessary to use an extension cord,use only a 3-wire extension cord that has a 3-blade grounding plug, and a 3-slot recepta-cle that will accept the plug on the appliance. The marked rating of the extension cord shallbe equal to or greater than the electrical rating of the appliance, or. . . .2. Do not use an extension cord. If the powersupply cord is too short, have a qualifiedelectrician or serviceman install an outlet nearthe appliance.NOTES:1.  A short power-supply cord is provided toreduce the risks resulting from becomingentangled in or tripping over a longer cord.2. Longer cord sets or extension cords are available and may be used if care isexer-cised in their use.3. If a long cord or extension cord is used, (1)the marked electrical rating of the cord set orextension cord should be at least as great asthe electrical rating of the appliance, (2) theextension cord must be a grounding-type 3-wire cord, and (3) the longer cord should bearranged so that it  will not drape over thecountertop or tabletop where it can be pulledon by children or tripped over accidentally.Ensure proper groundexists before use3
SAVE THESE INSTRUCTIONSSAFETYIMPORT ANT SAFETY  INSTRUCTIONSThe safety instructions below will tell you how to use your oven to avoid harm to yourself or damage to youroven.WARNING- To reduce the risk of burns, electric shock, fire, injury to persons, or exposure toexcessive microwave energy:1. Read all instructions before using the appliance.2. Read and follow the specific PRECAUTIONS TO AVOID POSSIBLE EXPOSURE TO EXCESSIVEMICROWAVE ENERGYfound on page 3 of this manual.3.  This appliance must be grounded. Connect only to properly grounded outlet. SeeGROUNDING INSTRUCTIONS found on page 3 of this manual .4. Install or locate this appliance only in accordance with the provided installation instructions.5.   Some products, such as whole eggs and sealed containers – for example, closed glass jars are able toexplode and should not be heated in this oven.6.   Use this appliance only for its intended use as described in the manual. Do not use corrosive chemicals or vapors in this appliance. This type of oven is specifically designed to heat, cook, or dry food. It is notdesigned for industrial or laboratory use.7. As with any appliance, close supervision is necessary when used by children.8. Do not operate this appliance if it has a damaged cord or plug, if it is not working properly, or if it has beendamaged or dropped.9.   This appliance should be serviced only by qualified service personnel. Contact the nearest authorized servicefacility for examination, repair, or adjustment.10. Do not cover or block any openings on the appliance.11 . Do not store this appliance outdoors. Do not use this product near water – for example, near a kitchen sink,in a wet basement, near a swimming pool, or similar location.12. Do not immerse cord or plug in water.13. Keep cord away from heated surfaces.14. Do not let cord hang over the edge of a table or counter.15. When cleaning surfaces of door and oven that come together on closing the door, use only mild, nonabrasivesoaps or detergents applied with a sponge or soft cloth.16. To reduce the risk of fire in the oven cavity:a. Do not overcook food. Carefully attend appliance when paper, plastic, or other combustible materials areplaced inside the oven to facilitate cooking.b. Remove wire twist-ties from paper or plastic bags before placing bag in oven.c. If materials inside the oven ignite, KEEP OVEN DOOR CLOSED, turn oven off, and disconnect the powercord or shut off power at the fuse or circuit breaker panel.d. Do not use the cavity for storage purposes. Do not leave paper products, cooking utensils, or food in the cavity when not in use.17. Liquids such as water, coffee, or tea are able to be overheated beyond the boiling point without appearing tobe boiling. Visible bubbling or boiling when the container is removed from the microwave oven is not alwayspresent. THIS COULD RESULT IN VERY HOT LIQUIDS SUDDENLY BOILING OVER WHEN THE CON-TAINER IS DISTURBED OR A SPOON OR OTHER UTENSIL IS INSERTED INTO THE LIQUID. To reducethe risk of injury to persons; 1) Do not overheat the liquid. 2) Stir the liquid both before and halfway throughheating it.  3) Do not use straight-sided containers with narrow necks. 4) After heating, allow the container tostand in the microwave oven for a short time before removing the container. 5) Use extreme care wheninserting a spoon or other utensil into the container.18. Avoid heating small-necked containers such as syrup bottles.19. Avoid using corrosive and vapors, such as sulfide and chloride.20. Liquids heated in certain shaped containers (especially cylindrical-shaped containers) may become overheat-ed. The liquid may splash out with a loud noise during or after heating or when adding ingredients (instantcoffee, etc.), resulting in harm to the oven and possible injury. In all containers, for best results, stir the liquidseveral times before heating. Always stir liquid several times between reheatings.4
UNDERSTANDING YOUR MICROWAVE OVENSPECIFICATIONS*IEC 60705 RATING STANDARD Specifications subject to change without prior notice.                              LCRT1513ST  MODELPower SupplyRated Power ConsumptionMicrowave OutputFrequencyRated CurrentOverall Dimensions (W xHxD)Oven Cavity Dimensions (W xHxD)Capacity of Oven Cavity                          120 V AC, 60 Hz                       150 W                       *1 00 W                         2450 MHz                      13.5 A                              217/8 '' x 121/2 '' x 177/32''                           51   21/32''  x 107/16'' x 1527/32'' 1.5 Cu.ft.          INSTALLATIONA. CircuitsFor safety purposes this oven must be plugged into a15 or 20 Amp circuit. No other electrical appliances orlighting circuits should be on this line. If in doubt, con-sult a licensed electrician.B. Voltage Warning The voltage used at the wall receptacle must be thesame as specified on the oven name plate located onthe back or on the side of the control panel of the oven.Use of a higher voltage is dangerous and may result ina fire or other type of accident causing oven damage.Low voltage will cause slow cooking. In case yourmicrowave oven does not perform normally in spite ofproper voltage, remove and reinsert the plug.C. Placement of the OvenYour microwave oven can be placed easily in yourkitchen, family room, or anywhere else in your home.Place the oven on a flat surface such as a kitchencountertop or a specially designed microwave ovencart. Do not place oven above a gas or electric range.Free air flow around the oven is important. Allow atleast 4 inches of space at the top, sides, and back ofthe oven for proper ventilation. D. Do not block the air ventsAll air vents should be kept clear during cooking. If airvents are covered during oven operation the oven mayoverheat. In this case, a sensitive thermal safety deviceautomatically turns the oven off. The oven will be inoperable until it has cooled sufficiently.E. Radio interference1. Microwave oven operation may interfere with TV orradio reception.2. When there is interference, it may be reduced oreliminated by taking the following measures:a. Clean the door and the sealing surfaces of theoven.b. Reorient the receiving antenna of radio or television.c. Relocate the microwave oven in relation to the TVor radio.d. Move the microwave oven away from the receiver.e. Plug the microwave oven into a different outlet so that microwave oven and receiver are on different branch circuits..501
UNDERSTANDING YOUR  MICROWAVE OVENPARTS AND ACCESSORIESYour oven comes with the following accessories:1  Use and Care Manual1  Glass Turntable1  Rotating Ring Oven Front Plate WindowDoor SealControl PanelDoor Open ButtonSafety Door Lock SystemDisplay Window6A. Glass TurntableB.  Turntable ShaftC. Rotating RingD. Motor ShaftABCDWARNING:Do not operate the oven when empty or without the glass tray. It is best to leave a glass water in the oven when not in use.  The water will safely absorb all microwave energy, if the oven isaccidentally started. w
UNDERSTANDING YOUR MICROWAVE OVEN7CONTROL PANEL1.  DISPLAY. The display includes a clock and indicators that tell you time of day, cooking timesettings, and cooking functions selected.2.   CLOCK. Touch this pad to enter the time of day.1 1. TIMER. Touch  this pad to use your microwave oven as a kitchen timer.1 2 . NUMBER  PADS Touch number pads to entercooking time, power level, quantities, or weights.13.  COOK TIME. Touch this pad to set a cooking time.1 4. COOK POWER. Touch this pad to set a cooking power1 5. STOP/CLEAR. Touch this pad to stop the oven orclear entries 1 6. START/EZ-ON: START allows oven  to begin functioning.Touch EZ-ON to cook at 100% cook power for 30seconds up to 3 minutes 30 seconds; after 3 minutes     30 seconds,every touch will add 1 minute up to 99 min59 seconds.             . 9 .  1 0. EZ-ON.Touch  this pad, it will add 30 seconds up to 3 minutes 30 seconds; after 3 minutes 30 seconds,every touch will add 1 minute up to 99 min 59 seconds.     8. MELT. Touch this pads to melt  butter/margarine,chocolate,cheese,or mashmallows.6. SOFTEN. Touch this pad to soften  butter,ice cream,cream cheese, or frozen juice.SENSOR  TOUCH .This pad allows you to cook most ofyour favorite foods without having to select cookingtimes and power levels.3. AUTO COOK. Touch this pad to select the foods that you like. it has 6 foods categories.              4. AUTO DEFROST. Meat,poultry and fish. Touch this pad to select food type and defrost food by weight .5. QUICK DEFROST.Touch this pad to thaw only 1 lbof food very quickly.7. 12345678910111213 1415 16MORE/LESS COOKING. By using the More or Less keys,timed cook program can be adjusted to cook food for a longer or shorter time.
UNDERSTANDING YOUR MICROWAVE OVENUSEOvenproof Glass•Glass treated for use in high-intensity heatincludes utility dishes, bread dishes, pie plates, cakeplates, liquid measuring cups, casseroles, and bowlswithout metallic trim.China•Bowls, cups, serving plates, and platters withoutmetallic trim can be used in your oven.Plastic•When using plastic wrap as a cover, make sure thatthe dish is deep enough so the plastic wrap does nottouch the food. As the food heats, it may melt theplastic wrap wherever the wrap touches the food. •Place plastic wrap loosely over the top of the dishand secure it by pressing the wrap to the sides ofthe dish. •Vent by turning back one corner of the plasticwrap.This will allow excess steam to escape.•Use plastic dishes, cups, semi-rigid freezer containers, and plastic bags only for short timecooking. Use these with care because the plastic may soften from the heat of the food.Paper•Microwave-safe paper towels, waxed paper, papernapkins, and paper plates with no metallic trim ordesign can be used in your oven.•Refer to the manufacturer’s label for use of anypaper product in the microwave oven.DO NOT USEMetal Utensil •Metal shields food from microwave energy and produces uneven cooking. Avoid metal skewers,thermometers, or foil trays. •Metal utensils can cause arcing, which is a discharge of electric current. Arcing can damageyour microwave oven.Metal Decoration•Do not use metal-trimmed or metal-banded dinnerware, casserole dishes, etc.Centura™ Tableware•The Corning Company recommends that you do not use Centura tableware and some Corelle™closed-handle cups for microwave cooking.Aluminum Foil•Avoid large sheets of aluminum foil because they hinder cooking and may cause arcing. •Use small pieces of foil to shield poultry legs and wings. •Keep all aluminum foil at least 1 inch from the wallsand door of the oven.Wood•Wooden bowls, boards, and baskets will dry out andmay split or crack when you use them in themicrowave oven.Tightly Closed Containers•Tightly closed cookware can explode. Be sure to leave an opening for steam to escape from covered cookware. Brown Paper•Avoid using brown paper bags. They absorb heat and could burn.Metal Twist Ties•Always remove metal twist ties as they can becomehot and cause a fire.COOKWARE GUIDEMost heat-resistant, non-metallic cookware is safe for use in your microwave oven. However, to test cookwarebefore using, follow these steps:1. Place the empty cookware in the microwave oven.2. Measure 1 cup of water in a glass measuring cup and place it in the oven beside the cookware.3. Microwave on 100% power for 1 minute. If the dish is warm, it should not be used for microwave cooking.8
UNDERSTANDING YOUR MICROWAVE OVENTIPS FOR MICROWAVE COOKINGBROWNINGMeat and poultry with high fat content that are cookedfor 10 or 15 minutes or longer will brown lightly. Foodscooked a shorter time can be brushed with a browningagent, such as Worcestershire sauce, soy sauce, orbarbecue sauce.COVERINGA cover traps heat and steam and causes the food tocook more quickly. Use a lid or microwave-safe plasticwrap with one corner folded back to vent the excesssteam. Lids on glass casseroles can become hot during cooking. Handle carefully. Waxed paper will prevent the food from splattering in the oven and helpretain heat. When warming bread items, use waxedpaper, napkins, or paper towels. To absorb extra moisture, wrap sandwiches and fatty foods in papertowels.SPACINGArrange individual foods, such as baked potatoes, cupcakes, and hors d’oeuvres in a circle and at least 1 inch apart. This will help the food cook more evenly.STIRRINGStirring blends flavors and redistributes the heat infoods. Always stir from the outside toward the center of the dish. Food at the outside of the dish heats first.TURNINGLarge foods, such as roasts and whole poultry, shouldbe turned so that the top and bottom cook evenly. Alsoturn over chicken pieces and chops.ARRANGEMENTDo not stack food. Arrange in a single layer in the dishfor more even cooking. Because dense foods cookmore slowly, place thicker portions of meat, poultry, fish,and vegetables toward the outside of the dish.TESTING FOR DONENESS Because foods cook quickly in a microwave oven, youneed to test frequently for doneness.STANDING TIME SHIELDINGTo prevent some portions of rectangular or square dish-es from overcooking, you may need to shield them with small strips of aluminum foil to block themicrowaves. You can also cover poultry legs and wing tips with foil to keep them from overcooking.Always keep foil at least 1 inch from oven wallsto prevent arcing.PIERCINGPierce the shell, skin, or membrane of foods beforecooking to prevent them from bursting. Foods thatrequire piercing include yolks and whites of eggs, hotdogs, clams, oysters, and whole vegetables, such aspotatoes and squash.CLEANINGWipe the oven inside and outside with a soft cloth anda mild detergent solution. Then rinse and wipe dry.This should be done weekly or more often, if needed.Never use cleaning powders or rough pads.Excessive oil splatters on the inside top will be difficultto remove if left for many days. Wipe splatters with awet paper towel, especially after cooking chicken orbacon.REMOVABLE PARTSThe turntable and turntable roller rest are removable.They should be hand-washed in warm (not hot) waterwith a mild detergent and a soft cloth. Once they areclean, rinse well and dry with a soft cloth. Never usecleaning powders, steel wool, or rough pads.•The glass turntable may be cleaned at the sink. Be careful not to chip or scratch the edges as this may cause the turntable to break during use.• The turntable roller rest should be cleaned regularly.SPECIALCAREFor best performance and safety, the inner door paneland the oven front frame should be free of food orgrease buildup. Wipe often with a mild detergent; thenrinse and wipe dry. Never use cleaning powders orrough pads.After cleaning the control panel, touch STOP/CLEARto clear any entries that might have been enteredaccidentally while cleaning the panel.Depending on density, food often needs to stand from 2 to 15 minutes either in or outside of oven to finish  cooking  after cooking power shuts off. Outside of oven,you usually need to cover food during standing time to Remove most foods when they are slightly and they will finish cooking during standinginternal temperature of food will rise about 10°F standing time.retain heat. undercooked time.The during9
1.2.1.TIMEREZ-ONYour microwave oven can be used as a kitchen A time-saving pad, this simplified control letstimer. You can set up to 99 minutes, 99 seconds. you quickly set and start microwave cooking.Example:  To set 3 minutes.Example : To set EZ-ON cooking 2 minutes.1. Touch STOP/CLEAR. Touch KITCHEN TIMER.2.3. Enter the time by using thenumber key pad. NOTE: Touch START .When the time is over, youwill hear seven beeps andEnd will display.If you touch EZ-ON, it will add 30 seconds up to 3 minutes 30 seconds; after 3 minutes 30 seconds,every touch will add 1 minute up to 99 min 99seconds.USING YOUR MICROWAVE OVENExample: To set the clock for 10:30(AM).CLOCK1.2.3.NOTE:  This is a 12 hour clock. You can switchbetween AM and PM by touching CLOCK.You can use this safety feature to lock the controlpanel so that children cannot use the oven whenyou do not want them to and when you are cleaning the oven.To set CHILD LOCK:CHILD LOCK4.To cancel CHILD LOCK:Touch: Touch STOP/CLEAR. Touch CLOCK. Enter the time by using thenumber key pad.  Touch CLOCK. (or START) Touch STOP/CLEAR. Touch and hold more than4 seconds. L will appearin the display window withtwo beeps. 4.Touch EZ - ON 4 times.The oven begins cooking and display shows time counting down.Touch and hold more than4 seconds. L will disappearin the display window withtwo beeps.STARTSTART10
Quick     cooking provides exciting new features to make microwave oven easier. Your newmicrowave oven will guide you, step by step,  whether it be simply to reheat food or cook food and sensor menu with all the popular food choiceshelps you to cook perfectly because it has been pre-programmed and can tell how long to cook or reheat food items.Categories :1.  Sensor Touch Potato 2. Sensor Touch Rice                     3. Sensor Touch Popcorn 4. Sensor Touch Fresh Vegetable5. Sensor Touch Frozen Vegetable6. Sensor Touch Frozen Entree1. The Sensor Touch system works by detecting  a build-up of vapor.2. Make sure the door remains closed.3. Opening the door or touching the STOP/CLEAR     pad before the vapor is detected will abort the process.The oven will stop.4. Before using Sensor Touch , make sure the exterior of the reheating container and the interior of the oven are dry,to assure the best results.SENSOR COOK  allows you to cook most of your            favorite foods without having to select cooking                        times and power levels.  This oven automatically determines    required cooking times for each food item.                                                 Example: To cook potatoThe oven will start automatically.1.2.SENSOR TOUCH OPERATION INSTRUCTIONPOTATO (EXAMPLE)QUICK  TABLETOUCHSENSORSensor TouchPotatoRicePopcornFreshVegetableFrozenVegetablePierce each potato witha fork and place on the oven tray around the edge,at least one inch apart.Place rice and twice as much liquid (water or chicken or vegetable stock) in a 2-quart   microwavable dish. Cover with plastic wrap. When cooking is complete,allow 10 minutes standing time.Stir for fluffier rice.Place only bag of prepackaged microwavepopcorn on the centerof turntable.Prepare as desired, wash, and leave residual water on the vegetables. Place inan appropriately-sized microwave container,coverwith plastic wrap and vent.Remove from package, rinse off frost under  running water.Place in an appropriately-sized microwave container, cover with plastic wrap and vent.1~4 medium approx. 10 oz. each1/2~2 cupsUse medium or long grain rice. Cook instant rice according to directions onthe package.Regular sizeUse one fresh bag of popcorn1~4 cups1~4 cupsFrozenEntreeRemove from outer display package.Slit cover. If not inmicrowave-safe container, place on plate, cover with plastic wrap, and vent.10.5~21 oz. 3.0-3.5 oz.NOTE: If you open the door or press STOP/CLEAR during sensing,the process will be canceled.CATEGORY DIRECTION AMOUNTUSING YOUR MICROWAVE OVEN Touch STOP/CLEAR. Touch  .11
SENSOR TOUCH POPCORNThis feature makes preparation of microwave Place one bag only(50-100g) of prepackaged popcorn simple and quick... microwave popcorn on a microwave-safe / one bag at a time. oven-safe dish on the turntable,The packageThe automatic popcorn uses the HI power only.  should be at room temperature. .The popping time counts down in the display.When the popping time is over, two short andone long tones sound and End shows. Oven shuts off automatically.The oven will start automatically.USING YOUR MICROWAVE OVENNOTE :If popcorn bag size is not  known, follow manufacturers' instructions  and do not use this feature. Do not use POPCORN key pad in  combination with any other feature key pads.Do not attempt to reheat or cook any unpopped kernels.Do not reuse bag. Overcooking can result in an oven fire.Prepare one bag only at a time.When popping prepackaged popcorn;Do not use popcorn popping devices Place carefully so the bag does not in microwave oven with this feature.touch the oven walls. Fold each end of  Do not leave microwave unattended the bag in half toward the center top of the bag.while cooking popcorn.CAUTION :  Never use a brown paperbag for popping corn. Touch STOP/CLEAR. Touch  .1.2.12
Example: To cook 4 slices of bacon Touch STOP/CLEAR. Touch AUTO COOK once.‘Ac-1’ appears in the display.Touch number 4.‘4’ appears in the display.AUTO COOKAUTO COOK made easy! You oven’s menuhas been preprogrammed to automaticallycook food. Tell the oven what you want andhow many items there are. Then let your microwave oven cook your selections.USING YOUR MICROWAVE OVEN  AUTO COOK CHART13 Touch START .1.2.3.4.
1.2.3.4.Example: To defrost 1.2 lbs of ground beef.Touch AUTO DEFROSTonce.AUTO DEFROSTThe AUTO DEFROST feature is an accuratedefrosting method for frozen ground meatpoultry fish up to 6.0 lb.The oven automatically determines requireddefrosting times for each food item according to the weight you enter.Three different defrosting levels are provided.    1. MEAT    2.POULTRY    3.FISHMEAT TOUCH 1POULTRY TOUCH 2FISH TOUCH 31 and 2 Touch START .Defrosting starts. The display changes todefrost time count down.QUICK DEFROSTThe QUICK DEFROST feature providesyou with the quick defrosting method for1.0 lb meat.1.2.3.Example: Quick DefrostQUICK DEFROST.Time counting down automatically.NOTE:When you touch the START pad, the display changes to defrosttime count down. The oven will beep during the DEFROSTcycle. At each beep, open the door and turn over, separate, orrearrange the food. Remove any portions that have thawed.Return frozen portions to the oven and touch START to resumethe defrost cycle.■ For best results, remove fish, shellfish, meat, and poultry fromits original closed paper or plastic package (wrapper).Otherwise, the wrap will hold steam and juice close to thefoods, which can cause the outer surface of the foods tocook.■ For best results, shape your ground meat into the form of adoughnut before freezing. When defrosting, scrape offthawed meat when the beep sounds and continue defrosting. ■ Place foods in a shallow container or on a microwaveroasting rack to catch drippings.■ Food should still be somewhat icy in the center whenremoved from the oven.14USING YOUR MICROWAVE OVEN
For best results, some recipes call for different cookpowers during different stages of a cook cycle. Youcan program your oven to switch from one powerlevel to another for up to 2 stages.Example: To set a 2-stage cook cycle.MULTI-STAGE COOKING1.2.5.3.4.6. 7.9.8.When the first stage is over, you will hear twoshort tones as the oven begins the secondcook stage.10.DEFROSTING TIPS• When using Auto Defrost, the weight to be entered is the net weight in pounds and tenths of pounds (the weight of the food minus the container).• Before starting, make sure to remove any and all metal twist-ties that often come with frozen food bags, and replace them with strings or elastic bands.• Open containers, such as cartons, before placing in the oven.• Always slit or pierce plastic pouches or packaging.• If food is foil wrapped, remove foil and place it in a suitable container.• Slit the skin of skinned food, such as sausage.• Bend plastic pouches of food to ensure even defrosting.• Always underestimate defrosting time. If defrosted food is still icy in the center, return it to the microwave oven for more defrosting.• The length of defrosting time varies according to how solidly the food is frozen.• The shape of the package affects how quicklyfood will defrost. Shallow packages will defrost more quickly than a deep block.• As food begins to defrost, separate the pieces. Separated pieces defrost more easily.• Use small pieces of aluminum foil to shield partsof food such as chicken wings,leg tips,fish tails, or areas that start to get warm. Make sure the foil does not touch the sides, top, or bottom of the oven. The foil can damage the oven lining.• For better results, let food stand after defrosting. (For more information on standing time, see the “Microwave Cooking Tips” section).• Turn over food during defrosting or standing time. Break apart and remove food as required.Touch START.Touch POWER LEVEL.Touch TIME COOK.Touch 8 to select powerlevel 80%.Touch 5 to select powerlevel 50%.Enter 3 minutes bytouching [3],[0]and[0].Enter 7 minutes bytouching [7],[0]and[0].Touch POWER LEVEL.Touch TIME COOK.15
SOFTEN    3.  MELTThe oven uses low power to melt foods (butter,margarine,chocolate, cheese and marshmallows). See the following table.Example: To Melt 8 oz. Chocolate.1.2.4.4.The oven uses low power to soften foods (butter,ice cream, cream cheese, and frozen juice)See the following table.Example:  To Soften  Quart Ice Cream.1.2.3.SOFTEN TABLEAmount1, 2 or 3sticksPint,Quart,Halfgallon3 or 8oz.6, 12 or16 oz.DirectionUnwrap and place inmicrowavable container.No need to cover butter.Butter will be at roomtemperature and readyfor use in recipe.Place container in oven.Ice cream will be softenough to makescooping easier.Unwrap and place inmicrowavable container.Cream cheese will be atroom temperature andready for use in recipe.Remove top.Place in oven.Frozen juice will be softenough to easily mix withwater.Cate-goryButterIceCreamCreamCheeseFrozenJuice1234CodeMELT TABLEAmount1, 2 or3 sticks4 or 8oz.8 or 16oz.5 or 10oz.DirectionUnwrap and place inmicrowavable container .No need to cover butter.Stir at the end of cookingto complete melting.Choose the 4 or 8 oz.(actualweight) selection to meltsquares of baking chocolate.Unwrap squares and place them in a microwavable container.Stir at the end ofcycle to complete melting. IfUse processed cheesefood only. Cut into cubes.Place in a single layer inmicrowavable container.Stir at the end of cookingto complete melting.Large or miniaturemarshmallows may beused. Place inmicrowavable container.Stir at the end of cycle tocomplete melting.Cate-goryButter/Marga-rineChocolateCheeseMarsh-mallows1234Code-using chocolate morselsalways use the 4 oz. setting.Stir at the end of the cycle tocomplete melting.Add time asnecessary  if more than 4 oz.dry measure is being melted.USING YOUR MICROWAVE OVENTouch SOFTEN twice.Touch STOP/CLEAR.Touch 2. Touch START.Touch MELT twice.Touch STOP/CLEAR.Touch 2. Touch START.16
USING YOUR MICROWAVE OVEN COOK TIME1.2.5.3.4.This feature lets you program a specific cook timeand power. For best results, there are 10 powerlevel settings in addition to HIGH power (100%).Refer to the “Microwave Power Level Table”  for more information.NOTE: If you do not select a power level, the ovenwill automatically cook at HIGH (100%) power.Example: To cook for 5 minutes, 30 secondsat 80% power.MICROWAVE POWER LEVELSYour microwave oven has 10 cook power levels to letyou cook or heat a wide variety of foods. Refer to thetable below for suggestions:Microwave Power Level Table• Boiling water.• Making candy.• Cooking poultry pieces, fish, & vegetables.• Cooking tender cuts of meat.• Whole poultry.• Reheating rice, pasta, & vegetables.• Reheating prepared foods quickly.• Reheating sandwiches.• Cooking egg, milk, & cheese dishes.• Cooking cakes, breads.• Melting chocolate.• Cooking veal.• Cooking whole fish.• Cooking puddings & custard.• Cooking ham, whole poultry, & lamb.• Cooking rib roast, sirloin tip.• Thawing meat, poultry, & seafood.• Cooking less tender cuts of meat.• Cooking pork chops, roast.• Taking chill out of fruit.• Softening butter.• Keeping casseroles & main dishes warm.• Softening butter & cream cheese.• Standing time.10(High)9876543210UsePowerLevelTouch POWER LEVEL.Touch TIME COOK.Touch 8.Touch [5],[3]and[0].Touch START.17
Meat1. No special techniques are required. Meat should beprepared as with conventional cooking. Season ifdesired. Always thoroughly defrost meat before cook-ing.2. Place the meat on a microwave roasting rack ormicrowave-proof plate and place on the turntable.3. Cook according to the Meat Cooking Table (below).Use the longer time for large cuts of meats and theshorter time for small cuts of meats. For thickerchops, use the longer time.4. Turn the meat once halfway through the cookingtime.5. .gnikooc retfa nevo ni setunim 01-5 rof dnats teL The standing time is very important as itcompletes the cooking process.6. Make sure meat, especially pork, is thoroughlycooked before eating.Poultry1. No special techniques are required. Poultry shouldbe prepared as with conventional cooking. Season ifdesired.2. Poultry should be thoroughly defrosted. Removegiblets and any metal clamps.3. Prick the skin and brush lightly with vegetable oilunless the poultry is self-basting.4. All poultry should be placed on a microwave roastingrack or a microwave-proof plate and placed on theturntable.5. Cook according to the instructions in the PoultryCooking Table below. Turn over halfway through thecooking time. Because of its shape, poultry has atendency to cook unevenly, especially in very bonyparts.Turning during roasting helps to cook theseareas evenly.6. Let stand  for 5-10 minutes in oven after cookingbefore carving. The standing time is very important,as it completes the cooking process.7. Make sure poultry is thoroughly cooked before eating.Whole poultry is completely cooked when the juicesrun clear from the inside thigh when it is pierced witha sharp knife. Poultry pieces should be pierced witha sharp knife through the thickest part to ensure thatthe juices are clear and the flesh is firm.WARNING: Do not use aluminum foil  during cooking cycle.Poultry Cooking TableNOTES:• The times listed above are only a guide. Allow for difference in individual tastes and preferences. Thetimes may also vary due to the shape, cut, and composition of the food.• If whole poultry is stuffed, the weight of the stuffedbird should be used when calculating the cookingtime.NOTE: The times listed above are only a guide. Allowfor difference in individual tastes and preferences. Thetimes may also vary due to the shape, cut, and compo-sition of the food.PoultryCOOKING TIPSUSING YOUR MICROWAVE OVENCHICKENWholeBreast (boned)PortionsTURKEYWholeMicrowavePower8888Cooking TimePer Pound11 to 15 minutes10 to 14 minutes11 to 17 minutes11 to 15 minutesBEEFStanding/Rolled Rib– Medium– Well-doneGround Beef (tobrown for casserole)Hamburgers,Fresh or defrosted(4 oz. each)– 2 patties– 4 pattiesPORKLoin, LegBacon– 4 slices– 6 slicesMicrowavePower88HIGH(100%)HIGH(100%)HIGH(100%)8HIGH(100%)HIGH(100%)Cooking TimePer Pound91/2to 111/2minutes111/2to 14 minutes 61/2to 91/2minutes21/2to 41/2minutes31/2to 51/2minutes121/2to 161/2minutes21/2to 31/2minutes31/2to 41/2minutesMeat Cooking TableMeat18
USING YOUR MICROWAVE OVENCOOKING TIPS  (continued)Fish1. Arrange fish in a large shallow non-metallic dish or casserole.2. Cover with pierced microwave plastic wrap or casserole lid.3. Place the dish on the turntable.4. Cook according to the instructions in the Fresh Fish Cooking Table below. Flakes of butter can be added to thefish if desired.5. Let stand as directed in the Cooking Table before serving.6. After standing time, check to see that the fish is thoroughly cooked. The fish should be opaque and flake easily.Fresh Fish Cooking TableFishFish FilletsWhole Mackerel,Cleaned and PreparedWhole Trout, Cleaned and PreparedSalmon SteaksMicrowavePowerHIGHHIGHHIGHHIGHCooking TimePer Pound41/2to 8 minutes41/2to 8 minutes51/2to 9 minutes51/2to 8 minutesStandingTime2 to 3 minutes3 to 4 minutes3 to 4 minutes3 to 4 minutesButterAdd 15 to 30 ml (1 to 2 tbsp lemon juice)––Add 15 to 30 ml (1 to 2 tbsp lemon juice)19ENERGY SAVINGECO ON feature saves energy by turning offthe display.This feature only operates when theSTOP/ CLEAR (ECO ON) button is touched and then cancels when the door is opened or any button is touched.To set the ECO ON1. Touch STOP/CLEAR (ECO ON)
QUESTIONS AND ANSWERSOperationQuestionWhy is the oven light not on during cooking?Why does steam come out of the airexhaust vent?Will the microwave oven be damaged if itoperates empty?Does microwave energy pass through theviewing screen in the door?Why does a tone sound when a pad onthe control panel is touched?Can my microwave oven be damaged iffood is cooked for too long?When the oven is plugged into the wall outlet for the first time, and it does not work properly. What is wrong?Why do I see light reflection around theouter case?What are the various sounds I hear whenthe microwave oven is operating?There may be several reasons why the oven light is not on.Have you:•Set a cooking time?  •Touched START?Steam is normally produced during cooking. The microwave ovenhas been designed to vent this steam.Yes. Never operate the oven empty or without the glass turntable.No. The metal screen bounces the energy back to the oven cavity.The holes (or ports) allow only light to pass through. They do not let microwave energy pass through.The tone tells you that the setting has been entered.Like any other cooking appliance, it is possible to overcook food to the point that the food creates smoke and even possibly fire, and damage to the inside of the oven. It is always best to be nearthe oven while you are cooking.The microcomputer controlling your oven may temporarily become scrambled and fail to function as programmed when youplug in for the first time or when power resumes after a power interruption. Unplug the oven from the 120 volt household outletand then plug it back in to reset the microcomputer.This light is from the oven light which is located between the oven cavity and the outer wall of the oven.The clicking sound is caused by a mechanical switch turning themicrowave oven’s magnetron ON and OFF.The heavy hum and clunk is from the change in power the magnetron draws as it is turned ON and OFF by a mechanicalswitch.The change in blower speed is from the change in line voltage caused by the magnetron being turned ON and OFF.AnswerTROUBLESHOOTING20
TROUBLESHOOTINGQUESTIONS AND ANSWERS  (continued)FoodQuestionWhat is wrong when baked foods have ahard, dry, brown spot?Why do eggs sometimes pop?Why are scrambled eggs sometimes a little dry after cooking?Is it possible to pop popcorn in a microwave oven?Why do baked apples sometimes burst during cooking?Why do baked potatoes sometimes burn during cooking?Why is a standing time recommendedafter microwave cooking time is over?Why is additional time required for cooking food stored in the refrigerator?A hard, dry, brown spot indicates overcooking. Shorten the cookingor reheating time.When baking, frying, or poaching eggs, the yolk may pop due tosteam build-up inside the yolk membrane. To prevent this, simply pierce the yolk with a wooden toothpick before cooking. CAUTION: Never microwave eggs in the shell.Eggs will dry out when they are overcooked, even if the samerecipe is used each time. The cooking time may need to be variedfor one of these reasons:•Eggs vary in size.•Eggs are at room temperature one time and at refrigerator temperature another time.•Eggs continue cooking during standing time.Yes, if using one of the two methods described below:(1) microwave-popping devices designed specifically for microwavecooking(2) prepackaged commercial microwave popcorn that is made for specific times and power output neededFollow exact directions given by each manufacturer for its popcorn popping product and do not leave the oven unattended while the corn is being popped. If corn fails to pop after the suggested time, discontinue cooking.Overcooking could result in an oven fire.CAUTION:•Never use a brown paper bag for popping corn or attempt topop leftover kernels.The peel has not been removed from the top half of each apple toallow for expansion of the interior of the apple during cooking. As inconventional cooking methods, the interior of the apple expandsduring the cooking process.If the cooking time is too long, fire could result. At the end of the recommended cooking time, potatoes should be slightly firm. CAUTION: Do not overcook.Standing time allows foods to continue cooking evenly for a few minutes after the actual microwave oven cooking cycle. Theamount of standing time depends upon the density of the foods.As in conventional cooking, the initial temperature of food affectstotal cooking time. You need more time to cook food taken out of arefrigerator than for food at room temperature.Answer21
BEFORE CALLING FOR SERVICEProblemOven does not startArcing or SparkingIncorrect time of dayUnevenly Cooked FoodsOvercooked FoodsUndercooked FoodsImproper DefrostingYou can often correct operating problems yourself. If your microwave oven fails to work properly, locate the operating problem in the list below and try the solutions listed for each problem.If the microwave oven still does not work properly, contact the nearest LG Authorized Service Center. LG Authorized Service Centers are fully equipped to handle your service requirements.• Is the power cord plugged in?• Is the door closed?• Is the cooking time set?• Are you using approved cookware?• Is the oven empty?• Have you tried to reset the time of day?• Are you using approved cookware?• Is the glass turntable in the oven?• Did you turn or stir the food while it was cooking?• Were the foods completely defrosted?• Was the time/cooking power level correct?• Was the time/cooking power level correct?• Are you using approved cookware?• Were the foods completely defrosted?• Was the time/cooking power level correct?• Are the ventilation ports clear?• Are you using approved cookware?• Was the time/cooking power level correct?• Did you turn or stir the food during the defrosting cycle?WARNING: This equipment generates and uses ISM frequencyenergy and if not installed and used properly, that is instrict accordance with the manufacturer’s instructions,may cause interference to radio and televisionreception. It has been type tested and found tocomply with limits for ISM Equipment pursuant to part18 of FCC Rules, which are designed to providereasonable protection against such interference in aresidential installation.However, there is no guarantee that interference willnot occur in a particular installation. If this equipmentdoes cause interference to radio or televisionreception, which can be determined by turning theequipment off and on, the user is encouraged to try tocorrect the interference by one or more of thefollowing:• Reorient the receiving antenna of the radio ortelevision.• Relocate the microwave oven with respect to thereceiver.• Move the microwave oven away from the receiver.• Plug the microwave oven into a different outlet sothat the microwave oven and the receiver are ondifferent branch circuits.The manufacturer is not responsible for any radio orTV interference caused by unauthorizedmodification to this microwave oven. It is theresponsibility of the user to correct such interference.FEDERAL COMMUNICATIONS COMMISSIONRADIO FREQUENCY INTERFERENCE Possible CausesSTATEMENTTROUBLESHOOTINGWARNING: This product contains chemicals known to the State of Californiato cause cancer. Wash hands after handing.w22
  LG  Electronics,  Inc.  will  repair  or  replace  your  product,  at  LG’s  option,  if  it  proves  to  be  defective  in material or workmanship under normal use, during the warranty period set forth below, effective from the date of original consumer purchase of the product. This warranty is good only to the original purchaser ofthe product and effective only when used in the United States, including U.S. Territories.    THIS  WARRANTY  IS  IN  LIEU  OF  ANY  OTHER  WARRANTY,  EXPRESS  OR  IMPLIED,  INCLUDING  WITHOUTLIMITATION, ANY WARRANTY OF MERCHANTABILITY OR FITNESS FOR A PARTICULAR PURPOSE. TO THE EXTENT  ANY IMPLIED WARRANTY  IS REQUIRED BY LAW, IT IS LIMITED  IN  DURATION TO THE EXPRESS  WARRANTY PERIOD ABOVE LG WILL NOT BE LIABLE FOR ANY INCIDENTAL, CONSEQUENTIAL, INDIRECT,  SPECIAL,  OR  PUNITIVE  DAMAGES  OF  ANY NATURE, INCLUDING  WITHOUT  LIMITATION,  LOST REVENUES  OR  PROFITS,  OR  ANY  OTHER  DAMAGE WHETHER  BASED  IN  CONTRACT,  TORT,  OR OTHERWISE. Some  states  do  not  allow  the  exclusion  or  limitation  of  incidental  or  consequential  damages  or   limitations  on  how  long  an  implied  warranty  lasts,  so  the above  exclusion  or  limitation  may  not  apply  to  you.  This warranty gives you specific legal rights and you may also  have other rights that vary from state to state.  THIS LIMITED WARRANTY DOES NOT APPLY TO: •  Service trips to  your  home  to  deliver,  pick  up,  and/or install the product, instruct, or replace  house  fuses  or  correct wiring, or correction of unauthorized repairs. • Damages  or  operating  problems  that result  from  misuse,  abuse, operation  outside  environmental specifications  or  contrary  to  the  requirements  of  precautions  in  the  Operating  Guide,  accident,  vermin,  fire, flood, improper installation, acts of God, unauthorized modification or alteration, incorrect electrical current or voltage, or commercial use, or use for other than intended purpose.  The cost of repair or replacement under these excluded circumstances shall be borne by the consumer.  CUSTOMER INTERACTIVE CENTER NUMBERS WARRANTY PERIOD:  LABOR: One Year  from the Date of Purchase*. PARTS (except as listed below): One  Year from the Date of Purchase*. MAGNETRON: Ten Years  from the Date of Purchase*.  Replacement Units and  Repair  Parts  are warranted for  the  remaining  portion  of  the  original  unit’s warranty period.  * Retain your Sales Receipt to prove the date of purchase.  A copy of your Sales Receipt must be submitted at the time warranty service is provided.  HOW SERVICE IS HANDLED:   Please  call  1-800-243-0000  and  choose  the appropriate option.  (Phones are answered 24 hours  a  day,  365  days  per  year.)  Please  have the product type (Microwave) and your ZIP code ready.        Or visit our website at:  http://us.lgservice.com  To  obtain  Customer  Assistance,  Product  Infor-mation,  or  Dealer  or  Authorized  Service  Center location : Call 1-800-243-0000   (24 hours a day, 365 days  per year) and select the appropriate option from the menu. Or visit our website at:  http://us.lgservice.com LG MICROWAVE OVEN LIMITED WARRANTY — USA Model LCRT1510SVTO CONTACT LG ELECTRONICS BY MAIL: LG Customer Interactive Center P. O. Box 240007 201 James Record Road Huntsville, Alabama 35824 ATTN: CIC
Printed in China

Navigation menu