LG Electronics USA S209FZ Microwave Oven User Manual EMISSION TEST REPORT
LG Electronics USA Microwave Oven EMISSION TEST REPORT
Users Manual

Order Number
: GETEC-C1-16-520
FCC Part 18
Test Report Number
: GETEC-E3-16-072
Page 1 / 1
EUT Type: Microwave Oven
FCC ID: BEJS209FZ
APPENDIX H
: USER’S MANUAL

OWNER’S MANUAL
MICROWAVE
OVEN
Read this owner’s manual thoroughly before operating the appliance
and keep it handy for reference at all times.
www.lg.com
MFL69850401_00
LMC2075**

Thank you for purchasing a LG microwave oven.
PRECAUTIONS TO AVOID POSSIBLE
EXPOSURE TO EXCESSIVE
MICROWAVE ENERGY
•Do not attempt to operate this oven
with the door open, since open-door
operation can result in harmful exposure
to microwave energy. It is important
not to defeat or tamper with the safety
interlocks.
•Do not place any object between the
oven front face and the door, or allow
soil or cleaner residue to accumulate on
sealing surfaces.
•Do not operate the oven if it is
damaged. It is particularly important
that the oven door close properly and
that there is no damage to the:
−door (bent),
−hinges and latches (broken or
loosened),
−door seals and sealing surfaces.
•The oven should not be adjusted or
repaired by anyone except properly
qualified service personnel.
Please record the model number and serial number
of this unit for future reference. We also suggest
you record the details of your contact with LG (LG
Electronics U.S.A., Inc.) concerning this unit.
Staple your receipt here for proof of purchase.
Model No:
Serial No:
Dealer:
Dealer Phone No:
Customer Relations
LG Electronics U.S.A., Inc.
Service Division Bldg. #3
201 James Record Rd.
Huntsville, AL 35824-0126

3
TABLE OF CONTENTS
TABLE OF CONTENTS
4 IMPORTANT SAFETY
INSTRUCTIONS
8 PRODUCT OVERVIEW
8 Location of Model Number
8 Electrical Requirements
8 Voltage Warning
8 Placement of the Oven
8 Do not block the air vents
8 Grounding Instructions
9 Oven Specifications
10 Microwave Oven Features
10 Accessories
11 Control Panel Overview
12 MICROWAVE COOKING TIPS
15 OPERATION
15 Using the Microwave Oven
15 Audible Signals
15 Clock
15 Interrupting Cooking
15 Child Lock
15 Timer
16 Quick Start
16 How to use manual cooking (timed cooking)
16 Microwave Power Levels
16 Microwave Power Level Table
17 Sensor Operation Instruction
17 Sensor Cooking Guide
17 Sensor Cook
17 Sensor Reheat
17 Popcorn
18 Sensor Cook Table
19 Sensor Reheat Table
19 Popcorn Table
20 Defrost
20 Weight Conversion Table
20 Operating Tips:
21 Defrosting Tips
22 SMART FUNCTIONS
22 FCC Notice (For transmitter module contained in
this product)
22 FCC RF Radiation Exposure Statement
23 SMART DIAGNOSIS™
23 Using the Smart Diagnosis™ Function
24 COOKING GUIDE
24 Cooking Tips
26 Heating/Reheating Guide
27 Fresh Vegetable Guide
28 MAINTENANCE
28 Caring for the Microwave Oven
29 Microwave Utensil Guide
30 Microwave-Safe Utensils
31 Food characteristics & microwave cooking
33 TROUBLESHOOTING
33 Frequently Asked Questions
34 Before Calling for Service
35 WARRANTY

4IMPORTANT SAFETY INSTRUCTIONS
IMPORTANT SAFETY INSTRUCTIONS
Read and follow all instructions when using the range to prevent the risk of fire, electric
shock, personal injury, or damage. This guide does not cover all possible conditions that
may occur. Always contact your service agent or manufacturer about problems that you do
not understand.
Download this owner's manual at: http://www.lg.com
This is the safety alert symbol. This symbol alerts you to potential hazards that
can result in property damage and/or serious bodily harm or death.
All safety messages will follow the safety alert symbol and either the word
WARNING or CAUTION. These words mean:
WARNING - Indicates a hazardous situation which, if not avoided, could result
in death or serious injury.
CAUTION - Indicates a hazardous situation which, if not avoided, could result
in minor or moderate injury.
The safety instructions below will tell you how to use your oven and avoid harm to yourself
or damage to your oven.
WARNING
•Read all the instructions before using your oven.
•As with any appliance, close supervision is necessary when used by children.
•Read and follow the specific PRECAUTIONS TO AVOID POSSIBLE EXPOSURE TO
EXCESSIVE MICROWAVE ENERGY found on page 2.
•Do not use corrosive chemicals or vapors, such as sulfide and chloride, in this
appliance. This type of oven is specifically designed to heat, cook, or dry food. It is not
designed for industrial or laboratory use.
•Do not store this appliance outdoors. Do not use this product near water - for example,
near a kitchen sink, in a wet basement, near a swimming pool, or similar location.
•Do not use the cavity for storage purposes. Do not leave paper products, cooking
utensils, or food in the cavity when not in use.
•Do not use this oven for commercial purposes. It is made for household use only.
•When cleaning surfaces of door and oven that come together on closing the
door, use only mild, nonabrasive soaps, or detergents applied with a sponge or
soft cloth.
•If your oven is dropped or damaged, have it thoroughly checked by a qualified
service technician before using it again.
•To reduce the risk of fire in the oven cavity:
- Do not overcook food. Carefully attend to the microwave oven when paper, plastic
or other combustible materials are placed inside the oven to facilitate cooking.
- Do not use the cavity for storage purposes.
Do not leave paper products, cooking utensils or food in the cavity when not in use.
- Remove wire twist-ties from paper or plastic bags before placing bags in oven.
•If materials inside the oven ignite:
- Keep oven door closed
- Turn the oven off
- Disconnect the power cord or shut off power at the fuse or circuit breaker
panel

5
IMPORTANT SAFETY INSTRUCTIONS
WARNING
•To avoid electric shock:
- This appliance must be grounded. Connect only to a properly grounded outlet. See
the electrical GROUNDING INSTRUCTIONS on page 8.
- Do not operate this appliance if it has a damaged cord or plug, if it is not working
properly or if it has been damaged or dropped.
- Do not immerse the electrical cord or plug in water.
- Keep cord away from heated surfaces.
- Do not let cord hang over edge of table or counter.
•Take care when the door is opened to avoid injury.
•To avoid improperly cooking some foods.
- Do not heat any types of baby bottles or baby food. Uneven heating may occur
and possibly cause personal injury.
- Do not heat small-necked containers, such as syrup bottles.
- Do not deep-fat fry in your microwave oven.
- Do not attempt home canning in your microwave oven.
- Some products such as whole eggs and sealed containers – for example,
closed glass jars – are able to explode and should not be heated in this oven.
•Do not cover or block any openings on the appliance.
•Use this appliance only for its intended use as described in the manual.
•Do not run the oven empty.
•Secure power cord in the cabinet above the oven.
•Preserve the oven floor:
- Do not heat the oven floor excessively.
- Do not allow the gray film on special microwave-cooking packages to touch the oven
floor. Put the package on a microwavable dish.
- Do not cook anything directly on the oven floor or turntable. Use a microwavable
dish.
- Keep a browning dish at least 3/16 inch above floor. Carefully read and follow the
instructions for the browning dish. If you use a browning dish incorrectly, you could
damage the oven floor.
•Install or locate this appliance only in accordance with the provided installation
instructions.
•This appliance should be serviced only by qualified service personnel. Contact the
nearest authorized service facility for examination, repair, or adjustment.
•Liquids, such as water, coffee, or tea can be overheated beyond the boiling point
without appearing to be boiling due to surface tension of the liquid. Visible bubbling or
boiling when the container is removed from the microwave oven is not always present.
THIS COULD RESULT IN VERY HOT LIQUIDS SUDDENLY BOILING OVER WHEN
THE CONTAINER IS DISTURBED OR A SPOON OR OTHER UTENSIL IS INSERTED
INTO THE LIQUID.
•To reduce the risk of injury to persons;
- Do not overheat the liquid.
- Stir the liquid both before and halfway through heating it.
- Do not use straight-sided containers with narrow necks.
- After heating, allow the container to stand in the microwave oven for a short time
before removing the container.
- Use extreme care when inserting a spoon or other utensil into the container.

6IMPORTANT SAFETY INSTRUCTIONS
•Do not use the oven for the purpose of dehumidification. (ex. Operating the microwave
oven with wet newspapers, clothes, toys, electric devices, plants, soil, pets or any other
living matter inside it.) The oven must only be used for heating or cooking food.
- It can be the cause of serious damage or safety risk such as fire, causing burns or
sudden death due to an electric shock.
•This appliance is not intended for use by persons (Including children) With reduced
physical, sensory or mental capabilities, or lack of experience and knowledge, unless
they have been given supervision or instruction concerning use of the appliance by a
person responsible for their safety. (Young) Children should be supervised to ensure
that they do not play with the appliance.
- Improper use may cause damage such as a fire, electric shock or burn.
•Accessible parts may become hot during use. Young children should be kept away.
- They may be burnt.
•Children must not be allowed to play with accessories or hang down from the door or
any part of the oven.
- Doing so can cause serious injury and damage.
•If the door or door seals are damaged, the oven must not be operated until it has been
repaired by a competent person.
•The appliance and its accessible parts become hot during use. Care should be taken
to avoid touching heating elements. Children shall be kept away unless continuously
supervised.
•During use the appliance becomes hot. Care should be taken to avoid touching heating
elements inside the oven.
•Do not use recycled paper products.
- They may contain impurities which may cause sparks and/or fires when used in
cooking.
•Do not rinse trays and racks by placing them in water just after cooking. This may
cause breakage or Damage.
- Improper use could result in damage to yore oven.
•The oven should be cleaned regularly and any food deposits should be removed.
- Failure to maintain the oven in a clean condition could lead to deterioration of the
surface that could adversely affect the life of the appliance and possibly result in a
hazardous situation.
•The door or the outer surface may get hot when the appliance is operating.
WARNING

7
IMPORTANT SAFETY INSTRUCTIONS
FEDERAL COMMUNICATIONS COMMISSION RADIO FREQUENCY
INTERFERENCE STATEMENT
This equipment generates and uses ISM frequency energy and if not installed and used
properly, that is in strict accordance with the manufacturer’s instructions, may cause
interference to radio and television reception. It has been type tested and found to comply
with limits for ISM Equipment pursuant to part 18 of FCC Rules, which are designed to
provide reasonable protection against such interference in a residential installation.
However, there is no guarantee that interference will not occur in a particular installation.
If this equipment does cause interference to radio or television reception, which can be
determined by turning the equipment off and on, the user is encouraged to try to correct the
interference by one or more of the following:
•Reorient the receiving antenna of the radio or television.
•Relocate the microwave oven with respect to the receiver.
•Move the microwave oven away from the receiver.
•Plug the microwave oven into a different outlet so that the microwave oven and the
receiver are on different branch circuits.
The manufacturer is not responsible for any radio or TV interference caused by
unauthorized modification to this microwave oven. It is the responsibility of the user to
correct such interference.
WARNING
This product contains chemicals known to the State of California to cause cancer and
birth defects or other reproductive harm. Wash hands after handling.
Read all instructions before using the appliance.
SAVE THESE INSTRUCTIONS

8PRODUCT OVERVIEW
PRODUCT OVERVIEW
Location of Model Number
To request service information or replacement parts,
the service center requires the complete model
number of your microwave oven. The model number
is on the oven front as shown in the illustration below.
Model number label
Electrical Requirements
The oven is designed to operate on a Standard 120
V/60 Hz household outlet. Be sure the circuit is at
least 15 A or 20 A and the microwave oven is the only
appliance on the circuit. It is not designed for 50 Hz
or any circuit other than a 120 V/60 Hz circuit.
Voltage Warning
The voltage used at the wall receptacle must be the
same as specified on the oven name plate located
on the back or on the side of the control panel of the
oven. Use of a higher voltage is dangerous and may
result in a fire or other type of accident causing oven
damage. Low voltage will cause slow cooking. In
case your microwave oven does not perform normally
in spite of proper voltage, remove and reinsert the
plug.
Placement of the Oven
Your microwave oven can be placed easily in your
kitchen, family room, or anywhere else in your home.
Place the oven on a flat surface such as a kitchen
countertop or a specially designed microwave oven
cart. Do not place oven above a gas or electric range.
Free air flow around the oven is important. Allow at
least 4 inches of space at the top, sides, and back of
the oven for proper ventilation.
Do not block the air vents
All air vents should be kept clear during cooking. If
air vents are covered during oven operation the oven
may overheat. In this case, a sensitive thermal safety
device automatically turns the oven off. The oven will
be inoperable until it has cooled sufficiently.
Grounding Instructions
This appliance must be grounded. In the event of an
electrical short circuit, grounding reduces the risk of electric
shock by providing an escape wire for the electric current.
This appliance is equipped with a cord having a grounding
wire with a grounding plug. The plug must be plugged into
an outlet that is properly installed and grounded.
WARNING
•Improper use of the grounding can result in
a risk of electric shock.
Consult a qualified electrician or service person if the
grounding instructions are not completely understood, or if
doubt exists as to whether the appliance is properly grounded.
If it is necessary to use an extension cord, use only a 3-wire
extension cord that has a 3-blade grounding plug, and a
3-slot receptacle that will accept the plug on the appliance.
The marked rating of the extension cord shall be equal to or
greater than the electrical rating of the appliance, or. . . .
Do not use an extension cord. If the power supply cord
is too short, have a qualified electrician or service person
install an outlet near the appliance. A short power supply
cord is provided to reduce the risks resulting from becoming
entangled in or tripping over a longer cord.
Longer cord sets or extension cords are available and may
be used if care is exercised in their use.
If a long cord or extension cord is used, (1) the marked
electrical rating of the cord set or extension cord should be
at least as great as the electrical rating of the appliance, (2)
the extension cord must be a grounding-type 3-wire cord,
and (3) the longer cord should be arranged so that it will
not drape over the counter top or tabletop where it can be
pulled on by children or tripped over accidentally.
See the separate Installation Instructions for directions on
placing the cord properly.
Ensure proper ground
exists before use
Keep the electrical power cord dry and do not pinch
or crush it in any way.

9
PRODUCT OVERVIEW
Oven Specifications
Model MS2096HST
Power Supply 120 V AC, 60 Hz
Rated Power Consumption 1200 W
Microwave Output Max. 1200 W*
Frequency 2450 MHz
Rated Current 10.0 A
Overall Dimensions (W x H x D) 23 7/8 x 13 9/16 x 19 13/16 Inch
Oven Cavity Dimensions (W x H x D) 16 11/16 x 11 1/4 x 18 1/16 Inch
Capacity of Oven Cavity 2.0 cu.ft
10 PRODUCT OVERVIEW
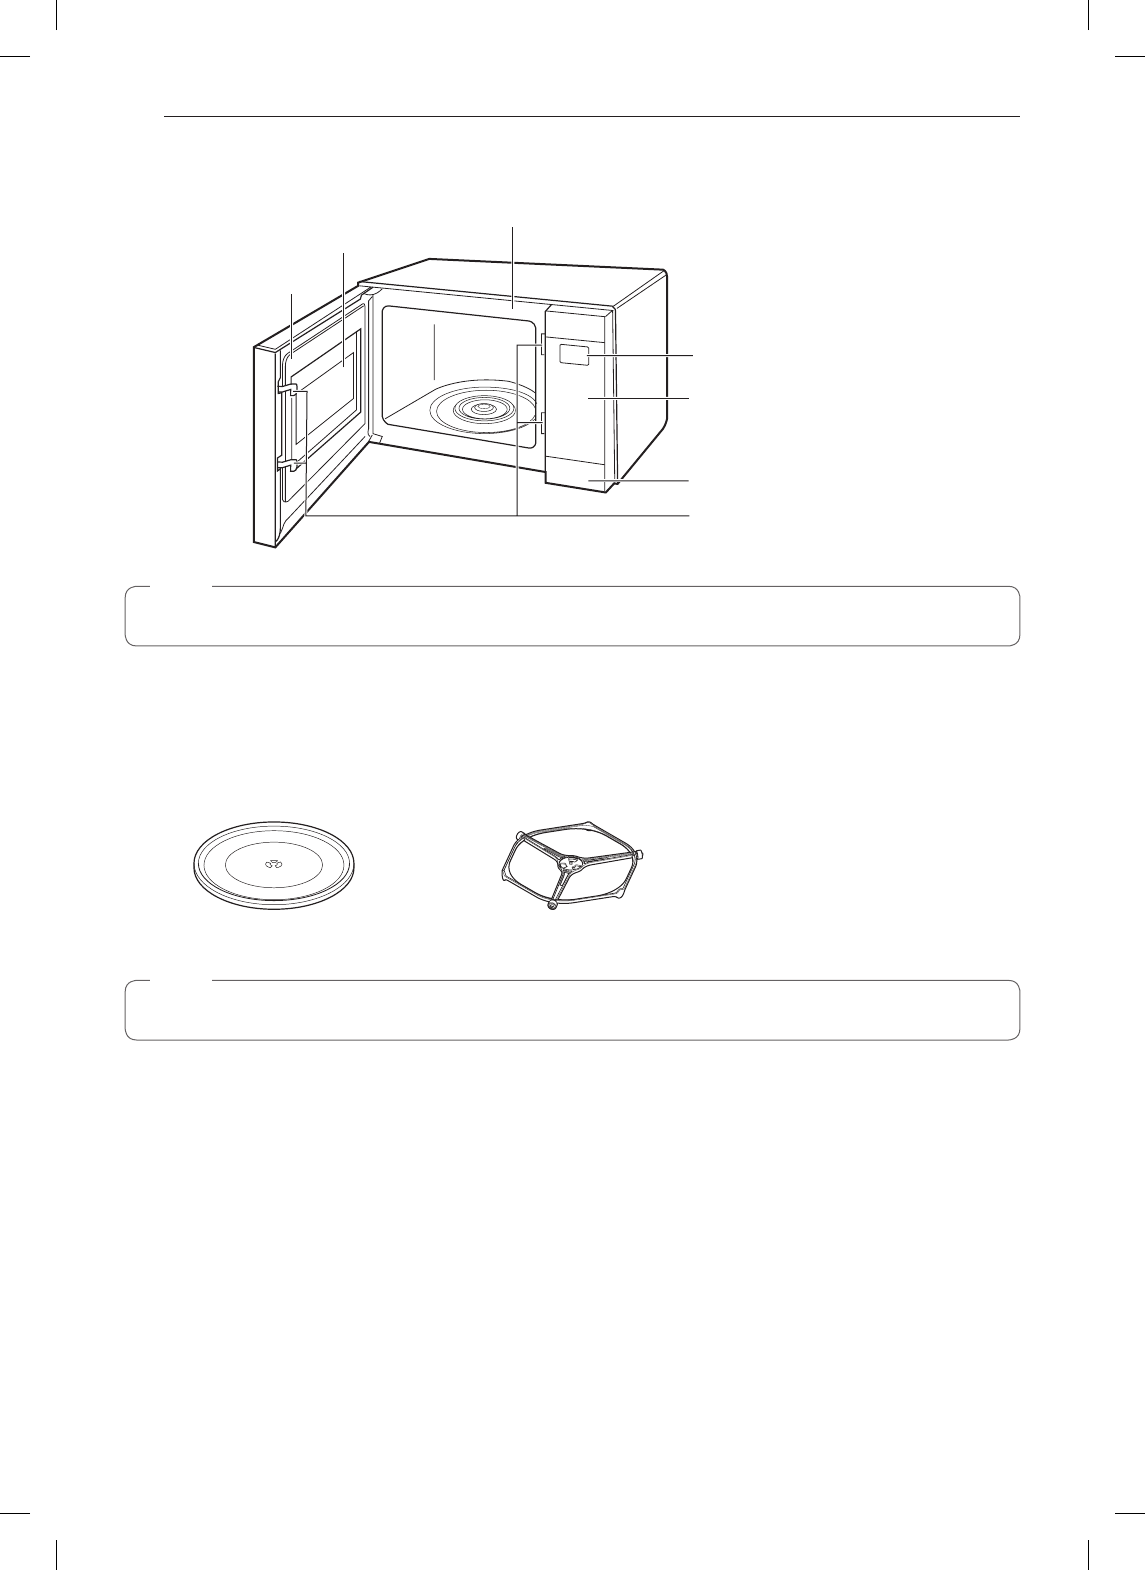
Microwave Oven Features
Door Seal
Window
Oven Front Plate
Display Window
Control Panel
Safety Door Lock System
Door Open Button
NOTE
To open the door, push the mark of button printed left.
Accessories
The turntable rotates in both direction to help food cook more evenly. Do not operate the microwave oven without
the glass tray in place.
Glass Tray Rotating ring
NOTE
This microwave oven is designed for household use only. It is not recommended for commercial use.
11
PRODUCT OVERVIEW
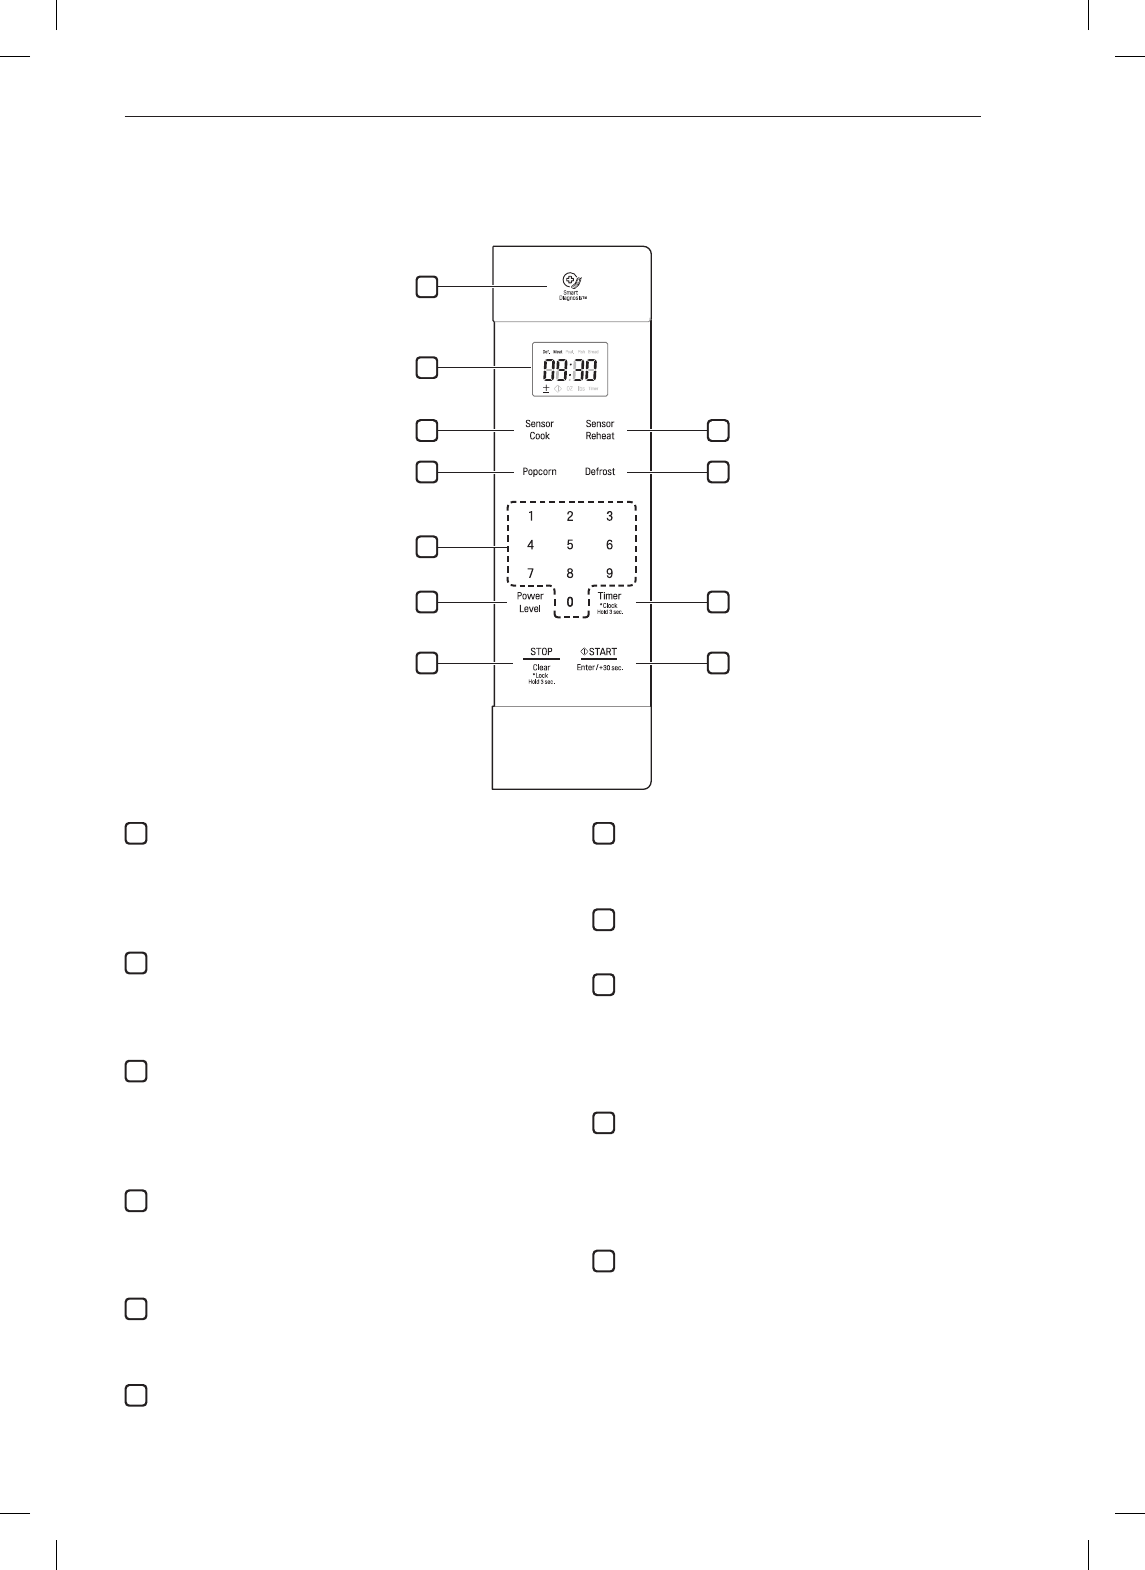
Control Panel Overview
Use the control panel to select the desired cooking function quickly and easily. Simply touch a command key to
select the desired function. For more information on these features, see the OPERATION section.
4
6
9
11
2
1
3
5
8
10
7
1
Smart Diagnosis
Hold the mouthpiece of a phone up to this icon
when directed to by service center personnel,
to help diagnosis problems with the oven when
calling for service.
2
Display
The display includes a clock and indicators that
tell you time of day cooking time settings, and
cooking functions selected.
3
Sensor Cook
Touch this key to cook potatoes, frozen
vegetables, fresh vegetables, frozen entrées,
bacons, oat meal , and rice having to select
cooking times and power levels.
4
Sensor Reheat
Touch this key to reheat beverage, casseroles,
pizza, dinner plates, and pies having to select
cooking times and power levels.
5
Popcorn
Touch this key to pop popcorn having to select
cooking times and power levels.
6
Defrost
Touch this key to defrost meat, poultry, fish, and
breads.
7
Number Keys
Touch number keys to enter cooking time, power
level, quantities, or weights.
8
Power Level
Touch this key to set a cooking power.
9
Timer / Clock
•Touch this key to use your microwave oven as a
kitchen timer.
•If you press and hold this key for 3 seconds,
you will be set the clock.
10
Stop / Clear
•Touch this key to stop the oven or clear all
entries.
•If you press and hold this key for 3 seconds,
you will be lock the key. (Child lock)
11
Start / Enter
•This feature allows oven to being functioning.
•Touch this key to cook at 100% cook power for
30 seconds up t o 99 min 59 seconds.
•If you touch this key during the cook, cooking
times increase to 30 seconds.

12 MICROWAVE COOKING TIPS
MICROWAVE COOKING TIPS
Amount of Food
•If you increase or decrease the amount of food
you prepare, the time it takes to cook that food will
also change. For example, if you double a recipe,
add a little more than half the original cooking time.
Check for doneness and, if necessary, add more
time in small increments.
Starting Temperature of Food
•The lower the temperature of the food being
put into the microwave oven, the longer it takes
to cook. Food at room temperature reheats more
quickly than food at refrigerator temperature.
Composition of Food
•Food with a lot of fat and sugar heats faster than
food containing a lot of water. Fat and sugar also
reach a higher temperature than water during the
cooking process.
•The more dense the food, the longer it takes to
heat. Very dense food like meat takes longer to
heat than lighter, more porous food like sponge
cakes.
Size and Shape
•Smaller pieces of food cook faster than larger
pieces. Also, same-shaped pieces cook more
evenly than different-shaped pieces.
•With foods that have different thicknesses,
the thinner parts cook faster than the thicker parts
Place the thinner parts of chicken wings and legs in
the center of the dish.
Stirring and Turning Foods
•Stirring and turning foods spreads heat quickly
to the center of the dish and avoids overcooking at
the outer edges of the food.
Covering Food
Cover food to:
•reduce splattering
•shorten cooking times
•keep food moist
Releasing Pressure in Foods
•Several foods (for example: baked potatoes,
sausages, egg yolks, and some fruits) are tightly
covered by a skin or membrane. Steam can build
up under the membrane during cooking, causing
the food to burst. To relieve the pressure and to
prevent bursting, pierce these foods before cooking
with a fork, cocktail pick, or toothpick.
Using Standing Time
•Always allow food to stand either in or out of the
oven after cooking power stops. Standing time after
defrosting and cooking allows the temperature to
evenly spread throughout the food, improving the
cooking results.
•The length of the standing time depends on how
much food you are cooking and how dense it is.
Sometimes it can be as short as the time it takes
you to remove the food from the oven and take it
to the serving table. However, with larger, denser
food items, the standing time may be as long as 10
minutes.
Arranging Food
For best results, place food evenly on the plate. You
can do this in several ways:
•If you are cooking several items of the same
food, such as baked potatoes, place them in a ring
pattern for uniform cooking.
•When cooking foods of uneven shapes or
thickness, such as chicken breasts, place the
smaller or thinner area of the food towards the
center of the dish where it will be heated last.
•Layer thin slices of meat on top of each other.
•When you cook or reheat whole fish, score the
skin to prevent cracking.
•Do not let food or a container touch the top or
sides of the oven. This will prevent possible arcing.
13
MICROWAVE COOKING TIPS
Using Aluminum Foil
Metal containers should not be used in a microwave
oven. However, if you have purchased food which
is prepackaged in an aluminum foil container, refer
to the instructions on the package. When using
aluminum foil containers, cooking times may be
longer because microwaves will only penetrate the
exposed top of the food and not the bottom or the
sides. If using aluminum containers without package
instructions, follow these guidelines:
•Place the aluminum foil container in a glass bowl
and add water so that it covers the bottom of the
container, but not more than ¼ in. (.64 cm) deep.
This ensures even heating of the container bottom.
•Always remove the container lid to avoid damage
to the oven.
•Use only undamaged containers.
•Do not use containers taller than ¾ in. (1.9 cm).
•Container must be at least half filled.
•To avoid arcing, there must be a minimum ¼
in.(.64 cm) between the aluminum container
and the walls of the oven and also between two
aluminum containers.
•Always place the container on the turntable.
•Shield parts of food that may cook quickly, such as
wing tips and leg ends of poultry, with small pieces
of aluminum foil.
•Heating food in aluminum foil containers usually
takes up to double the time compared to reheating
in plastic, glass, china, or paper containers.
The cooking time will vary depending upon the type
of container you use.
•Let food stand for 2 to 3 minutes after heating so
that heat is spread evenly throughout the container.
Do Not Can or Sterilize in Oven
•Do not try to can food in the oven. Closed glass
jars may explode, resulting in damage to the oven.
•Do not use the microwave oven to sterilize objects
(baby bottles, etc.). It is difficult to keep the oven at
the high temperature needed for sterilization.
Cooking Guide
Cooking with your new oven offers a wide variety of
food preparation options: microwave cooking.
Microwave cooking uses very short, high-frequency
radio waves. The movement of the microwaves
through the food generates heat and cooks most
foods faster than regular methods, while retaining
their natural texture and moisture. Microwave cooking
heats food directly, not the cookware or the interior
of the oven. Reheating is easy and defrosting is
particularly convenient because less time is spent in
food preparation.
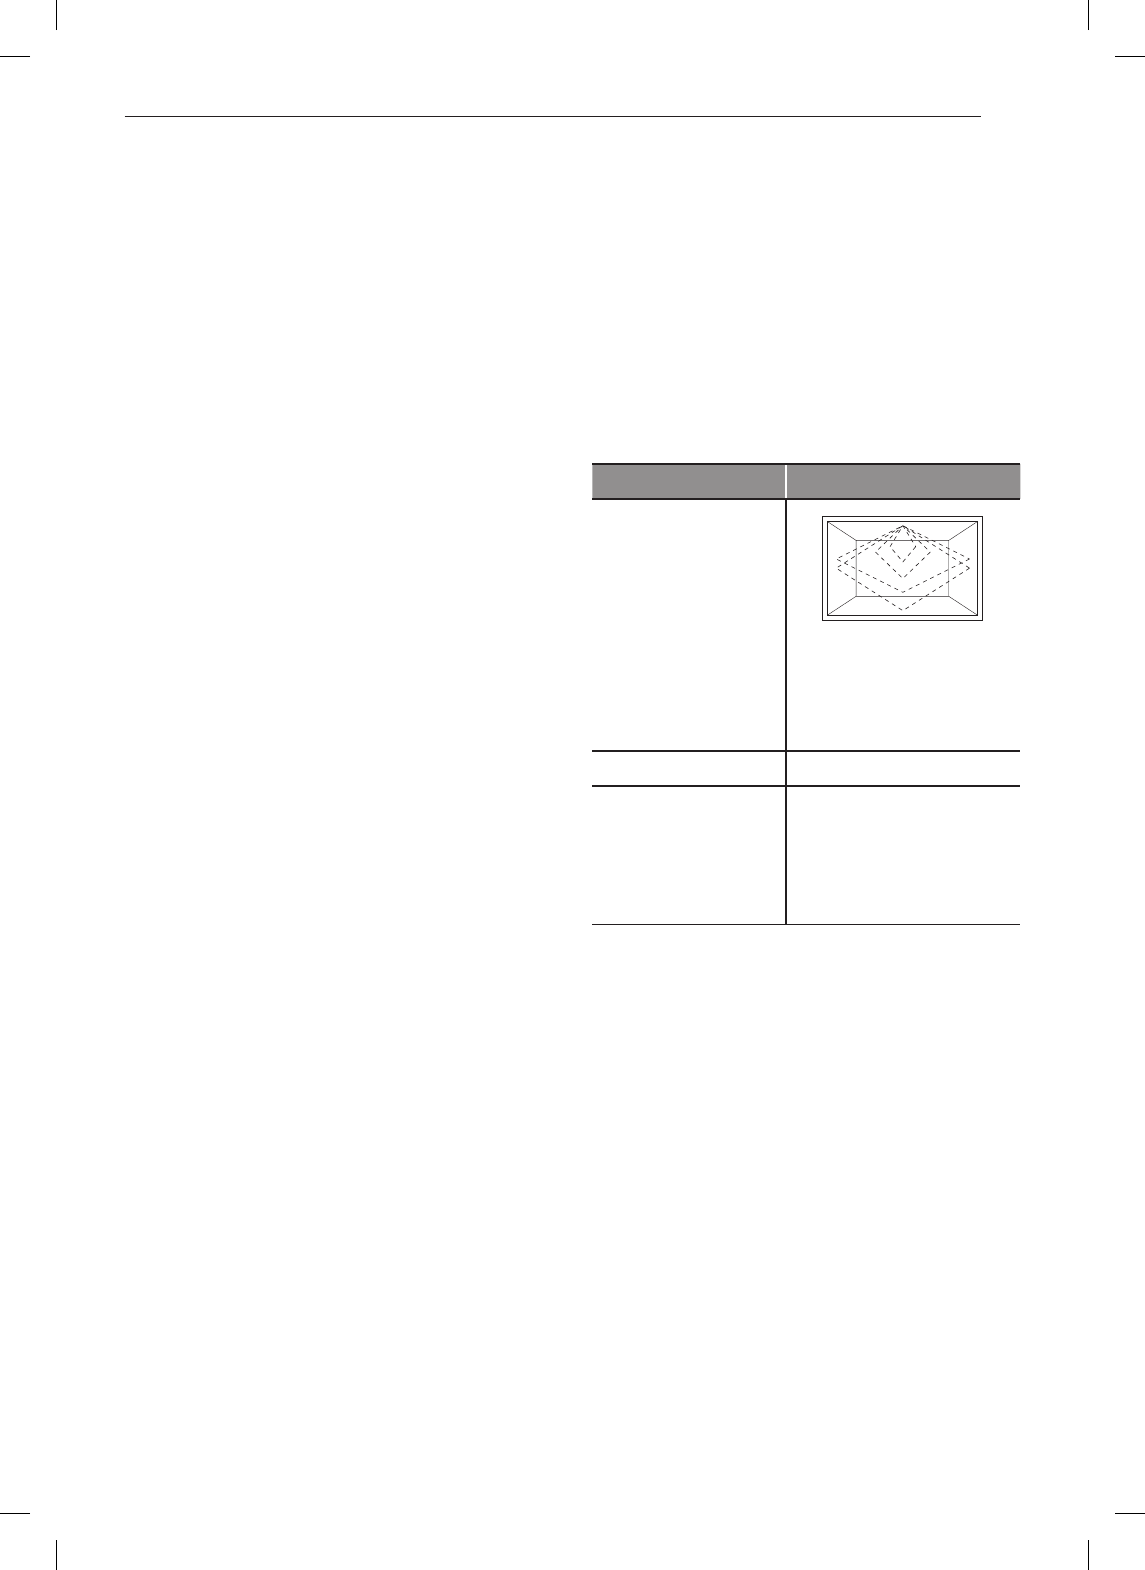
Microwave
Cooking Method
Microwave energy
is distributed evenly
throughout the oven for
fast, thorough cooking of
food.
Heat Source Microwave energy.
Benefits
•Fast, high efficiency
cooking.
•Oven and surroundings
do not get hot.
•Easy clean-up

14 MICROWAVE COOKING TIPS
Cookware Guide
Microwave Cooking
Most heat-resistant, non-metallic cookware is safe for
use in the microwave oven.
Testing Cookware Before Using
1Place the empty cookware in the microwave
oven.
2Measure 1 cup of water in a glass measuring cup
and place it in the oven beside the cookware.
3Microwave on 100% power for 1 minute. If
the dish is warm, it should not be used for
microwave cooking.
Cookware Microwave
Heat-Resistant Glass,
Ceramic Glass
Yes
Ceramics, China Yes
(Do not use china
with gold or silver
trim.)
Metal Cookware No
Non Heat-Resistant Glass No
Microwave-Safe Plastic Yes
Plastic Wrap, Wax Paper Yes
Paper Products Yes
Straw, Wicker, and Wood Yes
* Use only microwave cookware that is safe to 450°F
NOTE
•NEVER operate the microwave mode while the
oven is empty.

15
OPERATION
OPERATION
Using the Microwave Oven
This section discusses the concepts behind
microwave cooking and introduces you to the basics
you need to know to operate your microwave oven.
Please read this information before using your oven.
CAUTION
To avoid risk of personal injury or property
damage, do not use stoneware, metal utensils,
or metal trimmed utensils in the oven.
Audible Signals
Audible signals are available to guide you when
setting and using your oven:
•A tone will sound each time you touch a key.
•A melody signals the end of a Timer countdown.
•A melody signals the end of a cooking cycle.
Clock
Example: To set the clock for 10:30(AM).
1Touch STOP/Clear.
2Touch and hold until 12H appears in the display.
(approximately 3 second)
3Touch START/Enter/+30sec.
4Touch the Number keys to set the time. (10:30)
5Touch START/Enter/+30sec.
NOTE
•You can switch between 12 and 24 by touching
Timer/Clock after step 2.
CAUTION
To avoid risk of personal injury or property
damage, do not run oven empty.
Interrupting Cooking
Stop the oven during a cycle by opening the door.
The oven stops heating and the fan stops, but the
light stays on. To restart cooking, close the door and
touch START.
To stop cooking, open the door and touch STOP/
CLEAR.
Child Lock
Use this safety feature to lock the control panel when
cleaning the oven, or so children cannot use oven
unsupervised.
Example: To set the child lock.
1Touch STOP/Clear.
2Touch STOP/Clear and hold until loc appears in
the display. (approximately 3 seconds)
Example: To cancel the child lock.
1Touch STOP/Clear and hold until loc disappears
in the display. (approximately 3 seconds)
NOTE
•If the time of day was already set, The time of
day will appear on the display window after 1
second.
•If the Child Lock was already set and you touch
another ket pad, The ward Loc shows in the
display.
•After the Child Lock is turned off, The oven will
operate normally.
Timer
Your microwave oven can be used as a kitchen timer.
You can set up to 99 minutes, 99 seconds.
Example: To set 3 minutes.
1Touch Timer/Clock.
2Touch the Number keys to set the time. (3:00)
3Touch START/Enter/+30sec. Time counting
down.

16 OPERATION
Quick Start
The QUICK START feature allows you to set 30
seconds intervals of High power cooking with each
touch of the START/Clear/+30sec.
Example: Set 2 minutes of cooking on high power.
1Touch STOP/Clear.
2Touch START/Enter/+30sec. 4 times the oven
begins cooking and display shows time counting
down.
NOTE
•During QUICK START cooking, you can
extend the cooking time up to 99 minutes 59
seconds by repeatedly pressing the START/
Enter/+30sec. button.
How to use manual cooking
(timed cooking)
This feature lets you program a specific cook time
and power. For best results, there are 10 power
level settings in addition to HIGH power (100%).
Refer to the “Microwave Power Level Table” for more
information.
Example: To cook for 5 minutes, 30 seconds at
80% power.
1Touch STOP/Clear.
2Touch the Number keys to set the time. (5:30)
3Touch Power Level.
4Touch the Number keys to set the power level 8.
5Touch START/Enter/+30sec.
NOTE
•If you do not select a power level, the oven will
automatically cook at HIGH (100%) power.
Microwave Power Levels
Your microwave oven has 10 cook power levels to let
you cook or heat a wide variety of foods. Refer to the
table below for suggestions:
Microwave Power Level Table
Power
Level
Use
10
(High)
•Boiling water.
•Making candy.
•Cooking poultry pieces, fish &
vegetables.
•Cooking tender cuts of meat.
•Whole poultry.
9
•Reheating rice, pasta & vegetables.
8
•Reheating prepared foods quickly.
•Reheating sandwiches.
7
•Cooking egg, milk & cheese dishes.
•Melting chocolate.
6
•Cooking veal.
•Cooking whole fish.
5
•Cooking ham, whole poultry, & lamb.
•Cooking rib roast, sirloin tip.
4
•Thawing meat, poultry & seafood.
3
•Cooking less tender cuts of meat.
•Cooking pork chops, roast
2
•Taking chill out of fruit.
•Softening butter.
1
•Keeping casseroles & main dishes
warm.
•Softening butter & cream cheese.
0
•Standing time.

17
OPERATION
Sensor Operation Instruction
Sensor cooking provides exciting new features to
make microwave oven easier. Your new microwave
oven will guide you, step by step, whether it be simply
to reheat food or cook food and sensor menu with all
the popular food choices helps you to cook perfectly
because it has been pre-programmed and can tell
how long to cook or reheat food items.
Categories :
1. Sensor Cook
2. Sensor Reheat
3. Popcorn
1The Sensor system works by detecting
Vegetable a build-up of vapor.
2Make sure the door remains closed.
3Opening the door or touching the STOP/Clear
pad before the vapor is detected will abort the
process. The oven will stop.
4Before using Sensor, make sure the exterior of
the reheating container and the interior of the
oven are dry, to assure the best results.
Sensor Cooking Guide
Appropriate containers and coverings help assure
good sensor cooking results.
1Always use microwavable containers and cover
them with lids or vented plastic wrap.
2Never use tight-sealing plastic covers. They can
prevent steam from escaping and cause food to
overcook.
3Match the amount to the size of the container.
Fill containers at least half full for best results.
4Be sure the outside of the cooking container and
the inside of the microwave oven are dry before
placing food in the oven. Beads of moisture
turning into steam can mislead the sensor.
Sensor Cook
SENSOR COOK allows you to cook most of your
favorite foods without having to select cooking times
and power levels. This oven automatically determines
required cooking times for each food item.
Example: To cook Oat meal (Example)
1Touch STOP/Clear.
2Touch Sensor Cook 5 Times.
3Touch START/Enter/+30sec. The oven will start
automatically.
Sensor Reheat
The feature reheats single servings of previously
cooked foods or a plate of leftovers. Food item in the
Sensor Reheat menu include:
1. Baverage
2. Casserole
3. Dinner Plate
4. Pie
5. Pizza
Example: To reheat CASSEROLE simply follow
the steps below.
1Touch STOP/Clear.
2Touch Sensor Reheat 2 Times.
3Touch START/Enter/+30sec. The oven will start
automatically.
Popcorn
This feature makes preparation of microwave popcorn
simple and quick... one bag at a time.
The automatic popcorn uses the HI power only.
The popping time counts down in the display.
When the popping time is over, melody and End
shows. Oven shuts off automatically.
Place one bag only(50-100g) of prepackaged
microwave popcorn on a microwave-safe / oven-safe
dish on the turntable. The package should be at room
temperature.
1Touch STOP/Clear.
2Touch Popcorn.
3Touch START/Enter/+30s. The oven will start
automatically.
18 OPERATION
Sensor Cook Table
Code Category Amount Direction
Sc-1 Bacon 2 - 4 slices Place bacon slices on a microwave bacon rack for best results.
(Use dinner plate lined with paper towels if rack is not
available.)
Sc-2 Fresh
Vegetable
1 - 4 cups Place in a microwaveable bowl or casserole. Add water
according to the quantity.
•1-2 cups : add 2 tbsp water.
•3-4 cups : add 4 tbsp water.
Cover with vented plastic wrap. Let stand 3 minutes after
cooking.
Sc-3 Frozen Entrée 10 - 40 oz. Remove from outer display package. Slit cover. If not in
microwave-safe container, place on a microwaveable plate
and cover with vented plastic wrap. After cooking, let stand in
microwave oven 3 minutes.
Sc-4 Frozen
Vegetable
1 - 4 cups Place in a microwaveable bowl or casserole.
•1-2 cups : add 2 tbsp water.
•3-4 cups : add 4 tbsp water.
Cover with vented plastic wrap. Let stand 3 minutes.
Sc-5 Oat meal ½ - 1 cups 1 serving 2 serving
Oats ½ cup (40 g) 1 cup (80 g)
Water or Milk 1 cup (230 g) 1 ½ cup (345 g)
Salt (optional) Dash 1/8 tsp.
Combine water or milk, salt and oats in large microwave-safe
bowl. Cover with vented plastic wrap. Let stand 3 minutes after
cooking.
Sc-6 Potato 1 - 4 ea Pierce skin with a fork and place on paper towel. Do not cover.
Let stand 5 minutes after cooking.
Sc-7 Rice ½ - 2 cups ½ cup 1 cup 1 ½ cup 2 cup
Rice 96 g 192 g 288 g 384 g
Water 230 g 460 g 690 g 920 g
Add rice and water in a deep and large microwave-safe bowl
(3 L). Cover with vented plastic wrap. Let stand 5-10 minutes
after cooking.
NOTE
•If you open the door or press STOP during sensing, the process will be canceled.
19
OPERATION
Sensor Reheat Table
Code Category Amount Direction
Sr-1 Baverage 1 - 2 cups
(240 ml per cup)
Use a mug or microwave-safe cup. Do not cover. Stir after
reheating. (Be careful! The beverage will be very hot!
Sometimes liquids heated in cylindrical containers will splash
out unexpectedly when the cup is moved.)
Sr-2 Casserole 10 - 20 oz Place in a microwaveable bowl or casserole. Cover with
vented plastic wrap. Let stand 3 minutes.
Sr-3 Dinner plate 1 Place food on a plate. Cover with vented plastic wrap. Let
stand 3 minutes after heating.
Sr-4 Pie 10 - 20 oz Cut leftover pie into pieces. Place food on a microwave-safe
dish. Place food in the oven. Choose the menu and weight,
press start.
Sr-5 Pizza 1 - 3 slices This is a reheat function for leftover pizza. Place on paper
towel on a microwave safe plate.
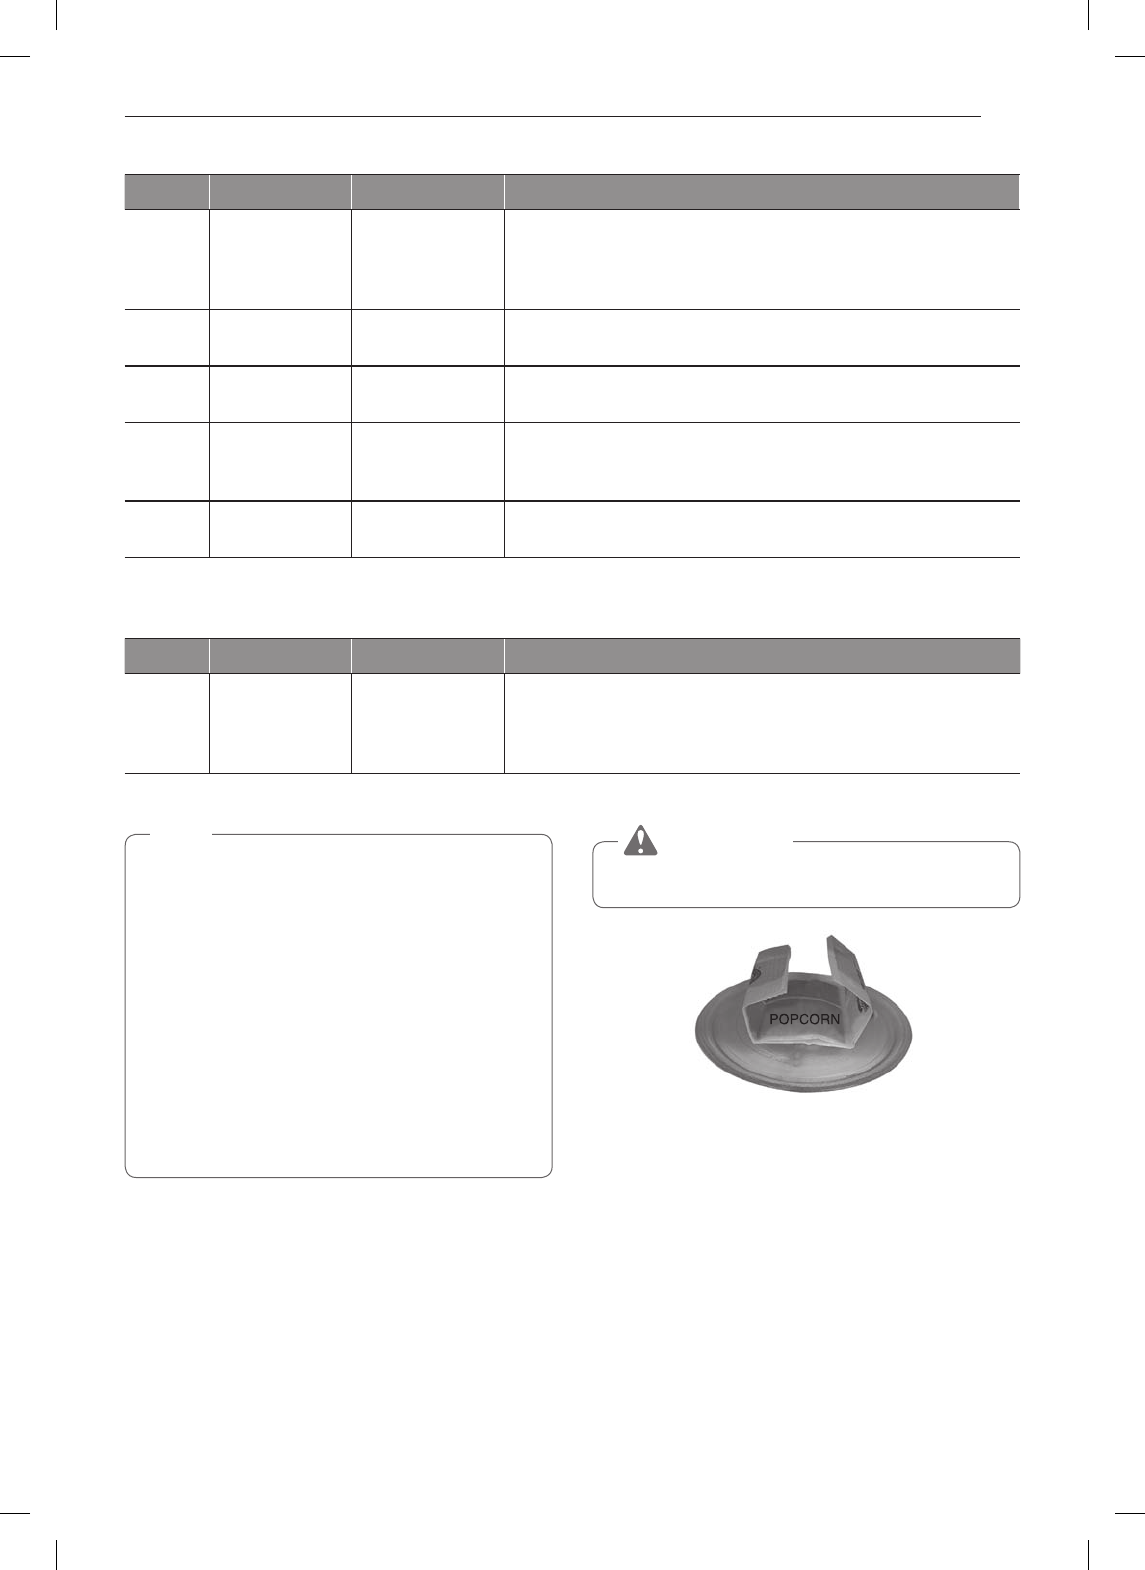
Popcorn Table
Code Category Amount Directions
PoP Popcorn 3.5 oz. Pop only one package at a time.
For best results, use a fresh bag of popcorn.
Place a bag of prepackaged microwave popcorn on he center
of the glass tray.
NOTE
•If popcorn bag size is not known, follow
manufacturers' instructions and do not use this
feature.
•Do not attempt to reheat or cook any unpopped
kernels.
•Do not reuse bag. Overcooking can result in an
oven fire.
•Prepare one bag only at a time.
•Do not use popcorn popping devices in
microwave oven with this feature.
•Do not leave microwave unattended while
cooking popcorn.
CAUTION
Never use a brown paper bag for popping corn.
When popping prepackaged popcorn; Place carefully
so the bag does not touch the oven walls. Fold each
end of the bag in half toward the center top of the
bag.

20 OPERATION
Defrost
Four defrost sequences are preset in the oven. The
defrost feature provides you with the best defrosting
method for frozen foods. The cooking guide will show
you which defrost sequence is recommended for the
food you are defrosting.
For added convenience, the Auto Defrost includes a
built-in beep mechanism that reminds you to check,
turn over, separate, or rearrange to get best defrost
results. Four different defrosting levels are provided.
1. Meat
2. Poultry
3. Fish
4. Bread
* Available weight
Meat : 0.1 - 6.0 lbs.
Poultry : 0.1 - 6.0 lbs.
Fish : 0.1 - 4.0 lbs.
Bread : 0.1 - 2.0 lbs.
Example: To defrost 1.2 lbs of ground beef.
1Touch STOP/Clear.
2Touch Defrost 1 Time.
3Touch START/Enter/+30sec.
4Touch the Number keys to set the weight 12.
5Touch START/Enter/+30sec. Time counting
down.
NOTE
•When the oven beeps during the DEFROST
cycle, open the door and turn, separate, or
rearrange the food. Remove any portions that
have thawed. Return frozen portions to the
oven and touch START/ENTER to resume the
defrost cycle.
Weight Conversion Table
Most food weights are given in pounds and ounces.
If using pounds, food weights must be entered
into Auto Defrost in pounds and tenths of pounds
(decimals).
Use the following table if necessary to convert food
weights to decimals.
Equivalent Weight
OUNCES
1.6
3.2
4.8
6.4
8.0
9.6
11.2
12.8
14.4
16.0
DECIMAL WEIGHT
.10
.20
.30
.40
.50 One-Half Pound
.60
.70
.80
.90
1.00 One Pound
Operating Tips:
•For best results, remove fish, shellfish, meat, and
poultry from its original closed paper or plastic
package (wrapper). Otherwise, the wrap will hold
steam and juice close to the foods, which can
cause the outer surface of the foods to cook.
•For best results, shape your ground meat into
the form of a doughnut before freezing. When
defrosting, scrape off thawed meat when the beep
sounds and continue defrosting.
•Place foods in a shallow container or on a
microwave roasting rack to catch drippings.
•Food should still be somewhat icy in the center
when removed from the oven.

21
OPERATION
Auto Defrost Table
Code Category Food to be Defrosted
dEF1 MEAT
0.1 - 6.0 kg
Beef
Ground beef, Round steak,
Cubes for stew, Tenderloin
steak, Pot roast, Rib roast,
Rump roast, Chuck roast,
Hamburger patty
Lamb
Chops, Rolled roast
Pork
Chops, Hot dogs, Spareribs,
Country-style ribs.
Rolled roast, Sausage
Veal
Cutlets (0.5 kg, 20 mm thick)
Turn food over at beep.
After defrosting, let stand for
5 - 15 minutes.
dEF2 POULTRY
0.1 - 6.0 kg
Poultry
Whole, Cut-up, Breast
(boneless).
Rinse chicken cavity with
tap water and let stand
for 60 minutes for better
performance.
Cornish Hens
Whole
Turkey
Breast
Turn food over at beep.
After defrosting , let stand for
60 minutes.
dEF3 FISH
0.1 - 4.0 kg
Fish
Fillets, Whole Steaks
Shellfish
Crab meat, Lobster tails,
Shrimp, Scallops
Turn food over at beep.
After defrosting, let stand for
5 - 10 minutes.
dEF4 BREAD
0.1 - 2.0 kg
Sliced bread, Buns, Baguette,
etc.
Separate slices and place
between paper towel or flat
plate.
Turn food over at beep.
After defrosting, let stand for
1 - 2 minutes.
Defrosting Tips
•When using Auto Defrost, the weight to be entered
is the net weight in pounds and tenths of pounds
(the weight of the food minus the container).
•Before starting, remove the metal twist-ties which
often come with frozen food bags, and replace
them with strings or elastic bands.
•Open containers such as cartons before they are
placed in the oven.
•Always slit or pierce plastic pouches or packaging.
•If food is foil wrapped, remove foil and place the
food in a suitable container.
•Slit the skins, if any, of frozen food such as
sausage.
•Bend plastic pouches of food to ensure even
defrosting.
•Always underestimate defrosting time. If
defrosted food is still icy in the center, return it to
the microwave oven for more defrosting.
•The length of defrosting time varies according to
how solidly the food is frozen.
•The shape of the package affects how quickly
food will defrost. Shallow packages will defrost
more quickly than a deep block.
•As food begins to defrost, separate the pieces
Separated pieces defrost more easily.
•Use small pieces of aluminum foil to shield parts
of food such as chicken wings, leg tips, fish tails,
or areas that start to get warm. Make sure the foil
does not touch the sides, top, or bottom of the
oven. The foil can damage the oven lining.
•For better results, let food stand after defrosting.
(For more information on standing time, see the
Microwave Cooking Tips section.)
•Turn over food during defrosting or standing time
Break apart and remove food as required.
23
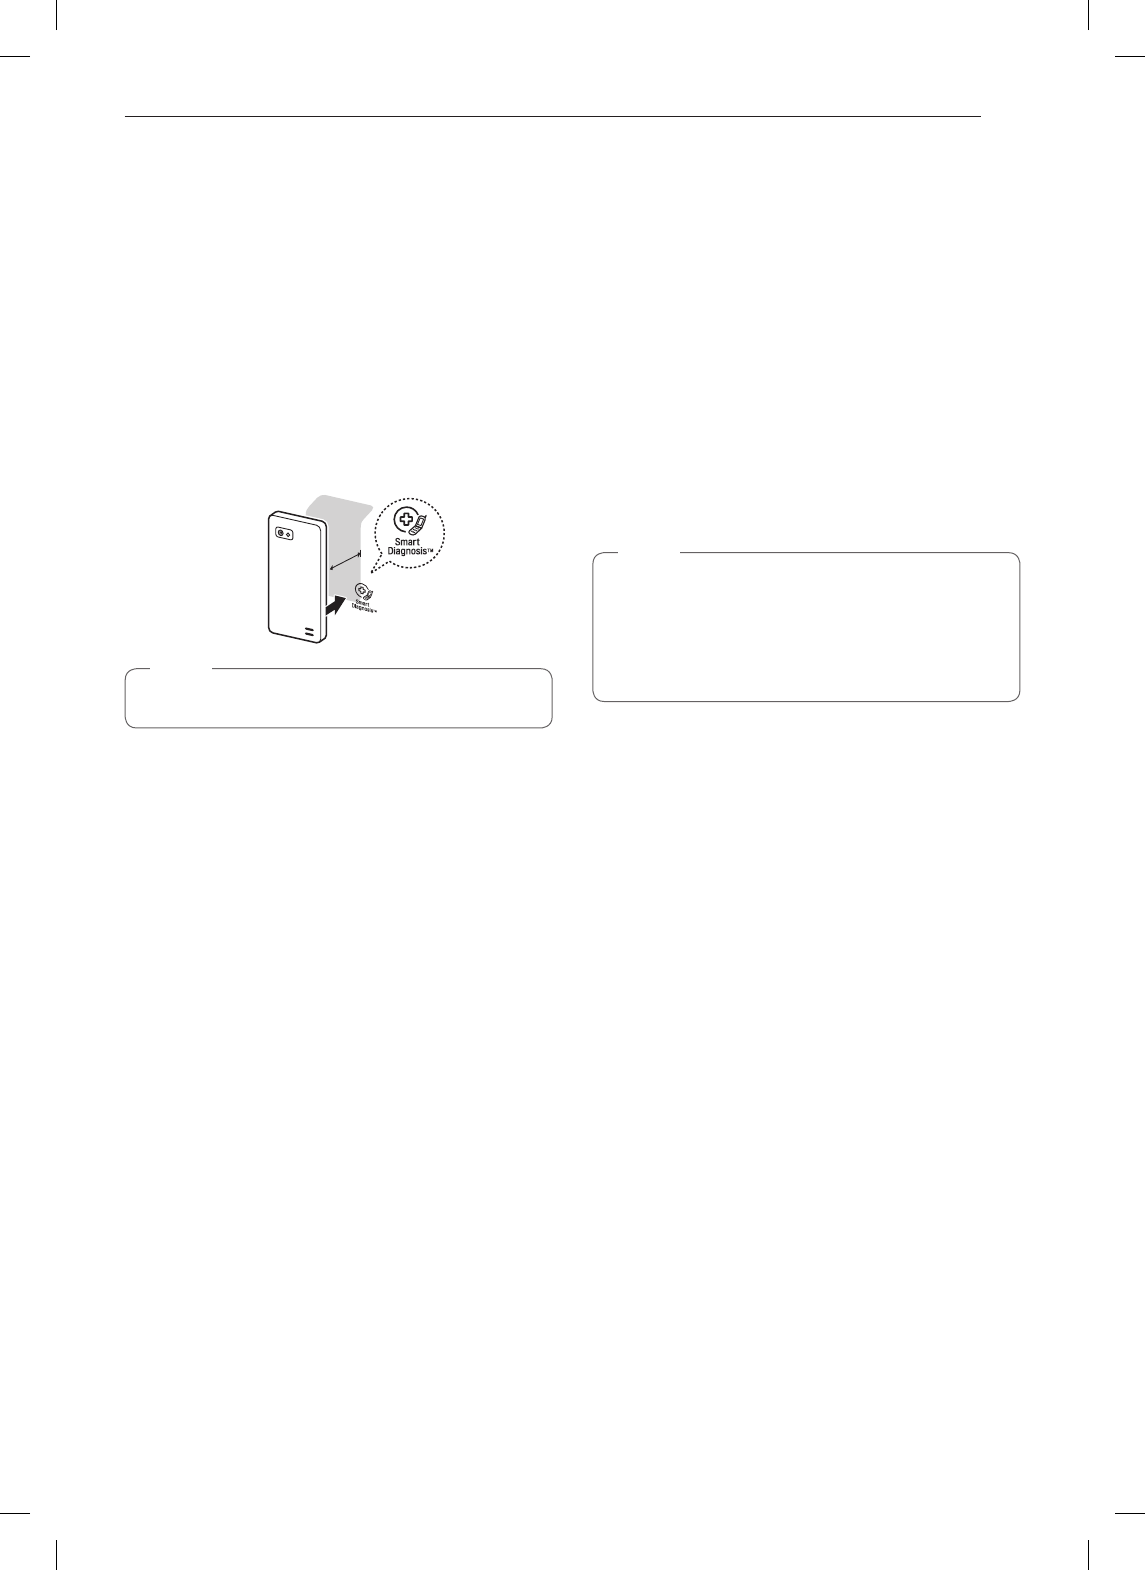
SMART DIAGNOSIS™
SMART DIAGNOSIS™
Using the Smart Diagnosis™
Function
Use this function if you need an accurate diagnosis
by an LG Electronics service centre when the
product malfunctions or fails. Use this function only to
contact the service representativ e, not during normal
operation.
1When instructed to do so by the call centre, hold
the mouthpiece of your phone over the Smart
Diagnosis™ logo on the controller.
Max
10 mm
NOTE
•Do not touch any other buttons.
2With the door opened, press and continue to
hold the Clear button for 3 seconds so that
Loc appears on the display. Continue to hold
the Clear button for a further 5 seconds until '5'
appears in the display.
(so, the Clear button will need to be held for 8
seconds continuously).
A tone will then emit from behind the Smart
Diagnosis symbol.
3Keep the phone in place until the tone
transmission has finished. The display will count
down the time.
4Once the countdown is over and the tones have
stopped, resume your conversation with the call
center agent, who will then be able to assist you
in using the information transmitted for analysis.
NOTE
•For best results, do not move the phone while
the tones are being transmitted.
•If the call center agent is not able to get an
accurate recording of the data, you may be
asked to try again.

24 COOKING GUIDE
COOKING GUIDE
Cooking Tips
WARNING
Do not use aluminum foil during cooking cycle.
Meat
1No special techniques are required. Meat should
be prepared as with conventional cooking.
Season if desired. Always thoroughly defrost
meat before cooking.
2Place the meat on a microwave roasting rack or
microwave-proof plate and place on the turntable.
3Cook according to the Meat Cooking Table
(below). Use the longer time for large cuts of
meats and the shorter time for small cuts of
meats. For thicker chops, use the longer time.
4Turn the meat once halfway through the cooking
time.
5Let stand for 5-10 minutes in oven after cooking.
The standing time is very important as it
completes the cooking process.
6Make sure meat, especially pork, is thoroughly
cooked before eating.
Meat Cooking Table
Meat Microwave
Power
Cooking Time Per
Pound
BEEF
Standing/Rolled Rib
– Medium 8 91/2 to 111/2 minutes
– Well-done 8 111/2 to 14 minutes
Ground Beef (to
brown for casserole)
HIGH(100%) 61/2 to 91/2 minutes
Hamburgers, Fresh or
defrosted (4 oz. each)
– 2 patties HIGH(100%) 21/2 to 41/2 minutes
– 4 patties HIGH(100%) 31/2 to 51/2 minutes
PORK
Loin, Leg Bacon 8
121/2 to 161/2 minutes
– 4 slices HIGH(100%) 21/2 to 31/2 minutes
– 6 slices HIGH(100%) 31/2 to 41/2 minutes
NOTE
•The times listed above are only a guide.
Allow for difference in individual tastes and
preferences. The times may also vary due to
the shape, cut, and composition of the food.
Poultry
1No special techniques are required. Poultry
should be prepared as with conventional
cooking. Season if desired.
2Poultry should be thoroughly defrosted. Remove
giblets and any metal clamps.
3Prick the skin and brush lightly with vegetable oil
unless the poultry is self-basting.
4All poultry should be placed on a microwave
roasting rack or a microwave-proof plate and
placed on the turntable.
5Cook according to the instructions in the Poultry
Cooking Table below. Turn over halfway through
the cooking time. Because of its shape, poultry
has a tendency to cook unevenly, especially in
very bony parts. Turning during roasting helps to
cook these areas evenly.
6Let stand for 5-10 minutes in oven after cooking
before carving. The standing time is very
important, as it completes the cooking process.
7Make sure poultry is thoroughly cooked before
eating. Whole poultry is completely cooked when
the juices run clear from the inside thigh when
it is pierced with a sharp knife. Poultry pieces
should be pierced with a sharp knife through the
thickest part to ensure that the juices are clear
and the flesh is firm.
Poultry Cooking Table
Poultry Microwave
Power
Cooking Time Per
Pound
CHICKEN
Whole 8 11 to 15 minutes
Breast (boned) 8 10 to 14 minutes
Portions 8 11 to 17 minutes
TURKEY
Whole HIGH(100%) 11 to 15 minutes
NOTE
•The times listed above are only a guide.
Allow for difference in individual tastes and
preferences. The times may also vary due to
the shape, cut, and composition of the food.
•If whole poultry is stuffed, the weight of the
stuffed bird should be used when calculating
the cooking time.

25
COOKING GUIDE
Fish
1Arrange fish in a large shallow non-metallic dish
or casserole.
2Cover with pierced microwave plastic wrap or
casserole lid.
3Place the dish on the turntable.
4Cook according to the instructions in the Fresh
Fish Cooking Table below. Flakes of butter can
be added to the fish if desired.
5Let stand as directed in the Cooking Table
before serving.
6After standing time, check to see that the fish is
thoroughly cooked. The fish should be opaque
and flake easily.
Fish Cooking Table
Fish Microwave
Power
Cooking Time
Per Pound Butter Standing Time
Fish Fillets HIGH 41/2 to 8 minutes Add 15 to 30 ml
(1 to 2 tbsp lemon juice)
2 to 3 minutes
Whole Mackerel,
Cleaned and Prepared
HIGH 41/2 to 8 minutes – 3 to 4 minutes
Whole Trout, Cleaned
and Prepared
HIGH 51/2 to 8 minutes – 3 to 4 minutes
Salmon Steaks HIGH 51/2 to 8 minutes Add 15 to 30 ml
(1 to 2 tbsp lemon juice)
3 to 4 minutes

26 COOKING GUIDE
Heating/Reheating Guide
To heat or reheat successfully in the microwave, it is important to follow several guidelines. Measure the amount
of food in order to determine the time needed to reheat. Arrange the food in a circular pattern for best results.
Room temperature food will heat faster than refrigerated food. Canned foods should be taken out of the can and
placed in a microwavable container. The food will be heated more evenly if covered with a microwavable lid or
plastic wrap and vented. Remove cover carefully to prevent steam burns. Use the following table as a guide for
reheating cooked food.
Items Cook Time (At High) Special Instructions
Sliced meat
3 slices (¼ -inch thick)
1 - 2 minutes Place sliced meat on microwavable plate.
Cover with plastic wrap and vent.
Note: Gravy or sauce helps to keep meat juicy.
Chicken pieces
1 breast
1 leg and thigh
2 - 3½ minutes
1½ - 3 minutes
Place chicken pieces on microwavable plate.
Cover with plastic wrap and vent.
Fish fillet (6-8 oz.) 2 - 4 minutes Place fish on microwavable plate.
Cover with plastic wrap and vent.
Lasagna
1 serving (10½ oz.)
6 - 8 minutes Place lasagna on microwavable plate.
Cover with plastic wrap and vent.
Casserole
1 cup
4 cups
1 - 3½ minutes
5 - 8 minutes
COOK covered in microwavable casserole. Stir
once halfway through cooking.
Casserole – cream or cheese
1 cup
4 cups
1½ - 3 minutes
3½ - 5½ minutes
COOK covered in microwavable casserole. Stir
once halfway through cooking.
Sloppy Joe or
Barbecued Beef
1 sandwich (½ cup meat
filling) without bun
1 - 2½ minutes
Reheat filling and bun separately.
Cook filling covered in microwavable casserole.
Stir once. Heat bun as directed in table below.
Mashed potatoes
1 cup
4 cups
1 - 3 minutes
5 - 8 minutes
COOK covered in microwavable casserole. Stir
once halfway through cooking.
Baked beans
1 cup 1½ - 3 minutes
COOK covered in microwavable casserole. Stir
once halfway through cooking.
Ravioli or pasta in sauce
1 cup
4 cups
2½ - 4 minutes
7½ - 11 minutes
COOK covered in microwavable casserole. Stir
once halfway through cooking.
Rice
1 cup
4 cups
1½ - 3½ minutes
4 - 6½ minutes
COOK covered in microwavable casserole. Stir
once halfway through cooking.
Sandwich roll or bun
1 roll 15 - 30 seconds
Wrap in paper towel and place on glass
mircrowavable rack
Vegetables
1 cup
4 cups
1½ - 2½ minutes
4 - 6 minutes
COOK covered in microwavable casserole. Stir
once halfway through cooking.
Soup
1 serving (8 oz.) 1½ - 2½ minutes
COOK covered in microwavable casserole. Stir
once halfway through cooking.

27
COOKING GUIDE
Fresh Vegetable Guide
Vegetable Amount
Cook Time
At High
(Minute)
Instructions Standing
Time
Artichokes
(8 oz.each)
2 medium
4 medium
5 - 8
10 - 13
Trim. Add 2 tsp water and 2 tsp juice. Cover. 2 - 3 minutes
Asparagus,
Fresh, Spears
1 Ib. 3 - 6 Add ½ cup water. Cover. 2 - 3 minutes
Beans, Green
and Wax
1 Ib. 7 - 11 Add ½ cup water in 1½ qt. casserole. Stir halfway
through cooking.
2 - 3 minutes
Beets, Fresh 1 Ib. 12 - 16 Add ½ cup water in 1½ qt. covered casserole.
Rearrange halfway through cooking.
2 - 3 minutes
Broccoli, Fresh,
Spears
1 Ib. 4 - 8 Place broccoli in baking dish. Add ½ cup water. 2 - 3 minutes
Cabbage, Fresh,
Chopped
1 Ib. 4 - 7 Add ½ cup water in 1½ qt. covered casserole.
Stir halfway through cooking.
2 - 3 minutes
Carrots, Fresh,
Sliced
2 cups 2 - 4 Add ¼ cup water in 1 qt. covered casserole. Stir
halfway through cooking.
2 - 3 minutes
Cauliflower,
Fresh, Whole
1 lb. 7 - 11 Trim and add ¼ cup water in 1 qt. covered
casserole. Stir halfway through cooking.
2 - 3 minutes
Flowerettes,
Fresh Celery,
Fresh, Sliced
2 cups
4 cups
2½ - 4½
6 - 8
Slice and add ½ cup water in 1½ qt. covered
casserole. Stir halfway through cooking.
2 - 3 minutes
Corn, Fresh 2 ears 5 - 9 Husk and add 2 tbsp water in 1½ qt. baking dish.
Cover.
2 - 3 minutes
Mushrooms,
Fresh, Sliced
½ Ib. 2 - 3½ Place mushrooms in 1½ qt. covered casserole.
Stir halfway through cooking.
2 - 3 minutes
Parsnips,
Fresh, Sliced
1 Ib. 4 - 8 Add ½ cup water in 1½ qt. covered casserole.
Stir halfway through cooking.
2 - 3 minutes
Peas, Green,
Fresh
4 cups 7 - 10 Add ½ cup water in 1½ qt. covered casserole.
Stir halfway through cooking.
2 - 3 minutes
Sweet Potatoes
Whole Baking
(6-8 oz.each)
2 medium
4 medium
5 - 10
7 - 13
Pierce potatoes several times with fork.
Place on 2 paper towels.
Turn over halfway through cooking.
2 - 3 minutes
2 - 3 minutes
White Potatoes
Whole Baking
(6-8 oz.each)
2 potatoes
4 potatoes
5 - 8
10 - 14
Pierce potatoes several times with fork.
Place on 2 paper towels.
Turn over halfway through cooking.
2 - 3 minutes
2 - 3 minutes
Spinach, Fresh,
Leaf
1 Ib. 4 - 7 Add ½ cup water in 2 qt. covered casserole. 2 - 3 minutes
Squash, Acorn or
Butternut, Fresh
1 medium 6 - 8 Cut squash in half. Remove seeds.
Place in 8 x 8-inch baking dish. Cover.
2 - 3 minutes
Zucchini, Fresh,
Sliced
1 Ib. 4½ - 7½ Add ½ cup water in 1½ qt. covered casserole.
Stir halfway through cooking.
2 - 3 minutes
Zucchini, Fresh,
Whole
1 Ib. 6 - 9 Pierce. Place on 2 paper towels. Turn over and
rearrange halfway through cooking.
2 - 3 minutes

28 MAINTENANCE
MAINTENANCE
Caring for the Microwave
Oven
Keep the inside of the oven clean
Food spatters or spilled liquids stick to oven walls
and between the seal and door surfaces. It is best
to wipe up spillovers with a damp cloth right away.
Crumbs and spillovers will absorb microwave energy
and lengthen cooking times and may even damage
the oven. Use a damp cloth to wipe out crumbs that
fall between the door and the frame. It is important to
keep this area clean to assure a tight seal. Remove
greasy spatters with a soapy cloth then rinse and dry.
Do not use harsh detergent or abrasive cleaners.
Anti-bacterial claim based on internal testing with
e-coli and staphylococcus bacteria, showing coating
prevents 99.99 % of bacterial growth on the surface
of the cavity of NeoChef.
Keep the outside of the oven clean
Disconnect the mains plug from the power outlet
before cleaning the oven to eliminate the possibility
of electric shock. Clean the outside of your oven with
soap and water then with clean water and dry with a
soft cloth or paper towel. To prevent damage to the
operating parts inside the oven, the water should
not be allowed to seep into the ventilation openings.
To clean control panel, open the door to prevent the
oven from accidentally starting, and wipe a damp
cloth followed immediately by a dry cloth. Press
STOP after cleaning.
If steam accumulates inside or around the outside
of the oven door, wipe the panels with a soft cloth.
Steam or condensation build up inside the door
is normal if foods are heated for a long period on
higher power levels. This is not a malfunction. The
condensation will eventually evaporate. Try covering
the food or vary the heating levels and time to reduce
any condensation forming in the door, this may also
occur when the oven is operated under high humidity
conditions and in no way indicates a malfunction of
the unit.
The door and door seals should be kept clean. Use
only warm, soapy water, rinse then dry thoroughly.
DO NOT USE ABRASIVE MATERIALS, SUCH AS
CLEANING POWDERS OR STEEL AND PLASTIC
PADS.
Metal parts will be easier to maintain if wiped
frequently with a damp cloth.
NOTE
•Abrasive cleansers, steel wool pads, gritty
wash cloths, some paper towels, etc., can
damage the control panel and the interior and
exterior oven surfaces.
To clean the glass tray and rotating ring, wash in
mild, sudsy water.
For heavily soiled areas use a mild cleanser and
scouring sponge.
The glass tray and rotating ring are dishwasher safe.
Glass Tray
Rotating Ring

29
MAINTENANCE
Microwave Utensil Guide
Use Do Not Use
OVENPROOF GLASS
(treated for high intensity heat):
utility dishes, loaf dishes, pie plates, cake
plates, liquid measuring cups, casseroles
and bowls without metallic trim.
CHINA:
bowls, cups, serving plates, and platters
without metallic trim.
PLASTIC:
Plastic wrap (as a cover)- lay the plastic
wrap loosely over the dish and press it to
the sides.
Vent plastic wrap by turning back one edge
slightly to allow excess steam to escape.
The dish should be deep enough so that
the plastic wrap will not touch the food. As
the food heats it may melt the plastic wrap
wherever the wrap touches the food.
Use plastic dishes, cups, semi-rigid freezer
containers and plastic bags only for
short cooking time. Use these with care
because the plastic may soften from
the heat of the food.
PAPER:
Paper towels, waxed paper, paper
napkins, and paper plates with no metallic
trim or design. Look for the manufacturer's
label for use in the microwave oven.
Note:
Do not use recycled paper products in the
microwave oven. They sometimes contain
impurities that cause arcing and sparking.
METAL CONTAINERS::
Metal shields the food from microwave energy and produces
uneven cooking. Also avoid metal skewers, thermometers, or
foil trays. Metal containers can cause arcing, which can damage
the microwave oven.
METAL DECORATION:
Metal-trimmed or metal-banded dinnerware, casserole dishes,
etc. The metal trim interferes with normal cooking and may
damage the oven.
ALUMINUM FOIL:
Avoid large sheets of aluminum foil because they hinder cooking
and may cause harmful arcing. Use small pieces of foil to shield
poultry legs and wings. Keep ALL aluminum foil at least 1 inch
from the side walls and door of the oven.
WOOD:
Wooden bowls and boards will dry out and may split or crack
when you use them in the microwave oven. Baskets react in the
same way.
TIGHTLY COVERED UTENSILS:
Be sure to leave openings for steam to escape from covered
containers. Pierce plastic pouches of vegetables or other food
items before cooking. Tightly closed pouches could explode.
BROWN PAPER:
Avoid using brown paper bags.
They absorb too much heat and could burn.
FLAWED OR CHIPPED UTENSILS:
Any container that is cracked, flawed, or chipped may break in
the oven.
METAL TWIST TIES:
Remove metal twist ties from plastic or paper bags.
They become hot and could cause a fire.

30 MAINTENANCE
Microwave-Safe Utensils
Never use metal or metal trimmed utensils in
using microwave function
Microwaves cannot penetrate metal. They will bounce
off any metal object in the oven and cause arcing, an
alarming phenomenon that resembles lightning. Most
heat resistant non metallic cooking utensils are safe
for use in your oven. However, some may contain
materials that render them unsuitable as microwave
cookware. If you have any doubts about a particular
utensil, there's a simple way to find out if it can be
used in the microwave.
Place the utensil in question next to a glass bowl filled
with water in using microwave function. Microwave
at power HIGH for 1 minute. If the water heats up but
the utensil remains cool to the touch, the utensil is
microwave-safe.
However, if the water does not change temperature
but the utensil becomes warm, microwaves are being
absorbed by the utensil and it is not safe for use in
using microwave function. You probably have many
items on hand in your kitchen right now that can be
used as cooking equipment in the microwave. Just
read through the following checklist.
Dinner plates
Many kinds of dinnerware are microwave-safe. If in
doubt consult the manufacturer's literature or perform
the microwave test. Do not heat dinner plates that
use any painted on decorative as they will arc if the
paint has metallic content.
Glassware
Glassware that is heat-resistant is microwave-safe.
This would include all brands of oven tempered glass
cookware.
However, do not use delicate glassware, such as
tumblers or wine glasses, as these might shatter as
the good warms.
Plastic storage containers
These can be used to hold foods that are to be
quickly reheated. However, they should not be used
to hold foods that will need considerable time in the
oven as hot foods will eventually warp or melt plastic
containers.
Paper
Paper plates and containers are convenient and safe
to use in using microwave function, provided that the
cooking tome is short and foods to be cooked are low
in fat and moisture. Paper towels are also very useful
for wrapping foods and for lining baking trays in which
greasy foods such as bacon are cooked. In general,
avoid coloured paper products as the colour may run.
Some recycled paper products may contain impurities
which could cause arcing or fires when used in the
microwave.
Plastic cooking bags
Provided they are made specially for cooking, cooking
bags are microwave safe. However, be sure to make
a slit in the bag so that steam can escape. Never use
ordinary plastic bags for cooking in using microwave
function, as they will melt and rupture.
Plastic microwave cookware
A variety of shapes and sizes of microwave cookware
are available. For the most part, you can probably use
items you already have on hand rather than investing
in new kitchen equipment.
Pottery, stoneware and ceramic
Containers made of these materials are usually fine
for use in using microwave function, but they should
be tested to be sure.
CAUTION
•Some items with high lead or iron content are
not suitable as cooking utensils.
•Utensils should be checked to ensure that they
are suitable for use in the microwave.

31
MAINTENANCE
Food characteristics &
microwave cooking
Keeping an eye on things
Always watch your food while it cooks. Your
microwave function is equipped with a light that turns
on automatically when the oven is in operation so
that you can see inside and check the progress of
your food. Directions given in recipes to elevate stir,
and the like should be thought of as the minimum
steps recommended. If the food seems to be cooking
unevenly, simply make the necessary adjustments
you think appropriate to correct the problem.
Factors affecting microwave cooking times
Many factors affect cooking times. The temperature
of ingredients used in a recipe makes a big difference
in cooking times. For example, a cake made with
ice-cold butter, milk, and eggs will take considerably
longer to bake than one made with ingredients
that are at room temperature. Some of the recipes,
particularly those for bread, cake, and custards,
recommend that food be removed from the oven
when they are slightly undercooked.
This is not a mistake. When allowed to stand, usually
covered, these foods will continue to cook outside of
the oven as the heat trapped within the outer portions
of the food gradually travels inward. If the food is left
in the oven until it is cooked all the way through, the
outer portions will become overcooked or even burnt.
You will become increasingly skillful is estimating both
cooking and standing times for various foods.
Density of food
Light, porous food such as cakes and breads cook
more quickly than heavy, dense foods such as
roasts and casseroles. You must take care when
microwaving porous food so that the outer edges do
not become dry and brittle.
Height of food
The upper portion of tall foods, particularly roasts, will
cook more quickly than the lower portion.
Therefore, it is wise to turn tall food several during
cooking.
Moisture content of food
Since the heat generated from microwaves causes
moisture to evaporate, relatively dry food such
as roasts and some vegetables should either be
sprinkled with water prior to cooking or covered to
retain moisture.
Bone and fat content of food
Bones conduct heat and fat cooks more quickly
than meat. Care must be taken when cooking bony
or fatty cuts of meat in order to prevent unevenly or
overcooked meat.
Quantity of food
The number of microwaves in your oven remains
constant regardless of how much food is being
cooked. Therefore, the more food you place in
the oven, the longer cooking time. Remember to
decrease cooking times by at least one third when
having a recipe.
Shape of food
Microwaves penetrate only about 2 cm into food, the
interior portion of thick foods are cooked as the heat
generated on the outside travels inward. Only the
outer edge of food is cooked by microwave energy;
the rest is cooked by conduction. The worst possible
shape for a food that is to be microwaved is a thick
square.
The corners will burn long before the centre is even
warm. Round thin foods and ring shaped foods cook
most successfully in the microwave.
Covering
A cover traps heat and steam which causes food to
cook more quickly. Use a lid or microwave cling film
with a corner folded back to prevent splitting.
Covering with greaseproof paper
It is a looser cover than a lid or cling film, the food
may dry out slightly. But because it makes a looser
cover than a lid or clingfilm, it allows the food to dry
out slightly.
Stirring
Stirring is one of the most important of all microwaving
techniques. In conventional cooking, food is stirred for
the purpose of blending. Microwaved food, however,
is stirred order to spread and redistribute heat. Always
stir from the outside towards the centre as the outside
of the food heats first.
Placing thicker portions facing outwards
Since microwaves are attracted to the outside portion
of food, it makes sense to place thicker portion of
meat, poultry and fish to the outer edge of the baking
dish. This way, thicker portions will receive the most
microwave energy and the food will cook evenly.

32 MAINTENANCE
Shielding
Strips of aluminium foil (which block microwaves)
can be placed over the corners or edges of square
and rectangular foods to prevent those portions from
overcooking. Never use too much foil and make sure
the foil is secured to the dish or it may cause 'arcing'
in the oven especially if the foil passes too closely to
the walls of the oven during rotation.
Elevating
Thick or dense foods can be elevated so that
microwaves can be absorbed by the underside and
centre of the foods.
Piercing
Foods enclosed in a shell, skin or membrane are
likely to burst in the oven unless they are pierced
prior to cooking. Such foods include yolks and whites
of eggs, clams and oysters and whole vegetables and
fruits.
Testing if cooked
Food cooks so quickly in a oven, it is necessary
to test it frequently. Some foods are left in the
microwave until completely cooked, but most foods,
including meats and poultry, are removed from the
oven while still slightly undercooked and allowed
to finish cooking during standing time. The internal
temperature of foods will rise between 5 °F (3 °C) and
15 °F (8 °C) during standing time.

33
TROUBLESHOOTING
TROUBLESHOOTING
Frequently Asked Questions
Why is the oven light not on during cooking?
There may be several reasons why the oven light is
not on.
Have you:
•Set a cooking time?
•Touched START?
Why does steam come out of the air exhaust
vent?
Steam is normally produced during cooking. The
microwave oven has been designed to vent this
steam.
Will the microwave oven be damaged if it operates
empty?
Yes. Never operate the oven empty or without the
glass turntable.
Does microwave energy pass through the viewing
screen in the door?
No. The metal screen bounces the energy back to
the oven cavity. The holes (or ports) allow only light to
pass through. They do not let microwave energy pass
through.
Why does a tone sound when a pad on the control
panel is touched?
The tone tells you that the setting has been entered.
Can my microwave oven be damaged if food is
cooked for too long?
Like any other cooking appliance, it is possible to
overcook food to the point that the food creates
smoke and even possibly fire, and damage to the
inside of the oven. It is always best to be near the
oven while you are cooking.
When the oven is plugged into the wall outlet for
the first time, and it does not work properly. What
is wrong?
The microcomputer controlling your oven may
temporarily become scrambled and fail to function
as programmed when you plug in for the first time
or when power resumes after a power interruption.
Unplug the oven from the 120 volt household outlet
and then plug it back in to reset the microcomputer.
Why do I see light reflection around the outer
case?
This light is from the oven light which is located
between the oven cavity and the outer wall of the
oven.
What are the various sounds I hear when the
microwave oven is operating?
The clicking sound is caused by a mechanical switch
turning the microwave oven’s magnetron ON and
OFF.
The heavy hum and clunk is from the change in
power the magnetron draws as it is turned ON and
OFF by a mechanical switch. The change in blower
speed is from the change in line voltage caused by
the magnetron being turned ON and OFF.
Is it possible to pop popcorn in a microwave
oven?
Yes, if using one of the two methods described below:
(1) microwave-popping devices designed specifically
for microwave cooking
(2) prepackaged commercial microwave popcorn that
is made for specific times and power output needed
Follow exact directions given by each manufacturer
for its popcorn popping product and do not leave the
oven unattended while the corn is being popped. If
corn fails to pop after the suggested time, discontinue
cooking. Overcooking could result in an oven fire.
CAUTION
Never use a brown paper bag for popping corn or
attempt to pop leftover kernels.
Why is a standing time recommended after
microwave cooking time is over?
Standing time allows foods to continue cooking
evenly for a few minutes after the actual microwave
oven cooking cycle. The amount of standing time
depends upon the density of the foods.
Why is additional time required for cooking food
stored in the refrigerator?
As in conventional cooking, the initial temperature of
food affects total cooking time. You need more time to
cook food taken out of a refrigerator than for food at
room temperature.

34 TROUBLESHOOTING
Federal Communications Commission Radio
Frequency Interference Statement
WARNING
This equipment generates and uses ISM
frequency energy and if not installed and
used properly, that is in strict accordance with
the manufacturer’s instructions, may cause
interference to radio and television reception. It
has been type tested and found to comply with
limits for ISM Equipment pursuant to part 18
of FCC Rules, which are designed to provide
reasonable protection against such interference
in a residential installation.
However, there is no guarantee that interference
will not occur in a particular installation. If this
equipment does cause interference to radio or
television reception, which can be determined
by turning the equipment off and on, the user is
encouraged to try to correct the interference by
one or more of the following:
•Reorient the receiving antenna of the radio or
television.
•Relocate the microwave oven with respect to the
receiver.
•Move the microwave oven away from the receiver.
•Plug the microwave oven into a different outlet so
that the microwave oven and the receiver are on
different branch circuits.
The manufacturer is not responsible for any
radio or TV interference caused by unauthorized
modification to this microwave oven. It is the
responsibility of the user to correct such interference.
Before Calling for Service
You can often correct operating problems yourself. If your microwave oven fails to work properly, locate the
operating problem in the list below and try the solutions listed for each problem.
If the microwave oven still does not work properly, contact the nearest LG Authorized Service Center.
LG Authorized Service Centers are fully equipped to handle your service requirements.
Symptoms Possible Causes / Solutions
Oven does not start
•Is the power cord plugged in?
•Is the door closed?
•Is the cooking time set?
Arcing or Sparking
•Are you using approved cookware?
•Is the oven empty?
Incorrect time of day
•Have you tried to reset the time of day?
Unevenly Cooked
Foods
•Are you using approved cookware?
•Is the glass turntable in the oven?
•Did you turn or stir the food while it was cooking?
•Were the foods completely defrosted?
•Was the time/cooking power level correct?
Overcooked Foods
•Was the time/cooking power level correct?
Undercooked Foods
•Are you using approved cookware?
•Were the foods completely defrosted?
•Was the time/cooking power level correct?
•Are the ventilation ports clear?
Improper Defrosting
•Are you using approved cookware?
•Was the time/cooking power level correct?
•Did you turn or stir the food during the defrosting cycle?

35
WARRANTY
WARRANTY(USA)
LG Electronics, Inc. will repair or replace your product, at LG’s option, if it proves to be defective in material or
workmanship under normal use, during the warranty period set forth below, effective from the date of original
consumer purchase of the product. This warranty is good only to the original purchaser of the product and
effective only when used in the United States, including U.S. Territories.
Warranty Period HOW SERVICE IS HANDLED
LABOR: One Year from the Date of Purchase*.
PARTS(except as listed below): One Years from the
Date of Purchase*.
MAGNETRON: Ten Years from the Date of
Purchase*.
Replacement Units and Repair Parts are warranted
for the remaining portion of the original unit’s
warranty period.
* Retain your Sales Receipt to prove the date of
purchase. A copy of your Sales Receipt must be
submitted at the time warranty service is provided.
Please call 1-800-243-0000 and choose the
appropriate option. (Phones are answered 24 hours
a day, 365 days per year.) Please have the product
type (Microwave) and your ZIP code ready.
Or visit our website at: www.lg.com
THIS WARRANTY IS IN LIEU OF ANY OTHER WARRANTY, EXPRESS OR IMPLIED, INCLUDING WITHOUT
LIMITATION, ANY WARRANTY OF MERCHANTABILITY OR FITNESS FOR A PARTICULAR PURPOSE.
TO THE EXTENT ANY IMPLIED WARRANTY IS REQUIRED BY LAW, IT IS LIMITED IN DURATION
TO THE EXPRESS WARRANTY PERIOD ABOVE. LG WILL NOT BE LIABLE FOR ANY INCIDENTAL,
CONSEQUENTIAL, INDIRECT, SPECIAL, OR PUNITIVE DAMAGES OF ANY NATURE, INCLUDING
WITHOUT LIMITATION, LOST REVENUES OR PROFITS, OR ANY OTHER DAMAGE WHETHER BASED IN
CONTRACT, TORT, OR OTHERWISE.
Some states do not allow the exclusion or limitation of incidental or consequential damages or limitations on how
long an implied warranty lasts, so the above exclusion or limitation may not apply to you. This warranty gives you
specific legal rights and you may also have other rights that vary from state to state.
THIS LIMITED WARRANTY DOES NOT APPLY TO:
•Service trips to your home to deliver, pick up, and/or install the product, instruct, or replace house fuses or
correct wiring, or correction of unauthorized repairs.
•Damages or operating problems that result from misuse, abuse, operation outside environmental specifications
or contrary to the requirements of precautions in the Operating Guide, accident, vermin, fire, flood, improper
installation, acts of God, unauthorized modification or alteration, incorrect electrical current or voltage, or
commercial use, or use for other than intended purpose.
The cost of repair or replacement under these excluded circumstances shall be borne by the consumer.
CUSTOMER INTERACTIVE CENTER NUMBERS
To obtain Customer Assistance, Product
Information, or Dealer or Authorized Service
Center location:
Call 1-800-243-0000 (24 hours a day, 365 days per year)
and select the appropriate option from the menu.
Or visit our website at: www.lg.com
TO CONTACT LG ELECTRONICS BY MAIL:
LG Customer Interactive Center
P. O. Box 240007
201 James Record Road
Huntsville, Alabama 35824
ATTN: CIC

36 WARRANTY
com

LG Customer Information Center
Register your product Online!
www.lg.com
1-800-243-0000
USA
1-888-542-2623
CANADA
Printed in China