LG Electronics USA S211ZH Microwave Oven User Manual
LG Electronics USA Microwave Oven Users Manual
Users Manual

MA-1417W/B
MS-214ZSE
website http://www.LGEservice.com
e-mail http://www.LGEservice.com/techsup.html

2
TABLE OF CONTENTS
SAFETY............................................................. 3-4
Precautions to Avoid Possible Exposure
To Excessive Microwave Energy ........................ 3
Grounding Instructions........................................ 3
Important Safety Instructions ..............................4
UNDERSTANDING YOUR
MICROWAVE OVEN ...................................... 5-10
Specifications...................................................... 5
Installation........................................................... 5
Parts and Accessories ........................................ 6
Control Panel ...................................................... 7
Cookware Guide ................................................. 8
Tips for Microwave Cooking ............................... 9
Precautions ........................................................10
Cleaning.............................................................10
USING YOUR MICROWAVE OVEN...............11-20
Setting the Clock................................................11
Child Lock...........................................................11
Timer ..................................................................12
EZ On.................................................................12
Timed Cooking...................................................12
Muti-Stage Cooking ...........................................13
Microwave Power Levels ...................................13
One Touch Cooking ...........................................14
One Touch Cook Chart ......................................15
More/Less ..........................................................16
Q-Defrost............................................................16
Auto Defrost.......................................................17
Auto Defrost Chart .............................................18
Cooking Tips................................................ 19-20
HEATING OR REHEATING GUIDE ................... 21
FRESH VEGETABLE CHART ........................... 22
TROUBLESHOOTING .................................. 23-25
Questions and Answers............................... 23-24
Before Calling for Service................................. 25
WARRANTY ........................................................27
Please record the model number and serial
number of this unit for future reference. We also
suggest you record the details of your contact
with GoldStar (LG Electronics U.S.A., Inc.)
concerning this unit.
Staple your receipt here for proof of retail
purchase.
Model No:
Serial No:
Dealer:
Dealer Phone No:
Customer Relations
LG Electronics U.S.A., Inc.
Service Divison Bldg. #3
201 James Record Rd.
Huntsville, AL 35824-0126
DO NOT remove the wave guide cover
inside the oven.
The wave
guide cover
Important Notes:
Thank You for purchasing a GoldStar microwave oven.

3
SAFETY
• Do not attempt to operate this oven with
the door open, since open-door operation can
result in harmful exposure to microwave
energy. It is important not to defeat or tamper
with the safety interlocks.
• Do not place any object between the oven
front face and the door, or allow soil or
cleaner residue to accumulate on sealing
surfaces.
• Do not operate the oven if it is damaged.
It is particularly important that the oven door
closes properly and that there is no damage to
the:
- door (bent),
- hinges and latches (broken or loosened),
- door seals and sealing surfaces.
• The oven should not be adjusted or
repaired by anyone except properly qualified
service personnel.
PRECAUTIONS TO AVOID POSSIBLE EXPOSURE
TO EXCESSIVE MICROWAVE ENERGY
GROUNDING INSTRUCTIONS
This appliance must be grounded. In the event
of an electrical short circuit, grounding reduces
the risk of electric shock by providing an escape
wire for the electric current. This appliance is
equipped with a cord having a grounding wire
and a grounding plug. The plug must be
plugged into an outlet that is properly installed
and grounded.
▲WARNING▲
Improper grounding can result in a risk of elec-
tric shock. Consult a qualified electrician if the
grounding instructions are not completely under-
stood, or if doubt exists as to whether the appli-
ance is properly grounded, and either:
1. If it is necessary to use an extension cord,
use only a 3-wire extension cord that has a
3-blade grounding plug, and a 3-slot recepta-
cle that will accept the plug on the appliance.
The marked rating of the extension cord shall
be equal to or greater than the electrical
rating of the appliance, or. . . .
2. Do not use an extension cord. If the power
supply cord is too short, have a qualified
electrician or serviceman install an outlet near
the appliance.
NOTES:
1. A short power-supply cord is provided to
reduce the risks resulting from becoming
entangled in or tripping over a longer cord.
2. Longer cord sets or extension cords are
available and may be used if care is exer-
cised in their use.
3. If a long cord or extension cord is used, (1)
the marked electrical rating of the cord set or
extension cord should be at least as great as
the electrical rating of the appliance, (2) the
extension cord must be a grounding-type
3-wire cord, and (3) the longer cord should be
arranged so that it will not drape over the
countertop or tabletop where it can be pulled
on by children or tripped over accidentally.
Ensure proper ground
exists before use
! !

4
SAFETY
IMPORTANT SAFETY INSTRUCTIONS
The safety instructions below will tell you how to use your oven to avoid harm to yourself or damage to your
oven.
WARNING - To reduce the risk of burns, electric shock, fire, injury to persons, or
exposure to excessive microwave energy:
1. Read all instructions before using the appliance.
2. Read and follow the specific PRECAUTIONS TO AVOID POSSIBLE EXPOSURE TO
EXCESSIVE MICROWAVE ENERGY found on page 3 of this manual.
3. This appliance must be grounded. Connect only to properly grounded outlet.
See GROUNDING INSTRUCTIONS found on page 3 of this manual .
4. Install or locate this appliance only in accordance with the provided installation instructions.
5. Some products, such as whole eggs and sealed containers – for example, closed glass jars – may
explode and should not be heated in this oven.
6. Use this appliance only for its intended use as described in the manual. Do not use corrosive chemicals
or vapors in this appliance. This type of oven is specifically designed to heat, cook, or dry food. It is not
designed for industrial or laboratory use.
7. As with any appliance, close supervision is necessary when used by children.
8. Do not operate this appliance if it has a damaged cord or plug, if it is not working properly, or if it has
been damaged or dropped.
9. This appliance should be serviced only by qualified service personnel. Contact the nearest authorized
service facility for examination, repair, or adjustment.
10. Do not cover or block any openings on the appliance.
11. Do not store this appliance outdoors. Do not use this product near water – for example, near a kitchen
sink, in a wet basement, or near a swimming pool, and the like.
12. Do not immerse cord or plug in water.
13. Keep cord away from heated surfaces.
14. Do not let cord hang over the edge of a table or counter.
15. When cleaning surfaces of door and oven that come together on closing the door, use only mild,
nonabrasive soaps or detergents applied with a sponge or soft cloth.
16. To reduce the risk of fire in the oven cavity:
a. Do not overcook food. Carefully attend appliance if paper, plastic, or other combustible materials are
placed inside the oven to facilitate cooking.
b. Remove wire twist-ties from paper or plastic bags before placing bag in oven.
c. If materials inside the oven should ignite, KEEP OVEN DOOR CLOSED, turn oven off, and disconnect
the power cord or shut off power at the fuse or circuit breaker panel.
d. Do not use the cavity for storage purposes. Do not leave paper products, cooking utensils, or food in
the cavity when not in use.
17. Do not heat any type of baby bottles or baby food. Uneven heating may occur and could cause personal
injury.
18. Avoid heating small-necked containers such as syrup bottles.
19. Avoid using corrosive and vapors, such as sulfide and chloride.
20. Liquids heated in certain shaped containers (especially cylindrical-shaped containers) may become over-
heated. The liquid may splash out with a loud noise during or after heating or when adding ingredients
(instant coffee, etc.), resulting in harm to the oven and possible injury. In all containers, for best results,
stir the liquid several times before heating. Always stir liquid several times between reheatings.
SAVE THESE INSTRUCTIONS

5
UNDERSTANDING YOUR MICROWAVE OVEN
SPECIFICATIONS
*IEC 60705 RATING STANDARD
Specifications subject to change without prior notice.
MA-1417W/B MS-214ZSE
MODEL
Power Supply
Rated Power Consumption
Microwave Output
Frequency
Rated Current
Overall Dimensions (WxHxD)
Oven Cavity Dimensions (WxHxD)
Capacity of Oven Cavity
120 V AC, 60 Hz
1,550 W 1,600W
*1,200 W
2,450 MHz
13.6 A 13.5 A
217/8˝ x 125/8˝ x 171/4˝23
7/8˝ x 139/16˝ x 1913/16˝
1413/16˝ x 97/8˝ x 1515/16˝17
17/32˝ x 107/8˝ x 1821/32˝
1.4 Cu.ft. 2.1 Cu.ft.
INSTALLATION
A. Circuits
For safety purposes this oven must be plugged into a
15 or 20 Amp circuit. No other electrical appliances or
lighting circuits should be on this line. If in doubt, con-
sult a licensed electrician.
B. Voltage Warning
The voltage used at the wall receptacle must be the
same as specified on the oven name plate located on
the back or on the side of the control panel of the oven.
Use of a higher voltage is dangerous and may result in
a fire or other type of accident causing oven damage.
Low voltage will cause slow cooking. In case your
microwave oven does not perform normally in spite of
proper voltage, remove and reinsert the plug.
C. Placement of the Oven
Your microwave oven can be placed easily in your
kitchen, family room, or anywhere else in your home.
Place the oven on a flat surface such as a kitchen
countertop or a specially designed microwave oven
cart. Do not place oven above a gas or electric range.
Free air flow around the oven is important. Allow at
least 4 inches of space at the top, sides, and back of
the oven for proper ventilation.
D. Do not block the air vents
All air vents should be kept clear during cooking. If air
vents are covered during oven operation the oven may
overheat. In this case, a sensitive thermal safety device
automatically turns the oven off. The oven will be
inoperable until it has cooled sufficiently.
E. Radio interference
1. Microwave oven operation may interfere with TV or
radio reception.
2. When there is interference, it may be reduced or
eliminated by taking the following measures:
a. Clean the door and the sealing surfaces of the
oven.
b. Reorient the receiving antenna of radio or
television.
c. Relocate the microwave oven in relation to the TV
or radio.
d. Move the microwave oven away from the
receiver.
e. Plug the microwave oven into a different outlet
so that microwave oven and receiver are on
different branch circuits.
6
UNDERSTANDING YOUR MICROWAVE OVEN
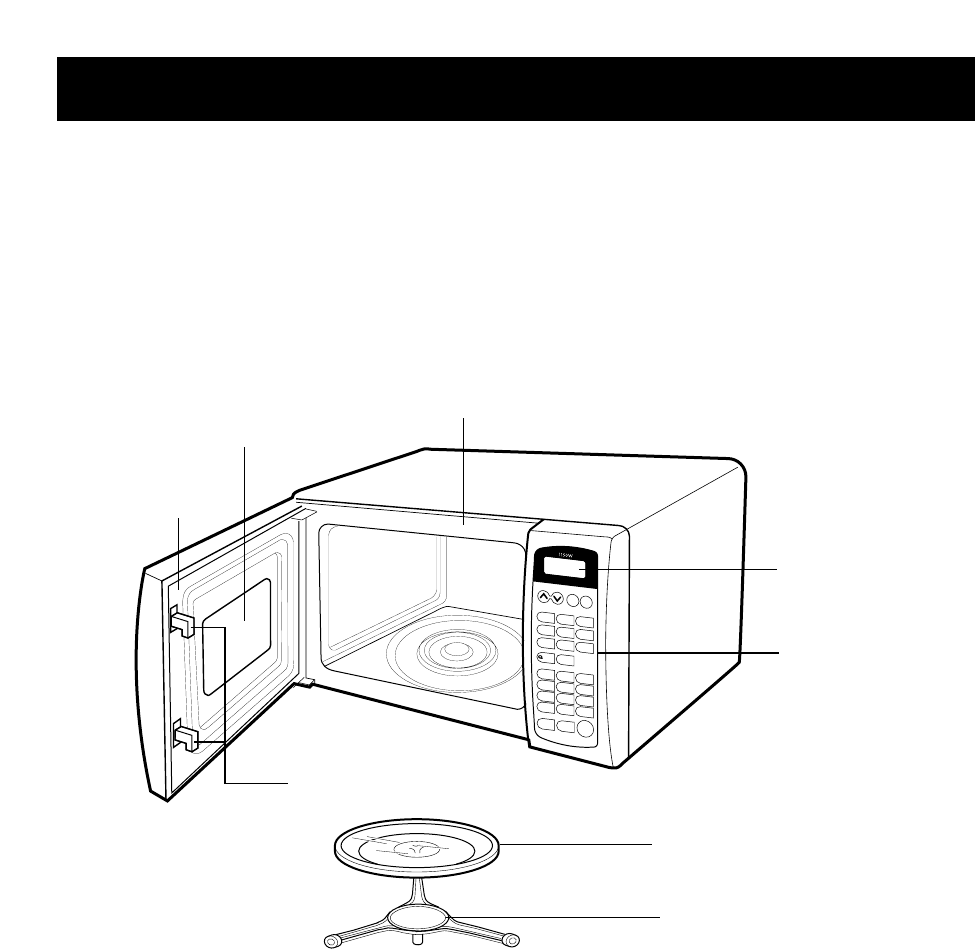
PARTS AND ACCESSORIES
Your oven comes with the following accessories:
1 Use and Care Manual
1 Glass Turntable
1 Rotating Ring
Oven Front Plate
Window Door Screen
Door Seal
Control Panel
Safety
Interlock
System
Turntable
Rotating Ring
Star
Start/
Pause
Pause
Clear
Clear
One TOne Touch Controlouch Control
More
More
Clock
Clock Timer
imer
Less
Less
1.Ground Meat
1.Ground Meat
2.Poultr2.Poultry
3.Steaks/Chops.Steaks/Chops
Ez OnEz On
Popcor
PopcornPotato
Potato Beverage
Beverage
Pizza
Pizza Food
Food
Plate
Plate Frozen
Frozen
Entree
Entree
Fresh
Fresh
Vegetable
egetable Baked
Baked
Goods
Goods Casserole
Casserole
-
-Defrost
Defrost
Auto
Auto
Defrost
Defrost
123
456
789
Time
ime
0
Power
Power
Display Window
NOTE: This microwave oven is designed for household use only. It is not recommended for commercial
use.
7
Start/
Pause
ClearClear
One Touch Control
MoreMore
Clock Timerimer
Less
1.Ground Meat
2.Poultry
3.Steaks/Chops
Ez On
Popcorn Potato Beverage
Pizza Food
Plate Frozen
Entree
Fresh
Vegetable Baked
GoodsGoods CasseroleCasserole
-Defrost
Auto
DefrostDefrost
123
456
789
Time 0Power
ባ
ቤ
ቧ
ቨ
ቪ
ቫ
ቮ
ቯ
ቱ
ቲ
ታ
ቴ
ቶ
ቩ
ቭ
ተ
ት
ብ
ቦ
ቢ
UNDERSTANDING YOUR MICROWAVE OVEN
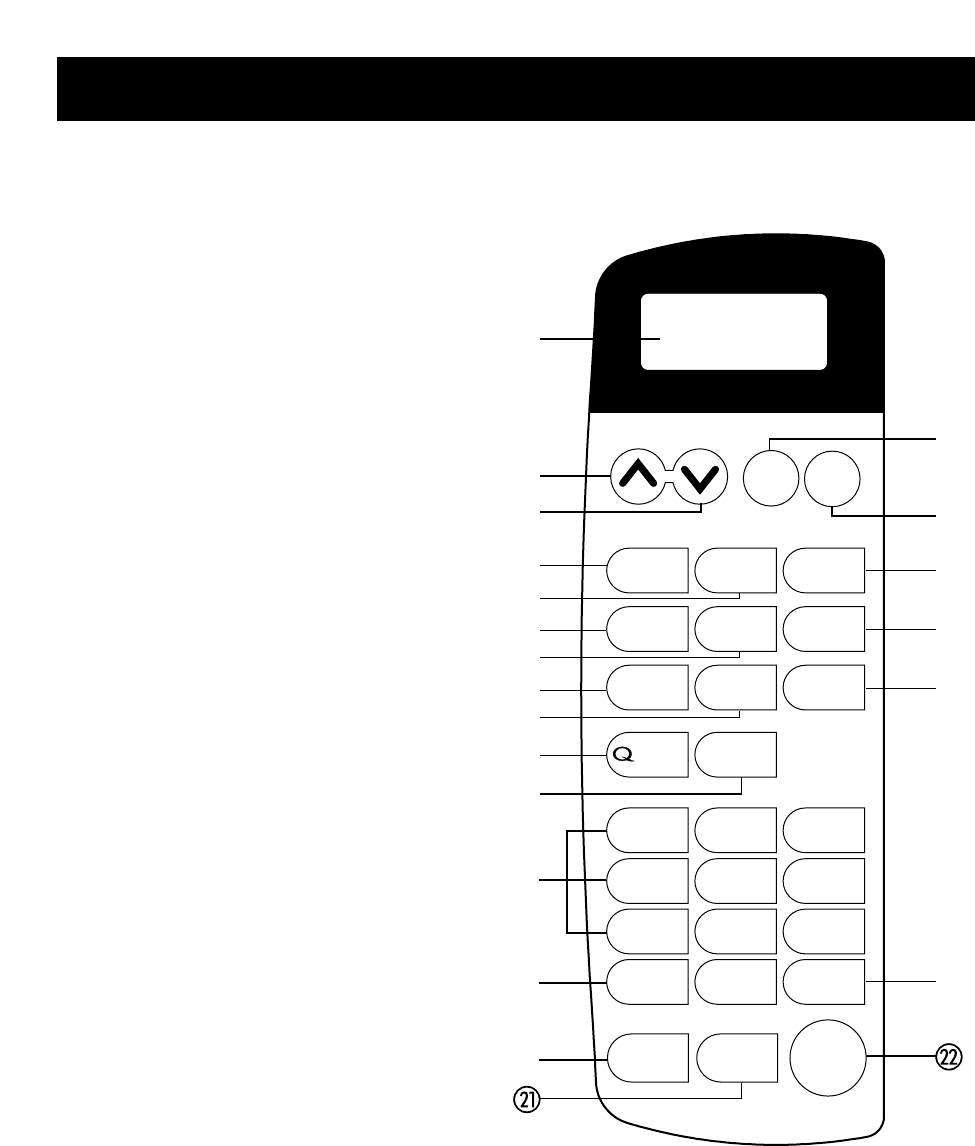
CONTROL PANEL
1. DISPLAY. The display includes a clock and
indicators that tell you time of day, cooking time
settings, and cooking functions selected.
2. MORE. Each time you touch this pad, you add
10 seconds to the cooking time.
3. LESS. Each time you touch this pad, you
subtract 10 seconds from the cooking time.
4. CLOCK. Touch this pad to enter the time of day.
5. TIMER. Touch this pad to use your microwave
oven as a kitchen timer.
6. ONE TOUCH POPCORN. Touch this pad
to pop a bag of microwave popcorn without
entering a cook power or time.
7. ONE TOUCH POTATO. Touch this pad to cook
up to 4 potatoes without entering a cook power
or time.
8. ONE TOUCH BEVERAGE. Touch this pad to
heat up to 2 cups of beverage without entering
a cook power or time.
9. ONE TOUCH PIZZA. Touch this pad to heat up
to 3 slices of refrigerated pizza without enter-
ing a cook power or time.
10. ONE TOUCH FOOD PLATE. Touch this pad to
heat a plate of food without entering a cook
power or time.
11. FROZEN ENTREE. Touch this pad to cook a
10 oz. frozen entree without entering a cook
power or time.
12. FRESH VEGETABLE. Touch this pad to cook
fresh vegetables without entering a cook power
or time.
13. BAKED GOODS. Touch this pad to heat up to
4 items without entering a cook power or time.
14. CASSEROLE. Touch this pad to heat up to 4
cups of casserole without entering a cook
power or time.
15. Q-DEFROST. Touch this pad to thaw only 1lb
of ground meat, poultry, or steaks/chops very
quickly.
16. AUTO DEFROST. Touch this pad to thaw
ground meat, poultry, or steaks/chops by enter-
ing a weight.
17. NUMBER PADS. Touch number pads to enter
cooking time, power level, quantities, or weights.
18. TIME. Touch this pad to set a cooking time.
19. POWER. Touch this pad to set a cooking power.
20. CLEAR. Touch this pad to clear entries.
21. START/PAUSE. Touch this pad to start or stop
all entries (except the ONE TOUCH and EZ ON
functions, which start automatically) and to turn
Child Lock on or off.
22. EZ ON. Touch this pad to cook at 100% cook power
for 1 minute to 99 minutes, 59 seconds.

8
USE
Ovenproof Glass
• Glass treated for use in high-intensity heat
includes utility dishes, bread dishes, pie plates,
cake plates, liquid measuring cups, casseroles,
and bowls without metallic trim.
China
• Bowls, cups, serving plates, and platters without
metallic trim can be used in your oven.
Plastic
• When using plastic wrap as a cover, make sure
that the dish is deep enough so the plastic wrap
does not touch the food. As the food heats, it may
melt the plastic wrap wherever the wrap touches
the food.
• Place plastic wrap loosely over the top of the dish
and secure it by pressing the wrap to the sides of
the dish.
• Vent by turning back one corner of the plastic wrap.
This will allow excess steam to escape.
• Use plastic dishes, cups, semi-rigid freezer
containers, and plastic bags only for short time
cooking. Use these with care because the
plastic may soften from the heat of the food.
Paper
• Microwave-safe paper towels, waxed paper, paper
napkins, and paper plates with no metallic trim or
design can be used in your oven.
• Refer to the manufacturer’s label for use of any
paper product in the microwave oven.
DO NOT USE
Metal Utensil
• Metal shields food from microwave energy and
produces uneven cooking. Avoid metal skewers,
thermometers, or foil trays.
• Metal utensils can cause arcing, which is a
discharge of electric current. Arcing can damage
your microwave oven.
Metal Decoration
• Do not use metal-trimmed or metal-banded
dinnerware, casserole dishes, etc.
Centura™Tableware
• The Corning Company recommends that you
do not use Centura tableware and some
Corelle™ closed-handle cups for microwave
cooking.
Aluminum Foil
• Avoid large sheets of aluminum foil because
they hinder cooking and may cause arcing.
• Use small pieces of foil to shield poultry legs
and wings.
• Keep all aluminum foil at least 1 inch from the
walls and door of the oven.
Wood
• Wooden bowls, boards, and baskets will dry out
and may split or crack when you use them in the
microwave oven.
Tightly Closed Containers
• Tightly closed cookware can explode. Be sure
to leave an opening for steam to escape from
covered cookware.
Brown Paper
• Avoid using brown paper bags. They absorb
heat and could burn.
Metal Twist Ties
• Always remove metal twist ties as they can
become hot and cause a fire.
UNDERSTANDING YOUR MICROWAVE OVEN
COOKWARE GUIDE
Most heat-resistant, non-metallic cookware is safe for use in your microwave oven. However, to test cookware
before using, follow these steps:
1. Place the empty cookware in the microwave oven.
2. Measure 1 cup of water in a glass measuring cup and place it in the oven beside the cookware.
3. Microwave on 100% power for 1 minute. If the dish is warm, it should not be used for microwave cooking.

9
UNDERSTANDING YOUR MICROWAVE OVEN
TIPS FOR MICROWAVE COOKING
BROWNING
Meat and poultry with high fat content that are cooked
for 10 or 15 minutes or longer will brown lightly. Foods
cooked a shorter time can be brushed with a browning
agent, such as Worcestershire sauce, soy sauce, or
barbecue sauce.
COVERING
A cover traps heat and steam and causes the food to
cook more quickly. Use a lid or microwave-safe plastic
wrap with one corner folded back to vent the excess
steam. Lids on glass casseroles can become hot
during cooking. Handle carefully. Waxed paper will
prevent the food from splattering in the oven and help
retain heat. When warming bread items, use waxed
paper, napkins, or paper towels. To absorb extra
moisture, wrap sandwiches and fatty foods in paper
towels.
SPACING
Arrange individual foods, such as baked potatoes,
cupcakes, and hors d’oeuvres in a circle and at least
1 inch apart. This will help the food cook more evenly.
STIRRING
Stirring blends flavors and redistributes the heat in
foods. Always stir from the outside toward the center
of the dish. Food at the outside of the dish heats first.
TURNING
Large foods, such as roasts and whole poultry, should
be turned so that the top and bottom cook evenly. Also
turn over chicken pieces and chops.
ARRANGEMENT
Do not stack food. Arrange in a single layer in the dish
for more even cooking. Because dense foods cook
more slowly, place thicker portions of meat, poultry,
fish, and vegetables toward the outside of the dish.
TESTING FOR DONENESS
Because foods cook quickly in a microwave oven, you
need to test frequently for doneness.
STANDING TIME
Food often needs to stand from 2 to 15 minutes after
you remove it from the oven. Usually, you need to
cover food during standing time to retain heat. Remove
most foods when they are slightly undercooked and
they will finish cooking during standing time. The
internal temperature of food will rise about 10 °F
during standing time.
SHIELDING
To prevent some portions of rectangular or square
dishes from overcooking, you may need to shield
them with small strips of aluminum foil to block the
microwaves. You can also cover poultry legs and
wing tips with foil to keep them from overcooking.
Always keep foil at least 1 inch from oven walls
to prevent arcing.
PIERCING
Pierce the shell, skin, or membrane of foods before
cooking to prevent them from bursting. Foods that
require piercing include yolks and whites of eggs, hot
dogs, clams, oysters, and whole vegetables, such as
potatoes and squash.

10
CLEANING
PRECAUTIONS
UNDERSTANDING YOUR MICROWAVE OVEN
• Place the front surface of the door three inches or
more from the countertop edge to avoid accidental
tipping of the microwave oven during normal use.
• To program the oven, make sure you touch the center
of each pad firmly since the areas between the pads
will not activate the oven. A tone will sound each time
a pad is touched correctly. Don’t touch several pads at
once.
• Do not strike the control panel with silverware,
utensils, etc. Breakage may occur.
• Always use caution when taking the cooking utensils
out of the oven. Some dishes absorb heat from the
cooked food and may be hot. See Cookware Guide
earlier in this section for more information.
• Do not rinse cooking utensils by placing them in water
immediately after cooking. This may cause breakage.
Also, always allow the turntable to cool before
removing it from the oven.
• Never operate the oven when it is empty. Food or
water should always be in the oven during operation
to absorb the microwave energy.
• Do not use the oven to dry newspapers or clothes.
They may catch fire.
• Use thermometers that have been approved for
microwave oven cooking.
• The turntable must always be in place when you
operate the oven.
• Do not use your microwave oven to cook eggs in the
shell. Pressure can build up inside the shell, causing it
to burst.
• There are several precautions to follow when
microwaving popcorn:
— Do not pop popcorn, except in a microwave-safe
container or commercial packages designed for
microwave ovens.
— Never try to pop popcorn in a paper bag that is not
microwave-approved.
— Overcooking may result in smoke and fire.
— Do not repop unpopped kernels.
— Do not reuse popcorn bags.
— Listen while corn pops. Stop oven when popping
slows to 2-3 seconds between pops.
— Do not leave microwave unattended while popping
corn.
— Follow directions on bag.
NOTE: Before cleaning the oven, unplug the power
cord. If this is impossible, open the oven door to pre-
vent an accidental oven start.
INTERIOR
Wipe the oven inside and outside with a soft cloth and
a mild detergent solution. Then rinse and wipe dry.
This should be done weekly or more often, if needed.
Never use cleaning powders or rough pads.
Excessive oil splatters on the inside top will be difficult
to remove if left for many days. Wipe splatters with a
wet paper towel, especially after cooking chicken or
bacon.
REMOVABLE PARTS
The turntable and rotating ring are removable. They
should be hand-washed in warm (not hot) water with a
mild detergent and a soft cloth. Once they are clean,
rinse well and dry with a soft cloth. Never use cleaning
powders, steel wool, or rough pads.
• The turntable may be cleaned at the sink. Be careful
not to chip or scratch the edges as this may cause
the turntable to break during use.
• The rotating ring should be cleaned regularly.
DOOR
For best performance and safety, the inner door panel
and the oven front frame should be free of food or
grease buildup. Wipe often with a mild detergent; then
rinse and wipe dry. Never use cleaning powders or
rough pads.
After cleaning the control panel, touch STOP/CLEAR
to clear any entries that might have been entered acci-
dentally while cleaning the panel. Also make sure that
the turntable and rotating ring are in the right position.
11
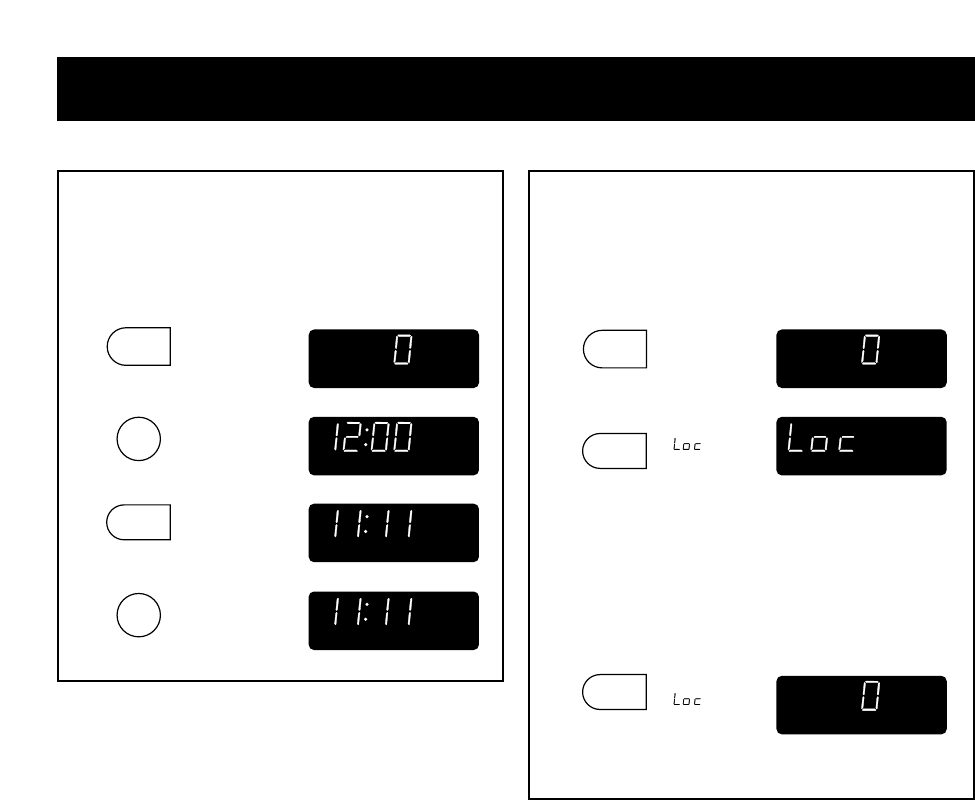
USING YOUR MICROWAVE OVEN
When your oven is plugged in or after a power
interruption, Oshows on the display.
Example: To set the clock for 11:11.
Touch: Display Shows:
SETTING THE CLOCK
1. once.
2.
3. four
times.
4. to start the
clock.
once.
You can use this safety feature to lock the control
panel so that children cannot use the oven when
you do not want them.
To set CHILD LOCK:
Touch: Display Shows:
CHILD LOCK
Hold until
appears in
the display.
To cancel CHILD LOCK:
Touch: Display Shows:
Hold until
disappears
from the
display.
1
ClockClock
DEFROST COOK START AUTO
Lbs
OZ
CUP
Kg
SLICE
PCS
DEFROST COOK START AUTO
Lbs
OZ
CUP
Kg
SLICE
PCS
DEFROST COOK START AUTO
Lbs
OZ
CUP
Kg
SLICE
PCS
DEFROST COOK START AUTO
Lbs
OZ
CUP
Kg
SLICE
PCS
DEFROST COOK START AUTO
Lbs
OZ
CUP
Kg
SLICE
PCS
DEFROST COOK START AUTO
Lbs
OZ
CUP
Kg
SLICE
PCS
DEFROST COOK START AUTO
Lbs
OZ
CUP
Kg
SLICE
PCS
0
0
1. once.
ClearClear
2.
ClearClear
ClockClock
12
TIMED COOKING
1.
2.
5. to start
oven.
once.
3. once.
4. to set a
cook power
of 80%.
6. At the end of the cook
time, four tones will
sound. The oven will
stop.
USING YOUR MICROWAVE OVEN
This feature lets you program a specific cook time
and power. For best results, there are 10 power
level settings in addition to HIGH power (100%).
Refer to the Microwave Power Level Chart on
page 13 for more information.
NOTE: If you do not select a power level, the oven
will automatically cook at HIGH (100%) power.
Example: To cook for 5 minutes, 30 seconds
at 80% power.
Touch: Display Shows:
This time-saving feature lets you cook at 100%
power for up to 99 minutes, 59 seconds.
1 minute are added to the cook time each time you
press EZ On.
Example: To cook for 1 minutes.
Touch: Display Shows:
EZ ON
1.
2. At the end of the cook
time, four tones will
sound. The oven will
stop.
once.
to set a cook time of
5 minutes, 30 seconds.
StarStart/
PausePause
Ez OnEz On
Timeime
PowerPower
5
3
0
8
COOKDEFROST START AUTO
Lbs
OZ
CUP
Kg
SLICE
PCS
COOKDEFROST AUTO
Lbs
OZ
CUP
Kg
SLICE
PCS
START
STARTDEFROST AUTO
Lbs
OZ
CUP
Kg
SLICE
PCS
COOK
COOKDEFROST START AUTO
Lbs
OZ
CUP
Kg
SLICE
PCS
COOKDEFROST AUTO
Lbs
OZ
CUP
Kg
SLICE
PCS
START
DEFROST COOK START AUTO
Lbs
OZ
CUP
Kg
SLICE
PCS
COOKDEFROST AUTO
Lbs
OZ
CUP
Kg
SLICE
PCS
START
DEFROST START AUTO
Lbs
OZ
CUP
Kg
SLICE
PCS
COOK
(Time counting down.)
(Time counting down.)
TIMER
1.
2.
3. to start the
timer.
once.
Time counting down.
Your microwave oven can be used as a kitchen
timer. You can set up to 99 minutes, 99 seconds.
Example: To set 3 minutes.
Touch: Display Shows:
Timerimer
3
0
0
Timerimer
DEFROST COOK START AUTO
Lbs
OZ
CUP
Kg
SLICE
PCS
DEFROST COOK START AUTO
Lbs
OZ
CUP
Kg
SLICE
PCS
DEFROST COOK START AUTO
Lbs
OZ
CUP
Kg
SLICE
PCS
* If you want to cancel the
TIMER, touch TIMER
during time counting down.
13
USING YOUR MICROWAVE OVEN
MICROWAVE POWER LEVELS
Your microwave oven has 10 cook power levels to let
you cook or heat a wide variety of foods. Refer to the
chart below for suggestions:
Microwave Power Level Chart
•Boiling water.
•Making candy.
•Cooking poultry pieces, fish, & vegetables.
•Cooking tender cuts of meat.
•Whole poultry.
•Reheating rice, pasta, & vegetables.
•Reheating prepared foods quickly.
•Reheating sandwiches.
•Cooking egg, milk, & cheese dishes.
•Cooking cakes, breads.
•Melting chocolate.
•Cooking veal.
•Cooking whole fish.
•Cooking puddings & custard.
•Cooking ham, whole poultry, & lamb.
•Cooking rib roast, sirloin tip.
•Thawing meat, poultry, & seafood.
•Cooking less tender cuts of meat.
•Cooking pork chops, roast.
•Taking chill out of fruit.
•Softening butter.
•Keeping casseroles & main dishes warm.
•Softening butter & cream cheese.
•Standing time.
10
(High)
9
8
7
6
5
4
3
2
1
0
Use
Power
Level
For best results, some recipes call for different cook
powers during different stages of a cook cycle. You
can program your oven to switch from one power
level to another for up to 2 stages.
NOTE: If you are using the AUTO DEFROST
feature as one of the cooking stages, it must be
programmed as the first stage.
Example: To set a 2-stage cook cycle.
Touch: Display Shows:
MULTI-STAGE COOKING
1.
2.
5. once.
once.
3. once.
4. to set an
80% cook
power for
the first
stage.
to set a 3 minute cook
time for the first stage.
6.
to set a 7 minute cook
time for second stage.
7. once.
8. to set a
50% cook
power for
the second
stage.
9.
At the end of the
cooking time, four
tones will sound.
The oven will stop.
to start
the
oven.
11.
When the first stage is over, you will hear two
short tones as the oven begins the second
cook stage.
10.
StarStart/
PausePause
PowerPower
PowerPower
5
Timeime
Timeime
COOKDEFROST START AUTO
Lbs
OZ
CUP
Kg
SLICE
PCS
COOKDEFROST AUTO
Lbs
OZ
CUP
Kg
SLICE
PCS
START
COOKDEFROST AUTO
Lbs
OZ
CUP
Kg
SLICE
PCS
START
COOKDEFROST AUTO
Lbs
OZ
CUP
Kg
SLICE
PCS
START
COOKDEFROST AUTO
Lbs
OZ
CUP
Kg
SLICE
PCS
START
COOKDEFROST AUTO
Lbs
OZ
CUP
Kg
SLICE
PCS
START
COOKDEFROST AUTO
Lbs
OZ
CUP
Kg
SLICE
PCS
START
STARTDEFROST AUTO
Lbs
OZ
CUP
Kg
SLICE
PCS
COOK
8
3
0
0
7
0
0
DEFROST COOK START AUTO
Lbs
OZ
CUP
Kg
SLICE
PCS
DEFROST COOK START AUTO
Lbs
OZ
CUP
Kg
SLICE
PCS
14
USING YOUR MICROWAVE OVEN
Use this function to cook food without entering a
cook time or power. Refer to the One Touch Cook
Chart below for more information.
Example: To cook a 3.5 oz. bag of
microwave popcorn.
Touch: Display Shows:
ONE TOUCH COOKING
1.
2.
3.
(Time counting down.)
At the end of cooking
time four tones will
sound. The oven will
stop.
Example 2: To cook 1 potato.
Touch: Display Shows:
1.
2.
3.
(Time counting down.)
The oven will start
automatically.
At the end of cooking
time four tones will
sound. The oven will
stop.
once.
once.
PopcorPopcorn
PotatoPotato
COOKDEFROST START AUTO
Lbs
OZ
CUP
Kg
SLICE
PCS
COOKDEFROST START AUTO
Lbs
OZ
CUP
Kg
SLICE
PCS
STARTCOOKDEFROST AUTO
Lbs
CUP
Kg
SLICE
PCS
OZ
COOKDEFROST AUTO
Lbs
OZ
CUP
Kg
SLICE
START
PCS
The oven will start
automatically.

15
USING YOUR MICROWAVE OVEN
ONE TOUCH COOK CHART
NOTE: No cover is needed for the ONE TOUCH foods listed in this chart unless called for in the directions.
Pad
POPCORN
BEVERAGE
POTATO
PIZZA
FROZEN
ENTREE
FOOD PLATE
FRESH
VEGETABLE
BAKED GOODS
CASSEROLE
Touch keypad
1 time
2 times
3 times
1 time
2 times
1 time
2 times
3 times
4 times
1 time
2 times
3 times
1 time
2 times
1 time
2 times
3 times
4 times
1 time
2 times
3 times
4 times
1 time
2 times
3 times
4 times
Serving size
3.5 oz.
3.0 oz.
1.75 oz.
1 cup
2 cups
1 ea (10 oz.)
2 ea (20 oz.)
3 ea (30 oz.)
4 ea (40 oz.)
1 slice (5 oz.)
2 slices (10 oz.)
3 slices (15 oz.)
10 oz.
1 serving (8 oz.)
2 servings (16 oz.)
1 cup
2 cups
3 cups
4 cups
1 ea
2 ea
3 ea
4 ea
1 cup
2 cups
3 cups
4 cups
Directions
• Follow package instructions.
• Use popcorn package which is made
especially for microwave cooking.
• Do not try to pop unpopped kernels.
• Heat only 1 package at a time.
• Do not leave the microwave oven unattended
while popping popcorn.
• Use mug or microwave-safe cup.
• Stir after reheating.
• Place in center of the oven on paper towel.
• Pierce potato several times with fork.
• After cooking, let stand for 5 minutes.
• Place the refrigerated pizza on the plate in
the center of the microwave oven.
• Follow the package instructions.
• Example of one frozen entrée is Lasagna
with Meat Sauce, Chicken with Rice, Sliced
Turkey Breast with Rice and Vegetable.
• Arrange food on microwave plate.
• Place meaty portions and bulky vegetable
to the outside of the plate.
• Cover with plastic wrap and vent.
• After cooking, let stand for 2 minutes.
• Prepare vegetable (wash and cut into
1/2-inch pieces).
• Most vegetables need 2 to 3 minutes
standing time to finish cooking.
1 cup – Add 2 tablespoons water
2 cups – Add 1/4 cup water
3 cups – Add 1/3 cup water
4 cups – Add 1/2 cup water
• Place in the center of the oven on a paper
towel.
• Place in the center of the oven.
• Cover with plastic wrap and vent.
16
USING YOUR MICROWAVE OVEN
Q-DEFROST
Use this function to thaw only 1lb of Ground meat,
Poultry, or Steaks/Chops very quickly.
Example: To cook 1lb of Poultry.
Touch: Display Shows:
MORE/LESS
By using the More and Less functions, you can
adjust the cook time for One Touch Cook for a
longer or shorter time. Pressing More will add 10
seconds to the cooking time each time you press
it. Pressing Less will subtract 10 seconds from the
cooking time each time you press it.
Example: To adjust the One Touch (Popcorn)
cooking time for a longer time.
Touch: Display Shows:
1.
3.
PopcorPopcorn
MoreMore LessLess
Remaining time will
increase or decrease by
10 seconds.
2.
STARTCOOKDEFROST AUTO
Lbs
CUP
Kg
SLICE
PCS
OZ
The oven will start
automatically.
1.
2.
3.
(Time counting down.)
(Time counting down.)
The oven will start
automatically.
• You can touch this pad once for 1lb of Ground
meat, or three times for 1lb of Steaks/Chops
continuously.
• Refer to Auto Defrost Chart.
-Defrost
START
Lbs
CUP
Kg
SLICE
PCS
OZ
COOK AUTODEFROST
COOKDEFROST AUTO
Lbs
OZ
CUP
Kg
SLICE
START
PCS
touch 2 times
continuously.
NOTES: When the oven will sound a tone during
time counting down, Open the door and turn,
separate, or rearrange food.
17
USING YOUR MICROWAVE OVEN
AUTO DEFROST thaws frozen food without entering
a cook time or cook power. Three defrost categories
are preset in your oven: Ground Meat, Poultry, and
Steaks/Chops. See the Auto Defrost Chart below.
NOTES:
• For added convenience, AUTO DEFROST has a
built-in reminder tone to tell you when to check, turn
over, separate, or rearrange food. The oven will sound a
tone during the defrost cycle. At the tone, open the door
and turn, separate, or rearrange food. Remove any por-
tions that have thawed. Return frozen portion to the oven
and touch START to resume the defrost cycle.
• You can defrost foods that weigh 0.1 to 6.0 lbs
(0.1-4.0 kgs).
For best results:
• Remove fish, shellfish, meat, and poultry from its
original closed paper or plastic package (wrapper).
Otherwise, the wrap will hold steam and juice close
to the foods, which can cause the outer surface of
the foods to cook.
• Shape ground meat into the form of a doughnut before
freezing. When defrosting, remove thawed meat when
the reminder tone sounds and continue defrosting.
• Place foods in a shallow container or on a microwave
roasting rack to catch drippings.
• Food should still be somewhat icy in the center when
removed from the oven.
Example: To defrost 1.2 lbs. of ground beef.
Touch: Display Shows:
AUTO DEFROST
1. once for
Ground
Meat.
3. to start
the oven.
4. At the end of the
defrost time, four
tones will sound.
The oven will stop.
StarStart/
PausePause
AutoAuto
DefrostDefrost
2.
to enter 1.2 lbs.
1
2
CUP
Kg
SLICE
PCS
OZ
COOK AUTOSTART
Lbs
DEFROST
(Time counting down.)
COOKDEFROST START AUTO
Lbs
OZ
CUP
Kg
SLICE
PCS
COOK AUTO
OZ
CUP
Kg
SLICE
START
PCS
DEFROST
Lbs

18
POULTRY 2 times Poultry
Whole Chicken
Chicken Pieces
Cornish Hens: Whole,
Split
Turkey
Breast (under 6 lbs.)
Turn over. Finish defrosting breast-side
down. Cover warm areas with aluminum
foil.
Separate pieces and rearrange.
Turn over. Cover warm areas with
aluminum foil.
Turn over and arrange.
10-20 min.
Rinse under cold
running water.
5-10 min.
10-20 min.
Rinse under cold
running water.
10-20 min.
Rinse under cold
running water.
STEAKS/
CHOPS
3 times Beef Steaks
Pork Chops
Lamp Chops
Fish
Steaks, whole fish
fillets
Shellfish
Crabmeat, Shrimp
Lobster tails
Scallops
Turn over. Cover warm areas with
aluminum foil.
Same as above.
Same as above.
Turn over and rearrange. Cover head
and tail with foil.
Turn over. Separate fillets when partially
thawed if possible.
Rearrange and break apart.
Turn over and rearrange.
Turn over and rearrange.
10-20 min.
10-20 min.
10-20 min.
5 min.
5 min.
Rinse with cold
water to separate.
5 min.
5 min.
5 min.
USING YOUR MICROWAVE OVEN
At Reminder Tone
Turn over. Remove thawed portions and
break apart. Return remainder to oven.
Turn over. Remove thawed portions with
fork.
Turn over.
Turn over. Cover warm areas with
aluminum foil.
Same as above.
Turn over.
Turn over.
Turn over.
Turn over. Cover warm areas with
aluminum foil.
Turn over. Cover warm areas with
aluminum foil.
Same as above.
Standing Time
5 min.
5 min.
5 min.
10-20 min.
10-20 min.
10-20 min.
2 min.
5 min.
5 min.
10-20 min.
10-20 min.
10-20 min.
AUTO DEFROST CHART
Category
GROUND
MEAT
Touch
keypad
1 time
Food
to be Defrosted
Beef
Ground beef
Cubes for stew
Hamburger patties
Pot roast
Rib roast, Rump roast,
Chuck roast
Pork
Bacon, Hot dogs
Sausage links
Sausage patties
Ribs, Roast
Lamb
Ribs
Roasts

19
Meat
1. No special techniques are required. Meat should be
prepared as with conventional cooking. Season if
desired. Always thoroughly defrost meat before
cooking.
2. Place the meat on a microwave roasting rack or
microwave-proof plate and place on the turntable.
3. Cook according to the Meat Cooking Chart (below).
Use the longer time for large meats and the shorter
time for smaller meats. For thicker chops, use the
longer time.
4. Turn the meat once halfway through the cooking
time.
5. Let stand for 5-10 minutes wrapped in foil after
cooking. The standing time is very important as it
completes the cooking process.
6. Make sure meat, especially pork, is thoroughly
cooked before eating.
Poultry
1. No special techniques are required. Poultry should
be prepared as with conventional cooking. Season
if desired.
2. Poultry should be thoroughly defrosted. Remove
giblets and any metal clamps.
3. Prick the skin and brush lightly with vegetable oil
unless the poultry is self-basting.
4. All poultry should be placed on a microwave roast-
ing rack or a microwave-proof plate and placed on
the turntable.
5. Cook according to the instructions in the Poultry
Cooking Chart below. Turn over halfway through the
cooking time. Because of its shape, poultry has a
tendency to cook unevenly, especially in very bony
parts.Turning during roasting helps to cook these
areas evenly.
6. Let stand for 5-10 minutes wrapped in foil after
cooking before carving. The standing time is very
important, as it completes the cooking process.
7. Make sure poultry is thoroughly cooked before eating.
Whole poultry is completely cooked when the juices
run clear from the inside thigh when it is pierced
with a sharp knife. Poultry pieces should be pierced
with a sharp knife through the thickest part to
ensure that the juices are clear and the flesh is firm.
USING YOUR MICROWAVE OVEN
WARNING: Do not use aluminum foil during cooking cycle.
BEEF
Standing/Rolled Rib
– Rare
– Medium
– Well-done
Ground Beef (to
brown for casserole)
Hamburgers,
Fresh or defrosted
(4 oz. each)
– 2 patties
– 4 patties
PORK
Loin, Leg
Bacon
– 4 slices
– 6 slices
Microwave
Power
8
8
8
HIGH(100%)
HIGH(100%)
HIGH(100%)
8
HIGH(100%)
HIGH(100%)
Cooking Time
Per Pound
8 to 10 minutes
9 to 11 minutes
10 to 13 minutes
5
1⁄2
to 8
1⁄2
minutes
2 to 4 minutes
3 to 5 minutes
11 to 15 minutes
2 to 3 minutes
3 to 4 minutes
Meat Cooking Chart
CHICKEN
Whole
Breast (boned)
Portions
TURKEY
Whole
Microwave
Power
8
8
8
8
Cooking Time
Per Pound
10 to 14 minutes
9 to 13 minutes
10 to 16 minutes
10 to 14 minutes
Poultry Cooking Chart
NOTES:
• The times listed above are only a guide. Allow for
difference in individual tastes and preferences. The
times may also vary due to the shape, cut, and
composition of the food.
• If whole poultry is stuffed, the weight of the stuffed
bird should be used when calculating the cooking
time.
NOTE: The times listed above are only a guide. Allow
for difference in individual tastes and preferences. The
times may also vary due to the shape, cut, and com-
position of the food.
Poultry
COOKING TIPS
Meat

20
USING YOUR MICROWAVE OVEN
COOKING TIPS (continued)
Fish
1. Arrange fish in a large shallow non-metallic dish or casserole.
2. Cover with pierced microwave plastic wrap or casserole lid.
3. Place the dish on the turntable.
4. Cook according to the instructions in the Fresh Fish Cooking Chart below. Flakes of butter can be added to the
fish if desired.
5. Let stand as directed in the Cooking Chart before serving.
6. After standing time, check to see that the fish is thoroughly cooked. The fish should be opaque and flake easily.
Fresh Fish Cooking Chart
Fish
Fish Fillets
Whole Mackerel,
Cleaned and Prepared
Whole Trout,
Cleaned and Prepared
Salmon Steaks
Power
HIGH
HIGH
HIGH
HIGH
Cooking Time
Per Pound
4 to 7 minutes
4 to 7 minutes
5 to 8 minutes
5 to 7 minutes
Standing
Time
2 to 3 minutes
3 to 4 minutes
3 to 4 minutes
3 to 4 minutes
Method
Add 15 to 30 ml (1 to 2 tbsp.) lemon juice
–
–
Add 15 to 30 ml (1 to 2 tbsp.) lemon juice

21
HEATING OR REHEATING GUIDE
To heat or reheat successfully in the microwave, it is important to follow several guidelines. Measure the amount of
food in order to determine the time needed to reheat. Arrange the food in a circular pattern for best results. Room
temperature food will heat faster than refrigerated food. Canned foods should be taken out of the can and placed
in a microwavable container. The food will be heated more evenly if covered with a microwavable lid or plastic wrap
and vented. Remove cover carefully to prevent steam burns. Use the following chart as a guide for reheating
cooked food.
Items Cook time Special Instructions
(at HIGH)
Sliced meat Place sliced meat on microwavable plate.
3 slices (1/4-inch thick) 1-2 minutes Cover with plastic wrap and vent.
* Note: Gravy or sauce helps to keep meat juicy.
Chicken pieces
1 breast 2-31/2minutes Place chicken pieces on microwavable plate. Cover with plastic
1 leg and thigh 11/2-3 minutes wrap and vent.
Fish fillet Place fish on microwavable plate. Cover with plastic wrap and
(6-8 oz.) 2-4 minutes vent.
Lasagna Place lasagna on microwavable plate. Cover with plastic wrap
1 serving (101/2oz.) 4-6 minutes and vent.
Casserole
1 cup 1-31/2minutes COOK covered in microwavable casserole. Stir once halfway
4 cups 5-8 minutes through cooking.
Casserole –
cream or cheese
1 cup 11/2-3 minutes COOK covered in microwavable casserole. Stir once halfway
4 cups 31/2-51/2minutes through cooking.
Sloppy Joe or
Barbecued beef Reheat filling and bun separately.
1 sandwich 1-21/2minutes Cook filling covered in microwavable casserole. Stir once.
(1/2cup meat filling) Heat bun as directed in chart below.
without bun
Mashed potatoes
1 cup 1-3 minutes COOK covered in microwavable casserole. Stir once halfway
4 cups 5-8 minutes through cooking.
Baked beans COOK covered in microwavable casserole.Stir once halfway
1 cup 11/2-3 minutes through cooking.
Ravioli or pasta in sauce
1 cup 21/2-4 minutes COOK covered in microwavable casserole. Stir once halfway
4 cups 71/2-11 minutes through cooking.
Rice
1 cup 11/2-31/2minutes COOK covered in microwavable casserole. Stir once halfway
4 cups 4-61/2minutes through cooking.
Sandwich roll or bun Wrap in paper towel and place on glass mircrowavable rack
1 roll 15-30 seconds
Vegetables
1 cup 11/2-21/2minutes COOK covered in microwavable casserole. Stir once halfway
4 cups 4-6 minutes through cooking.
Soup COOK covered in microwavable casserole. Stir once halfway
1 serving (8 oz.) 11/2-21/2minutes through cooking.

22
FRESH VEGETABLE CHART
Cook time Standing
at HIGH Time
Artichokes 2 medium 5-8 Trim. Add 2 tsp water and 2 tsp juice. Cover. 2-3 minutes
(8oz. each) 4 medium 10-13
Asparagus, 1Ib. 3-6 Add 1/2cup water. Cover. 2-3 minutes
Fresh, Spears
Beans, Green & 1 lb. 7-11 Add 1/2cup water in 11/2qt. casserole. Stir 2-3 minutes
Wax halfway through cooking.
Beets, Fresh 1 Ib. 12-16 Add 1/2cup water in 11/2qt. covered casserole. 2-3 minutes
Rearrange halfway through cooking.
Broccoli, Fresh, 1Ib. 4-8 Place broccoli in baking dish. Add 1/2cup water. 2-3 minutes
Spears
Cabbage, Fresh, 1Ib. 4-7 Add 1/2cup water in 11/2qt. covered casserole. 2-3 minutes
Chopped Stir halfway through cooking.
Carrots, Fresh, 2 cups 2-4 Add 1/4cup water in 1 qt. covered casserole. 2-3 minutes
Sliced Stir halfway through cooking.
Cauliflower, 1lb. 7-11 Trim. Add 1/4cup water in 1 qt. covered casserole. 2-3 minutes
Fresh, Whole Stir halfway through cooking.
Flowerettes, Fresh 2 cups 21/2-41/2Slice. Add 1/2 cup water in 11/2 qt. covered casserole. 2-3 minutes
Celery, Fresh, 4 cups 6-8 Stir halfway through cooking.
Sliced
Corn, Fresh 2 ears 5-9 Husk. Add 2 tbsp water in 11/2qt. baking dish. 2-3 minutes
Cover.
Mushrooms, 1/2 Ib. 2-31/2Place mushrooms in 11/2qt. covered casserole. 2-3 minutes
Fresh, Sliced Stir halfway through cooking.
Parsnips, Fresh, 1Ib. 4-8 Add 1/2cup water in 11/2 qt. covered casserole. 2-3 minutes
Sliced Stir halfway through cooking.
Peas, Green, 4 cups 7-10 Add 1/2cup water in 11/2qt. covered casserole. 2-3 minutes
Fresh Stir halfway through cooking.
Sweet Potatoes 2 medium 5-10 Pierce potatoes several times with fork. 2-3 minutes
Whole Baking 4 medium 7-13 Place on 2 paper towels. 2-3 minutes
(6-8 oz. each) Turn over halfway through cooking.
White Potatoes, 2 potatoes 5-8 Pierce potatoes several times with fork. 2-3 minutes
Whole Baking 4 potatoes 10-14 Place on 2 paper towels. 2-3 minutes
(6-8 oz. each) Turn over halfway through cooking.
Spinach, Fresh, 1Ib. 4-7 Add 1/2cup water in 2 qt. covered casserole. 2-3 minutes
Leaf
Squash, Acorn or 1 medium 6-8 Cut squash in half. Remove seeds. 2-3 minutes
Butternut, Fresh Place in 8 x 8-inch baking dish. Cover.
Zucchini, Fresh, 1Ib. 41/2-71/2Add 1/2cup water in 11/2qt. covered casserole. 2-3 minutes
Sliced Stir halfway through cooking.
Zucchini, Fresh, 1Ib. 6-9 Pierce. Place on 2 paper towels. 2-3 minutes
Whole Turn zucchini over and rearrange halfway through
cooking.
Vegetable Amount Instructions

23
TROUBLESHOOTING
Questions and Answers
Operation
Question
Why is the oven light not on during
cooking?
Why does steam come out of the air
exhaust vent?
Will the microwave oven be damaged if it
operates empty?
Does microwave energy pass through the
viewing screen in the door?
Why does a tone sound when a pad on
the control panel is touched?
Can my microwave oven be damaged if
food is cooked for too long?
When the oven is plugged into wall outlet
for the first time, it might not work properly.
What is wrong?
Why do I see light reflection around the
outer case?
What are the various sounds I hear when
the microwave oven is operating?
There may be several reasons why the oven light is not on.
Have you:
• Set a cooking time?
•Touched START?
Steam is normally produced during cooking. The microwave oven
has been designed to vent this steam.
Yes. Never operate the oven empty or without the glass turntable.
No. The metal screen bounces the energy back to the oven cavity.
The holes (or ports) allow only light to pass through. They do not
let microwave energy pass through.
The tone tells you that the setting has been entered.
Like any other cooking appliance, it is possible to overcook food
to the point that the food creates smoke and even possibly fire
and damage to the inside of the oven. It is always best to be near
the oven while you are cooking.
The microcomputer controlling your oven may temporarily
become scrambled and fail to function as programmed when you
plug in for the first time or when power resumes after a power
interruption. Unplug the oven from the 120-volt household outlet
and then plug it back in to reset the microcomputer.
This light is from the oven light which is located between the
oven cavity and the outer wall of the oven.
The clicking sound is caused by a mechanical switch turning the
microwave oven’s magnetron ON and OFF.
The heavy hum and clunk is from the change in power the
magnetron draws as it is turned ON and OFF by a mechanical
switch.The change in blower speed is from the change in line
voltage caused by the magnetron being turned ON and OFF.
Answer
Food
Question Answer
What is wrong when baked foods have a
hard, dry, brown spot?
Why do eggs sometimes pop?
A hard, dry, brown spot indicates overcooking. Shorten the
cooking or reheating time.
When baking, frying, or poaching eggs, the yolk may pop due to
steam build-up inside the yolk membrane. To prevent this,
simply pierce the yolk before cooking.
CAUTION: Never microwave eggs in the shell.

24
TROUBLESHOOTING
Questions and Answers (continued)
Food
Question
Why are scrambled eggs sometimes a
little dry after cooking?
Is it possible to pop popcorn in a
microwave oven?
Why do baked apples sometimes burst
during cooking?
Why do baked potatoes sometimes
burn during cooking?
Why is a standing time recommended
after microwave cooking time is over?
Why is additional time required for
cooking food stored in the refrigerator?
Eggs will dry out when they are overcooked, even if the same
recipe is used each time. The cooking time may need to be var-
ied for one of these reasons:
• Eggs vary in size.
• Eggs are at room temperature one time and at refrigerator
temperature another time.
• Eggs continue cooking during standing time.
Yes, if using one of the two methods described below:
(1) microwave-popping devices designed specifically for
microwave cooking
(2) prepackaged commercial microwave popcorn that is made
for specific times and power output needed
Follow exact directions given by each manufacturer for
its popcorn popping product and do not leave the oven
unattended while the corn is being popped. If corn fails
to pop after the suggested time, discontinue cooking.
Overcooking could result in an oven fire.
CAUTION:
• Never use a brown paper bag for popping corn or attempt
to pop leftover kernels.
• Do not pop prepackaged commercial microwave popcorn
directly on the glass turntable. To avoid excessive heating
of the glass turntable, place the popcorn bag on a plate.
• Listen while corn pops. Stop oven when popping slows to
2-3 seconds between pops.
• Do not leave microwave unattended while popping corn.
• Follow directions on bag.
The peel has not been removed from the top half of each apple
to allow for expansion of the interior of the apple during cooking.
As in conventional cooking methods, the interior of the apple
expands during the cooking process.
If the cooking time is too long, fire could result. At the end of the
recommended cooking time, potatoes should be slightly firm.
CAUTION: Do not overcook.
Standing time allows foods to continue cooking evenly for a few
minutes after the actual microwave oven cooking cycle. The
amount of standing time depends upon the density of the foods.
As in conventional cooking, the initial temperature of food affects
total cooking time. You need more time to cook food taken out of
a refrigerator than for food at room temperature.
Answer

25
TROUBLESHOOTING
Before Calling for Service
Problem
Oven does not start
Arcing or Sparking
Incorrect time of day
Unevenly Cooked Foods
Overcooked Foods
Undercooked Foods
Improper Defrosting
You can often correct operating problems yourself. If your microwave oven fails to work properly, locate the
operating problem in the list below and try the solutions listed for each problem.
If the microwave oven still does not work properly, contact the nearest GoldStar Authorized Service Center.
GoldStar Authorized Service Centers are fully equipped to handle your service requirements.
• Is the power cord plugged in?
• Is the door closed?
• Is the cooking time set?
• Are you using approved cookware?
• Is the oven empty?
• Have you tried to reset the time of day?
• Are you using approved cookware?
• Is the glass turntable in the oven?
• Did you turn or stir the food while it was cooking?
• Were the foods completely defrosted?
• Was the time/cooking power level correct?
• Was the time/cooking power level correct?
• Are you using approved cookware?
• Were the foods completely defrosted?
• Was the time/cooking power level correct?
• Are the ventilation ports clear?
• Are you using approved cookware?
• Was the time/cooking power level correct?
• Did you turn or stir the food during the defrosting cycle?
WARNING:
This equipment generates and uses ISM frequency
energy and if not installed and used properly, that is
in strict accordance with the manufacturer’s
instructions, may cause interference to radio and
television reception. It has been type tested and
found to comply with limits for ISM Equipment
pursuant to part 18 of FCC Rules, which are
designed to provide reasonable protection against
such interference in a residential installation.
However, there is no guarantee that interference will
not occur in a particular installation. If this equipment
does cause interference to radio or television
reception, which can be determined by turning the
equipment off and on, the user is encouraged to try to
correct the interference by one or more of the
following:
• Reorient the receiving antenna of the radio or
television.
• Relocate the microwave oven with respect to the
receiver.
• Move the microwave oven away from the receiver.
• Plug the microwave oven into a different outlet so
that the microwave oven and the receiver are on
different branch circuits.
The manufacturer is not responsible for any radio or
TV interference caused by unauthorized
modification to this microwave oven. It is the
responsibility of the user to correct such interference.
FEDERAL COMMUNICATIONS COMMISSION
RADIO FREQUENCY INTERFERENCE STATEMENT
Possible Causes

26
NOTE

27
LG Electronics U.S.A., Inc. will repair or at its option replace, without charge, your product
which proves to be defective in material or workmanship under normal use, during the warranty
period listed below from the date of original purchase. This warranty is good only to the
original purchaser of the product during the warranty period as long as it is in the U.S.
including Alaska, Hawaii, and U.S. Territories.
WARRANTY PERIOD
MODEL # LABOR PARTS HOW SERVICE IS HANDLED
MA- 1 Year 1 Year Call 1 (800) 243-0000, 24 hours a day, 7 days per week,
1417W/B press the appropriate option. Please have your product type
Magnetron
(MICROWAVE), model number, serial number, and ZIP code
MS- 8 Years ready. This warranty provides carry-in service for the first
214ZSE year.
No other express warranty is applicable to this product.
THE DURATION OF ANY IMPLIED
WARRANTIES, INCLUDING THE IMPLIED WARRANTY OF MERCHANTABILITY, IS LIMITED
TO THE DURATION OF THE EXPRESS WARRANTY HEREIN.
LG ELECTRONICS U.S.A., INC. SHALL NOT BE LIABLE FOR THE LOSS OF THE USE OF
THE PRODUCT, INCONVENIENCE, LOSS OR ANY OTHER DAMAGES, DIRECT OR
CONSEQUENTIAL, ARISING OUT OF THE USE OF, OR INABILITY TO USE, THIS PRODUCT
OR FOR ANY BREACH OF ANY EXPRESS OR IMPLIED WARRANTY, INCLUDING THE
IMPLIED WARRANTY OF MERCHANTABILITY APPLICABLE TO THIS PRODUCT.
Some states do not allow the exclusion or limitation of incidental or consequential damages or
limitations on how long an implied warranty lasts; so these limitations or exclusions may not
apply to you. This warranty gives you specific legal rights and you may also have other rights
which vary from state to state.
THE ABOVE WARRANTY DOES NOT APPLY IN THESE CASES:
* To damages or problems which result from delivery or improper installation.
* To damages or problems which result from misuse, abuse, accident, alteration, or incorrect
electrical current or voltage.
* To service calls which do not involve defective workmanship or material and explaining the
operation of the unit.
THEREFORE, THESE COSTS ARE PAID BY THE CONSUMER.
CUSTOMER ASSISTANCE NUMBERS:
To Prove Warranty Coverage: Retain your Sales Receipt to prove date of purchase.
Copy of your Sales Receipt must be submitted at the
time warranty service is provided.
To Obtain Product, Customer or Call 1 (800) 243-0000 (Mon.-Fri, 7am–7pm. CST)
Service Assistance: Please have your product type (MICROWAVE), model
number, serial number, and ZIP code ready.
Or see our web site at http://www.LGEservice.com
To Obtain Nearest Authorized Call 1 (800) 243-0000, 24 hours a day, 7 days per week,
Service Center, Parts Distributor press the appropriate option. Please have your product
or Sales Dealer: model number, serial number, and ZIP code ready.
GOLDSTAR MICROWAVE OVENS
LIMITED WARRANTY

P/NO : 3828W5A1389
Printed in Korea