LG Electronics USA S841MHA Microwave Oven User Manual
LG Electronics USA Microwave Oven Users Manual
UserManual.wiki
>
LG Electronics USA
>
S841MHA User Manual
Users Manual
Navigation menu
Upload a User Manual
Namespaces
Wiki Guide
HTML
PDF
Info
Views
User Manual
Discussion / Help
Navigation

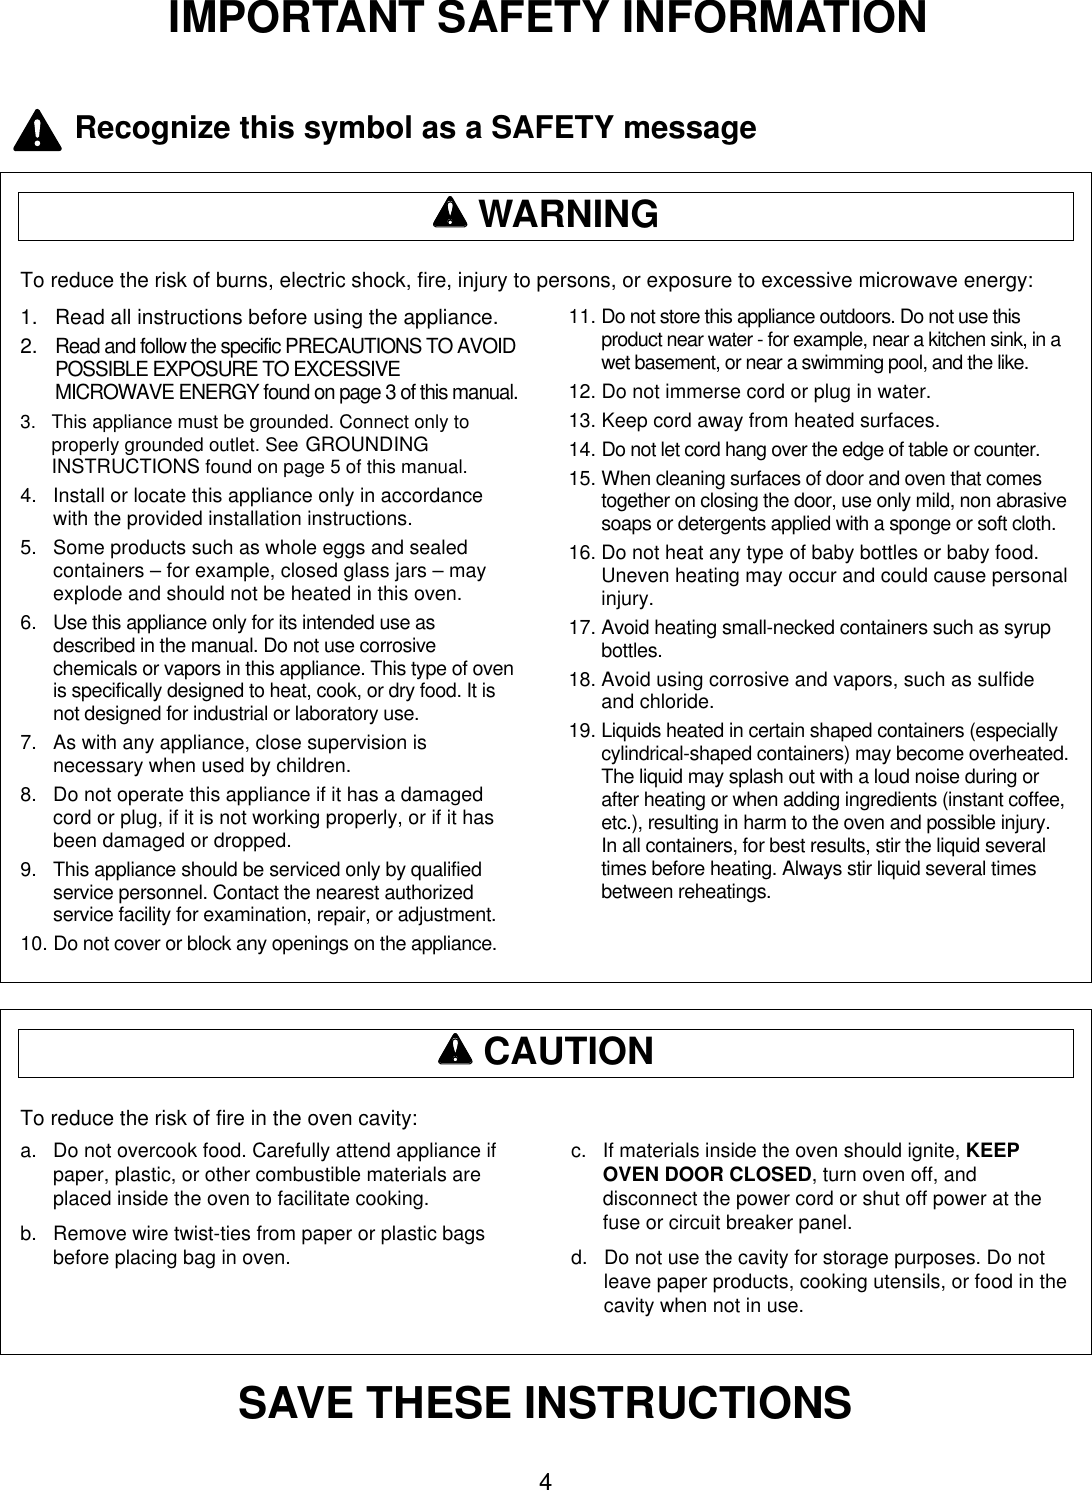


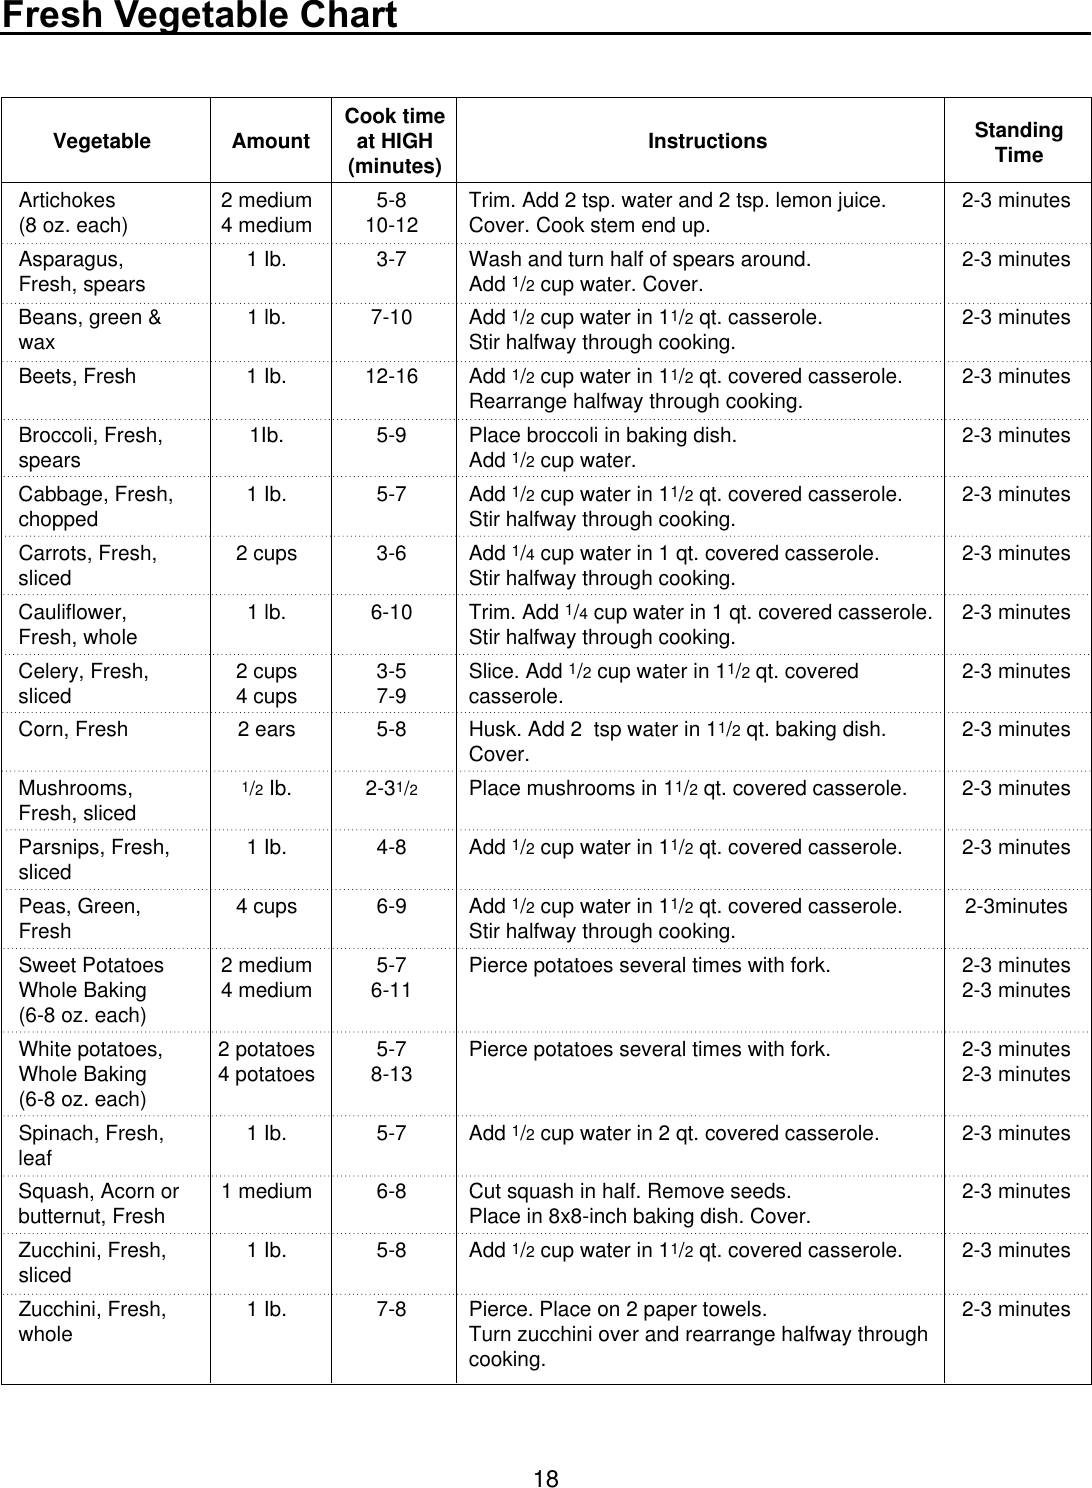
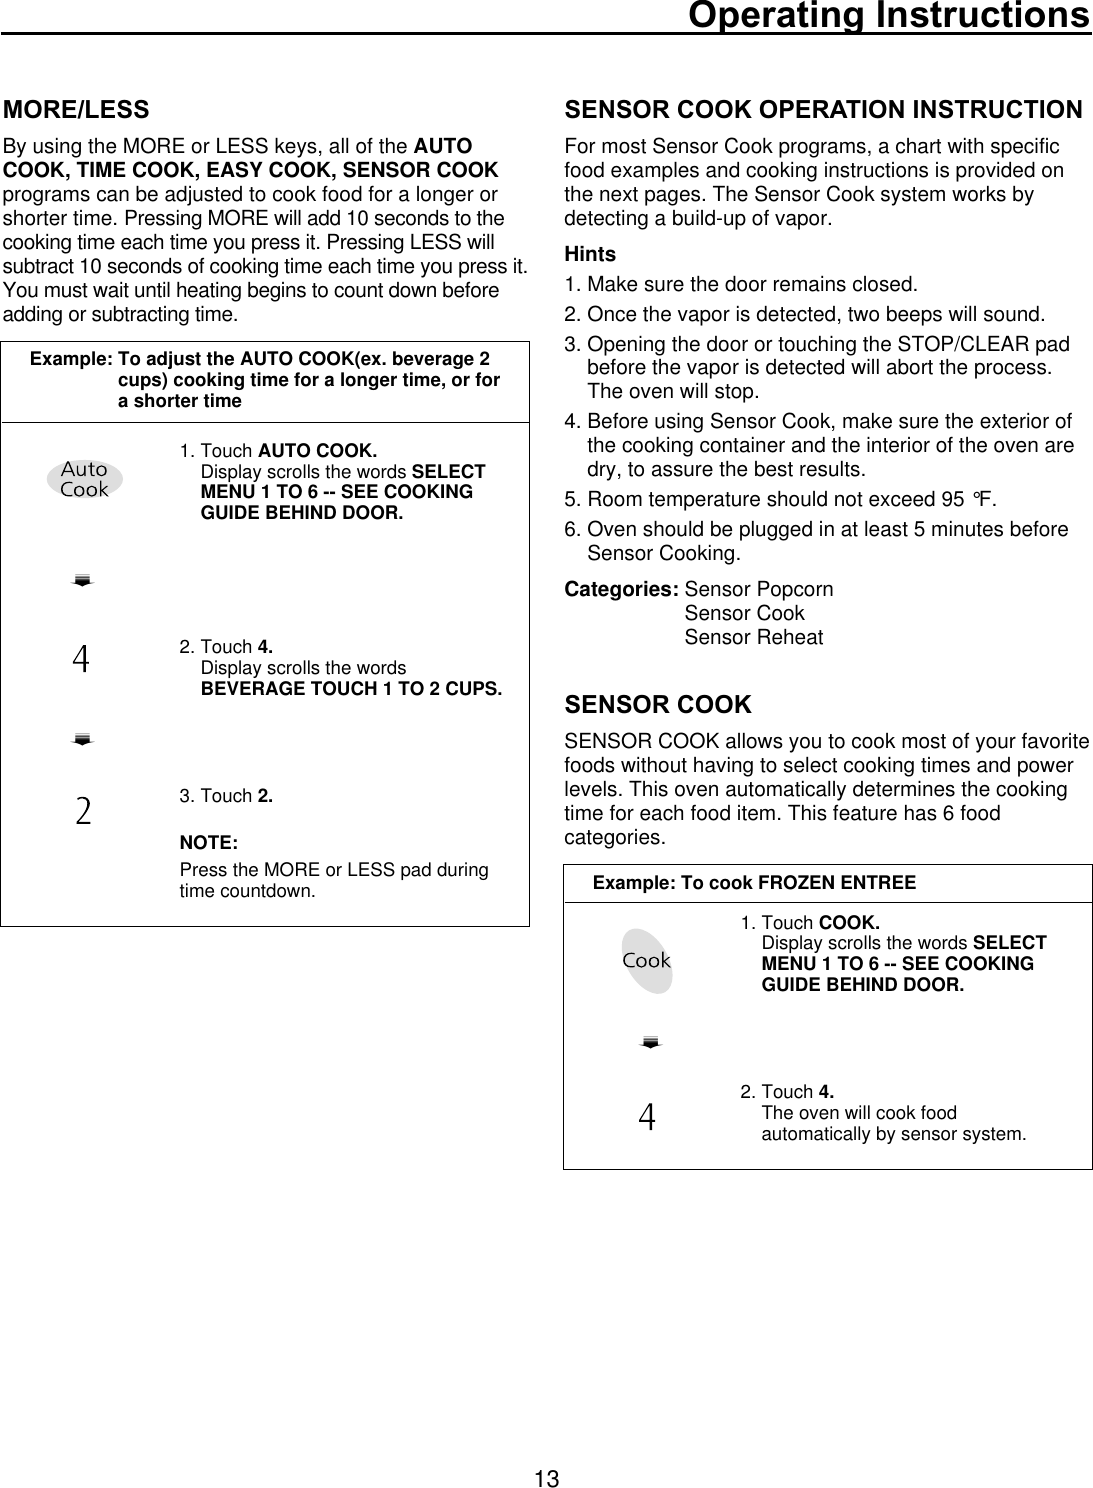
![SETTING CLOCKWhen your oven is plugged in for the first time or whenpower resumes after a power interruption, the numbersin the display reset to “:”.NOTE:You can select AM or PM by touching CLOCK padalternately.EASY COOKA time-saving pad, this simplified control lets you quicklyset and start microwave cooking without the need totouch START.NOTE:If you touch EASY COOK, it will add 30 seconds up to 3minutes 30 seconds; after 3 minutes 30 seconds, every touch will add 1 minute up to 99 min59 seconds.TIME COOKThis function allows you to cook food for a desiredamount of time. Because many foods need slowercooking (at less than HI-POWER), there are 10 powerlevel settings in addition to HI-POWER.When cooking is complete, beeps will sound. The wordEND shows in the display window. Then the oven shutsitself off.NOTE : If you do not select the power level, the oven will operateat power HIGH. To set HI-POWER cooking, skip steps 2& 3 above.Operating Instructions10Example: To set 11:11 (PM)1. Touch CLOCK pad twice. Display scrolls the words PMENTER TIME OF DAY shows inthe display.2. Enter the time by using thenumber key pads. [1], [1], [1], and [1].Display scrolls the words 11:11P TOUCH START.3. Touch START.The clock starts counting and11:11P shows in the display.Example: To set EASY COOK for 2 minutes.Touch EASY COOK 4 times. The oven begins cooking anddisplay shows time counting down.Example: To cook food on 80% Power (power8)for 5 minutes 30 seconds1. Enter 5 minutes 30 seconds bytouching [5], [3], and [0].Display scrolls the words 5:30TOUCH START OR POWER.2. Touch POWER LEVEL.Display scrolls the words ENTERPOWER LEVEL 1 TO 10.3. Touch 8.To select power level 80%.Display scrolls the words P-80TOUCH START.4. Touch START.➠➠➠➠➠](https://usermanual.wiki/LG-Electronics-USA/S841MHA/User-Guide-532738-Page-10.png)
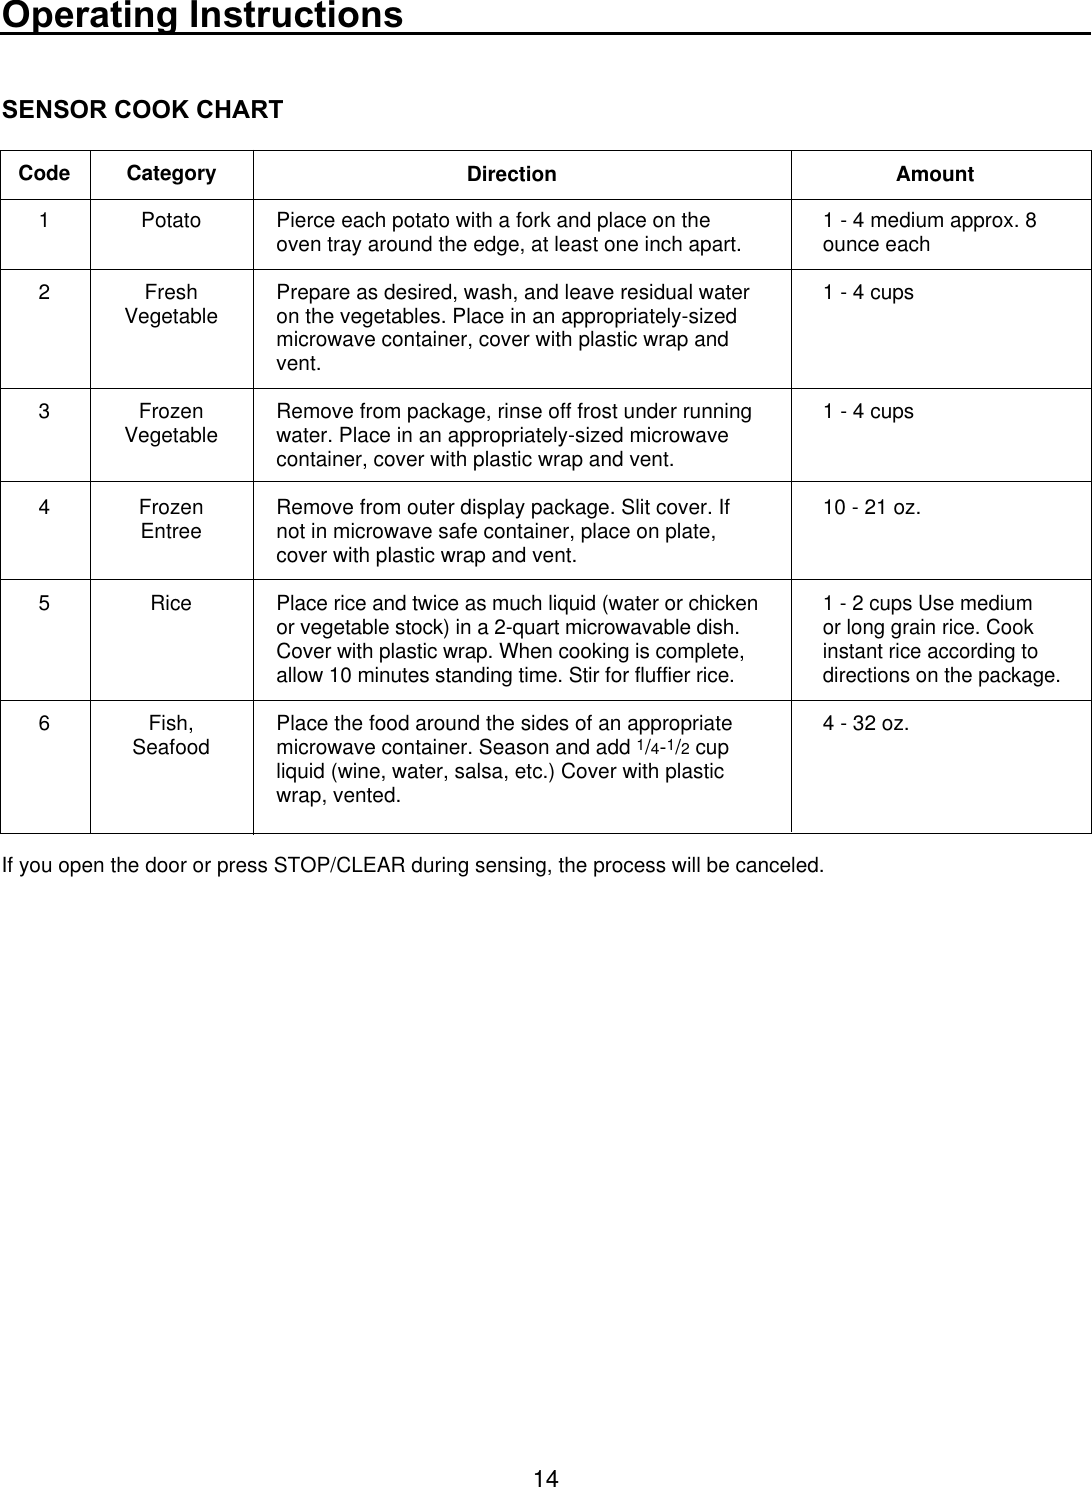

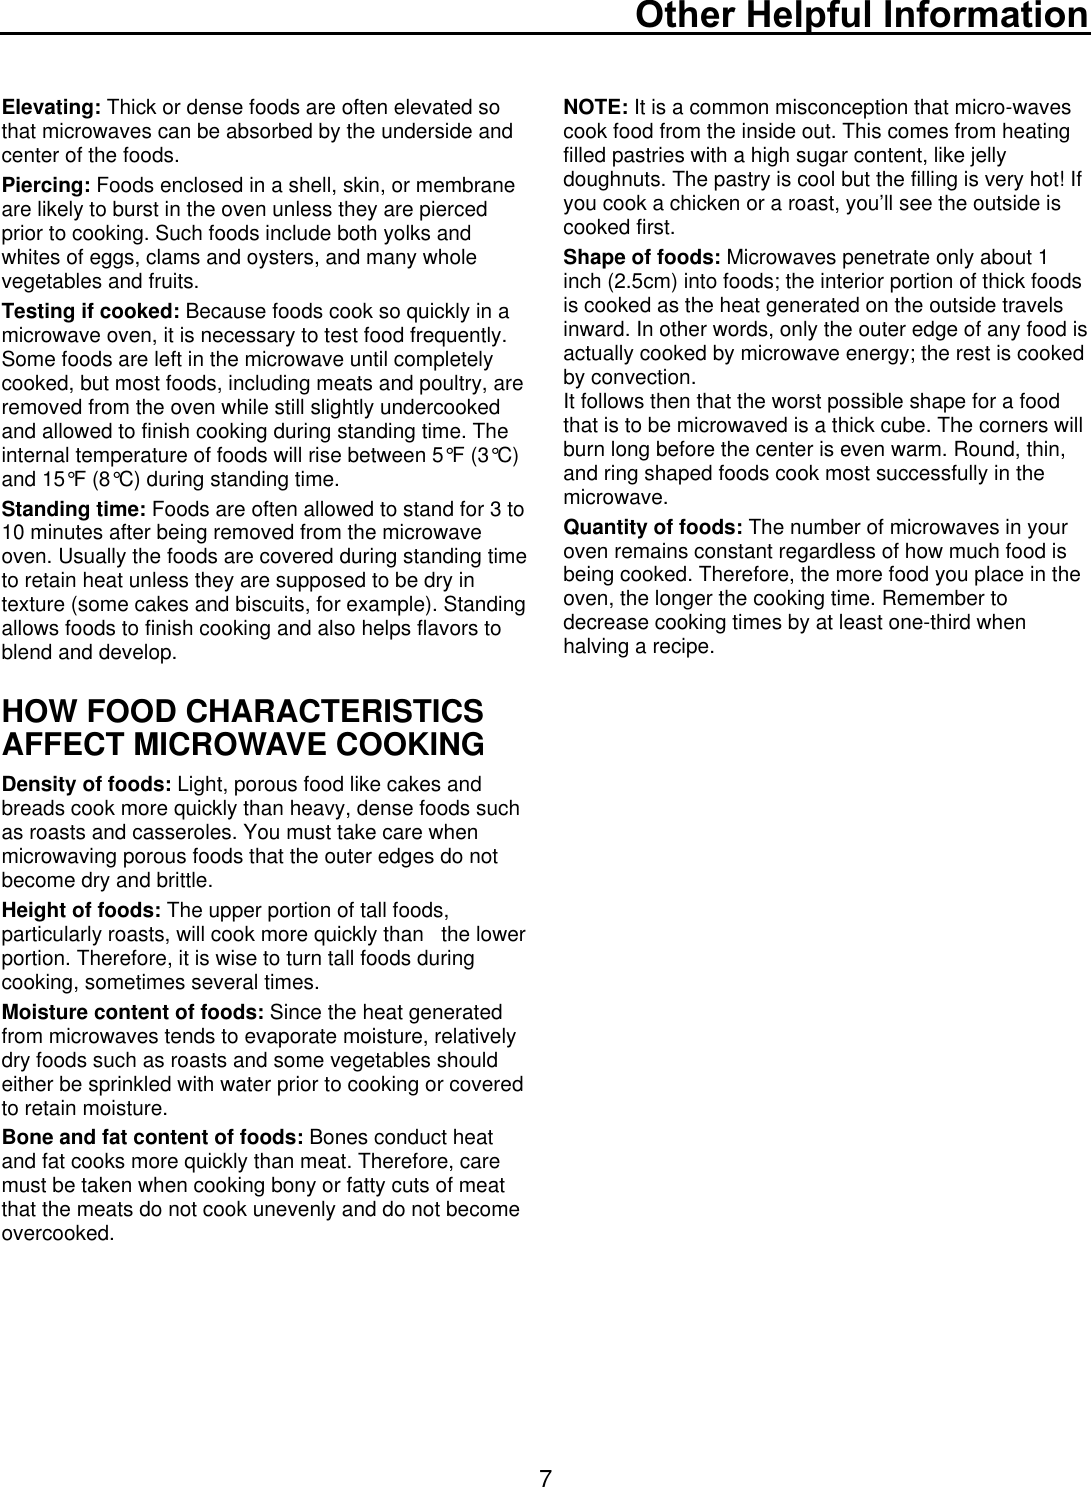
![AUTO DEFROSTThree defrost sequences are preset in the oven. Thedefrost feature provides you with the best defrostingmethod for frozen foods. The cooking guide will showyou which defrost sequence is recommended for thefood you are defrosting.With the Auto Defrost feature, the oven automaticallysets the defrosting time and power levels for you.The oven automatically determines required defrostingtimes for each food item according to the weight youenter.For added convenience, the Auto Defrost includes abuilt-in beep mechanism that reminds you to check, turnover, separate, or rearrange. Three different defrostinglevels are provided.1 MEAT2 POULTRY3 FISH• You can select the category by touching the numerickey 1 (MEAT), numeric key 2 (POULTRY), and numerickey 3 (FISH) after touching the AUTO DEFROST pad.• Available weight is 0.1~6.0 lbs(0.1 ~ 4.0 kgs).NOTE:When you touch the START pad, the display changes todefrost time count down. The oven will beep during theDEFROST cycle. At beep, open the door and turn,separate, or rearrange the food.Remove any portions that have thawed.Return frozen portions to the oven and touch START toresume the defrost cycle. • For best results, remove fish, shellfish, meat, andpoultry from its original closed paper or plastic package(wrapper). Otherwise, the wrap will hold steam andjuice close to the foods, which can cause the outersurface of the foods to cook.• For best results, shape your ground meat into the form of adoughnut before freezing. When defrosting, scrape offthawed meat when the beep sounds and continue defrosting.• Place foods in a shallow container or on a microwaveroasting rack to catch drippings.• Food should still be somewhat icy in the center whenremoved from the oven.AUTO DEFROST SEQUENCE LISTRAPID DEFROSTThis feature provides you with the quick defrostingmethed for 1.0 pound frozen ground beef.Operating Instructions17Sequence Food1MEAT2POULTRY3FISHBEEFGround beef, Round steak, Cubes for stew, Tenderloin steak, Pot roast, Rib roast, Rump roast, Chuck roast, Hamburger patty.LAMBChops (1 inch thick), Rolled roastPORKChops (1/2inch thick), Hot dogs,Spareribs, Country-style ribs.Rolled roast, Sausage.VEALCutlets (1 lb 1/2inch thick)POULTRYWhole (under 4 lbs.), Cut-up, Breasts (boneless)CORNISH HENSWholeTURKEYBreastFISHFillets, Whole SteaksSHELLFISHCrab meat, Lobster tails, Shrimp,ScallopsExample: To defrost 1.2 lbs of ground beef1. Touch AUTO DEFROST.Display scrolls the wordsMEAT TOUCH 1POULTRY TOUCH 2 FISH TOUCH 3.2. Touch 1.Display scrolls the words ENTER WEIGHT.3. Enter the weight by touching [1] and [2].Display scrolls the words 1.2 LBS TOUCH START.4. Touch START.Defrosting starts.➠➠➠1. Touch RAPID DEFROST.The oven begins thecooking without the need totouch START.](https://usermanual.wiki/LG-Electronics-USA/S841MHA/User-Guide-532738-Page-17.png)