LG Electronics USA TBLT20A TABLET PC WITH INTEL WIRELESS MINI-PCI User Manual 1
LG Electronics USA TABLET PC WITH INTEL WIRELESS MINI-PCI 1
Contents
- 1. User Manual 1
- 2. User Manual 2
- 3. User Manual 3
- 4. User Manual 4
User Manual 2
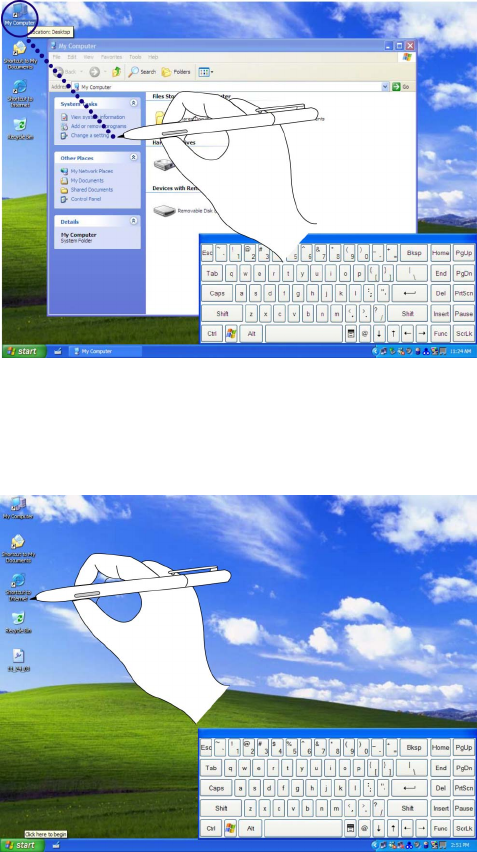
Double tab
The same function as double click.
Point
Touch on the screen lightly.
- 35 -
Click and drag
Drag one of icons with pressing pen point on the screen.
Note:
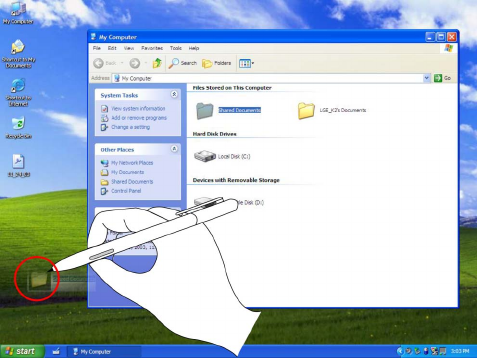
Pen can't be recognized when the pressure from it on the screen is not enough.
Use attached pen in tilt and make control sure.
You must use attached pen when using the touch panel. Do not use your fingers
and any other pen on it. There is the risk of the damage to the touch panel.
Do not press a pen excessively on the touch panel. There is the risk of the
damage to the touch panel.
- 36 -
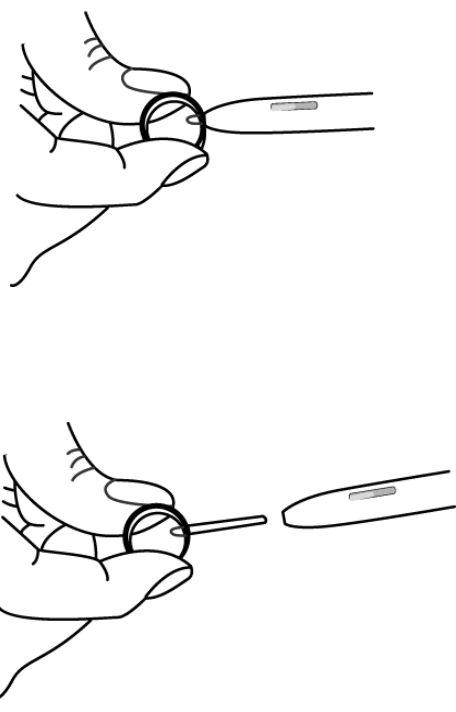
Exchange the pen point (offered Full size digital pen)
1. Use attached clip catching the pen point.
Pull out the pen point till it is separated from the pen.
Put new pen point into the pen after checking its direction.
- 37 -
Note:
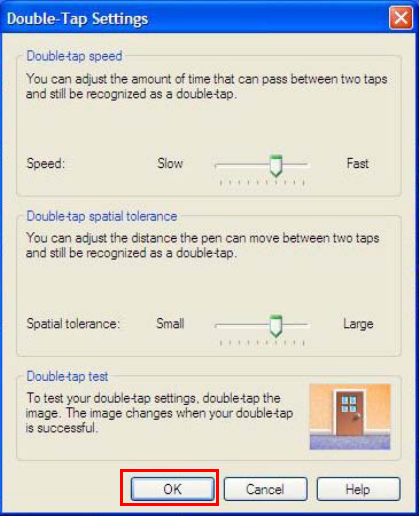
1. Go to [Control Panel]-[Tablet and Pen settings], and click [Setting] at [Pen
option].
2. Click [OK] after adjustment user need on Double-Tap Settings.
- 38 -
Basics
This section describes how to use the basic features of your computer. Read this
section before using the computer.
Using the battery pack
The battery pack recommended fully charged before first use.
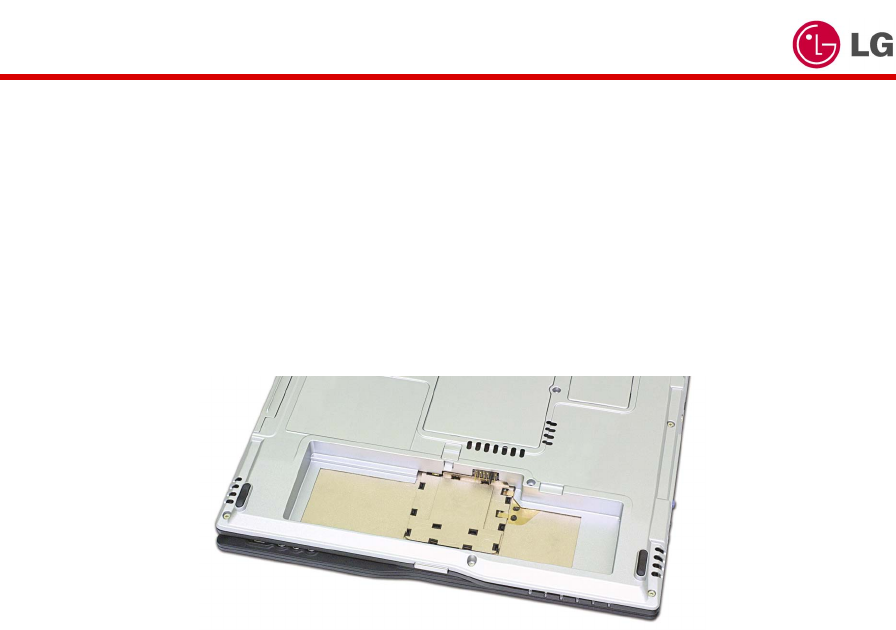
1. Turn the computer over so that the battery slot faces up.
- 39 -
2. Place the battery pack in the battery slot, and align the two protrusions on the
battery pack with the two slits on the side of the battery slot.
3. Gently push the battery pack into the slot until it clicks. The battery pack is
inserted. You can lock the battery pack in place by pushing the left battery latch
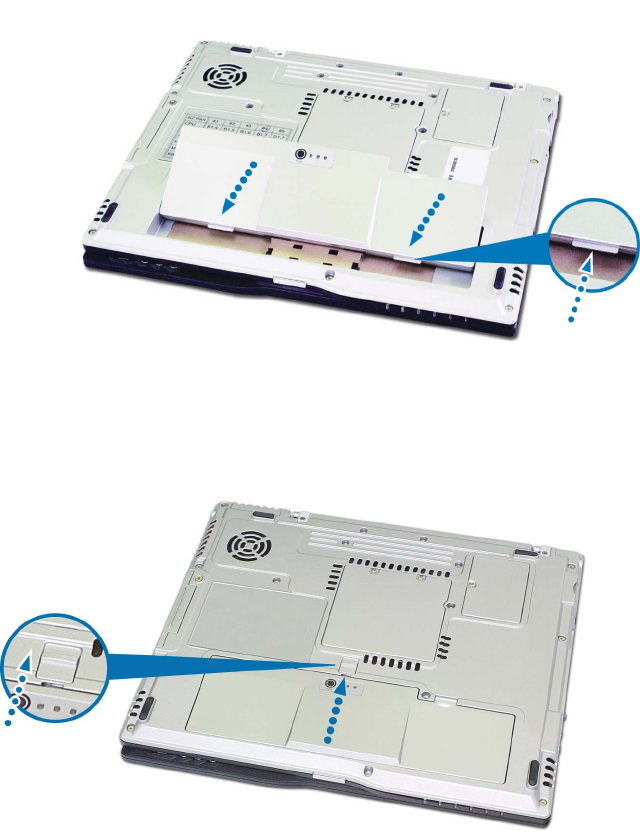
in the direction shown above. If you hear a click, the battery pack is locked in.
4. Connect the AC adaptor and open the LCD panel. The battery is charged
automatically right after connecting. (Refer to Page 38 “Using the AC adapter”)
5. Check the battery status indicator.
- 40 -
If the battery is fully charged, the indicator is green light.
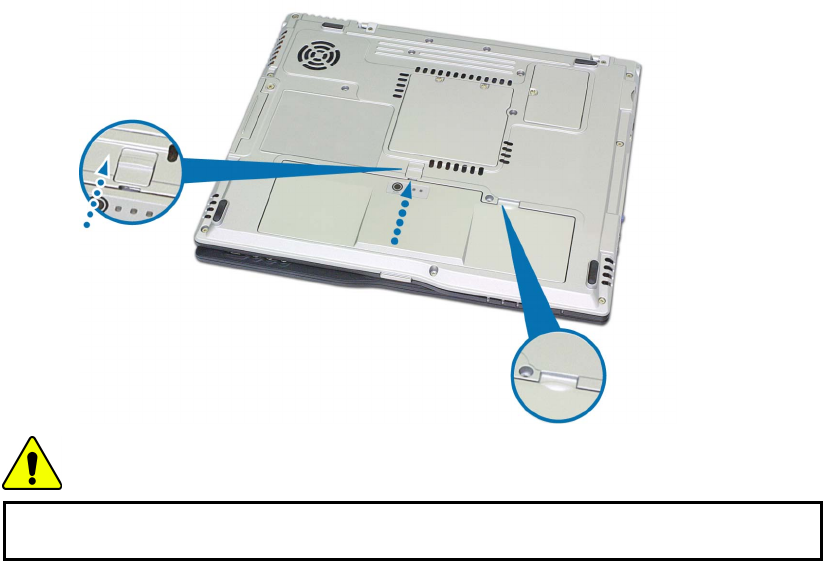
6. To remove the battery pack, unlock the left battery latch to the right until it
clicks, and push the right battery latch to the left and hold; then slide the
battery pack out of the slot.
Caution
When you are not using the computer, remove the battery pack.
Note:
Battery LED
When pressing [PUSH) button, 3 LEDs are turned on and brightened by charging
the battery.
In the case of exchange the battery on standby mode.
- Possible to change the battery when using AC adapter.
- Possible to change the battery depends on the system activation when using the
battery only without AC adapter.
* System is running (Power indicator LED: Green ):
- 41 -

- 42 -
Impossible to change the battery. There is the risk of losing data.
* Standby mode (Power indicator LED :Green blinking): Possible to change the
battery.
* But in standby mode, if the battery is removed for a long time, the
system is off and the data is blow up. So, there is the available time to change is
limited to I minute.
* If the battery is left for a long time without charging, then after charging
the battery for more than 12 hours, the battery change is possible.
* Hibernation mode / Windows off mode: (Power indicator LED off):
Possible to change and there is no limit in time.
Maximum power-saving mode / Turn off computer
No time limit to change the battery.
Note:
The battery pack has the following characteristics.
Self-discharge: The battery gradually loses its power over time without ever
being used.
Periodic full discharge/charge: Frequent recharging of the battery pack can
reduce the duration of the battery pack. Periodic performance of full
discharge/charge will restore the capacity of the battery pack, in every 30 ~ 60
days. You should use the battery until its power is low; then fully charge the
battery.
To use the battery pack safely and effectively,
- Do not short-circuit the battery pack.
- Keep the battery pack away from heat or fire.
- Do not disassemble the battery pack.
- Do not expose the battery pack to water.
- Keep the battery pack away from children.
- If the temperature of the battery pack drops below 50 °F (10 °C), the trickle
charging begins. The trickle charging may take up to 16 hours for the battery
pack to be fully charged
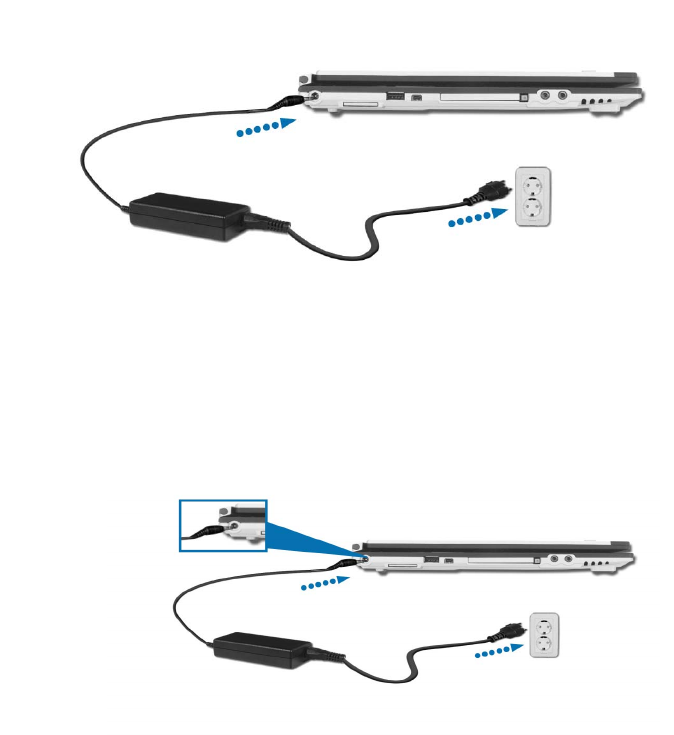
Using the AC adapter
An AC adapter or battery pack is needed to supply power to your computer. The
AC adapter can be used with a 100~240V AC power source. Use only the AC
adapter that comes with your computer. Using any other adapter may cause
damage to your computer.
Connecting the AC adapter to an AC outlet (100~240V)
Connect the power cord to the adapter, and then plug the other end into an AC
outlet.
Connecting AC adapter to the power device
Connect AC adapter to the power device at the left side of the computer.
- 43 -
Opening and positioning the LCD panel
Push the latch button, and open the display panel. Adjust the slope of the display
panel for comfortable viewing. (Refer to page 24)
Power On
Press the power switch to turn on the computer.
Turning the power on and off
Before turning on the computer, make sure the AC adapter is connected or the
battery is charged.
Turning on the computer
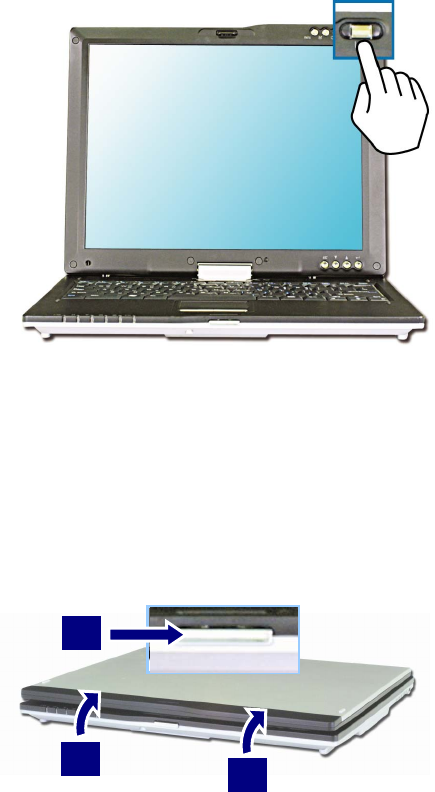
1. Push the latch button to the right1 and open the display panel2.
1
2 2
- 44 -
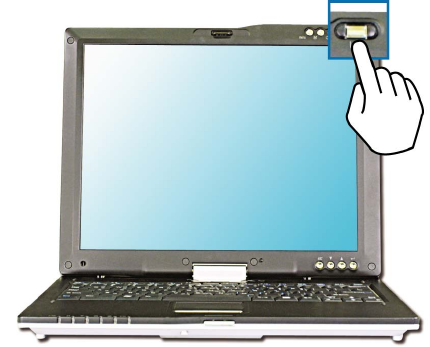
2. Press the power switch.
Note:
The power switch has an option to protect for pressing as user’s disposal.
3. Pressing the power switch starts the self-diagnostic procedures; then
Windows(R) XP startup screen is displayed.
4. If you turn the power on the computer for the first time, you have to register
your copy of Windows XP. The registration process may differ depending on
the model, but the difference does not affect the use of your computer.
5. In a moment, ‘Welcome to Microsoft Windows’ appears on the screen. Click
[Next].
- 45 -

6. “How should dates and currency appear?” appears on the screen. Select region,
language, and keyboard type on each box. Click [Next]
7. “What time zone are you in?” appears on the screen. Select time zone
you are in, and click [Next]
8. ‘The End User License Agreement’ appears on the screen. Be sure to read the
agreement, select ‘Yes, I accept’, and click [Next]
9. ‘What’s your computer’s name?’ appears on the screen. Type the name and
description of your computer, and click [Next].
10. ‘Ready to register with Microsoft?’ appears on the screen. Select ‘No, not this
time’ and click [Next].
- 46 -
11. ‘Who will use this computer?’ appears on the screen. Type the names of the
users and click [Next].
12. ‘Thank you!’ appears on the screen. Click [Finish] to complete the regist-
ration process.
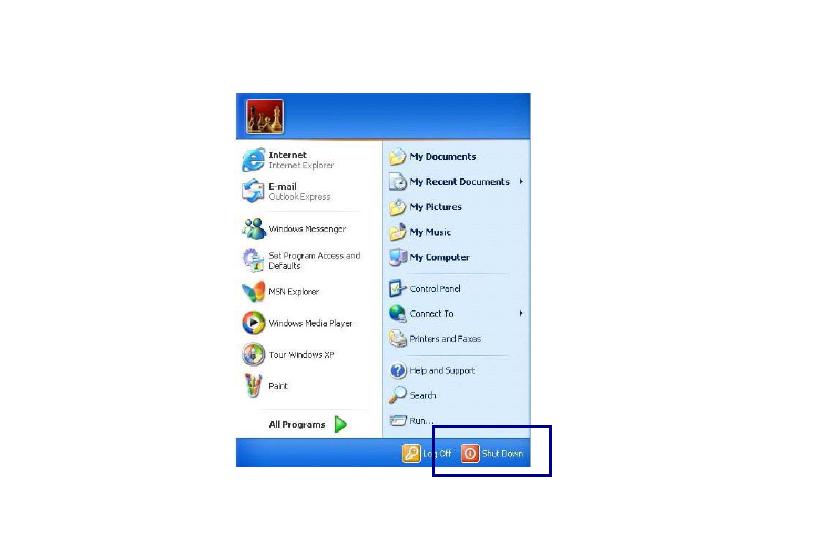
Turning off the computer
Quit all running applications; click [Start] and choose [Turn Off Computer]
from the start up menu.
In the Turn off computer window, choose Shut down.
- 47 -
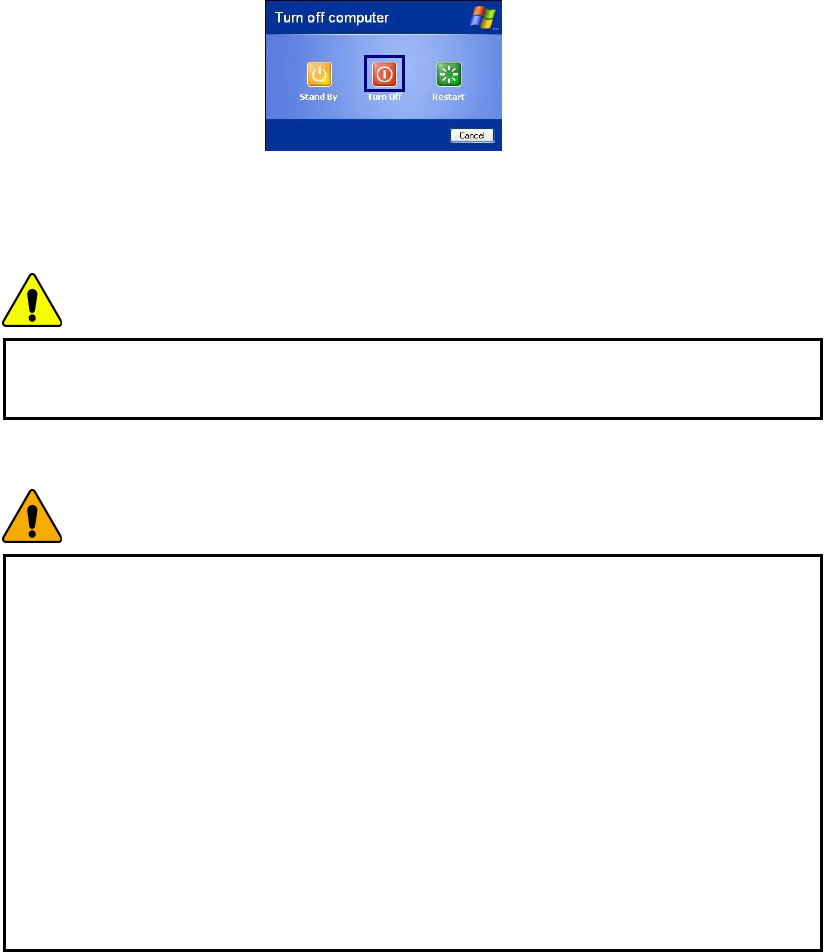
The computer is turned off automatically.
Caution
If the Drive in use indicator is on, do not turn off the computer, as doing so may
damage the data being read from or written to the drive.
Warning
If Windows does not shut down correctly, press and hold the power switch for
more than 5 seconds; the system will shut down.
Turning off the computer this way may damage the system. It is recommended
that you always turn off the computer by choosing Shut down in the Start menu.
If the computer does not shut down correctly while running applications, the
data in the hard disk drive may be damaged.
If a program does not respond, press the Ctrl+Alt+Delete combination to start
the Task manager; then quit the program or restart the system.
If Windows or program file is damaged by shutting down the system incorrectly,
reinstall the program. The user is responsible for the loss of data caused by
incorrect use of the computer.
- 48 -
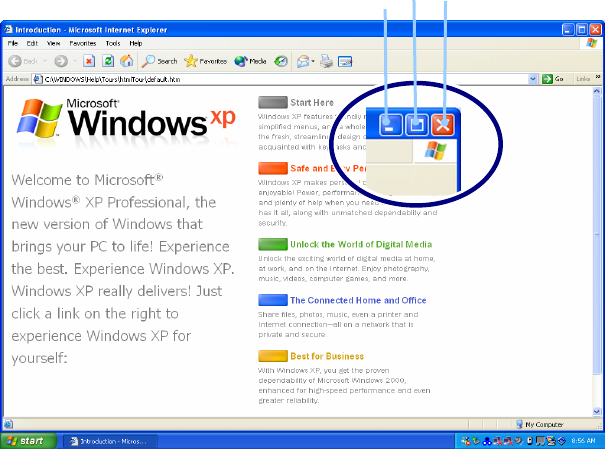
Using Windows XP
Windows XP is new, brilliant and easy-to-use. Background and title bar have been
rearranged concisely, and it became easier to access the application programs
from the start menu. Also, it allows the users with more diverse options to choose
from when decorating their desktop.
Overview
Windows XP is an operating system that runs a computer. Learning the basics
features in Windows is recommended to utilize a computer effectively. Click
[Start]->[Tour Windows XP] to explore the features and tools available in
Windows XP.
Window Buttons
1. Minimize
2. Maximize
3. Close
1 2 3
- 49 -
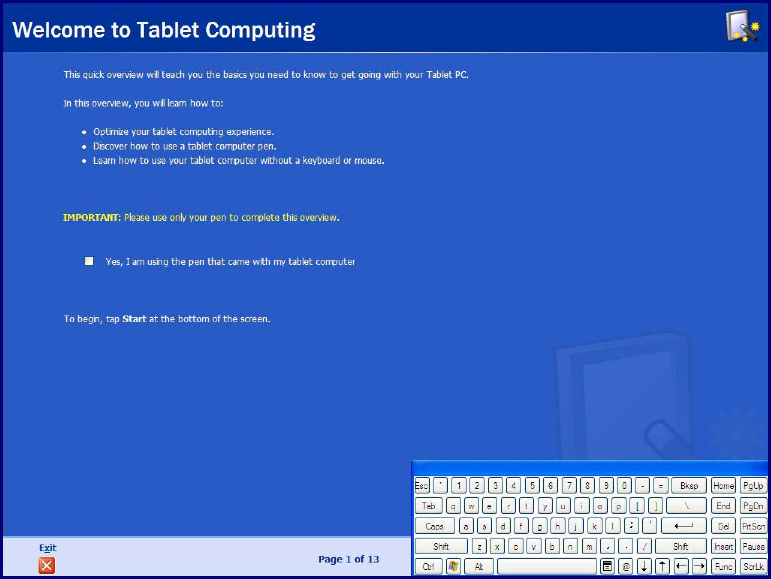
Using Tablet PC
The users can learn how to use tablet PC basically in this section.
Read following contents before you use.
Overview
Learning the basics features in tablet PC is recommended to utilize a computer
effectively.
Click [Start]-[All Programs]-[Get going with Tablet PC].
If the following window appears, it is available to get descriptions about the
function of Tablet PC.
- 50 -
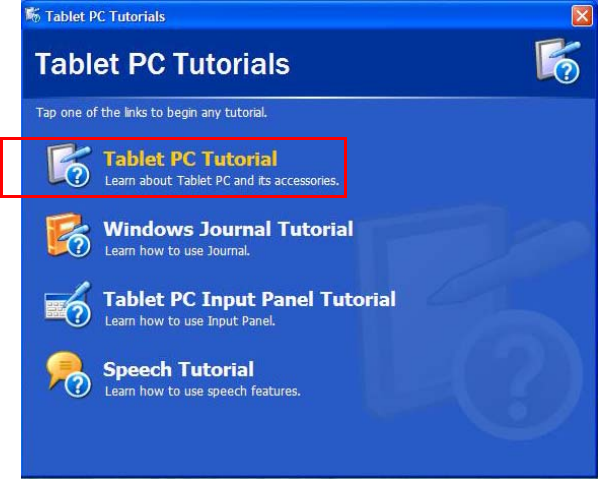
Using Tablet PC Tutorials
When using Tablet PC, it is very convenient to work.
Tablet PC Tutorials
1. Click [Start]-[All Programs]-[Tablet PC], and choose one of items.
2. When checking up other functions, click other Tablet PC Tutorials.
- 51 -
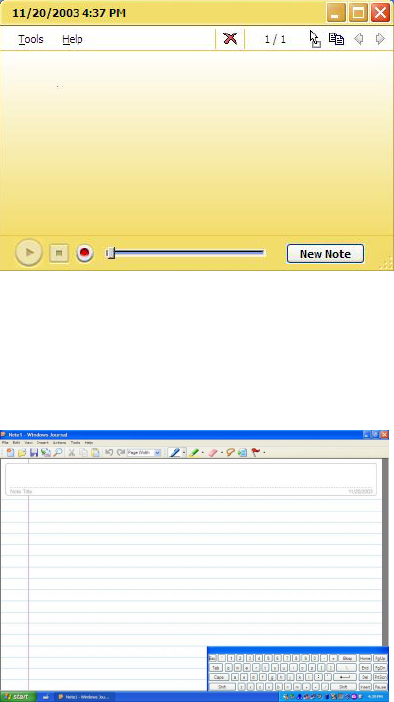
Using Tablet PC application programs
Sticky Notes
Sticky Notes has the function as convenient as normal notepad to save personal
information (name, phone number, address, etc.), and the function of recording
voice message.
Click [Start]-[All Programs]-[Sticky Notes]
Windows Journals
Click [Start]-[All Program]-[Windows Journals]
(* Press the button Windows Journal on LCD Panel)
- 52 -
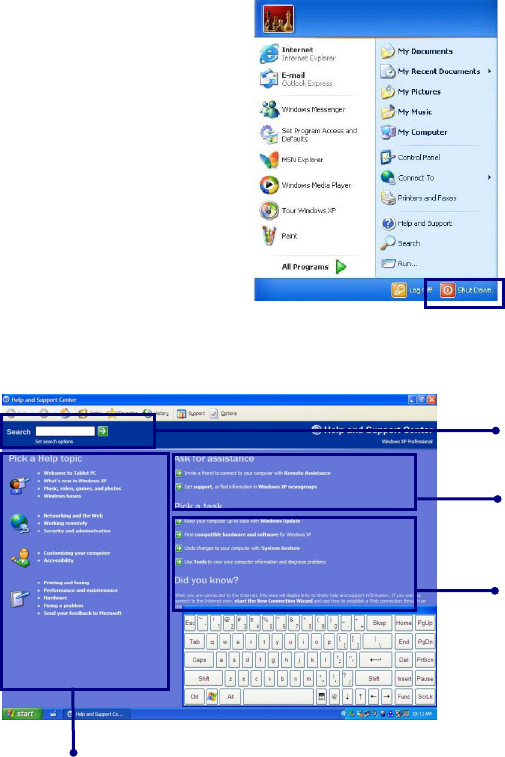
Help and Support
Click [Help and Support] to learn how to troubleshoot problems you may
encounter while using the computer.
- 53
You can search for useful
Help and Support
information.
Click to learn the features and troubleshooting information
You can connect to the
Internet and ask for
assistance online.
You can setup and
configure your computer
to personalize your
computing environment
LG
Click [Start]->[Help and Support].
LG
The following window appears.
-
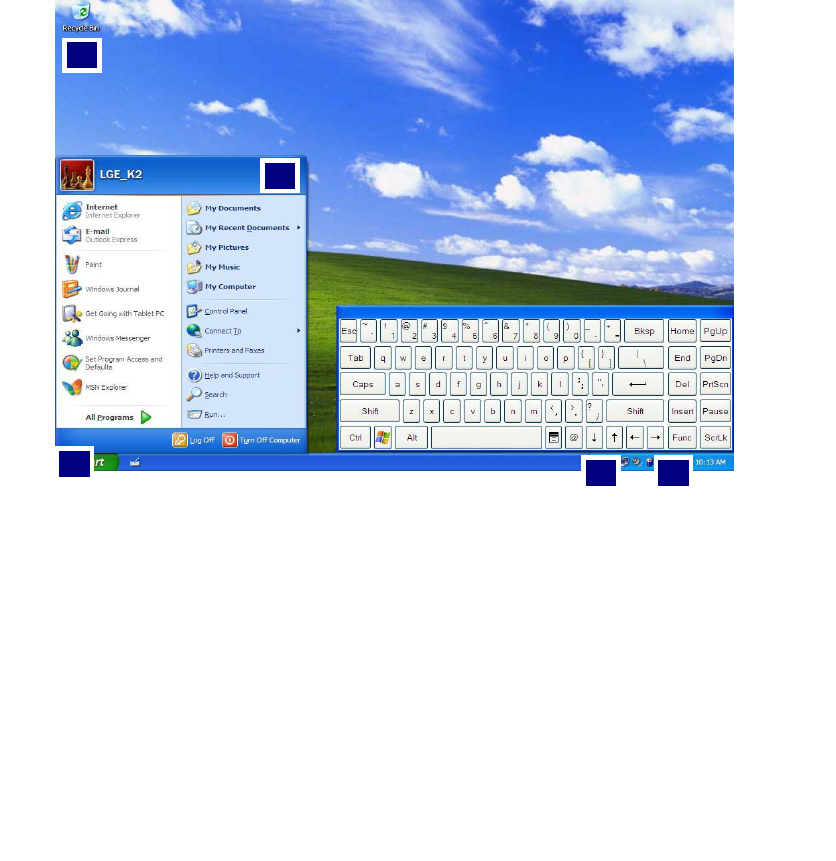
Windows XP desktop
5
3 4
2
1
1.[Start] button
Click [Start] button to open the [Start] menu. Click [All Programs] to open
the list of programs installed in the computer.
2.[Start] menu
[Start menu] shows everything you need to start working in the Windows XP
environment.
3. Taskbar
Taskbar shows programs that are currently open and running.
4. Taskbar icons and clock
Taskbar icons show and let you configure ongoing activities such as battery
power status, display properties, LAN settings, etc.
- 54 -
5. Recycle Bin
Put your unused items and files in the Recycle Bin. Right-click the Recycle Bin
and select [Empty Recycle Bin] to permanently delete the items inside the
Recycle Bin.
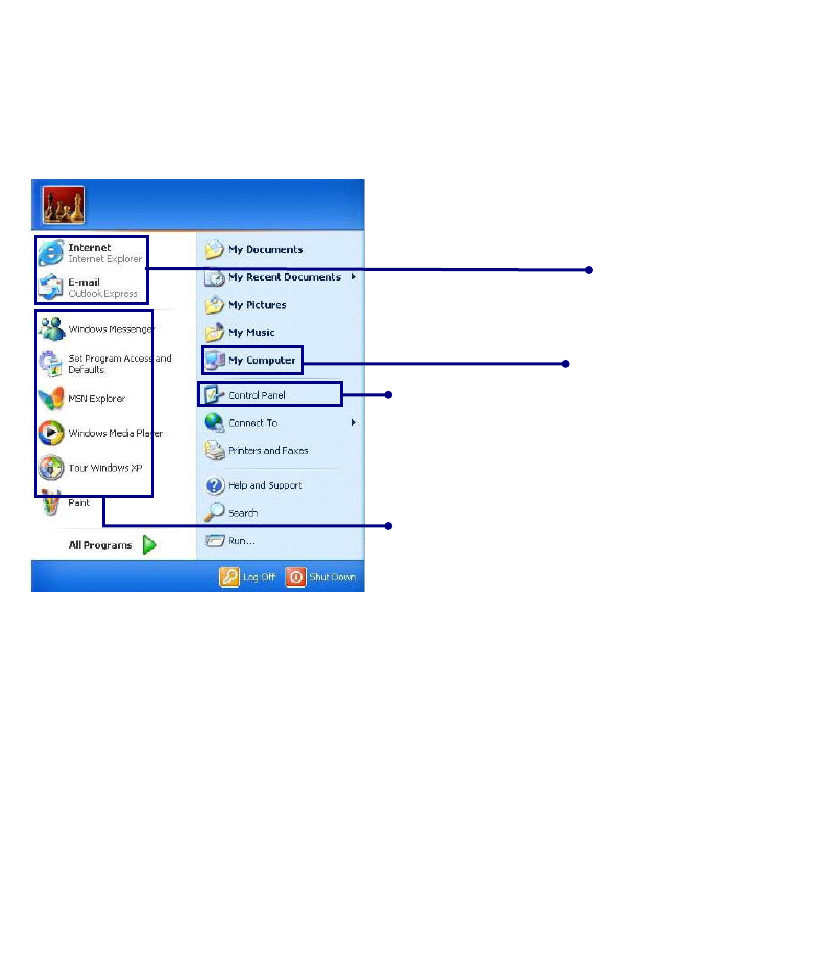
Start menu
Pinned items
Control Panel lets
you change the
settings in your
computer
Recently used items
My computer shows
the drive and network
information for your
computer
LG
Changing the look of the Start menu
Right click [Start] button and select [Properties].
In the Start menu tab, choose from either Start menu or Classic Start menu.
Click [OK] to apply the new setting.
Changing the pinned items in the Start menu
Right-click the item you want to pin it to the Start menu.
Select [Pin To Start Menu].
The item is pinned at the top of the Start menu.
Showing the recently used items on the Start menu
Right-click on [Start] button and click [Properties].
In [Start Menu] tab, select [Start menu] and click [Customize].
- 55 -
In [Advanced] tab, check [List my most recently opened documents] and
click [OK].In Taskbar and Start Menu Properties window, click [Apply]->[OK].
If you click [Start] button the next time, recently used items appear on the Start
Menu.
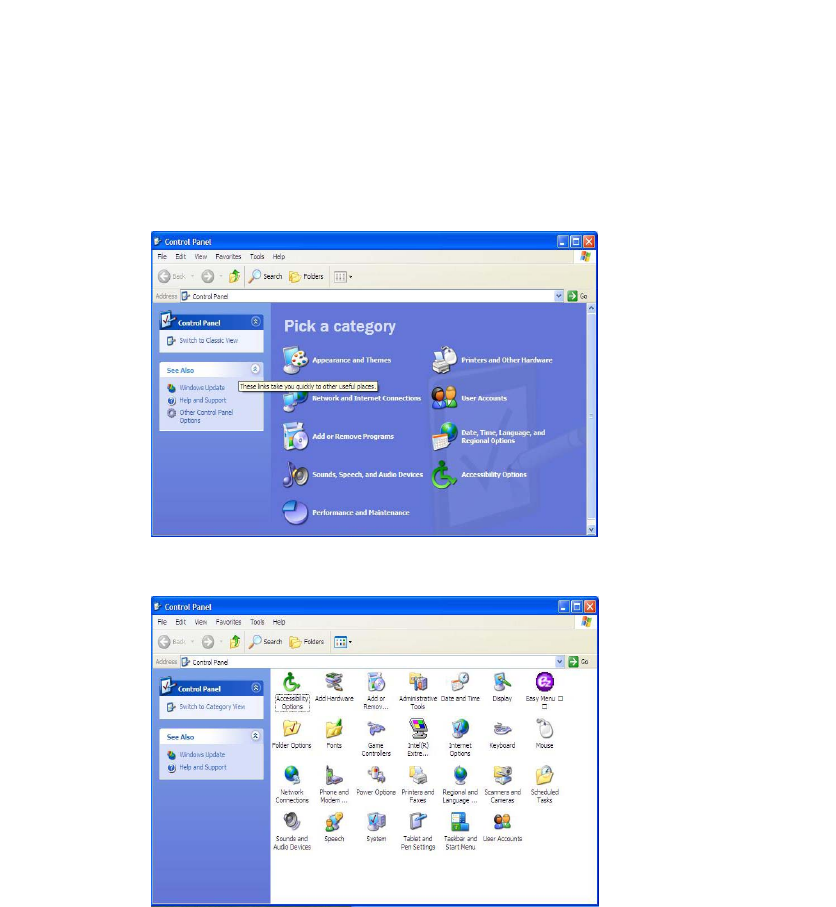
Control Panel
The Windows XP Control Panel can display items in either Category View or
Classic View.
Category View
Classic View
- 56 -
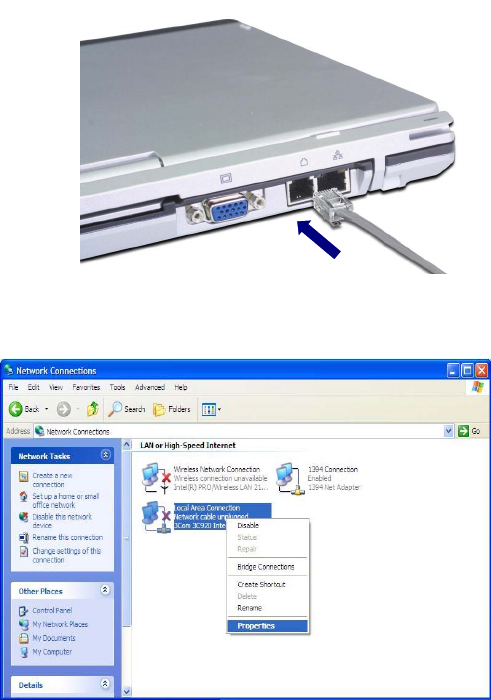
Setting up Local Area Network (LAN) connections
Local Area Network (LAN) connection provides high-speed network connection for
your home or company.
Attach a LAN cable to the Ethernet (LAN) port.
Click [Start]->[Control Panel]->[Network Connections].
Right-click a Local Area Connection and select [Properties].
- 57 -
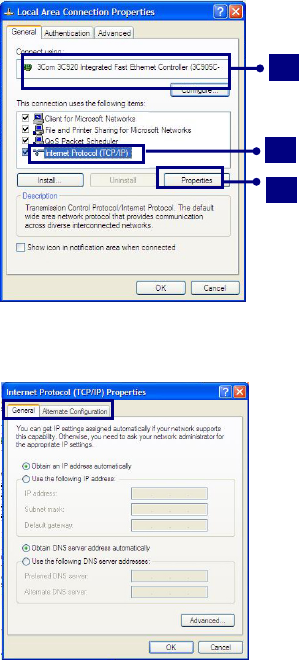
If the following window appears, click [General] tab and 1. check if 3COM 3C920
Integrated Fast Ethernet Controller is installed in the computer 2. Then, check
Internet Protocol, and 3. click on [Properties]
3
2
1
Click on [General] tab, and Select [Obtain an IP address automatically]
Click [Ok] when Internet protocol (TCP/IP) setting is completed.
Note:
Ask your network administrator for the appropriate IP settings.
- 58 -
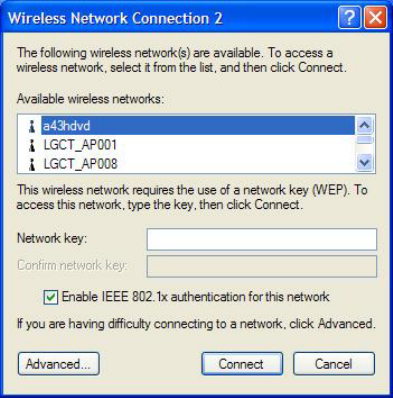
Using Wireless LAN
You can use Wireless LAN to connect to the network and use the Internet in your
home and office. You can share files and folders over the network without the
attaching network cables to the computer. For saving power, Wireless LAN is set
up as power off when shipping. When using the wireless network devices
(LAN/Bluetooth), use them on Easy Menu after turning on the wireless device.
Connecting and using the wireless network
Right-click the Wireless network icon on the Taskbar and select [View available
wireless network].
Select AP(Access Point) you want to connect to and type necessary information.
Click [Connect].
If you place the mouse pointer on the Wireless network icon on the Taskbar, you
can see the status of the wireless network.
- 59 -
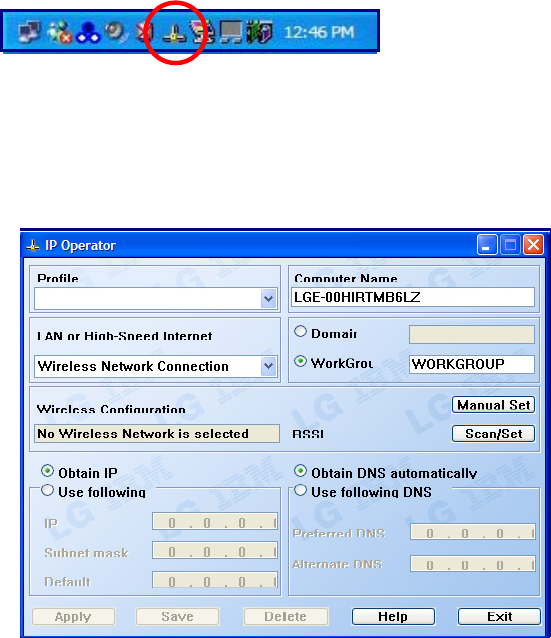
Using IP Operator
IP Operator is useful to access to network everywhere by notebook.
User access to network at the several places (Home, Office, and Vendor etc.) can
save and modify the network environment (IP address, Domain, Workgroup).
For more detailed information, refer to [IP Operator].
Double click [IP Operator] icon on Desktop System tray.
- 60 -
If the following window appears, select LAN or High-Speed Internet at the drop
down menu and type the computer name you use.
Type the name is appropriate at [Profile List] after making a decision whether a
user belonging to [Domain], or a member of [Work Group].
Choose one of setting options as below.
When setting [Obtain an IP address automatically],
- IP address, Subnet mask, Default Gateway windows are changed the color as
grey automatically.
When setting [Use the following IP address]
- Insert IP address, Subnet mask, Default Gateway window. Then, insert DNS
Server.
Click the [Profile Save] button when finishing inserting items in [Profile List]
Note:
When setting [Obtaining an IP address automatically], it is unavailable to
insert IP address, Subnet mask, and Default gateway.
When pressing [Profile Apply], no items appear at [Profile List].
If a user needs to apply the specific item, select one of items at [Profile List],
and click [Profile Apply].
Changing the Themes and Desktop background
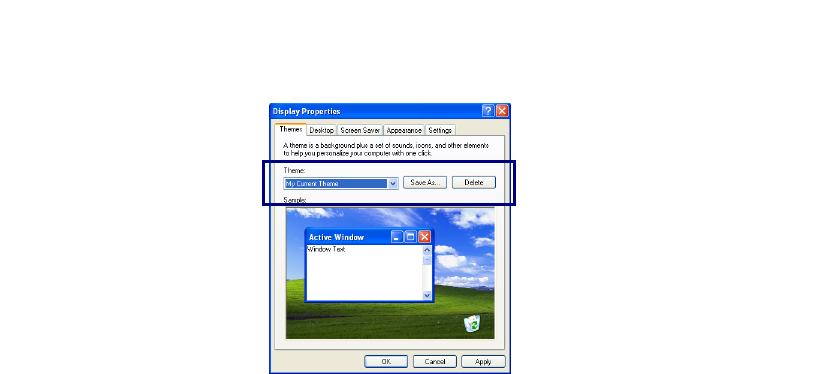
Using the Windows Classic Theme
Click [Start]->[Control Panel]->[Display].
Click [Themes] tab
Select [Windows Classic] from the [Theme] drop down menu.
- 61 -
Using a different theme
1. Click [Start]->[Control Panel]->[Display].
2. Click [Themes] tab
3. Select another theme from the [Theme] drop down menu.
Note:
In Appearance tab, you can click [Advanced] button and change the color
scheme, font size, and windows and button styles.
In Themes tab, you can change the overall appearance of the desktop.
If there is more than one user using the computer, each user can apply different
theme and desktop appearances.
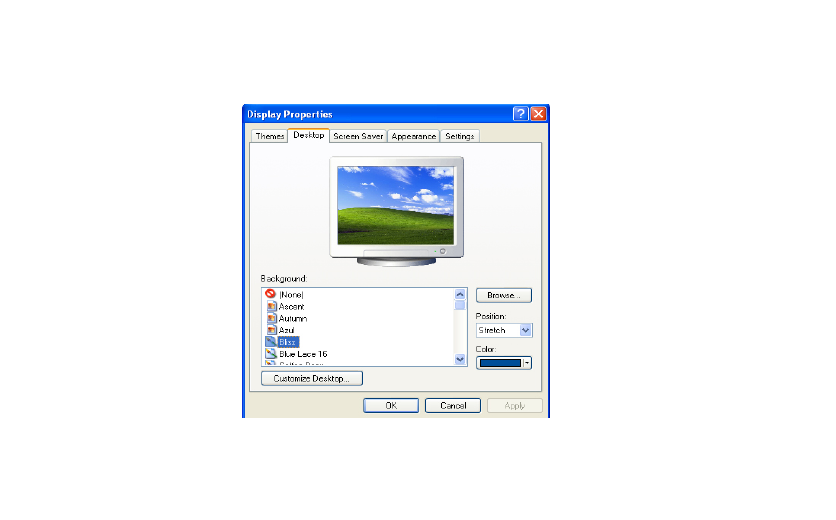
Changing the desktop background
Click [Start]->[Control Panel]->[Display].
Click [Desktop] tab. (OR you can right click on the mouse while in desktop
background. When a short cut menu pops up, choose [Properties]
Scroll down the [Background] drop down menu and select an image for the
background. You can also click [Browse] button and select an image you have
saved.
- 62 -

Setting the Screen Saver
Click [Start]->[Control Panel]->[Display].
Click [Screen Saver] tab.
- 63 -
Select the idle time before activating the Screen Saver from [Wait] drop down
menu. Check [On resume, password protect] to protect the computer from
unauthorized users.
Taskbar
Taskbar displays programs and files that are currently open. If there are many
programs running on the computer, the Taskbar group together files from the
same program to prevent taskbar icons from cluttering up the Taskbar.
Desktop cleanup
Desktop Cleanup Wizard removes unused desktop items to a folder. The Desktop
Cleanup Wizard runs every 60 days but you can also run it manually.
1. Click [Start]->[Control Panel]->[Display].
2. Click [Desktop] tab.
3. Click [Customize Desktop] -> [Clean Desktop Now] button.
Using the Power Options
Windows XP uses its own power-saving program to manage the battery power.
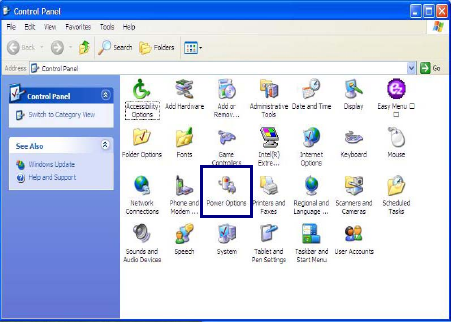
Click [Start]->[Control Panel]. Double-click [Power Options].
In Power Options Properties window, change the settings best suited for your
computing environment.
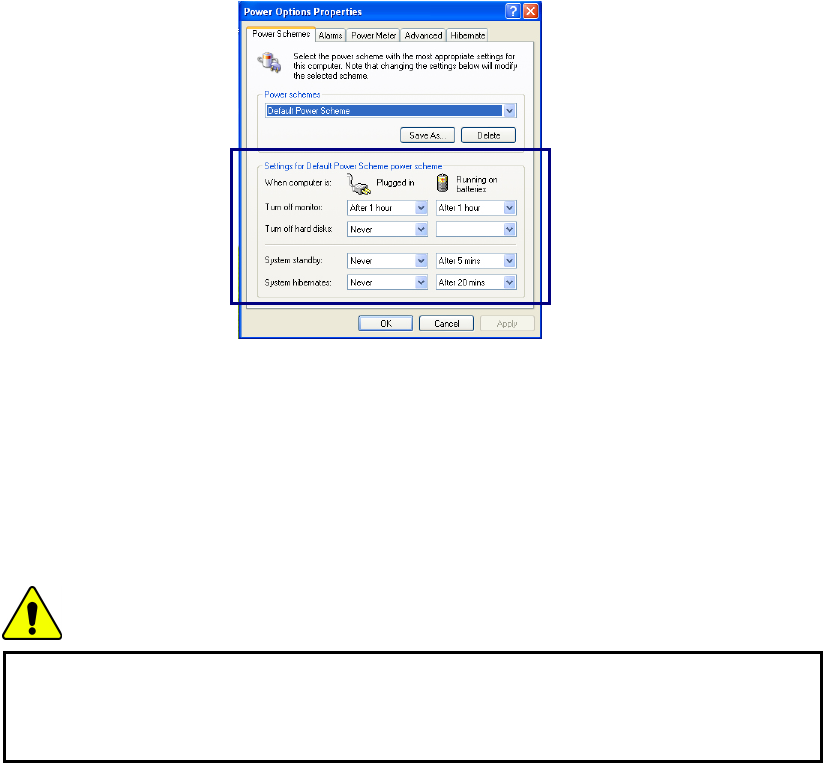
Power Options Properties
Click [Power Schemes] tab.
Drop down the menu and select [Portable/Laptop] to set notebook PC with the
appropriate power schemes. This includes detailed timeline for [Turn off
monitor], [Turn off hard disks], [System standby], and [System
hibernates].
- 64 -
Note:
If the computer enters System standby mode, the hard disk is turned off to
conserve the battery power.
In System standby mode, you cannot save your work. Be sure to save your work
before entering System standby mode.
When the computer enters System hibernation, the computer saves all your work
in the hard disk and turns off the computer.
Caution
If the computer enters System standby or hibernation mode while playing a
computer game, a serious error may occur. Be sure to quit the computer game
before entering a power-saving mode.
Power Options Properties
Click [Alarms] tab. Check [Low battery alarm] and [Critical battery alarm],
and move the sliders to set the power level to activate low battery alarm and
critical battery alarm.
- 65 -
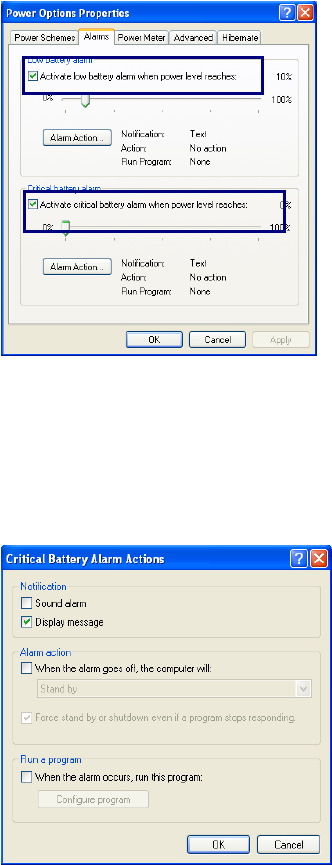
You can be notified with Sound alarm or Display message. You can also set the
alarm action such as putting the computer into System standby mode or System
hibernation mode. You can also run a specific program when the alarm goes off.
- 66 -
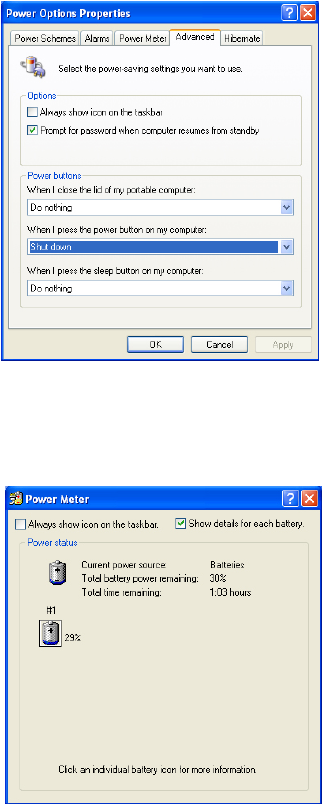
Advanced tab
In Options, you can set the computer to prompt for password when computer
resumes from standby. You can also set the computer to enter a power-saving
mode when closing the display panel, pressing the power switch or the
combination of Fn+F4.
Power Meter
You can click the Power Meter icon on the Taskbar to check the power level of
your computer.
- 67 -
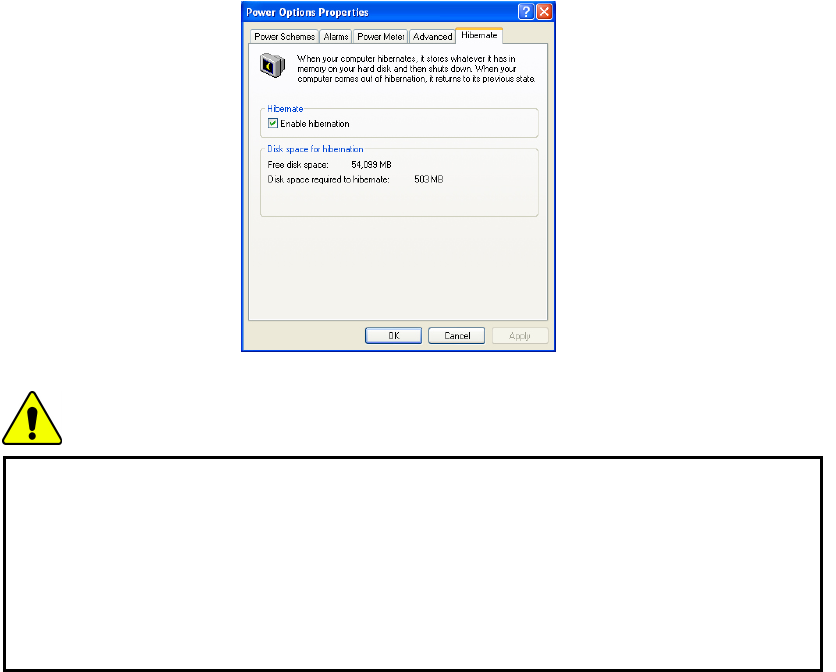
System Hibernation
In Hibernate tab, you can enable or disable System hibernation mode and check
the disk space needed for hibernation.
Caution
Do not remove the battery pack when the AC adapter is not connected to the
computer.
If you keep using the computer while low on the battery power, you may lose
the data when the battery power goes out. If you are notified of low battery
power, save your data and connect the AC adapter, or turn off the computer and
change the battery pack.
Using ez menu
To use ez menu is helpful for using Tablet PC.
Click [Start]-[All Program]-[Easy Menu], Or use ez menu button on LCD
Panel.
- 68 -
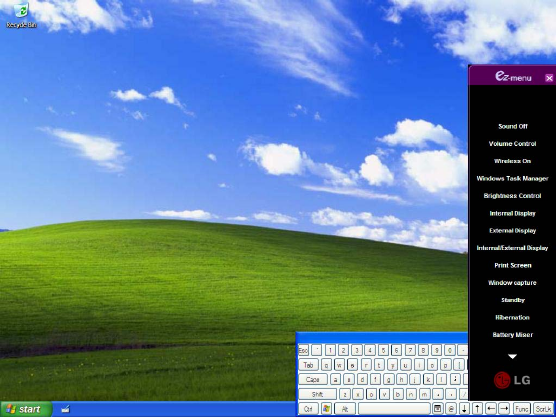
Note:
When pressing a triangle on lower column of ez menu, added menu will appear.
Sound On/Off: Turning sound on and off.
Volume Control: Adjust volume by using Up/Down button on LCD Panel
Wireless On/Off: When turning wireless off, it's available to extend the battery
power.
Windows Task Manager: Running Windows Task Manager.
Brightness Control: Adjusts brightness of the screen by using Up/Down button
on LCD Panel.
Internal Display: Using internal display.
External Display: Using external monitor that connected to VGA port at the
back of the computer.
- 69 -
Internal/External Display: Using both Internal Display and External Display.
Print Screen: Capturing the whole desktop screen as an image. It's possible to
edit and paste on the graphic program after the capture.
Window Capture: Capturing activated window.
Standby: Entering into standby mode.
Hibernation: Entering into hibernation mode. When pressing the power switch
on hibernation mode, it comes back as a normal.
Battery Miser: Running Battery Miser for setting up the power option.
Tablet PC Settings: Running the program for Tablet and Pen Settings.
Easy Menu Settings: User can modify, add, and delete Easy Menu Item
conveniently.
Using pen to input (attached pen in tilt / offered extra pen)
It’s possible to input letters by using pen.
Using pen to input (When inputting on notepad)
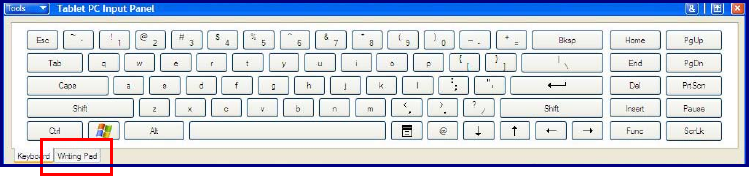
1. Tap Tablet PC icon on taskbar. Tablet PC Input Panel will appear.
2. Tap [Writing Pad] after running notepad.
- 70 -