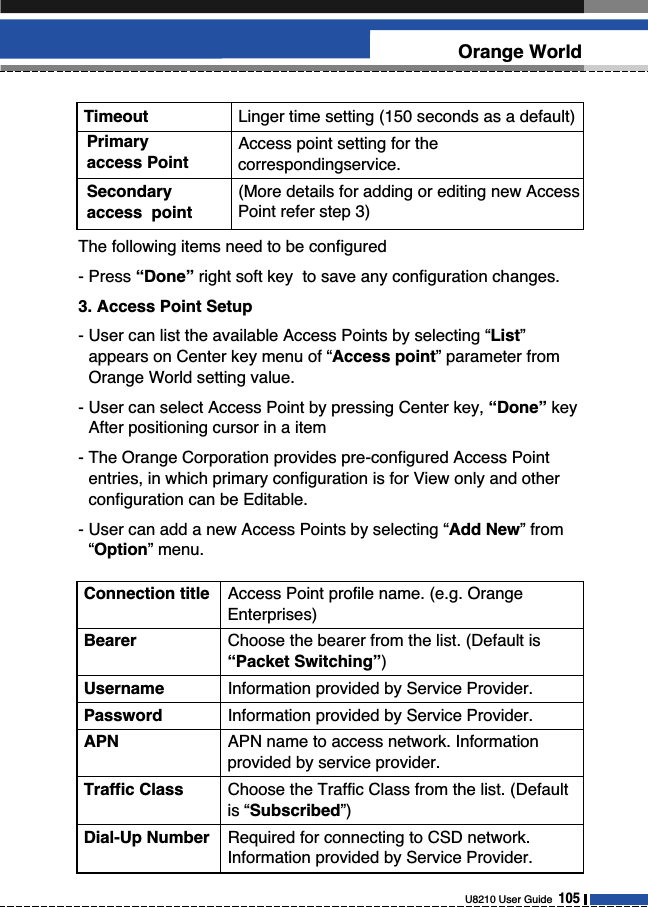
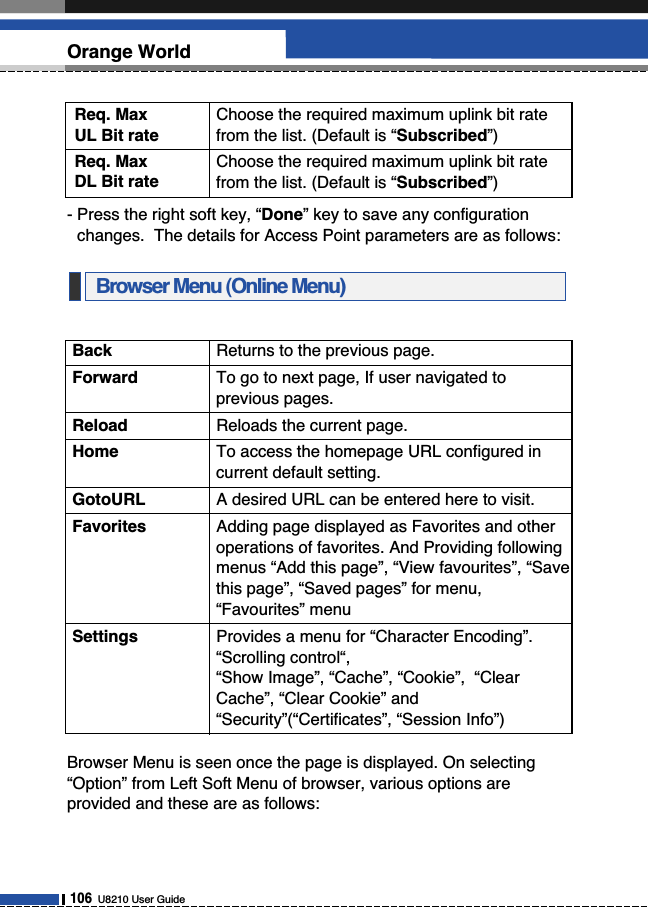
LG Electronics USA U8210 Single-Band PCS GSM Phone User Manual U8210
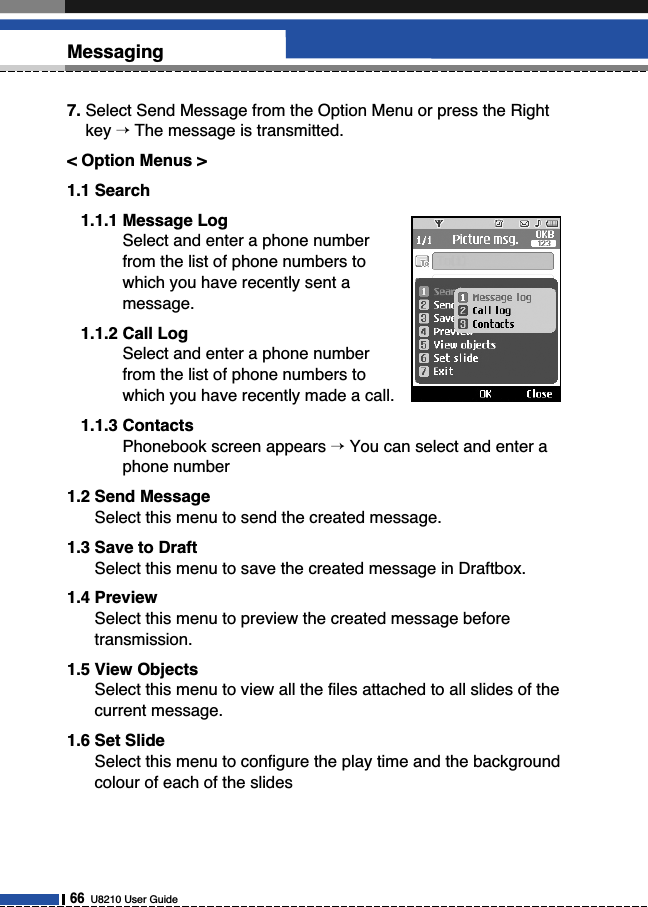
LG Electronics USA Single-Band PCS GSM Phone U8210
UserManual.wiki
>
LG Electronics USA
>
U8210 User Manual
Users Manual
Navigation menu
Upload a User Manual
Namespaces
Wiki Guide
HTML
PDF
Info
Views
User Manual
Discussion / Help
Navigation

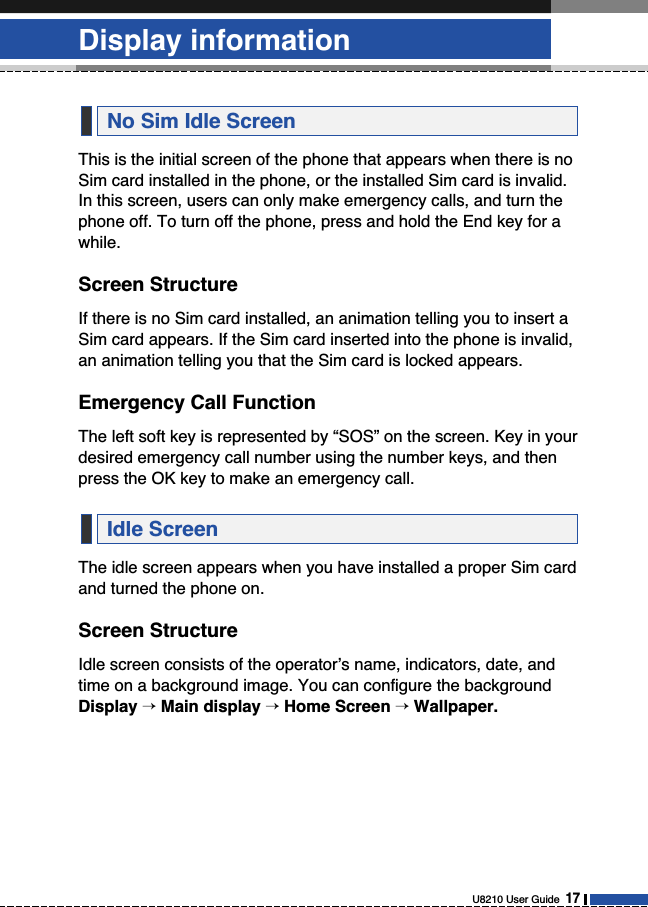
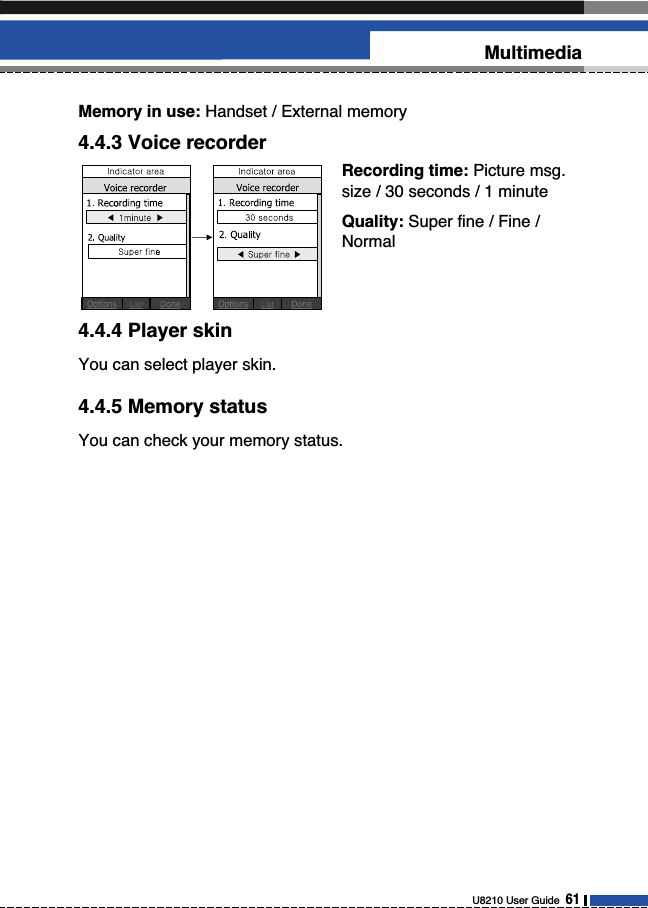
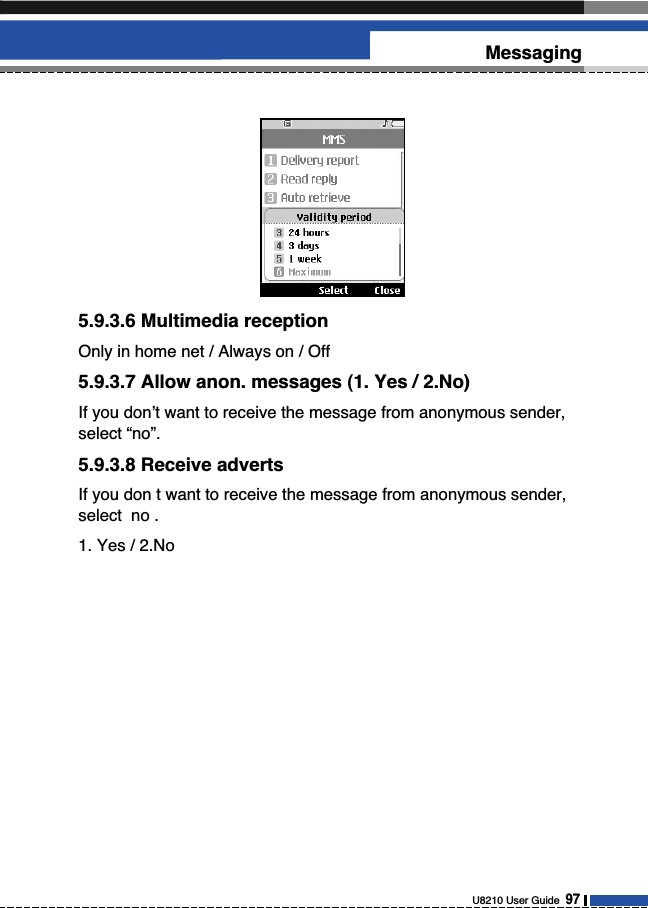
![20U8210 User GuideDisplay informationthe phone lock status, you will find the phone remains in phone lockstatus when you turn it on.Ensure that your USIM card is in your handset and the battery ischarged.Press and hold the key until power is on.Enter the USIM PIN code that was supplied with your USIM card ifPIN code setting is on.After a few seconds you will be registered on the network.Press and hold the key until power is off.There may be some delay while the handset powers down.Do not re-power the handset during this time.You can use the access codes described in this section to avoidunauthorized use of your phone. The access codes (except PUKand PUK2 codes) can be changed by using the Change codesfeature [Menu 3.5.2].PIN code (4 to 8 digits)The PIN (Personal Identification Number) code protects your USIMcard against unauthorized use. The PIN code is usually suppliedwith the USIM card. When the PIN Code Request is set to Enable,your phone will request the PIN code every time it is switched on.When the PIN Code Request is set to Disable, your phone connectsto the network directly without the PIN code.Access CodesTurning your handset offTurning your handset on](https://usermanual.wiki/LG-Electronics-USA/U8210/User-Guide-580162-Page-18.png)

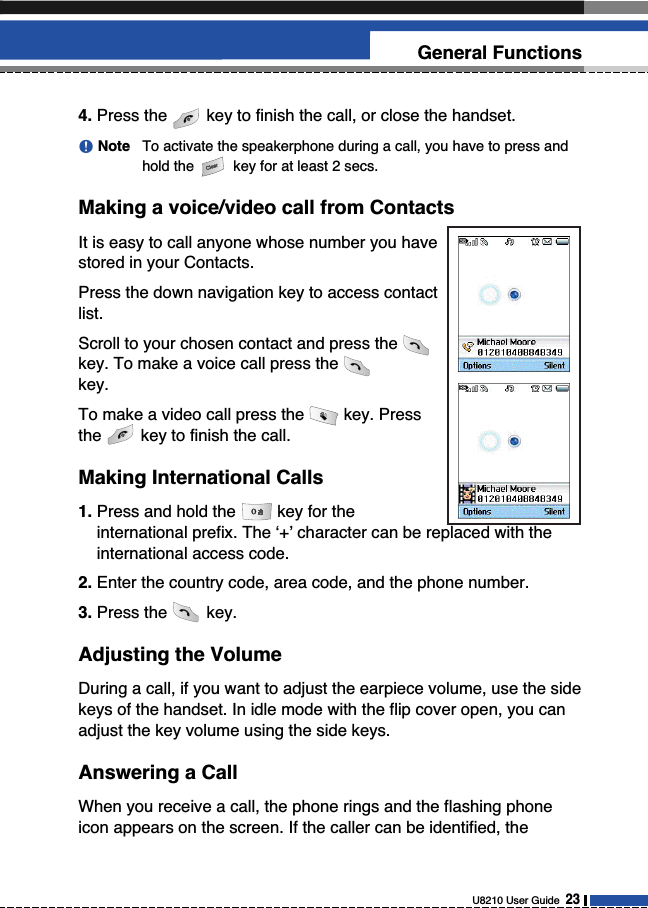
![You can make/answer a video call to a 3Gvideo phone the other party must have a 3Gvideo phone and be in a video service area.To make/answer a video call, do the following.1. Input the phone number using the keypad,or select the phone number from the callsmade/received lists.nNote To correct mistakes, press the keybriefly to delete the last number, or pressand hold the key to delete all numbers.2. If you do not want to use the speakerphone,ensure you have the headset plugged in.3. To start the video function, press .nNote You will be notified that you will need to close other applications tomake the video call.nNote The video call may take some time to connect. Please be patient.The connection time will also depend on how quickly the other partyanswers the call. While the video call is connecting, you will seeyour own images; after the other party has answered, their imagewill be displayed on screen.4. Adjust the camera position if necessary.5. Press the end key to finish the call, or close the handset.Making a voice call1. Make sure your handset is powered on.2. Enter the number including the full area code.]To delete a digit press the key. To delete all digits press and hold the key.3. Press the key to make the call.Making and Answering a video call22U8210 User GuideGeneral Functions](https://usermanual.wiki/LG-Electronics-USA/U8210/User-Guide-580162-Page-20.png)
![Using the T9 ModeThe T9 predictive text input mode allows you to enter words easilywith a minimum number of key presses. As you press each key, thehandset begins to display the characters that it thinks you are typingbased on a built-in dictionary. As new letters are added, the wordchanges to reflect the most likely candidate from the dictionary.1. When you are in the T9 predictive text input mode, start enteringa word by pressing keys to . Press one key per letter.]The word changes as letters are typed - ignore what’s on thescreen until the word is typed completely.]If the word is still incorrect after typing completely, press thekey once or more to cycle through the other word options.ExamplePress to type GoodPress the key to get Home]If the desired word is missing from the word choices list, add it byusing the ABC mode.2. Enter the whole word before editing or deleting any keystrokes.3. Complete each word with a space by pressing the key.To delete letters, press the key. Press and hold down the key to erase entire words.Using the ABC ModeUse the to keys to enter your text.1. Press the key labeled with the required letter:]Once for the first letter]Twice for the second letter]And so on2. To insert a space, press the key once.To delete letters,press the key. Press and hold down the key to clear thedisplay.U8210 User Guide 25General Functions](https://usermanual.wiki/LG-Electronics-USA/U8210/User-Guide-580162-Page-23.png)
![Using the 123 (Number) ModeThe 123 Mode enables you to enter numbers in a text message(a telephone number, for example).Press the keys corresponding to the required digits before manuallyswitching back to the appropriate text entry mode.Using the Symbol ModeThe symbol mode enables you to enter various symbols or specialcharacters.To enter a symbol, press the center soft key [Symbol]. Use thenavigation and numeric keys to select the desired symbol and pressthe key.Key descriptionEach key can be used for several symbols. There are shown below. 26U8210 User GuideGeneral FunctionsKey Characters in the Order DisplayLower case Upper case1. , ? ! 1 . , ? ! 1 2a b c 2 à á â ã ä ˙å æ ç A B C 2 À Á Â Ã Ä Å ÆÇ 3d e f 3 è é ê ë D E F 3 È É Ê Ë4g h i 4 ì í î ï G H I 4 Ì Í Î Ï 5j k l 5 £ J K L 5 £6m n o 6 ñ ò ó ô õ ö ø œ M N O 6 Ñ Ò Ó Ô Õ Ö Ø Œ 7p q r s 7 ß $ P Q R S 7 ß $8t u v 8 ù ú û ü T U V 8 Ù Ú Û Ü9w x y z 9 W X Y Z 90Space 0 Space 0](https://usermanual.wiki/LG-Electronics-USA/U8210/User-Guide-580162-Page-24.png)


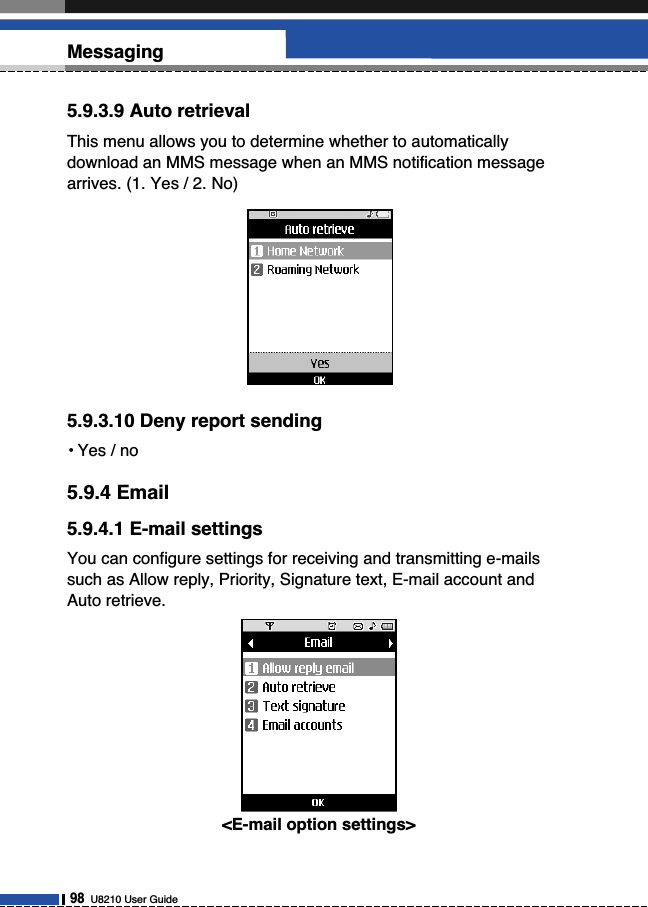
![Although the current time is automatically configured when thephone is registered to the network, users can configure time anddate directly using ‘Time & Date’ menu. The time configured by useris valid only while the phone is turned on.3.1.1 TimeScroll down to select the hour indicator format i.e Off,Cuckoo clockor Chime bell.1. Select the ‘Time’ item from the Time & Date list, and then press[OK] [Select].2. Move to your desired field, ‘Time’, ‘Minute’, or ‘AM’/‘PM’ fieldusing the navigation keys.3. Input ‘Time’, and ‘Minutes’ using the number keys.4. Press the [OK] or [Confirm] key to set the time with the specifiedvalue.3.1.2 Date1. Select ‘Date’ item from the Time & Date list, and then press [OK][Select].2. Select date format using Left and Right navigation keys or bypressing the [Setup] key.3. Input ‘Year’, ‘Month’, and ‘Day’ using the number keys.4. Press [Done] [Confirm] to set the date with the specified value.3.1.3 Auto Update Data/TimeWhen Auto Update is configured to On, the time and date areautomatically updated according to the current location. If Confirmfirst is selected, time and date update are confirmed before theautomatic update. When Autoupadte is On, the option selected in daylight saving will3.1 Time & Date3. Settings48U8210 User Guide](https://usermanual.wiki/LG-Electronics-USA/U8210/User-Guide-580162-Page-46.png)
![U8210 User Guide 51Settings- Press “Save” key to save any configuration changes.You can activate a PIN code.When it is activated, a window askingyou to enter the PIN code appears when you turn on the phone soas to prevent unauthorized use of the phone.3.4.1 PIN code requestYou can activate a PIN (Personal Identification Numeric). You cancheck the current status of configuration from the status bar.PIN request and release procedures1. Select ‘PIN request’ item from the list, and press [Select]. Then awindow allowing you to select ‘Enable’ or ‘Disable’ appears.- Select ‘Enable’/‘Disable’ from the list, press [Select], and inputthe current PIN code to set the PIN request. If ‘PIN request’ isalready enabled/disabled, an “Already enabled”/ “Alreadydisabled” message will be displayed.2. 3 incorrect PIN code entries in the PIN code input window wouldinvalidate the PIN code. In this case, you have to input the PUK(PIN Unblock Key) code to configure the PIN code again.3.4 SecurityItem DescriptionEnable PIN Request You have to input the PIN code eachtime the mobile phone is turned on.Disable PIN Request You do not have to input the PIN codewhen the mobile phone is turned on.Req. Max UL Bitrate Choose the Request Maximum UploadBitrate from the list. (Default is “Subscribed”)Req. Max DL Bitrate Choose the Request Maximum DownloadBitrate from the list.(Default is “Subscribed”)](https://usermanual.wiki/LG-Electronics-USA/U8210/User-Guide-580162-Page-49.png)
![3. The maximum allowed numeric of attempts of PUK input is 10times. 10 occasions of incorrect PUK entries would limit themobile phone use. Press the Back key in the PIN code input window to return to theprevious step.3.4.2 Handset lockYou can lock your mobile phone to prevent it being used by otherpeople. The following 4 lock functions are provided.- When switching on: Whenever the mobile phone is turned on.- If SIM Changed: When the mobile phone’s SIM card has beenchanged.- Immediate: Locks the phone immediately.- None: Cancels lock function.3.4.3 Change codeYou can change PIN, PIN2, the mobile phone password and the callbarring password.3.4.3.1 PINPIN is the abbreviation of Personal Identification Numeric, and isused to restrict the use of an unauthenticated user.PIN Password Change Procedure1. Select ‘PIN’ from the ‘Change code’ list and then press [Select].2. Input the current PIN,and press [Select].3. Input the new PIN,and press [Select].4. Input the new PIN once again,and press [Select ].- If the PIN is different from that of step 3, the procedure isrestarted from step 3.52U8210 User GuideSettings](https://usermanual.wiki/LG-Electronics-USA/U8210/User-Guide-580162-Page-50.png)
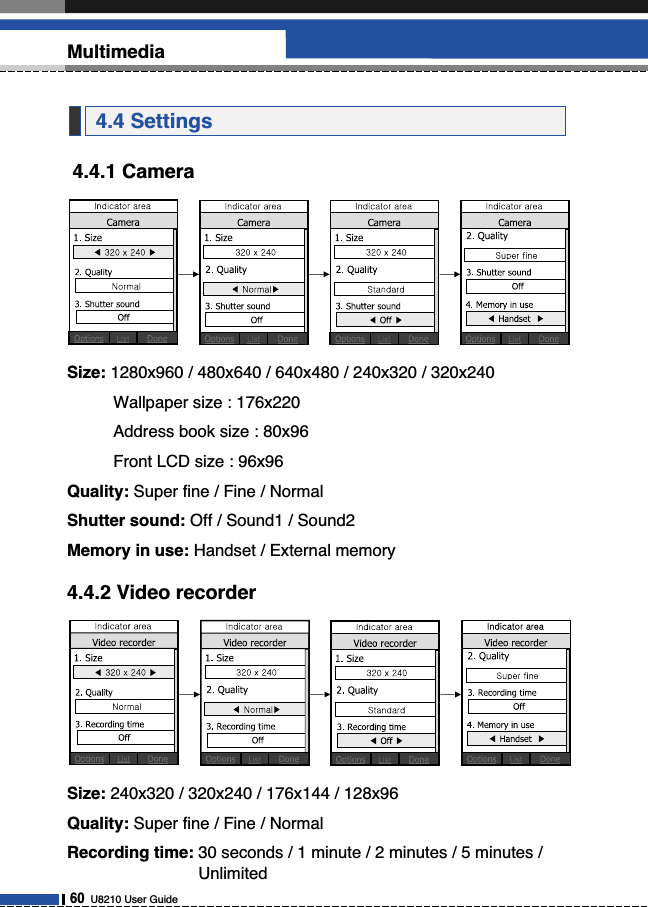
![4.1.1 Taking a Picture (Still picture)1. Select Camera or press the numeric key (#1) from the Mediaalbum menu.2. Environment Setting.- Select the [Option] key.- Size: Select ‘Size ’ and choose one from 1280x960 (only for theoutside camera), 640x480, 320x240, 160x120, wallpaper sizeand address book size. 320x240 means the width of picture is320 pixels and the height is 240 pixels.- Quality: You can select the desired quality of picture byselecting either super fine, fine or standard.- Flash: Select either Always on (always use flash), When taking(only when taking a picture) or Always off (do not use flash).- Zoom: You can select zoom level according to the picture sizeand preview size, and the range of zoom level is 0 to 10. Forpictures with 1280x960 for the outside camera and 640x480 forinside camera, only zoom level 0 (1:1) is supported.- Brightness: You can select a level from –2.0 to 2.0 with stepsize 0.5. The higher the level, the more brighter the screen.- White balance: Using this function you can adjust the tone ofthe background picture according to the weather by selectingeither Auto, Daylight, Cloudy, Shade or Fluorescent.- Delay timer: Using this function you can delay the camerashutter time by selecting either Off, 3 seconds, 5 seconds or 10seconds.- Camera Effect: Using this menu you can select special cameraeffect by selecting either Normal, Mono or Sepia.- Shutter sound: You can select the camera shutter sound byselecting either No sound, Sound1 or Sound2.4.1 Camera4. Multimedia56U8210 User Guide](https://usermanual.wiki/LG-Electronics-USA/U8210/User-Guide-580162-Page-54.png)
![3. Taking a Picture- Adjust the camera position so that object is in the center of thescreen, and then press the Take key to take a picture of theobject. A taken picture saved in the internal (phone)flashmemory or the external flash memory. To view existing takenpictures, select album soft menu. Then the Picture album islaunched, and displays existing pictures as thumbnails. Move toa desired picture to view, and select [View: View] to view thepicture. You can also send a selected picture to the other partythrough the MMS or Email service by pressing the Send key inthe thumbnail list screen.Summary)[Take a Picture] >Press the Take key.[Option] >Size >Select 1280*960, 640*480, 320*240, 160*120,Wallpaper or address book size >Zoom >Select zoom level[Album] >View pictures taken1. This function is selected when you select 2. Camcorder from theMultimedia album keys in 1 Camera mode.2. Environment Settings- Press the [Option] key.- Quality: You can select the desired quality of video by selectingeither Super fine, Fine or Standard (just as you can in Camera)- Flash: Select either Always on (always use flash), Whenrecording (only when recording a picture) and Always off (do notuse flash).- Zoom: Same as Camera4.2 Video recorderU8210 User Guide 57Multimedia](https://usermanual.wiki/LG-Electronics-USA/U8210/User-Guide-580162-Page-55.png)
![- Brightness: Same as Camera Recording time: You can selectrecording times of 30 seconds, 1 minute, 2 minutes, 5 minutes,unlimited, MMS. MMS means that the recording time isrestricted by the maximum file size can be sent.- Effect: Using this menu you can select a special camcordereffect by selecting either Normal, Mono or Sepia.- Recording time: You can select recording times of 10 seconds,30 seconds, or 1 minute.3. Recording a videoPut the camcorder where you want it and press the “Rec.” key tostart recording. Press the “Stop” key again to stop recording. The recorded video is saved in the gallery. To view the recordedvideo, select [List], select a desired video thumbnail from thevideo list and press “Play”.Summary)[Record] >“Rec.” button.[List] >Play recorded videoPress the left soft key to display the option pop up menu beforerecording.Move to the desired menu item using the up and down key andpress the OK key. 1. Quality: You can select a recording quality from Super Fine, Fineand Normal. 2. New Recording: Select this menu to start recording to a new file.3. Album: Select this menu to move to the Sound album. Therecorded files are saved in the Voice Records folder.4. Press the right soft key to close the sub-menu popup window.4.3 Voice Recoder58U8210 User GuideMultimedia](https://usermanual.wiki/LG-Electronics-USA/U8210/User-Guide-580162-Page-56.png)

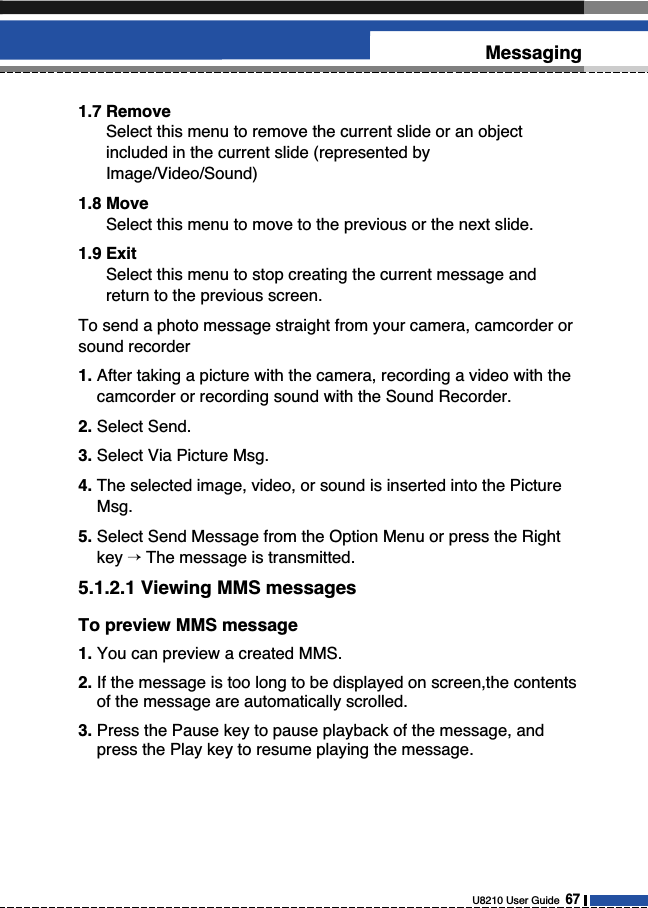

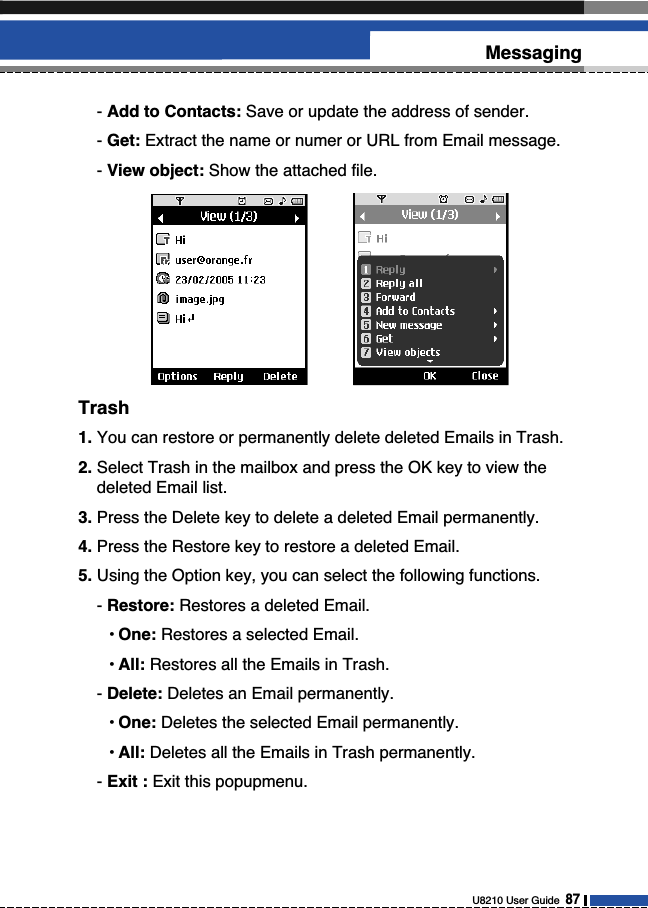
![[Inbox / Detailed View Screen Menus]- Play: Plays the message or pauses message playback.- Reply: Creates a reply to the selected message.- Reply all: Creates a reply to all recipients (copy of originator andCC addresses) of the selected message.- Forward: Forwards the selected message.- Add to contacts: Saves the sender’s number to the Phonebook.- New message: Displays the Edit screen where you can create anew message.- Get: Displays a screen (Get number/Email address/web addressscreen) that shows the number/Email address/web addressincluded in the message.- View objects: Displays the screen (Object View Screen) in whichyou can view the audio, image, and video files included in themessage.- Mute(or Unmute): This menu allows you to determine whether tomute the sound when there is an audio or a video file included inthe message.- Delete: Deletes the selected message.[Inbox / Play Screen Menus]- Play(or Pause): Plays the message or pauses messageplayback.- Reply: Creates reply to the selected message.- Reply all: Creates reply to all recipients (copy of originator andCC addresses) of the selected message.- Forward: Forwards the selected message.- Add to contacts: Saves the sender’s number to the Phonebook.- New message: Displays the Edit screen in which you can createa new message.70U8210 User GuideMessaging](https://usermanual.wiki/LG-Electronics-USA/U8210/User-Guide-580162-Page-68.png)
![- Get: Displays a screen (Get number/Email address/web addressscreen) that shows the number/Email address/web addressincluded in the message.- View objects: Displays the screen (Object View Screen)in whichyou can view the audio, image, and video files included in themessage.- Mute(or Unmute): This menu allows you to determine whether tomute the sound when there is an audio or a video file included inthe message.- Delete: Deletes the selected message.- Go to header page: Displays the Detailed View screen.[Outbox / Detailed View Screen Menus]- Resend: Resends the message.- Edit: Edits the selected message.- Play: Plays the message or pauses message playback.- Forward: Forwards the selected message.- Add to contacts: Saves the recipient’s number to thePhonebook.- New message: Displays the Edit screen in which you can createa new message.- Get: Displays a screen (Get number/Email address/web addressscreen) that shows the number/Email address/web addressincluded in the message.- View objects: Displays the screen (Object View Screen)in whichyou can view the audio, image, and video files included in themessage.- Mute(or Unmute): This menu allows you to determine whether tomute the sound when there is an audio or a video file included inthe message.- Delete: Deletes the selected message.U8210 User Guide 71Messaging](https://usermanual.wiki/LG-Electronics-USA/U8210/User-Guide-580162-Page-69.png)
![[Outbox / Play Screen Menus].- Resend: Resends the message.- Edit: Edits the selected message.- Play(or Pause): Plays the message or pauses messageplayback.- Forward: Forwards the selected message.- Add to contacts: Saves the recipient’s number to thePhonebook.- New message: Displays the Edit screen in which you can createa new message.- Get: Displays a screen (Get number/Email address/web addressscreen) that shows the number/Email address/web addressincluded in the message.- View objects: Displays the screen (Object View Screen) in whichyou can view the audio, image, and video files included in themessage.- Mute(or Unmute): This menu allows you to determine whether tomute the sound when there is an audio or a video file included inthe message.- Delete: Deletes the selected message.- Go to header page: Displays the Detailed View screen.[Sentbox / Detailed View Screen Menus]- Edit: Edits the selected message- Play: Plays the message or pauses message playback.- Forward: Forwards the selected message.- Add to contacts: Saves the recipient’s number to thePhonebook.- New message: Displays the Edit screen in which you can createa new message.- Get: Displays a screen (Get number/Email address/web address72U8210 User GuideMessaging](https://usermanual.wiki/LG-Electronics-USA/U8210/User-Guide-580162-Page-70.png)
![screen) that shows the number/Email address/web addressincluded in the message.- View objects: Displays the screen (Object View Screen) in whichyou can view the audio, image, and video files included in themessage.- Mute(or Unmute): This menu allows you to determine whether tomute the sound when there is an audio or a video file included inthe message.- Delete: Deletes the selected message.[Sentbox / play screen menus]- Edit: Edits the selected message.- Play(or Pause): Plays the message or pauses messageplayback.- Forward: Forwards the selected message.- Add to contacts: Saves the recipient’s number to thePhonebook.- New message: Displays the Edit screen where you can create anew message.- Get: Displays a screen (Get number/Email address/web addressscreen) that shows the number/Email address/web addressincluded in the message.- View objects: Displays the screen (Object View Screen) in whichyou can view the audio, image, and video files included in themessage.- Mute(or Unmute): This menu allows you to determine whether tomute the sound when there is an audio or a video file included inthe message.- Delete: Deletes the selected message.- Go to header page: Displays the Detailed View screen.U8210 User Guide 73Messaging](https://usermanual.wiki/LG-Electronics-USA/U8210/User-Guide-580162-Page-71.png)
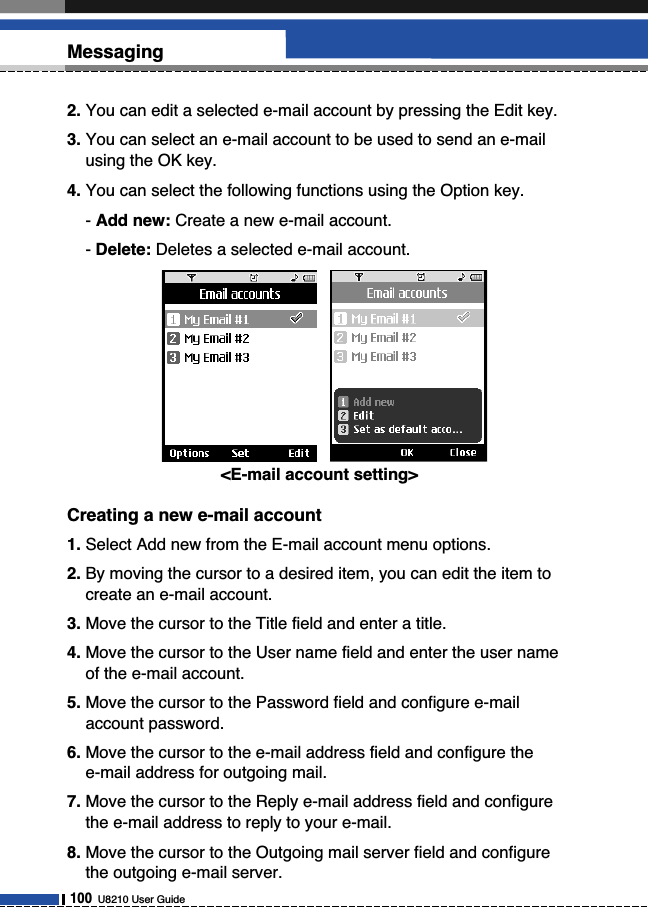
![5.1.3 Email5.1.3.1 Create Email1. You can create a new Email (Electronic mail).2. Select Email from Write message, and press the OK key.3. You can edit the items necessary to create an Email message byusing the cursor.4. Move the cursor to To field, and enter the Email address of therecipient of the Email.5. Move the cursor to CC (Carbon Copy) field, and enter thereference Email address to forward the Email.6. Move the cursor to BCC (Blind Carbon Copy), and enter a hiddenreference Email address to forward the Email without forwardinginformation.7. For the recipient (To), reference address (CC) and hiddenreference address (BCC) fields only valid Email addresses areallowed. When an Email address has been specified, anotherfield where you can specify another address appears. You canspecify up to 4 recipients for each of the fields.8. To enter data in the recipient (To), reference address (CC) andhidden reference address (BCC) fields, you can search theaddress book by using the Search key and use the followingfunctions by using the [Option] key.74U8210 User GuideMessaging](https://usermanual.wiki/LG-Electronics-USA/U8210/User-Guide-580162-Page-72.png)
![-Search: select this menu to search and insert the address inrecent message log or a name saved in address book.-Send message: Send the created Email.-Save to drafts: Select this menu to save the message in thedraftbox-View object: Show the attached file.-Remove: Remove the attached file.9. Move the cursor to the Subject field and create the subject. You can search the address book by using the Search key whileentering the Subject field, and use the following functions byusing the [Option] key.- Insert: Select this menu to insert the address in recentmessage log or a name saved in address book.- Dictionary: Select this menu to use dictionary.- Send message: Send the created Email.- Save to drafts: Select this menu to save the message in thedraftbox- View object: Show the attached file.- Remove: Remove the attached file.- Preview: You can preview the created Email before sending it.U8210 User Guide 75Messaging](https://usermanual.wiki/LG-Electronics-USA/U8210/User-Guide-580162-Page-73.png)
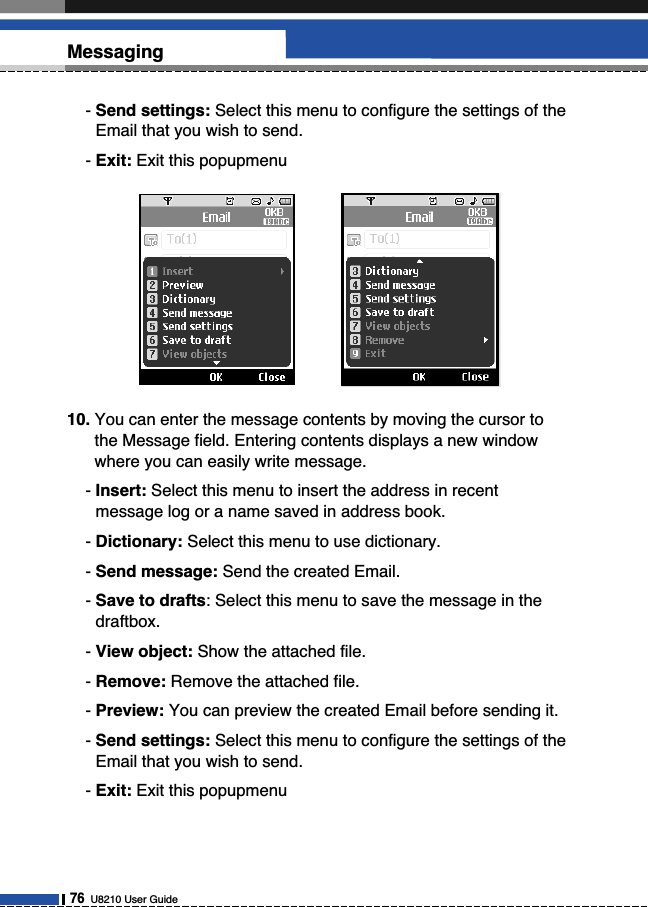
![11. You can attach a file by moving the cursor to the Attach field.Press the Attach key or select Attach from the Option menu. Inthe Attach menu, move the cursor to the Video, Audio or Imageitem, and press the OK key to attach a file. You can attach up to2 files, and the size of attached files should be 1MB or less. Youcan change the attached file for another by selecting theattached file name. You can cancel the attached file by using the[Option] key.U8210 User Guide 77Messaging](https://usermanual.wiki/LG-Electronics-USA/U8210/User-Guide-580162-Page-75.png)
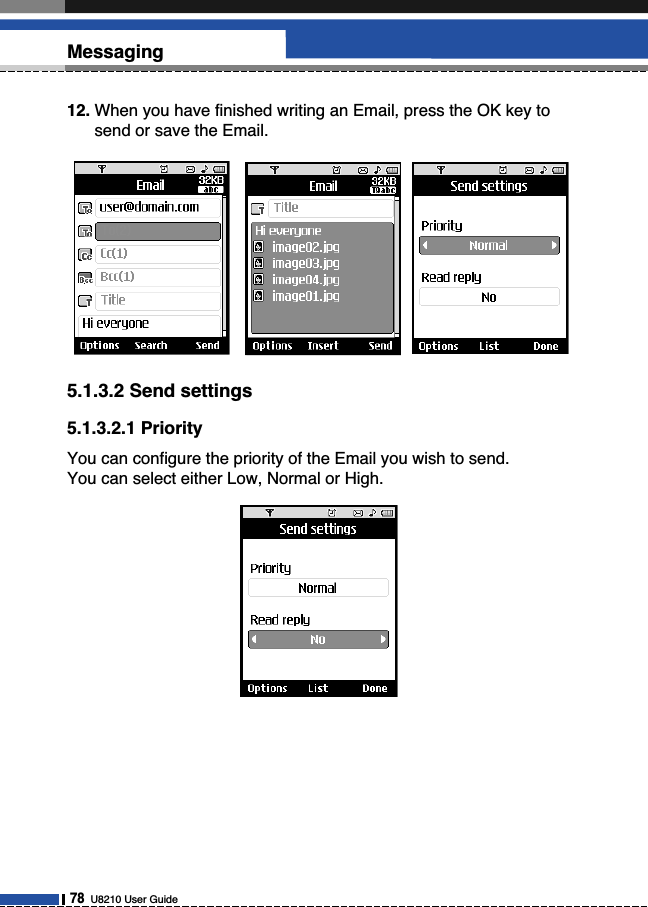
![5.1.3.2.2 Read replyYou can set whether you want to request a read receipt for a sentEmail.1. You can view saved messages. Select a message and thenpress the Select key to view the message.2. You can view the previous or next message by using the left andright keys.3. To view an MMS Noti message, select Retrieve in the messageview screen. Then the file is transmitted, and you can view the filewhen the transmission is complete.4. You can use the following functions by using [Option] key.[For a normal message]1. New message: You can write a new message.2. Reply: You can create a reply to the selected message.3. Forward: Forwards the selected message. (Not supported forMMSNoti message.)5.2 InboxU8210 User Guide 79Messaging](https://usermanual.wiki/LG-Electronics-USA/U8210/User-Guide-580162-Page-77.png)
![4. DeleteDeletes a selected message.5. Mark / Unmark : You can delete more than selected message orall messages.6. Filter: Displays messages by desired message types.[For WAP push message]1. Open: Opens a selected message.2. Mark/Unmark: Using the Mark function, you can delete multiplefiles.3. Filter: Displays messages by desired message types.4. Delete: Deletes the marked messages.5. Memory info: Shows how much memory the phone has left.5.3.1 IM Main Menu5.3 Instant message80U8210 User GuideMessaging](https://usermanual.wiki/LG-Electronics-USA/U8210/User-Guide-580162-Page-78.png)
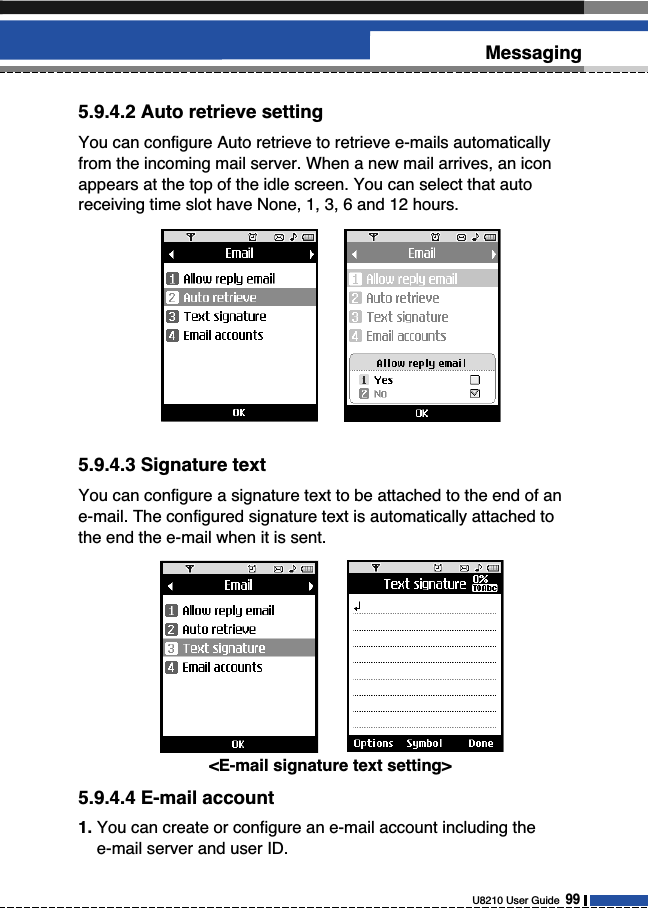
![5.4.1 Viewing Email Message List1. Select an Email account and then press the OK key to view thereceived Email list.2. Using the Retrieve key, you can retrieve a new Email list from theEmail server of the selected account. 3. In Email list, you can use the following functions by using the[Option] key.- New message: Create message.- Reply all: You can reply to all recipient using Email.- Delete: Deletes an Email. Deleted Emails are temporarily savedin Trash. The following Delete options are provided.5.4 Email inboxU8210 User Guide 85Messaging](https://usermanual.wiki/LG-Electronics-USA/U8210/User-Guide-580162-Page-83.png)
![5.4.2 Viewing an Email message1. Select one of the received Emails and press the OK key toreceive the contents of the Email. 2. The contents of the received Email are automatically displayed inthe View screen.3. You can view the contents of the previous or next Email by usingthe left/right key.4. In the Email View screen, you can select the following functionsby using the [Option] key.- Reply all: You can reply to all recipient using Email.- Forward: Forwards the selected Email message to another Email address.- Save address: Saves the address of the sender of the selectedEmail message in the phone book.- Get: Displays a screen(Get number/Email, address/web,address, screen) that shows the number/Email address/webaddress included in the message.- Delete: Deletes the selected Email message.86U8210 User GuideMessaging](https://usermanual.wiki/LG-Electronics-USA/U8210/User-Guide-580162-Page-84.png)
![sThe Emails in Trash would not be received again.1. You can view saved messages. Select a message and thenpress the Select key to view the message.2. You can view the previous or next message by using the left andright keys.3. You can use the following functions by using the [Option] key.- Write message: You can write a new message.- Delete.• One: Deletes the selected message.• Multiple delete: Deletes more than one selected messages.• All: Deletes all messages.- Filter: Displays messages by desired message types.- Message info: Displays information on the selected message.- Memory info: Shows how much memory the phone has left.5.5 Drafts88U8210 User GuideMessaging](https://usermanual.wiki/LG-Electronics-USA/U8210/User-Guide-580162-Page-86.png)
![1. You can view saved messages. Select a message and thenpress the Select key to view the message.2. You can view the previous or next message by using the left andright keys.3. You can use the following functions by using [Option] key.[For Normal Message]- New message: Create a new Email message.- Forward: You can forward a selected message.- Edit: You can edit a selected message.- Delete• One: Deletes a selected message.• Multiple delete: Deletes more than one selected messages.• All: Deletes all messages.- Filter: Displays messages by desired message types.- View error status : Show the reason why can t send message5.6 OutboxU8210 User Guide 89Messaging](https://usermanual.wiki/LG-Electronics-USA/U8210/User-Guide-580162-Page-87.png)
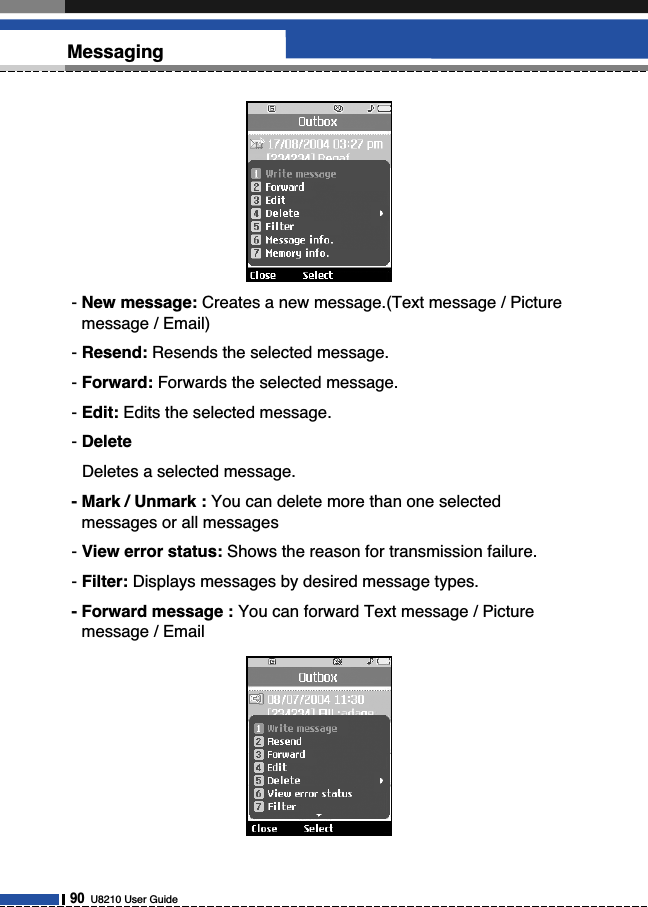
![4. A message transmission can be canceled while sending themessage by selecting Send & Save or Send menu (Only MMS).Show the messages you sent (Text message / Picture message /Email)[Options]- Forward: Forwards the selected message. (Text message /Picture message / Email)- Open : Open the selected message.- Edit : Edits the selected message. - New message: Creates a new message. (Text message / Picturemessage / Email) - Mark / Unmark : (Un)Mark / (Un)Mark all- Filter : All messages / Text messages / Picture messages / Email/ Service messages- Delete : you can delete the selected message5.7 SentU8210 User Guide 91Messaging<Sending a message> <Cancel Transmission>](https://usermanual.wiki/LG-Electronics-USA/U8210/User-Guide-580162-Page-89.png)
![6.4.2 Recent page“Recent page” is the recent browsed page. (History)User can delete and connect6.6.1 AccountsSettings information is explained before.6.6.2 Character encoding Choose the character encoding from the list. (Default is “English-Latin”)6.6.3 Show ImageUser can control the scroll depth (Default is “3 Line”)6.6.4 CacheSupporting the “Cache” function [On] or Not Supporting the “Cache”[Off].6.6.5 CookieSupporting the “Cookie” function [On] or Not Supporting the“Cookie” [Off].6.6.6 Clear cache6.6 Settings6.5 Security108U8210 User GuideOrange World](https://usermanual.wiki/LG-Electronics-USA/U8210/User-Guide-580162-Page-106.png)
![Clearing cache [On] or Not Clearing cache [Off].6.6.7 Clear cookieClearing cookie [On] or Not Clearing cookie[Off].U8210 User Guide 109Orange World](https://usermanual.wiki/LG-Electronics-USA/U8210/User-Guide-580162-Page-107.png)
![You can view JPEG, GIF, PNG, BMP and WBMP images with theImage Viewer. Picture album consists of Default images and Myimages folder as a default. Basically images are displayed inthumbnail. 9 thumbnail images are displayed on a screen at a time.You can use various functions by using the [Option] key.The current selection is a folder; you can use the following functionsusing the Options menu.[New Folder], [Folder Open], [Folder Move], [Folder copy], [Folderdelete], [Folder Rename], [Folder info.], [Sort by name], [Sort byDate], [Sort by Type], [Grid view/List view], [Mem. Info].You can select the view type using the [Grid view/List view].The current selection is a file; the following Option keys will bedisplayed.- New Folder: You can create a new folder within the foldercurrently selected.- Files: You can open, move, copy, delete and rename a file. Youcan also view the file information.- Mark/unmark: Using the Mark function, you can send, delete,move and copy multiple files. You can make a GIF animation ifthe file is an image file.- Send: You can send a file via E-mail, MMS and Bluetooth.7.1 Picture album7. Media album110U8210 User Guide](https://usermanual.wiki/LG-Electronics-USA/U8210/User-Guide-580162-Page-108.png)
![- Main Theme: You can set a selected file as Wallpaper or abackground image on the internal LCD for an incoming call, anoutgoing call or for sending a message.- Front Them: You can set a selected file as Wallpaper or abackground image on the external LCD for an incoming call.- Slide show: You can run the slide show. - Grid View/List View: You can select a view type.- Mem. Info: You can view the current phone memory andexternal memory status.Press the soft 2 key to execute [Send] function immediately.Select a thumbnail in the Thumbnail list screen, and select [View] toview the image enlarged.In the large image screen, you can view in full screen mode byclicking [Full] at the centre, and you can execute the [Send] functionusing the soft 2 key.Using the Options menu, you can use the following functions.Using [Files] menu, you can delete, rename and edit a file and youcan view the file information. Using the Edit menu, you can rotate,resize and crop an image and you can insert text or an effect.Select [Files] and select Edit option to enter the Edit window.In the Edit window, you can use the following different functionsusing the Option key.- Select [Save] to save the edited image.- Select [Rotate] to rotate the image by 90°,180° or 270°.- Select [Resize] to resize the image to smaller size.- Select [Crop] to crop the desired the part of the image.- Select [Text] to insert the desired text on the image.- Select [Effect] to apply the desired effect to the image.- Select [Undo/Redo] to undo or redo the last operation on theimage.U8210 User Guide111Media album](https://usermanual.wiki/LG-Electronics-USA/U8210/User-Guide-580162-Page-109.png)
![- Zoom: Same as Camera- Go to list- Main Theme: You can set a selected file as Wallpaper or abackground image on the internal LCD for an incoming call, anoutgoing call or for sending a message.- Front Theme: You can set a selected file as Wallpaper or abackground image on the external LCD for an incoming call.- Make GIF Animation: You can make a GIF animation bymarking multiple files.- Slide Show: You can run the slide show at your desired timeinterval in full or normal screen.Video album consists of Default videos and My videos folder as adefault. You can view a video using the video player. Video files aredisplayed in the list as thumbnails. You can select a desired videoby using the Up, Down, Left, and Right keys. Select a desired videoand select Play to view the recorded video.Select [Send] to attach the selected video to an MMS message andan E-mail service.7.2 Video album112U8210 User GuideMedia album](https://usermanual.wiki/LG-Electronics-USA/U8210/User-Guide-580162-Page-110.png)
![11. Sound & Profiles122U8210 User GuideYou can select ring tone or vibration for an incoming call andconfigure the sound and volume of the ring tone, button sound, foldersound, sound while navigating in main menu, sound effect, andpower on and off sound according to a profile. The profiles providedinclude [Normal], [Silent], [Outdoor], [Vibrate only], [Headset], [Car],[Customised], and [Customised]. Select a profile, and press the OKbutton to activate the profile. The [Silent], [Vibrate only], [Headset],and [Car] profiles do not have an Option menu. Move the cursor tothe corresponding profile. Then menus available are displayed on thesoftbar below the screen. >Select the Edit menu for [General],[Outdoor], [Headset], [Car], [Customised2] profile to change theconfiguration.The different list of options available when each profile has beenselected for editing.1. Alert type2. Ring tones3. Download more4. Effect tones5. System tonesThis option Alert type determines the incoming call notificationmode. You can select from [Ring], [Vibrate], [Light only], [Ring &vib.], [Vib. after ring], [Ring after vib.], [Ascending ring], [Max ring &vib.].a. Voice ring tone Line1: This option determines the notification (incoming call) from Line1b. Voice ring tone Line2: This option determines the notification(incoming call) from Line2Ring tonesAlert type](https://usermanual.wiki/LG-Electronics-USA/U8210/User-Guide-580162-Page-120.png)
![U8210 User Guide 123Sound & Profilec. VT ring tone: This option determines the incoming Videotelephony calld. Volume: This option determines the ring tone volume forincoming call notificationThis option allows to download ring tones over the air.a. Key tone: Key tone effect This option determines the key tonethat is played when a key is pressed.b. Flip tone: This option determines the flip tone effect that isplayed when the flip is opened or closed.c. Menu effect tone: This option determines the tone which playsduring the transition between different top level menu items.d. Effect tone volume: This option determines the volume at whichthe key tones, flip tones & menu effect tones need to be played.a. Feedback tone: This option determines the warning tone that isplayed for: [Feedback popup], [No network], [No battery], [WhenDelete all execute], [Factory default press], [Memory full],[Warning popup]b. Power on/off tone: This option determines the switch on/ switchoff effect that is sounded whenthe mobile phone is turned on/offrespectively.C. System tone volume: This option determines the volume atwhich the power on/off ringtone, keytone, feedback tone needs tobe played.System tonesEffect tonesDownload more](https://usermanual.wiki/LG-Electronics-USA/U8210/User-Guide-580162-Page-121.png)
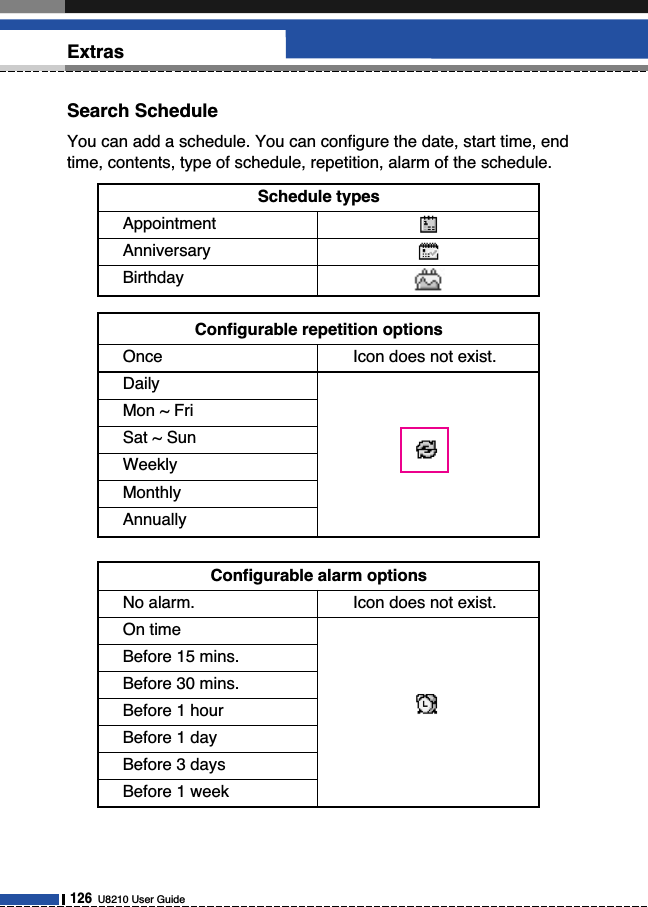
![U8210 User Guide 131ExtrasDeleting a MemoSelect ‘Option’ in the memo management screen, Select Multiple orAll memos using Mark/Unmark option. Then to delete the selectedmemos press the Delete key in the Options menu.12.1.5 Date FinderDate finder displays the date after the specified no of days to thedate in the From field and then displays the target date.The date inthe from field can be any one starting from 01 january 1900 to 31December 20991. Press [Menu]. 2. Select Diary.3. Select Date finder.1. Select Date finder menu. 2. Input desired date in [From] field.3. Input desired number of days in [After] field. 4. Press [OK] and view the [Deadline] date displayed[DD/MM/YYYY] displays the existing date format.12.1.6 Date counter Press [Menu]. 2. Select Diary.3. Select Date counter.1. Select Date counter menu. 2. Press [Add] and input text in [Title] field. 3. Input desired date in the [Deadline] date field and press [Done]. 4. To view detailed job contents, locate the cursor on the desireditem in the Date counter List and press [View]. Details of theselected item with days remain is displayed in Viewdetail page. 5. Details of the days remain is also displayed on Date counter Listpage.](https://usermanual.wiki/LG-Electronics-USA/U8210/User-Guide-580162-Page-129.png)
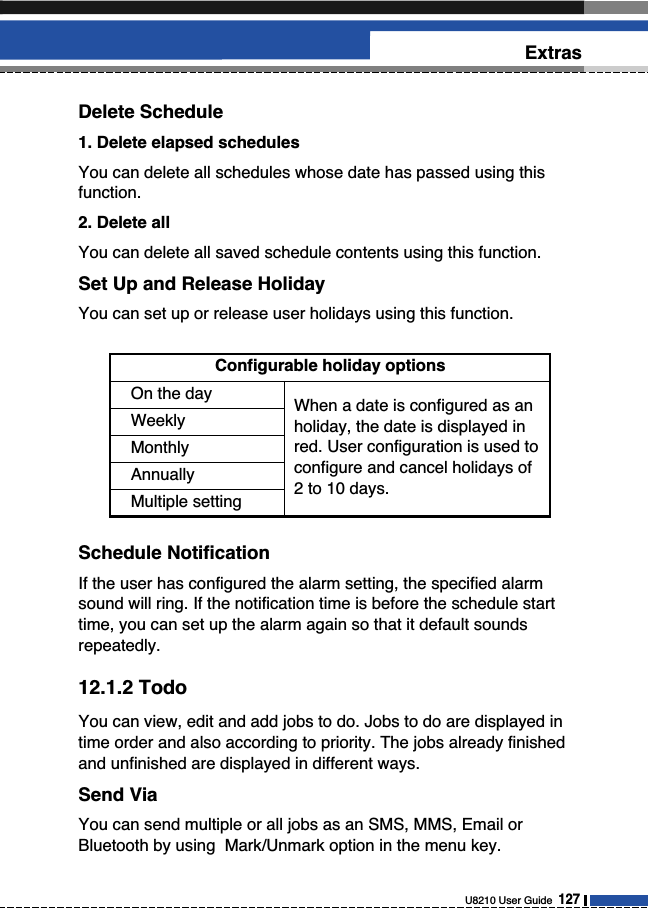
![132U8210 User GuideExtras6.You can add new items to the Date counter List , open,edit anddelete a Date counter item using [Options]. 7.You can also delete multiple Date counter item Marking multipleitems and Delete.8.You can set a Date counter item to appear on Idle screen.12.1.7 Settings12.1.7.1 Memory in useCheck memory status12.1.7.2 Clear allHandset / SIMIf you set up alarm, [Alarm icon] appears on the Indicator bar. The specified alarm sounds at the scheduled time. Press the[OK] key to stop the alarm, and the alarm is released. Press the[Right key] or [Snooze], choose the snooze interval, the alarm soundis stopped and resumed after selected Snooze duration. You canconfigure up to 5 alarms.1. Select your desired alarm to configure in the alarm list. If there isno alarm, press the right soft key [Add] to add a new alarm.2. Set/Cancel alarm: Set or cancel the alarm using the options forspecifying the alarm off or by choosing the alarm time.3. Input alarm time: Input your desired alarm time by specifyingHour and Minute. Choose either ‘AM’ or ‘PM’ visible if 12 hourformat is specified for the phone. 4. Select repeat mode: Select desired repeat mode using the leftand right direction keys or from the list pressing the center key.5. Select bell: Select the bell to ring at the alarm time, using the leftaddright direction keys or from the pressing the center key.6. Input memo: Input alarm name.12.2 Alarm clocks](https://usermanual.wiki/LG-Electronics-USA/U8210/User-Guide-580162-Page-130.png)
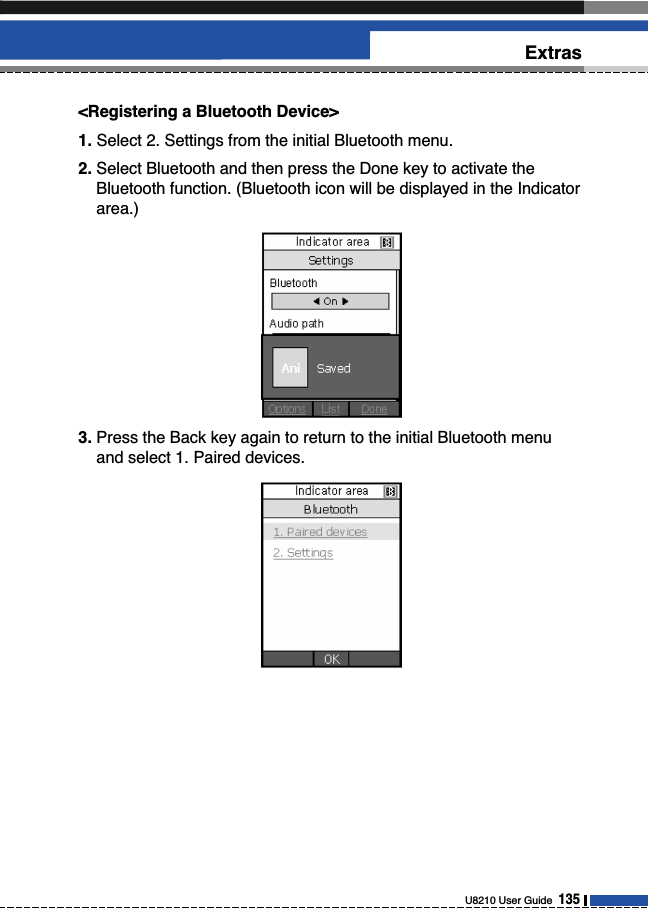
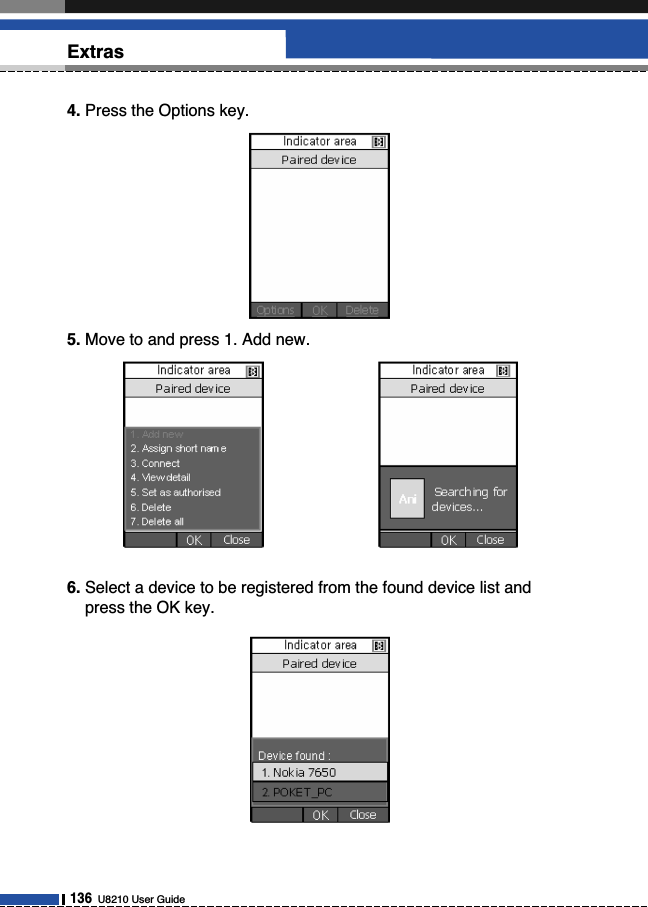
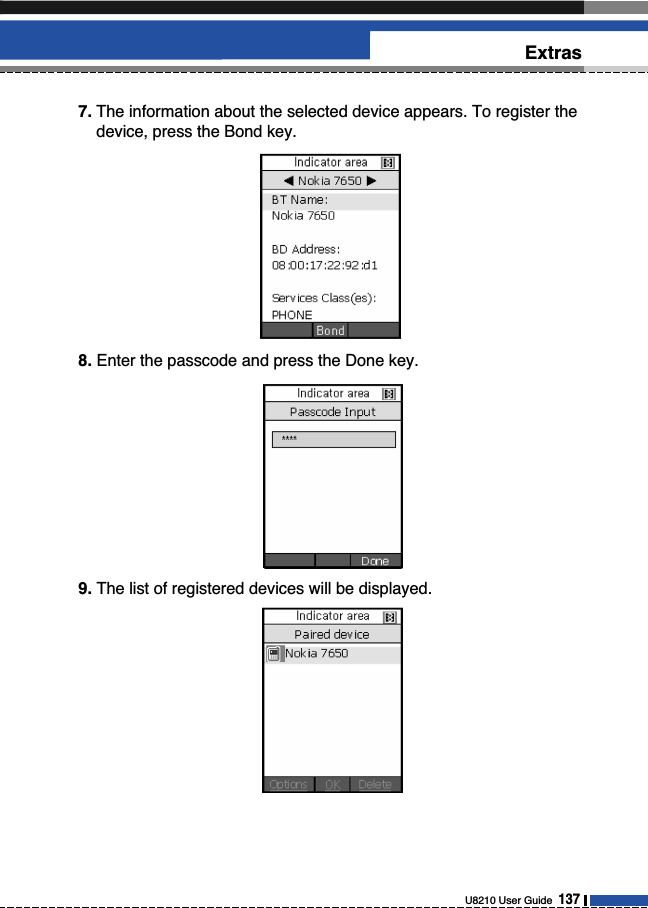
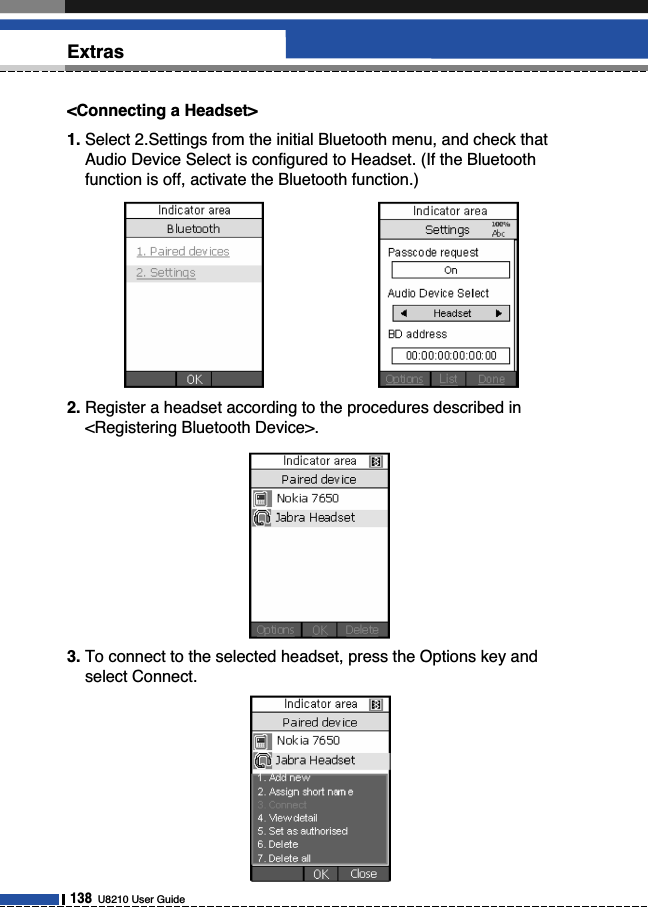
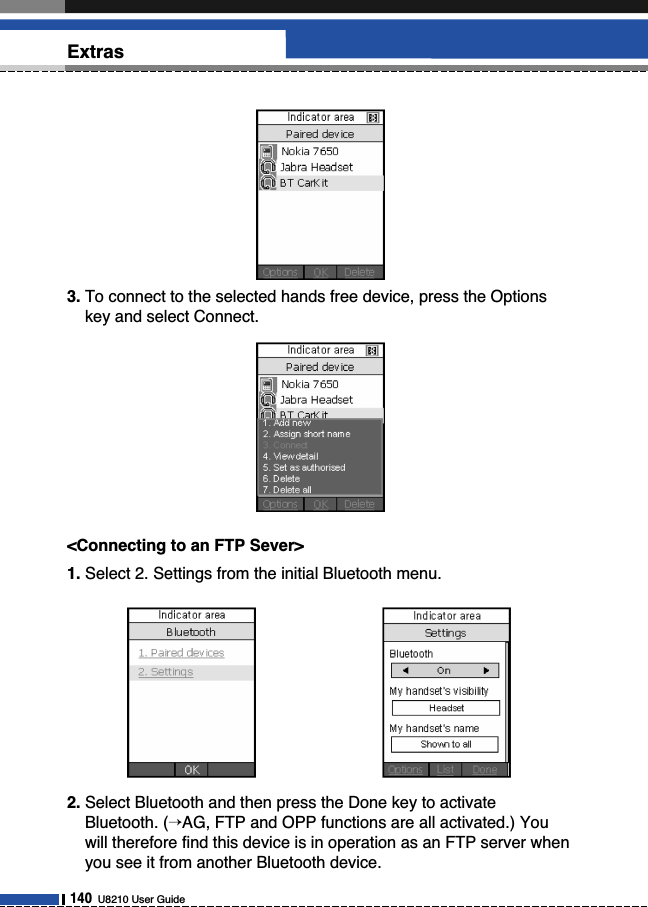
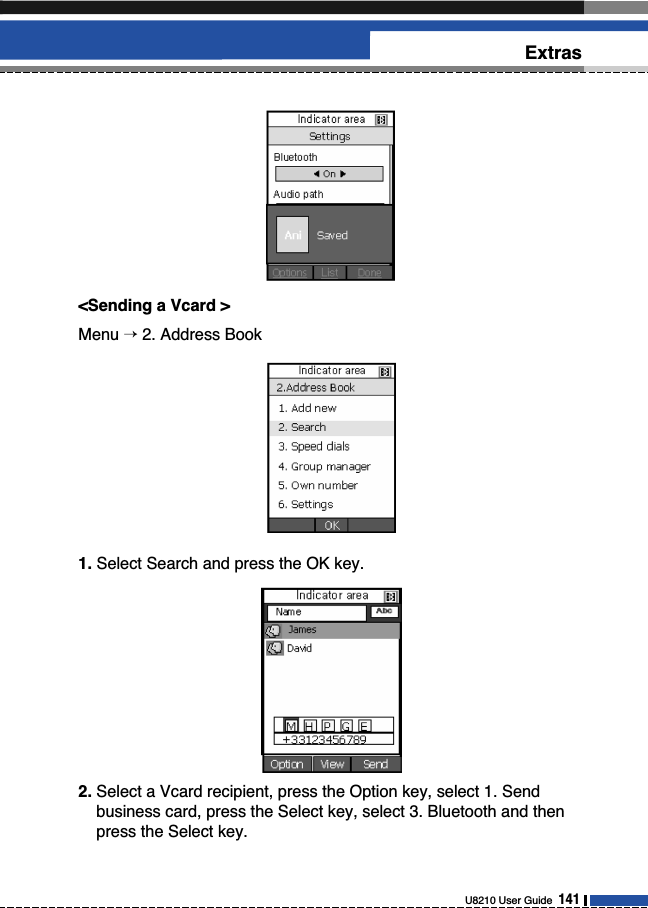
![U8210 User Guide 133Extras7. Select the Power off: Select the Power off option to enable ordisable the alarm at Phone Power off.When you have completed configuration, press the [ ] key [Save]to save the changed alarm configuration.12.3.1 BluetoothMenu >Extras >Connectivity >Bluetooth1. Paired Device (Registering a Device)• Initial Screen: Shows the (paired) devices within the phone.•Press Option Key1. Add new: Using this menu you can register new Bluetooth devices. A. If you select the Add new, surrounding Bluetooth devices arefound and listed.B. If you select a model and click OK, you can view the deviceinformation. C. If you press Bond, Passcode Input screen is displayed whereyou can register a paired device to add the device to the paireddevice list.2. Assign short name: You can rename the other phones registeredto your phone if necessary.3. Connect: Using this menu you can connect an audio device. Thisoption menu appears only for audio devices. A. It is activated in the Option menu only when you have selectedan audio device. Otherwise, it is disabled.B. Select Connect and press OK. Then the audio device isimmediately connected.4. View Detail: Shows the information about the selected device.12.3 Connetivity](https://usermanual.wiki/LG-Electronics-USA/U8210/User-Guide-580162-Page-131.png)
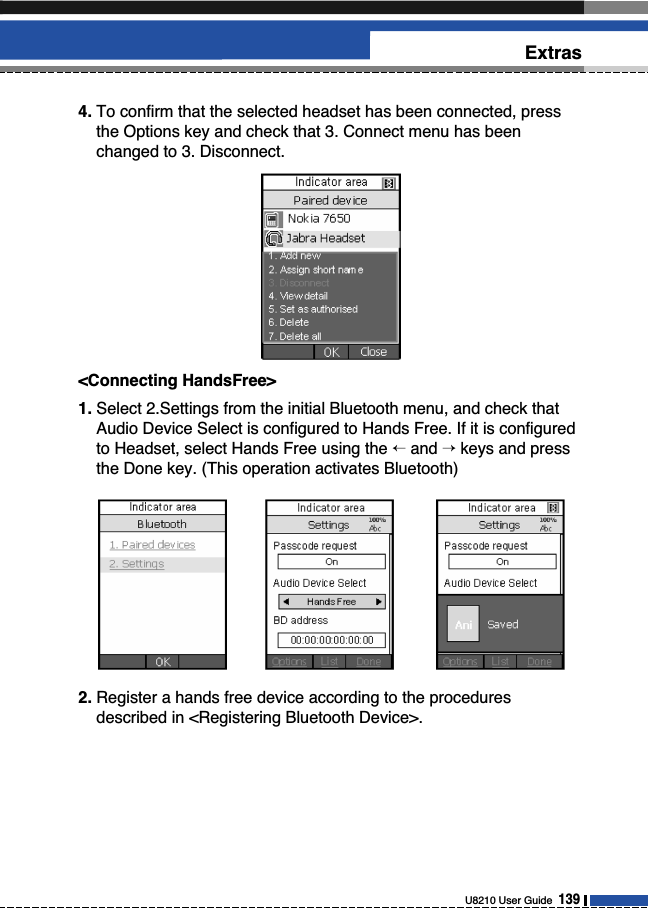
![U8210 User Guide 143Extras2. Connect to the server with the selected server profile and thesynchronization animation is displayed while the synchronizationis performed. 12.3.2.2 Log• Menu >Extras >Connectivity >Server Sync1. Select the Log item and then press the OK key to view the log forthe last synchronization operation performed. 12.3.2.3 Sync types• Menu >Extras >Connectivity >Server Sync1. Select the Sync Types item and then press the OK key to viewthe synchronization types.A. Normal The phone and the server are required to exchangeinformation about the modified data.B. BackupThe phone sends all its data from a database to the server.The server is expected to replace all data in the targetdatabase with the data sent by the phone. This means that thephone overwrites all data in the server database.12.3.2.4 Settings• Menu >Extras >Connectivity >Server Sync1. Select the Settings item and then press the OK key.2. This menu allows you to configure the profile for asynchronization server. 12.3.4.1 Select a profile• Menu >Extras >Connectivity >Server Sync >Settings1. Move the cursor on the profile which you want to select.2. Press [OK].](https://usermanual.wiki/LG-Electronics-USA/U8210/User-Guide-580162-Page-141.png)
![12.3.4.2 Adding a new profile• Menu >Extras >Connectivity >Server Sync >Settings1. the Settings screen, press the left soft key [Option] and selectAdd new to add a new profile. And then press OK.2. Enter or choose the Profile name, Host address, User name,Password, Contact, Contact name, Calendar, Calendar name, Todo, Todo Name and Access point.3. Press the Done key to add the new profile.12.3.4.3 Deleting profiles• Menu >Extras >Connectivity >Server Sync >Settings1. Move the cursor on the profile which you want to delete.2. Press the left soft key [Options] and select Delete.3. Select Yes to delete the selected profile. The default profile cannot be deleted by user.12.3.4.4 Editing a profile• Menu >Extras >Connectivity >Server Sync >Settings1. Move the cursor on the profile which you want to edit. 2. Press the left soft key [Options], select Edit, and edit the selectedprofile.When you select default profile, you cannot change all itemsexcept for user name and password. 12.3.4.5 View• Menu >Extras >Connectivity >Server Sync >Settings1.In the Settings screen, press the left soft key [Options] and selectView.You have a calculator function that provides 4 calculations ofaddition, subtraction, multiplication and division.12.4 Calculator144U8210 User GuideExtras](https://usermanual.wiki/LG-Electronics-USA/U8210/User-Guide-580162-Page-142.png)
![U8210 User Guide 145Extras1. Press [Func].2. Select Useful functions.3. Select Calculator.You can input numbers using the number keys, and operators usingthe up, down, left, and right direction key. You can input a decimalpoint by pressing the left soft key. Whenever you press the Deletekey, characters are sequentially deleted in reverse direction.When calculation is completed and the result is displayed on thescreen, pressing a number or decimal point (.) clears the previousresult and the calculator waits for new input, even though you did notpress AC key. When calculation is completed and the result isdisplayed on the screen, pressing a symbol saves the result into thesymbol, and continues calculation.Using this menu, users can convert the unit of 7 weights andmeasures of currency, length, width, weight, and volume velocity &temperature.1. Press [Menu].2. Select Useful functions.3. Select Unit converter.12.5.1 Currency1. Select the Currency menu.2. Users can set a currency exchange rate using [Rate].3. Input currency rates for upto 5 currencies equivalent to USD andthen press [Save]. Then you can convert to one currency toanother.4. You can view the value of between 5 currency units5. Press [Reset] to clear the current input filed.6. To exit currency conversion function, press the [Back] key.12.5 Unit Converter](https://usermanual.wiki/LG-Electronics-USA/U8210/User-Guide-580162-Page-143.png)
![146U8210 User GuideExtras12.5.2 Length1. Select length menu.2. Select the desired unit to convert using [Unit].3. Input the standard unit and view your converted value.4. Press [Input again] to clear the current input filed.5. To exit length conversion function, press [Back] key.12.5.3 Surface1. Select Surface menu.2. Select desired unit to convert using [Unit].3. Input standard unit and view converted value.4. Press [Reset] to clear the current input filed, and locate the cursorin the input field.5. To exit Surface conversion function, press [Back] key.12.5.4 Mass1. Select Mass menu.2. Select desired unit to convert using [Unit].3. Input standard unit and view converted value.4. Press [Reset] to clear the current input filed, and locate the cursorin the input field.5. To exit Mass conversion function, press [Back] key.12.5.5 Volume1. Select Volume menu.2. Select desired unit to convert using [Unit].3. Input standard unit and view converted value.4. Press [Reset] to clear the current input filed.](https://usermanual.wiki/LG-Electronics-USA/U8210/User-Guide-580162-Page-144.png)
![U8210 User Guide 147Extras5. To exit volume conversion function, press [Back] key.12.5.6 Velocity1. Select Velocity menu.2. Select desired unit to convert using [Unit]3. Input standard unit and view converted value.4. Press [Reset] to clear the current input field5. To exit Velocity conversion function, press [Back] key.12.5.7 Temperature1. Select Temperature menu.2. Position the cursor in desired unit by using up or down arrow key.3. Input standard unit and view converted value.4. Press [Reset] to clear the current input field.5. To exit Temperature conversion function, press [Back] key.The World time function provides time information on major citiesworldwide.1. Press [Menu].2. Select Useful functions.3. Select world time.4. You can view the time of desired country or city using the left andright key.5. You can select a desired city as a base using [Home].6. The home city selected in world time is the base for daylight savingcalculation for time.12.6 World Time](https://usermanual.wiki/LG-Electronics-USA/U8210/User-Guide-580162-Page-145.png)
![StopWatch allows to count the no of seconds elapsed after an eventstarted.1. Press [Menu].2. Select Stopwatch.A Stopwatch function is provided.1. Select Stopwatch menu.2. Press [Go] to start the stopwatch.3. Press [Stop] to stop the stopwatch and view the measuredduration of time. 4. Press [Go] to resume the stopwatch. 5. Press [Lap] during operation to record the duration of time atthe moment, and continue the stopwatch. 6. Users can save up to 6 time records by pressing [Lap]. If thenumber of recorded time exceeds 6, the oldest one is deleted. 7. Press Details to see recorded Lap timings.. Press [Reset] toinitialise the stopwatch. 12.7 Stop watch148U8210 User GuideExtras](https://usermanual.wiki/LG-Electronics-USA/U8210/User-Guide-580162-Page-146.png)