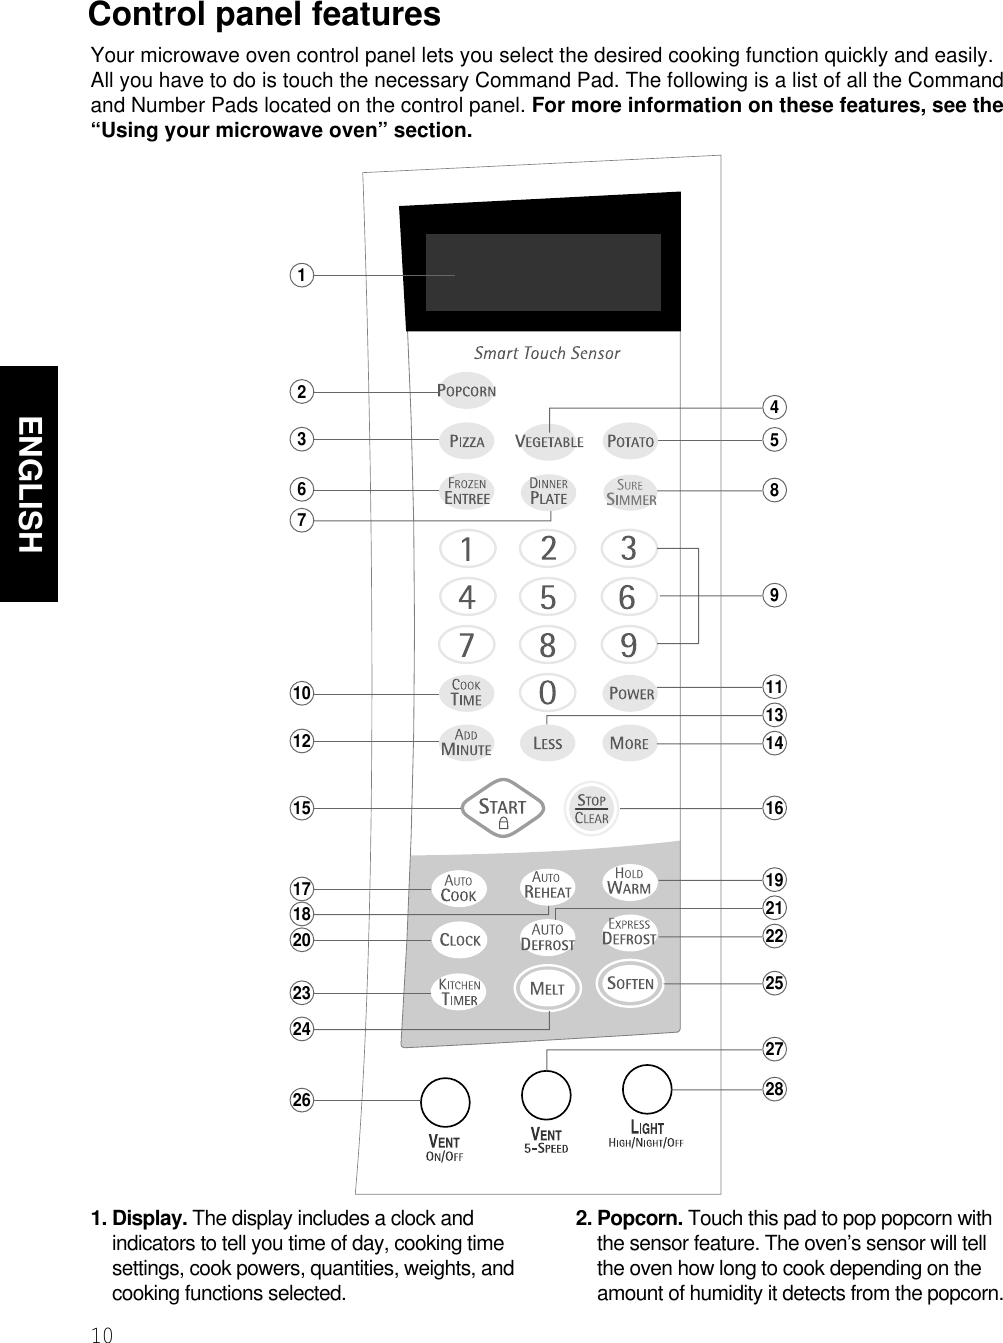
LG Electronics USA V204XJ Microwave Oven User Manual

LG Electronics USA Microwave Oven Users Manual

Users Manual

ULTRA WAVETM Microwave Hood CombinationUse & Care GuideCombinación Microondas Campana de ULTRA WAVETM Guía de uso y cuidadoModels/Modelos  MV-2042KQV3828W5A2893 Sears, Roebuck and Co., Hoffman Estates, IL 60179 www.sears.comENGLISH ESPAÑOL
2ENGLISHWarranty ...........................................................2Sears Service  ..................................................3Microwave Oven Safety ..................................4Getting to Know YourMicrowave Oven ..............................................7How your kenmore ULTRA WAVETM microwave hood combination works...............7Radio interference ..........................................7Testing your microwave oven .........................8Testing your dinnerware or cookware ............8Operating safety precautions..........................8Electrical connection ......................................8Microwave oven features ...............................9Control panel features...................................10Using Your Microwave Oven  .......................12Audible Signals .............................................12Interrupting Cooking......................................12Clock.............................................................12Child Lock .....................................................12Kitchen Timer................................................13Exhaust Fan..................................................13Cooktop Light................................................13Express Defrost ............................................13Add Minute....................................................14Timed Cooking..............................................14Multi-stage Cooking ......................................14Microwave Power Levels ..............................15Auto Defrost..................................................16Auto defrost table..........................................17Auto defrost table (Cont.)..............................18Defrosting tips ..............................................19Hold Warm....................................................19Sure Simmer.................................................20Using Sensor Cooking..................................21Sensor Cooking ............................................21Potato (Example) ..........................................21More/Less .....................................................21Sensor Cooking Table ..................................22Auto Cook, Auto Reheat ...............................23Auto Cook Table, Auto Reheat Table ...........24Melt, Melt Table ............................................25Soften, Soften Table .....................................25Caring for Your Microwave Oven .................26Caring for the filters.......................................27Replacing the cooktop and oven lights .........28Microwave Cooking Tips...............................30Questions and Answers................................32Troubleshooting.............................................33Service.............................................Back coverFULL ONE-YEAR WARRANTY ONMICROWAVE HOOD COMBINATIONFor one year from the date of purchase, if thisKenmore Microwave Hood Combination fails due toa defect in material or workmanship, Sears willrepair it free of charge.FULL FIVE-YEAR WARRANTY ON THEMAGNETRONFor five years from the date of purchase, if themagnetron in this Kenmore Microwave HoodCombination fails due to a defect in material orworkmanship, Sears will repair it free of charge.The above warranty coverage applies only toMicrowave Hood Combinations which are used forprivate household purposes.WARRANTY SERVICE IS AVAILABLE BYSIMPLY CONTACTING SEARS SERVICE AT 1-800-4-MY-HOME®This warranty applies only while this product is inuse in the United States.This warranty gives you specific legal rights, andyou may also have other rights which vary fromstate to state.Sears, Roebuck and Co.,Dept. 817WA,Hoffman Estates, IL 60179For service call:1-800-4-MY-HOME®(1-800-469-4663)Please record your model’s information.Whenever you call to request service for your     appliance, you need to know your complete modelnumber and serial number. You can find thisinformation on the model and serial numberlabel/plate (see “Microwave oven features” in the“Getting to Know Your Microwave Oven” section).Also, record the other information shown below.Model Number Serial Number Purchase Date Table ofContentsMicrowave HoodCombinationWarranty
Report No.: 02-LAE-M229 FCC Part 18 (ISM)Date: December 12, 2002CertificationLG Electronics Inc. FCC ID: BEJV204XJAPPENDIX F. Owner’s Manual with regard to FCC Instruction
3ENGLISHSears Service  Master Protection Agreements Congratulations on making a smart purchase.Your new Kenmore®appliance is designed and manufactured for years of dependable operation.But like all products, it may require preventive maintenance or repair from time to time.That’s when having a Master Protection Agreement can save you money and aggravation.Purchase a Master Protection Agreement now and protect yourself from unexpected hassleand expense. The Master Protection Agreement also helps extend the life of your new appliance. Here’swhat’s included in the Agreement:Expert service by our 12,000 professional repair specialists Unlimited service and no charge for parts and labor on all covered repairs “No-lemon” guarantee – replacement of your covered product if more than three product failuresoccur within twelve months Product replacement if your covered product can’t be fixedAnnual Preventive Maintenance Check at your request – no extra chargeFast help by phone – non-technical and instructional assistance on products repaired in yourhome, plus convenient repair schedulingPower surge protection against electrical damage due to power fluctuationsRental reimbursement if repair of your covered product takes longer than promised Once you purchase the Agreement, a simple phone call is all that it takes for you to schedule service. You can call anytime day or night, or schedule a service appointment online.Sears has over 12,000 professional repair specialists, who have access to over 4.5 million qualityparts and accessories. That’s the kind of professionalism you can count on to help prolong the life ofyour new purchase for years to come. Purchase your Master Protection Agreement today! Some limitations and exclusions apply. For prices and additional information call 1-800-827-6655.Sears Installation ServiceFor Sears guaranteed professional installation of home appliances and items like garage dooropeners and water heaters, in the U.S.A. call 1-800-4-MY-HOME®.
4ENGLISHMicrowave Oven SafetyYour safety and the safety of others are very important.We have provided many important safety messages in this manual and on your appliance. Always read and obey all safety messages.This is the safety alert symbol.This symbol alerts you to hazards that can kill or hurt you and others.All safety messages will be preceded by the safety alert symbol and the word“DANGER” or “WARNING.” These words mean:You will be killed or seriously injuredif you don’t follow immediately instructions.You can be killed or seriously injuredif you don’t follow instructions.All safety messages will identify the hazard, tell you how to reduce the chance of injury, and tellyou what can happen if the instructions are not followed.IMPORTANT SAFETY INSTRUCTIONSWhen using electrical appliances basic safety precautions should be followed, including thefollowing:WARNING: To reduce the risk of burns,electric shock, fire, injury to persons, orexposure to excessive microwave energy:• Read all instructions before using themicrowave oven.• Read and follow the specific“PRECAUTIONS TO AVOID POSSIBLEEXPOSURE TO EXCESSIVE MICROWAVEENERGY” found in this section.• The microwave oven must be grounded.Connect only to properly grounded outlet.See “GROUNDING INSTRUCTIONS” foundat the end of this section.• Install or locate the microwave oven only inaccordance with the provided installationinstructions.• Some products such as whole eggs in theshell and sealed containers – for example,closed glass jars – are able to explode andshould not be heated in the microwave oven.• Use the microwave oven only for its intendeduse as described in this manual. Do not usecorrosive chemicals or vapors in themicrowave oven. This type of oven isspecifically designed to heat, cook, or dryfood. It is not designed for industrial orlaboratory use.• As with any appliance, close supervision isnecessary when used by children.• Do not operate the microwave oven if it hasa damaged cord or plug, if it is not workingproperly, or if it has been damaged ordropped.SAVE THESE INSTRUCTIONS
5ENGLISHMICROWAVE OVEN SAFETYIMPORTANT SAFETY INSTRUCTIONS• The microwave oven should be serviced only byqualified service personnel. Call an authorizedservice company for examination, repair, oradjustment.• See door surface cleaning instructions in the “Caringfor Your Microwave Oven” section.• To reduce the risk of fire in the oven cavity:– Do not overcook food. Carefully attend themicrowave oven when paper, plastic, or othercombustible materials are placed inside the oven tofacilitate cooking.– Remove wire twist-ties from paper or plastic bagsbefore placing bags in oven.– If materials inside the oven ignite, keep oven doorclosed, turn oven off, and disconnect the powercord, or shut off power at the fuse or circuit breakerpanel.– Do not use the cavity for storage purposes. Do notleave paper products, cooking utensils, or food inthe cavity when not in use.• Suitable for use above both gas and electric cookingequipment.• Intended to be used above ranges with maximumwidth of 36 inches (91 cm).• Clean Ventilating Hoods Frequently - Grease shouldnot be allowed to accumulate on hood or filter.• When flaming foods under the hood, turn the fan on.• Use care when cleaning the vent-hood filter.Corrosive cleaning agents, such as lye-based ovencleaners, may damage the filter.• Oversized foods or oversized metal utensils shouldnot be inserted in the microwave oven as they maycreate a fire or risk of electric shock.• Do not clean with metal scouring pads. Pieces canburn off the pad and touch electrical parts involving arisk of electric shock.• Do not store anything directly on top of themicrowave oven when the microwave oven is inoperation.• Do not cover or block any openings on themicrowave oven.• Do not store this microwave oven outdoors. Do notuse the microwave oven near water for example,near a kitchen sink, in a wet basement, near aswimming pool, or similar location.• Do not immerse cord or plug in water.• Keep cord away from heated surfaces.• Do not let cord hang over edge of table or counter.• Do not mount over a sink.• Do not cover racks or any other part of the oven withmetal foil. This will cause overheating of the oven.• Liquids such as water, coffee, or tea are able tobe overheated beyond the boiling point withoutappearing to be boiling due to surface tension ofthe liquid. Visible bubbling or boiling when thecontainer is removed from the microwave oven isnot always present. This could result in very hotliquids suddenly boiling over when a spoon orother utensil is inserted into the liquid. To reducethe risk of injury to persons. 1) Do not overheat the liquid.  2) Stir the liquid both before and halfway throughheating it. 3) Do not use straight-sided containers withnarrow necks. 4) After heating, allow the container to standin the microwave oven for a short time beforeremoving the container. 5) Use extreme care when inserting a spoon orother utensil into the container.SAVE THESE INSTRUCTIONS
6ENGLISHMICROWAVE OVEN SAFETY  GROUNDING INSTRUCTIONS• For all cord connected appliances:The microwave oven must be grounded.In the event of an electrical short circuit,grounding reduces the risk of electricshock by providing an escape wire for theelectric current. The microwave oven isequipped with a cord having a groundingwire with a grounding plug. The plug mustbe plugged into an outlet that is properlyinstalled and grounded.WARNING: Improper use of thegrounding can result in a risk of electricshock.Consult a qualified electrician orserviceman if the grounding instructionsare not completely understood, or if doubtexists as to whether the microwave ovenis properly grounded.Do not use an extension cord. If the powersupply cord is too short, have a qualifiedelectrician or serviceman install an outletnear the microwave oven.• For a permanently connected appliance:The microwave oven must be connectedto a grounded, metallic, permanent wiringsystem, or an equipment groundingconductor should be run with the circuitconductors and connected to theequipment grounding terminal or lead on the microwave oven.ElectricalrequirementsObserve all governing codes andordinances. A 120 Volt, 60 Hz, AC only,20 amp fused electrical supply isrequired. (A time-delay fuse is recommended.)It is recommended that a separate circuitserving only this appliance be provided.Electrical Shock HazardPlug into a grounded 3-prongoutlet. Do not remove groundprong. Do not use an adapter.Do not use an extension cord.Failure to follow theseinstructions can result in death,fire, or electrical shock.SAVE THESE INSTRUCTIONSPRECAUTIONS TO AVOID POSSIBLEEXPOSURE TO EXCESSIVE MICROWAVEENERGY(a) Do not attempt to operate this oven with thedoor open since open - door operation canresult in harmful exposure to microwaveenergy. It is important not to defeat or tamperwith the safety interlocks.(b) Do not place any object between the ovenfront face and the door or allow soil or cleanerresidue to accumulate on sealing surfaces.(c) Do not operate the oven if it is damaged. It isparticularly important that the oven door closeproperly and that there is no damage to the:(1) Door (bent),(2) Hinges and latches (broken or loosened),(3) Door seals and sealing surfaces.(d) The oven should not be adjusted or repairedby anyone except properly qualified servicepersonnel.
ENGLISH7Getting to Know YourMicrowave OvenThis section discusses the concepts behind microwave cooking. It also shows you the basics you need to knowto operate your microwave oven. Please read this information before you use your oven.HOW YOUR KENMORE ULTRA WAVETM MICROWAVEHOOD COMBINATION WORKSRadio interferenceUsing your microwave oven may cause interferenceto your radio, TV, or similar equipment. When there isinterference, you can reduce it or remove it by:• Cleaning the door and sealing surfaces of the oven.• Adjusting the receiving antenna of the radio ortelevision.• Moving the receiver away from the microwave oven.• Plugging the microwave oven into a different outletso that the microwave oven and receiver are ondifferent branch circuits.Microwave energy is not hot. It causes food to makeits own heat, and it’s this heat that cooks the food.Microwaves are like TV waves, radio waves, orlight waves. You cannot see them, but you can seewhat they do.A magnetron in the microwave oven producesmicrowaves. The microwaves move into the ovenwhere they contact food as it turns on the turntable.The glass turntable of your microwave oven letsmicrowaves pass through. Then they bounce off ametal floor, back through the glass turntable, andare absorbed by the food.Microwaves pass through most glass, paper, andplastics without heating them so food absorbs theenergy. Microwaves bounce off metal containers sofood does not absorb the energy.ULTRA WAVETMInverter Microwave SystemULTRA WAVETM Inverter Microwave System givesyou better microwave cooking performance fordefrosting, cooking and reheating foods quicklyand uniformly.The ULTRA WAVETM Inverter Microwave Systemis proven technology that delivers a constantstream of microwave power - true high, medium,and low power.Conventional microwave ovens operate on HIGHpower only. To achieve a 70% power level in aconventional microwave oven, the oven operates70% of the time at HIGH power and 30% of thetime OFF.The ULTRA WAVETM Inverter Microwave Systemdelivers power continuously, to defrost more evenly andminimize overcooking of food and messy food spatters.Sensor CookingThe ULTRA WAVETM Inverter Microwave System fea-tures Sensor Cooking functions. A humidity sensor inthe oven cavity detects moisture and humidity emittedfrom food as it heats. The sensor adjusts cooking timesto various types and amounts of food. Sensor cookingtakes the guesswork out of microwave cooking.For the best cooking resultsMagnetronMetal floor Glass tray Oven cavity100% 100%0% 0%100% 100%0%70%• Always cook food for the shortest cooking timerecommended. Check to see how the food iscooking. • Stir, turn over, or rearrange the food beingcooked about halfway through the cooking timefor all recipes. This will help make sure the foodis evenly cooked. • If you do not have a cover for a dish, use waxpaper, or microwave-approved paper towels orplastic wrap. Remember to turn back a corner ofthe plastic wrap to vent steam during cooking.
8ENGLISHGETTING TO KNOW YOUR MICROWAVE OVEN    Testing your dinnerware or cookwareOperating safety precautionsElectrical connectionTest dinnerware or cookware before using. Totest a dish for safe use, put it into  the oven with acup of water beside it. Cook at 100% cook powerfor one minute. If the dish gets hot, do not use it.Some dishes (melamine, some ceramicdinnerware, etc.) absorb microwave energy,becoming too hot to handle and slowing cookingtimes. Cooking in metal containers not designed formicrowave use could damage the oven, as couldcontainers with hidden metal (twist-ties, foil lining,staples, metallic glaze or trim).• Never lean on the door or allow a child to swingon it when the door is open.• Use hot pads. Microwave energy does not heatcontainers, but the heat from the food can makethe container hot.• Do not use newspaper or other printed paper inthe oven.• Do not dry flowers, fruit, herbs, wood, paper,gourds, or clothes in the oven.• Do not start a microwave oven when it is empty.Product life may be shortened. If you practiceprogramming the oven, put a container of water inthe oven. It is normal for the oven door to lookwavy after the oven has been running for a while.• Do not try to melt paraffin wax in the oven.Paraffin wax will not melt in a microwave ovenbecause it allows microwaves to pass through it.• Do not operate the microwave oven unless theglass turntable is securely in place and can movefreely. The turntable can move in either direction.Make sure the turntable is correct-side up in theoven. Handle your turntable with care whenremoving it from the oven to avoid possiblybreaking it. If your turntable cracks or breaks,contact your dealer for a replacement. • When you use a browning dish, the browningdish bottom must be at least 3 ⁄16 inch above theturntable. Follow the directions supplied with thebrowning dish.• Never cook or reheat a whole egg inside theshell. Steam buildup in whole eggs may causethem to burst, and possibly damage the oven.Slice hard-boiled eggs before heating. In rarecases, poached eggs have been known toexplode. Cover poached eggs and allow astanding time of one minute before cutting intothem.• For best results, stir any liquid several timesduring heating or reheating. Liquids heated incertain containers (especially containers shapedlike cylinders) may become overheated. The liquidmay splash out with a loud noise during or afterheating or when adding ingredients (coffeegranules, tea bags, etc.). This can harm the oven.• Microwaves may not reach the center of a roast.The heat spreads to the center from the outer,cooked areas just as in regular oven cooking. Thisis one of the reasons for letting some foods (forexample, roasts or baked potatoes) stand for awhile after cooking, or for stirring some foodsduring the cooking time.• Do not deep fry in the oven. Microwavableutensils are not suitable and it is difficult tomaintain appropriate deep-frying temperatures.• Do not overcook potatoes. At the end of therecommended cooking time, potatoes should beslightly firm because they will continue cookingduring standing time. After microwaving, letpotatoes stand for 5 minutes. They will finishcooking while standing.If your electric power line or outlet voltage isless than 110 volts, cooking times may be longer. Have a qualified electrician check your electricalsystem.Testing your microwave ovenTo test the oven put about 1 cup of cold water in aglass container in the oven. Close the door. Make sure it latches. Cook at 100% power for 1 minute.When the time is up, the water should be heated.
9ENGLISHGETTING TO KNOW YOUR MICROWAVE OVEN  Microwave oven featuresYour microwave oven is designed to make yourcooking experience as enjoyable and productiveas possible. To get you up and running quickly, thefollowing is a list of the oven’s basic features:1. Metal Shielded Window. The shield preventsmicrowaves from escaping. It is designed as ascreen to allow you to view food as it cooks.2. Model and Serial Number Plate & CookingGuide Label3. Charcoal Filter (behind Vent Grille)4. Vent Grille5. Glass tray. The glass tray moves food as itcooks for more even cooking. It must be in theoven during operation for best cooking results.6. Cooktop Light7. Grease Filter. See “Caring for the filters”section.8. Control Panel. Touch the pads on this panel toperform all functions.9. Cooking Rack. Use for extra space whencooking in more than one container at the same time.The glass tray moves in both directions to help cook food moreevenly. Do not operate the microwave oven without the glasstray in place. To  Install:1. Place the support on the oven cavity bottom.2. Place the glass tray on the support.Fit the raised, hollowed groove of the glass tray bottombetween the rollers of the hub. The rollers on the supportshould fit inside the glass tray bottom ridge.1. Glass tray2. Support3. Hub
10ENGLISHGETTING TO KNOW YOUR MICROWAVE OVEN      Control panel features  48911141613516101215172023262418327192225282721Your microwave oven control panel lets you select the desired cooking function quickly and easily.All you have to do is touch the necessary Command Pad. The following is a list of all the Commandand Number Pads located on the control panel. For more information on these features, see the“Using your microwave oven” section.1. Display. The display includes a clock andindicators to tell you time of day, cooking timesettings, cook powers, quantities, weights, andcooking functions selected.2. Popcorn. Touch this pad to pop popcorn withthe sensor feature. The oven’s sensor will tellthe oven how long to cook depending on theamount of humidity it detects from the popcorn.
11ENGLISHGETTING TO KNOW YOUR MICROWAVE OVEN  3. Pizza. Touch this pad to reheat one or severalslices of pizza without entering a cook time orpower.4. Vegetable. Touch this pad to cook withoutentering a cook time or power.5. Potato. Touch this pad to cook potatoes withoutentering a cook time or power.6. Frozen Entree. Touch this pad to cook a 10- to21- ounce frozen entree without entering a cooktime or power.7. Dinner Plate. Touch this pad to cook withoutentering a cook time or power.8. Sure Simmer. Touch this pad to simmer soups,casseroles, stews, and other liquid foods.9. Number Pads. Touch number pads to entercooking times, cook powers, quantities, weights,or food categories.10. Cook Time. Touch this pad followed byNumber Pads to set a cooking time.11. Power. Touch this pad after the cook time hasbeen set, followed by a Number Pad to set theamount of microwave energy released to cookthe food. The higher the number, the higher themicrowave power or “cooking speed.”12. Add Minute. Touch this pad to cook for 1minute at 100% cook power, or to add extraminutes at the set cook power to your cookingcycle.13. Less. Touch this pad to subtract 10 seconds ofcook time each time you press it.14. More. Touch this pad to add 10 seconds ofcook time each time you press it.15. Start. Touch this pad to start a function. If youopen the door after the oven begins to cook,retouch Start.16. Stop/Clear. Touch this pad to erase anincorrect command, cancel a program duringcooking, or to clear the Display.17. Auto Cook. Touch this pad to cookmicrowavable foods without entering a cooktime or power.18. Auto Reheat. Touch this pad to reheatmicrowavable foods without entering a cooktime or power.19. Hold Warm. Touch this pad to keep hot,cooked foods safely warm in your oven for upto 99 minutes, 99 seconds. Hold Warm can beused by itself, or it can automatically follow acooking cycle.20. Clock. Touch this pad to enter the time of day.21. Auto Defrost. Touch this pad followed byNumber Pads to thaw frozen meat by weight.22. Express Defrost. Touch this pad to expressdefrost. “GROUND BEEF 1.0 LBS TOUCHSTART” will appear in the display.23. Kitchen Timer. Touch this pad to set theKitchen Timer.24. Melt. Touch this pad to melt chocolate, cheese,butter, or marshmallows.25. Soften. Touch this pad to soften ice cream,cream cheese, butter, or frozen juice.26. Vent On/Off. Touch this button to turn the fanon or off.27. Vent 5 Speed. Touch this button to chooseone of 5 fan speeds.28. Light High/Night/Off. Touch this button to turnthe light on high, night, or off.NOTE: If you try to enter incorrect instructions,you will not hear any tones. Touch STOP/CLEARand re-enter the instructions.
12ENGLISHUSING YOUR MICROWAVE OVEN  Using Your MicrowaveOvenThis section gives you instructions for operatingeach function. Please read these instructionscarefully.Use this safety feature to lock the control panelwhen you are cleaning the oven or so that childrencannot use the oven unsupervised.To set CHILD LOCK:Touch: Display Shows:CHILD LOCKTo cancel CHILD LOCK:Touch: Display Shows:Time of day.1.1.2.Audible signals are available to guide you whensetting and using your oven:• A programming tone will sound each timeyou touch a pad.• Seven tones signal the end of a Kitchen Timercountdown.• Four tones signal the end of a cooking cycle.AUDIBLE SIGNALSYou can stop the oven during a cycle by openingthe door. The oven stops heating and the fanstops, but the light stays on.To restart cooking, close the door and touchSTART.If you do not want to continue cooking,open the door and touch STOP/CLEAR.INTERRUPTING COOKINGExample for 10:30(AM):Touch: Display Shows:When your microwave oven is first plugged in orafter a power failure, the Display will show “PLEASESET TIME OF DAY. ” If a time of day is not set, “:” will show on the Display until you touch “Clock.”CLOCK1.2.3.5.NOTE: You can switch between AM and PM bytouching 1 or 2 after step 4.10 ::30 TOUCH START10 ::30AM TOUCH 1PM TOUCH 2AM10 ::30 TOUCHSTART6.4.::AM10 ::30Touch and hold untilLOCKEDdisappears in thedisplay(approximately 4 seconds).Touch and hold untilLOCKED appears inthe display(approximately 4 seconds).
13ENGLISHUSING YOUR MICROWAVE OVEN  The bottom of the control panel controls the 5-speedexhaust fan.Example for level 4:Touch: Display Shows:EXHAUST FANThis shows the last level until youselect the fan speed level.once for HIGH lighttwice for NIGHT lightTouch until Level 4.Turn off fan when desired.1.3.2.NOTE: If the temperature from the range or cooktopbelow the oven gets too hot, the exhaust fan in thevent hood will automatically turn on at the LEVEL 5setting to protect the oven.It may stay on up to an hour to cool the oven.When this occurs, the VENT button will not turn thefan off. level 1level 4off::ENTER TIME IN MINAND SEC3 ::00TOUCH STARTYour microwave oven can be used as a kitchentimer. You can set up to 99 minutes, 99 seconds.Example for 3 minutes:Touch: Display Shows:KITCHEN TIMERTIMER and timecounting down.1.2.3. 3 ::00HIGHThe pad on the bottom right of the control panelcontrols the cooktop light.Example for HIGH:Touch: Display Shows:COOKTOP LIGHT1.To turn off, touch button once or twice depending on lightsetting.OFF2.EXPRESS DEFROST1.2.One express defrost sequence is preset in the oven,The Express Defrost feature provides you with the quickdefrosting method for 1.0 pound “GROUND BEEF”only.Example for 1 lb of Ground beef:Touch: Display Shows:Time counting down andEXPRESS DEFROSTscrolls across display.
14ENGLISHUSING YOUR MICROWAVE OVEN  TIMED COOKING1.2.5.3.4.This feature lets you program a specific cook timeand power. For best results, there are 10 powerlevel settings in addition to HIGH (100%) power .Refer to the “Microwave Power Levels Table” onpage 15 for more information.NOTE: If you do not select a power level, the ovenwill automatically cook at HIGH (100%) power.Example for 5 minutes, 30 seconds at 80%power:Touch: Display Shows:::ENTER COOKING TIME5 ::30TOUCH STARTOR POWER5 ::30ENTER POWER LEVEL1 TO 105 ::30POWER80TOUCH STARTTime counting downand POWER 80.For best results, some recipes call for different cookpowers during different stages of a cook cycle. Youcan program your oven to switch from one powerlevel to another for up to 3 stages.Example for 2-stage cook cycle:Touch: Display Shows:MULTI-STAGE COOKING1.2.5.3.4.6.to set a 7-minute cook time for the second stage.to set a 3-minute cook time for the first stage.7.9.::ENTER COOKING TIME::ENTER COOKING TIME3 ::00TOUCH STARTOR POWER7 ::00TOUCH STARTOR POWER3 ::00 ENTER POWERLEVEL 1 TO107 ::00ENTER POWERLEVEL 1 TO103 ::00 POWER 80TOUCH START8.to set a 50% cook powerfor the second stage.to set an 80% cookpower for the first stage.7 ::00 POWER 50TOUCH STARTWhen the first stage is over, you will hear twoshort tones as the oven begins the secondcook stage.10.Time counting downand POWER 80.ADD MINUTE1.2.A time-saving pad, this simplified control letsyou quickly set and start microwave cooking at100% power without the need to touch START.Example for 2 minutesTouch: Display Shows:NOTE: Each time you touch ADD MINUTE, it willadd 1 minute up to 99 min 59 seconds.Twice Time counting downand POWER 100.Time of day.NOTE: After use of cook function, fan will run for 1minute to cool if it senses too much heat.
15ENGLISHUSING YOUR MICROWAVE OVEN  For best results, some recipes call for different cookpowers. The lower the cook power, the slower thecooking. Each number from 1 to 9 stands for a different percentage of full cook power.The following table gives the percentage of cook powereach number pad stands for, and the cook powername usually used. It also tells you when to use each cook power. Follow recipe or food package instructions if available.MICROWAVE POWER LEVELSCOOK POWER NAME WHEN TO USE IT100% of full power9 = 90% of full power8 = 80% of full power7 = 70% of full power6 = 60% of full power5 = 50% of full power4 = 40% of full power3 = 30% of full power2 = 20% of full power1 = 10% of full powerHighMedium-HighMediumMedium-Low,DefrostLow• Quick heating many convenience foods andfoods with high water content, such as soups andbeverages• Cooking tender cuts of meat, ground meat• Heating cream soups• Heating rice, pasta, or casseroles• Cooking and heating foods that need a Cook Power lower than high (for example,whole fish and meat loaf) or when food is cooking too fast• Reheating a single serving of food• Cooking requiring special care, such as cheeseand egg dishes, pudding, and custards• Finishing cooking casseroles• Cooking ham, whole poultry, and pot roasts• Simmering stews• Melting chocolate• Heating pastries• Manually defrosting foods, such as bread, fish,meats, poultry, and precooked foods• Softening butter, cheese, and ice cream• Keeping food warm• Taking chill out of fruit
16ENGLISHUSING YOUR MICROWAVE OVEN  Example for 1.2 lbs of ground beef:Touch: Display Shows:1.2.3. and4. Time counting downand DEFROST.to enter the weightAUTO DEFROSTFour defrost sequences are preset in the oven.The auto defrost feature provides you with the bestdefrosting method for frozen foods. The cooking guidewill show you which defrost sequence is recommendedfor the food you are defrosting. For added convenience,the Auto Defrost includes a built-in beep mechanismthat reminds you to check, turn over, separate, orrearrange to get best defrost results.1.  MEAT2.  POULTRY3.  FISH4.  BREADNOTE:When you touch the START pad, the display changesto defrost time count down. The oven will beep duringthe DEFROST cycle. At this time, open the door andturn, separate, or rearrange the food. Remove anyportions that have thawed. Return frozen portions tothe oven and touch START to resume the defrost cycle.Operating Tips• For best results, remove fish, shellfish, meat, andpoultry from its original closed paper or plasticpackage (wrapper). Otherwise, the wrap will holdsteam and juice close to the foods, which can causethe outer surface of the foods to cook.• For best results, shape your ground meat into theform of a doughnut before freezing. When defrosting,scrape off thawed meat when the beep sounds andcontinue defrosting.• Place foods in a shallow container or on a microwaveroasting rack to catch drippings.Weight conversion tableYou are probably used to food weights as being inpounds and ounces that are fractions of a pound (forexample, 4 ounces equals 1/4 pound). However, inorder to enter food weight in Auto Defrost, you mustspecify pounds and tenths of a pound.If the weight on the food package is in fractions of apound, you can use the following table to convert theweight to decimals.OUNCES1.63.24.04.86.48.09.611.212.012.814.416.0DECIMAL WEIGHT.10.20.25  One-Quarter Pound.30.40.50 One-Half Pound.60.70.75 Three-Quarters Pound.80.901.00 One PoundThis table shows you food type selections and theweights you can set for each type. For bestresults, loosen or remove covering on food.EQUIVALENT WEIGHTMeatPoultryFishBread1234WEIGHTS YOU CAN SET (tenths of a pound).1 to 6.0 (45g to 2722g).1 to 6.0 (45g to 2722g).1 to 6.0 (45g to 2722g).1 to 1.0 (45g to 450g)TOUCH Auto Defrost FOOD
17ENGLISHUSING YOUR MICROWAVE OVEN  AUTO DEFROST TABLEMeat settingFOOD AT BEEPSETTINGSPECIAL INSTRUCTIONSBEEFGround Beef,BulkGround Beef,PattiesRound SteakTenderloinSteakStew BeefPot Roast,Chuck RoastRib RoastRolled Rump RoastLAMBCubes forStewChops(1 inch thick)PORKChops(1/2 inch thick)Hot DogsSpareribsCountry-styleRibsSausage,LinksSausage,BulkLoin Roast,BonelessMEATMEATMEATMEATMEATMEATMEATMEATMEATMEATMEATMEATMEATMEATMEATMEATRemove thawed portions with fork.Turn over. Return remainder to oven.Separate and rearrange.Turn over. Cover warm areas withaluminum foil.Turn over. Cover warm areas withaluminum foil.Remove thawed portions with fork.Separate remainder.Return remainder to oven.Turn over. Cover warm areas withaluminum foil.Turn over. Cover warm areas withaluminum foil.Turn over. Cover warm areas withaluminum foil.Remove thawed portions with fork.Return remainder to oven.Separate and rearrange.Separate and rearrange.Separate and rearrange.Turn over. Cover warm areas withaluminum foil.Separate and rearrange.Remove thawed portions with fork.Turn over. Return remainder to oven.Turn over. Cover warm areas withaluminum foil.Meat of irregular shape and large, fatty cuts of meat should have the narrow or fatty areasshielded with foil at the beginning of a defrostsequence. Do not defrost less than 1/4 lb. Freeze in doughnut shape.Do not defrost less than 2 oz. patties. Depress center when freezing.Place on a microwavable roasting rack.Place on a microwavable roasting rack.Place in a microwavable baking dish.Place on a microwavable roasting rack.Place on a microwavable roasting rack.Place on a microwavable roasting rack.Place in a microwavable baking dish.Place on a microwavable roasting rack.Place on a microwavable roasting rack.Place on a microwavable roasting rack.Place on a microwavable roasting rack.Place on a microwavable roasting rack.Place in a microwavable baking dish.Place on a microwavable roasting rack.
18ENGLISHUSING YOUR MICROWAVE OVEN    AUTO DEFROST TABLE (CONT.)Poultry settingFish settingBread settingFOOD AT BEEPSETTINGSPECIAL INSTRUCTIONSCHICKENWhole (up to 6 lbs)   Cut-upCORNISHHENSWholeTURKEYBreast (up to 6 lbs)POULTRYPOULTRYPOULTRYTurn over (finish defrosting breast-side down). Cover warm areas withaluminum foil.Separate pieces and rearrange.Turn over. Cover warm areas withaluminum foil. Turn over. Cover warm areas withaluminum foil.Turn over. Cover warm areas withaluminum foil.Place chicken breast-side up on amicrowavable roasting rack. Finish defrostingby immersing in cold water. Remove gibletswhen chicken is partially defrosted.Place on a microwavable roasting rack.Finish defrosting by immersing in cold water.Place on a microwavable roasting rack.Finish defrosting by immersing in cold water.Place on a microwavable roasting rack.Finish defrosting by immersing in cold water.FOOD AT BEEPSETTINGSPECIAL INSTRUCTIONSFISHFilletsSteaksWholeSHELLFISHCrabmeatLobster tailsShrimpScallopsFISHFISHFISHFISHFISHFISHFISHTurn over. Separate fillets whenpartially thawed if possible.Separate and rearrange.Turn over.Break apart. Turn over.Turn over and rearrange.Separate and rearrange.Separate and rearrange.Place in a microwavable baking dish.Carefully separate fillets under coldwater.Place in a microwavable baking dish.Run cold water over to finish defrosting.Place in a microwavable baking dish.Cover head and tail with foil; do not letfoil touch sides of microwave. Finishdefrosting by immersing in cold water.Place in a microwavable baking dish.Place in a microwavable baking dish.Place in a microwavable baking dish.Place in a microwavable baking dish.FOOD AT BEEPSETTINGSPECIAL INSTRUCTIONSBagelDinner RollMuffinHamburgerHot Dog BunSlices of BreadLoaf of BreadBREAD Turn over and rearrange. Place on 3 sheets of paper towel.
19ENGLISHUSING YOUR MICROWAVE OVEN  • The length of defrosting time varies according tohow solidly the food is frozen.• The shape of the package affects how quickly foodwill defrost. Shallow packages will defrost morequickly than a deep block.• As food begins to defrost, separate the pieces.Separated pieces defrost more easily.• Use small pieces of aluminum foil to shield partsof food such as chicken wings, leg tips, fish tails, orareas that start to get warm. Make sure the foil doesnot touch the sides, top, or bottom of the oven. Thefoil can damage the oven lining.• For better results, let food stand after defrosting.(For more information on standing time, see the“Microwave Cooking Tips” section.)• Turn over food during defrosting or standing time.Break apart and remove food as required.• When using Auto Defrost, the weight to be enteredis the net weight in pounds and tenths of pounds(the weight of the food minus the container).• Before starting, make sure you have removed anyof the metal twist-ties which often come with frozenfood bags, and replace them with strings or elasticbands.• Open containers such as cartons before they areplaced in the oven.• Always slit or pierce plastic pouches or packaging.• If food is foil wrapped, remove foil and place it in asuitable container.• Slit the skins, if any, of frozen food such assausage.• Bend plastic pouches of food to ensure evendefrosting.• Always underestimate defrosting time. If defrostedfood is still icy in the center, return it to themicrowave oven for more defrosting. To make Hold Warmautomatically follow another cycle:• While you are touching in cooking instructions,touch HOLD WARM before touching START.• When the last cooking cycle is over, you will heartwo tones. “Hold Warm” will come on while the ovencontinues to run.• You can set Hold Warm to follow Auto Defrost,Cook, or multi-cycle cooking.NOTES:• Hold Warm operates for up to 99 minutes, 99seconds.• Opening the oven door cancels Hold Warm. Close the door and touch Hold Warm, then touch START if additional Hold Warm time is desired.• Food cooked covered should be covered duringHold Warm.• Pastry items (pies, turnovers, etc.) should beuncovered during Hold Warm.• Complete meals kept warm on a dinner plateshould be covered during Hold Warm.• Do not use more than one complete Hold Warmcycle (about 1 hour, 40 minutes). The quality ofsome foods will suffer with extended time.HOLD WARMDEFROSTING TIPS1.2.You can safely keep hot, cooked food warm in yourmicrowave oven for up to 99 minutes, 99 seconds(about 1 hour, 40 minutes). You can use Hold Warmby itself, or to automatically follow a cooking cycle.Example for hold warm:Touch: Display Shows:HOLD WARMTOUCH STARTHOLD WARMscrolls across display.At the end of the hold warm, “END” will bedisplayed and four tones will sound.
20ENGLISHUSING YOUR MICROWAVE OVEN    Your microwave oven lets you simmer soups,casseroles, stews, and other liquid foods. All you dois set a simmer time and your oven will bring yourfood to a boil and then simmer it for the time youspecify.NOTES:• You cannot change the cook power or donenessfor Sure Simmer.• This function uses the sensor. The sensor needs2 minutes 30 seconds to warm up after the ovenis connected to power or after a power failure. If you start Sure Simmer during the warm up,microwave energy will not be turned on until thesensor is warm.• When cooking vegetables, increase amount ofwater to 1/4 to 1/2 cup (60 to 125ml).• Cover dish with a hard lid, i.e., the lid that comeswith the dish or a dinner plate. Do not use plasticwrap.SURE SIMMER1.2.Touch: Display Shows:Place the food in the oven and close the door.3.Touch Number pads toenter the simmer time.Example for 30minutes.::ENTER COOKING TIME30::00TOUCH START4. scrolls acrossdisplay.The oven will bringthe food to a boil.The food will then simmer for the time you set.When simmering foods like pasta use a containerthat can hold enough water to cover the foodcompletely when cooking, such as a 3-quart (12 cup)casserole with a lid. When cooking pasta or noodles,add 1 tbsp (15ml) oil to the water before boiling. Use the following method:Place container with water in the oven and followsteps 2~4, setting the simmer time at 1 second. Atthe end of the signal, place the food in the water andstir until completely covered by water. Cover. Repeatsteps 2~4, setting the simmer time you want.Changing instructions you can change the simmeringtime while simmering by repeating steps 2, 3, and 4.SURE SIMMER
21ENGLISHUSING YOUR MICROWAVE OVEN  SENSOR OPERATING INSTRUCTIONSSensor Cook allows you to cook most of your favoritefoods without selecting cooking times and powerlevels. The oven automatically determines requiredcooking time for each food item. When the internalsensor detects a certain amount of humidity comingfrom the food, it will tell the oven how much longer toheat. The display will show the remaining heat time.For best results by Sensor, following theserecommendations.•  Food cooked with the sensor system should be atnormal storage temperature.•  Glass Tray and outside of container should be dryto assure best cooking results.•  Foods should always be covered loosely withmicrowavable plastic wrap, waxed paper or a lid.•  Do not open the door or touch the “STOP/CLEAR”key during the sensing time. When sensing time isover, the oven beeps twice and the remainingcooking time will appear in the display window. Atthis time you can open the door to stir, turn, orrearrange the food.SENSOR COOKING GUIDEAppropriate containers and coverings help assuregood Sensor cooking results.•  Always use microwavable containers and coverthem with lids or vented plastic wrap.•  Never use tight-sealing plastic covers. They canprevent steam from escaping and cause food toovercook.•  Match the amount to the size of the container. Fill containers at least half full for best results.•  Be sure the outside of the cooking container andthe inside of the microwave oven are dry beforeplacing food in the oven. Beads of moisture turninginto steam can mislead the sensor.Using Sensor CookingSENSOR COOKING POTATO (EXAMPLE)1.2.Sensor cook allows you to cook most of yourfavorite foods without selecting cooking times andpower levels.Example for Potato:Touch: Display Shows:POTATOscrolls across display.When the cook time is over, you will hear four beepsand COOK END will be displayed.By using the MORE or LESS pads all of the sensorcook and time cook settings can be adjusted to cookfood for a longer or shorter time.Pressing MORE will add 10 seconds of cooking timeeach time you press it.Pressing LESS will subtract 10 seconds of cookingtime each time you press it.MORE/LESSTime of day.
22ENGLISHUSING YOUR MICROWAVE OVEN    SENSOR COOKING TABLECATEGORY DIRECTIONAMOUNTFrozen Entree Dinner Plate FreshVegetableFrozenVegetableCannedVegetablePotato Remove from outer display package. Slit cover.If not in microwave-safe container, place on a plate.Cover with plastic wrap and vent the plastic film by piercing with a fork(3 times). After cooking, allow to stand for 3 minutes.Place foods to be heated on dinner plate or similar dish.Cover with plastic wrap and vent.After cooking, allow to stand for 3 minutes.Prepare as desired, wash, and leave residual water on the vegetables.Place in an appropriately sized microwave container. Add amount of water according to the quantity (1~2 cups : 2 tablespoons, 3~4 cups : 4 tablespoons). Cover with plastic wrap and vent. After cooking,stir and allow to stand for 3 minutes.Remove from package, rinse off frost under running water.Place in an appropriately sized microwave container. Add amount of water according to the quantity (1~2 cups : 2 tablespoons, 3~4 cups : 4 tablespoons). Cover with plastic wrap and vent. After cooking,stir and allow to stand for 3 minutes.Remove from the outer display can.Place in an appropriately sized microwave container,cover with plastic wrap, and vent. After cooking, stir and allow to stand for 3 minutes.Pierce each potato with a fork and place the oven trayaround the edge, at least one inch apart.After cooking, allow to stand for 5 minutes.PopcornPizzaPopcorn lets you pop commercially packagedmicrowave popcorn. Pop only one package at a time.For best results, use fresh bag of popcorn.Place bag of prepackaged microwave popcornon the center of turntable.This is reheat function for a leftover pizza.Place on paper towel on a microwave-safe plate.3.0~3.5 oz. package1~3 slices,(5 oz. each)10 to 21 oz.1~2 servings1~4 cups1~4 cups1~4 cups1~4 medium(approx.8 to 10 oz. each)Vegetable
23ENGLISHUSING YOUR MICROWAVE OVEN  The oven will cook food automatically by sensorsystem, except Bacon and Hot Cereal. When thecook time is over, you will hear four beeps and COOK END will be displayed.CATEGORYCasserole (Sensor)Rice (Sensor)BaconHot CerealTOUCH PADNUMBER1 234QUANTITY1 to 4 cups1/2 to 2 cups2 to 4 slices1 to 6 servingsCATEGORYCasserole (Sensor)Roll/MuffinBeverageTOUCH PADNUMBER1 23QUANTITY1 to 4 cups1 to 6 pieces1 to 2 cupsAUTO COOK1.2.Auto Cook lets you heat common microwave-prepared foods without selecting cooking times andpower levels. Auto Cook has preset cook powers for4 food categories: Casserole, Rice, Bacon, and HotCereal.Example for Rice:Touch: Display Shows:SELECT MENU 1 TO 4--SEE COOKING GUIDERICEscrolls across display.1.2.Auto Reheat lets you heat foods without selectingcooking times and power levels. Auto Reheat haspreset cook powers for 3 categories: Casserole,Roll/Muffin, and Beverage.Example for Casserole.Touch: Display Shows:SELECT MENU 1 TO 3--SEE COOKING GUIDECASSEROLEscrolls across display.The oven will reheat only Casserole automaticallyby sensor system. When the cook time is over, you will hear fourbeeps and COOK END will be displayed.AUTO REHEATChoose food category:Choose food category:
24ENGLISHUSING YOUR MICROWAVE OVEN    AUTO COOK TABLECATEGORY DIRECTIONTOUCHNUMBER PAD AMOUNTCasserole(Sensor)Rice(Sensor)BaconHot CerealAssemble the ingredients per the recipein a 1~2- quart casserole. Cover with plastic wrap and vent. After cooking, stir and allow to stand for 3 minutes.Place rice and twice as much liquid(water, chicken, or vegetable stock) in a 2- quartmicrowave dish. Cover with plastic wrap and vent. After cooking, allow to stand for 10 minutes. Stir for fluffier rice.Place bacon strips on a microwavebacon rack for best results.(Use dinner plate lined with paper towelsif rack is not available)Prepare as directed on package and cook. Stir well before eating. Use only instant hot cereal.1~4 cups1/2~2 cupsUse medium orlong grain rice.Cook instant riceaccording todirections onthe package.2~4 slices1~6 servings1234AUTO REHEAT TABLECATEGORY DIRECTIONTOUCHNUMBER PAD AMOUNTCasserole(Sensor)Roll/Muffin BeverageCover dish containing the casserolewith plastic wrap, and vent.After cooking, stir and allow to stand for 3 minutes.Remove from display package and place on a plate.Use a wide-mouth mug. Do not cover.Remove from display package and place on a plate.(Be careful! The beverage will be very hot! Sometimesliquids heated in cylindrical containers will splash outwhen the cup is moved.)1~4 cups1~6 pieces(2 oz. each)fresh1~2 cups(240 ml per cup)123
25ENGLISHMELTThe oven uses low power to melt foods (butter ormargarine, chocolate, marshmallows, or processedcheese food). See the following table.Example for 8 oz. Chocolate:Touch: Display Shows:1.2.3.4.SELECT MENU1 TO 4 --SEE COOKING GUIDE chocolate touch 1 to 28 OZ once andCHOCOLATEscrolls across display.Time counting down.Time of day.MELT TABLEAMOUNT1, 2 or 3sticks4 or 8 oz.8 or 16oz.5 or 10oz.DIRECTIONUnwrap and place inmicrowavable container.No need to cover butter.Stir at the end of cookingto complete melting.Chocolate chips orsquares of bakingchocolate may be used.Unwrap squares andplace in microwavablecontainer. Stir at the endof cycle to completemelting.Use processed cheesefood only. Cut into cubes.Place in a single layer inmicrowavable container.Stir at the end of cookingto complete melting.Large or miniaturemarshmallows may beused. Place inmicrowavable container.Stir at the end of cycle tocomplete melting.CATEGORYButter orMargarineCODESOFTENThe oven uses low power to soften foods (butter, icecream, cream cheese, and frozen juice)See the following table.Example for quart of ice cream:Touch: Display Shows:1.2.3.4.SOFTEN TABLEAMOUNT1, 2 or 3sticksPint,Quart,HalfgallonDIRECTIONButter will be at roomtemperature and readyfor use in recipe.Place container in oven.Ice cream will be softenough to makescooping easier.Unwrap and place inmicrowavable Container.Cream cheese will be atroom temperature andready for use in recipe.Remove top. Place in oven. Frozen juice will be softenough to easily mix withwater.CATEGORYButterIcecreamCreamcheeseFrozenjuiceCODE1234SELECT MENU 1 TO 4 --SEE COOKING GUIDE ice cream touch 1 to 3QUART once and ICECREAMscrolls across display.Time counting down.Time of day.USING YOUR MICROWAVE OVEN  12ChocolateCheese Marshmallows343 or 8 oz.6, 12 or16 oz.
26ENGLISHCaring for Your Microwave OvenTo make sure your microwave oven looks good and works well for a long time, you shouldmaintain it properly. For proper care, please follow these instructions carefully.For interior surfaces: Wash often with warm, sudsywater and a sponge orsoft cloth. Use only mild,nonabrasive soaps or amild detergent. Be sureto keep the areas cleanwhere the door andoven frame touchwhen closed. Wipe wellwith clean cloth. Over time, stains canoccur on the surfaces as the result of food particlesspattering during cooking. This is normal.For stubborn soil, boil a cup of water in the oven for 2to 3 minutes. Steam willsoften the soil. To get ridof odors inside the oven,boil a cup of water withsome lemon juice orvinegar in it.For exterior surfaces and control panel: Use a softcloth with spray glasscleaner. Apply the sprayglass cleaner to the softcloth; do not spraydirectly on the oven.NOTE: Abrasivecleansers, steel woolpads, gritty washcloths, some papertowels, etc., can damage the control panel and the interior and exterioroven surfaces.To clean grass tray and support, wash in mild,sudsy water; for heavilysoiled areas use a mildcleanser and scouringsponge. The glass trayand support aredishwasher safe.Glass trayHubSupport
Grease filter (Part No. 5230W2A004A):1. Unplug microwave oven or disconnect power.2. To remove grease filter, slide each filter to the side.Pull filter downward and push to the other side. The filter will drop out.3. Soak grease filter in hot water and a milddetergent. Scrub and swish to remove embeddeddirt and grease. Rinse well and shake to dry. Donot clean filter with ammonia, corrosive cleaningagents such as lye-based oven cleaners, or placethem in a dishwasher. The filter will turn black orcould be damaged.4. To replace grease filter, slide filter in the frame sloton back of the opening. Push filter upward andpush to front side to lock into place.5. Plug in microwave oven or reconnect power.27ENGLISHCARING FOR THE FILTERSCharcoal filter (Part No. 5230W1A003A):1. Unplug microwave oven or disconnect power.2. Remove the vent grille mounting screws.3. Push the right side lower part of the charcoal filter.Remove the filter.4. Lift the back of the charcoal filter. Slide the filterstraight out.CARING FOR YOUR MICROWAVE OVEN  The grease filter should be removed and cleaned often, at least once a month.NOTE: If your microwave hood combination is installed to recirculate air, the chacoal filter (Part No. 5230W1A003A) available from Sears by calling 1-800-4-MY-HOME®.The charcoal filter cannot be cleaned and should be replaced every 6 to 12 months.
28ENGLISHCARING FOR YOUR MICROWAVE OVEN        5. Slide a new charcoal filter into place. The filtershould rest at the angle shown.6. Slide the bottom of the vent grille into place. Pushthe top until it snaps into place. Replace themounting screws.7. Plug in microwave oven or reconnect power.NOTE: Do not operate the hood without the greasefilters in place.The cooktop light1. Unplug microwave oven or disconnect power.2. Remove the bulb cover mounting screw.3. Replace bulb with candelabra-base 20-watt bulb(Part No. 6912A40002A) available from Sears bycalling 1-800-4-MY-HOME®.4. Plug in microwave oven or reconnect power.The oven light1. Unplug microwave oven or disconnect power.2. Remove the vent grille mounting screws.3. Tip the grille forward, then lift out to remove.REPLACING THE COOKTOPAND OVEN LIGHTS
29ENGLISHCARING FOR YOUR MICROWAVE OVEN  4. Lift up the bulb holder.5. Replace the bulb with a candelabra-base 30-wattbulb (Part No. 3B70067A) available from Sears bycalling 1-800-4-MY-HOME®.6. Slide the top of the vent grille into place. Push thebottom until it snaps into place. Replace themounting screws.7. Plug in microwave oven or reconnect power.Bulb holder
30ENGLISHMICROWAVE COOKING TIPSMICROWAVE COOKING TIPSAmount of food• If you increase or decrease the amount of foodyou prepare, the time it takes to cook that food willalso change. For example, if you double a recipe,add a little more than half the original cooking time.Check for doneness and, if necessary, add moretime in small increments. Starting temperature of food• The lower the temperature of the food being putinto the microwave oven, the longer it takes to cook.Food at room temperature will be re-heated morequickly than food at refrigerator temperature.Composition of food• Food with a lot of fat and sugar will be heatedfaster than food containing a lot of water. Fat andsugar will also reach a higher temperature thanwater in the cooking process.• The more dense the food, the longer it takes toheat. “Very dense” food like meat takes longer toheat than lighter, more porous food like spongecakes. Size and shape• Smaller pieces of food will cook faster than largerpieces. Also, same-shaped pieces cook moreevenly than different-shaped pieces.• With foods that have different thicknesses, thethinner parts will cook faster than the thicker parts.Place the thinner parts of chicken wings and legs inthe center of the dish.Stirring, turning foods• Stirring and turning foods spreads heat quickly tothe center of the dish and avoids overcooking at theouter edges of the food.Covering foodCover food to:• Reduce splattering• Shorten cooking times• Keep food moistYou can use any covering that lets microwaves passthrough. See “Getting to Know Your MicrowaveOven” for materials that microwaves will passthrough. If you are using the Sensor function, be sureto vent.Releasing pressure in foods• Several foods (for example: baked potatoes,sausages, egg yolks, and some fruits) are tightlycovered by a skin or membrane. Steam can build upunder the membrane during cooking, causing thefood to burst. To relieve the pressure and to preventbursting, pierce these foods before cooking with afork, cocktail pick, or toothpick.Using standing time• Always allow food to stand after cooking.Standing time after defrosting and cooking allowsthe temperature to evenly spread throughout thefood, improving the cooking results.• The length of the standing time depends on howmuch food you are cooking and how dense it is.Sometimes it can be as short as the time it takesyou to remove the food from the oven and take it tothe serving table. However, with larger, denser food,the standing time may be as long as 10 minutes. Arranging food For best results, place food evenly on the plate. Youcan do this in several ways:• If you are cooking several items of the samefood, such as baked potatoes, place them in a ringpattern for uniform cooking.• When cooking foods of uneven shapes orthickness, such as chicken breasts, place thesmaller or thinner area of the food towards thecenter of the dish where it will be heated last.• Layer thin slices of meat on top of each other.• When you cook or reheat whole fish, score theskin – this prevents cracking.• Do not let food or a container touch the top or sidesof the oven. This will prevent possible arcing. Using aluminum foil Metal containers should not be used in a microwaveoven. There are, however, some exceptions. If youhave purchased food which is prepackaged in analuminum foil container, refer to the instructions onthe package. When using aluminum foil containers,cooking times may be longer because microwaveswill only penetrate the top of the food. If you usealuminum containers without package instructions,follow these guidelines:
31ENGLISHMICROWAVE COOKING TIPS (CONT.)Using aluminum foil (cont.)• Place the container in a glass bowl and add somewater so that it covers the bottom of the container,not more than 1⁄4 in. (.64 cm) high. This ensureseven heating of the container bottom.•Always remove the lid to avoid damage to theoven.• Use only undamaged containers.• Do not use containers taller than 3⁄4 in. (1.9 cm).• Container must be at least half filled.• To avoid arcing, there must be a minimum 1⁄4 in.(.64 cm) between the aluminum container and thewalls of the oven and also between two aluminumcontainers.• Always place the container on the turntable.• Shield with small pieces of aluminum foil, parts offood that may cook quickly, such as wing tips andleg ends of poultry.• Heating food in aluminum foil containers usuallytakes up to double the time compared to reheatingin plastic, glass, china, or paper containers.The time when food is ready will vary dependingupon the type of container you use.• Let food stand for 2 to 3 minutes after heating sothat heat is spread evenly throughout container.Cooking you should not do in yourmicrowave oven• Do not do canning of foods in the oven. Closedglass jars may explode, resulting in damage to theoven.• Do not use the microwave oven to sterilize objects(baby bottles, etc.). It is difficult to keep the oven atthe high temperature needed for sterilization.MICROWAVE COOKING TIPS
32ENGLISHQuestions and AnswersQUESTIONS ANSWERSCan I operate my microwave oven without the glasstray or move the glass tray over to hold a large dish?Can I use either metal or aluminum pans in mymicrowave oven?Is it normal for the glass tray to move in eitherdirection?Sometimes the door of my microwave oven appearswavy. Is this normal?Why does the dish become hot when I microwavefood in it? I thought that this should not happen.What does “standing time” mean?Why does steam come out of the air exhaust vent?Can I pop popcorn in my microwave oven?How do I get the best results?No. If you remove or move the glass tray, youwill get poor cooking results. Dishes used inyour oven must fit on the glass tray.You can use aluminum foil for shielding (usesmall, flat pieces), small skewers, and shallowfoil trays (if tray is not taller than 3⁄4 in. [1.9 cm]deep and is filled with food to absorb microwaveenergy). Never allow metal to touch walls ordoor.Yes. The glass tray moves from side to side,depending on the rotation of the motor when thecooking cycle begins.This appearance is normal and does not affectthe operation of your oven.As the food becomes hot it will conduct the heatto the dish. Be prepared to use hot pads toremove food after cooking.“Standing time” means that food should beremoved from the oven and covered foradditional time to allow it to finish cooking. Thisfrees the oven for other cooking.Steam is normally produced during cooking. Themicrowave oven has been designed to vent thissteam out the vents.Yes. Pop packaged microwave popcornfollowing manufacturer’s guidelines. Do not useregular paper bags. Do not repop unpopped kernels. Do not poppopcorn in glass cookware.
33ENGLISHTroubleshootingMICROWAVE OVEN DOES NOT WORKCOOKING TIMESNothing works.The microwave oven willnot run.PROBLEM CAUSE• The power supply cord is not plugged into a grounded 3 prong outlet. (See theElectrical Requirements” section on page 6 and the “Electrical connection”section on Page 8.)• A household fuse has blown or a circuit breaker has tripped.• The electric company has had a power failure.• You are using the oven as a timer. Touch STOP/CLEAR to cancel the KitchenTimer.• The door is not firmly closed and latched.• You did not touch START.• You did not follow directions exactly.• An operation that you set earlier is still running. Touch STOP/CLEAR to cancelthat operation.Food is not cookedenough.The display shows a timecounting down but the ovenis not cooking.PROBLEM CAUSE• The electric supply to your home or wall outlets is low or lower than normal. Yourelectric company can tell you if the line voltage is low. Your electrician or servicetechnician can tell you if the outlet voltage is low.• The cook power is not at the recommended setting. Check the chart on Page 15.• The oven door is not closed completely.• You have set the controls as a kitchen timer. Touch STOP/CLEAR to cancel theKitchen Timer.Most cooking problems often are caused by little things you can find and fix without tools of any kind. Check thelists below and on the next page before calling for assistance or service. If you still need help, call Sears Serviceat 1-800-4-MY-HOME®.
34ENGLISHTROUBLESHOOTINGGLASS TRAYTONESDISPLAY MESSAGESThe glass tray will notmove.PROBLEM CAUSE• The glass tray is not correctly in place. It should be correct-side up and sittingfirmly on the center hub.• The support is not operating correctly. Remove the glass tray and restart theoven. If the hub still does not move, call Sears Service at 1-800-4-MY-HOME®.Cooking without the glass tray can give you poor results.You do not hear the programming or end-of-cycle tone.PROBLEM CAUSE• You have not entered the correct command.The display is flashing “ : .”PROBLEM CAUSE• There has been a power interruption. Reset the clock. (See the “Clock” sectionon Page 12.)If none of these items are causing your problem, call Sears Service at 1-800-4-MY-HOME®.
35ENGLISHMEMO
36ESPAÑOLGarantía ..........................................................36Servicio Sears ................................................37Seguridad del horno de microondas ...........38Aprender a conocer su horno de microondas ...............................................41Cómo funciona su combinación microondascompana de kenmore ULTRA WAVETM ..........41Probar su horno de microondas......................41Probar su vajilla o batería de cocina...............42Precauciones de seguridad operativa ............42Conexión eléctrica  .........................................42Características del horno de microondas  ......43Funciones del panel de control.......................44Usar su horno de microondas......................46Señales audibles  ...........................................46Interrumpir la cocción .....................................46Reloj................................................................46Protección de seguridad para niños ...............46Cronómetro de cocina.....................................47Ventilador de extracción .................................47Luz superior de cocina....................................47Descongelamiento rápido   .............................47Agregar minuto ...............................................48Cocción cronometrada....................................48Cocción en etapas múltiples...........................48Niveles de potencia de microonda..................49Descongelamiento automático  ......................50Tabla de Descongelamiento Automático ........51Tabla de Descongelamiento Automático (cont.).....52Sugerencias para descongelar .......................53"Mantener caliente".........................................53Segura a fuego rento ......................................54Usar sensor de cocción ................................55Sensor de cocción ..........................................55Papas (Ejemplo) .............................................55Mas/Menos .....................................................55Cuadro de Cocción del sensor........................56Cocción Automática........................................57Recalentamiento Automático..........................57Cuadro de Cocción Automática ......................58 Cuadro de Recalentamiento Automático ........58Fundir............................................................. 59Tabla de indicaciones para fundir.................. 59Ablandar .........................................................59Tabla de indicaciones para ablandar..............59Cuidar su horno de microondas ..................60Cuidado de los filtros  .....................................61Reemplazar las luces de la parte superior y del horno ........................................63Sugerencias para la cocina en su microonda ...........................................65~66Preguntas y respuestas  ...............................67Solución de problemas .................................68Servicio.......................................tapa posteriorGARANTÍA TOTAL DE LA COMBINACIÓNEN LA CAMPANA DE SU MICROONDAPOR UN AÑO COMPLETODurante un año a partir de la fecha de compra, si estacombinación en la campana de su microondaKenmore tiene un fallo debido a defecto en el materialo en la mano de obra, Sears lo repara sin cargo.GARANTÍA TOTAL DE CINCO AÑOSSOBRE  EL MAGNETRÓNDurante cinco años a partir de la fecha de compra, si elmagnetrón de esta combinación en la campana de sumicroonda Kenmore tiene un fallo debido a defecto en elmaterial o en la mano de obra, Sears la repara sin cargo.La cobertura de la garantía mencionada arriba seaplica solamente a la combinación en la campana desu microonda que se usa sólo en casas particulares.EL SERVICIO DE GARANTÍA ESTA DISPONIBLECONTACTANDO SIMPLEMENTE AL SERVICIOSEARS A 1-800-4-MY-HOME®Esta garantía se aplica sólo mientras este productoestá en uso en los EE.UU.Esta garantía le da a usted derechos legalesespecíficos que varían de estado en estado. Sears, Roebuck y Co.,Dept. 817WA,Hoffman Estates, IL 60179Por llamado de servicio: 1-800-4-MY-HOME®SM (1-800-469-4663)Tenga a bien registrar la información de sumodelo.Siempre que llame para solicitar algún servicio parasu dispositivo, usted necesita conocer el númerocompleto de su modelo y el número de serie.   Puede encontrar esta información en el modelo y laetiqueta/placa el número de serie (ver "Características del Horno de microondas" enla sección "Conocer su Horno de microondas").También, anote la otra información que se muestramás abajo.Número de modeloNúmero de serie    Fecha de compra   Contenidos Garantía enCombinación
37ESPAÑOLServicio Sears Acuerdos Maestros de protecciónFelicitaciones por haber hecho una compra inteligenteSu nuevo dispositivo Kenmore®está diseñado y fabricado para años de funcionamiento confiable.Pero como todo producto, puede necesitar mantenimiento preventivo o reparaciones cada ciertotiempo. Es allí cuando el tener un Acuerdo Maestro de protección le puede ahorrar dinero o evitarque la falla empeore.Adquiera un Acuerdo Maestro de protección ahora y resguárdese de cualquier molestia o gastosinesperados. El Acuerdo Maestro de protección  también ayuda a extender la vida de su nuevo artefacto. Aquí veremos lo que está incluido en el Acuerdo:Servicio experto, llevado a cabo por cualquiera de nuestros 12.000 profesionales especialistas enreparaciones.Servicio ilimitado y sin cargo alguno, por las piezas o por el trabajo en toda las reparacionescubiertas por el Acuerdo.Garantía "no lemon"- reemplazo de su producto asegurado si ocurren más de tres fallas delmismo, dentro de los doce meses. Reemplazo del producto si su este asegurado no puede arreglarse. Control anual de mantenimiento preventivo a pedido suyo sin cargo extra. Asistencia rápida vía telefónica – asistencia no técnica y de instrucción sobre los productosreparados en su casa más una conveniente programación de reparaciones. Protección contra sobrecarga eléctrica, por daños eléctricos causados por fluctuaciones decorriente.  Reembolso de alquiler si la reparación del producto asegurado toma más tiempo de loprometido.  Una vez que ha comprado el Acuerdo, una simple llamada telefónica es todo lo que le tomará paraagendar un servicio. Puede llamar a cualquier hora del día o de la noche o hacer un compromiso deatención por teléfono.  Sears tiene más de 12,000 profesionales especialistas en reparaciones que tienen acceso a más de4.5 millones de piezas de calidad y accesorios. Esa es la clase de profesionalismo con la que puedeusted contar para ayudar a prolongar la vida de su nueva adquisición en los años por venir.¡Suscriba ya un Acuerdo Maestro de protección!  Se aplican algunas limitaciones y exclusiones. Por precios e información adicional llame al 1-800-827-6655.Servicio de instalación SearsPara la instalación Sears profesional garantizada de artefactos del hogar y dispositivos similares talescomo mandos para abrir la puerta del garaje y calentadores de agua, en los EE.UU. llamar a 1-800-4-MY-HOME®.
38ESPAÑOLSeguridad del horno de microondas Su seguridad y la seguridad de los otros son muy importante.Hemos dado muchos mensajes de seguridad en este manual y en su utensilio.Lea siempre y acate todos los mensajes de seguridad.Este es el símbolo de alerta de seguridad. Este símbolo indica que hay peligro de muerte o de heridas graves para usted u otros.Todos los mensajes de seguridad estarán precedidos por el símbolo de alerta de seguridady de la palabra "PELIGRO " o "ADVERTENCIA." Estas palabras significan:Hay peligro de muerte o de heridas graves si nose siguen inmediatamente las instrucciones.Hay peligro de muerte o de heridas graves si nose siguen las instrucciones.Todos los mensajes de seguridad identifican el riesgo, le indican cómo reducir los riesgos delesiones y le dicen lo que podría pasar si las instrucciones no se siguen.INSTRUCCIONES IMPORTANTES DE SEGURIDAD Cuando se usan dispositivos eléctricos, deben seguirse las PRECAUCIONES básicas deseguridad incluyendo las siguientesADVERTENCIA: Para reducir el riesgo dequemaduras, descarga eléctrica, incendio, lesionesa las personas o exposición a excesiva potencia demicroondas • Lea todas las instrucciones antes de usar elhorno de microondas.• Lea y siga las "PRECAUCIONES PARA EVITARPOSIBLE EXPOSICIÓN A UNA EXCESIVAPOTENCIA DE MICROONDAS" específicas quese encuentran en esta sección.• El horno de microondas debe ser conectado atierra. Conecte solo al tomacorrientescorrectamente conectado a tierra.Lea las "INSTRUCCIONES PARA CONECTAR ATIERRA" que se encuentran al final de estasección. • Instale o ubique el horno de microondassolamente siguiendo las instrucciones deinstalación provistas.• Algunos productos tales como huevos concáscara completa y envases herméticos porejemplo, recipientes cerrados de vidrio, puedenexplotar y no deben ser calentados en el horno demicroondas. • Use el horno de microondas sólo para el finespecífico tal como está descrito en este manual.No use productos químicos corrosivos  o vaporesen el horno de microondas. Este tipo de  hornoestá específicamente diseñado para calentar,cocinar o secar alimentos. No está diseñado parauso industrial o de laboratorio. • Como cualquier artefacto, es necesario un controlestricto cuando es usado por los niños. • No opere el horno de microondas si tiene dañadoel cable de alimentación o el enchufe, si no estáfuncionando correctamente o si ha sido dañado odejado caer.GUARDE ESTAS INSTRUCCIONES
39ESPAÑOLSEGURIDAD DEL HORNO DE MICROONDASIMPORTANTES INSTRUCCIONES de SEGURIDAD • El servicio al horno de microondas debe ser hechosolo por personal calificado. Llame a una compañíade servicio autorizada para  examinar, reparar ohacer ajustes.• Vea las instrucciones para la limpieza de la superficiede la puerta en la sección "Cuidado de su Horno demicroondas".• Para reducir el riesgo de incendio en el interior delhorno:– No cocine de más los alimentos. Tenga cuidado sise coloca para facilitar la cocción, papel, plástico uotros materiales combustibles dentro del horno demicroondas.– Quite las ataduras de alambre retorcido del papel obolsas de plástico antes de colocar bolsas en elhorno.  – Si los materiales dentro del horno se quemaran,mantenga la puerta del horno cerrada, apague elhorno y desconecte el cable de alimentación ocierre el paso de la corriente eléctrica en el fusible oen el panel del disyuntor. – No use el interior del horno para almacenamiento.No deje elementos de papel, utensilios de cocina oalimentos en el interior del horno cuando no esté en uso. • Adecuado para su uso sobre elementos de cocina degas o eléctricos. • Previsto para ser usado por sobre los rangos con unancho máximo de 36 pulgadas (91 cm).• Limpie con frecuencia las campanas de ventilación,no debe permitir que se acumule grasa en lacampana o en el filtro• Cuando haya alimentos que producen llamas bajo lacampana, encienda el extractor.• Tenga cuidado cuando limpie el filtro del extractor-campana. Los agentes corrosivos de limpieza, talescomo  limpiahornos basados en lejía, pueden dañarel filtro. • No deben ser colocados en el horno de microondasalimentos o utensilios de metal de gran tamaño yaque pueden ocasionar incendio o riesgo de descargaeléctrica.• No limpie sobre un almohadillas ásperas de metal .Las piezas pueden quemar la almohadilla y tocar laspartes eléctricas ocasionando riesgo de descargaeléctrica. • No almacene nada directamente sobre el horno demicroondas cuando esté en funcionamiento. • No cubra o bloquee ninguna abertura en el  horno demicroondas. • No deje este horno de microondas a la intemperie.No lo use cerca del agua, por ejemplo, cerca de lapileta de la cocina, sobre una base húmeda, o cercade una pileta de natación o algo por el estilo. • No sumerja el cable de alimentación o enchufe en elagua. • Mantenga el cable de alimentación lejos de lassuperficies calientes. • No deje el cable de alimentación colgando del bordede la mesa o mostrador.o No lo monte sobre unapileta.• No cubra las rejillas o cualquier otra parte del hornocon láminas de metal. Esto causarásobrecalentamiento del horno. • Los líquidos tales como agua, café o té,`puedensobrecalentarse más allá del punto de hervor si estaraparentemente hirviendo debido a su  tensiónsuperficial. No siempre se nota el burbujeo o elhervor al retirar el recipiente del horno. Esto puedecausar que los líquidos muy calientes hiervanrepentinamente cuando se introduce en el líquidouna cuchara o cualquier otro utensilio.   Para reducir el riesgo de producir lesiones a laspersonas; 1) No recaliente líquidos. 2) Revuelva el líquido antes y mientras se calienta. 3) No use recipientes de lados rectos con cuellosangostos. 4) Luego de calentar, permita al contenedorpermanecer en el horno de microondas por untiempo corto antes de quitarlo.  5) Tenga mucho cuidado cuando coloque una cucharau otro utensilio dentro del contenedor. GUARDE ESTAS INSTRUCCIONES
40ESPAÑOLSEGURIDAD DEL HORNO DE MICROONDASINSTRUCCIONES PARA CONECTAR A TIERRA• Para todos los artefactos conectados concable de  alimentación :El horno de microondas debe ser conectado atierra. En caso de corto circuito eléctrico, laconexión reduce el riesgo de descargaeléctrica, ya que provee un alambre deescape para la corriente eléctrica. El horno demicroondas está equipado con un cable dealimentación que tiene un enchufe con uncable de conexión a tierra. El enchufe debeestar conectado a un tomacorrientescorrectamente instalado y conectado a tierra.ADVERTENCIA: El uso incorrecto de laconexión a tierra puede ocasionar peligro deincendio o de descarga eléctrica. Consulte a un electricista calificado o personalde servicio si las instrucciones no soncompletamente comprendidas o si hay dudassobre si el horno está adecuadamenteconectado a tierra.No use una extensión de cable dealimentación. Si el cable de alimentación esdemasiado corto, haga instalar untomacorriente por un técnico calificado cercadel horno de microondas.• Para un artefacto permanentementeconectado:El horno de microondas debe estar conectadoa un sistema metálico de cables, permanente,de conexión a tierra o un conductor deconexión a tierra del equipo debe seraccionado con los conductores del circuito yconectados a la terminal a tierra del equipo otoma de alimentación del horno demicroondas.Requisitos eléctricosObserve todos los códigos y ordenanzas. Serequieren  en el equipo 120 Volt, 60 Hz, CAsolamente, se requieren fusibles de 20 amp  (Se recomienda  fusibles de retardo).Se recomienda que se use un circuito separadoque alimente sólo a este dispositivo. Peligro de descarga eléctrica.Enchufe en un tomacorriente conectado a tierra de 3 clavijas. No quite la clavijade conexión a tierra. No use adaptador.No use extensión de cable dealimentación.No seguir estas instrucciones puedellegar a causar muerte, incendio odescarga eléctrica.GUARDE ESTAS INSTRUCCIONESPRECAUCIONES PARA EVITAR POSIBLEEXPOSICIÓN A UNA EXCESIVA POTENCIA DEMICROONDAS(a) No intente hacer funcionar este horno con la puertaabierta ya que el funcionamiento con puerta abiertapuede causar exposición nociva a la potencia demicroondas. Es importante no descuidar uobstaculizar la seguridad de los enclavamientoseléctricos de interbloqueo . (b) No coloque ningún objeto entre la cara frontal delhorno y la puerta o permita que se acumulesuciedad o residuos de limpiador sobre lassuperficie de sellado. (c) No haga funcionar el horno si está dañado. Esparticularmente importante que la puerta del hornose cierre correctamente y que no haya daño en: (1) Puerta (torcida), (2) Bisagras y cerraduras (rotas o sueltas), (3) Cerraduras de las puertas o superficiesselladas.  (d) Nadie excepto el personal de serviciocalificado debe hacer ajustes o reparacionesen el horno .
41ESPAÑOLAprender a conocer su horno de microondasEsta sección habla de los conceptos de cocción a microondas. También le muestra los elementos básicos queusted debe conocer para operar el horno de microondas. Por favor lea esta información antes de usar su horno.CÓMO FUNCIONA SU COMBINACIÓN MICROONDASCOMPANA DE KENMORE ULTRA WAVE™Interferencia de radio  Usar su horno de microondas puede causarinterferencia en su radio, TV o equipo similar.Cuando hay interferencia, puede reducirla oquitarla de la siguiente forma: • Limpiar la puerta y sellar las superficie del horno. • Ajustar la antena receptora de la radio o televisor. • Llevar el receptor lejos del horno de microondas.• Enchufar el horno de microondas en untomacorriente diferente de modo que el  horno demicroondas y receptor estén en diferentes ramasde circuitos. La energía de microondas no produce calor. Estaenergía hace que los alimentos generen calor y éste asu vez hace que los alimentos se cocinen. Lasmicroondas son como las ondas de TV, radio o luz.Usted no las puede ver, pero puede ver lo que hacen.Un magnetrón de produce las microondas en unhorno de microondas. Las microondas se muevendentro del horno donde se ponen en contacto conlos alimentos cuando giran sobre la bandeja giratoria.La bandeja giratoria de vidrio de su horno demicroondas permite que las microondas pasen.Luego, estas rebotan en el piso de metal, atraviesanla bandeja giratoria de vidrio y son absorbidas porlos alimentos.Las microondas pasan a través de la mayoría delos tipos de vidrio, papel y plástico sin calentarlos,de manera que el alimento absorbe la energía. Lasmicroondas rebotan en los recipientes de metal, porlo tanto los alimentos no absorben la energía.Sistema de inversor de microondasULTRA WAVETMEl sistema de inversor de microondas ULTRAWAVE™ le ofrece mejor rendimiento de cocciónen microondas para descongelar, cocinar yrecalentar alimentos rápida y uniformemente. Latecnología probada del sistema de inversor demicroondas ULTRA WAVE™ entrega unacomente constante de energía de microondas -verdadera energía alta, media y baja, a la vez queusa menos potencia y ahorra tiempo.Los hornos convencionales a microondas operansólo en energía alta (HIGH). Para lograr un nivel deenergía de 70% en un horno convencional amicroondas, el horno opera el 70% del tiempo enenergía alta y el 30% del tiempo apagado (OFF).El sistema de inversor de microondas ULTRA WAVE™entrega energía al en forma continua, para descongelarmás uniformemente y minimizar el exceso de cocciónde los alimentos y las sucias salpicaduras.Cocción por sensorEl sistema de inversor de microondas ULTRA WAVE™cuenta con funciones de cocción por sensor. Un sensor de humedad en la cavidad del horno detectala humedad emitida por los alimentos al calentarse. El sensor ajusta el tiempo para diversos tipos ycantidades de alimentos. La cocción por sensor eliminala incertidumbre al cocinar con hornos de microondas.Cómo obtener los óptimos resultadosde cocción100% 100%0% 0%100% 100%0%70%• Siempre cocine los alimentos por el tiempo máscorto recomendado. Verifique cómo se estáncocinando los alimentos.• Para ayudar a asegurarse de que los alimentosestán cocinados de forma pareja, revuelva, roteo redistribuya los alimentos que se estáncocinando a la mitad del tiempo de cocción.• Si usted no tiene una tapa para un plato, usepapel encerado o toallas de papel aprobadas parauso con microondas o película de plástico.Recuerde doblar una esquina de la película deplástico para que el vapor salga durante la cocción.MagnetrónPiso de metal    Bandeja giratoria de vidrio   Cavidad del horno
42ESPAÑOLAPRENDER A CONOCER SU HORNO DE MICROONDASProbar su vajilla o batería de cocinaPrecauciones de seguridad operativa Conexión Eléctrica Pruebe su vajilla o batería de cocina antes de usar.Para probar un plato y tener un uso seguro, colóquelo enel horno con una taza de agua al lado del mismo. Si elplato se calienta demasiado y el agua queda fría, no louse. Si la vajilla se calienta, no lo use. Algunos platos(de melanina, alguna vajilla cerámica, etc.) absorbe laenergía de las microondas, calentándose demasiadopara tomarlos con la mano y demorando los tiempos decocción. Cocinar en recipientes de metal no diseñadospara uso de microondas pueden dañar el horno, ya quepodrían contener metal oculto (ataduras retorcidas,láminas metálicas, grapas, lustre o recortes metálicos).• Nunca se apoye en la puerta o permita a un niñoque se balancee en ella  cuando la puerta estáabierta.• Use protectores para objetos calientes. Lapotencia microonda no calienta los envases, peroel calor del alimento puede hacer que el recipientese caliente. • No use papel de diarios u otro papel impreso en elhorno.• No seque flores, frutas, hierbas, madera, papel,calabacines o ropas en el horno. • No encienda el horno de microondas cuando estávacío. La vida útil del producto puede seracortada. Si realiza la programación del horno,coloque un recipiente de agua en el horno. Esnormal que la puerta del horno se vea onduladadespués de que el horno ha estado funcionandopor un lapso.• No trate de derretir cera de parafina en el horno.La cera de parafina no se derretirá porque permitea las microondas pasar a través de la misma. • No opere el horno de microondas a menos que labandeja de vidrio giratoria esté segura en su lugary pueda mueve libremente. La bandeja giratoriapuede mueve hacia cualquier dirección.Asegúrese de que la bandeja giratoria estácorrectamente colocada en el horno. Tome subandeja giratoria con cuidado cuando la saque delhorno, para evitar la posibilidad de quebrarla. Sisu bandeja giratoria se rompe o se quiebra,contacte a su proveedor para un reemplazo.• Cuando use un plato dorador, el fondo del platodorador debe ser al menos de por lo menos  3 /16pulgadas por arriba de la bandeja giratoria. Sigalas directivas provistas con el plato dorador. • Nunca cocine o recaliente un huevo entero concáscara. La formación de vapor en los huevosenteros puede causar que revienten yposiblemente dañen el horno. Fraccione loshuevos duros hervidos antes de calentarlos. Enraras ocasiones, los huevos poché se hanreventado. Cubra los huevos poché y  deje untiempo de un minuto antes de cortarlos. • Para obtener mejores resultados, revuelvamientras se calienta o recalienta. Los líquidoscalentados en ciertos recipientes (especialmenterecipientes de forma cilíndrica) puedensobrecalentarse. El líquido puede saltar hacia conun fuerte sonido durante o después de calentarseo cuando se agreguen los  ingredientes (gránulosde café, saquitos de té, etc.). Esto puede dañar elhorno. • Las microondas pueden no llegar al centro de unasado. El calor se difunde desde el centro haciaafuera, áreas cocidas, tal como un horno común.Esta es una de las razones  para dejar algunosalimentos (por ejemplo, asados o papas al horno)permanecer por un momento después de lacocción o en otros alimentos, revolverlos duranteel tiempo de cocción. • En el horno, no sumerja al freir. Los utensiliospara microondas no son adecuados para esto yes difícil mantener temperaturas correctas parafrituras sumergidas. • No cocine demasiado las papas. Al final del tiempode cocción recomendado, las papas deberán estarligeramente firmes porque continuarán la coccióndurante el tiempo de permanencia. Luego decocinar en el horno de microondas, deje a laspapas permanecer durante 5 minutos. Seterminarán de cocinar mientras reposan.Si su línea de conexión eléctrica o voltaje desalida es de menos de 110 voltios, los tiempos de cocción pueden ser más largos.  Haga que unelectricista calificado controle su sistema eléctrico.Probar su horno de microondasPara probar el horno ponga aproximadamente 1taza  de agua fría en un recipiente de vidrio en elhorno. Cierre la puerta. Asegúrese que se cierra. Cocineal 100% de potencia por 1 minuto. A su debidotiempo, el agua debe calentarse.
43ESPAÑOLAPRENDER A CONOCER SU HORNO DE MICROONDASCaracterísticas del horno de microondas Su horno de microondas está diseñado para hacersu experiencia de cocina lo más agradable yproductiva posible. Para resumir y explicarrápidamente, la siguiente es una lista de lascaracterísticas básicas del horno: 1. Ventana con pantalla de metal evita que lasmicroondas se escapen.  Está diseñada comouna pantalla para permitirle visualizar la comidamientras se cocina.2. Placa de modelo y número de serie y etiquetade guía de cocción 3. Filtro de carbón (detrás de la rejilla deventilación) 4. Rejilla de ventilación. 5. Bandeja giratoria. La bandeja giratoria hacegirar los alimentos mientras cocina para obteneruna cocción más pareja. Debe estar en el hornodurante el funcionamiento para obtener mejoresresultados de cocción. 6. Luz auxiliar (para la mesada) 7. Filtro de grasa. Ver la sección "Cuidado del losfiltros". 8. Panel de control. Toque los pads en este panelpara realizar todas las funciones.9. Parrilla de cocción. Utilícela para obtenerespacio extra cuando cocine en más de unrecipiente a la vez.La bandeja de vidrio se mueve en ambas direccionespara ayudar a cocinar más parejamente. No opere el horno de microondas sin la bandeja devidrio en su lugar.Para instalar:1. Coloque el soporte en la cavidad del piso del horno.2. Coloque la bandeja de vidrio en el soporte.Acomode el pie acanalado del piso de la bandeja devidrio entre los rodillos del cubo central. Los rodillosdel soporte deben calzar dentro del reborde de labandeja de vidrio.1. Bandeja de vidrio2. Soporte3. Cubo central
44ESPAÑOLAPRENDER A CONOCER SU HORNO DE MICROONDASFunciones del panel de control  48911141613516101215172023262418327192225282721El panel de control de su horno de microondas le permite seleccionar rápida y fácilmente la funciónde cocción deseada. Todo lo que tiene que hacer es tocar el pad de comando. La siguiente es unalista  de todos los pads de comando y números ubicados en el panel de control. Para másinformación sobre estas características, vea la sección  "Usar su horno de microondas".1. Pantalla. La pantalla incluye un reloj eindicadores que le muestran la hora del día, losprogramas de las horas cocinar los alimentos,las potencias de cocción, las cantidades, pesosy las funciones de cocción seleccionadas. 2. Palomitas de maíz. Toque este pad parapreparar las palomitas de maíz con lacaracterística del sensor. El sensor del horno ledirá al horno cuanto tiempo deberá cocinarsegún la cantidad de humedad que detecta(deserta) en las palomitas.
45ESPAÑOLAPRENDER A CONOCER SU HORNO DE MICROONDAS3. Pizza. Toque este pad para recalentar una ovarias porciones de  pizza sin introducir unapotencia o tiempo de cocción.4. Verduras. Toque este pad para cocinar sinintroducir una potencia o tiempo de cocción.5. Papas (patatas) al horno. Toque este pad paracocinar papas sin introducir una potencia otiempo de cocción.6. Entrada congelada. Toque este pad paracocinar de 10 a 21 onzas de entrada congeladasin introducir una potencia o tiempo de cocción.7. Plato principal. Toque este pad para prepararsin introducir un tiempo o potencia de cocción. 8. Segura a fuego rento. Toque este pad parahervir lentamente sopas, cazuelas, estofados yotros alimentos líquidos.9. Pads numéricos. Toque los pads numéricospara introducir tiempos de cocción, potencias decocción, cantidades, pesos, o categorías decomidas. 10. Tiempo de cocción. Toque este pad seguidopor un pad numérico para determinar untiempo cocción. 11. Potencia. Toque este pad después determinarel tiempo de cocción, seguido por un padnumérico para instalar la cantidad de potenciade microondas liberadas para cocinar losalimentos. Cuando más alto el número másalto la potencia de microondas o "velocidad decocción."12. Agregar minuto. Toque este pad para cocinarpor 1 minuto, al 100% de Potencia de coccióno para agregar un minuto extra a la Potenciade cocción.13. Menos. Toque este pad para restar 10segundos de cocción por cada vez que lopresiona.14. Más. Toque este pad para agregar 10segundos de tiempo extra de cocción  cadavez que lo presiona. 15. INICIAR. Toque este pad para iniciar unafunción. Si abre la puerta después que el hornocomienza a cocinar, vuelva a tocar INICIAR(START).16. DETENER/Limpiar (STOP/Clear). Toque estepad para borrar un comando incorrecto,cancelar un programa durante la cocción, o limpiar la pantalla. 17. Cocción automática. Toque este pad paracocinar alimentos aptos para horno demicroondas sin introducir una potencia otiempo de cocción.18. Recalentamiento automático. Toque estepad para recalentar alimentos aptos parahorno de microondas sin introducir unapotencia o tiempo de cocción.19. "Mantener caliente". Toque este pad para"Mantener caliente" las comidas cocinadas ensu horno hasta 99 minutos, 99 segundos.  Lafunción "Mantener caliente" puede ser usadapor si misma o puede seguir automáticamenteel ciclo de cocción. 20. Reloj. Toque este pad para introducir la horadel día correcta. 21. Descongelamiento automático. Toque estepad seguido por pads numéricos paradescongelar carne  según el peso. 22. Descongelamiento rápido. Toque este padpara descongelamiento rápido. "GROUND BEEF 1.0 LBS TOUCH START"aparecerá en la pantalla. 23. Cronómetro de cocina. Toque este pad parainiciar el Cronómetro de cocina. 24. Fundir. Toque este pad para fundirchocolate, queso, mantequilla o malvavisco.25. Ablandar. Toque este pad para ablandarhelados, cremas, queso, mantequilla o jugoshelados.26. Ventilador On/Off. Toque este botón paraapagar o encender el ventilador. 27. Ventilador 5 Velocidades. Toque este botónpara elegir una de las 5 velocidades delventilador.28. Luz Alta/Nocturna/Apagarla. Toque estebotón para encender la luz, ponerla en alta, ennocturna o para apagarla. NOTA: Si trata de introducir instruccionesincorrectas, no escuchará ningún tono. ToqueDETENER/Limpiar (STOP/Clear) y reintroduzcalas instrucciones.
46ESPAÑOLUSAR SU HORNO DE MICROONDASUsar su horno demicroondasEsta sección contiene instrucciones para llevar acabo cada función. Tenga a bien leercuidadosamente estas instrucciones. Las señales auditivas están disponibles paraguiarlo cuando programa y usa su horno ;• Un tono de programación sonará cada vezque usted toque un pad.• Siete tonos señalan el final de un conteo delcronómetro de cocina.  • Cuatro tonos señalan la finalización de un ciclode cocción.SEÑALES AUDITIVASRELOJ Puede usar esta función de seguridad para bloquearel panel de control cuando se halla limpiando elhorno o que los niños no puedan utilizar el horno sinla supervisión.Para determinar CHILD LOCK: (Bloqueo deprotección)Toque:    La pantalla mostrará:   PROTECCIÓN DE SEGURIDADPARA NIÑOSToque y mantenga hastaque aparezca LOCKED en la pantalla(aproximadamente 4 segundos).Toque y mantenga hastaque desaparezca LOCKED en la pantalla(aproximadamente 4 segundos).Para cancelar CHILD LOCK: (Bloqueo deprotección)Toque:    La pantalla mostrará:   Hora del día.1.1.2.Abriendo la puerta, puede detener el hornodurante un ciclo.  El horno deja de calentar y elventilador se detiene, pero la luz permaneceencendida.Para retomar la cocción, cierre la puerta ytoque STARTSi no desea continuar la cocción, abra lapuerta y toque STOP/Clear.INTERRUMPIR LA COCCIÓNEjemplo para 10:30(AM):Toque:    La pantalla mostrará:   Luego de enchufar su horno de microondas porprimera vez o luego de una interrupción por fallaeléctrica, la pantalla mostrará el mensaje "PLEASESET TIME OF DAY". Si la hora del día no estádeterminada, la pantalla mostrará  ":"  hasta queusted toque "Reloj ".1.2.3.5.NOTA: Puede ir de A.M. y P.M. tocando 1 o 2 luegodel paso 4.6.4.10 ::30 TOUCH START10 ::30AM TOUCH 1PM TOUCH 2AM10 ::30 TOUCHSTART::AM10 ::30
47ESPAÑOLUSAR SU HORNO DE MICROONDAS Los dos pads en el centro inferior del panel de control,controlan las 5 velocidades del ventilador de extracciónEjemplo para nivel 4:Toque:    La pantalla mostrará:   VENTILADOR DE EXTRACCIÓN Muestra el ultimo nivel que eligió  para la velocidad del ventilador.         Una vez para luz alta Dos veces para luz nocturnaToque hasta nivel 4Apague el ventilador cuando desee1.3.2.NOTA: Si la temperatura del rango o de la parte superiorde la cocina que está por debajo del horno se elevademasiado, el ventilador de extracción en la campana deventilación se encenderá automáticamente en laVELOCIDAD 5 (LEVEL 5) predeterminada para protegerel horno. Puede permanecer así hasta una hora paraenfriar el horno. Cuando esto ocurre, el botón "VENT"(Ventilador) no apagará el ventilador.Su horno de microondas puede usarse comocronómetro de cocina. Puede  determinar hasta  99minutos, 99 segundos.Ejemplo para 3 minutos:Toque:    La pantalla mostrará:   CRONÓMETRO DE COCINATIMER y cuentaregresiva.1.2.3.HIGHEl pad en la parte inferior derecha del panel decontrol controla la luz superior de cocina. Ejemplo para HIGH:Toque:    La pantalla mostrará:   LUZ SUPERIOR DE COCINA1.Para apagarlo, toque el botónuna vez o dos vecesdependiendo del ajuste de la luz.OFF2.DESCONGELAMIENTO RÁPIDO1.2.Una secuencia de descongelamiento rápido se halla predeterminadaen el horno. La función de descongelamiento rápido (express defrost),provee un método de descongelamiento rápido para una pedazo de"CARNE MOLIDA (GROUND BEEF) " solamente de 1.0 libra.Ejemplo para 1 libra de carne molida: Toque:    La pantalla mostrará:   Cuenta regresiva de tiempo y EXPRESS DEFROST sedesplaza por la pantalla.                  ::ENTER TIME IN MINAND SEC3 ::00TOUCH START3 ::00level 1level 4off
48ESPAÑOLUSAR SU HORNO DE MICROONDAS COCCIÓN CRONOMETRADAEsta función le permite programar un tiempo de cocción ypotencia específicos. Para obtener mejores resultados,hay 10 niveles de graduación de potencia además deALTA (100%). Refiérase a la "Tabla de niveles de potenciade microonda" en la pág. 49 para más información.NOTE: Si no selecciona un nivel de potencia, elhorno automáticamente funcionará a potenciaALTA(100%).Ejemplo para 5 minutos, 30 segundos al 80% deenergía:Toque:    La pantalla mostrará:   Cuenta regresiva detiempo y POWER 80.Para mejores resultados, algunas recetas necesitan un Ciclode potencia para un período de tiempo determinado y otroCiclo de potencia para otro período de tiempo. Su hornopuede programarse para cambiar automáticamente de uno aotro en un total de hasta dos ciclos.Ejemplo para un ciclo de cocción en 2 etapas:Toque:    La pantalla mostrará:   COCCIÓN EN ETAPAS MÚLTIPLES1.2.5.3.4.6.Para programar  una                    cocción de 7 minutos para la segunda etapa.Para programar  una                                            cocción de 3 minutos para la 1 etapa. 7.9.::ENTER COOKING TIME::ENTER COOKING TIME3 ::00TOUCH STARTOR POWER7 ::00TOUCH STARTOR POWER3 ::00 ENTER POWERLEVEL 1 TO107 ::00ENTER POWERLEVEL 1 TO103 ::00 POWER 80TOUCH START8.Para programar  un 50%                             de la potencia de cocción para la segunda etapa.Para programar  un 80%                               de la potencia de cocción.7 ::00 POWER 50TOUCH STARTCuando la primera etapa termina, oirá dos tonoscortos cuando el horno comienza la segundaetapa de cocción.                                                      10.Cuenta regresiva detiempo y POWER 80.AGREGAR MINUTO1.2.Es un pad de ahorro de tiempo, este controlsimplificado le permite programar rápidamente einiciar la cocción por microonda al 100% de potenciasin necesidad de tocar START.Ejemplo para 2 minutosToque:    La pantalla mostrará:   NOTA: Cada vez que toque ADD MINUTE,agregará 1 minuto hasta 99 minutos 59 segundos.NOTA: Después del uso de la función de cocción,debe accionar el ventilador por 1 minuto para enfriaren caso de que se sienta demasiado calor.DosvecesCuenta  regresiva detiempo y POWER 100.Hora del día.1.2.5.3.4.::ENTER COOKING TIME5 ::30TOUCH STARTOR POWER5 ::30ENTER POWER LEVEL1 TO 105 ::30POWER80TOUCH START
49ESPAÑOLUSAR SU HORNO DE MICROONDASPara obtener mejores resultados, algunas recetas requierendiferentes potencias de cocción. Cuanto más baja es la potenciade cocción, más baja es la cocción. Cada número de 1 a 9representa un diferente porcentaje de potencia completa decocción.La siguiente tabla muestra el porcentaje de potencia de cocciónque cada número representa y el nombre de potencia decocción generalmente usado.También dice cuando usar cada potencia de cocción.Siga las instrucciones de la receta del paquete decomida si están disponibles. NIVELES DE POTENCIA  MICROONDAPOTENCIA DE COCCIÓN NOMBRE                       CUANDO USARLA100% de potencia completa9 =90% de potencia total 8 =80% de potencia total 7 =70% de potencia total 6 =60% de potencia total 5 =50% de potencia total 4 =40% de potencia total 3 =30% de potencia total 2 =20% de potencia total 1 =10% de potencia totalAltaMedio altaMedianaMedio baja,descongelarBaja• Calentado rápido de muchas alimentos preparadosy alimentos con un alto contenido de agua, talescomo sopas y bebidas.• Cocción de cortes tiernos de carne, carne molida. • Calentar sopas-crema.• Calentar arroz, pasta o cacerolas • Cocinar y calentar comidas que necesitan unapotencia de cocción más baja que alta (por ejemplo,pescado entero y una pieza de carne) o cuando lacomida se cocina demasiado rápidamente. • Recalentar una sola porción. • La cocción que requiere cuidado especial,  comoquesos y huevos y platos de huevos, budines yflanes.• Terminar la cocción de cacerolas • Cocinar jamón, aves enteras, y asados a la olla.• Cocer estofados a fuego lento.  • Derretir chocolate • Calentar pastelería • Descongelar manualmente alimentos, tales comopan, pescado, carnes, aves, y alimentos precocidos.• Ablandar manteca, queso, y helados.  • Mantener los alimentos calientes.• Sacar el frío de las frutas.
50ESPAÑOLUSAR SU HORNO DE MICROONDASEjemplo para 1.2 libra de carne molida:Toque:    La pantalla mostrará:   yCuenta regresiva de tiempoy DEFROST.para introducir el peso         DESCONGELAMIENTO  AUTOMÁTICO Tres secuencias de descongelamiento están predeterminadasen el horno. La función de descongelamiento automático leproporciona el mejor método de descongelamiento paraalimentos congelados. La guía de cocina le mostrará cuálsecuencia de descongelamiento se recomienda para elalimento que desea descongelar.Para mayor conveniencia, el descongelamiento automáticoincluye un mecanismo sonoro incorporado (bip)que le recuerdaque debe controlar. Dar vuelta, separar, o volver a arreglarpara obtener el mejor resultado del descongelamiento. Haytres diferentes niveles de descongelamiento.1 CARNE 2 AVES 3 PESCADO 4 PAN NOTA:Cuando toque el pad  START, la pantalla cambia para lacuenta regresiva de descongelamiento. Sonará un bip en elhorno durante el ciclo de DESCONGELAMIENTO. En estemomento, abra la puerta y dé vuelta o vuelva a arreglar elalimento. Quite cualquier porción que ya esté descongelada. Vuelva a colocar en el horno las porciones congeladas ytoque START para retornar al ciclo de descongelamiento.SUGERENCIAS PARA OPERAR• Para obtener mejores resultados, saque el pescado, marisco,carne o ave su paquete (envoltura) original.  De otro modo laenvoltura guardará el vapor y el jugo cerca de los alimentos,esto puede causar que la superficie externa de los alimentos secocine. • Para obtener mejores resultados, dé a la carne molida la formade una rosca (dona) antes de congelarla. Cuando ladescongele, al sonar el bip raspe la carne ya descongelada ycontinúe el descongelamiento. • Coloque los alimentos en un recipiente plano o sobre una rejillade asado para microondas para recoger el goteo.Tabla de conversión de pesoUsted probablemente no está acostumbrado a medir lospesos de los alimentos en libras y en onzas que sonfracciones de libra (por ejemplo, 4 onzas igual a 1/4 libra ).No obstante, para poder introducir el peso del alimento en"Descongelamiento automático", debe especificarlo enlibras y décimas de libra.Si el peso en el paquete del alimento está expresado enfracciones de libra, puede usar la siguiente tabla paraconvertir el peso a fracciones decimales.ONZAS1.63.24.04.86.48.09.611.212.012.814.416.0PESO DECIMAL.10.20.25  un cuarto de libra  .30.40.50 media libra  .60.70.75 tres cuartos de libra  .80.901.00 una libra Esta tabla le muestra la selección del tipo de alimento y el pesoque puede establecer para cada tipo. Para obtener mejoresresultados, afloje o quite la cubierta del alimento.Peso equivalenteALIMENTOCarneAvesPescadoPanTOQUEDescong.Automát.1234PESOS QUE PUEDEDETERMINAR (en décimas de libra ) .1 a 6.0 (45g a 2722g).1 a 6.0 (45g a 2722g).1 a 6.0 (45g a 2722g).1 a 1.0 (45g a 450g)1.2.3.4.
51ESPAÑOLUSAR SU HORNO DE MICROONDASTABLA DE DESCONGELAMIENTO AUTOMÁTICO Programar carnes ALIMENTOS SEÑAL ACÚSTICAPRO-GRAMARINSTRUCCIONES  ESPECIALESCARNE DEVACACarne molida,en bultoCarne molida, enhamburguesasBistec redondo Filete de lomoEstofado decarne Asado a la olla Carne molida asadaAsado decostilla Nalga arrolladaasada CORDEROCubos paraestofadoChuletas (de 1 pulgada de ancho)CERDOChuletas (de 1/2 pulgadade ancho)Perro calienteCostillas sueltasCostillas estilocountryTira deSalchichas, Salchicha, enbultoLomo asadodeshuesado CARNECARNECARNECARNECARNECARNECARNECARNECARNECARNECARNECARNECARNECARNECARNECARNEQuite con un tenedor las porcionesdescongeladas. Dé vuelta. Vuelva elresto al horno.Separe y vuelva a disponer.Dé vuelta. Cubra las áreas calientescon hojas de papel de aluminio.Dé vuelta. Cubra las áreas calientescon hojas de papel de aluminio.Quite las porciones descongeladascon tenedor.Separe el resto. Vuelva el resto al horno.Dé vuelta. Cubra las áreas calientescon hoja de papel de aluminio.Dé vuelta. Cubra las áreas calientescon hoja de papel de aluminio.Dé vuelta. Cubra las áreas calientescon hoja de papel de aluminio.Quite las porciones descongeladas conun tenedor. Vuelva el resto al horno.Separe y vuelva a disponer.Separe y vuelva a disponer.Separe y vuelva a disponer.Dé vuelta. Cubra las áreascalientes con hoja de papel dealuminio.Separe y vuelva a disponer.Quite las porciones descongeladas con untenedor. Dé vuelta. Vuelva el resto al horno.Dé vuelta. Cubra las áreas calientes con hojade papel de aluminio.La carne de forma irregular y los cortes de carne grandes ygrasosos deben tener las partes delgadas o grasosascubiertas y protegidas con una con una hoja de papel dealuminio al comienzo de una secuencia de descongelación.No descongelar menos de 1/4 onza. Congele enforma de rosca (dona).No descongele menos de dos onzas de hamburguesas.Comprima el centro cuando ponga a congelar.Coloque sobre una parrilla para asar apta paramicroondas.Coloque sobre una parrilla para asar apta paramicroondas.Coloque en un plato de horno apto paramicroondas.Coloque sobre una parrilla para asar apta paramicroondas.Coloque sobre una parrilla para asar apta paramicroondas.Coloque sobre una parrilla para asar apta paramicroondas.Coloque en un plato de horno apto paramicroondas.Coloque sobre una parrilla para asar apta paramicroondas.Coloque sobre una parrilla para asar apta paramicroondas.Coloque sobre una parrilla para asar apta para microondas.Coloque sobre una parrilla para asar apta paramicroondas.Coloque sobre una parrilla para asar apta paramicroondas.Coloque en un plato de horno apto paramicroondas.Coloque sobre una parrilla para asar apta paramicroondas.
Programar pan52ESPAÑOLUSAR SU HORNO DE MICROONDASTABLA DE DESCONGELAMIENTO AUTOMÁTICO (CONT.)Programar aves Programar pescadosPOLLOEntero (hasta6 libras)  DespresadoGALLINASEnterasPAVOPechuga(hasta 6libras) AVESAVESAVESDé vuelta (concluya el descongelamientocon la pechuga hacia abajo). Cubra lasáreas calientes con hojas de papel dealuminio.Separe las partes y reacomode.Dé vuelta. Cubra las áreas calientescon hoja de papel de aluminio.Dé vuelta. Cubra las áreas calientescon hoja de papel de aluminio.Dé vuelta. Cubra las áreas calientescon hoja de papel de aluminio.Coloque el pollo con la pechuga hacia arriba sobre una rejillapara asado apta para microondas. Concluya eldescongelamiento sumergiendo en agua fría. Quite losmenudos cuando el pollo esté parcialmente descongelado.Coloque en una parrilla para asar apta para microondas.Concluya el descongelamiento sumergiendoen agua fría.Coloque en una parrilla para asar apta para microondas.Concluya el descongelamiento sumergiendo en agua fría.Coloque en una parrilla para asar apta paramicroondas. Concluya el descongelamientosumergiendo en agua fría.PESCADOFiletesBistecEnterosSHELLFISHCrabmeatLobster tailsShrimpScallopsPESCADOPESCADOPESCADOPESCADOPESCADOPESCADOPESCADODé vuelta. Si fuera posible, separelos filetes cuando se hallenparcialmente descongelados.Separe y vuelva a disponer.Dé vuelta.Sepárelos. Dé vuelta.  Dé vuelta y vuelva a disponerlas.Sepárelos y vuelva a disponerlosSepárelos y vuelva a disponerlosColoque en un plato de horno apto paramicroondas. Cuidadosamente separe losfiletes bajo agua fría.Coloque en un plato de horno apto paramicroondas. Deje correr agua fría hasta queconcluya el descongelamiento.Coloque en un plato de horno apto paramicroondas.Cubra la cabeza y la cola con papel aluminio;no deje que el papel aluminio toque los ladosdel horno de microondas. Deje correr agua fríahasta que concluya el descongelamiento.Coloque en un plato de horno apto para microondas.  Coloque en un plato de horno apto para microondas.  Coloque en un plato de horno apto para microondas.  Coloque en un plato de horno apto para microondas.  ALIMENTOS SEÑAL ACÚSTICAPRO-GRAMARINSTRUCCIONES  ESPECIALESALIMENTOS SEÑAL ACÚSTICAPRO-GRAMARINSTRUCCIONES  ESPECIALESRosca Dinner RollMuffinHamburguesaHot Dog BunRebanadas de panHogaza de panPAN Dar vuelta y volver a cocinar. Coloque sobre 3 hojas de toalla de papel.ALIMENTOS SEÑAL ACÚSTICAPRO-GRAMARINSTRUCCIONES  ESPECIALES
53ESPAÑOLUSAR SU HORNO DE MICROONDAS• Cuando use el Descongelamiento automático, elpeso a ser introducido es el peso neto en libras ydécimas de libras (el peso del alimento menos elenvase).• Antes de comenzar, asegúrese de quitar cualquierade las hilos o ataduras de metal que a menudovienen con las bolsas de alimentos y reemplácelascon hilos o bandas elásticas.• Abra los envases tales como cartones antes decolocarlos en el horno.• Siempre rompa o perfore las bolsas plásticas oenvolturas.• Si los alimentos están envueltos, quite la hoja dealuminio y colóquelos en un envase adecuado.• Rompa las cáscaras si hubiera, de alimentoscongelados tales como salchichas.• Doble los envases plásticos de alimentos paraasegurar un descongelamiento parejo.• Siempre calcule en menos el tiempo dedescongelamiento. Si el alimento descongeladoestá aún helado en el centro, vuelva a colocarlo enel horno de microondas para másdescongelamiento.• El tiempo que toma el descongelamiento varía deacuerdo a la solidez de congelamiento del alimento.• La forma del envase afecta a la velocidad con queel alimento se descongela. descongelar. Los envases planos  se descongelan másrápidamente que un bloque profundo.• Cuando el alimento comienza a descongelarse,separare los pedazos. Los pedazos separados sedescongelan más fácilmente. • Use pedazos pequeños de hojas de papel de aluminiopara cubrir las partes de alimentos como alas de pollo,extremos de patas, colas de pescado, o áreas quecomienzan a calentarse. Asegúrese que la hoja dealuminio no toque los lados, techo, o fondo del horno.La hoja de aluminio puede dañar el revestimientointerior del horno. • Para obtener mejores resultados, permitapermanecer al alimento después de descongelarse.(Para más información sobre tiempo depermanencia, vea la sección "Sugerencias decocción en microondas ")• Dé vuelta el alimento durante el descongelamientoo tiempo de permanencia. Separe y quite elalimento cuando sea necesario.Para que "Mantener caliente" sigaautomáticamente a otro ciclo: • Mientras está tocando las instrucciones de cocina,toque  Mantener caliente  antes de tocar START .Cierre la puerta y toque Mantener Caliente, luegotoque  START si se desea un tiempo adicional deMantener Caliente. • Cuando termina el último ciclo de cocción, oirádos tonos. "Mantener caliente" seguirá mientras elhorno continúa funcionando. • Puede programar  que "Mantener caliente" siga aldescongelamiento automático, cocción o cocción enciclos múltiples.NOTAS:• "Mantener caliente" opera hasta un total de 99minutos, 99 segundos. • Abrir el horno cancela "Mantener caliente". Cierre la puerta y toque "Mantener caliente", luegotoque  START si se desea un tiempo adicional de"Mantener caliente" • Los alimentos ya cocinados deben ser cubiertosdurante "Mantener caliente". • Los platos de pastelería (pasteles, empanadas, etc.)deben estar sin cubierta durante la función"Mantener caliente".• Las comidas completas que se desee mantenercalientes sobre un plato, deben cubrirse durante lafunción "Mantener caliente". • No use más de un ciclo completo de "Mantenercaliente" (aproximadamente 1 hora, 40 minutos).  La calidad de algunos alimentos se desmejorarácon un tiempo muy extendido.MANTENER CALIENTE SUGERENCIAS PARA DESCONGELAMIENTOPuede mantener calientes y seguros los alimentoscocinados, calentados en su  horno de microondashasta 99 minutos, 99 segundos (aproximadamente 1hora, 40 minutos). Puede usar "Mantener caliente"por sí mismo, o seguir automáticamente un ciclo decocción.Ejemplo de “mantener caliente”:Toque:    La pantalla mostrará:   HOLD WARMTOUCH STARTHOLD WARMse desliza a través de lapantalla.Al final de la función "Mantener caliente",aparecerá en la pantalla el mensaje "END " yse oirán cuatro tonos. 1.2.
54ESPAÑOLSu horno de microondas le permite hervir lentamentesopas, casuelas, estofados y otros alimentoslíquidos. Todo lo que debe hacer es determinar untiempo para hervir lentamente y su horno llevará a sucomida a romper el hervor y luego a continuarhirviendo durante el tiempo que usted especifique.NOTAS:• No puede cambiar la energía o grado de cocciónpara Segura a fuego rento.• Esta función usa el sensor. El sensor necesita 2minutos 30 segundos para calentarse despuésque el horno se encienda o luego de un corte deenergía. Si inicia Segura a fuego rento duranteel calentamiento, la energía microondas no seencenderá hasta que el sensor esté caliente.• Cuando cocine verduras, aumente la cantidadde agua de 1/4 a 1/2 taza (60 a 125ml).• Cubra el plato con una tapa dura, i.e., la tapaque está disponible con el plato o plato de mesa.No use envolturas plasticas.SEGURA A FUEGO RENTO1.2.Toque:    La pantalla mostrará:   Coloque la comida en el horno ycierre la puerta.3.Toque los padsnuméricos para entrarSTART en el tiempo dehervor lento.Ejemplo para 30 minutos.::ENTER COOKING TIME30::00TOUCH START4.SURE SIMMEREl horno hará romper elhervor de la comida.Los alimentos hervirán lentamente durante el tiempoque determine.Al cocer lentamente los alimentos como pastas useun envase que pueda contener suficiente agua paracubrirlos totalmente al cocinarse, (como 3-quarts -12tazas- cazuela) con una tapa. Cuando cocine pasta ofideos agregue 1 cucharada (15ml) de aceite al aguaantes de hervir. Use el siguiente método: Coloque elrecipiente con agua en el horno y siga los pasos2~4, determinando el tiempo de cocción lenta en1segundo. Al final, coloque los alimentos en el aguay remueva hasta que estén completamente cubiertospor el agua.Cubra. Repita los pasos 2~4, determinando eltiempo de cocción lenta que desea. Cambiando lasinstrucciones, puede cambiar el tiempo de hervorlento mientras hierve.Para ello siga los pasos 2,3, y 4.USAR SU HORNO DE MICROONDAS
55ESPAÑOLUSAR SU HORNO DE MICROONDASSENSOR OPERATIVA INSTRUCCIONESEl sensor de cocción le permite cocinar la mayoría desus comidas favoritas sin seleccionar los tiempos decocción y niveles de potencia. La pantalla indicará"round shape " (forma redonda) durante el periodoinicial del sensor. El horno automáticamentedetermina el tiempo de cocción requerido para cadaartículo de cocina. Cuando el sensor interno detectauna cierta cantidad de humedad proveniente de losalimentos, le indicará al horno cuanto le tomarácalentarlo. La pantalla mostrará el tiempo restante decalentamiento. Para obtener los mejores resultadoscon el sensor, siga estas recomendaciones:•  Los alimentos cocinados con el sistema de sensordeben hallarse a temperatura normal dealmacenamiento. •  La bandeja de vidrio y la parte externa delrecipiente deben estar secos para asegurar losmejores resultados de cocción. •  Los alimentos siempre deben estar cubiertos demodo suelto con envoltura plástica apta paramicroondas, papel encerado o una tapa.  •  No abra la puerta ni toque la tecla "STOP/CLEAR "durante el tiempo correspondiente al sensor.Cuando este tiempo termine, el horno emitirá dosbips, y el tiempo restante para cocinar apareceráen la pantalla. En este momento podrá abrir lapuerta para revolver, girar o redistribuir el alimento. GUÍA DE COCINA CON SENSOR Envases apropiados y cubiertas asegurarán buenosresultados de cocción por medio del sensor.  • Siempre use envases aptos para microondas ycúbralos con tapas o envolturas plásticasventiladas.• Nunca use cubiertas plásticas ajustadas o selladas.Estas pueden evitar que el vapor escape y causarun exceso de cocción en los alimentos.• Haga coincidir la cantidad con el tamaño delenvase. Llene los envases por lo menos hasta lamitad para obtener mejores resultados. • Asegúrese que el exterior del envase de horneado yel interior del horno de microondas se hallen secosantes de colocar el alimento en el horno. Las gotasde humedad al transformarse en vapor puedenconfundir al sensor.USAR SENSOR DE COCCIÓNSENSOR DE COCCIÓN PAPAS (EJEMPLO)1.2.Cocción del sensor le permite cocinar sus alimentosfavoritos sin seleccionar los tiempos de cocción yniveles de potencia.Ejemplo para papas:Toque:    La pantalla mostrará:   POTATOque se desplaza a travésde la pantalla.Cuando haya concluido el tiempo de cocción oirácuatro bips y aparecerá "COOK END" en lapantalla.Usando las teclas Mas o Menos todas las coccionesdel sensor y los tiempos de cocción programadospueden ser ajustados por el alimento de cocción enun tiempo largo o corto.Presionando Mas se agregará 10 segundos deltiempo de cocción cada vez que lo presione.Presionando Menos se restará 10 segundos deltiempo de cocción cada vez que lo presione.MAS/MENOSHora del día.
56ESPAÑOLUSAR SU HORNO DE MICROONDASCUADRO DE COCCIÓN DEL SENSORCATEGORIA DIRECCIONESCANTIDADEntrada CongeladaPapasSaque del empaque exterior. Divídalo.Si no está en un plato de horno apto para microondas, colóquelo sobreel plato, cubra con envoltura plástica y abra unos respiraderos.Después de la cocción, deje reposar unos 3 minutos.Coloque los alimentos para ser calentado en el plato de cena o vajillasimilar. Cubra con el empaque plástico y abra un respiradero a la película plástica perforando con un tenedor (3 veces). Después de lacocción, deje reposar unos 3 minutos.Saque del empaque, lave la escarcha bajo el agua corriente.Coloque en un plato de horno apto para microondas del tamaño apropiado.Agregue la cantidad del agua de acuerdo a la cantidad (1-2 vasos: 2cucharadas de té, 3-4 vasos : 4 cucharadas de té)Cubra con envoltura plástica y abra unos respiraderos.Después de la cocción, agite y deje reposar unos 3 minutosPrepare como lo desee, limpie y quite el agua residual sobre lasverduras.Coloque en plato de horno apto para microondas del tamañoapropiado.  Agregue la cantidad del agua de acuerdo a la cantidad (1-2vasos: 2 cucharadas de té, 3-4 vasos : 4 cucharadas de té) Cubra conenvoltura plástica y abra unos respiraderos. Después de la cocción, agite ydeje reposar unos 3 minutosSaque de la lata externa.Coloque en un plato de horno apto para microondas del tamañoapropiado, cubra con envoltura plástica y abra unos respiraderos.Después de la cocción, agite y deje reposar unos 3 minutos.Perfore  cada papa con un tenedor y coloque sobre la bandeja delhorno al rededor del borde, apartada al menos una pulgada. Despuésde la cocción, deje reposar unos 5 minutos.De 10 a 21 onzas1-2 porciones1-4 vasos1-4 vasos1-4 vasos1-4 medio (aprox. De 8 a 10onzas cada una)Palomitas deMaízPizzaPopcorn le permite preparar las palomitas de maiz parahorno de microondas empacados comercialmente.Prepare únicamente un paquete cada vez.Para mejores resultados, use una bolsa fresca de polomitasde maíz. Coloque el empaque de palomitas preempacadopara horno de microondas. Este es la función de recalentamiento para una pizzasobrante.Coloque en un papel de cocina sobre un plato de horno aptopara microondas.Paquete de 3.0-3.5 onzas1-3 tajadas (5 onzas cada una)Plato de CenaVerduras CongeladasVerdura frescaVerdura EnlatadaVerduras
57ESPAÑOLUSAR SU HORNO DE MICROONDASEl horno cocinará los alimentos automáticamente por el sistema de sensor, excepto tocino (bacón)  yCereal caliente. Cuando haya concluido el tiempo de cocción oirá cuatro bips y aparecerá "COOK END" en la pantalla.CATEGORÍACacerola (Sensor) Arroz (Sensor)Tocino (bacón)Cereal CalienteTOCAR ELPAD NÚMERO1 234CANTIDADDe 1 a 4 vasosDe 1/2 a 2 vasosDe 2 a 4 tajadasDe 1 a 6 porcionesCATEGORÍACacerola (Sensor)  Rollos/Panecillos (muffins)  BebidasTOCAR ELPAD NÚMERO1 23CANTIDADDe 1 a 4 vasosDe 1 a 6 pedazosDe 1 a 2 vasosCOCCIÓN AUTOMÁTICACocción Automática le permite calentar los alimentoscomunes preparados por microonda sin necesidadde selección de tiempos de cocción o niveles depotencia. El programa "Auto Cook" tiene la potenciade cocción predeterminada para 4 categorías dealimentos: cacerola, arroz, tocino (bacón) y Cerealcaliente.Ejemplo para arroz:Toque:    La pantalla mostrará:   SELECT MENU 1 TO 4--SEE COOKING GUIDERICEque se desplaza a travésde la pantalla.Recalentamiento Automático le permite calentar losalimentos sin necesidad de selección de tiempos decocción o niveles de potencia.El programa "Auto Reheat" tiene la potencia decocción predeterminada para 3 categorías dealimentos:Cacerola, Rollos/Panecillos (muffins) y Bebidas.Ejemplo para cazuela:Toque:    La pantalla mostrará:   SELECT MENU 1 TO 3--SEE COOKING GUIDECASSEROLEque se desplaza a travésde la pantalla.El horno volverá a calentar automáticamente sólo"Cacerola" por sistema de sensor.Cuando haya concluido el tiempo de cocción oirácuatro bips y aparecerá "COOK END" en lapantalla.RECALENTAMIENTO AUTOMÁTICOElegir la categoría de alimento.Elija una categoría de alimento.1.2.1.2.
58ESPAÑOLUSAR SU HORNO DE MICROONDASCUADRO DE COCCIÓN AUTOMÁTICACATEGORÍA DIRECCIONESTOCAR EL PADNÚMEROCANTIDADCaserola(Sensor)Arroz(Sensor)TocinetaCerealCalientePrepare los ingredients por recipiente en una caserolacuarta de 1-2. Cocine con envoltura plástica y abraunos respiraderos. Después de la cocción, agite ydeje reposar unos 3 minutos.Coloque arroz y líquido doble veces de su cantidad(agua, pollo o esencia de verdura) en un plato dehorno apto para microondas de 2 cuarto.Cubra con envoltura plástica y abra unosrespiraderos. Después de la cocción, deje reposarunos 10 minutos. Agítelo para suavizar el arroz .Coloque las tiras de tocineta sobre la rejilla paramejores resultados. (Utilice un plato para cenaalineado con el papel de cocina si se dispone de larejilla.Prepare como lo indica el empaque y cocine.Agite bien antes de comer. Use únicamente loscereales calientes instantáneo.1-4 vasos1/2 – 2 vasosUse grano de arrozgrandes o medio.  Cocine el arrozinstantáneo de acuerdo a las indicaciones delpaquete.2-4 tajadas 1-6 porciones1234CUADRO DE RECALENTAMIENTO AUTOMÁTICOCATEGORÍA DIRECCIONESTOCAR EL PADNÚMEROCANTIDADCaserola(Sensor)Rollo/PanecillosBebidaCubra el plato que contiene la caserola con envolturaplástica y abra respiraderos. Después de la cocción,agite y deje reposar unos 3 minutos.Saque del empaque y coloque sobre un plato.Use una mug de boca ancha. No lo cubra. (Tenga cuidado, la bebida puede estar muy caliente!A veces los líquidos calientados en los contenedorescilíndricas salpicará al mover el vaso.)1-4 vasos1-6 pedazosfrescas(2-3 oz. Cada una)1-2 vasos(240ml por vaso)123
59ESPAÑOLUSAR SU HORNO DE MICROONDASFUNDIREl horno usa baja energía para fundir alimentos(mantequilla o margarina, chocolate, malvaviscos oalimentos procesados con queso). Vea la tabla acontinuación: Ejemplo para 8 onzas de chocolate:Toque:    La pantalla mostrará:   1.2.3.4. 4.SELECT MENU1 TO 4 --SEE COOKING GUIDE chocolate touch 1 to 28 OZ una vez yCHOCOLATEque se desplaza a travésde la pantalla. Cuentaregresiva de tiempo.Hora del día.TABLA DE INDICACIONES PARA FUNDIRCantidad1,2 o 3porciones4 o 8onzas8 o 16onzas5 o 10onzasInstruccionesDesenvuélvala y colóquela en un envase apto paramicroondas. No es necesariocubrir la  mantequilla. Alconcluir la cocción revuelvapara completar la fusión.Pueden usarse botones dechocolate o cubos dechocolate de hornear.Desenvuelva los cuadradosy colóquelos en unrecipiente apto paramicroondas.  Al fin del ciclorevuélvalos para completarla fusión.Use solamente alimentosprocesados con queso.Córtelo en cubos. Colóqueloen una sola capa en unenvase apto paramicroondas. Al concluir lacocción revuelva paracompletar la fusión.Pueden usarse malvaviscosgrandes o pequeños.Colóquelos en un envaseapto para microondas. Alfinal del ciclo revuélvalospara completar la fusión.CategoríaMantequillao margarinaCódigoABLANDAREl horno usa baja energía para ablandar alimentos(mantequilla, helados, quesos crema y jugoshelados). Vea la tabla a continuación.Ejemplo para cuarto de helado:Toque:    La pantalla mostrará:   1.2.3.TABLA DE INDICACIONES PARA ABLANDARCantidad1,2 o 3porcionesPinta,Cuarto,Mediogalón3 o 8onzas6, 12 o16 onzasInstruccionesLa mantequilla estará a latemperatura ambiente y listapara usar según la receta.Coloque el envase en elhorno. Los helados serán losuficientemente blandospara ser aprovechados másfácilmente.Desenvuelva y coloque enun envase apto paramicroondas. El queso cremaestará a temperaturaambiente y listo para usarsegún la receta.Quite la tapa. Colóquelo enel horno. El jugo helado serálo suficientemente blandopara  mezclarse fácilmentecon agua. CategoríaMantequillaHeladosQuesoscremaJugosheladosCódigo1234SELECT MENU 1 TO 4 --SEE COOKING GUIDE ice cream touch 1 to 3QUART una vez y ICECREAMque se desplaza a travésde la pantalla. Cuentaregresiva de tiempo.Hora del día.12ChocolateQuesosMalvaviscos34
60ESPAÑOLCuidar su horno de microondasPara asegurarse de que su horno de microondas se vea bien y trabaje debidamente durante mucho tiempo,debe mantenerlo adecuadamente. Para su cuidado correcto, siga cuidadosamente estas instrucciones.Para las superficies interiores :  Lave a menudocon agua jabonosa tibiacon esponja o pañosuave.   Use solo jabonessuaves no abrasivos oun detergente suave.Asegúrese demantener las áreaslimpias donde setocan la puerta y elmarco del horno cuando se cierran.Limpie bien con un paño limpio. Con el tiempo,pueden aparecer manchas en la superficie comoresultado de salpicaduras de partículas de alimentodurante la cocción. Esto es normal.Para suciedad rebelde,hierva una taza de aguaen el horno durante 2 o3 minutos. El vaporablandará la suciedad.Para quitar oloresdentro del horno, hiervauna taza de agua conalgo de jugo de limón ovinagre.Para superficies exteriores y panel de control:Use un paño suave conlimpiador de vidrios enspray. Aplique ellimpiador de vidrios enspray al paño suave; noaplique el spraydirectamente en elhorno.NOTA: Los limpiadoresabrasivos, las almohadillas de lana de acero, lospaños limpiadores ásperos, algunas toallas depapel, etc., pueden dañar el panel de control y lassuperficies interiores o exteriores del horno.Para limpiar la bandeja giratoria y el soporte de lamisma, lave las zonasmuy sucias con aguajabonosa templada. Useun limpiador suave yesponja para fregar.El soporte y la bandeja devidrio pueden lavarse enlavavajillas.Bandeja de vidrioCubo centralSoporte
Filtro de grasa (No. De Pedazo 5230W2A004A):1. Desenchufe el horno de microondas o desconectela energía eléctrica. 2. Para quitar los filtro de grasa, deslice cada filtrohacia el costado. Tire de los filtro hacia abajo yempuje hacia el otro lado. El filtro caerá. 3. Embeba el filtro de grasas en agua caliente y undetergente suave. Limpie y sacuda la suciedadembebida y la grasa. Enjuague bien y sacuda parasecar. No limpie los filtro con amoníaco, agentescorrosivos de limpieza tales como limpiadores dehorno basados en lejía ni los coloque en ellavaplatos. Los filtro se volverán negros o puedendañarse.  4. Para reemplazar los filtro de grasa. Deslice el filtroen la ranura del marco hacia apoye el lado de laabertura. Empuje el filtro hacia arriba y empujehacia el lado anterior para bloquear en su lugar.  5. Enchufe el horno de microondas o reconecte lacorriente eléctrica.61ESPAÑOLCUIDADO DE LOS FILTROSFiltro de carbón (No. De Pedazo 5230W1A003A):1. Desenchufe el horno de microondas o desconectela energía eléctrica. 2. Quite los tornillos de montaje de la rejilla delagujero de ventilación.  3. Incline la rejilla hacia delante, luego levántela paraquitarla.  4. Levante la parte posterior del filtro de carbón.Deslice el filtro directamente hacia fuera. CUIDAR SU HORNO DE MICROONDASLos filtro de grasa deben ser quitados y lavados a menudo, al menos una vez al mes.NOTA: Si está instalada la combinación en la campana de su microonda para recircular el aire, el filtro decarbón (No. De Pedazo 5230W1A003A) disponible de Sears llamando a 1-800-4-MY-HOME®.El filtro de carbon no puede ser limpiado y debería ser reemplazado cada 6 a 12 meses.
62ESPAÑOLCUIDAR SU HORNO DE MICROONDAS5. Deslice un Nuevo filtro de carbón en su lugar. El filtro debe descansar en el ángulo que semuestra.  6. Deslice el fondo de la rejilla del ventilador en sulugar. Empuje la parte superior hasta que calce ensu lugar. Reemplace los tornillos de montaje. 7. Enchufe el horno de microondas o reconecte laenergía eléctrica.NOTA: No opere la campana sin el filtro de grasasen su lugar.La luz de la parte superior para la cocina(cooktop)1. Desenchufe el horno de microondas o desconectela energía eléctrica. 2. Quite el tornillo de montar de cubierta de bombilla. 3. Reemplace la bombilla con una bombilla de basecandelabra de 20 vatios. (No. De Pedazo6912A40002A) disponible de Sears llamando a  1-800-4-MY-HOME®.4. Enchufe el horno de microondas o reconecte laenergía eléctrica.Luz del horno 1. Desenchufe el horno de microondas o desconectela energía eléctrica. 2. Quite los tornillos de montaje de la rejilla delagujero de ventilación. 3. Incline la rejilla hacia delante, luego levántela paraquitarla.REEMPLAZAR LAS LUCES DE LAPARTE SUPERIOR Y DEL HORNO
63ESPAÑOLCUIDAR SU HORNO DE MICROONDAS4. Levante el soporte de la bombilla.5. Reemplace la bombilla con una bombilla de basecandelabro de 30 vatios (No. De Pedazo3B70067A) disponible de Sears llamando a  1-800-4-MY-HOME®. 6. Desplice la parte superior de la rejilla de ventilacióndentro de su lugar.  Empuje la parte inferior hastaque encaje dentro del lugar.  Recoloque lostornillos de montaje.7. Enchufe el horno de microondas  o reconecte laenergía. Bulb holderSOPORTE DEBOMBILLA
64ESPAÑOLSUGERENCIAS PARA LA COCINA EN SU MICROONDASUGERENCIAS PARA LA COCINA EN SU MICROONDA Cantidad de alimentos• Si aumenta o disminuye la cantidad de alimentos que prepara,el tiempo que toma cocinar ese alimento también cambiará. Porejemplo, si duplica la cantidad que indica una receta, agregue unpoco más de la mitad del tiempo original indicado de cocción.Compruebe el grado de terminación y, si fuera necesario,agregue más tiempo en pequeños incrementos.Temperatura de inicio de la preparación • Mientras más baja la temperatura de los alimentos que secolocan en el horno de microondas, mayor será el tiempo quetomará para cocinar. Los alimentos a temperatura de lahabitación se podrán volver a calentar más rápidamente que losalimentos a temperatura del refrigerador.Composición de  los alimentos• Los alimentos con mucha grasa y mucha azúcar se calentaránmás rápido que los alimentos que contienen mucha agua. Lagrasa y el azúcar también alcanzan una temperatura más altaque la del agua en el proceso de cocción. • Mientras más densos sean los alimentos, más tiempo tomarápara calentarse. Los alimentos "Muy densos " tales como lacarne toman más tiempo para volver a calentarse que los máslivianos, más porosos como pasteles esponjosos.Tamaño y forma• Los pedazos más pequeños de alimentos se cocinarán másrápido que los pedazos más grandes. También los pedazos de lamisma forma se cocinan más parejo que los pedazos dediferentes formas. • Con los alimentos que tienen diferente espesor, las partesmás delgadas se cocinarán más rápidamente que las partes másgruesas. Coloque las partes más delgadas de las alas de pollo ylas piernas y patas en el centro del plato.Revolver, dar vuelta los alimentos• Revolver y dar vuelta los alimentos dispersa el calor rápidamentehacia el centro del plato y evita que se cocine de más en losbordes externos de los alimentos.Cubrir los alimentosCubra los alimentos para:• Reducir las salpicaduras • Acortar los tiempos de cocción • Mantener la humedad de los alimentosPuede usar cualquier cubierta que permita ser atravesado por lasmicroondas . Vea "Conocer su horno de microonda" para conocerlos materiales que las microondas atraviesan. Si está usando lafunción Sensor, asegure la ventilación.Liberar la presión en los alimentos• Cortar los alimentos (por ejemplo: papas al horno, salchichas,yemas de huevos, y algunas frutas) están ajustadamentecubiertos por una piel o membrana. El vapor puede levantarsebajo de la membrana durante la cocción, causando que losalimentos revienten. Para aliviar la presión para evitar querevienten, perfore los alimentos antes de conocer con untenedor, pinche de cocktail o escarbadientes. Usar el tiempo de  permanencia • Permita siempre que los alimentos permanezcan un momentodespués de la cocción. El tiempo de permanencia después deldescongelamiento y cocción permite que la temperatura sedisperse en forma pareja a través de todos los alimentos,mejorando los resultados de la cocción.  • La duración del tiempo de permanencia depende de lacantidad de alimentos que está cocinando y de la densidad delos mismos. A veces puede ser tan corto como el tiempo que letoma sacar los alimentos del horno y llevarlos a la mesa dondese sirven. Sin embargo, cuando se trata de alimentos de mayortamaño y más densos,  el tiempo de permanencia puede sermás o menos de 10 minutos.Ordenar los alimentosPara obtener mejores resultados, coloque los alimentos de modoparejo en el plato. Puede hacerlo de diferentes maneras: • Si está cocinando varios ingredientes para el mismo plato,por ejemplo papas (patatas) horneadas, colóquelas como unanillo para su cocimiento uniforme. • Cuando cocine alimentos de formas o densidadesirregulares, por ejemplo pechugas de pollo, coloque la porciónmás pequeña o más delgada en el centro del plato donde secalentará al final. • En capas de alimentos finos, coloque una sobre otra.• Cuando  cocine o vuelva a calentar un pescado entero, hagacortes sobre la piel, esto previene el resquebrajamiento. • No permita que los envases de los alimentos toquen la partesuperior o los costados del horno. Esto evitará la posibleformación de un arco eléctrico.    Uso de la hoja de papel de aluminioLos envases de metal no deben usarse en un horno demicroondas.  No obstante hay algunas excepciones. Sicompró alimentos que vienen embalado en una hoja depapel de aluminio, guíese por las instrucciones que estánen el envase.  Cuando use envases de hoja de papel dealuminio, los tiempos de cocción pueden ser más largos yaque las microondas penetrarán sólo la superficie de losalimentos. Si encuentra que no tiene instrucciones en elpaquete, siga estos lineamientos generales:
65ESPAÑOLSUGERENCIAS PARA LA COCINA EN SU MICROONDASUGERENCIAS PARA LA COCINA EN SU MICROONDA (Cont.)Uso de la hoja de papel dealuminio (cont.)• Coloque los envases en un cuenco de vidrio yagregue agua hasta cubrir la parte inferior de losenvases, no más de  1/4 de pulgada (0.64 cm.) dealtura. Esto asegurará la distribución uniforme decalor en la parte inferior de los envases.•Siempre quite la tapa para evitar daño al horno. • Use solamente envases no dañados. • No use envases más altos que 3/4 de pulgada (1.9 cm). • Los envases deben estar llenos al menos hasta lamitad. • Para evitar la formación de arco eléctrico debehaber una distancia mínima de 1/4 de pulgada (0.64 cm) entre los envases de aluminio y lasparedes del horno y también entre dos envases dealuminio. • Protección con pedazos pequeños de papel dealuminio, piezas de alimento que puede cocerrápidamente, tales como las puntas de ala, pernilesde aves.• Calentar alimento de los envases de papel dealuminio toma usualmente el doble del tiempocomparado con el recalmentamiento en envasesplásticas. Vidrio, china o papel. El tiempo que tomapara que un alimento esté listo variará según el tipode envases que use. • Deje descansar a los alimentos de 2 a 3 minutosluego de calentarlos de modo que el calor sedistribuya uniformemente por los envases.  Lo que no se debe cocinar en suhorno de microondas• No enlate alimentos en el horno. Los frascoscerrados pueden explotar causando daño al horno.  • No use el horno de microondas para esterilizarobjetos (biberones, etc.). Es difícil mantener alhorno en las altas temperaturas que se necesitanpara esterilizar.
66ESPAÑOLPreguntas y RespuestasPREGUNTAS RESPUESTAS¿Puedo usar mi horno de microondas sin la bandeja giratoria o hacerla girar sosteniendo un platogrande? ¿Puedo usar sartenes de metal o de aluminio en mihorno de microondas?¿Es normal que la bandeja giratoria gire encualquiera de las dos direcciones?A veces la puerta de mi horno de microondasaparece ondulada. ¿Es esto normal? ¿Por qué el plato se calienta cuando cocino conmicroonda en él?  Pienso que eso no deberíasuceder.¿Qué significa "tiempo de espera " ?¿Por qué sale vapor por los agujeros de ventilación?¿Puedo preparar palomitas de maíz en mi horno demicroondas?  ¿Cómo obtengo los mejores resultados?No. Si quita o no hace girar la bandeja giratoria,tendrá resultados pobres.  Los platos que se usan ensu horno deben encajar en la bandeja giratoria.Puede usar una hoja de papel de aluminio para proteger (usepedazos pequeños y planos), pequeños  trozos y en bandejasde aluminio planas (si la bandeja no es más alta que 3/4 pulg. [1.9 cm ] de profundidad y está llena con los alimentospara absorber la potencia de microonda). Si. La bandeja giratoria rota en sentido de las agujasdel reloj o contrario al mismo, dependiendo la rotacióndel motor cuando comienza el ciclo de cocción.Esta apariencia es normal y no afecta elfuncionamiento de su horno.A medida que los alimentos se calientan, éstos transmitensu calor al plato. Esté preparada para usar protección paralas manos para sacar los alimentos después de cocinar.  "Tiempo de espera" significa que los alimentos debenser sacados del horno y cubiertos por un tiempoadicional para permitir que terminen de cocinarse.Esto libera al horno para otra cocción.El vapor se produce normalmente durante la cocción. El horno de microondas ha sido diseñado para eliminar elvapor de este modo, a través de los agujeros de ventilación.Si. Prepare palomitas de maíz empacado paramicroonda siguiendo las indicaciones del fabricante.No use bolsas comunes de papel. No vuelva acolocar núcleos de maíz que no hayan explotado. No prepare palomitas de maíz en un recipiente devidrio.
67ESPAÑOLSolución de problemasEL HORNO DE MICROONDAS NO FUNCIONATIEMPOS DE COCCIÓNNada funciona.El horno de microondas nofuncionará.PROBLEMA CAUSA• El cable de alimentación de energía eléctrica no está enchufado a untomacorriente de tres clavijas. (Vea la sección "Requisitos eléctricos" en la pág.40 y la sección "Conexión eléctrica" en pág. 42.)• Ha saltado un fusible de la casa o un disyuntor ha interrumpido el circuito • Ha habido una falla de alimentación en el suministro de la compañía eléctrica. • Usted está usando el horno como cronómetro. Toque STOP/CLEAR para cancelar el horno como cronómetro de cocina.• La puerta no está firmemente cerrada y bloqueada. • No tocó START.• No siguió exactamente las instrucciones. • Continúa funcionando una operación programada previamente.  Toque STOP/CLEAR para cancelar esa operación.Los alimentos no estánsuficientemente cocidos. La pantalla mostrará unacuenta regresiva pero elhorno no está funcionando.PROBLEMA CAUSA• El suministro eléctrico a su casa o a ese enchufe de pared no es suficiente o esmás bajo que lo normal. Su compañía eléctrica puede decirle si la línea estábaja. Su electricista o técnico de servicio le puede decir si el enchufe de paredsuministra poco• La potencia de cocción no está en la programación recomendada. Compruebela tabla en la pág. 49. • La puerta del horno no está cerrado por completo.• Ha fijado los controles al temporalizador de cocina.  Toque STOP/CLEAR para cancelar el temporizador de cocina.La mayoría de los problemas de cocina están causados a menudo por pequeñas cosas que usted puededeterminar y solucionar sin herramientas de ningún tipo.  Controle las listas de más abajo en las páginassiguientes antes de pedir asistencia a un servicio.  Si aún necesita ayuda, llame a Service Sears a 1-800-4-MY-HOME®.
68ESPAÑOLBANDEJA GIRATORIATONOSMENSAJES EN LA PANTALLALa bandeja giratoria nogira.PROBLEMA CAUSA• La bandeja giratoria no está colocada correctamente en su lugar. Debe sercorregida levantando un costado y presionando firmemente sobre el eje central. • El soporte no está funcionando correctamente. Quite la bandeja giratoria yreinicie el horno. Si aún necesita ayuda, llame a Service Sears a 1-800-4-MY-HOME®. Cocinar sin la bandeja giratoria le dará resultados pobres.No se oye el tono de fin deprograma o de fin de ciclo.PROBLEMA CAUSA• No ha introducido el comando correcto.La pantalla estácentelleando " :".PROBLEMA CAUSA• Ha habido una interrupción de suministro de energía. Reinicie el reloj.(Vea la sección  "Reloj " en la pág. 46.)Si ninguna de estas temas le causa problemas, llame a Service Sears a 1-800-4-MY-HOME®.SOLUCIÓN DE PROBLEMAS
Your Homein your home all no matter who made it, no matter who sold it!1-800-4-MY-HOME (1-800-469-4663) www.sears.com www.sears.caOur HomeSears Parts & Repair Center.1-800-488-1222www.sears.com1-800-827-6655                  1-800-361-6665 1-888-SU-HOGAR 1-800-LE-FOYER

Navigation menu