LG Electronics USA V410 Portable Tablet PC with Multi-band WCDMA/LTE with WLAN and Bluetooth User Manual 1
LG Electronics MobileComm USA, Inc. Portable Tablet PC with Multi-band WCDMA/LTE with WLAN and Bluetooth Users Manual 1
Contents
- 1. Users Manual 1
- 2. Users Manual 2
Users Manual 1

MFL00000000 (1.0)
User Guide
LG-V410
www.lg.com
ENGLISH

User Guide
ENGLISH
• Screendisplaysandillustrationsmaydiffer
fromthoseyouseeonactualdevice.
• Someofthecontentsofthisguidemay
notapplytoyourdevice,dependingon
thesoftwareandyourserviceprovider.All
informationinthisdocumentissubjectto
changewithoutnotice.
• Thisdeviceisnotsuitableforpeoplewho
haveavisualimpairmentduetothetouch
screenkeyboard.
• Copyright©2014LGElectronics,Inc.All
rightsreserved.LGandtheLGlogoare
registeredtrademarksofLGGroupandits
relatedentities.Allothertrademarksare
thepropertyoftheirrespectiveowners.
• Google™,GoogleMaps™,Gmail™,
YouTube™,Hangouts™andGooglePlay™
aretrademarksofGoogle,Inc.

2
About this user guide ......................... 5
About this user guide ........................... 5
Trademarks ............................................. 5
DivX HD .................................................. 6
Dolby Digital Plus .................................. 6
Important notice ................................. 7
Getting to know your device ............ 12
Tablet Overview ..................................... 12
Charging your tablet ............................14
Optimizing Battery Life .......................15
To extend the life of your battery .........15
To view the battery charge level ...........16
To monitor and control what uses
the battery .....................................................16
Inserting a microSD card .....................16
Removing the microSD card ............... 17
Formatting the microSD card .............18
Locking and unlocking the screen......18
Your Home screen ............................. 19
Touch screen tips .................................. 19
Tap or touch .................................................19
Touch and hold ...........................................19
Drag .................................................................19
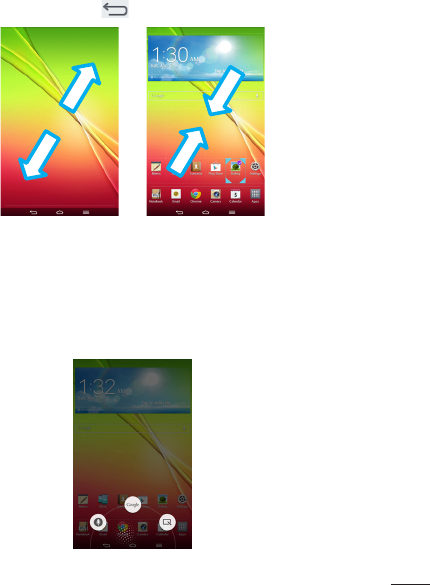
Swipe or slide ............................................. 20
Double-tap .................................................. 20
Pinch-to-Zoom .........................................20
Rotate the screen ..................................... 20
KnockON .......................................................21
Home screen ........................................22
Customizing the Home screen .......... 23
Customizing app icons on the
Home screen ........................................23
Home screen clean view .....................25
Quick access ........................................25
Returning to recently-used
applications ..........................................26
Notifications .........................................26
Accessing notifications .......................... 26
Quick Settings on the Notifications
Panel ..............................................................27
To rearrange Quick Setting options
on the Notification Panel ........................27
QSlide apps on the Notifications
Panel ..............................................................27
Using the QSlide apps ........................... 28
Notification icons on the Status
Bar .................................................................. 28
Multiple Users ......................................29
Slide Aside .............................................31
Plug & Pop ...........................................32
Capturing a Screenshot ......................32
Using QuickMemo to capture a
screenshot .................................................. 33
Using Capture plus to capture a
screenshot .................................................. 33
Entering Text.........................................33
Entering special characters .................. 34
Google account setup .......................35
Connecting to Networks and
Devices ...............................................36
Table of contents

3
Wi-Fi .....................................................36
Connecting to Wi-Fi networks ............ 36
Turning Wi-Fi on and connecting
to a Wi-Fi network .................................... 36
Bluetooth ..............................................36
Turning on Bluetooth and pairing up
your tablet with a Bluetooth device ....37
Send data using the Bluetooth
feature ........................................................... 38
Receive data using the Bluetooth
feature ........................................................... 38
SmartShare ..........................................38
Enjoying the content via a variety of
devices ......................................................... 39
Playing/Sending ....................................... 39
Enjoying the content from Nearby
devices ..................................................39
Connecting devices ................................ 39
Searching other devices........................ 39
Using the content from the Cloud ....40
Using the Cloud ....................................... 40
PC connections with a USB cable .....40
Transferring music, photos and
videos using the USB mass
storage mode ............................................40
Synchronize with Windows Media
Player ..............................................................41
Contacts ............................................ 42
Searching for a contact ......................42
Adding a new contact .........................42
Favorite Contacts .................................42
Creating a group ..................................43
Email .................................................. 44
Managing an email account ...............44
Working with account folders ............45
Composing and sending email ..........45
Receiving emails ..................................45
Camera ...............................................46
Getting to know the viewfinder ..........46
Using the advanced settings ..............47
Taking a photo ......................................48
Once you've taken a photo .................49
Viewing your saved photos .................50
Video camera ..................................... 51
Getting to know the viewfinder ...........51
Using the advanced settings ..............52
Recording a video ................................ 53
After recording a video .......................53
Watching your saved videos ...............54
Adjusting the volume when
viewing a video ..................................... 54
Multimedia .........................................55
Gallery ...................................................55
Viewing pictures ....................................... 55
Zooming in and out ................................ 56
Playing videos ............................................ 56
Deleting images and videos ................ 56
Setting as wallpaper ................................ 56
Slideshow ..............................................57
Videos ...................................................57
Playing a video ........................................... 57
Music .....................................................58
Playing a song ........................................... 58
Tools .....................................................61

4
QPair ......................................................61
QSlide ...................................................62
QuickMemo ..........................................64
QuickRemote .......................................66
QuickTranslator ....................................68
Voice Mate ............................................ 69
Alarm .....................................................70
Calculator ..............................................71
Calendar ................................................71
Tasks ...................................................... 72
File Manager ........................................ 73
Voice Recorder .....................................73
Task Manager ....................................... 74
POLARIS Office 5 .............................. 74
Google+................................................. 75
Voice Search ......................................... 76
Downloads ............................................ 76
Box......................................................... 76
The Web ............................................. 77
Internet.................................................. 77
Opening a page ........................................ 77
Searching the web by voice..................78
Bookmarks ................................................... 78
History ............................................................78
Using QSlide ...............................................78
Chrome .................................................78
Viewing web pages ..................................79
Opening a page ........................................79
Searching the web by voice..................79
Syncing with other devices ....................79
Adding and viewing bookmarks .........79
Chrome Options menu .........................80
Settings .............................................. 81
Access the Settings menu ..................81
WIRELESS NETWORKS .....................81
DEVICE .................................................84
PERSONAL ..........................................88
SYSTEM ................................................. 91
LG Backup ..........................................95
About backing up and restoring
device data ...........................................95
LG Backup your tablet data ................96
Scheduling automatic backups .........96
Restoring tablet data ..........................96
Tablet software update .....................98
Tablet software update .......................98
LG tablet software update via
Over-the-Air (OTA) ..............................98
Accessories ......................................100
Troubleshooting ................................ 101
For Your Safety ................................103

5
About this user guide
•Beforeusingyourdevice,pleasecarefullyreadthismanual.Thiswillensure
thatyouuseyourdevicesafelyandcorrectly.
•Someoftheimagesandscreenshotsprovidedinthisguidemayappear
differentlyonyourtablet.
•Yourcontentmaydifferfromthefinalproduct,orfromsoftwaresupplied
byserviceprovidersorcarriers,Thiscontentmaybesubjecttochange
withoutpriornotice.Forthelatestversionofthismanual,pleasevisitthe
LGwebsiteatwww.lg.com.
•Yourdevice'sapplicationsandtheirfunctionsmayvarybycountry,region,
orhardwarespecifications.LGcannotbeheldliableforanyperformance
issuesresultingfromtheuseofapplicationsdevelopedbyprovidersother
thanLG.
•LGcannotbeheldliableforperformanceorincompatibilityissuesresulting
fromeditedregistrysettingsbeingeditedoroperatingsystemsoftware
beingmodified.Anyattempttocustomizeyouroperatingsystemmay
causethedeviceoritsapplicationstonotworkastheyshould.
•Software,audio,wallpaper,images,andothermediasuppliedwithyour
devicearelicensedforlimiteduse.Ifyouextractandusethesematerials
forcommercialorotherpurposesis,youmaybeinfringingcopyrightlaws.
Asauser,youarefullyareentirelyresponsiblefortheillegaluseofmedia.
•Additionalchargesmaybeappliedfordataservices,suchasmessaging,
uploadinganddownloading,auto-syncing,orusinglocationservices.To
avoidadditionalcharges,selectadataplantoissuitableforyourneeds.
Contactyourserviceprovidertoobtainadditionaldetails.
Trademarks
•LGandtheLGlogoareregisteredtrademarksofLGElectronics.
•Allothertrademarksandcopyrightsarethepropertyoftheirrespective
owners.
About this user guide

6
DivX HD
ABOUT DIVX VIDEO:DivX®isadigitalvideoformatcreatedbyDivX,LLC,a
subsidiaryofRoviCorporation.ThisisanofficialDivXCertified®devicethat
haspassedrigoroustestingtoverifythatitplaysDivXvideo.Visitdivx.com
formoreinformationandsoftwaretoolstoconvertyourfilesintoDivXvideos.
ABOUT DIVX VIDEO-ON-DEMAND:ThisDivXCertified®devicemustbe
registeredinordertoplaypurchasedDivXVideo-on-Demand(VOD)movies.
Toobtainyourregistrationcode,locatetheDivXVODsectioninyourdevice
setupmenu.Gotovod.divx.comformoreinformationonhowtocomplete
yourregistration.
DivX Certified® to play DivX® video up to HD 720p, including premium
content.
DivX®, DivX Certified® and associated logos are trademarks of Rovi
Corporation or its subsidiaries and are used under license.
Notice: Open Source Software
ToobtainthecorrespondingsourcecodeunderGPL,LGPL,MPLand
otheropensourcelicences,pleasevisithttp://opensource.lge.com/
Allreferredlicenceterms,disclaimersandnoticesareavailablefor
downloadwiththesourcecode.
Dolby Digital Plus
ManufacturedunderlicensefromDolbyLaboratories.Dolby,DolbyDigital
Plus,andthedouble-DsymbolaretrademarksofDolbyLaboratories.
7
Please read this before you start using your tablet!
Pleasechecktoseewhetheranyproblemsyouencounteredwithyourtablet
aredescribedinthissectionbeforetakingthetabletinforserviceorcalling
aservicerepresentative.
1. Tablet Memory
Youneedtocheckyourtabletmemoryanddeletesomedata,suchas
applications,tomakemorememoryavailable.
To uninstall applications:
1 Tap > >Appstab>Settings>Apps.
2 Oncealloftheapplicationsappear,selecttheapplicationyouwantto
uninstall.
3 TapUninstallandOKtoconfirm.
2. Before installing an open source application and
operating system (OS)
WARNING
IfyouinstallanduseanOSotherthantheoneprovidedbythe
manufactureritmaycauseyourtablettomalfunction.Inaddition,your
tabletwillnolongerbecoveredbythewarranty.
Important notice
8
WARNING
Toprotectyourtabletandpersonaldata,onlydownloadapplications
fromtrustedsources,suchasPlayStore.Ifthereareimproperlyinstalled
applicationsonyourtablet,thetabletmaynotworknormallyoraserious
errormayoccur.Youmustuninstallthoseapplicationsandallassociated
dataandsettingsfromthetablet.
3. Using a Screen Lock
Setanscreenlocktosecureyourtablet.Tap > >Appstab>
Settings>Display>Lock screen>Select screen lockandselecta
desiredscreenlockfromSwipe,Face Unlock,Pattern,PINandPassword.
YoucancreateaBackupPINasasafetymeasureincaseyouforgetyour
screenlock.
Caution:CreateaGoogleaccountbeforesettingascreenlockand
remembertheBackupPINyoucreatedwhencreatingyourscreenlock.
WARNING
Precautions to take when using a screen lock.
Itisveryimportanttorememberthescreenlockyouset.Youwillnotbe
abletoaccessyourtabletifyouuseanincorrectscreenlock5times.You
have5opportunitiestoenteryourunlockpattern,PINorpassword.Ifyou
haveusedall5opportunities,youcantryagainafter30seconds.

9
When you can’t recall your Pattern, PIN or Password:
< If you have forgotten your pattern >
IfyouloggedintoyourGoogleaccountonthetabletbutfailedtoenterthe
correctpattern5times,taptheForgot pattern?buttonatthebottomofthe
screen.YouarethenrequiredtologinwithyourGoogleAccountoryouhave
toentertheBackupPINwhichyouenteredwhencreatingyourPatternLock.
IfyouhavenotcreatedaGoogleaccountonthetabletoryouforgotthe
BackupPIN,youhavetoperformahardreset.
< If you have forgotten your PIN or Password >
IfyouforgetyourPINorPassword,youwillneedtoperformahardreset.
Caution:Ifyouperformahardreset,alluserapplicationsanduserdatawill
bedeleted.
NOTE:IfyouhavenotloggedintoyourGoogleAccountandhave
forgottenyourPattern,youwillneedtoenteryourBackupPIN.
4. Using the Hard Reset (Factory Reset)
Ifyourtabletdoesnotrestoretoitsoriginalcondition,useaHardReset
(FactoryReset)toinitializeit.
1 Turnthetabletoff.
2 PressandholdthePower/Lock Key + Volume Down Key ontheright
sideofthetablet.
3 ReleaseonlythePower/Lock KeywhentheLGlogoisdisplayedand
keeppressingtheVolume Down Key .
4 ImmediatelypressandholdthePower/Lock Key+Volume Up Key at
thesametimewhilemaintainingtheVolume Down Key pressed.
10
5 ReleaseallkeyswhentheFactoryhardresetscreenisdisplayed.
6 PressthePower/Lock Key tocontinueoreitheroftheVolume Keys
tocancel.
7 PressthePower/Lock Key oncemoretoconfirmoreitheroftheVolume
Keystocancel.
8 Yourdevicewillperformahardreset.
WARNING
IfyouperformaHardReset,alluserapplications,userdataandDRM
licenseswillbedeleted.Pleaseremembertobackupanyimportantdata
beforeperformingaHardReset.
5. Opening and switching applications
Multi-taskingiseasywithAndroid,youcankeepmorethanoneapplication
runningatthesametime.Thereisnoneedtoquitanapplicationbefore
openinganotherone.
Useandswitchbetweenseveralopenapplications.Androidmanageseach
application,stoppingandstartingthemasneededtoensurethatidle
applicationsdon'tconsumeresourcesunnecessarily.
1 TouchandholdtheHome Key.Alistofrecentlyusedapplications
willbedisplayed.
2 Taptheapplicationyouwanttoaccess.Thisdoesnotstoptheprevious
apprunninginthebackgroundonthetablet.MakesuretotapBack Key
toexitanappafterusingit.

11
•Tostopapplications,tapTask Managerfromtherecentappslist,thentap
StoporStop all.
•Toremoveanappfromtherecentappslist,swipetheapppreviewtothe
leftorright.Toclearallapps,tapClear all.
6. When the screen freezes
If the screen freezes or the tablet does not respond when you try to operate
it:PressandholdthePower/Lock Key for8secondstorestartyourtablet.
Ifitstilldoesnotwork,pleasecontacttheservicecenter.

12
Getting to know your device
Tablet Overview
NOTE:Makesurethatthemicrophoneisnotblockedwhenrecordinga
videooraudioclip.

13
Front-Facing
Camera Lens
Usetotakepicturesandrecordvideosofyourself.You
canalsousethisforvideochatting.Keepitcleanfor
optimalperformance.
microSD Card
Slot
InsertamicroSDCardforstoringfilessuchasmusic,
videosandphotos.
Earphone Jack
Allowsyoutopluginanoptionalheadsetforconvenient,
hands-freeconversations.Youcanalsoplugin
headphonestolistentomusic.
Ambient Light
Sensor
MeasuresthesurroundinglightandadjuststheLCD
brightnesstoprovideavividscreen.
Power/Lock Key
Presstolock/unlockthescreen.Pressandholdtoturn
thetableton/off,restartit,activate/deactivateairplane
mode,andchangethesoundsettings.
Volume Keys
Allowyoutoadjustthemediavolumes.Pressandhold
bothkeysatthesametimetoaccesstheQuickMemo
feature.
Charger/USB
Port
AllowsyoutoconnectthetabletandtheUSBCable
forusewiththechargeradapter,yourPC,orother
compatibleaccessories.
Back-Facing
Camera Lens
Usetotakephotosandrecordvideos.Keepitcleanfor
optimalperformance.
Speakers Usetolistentotheaudiofromtheselectedfunction
(e.g.,music,videos,soundclips,etc.).
Microphone Recordyourvoiceandisusedforvoice-activated
functions.
Infrared (IR)
LED UsedasasensorfortheQuickRemoteapp.
14
WARNING
PlacingaheavyobjectonthetabletorsittingonitcandamagetheLCD
andtouchscreenfunctions.DonotcovertheLCDproximitysensorwith
protectivefilm.Thiscouldcausethesensortomalfunction.
TIP!
•TaptheMenu Keywheneveryouopenanapplicationtocheckwhat
optionsareavailable.
•Ifthedeviceislockedanddoesnotwork,pressandholdthePower/
Lock Keyfor8secondstoturnitoff.
Charging your tablet
ArechargeableLi-ionbatteryisusedtopoweryourtablet.AUSBadapter,
whichisincludedwithyourtablet,isusedtochargethebattery.Beforeusing
yourtabletforthefirsttime,makesurethebatteryisfullycharged.
NOTE:Yourdevicehasaninternalrechargeablebattery.Foryoursafety,do
notremovethebatteryincorporatedintheproduct.
Warning!Ifthetouchscreendoesnotfunctionwhilethetablet’sinthe
processofcharging,thismaybeduetoanunstablepowersupply.As
aresult,disconnecttheUSBcablefromthedeviceorunplugtheUSB
adapterfromthepoweroutlet.

15
1 ConnecttheUSBadapterandUSBcable.
2 PlugtheUSBcable(asshownbelow)intothetablet’sCharger/USBport.
3 Plugthechargerintoanelectricalsocket.
NOTE:Thebatterymustbefullychargedinitiallytoimprovebattery
lifetime.
Optimizing Battery Life
Youcanextendyourbattery’slifebetweenchargesbyturningofffeatures
thatyoudon’tneedtorunconstantlyinthebackground.Youcanalso
monitorhowapplicationsandsystemresourcesconsumebatterypower.
To extend the life of your battery
•Turnoffradiocommunicationsthatyouaren’tusing,suchasWi-Fi,
Bluetooth,orGPS.
•Lowerscreenbrightnessandsetashorterscreentimeout.
•TurnoffautomaticsyncingforGmail™,Calendar,Contacts,andother
applications.

16
•Someapplicationsyouhavedownloadedmaycauseyourbatterypowerto
bereduced.
•Whileusingdownloadedapplications,checkthebatterychargedlevel.
To view the battery charge level
1 FromtheHomescreen,tapApps>Settings>About tablet>
Battery.
2 Thebatterystatus(chargingordischarging)andlevelaredisplayedonthe
topmenuofthescreen.
To monitor and control what uses the battery
1 FromtheHomescreen,tapApps>Settings>About tablet>
Battery>Battery use.
2 Thebottomofthescreendisplaysbatteryusagetimeandalsolists
applicationsorservicesusingbatterypowerfromgreatestamounttoleast.
Inserting a microSD card
YourdevicesupportstheuseofmicroSDmemorycardsofupto64GB
capacity.MultimediacontentscanbesavedinthemicroSDcard.
1 Placeyourfingernailinthecutoutandpullthememorycardtrayout.

17
2 InsertthemicroSDcardintotheslotwiththecontactsfacingdown.
Carefullypushthetraygentlyintothedevice.
Removing the microSD card
TosafelyremovethemicroSDcardfromyourtablet,firstyouneedto
unmountit.
1 FromtheHomescreen,tapApps>Settings>Storage>
Unmount SD card.
2 OpenthemicroSDcardtrayandpushthecardintoreleaseit.
3 GentlypullthemicroSDcardfromtheslot.
Warning!DonotremovethemicroSDcardwithoutunmountingitfirst.
Otherwise,itmaydamagethemicroSDcardaswellasyourtablet,and
thedatastoredonthemicroSDcardmaybecorrupted.
18
Formatting the microSD card
Warning!AllfilesstoredonyourmicroSDcardaredeletedwhenyou
formatthecard.
1 FromtheHomescreen,tapApps>Settings>Storage.
2 TapErase SD card(twice).
3 Ifyousetanunlockpattern,enteritandtapErase everything.Thecard
willthenbeformattedandreadytouse.
NOTE:IfthereiscontentonyourmicroSDcard,thefolderstructuremay
bedifferentafterformattingsinceallthefileswillhavebeendeleted.
Locking and unlocking the screen
Ifyoudonotusethetabletforawhile,thescreenwillbeautomatically
turnedoffandlocked.Thishelpstopreventaccidentaltouchesandsaves
batterypower.Whenyouarenotusingtheyourtablet,pressthePower/Lock
Keytolockyourtablet.
Ifthereareanyprogramsrunningwhenyoulockyourscreen,theymaybe
stillrunninginLockmode.Itisrecommendedthatyouexitallprograms
beforeenteringLockmodetoavoidunnecessarycharges(e.g.webaccess,
datacommunications).
Towakeupyourtablet,pressthePower/Lock Key.TheLockscreenwill
appear.TouchandslidetheLockscreeninanydirectiontounlockyour
Homescreen.Thelastscreenyouviewedwillopen.

19
Touch screen tips
Herearesometipsonhowtonavigateonyourtablet.
NOTE:
•Toselectanitem,touchthecenteroftheicon.
•Donotpresstoohard;thetouchscreenissensitiveenoughtopickupa
light,yetfirmtouch.
•Usethetipofyourfingertotouchtheoptionyouwant.Becarefulnotto
touchanyotherkeys.
Tap or touch
Asinglefingertapselectsitems,links,shortcutsandlettersonthe
on-screenkeyboard.
Touch and hold
Touchandholdanitemonthescreenbytouchingitandnotliftingyour
fingeruntilanactionoccurs.Forexample,toopenacontact'savailable
options,touchandholdthecontactintheContactslistuntilthecontext
menuopens.
Drag
Touchandholdanitemforamomentandthen,withoutliftingyourfinger,
moveyourfingeronthescreenuntilyoureachthetargetposition.Youcan
dragitemsontheHomescreentorepositionthem.
Your Home screen

20
Swipe or slide
Toswipeorslide,quicklymoveyourfingeracrossthesurfaceofthescreen,
withoutpausingwhenyoufirsttouchit(soyoudon’tdraganiteminstead).
Forexample,youcanslidethescreenupordowntoscrollthroughalist,or
browsethroughthedifferentHomescreencanvasesbyswipingfromleftto
right(andviceversa).
Double-tap
Double-taptozoomonawebpageoramap.Forexample,quicklydouble-
tapasectionofawebpagetoadjustthatsectiontofitthewidthofthe
screen.Youcanalsodouble-taptozoominandoutwhenviewingapicture
andwhenusingMaps.Double-tapawordtohighlightit.Double-tapcanalso
activatetheKnockONfeaturetoturnthetouchscreenonoroff.
Pinch-to-Zoom
Useyourindexfingerandthumbinapinchingorspreadingmotiontozoom
inoroutwhenusingthebrowser,Maps,orwhenbrowsingpictures.
Rotate the screen
Frommanyapplicationsandmenus,theorientationofthescreenadjuststo
thedevice'sphysicalorientation.
21
KnockON
TheKnockONfeatureallowsyoutodouble-tapthescreentoeasilyturnthe
screenonoroff.
•Quicklydouble-tapthecenterofthescreen
toturnthescreenon.
•Quicklydouble-taptheStatusBar,anempty
areaontheHomescreen,ortheLockscreen
toturnthescreenoff.
NOTE:
•YoucandisablethisfeatureintheDisplay settings.
FromtheHomescreen,tapApps>Settings>Display>
KnockON>taptheKnockONcheckbox.
22
Home screen
Simplyswipeyourfingertotheleftorrighttoviewthepanels.Youcan
customizeeachpanelwithapps,downloads,widgetsandwallpapers.
TheQuickKeysareavailableatthebottompartoftheHomescreenand
provideeasy,one-touchaccesstothefunctionsyouusethemost.
Status Bar –Showsdevicestatusinformation,
includingthetime,Wi-Fisignalstrength,battery
status,andnotificationicons.
Back Key –Returnstothepreviousscreen.Also
closespop-upitemssuchasmenus,dialogboxes,
andtheon-screenkeyboard.
Application icons –Tapanicon(application,widget,
folder,etc.)toopenanduseit.
Quick Keys –Provideeasy,one-touchaccesstothe
functionsusedmostoften.
Home Key –ReturnstotheHomescreen(or
returnstoyourdefaultHomescreencanvasfrom
anyoftheHomescreenextensioncanvases).Touch
andholdittodisplayrecentlyusedapplicationswith
accesstotheTaskManagerapplication.
Menu Key –OpensanOptionsmenuwithoptions
thataffectthecurrentscreenorapplication.This
onlyapplieswhenavailable,dependingonthe
screenorapplication.

23
Customizing the Home screen
YoucancustomizeyourHomescreenbyaddingapps,downloads,widgets
orwallpapers.Formoreconvenienceusingyourtablet,addyourfavoriteapps
andwidgetstotheHomescreen.
To add items on your Home screen:
1 TouchandholdtheemptypartoftheHomescreen.
2 TaptheApps orWidgetstab.
3 Dragthedesireditemtothedesiredlocationandliftyourfinger.
To remove an item from the Home screen:
Touchandholdtheiconyouwanttoremove,dragitto ,andliftyour
finger.
TIP! ToaddanapplicationicontotheHomescreenfromtheApps
screen,touchandholdtheapplicationyouwanttoaddanddragittothe
desiredlocation.
TIP! Youcanaddseveralappiconsinafolder.Droponeappiconover
anotheroneonaHomescreen,andafolderwillbecreated.
Customizing app icons on the Home screen
YoucancustomizeeachapplicationiconwithimagesfromyourGallery.
24
1 Touchandholdanapplicationiconuntilit’sunlockedfromitscurrent
position.Thendropitonthescreen.Theediting iconwillappearinthe
upperrightcorneroftheapplication.
2 Taptheapplicationiconagainandselectthedesiredicondesignand
sizefromtheTheme icontab.OrtouchthePhoto icontabtotakeanew
pictureorselectapicturefromtheGallery.
25
Home screen clean view
YoucanseethewallpaperwithoutitemsontheHomescreenbypinching
out.PinchinortaptheBack Keytoseeapplicationsandwidgetsagain.
Quick access
Toviewthequickaccessitems,touchanywhereinthefrontkeyareaand
dragup.Thefollowingoptionsareavailable:VoiceMate,GoogleNow,and
QuickMemo.
26
Returning to recently-used applications
1 TouchandholdtheHome Key.Thescreendisplaysapop-up
containingtheiconsofapplicationsyouusedrecently.
2 Touchanicontoopentheapplication.OrtouchtheBack Keyto
returntoyourpreviousscreen.
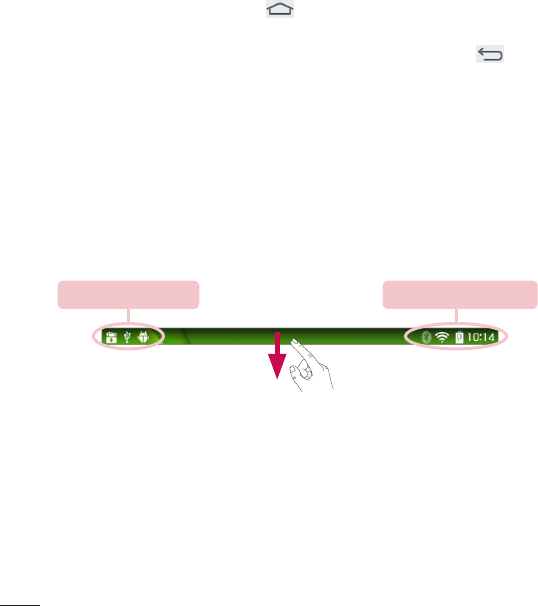
Notifications
Notificationsalertyoutothearrivalofnewmessages,calendarevents,and
alarms,aswellastoongoingevents,suchasdownloads.
FromtheNotificationsPanel,youcanviewyourtablet’scurrentstatusand
pendingnotifications.Whenanotificationarrives,itsiconappearsatthetop
ofthescreen.Iconsforpendingnotificationsappearontheleft,andsystem
iconsshowingthingslikeWi-Fiorbatterystrengthontheright.
Pending notifications System notifications
Accessing notifications
SwipetheStatusBardowntoopentheNotificationsPanelandaccess
notifications.ToclosetheNotificationsPanel,swipethebarthatisatthe
bottomofthescreenupwards.
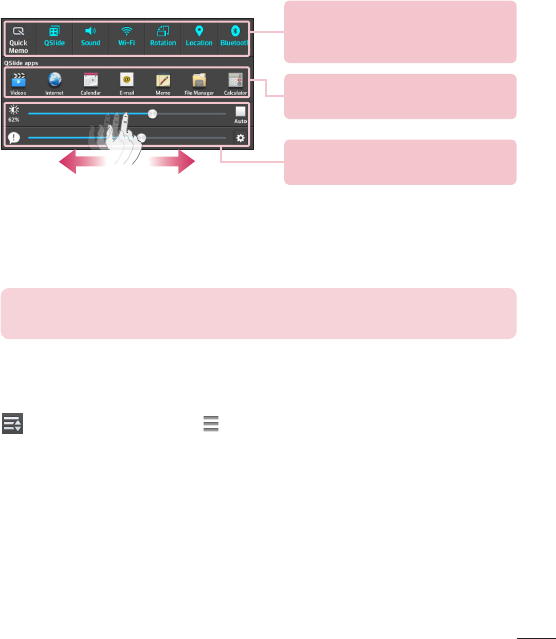
27
Quick Settings Bar–Swipetotheright
orlefttoscrollthroughthelist.Tapan
icontoactivate/deactivatethefeature.
QSlide Apps Bar–Taptoactivatea
QSlidefeature.
Slidetotheleftandrighttoadjustthe
screenbrightnessandvolume.
Quick Settings on the Notifications Panel
UsetheQuickSettingstoeasilytogglefunctionsettingslikeWi-Fi.The
QuickSettingsarelocatedatthetopoftheNotificationsPanel.
NOTE:TouchandholdaniconintheQuickSettingsBartoviewthe
function'ssettingsmenu.
To rearrange Quick Setting options on the Notification Panel
OpentheNotificationsPanel,swipetheQuickSettingstotheleft,andtap
.Torearrangeitems,drag tothedesiredlocation.Toaddmoreicons,
checkmarkthedesiredfunctions.
QSlide apps on the Notifications Panel
QSlideappsaredisplayedinabarontheNotificationsPanelbelowthe
QuickSettingsBar.Theseiconsprovideaquick,convenientwaytomulti-task
onthesamescreen(similartopicture-in-pictureonaTV).QSlidedisplaysa
smallapplicationwindowonthescreenthatcanbemoved,resized,ormade
transparent.
28
Using the QSlide apps
TapanyoftheQSlideappsinthebartoactivateit.Whenactivated,the
QSlidefeatureopenstheapplicationinawindowintheforeground,allowing
youtoaccessotherapplicationsinthebackground.Youcanopenuptotwo
QSlidewindowsatatime.
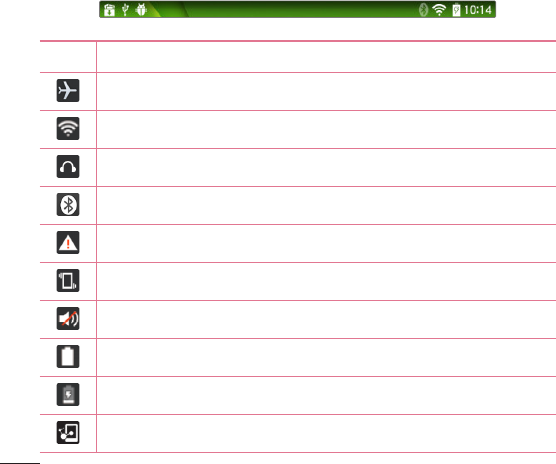
Notification icons on the Status Bar
Theiconslistedinthetablebelowaresomeofthemostcommonones.
Icon Description
Airplanemode
ConnectedtoaWi-Finetwork
Wiredheadset
Bluetoothison
Systemwarning
Vibratemodeison
Silentmodeison
Batteryfullycharged
Batteryischarging
DLNAison
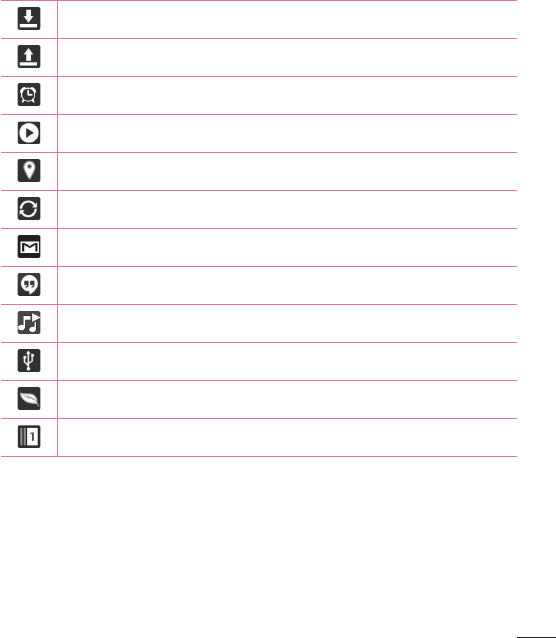
29
Downloadingdata
Uploadingdata
Analarmisset
SmartSharemusicplaying
GPSison
Dataissyncing
NewGmailmessage
NewHangoutsmessage
Asongiscurrentlyplaying
TabletisconnectedtoPCviaUSBcableorUSBtetheringisactive
Batterysavermodeison
SlideAsideison
Multiple Users
OnlyonetabletownerIDcanbecreated,butmultipleuserIDscanbe
addedsothatotherscanloginandusethetabletindependently.Eachuser
canconfiguretheirowntabletsettings,usetheirownstoragespace,and
havetheirownappupdateprivileges.

30
Tablet owner privileges
•OnlythetabletownerIDcanaddanewuserloginIDandremoveuser
IDs.
•OnlythetabletownerIDcanaccessandusethemicroSDcard.
•Thetabletownercanuninstallanyoftheuser'sapps.
Multiple tablet user limitations
• Alluserssharethesamebattery,internalmemory,anddatausagewithallof
theotherusers.
• Thelanguagesettingssetbyoneuserappliestoalloftheotherusers.
• Eachusercanconfigureanduseonlytheirowncontentanddata(e.g.,Home
screensettings,Soundsettings,etc.).
• Anyusercanacceptupdatedapppermissionsonthebehalfofallofthe
otherusers.
• Alarmswillsoundatthesettimenomatterwhichuseractivatedthealarm(s).
• Messagesandscheduledcalendareventswillbesenttonotifythespecified
userIDonly.
• OnceauserstartsprintingadocumentusingMobilePrint,theprintjobwill
continueeveniftheuserIDischanged.
• Datatransfer,download,multimediaplay,andcommunicationserviceswill
stopiftheuserIDischanged.
To add a new user on your tablet
1 FromtheHomescreen,tapApps >Settings>Users>Add user.
2 Selectthetypeofuseryouwanttoadd.
• User:Usershavetheirownappsandcontent.
• Restricted profile:Youcanrestrictaccesstoappsandcontentfrom
youraccount.
31
3 Thesetupwizardopenstohelpyouaddanewuser.TouchSet up now.
• Aftercreatinganewuser,thatpersonneedstogothroughthesetup
processupontheirfirstlogin.
To switch users
1 PressthePower/Lock Keytolockthetablet'sscreen.
2 PressthePower/Lock Keyoncemoretowakethetablet'sscreen.
3 Touchoneofthecolorediconsatthebottomofthescreen.Choosefrom
theownerIDoranyotheruserIDsyoucreated.
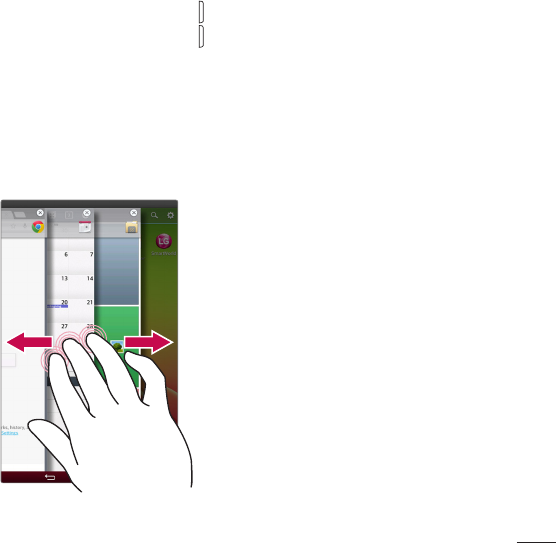
Slide Aside
SlideAsideallowsyoutoquicklyswitchbetweenthreeopenapplications(or
tasks)usingathreefingergesture.
1 Whileanapplicationisopen,placethree
fingersonthescreenandslidetotheleft.
ThecurrentscreenissavedandtheHome
screenappears.
2 Tore-openthesavedapps,placethree
fingersonthescreenandslidetotheright.
Tapthedesiredappyouwanttoopen.
32
Tip!TheSlideAsidefeaturedoesnotrecognizefewerfingers,additional
fingers,oryourpalm.
Plug & Pop
Plug&Popallowsyoutoquicklychooseappstousewhenplugginginan
earphoneorOn-the-Godevice,suchasamouseorkeyboard.
1 PluganearphoneorOTG(On-the-Go)device(i.e.,mouse,keyboard,etc.).
2 Theapplicationspanelwilldisplayandyoucanselectanapptorun.
NOTE:Youcanedittheapplicationstodisplayonthepanelandsetnotto
showtheapplicationspanel.
Setting up Plug & Pop
1 FromtheHomescreen,tapApps>Settings>Accessory.
2 TaponeofthedesiredPlug&Popfeaturesandselecttheappsyouwant
tomakeavailable.
NOTE:Drag torearrangetheorderoftheavailableapps.
3 Tap toactivatePlug&Pop.
Capturing a Screenshot
PressandholdtheVolumeDown KeyandPower/Lock Key atthesame
timefor2secondstocaptureascreenshotofthecurrentscreen.
Toviewthecapturedimage,gotoApps>Gallery >Screenshots
folder.
33
Using QuickMemo to capture a screenshot
Onthescreenyouwanttocapture,dragtheStatusBardownwardandselect
QuickMemo .
OR
PressandholdbothVolume Keysatthesametime.
Using Capture plus to capture a screenshot
Thisfeatureallowsyoutocaptureaportionofthescreeninthedefault
Internetbrowser.
1 OpentheInternetappandnavigatetothepageyouwanttocapturea
screenshotof.
2 TaptheMenu Key>Capture plus.ChooseCrop photoorCrop
pictureandselectAlwaysorJust once.
3 Adjusttheblueboxtothedesiredsize,andthentapOK.Theselected
areaissavedtotheCapture plusfolderintheGallery.
Entering Text
Youcanentertextusingtheon-screenkeyboard.Theon-screenkeyboard
appearsautomaticallyonthescreenwhenyouneedtoentertext.To
manuallydisplaythekeyboard,simplytouchatextfieldwhereyouwantto
entertext.
Using the keypad & entering text
Taponcetocapitalizethenextletteryoutype.Double-tapforallcaps.
Taptoswitchtothenumbersandsymbolskeyboard.
Taptousethehandwritingfunction.Touchandholdtoaccessthe
keyboardsettingsandClipTray.Thiskeychangesdependingonthe
lastfeatureyouuse.

34
Taptoenteraspace.
Taptocreateanewlineinthemessagefield.
Taptodeletethepreviouscharacter.
Entering special characters
Theon-screenkeyboardallowsyoutoenterspecialcharacters(e.g."á").
Forexample,touchandholdthedesiredkey(forexample,the"a"key).After
thedesiredcharacterappears,slideyourfingeroveritandliftitofftoenter
it.
NOTE:Asymbolatthetoprightcornerofakeyindicatesthatadditional
charactersareavailable.
35
Whenyoufirstturnonyourtablet,youhavetheopportunitytoactivatethe
network,tosignintoyourGoogleAccountandselecthowyouwanttouse
certainGoogleservices.
To set up your Google account
•SignintoaGoogleAccountfromthepromptedsetupscreen.
OR
•FromtheHomescreen,tapApps>Appstab>Settings >
Accounts & sync>Add account>Google.
IfyouhaveaGoogleaccount,touchExisting,enteryouremailaddressand
password,thentouch .Otherwise,touchNewandenterthenecessary
informationtocreateanewGoogleAccount.
OnceyouhavesetupyourGoogleaccountonyourtablet,yourtablet
automaticallysynchronizeswithyourGoogleaccountontheWeb.
Yourcontacts,Gmailmessages,Calendareventsandotherinformationfrom
theseapplicationsandservicesontheWebaresynchronizedwithyourtablet.
(Thiswilldependonyoursynchronizationsettings.)
Aftersigningin,youcanuseGmail™andtakeadvantageofGoogleservices
onyourtablet.
Google account setup
36
Wi-Fi
WithWi-Fi,youcanusehigh-speedInternetaccesswithinthecoverageof
thewirelessaccesspoint(AP).EnjoywirelessInternetusingWi-Fi,without
extracharges.
Connecting to Wi-Fi networks
TouseWi-Fionyourtablet,youneedtoaccessawirelessaccesspointor
‘hotspot’.Someaccesspointsareopenandyoucansimplyconnecttothem.
Othersarehiddenorusesecurityfeatures;youmustconfigureyourtabletto
beabletoconnecttothem.TurnoffWi-Fiwhenyou'renotusingittoextend
thelifeofyourbattery.
Turning Wi-Fi on and connecting to a Wi-Fi network
1 FromtheHomescreen,tapApps>Appstab>Settings>Wi-Fi.
2 Tap toturnWi-FionandstartscanningforavailableWi-Finetworks.
3 TapSearchtoseealistofactiveandin-rangeWi-Finetworks.
• Securednetworksareindicatedbyalockicon.
4 Touchanetworktoconnecttoit.
• Ifthenetworkissecured,youarepromptedtoenterapasswordor
othercredentials.(Askyournetworkadministratorfordetails)
5 TheStatusBardisplaysiconsthatindicateyourWi-Fistatus.
Bluetooth
YoucanuseBluetoothtosenddatabyrunningacorrespondingapplication,
butnotfromtheBluetoothmenuasonmostothermobilephones.
Connecting to Networks and Devices
37
NOTE:
•LGisnotresponsiblefortheloss,interceptionormisuseofdatasentor
receivedviatheBluetoothwirelessfeature.
•Alwaysensurethatyoushareandreceivedatawithdevicesthatare
trustedandproperlysecured.Ifthereareobstaclesbetweenthedevices,
theoperatingdistancemaybereduced.
•Somedevices,especiallythosethatarenottestedorapprovedby
BluetoothSIG,maybeincompatiblewithyourdevice.
Turning on Bluetooth and pairing up your tablet with a Bluetooth
device
Youmustpairyourdevicewithanotherdevicebeforeyouconnecttoit.
1 FromtheHomescreen,tapApps>Appstab>Settings >
Bluetooth.
2 TaptheBluetoothswitch toturniton.
3 Tapthecheckboxnexttoyourtablet'snametomakeyourtabletvisibleto
otherBluetoothdevices.
NOTE:Toselectthelengthoftimethatyourdevicewillbevisible,tapthe
Menu Key>Visibility timeout.
4 Alistofavailabledeviceswillbedisplayed.Tapthedeviceyouwanttopair
withfromthelist.
NOTE:Dependingonthetypeofdevice,youmayhavetoentermatching
codes,confirmmatchingcodes,orthedevicesmayautomaticallypair.
Oncepairingissuccessful,yourtabletwillconnecttotheotherdevice.
38
NOTE:Yourtabletdoesn'tsupportHandsfreeProfile.Therefore,theuse
ofcallfeatureswithsomeofaccessories,suchasBluetoothheadsetsor
Bluetooth-enableddevices,maynotbeavailableforthisdevice.
Send data using the Bluetooth feature
1 Opentheitemandtap .
OR
TouchandholdtheitemandselectShare.
OR
OpentheitemandtaptheMenu Key>Share.
2 TapBluetoothtoshareviaBluetooth.
NOTE:Themethodforselectinganoptionmayvarybydatatype.
3 SearchforandpairwithaBluetooth-enableddevice.
Receive data using the Bluetooth feature
1 RefertotheBluetoothdevice'suserguidetosendafiletoyourphone.
BothdevicesmustbepairedandBluetoothmustbeon.
2 PairthedevicesandtapAcceptwhenyoureceiveaBluetooth
AuthorizationRequesttoacceptthefile(s).
SmartShare
YoucanusetheSmartSharefeatureeasilyintheGallery,Music,Videoapps,
andothers.
39
Enjoying the content via a variety of devices
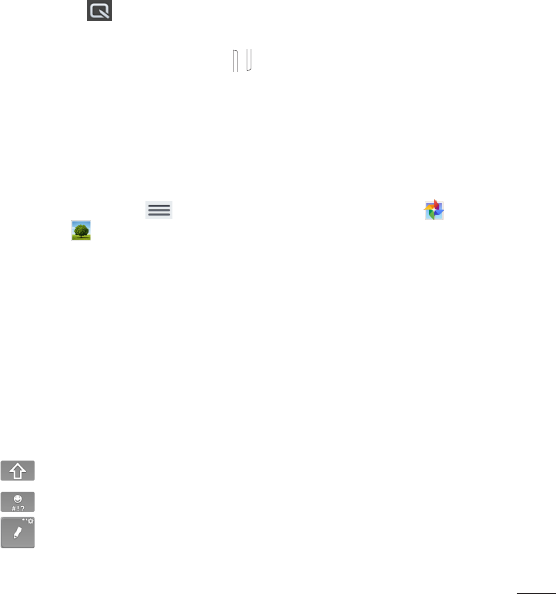
Youcanshareyourtablet'scontentwithavarietydevices.Tap toshare
thecontentintheGallery,Music,Videos,POLARIS Viewer 5apps.
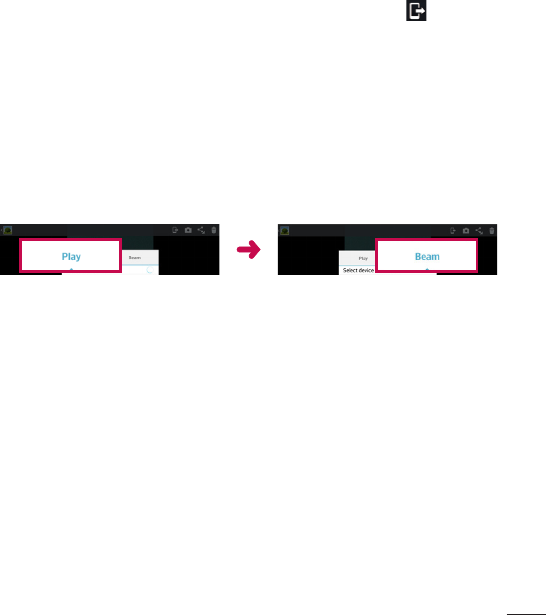
Playing/Sending
Play–YoucanplaythecontentviaaTV,aBluetoothspeakeroretc.
Beam–YoucansendthecontenttothedeviceofBluetoothand
SmartShareBeamsupported.
•SmartShare Beam–Thisallowstotransferthecontentfeaturefastvia
Wi-FiDirect.
< Play > < Beam >
Enjoying the content from Nearby devices
Youcanenjoythecontentfromnearbydevices(i.e.PC,NAS,Mobile)inthe
Gallery,Music,Videosapps.
Connecting devices
ConnectyourdeviceandotherdevicessupportedbyDLNAinthesame
Wi-Finetwork.
Searching other devices
TapNearby devices,thenyoucanseetheDLNA-supporteddevices.
Connecttothedevicetoviewthecontent.

40
Using the content from the Cloud
Youcanusethecontentfromthecloud(i.e.,Dropbox)intheGallery,Music,
Videosapps.
Using the Cloud
NOTE:Thesupportedfeaturesmayvarydependingonthecloud.
Retrievingdatamaytakesometimedependingonthecloud.
1 SelectCloudintheGallery,Music,Videosapps.
2 Selectthecloudwhatyouwanttouseandlogin.
3 Youcanusethecontentofthecloudafterloggingin.
4 Setthecloudsettingstoselecttheapptousethecloud.
PC connections with a USB cable
YoucanconnectyourtablettoyourPCtochargeit,transferitemstothePC
fromthetabletandviceversa.
Transferring music, photos and videos using the USB mass
storage mode
1 ConnectyourtablettoaPCusingaUSBcable.
2 Ifyouhaven'tinstalledtheLGAndroidPlatformDriveronyourPC,you
willneedtomanuallychangethesettings.FromtheHomescreen,tap
theMenu Key>System settings>PCconnection>Select USB
connection method>Media sync (MTP).
3 YoucannowviewthemassstoragecontentonyourPCandtransferthe
files.

41
Synchronize with Windows Media Player
EnsurethatWindowsMediaPlayerisinstalledonyourPC.
1 UsetheUSBcabletoconnectthetablettoaPConwhichWindows
MediaPlayerhasbeeninstalled.
2 SelecttheMedia sync (MTP)option.
3 Whenconnected,apop-upwindowwillappearonthePC.Selectthe
WindowsMediaPlayeroptiontosynchronizemusicfiles.
4 Editorenteryourdevice’snameinthepop-upwindow(ifnecessary).
5 Selectanddragmusicfilestothesynclist.
6 Startsynchronization.
•ThefollowingrequirementsmustbesatisfiedtosynchronizewithWindows
MediaPlayer.
Items Requirement
OS MicrosoftWindowsXPSP2,Vistaor
higher
WindowMediaPlayerversion WindowsMediaPlayer10orhigher
•IftheWindowsMediaPlayerversionisolderthan10,installversion10or
newer.
42
Youcanaddcontactsonyourtabletandsynchronizethemwiththecontacts
inyourGoogleAccountorotheraccountsthatsupportsyncingcontacts.
Searching for a contact
1 FromtheHomescreen,tapContactstoopenyourcontactlist.
2 TaptheSearch contactsboxandenterthecontact'sname.Youcanalso
tapaletteralongtheleftsideofthescreentoaccessnamesstartingwith
thechosenletter.
Adding a new contact
1 FromtheHomescreen,tapContacts .
2 Tapthe .Selectthedesiredaccount(ifapplicable).
3 Ifyouwanttoaddapicturetothenewcontact,tap .Choosefrom
Take photototakeapictureusingthecameraorSelect from Gallery.
Thenbrowseforanimageandselectit.
4 Tap toentermorespecificnameinformation.
5 Enterthedetailsaboutyourcontact.
6 TapSave.
Favorite Contacts
Youcanclassifyfrequentlycalledcontactsasfavorites.
To add a contact to your favorites
1 FromtheHomescreen,tapContactstoopenyourcontacts.
2 Tapacontacttoviewitsdetails.
Contacts
43
3 Tapthestar totherightofthecontact’sname.Thestarturnsgold
andthecontactisaddedtoyourfavorites.
To remove a contact from your favorites list
1 FromtheHomescreen,tapContactstoopenyourcontacts.
2 TaptheFavoritestabtoviewyourfavoritecontacts.
3 Tapacontacttoviewitsdetails.
4 Tapthegoldstartotherightofthecontact’sname.Thestarturnsgrey
andthecontactisremovedfromyourfavorites.
Creating a group
1 FromtheHomescreen,tapContactstoopenyourcontacts.
2 TouchtheGroupstab ,thentouch .
3 Enteranameforthenewgroup.
•TapAdd memberstoaddcontactentriestoyournewgroup.
•TaptheACCOUNTfieldtochangetheaccount(s)youwanttosavethe
newgroupto.
4 TouchSavetosavethegroup.
NOTE:Ifyoudeleteagroup,thecontactsassignedtothatgroupwillnot
belost.Theywillremaininyourcontacts.
44
YoucanusetheEmailapplicationtoreademailsfromserviceslikeYahoo!,
MSN,andAOL.TheEmailapplicationsupportsthefollowingaccounttypes:
POP3,IMAPandExchange.
Yourserviceproviderorsystemadministratorcanprovideyouwiththe
accountsettingsyouneed.
Managing an email account
TaptheEmailontheHomescreen.ThefirsttimeyouopentheEmail
application,aset-upwizardopenstohelpyoutosetupanemailaccount.
Aftertheinitialsetup,thecontentsofyourinboxaredisplayed.Ifyouhave
addedmorethanoneaccount,youcanswitchamongaccounts.
To add another email account:
•OpentheEmailapplicationandtaptheMenu Key>Settings > .
To switch between accounts:
Ifyou'veaddedmorethanoneaccount,youcaneasilyswitchbetweenthem.
Fromanyemailfolder,tapthecurrentaccount(atthetopofthescreen),
thentaptheaccountyouwanttoaccess.
To change an E-mail account’s settings:
OpentheE-mailapplicationandtaptheMenu Key>Settings >
General settingstoconfiguresettingsthatapplytoallofyouraccounts.Tap
anindividualaccounttoconfiguresettingsonlyforthatparticularaccount.
To delete an email account:
•OpentheEmailapplicationandtaptheMenu Key>Settings > Menu
Key>Remove account>touchanaccountyouwanttodelete>
Remove>Yes.
Email

45
Working with account folders
OpentheE-mailapplicationandtaptheMenu KeyandselectFolders.
EachaccounthasanInbox,Outbox,SentandDraftsfolder.Dependingon
thefeaturessupportedbyyouraccount’sserviceprovider,youmayhave
additionalfolders.
Composing and sending email
1 WhileintheEmailapplication,tapCompose .
2 Enteranaddressforthemessage’sintendedrecipient.Asyouenter
text,matchingaddresseswillbeproposedfromyourContacts.Separate
multipleaddressesusingsemicolons.
3 TapAttach toattachfiles,ifrequired.
4 Enterthesubjectandyourmessage.
5 TapSendtosendthemessage.
Ifyouaren’tconnectedtoanetwork,forexample,ifyou’reworkingin
airplanemode,themessagesthatyousendwillbestoredinyourOutbox
folderuntilyouconnecttoanetworkagain.Ifitcontainsanypending
messages,theOutboxwillbedisplayedontheAccountsscreen.
Receiving emails
WhenanewemailarrivesinyourInbox,you'llbenotifiedbyasound
orvibration(dependingonyoursoundandvibrationsettings)andits
notificationiconappearsontheStatusBar.
46
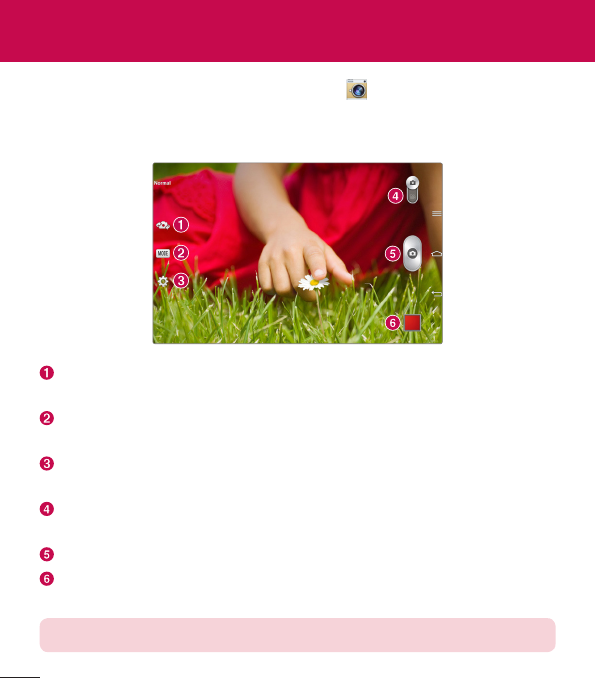
ToopentheCameraapplication,tapCameraontheHomescreen.
Getting to know the viewfinder
Swap camera–Switchbetweentheback-facingcameralensandthe
front–facingcameralens.
Shot mode–Allowsyoutochooseashotmodetodefinehowthepicture
willbetaken.
Settings–Touchthisicontoopenthesettingsmenu.SeeUsing the
advanced settingsonthefollowingpage.
Video mode–Tap(orslide)totogglebetweenCameramodeandVideo
mode.
Capture –Takesapicture.
Gallery–Touchtoviewthelastphotoyoucaptured.Thisenablesyouto
accessyourGalleryandviewsavedphotoswhileincameramode.
NOTE:Pleaseensurethecameralensiscleanbeforetakingpictures.
Camera
47
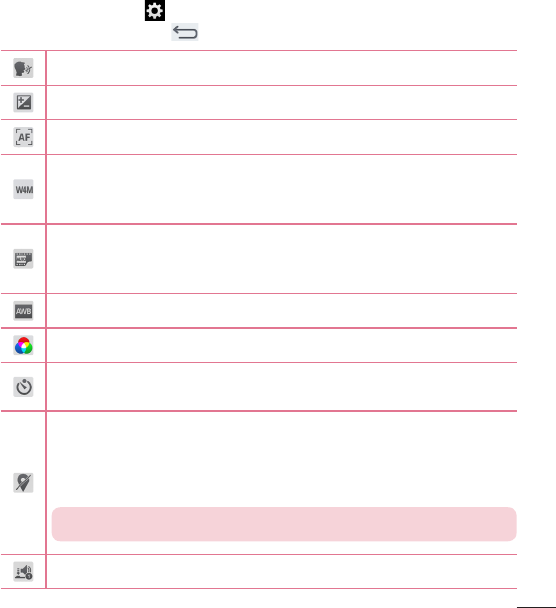
Using the advanced settings
Intheviewfinder,tap toopentheadvancedoptions.Afterselectingthe
option,taptheBack Key.
Takephotosbyvoicecommand.
Definesandcontrolstheamountofsunlightenteringthephoto.
Setsthefocusmode.
Selectsphotoresolution.Ifyouchooseahighresolution,thefilesize
willincrease,whichmeansyouwillbeabletostorefewerphotosin
thememory.
TheISOratingdeterminesthesensitivityofthecamera'slight
sensor.ThehighertheISO,themoresensitivethecamera.Thisis
usefulindarkerconditionswhenyoucannotusetheflash.
Improvescolorqualityinvariouslightingconditions.
Appliesartisticeffectstoyourpictures.
Setsadelayafterthecapturebuttonispressed.Thisisidealifyou
wanttobeinthephoto.
Activatethistouseyourtablet'slocation-basedservices.Take
pictureswhereveryouareandtagthemwiththelocation.Ifyou
uploadtaggedpicturestoablogthatsupportsgeo-tagging,you
canseethepicturesdisplayedonamap.
NOTE:ThisfunctionisonlyavailablewhenGPSisturnedon.
Selectsashuttersound.
48
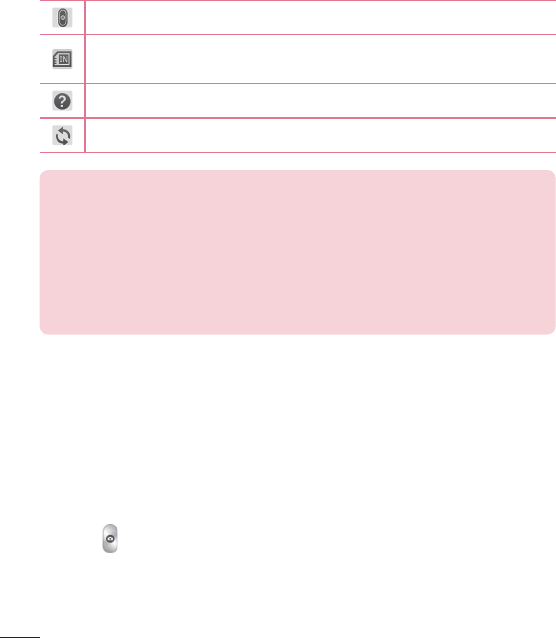
SettousetheVolumeKeyforcapturingpicturesorzooming.
Thissetsthelocationwhereyouwanttosaveyourpictures.Choose
fromInternalstorageandSDcard.
Opensthehelpguidetoknowhowafunctionoperates.
Restoresallcameradefaultsettings.
TIP!
•Whenyouexitthecamera,somesettingsreturntotheirdefaults,such
aswhitebalance,coloreffect,andtimer.Checkthesebeforeyoutake
yournextphoto.
•TheSettingsmenuissuperimposedovertheviewfinder,sowhenyou
changephotocolororqualityelements,youwillseeapreviewofthe
changedimagebehindtheSettingsmenu.
Taking a photo
1 OpentheCameraapplication.
2 Pointthelenstowardsthesubjectyouwanttophotograph.
3 Afocusboxwillappearinthecenteroftheviewfinderscreen.Youcan
alsotapanywhereonthescreentofocusonthatspot.
4 Whenthefocusboxturnsgreen,thecamerahasfocusedonyoursubject.
5 Touch tocapturethephoto.
49
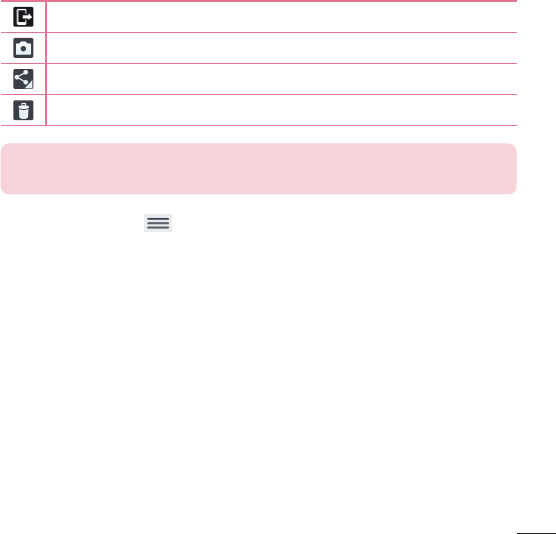
Once you've taken a photo
1 Taptheimagepreviewatthebottomofthescreentoviewthelastphoto
youcaptured.
2 TapGallery,thentapAlwaysorJust once.
TouchtoshareyourphotousingtheSmartSharefunction.
Touchtotakeanotherphotoimmediately.
Touchtosendyourphototoothers.
Touchtodeletethephoto.
TIP!Ifyouhaveasocialnetworkingaccountandsetituponyourtablet,
youcanshareyourphotowithyoursocialnetworkingcommunity.
TouchtheMenu Keytoopenthefollowingoptions.
Set image as–TouchtousethephotoasaContact photo,Home screen
wallpaper,Lock screen wallpaperorWallpaper.
Move–Touchtomovethephototoanotheralbum.
Copy–Touchtocopytheselectedphotoandsaveittoanotheralbum.
Copy to Clip Tray–TouchtocopythephotoandstoreintheClipTray.
Rename–Touchtoeditthenameoftheselectedphoto.
Rotate left/right–Touchtorotatethepicturetotheleftorright.
Crop–Cropyourphoto.Moveyourfingeracrossthescreentoselectthe
areatobecropped.
Edit–Touchtoeditthephoto.

50
Slideshow–Automaticallydisplaysaslideshowofallyourpictures.
Add location–Toaddthelocationinformation.
Print–Allowsyoutoprintthepicture.
Details–Displaysmoreinformationaboutthepicture.
Viewing your saved photos
Youcanaccessyoursavedphotoswhenincameramode.Justtapthe
imagepreviewinthebottomofthescreenandyourGallerywillbedisplayed.
1 Choosetheapptousetoviewand/oredityourphotos.TapGalleryor
Photos.
2 TapAlwaysorJust once.
•Toviewmorephotos,scrollleftorright.
•Tozoominorout,double-tapthescreenorplacetwofingersand
spreadthemapart(moveyourfingersclosertogethertozoomout).
51
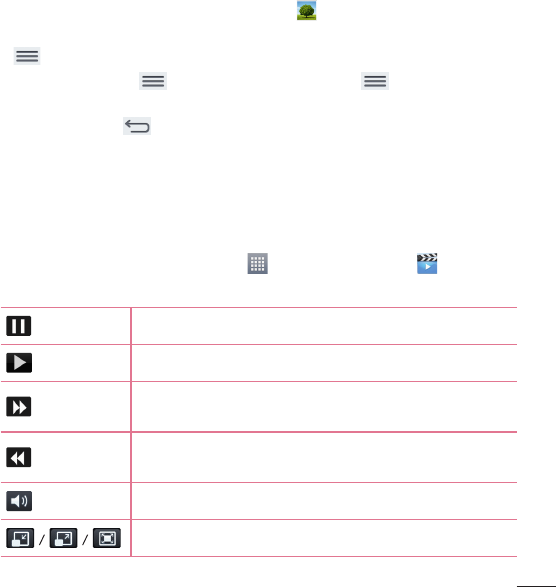
Toopenthevideocamera,tapCameraontheHomescreen,thentap
theVideo modeicon (ontheviewfinder)toswitchtovideomode.
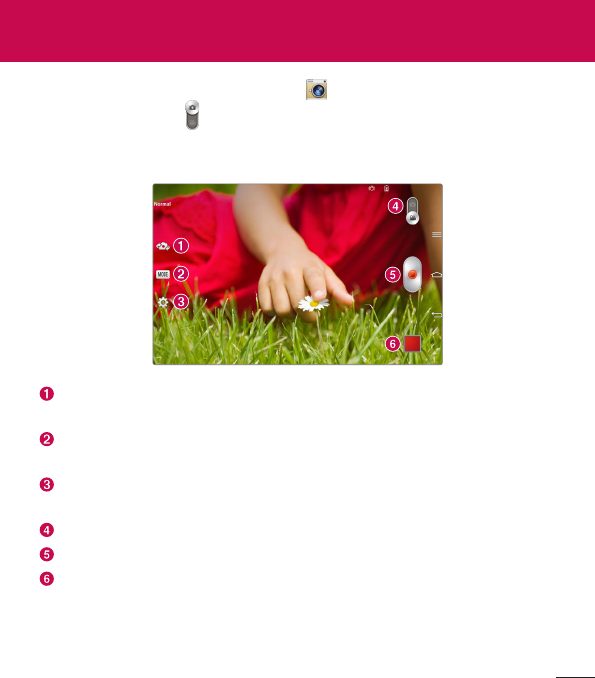
Getting to know the viewfinder
Swap camera–Switchbetweentheback-facingcameralensandthe
front–facingcameralens.
Record Mode–Allowsyoutochoosearecordmodetodefinehowthe
videowillberecorded.
Settings–Touchthisicontoopenthesettingsmenu.SeeUsing the
advanced settingsonthefollowingpage.
Camera mode–Touchandslideupthisicontoswitchtocameramode.
Record–Touchtostartrecordingavideo.
Gallery–Touchtoviewthelastvideoyourecorded.Thisenablesyouto
accessyourGalleryandviewyoursavedvideoswhileinvideomode.
Video camera
52
TIP!Whenrecordingavideo,placetwofingersonthescreenandpinch
tousetheZoomfunction.
NOTE:Makesurethatthemicrophoneisnotblockedwhenrecordinga
videooraudioclip.
Using the advanced settings
Usingtheviewfinder,touch toopenalltheadvancedoptions.
Taptosetthesize(inpixels)ofthevideoyouarerecording.
Definesandcontrolstheamountofsunlightenteringthevideo.
Preventsshakingwhilerecordingtogethighvideoquality.
Improvescolorqualityinvariouslightingconditions.
Chooseacolortonetouseforyournewview.
Activatethistouseyourtablet'slocation-basedservices.
SettousetheVolumeKeyforrecordingvideoorzooming.
Thissetsthelocationwhereyouwanttosaveyourvideos.Choose
fromInternalmemoryandSDcard.
Opensthehelpguidetoknowhowafunctionoperates.
Restoresallcameradefaultsettings.
53
Recording a video
1 OpentheCameraapplicationandtouchtheVideo modeicon .
2 Thevideocameraviewfinderappearsonthescreen.
3 Pointthelenstowardsthesubjectyouwishtocaptureinyourvideo.
4 Touch oncetostartrecording.
5 Atimershowingthelengthofthevideowillappear.
6 Touch onthescreentostoprecording.
TIP!
•Tap topausetherecording.
•Tap totakeascreenshotwhilerecordingavideo.
After recording a video
Taptheimagepreviewatthebottomofthescreentoviewthelastvideoyou
recorded.
TouchtoshareyourvideousingtheSmartSharefunction.
Touchtorecordanothervideoimmediately.
Touchtosendyourvideotoothers.
Touchtodeletethevideo.

54
Watching your saved videos
Accessyoursavedvideoswheninvideocameramodebytappingtheimage
previewinthelower-rightcorneroftheviewfinder.
1 Intheviewfinder,taptheimagepreviewatthebottomofthescreen.
2 YourGallerywillappearonthescreenwithyourmostrecentrecorded
videodisplayed.Swipetothelefttoscrolltoyourothervideos.
3 TapthePlayicon onavideotoplayitautomatically.
NOTE:YoucanviewyourvideosintheGallery,Photos,andVideosapps.
NOTE:Donottopresstoohard;thetouchscreenissensitiveenoughto
pickupalight,butfirmtouch.
Adjusting the volume when viewing a video
Toadjustthevolumeofavideowhileitisplaying,usetheVolumeKeyson
therightsideofthetablet.
55
Gallery
Youcanstoremultimediafilesininternalmemoryforeasyaccesstoallyour
multimediafiles.Usethisapplicationtoviewmultimediafileslikepictures
andvideos.
FromtheHomescreen,tapApps>Appstab>Gallery .
YoucanmanageandshareallyourimageandvideofileswiththeGallery.
NOTE:
•Somefileformatsarenotsupported,dependingonthesoftware
installedonthedevice.
•Somefilesmaynotplayproperly,dependingonhowtheyareencoded.
•Ifthefilesizeexceedstheavailablememory,anerrorcanoccurwhen
youopenfiles.
Viewing pictures
LaunchingtheGallerydisplaysyouravailablefolders.Whenanother
application,suchasEmail,savesapicture,theDownloadsfolderis
automaticallycreatedtocontainthepicture.Likewise,capturingascreenshot
automaticallycreatestheScreenshotsfolder.Tapafoldertoopenit.
Picturesaredisplayedinorderbycreationdate.Selectapicturetoviewitfull
screen.Scrollleftorrighttoviewthenextorpreviousimage.
Multimedia
56
Zooming in and out
Useoneofthefollowingmethodstozoominonanimage:
•Double-tapanywheretozoomin.Double-tapagaintoreturntofullscreen
view.
•Placetwofingersanywhereontheimageandspreadthemaparttozoom
in.Tozoombackout,pinchthemtogetherordouble-tapthescreen.
Playing videos
OpentheGalleryapp andselectanalbum.ThePlayicon is
displayedonvideofiles.Tapanimagetoselectit.Selecttheapptoplayit
(tapthePhotosapp ortheVideosapp ),thentapAlwaysorJust
onceandthevideobeginsplayback.
NOTE:
•WhenusingtheVideosapptoplayavideo,slidetheleftsideofthe
screenupanddowntoadjustthescreenbrightness.Slidetherightside
ofthescreenupanddowntoadjustthevolume.
•WhenusingtheVideosapptoplayavideo,slidethescreenleftorright
torewindorfast-forward.
Deleting images and videos
Useoneofthefollowingmethods:
•Inafolder,tap andselectthephotosandvideosyouwanttodelete,
thentapDelete.
•Whenviewingaphotoorvideo,tap ,thentapYe s toconfirm.
Setting as wallpaper
Whenviewingaphoto,touchtheMenu Key>Set image asandselect
Contact photo,Home screen wallpaper,Lock screen wallpaperorWallpaper.
57
Slideshow
Youcanviewyourphotosinaslideshowbyalbumorbyselectingallofyour
photos.FromtheHomescreen,tapGallery .
•Tapthealbumwiththephotosyouwanttoview,thentaptheMenuKey
>Slideshow>verifytheslideshowsettings>Start.
•TaptheMenuKey>View all files>MenuKey>Slideshow>
verifytheslideshowsettings>Start.
TaptheBackKeytostopplayingtheslideshow.
Videos
Yourtablethasavideoplayerthatletsyouplayallofyourfavoritevideos.
Playing a video
1 FromtheHomescreen,tapApps>Appstab>Videos .
2 Selectthevideoyouwanttoplay.
Touchtopausevideoplayback.
Touchtoresumevideoplayback.
Touchandholdtofast-forwardin3secondincrements.
Taponcetofast-forward10seconds.
Touchandholdtorewindin3secondincrements.Tap
oncetorewind10seconds.
Touchtomanagethevideovolume.
Touchtochangetheratioofthevideoscreen.
58
TouchaccessQSlideanddisplaythevideoinsmall
window.
TouchtoshareyourvideoviatheSmartSharefunction.
Taptocaptureimageduringplayingavideo.
Touchtolock/unlockavideoscreen.
Tochangethevolumewhilewatchingavideo,presstheVolumeKeysonthe
rightsideofthetablet.
Touchandholdavideointhelisttoaccessthefollowingoptions:
Share,Delete,TrimandDetails.
TIP!Whilewatchingavideo,slideupanddownalongtheleftsideofthe
screentoadjustthescreenbrightness.Slideupanddownalongtheright
sideofthescreentoadjustthevolume.
Music
Yourtablethasamusicplayerthatletsyouplayallyourfavoritetracks.To
accessthemusicplayer,fromtheHomescreen,tapApps>Appstab>
Music .
Playing a song
1 FromtheHomescreen,tapApps>Appstab>Music .
2 TouchtheSongstab.
3 Selectthesongyouwanttoplay.
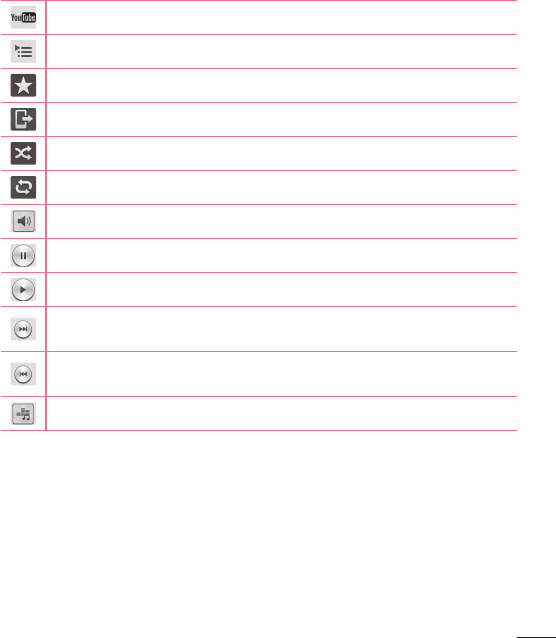
59
TouchtofindthesongonYouTube.
Touchtoseethecurrentplaylist.
Touchtosetthecurrentsongasafavorite.
TouchtoshareyourmusicviatheSmartSharefunction.
Touchtosetshufflemode.
Touchtosetrepeatmode.
Touchtomanagethemusicvolume.
Touchtopauseplayback.
Touchtoresumeplayback.
Touchtoskiptothenexttrackonthealbumorintheplaylist.Touch
andholdtofast-forward3seconds.
Touchtogobacktothebeginningofthesong.Touchtwiceto
returntotheprevioussong.Touchandholdtorewind3seconds.
Touchtosettheaudioeffect.
Tochangethevolumewhilelisteningtomusic,presstheVolumeKeyson
therightsideofthetablet.
Touchandholdanysonginthelisttoaccessthefollowingoptions:
Play,Add to playlist,Share,Delete,DetailsandSearch.

60
NOTE:
•Somefileformatsarenotsupported,dependingonthedevicesoftware.
•Ifthefilesizeexceedstheavailablememory,anerrorcanoccurwhen
youopenfiles.
•Musicfilecopyrightsmaybeprotectedbyinternationaltreatiesand
nationalcopyrightlaws.Therefore,itmaybenecessarytoobtain
permissionoralicencetoreproduceorcopymusic.Insomecountries,
nationallawsprohibitprivatecopyingofcopyrightedmaterial.Before
downloadingorcopyingthefile,checkthenationallawsoftherelevant
countryconcerningtheuseofsuchmaterial.