LG Electronics USA V496 Multi-band WCDMA/LTE Tablet with WLAN and Bluetooth User Manual 1

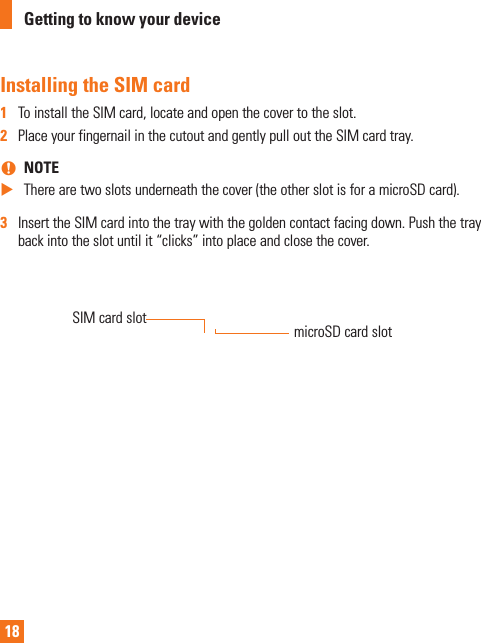
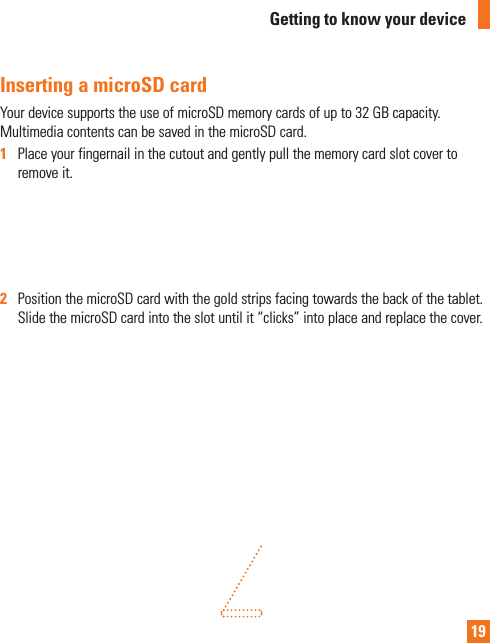
LG Electronics MobileComm USA, Inc. Multi-band WCDMA/LTE Tablet with WLAN and Bluetooth Users Manual 1

Contents

Users Manual 1

User GuideLG-V496All screen shots in this guide are simulated.Actual displays and the color of the tablet may vary.Some of the contents in this manual may differ from your tablet dependingon the software of the tablet or your service provider.www.lg.comMFL00000000 (1.0)
1. WHAT THIS WARRANTY COVERS:LG offers you a limited warranty that the enclosed subscriber unit and its enclosed accessories will be free from defects in material and workmanship, according to the following terms and conditions:(1)  The limited warranty for the product extends for TWELVE (12) MONTHS beginning on the date of purchase of the product with valid proof of purchase, or absent valid proof of purchase, FIFTEEN (15) MONTHS from date of manufacture as determined by the unit’s manufacture date code.(2)  The limited warranty extends only to the original purchaser of the product and is not assignable or transferable to any subsequent purchaser/end user.(3)  This warranty is good only to the original purchaser of the product during the warranty period as long as it is in the U.S., including Alaska, Hawaii, U.S. Territories and Canada.(4)  The external housing and cosmetic parts shall be free of defects at the time of shipment and, therefore, shall not be covered under these limited warranty terms.(5)  Upon request from LG, the consumer must provide information to reasonably prove the date of purchase.(6)  The customer shall bear the cost of shipping the product to the Customer Service Department of LG. LG shall bear the cost of shipping the product back to the consumer after the completion of service under this limited warranty.2. WHAT THIS WARRANTY DOES NOT COVER:(1)  Defects or damages resulting from use of the product in other than its normal and customary manner.(2)  Defects or damages from abnormal use, abnormal conditions, improper storage, exposure to moisture or dampness, unauthorized modifications, unauthorized connections, unauthorized repair, misuse, neglect, abuse, accident, alteration, improper installation, or other acts which are not the fault of LG, including damage caused by shipping, blown fuses, spills of food or liquid.(3)  Breakage or damage to antennas unless caused directly by defects in material or workmanship.(4)  That the Customer Service Department at LG was not notified by consumer of the alleged defect or malfunction of the product during the applicable limited warranty period.(5) Products which have had the serial number removed or made illegible.(6)  This limited warranty is in lieu of all other warranties, express or implied either in fact or by operations of law, statutory or otherwise, including, but not limited to any implied warranty of marketability or fitness for a particular use.LIMITED WARRANTY STATEMENT
(7) Damage resulting from use of non LG approved accessories.(8)  All plastic surfaces and all other externally exposed parts that are scratched or damaged due to normal customer use.(9) Products operated outside published maximum ratings.(10) Products used or obtained in a rental program.(11) Consumables (such as fuses).3. WHAT LG WILL DO:LG will, at its sole option, either repair, replace or refund the purchase price of any unit that is covered under this limited warranty. LG may choose at its option to use functionally equivalent re-conditioned, refurbished or new units or parts or any units. In addition, LG will not re-install or back-up any data, applications or software that you have added to your tablet. It is therefore recommended that you back-up any such data or information prior to sending the unit to LG to avoid the permanent loss of such information.4. STATE LAW RIGHTS:No other express warranty is applicable to this product. THE DURATION OF ANY IMPLIED WARRANTIES, INCLUDING THE IMPLIED WARRANTY OF MARKETABILITY OR MERCHANTABILITY OR FITNESS FOR A PARTICULAR PURPOSE, IS LIMITED TO THE DURATION OF THE EXPRESS WARRANTY HEREIN. LG SHALL NOT BE LIABLE FOR THE LOSS OF THE USE OF THE PRODUCT, INCONVENIENCE, LOSS OR ANY OTHER DAMAGES, DIRECT OR CONSEQUENTIAL, ARISING OUT OF THE USE OF, OR INABILITY TO USE, THIS PRODUCT OR FOR ANY BREACH OF ANY EXPRESS OR IMPLIED WARRANTY, INCLUDING THE IMPLIED WARRANTY OF MARKETABILITY OR MERCHANTABILITY OR FITNESS FOR A PARTICULAR PURPOSE APPLICABLE TO THIS PRODUCT.Some states do not allow the exclusive limitation of incidental or consequential damages or limitations on how long an implied warranty lasts; so these limitations or exclusions may not apply to you. This warranty gives you specific legal rights and you may also have other rights which vary from state to state.5. HOW TO GET WARRANTY SERVICE:To obtain warranty service, please call or fax to the following telephone numbers from anywhere in the continental United States:Tel. 1-800-793-8896 or Fax. 1-800-448-4026Or visit http://us.lgservice.com. Correspondence may also be mailed to:LG Electronics Service- Mobile Handsets, P.O. Box 240007, Huntsville, AL 35824
DO NOT RETURN YOUR PRODUCT TO THE ABOVE ADDRESS. Please call or write for the location of the LG authorized service center nearest you and for the procedures for obtaining warranty claims.7.11 Warranty Laws• The following laws govern warranties that arise in retail sales of consumer goods:• The California Song-Beverly Consumer Warranty Act [CC §§1790 et seq],• The California Uniform Commercial Code, Division Two [Com C §§2101 et seq], and The federal Magnuson-Moss Warranty Federal Trade Commission Improvement Act [15 USC §§2301 et seq; 16 CFR Parts 701– 703]. A typical Magnuson-Moss Act warranty is a written promise that the product is free of defects or a written promise to refund, repair, or replace defective goods. [See 15 USC §2301(6).] Remedies include damages for failing to honor a written warranty or service contract or for violating disclosure provisions. [See 15 USC §2310(d).] Except for some labeling and disclosure requirements, the federal Act does not preempt state law. [See 15 USC §2311.]The Consumer Warranty Act does not affect the rights and obligations of parties under the state Uniform Commercial Code, except the provisions of the Act prevail over provisions of the Commercial Code when they confl ict. [CC §1790.3.]For purposes of small claims actions, this course will focus on rights and duties under the state laws.
Table of ContentsAbout this user guide ..........................7About this user guide ................................7Trademarks ................................................8DivX HD ......................................................8Important notice...................................9Getting to know your device ...........13Tablet Overview .......................................13Charging your tablet ................................15Optimizing Battery Life ............................16Installing the SIM card ............................18Inserting a microSD card .........................19Removing the microSD card ....................20Formatting the microSD card ..................20Locking and unlocking the screen ...........21Your Home screen .............................23Touch screen tips .....................................23Home screen ............................................24Opening, switching, and stopping apps .26Using Dual Window ................................27Customizing app icons on the Home  screen .......................................................28Quick access ............................................29Notifications ............................................30Multiple Users .........................................34QSlide .......................................................35Capturing a Screenshot ...........................37Text Input Methods .................................38Google account setup .......................42To set up your Google account ................42Connecting to Networks and  Devices ................................................43Wi-Fi .........................................................43Bluetooth .................................................44SmartShare ..............................................46Enjoying the content from Nearby  devices .....................................................46QPair .........................................................47PC connections with a USB cable ...........49Contacts...............................................52Searching for a contact ...........................52Adding a new contact .............................52Favorite Contacts .....................................52Creating a group ......................................53Email ....................................................54Managing an email account ...................54Working with account folders .................55Composing and sending email ................55Receiving emails......................................55
Entertainment .....................................56Camera .....................................................56Gallery ......................................................61Slideshow ................................................63Videos ......................................................63Music .......................................................65Tools .....................................................68QuickMemo+............................................68QuickRemote............................................70Clock .........................................................71Calculator .................................................72Calendar ...................................................72Tasks ........................................................73File Manager ............................................74POLARIS Office 5 .....................................75Google+ ....................................................76LG SmartWorld ........................................76Google Applications .........................78About Google applications ......................78Launch Google Maps...............................78Play Store .................................................80Gmail ........................................................81Hangouts ..................................................81The Web ..............................................84Browser ....................................................84Chrome .....................................................85Settings................................................88Access the Settings menu ......................88WIRELESS NETWORKS...........................88DEVICE .....................................................91PERSONAL ...............................................95SYSTEM ...................................................97LG Backup .........................................101About backing up and restoring device data ........................................................101Backup your tablet data ........................101Scheduling automatic backups .............102Restoring tablet data .............................102Tablet software update ...................104Tablet software update .........................104LG tablet software update via Over-the-Air (OTA) .......................................................104Accessories ......................................106Troubleshooting ...............................107For Your Safety .................................109Table of Contents
7About this user guide• Before using your device, please carefully read this manual. This will ensure that you use your device safely and correctly.• Some of the images and screenshots provided in this guide may appear differently on your tablet.• Your content may differ from the final product, or from software supplied by service providers or carriers, This content may be subject to change without prior notice. For the latest version of this manual, please visit the LG website at www.lg.com.• Your device's applications and their functions may vary by country, region, or hardware specifications. LG cannot be held liable for any performance issues resulting from the use of applications developed by providers other than LG.• LG cannot be held liable for performance or incompatibility issues resulting from edited registry settings being edited or operating system software being modified. Any attempt to customize your operating system may cause the device or its applications to not work as they should.• Software, audio, wallpaper, images, and other media supplied with your device are licensed for limited use. If you extract and use these materials for commercial or other purposes is, you may be infringing copyright laws. As a user, you are fully are entirely responsible for the illegal use of media.• Additional charges may be applied for data services, such as messaging, uploading and downloading, auto-syncing, or using location services. To avoid additional charges, select a data plan to is suitable for your needs. Contact your service provider to obtain additional details.About this user guide
8Trademarks• LG and the LG logo are registered trademarks of LG Electronics.• All other trademarks and copyrights are the property of their respective owners.DivX HDABOUT DIVX VIDEO: DivX® is a digital video format created by DivX, LLC, a subsidiary of Rovi Corporation. This is an official DivX Certified® device that has passed rigorous testing to verify that it plays DivX video. Visit divx.com for more information and software tools to convert your files into DivX videos. ABOUT DIVX VIDEO-ON-DEMAND: This DivX Certified® device must be registered in order to play purchased DivX Video-on-Demand (VOD) movies. To obtain your registration code, locate the DivX VOD section in your device setup menu. Go to vod.divx.com for more information on how to complete your registration.DivX Certified® to play DivX® video up to HD 720p, including premium content.DivX®, DivX Certified® and associated logos are trademarks of Rovi Corporation or its subsidiaries and are used under license. nNotice: Open Source Software XTo obtain the corresponding source code under GPL, LGPL, MPL and other open source licences, please visit http://opensource.lge.com/ All referred licence terms, disclaimers and notices are available for download with the source code.About this user guide
9Please read this before you start using your tablet!Please check to see whether any problems you encountered with your tablet are described in this section before taking the tablet in for service or calling a service representative.1.  Tablet MemoryYou need to check your tablet memory and delete some data, such as applications, to make more memory available.To uninstall applications:1  Tap   >   > Apps tab > Settings   > Apps.2  Once all of the applications appear, select the application you want to uninstall.3  Tap Uninstall and OK to confirm.2.  Before installing an open source application and operating system (OS) nWARNING XIf you install and use an OS other than the one provided by the manufacturer it may cause your tablet to malfunction. In addition, your tablet will no longer be covered by the warranty. XTo protect your tablet and personal data, only download applications from trusted sources, such as Play Store. If there are improperly installed applications on your tablet, the tablet may not work normally or a serious error may occur. You must uninstall those applications and all associated data and settings from the tablet.Important notice
103.  Using a Screen LockSet an screen lock to secure your tablet. Tap   >   > Apps tab > Settings   > Display > Lock screen > Select screen lock and select a desired screen lock from Swipe, Face Unlock, Knock Code, Pattern, PIN and Password. You can create a Backup PIN as a safety measure in case you forget your screen lock.Caution: Create or sign into a Google account before setting a screen lock and remember the Backup PIN you created when creating your screen lock. nWARNING XPrecautions to take when using a screen lock. It is very important to remember the screen lock you set. You will not be able to access your tablet if you use an incorrect screen lock 5 times. You have 5 opportunities to enter your unlock pattern, PIN or password. If you have used all 5 opportunities, you can try again after 30 seconds.When you can’t recall your Pattern, PIN or Password:< If you have forgotten your pattern >If you logged in to your Google account on the tablet but failed to enter the correct pattern 5 times, tap the Forgot pattern? button at the bottom of the screen. You are then required to log in with your Google Account or you have to enter the Backup PIN which you entered when creating your Pattern Lock.If you have not created a Google account on the tablet or you forgot the Backup PIN, you have to perform a hard reset.< If you have forgotten your PIN or Password >If you forget your PIN or Password, you will need to perform a hard reset.Caution: If you perform a hard reset, all user applications and user data will be deleted.Important notice
11 nNOTE XIf you have not logged into your Google Account and have forgotten your Pattern, you will need to enter your Backup PIN.4. Using the Hard Reset (Factory Reset)If your tablet does not restore to its original condition, use a Hard Reset (Factory Reset) to initialize it.1  Turn the tablet off.2  Press and hold the Volume Down Key   first, then press and hold the Power/Lock Key   on the right side of the tablet until the LG logo is displayed.3  Release all of the keys when the LG logo is displayed. 4  Immediately press and hold the Power/Lock Key   + Volume Up Key   + Volume Down Key   at the same time.5  Release all keys when the Factory hard reset screen is displayed. 6  Press either of the Volume Keys     to move the cursor to Yes, then press the Power/Lock Key   to continue.7  Press either of the Volume Keys     to move the cursor to Yes once again, then press the Power/Lock Key   to confirm. 8  Your device will perform a hard reset. nWARNING XIf you perform a Hard Reset, all user applications, user data and DRM licenses will be deleted. Please remember to backup any important data before performing a Hard Reset.Important notice
125.  When the screen freezesIf the screen freezes or the tablet does not respond when you try to operate it: Press and hold the Power/Lock Key   for over 8 seconds until the LG logo is displayed to restart your tablet. If it still does not work, please contact the service center.Important notice
13Tablet OverviewVolume keysRear-facing cameraSpeakersFront-facing cameraPower/Lock keyEarphone jackSIM card/MicroSD card slotInfrared (IR) LEDCharger/USB portMicrophone nNOTE XYour tablet is designed to have two speaker openings on the back side for aesthetic reasons. However, the actual sound comes from only one speaker. Please note that it’s not a product defect. XMake sure that the microphone is not blocked when recording a video or audio clip.Getting to know your device
14Front-facing cameraUse to take pictures and record videos of yourself. You can also use this for video chatting. Keep it clean for optimal performance.Power/Lock keyPress to lock/unlock the screen. Press and hold to turn the tablet on/off, restart it, activate/deactivate airplane mode, and change the sound settings.Volume keysAllow you to adjust the media volumes. Press and hold both keys at the same time to access the QuickMemo+ feature.Earphone jackAllows you to plug in an optional headset for convenient, hands-free conversations. You can also plug in headphones to listen to music.Infrared (IR) LED Used as a sensor for the QuickRemote app.SIM card/MicroSD card slot Allows you to insert your SIM card and a microSD card.Microphone Records your voice and allows use for voice-activated functions.Charger/USB portAllows you to connect the tablet and the USB cable for use with the charger adapter, your PC, or other compatible accessories.Rear-facing camera Use to take photos and record videos. Keep it clean for optimal performance.Getting to know your device
15Speakers Use to listen to the audio from the selected function (e.g., music, videos, sound clips, etc.). nWARNING XPlacing a heavy object on the tablet or sitting on it can damage the LCD and touch screen functions.  nTIP! XTap the Menu icon   whenever you open an application to check what options are available. XIf the device is locked and does not work, press and hold the Power/Lock Key   for over 8 seconds until LG logo is displayed to restart your tablet.Charging your tabletA USB adapter, which is included with your tablet, is used to charge the battery. Before using your tablet for the first time, make sure the battery is fully charged. nNOTE XYour device has an internal rechargeable battery. For your safety, do not remove the battery incorporated in the product. nWarning!  XIf the touch screen does not function while the tablet’s in the process of charging, this may be due to an unstable power supply. If this occurs, disconnect the USB cable from the device or unplug the USB adapter from the power outlet.Getting to know your device
161  Connect the USB adapter and USB cable.2  Plug the USB cable (as shown below) into the tablet’s Charger/USB port.3  Plug the charger into an electrical socket. nNOTE XThe battery must be fully charged initially to improve battery lifetime.Optimizing Battery LifeYou can extend your battery’s life between charges by turning off features that you don’t need to run constantly in the background. You can also monitor how applications and system resources consume battery power. Getting to know your device
17To extend the life of your battery• Turn off radio communications that you aren’t using, such as Wi-Fi, Bluetooth, or GPS. • Lower screen brightness and set a shorter screen timeout.• Turn off automatic syncing for Gmail™, Calendar, Contacts, and other applications.• Some applications you have downloaded may cause your battery power to be reduced.• While using downloaded applications, check the battery charged level.To view the battery charge level1  From the Home screen, tap Apps   > Settings   > About tablet > Battery.2  The battery status (charging or discharging) and level are displayed on the top menu of the screen.To monitor and control what uses the battery1  From the Home screen, tap Apps   > Settings   > About tablet > Battery > Battery use.2  The screen displays battery usage time and also lists applications or services using battery power from greatest amount to least.Getting to know your device
18Installing the SIM card1  To install the SIM card, locate and open the cover to the slot.2  Place your fingernail in the cutout and gently pull out the SIM card tray. nNOTE XThere are two slots underneath the cover (the other slot is for a microSD card).3  Insert the SIM card into the tray with the golden contact facing down. Push the tray back into the slot until it “clicks” into place and close the cover.SIM card slot microSD card slotGetting to know your device
19Inserting a microSD cardYour device supports the use of microSD memory cards of up to 32 GB capacity. Multimedia contents can be saved in the microSD card.1   Place your fingernail in the cutout and gently pull the memory card slot cover to remove it.2  Position the microSD card with the gold strips facing towards the back of the tablet. Slide the microSD card into the slot until it “clicks” into place and replace the cover.Getting to know your device
20Removing the microSD cardTo safely remove the microSD card from your tablet, first you need to unmount it.1  From the Home screen, tap Apps   > Settings   > Storage > Unmount SD card.2  Open the microSD card tray and push the card in to release it. 3  Gently pull the microSD card from the slot. nWarning!  XDo not remove the microSD card without unmounting it first. Otherwise, it may damage the microSD card as well as your tablet, and the data stored on the microSD card may be corrupted.Formatting the microSD card nWarning!  XAll files stored on your microSD card are deleted when you format the card.1  From the Home screen, tap Apps   > Settings   > Storage.2  Tap Erase SD card (twice).3  If you set an unlock pattern, enter it and tap Erase everything. The card will then be formatted and ready to use. nNOTE XIf there is content on your microSD card, the folder structure may be different after formatting since all the files will have been deleted.Getting to know your device
21Locking and unlocking the screenIf you do not use the tablet for a while, the screen will be automatically turned off and locked. This helps to prevent accidental touches and saves battery power. When you are not using the your tablet, press the Power/Lock Key   to lock your tablet. If there are any programs running when you lock your screen, they may be still running in Lock mode. It is recommended that you exit all programs before entering Lock mode to avoid unnecessary charges (e.g. web access, data communications).To wake up your tablet, press the Power/Lock Key  . The Lock screen will appear. Touch and slide the Lock screen in any direction to unlock your Home screen. The last screen you viewed will open.Turning the screen on using the KnockON featureThe KnockON feature allows you to double-tap the screen to easily turn the screen on or off. • Quickly double-tap the center of the screen to turn the screen on.• Quickly double-tap the Status Bar, an empty area on the Home screen, or the Lock screen to turn the screen off.Getting to know your device
22Unlocking your screen using the Knock Code featureThe Knock Code feature allows you to create your own unlock code using a combination of knocks (or taps) on the screen.• While the screen is off, tap the same sequence you established anywhere on the screen. The Home screen will be accessed directly.To activate the Knock Code feature1  From the Home screen, tap Apps   > Settings   > Display > Lock screen > Select screen lock > Knock Code.2  This opens a screen that will guide you through how to select the unlock sequence. You have to create a backup PIN as a safety measure in case you forget your unlock sequence.Getting to know your device
23Your Home screenTouch screen tipsHere are some tips on how to navigate on your tablet. nNOTE XTo select an item, touch the center of the icon. XDo not press too hard; the touch screen is sensitive enough to pick up a light, yet firm touch. XUse the tip of your finger to touch the option you want. Be careful not to touch any other keys.Tap or touchA single finger tap selects items, links, shortcuts and letters on the on-screen keyboard.Touch and holdTouch and hold an item on the screen by touching it and not lifting your finger until an action occurs. For example, to open a contact's available options, touch and hold the contact in the Contacts list until the context menu opens.DragTouch and hold an item for a moment and then, without lifting your finger, move your finger on the screen until you reach the target position. You can drag items on the Home screen to reposition them.Swipe or slideTo swipe or slide, quickly move your finger across the surface of the screen, without pausing when you first touch it (so you don’t drag an item instead). For example, you can slide the screen up or down to scroll through a list, or browse through the different
24Home screen canvases by swiping from left to right (and vice versa).Double-tapDouble-tap to zoom on a webpage or a map. For example, quickly double-tap a section of a webpage to adjust that section to fit the width of the screen. You can also double-tap to zoom in and out when viewing a picture and when using Maps. Double-tap a word to highlight it. Double-tap can also activate the KnockON feature to turn the touchscreen on or off.Pinch-to-ZoomUse your index finger and thumb in a pinching or spreading motion to zoom in or out when using the browser, Maps, or when browsing pictures.Rotate the screenFrom many applications and menus, the orientation of the screen adjusts to the device's physical orientation.Home screenSimply swipe your finger to the left or right to view the panels. You can customize each panel with apps, downloads, widgets and wallpapers.The Quick Keys are available at the bottom part of the Home screen and provide easy, one-touch access to the functions you use the most.Your Home screen
25Your Home screenStatus Bar – Shows device status information, including the time, Wi-Fi signal strength, battery status, and notification icons.Application icons – Tap an icon (application, widget, folder, etc.) to open and use it.Quick Keys – Provide easy, one-touch access to the functions used most often.Dual Window Key – Tap to change to dual window mode. It allows you to manage two different apps at the same time by splitting the screen in two.Recent Apps Key – Tap to display recently used applications. You can also touch and hold it to display the Menu options in applications.Home Key – Returns to the Home screen (or returns to your default Home screen canvas from any of the Home screen extension canvases). Touch and hold it to access Google Now.Back Key – Returns to the previous screen. Also closes pop-up items such as menus, dialog boxes, and the on-screen keyboard. Touch and hold it to access Dual window.
26Customizing the Home screenYou can customize your Home screen by adding apps, downloads, widgets or wallpapers. For more convenience using your tablet, add your favorite apps and widgets to the Home screen.To add items on your Home screen:1  Touch and hold the empty part of the Home screen.2  Tap the Apps or Widgets tab.3  Drag the desired item to the desired location and lift your finger.To remove an item from the Home screen:Touch and hold the icon you want to remove, drag it to  , and lift your finger. nTIP!  XTo add an application icon to the Home screen from the Apps screen, touch and hold the application you want to add and drag it to the desired location. XYou can add several app icons in a folder. Drop one app icon over another one on a Home screen, and a folder will be created.Opening, switching, and stopping appsTap   to display recently used applications. You can keep multiple apps running at the same time, and switch between several open apps. You can also manually stop apps from running.Your Home screen
27Using Dual WindowThe Dual Window feature splits the screen to enable multi-tasking, drag and drop interaction, auto-linking and recently used apps. 1  Touch   to split the screen or touch and hold the   until the app list is displayed.2  Touch or drag an app icon to the desired space. 3  Tap   to display the following options. You can also drag the tabs to change the size of the windows. Switch the two screens. View the apps list. Full screen view. Close the apps.Your Home screen
28To disable the Dual Window feature1  Tap   > Apps   > Settings   > Dual window.2  Tap the Dual Window switch to toggle it to OFF. nTIP!  XYou can launch two Browser apps at the same time.Customizing app icons on the Home screenYou can customize each application icon with images from your Gallery.1  Touch and hold an application icon until it’s unlocked from its current position. Then drop it on the screen. The editing   icon will appear in the upper right corner of the application.2  Select the desired icon design and tap OK. Or tap Add new, adjust the icon size and select an image from your Gallery.Your Home screen
29To view other Home screen panels• Swipe (or flick) your finger left or right across the Home screen. • Pinch in on the Home screen to display the mini panel view, then tap the Home screen panel you want to view.Quick accessTo view the quick access items, touch anywhere in the front key area and drag up. The following options are available: Google Now and QuickMemo+.Your Home screen
30NotificationsNotifications alert you to the arrival of new messages, calendar events, and alarms, as well as to ongoing events, such as downloads.From the Notifications Panel, you can view your tablet’s current status and pending notifications. When a notification arrives, its icon appears at the top of the screen. Icons for pending notifications appear on the left, and system icons showing things like Wi-Fi or battery strength on the right.Pending notifications System notificationsYour Home screen
31Accessing notificationsSwipe the Status Bar down to open the Notifications Panel and access notifications. To close the Notifications Panel, swipe the bar that is at the bottom of the screen upwards.Quick Settings Bar – Swipe to the right or left to scroll through the list. Tap an icon to activate/deactivate the feature.QSlide Apps – Tap a QSlide app to open as a small window on your screen. Tap   to remove, add, or rearrange QSlide apps. The QSlide Quick Setting must be enabled for the QSlide Apps bar to be displayed.Clear Button – Tap here to clear your list of event-based notifications.Tap a notification to open it.Quick Settings on the Notifications PanelUse the Quick Settings to easily toggle function settings like Wi-Fi. The Quick Settings are located at the top of the Notifications Panel. nNOTE XTouch and hold an icon in the Quick Settings Bar to view the function's settings menu.Your Home screen
32To rearrange Quick Setting options on the Notification PanelOpen the Notifications Panel, swipe the Quick Settings to the left, and tap  . To rearrange items, drag   to the desired location. To add more icons, checkmark the desired functions.QSlide apps on the Notifications PanelQSlide apps are displayed in a bar on the Notifications Panel below the Quick Settings Bar. These icons provide a quick, convenient way to multi-task on the same screen (similar to picture-in-picture on a TV). QSlide displays a small application window on the screen that can be moved, resized, or made transparent. nNOTE XYou can remove the QSlide apps bar by tapping the QSlide icon in the Quick Settings bar.Using the QSlide appsTap any of the QSlide apps in the bar to activate it. When activated, the QSlide feature opens the application in a window in the foreground, allowing you to access other applications in the background. You can open up to two QSlide windows at a time.Notification icons on the Status BarThe icons listed in the table below are some of the most common ones.Icon DescriptionAirplane modeYour Home screen
33Connected to a Wi-Fi networkWired headset connectedBluetooth is onSystem warningVibrate mode is onSilent mode is onBattery fully chargedBattery is chargingContent sharing is onDownloading dataUploading dataAn alarm is setGPS is onData is syncingYour Home screen
34New Gmail messageNew Hangouts messageA song is currently playingTablet is connected to PC via USB cableBattery saver mode is onMultiple UsersOnly one tablet owner ID can be created, but multiple user IDs can be added so that others can log in and use the tablet independently. Each user can configure their own tablet settings, use their own storage space, and have their own app update privileges.Tablet owner privileges• Only the tablet owner ID can add a new user log in ID and remove user IDs.Multiple tablet user limitations• All users share the same battery, internal memory, and data usage with all of the other users.• The language settings set by one user apply to all of the other users.• Each user can configure and use only their own content and data (e.g., Home screen settings, Sound settings, etc.).• Any user can accept updated app permissions on the behalf of all of the other users.Your Home screen
35• Messages and scheduled calendar events will be sent to notify the specified user ID only.• Once a user starts printing a document using Mobile Print, the print job will continue even if the user ID is changed.• Data transfer, download, multimedia play, and communication services will stop if the user ID is changed. However, the data transfer through Play Store can be continued even if the user ID is changed.To add a new user on your tablet1  From the Home screen, tap Apps   > Settings   > Users > Add user.2  Select the type of user you want to add. XUser: Users have their own apps and content. XRestricted profile: You can restrict access to apps and content from your account.3  The setup wizard opens to help you add a new user. Touch Set up now. XAfter creating a new user, that person needs to go through the setup process upon their first login.To switch users1  Press the Power/Lock Key   to lock the tablet's screen.2  Press the Power/Lock Key   once more to wake the tablet's screen.3  Touch one of the colored icons at the bottom of the screen. Choose from the owner ID or any other user IDs you created.QSlideThe QSlide function enables an overlay window on your tablet’s display for easy multi-tasking. QSlide windows can be opened from the QSlide apps bar on the Notifications Your Home screen
36panel, or directly from the applications that support the QSlide function.Open the Notifications Panel and tap the QSlide Quick Settings  to enable the QSlide Apps bar. Then tap the desired app from the QSlide apps section.ORWhile using an application that supports QSlide, tap  . The function will be displayed continuously as a small window on your screen.Using QSlideThe QSlide function opens the associated app in a window in the foreground, allowing you to access other apps in the background. It’s displayed continuously on the screen until you close it.Your Home screen
37Tap to access QSlide.Tap to exit QSlide and return to full window.Tap to adjust the transparency.Tap to close QSlide.Tap to adjust the window size. nNOTE XThe QSlide function can support up to two windows at the same time. QSlide only supports the following applications: Video, Browser, Calendar, Email, File Manager, and Calculator.Capturing a ScreenshotPress and hold the Volume Down Key   and Power/Lock Key   at the same time for 2 seconds to capture a screenshot of the current screen.To view the captured image, go to Apps   > Gallery   > Screenshots folder.Using QuickMemo+ to capture a screenshotOn the screen you want to capture, drag the Status Bar downward and select QuickMemo+  .Your Home screen
38ORPress and hold both Volume Keys     at the same time.Using Capture plus to capture a screenshot of the browserThis feature allows you to capture a portion of the screen in the default Internet browser.1  Open the Browser app and navigate to the page you want to capture a screen shot of.2  Tap the Menu icon   > Capture plus. 3  Adjust the blue box to the desired size, and then tap Save. The selected area is saved to the Capture plus folder in the Gallery.Text Input MethodsThe on-screen keyboard displays automatically on the screen when you need to enter text. To manually display the on-screen keyboard, simply tap a text field where you want to enter text.Your Home screen
39Word suggestionsDisplays the word you've entered.Word suggestionsTap once to capitalize the next letter you type. Double-tap for all caps.Tap to switch to the numbers and symbols keyboard.Tap to select the keyboard language. Only available when multiple languages are enabled.Tap to access the LG keyboard settings. Touch and hold to access the Clip Tray.Tap to enter a space.Tap to create a new line in the message field.Tap to delete the previous character.Enter suggested word using gesture controlEnter text on the keyboard and the related word suggestions appear. Tap the left-side or right-side suggestion to insert it.Split keyboard using gestureThe split keyboard feature allows you to use both hands to type while in landscape view. Each half of the keyboard withdraws to the left and right of the screen. To activate Your Home screen
40the split keyboard, place both thumbs on the keyboard and slide them apart.To change the keyboard heightAdjust height of keyboard to show more of the screen and to control keyboard more easily. • Tap   > Keyboard height and layout > Keyboard height > Tap and drag the icon   to adjust the keyboard height.To change the bottom row keys• Tap   > Keyboard height and layout > Bottom row keys > Tap and drag to add or delete keys or change the order.  nNOTE XOnly QWERTY, QWERTZ, AZERTY keyboards can be customized. This function dose not support some languages.Entering special charactersThe on-screen keyboard allows you to enter special characters (e.g. "á").For example, touch and hold the desired key (for example, the "a" key). After the desired character appears, slide your finger over it and lift it off to enter it. nNOTE XA symbol at the top right corner of a key indicates that additional characters are available.Using Clip TrayEasily access the contents you stored in the Clip Tray whenever and wherever you want. You can copy images or texts and keep them in the Clip Tray. Then, you can paste them whenever and wherever you want.Your Home screen
411  Touch and hold text and images while viewing or editing them and tap Clip Tray.2  Touch and hold the text input field and select Clip Tray. You can also access the Clip Tray by touching and holding   >  . nNOTE XYou can save up to 10 items in the Clip Tray.  XAccess Clip Tray and tap  , select the items you want to delete, then tap Done. XThis function may not be supported in downloaded apps.Your Home screen
42When you first turn on your tablet, you have the opportunity to activate the network, to sign into your Google Account and select how you want to use certain Google services. To set up your Google account• Sign into a Google Account from the prompted setup screen.  OR • From the Home screen, tap Apps   > Apps tab > Settings   > Accounts & sync > Add account > Google.If you have a Google account, touch Existing, enter your email address and password, then touch  . Otherwise, touch New and enter the necessary information to create a new Google Account.Once you have set up your Google account on your tablet, your tablet automatically synchronizes with your Google account on the Web.Your contacts, Gmail messages, Calendar events and other information from these applications and services on the Web are synchronized with your tablet. (This will depend on your synchronization settings.)After signing in, you can use Gmail™ and take advantage of Google services on your tablet.Google account setup
43Wi-FiWith Wi-Fi, you can use high-speed Internet access within the coverage of the wireless access point (AP). Enjoy wireless Internet using Wi-Fi, without extra charges. Connecting to Wi-Fi networksTo use Wi-Fi on your tablet, you need to access a wireless access point or ‘hotspot’. Some access points are open and you can simply connect to them. Others are hidden or use security features; you must configure your tablet to be able to connect to them. Turn off Wi-Fi when you're not using it to extend the life of your battery. Turning Wi-Fi on and connecting to a Wi-Fi network1  From the Home screen, tap Apps   > Apps tab > Settings   > Wi-Fi.2  Tap   to turn Wi-Fi on and start scanning for available Wi-Fi networks.3  Tap Search to see a list of active and in-range Wi-Fi networks.• Secured networks are indicated by a lock icon.4  Touch a network to connect to it.• If the network is secured, you are prompted to enter a password or other credentials. (Ask your network administrator for details)5  The Status Bar displays icons that indicate your Wi-Fi status.Connecting to Networks and Devices
44BluetoothYou can use Bluetooth to send data by running a corresponding application, but not from the Bluetooth menu as on most other mobile phones and tablets.  nNOTE XLG is not responsible for the loss, interception or misuse of data sent or received via the Bluetooth wireless feature. XAlways ensure that you share and receive data with devices that are trusted and properly secured. If there are obstacles between the devices, the operating distance may be reduced. XSome devices, especially those that are not tested or approved by Bluetooth SIG, may be incompatible with your device.Turning on Bluetooth and pairing up your tablet with a Bluetooth deviceYou must pair your device with another device before you connect to it.1  From the Home screen, tap Apps   > Apps tab > Settings   > Bluetooth.2  Tap the Bluetooth switch   to turn it on.3  Tap the check box next to your tablet's name to make your tablet visible to other Bluetooth devices. nNOTE XTo select the length of time that your device will be visible, tap the Menu icon   > Visibility timeout.4  A list of available devices will be displayed. Tap the device you want to pair with from the list.Connecting to Networks and Devices
45 nNOTE XDepending on the type of device, you may have to enter matching codes, confirm matching codes, or the devices may automatically pair.5  Once pairing is successful, your tablet will connect to the other device. nNOTE XYour tablet doesn't support Handsfree Profile. Therefore, the use of call features with some of accessories, such as Bluetooth headsets or Bluetooth-enabled devices, may not be available for this device. Send data using the Bluetooth feature1  Open the item and tap  . OR  Touch and hold the item and select Share. OR  Open the item and tap the Menu icon   > Share.2  Tap Bluetooth to share via Bluetooth. nNOTE XThe method for selecting an option may vary by data type.3  Search for and pair with a Bluetooth-enabled device.Receive data using the Bluetooth feature1  Refer to the Bluetooth device's user guide to send a file to your tablet. Both devices must be paired and Bluetooth must be on.2  Pair the devices and tap Accept when you receive a Bluetooth Authorization Request to accept the file(s).Connecting to Networks and Devices
46SmartShareYou can use the SmartShare feature easily in the Gallery, Music, and others.Enjoying the content via a variety of devicesYou can share your tablet's content with a variety devices. Tap   or tap   > SmartShare Beam to share the content in the Gallery, Music, POLARIS Office 5 apps.Playing/SendingPlay – You can play the content via a TV, a Bluetooth speaker or etc.Beam – You can send the content to the device of Bluetooth and SmartShare Beam supported.• SmartShare Beam – This allows to transfer the content feature fast via Wi-Fi Direct.< Play > < Beam >Enjoying the content from Nearby devicesYou can enjoy the content from nearby devices (i.e. PC, NAS, Mobile) in the Gallery and Music apps.Connecting devicesConnect your device and other devices supported by DLNA in the same Wi-Fi network.Connecting to Networks and Devices
47Searching other devicesTap Nearby devices, then you can see the DLNA-supported devices.Connect to the device to view the content.QPairBy connecting your tablet and mobile phone via QPair, you can sync incoming calls, messages, and social networking notifications between your tablet and mobile phone.1  Run QPair   and tap Get started > Start on your tablet first and then run the same steps on your phone. nTIP!  XQPair may not be pre-installed on the phone. Go to the Google Play Store and search for QPair and install it.Connecting to Networks and Devices
48Connecting to Networks and Devices nNOTE XQPair works with phones running Android 4.1 or later. Some features may be limited depending on your phone model. XSince QPair uses the Bluetooth function, it may not work normally if you change the Bluetooth settings while QPair is in use.2  Bluetooth connection will be turned on and you will be able to pair the devices.QPair featuresCall notifications – Sends the tablet a notification when the phone receives a call. The notification displays the caller's number and allows you to answer and decline the call. You can also change call settings, such as a ringtone, ringtone volume, ringtone with vibration, or send a decline message when you get a call. nNOTE XYou can only receive a call supported by Bluetooth technology. Dialing a call from the tablet using the QPair feature is not possible.Message notifications – Sends the tablet a notification when the phone receives a message. You can also change message settings, such as message pop-up, message preview, notification sound, and notification vibration.Social network notifications – Displays a social networking notification on your tablet's Status Bar when it arrives on your phone.
49 nNOTE XTo enable this feature, turn the QPair social network notifications option on your phone (Settings > Accessibility > QPair social network notifications). This option allows you to be notified of social networking notifications on your tablet.QuickMemo+ transfer – Saves your current QuickMemo+ in the tablet's Gallery, and then syncs the tablet's Gallery with the Gallery on your phone. Recent app sticker – When the paired device's screen is unlocked, a sticker will display the last app used on the other device if the app is installed both on the tablet and the phone.PC connections with a USB cableYou can connect your tablet to your PC to charge it, transfer items to the PC from the tablet and vice versa.Transferring music, photos and videos using the Media device (MTP) mode1  Connect your tablet to a PC using a USB cable.2  If you haven't installed the LG Android Platform Driver on your PC, you will need to manually change the settings. To change the settings, slide the Status Bar down and tap the current USB connection mode > Media sync (MTP).3  You can now view the Media device content on your PC and transfer the files. nNOTE XIf you want to change the PC connection settings, slide the Status Bar down and select the USB connection mode option. This setting is visible on the Status Bar only when you connect a USB cable to your tablet.Connecting to Networks and Devices
50Synchronize with Windows Media PlayerEnsure that Windows Media Player is installed on your PC.1  Use the USB cable to connect the tablet to a PC on which Windows Media Player has been installed.2  Select the Media sync (MTP) option.3  When connected, a pop-up window will appear on the PC. Select the Windows Media Player option to synchronize music files.4  Edit or enter your device’s name in the pop-up window (if necessary).5  Select and drag music files to the sync list.6  Start synchronization.• The following requirements must be satisfied to synchronize with Windows Media Player.Items RequirementOS Microsoft Windows XP SP2, Vista or higherWindow Media Player version Windows Media Player 10 or higher• If the Windows Media Player version is older than 10, install version 10 or newer.PC connections with a USB cable for Mac OS X usersYou can transfer media contents to your Mac OS X PC from the tablet and vice versa by setting up the Android File Transfer program. 1  Download and install the Android File Transfer program from android.com website for Mac Users (http://www.android.com/filetransfer/).Connecting to Networks and Devices
512  Connect your tablet to your computer, and double click the AFT (Android File Transfer program) application to start it up.3  You can view the media contents, drag and drop the media file to and from the tablet (or PC).Connecting to Networks and Devices
52You can add contacts on your tablet and synchronize them with the contacts in your Google Account or other accounts that support syncing contacts.Searching for a contact1  From the Home screen, tap Contacts   to open your contact list.2  Tap the Search contacts box and enter the contact's name. You can also tap a letter along the left side of the screen to access names starting with the chosen letter.Adding a new contact1  From the Home screen, tap Contacts  .2  Tap New contact  . Select the desired account (if applicable).3  If you want to add a picture to the new contact, tap  . Choose from Take photo to take a picture using the camera or Select from Gallery. Then browse for an image and select it.4  Tap   to enter more specific name information.5  Enter the details about your contact.6  Tap Save.Favorite ContactsYou can classify frequently called contacts as favorites.To add a contact to your favorites1  From the Home screen, tap Contacts   to open your contacts.Contacts
532  Tap a contact to view its details.3  Tap the star   to the right of the contact’s name. The star turns gold and the contact is added to your favorites.To remove a contact from your favorites list1  From the Home screen, tap Contacts   to open your contacts.2  Tap the Favorites tab to view your favorite contacts.3  Tap a contact to view its details.4  Tap the gold star to the right of the contact’s name. The star turns grey and the contact is removed from your favorites.Creating a group1  From the Home screen, tap Contacts   to open your contacts.2  Touch the Groups tab, then touch  .3  Enter a name for the new group.• Tap Add members to add contact entries to your new group.• Tap the ACCOUNT field to change the account(s) you want to save the new group to.4  Touch Save to save the group. nNOTE XIf you delete a group, the contacts assigned to that group will not be lost. They will remain in your contacts.Contacts
54You can use the Email application to read emails from services like Yahoo!, MSN, and AOL. The Email application supports the following account types: POP3, IMAP and Exchange. Your service provider or system administrator can provide you with the account settings you need.Managing an email accountTap the Email   on the Home screen. The first time you open the Email application, a set-up wizard opens to help you to set up an email account.After the initial setup, the contents of your inbox are displayed. If you have added more than one account, you can switch among accounts.To add another email account:• Open the Email application and tap the Menu icon   > Settings > Add account.To switch between accounts:If you've added more than one account, you can easily switch between them. From any email folder, tap the current account (at the top of the screen), then tap the account you want to access.To change an email account’s settings:Open the Email application and tap the Menu icon   > Settings > General settings to configure settings that apply to all of your accounts. Tap an individual account to configure settings only for that particular account.To delete an email account:• Open the Email application and tap the Menu icon   > Settings > Menu icon   > Remove account > touch an account you want to delete > Remove > Yes.Email
55Working with account foldersOpen the Email application and tap the Menu icon   and select Folders. Each account has an Inbox, Outbox, Sent and Drafts folder. Depending on the features supported by your account’s service provider, you may have additional folders.Composing and sending email1  While in the Email application, tap Compose  .2  Enter an address for the message’s intended recipient. As you enter text, matching addresses will be proposed from your Contacts. Separate multiple addresses using semicolons.3  Tap Attach to attach files, if required.4  Enter the subject and your message.5  Tap Send to send the message.If you aren’t connected to a network, for example, if you’re working in airplane mode, the messages that you send will be stored in your Outbox folder until you connect to a network again. If it contains any pending messages, the Outbox will be displayed on the Accounts screen.Receiving emailsWhen a new email arrives in your Inbox, you'll be notified by a sound or vibration (depending on your sound and vibration settings) and its notification icon appears on the Status Bar.Email
56EntertainmentCameraTo open the Camera application, tap Camera   on the Home screen. Getting to know the viewfinder  Clean view – Touch to show or hide the camera menus on the view finder.  Swap camera – Switch between the back-facing camera lens and the front–facing camera lens. You can also switch the camera by swiping the screen. Mode –  Allows you select the shot mode from Auto and Panorama. Settings – Touch this icon to open the settings menu.  Gallery – Touch to view the last photo you captured. This enables you to access your Gallery and view saved photos while in camera mode. Video mode – Tap to start recording a video. Capture – Takes a picture. Exit – Touch to exit the camera.
57 nNOTE XPlease ensure the camera lens is clean before taking pictures.Using the advanced settingsIn the viewfinder, tap   to open the advanced options. Selects the photo and video resolution. If you choose a high resolution, the file size will increase, which means you will be able to store fewer photos and videos in the memory.Take photos by voice command.Sets a delay after the capture button is pressed. This is ideal if you want to be in the photo.Displays grid lines on the screen to help you align your photos.Opens the help guide to know how a function operates. nTIP!  XWhen you exit the camera, some settings return to their defaults, such as timer. Check these before you take your next photo.Taking a photo1  Open the Camera application.2  Point the lens towards the subject you want to photograph.3  Touch   (if displayed) or anywhere on the screen to capture the photo.Entertainment
58To zoom in or outWhen taking a picture or recording a video, place two fingers anywhere on the screen and spread them apart to zoom in. To zoom back out, pinch them together. Gesture shotThe Gesture shot feature allows you to take a picture with a hand gesture using the front camera. To take photo, raise your hand, with an open palm, until the front camera detects it and a box appears on the screen. Then close your hand into a fist and a timer will start, allowing you time to get ready.Once you've taken a photo1  Tap the image preview by the capture button to view the last photo you captured.2  Tap Gallery or Photos, then tap OK.Entertainment
59Touch to edit the photo.Touch to access the camera.Touch to send your memo to others or share it via social networking services. Touch to delete the photo.Touch to access more options.Touch to add the picture to your favorites. nTIP!  XIf you have a social networking account and set it up on your tablet, you can share your photo with your social networking community.Touch the Menu icon   to open the following options.SmartShare – Touch to share your photo using the SmartShare function. Set image as – Touch to use the photo as a Contact photo, Home screen wallpaper, Lock screen wallpaper or Wallpaper.Move – Touch to move the photo to another album.Copy – Touch to copy the selected photo and save it to another album.Copy to Clip Tray – Touch to copy the photo and store in the Clip Tray.Slideshow – Automatically shows you the images in the current folder one after the other.Rotate – Touch to rotate the picture to the left or right.Crop – Crop your photo. Move your finger across the screen to select the area to be cropped.Entertainment
60Add location – To add the location information.Rename – Touch to edit the name of the selected photo.Print – Allows you to print the picture.Details – Displays more information about the picture.Viewing your saved photosYou can access your saved photos when in camera mode. Just tap the image preview by the capture button and your Gallery will be displayed.1  Choose the app to use to view and/or edit your photos. Tap Gallery   or Photos .2  Tap OK.• To view more photos, scroll left or right.• To zoom in or out, double-tap the screen or place two fingers and spread them apart (move your fingers closer together to zoom out).Recording a video1  Open the Camera application.2  Point the lens towards the subject you wish to capture in your video.3  Touch the Video mode icon   to start recording.4  A timer showing the length of the video will appear.5  Touch   on the screen to stop recording. nTIP!  XTap   to pause the recording. XTap   to take a screen shot while recording a video.Entertainment
61Watching your saved videosAccess your saved videos from video camera mode by tapping the image preview by the capture button.1  In the viewfinder, tap the image preview by the capture button.2  Your Gallery will appear on the screen with your most recent recorded video displayed. Swipe to the left to scroll to your other videos. 3  Tap the Play icon   on a video to play it automatically. nNOTE  XYou can view your videos in the Gallery and Photos apps. XDo not to press too hard; the touch screen is sensitive enough to pick up a light, but firm touch.GalleryYou can store multimedia files in internal memory for easy access to all your multimedia files. Use this application to view multimedia files like pictures and videos.From the Home screen, tap Apps   > Apps tab > Gallery  . You can manage and share all your image and video files with the Gallery. nNOTE  XSome file formats are not supported, depending on the software installed on the device. XSome files may not play properly, depending on how they are encoded. XIf the file size exceeds the available memory, an error can occur when you open files.Entertainment
62Viewing picturesLaunching the Gallery app   displays your available folders. When another application, such as Email, saves a picture, the Downloads folder is automatically created to contain the picture. Likewise, capturing a screenshot automatically creates the Screenshots folder. Tap a folder to open it.Pictures are displayed in order by creation date. Select a picture to view it full screen. Scroll left or right to view the next or previous image.Playing videosOpen the Gallery app   and select an album. The Play icon   is displayed on video files. Tap an image to select it. Select the app to play it (tap the Photos app   or the Video app  ), then tap OK and the video begins playback. nNOTE  XWhen using the Videos app to play a video, slide the left side of the screen up and down to adjust the screen brightness. Slide the right side of the screen up and down to adjust the volume. XWhen using the Videos app to play a video, slide the screen left or right to rewind or fast-forward.Deleting images and videosUse one of the following methods:• In a folder, tap   and select the photos and videos you want to delete, then tap Delete, the Yes to confirm. • When viewing a photo or video, tap  , then tap Yes to confirm.Entertainment
63Setting as wallpaperWhen viewing a photo, touch the Menu icon   > Set image as and select Home screen wallpaper, Lock screen wallpaper or Wallpaper.SlideshowYou can view your photos in a slideshow by album or by selecting all of your photos. From the Home screen, tap Gallery  .• Tap the album with the photos you want to view, then tap the Menu icon   > Slideshow > choose the images you want to view > Next > verify the slideshow settings > Start.Tap the Back Key   to stop playing the slideshow.VideosYour Gallery has an integrated video player that lets you play all of your favorite videos. Playing a video1  From the Home screen, tap Apps   > Apps tab > Gallery   > Albums (at the top left corner) > Video.2  Select the video you want to play.Entertainment
64Touch access QSlide and display the video in small window.Touch to share your video via the SmartShare function.Touch to access more options.Touch to manage the video volume.Touch and hold to rewind in 3 second increments. Tap once to rewind 10 seconds.Touch to pause video playback.Touch and hold to fast-forward in 3 second increments. Tap once to fast-forward 10 seconds.Touch to lock/unlock a video screen.Entertainment
65To change the volume while watching a video, press the Volume Keys on the right side of the tablet.Touch and hold a video in the list to access the following options: Share, Delete, Trim, Rename and Details. nTIP!  XWhile watching a video, slide up and down along the left side of the screen to adjust the screen brightness. Slide up and down along the right side of the screen to adjust the volume.MusicYour tablet has a music player that lets you play all your favorite tracks. To access the music player, from the Home screen, tap Apps   > Apps tab > Music  .Transfer music using Media device (MTP) mode1  Connect the tablet to your PC using the USB cable.2  Select the Media device (MTP) option. Your tablet will appear as another hard drive on your computer. Click on the drive to view it. Copy the files from your PC to the drive folder.Playing a song1  From the Home screen, tap Apps   > Apps tab > Music  .2  Touch the Songs tab.3  Select the song you want to play.Entertainment
66Touch to share your music via the SmartShare function.Touch to set the current song as a favorite.Touch to see the Now playing playlist.Touch to access more options.Touch to set shuffle mode.Touch to set repeat mode.Entertainment
67Touch to manage the music volume.Touch to go back to the beginning of the song. Touch twice to return to the previous song. Touch and hold to rewind 3 seconds.Touch to pause playback.Touch to skip to the next track on the album or in the playlist. Touch and hold to fast-forward 3 seconds.Touch to set the audio effect.To change the volume while listening to music, press the Volume Keys on the right side of the tablet.Touch and hold any song in the list to access the following options:  Play, Add to playlist, Delete, Share, Details and Search. nNOTE XSome file formats are not supported, depending on the device software. XIf the file size exceeds the available memory, an error can occur when you open files. XMusic file copyrights may be protected by international treaties and national copyright laws. Therefore, it may be necessary to obtain permission or a licence to reproduce or copy music. In some countries, national laws prohibit private copying of copyrighted material. Before downloading or copying the file, check the national laws of the relevant country concerning the use of such material.Entertainment
68QuickMemo+The QuickMemo+ feature allows you to create memos and capture screen shots. Capture screens, draw on them, and share them with family and friends with QuickMemo+.Creating a memo1  From the Home screen, tap QuickMemo+  , then tap   to create a new memo. 2  You can edit texts by typing words directly or select the pen type and color you want to use and enter text by handwriting.3  Add a reminder by touching   to set the reminder notification for the event. 4  Add weather and location information to your memo if a data network is available.Using the QuickMemo+ optionsThe following options are available in the QuickMemo+ toolbar at the top of the screen.Touch to open the memo in QSlide.Allows you to undo and redo previous actions.Allows you to edit the text, its color and its alignment.Allows you to enter text by handwriting. You can select the type of pen to use and its thickness, transparency, and color.Erases pen marks you've made on the memo.Tools
69Saves the memo in QuickMemo+.Touch to access more options.Allows you to set a reminder notification for an event. Allows you to insert weather information into the memo.Allows you to add location information using GPS.Capturing a screen shot for your QuickMemo1  To access the QuickMemo+ feature, slide the Status Bar downwards and touch  .   OR Press both of the Volume Keys at the same time for one second.2  Select the desired menu option from the toolbar and create a memo.3  Tap   to save the memo. To exit QuickMemo+ at any time, tap the Back Key .Tools
70 nNOTE XPlease use a fingertip while using the QuickMemo+. Do not use your fingernail.QuickRemoteQuickRemote turns your tablet into a Universal Remote for your home TV or cable box. nNOTE XQuickRemote may not be available for some devices and areas.To open and configure QuickRemote1  From the Home screen, tap the Apps   > Apps tab > QuickRemote  . 2  Touch   to select a room type and touch   to add the device.3  Select the type and brand of device, then follow the on-screen instructions to configure the device(s). nNOTE XThe QuickRemote operates the same way as an ordinary infrared (IR) remote control in your region or country. Be careful not to cover the infrared sensor at the top of the tablet when you use the QuickRemote function. This function may not be supported depending on the model, the manufacturer or service company.Using QuickRemote1  Open QuickRemote   and choose the room where you configured the remote.2  Select the remote you want by tapping its type/name on the QuickRemote  bar along the left side of the screen.3  Tap the buttons on the displayed remote.Tools

Navigation menu