LG Electronics USA V500 WiFi Tablet With Bluetooth User Manual 2
LG Electronics MobileComm USA, Inc. WiFi Tablet With Bluetooth Users Manual 2
Contents
- 1. Users Manual 1
- 2. Users Manual 2
Users Manual 2
31
You can find your current location, view real-time
traffic conditions and get detailed directions. You can
search on a street map or a satellite image to locate
an address or a landmark.
To open the Maps application
•
Apps > Maps
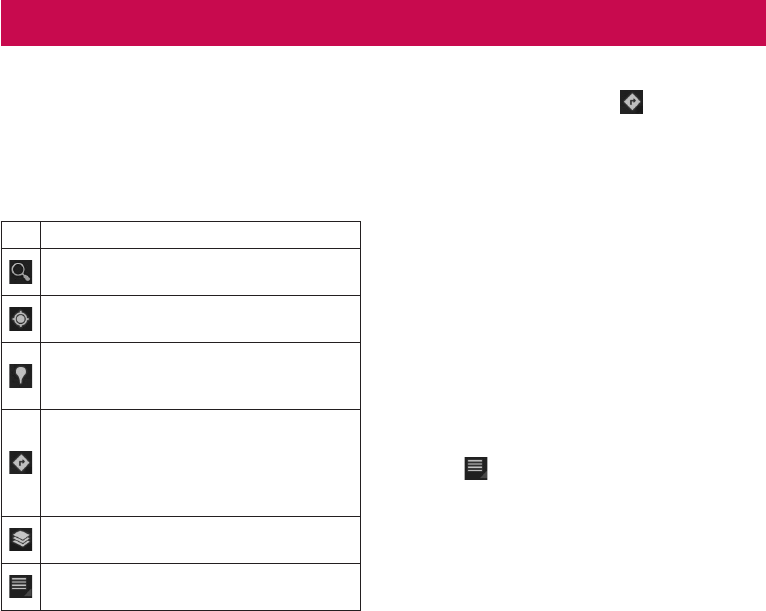
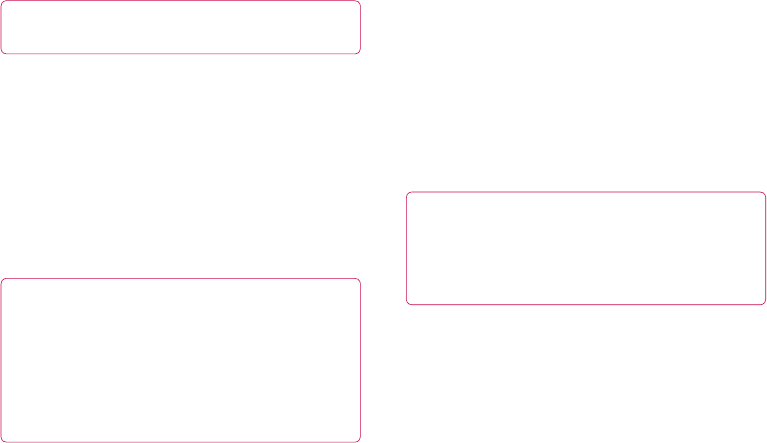
Icon Description
Search – You can search for a location you
want.
My Location – Point your current location on
the map.
Places – Searches for places around your
current location that are related to the
category you choose.
Directions – This will let you find out the route
of any place you enter. Touch the My Location
and End point fields to input the data. You
can also choose a location from Contacts or
a point on the map.
Layers – You can switch view from Traffic to
Satellite, Terrain, or others.
More – Clear map or find Starred places and
more.
Getting directions
1. While viewing a map, touch .
2. Enter your start point and destination point, type
the address, or find from contacts.
3. Choose the transportation method and touch
Go.
Starring a location
You can star any location or labeled feature on a map
to make it easy to spot.
1. Touch and hold a location or labeled feature on
a map.
2. Touch the balloon that opens.
3. Touch the gray star at the top of the screen to
star the location.
You can open a list of your starred locations, so you
can quickly go to a starred location on the map.
•
Touch > Starred Places
Maps and Latitude

32
LG-V500 | User Guide
Joining Latitude
Google Latitude™ lets you and your friends view
each others’ locations on maps and share status
messages with each other. Your location is not shared
automatically. You must join Latitude and then invite
your friends to view your location, or accept invitations
from your friends.
This allows you to choose to share your location with
friends you choose.
•
While viewing a map on the Google Maps
application, touch > Join Latitude
Finding your friends with Latitude
1. Apps > Latitude >
> Add friends
2. Touch Select from Contacts to check all of the
contacts you want to invite. Touch Add via email
address to enter one or more email addresses,
then touch Add friends.
3. When your friend accepts your invitation, you
can share locations.

33
Android Market™ lets you download useful
applications and games. If you install applications
and games from Android Market™, they appear in
the menu. You can check the downloaded application
by touching the My apps tab.
To open the Market application
•
Apps > Market
Downloading applications
1. Select a category to browse its contents.
2. Choose an application to install.
3. For free applications, touch Install. For paid
applications, touch the price button.
4. Read the information on the type of information
the application will access. If you agree to the
application’s access requirements, touch OK.
Removing applications
1. Apps > Market
2. Touch the My apps tab.
3. Choose the application you wish to remove and
touch Uninstall.
You can also remove an application from the Settings
menu.
•
Apps > Settings > Applications > Manage
applications > Downloaded
WARNING: To protect your device and
personal data, download applications only from
trusted sources, such as Android Market™. If some
applications are not properly installed on your
device, your device may not work normally or a
serious error can occur. You will need to uninstall
those applications and all of its data and settings
from the device.
Market
34
LG-V500 | User Guide
This application lets you chat with other people
who also use Google Talk™. You remain signed in,
even when you’re using other applications, until you
deliberately sign out.
Managing Your Friends List
Your Google Talk™ Friends list contains the friends
you’ve invited to become friends or whose invitations
you’ve accepted in Google Talk™. Friends can invite
each other to chat in Google Talk™ and see each
others’ online status in Google Talk™ and other
applications, such as in Gmail™ and Google Maps™.
To add a friend : Touch and enter your friend’s
email address. Then touch Send invitation.
Chatting with a friend
1. Apps > Talk
2. Find the friend you want to chat with and enter
your message. Then touch to send it.
The messages that you exchange are displayed
on the screen and include information about the
chat, such as whether it’s on the record, the time
a message was sent (if there’s no response after a
short while), etc.
•
If your friend is available for voice chat, will
appear next to their name on the Friends list. Touch
in the conversation screen to begin a voice chat.
•
If your friend is available for video chat, will
appear next to their name on the Friends list. Touch
in the conversation screen to begin a video
chat.
To sign out of Google Talk™
You can sign out of Google Talk™. For example, if
you want to limit Google Talk™ conversations to your
device. Also, signing out can extend your battery life.
•
Apps > Talk > > Sign out
Talk
35
Use Books to read eBooks you purchase or download
for free from the web-based Google Books service.
To shop for books:
1. Apps > Books > Shop
2. You will be connected to Market where you can
search for books.
To read books:
Apps > Books > Select a book from the library.
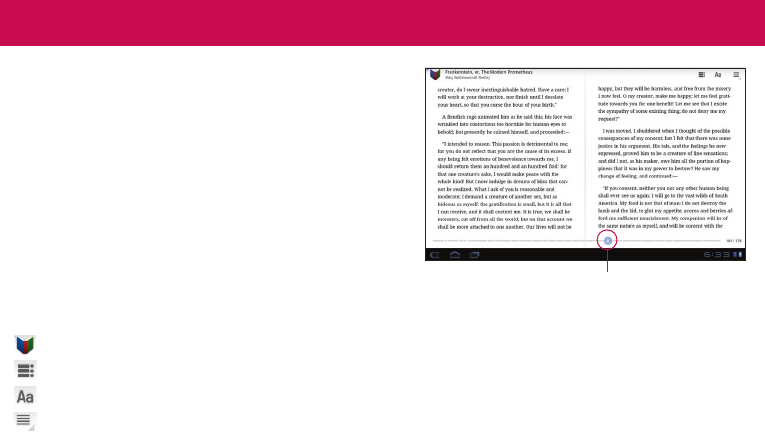
•
To show the menu while you are reading, touch the
screen.
•
returns to the main Book screen at any time.
•
shows the table of the contents.
•
goes to the settings.
•
opens the book menu.
Slide the bar to skip the page
backward and forward.
Books

36
LG-V500 | User Guide
Enjoy user-friendly Email environment with your
device. You can add multiple Email accounts using
POP3, IMAP and Exchange ActiveSync.
To open the Email application
•
Apps > Email
Adding an account
The first time you open the Email application, a setup
wizard opens to help you set up an email account.
Your service provider or system administrator can
provide the account settings you need.
To add other email accounts:
•
Apps > Email > > Account settings >
Addaccount
OR
•
Apps > Settings > Accounts & sync > Add account
Opening inbox
After the initial setup, Email displays the contents
of your inbox. If you have added more than one
account, you can switch among accounts.
•
allows you to compose an email.
•
synchronizes your messages with the mail web
server.
Using Combined view
If you added more than one account, you can view
all messages sent to all accounts. The accounts are
distinguished by colored labels.
•
Touch Combined view from the drop-down menu
at the top left corner of the screen. You can also
switch accounts by touching the desired account
on this menu.
Changing account settings
Once you finished setting up the email account, you
can change the general settings and set your favorite
ringtone to notify you when new email has arrived or
add and remove accounts.
•
Apps > Email
•
Touch > Account settings
•
Personalize the settings according to your needs.
Email

37
Remove an email account
•
Apps > Email > > Account settings >
Removeaccount
Gmail™
Gmail™ is configured when you first set up your
device. Depending on your synchronization settings,
Gmail™ on your device is automatically synchronized
with your Gmail™ account on the web.
When you open the Gmail application, the most
recent conversations are displayed in your Inbox.
To open the Gmail application
•
Apps > Gmail
The current Google account is displayed at the top
left corner of the Inbox. If you have more than one
Gmail account, you can switch accounts to view the
messages in each Inbox.
To search specific emails
•
Apps > Gmail >
A list of results will appear, displaying all of the
conversations with emails that contain the words you
searched for.

38
LG-V500 | User Guide
You can add contacts on your device and synchronize
them with the contacts in your Google account or
other accounts that support syncing contacts.
To open the Contacts application
•
Apps > Contacts
Adding a new contact
1. Touch Apps > Contacts.
2. Touch to create a new contact.
Choose the account you wish to add the contact
to, if necessary.
3. If you want to add a picture to the new contact,
touch the image area. Choose Take photo to
take a photo with the Camera or Select photo
from Gallery to choose one from your Gallery.
4. Enter any contact information you want to add.
5. Touch Done when you finish editing.
Editing a contact
While viewing a contact’s details, touch and
enter the desired contact information. Then touch
Done to save the contact entry.
Searching for a contact
Touch Find contacts on the top left side of your
screen and type the name you want to find. Matching
contacts will be displayed immediately. Touch the
contact you are searching for.
Once you find a contact, you can use the
following options:
•
Touch the Email field to send an email.
•
Touch the Website field connect to the URL.
•
Touch the Address field to pinpoint the location on
the map.
•
Touch the IM field to connect to instant messaging.
•
Touch and Delete contact to delete a contact.
Importing and Exporting contacts to
your memory
If you have contacts stored in vCard format on your
device’s memory, you can import and export them
into your Contacts application.
You can also export all of the contacts on your device
to your device’s memory as vCard files.
Contacts

39
To export your contacts:
1. Apps > Contacts
2. Select a contact you want to export.
3. Touch > Import/Export > Export to USB
storage then OK.
To import your contact:
1. Apps > Contacts
2. Touch > Import/Export > Import from USB
storage.
3. You can import one or multiple vCard files at
once. Choose the option you want and touch
OK.
4. In the menu that opens, all the vCard files
currently in your device’s memory are displayed.
Select the vCard file(s) you want to import.
Sharing contacts via Bluetooth
To share a contact:
1. Apps > Contacts
2. Touch > Share contact > Bluetooth
3. Check if Bluetooth is ON and let the tablet scan
for nearby devices.
4. Choose the device you want to send from the
list.
To share all visible contacts:
•
Touch > Import/Export > Share visible
contacts > Bluetooth, then follow the steps 3 and 4
from the previous section.
40
LG-V500 | User Guide
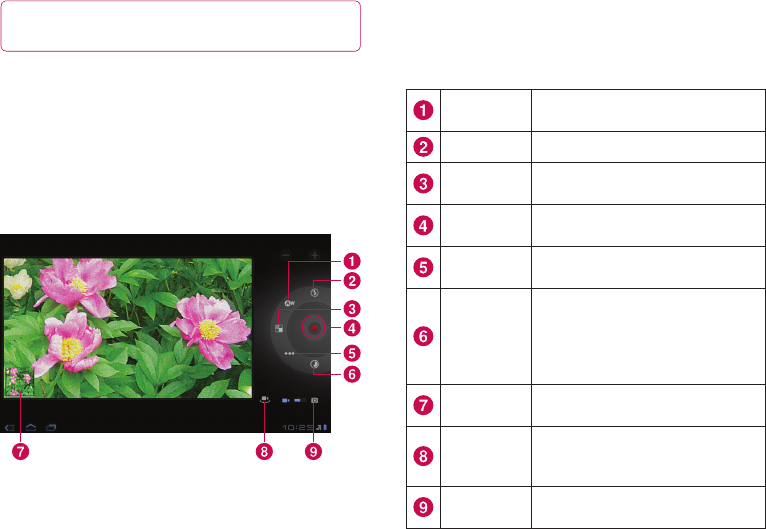
Camera
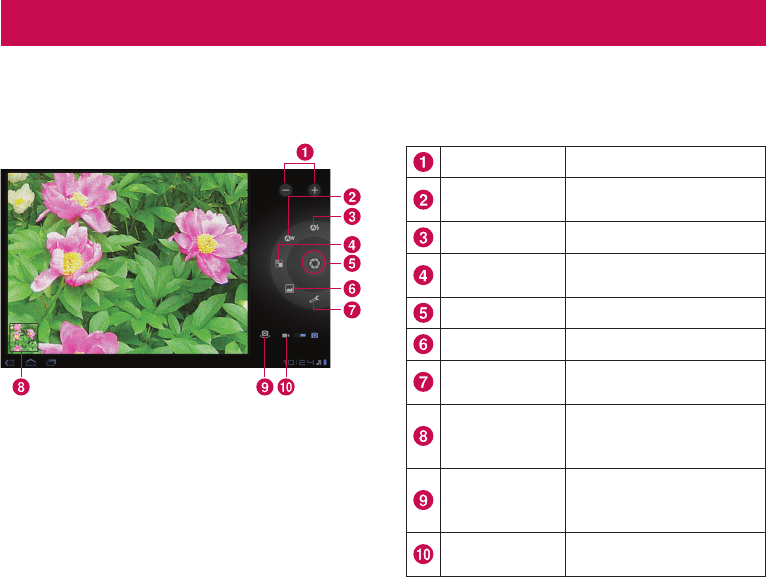
Getting to know your camera view finder
Taking a photo
1. Apps > Camera
2. Holding the device, point the lens towards the
subject you want to photograph.
3. Touch and hold the Capture button lightly and
a focus box will appear in the center of the
viewfinder screen. (A focus box appears only on
the rear-facing camera mode.)
4. Position the device so you can see the subject
in the focus box.
5. When the focus box turns green, the camera
has focused on your subject.
6. Take your finger off the Capture button.
Zoom Zoom in or zoom out.
White balance Adjust the amount of
sunlight entering the image.
Flash mode Enable and disable Flash.
Color effect Choose a color tone for a
new photo.
Capture Takes a photo.
Scene mode Change Scene mode.
Camera settings Change the camera
settings.
Gallery
Access your saved photos
from within the camera
mode.
Switch lenses
Switch between the rear-
facing camera lens and the
front-facing camera lens.
Video mode Touch the video icon to
switch to video mode.
Photos and videos
41
Tagging location information to your photo
Activate to use your device’s location-based services.
Take pictures wherever you are and tag them with the
location. If you upload tagged pictures to a blog that
supports geo-tagged photographs, you can see the
pictures displayed on a map.
NOTE: This function is only available when GPS is
active.
•
Apps > Camera > Camera settings > Store location
> On
Video Camera
Getting to know your video camera view
finder
Taking a video
1. Apps > Camera
2. Touch the Video mode button.
3. Holding the device, point the lens towards the
subject you want to record.
4. Touch the Record button once to start
recording. A timer showing the length of the
video will appear on your viewfinder.
5. Touch the Stop button to stop recording.
White
balance
Adjust the amount of sunlight
entering the video.
Flash mode Enable and disable Flash.
Color effect Choose a color tone for a new
video.
Record/
Stop
Starts and stops recording a
video.
Video
quality Adjusts the video quality.
Time lapse
interval
Captures each frame at a rate
much slower than it will be played
back. When replayed at normal
speed, time appears to be
moving faster and thus lapsing.
Gallery Access your saved videos from
within the video mode.
Switch
lenses
Switch between the rear-facing
camera lens and the front-facing
camera lens.
Camera
mode
Touch the camera icon to switch
to camera mode.
42
LG-V500 | User Guide
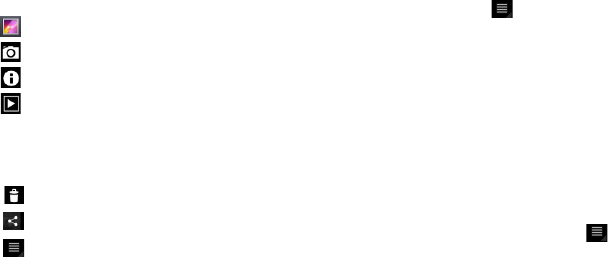
Gallery
Open the Gallery application to view albums of your
pictures and videos.
You can store multimedia files to your memory and
have easy access to all your image and video files.
To open the Gallery application
•
Apps > Gallery
Viewing your albums
•
returns to the main Gallery screen at any time.
•
opens the Camera application.
•
provides the file and folder properties.
•
play a slideshow of all your pictures.
Viewing and browsing pictures and videos
Touch a picture or video in an album to view it.
•
delete a file from device’s memory.
•
allows you to share the file with others.
•
opens more options.
•
Turn the device to view the picture in upright
(portrait) or sideways (landscape) orientation.
The picture is displayed in the new orientation.
•
Touch the picture to view the available menus.
•
You can use the pinch-to-zoom method; spread
out your two finger tips to zoom in and gather your
two finger tips to zoom out.
•
When the picture is zoomed in, drag the picture to
view parts that are not in view.
•
Swipe the screen left or right to view the next or
previous picture or video in the album.
Using a picture as a Contact icon or
Wallpaper
Choose images to use as a contact icon or wallpaper.
1. Touch a picture to view the available menus,
then touch > Set picture as.
2. Choose from Contact photo or Wallpaper.
•
If you choose Contact photo, choose the contact
you wish to set the photo to from your contact list.
•
If you choose Wallpaper, crop the photo and touch
Ok.
Getting details about your photo
You can view a photo’s detailed information, such as
Title, Time, File Size, etc. Touch a picture to view the
available menus, then touch > Details.
43
Calendar
Calendar makes it easy to create and manage events,
meetings, and appointments.
To open the Calendar application
•
Apps > Calendar
When you first set up your device, you configured it
to use an existing Google account or you created a
new account. The first time you open the Calendar
application on your device, it displays any existing
calendar events from your Google account on the web.
Calendar will keep your events synchronized between
your device and the web.
Viewing your calendar
1. Apps > Calendar
2. On the top left corner of the screen, you can
find the different view types of the Calendar
(Day, Week, Month).
Events from each account you have added to your
device and configured to synchronize calendars are
displayed in Calendar. Events from each calendar are
displayed in a different color.
Creating an event
1. Apps > Calendar >
2. Enter the necessary information and touch
Done.
Change synchronization and display settings
You can control whether an account synchronizes
changes to calendar events between a Google™ or
other calendar service with the Settings.
•
Apps > Calendar > > Settings
Clock
Use Clock to display the date and time in large
characters on your screen. You can also use it to set
alarms.
Setting an alarm
1. Apps > Clock > > Add alarm
2. Enter the alarm details and touch Set.
When an alarm sounds, touch Dismiss to turn it off
or Snooze to delay for ten minutes.
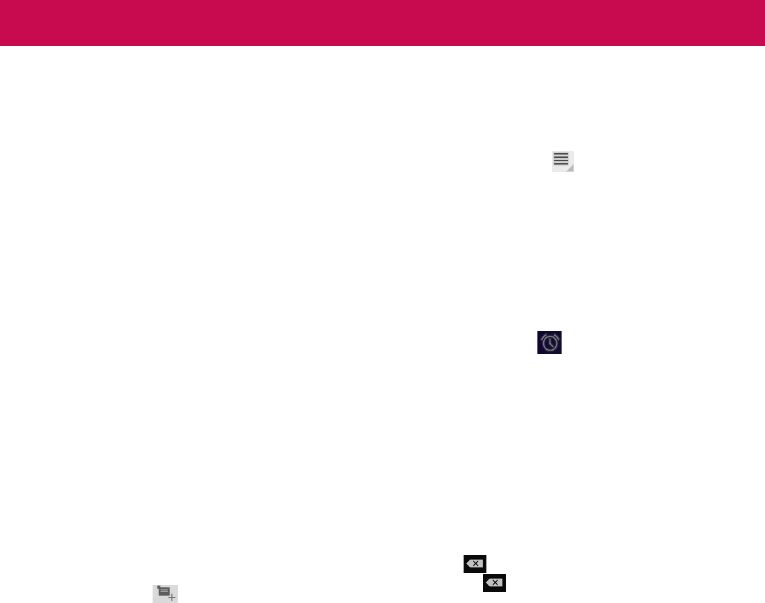
Calculator
To open and use the calculator
1. Apps > Calculator
2. Enter numbers and arithmetic operators.
•
Touch to delete numbers while you type. Touch
and hold to delete all the numbers you entered
at once.
•
Touch CLR to delete the calculation result.
•
To copy what you’ve entered, touch and hold the
input field.
Utilities
44
LG-V500 | User Guide
The Music application plays audio files that are stored
on your device’s memory. Copy audio files from your
computer onto the memory before you open the
Music application.
To open the Music application
•
Apps > Music
NOTE: Music file copyrights may be protected by
international treaties and national copyright laws.
Therefore, it may be necessary to obtain
permission or a licence to reproduce or copy
music. In some countries, national laws prohibit
private copying of copyrighted material. Before
downloading or copying the file, please check the
national laws of the relevant country concerning
the use of such material.
Viewing your music library
The Music application searches the memory for
music files you copied to your memory, then builds
a catalog of your music based on the information
contained in each music file.
The Music library screen opens with options to view
your music library organized by New and recent,
Albums, Artists, Songs, Playlists or Genres.
To create a playlist
1. When viewing a list of songs in the library, touch
to the right of the song name.
2. Touch Add to playlist.
3. Touch New playlist. If you want to add songs
to a playlist you have already created, touch the
name of it.
4. Enter a name for the playlist, then touch OK.
Playing music
Touch a song in your library to listen to it.
The Playback screen opens and the song you
touched or the first song in the album or other
playlist starts to play. Playback stops only if you stop
it, even when you switch applications.
Music
45
To control playback:
The Playback screen contains several icons that you
can touch to control the playback of songs, albums,
and playlists.
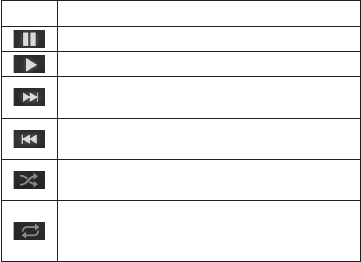
Icon Description
Touch to pause playback.
Touch to resume playback.
Touch to skip to the next track in the
album, playlist, or shuffle.
Touch to skip to the previous track in the
album, playlist, or shuffle.
Touch to play the current playlist in shuffle
mode (tracks are played in random order).
Touch to set repeat mode: don’t repeat,
repeat the playlist, or repeat the current
track.
46
LG-V500 | User Guide
Browser gives you a fast, full color world of games,
music, news, sports, entertainment, and much more,
right on your tablet device. Wherever you are and
whatever you’re into.
NOTE: Additional charges apply when connecting
to these services and downloading content. Check
data charges with your network provider.
Opening webpages
1. Apps > Browser
2. Touch the URL field and input the URL, then
touch .
To zoom in or out, double-tap the screen. You can
also use the two finger zoom; place your two fingers
on the screen and slowly pinch or spread apart.
While browsing the web page, use the
following options:
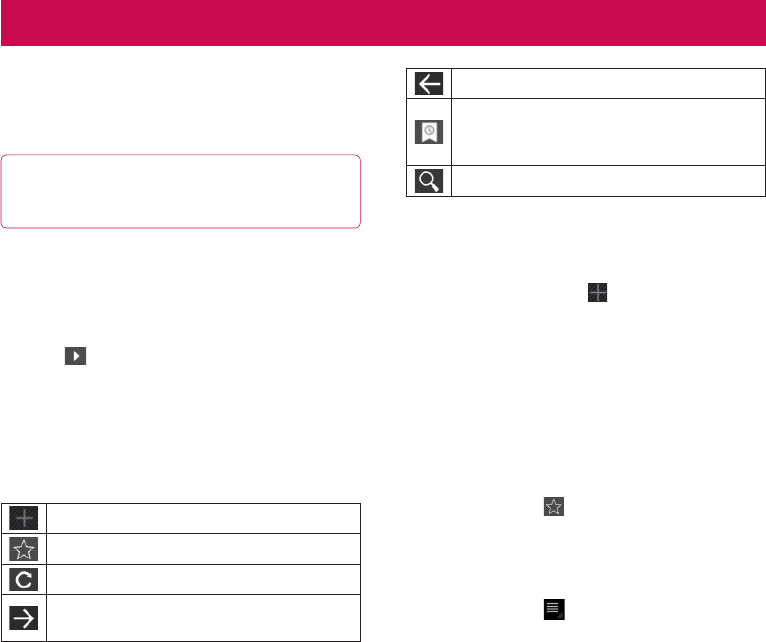
Open a new tab.
Add the current web page as a Bookmark.
Refresh the web page.
Go to the page you connected to after the
current page.
Goes to the previous page.
View your current bookmarks and add a new
bookmark. You can also view your browser
history.
Search web pages.
Opening multiple pages
With this feature, you can use multiple web page
simultaneously. Just touch to open a web page
on a new tab.
Adding Bookmarks to your Home
screen
Make quick access menus to your Home screen with
this feature. You can add icons of your favorite site
and make easy access by touching an icon on your
Home screen like other menus.
•
Apps > Browser > > Add bookmark > Add to
Home screen > OK
Changing browser settings
•
Apps > Browser > > Settings
Browser

47
The Settings application contains most of the tools
for customizing and configuring your device. Some of
functions are detailed on another chapter.
•
Apps > Settings
Wireless & networks
Allows you to manage Wi-Fi and Bluetooth
connections. You can also set Mobile networks and
Airplane mode.
Airplane mode – When Airplane mode is activated,
all wireless communications are disabled.
Wi-Fi settings – This allows you to set up and
manage wireless access points.
•
Wi-Fi – Checkmark to turn on Wi-Fi so you can
connect to Wi-Fi networks.
•
Network notification – Checkmark to receive a
notification when an open Wi-Fi network becomes
available and is in range.
•
Wi-Fi disconnect policy – Specify when to switch
from Wi-Fi to mobile data.
•
Wi-Fi networks – Displays a list of Wi-Fi networks
you’ve previously configured and those detected
when the device last scanned for Wi-Fi networks.
•
Add Wi-Fi Network – Allows you to add a
Wi-Fi network by entering its SSID (the name it
broadcasts) and security type.
Sound
Allows you to manage various Sound settings.
Volume – Allows you to set the multimedia,
notification, and alarm volumes.
Notification ringtone – Allows you to choose a
ringtone for your notifications.
Audible selection – Plays a sound when making a
screen selection.
Screen lock sounds – Plays a sound when locking
and unlocking the screen.
Screen
Allows you to manage various Screen settings.
Brightness – Adjust the brightness of the screen.
Auto-rotate screen – Checkmark to automatically
switch the orientation of the screen as you turn the
device sideways.
Animation – Opens a dialog where you can set
whether you want to enjoy animated transitions for
some effects, for all supported effects, or to enjoy a
device without any optional animation effects.
Timeout – Opens a dialog where you can set how
long to wait after you touch the screen or press
a button before the screen darkens. For the best
battery performance, use the shortest convenient
timeout.
Settings
48
LG-V500 | User Guide
Location & security
Allows you to set your preferences for using and
sharing your location when you search for information
and use location-based applications.
Use wireless networks – If you check Use wireless
networks, your device will determine your approximate
location by using Wi-Fi and mobile networks. When
you check this option, you’re asked whether you
consent to allowing Google™ to use your location
when providing these services.
Use GPS satellites – If you check Enable GPS
satellites, your device will be determine your location
to street-level accuracy.
Use location for Google search – Checkmark to allow
Google search to use your location for improved
results.
Configure screen lock – Set an unlock pattern to
secure your device. When setting this option, a set
of screens open and guide you through drawing
a screen unlock pattern. You can also set a PIN or
Password instead of a Pattern or leave as Unsecure
or Off.
When you turn on your device or wake up the screen,
you’re prompted to draw your unlock pattern to
unlock the screen.
Owner info – Allows you to choose if you want to
display owner information on the lock screen.
Visible passwords – Select to show passwords as you
type them or deselect to hide passwords.
Device administrators – Allows you to view or
deactivate device administrators.
Use secure credentials – Allows you to access secure
certificates.
Install from USB storage – Allows you to install
certificates from USB storage.
Set password – Set or change the credential storage
password.
Clear credentials – Clear credential storage of all
contents and reset its password.
Applications
Allows you to view details about the applications
installed on your device, manage their data, force
them to stop, and to set whether you want to permit
installation of applications that you obtain from
websites and email.
Manage applications – Opens a list of all the
applications and other software installed on your
device, along with their sizes.
Running services – Allows you to view and control
currently running services.

49
Storage use – Allows you to view the storage amount
used by applications.
Battery use – Allows you to view what applications
have been using the battery.
Unknown Sources – Permits installation of
applications that you obtain from websites, email, or
other locations other than Android Market™.
Development – Allows you to set options for
application development.
NOTE: To use USB debugging, you need to install the
“LG USB Driver” on your PC first.
The LG USB Driver is downloadable from the following
site: http://www.lg.com/us/mobile-phones/index.jsp
Click Mobile Support Select the Carrier Select
the Model (LG-V500) Click Driver to download.
Accounts & sync
Allows you to activate Background data
synchronization or Auto-sync. You can also verify
or add accounts and change their data and
synchronization settings.
This allows you to add, remove, and manage your
Google™ and other supported accounts. You also
use these settings to control how and whether all
applications send, receive, and sync data on their
own schedules and whether all applications can
synchronize user data automatically.
Background data – Permits applications to
synchronize data in the background, whether or not
you are actively working in them. Unchecking this
setting can save battery power and lowers data use.
Auto-sync – Check to permit applications
to synchronize data on their own schedule.
Synchronizing data automatically is disabled if
Background data is unchecked.
Privacy
Allows you to manage your personal information.
Back up my data – Checkmark to back up application
data, Wi-Fi passwords, and other settings to Google
servers.
Backup account – Backs up your accounts to debug-
only private cache.
Automatic restore – Checkmark to restore backed up
settings or other data when reinstalling an application.
Factory data reset – Erases all of your personal data
from internal device storage, including information
about your Google account, any other accounts, your
system and application data and settings, and any
downloaded applications. If you reset the device in
this way, you’re prompted to reenter the same kind of
information as when you first started your tablet.
Tip: Make sure you backup any important data
before performing this function.
50
LG-V500 | User Guide
Storage
Displays the amount of internal storage available and
what types of files are using storage space.
Language & input
Language settings:
Select the language for the text on your tablet and
configure the on-screen keyboard, including words
that you have added to its dictionary.
Voice recognizer settings:
Language – Select a language for the Google voice
recognition.
SafeSearch – Set the device to filter explicit text and/
or images from voice search results.
Block offensive words – Allows you to hide
recognized offensive words from voice results.
Text-to-speech settings:
Listen to an example – Plays a brief sample of the
speech synthesizer, using your current settings.
Always use my settings – Check to use the settings
on this screen in place of speech synthesizer settings
available in other applications.
Default Engine – Opens a dialog where you can set
the text-to-speech application you want to use, if you
have more than one installed.
Install voice data – If your device does not have
speech synthesizer data installed, touching this
option connects to Android Market and guides you
through the process of downloading and installing
the data. This setting is not available if the data is
already installed.
Speech rate – Opens a dialog where you can select
how quickly you want the synthesizer to speak.
Language – Opens a dialog where you can select the
language of the text you want the synthesizer to read.
This is particularly useful in combination with the
Always Use My Settings setting, to ensure that text is
spoken correctly in a variety of applications.
Engines – Lists the text-to-speech engines installed
on your device. Touch one to view or change its
settings.
Keyboard settings:
The Android Keyboard settings apply to the
on-screen keyboard that is included with your device.
The correction and capitalization features affect only
the English version of the keyboard.
51
Accessibility
Check to enable all installed accessibility plug-ins.
NOTE: Requires additional plug-ins to become
selectable.
Date & time
Allows you to change the date and time formats and
choose to automatically update it.
About tablet
View legal information and check device status and
software version.
Notice!
Open Source Software
To obtain the corresponding source code under
GPL, LGPL, MPL and other open source licences,
please visit http://opensource.lge.com/
All referred licence terms, disclaimers and notices
are available for download with the source code.
Software update
LG Mobile Software update via Over-the-Air (OTA)
This feature allows you to update the firmware of
your phone to the newer version conveniently via
OTA without connecting the USB cable. This feature
is only available if and when LG makes the newer
version of the firmware available for your device.
Apps > Settings > About tablet > System updates
allows you to check for Android system firmware
updates if and when such updates are made available
for your device by LG.
NOTE: LG reserves the right to make firmware
updates available only for selective models at
its own discretion and does not guarantee the
availability of the newer version of the firmware for
all handset models.
LIMITED WARRANTY STATEMENT
1. WHAT THIS WARRANTY COVER:
LG offers you a limited warranty that the enclosed hardware unit
and its enclosed accessories branded with the LG logo will be
free from defects in material and workmanship, according to the
following terms and conditions:
(1) The limited warranty for the product extends for TWELVE (12) MONTHS
beginning on the date of purchase of the product with valid proof of
purchase, or absent valid proof of purchase, FIFTEEN (15) MONTHS
from date of manufacture as determined by the unit’s manufacture
date code.
(2) The limited warranty extends only to the original purchaser of the
product and is not assignable or transferable to any subsequent
purchaser/end user.
(3) This limited warranty extends only to the hardware unit and the
included accessories branded with the LG logo.
(4) This warranty is good only to the original purchaser of the product
during the warranty period as long as it is in the U.S, including Alaska,
Hawaii, U.S. Territories and Canada.
(5) The external housing and cosmetic parts shall be free of defects at
the time of shipment and, therefore, shall not be covered under these
limited warranty terms.
(6) Upon request from LG, the consumer must provide information to
reasonably prove the date of purchase.
(7) The customer shall bear the cost of shipping the product to the
Customer Service Department of LG. LG shall bear the cost of shipping
the product back to the consumer after the completion of service
under this limited warranty.
2. WHAT THIS WARRANTY DOES NOT COVER:
(1) Defects or damages resulting from use of the product in other than its
normal and customary manner.
(2) Defects or damages from abnormal use, abnormal conditions,
improper storage, exposure to moisture or dampness, unauthorized
modifications, unauthorized connections, unauthorized repair, misuse,
neglect, abuse, accident, alteration, improper installation, or other acts
which are not the fault of LG, including damage caused by shipping,
blown fuses, spills of food or liquid.
(3) Breakage or damage to antennas unless caused directly by defects in
material or workmanship.
(4) Alleged product defects or malfunction of which the Customer Service
Department at LG was not notified by consumer during the applicable
limited warranty period.
(5) Products which have had the serial number removed or made illegible.
(6) Damage resulting from use of non-LG approved accessories.
(7) All plastic surfaces and all other externally exposed parts that are
scratched or damaged due to normal customer use.
(8) Products operated outside published maximum ratings.
(9) Products used or obtained in a rental program.
(10) Consumables (such as fuses).
(11) Defects or damage caused by carrier signal reception or transmission.
(12) Defects, damage, compatibility issues or viruses, bugs or other
software problems originating from third party software, including third
party software pre-loaded onto or packaged with the device or as may
be loaded on to the device or upgraded by the customer.
3. LIMITATIONS ON LG’S WARRANTY
TO THE EXTENT PERMITTED BY LAW, THIS WARRANTY
AND THE REMEDIES SET FORTH ABOVE ARE EXCLUSIVE
AND IN LIEU OF ALL OTHER WARRANTIES, REMEDIES AND
CONDITIONS, WHETHER ORAL, WRITTEN, STATUTORY,
EXPRESS OR IMPLIED, AS PERMITTED BY APPLICABLE LAW.
LG SPECIFICALLY DISCLAIMS ANY AND ALL STATUTORY OR
IMPLIED WARRANTIES, INCLUDING, WITHOUT LIMITATION,
WARRANTIES OF MERCHANTABILITY AND FITNESS FOR
A PARTICULAR PURPOSE AND WARRANTIES AGAINST
HIDDEN OR LATENT DEFECTS.
LG SHALL NOT BE LIABLE FOR THE LOSS OF THE USE OF
THE PRODUCT, INCONVENIENCE, LOSS OR ANY OTHER
DAMAGES, DIRECT OR CONSEQUENTIAL, ARISING OUT OF
THE USE OF, OR INABILITY TO USE, THIS PRODUCT OR FOR
ANY BREACH OF ANY EXPRESS OR IMPLIED WARRANTY,
INCLUDING THE IMPLIED WARRANTY OF MERCHANTABILITY
OR FITNESS FOR A PARTICULAR PURPOSE APPLICABLE
TO THIS PRODUCT. SOME STATES DO NOT ALLOW

THE EXCLUSIVE LIMITATION OF INCIDENTAL OR
CONSEQUENTIAL DAMAGES OR LIMITATIONS ON
HOW LONG AN IMPLIED WARRANTY LASTS; SO THESE
LIMITATIONS OR EXCLUSIONS MAY NOT APPLY TO YOU.
THIS WARRANTY GIVES YOU SPECIFIC LEGAL RIGHTS AND
YOU MAY ALSO HAVE OTHER RIGHTS WHICH VARY FROM
STATE TO STATE. IF LG CANNOT LAWFULLY DISCLAIM
ANY STATUTORY OR IMPLIED WARRANTIES THEN SUCH
WARRANTIES SHALL BE LIMITED IN DURATION TO THE
DURATION OF THE EXPRESS WARRANTY PROVIDED IN
THIS LIMITED WARRANTY AND TO THE OBLIGATION OF
REPAIRING OR REPLACING ANY DEFECTIVE PRODUCT
COVERED THEREBY.
FROM TIME TO TIME USERS MAY USE, LOAD, DOWNLOAD,
UPDATE OR UPGRADE THIRD PARTY SOFTWARE OR
SERVICES OR USE THIRD PARTY EQUIPMENT OR
ACCESSORIES IN CONJUNCTION WITH THIS DEVICE
(COLLECTIVELY, THIRD PARTY ITEMS”). LG MAKES NO
WARRANTIES OR REPRESENTATIONS AND THERE ARE
NO CONDITIONS, EXPRESS OR IMPLIED, STATUTORY
OR OTHERWISE, AS TO THE QUALITY, CAPABILITIES,
OPERATIONS, PERFORMANCE, COMPATIBILITY OR
SUITABILITY OF ANY THIRD PARTY ITEMS, WHETHER
INCLUDED WITH THE PRODUCT OR OTHERWISE. THE
QUALITY, CAPABILITY, OPERATIONS, PERFORMANCE AND
SUITABILITY OF ANY SUCH THIRD PARTY ITEMS SHALL BE
THE SOLE RESPONSIBILITY OF THE USER OR THE VENDOR
ORIGINATING, SELLING OR DISTRIBUTING SUCH THIRD
PARTY ITEMS.
LG IS NOT RESPONSIBLE FOR RETURNING ANY REMOVABLE
STORAGE MEDIA LIKE MEMORY CARDS YOU SEND WITH OR
CONTAINED IN THE DEVICE. PLEASE REMOVE SUCH MEDIA
PRIOR TO SENDING IN YOUR DEVICE FOR REPAIR.
THE RESELLERS, DEALERS, DISTRIBUTORS AGENTS, OR
EMPLOYEES OF LG ARE NOT AUTHORIZED TO MAKE ANY
MODIFICATION, EXTENSION, OR ADDITION TO THIS LIMITED
WARRANTY SO ANY SUCH STATEMENT BY ANY OF THE
FOREGOING SHOULD NOT BE RELIED UPON.
4. HOW TO GET WARRANTY SERVICE:
To obtain warranty service, please call or fax to the following
telephone numbers from anywhere in the continental United
States:
Tel. 1-800-793-8896
Or visit http://us.lgservice.com. Correspondence may also be
mailed to:
LG Electronics Service- Mobile Handsets
P.O. Box 240007, Huntsville, AL 35824
DO NOT RETURN YOUR PRODUCT TO THE ABOVE
ADDRESS. Please call or write for the location of the LG
authorized service center nearest you and for the procedures for
obtaining warranty claims.