LG Electronics USA V901 Tablet with WLAN and Bluetooth User Manual LG V901 Eng 110225 indd
LG Electronics USA Tablet with WLAN and Bluetooth LG V901 Eng 110225 indd
Users Manual

User Guide
LG-V901
P/NO : (1.0) www.lg.com
ENGLISH

Part 15.21 statement
" Change or Modifications that are not expressly approved by the manufacturer could void
the user's authority to operate the equipment. “
Part 15.105 statement
This equipment has been tested and found to comply with the limits for a class B digital
device, pursuant to Part 15 of the FCC Rules.
These limits are designed to provide reasonable protection against harmful interference in
a residential installation. This equipment generates uses and can radiate radio frequency
energy and, if not installed and used in accordance with the instructions, may cause harmful
interference to radio communications. However, there is no guarantee that interference will
not occur in a particular installation. If this equipment does cause harmful interference or
television reception, which can be determined by turning the equipment off and on, the user
is encouraged to try to correct the interference by one or more of the following measures:
- Reorient or relocate the receiving antenna.
- Increase the separation between the equipment and receiver.
- Connect the equipment into an outlet on a circuit different from that to
which the receiver is connected.
- Consult the dealer or an experienced radio/TV technician for help.

Part 15 Class B Compliance
This device and its accessories comply with part15 of FCC rules.
Operation is subject to the following two conditions:
(1) This device & its accessories may not cause harmful interference.
(2) This device & its accessories must accept any interference received,
including interference that may cause undesired operation.
Body-worn Operation
This device was tested for typical use with the back of the device
kept 0 inch (0 cm) from the body.

Conformité aux normes FCC Part 15 Class B
Cet appareil et ses accessoires sont conformes aux normes FCC
Part 15 Class B de la Federal Communications Commission et à
la norme NMB
003 classe B d'Industrie Canada sur les appareils
la
norme
NMB
-
003
classe
B
d'Industrie
Canada
sur
les
appareils
numériques.Son fonctionnement est sujet aux deux conditions
suivantes :(1) Cet appareil et ses accessoires ne doivent pas
provoquer de brouillage préjudiciable, et (2) cet appareil et ses
accessoires doivent accepter toutes les interférences reçues, y
compris celles pouvant causer un fonctionnement indésirable.
Utilisation comme appareil portatif
Ce téléphone a été testé en vue d'une utilisation type comme
appareil portatif, avec une distance de 0cm( 0, po) entre l'arrière
d l' il t l d l' tili t
d
e
l'
appare
il
e
t
l
e corps
d
e
l'
u
tili
sa
t
eur.
Les pinces de ceinture, les étuis et autres accessoires semblables
d'autres marques et contenant des composantes métalliques
ne doivent pas être utilisés.

Some of the contents of this manual may not apply
•
to your device depending on your device’s software or
your service provider.
This handset is not recommended for the visually
•
impaired because of its touch-screen keypad.
Copyright ©2011 LG Electronics, Inc. All rights
•
reserved. LG and the LG logo are registered
trademarks of LG Group and its related entities. All
other trademarks are the property of their respective
owners.
Google™, Google Maps™, Gmail™, YouTube™, Google
•
Talk™ and Android Market™ are trademarks of
Google, Inc.
LG-V901 User Guide
Congratulations on your purchase of the advanced and
compact LG-V901 device by LG, designed to operate with
the latest digital mobile communication technology.
Some of the contents in this manual may differ from your
device depending on the software of the device or your
service provider.
16
LG-V901 | User Guide
To optimize Battery Life
You can extend your battery’s life between charges
by turning off features that you don’t need to run
constantly in the background. You can also monitor
how applications and system resources consume
battery power.
To extend the life of your battery:
Turn off radio communications that you aren’t
•
using, such as Wi-Fi, Bluetooth, or GPS.
Turn down screen brightness and set a shorter
•
screen timeout.
Turn off automatic syncing for Gmail™, Calendar,
•
Contacts, and other applications.
Some applications you’ve downloaded may cause
•
your battery’s life to be reduced.
To download USB Driver
The LG USB Driver is downloadable from the
following site: http://www.lgmobilephones.com
Click Mobile Support Select the Carrier (T-Mobile)
Select the Model (LG-V901) Click USB Driver to
download.
To reboot your device when the screen
freezes
If the device does not respond to user input or the
screen freezes:
Remove the back cover and press the RESET button
with a pointed object to restart your device. If it still
does not work, please contact customer service.
To assure optimal device performance
While sending and receiving data, try to avoid holding
the part of the device where the antenna is located.
Avoiding contact with the antenna area when the
device is in use optimizes the antenna performance
and the battery life.
WiFi Antenna (Internal)
Understanding your device
Before you using the device, please read this!
17
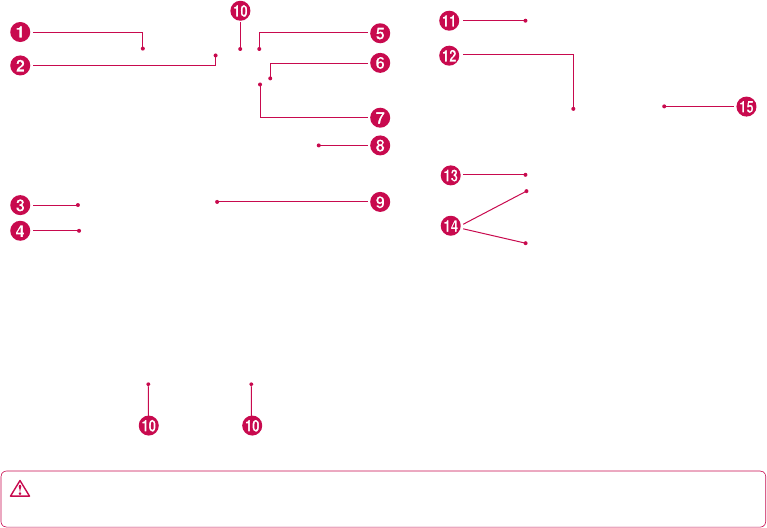
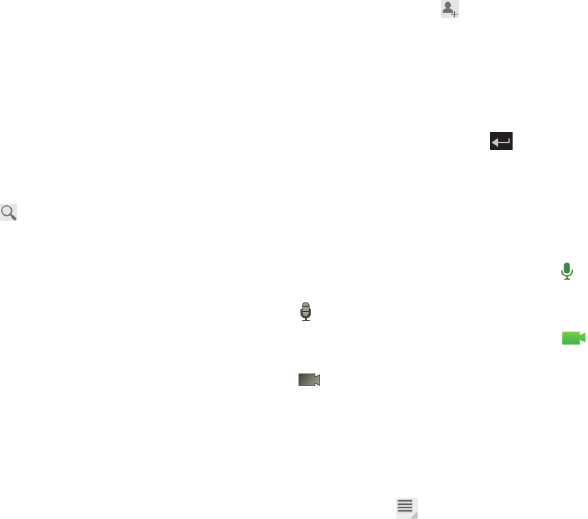
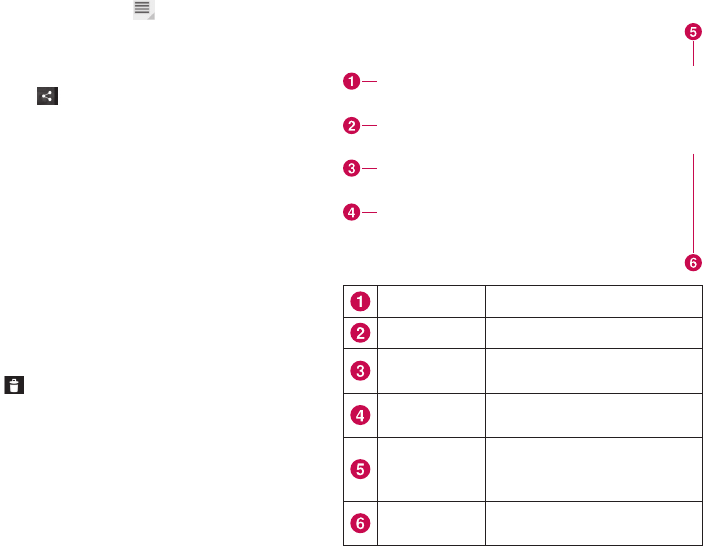
Device components
WARNING: Placing a heavy object on the device or sitting on it can damage its LCD and touch screen
functionalities.

18
LG-V901 | User Guide
Charger port lets you charge your device using the provided travel adapter.
3.5mm Headset Jack lets you to plug in an optional headset for convenient, hands-free use. You can also
plug in headphones to listen to music.
USB cable port allows you to connect a USB cable.
HDMI cable port allows you to connect an HDMI cable.
Power/Lock Key locks the screen on your device. Press and hold to open the power off menu.
Front-facing Camera Lens use for taking pictures and recording videos. Keep clean for optimal
performance.
Ambient Light Sensor detects available environmental light and automatically increases or decreases the
display’s backlighting.
Volume Keys allow you to adjust the notification and media volumes.
Touchscreen displays all the information needed to operate your device, such as applications, date, time,
signal status, and battery strength.
Speaker lets you hear notifications and sounds.
Back Cover encloses the SIM card compartment.
SIM card slot encloses the SIM card.
Camera Flash helps picture and video quality when taking pictures or recording videos in low light
conditions.
Rear-facing Camera Lens use for taking pictures and recording videos. Keep clean for optimal
performance.
Reset button reboots your device.
19
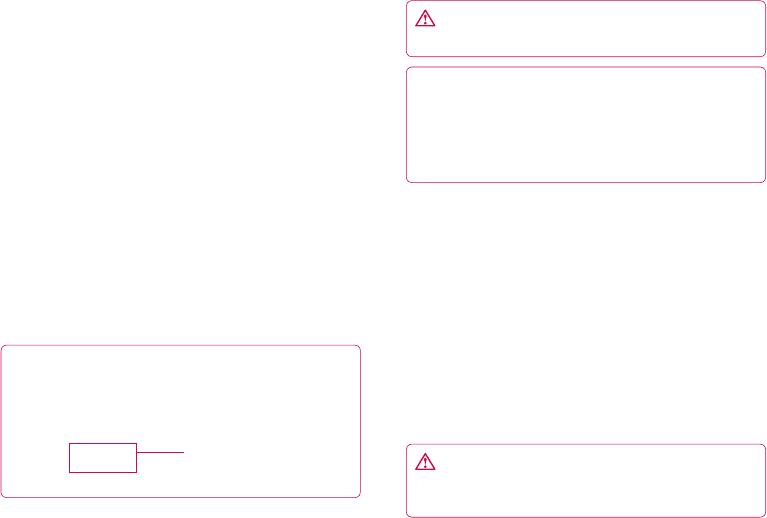
Inserting SIM card
Before you can start exploring your new device, you’ll
need to set it up.
To insert the SIM card:
Press and slide the back cover upwards with 1.
both hands (see image below).
Slide the SIM card into the SIM card slot until 2.
it clicks into place. Make sure the gold contact
area on the card is facing downwards.
Slide the back cover downwards until it clicks 3.
into place (see image below).
NOTICE: When you open the back cover to insert
the SIM card, you can find a label showing the
FCC ID number.
FCC ID label
Charging your battery
Your device has an internal rechargeable battery.
Keep the battery charged while not in use in order to
maximize use and standby time. The battery charge
level is shown on the Status Bar at the bottom right
corner of the screen.
WARNING: The battery must be fully charged
initially to improve battery lifetime.
NOTICE: Please use only an approved charging
accessory to charge your LG device. Improper
handling of the charger port, as well as the use of
an incompatible charger or adapter, may cause
damage to your device and void the warranty.
Connect the provided travel adapter into the wall 1.
power socket.
Plug the other end (as shown below) into the 2.
device’s charger port.
WARNING: Fully insert the plug into the
device’s charger port, otherwise it may not charge
your device.
Only TMUS
“NOTICE: FCC ID label
20
LG-V901 | User Guide
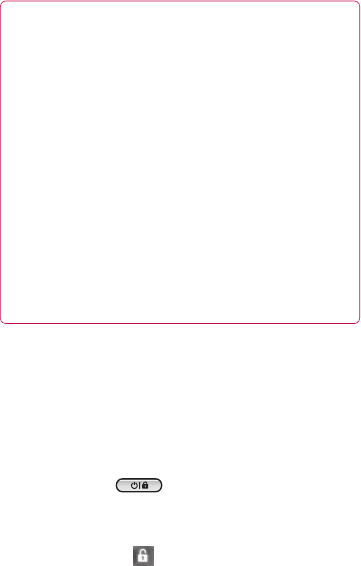
Turning your device on and off
To turn on the device, press and hold the
•
Power/
Lock Key for a few seconds.
To turn off the device, press and hold the
•
Power/
Lock Key and touch OK to confirm.
Using HDMI
LG-V901 supports HDMI output. Enjoy High-
Definition video recorded on your device on other
display devices via HDMI cable, such as a TV or a
projector that allows HDMI input. Use the supplied
HDMI cable to connect your device to the display
device.
Your tablet supports:
Video - resolutions up to 1080p
•
Non video - resolution up to 720p
•
3D Frame Packing - up to 720p
•
NOTE:
It may take time to play media files depending
•
on the display device connected.
Files may not be played properly when using
•
a cable or display device that is not HDMI-
certified.
The image orientation set in your tablet may be
•
Landscape-only and not be rotated to change
the orientation.
Your tablet may automatically adjust the output
•
resolution according to the resolution of the
display device you connected.
During the HDMI connection, video playback is
•
only visible on the display device.
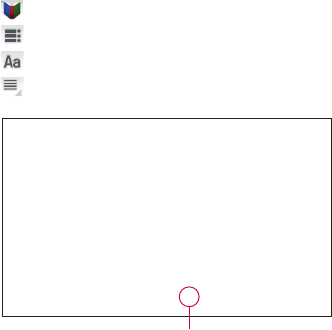
Locking and unlocking the screen
When you do not use the device for a while, the
screen is turned off and locked automatically to
prevent unintended operation and save the battery
power. When you are not using your device, press the
Power/Lock Key to lock your device.
You can turn on the screen by pressing the 1.
Power/Lock Key. Your Lock Screen will appear.
Touch and hold 2. . A circle appears on the
screen around your finger.
Drag your finger to the line of the circle. The 3.
screen is unlocked and the last screen you were
working on opens.

21
NOTE: If you have set up an Unlock Pattern, use
your fingertip to draw the pattern. If you set up a
PIN or Password, enter it and touch OK.
To adjust the delay before the screen turns off:
Settings
•
> Screen > Timeout
Set an Unlock Pattern
You can lock your screen so that only you can unlock
it to access your data, buy applications, etc.
Setting an Unlock Pattern, PIN, or Password
for the first time
Settings
•
> Location & security > Configure lock
screen > Pattern, PIN, or Password
The first time you set an Unlock Pattern, you will see
a tutorial with instructions on how to create it.
From then on, any time you wish to turn the device
on or unlock the screen, you will need to draw your
Unlock Pattern to unlock the screen.
You can also lock your screen by using a PIN or
Password. Once it is set, you can change it on the
Configure lock screen menu.
NOTES:
You have 5 opportunities to enter your Unlock
•
Pattern, PIN or Password. If you used all the
5 opportunities, you can attempt it after 30
seconds.
When you can’t recall your unlock Pattern:
•
- If you’ve created a Google account on the device,
touch Forgot pattern? Then you are required to
sign in with your Google account to unlock your
device.
- If you haven’t created a Google account on the
device, you need to perform a factory reset.
(Caution: If you perform a factory reset, all user
applications and user data will be deleted. Please
remember to back up any important data before
performing a factory reset.)
Power off you device.1.
Press and hold the following keys for 5 2.
seconds on lock screen state: Volume Up +
Volume Down + Power/Lock Key
When the power turns on, release these keys.3.
22
LG-V901 | User Guide
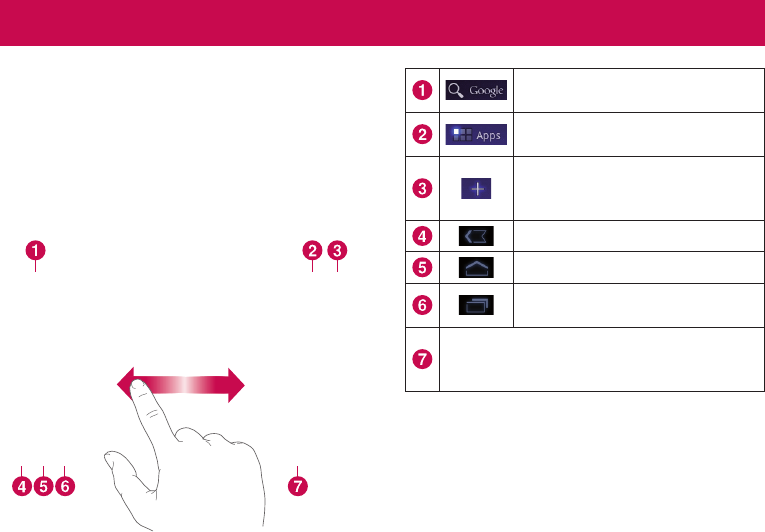
To navigate your Home screen, simply swipe your
finger to the left or right to view your Home screen
panels. You can also customize each panel with
widgets and shortcuts to your favorite applications,
folders and set a wallpaper.
The Home screen is your starting point to access all
the features on your device. It displays application
shortcuts, icons, widgets, and other features.
Google Search™ opens the Google
Search application.
Apps Launcher open the Launch
screen to view installed applications.
Home Screen Settings allows you
to customize your home screen
panels.
Back go to the previous screen.
Home return to the Home screen.
Recent Apps displays a list of your
recently used applications.
Status Bar displays device status information,
including the time, signal strength, battery
status, and notification icons.
Customizing the Home Screen
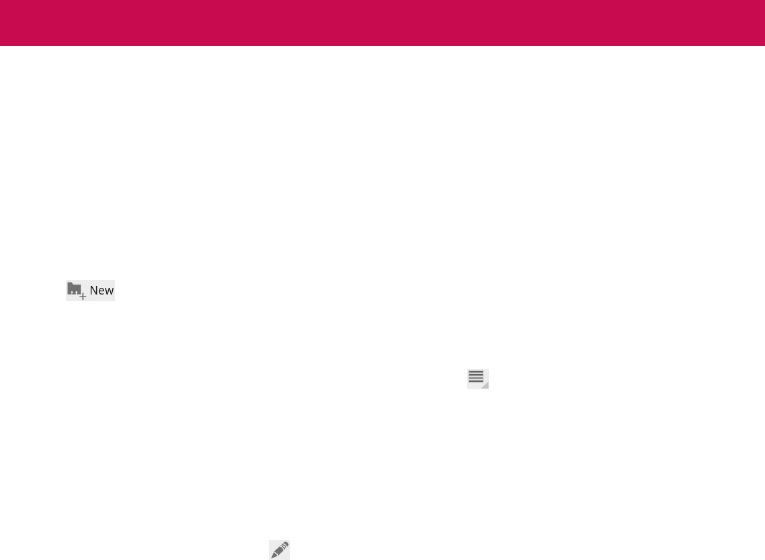
You can personalize your Home screen by adding
application icons, shortcuts, widgets, and other items
to any Home screen panel. You can also change the
wallpaper.
Your Home Screen
only TMUS -> must delete
23
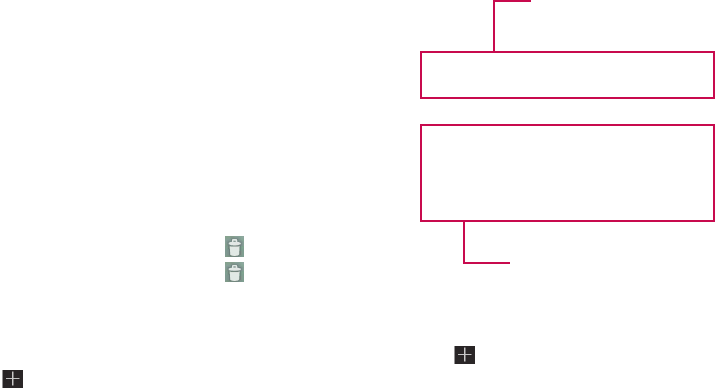
To move an item on the Home screen
Touch and hold the item on your Home screen.1.
Drag the item to a new location on the screen. 2.
Pause at the left or right edge of the screen
to drag the item into the next available Home
screen panel.
When the item is placed where you want it to 3.
be, lift your finger.
To delete an item from the Home screen
Touch and hold the item until the Apps launcher 1.
icon is changed to a Trash can .
Drag the item to the 2. Trash can and lift your
finger.
Adding Widgets on your Home screens
You can edit Home screen panels by touching 1.
on the Home screen.
Touch and hold the items from the 2. Widgets
category, then drag it to the Home screen panel
you want.
Pause on the Home screen panel and when the 3.
it gets enlarged, drag the item to the location
you want.
When the item is placed where you want it to 4.
be, lift your finger.
The screen will return to the 5. Home screen
settings automatically.
Home screen panels
Applications, widgets, shortcuts,
and other items
Changing the Home screen wallpaper
Touch 1. , then Wallpapers.
Select an image from 2. Gallery, Live Wallpapers,
or Wallpapers.
Touch the wallpaper, then 3. Set wallpaper
(if necessary). If the wallpaper needs to be
cropped, crop it and touch OK.

24
LG-V901 | User Guide
Adding More
You can add specific shortcut menus to the home
screen to your device, including Bookmarks and
Settings menus. Touch More and choose the
menu(s) you want to add.
Adding a quick contact icon to your Home
screen
You can create a quick access icon of your favorite
contact on your Home screen. It makes it easy to get
in touch with your contacts.
Touch 1. , then More.
Touch 2. Contact. You contact list will be displayed
on the screen. Select a contact you want to add
from the list.
Your contact will be added to the Home screen.3.
Status icons
The Status Bar appears at the bottom of every
screen. It displays icons indicating that you’ve
received notifications and icons indicating the
device’s status, along with the current time.
Below is a table explaining the meaning of icons
you’re likely to see in the Status Bar.
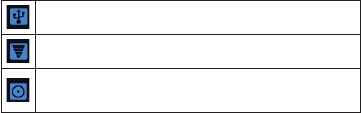
No signal
Signal strength
Bluetooth activated
Bluetooth connected
Alarm
Flight mode
Battery level
Battery is charging
USB to PC
Download
Upload
Onscreen keyboard is ON
Downloaded application
New Email message
New Gmail message
25
Using the Multi-tasking functions
Multi-tasking is easy with Android because open
applications keep running even when you open
another application. There’s no need to quit an
application before opening another. You can use and
switch among several open applications. Android
manages each application, stopping and starting
them as needed, to ensure that idle applications
don’t consume resources unnecessarily.
Opening and Switching Applications
Simply touch on the screen to view the list
recently used applications. Touch an application to
return to it.
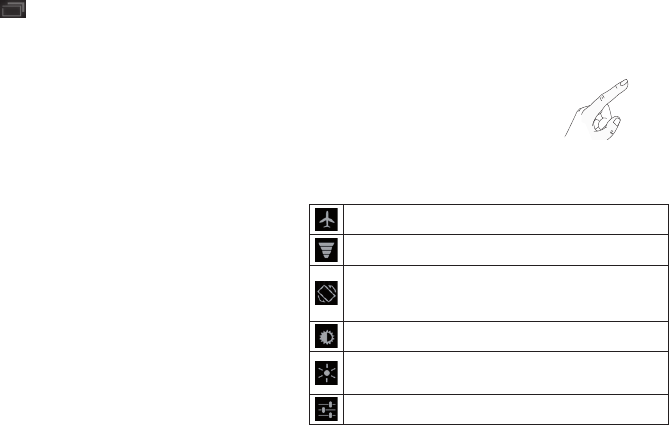
Notifications Panel
The Notifications Panel allows you to check
and manage Wi-Fi, Bluetooth as well as other
notifications, such as the arrival of new messages,
calendar events, alarms, and ongoing events. When
you receive a notification, text appears briefly and
the notification icon will be displayed in the Status
Bar. Depending on your settings, you may hear a
notification sound.
You can open the Notifications Panel to view a list of
all recent notifications. Tap the Status Bar once to
check overall information of your device. If you tap
on it again, you can get all the information of your
device.
The following icons are displayed on the Notifications
Panel:
Enables and disables Airplane Mode.
Directs you to the Wireless & networks menu.
Choose to automatically switch the orientation of
the screen as you turn the device to a horizontal
position.
Adjust the brightness of the screen.
Choose to enable or disable notifications and
display status icons on the Status Bar.
Directs you to the Settings menu.
26
LG-V901 | User Guide
Touch screen tips
Your touchscreen provides an excellent way to interact
with and use your device.
Here are some tips on how to navigate around your
device.
Touch – A single finger touch selects items.
Touch and hold – Touch and hold an item on the
screen by touching it and not lifting your finger until
an action occurs.
Drag – To scroll through a list or move slowly, drag
across the touch screen.
Flick – To scroll through a list or move quickly, flick
across the touch screen (drag quickly and release).
Swiping – Swiping means to quickly drag your
finger vertically or horizontally on the screen to
move the area of focus or to scroll through a list.
For example: slide your finger left or right on the
Home screen to scroll among the five panels.
Rotating the screen – The screen can be rotated to
change the orientation from portrait to landscape.
Double-tap – Double-tap to zoom a web page or
a map.
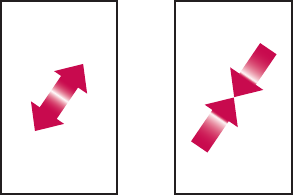
Zoom-in and Zoom-out – Pinch fingers together
or spread fingers apart on the screen when you’re
viewing images, web pages or on maps to zoom in
and out.

27
On-screen Keyboard
The on-screen keyboard displays automatically on
the screen when you need to enter text. To manually
display the keyboard, simply touch a text field where
you want to enter text.
Caps/Shift Key lets you enter capital letters.
To lock the Caps/Shift Key, touch it twice. To
unlock it, touch it again.
Settings Key lets you switch the input
language or access Android keyboard
settings. You can also touch and hold to
change the input method.
Number and Symbols Key change the input
to the numbers and symbols keyboard.
Enter Key moves the cursor to the next field
or text line or submits your query.
Close Key removes the keyboard from the
screen.
Delete Key deletes a single space or
character with each touch. Touch and hold to
delete text quicker.
Voice to Text Key enters text by voice.
Emoticon Key lets you insert emoticons
easily. Touch and hold to open a list of
emoticons.
Using the on-screen keyboard
Touch a text field where you want to type. The 1.
on-screen keyboard will open automatically.
Text fields for device numbers and other special
purposes may display numbers and symbols.
Touch the keys on the keyboard to start typing.2.
Entering text by speaking
You can enter text by speaking in most places that
you can enter text with the on-screen keyboard.
Touch a text field.1.
Touch the 2. on the keyboard.
When prompted to “Speak now,” speak what you 3.
want to enter.
28
LG-V901 | User Guide
Wi-Fi Networks
With Wi-Fi, you can use high-speed Internet access
within the coverage of the wireless access point. You
can enjoy wireless Internet with Wi-Fi without extra
charges. Once the Wi-Fi setting is ON, a list of active
and in-range Wi-Fi networks is displayed. You may
need a password depending on the network.
Turn on Wi-Fi and connect to a network
Settings 1. > Wireless & networks > Wi-Fi settings
> Wi-Fi
A checkmark indicates that Wi-Fi is on.2.
A list of active and in-range Wi-Fi networks will 3.
load. Touch the network you wish to connect to.
If the network is open, touch 4. Connect. If the
network is secured with a password, enter the
password and touch Connect.
NOTE: If you are out of the Wi-Fi zone or set Wi-Fi
to Off, additional charges may be applied by your
mobile operator for mobile data use.
USB Tethering & Portable Wi-Fi hotspot
USB tethering and portable Wi-Fi hotspot are great
features when there are no wireless connections
available. By using USB tethering, you can share your
device’s mobile data connection with a single PC via
USB cable. This will provide an internet service to a
PC over the mobile network.
Settings
•
> Wireless & networks > Tethering &
portable hotspot > USB tethering
A checkmark indicates that USB tethering is on.
NOTE: To use USB tethering, you need to install
the “LG USB Driver” on your PC first.
The LG USB Driver is downloadable from the
following site: http://www.lgmobilephones.com
Click Mobile Support Select the Carrier
(T-Mobile) Select the Model (LG-V901) Click
USB Driver to download.
By turning your device into a portable Wi-Fi hotspot,
you can share your device’s data connection with
more than a single device at once.
Settings
•
> Wireless & networks > Tethering &
portable hotspot > Portable Wi-Fi hotspot
A checkmark indicates that portable Wi-Fi hotspot
is on.
Connecting to Networks and Devices
29
When your device is sharing its data connection, an
icon appears in the Status Bar and as an ongoing
notification in the Notifications Panel.
USB tethering is active
Portable Wi-Fi hotspot is active
Both USB tethering and Portable Wi-Fi
hotspot are active
Bluetooth
Bluetooth is a short-range wireless communications
technology that devices can use to exchange
information. The most common Bluetooth devices
are headphones for listening to music and other
portable devices, including laptops and cell phones.
To connect to a Bluetooth device, you must turn
on your device’s Bluetooth. To use your device’s
Bluetooth with another device, you must first pair the
two devices. Pairing creates a secure connections
between the two devices.
Turn on Bluetooth
Settings
•
> Wireless & networks > Bluetooth
A checkmark indicates that Bluetooth is on.
To pair your device with a Bluetooth device
You must pair your device with another device before
you connect to it.
If Bluetooth is off, you need to touch Bluetooth to
turn it on first.
Settings
•
> Wireless & networks > Bluetooth
settings > Find nearby devices
Your device will scan for and display the IDs 1.
of all available Bluetooth in-range devices. If
the device you want to pair with isn’t on the
list, make sure the target device is set to be
discoverable, then scan again.
Touch the ID of the device you want to pair 2.
with your device. If you’re prompted to enter
a passcode, try entering 0000 or 1234
(the most common passcodes), or consult the
documentation that came with the target device
to find its passcode.
Once the pairing is successful, your device will 3.
connect to the device.
Connecting to a computer via USB
You can connect your device to a computer with a
USB cable, to transfer music, pictures, and other files
between your tablet and the computer. Using Media
Transfer Protocol (MTP), you can manage contents on
your tablet storage.

30
LG-V901 | User Guide
NOTE: Before using MTP, please read the
following first!
You must install the latest version of Windows
•
Media Player to use MTP. You can download the
latest version of windows media player from the
Microsoft website: http://www.microsoft.com/
windows/windowsmedia/download
MTP works with:
•
- Windows XP Service Pack 2 or higher with
Windows Media Player 10 or higher installed
(Windows Media Player 11 or higher is
recommended).
- Windows Vista and Windows 7.
- Mac OS with third party software XNJB.
- Linux with third party software libmtp.
You have to upgrade your device’s firmware
•
to the latest version before using the MTP
mode from the following site:
www.lg.com
To connect as a removable storage device:
Connect your device to a computer using the 1.
supplied USB cable.
Your tablet is automatically recognized as a 2.
portable device.
Find your device in My computer using file 3.
explorer on the computer. Files and folder
structure of your table will be displayed under
Device Storage.
You can now copy files and folders to and from 4.
your tablet.
To Synchronize with Windows Media Player:
Connect your device to a computer using the 1.
supplied USB cable.
When connected, a pop-up window will appear 2.
on the PC.
Open Windows Media Player.3.
Edit or enter your device’s name in the pop-up 4.
window (if necessary).
Select 5. Sync tab on Windows Media Player.
Select and drag files you want to the 6. Sync List
window.
Click 7. Start Sync on the bottom of the Sync List
window to start. It will copy files in Sync List to
your tablet.
NOTE:
Please do not disconnect the USB cable
•
during loading or synchronizing. It may cause
malfunction of the player and may corrupt the
files.
For details about usage of Windows Media
•
Player, refer to the Windows Media Player Help.

31
Setting up your Google account
Touch a Google application, such as 1. Gmail.
At the setup screen, touch 2. Create account to
create a new account. If you have a google
account, enter your e-mail address and
password, then touch Sign in.
Once you have set up your Google account on 3.
your device, your device will be automatically
synchronized with your Google account on
the web. (It depends on your synchronization
settings.)
Signing in to your Google Account lets you
synchronize Gmail and your Google contacts and
calendars between your device and the web. You also
need to sign in to a Google Account to use Google
applications such as Google Talk™ and Android
Market.
Adding additional accounts
After setup, you can add Google™, Microsoft
Exchange ActiveSync, Facebook, conventional
email, and other kinds of accounts, depending on
what applications you have installed. Each account
syncs some or all of the account’s data. If you
add more than one Google Account, only the first
Google Account you sign into is backed up to
Google servers. Some applications that only work
with a single account display data only from the first
account that you sign into.
Google account set up
32
LG-V901 | User Guide
You can use Google Applications after signing in with
your Google account. To use Google Applications,
your device must have a data connection.
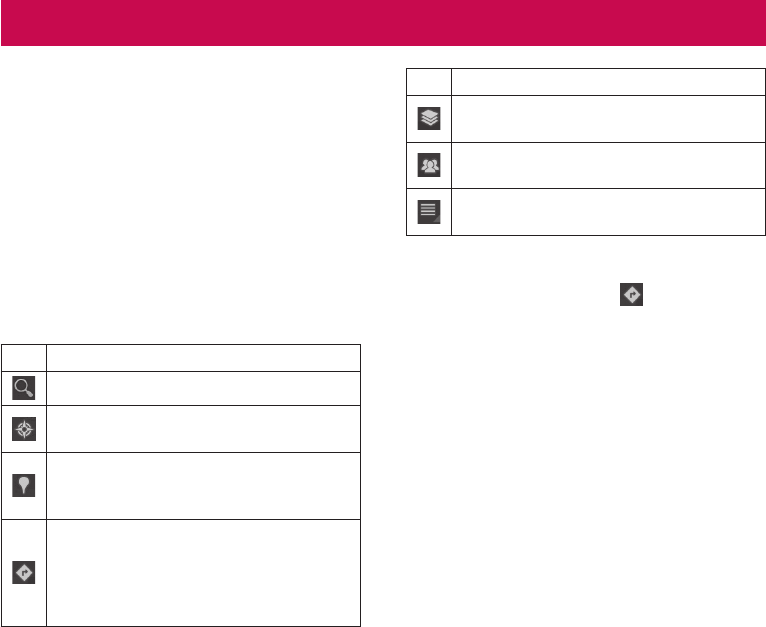
Maps
You can find your current location, view real-time
traffic conditions and get detailed directions. You can
search on a street map or a satellite image to locate
an address or a landmark.
To open the Maps application
Apps
•
> Maps
Icon Description
Search – You can search a location you want.
My Location – Point your current location on
the map.
Places – Searches for places around your
current location that are related to the
category you choose.
Directions – This will let you find out the
route of any place you enter. Touch the My
Location and End point fields to input the
data. You can also choose a location from
Contacts or a point on the map.
Icon Description
Layers – You can switch view from Traffic to
Satellite, Terrain, or others.
Join Latitude – Allows you to choose to
share your location with friends you choose.
More – Clear map or find Starred places and
more.
Getting directions
While viewing a map, touch1. .
Enter your start point and destination point, type 2.
the address, or find from contacts.
Choose the transportation method and touch 3.
Go.
Starring a location
You can star any location or labeled feature on a map
to make it easy to spot.
Touch and hold a location or labeled feature on 1.
a map.
Touch the balloon that opens.2.
Touch the gray star at the top of the screen to 3.
star the location.
Google Applications
33
You can open a list of your starred locations, so you
can quickly go to a starred location on the map.
Touch
•
> Starred Places
Finding your friends with Latitude
Google Latitude lets you and your friends view
each others’ locations on maps and share status
messages with each other. Your location is not shared
automatically. You must join Latitude and then invite
your friends to view your location, or accept invitations
from your friends.
Apps1. > Latitude > > Add friends
Touch 2. Select from Contacts to check all of the
contacts you want to invite. Touch Add via email
address to enter one or more email addresses.
Touch 3. Add friends.
When your friend accepts your invitation, you 4.
can share locations.
Market
Android Market™ lets you download useful
applications and games. If you install applications
and games from Android Market™, they appear in
the menu. You can check downloaded application by
touching the My apps tab.
To open the Market application
Apps
•
> Market
Downloading applications
Select a category to browse its contents.1.
Choose an application to install.2.
For free applications, touch Install. For paid 3.
applications, touch the price button.
Read the information on the type of information 4.
the application will access. If you agree to the
application’s access requirements, touch OK.
Removing applications
Touch the 1. My apps tab.
Choose the application you wish to remove and 2.
touch Uninstall.
You can also remove an application from the
•
Settings menu.
WARNING: To protect your device and
personal data, download applications only from
trusted sources, such as Android Market™. If some
applications are not properly installed on your
device, your device may not work normally or a
serious error can occur. You will need to uninstall
those applications and all of its data and settings
from the device.
34
LG-V901 | User Guide
Gmail™
Gmail™ is configured when you first set up your
device. Depending on your synchronization settings,
Gmail™ on your device is automatically synchronized
with your Gmail™ account on the web.
When you open the Gmail application, the most
recent conversations are displayed in your Inbox.
To open the Gmail application
Apps
•
> Gmail
The current Google Account is displayed at the top
left corner of the Inbox. If you have more than one
Gmail account, you can switch accounts to view the
messages in each Inbox.
To search specific emails
Apps
•
> Gmail >
A list of results will appear, displaying all of the
conversations with emails that contain the words you
searched for.
Google Talk™
This application lets you chat with other people
who also use Google Talk™. You remain signed in,
even when you’re using other applications, until you
deliberately sign out.
Managing Your Friends List
Your Google Talk™ Friends list contains the friends
you’ve invited to become friends or whose invitations
you’ve accepted in Google Talk™. Friends can invite
each other to chat in Google Talk™ and see each
others’ online status in Google Talk™ and other
applications, such as in Gmail™ and Google Maps™.
To add a friend : Touch and enter your friend’s
email address. Then touch Send invitation.
Chatting with a friend
Apps1. > Talk
Find the friend you want to chat with and enter 2.
your message. Then touch to send it.
The messages that you exchange are displayed
on the screen and include information about the
chat, such as whether it’s on the record, the time
a message was sent (if there’s no response after a
short while), etc.
If your friend is available for voice chat,
•
will
appear next to his name on the Friends list. Touch
to begin a voice chat.
If your friend is available for video chat,
•
will
appear next to his name on the Friends list. Touch
to begin a video chat.
To sign out of Google Talk™
You can sign out of Google Talk™. For example, if
you want to limit Google Talk™ conversations to your
device. Also, signing out can extend your battery life.
Apps
•
> Talk > > Sign out
35
Books
You can download electronic books and read them
anywhere.
To shop for books:
Apps > Books > Touch Shop, then it connect to
Market directly.
To read books:
Apps > Book > Select a book from the library.
To show the menu while you are reading, touch the
•
screen slightly.
•
returns to the main Book screen at any time.
•
shows the table of the contents.
•
goes to the settings.
•
opens menu.
Slide the bar to skip the page
backward and forward.

36
LG-V901 | User Guide
Enjoy user-friendly Email environment with your
device. You can add multiple Email accounts using
POP3, IMAP and Exchange ActiveSync.
To open the Email application
Apps
•
> Email
Adding an account
The first time you open the Email application, a setup
wizard opens to help you set up an email account.
Your service provider or system administrator can
provide the account settings you need.
After the initial setup, Email displays the contents
of your inbox. If you have added more than one
account, you can switch among accounts.
•
goes to an composing email screen.
•
synchronizes your messages with mail web
server.
Changing account settings
Once you finished setting up the email account, you
can change the general settings and set your favorite
ringtone to notify you when new email has arrived or
add and remove accounts.
Apps
•
> Email
Touch
•
> Account settings
Personalize the settings according to your needs.
•
Using Combined view
If you added more than one account, you can view
all messages sent to all accounts. The accounts are
distinguished by colored labels.
Touch
•
Combined view from the drop-down menu
at the top left corner of the screen. You can also
switch accounts by touching the desired account
on this menu.
Remove an email account
Apps
•
> Email > > Account settings > Remove
account
Email
37
You can add contacts on your device and synchronize
them with the contacts in your Google account or
other accounts that support syncing contacts.
To open the Contact application
Apps
•
> Contacts
Adding a new contact
Touch 1. Apps > Contacts.
Touch 2. to create a new contact.
Choose the account you wish to add the contact
to, if necessary.
If you want to add a picture to the new contact, 3.
touch the image area. Choose Take photo to
take a photo with the Camera or Select photo
from Gallery to choose one from your Gallery.
Enter any contact information you want to add.4.
Touch 5. Done when you finish editing.
Editing a contact
While viewing a contact’s details, touch and
enter the desired contact information. Then touch
Done to save the contact entry.
Searching for a contact
Touch Find contacts on the top left side of your
screen and type the name you want to find. Matching
contacts will be displayed immediately. Touch the
contact you are searching for.
Once you find a contact, you can use the
following options:
Touch the Email field to send an email.
•
Touch the Website field connect to the URL.
•
Touch the Address field to pinpoint the location on
•
the map.
Touch the IM field to connect to instant messaging.
•
Touch
•
and Delete contact to delete a contact.
Importing and Exporting contacts to
your memory
If you have contacts stored in vCard format on your
device’s memory, you can import and export them
into your Contacts application.
You can also export all of the contacts on your device
to your device’s memory as vCard files.
Contacts

38
LG-V901 | User Guide
To export your contacts:
Apps1. > Contacts
Select a contact you want to export.2.
Touch 3. > Import/Export > Export to USB
storage then OK.
To import your contact:
Apps1. > Contacts
Touch 2. > Import/Export > Import from USB
storage
You can import one or multiple vCard files at 3.
once. Choose the option you want and touch
OK.
In the menu that opens, all the vCard files 4.
currently in your device’s memory are displayed.
Select the vCard file(s) you want to import.

39
Camera
Getting to know your camera view finder
Taking a photo
Apps1. > Camera
Holding the device, point the lens towards the 2.
subject you want to photograph.
Touch the Capture button lightly and a focus 3.
box will appear in the center of the viewfinder
screen.
Position the phone so you can see the subject 4.
in the focus box.
When the focus box turns green, the camera 5.
has focused on your subject.
Take your finger off the Capture button.6.
Zoom Zoom in or zoom out.
White balance Adjust the amount of
sunlight entering the image.
Flash mode Enable and disable Flash.
Color effect Choose a color tone for a
new photo.
Capture Takes a photo.
Scene mode Change Scene mode.
Camera settings Change the camera
settings.
Gallery
Access your saved photos
from within the camera
mode.
Switch lenses
Switch between the rear-
facing camera lens and the
front-facing camera lens.
Video mode Touch the video icon to
switch to video mode.
Photos and videos

40
LG-V901 | User Guide
Video Camera
Getting to know your video camera view
finder
Taking a video
Apps1. > Camera
Touch the 2. Video mode button.
Holding the device, point the lens towards the 3.
subject you want to record.
Touch the 4. Record button once to start
recording. A timer showing the length of the
video will appear on your viewfinder.
Touch the 5. Stop button to stop recording.
White balance Adjust the amount of
sunlight entering the video.
Flash mode Enable and disable Flash.
Color effect Choose a color tone for a
new video.
Record/Stop Starts and stops recording
a video.
Video quality Adjusts the video quality.
Time lapse
interval
Captures each frame at a
rate much slower than it
will be played back. When
replayed at normal speed,
time appears to be moving
faster and thus lapsing.
Gallery Access your saved videos
from within the video mode.
Switch lenses
Switch between the rear-
facing camera lens and the
front-facing camera lens.
Camera mode Touch the camera icon to
switch to camera mode.
41
Tagging location information to your photo
Activate to use your device’s location-based services.
Take pictures wherever you are and tag them with the
location. If you upload tagged pictures to a blog that
supports geotagged photographs, you can see the
pictures displayed on a map.
NOTE: This function is only available when GPS is
active.
Apps
•
> Camera > Camera settings > Store location
> On
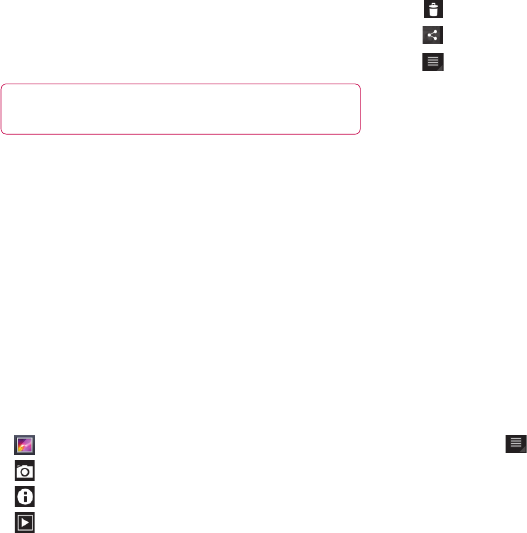
Gallery
Open the Gallery application to view albums of your
pictures and videos.
You can store multimedia files to your memory and
have easy access to all your image and video files.
To open the Gallery application
Apps
•
> Gallery
Viewing your albums
•
returns to the main Gallery screen at any time.
•
opens the Camera application.
•
provides the file and folder properties.
•
play a slideshow of all your pictures.
Viewing and browsing pictures
Touch a picture or video in an album to view it.
•
delete a file from device’s memory.
•
allows you to share the file with others.
•
opens more options.
Turn the device to view the picture in upright
•
(portrait) or sideways (landscape) orientation.
The picture is displayed in the new orientation.
Touch the picture to view the available menus.
•
You can use the pinch-to-zoom method; spread
•
out your two finger tips to zoom in and gather your
two finger tips to zoom out.
When the picture is zoomed in, drag the picture to
•
view parts that are not in view.
Swipe the screen left or right to view the next or
•
previous picture or video in the album.
Using a picture as a Contact icon or
Wallpaper
Choose images to use as a contact icon or wallpaper.
Touch a picture to view the available menus, 1.
then touch > Set picture as.
Choose from 2. Contact photo or Wallpaper.
If you choose Contact photo, choose the contact
•
you wish to set the photo to from your contact list.
If you choose Wallpaper, crop the photo and touch
•
Ok.
42
LG-V901 | User Guide
Getting details about your photo
You can view a photo’s detailed information, such as
Title, Time, File Size, etc. Touch a picture to view the
available menus, then touch > Details.
Sharing a picture
Touch a picture to view the available menus, 1.
then touch .
In the menu that opens, touch the application 2.
you would like to use to share the selected
pictures. Enter the necessary information, if
needed, and send it.
Deleting files
You can delete the entire contents of one or more
albums or individual images or videos from an album.
While in the Gallery, touch and hold an album, 1.
picture or video.
Touch each of the files you want to delete. You 2.
can use Select All to select all the available files.
Touch 3. to delete the file(s).
3D Camcoder and 3D Player
Getting to know your 3D Camcoder view
finder
3D mode Choose the 3D camera mode.
Depth control Control the depth of 3D video.
3D Camera
settings
Change the 3D camera
settings.
Help Provides you with a quick
guide for 3D Camera.
Gallery
Access your saved 3D videos
from within the 3D camera
mode.
Record/Stop Starts and stops recording a
3D video.
43
Taking a 3D Video
Apps1. > 3DCamcoder
Holding the device, point the lens towards the 2.
subject you want to record.
Touch the 3. Record button once to start
recording. REC will appear on your viewfinder
with a timer showing the length of the video.
Touch the 4. Stop button to stop recording.
Playing a 3D Video
Apps1. > 3DPlayer
Select a video from your 3D video list. It will start 2.
playing automatically.
Wear the 3D glasses and enjoy the 3D video.3.
If play mode is anaglyph, enjoy the video on your
•
device.
If play mode is Side by Side, connect the HDMI
•
cable to 3D TV, and then watch the video on 3D
T V.

44
LG-V901 | User Guide
Calendar
Calendar makes it easy to create and manage events,
meetings, and appointments.
To open the Calendar application
Apps
•
> Calendar
When you first set up your device, you configured it
to use an existing Google account or you created a
new account. The first time you open the Calendar
application on your device, it displays any existing
calendar events from your Google account on the
web.
Calendar will keep your events synchronized between
your device and the web.
Viewing your calendar
Apps1. > Calendar
On the top left corner of the screen, you can 2.
find the different view types of the calendar
(Day, Week, Month).
Events from each account you have added to your
phone and configured to synchronize calendars are
displayed in Calendar. Events from each calendar are
displayed in a different color.
Creating an event
Apps1. > Calendar >
Enter the necessary information and touch 2.
Done.
Change synchronization and display settings
You can control whether an account synchronizes
changes to calendar events between a Google™ or
other calendar service with the Settings.
Apps
•
> Calendar > > Settings
Clock
To add an alarm
Apps1. > Clock > > Add alarm
Enter the alarm details and touch 2. Set.
When an alarm sounds, touch to Dismiss to turn it
off or Snooze to delay for ten minutes.
Utilities
45
The Music application plays audio files that are stored
on your device’s memory. Copy audio files from your
computer onto the memory before you open the
Music application.
To open the Music application
Apps
•
> Music
To view your music library
The Music application searches the memory for
music files you copied to your memory, then builds
a catalog of your music based on the information
contained in each music file. This can take from a few
seconds to several minutes, depending on how many
files you have copied onto the memory.
When the catalog is complete, the Music library
screen opens, with options to view your music library
organized by New and recent, Albums, Artists, Songs,
Playlists or Genres.
To play music
Touch a song in your library to listen to it.
The Playback screen opens and the song you
touched or the first song in the album or other
playlist starts to play. Playback stops only if you stop
it, even when you switch applications.
To control playback
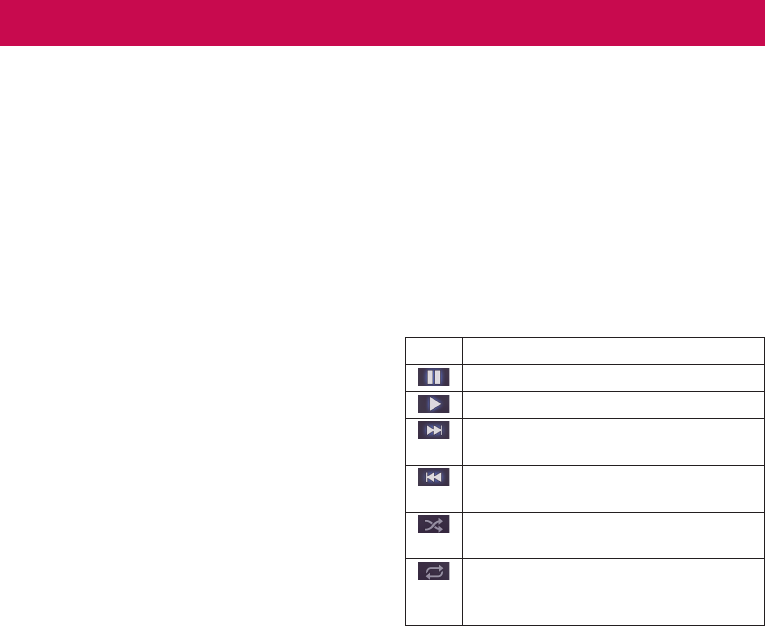
The Playback screen contains several icons that you
can touch to control the playback of songs, albums,
and playlists.
Icon Description
Touch to pause playback.
Touch to resume playback.
Touch to skip to the next track in the
album, playlist, or shuffle.
Touch to skip to the previous track in the
album, playlist, or shuffle.
Touch to play the current playlist in shuffle
mode (tracks are played in random order).
Touch to set repeat mode: don’t repeat,
repeat the playlist, or repeat the current
track.
Music

46
LG-V901 | User Guide
To create a playlist
When viewing a list of songs in the library, touch 1.
to the right of the song name.
Touch 2. Add to playlist.
Touch 3. New playlist. If you want to add songs
to a playlist you have already created, touch the
name of it.
Enter a name for the playlist, then touch 4. OK.
47
Browser gives you a fast, full color world of games,
music, news, sports, entertainment, and much more,
right on your tablet device. Wherever you are and
whatever you’re into.
NOTE: Additional charges apply when connecting
to these services and downloading content. Check
data charges with your network provider.
Opening webpages
Apps1. > Browser
Touch the URL field and input the URL, then 2.
touch .
To zoom in or out, double-tap the screen. You can
also use the two finger zoom; place your two fingers
on the screen and slowly pinch or spread apart.
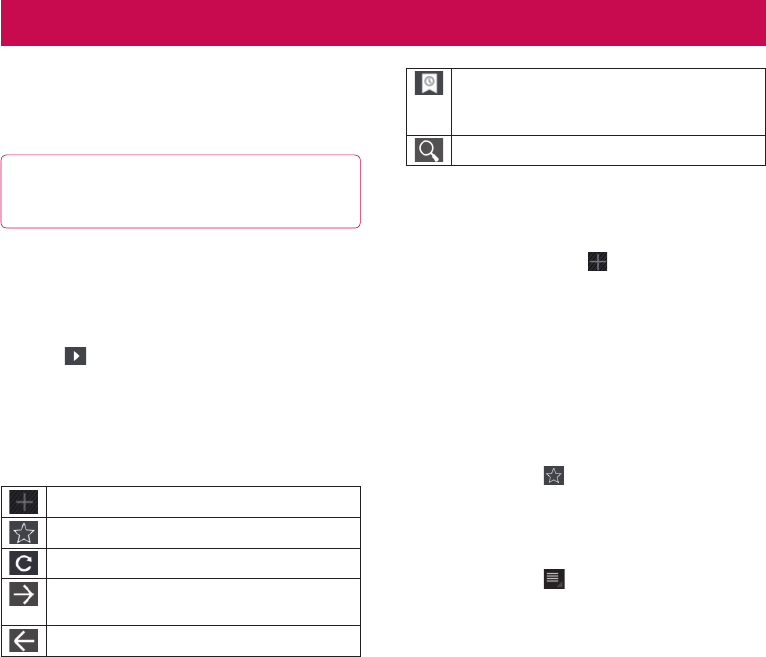
While browsing the web page, use the following
options:
Open a new tab.
Add the current web page as a Bookmark.
Refresh the web page.
Go to the page you connected later than
current page.
Goes to the previous page.
View your current bookmarks and add a new
bookmark. You can also view your browser
history.
Search web pages.
Opening multiple pages
With this feature, you can use multiple web page
simultaneously. Just touch to open a web page
on a new tab.
Adding Bookmarks to your Home
screen
Make quick access menus to your Home screen with
this feature. You can add icons of your favorite site
and make easy access by touching an icon on your
Home screen like other menus.
Apps
•
> Browser > > Add bookmark > Add to
Home screen > OK
Changing browser settings
Apps
•
> Browser > > Settings
Browser

48
LG-V901 | User Guide
The Settings application contains most of the tools
for customizing and configuring your device. Some of
functions are detailed on another chapter.
Apps
•
> Settings
Wireless & networks
Allows you to manage Wi-Fi and Bluetooth
connections. You can also set Mobile networks and
Airplane mode.
Airplane mode – When Airplane mode is activated,
all wireless communications are disabled.
Wi-Fi settings – This allows you to set up and
manage wireless access points.
Wi-Fi
•
– Checkmark to turn on Wi-Fi so you can
connect to Wi-Fi networks.
Network notification
•
– Checkmark to receive a
notification when an open Wi-Fi network becomes
available and is in range.
Wi-Fi disconnect policy
•
– Specify when to switch
from Wi-Fi to mobile data.
Wi-Fi networks
•
– Displays a list of Wi-Fi networks
you’ve previously configured and those detected
when the device last scanned for Wi-Fi networks.
Add Wi-Fi Network
•
– Allows you to add a
Wi-Fi network by entering its SSID (the name it
broadcasts) and security type.
Screen
Brightness – Adjust the brightness of the screen.
Auto-rotate screen – Checkmark to automatically
switch the orientation of the screen as you turn the
device sideways.
Animation – Opens a dialog where you can set
whether you want to enjoy animated transitions for
some effects, for all supported effects, or to enjoy a
device without any optional animation effects.
Timeout – Opens a dialog where you can set how
long to wait after you touch the screen or press
a button before the screen darkens. For the best
battery performance, use the shortest convenient
timeout.
Location & security
Allows you to set your preferences for using and
sharing your location when you search for information
and use location-based applications.
Use wireless networks – If you check Use wireless
networks, your device will determine your approximate
location by using Wi-Fi and mobile networks. When
you check this option, you’re asked whether you
consent to allowing Google™ to use your location
when providing these services.
Settings
49
Use GPS satellites – If you check Enable GPS
satellites, your device will be determine your location
to street-level accuracy.
Use location for Google search – Checkmark to allow
Google search to use your location for improved
results.
Configure screen lock – Set an unlock pattern to
secure your device. When setting this option, a set
of screens open and guide you through drawing
a screen unlock pattern. You can also set a PIN or
Password instead of a Pattern or leave as Unsecure
or Off.
When you turn on your device or wake up the screen,
you’re prompted to draw your unlock pattern to
unlock the screen.
Owner info – Allows you to choose if you want to
display owner information on the lock screen.
Encrypt tablet – Allows you to set the option to
require a numeric PIN or password to decrypt the
tablet each time you power it on.
Set up SIM card lock – Set up a PIN to be required
for device use or change the SIM PIN.
Visible passwords – Select to show passwords as you
type them or deselect to hide passwords.
Device administrators – Allows you to view or
deactivate device administrators.
Use secure credentials – Allows you to access secure
certificates.
Install from USB storage – Allows you to install
certificates from USB storage.
Set password – Set or change the credential storage
password.
Clear credentials – Clear credential storage of all
contents and reset its password.
Applications
Allows you to view details about the applications
installed on your device, manage their data, force
them to stop, and to set whether you want to permit
installation of applications that you obtain from
websites and email.
WARNING: To protect your device and personal
data, download applications only from trusted sources,
such as Android Market™. If some applications are
not properly installed on your device, your device may
not work normally or a serious error can occur. You will
need to uninstall those applications and all of its data
and settings from the device.
WARNING: If you install and use an OS other
than the one provided by the manufacturer, your
device is no longer covered by the warranty.
Manage Applications – Opens a list of all the
applications and other software installed on your
device, along with their sizes.
Running services – Allows you to view and control
currently running services.
Storage use – Allows you to view the storage amount
used by applications.

50
LG-V901 | User Guide
Battery use – Allows you to view what applications
have been using the battery.
Unknown Sources – Permits installation of
applications that you obtain from websites, email, or
other locations other than Android Market™.
Development – Allows you to set options for
application development.
NOTE: To use USB debugging, you need to install the
“LG USB Driver” on your PC first.
The LG USB Driver is downloadable from the following
site: http://www.lgmobilephones.com Click Mobile
Support Select the Carrier (T-Mobile) Select the
Model (LG-V901) Click USB Driver to download.
Accounts & sync
Allows you to activate Background data
synchronization or Auto-sync. You can also verify
or add accounts and change their data and
synchronization settings.
This allows you to add, remove, and manage your
Google™ and other supported accounts. You also
use these settings to control how and whether all
applications send, receive, and sync data on their
own schedules and whether all applications can
synchronize user data automatically.
Background data – Permits applications to
synchronize data in the background, whether or not
you are actively working in them. Unchecking this
setting can save battery power and lowers data use.
Auto-sync – Check to permit applications
to synchronize data on their own schedule.
Synchronizing data automatically is disabled if
Background data is unchecked.
Privacy
Allows you to manage your personal information.
Back up my data – Checkmark to back up application
data, Wi-Fi passwords, and other settings to Google
servers.
Automatic restore – Checkmark to restore backed up
settings or other data when reinstalling an application.
Factory data reset – Erases all of your personal data
from internal phone storage, including information
about your Google account, any other accounts, your
system and application data and settings, and any
downloaded applications. If you reset the phone in
this way, you’re prompted to reenter the same kind of
information as when you first started your tablet.
Tip: Make sure you backup any important data
before performing this function.
Language & input
Language settings:
Select the language for the text on your tablet and
for configuring the on-screen keyboard, including
words that you have added to its dictionary.

51
Voice recognizer settings:
Language – Select a language for the Google voice
recognition.
SafeSearch – Set the device to filter explicit text and/
or images from voice search results.
Block offensive words – Allows you to hide
recognized offensive voice results.
Text-to-speech settings:
Listen to an example – Plays a brief sample of the
speech synthesizer, using your current settings.
Always use my settings – Check to use the settings
on this screen in place of speech synthesizer settings
available in other applications.
Default Engine – Opens a dialog where you can set
the text-to-speech application you want to use, if you
have more than one installed.
Install voice data – If your phone does not have
speech synthesizer data installed, touching this
option connects to Android Market and guides you
through the process of downloading and installing
the data. This setting is not available if the data is
already installed.
Speech rate – Opens a dialog where you can select
how quickly you want the synthesizer to speak.
Language – Opens a dialog where you can select the
language of the text you want the synthesizer to read.
This is particularly useful in combination with the
Always Use My Settings setting, to ensure that text is
spoken correctly in a variety of applications.
Engines – Lists the text-to-speech engines installed
on your phone. Touch one to view or change its
settings.
Keyboard settings:
The Android Keyboard settings apply to the
on-screen keyboard that is included with your device.
The correction and capitalization features affect only
the English version of the keyboard.
Accessibility
Check to enable all installed accessibility plug-ins.
NOTE: Requires additional plug-ins to become
selectable.
About tablet
View legal information and check device status and
software version.
NOTICE: To obtain the corresponding source code
under GPL, LGPL, MPL and other open source
licences, please visit http://opensource.lge.com/
All referred licence terms, disclaimers and notices
are available for download with the source code.