LG Electronics USA VN170 Cellular/PCS CDMA Phone with Bluetooth User Manual VN170 VZW UG EN V1 0 140303
LG Electronics MobileComm USA, Inc. Cellular/PCS CDMA Phone with Bluetooth VN170 VZW UG EN V1 0 140303
Users Manual
User Guide XXXXXXXXXXX (1.0)
This booklet is made from 98% post-consumer recycled paper.
This booklet is printed with soy ink. Printed in Mexico
User Guide
Guía del
Usuario
VN170
VN170
VN170
Copyright©2014 LG Electronics, Inc. All rights reserved.
LG and the LG logo are registered trademarks of LG Group
and its related entities are registered. All other trademarks
are the property of their respective owners.
1
VN170
Important Safety Precautions
Read these instructions. Breaking the rules may be dangerous or illegal.
Further detailed information is given in this user guide.
WARNING! Violation of the instructions may cause serious injury or death.
1. Never use an unapproved battery since this could damage the
phone and/or battery and could cause the battery to explode.
2. Never place your phone in a microwave oven as it will cause
the battery to explode.
3. Do not dispose of your battery by fire or with hazardous or
flammable materials.
4. When riding in a car, do not leave your phone or set up the
hands-free kit near to the air bag. If wireless equipment is
improperly installed and the air bag is deployed, you may be
seriously injured.
5. Do not use a hand-held phone while driving.
6. Do not use the phone in areas where its use is prohibited. (For
example: aircraft)
7. Do not use your device for long periods of time while a part
of your body is making direct contact with it. The temperature
of the product may increase during normal operation and this
may result in harming or burning your skin.
Important Safety Precautions
2 VN170
8. Do not expose the battery charger or adapter to direct
sunlight or use it in places with high humidity, such as a
bathroom.
9. Do not use harsh chemicals (such as alcohol, benzene,
thinners, etc.) or detergents to clean your phone. This could
cause a fire.
10. Do not drop, strike, or shake your phone severely. It may
harm the internal circuit boards of the phone.
11. Do not use your phone in high explosive areas as the phone
may generate sparks.
12. Do not damage the power cord by bending, twisting, pulling,
or heating. Do not use the plug if it is loose as it may cause a
fire or electric shock.
13. Do not place any heavy items on the power cord. Do not
allow the power cord to be crimped as it may cause electric
shock or fire.
14. Do not handle the phone with wet hands while it is being
charged. It may cause an electric shock or seriously damage
your phone.
15. Do not disassemble the phone.
16. Do not place or answer calls while charging the phone as it
may short-circuit the phone and/or cause electric shock or
fire.
17. Do not hold or let the antenna come in contact with your
body during a call.
3
VN170
18. Make sure that no sharp-edged items such as animal’s teeth
or nails, come into contact with the battery. This could cause
a fire.
19. Store the battery out of reach of children.
20. Be careful that children do not swallow any parts (such as
rubber plugs, earphone, connection parts of the phone, etc.)
This could cause asphyxiation or suffocation resulting in
serious injury or death.
21. Unplug the power cord and charger during lightning storms
to avoid electric shock or fire.
22. Only use the batteries and chargers provided by LG. The
warranty will not be applied to products provided by other
suppliers.
23. Only authorized personnel should service the phone and its
accessories. Faulty installation or service may result in
accidents and consequently invalidate the warranty.
24. Your service provider programs one or more emergency
phone numbers, such as 911, that you can call under any
circumstances, even when your phone is locked. Your phone’s
preprogrammed emergency number(s) may not work in all
locations, and sometimes an emergency call cannot be placed
due to network, environmental, or interference issues.
25. Use and store your tablet in temperatures between 0°C/32°F
and 45°C/113°F, if possible. Exposing your tablet to extremely
low or high temperatures may result in damage, malfunction,
or even explosion.

4 VN170
Table of Contents
Important
Safety Precautions ········1
Table of Contents ·········4
Welcome ·················9
Technical Details ·········10
Important Information ·············10
Phone Overview ··········14
Rear view ························15
Menus Overview ·········16
Getting Started with Your
Phone ··················19
Installing the Battery ··············19
Removing the Battery ·············19
Charging the Battery ··············19
Charging with USB ················20
Battery Temperature Protection · · · ·20
Battery Charge Level ··············20
Signal Strength ···················20
Turning the Phone On and Off ······20
Turning the Phone On ··········· 20
Turning the Phone Off ············21
Making Calls ·····················21
Correcting Dialing Mistakes ········21
Redialing Calls ····················21
Receiving Calls ···················21
Screen Icons ·····················21
Quick Access to Convenient
Features ················22
Vibrate Mode ····················22
Sounds Off ······················22
Mute Function ····················22
Quick Volume Adjustment ··········22
Quick Font Resize ·················22
Call Waiting ······················22
3-way call ·······················22
Caller ID ·························23
Voice Commands ·················23
Dial Search ······················24
Entering and Editing
Information ·············25
Text Input ·······················25
Text Input Modes ················25
Contacts in Your Phone’s
Memory ················26
Storing Basics ····················26
Customizing Individual Entries ······26
Speed Dial ·······················26
Storing a Number with Pauses ······27
Adding a Pause to an Existing Contact
Entry ···························27
Adding Another Phone Number ·····27
From standby mode ··············27
From the Contact List Screen ····· 28
Changing Saved Information ········28
Changing the Default Number ······28
Deleting ·························29

5
VN170
Deleting a Contact Entry ········· 29
Removing a Speed Dial ··········· 29
Speed Dialing ····················29
Single Digit Speed Dials ·········· 29
Multiple Digit Speed Dials ········ 29
Speed Dials 95, 96, 97, 98, and 99 29
Contacts ················30
1. New Contact ···············30
2. Contact List ················30
3. Backup Assistant ············31
4. Favorites ···················31
5. Groups ····················32
Adding Contacts to a Group ·······32
6. Speed Dials ················32
7. In Case of Emergency (ICE) · · ·33
Entering Your ICE Personal Info· · · · ·33
To unassign an ICE Contacts ·······33
To delete Personal Info entry· · · · · · ·33
8. My Name Card ·············34
Messaging ··············35
1. New Message ···············35
1.1 TXT Message ················35
1.2 Picture Message ··············37
1.3 Voice Message ················39
2. Inbox ·····················40
Viewing Your Inbox ·············· 40
Message Icon Reference ·········· 40
3. Sent ······················41
4. Drafts ····················42
Message Icon Reference ···········42
5. Voicemail ·················42
6. Mobile Email ···············43
7. Social Networks ·············43
Messaging Settings ············43
Message Settings Sub-Menu
Descriptions ···················· 44
Erasing Messages ··············45
Recent Calls ·············46
1. Missed ····················46
2. Received ··················46
3. Dialed ····················47
4. All ························47
5. View Timers ···············47
Mobile Web ·············49
Media Center ············50
1. Mobile Web ················50
Ending a Browser Session ········ 50
Navigating Through the Mobile Web 50
Scrolling · · · · · · · · · · · · · · · · · · · · · · · ·51
Fast Scrolling ····················51
Scrolling by Page ·················51
Home Page ······················51
Soft Keys ·······················51
Entering Text, Numbers, or Symbols 51
Deleting Text/Number Entered ·····51
Initiating a Phone Call From the Mobile
Web ····························51
2. Tunes & Tones ··············51

Table of Contents
6 VN170
2.1 Get New Ringtones ············52
2.2 Get Ringback Tones ···········52
2.3 My Ringtones ················52
2.4 My Sounds ···················53
3. Pictures ···················53
3.1 Get New Pictures ·············53
3.2 My Pictures ··················54
3.3 Take Picture ··················55
3.4 Online Album ·················55
4. Games ····················55
5. Browse & Download ·········56
6. Extras ·····················57
Mobile Email / V CAST Tones
/ My Pictures ············58
Mobile Email ·················58
V CAST Tones ················58
My Pictures ··················58
Settings & Tools ·········59
1. My Verizon ·················59
2. Master Volume ·············59
3. Tools ·····················59
3.1 Voice Commands ·············59
Access and Options ··············59
3.1.1 Call <Name or Number>· · · · · 60
3.1.2 Send Msg to <Name or Number
or Group> ······················ 60
3.1.3 Go to <Menu> ············· 60
3.1.4 Check <Item> ·············· 60
3.1.5 Contacts <Name> ···········61
3.1.6 Redial ·····················61
3.1.7 My Verizon ················61
3.1.8 Help ······················61
3.2 Calculator ···················61
3.3 Ez Tip Calculator ··············61
3.4 Calendar ·····················62
Editing and Deleting calendar entries 62
3.5 To Do List ····················63
3.6 Alarm Clock ··················63
How to delete alarms ············ 63
How to edit alarms ·············· 64
3.7 Info Search ···················64
3.8 Stopwatch ···················64
3.9 World Clock ·················65
3.10 Notepad ···················65
4. Bluetooth
®
Menu ···········65
Turn On Bluetooth ·············· 66
4.1. Add New Device ··············66
For pairing with a
new Bluetooth
®
device ··········· 66
Icon Reference in
Adding New Device ···············67
Icon References When a Bluetooth
®
Wireless Connection is Searched
(neither connected nor paired). ····67
Icon References When Successfully
Connected ······················67
My Device Info ···················67
Discovery Mode ··················68
Supported Profiles ················68
5. Sounds Settings ············68
5.1 Easy Set-up ··················68
5.2 Call Sounds ··················69

7
VN170
5.2.1 Call Ringtone ············· 69
5.2.2 Call Vibrate ··············· 69
5.2.3 Caller ID Readout ·········· 69
5.3 Alert Sounds ·················69
5.4 Keypad Volume · · · · · · · · · · · · · · · 70
5.5 Digit Dial Readout ············70
5.6 Service Alerts ················70
5.7 Power On/Off ················71
5.8 Voice Clarity ··················71
6. Display Settings ············71
6.1 Easy Set-up ··················71
6.2 Banner ······················72
6.2.1 Personal Banner ············73
6.2.2 ERI Banner ·················73
6.3 Backlight ····················73
6.4 Brightness ···················73
6.5 Wallpaper ····················74
6.6 Display Themes ···············74
6.7 Main Menu Settings ···········74
6.8 Font Type ····················75
6.9 Font Size ·····················75
6.10 Internal Clock ···············76
7. Phone Settings ·············76
7.1 Airplane Mode ················76
7.2 Set Shortcut Keys ·············76
7.2.1 Set My Shortcuts ···········76
7.2.2 Set Directional Keys ·········77
7.3 Voice Commands ··············77
7.4 Language ·····················77
7.5 Location ·····················77
7.6 Current Country ··············78
7.7 Security ·····················78
7.7.1 Edit Codes ·················78
7.7.2 Restrictions ··············· 79
7.7.3 Phone Lock Setting ········· 79
7.7.4 Lock Phone Now ··········· 79
7.7.5 Reset Default ············· 80
7.7.6 Restore Phone ············· 80
7.8 System Select ·················80
7.9 NAM Select· · · · · · · · · · · · · · · · · · · 81
8. Call Settings ···············81
8.1 Answer Options ···············81
8.2 Call Forwarding ···············81
8.3 Auto Retry ···················82
8.4 TTY Mode ···················82
Connecting TTY Equipment and a
Terminal ······················· 82
8.5 One Touch Dial ··············83
8.6 Voice Privacy ·················83
8.7 DTMF Tones ·················84
8.8 Assisted Dialing ···············84
8.9 Dial Search ···················84
9. Memory ···················85
10. Phone Info ················85
10.1 My Number ·················85
10.2 SW/HW Version ·············85
10.3 Icon Glossary ················86
10.4 Software Update ·············86
11. Set-up Wizard ·············87
Safety ··················88
TIA Safety Information ·········88
Exposure to Radio Frequency Signal 88

Table of Contents
8 VN170
Antenna Care ··················· 88
Phone Operation ················ 88
Tips on Efficient Operation ······· 88
Driving ························ 89
Electronic Devices ··············· 89
Pacemakers· · · · · · · · · · · · · · · · · · · · · 89
Persons with pacemakers:· · · · · · · · · 89
Hearing Aids ··················· 89
Other Medical Devices ··········· 89
Health Care Facilities ············ 90
Vehicles ························ 90
Posted Facilities ················· 90
Aircraft ························ 90
Blasting Areas ·················· 90
Potentially Explosive Atmosphere · · 90
For Vehicles Equipped with an Air Bag ·
91
Safety Information ············91
Charger and Adapter Safety ······ 92
Battery Information and Care ····· 92
Caution:
Avoid potential hearing loss. · · · ·94
FDA Consumer Update ·········96
10 Driver Safety Tips ·········103
Consumer Information on SAR ·105
FCC Hearing-Aid Compatibility
(HAC) Regulations for Wireless
Devices ·····················108
Accessories ············110
LIMITED WARRANTY
STATEMENT ···········111
Glossary ···············114
Terminology ················114
Acronyms and Abbreviations · · · 114
Index ··················116

9
VN170
Welcome
Thank you for choosing the VN170
cellular phone designed to operate
with the latest digital mobile
communication technology, Code
Division Multiple Access (CDMA).
Along with the many advanced
features of the CDMA system, such
as greatly enhanced voice clarity,
this compact phone offers:
Built-in 1.3M Camera
Mobile Web
Sleek and Compact Design
Easy-to-read LCD display with
status icons
Media Center capable of
downloading games, wallpapers,
and ringtones
23-key keypad and Directional
Keys
Long battery standby and talk
time
Easy operation using menu-
driven interface with prompts
Messaging, Voicemail, caller ID,
and Social Networks
Advanced Voice Recognition
Quick calling functions including
auto answer, auto retry,
999 speed dials, and voice
commands
Flash Wallpapers with fun
animations
Multi-language (English,
Spanish, Korean and Chinese)
capability
Bluetooth® wireless technology
(for certain profiles)
Dial Search to find contacts
from the Dialing screen.
Note The Bluetooth
®
word mark
and logos are owned by the Bluetooth
SIG, Inc. and any use of such marks by
LG Electronics is under license. Other
trademarks and trade names are those of
their respective owners.
Tip
Find the interactive user guide on the
web for your convenience; where you can
freely surf and interactively learn how to
use your phone step-by-step.
Go to http://www.verizonwireless.com >
Support > Device > choose your phone
model. The interactive user guide is
available. You can select Device Manual
to download a copy.

10 VN170
Technical Details
Important Information
This user’s guide provides
important information on the use
and operation of your phone.
Please read this guide carefully
prior to using the phone to
be able to use your phone to
its greatest advantage and to
prevent any accidental damage or
misuse. Any unapproved changes
or modifications will void your
warranty.
FCC Part 15 Class B Compliance
This device and its accessories
comply with part 15 of FCC
rules. Operation is subject to the
following two conditions: (1) This
device and its accessories may not
cause harmful interference, and
(2) this device and its accessories
must accept any interference
received, including interference
that causes undesired operation.
Information to User
This equipment has been tested
and found to comply with the
limits for a Class B digital device,
pursuant to part 15 of the FCC
Rules. These limits are designed
to provide reasonable protection
against harmful interference in a
residential installation.
This equipment generates, uses
and can radiate radio frequency
energy and, if not installed
and used in accordance with
the instructions, may cause
harmful interference to radio
communications.
However, there is no guarantee
that interference will not occur
in a particular installation. If
this equipment does cause
harmful interference to radio or
television reception, which can
be determined by turning the
equipment off and on, the user is
encouraged to try to correct the
interference by one or more of the
following measures:
- Reorient or relocate the receiving
antenna
- Increase the separation between
the equipment and receiver
- Connect the equipment into
an outlet on a circuit different
from that which the receiver is
connected.
- Consult the dealer or an
experienced radio/TV technician
for help.
Modifications not expressly
approved by the manufacturer
could void the user’s authority to
FCC Part15.19 statement
This device complies with
part 15 of FCC rules.
Operation is subject to the
following two conditions: (1)
This device may not cause
harmful interface, and (2) this
device must accept any
interference received,
including interference that
causes undesired operation.
FCC Part15.105 statement

11
VN170
operated the equipment under
FCC rules.
Technical Details
The VN170 is an all digital
phone that operates on both
Code Division Multiple Access
(CDMA) frequencies: Cellular
services at 800 MHz and Personal
Communication Services (PCS) at
1.9 GHz.
CDMA technology uses a feature
called DSSS (Direct Sequence
Spread Spectrum) that enables
the phone to keep communication
from being crossed and to use
one frequency channel by multiple
users in the same specific area.
This results in a 10-fold capacity
increase when compared with
analog mode. In addition, features
such as soft / softer handoff, hard
handoff, and dynamic RF power
control technologies combine to
reduce call interruptions.
The Cellular and PCS CDMA
networks consist of MSO (Mobile
Switching Office), BSC (Base
Station Controller), BTS (Base
Station Transmission System), and
MS (Mobile Station).
* TSB -74: Protocol between an IS-
95A system and ANSI J-STD-008
1xRTT system receives twice as
many subscribers in the wireless
section as IS-95. Its battery life is
twice as long as IS-95.
The table on the following page
lists some major CDMA standards.
Part 15.105 statement
This equipment has been tested
and found to comply with the
limits for a class B digital device,
pursuant to Part 15 of the FCC
rules. These limits are designed
to provide reasonable protection
against harmful interference in
a residential installation. This
equipment generates, uses, and
can radiate radio frequency energy
and, if not installed and used in
accordance with the instructions,
may cause harmful interference
to radio communications.
However, there is no guarantee
that interference will not occur
in a particular installation. If
you experience interference
with reception (e.g., television),
determine if this equipment is
causing the harmful interference by
turning the equipment off and then
back on to see if the interference
is affected. If necessary, try
correcting the interference by one
or more of the following measures:
Technical Details
12 VN170
- Reorient or relocate the receiving
antenna.
- Increase the separation between
the equipment and receiver.
- Connect the equipment into
an outlet on a circuit different
from that to which the receiver is
connected.
- Consult the dealer or an
experienced radio/TV technician
for help.
Part 15.21 statement
Changes or modifications that
are not expressly approved by
the manufacturer could void the
user’s authority to operate the
equipment.
FCC RF Exposure Information
WARNING! Read this information
before operating the phone.
In August 1996, the Federal
Communications Commission
(FCC) of the United States,
with its action in Report and
Order FCC 96-326, adopted an
updated safety standard for human
exposure to Radio Frequency (RF)
electromagnetic energy emitted
by FCC regulated transmitters.
Those guidelines are consistent
with the safety standard previously
set by both U.S. and international
CDMA Standard Designator Description
Basic Air Interface
TIA/EIA-95A
TSB-74
ANSI J-STD-008
TIA/EIA-IS2000
CDMA Dual-Mode Air Interface
14.4kbps radio link protocol and
inter-band operations
IS-95 adapted for PCS frequency band
CDMA2000 1xRTT Air Interface
Network
TIA/EIA/IS-634
TIA/EIA/IS-651
TIA/EIA/IS-41-C
TIA/EIA/IS-124
MAS-BS
PCSC-RS
Intersystem operations
Non-signaling data comm.
Service
TIA/EIA/IS-96-B
TIA/EIA/IS-637
TIA/EIA/IS-657
IS-801
TIA/EIA/IS-707-A
Speech CODEC
Short Message Service
Packet Data
Position Determination Service (gpsOne)
High Speed Packet Data

13
VN170
standards bodies. The design of
this phone complies with the FCC
guidelines and these international
standards.
Bodily Contact During
Operation
This device was tested for typical
use with the back of the phone
kept 0.78 inches (2 cm) from
the body. To comply with FCC RF
exposure requirements, a minimum
separation distance of 0.78
inches (2 cm) must be maintained
between the user’s body and the
back of the phone, including the
antenna, whether extended or
retracted. Third-party belt-clips,
holsters, and similar accessories
containing metallic components
should not be used. Avoid the use
of accessories that cannot maintain
0.78 inches (2 cm) distance
between the user’s body and the
back of the phone and have not
been tested for compliance with
FCC RF exposure limits.
Vehicle-Mounted External
Antenna
(Optional, if available.)
To satisfy FCC RF exposure
requirements, keep 8 inches (20
cm) between the user / bystander
and vehicle-mounted external
antenna. For more information
about RF exposure, visit the FCC
website at www.fcc.gov.
Caution
Use only the supplied antenna.
Use of unauthorized antennas
(or modifications to the antenna)
could impair call quality, damage
the phone, void your warranty
and/or violate FCC regulations.
Don't use the phone with a
damaged antenna. A damaged
antenna could cause a minor skin
burn.
Contact your local dealer for a
replacement antenna.
0.59 inches (1.5cm)
(1.5cm)
0.59 inches (1.5cm)
may
0.59
Any belt-clips,
14 VN170
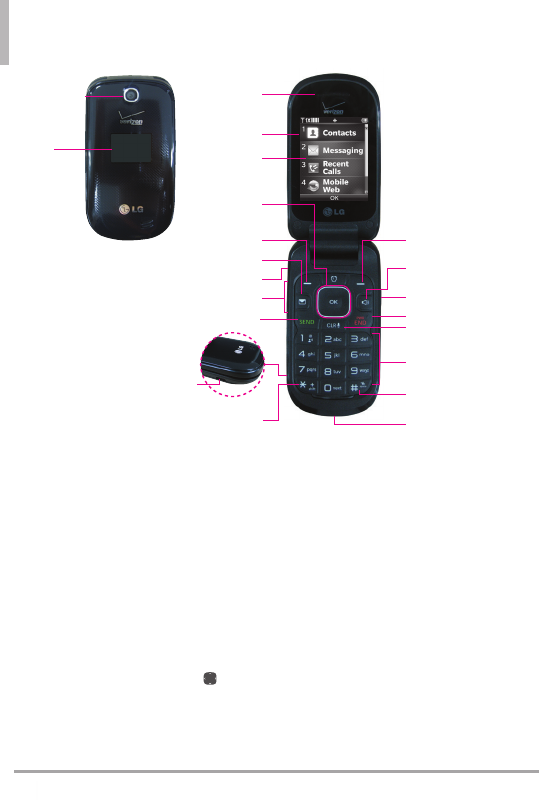
Phone Overview
Camera Lens Use to take photos. Keep it clean
for optimal photo quality.
Front LCD Screen Displays the digital clock
and phone status.
Earpiece Lets you hear the caller and
automated prompts.
Flip Use to make or answer calls. Flip open to
reveal the keypad to dial a number or answer
an incoming call. Close the flip to end the call.
Main LCD Screen Displays messages, indicator
icons and active functions.
OK Key / Directional Key Use the OK Key to
select the function displayed at the bottom
of the LCD between the Left and Right Soft
Key functions. Use the Directional Key to
scroll through the menu items and highlight
a specific field or object by moving up, down,
left or right.
Left Soft Key Performs functions identified on
the bottom-left corner of the screen.
Message Key
Headset Jack Allows you to plug in an optional
2.5mm headset for convenient, hands-free
conversations.
Volume Keys Use to adjust the Master
Volume in standby mode* and the Earpiece
Volume during a call. Use to adjust font sizes
when viewing messages, entering phone
numbers (in standby mode) or browsing
menus (except for the Main menu).
SEND Key Use to make and answer calls.
Press to access the All Calls list.
Charger/Accessory Port Connects the phone
to the Wall/USB charger, or other compatible
accessories.
International Call Prefix Key To make an
* Standby mode is when the phone is waiting
for input from you. No menu is displayed and
the phone isn’t performing any action. It’s the
starting point for all of the instruction steps.
1. Camera Lens
2. Front
LCD Screen
3. Earpiece
4. Flip
5. Main
LCD Screen
6. OK Key /
Directional Key
13. International
Call Prefix Key
12. Accessory/Charger
PortCall Prefix Key
11. SEND Key
9. Headset Jack
8. Message Key
7. Left Soft Key 14. Right Soft Key
16. Camera Key
17. PWR/END Key
18. CLR/ Voice
Commands Key
20. Vibrate Mode
Key
21. Microphone
15. Speakerphone Key
10. Volume Keys
19. Alphanumeric
Keypad
15
VN170
international call, press and hold for 3
seconds. + is the international calling code.
Right Soft Key Performs functions identified
on the bottom-right corner of the screen.
CLR/ Voice Commands Key Deletes single
spaces or characters with a quick press, or
press and hold to delete entire words in text
entry screens. Press to back out of menus,
one level at a time. Use for quick access to
Voice Commands.
Camera Key Press the Camera Key to turn the
handset in to camera mode to take pictures.
Speakerphone Key Use to change to
speakerphone mode.
PWR / END Key Use to turn the power on/
off and to end a call. Also returns to standby
mode.
Alphanumeric Keypad Use to enter numbers
and characters and select menu items.
Vibrate Mode Key Use to set Vibrate mode
(from standby mode press and hold for
about 3 seconds).
Microphone Allows other callers to hear you
clearly when you are speaking to them.
NOTE
The antenna is located
inside your phone.
Tip
If you hold the phone
enclosing the lower edge,
you may interfere with the
antenna's ability to receive
a clear signal which affects
call quality for voice or data
transfer.
NOTE
• It’s important to fully charge the battery
before using the phone for the first time.
• Battery life and signal strength are
significant factors (among others) that
affect your phone’s ability to send/receive
calls or data transfer.
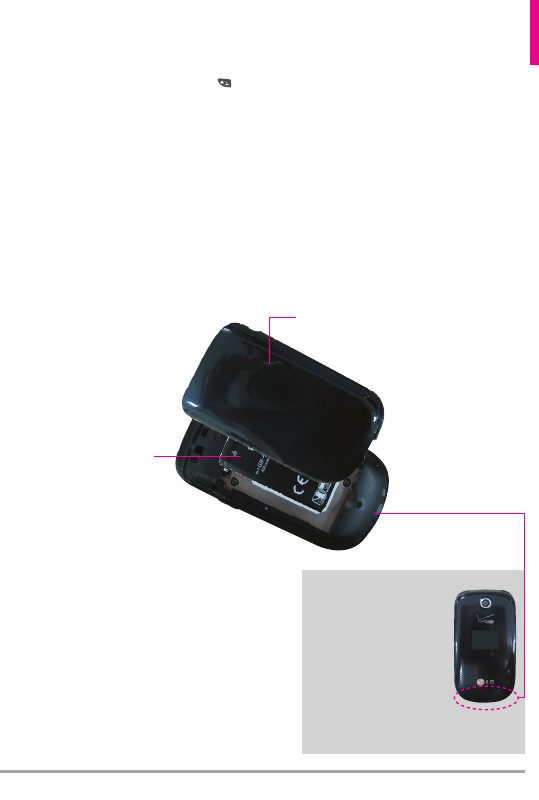
Rear view
Battery
Battery Cover

16 VN170
Menus Overview
Contacts
1. New Contact
2. Contact List
3. Backup Assistant
4. Favorites
1. ADD
1. Contacts
2. Group
5. Groups
6. Speed Dials
7. In Case of Emergency
8. My Name Card
Messaging
1.New Message
1. TXT Message
Add
1. From Contacts
2. From Recebt Calls
3. Favorites
4. Groups
2. Inbox
Options
1. Messaging Menu
2. Social Networks
3. Sent
Options
1. Messaging Menu
2. Social Networks
4. Drafts
Options
1. Messaging Menu
2. Social Networks
5. Voicemail
6. Mobile Email
7. Social Networks
Settings
1. Inbox View
2. Entry Mode
3. Auto Save Sent
4. Auto Erase Inbox
5. Messaging Font Size
6. TXT Auto View
7. TXT Instant Reply
8. Group Messaging
9. TXT Auto Scroll
10. Multimedia Auto
Receive
11. Quick Text
12. Emergency Alert
1. Receive Alerts
2. Alert Reminder
3. Alert Vibrate
13. Voicemail#
14. Callback #
15. Signature
16. Delivery Receipt
17. TXT-Media Msg
Notification
1. TXT->Media
Message
2. Media->TXT
Message
Options
1. Erase Inbox
2. Erase Sent
3. Erase Drafts
4. Erase All
Recent Calls
1. Missed
2. Received
3. Dialed
4. All
5. View Timers
Internet
Media Center
1. Apps
2. Internet
3. Tunes & Tones
1. My Ringtones
2. My Sounds
1. Record New
4. Pictures
1. My Pictures
2. Take PictureMobile
Emai

17
VN170
Info
1. Application Memory
2. Phone Memory
Mobile Email
Apps
My Picures
Options
1. Send
1. New Message
2. To Social Network
3. Via Email
4. Via Bluetooth
2. Set As
1. Wallpaper
2. Picture ID
3. Take Picture
4. Slide Show
5. Manage Pictures
1. Erase
2. Lock
3. Unlock
4. Send
6. File Info
Settings & Tools
1. My Verizon
2. Master Volume
3. Tools
1. Voice Commands
1. Call <Name or
Number>
2. Send Msg to <Name
or Number>
3. Go to <Menu>
4. Check <Item>
5. Contacts <Name>
6. Redial
7. My Verizon
8. Help
Settings
1. Confirm Choices
2. Sensitivity
3. Train Voice
4. Prompts
4. CLR Key Activation
2. Calculator
3. Ez Tip Caculator
4. Calendar
5. Alarm Clock
6. Info Search
7. Stopwatch
8. World Clock
9. Notepad
4. Bluetooth Menu
1. Add New Device
Options
1. My Phone Info
2. Discovery Mode
3. Supported Profiles
5. Sounds Settings
1. Easy Set-up
2. Call Sounds
1. Call Ringtone
2. Call Vibrate
3. Caller ID Readout
3. Alert Sounds
1. TXT Message
2. Multimedia
Message
3. Voicemail
1. Tone
2. Vibrate
3. Reminder
4. Emergency Tone
5. Missed Call
4. Keypad Volume
5. Digit Dial Readout
6. Service Alerts
1. ERI
2. Minute Beep
3. Call Connect
4. Charge Complete
5. Software Update
7. Hearing Assist
6. Display Settings
1. Easy Set-up
2. Banner
1. Personal Banner
2. ERI Banner
3. Backlight
1. Display Backlight
2. Keypad Backlight
4. Brightness
5. Wallpaper

Menus Overview
18 VN170
1. My Pictures
2. Fun Animations
3. Slide Show
6. Display Themes
7. Main Menu Settings
1. Menu Layout
2. Replace Menu Items
3. Position Menu Items
4. Reset Menu Settings
8. Font Type
9. Font Size
10.Internal Clock
7. Phone Settings
1. Airplane Mode
2. Set Shortcuts
1. Set My Shortcuts
2. Set Directional
Keys
3. Voice Commands
1. Confirm Choices
2. Sensitivity
3. Train Voice
4. Prompts
1. Mode
2. Audio Playback
3. Timeout
5. CLR Key Activation
4. Language
5. Location
6. Security
7. System Select
8. NAM Select
9. Data Roaming Access
8. Call Settings
1. Answer Options
2. Call Forwarding
1. Forward Call
2. Cancel Forwarding
3. Auto Retry
4. TTY Mode
5. One Touch Dial
6. Voice Privacy
7. DTMF Tones
8. Assisted Dialing
9. Memory
1. Memory Usage
2. My Pictures
3. My Ringtones
4. My Sounds
5. My Contacts
10.Phone Info
1. My Number
2. SW/HW Version
3. Icon Glossary
1. Status
2. Home Screen
3. Media Center
4. Messaging
5. Contacts
6. Recent Calls
7. Settings & Tools
4. Software Update
1. Status
2. Check New
11. Accessibility
1. Phone Readout
2. Speak Passwords
3. Invert Color
4. Large Text
5. Mono Audio
6. Turn Off All Sound
12. Set-up Wizard

19
VN170
Getting Started with Your Phone
Installing the Battery
1. Press down on indentation near
the bottom of the battery cover
and slide the cover upwards to
remove it.
2. Align the battery contacts with
the terminals near the top of
the battery compartment and
press until you hear the “click”.
3. Align the battery cover and
slide it downwards until it clicks
into place.tery compartment
and slide it downward until it
clicks into place.
Removing the Battery
1. Turn the phone off.
2. Press down on indentation nea
the bottom of the battery cover
and slide the cover upwards to
remove it.
3. Use the fingertip opening
near the bottom of the battery
compartment to lift the battery
out.
Charging the Battery
Your device comes with a cableless
wall adapter and a USB cable which
connect together to charge your
phone. To charge your phone:
NOTICE
Please use only an approved charging
accessory to charge your LG phone.
Improper handling of the Charger/
Accessory Port, as well as the use of an
incompatible charger, may cause damage
to your phone and void the warranty.
1. Connect the USB cable into the
cableless wall adapter. When
connecting as shown below,
the LG logo on the USB cable
should face toward you.
Cableless Wall Adapter
2. Gently uncover the Charger/
Accessory Port, then plug the
end of the adapter into the
phone's Charger/Accessory
Port and the other end into an
electrical outlet.
Getting Started with Your Phone
20 VN170
NOTE
Please make sure that the 'B' side
faces up before inserting a charger or
USB cable into the Charger/Accessory
Port of your phone.
The charge time varies depending
upon the battery level.
Charging with USB
You can use your computer to
charge your phone. To be able to
charge with the USB cable, you
may need to have the necessary
USB Driver installed on your PC
first. Connect one end of the USB
cable to the Charger/Accessory
Port on your phone and the other
end to the USB port on your PC.
NOTE Low-power USB ports are not
supported, such as the USB ports on
your keyboard or bus-powered USB hub.
Battery Temperature Protection
If the battery gets overheated, the
phone will automatically turn off.
When you turn the phone back on,
a message pops up alerting you
that the phone was powered off for
your safety.
Battery Charge Level
You can find the battery charge
level at the top right corner of
the LCD screen. When the charge
level becomes low, the battery
sensor sounds a warning tone,
blinks the battery icon, and/or
displays a warning message. As the
charge level approaches empty, the
phone automatically switches off
without saving.
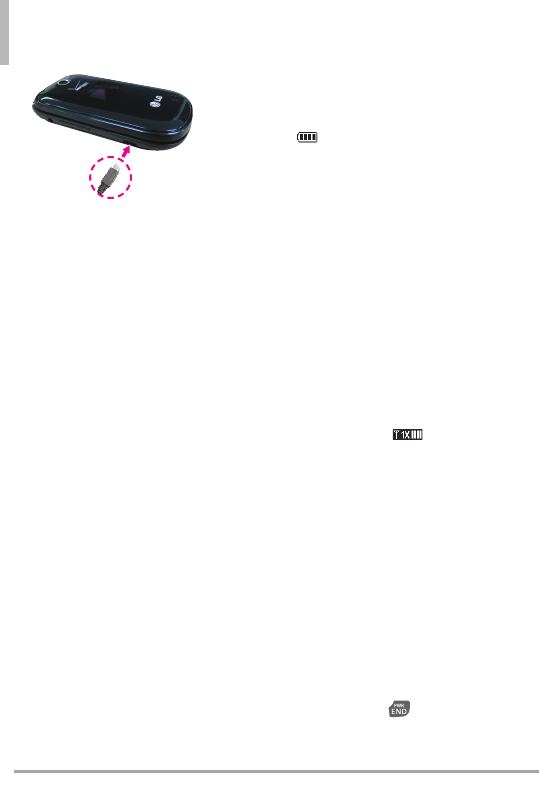
Signal Strength
Call quality depends on the signal
strength in your area. You can tell
how much signal strength you have
by the number of bars next to the
signal strength icon : the more
bars, the stronger the signal. If
you’re having problems with signal
quality, move to an open area or,
when inside a building, try moving
near a window.
Turning the Phone On and Off
Turning the Phone On
1. Insert the battery and connect
the phone to an external power
source if the battery level is low.
2. With the flip open, press the
PWR/END Key until the
LCD screen lights up.

21
VN170
Turning the Phone Off
With the flip open, press and hold
the PWR/END Key until the
LCD screen turns off.
Making Calls
1. Make sure the phone is turned
on.
If not, open the flip and press
the PWR/END Key for
about three seconds.
If necessary, enter the lock
code.
2. Enter the phone number.
3. Press the SEND Key to dial
the call.
4. Press the PWR/END Key
to end the call.
NOTE Your phone has a Voice
Commands feature that also lets you
make calls by saying a phone number or
Contact name.
Correcting Dialing Mistakes
While entering a phone number,
press the CLR Key once to
erase the last digit entered, or hold
it down for at least two seconds to
delete all the digits.
Redialing Calls
With the flip open, press the SEND
Key twice to redial the last
number dialed.
Receiving Calls
1. When the phone rings or
vibrates, you can answer the call
by simply opening the flip.
NOTE If the 'Flip Open' (Menu
> Settings & Tools > Call Settings >
Answer Options) answer option is NOT
MARKED, you can:
• Open the flip and press the Left Soft
Key [Quiet] to mute the ringing or
vibration for that call.
• Open the flip and press the Right Soft
Key [Ignore] to end the call or
send it directly to Voicemail.
• Open the flip and press [TXT]
to end the call and send a quick text
message.
2. Press the PWR/END Key
to end the call, or simply close
the flip.
Screen Icons
When the phone is on, the top line
of the LCD screen displays phone
status icons.
To see the icon glossary, with the
flip open, go to MENU > Settings
& Tools > Phone Info > Icon
Glossary on your phone.

22 VN170
Quick Access to Convenient Features
Vibrate Mode
Sets the phone to vibrate instead
of ringing ( is displayed). To set
Vibrate Mode, with the flip open,
press and hold . To return to
Normal Mode, press and hold
again.
Sounds Off
Quickly deactivate your phone's
sounds when you're in a place
where phone sounds would be
disruptive.
From standby mode with the flip
open, press and hold the lower
volume key for 3 seconds. To
return to normal sounds mode,
press and hold the upper volume
key.
Mute Function
The Mute Function prevents
the transmission of your voice
to the caller. To quickly activate
Mute while on a call, press the
Left Soft Key [Mute], then to
unmute press the Left Soft Key
[Unmute] again.
Quick Volume Adjustment
Quickly adjust ringer and earpiece
volumes by pressing the Volume
Keys on the left side of the
phone. Press the upper volume key
to increase and lower volume key
to decrease the volume.
NOTE The earpiece volume can only
be adjusted during a call and Keypad
Volume can only be adjusted through the
Sounds Settings menu.
Quick Font Resize
When you view messages, enter
phone numbers, or view sub-
menus, press the Volume Keys up
or down to quickly adjust the font
size. 3 levels (small, medium, large)
of font sizes are available.
NOTE Not supported on the Main
menu.
Call Waiting
During a call, one beep indicates
another incoming call. Press the
SEND Key to answer it and
put the first call on hold. Press the
SEND Key again to return to
the first call.
3-way call
You can talk with two people at
the same time with a three-way
conversation on your wireless
phone. Airtime and other charges,
which may include toll or long
distance charges, will apply for all
simultaneous calls until you end

23
VN170
one call.
1. While on the first call, dial the
10-digit number of the second
person.
2. Press the SEND Key . The
first person is automatically put
on hold while the call is made.
3. When the second person
answers, press the SEND Key
to create a conference call.
4. If the second person does
not answer, press the SEND
Key twice to end the
connection and go back to the
first person.
5. To end both conversations
completely, press the END Key
.
Caller ID
Caller ID displays the number and/
or name and picture (if applicable)
of the person calling when your
phone rings.
Voice Commands
Voice Commands allow you to do
things by verbal command (e.g.,
make calls, check Voicemail, etc.).
With the flip open, press the Voice
Commands Key on the keypad.
1. Call Say "Call" and then call
someone simply by saying the
name or phone number.
2. Send Msg to Say "Send
Message" and the command
will prompt you for the type of
message.
3. Go to This allows you to access
a menu within the phone.
4. Check This allows you to check
out a wide range of items such
as Phone Status, Voicemail,
Message, Missed Calls, Time,
Signal Strength, Battery Level,
Volume, Balance, Minutes,
Payment and My Number.
5. Contacts You can look up
names in your Contacts as well
as manage your Contact List
including creating, erasing or
modifying.
6. Redial Say "Redial" and the
phone will redial the last phone
number.
7. My Verizon This command
provides you with direct access
to your Verizon Wireless
account information.
8. Help Provides a general
guideline to using Voice
Commands.
NOTE Voice Commands can also be
started with the designated key on your
Bluetooth
®
device. Please check the user

Quick Access to Convenient Features
24 VN170
manual of the Bluetooth
®
device for
further instructions.
Dial Search
Set the Dial Search setting to On
(see page 84) to easily find entries
in your Contacts. From standby
mode with the flip open, press
the keypad key(s) with the first
letter(s) of the Contact name
you are trying to find. A list of
matching names will be displayed
for you to select to call, message,
or view.
25
VN170
Entering and Editing Information
Text Input
The following key functions are
available to help with text entry:
Left Soft Key: Left Soft Key:
Press to change the text input
mode.
Shift: Press to change
capitalization (initial cap, caps
lock, lowercase).
Next: Press to display other
matching words in the
database in T9 word mode.
Space: Press to complete a
word and insert a space.
Clear: Press to delete a single
space or character. Hold to
delete words.
Punctuation: Press to insert
punctuation symbols.
Text Input Modes
In a text field, press the Left Soft
Key to select a text input mode:
T9 Word/ Abc/ ABC/ 123/
T9 Palabra/ Symbols/
Quick Text/ Simplified Chinese/
Korean
NOTE
• T9 Palabra is the Spanish counterpart
of T9 Word which utilizes accents,
tildas, etc. for correct Spanish word
spelling.
• Simplified Chinese supports PinYin as
entry mode.
• Korean provides a key guide. To use
the key guide, select Options > Show
Key Guide.

26 VN170
Contacts in Your Phone’s Memory
Storing Basics
1. With the flip open, enter a
number (max. 48 digits), then
press the Left Soft Key
[Save].
2. Use the Directional Key to
highlight Add New Contact/
Update Existing, then press
.
3. Use the Directional Key to
highlight Mobile 1/ Home/
Business/ Mobile 2/ Fax, then
press .
4. Enter a name (max. 32
characters), and any additional
information, then press
[SAVE].
NOTE If you selected Update Existing
after you select the number type, the
contact information is automatically
updated.
Customizing Individual Entries
1. With the flip open, press the
Right Soft Key [Contacts],
then use the Directional Key
to highlight an entry.
2. Press the Left Soft Key
[Edit].
3. Use the Directional Key to
highlight the information to
customize.
4. Change the entry as you want,
then press [SAVE] to save
your changes.
Speed Dial
Allows you to set up your Speed
Dials.
1. With the flip open, press the
Right Soft Key [Contacts],
then use the Directional Key
to highlight an entry.
2. Press the Left Soft Key
[Edit].
3. Use the Directional Key to
highlight a phone number, then
press the Right Soft Key
[Options].
4. Use the Directional Key to
highlight Set Speed Dial, then
press .
5. Select a Speed Dial digit.
Enter a digit using the
keypad, then press [SET].
Use the Directional Key to
highlight the Speed Dial digit,
then press [SET].
6. Press Yes to confirm, then
press [SAVE] to update
your contact entry.

27
VN170
Storing a Number with Pauses
Pauses allow you to enter
additional series of numbers to
access automated systems such as
Voicemail or credit billing numbers.
Pause types are:
Wait (W) The phone stops dialing
until you press the Left Soft Key
[Release] to advance to the
following series of numbers.
2-Sec Pause (P) The phone waits
two seconds before dialing the
next string of digits.
1. With the flip open, enter the
phone number, then press the
Right Soft Key [Options].
2. Use the Directional Key to
highlight Add 2-Sec Pause or
Add Wait, then press .
3. Enter the additional number(s)
(e.g., pin number, credit card
number, etc.).
4. Press the Left Soft Key
[Save].
5. Choose Add New Contact/
Update Existing.
6. Choose Mobile 1/ Home/
Business/ Mobile 2/ Fax.
7. Continue entering information
for the Contact entry as
necessary.
NOTE If you selected Update Existing
after you select the number type, the
contact information is automatically
updated. You do not have the option to
enter additional information.
8. Press [SAVE] to update
your contact entry.
Adding a Pause to an Existing
Contact Entry
1. With the flip open, press the
Right Soft Key [Contacts].
2. Use the Directional Key
to highlight a Contact entry,
then press the Left Soft Key
[Edit].
3. Use the Directional Key
to highlight the number, then
press the Right Soft Key
[Options].
4. Press Add 2-Sec Pause or
Add Wait.
5. Enter the additional number(s),
then press [SAVE] to
update your contact entry.
Adding Another Phone Number
From standby mode
1. With the flip open, enter a
phone number, then press the
Left Soft Key [Save].
2. Use the Directional Key to
highlight Update Existing, then

Contacts in Your Phone’s Memory
28 VN170
press .
3. Use the Directional Key to
highlight an existing entry then
press [SAVE] to update
your contact entry.
4. Use the Directional Key to
highlight Mobile 1/ Home/
Business/ Mobile 2/ Fax, then
press [SAVE] to update
your contact entry.
From the Contact List Screen
1. With the flip open, press the
Right Soft Key [Contacts].
2. Use the Directional Key to
highlight an entry, then press
the Left Soft Key [Edit].
3. Use the Directional Key to
highlight the phone number
field you wish to add. Then
enter the number and press
[SAVE] to update your contact
entry.
Changing Saved Information
To edit any information you stored,
access the Edit Contact screen:
1. With the flip open, press the
Right Soft Key [Contacts].
2. Use the Directional Key
to highlight a Contact entry,
then press the Left Soft Key
[Edit].
3. Use the Directional Key to
highlight the field you want to
change.
4. Make the changes, then press
[SAVE] to update your
contact entry.
Changing the Default Number
The Default Number is the phone
number you first entered when
you created the Contact. However,
another number can be saved as
the Default Number.
1. With the flip open, press the
Right Soft Key [Contacts].
2. Use the Directional Key to
highlight an entry.
3. Press the Left Soft Key
[Edit].
4. Use the Directional Key to
highlight a phone number, then
press the Right Soft Key
[Options].
5. Use the Directional Key to
highlight Set As Default, then
press .
6. Press [Yes] to confirm the
new number as the default.
A confirmation message is
displayed.
7. Press [SAVE] to update
your contact entry.

29
VN170
Deleting
Deleting a Contact Entry
1. With the flip open, press the
Right Soft Key [Contacts].
2. Use the Directional Key to
highlight an entry.
3. Press the Right Soft Key
[Options].
4. Press Erase.
5. Press [Yes] to confirm.
Removing a Speed Dial
1. With the flip open, press the
Right Soft Key [Contacts].
2. Use the Directional Key to
highlight a Contact entry to
edit and press [VIEW].
3. Highlight the phone number
with the Speed Dial, then press
[EDIT].
4. Press the Right Soft Key
[Options].
5. Press Remove Speed Dial.
6. Press [Yes] to confirm.
7. Press [SAVE] to update
your contact entry.
Speed Dialing
Allows you to make phone calls
quickly and easily to numbers
stored in Contacts.
NOTE Speed Dial 1 is reserved for
Voicemail.
Single Digit Speed Dials
Press and hold the Speed Dial
digit. Your phone recalls the phone
number from your Contacts,
displays it, and dials it for you.
Multiple Digit Speed Dials
When you press and hold a
number key, it signals the phone
to call a Speed Dial. To dial Speed
Dials with multiple digits, press the
first digit(s), then press and hold
the last digit. For example, to call
Speed Dial 25, press , then
press and hold .
NOTE You can also enter the Speed
Dial digit(s) and press the SEND Key
.
Speed Dials 95, 96, 97, 98, and
99
Speed Dials 95, 96, 97, 98, and
99 are preset to access certain
phone account information: 95
(#Warranty Center), 96 (#DATA),
97 (#BAL), 98 (#MIN), 99
(#PMT) and 411 (Directory
Assistance). Unlike Speed Dial 1,
these can be changed if you want.

30 VN170
Contacts
Contacts
The Contacts menu allows you to
store names, phone numbers and
other information in your phone’s
memory.
Shortcut The Right Soft Key is a
shortcut key to the Contact List.
1. New Contact
Allows you to add a new contact to
your Contact List.
NOTE Using this submenu, the number
is saved as a new Contact, not into an
existing Contact.
1. Open the flip and press
[MENU].
2. Press Contacts.
3. Press New Contact.
4. Enter the name and press the
Directional Key downward
until the phone number type
you want is highlighted.
5. Enter the number and any
additional contact information
and press [SAVE] to update
your contact entry.
NOTE For more detailed information,
see page 26.
2. Contact List
Allows you to view your Contact
List.
1. Open the flip and press
[MENU].
2. Press Contacts.
3. Press Contact List.
4. Use the Directional Key to
scroll through your Contacts
alphabetically.
Press the Right Soft Key
[Options] to select one of
the following:
New Contact/ Erase/
New TXT Message/ New
Picture Message/ New
Voice Message/ Set As ICE
Contact/ Call/ Manage
Contacts/ Set As Favorite/
Search Entry Mode
Press the Left Soft Key
[Edit] to edit.
Press [VIEW] to view the
entry details.
TIP Use the Go To field, for quick
access to an entry without scrolling. For
example, to go to "Vet", enter the letter
V.

31
VN170
3. Backup Assistant
Backup Assistant safeguards your
mobile phone's address book and
automatically saves a copy of the
names, phone numbers, and email
addresses stored in your phone.
You can also view, print, add,
delete, and edit your Contacts
online. If you lose, damage, or
upgrade your phone, Backup
Assistant will restore your Contact
List to a new or replacement
phone.
Additional fees may apply. See
your service provider for details.
NOTE To use the Backup Assistant
service, you are required to activate the
service from your phone.
1. Open the flip and press
[MENU].
2. Press Contacts.
3. Press Backup Assistant.
4. Follow the instructions to
download the application.
4. Favorites
Allows you to add Contact entries
or Contact groups to your list of
Favorites to easily view, call, or
send messages.
1. Open the flip and press
[MENU].
2. Press Contacts.
3. Press Favorites.
4. Press [ADD].
TIP You can add up to 10 Contacts
and/or Contact groups as Favorites to
easily make calls, send messages, and
view messages.
5. Select whether you want to add
a favorite from your Contacts
or Group.
6. Use the Directional Key to
scroll through your Contacts or
Groups alphabetically and press
[MARK].
7. Press the Left Soft Key
[Done]. Once you have added
Contacts to the Favorites
list, the following options
will become available in the
Favorites menu:
Left Soft Key : View
OK Key : New Message/
View Messages
Right Soft Key : Options
Move Position/ Remove/
Remove All/ Set As ICE
Contact
Contacts
32 VN170
5. Groups
Allows you to view your grouped
Contacts, add a new group, change
the name of a group, delete a
group, or send a message to
everyone in the selected group.
1. Open the flip and press
[MENU].
2. Press Contacts.
3. Press Groups.
4. View a Group
Use the Directional Key to
highlight a group, then press
[VIEW].
Add a New Group
Press the Left Soft Key
[New] to add a new group to
the list. Select Enter new name/
Picture and press [SAVE].
Group's options
Press the Right Soft Key
[Options] to select one of the
following:
New TXT Message/ New
Picture Message/ New Voice
Message/ Edit Group Name
& ID/ Edit Members / Erase
Group/ Set As Favorite/ Send
Name Card/ Search Entry
Mode
Adding Contacts to a Group
1. From Groups submenu, press
[VIEW] and press [ADD]
again.
2. Highlight a desired contact list
and press [MARK].
3. Press Left Soft Key [Done]
to add contact to a group.
6. Speed Dials
Allows you to view your list of
Speed Dials or designate Speed
Dials for numbers entered in your
Contacts.
1. Open the flip and press
[MENU].
2. Press Contacts.
3. Press Speed Dials.
4. Use the Directional Key
to highlight the Speed Dial
position, or enter the Speed
Dial digit and press [SET].
5. Use the Directional Key
to highlight the Contact then
press . (For Contacts with
multiple numbers, highlight the
number for the Speed Dial, then
press .)
6. Press [Yes] to confirm.
A confirmation message is
displayed.

33
VN170
7. In Case of Emergency
(ICE)
This menu allows you to store
names, phone numbers and other
information, which will be very
helpful in case of emergency.
1. Open the flip and press
[MENU].
2. Press Contacts.
3. Press In Case of
Emergency.
4. Use the Directional Key to
highlight Contact 1, 2, or 3,
then press [ADD].
5. Press From Contacts or
From Favorites to add a
Contact from your Contact List.
Highlight the Contact, then
press .
OR
Press New Contact to
enter information not stored in
your Contact List.
6. Select the contact and press
.
7. The Contact label changes to
the specified name.
Entering Your ICE Personal Info
1. Open the flip and press
[MENU].
2. Press Contacts.
3. Press In Case of
Emergency.
4. Use the Directional Key to
highlight Personal Info, then
press [VIEW].
5. Use the Directional Key
to highlight one of the Note
entries, then press [ADD].
6. Enter information that would be
helpful in an emergency (e.g.,
your medical record number),
then press [SAVE]. The
note label changes to the text
entered.
TIP When you've assigned ICE
Contacts and your phone is locked,
the Left Soft Key appears as [ICE]
allowing the emergency information to
be viewed without unlocking the phone.
To unassign an ICE Contacts
From the ICE Contacts menu, press
the Right Soft Key [Options],
then press Unassign. Then
press [Yes].
To delete Personal Info entry
From the Personal Info menu, press
the Right Soft Key [Erase].
Then press [Yes].
Contacts
34 VN170
8. My Name Card
Allows you to create, edit, and
view your own personal Contact
information including name, phone
numbers, and email address in one
entry.
1. Open the flip and press
[MENU].
2. Press Contacts.
3. Press My Name Card.
4. Press [EDIT] to enter your
personal Contact information.
5. Use the Directional Key to
scroll to the information you
want to enter.
6. Enter your information as
necessary, then press
[SAVE].
NOTE Press the Right Soft Key
[Send] to send your name card.

35
VN170
Messaging
Messaging
SHORTCUT
From standby mode, pressing the
Left Soft Key is a shortcut to
your Messaging.
Depending on the content and
size of your messages, the phone
can store up to 500 messages
(including a max. of 300 SMS ,
100 emergency alerts and 100
MMS messages in the Inbox).
Content stored in the message
may be limited by phone model
and service capability. Other limits
to available characters per message
may exist. Please check with your
service provider for system features
and capabilities.
When viewing a received
message, you can call the
sender back by pressing the
SEND Key .
New Message Alert
Your phone can alert you when
you have new messages. Options
include:
1. The phone displays a message
on the screen.
2. The message icon () is
displayed on the display screen.
In the case of a high priority
message, the icon() will flash.
1. New Message
Allows you to send messages (Text,
Picture, and Voice). Each message
has a destination (Address) and
information (Message). Depending
on the type of message you
choose to send, you can also
attach files to your messages
including pictures, sounds, and
name cards.
1.1 TXT Message
The Basics of Sending a Text
Message
1. Open the flip and press the Left
Soft Key [Message].
2. Press New Message.
3. Press TXT Message.
4. Enter the phone number of the
recipient or the email address
for an email message. You can
enter up to 20 addresses for a
single message.
NOTE If you enter a phone number or
email address saved in your contacts, the
contact name will appear in the To field.
5. Press the Directional Key
downward to access the text
field.

Messaging
36 VN170
6. Type your message in the Text
field.
7. Press [SEND].
Using Messaging Options
'To' Field Options
1. With the 'To' field highlighted,
press the Right Soft Key
[Add].
2. Select from the following add
option(s).
From Contacts/ From Recent
Calls/ Favorites/ Groups/
Social Networks/ To Contacts
Text Field Options
1. With the Text field highlighted,
press the Right Soft Key
[Options].
2. Select from the following
option(s).
Insert Quick Text Allows you to
add Quick Text.
Save As Draft Saves the
message into the Drafts folder.
Add Allows you to add
Graphic, Animation, Sound,
Name Card, or Contact
Number/Email.
Copy Text Allows you to copy
text.
Paste Allows you to paste the
text you last copied into a text
field.
Format Text Allows you to
change the look of the text.
Alignment/ Font Size/
Font Style/ Text Color/
Background
Priority Level Allows you to
set the priority level for the
message.
High/ Normal
Callback # Inserts a pre-
programmed callback number
with your message.
On/ Off/ Edit
Save Quick Text Allows you to
save the message as a Quick
Text.
Cancel Message Cancels
message editing and goes to
the previous menu.
3. Complete and then press
[SEND] to send the message.
NOTE Refer to page 25 for the Left Soft
Key [Abc] options when in a text
field.
Using Contacts to Send a
Message
You can designate an entry saved
in your Contacts as the address
instead of manually entering the
destination.

37
VN170
1. Open the flip and press the the
Left Soft Key [Message].
2. Press New Message.
3. Press TXT Message.
4. Press the Right Soft Key
[Add].
5. Use the to highlight From
Contacts and press .
6. Use the Directional Key to
highlight the Contact entry
containing the destination and
press [MARK].
7. Press the Left Soft Key
[Done].
NOTE The Address feature allows a
maximum of 20 total addresses.
8. Complete the message as
necessary.
1.2 Picture Message
The Basics of Sending a Picture
Message
1. Open the flip and press the Left
Soft Key [Message].
2. Press New Message.
3. Press Picture Message.
4. Enter the cellular phone
number or email address of the
recipient.
5. Press the Directional Key
downward to access the text
field.
6. Type your message in the Text
field.
7. Use the Directional Key to
highlight the Picture field and
press the Left Soft Key [My
Pics]. Use the Directional Key
to highlight the image you
want to send, then press .
8. Use the Directional Key to
highlight Sound, then press
the Left Soft Key [Sounds].
Use the Directional Key to
highlight the audio file you want
to send and press .
9. Use the Directional Key to
highlight Name Card, then press
the Left Soft Key [Add].
Use the Directional Key
to choose My Name Card or
From Contacts and select an
entry.
10. Use the Directional Key to
highlight Subject and enter
the subject.
11. Press [SEND].
A confirmation message is
displayed.
'To' Field Options
1. With the To field highlighted,
press the Right Soft Key
[Add].

Messaging
38 VN170
2. Select from the following add
option(s).
From Contacts/ From Recent
Calls/ Favorites/ Groups/
To Online Album/ Social
Networks
Text Field Options
1. With the Text field highlighted,
press the Right Soft Key
[Options].
2. Select from the following
option(s).
Preview Displays the Picture
message as it would be seen by
the recipient.
Save As Draft Saves the
message into the Drafts folder.
Insert Quick Text Allows you to
add Quick Text.
Copy Text Allows you to copy
already-entered text.
Paste Allows you to paste the
text you last copied into a text
field.
Add Slide Insert multiple
pictures into a picture message.
Priority Level Allows you to
set the priority level for the
message.
High/ Normal
Callback # Inserts a
preprogrammed callback
number with your message.
On/ Off/ Edit
Cancel Message Cancels
message editing and returns to
the Messaging menu.
Picture Field Options
1. With the Picture field
highlighted, press the Right Soft
Key [Options].
2. Select from the following
option(s).
Preview/ Save As Draft/ Add
Slide/ Priority Level/ Remove
Picture/ Cancel Message
Sound Field Options
1. With the Sound field
highlighted, press the Right Soft
Key [Options].
2. Select from the following
option(s).
Preview/ Save As Draft/ Add
Slide/ Priority Level/ Remove
Sound/ Cancel Message
Name Card Field Options
1. With the Name Card field
highlighted, press the Right Soft
Key [Options].
2. Select from the following
option(s).
Preview/ Save As Draft/ Add

39
VN170
Slide/ Priority Level/ Remove
Name Card/ Cancel Message
Subject Field Options
1. With the Subject field
highlighted, press the Right Soft
Key [Options].
2. Select from the following
option(s).
Preview/ Save As Draft/ Insert
Quick Text/ Copy Text/
Paste/ Add Slide/ Priority
Level/ Cancel Message
1.3 Voice Message
The Basics of Sending a Voice
Message
1. Open the flip and press the Left
Soft Key [Message].
2. Press New Message.
3. Press Voice Message.
4. Press to start recording.
5. Record your voice message.
6. Press [STOP] to end
recording.
7. Enter the cellular phone
number or email address of the
recipient.
8. Press the Directional Key
downward to access the text
field.
9. Type your message.
10. Use the Directional Key to
highlight Name Card, then
press the Left Soft Key
[Add]. Use the Directional Key
to choose My Name Card
or From Contacts and select
an entry.
11. Use the Directional Key to
highlight Subject and enter
the subject.
12. Press [SEND] to send.
Voice Memo
The voice memo can be activated
by long pressing the CLR Key .
The saved Voice messages are
saved as memo.
The voice memo allows you to
record voice and sounds.
Once recording has started, the
following options are available:
stop/pause.
Once the recording has stopped,
the audio file will be automatically
saved.
You are allowed to record up to
1 Minute or 60 Minutes by
pressing the Right Soft Key
Options > 1. Recording Time.
Messaging
40 VN170
2. Inbox
The phone alerts you in up to
3 ways when you receive a new
message:
By displaying a notification
message on the screen.
By sounding a tone or vibration,
if set.
By displaying (The icon will be
when you get a high priority
message.)
Viewing Your Inbox
1. Open the flip and press the Left
Soft Key [Message].
2. Press Inbox.
3. Highlight a message. The
following options are available.
Press [OPEN] to view the
message.
Press the Left Soft Key
[Erase] to erase the highlighted
message.
Press the Right Soft Key
[Options] to access the
following options:
Reply Replies to the sender's
address of the received
message.
Reply With Copy Replies to the
sender's address with a copy
of the original message text
included.
Forward Forwards the
message to other destination
address(es).
Add To Contacts Stores the
callback number, email address,
and numbers from the address
of the received message into
your Contacts.
Extract Addresses Allows you to
extract addresses.
Sort By Sender/Time Allows
you to sort messages
alphabetically by sender's name
or by time received.
Settings Refer to Messaging
settings.
Manage Inbox Allows you to
manage (lock, erase and more)
multiple messages.
Message Info Allows you to
check the received message
information.
Message Icon Reference
New/ TXT Message
TXT Message Read
New Media Message
New Media Message Received
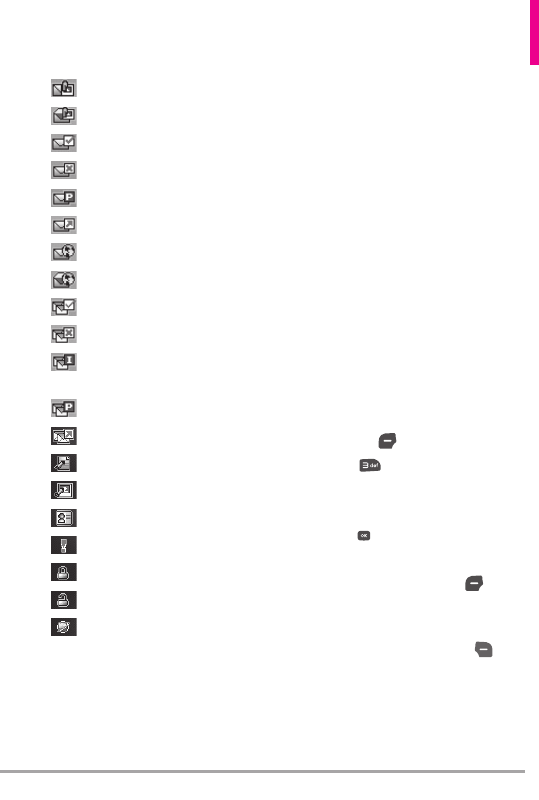
41
VN170
Media Message Unread
Media Message Read
Message Delivered
Message Failed
Pending Message
Message Sent
New Webmail
Webmail Read
Multiple Messaages Delivered
Multiple Messaages Failed
Multiple Messaages Delivered
Incomplete
Multiple Pending Messages
Multiple Messages Sent
TXT Message Draft
Media Message Draft
Namecard
High Priority
Lock
Unlock
Mobile Web Mail
* Multimedia Message indicates Picture/
Voice Message.
3. Sent
Depending on the content and size
of your messages, you can save up
to 150 messages (100 SMS/50
MMS). This menu lists your Sent
messages. Content stored in the
message may be limited by phone
model and service capability.
Other limits, such as available
characters per message, may exist.
Please check with your service
provider for system features
and capabilities. Use it to verify
whether the transmission was
successful or not and view message
contents.
1. Open the flip and press the Left
Soft Key [Message].
2. Press Sent.
3. Highlight a message. The
following options are available.
Press [OPEN] to view the
message.
Press the Left Soft Key
[Erase] to erase highlighted
message.
Press the Right Soft Key
[Options].
Forward Forwards a sent
message to other destination
address(es).
Messaging
42 VN170
Reply To All Replies to all
recipients of the selected
message.
Send/Resend Allows you
to retransmit the selected
message.
Add To Contacts Stores the
callback number, email address,
and numbers from the address
of the message into your
Contacts.
Sort By Recipient/Time Allows
you to sort alphabetically by
recipient's name or by time
sent.
Settings Refer to Messaging
settings.
Manage Sent Allows you to
manage (erase or lock) multiple
messages.
Message Info Allows you
to check the sent message
information.
4. Drafts
Saved message drafts are stored
here.
1. Open the flip and press the Left
Soft Key [Message].
2. Press Drafts.
3. Highlight a message. The
following options are available.
Press [EDIT] to continue
editing the message.
Press the Left Soft Key
[Erase].
Press the Right Soft Key
[Options].
Send Sends the selected
message.
Add To Contacts Stores the
number, email address, and
numbers from the address
included in the message into
your Contacts.
Manage Drafts Allows you
to manage (erase or lock)
messages.
Message Icon Reference
Draft Text Message
Draft Multimedia Message
5. Voicemail
Allows you to view the number
of new voice messages recorded
in the Voicemail box. Once you
exceed the storage limit, old
messages are overwritten. When
you have a new voice message,
your phone will alert you.
Checking Your Voicemail Box

43
VN170
1. Open the flip and press the Left
Soft Key [Message].
2. Press Voicemail.
3. The following options are
available.
Press the Left Soft Key
[Clear] to clear the Voicemail
Counter, then then press
[Yes].
Press the SEND Key or
[CALL] to listen to the
message(s).
OR
1. Enter (*VM) and
press the SEND Key from
your phone or dial your wireless
phone number from any touch-
tone phone.
OR
Press and hold from your
phone, as a speed dial to your
voicemail.
2. When the recorded
announcement begins, press
to interrupt (if applicable).
3. When prompted, enter your
password, then .
6. Mobile Email
Allows you to send an email via
Mobile Web. You can also send
and receive emails through Mobile
Email after downloading the
application.
1. Press the Left Soft Key
[Message].
2. Press Mobile Email.
3. Subscribe to the service (if
necessary).
4. Accept the Terms of Service.
5. Highlight an email provider and
press .
6. Follow the instructions to set up
your account(s).
7. Social Networks
The upgraded "Text based SNS"
that allow user to update "Wall"
and "Message" on the social
network site.
1. Open the flip and press the Left
Soft Key [Message].
2. Press Social Networks.
3. Select one of the social
networking service providers.
4. Update your information as
desired.
Messaging Settings
Allows you to configure settings for
your messages.

Messaging
44 VN170
1. With the flip open, press the
Left Soft Key [Message].
2. Press the Left Soft Key
[Settings].
3. Use the Directional Key to
highlight one of the settings
and press to select it.
Message Settings Sub-Menu
Descriptions
1. Inbox View
Select Time to display messages
chronologically in Inbox and Sent
folders. Select Contact to sort
all messages alphabetically by
Contact in one message folder.
NOTE By default, Time is set as
the Inbox View setting. If changed to
Contact, the Messaging menu will appear
differently.
2. Entry Mode
Select T9 Word , Abc , ABC, 123,
T9 Palabra, Simplified Chinese
or Korean to be your default input
method.
3. Auto Save Sent
Select On to automatically save
your Sent messages.
Select Off if you don't want to
save automatically. Select Prompt
to be asked to save.
4. Auto Erase Inbox
Select On to automatically delete
read messages when you exceed
the storage limit. Or, select Off.
5. Messaging Font Size
Select Resizable, Small, Normal or
Large for the size of the Messaging
characters.
6. TXT Auto View
Select On to automatically
display message content on the
screen. Select On + Readout to
automatically display content and
read it aloud.
Select Off for more security and
privacy by requiring the message
to be opened to view it.
7. TXT Instant Reply
Select On to text a reply instantly.
Or, select Off.
8. TXT Auto Scroll
Select On to automatically scroll
text down while viewing messages.
Or, select Off.
9. Multimedia Auto Receive
Select On to automatically
download attachments to
Multimedia messages.
Or, select Off.

45
VN170
10. Quick Text
Displays your list of Quick Text
phrases to help you to reduce
manual input into messages. Use
this submenu to edit and add text.
11. Emergency Alert
Set your configuaration for
receiving emergency alerts. This
menu has three options : Receive
Alerts/ Alert Reminder / Alert
Vibrate
12. Voicemail #
Allows you to manually enter
the access number for Voicemail
Service. This number should be
only used when a VMS (Voicemail
Service) access number is not
provided by the network.
13. Callback #
Select On to automatically send a
designated callback number with
your messages. Or, select Off.
14. Signature
Select Custom to create/edit a
signature to automatically send
with your messages. Select None
for no signature.
15. Delivery Receipt
When Delivery Receipt is set
to On, you can see if your sent
messages have been delivered. Or
select Off.
Erasing Messages
You can erase messages stored in
your Inbox, Sent, or Drafts folders.
You can also erase all messages at
the same time.
1. Open the flip and press the Left
Soft Key [Message].
2. Press the Right Soft Key
[Options] then select one of
the following:
Erase Inbox/ Erase Sent/
Erase Drafts/ Erase All
3. Press [Yes] to confirm the
deletion.
A confirmation message is
displayed.

46 VN170
Recent Calls
Recent Calls
The Recent Calls menu is a list
of the last phone numbers or
Contact entries for calls you
placed, accepted, or missed.
It's continually updated as
new numbers are added to the
beginning of the list and the oldest
entries are removed from the
bottom of the list.
1. Missed
Allows you to view the list of
missed calls; up to 90 entries.
1. Open the flip and press
[MENU].
2. Press Recent Calls.
3. Press Missed.
4. Use the Directional Key to
highlight an entry, then
Press [OPEN] to open
the entry.
Press the SEND Key to
place a call to the number.
Press the Right Soft Key
[Options] to select:
Save To Contacts (Contact
Info)/ Erase/ Lock(Unlock)/
Erase All/ View Timers
Press the Left Soft Key
[Message] to select:
TXT Message/ Picture
Message/ Voice Message
2. Received
Allows you to view the list of
incoming calls; up to 90 entries.
1. Open the flip and press
[MENU].
2. Press Recent Calls.
3. Press Received.
4. Use the Directional Key to
highlight an entry, then
Press [OPEN] to open
the entry.
Press the SEND Key to
place a call to the number.
Press the Right Soft Key
[Options] to select:
Save To Contacts (Contact
Info)/ Erase/ Lock(Unlock)/
Erase All/ View Timers
Press the Left Soft Key
[Message] to select:
TXT Message/ Picture
Message/ Voice Message

47
VN170
3. Dialed
Allows you to view the list of
outgoing calls; up to 90 entries.
1. Open the flip and press
[MENU].
2. Press Recent Calls.
3. Press Dialed.
4. Use the Directional Key to
highlight an entry, then
Press [OPEN] to open
the entry.
Press the SEND Key to
place a call to the number.
Press the Right Soft Key
[Options] to select:
Save to Contacts(Contact
Info)/ Erase/ Lock(Unlock)/
Erase All/ View Timers
Press the Left Soft Key
[Message] to select:
TXT Message/ Picture
Message/ Voice Message
4. All
Allows you to view the list of all
calls; up to 270 entries.
1. Open the flip and press
[MENU].
2. Press Recent Calls.
3. Press All.
4. Use the Directional Key to
highlight an entry, then
Press [OPEN] to open
the entry.
Press the SEND Key to
place a call to the number.
Press the Right Soft Key
[Options] to select:
Save to Contacts(Contact
Info)/ Erase/ Lock(Unlock)/
Erase All/ View Timers
Press the Left Soft Key
[Message] to select:
TXT Message/ Picture
Message/ Voice Message
Shortcut To view a quick list of all
your recent calls, press the SEND Key
from standby mode.
5. View Timers
Allows you to view the duration of
selected call types.
1. Open the flip and press
[MENU].
2. Press Recent Calls.
3. Press View Timers.
4. Use the Directional Key to
highlight a call list.
Last Call/ All Calls/ Received

Recent call
48 VN170
Calls/ Dialed Calls/ Roaming
Calls/ Transmit Data/
Received Data/ Total Data/
Last Reset/ Lifetime Calls/
Lifetime Data Counter
5. Press the Left Soft Key
[Reset] to reset the highlighted
timer.
6. Reset all the recorded timers by
pressing the Right Soft Key
[Reset All].
NOTE Lifetime Calls and Lifetime Data
Counter cannot be reset.

49
VN170
Mobile Web
Mobile Web
Allows you to access news,
sports, weather, and email from
your Verizon Wireless device.
Accessibility and selections within
this feature are dependent upon
your service provider. For specific
information on Mobile Web access
through your phone, contact your
service provider.
Shortcut Pressing the Dirctional Key
Left is the shortcut to accessing the
Browser when the flip is open.
1. Open the flip and press
[MENU].
2. Press Mobile Web.

50 VN170
Media Center
Media Center
Media Center allows you to do
more than just talk on your phone.
Media Center is a technology
and service that allows you to use
applications on your phone. With
Media Center, it’s quick and easy
to personalize your phone to your
lifestyle and tastes. Just download
the applications that appeal to
you. With a wide range of software
available, you can be assured that
you can find something useful,
practical, or entertaining.
Anything Unclear?
From the Media Center menu,
press the Right Soft Key [Info]
to see your memory status, and
Media Center status. Use the Help
option to view information from
buying new applications to expired
applications.
1. Mobile Web
The Mobile Web feature allows
you to access news, sports,
weather and email from your
Verizon Wireless device. Access
and selections within this feature
are dependent upon your service
provider. For specific information
on Mobile Web through your
phone, contact your service
provider.
Shortcut Pressing the Dirctional Key
Left is the shortcut to accessing the
Browser when the flip is open.
1. Open the flip and press
[MENU].
2. Press Media Center.
3. Press Mobile Web.
Ending a Browser Session
End a Browser session by pressing
the PWR/END Key .
Navigating Through the Mobile
Web
On-screen items appear in one of
the following ways:
Numbered options
You can use your numeric
keypad or you can select the
items by moving the cursor and
pressing the appropriate Soft
Keys.
Links embedded in content
You can act on the options or
the links using the Soft Keys
just below the display screen.
Text or numbers
You can select the items by
moving the cursor and pressing
.

51
VN170
Scrolling
Use the Directional Key . The
browser's cursor will highlight
currently selected items.
Fast Scrolling
Press and hold the Directional Key
to quickly move the cursor up
and down on the current screen.
Scrolling by Page
Press the Volume Keys to move
up and down a page at a time.
Home Page
Press Right Soft Key [Menu]
and select 1. VZW Home or press
and hold to go to the Home
Page.
Soft Keys
To use (if available) special
functions press the Soft Keys. The
function, associated with the Soft
Keys can change for each page and
depends on each highlighted item.
Entering Text, Numbers, or
Symbols
When prompted to enter text,
the current text entry method
appears above the Right Soft Key
as Word, Abc, ABC, 123 or
Symbols.
To change the input mode, press
the Right Soft Key . To enter an
upper case character, press .
Deleting Text/Number Entered
When entering text or numbers,
press to clear the last number,
letter, or symbol. Press and hold
to clear the input field completely.
Initiating a Phone Call From the
Mobile Web
You can make a phone call from
the Mobile Web if the site you
are using supports the feature
(the phone number or Call can
be highlighted). Highlight the link
and press to place the call. The
browser connection is terminated
when you initiate the call. After you
end the call, your phone returns to
the screen from which you initiated
the call.
2. Tunes & Tones
Personalize your phone with
ringtones. A wide variety of
choices are available, such as
current hits, pop, hip-hop, and
more.
Access and Options
1. Open the flip and press
[MENU].
Media Center
52 VN170
2. Press Media Center.
3. Press Tunes & Tones.
4. Select a submenu by pressing
the number that corresponds
with the submenu.
2.1 Get New Ringtones
Allows you to connect to Media
Center and download various
ringtones.
1. Open the flip and press
[MENU].
2. Press Media Center.
3. Press Tunes & Tones.
4. Press Get New Ringtones.
5. Press Get New
Applications to shop for
ringtones and ringtone
applications.
Playing the ringtone
Press [Play] you can listen
to the tone prior to selecting.
Removing the ringtone
1. Highlight the ringtone you
would like to delete.
2. Press the Right Soft Key
[Options].
3. Highlight Erase or Erase All and
press .
4. Highlight Yes and press to
delete the ringtone.
2.2 Get Ringback Tones
Allows you to select a desired
ringback tone or download a new
ringback tone.
1. Open the flip and press
[MENU].
2. Press Media Center.
3. Press Tunes & Tones.
4. Press Get Ringback Tones.
Follow the on-screen prompts.
2.3 My Ringtones
Allows you to select a desired
ringtone.
1. Open the flip and press
[MENU].
2. Press Media Center.
3. Press Tunes & Tones.
4. Press My Ringtones.
5. Use the Directional Key to
highlight a ringtone and press
[PLAY] to play the ringtone
or the Left Soft Key [Set
As] to set the ringtone as:
Ringtone
Contact ID: Highlight
and select the Contact to be
identified by the ringtone you
selected.
53
VN170
Alert Sounds: Press the
corresponding number key to
set the ringtone for one of the
following:
All Messages/ TXT Message/
Multimedia Message/
Voicemail
2.4 My Sounds
Allows you to record a new sound
or select a desired sound.
How to record a new sound
1. Open the flip and press
[MENU].
2. Press Media Center.
3. Press Tunes & Tones.
4. Press My Sounds.
5. Press Record New and
press to start recording,
then press [STOP] to end
recording.
How to select a sound
1. Open the flip and press
[MENU].
2. Press Media Center.
3. Press Tunes & Tones.
4. Press My Sounds.
5. Use the Directional Key to
scroll and highlight a preloaded
sound.
Options with a sound file
highlighted:
Press the Left Soft Key [Set
As] to set it as the Ringtone,
Contact ID or Alert Sounds.
Press [PLAY].
Press the Right Soft Key
[Options] to select:
Send/ Send via Email/ To
Online Album/ File Info
3. Pictures
View, take, and trade digital
pictures right from your wireless
phone.
Access and Options
1. Open the flip and press
[MENU].
2. Press Media Center.
3. Press Pictures.
4. Browse the submenus.
3.1 Get New Pictures
Allows you to download a variety
of images for My Pictures.
1. Open the flip and press
[MENU].
2. Press Media Center.
3. Press Pictures.
Media Center
54 VN170
4. Press Get New Pictures.
5. Press Get New
Applications.
6. Select the Application you
wish to use to download new
pictures and press . Follow
the on-screen prompts.
3.2 My Pictures
Allows you to view and manage
photos stored in the phone.
1. Open the flip and press
[MENU].
2. Press Media Center.
3. Press Pictures.
4. Press My Pictures.
5. Highlight a picture with the
Directional Key .
The following options are
available:
Press [VIEW] to view it.
Press the Left Soft Key
[Erase] to delete it.
Press the Right Soft Key
[Options] to select one of the
following options:
Send Picture Message/ To
Online Album/ To Social
Network/ Send via Email/ Via
Bluetooth
Set As Wallpaper/ Picture ID
Take Picture Turns on the
camera function.
Get New Pictures Allows you to
connect to picture downloading
services.
Slide Show Plays all pictures as
a slide show.
Manage Pictures Allows you
to mark multiple pictures to
be erased, sent or locked/
unlocked.
Rename Allows you to change
the file name.
*Lock (Unlock) Allows you
to lock or unlock. Locked files
can't be erased accidentally.
File Info Name/ Date/ Time/
Resolution/ Size
* Only appears when the picture is
stored on the phone.
Editing a Picture
Access My Pictures, then use the
Directional Key to highlight
a picture. Press [VIEW] and
then press the Right Soft Key
[Options] to access:
Edit Allows you to zoom, rotate
and crop the photo.

55
VN170
3.3 Take Picture
Lets you to take digital pictures.
Shortcut Press the Camera Key from
the Home screen to open the camera
function.
1. Open the flip and press
[MENU].
2. Press Media Center.
3. Press Pictures.
4. Press Take Picture.
5. Set the brightness by pressing
the Directional Key up and
down , zoom by pressing the
Directional Key left and
right, and press the Right Soft
Key [Options] to change
other settings.
NOTE Zooming is not available on the
highest resolution.
Select the option(s) to
customize.
RESOLUTION 1280X960/
640X480/ 320X240
SELF TIMER Off/ 3 Seconds/
5 Seconds/ 10 Seconds
WHITE BALANCE Auto/
Sunny/ Cloudy/ Fluorescent/
Glow
SHUTTER SOUND Shutter/
No Sound /Say “Cheese”/
Ready! 1 2 3
COLOR EFFECTS Normal/
Negative/ Aqua/ Sepia/
Black&White
NIGHT MODE On/ Off
NOISE REDUCTION On/ Off
Turning this setting on provides
improved picture quality in low-
lighting shots.
AUTO SAVE On/ Off
PREVIEW Actual view/ Full
screen
6. Take a picture by pressing
[TAKE].
7. Press the Left Soft Key
[Save]. The picture is stored in
My Pictures.
3.4 Online Album
Use to access the Online Album
(PIX Place).
1. Open the flip and press
[MENU].
2. Press Media Center.
3. Press Pictures.
4. Press Online Album.
5. Login with your mobile number
and password, as applicable.
4. Games
Allows you to download games and
applications. Games already on

Media Center
56 VN170
your phone are listed in this menu.
1. Open the flip and press
[MENU].
2. Press Media Center.
3. Press Games.
4. Press Get New
Applications. Follow the on-
screen prompts.
Or select one of the preloaded
games.
Removing a download
application or game
1. Highlight the application or
game you would like to delete.
2. Press the Right Soft Key
[Options].
3. Highlight Remove and press
.
4. Highlight Yes and press to
delete the application or game.
5. Browse & Download
Browse & Download allows you to
find applications for your phone.
It also allows you to use any other
downloaded applications.
1. Open the flip and press
[MENU].
2. Press Media Center.
3. Press Browse & Download.
4. Select one of the applications
already on your phone.
OR
Press Get New
Applications and follow the
on-screen prompts.
Backup Assistant
Backup Assistant safeguards your
mobile phone's address book and
automatically saves a copy of the
names, phone numbers, and email
addresses stored in your phone.
See page 31 for additional details.
City ID
City ID is an enhanced Caller ID
feature on select Verizon Wireless
handsets that automatically
displays the city and state of
every wireless call received. City
ID reads the area code and local
exchange of an incoming call and
displays the location associated
with that number. City ID includes
over 20,000 cities, towns and
neighborhoods in North America
and over 200 country codes
from around the world - providing
mobile subscribers with a
remarkably accurate tool to help
identify incoming callers. After
the free trial period, subscribers
will receive a message to purchase

57
VN170
the application. Subscribers are
then presented with the available
purchase options. If after
purchasing City ID a subscriber
decides to cancel the application,
the subscriber can follow the
standard Media Center process to
cancel a subscription.
Daily Scoop
Daily Scoop is an application
available in the Browse &
Download menu. It allows you to
receive interesting and valuable
information and offers from
restaurants and retailers in your
area. You will receive exclusive
discounts on products and services
useful to you, when and where they
are most useful. For details, visit
www.verizonwireless.com.
Mobile Email
Mobile Email is an application
downloadable from the Browse &
Download Menu. Don't miss an
important email. Thanks to Mobile
Email, you can get your emails on
your phone while you're on the
go. Mobile Email works with many
providers, including Yahoo!, AOL,
Verizon.net and others. Get alerts
from your Phone when new email
has arrived. Additional fees may
apply.
VZ Navigator®
Now you can find the address of
a great restaurant or the nearest
ATM, check movie times, discover
the latest hot spots, and know
exactly how to get to where you’re
going. VZ Navigator® puts all the
advanced features of the latest
GPS devices and systems on your
wireless device — at a fraction of
the price.
NOTES
• To use VZ Navigator
, you must turn
Location On (see page 77)
• Download and subscription required
for use only in National Enhanced
Service Coverage Area: accuracy and
completeness of information is not
guaranteed; information about the
location of the device will be used to
deliver service. Additional fees may
apply. See brochure for details or visit
www.verizonwireless.com.
6. Extras
Allows you to access extra
applications.
1. Open the flip and press
[MENU].
2. Press Media Center.
3. Press Extras.
4. Press Get New
Applications. Follow the on-
screen prompts.

58 VN170
Mobile Email / V CAST Tones / My Pictures
Mobile Email
The Mobile Email menu allows
you to set up your email account
and conveniently exchange emails
wirelessly using your device. To
use this feature, you may need
to download the application first;
read the instructions on your
device and follow them.
1. Open the flip and press
[MENU].
2. Press Mobile Email. Follow
the on-screen prompts.
V CAST Tones
Download and use of this app
(including browsing and previewing
content) will be build on a per-
megabyte basis, or according to
any data package you may have.
Content cost is displayed at time
of purchase. Monthly subscription
required to buy Ringback Tones,
valid for one year. You may cancel
your subscription at any time.
Ringback Tones require voicemail.
Verizon Wireless may provide a
default tone and greeting with
your subscription. You agree not
to copy, sublicense, transfer or
use tones for any unauthorized
purpose.
1. Open the flip and press
[MENU].
2. Press V CAST Tones.
Follow the on-screen prompts.
My Pictures
Allows you to view and manage
the pictures stored in your phone.
You can also take new photos and
download new pictures.
1. Open the flip and press
[MENU].
2. Press My Pictures.

59
VN170
Settings & Tools
Settings & Tools
1. My Verizon
Check your subscription
information ranging from your
payment plan to your software
upgrade or other available service.
1. Open the flip and press
[MENU].
2. Press Settings & Tools.
3. Press My Verizon.
2. Master Volume
Allows you to set the Master
Volume settings.
4. Open the flip and press
[MENU].
5. Press Settings & Tools.
6. Press Master Volume.
7. Adjust the volume with the
Directional Key and press
[SET] to save the setting.
3. Tools
Your phone tools include Voice
Commands, Calculator, Ez Tip
Calculator, Calendar, To Do
List, Alarm Clock, Info Search,
Stopwatch, World Clock, and
Notepad.
1. Open the flip and press
[MENU].
2. Press Settings & Tools.
3. Press Tools.
3.1 Voice Commands
This feature provides you with the
following options equipped with
AVR (Advanced Voice Recognition)
technology. Each option has
its detailed information on the
phone and you can check it out
by pressing the Left Soft Key
[Info].
1. Open the flip and press
[MENU].
2. Press Settings & Tools.
3. Press Tools.
4. Press Voice Commands.
Access and Options
With the flip open, press the Voice
Command Key on the keypad.
The Voice Commands feature has
several settings which allow you
to customize how you want to
use it. Access Voice Commands,
then press the Right Soft Key
[Settings].
Confirm Choices Automatic/
Always Confirm/ Never Confirm

Settings & Tools
60 VN170
Sensitivity Set the sensitivity as
More Sensitive/ Automatic/ Less
Sensitive.
Adapt Voice If the phone often
asks you to repeat voice command,
train the phone to recognize your
voice patterns.
Train Words/ Train Digits
Prompts Mode/ Audio Playback/
Timeout
For Mode, set Prompts/
Readout + Alerts/ Readout/
Tones Only.
For Audio Playback, set
Speakerphone or Earpiece.
For Timeout, set 5 seconds or
10 seconds.
CLR Key Activation On/ Off
By default, the CLR Key on
the keypad activates the Voice
Command feature. To deactivate,
change the CLR Key Activation
setting to Off.
3.1.1 Call <Name or Number>
Say "Call" and then call someone
simply by saying the name or
phone number. Please speak clearly
and say the name or number
exactly as it is entered in your
Contact List. When you have more
than one contact number, you can
state the name and number type
of the contact (for example, 'Call
John Work').
3.1.2 Send Msg to <Name or
Number or Group>
Say "Send Message" and the
command will prompt you for
the type of message. After
choosing the message type, you
will be prompted for the contact
name, number or group. It will
automatically start a message. If
you say a full-sentence command,
such as 'Send Message to Bob',
it will automatically start a text
message without asking for the
message type. When using 'Send
Message' command, speak clearly
and say the name, number or
group exactly as it is entered in
your Contact List.
3.1.3 Go to <Menu>
The 'Go to' command allows you
to access a menu within the phone
(for example, 'Go to Calendar').
If no menu option is stated, a list
of options will be provided.
3.1.4 Check <Item>
The ‘Check’ command allows you
to check out a wide range of items
such as Phone Status, Voicemail,

61
VN170
Messages, Missed Calls, Time,
Signal Strength, Battery Level,
Volume, Balance, Minutes,
Payment and My Number.
3.1.5 Contacts <Name>
You can look up names in your
Contacts (for example, 'Contacts
John') as well as manage your
Contact List including creating,
erasing or modifying.
Call/ Read out/ Create New/
Modify/ Erase
3.1.6 Redial
Say "Redial" and the phone will
redial the last phone number.
3.1.7 My Verizon
The 'My Verizon' command
provides you with direct access
to your Verizon Wireless account
information.
3.1.8 Help
Provides a general guideline to
using Voice Commands.
3.2 Calculator
Allows you to perform simple
mathematical calculations.
1. Open the flip and press
[MENU].
2. Press Settings & Tools.
3. Press Tools.
4. Press Calculator.
5. Enter the numbers to get the
value you want. To clear entered
items, press the Left Soft Key
[Clear].
6. Use the Right Soft Key
[Operators] to add other
operators.
7. Use the Directional Key to
enter an operation between
numbers and press [ = ] for
the result.
NOTE To insert a decimal, press .
To insert + and -, press .
Press the Directional Key
Up for + (addition).
Press the Directional Key
Down for - (subtraction).
Press the Directional Key
Left for ÷ (division).
Press the Directional Key
Right for x (multiplication).
3.3 Ez Tip Calculator
Allows you to quickly and easily
calculate bill amounts using the bill
total, tip % and number of people
as variables.
Settings & Tools
62 VN170
1. Open the flip and press
[MENU].
2. Press Settings & Tools.
3. Press Tools.
4. Press Ez Tip Calculator.
5. Enter the variable fields (Total
Bill, Tip (%), Split) and the
corresponding calculation fields
(tip and total for each person)
appear automatically.
6. Press the Left Soft Key
[Reset] for another calculation.
3.4 Calendar
Allows you to keep your agenda
convenient and easy to access.
Simply store your appointments
and your phone will alert you with
a reminder you set.
1. Open the flip and press
[MENU].
2. Press Settings & Tools.
3. Press Tools.
4. Press Calendar.
5. Use the Directional Key to
highlight the scheduled day.
Left : Previous Day
Right : Next Day
Up : Previous Week
Down : Next Week
6. Press the Left Soft Key
[Add].
7. Enter the Subject, then scroll
down to set the remaining
settings.
8. Highlight a Calendar setting
field, then press the Left
Soft Key [Set]. For each
Calendar event you can set:
• Subject • Start Date
• Start Time • End Date
• End Time • Repeat
• Until • Alerts
• Tones • Vibrate
9. Use the Directional Key to
highlight the setting you want,
then press .
10. Press [SAVE] when
Calendar information is
complete.
Editing and Deleting calendar
entries
1. From the calendar entry list,
press [VIEW].
2. Press [EDIT] to edit the
calendar entry or press the Left
Soft Key [Erase] to delete
the calendar entry.

63
VN170
3.5 To Do List
Allows you to add tasks to a To
Do List.
1. Open the flip and press
[MENU].
2. Press Settings & Tools.
3. Press Tools.
4. Press To Do List.
5. Press the Left Soft Key
[Add].
6. Enter the subject in the Subject
field, then press the Directional
Key Down to highlight Due
Date.
7. Press the Left Soft Key
[Date].
8. Enter the due date using
numeric keypad. (For example,
press the key , for
NOV.) And use the Directional
Key to move the cursor to
the date or year.
OR
Press the Right Soft Key
[More] to enter more specific
information such as Subject,
Start Date, Due Date, Priority,
Alert, Alert Date, Alert Time,
or Tones.
9. Press [SAVE] when
completed.
3.6 Alarm Clock
Allows you to set up to 10 alarms.
At the alarm time, your alarm will
be displayed on the LCD screen
and the alarm will sound.
1. Open the flip and press
[MENU].
2. Press Settings & Tools.
3. Press Tools.
4. Press Alarm Clock.
5. Press the Left Soft Key
[Add].
6. Use the Directional Key to
highlight the information you
want to set, then press the Left
Soft Key [Set] to view your
setting choices.
Enter the alarm information
including:
• Turn On/Off • Set Time
• Repeat • Ringtone
7
. Press [SAVE] after setting
all of the Alarm fields as
necessary.
NOTE Snooze or Dismiss the alarm
using the Soft Keys (flip open).
How to delete alarms
1. From the Alarm Clock list,
press the Right Soft Key
[Options] to view the available

Settings & Tools
64 VN170
options.
2. Press Erase to delete an
alarm or Erase All to delete
all alarm entries.
3. Press [Yes].
How to edit alarms
1. From the Alarm Clock list, press
[VIEW] and then press
[EDIT].
3.7 Info Search
Allows you to search items stored
on the phone.
1. Open the flip and press
[MENU].
2. Press Settings & Tools.
3. Press Tools.
4. Press Info Search.
5. Enter two or more characters in
the search field and press
[SEARCH].
6. By default, the phone will
search all the categories. To
specify the categories, highlight
All and press the Left Soft Key
[Set]. Use the Directional
Key to highlight a category
and press [MARK] to mark/
unmark the category. After
specifying the categories, press
the Left Soft Key [DONE].
7. To view a search result, highlight
the desired results and press
[VIEW]. If you want to retry the
search, press the Right Soft Key
[Retry]. If you want to start
a new search, press the Left
Soft Key [Search], enter
your key word, then press .
8. If no results are found, you
will be prompted to try again.
Choose Yes to try again or No
to return to the Tools menu.
3.8 Stopwatch
Allows you to use your phone as a
typical stopwatch.
1. Open the flip and press
[MENU].
2. Press Settings & Tools.
3. Press Tools.
4. Press Stopwatch.
5. Press [START].
6. Pressing [STOP] will stop or
resume Stopwatch time.
7. While measuring time, press
the Left Soft Key [Lap] to
record a lap.
8. After time has stopped, press
the Right Soft Key [Reset].

65
VN170
3.9 World Clock
Allows you to determine the
current time in another time zone
or country.
1. Open the flip and press
[MENU].
2. Press Settings & Tools.
3. Press Tools.
4. Press World Clock.
5. Press the Right Soft Key
[Cities] for a list of available
cities.
6. Highlight a city from the list,
then press .
7. The display shows the position
of the city on a global map.
8. Press again to zoom in on
the city and view its date and
time infomation.
NOTE Press the Left Soft Key [Set
DST], to set daylight saving time. Select
Yes and press to set DST.
3.10 Notepad
Allows you to add, read, edit, and
erase notes to yourself.
1. Open the flip and press
[MENU].
2. Press Settings & Tools.
3. Press Tools.
4. Select 10. Notepad.
5. Press the Left Soft Key
[Add] to write a new note.
6. Press the Left Soft Key to
change the entry mode. Or
press the Right Soft Key
[Options] to copy and paste
text or to cancel the notepad
entry.
7. After filling in the note, press
[SAVE] to save it.
4. Bluetooth® Menu
The VN170 is compatible
with devices that support the
Headset, Handsfree, Phonebook
Access, Object Push for vCard
and vCalendar, File Transfer, and
Message Access profiles.
You may create and store 20
pairings within the VN170 and
connect to one device.
The approximate communication
range for Bluetooth® wireless
technology is up to 30 feet (10
meters).
NOTE Read the user guide of each
Bluetooth
®
accessory that you are trying
to pair with your phone because the
instructions may be different.
NOTE Your phone is based on the
Bluetooth® specification, but it is not
guaranteed to work with all devices

Settings & Tools
66 VN170
enabled with Bluetooth
®
wireless
technology.
Phone does not support ALL Bluetooth
®
OBEX Profiles.
* For vehicle/accessory compatibility
go to www.verizonwireless.com/
bluetoothchart
Turn On Bluetooth
Allows you to set the phone's
Bluetooth® power On/Off.
1. Open the flip and press
[MENU].
2. Press Settings & Tools.
3. Press Bluetooth.
4. Press the Left Soft Key
[Turn On].
NOTE By default, your device’s
Bluetooth
®
functionality is turned off.
4.1. Add New Device
Pairing is the process that allows
the handset to locate, establish,
and register 1-to-1 connection
with the target device.
For pairing with a new
Bluetooth® device
1. Follow the Bluetooth® accessory
instructions to set the device to
pairing mode.
2. Open the flip and press
[MENU].
3. Press Settings & Tools.
4. Press Bluetooth Menu.
5. Press Add New Device.
6. Set the desired device to
discovery mode.
7. The device will appear in Add
New Device menu once it has
been located. Highlight the
device and press [PAIR].
8. The handset will prompt you
for the passcode. Consult
the Bluetooth® accessory
instructions for the appropriate
passcode (typically “0000” - 4
zeroes). Enter the passcode
and press . When Auto Pair
Handsfree is set to On, the
device will try to autopair for
headsets.
9. When pairing with the PC or
PDA is successful, highlight
either Always Ask or Always
Connect and press to
connect with the device.
10. Once connected, you will
see the device listed in
the Bluetooth® Menu and
when the pair is transferring
information the Bluetooth®
indicator will show up on your
screen.
67
VN170
Icon Reference in Adding New
Device
When the Bluetooth® wireless
connection is built and paired
devices are found, the following
icons are displayed.
Icon References When a
Bluetooth® Wireless Connection
is Searched (neither connected
nor paired).
When a carkit device is found
by your VN170 device
When an audio device is found
by your VN170 device
When a PC is found by your
VN170 device
When a PDA is found by your
VN170 device
When another phone device is
found by your VN170 device
When a printer is found by your
VN170 device
When other undefined devices
are found by your VN170
device
Icon References When
Successfully Connected
The following options are available
in the paired device.
1. Remove Device: You can
remove the device from the
pairing list.
2. Rename Device: You can
rename the paired device.
3. Incoming Security: Allows
you to set permission before
connecting an incoming device.
4. Service Discovery: Allows you
to search for the services that
the selected device supports.
5. Device Info: Shows the device
information.
NOTES While in the Bluetooth Menu,
you can turn the Bluetooth functionality
off by pressing the Left Soft Key
[Turn Off]. Reversely, you can turn it on
by pressing the Left Soft Key [Turn
On] again.
When connected with a Phone or PC
supporting OPP, the following menus are
possible:
• Send Name Card: Allows my contact
data to send other device up to 1000
Contacts.
• Get Name Card: Allows you to pull
name card of other device.
• Exchange Name Card: Allows you to
exchange the handset's name card with
other device.
• Send Calendar Event: Allows you to
send Calendar events to other devices.
My Device Info
Allows you to view and/ or edit the
name of the Bluetooth® device.
1. Open the flip and press
[MENU].

Settings & Tools
68 VN170
2. Press Settings & Tools.
3. Press Bluetooth Menu.
4. Press the Right Soft Key
[Options].
5. Press My Device Info.
6. Press to clear the existing
name.
7. Use the keypad to enter a new
custom name.
8. Press to save and exit.
Discovery Mode
Allows you to set whether your
device is able to be discovered/
found by other Bluetooth® devices
in the area.
1. Open the flip and press
[MENU].
2. Press Settings & Tools.
3. Press Bluetooth Menu.
4. Press the Right Soft Key
[Options].
5. Press Discovery Mode.
6. Use the Directional Key to
highlight a setting, then press
.
On/ Off
NOTE If you choose On for Discovery
Mode, your device is able to be searched
by other in-range Bluetooth
®
devices.
Supported Profiles
Allows you to see profiles that your
VN170 phone can support.
1. Open the flip and press
[MENU].
2. Press Settings & Tools.
3. Press Bluetooth Menu.
4. Press the Right Soft Key
[Options].
5. Press Supported Profiles.
5. Sounds Settings
Provides options to customize the
phone’s sounds.
5.1 Easy Set-up
Allows you to quickly set the
main Sounds Settings for keypad
volume, incoming calls and
messages (text, multimedia, and
voicemail).
1. Open the flip and press
[MENU].
2. Press Settings & Tools.
3. Press Sounds Settings.
4. Press Easy Set-up.
5. Read each setting description.
Press the Right Soft Key
[Skip] to go to the next menu
item. Press the Left Soft Key
69
VN170
[Play] to listen to the volume
setting. Highlight the setting
you want, then press [SET].
NOTE Set each alert separately with
Ring Only, Vibrate Only, Ring and Vibrate,
and Be Silent.
5.2 Call Sounds
Allows you to set how the phone
alerts you for types of incoming
calls.
1. Open the flip and press
[MENU].
2. Press Settings & Tools.
3. Press Sounds Settings.
4. Press Call Sounds.
5.2.1 Call Ringtone
1. Open the flip and press
[MENU].
2. Press Settings & Tools.
3. Press Sounds Settings.
4. Press Call Sounds.
5. Press Call Ringtone.
6. Use the Directional Key to
highlight a ringtone then press
to save the sound.
TIP To hear a ringtone before you
set it, press the Left Soft Key [Play].
5.2.2 Call Vibrate
1. Open the flip and press
[MENU].
2. Press Settings & Tools.
3. Press Sounds Settings.
4. Press Call Sounds.
5. Press Call Vibrate.
6. Use the Directional Key to
highlight a setting, then press
.
On/ Off
5.2.3 Caller ID Readout
1. Open the flip and press
[MENU].
2. Press Settings & Tools.
3. Press Sounds Settings.
4. Press Call Sounds.
5. Press Caller ID Readout.
6. Use the Directional Key to
highlight a setting, then press
.
Ring Only/ Caller ID + Ring/
Name Repeat
5.3 Alert Sounds
Allows you to select the alert type
sounds.
1. Open the flip and press
[MENU].
Settings & Tools
70 VN170
2. Press Settings & Tools.
3. Press Sounds Settings.
4. Press Alert Sounds.
5. Select TXT Message/
Multimedia Message/
Voicemail/ Emergency Tone/
Missed Call
6. The Alert Sounds menu has
these options:
Tone/ Vibrate/ Reminder
The exception for this is the
Emergency Tone menu. This
menu has these options:
Alert/ Vibrate/ Off
5.4 Keypad Volume
Allows you to set the keypad
volume.
1. Open the flip and press
[MENU].
2. Press Settings & Tools.
3. Press Sounds Settings.
4. Press Keypad Volume.
5. Adjust the volume with the
Directional Key and press
[SET] to save the setting.
5.5 Digit Dial Readout
Allows you to set the Digit Dial
Readout.
1. Open the flip and press
[MENU].
2. Press Settings & Tools.
3. Press Sounds Settings.
4. Press Digit Dial Readout.
5. Use the Directional Key to
highlight a setting, then press
.
On/ Off
5.6 Service Alerts
Allows you to set any of the five
Alert options to either On or Off.
1. Open the flip and press
[MENU].
2. Press Settings & Tools.
3. Press Sounds Settings.
4. Press Service Alerts.
5. Select an alert option.
ERI Alerts you to the status of
cellular service.
ERI: Enhanced Roaming
Indicator
Minute Beep Alerts you 10
seconds before the end of
every minute during a call.
Call Connect Alerts you when
the call is connected.
Charge Complete Alerts you
when the battery is completely
charged.
71
VN170
Software Update Alerts you of
an OTA software update to the
device.
NOTE Prepay Phone does not support
Software Update function.
6. Use the Directional Key to
highlight a setting, then press
.
On/ Off
NOTE When highlighting On, you can
play the alert option by pressing the Left
Soft Key [Play].
5.7 Power On/Off
Allows you to set the phone to
sound a tone when the phone is
powered on/off.
1. Open the flip and press
[MENU].
2. Press Settings & Tools.
3. Press Sounds Settings.
4. Press Power On/Off.
5. Highlight Power On or Power
Off and press .
6. Use the Directional Key to
highlight a setting, then press
.
On/ Off
5.8 Voice Clarity
Allows you to set the phone to
automatically adapt to noisy
environments by adjusting the
listening level and improving
speech intelligibility.
NOTE The Voice Clarity feature is
automatically disabled when you use the
speakerphone or the hands-free devices.
1. Open the flip and press
[MENU].
2. Press Settings & Tools.
3. Press Sounds Settings.
4. Press Voice Clarity.
5. Use the Directional Key to
highlight a setting, then press
.
On/ Off
6. Display Settings
Provides options to customize the
phone’s display screen.
1. Open the flip and press
[MENU].
2. Press Settings & Tools.
3. Press Display Settings.
6.1 Easy Set-up
Allows you quickly set the main
Display Settings.

Settings & Tools
72 VN170
1. Open the flip and press
[MENU].
2. Press Settings & Tools.
3. Press Display Settings.
4. Press Easy Set-up.
Customize the following display
settings:
PERSONAL BANNER
Allows you to enter a string
of up to18 characters which
displays on the screen.
DISPLAY BACKLIGHT
Set Backlight duration for the
Main screen.
7 Seconds/ 15 Seconds/ 30
Seconds/ Always On/ Always
Off
KEYPAD BACKLIGHT
Set Backlight duration for
keypad.
7 Seconds/ 15 Seconds/ 30
Seconds/ Always On/ Always
Off
WALLPAPER
Allows you to set the wallpaper
for your phone.
DISPLAY THEMES
Select your device Display
Theme.
Classic/ Luna
MENU LAYOUT
Select your Main Menu Layout.
Grid/ List/ Tab
FONT SIZE
When resizable is set, you can
use the side up and down keys
to adjust the font size.
Dial Digits/ Menu & List/
Message
INTERNAL CLOCK
Select the format of the Internal
clock.
Analog/ Digital 12/ Large
Digital 12/ Digital 24/ Large
Digital 24/ Dual City/ Off
5. Read each setting description,
highlight the setting you want,
then press [SET]. When
finished, press the Right Soft
Key [Done].
6.2 Banner
Allows you to enter a string of up
to 18 characters which displays on
the LCD screen.
1. Open the flip and press
[MENU].
2. Press Settings & Tools.
3. Press Display Settings.
73
VN170
4. Press Banner.
6.2.1 Personal Banner
1. Open the flip and press
[MENU].
2. Press Settings & Tools.
3. Press Display Settings.
4. Press Banner.
5. Press Personal Banner.
6. Enter your own banner text.
NOTE Press the Directional Key
to change the color of the text. Use the
Directional Key to select the color
you want.
Black/ White/ Yellow/ Orange/ Red/
Brown/ Blue/ Green/ Sky Blue
7. Press to save the setting.
6.2.2 ERI Banner
If you use ERI Service, ERI Text is
shown on the sub banner.
1. Open the flip and press
[MENU].
2. Press Settings & Tools.
3. Press Display Settings.
4. Press Banner.
5. Press ERI Banner.
6. Use the Directional Key to
highlight a setting, then press
.
On/ Off
6.3 Backlight
Allows you to set the duration for
illuminating the backlight for the
main display, front display, and
keypad. Each is set separately.
1. Open the flip and press
[MENU].
2. Press Settings & Tools.
3. Press Display Settings.
4. Press Backlight.
5. Highlight a Backlight submenu
and press .
Display Backlight/ Keypad
Backlight
Display Backlight: 7
Seconds/ 15 Seconds/
30 Seconds/ Always On/
Always Off
Keypad Backlight:
7 Seconds/ 15 Seconds/ 30
Seconds/ Always On/ Always
Off
6.4 Brightness
Allows you to set the backlight
levels.
1. Open the flip and press
[MENU].
2. Press Settings & Tools.
3. Press Display Settings.

Settings & Tools
74 VN170
4. Press Brightness.
5. Use the Directional Key to
highlight a setting, then press
.
NOTE Brightness level can be 1 to 7.
6.5 Wallpaper
Allows you to choose the kind of
background to be displayed on the
phone's LCD in standby mode.
1. Open the flip and press
[MENU].
2. Press Settings & Tools.
3. Press Display Settings.
4. Press Wallpaper.
5. Highlight a Wallpaper submenu
and press .
My Pictures/ Fun Animations/
Slide Show
6. Press to set.
6.6 Display Themes
Allows you to choose between the
different themes for the phone's
menus.
1. Open the flip and press
[MENU].
2. Press Settings & Tools.
3. Press Display Settings.
4. Press Display Themes.
5. Use the Directional Key to
highlight a setting, then press
.
Classic/ Luna
NOTE Press the Left Soft Key
[Preview] to preview the selected display
theme. Default setting is Luna.
6.7 Main Menu Settings
Allows you to choose how the Main
Menu displays for menu selection.
1. Open the flip and press
[MENU].
2. Press Settings & Tools.
3. Press Display Settings.
4. Press Main Menu Settings.
5. Use the Directional Key to
highlight a setting, then press
.
Menu Layout/ Replace Menu
Items/ Position Menu Items/
Reset Menu Settings
1. Menu Layout
Grid/ List/ Tab
2. Replace Menu Items
Select the item you want
to replace then press
[EDIT]. Select in the list the
item you want to replace it
with, then press [SET].

75
VN170
3. Position Menu Items
Select the item you want
to move, then press
[MOVE]. Move highlight to
desired position by pressing
Up, Down, Right and Left
Directional Keys, then press
[SET].
4. Reset Menu Settings
Menu Layout/ Menu Items/
Item Positions/ All
NOTE This User Guide gives
navigation instructions according to the
default "List" Main Menu Layout in the
Display Settings menu. If other menus are
set, navigating the phone's menus may
be different.
NOTE Press the Left Soft Key
[Preview] to preview the selected menu
setting.
6.8 Font Type
Allows you to set the font type.
1. Open the flip and press
[MENU].
2. Press Settings & Tools.
3. Press Display Settings.
4. Press Font Type.
5. Use the Directional Key to
highlight a setting, then press
.
VZW Font/ LG Secret/ LG
Mint
NOTE Press the Left Soft Key
[Preview] to preview the selected font
type.
6.9 Font Size
Allows you to set the font size
for Dial Digits, Menu & List and
Message. Plus, the Volume Key
Resize setting allows you to use
the side Volume Keys to instantly
scale screen fonts. This setting is
helpful for those who need the text
to display a little bit larger.
1. Open the flip and press
[MENU].
2. Press Settings & Tools.
3. Press Display Settings.
4. Press Font Size.
5. Use the Directional Key to
highlight Dial Digits/ Menu &
List/ Message.
6. Use the Directional Key to
highlight a setting, then press
[SET].
Dial Digits: Resizable/ Small/
Normal/ Large
Menu & Lists: Resizable/
Small/ Normal/ Large
Message: Resizable/ Small/
Normal/ Large
NOTE Press the Left Soft Key
[Preview] to preview the selected font
Settings & Tools
76 VN170
size.
6.10 Internal Clock
Allows you to choose the kind of
clock to be displayed on the front
and main LCD screens.
1. Open the flip and press
[MENU].
2. Press Settings & Tools.
3. Press Display Settings.
4. Select 10. Internal Clock.
5. Use the Directional Key to
highlight a setting, then press
.
Analog/ Digital 12/ Large
Digital 12/ Digital 24/ Large
Digital 24/ Dual City/ Off
NOTE Press the Left Soft Key
[Preview] to preview the selected clock
format.
7. Phone Settings
The Phone Settings menu allows
you to designate specific settings
to customize how you use your
phone.
7.1 Airplane Mode
Turning on Airplane Mode
will disable all wireless
communications.
1. Open the flip and press
[MENU].
2. Press Settings & Tools.
3. Press Phone Settings.
4. Press Airplane Mode.
5. Use the Directional Key to
highlight a setting, then press
.
On/ Off
7.2 Set Shortcut Keys
Allows you to set shortcuts to
phone menus using the down, up,
left and right Directional Keys.
7.2.1 Set My Shortcuts
NOTE To access these shortcuts,
press the Directional Key from
standby mode (by default) to display My
Shortcuts.
1. Open the flip and press
[MENU].
2. Press Settings & Tools.
3. Press Phone Settings.
4. Press Set Shortcut Keys
5. Press Set My Shortcuts.
6. Use the Directional Key to
highlight a shortcut key you
want to set.
Shortcut 1/ Shortcut 2/
Shortcut 3/ Shortcut 4
7. Press [SET] to display the
77
VN170
available shortcuts. Use the
Directional Key to highlight
one, then press .
7.2.2 Set Directional Keys
NOTE To access these shortcuts open
the flip, then press the Directional Key
in the direction (up, down, left) set
from standby mode for the Shortcut you
want to access.
1. Open the flip and press
[MENU].
2. Press Settings & Tools.
3. Press Phone Settings.
4. Press Set Shortcut Keys
5. Press Set Directional Keys.
6. Use the Directional Key to
highlight a shortcut key you
want to set.
Up Directional Key/ Left
Directional Key/ Down
Directional Key
7. Press [SET] to display the
available shortcuts. Use the
Directional Key to highlight
one, then press .
7.3 Voice Commands
Please refer to page 59 for details.
7.4 Language
Allows you to set the
Multi-language (English,
Spanish,Chinese, Korean) feature
according to your preference.
1. Open the flip and press
[MENU].
2. Press Settings & Tools.
3. Press Phone Settings.
4. Press Language.
5. Use the Directional Key to
highlight a setting, then
6. Press [SET].
English/ Español/Simplified
Chinese/ Korean.
7.5 Location
Allows you to set GPS (Global
Positioning System: Satellite
assisted location information
system) mode.
1. Open the flip and press
[MENU].
2. Press Settings & Tools.
3. Press Phone Settings.
4. Press Location.
5. Use the Directional Key to
highlight a setting, then press
.
Location On/ E911 Only
NOTES
• GPS satellite signals are not always
received by the phone, especially under
bad atmospheric and environmental
Settings & Tools
78 VN170
conditions, indoors, etc.
• When a Location Setting Restriction
is activated in the Security Menu, the
lock code is required when you enter
location menu. The lock code is the
same 4 digits you use as your device
lock code; initially the last 4 digits of
your phone number.
• When in Airplane Mode, services
supporting Location On functionality
(such as Chaperone) will be
suspended.
7.6 Current Country
The Current Country menu allows
to select your current location.
1. Open the flip and press
[MENU].
2. Press Settings & Tools.
3. Press Phone Settings.
4. Press Current Country.
5. Use the Directional Key to
highlight a setting, then press
.
NOTE To assure that your phone
works properly while you travel, please
verify the country of your current
location, so the correct Country Code
can be applied.
Once the current country value is set,
the value cannot be changed until next
location change or initialization of all
setting info such as 'Reset Default' or
'Restore Phone'.
7.7 Security
The Security menu allows you to
secure the phone electronically.
1. Open the flip and press
[MENU].
2. Press Settings & Tools.
3. Press Phone Settings.
4. Press Security.
5. Enter the four-digit lock code.
The lock code is the last 4
digits of your mobile phone
number if it is set. The lock
code is the last 4 digits of your
MEID if your mobile phone
number is not set.
7.7.1 Edit Codes
Allows you to enter a new four-digit
lock code.
1. Open the flip and press
[MENU].
2. Press Settings & Tools.
3. Press Phone Settings.
4. Press Security.
5. Enter the four-digit lock code.
6. Press Edit Codes.
7. Select Phone Only or Calls &
Services.
8. Enter your new four-digit lock
code.
79
VN170
9. For confirmation, it will ask you
to enter the new lock code
again.
7.7.2 Restrictions
Allows you to set separate
restrictions for Location Setting,
Calls and Messages.
1. Open the flip and press
[MENU].
2. Press Settings & Tools.
3. Press Phone Settings.
4. Press Security.
5. Enter the four-digit lock code.
6. Press Restrictions.
7. Enter the four-digit service
code.
8. Select a Restrictions menu then
press .
Location Setting/ Calls/
Messages
9. Use the Directional Key to
highlight the restriction then
press .
Location Setting Lock Setting/
Unlock Setting
Calls: Incoming Calls Allow All /
Contacts Only / Block All
Calls: Outgoing Calls Allow All /
Contacts Only / Block All
Messages: Incoming Messages
Allow All / Block All
Messages: Outgoing Messages
Allow All / Block All
7.7.3 Phone Lock Setting
Keeps your phone from
unauthorized use. Once the phone
is locked, it's in restricted mode
until the lock code is entered. You
can still receive phone calls and
make emergency calls. You can
modify the lock code using Edit
Codes submenu within the Security
menu.
1. Open the flip and press
[MENU].
2. Press Settings & Tools.
3. Press Phone Settings.
4. Press Security.
5. Enter the four-digit lock code.
6. Press Phone Lock Setting.
7. Highlight an option and press
.
Unlocked remains unlocked, by
default.
On Power Up The phone is
locked when it is turned on.
7.7.4 Lock Phone Now
1. Open the flip and press
[MENU].
Settings & Tools
80 VN170
2. Press Settings & Tools.
3. Press Phone Settings.
4. Press Security.
5. Enter the four-digit lock code.
6. Press Lock Phone Now.
NOTE To unlock the phone from
standby mode, press the Right Soft Key
Unlock and enter the four-digit lock
code.
7.7.5 Reset Default
Allows you to reset your phone to
the factory default settings.
1. Open the flip and press
[MENU].
2. Press Settings & Tools.
3. Press Phone Settings.
4. Press Security.
5. Enter the four-digit lock code.
6. Press Reset Default.
7. Press after reading the
warning message.
8. Highlight Revert and press .
A confirmation message is
displayed briefly before the
phone resets itself.
7.7.6 Restore Phone
Allows you to erase all user data
and Contact information you've
entered in the phone's memory so
it's as if it just left the factory.
1. Open the flip and press
[MENU].
2. Press Settings & Tools.
3. Press Phone Settings.
4. Press Security.
5. Enter the four-digit lock code.
6. Press Restore Phone.
7. Press after reading the
warning message.
8. Enter the four-digit lock code.
7.8 System Select
Allows you to set up the phone
management environment. Leave
this setting as the default unless
you want to alter system selection
as instructed by your service
provider.
1. Open the flip and press
[MENU].
2. Press Settings & Tools.
3. Press Phone Settings.
4. Press System Select.
5. Use the Directional Key to
highlight a setting, then press
.
Home Only/ Automatic

81
VN170
7.9 NAM Select
Allows you to select the phone’s
NAM (Number Assignment
Module) if the phone is registered
with multiple service providers.
1. Open the flip and press
[MENU].
2. Press Settings & Tools.
3. Press Phone Settings.
4. Press NAM Select.
5. Use the Directional Key to
highlight a setting, then press
.
NAM1/ NAM2
8. Call Settings
The Call Settings menu allows
you to designate how the phone
handles both incoming and
outgoing calls.
8.1 Answer Options
Allows you to determine how the
phone will answer an incoming call.
1. Open the flip and press
[MENU].
2. Press Settings & Tools.
3. Press Call Settings.
4. Press Answer Options.
5. Use the Directional Key to to
select the setting(s) you want
to use, then press [MARK].
Flip Open/ Any Key/ Auto
with Handsfree
6. Press the Left Soft Key
[Done] when you have marked
the setting(s) you want.
NOTE Auto with Handsfree is available
when any external device is connected to
your phone or speaker is set to on.
8.2 Call Forwarding
Allows an incoming call to be
redirected to a mobile telephone
or other telephone number.
1. Open the flip and press
[MENU].
2. Press Settings & Tools.
3. Press Call Settings.
4. Press Call Forwarding.
5. Use the Directional Key to
highlight either Forward Call
or Cancel Forwarding, then
press .
6. After selecting Forward Call,
enter the number to forward to
and press [FWD]. To cancel
forwarding, select Cancel
Forwarding.
Settings & Tools
82 VN170
8.3 Auto Retry
Allows you to set the length of
time the phone waits before
automatically redialing a number
when the attempted call fails.
1. Open the flip and press
[MENU].
2. Press Settings & Tools.
3. Press Call Settings.
4. Press Auto Retry.
5. Use the Directional Key to
highlight a setting, then pres
.
Off/ Every 10 Seconds/
Every 30 Seconds/ Every 60
Seconds
8.4 TTY Mode
Allows you to attach a TTY device
enabling you to communicate with
parties also using a TTY device. A
phone with TTY support is able to
translate typed characters to voice.
Voice can also be translated into
characters and then displayed on
the TTY.
1. Open the flip and press
[MENU].
2. Press Settings & Tools.
3. Press Call Settings.
4. Press TTY Mode.
5. An explanation message is
displayed.
6. Press to continue.
7. Use the Directional Key to
highlight a setting, then press
.
TTY Full/ TTY + Talk/ TTY +
Hear/ TTY Off
TTY Full: Users who cannot
talk or hear send and receive
a text message through TTY
equipment.
TTY + Talk: Users who can
talk but cannot hear receive a
text message and send voice
through TTY equipment.
TTY + Hear: Users who can
hear but cannot talk send a
text message and receive voice
through TTY equipment.
TTY Off: Users send and receive
without TTY equipment.
Connecting TTY Equipment and
a Terminal
1. Connect a TTY cable to TTY
connection on the terminal
(TTY connection location is the
same as a headset jack).
2. Enter the phone menu and set
the desired TTY mode.
3. After setting a TTY mode, check

83
VN170
the LCD screen of the phone
for the TTY icon.
4. Connect the TTY equipment to
the power source and turn it on.
5. Make a phone connection to
the desired number.
6. When connection is made, use
the TTY equipment to type
in and send a text message or
send voice.
7. The voice or text message from
the receiver end displays on the
TTY equipment display.
8.5 One Touch Dial
Allows you to initiate a speed
dial call by pressing and holding
the speed dial digit. If set to Off,
Speed Dial numbers designated in
your Contacts will not function.
1. Open the flip and press
[MENU].
2. Press Settings & Tools.
3. Press Call Settings.
4. Press One Touch Dial.
5. Use the Directional Key to
highlight a setting, then press
.
On/ Off
8.6 Voice Privacy
Allows you to set the voice privacy
feature for CDMA calls. CDMA
offers inherent voice privacy. Check
with your service provider for
availability.
1. Open the flip and press
[MENU].
2. Press Settings & Tools.
Menu User Menu Transmission/
Receiving Mode
When making
communications with a
non-TTY terminal
TTY Full For hearing-/
verbally-
impaired
text message
transmission, text
message receiving
Operator
required
TTY +
Talk For hearing-
impaired able to talk voice transmission, text
message receiving Operator required
TTY +
Hear For verbally-
impaired audible text message
transmission, voice
receiving Operator required
TTY Off voice transmission,
voice receiving
TTY Mode (Tele Type writer)

Settings & Tools
84 VN170
3. Press Call Settings.
4. Press Voice Privacy.
5. Use the Directional Key to
highlight a setting, then press
.
On/ Off
8.7 DTMF Tones
Allows you to set the DTMF tone
length.
1. Open the flip and press
[MENU].
2. Press Settings & Tools.
3. Press Call Settings.
4. Press DTMF Tones.
5. Use the Directional Key to
highlight a setting, then press
.
Normal/ Long
8.8 Assisted Dialing
Supports easy dialing on
international calls while traveling in
non-U.S. roaming region. If set to
On, Assisted Dialing is displayed in
calling screen.
1. Open the flip and press
[MENU].
2. Press Settings & Tools.
3. Press Call Settings.
4. Press Assisted Dialing.
5. Use the Directional Key to
highlight a setting, then press
.
On/ Off
6. Highlight Reference Country
and press the Left Soft Key
Set to select country.
7. Use the Directional Key to
scroll to the desired country.
8. Press the Left Soft Key
Details to edit and save the
Country Code, IDD Prefix
(International Direct Dial), NDD
Prefix(National Direct Dial),
Area/City Code and Length
(Length of Phone Number),
then press [SAVE] to set.
9. Press to set.
NOTE For example, if you make a call
from China to U.S when assisted dialing
option is on (Reference Country is set
to 'U.S.A'), '+' code will be automatically
replaced by the matched IDD prefix of
China.
8.9 Dial Search
Dial Search assists you to easily
dial any one of your contact
numbers without searching the
contact list. Press a number
key that matches with the first
character of the contact name you

85
VN170
wish to call. If dial search option is
on, the matched contact searched
list will be showed up on the dial
screen.
1. Open the flip and press
[MENU].
2. Press Settings & Tools.
3. Press Call Settings.
4. Press Dial Search.
5. Use the Directional Key to
highlight a setting, then pres
.
On/ Off
9. Memory
Allows you to check your VN170
internal phone memory. Shows the
memory information saved in your
phone.
1. Open the flip and press
[MENU].
2. Press Settings & Tools.
3. Press Memory.
4. Use the Directional Key to
select file storage type in the
VN170, then press to view
the memory used.
Memory Usage / My Pictures
/ My Ringtones / My Sounds /
My Contacts
10. Phone Info
Allows you to view the information
specific to your phone and
software.
1. Open the flip and press
[MENU].
2. Press Settings & Tools.
3. Select 10. Phone Info.
10.1 My Number
Allows you to view your phone
number.
1. Open the flip and press
[MENU].
2. Press Settings & Tools.
3. Select 10. Phone Info.
4. Press My Number.
10.2 SW/HW Version
Allows you to view the versions of
various applications such as SW,
PRL, ERI, Browser, Media Center,
AVR, EMS, MMS, Bluetooth®,
OTADM Version, MSUI, HW
Version, MEID, Warranty Date
Code and Operating System.
1. Open the flip and press
[MENU].
2. Press Settings & Tools.
3. Select 10. Phone Info.

Settings & Tools
86 VN170
4. Press SW/HW Version.
10.3 Icon Glossary
Allows you to view all the icons and
their meanings.
1. Open the flip and press
[MENU].
2. Press Settings & Tools.
3. Select 10. Phone Info.
4. Press Icon Glossary.
10.4 Software Update
This feature gives your phone
the ability to upgrade to the
latest software and keeps your
phone operating with the latest
features without visiting a Verizon
Wireless Communications Store
for the upgrade. You can either be
notified automatically that there
is an updated version of software
available for your phone, or you
can manually check to see if there
are any updates available for you
to download.
Automatic Update
Your phone will receive a
notification that there is an
updated version of software
available to be downloaded. You
can press when notified that
a download is available or it can
happen automatically. Once the
download is complete you may,
depending on the nature of
the update, have three options
available: Accept the update, Defer
the update, or Reject the update.
NOTE During the update you cannot
make or receive phone calls, including
911 calls, or text messages.
Manual Update
1. Open the flip and press
[MENU].
2. Press Settings & Tools.
3. Select 10. Phone Info.
4. Press Software Update.
The two options shown will be
Status and Check New.
Press Status to see the
status of a download or update
and see information on the last
successful update. If updates
have not yet been performed,
status information will be
unavailable.
Press Check New to check
if any new software updates
are available to download. If
a newer software version is
available, it will automatically
begin downloading after 30
seconds or you can begin
the download immediately by

87
VN170
pressing .
NOTE Prepay Phone does not support
Software Update function.
11. Set-up Wizard
1. Open the flip and press
[MENU].
2. Press Settings & Tools.
3. Select 11. Set-up Wizard.
4. Use the Directional Key to
scroll to a setting, then press
[SET].
NOTE If you don't want to change
the setting, press the Right Soft Key
[Skip] to go to the next setting.
1. FONT SIZE
When you view menus and lists,
you can adjust the font size
using the volume keys
2. CALL SOUNDS
Ring Only/ Vibrate Only/ Ring
and Vibrate/ Be Silent
3. DISPLAY THEMES
Classic / Luna
4. MENU LAYOUT
Grid/ List/ Tab
5. INTERNAL CLOCK
Select the format of the Internal
clock. Analog/ Digital 12/ Large
Digital 12/ Digital 24/ Large
Digital 24/ Dual City / Off
6. Press the Right Soft Key
[Done] to complete set-up.

88 VN170
Safety
TIA Safety Information
The following is the complete TIA
Safety Information for wireless
handheld phones.
Exposure to Radio Frequency
Signal
Your wireless handheld portable
phone is a low power radio
transmitter and receiver. When ON,
it receives and sends out Radio
Frequency (RF) signals.
In August, 1996, the Federal
Communications Commissions
(FCC) adopted RF exposure
guidelines with safety levels for
handheld wireless phones. Those
guidelines are consistent with the
safety standards previously set
by both U.S. and international
standards bodies:
ANSI C95.1 (1992) *
NCRP Report 86 (1986)
ICNIRP (1996)
* American National Standards
Institute; National Council
on Radiation Protection and
Measurements; International
Commission on Non-Ionizing
Radiation Protection
Those standards were based
on comprehensive and periodic
evaluations of the relevant
scientific literature. For example,
over 120 scientists, engineers,
and physicians from universities,
government health agencies, and
industry reviewed the available
body of research to develop the
ANSI Standard (C95.1).
The design of your phone complies
with the FCC guidelines (and those
standards).
Antenna Care
Use only the supplied or an
approved replacement antenna.
Unauthorized antennas,
modifications, or attachments
could damage the phone and may
violate FCC regulations.
Phone Operation
NORMAL POSITION: Hold the
phone as you would any other
telephone with the antenna
pointed up and over your shoulder.
Tips on Efficient Operation
For your phone to operate most
efficiently:
Don’t touch the antenna
unnecessarily when the phone is
in use. Contact with the antenna
affects call quality and may cause
the phone to operate at a higher

89
VN170
power level than otherwise needed.
Driving
Check the laws and regulations on
the use of wireless phones in the
areas where you drive and always
obey them. Also, if using your
phone while driving, please observe
the following:
Give full attention to driving
-- driving safely is your first
responsibility;
Use hands-free operation, if
available;
Pull off the road and park before
making or answering a call if
driving conditions or the law
require it.
Electronic Devices
Most modern electronic equipment
is shielded from RF signals.
However, certain electronic
equipment may not be shielded
against the RF signals from your
wireless phone.
Pacemakers
The Health Industry Manufacturers
Association recommends that a
minimum separation of six (6)
inches be maintained between
a handheld wireless phone and
a pacemaker to avoid potential
interference with the pacemaker.
These recommendations are
consistent with the independent
research by and recommendations
of Wireless Technology Research.
Persons with pacemakers:
Should ALWAYS keep the phone
more than six (6) inches from
their pacemaker when the
phone is turned ON;
Should not carry the phone in a
breast pocket;
Should use the ear opposite
the pacemaker to minimize the
potential for interference;
Should turn the phone
OFF immediately if there is
any reason to suspect that
interference is taking place.
Hearing Aids
Some digital wireless phones may
interfere with some hearing aids. In
the event of such interference, you
may want to consult your service
provider (or call the customer
service line to discuss alternatives).
Other Medical Devices
If you use any other personal
medical device, consult the

Safety
90 VN170
manufacturer of your device
to determine if it is adequately
shielded from external RF energy.
Your physician may be able
to assist you in obtaining this
information.
Health Care Facilities
Turn your phone OFF in health
care facilities when any regulations
posted in these areas instruct you
to do so. Hospitals or health care
facilities may use equipment that
could be sensitive to external RF
energy.
Vehicles
RF signals may affect improperly
installed or inadequately
shielded electronic systems in
motor vehicles. Check with the
manufacturer or its representative
regarding your vehicle. You should
also consult the manufacturer
of any equipment that has been
added to your vehicle.
Posted Facilities
Turn your phone OFF in any facility
where posted notices so require.
Aircraft
FCC regulations prohibit using
your phone while in the air. Switch
OFF your phone before boarding
an aircraft.
Blasting Areas
To avoid interfering with blasting
operations, turn your phone OFF
when in a “blasting area” or in
areas posted: “Turn off two-
way radio”. Obey all signs and
instructions.
Potentially Explosive Atmosphere
Turn your phone OFF when in any
area with a potentially explosive
atmosphere and obey all signs and
instructions. Sparks in such areas
could cause an explosion or fire
resulting in bodily injury or even
death.
Areas with a potentially explosive
atmosphere are often, but not
always marked clearly. Potential
areas may include: fueling areas
(such as gasoline stations); below
deck on boats; fuel or chemical
transfer or storage facilities;
vehicles using liquefied petroleum
gas (such as propane or butane);
areas where the air contains
chemicals or particles (such as
grain, dust, or metal powders); and
any other area where you would
normally be advised to turn off
your vehicle engine.

91
VN170
For Vehicles Equipped with an
Air Bag
An air bag inflates with great force.
DO NOT place objects, including
either installed or portable wireless
equipment, in the area over the air
bag or in the air bag deployment
area. If in-vehicle wireless
equipment is improperly installed
and the air bag inflates, serious
injury could result.
Safety Information
Please read and observe the
following information for safe and
proper use of your phone and to
prevent damage. Also, keep the
user guide in an accessible place at
all times after reading it.
Caution
Violation of the
instructions may
cause minor or serious damage
to the product.
Do not disassemble or open
crush, bend or deform, puncture
or shred.
Do not modify or
remanufacture, attempt to insert
foreign objects into the battery,
immerse or expose to water or
other liquids, expose to fire,
explosion or other hazard.
Only use the battery for the
system for which it is specified.
Only use the battery with
a charging system that has
been qualified with the system
per this standard. Use of an
unqualified battery or charger
may present a risk of fire,
explosion, leakage, or other
hazard.
Do not short circuit a battery
or allow metallic conductive
objects to contact battery
terminals.
Replace the battery only with
another battery that has been
qualified with the system per
this standard, IEEE-Std-1725-
200x. Use of an unqualified
battery may present a risk of
fire, explosion, leakage or other
hazard.
Promptly dispose of used
batteries in accordance with
local regulations.
Battery usage by children should
be supervised.
Avoid dropping the phone or
battery. If the phone or battery
is dropped, especially on a hard
surface, and the user suspects
damage, take it to a service

Safety
92 VN170
center for inspection.
Improper battery use may result
in a fire, explosion or other
hazard.
For those host devices that
utilize a USB port as a charging
source, the host device's
user manual shall include a
statement that the phone shall
only be connected to products
that bear the USB-IF logo or
have completed the USB-IF
compliance program.
Charger and Adapter Safety
The charger and adapter are
intended for indoor use only.
Insert the battery pack charger
vertically into the wall power
socket.
Only use the approved battery
charger. Otherwise, you may
cause serious damage to your
phone.
Use the correct adapter for your
phone when using the battery
pack charger abroad.
Battery Information and Care
Please dispose of your battery
properly or take it to your local
wireless carrier for recycling.
The battery doesn’t need to be
empty before recharging.
Use only LG-approved chargers
specific to your phone model
since they are designed to
maximize battery life.
Do not disassemble or short-
circuit the battery.
Keep the battery’s metal
contacts clean.
Replace the battery when it
no longer provides acceptable
performance. The battery can
be recharged several hundred
times before replacement.
Recharge the battery after long
periods of non-use to maximize
battery life.
Battery life will vary due
to usage patterns and
environmental conditions.
Use of extended backlighting,
Mobile Web, and data
connectivity kits affect battery
life and talk/ standby times.
The self-protection function of
the battery cuts the power of
the phone when its operation
is in an abnormal state. In this
case, remove the battery from
the phone, reinstall it, and turn

93
VN170
the phone on.
Explosion, Shock, and Fire
Hazards
Do not put your phone in a
place subject to excessive dust
and keep the minimum required
distance between the power
cord and heat sources.
Unplug the power cord prior
to cleaning your phone, and
clean the power plug pin when
it’s dirty.
When using the power plug,
ensure that it’s firmly connected.
If not, it may cause excessive
heat or fire.
If you put your phone in a
pocket or bag without covering
the receptacle of the phone
(power plug pin), metallic
articles (such as a coin,
paperclip or pen) may short-
circuit the phone. Always cover
the receptacle when not in use.
Don’t short-circuit the battery.
Metallic articles such as a coin,
paperclip or pen in your pocket
or bag may short-circuit the +
and – terminals of the battery
(metal strips on the battery)
upon moving. Short-circuit of
the terminal may damage the
battery and cause an explosion.
General Notice
Using a damaged battery or
placing a battery in your mouth
may cause serious injury.
Do not place items containing
magnetic components such as
a credit card, phone card, bank
book, or subway ticket near
your phone. The magnetism of
the phone may damage the data
stored in the magnetic strip.
Talking on your phone for a long
period of time may reduce call
quality due to heat generated
during use.
When the phone is not used for
a long period time, store it in a
safe place with the power cord
unplugged.
Using the phone in proximity to
receiving equipment (i.e., TV or
radio) may cause interference to
the phone.
Do not use the phone if the
antenna is damaged. If a
damaged antenna contacts
skin, it may cause a slight burn.
Please contact an LG Authorized
Service Center to replace the
damaged antenna.

Safety
94 VN170
Do not immerse your phone
in water. If this happens, turn
it off immediately and remove
the battery. If the phone does
not work, take it to an LG
Authorized Service Center.
Do not paint your phone.
The data saved in your phone
might be deleted due to careless
use, repair of the phone, or
upgrade of the software. Please
backup your important phone
numbers. (Ringtones, text
messages, voice messages,
pictures, and videos could also
be deleted.) The manufacturer is
not liable for damage due to the
loss of data.
When you use the phone in
public places, set the ringtone
to vibration so you don't disturb
others.
Do not turn your phone on or
off when putting it to your ear.
Use accessories, such as
earphones and headsets, with
caution. Ensure that cables are
tucked away safely and do not
touch the antenna unnecessarily.
Caution:
Avoid potential hearing
loss.
Prolonged exposure to loud
sounds (including music) is
the most common cause of
preventable hearing loss. Some
scientific research suggests that
using portable audio devices, such
as portable music players and
cellular telephones, at high volume
settings for long durations may
lead to permanent noise induced
hearing loss. This includes the
use of headphones (including
headsets, earbuds and Bluetooth®
or other wireless devices).
Exposure to very loud sound has
also been associated in some
studies with tinnitus (a ringing in
the ear), hypersensitivity to sound
and distorted hearing. Individual
susceptibility to noise-induced
hearing loss and other potential
hearing problems varies.
The amount of sound produced
by a portable audio device varies
depending on the nature of the
sound, the device, the device
settings and the headphones. You
should follow some commonsense
recommendations when using any
portable audio device:

95
VN170
Set the volume in a quiet
environment and select the
lowest volume at which you can
hear adequately.
When using headphones, turn
the volume down if you cannot
hear the people speaking near
you or if the person sitting next
to you can hear what you are
listening to.
Do not turn the volume up to
block out noisy surroundings.
If you choose to listen to your
portable device in a noisy
environment, use noise-
cancelling headphones to block
out background environmental
noise.
Limit the amount of time you
listen. As the volume increases,
less time is required before your
hearing could be affected.
Avoid using headphones after
exposure to extremely loud
noises, such as rock concerts,
that might cause temporary
hearing loss. Temporary hearing
loss might cause unsafe volumes
to sound normal.
Do not listen at any volume
that causes you discomfort.
If you experience ringing in
your ears, hear muffled speech
or experience any temporary
hearing difficulty after listening
to your portable audio device,
discontinue use and consult
your doctor.
You can obtain additional
information on this subject from
the following sources:
American Academy of Audiology
1
1730 Plaza American Drive,
Suite 300 Reston, VA 20190
Voice: (800) 222-2336
Email: info@audiology.org
Internet: www.audiology.org
National Institute on Deafness
and Other Communication
Disorders
National Institutes of Health 31
Center Drive, MSC 2320 Bethesda,
MD USA 20892-2320 Voice:
(301) 496-7243
Email: nidcdinfo@nih.gov
Internet: http://www.nidcd.nih.gov/
health/hearing
National Institute for
Occupational Safety and Health
Hubert H. Humphrey Bldg.
200 Independence Ave., SW
Washington, DC 20201
Voice: 1-800-35-NIOSH (1-800-

Safety
96 VN170
356-4674)
Internet:
http://www.cdc.gov/niosh/topics/
noise/default.html
FDA Consumer Update
The U.S. Food and
Drug Administration’s
Center for Devices and
Radiological Health Consumer
Update on Mobile Phones:
1. Do wireless phones pose a
health hazard?
The available scientific evidence
does not show that any health
problems are associated with using
wireless phones. There is no proof,
however, that wireless phones are
absolutely safe. Wireless phones
emit low levels of Radio Frequency
(RF) energy in the microwave
range while being used. They also
emit very low levels of RF when in
standby mode. Whereas high levels
of RF can produce health effects
(by heating tissue), exposure to
low level RF that does not produce
heating effects causes no known
adverse health effects. Many
studies of low level RF exposures
have not found any biological
effects. Some studies have
suggested that some biological
effects may occur, but such
findings have not been confirmed
by additional research. In some
cases, other researchers have had
difficulty in reproducing those
studies, or in determining the
reasons for inconsistent results.
2. What is the FDA's role
concerning the safety of wireless
phones?
Under the law, the FDA does not
review the safety of radiation-
emitting consumer products such
as wireless phones before they can
be sold, as it does with new drugs
or medical devices. However, the
agency has authority to take action
if wireless phones are shown to
emit Radio Frequency (RF) energy
at a level that is hazardous to
the user. In such a case, the FDA
could require the manufacturers
of wireless phones to notify users
of the health hazard and to repair,
replace, or recall the phones so
that the hazard no longer exists.
Although the existing scientific
data does not justify FDA
regulatory actions, the FDA has
urged the wireless phone industry
to take a number of steps,
including the following:
Support needed research into

97
VN170
possible biological effects of RF
of the type emitted by wireless
phones;
Design wireless phones in a way
that minimizes any RF exposure
to the user that is not necessary
for device function; and
Cooperate in providing users of
wireless phones with the best
possible information on possible
effects of wireless phone use on
human health.
The FDA belongs to an interagency
working group of the federal
agencies that have responsibility
for different aspects of RF safety
to ensure coordinated efforts at
the federal level. The following
agencies belong to this working
group:
National Institute for
Occupational Safety and Health
Environmental Protection
Agency
Occupational Safety and Health
Administration
National Telecommunications
and Information Administration
The National Institutes of Health
participates in some interagency
working group activities, as well.
The FDA shares regulatory
responsibilities for wireless phones
with the Federal Communications
Commission (FCC). All phones that
are sold in the United States must
comply with FCC safety guidelines
that limit RF exposure. The FCC
relies on the FDA and other health
agencies for safety questions
about wireless phones.
The FCC also regulates the base
stations that the wireless phone
networks rely upon. While these
base stations operate at higher
power than do the wireless phones
themselves, the RF exposures
that people get from these base
stations are typically thousands of
times lower than those they can
get from wireless phones. Base
stations are thus not the subject of
the safety questions discussed in
this document.
3. What kinds of phones are the
subject of this update?
The term “wireless phone” refers
here to handheld wireless phones
with built-in antennas, often called
“cell”, “mobile”, or “PCS” phones.
These types of wireless phones
can expose the user to measurable
Radio Frequency (RF) energy
because of the short distance

Safety
98 VN170
between the phone and the user’s
head.
These RF exposures are limited by
FCC safety guidelines that were
developed with the advice of the
FDA and other federal health and
safety agencies. When the phone
is located at greater distances
from the user, the exposure to
RF is drastically lower because a
person's RF exposure decreases
rapidly with increasing distance
from the source. The so-called
“cordless phones,” which have
a base unit connected to the
telephone wiring in a house,
typically operate at far lower
power levels, and thus produce RF
exposures far below the FCC safety
limits.
4. What are the results of the
research done already?
The research done thus far has
produced conflicting results,
and many studies have suffered
from flaws in their research
methods. Animal experiments
investigating the effects of Radio
Frequency (RF) energy exposures
characteristic of wireless phones
have yielded conflicting results that
often cannot be repeated in other
laboratories. A few animal studies,
however, have suggested that
low levels of RF could accelerate
the development of cancer in
laboratory animals. However,
many of the studies that showed
increased tumor development used
animals that had been genetically
engineered or treated with cancer-
causing chemicals so as to be
pre-disposed to develop cancer
in the absence of RF exposure.
Other studies exposed the animals
to RF for up to 22 hours per day.
These conditions are not similar
to the conditions under which
people use wireless phones, so
we do not know with certainty
what the results of such studies
mean for human health. Three
large epidemiology studies have
been published since December
2000. Between them, the
studies investigated any possible
association between the use of
wireless phones and primary brain
cancer, glioma, meningioma, or
acoustic neuroma, tumors of the
brain or salivary gland, leukemia, or
other cancers. None of the studies
demonstrated the existence of
any harmful health effects from
wireless phone RF exposures.
However, none of the studies can
answer questions about long-term
exposures, since the average period

99
VN170
of phone use in these studies was
around three years.
5. What research is needed to
decide whether RF exposure
from wireless phones poses a
health risk?
A combination of laboratory
studies and epidemiological
studies of people actually using
wireless phones would provide
some of the data that are needed.
Lifetime animal exposure studies
could be completed in a few years.
However, very large numbers
of animals would be needed
to provide reliable proof of a
cancer promoting effect, if one
exists. Epidemiological studies
can provide data that is directly
applicable to human populations,
but ten or more years follow-up
may be needed to provide answers
about some health effects, such as
cancer. This is because the interval
between the time of exposure to
a cancer-causing agent and the
time tumors develop — if they do
— may be many, many years. The
interpretation of epidemiological
studies is hampered by difficulties
in measuring actual RF exposure
during day-to-day use of wireless
phones. Many factors affect this
measurement, such as the angle at
which the phone is held, or which
model of phone is used.
6. What is the FDA doing to find
out more about the possible
health effects of wireless phone
RF?
The FDA is working with the U.S.
National Toxicology Program
and with groups of investigators
around the world to ensure that
high priority animal studies are
conducted to address important
questions about the effects of
exposure to Radio Frequency (RF)
energy.
The FDA has been a leading
participant in the World Health
Organization International Electro
Magnetic Fields (EMF) Project
since its inception in 1996. An
influential result of this work
has been the development of a
detailed agenda of research needs
that has driven the establishment
of new research programs around
the world. The project has also
helped develop a series of public
information documents on EMF
issues.
The FDA and the Cellular
Telecommunications & Internet
Association (CTIA) have a formal
Cooperative Research And

Safety
100
VN170
Development Agreement (CRADA)
to do research on wireless phone
safety. The FDA provides the
scientific oversight, obtaining
input from experts in government,
industry, and academic
organizations. CTIA-funded
research is conducted through
contracts with independent
investigators. The initial research
will include both laboratory studies
and studies of wireless phone
users. The CRADA will also include
a broad assessment of additional
research needs in the context of
the latest research developments
around the world.
7. How can I find out how
much Radio Frequency energy
exposure I can get by using my
wireless phone?
All phones sold in the United
States must comply with Federal
Communications Commission
(FCC) guidelines that limit Radio
Frequency (RF) energy exposures.
The FCC established these
guidelines in consultation with
the FDA and the other federal
health and safety agencies. The
FCC limit for RF exposure from
wireless phones is set at a Specific
Absorption Rate (SAR) of 1.6
watts per kilogram (1.6 W/kg).
The FCC limit is consistent with
the safety standards developed
by the Institute of Electrical and
Electronic Engineering (IEEE) and
the National Council on Radiation
Protection and Measurement.
The exposure limit takes into
consideration the body’s ability
to remove heat from the tissues
that absorb energy from the
wireless phone and is set well
below levels known to have effects.
Manufacturers of wireless phones
must report the RF exposure level
for each model of phone to the
FCC. The FCC website (http://
www.fcc.gov/cgb/cellular.
html) gives directions for locating
the FCC identification number on
your phone so you can find your
phone’s RF exposure level in the
online listing.
8. What has the FDA done to
measure the Radio Frequency
energy coming from wireless
phones?
The Institute of Electrical and
Electronic Engineers (IEEE) is
developing a technical standard
for measuring the Radio Frequency
(RF) energy exposure from
wireless phones and other wireless
handsets with the participation

101
VN170
and leadership of FDA scientists
and engineers. The standard,
“Recommended Practice for
Determining the Spatial-Peak
Specific Absorption Rate (SAR)
in the Human Body Due to
Wireless Communications Devices:
Experimental Techniques”, sets
forth the first consistent test
methodology for measuring the
rate at which RF is deposited
in the heads of wireless phone
users. The test method uses a
tissue-simulating model of the
human head. Standardized SAR
test methodology is expected to
greatly improve the consistency of
measurements made at different
laboratories on the same phone.
SAR is the measurement of the
amount of energy absorbed
in tissue, either by the whole
body or a small part of the
body. It is measured in watts/kg
(or milliwatts/g) of matter. This
measurement is used to determine
whether a wireless phone complies
with safety guidelines.
9. What steps can I take to reduce
my exposure to Radio Frequency
energy from my wireless phone?
If there is a risk from these
products — and at this point we
do not know that there is — it is
probably very small. But if you are
concerned about avoiding even
potential risks, you can take a
few simple steps to minimize your
exposure to Radio Frequency (RF)
energy. Since time is a key factor
in how much exposure a person
receives, reducing the amount
of time spent using a wireless
phone will reduce RF exposure.
If you must conduct extended
conversations by wireless phone
every day, you could place more
distance between your body
and the source of the RF, since
the exposure level drops off
dramatically with distance. For
example, you could use a headset
and carry the wireless phone away
from your body or use a wireless
phone connected to a remote
antenna. Again, the scientific data
does not demonstrate that wireless
phones are harmful. But if you are
concerned about the RF exposure
from these products, you can use
measures like those described
above to reduce your RF exposure
from wireless phone use.
10. What about children using
wireless phones?
The scientific evidence does
not show a danger to users of
wireless phones, including children
.

Safety
102
VN170
and teenagers. If you want to
take steps to lower exposure to
Radio Frequency (RF) energy, the
measures described above would
apply to children and teenagers
using wireless phones. Reducing
the time of wireless phone use and
increasing the distance between
the user and the RF source will
reduce RF exposure.
Some groups sponsored by
other national governments
have advised that children be
discouraged from using wireless
phones at all. For example, the
government in the United Kingdom
distributed leaflets containing
such a recommendation in
December 2000. They noted
that no evidence exists that using
a wireless phone causes brain
tumors or other ill effects. Their
recommendation to limit wireless
phone use by children was strictly
precautionary; it was not based on
scientific evidence that any health
hazard exists.
11. What about wireless phone
interference with medical
equipment?
Radio Frequency (RF) energy from
wireless phones can interact with
some electronic devices. For this
reason, the FDA helped develop a
detailed test method to measure
Electro Magnetic Interference
(EMI) of implanted cardiac
pacemakers and defibrillators from
wireless telephones. This test
method is now part of a standard
sponsored by the Association
for the Advancement of Medical
Instrumentation (AAMI). The final
draft, a joint effort by the FDA,
medical device manufacturers, and
many other groups, was completed
in late 2000. This standard will
allow manufacturers to ensure
that cardiac pacemakers and
defibrillators are safe from wireless
phone EMI.
The FDA has tested hearing aids
for interference from handheld
wireless phones and helped
develop a voluntary standard
sponsored by the Institute of
Electrical and Electronic Engineers
(IEEE). This standard specifies
test methods and performance
requirements for hearing aids
and wireless phones so that no
interference occurs when a person
uses a “compatible” phone and a
“compatible” hearing aid at the
same time. This standard was
approved by the IEEE in 2000.
The FDA continues to monitor

103
VN170
the use of wireless phones for
possible interactions with other
medical devices. Should harmful
interference be found to occur,
the FDA will conduct testing to
assess the interference and work to
resolve the problem.
12. Where can I find additional
information?
For additional information, please
refer to the following resources:
FDA web page on wireless phones
(http://www.fda.gov) Under “c”
in the subject index, select Cell
Phones > Research.
Federal Communications
Commission (FCC) RF Safety
Program (http://www.fcc.gov/cgb/
cellular.
html)
International Commission on
Nonlonizing Radiation Protection
(http://www.icnirp.de)
World Health Organization (WHO)
International EMF Project (http://
www.who.int/emf)
Health Protection Agency (http://
www.hpa.org.uk/)
10 Driver Safety Tips
Your wireless phone gives you the
powerful ability to communicate by
voice almost anywhere, anytime.
An important responsibility
accompanies the benefits of
wireless phones, one that every
user must uphold.
When operating a car, driving is
your first responsibility. When
using your wireless phone behind
the wheel of a car, practice good
common sense and remember the
following tips:
1. Get to know your wireless
phone and its features such as
speed dial and redial. Carefully
read your instruction manual
and learn to take advantage of
valuable features most phones
offer, including automatic redial
and memory. Also, work to
memorize the phone keypad
so you can use the speed dial
function without taking your
attention off the road.
2. When available, use a hands-
free device. A number of
hands-free wireless phone
accessories are readily available
today. Whether you choose
an installed mounted device
for your wireless phone or a

Safety
10 4
VN170
speaker phone accessory, take
advantage of these devices if
available to you.
3. Make sure you place your
wireless phone within easy
reach and where you can reach
it without removing your eyes
from the road. If you get an
incoming call at an inconvenient
time, if possible, let your
voicemail answer it for you.
4. Suspend conversations during
hazardous driving conditions or
situations. Let the person you
are speaking with know you are
driving; if necessary, suspend
the call in heavy traffic or
hazardous weather conditions.
Rain, sleet, snow, and ice can
be hazardous, but so is heavy
traffic. As a driver, your first
responsibility is to pay attention
to the road.
5. Don’t take notes or look up
phone numbers while driving.
If you are reading an address
book or business card, or
writing a “to-do” list while
driving a car, you are not
watching where you are going.
It is common sense. Do not get
caught in a dangerous situation
because you are reading or
writing and not paying attention
to the road or nearby vehicles.
6. Dial sensibly and assess the
traffic; if possible, place calls
when you are not moving or
before pulling into traffic. Try to
plan your calls before you begin
your trip or attempt to coincide
your calls with times you may
be stopped at a stop sign, red
light, or otherwise stationary.
But if you need to dial while
driving, follow this simple tip --
dial only a few numbers, check
the road and your mirrors, then
continue.
7. Do not engage in stressful or
emotional conversations that
may be distracting. Stressful or
emotional conversations and
driving do not mix; they are
distracting and even dangerous
when you are behind the
wheel of a car. Make people
you are talking with aware you
are driving and if necessary,
suspend conversations which
have the potential to divert
your attention from the road.
8. Use your wireless phone to call
for help. Your wireless phone is
one of the greatest tools you
can own to protect yourself
and your family in dangerous
situations -- with your phone

105
VN170
at your side, help is only three
numbers away. Dial 911 or other
local emergency number in the
case of fire, traffic accident,
road hazard, or medical
emergency. Remember, it’s a
free call on your wireless phone!
9. Use your wireless phone to
help others in emergencies.
Your wireless phone provides
you a perfect opportunity to
be a “Good Samaritan” in your
community. If you see an auto
accident, crime in progress or
other serious emergency where
lives are in danger, call 911 or
other local emergency number,
as you would want others to do
for you.
10. Call roadside assistance or a
special wireless non-emergency
assistance number when
necessary. Certain situations
you encounter while driving
may require attention, but are
not urgent enough to merit
a call for emergency services.
But you can still use your
wireless phone to lend a hand.
If you see a broken-down
vehicle posing no serious
hazard, a broken traffic signal,
a minor traffic accident where
no one appears injured or a
vehicle you know to be stolen,
call roadside assistance or
other special non-emergency
wireless number.
The above tips are meant as
general guidelines. Before deciding
to use your mobile device
while operating a vehicle, it is
recommended that you consult
your applicable jurisdiction’s
local laws or other regulations
regarding such use. Such laws or
other regulations may prohibit or
otherwise restrict the manner in
which a driver may use his or her
phone while operating a vehicle.
Consumer Information on
SAR
(Specific Absorption Rate)
This Model Phone Meets the
Government’s Requirements
for Exposure to Radio Waves.
Your wireless phone is a radio
transmitter and receiver. It is
designed and manufactured not
to exceed the emission limits
for exposure to radiofrequency
(RF) energy set by the Federal
Communications Commission
(FCC) of the U.S. Government.
These FCC exposure limits are
derived from the recommendations

Safety
106
VN170
of two expert organizations, the
National Counsel on Radiation
Protection and Measurement
(NCRP) and the Institute of
Electrical and Electronics Engineers
(IEEE). In both cases, the
recommendations were developed
by scientific and engineering
experts drawn from industry,
government, and academia after
extensive reviews of the scientific
literature related to the biological
effects of RF energy.
The exposure Limit for wireless
mobile phones employs a unit
of measurement known as the
Specific Absorption Rate, or SAR.
The SAR is a measure of the rate
of absorption of RF energy by the
human body expressed in units of
watts per kilogram (W/kg). The
FCC requires wireless phones to
comply with a safety limit of 1.6
watts per kilogram (1.6 W/kg). The
FCC exposure limit incorporates a
substantial margin of safety to give
additional protection to the public
and to account for any variations
in measurements.
Tests for SAR are conducted using
standard operating positions
specified by the FCC with the
phone transmitting at its highest
certified power level in all tested
frequency bands. Although SAR is
determined at the highest certified
power level, the actual SAR level
of the phone while operating can
be well below the maximum value.
Because the phone is designed to
operate at multiple power levels
to use only the power required to
reach the network, in general, the
closer you are to a wireless base
station antenna, the lower the
power output.
Before a phone model is available
for sale to the public, it must
be tested and certified to the
FCC that it does not exceed
the limit established by the
governmentadopted requirement
for safe exposure. The tests
are performed in positions and
locations (e.g., at the ear and worn
on the body) as required by the
FCC for each model.
This device was tested for typical
body-worn operations with the
back of the phone kept 0.78
inches (2.0 cm) between the
user’s body and the back of the
phone. To comply with FCC RF
exposure requirements, a minimum
separation distance of 0.78 inches
(2.0 cm) must be maintained
between the user s body and the

107
VN170
back of the phone. Third-party
belt-clips, holsters, and similar
accessories containing metallic
components should not be used.
Body-worn accessories that cannot
maintain 0.78 inches (2.0 cm)
separation distance between the
user's body and the back of the
phone, and have not been tested
for typical body-worn operations
may not comply with FCC RF
exposure limits and should be
avoided.
The FCC has granted an Equipment
Authorization for this model
phone with all reported SAR levels
evaluated as in compliance with the
FCC RF emission guidelines.
The highest SAR value for this
model phone when tested for use
at the ear is X.XX W/kg and when
worn on the body, as described
in this user’s manual, is X.XX W/
kg. While there may be differences
between SAR levels of various
phones and at various positions,
they all meet the government
requirement for safe exposure.
SAR information on this model
phone is on file with the FCC and
can be found under the Display
Grant section of http://www.fcc.
gov/oet/ea/fccid/ after searching
FCC ID: XXXXXXXX.
To find information that pertains to
a particular model phone, this site
uses the phone FCC ID number
which is usually printed somewhere
on the case of the phone.
Sometimes it may be necessary to
remove the battery pack to find
the number. Once you have the
FCC ID number for a particular
phone, follow the instructions on
the website and it should provide
values for typical or maximum SAR
for a particular phone.
Additional information on
Specific Absorption Rates (SAR)
can be found on the Cellular
Telecommunications Industry
Association (CTIA) website at
http://www.ctia.org/
*In the United States and Canada,
the SAR limit for mobile phones
used by the public is 1.6 watts/kg
(W/kg) averaged over one gram of
tissue. The standard incorporates a
substantial margin of safety to give
additional protection for the public
and to account for any variations
in measurements.
ZNFVN170.

Safety
108
VN170
FCC Hearing-Aid
Compatibility (HAC)
Regulations for Wireless
Devices
On July 10, 2003, the U.S. Federal
Communications Commission
(FCC) Report and Order in WT
Docket 01-309 modified the
exception of wireless phones under
the Hearing Aid Compatibility
Act of 1988 (HAC Act) to
require digital wireless phones
be compatible with hearing-aids.
The intent of the HAC Act is
to ensure reasonable access to
telecommunications services for
persons with hearing disabilities.
While some wireless phones are
used near some hearing devices
(hearing aids and cochlear
implants), users may detect a
buzzing, humming, or whining
noise. Some hearing devices are
more immune than others to this
interference noise, and phones also
vary in the amount of interference
they generate.
The wireless telephone industry
has developed a rating system for
wireless phones, to assist hearing
device users to find phones that
may be compatible with their
hearing devices. Not all phones
have been rated. Phones that are
rated have the rating on their box
or a label located on the box.
The ratings are not guarantees.
Results will vary depending on
the user's hearing device and
hearing loss. If your hearing device
happens to be vulnerable to
interference, you may not be able
to use a rated phone successfully.
Trying out the phone with your
hearing device is the best way to
evaluate it for your personal needs.
M-Ratings: Phones rated M3
or M4 meet FCC requirements
and are likely to generate less
interference to hearing devices
than phones that are not labeled.
M4 is the better/higher of the two
ratings.
T-Ratings: Phones rated T3 or T4
meet FCC requirements and are
likely to generate less interference
to hearing devices than phones
that are not labeled. T4 is the
better/ higher of the two ratings.
Hearing devices may also be rated.
Your hearing device manufacturer
or hearing health professional may
help you find this rating. Higher
ratings mean that the hearing
device is relatively immune to

109
VN170
interference noise. The hearing aid
and wireless phone rating values
are then added together. A sum
of 5 is considered acceptable
for normal use. A sum of 6 is
considered for best use.
In the above example, if a hearing
aid meets the M2 level rating and
the wireless phone meets the
M3 level rating, the sum of the
two values equal M5. This should
provide the hearing aid user with
“normal usage” while using their
hearing aid with the particular
wireless phone. “Normal usage” in
this context is defined as a signal
quality that’s acceptable for normal
operation.
The M mark is intended to be
synonymous with the U mark.
The T mark is intended to
be synonymous with the UT
mark. The M and T marks are
recommended by the Alliance for
Telecommunications Industries
Solutions (ATIS). The U and UT
marks are referenced in Section
20.19 of the FCC Rules. The HAC
rating and measurement procedure
are described in the American
National Standards Institute
(ANSI) C63.19 standard.
When you're talking over the cell
phone, it's recommended you'd
turn the BT (Bluetooth) mode off
for HAC.
This phone has been tested and
rated for use with hearing aids for
some of the wireless technologies
that it uses. However, there may be
some newer wireless technologies
used in this phone that have
not been tested yet for use with
hearing aids. It is important to
try the different features of this
phone thoroughly and in different
locations, using your hearing aid
or cochlear implant, to determine
if you hear any interfering noise.
Consult your service provider or
the manufacturer of this phone
for information on hearing aid
compatibility. If you have questions
about return or exchange policies,
consult your service provider or
phone retailer.
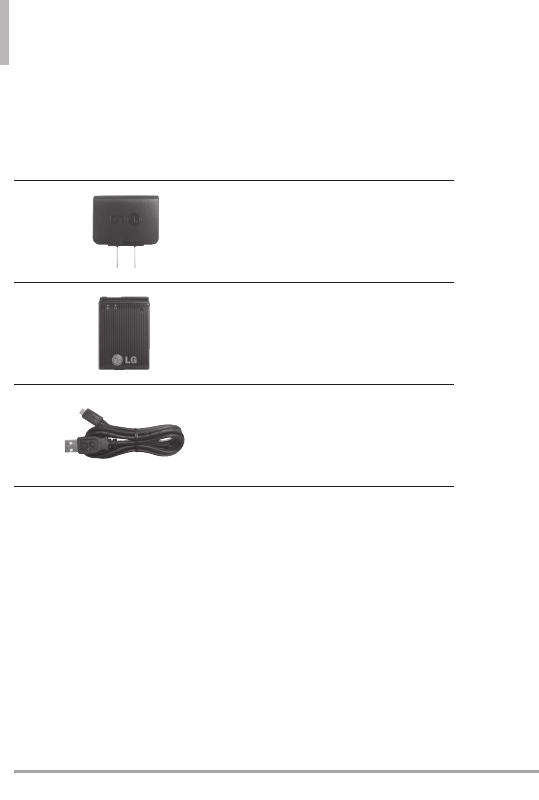
110
VN170
Accessories
There are a variety of (optional) acccessories available for your phone
and three easy ways to purchase them: shop online anytime at www.
verizonwireless.com, call us at 1-866-VZ-GOT-IT (1-866-894-6848) or
visit one of our Verizon Wireless Communication Stores.
Wall/USB Charger
Battery
USB Cable

111
VN170
LIMITED WARRANTY STATEMENT
1. WHAT THIS WARRANTY
COVERS:
LG offers you a limited warranty
that the enclosed subscriber unit
and its enclosed accessories will
be free from defects in material
and workmanship, according to the
following terms and conditions:
(1) The limited warranty for the
product extends for TWELVE (12)
MONTHS beginning on the date
of purchase of the product with
valid proof of purchase, or absent
valid proof of purchase, FIFTEEN
(15) MONTHS from date of
manufacture as determined by the
unit's manufacture date code.
(2) The limited warranty extends
only to the original purchaser of
the product and is not assignable
or transferable to any subsequent
purchaser/end user.
(3) This warranty is good only
to the original purchaser of the
product during the warranty period
as long as it is in the U.S., including
Alaska, Hawaii, U.S. Territories and
Canada.
(4) The external housing and
cosmetic parts shall be free of
defects at the time of shipment
and, therefore, shall not be covered
under these limited warranty terms.
(5) Upon request from LG,
the consumer must provide
information to reasonably prove
the date of purchase.
(6) The customer shall bear the
cost of shipping the product to
the Customer Service Department
of LG. LG shall bear the cost of
shipping the product back to the
consumer after the completion of
service under this limited warranty.
2. WHAT THIS WARRANTY
DOES NOT COVER:
(1) Defects or damages resulting
from use of the product in other
than its normal and customary
manner.
(2) Defects or damages from
abnormal use, abnormal
conditions, improper storage,
exposure to moisture or dampness,
unauthorized modifications,
unauthorized connections,
unauthorized repair, misuse,
neglect, abuse, accident, alteration,
improper installation, or other
acts which are not the fault of
LG, including damage caused by
shipping, blown fuses, spills of food
or liquid.
(3) Breakage or damage to
antennas unless caused directly by

LIMITED WARRANTY STATEMENT
112
VN170
defects in material or workmanship.
(4) That the Customer Service
Department at LG was not notified
by consumer of the alleged defect
or malfunction of the product
during the applicable limited
warranty period.
(5) Products which have had the
serial number removed or made
illegible.
(6) This limited warranty is in lieu
of all other warranties, express
or implied either in fact or by
operations of law, statutory or
otherwise, including, but not
limited to any implied warranty
of marketability or fitness for a
particular use.
(7) Damage resulting from use of
non LG approved accessories.
(8) All plastic surfaces and all
other externally exposed parts that
are scratched or damaged due to
normal customer use.
(9) Products operated outside
published maximum ratings.
(10) Products used or obtained in
a rental program.
(11) Consumables (such as fuses).
3. WHAT LG WILL DO:
LG will, at its sole option, either
repair, replace or refund the
purchase price of any unit that
does not conform to this limited
warranty. LG may choose at
its option to use functionally
equivalent re-conditioned,
refurbished or new units or parts
or any units. In addition, LG will
not re-install or back-up any data,
applications or software that you
have added to your phone. It
is therefore recommended that
you back-up any such data or
information prior to sending the
unit to LG to avoid the permanent
loss of such information.
4. STATE LAW RIGHTS:
No other express warranty is
applicable to this product. THE
DURATION OF ANY IMPLIED
WARRANTIES, INCLUDING
THE IMPLIED WARRANTY OF
MARKETABILITY, IS LIMITED TO
THE DURATION OF THE EXPRESS
WARRANTY HEREIN. LG SHALL
NOT BE LIABLE FOR THE LOSS
OF THE USE OF THE PRODUCT,
INCONVENIENCE, LOSS OR ANY
OTHER DAMAGES, DIRECT OR
CONSEQUENTIAL, ARISING OUT
OF THE USE OF, OR INABILITY

113
VN170
TO USE, THIS PRODUCT OR
FOR ANY BREACH OF ANY
EXPRESS OR IMPLIED WARRANTY,
INCLUDING THE IMPLIED
WARRANTY OF MARKETABILITY
APPLICABLE TO THIS PRODUCT.
Some states do not allow the
exclusive limitation of incidental
or consequential damages or
limitations on how long an implied
warranty lasts; so these limitations
or exclusions may not apply to you.
This warranty gives you specific
legal rights and you may also have
other rights which vary from state
to state.
5. HOW TO GET WARRANTY
SERVICE:
If you experience any problems
with either the Bluetooth headset
or the mobile handset, in each
case as may be covered by this
limited warranty, you need only
return the affected device. For
example, if a problem exists with
the Bluetooth headset, please DO
NOT return your mobile handset
with the headset. Likewise, if a
problem exists with the mobile
handset, please DO NOT return
the Bluetooth Headset with the
handset.
To obtain warranty service,
please call or fax to the following
telephone numbers from anywhere
in the continental United States:
Tel. 1-800-793-8896 or Fax.
1-800-448-4026
Or visit http://us.lgservice.com.
Correspondence may also be
mailed to:
LG Electronics Service- Mobile
Handsets, P.O. Box 240007,
Huntsville, AL 35824
DO NOT RETURN YOUR
PRODUCT TO THE ABOVE
ADDRESS. Please call or write for
the location of the LG authorized
service center nearest you and
for the procedures for obtaining
warranty claims.

114
VN170
Glossary
Terminology
EZ Tip Calculator
Feature for easy bill calculation
using the total cost, tip, and
number of people as variables.
Advanced Voice Recognition
Feature that allows you to perform
a wide range of verbal commands
by training the phone to recognize
your individual speech patterns.
Bluetooth® wireless technology
Technology used to allow mobile
phones, computers, and other
personal devices to be easily
coordinated and interconnected
using a short-range wireless
connection.
Media Center
Feature that accesses the Internet
to provide the ability to access
and even download a wide variety
of software, information, and more
right on your LG Verizon wireless
phone.
Acronyms and
Abbreviations
DTMF
Dual-Tone Multi Frequency (or
“touch-tone”) is a method used to
communicate keys pressed on the
phone. Pressing a key generates
two simultaneous tones, one for
the row and one for the column to
determine which key was pressed.
ERI
Enhanced Roaming Indicator is
a feature to indicate whether
a mobile phone is on its home
system, a partner network, or a
roaming network. Many phones
indicate home vs. roaming as an
icon, but ERI capable phones can
clearly indicate third “partner
network” status.
GPS
Global Positioning System is a
system of satellites, computers,
and receivers able to determine the
latitude and longitude of a specific
receiver on Earth. Position is
calculated using time and distance.
IS 2000
Type of digital signaling. It's the
second generation of CDMA digital

115
VN170
cellular, an extension of IS-95.
Differences between signaling
types have to do with pilot signal
and links to provide more traffic
channels, and control protocols.
NAM
Number Assignment Module is
how the phone stores the phone
number and its electronic serial
number.
SSL
Secure Sockets Layer Protocol used
to encrypt data sent over the air.
TTY
Teletypewriter. An
electromechanical typewriter
that either transmits or receives
messages coded in electrical
signals. A phone with TTY
support is able to translate typed
characters to voice or translate
voice into characters to display on
the TTY.

116
VN170
Index
123
3-way call 22
10 Driver Safety Tips
103
A
Accessories 110
Acronyms and
Abbreviations 114
Adding Another Phone
Number 27
Add New Device 66
Airplane Mode 76
Alarm Clock 63
Alert Sounds 69
All 47
Answer Options 81
Assisted Dialing 84
Auto Retry 82
B
Backlight 73
Backup Assistant 31
Banner 72
Battery Charge Level 20
Battery Temperature
Protection 20
Bluetooth® Menu 65
Brightness 73
Browse & Download 56
C
Calculator 61
Calendar 62
Caller ID 23
Call Forwarding 81
Call Settings 81
Call Sounds 69
Call Waiting 22
Changing Saved
Information 28
Changing the Default
Number 28
Charging the Battery 19
Charging with USB 20
Consumer Information on
SAR 105
Contact List 30
Contacts 30
Contacts in Your Phone’s
Memory 26
Current Country 78
Customizing Individual
Entries 26
D
Deleting 29
Dialed 47
Dial Search 24, 84
Digit Dial Readout 70
Discovery Mode 68
Display Settings 71
Display Themes 74
Drafts 42
DTMF Tones 84
E
Easy Set-up 68, 71
Entering and Editing
Information 25
Erasing Messages 45
Extras 57
Ez Tip Calculator 61
F
Favorites 31
FCC Hearing-Aid
Compatibility (HAC)
Regulations for Wireless
Devices 108
FDA Consumer Update
96
Font Size 75
Font Type 75
G
Games 55
Get New Pictures 53
Get New Ringtones 52
Get Ringback Tones 52
Getting Started with Your
Phone 19
Glossary 114

117
VN170
Groups 32
I
Icon Glossary 86
Important Safety
Precautions 1
Inbox 40
In Case of Emergency
(ICE) 33
Info Search 64
Installing the Battery 19
Internal Clock 76
K
Keypad Volume 70
L
Language 77
LIMITED WARRANTY
STATEMENT 111
Location 77
M
Main Menu Settings 74
Making Calls 21
Master Volume 59
Media Center 50
Memory 85
Menus Overview 16
Messaging 35
Messaging Settings 43
Missed 46
Mobile Email 43, 58
Mobile Email / V CAST
Tones / My Pictures 58
Mobile Web 49, 50
Mute Function 22
My Device Info 67
My Name Card 34
My Number 85
My Pictures 54, 58
My Ringtones 52
My Sounds 53
My Verizon 59
N
NAM Select 81
New Contact 30
New Message 35
Notepad 65
O
One Touch Dial 83
Online Album 55
P
Phone Info 85
Phone Overview 14
Phone Settings 76
Picture Message 37
Pictures 53
Power On/Off 71
Q
Quick Access to
Convenient Features 22
Quick Font Resize 22
Quick Volume
Adjustment 22
R
Received 46
Receiving Calls 21
Recent Calls 46
Redialing Calls 21
Removing the Battery 19
S
Safety Information 91
Screen Icons 21
Security 78
Sent 41
Service Alerts 70
Set Shortcut Keys 76
Settings & Tools 59
Set-up Wizard 87
Signal Strength 20
Social Networks 43
Software Update 86
Sounds Off 22
Sounds Settings 68
Speed Dial 26

Index
118
VN170
Speed Dialing 29
Speed Dials 32
Stopwatch 64
Storing a Number with
Pauses 27
Storing Basics 26
Supported Profiles 68
SW/HW Version 85
System Select 80
T
Take Picture 55
Technical Details 10
Terminology 114
Text Input 25
TIA Safety Information
88
To Do List 63
Tools 59
TTY Mode 82
Tunes & Tones 51
Turning the Phone On
and Off 20
TXT Message 35
V
V CAST Tones 58
Vibrate Mode 22
View Timers 47
Voice Clarity 71
Voice Commands 23,
59, 77
Voicemail 42
Voice Message 39
Voice Privacy 83
W
Wallpaper 74
World Clock 65

MEMO

MEMO