LG Electronics USA VN210 Cellular/PCS GSM/EDGE/CDMA Handset with Bluetooth User Manual
LG Electronics MobileComm USA, Inc. Cellular/PCS GSM/EDGE/CDMA Handset with Bluetooth
UserManual.wiki
>
LG Electronics USA
>
VN210 User Manual
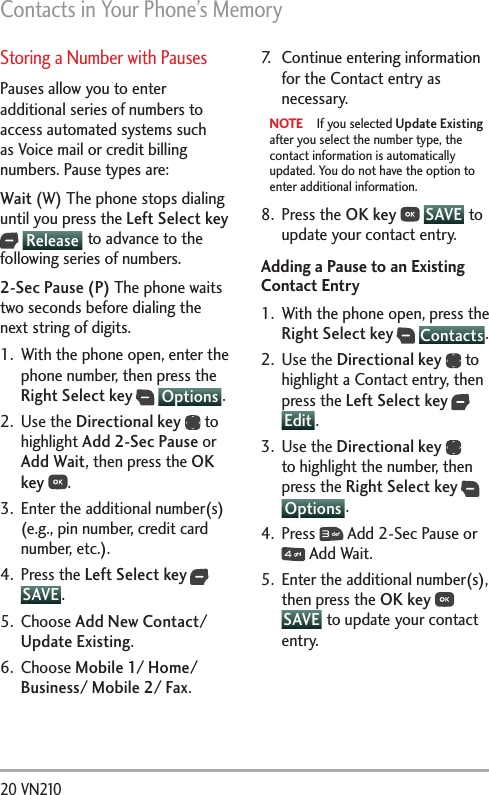
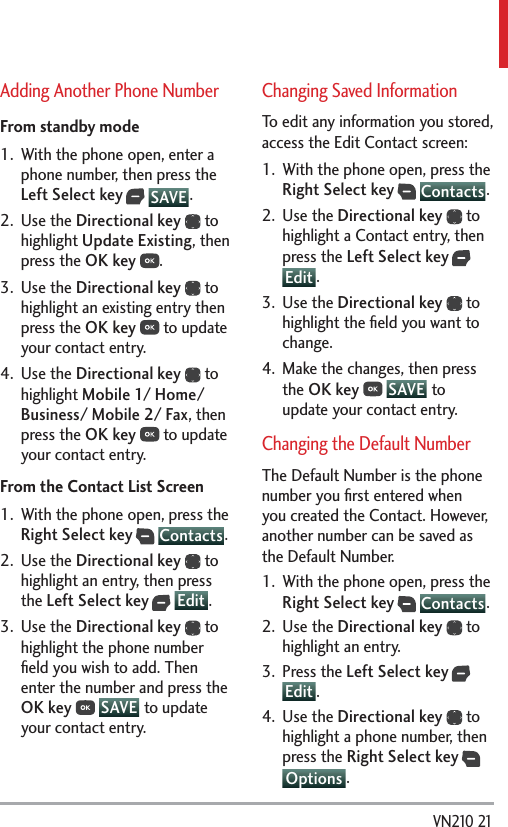
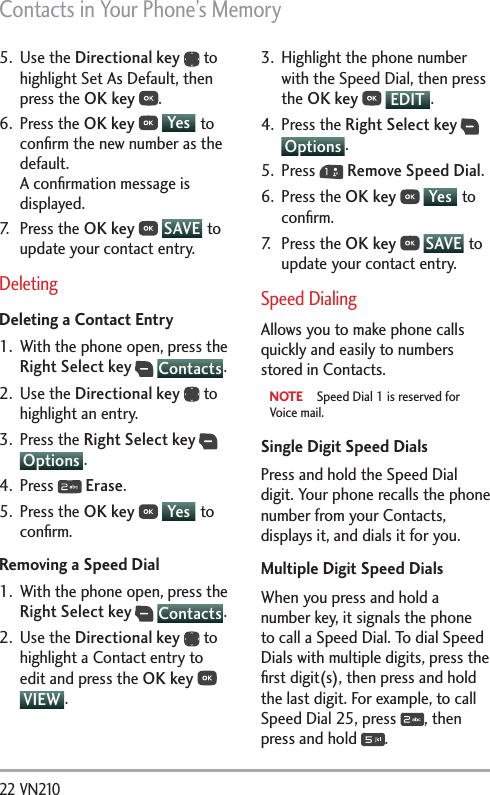
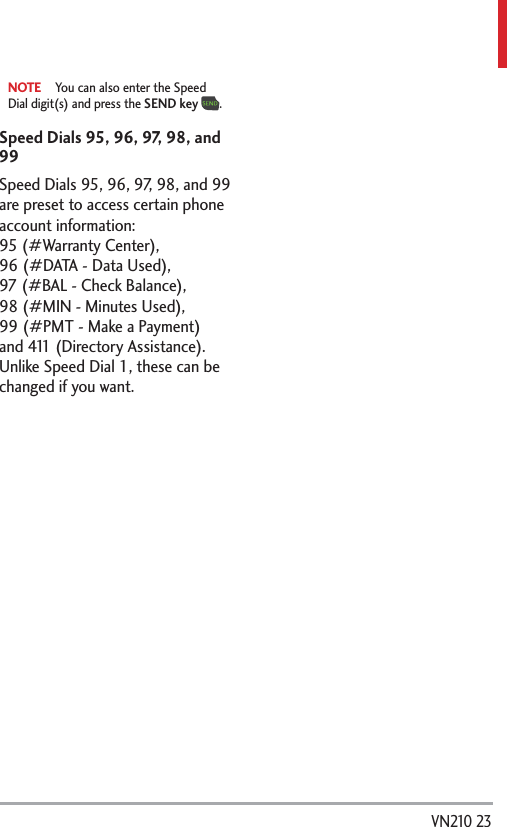
Users Manual
Navigation menu
Upload a User Manual
Namespaces
Wiki Guide
HTML
PDF
Info
Views
User Manual
Discussion / Help
Navigation


![VN210 85that part of the body will absorb more RF energy. Wireless phones marketed in the U.S. are required to meet safety requirements regardless of whether they are used against the head or against the body. Either configuration should result in compliance with the safety limit.” Also, if you use your wireless phone while in a car, you can use a phone with an antenna on the outside of the vehicle. You should also read and follow your wireless phone manufacturer’s instructions for the safe operation of your phone. Do wireless phones pose any special risks to children?The FDA/FCC website states that “the scientific evidence does not show a danger to users of wireless communication devices, including children.” The FDA/FCC website further states that “some groups sponsored by other national governments have advised that children be discouraged from using wireless phones at all”. For example, the Stewart Report from the United Kingdom [“UK”] made such a recommendation in December 2000. In this report a group of independent experts noted that no evidence exists that using a cell phone causes brain tumors or other ill effects. [The UK’s] recommendation to limit cell phone use by children was strictly precautionary; it was not based on scientific evidence that any health hazard exists. A copy of the UK’s leaflet is available at http://www.dh.gov.uk (search “mobile”), or you can write to: NRPB, Chilton, Didcot, Oxon OX11 ORQ, United Kingdom. Copies of the UK’s annual reports on mobile phones and RF are available online at www.iegmp.org.uk and http://www.hpa.org.uk/radiation/ (search “mobile”). Parents who wish to reduce their children’s RF exposure may choose to restrict their children’s wireless phone use. Where can I get further information about RF emissions?For further information, see the following additional resources (websites current as of April 2005):U.S. Food and Drug AdministrationFDA Consumer magazineNovember-December 2000Telephone: (888) INFO-FDA](https://usermanual.wiki/LG-Electronics-USA/VN210/User-Guide-2616098-Page-87.png)

![LIMITED WARRANTY STATEMENT 112 VN210 TO USE, THIS PRODUCT OR FOR ANY BREACH OF ANY EXPRESS OR IMPLIED WARRANTY, INCLUDING THE IMPLIED WARRANTY OF MARKETABILITY APPLICABLE TO THIS PRODUCT.Some states do not allow the exclusive limitation of incidental or consequential damages or limitations on how long an implied warranty lasts; so these limitations or exclusions may not apply to you. This warranty gives you specific legal rights and you may also have other rights which vary from state to state.5. HOW TO GET WARRANTY SERVICE:If you experience any problems with either the Bluetooth headset or the mobile handset, in each case as may be covered by this limited warranty, you need only return the affected device. For example, if a problem exists with the Bluetooth headset, please DO NOT return your mobile handset with the headset. Likewise, if a problem exists with the mobile handset, please DO NOT return the Bluetooth Headset with the handset.To obtain warranty service, please call or fax to the following telephone numbers from anywhere in the continental United States: Tel. 1-800-793-8896 or Fax. 1-800-448-4026Or visit http://us.lgservice.com. Correspondence may also be mailed to:LG Electronics Service- Mobile Handsets, P.O. Box 240007, Huntsville, AL 35824DO NOT RETURN YOUR PRODUCT TO THE ABOVE ADDRESS. Please call or write for the location of the LG authorized service center nearest you and for the procedures for obtaining warranty claims.7.11 Warranty LawsThe following laws govern warranties that arise in retail sales of consumer goods:The California Song-Beverly Consumer Warranty Act [CC §§1790 et seq],The California Uniform Commercial Code, Division Two [Com C §§2101 et seq], andThe federal Magnuson-Moss Warranty Federal Trade](https://usermanual.wiki/LG-Electronics-USA/VN210/User-Guide-2616098-Page-114.png)
![VN210 113Commission Improvement Act [15 USC §§2301 et seq; 16 CFR Parts 701– 703]. A typical Magnuson-Moss Act warranty is a written promise that the product is free of defects or a written promise to refund, repair, or replace defective goods. [See 15 USC §2301(6).] Remedies include damages for failing to honor a written warranty or service contract or for violating disclosure provisions. [See 15 USC §2310(d).] Except for some labeling and disclosure requirements, the federal Act does not preempt state law. [See 15 USC §2311.]The Consumer Warranty Act does not affect the rights and obligations of parties under the state Uniform Commercial Code, except the provisions of the Act prevail over provisions of the Commercial Code when they conflict. [CC §1790.3.]For purposes of small claims actions, this course will focus on rights and duties under the state laws.](https://usermanual.wiki/LG-Electronics-USA/VN210/User-Guide-2616098-Page-115.png)