LG Electronics USA VN220 Multi-Band GSM/EDGE/UMTS/LTE Phone with WLAN and Bluetooth User Manual
LG Electronics MobileComm USA, Inc. Multi-Band GSM/EDGE/UMTS/LTE Phone with WLAN and Bluetooth
UserManual.wiki
>
LG Electronics USA
>
VN220 User Manual
Users Manual
Navigation menu
Upload a User Manual
Namespaces
Wiki Guide
HTML
PDF
Info
Views
User Manual
Discussion / Help
Navigation

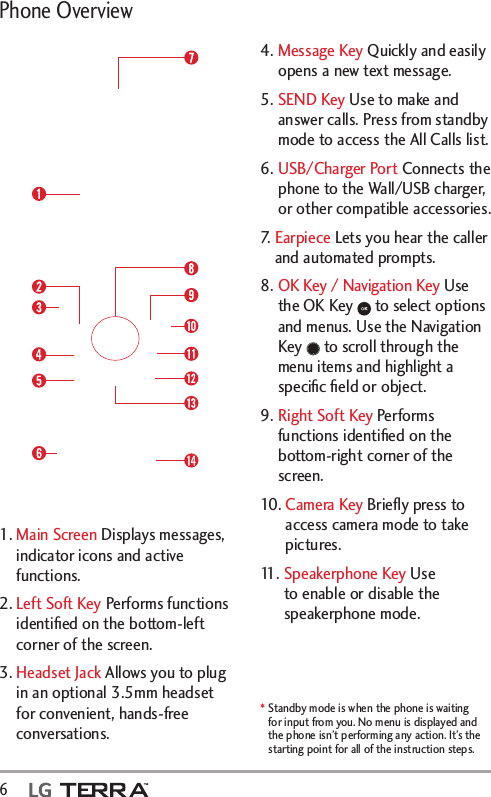

![Getting Started with Your Phone 13Making CallsWith the phone open, enter the phone number using the keypad. Press the SEND Key to dial the number. Press the PWR/END Key to end the call.NOTE Your phone has a Voice Commands feature that also lets you make calls by saying a phone number or Contact name. To access it, press and say Call followed by the name or number.Correcting Dialing MistakesWhile entering a phone number, press the Clear/Voice Commands Key once to erase the last digit entered, or hold it down for at least two seconds to delete all the digits.Redialing CallsWith the flip open, press the SEND Key twice to redial the last number dialed.Receiving CallsWhen the phone rings or vibrates, you can answer the call by simply opening the flip.When the flip is open, the following options are available. [Quiet] Press the Left Soft Key to mute the ringing or vibration for that call. [Ignore] Press the Right Soft Key to end the call and send the caller directly to Voice mail. [TXT] Press to end the call and send a quick text message. Press the PWR/END Key to end the call, or simply close the flip. Screen IconsWhen the phone is on, the top line of the LCD screen displays phone status icons. To see the icon glossary, with the flip open, press [MENU] > Settings & Tools > Phone Info > Icon Glossary and select a subcategory.](https://usermanual.wiki/LG-Electronics-USA/VN220/User-Guide-3320962-Page-15.png)
![14 Quick Access to Convenient FeaturesVibrate ModeSets the phone to vibrate instead of ringing ( is displayed). To set Vibrate Mode, with the flip open, press and hold . To return to Normal Mode, press and hold again. Sounds OffQuickly deactivate your phone's sounds when you're in a place where phone sounds would be disruptive. From standby mode with the flip open, press and hold the Volume Down Key . To return to normal sounds mode, press and hold the Volume Up Key .Mute FunctionThe Mute Function prevents the transmission of your voice to the caller. To quickly activate Mute while on a call, press the Left Soft Key [Mute]. To unmute press the Left Soft Key [Unmute].Quick Volume AdjustmentQuickly adjust ringer and earpiece volumes by pressing the Volume Keys on the left side of the phone. Press the Volume Up Key to increase and Volume Down Key to decrease the volume.NOTE The earpiece volume can only be adjusted during a call and Keypad Volume can only be adjusted through the Sounds Settings menu.Quick Font ResizeWhen you view messages, enter phone numbers, or view sub-menus, press the Volume Keys to quickly adjust the font size.NOTE Not supported on the Grid Main menu.Call WaitingDuring a call, one beep indicates another incoming call. Press the SEND Key to answer it and put the first call on hold. Press the SEND Key again to return to the first call. 3-way callYou can talk with two people at the same time with a three-way conversation on your wireless phone. Airtime and other charges, which may include toll or long distance charges, will apply for all simultaneous calls until you end one call.](https://usermanual.wiki/LG-Electronics-USA/VN220/User-Guide-3320962-Page-16.png)
![Quick Access to Convenient Features 151. While on the first call, dial the 10-digit number of the second person. 2. Press the SEND Key . The first person is automatically put on hold while the call is made. 3. When the second person answers, press [MERGE] to create a conference call. 4. If the second person does not answer, press the SEND Key twice to end the connection and go back to the first person. 5. To end both conversations completely, press the PWR/END Key . Caller IDCaller ID displays the number and/or name and picture (if applicable) of the person calling when your phone rings. Voice CommandsVoice Commands allow you to do things by verbal command (e.g., make calls, check Voice mail, etc.). With the flip open, press the Clear/Voice Commands Key on the keypad.1. Call Say "Call" and then call someone simply by saying the name or phone number.2. Send Msg to Say "Send Message" and the command will prompt you for the type of message.3. Go to This allows you to access a menu within the phone.4. Check This allows you to check out a wide range of items such as Phone Status, Voice mail, Messages, Missed Calls, Time, Signal Strength, Battery Level, Volume, Balance, Minutes, Payment and My Number.5. Contacts You can look up names in your Contacts as well as manage your Contact List including creating, erasing or modifying.6. Search Say "Search" to open Verizon Opera Mini to perform a search.7. Redial Say "Redial" and the phone will redial the last phone number.8. My Verizon This command provides you with direct access to your Verizon Wireless account information.9. Help Provides a general guideline to using Voice Commands.](https://usermanual.wiki/LG-Electronics-USA/VN220/User-Guide-3320962-Page-17.png)
![18 Contacts in Your Phone’s MemoryCreating a Contact1. With the flip open, enter a number (max. 48 digits), then press the Left Soft Key [Save].2. Use the Navigation Key to highlight Add New Contact or Update Existing, then press .3. Use the Navigation Key to highlight Mobile 1/ Home/ Business/ Mobile 2/ Fax, then press .4. Enter a name (max. 32 characters), and any additional information, then press [SAVE].NOTE If you inserted SIM card in your phone, you can also save the contact into your SIM card.NOTE If you selected the number type after selecting Update Existing, the contact information is automatically updated.Customizing Individual Entries1. With the flip open, press the Right Soft Key [Contacts], then use the Navigation Key to highlight an entry.2. Press the Left Soft Key [Edit].3. Use the Navigation Key to highlight the information to customize.4. Change the entry as you want, then press [SAVE] to save your changes.Speed DialAllows you to set up your Speed Dials.1. With the flip open, press the Right Soft Key [Contacts], then use the Navigation Key to highlight an entry.2. Press the Left Soft Key [Edit].3. Use the Navigation Key to highlight a phone number, then press the Right Soft Key [Options].4. Use the Navigation Key to highlight Set Speed Dial, then press .5. Select a Speed Dial digit.tEnter a digit using the keypad, then press [SET].tUse the Navigation Key to highlight the Speed Dial digit, then press [SET].6. Press [Yes] to confirm, then press [SAVE] to update your contact entry.](https://usermanual.wiki/LG-Electronics-USA/VN220/User-Guide-3320962-Page-20.png)
![Contacts in Your Phone’s Memory 19Storing a Number with PausesPauses allow you to enter additional series of numbers to access automated systems such as Voice mail or credit billing numbers. Pause types are: Wait (W) The phone stops dialing until you press the Left Soft Key [Release] to advance to the following series of numbers. 2-Sec Pause (P) The phone waits two seconds before dialing the next string of digits.1. With the flip open, enter the phone number, then press the Right Soft Key [Options].2. Use the Navigation Key to highlight Add 2-Sec Pause or Add Wait, then press .3. Enter the additional number(s) (e.g., pin number, credit card number, etc.).4. Press the Left Soft Key [Save].5. Choose Add New Contact or Update Existing. 6. Choose Mobile 1/ Home/ Business/ Mobile 2/ Fax. 7. Continue entering information for the Contact entry as necessary.NOTE If you selected the number type after selecting Update Existing, the contact information is automatically updated. You do not have the option to enter additional information.8. Press [SAVE] to update your contact entry.Adding a Pause to an Existing Contact Entry1. With the flip open, press the Right Soft Key [Contacts].2. Use the Navigation Key to highlight a Contact entry, then press the Left Soft Key [Edit].3. Use the Navigation Key to highlight the number, then press the Right Soft Key [Options].4. Press Add 2-Sec Pause or Add Wait.5. Enter the additional number(s), then press [SAVE] to update your contact entry.Adding Another Phone NumberFrom standby mode1. With the flip open, enter a phone number, then press the Left Soft Key [Save]. 2. Use the Navigation Key to highlight Update Existing, then press .](https://usermanual.wiki/LG-Electronics-USA/VN220/User-Guide-3320962-Page-21.png)
![Contacts in Your Phone’s Memory20 3. Use the Navigation Key to highlight an existing entry then press to update your contact entry. 4. Use the Navigation Key to highlight Mobile 1/ Home/ Business/ Mobile 2/ Fax, then press to update your contact entry.From the Contact List Screen1. With the flip open, press the Right Soft Key [Contacts].2. Use the Navigation Key to highlight an entry, then press the Left Soft Key [Edit].3. Use the Navigation Key to highlight the phone number field you wish to add. Then enter the number and press [SAVE] to update your contact entry.Changing Saved InformationTo edit any information you stored, access the Edit Contact screen:1. With the flip open, press the Right Soft Key [Contacts].2. Use the Navigation Key to highlight a Contact entry, then press the Left Soft Key [Edit].3. Use the Navigation Key to highlight the field you want to change.4. Make the changes, then press [SAVE] to update your contact entry.Changing the Default NumberThe default number is the phone number you first entered when you created the Contact. However, another number can be saved as the default number.1. With the flip open, press the Right Soft Key [Contacts].2. Use the Navigation Key to highlight an entry.3. Press the Left Soft Key [Edit].4. Use the Navigation Key to highlight a phone number, then press the Right Soft Key [Options].5. Use the Navigation Key to highlight Set As Default, then press .6. Press [Yes] to confirm the new number as the default. A confirmation message is displayed.7. Press [SAVE] to update your contact entry.](https://usermanual.wiki/LG-Electronics-USA/VN220/User-Guide-3320962-Page-22.png)
![Contacts in Your Phone’s Memory 21DeletingDeleting a Contact Entry1. With the flip open, press the Right Soft Key [Contacts].2. Use the Navigation Key to highlight an entry.3. Press the Right Soft Key [Options]. 4. Press Erase.5. Press [Yes] to confirm.Removing a Speed Dial1. With the flip open, press the Right Soft Key [Contacts].2. Use the Navigation Key to highlight a Contact entry to edit and press [VIEW].3. Highlight the phone number with the Speed Dial, then press [EDIT].4. Press the Right Soft Key [Options].5. Press Remove Speed Dial.6. Press [Yes] to confirm.7. Press [SAVE] to update your contact entry. Speed DialingAllows you to make phone calls quickly and easily to numbers stored in Contacts. NOTE Speed Dial 1 is reserved for Voice mail.Single Digit Speed DialsPress and hold the Speed Dial digit. Your phone recalls the phone number from your Contacts, displays it, and dials it for you.Multiple Digit Speed DialsWhen you press and hold a number key, it signals the phone to call a Speed Dial. To dial Speed Dials with multiple digits, press the first digit(s), then press and hold the last digit. For example, to call Speed Dial 25, press , then press and hold .NOTE You can also enter the Speed Dial digit(s) and press the SEND Key .Speed Dials 96, 97, 98, and 99Speed Dials 96, 97, 98, and 99 are preset to access certain phone account information: 96 (#DATA - Data Used), 97 (#BAL - Check Balance), 98 (#MIN - Minutes Used), 99 (#PMT - Make a Payment). Unlike Speed Dial 1, these can be changed if you want.](https://usermanual.wiki/LG-Electronics-USA/VN220/User-Guide-3320962-Page-23.png)
![22 ContactsContactsThe Contacts menu allows you to store names, phone numbers and other information in your phone’s memory. Shortcut The Right Soft Key is a shortcut key to the Contact List from standby mode.1. New ContactAllows you to add a new contact to your Contact List.NOTE Using this submenu, the number is saved as a new Contact, not into an existing Contact.1. With the phone open, press [MENU]. 2. Press Contacts.3. Press New Contact.4. Enter the name and press the Navigation Key downward until the phone number type you want is highlighted.5. Enter the number and any additional contact information and press [SAVE] to update your contact entry.NOTE For more detailed information, see page 18.2. Contact ListAllows you to view your Contact List.1. With the phone open, press [MENU]. 2. Press Contacts.3. Press Contact List.4. Use the Navigation Key to scroll through your Contacts alphabetically.tPress the Right Soft Key [Options] to select one of the following:New Contact/ Erase/ New Message/ Set As ICE Contact/ Call/ Manage Contacts/ Set As Favorite/ Filter Contacts / Search Entry ModetPress the Left Soft Key [Edit] to edit.tPress [VIEW] to view the entry details.Shortcut Use the Go To field, for quick access to an entry without scrolling. For example, to go to "Vet", enter the letter V.](https://usermanual.wiki/LG-Electronics-USA/VN220/User-Guide-3320962-Page-24.png)
![Contacts 233. Backup AssistantYou can save your phone’s address book to a secure server. If your phone is lost or damaged, or if you upgrade to a new phone, Backup Assistant will restore your contacts. Go to verizonwireless.com/baplus. NOTE Subject to specific terms of use. See verizonwireless.com/baplus for details.1. With the phone open, press [MENU]. 2. Press Contacts.3. Press Backup Assistant.4. Follow the instructions to configure the application.4. FavoritesAllows you to add Contact entries or Contact groups to your list of Favorites to easily view, call, or send messages.1. With the phone open, press [MENU]. 2. Press Contacts.3. Press Favorites.4. Press [ADD].Shortcut You can add up to 10 Contacts and/or Contact groups as Favorites to easily make calls, send messages, and view messages.5. Select whether you want to add a favorite from your Contacts or Group.6. Use the Navigation Key to scroll through your Contacts or Groups alphabetically and press [MARK].7. Press the Left Soft Key [Done]. Once you have added Contacts to the Favorites list, the following options will become available in the Favorites menu:Left Soft Key : View OK Key : New Message/ View MessagesRight Soft Key : OptionsMove Position/ Remove/ Remove All/ Set As ICE Contact5. GroupsAllows you to view your grouped Contacts, add a new group, change the name of a group, delete a group, or send a message to everyone in the selected group.1. Open the flip and press [MENU]. 2. Press Contacts.3. Press Groups.](https://usermanual.wiki/LG-Electronics-USA/VN220/User-Guide-3320962-Page-25.png)
![Contacts24 4. View a GroupUse the Navigation Key to highlight a group, then press [VIEW].Add a New GroupPress the Left Soft Key [New] to add a new group to the list. Enter a name and picture (if desired) and press [SAVE]. Group's optionsPress the Right Soft Key [Options] to select one of the following:New Message/ Edit Group Name & ID/ Edit Members/ Erase Group/ Set As Favorite/ Search Entry ModeAdding Contacts to a Group1. From Groups submenu, press [VIEW] and press [ADD].ORIf the Group already has members added, highlight the group name and press the Right Soft Key [Options], then press Edit Members.2. Highlight a desired contact and press [MARK].3. Press the Left Soft Key [Done] to add contact to a group. 6. Speed DialsAllows you to view your list of Speed Dials or designate Speed Dials for numbers entered in your Contacts.1. Open the flip and press [MENU]. 2. Press Contacts.3. Press Speed Dials.4. Use the Navigation Key to highlight the Speed Dial position, or enter the Speed Dial digit and press [SET].5. Use the Navigation Key to highlight the Contact then press [SET]. (For Contacts with multiple numbers, highlight the number for the Speed Dial, then press [SET].)6. Press [Yes] to confirm. A confirmation message is displayed.7. In Case of Emergency (ICE)This menu allows you to store names, phone numbers and other information, which will be very helpful in case of emergency.1. Open the flip and press [MENU].](https://usermanual.wiki/LG-Electronics-USA/VN220/User-Guide-3320962-Page-26.png)
![Contacts 252. Press Contacts.3. Press In Case of Emergency.4. Use the Navigation Key to highlight Contact 1, 2, or 3, then press [ADD].5. Press From Contacts or From Favorites to add a Contact from your Contact List. ORPress New Contact to enter information not stored in your Contact List.6. Select the contact and press .7. The Contact label changes to the specified name. Entering Your ICE Personal Info1. Open the flip and press [MENU]. 2. Press Contacts.3. Press In Case of Emergency.4. Use the Navigation Key to highlight Personal Info, then press [VIEW].5. Use the Navigation Key to highlight one of the Note entries, then press [ADD].6. Enter information that would be helpful in an emergency (e.g., your medical record number), then press [SAVE]. The note label changes to the text entered.Shortcut When you've assigned ICE Contacts and your phone is locked, the Left Soft Key appears as [ICE] allowing the emergency information to be viewed without unlocking the phone.To unassign an ICE ContactsFrom the ICE Contacts menu, press the Right Soft Key [Options], then press Unassign. Then press [Yes].To delete Personal Info entryFrom the Personal Info menu, press the Right Soft Key [Erase]. Then press [Yes].8. My Name CardAllows you to create, edit, and view your own personal Contact information including name, phone numbers, and email address in one entry.1. Open the flip and press [MENU]. 2. Press Contacts.3. Press My Name Card.](https://usermanual.wiki/LG-Electronics-USA/VN220/User-Guide-3320962-Page-27.png)
![Contacts26 4. Press [EDIT] to enter your personal Contact information.5. Use the Navigation Key to scroll to the information you want to enter.6. Enter your information as necessary, then press [SAVE].NOTE Press the Right Soft Key [Send] to send your name card.](https://usermanual.wiki/LG-Electronics-USA/VN220/User-Guide-3320962-Page-28.png)
![27MessagingMessagingShortcut From standby mode, pressing the Left Soft Key is a shortcut to Messages.Depending on the content and size of your messages, the phone can store up to 790 messages (including a max. of 300 text messages, 100 emergency alerts, 100 multimedia message notifications, and 100 multimedia messages in the Inbox; 100 text messages and 50 multimedia messages in the Outbox; 20 text messages and 20 multimedia messages in Drafts). Content stored in the message may be limited by phone model and service capability. Other limits to available characters per message may exist. Please check with your service provider for system features and capabilities.tWhen viewing a received message, you can call the sender back by pressing the SEND Key .New Message AlertYour phone can alert you when you have new messages. Options include:1. The phone displays a message on the screen.2. The message icon ( ) is displayed on the screen. In case of a high priority message, the icon( ) will appear.1. New MessageAllows you to send messages (Text, Picture, and Voice). Depending on the type of message you choose to send, you can also attach files to your messages including pictures, sounds, voice recordings and name cards.The Basics of Sending a Text Message1. Open the flip and press [MENU].2. Press Messaging.3. Press New Message. To access this feature, you can press the Message key .4. Enter a phone number or a recipient's name in the To field.As you enter the phone number or a recipient's name, matching contacts appear. You can choose a suggested recipient or continue entering the phone number.](https://usermanual.wiki/LG-Electronics-USA/VN220/User-Guide-3320962-Page-29.png)
![Messaging28 5. Press to access the text field.6. Use the keypad to enter your message.7. Press [SEND].Select Recipient(s) Using Add1. Open the flip and press [MENU].2. Press Messaging.3. Press New Message.4. With the To field highlighted, press the Right Soft Key Add.5. Select an option and press .From Contacts To select a recipient from your Contact List.From Recent Calls To select a recipient from Recent Calls.Favorites To select a recipient from Favorites.Groups To Select a recipient from your Groups.6. Use the keypad to enter your message.7. Press [SEND].Multimedia Message Using OptionsAllows you send messages with text, picture, sound and name card attachments.1. Open the flip and press [MENU].2. Press Messaging.3. Press New Message.4. Enter a phone number or a recipient's name in the To field.5. Press to access the text field.6. Use the keypad to enter your message.7. Press the Right Soft Key Options.8. Select an option and press .1. Attach1. Picture: Highlight a picture, then press . 2. Take Picture: Take a picture of the subject and press .3. Sound: Highlight a sound, then press . 4. Record Voice: Press to start recording and then press to STOP.](https://usermanual.wiki/LG-Electronics-USA/VN220/User-Guide-3320962-Page-30.png)
![Messaging 295. Name Card1. My Name Card: Press to add. 2. From Contacts: Press [MARK] to mark the name cards and press [Done]. 2. Insert Quick Text Highlight the text and press .3. Save As Draft Press to save as draft.4. Priority Level Choose from High or Normal and press [SET].5. Cancel Message Select Yes to save the message in drafts or No to cancel the message without saving the message in drafts.9. Use the keypad to enter your subject in the subject field.10. Press Send.2. MessagesThe phone alerts you when you receive a new message:tBy displaying a notification message on the screen.tBy sounding a tone or vibration, if set.Viewing Your Inbox1. Open the flip and press the Left Soft Key [Message].2. Highlight a message. The following options are available.tPress [OPEN] to view the message.tPress the Left Soft Key [Reply] to reply to the message.tPress the Right Soft Key [Options] to access the following options:Erase Allows you to erase the message.Add To Contacts Stores the callback number, email address, and numbers from the address of the received message into your Contacts.Manage Messages Allows you to Erase, Lock, and Unlock messages.Sort Alphabetically Allows you to sort your messages in alphabetical order.Messaging Menu Takes you to the Messaging menu.Settings Allows you to change various Messaging settings.](https://usermanual.wiki/LG-Electronics-USA/VN220/User-Guide-3320962-Page-31.png)
![Messaging30 Message Icon Reference New TXT Message Read TXT Message Unopened Multimedia Message Notification Opened Multimedia Message Notification Unread Multimedia Message Read Multimedia Message Message Delivered Message Failed Pending Message Message Sent New Webmail Webmail Read Multiple Messages Delivered Multiple Messages Failed Multiple Message Delivery Incomplete Multiple Pending Messages Multiple Messages Sent New Group Message Read Group Message Group Message Delivered Group Message Failed Group Message Delivery Incomplete Pending Group Message Group Messages Sent TXT Message Draft Media Message Draft Namecard High Priority Lock* Multimedia Message indicates Picture/Voice Message.3. Drafts Saved message drafts are stored here.1. Open the flip and press [MENU].2. Press Messaging.3. Press Drafts.4. Highlight a message. The following options are available.tPress [EDIT] to continue editing the message.tPress the Left Soft Key [Erase] to erase the message.tPress the Right Soft Key [Options] for the following options.](https://usermanual.wiki/LG-Electronics-USA/VN220/User-Guide-3320962-Page-32.png)
![Messaging 31Send Sends the selected message.Add To Contacts Stores the number, email address, and numbers from the address included in the message into your Contacts.Manage Drafts Allows you to manage (erase or lock) messages.Message Icon Reference Draft Text Message Draft Multimedia Message4. Voice mailAllows you to view the number of new voice messages recorded in the Voice mail box. Once you exceed the storage limit, old messages are overwritten. When you have a new voice message, your phone will alert you.Checking Your Voice mail Box1. Open the flip and press [MENU].2. Press Messaging.3. Press Voice mail.4. The following options are available.tPress the Left Soft Key [Clear] to clear the Voice mail Counter, then then press [Yes].tPress the SEND Key or [CALL] to listen to the message(s).OR1. Enter and press the SEND Key from your phone or dial your wireless phone number from any touch-tone phone. ORPress and hold from your phone, as a speed dial to your voice mail.2. When the recorded announcement begins, press to interrupt (if applicable).3. When prompted, enter your password, then .5. Social NetworksThe upgraded text-based social networks allow you to update your status, picture upload, and write on someone’s wall by sending a text message.1. Open the flip and press [MENU].](https://usermanual.wiki/LG-Electronics-USA/VN220/User-Guide-3320962-Page-33.png)
![Messaging32 2. Press Messaging.3. Press Social Networks.4. Select one of the social networking service providers.5. Update your information as desired.NOTE Press the Right Soft Key [Options] and select Help to find out how to subscribe to text-based updates.Messaging SettingsAllows you to configure settings for your messages.1. With the flip open, press [MENU].2. Press Messaging.3. Press the Left Soft Key [Settings]. 4. Use the Navigation Key to highlight one of the settings and press to select it.Message Settings Sub-Menu Descriptions1. Inbox ViewSelect Time to display messages chronologically in Inbox and Sent folders. Select Contact to sort all messages alphabetically by Contact in one message folder.NOTE By default, Contact is set as the Inbox View setting. If changed to Time, the Messaging menu will appear differently.2. Entry ModeSelect T9 Word, Abc, ABC, 123, T9 Palabra, Simplified (拼音) or Korean (о) to be your default input method.3. Auto Save SentSelect On to automatically save your Sent messages. Select Off if you don't want to save automatically. Select Prompt to be asked to save.4. Auto Erase InboxSelect On to automatically delete read messages when you exceed the storage limit. Or, select Off.5. Messaging Font SizeSelect Small, Normal or Large for the size of the Messaging characters.](https://usermanual.wiki/LG-Electronics-USA/VN220/User-Guide-3320962-Page-34.png)
![Messaging34 16. Delivery ReceiptWhen Delivery Receipt is set to On, you can see if your sent messages have been delivered (). Or select Off.17. TXT-Media Msg NotificationDisplays pop-up notification when switching message types between text and media. Erasing MessagesYou can erase messages stored in your Inbox, Sent, or Drafts folders. You can also erase all messages at the same time.1. Open the flip and press [MENU].2. Press Messaging.3. Press the Right Soft Key [Options] then select one of the following:Erase Sent/Received/ Erase Drafts/ Erase All Messages4. Press [Yes] to confirm the deletion or select which messages you want to delete.A confirmation message is displayed.](https://usermanual.wiki/LG-Electronics-USA/VN220/User-Guide-3320962-Page-36.png)
![35Recent CallsRecent CallsThe Recent Calls menu is a list of the last phone numbers or Contact entries for calls you placed, accepted, or missed. It's continually updated as new numbers are added to the beginning of the list and the oldest entries are removed from the bottom of the list.1. MissedAllows you to view the list of missed calls; up to 90 entries.1. Open the flip and press [MENU].2. Press Recent Calls.3. Press Missed.4. Use the Navigation Key to highlight an entry, thentPress [OPEN] to open the entry.tPress the SEND Key to place a call to the number.tPress the Right Soft Key [Options] to select:Save To Contacts (Contact Info)/ Erase/ Lock(Unlock)/ Erase All/ View TimerstPress the Left Soft Key [Message] to send a message to the number.2. ReceivedAllows you to view the list of incoming calls; up to 90 entries.1. Open the flip and press [MENU]. 2. Press Recent Calls.3. Press Received.4. Use the Navigation Key to highlight an entry, thentPress [OPEN] to open the entry.tPress the SEND Key to place a call to the number.tPress the Right Soft Key [Options] to select:Save To Contacts (Contact Info)/ Erase/ Lock(Unlock)/ Erase All/ View TimerstPress the Left Soft Key [Message] to send a message to the number.](https://usermanual.wiki/LG-Electronics-USA/VN220/User-Guide-3320962-Page-37.png)
![Recent Calls36 3. DialedAllows you to view the list of outgoing calls; up to 90 entries.1. Open the flip and press [MENU]. 2. Press Recent Calls.3. Press Dialed.4. Use the Navigation Key to highlight an entry, thentPress [OPEN] to open the entry.tPress the SEND Key to place a call to the number.tPress the Right Soft Key [Options] to select:Save to Contacts(Contact Info)/ Erase/ Lock(Unlock)/ Erase All/ View TimerstPress the Left Soft Key [Message] to send a message to the number.4. AllAllows you to view the list of all calls; up to 270 entries.1. Open the flip and press [MENU]. 2. Press Recent Calls.3. Press All.4. Use the Navigation Key to highlight an entry, thentPress [OPEN] to open the entry.tPress the SEND Key to place a call to the number.tPress the Right Soft Key [Options] to select:Save to Contacts(Contact Info)/ Erase/ Lock(Unlock)/ Erase All/ View TimerstPress the Left Soft Key [Message] to send a message to the number.Shortcut To view a quick list of all your recent calls, press the SEND Key from standby mode.](https://usermanual.wiki/LG-Electronics-USA/VN220/User-Guide-3320962-Page-38.png)
![Recent Calls 375. View TimersAllows you to view the duration of selected call types.1. Open the flip and press [MENU]. 2. Press Recent Calls.3. Press View Timers.4. Use the Navigation Key to highlight a call list.Last Call/ All Calls/ Received Calls/ Dialed Calls/ Roaming Calls/ Transmit Data/ Received Data/ Total Data/ Last Reset/ Lifetime Calls/ Lifetime Data Counter 5. Press the Left Soft Key [Reset] to reset the highlighted timer. 6. Reset all the recorded timers by pressing the Right Soft Key [Reset All].NOTE Lifetime Calls and Lifetime Data Counter cannot be reset.](https://usermanual.wiki/LG-Electronics-USA/VN220/User-Guide-3320962-Page-39.png)
![38 InternetInternetAllows you to access news, sports, weather, and email from your Verizon Wireless device. Accessibility and selections within this feature are dependent upon your service provider. For specific information on Internet access through your phone, contact your service provider.Shortcut Pressing the Left Navigation Key is the shortcut to accessing the Internet when the flip is open.1. Open the flip and press [MENU].2. Press Internet.NOTE Refer to the Media Center section on the following page for more Internet information.](https://usermanual.wiki/LG-Electronics-USA/VN220/User-Guide-3320962-Page-40.png)
![39Media CenterMedia CenterEverything you need to know while you’re on the go.1. Tunes & TonesPersonalize your phone with ringtones. A wide variety of choices are available, such as current hits, pop, hip-hop, and more.Access and Options1. With the phone open, press [MENU]. 2. Press Media Center.3. Press Tunes & Tones.4. Select a submenu by pressing the number that corresponds with the submenu.1.1 Shop RingtonesAllows you to download ringtones. 1. With the phone open, press [MENU].2. Press Media Center.3. Press Tunes & Tones.4. Press Shop Ringtones. If there is no application downloaded, it will directly access a server to browse for an application.ORIf there are applications downloaded, press Get New Applications to browse for and download new applications.1.2 My RingtonesAllows you to select a desired ringtone.1. With the phone open, press [MENU]. 2. Press Media Center.3. Press Tunes & Tones.4. Press My Ringtones.5. Use the Navigation Key to highlight a ringtone and press [PLAY] to play the ringtone or the Left Soft Key [Set As] to set the ringtone as:t Ringtone: Sets the ringtone for your incoming calls.t Contact ID: Highlight and select the Contact to be identified by the ringtone you selected.t Alert Sounds: Press the corresponding number key to set the ringtone for one of the following:](https://usermanual.wiki/LG-Electronics-USA/VN220/User-Guide-3320962-Page-41.png)
![Media Center40 All Messages/ TXT Message/ Multimedia Message/ Voice mail 1.3 My SoundsAllows you to record a new sound or select a desired sound.How to record a new sound1. With the phone open, press [MENU]. 2. Press Media Center.3. Press Tunes & Tones.4. Press My Sounds.5. Press Record New and press to start recording, then press [STOP] to end recording. How to select a sound1. With the phone open, press [MENU]. 2. Press Media Center.3. Press Tunes & Tones.4. Press My Sounds.5. Use the Navigation Key to scroll and highlight a preloaded sound.Options with a sound file highlighted:tPress the Left Soft Key [Set As] to set it as the Ringtone, Contact ID or Alert Sounds.tPress [PLAY].tPress the Right Soft Key [Options] to select:Send/ Rename/ Lock/ Erase/ Erase All/ File Info2. PicturesView, take, and share digital pictures right from your wireless phone. Access and Options1. With the phone open, press [MENU]. 2. Press Media Center.3. Press Pictures.4. Browse the submenus.2.1 Shop PicturesAllows you to download pictures. 1. With the phone open, press [MENU].2. Press Media Center.3. Press Pictures.4. Press Shop Pictures.](https://usermanual.wiki/LG-Electronics-USA/VN220/User-Guide-3320962-Page-42.png)
![Media Center 41If there is no application downloaded, it will directly access a server to browse for an application.ORIf there are applications downloaded, press Get New Applications to browse for and download new applications.2.2 My PicturesAllows you to view and manage photos stored in the phone.1. With the phone open, press [MENU]. 2. Press Media Center.3. Press Pictures.4. Press My Pictures.5. Highlight a picture with the Navigation Key .The following options are available:tPress [VIEW] to view it. tPress the Left Soft Key [Erase] to delete it.tPress the Right Soft Key [Options] to select one of the following options:Send New Message/ To Social Network/ Via BluetoothSet As Main Wallpaper/ Front Wallpaper/ Picture IDTake Picture Opens the camera so you can take a picture.Slide Show Plays all pictures as a slide show.Manage Pictures Allows you to mark multiple pictures to be erased, sent or locked/ unlocked.Rename Allows you to change the file name.*Lock (Unlock) Allows you to lock or unlock. Locked files can't be erased accidentally.File Info Allows you to view information about the file.* Only appears when the picture is stored on the phone.2.3 Take PictureLets you to take digital pictures.Shortcut Press the Camera Key to open the camera function.1. With the phone open, press [MENU]. 2. Press Media Center.3. Press Pictures.4. Press Take Picture.](https://usermanual.wiki/LG-Electronics-USA/VN220/User-Guide-3320962-Page-43.png)
![Media Center42 5. Set the brightness by pressing the Navigation Key up and down, zoom by pressing the Navigation Key left and right, and press the Right Soft Key [Options] to change other settings.NOTE Zooming is not available on the highest resolution.tPress the Navigation Key left and right to access the following settings:RESOLUTION 1280X960/ 640X480/ 320X240SELF TIMER Off/ 3 Seconds/ 5 Seconds/ 10 SecondsWHITE BALANCE Auto/ Sunny/ Cloudy/ Fluorescent/ GlowSHUTTER SOUND Shutter/ No Sound/ Say “Cheese”/ Ready! 1 2 3COLOR EFFECTS Normal/ Negative/ Aqua/ Sepia/ Black&White NIGHT MODE On/ OffAUTO SAVE On/ OffPREVIEW Actual view/ Full screen6. Take a picture by pressing [TAKE]. 7. Press the Left Soft Key [Save]. The picture is stored in My Pictures.tPress the Right Soft Key [Erase] to erase the picture.3. GamesAllows you to access downloaded games and purchase your favorite games.1. With the phone open, press [MENU].2. Press Media Center.3. Press Games.4. Choose the game you want to play or select Get New Applications to browse for and download new games.4. Internet1. With the phone open, press [MENU].2. Press Internet.ORPress Media Center, then press Internet.OR Press Media Center, then press Browser & Download, then select Verizon Opera Mini.](https://usermanual.wiki/LG-Electronics-USA/VN220/User-Guide-3320962-Page-44.png)
![Media Center44 5. Browse & DownloadAllows you to browse and access your applications, view information about them, and download new applications.1. With the phone open, press [MENU].2. Press Media Center.3. Press Browse & Download.4. Touch the application you want to run, touch to view information about the application, or touch Get New Applications to browse for and download new applications.VZ NavigatorGet where you need to be. VZ Navigator tells you where you are, what's nearby, and provides spoken turn-by-turn directions to get you to your destination on time.Find what you need. With VZ Navigator, easily find everything near you (like restaurants & gas stations) to get there faster.Verizon Opera MiniAllows you to access news, sports, weather, and email from your Verizon Wireless device. Accessibility and selections within this feature are dependent upon your service provider. For specific information on Internet access through your phone, contact your service provider.6. ExtrasAllows you to access downloaded more contents. 1. With the phone open, press [MENU].2. Press Media Center.3. Press Extras.](https://usermanual.wiki/LG-Electronics-USA/VN220/User-Guide-3320962-Page-46.png)
![45Settings & ToolsSettings & Tools1. My VerizonCheck your subscription information ranging from your payment plan to your software upgrade or other available service.1. Open the flip and press [MENU]. 2. Press Settings & Tools.3. Press My Verizon.2. Master VolumeAllows you to set the Master Volume settings.1. Open the flip and press [MENU]. 2. Press Settings & Tools.3. Press Master Volume.4. Adjust the volume with the Navigation Key and press [SET] to save the setting.3. AccessibilityAllows you to set the Accessibility settings.1. Open the flip and press [MENU]. 2. Press Settings & Tools.3. Press Accessibility.3.1 ReadoutAllows you to set various readout settings.1. Open the flip and press [MENU]. 2. Press Settings & Tools.3. Press Accessibility.4. Press Readout.3.1.1 Full ReadoutFull Readout reads the screens out loud for blind and low-vision users or when your eyes are busy. To listen to a text message, press the Speakerphone key .1. Open the flip and press [MENU]. 2. Press Settings & Tools.3. Press Accessibility.4. Press Readout.5. Press Full Readout.6. Use the Navigation Key to highlight a setting, then press [SET].On/ Off](https://usermanual.wiki/LG-Electronics-USA/VN220/User-Guide-3320962-Page-47.png)
![Settings & Tools46 3.1.2 Menu ReadoutAllows the phone to read out the menu.1. Open the flip and press [MENU]. 2. Press Settings & Tools.3. Press Accessibility.4. Press Readout.5. Press Menu Readout.6. Use the Navigation Key to highlight a setting, then press [SET].On/ Off3.1.3 Digit Dial ReadoutAllows you to set the phone to read out the digits entered in the dialing screen.1. Open the flip and press [MENU]. 2. Press Settings & Tools.3. Press Accessibility.4. Press Readout.5. Press Digit Dial Readout.6. Use the Navigation Key to highlight a setting, then press [SET].On/ Off3.1.4 Caller ID ReadoutAllows you to set the phone to read out the caller information.1. Open the flip and press [MENU]. 2. Press Settings & Tools.3. Press Accessibility.4. Press Readout.5. Press Caller ID Readout.6. Use the Navigation Key to highlight a setting, then press [SET].Ring only/ Caller ID + Ring/ Name Repeat3.1.5 Passwords ReadoutAllows you to set the phone to read out the password when you are entering.1. Open the flip and press [MENU]. 2. Press Settings & Tools.3. Press Accessibility.4. Press Readout.5. Press Passwords Readout.6. Use the Navigation Key to highlight a setting, then press [SET].On/ Off](https://usermanual.wiki/LG-Electronics-USA/VN220/User-Guide-3320962-Page-48.png)
![Settings & Tools 473.1.6 Speech RateAllows you to set the speech rate.1. Open the flip and press [MENU]. 2. Press Settings & Tools.3. Press Accessibility.4. Press Readout.5. Press Speech Rate.6. Use the Navigation Key to highlight a setting, then press [SET].Very Fast/ Fast/ Normal/ Slow/ Very Slow3.2 Invert ColorAllows you to invert the screen color contrast for people with difficulty perceiving colors.1. Open the flip and press [MENU]. 2. Press Settings & Tools.3. Press Accessibility.4. Press Invert Color.5. Use the Navigation Key to highlight a setting, then press [SET].On/ Off3.3 Large TextAllows you to set the text size to large.1. Open the flip and press [MENU]. 2. Press Settings & Tools.3. Press Accessibility.4. Press Large Text.5. Use the Navigation Key to highlight a setting, then press [SET].On/ Off3.4 Mono AudioPlays the same sounds to both earpieces so you can hear everything with just one ear.1. Open the flip and press [MENU]. 2. Press Settings & Tools.3. Press Accessibility.4. Press Mono Audio.5. Use the Navigation Key to highlight a setting, then press [SET].On/ Off](https://usermanual.wiki/LG-Electronics-USA/VN220/User-Guide-3320962-Page-49.png)
![Settings & Tools48 3.5 Turn Off All SoundsAllows you to turn off all sounds.1. Open the flip and press [MENU]. 2. Press Settings & Tools.3. Press Accessibility.4. Press Turn Off All Sounds.5. Use the Navigation Key to highlight a setting, then press [SET].On/ Off4. Tools This menu includes useful tools to make your life easier.1. Open the flip and press [MENU].2. Press Settings & Tools.3. Press Tools.4.1 Voice CommandsThis feature provides you with the following options equipped with AVR (Advanced Voice Recognition) technology. Each option has its detailed information on the phone and you can check it out by pressing the Left Soft Key [Info].1. Open the flip and press [MENU]. 2. Press Settings & Tools.3. Press Tools.4. Press Voice Commands.Access and OptionsShortcut With the flip open, press the Clear/Voice Command Key on the keypad.The Voice Commands feature has several settings which allow you to customize how you want to use it. Access Voice Commands, then press the Right Soft Key [Settings].Confirm Choices Automatic/ Always Confirm/ Never ConfirmSensitivity Set the sensitivity as More Sensitive/ Automatic/ Less Sensitive.Train Voice If the phone often asks you to repeat voice command, train the phone to recognize your voice patterns. Train Words/ Train DigitsPrompts Mode/ Audio Playback/ TimeouttFor Mode, set Prompts/ Readout + Alerts/ Readout/ Tones Only.](https://usermanual.wiki/LG-Electronics-USA/VN220/User-Guide-3320962-Page-50.png)
![Settings & Tools50 4.1.6 SearchThe “Search” command opens the browser and allows you to search for information over the internet.4.1.7 RedialSay "Redial" and the phone will redial the last phone number.4.1.8 My VerizonThe 'My Verizon' command provides you with direct access to your Verizon Wireless account information.4.1.9 HelpProvides a general guideline to using Voice Commands.4.2 Calculator Allows you to perform simple mathematical calculations. 1. Open the flip and press [MENU]. 2. Press Settings & Tools.3. Press Tools. 4. Press Calculator.5. Enter the numbers to get the value you want. To clear entered items, press the Left Soft Key [Clear]. 6. Use the Right Soft Key [Operators] to add other operators.7. Use the Navigation Key to enter an operation between numbers and press [ = ] for the result.NOTE To insert a decimal, press . To insert + and -, press .tPress the Up Navigation Key for + (addition).tPress the Down Navigation Key for - (subtraction).tPress the Left Navigation Key for ÷ (division).tPress the Right Navigation Key for x (multiplication).4.3 Ez Tip CalculatorAllows you to quickly and easily calculate bill amounts using the bill total, tip % and number of people as variables.1. Open the flip and press [MENU]. 2. Press Settings & Tools.3. Press Tools. 4. Press Ez Tip Calculator.](https://usermanual.wiki/LG-Electronics-USA/VN220/User-Guide-3320962-Page-52.png)
![Settings & Tools 515. Enter the variable fields (Bill, Tip (%), Split) and the corresponding calculation fields (Tip ($) and Split) appear automatically.6. Press the Left Soft Key [Reset] for another calculation.4.4 Eco-CalculatorAllows you to keep track of your walking and cycling distances. The amount of CO2 that is decreased by walking and cycling is displayed for you to see.1. Open the flip and press [MENU]. 2. Press Settings & Tools.3. Press Tools. 4. Press Eco-Calculator.5. Select the Walking or Cycling fields to edit the hours and miles.NOTE The decreasing CO2 amount is automatically updated when you enter the hour or mile amounts.6. Press the Left Soft Key [Settings] to set the following settings.tMode Allows you to switch the Eco-Calculator home screen animation to Person or Tree. Depending on what information you entered last (Walking or Cycling) an animation will appear. The number of trees in the animation is calculated depending on the amount of CO2 decreased.tCharacter Allows you to change the character to Man, Woman, or Man & Woman. This option is unavailable when Tree is set as the Mode.tUnit Allows you to change the unit amount to Hour or Mile.tMy Car Allows you to select the type of fuel your car uses and the Fuel Efficiency (mpg) of your car to measure the amount of CO2 discharged.4.5 CalendarAllows you to keep your agenda convenient and easy to access. Simply store your appointments and your phone will alert you with a reminder you set.1. Open the flip and press [MENU].](https://usermanual.wiki/LG-Electronics-USA/VN220/User-Guide-3320962-Page-53.png)
![Settings & Tools52 2. Press Settings & Tools.3. Press Tools. 4. Press Calendar.5. Use the Navigation Key to highlight the scheduled day.6. Press the Left Soft Key [Add].7. Enter the Subject, then scroll down to set the remaining settings.8. Highlight a Calendar setting field, then press the Left Soft Key [Set]. For each Calendar event you can set: s Subject s Start Date s Start Time s End Date s End Time s Repeat s Until s Alerts s Tones s Vibrate9. Use the Navigation Key to highlight the setting you want, then press .10. Press [SAVE] when Calendar information is complete.Editing and deleting calendar entries1. From the calendar entry list, press [VIEW].2. Press [EDIT] to edit the calendar entry or press the Left Soft Key [Erase] to delete the calendar entry.4.6 Alarm ClockAllows you to set up to 10 alarms. At the alarm time, your alarm will be displayed on the screen and the alarm will sound.1. Open the flip and press [MENU].2. Press Settings & Tools.3. Press Tools. 4. Press Alarm Clock.5. Press the Left Soft Key [Add].6. Use the Navigation Key to highlight the information you want to set, then press the Left Soft Key [Set] to view your setting choices.7. Enter the alarm information including: s Turn On/Off s Set Time s Repeat s Ringtone8. Press [SAVE] after setting all of the Alarm fields as necessary.NOTE Snooze or Dismiss the alarm using the Soft Keys (flip open).](https://usermanual.wiki/LG-Electronics-USA/VN220/User-Guide-3320962-Page-54.png)
![Settings & Tools 53How to delete alarms1. From the Alarm Clock list, press the Right Soft Key [Options] to view the available options.2. Press Erase to delete an alarm or Erase All to delete all alarm entries.3. Press [Yes].How to edit alarms1. From the Alarm Clock list, press [VIEW] and then press [EDIT].4.7 Info SearchAllows you to search items stored on the phone. 1. Open the flip and press [MENU]. 2. Press Settings & Tools.3. Press Tools. 4. Press Info Search.5. Enter two or more characters in the search field and press [SEARCH]. 6. By default, the phone will search all the categories. To specify the categories, highlight All and press the Left Soft Key [Set]. Use the Navigation Key to highlight a category and press [MARK] to mark/unmark the category. After specifying the categories, press the Left Soft Key [Done].7. To view a search result, highlight the desired results and press [VIEW]. If you want to retry the search, press the Right Soft Key [Retry]. If you want to start a new search, press the Left Soft Key [Search], enter your key word, then press .8. If no results are found, you will be prompted to try again. Choose Yes to try again or No to return to the Tools menu.4.8 StopwatchAllows you to use your phone as a typical stopwatch. 1. Open the flip and press [MENU]. 2. Press Settings & Tools.3. Press Tools. 4. Press Stopwatch.5. Press [START].6. While measuring time, press the Left Soft Key [Lap] to record a lap. 7. Pressing [STOP] will stop or resume Stopwatch time.](https://usermanual.wiki/LG-Electronics-USA/VN220/User-Guide-3320962-Page-55.png)
![Settings & Tools54 8. After time has stopped, press the Right Soft Key [Reset].4.9 World Clock Allows you to determine the current time in another time zone or country. 1. Open the flip and press [MENU]. 2. Press Settings & Tools.3. Press Tools. 4. Press World Clock.5. Press the Right Soft Key [Cities] for a list of available cities.6. Highlight a city from the list, then press .7. The display show zoom in on the city and view its date and time information. NOTE Press the Left Soft Key [Set DST], to set daylight saving time. Highlight Yes and press to set DST.4.10 Notepad Allows you to add, read, edit, and erase notes to yourself.1. Open the flip and press [MENU]. 2. Press Settings & Tools.3. Press Tools. 4. Select Notepad.5. Press the Left Soft Key [Add] to write a new note.6. Press the Left Soft Key to change the entry mode. Or press the Right Soft Key [Options] to copy and paste text or to cancel the notepad entry.7. After entering the note, press [SAVE] to save it.5. Bluetooth® MenuThe phone is compatible with devices that support the Headset, Handsfree, Stereo, Phonebook Access, Object Push and File Transfer.* You may create and store 20 pairings within the phone and connect to one device. The approximate communication range for Bluetooth® wireless technology is up to 30 feet (10 meters).NOTE Read the user guide of each Bluetooth® accessory that you are trying to pair with your phone because the instructions may be different.](https://usermanual.wiki/LG-Electronics-USA/VN220/User-Guide-3320962-Page-56.png)
![Settings & Tools 55NOTE Your phone is based on the Bluetooth® specification, but it is not guaranteed to work with all devices enabled with Bluetooth® wireless technology. Phone does not support ALL Bluetooth® OBEX Profiles. * For vehicle/accessory compatibility go to www.verizonwireless.com/bluetoothchartTurn On BluetoothAllows you to turn Bluetooth on or off and connect to other Bluetooth devices.1. Open the flip and press [MENU]. 2. Press Settings & Tools.3. Press Bluetooth Menu.4. Press the Left Soft Key [Turn On].NOTE By default, your device’s Bluetooth® functionality is turned off. 5.1. Add New DevicePairing is the process that allows the handset to locate, establish, and register 1-to-1 connection with the target device. For pairing with a new Bluetooth® device1. Follow the Bluetooth® accessory instructions to set the device to pairing mode.2. Open the flip and press [MENU]. 3. Press Settings & Tools.4. Press Bluetooth Menu.5. Press Add New Device.6. Set the desired device to discovery mode.7. The device will appear in Add New Device menu once it has been located. Highlight the device and press [PAIR].8. The handset will prompt you for the passcode. Consult the Bluetooth® accessory instructions for the appropriate passcode (typically “0000” - 4 zeroes). Enter the passcode and press . When Auto Pair Handsfree is set to On, the device will try to autopair for headsets.9. When pairing with the PC or PDA is successful, highlight either Always Ask or Always Connect and press to connect with the device.10. Once connected, you will see the device listed in the Bluetooth® Menu and when the pair is transferring information the Bluetooth® indicator will show up on your screen.](https://usermanual.wiki/LG-Electronics-USA/VN220/User-Guide-3320962-Page-57.png)
![Settings & Tools56 Icon Reference in Adding New DeviceWhen the Bluetooth® wireless connection is created and paired devices are found, the following icons are displayed.Icon References When a Bluetooth® Wireless Connection is Searched (neither connected nor paired)When a carkit device is found by your deviceWhen an audio device is found by your deviceWhen a PC is found by your deviceWhen a PDA is found by your deviceWhen another phone device is found by your deviceWhen other undefined devices are found by your deviceThe following options are available in the paired device.1. Remove Device: You can remove the device from the pairing list. 2. Rename Device: You can rename the paired device. 3. Incoming Security: Allows you to set permission before connecting an incoming device.4. Service Discovery: Allows you to search for the services that the selected device supports.5. Device Info: Shows the device information. NOTES While in the Bluetooth Menu, you can turn the Bluetooth functionality off by pressing the Left Soft Key [Turn Off]. You can turn it on by pressing the Left Soft Key [Turn On] again. When connected with a phone or PC supporting OPP, the following menus are possible: s Send Name Card: Allows my contact data to send other device up to 1000 Contacts. s Get Name Card: Allows you to pull name card of other device. s Exchange Name Card: Allows you to exchange the handset's name card with other device. s Send Calendar Event: Allows you to send Calendar events to other devices. s Send Picture: Allows you to send pictures.My Phone InfoAllows you to view and/or edit the name of the Bluetooth® device.1. Open the flip and press [MENU]. 2. Press Settings & Tools.3. Press Bluetooth Menu.](https://usermanual.wiki/LG-Electronics-USA/VN220/User-Guide-3320962-Page-58.png)
![Settings & Tools 574. Press the Right Soft Key [Options].5. Press My Phone Info.6. Press to clear the existing name.7. Use the keypad to enter a new custom name.8. Press [SET] to save and exit.Discovery ModeAllows you to set whether your device is able to be discovered/found by other Bluetooth® devices in the area.1. Open the flip and press [MENU]. 2. Press Settings & Tools.3. Press Bluetooth Menu.4. Press the Right Soft Key [Options].5. Press Discovery Mode.6. Use the Navigation Key to highlight a setting, then press [SET].On/ OffNOTE If you choose On for Discovery Mode, your device is able to be searched by other in-range Bluetooth® devices.Supported ProfilesAllows you to see profiles that your phone can support.1. Open the flip and press [MENU]. 2. Press Settings & Tools.3. Press Bluetooth Menu.4. Press the Right Soft Key [Options].5. Press Supported Profiles. Select an option to view a brief description.6. Sounds SettingsProvides options to customize the phone’s sounds.6.1 Easy Set-upAllows you to quickly set the main Sounds Settings for keypad volume, incoming calls and messages (text, multimedia, and voice mail).1. Open the flip and press [MENU]. 2. Press Settings & Tools.3. Press Sounds Settings.4. Press Easy Set-up.](https://usermanual.wiki/LG-Electronics-USA/VN220/User-Guide-3320962-Page-59.png)
![Settings & Tools58 5. Read each setting description. Press the Right Soft Key [Skip] to go to the next menu item. Press the Left Soft Key [Play] to listen to the volume setting. Highlight the setting you want, then press [SET].6.2 Call Sounds Allows you to set how the phone alerts you for types of incoming calls.1. Open the flip and press [MENU]. 2. Press Settings & Tools.3. Press Sounds Settings.4. Press Call Sounds.6.2.1 Call RingtoneThis menu allows you to set a ringtone for incoming calls.1. Open the flip and press [MENU]. 2. Press Settings & Tools.3. Press Sounds Settings.4. Press Call Sounds.5. Press Call Ringtone.6. Use the Navigation Key to highlight a ringtone then press [SET] to save the sound.Shortcut To hear a ringtone before you set it, press the Left Soft Key [Play].6.2.2 Call VibrateThis menu allows you to set the phone to vibrate when receiving incoming calls.1. Open the flip and press [MENU]. 2. Press Settings & Tools.3. Press Sounds Settings.4. Press Call Sounds.5. Press Call Vibrate.6. Use the Navigation Key to highlight a setting, then press [SET]. On/ Off6.2.3 Caller ID ReadoutThis menu allows you to set the phone to read out caller ID information or just ring for incoming calls.1. Open the flip and press [MENU]. 2. Press Settings & Tools.3. Press Sounds Settings.4. Press Call Sounds.5. Press Caller ID Readout.](https://usermanual.wiki/LG-Electronics-USA/VN220/User-Guide-3320962-Page-60.png)
![Settings & Tools 596. Use the Navigation Key to highlight a setting, then press [SET].Ring Only/ Caller ID + Ring/ Name Repeat6.3 Alert SoundsAllows you to select the alert type sounds.1. Open the flip and press [MENU]. 2. Press Settings & Tools.3. Press Sounds Settings.4. Press Alert Sounds.5. Select TXT Message/ Multimedia Message/ Voice mail/ Emergency Tone/ Missed Call 6. The Alert Sounds menu has these options: Tone/ Vibrate/ Reminder The exception for this is the Emergency Tone menu. This menu has these options: Alert/ Vibrate/ Off6.4 Keypad Volume Allows you to set the keypad volume.1. Open the flip and press [MENU]. 2. Press Settings & Tools.3. Press Sounds Settings.4. Press Keypad Volume.5. Adjust the volume with the Navigation Key and press [SET] to save the setting.6.5 Service Alerts Allows you to set any of the five Alert options to either On or Off.1. Open the flip and press [MENU]. 2. Press Settings & Tools.3. Press Sounds Settings.4. Press Service Alerts.5. Select an alert option.ERI Alerts you to the status of cellular service. ERI: Enhanced Roaming IndicatorMinute Beep Alerts you 10 seconds before the end of every minute during a call.Call Connect Alerts you when the call is connected.Charge Complete Alerts you when the battery is completely charged.](https://usermanual.wiki/LG-Electronics-USA/VN220/User-Guide-3320962-Page-61.png)
![Settings & Tools60 Software Update Alerts you of an Over-the-Air (OTA) software update to the device.6. Use the Navigation Key to highlight a setting, then press [SET].On/ OffNOTE When highlighting On, you can play the alert option by pressing the Left Soft Key [Play].6.6 Hearing AssistAllows you to set the phone to automatically adapt to noisy environments by adjusting the listening level and improving speech intelligibility.NOTE The Hearing Assist feature is automatically disabled when you use the speakerphone or the hands-free devices.1. Open the flip and press [MENU]. 2. Press Settings & Tools.3. Press Sounds Settings.4. Press Hearing Assist.5. Use the Navigation Key to highlight a setting, then press [SET].On/ Off7. Display SettingsProvides options to customize the phone’s display screen.1. Open the flip and press [MENU]. 2. Press Settings & Tools.3. Press Display Settings. 7.1 Easy Set-upAllows you quickly set the main and front Display Settings.1. Open the flip and press [MENU]. 2. Press Settings & Tools.3. Press Display Settings. 4. Press Easy Set-up.Customize the following display settings:tPERSONAL BANNEREnter the text to be displayed on your screen.tMAIN BACKLIGHTSet the backlight duration for the main display.7 Seconds/ 15 Seconds/ 30 Seconds/ Always Off](https://usermanual.wiki/LG-Electronics-USA/VN220/User-Guide-3320962-Page-62.png)
![Settings & Tools 61tFRONT BACKLIGHTSet the backlight duration for the front display.7 Seconds/ 15 Seconds/ 30 Seconds/ Always OfftKEYPAD BACKLIGHTSet the backlight duration for the keypad. 7 Seconds/ 15 Seconds/ 30 Seconds/ Always OfftMAIN WALLPAPERAllows you to set the main wallpaper for your phone.tFRONT WALLPAPERAllows you to set the front wallpaper for your phone.tDISPLAY THEMESSelect display theme.Aurora/ Soft Paper/ AquatMENU LAYOUTSelect your main menu layout.List/ Grid/ TabtFONT SIZEWhen resizable is set, you can use the Volume Keys to adjust the font size.Dial Digits/ Menu & List/ MessagetMAIN CLOCKSelect the format of the main clock.Analog/ Large Analog/ Digital 12/ Large Digital 12/ Digital 24/ Large Digital 24/ Dual City/ OfftFRONT CLOCKSelect the format of the front clock.Digital 12/ Digital 24/Analog/ Off5. Read each setting description, highlight the setting you want, then press [SET]. When finished, press the Right Soft Key [Done].7.2 BannerAllows you to enter a string which displays on the LCD screen.1. Open the flip and press [MENU]. 2. Press Settings & Tools.3. Press Display Settings. 4. Press Banner.7.2.1 Personal BannerAllows you to enter a string of up to18 characters which displays on the screen.](https://usermanual.wiki/LG-Electronics-USA/VN220/User-Guide-3320962-Page-63.png)
![Settings & Tools62 1. Open the flip and press [MENU]. 2. Press Settings & Tools.3. Press Display Settings. 4. Press Banner.5. Press Personal Banner.6. Enter your own banner text.NOTE Use the Navigation Key to select the color you want.7. Press [SET] to save the setting.7.2.2 ERI BannerIf you use ERI Service, ERI Text is shown on the sub banner.1. Open the flip and press [MENU]. 2. Press Settings & Tools.3. Press Display Settings. 4. Press Banner.5. Press ERI Banner.6. Use the Navigation Key to highlight a setting, then press [SET].On/ Off7.3 Backlight Allows you to set the duration for illuminating the backlight for the main display, front display, and keypad. Each is set separately.1. Open the flip and press [MENU]. 2. Press Settings & Tools.3. Press Display Settings. 4. Press Backlight.5. Highlight a Backlight submenu and press [SET].tMain Backlight: 7 Seconds/ 15 Seconds/ 30 Seconds/ Always OfftFront Backlight: 7 Seconds/ 15 Seconds/ 30 Seconds/ Always OfftKeypad Backlight: 7 Seconds/ 15 Seconds/ 30 Seconds/ Always Off7.4 BrightnessAllows you to set the backlight levels.1. Open the flip and press [MENU]. 2. Press Settings & Tools.3. Press Display Settings. 4. Press Brightness.](https://usermanual.wiki/LG-Electronics-USA/VN220/User-Guide-3320962-Page-64.png)
![Settings & Tools 635. Use the Navigation Key to highlight a setting, then press [SET].NOTE Brightness level can be 1 to 7.7.5 WallpaperAllows you to choose the kind of background to be displayed on the phone's LCD in standby mode.7.5.1 Main ScreenAllows you to choose the kind of background to be displayed on the main screen.1. Open the flip and press [MENU]. 2. Press Settings & Tools.3. Press Display Settings. 4. Press Wallpaper.5. Press Main Screen.6. Highlight a Wallpaper submenu and press .My Pictures/ Fun Animations/ Slide Show7. Highlight a wallpaper and press [SET].7.5.2 Front ScreenAllows you to choose the kind of background to be displayed on the front screen.1. Open the flip and press [MENU]. 2. Press Settings & Tools.3. Press Display Settings. 4. Press Wallpaper.5. Press Front Screen.6. Highlight a wallpaper and press [SET].7.6 Display ThemesAllows you to choose between the different themes for the phone's menus.1. Open the flip and press [MENU]. 2. Press Settings & Tools.3. Press Display Settings. 4. Press Display Themes.5. Use the Navigation Key to highlight a setting, then press [SET].Aurora/ Soft Paper/ AquaNOTE Press the Left Soft Key [Preview] to preview the highlighted option.](https://usermanual.wiki/LG-Electronics-USA/VN220/User-Guide-3320962-Page-65.png)
![Settings & Tools64 7.7 Main Menu SettingsAllows you to choose how the Main Menu displays for menu selection.1. Open the flip and press [MENU]. 2. Press Settings & Tools.3. Press Display Settings. 4. Press Main Menu Settings.5. Use the Navigation Key to highlight a setting, then press .tMenu Layout List/ Grid/ TabNOTE Press the Left Soft Key [Preview] to preview the selected menu setting.tReplace Menu Items Select the item you want to replace then press [EDIT]. Select in the list the item you want to replace it with, then press [SET].tPosition Menu Items Select the item you want to move, then press [MOVE]. Move highlight to desired position by pressing the Navigation Key, then press [SET].tReset Menu Settings Menu Layout/ Menu Items/ Item Positions/ All7.8 Font TypeAllows you to set the font type.1. Open the flip and press [MENU]. 2. Press Settings & Tools.3. Press Display Settings. 4. Press Font Type.5. Use the Navigation Key to highlight a setting, then press [SET].VZW Font/ LG Script/ LG SecretNOTE Press the Left Soft Key [Preview] to preview the selected font type.7.9 Font SizeAllows you to set the font size for Dial Digits, Menu & List and Message. Plus, the Volume Key Resize setting allows you to use the side Volume Keys to instantly scale screen fonts. This setting is helpful for those who need the text to display a little bit larger.1. Open the flip and press [MENU].](https://usermanual.wiki/LG-Electronics-USA/VN220/User-Guide-3320962-Page-66.png)
![Settings & Tools 652. Press Settings & Tools.3. Press Display Settings. 4. Press Font Size.5. Use the Navigation Key to highlight Dial Digits/ Menu & List/ Message.6. Use the Navigation Key to highlight a setting, then press [SET].Dial Digits: Resizable/ Small/ Normal/ LargeMenu & Lists: Resizable/ Small/ Normal/ LargeMessage: Resizable/ Small/ Normal/ LargeNOTE Press the Left Soft Key [Preview] to preview the selected font size. 7.10 Clock FormatAllows you to choose the kind of clock to be displayed on the front and main LCD screens.7.10.1 Main ClockAllows you to choose the kind of clock to be displayed on the main screen.1. Open the flip and press [MENU]. 2. Press Settings & Tools.3. Press Display Settings. 4. Select Clock Format.5. Select Main Clock.6. Use the Navigation Key to highlight a setting, then press [SET].Analog/ Large Analog/ Digital 12/ Large Digital 12/ Digital 24/ Large Digital 24/ Dual City/ OffNOTE Press the Left Soft Key [Preview] to preview the selected clock format.7.10.2 Front ClockAllows you to choose the kind of clock to be displayed on the front screen.1. Open the flip and press [MENU]. 2. Press Settings & Tools.3. Press Display Settings. 4. Select Clock Format.5. Select Front Clock.6. Use the Navigation Key to highlight a setting, then press [SET].Digital 12/ Digital 24/ Analog/ Off](https://usermanual.wiki/LG-Electronics-USA/VN220/User-Guide-3320962-Page-67.png)
![Settings & Tools66 8. Phone Settings The Phone Settings menu allows you to designate specific settings to customize how you use your phone.8.1 Airplane Mode Turning on Airplane Mode will disable all wireless communications.1. Open the flip and press [MENU]. 2. Press Settings & Tools.3. Press Phone Settings.4. Press Airplane Mode.5. Use the Navigation Key to highlight a setting, then press [SET].On/ Off8.2 Set Shortcut KeysAllows you to set shortcuts to phone menus using the down, up, left and right Navigation Keys.8.2.1 Set My ShortcutsAllows you to personalize the shortcuts displayed on the My Shortcuts screen.NOTE To access these shortcuts, press the Right Navigation Key from standby mode (by default) to display My Shortcuts.1. Open the flip and press [MENU]. 2. Press Settings & Tools.3. Press Phone Settings.4. Press Set Shortcut Keys5. Press Set My Shortcuts.6. Use the Navigation Key to highlight a shortcut key you want to set. Shortcut 1/ Shortcut 2/ Shortcut 3/ Shortcut 47. Press [SET] to display the available shortcuts. Use the Navigation Key to highlight one, then press [SET].8.2.2 Set Navigation KeysAllows you to personalize the shortcuts using the Navigation Keys.NOTE To access these shortcuts open the flip, then press the Navigation Key in the direction (up, down, left) set from standby mode for the Shortcut you want to access.1. Open the flip and press [MENU]. 2. Press Settings & Tools.](https://usermanual.wiki/LG-Electronics-USA/VN220/User-Guide-3320962-Page-68.png)
![Settings & Tools 673. Press Phone Settings.4. Press Set Shortcut Keys5. Press Set Navigation Keys.6. Use the Navigation Key to highlight a shortcut key you want to set. Up Navigation Key/ Left Navigation Key/ Down Navigation Key7. Press [SET] to display the available shortcuts. Use the Navigation Key to highlight one, then press [SET].8.3 Voice CommandsPlease refer to page 48 for details.8.4 LanguageAllows you to set the Multi-language (English, Spanish,Chinese, Korean) feature according to your preference. 1. Open the flip and press [MENU]. 2. Press Settings & Tools.3. Press Phone Settings.4. Press Language.5. Use the Navigation Key to highlight a setting, then press [SET].English/ Español/Simplified Chinese (简体中文)/ Korean (ೠҴয)NOTE The Date & Time menu will be available depending on the network mode that you’ve set.8.5 Location Allows you to set GPS (Global Positioning System: Satellite assisted location information system) mode.1. Open the flip and press [MENU]. 2. Press Settings & Tools.3. Press Phone Settings.4. Press Location.5. Use the Navigation Key to highlight a setting, then press [SET].Location On/ E911 OnlyNOTES s GPS satellite signals are not always received by the phone, especially under bad atmospheric and environmental conditions, indoors, etc.s When a Location Setting Restriction is activated in the Security Menu, the lock code is required when you enter location menu. The lock code is the same 4 digits you use as your device lock code; initially the last 4 digits of your phone number.](https://usermanual.wiki/LG-Electronics-USA/VN220/User-Guide-3320962-Page-69.png)
![Settings & Tools68 s When in Airplane Mode, services supporting Location On functionality will be suspended.8.6 Current Country Allows you to change the country when the phone cannot get country information from the network.1. Open the flip and press [MENU]. 2. Press Settings & Tools.3. Press Phone Settings.4. Press Current Country.5. Select a desired country.8.7 Security The Security menu allows you to secure the phone electronically.1. Open the flip and press [MENU]. 2. Press Settings & Tools.3. Press Phone Settings.4. Press Security.5. Enter the four-digit lock code.The lock code is the last 4 digits of your mobile phone number if it is set. The lock code is the last 4 digits of your MEID if your mobile phone number is not set.8.7.1 Request PIN codeWhen the PIN Request feature is on, you must enter your PIN each time you switch the phone on. Consequently, any person who does not have your PIN cannot use your phone without your approval.1. Open the flip and press [MENU]. 2. Press Settings & Tools.3. Press Phone Settings.4. Press Security.5. Enter the four-digit lock code.6. Press Request PIN code.NOTE Before setting the PIN Request feature off, you must enter your PIN. 8.7.2 Edit CodesAllows you to enter a new four-digit lock code or change your PIN code.1. Open the flip and press [MENU]. 2. Press Settings & Tools.3. Press Phone Settings.4. Press Security.5. Enter the four-digit lock code.6. Press Edit Codes.7. Select Phone Only, Calls & Services or Change PIN code.](https://usermanual.wiki/LG-Electronics-USA/VN220/User-Guide-3320962-Page-70.png)
![Settings & Tools 698. Enter your new four digits lock code or four to eight digit PIN code.9. For confirmation, it will ask you to enter the new lock code or PIN code again.8.7.3 Restrictions Allows you to set separate restrictions for Location Setting, Calls and Messages.1. Open the flip and press [MENU]. 2. Press Settings & Tools.3. Press Phone Settings.4. Press Security.5. Enter the four-digit lock code.6. Press Restrictions.7. Enter the four-digit service code.8. Select a Restrictions menu then press .Location Setting/ Calls/ Messages9. Use the Navigation Key to highlight the restriction then press . Location Setting Lock Setting/ Unlock SettingCalls: Incoming Calls Allow All/ Contacts Only/ Block AllCalls: Outgoing Calls Allow All/ Contacts Only/ Block AllMessages: Incoming Messages Allow All/ Block AllMessages: Outgoing Messages Allow All/ Block All8.7.4 Phone Lock SettingKeeps your phone from unauthorized use. Once the phone is locked, it's in restricted mode until the lock code is entered. You can still receive phone calls and make emergency calls. You can modify the lock code using Edit Codes submenu within the Security menu.1. Open the flip and press [MENU]. 2. Press Settings & Tools.3. Press Phone Settings.4. Press Security.5. Enter the four-digit lock code.6. Press Phone Lock Setting.7. Highlight an option and press [SET].Unlocked The phone remains unlocked, by default.On Power Up The phone is locked when it is turned on.](https://usermanual.wiki/LG-Electronics-USA/VN220/User-Guide-3320962-Page-71.png)
![Settings & Tools70 8.7.5 Lock Phone NowThis setting allows you to lock the phone immediately.1. Open the flip and press [MENU]. 2. Press Settings & Tools.3. Press Phone Settings.4. Press Security.5. Enter the four-digit lock code.6. Press Lock Phone Now.NOTE To unlock the phone from standby mode, press the Right Soft Key Unlock and enter the four-digit lock code. 8.7.6 Reset Default Allows you to reset your phone to the factory default settings.1. Open the flip and press [MENU]. 2. Press Settings & Tools.3. Press Phone Settings.4. Press Security.5. Enter the four-digit lock code.6. Press Reset Default.7. Press after reading the warning message.8. Highlight Revert and press .A confirmation message is displayed briefly before the phone resets itself.8.7.7 Restore PhoneAllows you to erase all user data and Contact information you've entered in the phone's memory so it's as if it just left the factory.1. Open the flip and press [MENU]. 2. Press Settings & Tools.3. Press Phone Settings.4. Press Security.5. Enter the four-digit lock code.6. Press Restore Phone.7. Press after reading the warning message.8. Enter the four-digit lock code.8.8 System SelectAllows you to set up the phone management environment. Leave this setting as the default unless you want to alter system selection as instructed by your service provider.8.8.1 Network ModeAllows you to set the network mode. GSM and Global Mode can be set only when the SIM card is inserted.1. Open the flip and press [MENU].](https://usermanual.wiki/LG-Electronics-USA/VN220/User-Guide-3320962-Page-72.png)
![Settings & Tools 712. Press Settings & Tools.3. Press Phone Settings.4. Press System Select.5. Press Network Mode.6. Use the Navigation Key to highlight a setting, then press [SET].CDMA Mode/ GSM Mode/ Global Mode8.8.2 CDMA SettingsAllows you to set the CDMA mode settings.1. Open the flip and press [MENU]. 2. Press Settings & Tools.3. Press Phone Settings.4. Press System Select.5. Press CDMA Settings.6. Use the Navigation Key to highlight a setting, then press [SET].Home Only/ Automatic8.8.3 GSM SettingsAllows you to set the GSM mode settings. This menu is accessible only when the GSM Mode is on. Automatic mode allows the phone to connect the GSM mode automatically.1. Open the flip and press [MENU]. 2. Press Settings & Tools.3. Press Phone Settings.4. Press System Select.5. Press GSM Settings.6. Use the Navigation Key to highlight a setting, then press [SET].Automatic/ Manual8.9 NAM SelectAllows you to select the phone’s NAM (Number Assignment Module) if the phone is registered with multiple service providers.1. Open the flip and press [MENU]. 2. Press Settings & Tools.3. Press Phone Settings.4. Press NAM Select.5. Use the Navigation Key to highlight a setting, then press [SET].NAM1/ NAM2](https://usermanual.wiki/LG-Electronics-USA/VN220/User-Guide-3320962-Page-73.png)
![Settings & Tools72 8.10 Data Roaming AccessAllows you to use data connections when you are roaming.1. Open the flip and press [MENU].2. Press Settings & Tools.3. Press Phone Settings.4. Press Data Roaming Access.5. Use the Navigation Key to highlight a setting, then press [SET]. Deny data roaming access / Allow access only for this trip / Allow access for all trips9. Call SettingsThe Call Settings menu allows you to designate how the phone handles both incoming and outgoing calls.9.1 Answer OptionsAllows you to determine how the phone will answer an incoming call.1. Open the flip and press [MENU]. 2. Press Settings & Tools.3. Press Call Settings. 4. Press Answer Options.5. Use the Navigation Key to to select the setting(s) you want to use, then press [MARK].Flip Open/ Any Key/ Auto with Handsfree6. Press the Left Soft Key [Done] when you have marked the setting(s) you want.NOTE Auto with Handsfree is available when any external device is connected to your phone or speaker is set to on. 9.2 Call ForwardingAllows an incoming call to be redirected to a mobile telephone or other telephone number.1. Open the flip and press [MENU].2. Press Settings & Tools.3. Press Call Settings. 4. Press Call Forwarding.5. Use the Navigation Key to highlight either Forward Call or Cancel Forwarding, then press .6. After selecting Forward Call, enter the number to forward to and press . To cancel forwarding, select Cancel.](https://usermanual.wiki/LG-Electronics-USA/VN220/User-Guide-3320962-Page-74.png)
![Settings & Tools 73Menu User Menu Transmission/ Receiving ModeWhen making communications with a non-TTY terminal TTY Full For hearing-/ verbally- impairedText message transmission, text message receivingOperator requiredTTY + Talk For hearing-impaired Able to talk Voice transmission, text message receiving Operator requiredTTY + Hear For verbally-impaired Audible Text message transmission, voice receiving Operator requiredTTY Off Voice transmission, voice receivingTTY Mode (Tele Type writer)9.3 Auto RetryAllows you to set the length of time the phone waits before automatically redialing a number when the attempted call fails.1. Open the flip and press [MENU]. 2. Press Settings & Tools.3. Press Call Settings. 4. Press Auto Retry.5. Use the Navigation Key to highlight a setting, then press [SET].Off/ Every 10 Seconds/ Every 30 Seconds/ Every 60 Seconds9.4 TTY ModeAllows you to attach a TTY device enabling you to communicate with parties also using a TTY device. A phone with TTY support is able to translate typed characters to voice. Voice can also be translated into characters and then displayed on the TTY.1. Open the flip and press [MENU]. 2. Press Settings & Tools.3. Press Call Settings. 4. Press TTY Mode.5. An explanation message is displayed.6. Press to continue.](https://usermanual.wiki/LG-Electronics-USA/VN220/User-Guide-3320962-Page-75.png)
![Settings & Tools74 7. Use the Navigation Key to highlight a setting, then press [SET].TTY Full: Users who cannot talk or hear send and receive a text message through TTY equipment.TTY + Talk: Users who can talk but cannot hear receive a text message and send voice through TTY equipment.TTY + Hear: Users who can hear but cannot talk send a text message and receive voice through TTY equipment.TTY Off: Users send and receive without TTY equipment.Connecting TTY Equipment and a Terminal1. Connect a TTY cable to TTY connection on the terminal (TTY connection location is the same as a headset jack). 2. Enter the phone menu and set the desired TTY mode.3. After setting a TTY mode, check the LCD screen of the phone for the TTY icon.4. Connect the TTY equipment to the power source and turn it on.5. Make a phone connection to the desired number.6. When connection is made, use the TTY equipment to type in and send a text message or send voice.7. The voice or text message from the receiver end displays on the TTY equipment display.9.5 One Touch Dial Allows you to initiate a speed dial call by pressing and holding the speed dial digit. If set to Off, Speed Dial numbers designated in your Contacts will not function.1. Open the flip and press [MENU]. 2. Press Settings & Tools.3. Press Call Settings. 4. Press One Touch Dial.5. Use the Navigation Key to highlight a setting, then press [SET].On/ Off9.6 Voice PrivacyAllows you to set the voice privacy feature for CDMA calls. CDMA offers inherent voice privacy. Check with your service provider for availability.1. Open the flip and press [MENU].](https://usermanual.wiki/LG-Electronics-USA/VN220/User-Guide-3320962-Page-76.png)
![Settings & Tools 752. Press Settings & Tools.3. Press Call Settings. 4. Press Voice Privacy.5. Use the Navigation Key to highlight a setting, then press [SET].On/ Off9.7 DTMF TonesAllows you to set the DTMF tone length.1. Open the flip and press [MENU]. 2. Press Settings & Tools.3. Press Call Settings. 4. Press DTMF Tones.5. Use the Navigation Key to highlight a setting, then press [SET].Normal/ Long9.8 Assisted DialingSupports easy dialing on international calls while traveling in non-U.S. roaming region. If set to On, Assisted Dialing is displayed in calling screen.1. Open the flip and press [MENU]. 2. Press Settings & Tools.3. Press Call Settings. 4. Press Assisted Dialing.5. Use the Navigation Key to highlight a setting, then press .On/ Off6. Highlight Reference Country and press the Left Soft Key [Set] to select country.7. Use the Navigation Key to scroll to the desired country.8. Press the Left Soft Key [Details] to edit and save the Country Code, IDD Prefix (International Direct Dial), NDD Prefix(National Direct Dial), Area/City Code and Length (Length of Phone Number), then press to set.9. Press to set.NOTE For example, if you make a call from China to U.S when assisted dialing option is on (Reference Country is set to 'U.S.A'), '+' code will be automatically replaced by the matched IDD prefix of China.](https://usermanual.wiki/LG-Electronics-USA/VN220/User-Guide-3320962-Page-77.png)
![Settings & Tools76 10. MemoryAllows you to check your phone's internal memory. Shows the memory information saved in your phone.1. Open the flip and press [MENU].2. Press Settings & Tools.3. Select Memory.4. Choose Memory Usage/ My Pictures/ My Ringtones/ My Sounds/ My Contacts.11. Phone InfoAllows you to view the information specific to your phone and software.1. Open the flip and press [MENU]. 2. Press Settings & Tools.3. Select Phone Info.11.1 My NumberAllows you to view your phone number. This also allows you to view the phone number of your SIM card inserted in your phone.1. Open the flip and press [MENU]. 2. Press Settings & Tools.3. Select Phone Info.4. Press My Number.11.2 Mobile NetworkAllows you to check the current network status.1. Open the flip and press [MENU]. 2. Press Settings & Tools.3. Select Phone Info.4. Press Mobile Network.11.3 SW/HW VersionAllows you to view the versions of various applications such as SW, PRL, ERI, Browser, Media Center, AVR, EMS, MMS, Bluetooth®, OTADM Version, MSUI, HW Version, ESN, Warranty Date Code and Operating System.1. Open the flip and press [MENU]. 2. Press Settings & Tools.3. Select Phone Info.4. Press SW/HW Version.11.4 Icon GlossaryAllows you to view all the icons and their meanings.1. Open the flip and press [MENU].](https://usermanual.wiki/LG-Electronics-USA/VN220/User-Guide-3320962-Page-78.png)
![Settings & Tools 772. Press Settings & Tools.3. Select Phone Info.4. Press Icon Glossary.5. Select a subcategory to view the icons.11.5 Software UpdateThis feature gives your phone the ability to upgrade to the latest software and keeps your phone operating with the latest features without visiting a Verizon Wireless Communications Store for the upgrade. You can either be notified automatically that there is an updated version of software available for your phone, or you can manually check to see if there are any updates available for you to download.Automatic UpdateYour phone will receive a notification that there is an updated version of software available to be downloaded. You can press when notified that a download is available or it can happen automatically. Once the download is complete you may, depending on the nature of the update, have three options available: Accept the update, Defer the update, or Reject the update.NOTE During the update you cannot make or receive phone calls, including 911 calls, or text messages.Manual Update1. Open the flip and press [MENU].2. Press Settings & Tools.3. Select Phone Info.4. Press Software Update.The two options shown will be Status and Check New.Press Status to see the status of a download or update and see information on the last successful update. If updates have not yet been performed, status information will be unavailable.Press Check New to check if any new software updates are available to download. If a newer software version is available, it will automatically begin downloading after 30 seconds or you can begin the download immediately by pressing .](https://usermanual.wiki/LG-Electronics-USA/VN220/User-Guide-3320962-Page-79.png)
![Settings & Tools78 11.6 SIM IDAllows you to check the SIM ID of the SIM inserted in your phone.1. Open the flip and press [MENU]. 2. Press Settings & Tools.3. Select Phone Info.4. Press SIM ID.12. Set-up Wizard1. Open the flip and press [MENU]. 2. Press Settings & Tools.3. Select Set-up Wizard.4. Use the Navigation Key to scroll to a setting, then press [SET].NOTE If you don't want to change the setting, press the Right Soft Key [Skip] to go to the next setting.tFONT SIZEWhen you view Dial Digits, Menu & List or Message screens, you can adjust the font size using the Volume Keys.tCALL SOUNDSRing Only/ Vibrate Only/ Ring and Vibrate/ Be SilenttDISPLAY THEMESAurora/ Soft Paper/ AquatMENU LAYOUTList/ Grid/ TabtMAIN CLOCKSelect the format of the main clock.Analog/ Large Analog/ Digital 12/ Large Digital 12/ Digital 24/ Large Digital 24/ Dual City/ OfftFRONT CLOCKSelect the format of the front clock. Digital 12/ Digital 24/ Analog/ Off5. Press the Right Soft Key [Done] to complete set-up.](https://usermanual.wiki/LG-Electronics-USA/VN220/User-Guide-3320962-Page-80.png)
![Safety86 that part of the body will absorb more RF energy. Wireless phones marketed in the U.S. are required to meet safety requirements regardless of whether they are used against the head or against the body. Either configuration should result in compliance with the safety limit.” Also, if you use your wireless phone while in a car, you can use a phone with an antenna on the outside of the vehicle. You should also read and follow your wireless phone manufacturer’s instructions for the safe operation of your phone. Do wireless phones pose any special risks to children?The FDA/FCC website states that “the scientific evidence does not show a danger to users of wireless communication devices, including children.” The FDA/FCC website further states that “some groups sponsored by other national governments have advised that children be discouraged from using wireless phones at all”. For example, the Stewart Report from the United Kingdom [“UK”] made such a recommendation in December 2000. In this report a group of independent experts noted that no evidence exists that using a cell phone causes brain tumors or other ill effects. [The UK’s] recommendation to limit cell phone use by children was strictly precautionary; it was not based on scientific evidence that any health hazard exists. A copy of the UK’s leaflet is available at http://www.dh.gov.uk (search “mobile”), or you can write to: NRPB, Chilton, Didcot, Oxon OX11 ORQ, United Kingdom. Copies of the UK’s annual reports on mobile phones and RF are available online at www.iegmp.org.uk and http://www.hpa.org.uk/radiation/ (search “mobile”). Parents who wish to reduce their children’s RF exposure may choose to restrict their children’s wireless phone use. Where can I get further information about RF emissions?For further information, see the following additional resources (websites current as of April 2005):U.S. Food and Drug AdministrationFDA Consumer magazineNovember-December 2000Telephone: (888) INFO-FDA](https://usermanual.wiki/LG-Electronics-USA/VN220/User-Guide-3320962-Page-88.png)
![Safety 91quality that’s acceptable for normal operation.The M mark is intended to be synonymous with the U mark. The T mark is intended to be synonymous with the UT mark. The M and T marks are recommended by the Alliance for Telecommunications Industries Solutions (ATIS). The U and UT marks are referenced in Section 20.19 of the FCC Rules. The HAC rating and measurement procedure are described in the American National Standards Institute (ANSI) C63.19 standard.When you're talking over the cell phone, it's recommended you'd turn the BT (Bluetooth) mode off for HAC.Wireless Phones and Hearing Aid Accessibility http://www.accesswireless.org/Gallaudet University, RERC http://tap.gallaudet.edu/Voice/FCC Hearing Aid Compatibility and Volume Control http://www.fcc.gov/cgb/dro/hearing.htmlThe Hearing Aid Compatibility FCC Order http://hraunfoss.fcc.gov/edocs_public/attachmatch/FCC-03-168A1.pdfHearing Loss Association of America [HLAA] http://hearingloss.org/content/telephones-and-mobile-devicesCaution: Avoid potential hearing loss.Prolonged exposure to loud sounds (including music) is the most common cause of preventable hearing loss. Some scientific research suggests that using portable audio devices, such as portable music players and cellular telephones, at high volume settings for long durations may BT or WiFi](https://usermanual.wiki/LG-Electronics-USA/VN220/User-Guide-3320962-Page-93.png)

![113LIMITED WARRANTY STATEMENT ARBITRATION NOTICE: THIS LIMITED WARRANTY CONTAINS AN ARBITRATION PROVISION THAT REQUIRES YOU AND LG TO RESOLVE DISPUTES BY BINDING ARBITRATION INSTEAD OF IN COURT, UNLESS YOU CHOOSE TO OPT OUT. IN ARBITRATION, CLASS ACTIONS AND JURY TRIALS ARE NOT PERMITTED. PLEASE SEE THE SECTION TITLED “PROCEDURE FOR RESOLVING DISPUTES” BELOW.Warranty LawsThe following laws govern warranties that arise in retail sales of consumer goods:tThe California Song-Beverly Consumer Warranty Act [CC §§1790 et seq],tThe California Uniform Commercial Code, Division Two [Com C §§2101 et seq], andtThe federal Magnuson-Moss Warranty Federal Trade Commission Improvement Act [15 USC §§2301 et seq; 16 CFR Parts 701– 703]. A typical Magnuson-Moss Act warranty is a written promise that the product is free of defects or a written promise to refund, repair, or replace defective goods. [See 15 USC §2301(6).] Remedies include damages for failing to honor a written warranty or service contract or for violating disclosure provisions. [See 15 USC §2310(d).] Except for some labeling and disclosure requirements, the federal Act does not preempt state law. [See 15 USC §2311.]1. WHAT THIS WARRANTY COVERS:LG offers you a limited warranty that the enclosed subscriber unit and its enclosed accessories will be free from defects in material and workmanship, according to the following terms and conditions:(1) The limited warranty for the product extends for TWELVE (12) MONTHS beginning on the date of purchase of the product with valid proof of purchase, or absent valid proof of purchase, FIFTEEN (15) MONTHS from date of manufacture as determined by the unit's manufacture date code.(2) The limited warranty extends only to the original purchaser of the product and is not assignable or transferable to any subsequent purchaser/end user.](https://usermanual.wiki/LG-Electronics-USA/VN220/User-Guide-3320962-Page-115.png)