LG Electronics USA VN250 Cellular/PCS CDMA Phone with Bluetooth User Manual Layout 1
LG Electronics USA Cellular/PCS CDMA Phone with Bluetooth Layout 1
UserManual.wiki
>
LG Electronics USA
>
VN250 User Manual
Users Manual
Navigation menu
Upload a User Manual
Namespaces
Wiki Guide
HTML
PDF
Info
Views
User Manual
Discussion / Help
Navigation
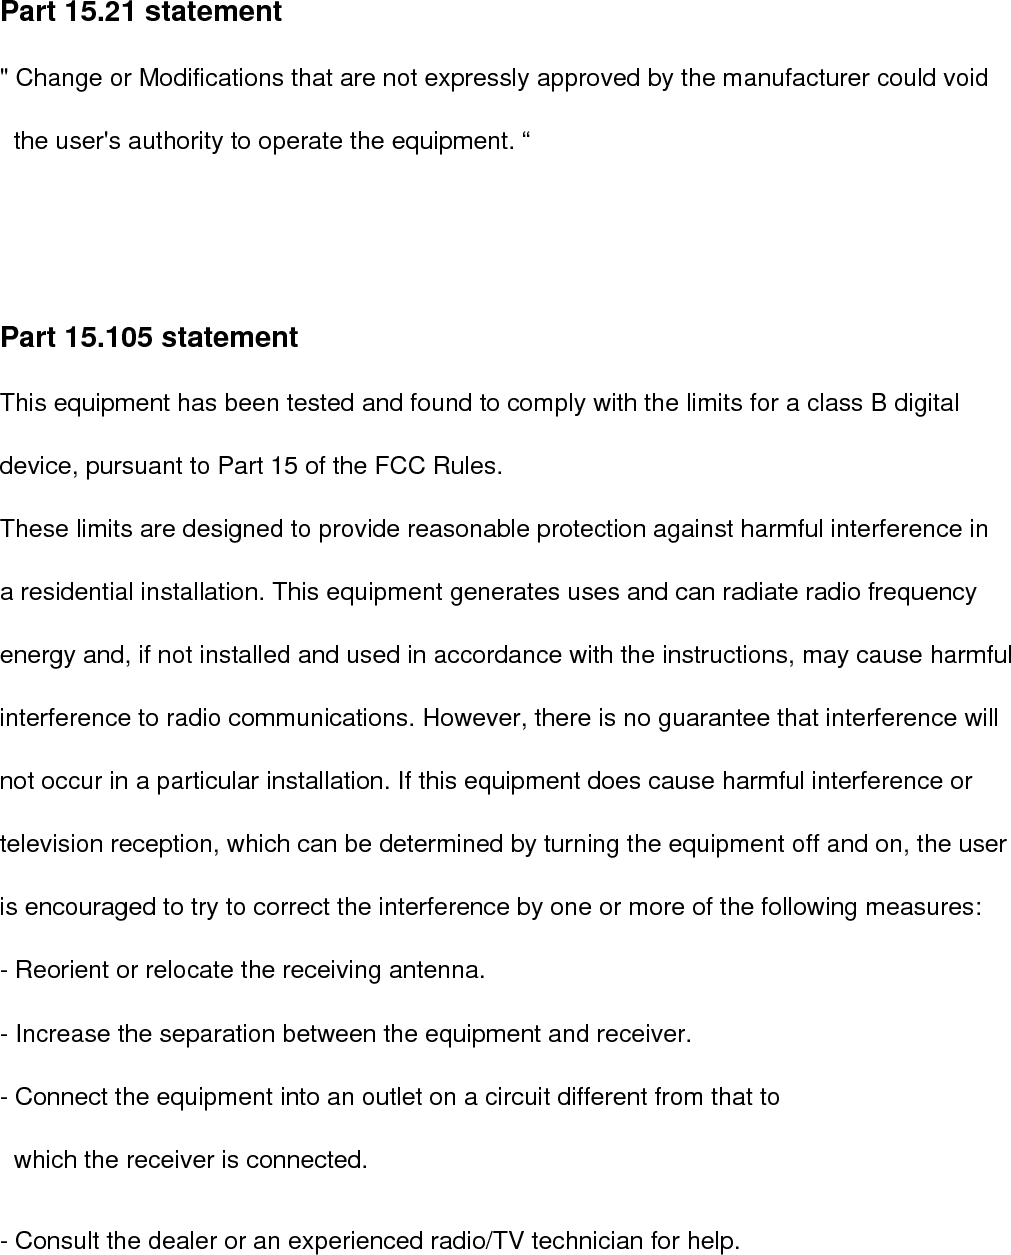

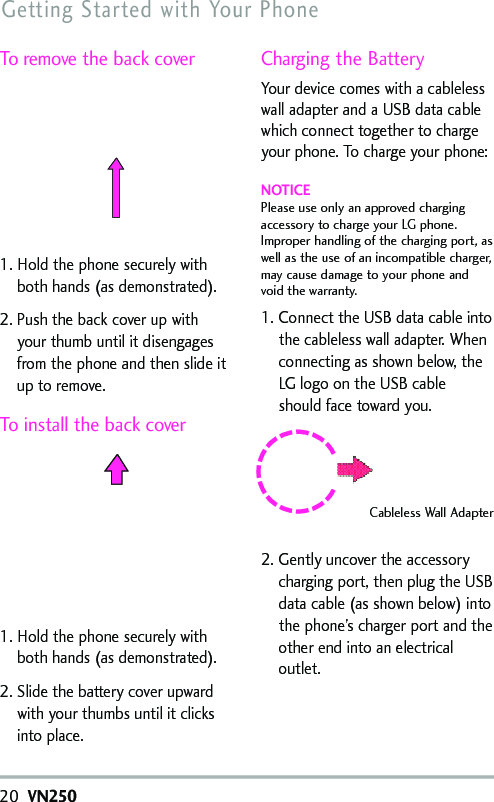
![VN25023Making Calls1.Make sure the phone is turned on. If not, open the flip and pressfor about three seconds. If necessary, enter the lock code.2. Enter the phone number.3. Press .4. Press to end the call.NOTEYour phone has a VoiceCommands feature that also letsyou make calls by saying a phonenumber, name, or location.Correcting Dialing MistakesWith the flip open, press onceto erase the last digit entered, orhold it down for atleast twoseconds to delete all the digits.Redialing CallsWith the flip open, press twice to redial the last numberdialed.Receiving Calls1. When the phone rings orvibrates, you can answer the callby simply opening the flip. Orpressing the speakerphone keylocated to the right sidewith the flip closed.NOTEIf the Answer Options setting isset to Any Key, you can:●Open the flip and press theLeft Soft Key [Quiet] tomutethe ringing or vibrationfor that call, then press any keytoanswer the call.●Open the flip and press theRight Soft Key[Ignore]toend the call or send itdirectlyto Voicemail.2. Press to end the call, orsimplyclose the flip. Screen IconsWhen the phone is on, the top lineof the LCD screen displays phonestatus icons. Tosee the icon glossary,with theflip open, go to MENU-> Settings&Tools-> Phone Info-> IconGlossaryon your phone.](https://usermanual.wiki/LG-Electronics-USA/VN250/User-Guide-1240913-Page-13.png)
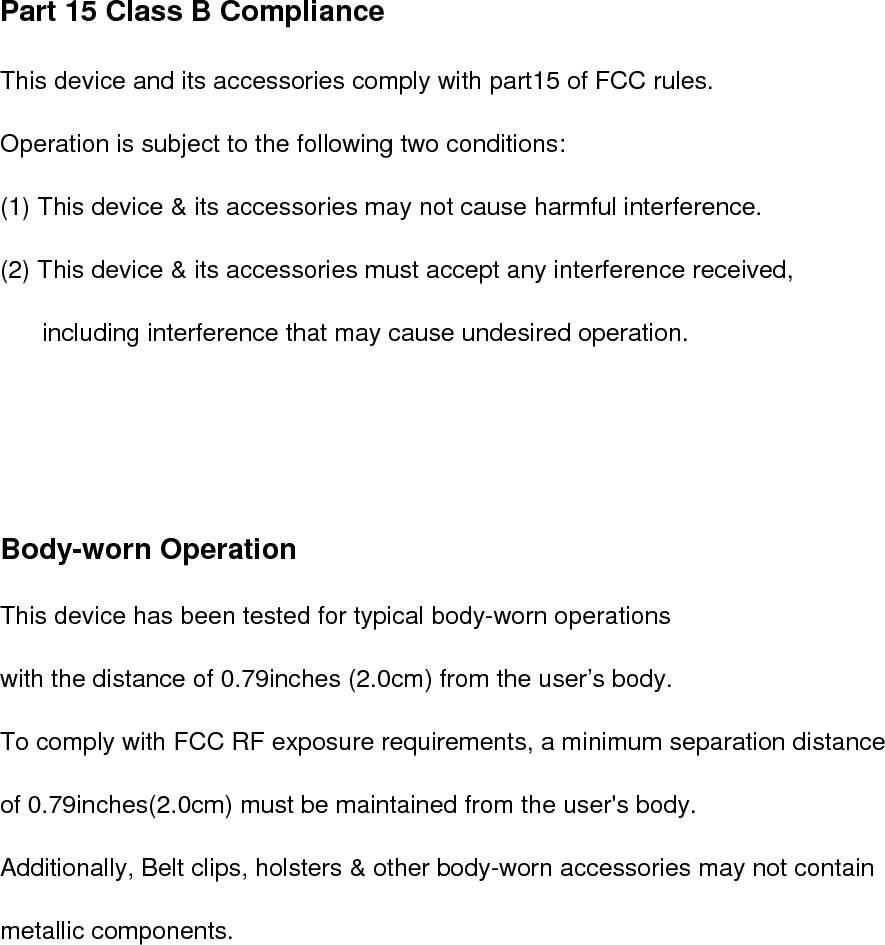
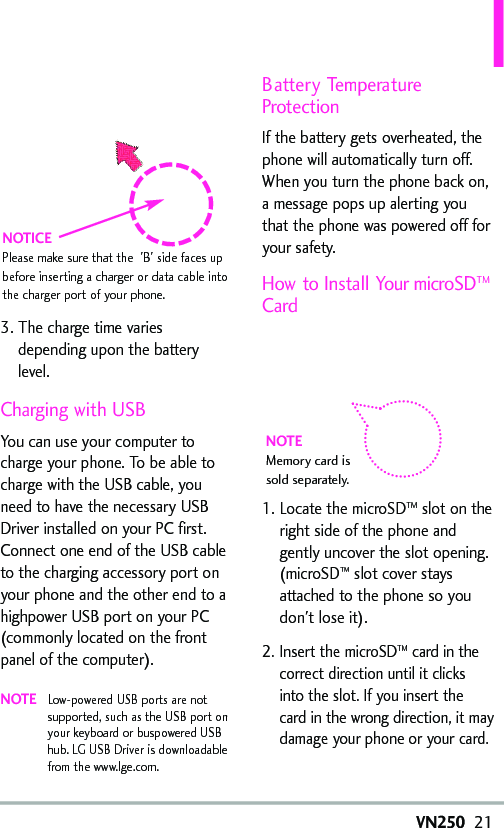
![24VN250Quick Access to Convenient FeaturesVibrate ModeSets the phone to vibrate instead ofring ( is displayed). To setVibrate Mode, with the flip open,press and hold .To return toNormal Mode, press and hold .Sounds OffQuickly deactivate your phone'ssounds when you're in a placewhere phone sounds would bedisruptive.From standby mode with the flipopen, press and hold the lower sidevolume keyfor 3 seconds. Toreturn to normal sounds mode,press and hold the upper side key.Mute FunctionThe Mute Function prevents thetransmission of your voice tothecaller. To quickly activate Mutewhile in a call, press the Left SoftKey[Mute], then tounmutepress the Left Soft Key [Unmute].Quick Volume AdjustmentQuickly adjust ringer and earpiecevolumes by pressing the upper sidevolume key on the left side ofthe phone to increase and lowervolume side key to decrease.NOTEThe earpiece volume can only beadjusted during a call andKeypad Volume can only beadjusted through the Menu.NOTEScalable Font:Users can directly control fontsize instead of accessing font sizesettings bypressing the sidevolume keys.e.g. using volume keys to adjust 3font sizesin 3 scenarios:-Message Viewing- List/Tab/Grid* Menu-Dial Up*Not support Grid menu layoutscreen.Call WaitingDuring a call, one beep indicatesanother incoming call. Press to answer it and put thefirst call on hold. Press againto return to the first call.](https://usermanual.wiki/LG-Electronics-USA/VN250/User-Guide-1240913-Page-14.png)
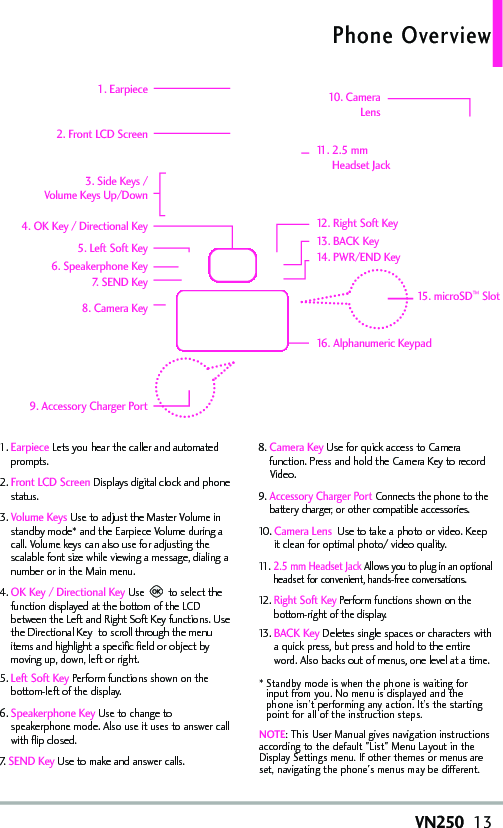
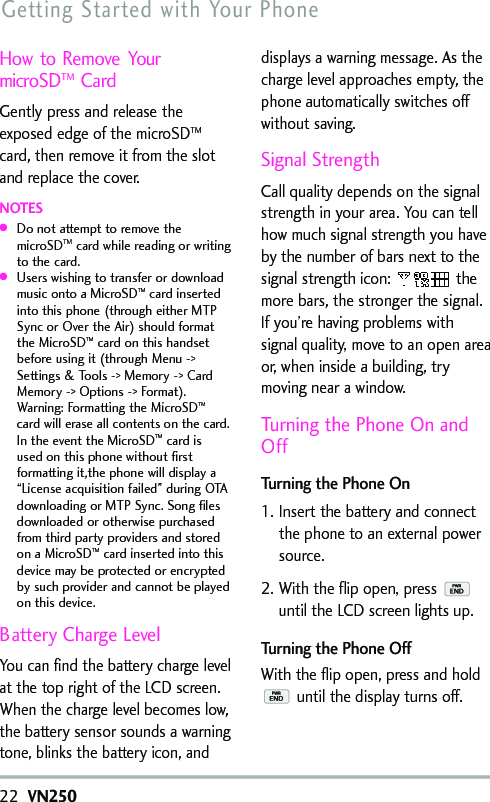
![VN25027Favorites KeyQuickly and easily call, message,and/or view ten of your Contactsyou set as your Favorites. 1. With the flip open, press theFavorites Key . 2. Use the Directional Key tohighlight the Favorite you want.●Press to call it.NOTEDefault Number is dialed if the Contacthas more than one phone number.●Press [MSG]toviewtheFavorites message history or sendamessage.●Press the Left Soft Key [View]to view the Favorites entry.●Press the Right Soft Key[Options]to access other options.Messaging KeyQuicklyand easily send a TXTmessage using the dedicatedMessaging Key.Simplyopen theflip, press the Messaging Key ,enter the address and message, thenpress [SEND].Voice Recorder Using theFront LCDTo quickly make a voice recordingwith the flip closed:1.Unlock the front LCD screen bypressing the Play/Pause Key ,then press the Voice Command Key(on the left side of the phone). NOTEIf the External Keyguard setting isOff, there's no need to unlock thefront LCD. Simply press and holdthe Voice Command Key .2.Press and hold the VoiceCommands Keyon the leftside of the phone again to activatethe Voice Recording feature.3. Press the Play/Pause Keytostart recording, then press thePlay/Pause Key to end therecording.4. To manage your recording(s), goto My Sounds menu.NOTEUsers can record voice message upto1hour subject tomemorycapacity. Default setting is 1minute. To change recording timesetting, users need to open the flipand press Right Soft Key [Options] during recording screenon front displayis activated , thenpress for recording time andmake selection.](https://usermanual.wiki/LG-Electronics-USA/VN250/User-Guide-1240913-Page-17.png)
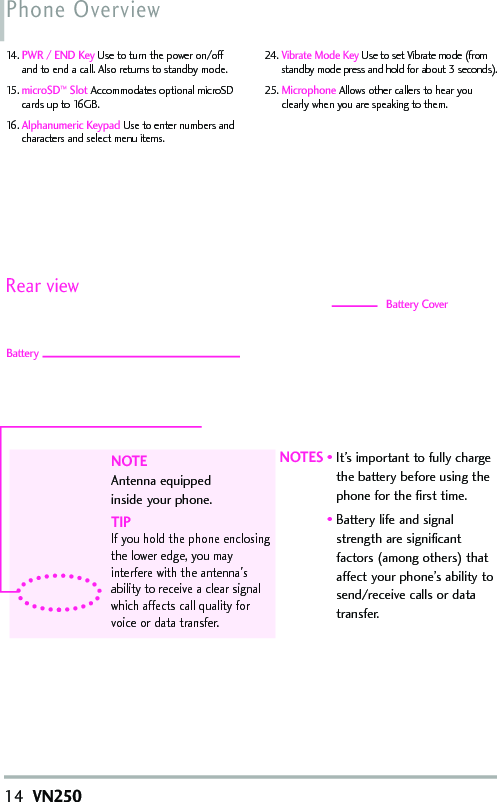
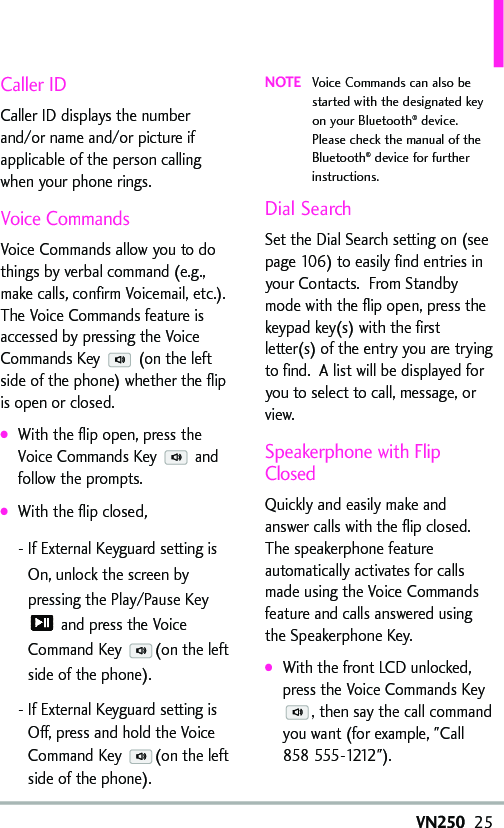
![VN25029Contacts in Your Phone’s MemoryStoring Basics1.With the flip open, enter anumber (max. 48 digits), thenpress the Left Soft Key [Save].2.Use the Directional Key tohighlight Add New Contact/Update Existing,then press.3. Use the Directional Key tohighlight Mobile 1/ Home/Business/ Mobile 2/ Fax,thenpress .4. Enter a name (max. 32characters), then press .5.Press to exit, to call,or the Right Soft Key [Options].Customizing Individual Entries1. With the flip open, press theRight Soft Key [Contacts],then use the Directional Keyto highlight an entry.2.Press the Left Soft Key [Edit].3. Use the Directional Key tohighlight the information tocustomize.4. Change the entry as you want,then press to save yourchanges.Speed DialAllows you to set up your SpeedDials.1. With the flip open, press theRight Soft Key [Contacts],then use the Directional Keyto highlight an entry.2. Press the Left Soft Key [Edit].](https://usermanual.wiki/LG-Electronics-USA/VN250/User-Guide-1240913-Page-19.png)
![3. Use the Directional Key tohighlight a phone number, thenpress the Right Soft Key [Options].4. Use the Directional Key tohighlight Set Speed Dial,thenpress .5. Enter a Speed Dial digit.●Use the keypad, then press.●Use the Directional Key tohighlight the Speed Dial digit,then press .6. Press Yesto confirm, thenpress to save.Storing a Number withPausesPauses allow you to enteradditional series of numbers toaccess automated systems such asVoicemail or credit billing numbers.Pause types are: Wait(W) Thephone stops dialing until you pressthe Left Soft Key [Release]toadvance tothe next number. 2-SecPause(P) The phone waits twoseconds before sending the nextstring of digits.1. With the flip open, enter thenumber, then press the RightSoft Key [Options].2. Use the Directional Key tohighlight 2-Sec Pause orWait,then press .3. Enter additional number(s) (e.g.,pin number, credit card number,etc.).4.Press the Left Soft Key [Save].5. Choose Add NewContact/Update Existing.6. Continue entering informationfor the Contact entry asnecessary.Adding Another PhoneNumberFrom standby mode1. With the flip open, enter aphone number, then press theLeft Soft Key[Save]. 2. Use the Directional Key tohighlight UpdateExisting,thenpress .30VN250Contacts in Your Phone’s Memory](https://usermanual.wiki/LG-Electronics-USA/VN250/User-Guide-1240913-Page-20.png)
![VN250313. Use the Directional Key tohighlight an existing entry, thenpress .4. Use the Directional Key tohighlight Mobile 1/ Home/Business/ Mobile 2/ Fax,thenpress to save.From the Contact List Screen1. With the flip open, press theRight Soft Key [Contacts].2. Use the Directional Key tohighlight an entry,then press theLeft Soft Key[Edit].3. Use the Directional Key tohighlight the phone number fieldto add, then enter the numberand press to save.Changing Saved InformationTo edit any information you stored,access the Edit Contacts screen:1. With the flip open, press theRight Soft Key [Contacts].2. Use the Directional Key tohighlight a Contact entry, thenpress the Left Soft Key [Edit].3. Use the Directional Key tohighlight the field you want tochange.4. Make the changes, then press.Adding a Pause to a ContactEntry1. With the flip open, press theRight Soft Key [Contacts].2.Use the Directional Key tohighlight a Contact entry, thenpress the Left Soft Key [Edit].](https://usermanual.wiki/LG-Electronics-USA/VN250/User-Guide-1240913-Page-21.png)
![32VN250Contacts in Your Phone’s Memory3. Use the Directional Key tohighlight the number, then pressthe Right Soft Key [Options].4. Press Add 2-Sec PauseorAdd Wait.5. Enter additional number(s), thenpress .Changing the DefaultNumberThe Default Number is the phonenumber you entered when youcreated the Contact. Another numbercan be saved as the Default Number.1. With the flip open, press theRight Soft Key [Contacts].2. Use the Directional Key tohighlight an entry.3. Press the Left Soft Key [Edit].4. Use the Directional Key tohighlight a phone number, thenpress the Right Soft Key [Options].5. Use the Directional Key tohighlight Set As Default,thenpress .6. Press Yesto set the newnumber as the default.Aconfirmation message isdisplayed.7. Press again to save.DeletingDeleting a Contact Entry1. With the flip open, press theRight Soft Key [Contacts].2. Use the Directional Keytohighlight an entry.3. Press the Right Soft Key [Options]. 4. Press Erase.5. Press Yestoconfirm.Deleting a Speed Dial1. With the flip open, press theRight Soft Key [Contacts].2. Use the Directional Keytohighlight a Contact entry to editand press [VIEW].3. Highlight the phone numberwith the Speed Dial, then press[EDIT].](https://usermanual.wiki/LG-Electronics-USA/VN250/User-Guide-1240913-Page-22.png)
![VN250334. Press the Right Soft Key [Options].5. Press Remove Speed Dial.6. Press Yesto confirm.7. Press again to save. Speed DialingAllows you to make phone callsquickly and easily to numbersstored in Contacts. NOTESpeed Dial 1 is for Voicemail.Speed Dial 411 is for DirectoryAssistance.Single Digit Speed DialsPress and hold the Speed Dialdigit. Your phone recalls the phonenumber from your Contacts,displays it, and dials it for you.Multiple Digit Speed DialsWhen you press and hold anumber key, it signals the phone toattempt a Speed Dial transmission.To dial Speed Dials with multipledigits, press the first digit(s) asnecessary, then press and hold thelast digit. For example, to SpeedDial 25, press , then pressand hold .NOTEYou can also enter the SpeedDial digit(s), then press .Speed Dials 95, 96, 97, 98, and 99Speed Dials 95, 96, 97, 98, and99 are preset to access certainphone account information: 95(#Warranty Center), 96 (#DATA),97 (#BAL), 98 (#MIN), and 99(#PMT). Unlike Speed Dial 1,these can be changed if you want.NOTE411 is not available for Set orRemove.](https://usermanual.wiki/LG-Electronics-USA/VN250/User-Guide-1240913-Page-23.png)
![34VN250MEDIA CENTERMEDIA CENTERMEDIA CENTER allows you to domore than just talk on your phone.MEDIA CENTER is a technologyand service that allows you todownload and use applications onyour phone. With MEDIA CENTER,it’s quick and easy to personalizeyour phone to your lifestyle andtastes. Just download theapplications that appeal to you.With a wide range of softwareavailable, you can be assured thatyou can find something useful,practical, or entertaining. Anything Unclear?From the MEDIA CENTER menu,press the Right Soft Key [Info]to see your memory status, activitylog, help text, and MEDIA CENTERstatus. Use the Help option to viewinformation from buying newapplications to expired applications.1. SearchRefer to page 63 for more information.1. Press [MENU]. 2. Press Media Center.3. Press Search.2. Tunes & TonesPersonalize your phone withringtones. A wide variety of choicesare available, such as current hits,pop, hip-hop, and more.Access and Options1. Press [MENU]. 2. Press Media Center.3. Press Tunes & Tones.4. Select a submenu by pressing thenumber that corresponds withthe submenu.2.1 Get New RingtonesAllows you toconnect toMEDIACENTER and download variousringtones. 1. Press [MENU]. 2. Press Media Center.3. Press Music & Tones.4. Press Get New Ringtones.](https://usermanual.wiki/LG-Electronics-USA/VN250/User-Guide-1240913-Page-24.png)
![VN250352.2 My RingtonesAllows you to select a desiredringtone, or download a newringtone.1. Press [MENU]. 2. Press Media Center.3. Press Music & Tones.4. Press My Ringtones.5. Use the Directional Key tohighlight a ringtone and pressthe Left Soft Key [Set As].You can press [PLAY] topreview the ringtone. ●Ringtone●Contact ID:Highlight andselect the Contact to beidentified by the ringtone youselected.●Alert Sounds:Press thecorresponding number key to setthe ringtone for one of thefollowing:All Messages/ TXT Message/Multimedia Message/ VoicemailTIP Player Volume AdjustmentWhile using My Ringtones, press theside Volume Keys to temporarilyset the player volume (the settingreverts to low after you exit). Usethe Directional Key to adjustthe volume and press [SET](changes to this setting will notaffect the master volume level setfor your device).High/ Medium High/ Medium/Medium Low/ Low/ Off2.3 My SoundsAllows you to record a new soundor select a desired sound.How to recordanewsound1. Press [MENU]. 2. Press Media Center.3. Press Music & Tones.4. Press My Sounds.5. Press Record Newandpress to start recording,then press again to stop.](https://usermanual.wiki/LG-Electronics-USA/VN250/User-Guide-1240913-Page-25.png)
![36VN250MEDIA CENTERHow to select a sound1. With the flip open, press [MENU]. 2. Press Media Center.3. Press Music & Tones.4. Press My Sounds.5. Use the Directional Key toscroll and highlight a preloadedsound.Options with a sound filehighlighted:●Press the Left Soft Key[SetAs].Ringtone:Sets the selectedsound as your phone's defaultringtone.Contact ID:Scroll andselect the Contact to beidentified by the sound youselected.AlertSounds:Press thecorresponding number key to setthe sound for one of thefollowing;All Messages/ TXT Message/Multimedia Message/ Voicemail●Press [PLAY].●Press the Right Soft Key [Options]to select:Send/ To Online Album/Rename/ Move/ Lock(Unlock)/Erase/ Erase All/ File Info3. PicturesView, take, and trade digital picturesand videos right from your wirelessphone. Access and Options1. Press [MENU]. 2. Press Media Center.3. Press Pictures.4. Select a submenu.3.1 GetNewPicturesAllows you to connect to MEDIACENTER and download a variety ofimages for My Pictures.1. Press [MENU]. 2. Press Media Center.3. Press Pictures.4. Press GetNew Pictures.](https://usermanual.wiki/LG-Electronics-USA/VN250/User-Guide-1240913-Page-26.png)
![VN250375. Press .3.2 My PicturesAllows you to view and managephotos stored in the phone.1. Press [MENU]. 2. Press Media Center.3. Press Pictures.4. Press My Pictures.5. Highlight a picturewith theDirectional Key .Options from here:●Press [VIEW]toviewit. ●Press the Left Soft Key [Erase]todelete it.●Press the Right Soft Key [Options]toselect one of thefollowing options:Send Picture Message/ ToOnline Album/ Via BluetoothSet As Main Wallpaper/ FrontWallpaper/ Picture IDTakePicture Turns on the camerafunction.GetNewPictures Downloadvarious pictures.Slide Show Plays all pictures as aslide show.Manage Pics Allows you to markmultiple pictures to be erased,moved, sent or locked/ unlocked.Rename Allows you to changethe file name.*Lock (Unlock) Allows you tolock or unlock. Locked files can'tbe erased accidentally.Print Print via Bluetooth/ PrintPreferencesFile Info Name/ Date/ Time/Resolution/ SizeNOTEThe option 'Send via Bluetooth' isnotdisplayed when you selectpictures protected by DRM(Digital Rights Management).*Only appears when the picture isstored on the phone.Editing a PictureYou can selectively zoom, crop, androtate your pictures. 1. Access My pictures, then use theDirectional Key to highlightapicture.](https://usermanual.wiki/LG-Electronics-USA/VN250/User-Guide-1240913-Page-27.png)
![38VN250MEDIA CENTER2. Press [View],then press theRight Soft Key [Options].3. Press Edit.4. Use the Directional Key toselect the photo edit.ZoomRotateCropTo resize image,“My Pictures-> Select picture ->View-> Options(Right Soft Key)->Edit-> OK in Zoom -> IN(RightSoft Key) -> DONE”3.3 Take PictureLets you to take digital pictures. TheVN250has improved picture qualityfor low lighting shots*.1. Press [MENU]. 2. Press Media Center.3. Press Pictures.4. Press TakePicture.5.Set the brightness by pressingthe Directional Key up and down,zoom by pressing theDirectional Key left and right ,and press the Right SoftKey [Options]to changeother settings.NOTEZoom is not available if theResolution is set to 1600x1200.*To turn on this feature, usersneed to press camera key => Right Soft Key to Options=> press right navigation key to"Noise Reduction" menu, thenselect On. Current default settingof this feature is "Off".●Select the option(s) tocustomize.Resolution 1600x1200/1280x960 / 640x480 /320x240Self Timer Off/ 3 Seconds/ 5Seconds/ 10 SecondsWhite Balance Auto/ Sunny/Cloudy/ Fluorescent/ GlowShutter Sound Shutter/ NoSound /Say “Cheese”/ Ready! 1 2 3Color Effects Normal/ Negative/Aqua/ Sepia/ Black&White](https://usermanual.wiki/LG-Electronics-USA/VN250/User-Guide-1240913-Page-28.png)
![VN25039Night Mode On/ OffSave Option Internal/ ExternalPhotometry Average/ Spot/Spot MultipleNoise Reduction On/ OffTurning this setting on providesimproved picture quality in low-lighting shots.Preview Actual view/ Full screenCapture Camera/ Video6. Take a picture by pressing [TAKE]. 7. Press the Left Soft Key [Save].The pictureis stored inMy Pictures. TIPTaking pictures with the flip closed.●With the Front LCD unlocked,press and hold the side CameraKey on the right side of thephone.●Press the side Camera Key totake a picture. Or press the frontRewind Key to exit.3.4 Online AlbumUse to access the Online Album(PIX Place).1. Press [MENU]. 2. Press Media Center.3. Press Pictures.4. Press Online Album.5. Login your mobile number andpassword, as applicable.4. GamesAllows you todownload gamesandapplications from the MEDIACENTER server. Choose thesoftware you want from the listdisplayed on the screen.1. Press [MENU]. 2. Press Media Center.3. Press Games.4. Press Get NewApplications.](https://usermanual.wiki/LG-Electronics-USA/VN250/User-Guide-1240913-Page-29.png)
![40VN250MEDIA CENTER5. Mobile WebMobile Web feature allows you toaccess news, sports, weather andemail from your Verizon Wirelessdevice. Access and selections withinthis feature are dependent uponyour service provider. For specificinformation on Mobile Web throughyour phone, contact your serviceprovider.SHORTCUTPressing the Directional Key Upwhile in Standbymode is a Shortcut toMobile Web 2.0.1. Press [MENU]. 2. Press Media Center.3. Press Mobile Web.Ending a Browser SessionEnd a Browser session by pressing.Navigating Through the BrowserOn-screen items appear in one ofthe following ways: ●Numbered optionsYou can use your numeric keypador you can select the items bymoving the cursor and pressingthe appropriate Soft Keys.●Links embedded in contentYou can act on the options orthe links using the Soft Keys justbelowthe displayscreen.●Text or numbersYou can select the items bymoving the cursor and pressingthe appropriateSoft Keys.Scrolling Use the Directional Key . Acursor lets you know which item iscurrently selected.Fast Scrolling Press and hold the Directional Keytoquicklymove the cursor upand down on the current screen.Scrolling by PagePress the Side Keys to move up anddown a page at a time.](https://usermanual.wiki/LG-Electronics-USA/VN250/User-Guide-1240913-Page-30.png)
![VN25041Home PagePress the Right Soft Key [Menu]and select 1. VZW Hometo go to the Home Page.NOTETo go to the Home Page fromOnline Album, Email, Chat, or MyVerizon, press and hold or.View Browser MenuPress the Right Soft Key [Menu]to display the Browsermenu.Soft KeysTonavigate todifferent screens orselect special functions, use theSoft Keys. The function associatedwith the Soft Keyscan change foreach page and depends on eachhighlighted item.Left Soft KeyLeft Soft Key is used primarilyfor options or selecting an item butitsfunction maychange, dependingon the content displayed.Right Soft Key Right Soft Keyis usedprimarily for secondary options or amenu of secondary options.Entering Text, Numbers, orSymbolsWhen prompted to enter text, thecurrent text entry method appearsabove the Right Soft Key as Word, Abc, ABC, 123or Symbols.To change the input mode, pressthe Right Soft Key . To createan upper case character, press theStar/Shift Key .Deleting Text/Number EnteredWhen entering text or numbers,press to clear the last number,letter, or symbol. Press and holdto clear the input fieldcompletely.Initiating a Phone Call From theBrowserYou can make a phone call from theBrowser if the site you are usingsupports the feature (the phonenumber may be highlighted and theLeft Soft Key appears as Call).The browser connection isterminated when you initiate thecall. After you end the call, yourphone returns to the screen fromwhich you initiated the call.](https://usermanual.wiki/LG-Electronics-USA/VN250/User-Guide-1240913-Page-31.png)
![42VN250MEDIA CENTER6. Browse & DownloadEverything you need to know whileyou’re on the go. 1. Press [MENU]. 2. Press Media Center.3. Press Browse & Download.4. Press Get NewApplications or select VZNavigator using the DirectionalKey then press .VZ NavigatorSMNow you can find the address of agreatrestaurant or the nearestATM. Check movie times. Discoverthe latest hot spots. And knowexactly how to get where you’regoing. VZ Navigator puts all theadvanced featuresof the latest GPSdevices and systems on yourwireless device — at a fraction ofthe price.NOTES●To use VZ Navigator, you must turnlocation on. (See page 97)●Download, subscription and airtimerequired for use; only in NationalEnhanced Service Coverage Area:accuracy and completeness ofinformation is not guaranteed;information about location of device willbe used to deliver service.7. ExtrasAllows you to access extraapplications.1. Press [MENU]. 2. Press Media Center.3. Press Extras.4. Press GetNewApplications.](https://usermanual.wiki/LG-Electronics-USA/VN250/User-Guide-1240913-Page-32.png)
![VN25043MESSAGINGSHORTCUTFrom standby mode, pressing the Left SoftKey is a hot key to yourMESSAGING. Text messages, Picture messages,and the Voicemail box becomeavailable as soon as the phone ispowered on. ●Check types of messages bypressing the Left Soft Key [Message].●Make a call to the callbacknumber (in Inbox) by pressingduring a message check.Depending on the content and sizeof your messages, the phone canstore well over 540 messages. Theinformation stored in the message isdetermined by phone model andservice capability. Other limits toavailable characters per messagemay exist. Please check with yourservice provider for system featuresand capabilities.NewMessage AlertYour phone will alert you when youhavenew messages.1. The phone displays a message onthe screen.2. The message icon ( ) isdisplayed on the display screen.In the case of a high prioritymessage, the icon( ) will flash.Viewing TXT Messages onthe Front LCD ScreenWhen you receive a TXT message,you can view it on the front LCDscreen without opening the flip.1. Press the Play/Pause Key toopen and view the TXT message.2. Press the Play/Pause Key [VIEW]to open and view theTXT message. 3. Press the Fast-Forward Key to scroll through any text notdisplayed on screen, then pressthe Play/Pause Key [OK]toexit the message. 1. New MessageAllows you to send messages (Text,Picture, Video, and Voice). Eachmessage has a destination(Address) and information(Message). These are dependentupon the type of message you wanttosend. You can also attach files toyour messages including pictures,videos, sounds, and name cards.MESSAGING](https://usermanual.wiki/LG-Electronics-USA/VN250/User-Guide-1240913-Page-33.png)
![44VN250MESSAGING1.1 TXT MessageThe Basics of Sending a TextMessage1. With the flip open, press the LeftSoft Key [Message].2. Press New Message.3. Press TXT Message.4. Enter the phone number of therecipient or the email address foran email message. You can enterup to 10 addresses for a singlemessage.5. Press the Directional Key downward.6. Type your message in the textfield.7. Press [SEND].Using Messaging Options●Editing the To: field1. With the To field highlighted,press the Right Soft Key [Add].2. Select from the following addoption(s).From Contacts/ From RecentCalls/ Favorites/ Groups●Editing Text1. With the Text field highlighted,press the Right Soft Key [Options].2. Select from the followingoption(s).Insert Quick Text Allows you toadd Quick Text.Save As Draft Saves the messageinto the Drafts folder. Add Allows you to add Graphic,Animation, Sound, Signature,Name Card, or ContactNumber/Email.Copy Text Allows you to copytext.Paste Allows you to paste thetext you last copied into a textfield.Format Text Allows you tochange the look of the text. Alignment/ Font Size/ FontStyle/ Text Color/ BackgroundPriority Level Gives priority tothe message. High/ Normal](https://usermanual.wiki/LG-Electronics-USA/VN250/User-Guide-1240913-Page-34.png)
![VN25045Callback # Inserts a pre-programmed callback numberwith your message.On/ Off/ EditSave Quick Text Allows you tosave the message as a Quick Text. Cancel Message Cancelsmessage editing and goes to theprevious menu. 3. Complete and then send or savethe message.Using Contacts to Send a MessageYou can designatean entry saved inyour Contacts as the addressinstead of manuallyentering thedestination.1. With the flip open, press the LeftSoft Key [Message].2. Press NewMessage.3. Press TXT Message.4. Press the Right Soft Key [Add].5. Use the Directional Key tohighlight From Contactsandpress . 6. Use the Directional Key tohighlight the Contact entrycontaining the destination andpress to mark the contact.7. Press the Left Soft Key [Done].NOTEThe Address feature allows multi-sending of up to 10 totaladdresses.8. Complete the message asnecessary.1.2 Picture MessageThe Basics of Sending a PictureMessage1. With the flip open, press the LeftSoft Key [Message].2. Press NewMessage.3. Press Picture Message.4. Enter the cellular phone numberor email address of the recipient.5. Press the Directional Key downward.6. Type your message in the textfield.](https://usermanual.wiki/LG-Electronics-USA/VN250/User-Guide-1240913-Page-35.png)
![46VN250MESSAGING7. Use the Directional Key tohighlight Pictureand press theLeft Soft Key [My Pics].Use the Directional Key toselect the image you want tosend, then press .8. Use the Directional Key tohighlight Sound,then press theLeft Soft Key [Sounds]. Usethe Directional Key tohighlight the audio file you wantto send then press .9. Use the Directional Key tohighlight Name Card,then pressthe Left Soft Key[Add].Use the Directional Key tochoose My Name Cardor FromContactsand select an entry.10. Use the Directional Key tohighlight Subjectand enter thesubject.11. Press [SEND]. Aconfirmation message isdisplayed.●Editing the To: field1. With the To field highlighted,press the Right Soft Key [Add].2. Select from the following addoption(s).From Contacts/ From RecentCalls/ Favorites/ Groups/ ToOnline Album/ To Contacts●Editing Text1. With the Text field highlighted,press the Right Soft Key [Options].2. Select from the followingoption(s).Preview Displays the Picturemessage as it would be seen bythe recipient.Save As Draft Saves the messageintothe Draftsfolder.Insert Quick Text Allows you toadd Quick Text.Copy Text Allows you to copy text.Paste Allows you to paste the textyou last copied into a text field.Add Slide Insert multiplepictures into a picture message.Priority Level Gives priority tothe message. High/ Normal](https://usermanual.wiki/LG-Electronics-USA/VN250/User-Guide-1240913-Page-36.png)
![VN25047Callback # Inserts a pre-programmed callback numberwith your message.On/ Off/ EditCancel Message Cancelsmessage editing and goes toMessaging menu.●Editing Picture1. With the Picture field highlighted,press the Right Soft Key [Options].2.Select from the following option(s).Preview/ Save As Draft/ AddSlide/ Priority Level/ RemovePicture/ Cancel Message●Editing Sound1. With the Sound field highlighted,press the Right Soft Key [Options].2. Select from the followingoption(s).Preview/ Save As Draft/ AddSlide/ Priority Level/ RemoveSound/ Cancel Message●Editing Name Card 1. With the Name Card fieldhighlighted, press the Right SoftKey [Options].2. Select from the followingoption(s).Preview/ Save As Draft/ AddSlide/ Priority Level/ RemoveName Card/ Cancel Message●Editing a Subject1. With the Subject fieldhighlighted, press the Right SoftKey [Options].2. Select from the followingoption(s).Preview/ Save As Draft/ InsertQuick Text/ Copy Text/ Paste/Add Slide/ PriorityLevel/Cancel Message1.3 Voice MessageThe Basics of Sending a VoiceMessage 1. With the flip open, press the LeftSoft Key [Message].2. Press New Message.3. Press Voice Message.](https://usermanual.wiki/LG-Electronics-USA/VN250/User-Guide-1240913-Page-37.png)
![48VN250MESSAGING4. Press to start recording.5. Record your voice message.6. Press to end recording.7. Enter the cellular phone numberor email address of the recipient.8. Press the Directional Key downward.9. Type your message.10. Use the Directional Key tohighlight Name Card,thenpress the Left Soft Key [Add].Use the Directional Keyto choose My Name Cardor From Contactsand select anentry.11. Use the Directional Key tohighlight Subjectand enter thesubject.12. Press [SEND]. After a connecting display,message is transmitted.2. InboxThe phone alerts you in 3 wayswhen you receive a new message:●By displaying a notificationmessage on the screen.●By sounding a sound orvibration, if set.●By displaying . (The icon willblink when you get a high prioritymessage.) NOTEIf the Volume Key Resize setting isactivated, you can change theviewing size (small, normal orlarge) of the message font usingthe side Volume Keys.Viewing Your Inbox1. With the flip open, press the LeftSoft Key [Message].2. Press Inbox.3. Options from here with amessage highlighted:●Press [OPEN]to view themessage.●Press the Left Soft Key [Erase]to erase the highlightedmessage.](https://usermanual.wiki/LG-Electronics-USA/VN250/User-Guide-1240913-Page-38.png)
![VN25049●Press the Right Soft Key [Options]to access the options. Reply Replies to the originationaddress of the received message.Reply With Copy Replies to theorigination address with a copyof the original message attached.Forward Forwards a receivedmessage to other destinationaddress(es).Add To Contacts Stores thecallback number, email address,and numbers from the address ofthe received message into yourContacts.Extract Addresses Allows you toextract addresses.Sort By Sender/Time Allows youtosort messages alphabeticallyby sender's name or by timereceived.Messages View Allows you toswitch message view from Timeto Contact.Manage InboxAllows you tomanage (lock or erase) messagelist.Message Info Allows you tocheck the received messageinformation.Message Icon ReferenceNew/ Unread TXTMessagesOpened/ Read TXTMessagesPriority HighLockedNew/ Unread MultimediaMessageOpen/ Read MultimediaMessageNew/Unread BrowserMessagesOpened/Read BrowserMessagesNew/Unread NotificationMessagesOpen/Read NotificationMessages*Multimedia Message indicates Picture/Video/ Voice Message.](https://usermanual.wiki/LG-Electronics-USA/VN250/User-Guide-1240913-Page-39.png)
![50VN250MESSAGING3. SentDepending on the content and sizeof your messages, you can save upto 100 Sent messages. This menulists your Sent messages. Use it toverify whether the transmission wassuccessful or not and view messagecontents.1. With the flip open, press the LeftSoft Key [Message].2. Press Sent.3. Options from herewith amessage highlighted:●Press [OPEN] toviewthemessage.●Press the Left Soft Key[Erase] toerase highlightedmessage.●Press the Right Soft Key [Options].Forward Forwards a sentmessage to other destinationaddress(es).Reply To All Replies to allrecipients of the selectedmessage. Send/Resend Allows you toretransmit the selected message.Add To Contacts Stores thecallback number, email address,and numbers from the address ofthe message into your Contacts.Sort By Recipient/Time Allowsyou to sort alphabetically byrecipient's name or by time sent.Messages View Allows you toswitch message view from Timeto Contact.Manage Sent Allows you tomanage (erase or lock) messagelist.Message Info Allowsyou tocheck the sent messageinformation.Message Icon ReferenceText/Picture/Video/VoiceMessages sentMessage delivered (Onlyappear when deliveryreceiptis setto on.)Text/Picture/Video/VoiceMessagesfailedMultiple Messages sentMultiple Messages deliveredMultiple Messages failedMultiple Messagesincomplete](https://usermanual.wiki/LG-Electronics-USA/VN250/User-Guide-1240913-Page-40.png)
![VN25051Priority HighLocked4. DraftsDisplays draft messages.1. With the flip open, press the LeftSoft Key [Message].2. Press Drafts.3. Options from here with amessage highlighted:●Press [EDIT]to continueediting the message.●Press the Left Soft Key [Erase].●Press the Right Soft Key [Options].Send Sends the selectedmessage.Add To Contacts Stores thecallback number, email address,and numbers from the addressincluded in the message intoyour Contacts.Manage DraftsAllows you tomanage (erase or lock) messages.Message Icon ReferenceDraft TxtDraft Multimedia Message5. VoicemailAllows you to view the number ofnew voice messages recorded in theVoicemail box. Once you exceed thestorage limit, old messages areoverwritten. When you have a newvoice message, your phone will alertyou.Checking Your Voicemail Box1. With the flip open, press the LeftSoft Key[Message].2. Press Voicemail.3. Options from here :●Press the Left Soft Key [Clear]to delete information,and then press [Yes].●Press or [CALL] tolisten tothe message(s).](https://usermanual.wiki/LG-Electronics-USA/VN250/User-Guide-1240913-Page-41.png)
![52VN250MESSAGINGOR1. Dial *86 (*VM) by pressing ,,,then from your phone or dial yourwireless phone number from anytouch-tone phone. 2. When the recordedannouncement begins, pressto interrupt (if applicable).3. When prompted, enter yourpassword, then press .6. Mobile IMAllows you to send and receive anInstant Message at any time.1. With the flip open, press the LeftSoft Key[Message].2. Press Mobile IM.7.EmailAllows you tosend an email viaMobile Web.1. With the flip open, press the LeftSoft Key [Message].2. Press Email.3. Select Mobile Emailor MobileWeb Email.4. A Mobile Web Browser sessionstarts.5. Highlight an email provider andpress .6. Login or enter your email addressand password.8. ChatAllows you to chat with InternetMessenger users.1. Press the Left Soft Key [Message].2. Press Chat.3. AMobile Web Browser sessionstarts.4. Highlight a Chat provider andpress .NOTEThis feature may require asubscription to a Chat serviceprovider.9. Social Networks1. Press the Left Soft Key [Message].2. Press Social Networks.](https://usermanual.wiki/LG-Electronics-USA/VN250/User-Guide-1240913-Page-42.png)
![VN25053Messaging SettingsAllows you to configure settings foryour messages.1. With the flip open, press the LeftSoft Key [Message].2. Press the Left Soft Key [Settings]. 3.Use the Directional Key tohighlight one of the settings andpress to select it.Message Settings Sub-MenuDescriptions1. Messages ViewSelect Time todisplay messageschronologically in Inbox and Sent.Select Contact to sort all messagesalphabetically by Contact in onemessage folder.2. Entry ModeSelect T9 Word , Abc , ABC, 123,T9 Palabra to be your default inputmethod.3. Auto Save SentSelect On to automatically saveyour Sent messages.Select Off if you don't want to saveautomatically. Select Prompt tobe asked tosave.4. Auto Erase InboxSelect On to automatically deleteread messages when you exceed thestorage limit. Or, select Off.5. Message Font SizeSelect Small, Normal or Large forthe size of the Messagingcharacters.6. TXT Auto ViewSelect On to automatically displaymessage content on the screen.Select Off for more security andprivacy by requiring the message tobe opened to view it.7. TXT Auto ScrollSelect On toautomatically scrolltext down while viewing messages.Or, select Off.8. Multimedia Auto ReceiveSelect On to automaticallydownload attachments toMultimedia messages. Or, select Off.9. Quick TextDisplaysyour list of Quick Textphrases to help you to reducemanual input into messages. Usethis submenuto edit and add text.](https://usermanual.wiki/LG-Electronics-USA/VN250/User-Guide-1240913-Page-43.png)
![54VN250MESSAGING10. Voicemail #Allows you to manually enter theaccess number for VoicemailService. This number should be onlyused when a VMS (VoicemailService) access number is notprovided by the network.11. Callback #Select On to automatically send adesignated callback number withyour messages. Or, select Off.12. SignatureSelect Custom to create/edit asignature to automatically send withyour messages. Select None for nosignature.13. Delivery ReceiptWhen Delivery Receipt is set to On,you can see if your sent messageshave been delivered ( ).Erasing MessagesAllows you to erase messages storedin your Inbox, Sent, or Draftsfolders. You can also erase allmessages at the same time.1. With the flip open, press the LeftSoft Key [Message].2. Press the Right Soft Key [Options]then select one of thefollowing:Erase Inbox/ Erase Sent/ EraseDrafts/ Erase All3. Press to erase the messagesselected.4. Press to confirm thedeletion.Aconfirmation message isdisplayed.](https://usermanual.wiki/LG-Electronics-USA/VN250/User-Guide-1240913-Page-44.png)
![VN25055CONTACTSThe Contacts Menu allows you tostore names, phone numbers andother information in your phone’smemory. SHORTCUTPressing the Right Soft Key is a hotkey to Contact List.1. NewContactAllows you to add a new number toyour Contact List.NOTEUsing this submenu, the numberis saved as a new Contact, notinto an existing Contact.1. Press [MENU]. 2. Press Contacts.3. Press NewContact.4. Enter the name and press theDirectional Key downwarduntil the phone number type youwant is highlighted.5. Enter the number and press .NOTEFor moredetailed information, seepage 26.2. Contact ListAllows you to view your Contact List.1. Press [MENU]. 2. Press Contacts.3. Press Contact List.4. Use the Directional Key toscroll through your Contactsalphabetically.●Press the Right Soft Key [Options]to select one of thefollowing:New Contact/ Erase/ NewTXT Message/ New PictureMessage/ New VideoMessage/ New VoiceMessage/ SetAsICEContact/ Call/ ManageContacts/ Set As Favorite●Press the Left Soft Key [Edit]to edit.●Press to view the entrydetails.TIPUse the Go To field, for quick access to anentry without scrolling. For example, to goto "Vet", enter the letter V.CONTACTS](https://usermanual.wiki/LG-Electronics-USA/VN250/User-Guide-1240913-Page-45.png)
![56VN250CONTACTS3. Backup AssistantBackup Assistant safeguards yourmobile phone's address book andautomatically saves a copy of thenames, phone numbers, and emailaddresses stored in your phone. Youcan also view, print, add, delete, andedit your Contacts online. If youlose, damage, or upgrade yourphone, Backup Assistant will restoreyour Contact List to a new orreplacement phone.Additional fees may apply. Seebrochure for details.NOTETo use the Backup Assistantservice, you are required toactivate the service from yourphone.1. Press [MENU]. 2. Press Contacts.3.Press Backup Assistant.4. Follow the instructions todownload the application.4. FavoritesAllows you to add Contact entriesor Contact groups to your list ofFavorites to easily view, call, or sendmessages.SHORTCUTFrom standby mode with the flip open,pressing the Favorites Key is a hotkey to the Favorites menu.1. Press [MENU]. 2. Press Contacts.3.Press Favorites.TIPYou can add up to 10 Contacts and/orContact groups as Favorites to easily makecalls, send messages, and view messages.4. With the ADD square selected,press to add a Favorite.5. Select whether you want to addafavorite from your Contacts orGroup.6. Use the Directional Key toscroll through your Contacts orGroups alphabetically and press[MARK]to select as manyentries as you want.](https://usermanual.wiki/LG-Electronics-USA/VN250/User-Guide-1240913-Page-46.png)
![7 Press the Left Soft Key [Done]. Once you have addedContacts to the Favorites list, thefollowing options will becomeavailable in the Favorites menu:Left Soft Key : ViewOK Key : MSGRight Soft Key : OptionsMove Position/ Remove/Remove All/ Set As ICE Contact5. GroupsAllows you to view your groupedContacts, add a newgroup, changethe name of a group, delete agroup, or send a message toeveryone in the selected group.1. Press [MENU]. 2. Press Contacts.3. Press Groups.4.ViewaGroupUse the Directional Key tohighlight a group, then press[VIEW].Add a New GroupPress the Left Soft Key [New]to add a new group to thelist. Options Using a GroupPress the Right Soft Key [Options]to select one of thefollowing:New TXT Message/ NewPicture Message/ New VideoMessage/ New Voice Message/Edit Group/ Erase Group/ EditMembers/ Set As Favorite/Send Name Card6. Speed DialsAllows you to view your list ofSpeed Dials or designate SpeedDials for numbersentered in yourContacts.1. Press [MENU]. 2. Press Contacts.3. Press Speed Dials.VN25057](https://usermanual.wiki/LG-Electronics-USA/VN250/User-Guide-1240913-Page-47.png)
![58VN250CONTACTS4. Use the Directional Key tohighlight the Speed Dial position,or enter the Speed Dial digit andpress [SET].5. Use the Directional Key tohighlight the Contact then press. (For Contacts with multiplenumbers, highlight the numberfor the Speed Dial, then press.)6. Press Yesto confirm. Aconfirmation message isdisplayed.7. In Case of Emergency(ICE)This menuallows you to storenames, phone numbers and otherinformation, which will be veryhelpful in case of emergency. Also, itallows you to add, read, edit, orerase the notes about yourself asnecessary in case an emergencytakes place.1. Press [MENU]. 2. Press Contacts.3. Press In Case ofEmergency.4. Use the Directional Key tohighlight Contact 1, 2,or 3,orPersonal Info,then press [ADD].5. Press to add Contact fromyour Contact List.Highlight the Contact, then press.ICE Contact Assigned isdisplayed.ORPress toadd Contact fromyour Favorite Contact List.ORPress to enter informationnot stored in your Contact List.6. The generic Contact labelchanges to the specified name. Entering Your ICE Personal Info1. With the flip open, press [MENU]. 2. Press Contacts.3. Press In Case ofEmergency.](https://usermanual.wiki/LG-Electronics-USA/VN250/User-Guide-1240913-Page-48.png)
![4. Use the Directional Key tohighlight Personal Info,thenpress .5. Use the Directional Key tohighlight one of the Note entries,then press .6. Enter information that would behelpful in an emergency (e.g.,your medical record number),then press .TIPWhen you've assigned ICE Contacts andyour phone is locked, the Left Soft Keyappears as [ICE] allowing theemergency information tobe viewedwithout unlocking the phone.8. My Name CardAllows you to view all of yourpersonal Contact informationincluding name, phone numbers,and email address in one entry.1. Press [MENU]. 2. Press Contacts.3. Press My Name Card.4. Press [EDIT]to enter yourpersonal Contact information.5. Use the Directional Key toscroll to the information youwant to enter.6. Enter your information asnecessary,then press [SAVE].NOTEPress the Right Soft Key[Send]to send your name card.VN25059](https://usermanual.wiki/LG-Electronics-USA/VN250/User-Guide-1240913-Page-49.png)
![60VN250RECENT CALLSRECENT CALLSThe Recent Calls Menu is a list of thelast phone numbers or Contact entriesfor calls you placed, accepted, ormissed. It's continually updated as newnumbers are added to the beginningof the list and the oldest entries areremoved from the bottom of the list.1. Missed Allows you to view the list of missedcalls; up to 90 entries.1. Press [MENU]. 2. Press Recent Calls.3. Press Missed.4. Use the Directional Keytohighlight an entry, then●Press toviewthe entry.●Press to place a call tothe number.●Press the Right Soft Key[Options]to select:Save To Contacts (Details)/Erase/ Lock(Unlock)/ EraseAll/ View Timers●Press the Left Soft Key [Message] to select:TXT Message/ PictureMessage/ Video Message /Voice Message2. ReceivedAllows you to view the list ofincoming calls; up to 90 entries.1. Press [MENU]. 2. Press Recent Calls.3. Press Received.4. Use the Directional Key tohighlight an entry, then●Press to view the entry.●Press to place a call tothe number.●Press the Right Soft Key [Options]to select:Save To Contacts (Details)/Erase/ Lock(Unlock)/ EraseAll/ View Timers](https://usermanual.wiki/LG-Electronics-USA/VN250/User-Guide-1240913-Page-50.png)
![VN25061●Press the Left Soft Key [Message]to select:TXT Message/ PictureMessage/ Video Message /Voice Message3. Dialed Allows you to view the list ofoutgoing calls; up to 90 entries.1. Press [MENU]. 2. Press Recent Calls.3. Press Dialed.4. Use the Directional Key tohighlight an entry, then●Press to view the entry.●Press to place a call tothe number.●Press the Right Soft Key[Options] toselect:Save to Contacts(Details)/Erase/ Lock(Unlock)/ EraseAll/ View Timers●Press the Left Soft Key [Message]to select:TXT Message/ PictureMessage/ Video Message /Voice Message4. AllAllows you to view the list of allcalls; up to 270 entries.1. Press [MENU]. 2. Press Recent Calls.3. Press All.4. Use the Directional Key tohighlight an entry, then●Press to view the entry.●Press to place a call tothe number.●Press the Right Soft Key [Options]to select:Save to Contacts(Details)/Erase/ Lock(Unlock)/ EraseAll/ View Timers](https://usermanual.wiki/LG-Electronics-USA/VN250/User-Guide-1240913-Page-51.png)
![●Press the Left Soft Key [Message]to select:TXT Message/ PictureMessage/ Video Message /Voice MessageSHORTCUTTo view a quick list of all your recent calls,press from standby mode.5. View TimersAllows you to view the duration ofselected calls.1. Press [MENU]. 2. Press Recent Calls.3. Press View Timers.4. Use the Directional Keytohighlight a call list.Last Call/ All Calls/ ReceivedCalls/ Dialed Calls/ RoamingCalls/ Transmit Data/ ReceivedData/ Total Data/ Last Reset/Lifetime Calls/ Lifetime Data 5. Press the Left Soft Key [Reset]to reset the highlightedtimer. 6. Reset all the recorded timers bypressing the Right Soft Key [Reset All].NOTELifetime Calls and Lifetime DataCounter cannot be reset. 62VN250RECENT CALLS](https://usermanual.wiki/LG-Electronics-USA/VN250/User-Guide-1240913-Page-52.png)
![SETTINGS & TOOLSVN25063SETTINGS & TOOLS1. My VerizonCheck your subscriptioninformation ranging from yourpayment plan to your softwareupgrade or other available service.1. Press [MENU]. 2. Press Settings & Tools.3. Press My Verizon.SHORTCUTPressing the Directional KeyLEFT isthe shorcut toaccessing My Verizon whenthe flip is open.2. Master VolumeAllowsyou to set volume settings.1. Press [MENU]. 2. Press Settings & Tools.3. Press Master Volume.4. Adjust the volume with theDirectional Key then pressto save the setting.3. Tools Your phone tools include VoiceCommands, Calculator, Ez TipCalculator, Calendar, To Do List,Alarm Clock, Info Search,Stopwatch, World Clock, Notepad,and USB Mass Storage.1. Press [MENU]. 2. Press Settings & Tools.3. Press Tools.3.1 Voice CommandsThis feature provides you with thefollowing options equipped withAVR (Advanced Voice Recognition)technology. Each option has itsdetailed information on the phoneand you can check it out by pressingthe Left Soft Key [Info].1. Press [MENU]. 2. Press Settings & Tools.3. Press Tools.4. Press Voice Commands.](https://usermanual.wiki/LG-Electronics-USA/VN250/User-Guide-1240913-Page-53.png)
![64VN250SETTINGS & TOOLSAccess and Options1. With the flip open, press theVoice Command Key (onthe left side of the phone).2. With the flip closed,●If External Keyguard setting isOn, unlock the screen bypressing the Play/Pause Keyand press the VoiceCommand Key (on theleft side of the phone).●If External Keyguard setting isOff, press and hold the VoiceCommand Key(on theleft side of the phone).The Voice Commands feature hasseveral settings which allow you tocustomize how you want to use it.Access Voice Commands, then pressthe Right Soft Key [Settings].Confirm ChoicesAutomatic/Always Confirm/ Never ConfirmSensitivity Adjust the sensitivity asMoreSensitive/Automatic/ LessSensitive.Adapt Voice If the phone asks youto repeat your voice command toooften, train the phone to recognizeyour voice patterns. Train Words/Train DigitsPromptsMode/ Audio Playback/Timeout. ForMode, setPrompts/Readout + Alerts/ Readout/Tones Only.For Audio Playback,set Speakerphoneor Earpiece.ForTimeout,set 5secondsor 10seconds.3.1.1 Call <Name or Number>Say "Call" and then call someonesimply bysaying the name or phonenumber.Please speak clearlyand saythe name or number exactly as it isentered in your Contact List. Whenyou havemore than one contactnumber, you can statethe name andnumber type of the contact (forexample, 'Call John Business').3.1.2 Send Msg to<Name orNumber or Group>Say "Send Message" and thecommand will prompt you for the typeof message. After choosing themessage type, you will be promptedfor the contact name, number or](https://usermanual.wiki/LG-Electronics-USA/VN250/User-Guide-1240913-Page-54.png)
![66VN250SETTINGS & TOOLS3.2 Calculator Allows you to perform simplemathematical calculations. You canenter numbers up to eight digitsand the sixth decimal place.Calculations can be made with upto 4 lines at one time.1. Press [MENU]. 2. Press Settings & Tools.3. Press Tools.4. Press Calculator.5. Enter the numbers to get thevalue you want. To cancel anumber, press the Left Soft Key[Clear]. 6. Use the Right Soft Key [Operators]to add parenthesisor power among numbers forcalculation.7. Use the Directional Key toenter operation between numbersand press [=]for theresult.NOTETo insert a decimal, press the Star Key . To insert +/-, press.3.3 Ez Tip CalculatorAllows you to quickly and easilycalculate bill amounts using the billtotal, tip % and number of peopleas variables.1. Press [MENU]. 2. Press Settings & Tools.3. Press Tools.4. Press Ez Tip Calculator.5. Enter the variable fields (Totalbill, Tip (%), Split) and thecorresponding calculation fields(tip and total for each person)appear automatically.6. Press the Left Soft Key [Reset]for another calculation.3.4 CalendarAllows you to keep your agendaconvenient and easy to access.Simply store your appointments andyour phone will alert you with areminder you set.1. Press [MENU]. 2. Press Settings & Tools.](https://usermanual.wiki/LG-Electronics-USA/VN250/User-Guide-1240913-Page-56.png)
![VN250673. Press Tools.4. Press Calendar.5. Use the Directional Key tohighlight the scheduled day.Left : Previous DayRight : Next DayUp : Previous Week Down : Next Week6. Press the Left Soft Key [Add].7. Enter Subject, then scroll downto set remaining settings.8. Highlight a Calendar setting field,then press the Left Soft Key [Set]. For each Calendar eventyou can set:●StartDate ●Start Time●End Date ●End Time●Repeat ●Until●Alerts ●Tones●Vibrate9. Use the Directional Key tohighlight the setting you want,then press .10. Press [SAVE]whenCalendar information iscomplete.3.5 To Do ListAllows you to create a To Do list.1. Press [MENU]. 2. Press Settings & Tools.3. Press Tools.4. Press ToDo List.5. Press the Left Soft Key [Add].6. Enter Subject.7Highlight the Due Date field,then press the Left Soft Key[Date].Use the keypad to enterthe date(for example, pressto select June). Press theRight Soft Key [More]forthe following options:●Start Date l Due Date●PrioritylAlert●Alert Date l Alert Time●Tones8. Press [SAVE].](https://usermanual.wiki/LG-Electronics-USA/VN250/User-Guide-1240913-Page-57.png)
![68VN250SETTINGS & TOOLS3.6 Alarm ClockAllows you to add up to ten alarms. At the alarm time, Alarm will bedisplayed on the LCD screen andthe alarm will sound.1. Press [MENU]. 2. Press Settings & Tools.3. Press Tools.4. Press Alarm Clock.5. Press the Left Soft Key [Add].6. Enter the alarm informationincluding:●Turn On/Off ●Set Time●Repeat ●Ringtone7. Use the Directional Key tohighlight the information youwant toset, then press the LeftSoft Key [Set]to view yoursetting choices.8. Press [SAVE]after settingall of the Alarm fields asnecessary.NOTESnooze or Dismiss the soundingalarm using the Soft Keys (flipopen), or the front music controlkeys (flip closed).3.7 Info SearchYou can search information storedon the phone from Contact entriesto Missed calls to Notes toCalendar events, and more.1. Press [MENU]. 2. Press Settings & Tools.3. Press Tools.4. Press Info Search.5. Enter text you want to find inyour phone, then press .3.8 StopwatchAllows you touse your phone as atypical stopwatch. Pressing willstart and stop Stopwatch time.While measuring time, press the LeftSoft Key to lap. After time hasstopped, press the Right Soft Key[Reset].Then, press the RightSoft Key [Record]to viewprevious lap times recorded.1. With the flip open, press [MENU]. 2. Press Settings & Tools.3. Press Tools.](https://usermanual.wiki/LG-Electronics-USA/VN250/User-Guide-1240913-Page-58.png)
![VN250694. Press Stopwatch.3.9 World Clock Allows you to determine the currenttime in another time zone orcountry by navigating with theDirectional Key to the right or left. 1. Press [MENU]. 2. Press Settings & Tools.3. Press Tools.4. Press World Clock.5. Press the Right Soft Key [Cities]for a list of availablecities.6. Select a city from the list, thenpress . The displayshows the position ofthe city on a global map. 7. Press again to zoom in onthe city and view its date andtime infomation.NOTEWith the Left Soft Key [SetDST], set to daylight saving time.3.0 Notepad Allows you to add, read, edit, anderase notes to yourself.1. Press [MENU]. 2. Press Settings & Tools.3. Press Tools.4. Press the 0 Key Notepad.5. Press the Left Soft Key [Add]to write a new note.6. Press the Left Soft Key tochange the entry mode. 7. After filling in the note, pressto save it.3.* USB Mass StorageThis menuallows you to transfercontent from your phone to yourWindows®XP, Windows®7orWindows Vista®PC (or vice versa)when your phone is connected toyour Windows®XP, Windows®7orWindowsVista®PC with acompatible USB cable. Mac OSTMorLinux OS operating system is notsupported. You can only accessthis menu when a microSD™card isinserted in your phone. (see page19 toinsert it).](https://usermanual.wiki/LG-Electronics-USA/VN250/User-Guide-1240913-Page-59.png)
![70VN250SETTINGS & TOOLS1. Press [MENU]. 2. Press Settings & Tools.3. Press Tools.4. Press USB Mass Storage.4. Bluetooth®MenuThe VN250is compatible withdevices that support the Bluetooth®Headset, Handsfree, Dial UpNetworking , Object Push forContacts including name cards andCalendar events, Advanced AudioDistribution (Stereo), File TransferProfile(s), PhoneBook AccessProfile, Basic Printing Profile andBasic Imaging Profile. You may create and store 20pairings within the VN250andconnect to one device. The approximate communicationrange for Bluetooth®wirelesstechnology is up to 30 feet (10meters).Bluetooth®QD ID B015791NOTERead the user guide of eachBluetooth®accessory that you aretrying topair with your phonebecause the instructions may bedifferent. NOTEYour phone is based on theBluetooth®specification, but it isnot guaranteed to work with alldevices enabled with Bluetooth®wireless technology. Phone doesnot support ALL Bluetooth®OBEX Profiles.*For vehicle/accessorycompatibility go towww.verizonwireless.com/bluetoothchart.TIPS●HEADSET: Supports use of acompatible bluetooth®headsetfor mono voice.●HANDSFREE: SupportsBluetooth®headsets, and mayalso support other installedcompatible Bluetooth®deviceswith speakerphone capabilities,such as car kits or a conferenceroom device. For Handsfree CarKit Compatibility,refer towww.verizonwireless.com/bluetoothcharton the VerizonWireless website.●DIAL UP NETWORKING: Allowsthe phone tobe used as a datamodem with a compatibleBluetooth®device, such as alaptop or PDA, over the VZWNationalAccess and / or VZWBroadbandAccess systems.●STEREO: Supports delivery ofstereo audio to a compatibleBluetooth®device.●PHONEBOOK ACCESS: Allowssharing of your name card,phonebook entries, and callhistory with a compatibleBluetooth®device.](https://usermanual.wiki/LG-Electronics-USA/VN250/User-Guide-1240913-Page-60.png)
![VN25071●BASIC PRINTING: Allowsprinting of JPEG files to aBluetooth®enabled printer.●OBJECT PUSH: Allows sendingand receiving of contact namecards, calendar events, andJPEG pictures between devices.●FILE TRANSFER: Allows acompatible Bluetooth®deviceto view a list of files andtransfer non-protected files ineither direction.●BASIC IMAGING: Allowssending and receiving of non-protected images for storingand printing.4.1 Add New DevicePairing is the process that allowsthe handset to locate, establish, andregister 1-to-1 connection with thetarget device. 4.1.1 For pairing with a newBluetooth®device1. Followthe Bluetooth®accessoryinstructions tosetthe device topairing mode.2. Press [MENU]. 3. Press Settings & Tools.4. Press Bluetooth Menu.5. Press Add New Device.Set the desired device to pairing.6. If Bluetooth®power is set to off,you will be prompted to turnpower on. Highlight Yes andpress .7. The device will appear in AddNew Device menu once it hasbeen located. Highlight thedevice and press .8.The handset will prompt you forthe passcode. Consult theBluetooth®accessory instructionsfor the appropriate passcode(typically“0000” - 4 zeroes).Enter the passcode and press.When Auto Pair Handsfree isset to On, the device will try toautopair for headset.9. When pairing with the PC or PDAis successful, highlight eitherAlways Ask or Always Connectand press toconnect withthe device.10. Once connected, you will see thedevice listed in the Bluetooth®Menu and Bluetooth®indicatorwill show up on your screenwhen connected to the Bluetooth®device. You can also check out theconnection with a blue icon on the list.](https://usermanual.wiki/LG-Electronics-USA/VN250/User-Guide-1240913-Page-61.png)
![72VN250SETTINGS & TOOLS4.1.2 Icon Reference in AddingNew DeviceWhen the Bluetooth®wirelessconnection is built and paireddevices are found, the followingicons are displayed. ●Icon References When aBluetooth®Wireless Connectionis Searched(neither connectednor paired).Turn OnAllows you to set the phone'sBluetooth®power On/Off.1. Press [MENU]. 2. Press Settings & Tools.3. Press Bluetooth Menu.4. Press the Left Soft Key [Turn On].NOTEBy default, your device’sBluetooth®functionality is turnedoff. My Device InfoAllows you to edit the name of theBluetooth®device when Add NewDevice menu is highlighted.1. Press [MENU]. 2. Press Settings & Tools.3. Press Bluetooth Menu.4. Press the Right Soft Key [Options].5. Press My Device Info.6. Press to clear the existingname.When an audio device isfound by your VN250 deviceWhen a PC is found by yourVN250 deviceWhen a PDA is found by yourVN250 deviceWhen another phone deviceis found by your VN250 deviceWhen a printer is found byyour VN250 deviceWhen other undefineddevices are found by yourVN250 deviceWhen a carkit device is foundby your VN250 device](https://usermanual.wiki/LG-Electronics-USA/VN250/User-Guide-1240913-Page-62.png)
![VN250737. Use the Alphanumeric Keypad toenter a new custom name.8. Press to save and exit.TIPBluetooth®wireless connection isdependent on your Bluetooth®stereodevice. Even though you want to connectwith a headset that supports both stereoand handsfree profiles, you may only beable to connect with one. Discovery ModeAllows you to set whether yourdevice is able tobe searched byother Bluetooth devices in the area.1. Press [MENU]. 2. Press Settings & Tools.3. Press Bluetooth Menu.4. Press the Right Soft Key [Options].5. Press Discovery Mode.6.Use the Directional Key tohighlight a setting, then press .On/ OffNOTEIf you choose On for DiscoveryMode, your device is able to besearched by other in-rangeBluetooth®devices.Supported ProfilesAllows you to see profiles that yourVN250phone can support.1. Press [MENU]. 2. Press Settings & Tools.3. Press Bluetooth Menu.4. Press the Right Soft Key [Options].5. Press Supported Profiles.Dial-up NetworkingIn order tostartadial-upnetworking session:1. Start the Bluetooth®serviceapplication or program presenton the Client device.2. Find your phone’s name from thelist of available devices.3. From the list of available servicesor menu, select dial-upnetworking.4. Enter required information suchas ID, password and phonenumber in the "Connect To"dialog box.](https://usermanual.wiki/LG-Electronics-USA/VN250/User-Guide-1240913-Page-63.png)
![74VN250SETTINGS & TOOLS5. Select the "Dial" button toinitiate the call. Once the connection isestablished, you can start usingthe Internet.File TransferIn order to start a file transfersession:1. Start the Bluetooth®serviceapplication or program presenton the Client device. 2. Set the Discovery Mode on.3. Find your phone’s name from thelist of available devices.4. From the list of available servicesor menu, select file-transferservice. 5. Aseparatewindowappears withthe directory structure of yourphone. You are now able totransfer files toand from theClient device.Phonebook Access Please refer to your handsfreedevice or car audio system manualfor further instructions.The following options are availablein the paired device for phonedevices:1. Remove Device:You can removethe device from the pairing list. 2.Rename Device: You can renamethe paired device. 3. Incoming Security:Allows you toset permission before connectingan incoming device.4. Service Discovery:Allows you tosearch for the servicesthattheselected device supports.5. Device Info: Showsthe deviceinformation. NOTESIn the pairing list, you can disconnect theconnected device with the blue arrowsignal by pressing or by pressing theLeft Soft Key [Turn Off]. Reversely,you can turn it on by pressing the LeftSoft Key [Turn On] again.When an audio device is connected, thenyou select another device and press ,both devices are connected.In case your search fails to find any pairingdevice, select found device instead.](https://usermanual.wiki/LG-Electronics-USA/VN250/User-Guide-1240913-Page-64.png)
![VN25075Print Picture allows you to print to devicesthat support BPP profiles:●When connected with phone or PCsupporting OPP, the following menusare possible: Send name card: Allowsmy contact data to be sent to anotherdevice up to 1000 Contacts. ●Get name card: Allows you to pull namecard of other device. Exchange namecard: Allows you to exchange my namecard with other device. ●Send Calendar Event: Allows you tosend up to 300 Calendar events toother device. ●Send Picture: Allows you to send myphone image to other device. ●Browse/Get file: Allows you to get filesfrom another device. (Only when otherdevice can support FTP.)5. Keyguard Settings1. Press [MENU]. 2. Press Settings & Tools.3. Press Keyguard Settings.4.Use the Directional Keytohighlight a setting, then press .1. AutoLockOn/ Off2. Unlock OptionsPress Once/ Press Twice6. Sounds SettingsProvides options to customize thephone’s sounds.6.1 Easy Set-upAllows you to quickly set the mainSounds settings for keypad volume,incoming calls and messages (text,multimedia, and voicemail).1. Press [MENU]. 2. Press Settings & Tools.3. Press Sounds Settings.4.Press Easy Set-up.5. Read each setting description,select the setting you want, thenpress [SET].NOTESet each alert separately withRing Only, Vibrate Only, Ring andVibrate, Be Silent, and ringtone asnecessary.](https://usermanual.wiki/LG-Electronics-USA/VN250/User-Guide-1240913-Page-65.png)
![76VN250SETTINGS & TOOLS6.2 Call Sounds Allows you to set how the phonealerts you for types of incomingcalls.1. Press [MENU]. 2. Press Settings & Tools.3. Press Sounds Settings.4. Press Call Sounds.6.2.1 Call Ringtone 1. Press [MENU]. 2. Press Settings & Tools.3. Press Sounds Settings.4. Press Call Sounds.5. Press Call Ringtone.6.Use the Directional Key tohighlight a ringtone then presstosavethe sound.TIPTohear a ringtone beforeyou set it, pressthe Left Soft Key[Play].6.2.2 Call Vibrate1. Press [MENU]. 2. Press Settings & Tools.3. Press Sounds Settings. 4. Press Call Sounds. 5. Press Call Vibrate.6.Use the Directional Key tohighlight a setting, then press.On/ Off6.2.3 Caller ID Readout1. Press [MENU]. 2. Press Settings & Tools.3. Press Sounds Settings.4. Press Call Sounds.5.Press Caller ID Readout.6.Use the Directional Key tohighlight a setting, then press .Ring Only/ Caller ID + Ring/Name Repeat](https://usermanual.wiki/LG-Electronics-USA/VN250/User-Guide-1240913-Page-66.png)
![VN250776.3 Alert SoundsAllows you to select the alert typefor a new message.1. Press [MENU]. 2. Press Settings & Tools.3. Press Sounds Settings.4. Press Alert Sounds.5. Select TXT Message/Multimedia Message/Voicemail/Emergency Tone/Missed Call6. The Alert Sounds menu hasthese options:Tone/ Vibrate/ ReminderThe exception for this is theEmergency Tone menu. Thismenuhasthese options:Alert/ Vibrate/ Off6.4 Keypad VolumeAllows you to set the keypadvolume.1. Press [MENU]. 2. Press Settings & Tools.3. Press Sounds Settings.4. Press Keypad Volume.5. Adjust the volume with theDirectional Key then press.6.5 Digit Dial ReadoutAllows you to set the Digit DialReadout.1. Press [MENU]. 2. Press Settings & Tools.3. Press Sounds Settings.4. Press Digit Dial Readout.5.Use the Directional Key toscroll to a setting, then press .On/Off.](https://usermanual.wiki/LG-Electronics-USA/VN250/User-Guide-1240913-Page-67.png)
![78VN250SETTINGS & TOOLS6.6 Service Alerts Allows you to set any of the fiveAlert options to either On or Off.1. Press [MENU]. 2. Press Settings & Tools.3. Press Sounds Settings.4. Press Service Alerts.5. Select an alert option.ERI Alerts you to the status ofcellular service. ERI: Enhanced Roaming IndicatorMinuteBeep Alerts you 10seconds before the end of everyminuteduring a call.Call Connect Alerts you whenthe call is connected.Charge Complete Alerts youwhen the battery is completelycharged. Software Update Alerts you ofan OTA software update to thedevice.6. Use the Directional Key tohighlight a setting, then press theOK Key .On/ Off6.7 Power On/Off Allows you to set the phone tosound a tone when the phone ispowered on/off.1. Press [MENU]. 2. Press Settings & Tools.3. Press Sounds Settings.4. Press Power On/Off.5. Select Power On/ Power Off.6. Use the Directional Key tohighlight a setting, then press.On/ Off6.8 Voice ClarityAudio volume is relative tosurrounding noise level, and volumelevel setting optimal for office/homeenvironment may suddenly becomepoor in crowded street orrestaurant. When user moves tonoisy environment, EarpieceOptimizer feature will automaticallyincrease the earpiece audio level toimprove speech intelligibility.1. Press [MENU]. 2. Press Settings & Tools.](https://usermanual.wiki/LG-Electronics-USA/VN250/User-Guide-1240913-Page-68.png)
![VN250793. Press Sounds Settings.4. Press Voice Clarity.5. Use the Directional Key toscroll to a setting, then press .On/ Off7. Display SettingsProvides options to customize thephone’s display screen.1. With the flip open, press [MENU]. 2. Press Settings & Tools.3. Press Display Settings.7.1 Easy Set-upAllows you quickly set the mainDisplay Settings.1. Press [MENU]. 2. Press Settings & Tools.3. Press Display Settings.4. Press EasySet-up.5. Customize the following displaysettings:●PERSONAL BANNEREnter the text to be displayed onyour screen.●DISPLAY BACKLIGHTSet Backlight duration for Maindisplay.7Seconds/ 15 Seconds/ 30Seconds/ Always On/ AlwaysOff●KEYPAD BACKLIGHTSet Backlight duration forkeypad.7Seconds/ 15 Seconds/ 30Seconds/ Always On/ AlwaysOff●WALLPAPERSet the main wallpaper.●DISPLAY THEMESSelect your device DisplayTheme.White/ Aqua Diamond●MENU LAYOUTSelect your Main Menu Layout.Tab/ List/ Grid●DIAL DIGITSSetthe dial digitsfont size.Small/ Normal/ Large](https://usermanual.wiki/LG-Electronics-USA/VN250/User-Guide-1240913-Page-69.png)
![80VN250SETTINGS & TOOLS●MENU & LISTSet the menu & list font size.Small/ Normal/ Large●MESSAGESet the message font size.Small/ Normal/ Large●CLOCK FORMATSelect the format of the Mainclock.Small Digital 12 / Small Analog/Large Analog/ Large Digital 12/Large Digital 24/ Dual City/ Off7. 2 BannerAllowsyou to enter a string of up to23characterswhich displayson theLCD screen.1. Press [MENU]. 2. Press Settings & Tools.3. Press Display Settings.4. Press Banner.7.2.1 Personal Banner1. Press [MENU].2. Press Settings & Tools.3. Press Display Settings.4. Press Banner.5. Press Personal Banner.6. Enter your own banner text.NOTEPress the Directional Key tochange the color of the text. Usethe Directional Key toselect the color you want. Black/White/ Yellow/ Orange/ Red/Brown/ Blue/ Green/ Light Blue7. Press .7.2.2 ERI BannerIf you use ERI Service, ERI Text isshown on the sub banner.1. Press [MENU]. 2. Press Settings & Tools.3. Press DisplaySettings.4. Press Banner.5. Press ERI Banner.](https://usermanual.wiki/LG-Electronics-USA/VN250/User-Guide-1240913-Page-70.png)
![VN250816. Use the Directional Key tohighlight a setting, then press.On/ Off7. 3Backlight Allows you to set the duration forilluminating the backlight for thefront display, main display andkeypad. Each is set separately.1. Press [MENU]. 2. Press Settings & Tools.3. Press Display Settings.4. Press Backlight.5. Highlight a Backlight submenuand press .DisplayBacklight:7Seconds/15 Seconds/ 30 Seconds/ Always On/ Always OffKeypad Backlight:7Seconds/15 Seconds/ 30 Seconds/ Always On/ Always Off7. 4BrightnessAllows you to set the backlightbrightness level.1. Press [MENU]. 2. Press Settings & Tools.3. Press Display Settings.4. Press Brightness.5. Use the Directional Key toscroll to a setting, then press theOK Key.7. 5WallpaperAllows you to choose the kind ofbackground to be displayed on thephone's LCD in standby mode.1. Press [MENU]. 2. Press Settings & Tools.3. Press DisplaySettings.4. Press Wallpaper.5. Highlight a Wallpaper submenuand press .My Pictures/Fum Animations/Slide Show6. Select from available screensthen press .](https://usermanual.wiki/LG-Electronics-USA/VN250/User-Guide-1240913-Page-71.png)
![82VN250SETTINGS & TOOLS7. 6Display ThemesAllows you to choose the colorscheme used in the background ofthe main LCD.1. Press [MENU]. 2. Press Settings & Tools.3. Press Display Settings.4. Press Display Themes.5. Use the Directional Key tohighlight a setting, then press.White/ Aqua DiamondNOTEPress the Left Soft Key [Preview]to preview the selecteddisplay theme.7.7 Main Menu SettingsAllowsyou to choose how the MainMenu displays for menu selection,as well as replace and move menuitems.1. Press [MENU]. 2. Press Settings & Tools.3. Press Display Settings.4. Press Main Menu Settings.5. Use the Directional Key tohighlight a setting, then press.Menu Layout/ Replace MenuItems/ Position Menu Items/Reset Menu SettingsNOTEThis User Guide gives navigationinstructions according to thedefault "List" Main Menu Layoutin the Display Settings menu. Ifother menus are set, navigatingthe phone's menus may bedifferent.NOTEPress the Left Soft Key[Preview] topreviewthe selectedmenusetting.7. 8Font TypeAllows you to set the font type.1. Press [MENU]. 2. Press Settings & Tools.3. Press Display Settings.4. Press Font Type.](https://usermanual.wiki/LG-Electronics-USA/VN250/User-Guide-1240913-Page-72.png)
![VN250835. Use the Directional Key toscroll to a setting, then press theOK Key .VZW Font/ LG Secret/ LG MintNOTEPress the Left Soft Key [Preview]to preview the selectedfont.7. 9Font SizeAllows you to set the font size forDial Digits, Menu & List andMessage. Plus, the Volume KeyResize setting allows you touse theside Volume Keys to instantly scalescreen fonts. These settings arehelpful for those who need the texttodisplayalittle bit larger.1. Press [MENU]. 2. Press Settings & Tools.3. Press Display Settings.4. Press Font Size.5. Use the Directional Key toselect Dial Digits/ Menu&List/Message/ Volume Key Resize.6. Use the Directional Key tohighlight a setting, then press[SET].Dial Digits: Normal/ Large/SmallMenu & List: Normal/ Large/SmallMessage: Normal/ Large/ SmallVolume Key Resize: On/ OffNOTEPress the Left Soft Key [Preview] to preview the selectedfont size.7. 0Clock Format Allows you to choose the kind ofclock tobe displayed on the frontand main LCD screens.1. Press [MENU]. 2. Press Settings & Tools.3. Press Display Settings.4. Press the 0 Key ClockFormat.5. Highlight a Clock Formatsubmenu and press .Small Digital 12/ Small Analog/Large Analog/ Large Digital 12/Large Digital 24/ Dual City/ Off](https://usermanual.wiki/LG-Electronics-USA/VN250/User-Guide-1240913-Page-73.png)
![84VN250SETTINGS & TOOLS6. Use the Directional Key tohighlight a setting, then press.NOTEPress the Right Soft Key [Preview]to preview the selectedclock format.In Preview mode, color can becustomized with the Right SoftKey [Color]. (Main :SmallAnalog, Large Digital 12Front :Digital1, Digital2,Minimize)8. Phone Settings The Phone Settings Menu allowsyou to designate specific settings tocustomize how you use your phone.8.1 Airplane Mode Turning on Airplane Mode willdisable all wireless communications.1. Press [MENU]. 2. Press Settings & Tools.3. Press Phone Settings.4. Press Airplane Mode.5. Use the Directional Key tohighlight a setting, then press.On/ Off8.2 Set ShortcutsAllows you to set shortcuts tophone menus using the down, up,left and right Directional Key.8.2.1 Set My ShortcutsTo access these shortcuts open theflip, then press the Directional Keyto the right from standby mode (bydefault) todisplay your fourshortcuts.1. Press [MENU]. 2. Press Settings & Tools.3. Press Phone Settings.4. Press Set Shortcuts.5. Press Set My Shortcuts.6. Use the Directional Key tohighlight a shortcut key you wanttoset. Shortcut 1/ Shortcut 2/Shortcut 3/ Shortcut 4](https://usermanual.wiki/LG-Electronics-USA/VN250/User-Guide-1240913-Page-74.png)
![VN250857. Press [SET]to display theavailable shortcuts. Use theDirectional Key to select one,then press .8.2.2 Set Directional KeysTo access these shortcuts open theflip, then press the Directional Keyin the direction (up, down, left) setfor the Shortcut you want toaccess.1. Press [MENU]. 2. Press Settings & Tools.3. Press Phone Settings.4. Press Set Shortcuts.5. Press Set Directional Keys.6. Use the Directional Key tohighlight a shortcut key you wantto set. Up Directional Key/ Left Directional Key/ Down Directional Key7. Press [SET] to display theavailable shortcuts. Use theDirectional Key to selectone, then press .8.3 Voice Commands1. Press [MENU]. 2. Press Settings & Tools.3. Press Phone Settings.4. Press Voice Commands.5. Highlight a Voice Commandssubmenu and press .Confirm Choices/ Sensitivity/Adapt Voice/ Prompts/ CLRKey Activation6. Use the Directional Key toscroll to a setting. Then press.Confirm ChoicesAutomatic/Always Confirm/ Never ConfirmSensitivityMore Sensitive/Automatic/ Less SensitiveAdapt VoiceTrain Words/ TrainDigitsPromptsMode/ AudioPlayback/ TimeoutFor Mode, set Prompts/Readout + Alerts/ Readout/Tones Only.For Audio Playback,set Speakerphone/ Earpiece.For Timeout, set 5secondsor10 seconds.](https://usermanual.wiki/LG-Electronics-USA/VN250/User-Guide-1240913-Page-75.png)
![86VN250SETTINGS & TOOLSCLR Key ActivationOn/ Off8.4 LanguageAllows you to set the bilingual(English or Spanish) featureaccording to your preference. 1. Press [MENU]. 2. Press Settings & Tools.3. Press Phone Settings.4. Press Language.5. Use the Directional Key tohighlight a setting, then press.English/ Español8.5 Location Allows you to set GPS (GlobalPositioning System: Satellite assistedlocation information system) mode.1. Press [MENU]. 2. Press Settings & Tools.3. Press Phone Settings.4. Press Location.5. Use the Directional Key tohighlight a setting, then press.Location On/ E911OnlyNOTES●GPS satellite signals are notalways received by the phone,especially under badatmospheric and environmentalconditions, indoors, etc.●When a Location SettingRestriction is activated in theSecurity Menu, the lock code isrequired when you enter locationmenu. The lock code is the same4digits you use as your devicelock code; initially the last 4digits of your phone number.●When in Airplane Mode,services supporting LocationOn functionality (such asChaperone) will be suspended.8.6 Current CountryAllows you to set the CurrentCountry.NOTECurrent country setting cannot bechanged after it's set for the firsttime unless real location changesto another country.1. Press [MENU]. 2. Press Settings & Tools.3. Press Phone Settings.](https://usermanual.wiki/LG-Electronics-USA/VN250/User-Guide-1240913-Page-76.png)
![VN250874. Press Current Country.5.Use the Directional Key toscroll to a setting, then press .8.7 Security The Security menu allows you tosecure the phone electronically.1. Press [MENU]. 2. Press Settings & Tools.3. Press Phone Settings.4. Press Security.5. Enter the four-digit lock code.The lock code is the last 4 digitsof your mobile phone number ifit is set.The lock code is the last 4 digitsof your MEID if your mobilephone number is not set.8.7.1 Edit CodesAllows you to enter a new four-digit lock code.1. Press [MENU]. 2. Press Settings & Tools.3. Press Phone Settings.4. Press Security.5. Enter the four-digit lock code.6. Press Edit Codes.7. Select Phone Onlyor Calls &Services.8. Enter your new four-digit lockcode.9. For confirmation, it will ask youto enter the new lock code again.8.7.2 Restrictions Allows you tosetseparaterestrictions for Location Setting,Calls, Messages, and Dial UpModem.1. Press [MENU]. 2. Press Settings & Tools.3. Press Phone Settings.4. Press Security.5. Enter the four-digit lock code.6. Press Restrictions.7. Enter the four-digit PIN code.](https://usermanual.wiki/LG-Electronics-USA/VN250/User-Guide-1240913-Page-77.png)
![88VN250SETTINGS & TOOLS8. Select a Restrictions menu thenpress .Location Setting/ Calls/Messages9. Use the Directional Key tohighlight the restriction thenpress . Location Setting Lock Setting/Unlock SettingCalls: Incoming Calls Allow All /ContactsOnly/Block AllCalls: Outgoing Calls Allow All /Contacts Only / Block AllMessages: Incoming MessagesAllow All / Block AllMessages: Outgoing MessagesAllow All / Block All8.7.3 Phone Lock SettingKeeps your phone fromunauthorized use. Once the phoneis locked, it's in restricted modeuntil the lock code is entered. Youcan still receive phone calls andmake emergency calls. You canmodify the lock code using EditCodes submenu within the Securitymenu.1. With the flip open, press [MENU]. 2. Press Settings & Tools.3. Press Phone Settings.4. Press Security.5. Enter the four-digit lock code.6. Press Phone Lock Settings.7. Highlight a setting then press.Unlocked The phone is neverlocked (Lock mode can still beused). On Power Up The phone islocked when it is turned on.8.7.4 Lock Phone Now1. Press [MENU]. 2. Press Settings & Tools.3. Press Phone Settings.4. Press Security.5. Enter the four-digit lock code.6. Press Lock Phone Now.](https://usermanual.wiki/LG-Electronics-USA/VN250/User-Guide-1240913-Page-78.png)
![VN250898.7.5 Reset Default Allows you to reset your phone tothe factory default settings.1. Press [MENU]. 2. Press Settings & Tools.3. Press Phone Settings.4. Press Security.5. Enter the four-digit lock code.6. Press Reset Default.7. Press after reading thewarning message.8. Select Revertbypressing .Aconfirmation message isdisplayed briefly before thephone resets itself.8.7.6 Restore PhoneAllows you to erase all user data andContact information you've enteredin the phone's memory so it's as ifit just left the factory.1. Press [MENU]. 2. Press Settings & Tools.3. Press Phone Settings.4. Press Security.5. Enter the four-digit lock code.6. Press Restore Phone.7. Press after reading thewarning message.8. Enter the four-digit lock code.8.8 System SelectAllows you to set up the phonemanagement environment. Leavethis setting as the default unlessyou want toalter system selectionasinstructed by your serviceprovider.1. Press [MENU]. 2. Press Settings & Tools.3. Press Phone Settings.4. Press System Select.5. Use the Directional Keytohighlight a setting, then press theOK Key .Home Only / Automatic (orAutomatic A / Automatic B)Automatic setting options aredependent on the PRL.](https://usermanual.wiki/LG-Electronics-USA/VN250/User-Guide-1240913-Page-79.png)
![90VN250SETTINGS & TOOLS8.9 NAM SelectAllows you to select the phone’sNAM (Number Assignment Module)if the phone is registered withmultiple service providers.1. Press [MENU]. 2. Press Settings & Tools.3. Press Phone Settings.4. Press NAM Select.5. Use the Directional Key tohighlight a setting, then press.NAM1/ NAM29. Call SettingsThe Call Settings Menu allows youtodesignate how the phone handlesboth incoming and outgoing calls.9.1 Answer OptionsAllows you to determine how thephone will answer an incoming call.1. Press [MENU]. 2. Press Settings & Tools.3. Press Call Settings.4. Press Answer Options.5. Use the Directional Key toto mark the setting(s) you wantto use, then press .Slide Up/ OK Key/ Auto withHandsfree6. Press the Left Soft Key [Done]when you have markedthe setting(s) you want.NOTEAuto with Handsfree is availableonly when any external device isconnected to your phone. When the following settings are set,Ringer is not activated.●When Sounds Off / Alarm Onlyis set or individual ContactRinger ID is set to No Ring/Silence.●When Ringer is set to SoundsOffwith side key or "Quiet".9.2 End Call Options1. Press [MENU]. 2. Press Settings & Tools.3. Press Call Settings.](https://usermanual.wiki/LG-Electronics-USA/VN250/User-Guide-1240913-Page-80.png)
![VN250914. Press End Call Options.5.Use the Directional Key toscroll to a setting, then press.On/ Off9.3 Auto RetryAllows you to set the length of timethe phone waits beforeautomatically redialing a numberwhen the attempted call fails.1. Press [MENU]. 2. Press Settings & Tools.3. Press Call Settings.4. Press Auto Retry.5. Use the Directional Key tohighlight a setting, then press theOK Key .Off/ Every 10 Seconds/ Every30Seconds/ Every 60Seconds9.4 TTY ModeAllows you to attach a TTY deviceenabling you to communicate withparties also using a TTY device. Aphone with TTY support is able totranslate typed characters to voice.Voice can also be translated intocharacters and then displayed onthe TTY.1. Press [MENU]. 2. Press Settings & Tools.3. Press Call Settings.4. Press TTY Mode.An explanation message isdisplayed.5. Press to continue.6. Use the Directional Key tohighlight a setting, then press.TTY Full/ TTY + Talk/ TTY +Hear/ TTY OffTTY Full:Users who cannot talkor hear send and receive a textmessage through TTYequipment.](https://usermanual.wiki/LG-Electronics-USA/VN250/User-Guide-1240913-Page-81.png)

![VN250939.5 One Touch DialAllows you to initiate a speed dialcall by pressing and holding thespeed dial digit. If set to Off, SpeedDial numbers designated in yourContacts will not function.1. Press [MENU]. 2. Press Settings & Tools.3. Press Call Settings.4. Press One Touch Dial.5. Use the Directional Key tohighlight a setting, then press.On/ Off9.6 Voice PrivacyAllows you to set the voice privacyfeature for CDMA calls. CDMA offersinherent voice privacy. Check withyour service provider for availability.1. Press [MENU]. 2. Press Settings & Tools.3. Press Call Settings.4. Press Voice Privacy.5. Use the Directional Key tohighlight a setting, then press.On/ Off9.7 DTMF TonesAllows you to set the DTMF tonelength.1. Press [MENU]. 2. Press Settings & Tools.3. Press Call Settings.4. Press DTMF Tones.5. Use the Directional Key tohighlight a setting, then press.Normal/ Long9.8 Assisted DialingAllows you to set the phone toassist in dialing numbers when youare outside your home country.1. Press [MENU]. 2. Press Settings & Tools.3. Press Call Settings.4. Press Assisted Dialing.](https://usermanual.wiki/LG-Electronics-USA/VN250/User-Guide-1240913-Page-83.png)
![94VN250SETTINGS & TOOLS5. Use the Directional Key toscroll to Assisted Dialing/Reference Country.6. Select the Reference Countryand enter the international prefixnumbers as necessary.9.9 Dial SearchDisplays predictive list ofContact(s) on the dial screenallowing quick and easy selection tocall, view or message. Predictive listis generated based the key(s)pressed. For example, if you pressall Contacts beginning withthe lettersg, h, and i will be listed.Pressing more keys narrows thesearch. 1. Press [MENU]. 2. Press Settings & Tools.3. Press Call Settings.4. Press Dial Search.5. Use the Directional Keytochoose a setting, then press . On / Off0. MemoryAllows you to check your VN250internal phone memory as well asthe microSD external memory. The VN250can access thefollowing file types stored on theremovable microSD card.My Pictures: png, jpg, bmp, gifMy Sounds: mid, qcp (can be set asringtones)My Videos: 3gp, 3g2, MP4My Music: wma, mp3, unprotectedaac & aac+Store onVN250Store onmicroSDCardTransferPhone toPC viaCardTransferPC toPhonevia CardVCASTMusic/WMASongsWW W WRingtonesWSoundWW W WVCASTVideo ClipsWDownloadedPicture/VideoWPicture/Video (user-generatedor receivedvia MMS)WW W W](https://usermanual.wiki/LG-Electronics-USA/VN250/User-Guide-1240913-Page-84.png)
![VN250950.1 Save OptionsAllows you to select which memory(phone or memory card) to use tosave your files.1. Press [MENU]. 2. Press Settings & Tools.3. Press the 0 Key Memory.4. Press Save Options.5. Use the Directional Key toselect file type, then press . Pictures / Videos / Sounds/Ringtones6. Use the Directional Key toselect place tosave, then press.Phone Memory / Card Memory0.2 Phone MemoryShowsthe memory informationsaved in your phone.1. Press [MENU]. 2. Press Settings & Tools.3. Press the 0 Key Memory.4. Press Phone Memory.5. Use the Directional Key toselect file storage type in theVN250,then press to viewthe memory used.Memory Usage/ My Pictures/My Ringtones/ My Sounds/ MyContacts/ Move All To CardNOTEYou can reset the My Musicoption. This removes all songsand playlists purchased orsubscribed by V CAST Music withRhapsody. Playlists created on thephone will not be affected. 0.3 CardMemory Shows the memory informationsaved in the card.1. Press [MENU]. 2. Press Settings & Tools.3. Press the 0 Key Memory.4. Press Card Memory.5. Use the Directional Key toselect file storage type on thememory card, then press .Memory Usage/ My Pictures/My Videos/ My Ringtones/ MyMusic/ My Sounds/ MyContacts/ MoveAll ToPhone](https://usermanual.wiki/LG-Electronics-USA/VN250/User-Guide-1240913-Page-85.png)
![96VN250SETTINGS & TOOLSNOTEThe option Card Memory Usageshows the total used memory andmemory space remaining. NOTEDo not insert or remove themicroSDTMcard while playing,deleting or downloadingPictures/Videos/ Music/Sounds.*. Phone InfoAllows you to view the informationspecific to your phone and software.1. Press [MENU]. 2. Press Settings & Tools.3. Press Phone Info.*.1 My NumberAllows you to view your phonenumber.1. Press [MENU]. 2. Press Settings & Tools.3. Press Phone Info.4. Press My Number.*.2 SW/HW VersionAllows you to view the versions ofvarious applications such as SW,PRL, ERI, Browser, Media Center,AVR, EMS, MMS, Bluetooth®, MSUI,OTADM, HW, MEID Version, andWarranty Date Code.1. Press [MENU]. 2. Press Settings & Tools.3. Press Phone Info.4. Press SW/HW Version.*.3 Icon GlossaryAllows you to view all the icons andtheir meanings.1. Press [MENU]. 2. Press Settings & Tools.3. Press Phone Info.4. Press Icon Glossary.](https://usermanual.wiki/LG-Electronics-USA/VN250/User-Guide-1240913-Page-86.png)
![VN25097*.4 Software UpdateThis feature gives your phone theability to upgrade to the latestsoftware and keeps your phoneoperating with the latest featureswithout visiting a Verizon WirelessCommunications Store for theupgrade. You can either be notifiedautomatically that there is anupdated version of softwareavailable for your phone, or you canmanually check to see if there areany updates available for you todownload.Automatic UpdateYour phone will receive anotification that there is an updatedversion of software available to bedownloaded. You can press when notified that a download isavailable or it can happenautomatically. Once the download iscomplete you may, depending onthe nature of the update, have threeoptions available: Accept theupdate, Defer the update, or Rejectthe update.NOTEDuring the update you cannotmake or receive phone calls,including 911 calls, or textmessages.Manual Update1. Press [MENU]. 2. Press Settings & Tools.3. Press Phone Info.4. Press Software Update.The two options shown will beStatusand Check New.Press Statusto see thestatus of a download or updateand see information on the lastsuccessful update. If updateshave not yet been performed,status information will beunavailable.Press Check Newto checkif anynew software updates areavailable to download. If a newersoftware version is available, it willautomatically begin downloadingafter 30 seconds or you canbegin the download immediatelyby pressing . To stop thesoftwaredownload press theRight Soft Key[Quit].](https://usermanual.wiki/LG-Electronics-USA/VN250/User-Guide-1240913-Page-87.png)
![98VN250SETTINGS & TOOLS#. Set-up Wizard1. Press [MENU]. 2. Press Settings & Tools.3. Press Set-up Wizard.4. Use the Directional Key toscroll to a setting, then press[SET].NOTEIf you don't want to change thesetting, press the Right Soft Key[Skip] to go to the nextsetting.1. FONT RESIZE INFOUse the side up down keys toadjust the font sizes on the screen.2. VOLUME KEY RESIZESelect whether you would like touse volume key for font sizeadjustment.3. CALL SOUNDSRing Only/ Vibrate Only/ Ringand Vibrate/ Be SilentIf a ring setting is selected, youwill be prompted for theringtone.4. DISPLAY THEMESSelect your device DisplayTheme.5. MENU LAYOUTTab/ List/ Grid6. MAIN CLOCKSelect the format of the Mainclock. Small Analog/ Large Analog/Large Digital 12/ Large Digital24/ Dual City/ Off7.FRONT CLOCKSelect the format of the Frontclock. Digital 1/ Digital 2/ Analog/Minimize/ Off](https://usermanual.wiki/LG-Electronics-USA/VN250/User-Guide-1240913-Page-88.png)