LG Electronics USA VN251 Cellular/PCS CDMA Phone with Bluetooth User Manual LG VN251
LG Electronics USA Cellular/PCS CDMA Phone with Bluetooth LG VN251
Users Manual
User Manual
LG-VN251
Body-worn Operation
This device was tested for typical body-worn operations with the back of the phone kept 0.79
inches (2 ) from the body. To comply with FCC RF exposure requirements, a minimum
separation distance of 0.79 inches (2 ) must be maintained between the user’s body and the
back of the phone, including the antenna, whether extended or retracted. Third-party belt-clips,
holsters and similar accessories containing metallic components should not be used. Body-worn
accessories that cannot maintain 0.79 inch (2 ) separation distance between the user’s body
and the back of the phone, and have not been tested for typical body-worn operations may not
comply with FCC RF exposure limits and should be avoided.
FCC Part 15.19 statement
This device and its accessories comply with part 15 of FCC rules. Operation is subject to the
following two conditions: (1) This device and its accessories may not cause harmful interference,
and (2) this device and its accessories must accept any interference received, including
interference that cause undesired operation.
FCC Part 15.21 statement
Changes or Modifications that are not expressly approved by the manufacturer could void the
user's authority to operate the equipment.
FCC Part 15.105 statement
This equipment has been tested and found to comply with the limits for a class B digital device,
pursuant to Part 15 of the FCC Rules. These limits are designed to provide reasonable
protection against harmful interference in a residential installation. This equipment generates
uses and can radiate radio frequency energy and, if not installed and used in accordance with
the instructions, may cause harmful interference to radio communications. However, there is
no guarantee that interference will not occur in a particular installation. If this equipment does
cause harmful interference or television reception, which can be determined by turning the
equipment off and on, the user is encouraged to try to correct the interference by one or more of
the following measures:
- Reorient or relocate the receiving antenna.
- Increase the separation between the equipment and receiver.
- Connect the equipment into an outlet on a circuit different from that to which the receiver is
connected.
- Consult the dealer or an experienced radio/TV technician for help.

Unlocking Your Phone
If your LG-VN251 received is in the Lock status, you may need to unlock it before making calls.
1. Press soft key Unlock.
2. Enter your four-digit lock code. For security purposes, the code will not be visible as you type.
Note: If you can’t recall your lock code, try using the last four digits of your Social Security number, the
last four digits of your Phone Number or 0000.
View of Phone
1. (PWR/END) Switch: Lets you power the phone on or off.
2. Antenna: Internal antenna provides optimum reception for 800 MHz & 1900 MHz frequencies.
3. Power On Indicator: Illuminates red when the phone powers on with power on sound indicator.
4. Headset Jack: Provides connection for an optional headset.
5. Volume Control Keys: Adjust the Ring Volume in the Main Menu or the Voice Volume during a call.
The keys also scroll through mouths in the Calendar or pages in the Mini Browser.
6. Mouse Key: Allows quick and easy scrolling through the menus.
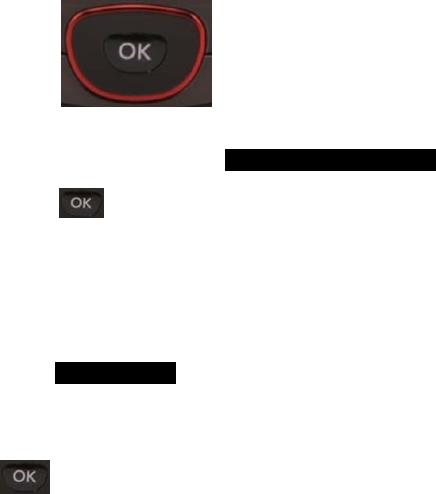
7. OK: Lets you place a call, receive a call, end a call or select menu options.
8. : Lets you clear an entry or back-up in the menu.
9. Slider: Lets you answer or end calls.
Installing and Removing the Battery

To install the battery, insert the bottom of the battery into the opening on the back of the phone. Then,
push the battery down until the latch clicks.
To remove the battery, press down on the latch and remove the battery from the phone.
Turning Your Phone On and Off
To turn your phone on, push the On/Off Switch for 2 ~3 seconds. Your phone performs a short self-
test before letting you know it is operational.
If your phone does not turn on, make sure the battery is installed correctly and is adequately charged or
has external power (via the AC Adapter, Cigarette Lighter Adapter).
To turn your phone off, push the On/Off Switch for 2 ~3 seconds.
Main Menu
When your phone acquires Service, the Greeting (a banner of text), the current time and date and the
Main Menu are displayed. If you are in authorized cellular provider’s service area, you are ready to send
and receive calls.
Power Save Mode
When the phone is in an area without service for 15 minutes, it stops searching for service and enters into
the power Save Mode. When your phone activates this feature, Power Save is displayed on your screen.
The phone automatically checks for service periodically or you can check manually by pressing any key.
Menu Navigation
The Navigation Key lets you scroll circularly through menus quickly and easily.
As you navigate through a menu, the options are highlighted (Highlighted Test Example ) . Select an
option by highlighting it and pressing . The scroll bar at the right of the menu keeps track of your
position in the menu at all times.
For example, if you want to view your last incoming call:
1. From the Main Menu, select RECENT CALLS and press “2. Received“ (It may already be
highlighted.)
2. Press the OK Key down to highlight and press .
If you have received any calls, they are displayed on the screen.
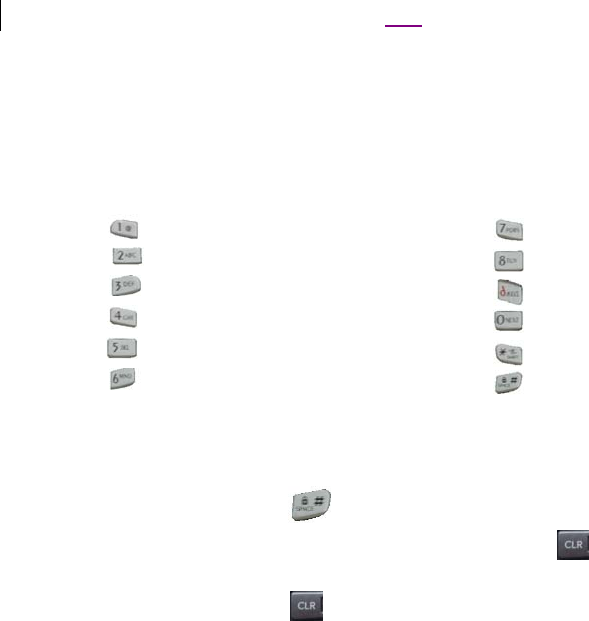
Entering Characters Using the Keypad(T9)
To enter a letter, punctuation or number when creating Phone Book or Scheduler entries, press the
corresponding key until the desired character appears. By default, the first letter of a word is capitalized
and following letters are lowercase. Characters in the following order:
1 . ? , ‘ & - @ ( ) / ~ P Q R S 7 p q r s
A B C 2 a b c 2 T U V 8 t u v 8
D E F 3 d e f 3 W X Y Z 9 w x y z 9
G H I 4 g h i 4 Next 0
J K L 5 j k l 5 Shift
M N O 6 m n o 6 Space
After a character is entered, the cursor automatically advances to the next space after two seconds. You
can also advance the cursor by pressing or entering a character not on the same key.
If you make a mistake, press “Left Navigation Key” to move the cursor left or [ ] to erase a character.
To clear the entire entry, press and hold [ ] for two seconds.
1 7PQRS
9WXYZ
8TUV
6MNO
5
J
4
G
3DEF
ABC
1
*
0Space
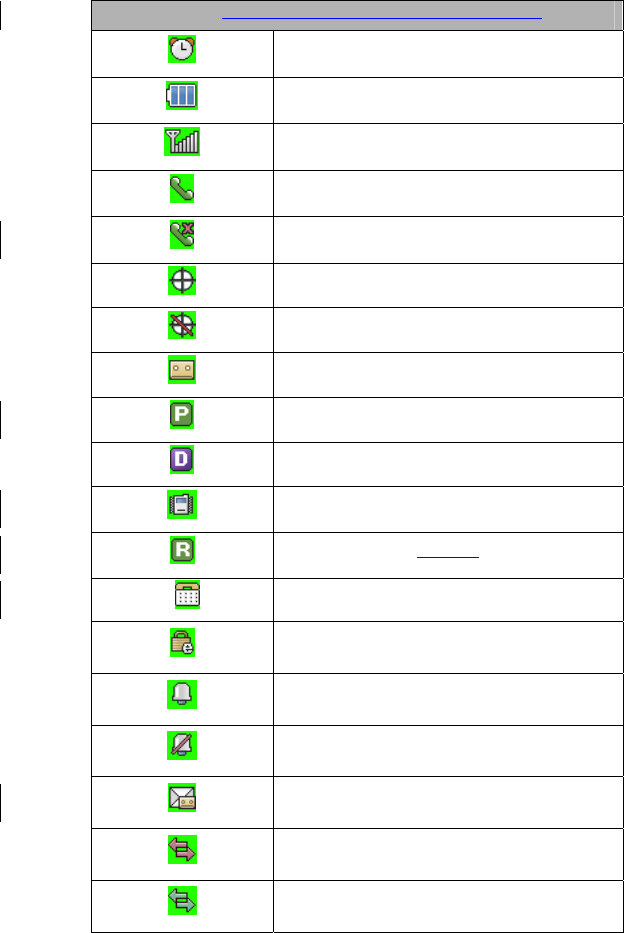
Display Icons
Display icons are the symbols your phone uses to communicate important information. They are as
follows:
ICON DESCRIPTION
Alarm
Battery
Antenna
In use
No service
Location On
E911 Only
Vo i c e
Voice Pr ivacy
Digital
Vibrate
Roaming
TTY
SSL
Ringer
Ringer off
Text + voice
1x Active Data
1x Dormant Data
Antenna
The antenna on your LG-VN251 provides maximum reception by extending of retracting it.
!!! WARNING – CHOKING HAZARD – ANTENNA MAY BECOME DISLODGED
Attempting to remove or repeated twisting of the antenna will loosen the materials securing it into
antenna. Once the antenna is loosened or removed, only an authorized service provider
Representative can restore the antenna’s original integrity. Do not attempt to remove or twist the
antenna.
Signal Strength
The quality of each call you make or receive depends on the signal strength on your area. The number of
bars in the Signal Strength icon informs you of the current strength. The more bars, the stronger the signal.
Battery Capacity
You r LG-VN251 is equipped with a Lithium Polymer battery. It allows you to recharge your battery
before it is fully drained. The battery provides approximately 160 minuets of continuous digital talk time
or approximately 160 hours of continuous digital standby time.
Note: Long backlight settings affect the battery’s talk and standby times.
When the battery reaches 5% of its capacity, the battery icon blinks. When there is about one minute of
talk time left, the phone sounds an audible alert every 30 seconds and then powers down.
If the battery’s charge is completely run down, it takes 2 to 3 hours to fully recharge. It is not necessary to
let the battery completely run down before recharging.
To charge your batteries, use only approved charging accessories.
3.25

Using the AC Adapter
To charge the battery, plug the AC Adapter into a standard wall outlet and connect it to the phone via the
I/O Connector on the bottom of the phone. Alternatively, you can place the phone in the charging cradle
provided with your phone and connect the AC Adapter to the back of the cradle.
The battery Charge Status icon flashes during charging. When the battery is fully charged, the battery icon
stops flashing.
Using Your Phone
Placing a Call
When the phone is turned on, check the Signal Strength icon to see of you are in a Service Area or
authorized PCS CDMA provider’s service area.
1. Open the Slide.
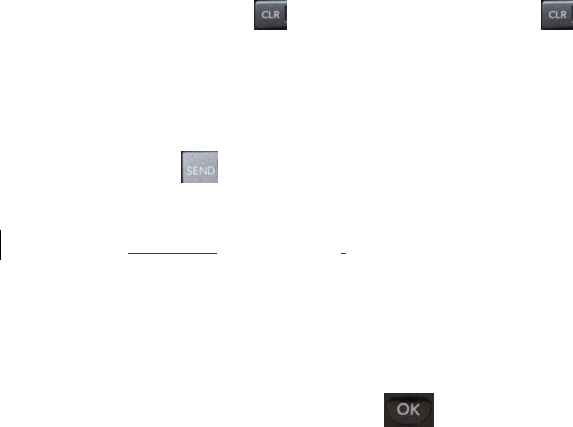
2. Enter the phone number and press [SEND].
☞Tip! When dialing long distance, it is not necessary to dial a “1” before the area code.
3. When you are finished with your call and press [END] . If the phone is in Active Slide Mode,
closing the Slide will also end the call.
Roaming With Your Phone
Your Phone is you can use it to make and receive calls in many places.
Setting Your Phone’s Mode
Your Phone allows you to control your ability to roam. (See “Set Mode”)
Calling Experience
When you use your phone on other PCS CDMA networks, your calling experience and call quality will be
quite similar to what you experience when making calls within the Network. Although certain calling
features may not be available, your phone calls are still private and secure.
Correcting Dialing Mistakes
To delete one digit at a time, press . To delete all digits, press and hole .
Redialing Last Outgoing Number
Press and hold [SEND] for 2 seconds.
Dialing Options (phone book – Not Functioning)
When you enter numbers in the Main Menu, dialing options are displayed. To display a Phone Book entry,
enter its entry number. To use the 4- Digit Dial option, enter the last four digits of a phone number in your
Phone Book.
To select an option, highlight it and press press [OK] . (phone book – Not Functioning)
Call – Dials the phone number.
Roam Confirm – Reminds you that you are making a call on an. (See “Disabling Roam Confirm” )
Roam Call – Dials the phone number using the current PCS CDMA or analog cellular network.
Save – Saves the phone number in your Phone Book. (See “Saving a Phone Number” on the
following page.)
Find – Displays phone numbers in your Phone Book that contain the entered numbers. (See “Finding
a Phone Number” )
Hard Pause – Inserts a Hard Pause. (See “Dialing and Saving Phone Numbers With Pauses” )

2- Second pause – Inserts a two-second pause. (See “ Dialing and Saving Phone Numbers With
Pauses” )
Exit – Returns to the Main Menu.
A Phone Book Entry – Displays the Phone Book entry. To dial the entry’s speed-dealing number,
press and hold [SEND]. To dial an alternate number, highlight it and press and hold [SEND].
☞Tip! To speed dial a Phone Book entry from the Main Menu, press and hold the entry’s number.
If the entry number is two digits, enter the first digit, then press and hole the second digit. (This
feature will not work when the Roam Confirm option is enabled.)
In Call Options
During a call, your phone displays menu options in addition to the Main Menu.
To select an option, Highlight it and press [OK].( functions ‘Send’ and ‘End’ only)
End Call - Ends the call
Send Tones - Sends the next set of numbers after a Hard Pause. (See “Dialing and Saving Phone
Numbers With Pauses “ on the previous page.)
Mute or Unmute – Select Mute to mute your phone’s microphone. Select Unmute to reactivate the
microphone.
Dial 3-Way Call – Lets you dial another phone number.
Flash – Answers an incoming Call Waiting call or connects the third party for Three-Way Calling.

Incoming Call Notification
Depending on your settings, your phone notifies you of incoming calls in the following ways:
The phone rings or vibrates
The LED flashes green
The backlight illuminates
The screen displays an incoming call message
The phone number of the caller is displayed of the phone number is available
The caller’s name is displayed if the phone number is in your Phone Book
The following options are also displayed. To select an option, highlight it and press [SEND].
Answer – answers the call.
Silent Ringer – Mutes the ringer.
Note: You can also mute the ringer by pressing the up or down Volume Control key or [BACK].
Answering Calls
To answer incoming calls, open the Slide (in Active Slide Mode) or press [SEND].
Note: If you open the Slide (in Active Slide Mode) and then press [SEND], you will hang up on the caller.
To answer incoming roam calls, highlight Answer and press [SEND].

Displaying Your Phone Number(phone book – not functioning)
To display your phone number:
1. From the Main Menu, select SETTING & TOOLS
2. And press #0 – 1. (Phone Info – My Number)
Setting the Ring Volume to Vibrate
To set the phone to Vibrate Mode, press the down Volume Control key until Vibrate Only is displayed.
The phone will vibrate and “ Vibrate Only” is displayed above the Main Menu.
To set the phone to Vibrate Mode using the Main Menu, see “Adjusting the Volume” .
Getting the Most From Service
Retrieving Page/Text Messages
To retrieve page/text messages:
1. From the Messaging
2. Highlight Inbox and press [OK].
Highlight the message you want to display and press [OK] .
To select an option, highlight it and press [OK] .
Text Message options:
Delete
Forward
Save Contact
Save as Templates
Call Back
Go to website
Lock
Message Info
Erasing All Page/Text Messages
1. From the Messages Menu
2. Highlight Delete All and press [OK].
3. Highlight Delete All Messages and press [OK].
3.4. Highlight Yes and press [OK].
Page/Text Message Storage
Your LG-VN251 can store up to 100 page/text messages. When the message memory is 100% full, a
warning message prompts you to erase messages to obtain more memory space.
서식 있음: 글머리 기호 및 번호
매기기
Roaming on to Other Service Providers
Roaming occurs when you are in an area serviced by another authorized service provider. When this
situation occurs, the icon and Digital Roam of Analog Roam are displayed. If there is no service
available, the icon is displayed.
(Call History- not functioning)
Page/Text Messages
For information on page/text messages, see “Retrieving Page/Text Messages” .
Sounds
Adjusting the Volume
1. From the Main Menu, highlight Settings & Tools and press [OK], highlight Sound and press [OK].
2. Highlight Volume and press [OK].
3. Highlight Master Volume or Keypad or Earpiece or Speaker and press [OK].
☞Tip! You can use the Volume Control keys to adjust the Ring Volume in the Main Menu or the
Voice Volume during a call.
4. Highlight Volume 5 ~ Volume 1, 1 Beep, Vibrate Only or Alarm Only or Silent All and press [OK].
Note: When the phone is in Vibrate Mode and attached to and accessory (Desktop Charger, Hands-
Free Car Kit, etc.), it uses the Ringers to alert you of incoming calls, alarms or messages.
Selecting Ring Types for Voice Calls
To Select a Ring Type for Voice Calls:
1. From the Main Menu, highlight Settings and press [OK], highlight Sound and press [OK].
2. Highlight Ringers and press [OK].
3. Highlight All Calls or Caller ID or No Caller ID or Restricted Calls and press [OK].
4. To select Ringer directory.
5. Highlight a Ringtone and press [Play]. You will hear a preview of the Ringers when you highlight it.
6. Highlight a Ringtone and press [Set].
☞Tip! You can also assign different Ring Types to individual Phone Book entries. (See “Selecting an
ID Finger” on page 46.)
Selecting Ring Types for Messages
To select a Ring Type for Messages:
1. From the Main Menu, highlight Settings and press [OK], highlight Sound and press [OK].
2. Highlight Message Alerts and press [OK].
3. Highlight Text Message, Picture Message of Voicemail or All Messages and press [OK].
4. Highlight a Ringtone and press [Play]. You will hear a preview of the Ringers when you highlight it.
5. Highlight a Ringtone and press [Set].

Tone Length
Longer tone lengths may be better for tone recognition when dialing voicemail or other automated
systems.
To select a tone length:
1. To make a call.
2. To select Options, highlight it and press [DTMF Tones].
3. Highlight Normal of Long or Off and press [OK].
Alert Notification
To enable of disable alert sounds:
1. From the Main Menu, highlight Sound and press [OK].
2. Highlight Message Alerts or Service Alerts and press [OK].
3. Select an alert by highlighting it and pressing [OK].
Services – An alert sounds when you exit or enter PCS CDMA or cellular coverage.
Messages – An alert sounds when you receive a voicemail or page/text message.
4. Highlight ON or Off and press [OK].
Display
For information on changing Backlight, Greeting or Contrast settings, see Handy Tips.
Display Menu
Security
Accessing the Security Menu
You must enter your lock code to view the Security menu. If you forget your lock code, try using the last
four digits of your Social Security number, the last four digits of your Phone Number or 0000.
Security Menu
To access the Security menu:
1. From the Main Menu, select Settings and press 3 (Security menu)
2. Enter your lock code.
Locking Your Phone
When your phone is locked, you can only make calls to 911, Customer Care and Special Numbers or
receive incoming calls.
To lock your phone:
1. From the Security menu, highlight Lock Phone and press [OK].
2. Highlight Unlock or Lock or On Power up and press [OK]. If you select On Power Up, the phone
will be locked each time it power up.
Unlocking Your Phone
1. Highlight Unlock and press [OK].
2. Enter your lock code.

Changing the Lock Code
To change your lock code:
1. From the Security menu, highlight Change Lock and press [OK].
2. Highlight Phone Only or Call & Applications and press [OK].
3. Enter your new lock code.
4. Reenter your new lock code.
Answering Your Phone with the Hands-Free Car Kit
You can select different answering options when your phone is connected to the Hands-Free Car Kit.
To answer calls automatically or by pressing any key:
1. From the Main Menu, highlight Setup and press [OK].
2. Highlight Car Use and press [OK].
To select and option, highlight it and press [OK].
Slide Up – You can answer calls by open the slide.
OK Key - You can answer calls by pressing OK key when the slide is closed.
Auto with Handsfree - Your phone answers incoming calls automatically after five seconds.
3. Highlight On and press [OK].
To disable an option, follow steps 1 and 2 and select Off.
HAC statement
This phone has been tested and rated for use with hearing aids for some of the wireless technologies that
it uses. However, there may be some newer wireless technologies used in this phone that have not been
tested yet for use with hearing aids. It is important to try the different features of this phone thoroughly
and in different locations, using your hearing aid or cochlear implant, to determine if you hear any
interfering noise. Consult your service provider or the manufacturer of this phone for information on
hearing aid compatibility. If you have questions about return or exchange policies, consult your service
provider or phone retailer.
FCC Hearing-Aid Compatibility (HAC) Regulations for Wireless Devices
On July 10, 2003, the U.S. Federal Communications Commission (FCC) Report and Order in WT Docket
01-309 modified the exception of wireless phones under the Hearing Aid Compatibility Act of 1988
(HAC Act) to require digital wireless phones be compatible with hearing-aids. The intent of the HAC Act
is to ensure reasonable access to telecommunications services for persons with hearing disabilities.
While some wireless phones are used near some hearing devices (hearing aids and cochlear implants),
users may detect a buzzing, humming, or whining noise. Some hearing devices are more immune than
others to this interference noise, and phones also vary in the amount of interference they generate.
The wireless telephone industry has developed a rating system for wireless phones, to assist hearing
device users to find phones that may be compatible with their hearing devices. Not all phones have been
rated. Phones that are rated have the rating on their box or a label located on the box.
The ratings are not guarantees. Results will vary depending on the user's hearing device and hearing loss.
If your hearing device happens to be vulnerable to interference, you may not be able to use a rated phone
successfully. Trying out the phone with your hearing device is the best way to evaluate it for your
personal needs.
M-Ratings: Phones rated M3 or M4 meet FCC requirements and are likely to generate less interference to
hearing devices than phones that are not labeled. M4 is the better/higher of the two ratings.
T-Ratings: Phones rated T3 or T4 meet FCC requirements and are likely to generate less interference to
hearing devices than phones that are not labeled. T4 is the better/ higher of the two ratings.
Hearing devices may also be rated. Your hearing device manufacturer or hearing health professional may
help you find this rating. Higher ratings mean that the hearing device is relatively immune to interference
noise. The hearing aid and wireless phone rating values are then added together. A sum of 5 is considered
acceptable for normal use. A sum of 6 is considered for best use. In the example to the left, if a hearing

aid meets the M2 level rating and the wireless phone meets the M3 level rating, the sum of the two values
equal M5. This should provide the hearing aid user with “normal usage” while using their hearing aid
with the particular wireless phone. “Normal usage” in this context is defined as a signal quality that’s
acceptable for normal operation. The M mark is intended to be synonymous with the U mark. The T mark
is intended to be synonymous with the UT mark. The M and T marks are recommended by the Alliance
for Telecommunications Industries Solutions (ATIS). The U and UT marks are referenced in Section
20.19 of the FCC Rules. The HAC rating and measurement procedure are described in the American
National Standards Institute (ANSI) C63.19 standard. When you're talking on a cell phone,
it's recommended that you turn the BT (Bluetooth) mode off for HAC.
For information about hearing aids and digital wireless phones
Wireless Phones and Hearing Aid Accessibility
http://www.accesswireless.org/hearingaid/
FCC Hearing Aid Compatibility and Volume Control
http://www.fcc.gov/cgb/consumerfacts/hac_wireless.html