LG Electronics USA VN271 Cellular/PCS CDMA Phone with Bluetooth User Manual
LG Electronics MobileComm USA, Inc. Cellular/PCS CDMA Phone with Bluetooth Users Manual
UserManual.wiki
>
LG Electronics USA
>
VN271 User Manual
Users Manual
Navigation menu
Upload a User Manual
Namespaces
Wiki Guide
HTML
PDF
Info
Views
User Manual
Discussion / Help
Navigation


![9 Calling Experience When you use your phone on other PCS CDMA networks, your calling experience and call quality will be quite similar to what you experience when making calls within the Network. Although certain calling features may not be available, your phone calls are still private and secure. Correcting Dialing Mistakes To delete one digit at a time, press Dialing recent call Press send key . You can see the recent call list. If you press send key again, outgoing call to recent number will be initiated. Dialing Options (phone book) When you enter numbers in the number edit mode, dialing options [More] are displayed. To display a Phone Book entry, enter its entry number. To select an option, touch it. Call – Dials the phone number. Save – Saves the phone number in your Phone Book. (See “Saving a Phone Number” on the following page.) Wait – Inserts a Hard Pause. (See “Dialing and Saving Phone Numbers With Pauses” ) 2- Second pause – Inserts a two-second pause. (See “ Dialing and Saving Phone Numbers With Pauses” )](https://usermanual.wiki/LG-Electronics-USA/VN271/User-Guide-1512930-Page-12.png)

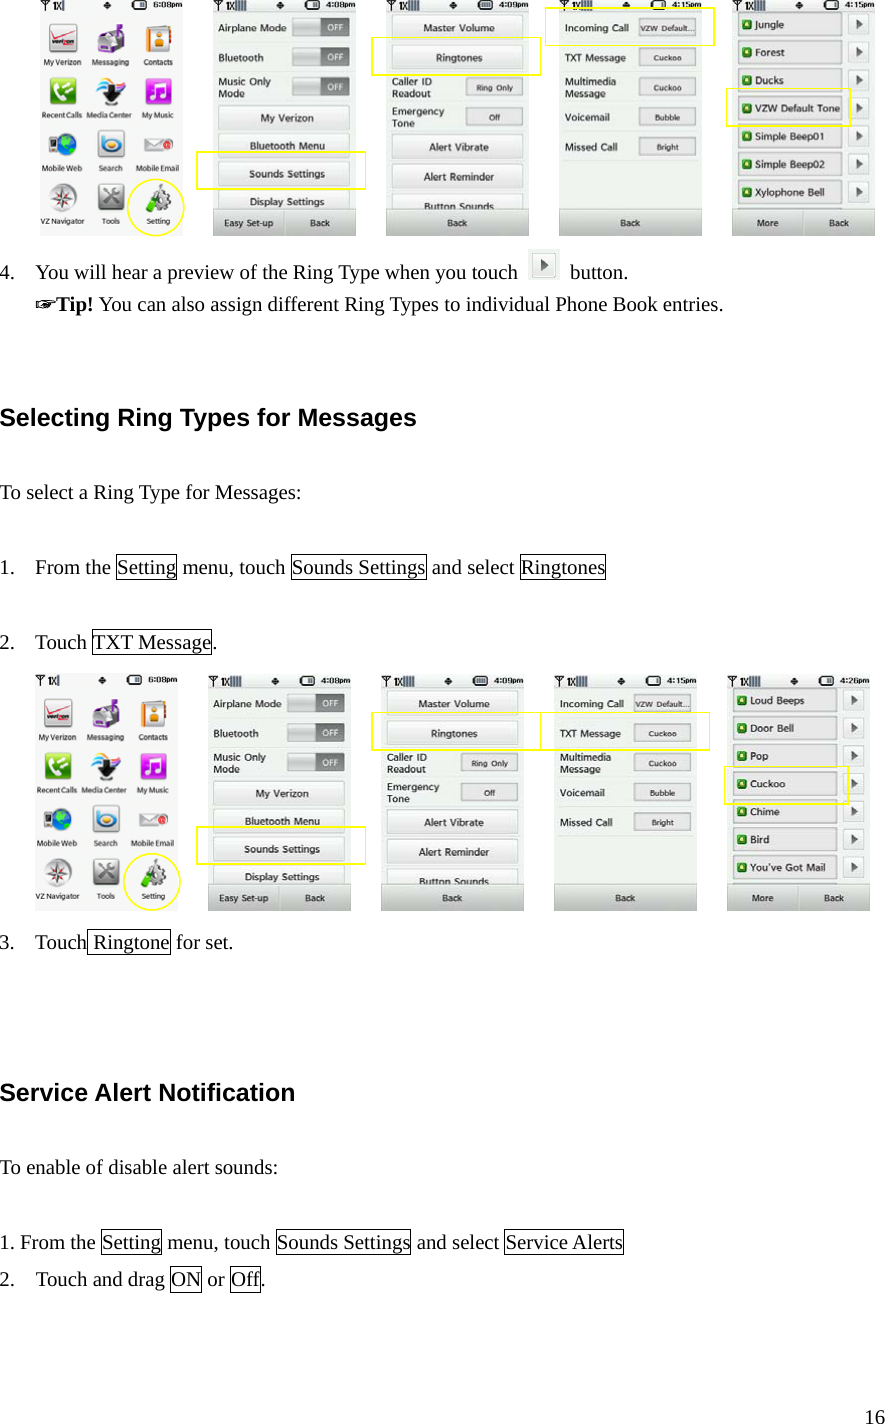
![15 Sounds Adjusting the Volume 1. From the Setting menu, touch Sounds Settings menu. 2. Touch Master Volume. ☞Tip! You can use the Volume Control keys to adjust the Ring Volume in the Main Menu or the Voice Volume during a call. 3. Highlight Level 1~5 , Vibrate Only , Alarm Only and All Sounds Off (for Ringer only) and press [SET]. Selecting Ring Types for Voice Calls To Select a Ring Type for Voice Calls: 1. From the Setting menu, touch Sounds Settings and select Ringtones 2. Touch Incoming Call. 3. Touch Ringtone for set.](https://usermanual.wiki/LG-Electronics-USA/VN271/User-Guide-1512930-Page-18.png)
![20 1.From the Settings & Tools menu, touch Call Settings and select Answer Options To select and option, touch it and press [Done]. Slide Out– You can answer incoming calls by Slide Out. Any Key - You can answer calls by pressing any key (not including the Mouse Key or Volume Control keys). Auto with Handsfree - Your phone answers incoming calls automatically after five seconds.](https://usermanual.wiki/LG-Electronics-USA/VN271/User-Guide-1512930-Page-23.png)
![8SXYVR&PYIXSSXLSRSVSJJ 4 V I W W X L I ,SQI /I] XLIRXSYGLXLI%TTPMGEXMSRW0EYRGLIV/I] 7GVSPPHS[RERHXSYGL7IXXMRKW ";MVIPIWWRIX[SVOW 8SYGL&PYIXSSXLXSXYVRXLIJYRGXMSRSRSVSJJ8LITLSRIWYTTSVXW,*4,74%(4%:6'43444&%4 *84(92&PYIXSSXL5(-(&8SGLERKI]SYVTLSRI¬W&PYIXSSXLREQI=SYVTLSRILEWEKIRIVMG&PYIXSSXLREQIF]HIJEYPX[LMGLMWZMWMFPIXSSXLIVHIZMGIW[LIR]SYWIXXLITLSRIEW(MWGSZIVEFPI=SYGERGLERKIXLIREQIXSGYWXSQM^IMXXS]SYVTVIJIVIRGI 4 V I W W X L I ,SQI /I] XLIRXSYGLXLI%TTPMGEXMSRW0EYRGLIV/I] 7GVSPPHS[RERHXSYGL7IXXMRKW ";MVIPIWWRIX[SVOW"&PYIXSSXLWIXXMRKWG-J&PYIXSSXLMWSJJXSYGL&PYIXSSXLXSXYVRMXSR 8SYGL(IZMGI REQI IRXIVERI[REQIXLIRXSYGL3/8STEMV]SYVTLSRI[MXLE&PYIXSSXLHIZMGI=SYQYWXTEMV]SYVTLSRI[MXLERSXLIVHIZMGIFIJSVI]SYGERGSRRIGXXSMX 4 V I W W X L I ,SQI /I] XLIRXSYGLXLI%TTPMGEXMSRW0EYRGLIV/I] 7GVSPPXHS[RERHXSYGL7IXXMRKW ";MVIPIWWRIX[SVOW"&PYIXSSXLWIXXMRKWG-J&PYIXSSXLMWSJJXSYGL&PYIXSSXLXSXYVRMXSRG8SYGL7GERJSVHIZMGIWXSWGERJSVERHHMWTPE]XLI-(WSJEPPEZEMPEFPIMRVERKI&PYIXSSXLHIZMGIW 'SRRIGXMRKXSRIX[SVOWERHHIZMGIW21](https://usermanual.wiki/LG-Electronics-USA/VN271/User-Guide-1512930-Page-24.png)
![G-JXLIHIZMGI]SY[ERXXSTEMV[MXLMWRXSRXLIPMWXQEOIWYVIXLIXEVKIXHIZMGIMWWIXXSFIHMWGSZIVEFPIXLIRXSYGL7GERJSVHIZMGIWXSWGEREKEMR 8SYGLXLI-(SJXLIHIZMGI]SY[ERXXSTEMV[MXL]SYVTLSRIG3JXIRXLIXEVKIXHIZMGI[MPPFIHMWGSZIVIHERHTEMVMRK[MPPSGGYVEYXSQEXMGEPP]G-J]SYVITVSQTXIHXSIRXIVETEWWGSHIXV]IRXIVMRKSV XLIQSWXGSQQSRTEWWGSHIWSVGSRWYPXXLIHSGYQIRXEXMSRXLEXGEQI[MXLXLIXEVKIXHIZMGIXSJMRHMXWTEWWGSHIG3RGIXLITEMVMRKMWWYGGIWWJYP]SYVTLSRI[MPPGSRRIGXXSXLIHIZMGI8SGSRRIGXXSE&PYIXSSXLHIZMGI3RGITEMVIH]SYGERGSRRIGXXSE&PYIXSSXLHIZMGIEWRIIHIH 4VIWWXLI,SQI /I] XLIRXSYGL XLI%TTPMGEXMSRW0EYRGLIV/I] 7GVSPPHS[RERHXSYGL7IXXMRKW";MVIPIWWRIX[SVOW"&PYIXSSXLWIXXMRKWG-J&PYIXSSXLMWSJJXSYGL&PYIXSSXLXSXYVRMXSR -RXLIPMWXSJ&PYIXSSXLHIZMGIWXSYGLERHLSPHXLIREQIJSVXLITEMVIHHIZMGISRXLIPMWX8S GSRJMKYVI XLI&PYIXSSXLJIEXYVIW]SY[ERXXSYWI7SQI&PYIXSSXLHIZMGIWLEZIQYPXMTPITVSJMPIW4VSJMPIWGERFIXLIEFMPMX]XSXVERWQMX]SYVTLSRIGSRZIVWEXMSRWXSTPE]QYWMG[MXL&PYIXSSXLWXIVISLIEHTLSRIWSVXSXVERWJIVJMPIWSVSXLIVHEXE 8SYGL ERHLSPHXLIHIZMGIPMWXIHMRXLI&PYIXSSXLWIXXMRKWWGVIIR 8SYGL3TXMSRWMRXLIQIRYXLEXSTIRW% WGVIIRSTIRW[MXLEPMWXSJXLIEZEMPEFPITVSJMPIW 8SYGLETVSJMPIXSEHHSVVIQSZIXLIGLIGOQEVOXSIREFPISVHMWEFPIXLITVSJMPI ;LIR]SYVIJMRMWLIHTVIWWXLI&EGO/I] 'SRRIGXMRKXSRIX[SVOWERHHIZMGIW22](https://usermanual.wiki/LG-Electronics-USA/VN271/User-Guide-1512930-Page-25.png)
![8SHMWGSRRIGXJVSQE&PYIXSSXLHIZMGI8SYGLXLIHIZMGIMRXLI&PYIXSSXLWIXXMRKWWGVIIR 8SYGL3/XSGSRJMVQXLEX]SY[ERXXSHMWGSRRIGX8SYRTEMVE&PYIXSSXLHIZMGI=SYGERYRTEMVE&PYIXSSXLHIZMGIERHIVEWIEPPTEMVMRKMRJSVQEXMSREFSYXMX 8SYGLERHLSPHXLIHIZMGIPMWXIHMRXLI&PYIXSSXLWIXXMRKWWGVIIR8SYGL(MWGSRRIGXERHYRTEMVSV9RTEMVMRXLIQIRYXLEXSTIRW'SRRIGXMRKXS :MVXYEP4VMZEXI2IX[SVOW:MVXYEPTVMZEXIRIX[SVOW:42WEPPS[]SYXSGSRRIGXXSVIWSYVGIWMRWMHIEWIGYVIHPSGEPRIX[SVOJVSQSYXWMHIXLEXRIX[SVO:42WEVIGSQQSRP]HITPS]IHF]GSVTSVEXMSRWWGLSSPWERHSXLIVMRWXMXYXMSRWWSXLEXXLIMVYWIVWGEREGGIWWPSGEPRIX[SVOVIWSYVGIW[LIRRSXSRGEQTYWSV[LIRGSRRIGXIHXSE[MVIPIWWRIX[SVO8LIVIEVIRYQIVSYWW]WXIQWJSVWIGYVMRK:42GSRRIGXMSRWMRGPYHMRKWSQIXLEXVIP]SRWIGYVIGIVXMJMGEXIWSVSXLIVQIXLSHWXSIRWYVIXLEXSRP]EYXLSVM^IHYWIVWGERGSRRIGX8SGSRJMKYVI:42EGGIWWJVSQ]SYVTLSRI]SYQYWXSFXEMRXLIHIXEMPWJVSQ]SYVRIX[SVOEHQMRMWXVEXSV8SEHHE:42 4 V I W W X L I ,SQI /I] XLIRXSYGLXLI%TTPMGEXMSRW0EYRGLIV/I] 7GVSPPHS[RERHXSYGL7IXXMRKW ";MVIPIWWRIX[SVOW":42WIXXMRKW 8SYGL%HH:42 8SYGLXLIX]TISJ:42XSEHH 'SRRIGXMRKXSRIX[SVOWERHHIZMGIW23](https://usermanual.wiki/LG-Electronics-USA/VN271/User-Guide-1512930-Page-26.png)