LG Electronics USA VS750 Cellular/PCS GSM/EDGE/CDMA/WCDMA Phone with WLAN and Bluetooth User Manual Layout 1
LG Electronics USA Cellular/PCS GSM/EDGE/CDMA/WCDMA Phone with WLAN and Bluetooth Layout 1
Users Manual

Part 15.21 statement
" Change or Modifications that are not expressly approved by the manufacturer could void
the user's authority to operate the equipment. “
Part 15.105 statement
This equipment has been tested and found to comply with the limits for a class B digital
device, pursuant to Part 15 of the FCC Rules.
These limits are designed to provide reasonable protection against harmful interference in
a residential installation. This equipment generates uses and can radiate radio frequency
energy and, if not installed and used in accordance with the instructions, may cause harmful
interference to radio communications. However, there is no guarantee that interference will
not occur in a particular installation. If this equipment does cause harmful interference or
television reception, which can be determined by turning the equipment off and on, the user
is encouraged to try to correct the interference by one or more of the following measures:
- Reorient or relocate the receiving antenna.
- Increase the separation between the equipment and receiver.
- Connect the equipment into an outlet on a circuit different from that to
which the receiver is connected.
- Consult the dealer or an experienced radio/TV technician for help.

Part 15 Class B Compliance
This device and its accessories comply with part15 of FCC rules.
Operation is subject to the following two conditions:
(1) This device & its accessories may not cause harmful interference.
(2) This device & its accessories must accept any interference received,
including interference that may cause undesired operation.
Body-worn Operation
This device has been tested for typical body-worn operations
with the distance of 0.79inches (2.0cm) from the user’s body.
To comply with FCC RF exposure requirements, a minimum separation distance
of 0.79inches(2.0cm) must be maintained from the user's body.
Additionally, Belt clips, holsters & other body-worn accessories may not contain
metallic components.
12 VS750
Phone Overview
1. Earpiece Lets you hear the caller.
2. Lamp
3. Headset Jack Allows you to plug in an optional
headset for convenient, hands-free conversations.
Plug headsetintothe 2.5mm jack located at the
top right corner of the device.
4. Volume Keys Use to adjust the Master Volume in
standby mode* and the Earpiece Volume during a
call.
5. Accessory/ Charger Port Connects the phone to
the battery charger, or other compatible accessory.
6. LCD Screen Allows you to view incoming calls,
messages and icons indicators as well as a wide
variety of content you select for viewing.
7. Phone Key Use to make and answer calls.
8. Menu Key
9. End Key Use to end a call.
1
0. Camera Key Use for quick access to Camera
function.
11. Power/Lock Key Use to turn the power on/off.
Also returns to standby mode.*
12. CameraLens Used for taking pictures and
recording video. Keep it clean for optimal photo
quality.
13. Speaker Lets you hear the caller's voice, music and
video in speakerphone mode.
14. microSD™SlotAccommodates an optional
microSD™card.
15. Proximity Sensor
16. Power key
14. micro SDTM Slot
13. Speaker
11. Multi-tasking key
10. Camera key
3. headset Jack
2. Lamp
1. Earpiece
6. LCD Screen
7. Phone key
9. End key
15. Proximity Sensor
16. Power key
*Standby mode is when the phone is waiting for input from you. No
menu is displayed and the phone isn’t performing any action. It’s the
starting point for all of the instruction steps.
Note:This User Manual gives navigation instructions according to the
default "Grid" Menu Layout in the Display Settings menu. If other
themes or menus are set, navigating the phone's menus may be
different.
4. Volume Keys
5. Accessory/
Charger Port
12. Camera Lens
8. Menu key

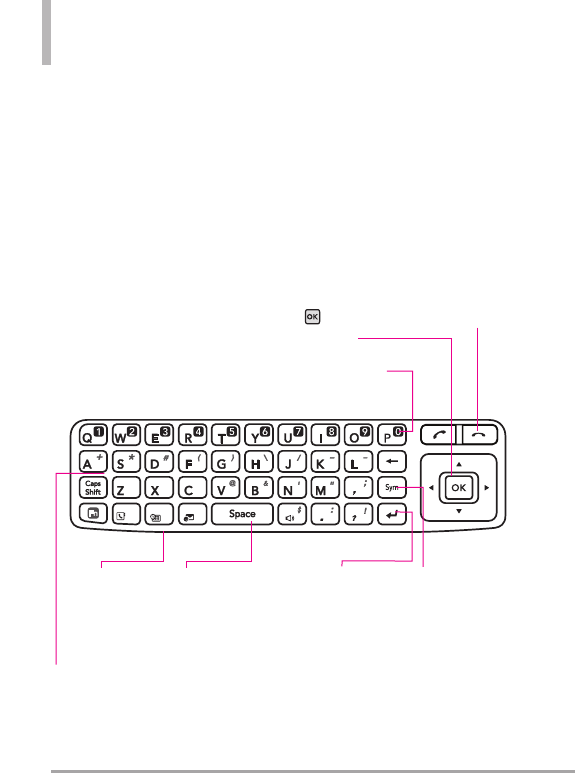
VS750 13
1. Alphanumeric Keypad Use toenter numbersand
characters and select menu items.
2. Caps/ Shift key Use to change letter case when
typing.
3. Fn Key
4. Contact Key
5. Calendar Key
6. Message Key Use for quick access to New TXT
Message.
7. Space Key Use to enter a space while editing.
8. Speakerphone Key Use to activate Speakerphone
Mode.
9. Return Key Movescursor to the next line.
10. Sym Key Use toinsert symbols (displayed at the
top of designated keys) into your text.
11. Directional Key Use for quick, convenient
navigation. From standby mode, access Mobile
Web, My Account, Calendar, and My Shortcuts
(you can change any of these to other menus in
the Settings menu). In menus use to scroll to
choicesand settings.
12. OK Key Use toactivateaselected screen item.
13. END Key Use to to end a call. Use to return to
standby mode.
14. Send Key Use tomakeor answer calls.
7. Space/ Voice
Commands Key
9. Return Key
5. Calendar Key
1. Alphanumeric
Keypad
4. Contact key
3. Fn Key 10. Sym Key
12. OK Key
14. SEND Key
8. Speakerphone Key
11. Directional Keys
13. END Key
6. Messaging key
2. Caps/ Shift key
14 VS750
Entering and Editing Information
From the Internal Qwerty Keypad
Press this key to access your
Favorite contacts list. From here
you can easily make calls, send
and view messages.
Use the arrow keys to go to
next field such as recipient
address, text, picture and video
depending on the message
types. Use the Key to send
amessage when finished.
Use to enter
letters.
Use to insert a
space between a
letter, words and
sentences.
Press this key first and
then anykey with a
symbol on it to insert
thatsymbol in your
message.
Use to go to next
line editing your
message.
Use to delete a letter,
words or sentences.
Also use it to exit the
menu and go back to
standby mode.
Use toenter numbers.
When creating a Text, Picture or Video message using the inside LCD, use
the Qwerty keypad.
VS750 15
Menu Tree on the Internal Screen
T
Toda
oday
y
T
Te
ext
xt
Menu
Phone
Phone
Hide Keypad
Menu
Network/ dial enumerator
1-0, * and #
Back key
Call History
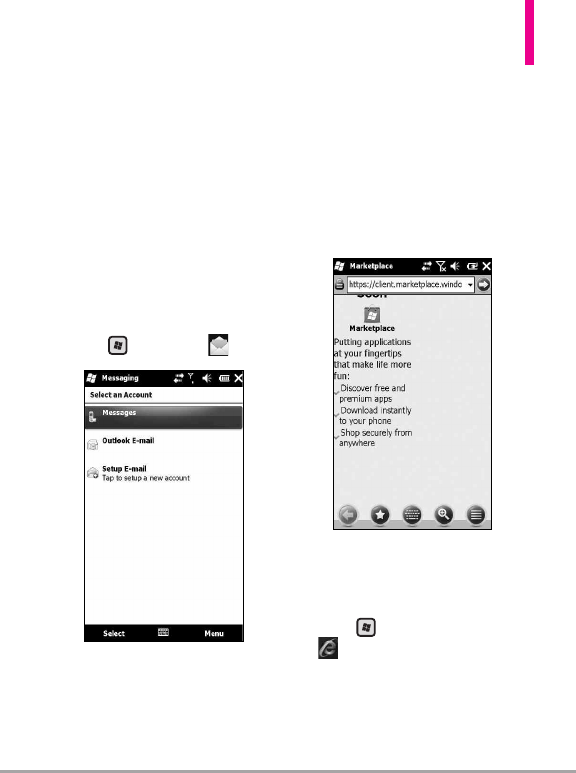
E-mail
E-mail
Select an Account
Text Messages
Setup E-Mail
E-Mail account (POP3)
Delete
Menu
Int
Interne
ernetExplor
tExplorer
er
Touch Menuicon only
Address Bar
Forward/Stop
Back key
Favorites
Software Keyboard
Zoom
Menu icon
C
Cont
ontact
acts
s
Enter a name
abc-xyz
New
Menu
C
Cont
ontact
acts(Existing)
s(Existing)
Call
Menu
Calendar (Agenda vie
Calendar (Agenda view)
w)
Day
Menu
Go To Today
Go To Date
Edit
Tools
View
Ge
Get
tting St
ting Star
art
ted
ed
Make a call
Set date and time
Set up e-mail
16 VS750
Menu Tree on the Internal Screen
Set up a device password
Set up a Bluetooth headset
Set up PC Synchronization
Set background
Set ring tone
Transfer Music
Set up an Internet connection
Add/remove Getting Started
View
Pictur
Picture
es&V
s&Videos
ideos
Camera
View
Folder picker
Sortby Picker (titled Date)
Menu
Game
Games(folder)
s(folder)
Bubble Breaker
Solitaire
Calcula
Calculat
tor
or
Edit
W
Windo
indow
wsMedia
sMedia
Now Playing
On-screen controls to control
media
Menu
Liv
LiveSear
eSearch 1st use
ch 1st use
Service Agreement screen
Accept
Cancel
Liv
LiveSear
eSearch normal use
ch normal use
Speak or type Business (box at
top of screen)
Location is shown with option
to change location
on screen
Categories
Map
Directions
Traffic
Movies
Gas Prices
Collections
Web
Weather
Menu
VS750 17
No
Not
te
es
s
New
Menu
In list view
Tap and Hold Menu
T
Ta
asks
sks
Text entry box for new item
High priority button
low priority button
Complete
Menu
Tap'n'hold menu
Int
Interne
ernetSharing
tSharing
Status information
PC Connection
Network Connection
Connect
Disconnect
Menu
A
Activ
ctiveS
eSync
ync
Status information
Sync
Menu
T
Ta
ask Manager
sk Manager
Tasks running are shown
End Task
Menu
F
File Explor
ile Explorer
er
Screen showing files and
folders
folder navigator
sort by
Up
Menu
Tap and Hold Menu
Help
Help
On screen topics
Contents
Search
Previous
Next
Sear
Search Phone
ch Phone
Search for text
Type
Search
Advanced
18 VS750
Menu Tree on the Internal Screen
Micr
Microsoft My Phone
osoft My Phone
Information about the service
Cancel
Next
After Setup first use
Never synchronized info
Sync
Menu
W
Windo
indow
ws Liv
s Live
e
search bar
sign into Windows Live
Menu
Me
Messenger
ssenger
If logged in
Menu
Ex
Excel Mobile
cel Mobile
View
Menu
P
Po
ow
werP
erPoint Mobile
oint Mobile
Open
Menu
When in presentation
on screen menu
OneNo
OneNot
teMobile
eMobile
New
Menu
When in a new note
Done
Menu
W
Wor
ordMobile
dMobile
New
Menu
When in a Document
View
Menu
Onscreen bar
MSN Mone
MSN Money W
y Widge
idget
t
Warning screen about going
online
Don't ask me again checkbox
Continue
Exit
VS750 19
MSN W
MSN Wea
eather W
ther Widge
idget
t
Warning screen about going
online
Don't ask me again checkbox
Continue
Exit
Sear
Search W
ch Widge
idget
t
Warning screen about going
online
Don't ask me again checkbox
Continue
Exit
R
Remo
emot
te De
e Deskt
sktop
op
Mobile
Mobile
Connect
Options
Status
Computer:
User name:
Password:
Domain:
Save Password
Mark
Marke
etplace
tplace
Se
Set
ttings
tings
Bluetooth
Power
Clock & Alarms
Lock
Today
Sounds & Notifications
Personal
Connections
System
Lock Key
Gesture Recogniton
Camer
Camera
a
Settings
Flash
Macro
Brightness
Capture
Go togallery
Exit
R
RSS V
SS Vie
iew
wer
er

20 VS750
Getting Started with Your Phone
The Battery
NOTE
It is important to fully charge the
battery before initial use of the phone.
The phone comes with a
rechargeable battery. Keep the
battery charged while not in use in
order to maximize talk and standby
time. The battery charge level is
shown at the top of the LCD
screen.
Installing the Battery
To install the battery, insert the top
edge (opposite the battery
terminals) of the battery into the
opening on the back of the phone.
Push the battery down until it clicks
into place.
Removing the Battery
Turn power off. Slide the battery
release latch away from the edge of
the battery, then lift the edge of
the battery to remove it.
Charging the Battery
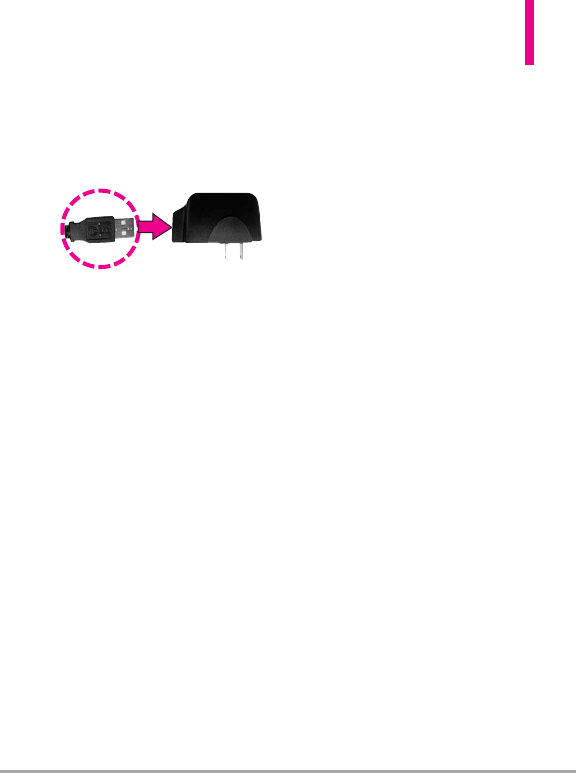
Your VS750 device comes with a
cableless travel adapter and a USB
data cable which are connected
together to charge your phone. To
charge your phone:
NOTICE
Please use only an approved charging
accessory to charge your LG phone.
Improper handling of the charging port, as
well as the use of an incompatible charger,
may cause damage to your phone and
void the warranty.
VS750 21
1. Connect the cableless wall
adapter and USB data cable.
When connecting as shown
below, the LG logo on the USB
cable should face toward you.
2. Gently uncover the accessory
charging port, then plug the end
of the ACadapter intothe
phone’s charger port and the
other end into an electrical
outlet.
3. The charge time varies
depending upon the battery
level.
Charging with USB
You can use your computer to
charge your phone. To be able to
charge with the USB cable, you
need to have the necessary USB
drivers installed on your PC first.
Connect one end of the USB cable
to the charging accessory port on
your phone and the other end to a
highpower USB port on your PC
(commonly located on the front
panel of the computer). It is best to
use the rear USB port when
connecting to a desktop PC. A USB
Hub should be powered by an
external power source (see Note
below).
NOTE
●
Low-power USB ports are not
supported, such as the USB
port on your keyboard or bus-
powered USB hub.
●
LG USB Driver is downloadable
from the following site:
http://www.lgmobilephones.com
>Click SUPPORT > Select a
Carrier(Verizon) > Select a
Model > Click USB Cable Driver
to download.
NOTICE
Please make sure that the 'B' Side faces
up before inserting a charger or data
cable intothe charger portof your
phone.

22 VS750
Getting Started with Your Phone
How to Install Your microSD™
Card
1. Locate the microSD
™
slot on the
right side of the phone and
gently uncover the slot opening
(microSD
™
slot cover stays
attached to the phone so you
don't lose it).
2. Insert the microSD
™
card facing
up and push until it clicks into
the slot. If you insert the card in
the wrong direction, it may
damage your phone or your
card.
How to Remove Your
microSD™Card
1. Push the card in to release the
exposed edge of the microSD
™
card to eject it.
2. Remove the microSD
™
card from
the slot and replace the cover.
NOTE
●Do not attempt to remove the
microSD™card while reading or
writing to the card.
●Users wishing to transfer or
download music onto a
MicroSD™card inserted into this
phone (through either MTP Sync
or Over the Air) should format
the MicroSD™card on this
handsetbeforeusing it
through(Menu -> Settings &
Tools -> Memory -> Card
Memory -> Options -> Format).
Warning: Formatting the
MicroSD™card will erase all
contents on the card. In the
event the MicroSD™cardis used
on this phone without first
formatting it, the phone will
display a “License acquisition
failed” during OTA downloading
or MTP Sync. Song files
downloaded or otherwise
purchased from third party
providers and stored on a
MicroSD™card inserted into this
device maybe protected or
encrypted by such provider and
cannot be played on this device.

VS750 23
Battery Temperature
Protection
Though extremely rare, if the
battery becomes overheated, the
phone will automatically turn off.
When you turn the phone back on,
amessage pops up alerting you
that the phone was powered off for
your safety.
Battery Charge Level
You can find the battery charge
level at the top right of the LCD
screen. When the charge level
becomes low, the battery sensor
sounds a warning tone, blinks the
battery icon, and displays a warning
message. As the charge level
approaches empty, the phone
automatically switches off without
saving.
Turning the Phone On and
Off
Turning the Phone On
Using the Internal Keypad
1. Install a charged battery or
connect the phone to external
power source.
2. Open the flip and press
for a few seconds until the LCD
screen lights up.
Using the External Power Key
1. Install a charged battery or
connect the phone to external
power source.
2. Press for a fewseconds
until the LCD screen lights up.
Turning the Phone Off
Using the Internal Keypad
1. Press and hold until the
display turns off.
Using the External Power Key
1. Unlock the screen by pressing
once or twice.
2.
Press and hold until the
display turns off.
24 VS750
Getting Started with Your Phone
Signal Strength
Call quality depends on the signal
strength in your area. You can tell
how much signal strength you have
by the number of bars next to the
signal strength icon: the more bars,
the stronger the signal. If you’re
having problems with signal quality,
move to an open area or, when
inside a building, try moving
towards a nearby window.
Screen Icons
When the phone is on, the top line
of the LCD screen displays phone
status icons.
Using the Internal Keypad
Tosee the icon glossary,go to
MENU
➔
Settings & Tools
➔
Phone Info
➔
Icon Glossary
on
your phone.
Making Calls
Make sure the phone is turned on.
If necessary, enter the lock code.
NOTE
To activate the speakerphone
during a call, simply open the flip.
Using the External Keypad
1. Unlock the screen by pressing
once or twice.
2. Enter the phone number (include
the area code, if needed).
3. Press the key.
4. Press the key to end the
call.
Using the Internal Keypad
1. Open the flip and enter the
phone number (include the area
code, if needed).
2. Press the key.
3.
Press the key to end the call.
Correcting Dialing Mistakes
If you make a mistake while dialing
a number, press once toerase
the last digit entered, or hold down
for at least 2 seconds to
delete all digits. When using
external keypad, use .

VS750 25
Redialing Calls
Press and hold the external
key or the internal key to
redial the last number you dialed,
received or missed in call history.
The last 270 numbers are stored in
the call history list and you can
select any of these to redial.
Receiving Calls
Using the External Keypad
1. When the phone rings or vibrates,
press the key.
2.
Press the key to end the call.
NOTE
Simplypress the keyto
immediatelysilence the ringtone
or vibration for thatcall. Or, you
can press the key twice, then
select Quiet. (1 = Unlock, 2 =
Options, and 3 = Quiet).
NOTE
Toignore the incoming call, press
the key twice to
immediately end the call. Or, you
can press the key twice, then
select Ignore.
Using the Internal Keypad
1. There are several ways of
answering a call, depending on
your selected Answer Options
(for instructions on how to set
your preferences, see page 110):
●
Flip Open
:Open the flip.
●
AnyKey
:Press the
key
or,
with the phone unlocked, press
any other key except the
key
.
●
Autowith Handsfree
:The call
automaticallyconnectswhen
connected to a handsfree
device.
●
SEND Key only
:If none of the
Answer Option boxes are
checked, only the SEND Key will
answer a call.
NOTE
If you press the Left Soft Key
[
[Q
Qu
ui
ie
et
t]
]while the phone is ringing
and the flip is open, the ringing or
vibration is muted for that call.
NOTE
If you press the Right Soft Key
[
[I
Ig
gn
no
or
re
e]
]while the phone is ringing
and the flip is open, the call will end
or go to voicemail.
NOTE
If you press while the phone is
ringing and the flip is already open,
the call will end and will be able to
select a Quick Text to send to the
caller.
26 VS750
Quick Access to Convenient Features
Adjust the Device Volume
You can set the volume of System
and Ringtone, which can be set
the volume On or Vibrate state or
Off.
●
System volume : You can change
the volume for sounds, such as
the sound you hear when you
tap program names and menu
options.
●
Ringer volume : You can set the
volume of Ringtone.
Volume Quick Adjustment
Quickly adjust ringer and earpiece
volumes by pressing the upper
volume key to increase and the
lower volume key to decrease.
NOTE
The earpiece volume can only be
adjusted during a call.
Ringer
volume
System
volume
VS750 27
Call Waiting
During a call, one beep indicates
that you have another incoming call.
Ignoring a Call Waiting
If you don't want to answer the
incoming call, press the Right Soft
Key [Ignore] when the flip
is open. When the flip is closed,
you can ignore the call by pressing
[OPTIONS] and selecting
Ignore.
Answering a Call Waiting
1. Press the internal key /
the external key whether
the flip is open or closed to
automatically put the first call
on hold and answer the new call.
2. Press the internal key /
the external key again to
put the second call on hold and
return to the first call.
Voice Commands
Voice Commands allow you to do
things by verbal command (e.g.,
make calls, confirm Voicemail,
etc.).
1. Access the Voice Commands
feature:
●
With the flip open, press .
●
With the flip closed and the
screen unlocked, give the
a quick press (an extended press
activates the Voice Recorder
feature instead).
2. Follow the prompts to use your
voice command(s).
NOTE
Voice Commands can also be
started with the designated key
on your Bluetooth®device.
Please check the manual of the
Bluetooth®device for further
instructions.
Storing Basics
Using the Internal Keypad
1. Open the flip.
2. Enter a number (max. 48 digits),
then press the Left Soft Key
[Save]
.
3.
Use the Directional Key to
scroll to Add New Contact/
Update Existing, then press .
4. Use the Directional Key to
scroll to
Mobile 1/ Home/
Work/ Mobile 2/ Fax,
then
press .
5. Enter a name (max. 32
characters), then press to
save.
6. Press to exit, to call,
or the Right Soft Key
[Options] for other options.
Using the External Keypad
1. Unlock the screen by pressing
once or twice.
2. Enter a number (max. 48 digits),
then press [OPTIONS].
3. Press to
Save.
4. Use the Directional Key to
scroll to
Mobile 1/ Home/
Work/ Mobile 2/ Fax,
then
press .
5.
Enter a name (max. 32
characters), then press to
save.
Using the External Keypad with
the Contacts Menu
1. Unlock the screen by pressing
once or twice.
2. Press [MENU].
3. Use the Directional Key to
scroll to Contacts, then press
.
4. Press New Contact.
5. Enter the name, then use the
Directional Key to scroll
down to the phone number
type you want to enter.
6. Enter the number, then press
to save.
28 VS750
Contacts in Your Phone’s Memory
VS750 29
Customizing Individual Entries
Using the Internal Keypad
1. Press the Right Soft Key
[Contacts], then use the
Directional Key to scroll to an
entry.
2. Press the Left Soft Key
[Edit].
3. Use the Directional Key to
scroll to the information to
customize.
4. Change the entry as you want,
then press to save your
changes.
NOTE
The external keypad cannot be
used to customize an existing
Contact entry.
Speed Dial
Allows you to set up your Speed
Dials.
Using the Internal Keypad
1. Press the Right Soft Key
[Contacts], then use the
Directional Key to scroll to an
entry.
2. Press the Left Soft Key
[Edit]
.
3. Use the Directional Key to
scroll to a phone number, then
press the Right Soft Key
[Options].
4. Use the Directional Key to
scroll to
Set Speed Dial
, then
press .
5. Enter a Speed Dial digit.
●Use the keypad, then press
to set.
●You can also use the
Directional Key to scroll
to the Speed Dial digit, then
press to set.
6. Screen prompt appears Assign
Speed Dial to Contact? Press
to select Yes , then press
to select Save.
30 VS750
Contacts in Your Phone’s Memory
Storing a Number with
Pauses
Pauses allow you to enter
additional series of numbers to
access automated systems such as
Voicemail or credit billing
numbers. Pause types are:
Wait
(W) The phone stops dialing until
you press the Left Soft Key
[Release]
to advance to the next
number.
2-Sec Pause
(P) The
phone waits two seconds before
sending the next string of digits.
Using the Internal Keypad
1. Enter a number, then press the
Right Soft Key
[Options]
.
2. Use the Directional Key
to scroll to
Add 2-Sec Pause
or
Add Wait,
then press .
3. Enter additional number(s)
(e.g., pin number, credit card
number, etc.).
4. Press the Left Soft Key
[Save]
.
5. Complete the Contact entry as
necessary.
Using the External Keypad
1. Unlock the screen by pressing
once or twice.
2. Enter a number, then press
[OPTIONS].
3. Use the Directional Key
to scroll to
Add 2-Sec Pause
or
Add Wait,
then press .
4. Enter additional number(s)
(e.g., pin number, credit card
number, etc.).
5. Press [OPTIONS] and
select Save.
6. Complete the Contact entry as
necessary.

VS750 31
Adding Additional Phone
Number(s) to Existing
Contact
From Standby Mode Using the
Internal Keypad
1. Enter a phone number, then
press the Left Soft Key
[Save]
.
2. Use the Directional Key
to scroll to
Update Existing
,
then press .
3. Use the Directional Key
to scroll to an existing entry,
then press .
4. Use the Directional Key
to scroll to
Mobile 1/ Home/
Work/ Mobile 2/ Fax
, then
press to save.
From the Contact List Screen
Using the Internal Keypad
1. Press the Right Soft Key
[Contacts].
2. Use the Directional Key
to scroll to an entry, then press
the Left Soft Key
[Edit]
.
3. Use the Directional Key
to scroll to the phone number
field to add, then enter the
number and press to save.
Changing Saved Information
Using the Internal Keypad
1. Press the Right Soft Key
[Contacts].
2. Use the Directional Key
to scroll to a Contact entry,
then press the Left Soft Key
[Edit]
.
3. Use the Directional Key
to scroll to the field you want
to change.
4. Make the changes, then press
to save.
Changing the Default
Number
The Default Number is the first
phone number you entered when
you created the Contact. Another
number can be saved as the
Default Number.

32 VS750
Contacts in Your Phone’s Memory
Using the Internal Keypad
1. Press the Right Soft Key
[Contacts].
2. Use the Directional Key
to scroll to an entry.
3. Press the Left Soft Key
[Edit]
.
4. Use the Directional Key
to highlight a phone number,
then press the Right Soft Key
[Options].
5. Use the Directional Key
to highlight
Set As Default
,
then press .
6. A confirmation message is
displayed. Press to set the
new number as the default.
7. Press again to save.
Deleting
Deleting a Phone Number Using
the Internal Keypad
1. Press the Right Soft Key
[Contacts].
2. Use the Directional Key
to scroll to an entry.
3. Press the Left Soft Key
[Edit]
.
4. Use the Directional Key to
scroll to a phone number.
5.
Press and hold to delete it.
6. Press .
NOTE
This will only work when you
have more than one number
listed per contact.
Deleting a Contact Entry Using
the Internal Keypad
1.
Press the Right Soft Key
[Contacts].
2. Use the Directional Key
to scroll to an entry.
3. Press the Right Soft Key
[Options]
, then press
Erase
.
4. Press
[Yes]
.
Deleting a Speed Dial
Using the Internal Keypad
1. Press the Right Soft Key
[Contacts].
2. Use the Directional Key
to highlight a Contact entry to
edit and press
[VIEW]
.
VS750 33
3. Select the phone number with
the Speed Dial, then press
[EDIT]
.
4. Press the Right Soft Key
[Options].
5. Press
Remove Speed Dial
.
6. Press
[Yes]
.
7. Press to save.
Speed Dialing
Allows you to make phone calls
quickly and easily to numbers
stored in Contacts. You need to
set Speed Dials in your Contacts
before using this feature.
NOTE
Speed Dial 1 is for Voicemail.
Single Digit Speed Dials
From the Standby screen, press
and hold the Speed Dial digit. Your
phone recalls the phone number
from your Contacts, displays it, and
dials it for you.
Multiple Digit Speed Dials
When you press and hold a number
key, it signals the phone to attempt
a Speed Dial transmission. To dial
Speed Dials with multiple digits,
press the first digit(s) as necessary,
then press and hold the last digit.
For example, to Speed Dial 25, press
, then press and hold .
NOTE
You can also enter the Speed
Dial digit(s), then press the
internal key / external
key.
Account Information Speed Dials
Speed Dials 95-99 are preset to
access certain phone account
information for your convenience:
95 (Warranty Center), 96
(#DATA), 97 (#BAL), 98
(#MIN), and 99 (#PMT).
Unlike Speed Dial 1, you can
delete and/or change these.
34 VS750
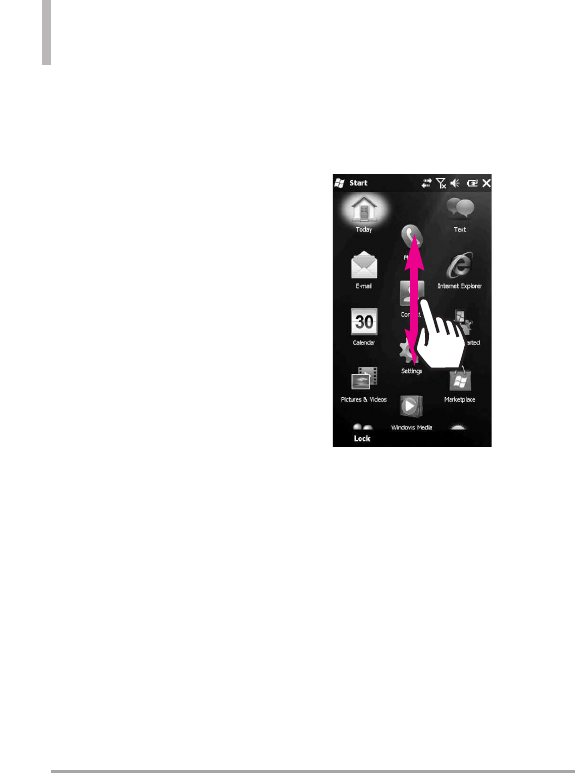
Your home screen
From this screen you can access
menu options, make a call, view the
status of your phone and much
more.
Touch screen tips
The home screen is also a great
place to get used to using the touch
screen. To select an item, touch the
centre of the icon.
●
Do not to press too hard; the
touchscreen is sensitive enough
to pick up on a light, firm touch.
●
Use the tip of your finger to
touch the option you require. Be
careful not to touch any other
keys.
●
When the screen light is off,
either press the power key or
hold down the Unlock/Lock key
on the touch screen to return the
home screen.
●
Whenever your VS750 is not in
use, it will return to the lock
screen.
Scrolling
Drag from side to side to scroll. On
some screens, such as web pages,
you can also scroll up or down.
VS750 35
You are available to the various
input methods on the screen,
including Keyboard, LGJavaKey,
Trnscriber, and XT9 Keypad. The
Input Panel icon appears on the
menu bar to indicate which input
method is currently selected. The
Input Selector arrow (shown at the
right side of the Input Panel icon)
opens a list of available input
methods
Using the KeyboardUsing the
Keyboard
To enter text, symbols, and
numbers, you can either type using
the QWERTY Keyboard to type
ABC charanters or the standard on-
screen Keyboard.
Using the standard on-screen
Keyboard
The on-screen Keyboard is available
when text entry is possible. You can
enter text by tapping keys on the
keyboard that are displayed on the
screen.
Enter text using the on-screen
keyboard
●
The on-screen keyboard is
available when text entry is
possible.
●
To make the keys larger, tap the
Input Selector arrow, and then
Options. In the Input method list,
select Keyboard, and then tap
Large Keys.
●
General rule for entering text is
same as MS based PC.
Entering and Searching Information
Input Panel
(Keyboard)
Input Panel
icon Input Selector
arrow
36 VS750
Using Phone Menus
Today
The Today screen displays
important information, such as
upcoming appointments and status
indicators.
You can tap a section on the screen
to open the associated program.
●
To access the Today screen, tap
(LG Menu) > Settings > Today >
Items tab.
You can select the item you want to
appear on the Today screen. To
change its position, tap Move up or
Move Down. If you want to customise
the further task and appointment
information by tapping Options.
Check the Today timeout select the
number of hours from the drop
down list. If you don't use your
phone after the specified length of
time has elapsed, the screen
switches to the Today screen.
●
To synchronise the Today screen
display, including the background
image, tap (LG Menu) > Settings >
Today > Appearance tab.
You can select the desired theme for
the background. If you use your own
background image, tap the Use this
picture as the background and tap
Browse to locate the file you want.
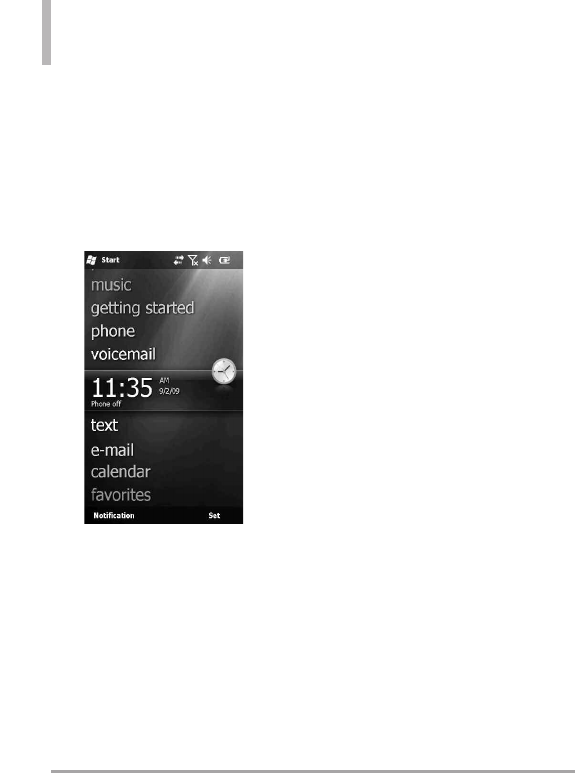
Default MS Today Screen
On the Today screen, you can see
important and recent information
for the day.
●picture
●music
●getting started
●phone
●voicemail
●3:14
PM
●text
●e-mail
●calendar
●favorites
VS750 37
Text
The phone can store over 690
messages. The information stored in
the message is determined by
phone model and service capability.
Other limits to available characters
per message may exist. Please check
with your service provider for
system features and capabilities.
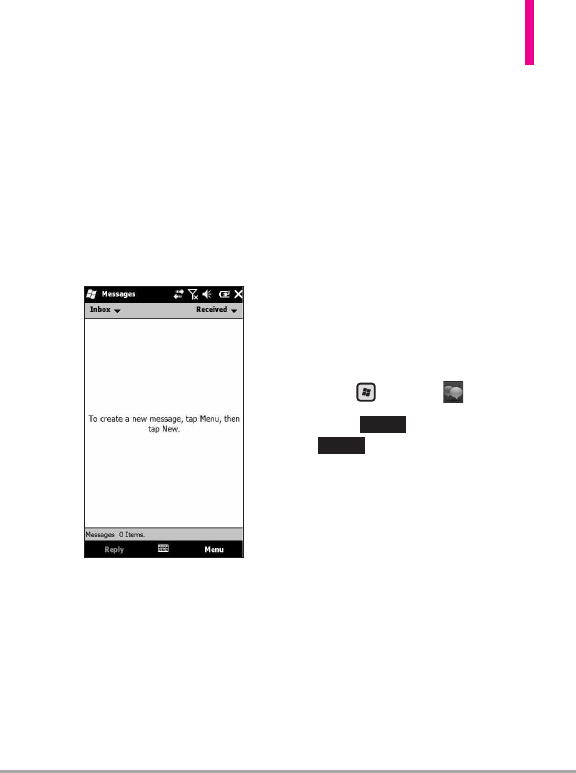
●Inbox
Messages :
Deleted Items/ Drafts/ Inbox/
Outbox/ Sent Item
Outlook E-mail :
Deleted Items/ Draft/ Inbox/
Outbox/ Rss/ Sent Items
●Sort by
Message Type/ From/
Received/ Subject
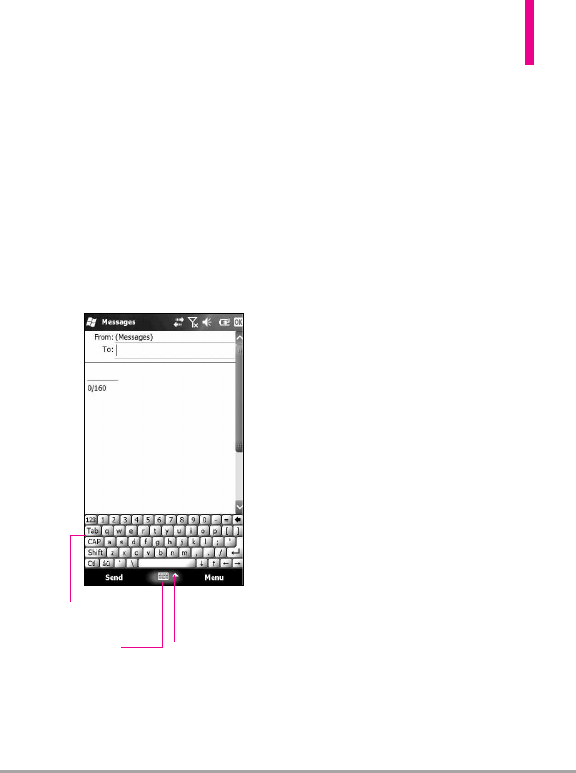
The Basics of Sending a Text
Message
1. Press and
Tex t
.
2.
Touch , then youch
.
MMS/ SMS
3. Touch To to enter the recipient’s
number, or open your contacts
or favourites. You can add
multiple contacts. When you are
finished, touch the message box
below to start composing the
message text.
4. After entering the text, you can
send the SMS by touching the
send button on top of the
message.
New
Menu
38 VS750
Using Phone Menus
Text Options
While you are composing the text of
a message, you have various options
to customize the text.
1. Press and
Tex t
.
2.
Touch .
3. Touch the option(s) to
customize.
New/ Delete/ Mark as Read/
Follow up/ Move.../ Go to/
Tools/ Select Messages/ Refly/
Forward
5. Complete your message and
send or save it.
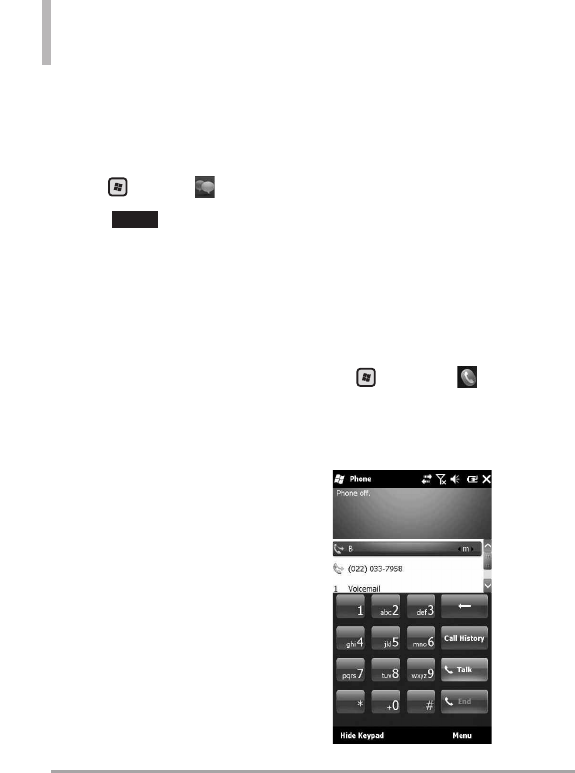
Phone
You can use easily with smart dial
feature. If you press a number on
the keypad, the screen displays the
phone number in Call History,
Starting with the number you enter,
and the names in Contacts or Call
History, starting with the characters
you enter.
You can select you want to call
number.
You can also make an international
call or emergency call.
1. Press and
Phone
.
NOTE
You can find your phone number
by tapping (LG Menu) > Settings >
Phone.
Menu
VS750 39
E-mail
Allows you to mobile email. Select
an email service. Mobile Email is an
application downloadable from the
Messaging Menu. Don't miss an
important email. Thanks to Mobile
Email, you can get your emails on
your phone, while you're on the go.
Mobile Email works with many
providers, including Yahoo! and
AOL. Get alerts from your VS750
when new email has arrived.
1. Press and
E-mail
.
Internet Explorer
The Web feature allows you to view
Internet content. Accessibility and
selections within this feature are
dependent upon your service
provider. For specific information on
Alltel Web contact your service
provider.
Start Browser
Starting an Alltel Web session.
1. Press and
Internet Explorer
.
2. After a few seconds, you will see
the home page.

40 VS750
Using Phone Menus
Contacts
Contacts is your address book and
information storage for the people
and business you communicate with.
Store phone numbers, e-mail
addresses, home addresses, and any
other information that relates to a
contact, such as a birthday or an
anniversary date. You can also add a
picture or assign a ring tone to a
contact.
From the contact list, you can
quickly communicate with people.
Tap a contact in the list for a
summary of contact information.
From there, you can call or send a
message.
If you use Outlook on your PC, you
can synchronise contacts between
your device and PC.
Overview of Contacts
Contacts is your address book and
information storage for the people
and business you communicate with.
Store phone numbers, e-mail
addresses, home addresses, and any
other information that relates to a
contact, such as a birthday or an
anniversary date. You can also add a
picture or assign a ring tone to a
contact.

VS750 41
Allows you to add a new contact to
your Contact List.
1. Press and
Contacts
.
2. Tap New and enter the contact
information.
3. Select
Outlook Contact
or SIM
Contact, and enter contact
detail.
4. When finished, tap
OK
.
Contacts (Existing)
42 VS750
Using Phone Menus
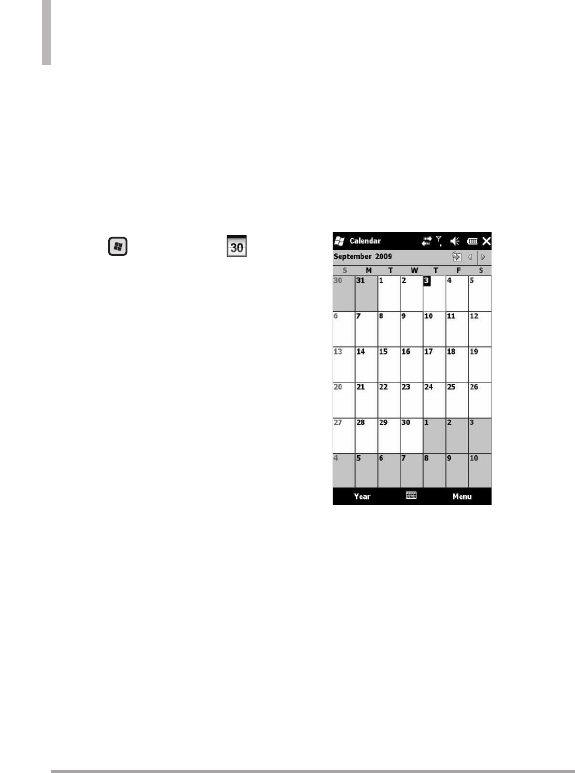
Calendar
(Agenda view)
Allows you to store and access your
agenda(s). Simply store your
appointments in your Calendar and
your phone will alert you with a
reminder.
1. Press and
Calendar
.
2. Press the Next button to open
the Backup Schedule screen.
3. Select a Frequency and enter a
valid Date and/or Time for the
backup or backups.
- '
Once
': will start a backup at the
designated time and date.
- '
Daily
': will start a backup at the
designated time each day.
- '
Weekly
': will start at the
designated time and day each
week, starting with the selected
date.
4. Press the Next to continue and
to open the Save As screen.
5. In the Save As screen, you will
need to enter a file name and
select the location for the
backup file.
6. Optionally enter a description for
the backup file.
7. Press Next to complete the setup.
8. Press the Next button to confirm
the changes and go back to
Sprite Backup main screen.

VS750 43
Getting Started
1. Press and
Getting Started
.
●
Make a call
●
Set date and time
●
Set up e-mail
●
Set up a device password
●
Set up a Bluetooth headset
●
Set up PC Synchronization
●
Set background
●
Set ring tone
●
Transfer Music
●
Set up an Internet connection
●
Add/remove Getting Started
●
View
Pictures & Videos
The Pictures and Videos program
collects, organizes, and sorts images
and video clips in the following
formats on your device.
File Type/ Extensions
Image *.bmp, *.jpg
Video *.avi, *.wmv, *.mp4, *.3gp
Audio *.aac, *.wma, *.mp3, *.wav,
*.midi
You can view the pictures as a slide
show, bean them, send them via
e-mail, edit them, or set them as the
background on the Today screen.
1. Press and
Pictures & Videos
.
44 VS750
Using Phone Menus
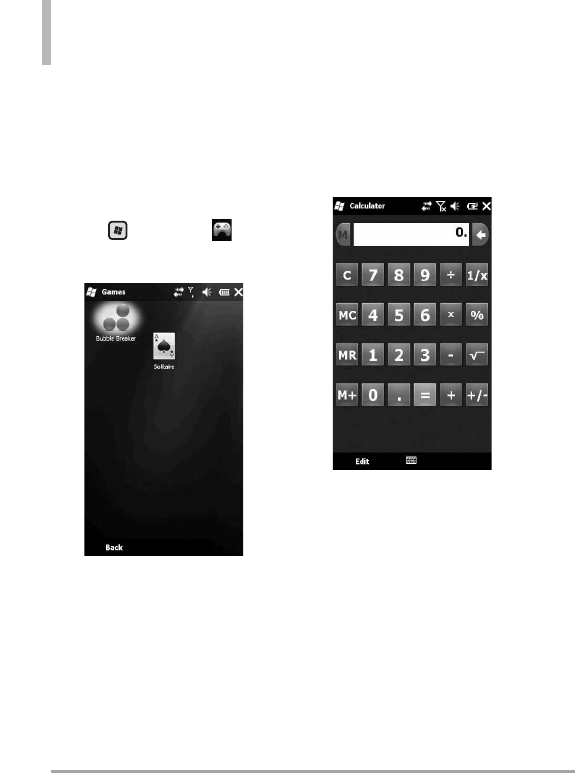
Games
Allows you to download games and
applications from the Media Center
server. Choose the software you
want from the list displayed on the
screen.
1. Press and
Games
.
Bubble Breaker/ Solitaire
Calculator
Allows you to perform simple
mathematical calculations. You can
enter numbers up to the sixth
decimal place.

VS750 45
1. Press and
Calculator
.
2. Enter data.
●
Touch the keypad that pops
up to enter numbers.
●
Touch to enter decimals.
●
Touch to delete the last
digit entered.
●
Touch the corresponding
Touch Keys to enter functions
( +, -, x, / ).
●
Touch to complete
equation.
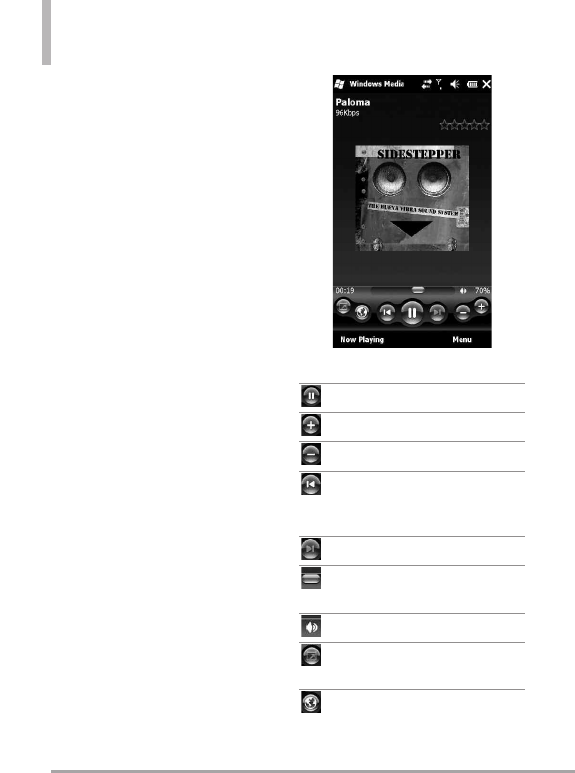
Windows Media
You can use Microsoft Windows
Media Player 10 Mobile for Pocket
PC to play digital audio and video
files that are stored on your device
or on a network, such as on a Web
site.
Using Windows Media Player, you
can play both audio and video files.
These are the following file formats
that are supported by this version
of Windows Media Player (WAV,
WMA, WMV, MP3, MIDI,SPMIDI,
SMAF, AAC,AMR,3GP,MP4 etc).
1. Press and
Windows Media
.
Playback Screen
The default screen that displays the
playback controls (such as Play,
Pause, Next, Previous, and Volume),
the album art window, and the video
window. You can change the
appearance of this screen by
choosing a different skin.
When you are viewing the Playback
screen, the following commands
appear on Menu.
●
Library
: Displays the Library
screen so you can choose a file
to play.
=
C
.
46 VS750
Using Phone Menus
●
Play/Pause
: Starts or pauses
playback.
●
Stop
: Stops playback.
●
Shuffle /Repeat
: Plays the items
in the Now Playing playlist
randomly/ repeatedly.
●
Full Screen
: When a video is
playing, displays it by using the
entire screen.
●
Options
: Lets you adjust various
Windows Media Player options,
including network, skin, and
hardware button options.
●
Properties
: Displays information
about the currently playing file.
●
About
: Displays information
about Windows Media Player,
such as the version
number.About the screens and
menus
Icon Description
Plays/Pauses a file.
Increases the volume level.
Decreases the volume level.
Skips to the beginning of the
current file or to the
previous file.
Skips to the next file.
Adjusts the playback
progress of a selected file.
Turns the sound on or off.
Displays a video by using the
entire screen (full screen).
Displays a Web site where
you can find music and
videos to play.

VS750 47
Live Search 1st use
You can search for files and other
items stored on your device in the
My Documents folder or on a
storage card. You can search by file
name or by words located in the
item. For example, you can search in
e-mail messages, notes,
appointments, contacts, and tasks,
as well as in online Help.
1. Press and
Live Search
.
2. In Search for, enter the file name,
word, or other information you
want to search for.
3. If you have looked for this item
before, tap the Search for arrow
and select the item from the list.
4. In Type, select a data type to
help narrow your search.
5. Tap Search.
6. The My Documents folder and
subfolders are searched.
7. In the Results list, tap the item
you want to open.
Live Search normal use
48 VS750
Using Phone Menus
Notes
Notes helps you to quickly capture
thoughts, questions, reminders, to-
do lists, and meeting notes. You can
create handwritten and typed notes,
record voice notes, convert
handwritten notes to text for easy
readability, and send notes to
others.
1. Press and
Notes
.
Entering Information in Notes
You can enter typed text by using
the on-screen keyboard or
handwriting recognition software.
You can also use the stylus to write
or draw directly on the screen. On
devices that support recording, you
can create a standalone recording
or embed a recording in a note.
1. Press and
Notes
.
2. Touch to write a new note.
3.
Type the note, then touch .
A confirmation message displays
briefly, then displays your list of
notes.
Viewing a Notepad Entry
1. Access Notepad and select the
entry.
2. To erase, touch select list then,
touch .
To edit, touch ,
touch to delete.
Erase
Edit
Erase
Save
Add
VS750 49
Tasks
Use Tasks to keep track of things
you need to do. A task can occur
once or repeatedly (recurring). You
can set reminders for your tasks and
you can organize them using
categories. Your tasks are displayed
in a task list. Overdue tasks are
displayed in red.
To Create a Task
1. Press and
Tasks
.
2. Tap
Menu > New Task
3. Enter a subject for the task, and
fill in information such as start
and due dates, priority, and so
on.
4. When finished, tap OK.
NOTE
You can easily create a short, to-
do-type task. Simply tap the Tap
here to add a new task box, enter
a subject. If the task entry box is
not available, tap Menu > Options
and select the Show Tasks entry
bar check box.
To Change the Priority of a Task
Before you can sort tasks by
priority, you need to specify a
priority level for each task.
1. Press and
Tasks
.
2. Tap the task you want to change
the priority for.
3. Tap Edit and in the Priority box,
tap a priority level.
4. Tap OK to return to the task list.
NOTE All new tasks are assigned a
Normal priority by default.
To Set a Default reminder for all
New Tasks
You can have a reminder
automatically turned on for all new
tasks you create.
1. Press and
Tasks
.
2. Tap Menu > Options.

50 VS750
Using Phone Menus
3. Select the Set reminders for
new items check box.
4. Tap OK to return to the task list.
NOTE The new tasks must have due
dates set in order for the
reminder to take effect.
To Show Start and Due Dates in
the Task List
1. Press and
Tasks
.
2. Tap Menu > Options.
3. Select the Show start and due
dates check box.
4. Tap OK.
To Locate a Task
When your list of tasks is long, you
can display a subset of the tasks or
sort the list to quickly find a
specific task.
1. Press and
Tasks
.
2. In the task list, do one of the
following:
●Sort the list. Tap Menu > Sort
by, and tap a sort option.
●Filter the list by category. Tap
Menu > Filter, and tap the
category you want displayed.
NOTE To filter your tasks further, tap
Menu > Filter > Active Tasks or
Completed Tasks.
VS750 51
Internet Sharing
NOTE
ActiveSync software version 4.5
or higher is required.
●
Connect the USB cable to the
PC.
●
Tap (LG Menu) > Applications >
Internet Share.
●
Set PC Connection to USB or
Bluetooth PAN
●
Set Network Connection to
proper APN
●
Tap Connect in the bottom line
●
D ata connection indicator (G/
E/ 3G) is displayed when PDP
activation is performed
successfully.
NOTE
Operating System on your PC is
required Windows XP SP2 or later.
ActiveSync
ActiveSync synchronizes information
on your device with information on
your PC, such as Outlook content.
ActiveSync can also synchronize
over a cellular network with
Microsoft Exchange Server, if your
company or service provider is
running Microsoft Exchange Server
with Exchange ActiveSync. When
you synchronize, ActiveSync
compares the information on your
device with the information on your
PC and/or Exchange Server and
updates all locations with the most
recent information.

52 VS750
Using Phone Menus
With ActiveSync, you can:
●
Synchronize information, such as
Outlook E-mail, Contacts,
Calendar, or Tasks information on
your device with your PC, as well
as pictures, video, and music.
●
Synchronize Outlook E-mail,
Contacts, Calendar
appointments, and Tasks on your
device directly with Exchange
Server so that you can stay up to
date even when your PC is
turned off.
●
Exchange files between your
device and your PC without
synchronizing.
●
Select which types of information
are synchronized and specify how
much information is
synchronized. For example, you
can choose how many weeks of
past Calendar appointments to
synchronize.
Before you can synchronize
information with a PC, first, you
must install ActiveSync on your PC.
And then you create a
synchronization relationship
between your device and the PC.
You can install ActiveSync from the
Getting Started disc that comes.
Once you have installed ActiveSync
and set up a synchronization
relationship, ActiveSync on the PC
recognizes your device when you
connect it, and automatically
transfers the synchronization
settings you specified on your
device.
You may be able to synchronize
your device with Exchange Server
through your company or wireless
service provider. If you plan to do
so, obtain e-mail address, Exchange
Server address, user name,
password, and domain name from
your administrator before starting
the Sync Setup Wizard.

VS750 53
Task Manager
In most cases, programs
automatically close to free needed
memory, however, you can close
programs manually, if you prefer.
1. Press and
Tasks
.
2. You can check the running
programs list on Application
column and there Memory and
CPU information.
3. You can end the programs
manually by tapping
End Task
.
File Explorer
The File Explorer application allows
you to open an explorer window
similar to a desktop Windows based
system. The explorer window allows
you to navigate through your phone
to locate desired folders and files.
You can also quickly manage, delete,
copy, or edit any files and folders
on your phone. You can create new
folders.
If you want to see the files or
folders in the My device or Storage
Card folder, tap either of the two.
To view the files or folders in the
phone’s memory, tap .
To open a file on a network, tap .
Enter the file path and tap OK.
Tap the folder category (labelled
My Documents by default) and
then the folder that you want to
view.

54 VS750
Using Phone Menus
Help Search Phone
You can search for files and other
items stored on your device in the
My Documents folder or on a
storage card. You can search by file
name or by words located in the
item. For example, you can search in
e-mail messages, notes,
appointments, contacts, and tasks,
as well as in online Help.
To search for a file or an item
1. Press and
Search Phone
.
2. In
Search for
, enter the file
name, word, or other information
you want to search for.
3. If you have looked for this item
before, tap the Search for arrow
and select the item from the list.
4. In
Type
, select a data type to
help narrow your search.
5. Tap
Search
.
6. The
My Documents
folder and
subfolders are searched.
7. In the
Results
list, tap the item
you want to open.

VS750 55
Microsoft My Phone Windows Live
56 VS750
Using Phone Menus
Messenger
The Instant Messaging feature can
only be used with the support of
the network operator or
communities such as AIM, Windows
Live and Yahoo! Messenger.
For Instant Messaging users, a valid
User ID and Password will be
required in order to login and
exchange messages as well as
checking the online status.
The menu items below might not
appear since not all IM communities
support the various options. Also
the menu strings may appear
differently based on the selected IM
communities. The keywords such as
User ID, Login and Contact will be
used as general terms in IM menus
according to the currently selected
communities such as AIM, Windows
Live and Yahoo! Messenger.
Sign in
1. Select the community.
2. Type your user name and
password. For Windows Live
messenger, you will also need to
enter the respective domain
name. e.g.: xyz@hotmail.com
NOTE
If you do not have a community
user name, you will need to create
one on the community website
using your desktop internet
browser.
3. Tap sign in.
NOTE
To avoid typing your username
and password each time you log
in, select the Save Password check
box. To set your device to sign in
to the community automatically
each time you start the device,
select Auto Sign In.

VS750 57
Excel Mobile
Excel Mobile makes it easy for you
to open and edit Excel workbooks
and templates created on your PC.
You can also can create new
workbooks and templates on your
device.
NOTE
Work in full-screen mode to see
as much of your workbook as
possible. Tap View > Zoom and
select a percentage so that you
can easily read the worksheet.
Unsupported features in Excel
Mobile
Excel Mobile does not fully support
some features such as formulas and
cell comments. Some data and
formatting may be lost when you
save the workbook on your device.
Note the following Excel Mobile
formatting considerations:
●
Alignment. Horizontal, vertical,
and wrap-text attributes remain
the same, but vertical text
appears horizontal.
●
Borders. Appear as a single line.
●
Cell patterns. Patterns applied to
cells are removed.
●
Fonts and font sizes. Fonts not
supported by your device are
mapped to the closest font
available. The original font is
listed on your device. When the
workbook is opened in Excel on
your PC again, the data is
displayed in the original font.
●
Number formats. Numbers
formatted using the Microsoft
Excel 2007 Version 6.1
conditional formatting feature are
displayed in Number format.
●
Formulas and functions. If an
Excel file contains a function that
is not supported by Excel Mobile,
the function is removed, and only
the returned value of the
function appears. The following
formulas are also converted to
values: formulas entered as an
array or containing an array
argument, for example,
=SUM({1;2;3;4}); formulas
containing external link
references or an intersection
range reference; and formulas
containing references past row
16384 are replaced with #REF!

58 VS750
Using Phone Menus
●
Protection settings. Most
worksheet and workbook
protection features are disabled
but not removed. However,
support for password protection
has been removed. Workbooks
that are password-protected or
workbooks in which one or more
worksheets are password-
protected cannot be opened. You
must remove the password
protection in Excel on the PC and
then synchronise to open the file
on the device.
●
Zoom settings. Are not retained.
Excel supports a per worksheet
zoom setting, while the Excel
Mobile zoom setting is applied to
the entire workbook.
●
Worksheet names. Names that
reference worksheets within the
same workbook are displayed
accurately, but names that refer
to other workbooks, arrays, for
example, ={1;2;3;4}, array
formulas, or intersection ranges
are removed from the name list. If
a name is removed from the list,
it is left in formulas and
functions, causing those formulas
to be resolved as “#NAME?” All
hidden names are not hidden.
●
AutoFilter settings. Are removed.
However, you can use the
AutoFilter command in Excel
Mobile to perform similar
functions. If you have an
AutoFilter applied to a worksheet
that causes rows to be hidden,
the rows remain hidden when the
file is opened in Excel Mobile.
Use the Unhide command to
display the hidden rows.
●
Chart formatting. All charts will
be saved the way they are shown
in Excel Mobile. Unsupported
chart types are changed to one
of these supported types:
Column, Bar, Line, Pie, Scatter,
and Area. Background colors,
gridlines, data labels, trend lines,
shadows, 3D effects, secondary
axes, and logarithmic scales are
turned off.

VS750 59
●
Worksheet features. The
following features are not
supported in Excel Mobile and
are removed or modified when a
workbook is opened on the
device: hidden sheets are not
hidden; VBA modules, macro
sheets, and dialog sheets are
removed and replaced with a
place holder sheet; text boxes,
drawing objects, pictures, lists,
conditional formats, and controls
are removed; pivot table data is
converted to values.
PowerPoint Mobile
With PowerPoint Mobile, you can
open and view slide show
presentations created on your PC in
*.ppt and *.pps format with
PowerPoint '97 and later.
Many presentation elements built
into the slide shows such as slide
transitions and animations will play
back on the device. If the
presentation is set up as a timed
slide show, one slide will advance to
the next automatically. Links to
URLs are also supported.
PowerPoint features not supported
on the device include:
●
Notes. Notes written for slides
will not be visible.
●
Rearranging or editing slides.
PowerPoint Mobile is a viewer
only.
●
File formats. Files created in *.ppt
format earlier than PowerPoint
'97 and HTML files in *.htm and
*.mht formats are not supported.

60 VS750
Using Phone Menus
To start a slide show
presentation
1. Press and
PowerPoint
Mobile
.
2. In the presentation list, tap the
slide show you want to view.
3. Tap the current slide to advance
to the next slide.
If the presentation is set up as a
timed slide show, slides will advance
automatically.
To stop a slide show
●
In a PowerPoint Mobile
presentation, tap > End Show.
To navigate between slides
You can advance to the next slide if
a presentation is not set up as a
timed slide show, return to the
previous slide, or go to any slide
out of sequence.
1. Press and
PowerPoint
Mobile
.
2. Open the presentation you want
to view.
3. Tap > Next or Previous, or tap Go
to Slide and tap the the slide you
want to view.
Tip
●
Simply tap the current slide to
go to the next one.
●
If you have zoomed in to see a
slide in more detail, you cannot
navigate to another slide until
you zoom out. Tapping Next or
Previous may play an animation
on a slide rather than navigate
to another slide.

VS750 61
OneNote Mobile Word Mobile
Word Mobile is a streamlined
version of Microsoft Word. Word
documents created on your PC can
be opened and edited on your
device. You can also create and edit
documents and templates in Word
Mobile and save them as *.doc, *.rtf,
*.txt, and *.dot files.
You can have only one document
open at a time. When you open a
second document, the first one is
saved and closed automatically.
When you close a newly created
document, it is automatically named
after the first several words in the
document and placed in the Word
Mobile document list. You can
easily rename the document with a
more meaningful name and move it
to another folder or a storage card.

62 VS750
Using Phone Menus
To create a file
Tap (LG Menu) > Applications >
Office Mobile > Word Mobile.
1. In Word Mobile, tap New.
2. You’ll see either a blank
document or template,
depending on what you’ve
selected as the default
template.
3. Enter text as desired.
4. When finished, tap OK to save
the file.
Word Mobile does not fully support
some features of Microsoft Word
such as revision marks and
password protection. Some data
and formatting may be lost when
you save the document on your
device.
The following features are not
supported in Word Mobile.
●
Backgrounds
●
Shapes and text boxes
●
Artistic page borders
●
Smart tags
●
Metafiles
●
Bi-directional text. While Word
Mobile will open documents
containing bi-directional text, the
indentations and alignment may
be displayed and saved
incorrectly.
●
Password-protected files. Word
Mobile does not support
opening password-protected
documents. You must first
remove the password protection
in Word on the PC if you want to
view the document on the device.
●
Document protection. Word
Mobile does not support
displaying files that have been
protected in Word on the PC.
The following features are
partially supported in Word
Mobile.
●
Picture bullets
●
Revision marks: When you open a
document that has revision marks
in Word Mobile, the document
appears as if all revision marks
were accepted. When you save
the document in Word Mobile,
revision marks are lost.

VS750 63
●
Table styles: When you save a
document in Word Mobile, some
or all the formatting that is
defined in the table style is lost.
●
U nderline styles. Underline
styles not supported by Word
Mobile are mapped to one of the
four supported styles: regular,
dotted, wavy, or thick/bold/wide.
●
Legacy Pocket Word files. You
can open *.psw files in Word
Mobile; however, if you edit a file,
you will need to save it in *.doc,
*.rtf, *.txt, or *.dot format.
The following features are not
supported on the device; however,
they are retained in the file so that
when a file is opened on the PC
again, they appear as expected.
●
Footnotes, endnotes, headers,
footers
●
Page breaks: Word Mobile does
not display breaks between
pages. However, all page breaks
except for breaks at the end of a
document are retained in the
document.
●
Lists: When you open the
document on the computer
again, indented lists are displayed
in the original form.
●
Fonts and font sizes. Fonts not
supported by the device are
mapped to the closest font
available, although the original
font will be listed on the device.
64 VS750
Using Phone Menus
To get more help about Word
Mobile
●
When in Word Mobile, tap
Start > Help.
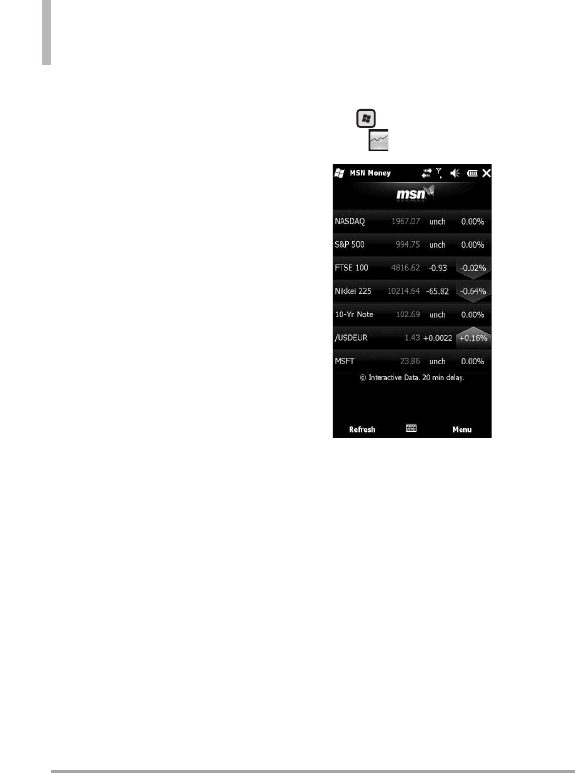
MSN Money Widget
1. Press and
MSN Money
Widget
.
VS750 65
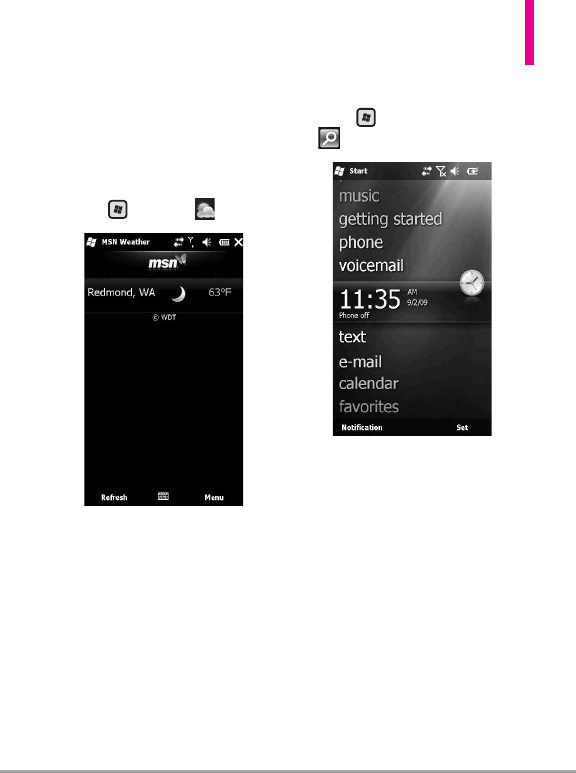
MSN Weather Widget
You can check today's weather and
the weather forecast of the city that
you chose. Just tap the icon of
weather from your home screen.
1. Press and
Tex t
.
Search Widget
1. Press and
Search Widget
.
66 VS750
Using Phone Menus
Remote Desktop
Mobile
1. Press and
Remote Desktop
Mobile
.
Marketplace
1. Press
and
Marketplace
.
VS750 67
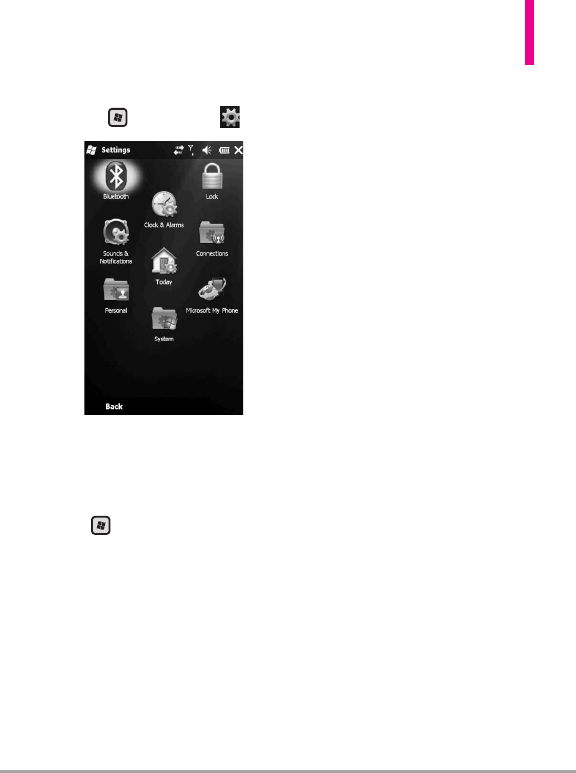
Settings
1. Press and
Settings
.
1. Bluetooth
To Set the Bluetooth
Configuration
Press > Settings > Bluetooth
Bluetooth enables compatible
mobile devices, peripherals and
computers that are in close
proximity to communicate directly
with each other without wires. This
handset supports built-in Bluetooth
connectivity, which makes it
possible to connect them with
compatible Bluetooth headsets,
computer applications and so on.
NOTE
●
If you use a pcsync via
Bluetooth, you can exchange
the data within only the
phonebook.
●
When you receive data from
another Bluetooth device, the
phone requests a confirmation.
After confirming the transfer,
the file will be copied in your
phone.
●
You can set the shared folder
by Bluetooth settings->services-
>File Transfer->advanced.
General
●
Current profile
: You can save the
different bluetooth settings with
different profile name.
●
Bluetooth status
: Bluetooth Turn
On/Off.

68 VS750
Using Phone Menus
2. Lock
There are two kinds of security on
your device. You can protect your
phone from unauthorized use by
assigning a type of password called
a PIN (personal identification
number). Additionally, you can
prevent unauthorized access to any
part of the device by using
password protection.
Your first PIN will be given to you
by your wireless service provider;
you can change the PIN later.
You create your own password when
you begin using your device.
To Protect your Phone with a PIN
1. Tap (LG Menu) > Settings >
Phone > Security tab.
2. Tap Require PIN when phone is
used.
3. To change the PIN at any time,
tap Change PIN.
TIP
Emergency calls can be placed at
any time, without requiring a PIN.
To Protect your Device with a
Password
You can help keep your data more
secure by requiring a password
every time the device is turned on.
1. Tap (LG Menu) > Settings > Lock.
2. Select the Prompt if device
unused for check box, and in the
box to the right, select how long
your device must be turned off
before a password is required. In
the Password type box, select the
type of password you would like
to use. Enter the password and, if
necessary, confirm the password.
If your device is configured to
connect to a network, use a
strong password to help protect
network security.
3. On the Hint tab, enter a phrase
that will help you remember your
password, but doesn’t allow
others to guess your password.
The hint will be displayed after
the wrong password is entered
four times.
4. Tap OK. The next time the device
is turned on, you will be
prompted to enter your
password.

VS750 69
NOTE
Each time a wrong password is
entered, the time the device takes
to respond will get longer and
longer until the device appears to
be not responding.
If you forget your password, you
must follow the instructions in
your owner’s manual to clear
memory before you can access
your device.
To Change your Password
1. Tap (LG Menu) > Settings > Lock.
You will be prompted to enter
your current password.
2. In the Password box, enter your
new password.
3. On the Hint tab, enter a phrase
that will help you remember your
new password, but doesn’t allow
others to guess your password.
The hint will be displayed after
the wrong password is entered
four times.
4. Tap OK.
To Display Owner Information on
the Today Screen
Having your contact information
displayed on the Today screen on
startup allows for easy identification
of the device in case it is lost.
1. Tap Start > Settings > Personal
tab > Owner Information.
2. On the Options tab, select the
Identification information check
box.
3. On the Options tab, select the
Notes check box if you want
additional text displayed, such as:
Reward if found.
4. On the Notes tab, enter the
additional text.
TIP
To display owner information on
the Today screen, tap (LG Menu)
> Settings > Today.
On the Items tab, select the
Owner Info check box.

70 VS750
Using Phone Menus
3. Clock & Alarms
Time
You can view the time, day of the
week and date.
Tap (LG Menu) > Settings > Clock &
Alarms > Time tab.
Tap the hour, minutes, or seconds,
then tap the up or down arrow to
change the time setting.
Tap the down arrow in the Date
field to display a calendar.
Tap a day on the calendar to select
the current date.
You can tap the left or right arrow
at the top of the calendar to move
backward or forward through the
calendar.
Alarm
Tap Alarms tap.
Tap a check box on the left and set
the weekday and the clock you want
to activate alarm.
Tap <Description> and enter a
description of the alarm, and tap
the day(s) of the week you want.
Tap to set the alarm options, such
as Play sound and Display message,
and tap the time field to set the
time for the alarm to sound.
More
Set more details.
Select Display the clock on the title
bar in all programs check box to see
the clock in every programs.
Select Sound alarms even when the
device is set to silent or vibrate
check box to sound alarm in every
case.

VS750 71
4. Sounds & notifications
To Set Sound & Notifications on
Actions
1. Tap (LG Menu) > Settings >
Sounds & Notifications.
2. On the Sounds tab, choose how
you want to be notified by
selecting the appropriate drop-
down boxes.
3. On the Notifications tab, in
Event, tap an event name and
choose how you want to be
notified by selecting the
appropriate drop-down boxes.
You can choose from several
options, such as a special sound,
a message, or a flashing light.
4. On the Vibrations tab, choose
how you want to be notified by
vibrations for screen taps.
5. Connections

72 VS750
Using Phone Menus
6. Today
Today Screen Settings
The Today screen shows your
upcoming appointments, active
tasks, and information about e-mail
messages.
To Synchronise the Today Screen
1. Tap (LG Menu) > Settings >
Today.
2. On the Appearance tab, select
the desired theme for the
background of the Today screen.
3. On the Items tab, select the
items you want to appear on the
Today screen.
7. Personal
8.
microsoft My Phone
9. System
VS750 73
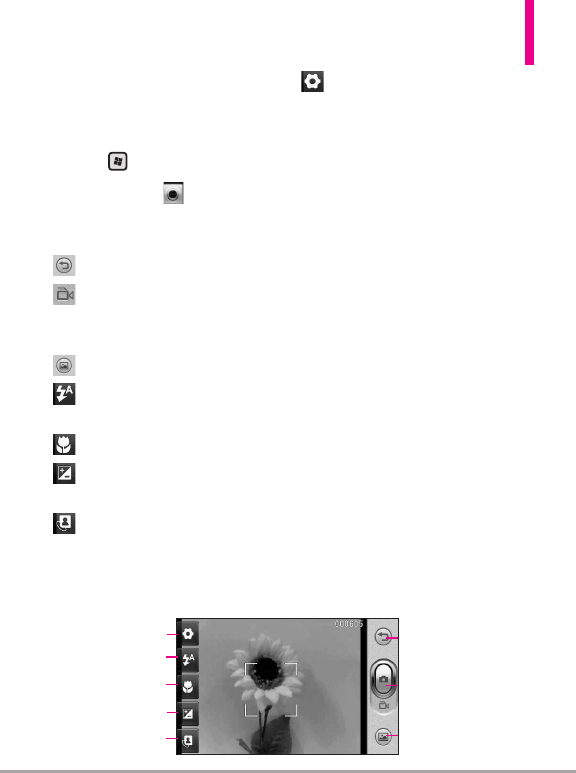
Camera
1. Camera
1. Press .
2. Touch
Camera
or use the one
of the following options to
customize your settings:
Back
Record Video Changes from
Camera mode to
Video mode.
My Images
Flash Auto/ Always Off/
Always On
?? Macro/ Auto
Zoom (not available at highest
resolution).
??
Settings
Image 5M(2592X1944)/
3M(2048X1536)/
2M(1600X1200)/
1M(1024X768)/ 640X480/
320X240
Scene Auto/ Portrait/
Landscape/ Spots/ Night
Colour Off/ Sepia/ Mono/
Negative/ Solarize
White Auto/ Incandescent/
Sunny/ Fluorescent/ Cloudy
Timer Off/ 3 Sec/ 5 Sec/ 10
Sec
Shot mode Normal/
Continuous Shot/ Frame Shot/
Panorama Shot
Preview Full Screen/ Full Image
ISO Auto/ 100/ 200/ 300/
400/ 800
Image Super Fine/ Fine/
Normal
Memory Handset Memory/
External Memory
Zoom
Setting
Flash
Back
My Images
Shot Mode
??
??
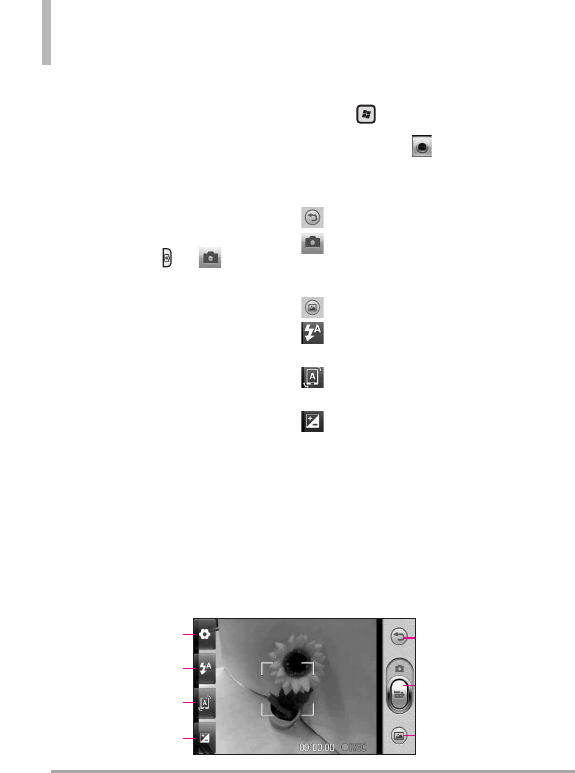
74 VS750
Using Phone Menus
Hide Icon Auto/ Manual
Shutter Off/ Shutter 1/
Shutter 2/ Shutter 3/ Shutter
4/ Shutter 5
Grid View Off/ Simple Cross/
Trisection
Reset Reset All
4. Take a picture by pressing the
Camera button or
Ta k e
Photo
.
2. video
1. Press .
2. Touch
Camera
or use the one
of the following options to
customize your settings:
Back
Record Video Changes from
Camera mode to
Video mode.
My Video
Flash Auto/ Always Off/
Always On
?? Auto/ Portrait/ Landscape/
Sports
Zoom (not available at highest
resolution).
???
Setting
Flash
Back
My Video
Shot Mode
Zoom

VS750 75
Settings
Video Size 640X480/
320X240/ 176X144
Scene Auto/ Portrait/
Landscape/ Spots
Colour Off/ Sepia/ Mono/
Negative/ Vivid
White Auto/ Incandescent/
Sunny/ Fluorescent/ Cloudy
Video Super Fine/ Fine/
Normal
Duration Normal/ MMS
Momory In Handset Memory/
External Memory
Voice Mute/ Unmute
Hide Icons Auto/ Manual
Reset Reset All
4. Take a picture by pressing the
Camera button or
Take
Photo
.
RSS Viewer
According to HAC policy (KDB 285076),
we state this handset has not been rated for
hearing aid compatibility with respect to the
WiFi capability.

98 VS750
Safety
FCC Hearing-Aid
Compatibility (HAC)
Regulations for Wireless
Devices
On July 10, 2003, the U.S. Federal
Communications Commission
(FCC) Report and Order in WT
Docket 01-309 modified the
exception of wireless phones under
the Hearing Aid Compatibility Act
of 1988 (HAC Act) to require
digital wireless phones be
compatible with hearing-aids. The
intent of the HAC Act is to ensure
reasonable access to
telecommunications services for
persons with hearing disabilities.
While some wireless phones are
used near some hearing devices
(hearing aids and cochlear
implants), users may detect a
buzzing, humming, or whining
noise. Some hearing devices are
more immune than others to this
interference noise, and phones also
vary in the amount of interference
they generate.
The wireless telephone industry
has developed a rating system for
wireless phones, to assist hearing
device users to find phones that
may be compatible with their
VS750 99
hearing devices. Not all phones
have been rated. Phones that are
rated have the rating on their box
or a label located on the box.
The ratings are not guarantees.
Results will vary depending on the
user's hearing device and hearing
loss. If your hearing device
happens to be vulnerable to
interference, you may not be able
to use a rated phone successfully.
Trying out the phone with your
hearing device is the best way to
evaluate it for your personal needs.
M-Ratings: Phones rated M3 or
M4 meet FCC requirements and
are likely to generate less
interference to hearing devices
than phones that are not labeled.
M4 is the better/higher of the two
ratings.
T-Ratings: Phones rated T3 or T4
meet FCC requirements and are
likely to generate less interference
to hearing devices than phones
that are not labeled. T4 is the
better/higher of the two ratings.
Hearing devices may also be rated.
Your hearing device manufacturer
or hearing health professional may
help you find this rating. Higher
ratings mean that the hearing
device is relatively immune to
interference noise. The hearing aid
and wireless phone rating values
are then added together. A sum of
5 is considered acceptable for
normal use. A sum of 6 is
considered for best use.
In the above example, if a hearing
aid meets the M2 level rating and
the wireless phone meets the M3
level rating, the sum of the two
values equal M5. This should
provide the hearing aid user with
M3+ M2= 5
M3+ M2= 5

100 VS750
Safety
“normal usage” while using their
hearing aid with the particular
wireless phone. “Normal usage” in
this context is defined as a signal
quality that’s acceptable for normal
operation.
The M mark is intended to be
synonymous with the U mark. The
T mark is intended to be
synonymous with the UT mark.
The M and T marks are
recommended by the Alliance for
Telecommunications Industries
Solutions (ATIS). The U and UT
marks are referenced in Section
20.19 of the FCC Rules. The HAC
rating and measurement procedure
are described in the American
National Standards Institute
(ANSI) C63.19 standard.
To enter that the Hearing Aid
Compatibility rating for your phone
is maintained, secondary
transmitters such as Bluetooth and
WLAN(this phone does not have
WLAN) components must be
disabled during a call. See Page 91
for instructions to disable these
components.
For information about hearing aids
and digital wireless phones
FCC Hearing Aid Compatibility and
Volume Control
http://www.fcc.gov/cgb/dro/hearing.
html
Gallaudet University, RERC
http://tap.gallaudet.edu/DigWireless
.KS/DigWireless.htm
HLAA (Hearing Loss Association of
America)
http://www.hearingloss.org/learn/cel
lphonetech.asp
The Hearing Aid Compatibility FCC
Order
http://hraunfoss.fcc.gov/edocs_publi
c/attachmatch/FCC-03-168A1.pdf