LG 47WV50BR B User Manual Owner's SAC35435701 Eng
47WS50BS-B Owner's Manual SAC35435701_eng Most comprehensive of product setup and usage. (English)
47WV50BR-B Owner's Manual File?fileId=KROWM000572183 Most comprehensive of product setup and usage. (English)
47WS50BS-B Owner's Manual File?fileId=KROWM000577419 Most comprehensive of product setup and usage. (English)
2014-05-13
User Manual: LG 47WV50BR-B Owner's Manual Most comprehensive of product setup and usage. (English)
Open the PDF directly: View PDF ![]() .
.
Page Count: 128 [warning: Documents this large are best viewed by clicking the View PDF Link!]
- Overview
- SuperSign Player
- SuperSign Manager
- Appendix

www.lgecommercial.com
OWNER’S MANUAL
SuperSign Elite-w/
SuperSign Elite-w Lite
Please read this manual carefully before operating
your set and retain it for future reference.

i
ENGLISH
Copyright
Contents and programs in this software (SuperSign Elite-w) user guide are subject to the Copy-
right law, the Computer Programs Protection Act, and applicable international treaties. The user
guide's contents and programs may be used only under a License Agreement with LG Electron-
ics, and may only be used or copied in accordance with the License Agreement. All or part of
this user guide may not be transmitted, copied, distributed, utilized for derivative works using
electronic, mechanical, or recording devices without the prior written consent of LG Electronics.
Copyright © 2011 LG Electronics. All rights reserved.
Twin Tower, Yeouido-dong 20, Yeongdeungpo-gu, Seoul
Registered Trademarks
SuperSign Elite-w is a registered trademark of LG Electronics. All other names of products and
companies are trademarks of the respective owners, and are used as references only.
About the User Guide
Please read through this user guide before using the SuperSign Elite-w solution.
Make it available at all times by keeping a copy close by for reference.
Notational Convention
• Keyboard input required to perform functions is in bold.
Example: <Esc> key
• Keyboard input with more than one key is combined with + and in bold.
Example: <Ctrl+C> keys
Program UI Notation
• Button controls shown on the program screen are in bold.
Example: [OK], [Save]
• Names of options shown on the program screen are in bold.
Example: Start, All Programs

ENGLISH
ii
MEMO

iii
TABLE OF CONTENTS
ENGLISH
Contents
1 OVERVIEW
1 Introduction to SuperSign
Elite-w
1 Components of SuperSign
Elite-w
1 - Display
1 - SuperSign Player
1 - SuperSign Manager
2 Functions Available in
SuperSignElite-w Versions
3 SUPERSIGN PLAYER
3 Using the SuperSign Player
3 - Signage Mode (Video Mode)
4 - Tray Icon
4 - Tray Menu
4 - Overview of the SuperSign
Player
5 Settings
5 - Log in to Settings Menu
6 - Network Setup
12 - Screen
13 - Password
15 - Enhanced Write Filter (EWF)
16 - Initialize S/W
17 - Info.
18 - USB AutoPlay
19 - Language Options and Regional
Settings
21 SUPERSIGN MANAGER
21 System Requirements
21 - Server
21 - Client
22 Creating the User Account
23 Log in/Log out
23 - Logging In
24 - Logging Out
25 Home
25 - Home Window Layout and
Functions
26 - Dashboard Settings
28 - Software Update Notification
Function
29 Content
29 - Content Window Layout and
Functions
31 - Loading Content
32 - Content Creation
43 - Saving Content
43 - Editing Content
50 - Content Management
51 - PC Editor
63 Schedule
63 - Schedule Window Layout and
Functions
65 - Creating New Schedules
72 - Schedule Management
74 - AutoPlaying schedule files
75 Player
75 - Player Window Layout and
Functions

ENGLISH
iv TABLE OF CONTENTS
77 - Player Search
78 - Player Control
84 - Creating Tiles
86 - Player Management
87 User
87 - User Window Layout and
Functions
88 - User Account Registration
89 - User Account View
90 - User Account Management
91 Distribution
91 - Distribution Window Layout and
Functions
93 - Creating Content Distribution
Files
96 - Creating Schedule Distribution
Files
98 - Searching Distribution Details
99 - Distribution Details Management
101 Message
104 Log report
105 Setup
105 - Profile
106 - Role
110 - Server
111 - System
112 - Info.
113 APPENDIX
113 SuperSign Network Connection
113 - LAN Connection
114 - Internet Connection
115 - Wireless Connection
115 - Available Ports
116 Required Software and United
Codec
116 - Required Software
117 - SuperSign File Support
117 - Unified Codecs
118 Microsoft Windows Embedded
Standard Constraints
118 Changing Primary/Secondary
Display
119 Frequently Asked Questions
121 List of Monitor Models
Supported by SuperSign

1
OVERVIEW
ENGLISH
Overview
The brief introduction and components of the SuperSign Elite-w are described below.
Introduction to SuperSign Elite-w
The SuperSign Elite-w is a network-based solution for digital advertising communications de-
veloped by LG Electronics. It is a program for integrated management of the SuperSign Elite-w
solution, providing support for digital media creation and management, content deployment, video
play, and remote control. The SuperSign Elite-w solution includes the Display, SuperSign Player
(hardware and software), and SuperSign Manager as its components.
Components of SuperSign Elite-w
Display
The Display is connected to the SuperSign Player (media player) to display advertising content,
and supports most LCD monitors using the LG RS232C protocol. You can control monitor func-
tions (e.g., brightness, resolution, and volume) of such monitors, using the SuperSign Manager.
SuperSign Player
The SuperSign Player consists of a media player (hardware), and the SuperSign Player software
which is installed on the media player. The media player comes in two types, box type (NC/
NA1000 series) and a built-in type (NC/NA2000 series).
SuperSign Manager
The SuperSign Elite-w solution provides the SuperSign Manager, an all-in-one management pro-
gram that allows you to manage the display and media player, and create and distribute media.
SuperSign Manager is embedded with a client-side PC Editor which is capable of creating and
editing content, and a server-side Web Editor.
ENGLISH
2OVERVIEW
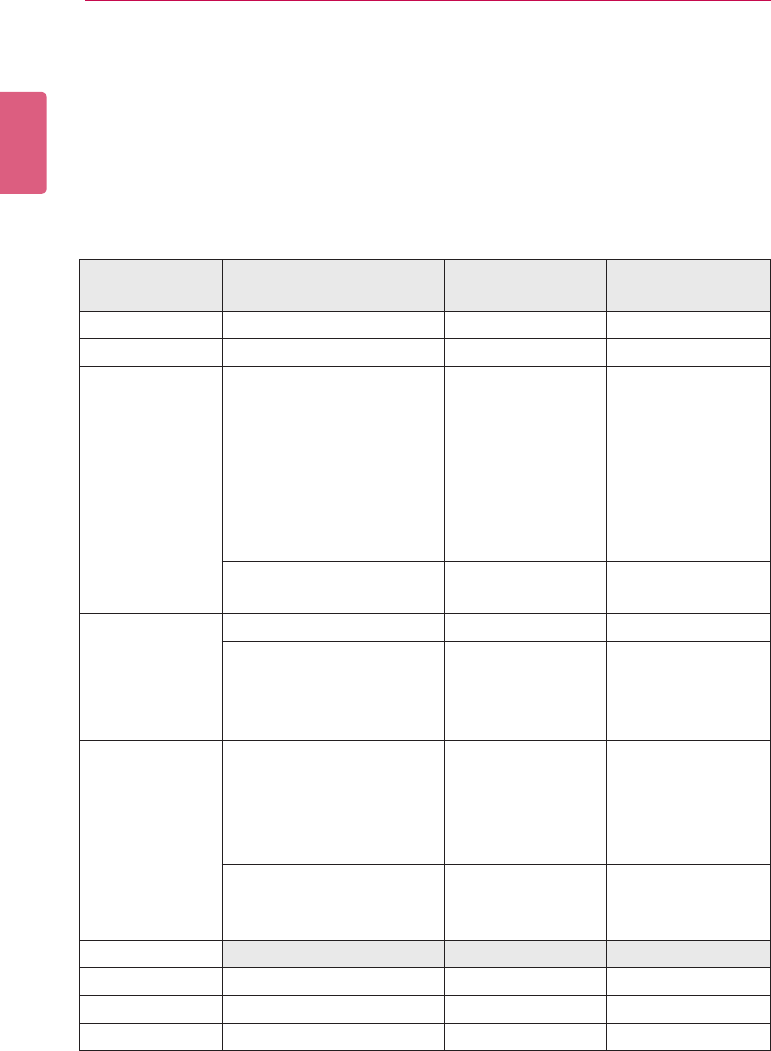
Functions Available in SuperSignElite-w Versions
Some functions may not be available depending on the SuperSignElite-w version.
Please refer to the table below.
• Standard version: provides all the functions available in SuperSignElite-w
• Lite version: provides only some of the functions available in SuperSignElite-w
The Lite version is a package distributed free of charge for content authoring and basic controls.
Purchase the Standard version to access all the functions available in SuperSignElite-w.
Menu Function SuperSignElite-w
Standard version
SuperSignElite-w
Lite version
Content Content related functions o o
Schedule Schedule related functions o o
Player
Player scan
Player control
Display control
Player deletion
Player modication
Player approval
Player refusal
Software update
o o
Snapshot capture
Power schedule o o
Setting
Prole o o
Role
Server
System
Information
o o
Home
System summary
Error list
Last modied content
Last modied player
Last modied schedule
o o
Approval status
Notice board
Last modied user
o o
User User related functions o x
Distribution Distribution related functions o o
Urgent Message Urgent Message o o
Log Report Log Report o o
3
SuperSign Player
ENGLISH
SuperSign Player
TheSuperSignPlayerisasoftwareprogramusedtoplaydigitalsignagelesstoredintheLG
DigitalSignageMediaPlayer.Youcanplaymediales,suchasvideos,images,music,ash,and
documents, transmitted from the SuperSign Manager using the SuperSign Player.
Using the SuperSign Player
Signage Mode (Video Mode)
If the Media Player is turned on and the operating system is booted completely, SuperSign Player
runs automatically. The SuperSign Player auto-runs schedules when it starts. The Signage mode
refers to a mode in which pre-distributed videos are played on a schedule.
• SuperSign Player is a built-in software program installed in the Media Player.
Start the Media Player and check whether SuperSign Player has been installed.
If the initial window of the SuperSign Player does not appear, check that the monitor is
turned on.
If the monitor is turned on, make sure that the cables between the Media Player and the
monitor are properly connected.
• SeetheSuperSignlesupport.
• You can go to the desktop by pressing <Esc> on the initial SuperSign Player screen.
NOTE
• When the SuperSign Player restarts, it auto-runs the advertising content according to
the schedule last transmitted. For more information, see “Schedule” on page 63.
• PlayingmorethanonefullHDvideowithothermedialemayslowdownplayback.
• Placingamessageortextonmorethantwovideosmaycauseaicker.
• When the PowerDVD is removed from the SuperSign Player with the PowerDVD SE
installed, videos encoded to H.264, MPEG-2 and WMV are played without hardware
acceleration.
• Using a transition effect on a full-HD picture, or more than two pictures, may slow down
the speed of play.
• When you change the time zone in Windows, restart the SuperSign Player to apply the
changes.
• It is recommended to use videos encoded to H.264 (AVC).
• The video with resolutions above full-HD (1920*1080) may not be played properly.
NOTE
ENGLISH
4SuperSign Player
Tray Icon
Pressing <Esc> while playing a video in the Signage mode stops the video and takes the user to
the desktop. The SuperSign Player tray icon is in the bottom right side of the desktop.
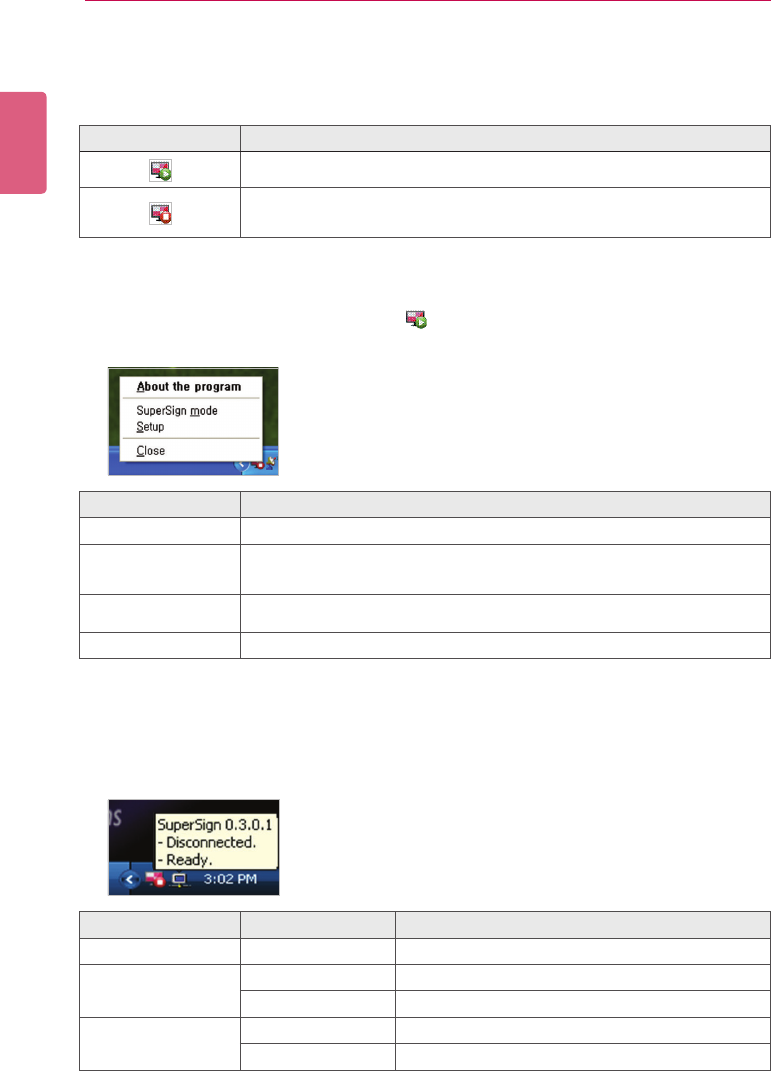
Tray Menu
Right-clicking the SuperSign Player tray icon ( ) in the bottom right side of the desktop prompts
the Tray Menu to appear.
Overview of the SuperSign Player
Hovering the mouse pointer over the SuperSign Player tray icon for 5 seconds displays the brief
SuperSign Player information.
Function Description
The SuperSign Player is connected to the SuperSign Manager.
The SuperSign Player is not connected to the SuperSign Manager
server.
Function Description
About the program Displays the SuperSign Player program version.
SuperSign mode Plays back the content according to the schedule stored in the Super-
Sign Player.
Setup Enters the SuperSign Player menu.
Close Exits the SuperSign Player.
Function Message Description
Software SuperSign 0.1.x.x SuperSign Player version
Server Connection Disconnected Not connected to the SuperSign Manager.
IP address IP address of the connected SuperSign Manager.
Schedule Ready No schedule registered.
Scheduled Schedule registered.
5
SuperSign Player
ENGLISH
Settings
You can adjust the SuperSign Player settings to the user environment.
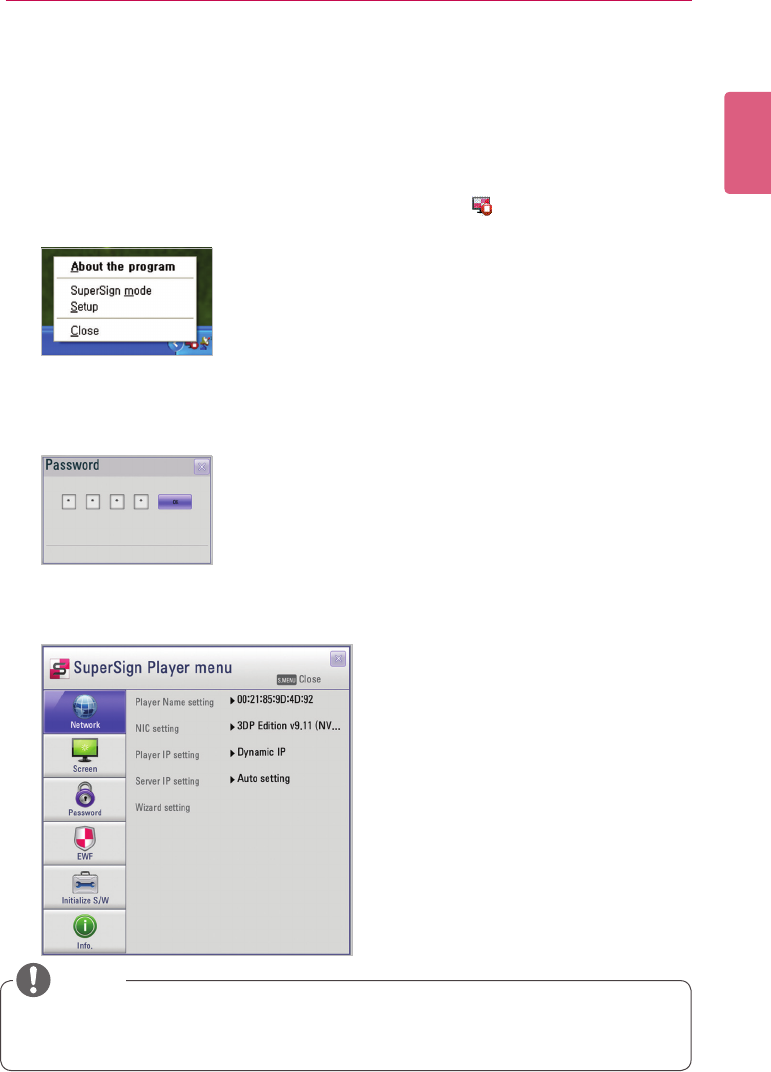
Log in to Settings Menu
Please log in to set the program environment.
1 On the Windows taskbar, right-click the SuperSign Player icon ( ).
• The tray menu appears as shown below.
2 Click Setup on the tray menu.
• The Password window appears.
• The default password of the SuperSign Player is “0000.”
3 Enter the password and click the [OK] button.
• The SuperSign Player menu window appears.
• The user can change the password. For more information on the password setting, see 13
Page, “Password”.
NOTE
ENGLISH
6SuperSign Player
Network Setup
The Network menu allows you to set the player IP (the IP address of the media player where
SuperSign Player is installed) and the server IP (the IP address of the computer where SuperSign
Manager is installed).
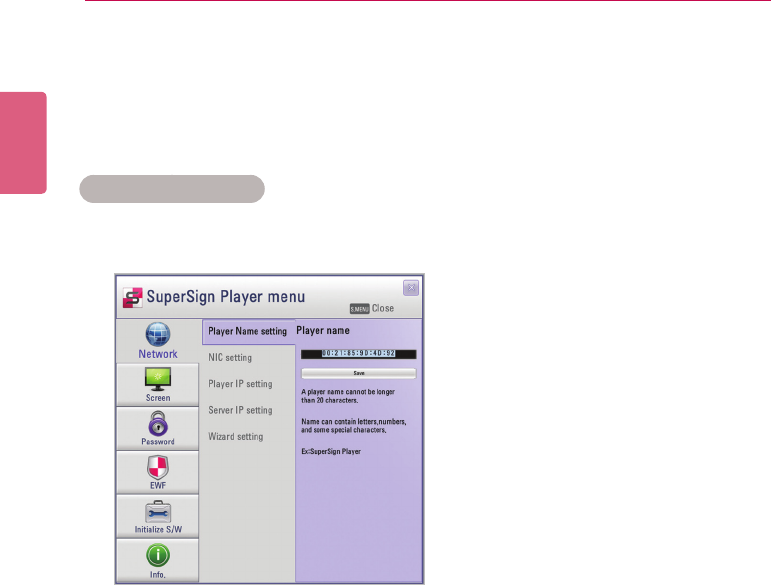
Player Name Setting
The default name of the player is the same as the MAC address for the network device of the
Media Player. If required, you can change the name.
1 In the SuperSign Player menu, click Network > Player Name setting.
2Enteranewnamefortheplayerintheeld.
3 Click the [Save] button.
• The player name is now changed.
7
SuperSign Player
ENGLISH
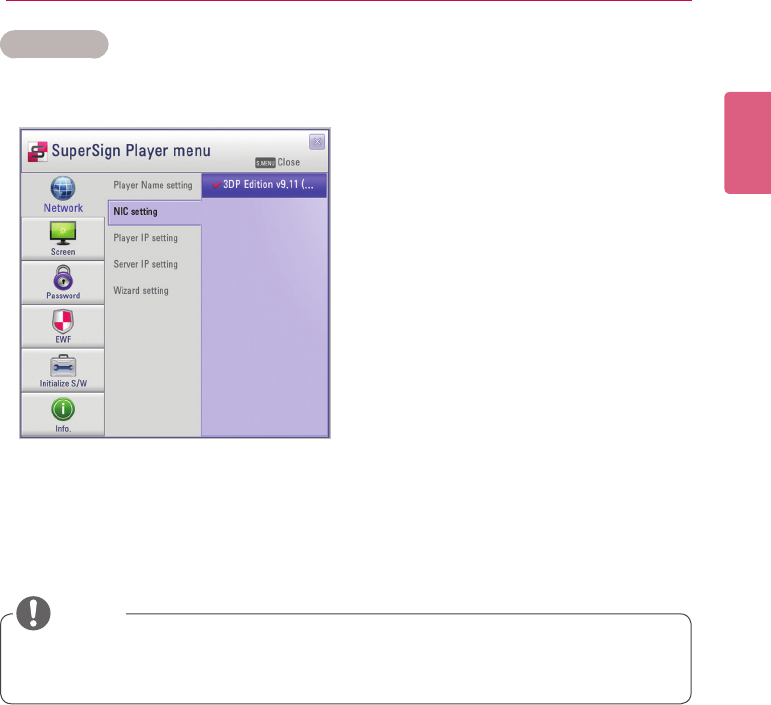
NIC Setting
You can select a network card to use for the network connections. If multiple network cards are
installed, select the one you want to use.
1 In the SuperSign Player menu, click Network > NIC setting.
2 Select a network card you want to use.
• During startup, the SuperSign Player will automatically detect an available network
interface card.
NOTE
ENGLISH
8SuperSign Player
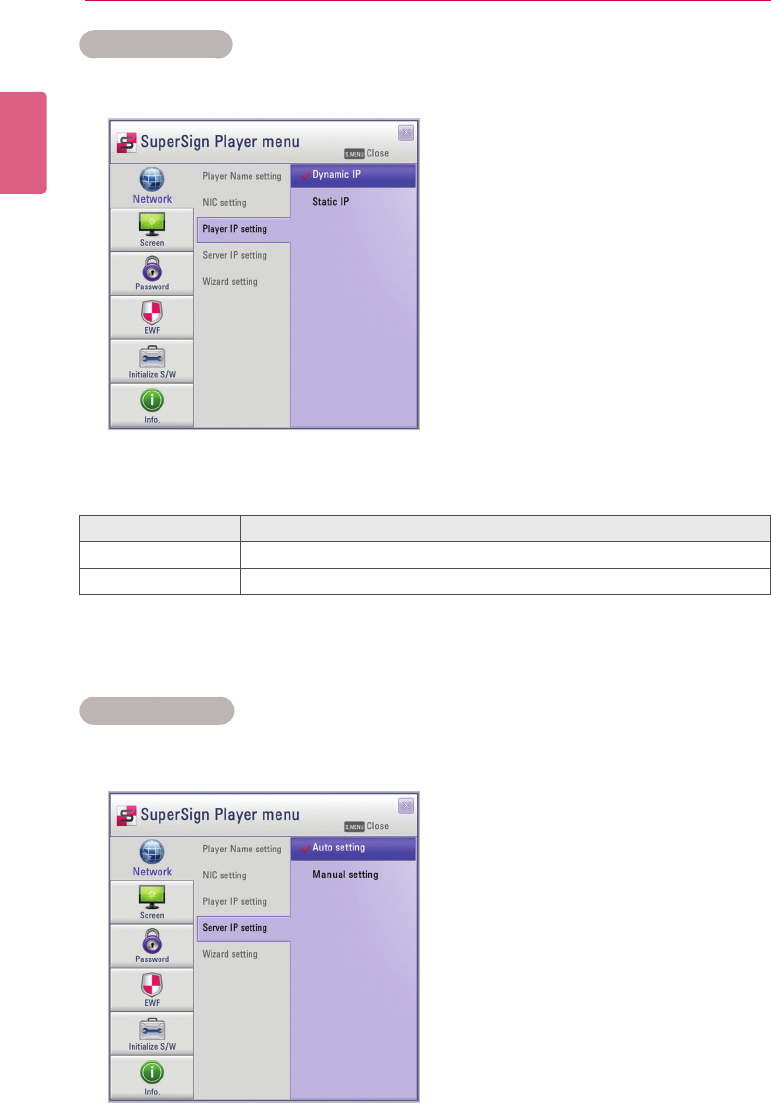
Player IP Setting
In the Player IP setting menu, you can set the IP address of the media player. It is set to Dynamic
IP by default.
1 In the SuperSign Player menu, click Network > Player IP setting.
2 Select the player IP setting mode you require.
3 If you select Static IP, enter an IP address you require.
• If you select Dynamic IP, the IP address is automatically assigned.
4 Click the [Save] button.
Server IP Setting
The Server IP setting menu is for the PC (server) settings, on which the SuperSign Manager is
installed. It is set to Auto setting by default.
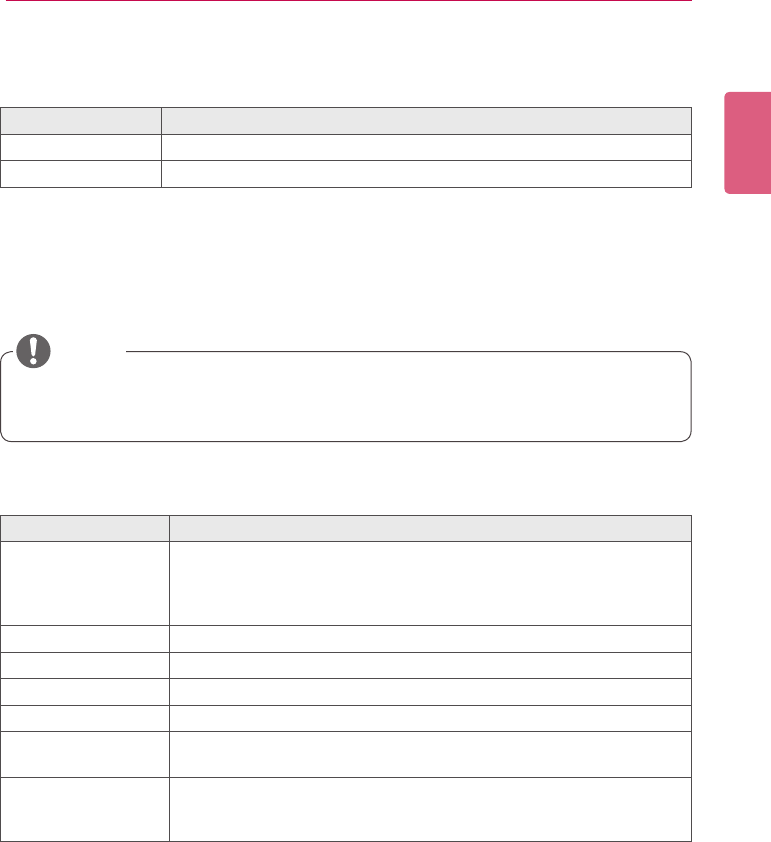
Menu Description
Dynamic IP The IP will be automatically generated.
Static IP YoucanassignaspecicIPaddressforthemediaplayer.
9
SuperSign Player
ENGLISH
1 In the SuperSign Player menu click, Network > Server IP setting.
2 Select the server IP setting mode you want.
3 If you select Manual setting, enter an IP address you require.
• If you select Auto setting, you can search for a player to connect it.
4 Click the [Connection] button.
Network Connection Message
Menu Description
Auto setting The SuperSign Manager searches for a player to connect it.
Manual setting YoucanassignaspecicIPaddressfortheserver.
Menu Description
It is not a valid IP
address.
Please check IP ad-
dress and try again.
TheeldvalueofanIPaddressmustbeanumberbetween0to255.
Waiting for approval Waiting for an administrator’s approval to connect.
Approval denied The connection has been rejected by an administrator.
Connecting Attempting to connect to server.
Connected Connection successful.
ID or password is
incorrect.
The ID and password are not the same as the ID and password regis-
tered on the server.
You cannot currently
access the server.
Please try again later.
Please check, the server status, server’s IP address and network status
and try again.
• Only the IPv4 is supported for setting the player and server’s IP address.
NOTE

ENGLISH
10 SuperSign Player
Wizard Setting
The SuperSign Elite-w solution provides you with the SuperSign Network Setting Wizard, making
the network setting fast and easy. Using the wizard, you can set the IP addresses of the Super-
Sign Player and SuperSign Manager according to the network environment.
1 In the SuperSign Player menu, click Network > Wizard setting.
2 Click the icon.
• The SuperSign Network Setup Wizard screen appears.
3 Enter the SuperSign Player name.
• The Player name is used later on to identify multiple players.
4 Select a network card to use for the network connection.
5 Set the SuperSign Player’s IP address.
6 Set the IP address of the server where the SuperSign Manager is installed.
• Install the SuperSign Manager program on the server PC before launching the wizard. If
theSuperSignManagerisnotinstalled,youcannotcongurethenetworkproperlyusing
the SuperSign’s Wizard setting.
CAUTION
Menu Description
Dynamic IP The SuperSign Player's IP address is automatically generated.
Static IP You can manually set the SuperSign Player's IP address.
Menu Description
Auto setting The SuperSign Manager searches for a player to connect it.
Manual setting You can manually set the server's IP address.
11
SuperSign Player
ENGLISH
7 The player is connected to the network cable.
• If the connection is not complete, please use the player search function on the SuperSign
Elite-w server.
Checking the Network Connection
You can check the network connection status.
1 On the computer where the SuperSign Manager is installed, go to Control Panel > Network
Connections.
2 Right-click Local Area Connection (or Wireless Network Connection) and select Properties.
• The Local Area Connection Properties window appears.
3 Select the Internet Protocol (TCP/IP) and click the [Properties] button.
• The Internet Protocol (TCP/IP) Properties window appears.
4 Check the default gateway and subnet mask settings.
• If the network settings fail, then please recheck the network connection status of the
server and player.
CAUTION
ENGLISH
12 SuperSign Player
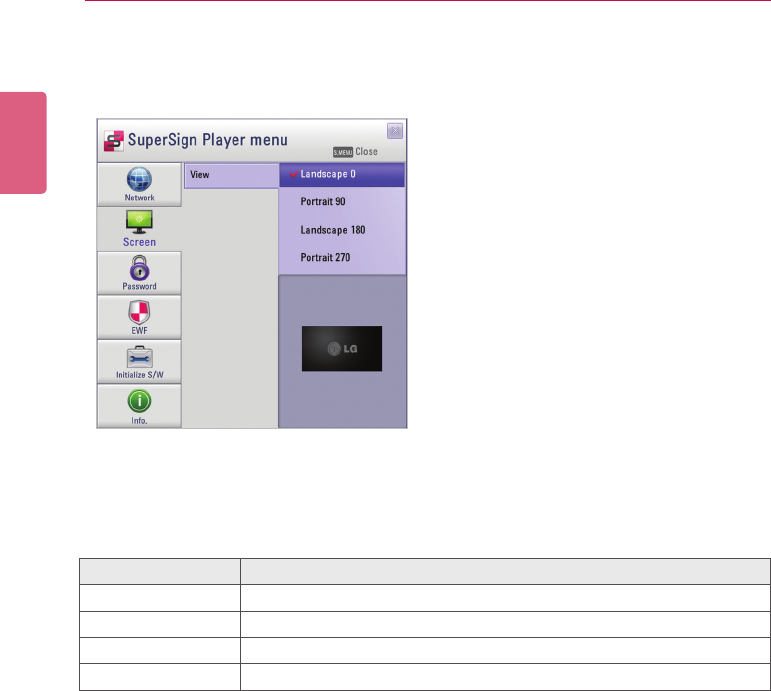
1 In the SuperSign Player menu, click Screen > View.
2 Select the view mode you require.
Menu Description
Landscape 0 Short and wide view with zero rotation
Portrait 90 Tall and narrow view clockwise
Landscape 180 Short and wide view with 180° rotation
Portrait 270 Tall and narrow view counter-clockwise
Screen
In the Screen menu, you can set the view mode of the screen. The default setting is Landscape 0.
13
SuperSign Player
ENGLISH
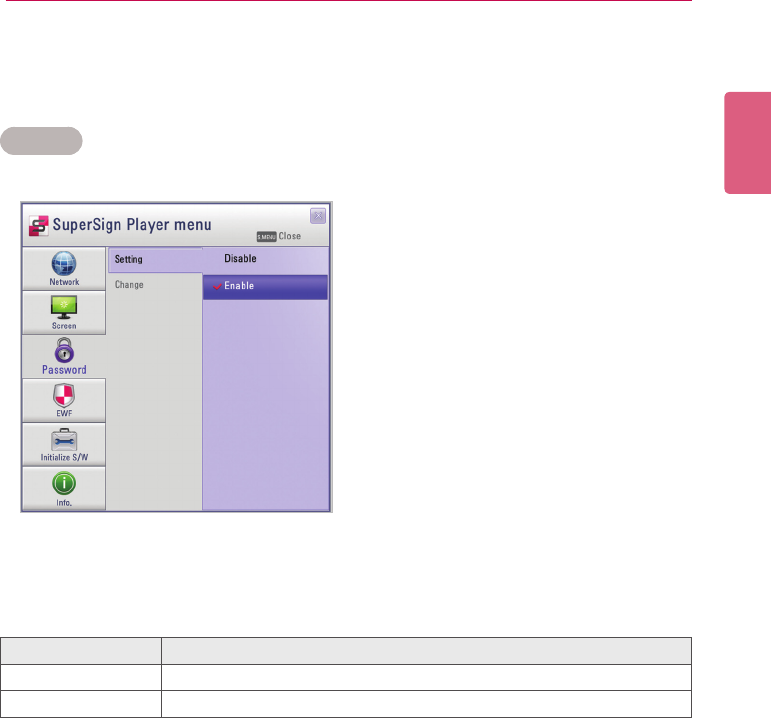
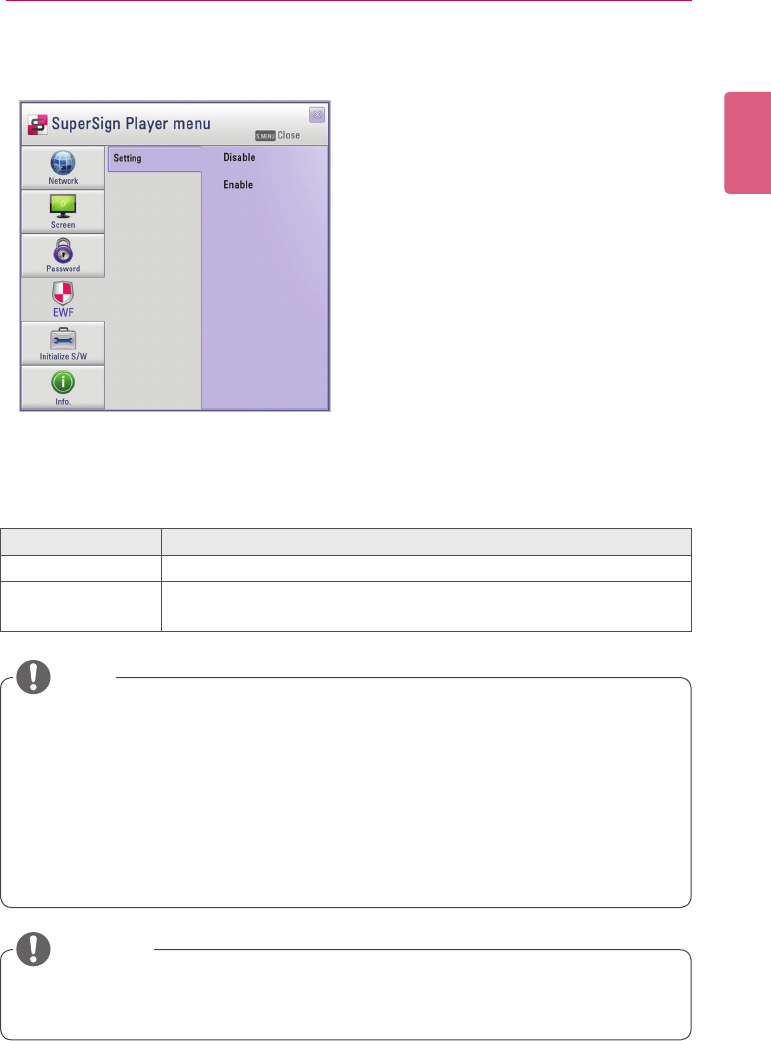
Password
In the Password menu, you can set a login password to access the SuperSign Player menu.
Settings
You can select whether to use a password when accessing the SuperSign Player menu.
1 In the SuperSign Player menu, click Password > Setting.
2 Select whether to enable or disable the password.
Menu Description
Enable A password is not required when accessing the SuperSign Player menu.
Disable A password is required when accessing the SuperSign Player menu.
ENGLISH
14 SuperSign Player
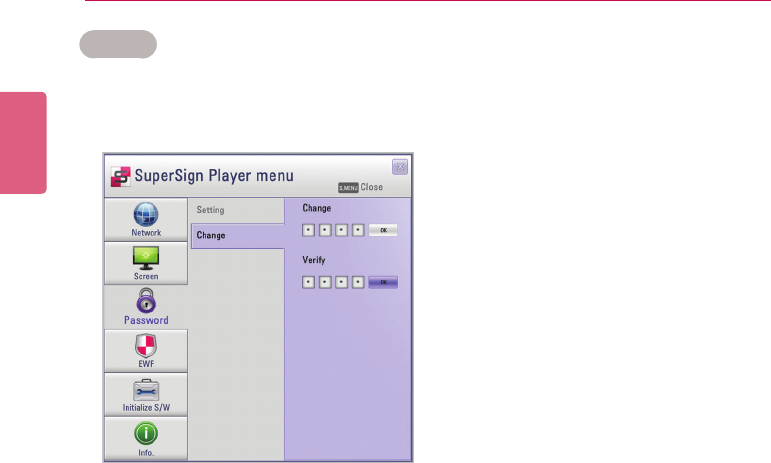
Change
You can change the login password (4-digit number) used to access the SuperSign Player menu.
If the password is successfully changed, you can access the SuperSign Player menu using the
new password.
1 In the SuperSign Player menu, click Password > Change.
2 EnteranewpasswordintheChangeeldandclickthe[OK] button.
• TheVerifyeldisactivated.
3 EnterthenewpasswordintheVerifyeldandclickthe[OK] button.
• Click the [OK] button “when the Your password has been changed” message appears.
15
SuperSign Player
ENGLISH
Enhanced Write Filter (EWF)
TheEWFprotectstheproduct’slesystemagainstintentionaldamageorviruses.
1 In the SuperSign Player menu, click EWF > Setting.
2 Select whether to enable or disable EWF.
Menu Description
Enable Protecttheproduct'slesystemagainstintentionaldamageandviruses.
Disable Donotprotecttheproduct'slesystemagainstintentionaldamageand
viruses.
• For more information on the EWF, visit the Microsoft website.
• If EWF is set to “Enable”, you cannot add, delete, or change the data stored on the C
drive of the Media Player.
• You must set EWF to “Disable” when you install a new program in the Media Player.
• If EWF is set to “Enable”, you cannot install new programs.
• Restart the system if you want to apply changes to the EWF setting.
• The settings in the SuperSign Player menu (Network, Screen, Password, and EWF) are
not affected by the EWF and are not deleted from the system.
NOTE
• When EWF is enabled, data stored on the C Drive will be deleted upon system startup.
Please save the data to the D drive.
CAUTION
ENGLISH
16 SuperSign Player
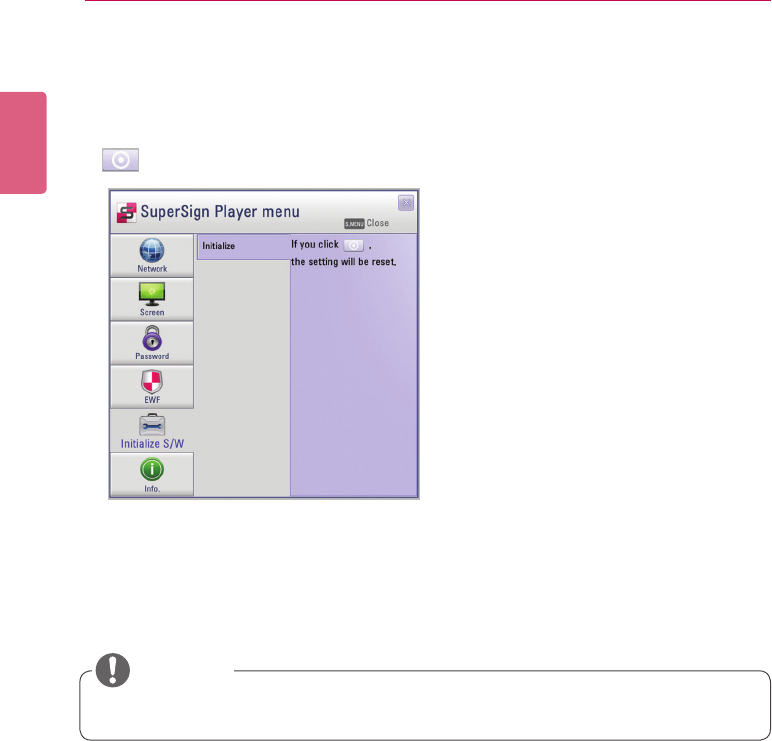
Initialize S/W
You can reset the SuperSign Player to the factory settings.
1 In the SuperSign Player menu, click Initialize S/W > Initialize.
2 Click the icon.
3 Click the [Yes] button when the Information window appears.
• This resets SuperSign Player to the factory settings.
• The network settings are not affected by the software reset.
CAUTION
17
SuperSign Player
ENGLISH
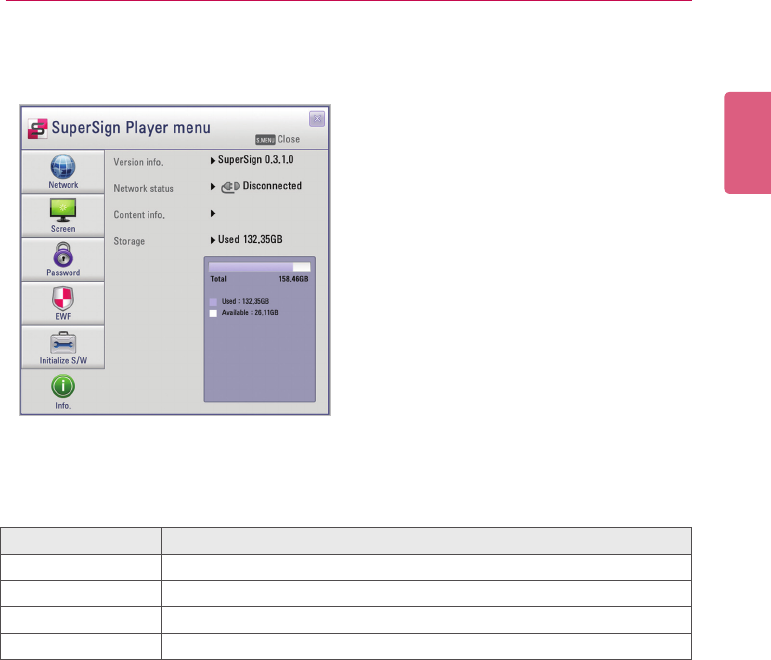
Info.
You can check the SuperSign Player’s program status.
1 In the SuperSign Player menu, click [Info].
• The information on the program appears.
Menu Description
Version info. SuperSign Player software version
Network status Network connection status
Content info. File name being played
Storage Storage capacity (used and available)
ENGLISH
18 SuperSign Player
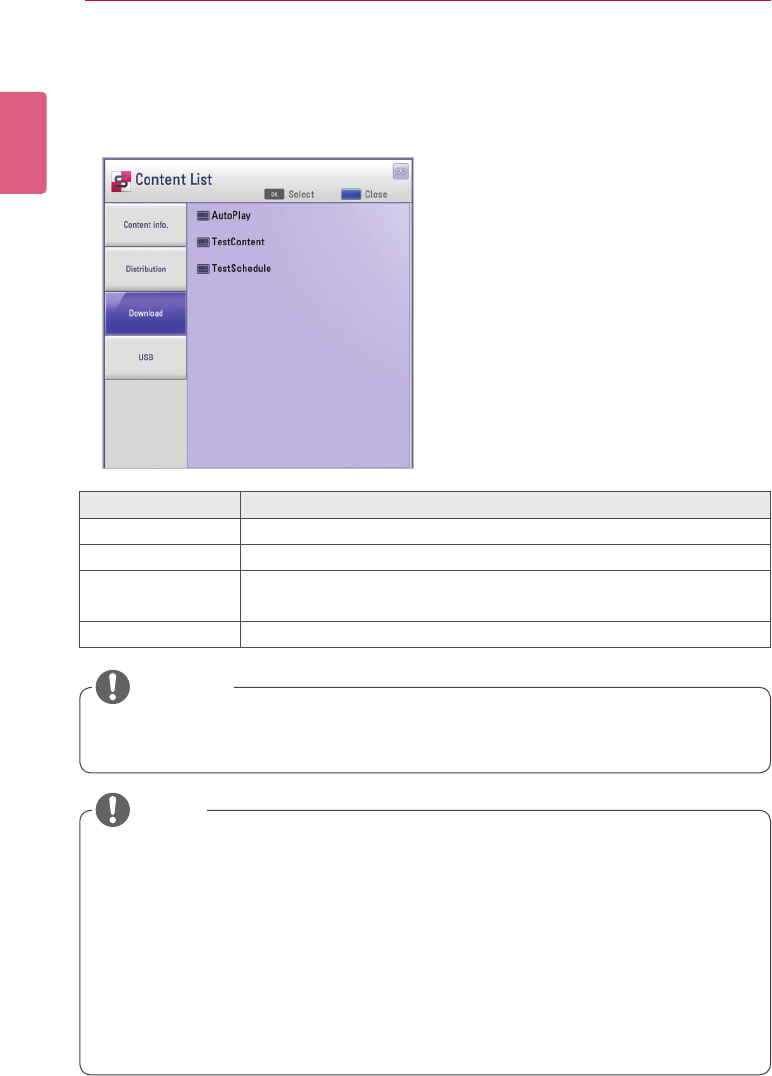
USB AutoPlay
IfyouconnectaUSBstoragedevicetoaSuperSignPlayer,alistofcontentlesstoredonthe
USBdevicewillbeautomaticallydisplayed.Theselectedcontentlecaneitherbeplayed,or
saved on the SuperSign Player’s hard disk for playback.
Menu Description
Content info. List of the content currently playing.
Distribution List of schedules recently distributed from the SuperSign Elite-w server.
Download ThelistofcontentlescopiedfromtheUSBstoragedevicetotheSu-
perSign Player's hard disk.
USB ThelistofcontentlesexportedfromtheSuperSignManager.
• Thecontentledownloadedtothe“AutoPlay”folderwillbedeletedwhenthescheduleis
set.
CAUTION
• If the USB playback list is not displayed automatically, press the blue button on the remote
control, or the <F12> key on the keyboard, to display the content list.
• The SuperSign Player can only read from one USB storage device at a time; it cannot read
from two or more USB storage devices simultaneously.
• YoucanalsostartplaybackofthecontentlesstoredontheUSBdevice,byusingthe
remote control for the monitor connected to the SuperSign Player. Use the blue button on
the remote control.
• If you restart SuperSign Player, or select the tray icon, SuperSign mode, it remembers the
lastplayeditem(thescheduledle)andplaysit.
• Whenthescheduledplaybackoftheleends,themonitorswitchestoidlemode.
NOTE
19
SuperSign Player
ENGLISH
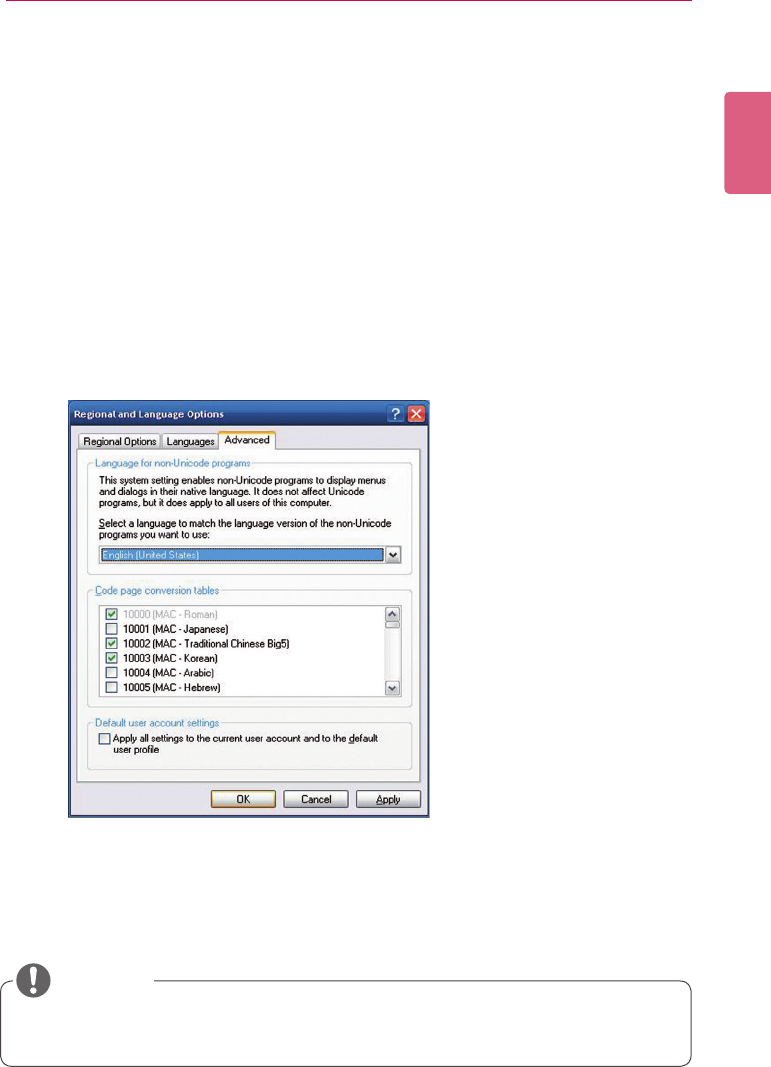
Language Options and Regional Settings
If you want to use SuperSign Player in other languages, you can change the language under
Regional and Language Options in your operating system (Microsoft Windows XP Embedded).
To Change the Language:
1 Disable EWF in <SuperSign Player Menu>.
2 In Windows, select Start > Control Panel > Regional and Language Options.
3 Choose the language you want to use as shown below.
4 Re-install the SuperSign Player with the new language.
5 Enable EWF in the <SuperSign Player Menu>.
SuperSign Manager and SuperSign Player should use the same language.
CAUTION

ENGLISH
20
MEMO
21
SuperSign Server
ENGLISH
SuperSign Manager
SuperSign Manager is an integrated management program supporting the network-based crea-
tion and management of digital media, content distribution, video play, or remote control etc.
SuperSign Manager is embedded with a client-side PC Editor which is capable of creating and
editing content, and a server-side Web Editor.
System Requirements
Please check the system requirements for proper operation.
Server
Client
Component Requirements
CPU 2.5 GHz Core 2 Duo L2 Cache 2 MB or higher
RAM 2 GB or higher
HDD 250 GB or higher
Network 100 Mbps or higher
OS Windows XP SP3 or Windows 2003 Server, Window7
Graphics Card
Memory 512 MB or higher
Browser Internet Explorer 7,8
Component Requirements
CPU 2.0 GHz L2 Cache 512 KB or higher
RAM 2 GB or higher
HDD 40 GB or higher
Network 10 Mbps or higher
OS Windows XP SP2 or higher
Graphics Card
Memory 512 MB or higher
ENGLISH
22 SuperSign Server
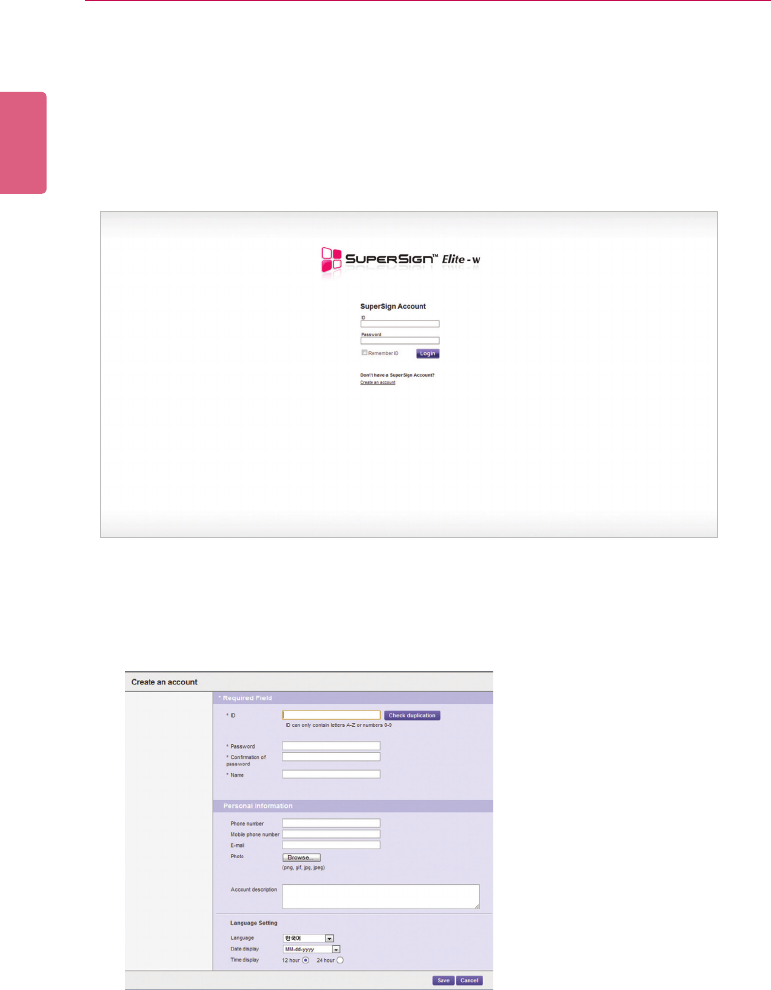
Creating the User Account
You can make a request for an account via the server.
1 Go to Start > All Programs > SuperSign Elite-w.
• The User Login window will appear.
2 Click Create an account now to make an account request.
3 Enter all required information.
4 Click the [Save] button in the top left of the screen to save the information.
23
SuperSign Server
ENGLISH
5 Click the [OK] button when the account creation complete message appears.
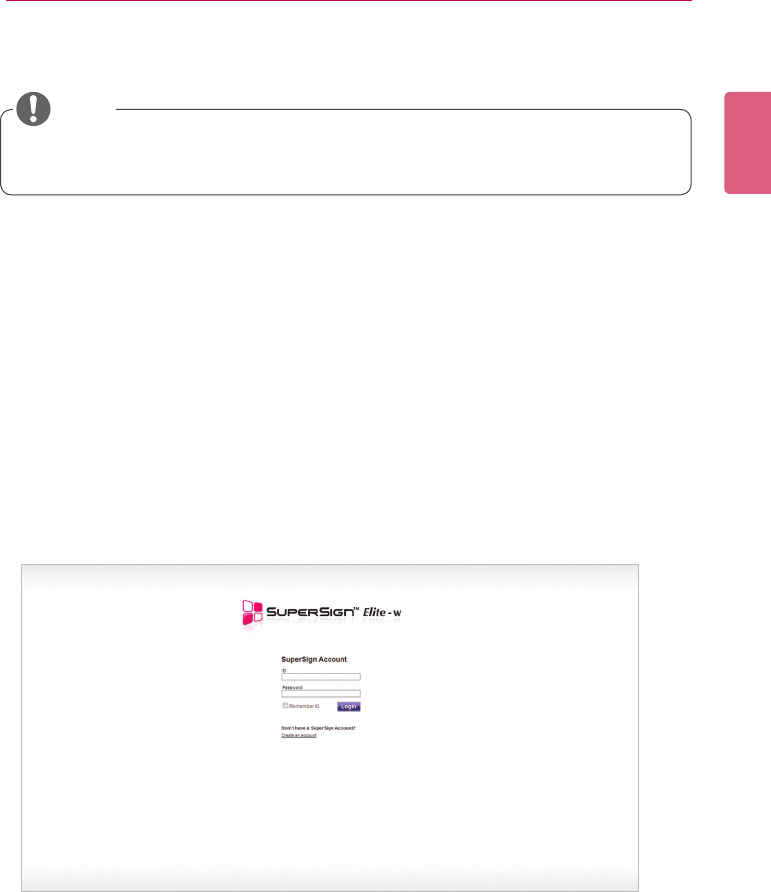
Log in/Log out
Youcanndouthowtologintousetheprogram,andhowtologouttoexittheprogram.
Logging In
1 Entertheserveraddressintheaddresseldofthewebbrowser.
• The program login screen will appear.
2 Enter the user ID and password, and then click the [Sign In] button.
• The user ID and password can be saved by selecting the Remember ID checkbox. This
means that next time you log in, the user ID and password will automatically be remem-
bered. ID and Password are initialized to admin/000000.
• Theaccountcreatedbytheusermustrstbeapprovedbytheserveradministrator.For
more information on approving accounts, see 90 Page, "Approving User Accounts".
NOTE
ENGLISH
24 SuperSign Server
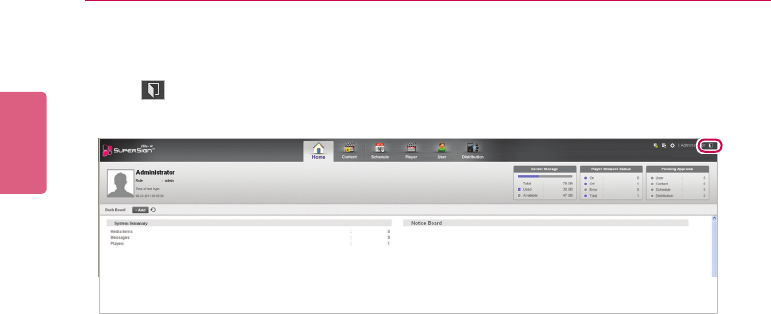
Logging Out
1 Click in the top right corner of the screen.
• The Login screen is displayed.
25
SuperSign Server
ENGLISH
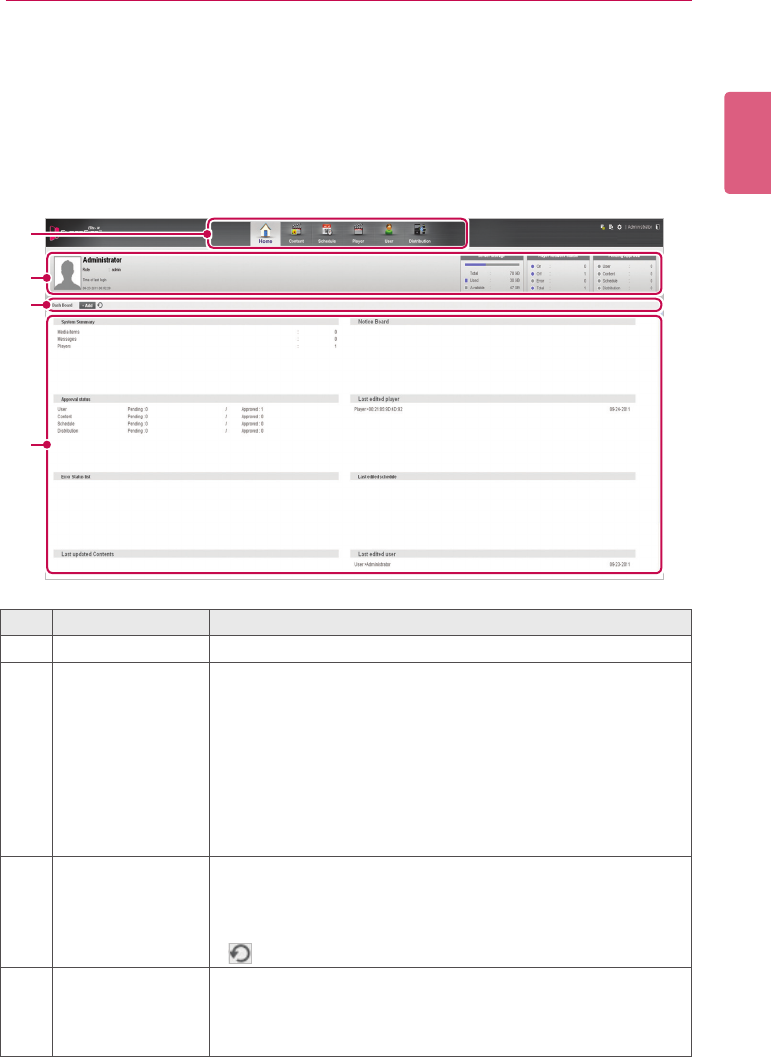
Home
On the main screen of the SuperSign Elite-w, you can monitor the general system through the
dashboard.
Home Window Layout and Functions
The following shows the layout and functions of the Home window.
①
②
③
④
No. Name Function
①Menu tab Menu tabs for key functions
②
Personal details
and monitoring area
• Displays the user’s personal information.
- Including user ID, name, role, and most recent login.
• Monitored information
- Server storage: Displays used and available space com-
pared to the total space.
- Player Network Status: Display the status of a connected
player, disconnected player or player with errors.
- Pending Approval: Shows a list of items pending approval
(accounts, content, schedule, and distribution).
③
Dashboard title and
launch menu
Adds or deletes dashboard categories, or loads updated informa-
tion.
• [+Add] : Allows users to select a category to add to, or to
delete from the dashboard.
• : Loads information on the updated categories.
④
Dashboard area • Dashboard information
- Goes to the details page when the linked information is
clicked.
• Moves the category location.
ENGLISH
26 SuperSign Server
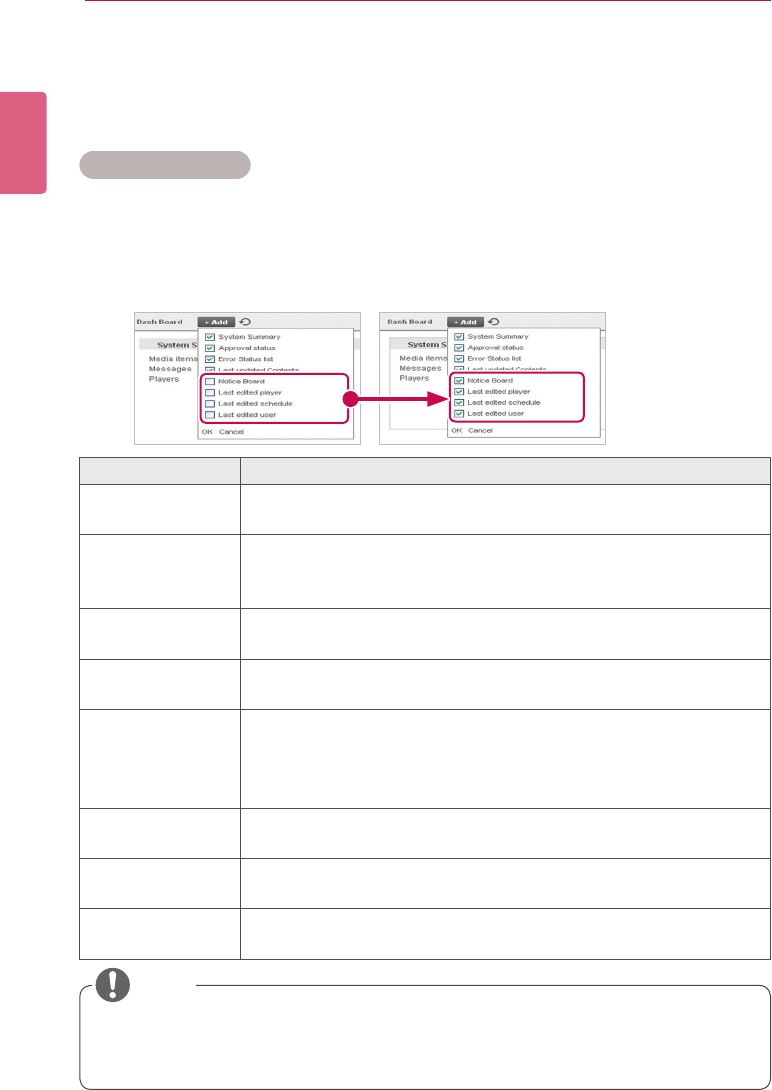
Dashboard Settings
You can add or delete dashboard categories, and re-order them according to your own prefer-
ence.
Adding Categories
1 Click the [+Add] button at the center of the Home screen.
• The dashboard appears.
2 Click the checkbox next to the category you want to add.
• The dashboard category you selected is shown with a check mark.
Item Function
System Summary Displays the system summary (number of media items, messages, playl-
ists, and players).
Approval status • Displays the number of content, schedule and distribution that are
approved or pending approval.
• Goes to the details page when the user clicks the information.
Error Status list • Displays a list of errors.
• Goes to the details page when the user clicks the information.
Last updated Con-
tents
• Displays a list of schedules recently updated.
• Goes to the details page when the user clicks the information.
Notice board • Display the list of notices
• An administrator can write/edit/delete a notice
• Anyone can write a notice regardless of privilege
• A user can edit/delete his/her own notice
Last edited player Displays a list of players recently updated.
Goes to the details page when the user clicks on the information.
Last edited sched-
ule
Displays a list of schedules recently updated.
Goes to the details page when the user clicks on the information.
Last edited user Displays a list of user accounts recently updated.
Goes to the details page when the user clicks on the information.
• TheApprovalStatus,NoticeBoardandLastModiedUseritemsareonlyavailablein
the SuperSignElite-w Standard version. To access these functions, please purchase the
Standard version.
NOTE
27
SuperSign Server
ENGLISH
3 Click the blank area of the dashboard.
• The dashboard category which you selected is added.
Deleting Categories
1 Click the [+Add] button at the center of the Home screen.
• The dashboard appears.
2 Select the checkbox next to the category you want to delete.
• The dashboard category you selected is unchecked.
3 Click the blank area of the dashboard.
• The deleted category disappears from the dashboard and the rest of the list moves up.
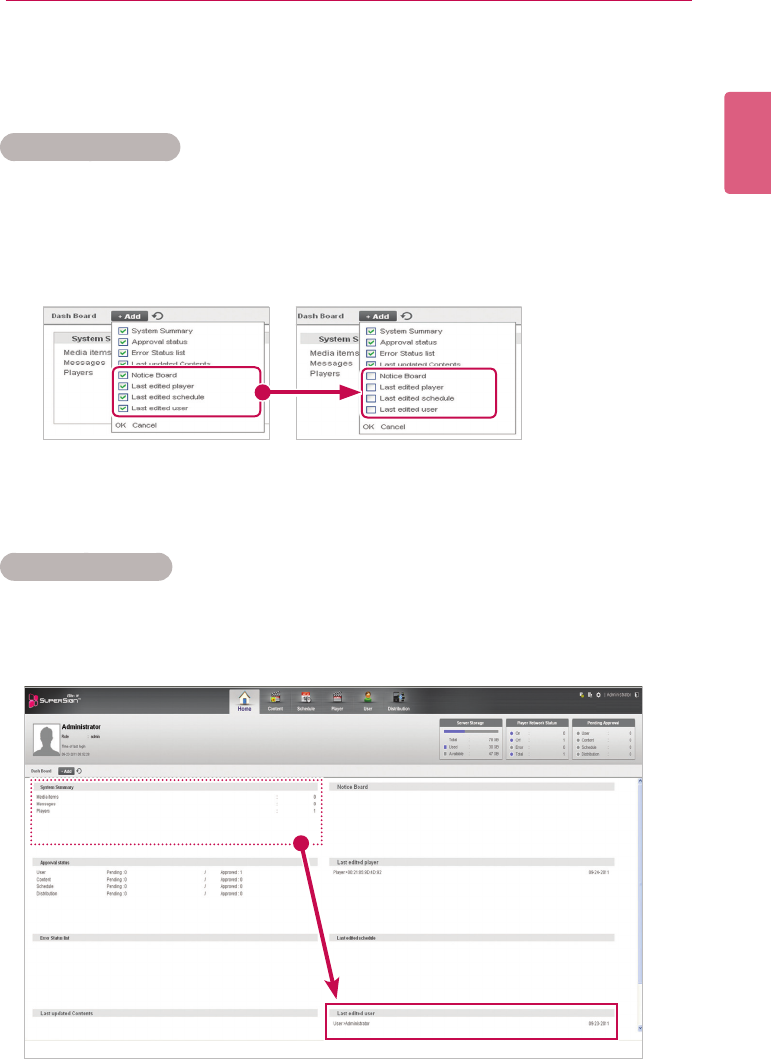
Moving Categories
1 Click the title bar of the category you want to move, and drag-and-drop it onto a desired area
within the dashboard.
• The categories in the dashboard are automatically re-sorted.
ENGLISH
28 SuperSign Server
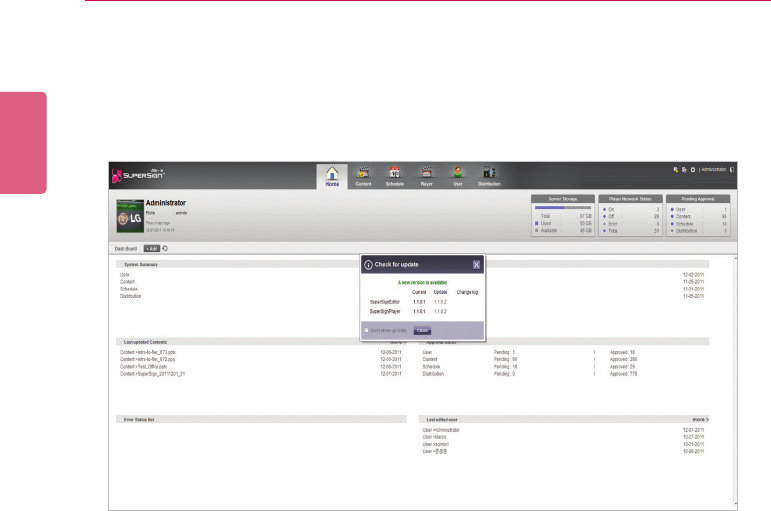
Software Update Notication Function
WhenaadminuseraccesstheHomescreen,thenoticationwindowpopsoutifthereare
software updates available at www.lgecommercial.com
1 Displays the current version and the update version available.
2 Click the update version to download a new version of the software. Then, save it on your PC
to upgrade the SuperSignElite-w server.
3 Click Change log to check the update history.
4 ClicktheDon'tshowuptodaycheckboxandselectClose.Then,theupdatenoticationwin-
dow will not appear during the day.
29
SuperSign Server
ENGLISH
Content
You can create advertising content using various templates and layouts.
SuperSign Manager provides a client-side PC Editor capable of creating and editing content, and
a server-side Web Editor. This document describes the server-side Web Editor.
For details on the client-side PC Editor, see 43 Page, “PC Editor”.
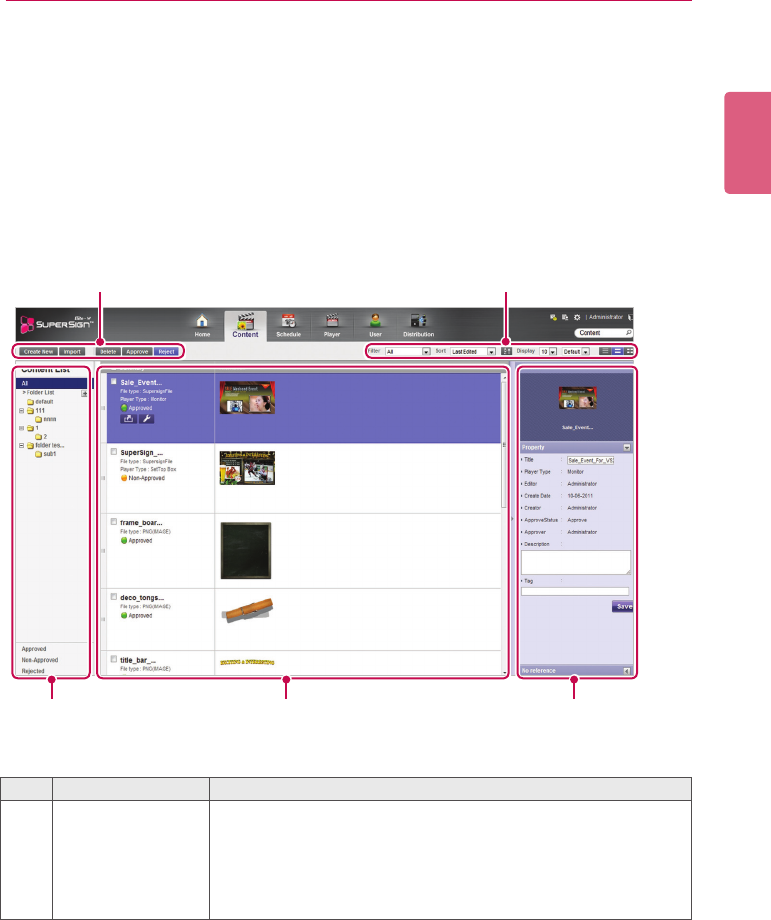
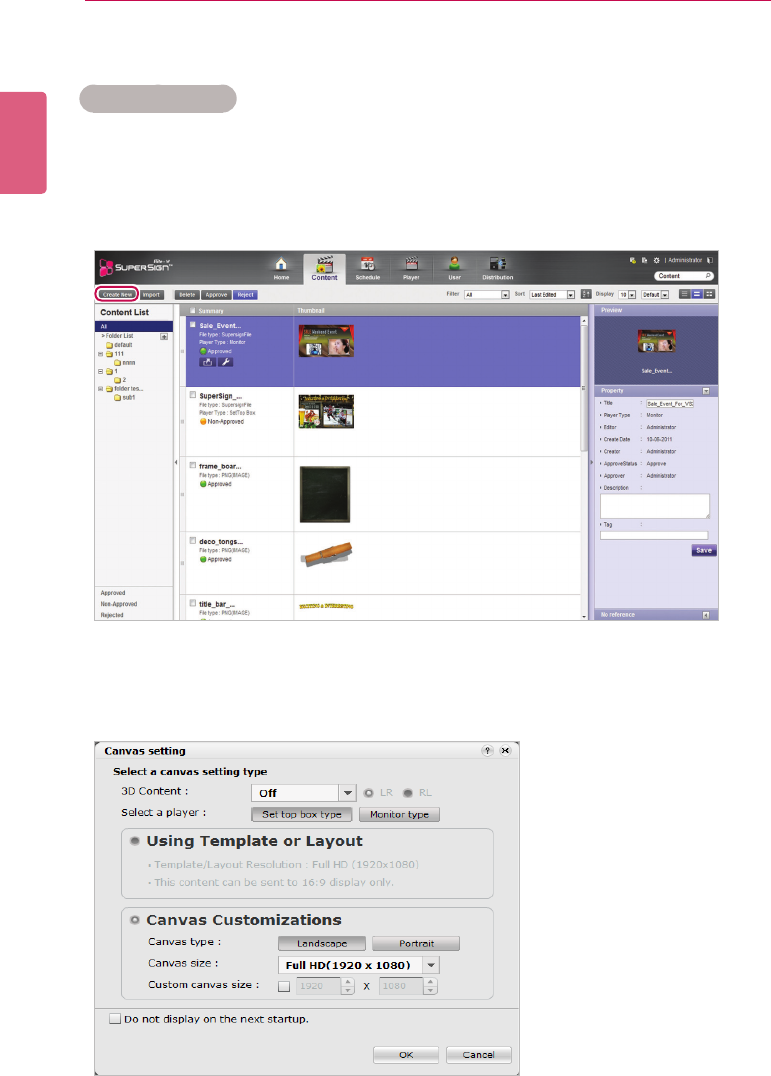
Content Window Layout and Functions
The following shows the layout and functions of the Content window.
①②
③ ④ ⑤
No. Name Function
①Action buttons • [Create New]:CreatesaSuperSignle.
• [Import]:LoadsaSuperSignle.
• [Delete]:DeletesaSuperSignle.
• [Approve]: Approves content.
• [Reject]: Rejects content.
ENGLISH
30 SuperSign Server
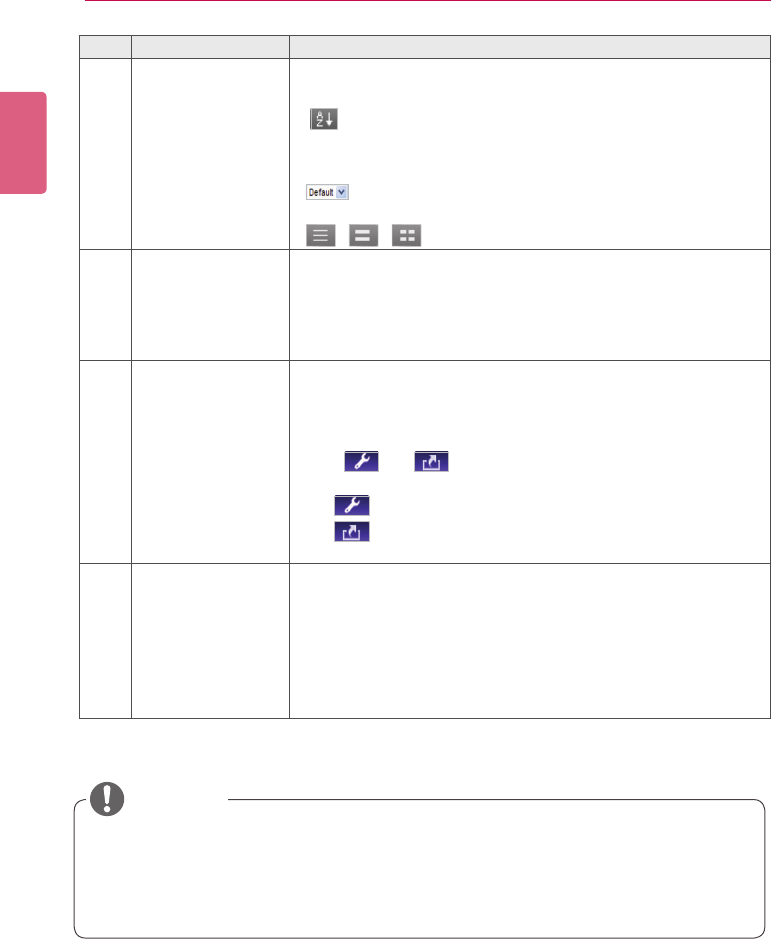
No. Name Function
②Sorting • Filter: Sort by content created.
• Sort: Sort by various categories (e.g., last date updated).
•
: Sort in ascending or descending order.
• Display: Set the number of items to display by pressing the
[▼]button.
•
:Clickthe[▼]buttontoselectasizeoftheimage
shown in the details list.
• / / : List view/Normal view/Thumbnail view
③Content list Shows the list of stored content
• All: Shows the list of all content
• Approval: Shows the list of approved content
• Non-Approved: Shows the list of non-approved content
• Rejected: Shows the list of rejected content
④Details list • Summary
- Displayslename,letype,playertype(onlyforsettopbox),
scheduleshowingwhencontentisused,lecreationdate,
included content, and approval status
- The and buttons are enabled when you click the
mouse.
• button: Switches to the content editing screen
• button: Exports the content
• Thumbnail: The thumbnail image of content
⑤Details Allows the user to check the content details and edit the information
for the content
• Preview:Showsapreviewoftheimageinthecontentle
• Property: Allows the user to check or edit the information
enteredwhenaddingacontentle
• Used In (area): Displays the area (schedule, player, content)
in which the content is used and it details
• AftereditingthepropertiesunderDetails,ifyoundthechangesarenotreected,cong-
ure Internet browser options as follows:
Go to Tools > Internet Options > Browsing History > Settings and click "Every time I visit
the webpage" under "Check for newer versions of stored pages".
CAUTION
31
SuperSign Server
ENGLISH
Loading Content
1 Click Content on the Menu tab at the top of the program.
2 In the content list, select the folder from which you will import content and then click [Import].
3 When the le import pop-up window appears, click the [Browse] button and select a le to
import.
4 After selecting a le path, click the [Save] button.
• Once the le is open, the Editor switches to the Content window, displaying the le status
with the icon.
ENGLISH
32 SuperSign Server
Content Creation
Creating Content
You can easily provide desired advertising content.
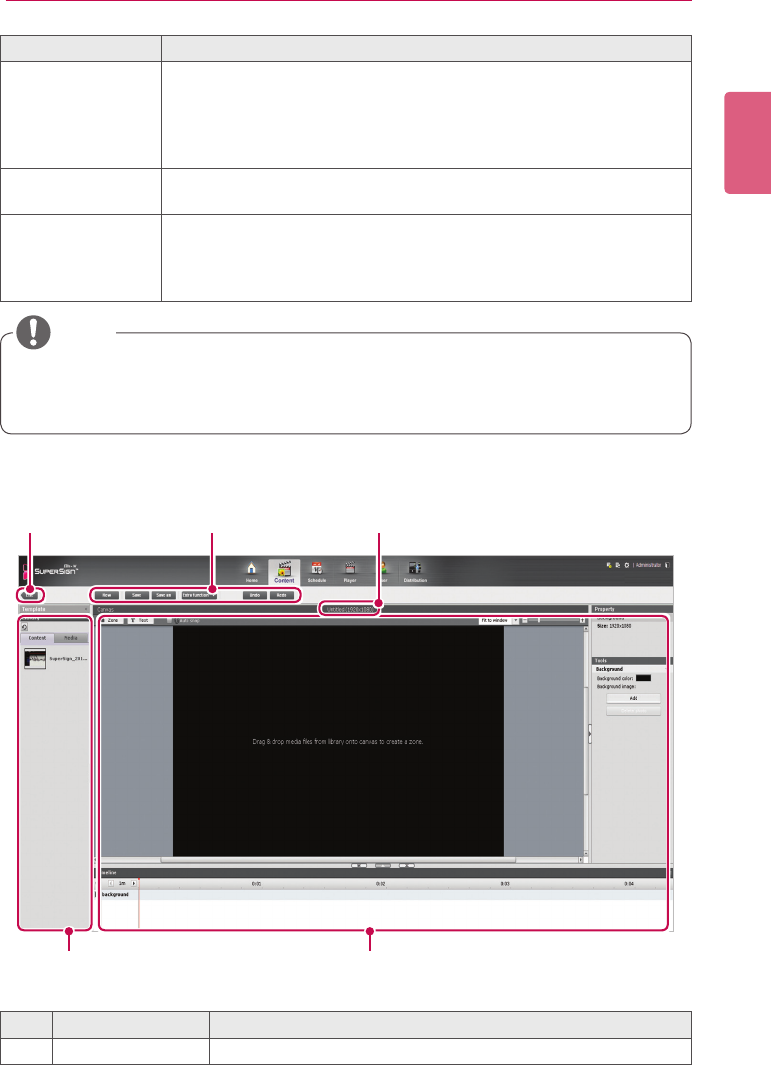
1 Click Content on the Menu tab at the top of the program.
2 Click the [Create New] button in the top left of the Content window.
3 Select the desired canvas settings.
• If you do not want to display the Canvas setting window after the settings are complete,
select the Do not display on the next startup checkbox.
33
SuperSign Server
ENGLISH
4 Click the [OK] button to complete the canvas settings.
• The content edit window appears when the canvas settings are complete.
Menu Description
Select a player Select a player type.
• Set top box type: Content can be distributed only to a set-top box
type, not a monitor type
• Monitor type:Upto1videoleand20imagescanbedistributedto
all types of players
Using Template or
Layout
Select a built-in template or layout.
Canvas Customiza-
tions
Select a desired canvas type and resolution.
• Canvas type: Select either landscape or portrait.
• Canvas size: Select the default standard resolution.
• Custom canvas size: Select the size you want
• When you select a monitor-type player, some functions are not available when editing
content.
• For more information, see “Restrictions When Using a Monitor Player” on page 35.
NOTE
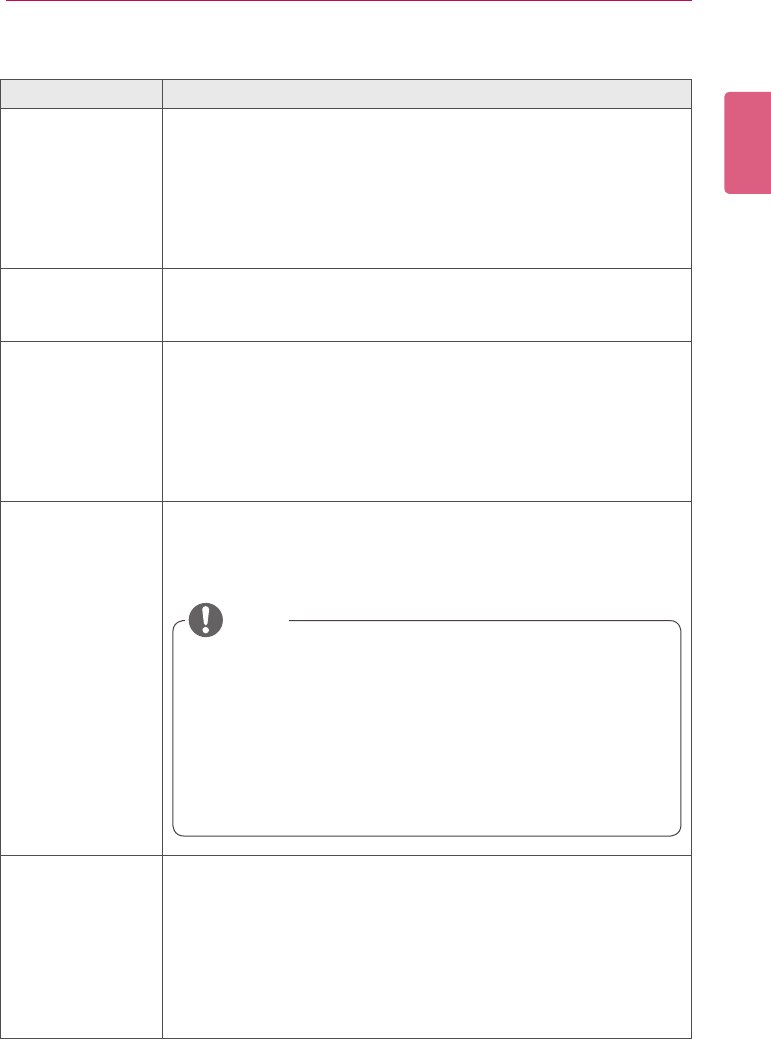
① ② ③
④ ⑤
No. Name Function
①List button Moves to the content list

ENGLISH
34 SuperSign Server
No. Name Function
②Action buttons
• [New]: Opens a new canvas.
• [Save]: Saves the canvas content.
• [Save As]: Saves the canvas content with a new name.
• [Extra function ▼]: Enables additional action buttons.
- Save as Template:Savesthecontentcreated/modiedasa
custom template.
- Canvas Size: Opens the Canvas Settings window.
- Edit: Opens the edit window to cut, copy, paste, delete,
select all, etc.
- Canvas Setting Window: Allows the Canvas setting window
to open or close.
• [Undo]: Cancels the last change made.
• [Redo]: Returns to the setting previous to Undo.
③File name display
area Displaysthecurrentle'sname.
④Library area
• Template/Layout: The default layout is by category.
You can select a custom template previously saved.
• Library
- Content:Viewthelistofcontentsavedorselectaletoadd
to the Canvas.
- Media:Viewthelistoflessaved(photos,videos,ash,mu-
sic,PDFs,andOfce)orselectaletoaddtotheCanvas.
• Services
- Element: Select a component (Web, RSS, Widget, and
streaming) to add to the Canvas.
- Date/Time: Provides a text-type or an image-type frame,
showing the date and time.
- Clipart: Provides shapes and frames included in the built-in
templatesasanimage,oraash.
⑤Content edit area Used to edit content.
5 Select an item you want in the Library area.
• You can view the item details in the Property panel.
6 Use the Tools panel to edit the selected item in a desired fashion.
• The Tools panel changes according to the selected item. For details on the tool functions,
see 44 Page, “Editing with the Tools Panel”.
7 Click the [Save] button at the top of the Canvas to save the content created.
• You can view the content saved in the Content List.
35
SuperSign Server
ENGLISH
Restrictions When Using a Monitor Player
When you use a monitor player to edit content, the following restrictions apply:
Item Restrictions
Templates • Ifyouselectatemplatewhichhasaash,theashzoneisauto-
matically deleted and only the rest zone is displayed.
• Ifyouselectatemplatewhichhasalethatisnotsupportedbya
monitor player, the warning pop-up appears.
If you click the [OK] button in the warning pop-up window and open
thecorrespondingtemplate,theunsupportedlezoneisdeleted
and the rest zone is displayed in the screen.
Canvas size • The size of the canvas is determined by the connected monitor; no
custom setting is available.
• The zone cannot be out of canvas background.
Library • Only monitor content can be displayed (Only set top box content is
displayed on set top box players).
• Anyunsupportedlesaredisabledandcannotbeaddedtothe
zone.
- Photo/Video:Alewhichhasaresolutionhigherthan1920X1080
cannotbeaddedtothezone.Anyunsupportedlecannotbeaddedto
the zone (see 117 Page, "SuperSign File Support").
Service • Anyunsupportedlesaredisabled.
- Element: Web, RSS, Widgets, and Streaming menus are disabled.
- Date/Time:Imagetype(ashle)menusaredisabled.
- Clipart:Backgroundimage(Portrait)/ashmenusaredisabled.
Tools • Anyunsupportedlesaredisabledortheirusablerangeisreduced.
- Photo transition effects: Limited to 9 including No effect.
- Background:Youcannotselectalewithabackgroundphoto
resolution higher than 1920 x 1080.
- Text/Date/Time: Only default fonts can be used.
The font displayed for preview during editing may be different to
the font displayed in a player. Bold, italic, and underline are not
allowed.
• Restrictions on External Input
1.Theexternalinputzoneisxedatthebottomofthezoneset.
(It is always placed as the last one.)
2. The content in the external input zone cannot be played
simultaneously with the one in the video/music zone.
- If a video (or music) zone already exists, an external input
zone cannot be added.
- If an external input zone already exists, a video (or music)
zone cannot be added.
NOTE

ENGLISH
36 SuperSign Server
Adding Media Files to the Library
Youcanaddphotos,videos,ashles,music,PDFs,andOfcelestothelibraryusingthePC
Editor.
1 Click the [+Add]buttonontheMediatabtoaddmediales.
2 Whentheleopendialogappears,selectamedialeandclickthe[Open] button.
• Theselectedleisaddedtothelibrary.Pleasenotethatonlythemedialesstoredinthe
local disk can be added to the library.
• Youcanalsoaddvideos,ash,music,PDFs,andOfcelestothelibraryusingthesame
method.
Adding Library Media Files to Canvas
Youcanplacethemediales(photos,videos,music,PDFs,andOfcelesaddedtotheLibrary)
on the Canvas.
• AddingmedialestotheLibraryisonlyavailableinthePCEditor.
• YoucanalsoselectanddragthedesiredmedialefromWindowsExplorerdirectlytothe
medialibrary.Themedialewillthenbeautomaticallyclassiedandstoredinthecor-
responding category.
InWindows7,youcandrag-and-droplesfromWindowsExploreronlywhenthe“User
Account Control (UAC)” is disabled.
NOTE
• WhenyouaddandeditamedialeontheCanvas,themedialeisauto-locked.Auto-
lockedmedialescannotbeaccessedbyotherusers.
NOTE
37
SuperSign Server
ENGLISH
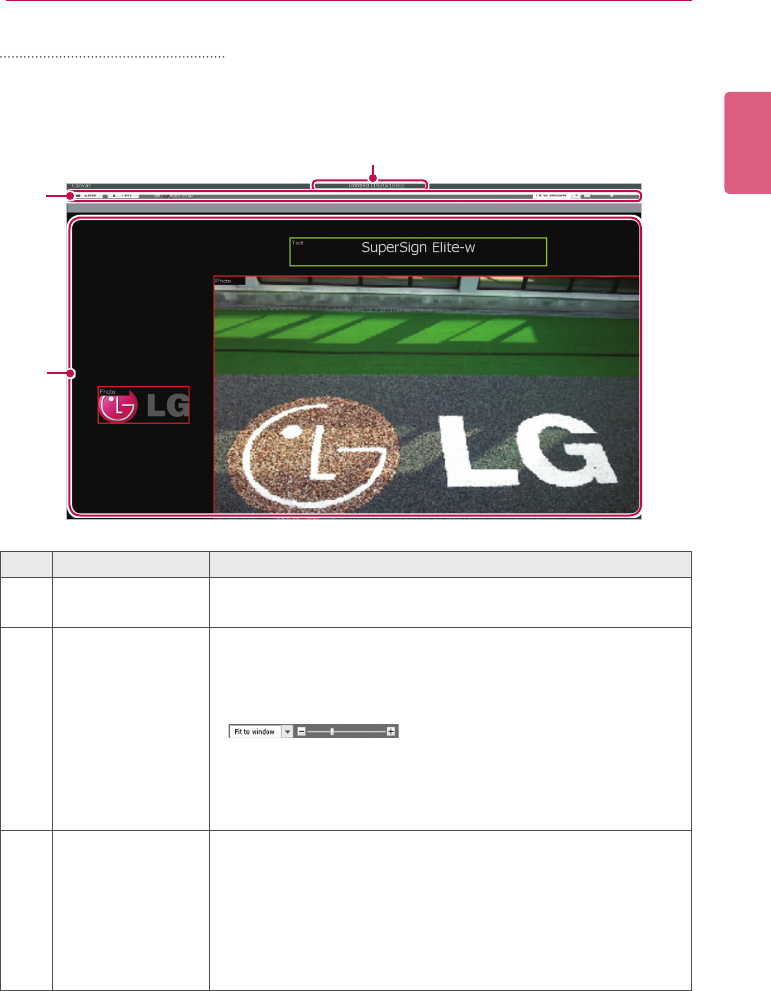
Adding media to a zone
You can create a custom layout using the [Zone] and [Text] buttons at the top of the Canvas.
1 In the content edit mode, click the [Zone] button at the top of the Canvas.
• Then, a zone is created on the Canvas.
③
No. Name Function
①File information
area Displaysthecanvaslenameandresolution.
②Action buttons
• [Zone]: Creates a zone on the Canvas.
• [Text]: Creates a text zone on the Canvas.
• [Auto snap]: Aligns the edges of the selected zone with the
edges of other zones.
• :Pressthe[▼]buttontoselectFit to
window and adjust the canvas size
to full screen or enlarge/reduce the
canvas screen by moving the slide
bar to the left or right.
③Canvas area
Entering the Canvas after selecting a template/layout, automati-
cally creates the zones.
• Background: The canvas is created according to the display
resolution.
• Zone: Created when clicking the [Zone] button; it has no
property initially. When the user inserts media, a zone
property is created.
2 Drag-and-dropamedialeaddedtothelibraryonthezone.
• ThemedialeisaddedtotheCanvaszone.
②
①
ENGLISH
38 SuperSign Server
• What is a zone? A SuperSign Manager Zone is an area on the canvas in which the media or
a layer is placed while the content is being edited. You can create a zone by combining dif-
ferent types of media items and creating an ad by including another zone or zones (a zone
can accommodate only one type of media).
Thezonecanincludephotos,documents,webpages,videos,Flashles,music,andmore.
Because each zone is a separate area, it has its own properties and can be easily deleted
or inserted. Also, ad content is easily created by dragging and dropping on to the canvas.
• Only media with a single property can be added to a zone.
• ForOfceles,closetheOfceprogrambeforepreview.
• Ofcelesorwebpagesmaynotbedisplayedintheeditorder(Z-order).
• WhenusinganSWFle,youcandorepeatplaywhentheleisconguredtodoso.
• Somespecialcharacterscannotbeusedincontentlenames.(^,|,\,<,>,?,/,‘,“,*,;,:,%)
• The maximum number of zones that can be created in the canvas varies depending on the
type of zone:
- Photo zone: up to 20
- Music zone: up to 4 (max. 1 for a monitor player)
- Text zone: up to 20
- Video zone: up to 4 (max. 1 for a monitor player)
- Flash zone: up to 20
- Web or Widget zone: up to 4
- Ofcezone:upto4
- PDF zone: up to 10
• The monitor player cannot have both a music zone and a video zone in the same content.
• Videothumbnailsarerandomlyextractedfromtherstfewsecondsofplayback.
• Ifavideofailstoupload,see117Page,“UniedCodecs”andmakesurethatarequiredcodec
is installed.
• Services (RSS, websites, RSS, etc.) and text cannot be copied.
NOTE
Placing media directly on to a zone
YoucanaddamedialeyouselecteddirectlyontotheCanvas.
1 Drag-and-dropamedialeaddedtothelibrary,ontotheCanvas.
• The media is placed on to the Canvas with its area created automatically. You can
change the size and location of the new area.
• InthePCEditor,drag-and-droppingamediale,selectedfromtheWindowsExploreronto
the Canvas, automatically creates its media zone.
NOTE
39
SuperSign Server
ENGLISH
Adding Service Content
You can add online content (websites, RSS, and widgets) and date/time to the Canvas.
Adding websites
1 In the Library area, click Service > Element > Web.
2 Enter a website address (URL) and click the [Add] button.
• A web zone is created on to the Canvas.
3 Place the website zone anywhere you want on the Canvas.
4 Click the Preview from the quick menu at the bottom of the screen.
• You can see that the website zone is added.
5 Set the web zone in the Tools panel.
• For more information on the Tools panel, see 44 Page, “Editing with the Tools Panel”.
Adding RSS feeds
1 In the Library area, click Service > Element > RSS.
2 Enter an RSS address and click the [Add] button.
• An RSS zone is created on the Canvas.
3 Place the RSS zone anywhere you want on the Canvas.
4 Click the Preview from the quick menu at the bottom of the screen.
• You can see that the RSS zone is added.
5 Set the RSS zone in the Tools panel.
• For more information on the Tools panel, see 44 Page, “Editing with the Tools Panel”.
• You cannot add service content to a monitor player during editing.
• Theserviceandtextzonescanhaveasinglemediaandtextle,respectively.
• Really Simple Syndication (RSS) is a web feed format that allows subscription to new post-
ings on a website. The website provides updates and new posts according to RSS, and
users can receive such content through an RSS reader.
NOTE
ENGLISH
40 SuperSign Server
Adding widgets
1 In the Library area, click Service > Element > Widget.
2 Enter a widget code and click the [Add] button.
• A widget zone is created on the Canvas.
3 Place the widget zone anywhere you want on the Canvas.
4 Click the Preview from the quick menu at the bottom of the screen.
• You can see that the widget zone is added.
5 Set the widget zone in the Tools panel.
• For more information on the Tools panel, see 44 Page, “Editing with the Tools Panel”.
Adding streaming media
1 In the Library area, click Services > Element > Streaming.
2 Select an item, video, or audio.
3 Enter a streaming address (URI) and click the [Add] button.
• A streaming zone is created on the Canvas.
4 Place the streaming zone anywhere you want on the Canvas.
5 Click the Preview from the quick menu at the bottom of the screen.
• You can see that the streaming zone is added.
6 Set the streaming zone in the Tools panel.
• For more information on the Tools panel, see 44 Page, “Editing with the Tools Panel”.
Adding dates
1 In the Library area, click Service > Date/Time.
2 Click the [Add Date] button in Date/Time or drag and drop a preferred date image into the
canvas.
• A date zone is created on the Canvas.
3 Place the date zone anywhere you want on the Canvas.
4 Click the Preview from the quick menu at the bottom of the screen.
• A date zone is created on the Canvas.
5 Set the date zone in the Tools panel.
• For more information on the Tools panel, see 44 Page, “Editing with the Tools Panel”.
• When you provide streaming services, please use Windows Media Encoder.
NOTE
41
SuperSign Server
ENGLISH
Adding time
1 In the Library area, click Service > Date/Time.
2 Click the [Add Time] button in Date/Time or drag and drop a preferred time image into the
canvas.
• A time zone is created on the Canvas.
3 Place the time zone anywhere you want on the Canvas.
4 Click the Preview from the quick menu at the bottom of the screen.
• A time zone is created on the Canvas.
5 Set the time zone in the Tools panel.
• For more information on the Tools panel, see 44 Page, “Editing with the Tools Panel”.
Adding Clip Art
1 In the Library area, click Service > Clipart.
2 Select a preferred clip art category and drag and drop a clip art into the canvas.
• The corresponding zone is created in the canvas.
3 Place the clip art zone anywhere you want on the Canvas.
4 Click the Preview from the quick menu at the bottom of the screen.
• The clip art zone is created in the canvas.
5 Set the clip art zone in the Tools panel.
• For more information on the Tools panel, see 44 Page, “Editing with the Tools Panel”.
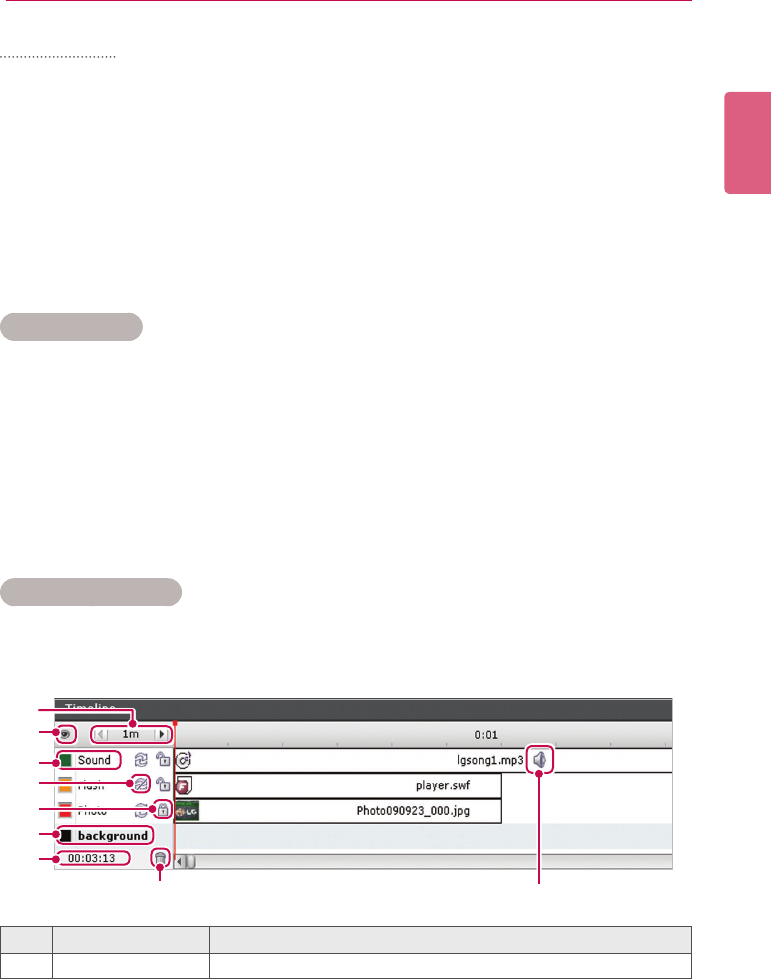
Setting the Timeline
The timeline allows you to set the duration for each content clip so that your media can be played
at the desired time. On the timeline, you can set the start time, duration, and the end time of the
content in the zone. You can set the content to play for up to 12 hours.
⑧⑨
③
②
④
⑤
①
⑥
⑦
No. Name Function
①Default time unit Sets the default time unit (1, 10, or 30 min.) of a timeline.
ENGLISH
42 SuperSign Server
No. Name Function
②
Show/hide layers Shows or hides the border color and the name of a zone placed on
the Canvas.
• : Show
• : Hide
③Zone name and
color
To change the zone name and color:
• Zone Name: Double-click the zone name and enter a new name.
• Border Color: Click the square box next to the zone to select a
new color.
④Repeat playback Repeat playback
• : Enables repeat playback. A zone with the repeat playback
enabled, will be repeatedly played back until the playback of
the entire content is complete.
• : Disables loop playback.
⑤Content lock Content lock
• : Enables lock. Locked zones cannot be selected or edited.
• : Disables lock.
⑥Canvas background Canvas background
• Change the canvas background color: Click the square shape
before the canvas name to select a new background color.
• Change the canvas background display: From the library, drag
and drop a photo which will be used as background screen into
the background timeline zone.
• You can set only one photo on the canvas background display.
⑦Total playback time
of the content
Displays the content's total playback time. It is based on the time of
the zone whose end time of playback will be the latest.
⑧Zone deletion Deletes the selected zone or media.
• Select a zone to delete and click .
⑨Content sound Turns on or off the selected content's sound.
• : Turns the sound on.
• : Turns the sound off.

43
SuperSign Server
ENGLISH
Saving Content
Web Editor
1 Click the [Save] button at the top of the Canvas to save the content created.
• You can view the content saved in the Content List.
• To save a custom template you created, click the [Extra function] button at the Canvas
top, and click Save As template.
PC Editor
1 To save the content created on the local PC, click File > Save or Save as.
To save it in the library of the server, click Server > Save or Save as.
• You can view the content saved in the Content List.
• To save a custom template you created, click File > Save as template.
• To save a template in the server, click Server > Save as template.
Editing Content
You can edit the media or service content added to the zone while creating the content.
• If you change the layout, all of the content you previously worked on will be deleted. Make
sure you save the content before you change the layout.
• If you change the template, all of the content you previously worked on will be deleted.
Make sure you save the template before you change the layout.
CAUTION
ENGLISH
44 SuperSign Server
Editing with the Tools Panel
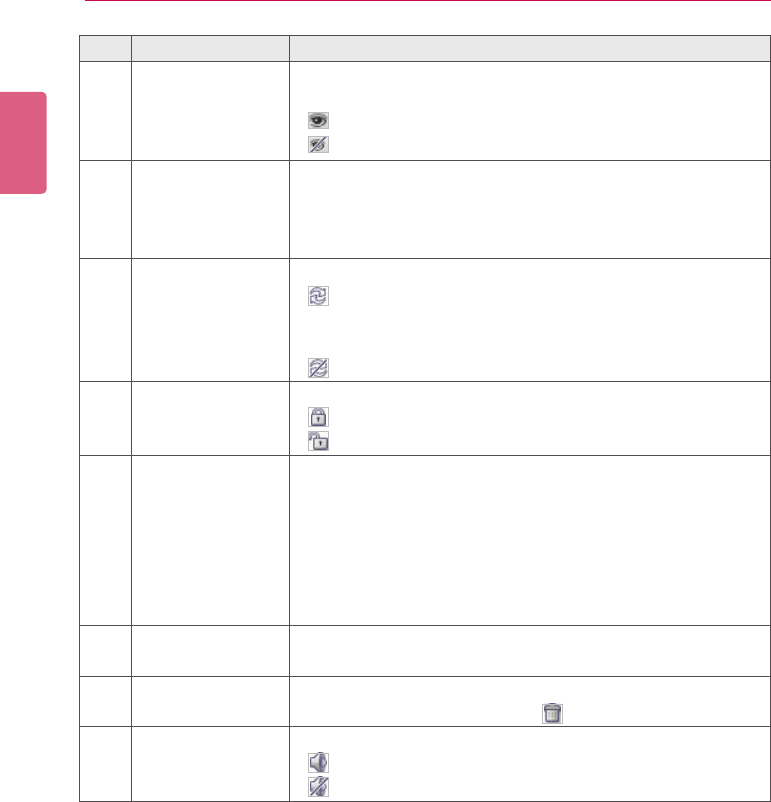
Photo
Videos
Menu Function
Time Sets the playback duration of a photo.
Fitting • Original: Displaystheoriginalsize;ts
to the zone if the photo is larger than
the zone.
• Fit to zone: Fits to the zone while pre-
serving the original aspect ratio.
• Full zone: Fits to the zone as full
screen.
Transition ef-
fects Sets the transition effects of a photo.
Menu Function
Time Sets the video playback time.
Fitting • Original:Displaystheoriginalsize;ts
to the zone if the photo is larger than
the zone.
• Fit to zone: Fits to the zone while pre-
serving the original aspect ratio.
• Full zone: Fits to the zone as a full
screen.
Play Enables the video's loop playback.
Volume Sets the video volume.
• With a transition effect, the minimum editing unit is 10 seconds.
• If no transition effect is applied, the minimum editing unit for the playback time is 3 sec-
onds.
NOTE
45
SuperSign Server
ENGLISH
Flash
Music
Document
Menu Function
Time Settheashplaybacktime.
Fitting • Original:Displaystheoriginalsize;ts
to the zone if the photo is larger than
the zone.
• Fit to zone: Fits to the zone while pre-
serving the original aspect ratio.
• Full zone: Fits to the zone as a full
screen.
Play Enablestheash'sloopplayback.
Transparent
ashback-
ground
Sets whether to use the transparency effect
inthebackgroundoftheFlashle.
Menu Function
Time Setstheplaybackdurationofthemusicle.
Play Sets whether to repeat playing the selected
audiole.
Volume Adjusts the volume of the audio.
Menu Function
Time Sets the playback duration of a document.
Slide show
• Start page:Setstherstpageofthe
slide show.
• Set: Sets whether to use the slide
show.
• Slide time: Sets the duration of each
slide.
ENGLISH
46 SuperSign Server
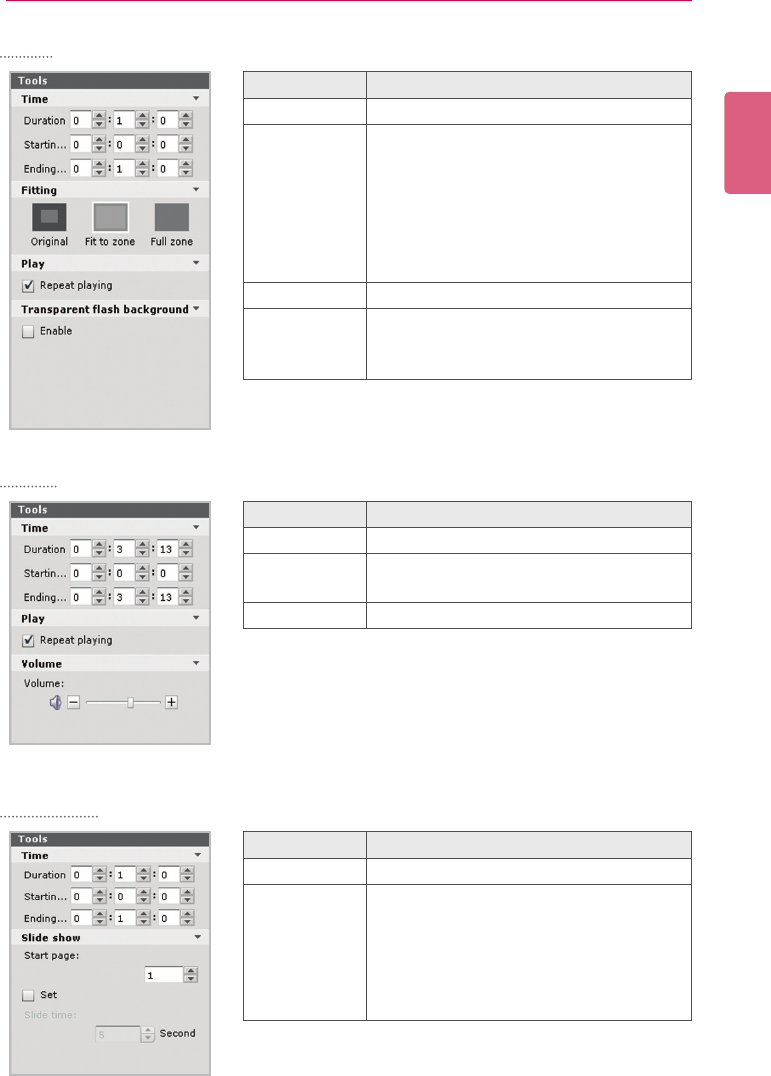
Websites
RSS
Menu Function
Time Sets the selected website's playback time.
Web Changes the URL.
Web page • Position: Sets the position of where
the website is displayed on the screen
• Scale: Enlarges or reduces the size of
the website.
Menu Function
Time Sets the RSS feed's display time.
Text Sets the text formatting (Font, Size, Color,
and Style).
Text scroll • Text scroll: Sets the scroll direction of
the text.
• Speed: Sets the scroll speed of the
text.
RSS Feed • RSS Feed:Changes the address of the
RSS feed to be connected.
• Title space: Sets the space of the RSS
feed title.
• Update cycle: Sets the refresh interval
of the connected RSS feed.
47
SuperSign Server
ENGLISH
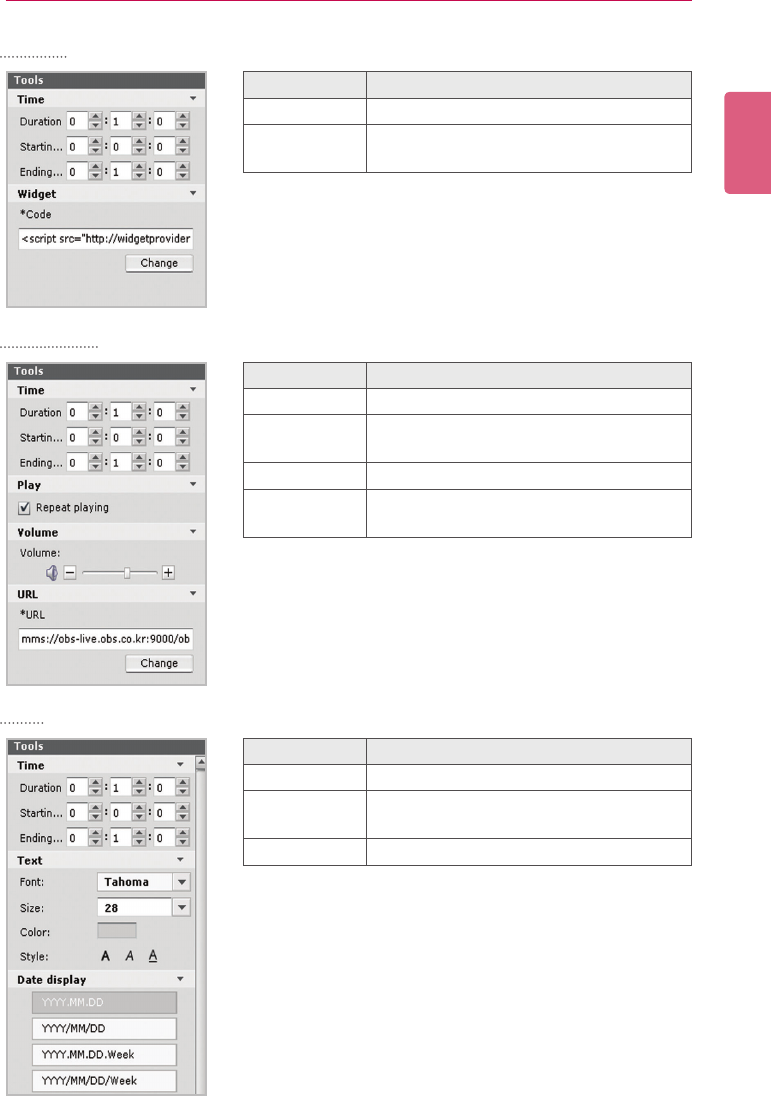
Widget
Streaming
Date
Menu Function
Time Sets the display time of the widget.
Widget Displays the address of the widget to be
connected.
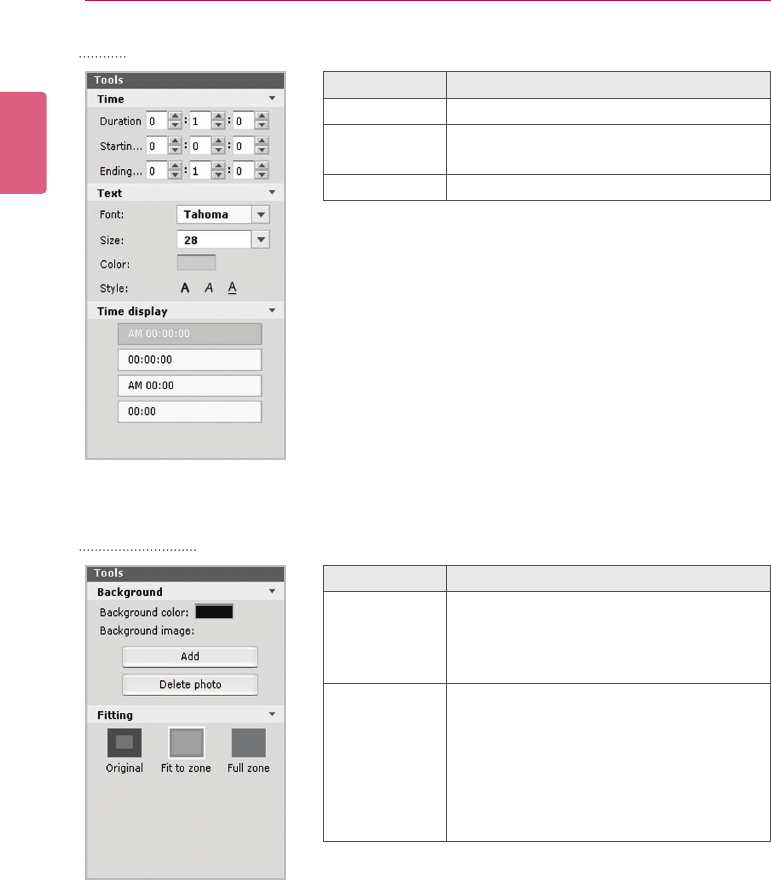
Menu Function
Time Sets the duration of the streaming media.
Play Sets whether to repeat playing the stream-
ing media.
Volume Sets the volume of the streaming media.
URL Changes the address of the streaming
service to play.
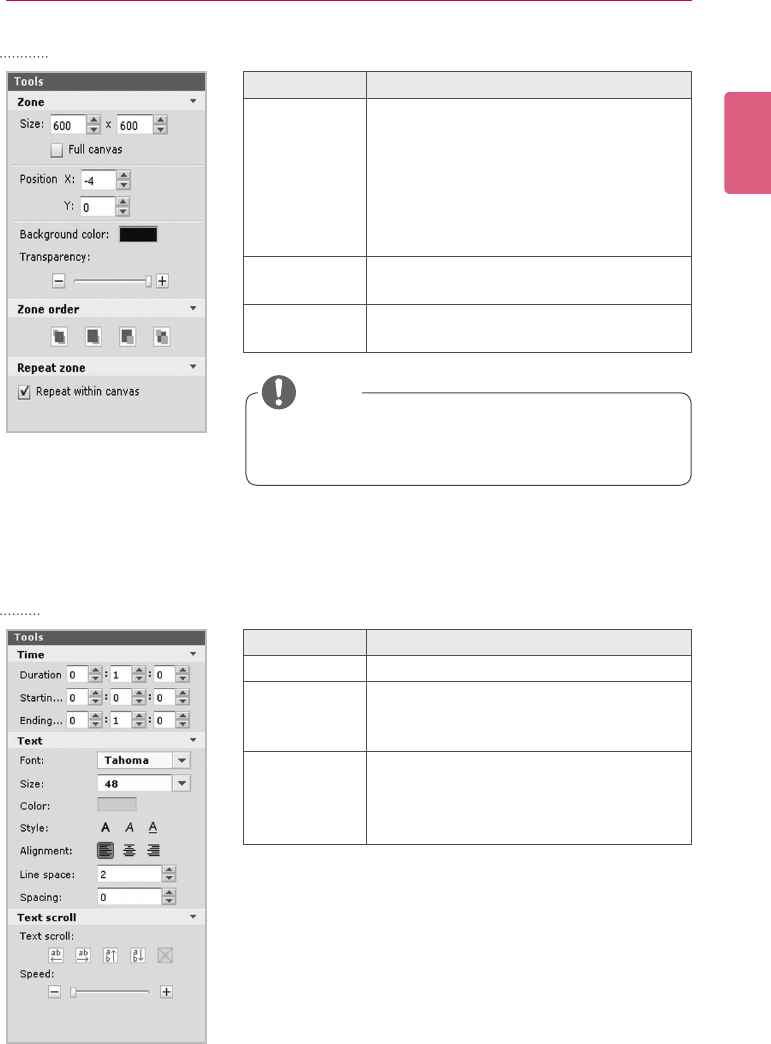
Menu Function
Time Sets the display time of the date.
Text Sets the text formatting (Font, Size, Color,
and Style).
Date display Sets the display format of the date.
ENGLISH
48 SuperSign Server
Time
Background
Menu Function
Time Sets the display time of the text.
Text Sets the text formatting (Font, Size, Color,
and Style).
Time display Sets the display format of the time.
Menu Function
Background • Background color: Changes the back-
ground color.
• Background image: Adds or deletes
the photo to use as the background.
Fitting • Original: Displays the original size; if
thephotoislargerthanthezone,itts
it to size of the zone.
• Fit to zone: Fits to the zone while pre-
serving the original aspect ratio.
• Full zone: Fits to the zone as a full
screen.
49
SuperSign Server
ENGLISH
Zone
Text
Menu Function
Zone • Size: Adjusts the zone size.
• Position: Adjusts the zone's position
on the Canvas.
• Background color: Changes the
zone's background color.
• Transparency: Adjusts the zone's
transparency.
Zone order Determines the display order of multiple
overlaid zones.
Repeat zone Enables or disables the zone's loop play-
back.
Menu Function
Time Sets the playback duration of a document.
Text
Sets the text formatting (Font, Size, Color,
Style, Alignment, Line space, and Spac-
ing).
Text Scroll
• Text scroll: Sets the scroll direction of
the text.
• Speed: Sets the scroll speed of the
text.
• Transparency cannot be adjusted for the Web zone.
• Transparency cannot be adjusted for the video zone.
NOTE
ENGLISH
50 SuperSign Server
Content Management
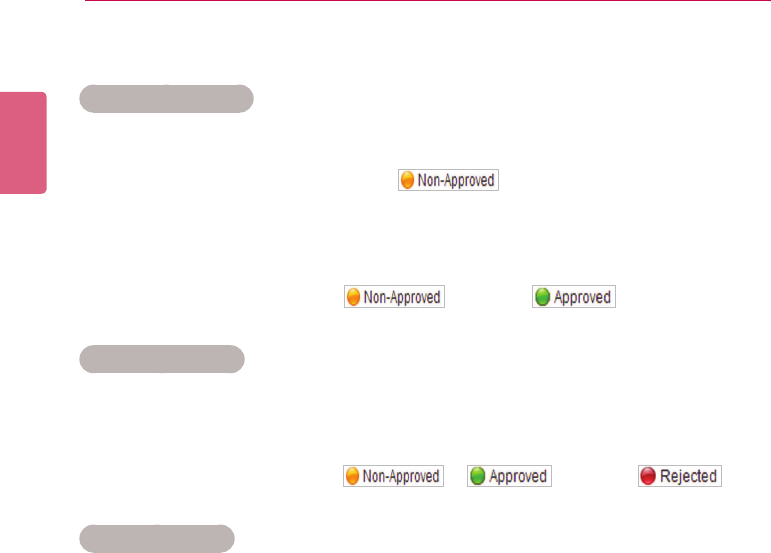
Approving Content
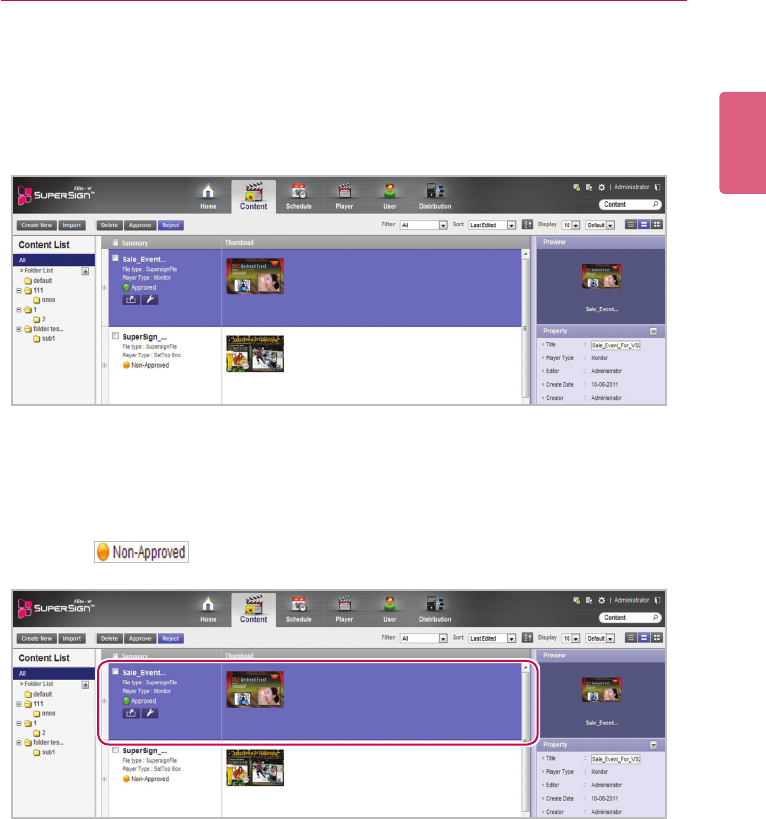
1 Click the Non-Approval category in the content list.
• The content not been approved appears in the item list.
• Alternatively, select a content item with shown in the item list.
2 Select the content you want to approve in the content details list.
• The selected content is shown with a check mark.
3 Click the [Approval] button to approve the selected content.
• Once the approval is complete, changes to .
Rejecting Content
1 Select the content you want to reject in the content details list.
• The selected content is shown with a check mark.
2 Click the [Rejected] button to reject the selected content.
• Once the rejection is complete, or changes to .
Deleting Content
1 Select the content you want to delete in the content details list.
• The selected content is shown with a check mark.
2 Click the [Delete] button to delete the selected content.
3 WhentheConrmDeletewindowappears,clickthe[OK] button.
4 Whenthedeletionconrmationwindowappears,clickthe[OK] button.
• Once the deletion is complete, the deleted content will disappear from the details list.

51
SuperSign Server
ENGLISH
PC Editor
Learn about the PC Editor, a local PC-based program for content creation.
Installing/Uninstalling PC Editor
Installing PC Editor
1 Insert the CD provided with the Media Player package onto your computer.
• The install program runs automatically.
2 On the main screen, click [SuperSign Editor].
3 When the File Download pop-up appears, click the [Run] button.
4 When the Security Warning pop-up appears, click the [Run] button.
5 Select the language and click the [OK] button.
6 Read the SuperSign Editor installation instructions and click the [Next] button.
7 Select the installation path of the SuperSign Editor and click the [Install] button.
• The program installation begins. You can view the installation details if you click the
[Show details] button whilst installing.
8 When the Adobe AIR Setup pop-up appears, click the [I Agree] button.
9 When the Adobe AIR installation is complete, click the [Finish] button.
10 When the Install Adobe Flash Player Active X pop-up appears, click the [Install] button.
11 When the Adobe Flash Player Active X installation is complete, click the [Done] button.
12 When the SuperSign Editor installation is complete, click the [Finish] button.
• If the Install program does not start automatically, go to the CD-ROM drive:
\SuperSign\SuperSign_Software\Application\SuperSignEditorandrunSuperSignEdi-
tor_setup.exemanually.
• If you re-install the program without uninstalling it, you can choose to keep or initialize the
data.
• If your operating system is Windows 7, you need to install/run the program as an adminis-
trator to allow you to access the system.
NOTE
ENGLISH
52 SuperSign Server
Uninstalling PC Editor
■Uninstalling with the uninstall program
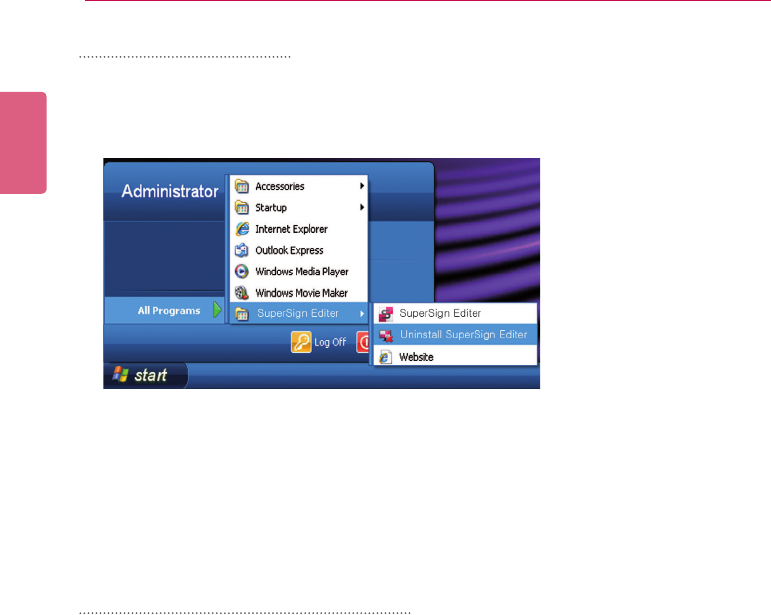
1 On Windows, click Start > All Programs > SuperSign Editor > Uninstall SuperSign Editor.
2 When the uninstall program starts, click the [Uninstall] button.
• The uninstallation begins. You can view the uninstallation details if you click the [Show
details] button while uninstalling.
3 Click the [Finish] button when the uninstallation is complete.
Uninstalling with the Control Panel
■Windows XP, Windows 2003 Server
1 Go to Start > Setup > Control Panel > Add/Remove Programs > SuperSign Editor.
2 Click the [Uninstall] button.
■Windows 7
1 Go to Start > Setup > Control Panel > Programs > Uninstall a Program > SuperSign Edi-
tor.
2 Click the [Uninstall] button.
53
SuperSign Server
ENGLISH
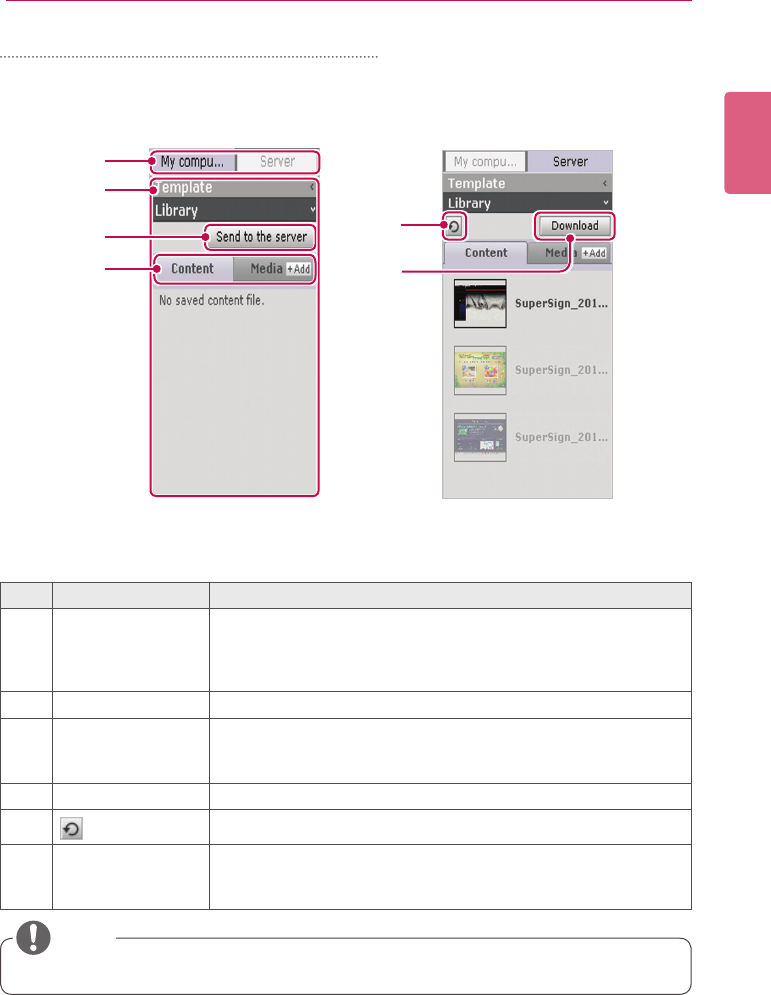
PC Editor Library Layout and Functions
①
②
③
④
⑤
⑥
No. Name Function
①PC/Server switch
tab
Selectsalocationwherecontentormedialesarestored:
• My computer: Displays the Library list saved in the local
computer (PC Editor).
• Server: Viewing the list of libraries in the server.
②Library area Displaysalistofcontentandmediales.
③[Send to the
server] button
When the save location is set to My computer, you can upload
contentormediallesfromthelocalcomputer(PCEditor)tothe
server's library.
④File type tab Selectscontentormediale.
⑤ button Refreshes the server's library.
⑥[Download] button When the save location is set to the server, you can download
contentormediallesfromtheservertothelocalcomputer(PC
Editor) library.
• The server-side Web Editor does not have the PC/Server switch tab.
NOTE
ENGLISH
54 SuperSign Server
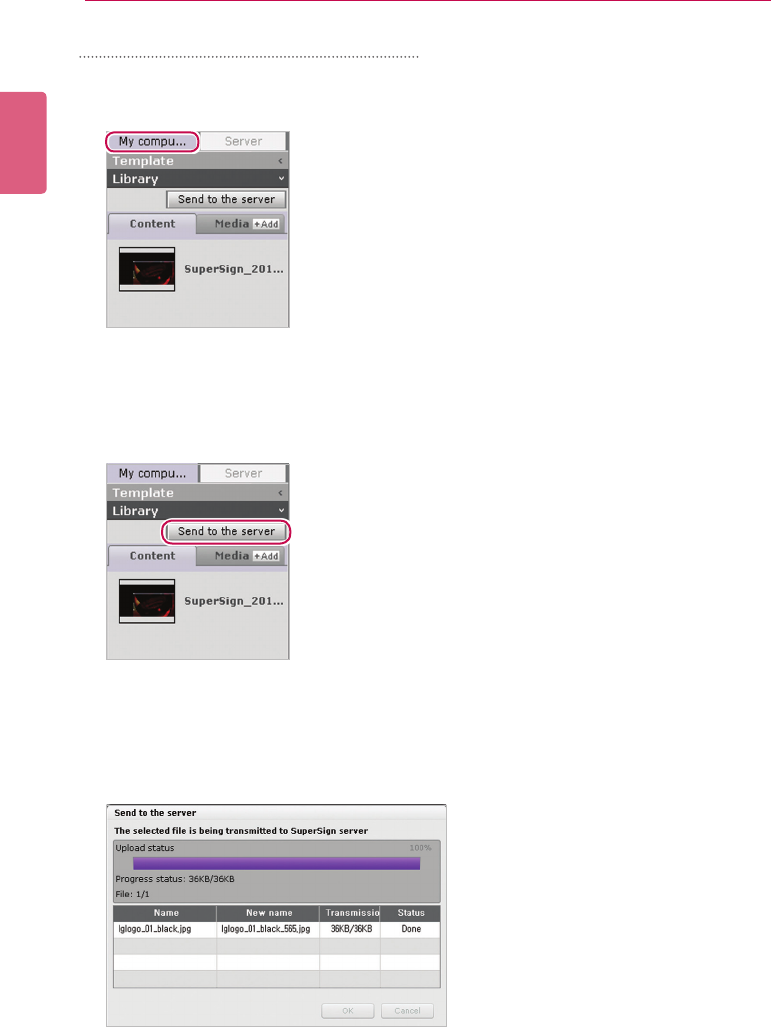
Transferring local les to the server
Youcanuploadcontentandmedialesfromthelocallibrarytotheserver.
1 Click the My computer tab in the Library.
2 Selectlibrarylestouploadtotheserver.
• Press and hold the <Shift>keytoselectmultiplelesatonce.
3 Click the [Send to the server] button.
• The [Send to the server] button is only enabled when you are logged into the server.
4 WhentheSendtotheserverwindowappears,conrmthelestouploadandclickthe[OK]
button.
• Whenyouuploadthelocallibrary’scontenttotheserver,themedialesincludedinthe
content will also be uploaded.
55
SuperSign Server
ENGLISH
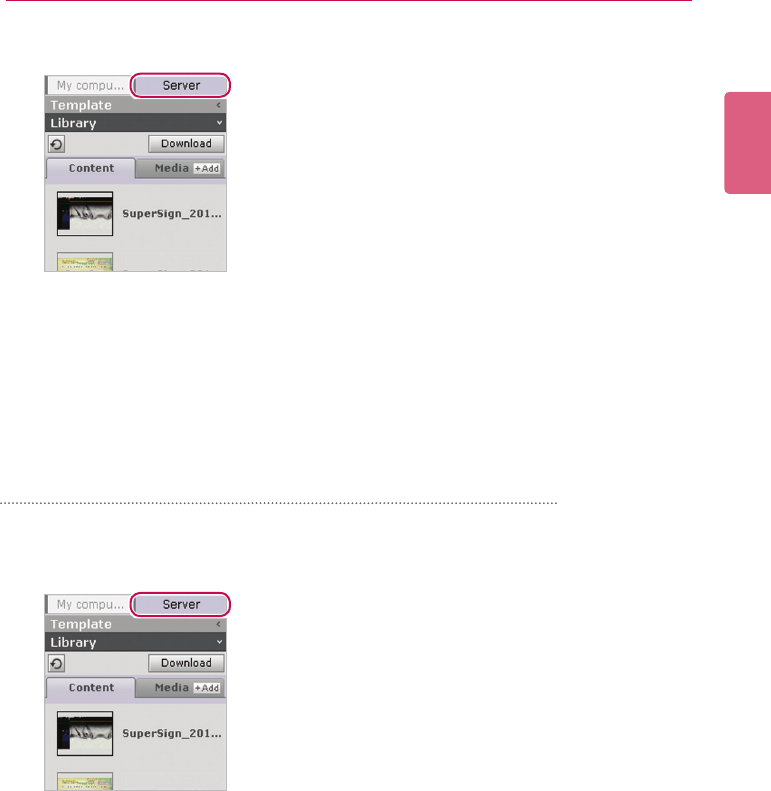
5 When the upload is complete, click the Server tab in the library.
6 You can view the uploaded content in the server library.
• Please note that the disabled content will be enabled once you have approved it. For
more information on approving content, see 50 Page, "Approving Content".
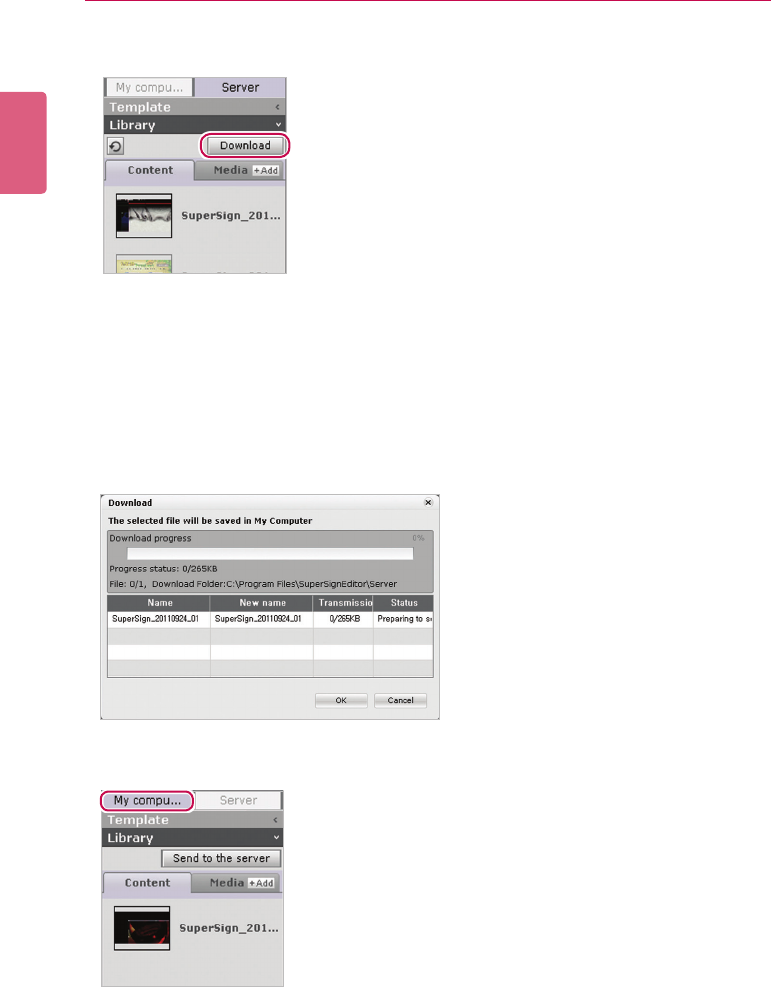
2 Selectthelibrarylestodownloadtothelocalcomputer.
• Press and hold the <Shift>keytoselectmultiplelesatonce.
Transferring the les from the server to the local computer
Youcandownloadmedialesfromtheserverlibrarytothelocalcomputer.
1 Click the Server tab in the Library.
ENGLISH
56 SuperSign Server
3 Click the [Download] button.
4 When the Download pop-up appears, click the [OK] button.
• Whenyoudownloadtheserverlibrarycontenttothelocalcomputer,themediales
included in the content will also be downloaded.
• To change the download destination, go to Server > Download folder, and specify a
desired location.
• Duplicateleswillbeignoredwhiledownloading
5 When the download is complete, select the My computer tab in the Library.
6 You can view the downloaded content in the local library.
57
SuperSign Server
ENGLISH
PC Editor Menu Layout and Functions
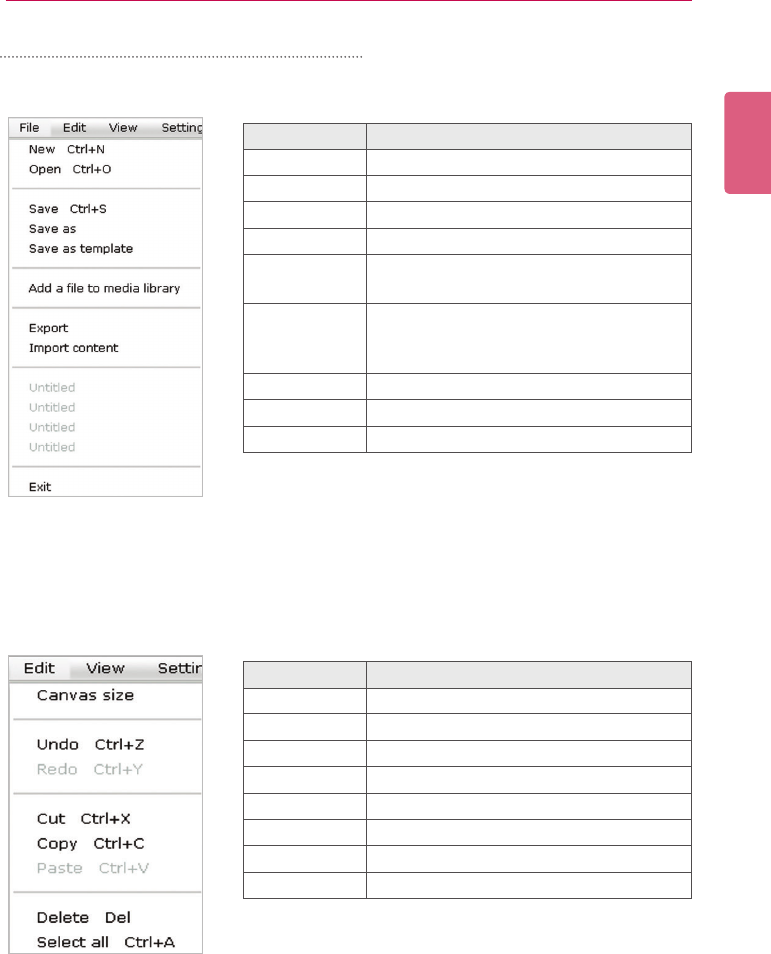
■File
■Edit
Menu Function
New Creates a new contents.
Open Opens a contents.
Save Saves the content.
Save as Saves the content with a new name.
Save as tem-
plate Savesaleastemplate.
Addaleto
the media
library
Addsamedialetothelibrary.
Export Exports the content.
Import content Imports the content.
Exit Exits the program.
Menu Function
Canvas size Sets the canvas size.
Undo Cancels the last change made.
Redo Reverses the Undo action.
Cut Cuts the selected area.
Copy Copies the selected area.
Paste Pastes the area cut or copied.
Delete Deletes the selected area.
Select all Selects all items.
ENGLISH
58 SuperSign Server
■View
Menu Function
Zoom in/out • Zooms the canvas in/out. (150%/120%/
100%/80%/60%/50%/30%)
• Fit to window: Automatically adjust the
canvas to show all whenever the size
of canvas work zone is changed.
Preview Previews in edit mode.
Content Edit
Window
• Timeline: Shows or hides the timeline.
• Template/Library:Shows or hides the
template/library.
• Property/Tools: Shows or hides the
properties/tools.
■Settings
Menu Function
Canvas Set-
ting Window
Shows or hides the Canvas setting window
Server IP Sets the IP address of the server to which
medialesofthelocalcomputerwillbe
uploaded.
Download
folder
Setsthelocalfoldertowhichmedialesof
the server will be downloaded.
Language Sets the language to be used in the pro-
gram.
Initialize Initializes the settings.
59
SuperSign Server
ENGLISH
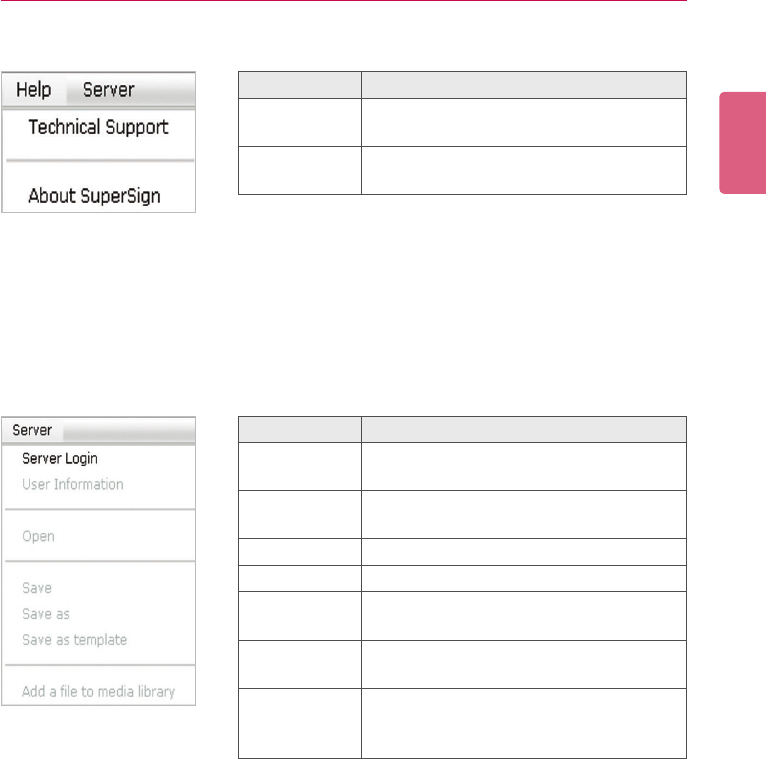
■Help
■Server
Menu Function
Server Logout
(Login) Logs into or out of the server.
User informa-
tion Shows the user role.
Open Opensthecontentlestoredintheserver.
Save Saves the content to the server.
Save as Saves the content to the server with a new
name.
Save as tem-
plate Saves the template to the server.
Addaleto
the media
library
Addsamedialetotheserverlibrary.
Menu Function
Technical Sup-
port
Displays the information for LG Electronics
Technical Support
About Super-
Sign Provides the SuperSign program details.
ENGLISH
60 SuperSign Server
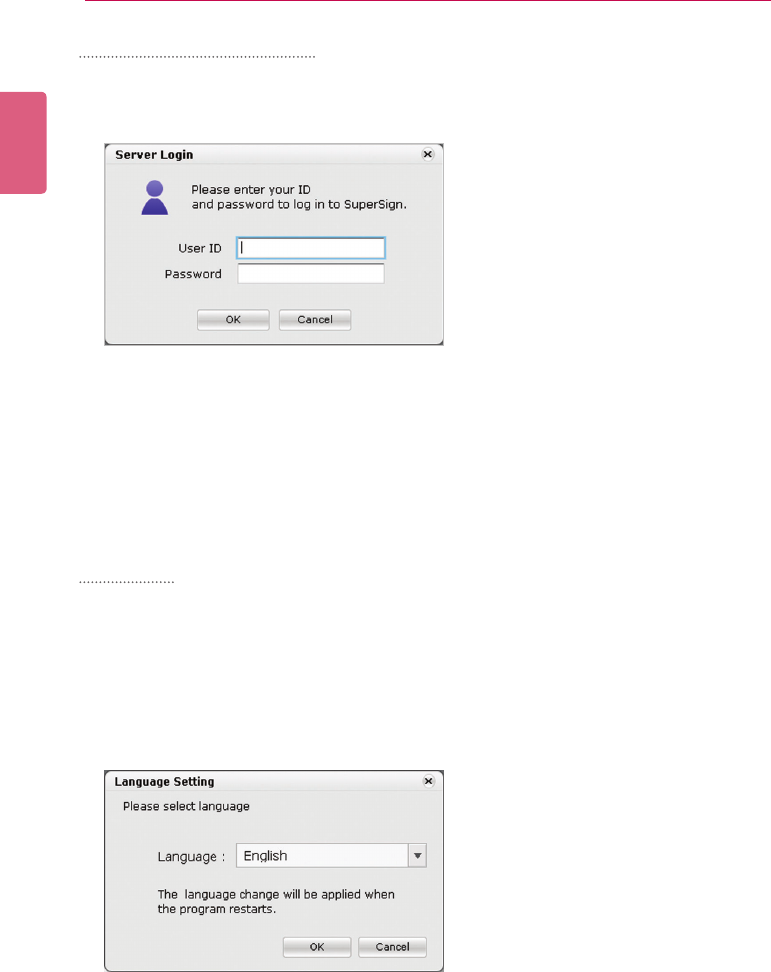
Connecting to the server
In the PC Editor, you can connect to the SuperSign Elite-w Server.
1 Click Server > Server Login.
2 When the Server IP setting window appears, enter the server IP address and click the [OK]
button.
• The Server IP setting window appears only if the server’s IP address has not been set.
The window will not appear if you have already set the server IP address. Skip to Step 3.
3 When the Login window appears, enter the User ID and Password, and click the [OK] button.
Language
You can select the language to use in the program.
1 Click Settings > Language setting.
2 When the Language window appears, select a preferred language.
• The default language is set to the language selected when installing the program.
• On restarting, the program will be displayed in the selected language.

61
SuperSign Server
ENGLISH
Viewing user rights
You can view the role and permissions of the user logged in.
1 Click Server > User information.
2 You can view the user rights when the User information window appears.
Server IP setting
You can set the server’s IP address.
1 Click Settings > Server IP.
2 Enter a Server IP address and click the [OK] button.
ENGLISH
62 SuperSign Server
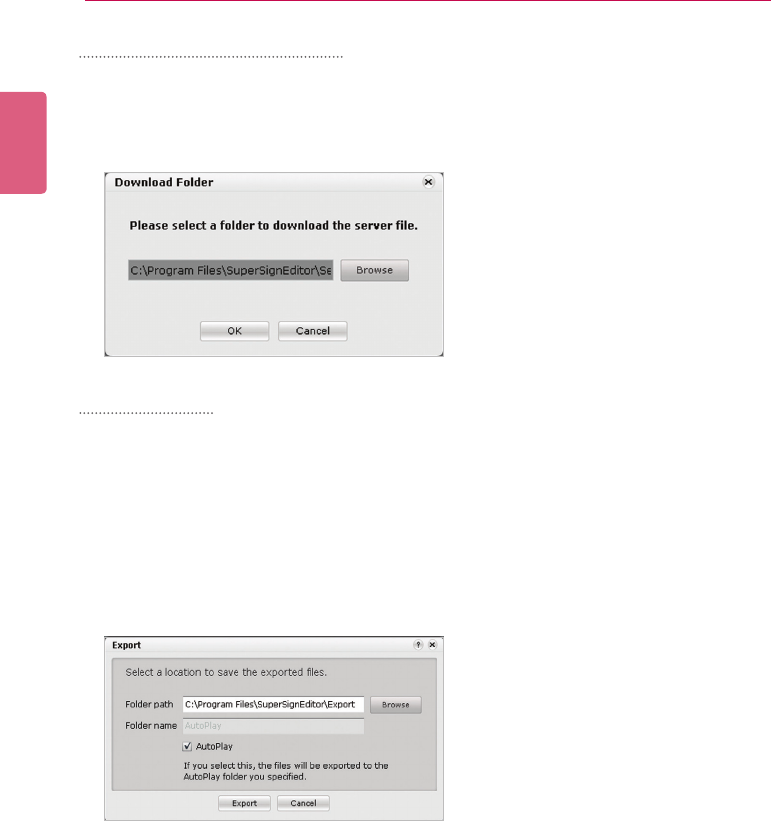
Setting the download folder
You can specify a local folder to save media when you download it from the Server.
1 Click Settings > Download Folder.
2 IntheDownloadFolderwindow,specifyaledestinationfolderandclickthe[OK] button.
USB AutoPlay
The USB AutoPlay function allows you to save your content in a USB storage device and play it
in SuperSign Player. You can enable this function in Export of the Content Edit menu or in Export
schedule of the Schedule menu.
■ AutoPlaying content les
Youcanauto-playcontentlesintheSuperSignPlayerbysavingthemonaUSBdevice.
1 In the Content Edit menu, click File > Export.
- The Export window appears.
2 SelecttherootfolderoftheUSBdeviceastheSaveContentdestination.(Forexample,F:\,
G:\)
3 To send to the AutoPlay folder, click the AutoPlay checkbox.
4 Click the [Export] button.
- An AutoPlay folder is created in the root directory, and the content is saved.
5 Connect the USB device containing the content, to the USB port of the media player.
- The content begins auto-playing.
63
SuperSign Server
ENGLISH
Schedule
You can create or modify a schedule to deploy the content.
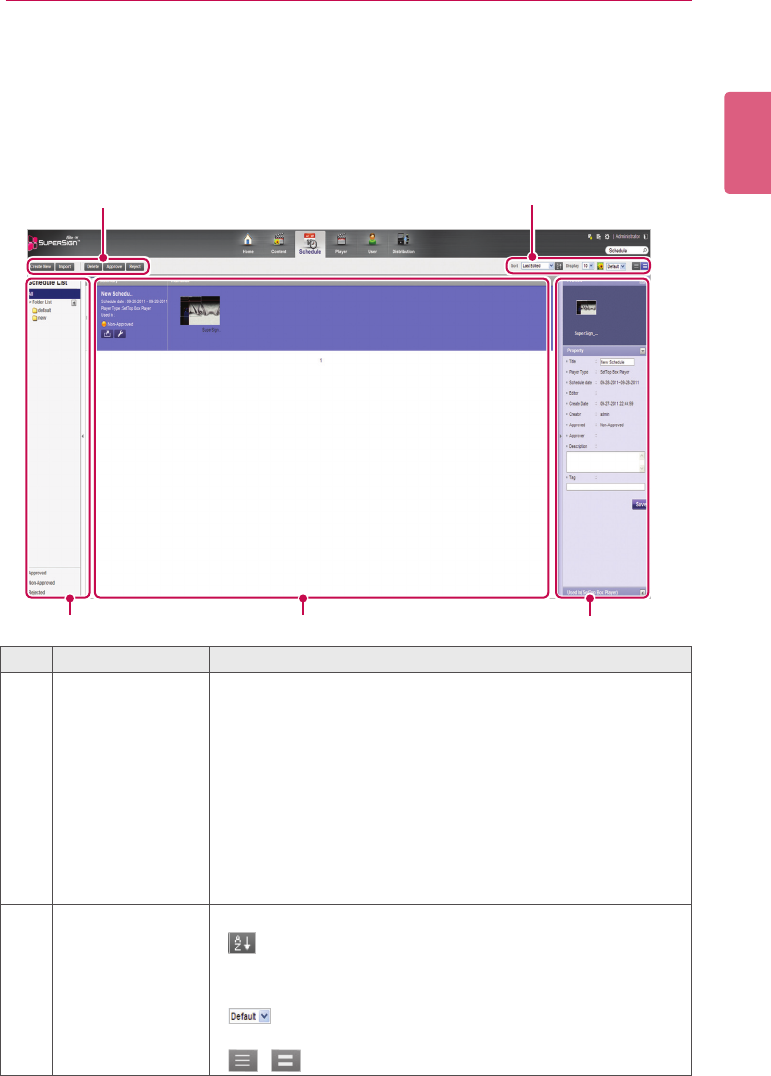
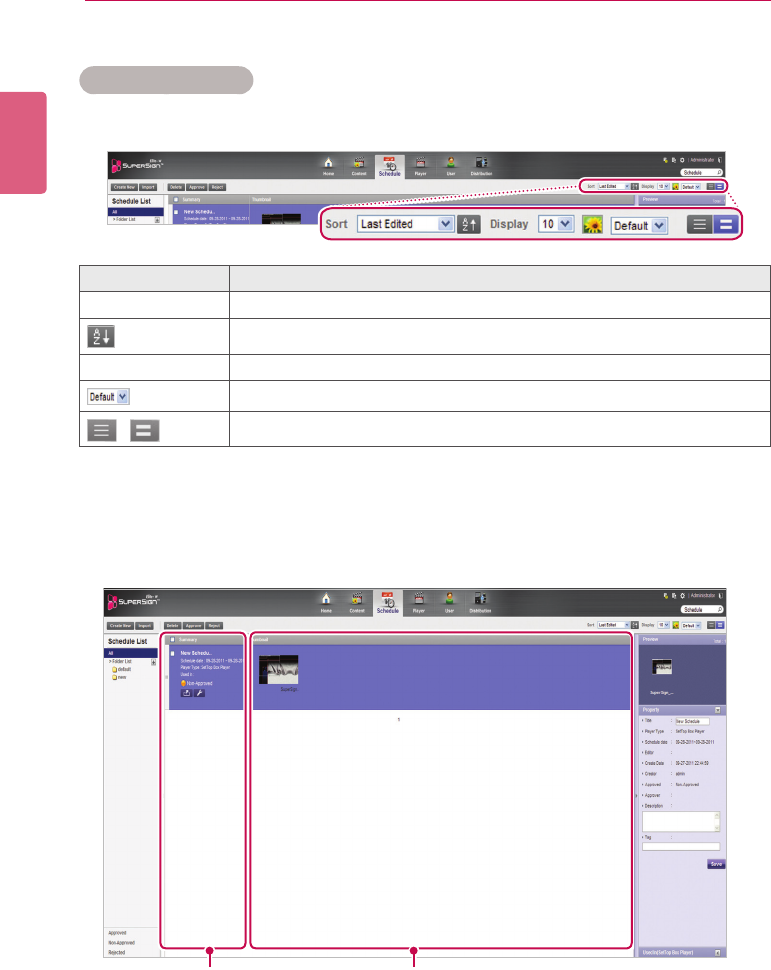
Schedule Window Layout and Functions
The following shows the layout and functions of the Content window.
①②
③ ④ ⑤
No. Name Function
①Action buttons • [Create New]: Creates a schedule.
• [Import]: Loads a schedule.
- Supportstwoleformats:XMLandZIP.
- WhenimportingtheexportedXMLschedulele,allofthe
included content must reside on the server.
- WhenimportingtheexportedZIPle,alloftheincluded
content will be registered on the same server.
• [Delete]: Deletes a schedule.
• [Approve]: Approves a schedule not approved.
• [Reject]: Rejects a schedule not approved.
②Sorting • Sort: Sort by various categories (e.g., last date updated).
•
: Sort in ascending or descending order.
• Display: Set the number of items to display by pressing the
[▼]button.
•
: Click the [▼]buttontoselectasizeoftheimage
shown in the details list.
• / : List view/Normal view

ENGLISH
64 SuperSign Server
No. Name Function
③Schedule list Displays the list of saved schedules.
• All: View the list of all schedules.
• Approved: View the list of approved schedules.
• Non-Approved: View the list of unapproved schedules.
• Rejected: View the list of rejected schedules.
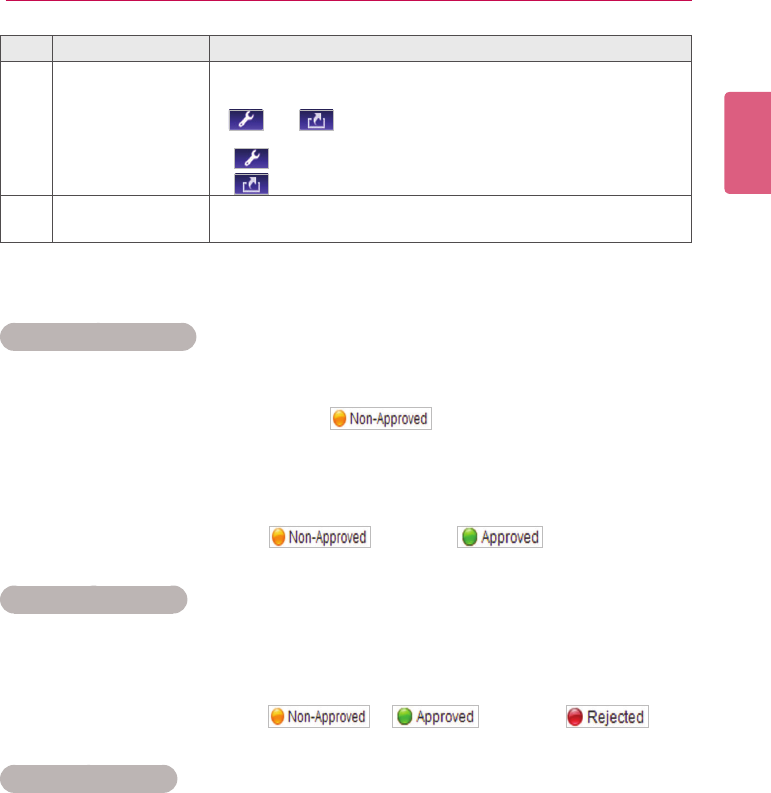
④Details list • Summary
- Displaylename,scheduledate,playertype(displayedonly
for set top box players),
scheduled player, and approved status
- The and buttons are enabled when you click the
mouse.
• button: Switches to schedule editing screen
• button: Exports the schedule
• Thumbnail:Displaysthethumbnailimageandlenameofa
contentleinaschedule
⑤Details Provides the details of the selected schedule.
• Preview: Thumbnailimageandlenameofthecontent
included in the schedule.
• Property: Schedule properties (the title, player type (only
for set top box players), schedule date, editor, creation date,
creator, approval, approver, description, and tag)
• Used By (Player): Information on players using the current
schedule.
* The administrator can edit the information.
AftereditingthepropertiesunderDetails,ifyoundthechangesarenotreected,congure
Internet browser options as follows:
Go to Tools > Internet Options > Browsing History > Settings and click "Every time I visit the
webpage" under "Check for newer versions of stored pages".
CAUTION
65
SuperSign Server
ENGLISH
Creating New Schedules
1 Click Schedule on the Menu tab at the top of the program.
2 In the schedule list screen, click [Create New] button at the top left corner.
3 In the player type selection window, select a preferred player type and click the [OK] button.
• The new schedule edit area page appears. By default, the schedules are sorted per
week.
① ③②
④ ⑤ ⑥
No. Name Function
①List button Moves to the content list
②File name display
area Displaysthecurrentle'sname.
③Action buttons • [New]: Creates a schedule.
• [Save]: Saves a schedule.
• [Save as]: Saves the schedule with a new name.
④Library area Browsecontentles
• Content: Provides only the content that is relevant to the
selected schedule type.
- Monitor: Provides monitor-type content only.
- Set-top box: Provides all content.
• Media:Browsealistoflessaved(photos,videos,ash,
music,PDFs,andOfce).
ENGLISH
66 SuperSign Server
No. Name Function
⑤Schedule edit area • Provides functions at the top to browse durations and sets the
time unit.
• Sorts by category (Today, Day, Week, and Month)
⑥Details • Preview: Preview the selected content.
• Property: View the properties of the selected content.
• Time setting: Set the play time of the selected content.
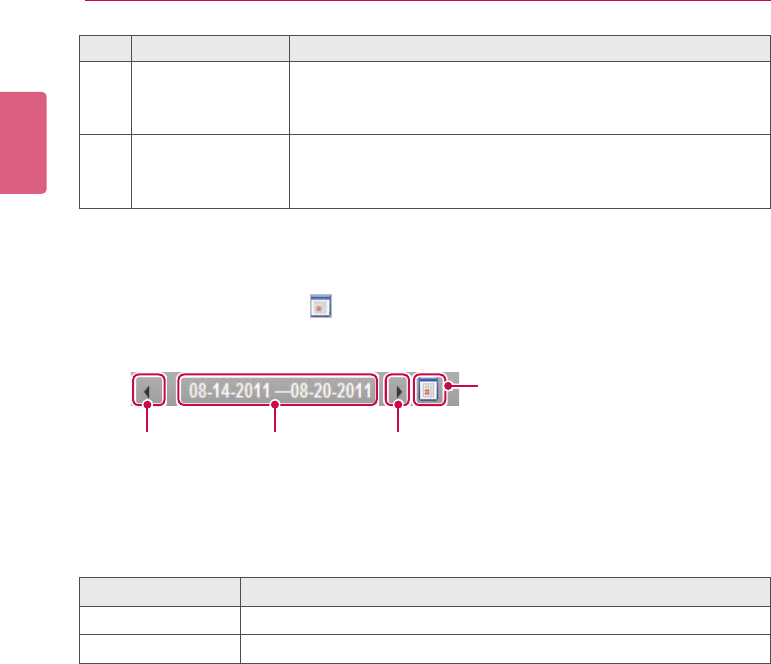
4 To select a date, use the Date box at the top of the Schedule Edit Area.
• Press the [◄/►] button or to select a date.
5 Selectcontentormedialesyouwantinthelibrary.
Previous Current
Next
View Calendar
Player Type Availablemedialetype
Monitor Content, photo, video, and music
Set Top Box Content,photo,video,ash,music,andPDF/Ofce

67
SuperSign Server
ENGLISH
6 Drag-and-drop the selected item onto a desired date in the schedule edit area.
• TheselecteditemisshownincellformatintheScheduleEditArea.Ifthelehasatime
property,anareaisassignedwhichisproportionatetothetimeoftheoriginalle.Oth-
erwise(i.e.,imageanddocumentleswithoutthetimeproperty,)aminimumamountof
time is assigned, depending on the view type.
Schedule Cell
7 Set the item’s play duration in the Time setting.
①
②
ENGLISH
68 SuperSign Server
No. Name Function
①Time Settings • All day: Displays the schedule cell throughout the day.
• Start at/End at: Displays or edits the start/end time of the
schedule cell.
②Repeat • Click Repeat to repeat the schedule cell.
- A check mark is shown, and the repeat details are enabled.
- Click Repeat again to disable the repeat setting and clear
the check mark.
• Repeat cycle
- Every day: Repeat every day (default setting).
- Every week: Repeat every day on a selected day. (multiple
days are possible.)
- Every month: Repeat every month on a selected date.
• Repeat Until
- Click the icon and select an end date.
- Initially, the end date is set to the cell value of the current
schedule by default.
8 To save the schedule, click the [Save] button.
Copying Schedule Cells
1 In the Schedule Edit mode, select a schedule cell to copy, and press <Ctrl+C>.
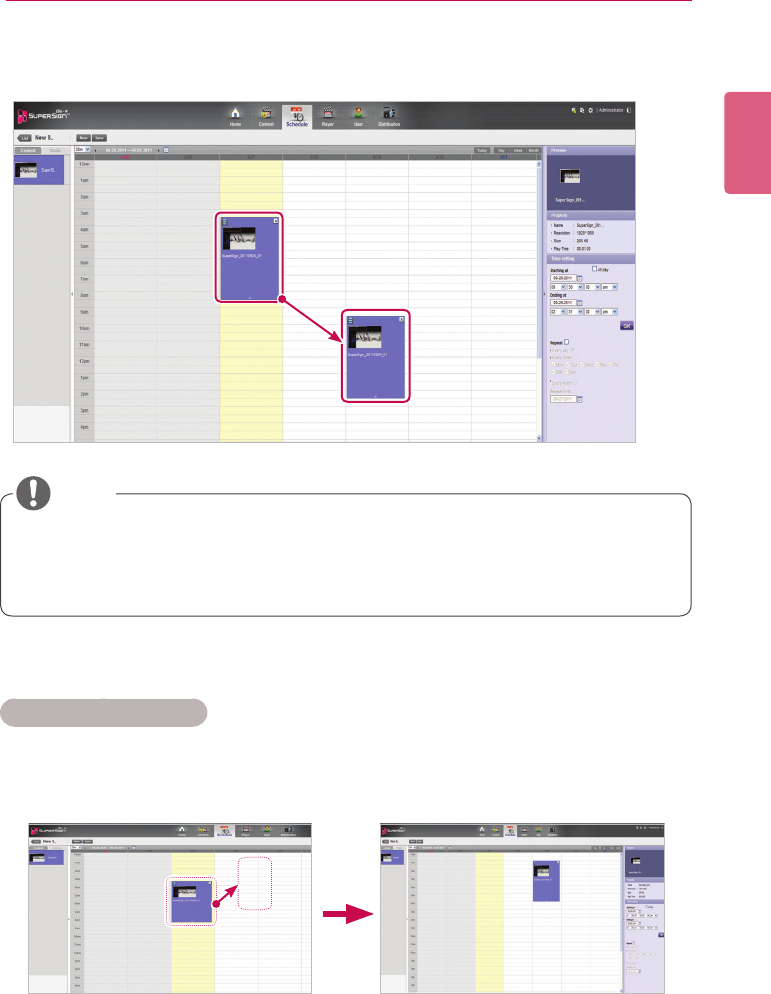
69
SuperSign Server
ENGLISH
2 Select an area to copy to, and press <Ctrl+V>.
• The schedule cell is copied to the selected area.
• Pressing <Ctrl+V> without selecting a copy area after pressing <Ctrl+C>, displays a pop-
up that prompts the user to select a copy location. Be sure to select a copy location, and
then press <Ctrl+V> .
NOTE
Moving Schedule Cells
1 In the Schedule Edit mode, select a schedule cell to move, and drag-and-drop it onto a de-
sired position.
• The schedule cell is moved to the selected area.
ENGLISH
70 SuperSign Server
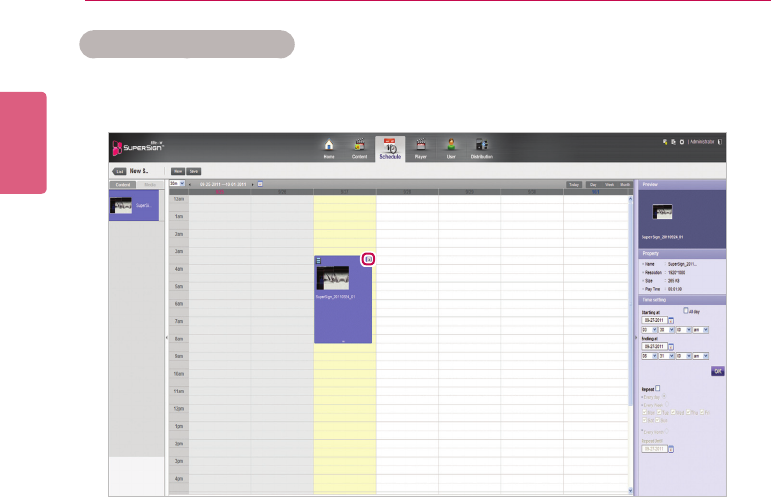
Deleting Schedule Cells
1 In schedule edit mode, select a schedule cell to delete, and press the [Delete] key or click the
[X] icon at the schedule cell top.
2 WhentheConrmDeletepop-upappears,clickthe[OK] button.
• The selected schedule cell is deleted.

71
SuperSign Server
ENGLISH
Adjusting the Schedule Cell Time
1 In the Schedule Edit mode, select a schedule cell to adjust the time, and drag the tail end to a
desired time area.
• When you place the mouse over the bottom of the schedule cell, the mouse cursor
changes. Drag the schedule cell to increase or decrease the time.
ENGLISH
72 SuperSign Server
Schedule Management
Viewing Schedules
1 Select a Sort By category you want at the top of the Schedule window.
2 Select a schedule to view in the Schedule list.
• Items included in the selected schedule are shown in the item list.
Menu Description
Sort Sort by various categories (e.g., last date updated).
Sort in ascending or descending order.
Display Setthenumberofitemstodisplaybypressingthe[▼]button.
Click the [▼] button to select a size of the image shown in the details list.
/ List view/Normal view
① ②
73
SuperSign Server
ENGLISH
Approving Schedules
1 Click the Non-approval category in the schedule list.
• Schedules not been approved appear in the item list.
• Alternatively, select a schedule item with shown in the item list.
2 Select a schedule you want to approve in the schedule details list.
• The selected schedule is shown with a check mark.
3 Click the [Approve] button to approve the selected schedule.
• Once the approval is complete, changes to .
Rejecting Schedules
1 Select a schedule you want to reject in the schedule details list.
• The selected schedule is shown with a check mark.
2 Click the [Reject] button to reject the selected schedule.
• Once the rejection is complete, or changes to .
Deleting Schedules
1 Select a schedule you want to delete in the schedule details list.
• The selected schedule is shown with a check mark.
2 Click the [Delete] button to delete the selected schedule.
3 WhentheConrmDeletewindowappears,clickthe[OK] button.
4 Whenthedeletionconrmationwindowappears,clickthe[OK] button.
• Once the deletion is complete, the deleted schedule will disappear from the item list.
No. Name Function
①Summary • Displays the schedule title/period, and the player to which the
schedule is applied, and schedule approval status
• and buttons are enabled when you click the
mouse.
- button: Switches to schedule editing screen
- button: Exports the schedule
②Thumbnail Displaysthethumbnailimageandthelenameofthecontent
included in the schedule.
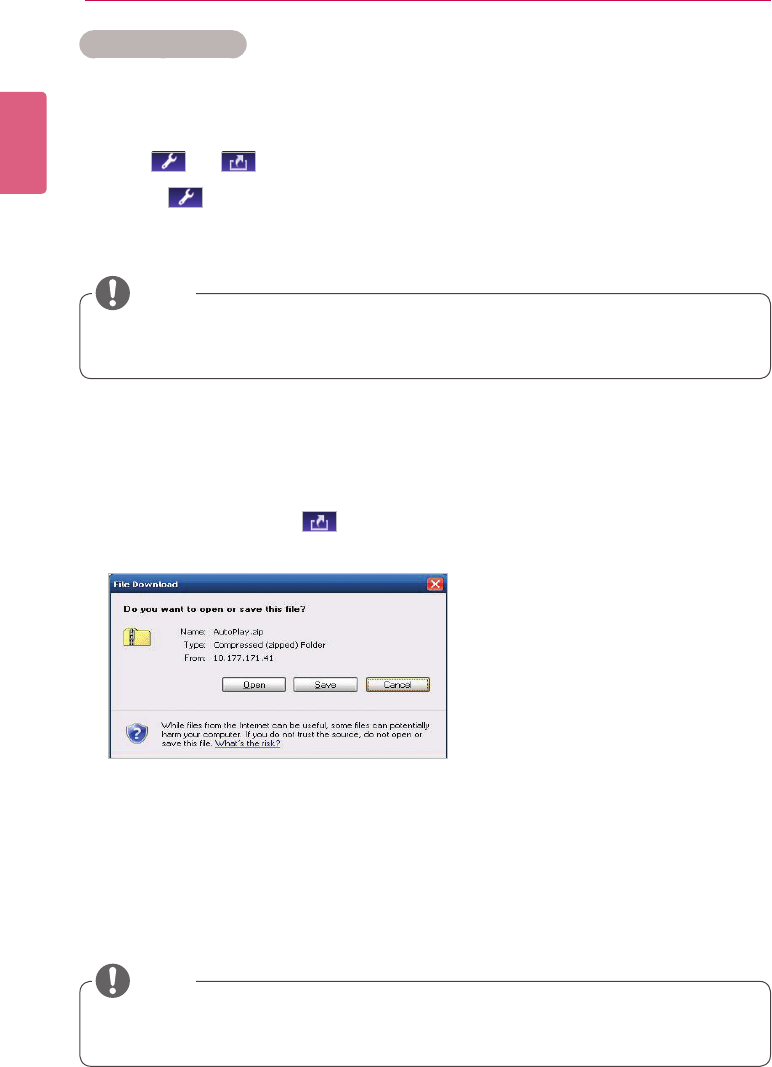
ENGLISH
74 SuperSign Server
Editing Schedules
1 Select a schedule to edit in the Schedule List.
• The selected schedule appears in the item list.
2 Hover the mouse over the schedule summary.
• The and buttons are enabled.
3 Click the button.
• The window switches to an edit mode. When switching to editing mode, the current date
is displayed by default.
AutoPlaying schedule les
Youcanauto-playschedulelesintheSuperSignPlayerbysavingthemonaUSBdevice.
1 In the Schedule menu, click .
- Theledownloadwindowappears.
2 DownloadtheAutoPlay.zipleandunzipit.
- Use a compression program that supports UTF-8 encoding, such as ALZip and WinRAR.
3 Move the AutoPlay folder to a USB device.
4 Connect the USB device, where schedule (AutoPlay) is stored, to the USB port of the media
player.
- The content begins auto-playing.
• Content created using a template or layout provided by SuperSign will only be displayed
normally on a 16:9 monitor. Otherwise, it will not be played correctly.
NOTE
• Whenyoueditaschedule,itisauto-locked.Auto-lockedschedulelescannotbeaccessed
by other users.
NOTE
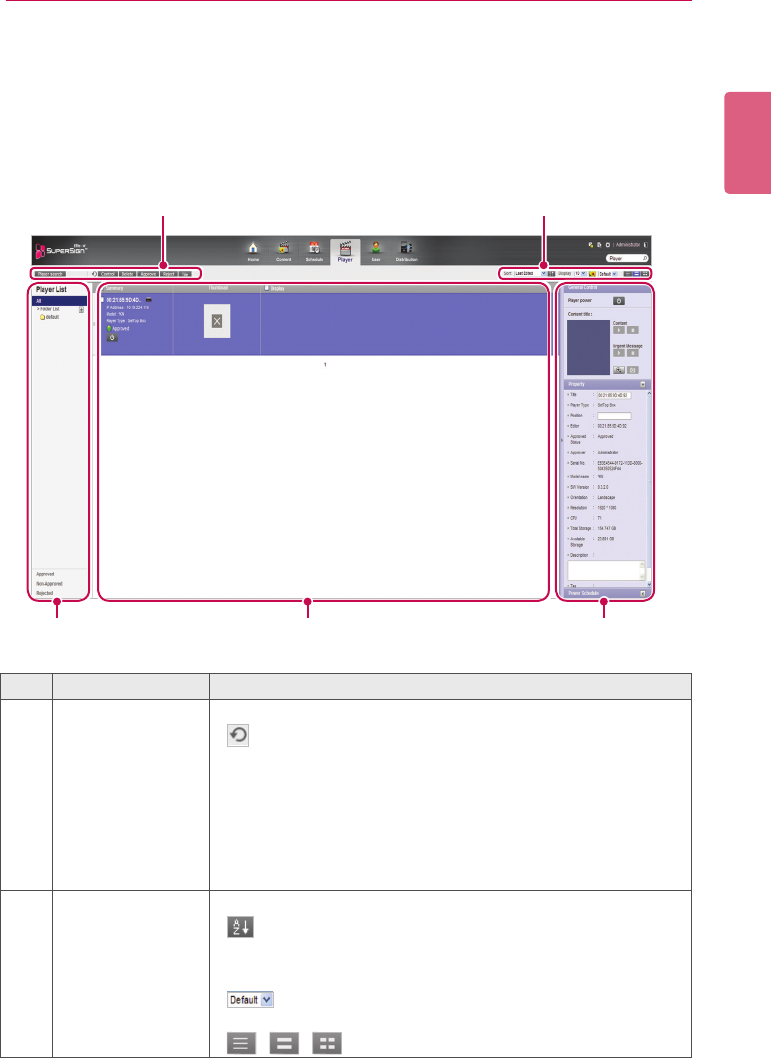
75
SuperSign Server
ENGLISH
Player
You can select a player for content play, or control the selected player.
Player Window Layout and Functions
The following shows the layout and functions of the Player window.
① ②
③ ④ ⑤
No. Name Function
①Action buttons • [Player search]: Search players.
• : Refresh the current display and status of the player, or
browse a new player.
• [Control]: Opens the Control pop-up.
• [Delete]: Deletes a player.
• [Approve]: Approves a player not approved.
• [Reject]: Rejects a player not approved.
• [Tile]: Enables the Tile mode.
②Sorting • Sort: Sort by various categories (e.g., last date updated).
• : Sort in ascending or descending order.
• Display: Set the number of items to display by pressing the
[▼]button.
• : Click the [▼]buttontoselectasizeoftheimage
shown in the details list.
• / / : List view/Normal view/Thumbnail view
ENGLISH
76 SuperSign Server
No. Name Function
③Player List View the list of players saved.
•All: View the list of all players.
•Group: Shows the player list in a group
•Approved: View the list of approved players.
•Non-approved: View the list of unapproved players.
•Rejected: View the list of rejected players.
④Details list •Summary
- Displays player name, IP address, model name, player type,
and approval status
- Player Power([On]/[Off]) buttons
•Thumbnail
- Title and display of the content currently being played.
- List of displays (up to 225 items) connected to, and recog-
nized, in the player.
⑤Details Provides the player details and control functions.
•General Control: Power management, content preview/en-
larged view and capture, and management of playing content
and urgent message play
•Property: Player properties (Title, Player Type, Location,
ModiedBy,ApprovalStatus,ApprovedBy,SerialNumber,
ModelName,SoftwareVersion,DisplayOrientation,Resolu-
tion,CPU,TotalSpace,AvailableSpace,Descriptions,and
Tags)
•Player Power Schedule: schedules the time to power players
on/of
*PropertiescanbeeditedbytheAdministrator.
• AftereditingthepropertiesunderDetails,ifyoundthechangesarenotreected,cong-
ure Internet browser options as follows:
GotoTools>InternetOptions>BrowsingHistory>Settingsandclick"EverytimeIvisit
thewebpage"under"Checkfornewerversionsofstoredpages".
CAUTION
77
SuperSign Server
ENGLISH
Player Search
You can search for a preferred player.
1 Click Player on the Menu tab located at the top.
2 Click the [Player search] button in the top left side of the Player window.
3 When the device search window appears, enter the range of IP addresses to search for.
4 Click the [Player search] button to start searching.
• Discovered players are registered as pending approval under the ‘default’ group.
• For a newly added player, ‘NEW’ is displayed next to it and it will disappear after one day.
ENGLISH
78 SuperSign Server
Player Control
You can control the power and detail functions of player and display.
Turning Players On/Off
Turns the player power on/off.
1 You can control the power by clicking the ON/OFF buttons in the player details list.
• The green button is displayed for players whose power is on; click the button to turn it off.
• The gray button is displayed for players whose poser is off; click the button to turn it on.
79
SuperSign Server
ENGLISH
Turning the Display On/Off
Turns the display power on/off.
1 You can control the power by clicking the ON/OFF buttons of the display area in the player
details list. Ifthepowerison,[ON]isdisplayed.Clickthebuttontoturnthepoweroff.
2 Ifthepowerisoff,[OFF]isdisplayed.
3 Powering the display on/off is different depending on the player type.
• Settopbox:Iftheplayerispoweredon,click[OFF]ofthedisplaytoturniton.Ifthe
playerispoweredoff,turnonthedisplay'spowerrstandfollowthesameprocedureas
above.
• Monitor: For a monitor type player, turn on the player's power.
Controlling the Device Details
You can control a player and display in details.
1 Select a player you want to control in the player details list.
• The selected player is shown with a check mark.
• To control individual displays under the player, click the checkbox next to the display you
want to control in the Display list.
2 Click the [Control] button at the top of the Player List.
• The Control pop-up window appears.
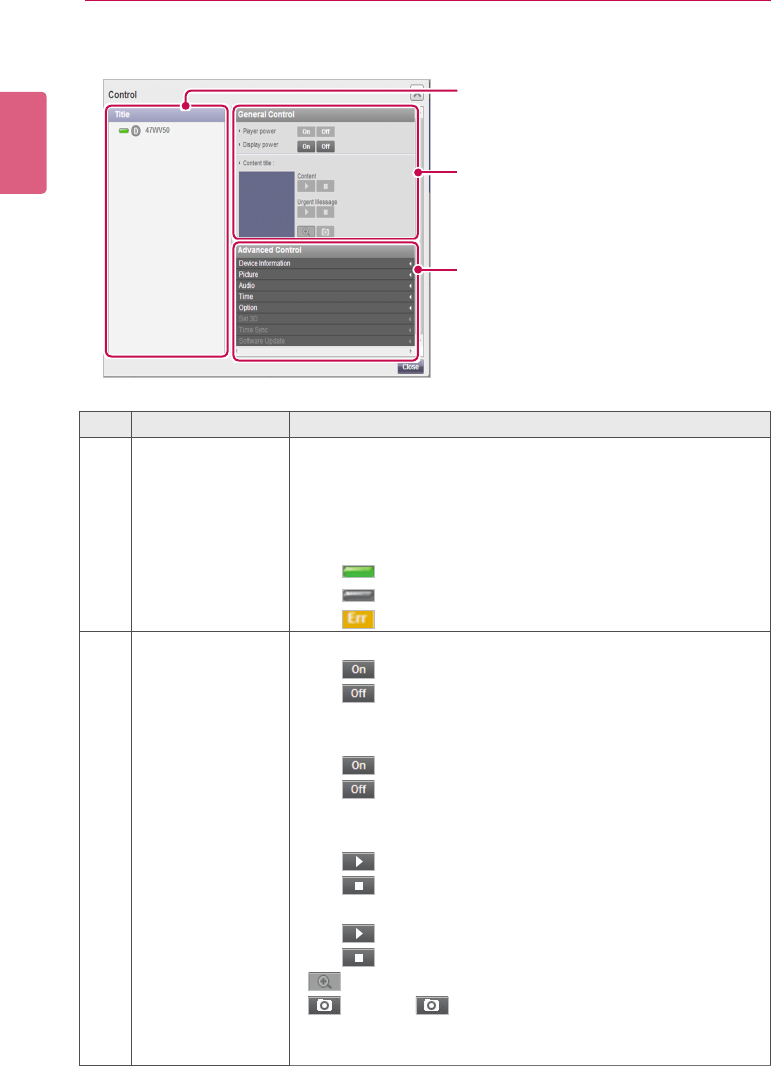
ENGLISH
80 SuperSign Server
3 In the Control pop-up, select a player, or display, and specify the control settings.
②
③
①
No. Name Function
①Player/Display List List of the selected player and its displays.
• If you select both the player and display, the display name is
right-indented under the player name.
• If you only select displays, their names are displayed with no
indent.
-
: Player/display are turned on.
-
: Player/display are turned off.
- : Player/display have errors.
②General Control • Player Power: Controls the player power.
- : Turns the power on.
- : Turns the power off.
• Display Power: Controls the power of displays under the
player.
- : Turns the power on.
- : Turns the power off.
• Content Title: Name of the content currently playing.
• Content: Play or stop the current content.
- : Play the content.
- : Stop the content.
• Urgent Message: Play or stop the current urgent message.
- : Play the content.
- : Stop the content.
•
: Enlarges the content
• : Click the button to capture the current display.
(Only set top box type players are able to capture the current
display.)
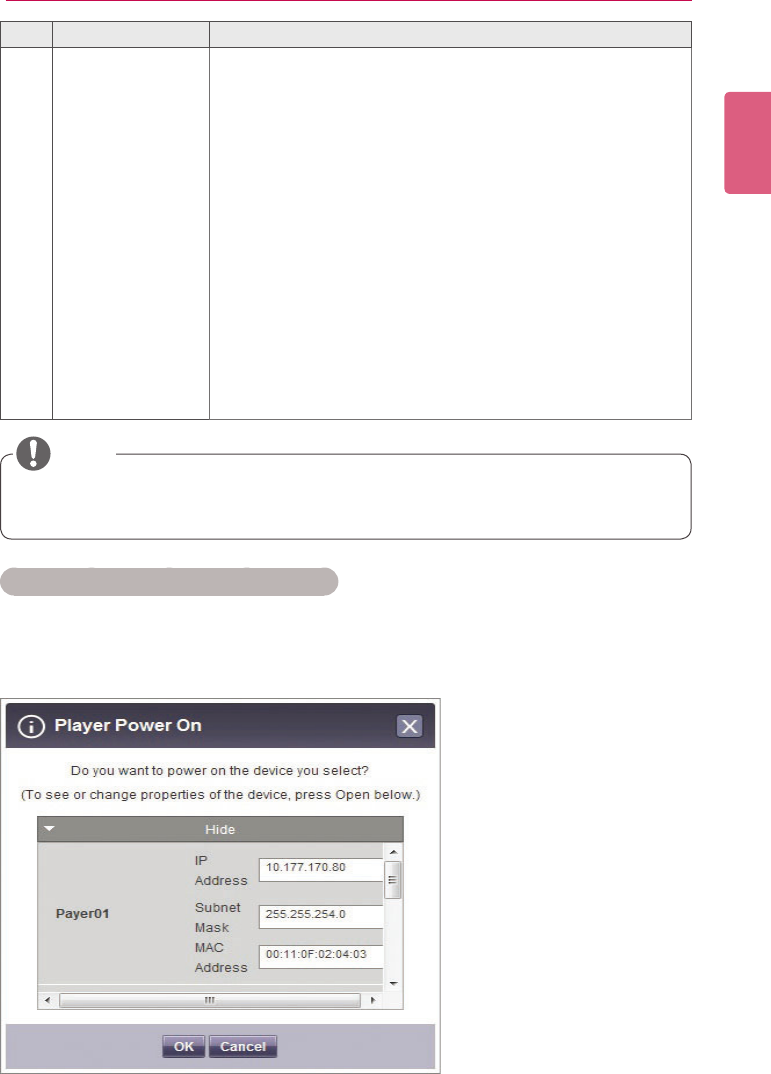
81
SuperSign Server
ENGLISH
No. Name Function
③Advanced Control
• Device Information: displays detailed information for each device
andnetworkcongurationstatus.
- Player:device,statusandnetworkconnectioninformation.
- Display:device,status,self-diagnosis,andnetworkinforma-
tion.
• Video: input,aspectratio,power-savingmode,picturemode,back-
light,contrast,brightness,sharpness,tint,colortemperature,screen
off,OSDmenuetc.
• Audio:setsthecurrenttimeofthedeviceandcontrolsthepower
schedule.
• Time:Changesthestandardtimeofthedevice.
• Option: ISM mode, DPM Select, factory reset, remote control/local
keylock,sleeptime,power-ondelay,advancedcontroletc.
• 3D Settings:enables/disables3Dmodeandeditsthe3Dsettings
(picturecorrection,viewpoint).The3Dsettingsareonlyavailablefor
monitorsthatsupport3D.
• Time Synchronization:setsthetimesyncforplayers.
• Software Update:updatessoftwareupdateafteraletoupdatehas
beenselected.
• ThenameofthesoftwareupdatelemuststartwithSuperSignPlayer_setup.
• Aftertheplayerupdatesthesoftware,itisautomaticallyrebooted.
NOTE
Controlling the player power in details
Ifyoucontroltheplayerpowersettingsinthecontrolpop-upwindow,youcanverifythedetailed
informationfortheconnectedplayerinthepop-upwindow.
Controlling power settings after selecting multiple players
ENGLISH
82 SuperSign Server
Restrictions on Connecting the Player/Display
Some functions cannot be controlled in the control window depending on the player/display connec-
tion status.
See the table below.
* STB: set top box type player/MNT: monitor type player
Device Combination
OPTION Settings
Player Display Content Instant Mes-
sage Snapshot
On Off On Off Plays Stop Plays Stop Capture Zoom
STB: 1 MNT: 0,
Display
: 0 O O O O O O O O
STB: 0 MNT: 1,
Display
: 0 O O O O O O
STB: n MNT: 0,
Display
: 0 O O O O O O
STB: 0 MNT: n,
Display
: 0 O O O O O O
STB: m MNT: n,
Display
: 0 O O O O O O
STB: 0 MNT: 0,
Display:
1 O O
STB: 0 MNT: 0,
Display:
n O O
STB: m MNT: 0,
Display
: n O O O O O O O O O O
STB: 0 MNT: m,
Display
: n O O O O O O O O
STB: m MNT: n,
Display
:
NO O O O O O O O
Device Combination
Advanced Command
Device
info
Pic-
ture Sound Hours Gen-
eral
Time
Synchro-
nization
Software Update
STB: 1 MNT: 0, Display: 0 O O O
STB: 0 MNT: 1, Display: 0 O
STB: n MNT: 0, Display: 0 O O O
STB: 0 MNT: n, Display: 0 O
STB: 0 MNT: 0, Display: n O O O O O O O
STB: m MNT: m, Display:
nO O O O O
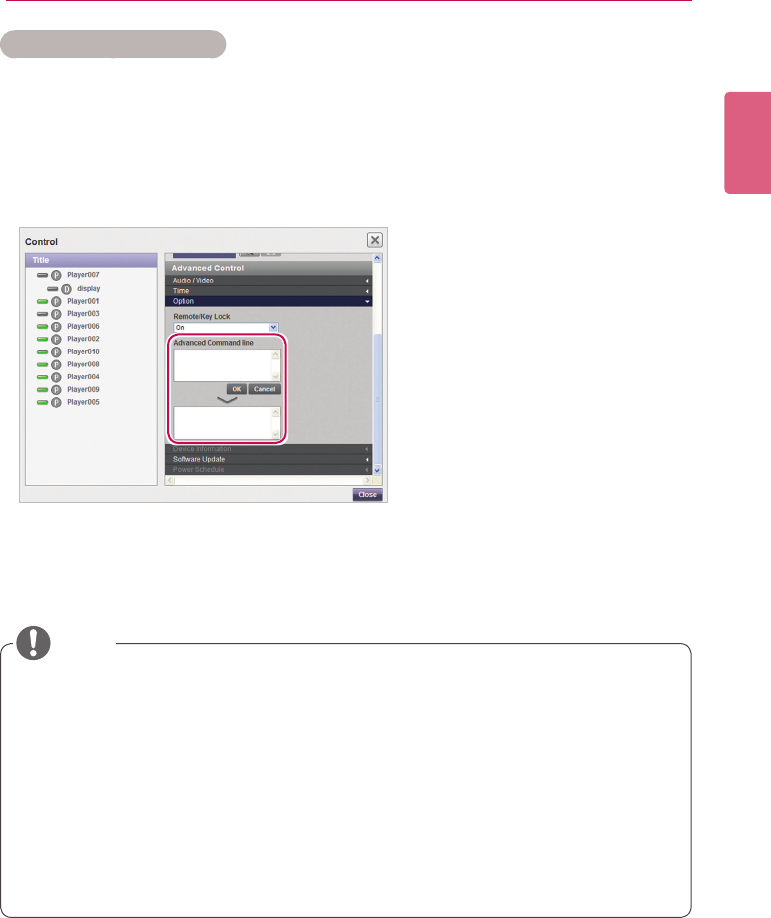
83
SuperSign Server
ENGLISH
Advanced Command line
The Advanced Command line menu allows you to remotely control the LG Electronics monitor
connected to the media player. This menu is located in the Display general tab.
1 Enter the RS232C control command supported by the connected monitor, along with the set
ID and click the [OK] button.
• The control command does not work if the set ID is invalid.
• TondoutwhichmonitorsandcontrolcommandsaresupportedbySuperSign,seethe
appendix. Monitor Models Supported by SuperSign.
• The RS232C control command is dependent on the type of monitor; see the RS232C
protocol in the user’s monitor manual.
• When controlling a monitor individually, enter the same set ID as the one set for the moni-
tor.
• Advanced Command line does not work if the set ID you entered is invalid.
• When controlling a group of monitors, select the group and enter “00” for the set ID in the
Advanced Command line box. In this case, no acknowledgement is returned.
NOTE
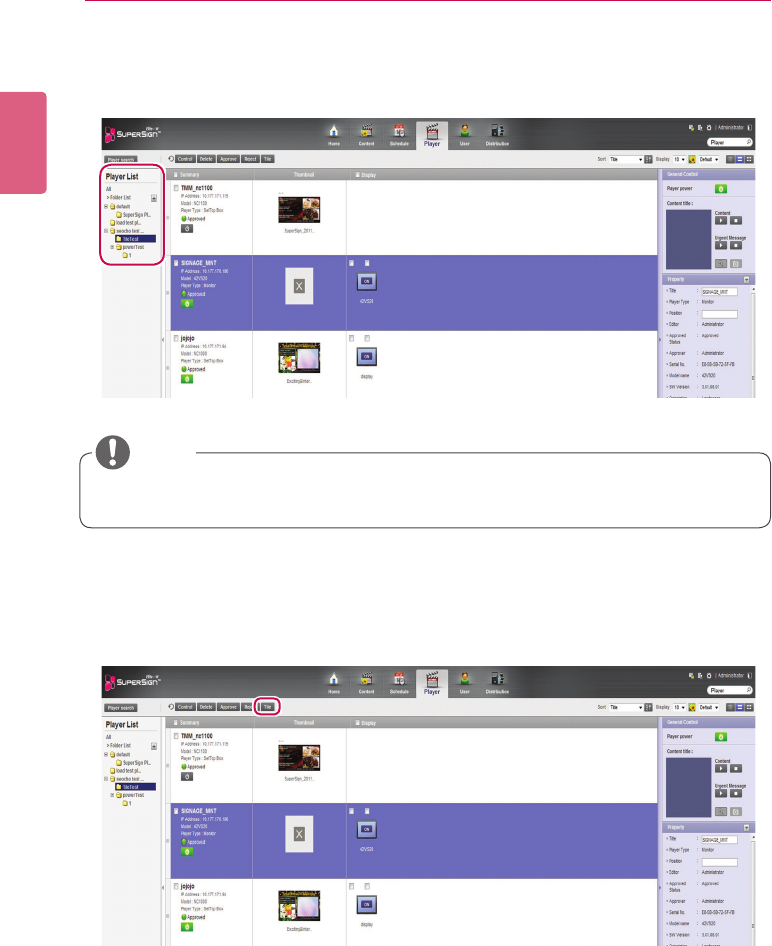
ENGLISH
84 SuperSign Server
Creating Tiles
1 Choose a group for which tiles are created in the left group tree.
2 Click the [Tile] button. The Create Tile window appears.
• Creating tiles is only available in the Normal view.
NOTE
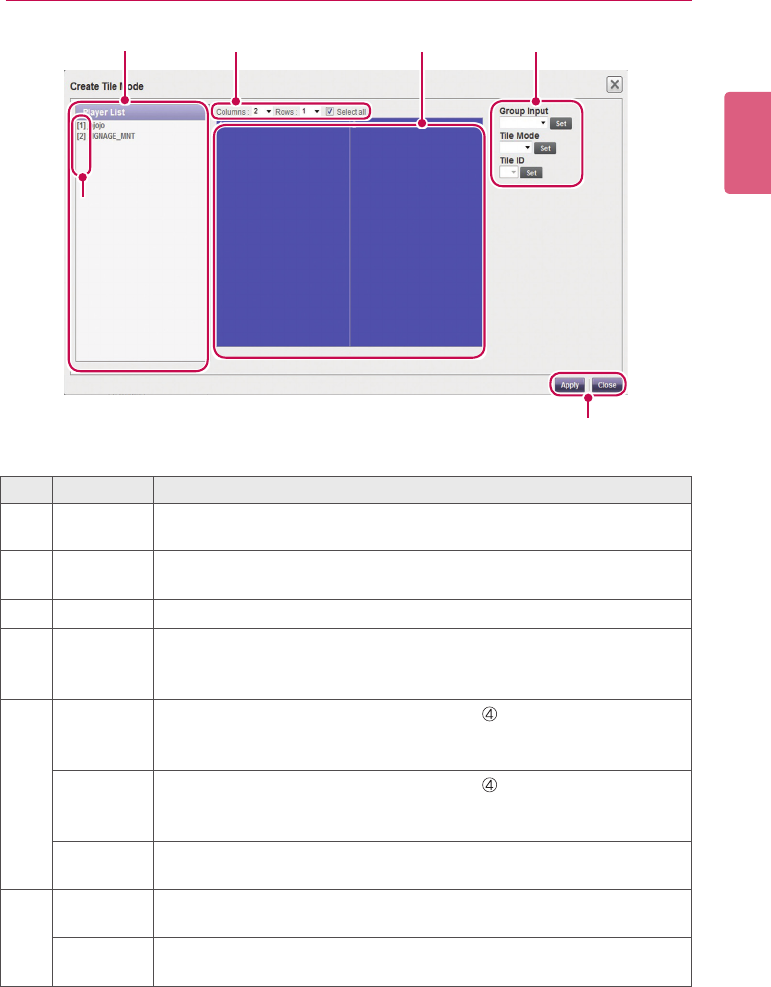
85
SuperSign Server
ENGLISH
① ③ ⑤④
②
⑥
No. Name Function
①Player List Shows a list of monitors to be displayed in tile mode.
You can drag & drop the monitors to change the order.
②Order of
Monitors
Shows the order of monitors.
③
Tile Size
Sets the number of tile columns and rows.
④Monitor
Selection
Area
When selected, the area is displayed in blue and click again to release it.
⑤Group Input Click monitors in the monitor selection area ( ) to choose a tile group.
Select an option in the Group Input dropdown list and click the Set but-
ton to apply the change.
Tile Mode Click monitors in the monitor selection area ( ) to choose a tile group.
SelectanoptionintheTileModedropdownlistandclickthe[Set]button
to apply the change.
Tile ID Click the monitor for which you want change the tile ID.
ChangethetileIDandclickthe[Set]button.
⑥Apply Clickthe[Apply]buttontoapplythetilesettingstothemonitorsanda
message window pops up to confirm it.
Close Clickthe[Close]buttonorthe[X]buttonatthetoprightofthewindowto
go back to the player list.
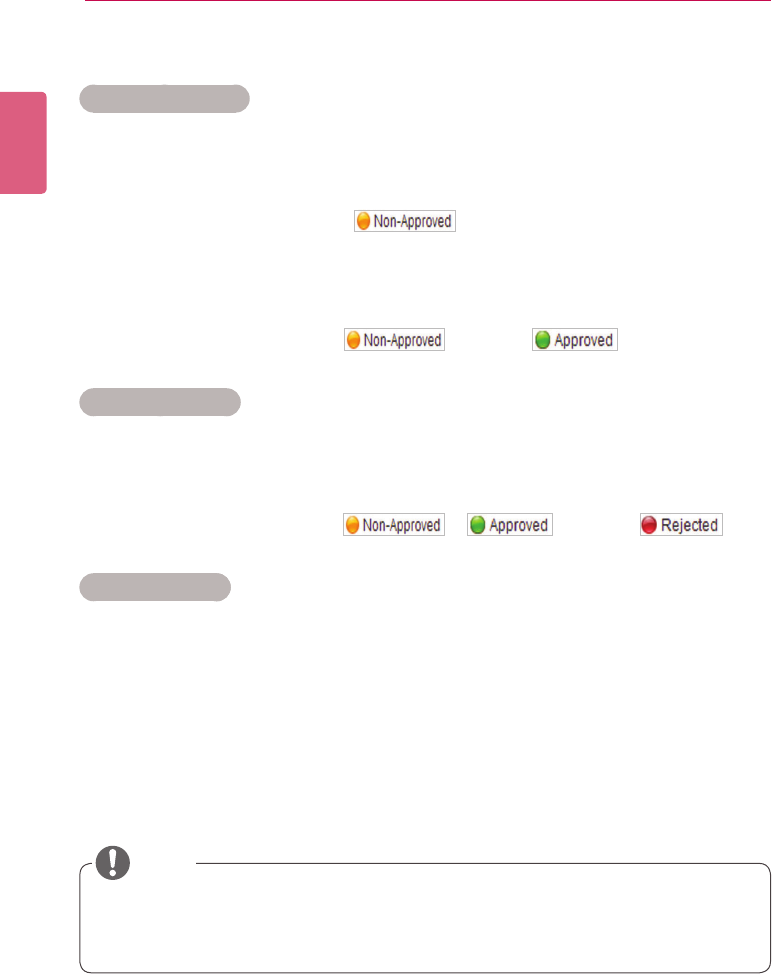
ENGLISH
86 SuperSign Server
Player Management
Approving Players
1 Click Player on the Menu tab located at the top of the program.
2 Click the Non-Approved category in the Player List.
• Unapproved players appear in the details list.
• Alternatively, select a player with shown in the item list.
3 Select a player you want to approve in the player details list.
• The selected player is shown with a check mark.
4 Click the [Approved] button to approve the selected player.
• Once the approval is complete, changes to .
Rejecting Players
1 Select a player you want to reject in the player details list.
• The selected player is shown with a check mark.
2 Click the [Rejected] button to reject the selected player.
• Once the rejection is complete, or changes to .
Deleting Players
1 Select a player you want to delete in the player details list.
• The selected player is shown with a check mark.
2 Click the [Delete] button to delete the selected player.
3 WhentheConrmDeletewindowappears,clickthe[OK] button.
4 Whenthedeletionconrmationwindowappears,clickthe[OK] button.
• Once the deletion is complete, the deleted player will disappear from the details list.
• If a player is rejected, the connection with the player is cut off. However, it may take a while
to disconnect completely.
• You can only delete players that are powered off.
NOTE
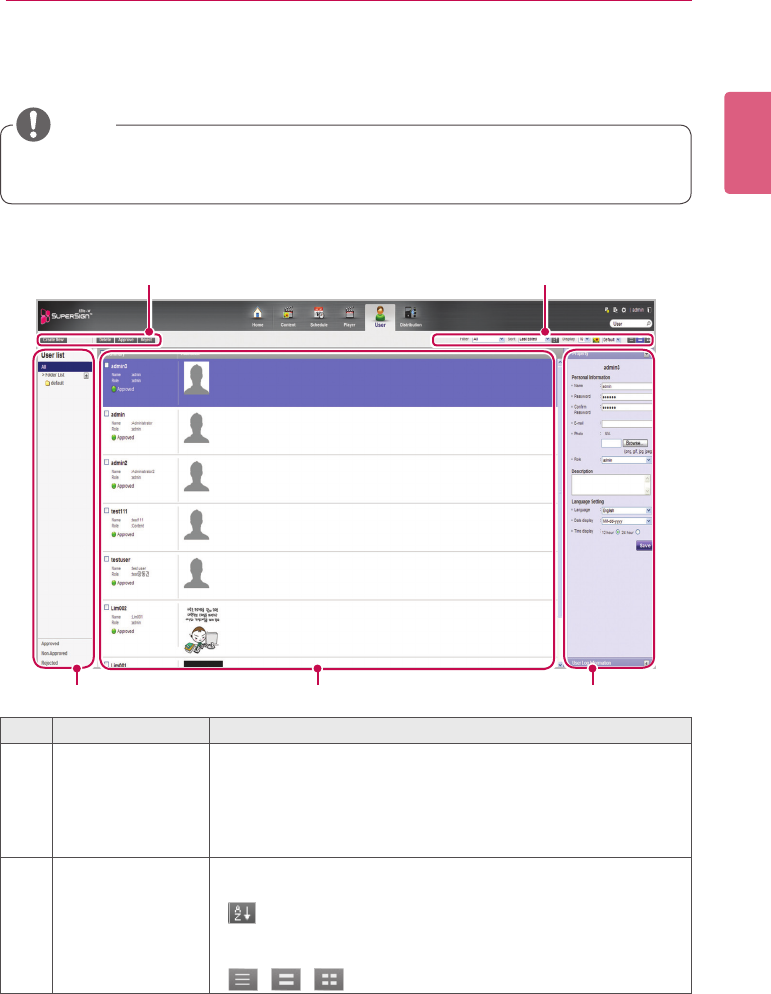
87
SuperSign Server
ENGLISH
User
You can view or manage (approve, reject, and delete) all user accounts.
User Window Layout and Functions
The following shows the layout and functions of the User window.
① ②
③ ④ ⑤
No. Name Function
①Action buttons • [Create New]: Creates a user account.
• [Delete]: Deletes a user account. (all information related to
the user ID will also be deleted.)
• [Approve]: Approves a user account not approved.
• [Reject]: Rejects a user account not approved.
②Sorting • Filter: Filter by role.
• Sort: Sort by various categories (e.g., last date updated).
• : Sort in ascending or descending order.
• Display: Set the number of items to display by pressing the
[▼]button.
• / / : List view/Normal view/Thumbnail view
• The User menu is only available in the SuperSignElite-w Standard version. To access this
function, please get the Standard version.
NOTE
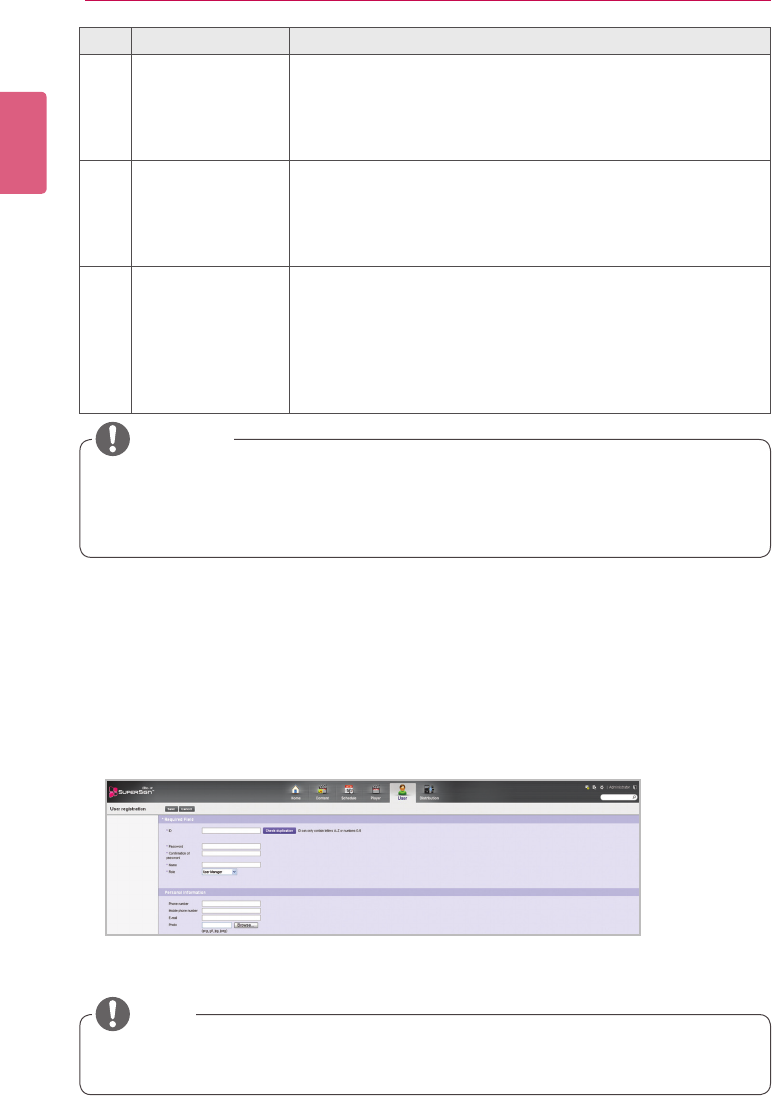
ENGLISH
88 SuperSign Server
No. Name Function
③User List View the list of user accounts saved.
• All: View the list of all accounts.
• Approved: View the list of approved accounts.
• Non-Approved: View the list of unapproved accounts.
• Rejected: View the list of rejected accounts.
④Details list • Summary
- Displays the user ID, name, role, player type (only for set top
box player), and approval status
• Thumbnail
- Displays the user image
⑤Details Details page of the selected user ID
• Property: All the information entered when creating a user
account (private information, description, and language set-
ting)
• User Log Information: Displays the creation date, creator,
recent editing date, editor, approval status, approver, last
login, and last logout information
User Account Registration
You can create accounts to use in the program.
1 Click User on the Menu tab located at the top.
2 Click the [Create New] button in the top left side of the User window.
3 Enter all required information.
4 Click the [Save] button in the top left of the screen to save the information.
5 Click the [OK] button when The account is created successfully message appears in a pop-up.
• Adding user accounts on the User tab is carried out in the same way as on the Login
screen.
NOTE
• AftereditingthepropertiesunderDetails,ifyoundthechangesarenotreected,cong-
ure Internet browser options as follows:
Go to Tools > Internet Options > Browsing History > Settings and click "Every time I visit
the webpage" under "Check for newer versions of stored pages".
CAUTION

89
SuperSign Server
ENGLISH
User Account View
You can view details of registered user accounts.
1 Click User on the Menu tab located at the top.
2 Select a user group you want in the User List.
3 Select a user to view the information in the details list.
• You can view the information of the selected user account in the More Details box.
①④
②
③
No. Name Function
①Personal Informa-
tion
User name, password, email, picture, role, and approval status.
②Description Theuseraccountisbrieyexplained.
③Local setting • Language setting of the user account. There are 14 languag-
es available.
• Date format (e.g., MM/DD/YYYY)
• Sets the time display format
④User Log Informa-
tion
Displays the Create Date, Creator, Last Edited, Editor, Approved
Status, Approver, Last Login, and Last Logout information
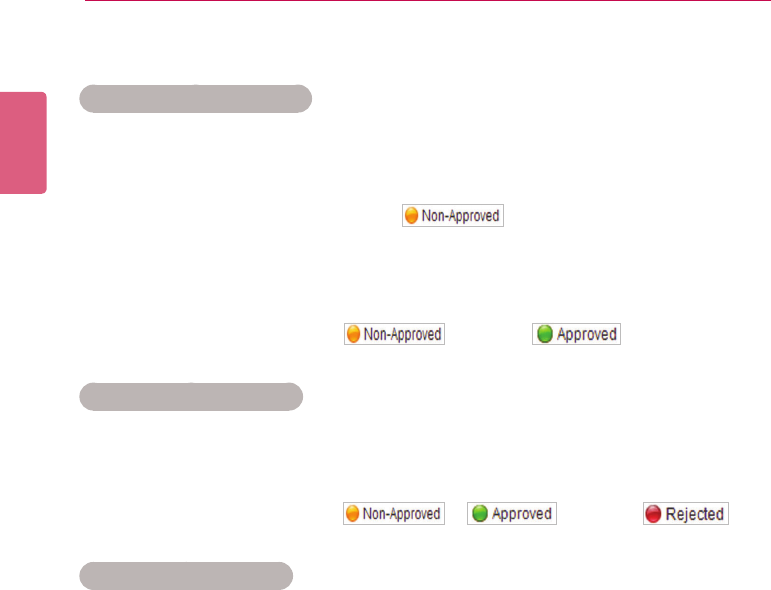
ENGLISH
90 SuperSign Server
User Account Management
Approving User Accounts
1 Click User on the Menu tab located at the top.
2 Click the Non-Approved category in the User List.
• Unapproved user accounts appear in the details list.
• Alternatively, select a user account with shown in the item list.
3 Select an account you want to approve in the user details list.
• The selected account is shown with a check mark.
4 Click the [Approved] button to approve the selected account.
• Once the approval is complete, changes to .
Rejecting User Accounts
1 Select an account you want to reject in the user details list.
• The selected account is shown with a check mark.
2 Click the [Rejected] button to reject the selected account.
• Once the rejection is complete, or changes to .
Deleting User Accounts
1 Select an account you want to delete in the user details list.
• The selected account is shown with a check mark.
2 Click the [Delete] button to delete the selected account.
3 WhentheConrmDeletewindowappears,clickthe[OK] button.
4 Whenthedeletionconrmationwindowappears,clickthe[OK] button.
• Once the deletion is complete, the deleted player will disappear from the details list.
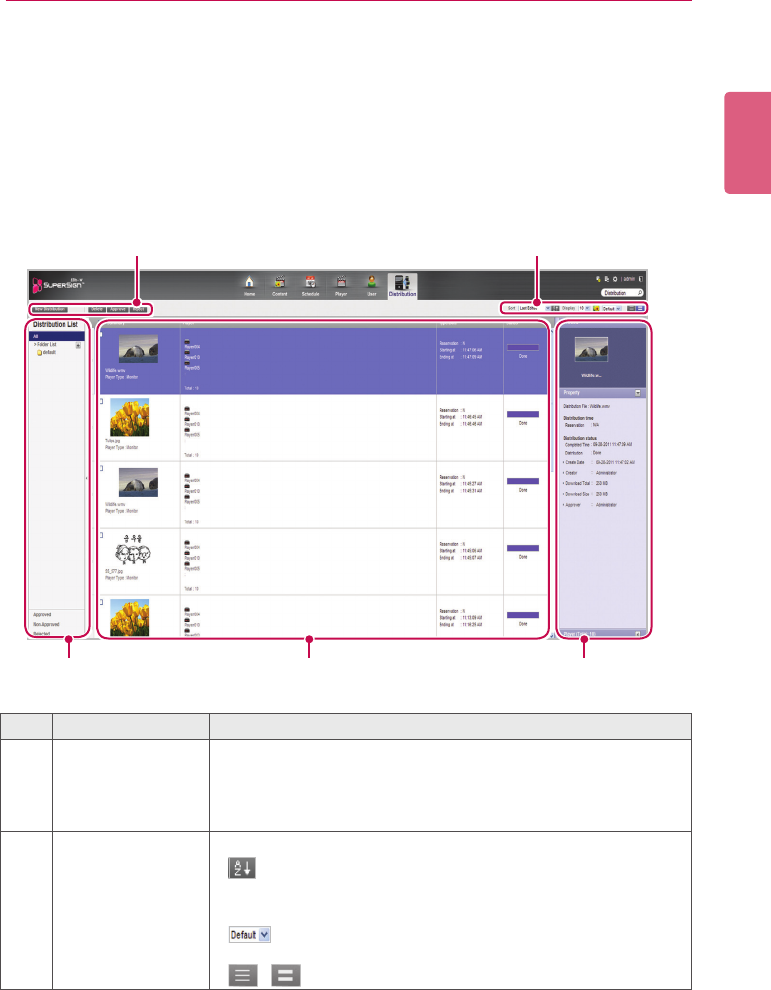
91
SuperSign Server
ENGLISH
Distribution
You can distribute content to players.
Distribution Window Layout and Functions
The following shows the layout and functions of the Distribution window.
① ②
③ ④ ⑤
No. Name Function
①Action buttons • [New Distribution]: Creates a new distribution.
• [Delete]: Deletes a distribution.
• [Approve]: Approves a distribution.
• [Reject]: Rejects a distribution.
②Sorting • Sort: Sort by various categories (e.g., last date updated).
• : Sort in ascending or descending order.
• Display: Set the number of items to display by pressing the
[▼]button.
• :Clickthe[▼]buttontoselectasizeoftheimage
shown in the details list.
• / : List view/Normal view

ENGLISH
92 SuperSign Server
No. Name Function
③Distribution list Shows the stored distribution list
• All: Shows all the distribution list
• Approved: Shows approved distribution list
• Non-Approved: Shows non-approved distribution list
• Rejected: Shows rejected distribution list
④Details list • Summary
- Displaystheimageandlenameforcontentdistribution.
Displayinformationincludingthelenameforschedule
distribution.
- Display the player type (set top box/monitor)
• Player
- Displaystheselectedplayernames(‘…’isshownifthereis
not enough space) /the number of all players
- Displays the player icon per player type
• Type/Date
- Provides distribution method, time, and distribution status
- Displays the reservation time
• Status: Provides distribution status information
- The distribution status can be checked on the status display
bar
• : Distribution is being processed
• : Distribution is complete
- [Cancel] button: Distribution is cancelled.
- [Retry] button: Retry distribution of a cancelled item.
* A newly created distribution is registered as non-approved
status.
⑤Details Allows the user to check the information page for distribution
selections and edit its information
• Preview:Thumbnailimageandlenameofcontentto
distribute
• Property: Provides the property values for the distribution
(distributionlename,distributiontime,distributionstatus)
• Player: Displays the player name, IP address, model name,
and player type
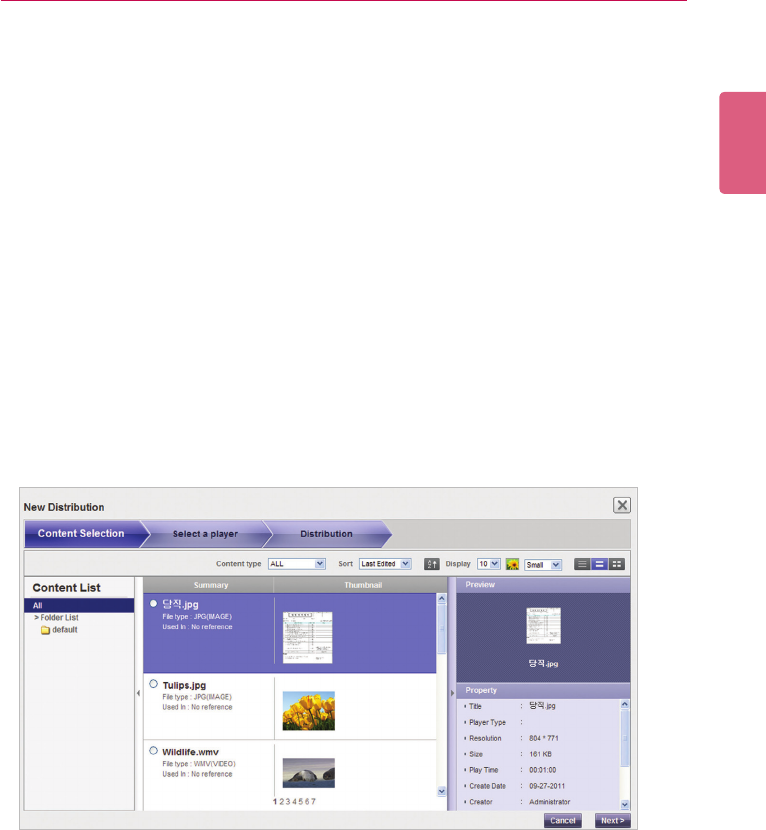
93
SuperSign Server
ENGLISH
Creating Content Distribution Files
You can send scheduled content to players.
1 In the Menu tab at the top of the program screen, click Distribution.
2 Click the [New Distribution] button in the top left of the Distribution window.
3 When the drop-down menu appears, click Distribute content.
4 Select the content category to distribute in the content list.
- The approved content appears in the details list.
5 Select a content item you want to distribute in the details list.
• The selected content is shown with a check mark.
• You can view the content details in the Property panel.
• The type of player you can select varies depending on content limitations.
- Contentrestrictions:Photo/videoleandFlash/PDF/Ofcelewheretheresolutionis
higher than 1920 x 1080
- Selecting content without limitations: You can select either a monitor or set top box
player.
- Selecting content with limitations: You can only select a set top box player.
6 Click the [Next] button to proceed.
• The player selection window appears.
7 Select a player you want to distribute to in the player list.
• The approved player appears in the details list.
• Ifthelenameoftheselectedcontentislongerthan42characters,thecheckboxfor
monitor type player will not be displayed. (Longer than 100 characters in the case of set
top box type players.)
• The check box for monitor type player with a lower resolution than that of the selected
content will not be displayed.
8 Select a player you want to distribute to in the details list.
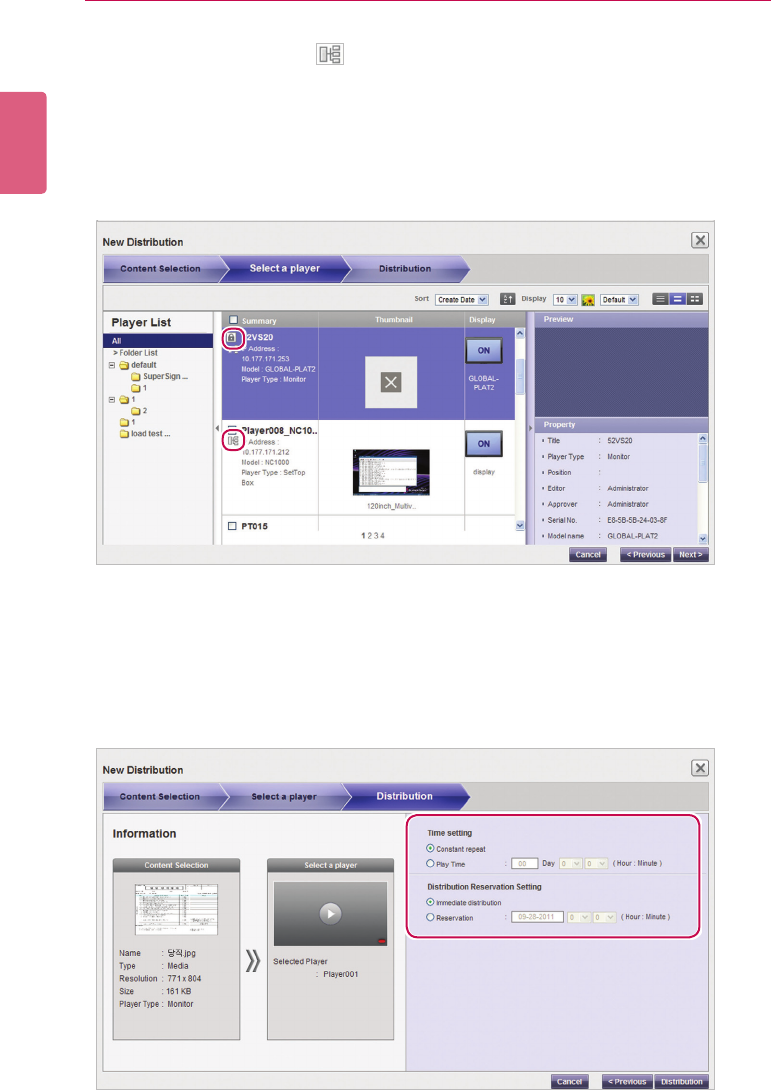
ENGLISH
94 SuperSign Server
9 Click the [Next] button to proceed.
• The distribution setting window appears.
• If there is not enough free space on the player, the warning message, “There is not
enough free space on the player.” is displayed and the next screen does not appear.
10 Conrmthecontenttodistribute,conrmtheplayerinformation,andthenspecifydistribution
settings.
• The selected player is shown with a check mark.
• If you select a player with a mark, the pop-up message, “The selected player(s)
has already been distributed. Do you want to select?” is displayed. If you do not want
to select the player, select another player and go to the next step.
• A player currently engaged in a distribution is locked, and a lock icon is displayed in the
check box. Another distribution cannot be entered until the current one is complete.
• You can view the player details in the Property panel.
• If you select set top box content, monitor type players will not be displayed in the player list.
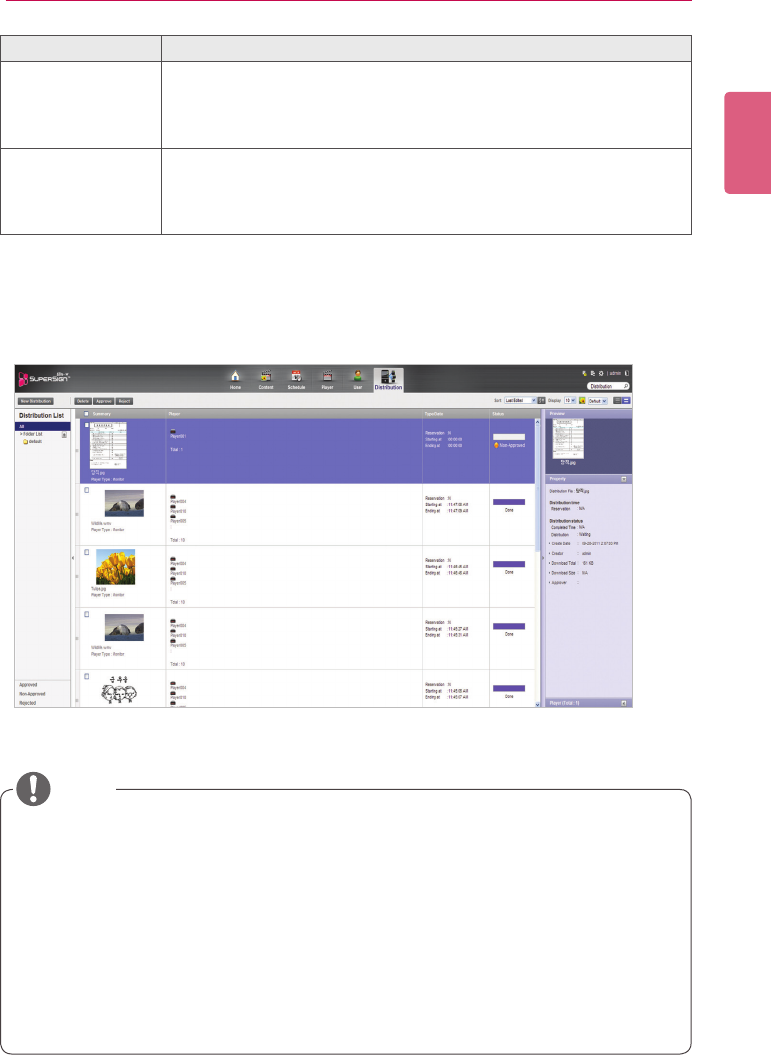
95
SuperSign Server
ENGLISH
11 Tocreateadistributionleascongured,clickthe[Distribution] button.
12 Whenthedistributionconrmationwindowappears,clickthe[OK] button.
Menu Description
Time Settings Sets the distributed content's playback time.
- Constant repeat: Repeat playing until the next scheduled content
runs.
- Play Time: Selects the playback duration.
Distribution Reser-
vation Setting
Sets a time for scheduled distribution.
- Immediate distribution: Distribute immediately after the distribu-
tion setting is made.
- Reservation: Schedule a date and time to distribute.
• When the content is distributed, any previous schedule sent are ignored.
• Aleover4GBcannotbetransferred.
• Whendistributionhasbeenreserved,theleisdistributedifapprovalisgivenbeforethe
time reserved. If approval is given after the reserved time, then distribution takes place as
soon as approval is given.
• You can cancel distribution in the middle of playback. Because content cannot be continu-
ously downloaded when the distribution has been cancelled, distribution must be restarted
from the beginning. For more information, see 99 Page, “Canceling Distribution”.
• Youcannotplaycontentwhenthedistributionpercentageisnot100%.
NOTE

ENGLISH
96 SuperSign Server
Creating Schedule Distribution Files
You can send scheduled content to players.
1 In the Menu tab at the top of the program screen, click Distribution.
2 Click the [New Distribution] button in the top left of the Distribution window.
3 When the drop-down menu appears, click Distribute schedule.
4 In the schedule list, select a schedule category to distribute.
• The approved schedule appears in the details list.
5 Select a schedule you want to distribute in the details list.
• The selected schedule is shown with a check mark.
• You can view the schedule details in the Property panel.
6 Click the [Next] button to proceed.
• The player selection window appears.
7 Select a player you want to distribute to in the player list.
• The approved player appears in the details list.
8 Select a player you want to distribute to in the details list.
• The selected player is shown with a check mark.
• If you select a player with the mark, the pop-up message, “The selected player(s)
has already been distributed. Do you want to select?” is displayed. If you do not want to
select the player, select another player and go to the next step.
• A player currently engaged in a distribution is locked, and a lock icon is displayed in the
check box. Another distribution cannot be entered until the current one is complete.
• You can view the player details in the Property panel.
• If you select set top box schedule, monitor players will not be displayed in the player list.
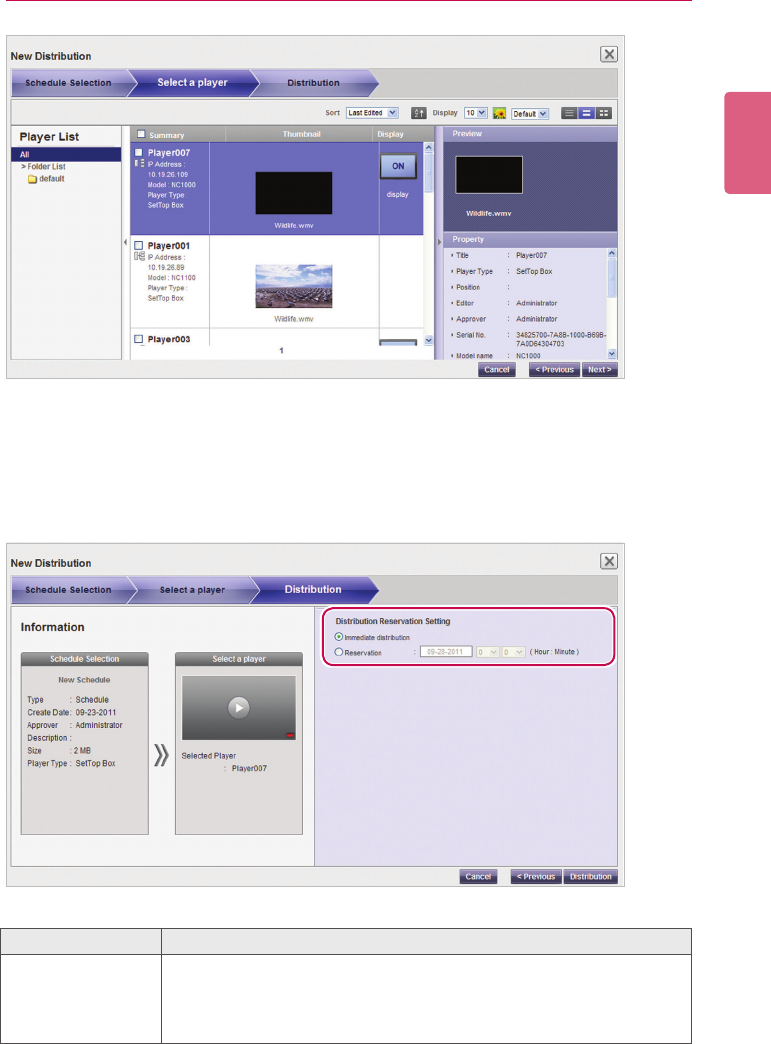
97
SuperSign Server
ENGLISH
9 Click the [Next] button to proceed.
• The distribution setting window appears.
• If there is not enough free space on the player, the warning message, “There is not
enough free space on the player.” is displayed and the next screen does not appear.
10 Conrmthescheduletodistribute,conrmtheplayerinformation,andthenspecifydistribu-onrmthescheduletodistribute,conrmtheplayerinformation,andthenspecifydistribu-
tion settings.
Menu Description
Distribution Reserva-
tion Setting
Sets a time for scheduled distribution.
- Immediate distribution: Distribute immediately after the distribution
setting is made.
- Reservation: Schedule a date and time to distribute.
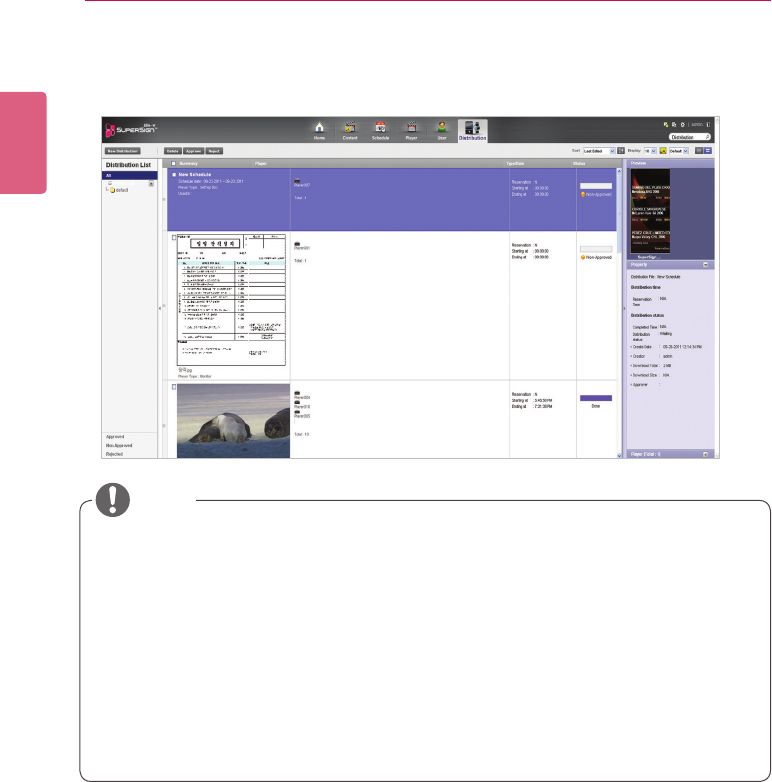
ENGLISH
98 SuperSign Server
11 Tocreateadistributionleascongured,clickthe[Distribution] button.
12 Whenthedistributionconrmationwindowappears,clickthe[OK] button.
Searching Distribution Details
Youcanndandviewitems(schedules,content,andplayers)thataredistributedpreviously,or
scheduled for distribution.
1 You can search for distribution history in the distribution list on the left side of screen or by
entering a search keyword in the search box in the top right corner of the screen.
• Search results on distribution details are shown in a list. Clicking an item displays the
results in the details list.
• When the content is distributed, any previous schedule sent are ignored.
• Aleover4GBcannotbetransferred.
• Whendistributionhasbeenreserved,theleisdistributedifapprovalisgivenbeforethe
time reserved. If approval is given after the reserved time, then distribution takes place as
soon as approval is given.
• You can cancel distribution in the middle of playback. Because content download cannot
be resumed on a monitor type player when the distribution has been canceled, distribution
must be restarted from the beginning. For more information, see “Canceling Distribution”
on page 99. (It is possible to resume downloads on a set top box type player.)
• Youcannotplaycontentwhenthedistributionpercentageisnot100%.
NOTE
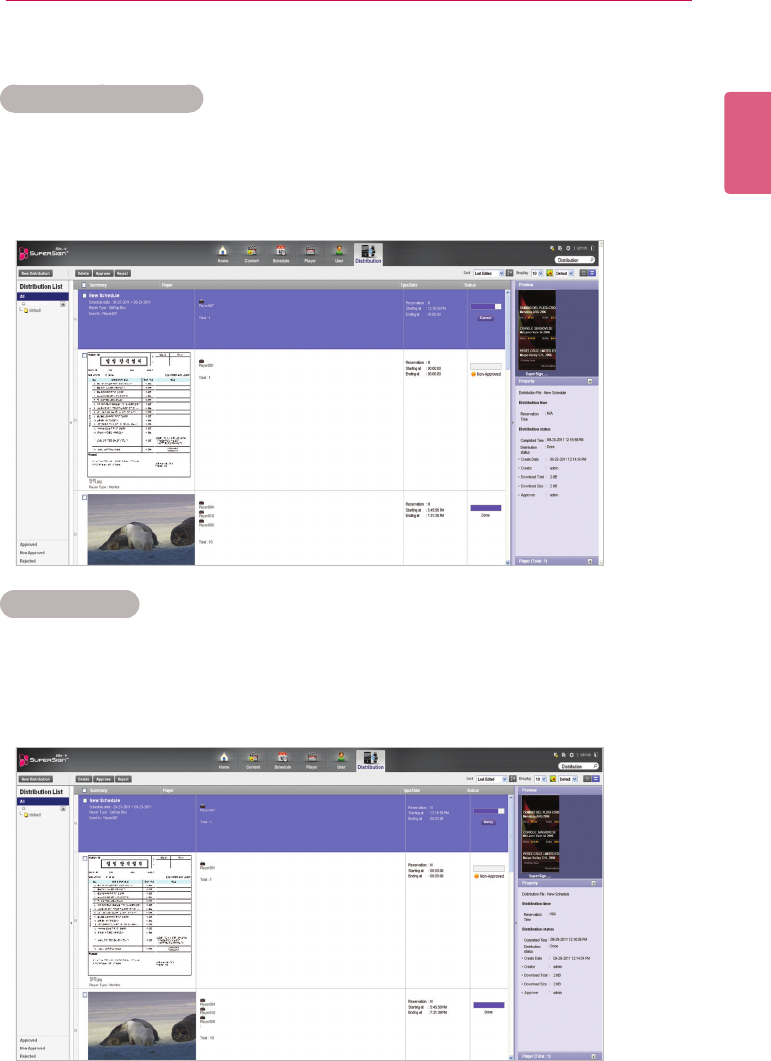
99
SuperSign Server
ENGLISH
Distribution Details Management
Canceling Distribution
You can cancel an item being currently distributed.
1 In the distribution details list, click the [Cancel] button of the item being distributed.
• When the distribution is canceled, the [Cancel] button changes to the [Retry] button.
• The player lock is released.
Re-distribution
You can select an item that you canceled distributing and redistribute it.
1 Select a canceled item in the distribution details list, and click the [Retry] button.
• Redistribution begins.
• Another distribution cannot be entered until the current one is complete.
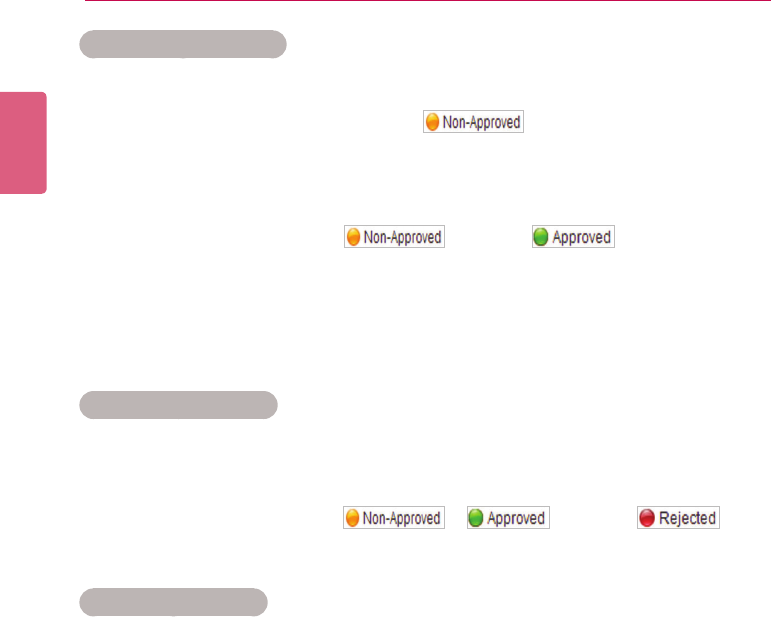
ENGLISH
100 SuperSign Server
Approving Distribution
1 Click the Non-Approved category in the Distribution List.
• Unapproved distributions appear in the details list.
• Alternatively, select a distribution item with shown in the details list.
2 Select a distribution item you want to approve in the distribution details list.
• The selected item is shown with a check mark.
3 Click the [Approved] button to approve the selected item.
• Once the approval is complete, changes to .
• Another distribution cannot be entered until the current one is complete.
• Furthermore, because the check box for a player currently distributing content is changed
to a lock icon, you cannot select the player.
• When the distribution is complete, the player lock is released and the distribution screen
appears automatically.
Rejecting Distribution
1 Select a distribution item you want to reject in the distribution details list.
• The selected item is shown with a check mark.
2 Click the [Rejected] button to reject the selected item.
• Once the rejection is complete, or changes to .
• The player lock is released.
Deleting Distribution
1 Select a distribution item you want to delete in the distribution details list.
• The selected item is shown with a check mark.
2 Click the [Delete] button to delete the selected item.
3 WhentheConrmDeletewindowappears,clickthe[OK] button.
4 Whenthedeletionconrmationwindowappears,clickthe[OK] button.
• Once the deletion is complete, the deleted distribution will disappear from the details list.
• The player lock is released.
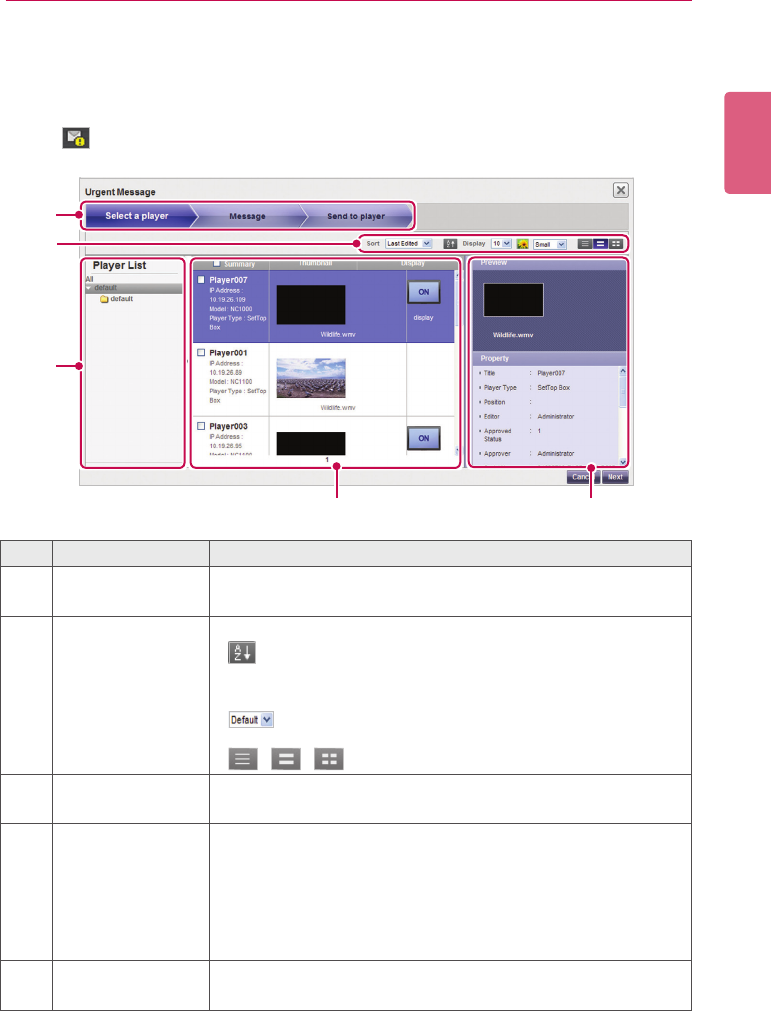
101
SuperSign Server
ENGLISH
Message
You can send messages to players connected with the Server using a Web-based message ap-
plication.
1 Click in the top right corner of the screen.
• The Urgent Message window appears.
⑤④
①
②
③
No. Name Function
①Progress Bar Displays the step-by-step progress when creating an urgent mes-
sage.
②Sorting • Sort: Sort by various categories (e.g., last date updated).
• : Sort in ascending or descending order.
• Display: Set the number of items to display by pressing the
[▼]button.
• :Clickthe[▼]buttontoselectasizeoftheimage
shown in the details list.
• / / : List view/Normal view/Thumbnail view
③ Player list View the list of players saved.
• All: View the list of all players.
④Details list • Summary: Displays the player name, IP address, model
name and player type (displayed only for set top box players).
• Thumbnail: Title and display of the content currently being
played.
• Display: List of displays connected to and recognized by a
player and power control status
⑤Details Displays the content preview for a selected player and its property
information
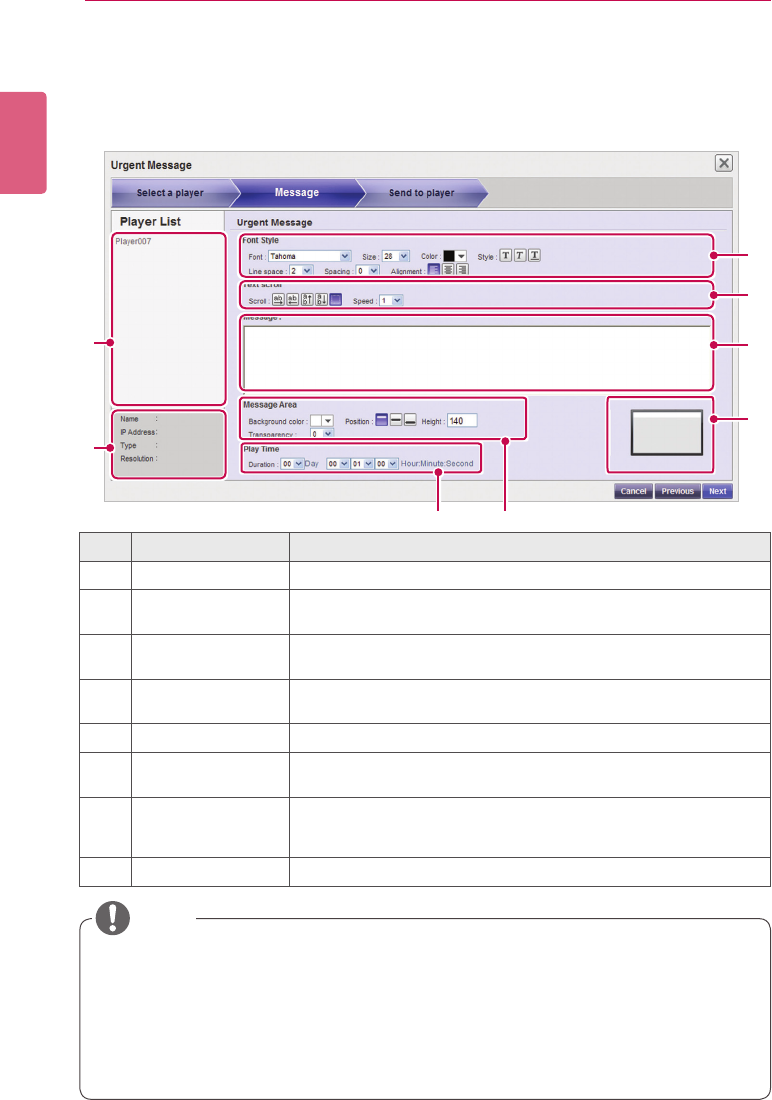
ENGLISH
102 SuperSign Server
• When you compose an emergency message, if you enter a large amount of text at once,
the text may not be displayed on the Internet Explorer temporarily.
• The length of an emergency message is limited to 1024 bytes and the length limit may dif-
ferent depending on the language.
• The play time of an emergency message cannot be set to 0 day, 0 hour, 0 minute, and 0
second. If it is 0 day, 0 hour, 0 minute and 0 second, the play time is automatically set to 30
seconds.
NOTE
④
③
⑤
⑥
⑧ ⑦
①
②
No. Name Function
①Player list Displays a list of players to which an urgent message is sent.
②Summary Displays the player name, IP address, player type (portrait, land-
scape) and resolution.
③Font Property Font,size,color,align(left,justied,right,)style(bold,italic,
underline,) line space, and spacing.
④Text scroll Sets the text, scroll direction (left/right/up/down/no effect), and
scroll speed
⑤Message box Message to send to players.
⑥Preview Allows the user to check the screen position where a message will
be displayed
⑦Message Area Sets the background color of the area where the urgent message
is displayed, arrangement of the message (top, middle, bottom)
and transparency.
⑧Play Time Sets the duration that the message is displayed.
2 Select a player group you want to send a message to in the Player List.
3 Select a player to send the message to in the player details list, and click the [Next] button.
• To send the message to multiple players at once, click the checkbox before the player list.
4 Compose a message you want to send and click the [Next] button.
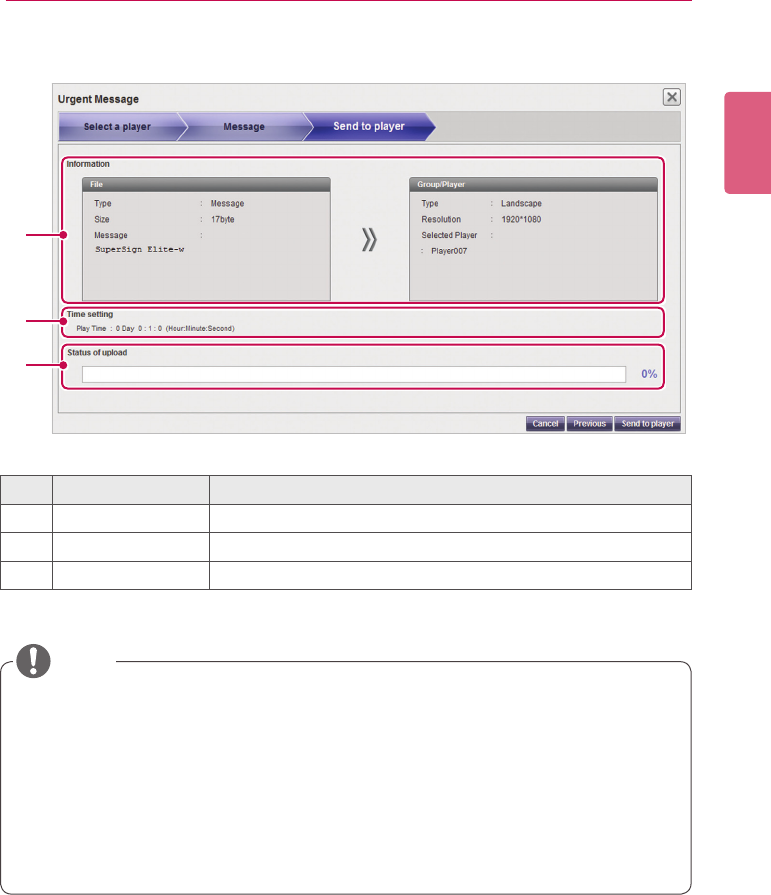
103
SuperSign Server
ENGLISH
5 Conrmtheleandtheplayer,andclickthe[Send to player] button.
①
③
②
No. Name Function
①Information Displays the content and player details.
②Time setting Displays the message play time
③Progress Displays the progress of the message upload.
• A message can only be displayed horizontally.
• The message content will not be saved.
• When you transfer a message to a monitor player, the available message editing options
are limited.
- Font: Fixed
- Style: Only underline is available.
- Special characters: Only special characters which can be entered by a keyboard are al-
lowed:(`,!,@,#,$,%,^,&,*,(,),-,+,=,|,\,:,;,“,‘,<,>,/,?etc)
NOTE
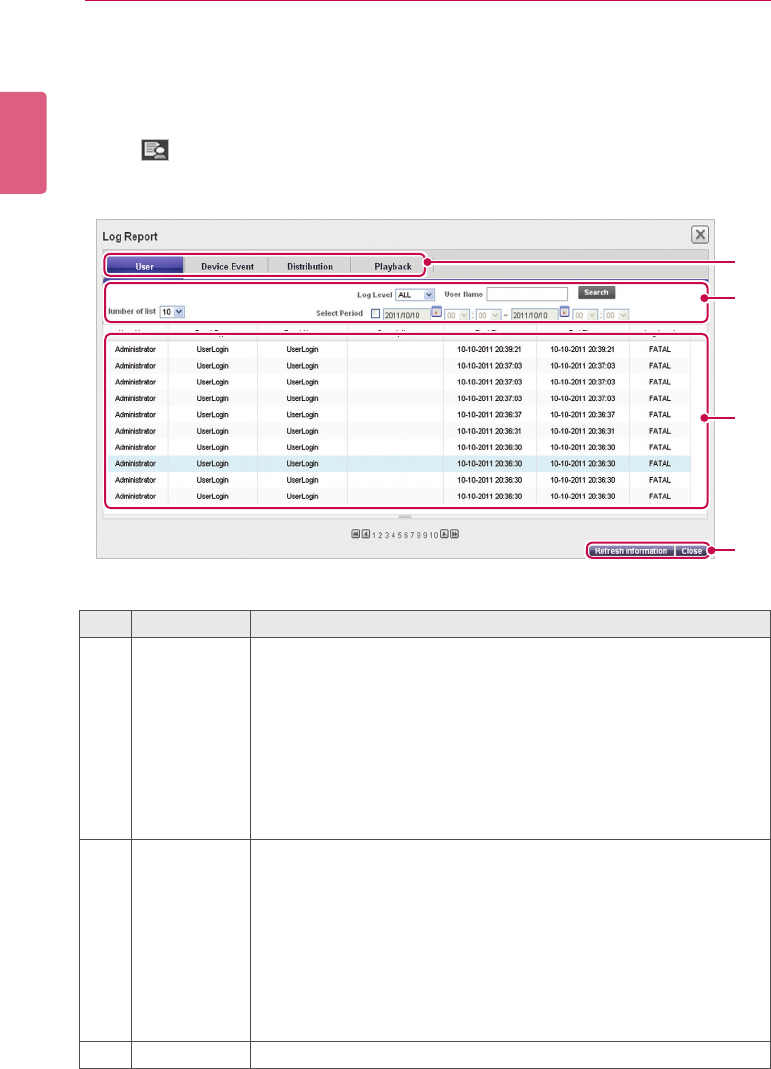
ENGLISH
104 SuperSign Server
Log report
You can view logs recorded in the database with a Web browser.
1 Click in the top right side of the screen.
• The Log report window appears.
③
②
④
①
No. Name Function
①Log catego-
ries
• User: Records a user log when a user or an administrator connects
to the Server to change system resources (e.g., media, or content,)
or system settings.
• DeviceEvent: Records a play log (content title, repeat number,
etc.) when a media player runs content.
• Distribution: Records a distribution log (transfer time, transfer
result, etc.) when a user distributes content to players.
• PlayBack: Records a play log (content title, repeat number, etc.)
when a media player runs content.
②Sort and
Search
• Number of list: Select a number of rows to show on a page.
• Log Level: Select a desired level from FATAL, ERROR, WARN,
INFO, or DEBUG.
• User Name: Select a search category, User ID or User Name.
• Select Period: Click the date box to select a date from the calen-
dar, click the [▼]buttontoselectatime,andviewtheloginforma-
tion.
• Search: Shows the log report by pressing Search after selecting a
search condition
③Log details Viewthelogrecordedduringthespeciedperiod.
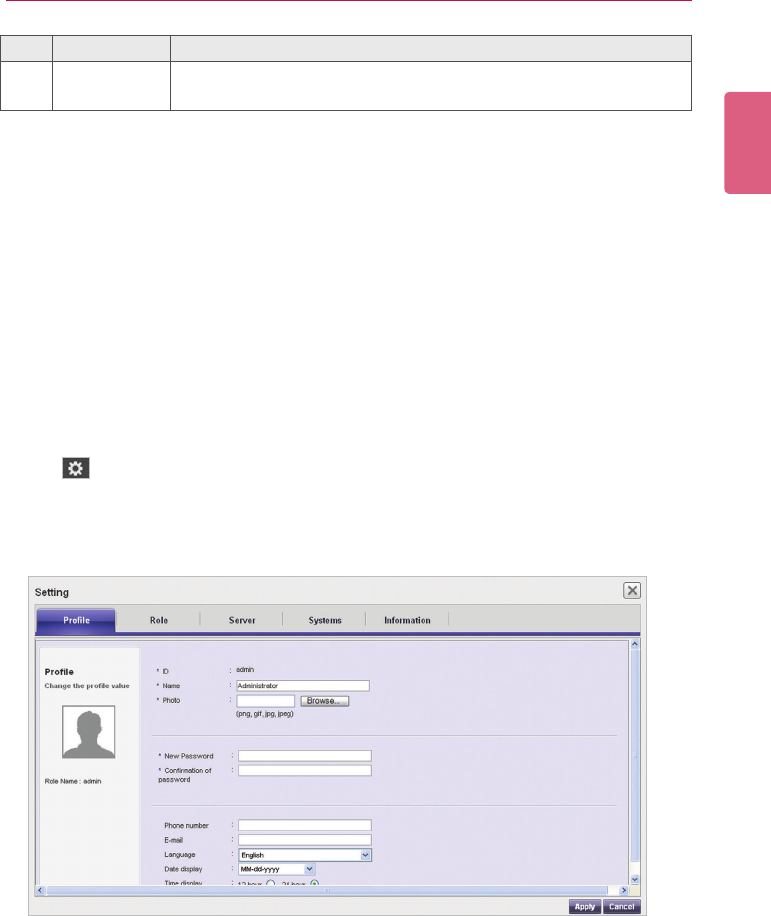
105
SuperSign Server
ENGLISH
2 Select a log category you want at the top.
• The Log report window appears for the selected category.
3 Select a period to view the log in the top side of the window.
• Eventdetailscreatedduringthespeciedperiodaredisplayed.
4 To close the Log report window, click the [Close] button or the [X] button at the top left of the
screen.
Setup
Prole
You can view user information or modify user account details except the User ID and role.
1 Click in the top right corner of the screen.
• The Setup window appears.
2 Click the Prole tab.
• WhentheProlepop-upwindowappears,youcanviewormodifytheuserinformation.
3 To modify the account details, select an item you want to modify and make changes.
4 To save the changes, click the [Apply] button.
5 To close the Setup window, click the [X] icon in the top right corner of the screen.
No. Name Function
④Action buttons • [Refresh]: Reload the log.
• [Close]: Close the Log Report window.
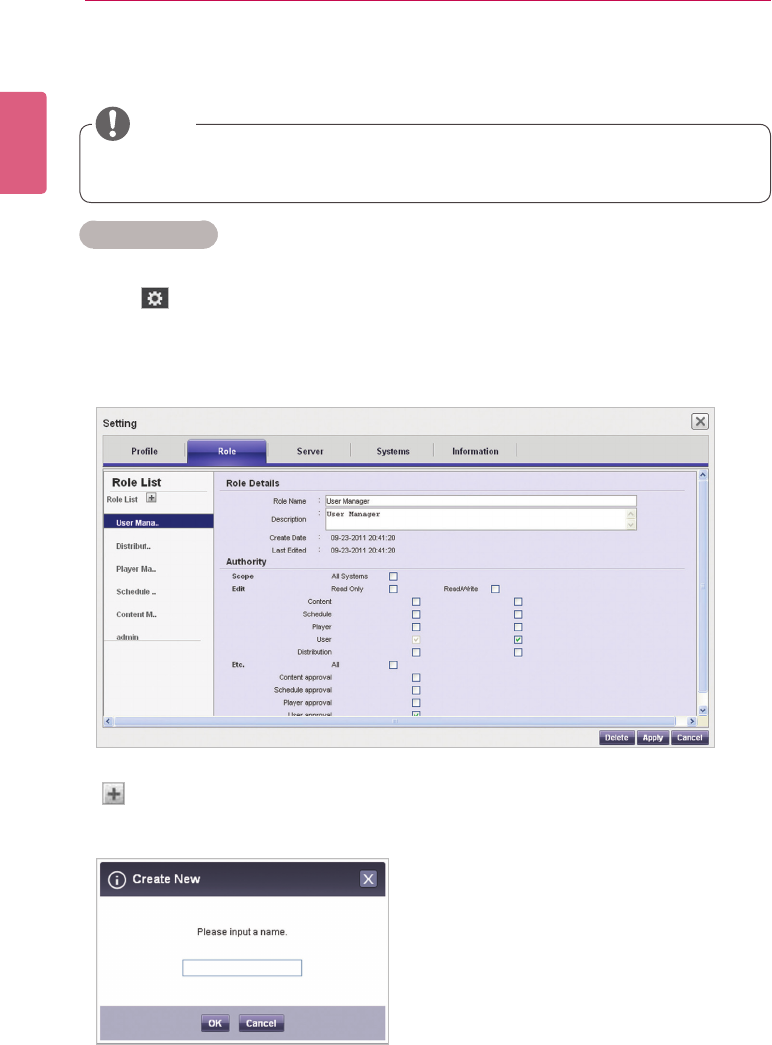
ENGLISH
106 SuperSign Server
Role
You can create, modify, or delete user roles.
Creating Roles
A general administrator or workgroup administrator can create roles in workgroups.
1 Click in the top right corner of the screen.
• The Setup window appears.
2 Click the Role tab.
• The Role Setting window appears.
3 Click the icon.
4 When the registration window appears, enter role name.
• The Role tab is only available in the SuperSignElite-w Standard version.
• To access this function, please get the Standard version.
NOTE
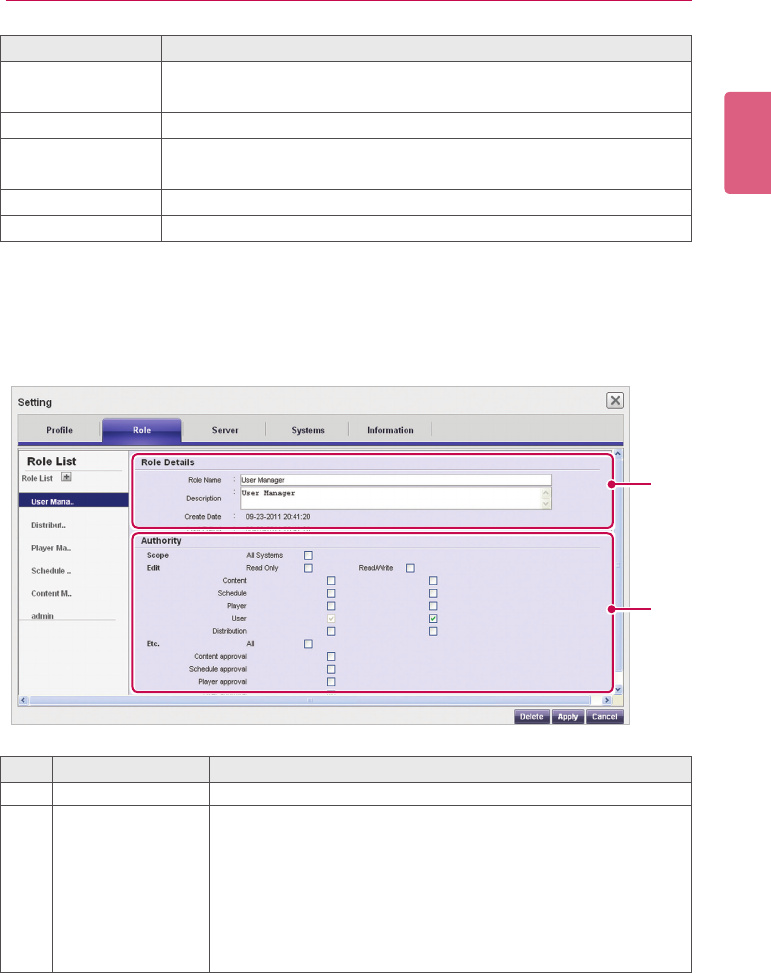
107
SuperSign Server
ENGLISH
Role Description
All system adminis-
tration
Own all rights to the system (read/write access to all resources, system
settings, urgent messages, and log reports).
Content manager Read/write access and rights to approve the content.
Distribution man-
ager
Read access to Content and Player, read/write access and rights to ap-
prove the distribution.
Player manager Read/write access and rights to approve the player.
User manager Read/write access and rights to approve the user.
5 Click the [OK] button.
6 Specify the role information and rights under the Role Details and Rights.
7 To save the settings, click the [Apply] button.
8 To close the Setup window, click the [X] icon in the top right corner of the screen.
①
②
No. Name Function
①Role Details Role name, description, created date, and last updated date.
②Authority
Specify the user rights (read, write, read-only).
Scope: Entire system
Edit: Select read, write or read-only for Contents, Schedule, Player,
User, and Distribution.
Etc.: Select right for Shared group/Content approval/Schedule ap-
proval/Player approval/User approval/Message transmission/
Log view/Distribution
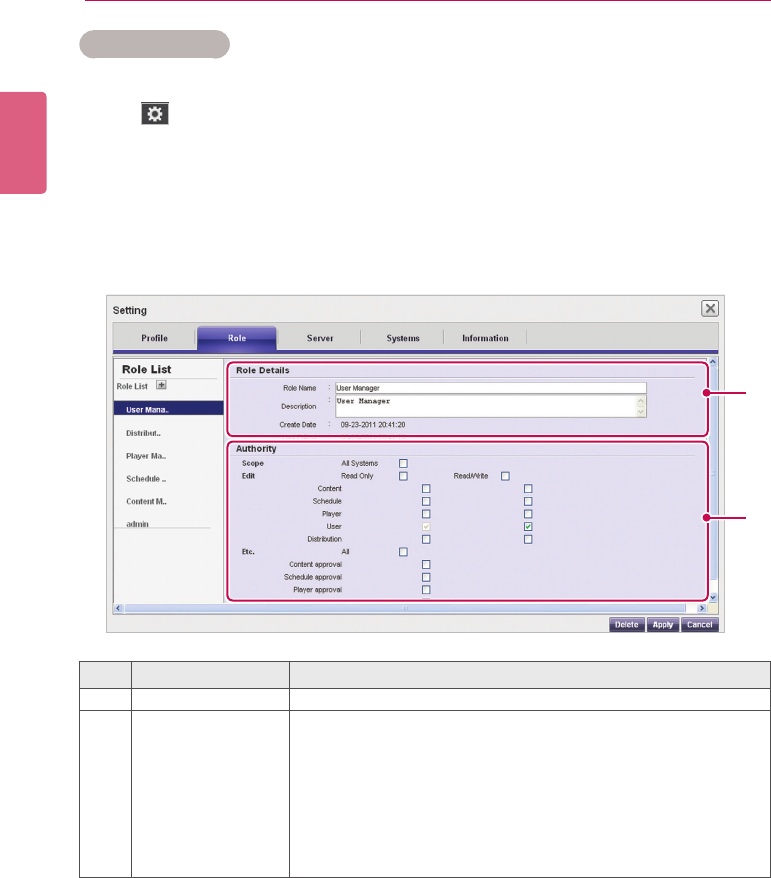
ENGLISH
108 SuperSign Server
Modifying Roles
You can modify roles previously created in a workgroup.
1 Click in the top right corner of the screen.
• The Setup window appears.
2 Click the Role tab.
• The Role Setting window appears.
3 Select a role you want to modify in the Role List.
4 Specify the role details and rights as needed.
5 To save the settings, click the [Apply] button.
6 To close the Setup window, click the [X] icon in the top right corner of the screen.
No. Name Function
①Role Details Role name, description, created date, and last updated date.
②Authority
Specify the user rights (read, write, read-only).
Scope: Entire system.
Edit: Select read, write or read-only for Contents, Schedule, Player,
User, and Distribution.
Etc.: Select right for Shared group/Content approval/Schedule ap-
proval/Player approval/User approval/Message transmission/
Log view/Distribution
①
②
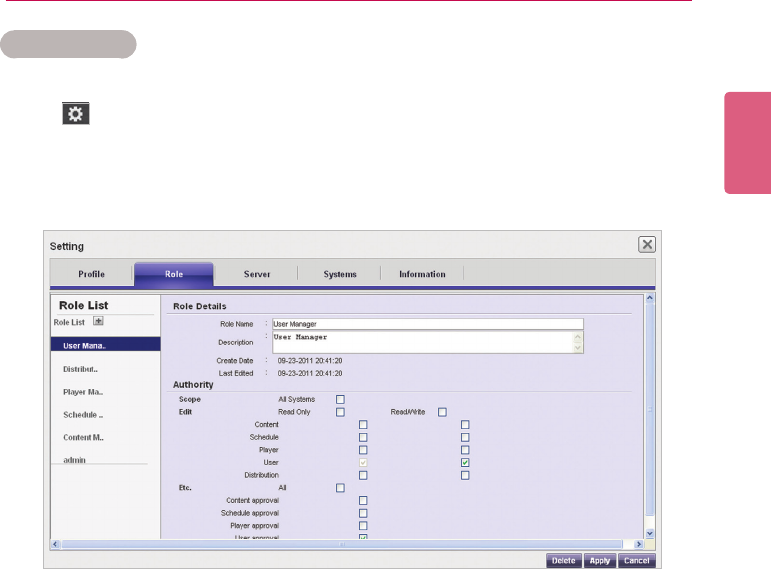
109
SuperSign Server
ENGLISH
Deleting Roles
You can delete existing roles.
1 Click in the top right corner of the screen.
• The Setup window appears.
2 Click the Role tab.
• The Role Setting window appears.
3 Click a role item you want to delete in the role list.
4 Click the [Delete] button.
5 Whenthedeletionconrmationpop-upwindowappears,clickthe[OK] button.
6 Whenthedeletionconrmationwindowappears,clickthe[OK] button.
• The selected role is deleted.
7 To close the Setup window, click the [X] icon in the top right corner of the screen.
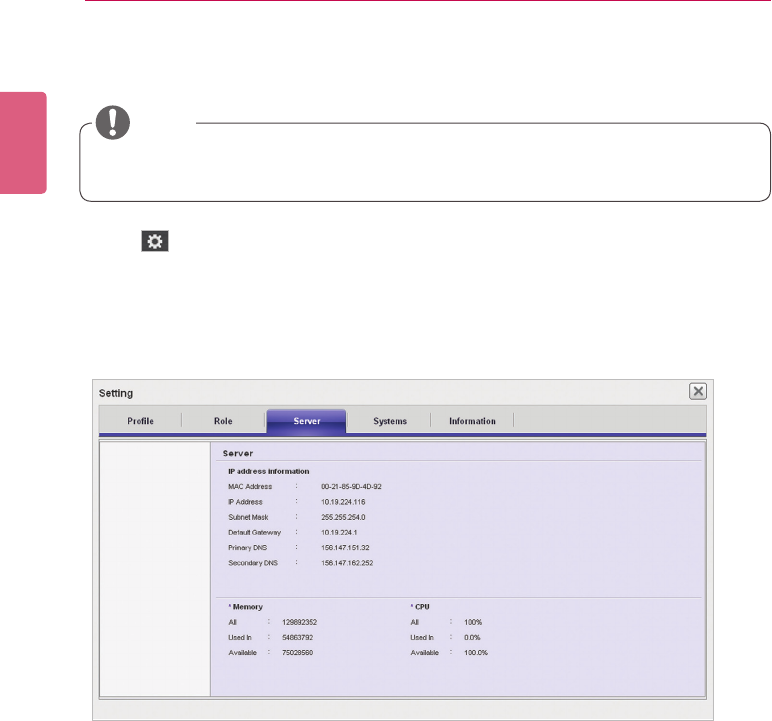
ENGLISH
110 SuperSign Server
Server
You can view the server operations.
1 Click in the top right corner of the screen.
• The Setup window appears.
2 Click the Server tab.
• The server window appears. You can view the server details, such as the server IP ad-
dress, server port, memory usage, CPU usage, etc.
3 To close the Setup window, click the [X] icon in the top right corner of the screen.
• The Server tab is only available in the SuperSignElite-w Standard version.
• To access this function, please get the Standard version.
NOTE
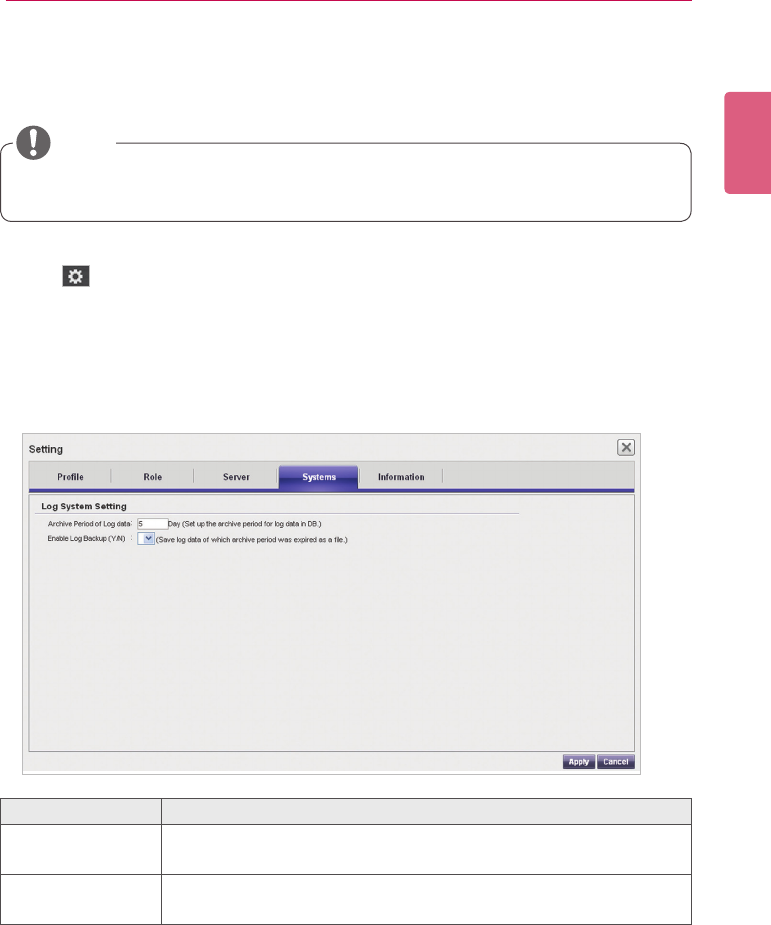
111
SuperSign Server
ENGLISH
System
You can enable or disable the approved systems and specify the settings for system manage-
ment.
1 Click in the top right corner of the screen.
• The Setup window appears.
2 Click the Systems tab.
• The current settings are displayed in the System window.
3 Specify the system environment as needed.
4 To apply the settings, click the [Apply] button.
5 To close the Setup window, click the [X] icon in the top right corner of the screen.
Role Description
Archive Period of
Log data
Setanumberofdaystokeepalogle.
Enable Log
Backup
Select to enable or disable a log backup.
• The System tab is only available in the SuperSignElite-w Standard version.
• To access this function, please get the Standard version.
NOTE
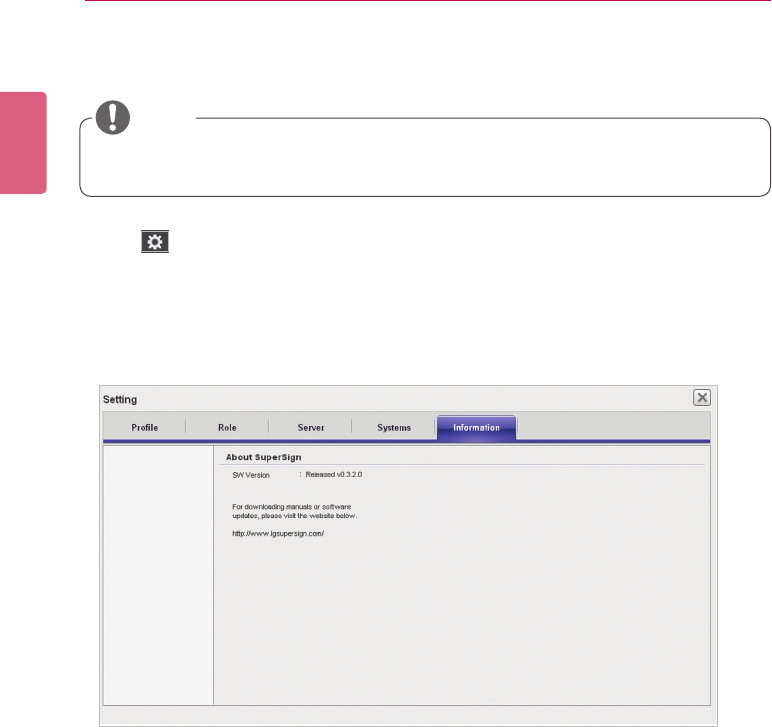
ENGLISH
112 SuperSign Server
Info.
You can view the SuperSign software version and customer support website link.
1 Click in the top right corner of the screen.
• The Setup window appears.
2 Click the Information tab.
• The software version and customer support website link are displayed in the Information
window.
3 To close the Setup window, click the [X] icon in the top right corner of the screen.
• The Info tab is only available in the SuperSignElite-w Standard version.
• To access this function, please get the Standard version.
NOTE
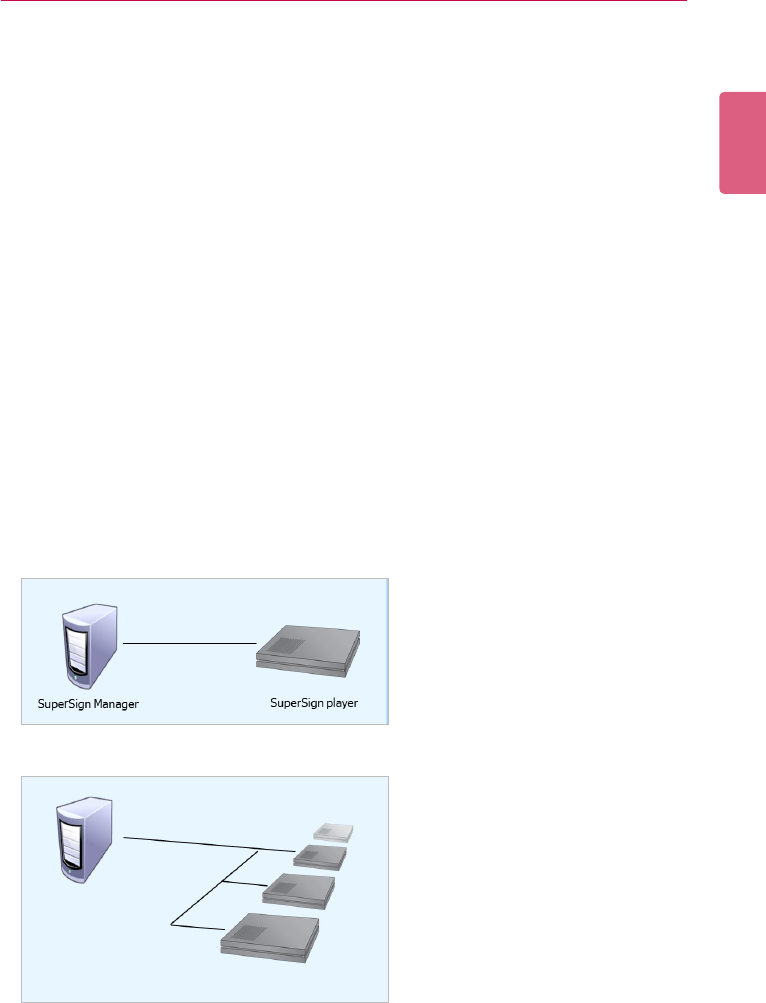
113
APPENDIX
ENGLISH
Appendix
SuperSign Network Connection
Refer to the information below when establishing network connections for the SuperSign Manager
and SuperSign Player.
LAN Connection
You can choose the LAN connection when the SuperSign Manager and SuperSign Player are in
the same network.
• The same network means the same gateway and subnet address for IP communications.
• TheSuperSignManagercanndtheSuperSignPlayersinthesamenetworkusingthe
scan feature.
• For 1:1 connections, use a crossover cable that allows communications without network
equipment.
• Features such as the Web, widgets, and RSS are not available in closed networks with-
out an external connection to the Internet.
• If the network does not have a DHCP server, you should manually set the IP addresses of
the SuperSign Manager and the SuperSign Player.
1:1 Connections
1:N Connections
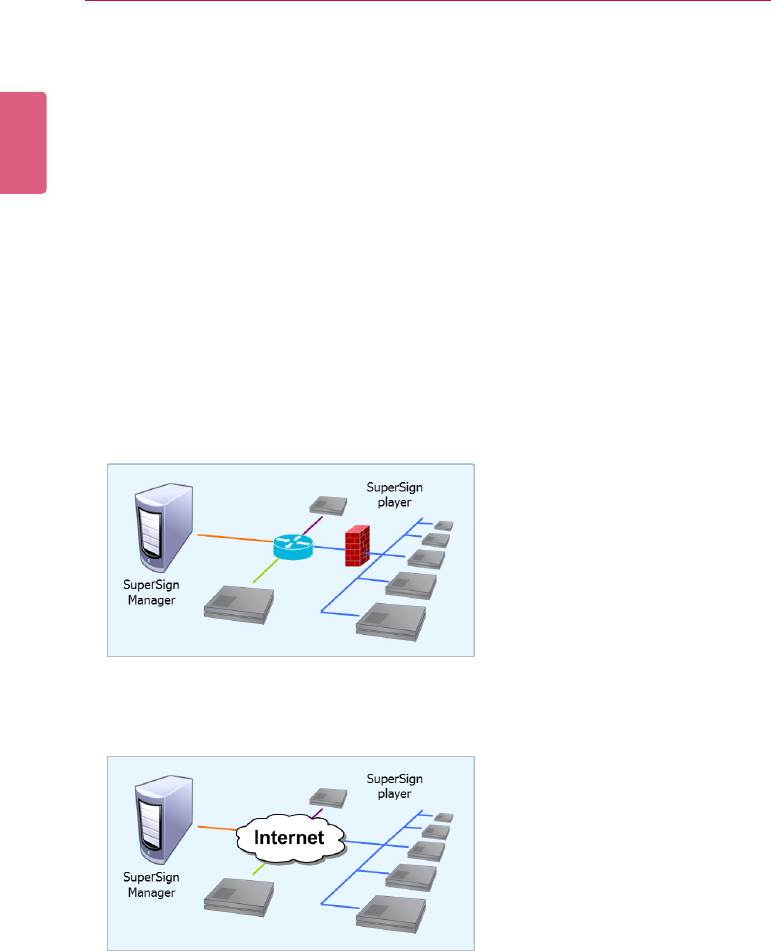
ENGLISH
114 APPENDIX
Internet Connection
You can choose the Internet connection when the SuperSign Manager and the SuperSign Player
are in two different networks.
• TheSuperSignManagercannotndtheSuperSignPlayerapplicationsusingthescan
feature.
• The SuperSign Player can be connected to the SuperSign Manager by using the manual
scan mode.
• If the SuperSign Manager is in a private network, the SuperSign Player may not be prop-
erly connected.
• Ifthenetworkhasarewall,someoftransmissionfeaturesmaynotworkproperly.
• Features such as the Web, widgets, and RSS are not available in closed networks with-
out an external connection to the Internet.
• If the network does not have a DHCP server, you should manually set the IP addresses of
the SuperSign Manager and the SuperSign Player.
Hierarchical Connection
Internet Connection
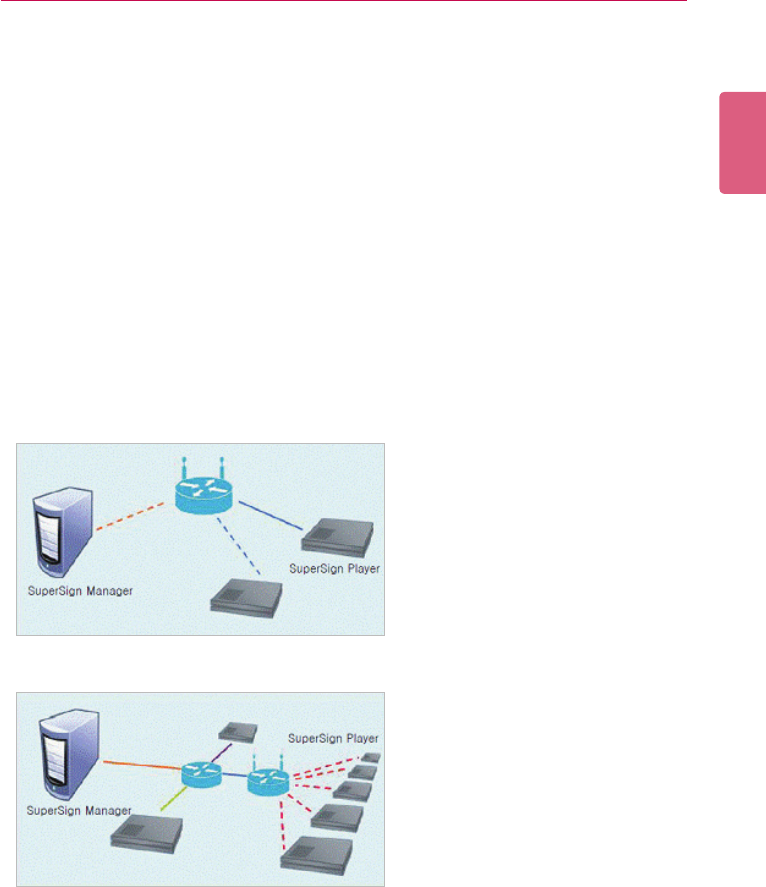
115
APPENDIX
ENGLISH
Wireless Connection
You can connect the SuperSign Player to the SuperSign Manager using a wireless router.
• The SuperSign Manager and the SuperSign Player both support wired, and wireless
network connections.
• The SuperSign Player may not work properly if you use wired and wireless network
devices simultaneously.
• Unplug the LAN cable when you connect the Player to the SuperSign Manager using a
wireless network.
Do not plug a wireless network device when you connect the Player to the SuperSign
Manager using a wired network.
• Make sure that the SuperSign Manager and the SuperSign Player are in the same net-
work when you use a wired/wireless router. The SuperSign Player cannot be recognized
by a scan when it is in a different network. If the SuperSign Manager is behind a router or
a rewall, a connection may not be established.
Available Ports
SuperSign Manager can be connected to SuperSign Player via the port listed below:
• 8080: Server Open
• 5432: PostgreSQL DB
• 6950: Search for a Player
• 9: WOL(WakeOnLan)
Wired/Wireless Router
Wired/Wireless Network
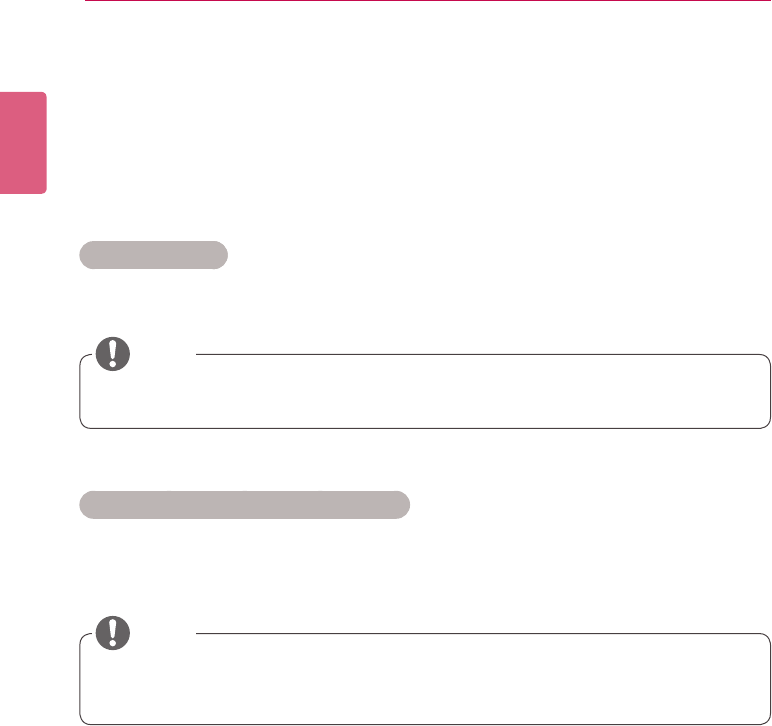
ENGLISH
116 APPENDIX
Required Software and United Codec
Refertotheinformationbelowonkeysoftwarerequiredtousetheprogramanduniedcodecs
needed to register and play videos.
Required Software
Below is a list of required software to install in order to use all edit functions of the SuperSign
solution.
Microsoft Office
InstallMicrosoftOfceontheSuperSignManagerandtheSuperSignPlayertouseOfcelesas
mediacontent.(MicrosoftOfce2000,XP,2003,and2007aresupported.)
Adobe Acrobat Reader (8.1 or higher)
Adobe Acrobat Reader 8.1 or higher (Lite version excluded) is required to see the Help or create
content using PDF-type media content. Install the Adobe Acrobat Reader on the SuperSign Man-
ager and the SuperSign Player.
• YouneedtopurchaseandinstallMicrosoftOfceindividually.
NOTE
• The Adobe Acrobat Reader is available as a CD or free download at the Adobe website
(www.adobe.com).
NOTE
117
APPENDIX
ENGLISH
SuperSign File Support
Thefollowingmedialeformatsaresupported:
Unied Codecs
Install codecs required to register and play videos. If you install different codecs on the SuperSign
Manager and the SuperSign Player, videos may fail to play. Make sure you install codecs of the
same type and version on the SuperSign Manager and the SuperSign Player.
Videolesmayrequiredifferentcodecsforplaying.
Websitestodownloaduniedcodecsarelistedbelow:
• http://www.codecguide.com
• http://shark007.net
• http://www.free-codecs.com
Player Type Media Type Supported File
Monitor
image .jpeg, .jpg, .bmp, .png (smaller than 1920 x 1080)
Video .avi, .wmv, .mp4, .mov, .mkv, .ts, .tp, .mpg, .mpeg, .flv
(smaller than 1920 x 1080)
sound .mp3
ash Not supported
documentle .ppt, .pdf, pptx, .pps
Set Top Box
image .jpg, .bmp, .png
Video .avi,.wmv,.mp4,.mov,.mkv,.ts,.tp,.mpg,.mpeg,.v
sound .mp3, .wma, .wav
ash .swf
documentle .ppt, .xls, .doc, .pdf, pptx, .pps, .xlsx, .docx,
• Toregisterandplayvideos,youneedtoinstallanappropriateuniedcodecontheSuper-
Sign Manager and the SuperSign Player.
• A maximum image size of 8,192 pixels (width or height) can be supported. A total number
of 16,777,216 pixels are supported.
• The websites above are not related to LG Electronics, and are subject to change.
• Visit their websites for details about the codec license.
• Make sure that a codec required to play the content you require is included in the down-
load package before you install it.
• Install the same codec package on the SuperSign Manager and the SuperSign Player.
• Avoid duplicate installations of a codec package.
• Ifyouwanttoinstalladifferentcodepackage,uninstallthepreviouscodecrst.
NOTE
NOTE
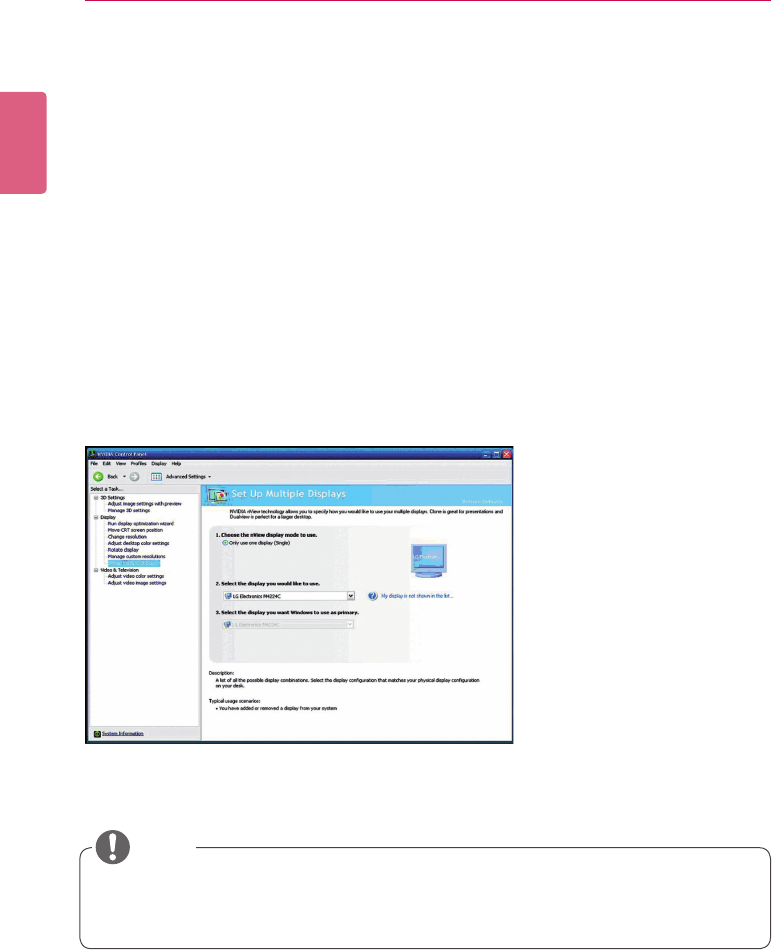
ENGLISH
118 APPENDIX
Microsoft Windows Embedded Standard Con-
straints
Due to internal constraints in Microsoft Windows Embedded Standard, the SuperSign Player’s
operating system, the following errors can occur.
If you switch to the full screen by pressing <Alt+Enter> in the DOS window, characters except
the Roman alphabet, may not appear properly.
When you select to “save as” in the Print window, the menu name appears in English.
When you navigate to submenu items (as in the Control Panel), some appear in English. (Hyper-
Terminal, Regional, and Language Options, etc.)
Changing Primary/Secondary Display
To change the primary and auxiliary monitors of the SuperSign Player, go to Control Panel > Appear-
ance and Themes > Display > Screen Resolution.
• The Nvidia graphics chipset, a video card installed on the SuperSign media player, does
not support changing the primary/secondary monitor in Display Properties of Windows.
NOTE

119
APPENDIX
ENGLISH
Frequently Asked Questions
If the program is not working properly, refer to the information below before contacting the Service
Center.
Question Troubleshooting
I clicked Scan, but I
cannotndplayers.
• Check that the SuperSign Player is turned on.
• Check that the SuperSign Player is working.
• Check the network cable of the SuperSign Player. Check the
network IP settings of the SuperSign Player. Set the network IP
of the SuperSign Player manually.
The media player
and the display are
not automatically
connected.
• When you connect the media player to a display, check the se-
rial cable connection between the player and the display.
• If the Set ID of the display is set to Off, then set the Set ID
value.
• When you connect the media player to a display, reboot the
player after setup is complete.
Data saved in the
local disk (C:) of the
SuperSign Player disap-
peared.
The SuperSign Player uses the Enhanced Write Filter (EWF) to
protect the program. If the EWF is set to “Enable”, the user can
only temporarily save data onto the local disk. When the SuperSign
Player restarts, the EWF deletes the data that was temporarily
saved. If you don't want to use the EWF, set it to “Disable” on the
Player menu.
I cannot open Microsoft
OfcelesintheSuper-
Sign Player.
CheckthattheMicrosoftOfceprogramisinstalledproperly.Ifthe
EWF is set to “Enable”, the installation may not continue prop-
erly. Set EWF to “Disable”, and retry installing the program. It is
recommended that you set EWF to “Enable” once the installation
is complete.
The schedule transmit-
ted to the player does
not start playing at the
scheduled time.
Check that the system time set in the SuperSign Manager and the
SuperSign Player are the same. If the time is different, synchronize
the settings and re-transmit the schedule.
Characters in the RSS,
text and message are
not displayed properly.
Refer to the Regional and Language Options, and change the sys-
tem language accordingly.
PictureandPDFles
are not displayed.
Refer to the settings under the Regional and Language Options of
themediaplayer'soperatingsystem,changethelenameinthe
speciedlanguage,andre-registerittotheLibrary.Forinstance,
ifthelanguageissettoEnglishandthepictureleisnamedin
Korean, the image may fail to display.

ENGLISH
120 APPENDIX
Question Troubleshooting
The focus disappears
from the "SuperSign
Player menu" or
"Content List" window
while working with the
SuperSign Player.
If the keyboard and mouse are connected to the player, you can
make the focus appear again by moving the cursor to the window
and clicking it. If you are using a remote control only, use S.Menu or
the blue button to close the "SuperSign Player menu" or "Content
List" window and run again.
The time changes
on its own even after
synching the time on
the Windows where the
SuperSign Player is
installed.
• Make sure that the EWF is set to “Disable” before you change
the system time.
• If the EWF was set to “Enable” when you set the time, change
it to “Disable” and retry setting the time.
• On the Windows taskbar, right-click to open the Adjust Date/
Time menu (Date and Time dialog) and check the Time syn-
chronization option. If this option is checked, the time is peri-
odically set to the Time zone selected by the user. If you don't
want to use this option, click the Internet Time tab on the menu
and clear the “Automatically synchronize with an Internet
time server” checkbox.
I sent content to the
SuperSign Player while
playing a video, but the
video stops playing.
Network conditions may affect the video play. Retry sending the
content when the SuperSign Player is not playing a video.
Where can I obtain the
SuperSign Player pro-
gramordriverles?
They are available at the SuperSign support website (www.lgecom-
mercial.com).
Flashlesplayslowly. A large size of Flash displayed on the screen, multiple objects using
the animation function, or the animation applied to a large area, may
all affect the slow play.

121
APPENDIX
ENGLISH
List of Monitor Models Supported by SuperSign
The functions that can control monitors or distribute content on SuperSign Elite-w server may
vary per monitor. Refer to the supported functions based on the monitor models below:
Platform
Model Name Available for
Distribution
Controllable Controllable Elite-w
SW Version
H5 Series
M3203C △X -
M4213C △X -
M3703C △X -
M4214T △X -
M4716T △X -
M4224C △X -
M4715C △X -
M5203C △X -
M6503C △X -
47VL10 △X -
M4224F △X -
S4 Series
M3704C △ △ 1.5.3. or later
M4716C △ △ 1.5.5. or later
M4225C △ △ 1.5.3. or later
M4720C △ △ 1.5.3. or later
M5520C △ △ 1.5.3. or later
M3204C △ △ 1.5.5. or later
M4214C △ △ 1.5.5. or later
M4215N △ △ 1.5.5. or later
32/42/47VS10 △ △ 1.5.5. or later
65VS10 △ △ 1.5.3. or later
47VX30MF △ △ 1.5.3. or later
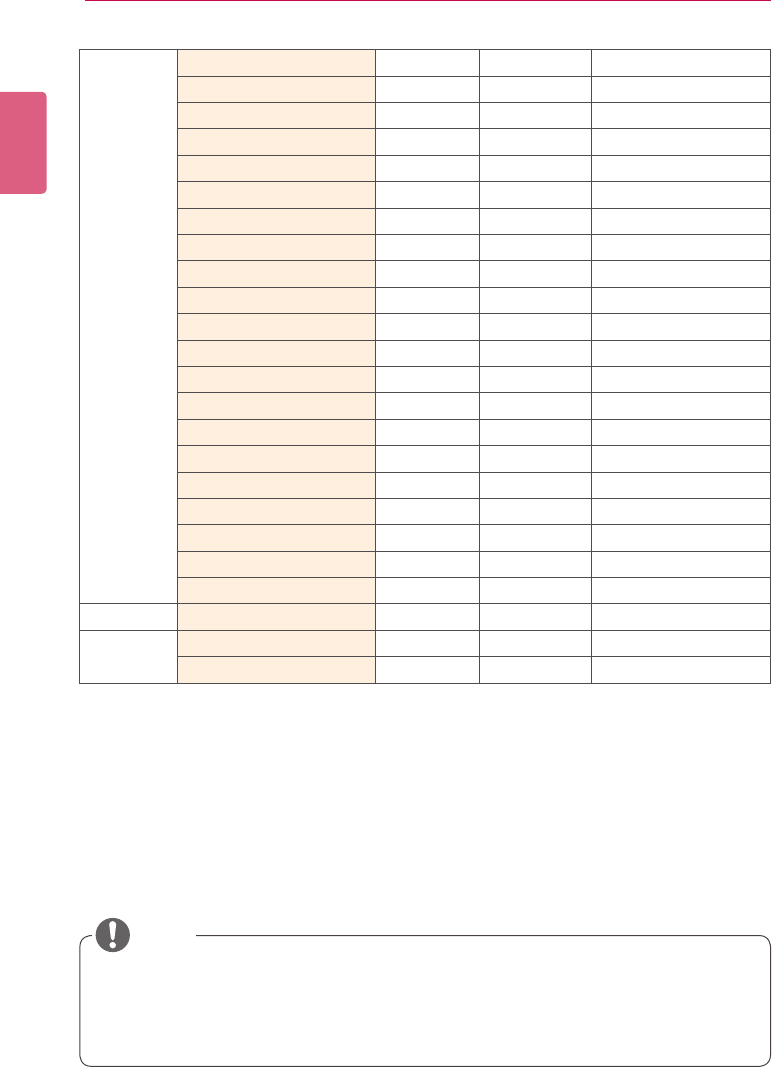
ENGLISH
122 APPENDIX
• DisplaydevicessupportedintheMediaPlayeraresubjecttochangewithoutpriornoticeto
improvetheproductperformance.
• Somemodelsmaynotsupportthecontrolfunctiondependingonthermwareversionof
themonitor.
NOTE
※O:PossibleforSet-topbox/monitortosupport,
△
:PossibleforSet-topboxtosupport,
X:ImpossibleforSet-topbox/monitortosupport..
S7Series
42/47VX30 O O 1.5.9.orlater
42/47/55VS20 O O 1.3.9.orlater
42/47/55WS10 O O 1.3.9.orlater
42/47/55WS50 O O 1.5.9.orlater
32WL30 O O 1.3.5.orlater
42/47/55/60WL30 O O 1.5.9.orlater
42/47/55WL10 O O 1.5.11.orlater
TSP500 O O 1.3.9.orlater
47WV30 △O 1.3.3.orlater
47WV30BR △O 1.3.7.orlater
47WV50 O O 1.5.11.orlater
55WV70 OO 1.5.9.orlater
55WV70MD △ △ 1.3.3.orlater
29WR30 △X -
38WR50 O O 1.3.5.orlater
42/47/55WX30 O O 1.5.9.orlater
47WX50 O O 1.5.9.orlater
72WX70 O O 1.5.5.orlater
42/47/55WT30 O O 1.5.11.orlater
42/47LT55A O O 1.5.15.orlater
55LV75A O O 1.5.17.1.orlater
L9Series 84WS70 △ △ 1.5.1.orlater
L14Series 32/42/47/55/65LS33A O O 1.5.17.1.orlater
42/47/55LS35A O O 1.5.19.orlater
Make sure to read the Important Precautions
before using the product.
Keep the User’s Guide(CD) in an accessible
place for furture reference.
The model and serial number of the SET is
located on the back and one side of the SET.
Record it below should you ever need service.
WARNING - This is a class A product. In
a domestic environment this product may
cause radio interference in which case the
user may be required to take adequate
measures.
MODEL
SERIAL
Temporary noise is normal when powering
ON or OFF this device.
