LG LFX25960SB User Manual OWNERS LFX21960
Lg-Lfx21960St-Owners-Manual-675271 lg-lfx21960st-owners-manual-675271
2015-03-12
User Manual: LG LFX25960SB OWNERS MANUAL (OWNERS MANUAL)
Open the PDF directly: View PDF ![]() .
.
Page Count: 40
BOTTOM FREEZER
REFRIGERATOR
User's Guide
Please read this guide thoroughly
before operating and keep it handy for
reference at all times.
CONGELADOR
INFERIOR
REFRIGERADOR
Gu\303\255a para el Uso yCuidado
Leadetenidamenteestasinstrucciones antes
utilizar el frigor\303\255fico ygu\303\241rdelas como referencia
para el futuro.
CONG\303\211LATEUR
INF\303\211RIEUR
R\303\211FRIG\303\211RATEUR
Guide d'Utilisation et
d'Entretien
Veuillez lire ce manuel en entier avant de mettre
en marchel'unit\303\251 et conservez-le \303\240
port\303\251e de la
main pour le consulter \303\240tout moment.
Models /Modelos /Mod\303\250les
LFX25970 ** /LFX21970 ** /LFX25960 **/LFX21960**
P/No. 3828JL8097A
website:http://us.lge.com
1-800-243-0000
24 HOURS ADAY, 7DAYS AWEEK FOR LG CUSTOMER SERVICE
parael Servicio LG (Atenci\303\263n al Cliente) 24 horas al d\303\255a,
7d\303\255asala semana
24 HEURES SUR 24,SERVICE \303\200LA CLIENT\303\210LE LG 7JOURS SUR 7
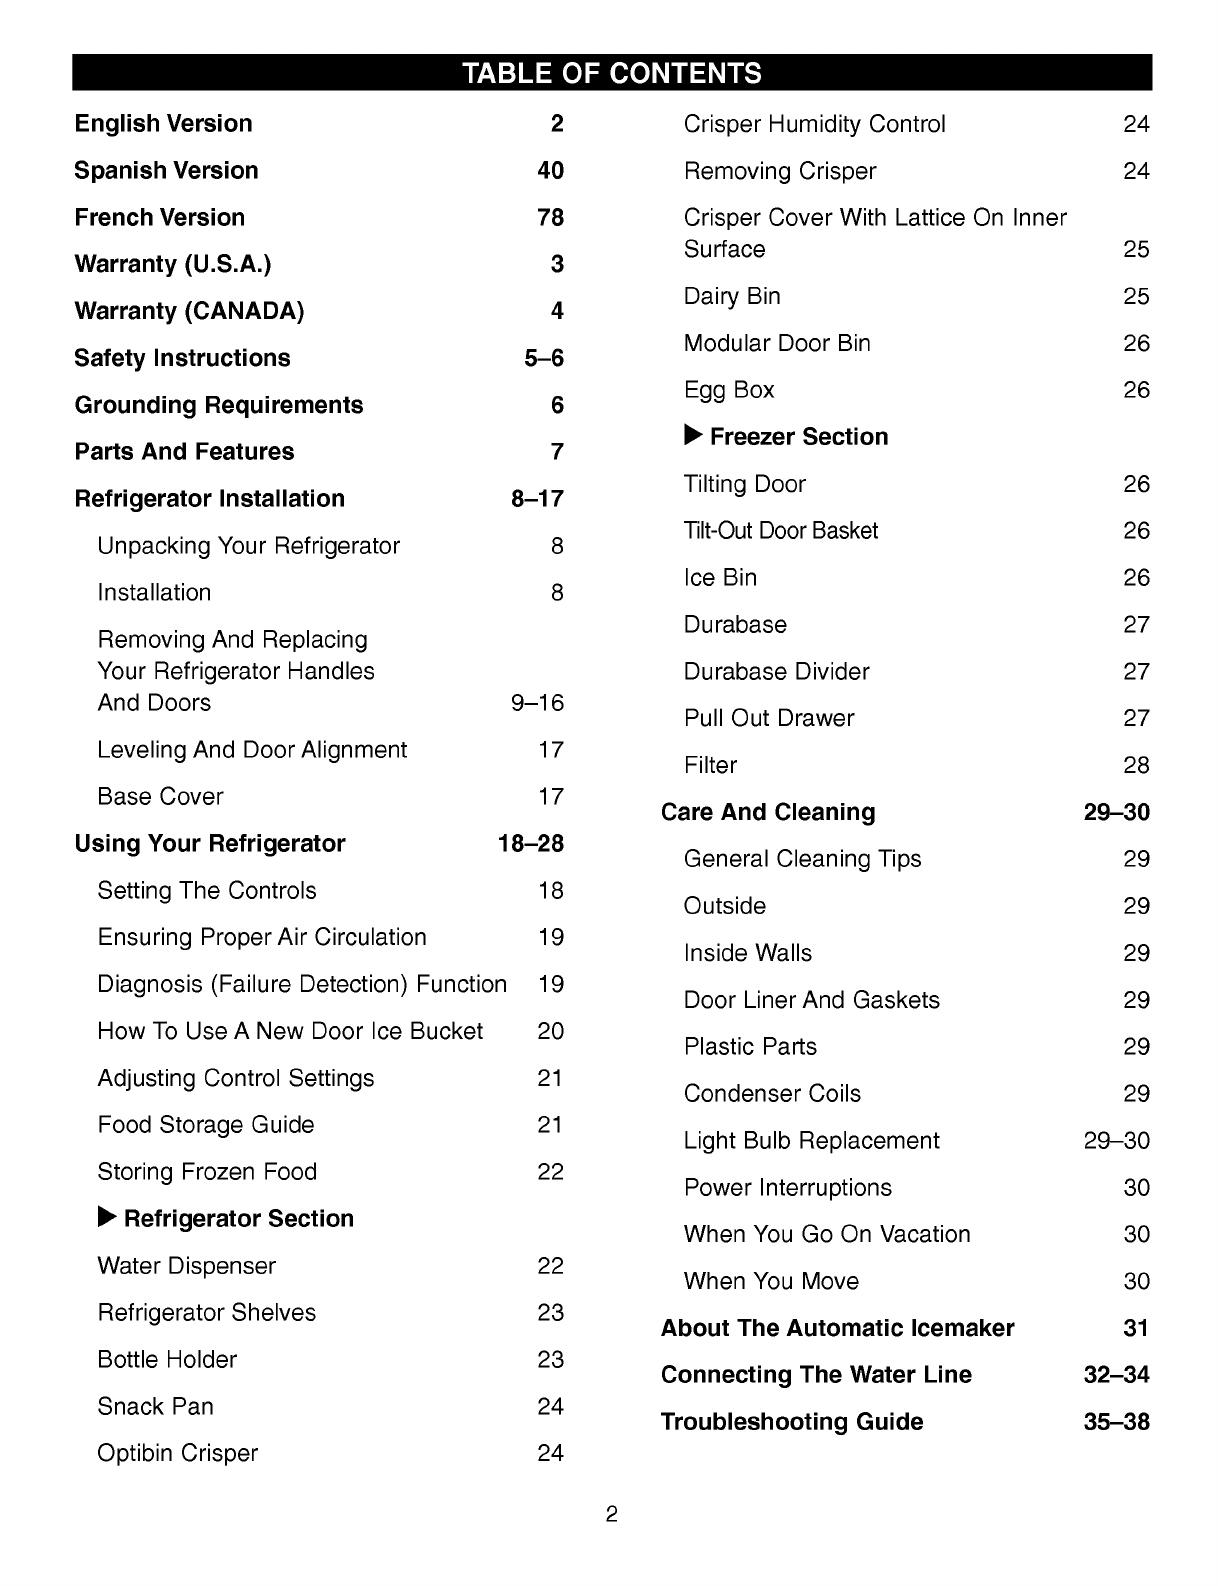
English Version 2
Spanish Version 40
FrenchVersion 78
Warranty (U.S.A.) 3
Warranty (CANADA) 4
Safety Instructions 5--6
Grounding
Requirements 6
Parts And Features 7
Refrigerator Installation 8--17
UnpackingYour Refrigerator 8
Installation 8
Removing And Replacing
Your Refrigerator Handles
And Doors 9--16
Leveling And DoorAlignment 17
Base Cover 17
Using Your Refrigerator 18--28
SettingTheControls 18
Ensuring Proper Air Circulation 19
Diagnosis (Failure Detection) Function 19
How To Use ANew Door Ice Bucket 20
Adjusting Control Settings 21
Food Storage Guide 21
Storing Frozen Food 22
uRefrigerator Section
Water Dispenser 22
Refrigerator Shelves 23
BottleHolder 23
SnackPan 24
Optibin Crisper 24
Crisper Humidity Control 24
Removing Crisper 24
Crisper Cover With Lattice On Inner
Surface 25
Dairy Bin 25
Modular Door Bin 26
Egg Box 26
uFreezerSection
Tilting Door 26
Tilt-Out Door Basket 26
Ice Bin 26
Durabase 27
DurabaseDivider 27
Pull Out Drawer 27
Filter 28
Care And Cleaning 29--30
General Cleaning Tips 29
Outside 29
InsideWalls 29
Door Liner And Gaskets 29
Plastic Parts 29
CondenserCoils 29
Light Bulb Replacement 29--30
Power Interruptions 30
When You Go On Vacation 30
When You Move 30
About TheAutomaticIcemaker 31
Connecting The Water Line 32--34
Troubleshooting Guide 35--38
2
3
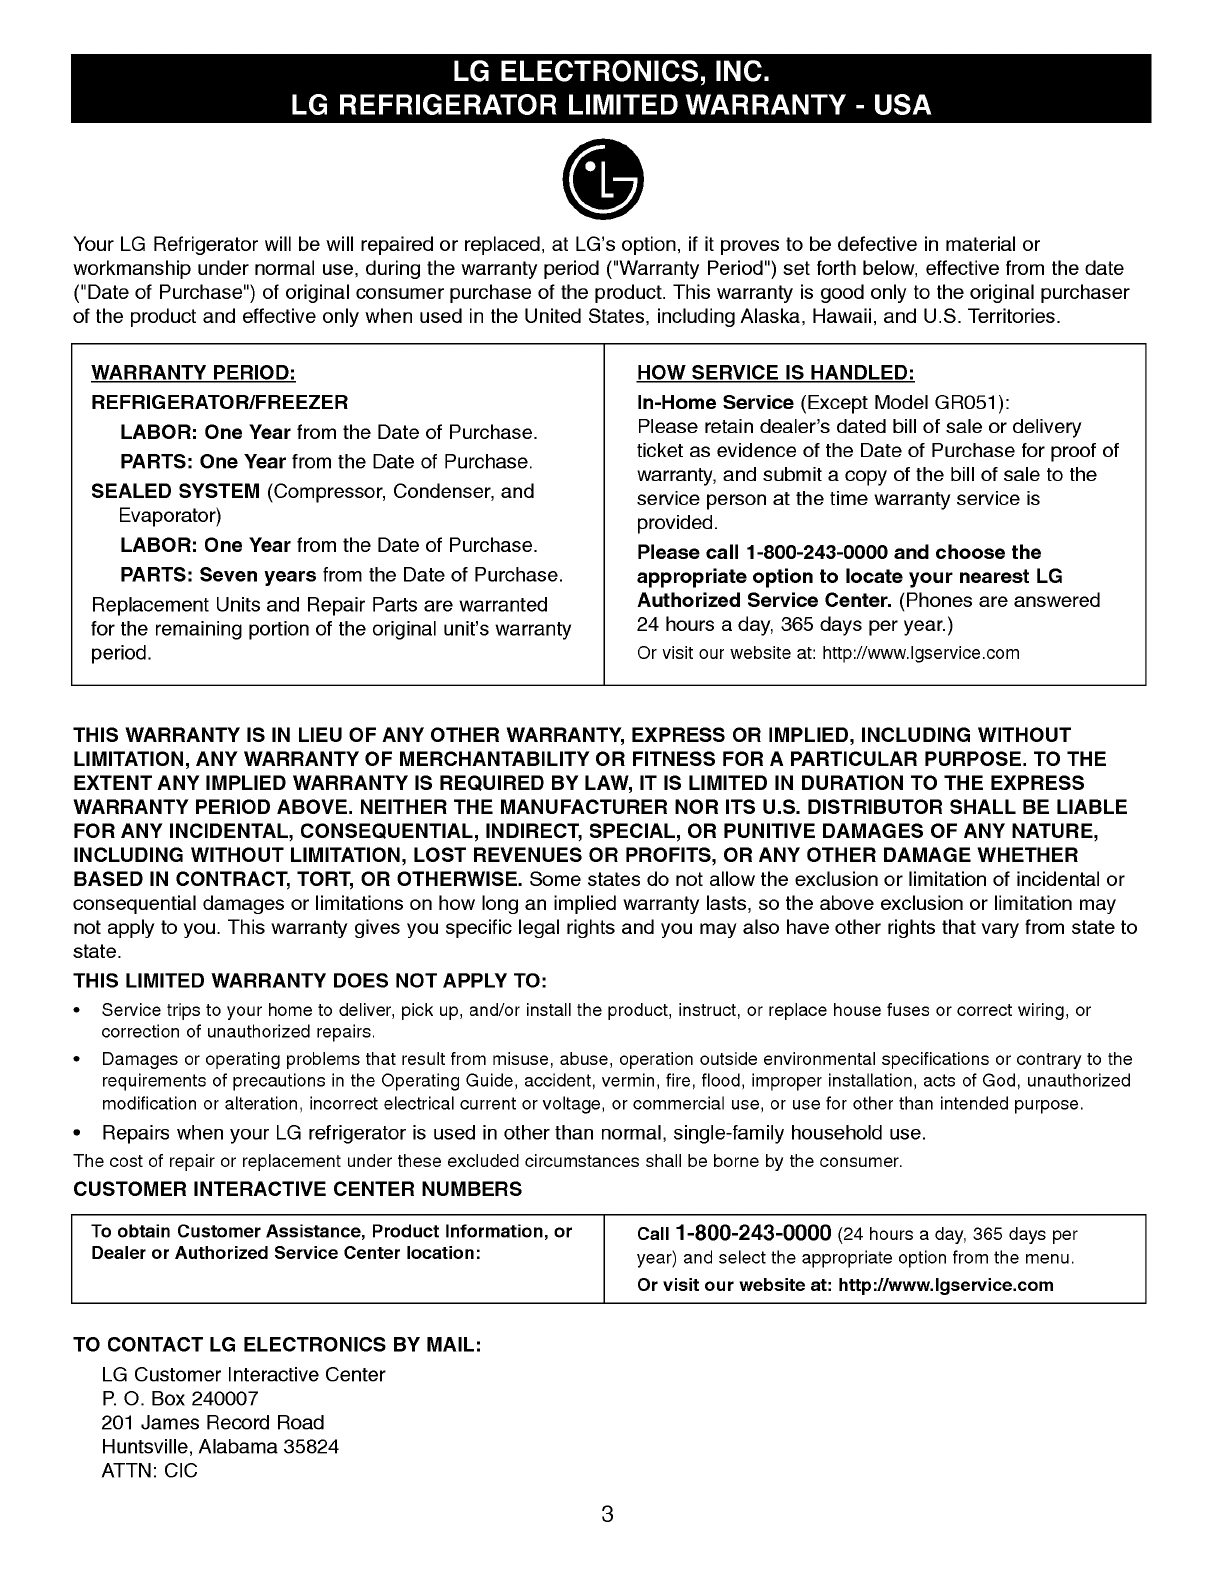
Your LG Refrigerator will be will repaired or replaced, at LG's option, if it proves to be defective in material or
workmanship under normal use, during the warranty period (\"Warranty Period\") set forth below, effective from the date
(\"Dateof Purchase\")of original consumer purchase of the product. This warranty is good only to the original purchaser
of the product and effective only when used in the United States, including Alaska, Hawaii, and U.S. Territories.
THISWARRANTY IS IN LIEU OF ANY OTHER WARRANTY, EXPRESS OR IMPLIED, INCLUDINGWITHOUT
LIMITATION, ANY WARRANTY OF MERCHANTABILITY OR FITNESSFOR APARTICULAR PURPOSE. TO THE
EXTENTANY IMPLIED WARRANTY IS REQUIRED BY LAW, IT IS LIMITED IN DURATION TO THE EXPRESS
WARRANTY PERIOD ABOVE. NEITHER THE MANUFACTURER NOR ITSU.S.DISTRIBUTOR SHALL BE LIABLE
FOR ANY INCIDENTAL, CONSEQUENTIAL, INDIRECT, SPECIAL, OR PUNITIVE DAMAGESOF ANY NATURE,
INCLUDING WITHOUT LIMITATION, LOST REVENUESOR PROFITS,
OR ANY OTHER DAMAGE WHETHER
BASED IN CONTRACT, TORT, OR OTHERWISE. Some states do not allow the exclusion or limitation of incidental or
consequential damages or limitations on how long an implied warranty lasts, so the above exclusion or limitation may
not apply to you. This warranty gives you specific legal rights and you may also have other rights that vary from state to
state.
THIS LIMITED WARRANTY DOES NOT APPLY TO:
\342\200\242
Service trips to your home to deliver, pick up, and/or install the product, instruct, or replace housefuses or correct wiring, or
correction of unauthorized repairs.
\342\200\242
Damages or operating problems that result from misuse, abuse, operation outside environmental specifications or contrary to the
requirements of precautions in the Operating Guide, accident, vermin, fire, flood, improper installation, acts of God, unauthorized
modification or alteration, incorrect electrical current or voltage, or commercial
use,or use for other than intended purpose.
\342\200\242
Repairs when your LG refrigerator is used in other than normal, single-family household use.
The cost of repair or replacement under these excluded circumstances shall be borneby the consumer.
CUSTOMER INTERACTIVE CENTER NUMBERS
TO CONTACT LG ELECTRONICS BY MAIL:
LGCustomerInteractive Center
P. O. Box 240007
201 James RecordRoad
Huntsville, Alabama 35824
ATTN: CIC
WARRANTY PERIOD:
REFRIGERATOR/FREEZER
LABOR: One Year from the Date of Purchase.
PARTS: One Year from the Date of Purchase.
SEALED SYSTEM (Compressor, Condenser,and
Evaporator)
LABOR: One Year from the Date of Purchase.
PARTS: Seven years from the Date of Purchase.
Replacement Units and Repair Parts are warranted
for the remaining portion of the original unit's warranty
period.
HOW SERVICE IS HANDLED:
In-Home Service (ExceptModel GR051):
Please retain dealer's dated bill of sale or delivery
ticket as evidenceof the Date of Purchase for proof of
warranty, and submit acopy of the bill of sale to the
service person at the time warranty service is
provided.
Please call 1-800-243-0000and choose the
appropriate option to locate your nearestLG
Authorized Service Center. (Phones are answered
24 hours aday, 365 days per year.)
Or visit our website at: http://www.lgservice.com
To obtain CustomerAssistance,Product Information, or
Dealer or Authorized Service Center location: Call 1-800-243-0000 (24 hours aday, 365 days per
year) and select the appropriate option from the menu.
Orvisit our website at: http://www.lgservice.com

4
LIMITED WARRANTY (CANADA)
LG REFRIGERATOR
LG Electronics will repair or at its option replace, without charge, your product which proves to be defective
in
material or workmanship under normal use, during the warranty period listed below from the date of original
purchase. This warranty is good only to the original purchaser ofthe product during the warranty period as
long as it is in any Canadian Province.
WARRANTY PERIOD
MODEL# :LFX25970**/LFX21970**/LFX25960**/LFX21960** LABOR :2Years PARTS : 2Years
SEALED SYSTEM :Labor/ 2Years, Parts/ 5Years (Compressor, condenser, and evaporator)
HOW SERVICEISHANDLED :Call 1-888-542-2623 (1-888-LG-CANADA) and choose the appropriate
prompt. Pleasehave product type (refrigerator) and ZIP Codeready.
See our website at http://www.lg.ca
This warranty provides in-home service.
No other express warranty is applicable to this product. THE DURATION OF ANY IMPLIED WARRANTIES,
INCLUDING THE IMPLIED WARRANTY OF MERCHANTABILITY, IS LIMITED TO THE
DURATION OF THE EXPRESS WARRANTY HEREIN. LG ELECTRONICS
USA, INC. SHALL NOT
BE LIABLE FORTHELOSS OF THE USE OF THE PRODUCT,INCONVIENCE,
LOSSOR ANY
OTHER DAMAGES, DIRECT OR CONSEQUENTIAL,
ARISINGOUTOFTHEUSE OF, OR
INABILITY TO USE, THISPRODUCTOR FORANY BREACH OF ANY EXPRESS OR IMPLIED
WARRANTY, INCLUDING THE IMPLIED WARRANTY OF MERCHANTABILITYAPPLICABLE TO
THIS PRODUCT.
Some provincesdonot allow the exclusion or limitation of incidental or consequential damagesor limitations on
how long an implied warranty lasts; so these limitations or exclusionsmay not apply to you. This warranty gives
you specific legal rights and you may also have other rights which vary from provinceto province.
THE ABOVE WARRANTY DOES NOT APPLY TO:
1. Service trips to your home to deliver and pickup, install, instruct, or replace house fusesor correct wiring, plumbing,
or correctionof unauthorized repairs.
2. Damage to the productcausedby accident, vermin, fire, flood, alteration, misues, abuse,improper installation, or acts
of God.
3. Commercial use or use for otherthan the intended purpose.
Therefore, these costs are the responsibility of the consumer.
CUSTOMER ASSISTANCE NUMBERS:
Retain your Sales Receipt to prove dateof purchase.
Acopy of your Sales Receipt must be submitted at the time
warranty service is provided.
Call 1-888-542-2623(1-888-LG-CANADA)
and choose the
appropriate prompt.
http://www.lg.ca
Call 1-888-542-2623 (1-888-LG-CANADA) and choosethe
appropriate prompt. Please have your product type
(refrigerator) and ZIP Codeready.
http://www.lg.ca
To Prove Warranty Coverage:
ToObtain Product, Customer, or
Service Assistance by phone:
or by Internet:
To ObtainNearest Authorized
Service Center, Parts Distributor,
or Sales Dealer by phone:
or by Internet:
5
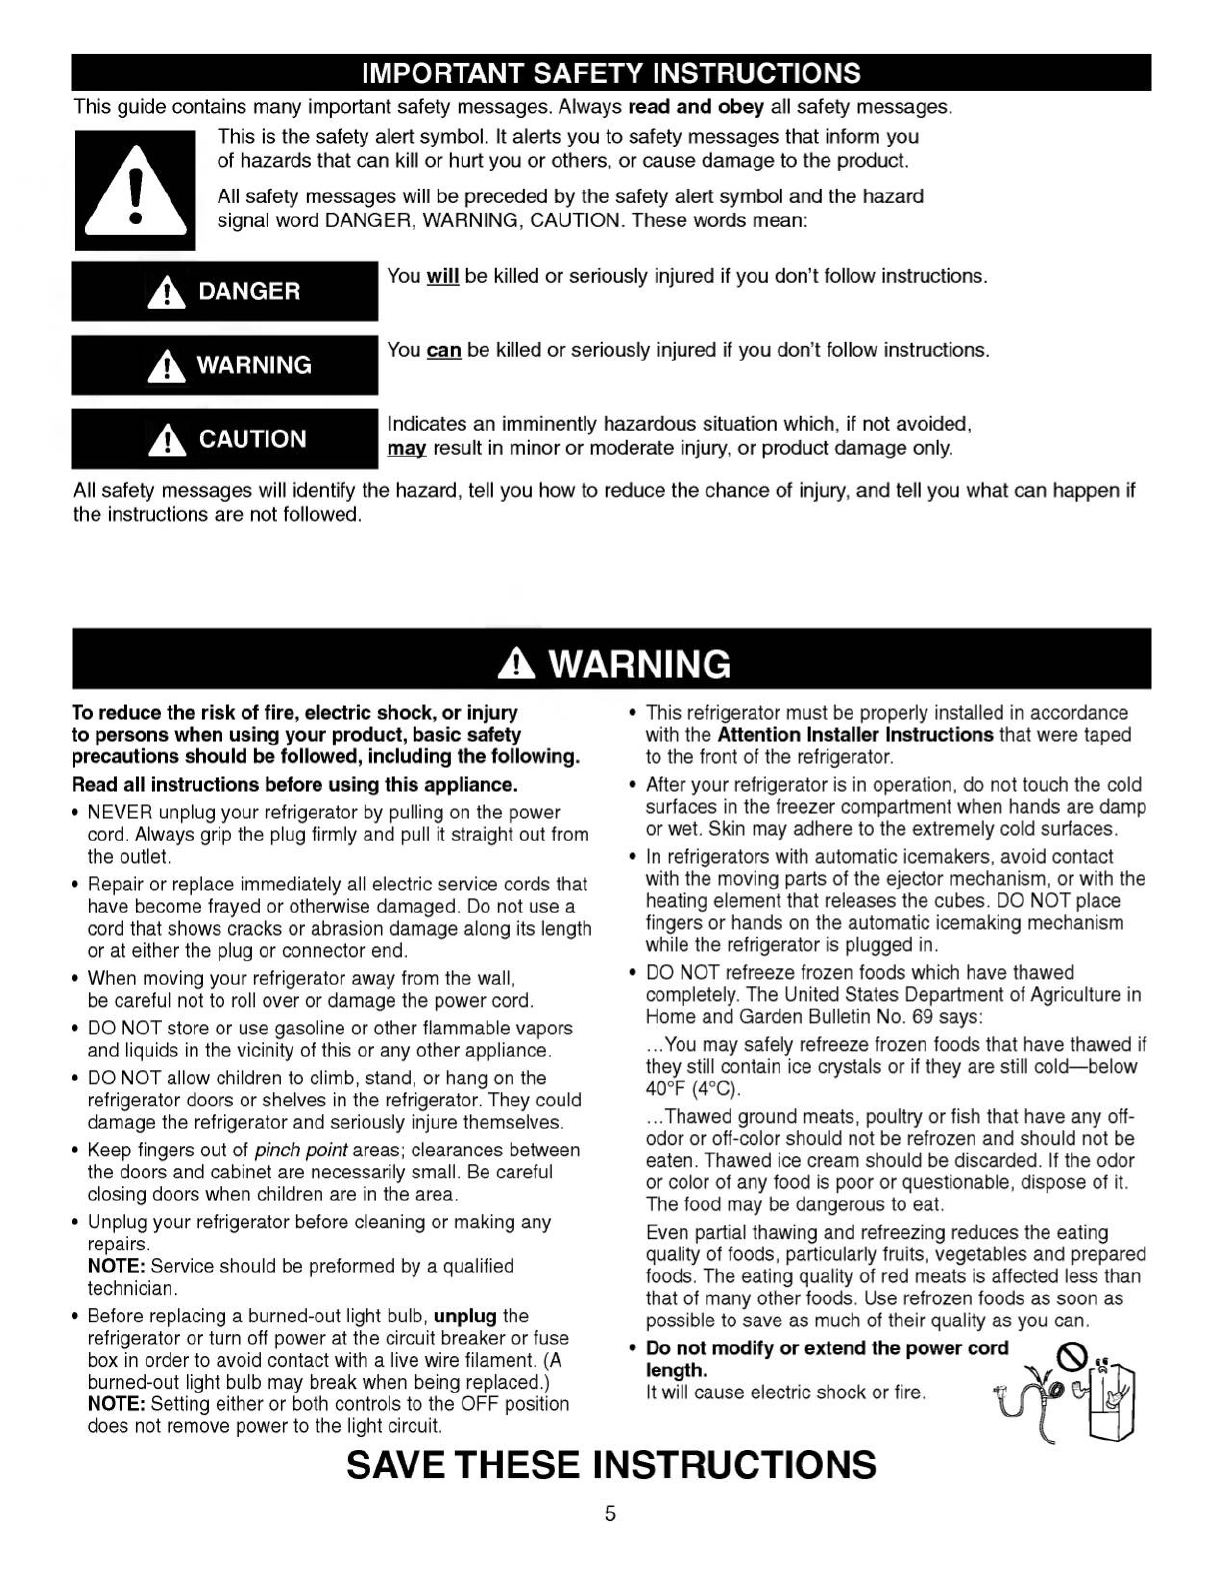
This guide contains many important safety messages. Always read and obey all safety messages.
This is the safety alert symbol. It alerts you to safety messages that inform you
of hazards that can kill or hurt you or others, or cause damageto the product.
All safety messages will be preceded by the safety alert symbol and the hazard
signalword DANGER, WARNING, CAUTION. These words mean:
CAUTION
WARNING
You can be killed or seriously injured if you don't follow instructions.
Indicates an imminently hazardous situation which, if not avoided,
may result in minor or moderate injury, or product damage only.
All safety messages will identify the hazard, tell you how to reduce the chance of injury, and tell you what can happen if
the instructions are not followed.
IMPORTANT SAFETY INSTRUCTIONS
WARNING
To reduce the risk of fire, electric shock,orinjury
to persons when using your product, basic safety
precautions should be followed, including the following.
Read all instructions before using this appliance.
\342\200\242
NEVER unplug your refrigerator by pulling on the power
cord. Always grip the plug firmly and pull it straight out from
the outlet.
\342\200\242
Repair or replace immediately all electric service cords that
have become frayed or otherwise damaged. Do not use a
cord that shows cracks or abrasion damage along its length
or at either the plug or connector end.
\342\200\242
When moving your refrigerator away from the wall,
be careful not to roll over or damage the powercord.
\342\200\242
DO NOT store or use gasolineor other flammable vapors
and liquids in the vicinity of this or any other appliance.
\342\200\242
DO NOT allow children to climb, stand, or hang on the
refrigerator doors or shelves in the refrigerator. They could
damage the refrigerator and seriouslyinjure themselves.
\342\200\242
Keep fingers out of pinch point areas; clearances between
the doors and cabinet are necessarily small. Becareful
closing doors when children are in the area.
\342\200\242
Unplug your refrigerator before cleaning or making any
repairs.
NOTE: Service should be preformed by aqualified
technician.
\342\200\242
Before replacing aburned-out light bulb, unplug the
refrigerator or turn off power at the circuit breaker or fuse
box in order to avoid contact with alive wire filament. (A
burned-out light bulb may break when being replaced.)
NOTE: Setting either or both controls to the OFF position
does not remove power to the light circuit.
\342\200\242
This refrigerator must be properly installed in accordance
with the Attention Installer Instructions that were taped
to the front of the refrigerator.
\342\200\242
After your refrigerator is in operation, do not touch the cold
surfaces in the freezer compartment when hands are damp
or wet. Skin may adhere to the extremely coldsurfaces.
\342\200\242
In refrigerators with automatic icemakers, avoid contact
with the moving parts of the ejector mechanism,or with the
heating element that releases the cubes. DO NOT place
fingers or hands on the automatic icemaking mechanism
while the refrigerator is plugged in.
\342\200\242
DO NOT refreeze frozen foods which have thawed
completely. The United States Department of Agriculture in
Home and Garden Bulletin No. 69 says:
...You
may safely refreeze frozen foods that have thawed if
they still contain ice crystals or if they are still cold---below
40\302\260F
(4\302\260C).
...Thawed ground meats, poultry or fish that have any off-
odor or off-colorshould not be refrozen and should not be
eaten. Thawed ice cream should be discarded.If the odor
or color of any food is poor or questionable, dispose of it.
The food may be dangerous to eat.
Even partial thawing and refreezing reduces the eating
quality of foods, particularly fruits, vegetables and prepared
foods. The eating quality of red meats is affected less than
that of many other foods. Use refrozen foods as soon as
possible to save as much of their quality as you can.
\342\200\242
Do not modify or extend the powercord
length.
It will cause electric shock or fire.
SAVE THESE INSTRUCTIONS
DANGER
You will be killed or seriously injured if you don't follow instructions.
IMPORTANT: Please read carefully.
TOCONNECTELECTRICITY
RECOMMENDED GROUNDING METHOD
The refrigerator should always be pluggedinto its own
individual properly grounded electrical outlet rated for
115 Volts, 60 Hz,AC only, and fused at 15 or 20 amperes.
This provides the best performance and also prevents
overloading house wiring circuits which could cause afire
hazard from overheated wires. It is recommended that a
separate circuit serving only this appliance be provided.
Use areceptaclewhich cannot be turned off with aswitch
or pull chain. Do not use an extension cord.
Where astandard two-prong wall outlet is encountered,
it is your personal responsibility and obligationto have it
replaced with aproperly grounded three-prong wall outlet.
Do not, under any circumstances, cut or removethe
third (ground) prong from the power cord.
NOTE: Before performing any type of installation,
cleaning, or removing alight bulb, turn the control
(Thermostat, Refrigerator Control or Freezer Control,
depending on the model)to OFF and then disconnect the
refrigeratorfrom the electrical source. When you are
finished, reconnectthe refrigerator to the electrical source
and reset the control (Thermostat, Refrigerator Control or
Freezer Control,dependingon the model)to the desired
setting.
USE OF EXTENSION CORDS
Becauseof potential safety hazards under certain
conditions, we strongly recommend
againstthe use of
an extension cord. However,if you still elect to use an
extensioncord,it is absolutely necessary that it be a
UL-listed (USA), 3-wire grounding type appliance
extensioncordhaving agrounding type plug and outlet,
and that the electrical rating of the cord be 15amperes
(minimum) and 120 volts.
Use of an extension cordwill increase the clearance
needed for the back of the refrigerator.
WARNING
Electrical Shock Hazard
FOR PERSONAL SAFETY, this appliance must be
properly grounded.Have the wall outlet and the
circuit checked by aqualified electrician to make sure
the outlet is properly grounded.
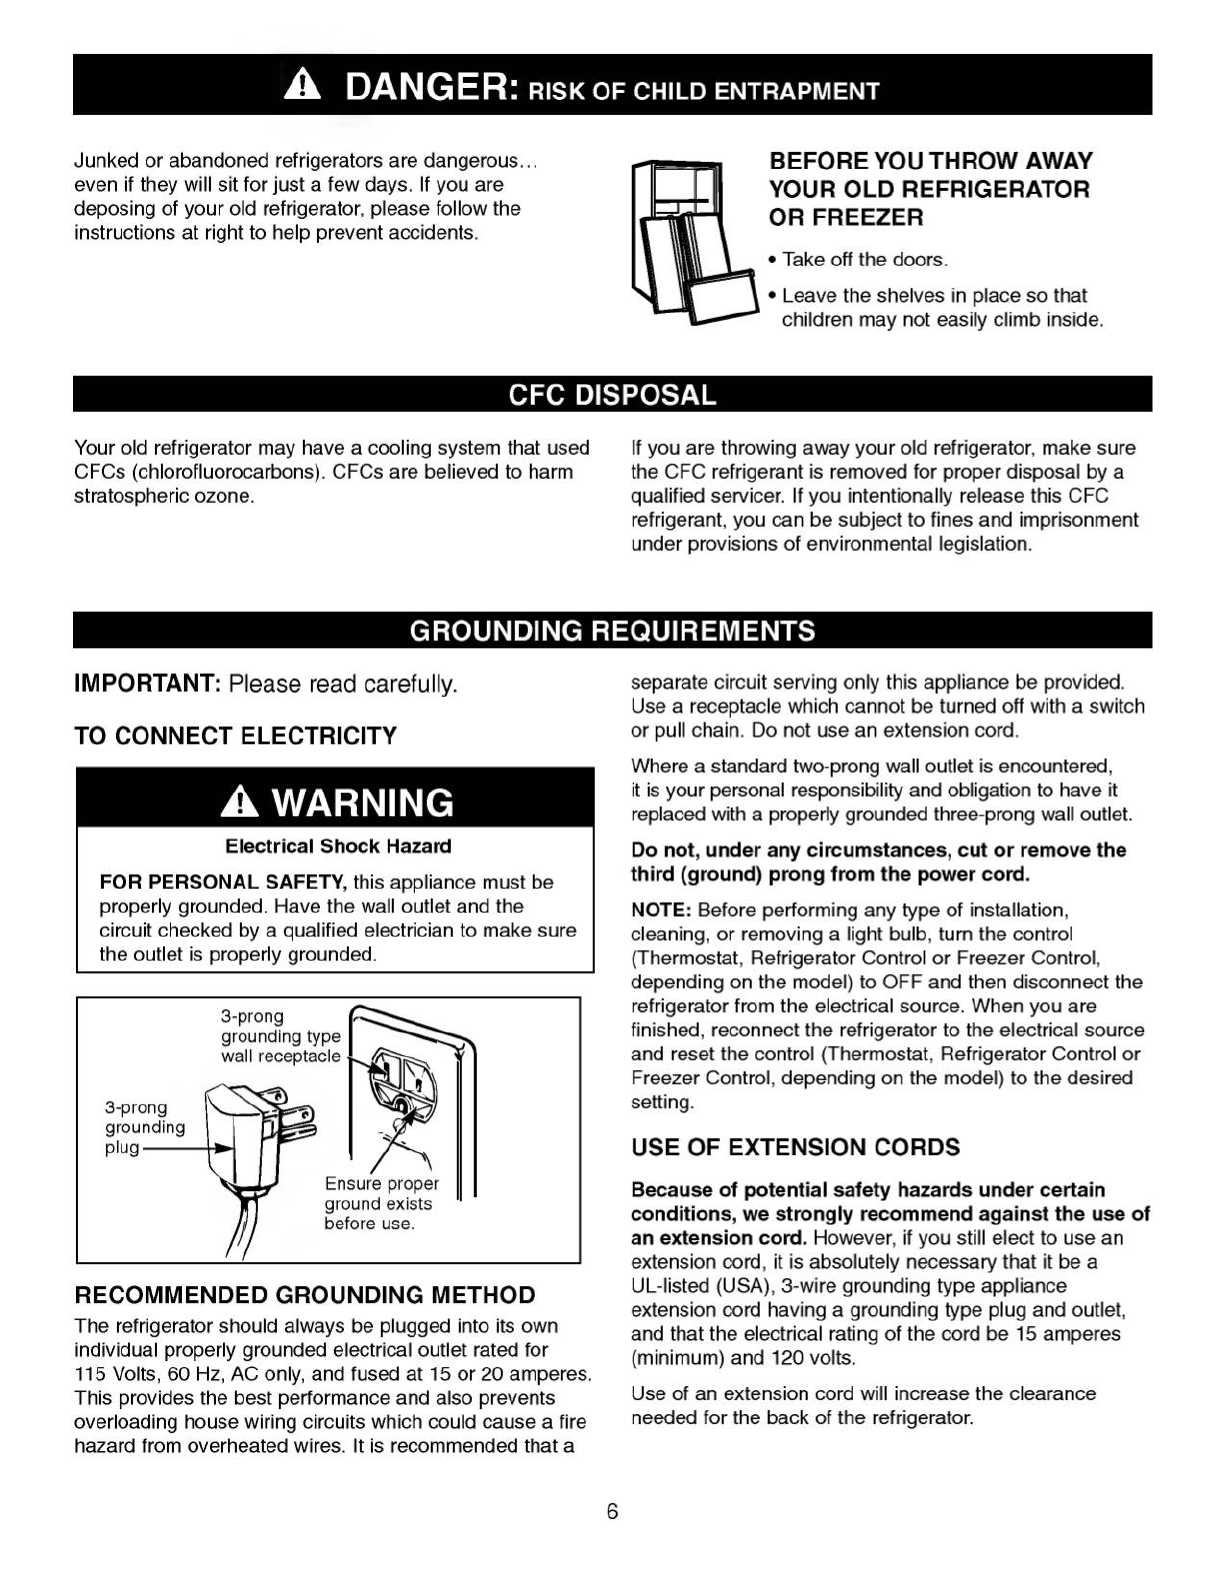
Ensure proper
ground exists
before use.
3-prong
grounding
plug
3-prong
grounding type
wall receptacle
Your old refrigerator may have acoolingsystem that used
CFCs (chlorofluorocarbons). CFCs are believedto harm
stratospheric ozone.
If you are throwing away your old refrigerator,makesure
the CFC refrigerant is removed for proper disposal by a
qualified servicer. If you intentionally release this CFC
refrigerant,you can be subject to fines and imprisonment
under provisions of environmental legislation.
DANGER: RISK OF CHILDENTRAPMENT
Junked or abandoned refrigerators are dangerous...
even if they will sit for just afew days. If you are
deposing of your old refrigerator,please follow the
instructions at right to help prevent accidents.
BEFOREYOU THROW AWAY
YOUR OLD REFRIGERATOR
OR FREEZER
\342\200\242
Take off the doors.
\342\200\242
Leave the shelves in place so that
children may not easily climb inside.
CFC DISPOSAL
GROUNDING REQUIREMENTS
6
7
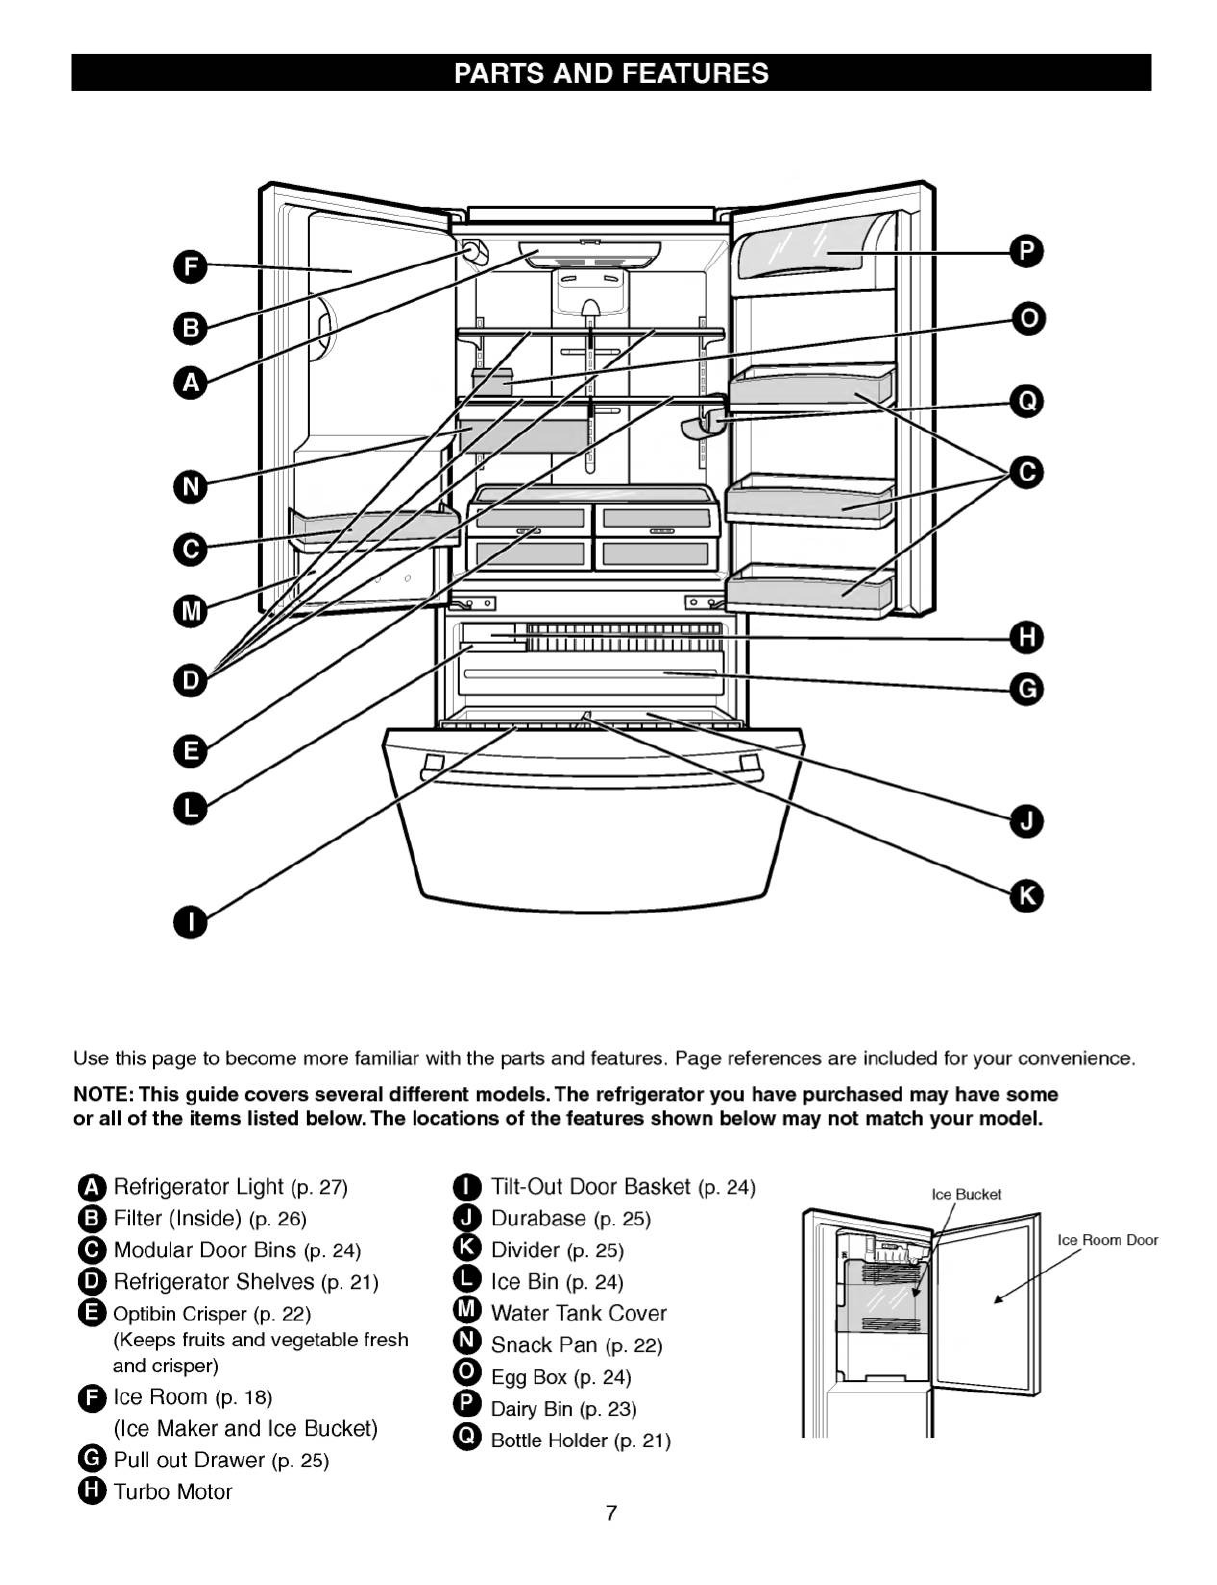
PARTS AND FEATURES
Use this page to become more familiar with the parts and features. Page references are included for your convenience.
NOTE: This guide covers severaldifferent models. The refrigerator you have purchased may have some
or all of the items listedbelow.The locations of the features shown below may not match your model.
A
B
F
N
M
E
L
I
H
G
K
J
P
C
D
Q
C
O
Refrigerator Light (p. 27)
Filter (Inside) (p. 26)
Modular Door Bins (p. 24)
Refrigerator Shelves (p.21)
Optibin Crisper (p. 22)
(Keeps fruits and vegetable fresh
and crisper)
Ice Room (p.18)
(IceMaker and Ice Bucket)
Pull out Drawer (p.25)
Turbo Motor
Tilt-Out Door Basket (p. 24)
Durabase (p.25)
Divider (p. 25)
Ice Bin (p. 24)
Water Tank Cover
Snack Pan (p. 22)
EggBox(p.24)
Dairy Bin (p. 23)
Bottle Holder (p.21)
A
B
C
D
E
F
G
H
I
J
K
L
M
N
O
P
Q
Ice Bucket
IceRoom Door
UNPACKING YOUR REFRIGERATOR
Remove tape and any temporary labels from your
refrigerator before using.Do not remove any warning-
type labels, the modeland serial number label, or the
TechSheet that is attached to back wall of the refrigerator.
To remove any remaining tape or glue,rub the area
briskly with your thumb. Tape or glue residuecanalsobe
easily removed by rubbing asmall amount of liquid dish
soap over the adhesive with your fingers. Wipe with warm
water and dry.
Do not use sharp instruments, rubbing alcohol, flammable
fluids, or abrasive cleaners to remove tape or glue.These
products can damage the surface of your refrigerator. For
more information, see the Important Safety Instructions
section.
Refrigerator shelves are installed in the shipping position.
Please reinstall shelves accordingto your individual
storage needs.
INSTALLATION
1. To avoid vibration, the unit must be level. If required,
adjust the leveling legs to compensate for unevenness
of the floor. The front should be slightly higher than the
rear to aid in door closing. Leveling legs can be turned
easily by tipping the cabinet slightly. Turn the leveling
legs clockwise ( ) to raise the unit,
counterclockwise ( ) to lower it.
2. Install this appliance in an area where the temperature
is between 55\302\260F
(13\302\260C) and 110\302\260F(43\302\260C.) If the
temperature around the appliance is too low or high,
cooling ability may be adversely affected.
3. Allow the clearance of at least 2inch from the ceiling and 1
inch from the side walls for better cooling efficiency, ease of
installation, proper air circulation and electrical connections.
wCAUTION: Avoid placing the unit near heat sources,
direct sunlight or moisture.
NEXT
1. Clean your refrigeratorthoroughly and wipe off all dust
accumulated during shipping.
2. Install accessories such as ice cube bin, drawers,
shelves, etc., in their proper places. They are packed
togetherto prevent possible damage during shipment.
3. Let your refrigerator run for at least 2 or 3hours before
putting food in it. Check the flow of cold air in the
freezer compartment to ensure proper cooling.Your
refrigerator is now ready for use.
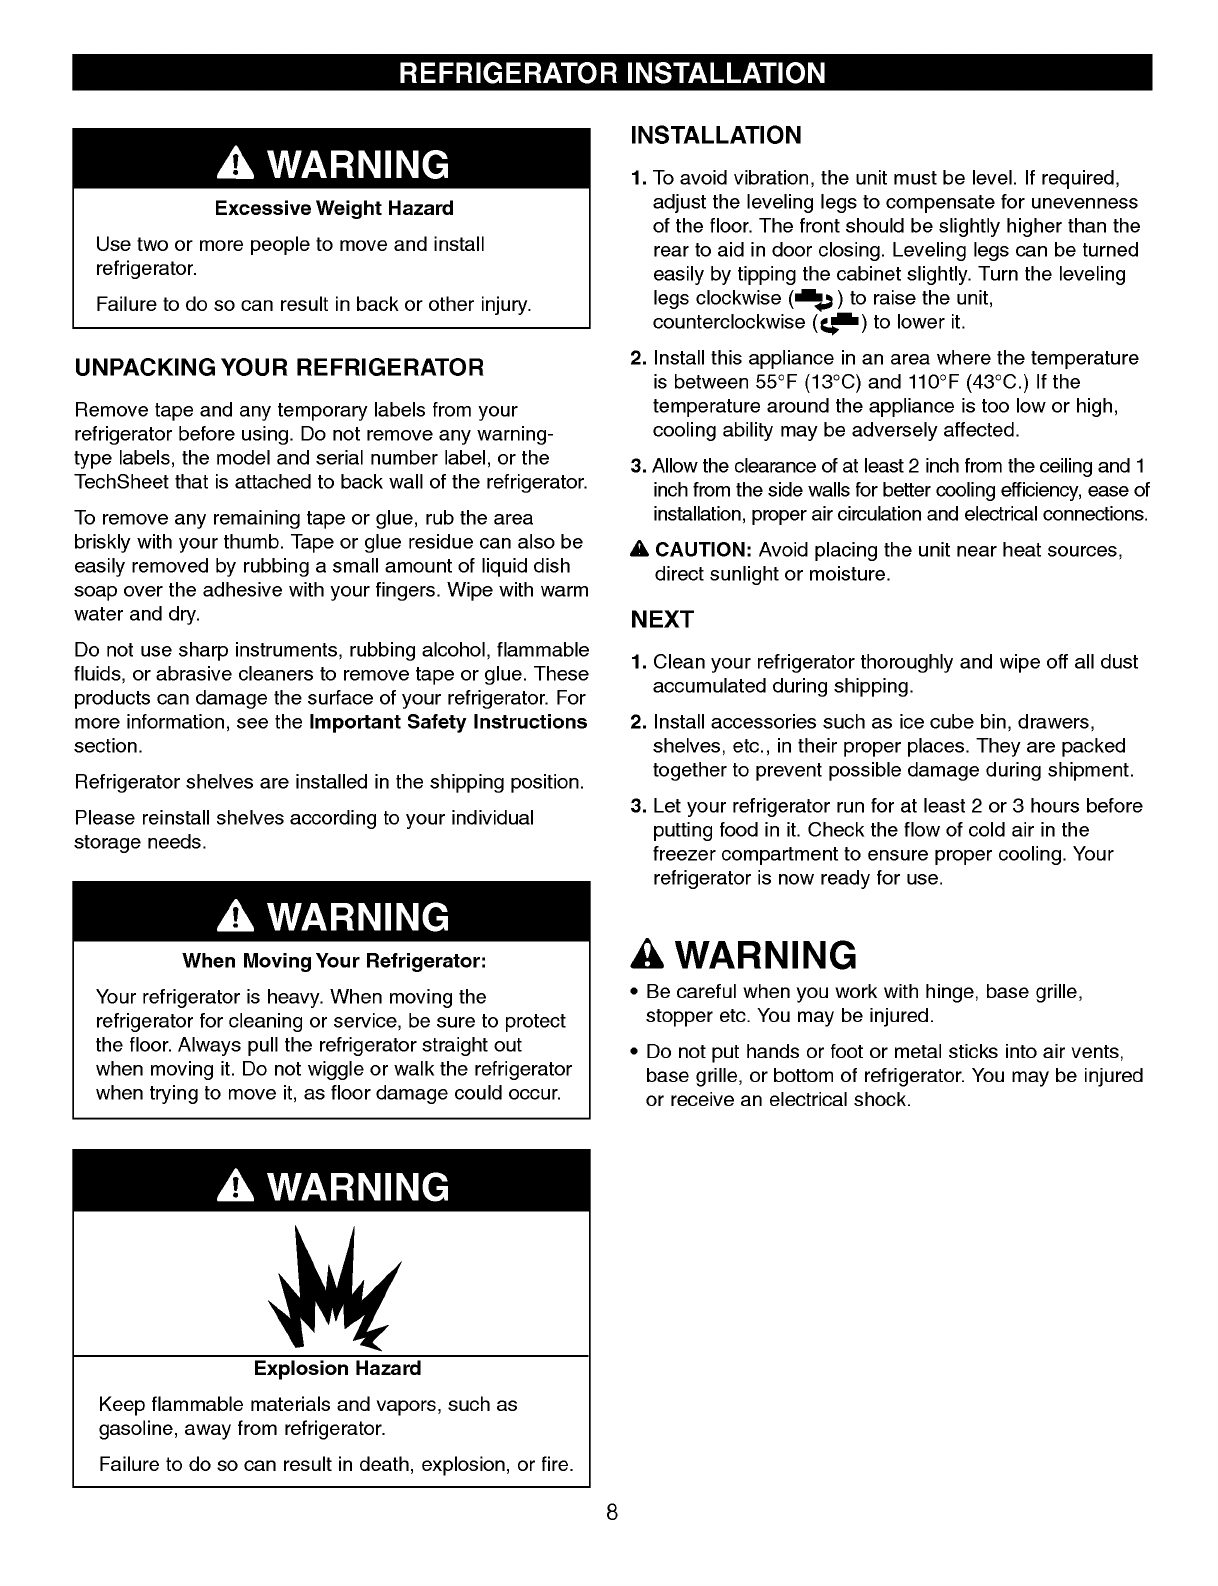
wWARNING
\342\200\242
Be careful when you work with hinge, base grille,
stopper etc. You may be injured.
\342\200\242
Do not put hands or foot or metal sticks into air vents,
base grille, or bottom of refrigerator. You may be injured
or receive an electrical shock.
Excessive Weight Hazard
Use two or more people to move and install
refrigerator.
Failure to do so canresult in back or other injury.
When Moving Your Refrigerator:
Your refrigerator is heavy. When moving the
refrigerator for cleaning or service, be sure to protect
the floor. Always pull the refrigerator straight out
when moving it. Do not wiggle or walk the refrigerator
when trying to move it, as floor damage could occur.
Explosion Hazard
Keepflammable materials and vapors, such as
gasoline, away from refrigerator.
Failure to do so can result in death, explosion, or fire.
8

HOW TO REMOVE DOOR HANDLES(LFX25960**/LFX21960**Models)
To move refrigerator through ahouse door, it may be necessary to remove the refrigertor door handles.
NOTE: Handle appearance may vary from
illustrations on this page.
1. Removing Refrigerator Handle
\342\200\242
Grasp the handle tightly with both hands
and slide the handleup (1)(this may
require some force).
\342\200\242
The keyhole slots (2) on the backof the
handle allow the handle to separate from
the mounting screws (3).
wCAUTION:The handlecouldbe
damagedif you hit it with ahammer
while removingor attaching.
wCAUTION: When you assemble or
disassemble handle, you must push or
pull with reasonable force.
2. Removing Freezer Drawer Handle
\342\200\242
Press the handle against door first.
\342\200\242
Grasp the handle tightly with both hands
and slide the handleto right (1)(this may
require some force).
\342\200\242
The keyhole slots (2) on the backof the
handle allow the handle to separate from
the mounting screws (3).
9
Screws
mounted
on door
Keyhole slots
on backof
handle
Screws
mounted
on door
Keyholeslots
on back of
handle
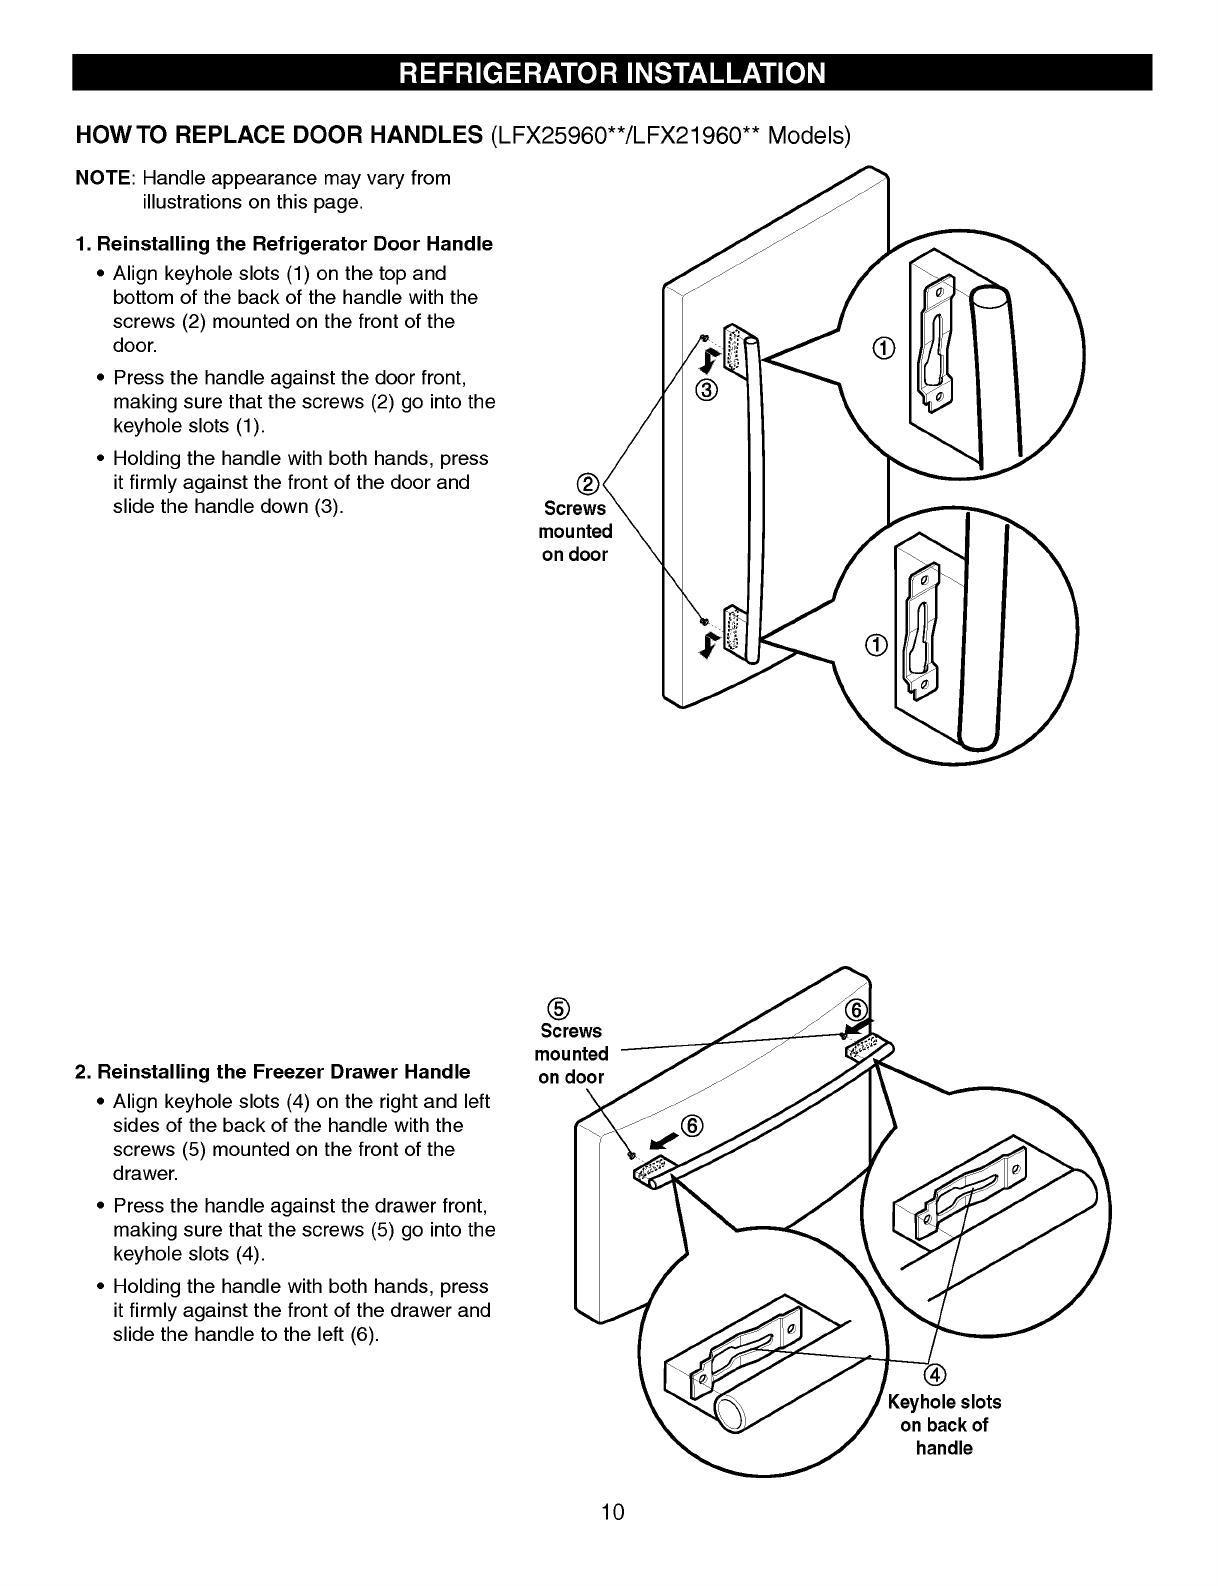
HOW TO REPLACE DOOR HANDLES(LFX25960**/LFX21960**Models)
NOTE: Handle appearance may vary from
illustrations on this page.
1. Reinstalling the Refrigerator DoorHandle
\342\200\242
Align keyhole slots (1) on the top and
bottom of the back of the handle with the
screws (2) mounted on the front of the
door.
\342\200\242
Press the handle against the door front,
making sure that the screws (2) go into the
keyhole slots (1).
\342\200\242
Holding the handle with both hands, press
it firmly against the front of the door and
slidethe handledown (3).
2. Reinstalling the Freezer Drawer Handle
\342\200\242
Align keyhole slots (4) on the right and left
sides of the back of the handle with the
screws (5) mounted on the front of the
drawer.
\342\200\242
Press the handle against the drawer front,
making sure that the screws (5) go into the
keyhole slots (4).
\342\200\242
Holding the handle with both hands, press
it firmly against the front of the drawer and
slidethe handleto the left (6).
10
Screws
mounted
on door
Screws
mounted
on door
Keyhole slots
on back of
handle
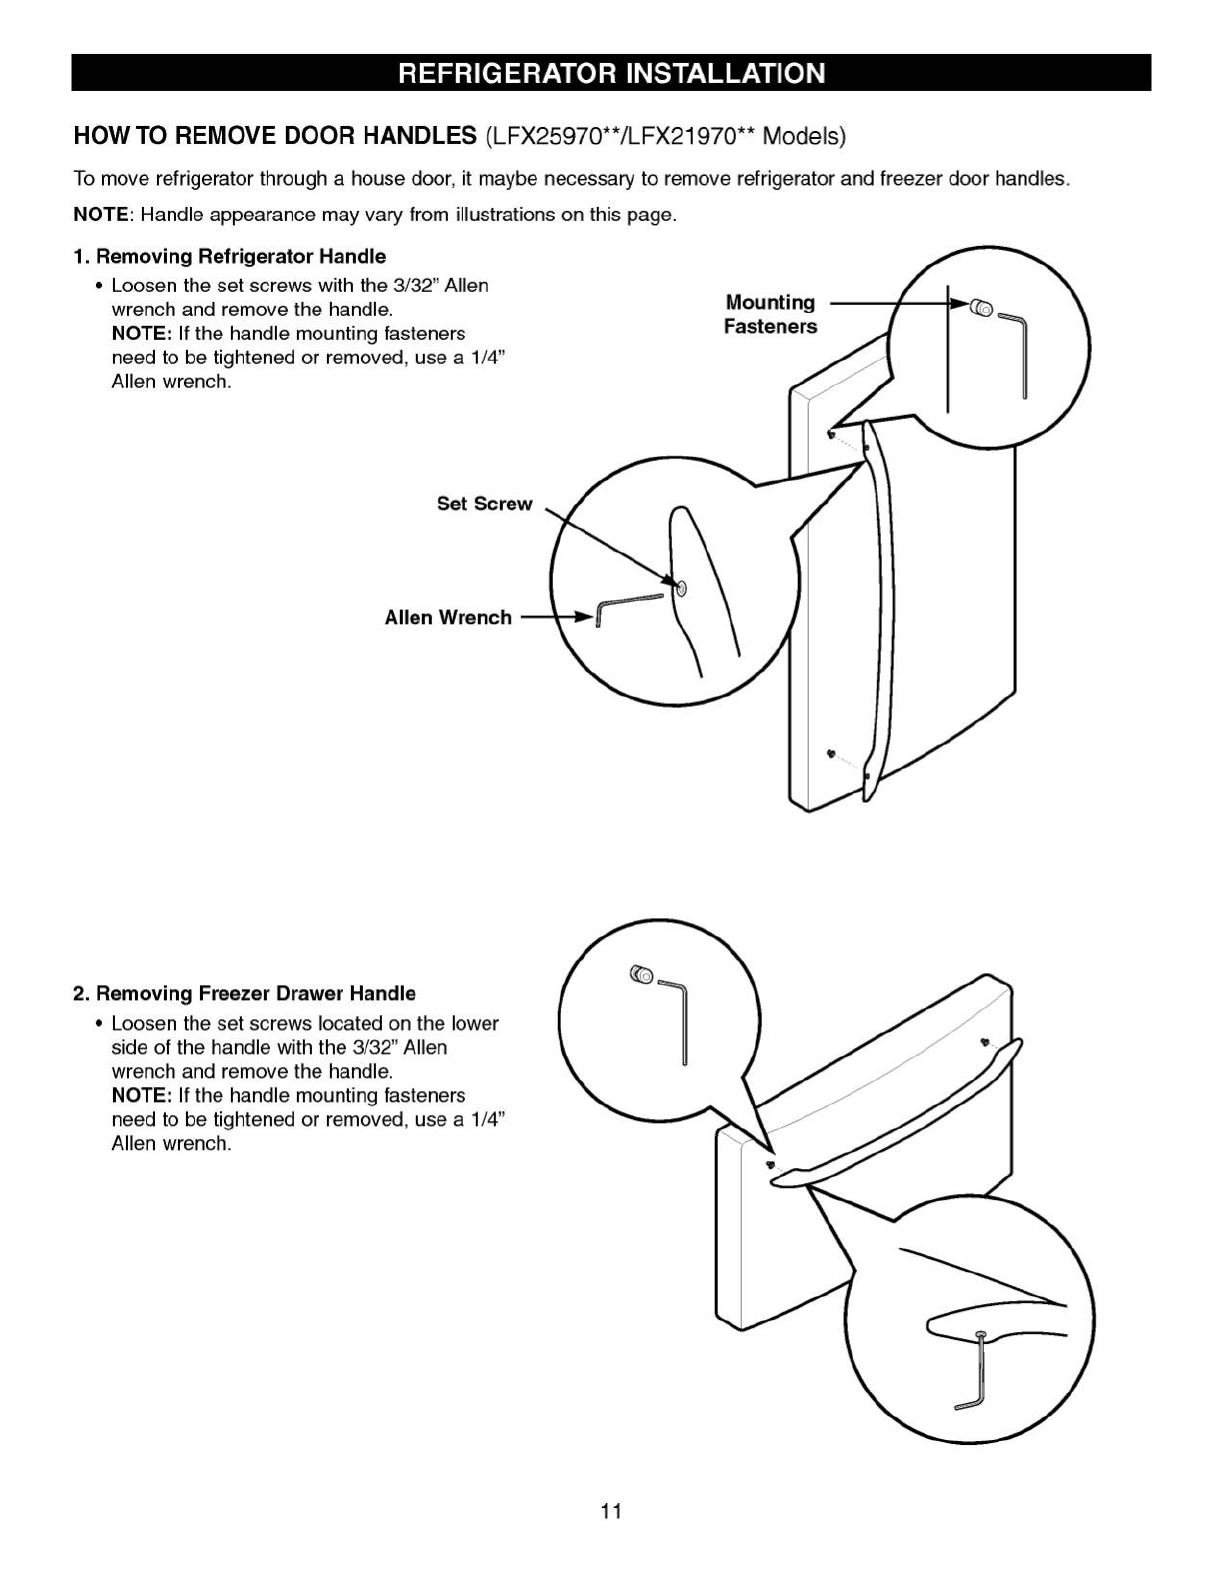
HOWTO REMOVE DOOR HANDLES (LFX25970**/LFX21970** Models)
To move refrigerator through ahouse door, it maybe necessary to remove refrigerator and freezerdoorhandles.
NOTE: Handle appearance may vary from illustrations on this page.
1. Removing Refrigerator Handle
\342\200\242
Loosen the set screws with the 3/32\" Allen
wrench and remove the handle.
NOTE: If the handle mounting fasteners
need to be tightened or removed,usea1/4\"
Allen wrench.
2. Removing Freezer Drawer Handle
\342\200\242
Loosen the set screws located on the lower
side of the handle with the 3/32\"Allen
wrench and remove the handle.
NOTE:If the handle mounting fasteners
need to be tightened or removed,usea1/4\"
Allen wrench.
REFRIGERATOR INSTALLATION
11
Allen Wrench
Set Screw
Mounting
Fasteners
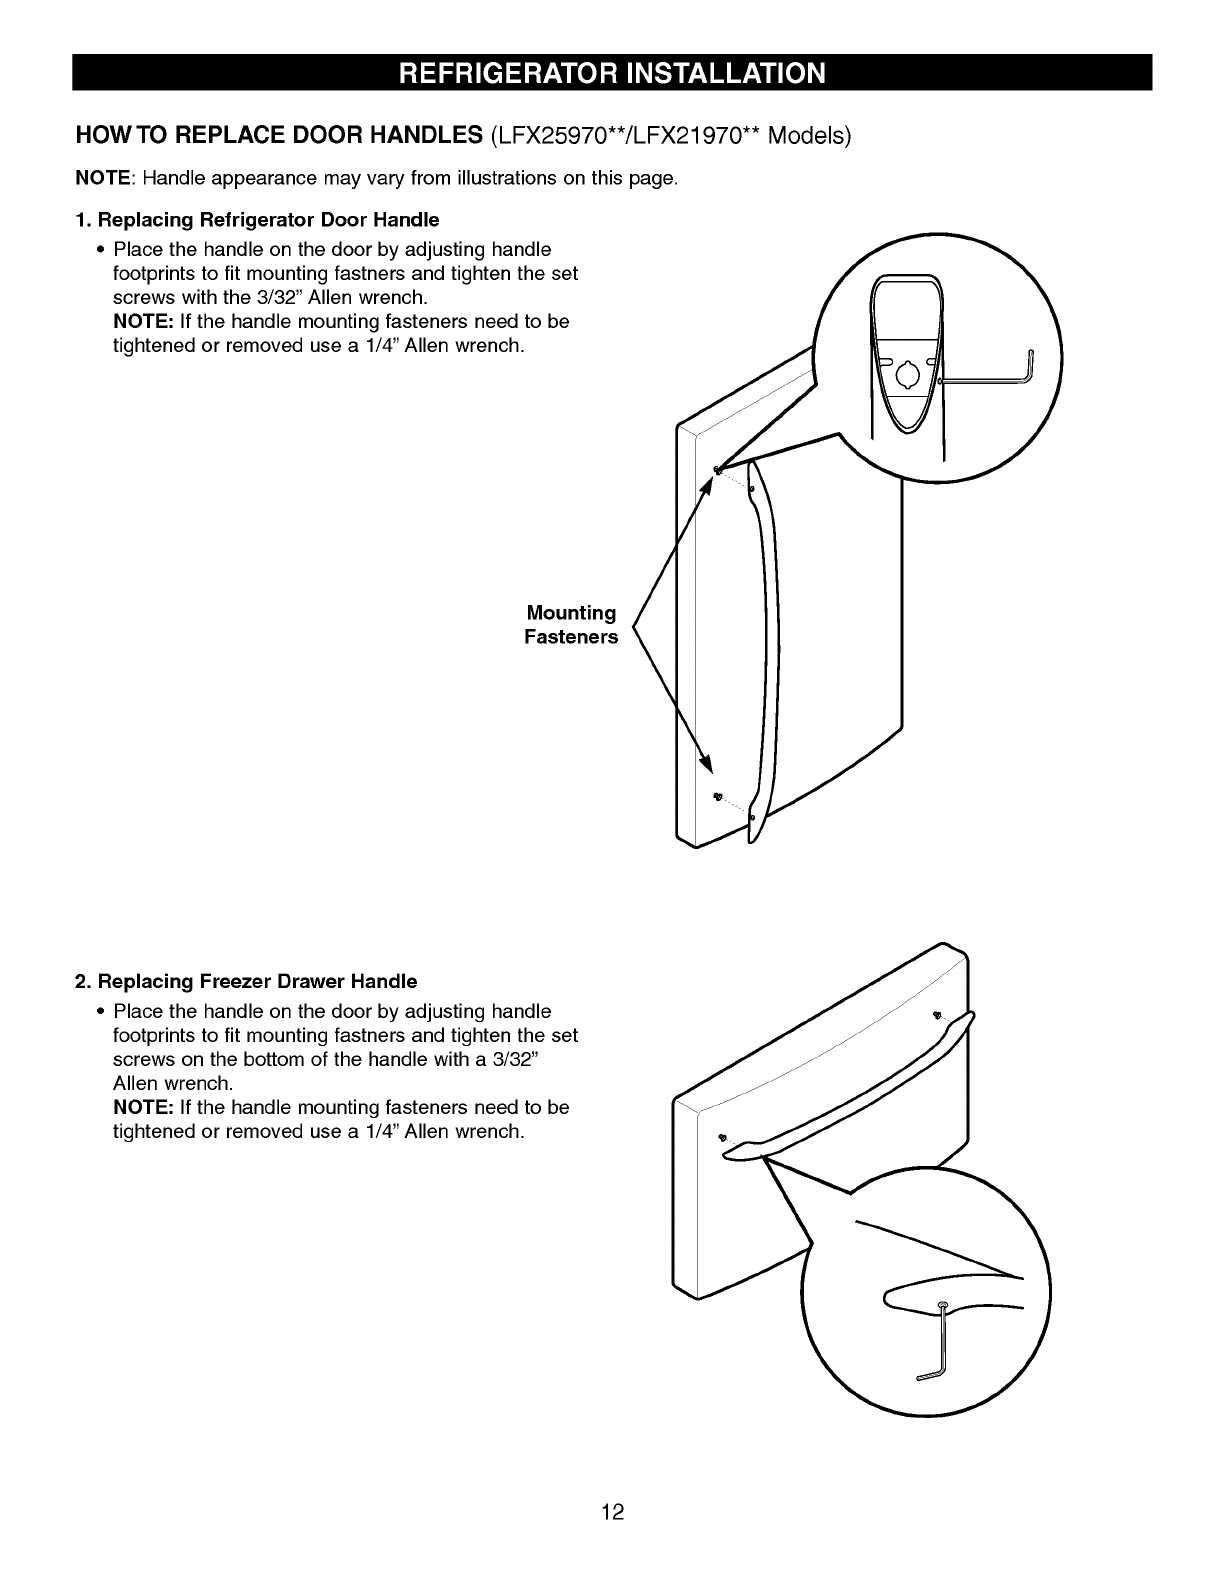
HOW TO REPLACE DOOR HANDLES (LFX25970**/LFX21970** Models)
NOTE: Handle appearance may vary from illustrations on this page.
1. Replacing Refrigerator DoorHandle
\342\200\242
Place the handle on the door by adjusting handle
footprints to fit mounting fastners and tighten the set
screws with the 3/32\"Allen wrench.
NOTE: If the handle mounting fasteners need to be
tightened or removed use a1/4\" Allen wrench.
2. Replacing Freezer Drawer Handle
\342\200\242
Place the handle on the door by adjusting handle
footprints to fit mounting fastners and tighten the set
screws on the bottom of the handle with a3/32\"
Allen wrench.
NOTE: If the handle mounting fasteners need to be
tightened or removed use a1/4\" Allen wrench.
12
Mounting
Fasteners
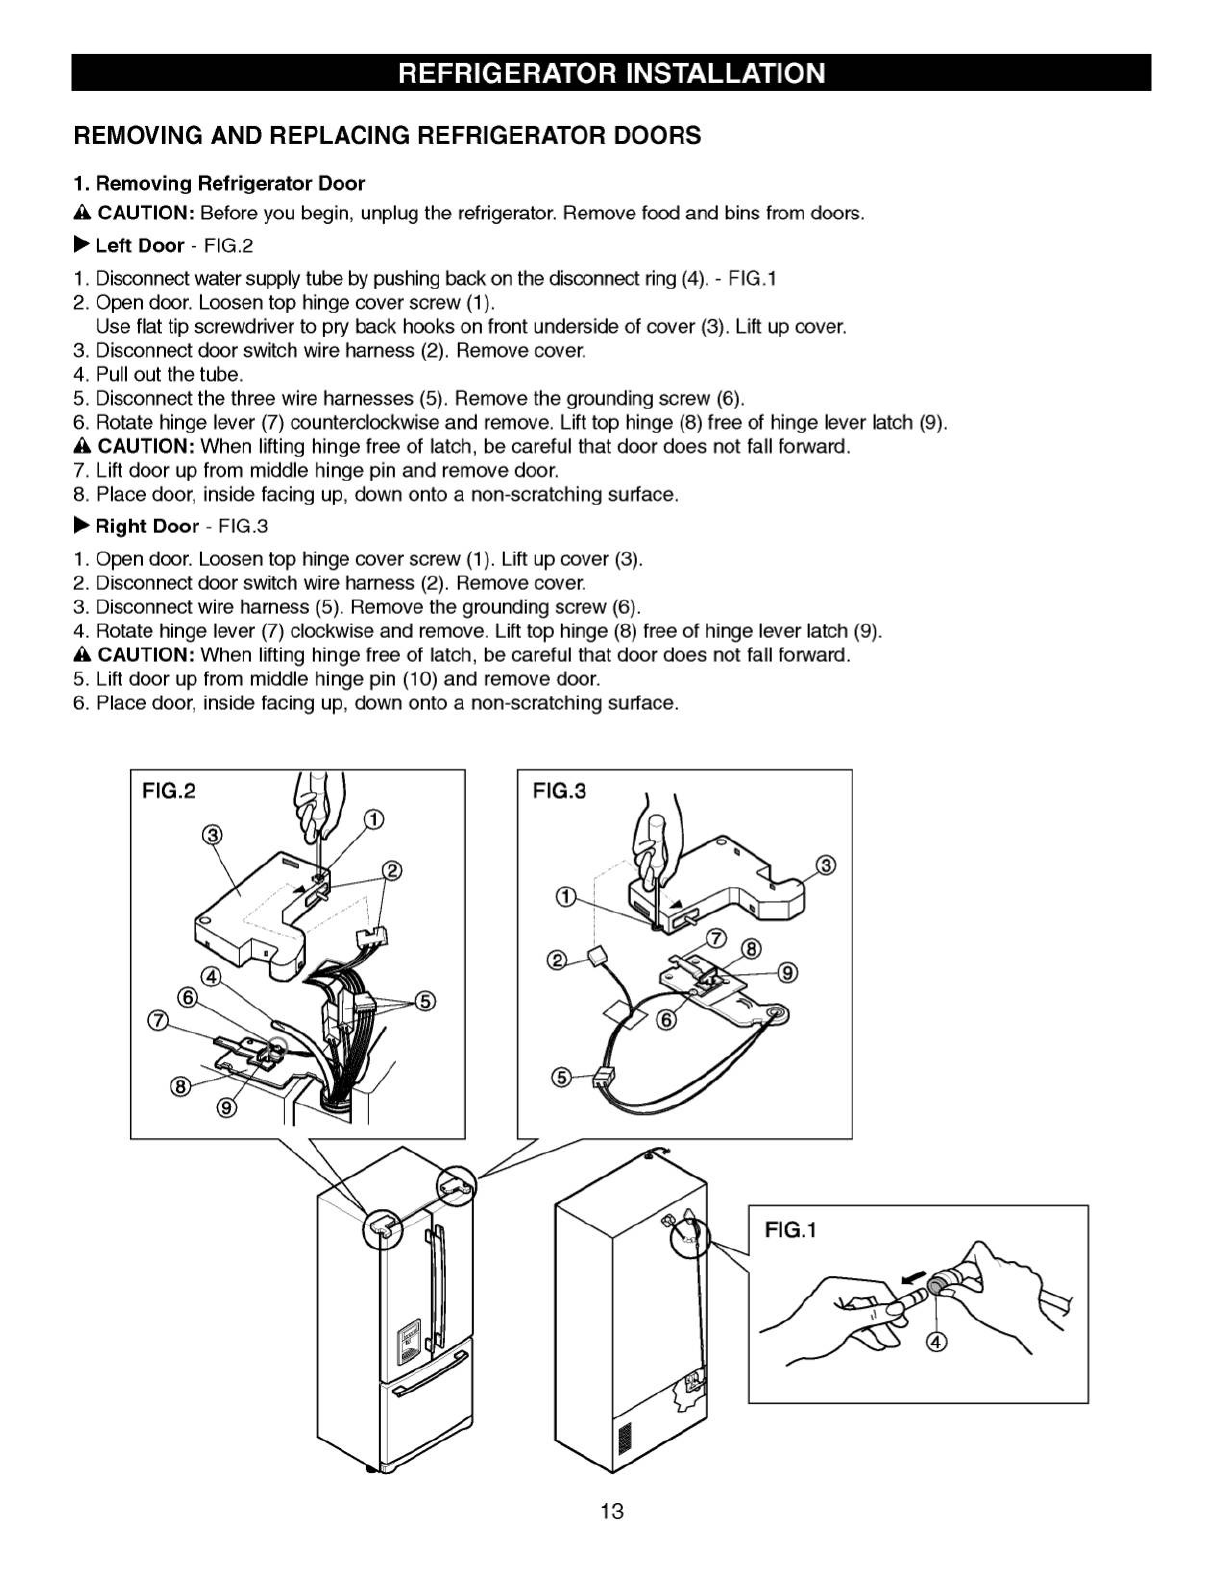
REMOVING AND REPLACINGREFRIGERATORDOORS
1.Removing Refrigerator Door
wCAUTION: Before you begin, unplug the refrigerator. Remove food and bins from doors.
uLeft Door -FIG.2
1.Disconnect water supply tube by pushing back on the disconnect ring (4). -FIG.1
2. Opendoor.Loosentop hinge cover screw (1).
Use flat tip screwdriver to pry back hooks on front underside of cover (3). Lift up cover.
3. Disconnect door switch wire harness (2).Remove cover.
4. Pull out the tube.
5. Disconnectthe threewire harnesses (5). Remove the grounding screw (6).
6. Rotate hinge lever (7)counterclockwiseand remove. Lift top hinge (8) free of hinge lever latch (9).
wCAUTION:When lifting hinge free of latch, be careful that door does not fall forward.
7. Lift door up from middle hinge pin and remove door.
8. Place door, insidefacing up, down onto anon-scratching surface.
uRight Door -FIG.3
1. Open door. Loosentop hinge cover screw (1). Lift up cover (3).
2. Disconnect door switch wire harness (2). Remove cover.
3. Disconnectwire harness (5). Remove the grounding screw (6).
4. Rotate hinge lever (7)clockwiseand remove. Lift top hinge (8) free of hinge lever latch (9).
wCAUTION:When lifting hinge free of latch, be careful that door does not fall forward.
5. Lift door up from middle hinge pin (10) and remove door.
6. Place door,inside facing up, down onto anon-scratching surface.
REFRIGERATOR INSTALLATION
13
14
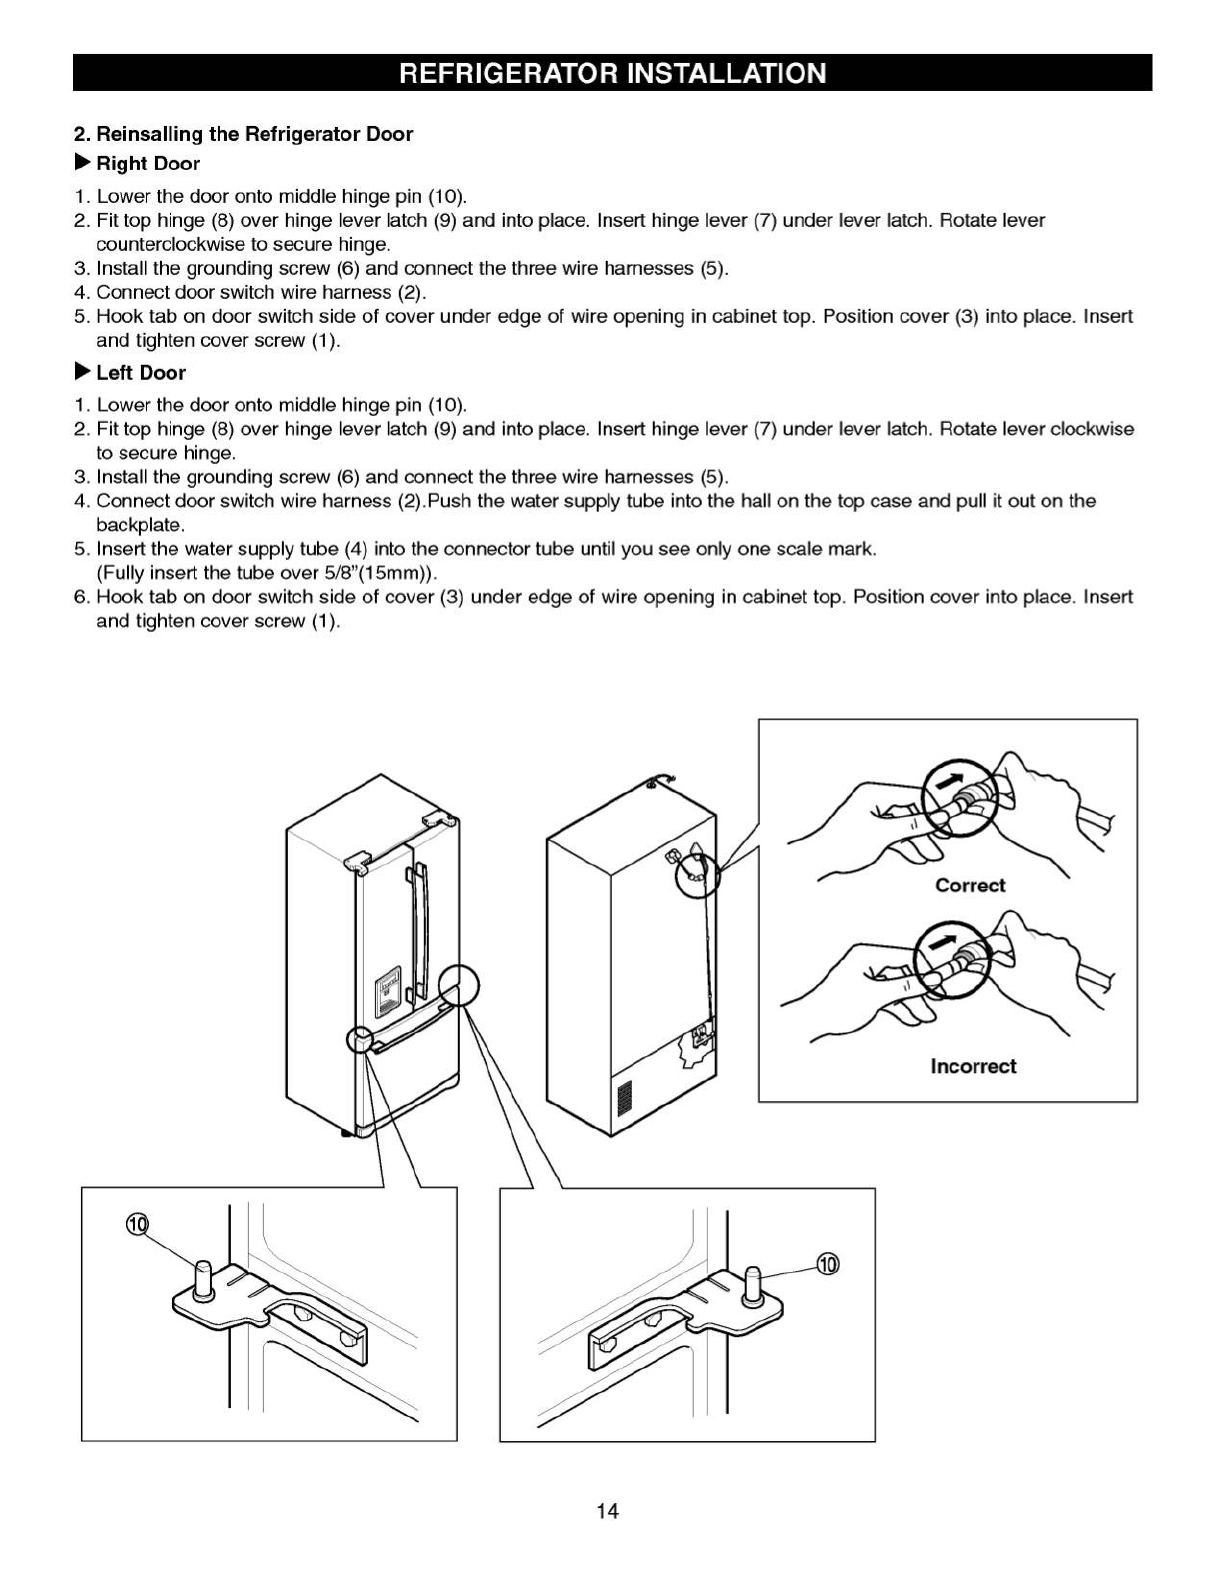
2.Reinsalling the Refrigerator Door
uRight Door
1. Lower the door onto middle hinge pin (10).
2. Fit top hinge (8)over hinge lever latch (9) and into place. Insert hinge lever (7) under lever latch. Rotate lever
counterclockwise to secure hinge.
3. Install the grounding screw (6) and connect the three wire harnesses (5).
4. Connect door switch wire harness (2).
5.Hook tab on door switch side of coverunder edge of wire opening in cabinet top. Position cover (3) into place. Insert
and tighten cover screw (1).
uLeft Door
1. Lower the door onto middle hinge pin (10).
2. Fit top hinge (8) over hinge lever latch (9) and into place. Insert hinge lever (7) under lever latch. Rotate lever clockwise
to secure hinge.
3. Install the grounding screw (6) and connect the three wire harnesses (5).
4. Connect door switch wire harness (2).Pushthe water supply tube into the hall on the top case and pull it out on the
backplate.
5. Insertthe water supply tube (4) into the connector tube until you see only one scale mark.
(Fully insert the tube over 5/8\"(15mm)).
6. Hook tab on door switch side of cover(3)under edge of wire opening in cabinet top. Position cover into place. Insert
and tighten cover screw (1).
Correct
Incorrect
15
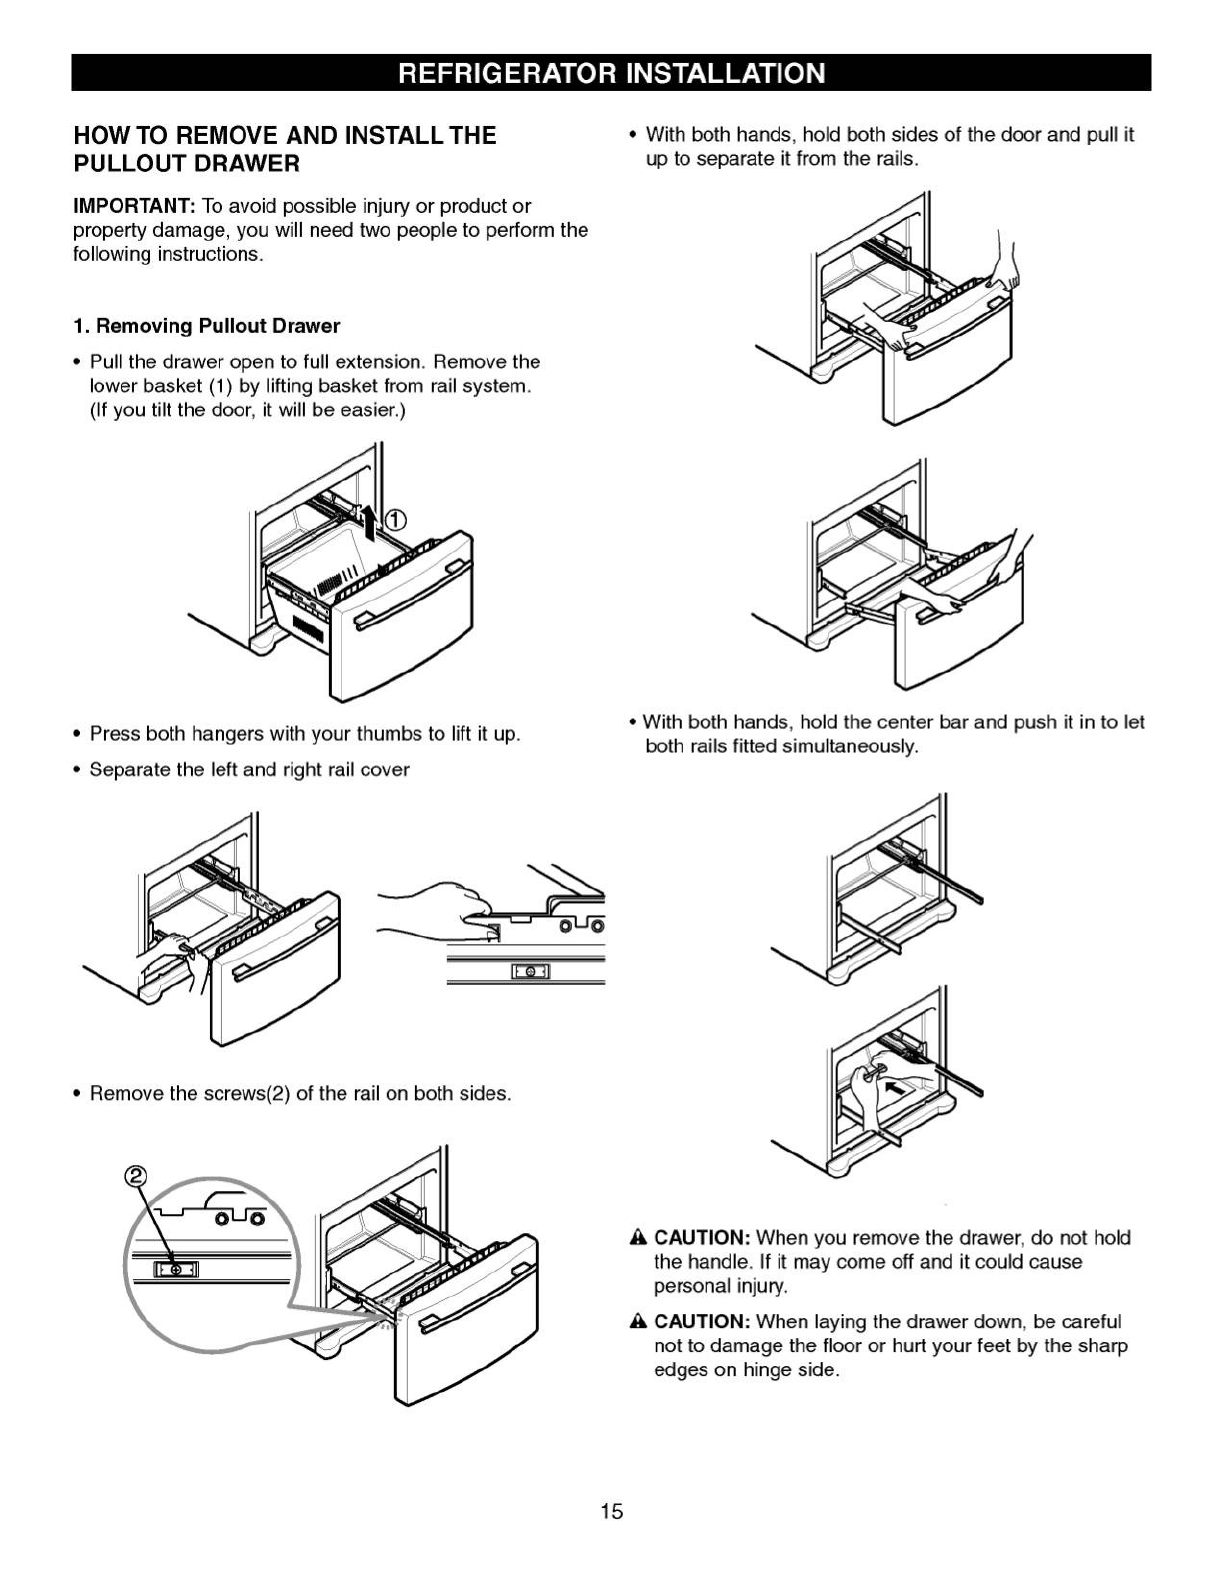
HOW TO REMOVE AND INSTALL THE
PULLOUT DRAWER
IMPORTANT: To avoid possible injury or product or
property damage, you will need two people to perform the
following instructions.
1. Removing Pullout Drawer
\342\200\242
Pull the drawer open to full extension. Remove the
lower basket (1) by lifting basket from rail system.
(If you tilt the door, it will be easier.)
\342\200\242
Press both hangers with your thumbs to lift it up.
\342\200\242
Separate the left and right rail cover
\342\200\242
Remove the screws(2) of the rail on both sides.
\342\200\242
With both hands, hold both sides of the doorand pull it
up to separate it from the rails.
\342\200\242
With both hands, hold the center bar and push it in to let
both rails fitted simultaneously.
wCAUTION: When you remove the drawer, do not hold
the handle. If it may come off and it could cause
personal injury.
wCAUTION: When laying the drawer down, be careful
not to damage the floor or hurt your feet by the sharp
edges on hinge side.
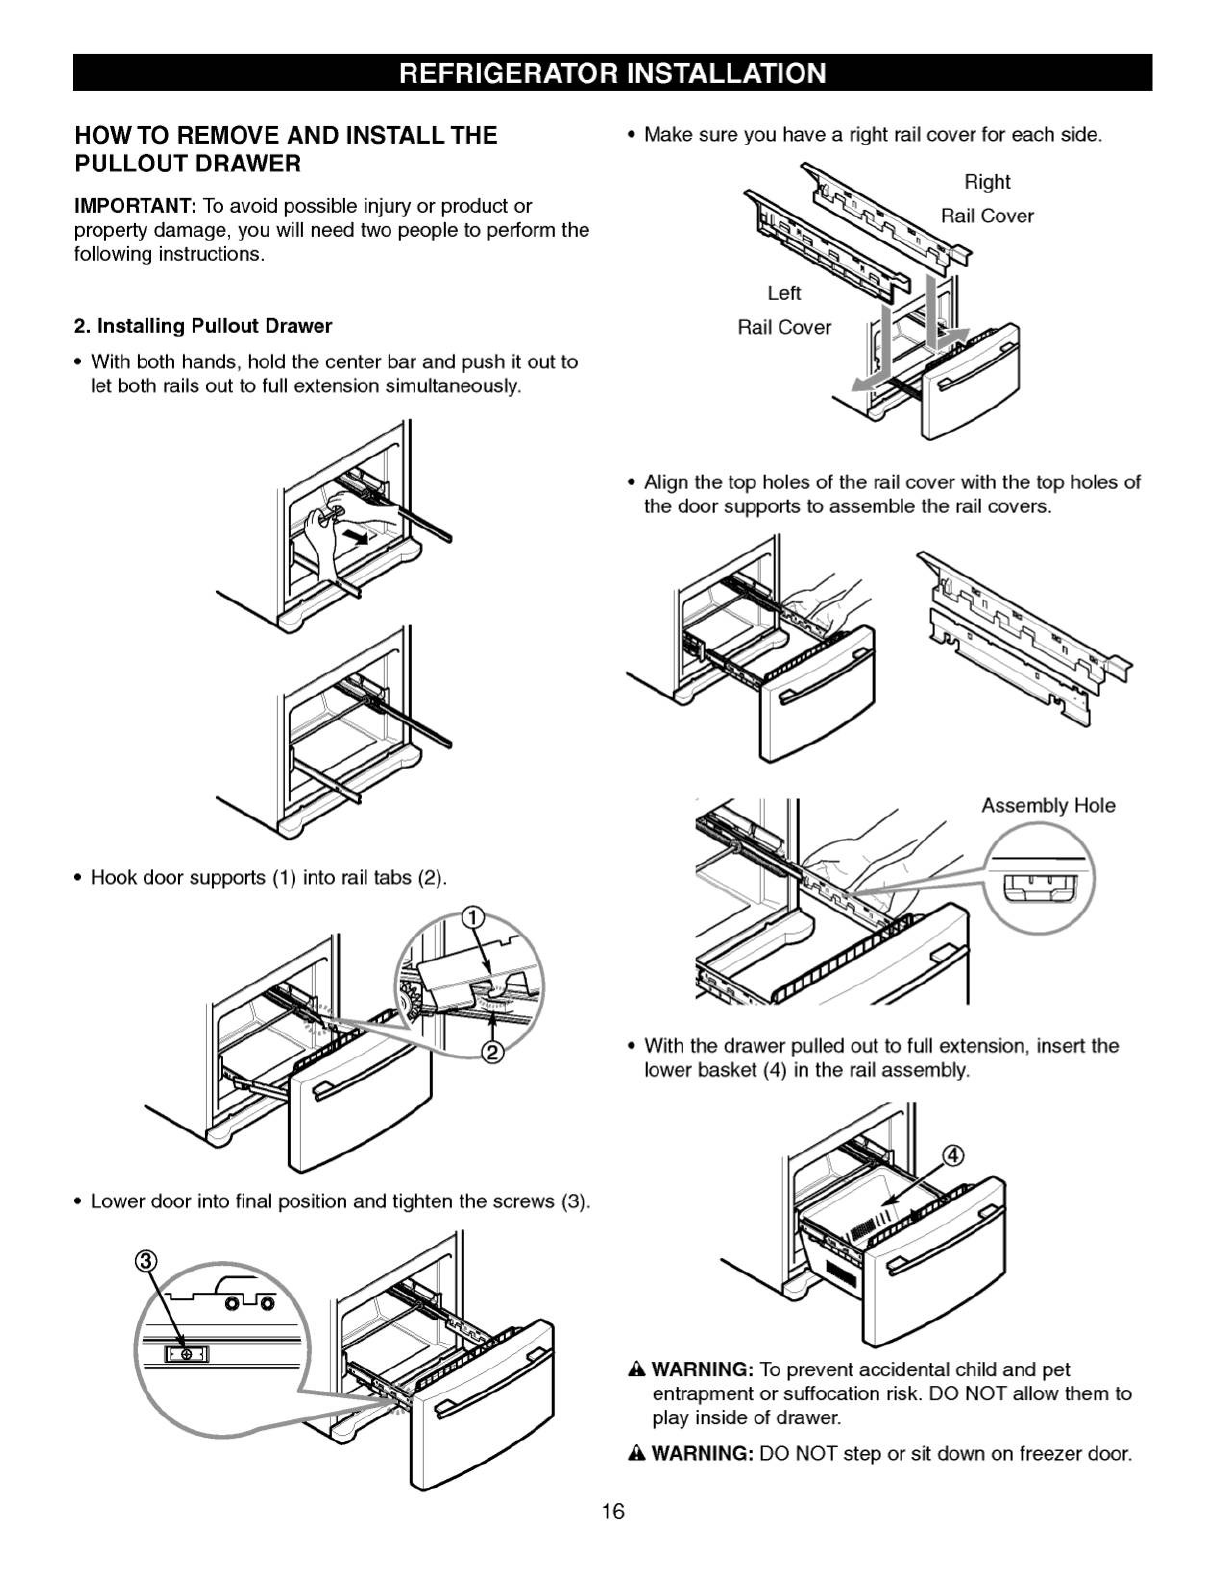
HOW TO REMOVE AND INSTALL THE
PULLOUT DRAWER
IMPORTANT: To avoid possible injury or product or
property damage, you will need two people to perform the
following instructions.
2. Installing Pullout Drawer
\342\200\242
With both hands, hold the center bar and push it out to
let both rails out to full extension simultaneously.
\342\200\242
Hook door supports (1) into rail tabs (2).
\342\200\242
Lower door into final position and tighten the screws (3).
\342\200\242
Make sure you have aright rail cover for each side.
\342\200\242
Align the top holes of the rail cover with the top holes of
the doorsupports to assemble the rail covers.
\342\200\242
With the drawer pulled out to full extension, insert the
lower basket (4) in the rail assembly.
wWARNING: To prevent accidental child and pet
entrapment or suffocation risk. DO NOT allow them to
play inside of drawer.
wWARNING: DO NOT step or sit down on freezerdoor.
Right
Rail Cover
Left
Rail Cover
Assembly Hole
16
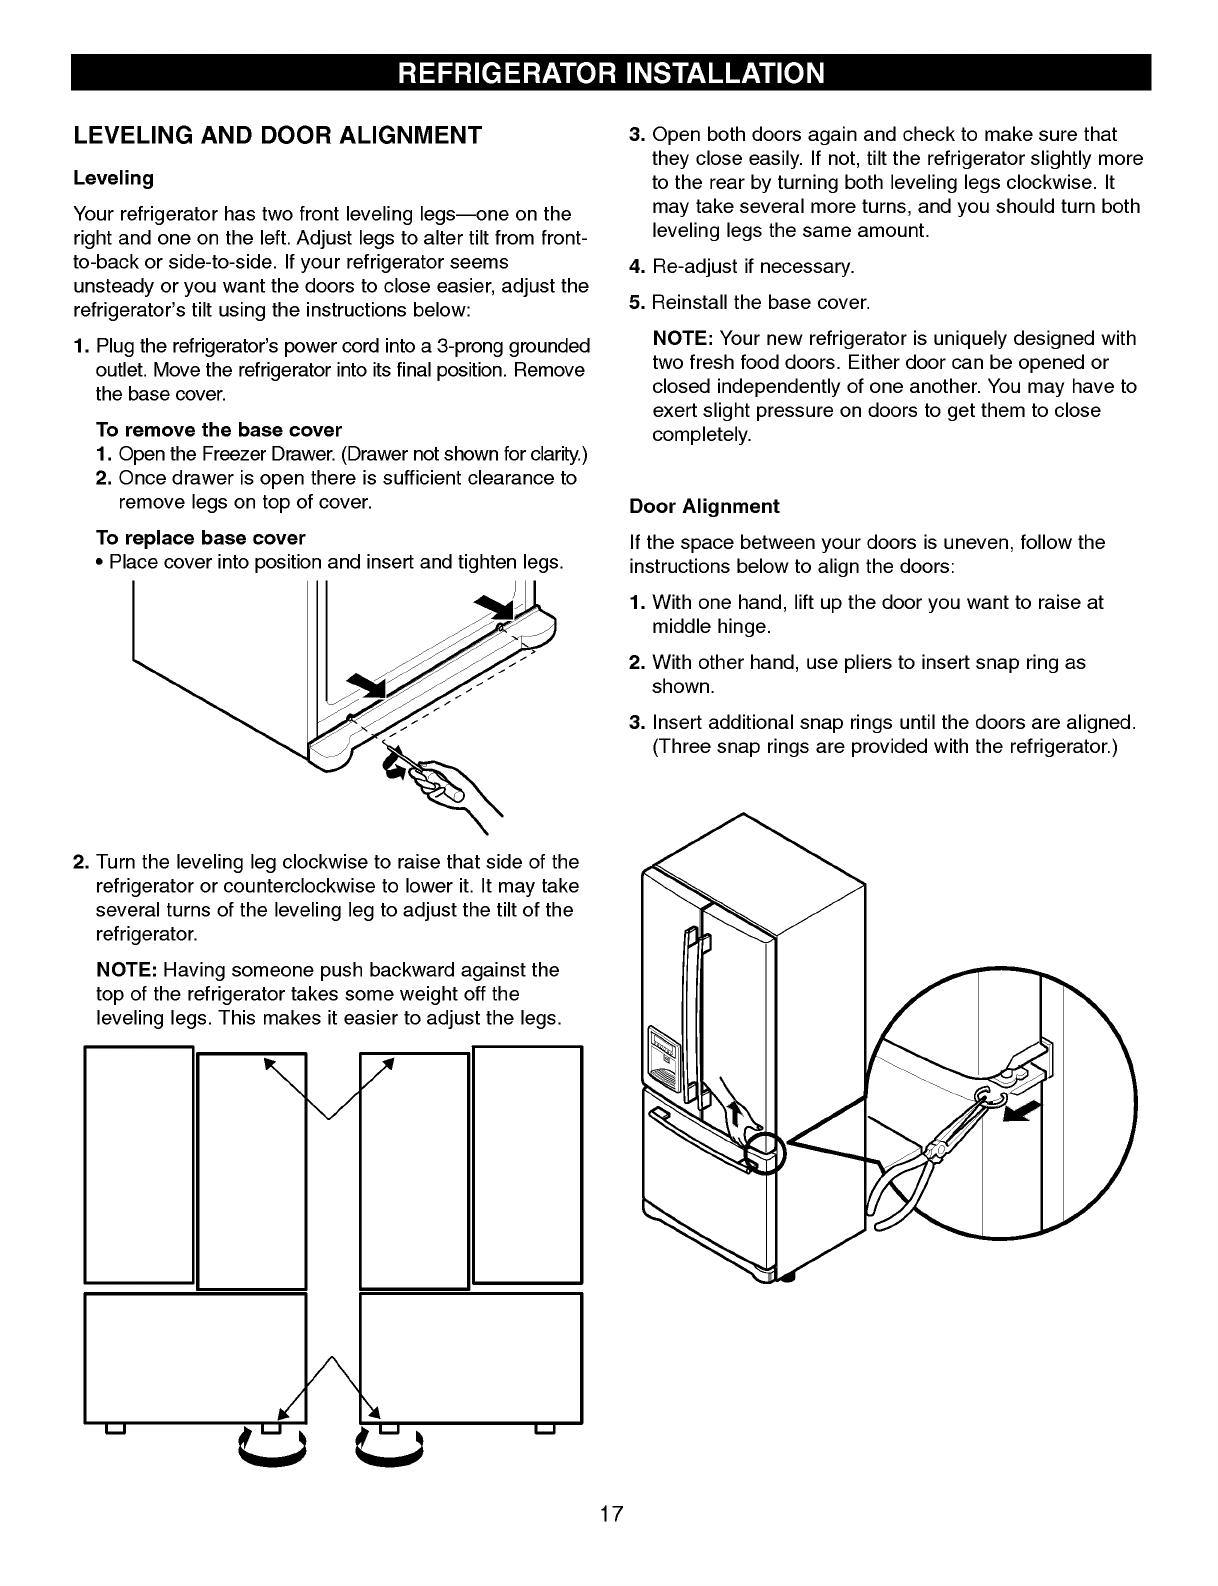
LEVELINGAND DOOR ALIGNMENT
Leveling
Your refrigerator has two front leveling legs---one on the
right and one on the left. Adjust legs to alter tilt from front-
to-back or side-to-side. If your refrigerator seems
unsteady or you want the doors to close easier, adjust the
refrigerator's
tilt using the instructions below:
1. Plug the refrigerator's power cord into a3-prong grounded
outlet. Move the refrigerator into its final position. Remove
the base cover.
To remove the base cover
1. Open the Freezer Drawer. (Drawer not shown for clarity.)
2. Once drawer is open there is sufficient clearance to
remove legs on top of cover.
To replace base cover
\342\200\242
Place cover into position and insert and tighten legs.
2. Turn the leveling leg clockwiseto raise that side of the
refrigeratoror counterclockwiseto lower it. It may take
several turns of the leveling leg to adjust the tilt of the
refrigerator.
NOTE: Having someone push backwardagainstthe
top of the refrigerator takes some weight off the
leveling legs. This makes it easier to adjust the legs.
3. Openboth doors again and check to make sure that
they close easily. If not, tilt the refrigerator slightly more
to the rear by turning both leveling legs clockwise. It
may take several more turns, and you should turn both
leveling legs the same amount.
4. Re-adjust if necessary.
5. Reinstall the base cover.
NOTE:Your new refrigerator is uniquely designed with
two fresh food doors. Either door can be openedor
closed
independently of one another. You may have to
exert slight pressure on doors to get them to close
completely.
Door Alignment
If the space between your doors is uneven, follow the
instructions below to align the doors:
1. With one hand, lift up the door you want to raise at
middle hinge.
2. With other hand, use pliers to insert snap ring as
shown.
3. Insert additional snap rings until the doors are aligned.
(Three snap rings are provided with the refrigerator.)
17
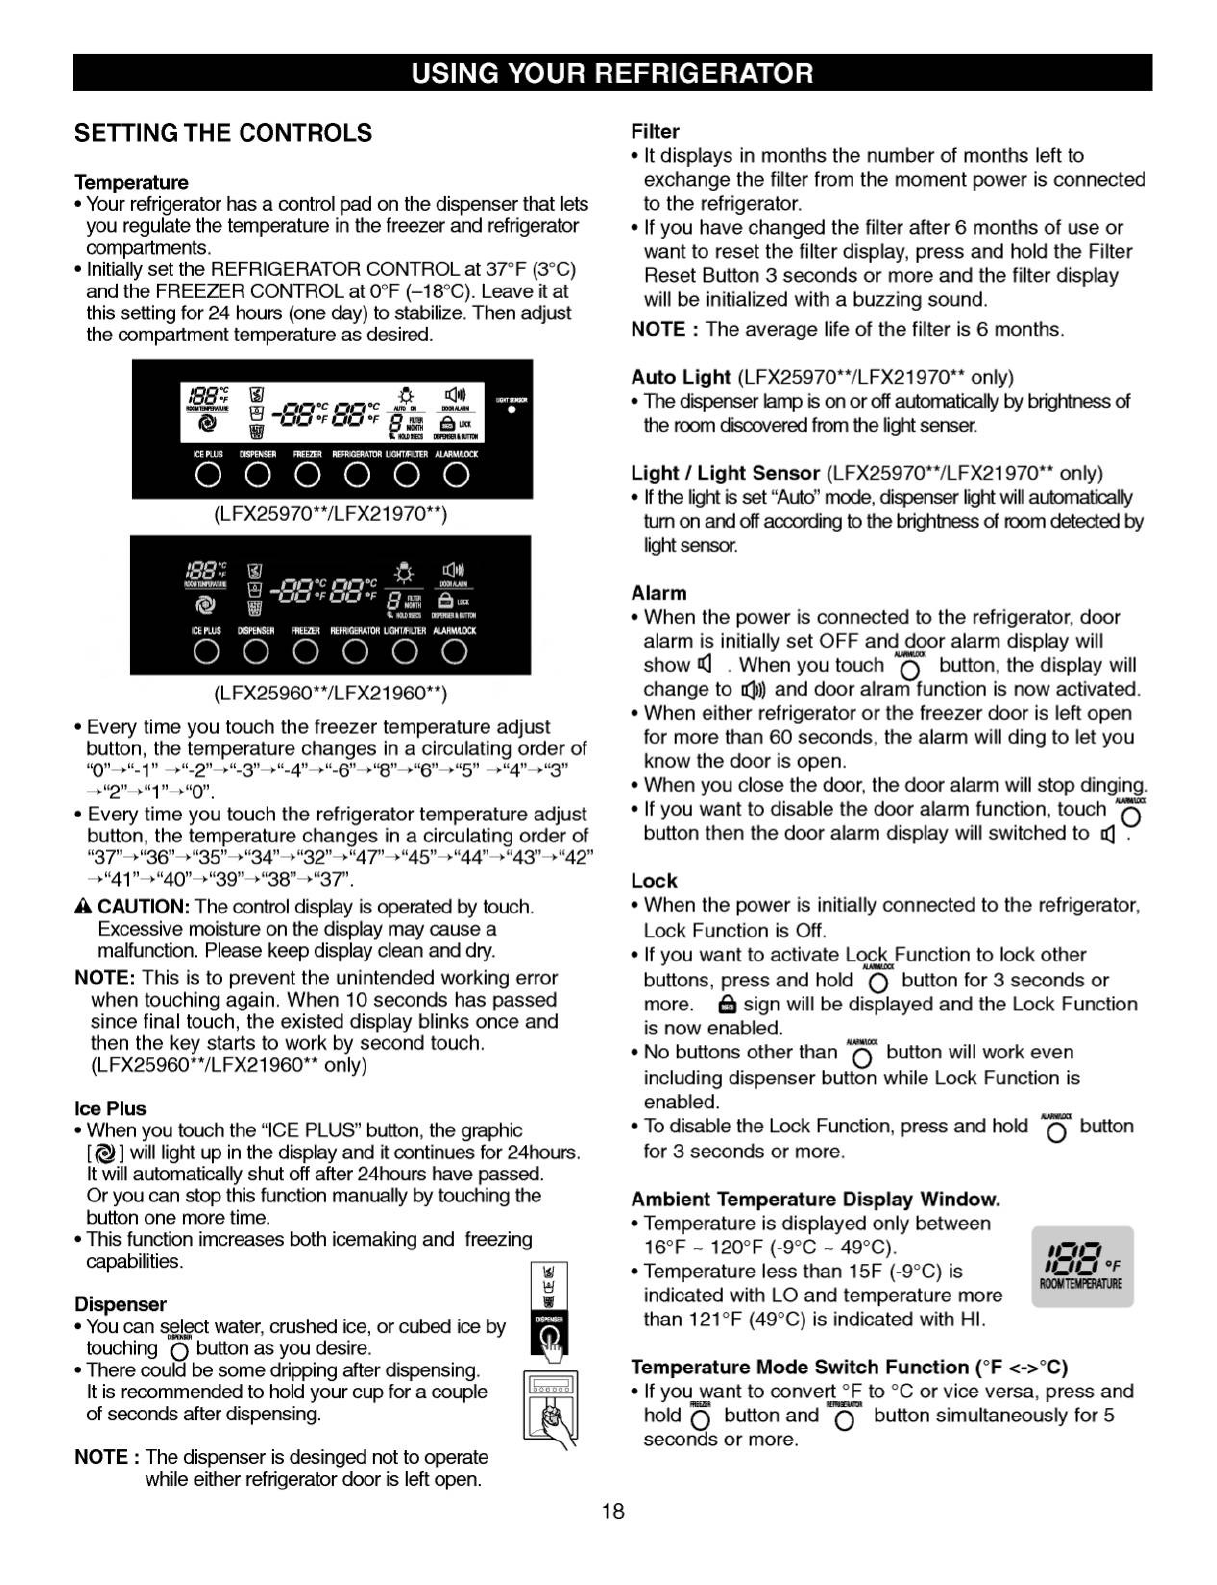
SETTING THE CONTROLS
Temperature
\342\200\242
Your refrigerator has a control pad on the dispenser that lets
you regulate the temperaturein the freezer and refrigerator
compartments.
\342\200\242
Initially set the REFRIGERATOR CONTROL at 37\302\260F
(3\302\260C)
and the FREEZER CONTROL at 0\302\260F
(--18\302\260C). Leave it at
this setting for 24 hours (one day) to stabilize. Then adjust
the compartment temperatureas desired.
\342\200\242
Every time you touch the freezer temperatureadjust
button, the temperature changes in acirculating order of
"-1\" "5\" "3\"
"0\".
\342\200\242
Every time you touch the refrigeratortemperatureadjust
button, the temperature changes in acirculating order of
"42\"
"37\".
wCAUTION: The control display is operated by touch.
Excessive moisture on the display may cause a
malfunction. Please keep displaycleanand dry.
NOTE: This is to prevent the unintended working error
when touching again. When 10 seconds has passed
sincefinal touch, the existed display blinks once and
then the key starts to work by second touch.
(LFX25960**/LFX21960** only)
Ice Plus
\342\200\242
When you touch the \"ICE PLUS\" button, the graphic
[ ] will light up in the display and it continues for 24hours.
It will automatically shut off after 24hours have passed.
Or you can stop this function manually by touching the
button one more time.
\342\200\242
This function imcreases both icemaking and freezing
capabilities.
Dispenser
\342\200\242
You can select water, crushed ice,or cubediceby
touching button as you desire.
\342\200\242
There could be some dripping after dispensing.
It is recommended to hold your cup for acouple
of seconds after dispensing.
NOTE :The dispenser is desinged not to operate
while either refrigerator door is left open.
Filter
\342\200\242
It displays in months the number of months left to
exchange the filter from the moment power is connected
to the refrigerator.
\342\200\242
If you have changed the filter after 6months of use or
want to reset the filter display, press and hold the Filter
Reset Button 3seconds or more and the filter display
will be initialized with abuzzing sound.
NOTE :The average life of the filter is 6months.
Auto Light (LFX25970**/LFX21970** only)
\342\200\242
The dispenser lamp is on or off automatically by brightness of
the room discoveredfrom the light senser.
Light /Light Sensor (LFX25970**/LFX21970** only)
\342\200\242
If the light is set \"Auto\" mode, dispenser light will automatically
turn on and off according to the brightness of room detectedby
light sensor.
Alarm
\342\200\242
When the power is connected to the refrigerator, door
alarm is initially set OFF and door alarm display will
show .When you touch button, the display will
change to and door alram function is now activated.
\342\200\242
When either refrigerator or the freezer dooris left open
for more than 60 seconds, the alarm will ding to let you
know the door is open.
\342\200\242
When you close the door, the dooralarm will stop dinging.
\342\200\242
If you want to disable the door alarm function, touch
button then the door alarm display will switched to .
Lock
\342\200\242
When the power is initially connected to the refrigerator,
Lock Function is Off.
\342\200\242
If you want to activate Lock Function to lock other
buttons, press and hold button for 3seconds or
more. signwill be displayed and the Lock Function
is now enabled.
\342\200\242
No buttons other than button will work even
including dispenser button while Lock Function is
enabled.
\342\200\242
To disable the Lock Function, press and hold button
for 3seconds or more.
Ambient Temperature Display Window.
\342\200\242
Temperature is displayed only between
16\302\260F
~120\302\260F (-9\302\260C~49\302\260C).
\342\200\242
Temperature less than 15F (-9\302\260C) is
indicated with LO and temperature more
than 121\302\260F (49\302\260C) is indicated with HI.
Temperature Mode Switch Function(\302\260F<->\302\260C)
\342\200\242
If you want to convert \302\260Fto \302\260Cor vice versa, press and
hold button and button simultaneously for 5
seconds or more.
USING YOUR REFRIGERATOR
(LFX25970**/LFX21970**)
(LFX25960**/LFX21960**)
18
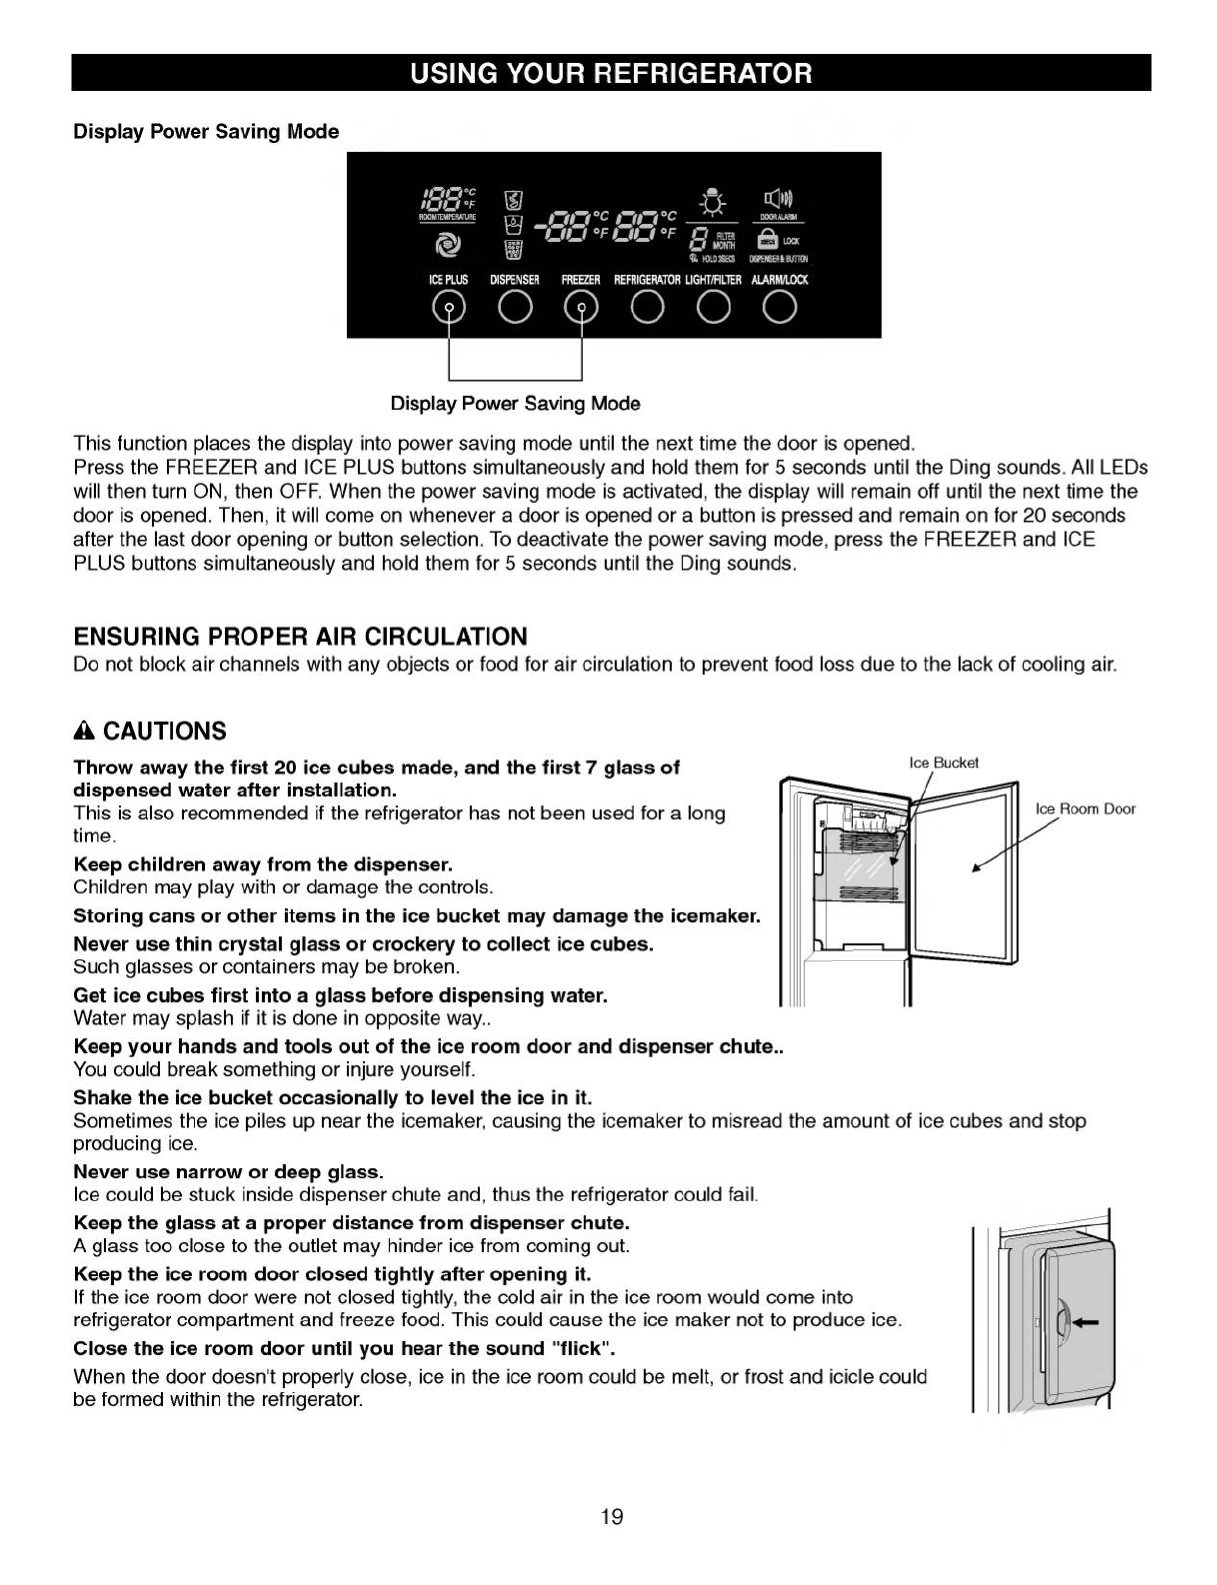
Display Power Saving Mode
This function places the display into power saving modeuntil the next time the door is opened.
Pressthe FREEZER and ICE PLUS buttons simultaneously and hold them for 5seconds until the Ding sounds. All LEDs
will then turn ON, then OFF.When the power saving mode is activated, the displaywill remain off until the next time the
dooris opened. Then, it will come on whenever adoor is opened or abutton is pressed and remain on for 20 seconds
after the last door opening or button selection. To deactivate the power saving mode,pressthe FREEZER and ICE
PLUS buttons simultaneously and hold them for 5seconds until the Ding sounds.
ENSURING PROPER AIR CIRCULATION
Do not block air channels with any objects or food for air circulationto prevent food loss due to the lack of cooling air.
wCAUTIONS
Throw away the first 20 ice cubes made, and the first 7glass of
dispensed
water after installation.
This is also recommended if the refrigerator has not been used for along
time.
Keep children away from the dispenser.
Children may play with or damage the controls.
Storing cans or otheritemsin the ice bucket may damage the icemaker.
Never use thin crystal glass or crockery to collecticecubes.
Such glasses or containers may be broken.
Get icecubesfirst into aglass before dispensing water.
Water may splash if it is done in opposite way..
Keep your hands and tools outofthe iceroom door and dispenser chute..
You could break something or injure yourself.
Shake the ice bucket occasionally to levelthe icein it.
Sometimes the ice piles up near the icemaker,causing
the icemaker to misread the amount of ice cubes and stop
producing ice.
Never use narrow or deep glass.
Icecould be stuck inside dispenser chute and, thus the refrigerator could fail.
Keep the glass at aproperdistancefrom dispenser chute.
Aglass too close to the outlet may hinder ice from coming out.
Keep the ice room door closedtightly after opening it.
If the ice room door were not closed tightly, the cold air in the ice room would come into
refrigerator compartment and freeze food. This couldcausethe ice maker not to produce ice.
Close the iceroom door until you hear the sound \"flick\".
When the door doesn't properly close, ice in the ice room could be melt, or frost and icicle could
be formed within the refrigerator.
USING YOUR REFRIGERATOR
IceBucket
Ice Room Door
19
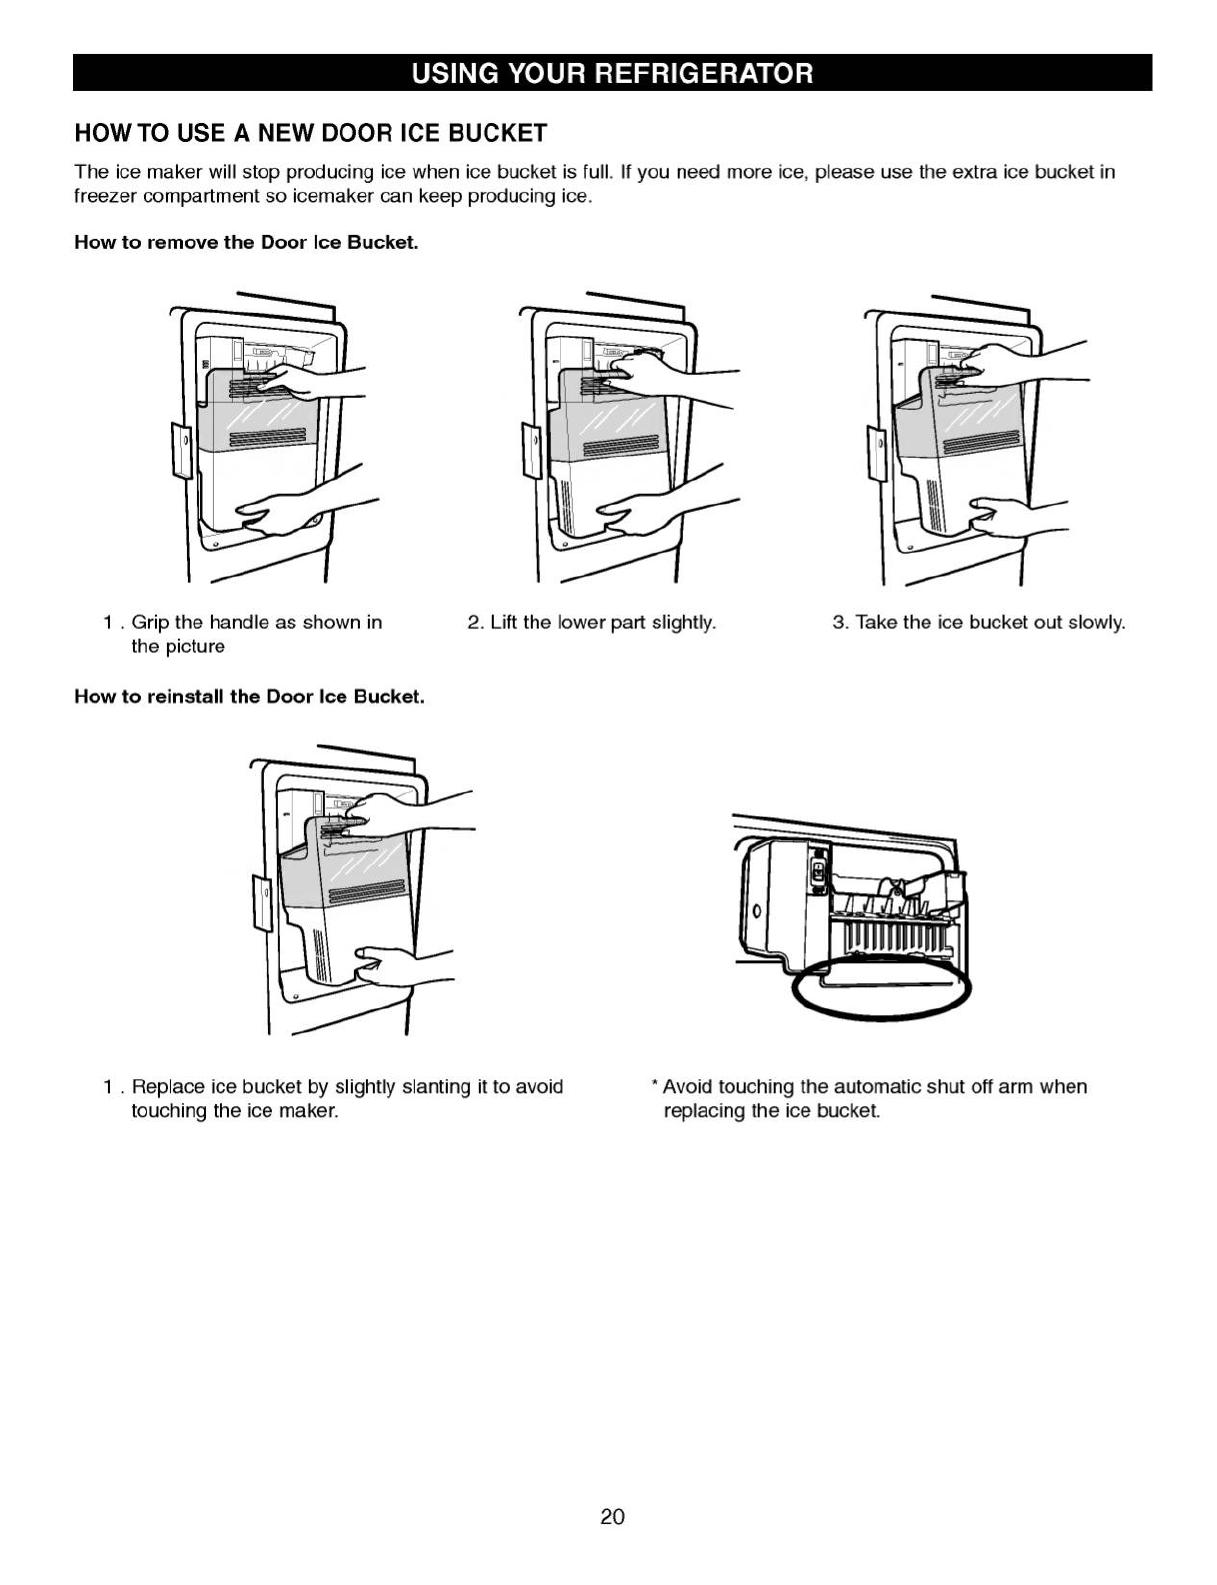
HOW TO USE ANEW DOOR ICEBUCKET
The ice maker will stop producing ice when icebucket is full. If you need more ice, please use the extra ice bucket in
freezer compartment so icemaker can keep producing ice.
How to remove the Door Ice Bucket.
How to reinstall the Door Ice Bucket.
USING YOUR REFRIGERATOR
20
1.Grip the handle as shown in
the picture
2. Lift the lower part slightly. 3. Take the icebucket out slowly.
1.Replace ice bucket by slightly slanting it to avoid
touching the ice maker.
*Avoid touching the automatic shut off arm when
replacing the ice bucket.
ADJUSTING CONTROLSETTINGS
Give the refrigerator time to cool down completely
before
making final adjustments. It is best to wait 24 hours
before doing this. The mid-settings
indicated in the
previous section should be correctfor normal household
refrigerator usage. The controls are set correctly when
milk or juice is as cold as you like and when ice cream
is firm.
The refrigerator control functions as the thermostat for the
entire appliance (refrigerator and freezer sections).The
higherthe number setting, the longer the compressor will
run to keep the temperature colder. The freezercontrol
adjusts the cold air flow from the freezer to the
refrigerator.Setting the freezercontrol to alower
temperature keeps more coldair in the Freezer
compartment to make it colder.
If you need to adjust temperatures in the refrigerator or
freezer, start by adjusting the refrigerator. Then wait 24
hours before checking the freezer temperature.If it is too
warm or too cold,then adjust the freezer control.
Use the settingslisted in the chart below as aguide.
Always remember to wait at least 24 hours between
adjustments.
FOODSTORAGE GUIDE
Wrap or store food in the refrigerator in airtight and
moisture-proofmaterial unless otherwise noted. This
prevents food odorand taste transfer throughout the
refrigerator. For dated products, check date code to
ensure freshness.
21
CONDITION/
REASON:
REFRIGERATOR section too
warm
-- Dooropenedoften
-- Large amount of food added
-- Room temperature very warm
FREEZER section too
warm/ice not made fast
enough
-- Door opened often
-- Large amount of food added
--Very cold room temperature
(can't cycle often enough)
--Heavy ice usage
-- Air vents blocked by items
REFRIGERATOR section too
cold
--Controlsnot set correctly for
your conditions
FREEZERsectiontoo cold
--Controls not set correctly for
your conditions
RECOMMENDED
ADJUSTMENT:
Set REFRIGERATOR
control to next lower
number, wait 24
hours, then re-check
Set FREEZERcontrol
to next lower number,
wait 24 hours, then re-
check
Move items out of
airstream
Set REFRIGERATOR
control to next higher
number, wait 24
hours, then re-check
Set FREEZERcontrol
to next higher number,
wait 24 hours, then re-
check
Items
Butter or
margarine
Cheese
Milk
Eggs
Fruit
Leafy vegetables
Vegetables with
skins (carrots,
peppers)
Fish
Leftovers
How to
uKeepopened
butter in acovered
dish or closed compartment.
When storing an extra supply,
wrap in freezer packaging and
freeze.
uStore in the original wrapping until
you are ready to use it. Once
opened, rewrap tightly in plastic
wrap or aluminum foil.
uWipe milk cartons. For best
storage, place milk on interior
shelf, not on door shelf.
uStore in original carton or Egg Box
on interior shelf, not on door shelf.
uWash, let dry, and store in
refrigerator in plastic bags or in
the crisper. Do not wash or hull
berries until you are ready to use
them. Sortand keep berries in
their original container in a
crisper, or store in asloosely
closed paper bag on arefrigerator
shelf.
uRemove store wrapping and trim
or tear off bruised and discolored
areas. Wash in cold water and
drain. Place in plastic bag or
plastic container and store in
crisper.
uPlace in plastic bags or plastic
container and store in crisper.
uUse fresh fish and shellfish the
same day purchased.
uCoverleftovers with plastic wrap
or aluminum foil. Plastic
containerswith tight lids can also
be used.
STORING FROZEN FOOD
NOTE: For further information about preparing food for
freezing or food storage times, check afreezerguide or a
reliable cookbook.
Packaging
Successful freezing depends on correct packaging. When
you close and seal the package,it must not allow air or
moisture in or out. If it does, you could have food odor
and taste transfer throughout the refrigerator and also dry
out frozen food.
Packaging recommendations
\342\200\242
Rigid plastic containers with tight-fitting lids
\342\200\242
Straight-sided canning/freezing jars
\342\200\242
Heavy-duty aluminum foil
\342\200\242
Plastic-coated paper
\342\200\242
Non-permeable plastic wraps
\342\200\242
Specified freezer-grade self-sealing plastic bags
Follow package or containerinstructions for proper
freezing methods.
Do not use
\342\200\242
Bread wrappers
\342\200\242
Non-polyethylene plastic containers
\342\200\242
Containers without tight lids
\342\200\242
Wax paper or wax-coated freezer wrap
\342\200\242
Thin, semi-permeable wrap
wCAUTION: Do not keep beverage cans or plastic food
containersin the freezer compartment. They may break
if they freezer.
Freezing
Your freezer will not quick-freeze any large quantity of
food. Do not put more unfrozen food into the freezer than
will freeze within 24 hours (no more than 2to 3lbs of food
per cubicfoot of freezer space). Leave enough space in
the freezer for air to circulate around packages. Becareful
to leave enough room at the front so the door can close
tightly.
Storage times will vary according to the quality and type
of food, the type of packaging or wrap used (airtight and
moisture-proof) and the storage temperature. Icecrystals
inside asealed package are normal. This simply means
that moisture in the food and air inside the packagehave
condensed, creating ice crystals.
NOTE: Allow hot foods to cool at room temperature for
30 minutes, then package and freeze. Cooling hot foods
before freezing saves energy.
REFRIGERATOR SECTION
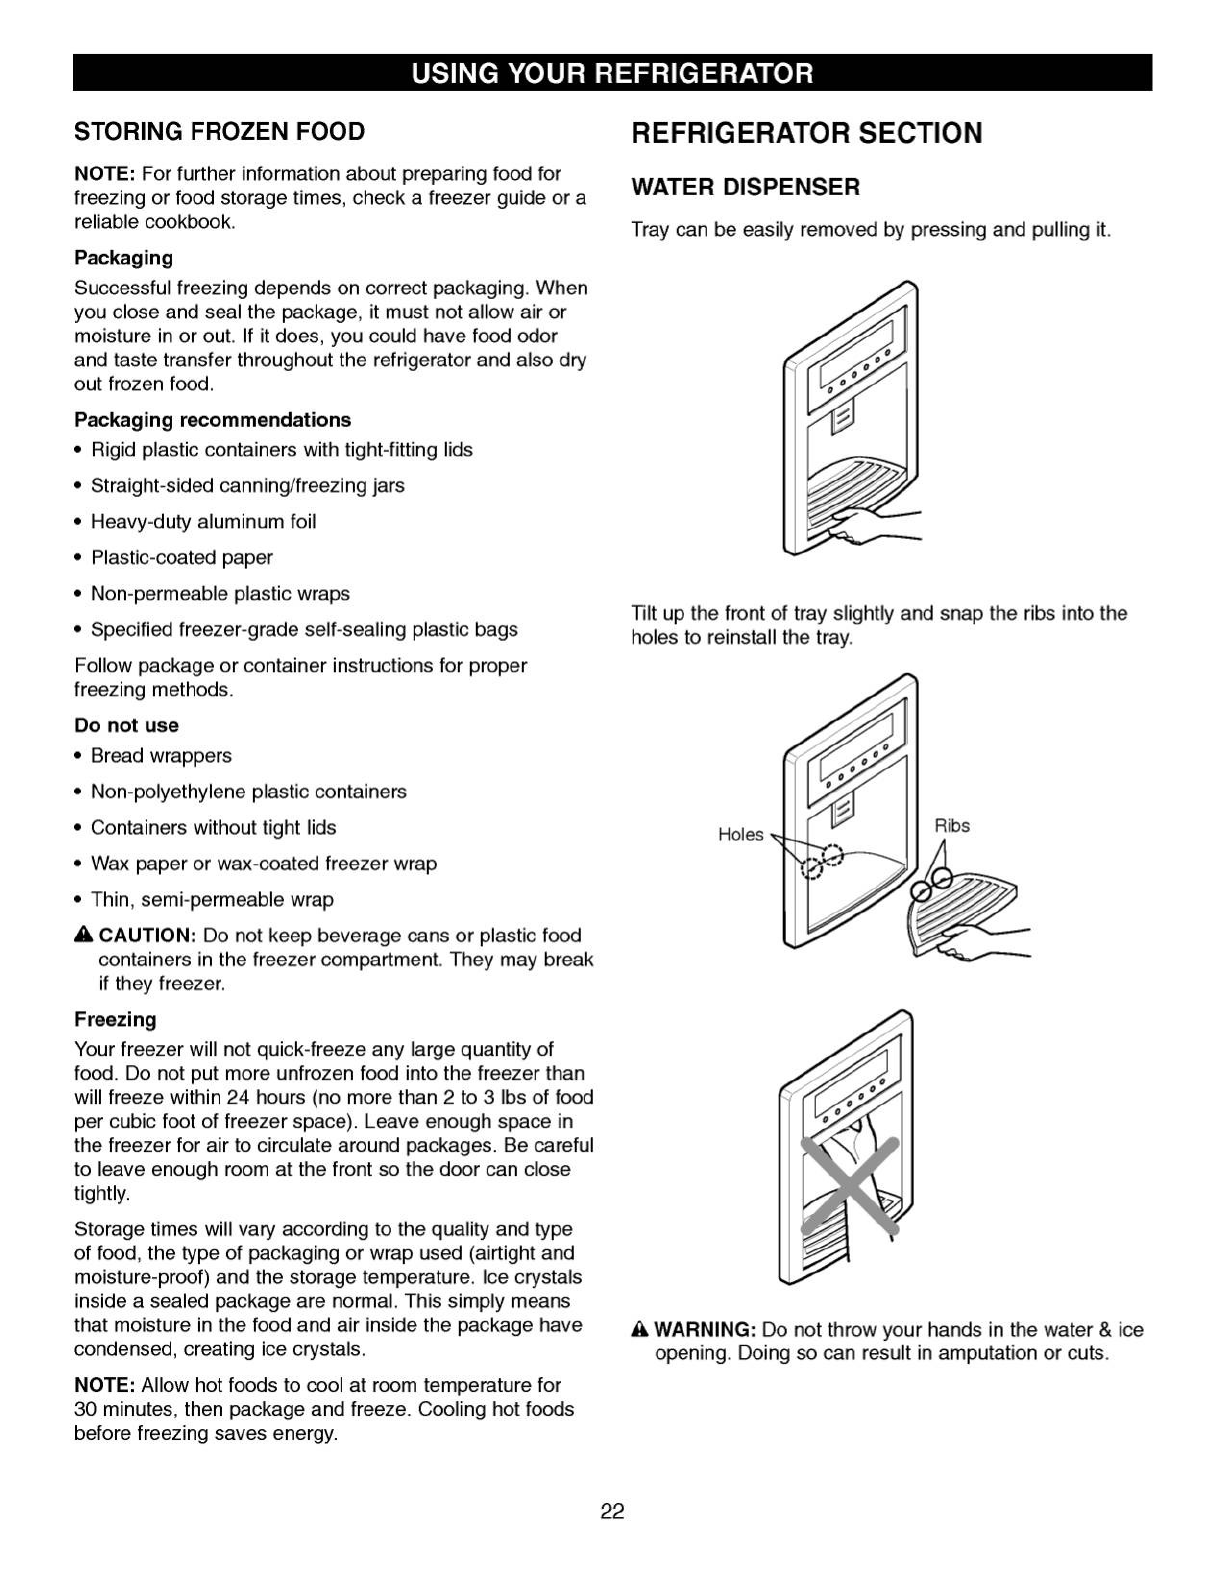
WATER DISPENSER
Tray can be easily removed by pressing and pulling it.
Tilt up the front of tray slightly and snap the ribs into the
holes to reinstall the tray.
wWARNING: Do not throw your hands in the water &ice
opening. Doing so can result in amputation or cuts.
22
Holes Ribs
REFRIGERATOR SHELVES
The shelves in your refrigerator are adjustable to meet
your individual storage needs. Your model may have
glass or wire shelves.
Storing similar food items together in your refrigerator and
adjusting the shelves to fit different heights of items will
make finding the exact item you want easier; it will also
reduce the amount of time the refrigerator door is open,
saving energy.
IMPORTANT: Do not clean glass shelveswith warm
water when they are cold. Shelvesmay break if exposed
to sudden temperature changes or impact, such as
bumping. For your protection, glass shelvesare made
with tempered glass, which will shatter into small pebble-
sized pieces.
NOTE:Glassshelvesareheavy. Use special care when
removing them to avoid droppingthem.
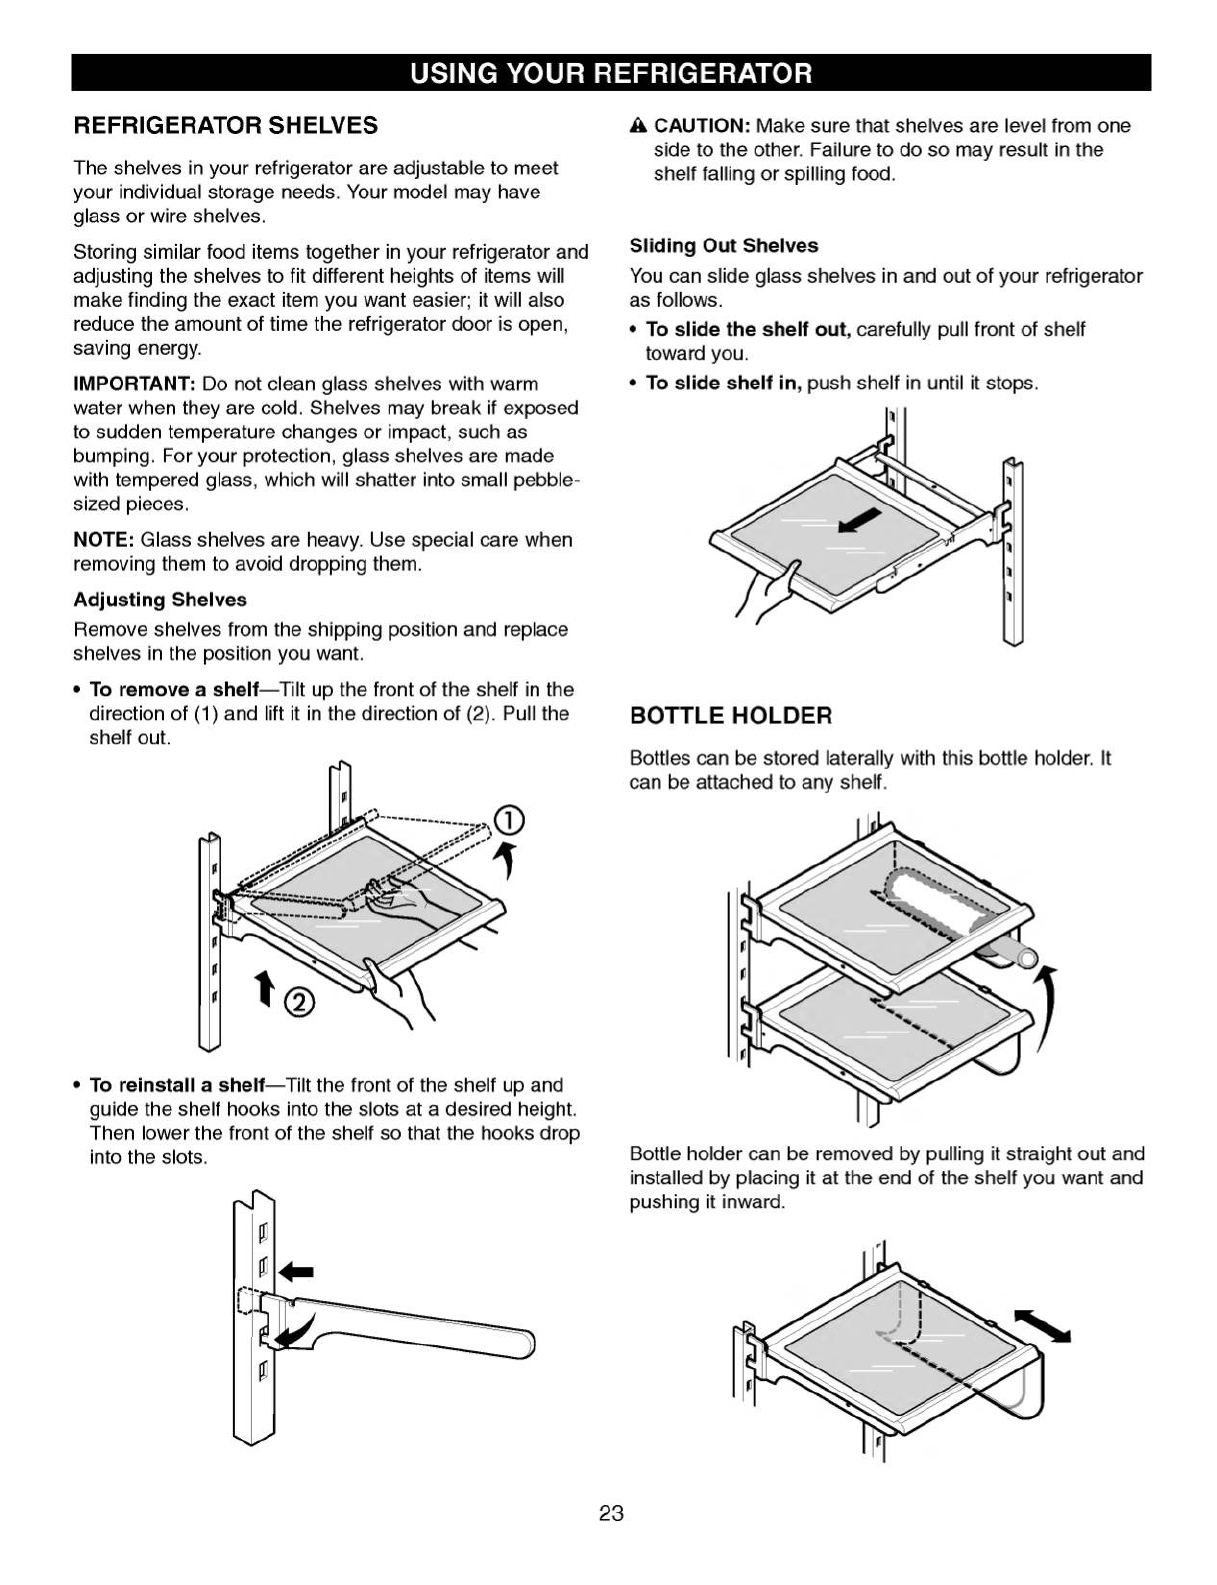
Adjusting Shelves
Remove shelves from the shipping position and replace
shelvesin the position you want.
\342\200\242
To remove ashelf---Tilt up the front of the shelf in the
direction of (1) and lift it in the direction of (2). Pull the
shelf out.
\342\200\242
To reinstall ashelf---Tilt the front of the shelf up and
guide the shelf hooksinto the slots at adesired height.
Then lowerthe front of the shelf so that the hooks drop
into the slots.
wCAUTION: Make sure that shelves are level from one
side to the other. Failure to do so may result in the
shelf falling or spilling food.
Sliding Out Shelves
You can slide glass shelves in and out of your refrigerator
as follows.
\342\200\242
To slide the shelf out, carefullypull front of shelf
toward you.
\342\200\242
To slide shelf in, push shelf in until it stops.
BOTTLE HOLDER
Bottles can bestored
laterally with this bottle holder. It
can be attached to any shelf.
Bottle holdercanberemoved by pulling it straight out and
installed by placing it at the end of the shelf you want and
pushing it inward.
USING YOUR REFRIGERATOR
23
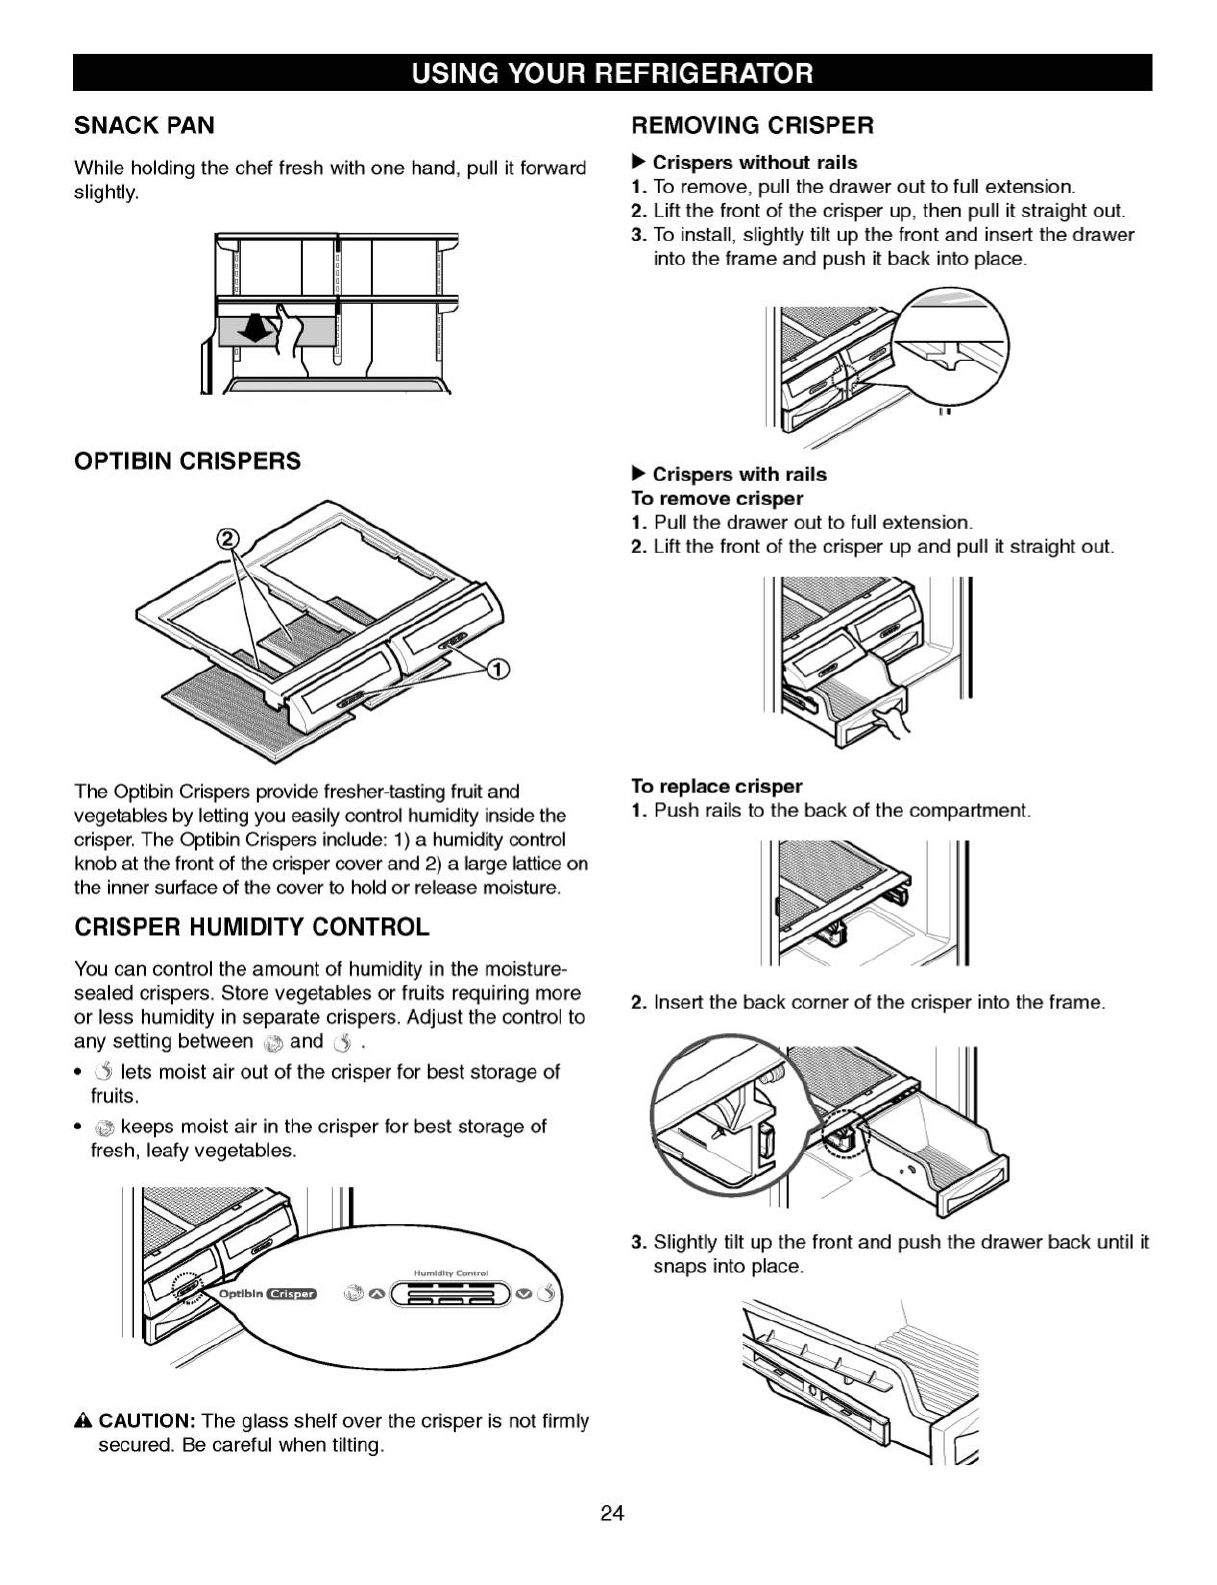
SNACK PAN
While holding the chef fresh with one hand, pull it forward
slightly.
OPTIBIN CRISPERS
The Optibin Crispers provide fresher-tasting fruit and
vegetables by letting you easily control humidity inside the
crisper. The Optibin Crispers include: 1) ahumidity control
knob at the front of the crisper cover and 2) alargelattice on
the inner surface of the cover to hold or release moisture.
CRISPER HUMIDITY CONTROL
You can control the amount of humidity in the moisture-
sealed crispers. Store vegetablesor fruits requiring more
or less humidity in separate crispers. Adjust the control to
any setting between and .
\342\200\242
lets moist air out of the crisper for best storage of
fruits.
\342\200\242
keeps moist air in the crisper for best storage of
fresh, leafy vegetables.
wCAUTION: The glass shelf over the crisperis not firmly
secured. Be careful when tilting.
REMOVING CRISPER
uCrispers without rails
1.To remove, pull the drawer out to full extension.
2. Lift the front of the crisper up, then pull it straight out.
3. To install, slightly tilt up the front and insert the drawer
into the frame and push it back into place.
uCrispers with rails
To remove crisper
1. Pull the drawer out to full extension.
2. Lift the front of the crisper up and pull it straight out.
To replace crisper
1. Push rails to the back of the compartment.
2. Insert the back corner of the crisper into the frame.
3. Slightly tilt up the front and push the drawerback until it
snaps into place.
USING YOUR REFRIGERATOR
24
1
2
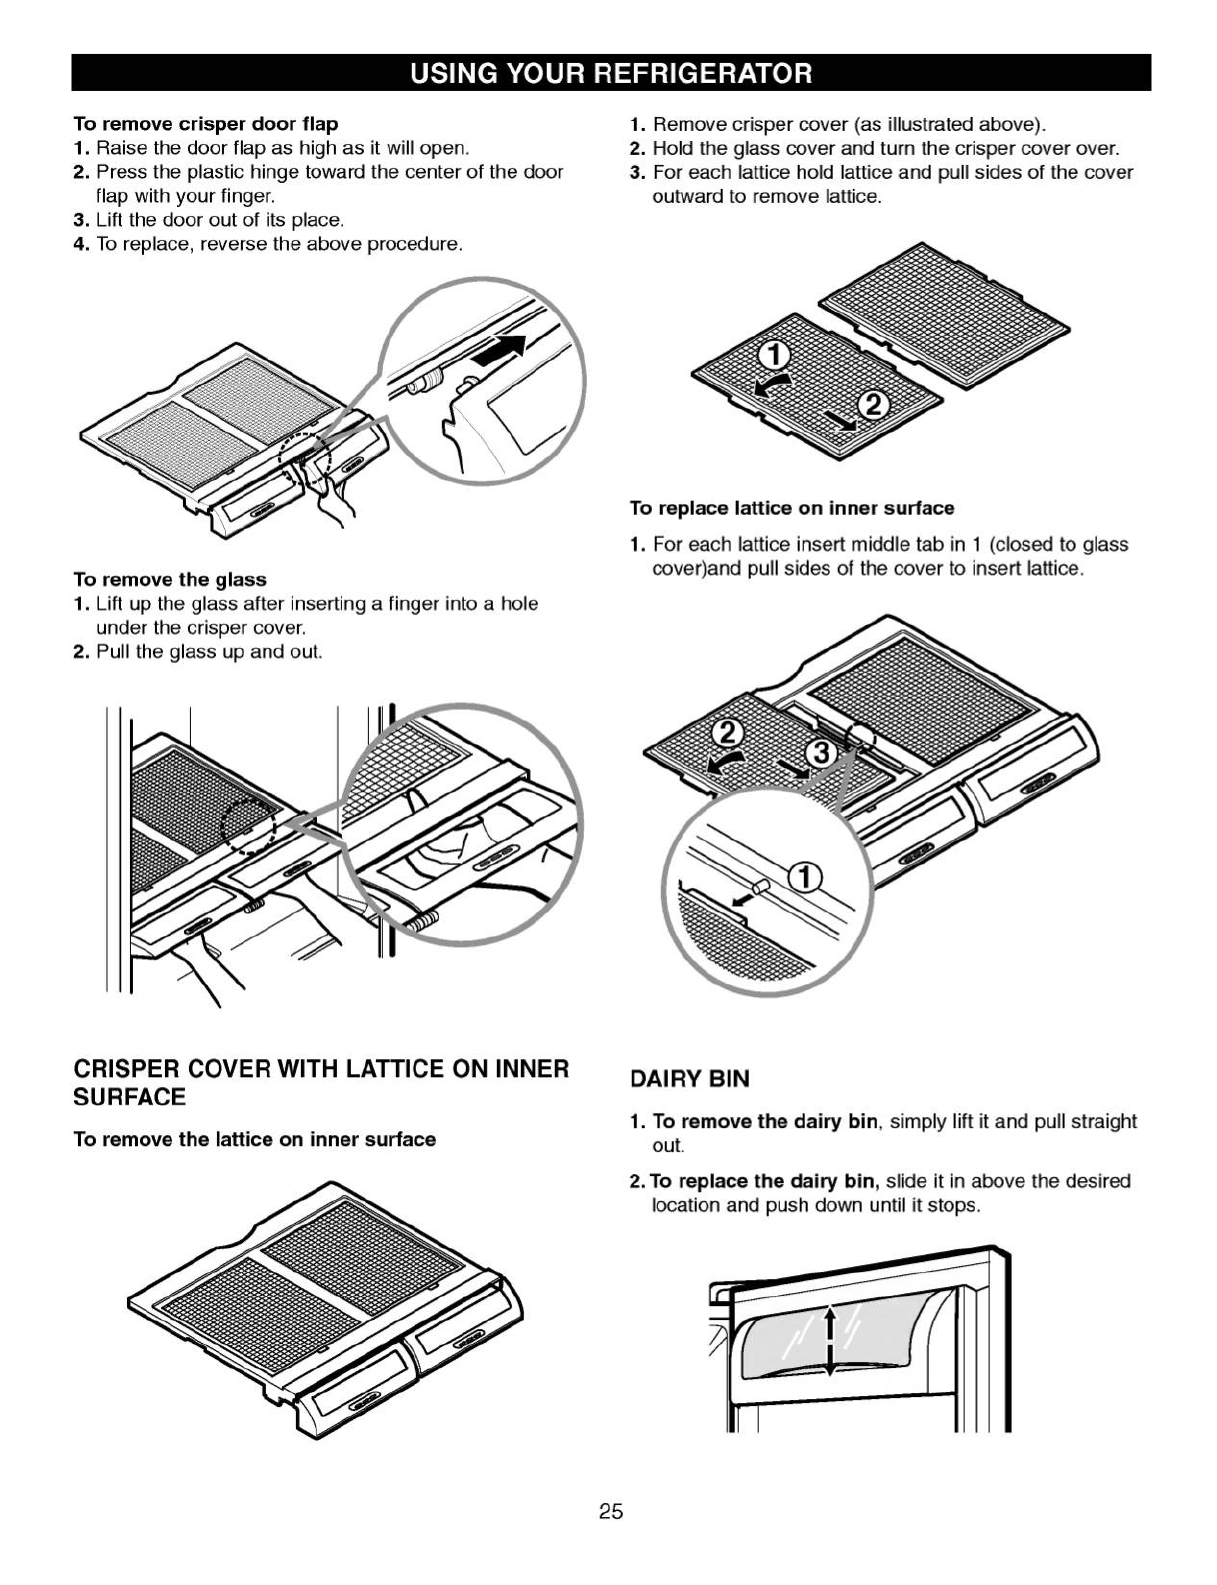
To remove crisper door flap
1. Raise the doorflap as high as it will open.
2. Press the plastic hinge toward the center of the door
flap with your finger.
3. Lift the door out of its place.
4. To replace, reverse the above procedure.
To remove the glass
1. Lift up the glass after inserting afinger into ahole
under the crisper cover.
2. Pull the glass up and out.
CRISPER COVER WITH LATTICE ON INNER
SURFACE
To remove the latticeon inner surface
1. Remove crisper cover (as illustrated above).
2. Hold the glass cover and turn the crisper cover over.
3. For each lattice hold lattice and pull sides of the cover
outward to remove lattice.
To replace lattice on innersurface
1.For each lattice insert middle tab in 1(closed to glass
cover)and pull sides of the cover to insert lattice.
DAIRYBIN
1.To remove the dairy bin, simply lift it and pull straight
out.
2.To replace the dairy bin, slide it in above the desired
location and push down until it stops.
USING YOUR REFRIGERATOR
25
1
2
23
1
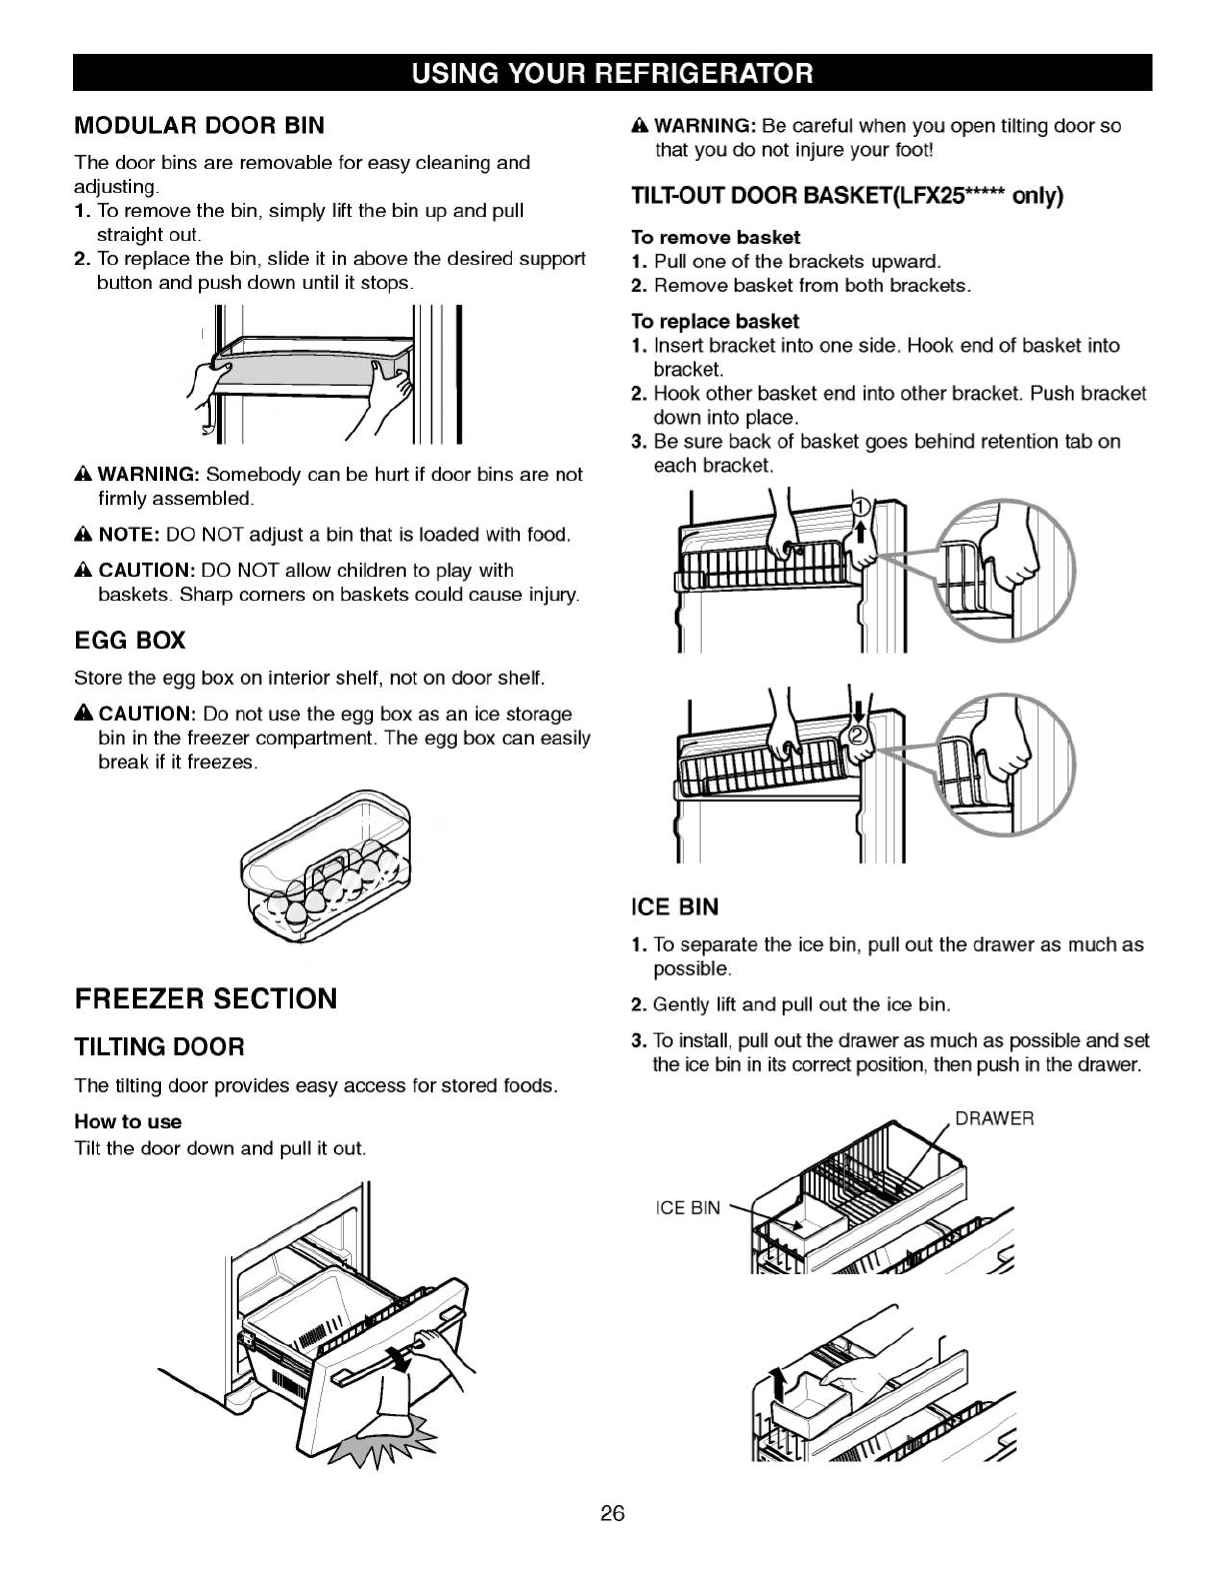
MODULAR DOOR BIN
The door bins are removable for easy cleaning and
adjusting.
1. To remove the bin, simply lift the bin up and pull
straight out.
2. To replace the bin, slide it in above the desired support
button and push down until it stops.
wWARNING: Somebody can be hurt if door bins are not
firmly assembled.
wNOTE: DO NOT adjust abin that is loaded with food.
wCAUTION:DO NOT allow children to play with
baskets. Sharp corners on baskets could cause injury.
EGG BOX
Store the egg box on interior shelf, not on door shelf.
wCAUTION:Do not use the egg box as an icestorage
bin in the freezer compartment. The egg boxcaneasily
break if it freezes.
FREEZER SECTION
TILTING DOOR
Thetilting door provides easy access for stored foods.
Howto use
Tilt the door down and pull it out.
wWARNING: Be careful when you open tilting door so
that you do not injure your foot!
TILT-OUTDOOR BASKET(LFX25***** only)
To remove basket
1. Pull one of the brackets upward.
2. Remove basket from both brackets.
To replace basket
1.Insert bracket into one side. Hook end of basket into
bracket.
2. Hook other basketend into other bracket. Push bracket
down into place.
3. Be sure back of basket goes behind retention tab on
each bracket.
ICE BIN
1.To separate the ice bin, pull out the drawer as much as
possible.
2.Gently lift and pull out the ice bin.
3.To install, pull out the drawer as much as possible and set
the ice bin in its correct position, then push in the drawer.
USING YOUR REFRIGERATOR
26
1
2
DRAWER
ICE BIN
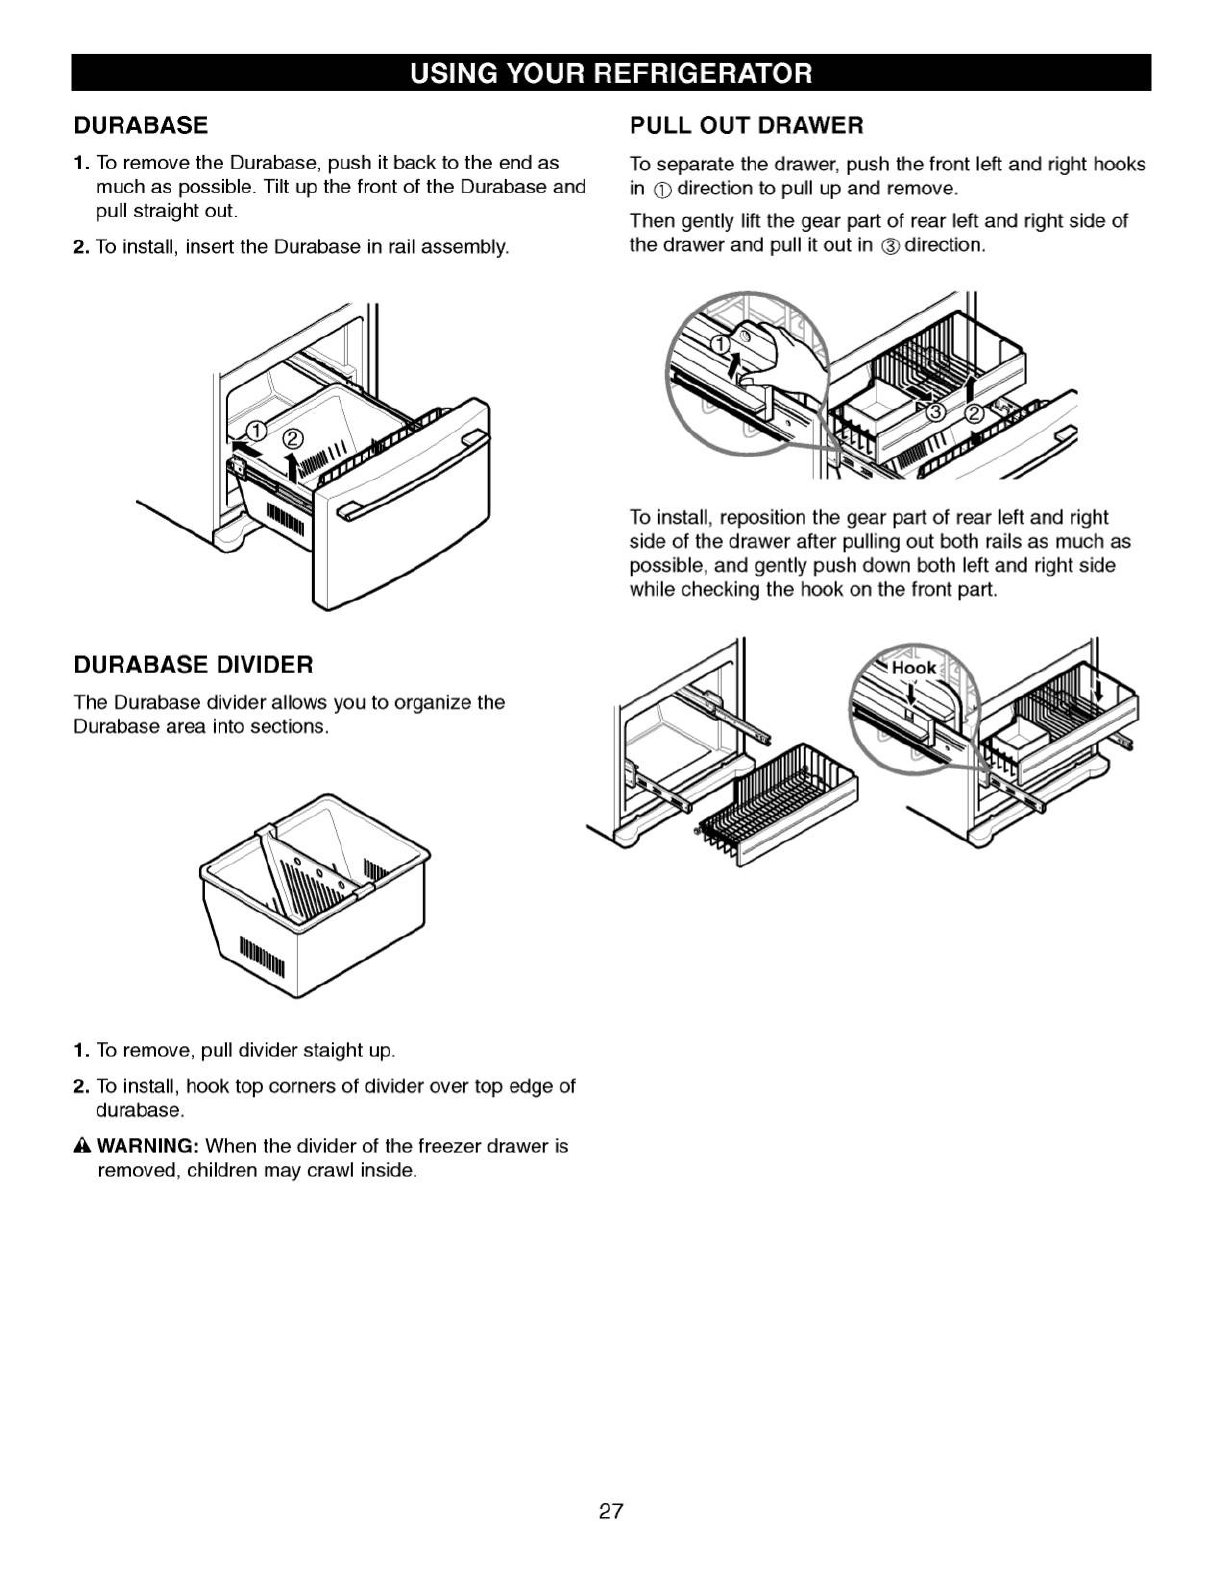
DURABASE
1. To remove the Durabase,push it back to the end as
much as possible. Tilt up the front of the Durabase and
pull straight out.
2. To install, insert the Durabase in rail assembly.
DURABASE DIVIDER
The Durabase divider allows you to organize the
Durabase area into sections.
1. To remove, pull divider staight up.
2. To install, hook top corners of divider over top edge of
durabase.
wWARNING: When the dividerof the freezer drawer is
removed, children may crawl inside.
PULL OUT DRAWER
Toseparate the drawer, push the front left and right hooks
in direction to pull up and remove.
Then gently lift the gear part of rear left and right side of
the drawer and pull it out in direction.
To install, reposition the gear part of rear left and right
side of the drawer after pulling out both rails as much as
possible,and gently push down both left and right side
while checking the hook on the front part.
27
12
2
3
1
Hook

28
FILTER
It is recommended that you replace the filter when the
water filter indicator light turns on or your water dispenser
or ice makerperformancedecreasesnoticeably.
After changing the water filter cartridge, reset the water
filter status display and indicator light by pressing and
holding the button for 3seconds.
1. Remove the old cartridge.
Placea container under
the hole of filter holder.
NOTE: When filter is being removed, the water drains
through the hole.
Rotate the knob of the
cartridgecounter
clockwise.
Pull out the filter cartridge.
2. Replace with anew cartridge.
Take the new cartridgeout of its packaging and
remove protective coverfrom the o-rings.
With cartridge knob in the vertical position, push the
new filter cartridge into the cover until it stops.
If you can't turn the filter from side to side, it isn't fully
inserted. Push it in firmly and twist it into place. You
will hear the snap when it clicks into place.
Using its handle, twist the cartridge clockwise about 1/4
turn. You will hear the snap when it clicks into place.
3. Flushing the Water System After Replacing Filter
Dispense water through the water dispenser for 3
minutes to purge the system.
NOTE: To purchase replacement water filter cartridges,
visit your local appliance dealer or part distributor. You
can also visit our website: www.lgappliances.com
or call
1-877-714-7481.The replacement water filter cartridge's
part number is 5231JA2006B.
Both the refrigerator and freezer sections defrost
automatically. However, clean both sections about once
amonth to prevent odors. Wipe up spills immediately.
GENERAL CLEANINGTIPS
\342\200\242
Unplug refrigerator or disconnect power.
\342\200\242
Remove all removable parts, such as shelves,
crispers,
etc.Refer to sections in Using Your
Refrigerator for removal instructions.
\342\200\242
Use aclean sponge or soft cloth and amild detergent in
warm water. Do not use abrasive or harsh cleaners.
\342\200\242
Hand wash, rinse and dry all surfaces thoroughly.
\342\200\242
Plug in refrigerator or reconnect power.
OUTSIDE
Waxing external painted metal surfaces helps provide rust
protection. Do not wax plastic parts. Wax painted metal
surfaces at least twice ayear using appliance wax (or
auto paste wax).Apply wax with aclean, soft cloth.
For products with astainless steel exterior, use aclean
sponge
or soft cloth and a mild detergent in warm water.
Do not use abrasive or harsh cleaners. Dry thoroughly
with asoft cloth.
INSIDE WALLS (allow freezer to warm up so
cloth won't stick)
To help remove odors, you can wash the insideof the
refrigerator with a mixture of baking soda and warm water.
Mix 2tablespoons baking soda to 1quart of water (26 g
soda to 1 liter water.) Be sure the baking soda is
completely dissolved so does it not scratch the surfaces
of the refrigerator.
wCAUTION: While cleaning the inside, do not spray water.
DOOR LINERS AND GASKETS
Do not use cleaning waxes, concentrated detergents,
bleaches, or cleanerscontaining petroleum on plastic
refrigerator parts.
PLASTIC PARTS (covers and panels)
Do not use window sprays, abrasive cleansers, or flammable
fluids. These can scratch or damage the material.
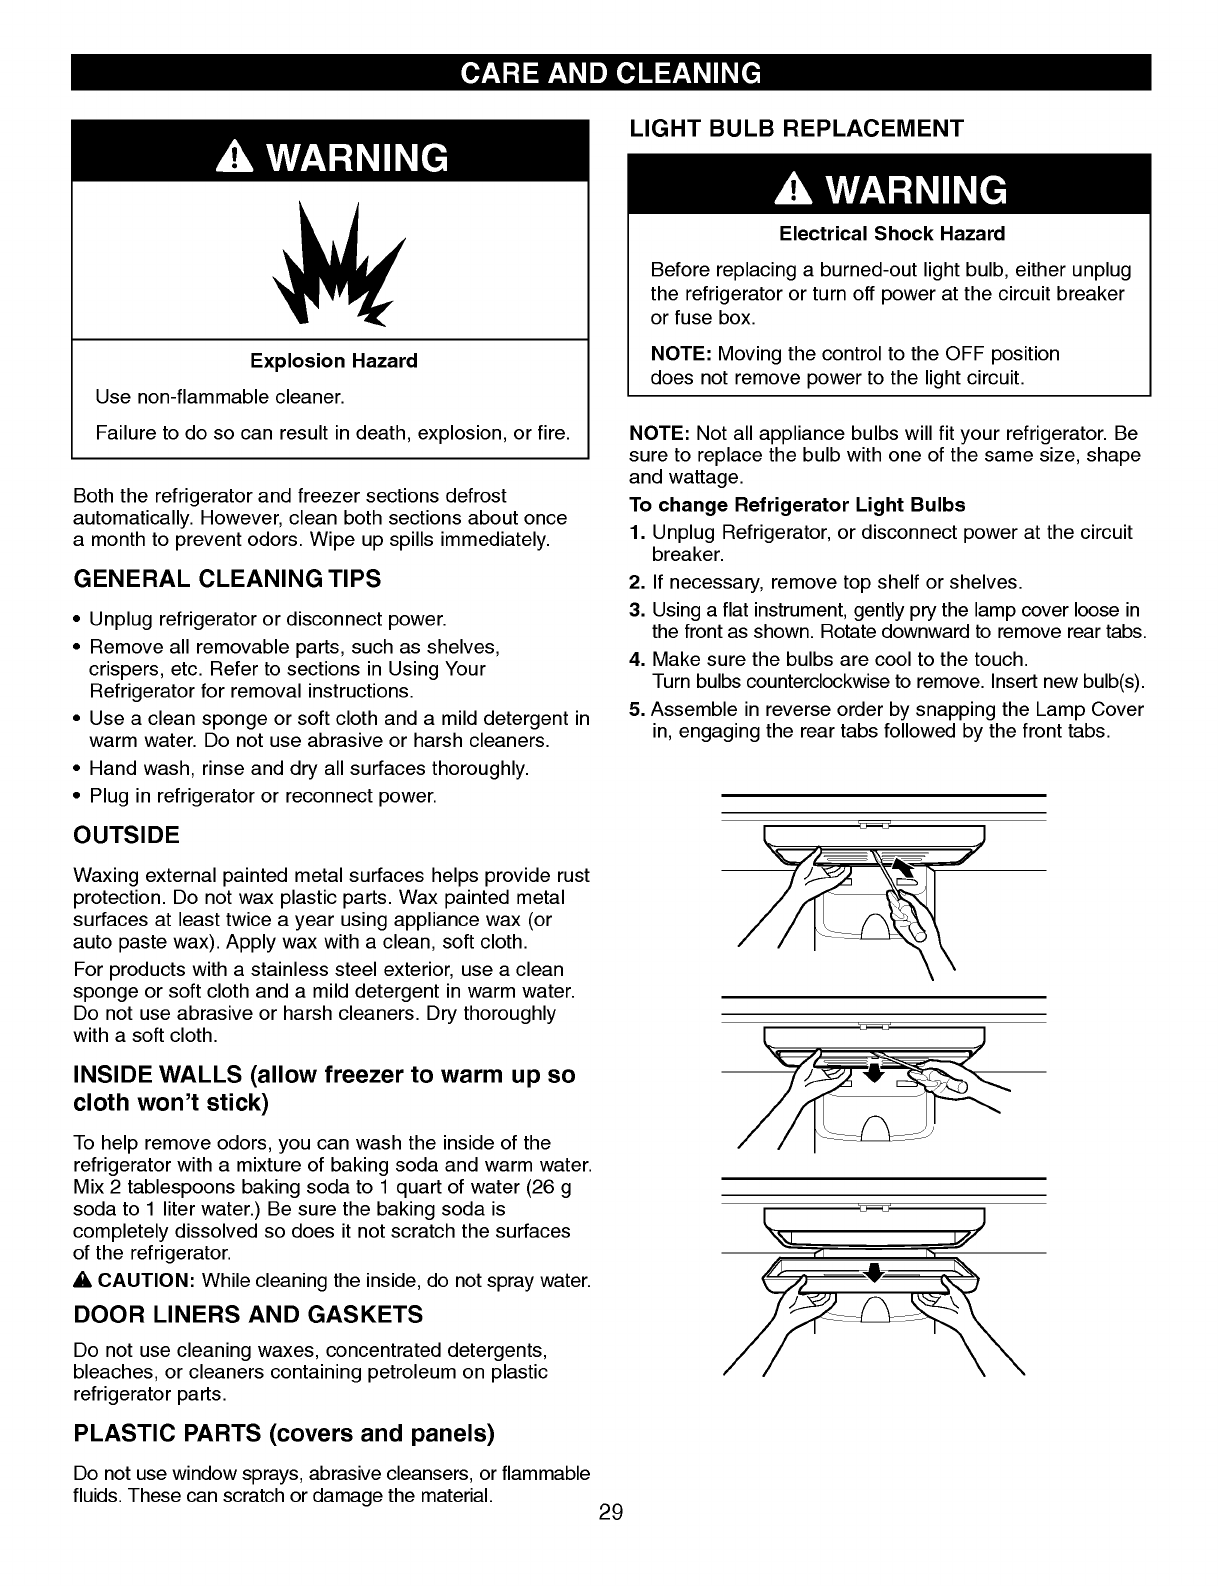
LIGHT BULB REPLACEMENT
NOTE: Not all appliance bulbs will fit your refrigerator. Be
sure to replace the bulb with one of the same size, shape
and wattage.
To change Refrigerator Light Bulbs
1. Unplug Refrigerator, or disconnect power at the circuit
breaker.
2. If necessary, remove top shelf or shelves.
3. Using aflat instrument, gently pry the lamp cover loose in
the front as shown. Rotate downward to remove rear tabs.
4. Make sure the bulbs are cool to the touch.
Turn bulbs counterclockwise to remove. Insert new bulb(s).
5.Assemblein reverse order by snapping the Lamp Cover
in, engaging the rear tabs followed by the front tabs.
Electrical Shock Hazard
Beforereplacingaburned-out light bulb, either unplug
the refrigeratoror turn off power at the circuit breaker
or fuse box.
NOTE: Moving the control to the OFF position
does not remove power to the light circuit.
29
Explosion Hazard
Use non-flammablecleaner.
Failure to do so can result in death, explosion, or fire.
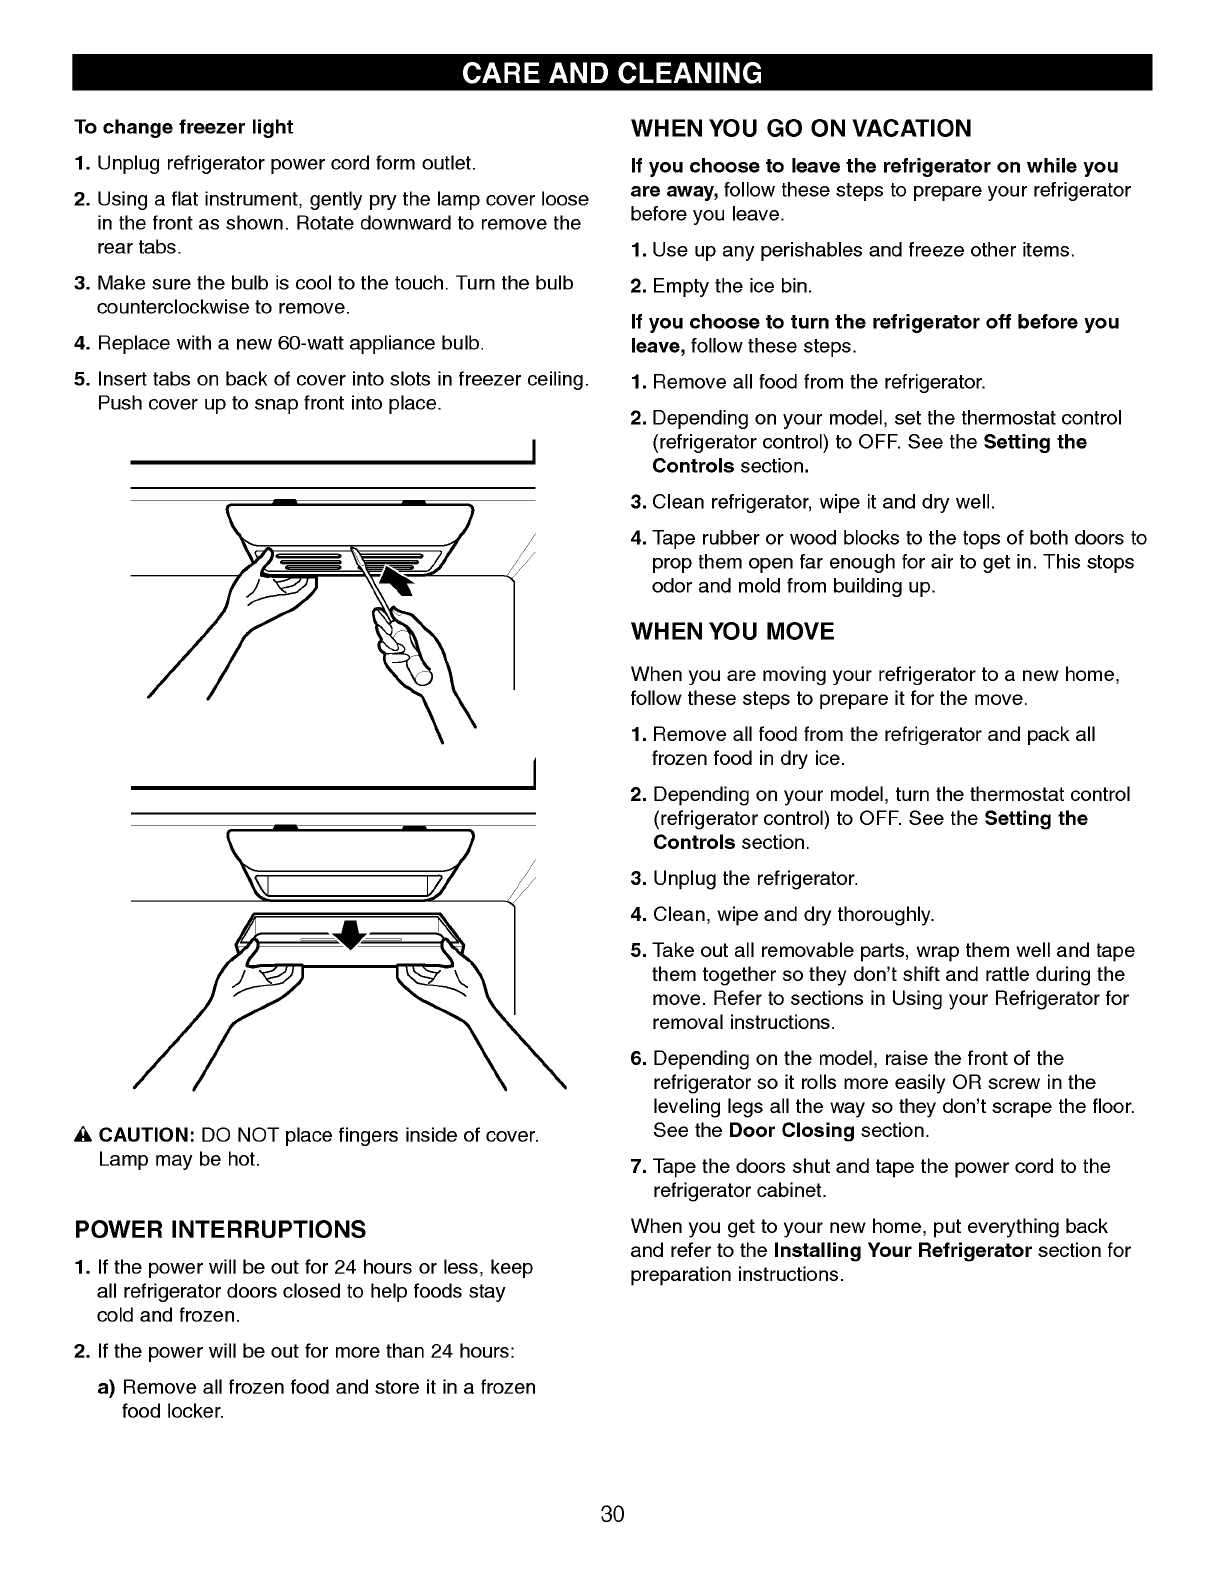
To change freezer light
1.Unplug refrigerator power cord form outlet.
2. Usingaflat instrument, gently pry the lamp cover loose
in the front as shown. Rotate downward to remove the
rear tabs.
3. Make sure the bulb is cool to the touch. Turn the bulb
counterclockwise to remove.
4. Replacewith anew 60-watt appliance bulb.
5. Insert tabs on backof cover into slots in freezer ceiling.
Push cover up to snap front into place.
wCAUTION: DO NOTplacefingers inside of cover.
Lamp may be hot.
POWER INTERRUPTIONS
1.If the power will be out for 24 hours or less, keep
all refrigerator doors closed to help foods stay
coldand frozen.
2. If the power will be out for more than 24 hours:
a) Remove all frozen food and store it in afrozen
food locker.
WHEN YOU GO ONVACATION
If you choose to leave the refrigerator onwhile you
are away, follow these steps to prepare your refrigerator
before you leave.
1. Use up any perishables and freeze other items.
2. Empty the ice bin.
If you choose to turn the refrigerator off before you
leave, follow these steps.
1. Remove all food from the refrigerator.
2. Dependingon your model, set the thermostat control
(refrigeratorcontrol) to OFF. See the Setting the
Controls section.
3.Clean refrigerator, wipe it and dry well.
4. Tape rubber or wood blocksto the tops of both doors to
prop them open far enough for air to get in. This stops
odorand mold from building up.
WHEN YOU MOVE
When you are moving your refrigerator to a new home,
follow these steps to prepare it for the move.
1. Remove all food from the refrigerator and pack all
frozen food in dry ice.
2. Depending on your model, turn the thermostat control
(refrigerator control) to OFF. See the Settingthe
Controlssection.
3.Unplug the refrigerator.
4. Clean, wipe and dry thoroughly.
5. Take out all removable parts, wrap them well and tape
them together so they don't shift and rattle during the
move. Refer to sections in Using your Refrigerator for
removal instructions.
6. Dependingon the model,raisethe front of the
refrigerator so it rolls more easily OR screw in the
leveling legs all the way so they don't scrape the floor.
See the Door Closing section.
7. Tapethe doorsshut and tape the power cord to the
refrigerator cabinet.
When you get to your new home, put everything back
and refer to the Installing Your Refrigerator section for
preparation instructions.
30

31
OPERATIONINSTRUCTIONS
Anewly-installed refrigerator may take
12 to 24 hours to beginmaking ice.
The icemaker will produce six cubes per cycle---
approximately 100--130cubesin a24-hour period,
depending on freezer compartment temperature, room
temperature, number of door openings and other
operating conditions.
If the refrigerator is used before the water connectionis
made to the icemaker, set the powerswitch to O(off).
When the refrigerator has beenconnectedto the water
supply, set the power switch to I (on).
The icemaker will fill with water when it cools to freezing.
Anewly-installed refrigerator may take 12 to 24 hours to
begin making ice cubes.
Throw away the first few batches of ice to allow the water
line to clear.
Be sure nothing interferes with the sweep of the
Automatic Shut off Arm.
When the bin fills to the level of the Automatic Shut off
Arm, the icemaker will stop producing ice.
It is normal for several cubes to be stucktogether.
If ice is not used frequently, old ice cubes will become
cloudy, taste stale, and shrink.
NOTE: If the cube size is smaller or larger than you
expected, you can regulate the size with the cube size
button.
Every time you press the cube sizebutton, the indicator
moves up one light. The higher the light position, the
larger the cubes will be. Pressing at the highest position
returns the indicator to the lowest position.
WHEN YOU SHOULD SET THE ICEMAKER
POWER SWITCH TO O(OFF)
\342\200\242
When the water supply will be shut off for several hours.
\342\200\242
When the ice bucket is removed for more than aminute
or two.
\342\200\242
When the refrigerator will not be used for several days.
NORMAL SOUNDSYOU MAY HEAR
NOTE: Keeping the power switch in the I(on) position
before the water line is connected can damagethe
icemaker.
\342\200\242
You will hear the sound of cubes droppinginto the bin
and water running in the pipes as the icemaker refills.
PREPARING FOR VACATION
Personal Injury Hazard
Avoid contact with the moving parts of the ejector
mechanism, or with the heating element that releases
the cubes. DO NOT place fingers or hands on the
automatic icemaking mechanism while the refrigerator
is plugged in.
\342\200\242
If you turn the ICE Maker off with ice in the Ice Bin ,
the ice can melt and leak onto the floor.
\342\200\242
When you turn off the ice maker due to along
vacation, empty all the ice within the ice bin.
Automatic
Shut off Arm
Icemaker
Cube Size
Indicator Light Cube Size
Select Button
Power Switch
32
BEFORE YOU BEGIN
This water line installation is not warranted by the
refrigerator or icemaker manufacturer. Followthese
instructions carefully to minimize the risk of expensive
water damage.
Water hammer (water banging in the pipes) in house
plumbing can cause damageto refrigerator parts and lead
to water leakage or flooding. Call aqualified plumber to
correct water hammer beforeinstalling the water supply
line to the refrigerator.
To prevent burns and product damage, do not hook up
the water line to the hot water line.
If you use your refrigerator before connecting the water
line, make sure the icemaker power switch is in the O
(off) position.
Do not install the icemaker tubing in areas where
temperatures fall below freezing.
When using any electrical device (suchas apower
drill) during installation, be sure the deviceis double-
insulated or grounded in amanner to prevent the hazard
of electric shock, or is battery-powered.
All installations must be in accordance with local plumbing
code requirements.
NOTE:Wear eye protection.
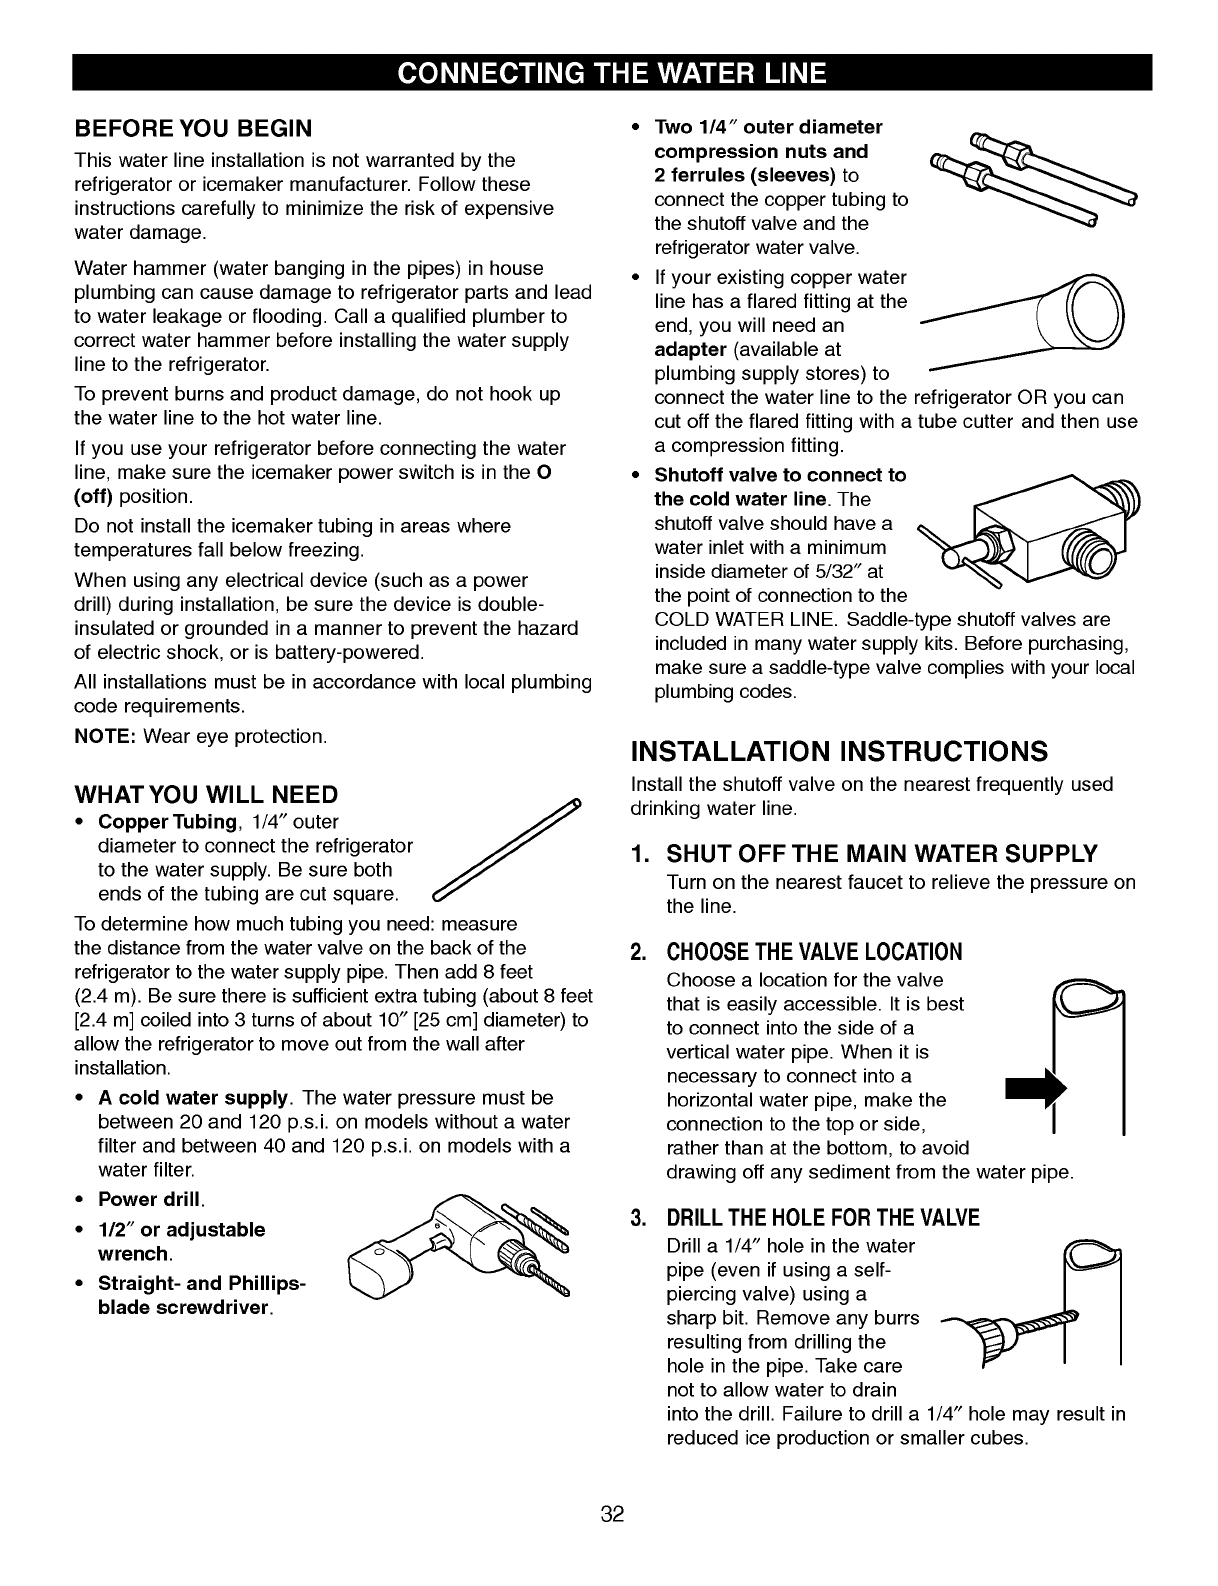
WHAT YOU WILL NEED
\342\200\242
Copper Tubing, 1/4 \342\200\262\342\200\262
outer
diameter to connect the refrigerator
to the water supply. Be sure both
ends of the tubing are cut square.
Todetermine how much tubing you need: measure
the distancefrom the water valve on the back of the
refrigerator to the water supply pipe.Then add 8feet
(2.4 m). Be sure there is sufficient extra tubing (about 8feet
[2.4m] coiled into 3turns of about 10\342\200\262\342\200\262
[25 cm] diameter) to
allow the refrigerator to move out from the wall after
installation.
\342\200\242
Acold water supply. The water pressure must be
between 20 and 120 p.s.i. on modelswithout awater
filter and between 40 and 120p.s.i.on models with a
water filter.
\342\200\242
Power drill .
\342\200\242
1/2 \342\200\262\342\200\262
or adjustable
wrench.
\342\200\242
Straight- and Phillips-
blade screwdriver .
\342\200\242
Two 1/4 \342\200\262\342\200\262
outer diameter
compression nuts and
2ferrules (sleeves)to
connect the copper tubing to
the shutoff valve and the
refrigerator water valve.
\342\200\242
If your existing copper water
line has aflared fitting at the
end, you will need an
adapter (available at
plumbing supply stores) to
connect the water line to the refrigeratorOR you can
cut off the flared fitting with atube cutter and then use
acompression fitting.
\342\200\242
Shutoff valve to connect to
the cold water line.The
shutoff valve should have a
water inlet with aminimum
inside diameter of 5/32\342\200\262\342\200\262
at
the point of connection to the
COLDWATER LINE. Saddle-type shutoff valves are
includedin many water supply kits. Before purchasing,
makesureasaddle-type valve complies with your local
plumbing codes.
INSTALLATION INSTRUCTIONS
Install the shutoff valve on the nearest frequently used
drinking water line.
1. SHUT OFF THE MAINWATER SUPPLY
Turn on the nearest faucet to relieve the pressure on
the line.
2. CHOOSE THE VALVE LOCATION
Choose alocationfor the valve
that is easily accessible. It is best
to connect into the side of a
vertical water pipe. When it is
necessary to connect into a
horizontal water pipe, make the
connectionto the top or side,
rather than at the bottom, to avoid
drawing off any sediment from the water pipe.
3. DRILL THE HOLE FOR THE VALVE
Drill a1/4\342\200\262\342\200\262hole in the water
pipe (even if using aself-
piercing valve) using a
sharp bit. Remove any burrs
resulting from drilling the
hole in the pipe. Take care
not to allow water to drain
into the drill. Failure to drill a1/4\342\200\262\342\200\262hole may result in
reduced ice production or smaller cubes.
INSTALLATION INSTRUCTIONS
(CONTINUED)
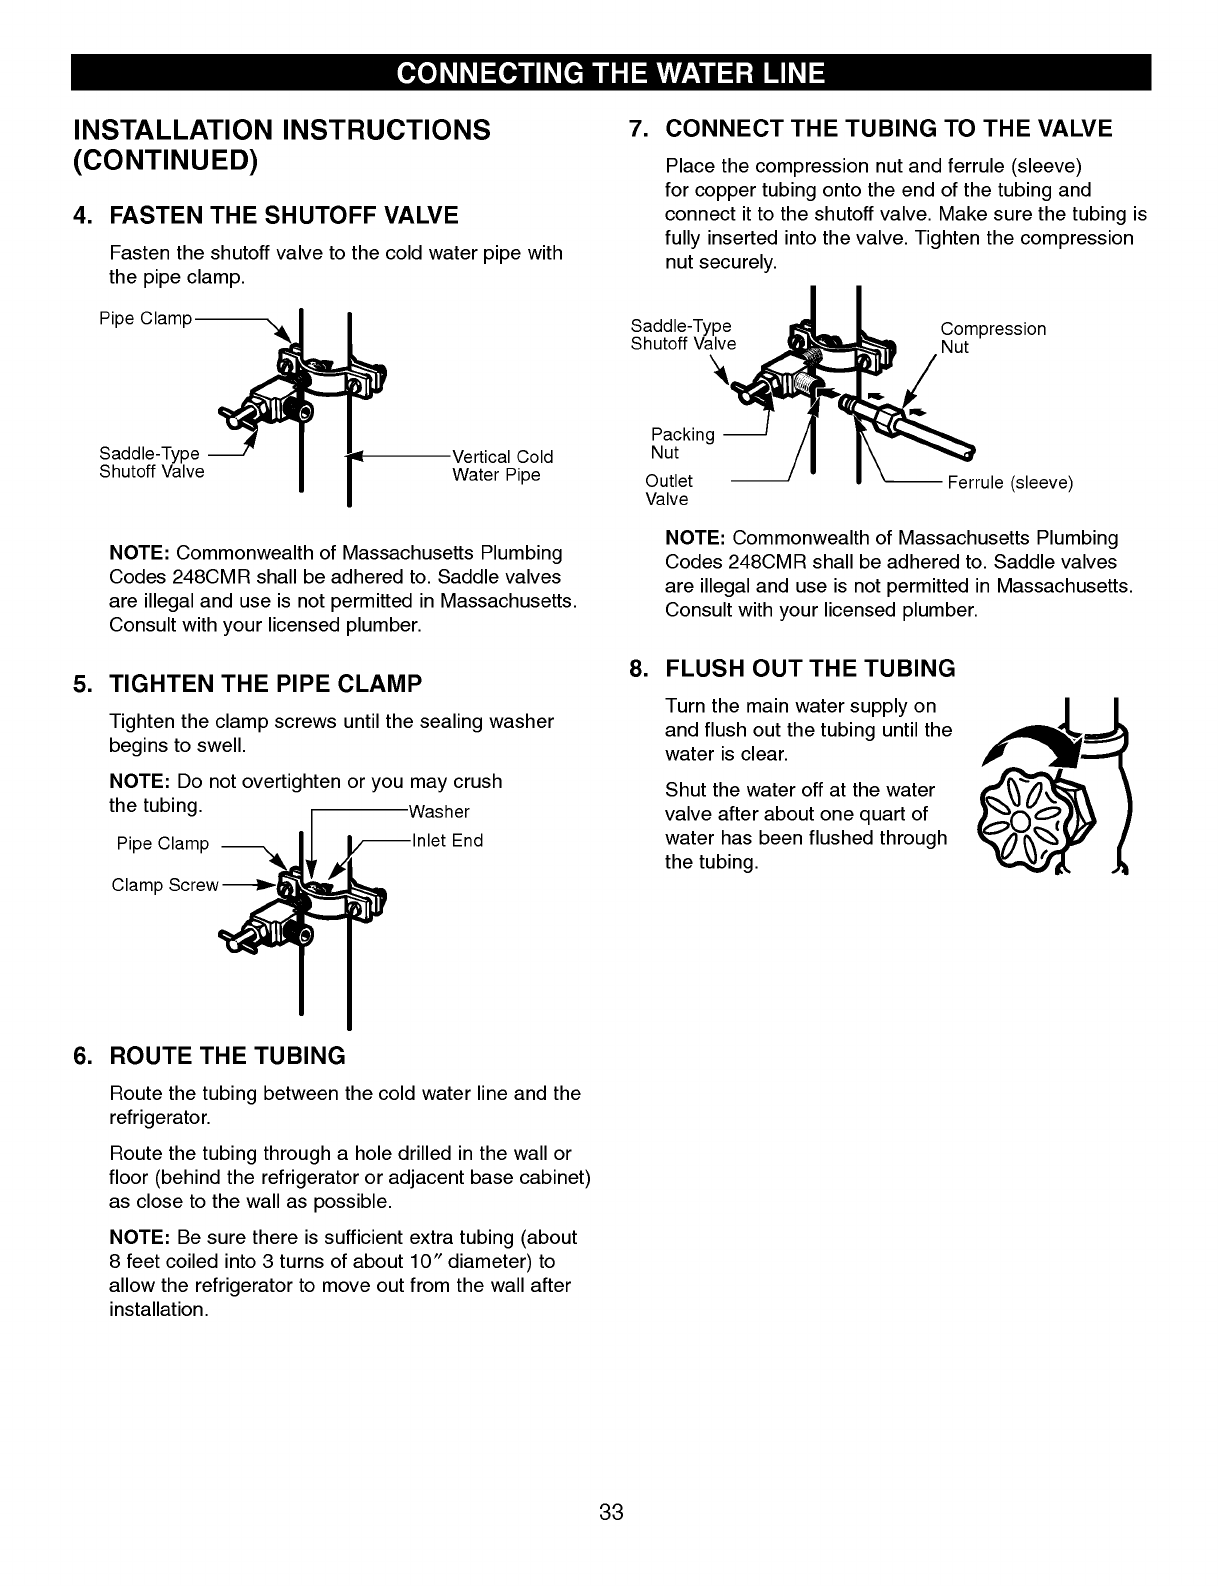
4. FASTEN THE SHUTOFF VALVE
Fasten the shutoff valve to the cold water pipe with
the pipe clamp.
NOTE: Commonwealth of Massachusetts Plumbing
Codes 248CMR shall be adhered to. Saddlevalves
are illegal and use is not permitted in Massachusetts.
Consult with your licensed plumber.
5. TIGHTEN THE PIPE CLAMP
Tighten the clamp screws until the sealing washer
begins to swell.
NOTE:Do not overtighten or you may crush
the tubing.
6. ROUTE THE TUBING
Route the tubing between the cold water line and the
refrigerator.
Route the tubing through ahole drilled in the wall or
floor (behind the refrigerator or adjacent base cabinet)
as close to the wall as possible.
NOTE: Be sure thereis sufficient extra tubing (about
8feet coiledinto 3turns of about 10 \342\200\262\342\200\262
diameter) to
allow the refrigerator to move out from the wall after
installation.
7. CONNECT THE TUBINGTOTHE VALVE
Place the compression nut and ferrule (sleeve)
for copper tubing onto the end of the tubing and
connect it to the shutoff valve. Make sure the tubing is
fully inserted into the valve. Tighten the compression
nut securely.
NOTE: Commonwealthof Massachusetts Plumbing
Codes 248CMR shall be adheredto. Saddlevalves
are illegal and use is not permitted in Massachusetts.
Consult with your licensed plumber.
8. FLUSH OUT THE TUBING
Turn the main water supply on
and flush out the tubing until the
water is clear.
Shut the water off at the water
valve after about one quart of
water has been flushed through
the tubing.
33
Vertical Cold
Water Pipe
Saddle-Type
Shutoff Valve
Pipe Clamp
Washer
Inlet End
Pipe Clamp
Clamp Screw
Saddle-Type
Shutoff Valve
Packing
Nut
Outlet
Valve
Ferrule (sleeve)
Compression
Nut
34
CONNECTING THE WATER LINE
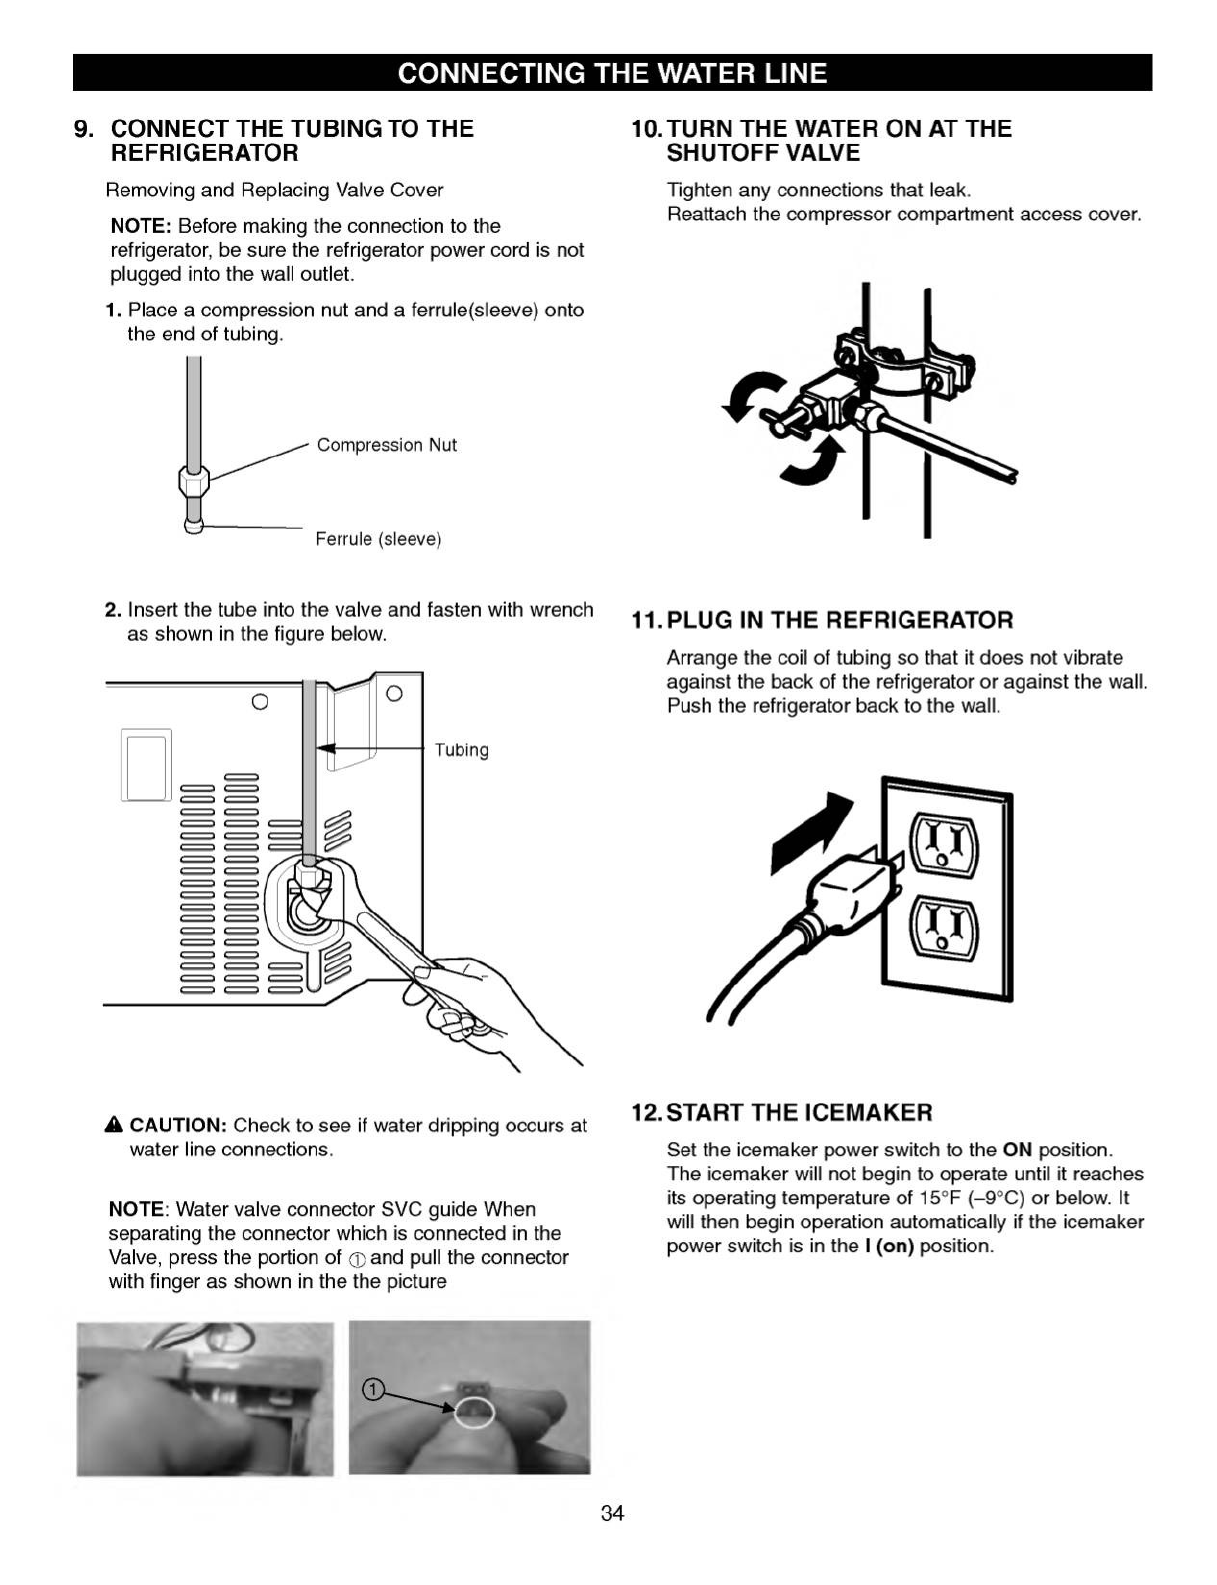
9. CONNECT THE TUBINGTOTHE
REFRIGERATOR
Removing and Replacing Valve Cover
NOTE:Beforemaking the connection to the
refrigerator, be sure the refrigerator power cord is not
plugged into the wall outlet.
1. Place acompressionnut and aferrule(sleeve) onto
the end of tubing.
2. Insert the tube into the valve and fasten with wrench
as shown in the figure below.
wCAUTION: Check to see if water dripping occurs at
water line connections.
NOTE:Water valve connector SVC guide When
separating the connectorwhich is connected in the
Valve, press the portion of and pull the connector
with finger as shown in the the picture
10. TURN THE WATER ON AT THE
SHUTOFF VALVE
Tighten any connections that leak.
Reattach the compressor compartment access cover.
11. PLUG IN THE REFRIGERATOR
Arrange the coil of tubing so that it does not vibrate
against the backof the refrigerator or against the wall.
Push the refrigerator back to the wall.
12. START THE ICEMAKER
Setthe icemaker power switch to the ON position.
The icemakerwill not begin to operate until it reaches
its operating temperature of 15\302\260F
(--9\302\260C) or below. It
will then begin operation automatically if the icemaker
power switch is in the I (on) position.
Tubing
Compression Nut
Ferrule (sleeve)
1
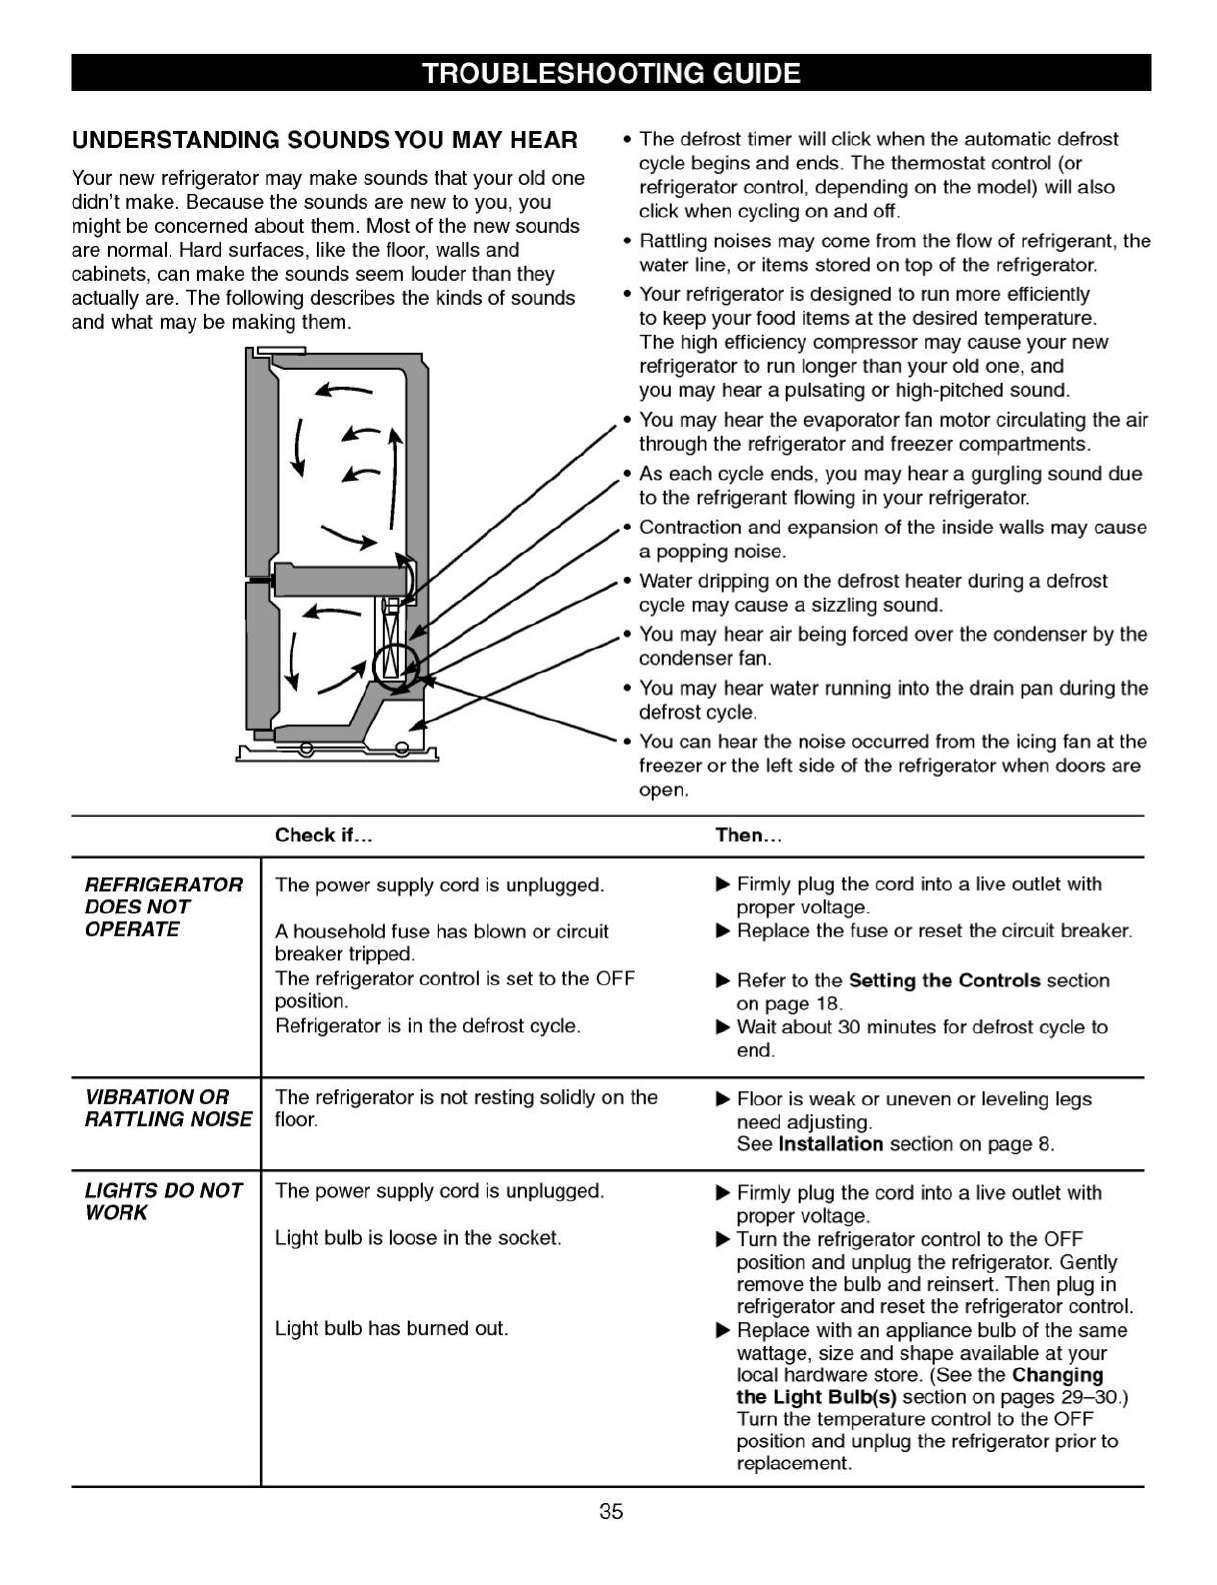
UNDERSTANDING SOUNDS YOU MAY HEAR
Your new refrigerator may make sounds that your old one
didn't make. Because the sounds are new to you, you
might be concerned about them. Mostof the new sounds
are normal. Hard surfaces, like the floor, walls and
cabinets, can makethe soundsseemlouder than they
actually are. The following describes the kinds of sounds
and what may be making them.
\342\200\242
The defrost timer will click when the automatic defrost
cycle beginsand ends. The thermostat control (or
refrigeratorcontrol, depending on the model) will also
click when cycling on and off.
\342\200\242
Rattling noises may come from the flow of refrigerant, the
water line, or items storedon top of the refrigerator.
\342\200\242
Your refrigerator is designed to run more efficiently
to keep your food items at the desiredtemperature.
The high efficiency compressor may cause your new
refrigerator to run longer than your old one, and
you may hear apulsating or high-pitchedsound.
\342\200\242
You may hear the evaporator fan motor circulatingthe air
through the refrigerator and freezer compartments.
\342\200\242
As each cycle ends, you may hear agurgling sound due
to the refrigerant flowing in your refrigerator.
\342\200\242
Contraction and expansion of the inside walls may cause
apopping noise.
\342\200\242
Water dripping on the defrost heater during adefrost
cycle may cause asizzling sound.
\342\200\242
You may hear air being forced over the condenserby the
condenser fan.
\342\200\242
You may hear water running into the drain pan during the
defrost cycle.
\342\200\242
You can hear the noise occurred from the icing fan at the
freezer or the left side of the refrigerator when doors are
open.
Checkif...
The power supply cord is unplugged.
Ahousehold fuse has blown or circuit
breaker tripped.
The refrigerator control is set to the OFF
position.
Refrigerator is in the defrost cycle.
The refrigerator is not resting solidly on the
floor.
The power supply cord is unplugged.
Light bulb is loose in the socket.
Light bulb has burned out.
REFRIGERATOR
DOES NOT
OPERATE
VIBRATION OR
RATTLINGNOISE
LIGHTS DO NOT
WORK
Then...
uFirmly plug the cord into alive outlet with
proper voltage.
uReplace the fuse or resetthe circuit breaker.
uRefer to the Setting the Controlssection
on page 18.
uWait about 30 minutes for defrost cycle to
end.
uFloor is weak or uneven or levelinglegs
needadjusting.
See Installation section on page 8.
uFirmly plug the cord into alive outlet with
proper voltage.
uTurn the refrigerator control to the OFF
position and unplug the refrigerator. Gently
remove the bulb and reinsert.Thenplug in
refrigerator and reset the refrigeratorcontrol.
uReplace
with an appliance bulb of the same
wattage, size and shape available at your
local hardware store. (Seethe Changing
the Light Bulb(s) section on pages 29--30.)
Turn the temperature control to the OFF
position and unplug the refrigerator prior to
replacement.
35

36
Checkif...
The refrigerator that was replaced was an
oldermodel.
The room temperature is hotter than normal.
The door is opened often or alargeamount of
food has just been added.
The refrigerator was recently plugged in and
the refrigerator control was set correctly.
The refrigerator control is not set correctly for
the surrounding conditions.
Thedoorsarenot closed completely.
The condenser coils are dirty.
The refrigerator is not level.
Food packagesareblocking the door open.
The ice bin, crisper cover, pans, shelves, door
bins or baskets areout of position.
The gaskets are sticking.
The refrigerator wobbles or seems unstable.
The doors were removed during product
installation and not properly replaced.
The dooris not closing properly.
The door is opened often.
COMPRESSOR
MOTOR SEEMS
TO RUN TOO
MUCH
DOORSWILL
NOT CLOSE
COMPLETELY
FROST OR ICE
CRYSTALSON
FROZEN FOOD
Then...
uModern refrigerators with more storage
space require more operating time.
uThe motor will run longer under warm
conditions.At normal room temperatures,
expect your motor to run about 40% to 80%
of the time. Underwarmer conditions,
expect it to run even more often.
uAdding food and opening the door warms
the refrigerator.
It is normal for the refrigeratorto run longer
in order to cool the refrigerator back down.
Adding alarge amount of food warms the
refrigerator. See the Food Storage Guide
section on page 21.In order to conserve
energy, try to get everything you need out of
the refrigerator at once, keep food organized
so it is easy to find and close the dooras
soonasthe food is removed.
uThe refrigeratorwill take up to 24 hours to
cool completely.
uSeethe Adjusting Control Settings section
on page 21.
uPush the doors firmly shut. If they will not
shut all the way, see Doors will not close
completely below.
uThis prevents air transfer and makes the
motor work harder.
Clean the condenser coils. Refer to the
Care and Cleaning section on pages
29--30.
uSeeLeveling and Door Alignment on
page 17.
uRearrange
food containers to clear door and
door shelves.
uPush bins all the way in and put crisper
cover, pans, shelves and baskets into their
correct positions. See the Using Your
Refrigerator section on pages 18--28.
uCleangasketsand the surface that they
touch. Rub athin coat of paraffin wax on the
gaskets after cleaning.
uLevel the refrigerator. Refer to the Leveling
and Door Alignment section on page 17.
uRemove and replace the doors according to
the Removingand ReplacingRefrigerator
handlesand doors section on pages 9--16,
or call aqualified service technician.
uSee Doors will not close completely above.
uWhen the door is opened, warm, humid air
is allowed in the freezer, resulting in frost.
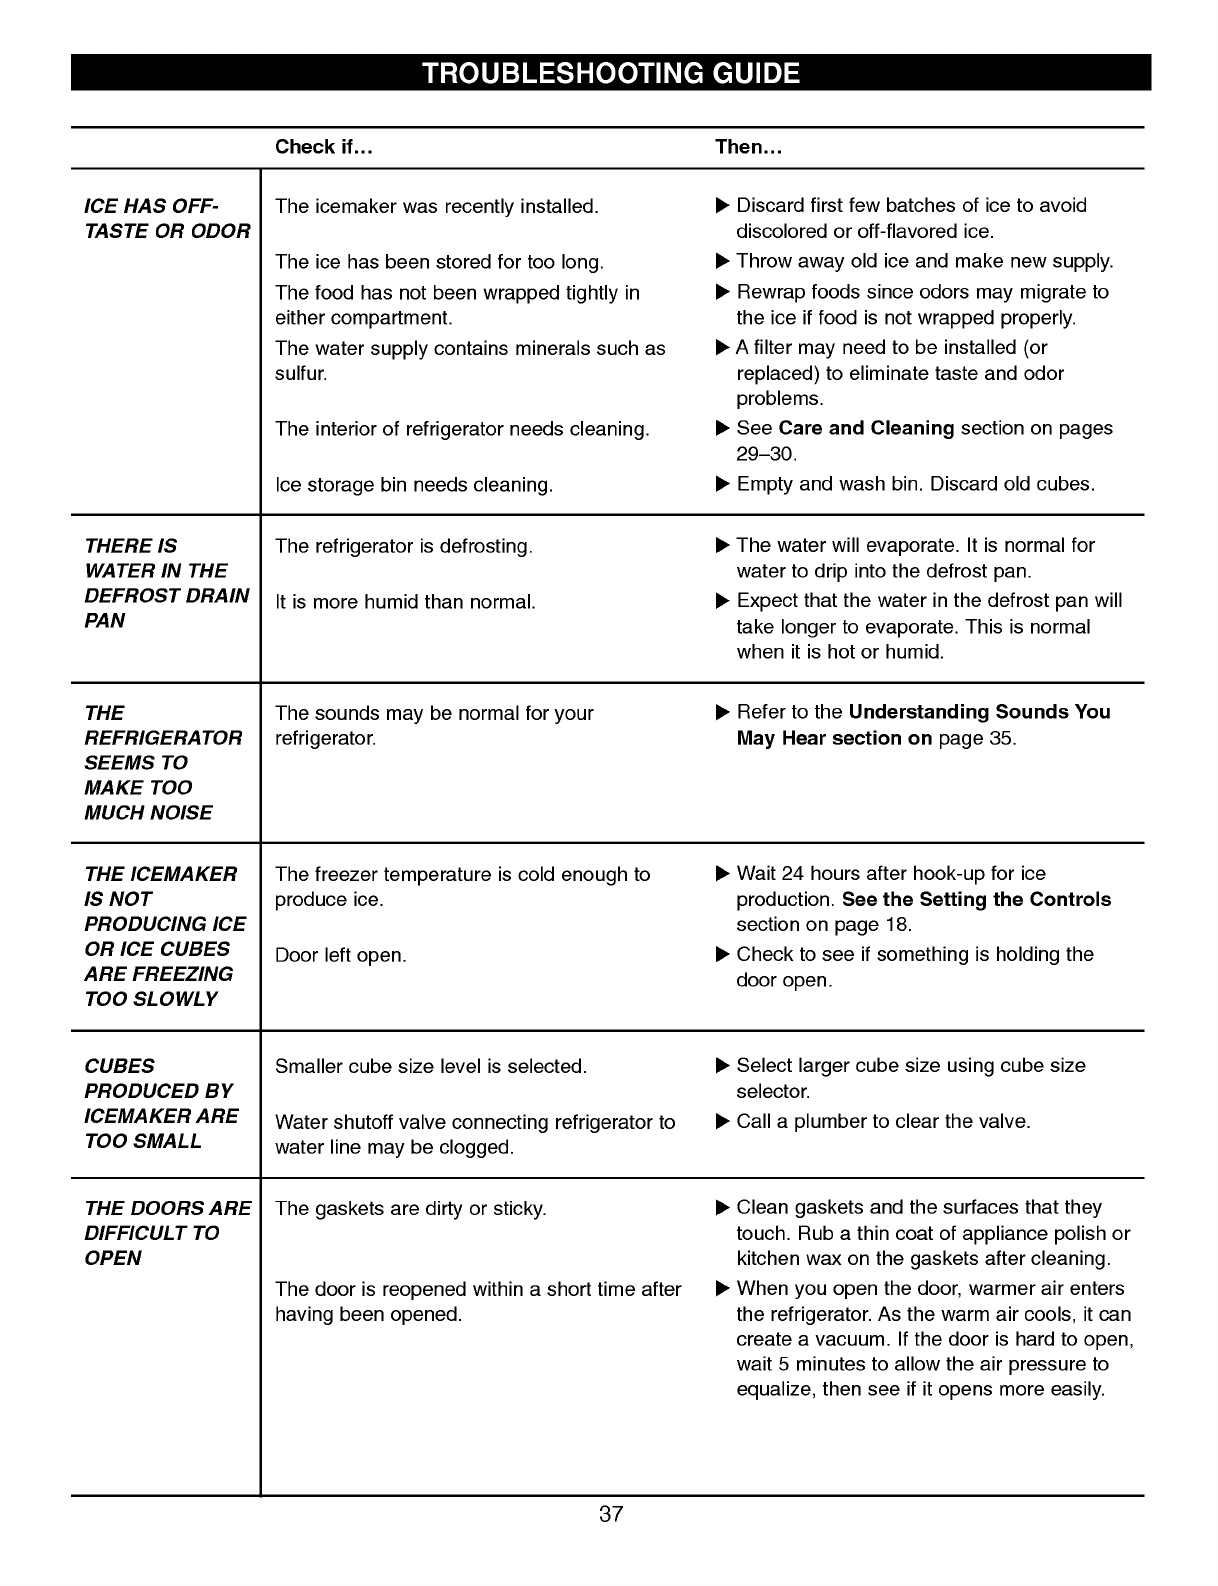
37
Check if...
The icemaker was recently installed.
The ice has been stored for too long.
The food has not been wrapped tightly in
either compartment.
The water supply contains minerals such as
sulfur.
The interior of refrigerator needs cleaning.
Icestoragebin needs cleaning.
The refrigerator is defrosting.
It is more humid than normal.
The sounds may be normal for your
refrigerator.
The freezertemperatureis cold enough to
produce ice.
Door left open.
Smaller cube size level is selected.
Water shutoff valve connecting refrigerator to
water line may be clogged.
The gaskets are dirty or sticky.
The door is reopened within ashort time after
having been opened.
ICEHAS OFF-
TASTE OR ODOR
THERE IS
WATER IN THE
DEFROST DRAIN
PAN
THE
REFRIGERATOR
SEEMSTO
MAKE TOO
MUCH NOISE
THE ICEMAKER
IS NOT
PRODUCING ICE
OR ICE CUBES
ARE FREEZING
TOOSLOWLY
CUBES
PRODUCED BY
ICEMAKER ARE
TOOSMALL
THEDOORSARE
DIFFICULT TO
OPEN
Then...
uDiscard first few batches of ice to avoid
discolored or off-flavored ice.
uThrow away old ice and makenew supply.
uRewrap foods since odors may migrate to
the ice if food is not wrapped properly.
uAfilter may need to be installed (or
replaced)to eliminate taste and odor
problems.
uSee Careand Cleaning
sectionon pages
29--30.
uEmpty and wash bin. Discardold cubes.
uThe water will evaporate. It is normal for
water to drip into the defrost pan.
uExpect that the water in the defrost pan will
take longer to evaporate. This is normal
when it is hot or humid.
uRefer to the Understanding Sounds You
May Hear section on page 35.
uWait 24 hours after hook-up for ice
production. See the Setting the Controls
section on page 18.
uCheckto see if something is holding the
door open.
uSelect
larger cube size using cube size
selector.
uCall aplumber to clear the valve.
uCleangasketsand the surfaces that they
touch. Rub athin coat of appliance polish or
kitchen wax on the gaskets after cleaning.
uWhen you open the door,warmer air enters
the refrigerator. As the warm air cools, it can
create avacuum. If the door is hard to open,
wait 5minutes to allow the air pressure to
equalize, then see if it opens more easily.
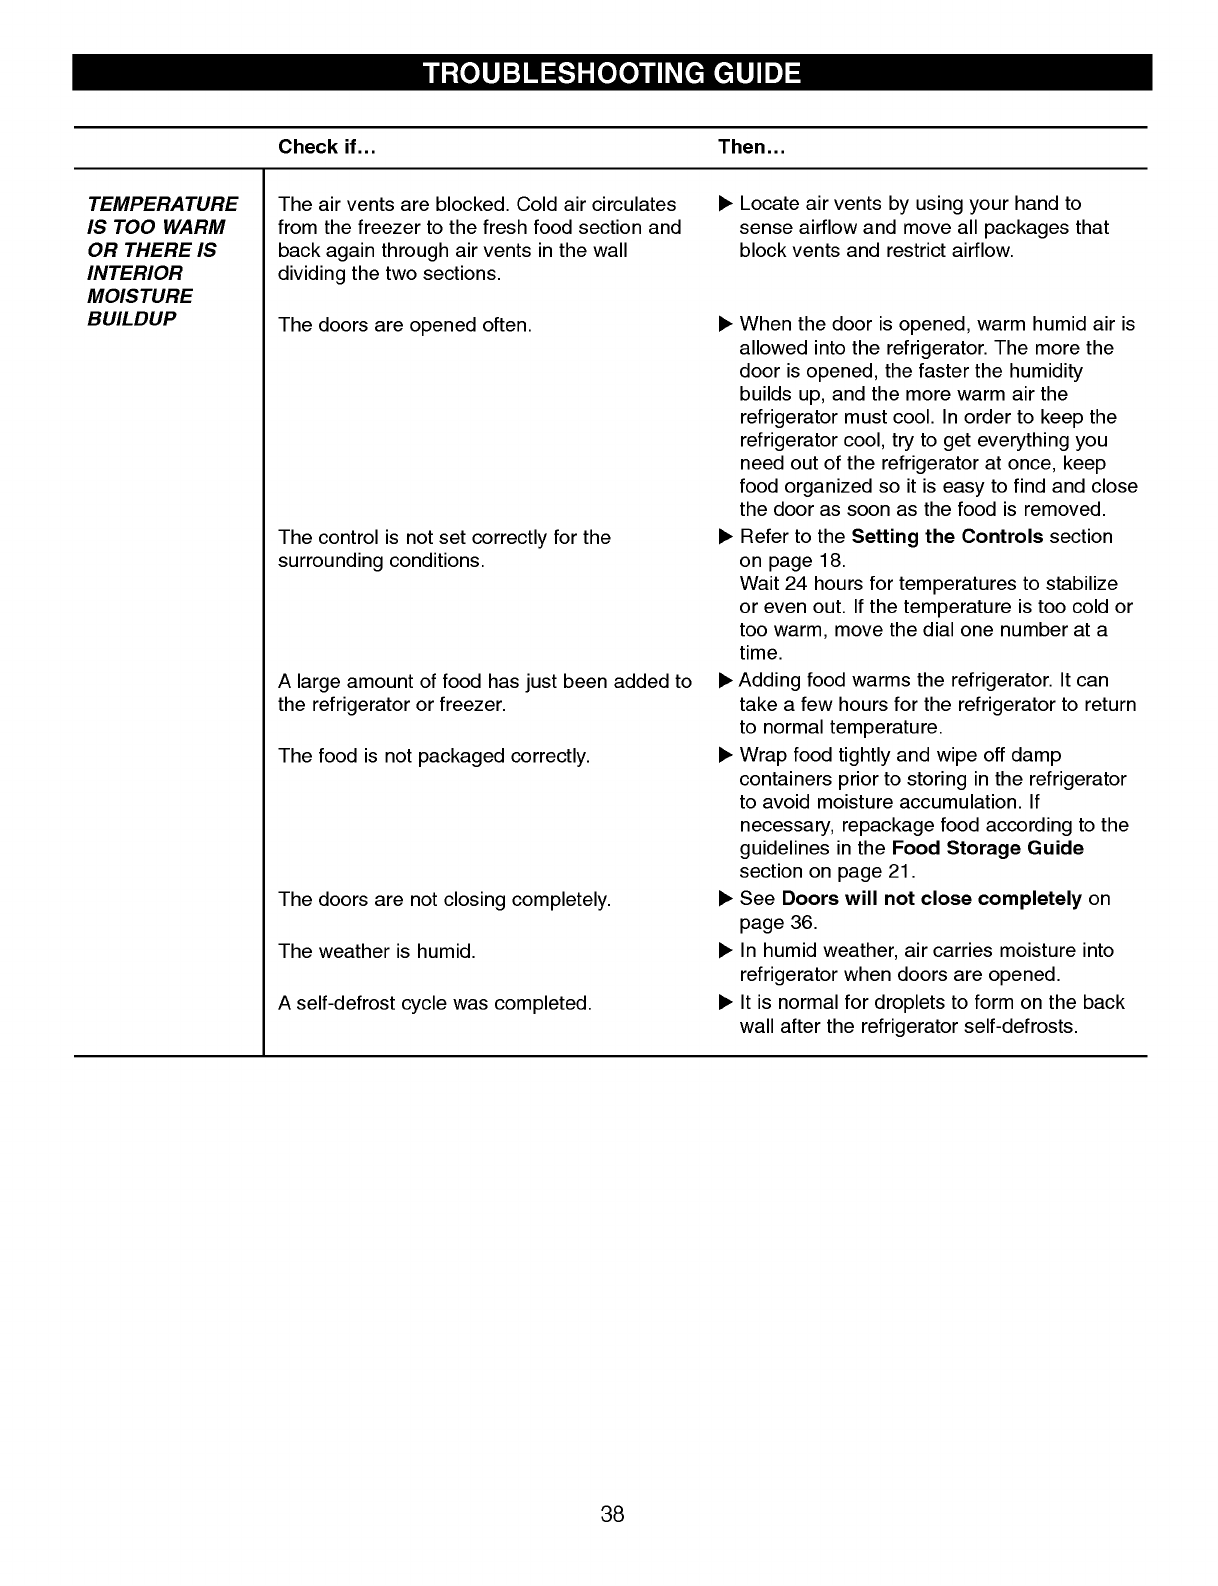
38
Check if...
Theair vents are blocked. Cold air circulates
from the freezer to the fresh food sectionand
back again through air vents in the wall
dividing the two sections.
The doorsareopened
often.
The control is not set correctly for the
surrounding conditions.
Alarge amount of food has just been added to
the refrigerator or freezer.
Thefood is not packaged correctly.
The doors are not closing completely.
The weather is humid.
Aself-defrost cycle was completed.
TEMPERATURE
IS TOO WARM
OR THERE IS
INTERIOR
MOISTURE
BUILDUP
Then...
uLocateair vents by using your hand to
sense airflow and move all packages that
block vents and restrict airflow.
uWhen the door is opened, warm humid air is
allowed into the refrigerator. The more the
door is opened,the faster the humidity
builds up, and the more warm air the
refrigerator must cool. In order to keep the
refrigerator cool, try to get everything you
need out of the refrigerator at once, keep
food organized so it is easy to find and close
the dooras soonas the food is removed.
uRefer to the Setting the Controlssection
on page 18.
Wait 24 hours for temperatures to stabilize
or even out. If the temperature is too cold or
too warm, move the dial one number at a
time.
uAdding food warms the refrigerator. It can
take afew hours for the refrigerator to return
to normal temperature.
uWrap food tightly and wipe off damp
containers prior to storing in the refrigerator
to avoid moisture accumulation. If
necessary, repackage food according to the
guidelines in the Food Storage Guide
section on page 21.
uSeeDoorswill not close completely on
page 36.
uIn humid weather, air carries moisture into
refrigerator when doors are opened.
uIt is normal for droplets to form on the back
wall after the refrigerator self-defrosts.

39